Table of Contents for
Mastering C++ Programming

Version ebook / Retour

Cover image for bash Cookbook, 2nd Edition Mastering C++ Programming by Jeganathan Swaminathan Published by Packt Publishing, 2017
  1. Mastering C++ Programming
  2. Title Page
  3. Copyright
  4. Mastering C++ Programming
  5. Credits
  6. About the Author
  7. About the Reviewer
  8. www.PacktPub.com
  9. Why subscribe?
  10. Customer Feedback
  11. Dedication
  12. Table of Contents
  13. Preface
  14. What this book covers
  15. What you need for this book
  16. Who this book is for
  17. Conventions
  18. Reader feedback
  19. Customer support
  20. Downloading the example code
  21. Errata
  22. Piracy
  23. Questions
  24. C++17 Features
  25. C++17 background
  26. What's new in C++17?
  27. What features are deprecated or removed in C++17?
  28. Key features in C++17
  29. Easier nested namespace syntax
  30. New rules for type auto-detection from braced initializer list 
  31. Simplified static_assert 
  32. The std::invoke( ) method
  33. Structured binding
  34. If and Switch local scoped variables
  35. Template type auto-deduction for class templates
  36. Inline variables
  37. Summary
  38. Standard Template Library
  39. The Standard Template Library architecture
  40. Algorithms
  41. Iterators
  42. Containers
  43. Functors
  44. Sequence containers
  45. Array
  46. Code walkthrough
  47. Commonly used APIs in an array
  48. Vector 
  49. Code walkthrough
  50. Commonly used vector APIs
  51. Code walkthrough
  52. Pitfalls of a vector
  53. List 
  54. Commonly used APIs in a list
  55. Forward list
  56. Code walkthrough
  57. Commonly used APIs in a forward_list container
  58. Deque
  59. Commonly used APIs in a deque
  60. Associative containers
  61. Set
  62. Code walkthrough
  63. Commonly used APIs in a set
  64. Map
  65. Code walkthrough
  66. Commonly used APIs in a map
  67. Multiset
  68. Multimap
  69. Unordered sets
  70. Unordered maps
  71. Unordered multisets
  72. Unordered multimaps
  73. Container adapters
  74. Stack
  75. Commonly used APIs in a stack
  76. Queue
  77. Commonly used APIs in a queue
  78. Priority queue
  79. Commonly used APIs in a priority queue
  80. Summary
  81. Template Programming
  82. Generic programming
  83. Function templates
  84. Code walkthrough
  85. Overloading function templates
  86. Code walkthrough
  87. Class template
  88. Code walkthrough
  89. Explicit class specializations
  90. Code walkthrough
  91. Partial template specialization
  92. Summary
  93. Smart Pointers
  94. Memory management
  95. Issues with raw pointers
  96. Smart pointers
  97. auto_ptr
  98. Code walkthrough - Part 1
  99. Code walkthrough - Part 2
  100. unique_ptr
  101. Code walkthrough
  102. shared_ptr
  103. Code walkthrough
  104. weak_ptr
  105. Circular dependency
  106. Summary
  107. Developing GUI Applications in C++
  108. Qt 
  109. Installing Qt 5.7.0 in Ubuntu 16.04
  110. Qt Core
  111. Writing our first Qt console application
  112. Qt Widgets
  113. Writing our first Qt GUI application
  114. Layouts
  115. Writing a GUI application with a horizontal layout
  116. Writing a GUI application with a vertical layout
  117. Writing a GUI application with a box layout
  118. Writing a GUI application with a grid layout
  119. Signals and slots
  120. Using stacked layout in Qt applications
  121. Writing a simple math application combining multiple layouts
  122. Summary
  123. Multithreaded Programming and Inter-Process Communication
  124. Introduction to POSIX pthreads
  125. Creating threads with the pthreads library
  126. How to compile and run
  127. Does C++ support threads natively?
  128. How to write a multithreaded application using the native C++ thread feature
  129. How to compile and run
  130. Using std::thread in an object-oriented fashion
  131. How to compile and run
  132. What did you learn?
  133. Synchronizing threads
  134. What would happen if threads weren't synchronized?
  135. How to compile and run
  136. Let's use mutex
  137. How to compile and run
  138. What is a deadlock?
  139. How to compile and run
  140. What did you learn?
  141. Shared mutex
  142. Conditional variable
  143. How to compile and run
  144. What did you learn?
  145. Semaphore
  146. Concurrency
  147. How to compile and run
  148. Asynchronous message passing using the concurrency support library
  149. How to compile and run
  150. Concurrency tasks
  151. How to compile and run
  152. Using tasks with a thread support library
  153. How to compile and run
  154. Binding the thread procedure and its input to packaged_task 
  155. How to compile and run
  156. Exception handling with the concurrency library
  157. How to compile and run
  158. What did you learn?
  159. Summary
  160. Test-Driven Development
  161. TDD
  162. Common myths and questions around TDD
  163. Does it take more efforts for a developer to write a unit test? 
  164. Is code coverage metrics good or bad?
  165. Does TDD work for complex legacy projects? 
  166. Is TDD even applicable for embedded or products that involve hardware?
  167. Unit testing frameworks for C++
  168. Google test framework
  169. Installing Google test framework on Ubuntu
  170. How to build google test and mock together as one single static library without installing?
  171. Writing our first test case using the Google test framework
  172. Using Google test framework in Visual Studio IDE
  173. TDD in action
  174. Testing a piece of legacy code that has dependency
  175. Summary
  176. Behavior-Driven Development
  177. Behavior-driven development
  178. TDD versus BDD
  179. C++ BDD frameworks
  180. The Gherkin language
  181. Installing cucumber-cpp in Ubuntu
  182. Installing the cucumber-cpp framework prerequisite software
  183. Building and executing the test cases
  184. Feature file
  185. Spoken languages supported by Gherkin
  186. The recommended cucumber-cpp project folder structure
  187. Writing our first Cucumber test case
  188. Integrating our project in cucumber-cpp CMakeLists.txt
  189. Executing our test case
  190. Dry running your cucumber test cases
  191. BDD - a test-first development approach
  192. Let's build and run our BDD test case
  193. It's testing time!
  194. Summary
  195. Debugging Techniques
  196. Effective debugging
  197. Debugging strategies
  198. Debugging tools
  199. Debugging your application using GDB
  200. GDB commands quick reference
  201. Debugging memory leaks with Valgrind
  202. The Memcheck tool
  203. Detecting memory access outside the boundary of an array
  204. Detecting memory access to already released memory locations
  205. Detecting uninitialized memory access
  206. Detecting memory leaks
  207. Fixing the memory leaks
  208. Mismatched use of new and free or malloc and delete
  209. Summary
  210. Code Smells and Clean Code Practices
  211. Code refactoring
  212. Code smell
  213. What is agile?
  214. SOLID design principle
  215. Single responsibility principle
  216. Open closed principle
  217. Liskov substitution principle
  218. Interface segregation
  219. Dependency inversion
  220. Code smell
  221. Comment smell
  222. Long method
  223. Long parameter list
  224. Duplicate code
  225. Conditional complexity
  226. Large class
  227. Dead code
  228. Primitive obsession
  229. Data class
  230. Feature envy
  231. Summary

Writing our first Cucumber test case

Let's write our very first Cucumber test case! As this is our first exercise, I would like to keep it short and simple. First, let's create the folder structure for our HelloBDD project.

To create the Cucumber project folder structure, we can use the cucumber utility, as follows:

cucumber --init

This will ensure that the features and steps_definitions folders are created as per Cucumber best practices:

Once the basic folder structure is created, let's manually create the rest of the files:

mkdir src
cd HelloBDD
touch CMakeLists.txt
touch features/hello.feature
touch features/step_definitions/cucumber.wire
touch features/step_definitions/HelloBDDSteps.cpp
touch src/Hello.h
touch src/Hello.cpp

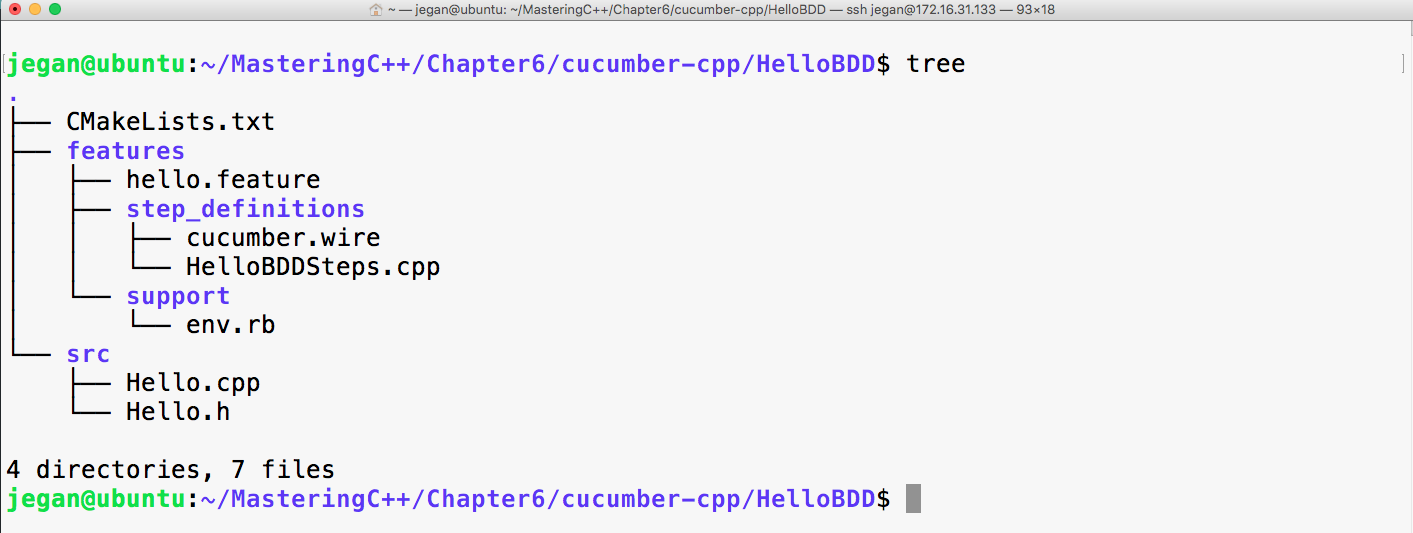
Once the folder structure and empty files are created, the project folder structure should look like the following screenshot:

It's time to start applying our Gherkin knowledge in action; hence, let's first start with the feature file:

# language: en

Feature: Application should be able to print greeting message Hello BDD!

Scenario: Should be able to greet with Hello BDD! message
Given an instance of Hello class is created
When the sayHello method is invoked
Then it should return "Hello BDD!"

Let's take a look at the cucumber.wire file:

host: localhost
port: 3902
As Cucumber is implemented in Ruby, the Cucumber steps implementation has to be written in Ruby. This approach discourages using the cucumber-cpp framework for projects that are implemented in platforms other than Ruby. The wire protocol is the solution offered by the cucumber-cpp framework to extend cucumber support for non-Ruby platforms. Basically, whenever the cucumber-cpp framework executes the test cases, it looks for steps definitions, but if Cucumber finds a .wire file, it will instead connect to that IP address and port, in order to query the server if the process has definitions for the steps described in the .feature file. This helps Cucumber support many platforms apart from Ruby. However, Java and .NET have native Cucumber implementations: Cucumber-JVM and Specflow, respectively. Hence, in order to allow the test cases to be written in C++, the wire protocol is used by cucumber-cpp.

Now let's see how to write the steps file using the gtest Framework.

Thanks to Google! The Google Test Framework (gtest) includes Google Mock Framework (gmock). For C/C++, the gtest framework is one of the best frameworks I have come across, as this is pretty close to the JUnit and Mockito/PowerMock offerings for Java. For a relatively modern language like Java compared to C++, it should be much easier to support mocking with the help of reflection, but from a C/C++ point of view, without the reflection feature from C++, gtest/gmock is nothing short of JUnit/TestNG/Mockito/PowerMock.  

You can observe the written steps files using gtest in the following screenshot:

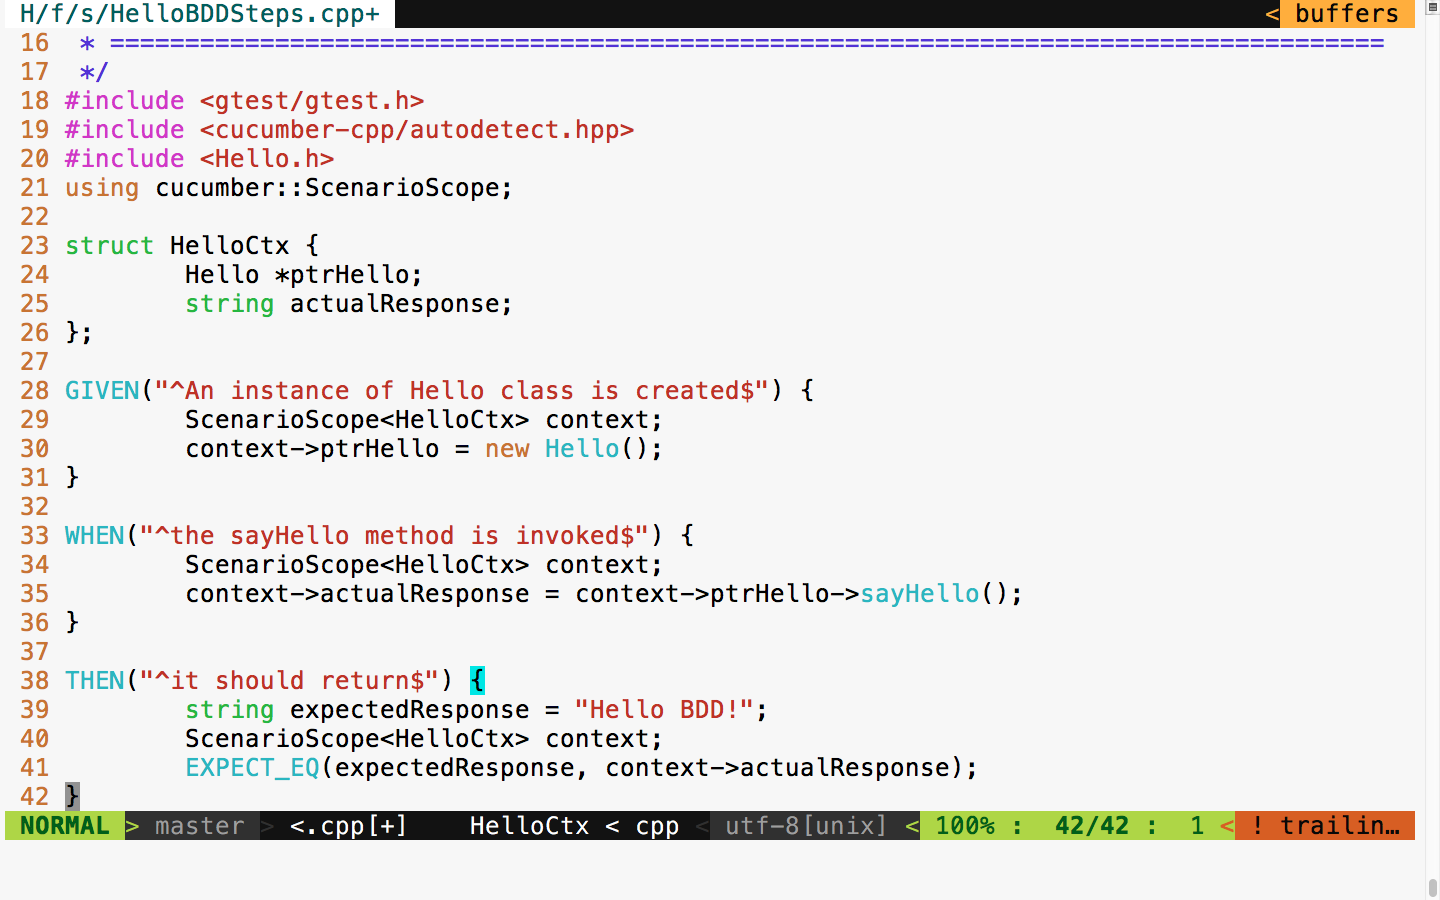
The following header files ensure that the gtest header and Cucumber headers necessary for writing Cucumber steps are included:

#include <gtest/gtest.h>
#include <cucumber-cpp/autodetect.hpp>

Now let's proceed with writing the steps:

struct HelloCtx {
Hello *ptrHello;
string actualResponse;
};

The HelloCtx struct is a user-defined test context that holds the object instance under test and its test response. The cucumber-cpp framework offers a smart ScenarioScope class that allows us to access the object under test and its output, across all the steps in a Cucumber test scenario.

For every Given, When, and Then statement that we wrote in the feature file, there is a corresponding function in the steps file. The appropriate cpp functions that correspond to Given, When, and Then are mapped with the help of regular expressions.

For instance, consider the following Given line in the feature file:  

Given an instance of Hello class is created

This corresponds to the following cpp function that gets mapped with the help of regex. The ^ character in the regex implies that the pattern starts with an, and the $ character implies that the pattern ends with created:

GIVEN("^an instance of Hello class is created$")
{
ScenarioScope<HelloCtx> context;
context->ptrHello = new Hello();
}

As the GIVEN step says that, at this point, we must ensure that an instance of the Hello object is created; the corresponding C++ code is written in this function to instantiate an object of the Hello class.

On a similar note, the following When step and its corresponding cpp functions are mapped by cucumber-cpp:

When the sayHello method is invoked

It is important that the regex matches exactly; otherwise, the cucumber-cpp framework will report that it can't find the steps function:

WHEN("^the sayHello method is invoked$")
{
ScenarioScope<HelloCtx> context;
context->actualResponse = context->ptrHello->sayHello();
}

Now let's look at the Hello.h file:

#include <iostream>
#include <string>
using namespace std;

class Hello {
public:
string sayHello();
};

Here is the respective source file, that is, Hello.cpp:

#include "Hello.h"

string Hello::sayHello() {
return "Hello BDD!";
}
As an industry best practice, the only header file that should be included in the source file is its corresponding header file. The rest of the headers required should go into the header files corresponding to the source file. This helps the development team to locate the headers quite easily. BDD is not just about test automation; the expected end result is clean, defectless, and maintainable code.

Finally, let's write CMakeLists.txt:

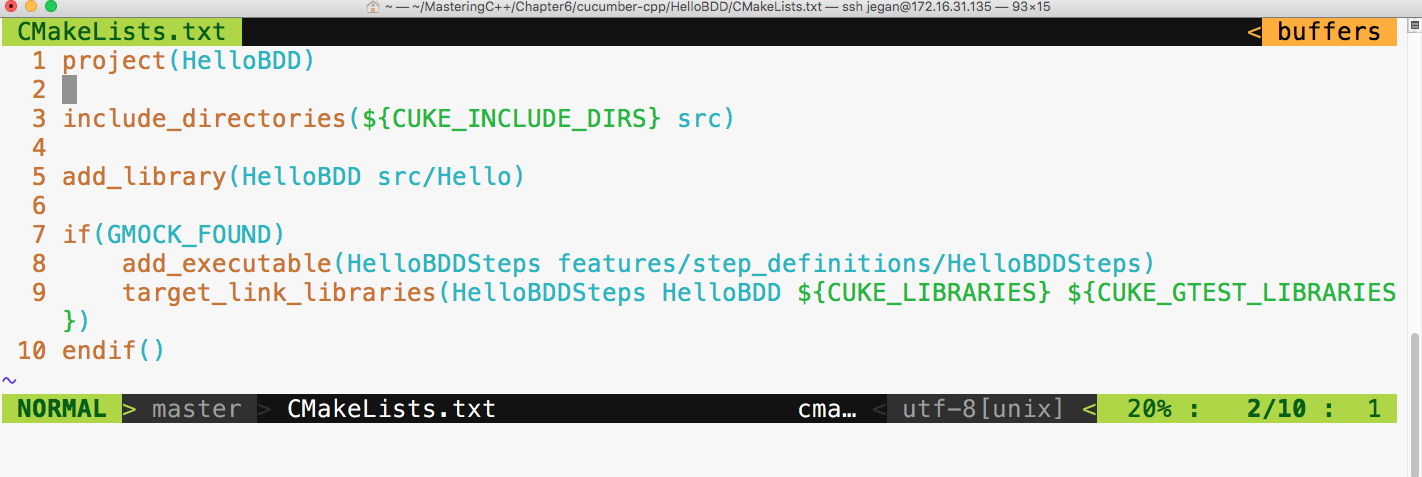
The first line implies the name of the project. The third line ensures that the Cucumber header directories and our project's include_directories are in the INCLUDE path. The fifth line basically instructs the cmake utility to create a library out of the files present under the src folder, that is, Hello.cpp, and its Hello.h file. The seventh line detects whether the gtest framework is installed on our system, and the eighth line ensures that the HelloBDDSteps.cpp file is compiled. Finally, in the ninth line, the final executable is created, linking all the HelloBDD libraries that have our production code, the HelloBDDSteps object file, and the respective Cucumber and gtest library files.