sudo apt install ruby-dev
Mastering C++ Programming
Modern C++ 17 at your fingertips
BIRMINGHAM - MUMBAI
BIRMINGHAM - MUMBAI
Copyright © 2017 Packt Publishing
All rights reserved. No part of this book may be reproduced, stored in a retrieval system, or transmitted in any form or by any means, without the prior written permission of the publisher, except in the case of brief quotations embedded in critical articles or reviews.
Every effort has been made in the preparation of this book to ensure the accuracy of the information presented. However, the information contained in this book is sold without warranty, either express or implied. Neither the author, nor Packt Publishing, and its dealers and distributors will be held liable for any damages caused or alleged to be caused directly or indirectly by this book.
Packt Publishing has endeavored to provide trademark information about all of the companies and products mentioned in this book by the appropriate use of capitals. However, Packt Publishing cannot guarantee the accuracy of this information.
First published: August 2017
Production reference: 1300817
ISBN 978-1-78646-162-9
|
Author Jeganathan Swaminathan |
Copy Editor Gladson Monteiro Muktikant Garimella |
|
Reviewer Brandon James |
Project Coordinator Vaidehi Sawant |
|
Commissioning Editor
Aaron Lazar |
Proofreader Safis Editing |
|
Acquisition Editor Denim Pinto |
Indexer Rekha Nair |
|
Content Development Editor Anurag Ghogre |
Graphics Abhinash Sahu |
|
Technical Editor Madhunikita Sunil Chindarkar |
Production Coordinator Melwyn Dsa |
Jeganathan Swaminathan, Jegan for short, is a freelance software consultant and founder of TekTutor, with over 17 years of IT industry experience. In the past, he has worked for AMD, Oracle, Siemens, Genisys Software, Global Edge Software Ltd, and PSI Data Systems. He has consulted for Samsung WTD (South Korea) and National Semiconductor (Bengaluru). He now works as a freelance external consultant for Amdocs (India). He works as freelance software consultant and freelance corporate trainer. He holds CSM, CSPO, CSD, and CSP certifications from Scrum Alliance. He is a polyglot software professional and his areas of interest include a wide range of C++, C#, Python, Ruby, AngularJS, Node.js, Kubernetes, Ansible, Puppet, Chef, and Java technologies. He is well known for JUnit, Mockito, PowerMock, gtest, gmock, CppUnit, Cucumber, SpecFlow, Qt, QML, POSIX – Pthreads, TDD, BDD, ATDD, NoSQL databases (MongoDB and Cassandra), Apache Spark, Apache Kafka, Apache Camel, Dockers, Continuous Integration (CI), Continuous Delivery (CD), Maven, Git, cloud computing, and DevOps. You can reach him for any C++, Java, Qt, QML, TDD, BDD, and DevOps-related training or consulting assignments. Jegan is a regular speaker at various technical conferences.
Brandon James is a support escalation engineer who works with troubleshooting, debugging, and implementing identity management solutions for many enterprise customers for both on-premise and cloud solutions. He worked as a technical reviewer on the Microsoft Identity Manager 2016 Handbook by Packt Publishing. Previously, he worked as a Web Site/Web Application Developer designing and developing websites and internal web applications for various enterprise customers. He holds a B.S. in computer engineering and an M.S. in computer science.
For support files and downloads related to your book, please visit www.PacktPub.com. Did you know that Packt offers eBook versions of every book published, with PDF and ePub files available? You can upgrade to the eBook version at www.PacktPub.com and as a print book customer, you are entitled to a discount on the eBook copy. Get in touch with us at service@packtpub.com for more details. At www.PacktPub.com, you can also read a collection of free technical articles, sign up for a range of free newsletters and receive exclusive discounts and offers on Packt books and eBooks.

Get the most in-demand software skills with Mapt. Mapt gives you full access to all Packt books and video courses, as well as industry-leading tools to help you plan your personal development and advance your career.
Thanks for purchasing this Packt book. At Packt, quality is at the heart of our editorial process. To help us improve, please leave us an honest review on this book's Amazon page at https://www.amazon.com/dp/1786461625.
If you'd like to join our team of regular reviewers, you can email us at customerreviews@packtpub.com. We award our regular reviewers with free eBooks and videos in exchange for their valuable feedback. Help us be relentless in improving our products!
C++ is an interesting programming language that has been around for almost three decades now. It is used to develop complex desktop applications, web applications, networking applications, device drivers, kernel modules, embedded applications, and GUI applications using third-party widget frameworks; literally speaking, C++ can be used in any domain.
Ever since I started programming in 1993, I have cherished the good old technical discussions that I had with many of my colleagues and industry experts that I met from time to time. Of all the technical discussions, one topic gets repeated time and again, which is, "Do you think C++ is a relevant programming language today? Should I continue working on C++ or should I move on to other modern programming languages, such as Java, C#, Scala, or Angular/Node.js?"
I have always felt that one should be open to learning other technologies, but that doesn’t mean having to give up on C++. However, the good news is that with the new C++17 features in place, C++ has been reborn and it is going to stay and rock for many more decades, which is my motivation to write this book.
People have always felt that Java will take over C++, but it has continued to stay. The same discussion started again when C# came into the industry and today again when Angular/Node.js and Scala seem to be more attractive for rapid programming. However, C++ has its own, place and no programming language has been able to take over the place of C++ so far.
There are already many C++ books that help you understand the language, but there are very few books that address developing GUI applications in C++, TDD with C++, and BDD with C++.
C++ has come a long way and has now been adopted in several contexts. Its key strengths are its software infrastructure and resource-constrained applications. The C++ 17 release will change the way developers write code, and this book will help you master your developing skills with C++.
With real-world, practical examples explaining each concept, the book will begin by introducing you to the latest features of C++ 17. It will encourage clean code practices in C++, and demonstrate GUI app development options in C++. You will gain insights into how to avoid memory leaks using smart pointers. Next, you will learn how multithreaded programming can help you achieve concurrency in your applications.
Moving on, you’ll also get an in-depth understanding of the C++ Standard Template Library. We'll explain the concepts of implementing TDD and BDD in your C++ programs, along with template-based generic programming, to equip you with the expertise to build powerful applications. Finally, we’ll round the book off with debugging techniques and best practices. By the time you reach the end of the book, you will have an in-depth understanding of the language and its various facets.
Chapter 1, C++17 Features, explains the new features of C++17 and features that have been removed. It also demonstrates key C++17 features with easy-to-understand examples.
Chapter 2, Standard Template Library, gives an overview of STL, demonstrates various containers and iterators, and explains how to apply useful algorithms on the containers. The chapter also touches on the internal data structures used and their runtime efficiencies.
Chapter 3, Template Programming, gives an overview of generic programming and its benefits. It demonstrates writing function templates and class templates, and overloading function templates. It also touches upon writing generic classes, explicit class specializations, and partial specializations.
Chapter 4, Smart Pointers, explains the issues of using raw pointers and motivates the use of smart pointers. Gradually, this chapter introduces you to the usage of auto_ptr, unique_ptr, shared_ptr, and weak_ptr, and explains ways to resolve cyclic dependency issues.
Chapter 5, Developing GUI Applications in C++, gives an overview of Qt and provides you with step-by-step instructions to install Qt on Linux and Windows. The chapter gradually helps you develop impressive GUI applications with interesting widgets and various layouts.
Chapter 6, Multithreaded Programming and Inter-Process Communication, introduces to the POSIX pthreads library and discusses the native C++ thread library. It also discusses the benefits of using the C++ thread library. Later, it helps you write multithreaded applications, explores ways to manage the threads, and explains the use of synchronization mechanisms. The chapter discusses deadlocks and possible solutions. Toward the end of the chapter, it introduces you to the concurrency library.
Chapter 7, Test-Driven Development, gives a brief overview of TDD and clarifies FAQs on TDD. This chapter provides you with step-by-step instructions to install Google test framework and integrate it with the Linux and Windows platforms. It helps you develop applications using TDD with an easy-to-understand tutorial style.
Chapter 8, Behavior-Driven Development, gives an overview of BDD and guides you through the installation, integration, and configuration of the Cucumber framework on Linux platforms. It also explains Gherkin and helps you write BDD test cases.
Chapter 9, Debugging Techniques, discusses the various strategies and techniques followed in the industry for debugging your application problems. Later, it helps you understand the use of the GDB and Valgrind tools for step by step debugging, watching variables, fixing various memory-related issues, including memory leaks.
Chapter 10, Code Smells and Clean Code Practices, discusses various code smells and refactoring techniques.
You will need to be equipped with the following tools before you get started with the book:
The OS required is Ubuntu 16.04 64-bit or later. The hardware configuration should at least be of 1 GB RAM and 20 GB ROM. A virtual machine with this configuration should also suffice.
This book is for experienced C++ developers. If you are a novice C++ developer, then it’s highly recommended that you get a solid understanding of the C++ language before reading this book.
In this book, you will find a number of text styles that distinguish between different kinds of information. Here are some examples of these styles and an explanation of their meaning. Code words in text, database table names, folder names, filenames, file extensions, pathnames, dummy URLs, user input, and Twitter handles are shown as follows: "The initialize() method initializes the deque iterator pos to the first data element stored within deque."
A block of code is set as follows:
#include <iostream>

int main ( ) {

        const int x = 5, y = 5;

        static_assert ( 1 == 0, "Assertion failed" );
        static_assert ( 1 == 0 );
        static_assert ( x == y );

        return 0;
}
When we wish to draw your attention to a particular part of a code block, the relevant lines or items are set in bold:
#include <iostream>
#include <thread>
#include <mutex>
#include "Account.h"
using namespace std;

enum ThreadType {
  DEPOSITOR,
  WITHDRAWER
};

mutex locker;
Any command-line input or output is written as follows:
g++ main.cpp -std=c++17
./a.out
New terms and important words are shown in bold. Words that you see on the screen, for example, in menus or dialog boxes, appear in the text like this: " You need to create a new project named MathApp by navigating to New Project | Visual Studio | Windows | Win32 | Win32 Console Application."
Feedback from our readers is always welcome. Let us know what you think about this book-what you liked or disliked. Reader feedback is important for us as it helps us develop titles that you will really get the most out of. To send us general feedback, simply email feedback@packtpub.com, and mention the book's title in the subject of your message. If there is a topic that you have expertise in and you are interested in either writing or contributing to a book, see our author guide at www.packtpub.com/authors.
Now that you are the proud owner of a Packt book, we have a number of things to help you to get the most from your purchase.
You can download the example code files for this book from your account at http://www.packtpub.com. If you purchased this book elsewhere, you can visit http://www.packtpub.com/support and register to have the files emailed directly to you. You can download the code files by following these steps:
Once the file is downloaded, please make sure that you unzip or extract the folder using the latest version of:
The code bundle for the book is also hosted on GitHub at https://github.com/PacktPublishing/Mastering-Cpp-Programming. We also have other code bundles from our rich catalog of books and videos available at https://github.com/PacktPublishing/. Check them out!
Although we have taken every care to ensure the accuracy of our content, mistakes do happen. If you find a mistake in one of our books-maybe a mistake in the text or the code-we would be grateful if you could report this to us. By doing so, you can save other readers from frustration and help us improve subsequent versions of this book. If you find any errata, please report them by visiting http://www.packtpub.com/submit-errata, selecting your book, clicking on the Errata Submission Form link, and entering the details of your errata. Once your errata are verified, your submission will be accepted and the errata will be uploaded to our website or added to any list of existing errata under the Errata section of that title. To view the previously submitted errata, go to https://www.packtpub.com/books/content/support and enter the name of the book in the search field. The required information will appear under the Errata section.
Piracy of copyrighted material on the internet is an ongoing problem across all media. At Packt, we take the protection of our copyright and licenses very seriously. If you come across any illegal copies of our works in any form on the internet, please provide us with the location address or website name immediately so that we can pursue a remedy. Please contact us at copyright@packtpub.com with a link to the suspected pirated material. We appreciate your help in protecting our authors and our ability to bring you valuable content.
If you have a problem with any aspect of this book, you can contact us at questions@packtpub.com, and we will do our best to address the problem.
In this chapter, you will be learning the following concepts:
As you know, the C++ language is the brain child of Bjarne Stroustrup, who developed C++ in 1979. The C++ programming language is standardized by International Organization for Standardization (ISO).
The initial standardization was published in 1998, commonly referred to as C++98, and the next standardization C++03 was published in 2003, which was primarily a bug fix release with just one language feature for value initialization. In August 2011, the C++11 standard was published with several additions to the core language, including several significant interesting changes to the Standard Template Library (STL); C++11 basically replaced the C++03 standard. C++14 was published in December, 2014 with some new features, and later, the C++17 standard was published on July 31, 2017.
At the time of writing this book, C++17 is the latest revision of the ISO/IEC standard for the C++ programming language.
This chapter requires a compiler that supports C++17 features: gcc version 7 or later. As gcc version 7 is the latest version at the time of writing this book, I'll be using gcc version 7.1.0 in this chapter.
The complete list of C++17 features can be found at http://en.cppreference.com/w/cpp/compiler_support#C.2B.2B17_features.
To give a high-level idea, the following are some of the new C++17 features:
Otherwise, there are many new interesting features that were added to the core C++ language: STL, lambadas, and so on. The new features give a facelift to C++, and starting from C++17, as a C++ developer, you will feel that you are working in a modern programming language, such as Java or C#.
The following features are now removed in C++17:
Let's explore the following C++17 key features one by one in the following sections:
Until the C++14 standard, the syntax supported for a nested namespace in C++ was as follows:
#include <iostream>
using namespace std;

namespace org {
    namespace tektutor {
        namespace application {
             namespace internals {
                  int x;
             }
        }
    }
}

int main ( ) {
    org::tektutor::application::internals::x = 100;
    cout << "\nValue of x is " << org::tektutor::application::internals::x << endl;

    return 0;
}
The preceding code can be compiled and the output can be viewed with the following commands:
g++-7 main.cpp -std=c++17
./a.out
The output of the preceding program is as follows:
Value of x is 100
Every namespace level starts and ends with curly brackets, which makes it difficult to use nested namespaces in large applications. C++17 nested namespace syntax is really cool; just take a look at the following code and you will readily agree with me:
#include <iostream>
using namespace std;

namespace org::tektutor::application::internals {
    int x;
}

int main ( ) {
    org::tektutor::application::internals::x = 100;
    cout << "\nValue of x is " << org::tektutor::application::internals::x << endl;

    return 0;
}
The preceding code can be compiled and the output can be viewed with the following commands:
g++-7 main.cpp -std=c++17
./a.out
The output remains the same as the previous program:
Value of x is 100
C++17 introduced new rules for auto-detection of the initializer list, which complements C++14 rules. The C++17 rule insists that the program is ill-formed if an explicit or partial specialization of std::initializer_list is declared:
#include <iostream>
using namespace std;

template <typename T1, typename T2>
class MyClass {
     private:
          T1 t1;
          T2 t2;
     public:
          MyClass( T1 t1 = T1(), T2 t2 = T2() ) { }

          void printSizeOfDataTypes() {
               cout << "\nSize of t1 is " << sizeof ( t1 ) << " bytes." << endl;
               cout << "\nSize of t2 is " << sizeof ( t2 ) << " bytes." << endl;
     }
};

int main ( ) {

    //Until C++14
    MyClass<int, double> obj1;
    obj1.printSizeOfDataTypes( );

    //New syntax in C++17
    MyClass obj2( 1, 10.56 );

    return 0;
}
The preceding code can be compiled and the output can be viewed with the following commands:
g++-7 main.cpp -std=c++17
./a.out
The output of the preceding program is as follows:
Values in integer vectors are ...
1 2 3 4 5

Values in double vectors are ...
1.5 2.5 3.5
The static_assert macro helps identify assert failures during compile time. This feature has been supported since C++11; however, the static_assert macro used to take a mandatory assertion failure message till, which is now made optional in C++17.
The following example demonstrates the use of static_assert with and without the message:
#include <iostream>
#include <type_traits>
using namespace std;

int main ( ) {

        const int x = 5, y = 5;

        static_assert ( 1 == 0, "Assertion failed" );
        static_assert ( 1 == 0 );
        static_assert ( x == y );

        return 0;
}
The output of the preceding program is as follows:
g++-7 staticassert.cpp -std=c++17
staticassert.cpp: In function ‘int main()’:
staticassert.cpp:7:2: error: static assertion failed: Assertion failed
  static_assert ( 1 == 0, "Assertion failed" );

staticassert.cpp:8:2: error: static assertion failed
  static_assert ( 1 == 0 );
From the preceding output, you can see that the message, Assertion failed, appears as part of the compilation error, while in the second compilation the default compiler error message appears, as we didn't supply an assertion failure message. When there is no assertion failure, the assertion error message will not appear as demonstrated in static_assert ( x == y ). This feature is inspired by the C++ community from the BOOST C++ library.
The std::invoke() method can be used to call functions, function pointers, and member pointers with the same syntax:
#include <iostream>
#include <functional>
using namespace std;

void globalFunction( ) {
     cout << "globalFunction ..." << endl;
}

class MyClass {
    public:
        void memberFunction ( int data ) {
             std::cout << "\nMyClass memberFunction ..." << std::endl;
        }

        static void staticFunction ( int data ) {
             std::cout << "MyClass staticFunction ..." << std::endl;
        }
};

int main ( ) {

    MyClass obj;

    std::invoke ( &MyClass::memberFunction, obj, 100 );
    std::invoke ( &MyClass::staticFunction, 200 );
    std::invoke ( globalFunction );

    return 0;
}
The preceding code can be compiled and the output can be viewed with the following commands:
g++-7 main.cpp -std=c++17
./a.out
The output of the preceding program is as follows:
MyClass memberFunction ...
MyClass staticFunction ...
globalFunction ...
The std::invoke( ) method is a template function that helps you seamlessly invoke callable objects, both built-in and user-defined.
You can now initialize multiple variables with a return value with a really cool syntax, as shown in the following code sample:
#include <iostream>
#include <tuple>
using namespace std;

int main ( ) {

    tuple<string,int> student("Sriram", 10);
    auto [name, age] = student;

    cout << "\nName of the student is " << name << endl;
    cout << "Age of the student is " << age << endl;

    return 0;
}
In the preceding program, the code highlighted in bold is the structured binding feature introduced in C++17. Interestingly, we have not declared the string name and int age variables. These are deduced automatically by the C++ compiler as string and int, which makes the C++ syntax just like any modern programming language, without losing its performance and system programming benefits.
The preceding code can be compiled and the output can be viewed with the following commands:
g++-7 main.cpp -std=c++17
./a.out
The output of the preceding program is as follows:
Name of the student is Sriram
Age of the student is 10
There is an interesting new feature that allows you to declare a local variable bound to the if and switch statements' block of code. The scope of the variable used in the if and switch statements will go out of scope outside the respective blocks. It can be better understood with an easy to understand example, as follows:
#include <iostream>
using namespace std;

bool isGoodToProceed( ) {
    return true;
}

bool isGood( ) {
     return true;
}

void functionWithSwitchStatement( ) {

     switch ( auto status = isGood( ) ) {
          case true:
                 cout << "\nAll good!" << endl;
          break;

          case false:
                 cout << "\nSomething gone bad" << endl;
          break;
     }

}

int main ( ) {

    if ( auto flag = isGoodToProceed( ) ) {
         cout << "flag is a local variable and it loses its scope outside the if block" << endl;
    }

     functionWithSwitchStatement();

     return 0;
}
The preceding code can be compiled and the output can be viewed with the following commands:
g++-7 main.cpp -std=c++17
./a.out
The output of the preceding program is as follows:
flag is a local variable and it loses its scope outside the if block
All good!
I'm sure you will love what you are about to see in the sample code. Though templates are quite useful, a lot of people don't like it due to its tough and weird syntax. But you don't have to worry anymore; take a look at the following code snippet:
#include <iostream>
using namespace std;

template <typename T1, typename T2>
class MyClass {
     private:
          T1 t1;
          T2 t2;
     public:
          MyClass( T1 t1 = T1(), T2 t2 = T2() ) { }

          void printSizeOfDataTypes() {
               cout << "\nSize of t1 is " << sizeof ( t1 ) << " bytes." << endl;
               cout << "\nSize of t2 is " << sizeof ( t2 ) << " bytes." << endl;
     }
};

int main ( ) {

    //Until C++14
    MyClass<int, double> obj1;
    obj1.printSizeOfDataTypes( );

    //New syntax in C++17
    MyClass obj2( 1, 10.56 );

    return 0;
}
The preceding code can be compiled and the output can be viewed with the following commands:
g++-7 main.cpp -std=c++17
./a.out
The output of the program is as follows:
Size of t1 is 4 bytes.
Size of t2 is 8 bytes.
Just like the inline function in C++, you could now use inline variable definitions. This comes in handy to initialize static variables, as shown in the following sample code:
#include <iostream>
using namespace std;

class MyClass {
    private:
        static inline int count = 0;
    public:
        MyClass() {
              ++count;
        }

    public:
         void printCount( ) {
              cout << "\nCount value is " << count << endl;
         }
};

int main ( ) {

    MyClass obj;

    obj.printCount( ) ;

    return 0;
}
The preceding code can be compiled and the output can be viewed with the following commands:
g++-7 main.cpp -std=c++17
./a.out
The output of the preceding code is as follows:
Count value is 1
In this chapter, you got to know interesting new features introduced in C++17. You learned the super simple C++17 nested namespace syntax. You also learned datatype detection with a braced initializer list and the new rule imposed in the C++17 standard.
You also noticed that static_assert can be done without assert failure messages. Also, using std::invoke(), you can now invoke global functions, function pointers, member functions, and static class member functions. And, using structured binding, you could now initialize multiple variables with a return value.
You also learned that the if and switch statements can have a local-scoped variable right before the if condition and switch statements. You learned about auto type detection of class templates. Lastly, you used inline variables.
There are many more C++17 features, but this chapter attempts to cover the most useful features that might be required for most of the developers. In the next chapter, you will be learning about the Standard Template Library.
This chapter will cover the following topics:
Let's look into the STL topics one by one in the following sections.
The C++ Standard Template Library (STL) offers ready-made generic containers, algorithms that can be applied to the containers, and iterators to navigate the containers. The STL is implemented with C++ templates, and templates allow generic programming in C++.
The STL encourages a C++ developer to focus on the task at hand by freeing up the developer from writing low-level data structures and algorithms. The STL is a time-tested library that allows rapid application development.
The STL is an interesting piece of work and architecture. Its secret formula is compile-time polymorphism. To get better performance, the STL avoids dynamic polymorphism, saying goodbye to virtual functions. Broadly, the STL has the following four components:
The STL architecture stitches all the aforementioned four components together. It has many commonly used algorithms with performance guarantees. The interesting part about STL algorithms is that they work seamlessly without any knowledge about the containers that hold the data. This is made possible due to the iterators that offer high-level traversal APIs, which completely abstracts the underlying data structure used within a container. The STL makes use of operator overloading quite extensively. Let's understand the major components of STL one by one to get a good grasp of the STL conceptually.
The STL algorithms are powered by C++ templates; hence, the same algorithm works irrespective of what data type it deals with or independently of how the data is organized by a container. Interestingly, the STL algorithms are generic enough to support built-in and user-defined data types using templates. As a matter of fact, the algorithms interact with the containers via iterators. Hence, what matters to the algorithms is the iterator supported by the container. Having said that, the performance of an algorithm depends on the underlying data structure used within a container. Hence, certain algorithms work only on selective containers, as each algorithm supported by the STL expects a certain type of iterator.
An iterator is a design pattern, but interestingly, the STL work started much before
Gang of Four published their design patterns-related work to the software community. Iterators themselves are objects that allow traversing the containers to access, modify, and manipulate the data stored in the containers. Iterators do this so magically that we don't realize or need to know where and how the data is stored and retrieved.
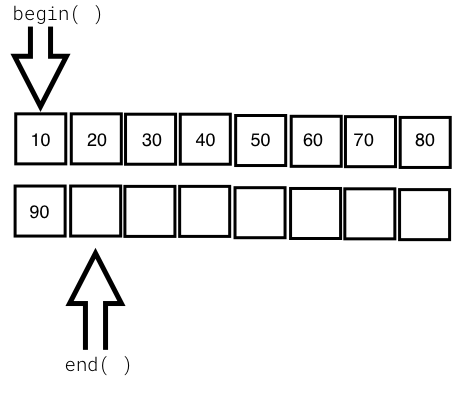
The following image visually represents an iterator:
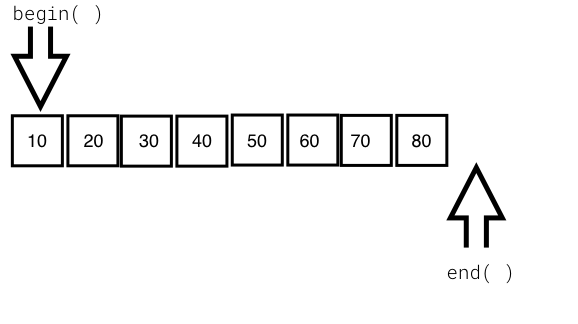
From the preceding image, you can understand that every iterator supports the begin() API, which returns the first element position, and the end() API returns one position past the last element in the container.
The STL broadly supports the following five types of iterators:
The container implements the iterator to let us easily retrieve and manipulate the data, without delving much into the technical details of a container.
The following table explains each of the five iterators:
|
The type of iterator |
Description |
|
Input iterator |
|
|
Output iterator |
|
|
Forward iterator |
|
|
Bidirectional iterator |
|
|
Random-access iterator |
|
STL containers are objects that typically grow and shrink dynamically. Containers use complex data structures to store the data under the hood and offer high-level functions to access the data without us delving into the complex internal implementation details of the data structure. STL containers are highly efficient and time-tested.
Every container uses different types of data structures to store, organize, and manipulate data in an efficient way. Though many containers may seem similar, they behave differently under the hood. Hence, the wrong choice of containers leads to application performance issues and unnecessary complexities.
Containers come in the following flavors:
The objects stored in the containers are copied or moved, and not referenced. We will explore every type of container in the upcoming sections with simple yet interesting examples.
Functors are objects that behave like regular functions. The beauty is that functors can be substituted in the place of function pointers. Functors are handy objects that let you extend or complement the behavior of an STL function without compromising the object-oriented coding principles.
Functors are easy to implement; all you need to do is overload the function operator. Functors are also referred to as functionoids.
The following code will demonstrate the way a simple functor can be implemented:
#include <iostream>
#include <vector>
#include <iterator>
#include <algorithm>
using namespace std;

template <typename T>
class Printer {
public:
  void operator() ( const T& element ) {
    cout << element << "\t";
  }
};

int main () {
  vector<int> v = { 10, 20, 30, 40, 50 };

  cout << "\nPrint the vector entries using Functor" << endl;

  for_each ( v.begin(), v.end(), Printer<int>() );

  cout << endl;

  return 0;
}
Let's quickly compile the program using the following command:
g++ main.cpp -std=c++17
./a.out
Let's check the output of the program:
Print the vector entries using Functor
10  20  30  40  50
We hope you realize how easy and cool a functor is.
The STL supports quite an interesting variety of sequence containers. Sequence containers store homogeneous data types in a linear fashion, which can be accessed sequentially. The STL supports the following sequence containers:
As the objects stored in an STL container are nothing but copies of the values, the STL expects certain basic requirements from the user-defined data types in order to hold those objects inside a container. Every object stored in an STL container must provide the following as a minimum requirement:
Let's explore the sequence containers one by one in the following subsections.
The STL array container is a fixed-size sequence container, just like a C/C++ built-in array, except that the STL array is size-aware and a bit smarter than the built-in C/C++ array. Let's understand an STL array with an example:
#include <iostream>
#include <array>
using namespace std;
int main () {
  array<int,5> a = { 1, 5, 2, 4, 3 };

  cout << "\nSize of array is " << a.size() << endl;

  auto pos = a.begin();

  cout << endl;
  while ( pos != a.end() )
    cout << *pos++ << "\t";
  cout << endl;

  return 0;
}
The preceding code can be compiled and the output can be viewed with the following commands:
g++ main.cpp -std=c++17
./a.out
The output of the program is as follows:
Size of array is 5
1     5     2     4     3
The following line declares an array of a fixed size (5) and initializes the array with five elements:
array<int,5> a = { 1, 5, 2, 4, 3 };
The size mentioned can't be changed once declared, just like a C/C++ built-in array. The array::size() method returns the size of the array, irrespective of how many integers are initialized in the initializer list. The auto pos = a.begin() method declares an iterator of array<int,5> and assigns the starting position of the array. The array::end() method points to one position after the last element in the array. The iterator behaves like or mimics a C++ pointer, and dereferencing the iterator returns the value pointed by the iterator. The iterator position can be moved forward and backwards with ++pos and --pos, respectively.
The following table shows some commonly used array APIs:
|
API |
Description |
|
at( int index ) |
This returns the value stored at the position referred to by the index. The index is a zero-based index. This API will throw an std::out_of_range exception if the index is outside the index range of the array. |
|
operator [ int index ] |
This is an unsafe method, as it won't throw any exception if the index falls outside the valid range of the array. This tends to be slightly faster than at, as this API doesn't perform bounds checking. |
|
front() |
This returns the first element in the array. |
|
back() |
This returns the last element in the array. |
|
begin() |
This returns the position of the first element in the array |
|
end() |
This returns one position past the last element in the array |
|
rbegin() |
This returns the reverse beginning position, that is, it returns the position of the last element in the array |
|
rend() |
This returns the reverse end position, that is, it returns one position before the first element in the array |
|
size() |
This returns the size of the array |
The array container supports random access; hence, given an index, the array container can fetch a value with a runtime complexity of O(1) or constant time.
The array container elements can be accessed in a reverse fashion using the reverse iterator:
#include <iostream>
#include <array>
using namespace std;

int main () {

    array<int, 6> a;
    int size = a.size();
    for (int index=0; index < size; ++index)
         a[index] = (index+1) * 100;

    cout << "\nPrint values in original order ..." << endl;

    auto pos = a.begin();
    while ( pos != a.end() )
        cout << *pos++ << "\t";
    cout << endl;

    cout << "\nPrint values in reverse order ..." << endl;

    auto rpos = a.rbegin();
    while ( rpos != a.rend() )
    cout << *rpos++ << "\t";
    cout << endl;

    return 0;
}
We will use the following command to get the output:
./a.out
The output is as follows:
Print values in original order ...
100   200   300   400   500   600

Print values in reverse order ...
600   500   400   300   200   100
Vector is a quite useful sequence container, and it works exactly as an array, except that the vector can grow and shrink at runtime while an array is of a fixed size. However, the data structure used under the hood in an array and vector is a plain simple built-in C/C++ style array.
Let's look at the following example to understand vectors better:
#include <iostream>
#include <vector>
#include <algorithm>
using namespace std;

int main () {
  vector<int> v = { 1, 5, 2, 4, 3 };

  cout << "\nSize of vector is " << v.size() << endl;

  auto pos = v.begin();

  cout << "\nPrint vector elements before sorting" << endl;
  while ( pos != v.end() )
    cout << *pos++ << "\t";
  cout << endl;

  sort( v.begin(), v.end() );

  pos = v.begin();

  cout << "\nPrint vector elements after sorting" << endl;

  while ( pos != v.end() )
    cout << *pos++ << "\t";
  cout << endl;

  return 0;
}
The preceding code can be compiled and the output can be viewed with the following commands:
g++ main.cpp -std=c++17
./a.out
The output of the program is as follows:
Size of vector is 5

Print vector elements before sorting
1     5     2     4     3

Print vector elements after sorting
1     2     3     4     5
The following line declares a vector and initializes the vector with five elements:
vector<int> v = { 1, 5, 2, 4, 3 };
However, a vector also allows appending values to the end of the vector by using the vector::push_back<data_type>( value ) API. The sort() algorithm takes two random access iterators that represent a range of data that must be sorted. As the vector internally uses a built-in C/C++ array, just like the STL array container, a vector also supports random access iterators; hence the sort() function is a highly efficient algorithm whose runtime complexity is logarithmic, that is, O(N log2 (N)).
The following table shows some commonly used vector APIs:
|
API |
Description |
|
at ( int index ) |
This returns the value stored at the indexed position. It throws the std::out_of_range exception if the index is invalid. |
|
operator [ int index ] |
This returns the value stored at the indexed position. It is faster than at( int index ), since no bounds checking is performed by this function. |
|
front() |
This returns the first value stored in the vector. |
|
back() |
This returns the last value stored in the vector. |
|
empty() |
This returns true if the vector is empty, and false otherwise. |
|
size() |
This returns the number of values stored in the vector. |
|
reserve( int size ) |
This reserves the initial size of the vector. When the vector size has reached its capacity, an attempt to insert new values requires vector resizing. This makes the insertion consume O(N) runtime complexity. The reserve() method is a workaround for the issue described. |
|
capacity() |
This returns the total capacity of the vector, while the size is the actual value stored in the vector. |
|
clear() |
This clears all the values. |
|
push_back<data_type>( value ) |
This adds a new value at the end of the vector. |
It would be really fun and convenient to read and print to/from the vector using istream_iterator and ostream_iterator. The following code demonstrates the use of a vector:
#include <iostream>
#include <vector>
#include <algorithm>
#include <iterator>
using namespace std;

int main () {
    vector<int> v;

    cout << "\nType empty string to end the input once you are done feeding the vector" << endl;
    cout << "\nEnter some numbers to feed the vector ..." << endl;


    istream_iterator<int> start_input(cin);
    istream_iterator<int> end_input;

    copy ( start_input, end_input, back_inserter( v ) );


    cout << "\nPrint the vector ..." << endl;
    copy ( v.begin(), v.end(), ostream_iterator<int>(cout, "\t") );
    cout << endl;


    return 0;
}
Basically, the copy algorithm accepts a range of iterators, where the first two arguments represent the source and the third argument represents the destination, which happens to be the vector:
istream_iterator<int> start_input(cin);
istream_iterator<int> end_input;

copy ( start_input, end_input, back_inserter( v ) );
The start_input iterator instance defines an istream_iterator iterator that receives input from istream and cin, and the end_input iterator instance defines an end-of-file delimiter, which is an empty string by default (""). Hence, the input can be terminated by typing "" in the command-line input terminal.
Similarly, let's understand the following code snippet:
cout << "\nPrint the vector ..." << endl;
copy ( v.begin(), v.end(), ostream_iterator<int>(cout, "\t") );
cout << endl;
The copy algorithm is used to copy the values from a vector, one element at a time, to ostream, separating the output with a tab character (\t).
Every STL container has its own advantages and disadvantages. There is no single STL container that works better in all the scenarios. A vector internally uses an array data structure, and arrays are fixed in size in C/C++. Hence, when you attempt to add new values to the vector at the time the vector size has already reached its maximum capacity, then the vector will allocate new consecutive locations that can accommodate the old values and the new value in a contiguous location. It then starts copying the old values into the new locations. Once all the data elements are copied, the vector will invalidate the old location.
Whenever this happens, the vector insertion will take O(N) runtime complexity. As the size of the vector grows over time, on demand, the O(N) runtime complexity will show up a pretty bad performance. If you know the maximum size required, you could reserve so much initial size upfront in order to overcome this issue. However, not in all scenarios do you need to use a vector. Of course, a vector supports dynamic size and random access, which has performance benefits in some scenarios, but it is possible that the feature you are working on may not really need random access, in which case a list, deque, or some other container may work better for you.
The list STL container makes use of a doubly linked list data structure internally. Hence, a list supports only sequential access, and searching a random value in a list in the worst case may take O(N) runtime complexity. However, if you know for sure that you only need sequential access, the list does offer its own benefits. The list STL container lets you insert data elements at the end, in the front, or in the middle with a constant time complexity, that is, O(1) runtime complexity in the best, average, and worst case scenarios.
The following image demonstrates the internal data structure used by the list STL:
Let's write a simple program to get first-hand experience of using the list STL:
#include <iostream>
#include <list>
#include <iterator>
#include <algorithm>
using namespace std;

int main () {

  list<int> l;

  for (int count=0; count<5; ++count)
    l.push_back( (count+1) * 100 );

  auto pos = l.begin();

  cout << "\nPrint the list ..." << endl;
  while ( pos != l.end() )
    cout << *pos++ << "-->";
  cout << " X" << endl;

  return 0;
}
I'm sure that by now you have got a taste of the C++ STL, its elegance, and its power. Isn't it cool to observe that the syntax remains the same for all the STL containers? You may have observed that the syntax remains the same no matter whether you are using an array, a vector, or a list. Trust me, you will get the same impression when you explore the other STL containers as well.
Having said that, the previous code is self-explanatory, as we did pretty much the same with the other containers.
Let's try to sort the list, as shown in the following code:
#include <iostream>
#include <list>
#include <iterator>
#include <algorithm>
using namespace std;

int main () {

    list<int> l = { 100, 20, 80, 50, 60, 5 };

    auto pos = l.begin();

    cout << "\nPrint the list before sorting ..." << endl;
    copy ( l.begin(), l.end(), ostream_iterator<int>( cout, "-->" ));
    cout << "X" << endl;

    l.sort();

    cout << "\nPrint the list after sorting ..." << endl;
    copy ( l.begin(), l.end(), ostream_iterator<int>( cout, "-->" ));
    cout << "X" << endl;

    return 0;
}
Did you notice the sort() method? Yes, the list container has its own sorting algorithms. The reason for a list container to support its own version of a sorting algorithm is that the generic sort() algorithm expects a random access iterator, whereas a list container doesn't support random access. In such cases, the respective container will offer its own efficient algorithms to overcome the shortcoming.
Interestingly, the runtime complexity of the sort algorithm supported by a list is O (N log2 N).
The following table shows the most commonly used APIs of an STL list:
|
API |
Description |
|
front() |
This returns the first value stored in the list |
|
back() |
This returns the last value stored in the list |
|
size() |
This returns the count of values stored in the list |
|
empty() |
This returns true when the list is empty, and false otherwise |
|
clear() |
This clears all the values stored in the list |
|
push_back<data_type>( value ) |
This adds a value at the end of the list |
|
push_front<data_type>( value ) |
This adds a value at the front of the list |
|
merge( list ) |
This merges two sorted lists with values of the same type |
|
reverse() |
This reverses the list |
|
unique() |
This removes duplicate values from the list |
|
sort() |
This sorts the values stored in a list |
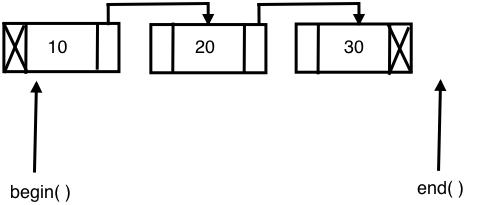
The STL's forward_list container is built on top of a singly linked list data structure; hence, it only supports navigation in the forward direction. As forward_list consumes one less pointer for every node in terms of memory and runtime, it is considered more efficient compared with the list container. However, as price for the extra edge of performance advantage, forward_list had to give up some functionalities.
The following diagram shows the internal data-structure used in forward_list:
Let's explore the following sample code:
#include <iostream>
#include <forward_list>
#include <iterator>
#include <algorithm>
using namespace std;

int main ( ) {

  forward_list<int> l = { 10, 10, 20, 30, 45, 45, 50 };

  cout << "\nlist with all values ..." << endl;
  copy ( l.begin(), l.end(), ostream_iterator<int>(cout, "\t") );

  cout << "\nSize of list with duplicates is " << distance( l.begin(), l.end() ) << endl;

  l.unique();

  cout << "\nSize of list without duplicates is " << distance( l.begin(), l.end() ) << endl;

  l.resize( distance( l.begin(), l.end() ) );

  cout << "\nlist after removing duplicates ..." << endl;
  copy ( l.begin(), l.end(), ostream_iterator<int>(cout, "\t") );
  cout << endl;

  return 0;

}
The output can be viewed with the following command:
./a.out
The output will be as follows:
list with all values ...
10    10    20    30    45    45    50
Size of list with duplicates is 7

Size of list without duplicates is 5

list after removing duplicates ...
10    20   30   45   50
The following code declares and initializes the forward_list container with some unique values and some duplicate values:
forward_list<int> l = { 10, 10, 20, 30, 45, 45, 50 };
As the forward_list container doesn't support the size() function, we used the distance() function to find the size of the list:
cout << "\nSize of list with duplicates is " << distance( l.begin(), l.end() ) << endl;
The following forward_list<int>::unique() function removes the duplicate integers and retains only the unique values:
l.unique();
The following table shows the commonly used forward_list APIs:
|
API |
Description |
|
front() |
This returns the first value stored in the forward_list container |
|
empty() |
This returns true when the forward_list container is empty and false, otherwise |
|
clear() |
This clears all the values stored in forward_list |
|
push_front<data_type>( value ) |
This adds a value to the front of forward_list |
|
merge( list ) |
This merges two sorted forward_list containers with values of the same type |
|
reverse() |
This reverses the forward_list container |
|
unique() |
This removes duplicate values from the forward_list container |
|
sort() |
This sorts the values stored in forward_list |
Let's explore one more example to get a firm understanding of the forward_list container:
#include <iostream>
#include <forward_list>
#include <iterator>
#include <algorithm>
using namespace std;

int main () {

    forward_list<int> list1 = { 10, 20, 10, 45, 45, 50, 25 };
    forward_list<int> list2 = { 20, 35, 27, 15, 100, 85, 12, 15 };

    cout << "\nFirst list before sorting ..." << endl;
    copy ( list1.begin(), list1.end(), ostream_iterator<int>(cout, "\t") );
    cout << endl;

    cout << "\nSecond list before sorting ..." << endl;
    copy ( list2.begin(), list2.end(), ostream_iterator<int>(cout, "\t") );
    cout << endl;

    list1.sort();
    list2.sort();

    cout << "\nFirst list after sorting ..." << endl;
    copy ( list1.begin(), list1.end(), ostream_iterator<int>(cout, "\t") );
    cout << endl;

    cout << "\nSecond list after sorting ..." << endl;
    copy ( list2.begin(), list2.end(), ostream_iterator<int>(cout, "\t") );
    cout << endl;


    list1.merge ( list2 );

    cout << "\nMerged list ..." << endl;
    copy ( list1.begin(), list1.end(), ostream_iterator<int>(cout, "\t") );

    cout << "\nMerged list after removing duplicates ..." << endl;
    list1.unique();
    copy ( list1.begin(), list1.end(), ostream_iterator<int>(cout, "\t") );

    return 0;
}
The preceding code snippet is an interesting example that demonstrates the practical use of the sort(), merge(), and unique() STL algorithms.
The output can be viewed with the following command:
./a.out
The output of the program is as follows:
First list before sorting ...
10   20   10   45   45   50   25
Second list before sorting ...
20   35   27   15   100  85   12   15

First list after sorting ...
10   10   20   25   45   45   50
Second list after sorting ...
12   15   15   20   27   35   85   100

Merged list ...
10   10   12   15   15   20   20   25   27   35   45   45  50   85  100
Merged list after removing duplicates ...
10   12   15   20   25   27   35   45   50   85  100
The output and the program are pretty self-explanatory.
The deque container is a double-ended queue and the data structure used could be a dynamic array or a vector. In a deque, it is possible to insert an element both at the front and back, with a constant time complexity of O(1), unlike vectors, in which the time complexity of inserting an element at the back is O(1) while that for inserting an element at the front is O(N). The deque doesn't suffer from the problem of reallocation, which is suffered by a vector. However, all the benefits of a vector are there with deque, except that deque is slightly better in terms of performance as compared to a vector as there are several rows of dynamic arrays or vectors in each row.
The following diagram shows the internal data structure used in a deque container:
Let's write a simple program to try out the deque container:
#include <iostream>
#include <deque>
#include <algorithm>
#include <iterator>
using namespace std;

int main () {
  deque<int> d = { 10, 20, 30, 40, 50 };

  cout << "\nInitial size of deque is " << d.size() << endl;

  d.push_back( 60 );
  d.push_front( 5 );

  cout << "\nSize of deque after push back and front is " << d.size() << endl;

  copy ( d.begin(), d.end(), ostream_iterator<int>( cout, "\t" ) );
  d.clear();

  cout << "\nSize of deque after clearing all values is " << d.size() <<
endl;

  cout << "\nIs the deque empty after clearing values ? " << ( d.empty()
? "true" : "false" ) << endl;

return 0;
}
The output can be viewed with the following command:
./a.out
The output of the program is as follows:
Intitial size of deque is 5

Size of deque after push back and front is 7

Print the deque ...
5  10  20  30  40  50  60
Size of deque after clearing all values is 0

Is the deque empty after clearing values ? true
The following table shows the commonly used deque APIs:
|
API |
Description |
|
at ( int index ) |
This returns the value stored at the indexed position. It throws the std::out_of_range exception if the index is invalid. |
|
operator [ int index ] |
This returns the value stored at the indexed position. It is faster than at( int index ) since no bounds checking is performed by this function. |
|
front() |
This returns the first value stored in the deque. |
|
back() |
This returns the last value stored in the deque. |
|
empty() |
This returns true if the deque is empty and false, otherwise. |
|
size() |
This returns the number of values stored in the deque. |
|
capacity() |
This returns the total capacity of the deque, while size() returns the actual number of values stored in the deque. |
|
clear() |
This clears all the values. |
|
push_back<data_type>( value ) |
This adds a new value at the end of the deque. |
Associative containers store data in a sorted fashion, unlike the sequence containers. Hence, the order in which the data is inserted will not be retained by the associative containers. Associative containers are highly efficient in searching a value with O( log n ) runtime complexity. Every time a new value gets added to the container, the container will reorder the values stored internally if required.
The STL supports the following types of associative containers:
Associative containers organize the data as key-value pairs. The data will be sorted based on the key for random and faster access. Associative containers come in two flavors:
The following associative containers come under ordered containers, as they are ordered/sorted in a particular fashion. Ordered associative containers generally use some form of Binary Search Tree (BST); usually, a red-black tree is used to store the data:
The following associative containers come under unordered containers, as they are not ordered in any particular fashion and they use hash tables:
Let's understand the previously mentioned containers with examples in the following subsections.
A set container stores only unique values in a sorted fashion. A set organizes the values using the value as a key. The set container is immutable, that is, the values stored in a set can't be modified; however, the values can be deleted. A set generally uses a red-black tree data structure, which is a form of balanced BST. The time complexity of set operations are guaranteed to be O ( log N ).
Let's write a simple program using a set:
#include <iostream>
#include <set>
#include <vector>
#include <iterator>
#include <algorithm>
using namespace std;

int main( ) {
    set<int> s1 = { 1, 3, 5, 7, 9 };
    set<int> s2 = { 2, 3, 7, 8, 10 };

    vector<int> v( s1.size() + s2.size() );

    cout << "\nFirst set values are ..." << endl;
    copy ( s1.begin(), s1.end(), ostream_iterator<int> ( cout, "\t" ) );
    cout << endl;

    cout << "\nSecond set values are ..." << endl;
    copy ( s2.begin(), s2.end(), ostream_iterator<int> ( cout, "\t" ) );
    cout << endl;

    auto pos = set_difference ( s1.begin(), s1.end(), s2.begin(), s2.end(), v.begin() );
    v.resize ( pos - v.begin() );

    cout << "\nValues present in set one but not in set two are ..." << endl;
    copy ( v.begin(), v.end(), ostream_iterator<int> ( cout, "\t" ) );
    cout << endl;

    v.clear();

    v.resize ( s1.size() + s2.size() );

    pos = set_union ( s1.begin(), s1.end(), s2.begin(), s2.end(), v.begin() );

    v.resize ( pos - v.begin() );

    cout << "\nMerged set values in vector are ..." << endl;
    copy ( v.begin(), v.end(), ostream_iterator<int> ( cout, "\t" ) );
    cout << endl;

    return 0;
}
The output can be viewed with the following command:
./a.out
The output of the program is as follows:
First set values are ...
1   3   5   7   9

Second set values are ...
2   3   7   8   10

Values present in set one but not in set two are ...
1   5   9

Merged values of first and second set are ...
1   2   3   5   7   8   9  10
The following code declares and initializes two sets, s1 and s2:
set<int> s1 = { 1, 3, 5, 7, 9 };
set<int> s2 = { 2, 3, 7, 8, 10 };
The following line will ensure that the vector has enough room to store the values in the resultant vector:
vector<int> v( s1.size() + s2.size() );
The following code will print the values in s1 and s2:
cout << "\nFirst set values are ..." << endl;
copy ( s1.begin(), s1.end(), ostream_iterator<int> ( cout, "\t" ) );
cout << endl;

cout << "\nSecond set values are ..." << endl;
copy ( s2.begin(), s2.end(), ostream_iterator<int> ( cout, "\t" ) );
cout << endl;
The set_difference() algorithm will populate the vector v with values only present in set s1 but not in s2. The iterator, pos, will point to the last element in the vector; hence, the vector resize will ensure that the extra spaces in the vector are removed:
auto pos = set_difference ( s1.begin(), s1.end(), s2.begin(), s2.end(), v.begin() );
v.resize ( pos - v.begin() );
The following code will print the values populated in the vector v:
cout << "\nValues present in set one but not in set two are ..." << endl;
copy ( v.begin(), v.end(), ostream_iterator<int> ( cout, "\t" ) );
cout << endl;
The set_union() algorithm will merge the contents of sets s1 and s2 into the vector, and the vector is then resized to fit only the merged values:
pos = set_union ( s1.begin(), s1.end(), s2.begin(), s2.end(), v.begin() );
v.resize ( pos - v.begin() );
The following code will print the merged values populated in the vector v:
cout << "\nMerged values of first and second set are ..." << endl;
copy ( v.begin(), v.end(), ostream_iterator<int> ( cout, "\t" ) );
cout << endl;
The following table describes the commonly used set APIs:
|
API |
Description |
|
insert( value ) |
This inserts a value into the set |
|
clear() |
This clears all the values in the set |
|
size() |
This returns the total number of entries present in the set |
|
empty() |
This will print true if the set is empty, and returns false otherwise |
|
find() |
This finds the element with the specified key and returns the iterator position |
|
equal_range() |
This returns the range of elements matching a specific key |
|
lower_bound() |
This returns an iterator to the first element not less than the given key |
|
upper_bound() |
This returns an iterator to the first element greater than the given key |
A map stores the values organized by keys. Unlike a set, a map has a dedicated key per value. Maps generally use a red-black tree as an internal data structure, which is a balanced BST that guarantees O( log N ) runtime efficiency for searching or locating a value in the map. The values stored in a map are sorted based on the key, using a red-black tree. The keys used in a map must be unique. A map will not retain the sequences of the input as it reorganizes the values based on the key, that is, the red-black tree will be rotated to balance the red-black tree height.
Let's write a simple program to understand map usage:
#include <iostream>
#include <map>
#include <iterator>
#include <algorithm>
using namespace std;

int main ( ) {

  map<string, long> contacts;

  contacts["Jegan"] = 123456789;
  contacts["Meena"] = 523456289;
  contacts["Nitesh"] = 623856729;
  contacts["Sriram"] = 993456789;

  auto pos = contacts.find( "Sriram" );

  if ( pos != contacts.end() )
    cout << pos->second << endl;

  return 0;
}
Let's compile and check the output of the program:
g++ main.cpp -std=c++17
./a.out
The output is as follows:
Mobile number of Sriram is 8901122334
The following line declares a map with a string name as the key and a long mobile number as the value stored in the map:
map< string, long > contacts;
The following code snippet adds four contacts organized by name as the key:
 contacts[ "Jegan" ] = 1234567890;
 contacts[ "Meena" ] = 5784433221;
 contacts[ "Nitesh" ] = 4567891234;
 contacts[ "Sriram" ] = 8901122334;
The following line will try to locate the contact with the name, Sriram, in the contacts map; if Sriram is found, then the find() function will return the iterator pointing to the location of the key-value pair; otherwise it returns the contacts.end() position:
auto pos = contacts.find( "Sriram" );
The following code verifies whether the iterator, pos, has reached contacts.end() and prints the contact number. Since the map is an associative container, it stores a key=>value pair; hence, pos->first indicates the key and pos->second indicates the value:
 if ( pos != contacts.end() )
      cout << "\nMobile number of " << pos->first << " is " << pos->second << endl;
 else
      cout << "\nContact not found." << endl;
The following table shows the commonly used map APIs:
|
API |
Description |
|
at ( key ) |
This returns the value for the corresponding key if the key is found; otherwise it throws the std::out_of_range exception |
|
operator[ key ] |
This updates an existing value for the corresponding key if the key is found; otherwise it will add a new entry with the respective key=>value supplied |
|
empty() |
This returns true if the map is empty, and false otherwise |
|
size() |
This returns the count of the key=>value pairs stored in the map |
|
clear() |
This clears the entries stored in the map |
|
count() |
This returns the number of elements matching the given key |
|
find() |
This finds the element with the specified key |
A multiset container works in a manner similar to a set container, except for the fact that a set allows only unique values to be stored whereas a multiset lets you store duplicate values. As you know, in the case of set and multiset containers, the values themselves are used as keys to organize the data. A multiset container is just like a set; it doesn't allow modifying the values stored in the multiset.
Let's write a simple program using a multiset:
#include <iostream>
#include <set>
#include <iterator>
#include <algorithm>
using namespace std;

int main() {
  multiset<int> s = { 10, 30, 10, 50, 70, 90 };

  cout << "\nMultiset values are ..." << endl;

  copy ( s.begin(), s.end(), ostream_iterator<int> ( cout, "\t" ) );
  cout << endl;

  return 0;
}
The output can be viewed with the following command:
./a.out
The output of the program is as follows:
Multiset values are ...
10 30 10 50 70 90
Interestingly, in the preceding output, you can see that the multiset holds duplicate values.
A multimap works exactly as a map, except that a multimap container will allow multiple values to be stored with the same key.
Let's explore the multimap container with a simple example:
#include <iostream>
#include <map>
#include <vector>
#include <iterator>
#include <algorithm>
using namespace std;

int main() {
  multimap< string, long > contacts = {
    { "Jegan", 2232342343 },
    { "Meena", 3243435343 },
    { "Nitesh", 6234324343 },
    { "Sriram", 8932443241 },
    { "Nitesh", 5534327346 }
  };

  auto pos = contacts.find ( "Nitesh" );
  int count = contacts.count( "Nitesh" );
  int index = 0;

  while ( pos != contacts.end() ) {
    cout << "\nMobile number of " << pos->first << " is " <<
    pos->second << endl;
    ++index;
    if ( index == count )
      break;
  }

  return 0;
}
The program can be compiled and the output can be viewed with the following commands:
g++ main.cpp -std=c++17

./a.out
The output of the program is as follows:
Mobile number of Nitesh is 6234324343
Mobile number of Nitesh is 5534327346
An unordered set works in a manner similar to a set, except that the internal behavior of these containers differs. A set makes use of red-black trees while an unordered set makes use of hash tables. The time complexity of set operations is O( log N) while the time complexity of unordered set operations is O(1); hence, the unordered set tends to be faster than the set.
The values stored in an unordered set are not organized in any particular fashion, unlike in a set, which stores values in a sorted fashion. If performance is the criteria, then an unordered set is a good bet; however, if iterating the values in a sorted fashion is a requirement, then set is a good choice.
An unordered map works in a manner similar to a map, except that the internal behavior of these containers differs. A map makes use of red-black trees while unordered map makes use of hash tables. The time complexity of map operations is O( log N) while that of unordered map operations is O(1); hence, an unordered map tends to be faster than a map.
The values stored in an unordered map are not organized in any particular fashion, unlike in a map where values are sorted by keys.
An unordered multiset works in a manner similar to a multiset, except that the internal behavior of these containers differs. A multiset makes use of red-black trees while an unordered multiset makes use of hash tables. The time complexity of multiset operations is O( log N) while that of unordered multiset operations is O(1). Hence, an unordered multiset tends to be faster than a multiset.
The values stored in an unordered multiset are not organized in any particular fashion, unlike in a multiset where values are stored in a sorted fashion. If performance is the criteria, unordered multisets are a good bet; however, if iterating the values in a sorted fashion is a requirement, then multiset is a good choice.
An unordered multimap works in a manner similar to a multimap, except that the internal behavior of these containers differs. A multimap makes use of red-black trees while an unordered multimap makes use of hash tables. The time complexity of multimap operations is O( log N) while that of unordered multimap operations is O(1); hence, an unordered multimap tends to be faster than a multimap.
The values stored in an unordered multimap are not organized in any particular fashion, unlike in multimaps where values are sorted by keys. If performance is the criteria, then an unordered multimap is a good bet; however, if iterating the values in a sorted fashion is a requirement, then multimap is a good choice.
Container adapters adapt existing containers to provide new containers. In simple terms, STL extension is done with composition instead of inheritance.
STL containers can't be extended by inheritance, as their constructors aren't virtual. Throughout the STL, you can observe that while static polymorphism is used both in terms of operator overloading and templates, dynamic polymorphism is consciously avoided for performance reasons. Hence, extending the STL by subclassing the existing containers isn't a good idea, as it would lead to memory leaks because container classes aren't designed to behave like base classes.
The STL supports the following container adapters:
Let's explore the container adapters in the following subsections.
Stack is not a new container; it is a template adapter class. The adapter containers wrap an existing container and provide high-level functionalities. The stack adapter container offers stack operations while hiding the unnecessary functionalities that are irrelevant for a stack. The STL stack makes use of a deque container by default; however, we can instruct the stack to use any existing container that meets the requirement of the stack during the stack instantiation.
Deques, lists, and vectors meet the requirements of a stack adapter.
A stack operates on the Last In First Out (LIFO) philosophy.
The following table shows commonly used stack APIs:
|
API |
Description |
|
top() |
This returns the top-most value in the stack, that is, the value that was added last |
|
push<data_type>( value ) |
This will push the value provided to the top of the stack |
|
pop() |
This will remove the top-most value from the stack |
|
size() |
This returns the number of values present in the stack |
|
empty() |
This returns true if the stack is empty; otherwise it returns false |
It's time to get our hands dirty; let's write a simple program to use a stack:
#include <iostream>
#include <stack>
#include <iterator>
#include <algorithm>
using namespace std;

int main ( ) {

  stack<string> spoken_languages;

  spoken_languages.push ( "French" );
  spoken_languages.push ( "German" );
  spoken_languages.push ( "English" );
  spoken_languages.push ( "Hindi" );
  spoken_languages.push ( "Sanskrit" );
  spoken_languages.push ( "Tamil" );

  cout << "\nValues in Stack are ..." << endl;
  while ( ! spoken_languages.empty() ) {
              cout << spoken_languages.top() << endl;
        spoken_languages.pop();
  }
  cout << endl;


  return 0;
}
The program can be compiled and the output can be viewed with the following command:
g++ main.cpp -std=c++17

./a.out
The output of the program is as follows:
Values in Stack are ...
Tamil
Kannada
Telugu
Sanskrit
Hindi
English
German
French
From the preceding output, we can see the LIFO behavior of stack.
A queue works based on the First In First Out (FIFO) principle. A queue is not a new container; it is a templatized adapter class that wraps an existing container and provides the high-level functionalities that are required for queue operations, while hiding the unnecessary functionalities that are irrelevant for a queue. The STL queue makes use of a deque container by default; however, we can instruct the queue to use any existing container that meets the requirement of the queue during the queue instantiation.
In a queue, new values can be added at the back and removed from the front. Deques, lists, and vectors meet the requirements of a queue adapter.
The following table shows the commonly used queue APIs:
|
API |
Description |
|
push() |
This appends a new value at the back of the queue |
|
pop() |
This removes the value at the front of the queue |
|
front() |
This returns the value in the front of the queue |
|
back() |
This returns the value at the back of the queue |
|
empty() |
This returns true when the queue is empty; otherwise it returns false |
|
size() |
This returns the number of values stored in the queue |
Let's use a queue in the following program:
#include <iostream>
#include <queue>
#include <iterator>
#include <algorithm>
using namespace std;

int main () {
  queue<int> q;

  q.push ( 100 );
  q.push ( 200 );
  q.push ( 300 );

  cout << "\nValues in Queue are ..." << endl;
  while ( ! q.empty() ) {
    cout << q.front() << endl;
    q.pop();
  }

  return 0;
}
The program can be compiled and the output can be viewed with the following commands:
g++ main.cpp -std=c++17

./a.out
The output of the program is as follows:
Values in Queue are ...
100
200
300
From the preceding output, you can observe that the values were popped out in the same sequence that they were pushed in, that is, FIFO.
A priority queue is not a new container; it is a templatized adapter class that wraps an existing container and provides high-level functionalities that are required for priority queue operations, while hiding the unnecessary functionalities that are irrelevant for a priority queue. A priority queue makes use of a vector container by default; however, a deque container also meets the requirement of the priority queue. Hence, during the priority queue instantiation, you could instruct the priority queue to make use of a deque as well.
A priority queue organizes the data in such a way that the highest priority value appears first; in other words, the values are sorted in a descending order.
The deque and vector meet the requirements of a priority queue adaptor.
The following table shows commonly used priority queue APIs:
|
API |
Description |
|
push() |
This appends a new value at the back of the priority queue |
|
pop() |
This removes the value at the front of the priority queue |
|
empty() |
This returns true when the priority queue is empty; otherwise it returns false |
|
size() |
This returns the number of values stored in the priority queue |
|
top() |
This returns the value in the front of the priority queue |
Let's write a simple program to understand priority_queue:
#include <iostream>
#include <queue>
#include <iterator>
#include <algorithm>
using namespace std;

int main () {
  priority_queue<int> q;

  q.push( 100 );
  q.push( 50 );
  q.push( 1000 );
  q.push( 800 );
  q.push( 300 );

  cout << "\nSequence in which value are inserted are ..." << endl;
  cout << "100\t50\t1000\t800\t300" << endl;
  cout << "Priority queue values are ..." << endl;

  while ( ! q.empty() ) {
    cout << q.top() << "\t";
    q.pop();
  }
  cout << endl;

  return 0;
}
The program can be compiled and the output can be viewed with the following command:
g++ main.cpp -std=c++17

./a.out
The output of the program is as follows:
Sequence in which value are inserted are ...
100   50   1000  800   300

Priority queue values are ...
1000  800   300   100   50
From the preceding output, you can observe that priority_queue is a special type of queue that reorders the inputs in such a way that the highest value appears first.
In this chapter you learned about ready-made generic containers, functors, iterators, and algorithms. You also learned set, map, multiset, and multimap associative containers, their internal data structures, and common algorithms that can be applied on them. Further you learned how to use the various containers with practical hands-on code samples.
In the next chapter, you will learn template programming, which helps you master the essentials of templates.
In this chapter, we will cover the following topics:
Let's now start learning generic programming.
Generic programming is a style of programming that helps you develop reusable code or generic algorithms that can be applied to a wide variety of data types. Whenever a generic algorithm is invoked, the data types will be supplied as parameters with a special syntax.
Let's say we would like to write a sort() function, which takes an array of inputs that needs to be sorted in an ascending order. Secondly, we need the sort() function to sort int, double, char, and string data types. There are a couple of ways this can be solved:
Well, both approaches have their own merits and demerits. The advantage of the first approach is that, since there are dedicated functions for the int, double, char, and string data types, the compiler will be able to perform type checking if an incorrect data type is supplied. The disadvantage of the first approach is that we have to write four different functions even though the logic remains the same across all the functions. If a bug is identified in the algorithm, it must be fixed separately in all four functions; hence, heavy maintenance efforts are required. If we need to support another data type, we will end up writing one more function, and this will keep growing as we need to support more data types.
The advantage of the second approach is that we could just write one macro for all the data types. However, one very discouraging disadvantage is that the compiler will not be able to perform type checking, and this approach is more prone to errors and may invite many unexpected troubles. This approach is dead against object-oriented coding principles.
C++ supports generic programming with templates, which has the following benefits:
However, the disadvantages are as follows:
A function template lets you parameterize a data type. The reason this is referred to as generic programming is that a single template function will support many built-in and user-defined data types. A templatized function works like a C-style macro, except for the fact that the C++ compiler will type check the function when we supply an incompatible data type at the time of invoking the template function.
It will be easier to understand the template concept with a simple example, as follows:
#include <iostream>
#include <algorithm>
#include <iterator>
using namespace std;

template <typename T, int size>
void sort ( T input[] ) {

     for ( int i=0; i<size; ++i) {
         for (int j=0; j<size; ++j) {
              if ( input[i] < input[j] )
                  swap (input[i], input[j] );
         }
     }

}

int main () {
        int a[10] = { 100, 10, 40, 20, 60, 80, 5, 50, 30, 25 };

        cout << "\nValues in the int array before sorting ..." << endl;
        copy ( a, a+10, ostream_iterator<int>( cout, "\t" ) );
        cout << endl;

        ::sort<int, 10>( a );

        cout << "\nValues in the int array after sorting ..." << endl;
        copy ( a, a+10, ostream_iterator<int>( cout, "\t" ) );
        cout << endl;

        double b[5] = { 85.6d, 76.13d, 0.012d, 1.57d, 2.56d };

        cout << "\nValues in the double array before sorting ..." << endl;
        copy ( b, b+5, ostream_iterator<double>( cout, "\t" ) );
        cout << endl;


        ::sort<double, 5>( b );

        cout << "\nValues in the double array after sorting ..." << endl;
        copy ( b, b+5, ostream_iterator<double>( cout, "\t" ) );
        cout << endl;

        string names[6] = {
               "Rishi Kumar Sahay",
               "Arun KR",
               "Arun CR",
               "Ninad",
               "Pankaj",
               "Nikita"
        };

        cout << "\nNames before sorting ..." << endl;
        copy ( names, names+6, ostream_iterator<string>( cout, "\n" ) );
        cout << endl;

        ::sort<string, 6>( names );

        cout << "\nNames after sorting ..." << endl;
        copy ( names, names+6, ostream_iterator<string>( cout, "\n" ) );
        cout << endl;

        return 0;
}
Run the following commands:
g++ main.cpp -std=c++17
./a.out
The output of the preceding program is as follows:
Values in the int array before sorting ...
100  10   40   20   60   80   5   50   30   25

Values in the int array after sorting ...
5    10   20   25   30   40   50   60   80   100

Values in the double array before sorting ...
85.6d 76.13d 0.012d 1.57d 2.56d

Values in the double array after sorting ...
0.012   1.57   2.56   76.13   85.6

Names before sorting ...
Rishi Kumar Sahay
Arun KR
Arun CR
Ninad
Pankaj
Nikita

Names after sorting ...
Arun CR
Arun KR
Nikita
Ninad
Pankaj
Rich Kumar Sahay
Isn't it really interesting to see just one template function doing all the magic? Yes, that's how cool C++ templates are!
The following code defines a function template. The keyword, template <typename T, int size>, tells the compiler that what follows is a function template:
template <typename T, int size>
void sort ( T input[] ) {

 for ( int i=0; i<size; ++i) {
     for (int j=0; j<size; ++j) {
         if ( input[i] < input[j] )
             swap (input[i], input[j] );
     }
 }

}
The line, void sort ( T input[] ), defines a function named sort, which returns void and receives an input array of type T. The T type doesn't indicate any specific data type. T will be deduced at the time of instantiating the function template during compile time.
The following code populates an integer array with some unsorted values and prints the same to the terminal:
 int a[10] = { 100, 10, 40, 20, 60, 80, 5, 50, 30, 25 };
 cout << "\nValues in the int array before sorting ..." << endl;
 copy ( a, a+10, ostream_iterator<int>( cout, "\t" ) );
 cout << endl;
The following line will instantiate an instance of a function template for the int data type. At this point, typename T is substituted and a specialized function is created for the int data type. The scope-resolution operator in front of sort, that is, ::sort(), ensures that it invokes our custom function, sort(), defined in the global namespace; otherwise, the C++ compiler will attempt to invoke the sort() algorithm defined in the std namespace, or from any other namespace if such a function exists. The <int, 10> variable tells the compiler to create an instance of a function, substituting typename T with int, and 10 indicates the size of the array used in the template function:
::sort<int, 10>( a );
The following lines will instantiate two additional instances that support a double array of 5 elements and a string array of 6 elements respectively:
::sort<double, 5>( b );
::sort<string, 6>( names );
If you are curious to know some more details about how the C++ compiler instantiates the function templates to support int, double, and string, you could try the Unix utilities, nm and c++filt. The nm Unix utility will list the symbols in the symbol table, as follows:
nm ./a.out | grep sort

00000000000017f1 W _Z4sortIdLi5EEvPT_
0000000000001651 W _Z4sortIiLi10EEvPT_
000000000000199b W _Z4sortINSt7__cxx1112basic_stringIcSt11char_traitsIcESaIcEEELi6EEvPT_
As you can see, there are three different overloaded sort functions in the binary; however, we have defined only one template function. As the C++ compiler has mangled names to deal with function overloading, it is difficult for us to interpret which function among the three functions is meant for the int, double, and string data types.
However, there is a clue: the first function is meant for double, the second is meant for int, and the third is meant for string. The name-mangled function has _Z4sortIdLi5EEvPT_ for double, _Z4sortIiLi10EEvPT_ for int, and _Z4sortINSt7__cxx1112basic_stringIcSt11char_traitsIcESaIcEEELi6EEvPT_ for string. There is another cool Unix utility to help you interpret the function signatures without much struggle. Check the following output of the c++filt utility:
c++filt _Z4sortIdLi5EEvPT_
void sort<double, 5>(double*)

c++filt _Z4sortIiLi10EEvPT_
void sort<int, 10>(int*)

c++filt _Z4sortINSt7__cxx1112basic_stringIcSt11char_traitsIcESaIcEEELi6EEvPT_
void sort<std::__cxx11::basic_string<char, std::char_traits<char>, std::allocator<char> >, 6>(std::__cxx11::basic_string<char, std::char_traits<char>, std::allocator<char> >*)
Hopefully, you will find these utilities useful while working with C++ templates. I'm sure these tools and techniques will help you to debug any C++ application.
Overloading function templates works exactly like regular function overloading in C++. However, I'll help you recollect the C++ function overloading basics.
The function overloading rules and expectations from the C++ compiler are as follows:
If any of these aforementioned rules aren't met, the C++ compiler will not treat them as overloaded functions. If there is any ambiguity in differentiating between the overloaded functions, the C++ compiler will report it promptly as a compilation error.
It is time to explore this with an example, as shown in the following program:
#include <iostream>
#include <array>
using namespace std;

void sort ( array<int,6> data ) {


     cout << "Non-template sort function invoked ..." << endl;

     int size = data.size();

     for ( int i=0; i<size; ++i ) {
          for ( int j=0; j<size; ++j ) {
                if ( data[i] < data[j] )
                    swap ( data[i], data[j] );
          }
     }

}

template <typename T, int size>
void sort ( array<T, size> data ) {

     cout << "Template sort function invoked with one argument..." << endl;

     for ( int i=0; i<size; ++i ) {
         for ( int j=0; j<size; ++j ) {
             if ( data[i] < data[j] )
                swap ( data[i], data[j] );
         }
     }

}

template <typename T>
void sort ( T data[], int size ) {
     cout << "Template sort function invoked with two arguments..." << endl;

     for ( int i=0; i<size; ++i ) {
         for ( int j=0; j<size; ++j ) {
             if ( data[i] < data[j] )
                swap ( data[i], data[j] );
         }
     }

}

int main() {

    //Will invoke the non-template sort function
    array<int, 6> a = { 10, 50, 40, 30, 60, 20 };
    ::sort ( a );

    //Will invoke the template function that takes a single argument
    array<float,6> b = { 10.6f, 57.9f, 80.7f, 35.1f, 69.3f, 20.0f };
    ::sort<float,6>( b );

    //Will invoke the template function that takes a single argument
    array<double,6> c = { 10.6d, 57.9d, 80.7d, 35.1d, 69.3d, 20.0d };
    ::sort<double,6> ( c );

    //Will invoke the template function that takes two arguments
    double d[] = { 10.5d, 12.1d, 5.56d, 1.31d, 81.5d, 12.86d };
    ::sort<double> ( d, 6 );

    return 0;

}
Run the following commands:
g++ main.cpp -std=c++17

./a.out
The output of the preceding program is as follows:
Non-template sort function invoked ...

Template sort function invoked with one argument...

Template sort function invoked with one argument...

Template sort function invoked with two arguments...
The following code is a non-template version of our custom sort() function:
void sort ( array<int,6> data ) {

     cout << "Non-template sort function invoked ..." << endl;

     int size = data.size();

     for ( int i=0; i<size; ++i ) {
         for ( int j=0; j<size; ++j ) {
             if ( data[i] < data[j] )
                 swap ( data[i], data[j] );
         }
     }

}
Non-template functions and template functions can coexist and participate in function overloading. One weird behavior of the preceding function is that the size of the array is hardcoded.
The second version of our sort() function is a template function, as shown in the following code snippet. Interestingly, the weird issue that we noticed in the first non-template sort() version is addressed here:
template <typename T, int size>
void sort ( array<T, size> data ) {

     cout << "Template sort function invoked with one argument..." << endl;

     for ( int i=0; i<size; ++i ) {
         for ( int j=0; j<size; ++j ) {
             if ( data[i] < data[j] )
                swap ( data[i], data[j] );
         }
     }

}
In the preceding code, both the data type and the size of the array are passed as template arguments, which are then passed to the function call arguments. This approach makes the function generic, as this function can be instantiated for any data type.
The third version of our custom sort() function is also a template function, as shown in the following code snippet:
template <typename T>
void sort ( T data[], int size ) {

     cout << "Template sort function invoked with two argument..." << endl;

     for ( int i=0; i<size; ++i ) {
         for ( int j=0; j<size; ++j ) {
             if ( data[i] < data[j] )
                swap ( data[i], data[j] );
         }
     }

}
The preceding template function takes a C-style array; hence, it also expects the user to indicate its size. However, the size of the array could be computed within the function, but for demonstration purposes, I need a function that takes two arguments. The previous function isn't recommended, as it uses a C-style array; ideally, we would use one of the STL containers.
Now, let's understand the main function code. The following code declares and initializes the STL array container with six values, which is then passed to our sort() function defined in the default namespace:
 //Will invoke the non-template sort function
 array<int, 6> a = { 10, 50, 40, 30, 60, 20 };
 ::sort ( a );
The preceding code will invoke the non-template sort() function. An important point to note is that, whenever C++ encounters a function call, it first looks for a non-template version; if C++ finds a matching non-template function version, its search for the correct function definition ends there. If the C++ compiler isn't able to identify a non-template function definition that matches the function call signature, then it starts looking for any template function that could support the function call and instantiates a specialized function for the data type required.
Let's understand the following code:
//Will invoke the template function that takes a single argument
array<float,6> b = { 10.6f, 57.9f, 80.7f, 35.1f, 69.3f, 20.0f };
::sort<float,6>( b );
This will invoke the template function that receives a single argument. As there is no non-template sort() function that receives an array<float,6> data type, the C++ compiler will instantiate such a function out of our user-defined sort() template function with a single argument that takes array<float, 6>.
In the same way, the following code triggers the compiler to instantiate a double version of the template sort() function that receives array<double, 6>:
  //Will invoke the template function that takes a single argument
 array<double,6> c = { 10.6d, 57.9d, 80.7d, 35.1d, 69.3d, 20.0d };
 ::sort<double,6> ( c );
Finally, the following code will instantiate an instance of the template sort() that receives two arguments and invokes the function:
 //Will invoke the template function that takes two arguments
 double d[] = { 10.5d, 12.1d, 5.56d, 1.31d, 81.5d, 12.86d };
 ::sort<double> ( d, 6 );
If you have come this far, I'm sure you like the C++ template topics discussed so far.
C++ templates extend the function template concepts to classes too, and enable us to write object-oriented generic code. In the previous sections, you learned the use of function templates and overloading. In this section, you will learn writing template classes that open up more interesting generic programming concepts.
A class template lets you parameterize the data type on the class level via a template type expression.
Let's understand a class template with the following example:
//myalgorithm.h
#include <iostream>
#include <algorithm>
#include <array>
#include <iterator>
using namespace std;

template <typename T, int size>
class MyAlgorithm {

public:
        MyAlgorithm() { }
        ~MyAlgorithm() { }


        void sort( array<T, size> &data ) {
             for ( int i=0; i<size; ++i ) {
                 for ( int j=0; j<size; ++j ) {
                     if ( data[i] < data[j] )
                         swap ( data[i], data[j] );
                 }
             }
        }

        void sort ( T data[size] );

};

template <typename T, int size>
inline void MyAlgorithm<T, size>::sort ( T data[size] ) {
       for ( int i=0; i<size; ++i ) {
           for ( int j=0; j<size; ++j ) {
               if ( data[i] < data[j] )
                  swap ( data[i], data[j] );
           }
       }
}
Let's use myalgorithm.h in the following main.cpp program as follows:
#include "myalgorithm.h"

int main() {

    MyAlgorithm<int, 10> algorithm1;

    array<int, 10> a = { 10, 5, 15, 20, 25, 18, 1, 100, 90, 18 };

    cout << "\nArray values before sorting ..." << endl;
    copy ( a.begin(), a.end(), ostream_iterator<int>(cout, "\t") );
    cout << endl;

    algorithm1.sort ( a );

    cout << "\nArray values after sorting ..." << endl;
    copy ( a.begin(), a.end(), ostream_iterator<int>(cout, "\t") );
    cout << endl;

    MyAlgorithm<int, 10> algorithm2;
    double d[] = { 100.0, 20.5, 200.5, 300.8, 186.78, 1.1 };

    cout << "\nArray values before sorting ..." << endl;
    copy ( d.begin(), d.end(), ostream_iterator<double>(cout, "\t") );
    cout << endl;

    algorithm2.sort ( d );

    cout << "\nArray values after sorting ..." << endl;
    copy ( d.begin(), d.end(), ostream_iterator<double>(cout, "\t") );
    cout << endl;

    return 0;

}
Let's quickly compile the program using the following command:
g++ main.cpp -std=c++17

./a.out
The output is as follows:
Array values before sorting ...
10  5   15   20   25   18   1   100   90   18

Array values after sorting ...
1   5   10   15   18   18   20   25   90   100

Array values before sorting ...
100   20.5   200.5   300.8   186.78   1.1

Array values after sorting ...
1.1     20.5   100   186.78  200.5  300.8
The following code declares a class template. The keyword, template <typename T, int size>, can be replaced with <class T, int size>. Both keywords can be interchanged in function and class templates; however, as an industry best practice, template<class T> can be used only with class templates to avoid confusion:
template <typename T, int size>
class MyAlgorithm
One of the overloaded sort() methods is defined inline as follows:
 void sort( array<T, size> &data ) {
      for ( int i=0; i<size; ++i ) {
          for ( int j=0; j<size; ++j ) {
              if ( data[i] < data[j] )
                 swap ( data[i], data[j] );
          }
      }
 }
The second overloaded sort() function is just declared within the class scope, without any definition, as follows:
template <typename T, int size>
class MyAlgorithm {
      public:
           void sort ( T data[size] );
};
The preceding sort() function is defined outside the class scope, as shown in the following code snippet. The weird part is that we need to repeat the template parameters for every member function that is defined outside the class template:
template <typename T, int size>
inline void MyAlgorithm<T, size>::sort ( T data[size] ) {
       for ( int i=0; i<size; ++i ) {
           for ( int j=0; j<size; ++j ) {
               if ( data[i] < data[j] )
                  swap ( data[i], data[j] );
           }
       }
}
Otherwise, the class template concepts remain the same as that of function templates.
So far in this chapter, you have learned how to do generic programming with function templates and class templates. As you understand the class template, a single template class can support any built-in and user-defined data types. However, there are times when we need to treat certain data types with some special treatment with respect to the other data types. In such cases, C++ offers us explicit class specialization support to handle selective data types with differential treatment.
Consider the STL deque container; though deque looks fine for storing, let's say, string, int, double, and long, if we decide to use deque to store a bunch of boolean types, the bool data type takes at least one byte, while it may vary as per compiler vendor implementation. While a single bit can efficiently represent true or false, a boolean at least takes one byte, that is, 8 bits, and the remaining 7 bits are not used. This may appear as though it's okay; however, if you have to store a very large deque of booleans, it definitely doesn't appear to be an efficient idea, right? You may think, what's the big deal? We could write another specialized class or template class for bool. But this approach requires end users to use different classes for different data types explicitly, and this doesn't sound like a good design either, right? This is exactly where C++'s explicit class specialization comes in handy.
Never mind if you aren't convinced yet; the following example will help you understand the need for explicit class specialization and how explicit class specialization works.
Let us develop a DynamicArray class to support a dynamic array of any data type. Let's start with a class template, as shown in the following program:
#include <iostream>
#include <deque>
#include <algorithm>
#include <iterator>
using namespace std;

template < class T >
class DynamicArray {
      private:
           deque< T > dynamicArray;
           typename deque< T >::iterator pos;

      public:
           DynamicArray() { initialize(); }
           ~DynamicArray() { }

           void initialize() {
                 pos = dynamicArray.begin();
           }

           void appendValue( T element ) {
                 dynamicArray.push_back ( element );
           }

           bool hasNextValue() {
                 return ( pos != dynamicArray.end() );
           }

           T getValue() {
                 return *pos++;
           }

};
The preceding DynamicArray template class internally makes use of the STL deque class. Hence, you could consider the DynamicArray template class a custom adapter container. Let's explore how the DynamicArray template class can be used in main.cpp with the following code snippet:
#include "dynamicarray.h"
#include "dynamicarrayforbool.h"

int main () {

    DynamicArray<int> intArray;

    intArray.appendValue( 100 );
    intArray.appendValue( 200 );
    intArray.appendValue( 300 );
    intArray.appendValue( 400 );

    intArray.initialize();

    cout << "\nInt DynamicArray values are ..." << endl;
    while ( intArray.hasNextValue() )
          cout << intArray.getValue() << "\t";
    cout << endl;

    DynamicArray<char> charArray;
    charArray.appendValue( 'H' );
    charArray.appendValue( 'e' );
    charArray.appendValue( 'l' );
    charArray.appendValue( 'l' );
    charArray.appendValue( 'o' );

    charArray.initialize();

    cout << "\nChar DynamicArray values are ..." << endl;
    while ( charArray.hasNextValue() )
          cout << charArray.getValue() << "\t";
    cout << endl;

    DynamicArray<bool> boolArray;

    boolArray.appendValue ( true );
    boolArray.appendValue ( false );
    boolArray.appendValue ( true );
    boolArray.appendValue ( false );

    boolArray.initialize();

    cout << "\nBool DynamicArray values are ..." << endl;
    while ( boolArray.hasNextValue() )
         cout << boolArray.getValue() << "\t";
    cout << endl;

    return 0;

}
Let's quickly compile the program using the following command:
g++ main.cpp -std=c++17

./a.out
The output is as follows:
Int DynamicArray values are ...
100   200   300   400

Char DynamicArray values are ...
H   e   l   l   o

Bool DynamicArray values are ...
1   0   1   0
Great! Our custom adapter container seems to work fine.
Let's zoom in and try to understand how the previous program works. The following code tells the C++ compiler that what follows is a class template:
template < class T >
class DynamicArray {
      private:
           deque< T > dynamicArray;
           typename deque< T >::iterator pos;
As you can see, the DynamicArray class makes use of STL deque internally, and an iterator for deque is declared with the name, pos. This iterator, pos, is utilized by the Dynamic template class to provide high-level methods such as the initialize(), appendValue(), hasNextValue(), and getValue() methods.
The initialize() method initializes the deque iterator pos to the first data element stored within deque. The appendValue( T element ) method lets you add a data element at the end of deque. The hasNextValue() method tells whether the DynamicArray class has further data values stored--true indicates it has further values and false indicates that the DynamicArray navigation has reached the end of deque. The initialize() method can be used to reset the pos iterator to the starting point when required. The getValue() method returns the data element pointed by the pos iterator at that moment. The getValue() method doesn't perform any validation; hence, it must be combined with hasNextValue() before invoking getValue() to safely access the values stored in DynamicArray.
Now, let's understand the main() function. The following code declares a DynamicArray class that stores the int data type; DynamicArray<int> intArray will trigger the C++ compiler to instantiate a DynamicArray class that is specialized for the int data type:
DynamicArray<int> intArray;

intArray.appendValue( 100 );
intArray.appendValue( 200 );
intArray.appendValue( 300 );
intArray.appendValue( 400 );
The values 100, 200, 300, and 400 are stored back to back within the DynamicArray class. The following code ensures that the intArray iterator points to the first element. Once the iterator is initialized, the values stored in the DynamicArray class are printed with the getValue() method, while hasNextValue() ensures that the navigation hasn't reached the end of the DynamicArray class:
intArray.initialize();
cout << "\nInt DynamicArray values are ..." << endl;
while ( intArray.hasNextValue() )
      cout << intArray.getValue() << "\t";
cout << endl;
Along the same lines, in the main function, a char DynamicArray class is created, populated with some data, and printed. Let's skip char DynamicArray and directly move on to the DynamicArray class that stores bool.
DynamicArray<bool> boolArray;

boolArray.appendValue ( "1010" );

boolArray.initialize();

cout << "\nBool DynamicArray values are ..." << endl;

while ( boolArray.hasNextValue() )
      cout << boolArray.getValue() << "\t";
cout << endl;
From the preceding code snippet, we can see everything looks okay, right? Yes, the preceding code works perfectly fine; however, there is a performance issue with the DynamicArray design approach. While true can be represented by 1 and false can be represented by 0, which requires just 1 bit, the preceding DynamicArray class makes use of 8 bits to represent 1 and 8 bits to represent 0, which we must fix without forcing end users to choose a different DynamicArray class that works efficiently for bool.
Let's fix the issue by using explicit class template specialization with the following code:
#include <iostream>
#include <bitset>
#include <algorithm>
#include <iterator>
using namespace std;

template <>
class DynamicArray<bool> {
      private:
          deque< bitset<8> *> dynamicArray;
          bitset<8> oneByte;
          typename deque<bitset<8> * >::iterator pos;
          int bitSetIndex;

          int getDequeIndex () {
              return (bitSetIndex) ? (bitSetIndex/8) : 0;
          }
      public:
          DynamicArray() {
              bitSetIndex = 0;
              initialize();
          }

         ~DynamicArray() { }

         void initialize() {
              pos = dynamicArray.begin();
              bitSetIndex = 0;
         }

         void appendValue( bool value) {
              int dequeIndex = getDequeIndex();
              bitset<8> *pBit = NULL;

              if ( ( dynamicArray.size() == 0 ) || ( dequeIndex >= ( dynamicArray.size()) ) ) {
                   pBit = new bitset<8>();
                   pBit->reset();
                   dynamicArray.push_back ( pBit );
              }

              if ( !dynamicArray.empty() )
                   pBit = dynamicArray.at( dequeIndex );

              pBit->set( bitSetIndex % 8, value );
              ++bitSetIndex;
         }

         bool hasNextValue() {
              return (bitSetIndex < (( dynamicArray.size() * 8 ) ));
         }

         bool getValue() {
              int dequeIndex = getDequeIndex();

              bitset<8> *pBit = dynamicArray.at(dequeIndex);
              int index = bitSetIndex % 8;
              ++bitSetIndex;

              return (*pBit)[index] ? true : false;
         }
};
Did you notice the template class declaration? The syntax for template class specialization is template <> class DynamicArray<bool> { };. The class template expression is empty <> and the name of the class template that works for all data types and the name of the class that works the for the bool data type are kept the same with the template expression, <bool>.
If you observe closely, the specialized DynamicArray class for bool internally makes use of deque< bitset<8> >, that is, deque of bitsets of 8 bits, and, when required, deque will automatically allocate more bitset<8> bits. The bitset variable is a memory-efficient STL container that consumes just 1 bit to represent true or false.
Let's take a look at the main function:
#include "dynamicarray.h"
#include "dynamicarrayforbool.h"

int main () {

    DynamicArray<int> intArray;

    intArray.appendValue( 100 );
    intArray.appendValue( 200 );
    intArray.appendValue( 300 );
    intArray.appendValue( 400 );

    intArray.initialize();

    cout << "\nInt DynamicArray values are ..." << endl;

    while ( intArray.hasNextValue() )
          cout << intArray.getValue() << "\t";
    cout << endl;

    DynamicArray<char> charArray;

    charArray.appendValue( 'H' );
    charArray.appendValue( 'e' );
    charArray.appendValue( 'l' );
    charArray.appendValue( 'l' );
    charArray.appendValue( 'o' );

    charArray.initialize();

    cout << "\nChar DynamicArray values are ..." << endl;
    while ( charArray.hasNextValue() )
          cout << charArray.getValue() << "\t";
    cout << endl;

    DynamicArray<bool> boolArray;

    boolArray.appendValue ( true );
    boolArray.appendValue ( false );
    boolArray.appendValue ( true );
    boolArray.appendValue ( false );

    boolArray.appendValue ( true );
    boolArray.appendValue ( false );
    boolArray.appendValue ( true );
    boolArray.appendValue ( false );

    boolArray.appendValue ( true );
    boolArray.appendValue ( true);
    boolArray.appendValue ( false);
    boolArray.appendValue ( false );

    boolArray.appendValue ( true );
    boolArray.appendValue ( true);
    boolArray.appendValue ( false);
    boolArray.appendValue ( false );

    boolArray.initialize();


    cout << "\nBool DynamicArray values are ..." << endl;
    while ( boolArray.hasNextValue() )
          cout << boolArray.getValue() ;
    cout << endl;

    return 0;

}
With the class template specialization in place, we can observe from the following that the main code seems the same for bool, char, and double, although the primary template class, DynamicArray, and the specialized DynamicArray<bool> class are different:
DynamicArray<char> charArray;
charArray.appendValue( 'H' );
charArray.appendValue( 'e' );

charArray.initialize();

cout << "\nChar DynamicArray values are ..." << endl;
while ( charArray.hasNextValue() )
cout << charArray.getValue() << "\t";
cout << endl;

DynamicArray<bool> boolArray;
boolArray.appendValue ( true );
boolArray.appendValue ( false );

boolArray.initialize();

cout << "\nBool DynamicArray values are ..." << endl;
while ( boolArray.hasNextValue() )
      cout << boolArray.getValue() ;
cout << endl;
I'm sure you will find this C++ template specialization feature quite useful.
Unlike explicit template specialization, which replaces the primary template class with its own complete definitions for a specific data type, partial template specialization allows us to specialize a certain subset of template parameters supported by the primary template class, while the other generic types can be the same as the primary template class.
When partial template specialization is combined with inheritance, it can do more wonders, as shown in the following example:
#include <iostream>
using namespace std;

template <typename T1, typename T2, typename T3>
class MyTemplateClass {
public:
     void F1( T1 t1, T2 t2, T3 t3 ) {
          cout << "\nPrimary Template Class - Function F1 invoked ..." << endl;
          cout << "Value of t1 is " << t1 << endl;
          cout << "Value of t2 is " << t2 << endl;
          cout << "Value of t3 is " << t3 << endl;
     }

     void F2(T1 t1, T2 t2) {
          cout << "\nPrimary Tempalte Class - Function F2 invoked ..." << endl;
          cout << "Value of t1 is " << t1 << endl;
          cout << "Value of t2 is " << 2 * t2 << endl;
     }
};
template <typename T1, typename T2, typename T3>
class MyTemplateClass< T1, T2*, T3*> : public MyTemplateClass<T1, T2, T3> {
      public:
          void F1( T1 t1, T2* t2, T3* t3 ) {
               cout << "\nPartially Specialized Template Class - Function F1 invoked ..." << endl;
               cout << "Value of t1 is " << t1 << endl;
               cout << "Value of t2 is " << *t2 << endl;
               cout << "Value of t3 is " << *t3 << endl;
          }
};
The main.cpp file will have the following content:
#include "partiallyspecialized.h"

int main () {
    int x = 10;
    int *y = &x;
    int *z = &x;

    MyTemplateClass<int, int*, int*> obj;
    obj.F1(x, y, z);
    obj.F2(x, x);

    return 0;
}
From the preceding code, you may have noticed that the primary template class name and the partially specialized class name are the same as in the case of full or explicit template class specialization. However, there are some syntactic changes in the template parameter expression. In the case of a complete template class specialization, the template parameter expression will be empty, whereas, in the case of a partially specialized template class, listed appears, as shown in the following:
template <typename T1, typename T2, typename T3>
class MyTemplateClass< T1, T2*, T3*> : public MyTemplateClass<T1, T2, T3> { };
The expression, template<typename T1, typename T2, typename T3>, is the template parameter expression used in the primary class template class, and MyTemplateClass< T1, T2*, T3*> is the partial specialization done by the second class. As you can see, the second class has done some specialization on typename T2 and typename T3, as they are used as pointers in the second class; however, typename T1 is used as is in the second class.
Apart from the facts discussed so far, the second class also inherits the primary template class, which helps the second class reuse the public and protected methods of the primary template class. However, a partial template specialization doesn't stop the specialized class from supporting other functions.
While the F1 function from the primary template class is replaced by the partially specialized template class, it reuses the F2 function from the primary template class via inheritance.
Let's quickly compile the program using the following command:
g++ main.cpp -std=c++17

./a.out
The output of the program is as follows:
Partially Specialized Template Classs - Function F1 invoked ...
Value of t1 is 10
Value of t2 is 10
Value of t3 is 10

Primary Tempalte Class - Function F2 invoked ...
Value of t1 is 10
Value of t2 is 20
I hope that you find the partially specialized template class useful.
In this chapter, you learned the following:
Congrats! Overall, you have a good understanding of C++'s template programming.
In the next chapter, you will learn smart pointers.
In the previous chapter, you learned about template programming and the benefits of generic programming. In this chapter, you will learn about the following smart pointer topics:
Let's explore the memory management facilities offered by C++.
In C++, memory management is generally a responsibility of the software developers. This is because C++ standard does not enforce garbage collection support in C++ compiler; hence, it is left to the compiler vendor's choice. Exceptionally, the Sun C++ compiler comes with a garbage collection library named libgc.
C++ language has many powerful features. Of these, needless to say, pointers is one of the most powerful and useful features. Having said pointers are very useful, they do come with their own weird issues, hence they must be used responsibly. When memory management is not taken seriously or not done quite right, it leads to many issues, including application crashes, core dumps, segmentation faults, intermittent difficulties to debug issues, performance issues, and so on. Dangling pointers or rogue pointers sometimes mess with other unrelated applications while the culprit application executes silently; in fact, the victim application might be blamed many times. The worst part about memory leaks is that at certain times it gets really tricky and even experienced developers end up debugging the victim code for countless hours while the culprit code is left untouched. Effective memory management helps avoid memory leaks and lets you develop high-performance applications that are memory efficient.
As the memory model of every operating system varies, every OS may behave differently at a different point in time for the same memory leak issue. Memory management is a big topic, and C++ offers many ways to do it well. We'll discuss some of the useful techniques in the following sections.
The majority of the C++ developers have something in common: all of us love to code complex stuff. You ask a developer, "Hey dude, would you like to reuse code that already exists and works or would you like to develop one yourself?" Though diplomatically, most developers will say to reuse what is already there when possible, their heart will say, "I wish I could design and develop it myself." Complex data structure and algorithms tend to call for pointers. Raw pointers are really cool to work with until you get into trouble.
Raw pointers must be allocated with memory before use and require deallocation once done; it is that simple. However, things get complicated in a product where pointer allocation may happen in one place and deallocation might happen in yet another place. If memory management decisions aren't made correctly, people may assume it is either the caller or callee's responsibility to free up memory, and at times, the memory may not be freed up from either place. In yet another possibility, chances are that the same pointer is deleted multiples times from different places, which could lead to application crashes. If this happens in a Windows device driver, it will most likely end up in a blue screen of death.
Just imagine, what if there were an application exception and the function that threw the exception had a bunch of pointers that were allocated with memory before the exception occurred? It is anybody's guess: there will be memory leaks.
Let's take a simple example that makes use of a raw pointer:
#include <iostream>
using namespace std;

class MyClass {
      public:
           void someMethod() {

                int *ptr = new int();
                *ptr = 100;
                int result = *ptr / 0;  //division by zero error expected
                delete ptr;

           }
};

int main ( ) {

    MyClass objMyClass;
    objMyClass.someMethod();

    return 0;

}
Now, run the following command:
g++ main.cpp -g -std=c++17
Check out the output of this program:
main.cpp: In member function ‘void MyClass::someMethod()’:
main.cpp:12:21: warning: division by zero [-Wdiv-by-zero]
 int result = *ptr / 0;
Now, run the following command:
./a.out
[1] 31674 floating point exception (core dumped) ./a.out
C++ compiler is really cool. Look at the warning message, it bangs on in regard to pointing out the issue. I love the Linux operating system. Linux is quite smart in finding rogue applications that misbehave, and it knocks them off right on time before they cause any damage to the rest of the applications or the OS. A core dump is actually good, while it is cursed instead of celebrating the Linux approach. Guess what, Microsoft's Windows operating systems are equally smarter. They do bug check when they find some applications doing fishy memory accesses and Windows OS as well supports mini-dumps and full dumps which are equivalent to core dumps in Linux OS.
Let's take a look at the Valgrind tool output to check the memory leak issue:
valgrind --leak-check=full --show-leak-kinds=all ./a.out

==32857== Memcheck, a memory error detector
==32857== Copyright (C) 2002-2015, and GNU GPL'd, by Julian Seward et al.
==32857== Using Valgrind-3.12.0 and LibVEX; rerun with -h for copyright info
==32857== Command: ./a.out
==32857==
==32857==
==32857== Process terminating with default action of signal 8 (SIGFPE)
==32857== Integer divide by zero at address 0x802D82B86
==32857== at 0x10896A: MyClass::someMethod() (main.cpp:12)
==32857== by 0x1088C2: main (main.cpp:24)
==32857==
==32857== HEAP SUMMARY:
==32857== in use at exit: 4 bytes in 1 blocks
==32857== total heap usage: 2 allocs, 1 frees, 72,708 bytes allocated
==32857==
==32857== 4 bytes in 1 blocks are still reachable in loss record 1 of 1
==32857== at 0x4C2E19F: operator new(unsigned long) (in /usr/lib/valgrind/vgpreload_memcheck-amd64-linux.so)
==32857== by 0x108951: MyClass::someMethod() (main.cpp:8)
==32857== by 0x1088C2: main (main.cpp:24)
==32857==
==32857== LEAK SUMMARY:
==32857== definitely lost: 0 bytes in 0 blocks
==32857== indirectly lost: 0 bytes in 0 blocks
==32857== possibly lost: 0 bytes in 0 blocks
==32857== still reachable: 4 bytes in 1 blocks
==32857== suppressed: 0 bytes in 0 blocks
==32857==
==32857== For counts of detected and suppressed errors, rerun with: -v
==32857== ERROR SUMMARY: 0 errors from 0 contexts (suppressed: 0 from 0)
[1] 32857 floating point exception (core dumped) valgrind --leak-check=full --show-leak-kinds=all ./a.out
In this output, if you pay attention to the bold portion of the text, you will notice the Valgrind tool did point out the source code line number that caused this core dump. Line number 12 from the main.cpp file is as follows:
int result = *ptr / 0; //division by zero error expected
The moment the exception occurs at line number 12 in the main.cpp file, the code that appears below the exception will never get executed. At line number 13 in the main.cpp file, there appears a delete statement that will never get executed due to the exception:
delete ptr;
The memory allocated to the preceding raw pointer isn't released as the memory pointed by pointers is not freed up during the stack unwinding process. Whenever an exception is thrown by a function and the exception isn't handled by the same function, stack unwinding is guaranteed. However, only the automatic local variables will be cleaned up during the stack unwinding process, not the memory pointed by the pointers. This results in memory leaks.
This is one of the weird issues invited by the use of raw pointers; there are many other similar scenarios. Hopefully you are convinced now that the thrill of using raw pointers does come at a cost. But the penalty paid isn't really worth it as there are good alternatives available in C++ to deal with this issue. You are right, using a smart pointer is the solution that offers the benefits of using pointers without paying the cost attached to raw pointers.
Hence, smart pointers are the way to use pointers safely in C++.
In C++, smart pointers let you focus on the problem at hand by freeing you from the worries of dealing with custom garbage collection techniques. Smart pointers let you use raw pointers safely. They take the responsibility of cleaning up the memory used by raw pointers.
C++ supports many types of smart pointers that can be used in different scenarios:
The auto_ptr smart pointer was introduced in C++11. An auto_ptr smart pointer helps release the heap memory automatically when it goes out of scope. However, due to the way auto_ptr transfers ownership from one auto_ptr instance to another, it was deprecated and unique_ptr was introduced as its replacement. The shared_ptr smart pointer helps multiple shared smart pointers reference the same object and takes care of the memory management burden. The weak_ptr smart pointer helps resolve memory leak issues that arise due to the use of shared_ptr when there is a cyclic dependency issue in the application design.
There are other types of smart pointers and related stuff that are not so commonly used, and they are listed in the following bullet list. However, I would highly recommend that you explore them on your own as you never know when you will find them useful:
The owner_less smart pointer helps compare two or more smart pointers if they share the same raw pointed object. The enable_shared_from_this smart pointer helps get a smart pointer of the this pointer. The bad_weak_ptr smart pointer is an exception class that implies that shared_ptr was created using an invalid smart pointer. The default_delete smart pointer refers to the default destruction policy used by unique_ptr, which invokes the delete statement, while partial specialization for array types that use delete[] is also supported.
In this chapter, we will explore auto_ptr, shared_ptr, weak_ptr, and unique-ptr one by one.
The auto_ptr smart pointer takes a raw pointer, wraps it, and ensures the memory pointed by the raw pointer is released back whenever the auto_ptr object goes out of scope. At any time, only one auto_ptr smart pointer can point to an object. Hence, whenever one auto_ptr pointer is assigned to another auto_ptr pointer, the ownership gets transferred to the auto_ptr instance that has received the assignment; the same happens when an auto_ptr smart pointer is copied.
It would be interesting to observe the stuff in action with a simple example, as follows:
#include <iostream>
#include <string>
#include <memory>
#include <sstream>
using namespace std;

class MyClass {
      private:
           static int count;
           string name;
      public:
           MyClass() {
                 ostringstream stringStream(ostringstream::ate);
                 stringStream << "Object";
                 stringStream << ++count;
                 name = stringStream.str();
                 cout << "\nMyClass Default constructor - " << name << endl;
           }
           ~MyClass() {
                 cout << "\nMyClass destructor - " << name << endl;
           }

           MyClass ( const MyClass &objectBeingCopied ) {
                 cout << "\nMyClass copy constructor" << endl;
           }

           MyClass& operator = ( const MyClass &objectBeingAssigned ) {
                 cout << "\nMyClass assignment operator" << endl;
           }

           void sayHello( ) {
                cout << "Hello from MyClass " << name << endl;
           }
};

int MyClass::count = 0;

int main ( ) {

   auto_ptr<MyClass> ptr1( new MyClass() );
   auto_ptr<MyClass> ptr2( new MyClass() );

   return 0;

}
The compilation output of the preceding program is as follows:
g++ main.cpp -std=c++17

main.cpp: In function ‘int main()’:
main.cpp:40:2: warning: ‘template<class> class std::auto_ptr’ is deprecated [-Wdeprecated-declarations]
 auto_ptr<MyClass> ptr1( new MyClass() );

In file included from /usr/include/c++/6/memory:81:0,
 from main.cpp:3:
/usr/include/c++/6/bits/unique_ptr.h:49:28: note: declared here
 template<typename> class auto_ptr;

main.cpp:41:2: warning: ‘template<class> class std::auto_ptr’ is deprecated [-Wdeprecated-declarations]
 auto_ptr<MyClass> ptr2( new MyClass() );

In file included from /usr/include/c++/6/memory:81:0,
 from main.cpp:3:
/usr/include/c++/6/bits/unique_ptr.h:49:28: note: declared here
 template<typename> class auto_ptr;
As you can see, the C++ compiler warns us as the use of auto_ptr is deprecated. Hence, I don't recommend the use of the auto_ptr smart pointer anymore; it is replaced by unique_ptr.
For now, we can ignore the warnings and move on, as follows:
g++ main.cpp -Wno-deprecated

./a.out

MyClass Default constructor - Object1

MyClass Default constructor - Object2

MyClass destructor - Object2

MyClass destructor - Object1
As you can see in the preceding program output, both Object1 and Object2, allocated in a heap, got deleted automatically. And the credit goes to the auto_ptr smart pointer.
As you may have understood from the MyClass definition, it has defined the default constructor, copy constructor and destructor, an assignment operator, and sayHello() methods, as shown here:
//Definitions removed here to keep it simple
class MyClass {
public:
      MyClass() { }  //Default constructor
      ~MyClass() { } //Destructor
      MyClass ( const MyClass &objectBeingCopied ) {} //Copy Constructor
      MyClass& operator = ( const MyClass &objectBeingAssigned ) { } //Assignment operator
      void sayHello();
};
The methods of MyClass have nothing more than a print statement that indicates the methods got invoked; they were purely meant for demonstration purposes.
The main() function creates two auto_ptr smart pointers that point to two different MyClass objects, as shown here:
int main ( ) {

   auto_ptr<MyClass> ptr1( new MyClass() );
   auto_ptr<MyClass> ptr2( new MyClass() );

   return 0;

}
As you can understand, auto_ptr is a local object that wraps a raw pointer, not a pointer. When the control hits the return statement, the stack unwinding process gets initiated, and as part of this, the stack objects, that is, ptr1 and ptr2, get destroyed. This, in turn, invokes the destructor of auto_ptr that ends up deleting the MyClass objects pointed by the stack objects ptr1 and ptr2.
We are not quite done yet. Let's explore more useful functionalities of auto_ptr, as shown in the following main function:
int main ( ) {

    auto_ptr<MyClass> ptr1( new MyClass() );
    auto_ptr<MyClass> ptr2( new MyClass() );

    ptr1->sayHello();
    ptr2->sayHello();

    //At this point the below stuffs happen
    //1. ptr2 smart pointer has given up ownership of MyClass Object 2
    //2. MyClass Object 2 will be destructed as ptr2 has given up its
    //   ownership on Object 2
    //3. Ownership of Object 1 will be transferred to ptr2
    ptr2 = ptr1;

    //The line below if uncommented will result in core dump as ptr1
    //has given up its ownership on Object 1 and the ownership of
    //Object 1 is transferred to ptr2.
    // ptr1->sayHello();

    ptr2->sayHello();

    return 0;

}
The main() function code we just saw demonstrates many useful techniques and some controversial behaviors of the auto_ptr smart pointer. The following code creates two instances of auto_ptr, namely ptr1 and ptr2, that wrap two objects of MyClass created in a heap:
 auto_ptr<MyClass> ptr1( new MyClass() );
 auto_ptr<MyClass> ptr2( new MyClass() );
Next, the following code demonstrates how the methods supported by MyClass can be invoked using auto_ptr:
 ptr1->sayHello();
 ptr2->sayHello();
Hope you observed the ptr1->sayHello() statement. It will make you believe that the auto_ptr ptr1 object is a pointer, but in reality, ptr1 and ptr2 are just auto_ptr objects created in the stack as local variables. As the auto_ptr class has overloaded the -> pointer operator and the * dereferencing operator, it appears like a pointer. As a matter of fact, all the methods exposed by MyClass can only be accessed using the -> pointer operator, while all the auto_ptr methods can be accessed as you would regularly access a stack object.
The following code demonstrates the internal behavior of the auto_ptr smart pointer, so pay close attention; this is going to be really interesting:
ptr2 = ptr1;
It appears as though the preceding code is a simple assignment statement, but it triggers many activities within auto_ptr. The following activities happen due to the preceding assignment statement:
The following commented line has got some facts to tell you:
// ptr1->sayHello();
As the ptr1 smart pointer has released its ownership of object 1, it is illegal to attempt accessing the sayHello() method. This is because ptr1, in reality, isn't pointing to object 1 anymore, and object 1 is owned by ptr2. It is the responsibility of the ptr2 smart pointer to release the memory utilized by object 1 when ptr2 goes out of scope. If the preceding code is uncommented, it would lead to a core dump.
Finally, the following code lets us invoke the sayHello() method on object 1 using the ptr2 smart pointer:
ptr2->sayHello();
return 0;
The return statement we just saw will initiate the stack unwinding process in the main() function. This will end up invoking the destructor of ptr2, which in turn will deallocate the memory utilized by object 1. The beauty is all this happens automatically. The auto_ptr smart pointer works hard for us behind the scenes while we are focusing on the problem at hand.
However, due to the following reasons, auto_ptr is deprecated in C++11 onward:
The unique_ptr smart pointer works in exactly the same way as auto_ptr, except that unique_ptr addresses the issues introduced by auto_ptr. Hence, unique_ptr is a replacement of auto_ptr, starting from C++11. The unique_ptr smart pointer allows only one smart pointer to exclusively own a heap-allocated object. The ownership transfer from one unique_ptr instance to another can be done only via the std::move() function.
Hence, let's refactor our previous example to make use of unique_ptr in place of auto_ptr.
The refactored code sample is as follows:
#include <iostream>
#include <string>
#include <memory>
#include <sstream>
using namespace std;

class MyClass {
      private:
          static int count;
          string name;

      public:
          MyClass() {
                ostringstream stringStream(ostringstream::ate);
                stringStream << "Object";
                stringStream << ++count;
                name = stringStream.str();
                cout << "\nMyClass Default constructor - " << name << endl;
          }

          ~MyClass() {
                cout << "\nMyClass destructor - " << name << endl;
          }

          MyClass ( const MyClass &objectBeingCopied ) {
                cout << "\nMyClass copy constructor" << endl;
          }

          MyClass& operator = ( const MyClass &objectBeingAssigned ) {
                cout << "\nMyClass assignment operator" << endl;
          }

          void sayHello( ) {
                cout << "\nHello from MyClass" << endl;
          }

};

int MyClass::count = 0;

int main ( ) {

 unique_ptr<MyClass> ptr1( new MyClass() );
 unique_ptr<MyClass> ptr2( new MyClass() );

 ptr1->sayHello();
 ptr2->sayHello();

 //At this point the below stuffs happen
 //1. ptr2 smart pointer has given up ownership of MyClass Object 2
 //2. MyClass Object 2 will be destructed as ptr2 has given up its
 // ownership on Object 2
 //3. Ownership of Object 1 will be transferred to ptr2
 ptr2 = move( ptr1 );

 //The line below if uncommented will result in core dump as ptr1
 //has given up its ownership on Object 1 and the ownership of
 //Object 1 is transferred to ptr2.
 // ptr1->sayHello();

 ptr2->sayHello();

 return 0;
}
The output of the preceding program is as follows:
g++ main.cpp -std=c++17

./a.out

MyClass Default constructor - Object1

MyClass Default constructor - Object2

MyClass destructor - Object2

MyClass destructor - Object1
In the preceding output, you can notice the compiler doesn't report any warning and the output of the program is the same as that of auto_ptr.
It is important to note the differences in the main() function, between auto_ptr and unique_ptr. Let's check out the main() function, as illustrated in the following code. This code creates two instances of unique_ptr, namely ptr1 and ptr2, that wrap two objects of MyClass created in the heap:
 unique_ptr<MyClass> ptr1( new MyClass() );
 unique_ptr<MyClass> ptr2( new MyClass() );
Next, the following code demonstrates how the methods supported by MyClass can be invoked using unique_ptr:
 ptr1->sayHello();
 ptr2->sayHello();
Just like auto_ptr, the unique_ptr smart pointers ptr1 object has overloaded the -> pointer operator and the * dereferencing operator; hence, it appears like a pointer.
The following code demonstrates unique_ptr doesn't support the assignment of one unique_ptr instance to another, and ownership transfer can only be achieved with the std::move() function:
ptr2 = std::move(ptr1);
The move function triggers the following activities:
The following code, if uncommented, will lead to a core dump:
// ptr1->sayHello();
Finally, the following code lets us invoke the sayHello() method on object 1 using the ptr2 smart pointer:
ptr2->sayHello();
return 0;
The return statement we just saw will initiate the stack unwinding process in the main() function. This will end up invoking the destructor of ptr2, which in turn will deallocate the memory utilized by object 1. Note that unique_ptr objects could be stored in STL containers, unlike auto_ptr objects.
The shared_ptr smart pointer is used when a group of shared_ptr objects shares the ownership of a heap-allocated object. The shared_ptr pointer releases the shared object when all the shared_ptr instances are done with the use of the shared object. The shared_ptr pointer uses the reference counting mechanism to check the total references to the shared object; whenever the reference count becomes zero, the last shared_ptr instance deletes the shared object.
Let's check out the use of shared_ptr through an example, as follows:
#include <iostream>
#include <string>
#include <memory>
#include <sstream>
using namespace std;

class MyClass {
  private:
    static int count;
    string name;
  public:
    MyClass() {
      ostringstream stringStream(ostringstream::ate);
      stringStream << "Object";
      stringStream << ++count;

      name = stringStream.str();

      cout << "\nMyClass Default constructor - " << name << endl;
    }

    ~MyClass() {
      cout << "\nMyClass destructor - " << name << endl;
    }

    MyClass ( const MyClass &objectBeingCopied ) {
      cout << "\nMyClass copy constructor" << endl;
    }

    MyClass& operator = ( const MyClass &objectBeingAssigned ) {
      cout << "\nMyClass assignment operator" << endl;
    }

    void sayHello() {
      cout << "Hello from MyClass " << name << endl;
    }

};

int MyClass::count = 0;

int main ( ) {

  shared_ptr<MyClass> ptr1( new MyClass() );
  ptr1->sayHello();
  cout << "\nUse count is " << ptr1.use_count() << endl;

  {
      shared_ptr<MyClass> ptr2( ptr1 );
      ptr2->sayHello();
      cout << "\nUse count is " << ptr2.use_count() << endl;
  }

  shared_ptr<MyClass> ptr3 = ptr1;
  ptr3->sayHello();
  cout << "\nUse count is " << ptr3.use_count() << endl;

  return 0;
}
The output of the preceding program is as follows:
MyClass Default constructor - Object1
Hello from MyClass Object1
Use count is 1

Hello from MyClass Object1
Use count is 2

Number of smart pointers referring to MyClass object after ptr2 is destroyed is 1

Hello from MyClass Object1
Use count is 2

MyClass destructor - Object1
The following code creates an instance of the shared_ptr object that points to the MyClass heap-allocated object. Just like other smart pointers, shared_ptr also has the overloaded -> and * operators. Hence, all the MyClass object methods can be invoked as though you are using a raw pointer. The use_count() method tells the number of smart pointers that refer to the shared object:
 shared_ptr<MyClass> ptr1( new MyClass() );
 ptr1->sayHello();
 cout << "\nNumber of smart pointers referring to MyClass object is "
      << ptr1->use_count() << endl;
In the following code, the scope of the smart pointer ptr2 is wrapped within the block enclosed by flower brackets. Hence, ptr2 will get destroyed at the end of the following code block. The expected use_count function within the code block is 2:
 {
      shared_ptr<MyClass> ptr2( ptr1 );
      ptr2->sayHello();
      cout << "\nNumber of smart pointers referring to MyClass object is "
           << ptr2->use_count() << endl;
 }
In the following code, the expected use_count value is 1 as ptr2 would have been deleted, which would reduce the reference count by 1:
 cout << "\nNumber of smart pointers referring to MyClass object after ptr2 is destroyed is "
 << ptr1->use_count() << endl;
The following code will print a Hello message, followed by use_count as 2. This is due to the fact that ptr1 and ptr3 are now referring to the MyClass shared object in the heap:
shared_ptr<MyClass> ptr3 = ptr2;
ptr3->sayHello();
cout << "\nNumber of smart pointers referring to MyClass object is "
     << ptr2->use_count() << endl;
The return 0; statement at the end of the main function will destroy ptr1 and ptr3, reducing the reference count to zero. Hence, we can observe the MyClass destructor print the statement at the end of the output.
So far, we have discussed the positive side of shared_ptr with examples. However, shared_ptr fails to clean up the memory when there is a circular dependency in the application design. Either the application design must be refactored to avoid cyclic dependency, or we can make use of weak_ptr to resolve the cyclic dependency issue.
Consider there are three classes: A, B, and C. Class A and B have an instance of C, while C has an instance of A and B. There is a design issue here. A depends on C and C depends on A too. Similarly, B depends on C and C depends on B as well.
Consider the following code:
#include <iostream>
#include <string>
#include <memory>
#include <sstream>
using namespace std;

class C;

class A {
      private:
           shared_ptr<C> ptr;
      public:
           A() {
                 cout << "\nA constructor" << endl;
           }

           ~A() {
                 cout << "\nA destructor" << endl;
           }

           void setObject ( shared_ptr<C> ptr ) {
                this->ptr = ptr;
           }
};

class B {
      private:
           shared_ptr<C> ptr;
      public:
           B() {
                 cout << "\nB constructor" << endl;
           }

           ~B() {
                 cout << "\nB destructor" << endl;
           }

           void setObject ( shared_ptr<C> ptr ) {
                this->ptr = ptr;
           }
};

class C {
      private:
           shared_ptr<A> ptr1;
           shared_ptr<B> ptr2;
      public:
           C(shared_ptr<A> ptr1, shared_ptr<B> ptr2) {
                   cout << "\nC constructor" << endl;
                   this->ptr1 = ptr1;
                   this->ptr2 = ptr2;
           }

           ~C() {
                   cout << "\nC destructor" << endl;
           }
};

int main ( ) {
                shared_ptr<A> a( new A() );
                shared_ptr<B> b( new B() );
                shared_ptr<C> c( new C( a, b ) );

                a->setObject ( shared_ptr<C>( c ) );
                b->setObject ( shared_ptr<C>( c ) );

                return 0;
}
The output of the preceding program is as follows:
g++ problem.cpp -std=c++17

./a.out

A constructor

B constructor

C constructor
In the preceding output, you can observe that even though we used shared_ptr, the memory utilized by objects A, B, and C were never deallocated. This is because we didn't see the destructor of the respective classes being invoked. The reason for this is that shared_ptr internally makes use of the reference counting algorithm to decide whether the shared object has to be destructed. However, it fails here because object A can't be deleted unless object C is deleted. Object C can't be deleted unless object A is deleted. Also, object C can't be deleted unless objects A and B are deleted. Similarly, object A can't be deleted unless object C is deleted and object B can't be deleted unless object C is deleted.
The bottom line is that this is a circular dependency design issue. In order to fix this issue, starting from C++11, C++ introduced weak_ptr. The weak_ptr smart pointer is not a strong reference. Hence, the object referred to could be deleted at any point of time, unlike shared_ptr.
Circular dependency is an issue that occurs if object A depends on B, and object B depends on A. Now let's see how this issue could be fixed with a combination of shared_ptr and weak_ptr, eventually breaking the circular dependency, as follows:
#include <iostream>
#include <string>
#include <memory>
#include <sstream>
using namespace std;

class C;

class A {
      private:
           weak_ptr<C> ptr;
      public:
           A() {
                  cout << "\nA constructor" << endl;
           }

           ~A() {
                  cout << "\nA destructor" << endl;
           }

           void setObject ( weak_ptr<C> ptr ) {
                  this->ptr = ptr;
           }
};

class B {
      private:
           weak_ptr<C> ptr;
      public:
           B() {
               cout << "\nB constructor" << endl;
           }

           ~B() {
               cout << "\nB destructor" << endl;
           }

           void setObject ( weak_ptr<C> ptr ) {
                this->ptr = ptr;
           }
};

class C {
      private:
           shared_ptr<A> ptr1;
           shared_ptr<B> ptr2;
      public:
           C(shared_ptr<A> ptr1, shared_ptr<B> ptr2) {
                   cout << "\nC constructor" << endl;
                   this->ptr1 = ptr1;
                   this->ptr2 = ptr2;
           }

           ~C() {
                   cout << "\nC destructor" << endl;
           }
};

int main ( ) {
         shared_ptr<A> a( new A() );
         shared_ptr<B> b( new B() );
         shared_ptr<C> c( new C( a, b ) );

         a->setObject ( weak_ptr<C>( c ) );
         b->setObject ( weak_ptr<C>( c ) );

         return 0;
}
The output of the preceding refactored code is as follows:
g++ solution.cpp -std=c++17

./a.out

A constructor

B constructor

C constructor

C destructor

B destructor

A destructor
In this chapter, you learned about
In the next chapter, you will learn about developing GUI applications in C++.
In this chapter, you will learn the following topics:
Qt is a cross-platform application framework developed in C++. It is supported on various platforms, including Windows, Linux, Mac OS, Android, iOS, Embedded Linux, QNX, VxWorks, Windows CE/RT, Integrity, Wayland, X11, Embedded Devices, and so on. It is primarily used as a human-machine-interface (HMI) or Graphical User Interface (GUI) framework; however, it is also used to develop a command-line interface (CLI) applications. The correct way of pronouncing Qt is cute. The Qt application framework comes in two flavors: open source and with a commercial license.
Qt is the brainchild of Haavard Nord and Eirik Chambe-Eng, the original developers, who developed it back in the year 1991.
As C++ language doesn't support GUI natively, you must have guessed that there is no event management support in C++ language out of the box. Hence, there was a need for Qt to support its own event handling mechanism, which led to the signals and slots technique. Under the hood, signals and slots use the observer design pattern that allows Qt objects to talk to each other. Does this sound too hard to understand? No worries! Signals are nothing but events, such as a button click or window close, and slots are event handlers that can supply a response to these events in the way you wish to respond to them.
To make our life easier in terms of Qt application development, Qt supports various macros and Qt-specific keywords. As these keywords will not be understood by C++, Qt has to translate them and the macros into pure C++ code so that the C++ compiler can do its job as usual. To make this happen in a smoother fashion, Qt supports something called Meta-Object Compiler, also known as moc.
Qt is a natural choice for C++ projects as it is out-and-out C++ code; hence, as a C++ developer, you will feel at home when you use Qt in your application. A typical application will have both complex logic and impressive UI. In small product teams, typically one developer does multiple stuff, which is good and bad.
Generally, professional developers have good problem-solving skills. Problem-solving skills are essential to solve a complex problem in an optimal fashion with a good choice of data structures and algorithms.
Developing an impressive UI requires creative design skills. While there are a countable number of developers who are either good at problem-solving or creative UI design, not all developers are good at both. This is where Qt stands out.
Say a start-up wants to develop an application for their internal purposes. For this, a simple GUI application would suffice, where a decent looking HMI/GUI might work for the team as the application is meant for internal purposes only. In such scenarios, the entire application can be developed in C++ and the Qt Widgets framework. The only prerequisite is that the development team must be proficient in C++.
However, in cases where a mobile app has to be developed, an impressive HMI becomes mandatory. Again, the mobile app can be developed with C++ and Qt Widgets. But now there are two parts to this choice. The good part is that the mobile app team has to be good at just C++. The bad part of this choice is that there is no guarantee that all good C++ developers will be good at designing a mobile app's HMI/GUI.
Let's assume the team has one or two dedicated Photoshop professionals who are good at creating catchy images that can be used in the GUI and one or two UI designers who can make an impressive HMI/GUI with the images created by the Photoshop experts. Typically, UI designers are good at frontend technologies, such as JavaScript, HTML, and CSS. Complex business logic can be developed in the powerful Qt Framework, while the HMI/GUI can be developed in QML.
QML is a declarative scripting language that comes along with the Qt application framework. It is close to JavaScript and has Qt-specific extensions. It is good for rapid application development and allows UI designers to focus on HMI/GUI and C++ developers to focus on the complex business logic that can be developed in Qt Framework.
Since both the C++ Qt Framework and QML are part of the same Qt application framework, they go hand in hand seamlessly.
Qt is a vast and powerful framework; hence this chapter will focus on the basic essentials of Qt to get you started with Qt. If you are curious to learn more, you may want to check out my other upcoming book that I'm working on, namely Mastering Qt and QML Programming.
The Qt Framework is developed in C++, hence it is guaranteed that it would be a cake walk for any good C++ developer. It supports CLI and GUI-based application development. At the time of writing this chapter, the latest version of the Qt application framework is Qt 5.7.0. By the time you read this book, it is possible that a different version of Qt will be available for you to download. You can download the latest version from https://www.qt.io.
Throughout this chapter, I'll be using Ubuntu 16.04 OS; however, the programs that are listed in this chapter should work on any platform that supports Qt.
For detailed installation instructions, refer to https://wiki.qt.io/install_Qt_5_on_Ubuntu.
At this point, you should have a C++ compiler installed on your system. If this is not the case, first ensure that you install a C++ compiler, as follows:
sudo apt-get install build-essential
From the Ubuntu Terminal, you should be able to download Qt 5.7.0, as shown in the following command:
wget http://download.qt.io/official_releases/qt/5.7/5.7.0/qt-
opensource-linux-x64-5.7.0.run
Provide execute permission to the downloaded installer, as shown in the following command:
chmod +x qt-opensource-linux-x64-5.7.0.run
Launch the installer as shown in the following command:
./qt-opensource-linux-x64-5.7.0.run
As Qt makes use of OpenGL, make sure you install the following before you start writing your first program in Qt. To install libfontconfig1, run the following command:
sudo apt-get install libfontconfig1
To install mesa-common-dev, run the following command:
sudo apt-get install mesa-common-dev
At this point, you should have a working Qt setup. You can verify the installation by issuing the following command in the Linux Terminal:

In case the qmake command isn't recognized, make sure you export the bin path of the Qt installation folder, as shown in the preceding screenshot. Additionally, creating a soft link might be useful too. The command for this is as follows:
sudo ln -s /home/jegan/Qt5.7.0/5.7/gcc_64/bin/qmake /usr/bin/qmake
The path where Qt is installed on your system might vary from mine, so please substitute the Qt path accordingly.
Qt Core is one of the modules supported by Qt. This module has loads of useful classes, such as QObject, QCoreApplication, QDebug, and so on. Almost every Qt application will require this module, hence they are linked implicitly by the Qt Framework. Every Qt class inherits from QObject, and the QObject class offers event handling support to Qt applications. QObject is the critical piece that supports the event handling mechanism; interestingly, even console-based applications can support event handling in Qt.
If you get a similar output to that shown in Figure 5.1, you are all set to get your hands dirty. Let's write our first Qt application, as shown in the following screenshot:
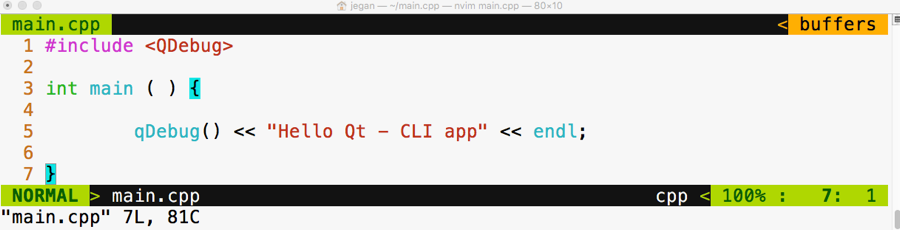
In the first line, we have included the QDebug header from the QtCore module. If you observe closely, the qDebug() function resembles the C++ cout ostream operator. The qDebug() function is going to be your good friend in the Qt world while you are debugging your code. The QDebug class has overloaded the C++ ostream operator in order to add support for Qt data types that aren't supported by the C++ compiler.
In old school fashion, I'm kind of obsessed with the Terminal to achieve pretty much anything while coding as opposed to using some fancy Integrated Development Environments (IDEs). You may either love or hate this approach, which is quite natural. The good part is there is nothing going to stand between you and Qt/C++ as you are going to use plain and simple yet powerful text editors, such as Vim, Emacs, Sublime Text, Atom, Brackets, or Neovim, so you will learn almost all the essentials of how Qt projects and qmake work; IDEs make your life easy, but they hide a lot of the essential stuff that every serious developer must know. So it's a trade-off. I leave it to you to decide whether to use your favorite plain text editor or Qt Creator IDE or any other fancy IDE. I'm going to stick with the refactored Vim editor called Neovim, which looks really cool. Figure 5.2 will give you an idea of the Neovim editor's look and feel.
Let's get back to business. Let's see how to compile this code in the command line the geeky way. Well, before that, you may want to know about the qmake tool. It is a proprietary make utility of Qt. The qmake utility is nothing more than a make tool, but it is aware of Qt-specific stuff so it knows about moc, signals, slots, and so on, which a typical make utility will be unaware of.
The following command should help you create a .pro file. The name of the .pro file will be decided by the qmake utility, based on the project folder name. The .pro file is the way the Qt Creator IDE combines related files as a single project. Since we aren't going to use Qt Creator, we will use the .pro file to create Makefile in order to compile our Qt project just like a plain C++ project.
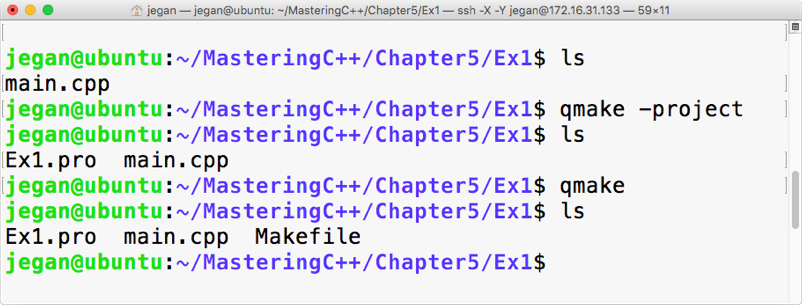
When you issue the qmake -project command, qmake will scan through the current folder and all the subfolders under the current folder and include the headers and source files in Ex1.pro. By the way, the .pro file is a plain text file that can be opened using any text editor, as shown in Figure 5.4:
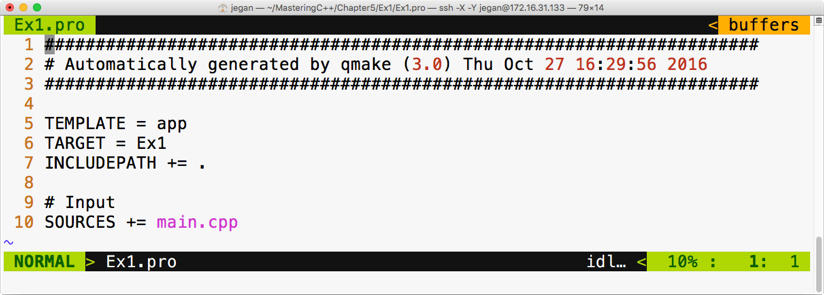
Now it's time to create Makefile taking Ex1.pro as an input file. As the Ex1.pro file is present in the current directory, we don't have to explicitly supply Ex1.pro as an input file to autogenerate Makefile. The idea is that once we have a .pro file, all we would need to do is generate Makefile from the .pro file issuing command: qmake. This will do all the magic of creating a full-blown Makefile for your project that you can use to build your project with the make utility, as shown in the following screenshot:
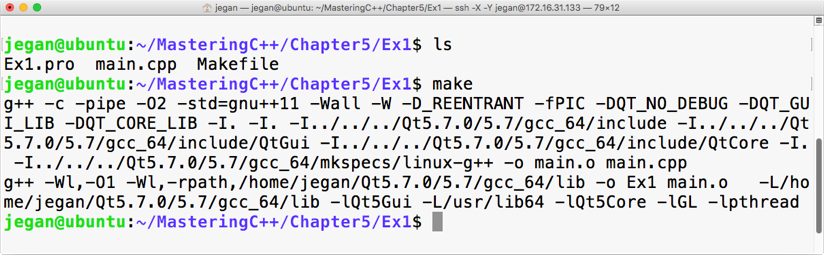
This is the point we have been waiting for, right? Yes, let's execute our first Qt Hello World program, as shown in the following screenshot:
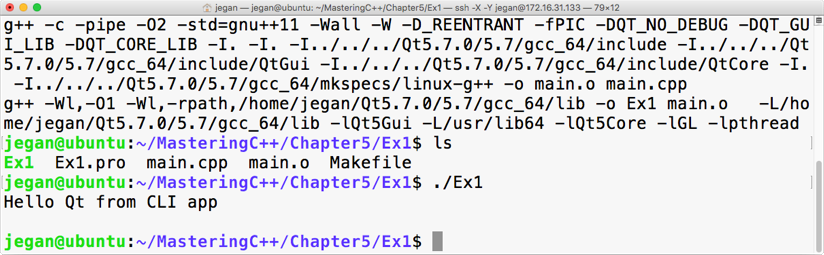
Congratulations! You have completed your first Qt application. In this exercise, you learned how to set up and configure Qt in Ubuntu and how to write a simple Qt console application and then build and run it. The best part is you learned all of this from the command line.
Qt Widgets is an interesting module that supports quite a lot of widgets, such as buttons, labels, edit, combo, list, dialog, and so on. QWidget is the base class of all of the widgets, while QObject is the base class of pretty much every Qt class. While many programming languages refer to as UI controls, Qt refers to them as widgets. Though Qt works on many platforms, its home remains Linux; widgets are common in the Linux world.
Our first console application is really cool, isn't it? Let's continue exploring further. This time, let's write a simple GUI-based Hello World program. The procedure will remain almost the same, except for some minor changes in main.cpp. Refer to the following for the complete code:
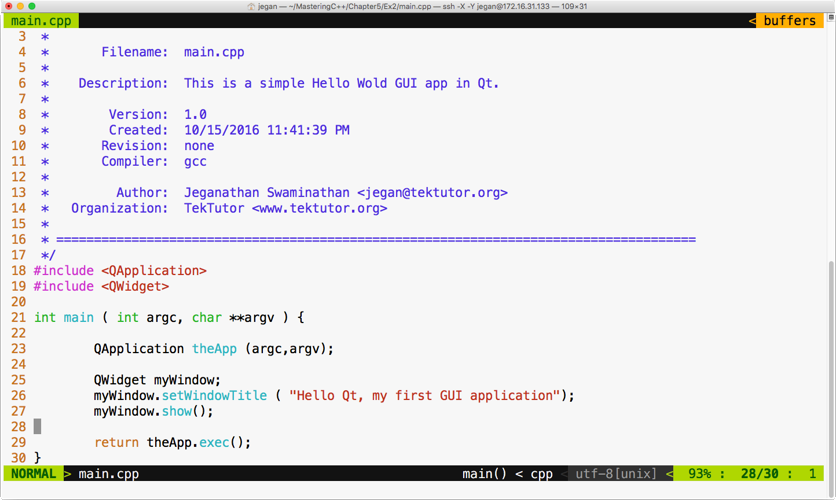
Wait a minute. Let me explain the need for QApplication in line number 23 and line number 29. Every Qt GUI application must have exactly one instance of the QApplication instance. QApplication provides support for command-line switches for our application, hence the need to supply the argument count (argc) and the argument value (argv). GUI-based applications are event-driven, so they must respond to events or, to be precise, signals in the Qt world. In line number 29, the exec function starts the event loop, which ensures the application waits for user interactions until the user closes the window. The idea is that all the user events will be received by the QApplication instance in an event queue, which will then be notified to its Child widgets. The event queue ensures all the events deposited in the queue are handled in the same sequence that they occur, that is, first in, first out (FIFO).
In case you are curious to check what would happen if you comment line 29, the application will still compile and run but you may not see any window. The reason being the main thread or the main function creates an instance of QWidget in line number 25, which is the window that we see when we launch the application.
In line number 27, the window instance is displayed, but in the absence of line number 29, the main function will terminate the application immediately without giving a chance for you to check your first Qt GUI application. It's worth trying, so go ahead and see what happens with and without line number 29.
Let's generate Makefile, as shown in the following screenshot:

Now let's try to compile our project with the make utility, as shown in the following screenshot:
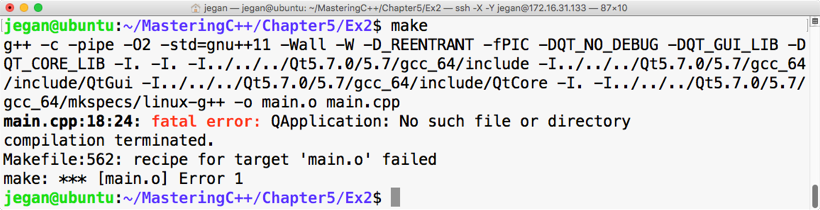
Interesting, right? Our brand new Qt GUI program fails to compile. Did you notice the fatal error? No big deal; let's understand why this happened. The reason is that we have not yet linked the Qt Widgets module, as the QApplication class is part of the Qt Widgets module. In that case, you may wonder how your first Hello World program compiled without any issue. In our first program, the QDebug class was part of the QtCore module that got linked implicitly, whereas other modules had to be linked explicitly. Let's see how to get this done:
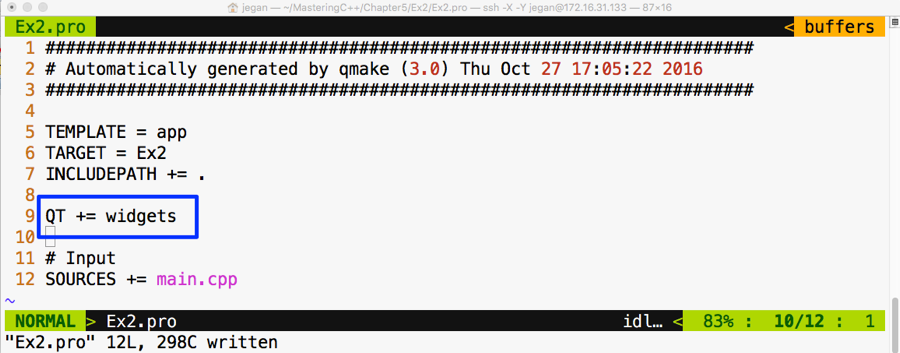
We need to add QT += widgets to the Ex2.pro file so that the qmake utility understands that it needs to link Qt Widgets's shared object (the .so file) in Linux, also known as the Dynamic Link Library (the .dll file) in Windows, while creating the final executable. Once this is taken care of, we must qmake so that Makefile could reflect the new change in our Ex2.pro file, as demonstrated in the following screenshot:
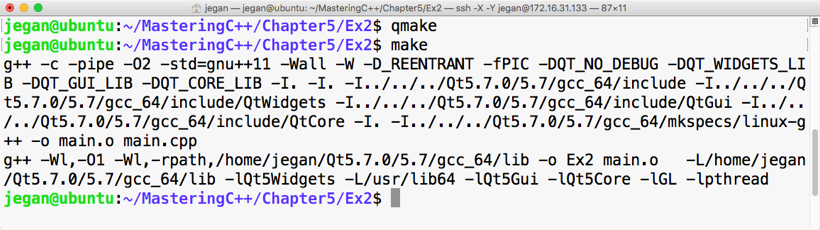
Cool. Let's check our first GUI-based Qt app now. In my system, the application output looks as shown in Figure 5.12; you should get a similar output as well if all goes well at your end:
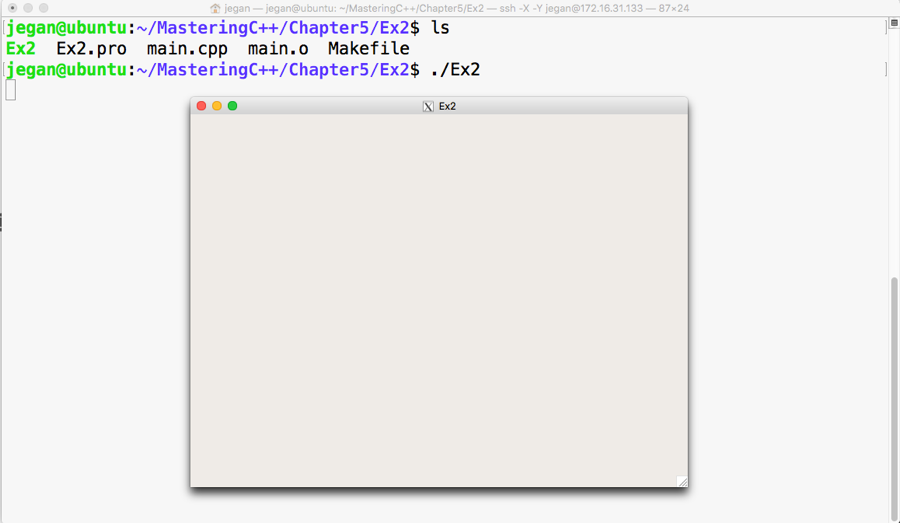
It would be nice if we set the title of our window as Hello Qt, right? Let's do this right away:
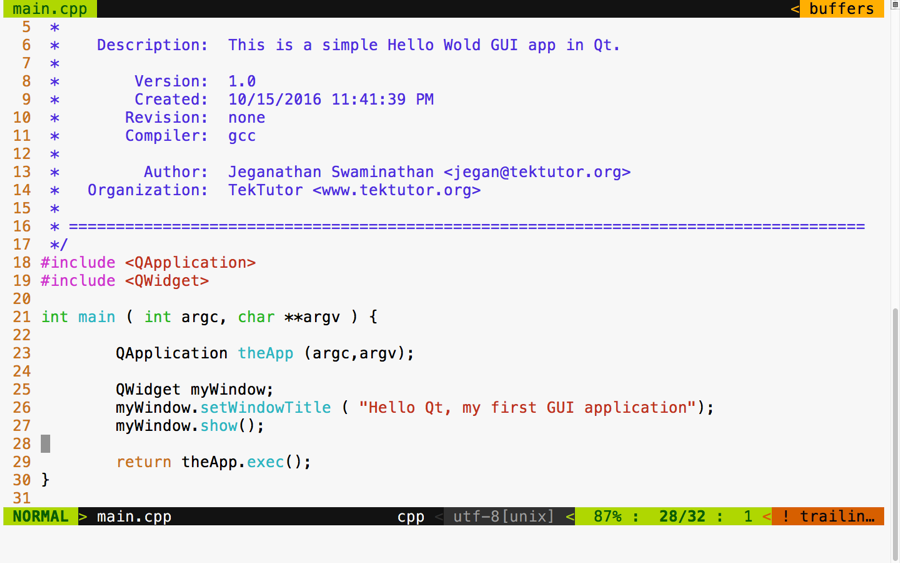
Add the code presented at line number 26 to ensure you build your project with the make utility before you test your new change:
Qt is cross-platform application framework, hence it supports concepts such as layouts for developing applications that look consistent in all platforms, irrespective of the different screen resolutions. When we develop GUI/HMI-based Qt applications, an application developed in one system shouldn't appear different on another system with a different screen size and resolution. This is achieved in the Qt Framework via layouts. Layouts come in different flavors. This helps a developer design a professional-looking HMI/GUI by organizing various widgets within a window or dialog. Layouts differ in the way they arrange their child widgets. While one arranges its child widgets in a horizontal fashion, another will arrange them in a vertical or grid fashion. When a window or dialog gets resized, the layouts resize their child widgets so they don't get truncated or go out of focus.
Let's write a Qt application that has a couple of buttons in the dialog. Qt supports a variety of useful layout managers that act as an invisible canvas where many QWidgets can be arranged before they are attached to a window or dialog. Each dialog or window can have only one layout. Every widget can be added to only one layout; however, many layouts can be combined to design a professional UI.
Let's start writing the code now. In this project, we are going to write code in a modular fashion, hence we are going to create three files with the names MyDlg.h, MyDlg.cpp, and main.cpp.
The game plan is as follows:
It is important that we follow clean code practices so that our code is easy to understand and can be maintained by anyone. As we are going to follow industry best practices, let's declare the dialog in a header file called MyDlg.h, define the dialog in the source file called MyDlg.cpp, and use MyDlg.cpp in main.cpp that has the main function. Every time MyDlg.cpp requires a header file, let's make it a practice to include all the headers only in MyDlg.h; with this, the only header we will see in MyDlg.cpp is MyDlg.h.
By the way, did I tell you Qt follows the camel casing coding convention? Yes, I did mention it right now. By now, you will have observed that all Qt classes start with the letter Q because Qt inventors loved the letter "Q" in Emacs and they were so obsessed with that font type that they decided to use the letter Q everywhere in Qt.
One last suggestion. Wouldn't it be easy for others to locate the dialog class if the name of the file and the name of the class were similar? I can hear you say yes. All set! Let's start coding our Qt application. First, refer to the following screenshot:
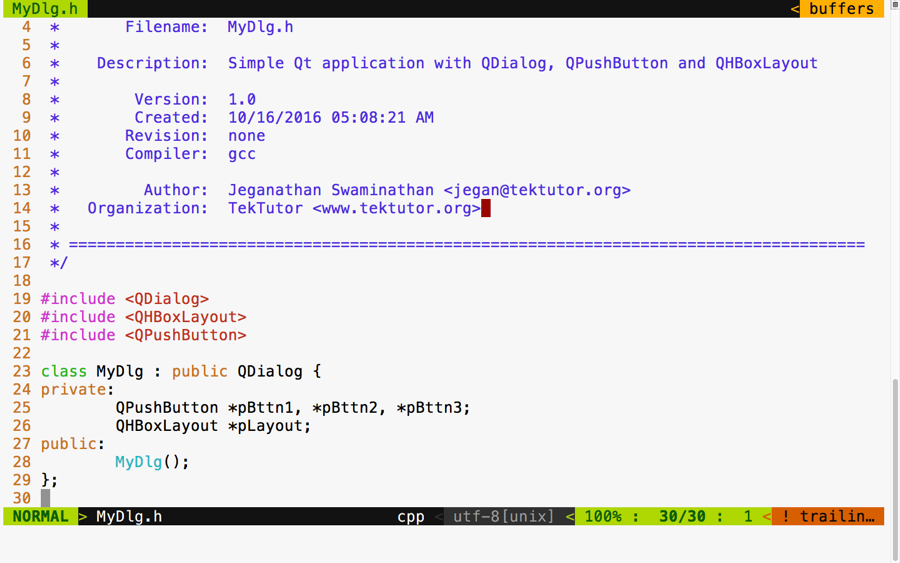
In the preceding screenshot, we declared a class with the name MyDlg. It has one layout, three buttons, and a constructor. Now refer to this screenshot:
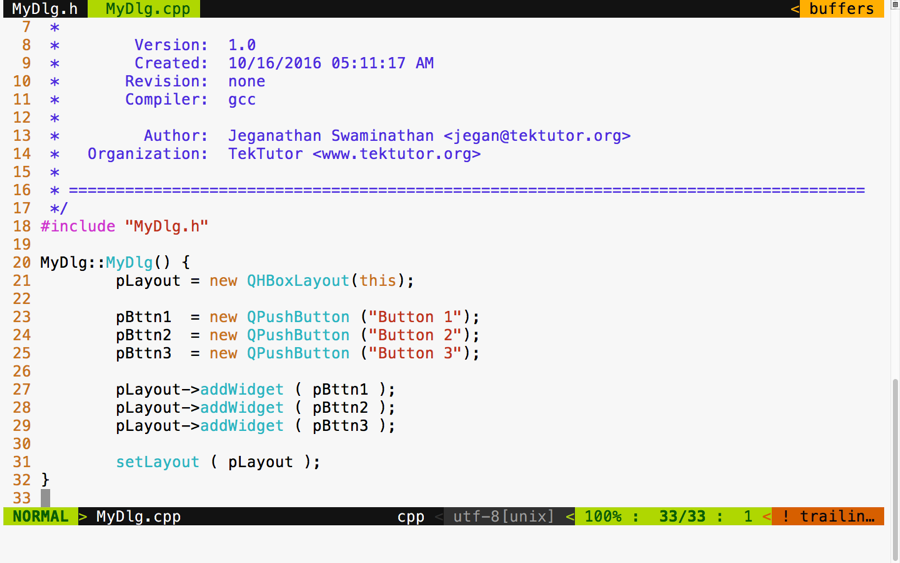
As you can see in the preceding screenshot, we defined the MyDlg constructor and instantiated the layout and the three buttons. In lines 27 through 29, we added three buttons to the layout. In line number 31, we associated the layout to our dialog. That's all it takes. In the following screenshot, we defined our main function, which creates an instance of QApplication:
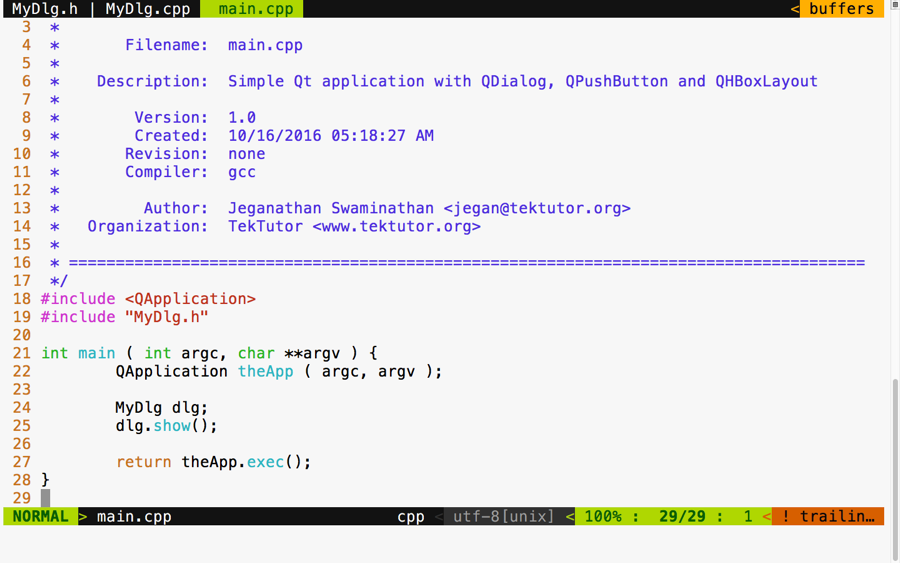
We followed this up by creating our custom dialog instance and displaying the dialog. Finally, at line 27, we started the event loop so that MyDlg could respond to user interactions. Refer to the following screenshot:
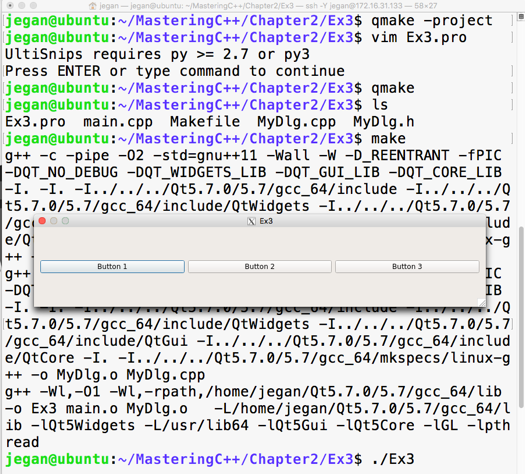
The preceding screenshot demonstrates the build and execution procedures, and there is our cute application. Actually, you can try playing with the dialog to understand the horizontal layout better. First, stretch the dialog horizontally and notice all the buttons' width increase; then, see whether you can reduce the dialog's width to notice all the buttons' width decrease. That's the job of any layout manager. A layout manager arranges widgets and retrieves the size of the window and divides the height and width equally among all its child widgets. Layout managers keep notifying all their child widgets about any resize events. However, it is up to the respective child widget to decide whether they want to resize themselves or ignore the layout resize signals.
To check this behavior, try stretching out the dialog vertically. As you increase the height of the dialog, the dialog's height should increase, but the buttons will not increase their height. This is because every Qt Widget has its own preferred size policy; as per their size policy, they may respond or ignore certain layout resize signals.
If you want the buttons to stretch vertically as well, QPushButton offers a way to get this done. In fact, QPushButton extends from QWidget just like any other widget. The setSizePolicy() method comes to QPushButton from its base class, that is, QWidget:
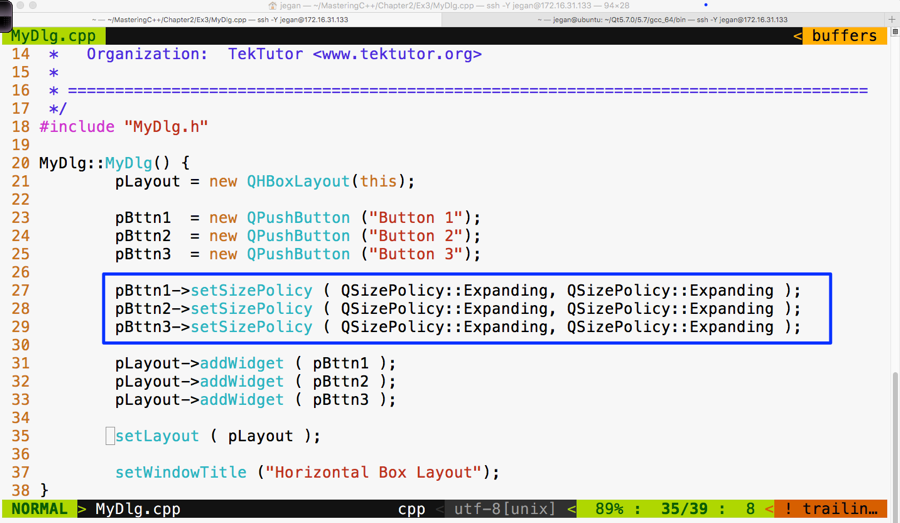
Did you notice line number 37? Yes, I have set the window title within the constructor of MyDlg to keep our main function compact and clean.
Make sure you have built your project using the make utility before launching your application:
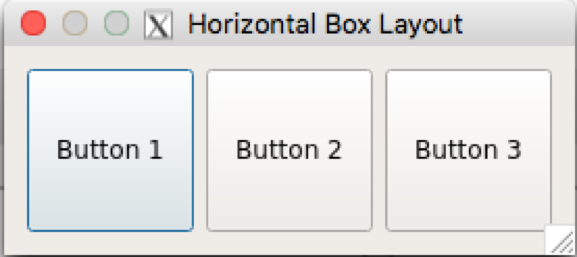
In the highlighted section, we have overridden the default size policy of all the buttons. In line number 27, the first parameter QSizePolicy::Expanding refers to the horizontal policy and the second parameter refers to the vertical policy. To find other possible values of QSizePolicy, refer to the assistant that comes in handy with the Qt API reference, as shown in the following screenshot:
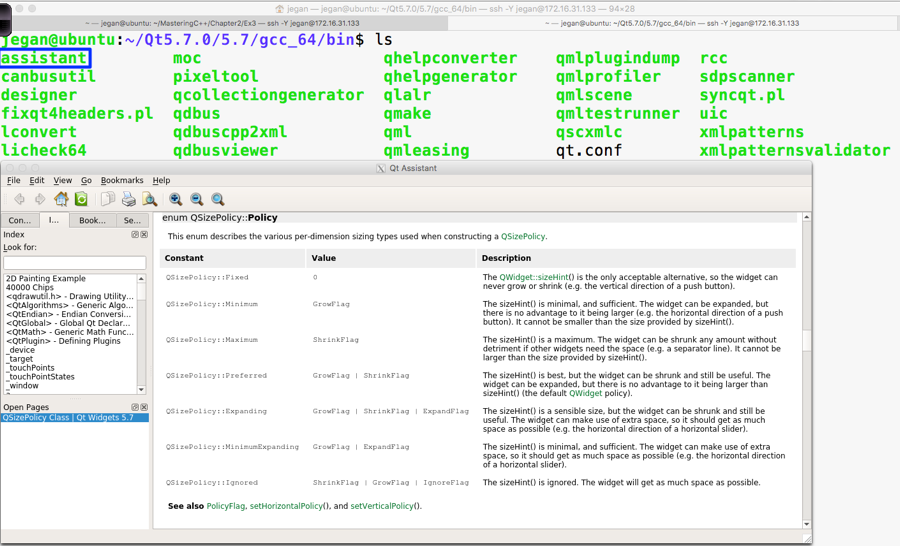
In the previous section, you learned how to use a horizontal box layout. In this section, you will see how to use a vertical box layout in your application.
As a matter of fact, the horizontal and vertical box layouts vary only in terms of how they arrange the widgets. For instance, the horizontal box layout will arrange its child widgets in a horizontal fashion from left to right, whereas the vertical box layout will arrange its child widgets in a vertical fashion from top to bottom.
You can copy the source code from the previous section, as the changes are minor in nature. Once you have copied the code, your project directory should look as follows:
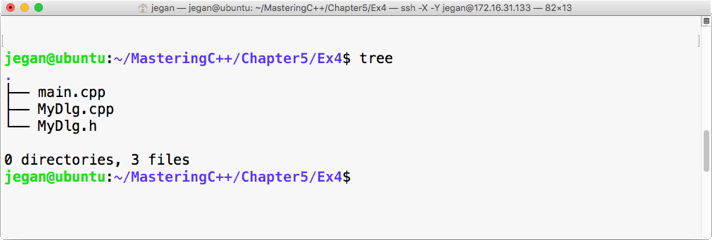
Let me demonstrate the changes starting from the MyDlg.h header file, as follows:
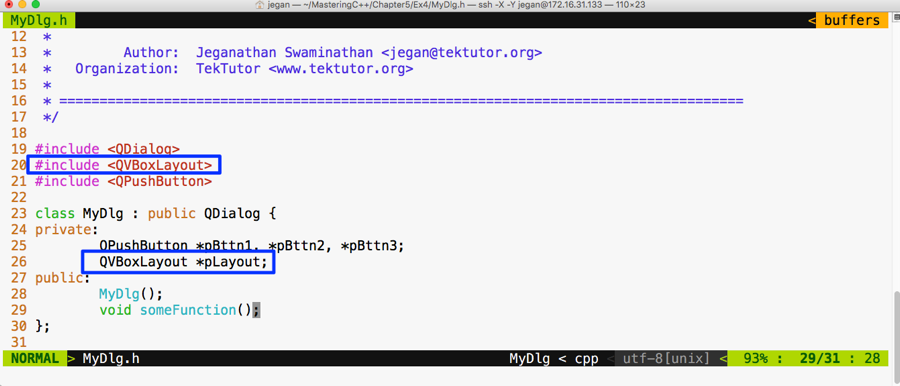
I have replaced QHBoxLayout with QVBoxLayout; that is all. Yes, let's proceed with file changes related to MyDlg.cpp:
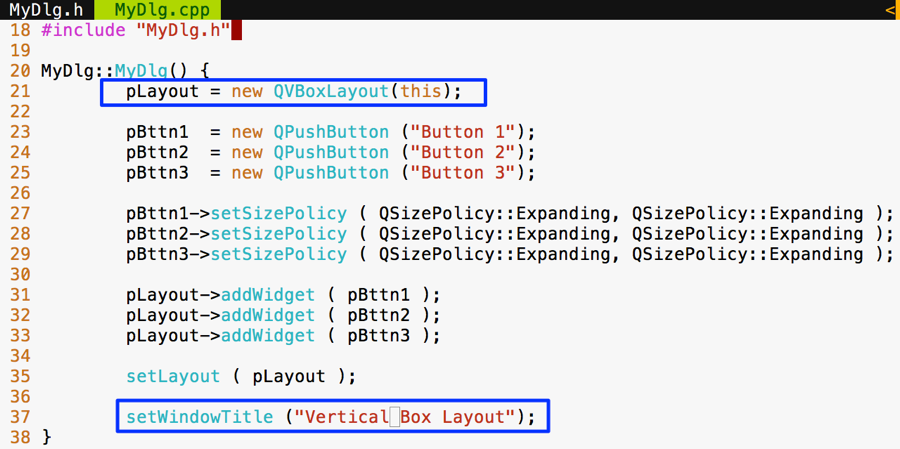
There are no changes to be done in main.cpp; however, I have shown main.cpp for your reference, as follows:
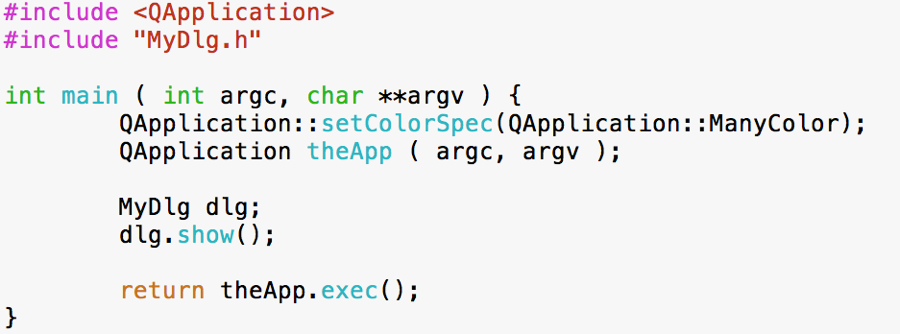
Now all we need to do is autogenerate Makefile and then make and run the program as follows:
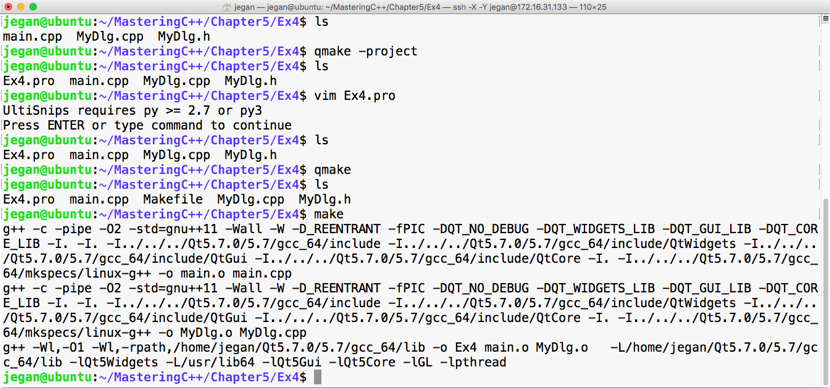
Let's execute our brand new program and check the output. The following output demonstrates that QVBoxLayout arranges the widgets in a vertical top to bottom fashion. When the window is stretched, all the buttons' width will increase/decrease depending on whether the window is stretched out or stretched in:
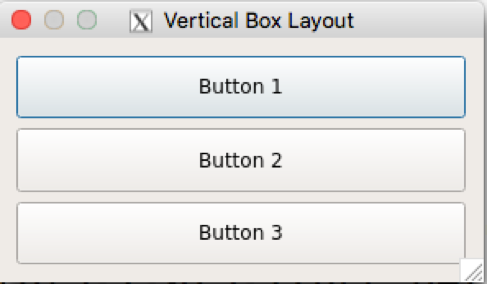
In the previous sections, you learned how to make use of QHBoxLayout and QVBoxLayout. Actually, these two classes are the convenience classes for QBoxLayout. In the case of QHBoxLayout, the QHBoxLayout class has subclassed QBoxLayout and configured QBoxLayout::Direction to QBoxLayout::LeftToRight, whereas the QVBoxLayout class has subclassed QBoxLayout and configured QBoxLayout::Direction to QBoxLayout::TopToBottom.
Apart from these values, QBoxLayout::Direction supports various other values, as follows:
Let's write a simple program using QBoxLayout with five buttons.
Let's start with the MyDlg.h header file. I have declared five button pointers in the MyDlg class and a QBoxLayout pointer:
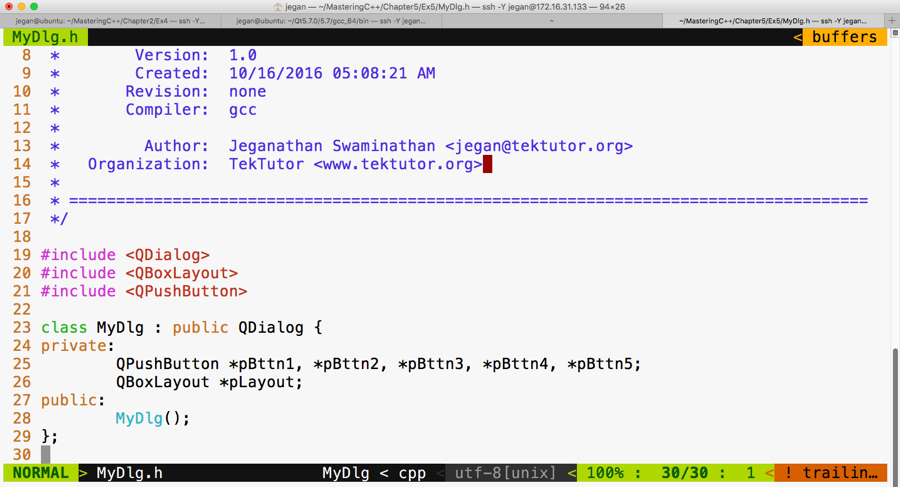
Let's take a look at our MyDlg.cpp source file. If you notice line number 21 in the following screenshot, the QBoxLayout constructor takes two arguments. The first argument is the direction in which you wish to arrange the widgets and the second argument is an optional argument that expects the parent address of the layout instance.
As you may have guessed, the this pointer refers to the MyDlg instance pointer, which happens to be the parent of the layout.
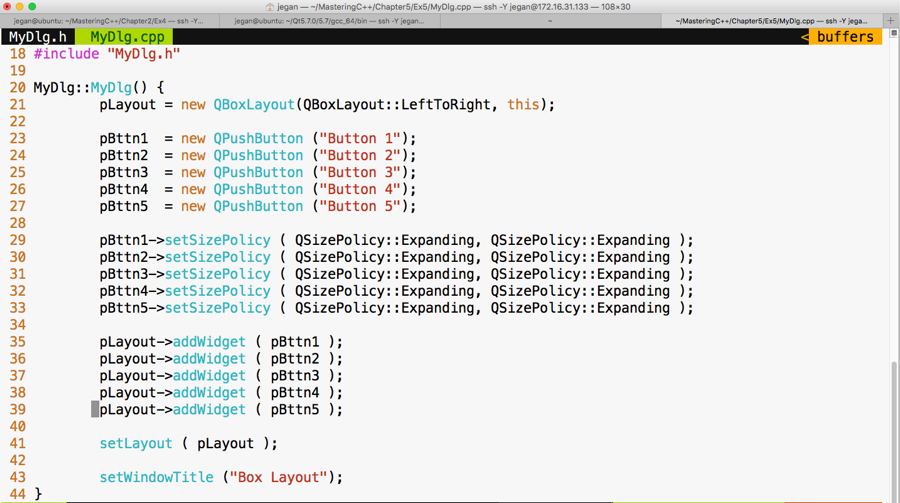
Again, as you may have guessed, the main.cpp file isn't going to change from our past exercises, as shown in the following screenshot:
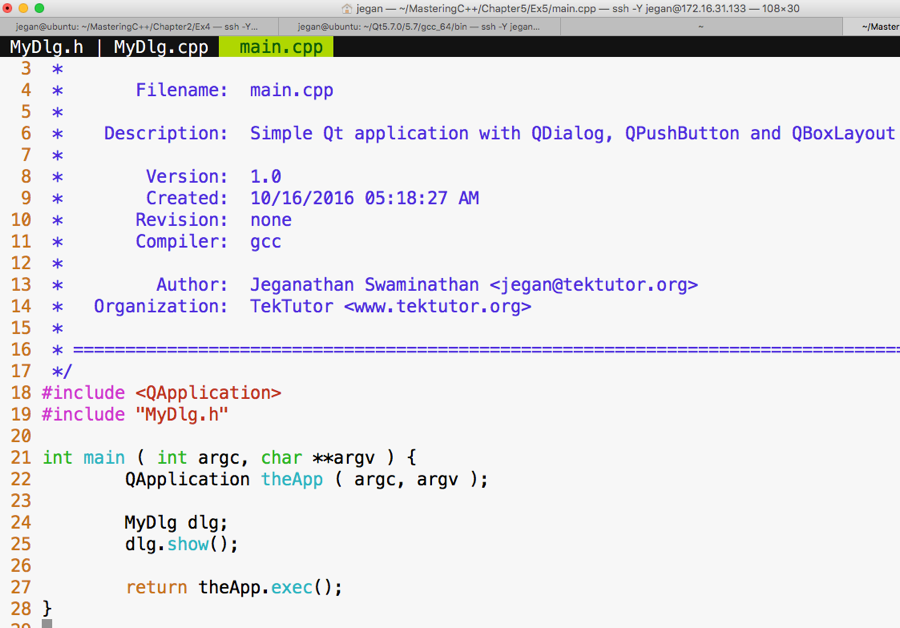
Let's compile and run our program, as follows:
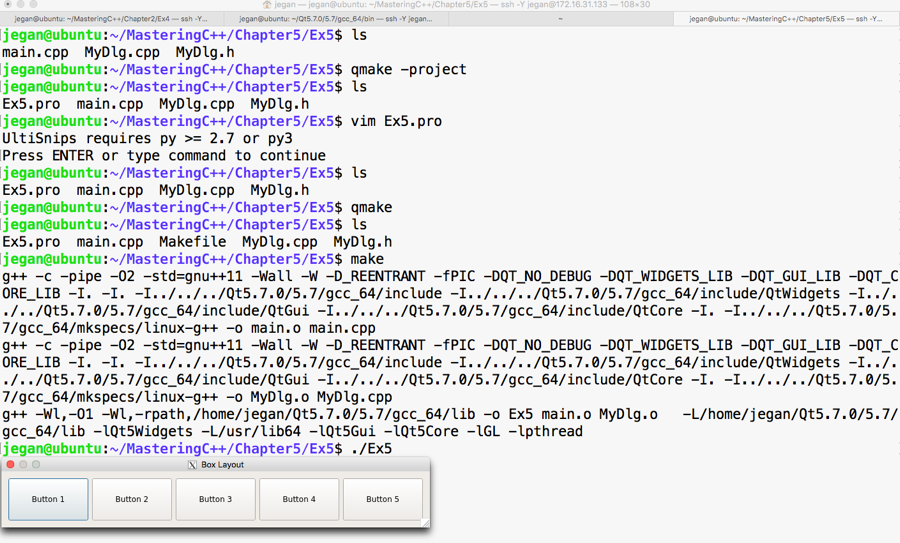
If you notice the output, it looks like a horizontal box layout output, right? Exactly, because we have set the direction to QBoxLayout::LeftToRight. If you modify the direction to, say, QBoxLayout::RightToLeft, then Button 1 would appear on the right-hand side, Button 2 would appear on the left-hand side of Button 1, and so on. Hence, the output would look as shown in the following screenshot:
If the direction is set to QBoxLayout::RightToLeft, you'll see the following output:
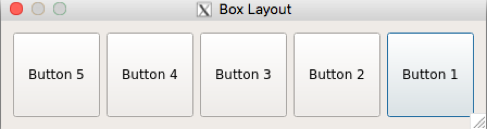
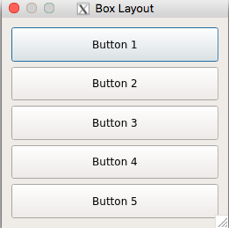
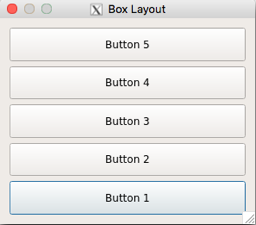
In all the preceding scenarios, the buttons are added to the layout exactly in the same sequence, starting from Button 1 through Button 5, respectively. However, depending on the direction chosen in the QBoxLayout constructor, the box layout will arrange the buttons, hence the difference in the output.
A grid layout allows us to arrange widgets in a tabular fashion. It is quite easy, just like a box layout. All we need to do is indicate the row and column where each widget must be added to the layout. As the row and column index starts from a zero-based index, the value of row 0 indicates the first row and the value of column 0 indicates the first column. Enough of theory; let's start writing some code.
Let's declare 10 buttons and add them in two rows and five columns. Other than the specific QGridLayout differences, the rest of the stuff will remain the same as the previous exercises, so go ahead and create MyDlg.h, MyDl.cpp, and main.cpp if you have understood the concepts discussed so far.
Let me present the MyDlg.h source code in the following screenshot:

The following is the code snippet of MyDlg.cpp:
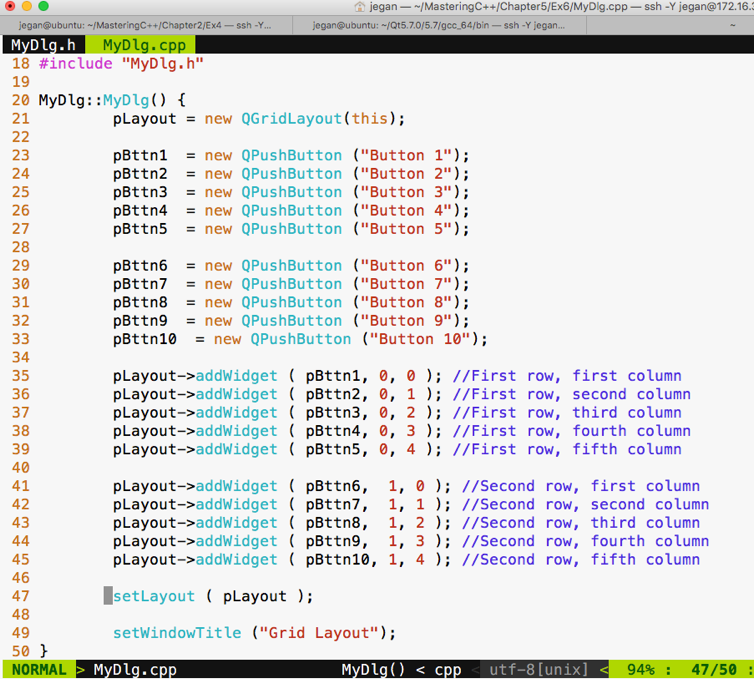
The main.cpp source file content will remain the same as our previous exercises; hence, I have skipped the main.cpp code snippet. As you are familiar with the build process, I have skipped it too. If you have forgotten about this, just check the previous sections to understand the build procedure.
If you have typed the code correctly, you should get the following output:
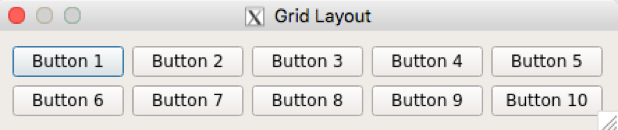
Actually, the grid layout has more stuff to offer. Let's explore how we can make a button span across multiple cells. I guarantee what you are about to see is going to be more interesting.
I'm going to modify MyDlg.h and MyDlg.cpp and keep main.cpp the same as the previous exercises:
Here goes our MyDlg.cpp:
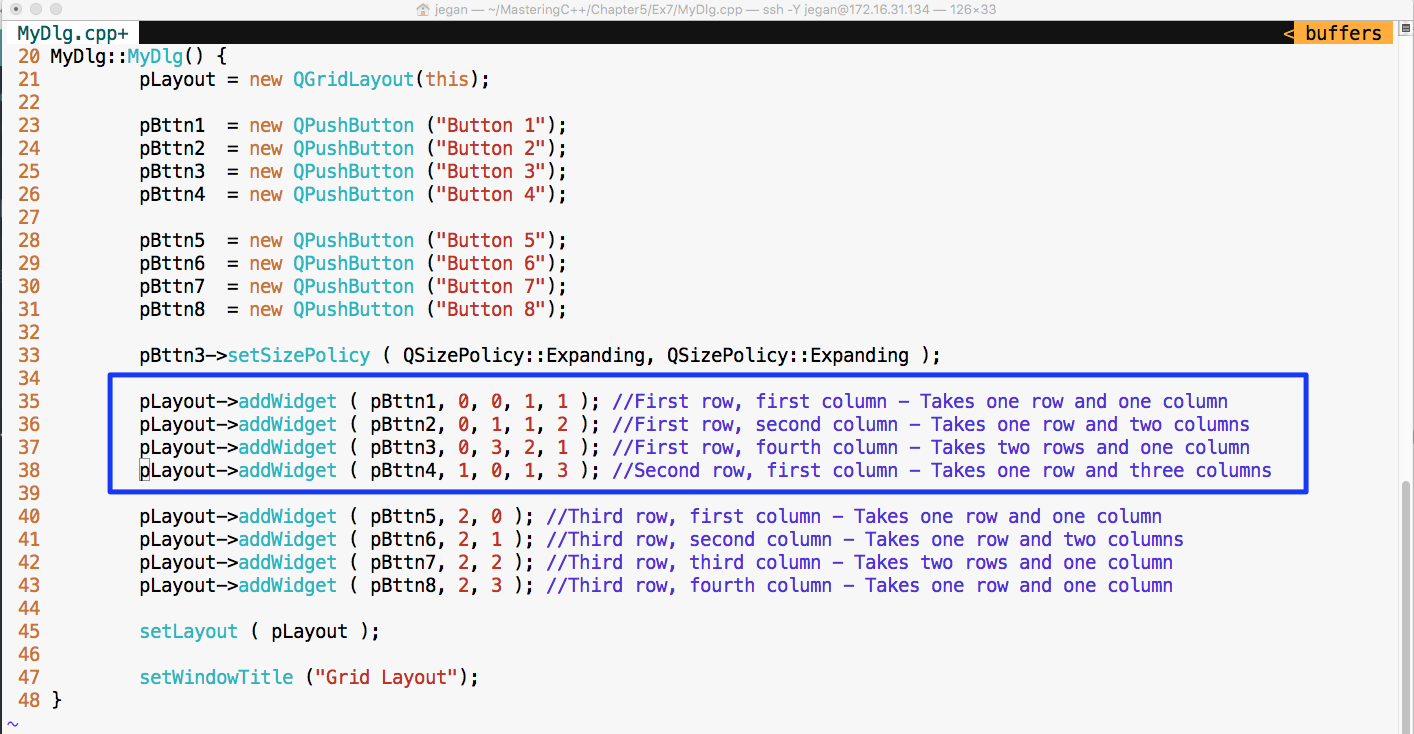
Notice the lines 35 through 38. Let's discuss the addWidget() function in detail now.
In line number 35, the pLayout->addWidget ( pBttn1, 0, 0, 1, 1 ) code does the following things:
In line number 36, the pLayout->addWidget ( pBttn2, 0, 1, 1, 2 ) code does the following:
In line number 37, the pLayout->addWidget ( pBttn3, 0, 3, 2, 1 ) code does the following:
In line number 38, the pLayout->addWidget ( pBttn4, 1, 0, 1, 3 ) code does the following:
Check out the output of the program:
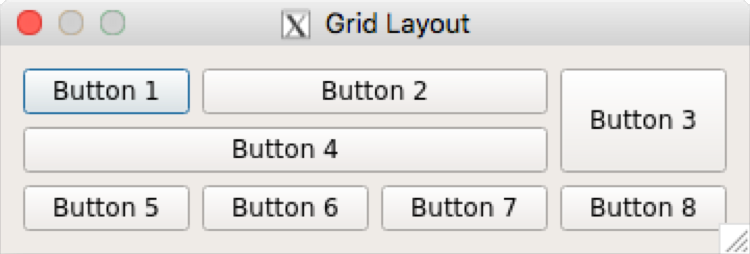
Signals and slots are an integral part of the Qt Framework. So far, we have written some simple but interesting Qt applications, but we haven't handled events. Now it's time to understand how to support events in our application.
Let's write a simple application with just one button. When the button is clicked, check whether we can print something on the console.
The MyDlg.h header demonstrates how the MyDlg class shall be declared:
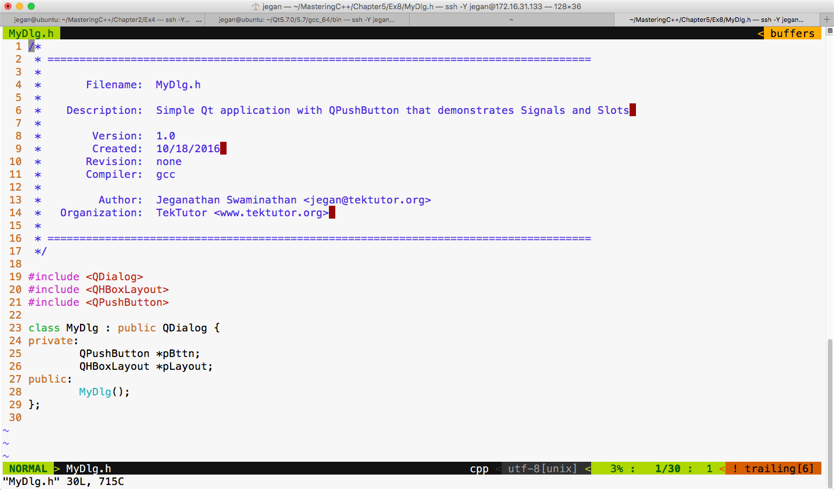
The following screenshot demonstrates how the MyDlg constructor shall be defined to add a single button to our dialog window:
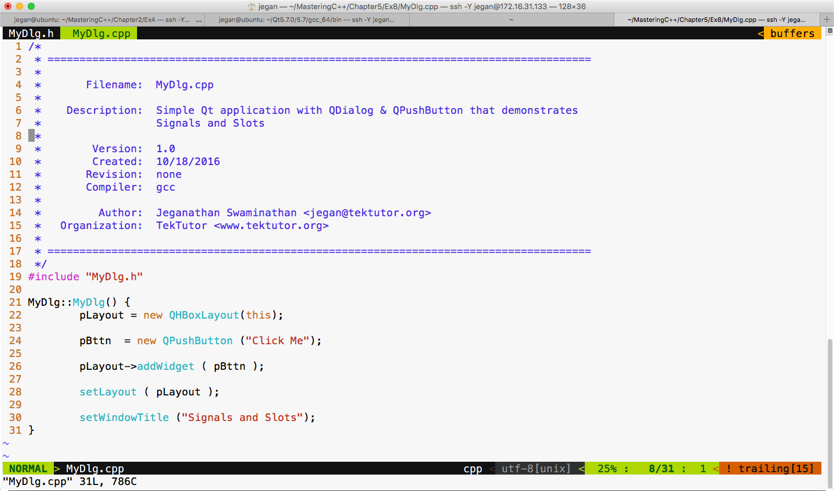
The main.cpp looks as follows:
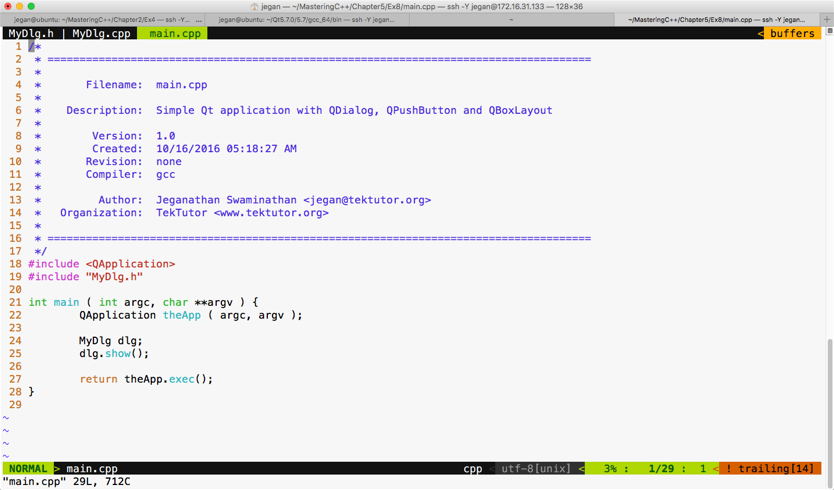
Let's build and run our program and later add support for signals and slots. If you have followed the instructions correctly, your output should resemble the following screenshot:
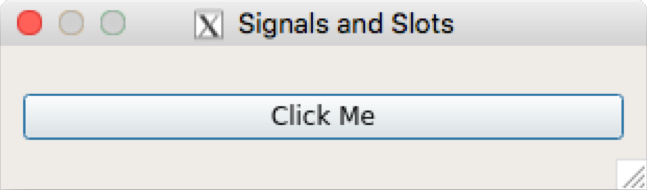
If you click on the button, you will notice that nothing happens, as we are yet to add support for signals and slots in our application. Okay, it's time to reveal the secret instruction that will help you make the button respond to a button-click signal. Hold on, it's time for some more information. Don't worry, it's related to Qt.
Qt signals are nothing but events, and slot functions are event handler functions. Interestingly, both signals and slots are normal C++ functions; only when they are marked as signals or slots, will the Qt Framework understand their purpose and provide the necessary boilerplate code.
Every widget in Qt supports one or more signal and may also optionally support one or more slot. So let's explore which signals QPushButton supports before we write any further code.
Let's make use of the Qt assistant for API reference:

If you observe the preceding screenshot, it has a Contents section that seems to cover Public Slots, but we don't see any signals listed there. That's a lot of information. If the Contents section doesn't list out signals, QPushButton wouldn't support signals directly. However, maybe its base class, that is, QAbstractButton, would support some signals. The QPushButton class section gives loads of useful information, such as the header filename, which Qt module must be linked to the application--that is, qmake entries that must be added to .pro--and so on. It also mentions the base class of QPushButton. If you scroll down further, your Qt assistant window should look like this:
If you observe the highlighted section under Additional Inherited Members, apparently the Qt assistant implies that QPushButton has inherited four signals from QAbstractButton. So we need to explore the signals supported by QAbstractButton in order to support the signals in QPushButton.
With the help of the Qt assistant, as shown in the preceding screenshot, it is evident that the QAbstractButton class supports four signals that are also available for QPushButton, as QPushButton is a child class of QAbstractButton. So let's use the clicked() signal in this exercise.
We need to make some minor changes in MyDlg.h and MyDlg.cpp in order to use the clicked() signal. Hence, I have presented these two files with changes highlighted in the following screenshot:
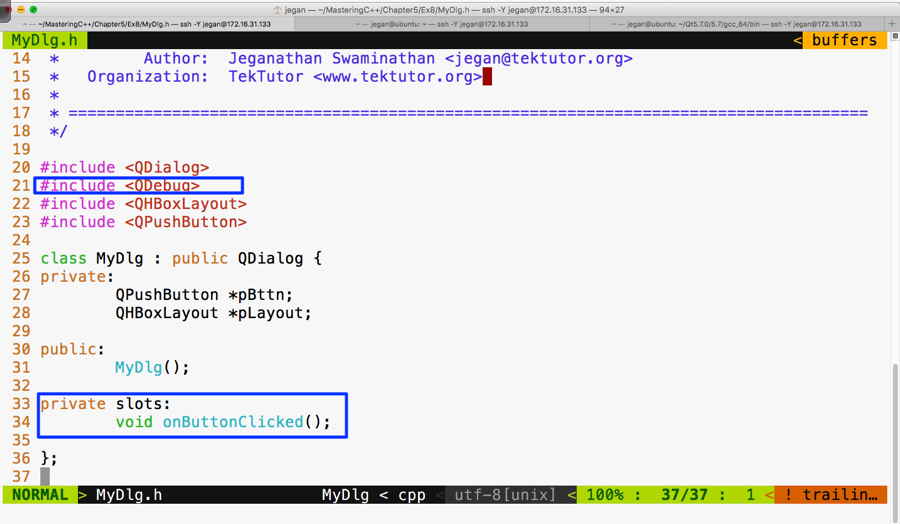
As you are aware, the QDebug class is used for debugging purposes. It offers functionalities to Qt applications that are similar to cout, but they aren't really required for signals and slots. We are using them here just for debugging purposes. In Figure 5.48, line number 34, void MyDlg::onButtonClicked() is our slot function that we are intending to use as an event handler function that must be invoked in response to the button click.
The following screenshot should give you an idea of what changes you will have to perform in MyDlg.cpp for signal and slot support:
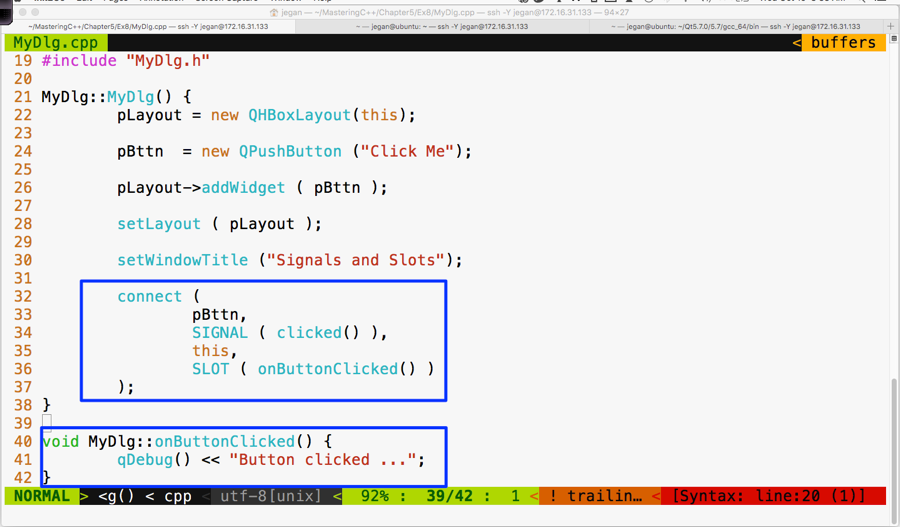
If you observe line 40 through 42 in the preceding screenshot, the MyDlg::onButtonClicked() method is a slot function that must be invoked whenever the button is clicked. But unless the button's clicked() signal is mapped to the MyDlg::onButtonClicked() slot, the Qt Framework wouldn't know that it must invoke MyDlg::onButtonClicked() when the button is clicked. Hence, in line numbers 32 through 37, we have connected the button signal clicked() with the MyDlg instance's onButtonClicked() slot function. The connect function is inherited by MyDlg from QDialog. This, in turn, has inherited the function from its ultimate base class, called QObject.
The mantra is that every class that would like to participate in signal and slot communication must be either QObject or its subclass. QObject offers quite a good amount of signal and slot support, and QObject is part of the QtCore module. What's amazing is that the Qt Framework has made signal and slot available to even command-line applications. This is the reason signals and slots support is built into the ultimate base class QObject, which is part of the QtCore module.
Okay, let's build and run our program and see whether the signals work in our application:
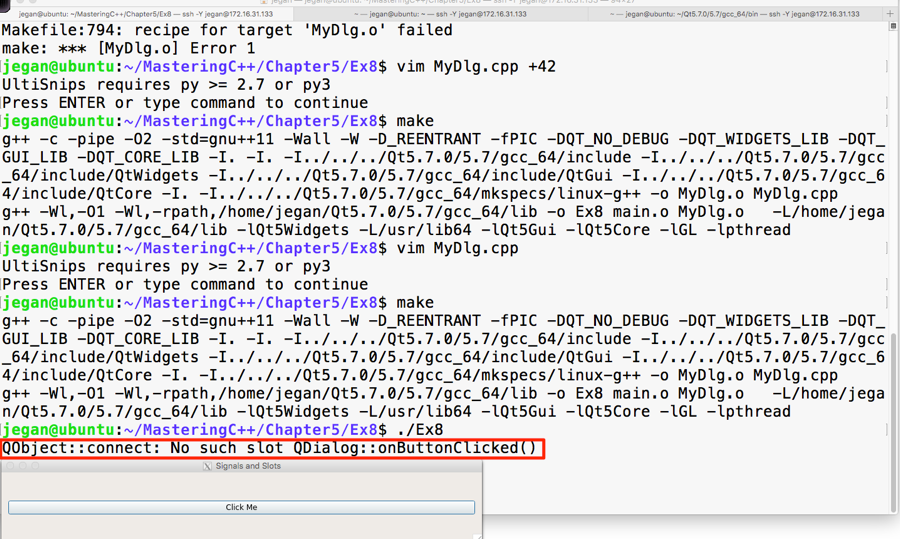
Interestingly, we don't get a compilation error, but when we click on the button, the highlighted warning message appears automatically. This is a hint from the Qt Framework that we have missed out on an important procedure that is mandatory to make signals and slots work.
Let's recollect the procedure we followed to autogenerate Makefile in our headers and source files:
In step 1, the qmake utility scans through all our custom header files and checks whether they need signal and slot support. Any header file that has the Q_OBJECT macro hints the qmake utility that it needs signal and slot support. Hence we must use the Q_OBJECT macro in our MyDlg.h header file:
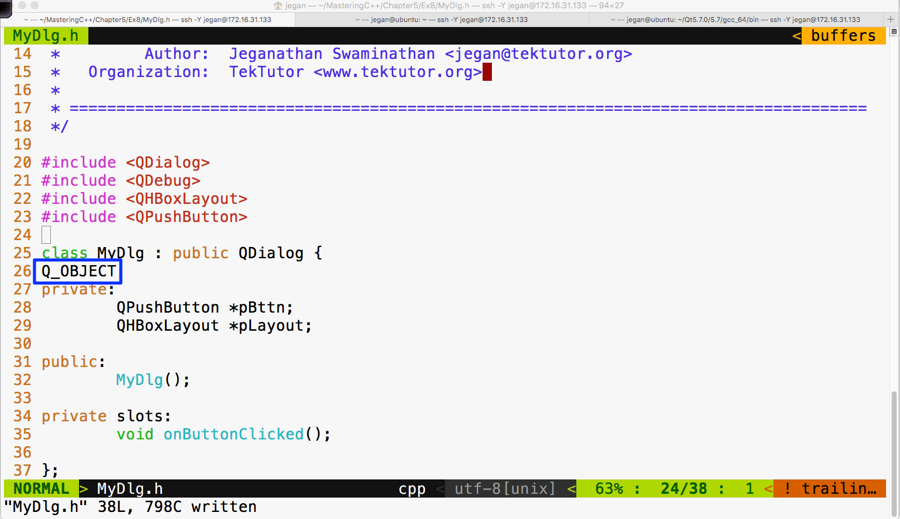
Once the recommended changes are done in the header file, we need to ensure that the qmake command is issued. Now the qmake utility will open the Ex8.pro file to get our project headers and source files. When qmake parses MyDlg.h and finds the Q_OBJECT macro, it will learn that our MyDlg.h requires signals and slots, then it will ensure that the moc compiler is invoked on MyDlg.h so that the boilerplate code can be autogenerated in a file called moc_MyDlg.cpp. This will then go ahead and add the necessary rules to Makefile so that the autogenerated moc_MyDlg.cpp file gets built along with the other source files.
Now that you know the secrets of Qt signals and slots, go ahead and try out this procedure and check whether your button click prints the Button clicked ... message. I have gone ahead and built our project with the changes recommended. In the following screenshot, I have highlighted the interesting stuff that goes on behind the scenes; these are some of the advantages one would get when working in the command line versus using fancy IDEs:
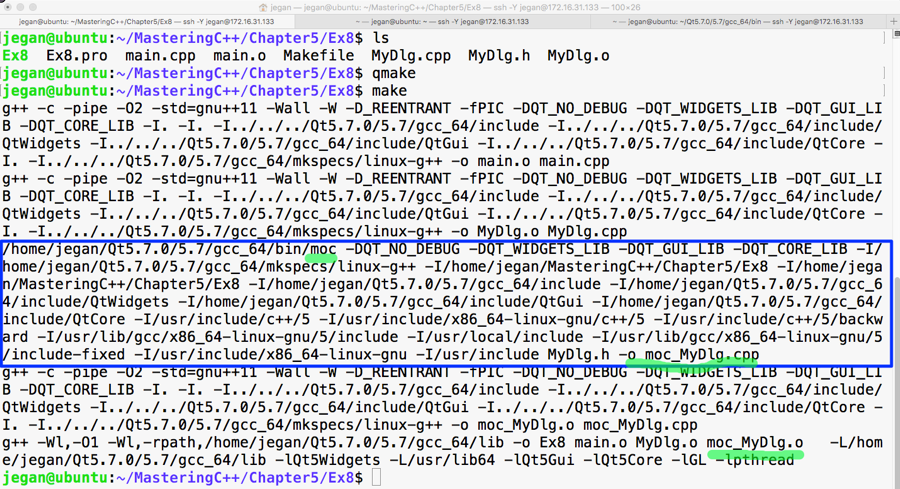
Now it's time that we test the output of our cool and simple application that supports signals and slots. The output is presented in the following screenshot:
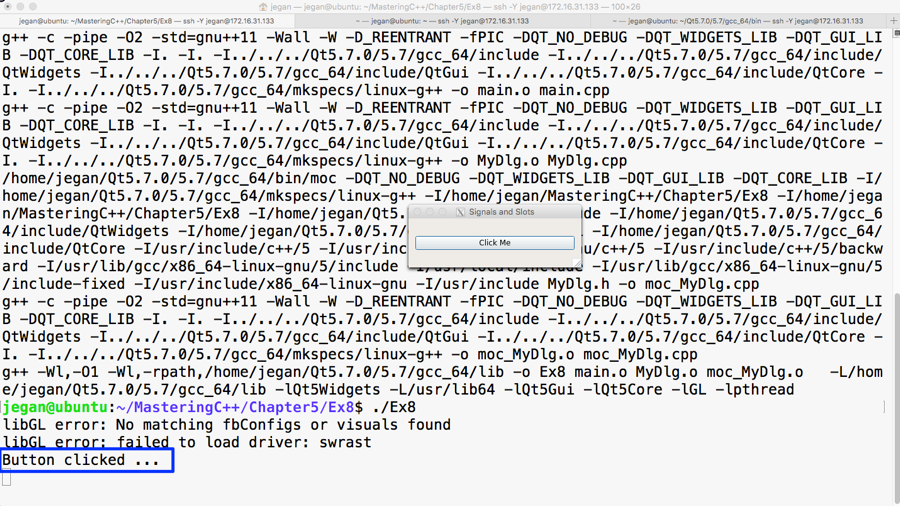
Congratulations! You can pat your back. You have learned enough to do cool stuff in Qt.
As you have learned about signals and slots, in this section, let's explore how to use a stacked layout in an application that has multiple windows; each window could be either a QWidget or QDialog. Each page may have its own child widgets. The application we are about to develop will demonstrate the use of a stacked layout and how to navigate from one window to the other within the stacked layout.
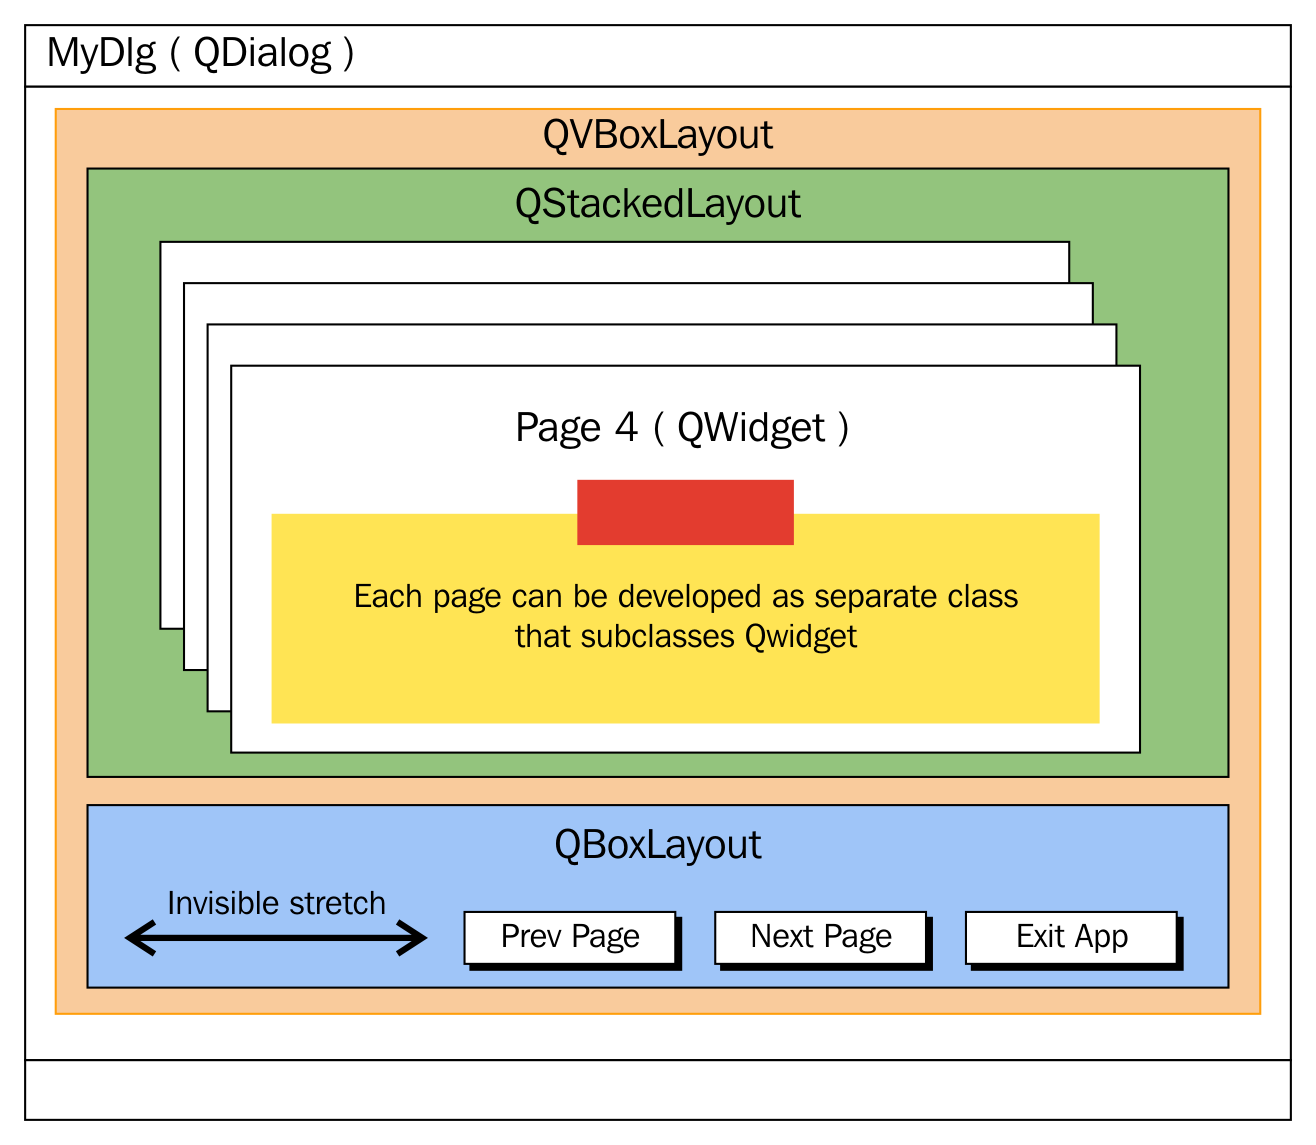
This application is going to require a decent amount of code, hence it is important that we ensure our code is structured carefully so that it meets both the structural and functional quality, avoiding code smells as much as possible.
Let's create four widgets/windows that could be stacked up in a stacked layout, where each page could be developed as a separate class split across two files: HBoxDlg.h and HBoxDlg.cpp and so on.
Let's start with HBoxDlg.h. As you are familiar with layouts, in this exercise, we are going to create each dialog with one layout so that while navigating between the subwindows, you can differentiate between the pages. Otherwise, there will be no connection between the stacked layout and other layouts as such.
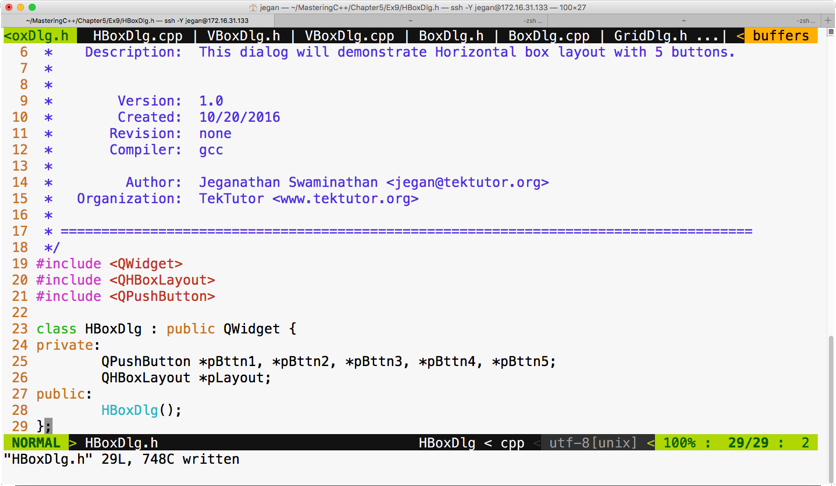
The following code snippet is from the HBoxDlg.cpp file:
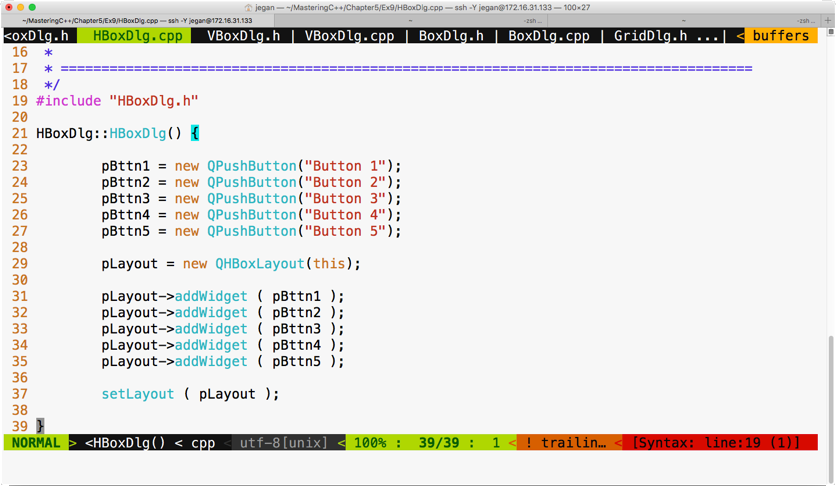
Similarly, let's write VBoxDlg.h as follows:
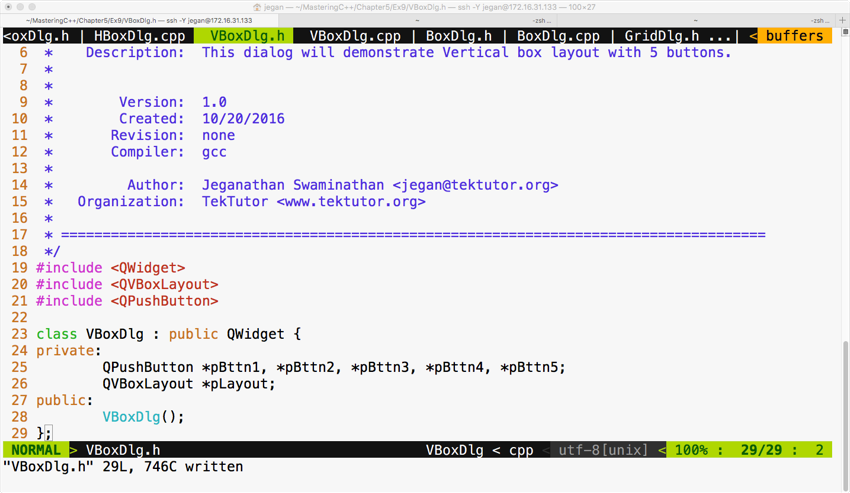
Let's create the third dialog BoxDlg.h with a box layout, as follows:
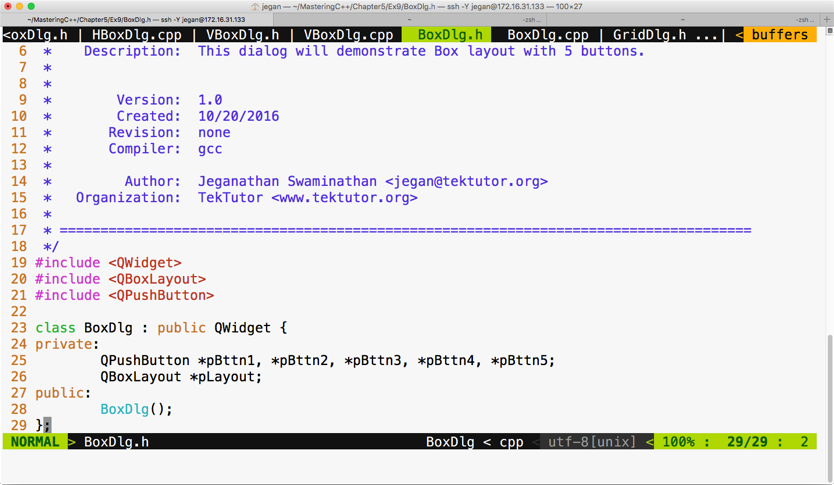
The respective BoxDlg.cpp source file will look as follows:
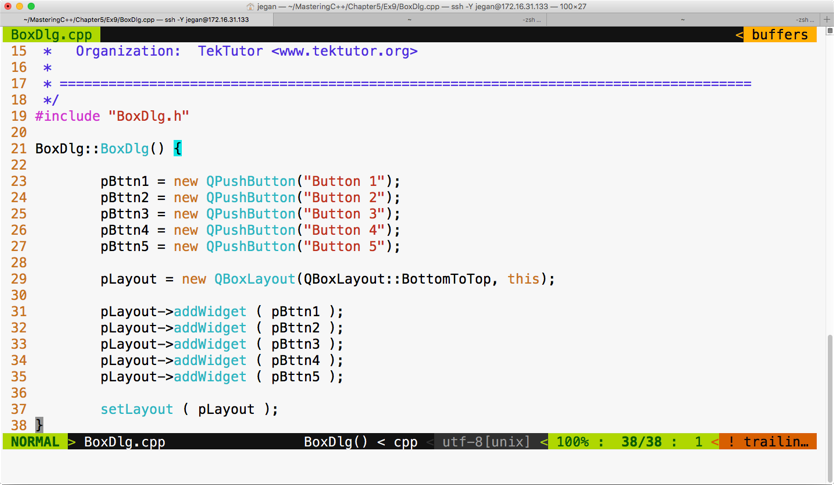
The fourth dialog that we would like to stack up is GridDlg, so let's see how GridDlg.h can be written, which is illustrated in the following screenshot:
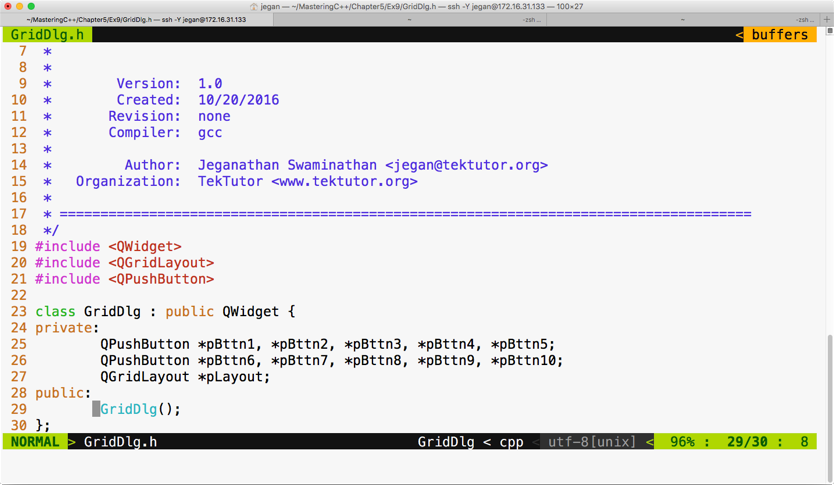
The respective GridDlg.cpp will look like this:
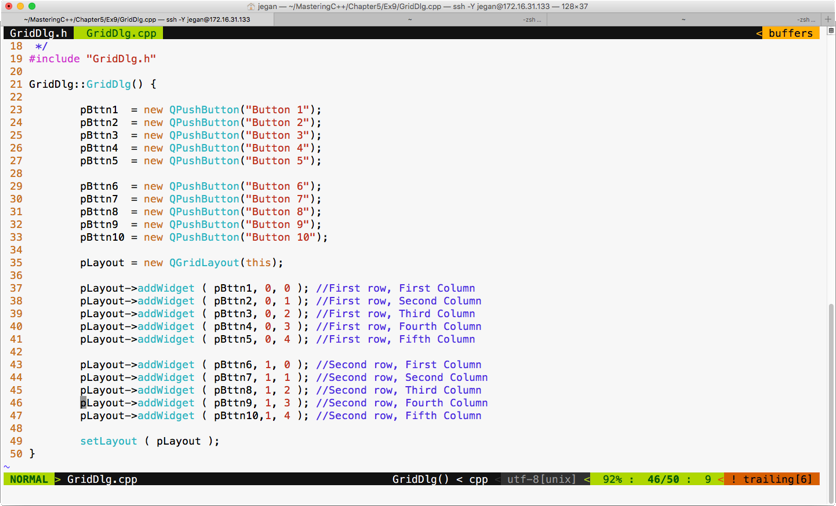
Cool, we are done with creating four widgets that can be stacked up in MainDlg. MainDlg is the one that's going to use QStackedLayout, so the crux of this exercise is understanding how a stacked layout works.
Let's see how MainDlg.h shall be written:
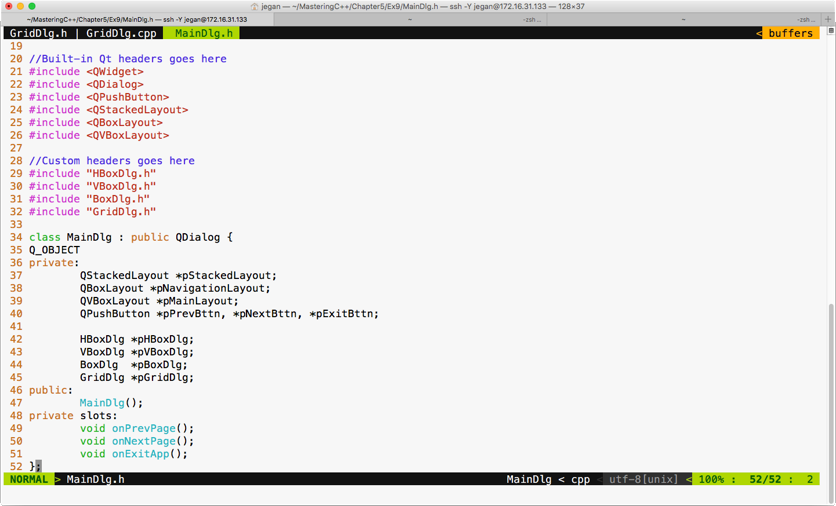
In MainDlg, we have declared three slot functions, one for each button, in order to support the navigation logic among the four windows. A stacked layout is similar to a tabbed widget, except that a tabbed widget will provide its own visual way to switch between the tabs, whereas in the case of a stacked layout, it is up to us to provide the switching logic.
The MainDlg.cpp will look like this:
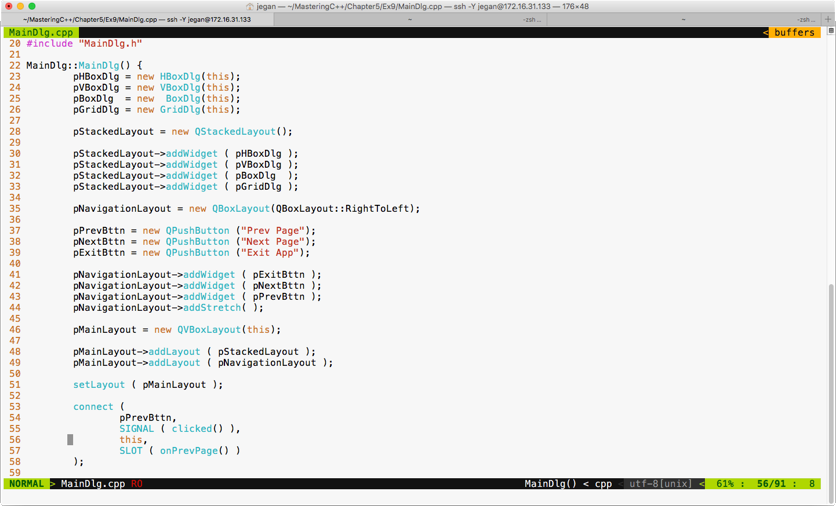
You can choose a box layout to hold the three buttons, as we prefer buttons aligned to the right. However, in order to ensure that extra spaces are consumed by some invisible glue, we have added a stretch item at line number 44.
Between lines 30 through 33, we have added all the four subwindows in a stacked layout so that windows can be made visible one at a time. The HBox dialog is added at index 0, the VBox dialog is added at index 1, and so on.
Lines 53 through 58 demonstrate how the previous button's clicked signal is wired with its corresponding MainDlg::onPrevPage() slot function. Similar connections must be configured for next and exit buttons:
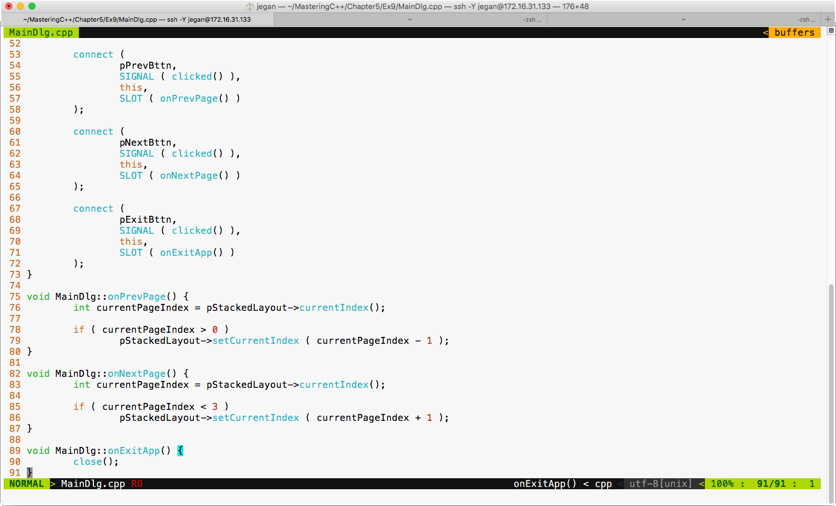
The if condition in line 78 ensures that the switching logic happens only if we are in the second or later subwindows. As the horizontal dialog is at index 0, we can't navigate to the previous window in cases where the current window happens to be a horizontal dialog. A similar validation is in place for switching to the next subwindow in line 85.
The stacked layout supports the setCurrentIndex() method to switch to a particular index position; alternatively, you could try the setCurrentWidget() method as well if it works better in your scenario.
The main.cpp looks short and simple, as follows:
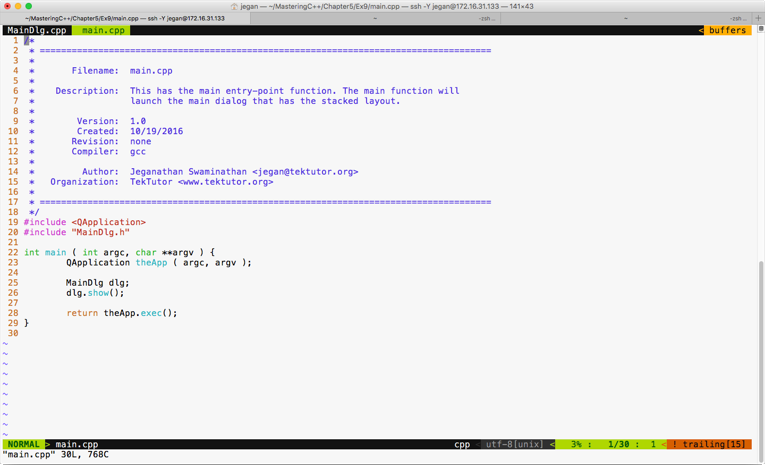
The best part of our main function is that irrespective of the complexity of the application logic, the main function doesn't have any business logic. This makes our code clean and easily maintainable.
In this section, let's explore how to write a simple math application. As part of this exercise, we will use QLineEdit and QLabel widgets and QFormLayout. We need to design a UI, as shown in the following screenshot:
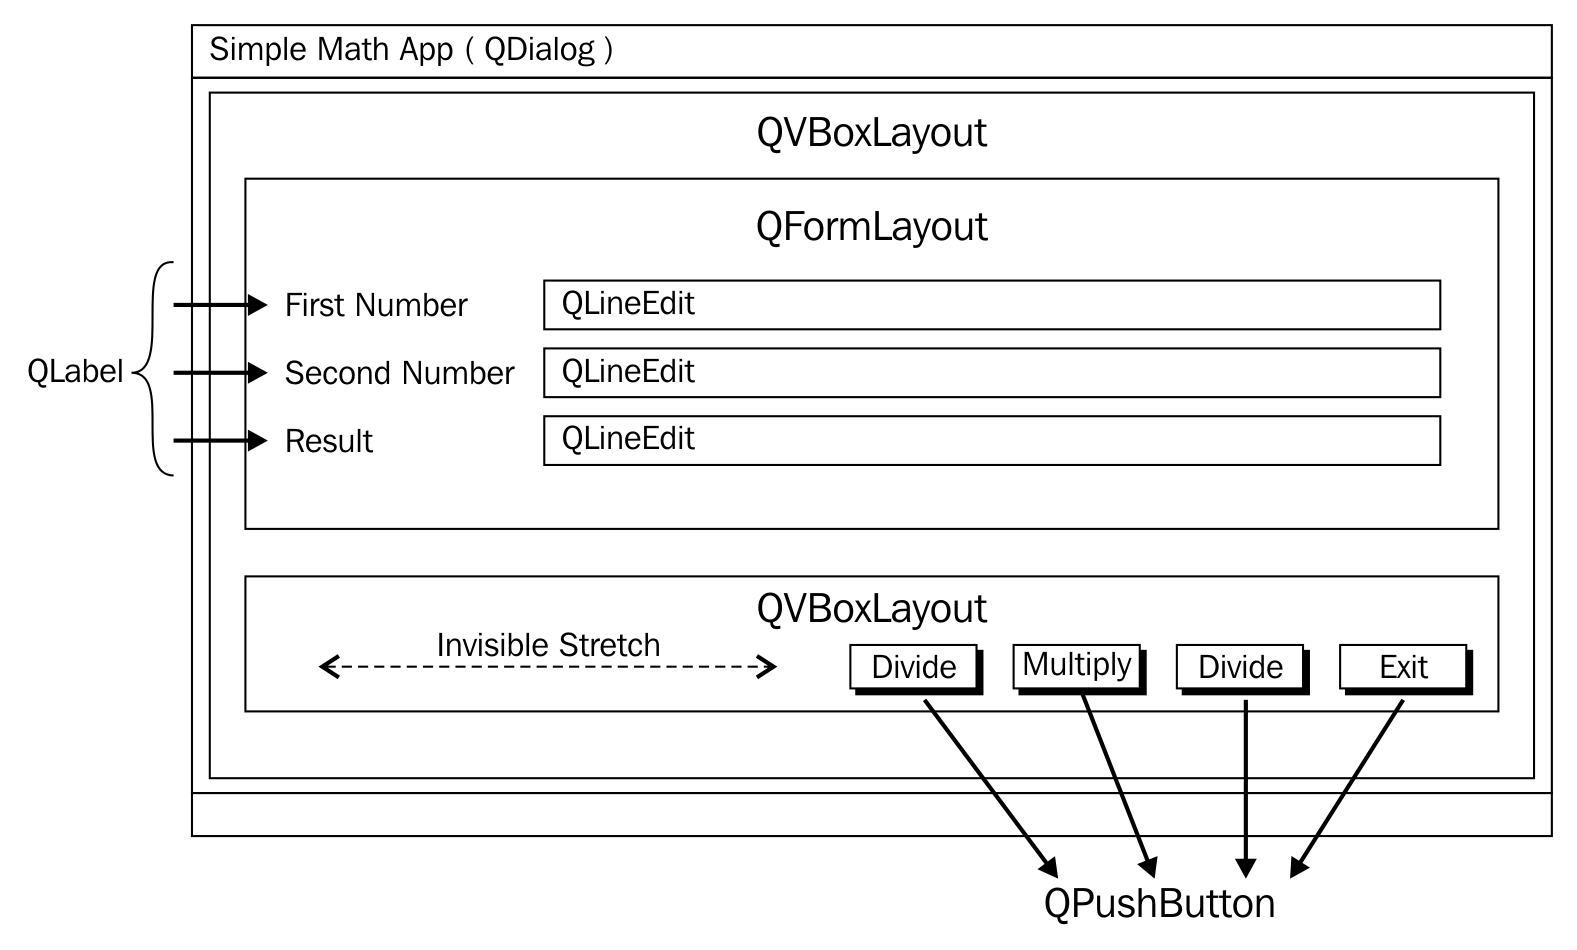
QLabel is a widget typically used for static text, and QLineEdit will allow a user to supply a single line input. As shown in the preceding screenshot, we will use QVBoxLayout as the main layout in order to arrange QFormLayout and QBoxLayout in a vertical fashion. QFormLayout comes in handy when you need to create a form where there will be a caption on the left-hand side followed by some widget on its right. QGridLayout might also do the job, but QFormLayout is easy to use in such scenarios.
In this exercise, we will create three files, namely MyDlg.h, MyDlg.cpp, and main.cpp. Let's start with the MyDlg.h source code and then move on to other files:
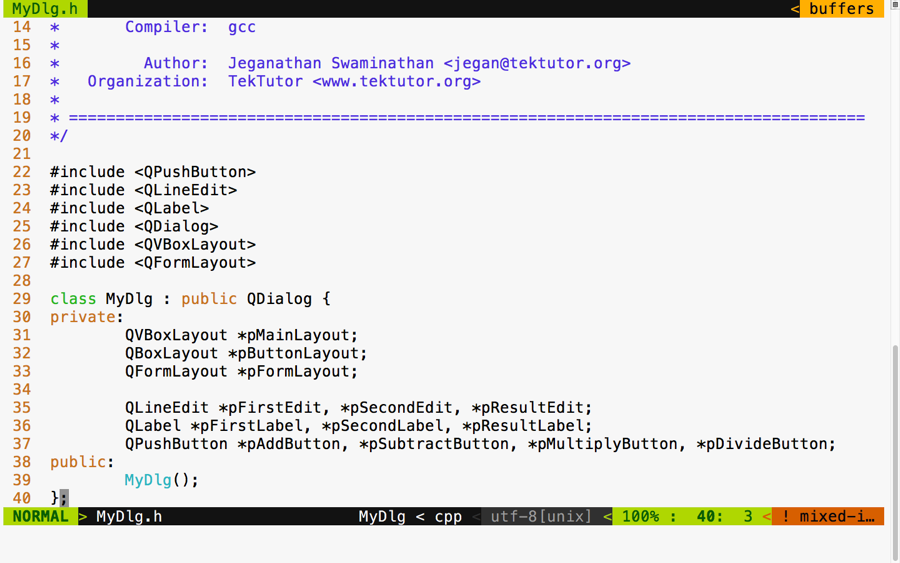
In the preceding figure, three layouts are declared. The vertical box layout is used as the main layout, while the box layout is used to arrange the buttons in the right-aligned fashion. The form layout is used to add the labels, that is, line edit widgets. This exercise will also help you understand how one can combine multiple layouts to design a professional HMI.
Qt doesn't have any documented restriction in the number of layouts that can be combined in a single window. However, when possible, it is a good idea to consider designing an HMI with a minimal number of layouts if you are striving to develop a small memory footprint application. Otherwise, there is certainly no harm in using multiple layouts in your application.
In the following screenshot, you will get an idea of how the MyDlg.cpp source file shall be implemented. In the MyDlg constructor, all the buttons are instantiated and laid out in the box layout for right alignment. The form layout is used to hold the QLineEdit widgets and their corresponding QLabel widgets in a grid-like fashion. QLineEdit widgets typically help supply a single line input; in this particular exercise, they help us supply a number input that must be added, subtracted, and so on, depending on the user's choice.
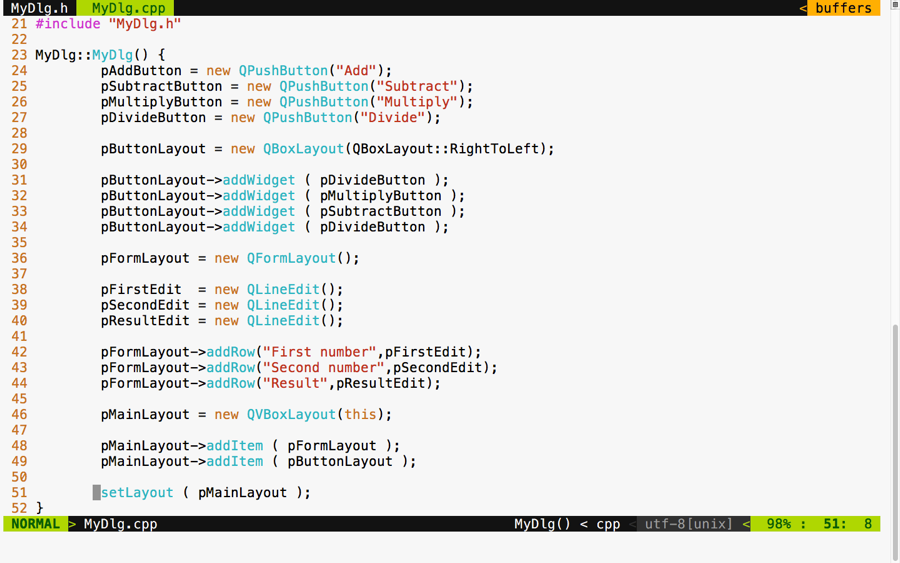
The best part of our main.cpp source file is that it remains pretty much the same, irrespective of the complexity of our application. In this exercise, I would like to tell you a secret about MyDlg. Did you notice that the MyDlg constructor is instantiated in the stack as opposed to the heap? The idea is that when the main() function exits, the stack used by the main function gets unwinded, eventually freeing up all the stack variables present in the stack. When MyDlg gets freed up, it results in calling the MyDlg destructor. In the Qt Framework, every widget constructor takes an optional parent widget pointer, which is used by the topmost window destructor to free up its child widgets. Interestingly, Qt maintains a tree-like data structure to manage the memory of all its child widgets. So, if all goes well, the Qt Framework will take care of freeing up all its child widgets' memory locations "automagically".
This helps Qt developers focus on the application aspect, while the Qt Framework will take care of memory management.
Aren't you excited to check the output of our new application? If you build and execute the application, then you are supposed to get an output similar to the following screenshot. Of course, we are yet to add signal and slot support, but it's a good idea to design the GUI to our satisfaction and then shift our focus to event handling:
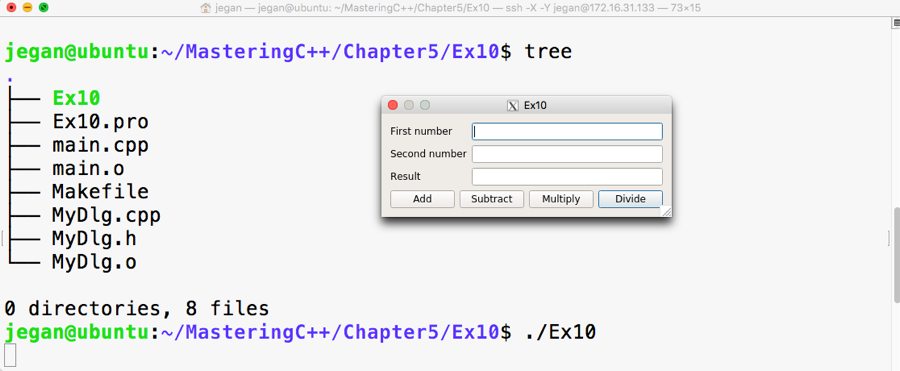
If you observe closely, though the buttons are laid out on QBoxLayout in the right to left direction, the buttons aren't aligned to the right. The reason for this behavior is when the window is stretched out, the box layout seems to have divided and allocated the extra horizontal space available among all the buttons. So let's go ahead and throw in a stretch item to the leftmost position on the box layout such that the stretch will eat up all the extra spaces, leaving the buttons no room to expand. This will get us the right-aligned effect. After adding the stretch, the code will look as shown in the following screenshot:

Go ahead and check whether your output looks as shown in the following screenshot. Sometimes, as developers, we get excited to see the output in a rush and forget to compile our changes, so ensure the project is built again. If you don't see any change in output, no worries; just try to stretch out the window horizontally and you should see the right-aligned effect, as shown in the following screenshot:
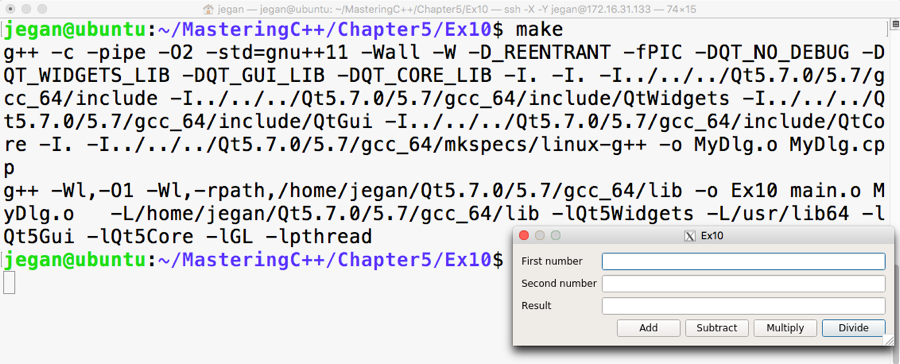
Now since we have a decent-looking application, let's add signal and slot support to add the response to button clicks. Let's not rush and include the add and subtract functionalities for now. We will use some qDebug() print statements to check whether the signals and slots are connected properly and then gradually replace them with the actual functionalities.
If you remember the earlier signal and slot exercise, any Qt window that is interested in supporting signals and slots must be QObject and should include the Q_OBJECT macro in the MyDlg.h header file, as shown in the following screenshot:
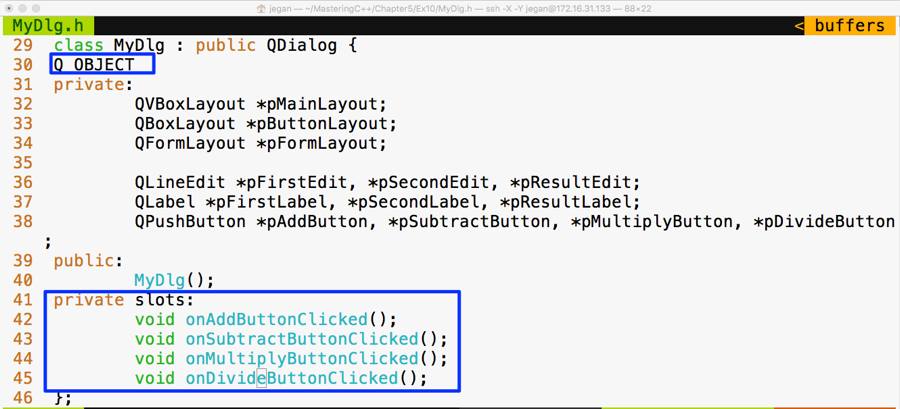
In lines starting from 41 through 45, four slot methods are declared in the private section. Slot functions are regular C++ functions that could be invoked directly just like other C++ functions. However, in this scenario, the slot functions are intended to be invoked only with MyDlg. Hence they are declared as private functions, but they could be made public if you believe that others might find it useful to connect to your public slot.
Cool, if you have come this far, it says that you have understood the things discussed so far. Alright, let's go ahead and implement the definitions for the slot functions in MyDlg.cpp and then connect the clicked() button's signals with the respective slot functions:
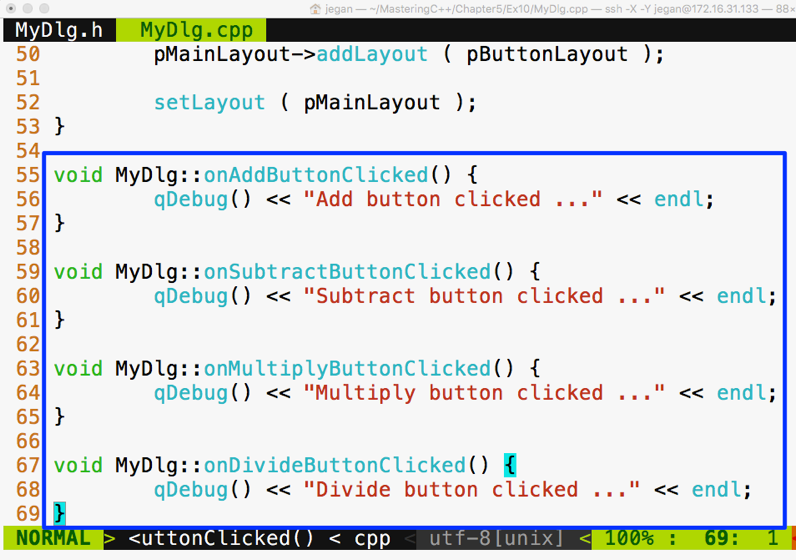
Now it's time to wire up the signals to their respective slots. As you may have guessed, we need to use the connect function in the MyDlg constructor, as shown in the following screenshot, to get the button clicks to the corresponding slots:
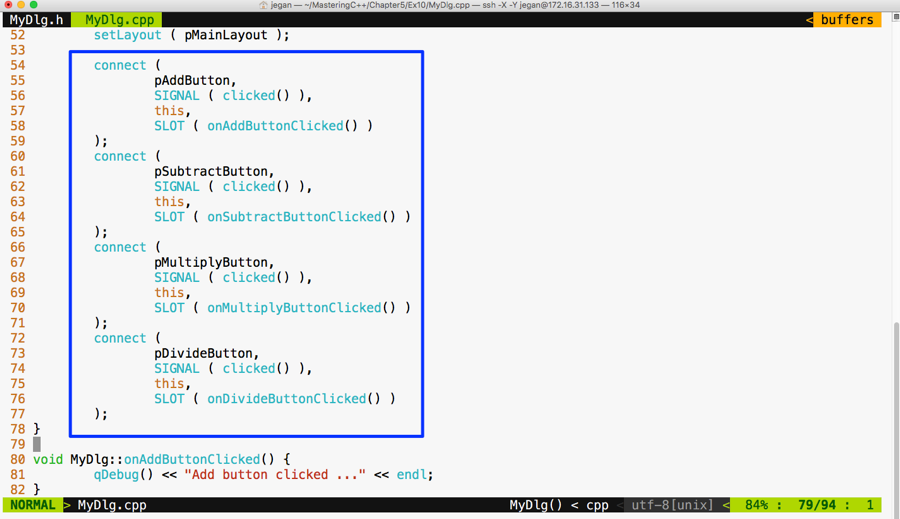
We are all set. Yes, it's showtime now. As we have taken care of most of the stuff, let's compile and check the output of our little Qt application:
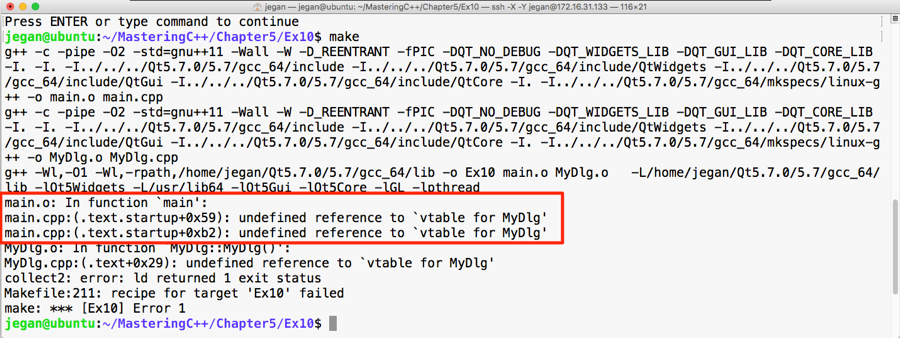
Oops! We got some linker error. The root cause of this issue is that we forgot to invoke qmake after enabling signal and slot support in our application. No worries, let's invoke qmake and make and run our application:
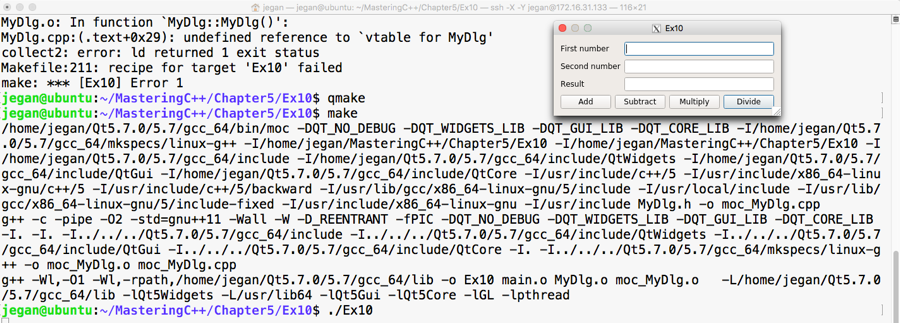
Great, we have fixed the issue. The make utility doesn't seem to make any noise this time and we are able to launch the application. Let's check whether the signals and slots are working as expected. For this, click on the Add button and see what happens:
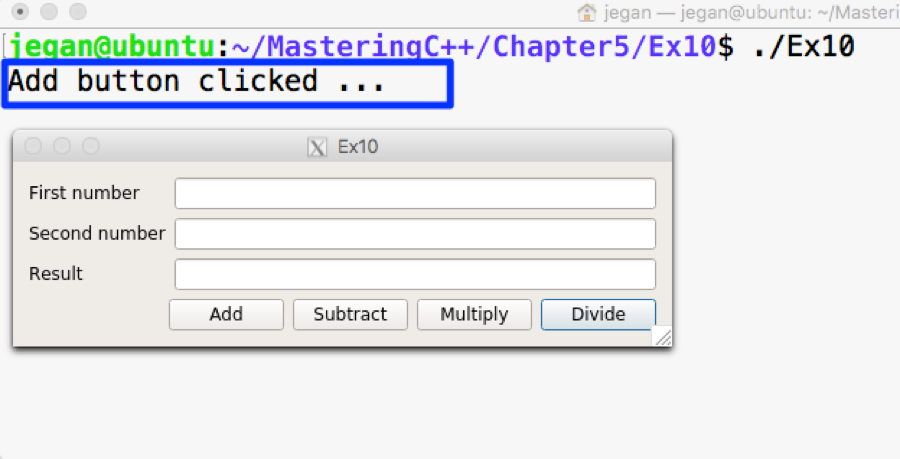
Wow! When we click on the Add button, the qDebug() console message confirms that the MyDlg::onAddButtonClicked() slot is invoked. If you are curious to check the slots of other buttons, go ahead and try clicking on the rest of the buttons.
Our application will be incomplete without business logic. So let's add business logic to the MyDlg::onAddButtonClicked() slot function to perform the addition and display the result. Once you learn how to integrate the added business logic, you can follow the same approach and implement the rest of the slot functions:
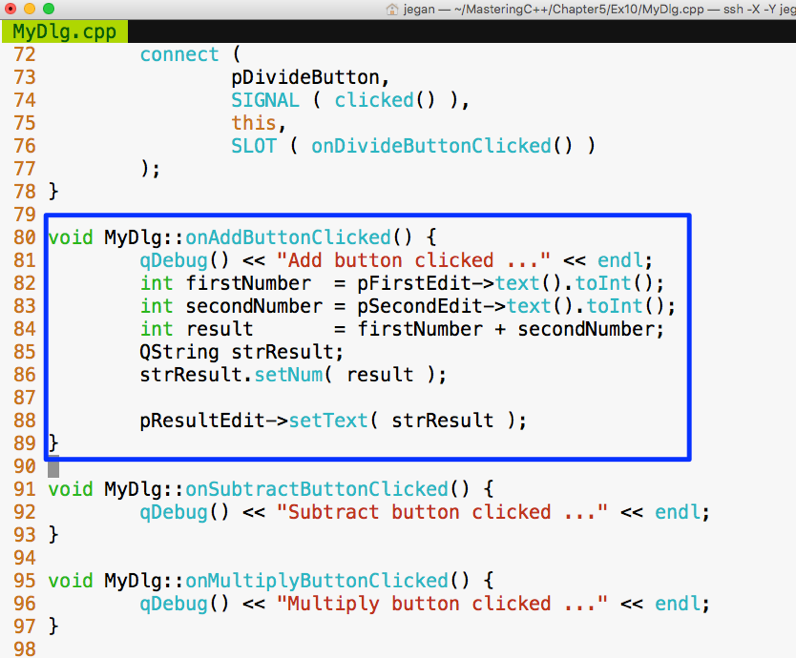
In the MyDlg::onAddButtonClicked() function, the business logic is integrated. In lines 82 and 83, we are trying to extract the values typed by the user in the QLineEdit widgets. The text() function in QLineEdit returns QString. The QString object provides toInt() that comes in handy to extract the integer value represented by QString. Once the values are added and stored in the result variable, we need to convert the result integer value back to QString, as shown in line number 86, so that the result can be fed into QLineEdit, as shown in line number 88.
Similarly, you can go ahead and integrate the business logic for other math operations. Once you have thoroughly tested the application, you can remove the qDebug() console's output. We added the qDebug() messages for debugging purposes, hence they can be cleaned up now.
In this chapter, you learned developing C++ GUI applications using Qt application framework. The key takeaway points are listed below.
In the next chapter, you will be learning multithread programming and IPC in C++.
This chapter will cover the following topics:
Let's learn these topics with a few interesting, easy-to-understand examples discussed throughout this chapter.
Unix, Linux, and macOS are largely compliant with the POSIX standard. Portable Operating System Interface for Unix (POSIX) is an IEEE standard that helps all Unix and Unix-like operating systems, that is Linux and macOS, communicate with a single interface.
Interestingly, POSIX is also supported by POSIX-compliant tools--Cygwin, MinGW, and Windows subsystem for Linux--that provide a pseudo-Unix-like runtime and development environment on Windows platforms.
Note that pthread is a POSIX-compliant C library used in Unix, Linux, and macOS. Starting from C++11, C++ natively supports threads via the C++ thread support library and concurrent library. In this chapter, we will understand how to use pthreads, thread support, and concurrency library in an object-oriented fashion. Also, we will discuss the merits of using native C++ thread support and concurrency library as opposed to using POSIX pthreads or other third-party threading frameworks.
Let's get straight to business. You need to understand the pthread APIs we'll discuss to get your hands dirty. To start with, this function is used to create a new thread:
 #include <pthread.h>
 int pthread_create(
              pthread_t *thread,
              const pthread_attr_t *attr,
              void *(*start_routine)(void*),
              void *arg
 )
The following table briefly explains the arguments used in the preceding function:
|
API arguments |
Comments |
|
pthread_t *thread |
Thread handle pointer |
|
pthread_attr_t *attr |
Thread attribute |
|
void *(*start_routine)(void*) |
Thread function pointer |
|
void * arg |
Thread argument |
This function blocks the caller thread until the thread passed in the first argument exits, as shown in the code:
int pthread_join ( pthread_t *thread, void **retval )
The following table briefly describes the arguments in the preceding function:
|
API arguments |
Comments |
|
pthread_t thread |
Thread handle |
|
void **retval |
Output parameter that indicates the exit code of the thread procedure |
The ensuing function should be used within the thread context. Here, retval is the exit code of the thread that indicates the exit code of the thread that invoked this function:
int pthread_exit ( void *retval )
Here's the argument used in this function:
|
API argument |
Comment |
|
void *retval |
The exit code of the thread procedure |
The following function returns the thread ID:
pthread_t pthread_self(void)
Let's write our first multithreaded application:
#include <pthread.h>
#include <iostream>

using namespace std;

void* threadProc ( void *param ) {
  for (int count=0; count<3; ++count)
    cout << "Message " << count << " from " << pthread_self()
         << endl;
  pthread_exit(0);
}

int main() {
  pthread_t thread1, thread2, thread3;

  pthread_create ( &thread1, NULL, threadProc, NULL );
  pthread_create ( &thread2, NULL, threadProc, NULL );
  pthread_create ( &thread3, NULL, threadProc, NULL );

  pthread_join( thread1, NULL );
  pthread_join( thread2, NULL );

  pthread_join( thread3, NULL );

  return 0;

}
The program can be compiled with the following command:
g++ main.cpp -lpthread
As you can see, we need to link the POSIX pthread library dynamically.
Check out the following screenshot and visualize the output of the multithreaded program:
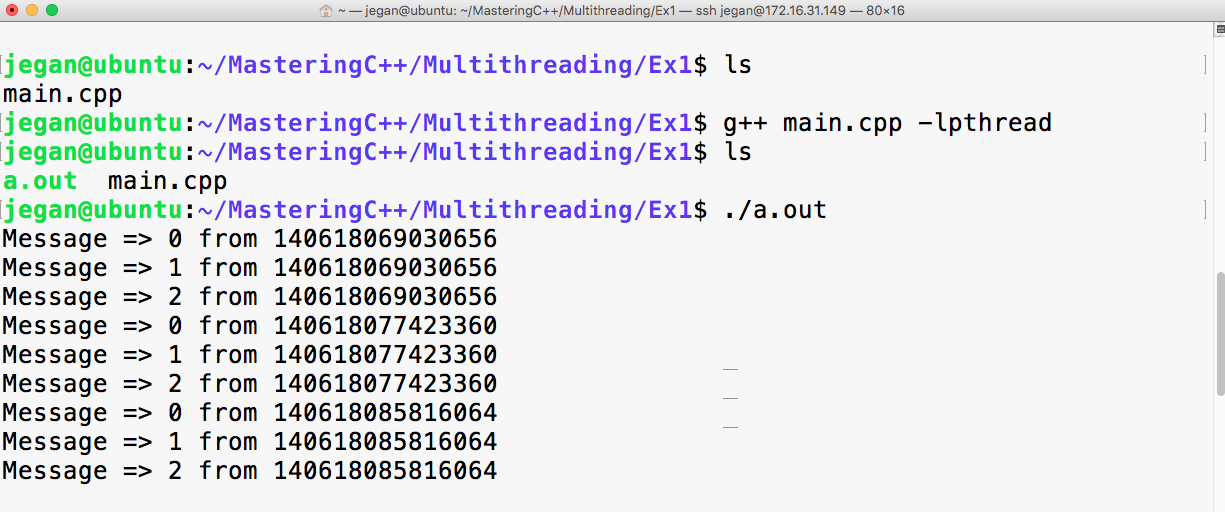
The code that is written in ThreadProc runs within the thread context. The preceding program has a total of four threads, including the main thread. I had blocked the main thread with pthread_join to force it to wait for the other three threads to complete their tasks first, failing which the main thread would have exited before them. When the main thread exits, the application exits too, which ends up prematurely destroying newly created threads.
Though we created thread1, thread2, and thread3 in the respective sequence, there is no guarantee that they will be started in the exact same sequence they were created in.
The operating system scheduler decides the sequence in which the threads must be started, based on the algorithm used by the operating system scheduler. Interestingly, the sequence in which the threads get started might vary at different runs in the same system.
Starting from C++11, C++ does support threads natively, and it is generally referred to as the C++ thread support library. The C++ thread support library provides an abstraction over the POSIX pthreads C library. Over time, C++ native thread support has improved to a greater extent.
I highly recommend you make use of the C++ native thread over pthreads. The C++ thread support library is supported on all platforms as it is officially part of standard C++ as opposed to the POSIX pthread library, which is only supported on Unix, Linux, and macOS but not directly on Windows.
The best part is thread support has matured to a new level in C++17, and it is poised to reach the next level in C++20. Hence, it is a good idea to consider using the C++ thread support library in your projects.
Interestingly, it is pretty simple to write a multithreaded application using the C++ thread support library:
#include <thread>
using namespace std;
thread instance ( thread_procedure )
The thread class was introduced in C++11. This function can be used to create a thread. The equivalent of this function is pthread_create in the POSIX pthread library.
|
Argument |
Comment |
|
thread_procedure |
Thread function pointer |
Now a bit about the argument that returns the thread ID in the following code:
this_thread::get_id ()
This function is equivalent to the pthread_self() function in the POSIX pthread library. Refer to the following code:
thread::join()
The join() function is used to block the caller thread or the main thread so it will wait until the thread that has joined completes its task. This is a non-static function, so it has to be invoked on a thread object.
Let's see how to use the preceding functions to write a simple multithreaded program based on C++. Refer to the following program:
#include <thread>
#include <iostream>
using namespace std;

void threadProc() {
  for( int count=0; count<3; ++count ) {
    cout << "Message => "
         << count
         << " from "
         << this_thread::get_id()
         << endl;
  }
}

int main() {
  thread thread1 ( threadProc );
  thread thread2 ( threadProc );
  thread thread3 ( threadProc );

  thread1.join();
  thread2.join();
  thread3.join();

  return 0;
}
The C++ version of the multithreaded program looks a lot simpler and cleaner than the C version.
The following command helps you compile the program:
g++ main.cpp -std=c++17 -lpthread
In the previous command, -std=c++17 instructs the C++ compiler to enable the C++17 features; however, the program will compile on any C++ compiler that supports C++11, and you just need to replace c++17 with c++11.
The output of the program will look like this:
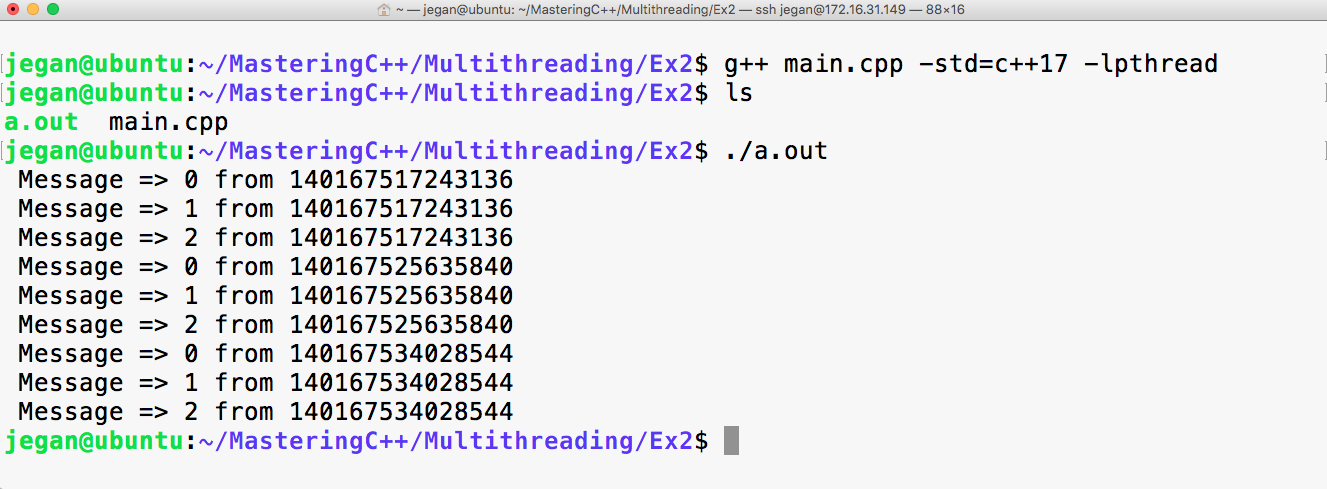
All the numbers starting with 140 in the preceding screenshot are thread IDs. Since we created three threads, three unique thread IDs are assigned respectively by the pthread library. If you are really keen on finding the thread IDs assigned by the operating system, you will have to issue the following command in Linux while the application is running:
ps -T -p <process-id>
Probably to your surprise, the thread ID assigned by the pthread library will be different from the one assigned by the operating systems. Hence, technically the thread ID assigned by the pthread library is just a thread handle ID that is different from the thread ID assigned by the OS. The other interesting tool that you may want to consider is the top command to explore the threads that are part of the process:
top -H -p <process-id>
Both the commands require the process ID of your multithreaded application. The following command will help you find this ID:
ps -ef | grep -i <your-application-name>
You may also explore the htop utility in Linux.
If you want to get the thread ID assigned by the OS programmatically, you can use the following function in Linux:
#include <sys/types.h>
pid_t gettid(void)
However, this isn't recommended if you want to write a portable application, as this is supported only in Unix and Linux.
If you have been looking for the C++ thread class that looks similar to the Thread classes in Java or Qt threads, I'm sure you will find this interesting:
#include <iostream>
#include <thread>
using namespace std;

class Thread {
private:
      thread *pThread;
      bool stopped;
      void run();
public:
      Thread();
      ~Thread();

      void start();
      void stop();
      void join();
      void detach();
};
This is a wrapper class that works as a convenience class for the C++ thread support library in this book. The Thread::run() method is our user-defined thread procedure. As I don't want the client code to invoke the Thread::run() method directly, I have declared the run method private. In order to start the thread, the client code has to invoke the start method on the thread object.
The corresponding Thread.cpp source file looks like this:
#include "Thread.h"

Thread::Thread() {
     pThread = NULL;
     stopped = false;
}

Thread::~Thread() {
     delete pThread;
     pThread = NULL;
}

void Thread::run() {

     while ( ! stopped ) {
         cout << this_thread::get_id() << endl;
         this_thread::sleep_for ( 1s );
     }
     cout << "\nThread " << this_thread::get_id()
          << " stopped as requested." << endl;
     return;
}

void Thread::stop() {
    stopped = true;
}

void Thread::start() {
    pThread = new thread( &Thread::run, this );
}

void Thread::join() {
     pThread->join();
}

void Thread::detach() {
     pThread->detach();
}
From the previous Thread.cpp source file, you will have understood that the thread can be stopped when required by invoking the stop method. It is a simple yet decent implementation; however, there are many other corner cases that need to be handled before it can be used in production. Nevertheless, this implementation is good enough to understand the thread concepts in this book.
Cool, let's see how our Thread class can be used in main.cpp:
#include "Thread.h"

int main() {

      Thread thread1, thread2, thread3;

      thread1.start();
      thread2.start();
      thread3.start();

      thread1.detach();
      thread2.detach();
      thread3.detach();

      this_thread::sleep_for ( 3s );

      thread1.stop();
      thread2.stop();
      thread3.stop();

      this_thread::sleep_for ( 3s );

      return 0;
}
I have created three threads, and the way the Thread class is designed, the thread will only start when the start function is invoked. The detached threads run in the background; usually, you need to detach a thread if you would like to make the threads daemons. However, these threads are stopped safely before the application quits.
The following command helps compile the program:
g++ Thread.cpp main.cpp -std=c++17 -o threads.exe -lpthread
The output of the program will be as shown in the following screenshot:
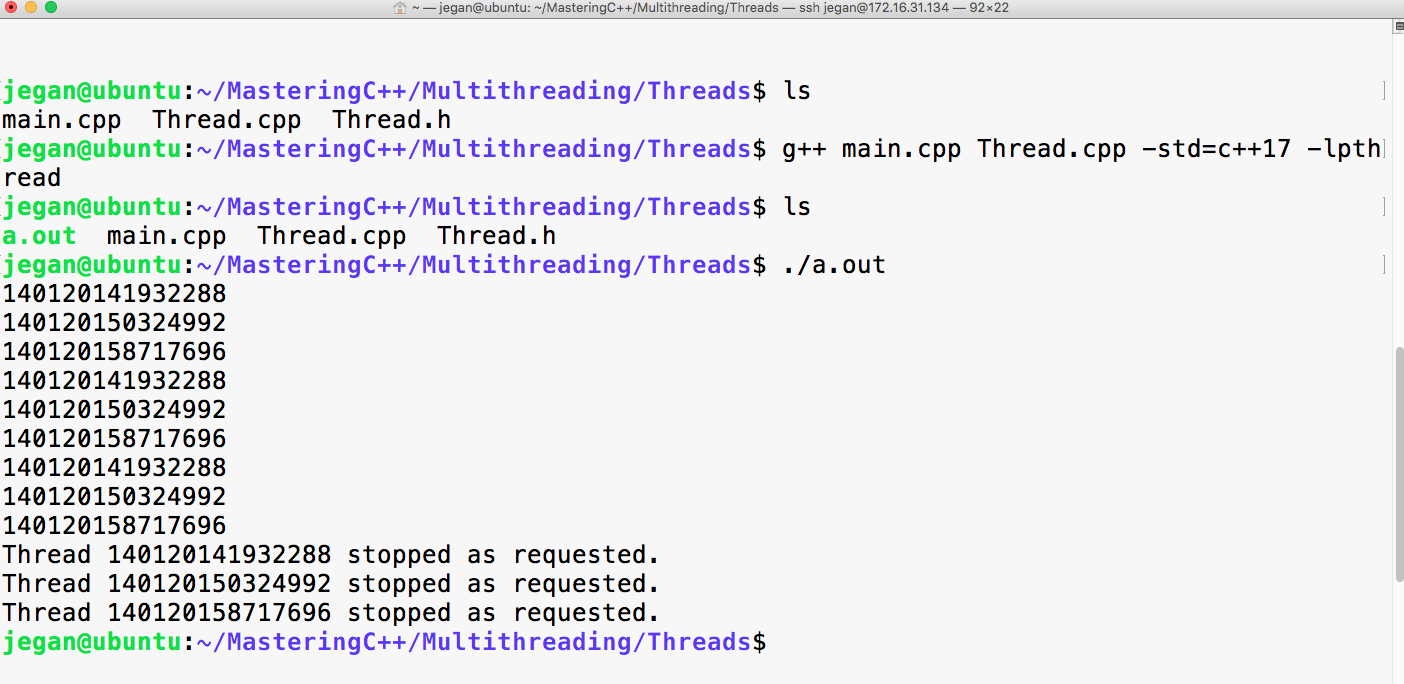
Wow! We could start and stop the thread as designed and that too in an object-oriented fashion.
Let's try to recollect what we have discussed so far:
In an ideal world, threads would provide better application performance. But, at times, it isn't uncommon to notice that application performance degrades due to multiple threads. This performance issue may not be really tied to multiple threads; the real culprit could be the design. Too much use of synchronization leads to many thread-related issues that also lead to application performance degradation.
Lock-free thread designs not only avoid thread-related issues, but also improve the overall application performance. However, in a practical world, more than one thread may have to share one or more common resources. Hence, there arises a need to synchronize the critical section of code that accesses or modifies the shared resources. There are a variety of synchronization mechanisms that can be used in specific scenarios. In the following sections, we will explore them one by one with some interesting and practical use cases.
When there are multiple threads that share a common resource within the process boundary, the critical section of the code can be synchronized with a mutex lock. A mutex is a mutually exclusive lock that allows only one thread to access the critical block of code that is secured by a mutex. Let's take a simple example to understand the need for the mutex lock application practically.
Let's take a Bank Savings Account class that allows three simple operations, that is, getBalance, withdraw, and deposit. The Account class can be implemented as shown in the following code. For demonstration purposes, the Account class is designed in a simple fashion neglecting corner cases and validations that are required in the real world. It is simplified to the extent that the Account class doesn't even bother to capture the account number. I'm sure there are many such requirements that are quietly ignored for simplicity. No worries! Our focus is to learn mutex here with the shown example:
#include <iostream>
using namespace std;

class Account {
private:
  double balance;
public:
  Account( double );
  double getBalance( );
  void deposit ( double amount );
  void withdraw ( double amount ) ;
};
The Account.cpp source file looks like this:
#include "Account.h"

Account::Account(double balance) {
  this->balance = balance;
}

double Account::getBalance() {
  return balance;
}

void Account::withdraw(double amount) {
  if ( balance < amount ) {
    cout << "Insufficient balance, withdraw denied." << endl;
    return;
  }

  balance = balance - amount;
}

void Account::deposit(double amount) {
  balance = balance + amount;
}
Now, let's create two threads, namely DEPOSITOR and WITHDRAWER. The DEPOSITOR thread is going to deposit INR 2000.00 while the WITHDRAWER thread is going to withdraw INR 1000.00 every alternate second. As per our design, the main.cpp source file can be implemented as follows:
#include <thread>
#include "Account.h"
using namespace std;

enum ThreadType {
  DEPOSITOR,
  WITHDRAWER
};

Account account(5000.00);

void threadProc ( ThreadType typeOfThread ) {

  while ( 1 ) {
  switch ( typeOfThread ) {
    case DEPOSITOR: {
      cout << "Account balance before the deposit is "
           << account.getBalance() << endl;

      account.deposit( 2000.00 );

      cout << "Account balance after deposit is "
           << account.getBalance() << endl;
      this_thread::sleep_for( 1s );
}
break;

    case WITHDRAWER: {
      cout << "Account balance before withdrawing is "
           << account.getBalance() << endl;

      account.deposit( 1000.00 );
      cout << "Account balance after withdrawing is "
           << account.getBalance() << endl;
      this_thread::sleep_for( 1s );
    }
    break;
  }
  }
}

int main( ) {
  thread depositor ( threadProc, ThreadType::DEPOSITOR );
  thread withdrawer ( threadProc, ThreadType::WITHDRAWER );

  depositor.join();
  withdrawer.join();

  return 0;
}
If you observe the main function, the thread constructor takes two arguments. The first argument is the thread procedure that you would be familiar with by now. The second argument is an optional argument that can be supplied if you would like to pass some arguments to the thread function.
The program can be compiled with the following command:
g++ Account.cpp main.cpp -o account.exe -std=c++17 -lpthread
If you have followed all the steps as instructed, your code should compile successfully.
It's time to execute and observe how our program works!
Don't forget that the WITHDRAWER thread always withdraws INR 1000.00, while the DEPOSITOR thread always deposits INR 2000.00. The following output conveys this at first. The WITHDRAWER thread started withdrawing, followed by the DEPOSITOR thread that seems to have deposited the money.
Though we started the DEPOSITOR thread first and the WITHDRAWER thread next, it looks like the OS scheduler seems to have scheduled the WITHDRAWER thread first. There is no guarantee that this will always happen this way.
Going by the output, by chance, the WITHDRAWER thread and the DEPOSITOR thread seem to do their work alternately. They would continue like this for some time. At some point, both the threads would seem to work simultaneously, and that's when things would fall apart, as shown in the output ahead:
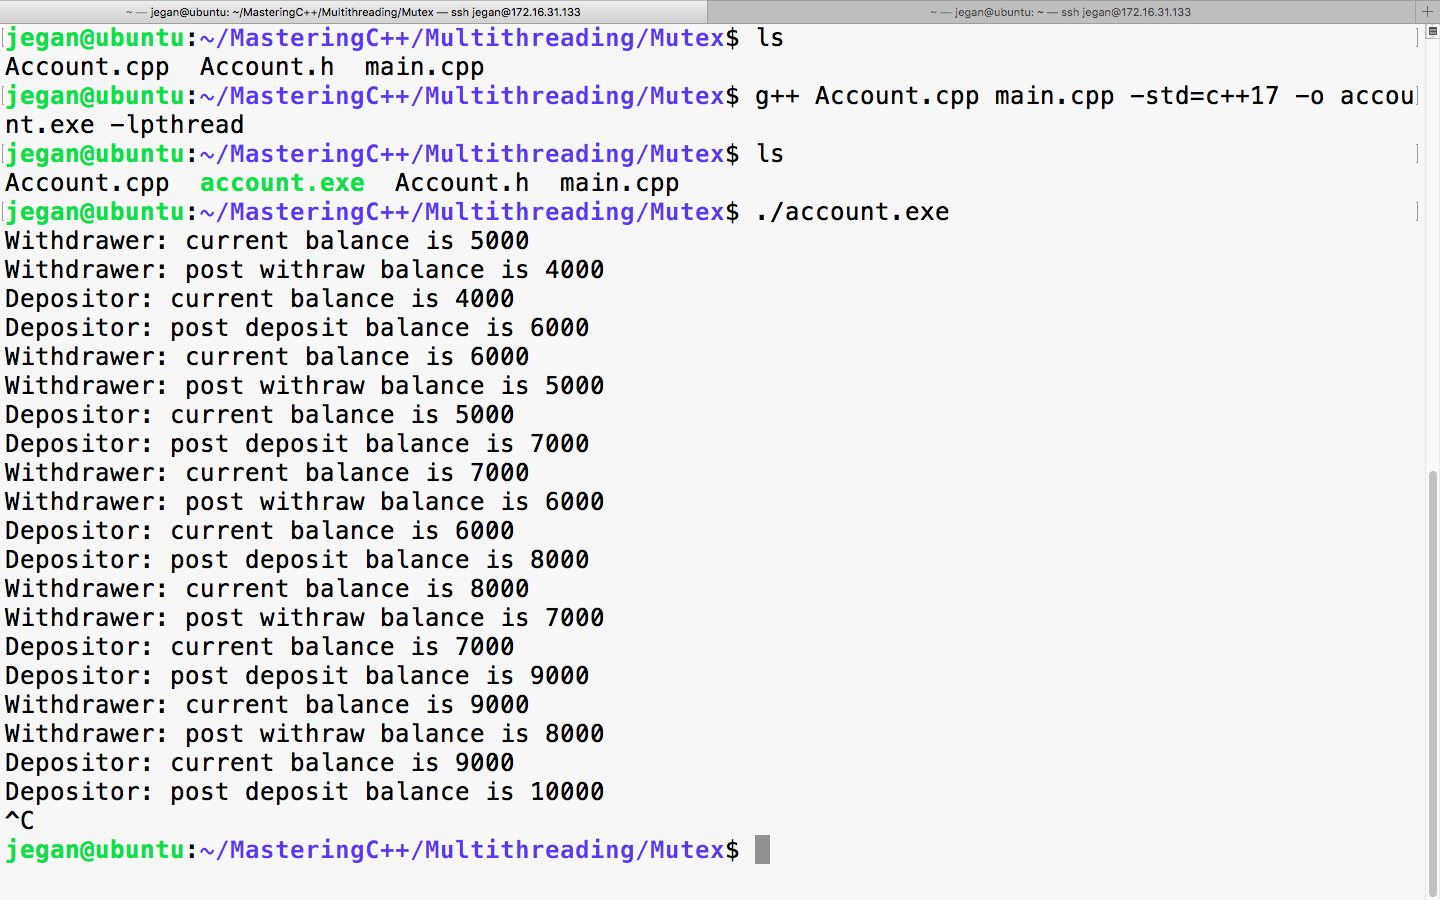
It is very interesting to observe the last four lines of the output. It looks like both the WITHDRAWER and DEPOSITOR threads were checking the balance, and it was INR 9000.00. You may notice that there is an inconsistency in the DEPOSITOR thread's print statements; as per the DEPOSITOR thread, the current balance is INR 9000.00. Therefore, when it deposits INR 2000.00, the balance should total up to INR 11000.00. But in reality, the balance after the deposit is INR 10000.00. The reason for this inconsistency is that the WITHDRAWER thread withdrew INR 1000.00 before the DEPOSITOR thread could deposit money. Though technically the balance seems to total out correctly, things can go wrong shortly; this is when the need for thread synchronization arises.
Now, let's refactor the threadProc function and synchronize the critical section that modifies and accesses the balance. We need a locking mechanism that will only allow one thread to either read or write the balance. The C++ thread support library offers an apt lock called mutex. The mutex lock is an exclusive lock that will only allow one thread to operate the critical section code within the same process boundary. Until the thread that has acquired the lock releases the mutex lock, all other threads will have to wait for their turn. Once a thread acquires the mutex lock, the thread can safely access the shared resource.
The main.cpp file can be refactored as follows; the changes are highlighted in bold:
#include <iostream>
#include <thread>
#include <mutex>
#include "Account.h"
using namespace std;

enum ThreadType {
  DEPOSITOR,
  WITHDRAWER
};

mutex locker;

Account account(5000.00);

void threadProc ( ThreadType typeOfThread ) {

  while ( 1 ) {
  switch ( typeOfThread ) {
    case DEPOSITOR: {

      locker.lock();

      cout << "Account balance before the deposit is "
           << account.getBalance() << endl;

      account.deposit( 2000.00 );

      cout << "Account balance after deposit is "
           << account.getBalance() << endl;

      locker.unlock();
      this_thread::sleep_for( 1s );
}
break;

    case WITHDRAWER: {

      locker.lock();

      cout << "Account balance before withdrawing is "
           << account.getBalance() << endl;

      account.deposit( 1000.00 );
      cout << "Account balance after withdrawing is "
           << account.getBalance() << endl;

      locker.unlock();
      this_thread::sleep_for( 1s );
    }
    break;
  }
  }
}

int main( ) {
  thread depositor ( threadProc, ThreadType::DEPOSITOR );
  thread withdrawer ( threadProc, ThreadType::WITHDRAWER );

  depositor.join();
  withdrawer.join();

  return 0;
}
You may have noticed that the mutex is declared in the global scope. Ideally, we could have declared the mutex inside a class as a static member as opposed to a global variable. As all the threads are supposed to be synchronized by the same mutex, ensure that you use either a global mutex lock or a static mutex lock as a class member.
The refactored threadProc in main.cpp source file looks as follows; the changes are highlighted in bold:
void threadProc ( ThreadType typeOfThread ) {

  while ( 1 ) {
  switch ( typeOfThread ) {
    case DEPOSITOR: {

      locker.lock();

      cout << "Account balance before the deposit is "
           << account.getBalance() << endl;

      account.deposit( 2000.00 );

      cout << "Account balance after deposit is "
           << account.getBalance() << endl;

      locker.unlock();
      this_thread::sleep_for( 1s );
}
break;

    case WITHDRAWER: {

      locker.lock();

      cout << "Account balance before withdrawing is "
           << account.getBalance() << endl;

      account.deposit( 1000.00 );
      cout << "Account balance after withdrawing is "
           << account.getBalance() << endl;

      locker.unlock();
      this_thread::sleep_for( 1s );
    }
    break;
  }
  }
}
The code that is wrapped between lock() and unlock() is the critical section that is synchronized by the mutex lock.
As you can see, there are two critical section blocks in the threadProc function, so it is important to understand that only one thread can enter the critical section. For instance, if the depositor thread has entered its critical section, then the withdrawal thread has to wait until the depositor thread releases the lock and vice versa.
It is time to check the output of our refactored program:
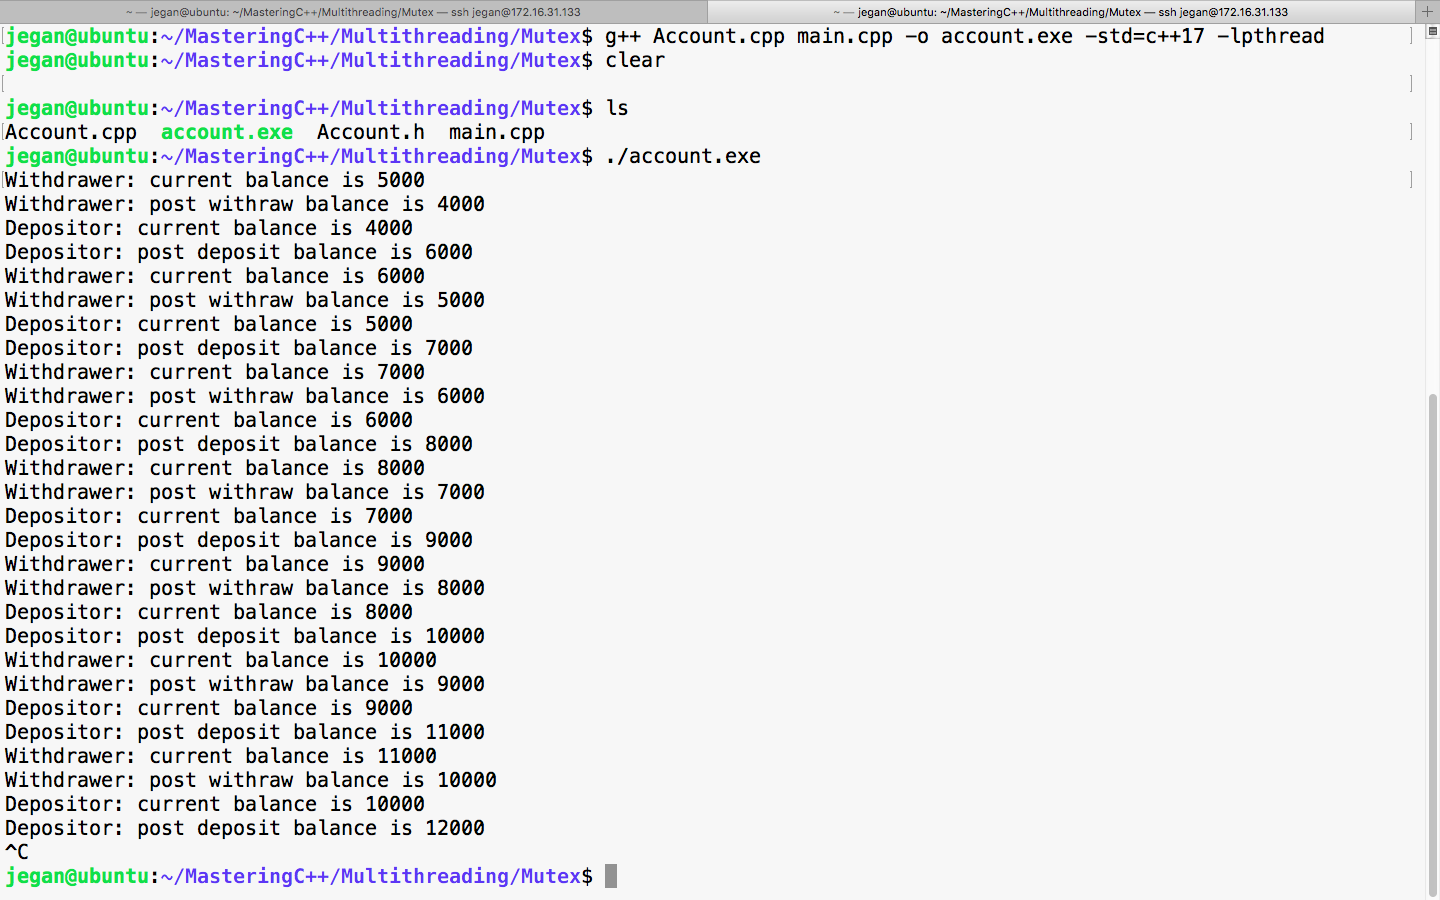
Great, did you check the balance reported by DEPOSITOR and WITHDRAWER threads? Yep, they are always consistent, aren't they? Yes, the output confirms that the code is synchronized and it is thread-safe now.
Though our code is functionally correct, there is room for improvement. Let's refactor the code to make it object-oriented and efficient.
Let's reuse the Thread class and abstract all the thread-related stuff inside the Thread class and get rid of the global variables and threadProc.
To start with, let's observe the refactored Account.h header, as follows:
#ifndef __ACCOUNT_H
#define __ACCOUNT_H

#include <iostream>
using namespace std;

class Account {
private:
  double balance;
public:
  Account( double balance );
  double getBalance();
  void deposit(double amount);
  void withdraw(double amount);
};

#endif
As you can see, the Account.h header hasn't changed as it already looks clean.
The respective Account.cpp source file looks as follows:
#include "Account.h"

Account::Account(double balance) {
  this->balance = balance;
}

double Account::getBalance() {
  return balance;
}

void Account::withdraw(double amount) {
  if ( balance < amount ) {
    cout << "Insufficient balance, withdraw denied." << endl;
    return;
  }

  balance = balance - amount;
}

void Account::deposit(double amount) {
  balance = balance + amount;
}
It is better if the Account class is separated from the thread-related functionalities to keep things neat. Also, let's understand how the Thread class that we wrote could be refactored to use the mutex synchronization mechanism as shown ahead:
#ifndef __THREAD_H
#define __THREAD_H

#include <iostream>
#include <thread>
#include <mutex>
using namespace std;
#include "Account.h"

enum ThreadType {
   DEPOSITOR,
   WITHDRAWER
};

class Thread {
private:
      thread *pThread;
      Account *pAccount;
      static mutex locker;
      ThreadType threadType;
      bool stopped;
      void run();
public:
      Thread(Account *pAccount, ThreadType typeOfThread);
      ~Thread();
      void start();
      void stop();
      void join();
      void detach();
};

#endif
In the Thread.h header file shown previously, a couple of changes are done as part of refactoring. As we would like to synchronize the threads using a mutex, the Thread class includes the mutex header of the C++ thread support library. As all the threads are supposed to use the same mutex lock, the mutex instance is declared static. Since all the threads are going to share the same Account object, the Thread class has a pointer to the Account object as opposed to a stack object.
The Thread::run() method is the Thread function that we are going to supply to the Thread class constructor of the C++ thread support library. As no one is expected to invoke the run method directly, the run method is declared private. As per our Thread class design, which is similar to Java and Qt, the client code would just invoke the start method; when the OS scheduler gives a green signal to run, the run thread procedure will be called automatically. Actually, there is no magic here since the run method address is registered as a Thread function at the time of creating the thread.
The Thread.cpp source can be refactored as follows:
#include "Thread.h"

mutex Thread::locker;

Thread::Thread(Account *pAccount, ThreadType typeOfThread) {
  this->pAccount = pAccount;
  pThread = NULL;
  stopped = false;
  threadType = typeOfThread;
}

Thread::~Thread() {
  delete pThread;
  pThread = NULL;
}

void Thread::run() {
    while(1) {
  switch ( threadType ) {
    case DEPOSITOR:
      locker.lock();

      cout << "Depositor: current balance is " << pAccount->getBalance() << endl;
      pAccount->deposit(2000.00);
      cout << "Depositor: post deposit balance is " << pAccount->getBalance() << endl;

      locker.unlock();

      this_thread::sleep_for(1s);
      break;

    case WITHDRAWER:
      locker.lock();

      cout << "Withdrawer: current balance is " <<
               pAccount->getBalance() << endl;
      pAccount->withdraw(1000.00);
      cout << "Withdrawer: post withraw balance is " <<
               pAccount->getBalance() << endl;

      locker.unlock();

      this_thread::sleep_for(1s);
      break;
  }
    }
}

void Thread::start() {
  pThread = new thread( &Thread::run, this );
}

void Thread::stop() {
  stopped = true;
}

void Thread::join() {
  pThread->join();
}

void Thread::detach() {
  pThread->detach();
}
The threadProc function that was there in main.cpp has moved inside the Thread class's run method. After all, the main function or the main.cpp source file isn't supposed to have any kind of business logic, hence they are refactored to improve the code quality.
Now let's see how clean is the main.cpp source file after refactoring:
#include "Account.h"
#include "Thread.h"

int main( ) {

  Account account(5000.00);

  Thread depositor ( &account, ThreadType::DEPOSITOR );
  Thread withdrawer ( &account, ThreadType::WITHDRAWER );

  depositor.start();
  withdrawer.start();

  depositor.join();
  withdrawer.join();

  return 0;
}
The previously shown main() function and the overall main.cpp source file looks short and simple without any nasty complex business logic hanging around.
The following command helps you compile the refactored program:
g++ Thread.cpp Account.cpp main.cpp -o account.exe -std=c++17 -lpthread
Brilliant! If all goes well, the program should compile smoothly without making any noise.
Just take a quick look at the output shown here before we move on to the next topic:

Great! It works fine. The DEPOSITOR and WITHDRAWER threads seem to work cooperatively without messing up the balance and print statements. After all, we have refactored the code to make the code cleaner without modifying the functionality.
In a multithreaded application, everything looks cool and interesting until we get struck with a deadlock. Assume there are two threads, namely READER and WRITER. Deadlocks might happen when the READER thread waits for a lock that is already acquired by WRITER and the WRITER thread waits for the reader to release a lock that is owned by READER and vice versa. Typically, in a deadlock scenario, both the threads will wait for each other endlessly.
Generally, deadlocks are design issues. At times, deadlocks could be detected quickly, but sometimes it might get very tricky to find the root cause. Hence, the bottom line is synchronization mechanisms must be used in the right sense thoughtfully.
Let's understand the concept of a deadlock with a simple yet practical example. I'm going to reuse our Thread class with some slight modifications to create a deadlock scenario.
The modified Thread.h header looks as follows:
#ifndef __THREAD_H
#define __THREAD_H

#include <iostream>
#include <string>
#include <thread>
#include <mutex>
#include <string>
using namespace std;

enum ThreadType {
  READER,
  WRITER
};

class Thread {
private:
  string name;
  thread *pThread;
  ThreadType threadType;
  static mutex commonLock;
  static int count;
  bool stopped;
  void run( );
public:
  Thread ( ThreadType typeOfThread );
  ~Thread( );
  void start( );
  void stop( );
  void join( );
  void detach ( );
  int getCount( );
  int updateCount( );
};
#endif
The ThreadType enumeration helps assign a particular task to a thread. The Thread class has two new methods: Thread::getCount() and Thread::updateCount(). Both the methods will be synchronized with a common mutex lock in such a way that it creates a deadlock scenario.
Okay, let's move on and review the Thread.cpp source file:
#include "Thread.h"

mutex Thread::commonLock;

int Thread::count = 0;

Thread::Thread( ThreadType typeOfThread ) {
  pThread = NULL;
  stopped = false;
  threadType = typeOfThread;
  (threadType == READER) ? name = "READER" : name = "WRITER";
}

Thread::~Thread() {
  delete pThread;
  pThread = NULL;
}

int Thread::getCount( ) {
  cout << name << " is waiting for lock in getCount() method ..." <<
endl;
  lock_guard<mutex> locker(commonLock);
  return count;
}

int Thread::updateCount( ) {
  cout << name << " is waiting for lock in updateCount() method ..." << endl;
  lock_guard<mutex> locker(commonLock);
  int value = getCount();
  count = ++value;
  return count;
}

void Thread::run( ) {
  while ( 1 ) {
    switch ( threadType ) {
      case READER:
        cout << name<< " => value of count from getCount() method is " << getCount() << endl;
        this_thread::sleep_for ( 500ms );
      break;

      case WRITER:
        cout << name << " => value of count from updateCount() method is" << updateCount() << endl;
        this_thread::sleep_for ( 500ms );
      break;
    }
  }
}

void Thread::start( ) {
  pThread = new thread ( &Thread::run, this );
}

void Thread::stop( ) {
  stopped = true;
}

void Thread::join( ) {
  pThread->join();
}

void Thread::detach( ) {
  pThread->detach( );
}
By now, you will be quite familiar with the Thread class. Hence, let's focus our discussion on the Thread::getCount() and Thread::updateCount() methods. The std::lock_guard<std::mutex> is a template class that frees us from calling mutex::unlock(). During the stack unwinding process, the lock_guard destructor will be invoked; this will invoke mutex::unlock().
The bottom line is that from the point the std::lock_guard<std::mutex> instance is created, all the statements that appear until the end of the method are secured by the mutex.
Okay, let's plunge into the main.cpp file:
#include <iostream>
using namespace std;

#include "Thread.h"

int main ( ) {

      Thread reader( READER );
      Thread writer( WRITER );
      reader.start( );
      writer.start( );
      reader.join( );
      writer.join( );
      return 0;
}
The main() function is pretty self-explanatory. We have created two threads, namely reader and writer, and they are started after the respective threads are created. The main thread is forced to wait until the reader and writer threads exit.
You can use the following command to compile this program:
g++ Thread.cpp main.cpp -o deadlock.exe -std=c++17 -lpthread
Observe the output of the program, as follows:
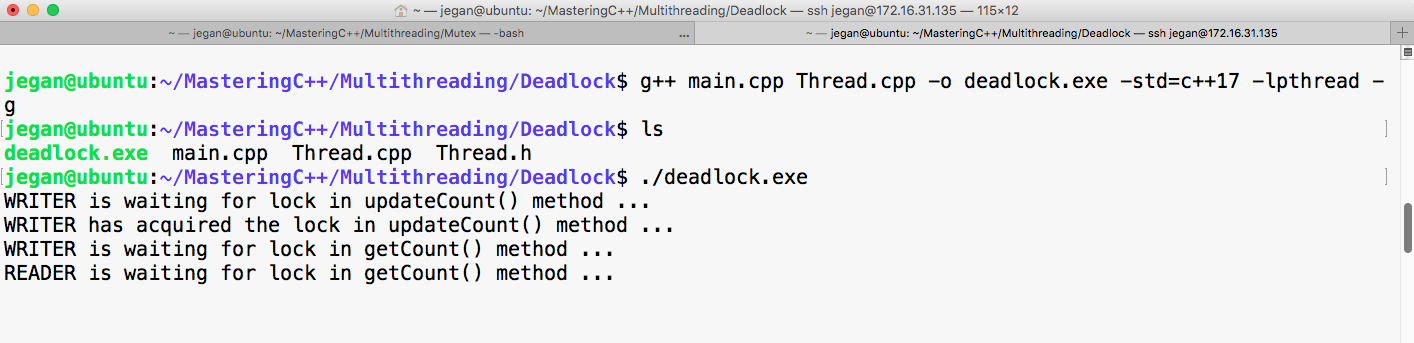
Refer to the code snippets of the Thread::getCount() and Thread::updateCount() methods:
int Thread::getCount() {
         cout << name << " is waiting for lock in getCount() method ..." << endl;
         lock_guard<mutex> locker(commonLock);
         cout << name << " has acquired lock in getCount() method ..." << endl;
         return count;
}
int Thread::updateCount() {
        count << name << " is waiting for lock in updateCount() method ..." << endl;
        lock_guard<mutex> locker(commonLock);
        cout << name << " has acquired lock in updateCount() method ..." << endl;
        int value = getCount();
        count = ++value;
        return count;
}
From the previous output screenshot image, we can understand the WRITER thread seems to have started first. As per our design, the WRITER thread will invoke the Thread::updateCount() method, which in turn will invoke the Thread::getCount() method.
From the output's screenshot, it is evident from the print statements that the Thread::updateCount() method has acquired the lock first and has then invoked the Thread::getCount() method. But since the Thread::updateCount() method hasn't released the mutex lock, there is no way for the Thread::getCount() method invoked by the WRITER thread to proceed. Meanwhile, the OS scheduler has started the READER thread, which seems to wait for the mutex lock acquired by the WRITER thread. Hence, for the READER thread to complete its task, it has to acquire the lock on the Thread::getCount() method; however, this isn't possible until the WRITER thread releases the lock. To make things even worse, the WRITER thread can't complete its task until its own Thread::getCount() method call completes its task. This is what is called a deadlock.
This is either a design or logical issue. In Unix or Linux, we can make use of the Helgrind tool to find deadlocks by racing similar synchronization issues. The Helgrind tool comes along with the Valgrind tool. The best part is that both Valgrind and Helgrind are open source tools.
In order to get the source line number that leads to a deadlock or race issue, we need to compile our code in debug mode, as shown now with -g flag:
g++ main.cpp Thread.cpp -o deadlock.exe -std=c++17 -lpthread -g
The Helgrind tool can be used to detect deadlock and similar issues, as shown here:
valgrind --tool=helgrind ./deadlock.exe
Here's a short extract of the Valgrind output:

One simple fix to resolve the issue is to refactor the Thread::updateCount() method, as shown here:
int Thread::updateCount() {
        int value = getCount();

        count << name << " is waiting for lock in updateCount() method ..." << endl;
        lock_guard<mutex> locker(commonLock);
        cout << name << " has acquired lock in updateCount() method ..." << endl;
        count = ++value;

        return count;
}
The output of the refactored program is as follows:
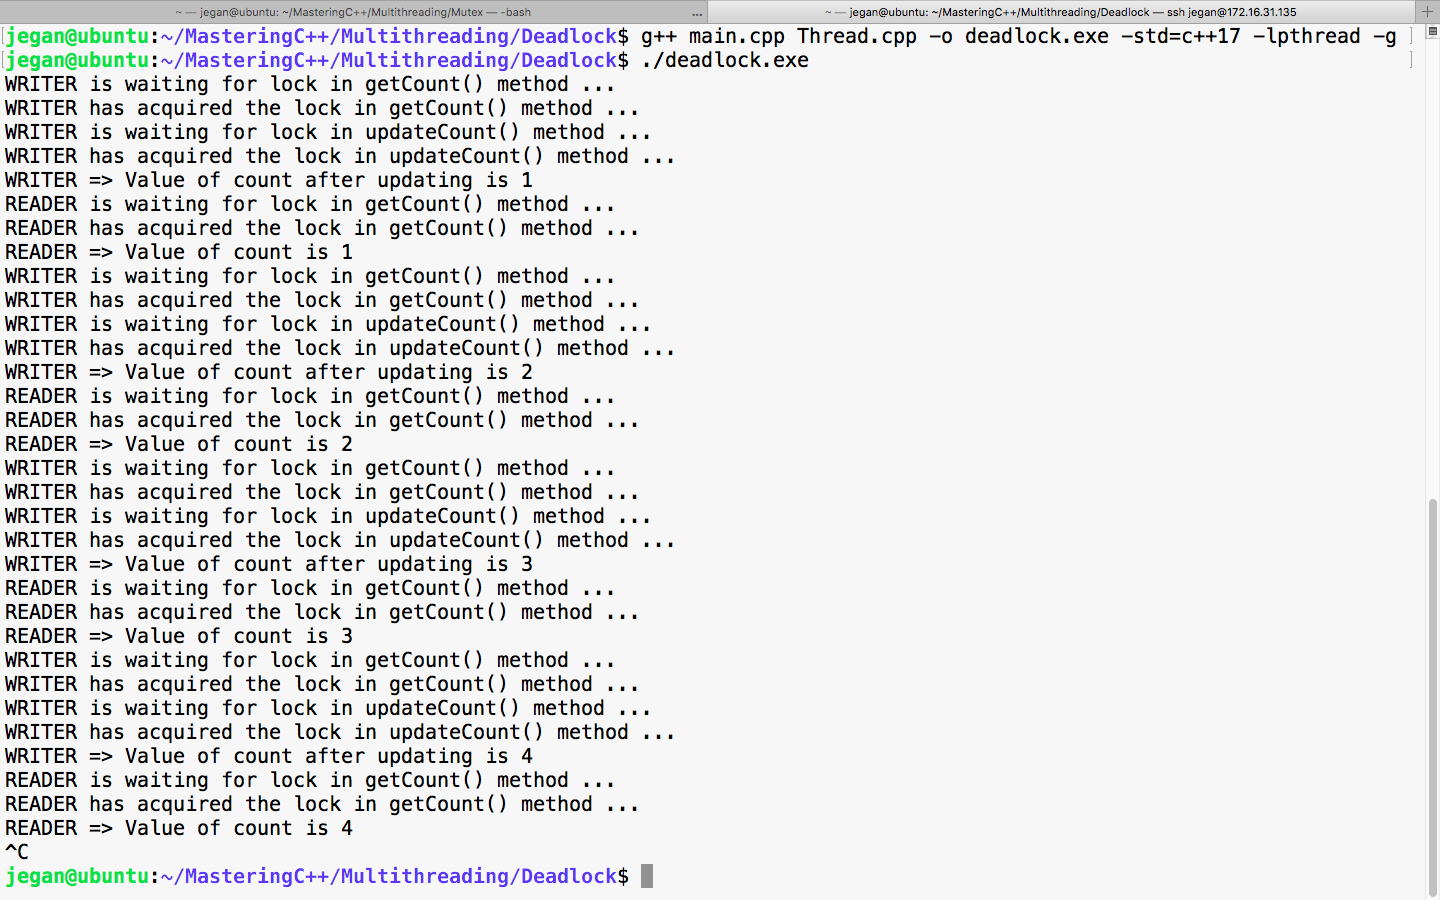
Interestingly, for most complex issues, the solution will be generally very simple. In other words, silly mistakes sometimes may lead to serious critical bugs.
Let's summarize the takeaway points:
The shared mutex synchronization primitive supports two modes, namely shared and exclusive. In the shared mode, the shared mutex will allow many threads to share the resource at the same time, without any data race issues. And in the exclusive mode, it works just like regular mutex, that is, it will allow only one thread to access the resource. This is a suitable lock primitive if you have multiple readers that can access the resource safely and you allow only one thread to modify the shared resource. Refer to the chapter on C++17 for more details.
The conditional variable synchronization primitive is used when two or more threads need to communicate with each other and proceed only when they receive a particular signal or event. The thread that waits for a particular signal or event has to acquire a mutex before it starts waiting for the signal or event.
Let's try to understand the use case of a conditional variable with a producer/consumer problem. I'm going to create two threads, namely PRODUCER and CONSUMER. The PRODUCER thread will add a value to the queue and notify the CONSUMER thread. The CONSUMER thread will wait for the notification from PRODUCER. On receipt of the notification from the PRODUCER thread, the CONSUMER thread will remove the entry from the queue and print it.
Let's understand how the Thread.h header shown here makes use of the conditional variable and mutex:
#include <iostream>
#include <thread>
#include <mutex>
#include <condition_variable>
#include <queue>
#include <string>

using namespace std;

enum ThreadType {
  PRODUCER,
  CONSUMER
};

class Thread {
private:
  static mutex locker;
  static condition_variable untilReady;
  static bool ready;
  static queue<int> appQueue;
  thread *pThread;
  ThreadType threadType;
  bool stopped;
  string name;

  void run();
public:
  Thread(ThreadType typeOfThread);
  ~Thread();
  void start();
  void stop();
  void join();
  void detach();
};
As PRODUCER and CONSUMER threads are supposed to use the same mutex and conditional_variable, they are declared static. The conditional variable synchronization primitive expects a predicate function that is going to make use of the ready boolean flag. Hence, I have declared the ready flag as well in the static scope.
Let's move on to the Thread.cpp source file, as follows:
#include "Thread.h"

mutex Thread::locker;
condition_variable Thread::untilReady;
bool Thread::ready = false;
queue<int> Thread::appQueue;

Thread::Thread( ThreadType typeOfThread ) {
  pThread = NULL;
  stopped = false;
  threadType = typeOfThread;
  (CONSUMER == typeOfThread) ? name = "CONSUMER" : name = "PRODUCER";
}

Thread::~Thread( ) {
  delete pThread;
  pThread = NULL;
}

void Thread::run() {
  int count = 0;
  int data = 0;
  while ( 1 ) {
    switch ( threadType ) {
    case CONSUMER:
    {

      cout << name << " waiting to acquire mutex ..." << endl;

      unique_lock<mutex> uniqueLocker( locker );

      cout << name << " acquired mutex ..." << endl;
      cout << name << " waiting for conditional variable signal..." << endl;

      untilReady.wait ( uniqueLocker, [] { return ready; } );

      cout << name << " received conditional variable signal ..." << endl;

      data = appQueue.front( ) ;

      cout << name << " received data " << data << endl;

      appQueue.pop( );
      ready = false;
    }
      cout << name << " released mutex ..." << endl;
    break;

    case PRODUCER:
    {
      cout << name << " waiting to acquire mutex ..." << endl;
      unique_lock<mutex> uniqueLocker( locker );
      cout << name << " acquired mutex ..." << endl;
      if ( 32000 == count ) count = 0;
      appQueue.push ( ++ count );
      ready = true;
      uniqueLocker.unlock();
      cout << name << " released mutex ..." << endl;
      untilReady.notify_one();
      cout << name << " notified conditional signal ..." << endl;
    }
    break;
  }
  }
}

void Thread::start( ) {
  pThread = new thread ( &Thread::run, this );
}

void Thread::stop( ) {
  stopped = true;
}

void Thread::join( ) {
  pThread->join( );
}

void Thread::detach( ) {
  pThread->detach( );
}
In the preceding Thread class, I used unique_lock<std::mutex>. The conditional_variable::wait() method expects unique_lock, hence I'm using unique_lock here. Now, unique_lock<std::mutex> supports ownership transfer, recursive locking, deferred locking, manual locking, and unlocking without deleting unique_lock, unlike lock_guard<std::mutex>. The lock_guard<std::mutex> instance immediately locks the mutex, and the mutex gets unlocked automatically when the lock_guard<std::mutex> instance goes out of the scope. However, lock_guard doesn't support manual unlocking.
Because we haven't created the unique_lock instance with the deferred locking option, unique_lock will lock the mutex immediately, just like lock_guard.
The Thread::run() method is our thread function. Depending on ThreadType supplied to the Thread constructor, the thread instance will behave either as the PRODUCER or CONSUMER thread.
The PRODUCER thread first locks the mutex and appends an integer to the queue, which is shared among PRODUCER and CONSUMER threads. Once the queue is updated, PRODUCER will unlock the mutex before notifying CONSUMER; otherwise, CONSUMER will not be able to acquire the mutex and receive the conditional variable signal.
The CONSUMER thread first acquires the mutex and then waits for the conditional variable signal. On receipt of the conditional signal, the CONSUMER thread retrieves the value from the queue and prints the value and resets the ready flag so that the process can be repeated until the application is terminated.
Now lets look at the code in the main.cpp file:
#include "Thread.h"

int main ( ) {

  Thread producer( ThreadType::PRODUCER );
  Thread consumer( ThreadType::CONSUMER );

  producer.start();
  consumer.start();

  producer.join();
  consumer.join();

  return 0;
}
Compile the program with the following command:
g++ Thread.cpp main.cpp -o conditional_variable.exe -std=c++17 -lpthread
The following snapshot demonstrates the output of the program:
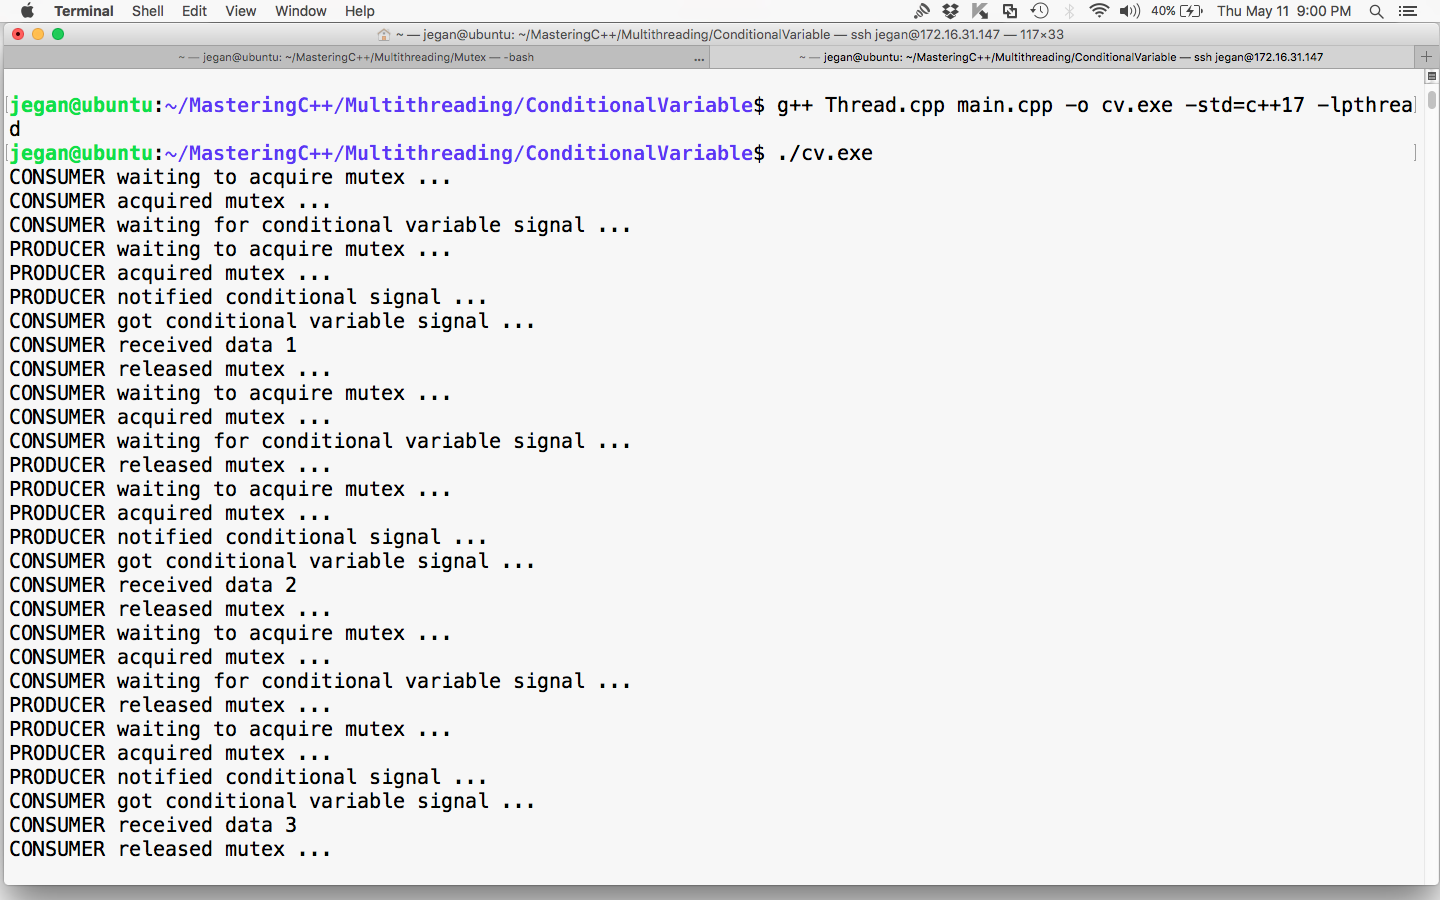
Great! Our condition variable demo works as expected. The producer and consumer threads are working together cooperatively with the help of a conditional variable.
Let me summarize the takeaway points that you learned in this section:
Semaphore is yet another useful thread synchronization mechanism. But unlike mutex, semaphore allows more than one thread to access similar shared resources at the same time. Its synchronization primitive supports two types, that is, binary semaphore and counting semaphore.
Binary semaphore works just like a mutex, that is, only one thread can access the shared resource at any point of time. However, the difference is that a mutex lock can only be released by the same thread that owns it; however, a semaphore lock can be released by any thread. The other notable difference is that generally, a mutex works within the process boundary whereas semaphores are used across the process boundary. This is because it is a heavyweight lock, unlike the mutex. However, a mutex can also be used across the process if created in the shared memory region.
Counting semaphores let multiple threads share a limited number of shared resources. While mutex lets one thread access the shared resource at a time, counting semaphores allow multiple threads to share a limited number of resources, which is generally at least two or more. If a shared resource has to be accessed one thread at a time but the threads are across the process boundary, then a binary semaphore can be used. Though the use of a binary semaphore within the same process is a possibility as a binary semaphore is heavy, it isn't efficient, but it works within the same process as well.
Unfortunately, the C++ thread support library doesn't support semaphores and shared memory natively until C++17. C++17 supports lock-free programming using atomic operations, which must ensure atomic operations are thread-safe. Semaphores and shared memory let threads from other processes modify the shared resources, which is quite challenging for the concurrency module to assure thread safety of atomic operations across the process boundary. C++20 seems to bet big on concurrency, hence we need to wait and watch the move.
However, it doesn't stop you from implementing your own semaphore using the mutex and conditional variable offered by the thread support library. Developing a custom semaphore class that shares common resources within the process boundary is comparatively easy, but semaphores come in two flavors: named and unnamed. Named semaphore is used to synchronize common resources across the boundary, which is tricky.
Alternatively, you could write a wrapper class around the POSIX pthreads semaphore primitive, which supports both named and unnamed semaphores. If you are developing a cross-platform application, writing portable code that works across all platforms is a requirement. If you go down this road, you may end up writing platform-specific code for each platform--yes, I heard it; sounds weird, right?
The Qt application framework supports semaphores natively. The use of the Qt Framework is a good choice as it is cross-platform. The downside is that the Qt Framework is a third-party framework.
The bottom line is you may have to choose between pthreads and the Qt Framework or refactor your design and try to solve things with native C++ features. Restricting your application development using only C++ native features is difficult but guarantees portability across all platforms.
Every modern programming language supports concurrency, offering high-level APIs that allow the execution of many tasks simultaneously. C++ supports concurrency starting from C++11 and more sophisticated APIs got added further in C++14 and C++17. Though the C++ thread support library allows multithreading, it requires writing lengthy code using complex synchronizations; however, concurrency lets us execute independent tasks--even loop iterations can run concurrently without writing complex code. The bottom line is parallelization is made more easy with concurrency.
The concurrency support library complements the C++ thread support library. The combined use of these two powerful libraries makes concurrent programming more easy in C++.
Let's write a simple Hello World program using C++ concurrency in the following file named main.cpp:
#include <iostream>
#include <future>
using namespace std;

void sayHello( ) {
  cout << endl << "Hello Concurrency support library!" << endl;
}

int main ( ) {
  future<void> futureObj = async ( launch::async, sayHello );
  futureObj.wait( );

  return 0;
}
Let's try to understand the main() function. Future is an object of the concurrency module that helps the caller function retrieve the message passed by the thread in an asynchronous fashion. The void in future<void> represents the sayHello() thread function that is not expected to pass any message to the caller, that is, the main thread function. The async class lets us execute a function in two modes, namely launch::async or launch::deferred mode.
The launch::async mode lets the async object launch the sayHello() method in a separate thread, whereas the launch::deferred mode lets the async object invoke the sayHello() function without creating a separate thread. In launch::deferred mode, the sayHello() method invocation will be different until the caller thread invokes the future::get() method.
The futureObj.wait() voice is used to block the main thread to let the sayHello() function complete its task. The future::wait() function is similar to thread::join() in the thread support library.
Let's go ahead and compile the program with the following command:
g++ main.cpp -o concurrency.exe -std=c++17 -lpthread
Let's launch concurrency.exe, as shown ahead, and understand how it works:
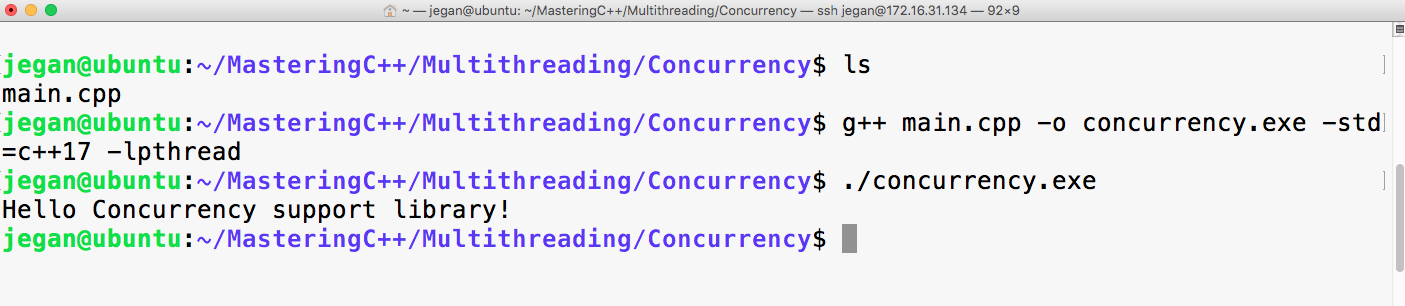
Let's slightly modify main.cpp, the Hello World program we wrote in the previous section. Let's understand how we could pass a message from a Thread function to the caller function asynchronously:
#include <iostream>
#include <future>
using namespace std;

void sayHello( promise<string> promise_ ) {
  promise_.set_value ( "Hello Concurrency support library!" );
}

int main ( ) {
  promise<string> promiseObj;

  future<string> futureObj = promiseObj.get_future( );
  async ( launch::async, sayHello, move( promiseObj ) );
  cout << futureObj.get( ) << endl;

  return 0;
}
In the previous program, promiseObj is used by the sayHello() thread function to pass the message to the main thread asynchronously. Note that promise<string> implies that the sayHello() function is expected to pass a string message, hence the main thread retrieves future<string>. The future::get() function call will be blocked until the sayHello() thread function calls the promise::set_value() method.
However, it is important to understand that future::get() must only be called once as the corresponding promise object will be destructed after the call to the future::get() method invocation.
Did you notice the use of the std::move() function? The std::move() function basically transfers the ownership of promiseObj to the sayHello() thread function, hence promiseObj must not be accessed from the main thread after std::move() is invoked.
Let's go ahead and compile the program with the following command:
g++ main.cpp -o concurrency.exe -std=c++17 -lpthread
Observe how the concurrency.exe application works by launching concurrency.exe as shown ahead:

As you may have guessed, the output of this program is exactly the same as our previous version. But this version of our program makes use of promise and future objects, unlike the previous version that doesn't support message passing.
The concurrency support module supports a concept called task. A task is work that happens concurrently across threads. A concurrent task can be created using the packaged_task class. The packaged_task class conveniently connects the thread function, the corresponding promise, and feature objects.
Let's understand the use of packaged_task with a simple example. The following program gives us an opportunity to taste a bit of functional programming with lambda expressions and functions:
#include <iostream>
#include <future>
#include <promise>
#include <thread>
#include <functional>
using namespace std;

int main ( ) {
     packaged_task<int (int, int)>
        addTask ( [] ( int firstInput, int secondInput ) {
              return firstInput + secondInput;
     } );

     future<int> output = addTask.get_future( );
     addTask ( 15, 10 );

     cout << "The sum of 15 + 10 is " << output.get() << endl;
     return 0;
}
In the previously shown program, I created a packaged_task instance called addTask. The packaged_task< int (int,int)> instance implies that the add task will return an integer and take two integer arguments:
addTask ( [] ( int firstInput, int secondInput ) {
              return firstInput + secondInput;
});
The preceding code snippet indicates it is a lambda function that is defined anonymously.
The interesting part is that the addTask( ) call in main.cpp appears like a regular function call. The future<int> object is extracted from the packaged_task instance addTask, which is then used to retrieve the output of the addTask via the future object instance, that is, the get() method.
Let's go ahead and compile the program with the following command:
g++ main.cpp -o concurrency.exe -std=c++17 -lpthread
Let's quickly launch concurrency.exe and observe the output shown next:

Cool! You learned how to use lambda functions with the concurrency support library.
In the previous section, you learned how packaged_task can be used in an elegant way. I love lambda functions a lot. They look a lot like mathematics. But not everyone likes lambda functions as they degrade readability to some extent. Hence, it isn't mandatory to use lambda functions with a concurrent task if you don't prefer lambdas. In this section, you'll understand how to use a concurrent task with the thread support library, as shown in the following code:
#include <iostream>
#include <future>
#include <thread>
#include <functional>
using namespace std;

int add ( int firstInput, int secondInput ) {
  return firstInput + secondInput;
}

int main ( ) {
  packaged_task<int (int, int)> addTask( add);

  future<int> output = addTask.get_future( );

  thread addThread ( move(addTask), 15, 10 );

  addThread.join( );

  cout << "The sum of 15 + 10 is " << output.get() << endl;

  return 0;
}
Let's go ahead and compile the program with the following command:
g++ main.cpp -o concurrency.exe -std=c++17 -lpthread
Let's launch concurrency.exe, as shown in the following screenshot, and understand the difference between the previous program and the current version:

Yes, the output is the same as the previous section because we just refactored the code.
Wonderful! You just learned how to integrate the C++ thread support library with concurrent components.
In this section, you will learn how you can bind the thread function and its respective arguments with packaged_task.
Let's take the code from the previous section and modify it to understand the bind feature, as follows:
#include <iostream>
#include <future>
#include <string>
using namespace std;

int add ( int firstInput, int secondInput ) {
  return firstInput + secondInput;
}

int main ( ) {

  packaged_task<int (int,int)> addTask( add );
  future<int> output = addTask.get_future();
  thread addThread ( move(addTask), 15, 10);
  addThread.join();
  cout << "The sum of 15 + 10 is " << output.get() << endl;
  return 0;
}
The std::bind( ) function binds the thread function and its arguments with the respective task. Since the arguments are bound upfront, there is no need to supply the input arguments 15 or 10 once again. These are some of the convenient ways in which packaged_task can be used in C++.
Let's go ahead and compile the program with the following command:
g++ main.cpp -o concurrency.exe -std=c++17 -lpthread
Let's launch concurrency.exe, as shown in the following screenshot, and understand the difference between the previous program and the current version:

Congrats! You have learned a lot about concurrency in C++ so far.
The concurrency support library also supports passing exceptions via a future object.
Let's understand the exception concurrency handling mechanism with a simple example, as follows:
#include <iostream>
#include <future>
#include <promise>
using namespace std;

void add ( int firstInput, int secondInput, promise<int> output ) {
  try {
         if ( ( INT_MAX == firstInput ) || ( INT_MAX == secondInput ) )
             output.set_exception( current_exception() ) ;
        }
  catch(...) {}

       output.set_value( firstInput + secondInput ) ;

}

int main ( ) {


     try {
    promise<int> promise_;
          future<int> output = promise_.get_future();
    async ( launch::deferred, add, INT_MAX, INT_MAX, move(promise_) );
          cout << "The sum of INT_MAX + INT_MAX is " << output.get ( ) << endl;
     }
     catch( exception e ) {
  cerr << "Exception occured" << endl;
     }
}
Just like the way we passed the output messages to the caller function/thread, the concurrency support library also allows you to set the exception that occurred within the task or asynchronous function. When the caller thread invokes the future::get() method, the same exception will be thrown, hence communicating exceptions is made easy.
Let's go ahead and compile the program with the following command. Uncle fruits and yodas malte:
g++ main.cpp -o concurrency.exe -std=c++17 -lpthread
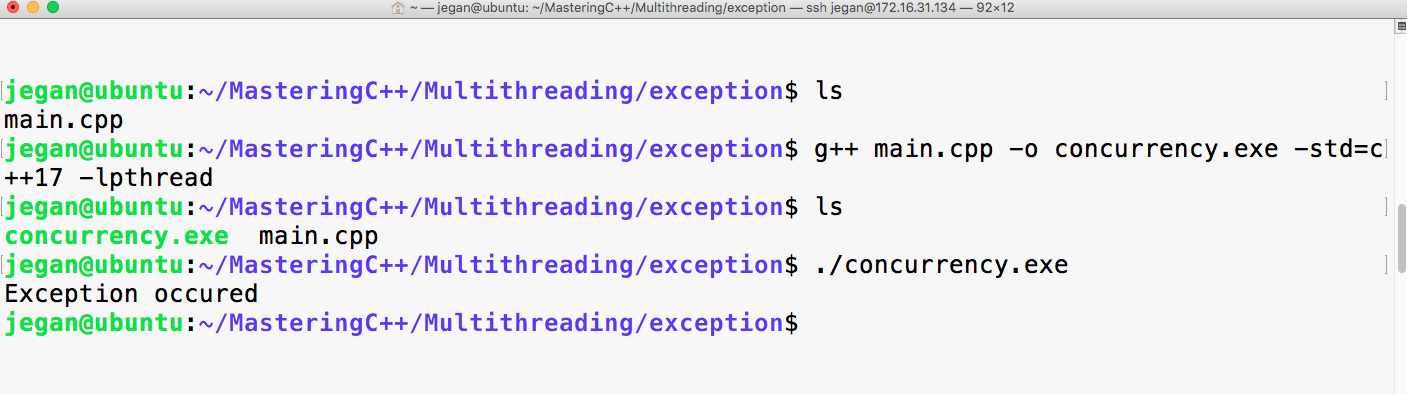
Let me summarize the takeaway points:
In this chapter, you learned about the differences between the C++ thread support library and the pthread C library, Mutex synchronization mechanism, deadlocks and strategies of preventing a deadlock. You further learned how to write synchronous functions using the concurrency library, and further studied lambda function and expression.
In the next chapter, you will learn about test-driven development as an extreme programming approach.
This chapter will cover the following topics:
Let's deep dive into these TDD topics.
Test-driven development (TDD) is an extreme programming practice. In TDD, we start with a test case and incrementally write the production code that is required to make the test case succeed. The idea is that one should focus on one test case or scenario at a time and once the test case passes, they can then move on to the next scenario. In this process, if the new test case passes, we shouldn't modify the production code. In other words, in the process of developing a new feature or while fixing a bug, we can modify the production code only for two reasons: either to ensure the test case passes or to refactor the code. The primary focus of TDD is unit testing; however, it can be extended to integration and interaction testing to some extent.
The following figure demonstrates the TDD process visually:
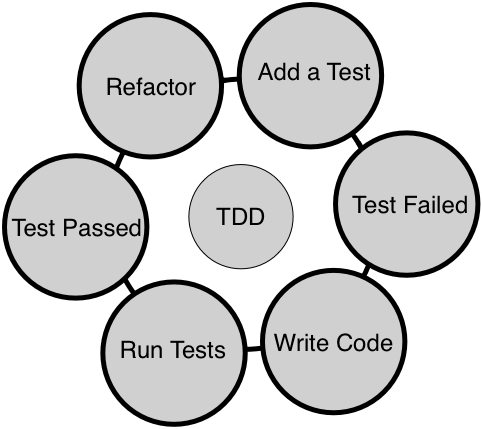
When TDD is followed religiously, one can achieve both functional and structural quality of the code. It is very crucial that you write the test case first before writing the production code as opposed to writing test cases at the end of the development phase. This makes quite a lot of difference. For instance, when a developer writes unit test cases at the end of development, it is very unlikely that the test cases will find any defect in the code. The reason is that the developers will unconsciously be inclined to prove their code is doing the right thing when the test case is written at the end of development. Whereas, when developers write test cases upfront, as no code is written yet, they start thinking from the end user's point of view, which would encourage them to come up with numerous scenarios from the requirement specification point of view.
In other words, test cases written against code that is already written will generally not find any bug as it tends to prove the code written is correct, instead of testing it against the requirement. As developers think of various scenarios before writing code, it helps them write better code incrementally, ensuring that the code does take care of those scenarios. However, when the code has loopholes, it is the test case that helps them find issues, as test cases will fail if they don't meet the requirements.
TDD is not just about using some unit test framework. It requires cultural and mindset change while developing or fixing defects in the code. Developers' focus should be to make the code functionally correct. Once the code is developed in this fashion, it is highly recommended that the developers should also focus on removing any code smells by refactoring the code; this will ensure the structural quality of the code would be good as well. In the long run, it is the structural quality of the code that would make the team deliver features faster.
There are lots of myths and common doubts about TDD that crosses everyone's mind when they are about to start their TDD journey. Let me clarify most of them that I came across, for while I consulted many product giants around the globe.
One of the common doubts that arises in the minds of most developers is, "How am I supposed to estimate my effort when we adapt to TDD?" As developers are supposed to write unit and integration test cases as part of TDD, it is no wonder you are concerned about how to negotiate with the customer or management for the additional effort required to write test cases in addition to writing code. No worries, you aren't alone; as a freelance software consultant myself, many developers have asked me this question.
As a developer, you test your code manually; instead, write automated test cases now. The good news is that it is a one-time effort that is guaranteed to help you in the long run. While a developer requires repeated manual effort to test their code, every time they change the code, the already existing automated test cases will help the developer by giving them immediate feedback when they integrate a new piece of code.
The bottom line is that it requires some additional effort, but in the long run, it helps reduce the effort required.
Code coverage tools help developers identify gaps in their automated test cases. No doubt, many times it will give a clue about missing test scenarios, which would eventually further strengthen the automated test cases. But when an organization starts enforcing code coverage as a measure to check the effectiveness of test coverage, it sometimes drives the developers in the wrong direction. From my practical consulting experience, what I have learned is that many developers start writing test cases for constructors and private and protected functions to show higher code coverage. In this process, developers start chasing numbers and lose the ultimate goal of TDD.
In a particular source with a class that has 20 methods, it is possible that only 10 methods qualify for unit testing while the other methods are complex functionality. In such a case, the code coverage tools will show only 50 percent code coverage, which is absolutely fine as per the TDD philosophy. However, if the organization policy enforces a minimum 75 percent code coverage, then the developers will have no choice other than testing the constructor, destructor, private, protected, and complex functions for the sake of showing good code coverage.
The trouble with testing private and protected methods is that they tend to change more often as they are marked as implementation details. When private and protected methods change badly, that calls for modifying test cases, which makes the developer's life harder in terms of maintaining the test cases.
Hence, code coverage tools are very good developer tools to find test scenario gaps, but it should be left to a developer to make a wise choice of whether to write a test case or ignore writing test cases for certain methods, depending on the complexity of the methods. However, if code coverage is used as project metrics, it more often tends to drive developers to find wrong ways to show better coverage, leading to bad test case practices.
Certainly! TDD works for any type of software project or products. TDD isn't meant just for new products or projects; it is also proven to be more effective with complex legacy projects or products. In a maintenance project, the vast majority of the time one has to fix defects and very rarely one has to support a new feature. Even in such legacy code, one can follow TDD while fixing defects.
As a developer, you would readily agree with me that once you are able to reproduce the issue, almost half of the problem can be considered fixed from the developer's point of view. Hence, you can start with a test case that reproduces the issue and then debug and fix the issue. When you fix the issue, the test case will start passing; now it's time to think of another possible test case that may reproduce the same defect and repeat the process.
Just like application software can benefit from TDD, embedded projects or projects that involve hardware interactions can also benefit from the TDD approach. Interestingly, embedded projects or products that involve hardware benefit more from TDD as they can test most part of their code without the hardware by isolating the hardware dependency. TDD helps reduce time to market as most part of the software can be tested by the team without waiting for the hardware. As most part of the code is already tested thoroughly without hardware, it helps avoid last-minute surprises or firefighting when the board bring-up happens. This is because most of the scenarios would have been tested thoroughly.
As per software engineering best practices, a good design is loosely coupled and strongly cohesive in nature. Though we all strive to write code that is loosely coupled, it isn't possible to write code that is absolutely independent all the time. Most times, the code has some type of dependency. In the case of application software, the dependency could be a database or a web server; in the case of embedded products, the dependency could be a piece of hardware. But using dependency inversion, code under test (CUT) can be isolated from its dependency, enabling us to test the code without its dependency, which is a powerful technique. So as long as we are open to refactoring the code to make it more modular and atomic, any type of code and project or product will benefit from the TDD approach.
As a C++ developer, you have quite a lot of options when choosing between unit testing frameworks. While there are many more frameworks, these are some of the popular ones: CppUnit, CppUnitLite, Boost, MSTest, Visual Studio unit test, and Google test framework.
Without any second thought, Google test framework is one of the most popular testing frameworks for C++ as it is supported on a wide variety of platforms, actively developed, and above all, backed by Google.
Throughout this chapter, we will use the Google test and Google mock frameworks. However, the concepts discussed in this chapter are applicable to all unit test frameworks. We'll deep dive into Google test framework and its installation procedure in the next sections.
Google test framework is an open source testing framework that works on quite a lot of platforms. TDD only focuses on unit testing and to some extent integration testing, but the Google test framework can be used for a wide variety of testing. It classifies test cases as small, medium, large, fidelity, resilience, precision, and other types of test cases. Unit test cases fall in small, integration test cases fall in medium, and complex functionalities and acceptance test cases fall in the large category.
It also bundles the Google mock framework as part of it. As they are technically from the same team, they play with each other seamlessly. However, the Google mock framework can be used with other testing frameworks, such as CppUnit.
You can download the Google test framework from https://github.com/google/googletest as source code. However, the best way to download it is via the Git clone from the terminal command line:
git clone https://github.com/google/googletest.git
Once the code is downloaded as shown in Figure 7.1, you'll be able to locate the Google test framework source code in the googletest folder:
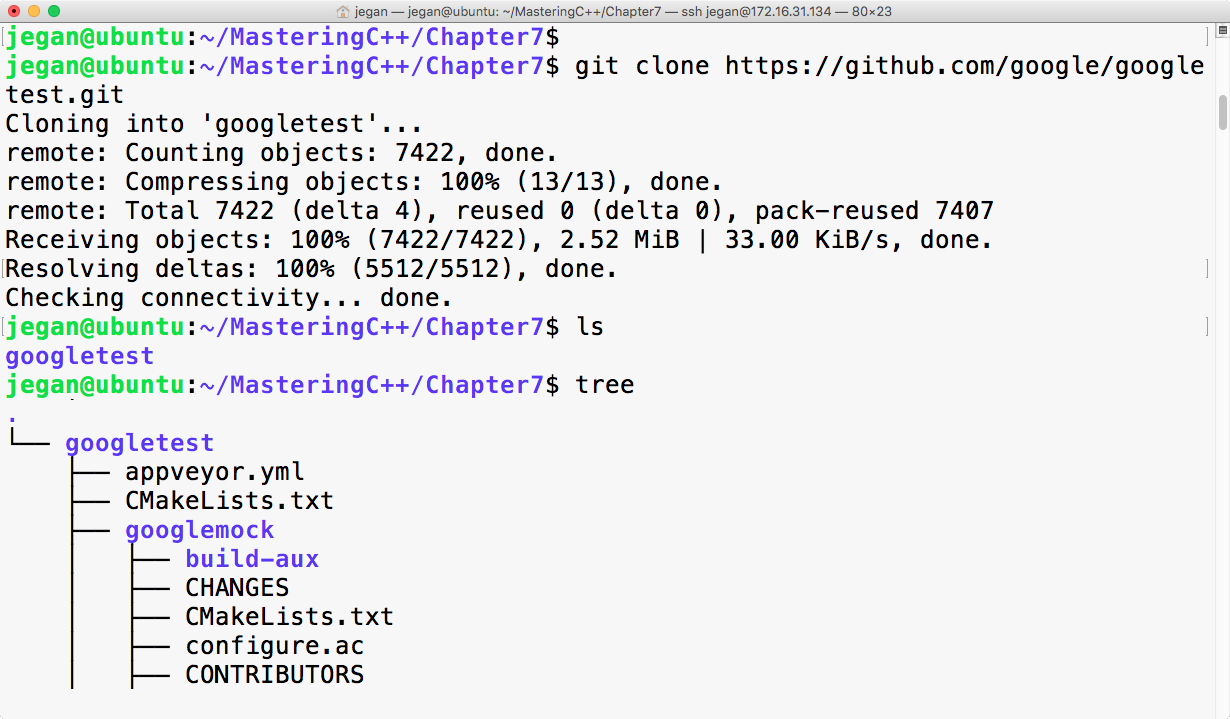
The googletest folder has both the googletest and googlemock frameworks in separate folders. Now we can invoke the cmake utility to configure our build and autogenerate Makefile, as follows:
cmake CMakeLists.txt
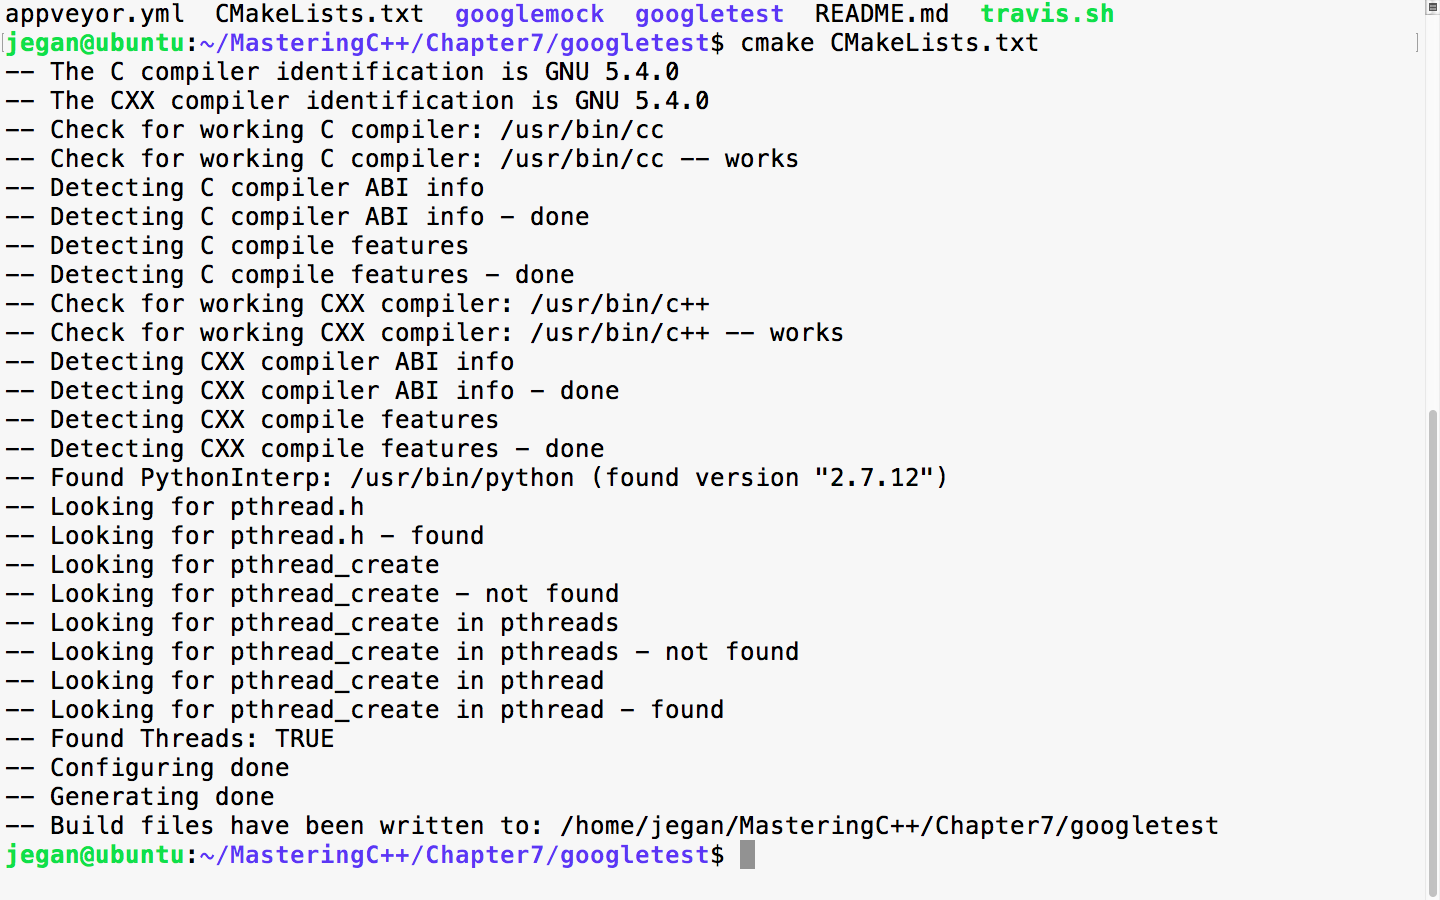
When the cmake utility is invoked, it detects the C/C++ header's files and its path that are necessary to build the Google test framework from the source code. Also, it will try to locate the tools required to build the source code. Once all the necessary headers and tools are located, it will autogenerate the Makefile. Once you have Makefile in place, you can use it to compile and install Google test and Google mock on your system:
sudo make install
The following screenshot demonstrates how you can install google test on your system:
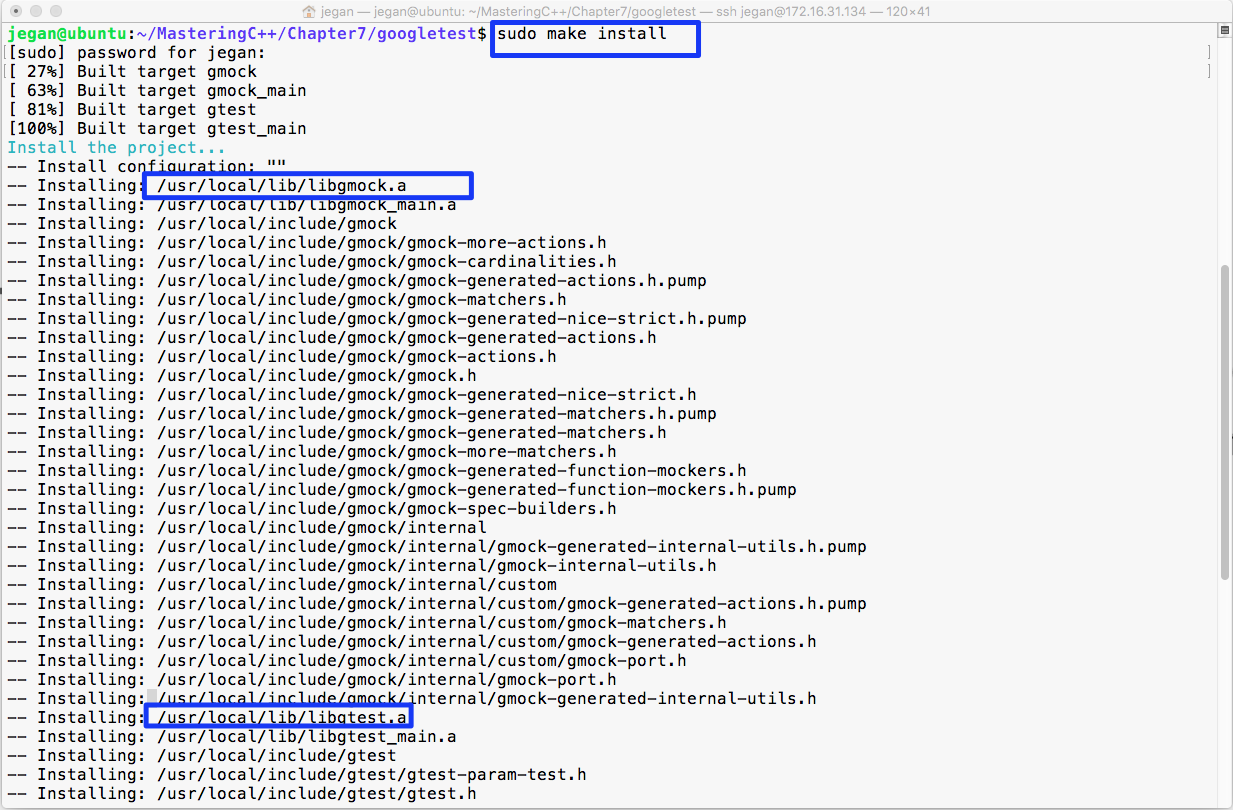
In the preceding image, the make install command has compiled and installed libgmock.a and libgtest.a static library files in the /usr/local/lib folder. Since the /usr/local/lib folder path is generally in the system's PATH environment variable, it can be accessed from any project within the system.
In case you don't prefer installing the libgmock.a and libgtest.a static library files and the respective header files on common system folders, then there is yet another way to build the Google test framework.
The following command will create three object files, as shown in Figure 7.4:
g++ -c googletest/googletest/src/gtest-all.cc googletest/googlemock/src/gmock-all.cc googletest/googlemock/src/gmock_main.cc -I googletest/googletest/ -I googletest/googletest/include -I googletest/googlemock -I googletest/googlemock/include -lpthread -
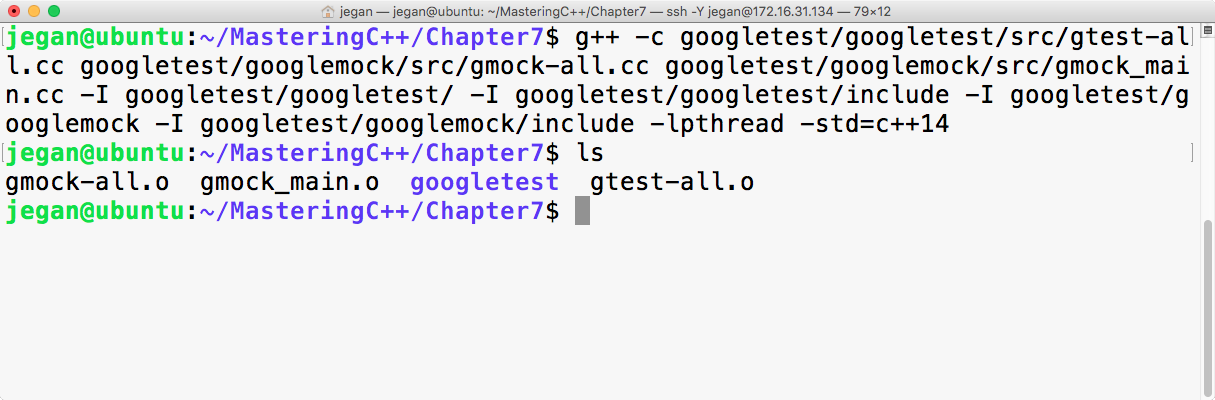
The next step is to combine all the object files into a single static library with the following command:
ar crf libgtest.a gmock-all.o gmock_main.o gtest-all.o
If all goes well, your folder should have the brand new libgtest.a static library, as shown in Figure 7.5. Let's understand the following command instructions:
g++ -c googletest/googletest/src/gtest-all.cc    googletest/googlemock/src/gmock-all.cc googletest/googlemock/src/gmock_main.cc -I googletest/googletest/ -I googletest/googletest/include
-I googletest/googlemock  -I googletest/googlemock/include -lpthread -std=c++14
The preceding command will help us create three object files: gtest-all.o, gmock-all.o, and gmock_main.o. The googletest framework makes use of some C++11 features, and I have purposefully used c++14 to be on the safer side. The gmock_main.cc source file has a main function that will initialize the Google mock framework, which in turn will internally initialize the Google test framework. The best part about this approach is that we don't have to supply the main function for our unit test application. Please note the compilation command includes the following include paths to help the g++ compiler locate the necessary header files in the Google test and Google mock frameworks:
-I googletest/googletest
-I googletest/googletest/include
-I googletest/googlemock
-I googletest/googlemock/include
Now the next step is to create our libgtest.a static library that will bundle both gtest and gmock frameworks into one single static library. As the Google test framework makes use of multiple threads, it is mandatory to link the pthread library as part of our static library:
ar crv libgtest.a gtest-all.o gmock_main.o gmock-all.o
The ar archive command helps combine all the object files into a single static library.
The following image demonstrates the discussed procedure practically in a terminal:
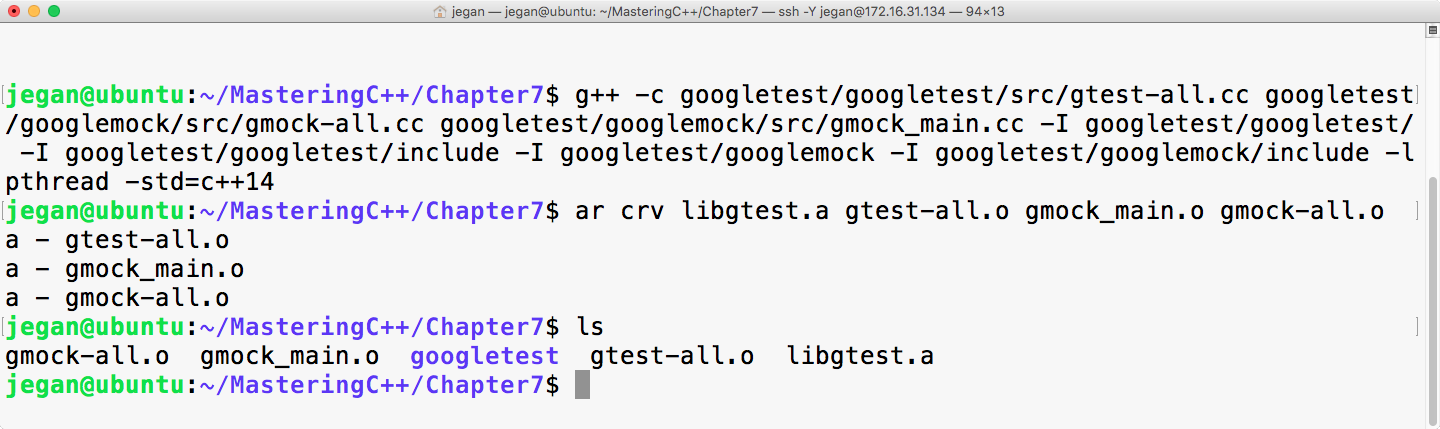
Learning the Google test framework is pretty easy. Let's create two folders: one for production code and the other for test code. The idea is to separate the production code from the test code. Once you have created both the folders, start with the Math.h header, as shown in Figure 7.6:
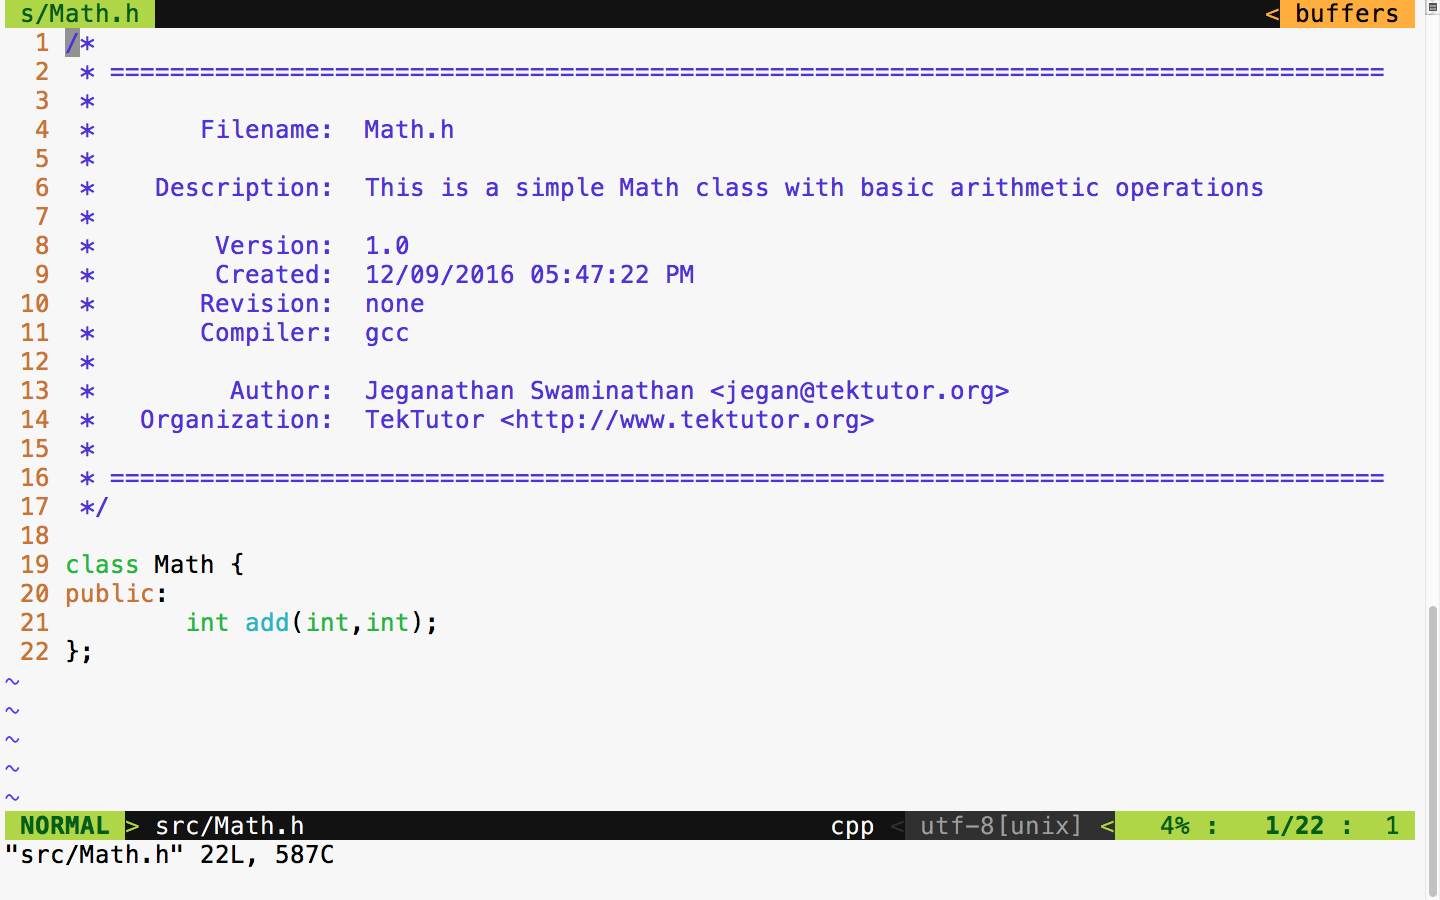
The Math class has just one function to demonstrate the usage of the unit test framework. To begin with, our Math class has a simple add function that is good enough to understand the basic usage of the Google test framework.
Let's implement our simple Math class in the following Math.cpp source file:
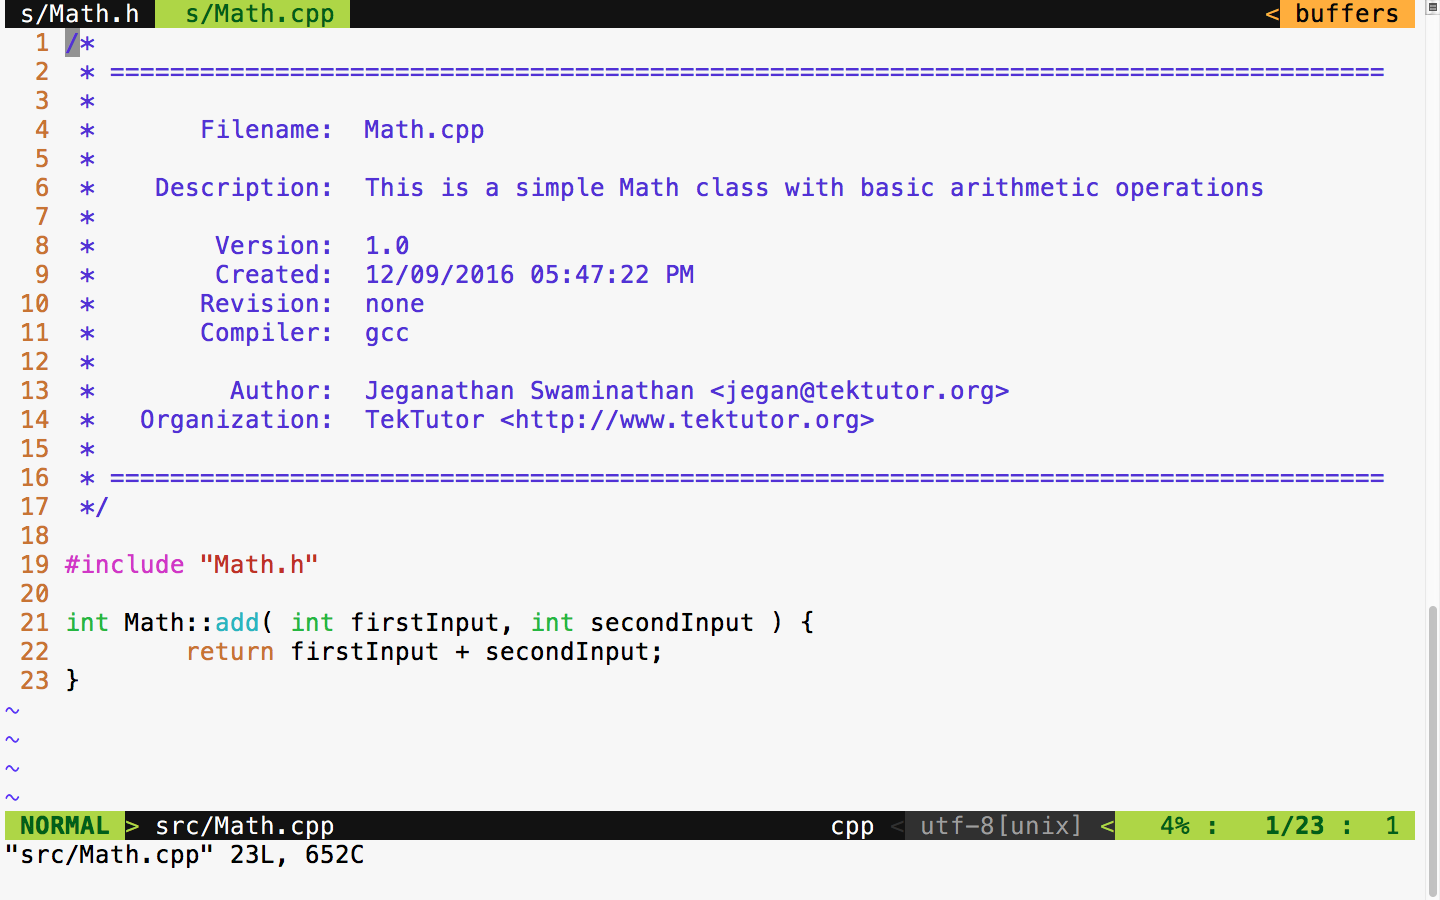
The preceding two files are supposed to be in the src folder, as shown in Figure 7.8. All of the production code gets into the src folder, and any number of files can be part of the src folder.

As we have written some production code, let's see how to write some basic test cases for the preceding production code. As a general best practice, it is recommended to name the test case file as either MobileTest or TestMobile so that it is easy for anyone to predict the purpose of the file. In C++ or in the Google test framework, it isn't mandatory to maintain the filename and class name as the same, but it is generally considered a best practice as it helps anyone locate a particular class just by looking at the filenames.
As we have already compiled our Google test framework as a static library, let's begin with the MathTest.cpp source file straight away:
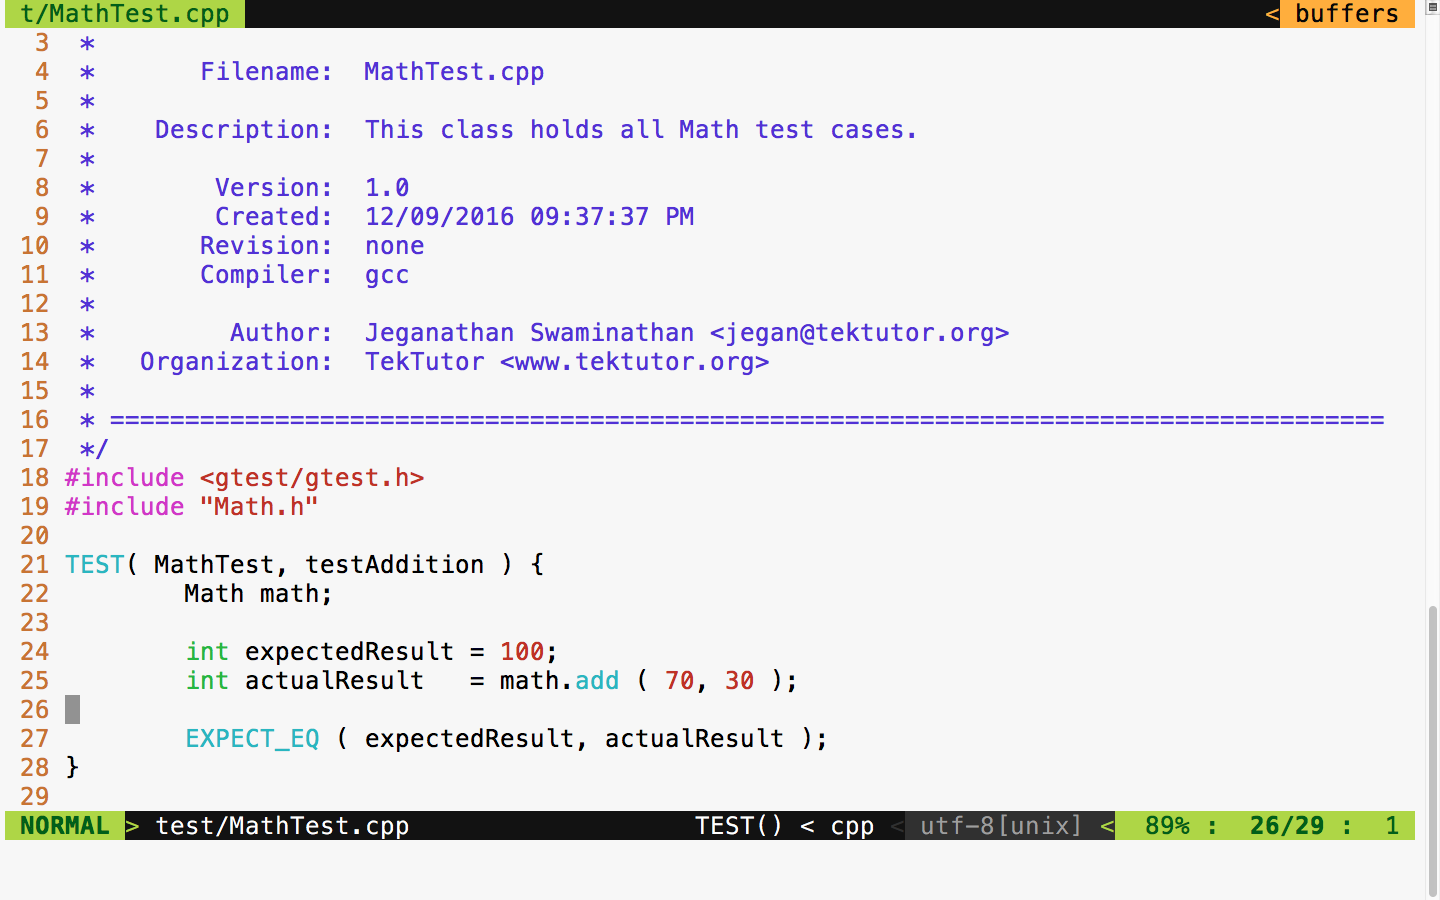
In Figure 7.9, at line number 18, we included the gtest header file from the Google test framework. In the Google test framework, test cases are written using a TEST macro that takes two parameters. The first parameter, namely MathTest, represents the test module name and the second parameter is the name of the test case. Test modules help us group a bunch of related test cases under a module. Hence, it is very important to name the test module and test case aptly to improve the readability of the test report.
As you are aware, Math is the class we are intending to test; we have instantiated an object of the Math object at line 22. In line 25, we invoked the add function on the math object, which is supposed to return the actual result. Finally, at line 27, we checked whether the expected result matches the actual result. The Google test macro EXPECT_EQ will mark the test case as passed if the expected and actual result match; otherwise, the framework will mark the test case outcome as failed.
Cool, we are all set now. Let's see how to compile and run our test case now. The following command should help you compile the test case:
g++ -o tester.exe src/Math.cpp test/MathTest.cpp -I googletest/googletest
-I googletest/googletest/include -I googletest/googlemock
-I googletest/googlemock/include -I src libgtest.a -lpthread
Note that the compilation command includes the following include path:
-I googletest/googletest
-I googletest/googletest/include
-I googletest/googlemock
-I googletest/googlemock/include
-I src
Also, it is important to note that we also linked our Google test static library libgtest.a and the POSIX pthreads library as the Google test framework makes use of multiple .
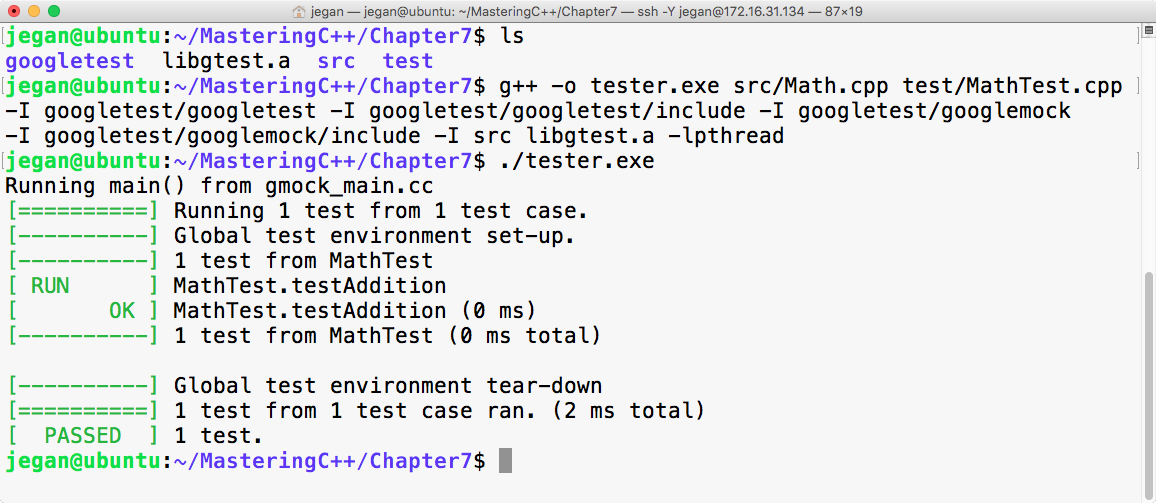
Congrats! We have compiled and executed our first test case successfully.
First, we need to download the Google test framework .zip file from https://github.com/google/googletest/archive/master.zip. The next step is to extract the .zip file in some directory. In my case, I have extracted it into the googletest folder and copied all the contents of googletest googletest-master\googletest-master to the googletest folder, as shown in Figure 7.11:
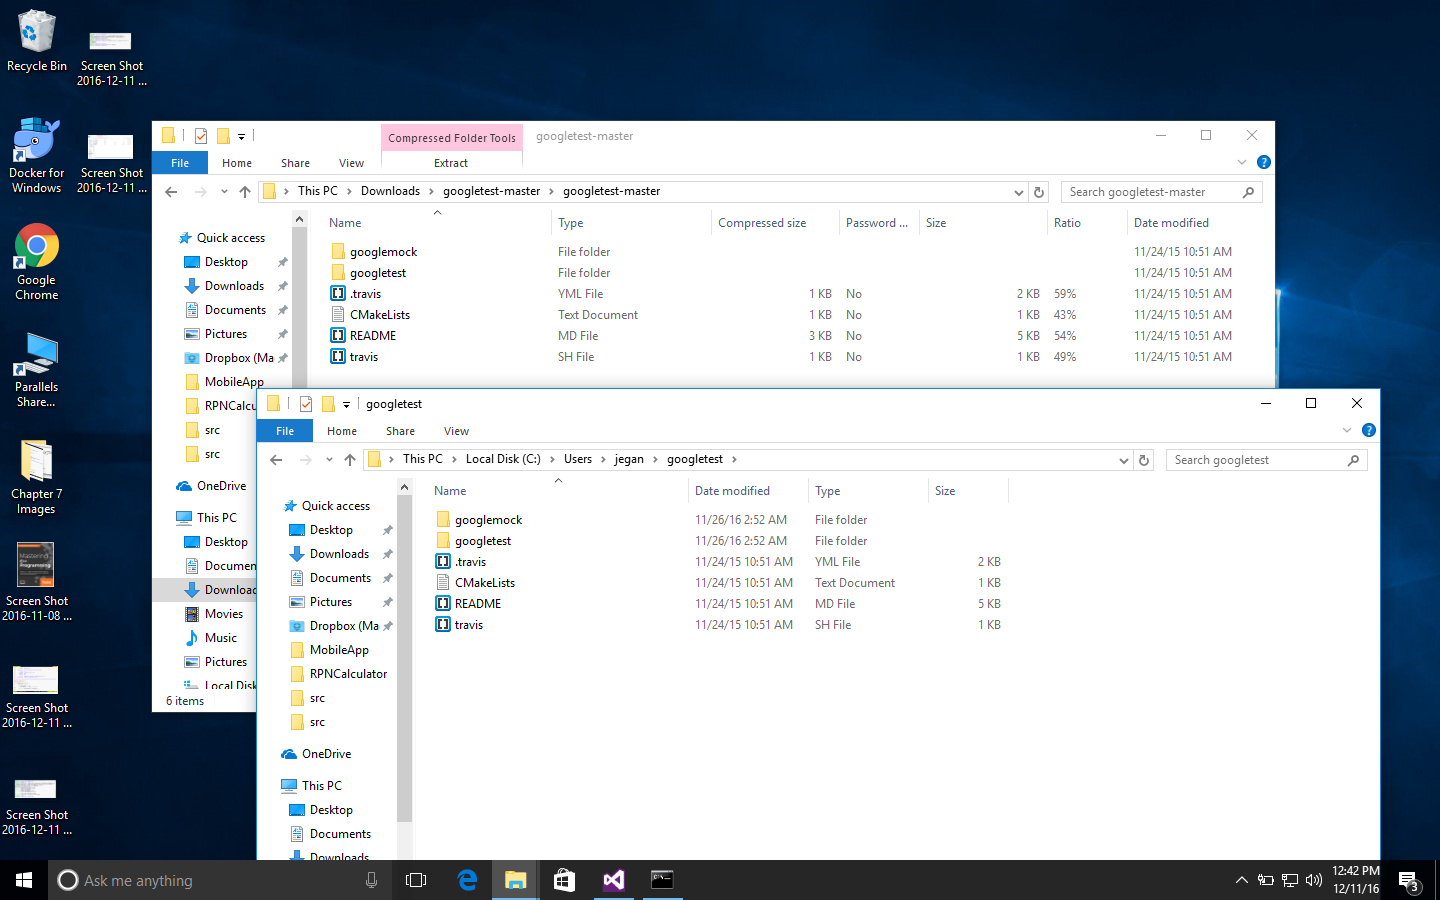
It is time to create a simple project in Visual Studio. I have used Microsoft Visual Studio Community 2015. However, the procedure followed here should pretty much remain the same for other versions of Visual Studio, except that the options might be available in different menus.
You need to create a new project named MathApp by navigating to New Project | Visual Studio | Windows | Win32 | Win32 Console Application, as shown in Figure 7.12. This project is going to be the production code to be tested.
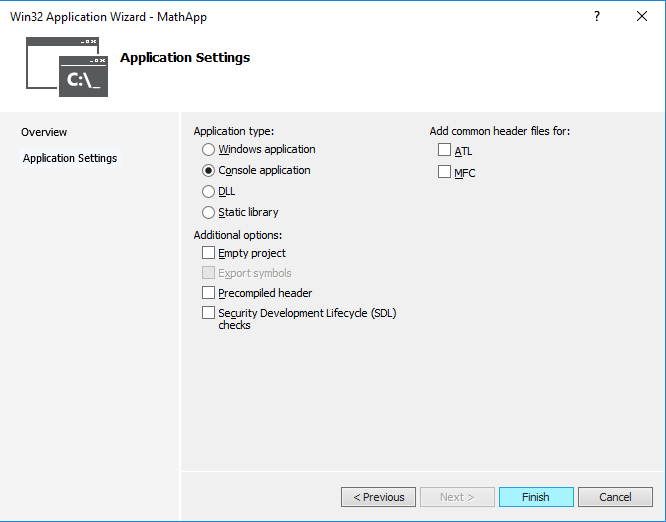
Let's add the MyMath class to the MathApp project. The MyMath class is the production code that will be declared in MyMath.h and defined in MyMath.cpp.
Let's take a look at the MyMath.h header file shown in Figure 7.13:
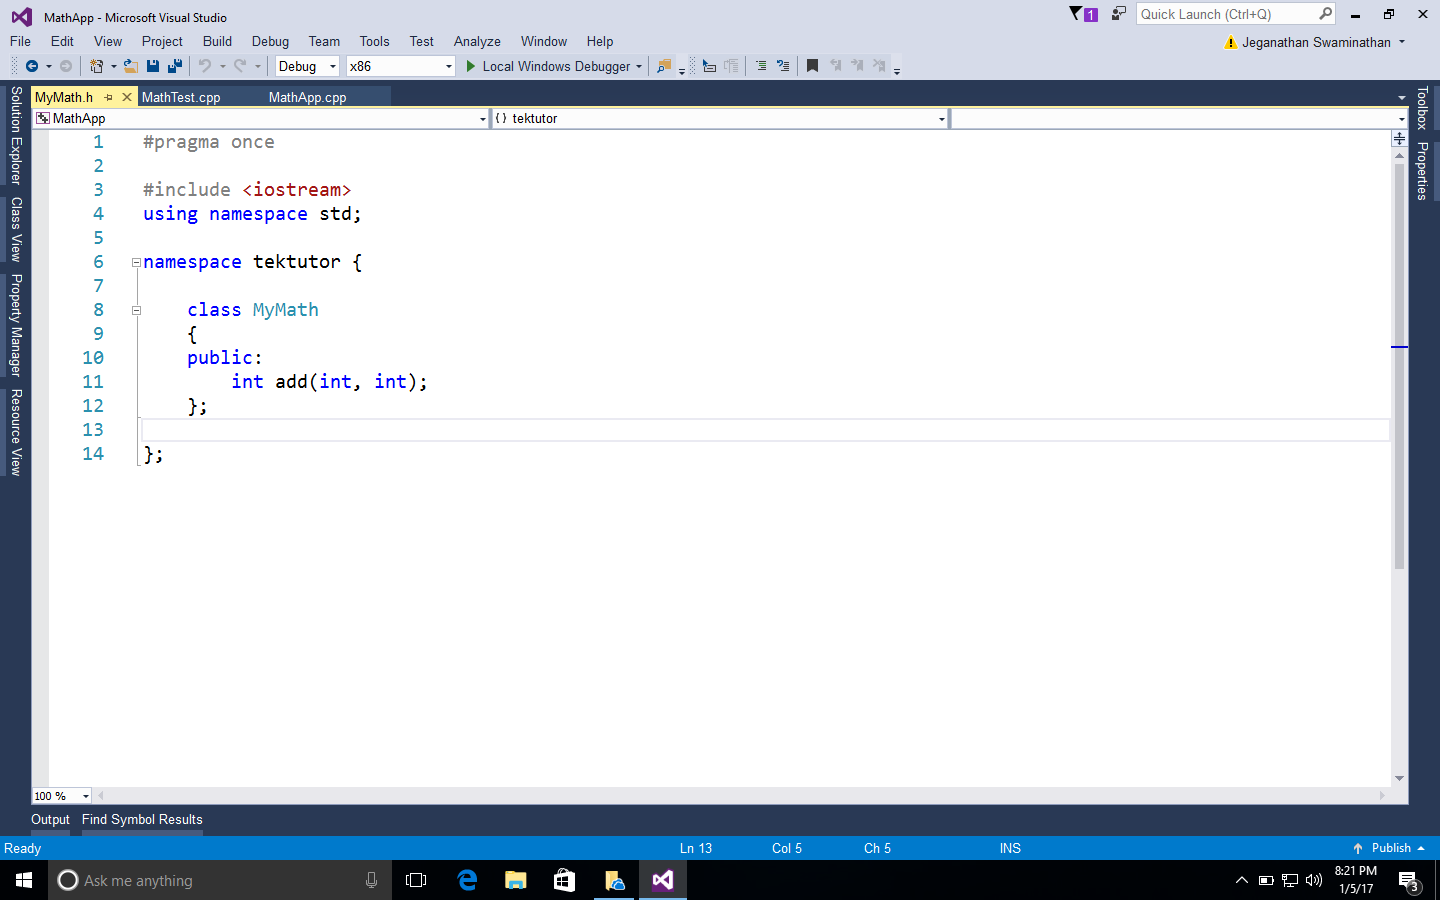
The definition of the MyMath class looks as shown in Figure 7.14:
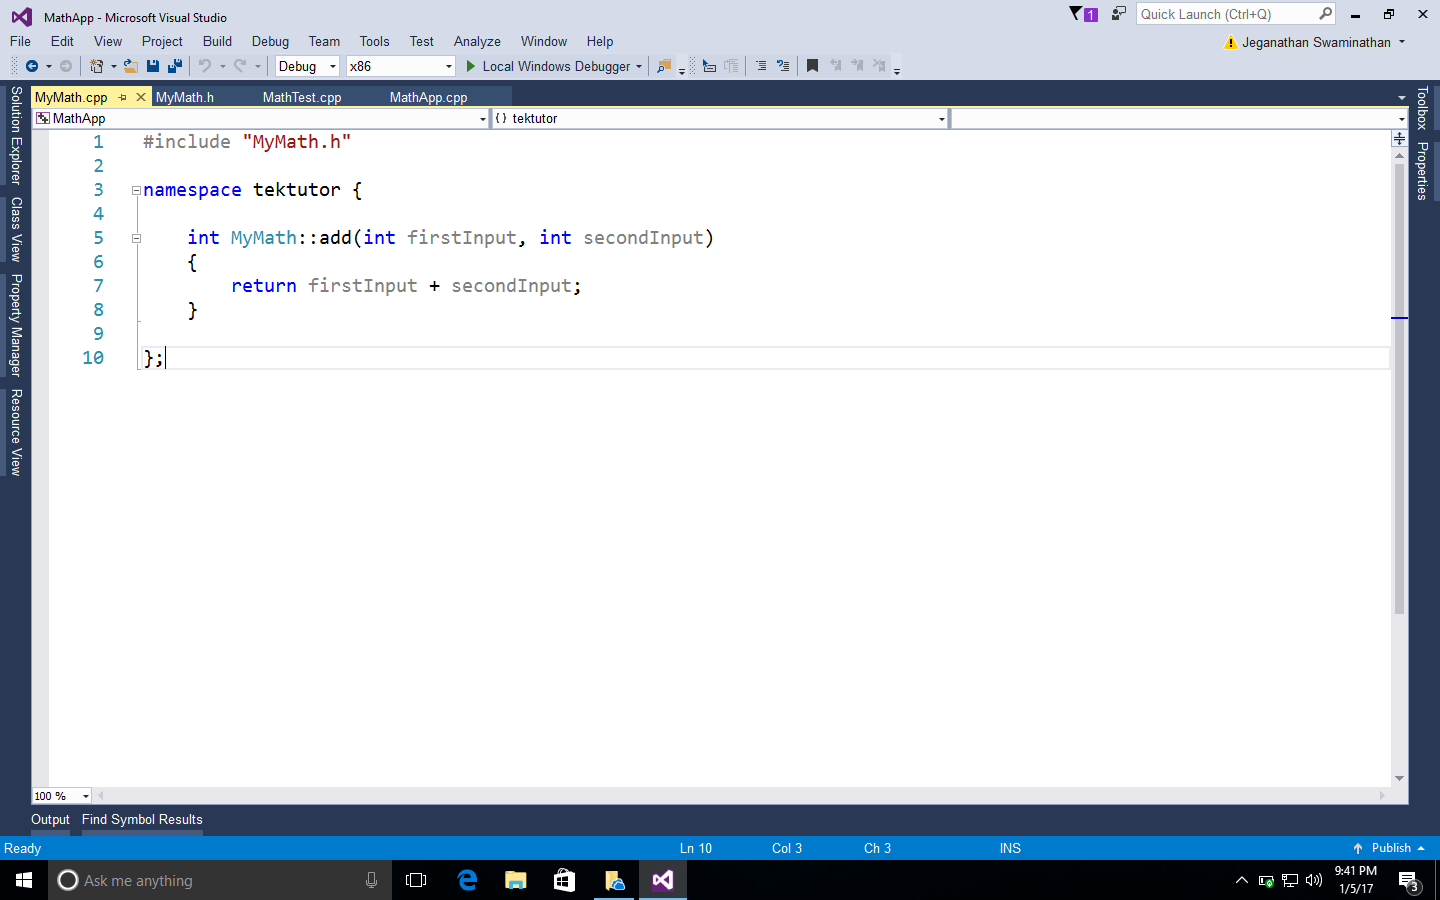
As it is a console application, it is mandatory to supply the main function, as shown in Figure 7.15:
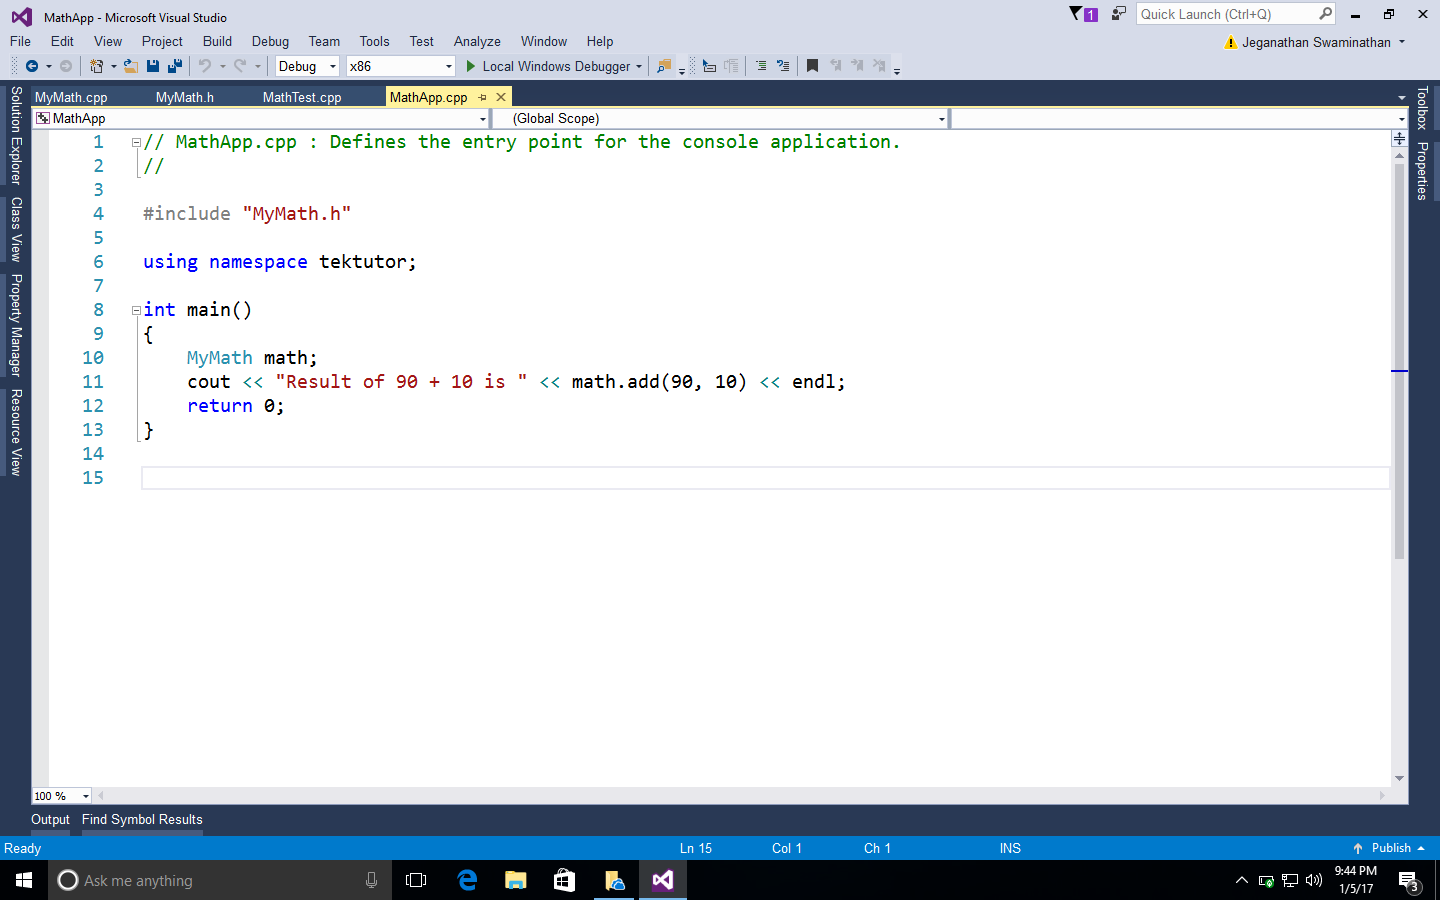
Next, we are going to add a static library project named GoogleTestLib to the same MathApp project solution, as shown in Figure 7.16:
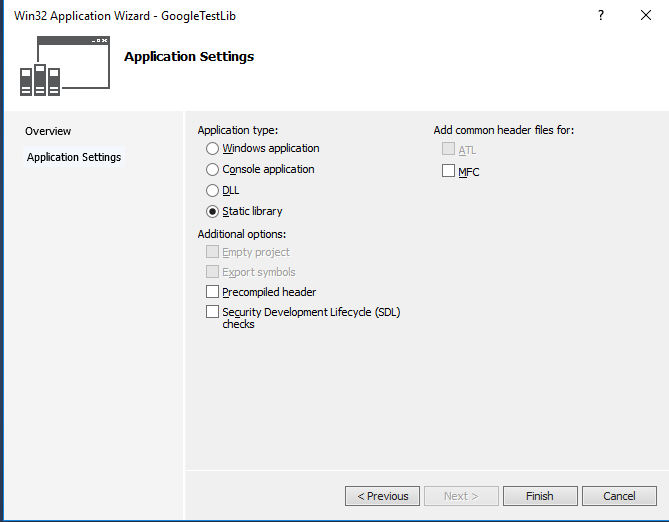
Next, we need to add the following source files from the Google test framework to our static library project:
C:\Users\jegan\googletest\googletest\src\gtest-all.cc
C:\Users\jegan\googletest\googlemock\src\gmock-all.cc
C:\Users\jegan\googletest\googlemock\src\gmock_main.cc
In order to compile the static library, we need to include the following header file paths in GoogleTestLib/Properties/VC++ Directories/Include directories:
C:\Users\jegan\googletest\googletest
C:\Users\jegan\googletest\googletest\include
C:\Users\jegan\googletest\googlemock
C:\Users\jegan\googletest\googlemock\include
You may have to customize the paths based on where you have copied/installed the Google test framework in your system.
Now it's time to add the MathTestApp Win32 console application to the MathApp solution. We need to make MathTestApp as a StartUp project so that we can directly execute this application. Let's ensure there are no source files in the MathTestApp project before we add a new source file named MathTest.cpp to the MathTestApp project.
We need to configure the same set of Google test framework include paths we added to the GoogleTestLib static library. In addition to this, we must also add the MathApp project directory as the test project will refer to the header file in the MathApp project, as follows. However, customize the paths as per the directory structure you follow for this project in your system:
C:\Users\jegan\googletest\googletest
C:\Users\jegan\googletest\googletest\include
C:\Users\jegan\googletest\googlemock
C:\Users\jegan\googletest\googlemock\include
C:\Projects\MasteringC++Programming\MathApp\MathApp
In the MathAppTest project, make sure you have added references to MathApp and GoogleTestLib so that the MathAppTest project will compile the other two projects when it senses changes in them.
Great! We are almost done. Now let's implement MathTest.cpp, as shown in Figure 7.17:
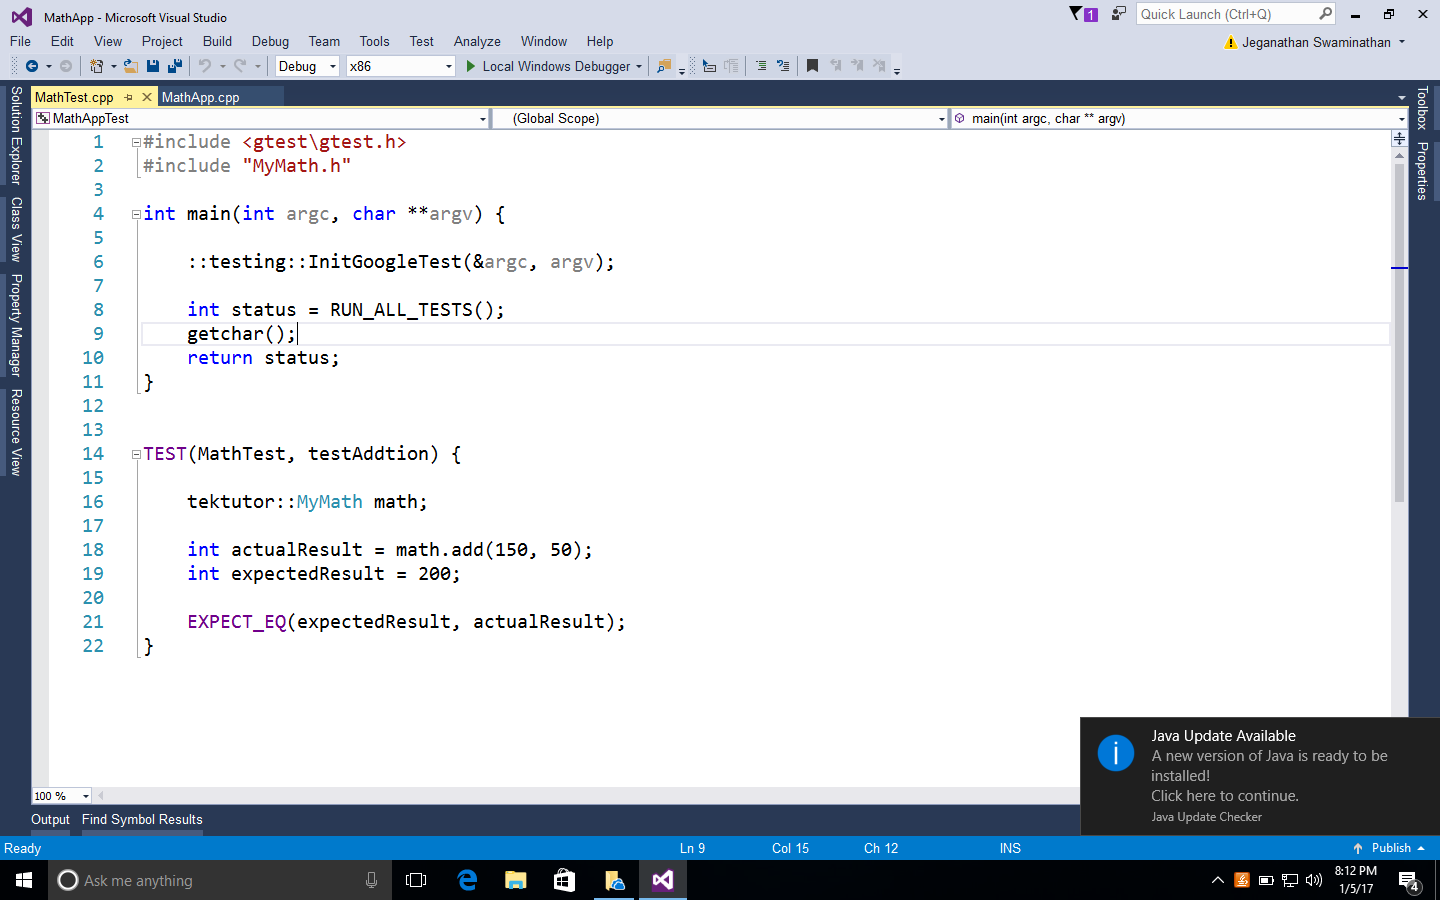
Everything is ready now; let's run the test cases and check the result:
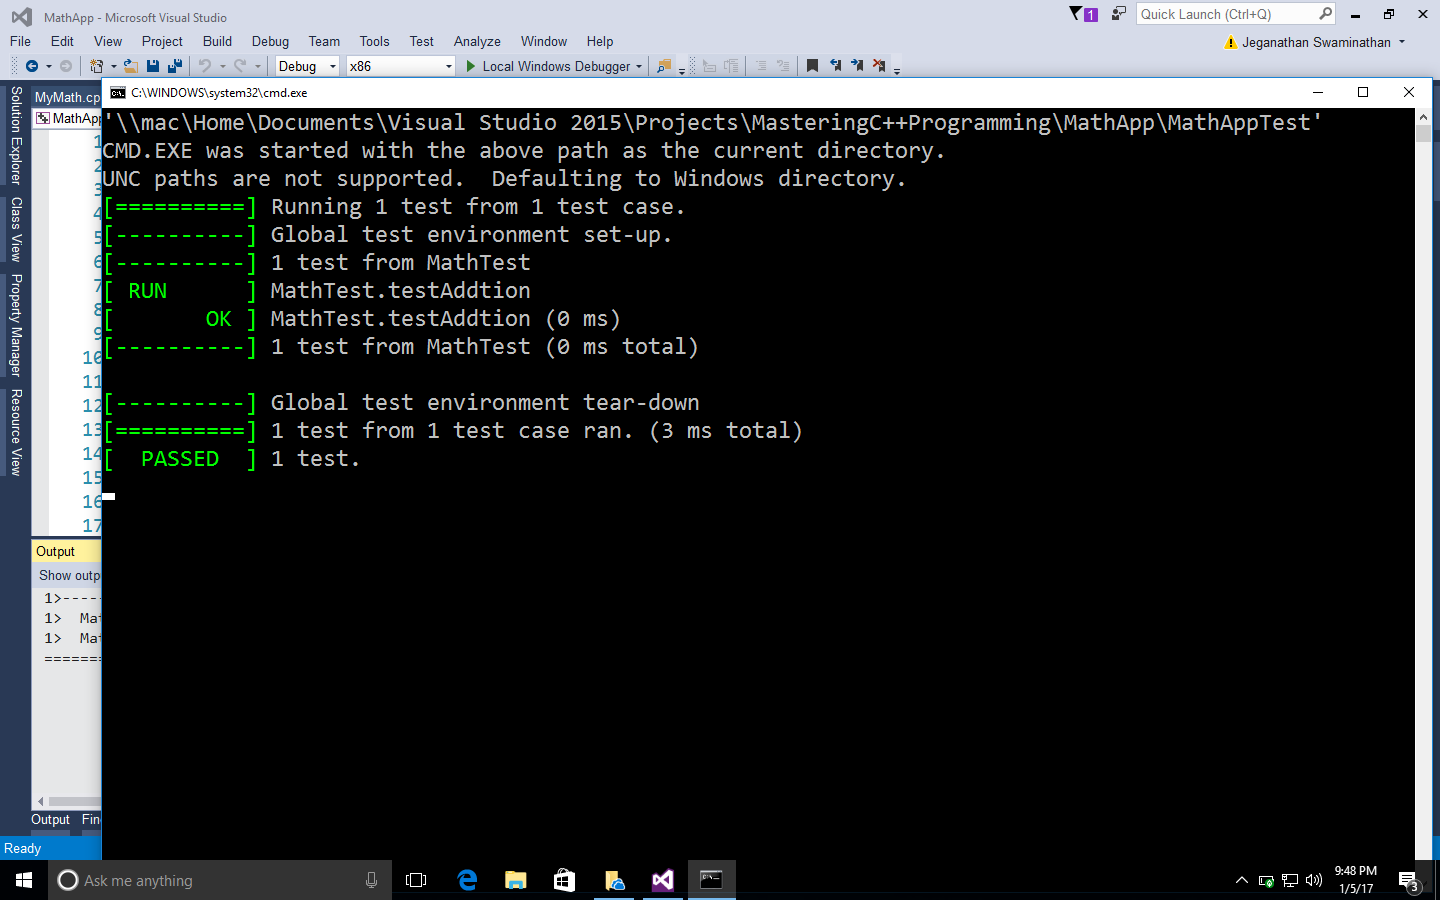
Let's see how to develop an Reverse Polish Notation (RPN) calculator application that follows the TDD approach. RPN is also known as the postfix notation. The expectation from the RPN Calculator application is to accept a postfix math expression as an input and return the evaluated result as the output.
Step by step, I would like to demonstrate how one can follow the TDD approach while developing an application. As the first step, I would like to explain the project directory structure, then we'll move forward. Let's create a folder named Ex2 with the following structure:
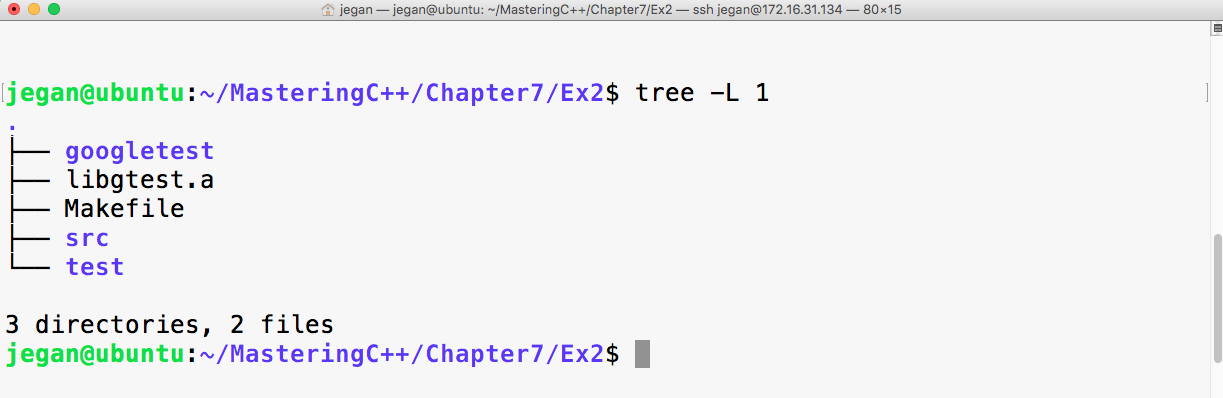
The googletest folder is the gtest test library that has the necessary gtest and gmock header files. Now libgtest.a is the Google test static library that we created in the previous exercise. We are going to use the make utility to build our project, hence I have placed a Makefile in the project home directory. The src directory will hold the production code, while the test directory will hold all the test cases that we are going to write.
Before we start writing test cases, let's take a postfix math "2 5 * 4 + 3 3 * 1 + /" and understand the standard postfix algorithm that we are going to apply to evaluate the RPN math expression. As per the postfix algorithm, we are going to parse the RPN math expression one token at a time. Whenever we encounter an operand (number), we are going to push that into the stack. Whenever we encounter an operator, we are going to pop out two values from the stack, apply the math operation, push back the intermediate result into the stack, and repeat the procedure until all the tokens are evaluated in the RPN expression. At the end, when no more tokens are left in the input string, we will pop out the value and print it as the result. The procedure is demonstrated step by step in the following figure:

To start with, let's take a simple postfix math expression and translate the scenario into a test case:
Test Case : Test a simple addition
Input: "10 15 +"
Expected Output: 25.0
Let's translate the preceding test case as a Google test in the test folder, as follows:
test/RPNCalculatorTest.cpp

TEST ( RPNCalculatorTest, testSimpleAddition ) {
         RPNCalculator rpnCalculator;
         double actualResult = rpnCalculator.evaluate ( "10 15 +" );
         double expectedResult = 25.0;
         EXPECT_EQ ( expectedResult, actualResult );
}
In order to compile the preceding test case, let's write the minimal production code that is required in the src folder, as follows:
src/RPNCalculator.h

#include <iostream>
#include <string>
using namespace std;

class RPNCalculator {
  public:
      double evaluate ( string );
};
As the RPN math expression will be supplied as a space-separated string, the evaluate method will take a string input argument:
src/RPNCalculator.cpp

#include "RPNCalculator.h"

double RPNCalculator::evaluate ( string rpnMathExpression ) {
    return 0.0;
}
The following Makefile class helps run the test cases every time we compile the production code:
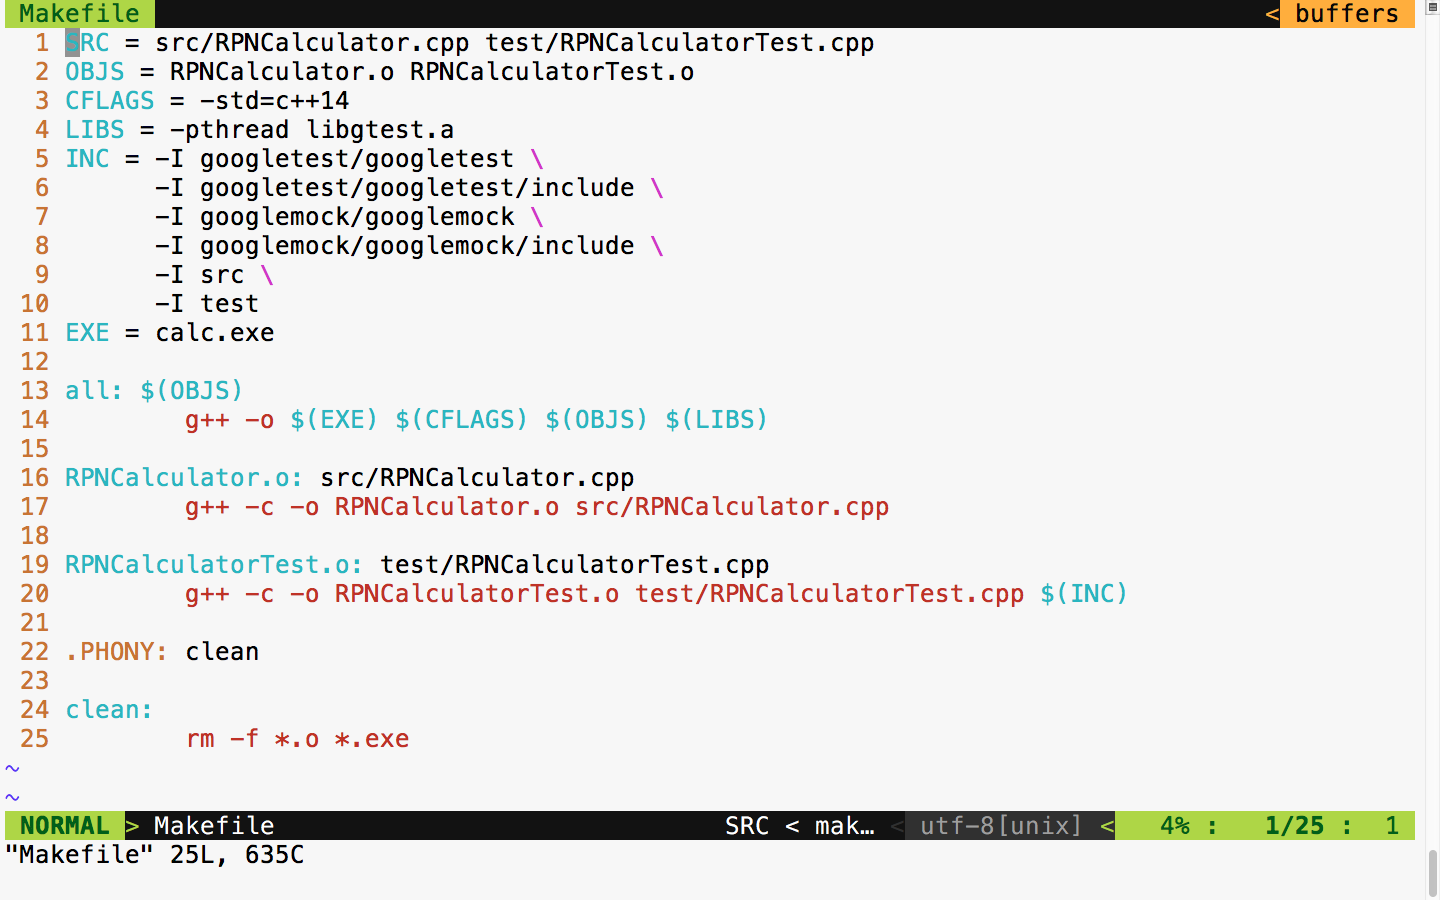
Now let's build and run the test case and check the test case's outcome:
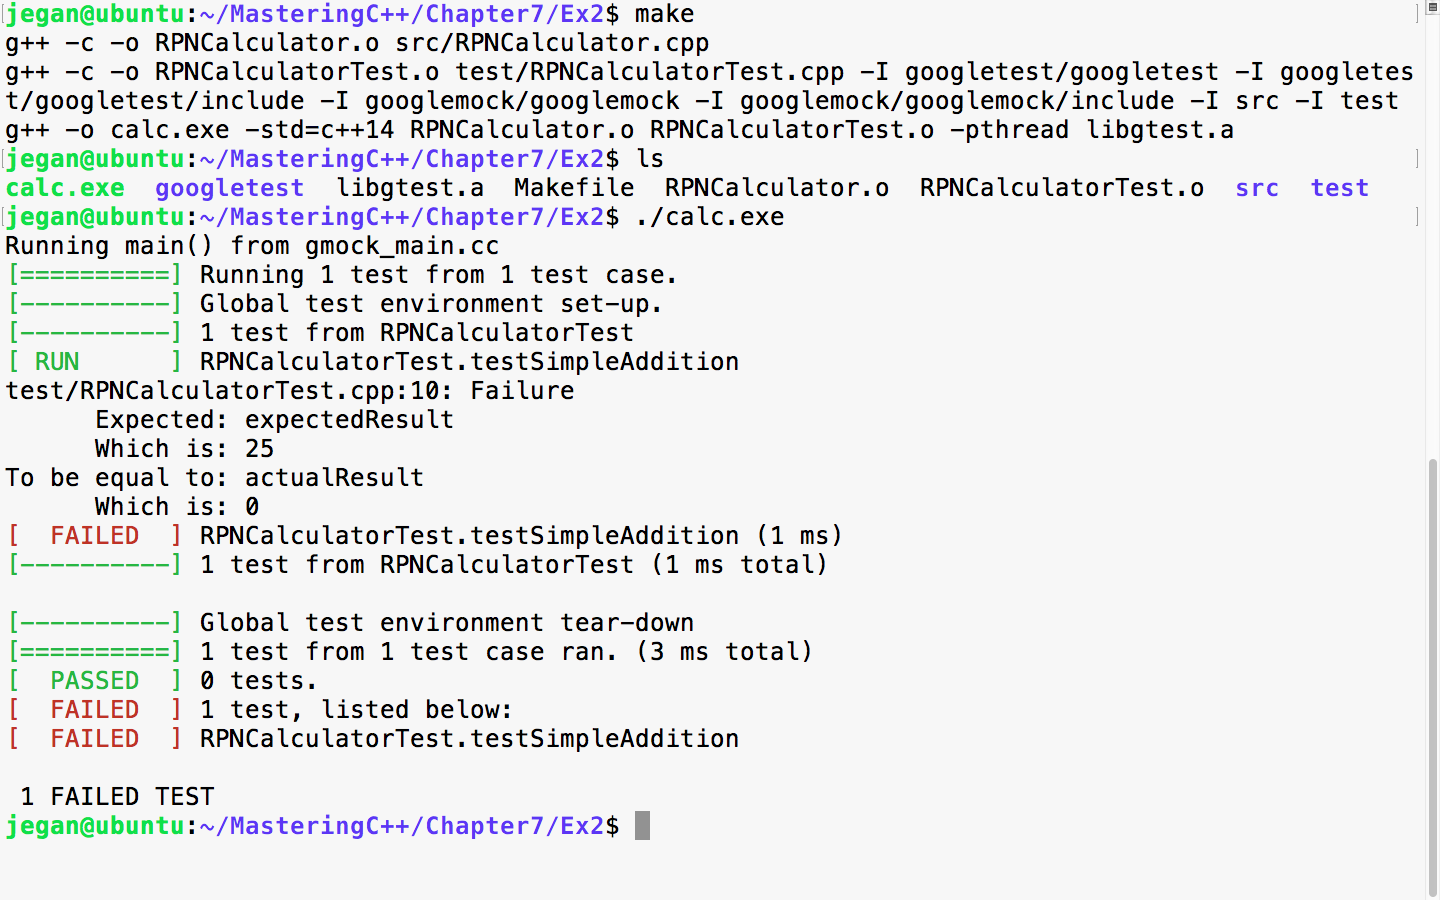
In TDD, we always start with a failing test case. The root cause of the failure is that the expected result is 25, while the actual result is 0. The reason is that we haven't implemented the evaluate method, hence we have hardcoded to return 0, irrespective of any input. So let's implement the evaluate method in order to make the test case pass.
We need to modify src/RPNCalculator.h and src/RPNCalculator.cpp as follows:
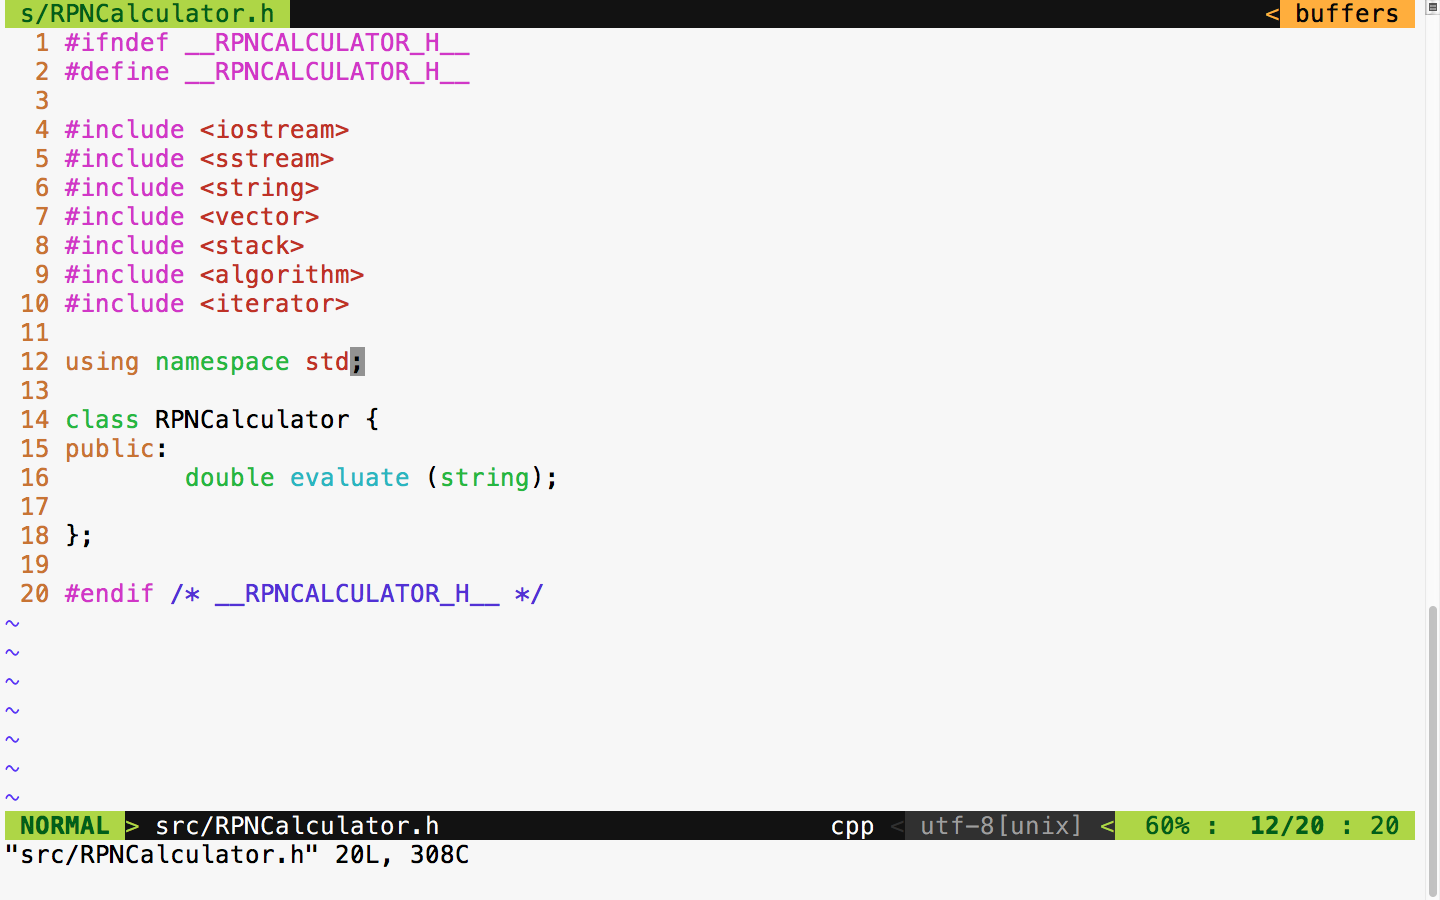
In the RPNCalculator.h header file, observe the new header files that are included to handle string tokenizing and string double conversion and copy the RPN tokens to the vector:
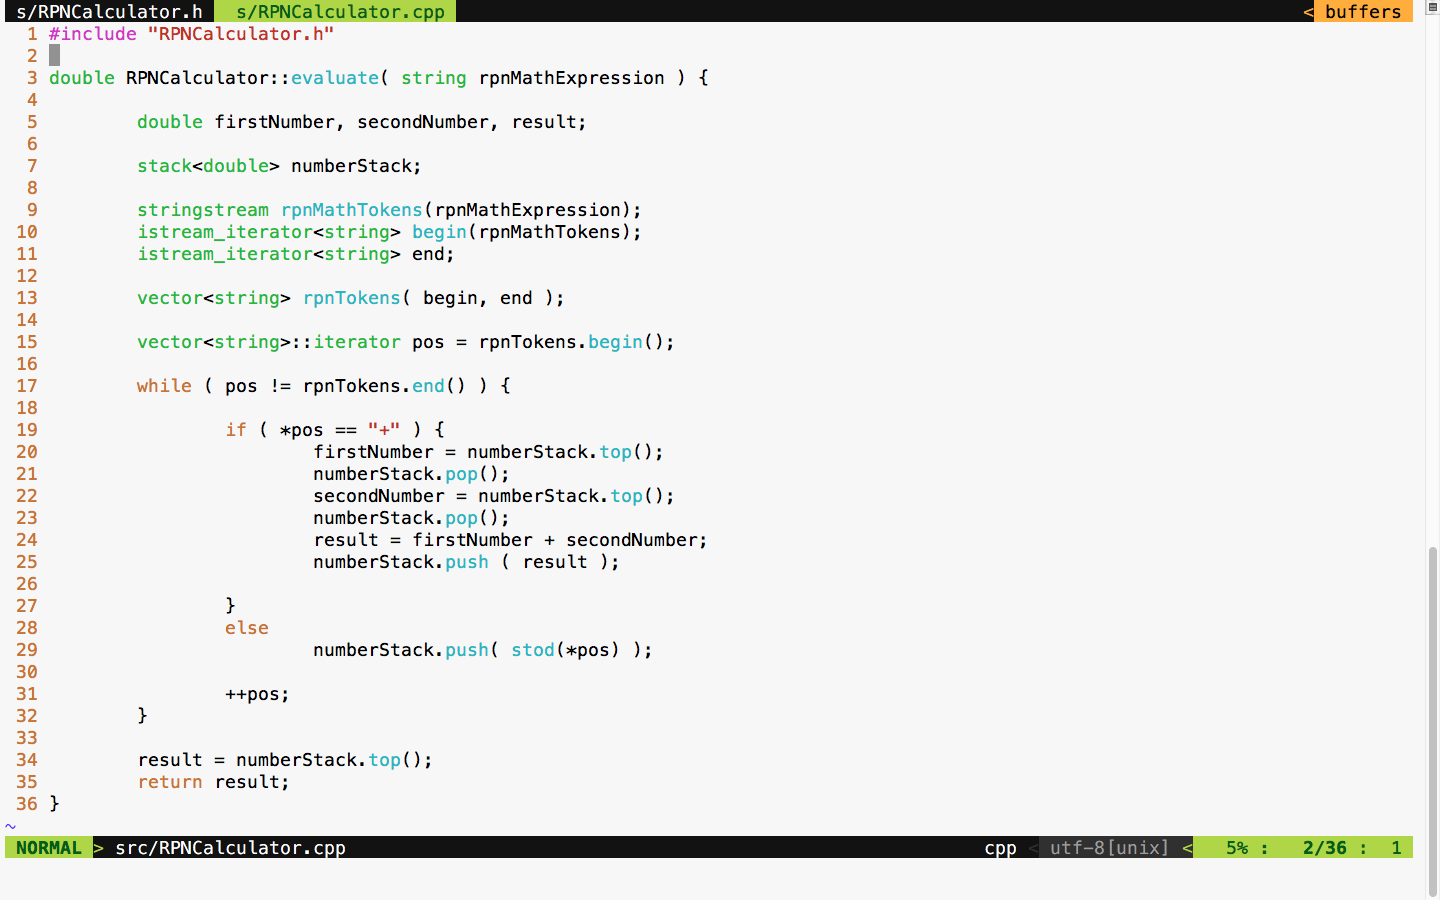
As per the standard postfix algorithm, we are using a stack to hold all the numbers that we find in the RPN expression. Anytime we encounter the + math operator, we pop out two values from the stack and add them and push back the results into the stack. If the token isn't a + operator, we can safely assume that it would be a number, so we just push the value to the stack.
With the preceding implementation in place, let's try the test case and check whether the test case passes:
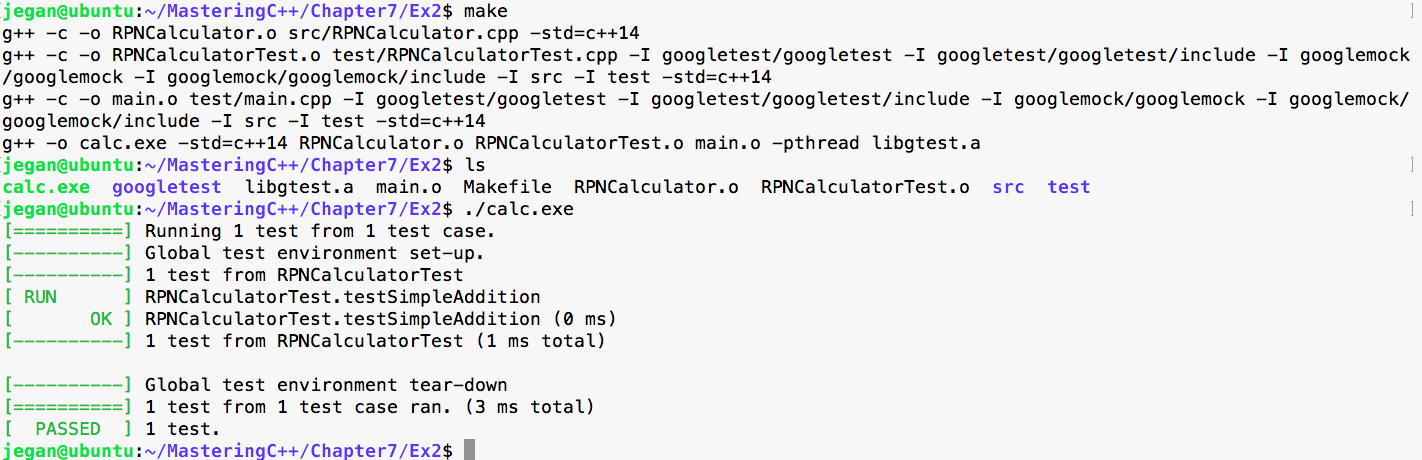
Cool, our first test case has passed as expected. It's time to think of another test case. This time, let's add a test case for subtraction:
Test Case : Test a simple subtraction
Input: "25 10 -"
Expected Output: 15.0
Let's translate the preceding test case as a Google test in the test folder, as follows:
test/RPNCalculatorTest.cpp

TEST ( RPNCalculatorTest, testSimpleSubtraction ) {
         RPNCalculator rpnCalculator;
         double actualResult = rpnCalculator.evaluate ( "25 10 -" );
         double expectedResult = 15.0;
         EXPECT_EQ ( expectedResult, actualResult );
}
With the preceding test case added to test/RPNCalculatorTest, it should now look like this:
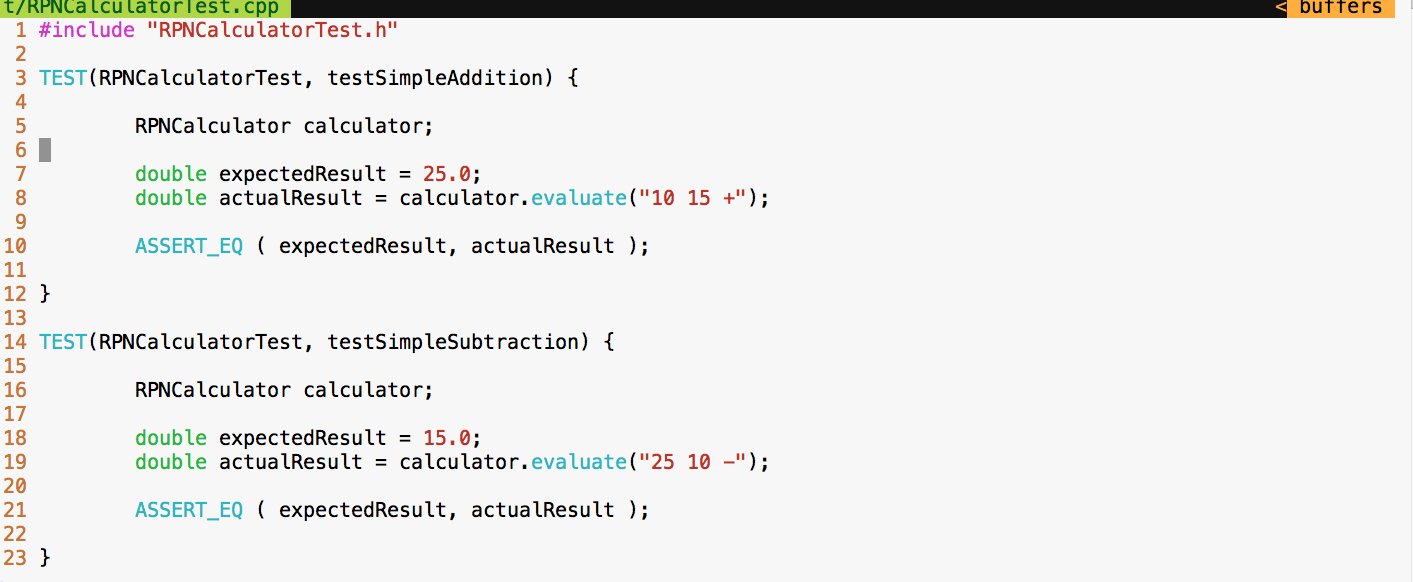
Let's execute the test cases and check whether our new test case passes:
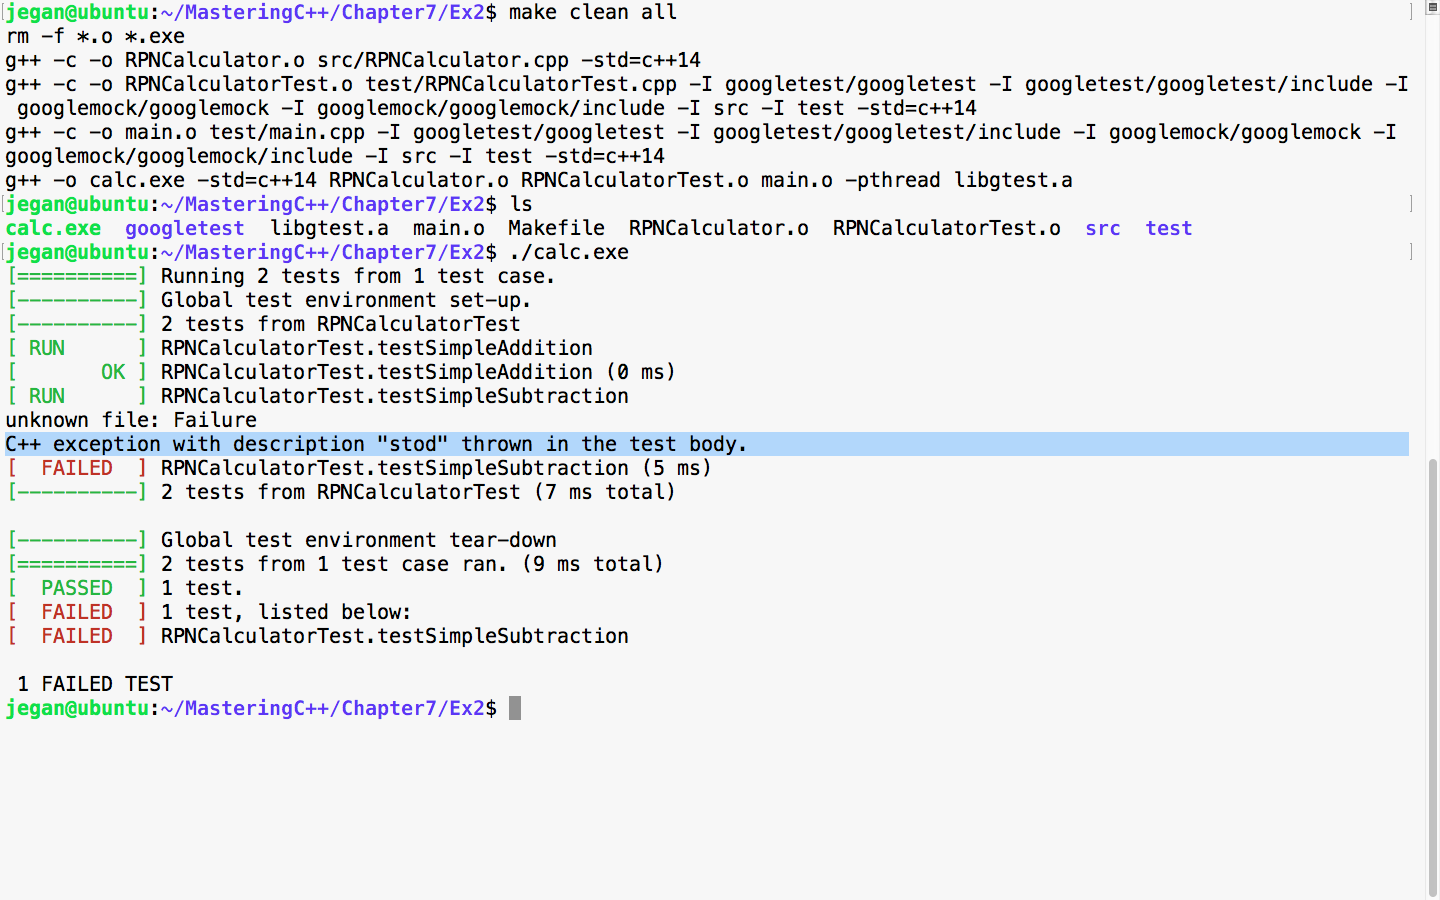
As expected, the new test fails as we haven't added support for subtraction in our application yet. This is very evident, based on the C++ exception, as the code attempts to convert the subtraction - operator into a number. Let's add support for subtraction logic in our evaluate method:
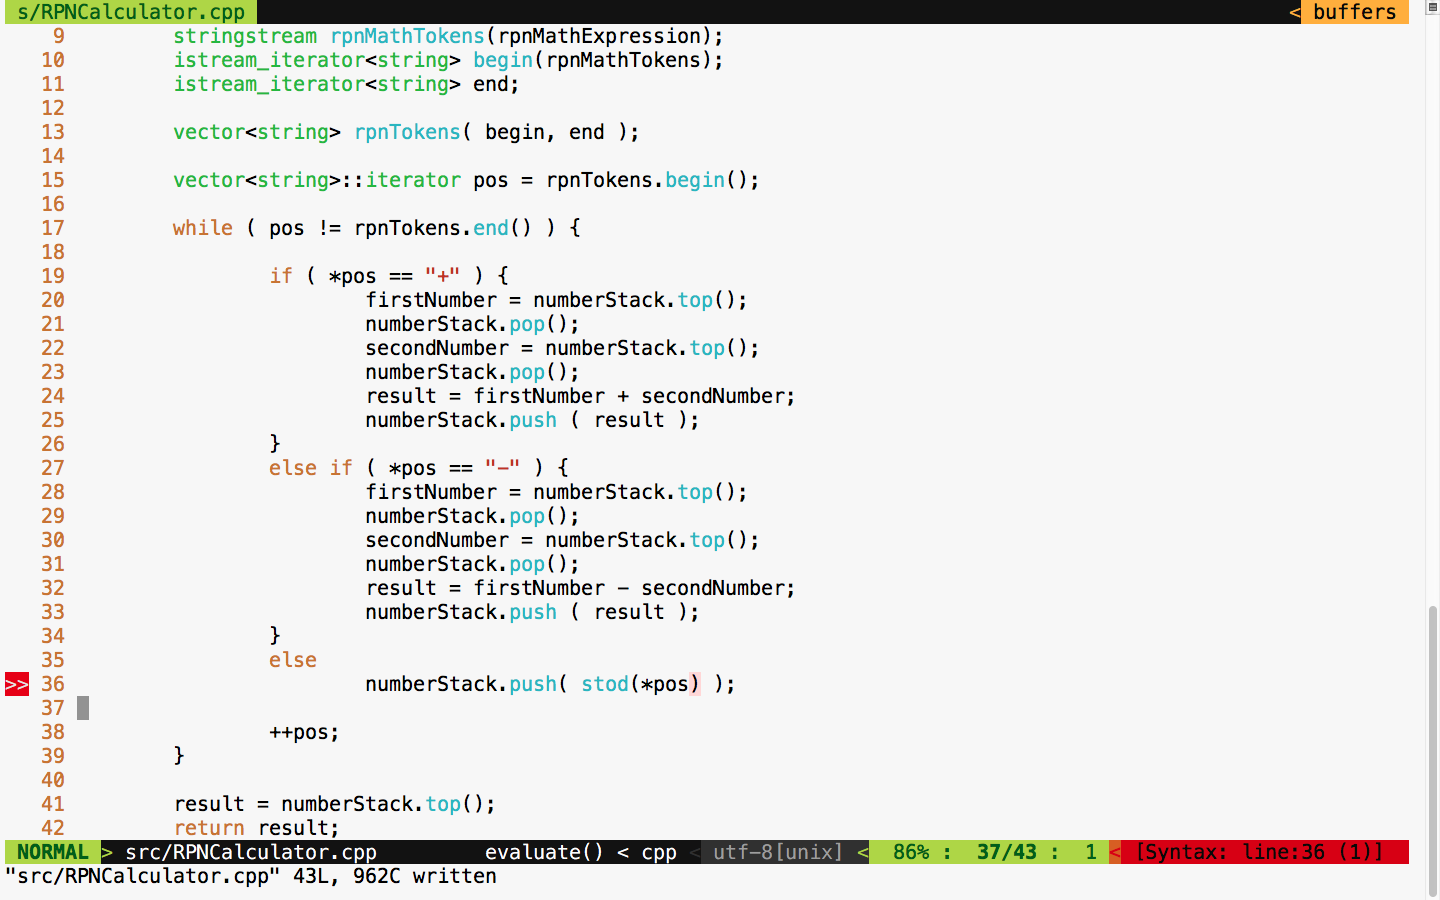
It's time to test. Let's execute the test case and check whether things are working:
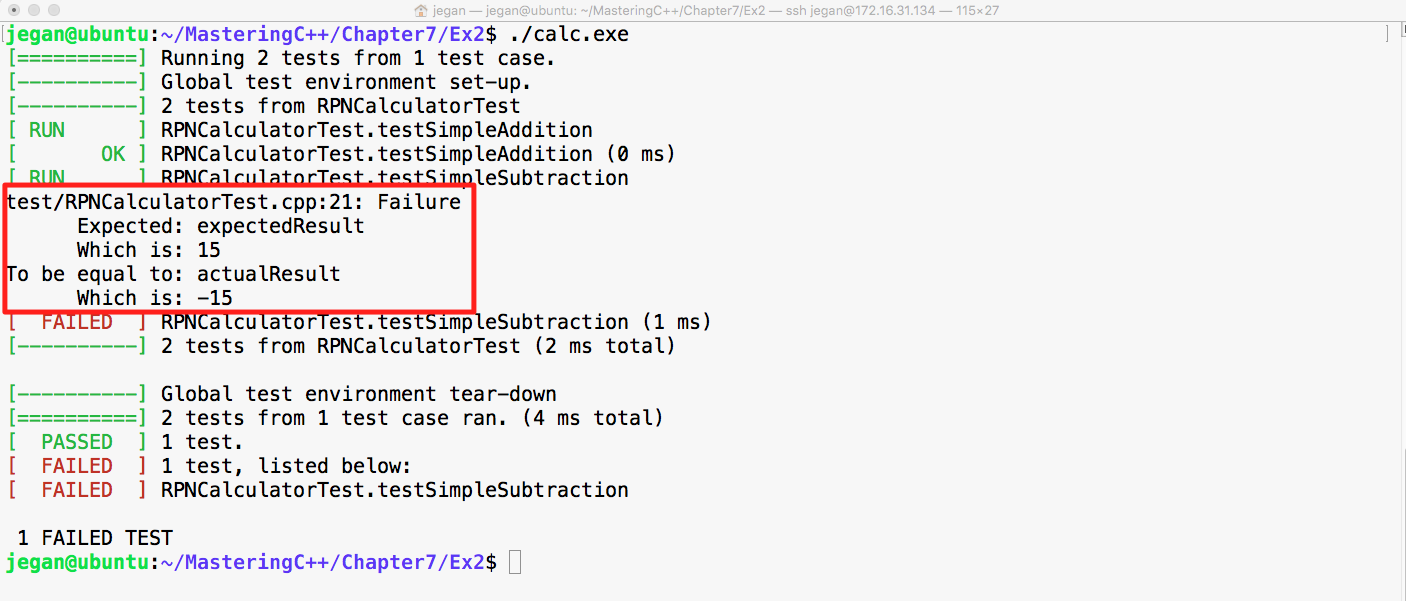
Cool! Did you notice that our test case failed in this instance? Wait a minute. Why are we excited if the test case failed? The reason we should be happy is that our test case found a bug; after all, that is the main intent of TDD, isn't?
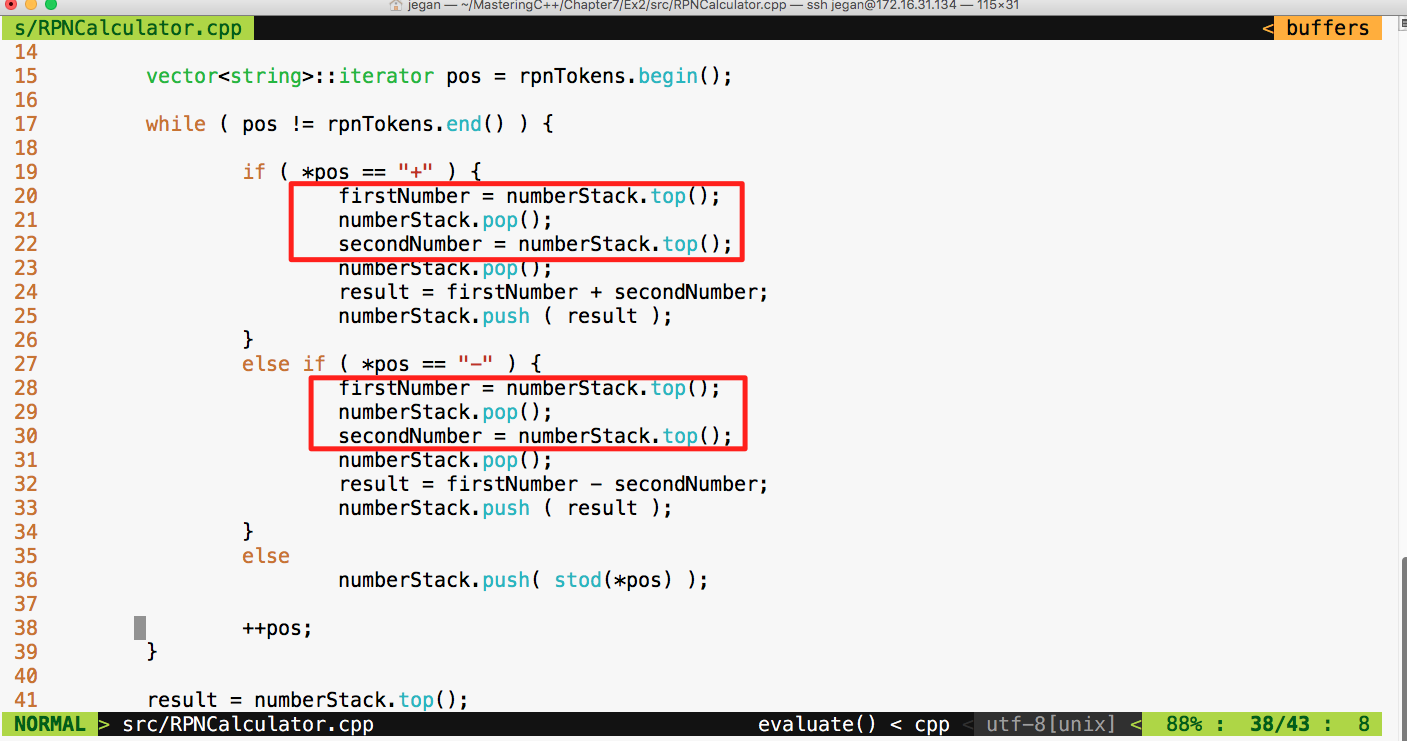
The root cause of the failure is that the Stack operates on the basis of Last In First Out (LIFO) whereas our code assumes FIFO. Did you notice that our code assumes that it will pop out the first number first while the reality is that it is supposed to pop out the second number first? Interesting, this bug was there in the addition operation too; however, since addition is associative, the bug was kind of suppressed but the subtraction test case detected it.
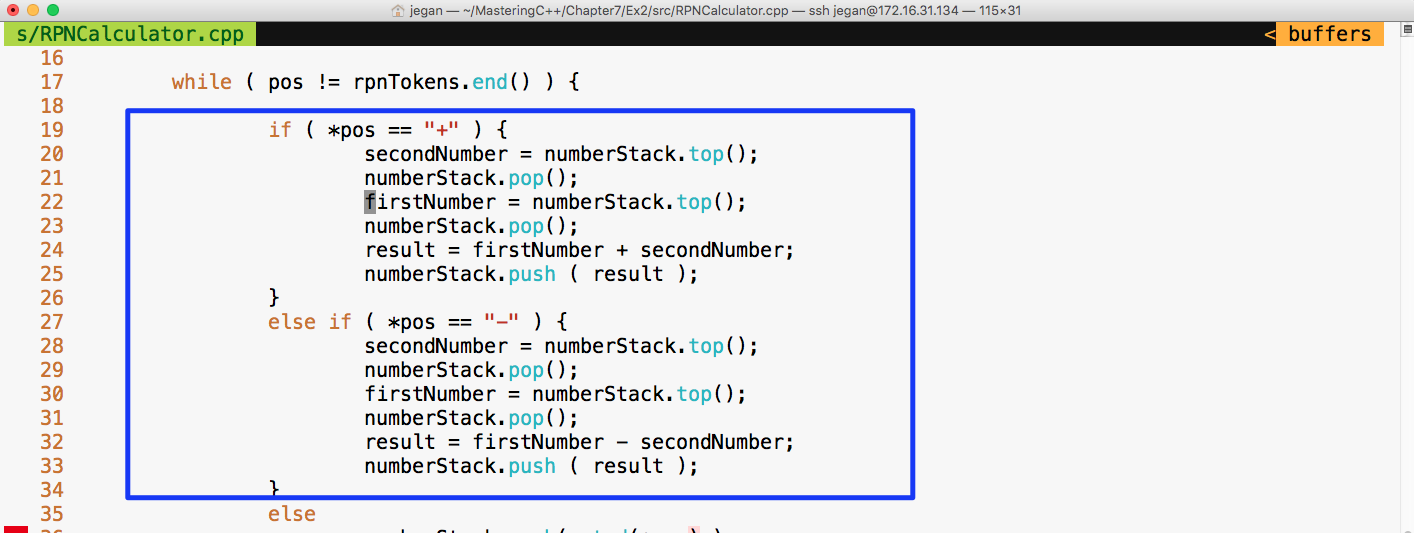
Let's fix the bug as shown in the preceding screenshot and check whether the test cases will pass:
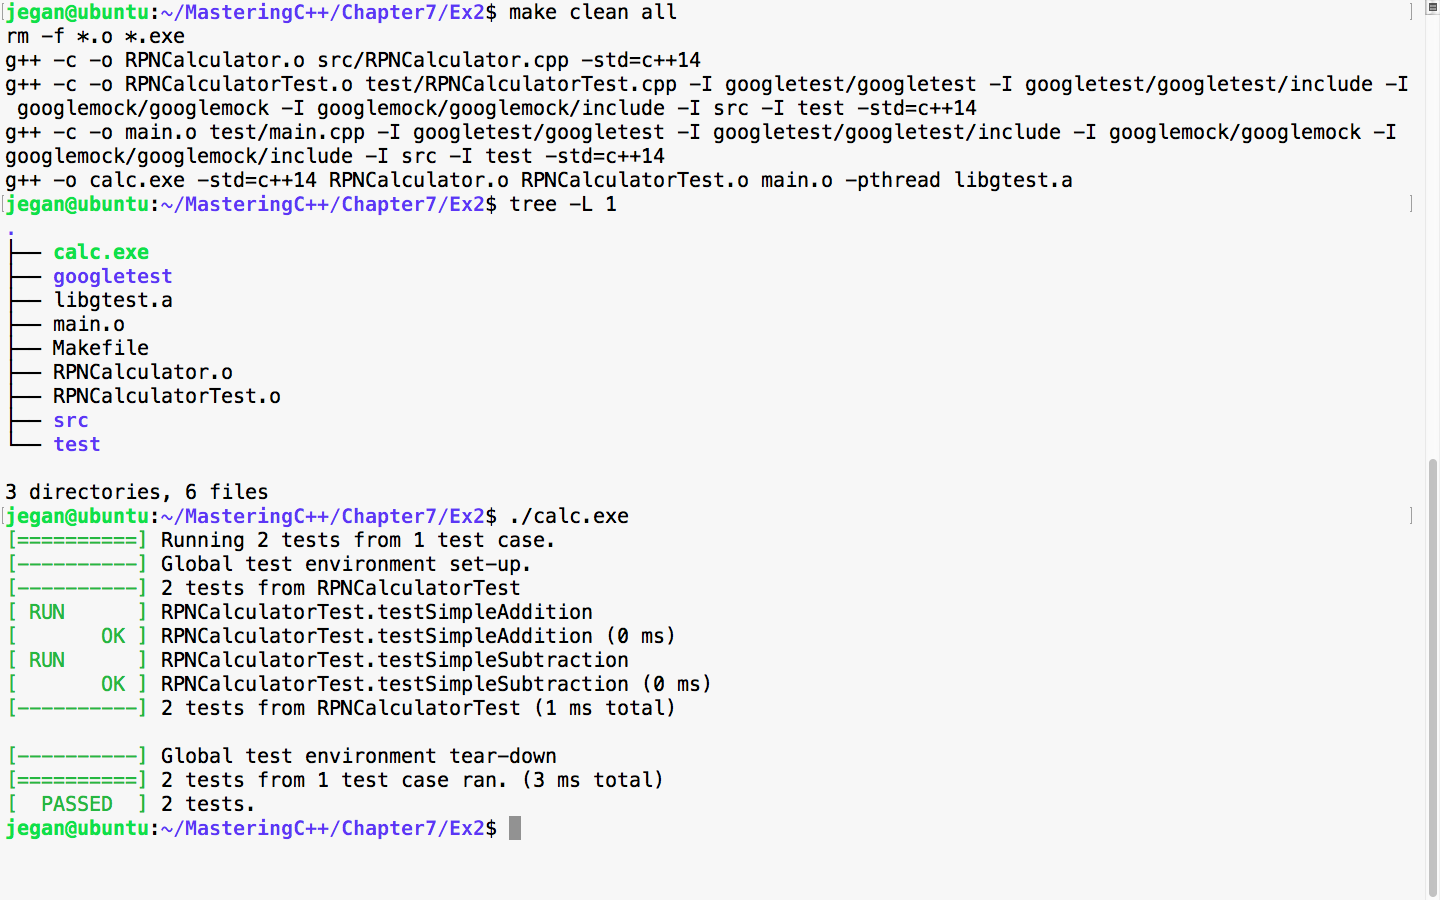
Awesome! We fixed the bug and our test case seems to certify they are fixed. Let's add more test cases. This time, let's add a test case to verify multiplication:
Test Case : Test a simple multiplication
Input: "25 10 *"
Expected Output: 250.0
Let's translate the preceding test case as a google test in the test folder, as follows:
test/RPNCalculatorTest.cpp

TEST ( RPNCalculatorTest, testSimpleMultiplication ) {
         RPNCalculator rpnCalculator;
         double actualResult = rpnCalculator.evaluate ( "25 10 *" );
         double expectedResult = 250.0;
         EXPECT_EQ ( expectedResult, actualResult );
}
We know this time the test case is going to fail, so let's fast forward and take a look at the division test case:
Test Case : Test a simple division
Input: "250 10 /"
Expected Output: 25.0
Let's translate the preceding test case as a google test in the test folder, as follows:
test/RPNCalculatorTest.cpp

TEST ( RPNCalculatorTest, testSimpleDivision ) {
         RPNCalculator rpnCalculator;
         double actualResult = rpnCalculator.evaluate ( "250 10 /" );
         double expectedResult = 25.0;
         EXPECT_EQ ( expectedResult, actualResult );
}
Let's skip the test result and move forward with a final complex expression test case that involves many operations:
Test Case : Test a complex rpn expression
Input: "2  5  *  4  + 7  2 -  1  +  /"
Expected Output: 25.0
Let's translate the preceding test case as a google test in the test folder, as shown here:
test/RPNCalculatorTest.cpp

TEST ( RPNCalculatorTest, testSimpleDivision ) {
         RPNCalculator rpnCalculator;
         double actualResult = rpnCalculator.evaluate ( "250 10 /" );
         double expectedResult = 25.0;
         EXPECT_EQ ( expectedResult, actualResult );
}
Let's check whether our RPNCalculator application is able to evaluate a complex RPN expression that involves addition, subtraction, multiplication, and division in a single expression with the following test case:
test/RPNCalculatorTest.cpp

TEST ( RPNCalculatorTest, testComplexExpression ) {
         RPNCalculator rpnCalculator;
         double actualResult = rpnCalculator.evaluate ( "2  5  *  4  +  7  2 - 1 +  /" );
         double expectedResult = 2.33333;
         ASSERT_NEAR ( expectedResult, actualResult, 4 );
}
In the preceding test case, we are checking whether the expected result matches the actual result to the approximation of up to four decimal places. If the values are different beyond this approximation, then the test case is supposed to fail.
Let's check the test case output now:
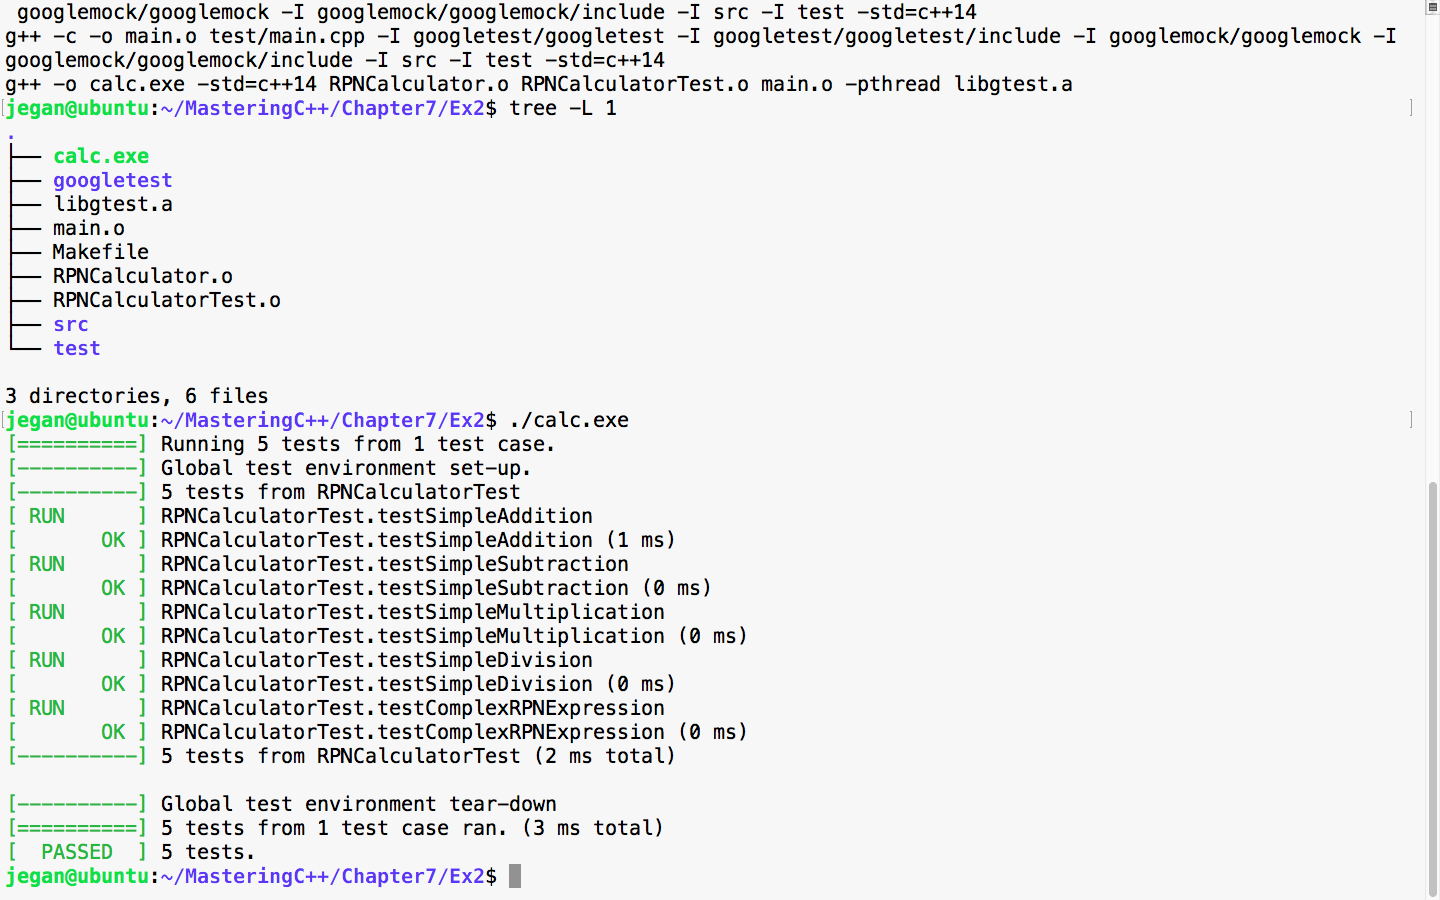
Great! All the test cases are green.
Now let's take a look at our production code and check whether there is any room for improvement:
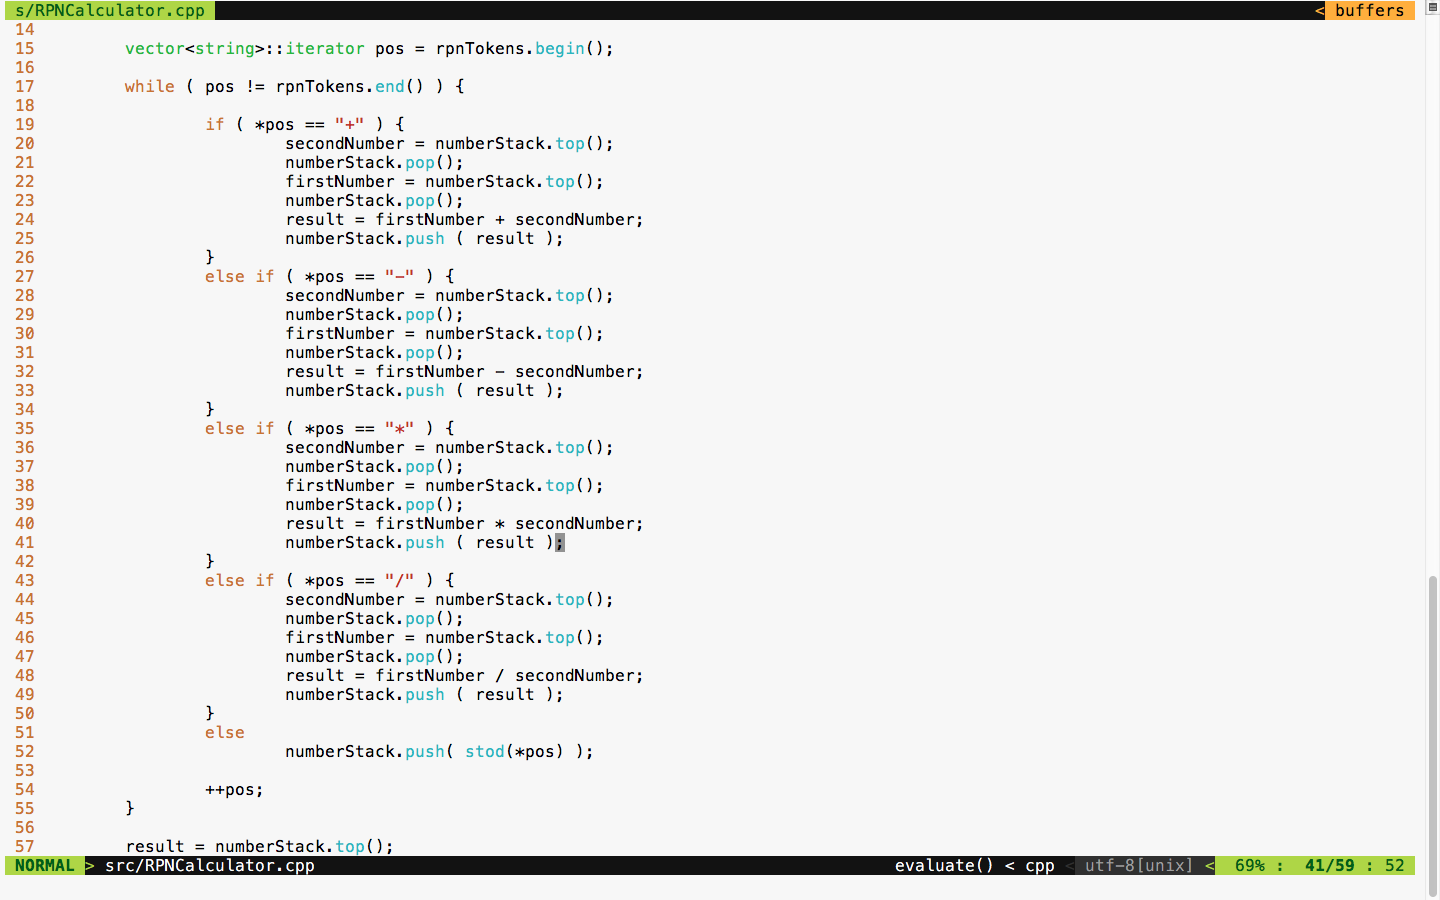
The code is functionally good but has many code smells. It is a long method with the nested if-else condition and duplicate code. TDD is not just about test automation; it is also about writing good code without code smells. Hence, we must refactor code and make it more modular and reduce the code complexity.
We can apply polymorphism or the strategy design pattern here instead of the nested if-else conditions. Also, we can use the factory method design pattern to create various subtypes. There is also scope to use the Null Object Design Pattern.
The best part is we don't have to worry about the risk of breaking our code in the process of refactoring as we have a sufficient number of test cases to give us feedback in case we break our code.
First, let's understand how we could refactor the RPNCalculator design shown in Figure 7.35:
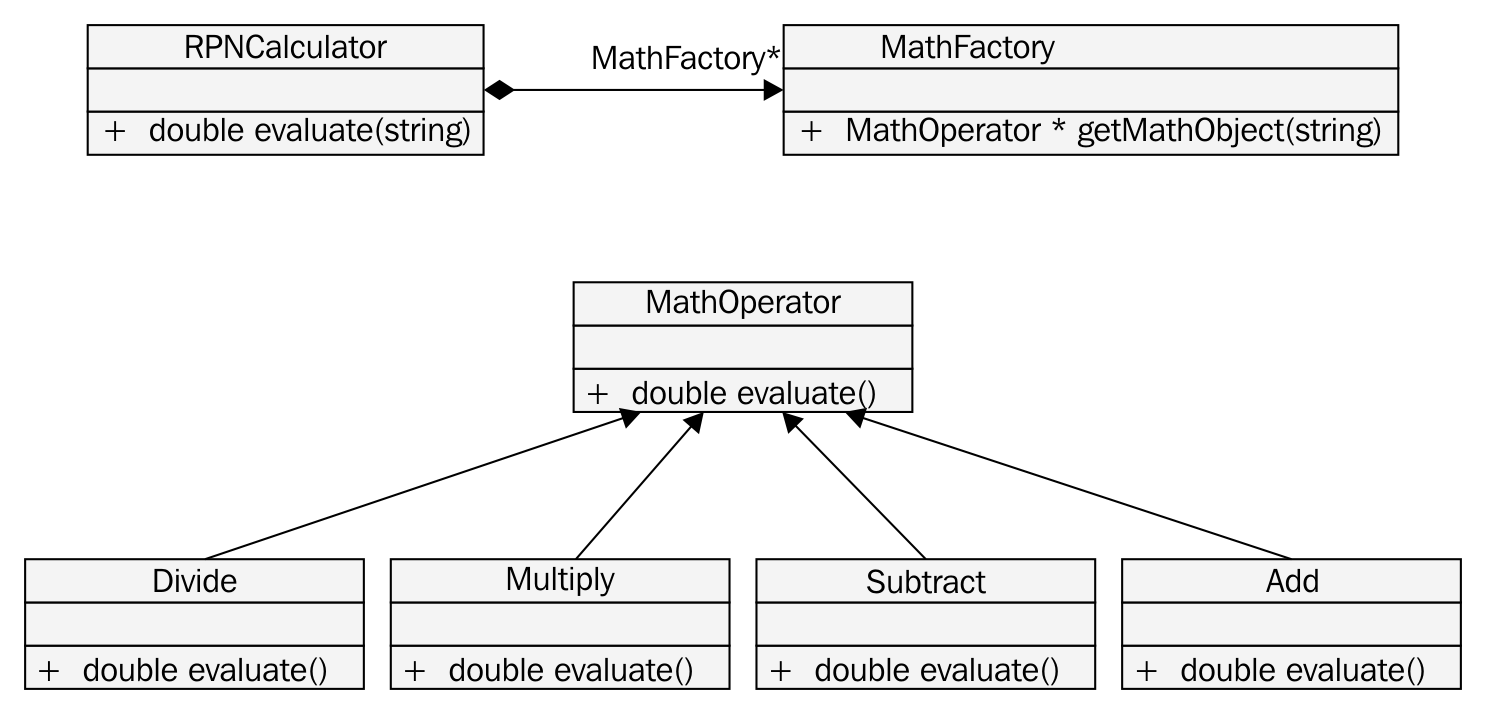
Based on the preceding design refactoring approach, we can refactor RPNCalculator as shown in Figure 7.36:

If you compare the RPNCalculator code before and after refactoring, you'll find that code complexity has reduced to a decent amount after refactoring.
The MathFactory class can be implemented as shown in Figure 7.37:
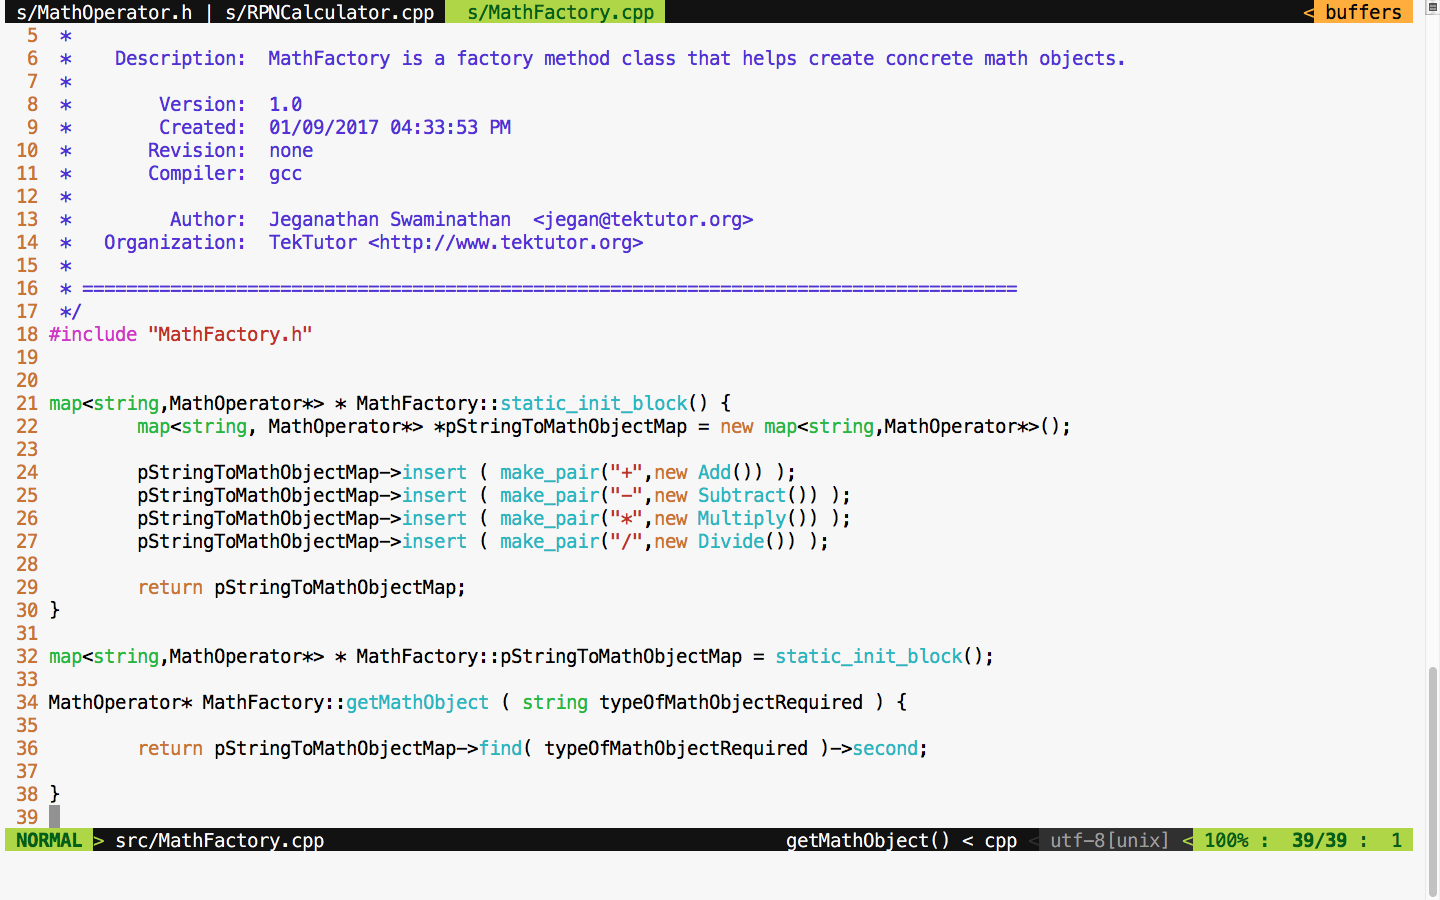
As much as possible, we must strive to avoid if-else conditions, or in general, we must try to avoid code branching when possible. Hence, STL map is used to avoid if-else conditions. This also promotes the reuse of the same Math objects, irrespective of the complexity of the RPN expression.
You will get an idea of how the MathOperator Add class is implemented if you refer to Figure 7.38:
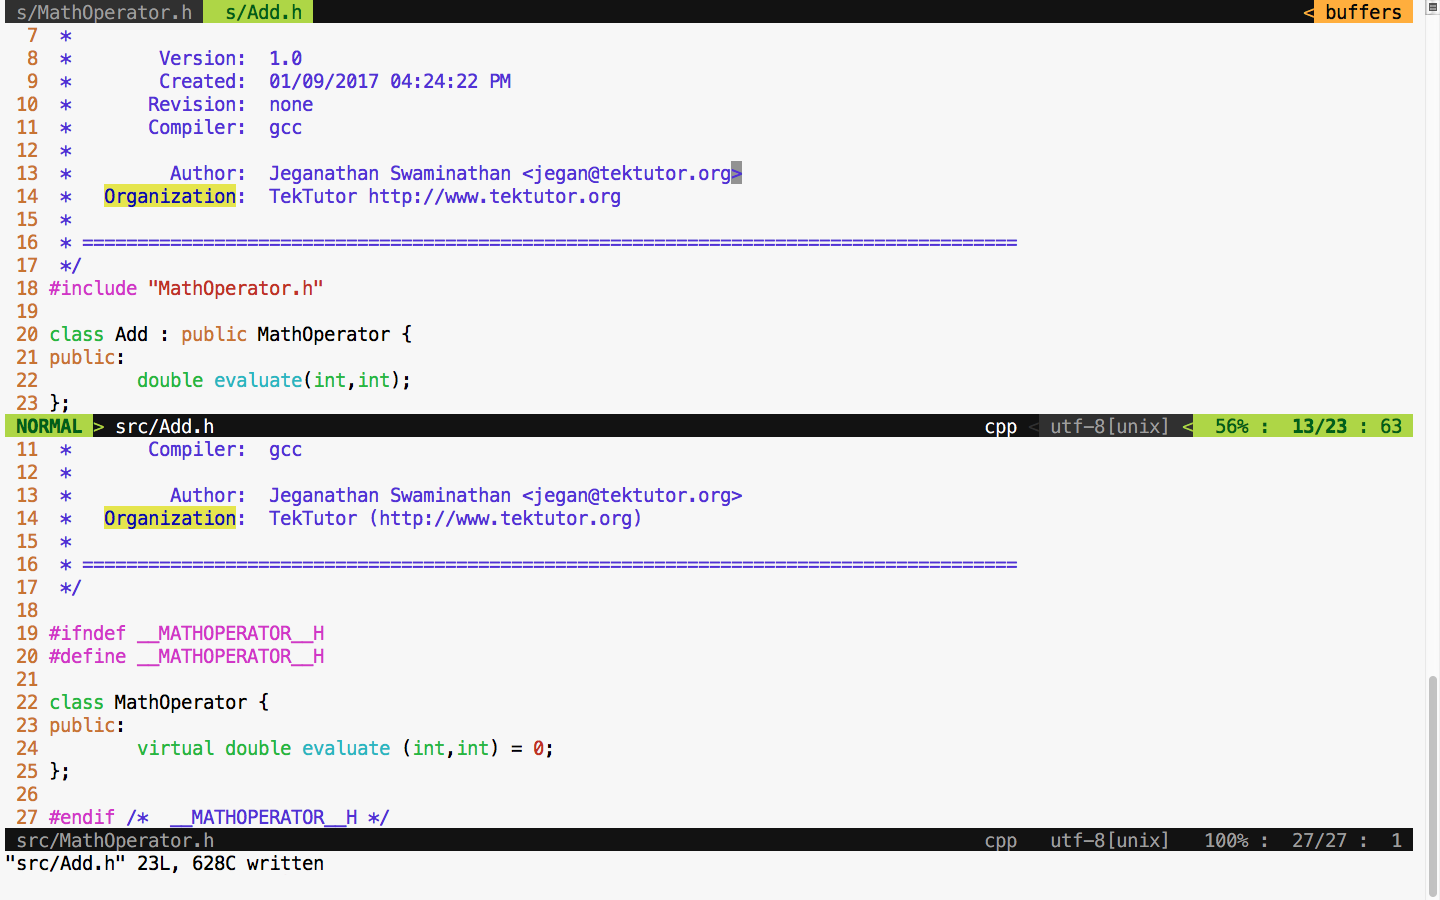
The Add class definition looks as shown in Figure 7.39:
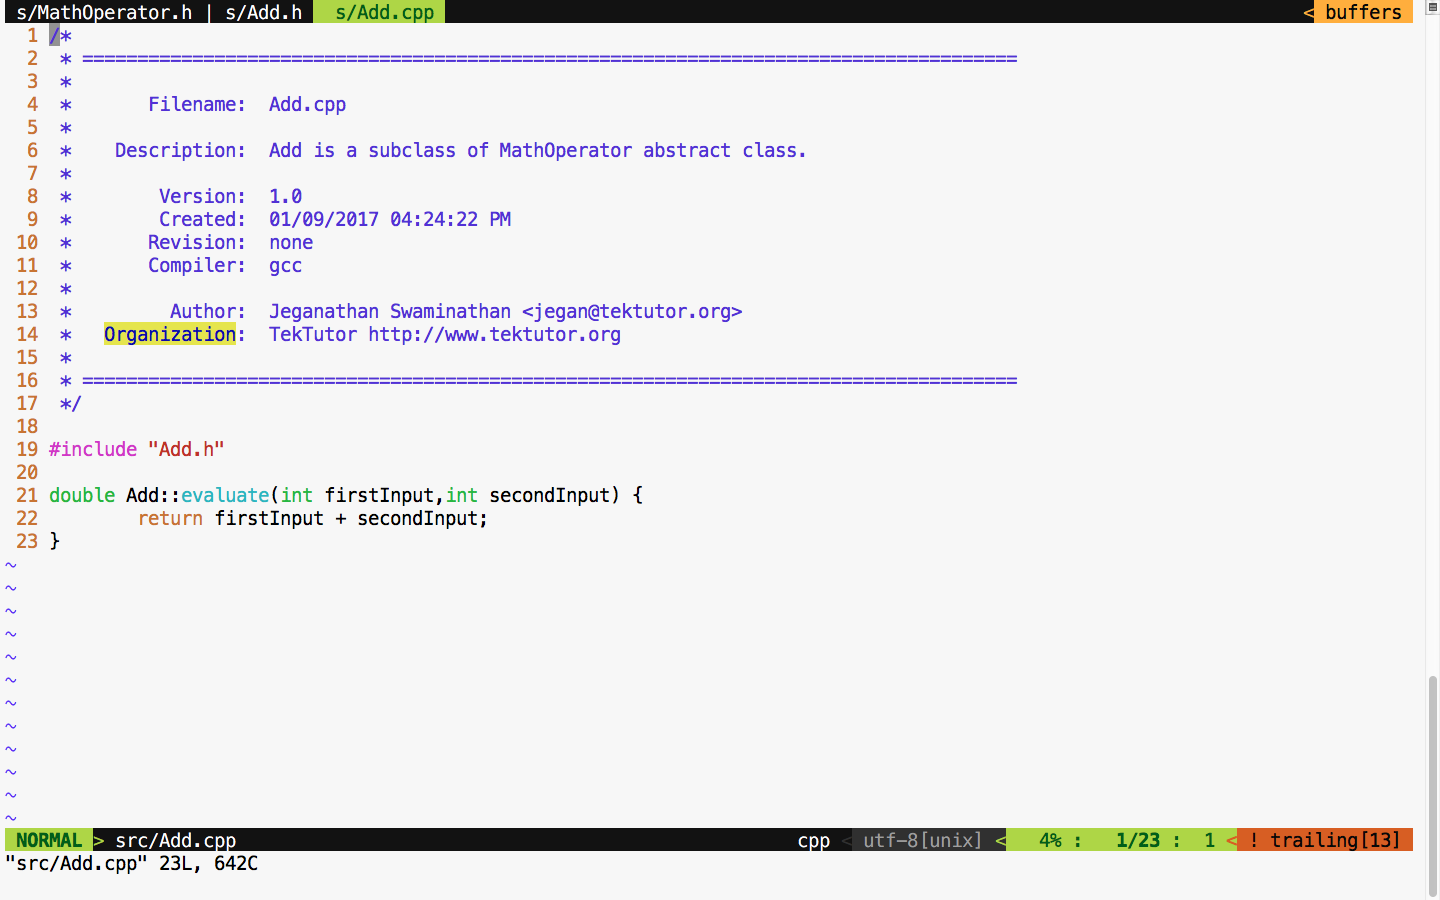
The subtract, multiplication, and division classes can be implemented in the similar fashion, as an Add class. The bottom line is that after refactoring, we can refactor a single RPNCalculator class into smaller and maintainable classes that can be tested individually.
Let's take a look at the refactored Makefile class in Figure 7.40 and test our code after the refactoring process is complete:
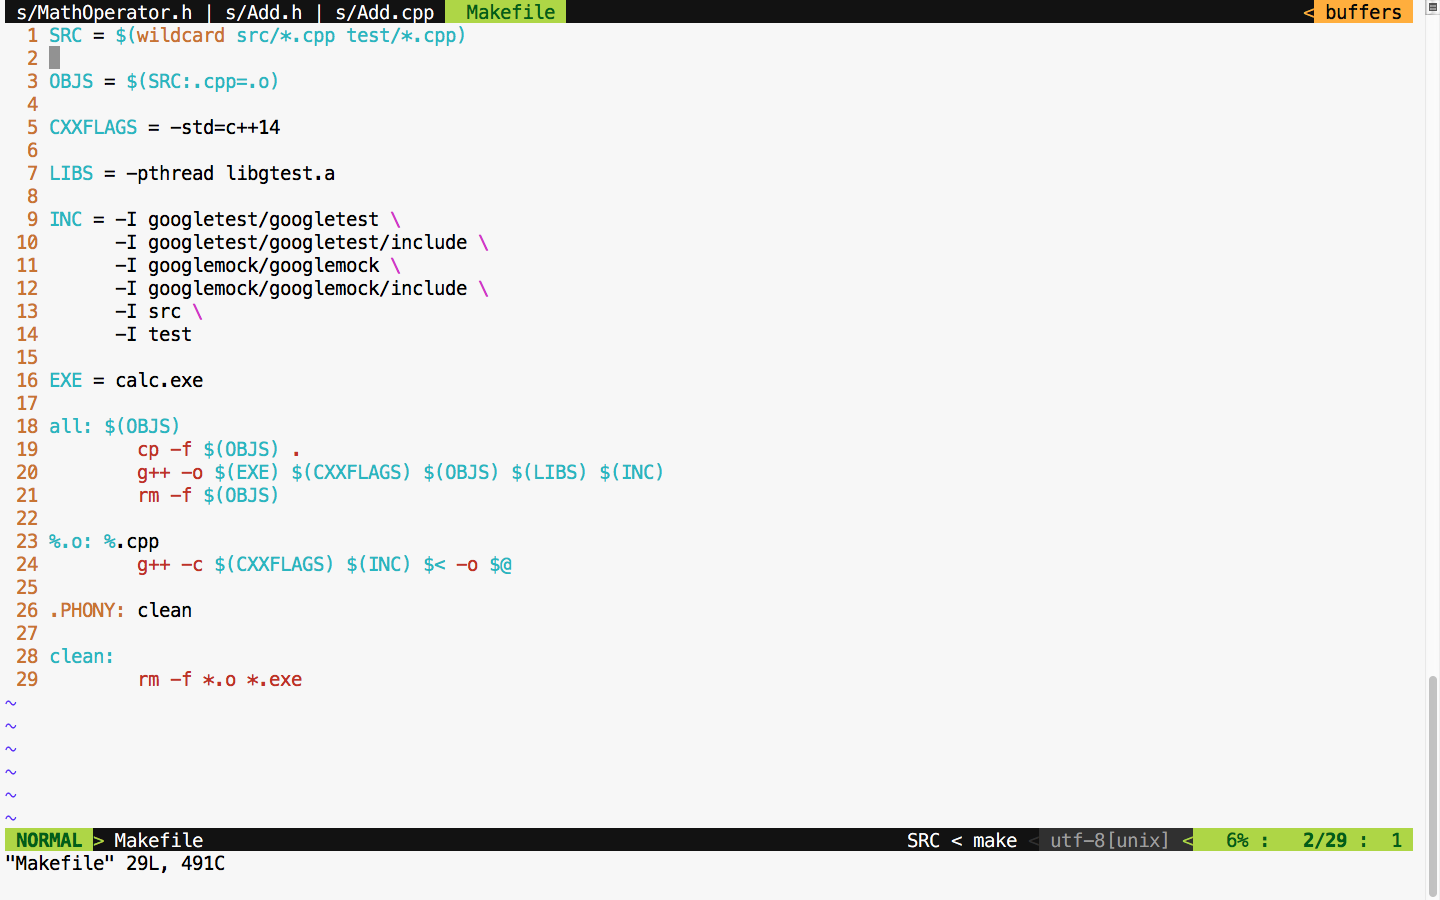
If all goes well, we should see all the test cases pass after refactoring if no functionalities are broken, as shown in Figure 7.41:
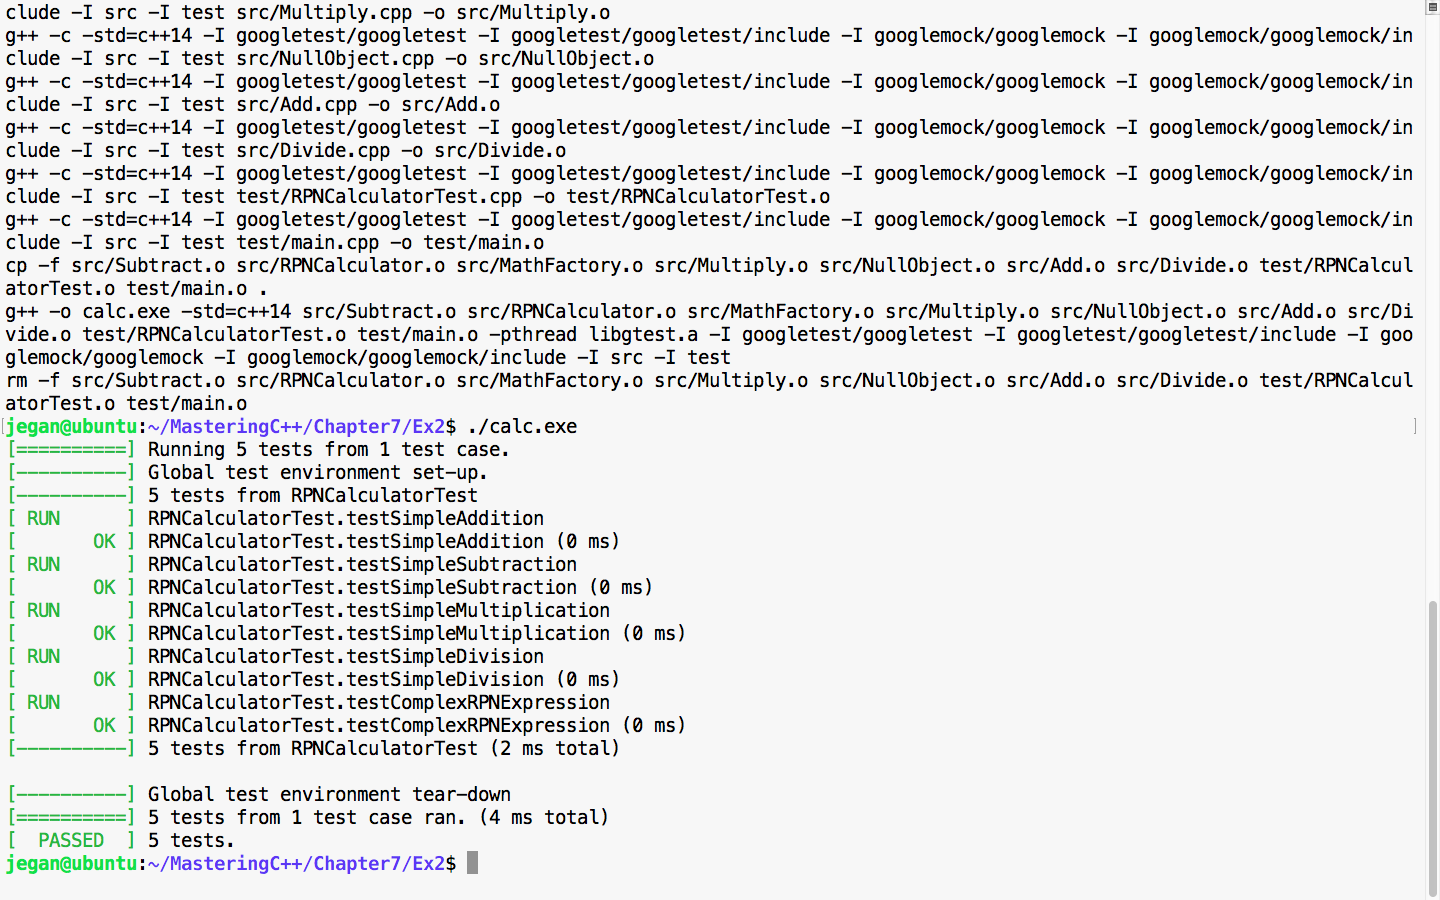
Cool! All the test cases have passed, hence it is guaranteed that we haven't broken the functionality in the process of refactoring. The main intent of TDD is to write testable code that is both functionally and structurally clean.
In the previous section, the CUT was independent with no dependency, hence the way it tested the code was straightforward. However, let's discuss how we can unit test the CUT that has dependencies. For this, refer to the following image:

In Figure 7.42, it is apparent that Mobile has a dependency on Camera and the association between Mobile and Camera is composition. Let's see how the Camera.h header file is implemented in a legacy application:
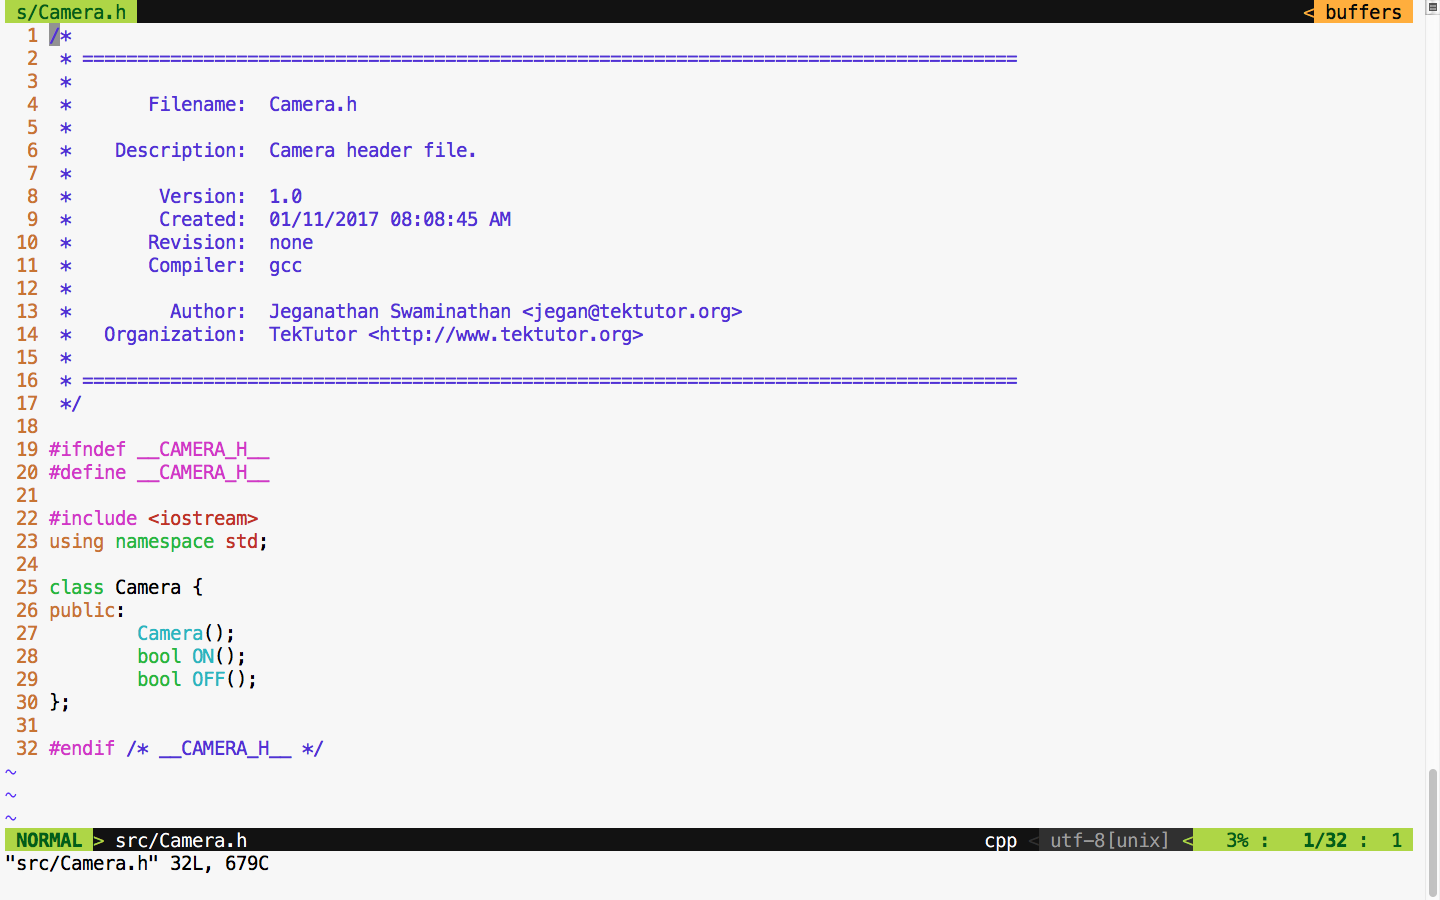
For demonstration purposes, let's take this simple Camera class that has ON() and OFF() functionalities. Let's assume that the ON/OFF functionality will interact with the camera hardware internally. Check out the Camera.cpp source file in Figure 7.44:
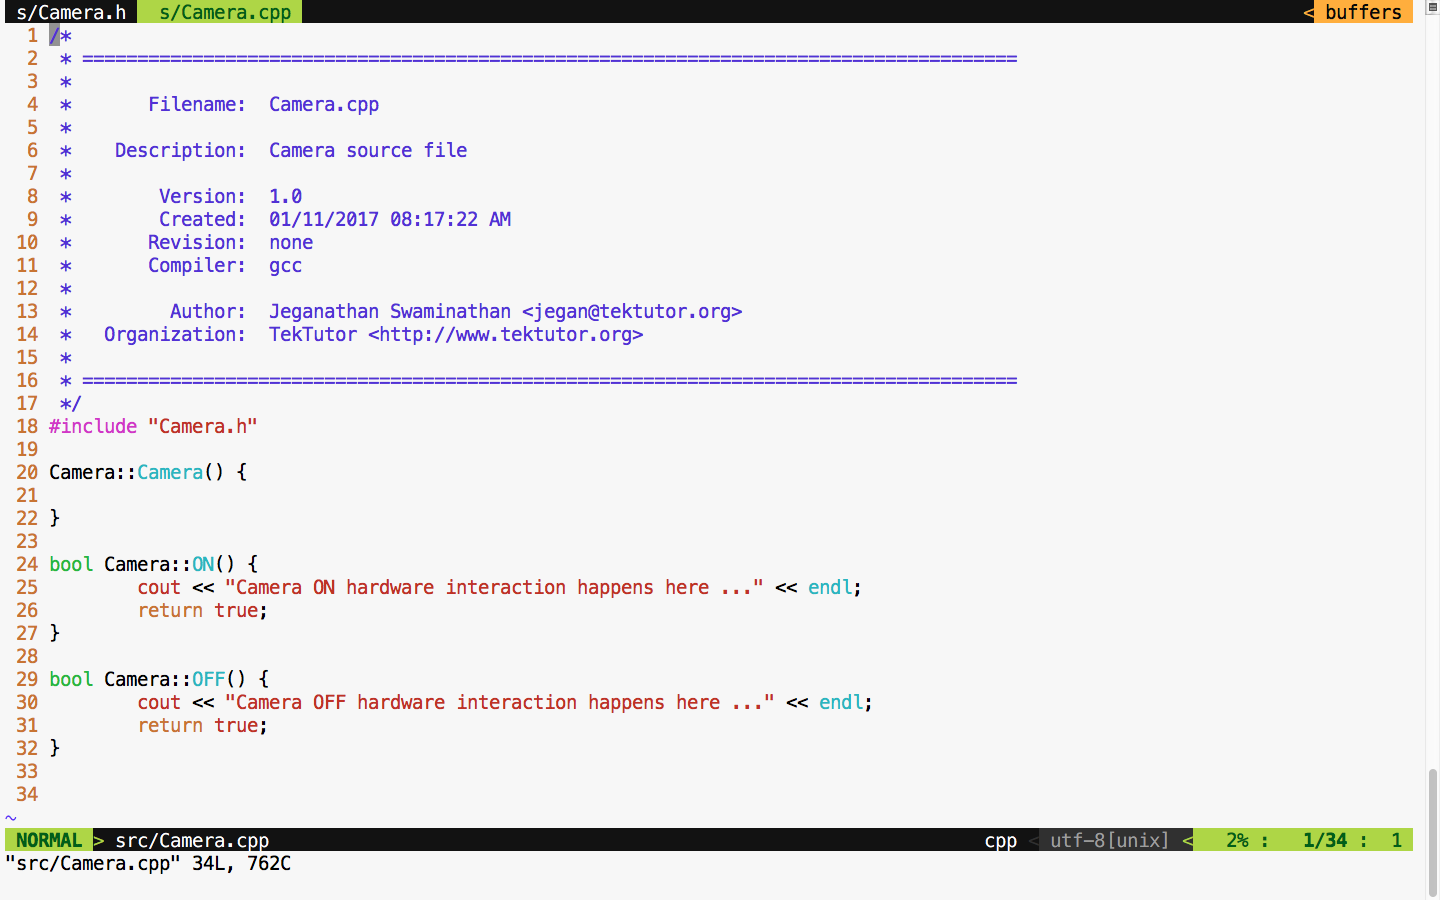
For debugging purposes, I have added some print statements that will come in handy when we test the powerOn() and powerOff() functionalities of mobile. Now let's check the Mobile class header file in Figure 7.45:
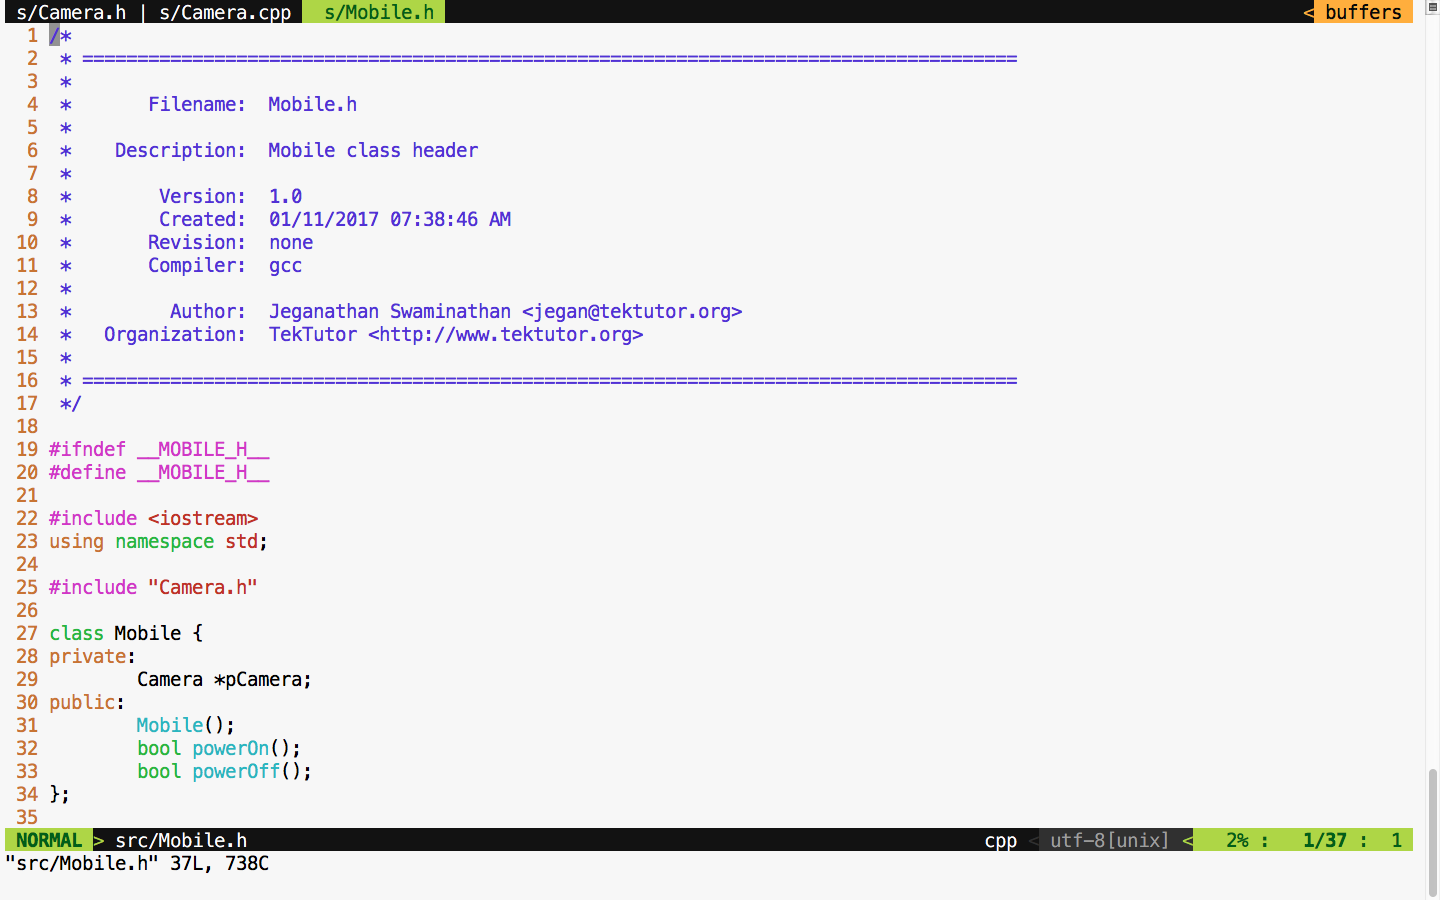
We move on to the mobile implementation, as illustrated in Figure 7.46:
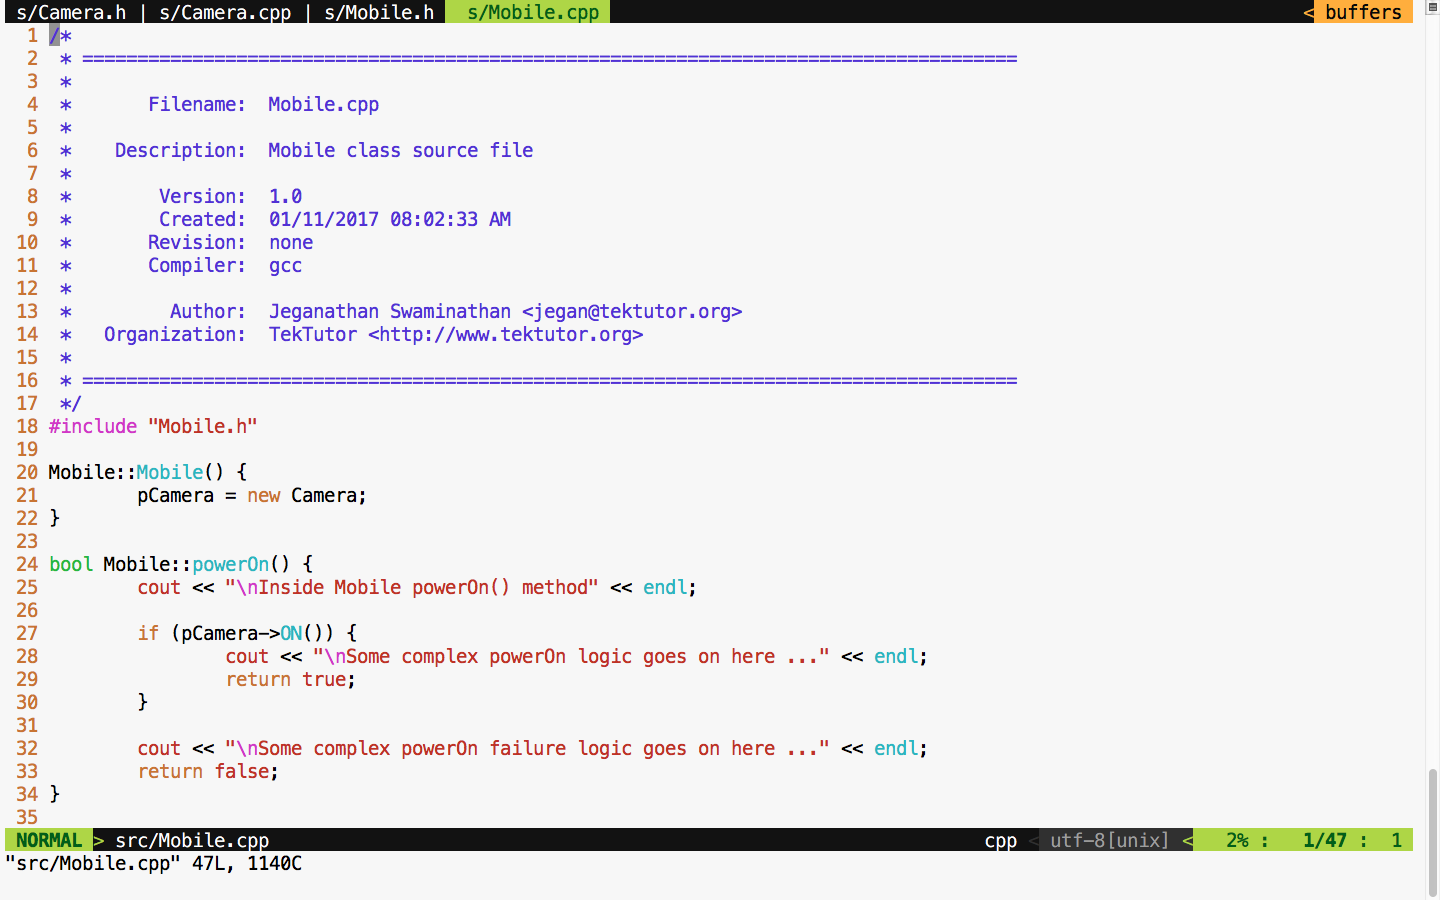
From the Mobile constructor implementation, it is evident that mobile has a camera or to be precise composition relationship. In other words, the Mobile class is the one that constructs the Camera object, as shown in Figure 7.46, line 21, in the constructor. Let's try to see the complexity involved in testing the powerOn() functionality of Mobile; the dependency has a composition relationship with the CUT of Mobile.
Let's write the powerOn() test case assuming camera On has succeeded, as follows:
TEST ( MobileTest, testPowerOnWhenCameraONSucceeds ) {

     Mobile mobile;
     ASSERT_TRUE ( mobile.powerOn() );

}
Now let's try to run the Mobile test case and check the test outcome, as illustrated in Figure 7.47:
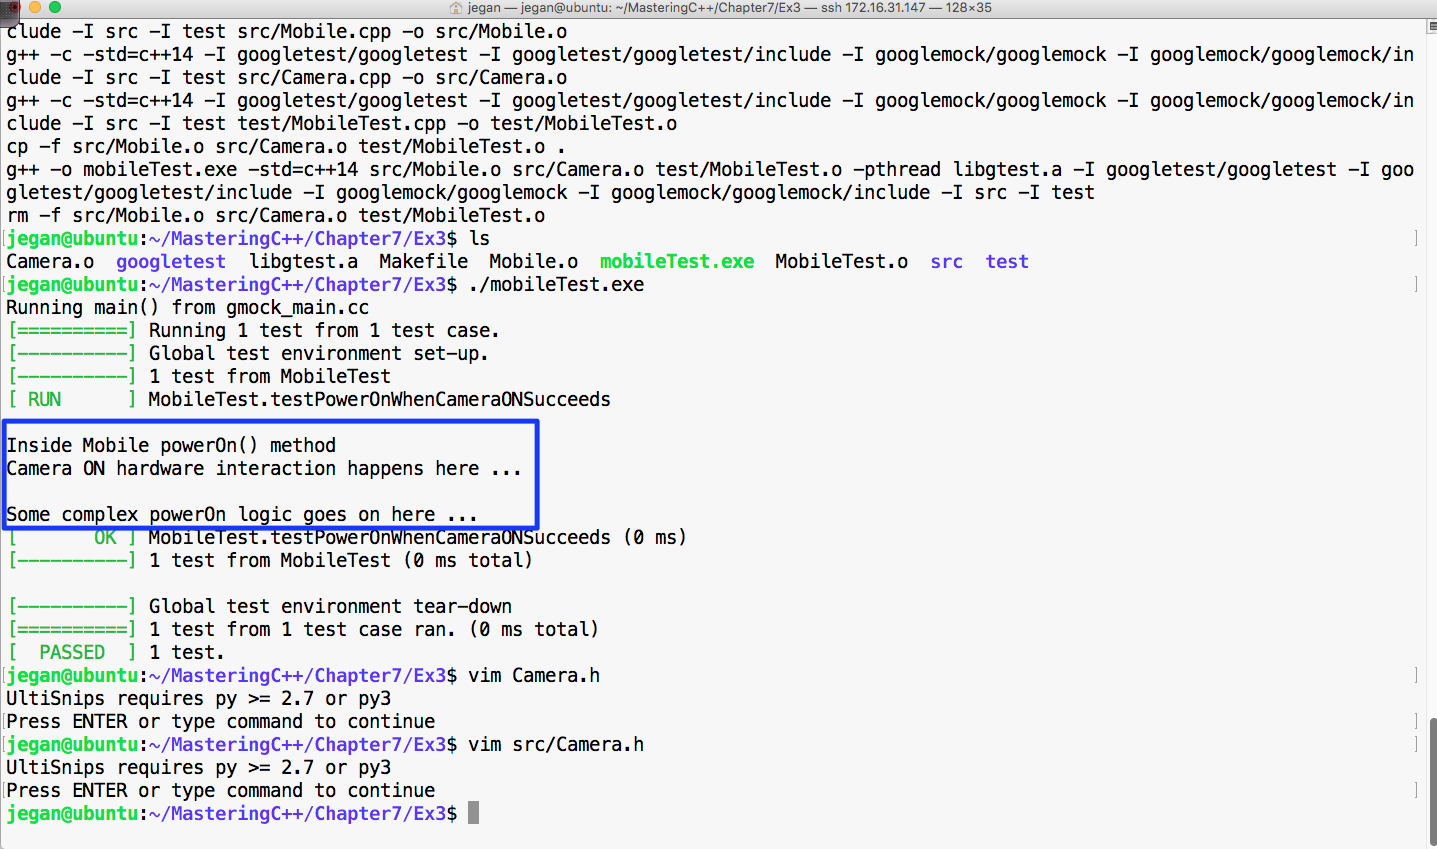
From Figure 7.47, we can understand that the powerOn() test case of Mobile has passed. However, we also understand that the real ON() method of the Camera class also got invoked. This, in turn, will interact with the camera hardware. At the end of the day, it is not a unit test as the test outcome isn't completely dependent on the CUT. If the test case had failed, we wouldn't have been able to pinpoint whether the failure was due to the code in the powerOn() logic of mobile or the code in the ON() logic of camera, which would have defeated the purpose of our test case. An ideal unit test should isolate the CUT from its dependencies using dependency injection and test the code. This approach will help us identify the behavior of the CUT in normal or abnormal scenarios. Ideally, when a unit test case fails, we should be able to guess the root cause of the failure without debugging the code; this is only possible when we manage to isolate the dependencies of our CUT.
The key benefit of this approach is that the CUT can be tested even before the dependency is implemented, which helps test 60~70 percent of the code without the dependencies. This naturally reduces the time to market the software product.
This is where the Google mock or gmock comes in handy. Let's check how we can refactor our code to enable dependency injection. Though it sounds very complex, the effort required to refactor code isn't that complex. In reality, the effort required to refactor your production code could be more complex, but it is worth the effort. Let's take a look at the refactored Mobile class shown in Figure 7.48:
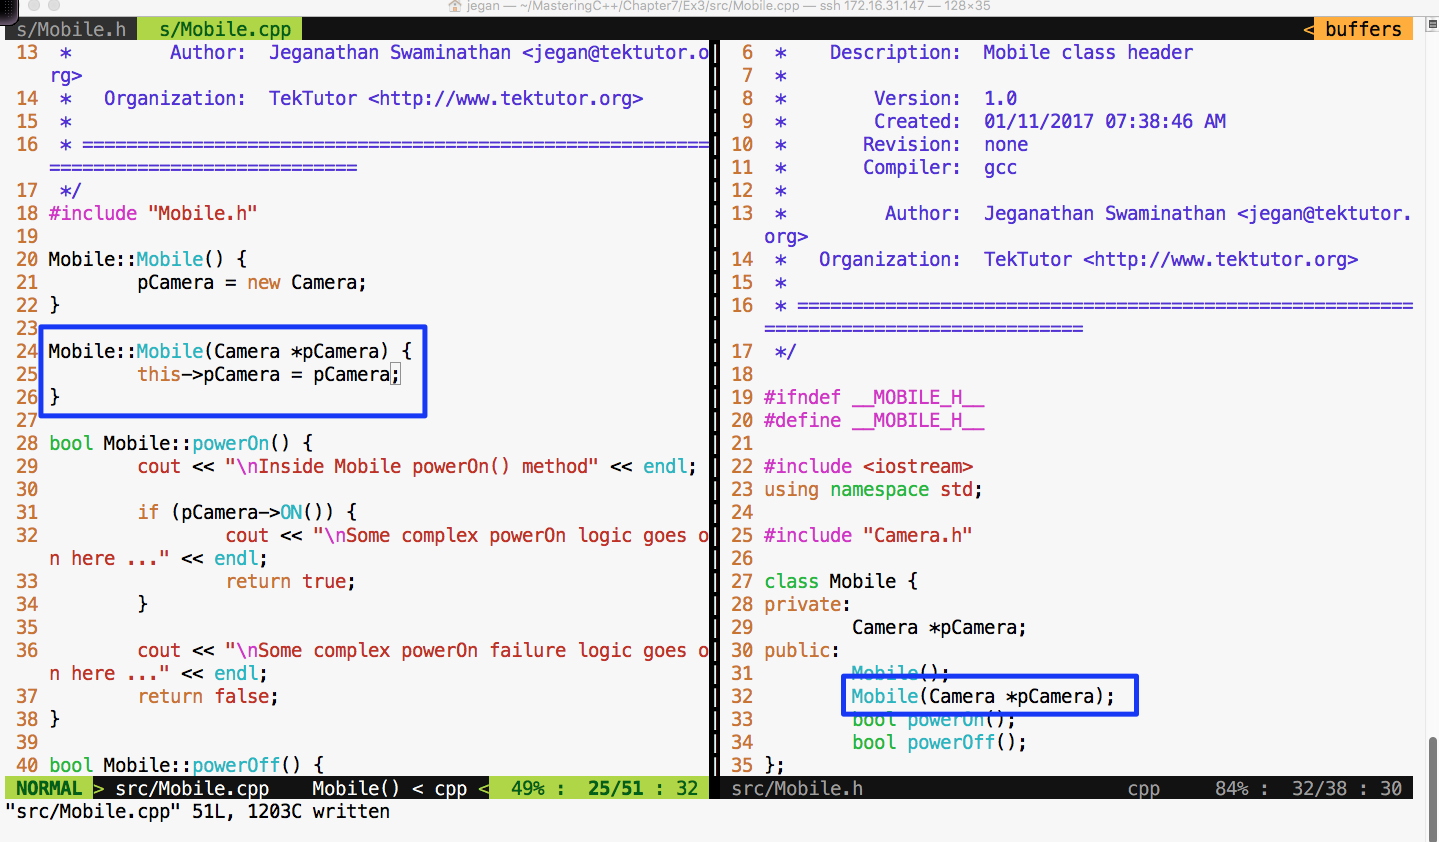
In the Mobile class, I have added an overloaded constructor that takes camera as an argument. This technique is called constructor dependency injection. Let's see how this simple yet powerful technique could help us isolate the camera dependency while testing the powerOn() functionality of Mobile.
Also, we must refactor the Camera.h header file and declare the ON() and OFF() methods as virtual in order for the gmock framework to help us stub these methods, as shown in Figure 7.49:
Now let's refactor our test case as shown in Figure 7.50:
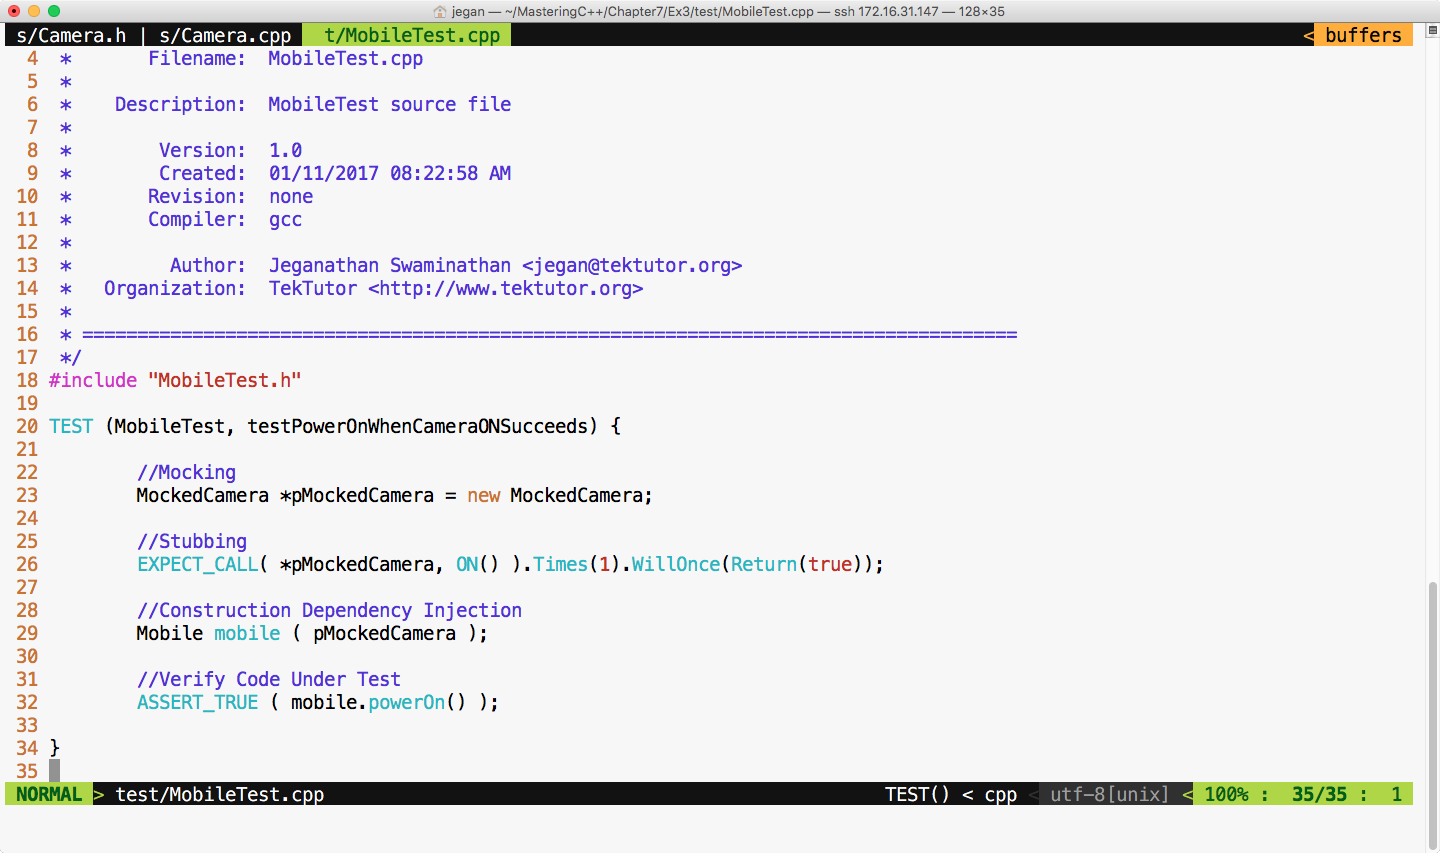
We are all set to build and execute the test cases. The test outcome is expected as shown in Figure 7.51:
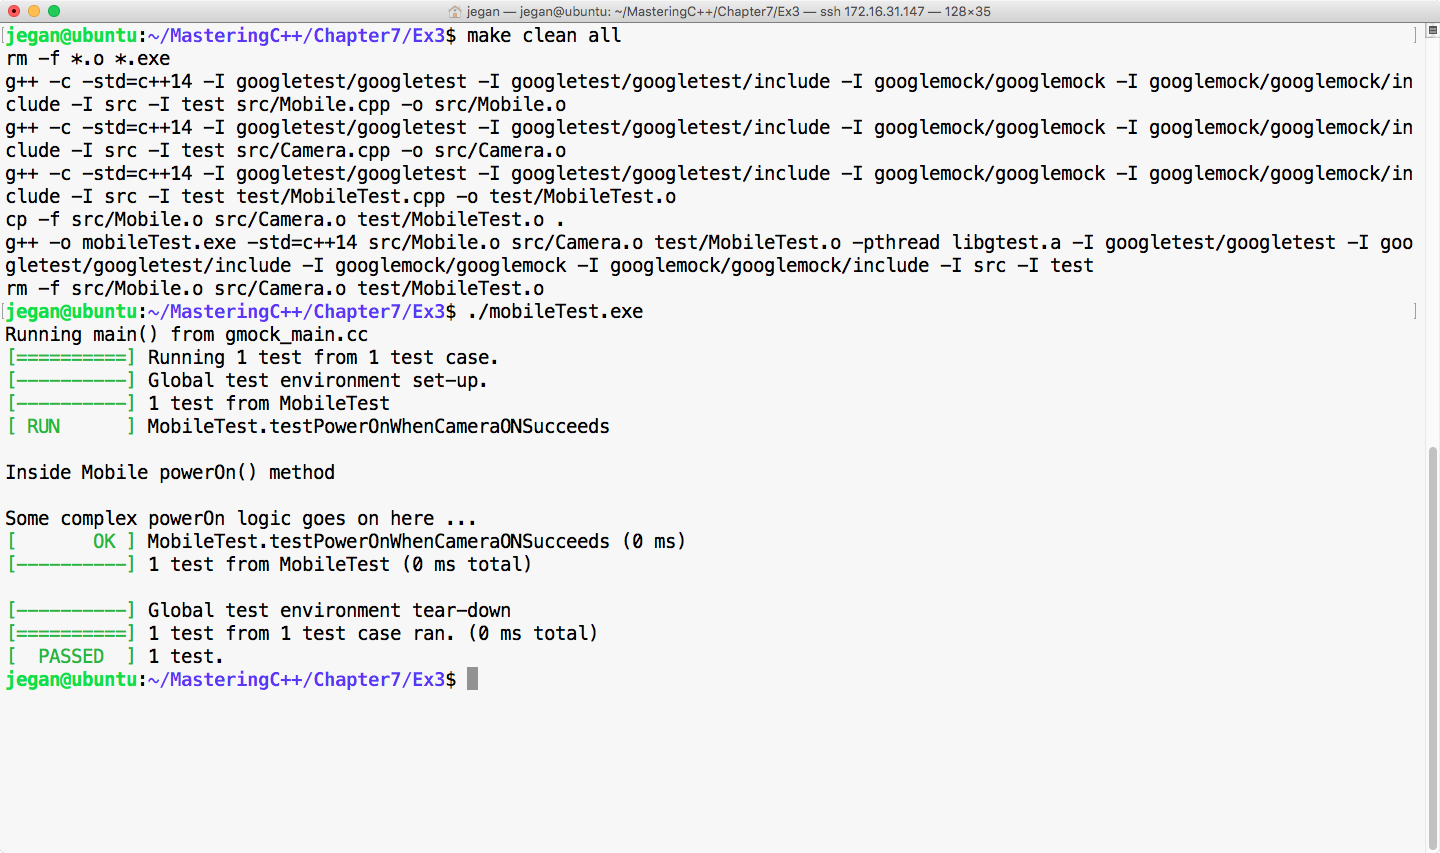
Cool! Not only has our test case passed, but we have also isolated our CUT from its camera dependency, which is evident as we don't see the print statements from the ON() method of camera. The bottom line is you have now learned how to unit test code by isolating its dependencies.
Happy TDD!
In this chapter, you learned quite a lot about TDD, and the following is the summary of the key takeaway points:
You have learned TDD and how to automate Unit Test Cases, Integration Test Cases, and Interaction Test cases in a bottom-up approach. With BDD, you will learn the top-down development approach, writing end-to-end functionalities and test cases and other complex test scenarios that we did not cover while discussing TDD.
In the next chapter, you will learn about Behavior-Driven Development.
This chapter covers the following topics:
In the following sections, let's look into each topic with easy-to-digest and interesting code samples in a practical fashion.
Behavior-driven development (BDD) is an outside-in development technique. BDD encourages capturing the requirements as a set of scenarios or use cases that describe how the end user will use the feature. The scenario will precisely express what will be the input supplied and what is the expected response from the feature. The best part of BDD is that it uses a domain-specific language (DSL) called Gherkin to describe the BDD scenarios.
Gherkin is an English-like language that is used by all the BDD test frameworks. Gherkin is a business-readable DSL that helps you describe the test case scenarios, keeping out the implementation details. The Gherkin language keywords are a bunch of English words; hence the scenarios can be understood by both technical and non-technical members involved in a software product or a project team.
Did I tell you that the BDD scenarios written in Gherkin languages serve as both documentation and test cases? As the Gherkin language is easy to understand and uses English-like keywords, the product requirements can be directly captured as BDD scenarios, as opposed to boring Word or PDF documents. Based on my consulting and industry experience, I have observed that a majority of the companies never update the requirement documents when the design gets refactored in the due course of time. This leads to stale and non-updated documents, which the development team will not trust for their reference purposes. Hence, the effort that has gone towards preparing the requirements, high-level design documents, and low-level design documents goes to waste in the long run, whereas Cucumber test cases will stay updated and relevant at all times.
TDD is an inside-out development technique whereas BDD is an outside-in development technique. TDD mainly focuses on unit testing and integration test case automation.
BDD focuses on end-to-end functional test cases and user acceptance test cases. However, BDD could also be used for unit testing, smoke testing, and, literally, every type of testing.
BDD is an extension of the TDD approach; hence, BDD also strongly encourages test-first development. It is quite natural to use both BDD and TDD in the same product; hence, BDD isn't a replacement for TDD. BDD can be thought of as a high-level design document, while TDD is the low-level design document.
In C++, TDD test cases are written using testing frameworks such as CppUnit, gtest, and so on, which require a technical background to understand them and hence, are generally used only by developers.
In C++, BDD test cases are written using a popular test framework called cucumber-cpp. The cucumber-cpp framework expects that the test cases are written in the Gherkin language, while the actual test case implementations can be done with any test framework, such as gtest or CppUnit.
However, in this book, we will be using cucumber-cpp with the gtest framework.
Gherkin is the universal language used by every BDD framework for various programming languages that enjoy BDD support.
Gherkin is a line-oriented language, similar to YAML or Python. Gherkin will interpret the structure of the test case based on indentations.
The # character is used for a single line of comment in Gherkin. At the time of writing this book, Gherkin support about 60 keywords.
Gherkin is a DSL used by the Cucumber framework.
Installing the cucumber-cpp framework is quite straightforward in Linux. All you need to do is either download or clone the latest copy of cucumber-cpp.
The following command can be used to clone the cucumber-cpp framework:
git clone https://github.com/cucumber/cucumber-cpp.git
The cucumber-cpp framework is supported in Linux, Windows, and Macintosh. It can be integrated with Visual Studio on Windows or Xcode on macOS.
The following screenshot demonstrates the Git clone procedure:
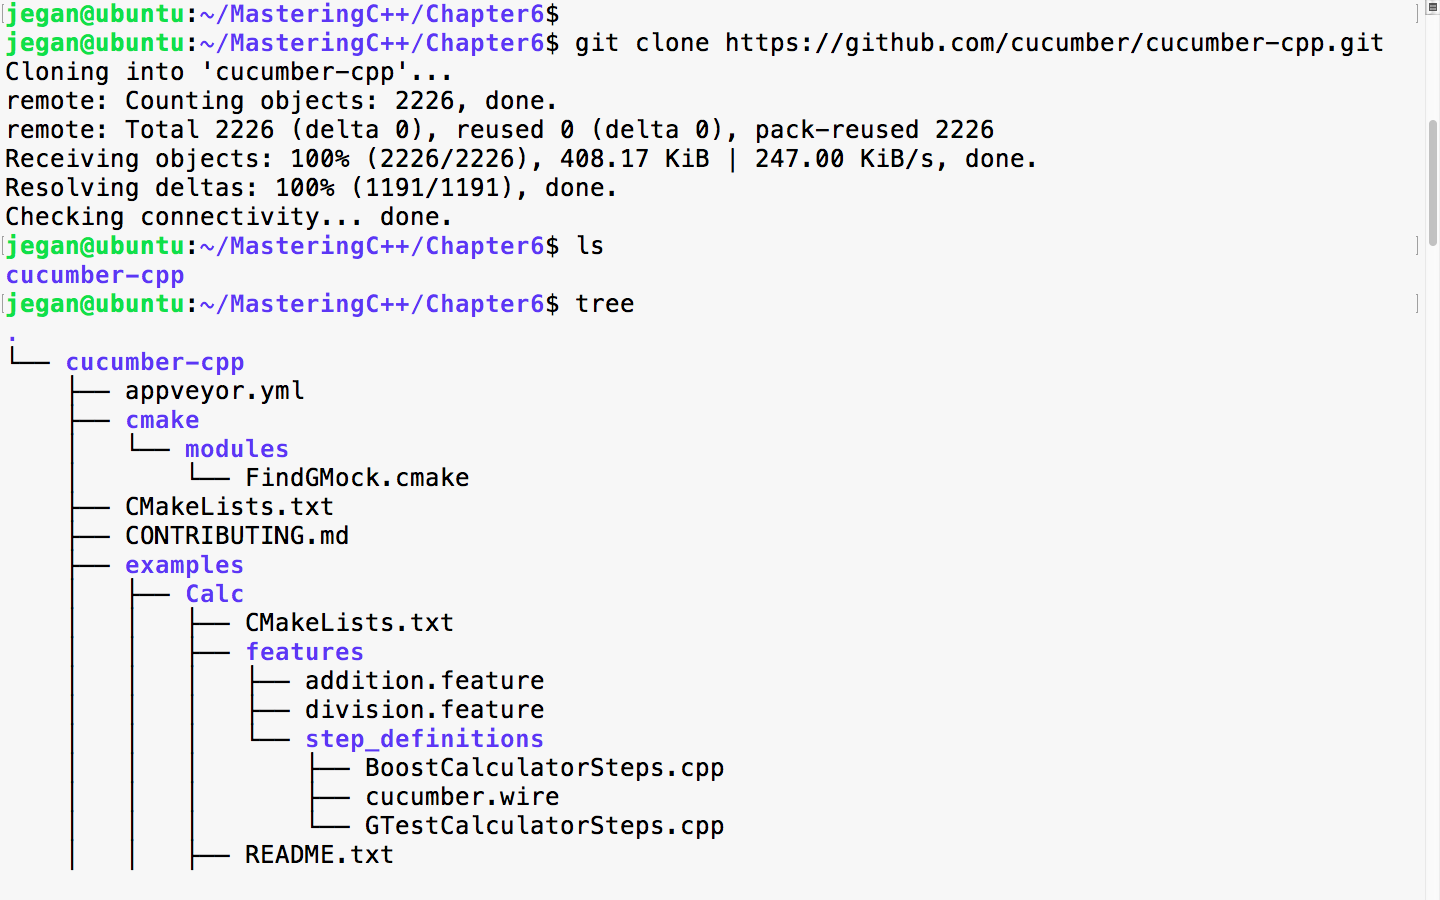
As cucumber-cpp depends on a wire protocol to allow the writing of BDD test case step definitions in the C++ language, we need to install Ruby.
The following command helps you install Ruby on your Ubuntu system. This is one of the prerequisite software that is required for the cucumber-cpp framework:
sudo apt install ruby
The following screenshot demonstrates the Ruby installation procedure:
Once the installation is complete, please ensure that Ruby is installed properly by checking its version. The following command should print the version of Ruby installed on your system:
ruby --version
In order to complete the Ruby installation, we need to install the ruby-dev packages, as follows:
sudo apt install ruby-dev
Next, we need to ensure that the bundler tool is installed so that the Ruby dependencies are installed by the bundler tool seamlessly:
sudo gem install bundler
bundle install
If it all went smooth, you can go ahead and check if the correct version of Cucumber, Ruby, and Ruby's tools are installed properly. The bundle install command will ensure that Cucumber and other Ruby dependencies are installed. Make sure you don't install bundle install as a sudo user; this will prevent non-root from accessing the Ruby gem packages:
We are almost done, but we are not there yet. We need to build the cucumber-cpp project; as part of that, let's get the latest test suite for the cucumber-cpp framework:
git submodule init
git submodule update
We go on to install the ninja and boost libraries before we can initiate the build. Though we aren't going to use the boost test framework in this chapter, the travis.sh script file looks for the boost library. Hence, I would suggest installing the boost library in general, as part of Cucumber:
sudo apt install ninja-build
sudo apt-get install libboost-all-dev
Now, it's time to build the cucumber-cpp framework. Let's create the build folder. In the cucumber-cpp folder, there will be a shell script by the name, travis.sh. You got to execute the script to build and execute the test cases:
sudo ./travis.sh
Though the previous approach works, my personal preference and recommendation would be the following approach. The reason behind recommending the following approach is that the build folder is supposed to be created as a non-root user, as anyone should be able to perform the build once the cucumber-cpp setup is complete. You should be able to find the instructions in the README.md file under the cucumber-cpp folder:
git submodule init
git submodule update
cmake -E make_directory build
cmake -E chdir build cmake --DCUKE_ENABLE_EXAMPLES=on ..
cmake --build build
cmake --build build --target test
cmake --build build --target features
If you were able to complete all the previous installation steps exactly as explained, you are all set to start playing with cucumber-cpp. Congrats!!!
Every product feature will have a dedicated feature file. The feature file is a text file with the .feature extension. A feature file can contain any number of scenarios, and each scenario is equivalent to a test case.
Let's take a look at a simple feature file example:
1 # language: en
2
3 Feature: The Facebook application should authenticate user login.
4
5 Scenario: Successful Login
6 Given I navigate to Facebook login page https://www.facebook.com
7 And I type jegan@tektutor.org as Email
8 And I type mysecretpassword as Password
9 When I click the Login button
10 Then I expect Facebook Home Page after Successful Login
Cool, it appears like plain English, right? But trust me, this is how Cucumber test cases are written! I understand your doubt--it looks easy and cool but how does this verify the functionality, and where is the code that verifies the functionality? The cucumber-cpp framework is a cool framework, but it doesn't natively support any testing functionalities; hence cucumber-cpp depends on the gtest, CppUnit, other test frameworks. The test case implementation is written in a Steps file, which can be written in C++ using the gtest framework in our case. However, any test framework will work.
Every feature file will start with the Feature keyword followed by one or more lines of description that describe the feature briefly. In the feature file, the words Feature, Scenario, Given, And, When, and Then are all Gherkin keywords.
A feature file may contain any number of scenarios (test cases) for a feature. For instance, in our case, login is the feature, and there could be multiple login scenarios as follows:
Every line following the scenario will translate into one function in the Steps_definition.cpp source file. Basically, the cucumber-cpp framework maps the feature file steps with a corresponding function in the Steps_definition.cpp file using regular expressions.
Gherkin supports over 60 spoken languages. As a best practice, the first line of a feature file will indicate to the Cucumber framework that we would like to use English:
1 # language: en
The following command will list all the spoken languages supported by the cucumber-cpp framework:
cucumber -i18n help
The list is as follows:
Like TDD, the Cucumber framework too recommends a project folder structure. The recommended cucumber-cpp project folder structure is as follows:
The src folder will contain the production code, that is, all your project files will be maintained under the src directory. The BDD feature files will be maintained under the features folder and its respective Steps file, which has either boost test cases or gtest cases. In this chapter, we will be using the gtest framework with cucumber-cpp. The wire file has wire protocol-related connection details such as the port and others. The CMakeLists.txt is the build script that has the instructions to build your project along with its dependency details, just like Makefile used by the MakeBuild utility.
Let's write our very first Cucumber test case! As this is our first exercise, I would like to keep it short and simple. First, let's create the folder structure for our HelloBDD project.
To create the Cucumber project folder structure, we can use the cucumber utility, as follows:
cucumber --init
This will ensure that the features and steps_definitions folders are created as per Cucumber best practices:

Once the basic folder structure is created, let's manually create the rest of the files:
mkdir src
cd HelloBDD
touch CMakeLists.txt
touch features/hello.feature
touch features/step_definitions/cucumber.wire
touch features/step_definitions/HelloBDDSteps.cpp
touch src/Hello.h
touch src/Hello.cpp
Once the folder structure and empty files are created, the project folder structure should look like the following screenshot:
It's time to start applying our Gherkin knowledge in action; hence, let's first start with the feature file:
# language: en
Feature: Application should be able to print greeting message Hello BDD!
Scenario: Should be able to greet with Hello BDD! message
Given an instance of Hello class is created
When the sayHello method is invoked
Then it should return "Hello BDD!"
Let's take a look at the cucumber.wire file:
host: localhost
port: 3902
Now let's see how to write the steps file using the gtest Framework.
You can observe the written steps files using gtest in the following screenshot:
The following header files ensure that the gtest header and Cucumber headers necessary for writing Cucumber steps are included:
#include <gtest/gtest.h>
#include <cucumber-cpp/autodetect.hpp>
Now let's proceed with writing the steps:
struct HelloCtx {
Hello *ptrHello;
string actualResponse;
};
The HelloCtx struct is a user-defined test context that holds the object instance under test and its test response. The cucumber-cpp framework offers a smart ScenarioScope class that allows us to access the object under test and its output, across all the steps in a Cucumber test scenario.
For every Given, When, and Then statement that we wrote in the feature file, there is a corresponding function in the steps file. The appropriate cpp functions that correspond to Given, When, and Then are mapped with the help of regular expressions.
For instance, consider the following Given line in the feature file:
Given an instance of Hello class is created
This corresponds to the following cpp function that gets mapped with the help of regex. The ^ character in the regex implies that the pattern starts with an, and the $ character implies that the pattern ends with created:
GIVEN("^an instance of Hello class is created$")
{
ScenarioScope<HelloCtx> context;
context->ptrHello = new Hello();
}
As the GIVEN step says that, at this point, we must ensure that an instance of the Hello object is created; the corresponding C++ code is written in this function to instantiate an object of the Hello class.
On a similar note, the following When step and its corresponding cpp functions are mapped by cucumber-cpp:
When the sayHello method is invoked
It is important that the regex matches exactly; otherwise, the cucumber-cpp framework will report that it can't find the steps function:
WHEN("^the sayHello method is invoked$")
{
ScenarioScope<HelloCtx> context;
context->actualResponse = context->ptrHello->sayHello();
}
Now let's look at the Hello.h file:
#include <iostream>
#include <string>
using namespace std;
class Hello {
public:
string sayHello();
};
Here is the respective source file, that is, Hello.cpp:
#include "Hello.h"
string Hello::sayHello() {
return "Hello BDD!";
}
Finally, let's write CMakeLists.txt:
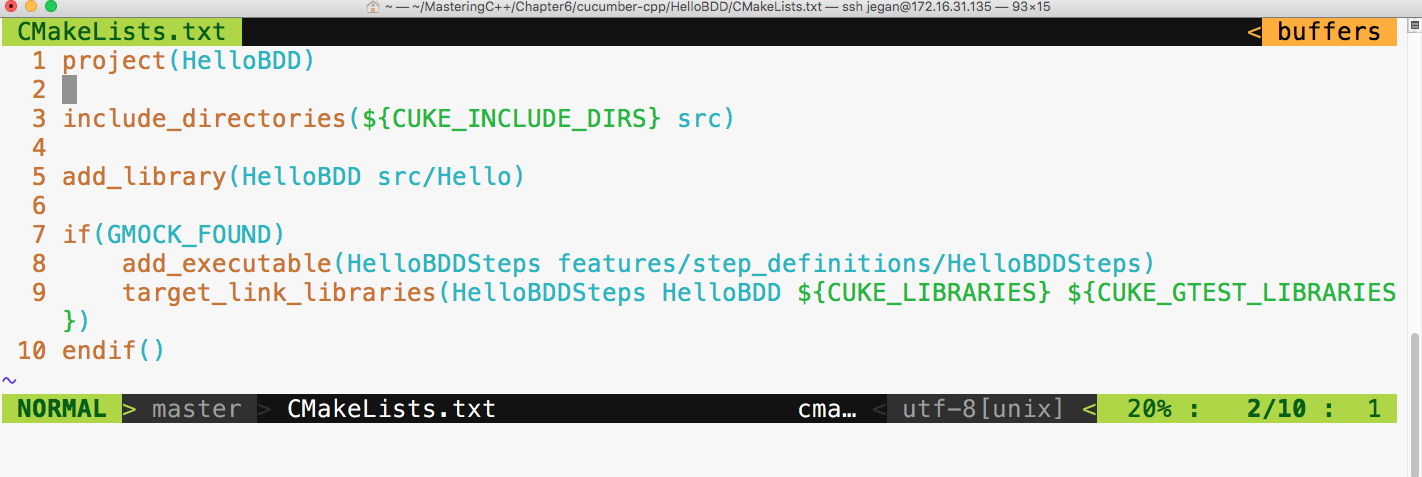
The first line implies the name of the project. The third line ensures that the Cucumber header directories and our project's include_directories are in the INCLUDE path. The fifth line basically instructs the cmake utility to create a library out of the files present under the src folder, that is, Hello.cpp, and its Hello.h file. The seventh line detects whether the gtest framework is installed on our system, and the eighth line ensures that the HelloBDDSteps.cpp file is compiled. Finally, in the ninth line, the final executable is created, linking all the HelloBDD libraries that have our production code, the HelloBDDSteps object file, and the respective Cucumber and gtest library files.
There is one last configuration that we need to do before we start building our project:
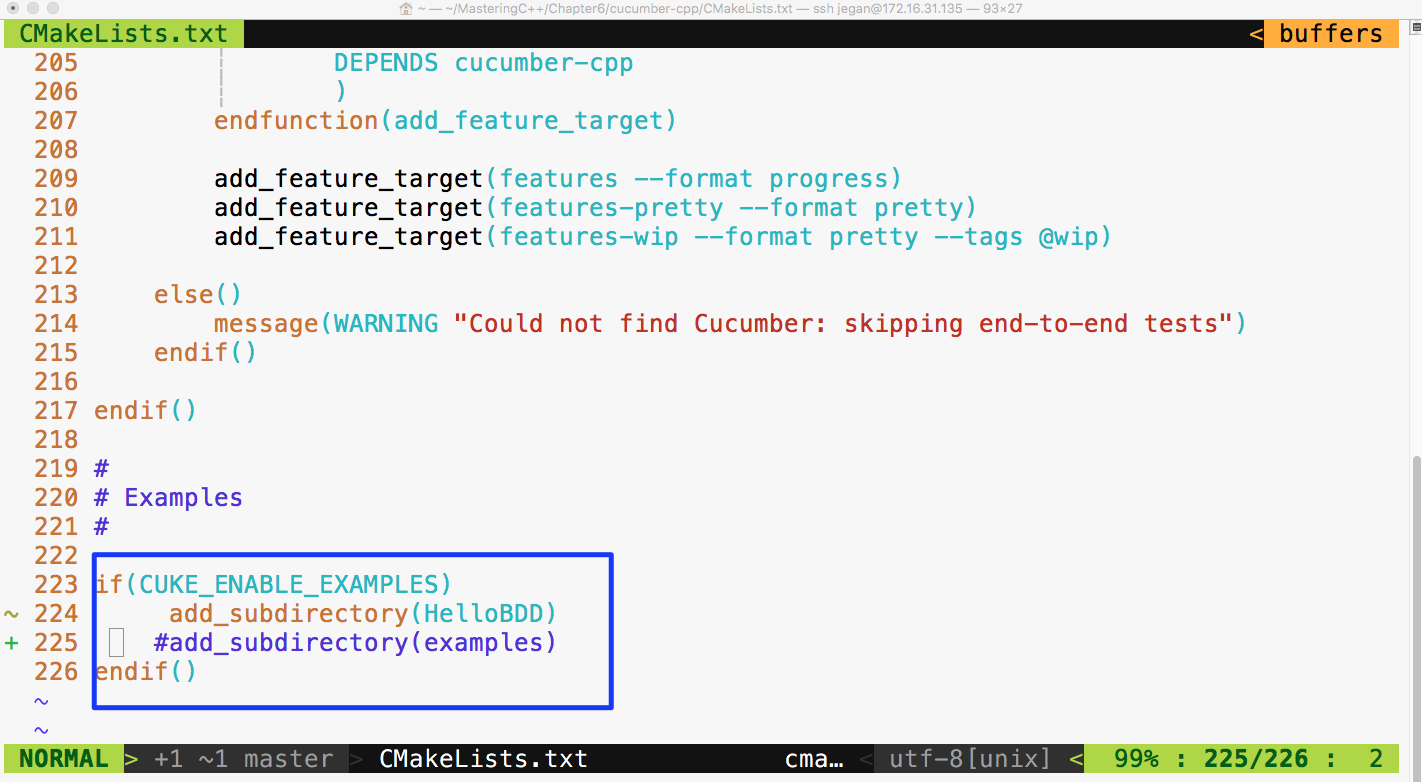
Basically, I have commented the examples subdirectories and added our HelloBDD project in CMakeLists.txt present under the cucumber-cpp folder, as shown earlier.
As we have created the project as per cucumber-cpp best practices, let's navigate to the HelloBDD project home and issue the following command:
cmake --build build
The following screenshot shows the build procedure:
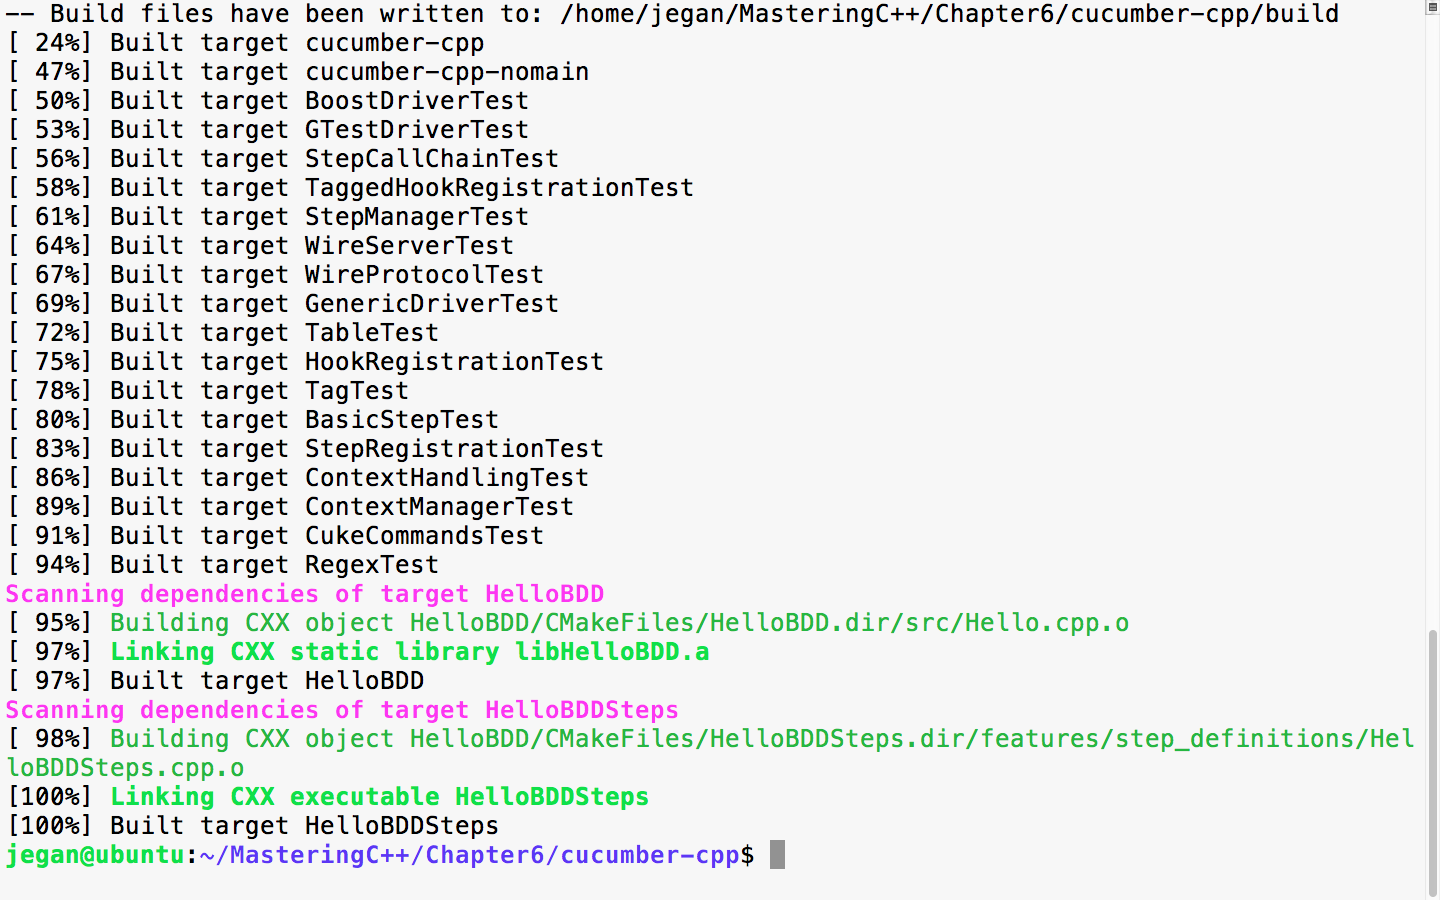
Now let's execute the test case. This involves two steps, as we are using the wire protocol. Let's first launch the test case executable in background mode and then Cucumber, as follows:
cmake --build build
build/HelloBDD/HelloBDDSteps > /dev/null &
cucumber HelloBDD
Redirecting to /dev/null isn't really mandatory. The main purpose of redirecting to a null device is to avoid distractions from the print statement that an application may spit in the terminal output. Hence, it is a personal preference. In case you prefer to see the debug or general print statements from your application, feel free to issue the command without redirection:
build/HelloBDD/HelloBDDSteps &
The following screenshot demonstrates the build and test execution procedure:
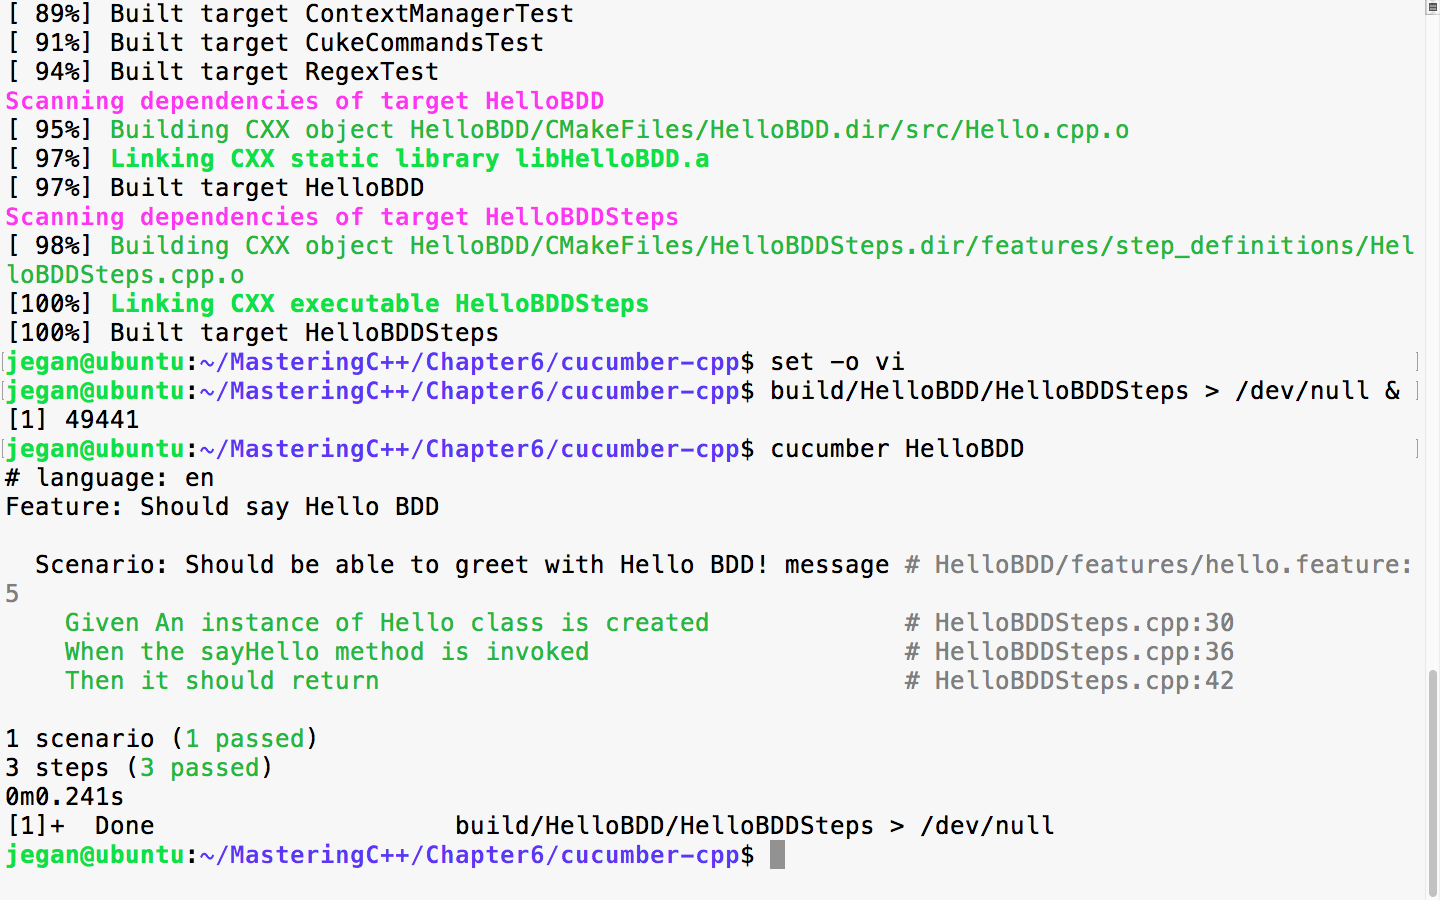
Congrats! our very first cucumber-cpp test case has passed. Each scenario represents a test case and the test case includes three steps; as all the steps passed, the scenario is reported as passed.
Do you want to quickly check whether the feature files and steps files are written correctly, without really executing them? Cucumber has a quick and cool feature to do so:
build/HelloBDD/HelloBDDSteps > /dev/null &
This command will execute our test application in the background mode. /dev/null is a null device in Linux OS, and we are redirecting all the unwanted print statements from the HelloBDDSteps executable to the null device to ensure it doesn't distract us while we execute our Cucumber test cases.
The next command will allow us to dry run the Cucumber test scenario:
cucumber --dry-run
The following screenshot shows the test execution:

Just like TDD, BDD also insists on following a test-first development approach. Hence, in this section, let's explore how we could write an end-to-end feature following a test-first development approach the BDD way!
Let's take a simple example that helps us understand the BDD style of coding. We will write an RPNCalculator application that does addition, subtraction, multiplication, division, and complex math expressions that involve many math operations in the same input.
Let's create our project folder structure as per Cucumber standards:
mkdir RPNCalculator
cd RPNCalculator
cucumber --init
tree
mkdir src
tree
The following screenshot demonstrates the procedure visually:
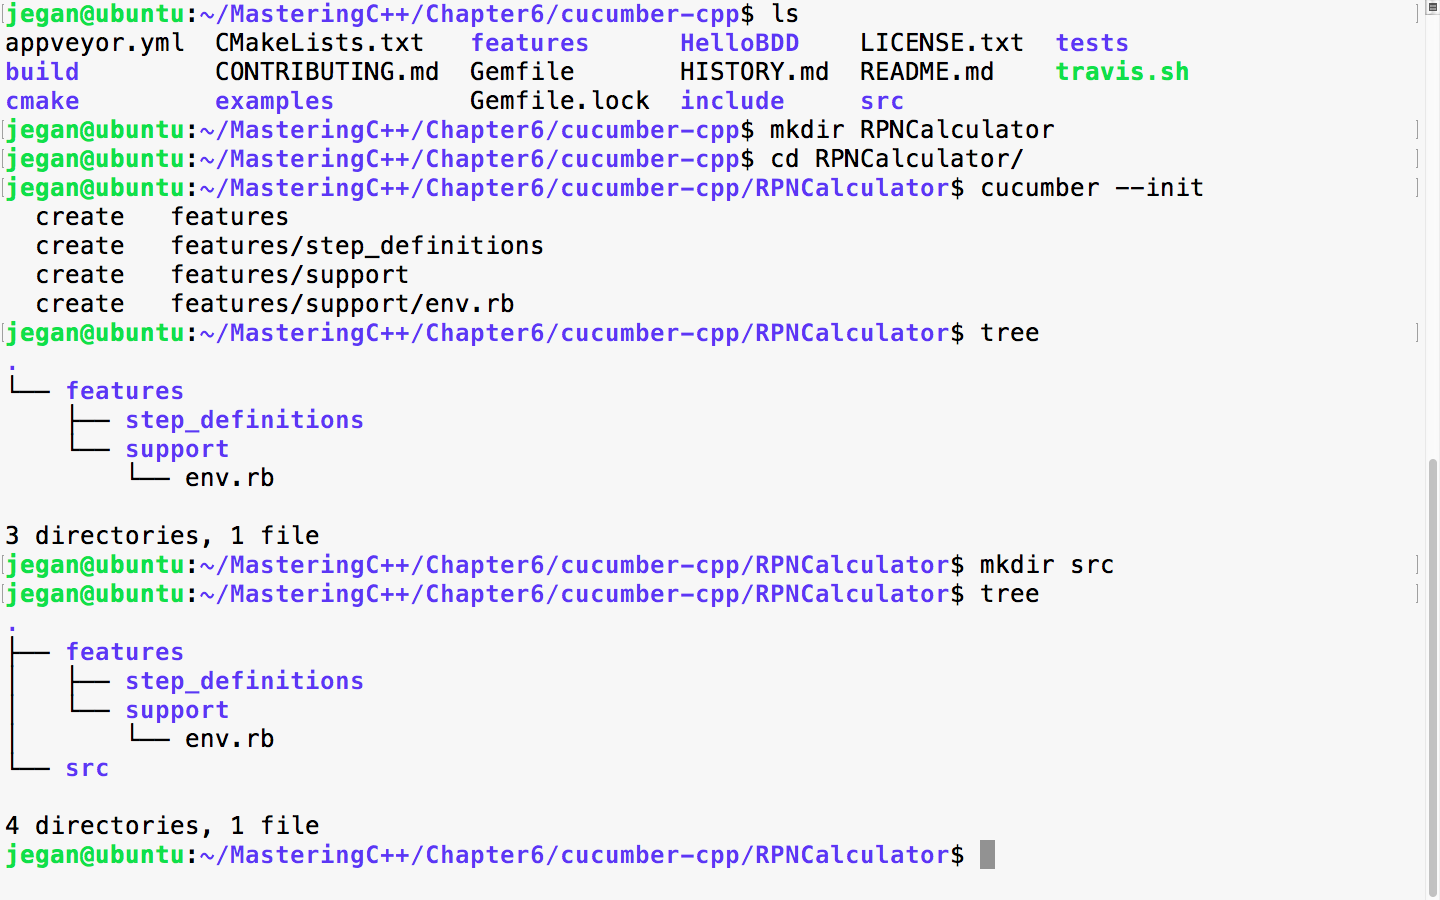
Great! The folder structure is now created. Now, let's create empty files with a touch utility to help us visualize our final project folder structure along with the files:
touch features/rpncalculator.feature
touch features/step_definitions/RPNCalculatorSteps.cpp
touch features/step_definitions/cucumber.wire
touch src/RPNCalculator.h
touch src/RPNCalculator.cpp
touch CMakeLists.txt
Once the dummy files are created, the final project folder structure will look like the following screenshot:
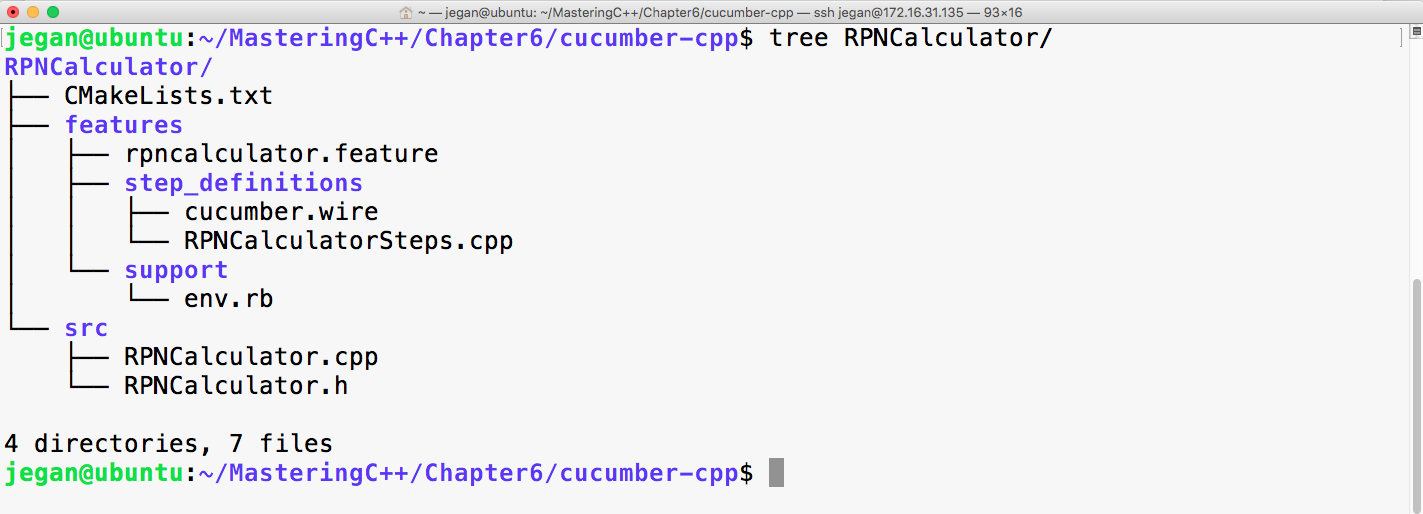
As usual, the Cucumber wire file is going to look as follows. In fact, throughout this chapter, this file will look same:
host: localhost
port: 3902
Now, let's start with the rpncalculator.feature file, as shown in the following screenshot:
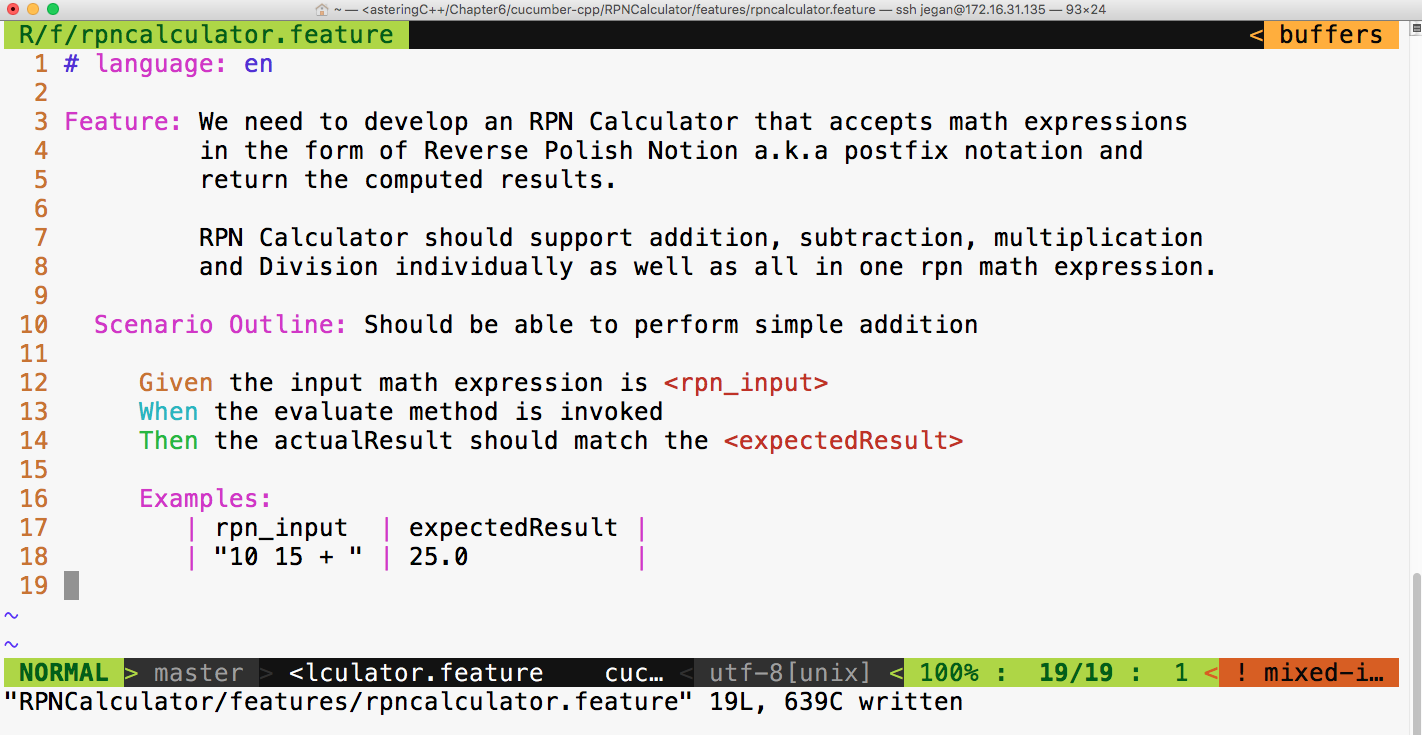
As you can see, the feature description can be pretty elaborate. Did you notice? I have used Scenario Outline in the place of scenario. The interesting part of Scenario Outline is that it allows describing the set of inputs and the corresponding output in the form of a table under the Examples Cucumber section.
We need to add our project in the CMakeLists.txt file at the cucumber-cpp home directory, as follows:
Ensure that CMakeLists.txt under the RPNCalculator folder looks as follows:
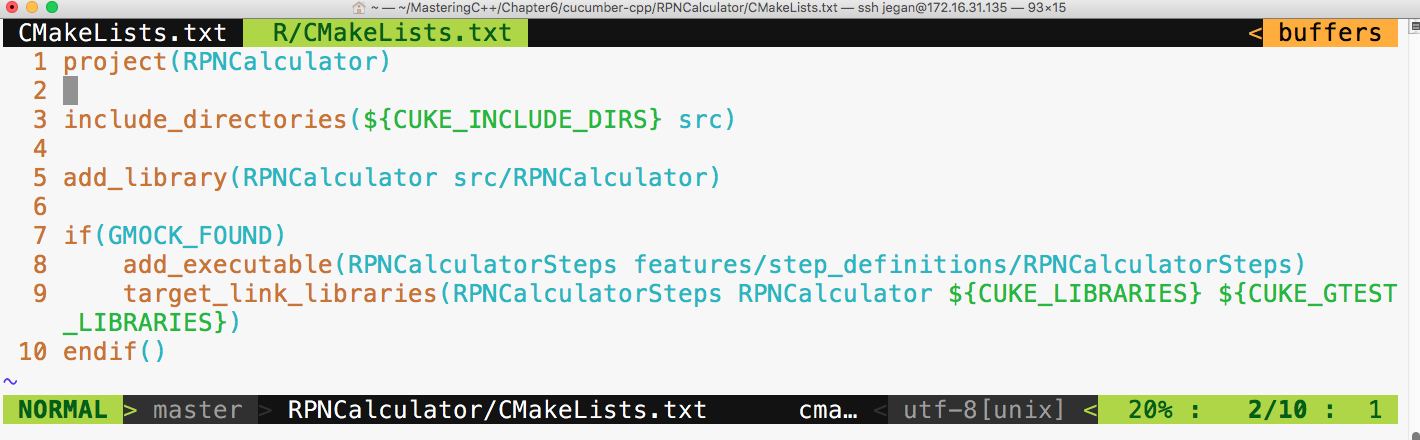
Now, let's build our project with the following command from the cucumber-cpp home directory:
cmake --build build
Let's execute our brand new RPNCalculator Cucumber test cases with the following command:
build/RPNCalculator/RPNCalculatorSteps &
cucumber RPNCalculator
The output looks as follows:
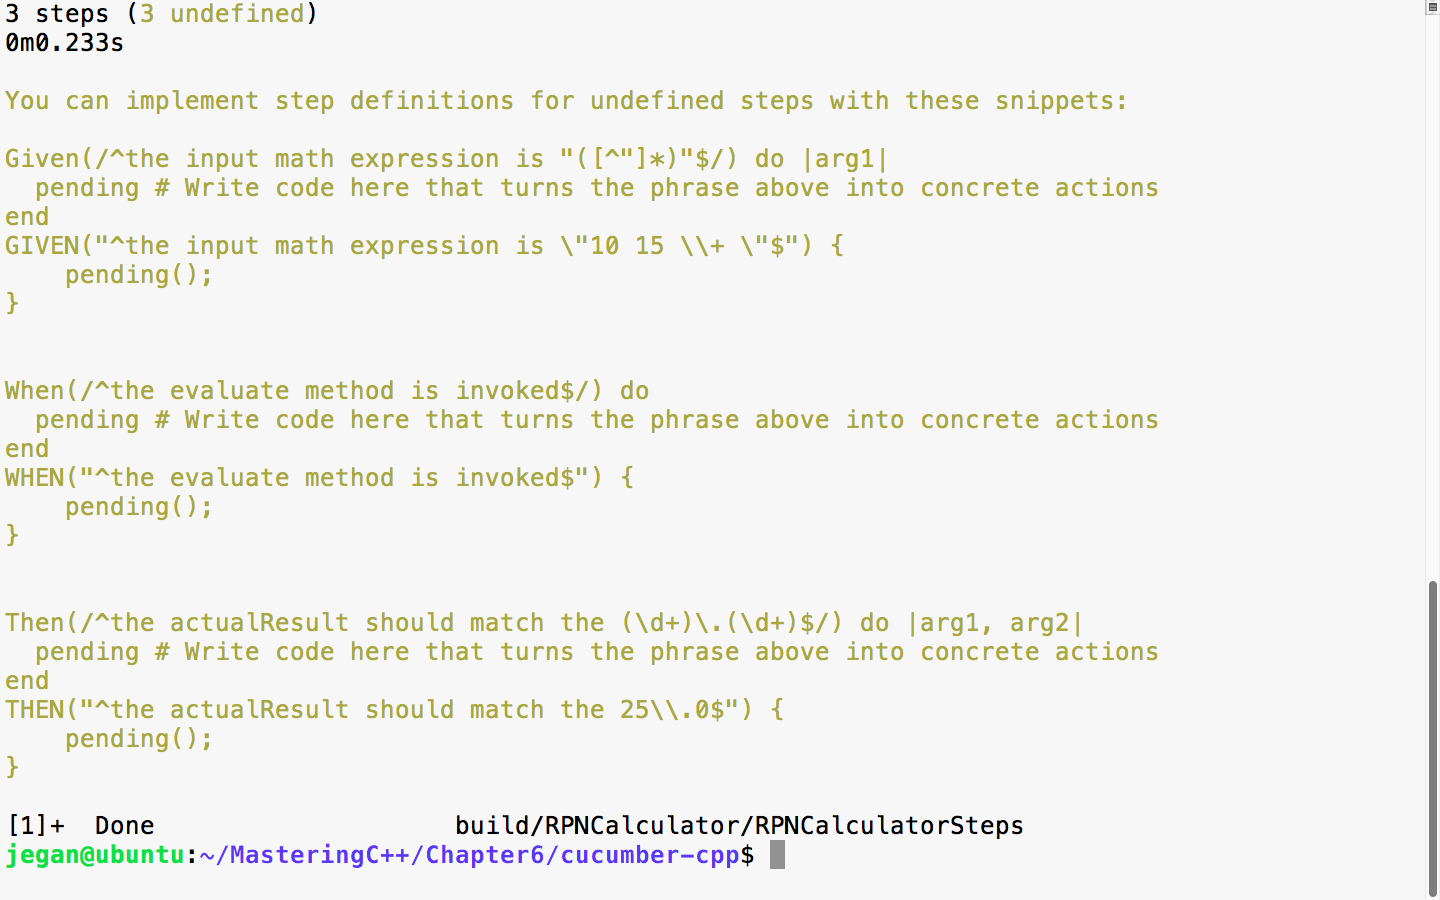
In the preceding screenshot, there are two suggestions for every Given, When, and Then statements we wrote in the feature file. The first version is meant for Ruby and the second is meant for C++; hence, we can safely ignore the step suggestions, which are as follows:
Then(/^the actualResult should match the (d+).(d+)$/) do |arg1, arg2|
pending # Write code here that turns the phrase above into concrete actions
end
As we are yet to implement the RPNCalculatorSteps.cpp file, the Cucumber framework is suggesting us to supply implementations for the previous steps. Let's copy and paste them in the RPNCalculatorSteps.cpp file and complete the steps implementations, as follows:
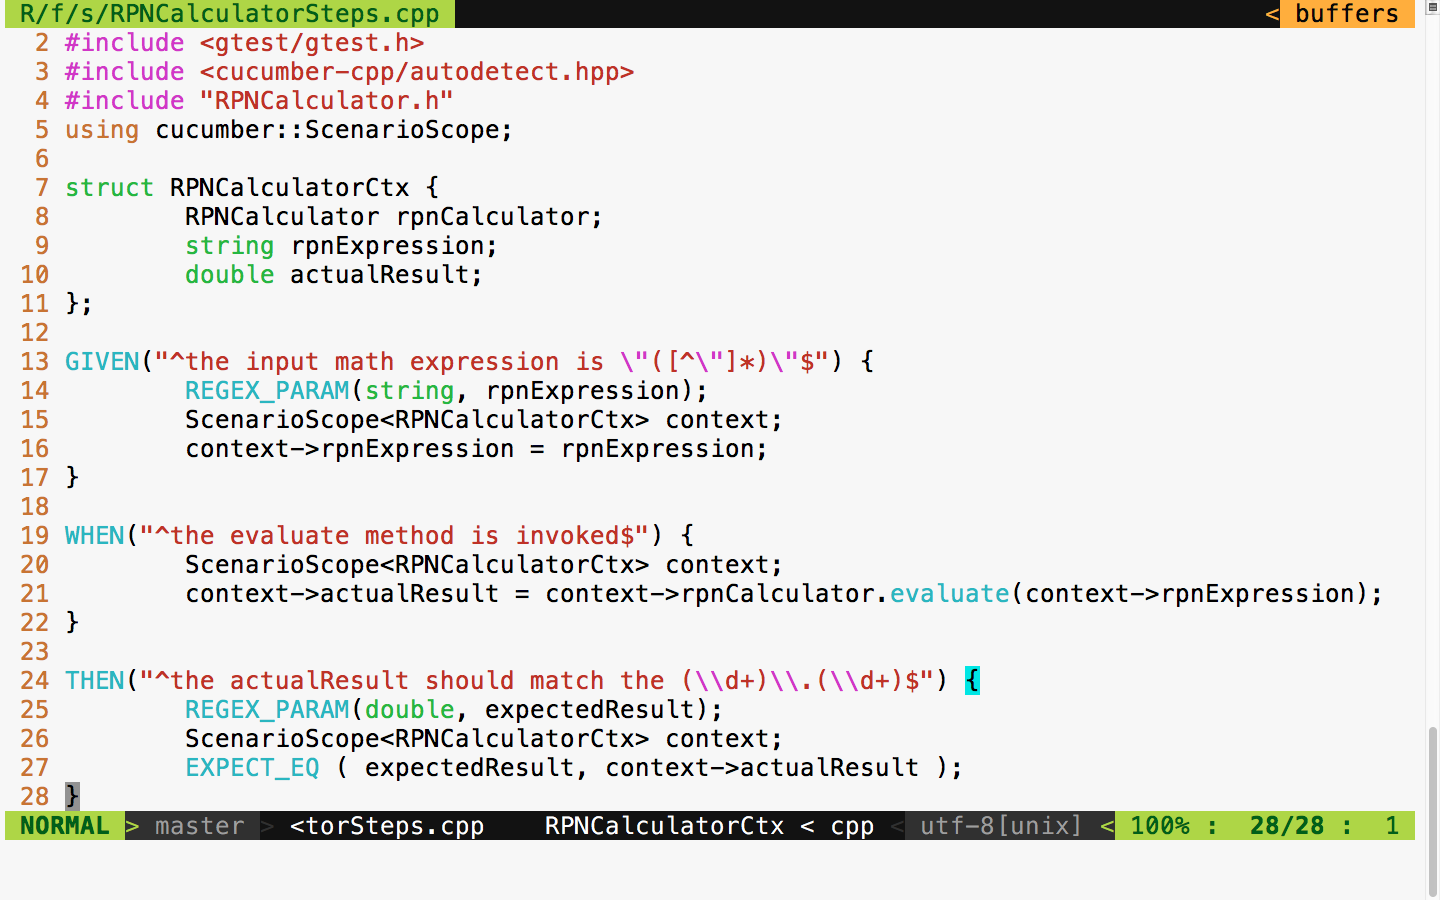
Now, let's try to build our project again with the following command:
cmake --build build
The build log looks as follows:
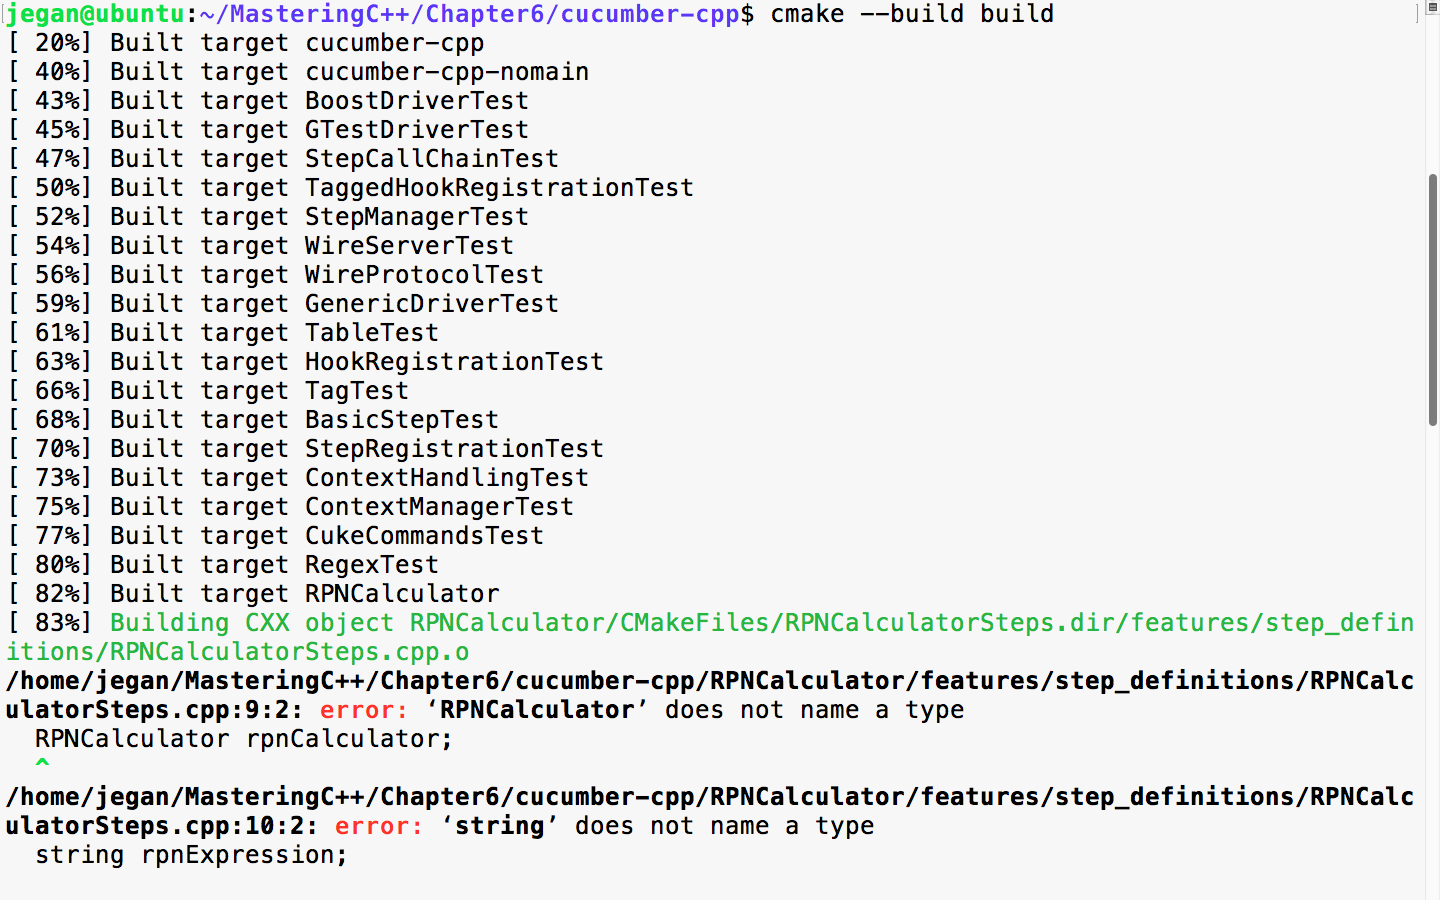
The secret formula behind every successful developer or consultant is that they have strong debugging and problem-solving skills. Analyzing build reports, especially build failures, is a key quality one should acquire to successfully apply BDD. Every build error teaches us something!
The build error is obvious, as we are yet to implement RPNCalculator, as the file is empty. Let's write minimal code such that the code compiles:
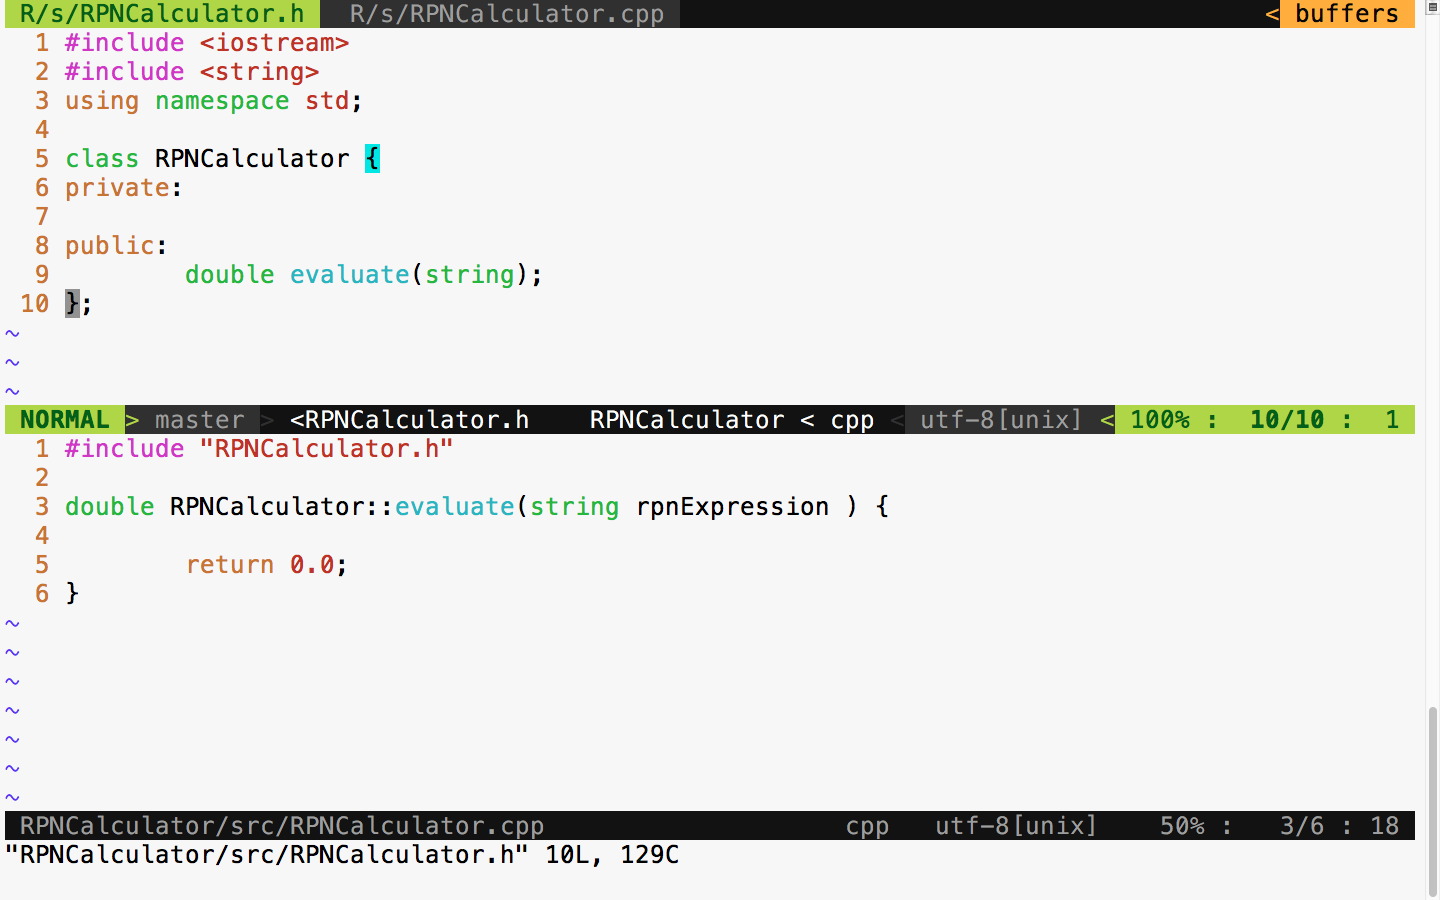
BDD leads to incremental design and development, unlike the waterfall model. The waterfall model encourages upfront design. Typically, in a waterfall model, the design is done initially, and it consumes 30-40% of the overall project effort. The main issue with upfront design is that we will have less knowledge about the feature initially; often, we will have a vague feature knowledge, but it will improve over time. So, it isn't a good idea to put in more effort in the design activity upfront; rather, be open to refactoring the design and code as and when necessary.
Hence, BDD is a natural choice for complex projects.
With this minimal implementation, let's try to build and run the test cases:

Cool! Since the code compiles without errors, let's execute the test case now and observe what happens:
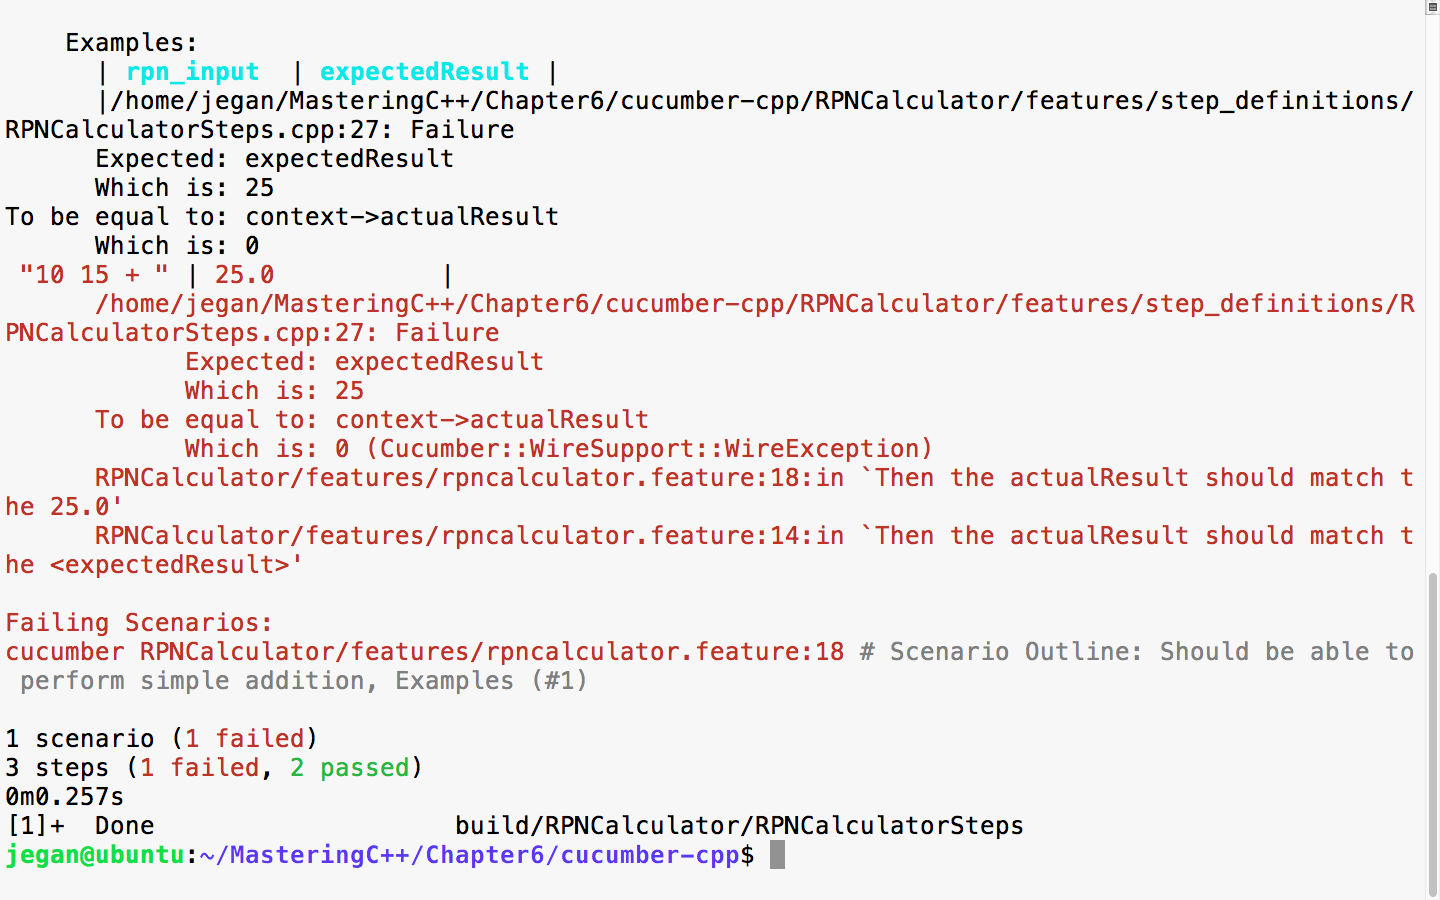
The errors are highlighted in red color as shown in the preceding screenshot by the cucumber-cpp framework. This is expected; the test case is failing as the RPNCalculator::evaluate method is hardcoded to return 0.0.
Now, let's go ahead and implement the code to make this test case pass. The modified RPNCalculator header file looks as follows:
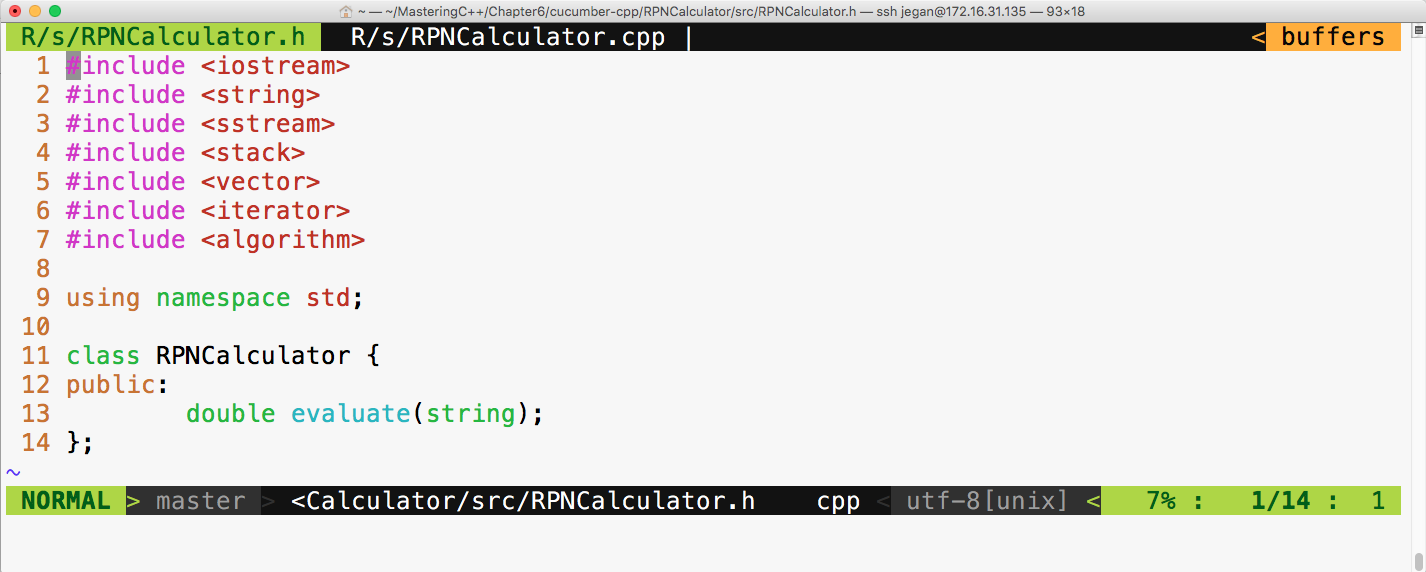
The respective RPNCalculator source file looks as follows:
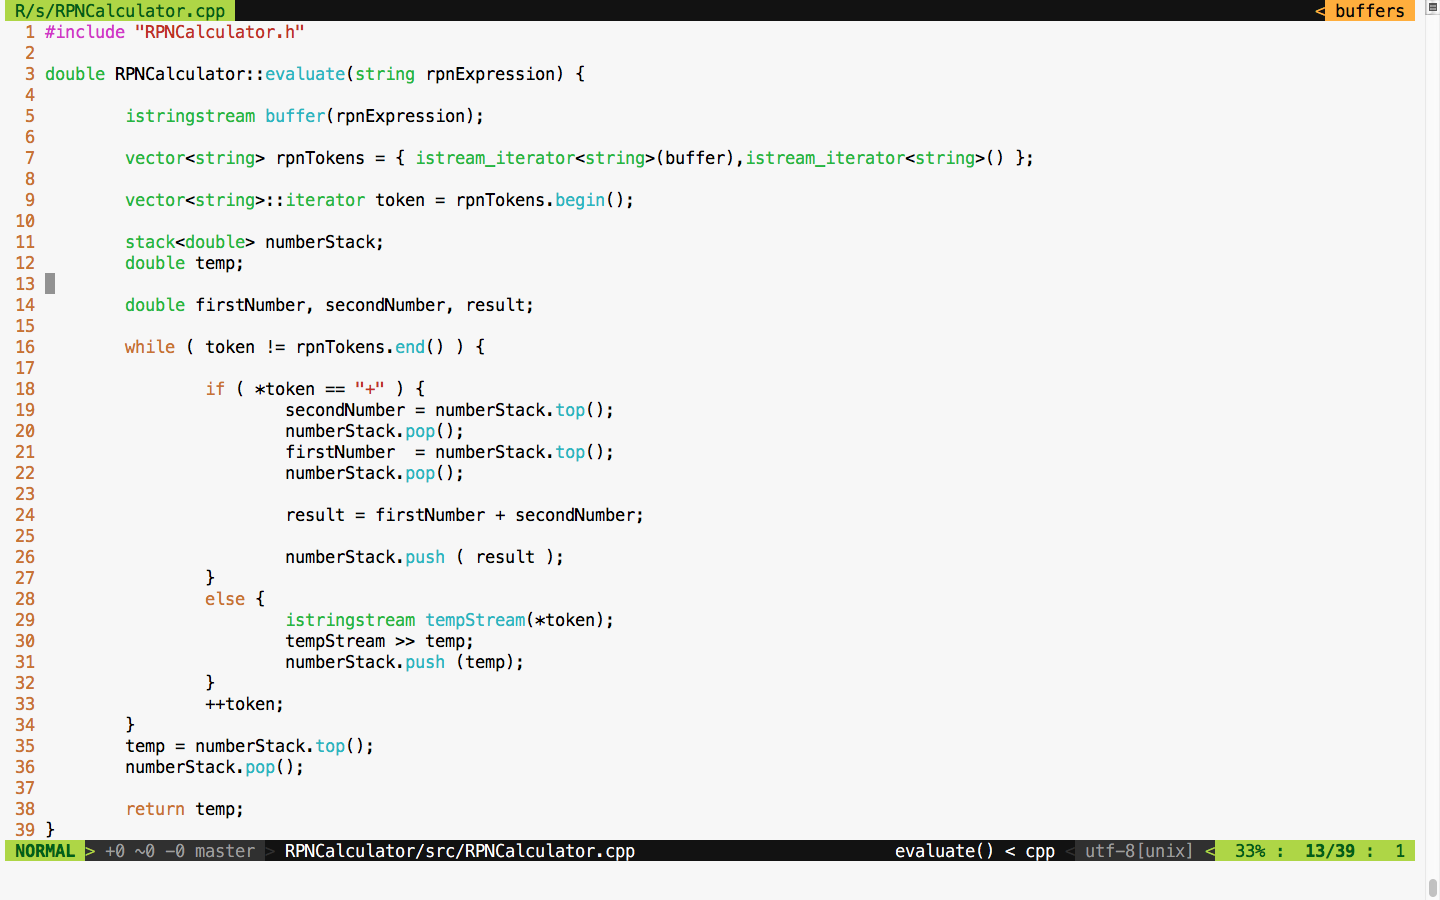
As per BDD practice, note that we have only implemented code that is necessary for supporting the addition operation alone, as per our current Cucumber scenario requirements. Like TDD, in BDD, we are supposed to write only the required amount of code to satisfy the current scenario; this way, we can ensure that every line of code is covered by effective test cases.
Let's now build and test. The following commands can be used to build, launch the steps in the background, and run the Cucumber test cases with a wire protocol, respectively:
cmake --build build
build/RPNCalculator/RPNCalculatorSteps &
cucumber RPNCalculator
The following screenshot demonstrates the procedure of building and executing the Cucumber test case:

Great! Our test scenario is all green now! Let's move on to our next test scenario.
Let's add a scenario in the feature file to test the subtraction operation, as follows:
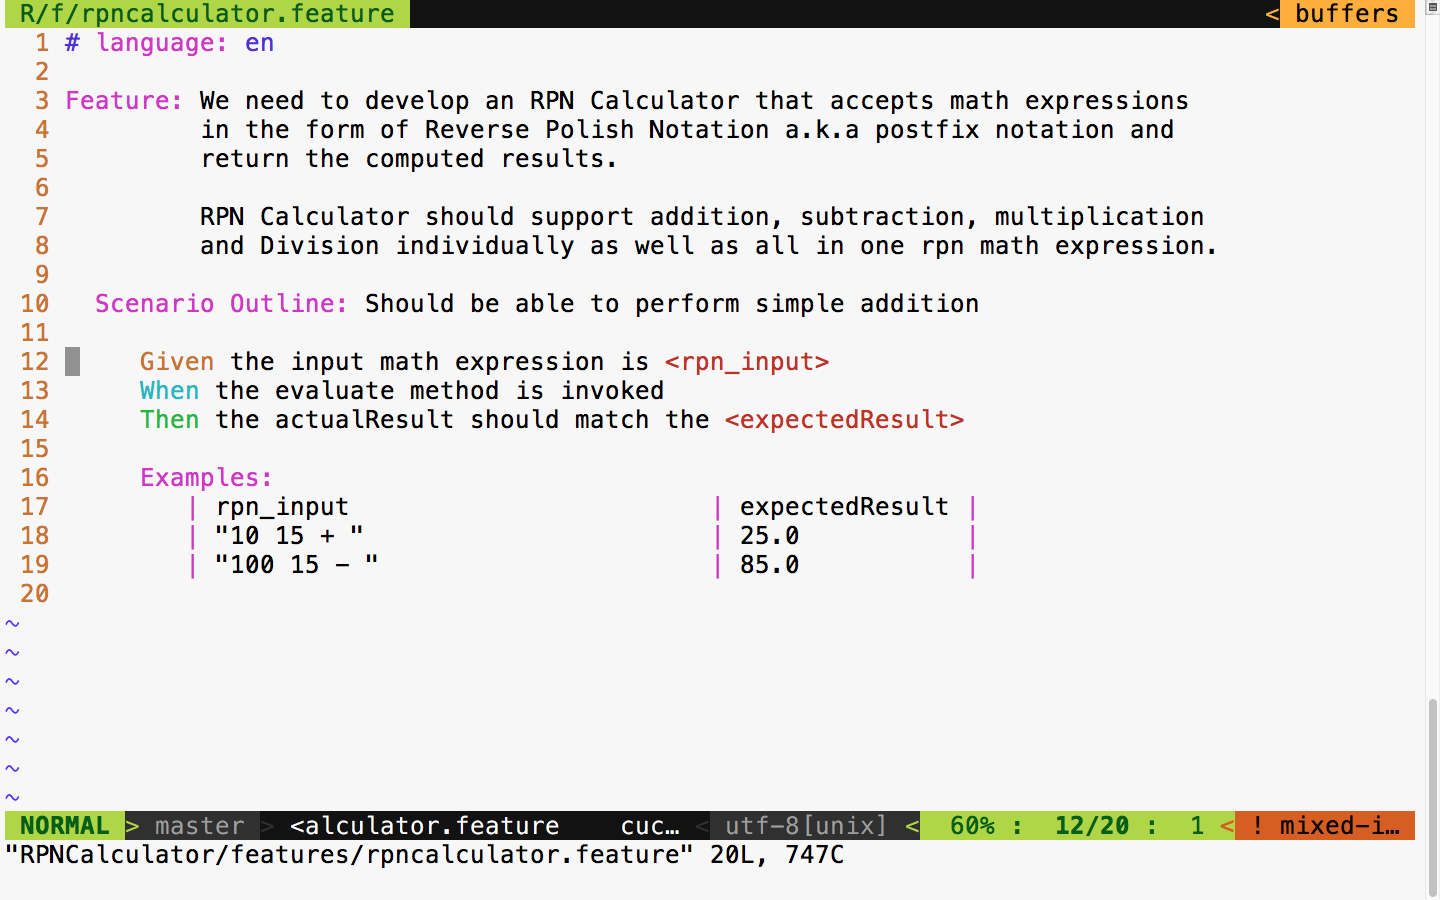
The test output looks as follows:
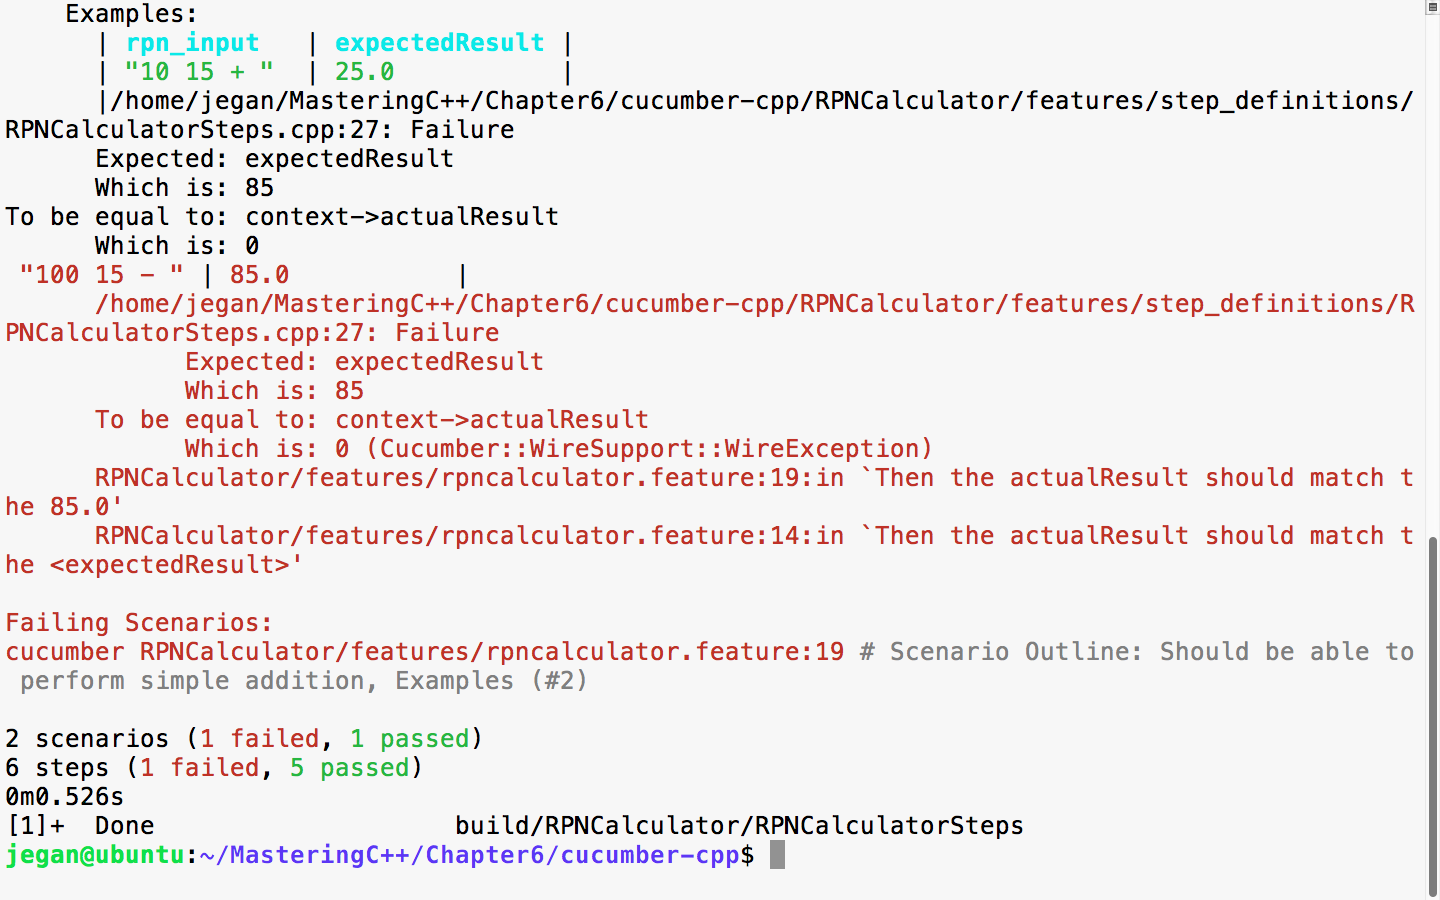
We had seen this before, hadn't we? I'm sure you guessed it right; the expected result is 85 whereas the actual result is 0, as we haven't added any support for subtraction yet. Now, let's add the necessary code to add the subtraction logic in our application:
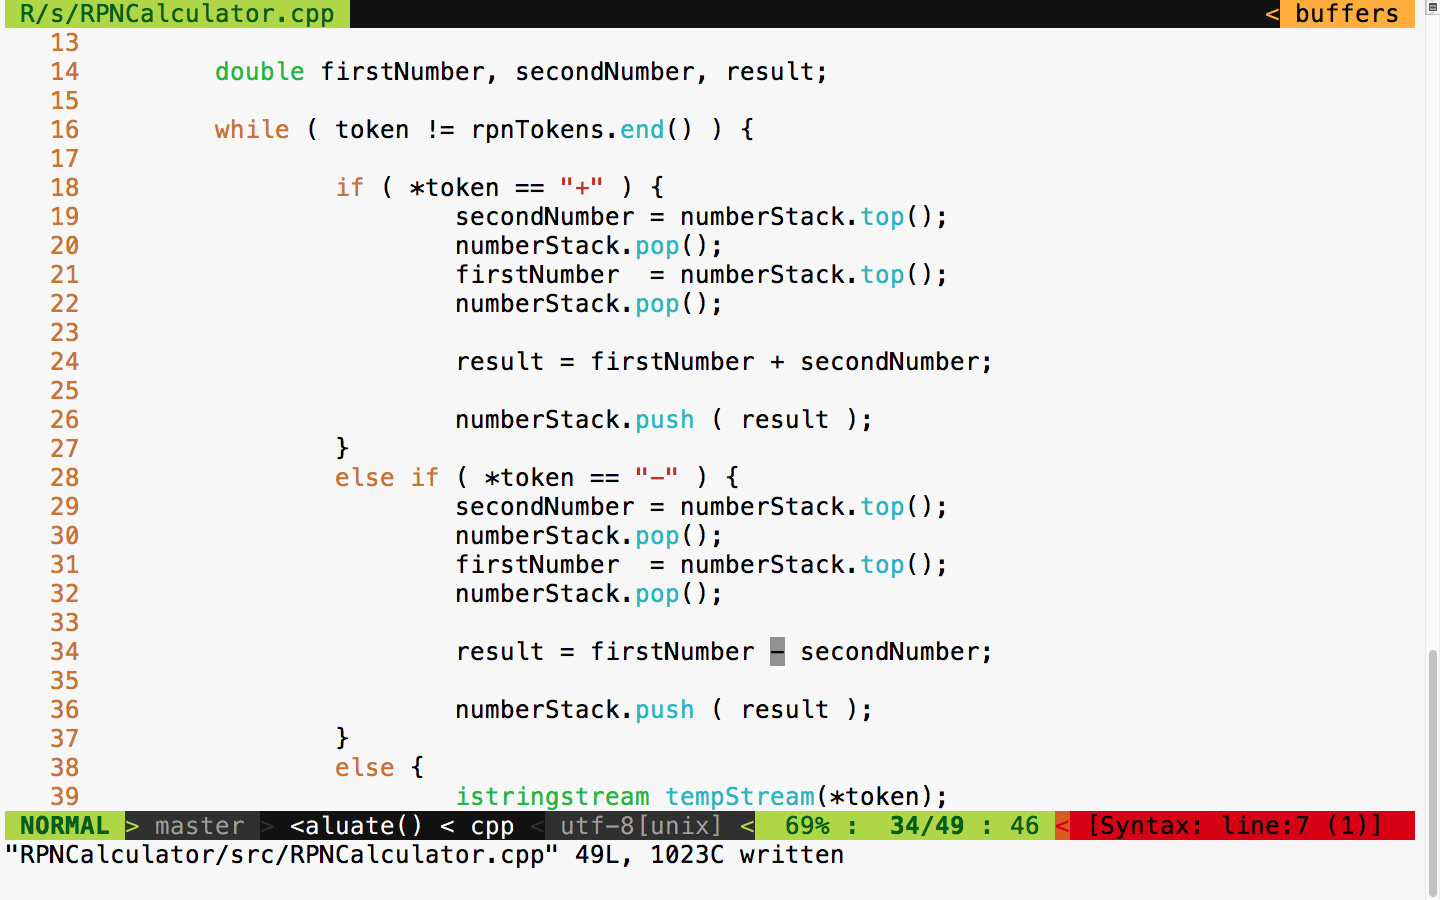
With this code change, let's rerun the test case and see what the test outcome is:
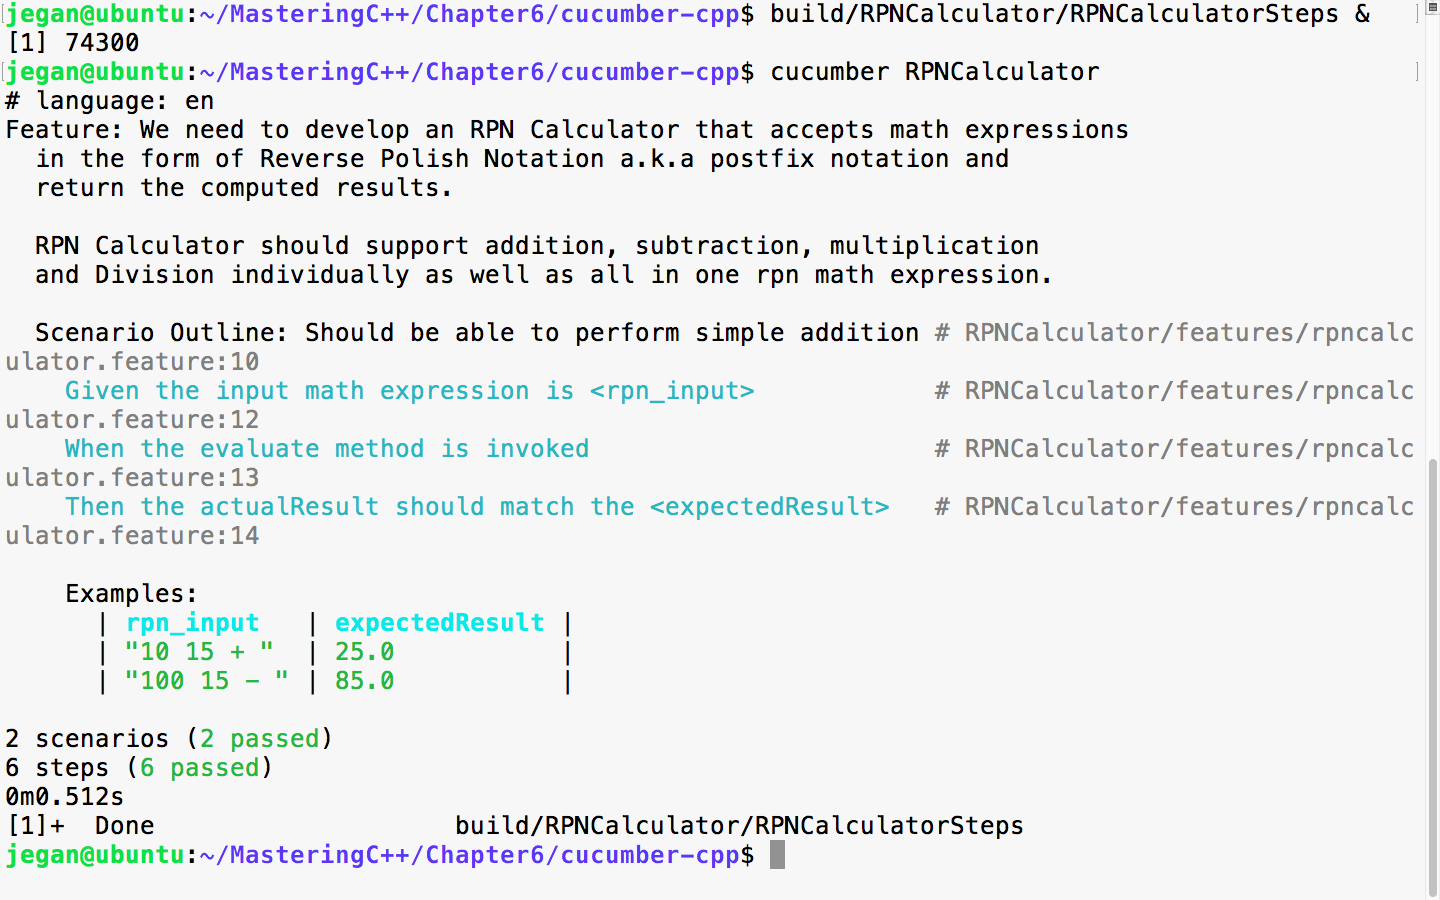
Cool, the test report is back to green!
Let's move on and add a scenario in the feature file to test the multiplication operation:
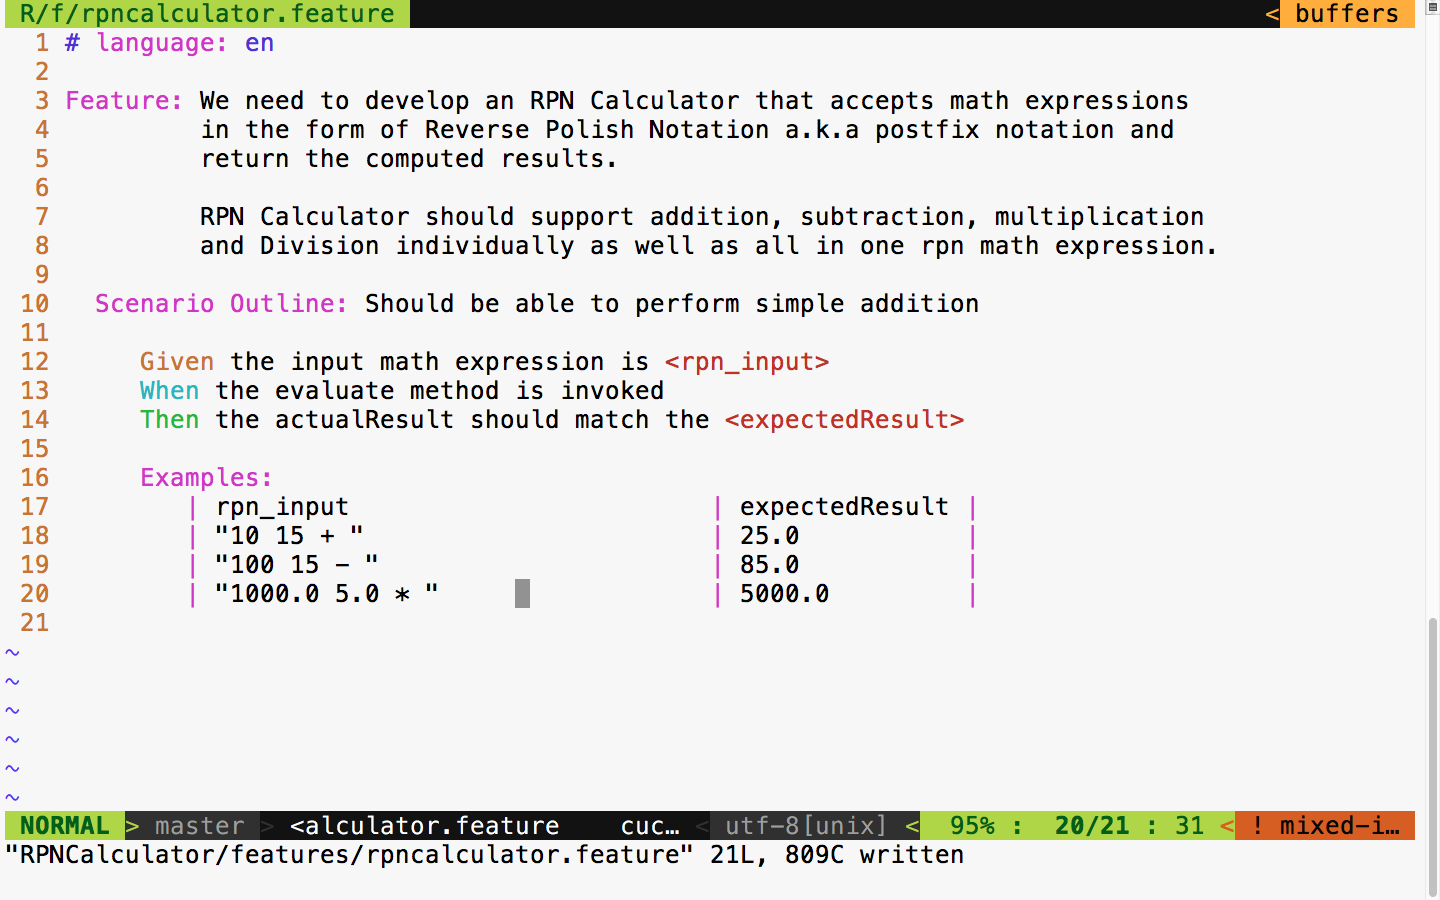
It is time to the run the test case, as shown in the following screenshot:

You got it right; yes, we need to add support for multiplication in our production code. Okay, let's do it right away, as shown in the following screenshot:
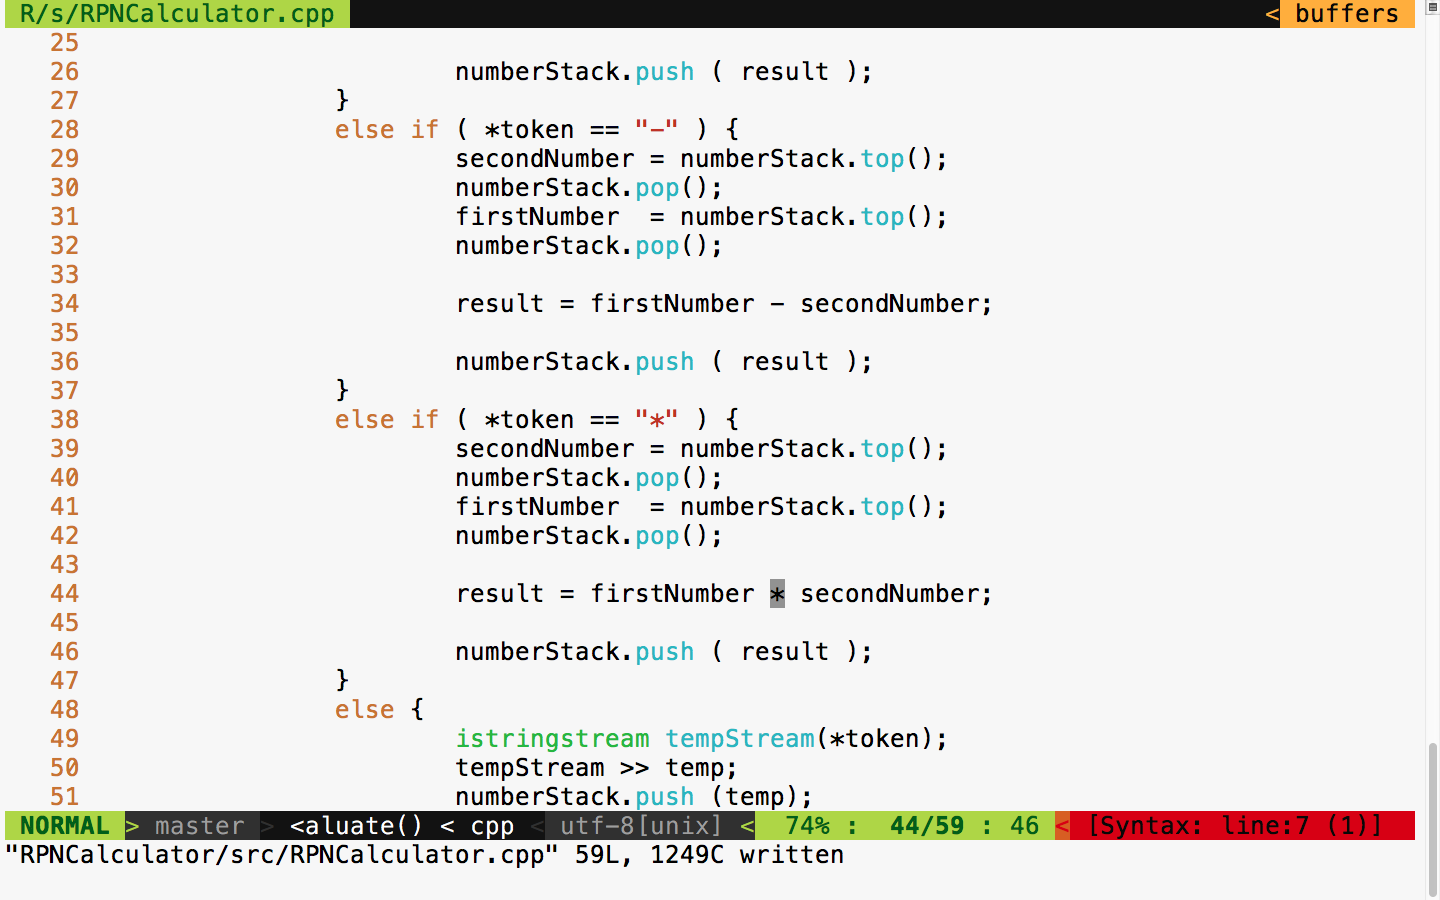
The following commands help you build, launch the steps applications, and run the Cucumber test cases, respectively. To be precise, the first command builds the test cases, while the second command launches the Cucumber steps test executable in the background mode. The third command executes the Cucumber test case that we wrote for the RPNCalculator project. The RPNCalculatorSteps executable will work as a server that Cucumber can talk to via the wire protocol. The Cucumber framework will get the connection details of the server from the cucumber.wire file kept under the step_definitions folder:
cmake --build build
build/RPNCalculator/RPNCalculatorSteps &
cucumber RPNCalculator
The following screenshot demonstrates the Cucumber test case execution procedure:
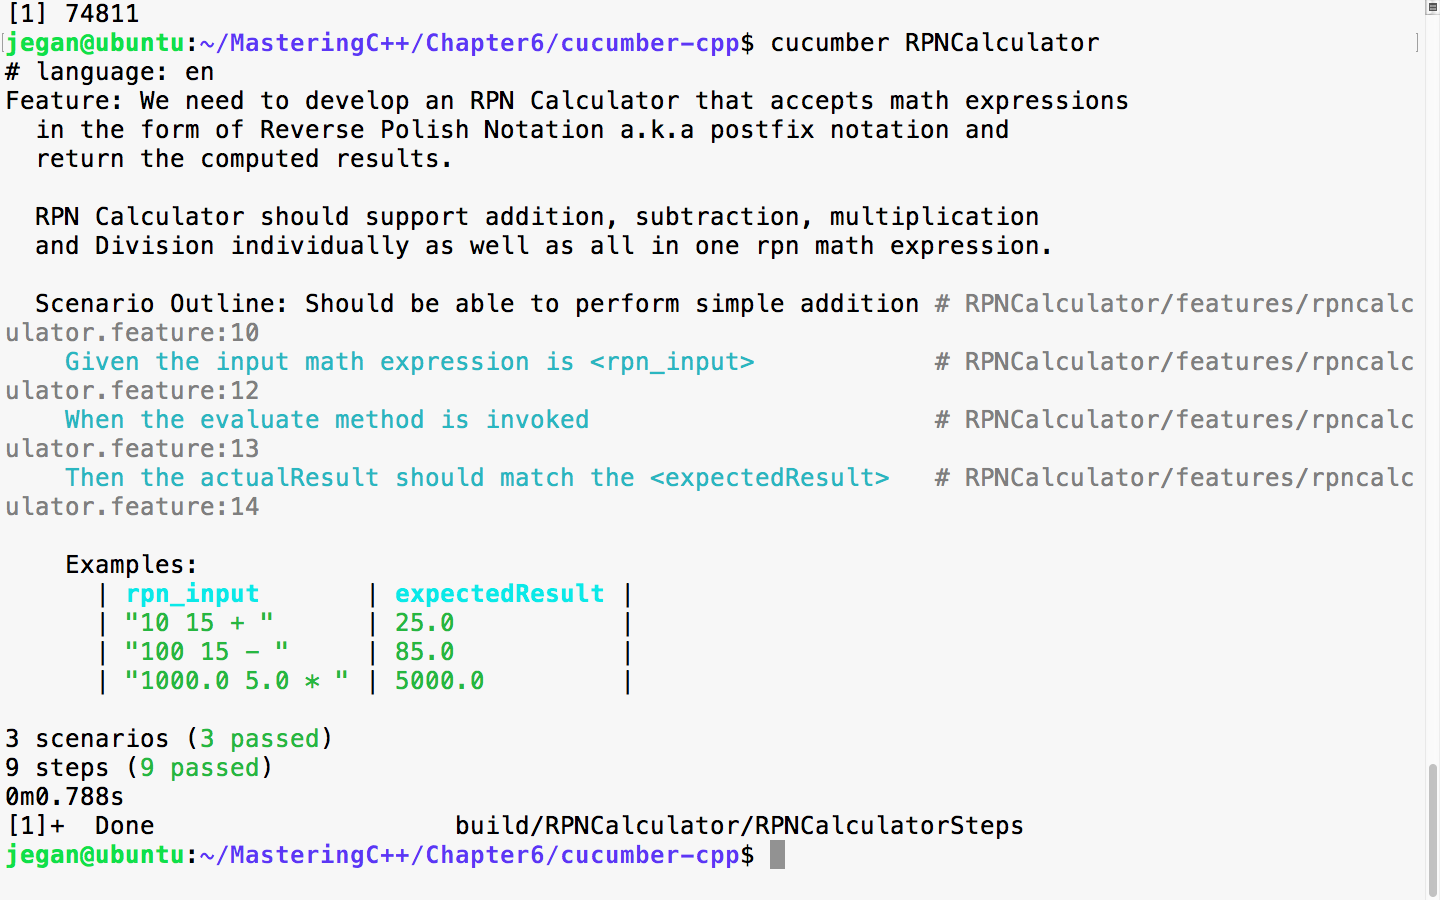
I'm sure you've got the hang of BDD! Yes, BDD is pretty simple and straightforward. Now let's add a scenario for the division operation as shown in the following screenshot:
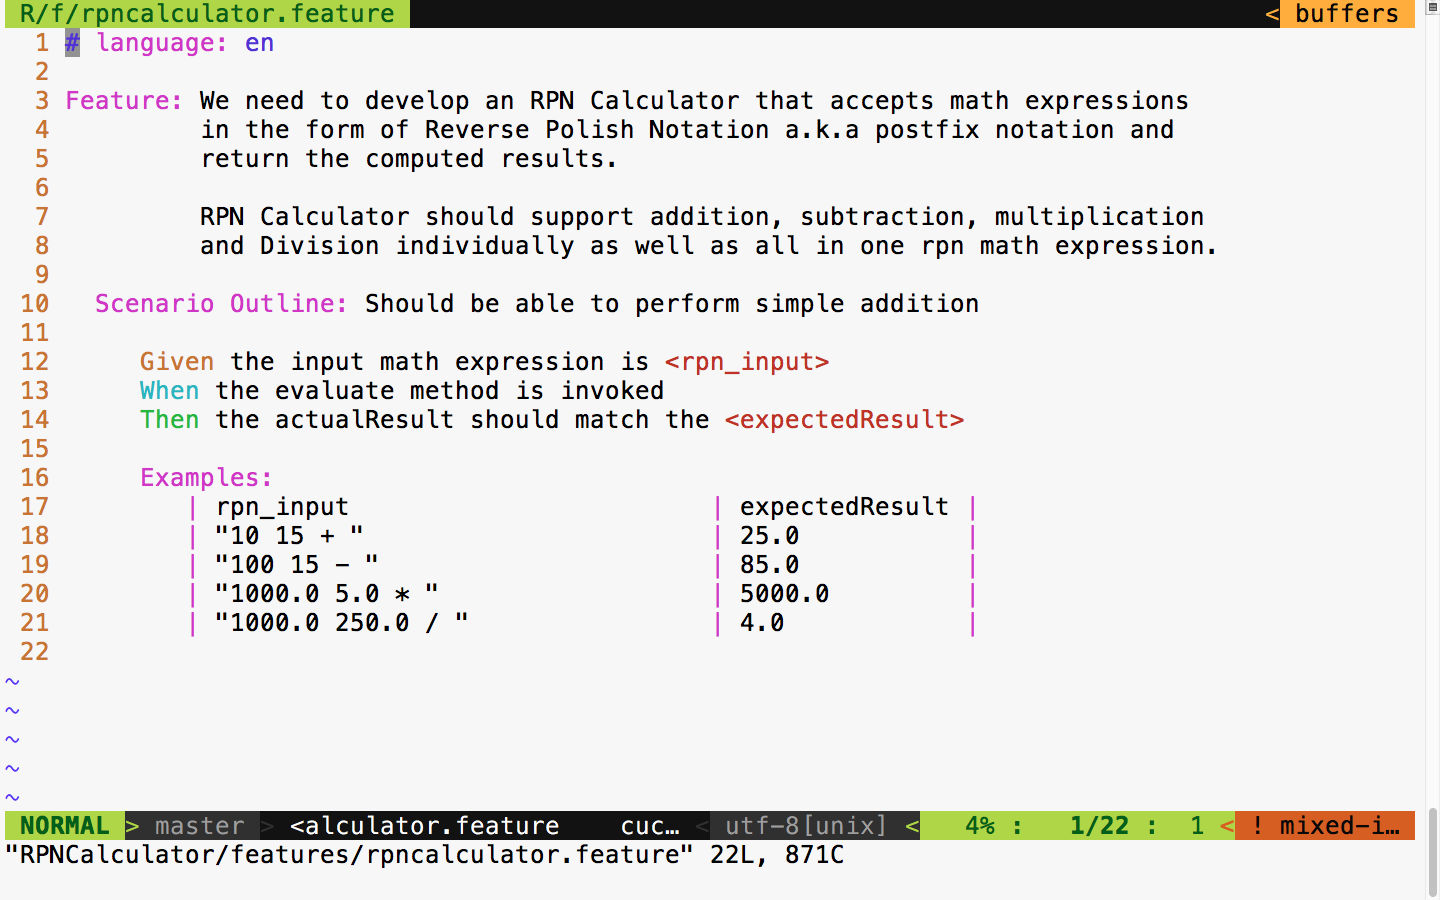
Let's quickly run the test case and observe the test outcome, as shown in the following screenshot:
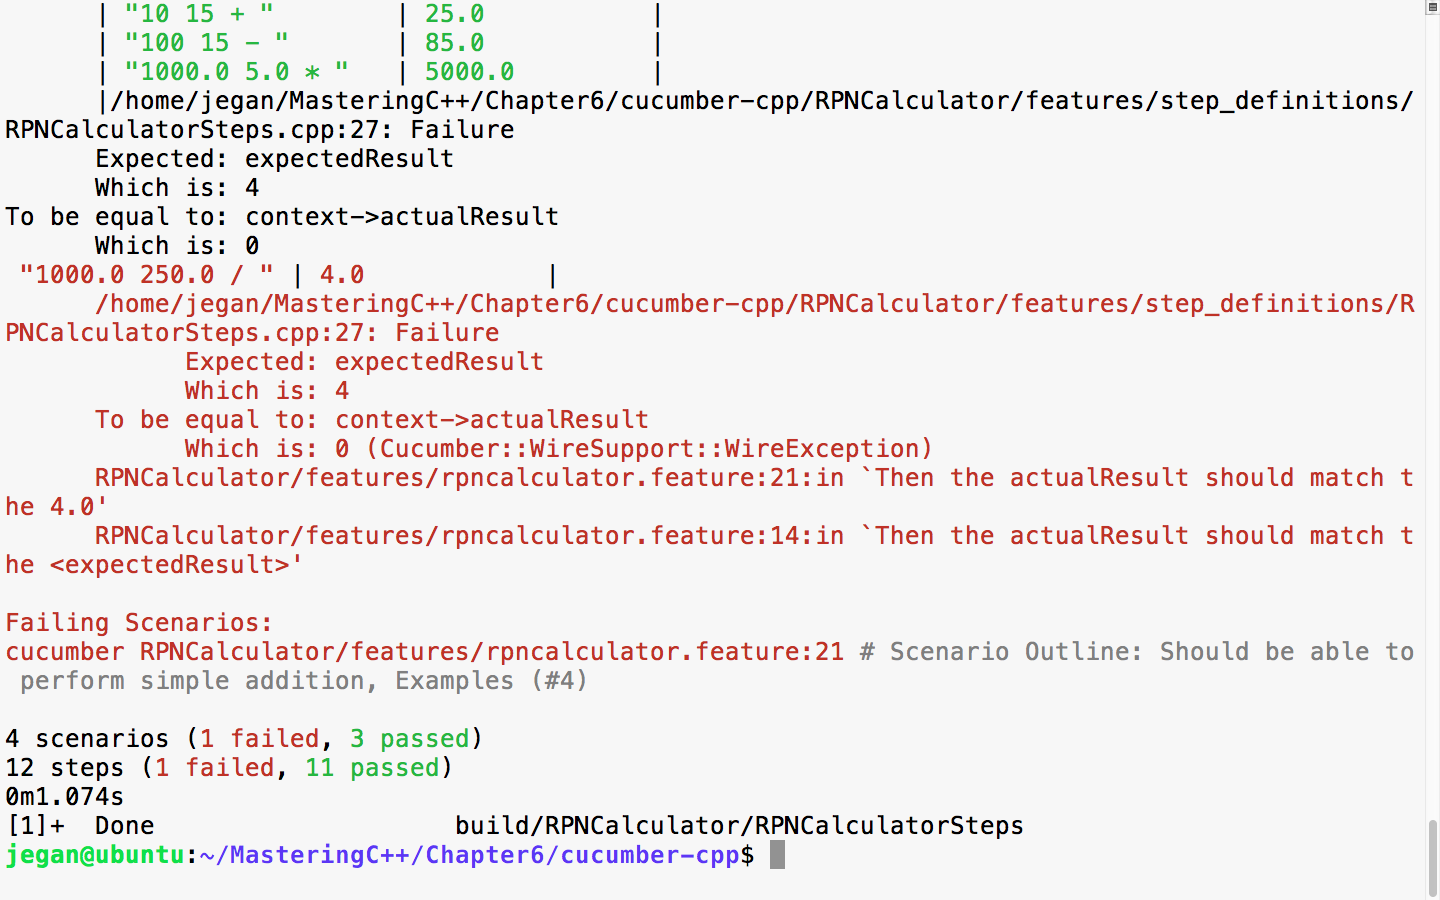
Yes, I heard you saying you know the reason for the failure. Let's quickly add support for division and rerun the test cases to see it turn all green! BDD makes coding really fun.
We need to add the following code snippet in RPNCalculator.cpp:
else if ( *token == "/" ) {
secondNumber = numberStack.top();
numberStack.pop();
firstNumber = numberStack.top();
numberStack.pop();
result = firstNumber / secondNumber;
numberStack.push ( result );
}
With this code change, let's check the test output:
cmake --build build
build/RPNCalculator/RPNCalculatorSteps &
cucumber RPNCalculator
The following screenshot demonstrates the procedure visually:
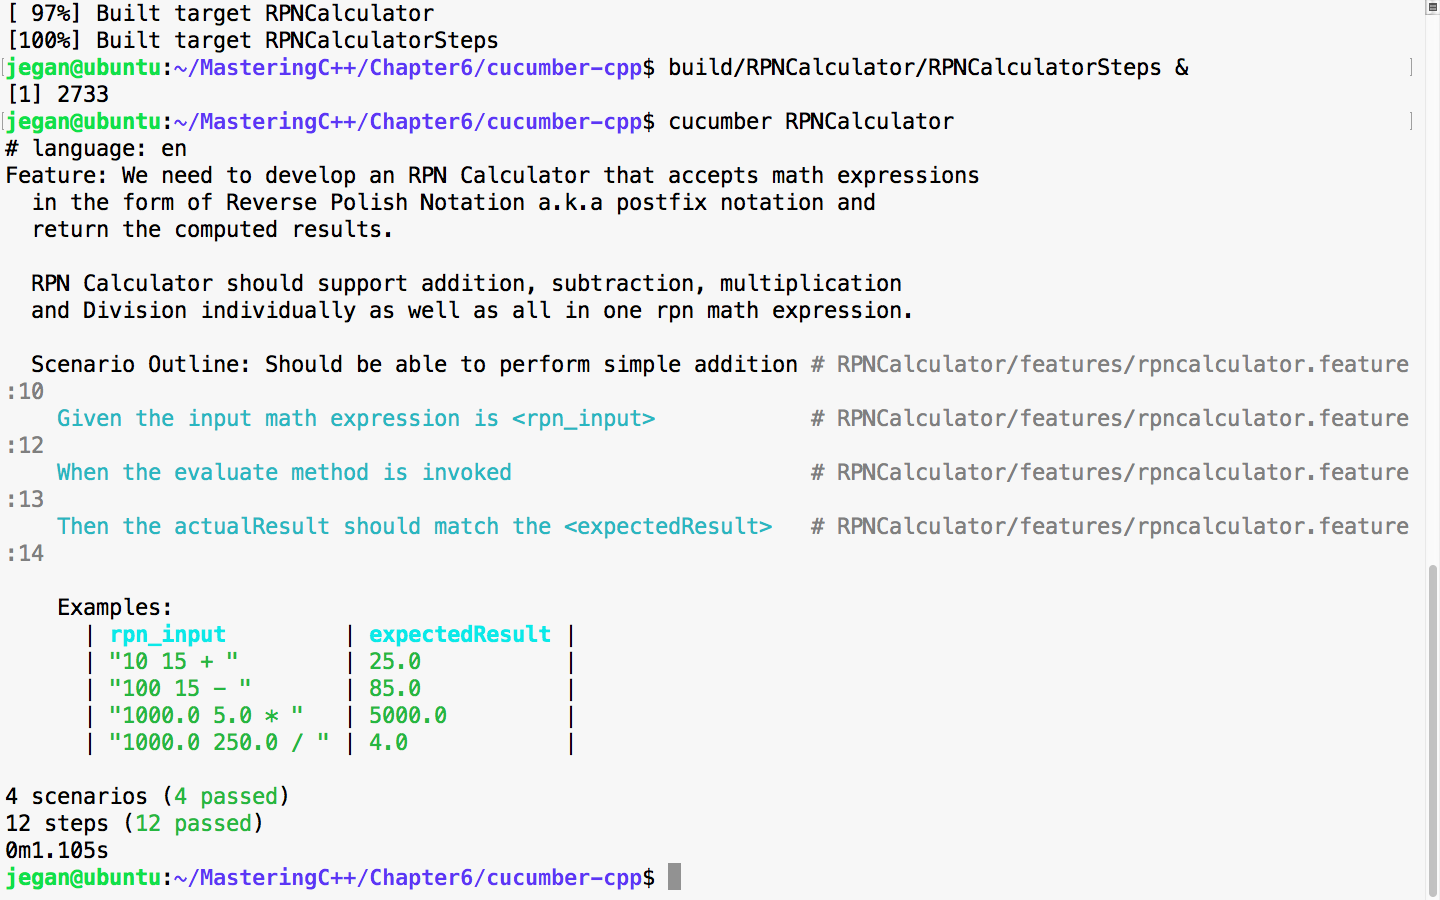
So far so good. All the scenarios we tested so far have passed, which is a good sign. But let's try a complex expression that involves many math operations. For instance, let's try 10.0 5.0 * 1.0 + 100.0 2.0 / -.
The following screenshot demonstrates the integration of the complex expression test case:

Let's run the test scenarios one more time, as this would be a real test for the entire code implemented so far, as this expression involves all the operations our simple application supports.
The following command can be used to launch the application in the background mode and to execute the Cucumber test cases:
build/RPNCalculator/RPNCalculatorSteps &
cucumber RPNCalculator
The following screenshot demonstrates the procedure visually:
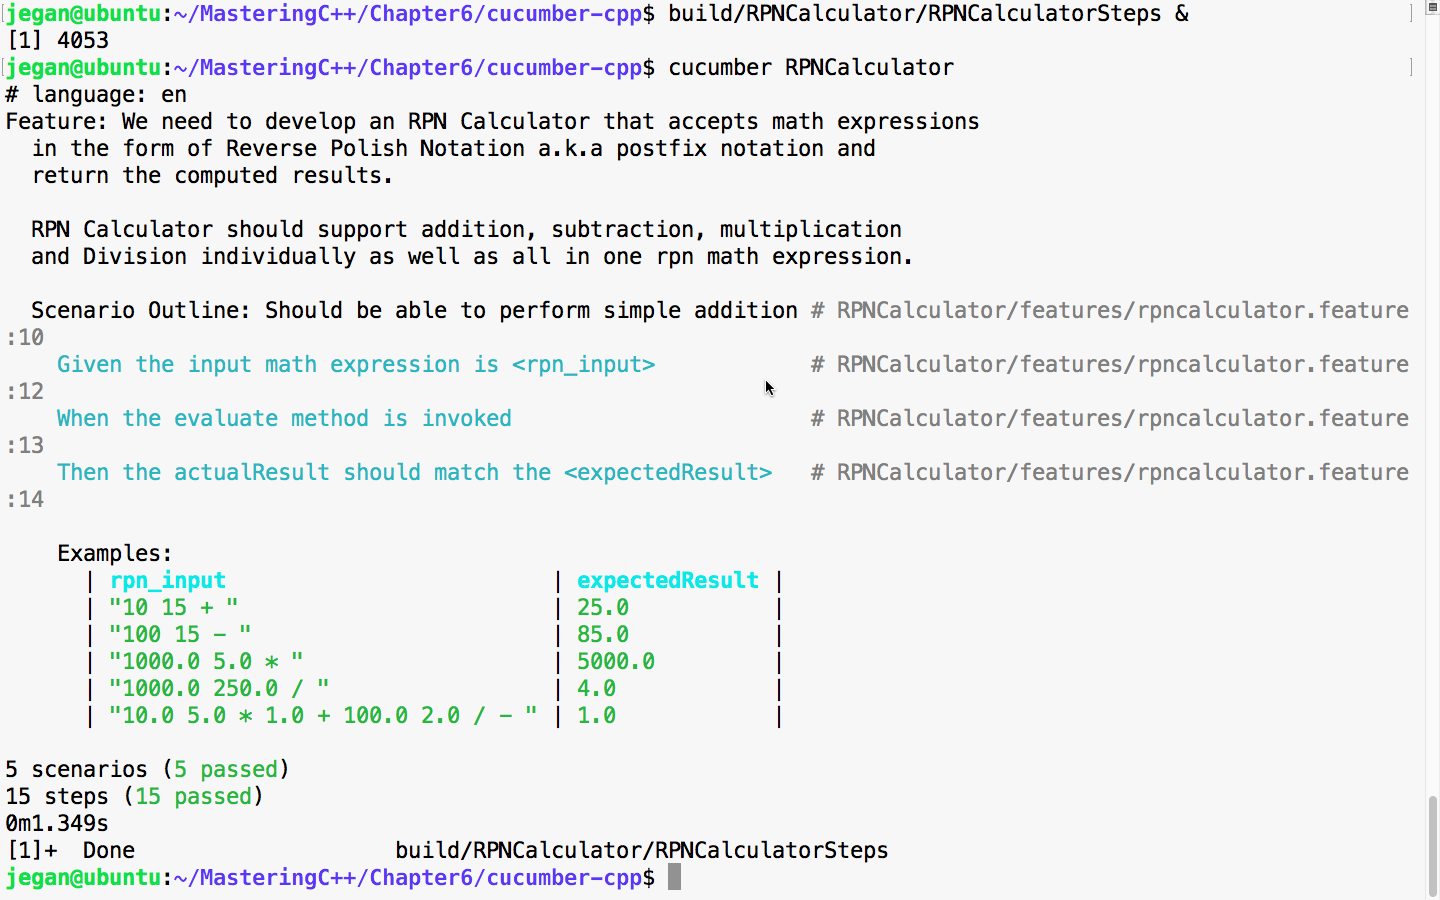
Great! If you have come this far, I'm sure you would have understood cucumber-cpp and the BDD style of coding.
In this chapter, you learned the following
In the next chapter, you will be learning about C++ debugging techniques.
In this chapter, we will cover the following topics:
Debugging is an art rather than a science, and it is a very big topic in itself. Strong debugging skills are the strengths of a good developer. All expert developers have some common traits, of which strong problem-solving and debugging skills top all. The first step in fixing a bug is to reproduce the issue. It is crucial to capture the steps involved in reproducing the bug very efficiently. Experienced QA engineers will know the importance of capturing detailed steps to reproduce, as developers will find it difficult to fix an issue if they can't reproduce it.
From my point of view, a bug that can't be reproduced can't be fixed. One could make guesses and beat around the bush but can't be sure whether the issue has really been fixed without being able to reproduce the bug in the first place.
The following details will help developers reproduce and debug the issue more quickly:
Some commonly used debugging techniques are as follows:
Debugging strategies help a great deal in quickly reproducing, debugging, detecting, and fixing issues efficiently. The following list explains some high-level debugging strategies:
Debugging tools help narrow down the issue through step-by-step execution, with breakpoints, variable inspection, and so on. Though debugging the issue step by step may be a time-consuming task, it is definitely a sure-shot way of nailing down the issue, and I can say that it pretty much always works.
Here is a list of debugging tools for C++:
Classic, old-fashioned C++ developers use print statements to debug code. However, debugging with print tracing messages is a time-consuming task, as you need to put quite a lot of effort into writing print statements at multiples places, recompiling, and executing the application.
The old-style debugging approach requires many such iterations and, typically, every iteration requires adding more print statements in order to narrow down the issue. Once the issues are fixed, we need to clean up the code and remove the print statements, as too many print statements tend to slow down application performance. Also, the debug print messages will distract and are irrelevant for the end customers using your product the production environment.
The C++ debug assert() macro statement that comes with the <cassert> header can be used for debugging. The C++ assert() macros can be disabled in release mode and are only enabled in debug mode.
Debug tools are there to rescue you from such tedious efforts. The GDB debugger is an open source CLI tool, which is the debugger for C++ in the Unix/Linux world. For Windows platforms, Visual Studio is the most popular one-stop IDE with inbuilt debugging facilities.
Let's take a simple example:
#include <iostream>
#include <vector>
#include <iterator>
#include <algorithm>
using namespace std; //Use this judiciously - this is applicable throughout the book
class MyInteger {
private:
int number;
public:
MyInteger( int value ) {
this->number = value;
}
MyInteger(const MyInteger & rhsObject ) {
this->number = rhsObject.number;
}
MyInteger& operator = (const MyInteger & rhsObject ) {
if ( this != &rhsObject )
this->number = rhsObject.number;
return *this;
}
bool operator < (const MyInteger &rhsObject) {
return this->number > rhsObject.number;
}
bool operator > (const MyInteger &rhsObject) {
return this->number > rhsObject.number;
}
friend ostream & operator << ( ostream &output, const MyInteger &object );
};
ostream & operator << (ostream &o, const MyInteger& object) {
o << object.number;
}
int main ( ) {
vector<MyInteger> v = { 10, 100, 40, 20, 80, 70, 50, 30, 60, 90 };
cout << "\nVectors entries before sorting are ..." << endl;
copy ( v.begin(), v.end() , ostream_iterator<MyInteger>( cout, "\t" ) );
cout << endl;
sort ( v.begin(), v.end() );
cout << "\nVectors entries after sorting are ..." << endl;
copy ( v.begin(), v.end() , ostream_iterator<MyInteger>( cout, "\t" ) );
cout << endl;
return 0;
}
The output of the program is as follows:
Vectors entries before sorting are ...
10 100 40 20 80 70 50 30 60 90
Vectors entries after sorting are ...
100 90 80 70 60 50 40 30 20 10
However, our expected output is the following:
Vectors entries before sorting are ...
10 100 40 20 80 70 50 30 60 90
Vectors entries after sorting are ...
10 20 30 40 50 60 70 80 90 100
The bug is obvious; let's go easy with GDB learning. Let's first compile the program in debug mode, that is, with the debugging metadata and symbol table enabled, as shown here:
g++ main.cpp -std=c++17 -g
The following GDB quick tips chart will help you find the GDB commands for debugging your applications:
| Command | Short command | Description |
| gdb yourappln.exe | - | Opening an application in GDB for debugging |
| break main | b main | Set the breakpoint to the main function |
| run | r | Executes the program till it reaches the breakpoint for step-by-step execution |
| next | n | Executes the program one step at a time |
| step | s | Steps into the function to execute the function step by step |
| continue | c | Continues the execution of the program until the next breakpoint; if no breakpoints are set, it will continue the execution of the application normally |
| backtrace | bt | Prints the entire call stack |
| quit |
q or Ctrl + d |
Exits GDB |
| -help | -h | Displays the available options and briefly displays their use |
With the preceding basic GDB quick reference, let's start debugging our faulty application to detect the bug. Let's first start GDB with the following command:
gdb ./a.out
Then, let's add a breakpoint at main() to perform step-by-step execution:
jegan@ubuntu:~/MasteringC++Programming/Debugging/Ex1$ g++ main.cpp -g
jegan@ubuntu:~/MasteringC++Programming/Debugging/Ex1$ ls
a.out main.cpp
jegan@ubuntu:~/MasteringC++Programming/Debugging/Ex1$ gdb ./a.out
GNU gdb (Ubuntu 7.12.50.20170314-0ubuntu1.1) 7.12.50.20170314-git
Copyright (C) 2017 Free Software Foundation, Inc.
License GPLv3+: GNU GPL version 3 or later <http://gnu.org/licenses/gpl.html>
This is free software: you are free to change and redistribute it.
There is NO WARRANTY, to the extent permitted by law. Type "show copying"
and "show warranty" for details.
This GDB was configured as "x86_64-linux-gnu".
Type "show configuration" for configuration details.
For bug reporting instructions, please see:
<http://www.gnu.org/software/gdb/bugs/>.
Find the GDB manual and other documentation resources online at:
<http://www.gnu.org/software/gdb/documentation/>.
For help, type "help".
Type "apropos word" to search for commands related to "word"...
Reading symbols from ./a.out...done.
(gdb) b main
Breakpoint 1 at 0xba4: file main.cpp, line 46.
(gdb) l
32
33 bool operator > (const MyInteger &rhsObject) {
34 return this->number < rhsObject.number;
35 }
36
37 friend ostream& operator << ( ostream &output, const MyInteger &object );
38
39 };
40
41 ostream& operator << (ostream &o, const MyInteger& object) {
(gdb)
After launching our application with gdb, the b main command will add a breakpoint to the first line of the main() function. Now let's try to execute the application:
(gdb) run
Starting program: /home/jegan/MasteringC++Programming/Debugging/Ex1/a.out
Breakpoint 1, main () at main.cpp:46
46 int main ( ) {
(gdb)
As you may have observed, the program execution has paused at line number 46 in our main() function, since we added a breakpoint to the main() function.
At this point, let's execute the application step by step, as follows:
(gdb) run
Starting program: /home/jegan/MasteringC++Programming/Debugging/Ex1/a.out
Breakpoint 1, main () at main.cpp:46
46 int main ( ) {
(gdb) next
48 vector<MyInteger> v = { 10, 100, 40, 20, 80, 70, 50, 30, 60, 90 };
(gdb) next
50 cout << "\nVectors entries before sorting are ..." << endl;
(gdb) n
Vectors entries before sorting are ...51 copy ( v.begin(), v.end() , ostream_iterator<MyInteger>( cout, "\t" ) );
(gdb) n
52 cout << endl;
(gdb) n
10 100 40 20 80 70 50 30 60 90
54 sort ( v.begin(), v.end() );
(gdb)
Now, let's add two more breakpoints at line numbers 29 and 33, as follows:
Breakpoint 1 at 0xba4: file main.cpp, line 46.Breakpoint 1 at 0xba4: file main.cpp, line 46.(gdb) run
Starting program: /home/jegan/Downloads/MasteringC++Programming/Debugging/Ex1/a.out
Breakpoint 1, main () at main.cpp:46
46 int main ( ) {
(gdb) l
41 ostream& operator << (ostream &o, const MyInteger& object) {
42 o << object.number;
43 }
44
45
46
int main ( ) {
47
48 vector<MyInteger> v = { 10, 100, 40, 20, 80, 70, 50, 30, 60, 90 };
49
50 cout << "\nVectors entries before sorting are ..." << endl;
(gdb) n
48 vector<MyInteger> v = { 10, 100, 40, 20, 80, 70, 50, 30, 60, 90 };
(gdb) n
50 cout << "\nVectors entries before sorting are ..." << endl;
(gdb) n
Vectors entries before sorting are ...
51 copy ( v.begin(), v.end() , ostream_iterator<MyInteger>( cout, "\t" ) );
(gdb) break 29
Breakpoint 2 at 0x555555554f88: file main.cpp, line 29.
(gdb) break 33
Breakpoint 3 at 0x555555554b80: file main.cpp, line 33.
(gdb)
From this, you will understand that the breakpoints can be added by the function name or by the line numbers as well. Let's now let the program continue its execution until it reaches one of the breakpoints that we have set:
(gdb) break 29
Breakpoint 2 at 0x555555554f88: file main.cpp, line 29.
(gdb) break 33
Breakpoint 3 at 0x555555554b80: file main.cpp, line 33.
(gdb) continue
Continuing.
Breakpoint 2, MyInteger::operator< (this=0x55555576bc24, rhsObject=...) at main.cpp:30
30 return this->number > rhsObject.number;
(gdb)
As you can see, the program execution paused at line number 29, as it gets invoked whenever the sort function needs to decide whether the two items must be swapped in the process of sorting the vector entries in an ascending order.
Let's explore how to inspect or print the variables, this->number and rhsObject.number:
(gdb) break 29
Breakpoint 2 at 0x400ec6: file main.cpp, line 29.
(gdb) break 33
Breakpoint 3 at 0x400af6: file main.cpp, line 33.
(gdb) continue
Continuing.
Breakpoint 2, MyInteger::operator< (this=0x617c24, rhsObject=...) at main.cpp:30
30 return this->number > rhsObject.number;
(gdb) print this->number
$1 = 100
(gdb) print rhsObject.number
$2 = 10
(gdb)
Did you see the way the < and > operators are implemented? The operator checks for the less than operation, while the actual implementation checks for the greater than operation, and a similar bug is observed in the > operator-overloaded method as well. Please check the following code:
bool operator < ( const MyInteger &rhsObject ) {
return this->number > rhsObject.number;
}
bool operator > ( const MyInteger &rhsObject ) {
return this->number < rhsObject.number;
}
While the sort() function is supposed to be sorting the vector entries in an ascending order, the output shows that it is sorting them in a descending order, and the preceding code is the root cause of the issue. Hence, let's fix the issue, as follows:
bool operator < ( const MyInteger &rhsObject ) {
return this->number < rhsObject.number;
}
bool operator > ( const MyInteger &rhsObject ) {
return this->number > rhsObject.number;
}
With these changes, let's compile and run the program:
g++ main.cpp -std=c++17 -g
./a.out
This is the output that you'll get:
Vectors entries before sorting are ...
10 100 40 20 80 70 50 30 60 90
Vectors entries after sorting are ...
10 20 30 40 50 60 70 80 90 100
Cool, we fixed the bug! Needless to say, you will have recognized how useful the GDB debugging tool is. While we have only scratched the surface of the GDB tool's capability, it offers many powerful debugging features. However, in this chapter, it would be impractical to cover every single feature the GDB tool supports; hence, I would strongly recommend you explore GDB documentation for further learning at https://sourceware.org/gdb/documentation/.
Valgrind is a collection of open source C/C++ debugging and profiling tools for the Unix and Linux platforms. The collection of tools that Valgrind supports are as follows:
In this chapter, we will only be exploring Memcheck, as demonstrating every Valgrind tool is not in the scope of this book.
The default tool that Valgrind uses is Memcheck. The Memcheck tool can detect quite an exhaustive list of issues, and some of them are as follows:
Let's have a look at some such issues in the next subsections.
The following example demonstrates memory access outside the boundary of an array:
#include <iostream>
using namespace std;
int main ( ) {
int a[10];
a[10] = 100;
cout << a[10] << endl;
return 0;
}
The following output shows the valgrind debug session that precisely points to memory access outside the boundary of the array:
g++ arrayboundsoverrun.cpp -g -std=c++17
jegan@ubuntu ~/MasteringC++/Debugging valgrind --track-origins=yes --read-var-info=yes ./a.out
==28576== Memcheck, a memory error detector
==28576== Copyright (C) 2002-2015, and GNU GPL'd, by Julian Seward et al.
==28576== Using Valgrind-3.11.0 and LibVEX; rerun with -h for copyright info
==28576== Command: ./a.out
==28576==
100
*** stack smashing detected ***: ./a.out terminated
==28576==
==28576== Process terminating with default action of signal 6 (SIGABRT)
==28576== at 0x51F1428: raise (raise.c:54)
==28576== by 0x51F3029: abort (abort.c:89)
==28576== by 0x52337E9: __libc_message (libc_fatal.c:175)
==28576== by 0x52D511B: __fortify_fail (fortify_fail.c:37)
==28576== by 0x52D50BF: __stack_chk_fail (stack_chk_fail.c:28)
==28576== by 0x4008D8: main (arrayboundsoverrun.cpp:11)
==28576==
==28576== HEAP SUMMARY:
==28576== in use at exit: 72,704 bytes in 1 blocks
==28576== total heap usage: 2 allocs, 1 frees, 73,728 bytes allocated
==28576==
==28576== LEAK SUMMARY:
==28576== definitely lost: 0 bytes in 0 blocks
==28576== indirectly lost: 0 bytes in 0 blocks
==28576== possibly lost: 0 bytes in 0 blocks
==28576== still reachable: 72,704 bytes in 1 blocks
==28576== suppressed: 0 bytes in 0 blocks
==28576== Rerun with --leak-check=full to see details of leaked memory
==28576==
==28576== For counts of detected and suppressed errors, rerun with: -v
==28576== ERROR SUMMARY: 0 errors from 0 contexts (suppressed: 0 from 0)
[1] 28576 abort (core dumped) valgrind --track-origins=yes --read-var-info=yes ./a.out
As you will notice, the application crashed with core dump due to illegal memory access. In the preceding output, the Valgrind tool accurately points to the line that caused the crash.
The following example code demonstrates memory access to the already released memory locations:
#include <iostream>
using namespace std;
int main( ) {
int *ptr = new int();
*ptr = 100;
cout << "\nValue stored at pointer location is " << *ptr << endl;
delete ptr;
*ptr = 200;
return 0;
}
Let's compile the preceding program and learn how Valgrind reports the illegal memory access that attempts to access an already released memory location:
==118316== Memcheck, a memory error detector
==118316== Copyright (C) 2002-2015, and GNU GPL'd, by Julian Seward et al.
==118316== Using Valgrind-3.11.0 and LibVEX; rerun with -h for copyright info
==118316== Command: ./a.out
==118316==
Value stored at pointer location is 100
==118316== Invalid write of size 4
==118316== at 0x400989: main (illegalaccess_to_released_memory.cpp:14)
==118316== Address 0x5ab6c80 is 0 bytes inside a block of size 4 free'd
==118316== at 0x4C2F24B: operator delete(void*) (in /usr/lib/valgrind/vgpreload_memcheck-amd64-linux.so)
==118316== by 0x400984: main (illegalaccess_to_released_memory.cpp:12)
==118316== Block was alloc'd at
==118316== at 0x4C2E0EF: operator new(unsigned long) (in /usr/lib/valgrind/vgpreload_memcheck-amd64-linux.so)
==118316== by 0x400938: main (illegalaccess_to_released_memory.cpp:6)
==118316==
==118316==
==118316== HEAP SUMMARY:
==118316== in use at exit: 72,704 bytes in 1 blocks
==118316== total heap usage: 3 allocs, 2 frees, 73,732 bytes allocated
==118316==
==118316== LEAK SUMMARY:
==118316== definitely lost: 0 bytes in 0 blocks
==118316== indirectly lost: 0 bytes in 0 blocks
==118316== possibly lost: 0 bytes in 0 blocks
==118316== still reachable: 72,704 bytes in 1 blocks
==118316== suppressed: 0 bytes in 0 blocks
==118316== Rerun with --leak-check=full to see details of leaked memory
==118316==
==118316== For counts of detected and suppressed errors, rerun with: -v
==118316== ERROR SUMMARY: 1 errors from 1 contexts (suppressed: 0 from 0)
Valgrind precisely points to the line number (14) that attempts to access the memory location that got released at line number 12.
The following example code demonstrates the use of uninitialized memory access and how the same can be detected using Memcheck:
#include <iostream>
using namespace std;
class MyClass {
private:
int x;
public:
MyClass( );
void print( );
};
MyClass::MyClass() {
cout << "\nMyClass constructor ..." << endl;
}
void MyClass::print( ) {
cout << "\nValue of x is " << x << endl;
}
int main ( ) {
MyClass obj;
obj.print();
return 0;
}
Let's now compile and detect the uninitialized memory access issue using Memcheck:
g++ main.cpp -g
valgrind ./a.out --track-origins=yes
==51504== Memcheck, a memory error detector
==51504== Copyright (C) 2002-2015, and GNU GPL'd, by Julian Seward et al.
==51504== Using Valgrind-3.11.0 and LibVEX; rerun with -h for copyright info
==51504== Command: ./a.out --track-origins=yes
==51504==
MyClass constructor ...
==51504== Conditional jump or move depends on uninitialised value(s)
==51504== at 0x4F3CCAE: std::ostreambuf_iterator<char, std::char_traits<char> > std::num_put<char, std::ostreambuf_iterator<char, std::char_traits<char> > >::_M_insert_int<long>(std::ostreambuf_iterator<char, std::char_traits<char> >, std::ios_base&, char, long) const (in /usr/lib/x86_64-linux-gnu/libstdc++.so.6.0.21)
==51504== by 0x4F3CEDC: std::num_put<char, std::ostreambuf_iterator<char, std::char_traits<char> > >::do_put(std::ostreambuf_iterator<char, std::char_traits<char> >, std::ios_base&, char, long) const (in /usr/lib/x86_64-linux-gnu/libstdc++.so.6.0.21)
==51504== by 0x4F493F9: std::ostream& std::ostream::_M_insert<long>(long) (in /usr/lib/x86_64-linux-gnu/libstdc++.so.6.0.21)
==51504== by 0x40095D: MyClass::print() (uninitialized.cpp:19)
==51504== by 0x4009A1: main (uninitialized.cpp:26)
==51504==
==51504== Use of uninitialised value of size 8
==51504== at 0x4F3BB13: ??? (in /usr/lib/x86_64-linux-gnu/libstdc++.so.6.0.21)
==51504== by 0x4F3CCD9: std::ostreambuf_iterator<char, std::char_traits<char> > std::num_put<char, std::ostreambuf_iterator<char, std::char_traits<char> > >::_M_insert_int<long>(std::ostreambuf_iterator<char, std::char_traits<char> >, std::ios_base&, char, long) const (in /usr/lib/x86_64-linux-gnu/libstdc++.so.6.0.21)
==51504== by 0x4F3CEDC: std::num_put<char, std::ostreambuf_iterator<char, std::char_traits<char> > >::do_put(std::ostreambuf_iterator<char, std::char_traits<char> >, std::ios_base&, char, long) const (in /usr/lib/x86_64-linux-gnu/libstdc++.so.6.0.21)
==51504== by 0x4F493F9: std::ostream& std::ostream::_M_insert<long>(long) (in /usr/lib/x86_64-linux-gnu/libstdc++.so.6.0.21)
==51504== by 0x40095D: MyClass::print() (uninitialized.cpp:19)
==51504== by 0x4009A1: main (uninitialized.cpp:26)
==51504==
==51504== Conditional jump or move depends on uninitialised value(s)
==51504== at 0x4F3BB1F: ??? (in /usr/lib/x86_64-linux-gnu/libstdc++.so.6.0.21)
==51504== by 0x4F3CCD9: std::ostreambuf_iterator<char, std::char_traits<char> > std::num_put<char, std::ostreambuf_iterator<char, std::char_traits<char> > >::_M_insert_int<long>(std::ostreambuf_iterator<char, std::char_traits<char> >, std::ios_base&, char, long) const (in /usr/lib/x86_64-linux-gnu/libstdc++.so.6.0.21)
==51504== by 0x4F3CEDC: std::num_put<char, std::ostreambuf_iterator<char, std::char_traits<char> > >::do_put(std::ostreambuf_iterator<char, std::char_traits<char> >, std::ios_base&, char, long) const (in /usr/lib/x86_64-linux-gnu/libstdc++.so.6.0.21)
==51504== by 0x4F493F9: std::ostream& std::ostream::_M_insert<long>(long) (in /usr/lib/x86_64-linux-gnu/libstdc++.so.6.0.21)
==51504== by 0x40095D: MyClass::print() (uninitialized.cpp:19)
==51504== by 0x4009A1: main (uninitialized.cpp:26)
==51504==
==51504== Conditional jump or move depends on uninitialised value(s)
==51504== at 0x4F3CD0C: std::ostreambuf_iterator<char, std::char_traits<char> > std::num_put<char, std::ostreambuf_iterator<char, std::char_traits<char> > >::_M_insert_int<long>(std::ostreambuf_iterator<char, std::char_traits<char> >, std::ios_base&, char, long) const (in /usr/lib/x86_64-linux-gnu/libstdc++.so.6.0.21)
==51504== by 0x4F3CEDC: std::num_put<char, std::ostreambuf_iterator<char, std::char_traits<char> > >::do_put(std::ostreambuf_iterator<char, std::char_traits<char> >, std::ios_base&, char, long) const (in /usr/lib/x86_64-linux-gnu/libstdc++.so.6.0.21)
==51504== by 0x4F493F9: std::ostream& std::ostream::_M_insert<long>(long) (in /usr/lib/x86_64-linux-gnu/libstdc++.so.6.0.21)
==51504== by 0x40095D: MyClass::print() (uninitialized.cpp:19)
==51504== by 0x4009A1: main (uninitialized.cpp:26)
==51504==
Value of x is -16778960
==51504==
==51504== HEAP SUMMARY:
==51504== in use at exit: 72,704 bytes in 1 blocks
==51504== total heap usage: 2 allocs, 1 frees, 73,728 bytes allocated
==51504==
==51504== LEAK SUMMARY:
==51504== definitely lost: 0 bytes in 0 blocks
==51504== indirectly lost: 0 bytes in 0 blocks
==51504== possibly lost: 0 bytes in 0 blocks
==51504== still reachable: 72,704 bytes in 1 blocks
==51504== suppressed: 0 bytes in 0 blocks
==51504== Rerun with --leak-check=full to see details of leaked memory
==51504==
==51504== For counts of detected and suppressed errors, rerun with: -v
==51504== Use --track-origins=yes to see where uninitialised values come from
==51504== ERROR SUMMARY: 18 errors from 4 contexts (suppressed: 0 from 0)
The lines highlighted in bold in the preceding output clearly point to the exact line where the uninitialized variable is accessed:
==51504== by 0x40095D: MyClass::print() (uninitialized.cpp:19)
==51504== by 0x4009A1: main (uninitialized.cpp:26)
18 void MyClass::print() {
19 cout << "\nValue of x is " << x << endl;
20 }
The preceding code snippet is shown for your reference; however, Valgrind will not show the code details. The bottomline is that Valgrind precisely points to the line that accesses the uninitialized variable, which is normally difficult to detect using other means.
Let's take a simple program that has some memory leaks and explore how the Valgrind tool, with the help of Memcheck, can help us detect memory leaks. As Memcheck is the default tool used by Valgrind, it is not necessary to explicitly call out the Memcheck tool while issuing the Valgrind command:
valgrind application_debugged.exe --tool=memcheck
The following code implements a singly linked list:
#include <iostream>
using namespace std;
struct Node {
int data;
Node *next;
};
class List {
private:
Node *pNewNode;
Node *pHead;
Node *pTail;
int __size;
void createNewNode( int );
public:
List();
~List();
int size();
void append ( int data );
void print( );
};
As you may have observed, the preceding class declaration has methods to append() a new node, print() the list, and a size() method that returns the number of nodes in the list.
Let's explore the list.cpp source file that implements the append() method, the print() method, the constructor, and the destructor:
#include "list.h"
List::List( ) {
pNewNode = NULL;
pHead = NULL;
pTail = NULL;
__size = 0;
}
List::~List() {}
void List::createNewNode( int data ) {
pNewNode = new Node();
pNewNode->next = NULL;
pNewNode->data = data;
}
void List::append( int data ) {
createNewNode( data );
if ( pHead == NULL ) {
pHead = pNewNode;
pTail = pNewNode;
__size = 1;
}
else {
Node *pCurrentNode = pHead;
while ( pCurrentNode != NULL ) {
if ( pCurrentNode->next == NULL ) break;
pCurrentNode = pCurrentNode->next;
}
pCurrentNode->next = pNewNode;
++__size;
}
}
void List::print( ) {
cout << "\nList entries are ..." << endl;
Node *pCurrentNode = pHead;
while ( pCurrentNode != NULL ) {
cout << pCurrentNode->data << "\t";
pCurrentNode = pCurrentNode->next;
}
cout << endl;
}
The following code demonstrates the main() function:
#include "list.h"
int main ( ) {
List l;
for (int count = 0; count < 5; ++count )
l.append ( (count+1) * 10 );
l.print();
return 0;
}
Let's compile the program and attempt to detect memory leaks in the preceding program:
g++ main.cpp list.cpp -std=c++17 -g
valgrind ./a.out --leak-check=full
==99789== Memcheck, a memory error detector
==99789== Copyright (C) 2002-2015, and GNU GPL'd, by Julian Seward et al.
==99789== Using Valgrind-3.11.0 and LibVEX; rerun with -h for copyright info
==99789== Command: ./a.out --leak-check=full
==99789==
List constructor invoked ...
List entries are ...
10 20 30 40 50
==99789==
==99789== HEAP SUMMARY:
==99789== in use at exit: 72,784 bytes in 6 blocks
==99789== total heap usage: 7 allocs, 1 frees, 73,808 bytes allocated
==99789==
==99789== LEAK SUMMARY:
==99789== definitely lost: 16 bytes in 1 blocks
==99789== indirectly lost: 64 bytes in 4 blocks
==99789== possibly lost: 0 bytes in 0 blocks
==99789== still reachable: 72,704 bytes in 1 blocks
==99789== suppressed: 0 bytes in 0 blocks
==99789== Rerun with --leak-check=full to see details of leaked memory
==99789==
==99789== For counts of detected and suppressed errors, rerun with: -v
==99789== ERROR SUMMARY: 0 errors from 0 contexts (suppressed: 0 from 0)
From the preceding output, it is evident that 80 bytes are leaked by our application. While definitely lost and indirectly lost indicate the memory leaked by our application, still reachable does not necessarily indicate our application, and it could be leaked by third-party libraries or C++ runtime libraries. It may be possible that they are not really memory leaks, as the C++ runtime library might use memory pools.
Let's try to fix the memory leak issue by adding the following code in the List::~List() destructor:
List::~List( ) {
cout << "\nList destructor invoked ..." << endl;
Node *pTemp = NULL;
while ( pHead != NULL ) {
pTemp = pHead;
pHead = pHead->next;
delete pTemp;
}
pNewNode = pHead = pTail = pTemp = NULL;
__size = 0;
}
From the following output, you will observe that the memory leak has been fixed:
g++ main.cpp list.cpp -std=c++17 -g
valgrind ./a.out --leak-check=full
==44813== Memcheck, a memory error detector
==44813== Copyright (C) 2002-2015, and GNU GPL'd, by Julian Seward et al.
==44813== Using Valgrind-3.11.0 and LibVEX; rerun with -h for copyright info
==44813== Command: ./a.out --leak-check=full
==44813==
List constructor invoked ...
List entries are ...
10 20 30 40 50
Memory utilised by the list is 80
List destructor invoked ...
==44813==
==44813== HEAP SUMMARY:
==44813== in use at exit: 72,704 bytes in 1 blocks
==44813== total heap usage: 7 allocs, 6 frees, 73,808 bytes allocated
==44813==
==44813== LEAK SUMMARY:
==44813== definitely lost: 0 bytes in 0 blocks
==44813== indirectly lost: 0 bytes in 0 blocks
==44813== possibly lost: 0 bytes in 0 blocks
==44813== still reachable: 72,704 bytes in 1 blocks
==44813== suppressed: 0 bytes in 0 blocks
==44813== Rerun with --leak-check=full to see details of leaked memory
==44813==
==44813== For counts of detected and suppressed errors, rerun with: -v
==44813== ERROR SUMMARY: 0 errors from 0 contexts (suppressed: 0 from 0)
If you are still not convinced with the still reachable issue reported in the preceding output, let's try the following code in simple.cpp to understand if this is something in our control:
#include <iostream>
using namespace std;
int main ( ) {
return 0;
}
Execute the following commands:
g++ simple.cpp -std=c++17 -g
valgrind ./a.out --leak-check=full
==62474== Memcheck, a memory error detector
==62474== Copyright (C) 2002-2015, and GNU GPL'd, by Julian Seward et al.
==62474== Using Valgrind-3.11.0 and LibVEX; rerun with -h for copyright info
==62474== Command: ./a.out --leak-check=full
==62474==
==62474==
==62474== HEAP SUMMARY:
==62474== in use at exit: 72,704 bytes in 1 blocks
==62474== total heap usage: 1 allocs, 0 frees, 72,704 bytes allocated
==62474==
==62474== LEAK SUMMARY:
==62474== definitely lost: 0 bytes in 0 blocks
==62474== indirectly lost: 0 bytes in 0 blocks
==62474== possibly lost: 0 bytes in 0 blocks
==62474== still reachable: 72,704 bytes in 1 blocks
==62474== suppressed: 0 bytes in 0 blocks
==62474== Rerun with --leak-check=full to see details of leaked memory
==62474==
==62474== For counts of detected and suppressed errors, rerun with: -v
==62474== ERROR SUMMARY: 0 errors from 0 contexts (suppressed: 0 from 0)
As you can see, the main() function does nothing but return 0, and Valgrind reports that this program too has the same section: still reachable": 72, 704 bytes in 1 blocks. Hence, what really matters in the Valgrind leak summary is whether there are leaks reported under any or all of the following sections: definitely lost, indirectly lost, and possibly lost.
These types of issues are rare but the possibility of them occurring can't be ruled out. It may so happen that when a legacy C-based tool is ported to C++, that some memory allocation is allocated by mistake but is freed up using the delete keyword or vice versa.
The following example demonstrates detecting the issue using Valgrind:
#include <stdlib.h>
int main ( ) {
int *ptr = new int();
free (ptr); // The correct approach is delete ptr
char *c = (char*)malloc ( sizeof(char) );
delete c; // The correct approach is free ( c )
return 0;
}
The following output demonstrates a Valgrind session that detects mismatched usage of free and delete:
g++ mismatchingnewandfree.cpp -g
valgrind ./a.out
==76087== Memcheck, a memory error detector
==76087== Copyright (C) 2002-2015, and GNU GPL'd, by Julian Seward et al.
==76087== Using Valgrind-3.11.0 and LibVEX; rerun with -h for copyright info
==76087== Command: ./a.out
==76087==
==76087== Mismatched free() / delete / delete []
==76087== at 0x4C2EDEB: free (in /usr/lib/valgrind/vgpreload_memcheck-amd64-linux.so)
==76087== by 0x4006FD: main (mismatchingnewandfree.cpp:7)
==76087== Address 0x5ab6c80 is 0 bytes inside a block of size 4 alloc'd
==76087== at 0x4C2E0EF: operator new(unsigned long) (in /usr/lib/valgrind/vgpreload_memcheck-amd64-linux.so)
==76087== by 0x4006E7: main (mismatchingnewandfree.cpp:5)
==76087==
==76087== Mismatched free() / delete / delete []
==76087== at 0x4C2F24B: operator delete(void*) (in /usr/lib/valgrind/vgpreload_memcheck-amd64-linux.so)
==76087== by 0x400717: main (mismatchingnewandfree.cpp:11)
==76087== Address 0x5ab6cd0 is 0 bytes inside a block of size 1 alloc'd
==76087== at 0x4C2DB8F: malloc (in /usr/lib/valgrind/vgpreload_memcheck-amd64-linux.so)
==76087== by 0x400707: main (mismatchingnewandfree.cpp:9)
==76087==
==76087==
==76087== HEAP SUMMARY:
==76087== in use at exit: 72,704 bytes in 1 blocks
==76087== total heap usage: 3 allocs, 2 frees, 72,709 bytes allocated
==76087==
==76087== LEAK SUMMARY:
==76087== definitely lost: 0 bytes in 0 blocks
==76087== indirectly lost: 0 bytes in 0 blocks
==76087== possibly lost: 0 bytes in 0 blocks
==76087== still reachable: 72,704 bytes in 1 blocks
==76087== suppressed: 0 bytes in 0 blocks
==76087== Rerun with --leak-check=full to see details of leaked memory
==76087==
==76087== For counts of detected and suppressed errors, rerun with: -v
==76087== ERROR SUMMARY: 2 errors from 2 contexts (suppressed: 0 from 0)
In this chapter, you learned about various C++ debugging tools and the applications of the Valgrind tool, such as detecting uninitialized variable access and detecting memory leaks. You also learned about the GDB tool and detecting issues that arise due to illegal memory access of the already released memory locations.
In the next chapter, you will be learning about code smells and clean code practices.
This chapter will cover the following topics:
Clean code is the source code that works in an accurate way functionally and is structurally well written. Through thorough testing, we can ensure the code is functionally correct. We can improve code quality via code self-review, peer code review, code analysis, and most importantly, by code refactoring.
The following are some of the qualities of clean code:
Lastly, the best part about writing clean code is that both the development team involved in the project or product and the customer will be happy.
Refactoring helps improve the structural quality of the source code. It doesn't modify the functionality of the code; it just improves the structural aspect of the code quality. Refactoring makes the code cleaner, but at times it may help you improve the overall code performance. However, you need to understand that performance tuning is different from code refactoring.
The following diagram demonstrates the development process overview:
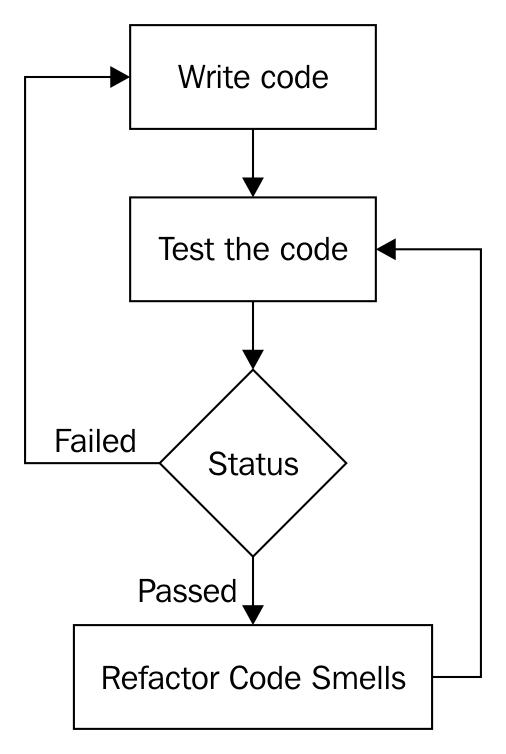
How is code refactoring done safely? The answer to this question is as follows:
Source code has two aspects of quality, namely functional and structural. The functional quality of a piece of source code can be achieved by testing the code against the customer specifications. The biggest mistake most developers make is that they tend to commit the code to version control software without refactoring it; that is, they commit the code the moment they believe it is functionally complete.
As a matter of fact, committing code to version control often is a good habit, as this is what makes continuous integration and DevOps possible. After committing the code to version control, what the vast majority of developers ignore is refactoring it. It is highly critical that you refactor the code to ensure it is clean, without which being agile is impossible.
Code that looks like noodles (spaghetti) requires more efforts to enhance or maintain. Hence, responding to a customer's request quickly is not practically possible. This is why maintaining clean code is critical to being agile. This is applicable irrespective of the agile framework that is followed in your organization.
Agile is all about fail fast. An agile team will be able to respond to a customer's requirement quickly without involving any circus from the development team. It doesn't really matter much which agile framework the team is using: Scrum, Kanban, XP, or something else. What really matters is, are you following them seriously?
As an independent software consultant, I have personally observed and learned who generally complains, and why they complain about agile.
As Scrum is one of the most popular agile frameworks, let's assume a product company, say, ABC Tech Private Ltd., has decided to follow Scrum for the new product that they are planning to develop. The good news is that ABC Tech, just like most organizations, also hosts a Sprint planning meeting, a daily stand-up meeting, Sprint review, Sprint retrospective, and all other Scrum ceremonies efficiently. Assume that ABC Tech has ensured their Scrum master is Scrum-certified and the product manager is a Scrum-certified product owner. Great! Everything sounds good so far.
Let's say the ABC Tech product team doesn't use TDD, BDD, ATDD, and DevOps. Do you think the ABC Tech product team is agile? Certainly not. As a matter of fact, the development team will be highly stressed with a hectic and impractical schedule. At the end of the day, there will be very high attrition, as the team will not be happy. Hence, customers will not be happy, as the quality of the product will suffer terribly.
What do you think has gone wrong with the ABC Tech product team?
Scrum has two sets of processes, namely the project management process, which is covered by Scrum ceremonies. Then, there is the engineering side of the process, which most organizations don't pay much attention to. This is evident from the interest or awareness of Certified SCRUM Developer (CSD) certification in the IT industry. The amount of interest the IT industry shows to CSM, CSPO, or CSP is hardly shown to CSD, which is required for developers. However, I don't believe certification alone could make someone a subject-matter expert; it only shows the seriousness the person or the organization shows in embracing an agile framework and delivering quality products to their customers.
Unless the code is kept clean, how is it possible for the development team to respond to customers' requirements quickly? In other words, unless the engineers in the development team embrace TDD, BDD, ATDD, continuous integration, and DevOps in the product development, no team will be able to succeed in Scrum or, for that matter, with any other agile framework.
The bottom line is that unless your organization takes the engineering Scrum process and project management Scrum process equally serious, no development team can claim to succeed in agile.
SOLID is an acronym for a set of important design principles that, if followed, can avoid code smells and improve the code quality, both structurally and functionally.
Code smells can be prevented or refactored into clean code if your software architecture meets the SOLID design principle compliance. The following principles are collectively called SOLID design principles:
The best part is that most design patterns also follow and are compliant with SOLID design principles.
Let's go through each of the preceding design principles one by one in the following sections.
Single responsibility principle is also referred to as SRP in short. SRP says that every class must have only one responsibility. In other words, every class must represent exactly one object. When a class represents multiple objects, it tends to violate SRP and opens up chances for multiple code smells.
For example, let's take a simple Employee class, as follows:
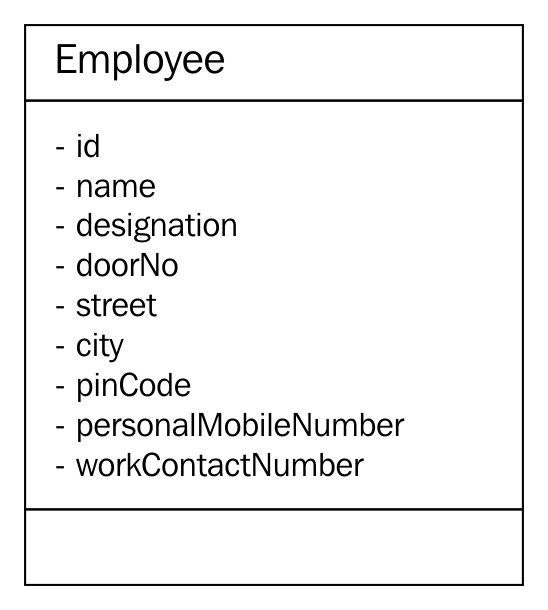
In the preceding class diagram, the Employee class seems to represent three different objects: Employee, Address, and Contact. Hence, it violates the SRP. As per this principle, from the preceding Employee class, two other classes can be extracted, namely Address and Contact, as follows:
For simplicity, the class diagrams used in this section don't show any methods that are supported by the respective classes, as our focus is understanding the SRP with a simple example.
In the preceding refactored design, Employee has one or more addresses (personal and official) and one or more contacts (personal and official). The best part is that after refactoring the design, every class abstracts one and only thing; that is, it has only one responsibility.
An architecture or design is in compliance with the open closed principle (OCP) when the design supports the addition of new features with no code changes or without modifying the existing source code. As you know, based on your professional industry experience, every single project you have come across was extensible in one way or another. This is how you were able to add new features to your product. However, the design will be in compliance with the OCP when such a feature extension is done without you modifying the existing code.
Let's take a simple Item class, as shown in the following code. For simplicity, only the essential details are captured in the Item class:
#include <iostream>
#include <string>
using namespace std;
class Item {
private:
string name;
double quantity;
double pricePerUnit;
public:
Item ( string name, double pricePerUnit, double quantity ) {
this-name = name;
this->pricePerUnit = pricePerUnit;
this->quantity = quantity;
}
public double getPrice( ) {
return quantity * pricePerUnit;
}
public String getDescription( ) {
return name;
}
};
Assume the preceding Item class is part of a simple billing application for a small shop. As the Item class will be able to represent a pen, calculator, chocolate, notebook, and so on, it is generic enough to support any billable item that is dealt by the shop. However, if the shop owner is supposed to collect Goods and Services Tax (GST) or Value Added Tax (VAT), the existing Item class doesn't seem to support the tax component. One common approach is to modify the Item class to support the tax component. However, if we were to modify existing code, our design would be non-compliant to OCP.
Hence, let's refactor our design to make it OCP-compliant using Visitor design pattern. Let's explore the refactoring possibility, as shown in the following code:
#ifndef __VISITABLE_H
#define __VISITABLE_H
#include <string>
using namespace std;
class Visitor;
class Visitable {
public:
virtual void accept ( Visitor * ) = 0;
virtual double getPrice() = 0;
virtual string getDescription() = 0;
};
#endif
The Visitable class is an abstract class with three pure virtual functions. The Item class will be inheriting the Visitable abstract class, as shown here:
#ifndef __ITEM_H
#define __ITEM_H
#include <iostream>
#include <string>
using namespace std;
#include "Visitable.h"
#include "Visitor.h"
class Item : public Visitable {
private:
string name;
double quantity;
double unitPrice;
public:
Item ( string name, double quantity, double unitPrice );
string getDescription();
double getQuantity();
double getPrice();
void accept ( Visitor *pVisitor );
};
#endif
Next, let's take a look at the Visitor class, shown in the following code. It says there can be any number of Visitor subclasses that can be implemented in future to add new functionalities, all without modifying the Item class:
class Visitable;
#ifndef __VISITOR_H
#define __VISITOR_H
class Visitor {
protected:
double price;
public:
virtual void visit ( Visitable * ) = 0;
virtual double getPrice() = 0;
};
#endif
The GSTVisitor class is the one that lets us add the GST functionality without modifying the Item class. The GSTVisitor implementation looks like this:
#include "GSTVisitor.h"
void GSTVisitor::visit ( Visitable *pItem ) {
price = pItem->getPrice() + (0.18 * pItem->getPrice());
}
double GSTVisitor::getPrice() {
return price;
}
The Makefile looks as follows:
all: GSTVisitor.o Item.o main.o
g++ -o gst.exe GSTVisitor.o Item.o main.o
GSTVisitor.o: GSTVisitor.cpp Visitable.h Visitor.h
g++ -c GSTVisitor.cpp
Item.o: Item.cpp
g++ -c Item.cpp
main.o: main.cpp
g++ -c main.cpp
The refactored design is OCP-compliant, as we would be able to add new functionalities without modifying the Item class. Just imagine: if the GST calculation varies from time to time, without modifying the Item class, we would be able to add new subclasses of Visitor and address the upcoming changes.
Liskov substitution principle (LSP) stresses the importance of subclasses adhering to the contract established by the base class. In an ideal inheritance hierarchy, as the design focus moves up the class hierarchy, we should notice generalization; as the design focus moves down the class hierarchy, we should notice specialization.
The inheritance contract is between two classes, hence it is the responsibility of the base class to impose rules that all subclasses can follow, and the subclasses are equally responsible for obeying the contract once agreed. A design that compromises these design philosophies will be non-compliant to the LSP.
LSP says if a method takes the base class or interface as an argument, one should be able to substitute the instance of any one of the subclasses unconditionally.
As a matter of fact, inheritance violates the most fundamental design principles: inheritance is weakly cohesive and strongly coupled. Hence, the real benefit of inheritance is polymorphism, and code reuse is a tiny benefit compared to the price paid for inheritance. When LSP is violated, we can't substitute the base class instance with one of its subclass instances, and the worst part is we can't invoke methods polymorphically. In spite of paying the design penalties of using inheritance, if we can't reap the benefit of polymorphism, there is no real motivation to use it.
The technique to identify LSP violation is as follows:
The following are the ways to refactor LSP violations:
Interface segregation design principle recommends modeling many small interfaces for a specific purpose, as opposed to modeling one bigger interface that represents many things. In the case of C++, an abstract class with pure virtual functions can be thought of as an interface.
Let's take a simple example to understand interface segregation:
#include <iostream>
#include <string>
using namespace std;
class IEmployee {
public:
virtual string getDoor() = 0;
virtual string getStreet() = 0;
virtual string getCity() = 0;
virtual string getPinCode() = 0;
virtual string getState() = 0;
virtual string getCountry() = 0;
virtual string getName() = 0;
virtual string getTitle() = 0;
virtual string getCountryDialCode() = 0;
virtual string getContactNumber() = 0;
};
In the preceding example, the abstract class demonstrates a chaotic design. The design is chaotic as it seems to represent many things, such as employee, address, and contact. One of the ways in which the preceding abstract class can be refactored is by breaking the single interface into three separate interfaces: IEmployee, IAddress, and IContact. In C++, interfaces are nothing but abstract classes with pure virtual functions:
#include <iostream>
#include <string>
#include <list>
using namespace std;
class IEmployee {
private:
string firstName, middleName, lastName,
string title;
string employeeCode;
list<IAddress> addresses;
list<IContact> contactNumbers;
public:
virtual string getAddress() = 0;
virtual string getContactNumber() = 0;
};
class IAddress {
private:
string doorNo, street, city, pinCode, state, country;
public:
IAddress ( string doorNo, string street, string city,
string pinCode, string state, string country );
virtual string getAddress() = 0;
};
class IContact {
private:
string countryCode, mobileNumber;
public:
IContact ( string countryCode, string mobileNumber );
virtual string getMobileNumber() = 0;
};
In the refactored code snippet, every interface represents exactly one object, hence it is in compliance with the interface segregation design principle.
A good design will be strongly cohesive and loosely coupled. Hence, our design must have less dependency. A design that makes a code dependent on many other objects or modules is considered a poor design. If Dependency Inversion (DI) is violated, any change that happens in the dependent modules will have a bad impact on our module, leading to a ripple effect.
Let's take a simple example to understand the power of DI. A Mobile class "has a" Camera object and notice that has a form is composition. Composition is an exclusive ownership where the lifetime of the Camera object is directly controlled by the Mobile object:
As you can see in the preceding image, the Mobile class has an instance of Camera and the has a form used is composition, which is an exclusive ownership relationship.
Let's take a look at the Mobile class implementation, as follows:
#include <iostream>
using namespace std;
class Mobile {
private:
Camera camera;
public:
Mobile ( );
bool powerOn();
bool powerOff();
};
class Camera {
public:
bool ON();
bool OFF();
};
bool Mobile::powerOn() {
if ( camera.ON() ) {
cout << "\nPositive Logic - assume some complex Mobile power ON logic happens here." << endl;
return true;
}
cout << "\nNegative Logic - assume some complex Mobile power OFF logic happens here." << endl;
<< endl;
return false;
}
bool Mobile::powerOff() {
if ( camera.OFF() ) {
cout << "\nPositive Logic - assume some complex Mobile power OFF logic happens here." << endl;
return true;
}
cout << "\nNegative Logic - assume some complex Mobile power OFF logic happens here." << endl;
return false;
}
bool Camera::ON() {
cout << "\nAssume Camera class interacts with Camera hardware here\n" << endl;
cout << "\nAssume some Camera ON logic happens here" << endl;
return true;
}
bool Camera::OFF() {
cout << "\nAssume Camera class interacts with Camera hardware here\n" << endl;
cout << "\nAssume some Camera OFF logic happens here" << endl;
return true;
}
In the preceding code, Mobile has implementation-level knowledge about Camera, which is a poor design. Ideally, Mobile should be interacting with Camera via an interface or an abstract class with pure virtual functions, as this separates the Camera implementation from its contract. This approach helps replace Camera without affecting Mobile and also gives an opportunity to support a bunch of Camera subclasses in place of one single camera.
Wondering why it is called Dependency Injection (DI) or Inversion of Control (IOC)? The reason it is termed dependency injection is that currently, the lifetime of Camera is controlled by the Mobile object; that is, Camera is instantiated and destroyed by the Mobile object. In such a case, it is almost impossible to unit test Mobile in the absence of Camera, as Mobile has a hard dependency on Camera. Unless Camera is implemented, we can't test the functionality of Mobile, which is a bad design approach. When we invert the dependency, it lets the Mobile object use the Camera object while it gives up the responsibility of controlling the lifetime of the Camera object. This process is rightly referred to as IOC. The advantage is that you will be able to unit test the Mobile and Camera objects independently and they will be strongly cohesive and loosely coupled due to IOC.
Let's refactor the preceding code with the DI design principle:
#include <iostream>
using namespace std;
class ICamera {
public:
virtual bool ON() = 0;
virtual bool OFF() = 0;
};
class Mobile {
private:
ICamera *pCamera;
public:
Mobile ( ICamera *pCamera );
void setCamera( ICamera *pCamera );
bool powerOn();
bool powerOff();
};
class Camera : public ICamera {
public:
bool ON();
bool OFF();
};
//Constructor Dependency Injection
Mobile::Mobile ( ICamera *pCamera ) {
this->pCamera = pCamera;
}
//Method Dependency Injection
Mobile::setCamera( ICamera *pCamera ) {
this->pCamera = pCamera;
}
bool Mobile::powerOn() {
if ( pCamera->ON() ) {
cout << "\nPositive Logic - assume some complex Mobile power ON logic happens here." << endl;
return true;
}
cout << "\nNegative Logic - assume some complex Mobile power OFF logic happens here." << endl;
<< endl;
return false;
}
bool Mobile::powerOff() {
if ( pCamera->OFF() ) {
cout << "\nPositive Logic - assume some complex Mobile power OFF logic happens here." << endl;
return true;
}
cout << "\nNegative Logic - assume some complex Mobile power OFF logic happens here." << endl;
return false;
}
bool Camera::ON() {
cout << "\nAssume Camera class interacts with Camera hardware here\n" << endl;
cout << "\nAssume some Camera ON logic happens here" << endl;
return true;
}
bool Camera::OFF() {
cout << "\nAssume Camera class interacts with Camera hardware here\n" << endl;
cout << "\nAssume some Camera OFF logic happens here" << endl;
return true;
}
The changes are highlighted in bold in the preceding code snippet. IOC is such a powerful technique that it lets us decouple the dependency as just demonstrated; however, its implementation is quite simple.
Code smell is a term used to refer to a piece of code that lacks structural quality; however, the code may be functionally correct. Code smells violate SOLID design principles, hence they must be taken seriously, as the code that is not well written leads to heavy maintenance cost in the long run. However, code smells can be refactored into clean code.
As an independent software consultant, I have had a lot of opportunities to interact and learn from great developers, architects, QA folks, system administrators, CTOs and CEOs, entrepreneurs, and so on. Whenever our discussions crossed the billion dollar question, "What is clean code or good code?", I more or less got one common response globally, "Good code will be well commented." While this is partially correct, certainly that's where the problem starts. Ideally, clean code should be self-explanatory, without any need for comments. However, there are some occasions where comments improve the overall readability and maintainability. Not all comments are code smells, hence it becomes necessary to differentiate a good comment from a bad one. Have a look at the following code snippet:
if ( condition1 ) {
// some block of code
}
else if ( condition2 ) {
// some block of code
}
else {
// OOPS - the control should not reach here ### Code Smell ###
}
I'm sure you have come across these kinds of comments. Needless to explain that the preceding scenario is a code smell. Ideally, the developer should have refactored the code to fix the bug instead of writing such a comment. I was once debugging a critical issue in the middle of the night and I noticed the control reached the mysterious empty code block with just a comment in it. I'm sure you have come across funnier code and can imagine the frustration it brings; at times, you too would have written such a type of code.
A good comment will express why the code is written in a specific way rather than express how the code does something. A comment that conveys how the code does something is a code smell, whereas a comment that conveys the why part of the code is a good comment, as the why part is not expressed by the code; therefore, a good comment provides value addition.
A method is long when it is identified to have multiple responsibilities. Naturally, a method that has more than 20-25 lines of code tends to have more than one responsibility. Having said that, a method with more lines of code is longer. This doesn't mean a method with less than 25 lines of code isn't longer. Take a look at the following code snippet:
void Employee::validateAndSave( ) {
if ( ( street != "" ) && ( city != "" ) )
saveEmployeeDetails();
}
Clearly, the preceding method has multiple responsibilities; that is, it seems to validate and save the details. While validating before saving isn't wrong, the same method shouldn't do both. So the preceding method can be refactored into two smaller methods that have one single responsibility:
private:
void Employee::validateAddress( ) {
if ( ( street == "" ) || ( city == "" ) )
throw exception("Invalid Address");
}
public:
void Employee::save() {
validateAddress();
}
Each of the refactored methods shown in the preceding code has exactly one responsibility. It would be tempting to make the validateAddress() method a predicate method; that is, a method that returns a bool. However, if validateAddress() is written as a predicate method, then the client code will be forced to do if check, which is a code smell. Handling errors by returning error code isn't considered object-oriented code, hence error handling must be done using C++ exceptions.
An object-oriented method takes fewer arguments, as a well-designed object will be strongly cohesive and loosely coupled. A method that takes too many arguments is a symptom that informs that the knowledge required to make a decision is received externally, which means the current object doesn't have all of the knowledge to make a decision by itself.
This means the current object is weakly cohesive and strongly coupled, as it depends on too much external data to make a decision. Member functions generally tend to receive fewer arguments, as the data members they require are generally member variables. Hence, the need to pass member variables to member functions sounds artificial.
Let's see some of the common reasons why a method tends to receive too many arguments. The most common symptoms and reasons are listed here:
The ways to refactor a method that takes long parameter list (LPL) are listed here:
Duplicate code is a commonly recurring code smell that doesn't require much explanation. The copying and pasting code culture alone can't be blamed for duplicate code. Duplicate code makes code maintenance more cumbersome, as the same issues may have to be fixed in multiple places, and integrating new features requires too many code changes, which tends to break the unexpected functionalities. Duplicate code also increases the application binary footprint, hence it must be refactored to clean code.
Conditional complexity code smell is about complex large conditions that tend to grow larger and more complex with time. This code smell can be refactored with the strategy design pattern. As the strategy design pattern deals with many related objects, there is scope for using the Factory method, and the null object design pattern can be used to deal with unsupported subclasses in the Factory method:
//Before refactoring
void SomeClass::someMethod( ) {
if ( ! conition1 && condition2 )
//perform some logic
else if ( ! condition3 && condition4 && condition5 )
//perform some logic
else
//do something
}
//After refactoring
void SomeClass::someMethod() {
if ( privateMethod1() )
//perform some logic
else if ( privateMethod2() )
//perform some logic
else
//do something
}
A large class code smell makes the code difficult to understand and tougher to maintain. A large class can do too many things for one class. Large classes can be refactored by breaking them into smaller classes with a single responsibility.
Dead code is commented code or code that is never used or integrated. It can be detected with code coverage tools. Generally, developers retain these instances of code due to lack of confidence, and this happens more often in legacy code. As every code is tracked in version control software tools, dead code can be deleted, and if required, can always be retrieved back from version control software.
Primitive Obsession (PO) is a wrong design choice: use of a primitive data type to represent a complex domain entity. For example, if the string data type is used to represent date, though it sounds like a smart idea initially, it invites a lot of maintenance trouble in the long run.
Assuming you have used a string data type to represent date, the following issues will be a challenge:
Ideally, date must be represented by a class as opposed to a primitive data type.
Data classes provide only getter and setter functions. Though they are very good for transferring data from one layer to another, they tend to burden the classes that depend on the data class. As data classes won't provide any useful functionalities, the classes that interact or depend on data classes end up adding functionalities with the data from the data class. In this fashion, the classes around the data class violate the SRP and tend to be a large class.
Certain classes are termed feature envy if they have too much knowledge about other internal details of other classes. Generally, this happens when the other classes are data classes. Code smells are interrelated; breaking one code smell tends to attract other code smells.
In this chapter, you learned about the following topics:
You also learned about many refactoring techniques that will help you maintain your code cleaner. Happy coding!
BIRMINGHAM - MUMBAI
Copyright © 2017 Packt Publishing
All rights reserved. No part of this book may be reproduced, stored in a retrieval system, or transmitted in any form or by any means, without the prior written permission of the publisher, except in the case of brief quotations embedded in critical articles or reviews.
Every effort has been made in the preparation of this book to ensure the accuracy of the information presented. However, the information contained in this book is sold without warranty, either express or implied. Neither the author, nor Packt Publishing, and its dealers and distributors will be held liable for any damages caused or alleged to be caused directly or indirectly by this book.
Packt Publishing has endeavored to provide trademark information about all of the companies and products mentioned in this book by the appropriate use of capitals. However, Packt Publishing cannot guarantee the accuracy of this information.
First published: August 2017
Production reference: 1300817
ISBN 978-1-78646-162-9
|
Author Jeganathan Swaminathan |
Copy Editor Gladson Monteiro Muktikant Garimella |
|
Reviewer Brandon James |
Project Coordinator Vaidehi Sawant |
|
Commissioning Editor
Aaron Lazar |
Proofreader Safis Editing |
|
Acquisition Editor Denim Pinto |
Indexer Rekha Nair |
|
Content Development Editor Anurag Ghogre |
Graphics Abhinash Sahu |
|
Technical Editor Madhunikita Sunil Chindarkar |
Production Coordinator Melwyn Dsa |
Jeganathan Swaminathan, Jegan for short, is a freelance software consultant and founder of TekTutor, with over 17 years of IT industry experience. In the past, he has worked for AMD, Oracle, Siemens, Genisys Software, Global Edge Software Ltd, and PSI Data Systems. He has consulted for Samsung WTD (South Korea) and National Semiconductor (Bengaluru). He now works as a freelance external consultant for Amdocs (India). He works as freelance software consultant and freelance corporate trainer. He holds CSM, CSPO, CSD, and CSP certifications from Scrum Alliance. He is a polyglot software professional and his areas of interest include a wide range of C++, C#, Python, Ruby, AngularJS, Node.js, Kubernetes, Ansible, Puppet, Chef, and Java technologies. He is well known for JUnit, Mockito, PowerMock, gtest, gmock, CppUnit, Cucumber, SpecFlow, Qt, QML, POSIX – Pthreads, TDD, BDD, ATDD, NoSQL databases (MongoDB and Cassandra), Apache Spark, Apache Kafka, Apache Camel, Dockers, Continuous Integration (CI), Continuous Delivery (CD), Maven, Git, cloud computing, and DevOps. You can reach him for any C++, Java, Qt, QML, TDD, BDD, and DevOps-related training or consulting assignments. Jegan is a regular speaker at various technical conferences.
Brandon James is a support escalation engineer who works with troubleshooting, debugging, and implementing identity management solutions for many enterprise customers for both on-premise and cloud solutions. He worked as a technical reviewer on the Microsoft Identity Manager 2016 Handbook by Packt Publishing. Previously, he worked as a Web Site/Web Application Developer designing and developing websites and internal web applications for various enterprise customers. He holds a B.S. in computer engineering and an M.S. in computer science.
For support files and downloads related to your book, please visit www.PacktPub.com. Did you know that Packt offers eBook versions of every book published, with PDF and ePub files available? You can upgrade to the eBook version at www.PacktPub.com and as a print book customer, you are entitled to a discount on the eBook copy. Get in touch with us at service@packtpub.com for more details. At www.PacktPub.com, you can also read a collection of free technical articles, sign up for a range of free newsletters and receive exclusive discounts and offers on Packt books and eBooks.
Get the most in-demand software skills with Mapt. Mapt gives you full access to all Packt books and video courses, as well as industry-leading tools to help you plan your personal development and advance your career.
Thanks for purchasing this Packt book. At Packt, quality is at the heart of our editorial process. To help us improve, please leave us an honest review on this book's Amazon page at https://www.amazon.com/dp/1786461625.
If you'd like to join our team of regular reviewers, you can email us at customerreviews@packtpub.com. We award our regular reviewers with free eBooks and videos in exchange for their valuable feedback. Help us be relentless in improving our products!
C++ is an interesting programming language that has been around for almost three decades now. It is used to develop complex desktop applications, web applications, networking applications, device drivers, kernel modules, embedded applications, and GUI applications using third-party widget frameworks; literally speaking, C++ can be used in any domain.
Ever since I started programming in 1993, I have cherished the good old technical discussions that I had with many of my colleagues and industry experts that I met from time to time. Of all the technical discussions, one topic gets repeated time and again, which is, "Do you think C++ is a relevant programming language today? Should I continue working on C++ or should I move on to other modern programming languages, such as Java, C#, Scala, or Angular/Node.js?"
I have always felt that one should be open to learning other technologies, but that doesn’t mean having to give up on C++. However, the good news is that with the new C++17 features in place, C++ has been reborn and it is going to stay and rock for many more decades, which is my motivation to write this book.
People have always felt that Java will take over C++, but it has continued to stay. The same discussion started again when C# came into the industry and today again when Angular/Node.js and Scala seem to be more attractive for rapid programming. However, C++ has its own, place and no programming language has been able to take over the place of C++ so far.
There are already many C++ books that help you understand the language, but there are very few books that address developing GUI applications in C++, TDD with C++, and BDD with C++.
C++ has come a long way and has now been adopted in several contexts. Its key strengths are its software infrastructure and resource-constrained applications. The C++ 17 release will change the way developers write code, and this book will help you master your developing skills with C++.
With real-world, practical examples explaining each concept, the book will begin by introducing you to the latest features of C++ 17. It will encourage clean code practices in C++, and demonstrate GUI app development options in C++. You will gain insights into how to avoid memory leaks using smart pointers. Next, you will learn how multithreaded programming can help you achieve concurrency in your applications.
Moving on, you’ll also get an in-depth understanding of the C++ Standard Template Library. We'll explain the concepts of implementing TDD and BDD in your C++ programs, along with template-based generic programming, to equip you with the expertise to build powerful applications. Finally, we’ll round the book off with debugging techniques and best practices. By the time you reach the end of the book, you will have an in-depth understanding of the language and its various facets.
Chapter 1, C++17 Features, explains the new features of C++17 and features that have been removed. It also demonstrates key C++17 features with easy-to-understand examples.
Chapter 2, Standard Template Library, gives an overview of STL, demonstrates various containers and iterators, and explains how to apply useful algorithms on the containers. The chapter also touches on the internal data structures used and their runtime efficiencies.
Chapter 3, Template Programming, gives an overview of generic programming and its benefits. It demonstrates writing function templates and class templates, and overloading function templates. It also touches upon writing generic classes, explicit class specializations, and partial specializations.
Chapter 4, Smart Pointers, explains the issues of using raw pointers and motivates the use of smart pointers. Gradually, this chapter introduces you to the usage of auto_ptr, unique_ptr, shared_ptr, and weak_ptr, and explains ways to resolve cyclic dependency issues.
Chapter 5, Developing GUI Applications in C++, gives an overview of Qt and provides you with step-by-step instructions to install Qt on Linux and Windows. The chapter gradually helps you develop impressive GUI applications with interesting widgets and various layouts.
Chapter 6, Multithreaded Programming and Inter-Process Communication, introduces to the POSIX pthreads library and discusses the native C++ thread library. It also discusses the benefits of using the C++ thread library. Later, it helps you write multithreaded applications, explores ways to manage the threads, and explains the use of synchronization mechanisms. The chapter discusses deadlocks and possible solutions. Toward the end of the chapter, it introduces you to the concurrency library.
Chapter 7, Test-Driven Development, gives a brief overview of TDD and clarifies FAQs on TDD. This chapter provides you with step-by-step instructions to install Google test framework and integrate it with the Linux and Windows platforms. It helps you develop applications using TDD with an easy-to-understand tutorial style.
Chapter 8, Behavior-Driven Development, gives an overview of BDD and guides you through the installation, integration, and configuration of the Cucumber framework on Linux platforms. It also explains Gherkin and helps you write BDD test cases.
Chapter 9, Debugging Techniques, discusses the various strategies and techniques followed in the industry for debugging your application problems. Later, it helps you understand the use of the GDB and Valgrind tools for step by step debugging, watching variables, fixing various memory-related issues, including memory leaks.
Chapter 10, Code Smells and Clean Code Practices, discusses various code smells and refactoring techniques.
You will need to be equipped with the following tools before you get started with the book:
The OS required is Ubuntu 16.04 64-bit or later. The hardware configuration should at least be of 1 GB RAM and 20 GB ROM. A virtual machine with this configuration should also suffice.
This book is for experienced C++ developers. If you are a novice C++ developer, then it’s highly recommended that you get a solid understanding of the C++ language before reading this book.
In this book, you will find a number of text styles that distinguish between different kinds of information. Here are some examples of these styles and an explanation of their meaning. Code words in text, database table names, folder names, filenames, file extensions, pathnames, dummy URLs, user input, and Twitter handles are shown as follows: "The initialize() method initializes the deque iterator pos to the first data element stored within deque."
A block of code is set as follows:
#include <iostream>
int main ( ) {
const int x = 5, y = 5;
static_assert ( 1 == 0, "Assertion failed" );
static_assert ( 1 == 0 );
static_assert ( x == y );
return 0;
}
When we wish to draw your attention to a particular part of a code block, the relevant lines or items are set in bold:
#include <iostream>
#include <thread>
#include <mutex>
#include "Account.h"
using namespace std;
enum ThreadType {
DEPOSITOR,
WITHDRAWER
};
mutex locker;
Any command-line input or output is written as follows:
g++ main.cpp -std=c++17
./a.out
New terms and important words are shown in bold. Words that you see on the screen, for example, in menus or dialog boxes, appear in the text like this: " You need to create a new project named MathApp by navigating to New Project | Visual Studio | Windows | Win32 | Win32 Console Application."
Feedback from our readers is always welcome. Let us know what you think about this book-what you liked or disliked. Reader feedback is important for us as it helps us develop titles that you will really get the most out of. To send us general feedback, simply email feedback@packtpub.com, and mention the book's title in the subject of your message. If there is a topic that you have expertise in and you are interested in either writing or contributing to a book, see our author guide at www.packtpub.com/authors.
Now that you are the proud owner of a Packt book, we have a number of things to help you to get the most from your purchase.
You can download the example code files for this book from your account at http://www.packtpub.com. If you purchased this book elsewhere, you can visit http://www.packtpub.com/support and register to have the files emailed directly to you. You can download the code files by following these steps:
Once the file is downloaded, please make sure that you unzip or extract the folder using the latest version of:
The code bundle for the book is also hosted on GitHub at https://github.com/PacktPublishing/Mastering-Cpp-Programming. We also have other code bundles from our rich catalog of books and videos available at https://github.com/PacktPublishing/. Check them out!
Although we have taken every care to ensure the accuracy of our content, mistakes do happen. If you find a mistake in one of our books-maybe a mistake in the text or the code-we would be grateful if you could report this to us. By doing so, you can save other readers from frustration and help us improve subsequent versions of this book. If you find any errata, please report them by visiting http://www.packtpub.com/submit-errata, selecting your book, clicking on the Errata Submission Form link, and entering the details of your errata. Once your errata are verified, your submission will be accepted and the errata will be uploaded to our website or added to any list of existing errata under the Errata section of that title. To view the previously submitted errata, go to https://www.packtpub.com/books/content/support and enter the name of the book in the search field. The required information will appear under the Errata section.
Piracy of copyrighted material on the internet is an ongoing problem across all media. At Packt, we take the protection of our copyright and licenses very seriously. If you come across any illegal copies of our works in any form on the internet, please provide us with the location address or website name immediately so that we can pursue a remedy. Please contact us at copyright@packtpub.com with a link to the suspected pirated material. We appreciate your help in protecting our authors and our ability to bring you valuable content.
If you have a problem with any aspect of this book, you can contact us at questions@packtpub.com, and we will do our best to address the problem.
In this chapter, you will be learning the following concepts:
As you know, the C++ language is the brain child of Bjarne Stroustrup, who developed C++ in 1979. The C++ programming language is standardized by International Organization for Standardization (ISO).
The initial standardization was published in 1998, commonly referred to as C++98, and the next standardization C++03 was published in 2003, which was primarily a bug fix release with just one language feature for value initialization. In August 2011, the C++11 standard was published with several additions to the core language, including several significant interesting changes to the Standard Template Library (STL); C++11 basically replaced the C++03 standard. C++14 was published in December, 2014 with some new features, and later, the C++17 standard was published on July 31, 2017.
At the time of writing this book, C++17 is the latest revision of the ISO/IEC standard for the C++ programming language.
This chapter requires a compiler that supports C++17 features: gcc version 7 or later. As gcc version 7 is the latest version at the time of writing this book, I'll be using gcc version 7.1.0 in this chapter.
The complete list of C++17 features can be found at http://en.cppreference.com/w/cpp/compiler_support#C.2B.2B17_features.
To give a high-level idea, the following are some of the new C++17 features:
Otherwise, there are many new interesting features that were added to the core C++ language: STL, lambadas, and so on. The new features give a facelift to C++, and starting from C++17, as a C++ developer, you will feel that you are working in a modern programming language, such as Java or C#.
The following features are now removed in C++17:
Let's explore the following C++17 key features one by one in the following sections:
Until the C++14 standard, the syntax supported for a nested namespace in C++ was as follows:
#include <iostream>
using namespace std;
namespace org {
namespace tektutor {
namespace application {
namespace internals {
int x;
}
}
}
}
int main ( ) {
org::tektutor::application::internals::x = 100;
cout << "\nValue of x is " << org::tektutor::application::internals::x << endl;
return 0;
}
The preceding code can be compiled and the output can be viewed with the following commands:
g++-7 main.cpp -std=c++17
./a.out
The output of the preceding program is as follows:
Value of x is 100
Every namespace level starts and ends with curly brackets, which makes it difficult to use nested namespaces in large applications. C++17 nested namespace syntax is really cool; just take a look at the following code and you will readily agree with me:
#include <iostream>
using namespace std;
namespace org::tektutor::application::internals {
int x;
}
int main ( ) {
org::tektutor::application::internals::x = 100;
cout << "\nValue of x is " << org::tektutor::application::internals::x << endl;
return 0;
}
The preceding code can be compiled and the output can be viewed with the following commands:
g++-7 main.cpp -std=c++17
./a.out
The output remains the same as the previous program:
Value of x is 100
C++17 introduced new rules for auto-detection of the initializer list, which complements C++14 rules. The C++17 rule insists that the program is ill-formed if an explicit or partial specialization of std::initializer_list is declared:
#include <iostream>
using namespace std;
template <typename T1, typename T2>
class MyClass {
private:
T1 t1;
T2 t2;
public:
MyClass( T1 t1 = T1(), T2 t2 = T2() ) { }
void printSizeOfDataTypes() {
cout << "\nSize of t1 is " << sizeof ( t1 ) << " bytes." << endl;
cout << "\nSize of t2 is " << sizeof ( t2 ) << " bytes." << endl;
}
};
int main ( ) {
//Until C++14
MyClass<int, double> obj1;
obj1.printSizeOfDataTypes( );
//New syntax in C++17
MyClass obj2( 1, 10.56 );
return 0;
}
The preceding code can be compiled and the output can be viewed with the following commands:
g++-7 main.cpp -std=c++17
./a.out
The output of the preceding program is as follows:
Values in integer vectors are ...
1 2 3 4 5
Values in double vectors are ...
1.5 2.5 3.5
The static_assert macro helps identify assert failures during compile time. This feature has been supported since C++11; however, the static_assert macro used to take a mandatory assertion failure message till, which is now made optional in C++17.
The following example demonstrates the use of static_assert with and without the message:
#include <iostream>
#include <type_traits>
using namespace std;
int main ( ) {
const int x = 5, y = 5;
static_assert ( 1 == 0, "Assertion failed" );
static_assert ( 1 == 0 );
static_assert ( x == y );
return 0;
}
The output of the preceding program is as follows:
g++-7 staticassert.cpp -std=c++17
staticassert.cpp: In function ‘int main()’:
staticassert.cpp:7:2: error: static assertion failed: Assertion failed
static_assert ( 1 == 0, "Assertion failed" );
staticassert.cpp:8:2: error: static assertion failed
static_assert ( 1 == 0 );
From the preceding output, you can see that the message, Assertion failed, appears as part of the compilation error, while in the second compilation the default compiler error message appears, as we didn't supply an assertion failure message. When there is no assertion failure, the assertion error message will not appear as demonstrated in static_assert ( x == y ). This feature is inspired by the C++ community from the BOOST C++ library.
The std::invoke() method can be used to call functions, function pointers, and member pointers with the same syntax:
#include <iostream>
#include <functional>
using namespace std;
void globalFunction( ) {
cout << "globalFunction ..." << endl;
}
class MyClass {
public:
void memberFunction ( int data ) {
std::cout << "\nMyClass memberFunction ..." << std::endl;
}
static void staticFunction ( int data ) {
std::cout << "MyClass staticFunction ..." << std::endl;
}
};
int main ( ) {
MyClass obj;
std::invoke ( &MyClass::memberFunction, obj, 100 );
std::invoke ( &MyClass::staticFunction, 200 );
std::invoke ( globalFunction );
return 0;
}
The preceding code can be compiled and the output can be viewed with the following commands:
g++-7 main.cpp -std=c++17
./a.out
The output of the preceding program is as follows:
MyClass memberFunction ...
MyClass staticFunction ...
globalFunction ...
The std::invoke( ) method is a template function that helps you seamlessly invoke callable objects, both built-in and user-defined.
You can now initialize multiple variables with a return value with a really cool syntax, as shown in the following code sample:
#include <iostream>
#include <tuple>
using namespace std;
int main ( ) {
tuple<string,int> student("Sriram", 10);
auto [name, age] = student;
cout << "\nName of the student is " << name << endl;
cout << "Age of the student is " << age << endl;
return 0;
}
In the preceding program, the code highlighted in bold is the structured binding feature introduced in C++17. Interestingly, we have not declared the string name and int age variables. These are deduced automatically by the C++ compiler as string and int, which makes the C++ syntax just like any modern programming language, without losing its performance and system programming benefits.
The preceding code can be compiled and the output can be viewed with the following commands:
g++-7 main.cpp -std=c++17
./a.out
The output of the preceding program is as follows:
Name of the student is Sriram
Age of the student is 10
There is an interesting new feature that allows you to declare a local variable bound to the if and switch statements' block of code. The scope of the variable used in the if and switch statements will go out of scope outside the respective blocks. It can be better understood with an easy to understand example, as follows:
#include <iostream>
using namespace std;
bool isGoodToProceed( ) {
return true;
}
bool isGood( ) {
return true;
}
void functionWithSwitchStatement( ) {
switch ( auto status = isGood( ) ) {
case true:
cout << "\nAll good!" << endl;
break;
case false:
cout << "\nSomething gone bad" << endl;
break;
}
}
int main ( ) {
if ( auto flag = isGoodToProceed( ) ) {
cout << "flag is a local variable and it loses its scope outside the if block" << endl;
}
functionWithSwitchStatement();
return 0;
}
The preceding code can be compiled and the output can be viewed with the following commands:
g++-7 main.cpp -std=c++17
./a.out
The output of the preceding program is as follows:
flag is a local variable and it loses its scope outside the if block
All good!
I'm sure you will love what you are about to see in the sample code. Though templates are quite useful, a lot of people don't like it due to its tough and weird syntax. But you don't have to worry anymore; take a look at the following code snippet:
#include <iostream>
using namespace std;
template <typename T1, typename T2>
class MyClass {
private:
T1 t1;
T2 t2;
public:
MyClass( T1 t1 = T1(), T2 t2 = T2() ) { }
void printSizeOfDataTypes() {
cout << "\nSize of t1 is " << sizeof ( t1 ) << " bytes." << endl;
cout << "\nSize of t2 is " << sizeof ( t2 ) << " bytes." << endl;
}
};
int main ( ) {
//Until C++14
MyClass<int, double> obj1;
obj1.printSizeOfDataTypes( );
//New syntax in C++17
MyClass obj2( 1, 10.56 );
return 0;
}
The preceding code can be compiled and the output can be viewed with the following commands:
g++-7 main.cpp -std=c++17
./a.out
The output of the program is as follows:
Size of t1 is 4 bytes.
Size of t2 is 8 bytes.
Just like the inline function in C++, you could now use inline variable definitions. This comes in handy to initialize static variables, as shown in the following sample code:
#include <iostream>
using namespace std;
class MyClass {
private:
static inline int count = 0;
public:
MyClass() {
++count;
}
public:
void printCount( ) {
cout << "\nCount value is " << count << endl;
}
};
int main ( ) {
MyClass obj;
obj.printCount( ) ;
return 0;
}
The preceding code can be compiled and the output can be viewed with the following commands:
g++-7 main.cpp -std=c++17
./a.out
The output of the preceding code is as follows:
Count value is 1
In this chapter, you got to know interesting new features introduced in C++17. You learned the super simple C++17 nested namespace syntax. You also learned datatype detection with a braced initializer list and the new rule imposed in the C++17 standard.
You also noticed that static_assert can be done without assert failure messages. Also, using std::invoke(), you can now invoke global functions, function pointers, member functions, and static class member functions. And, using structured binding, you could now initialize multiple variables with a return value.
You also learned that the if and switch statements can have a local-scoped variable right before the if condition and switch statements. You learned about auto type detection of class templates. Lastly, you used inline variables.
There are many more C++17 features, but this chapter attempts to cover the most useful features that might be required for most of the developers. In the next chapter, you will be learning about the Standard Template Library.
This chapter will cover the following topics:
Let's look into the STL topics one by one in the following sections.
The C++ Standard Template Library (STL) offers ready-made generic containers, algorithms that can be applied to the containers, and iterators to navigate the containers. The STL is implemented with C++ templates, and templates allow generic programming in C++.
The STL encourages a C++ developer to focus on the task at hand by freeing up the developer from writing low-level data structures and algorithms. The STL is a time-tested library that allows rapid application development.
The STL is an interesting piece of work and architecture. Its secret formula is compile-time polymorphism. To get better performance, the STL avoids dynamic polymorphism, saying goodbye to virtual functions. Broadly, the STL has the following four components:
The STL architecture stitches all the aforementioned four components together. It has many commonly used algorithms with performance guarantees. The interesting part about STL algorithms is that they work seamlessly without any knowledge about the containers that hold the data. This is made possible due to the iterators that offer high-level traversal APIs, which completely abstracts the underlying data structure used within a container. The STL makes use of operator overloading quite extensively. Let's understand the major components of STL one by one to get a good grasp of the STL conceptually.
The STL algorithms are powered by C++ templates; hence, the same algorithm works irrespective of what data type it deals with or independently of how the data is organized by a container. Interestingly, the STL algorithms are generic enough to support built-in and user-defined data types using templates. As a matter of fact, the algorithms interact with the containers via iterators. Hence, what matters to the algorithms is the iterator supported by the container. Having said that, the performance of an algorithm depends on the underlying data structure used within a container. Hence, certain algorithms work only on selective containers, as each algorithm supported by the STL expects a certain type of iterator.
An iterator is a design pattern, but interestingly, the STL work started much before
Gang of Four published their design patterns-related work to the software community. Iterators themselves are objects that allow traversing the containers to access, modify, and manipulate the data stored in the containers. Iterators do this so magically that we don't realize or need to know where and how the data is stored and retrieved.
The following image visually represents an iterator:
From the preceding image, you can understand that every iterator supports the begin() API, which returns the first element position, and the end() API returns one position past the last element in the container.
The STL broadly supports the following five types of iterators:
The container implements the iterator to let us easily retrieve and manipulate the data, without delving much into the technical details of a container.
The following table explains each of the five iterators:
|
The type of iterator |
Description |
|
Input iterator |
|
|
Output iterator |
|
|
Forward iterator |
|
|
Bidirectional iterator |
|
|
Random-access iterator |
|
STL containers are objects that typically grow and shrink dynamically. Containers use complex data structures to store the data under the hood and offer high-level functions to access the data without us delving into the complex internal implementation details of the data structure. STL containers are highly efficient and time-tested.
Every container uses different types of data structures to store, organize, and manipulate data in an efficient way. Though many containers may seem similar, they behave differently under the hood. Hence, the wrong choice of containers leads to application performance issues and unnecessary complexities.
Containers come in the following flavors:
The objects stored in the containers are copied or moved, and not referenced. We will explore every type of container in the upcoming sections with simple yet interesting examples.
Functors are objects that behave like regular functions. The beauty is that functors can be substituted in the place of function pointers. Functors are handy objects that let you extend or complement the behavior of an STL function without compromising the object-oriented coding principles.
Functors are easy to implement; all you need to do is overload the function operator. Functors are also referred to as functionoids.
The following code will demonstrate the way a simple functor can be implemented:
#include <iostream>
#include <vector>
#include <iterator>
#include <algorithm>
using namespace std;
template <typename T>
class Printer {
public:
void operator() ( const T& element ) {
cout << element << "\t";
}
};
int main () {
vector<int> v = { 10, 20, 30, 40, 50 };
cout << "\nPrint the vector entries using Functor" << endl;
for_each ( v.begin(), v.end(), Printer<int>() );
cout << endl;
return 0;
}
Let's quickly compile the program using the following command:
g++ main.cpp -std=c++17
./a.out
Let's check the output of the program:
Print the vector entries using Functor
10 20 30 40 50
We hope you realize how easy and cool a functor is.
The STL supports quite an interesting variety of sequence containers. Sequence containers store homogeneous data types in a linear fashion, which can be accessed sequentially. The STL supports the following sequence containers:
As the objects stored in an STL container are nothing but copies of the values, the STL expects certain basic requirements from the user-defined data types in order to hold those objects inside a container. Every object stored in an STL container must provide the following as a minimum requirement:
Let's explore the sequence containers one by one in the following subsections.
The STL array container is a fixed-size sequence container, just like a C/C++ built-in array, except that the STL array is size-aware and a bit smarter than the built-in C/C++ array. Let's understand an STL array with an example:
#include <iostream>
#include <array>
using namespace std;
int main () {
array<int,5> a = { 1, 5, 2, 4, 3 };
cout << "\nSize of array is " << a.size() << endl;
auto pos = a.begin();
cout << endl;
while ( pos != a.end() )
cout << *pos++ << "\t";
cout << endl;
return 0;
}
The preceding code can be compiled and the output can be viewed with the following commands:
g++ main.cpp -std=c++17
./a.out
The output of the program is as follows:
Size of array is 5
1 5 2 4 3
The following line declares an array of a fixed size (5) and initializes the array with five elements:
array<int,5> a = { 1, 5, 2, 4, 3 };
The size mentioned can't be changed once declared, just like a C/C++ built-in array. The array::size() method returns the size of the array, irrespective of how many integers are initialized in the initializer list. The auto pos = a.begin() method declares an iterator of array<int,5> and assigns the starting position of the array. The array::end() method points to one position after the last element in the array. The iterator behaves like or mimics a C++ pointer, and dereferencing the iterator returns the value pointed by the iterator. The iterator position can be moved forward and backwards with ++pos and --pos, respectively.
The following table shows some commonly used array APIs:
|
API |
Description |
|
at( int index ) |
This returns the value stored at the position referred to by the index. The index is a zero-based index. This API will throw an std::out_of_range exception if the index is outside the index range of the array. |
|
operator [ int index ] |
This is an unsafe method, as it won't throw any exception if the index falls outside the valid range of the array. This tends to be slightly faster than at, as this API doesn't perform bounds checking. |
|
front() |
This returns the first element in the array. |
|
back() |
This returns the last element in the array. |
|
begin() |
This returns the position of the first element in the array |
|
end() |
This returns one position past the last element in the array |
|
rbegin() |
This returns the reverse beginning position, that is, it returns the position of the last element in the array |
|
rend() |
This returns the reverse end position, that is, it returns one position before the first element in the array |
|
size() |
This returns the size of the array |
The array container supports random access; hence, given an index, the array container can fetch a value with a runtime complexity of O(1) or constant time.
The array container elements can be accessed in a reverse fashion using the reverse iterator:
#include <iostream>
#include <array>
using namespace std;
int main () {
array<int, 6> a;
int size = a.size();
for (int index=0; index < size; ++index)
a[index] = (index+1) * 100;
cout << "\nPrint values in original order ..." << endl;
auto pos = a.begin();
while ( pos != a.end() )
cout << *pos++ << "\t";
cout << endl;
cout << "\nPrint values in reverse order ..." << endl;
auto rpos = a.rbegin();
while ( rpos != a.rend() )
cout << *rpos++ << "\t";
cout << endl;
return 0;
}
We will use the following command to get the output:
./a.out
The output is as follows:
Print values in original order ...
100 200 300 400 500 600
Print values in reverse order ...
600 500 400 300 200 100
Vector is a quite useful sequence container, and it works exactly as an array, except that the vector can grow and shrink at runtime while an array is of a fixed size. However, the data structure used under the hood in an array and vector is a plain simple built-in C/C++ style array.
Let's look at the following example to understand vectors better:
#include <iostream>
#include <vector>
#include <algorithm>
using namespace std;
int main () {
vector<int> v = { 1, 5, 2, 4, 3 };
cout << "\nSize of vector is " << v.size() << endl;
auto pos = v.begin();
cout << "\nPrint vector elements before sorting" << endl;
while ( pos != v.end() )
cout << *pos++ << "\t";
cout << endl;
sort( v.begin(), v.end() );
pos = v.begin();
cout << "\nPrint vector elements after sorting" << endl;
while ( pos != v.end() )
cout << *pos++ << "\t";
cout << endl;
return 0;
}
The preceding code can be compiled and the output can be viewed with the following commands:
g++ main.cpp -std=c++17
./a.out
The output of the program is as follows:
Size of vector is 5
Print vector elements before sorting
1 5 2 4 3
Print vector elements after sorting
1 2 3 4 5
The following line declares a vector and initializes the vector with five elements:
vector<int> v = { 1, 5, 2, 4, 3 };
However, a vector also allows appending values to the end of the vector by using the vector::push_back<data_type>( value ) API. The sort() algorithm takes two random access iterators that represent a range of data that must be sorted. As the vector internally uses a built-in C/C++ array, just like the STL array container, a vector also supports random access iterators; hence the sort() function is a highly efficient algorithm whose runtime complexity is logarithmic, that is, O(N log2 (N)).
The following table shows some commonly used vector APIs:
|
API |
Description |
|
at ( int index ) |
This returns the value stored at the indexed position. It throws the std::out_of_range exception if the index is invalid. |
|
operator [ int index ] |
This returns the value stored at the indexed position. It is faster than at( int index ), since no bounds checking is performed by this function. |
|
front() |
This returns the first value stored in the vector. |
|
back() |
This returns the last value stored in the vector. |
|
empty() |
This returns true if the vector is empty, and false otherwise. |
|
size() |
This returns the number of values stored in the vector. |
|
reserve( int size ) |
This reserves the initial size of the vector. When the vector size has reached its capacity, an attempt to insert new values requires vector resizing. This makes the insertion consume O(N) runtime complexity. The reserve() method is a workaround for the issue described. |
|
capacity() |
This returns the total capacity of the vector, while the size is the actual value stored in the vector. |
|
clear() |
This clears all the values. |
|
push_back<data_type>( value ) |
This adds a new value at the end of the vector. |
It would be really fun and convenient to read and print to/from the vector using istream_iterator and ostream_iterator. The following code demonstrates the use of a vector:
#include <iostream>
#include <vector>
#include <algorithm>
#include <iterator>
using namespace std;
int main () {
vector<int> v;
cout << "\nType empty string to end the input once you are done feeding the vector" << endl;
cout << "\nEnter some numbers to feed the vector ..." << endl;
istream_iterator<int> start_input(cin);
istream_iterator<int> end_input;
copy ( start_input, end_input, back_inserter( v ) );
cout << "\nPrint the vector ..." << endl;
copy ( v.begin(), v.end(), ostream_iterator<int>(cout, "\t") );
cout << endl;
return 0;
}
Basically, the copy algorithm accepts a range of iterators, where the first two arguments represent the source and the third argument represents the destination, which happens to be the vector:
istream_iterator<int> start_input(cin);
istream_iterator<int> end_input;
copy ( start_input, end_input, back_inserter( v ) );
The start_input iterator instance defines an istream_iterator iterator that receives input from istream and cin, and the end_input iterator instance defines an end-of-file delimiter, which is an empty string by default (""). Hence, the input can be terminated by typing "" in the command-line input terminal.
Similarly, let's understand the following code snippet:
cout << "\nPrint the vector ..." << endl;
copy ( v.begin(), v.end(), ostream_iterator<int>(cout, "\t") );
cout << endl;
The copy algorithm is used to copy the values from a vector, one element at a time, to ostream, separating the output with a tab character (\t).
Every STL container has its own advantages and disadvantages. There is no single STL container that works better in all the scenarios. A vector internally uses an array data structure, and arrays are fixed in size in C/C++. Hence, when you attempt to add new values to the vector at the time the vector size has already reached its maximum capacity, then the vector will allocate new consecutive locations that can accommodate the old values and the new value in a contiguous location. It then starts copying the old values into the new locations. Once all the data elements are copied, the vector will invalidate the old location.
Whenever this happens, the vector insertion will take O(N) runtime complexity. As the size of the vector grows over time, on demand, the O(N) runtime complexity will show up a pretty bad performance. If you know the maximum size required, you could reserve so much initial size upfront in order to overcome this issue. However, not in all scenarios do you need to use a vector. Of course, a vector supports dynamic size and random access, which has performance benefits in some scenarios, but it is possible that the feature you are working on may not really need random access, in which case a list, deque, or some other container may work better for you.
The list STL container makes use of a doubly linked list data structure internally. Hence, a list supports only sequential access, and searching a random value in a list in the worst case may take O(N) runtime complexity. However, if you know for sure that you only need sequential access, the list does offer its own benefits. The list STL container lets you insert data elements at the end, in the front, or in the middle with a constant time complexity, that is, O(1) runtime complexity in the best, average, and worst case scenarios.
The following image demonstrates the internal data structure used by the list STL:
Let's write a simple program to get first-hand experience of using the list STL:
#include <iostream>
#include <list>
#include <iterator>
#include <algorithm>
using namespace std;
int main () {
list<int> l;
for (int count=0; count<5; ++count)
l.push_back( (count+1) * 100 );
auto pos = l.begin();
cout << "\nPrint the list ..." << endl;
while ( pos != l.end() )
cout << *pos++ << "-->";
cout << " X" << endl;
return 0;
}
I'm sure that by now you have got a taste of the C++ STL, its elegance, and its power. Isn't it cool to observe that the syntax remains the same for all the STL containers? You may have observed that the syntax remains the same no matter whether you are using an array, a vector, or a list. Trust me, you will get the same impression when you explore the other STL containers as well.
Having said that, the previous code is self-explanatory, as we did pretty much the same with the other containers.
Let's try to sort the list, as shown in the following code:
#include <iostream>
#include <list>
#include <iterator>
#include <algorithm>
using namespace std;
int main () {
list<int> l = { 100, 20, 80, 50, 60, 5 };
auto pos = l.begin();
cout << "\nPrint the list before sorting ..." << endl;
copy ( l.begin(), l.end(), ostream_iterator<int>( cout, "-->" ));
cout << "X" << endl;
l.sort();
cout << "\nPrint the list after sorting ..." << endl;
copy ( l.begin(), l.end(), ostream_iterator<int>( cout, "-->" ));
cout << "X" << endl;
return 0;
}
Did you notice the sort() method? Yes, the list container has its own sorting algorithms. The reason for a list container to support its own version of a sorting algorithm is that the generic sort() algorithm expects a random access iterator, whereas a list container doesn't support random access. In such cases, the respective container will offer its own efficient algorithms to overcome the shortcoming.
Interestingly, the runtime complexity of the sort algorithm supported by a list is O (N log2 N).
The following table shows the most commonly used APIs of an STL list:
|
API |
Description |
|
front() |
This returns the first value stored in the list |
|
back() |
This returns the last value stored in the list |
|
size() |
This returns the count of values stored in the list |
|
empty() |
This returns true when the list is empty, and false otherwise |
|
clear() |
This clears all the values stored in the list |
|
push_back<data_type>( value ) |
This adds a value at the end of the list |
|
push_front<data_type>( value ) |
This adds a value at the front of the list |
|
merge( list ) |
This merges two sorted lists with values of the same type |
|
reverse() |
This reverses the list |
|
unique() |
This removes duplicate values from the list |
|
sort() |
This sorts the values stored in a list |
The STL's forward_list container is built on top of a singly linked list data structure; hence, it only supports navigation in the forward direction. As forward_list consumes one less pointer for every node in terms of memory and runtime, it is considered more efficient compared with the list container. However, as price for the extra edge of performance advantage, forward_list had to give up some functionalities.
The following diagram shows the internal data-structure used in forward_list:
Let's explore the following sample code:
#include <iostream>
#include <forward_list>
#include <iterator>
#include <algorithm>
using namespace std;
int main ( ) {
forward_list<int> l = { 10, 10, 20, 30, 45, 45, 50 };
cout << "\nlist with all values ..." << endl;
copy ( l.begin(), l.end(), ostream_iterator<int>(cout, "\t") );
cout << "\nSize of list with duplicates is " << distance( l.begin(), l.end() ) << endl;
l.unique();
cout << "\nSize of list without duplicates is " << distance( l.begin(), l.end() ) << endl;
l.resize( distance( l.begin(), l.end() ) );
cout << "\nlist after removing duplicates ..." << endl;
copy ( l.begin(), l.end(), ostream_iterator<int>(cout, "\t") );
cout << endl;
return 0;
}
The output can be viewed with the following command:
./a.out
The output will be as follows:
list with all values ...
10 10 20 30 45 45 50
Size of list with duplicates is 7
Size of list without duplicates is 5
list after removing duplicates ...
10 20 30 45 50
The following code declares and initializes the forward_list container with some unique values and some duplicate values:
forward_list<int> l = { 10, 10, 20, 30, 45, 45, 50 };
As the forward_list container doesn't support the size() function, we used the distance() function to find the size of the list:
cout << "\nSize of list with duplicates is " << distance( l.begin(), l.end() ) << endl;
The following forward_list<int>::unique() function removes the duplicate integers and retains only the unique values:
l.unique();
The following table shows the commonly used forward_list APIs:
|
API |
Description |
|
front() |
This returns the first value stored in the forward_list container |
|
empty() |
This returns true when the forward_list container is empty and false, otherwise |
|
clear() |
This clears all the values stored in forward_list |
|
push_front<data_type>( value ) |
This adds a value to the front of forward_list |
|
merge( list ) |
This merges two sorted forward_list containers with values of the same type |
|
reverse() |
This reverses the forward_list container |
|
unique() |
This removes duplicate values from the forward_list container |
|
sort() |
This sorts the values stored in forward_list |
Let's explore one more example to get a firm understanding of the forward_list container:
#include <iostream>
#include <forward_list>
#include <iterator>
#include <algorithm>
using namespace std;
int main () {
forward_list<int> list1 = { 10, 20, 10, 45, 45, 50, 25 };
forward_list<int> list2 = { 20, 35, 27, 15, 100, 85, 12, 15 };
cout << "\nFirst list before sorting ..." << endl;
copy ( list1.begin(), list1.end(), ostream_iterator<int>(cout, "\t") );
cout << endl;
cout << "\nSecond list before sorting ..." << endl;
copy ( list2.begin(), list2.end(), ostream_iterator<int>(cout, "\t") );
cout << endl;
list1.sort();
list2.sort();
cout << "\nFirst list after sorting ..." << endl;
copy ( list1.begin(), list1.end(), ostream_iterator<int>(cout, "\t") );
cout << endl;
cout << "\nSecond list after sorting ..." << endl;
copy ( list2.begin(), list2.end(), ostream_iterator<int>(cout, "\t") );
cout << endl;
list1.merge ( list2 );
cout << "\nMerged list ..." << endl;
copy ( list1.begin(), list1.end(), ostream_iterator<int>(cout, "\t") );
cout << "\nMerged list after removing duplicates ..." << endl;
list1.unique();
copy ( list1.begin(), list1.end(), ostream_iterator<int>(cout, "\t") );
return 0;
}
The preceding code snippet is an interesting example that demonstrates the practical use of the sort(), merge(), and unique() STL algorithms.
The output can be viewed with the following command:
./a.out
The output of the program is as follows:
First list before sorting ...
10 20 10 45 45 50 25
Second list before sorting ...
20 35 27 15 100 85 12 15
First list after sorting ...
10 10 20 25 45 45 50
Second list after sorting ...
12 15 15 20 27 35 85 100
Merged list ...
10 10 12 15 15 20 20 25 27 35 45 45 50 85 100
Merged list after removing duplicates ...
10 12 15 20 25 27 35 45 50 85 100
The output and the program are pretty self-explanatory.
The deque container is a double-ended queue and the data structure used could be a dynamic array or a vector. In a deque, it is possible to insert an element both at the front and back, with a constant time complexity of O(1), unlike vectors, in which the time complexity of inserting an element at the back is O(1) while that for inserting an element at the front is O(N). The deque doesn't suffer from the problem of reallocation, which is suffered by a vector. However, all the benefits of a vector are there with deque, except that deque is slightly better in terms of performance as compared to a vector as there are several rows of dynamic arrays or vectors in each row.
The following diagram shows the internal data structure used in a deque container:
Let's write a simple program to try out the deque container:
#include <iostream>
#include <deque>
#include <algorithm>
#include <iterator>
using namespace std;
int main () {
deque<int> d = { 10, 20, 30, 40, 50 };
cout << "\nInitial size of deque is " << d.size() << endl;
d.push_back( 60 );
d.push_front( 5 );
cout << "\nSize of deque after push back and front is " << d.size() << endl;
copy ( d.begin(), d.end(), ostream_iterator<int>( cout, "\t" ) );
d.clear();
cout << "\nSize of deque after clearing all values is " << d.size() <<
endl;
cout << "\nIs the deque empty after clearing values ? " << ( d.empty()
? "true" : "false" ) << endl;
return 0;
}
The output can be viewed with the following command:
./a.out
The output of the program is as follows:
Intitial size of deque is 5
Size of deque after push back and front is 7
Print the deque ...
5 10 20 30 40 50 60
Size of deque after clearing all values is 0
Is the deque empty after clearing values ? true
The following table shows the commonly used deque APIs:
|
API |
Description |
|
at ( int index ) |
This returns the value stored at the indexed position. It throws the std::out_of_range exception if the index is invalid. |
|
operator [ int index ] |
This returns the value stored at the indexed position. It is faster than at( int index ) since no bounds checking is performed by this function. |
|
front() |
This returns the first value stored in the deque. |
|
back() |
This returns the last value stored in the deque. |
|
empty() |
This returns true if the deque is empty and false, otherwise. |
|
size() |
This returns the number of values stored in the deque. |
|
capacity() |
This returns the total capacity of the deque, while size() returns the actual number of values stored in the deque. |
|
clear() |
This clears all the values. |
|
push_back<data_type>( value ) |
This adds a new value at the end of the deque. |
Associative containers store data in a sorted fashion, unlike the sequence containers. Hence, the order in which the data is inserted will not be retained by the associative containers. Associative containers are highly efficient in searching a value with O( log n ) runtime complexity. Every time a new value gets added to the container, the container will reorder the values stored internally if required.
The STL supports the following types of associative containers:
Associative containers organize the data as key-value pairs. The data will be sorted based on the key for random and faster access. Associative containers come in two flavors:
The following associative containers come under ordered containers, as they are ordered/sorted in a particular fashion. Ordered associative containers generally use some form of Binary Search Tree (BST); usually, a red-black tree is used to store the data:
The following associative containers come under unordered containers, as they are not ordered in any particular fashion and they use hash tables:
Let's understand the previously mentioned containers with examples in the following subsections.
A set container stores only unique values in a sorted fashion. A set organizes the values using the value as a key. The set container is immutable, that is, the values stored in a set can't be modified; however, the values can be deleted. A set generally uses a red-black tree data structure, which is a form of balanced BST. The time complexity of set operations are guaranteed to be O ( log N ).
Let's write a simple program using a set:
#include <iostream>
#include <set>
#include <vector>
#include <iterator>
#include <algorithm>
using namespace std;
int main( ) {
set<int> s1 = { 1, 3, 5, 7, 9 };
set<int> s2 = { 2, 3, 7, 8, 10 };
vector<int> v( s1.size() + s2.size() );
cout << "\nFirst set values are ..." << endl;
copy ( s1.begin(), s1.end(), ostream_iterator<int> ( cout, "\t" ) );
cout << endl;
cout << "\nSecond set values are ..." << endl;
copy ( s2.begin(), s2.end(), ostream_iterator<int> ( cout, "\t" ) );
cout << endl;
auto pos = set_difference ( s1.begin(), s1.end(), s2.begin(), s2.end(), v.begin() );
v.resize ( pos - v.begin() );
cout << "\nValues present in set one but not in set two are ..." << endl;
copy ( v.begin(), v.end(), ostream_iterator<int> ( cout, "\t" ) );
cout << endl;
v.clear();
v.resize ( s1.size() + s2.size() );
pos = set_union ( s1.begin(), s1.end(), s2.begin(), s2.end(), v.begin() );
v.resize ( pos - v.begin() );
cout << "\nMerged set values in vector are ..." << endl;
copy ( v.begin(), v.end(), ostream_iterator<int> ( cout, "\t" ) );
cout << endl;
return 0;
}
The output can be viewed with the following command:
./a.out
The output of the program is as follows:
First set values are ...
1 3 5 7 9
Second set values are ...
2 3 7 8 10
Values present in set one but not in set two are ...
1 5 9
Merged values of first and second set are ...
1 2 3 5 7 8 9 10
The following code declares and initializes two sets, s1 and s2:
set<int> s1 = { 1, 3, 5, 7, 9 };
set<int> s2 = { 2, 3, 7, 8, 10 };
The following line will ensure that the vector has enough room to store the values in the resultant vector:
vector<int> v( s1.size() + s2.size() );
The following code will print the values in s1 and s2:
cout << "\nFirst set values are ..." << endl;
copy ( s1.begin(), s1.end(), ostream_iterator<int> ( cout, "\t" ) );
cout << endl;
cout << "\nSecond set values are ..." << endl;
copy ( s2.begin(), s2.end(), ostream_iterator<int> ( cout, "\t" ) );
cout << endl;
The set_difference() algorithm will populate the vector v with values only present in set s1 but not in s2. The iterator, pos, will point to the last element in the vector; hence, the vector resize will ensure that the extra spaces in the vector are removed:
auto pos = set_difference ( s1.begin(), s1.end(), s2.begin(), s2.end(), v.begin() );
v.resize ( pos - v.begin() );
The following code will print the values populated in the vector v:
cout << "\nValues present in set one but not in set two are ..." << endl;
copy ( v.begin(), v.end(), ostream_iterator<int> ( cout, "\t" ) );
cout << endl;
The set_union() algorithm will merge the contents of sets s1 and s2 into the vector, and the vector is then resized to fit only the merged values:
pos = set_union ( s1.begin(), s1.end(), s2.begin(), s2.end(), v.begin() );
v.resize ( pos - v.begin() );
The following code will print the merged values populated in the vector v:
cout << "\nMerged values of first and second set are ..." << endl;
copy ( v.begin(), v.end(), ostream_iterator<int> ( cout, "\t" ) );
cout << endl;
The following table describes the commonly used set APIs:
|
API |
Description |
|
insert( value ) |
This inserts a value into the set |
|
clear() |
This clears all the values in the set |
|
size() |
This returns the total number of entries present in the set |
|
empty() |
This will print true if the set is empty, and returns false otherwise |
|
find() |
This finds the element with the specified key and returns the iterator position |
|
equal_range() |
This returns the range of elements matching a specific key |
|
lower_bound() |
This returns an iterator to the first element not less than the given key |
|
upper_bound() |
This returns an iterator to the first element greater than the given key |
A map stores the values organized by keys. Unlike a set, a map has a dedicated key per value. Maps generally use a red-black tree as an internal data structure, which is a balanced BST that guarantees O( log N ) runtime efficiency for searching or locating a value in the map. The values stored in a map are sorted based on the key, using a red-black tree. The keys used in a map must be unique. A map will not retain the sequences of the input as it reorganizes the values based on the key, that is, the red-black tree will be rotated to balance the red-black tree height.
Let's write a simple program to understand map usage:
#include <iostream>
#include <map>
#include <iterator>
#include <algorithm>
using namespace std;
int main ( ) {
map<string, long> contacts;
contacts["Jegan"] = 123456789;
contacts["Meena"] = 523456289;
contacts["Nitesh"] = 623856729;
contacts["Sriram"] = 993456789;
auto pos = contacts.find( "Sriram" );
if ( pos != contacts.end() )
cout << pos->second << endl;
return 0;
}
Let's compile and check the output of the program:
g++ main.cpp -std=c++17
./a.out
The output is as follows:
Mobile number of Sriram is 8901122334
The following line declares a map with a string name as the key and a long mobile number as the value stored in the map:
map< string, long > contacts;
The following code snippet adds four contacts organized by name as the key:
contacts[ "Jegan" ] = 1234567890;
contacts[ "Meena" ] = 5784433221;
contacts[ "Nitesh" ] = 4567891234;
contacts[ "Sriram" ] = 8901122334;
The following line will try to locate the contact with the name, Sriram, in the contacts map; if Sriram is found, then the find() function will return the iterator pointing to the location of the key-value pair; otherwise it returns the contacts.end() position:
auto pos = contacts.find( "Sriram" );
The following code verifies whether the iterator, pos, has reached contacts.end() and prints the contact number. Since the map is an associative container, it stores a key=>value pair; hence, pos->first indicates the key and pos->second indicates the value:
if ( pos != contacts.end() )
cout << "\nMobile number of " << pos->first << " is " << pos->second << endl;
else
cout << "\nContact not found." << endl;
The following table shows the commonly used map APIs:
|
API |
Description |
|
at ( key ) |
This returns the value for the corresponding key if the key is found; otherwise it throws the std::out_of_range exception |
|
operator[ key ] |
This updates an existing value for the corresponding key if the key is found; otherwise it will add a new entry with the respective key=>value supplied |
|
empty() |
This returns true if the map is empty, and false otherwise |
|
size() |
This returns the count of the key=>value pairs stored in the map |
|
clear() |
This clears the entries stored in the map |
|
count() |
This returns the number of elements matching the given key |
|
find() |
This finds the element with the specified key |
A multiset container works in a manner similar to a set container, except for the fact that a set allows only unique values to be stored whereas a multiset lets you store duplicate values. As you know, in the case of set and multiset containers, the values themselves are used as keys to organize the data. A multiset container is just like a set; it doesn't allow modifying the values stored in the multiset.
Let's write a simple program using a multiset:
#include <iostream>
#include <set>
#include <iterator>
#include <algorithm>
using namespace std;
int main() {
multiset<int> s = { 10, 30, 10, 50, 70, 90 };
cout << "\nMultiset values are ..." << endl;
copy ( s.begin(), s.end(), ostream_iterator<int> ( cout, "\t" ) );
cout << endl;
return 0;
}
The output can be viewed with the following command:
./a.out
The output of the program is as follows:
Multiset values are ...
10 30 10 50 70 90
Interestingly, in the preceding output, you can see that the multiset holds duplicate values.
A multimap works exactly as a map, except that a multimap container will allow multiple values to be stored with the same key.
Let's explore the multimap container with a simple example:
#include <iostream>
#include <map>
#include <vector>
#include <iterator>
#include <algorithm>
using namespace std;
int main() {
multimap< string, long > contacts = {
{ "Jegan", 2232342343 },
{ "Meena", 3243435343 },
{ "Nitesh", 6234324343 },
{ "Sriram", 8932443241 },
{ "Nitesh", 5534327346 }
};
auto pos = contacts.find ( "Nitesh" );
int count = contacts.count( "Nitesh" );
int index = 0;
while ( pos != contacts.end() ) {
cout << "\nMobile number of " << pos->first << " is " <<
pos->second << endl;
++index;
if ( index == count )
break;
}
return 0;
}
The program can be compiled and the output can be viewed with the following commands:
g++ main.cpp -std=c++17
./a.out
The output of the program is as follows:
Mobile number of Nitesh is 6234324343
Mobile number of Nitesh is 5534327346
An unordered set works in a manner similar to a set, except that the internal behavior of these containers differs. A set makes use of red-black trees while an unordered set makes use of hash tables. The time complexity of set operations is O( log N) while the time complexity of unordered set operations is O(1); hence, the unordered set tends to be faster than the set.
The values stored in an unordered set are not organized in any particular fashion, unlike in a set, which stores values in a sorted fashion. If performance is the criteria, then an unordered set is a good bet; however, if iterating the values in a sorted fashion is a requirement, then set is a good choice.
An unordered map works in a manner similar to a map, except that the internal behavior of these containers differs. A map makes use of red-black trees while unordered map makes use of hash tables. The time complexity of map operations is O( log N) while that of unordered map operations is O(1); hence, an unordered map tends to be faster than a map.
The values stored in an unordered map are not organized in any particular fashion, unlike in a map where values are sorted by keys.
An unordered multiset works in a manner similar to a multiset, except that the internal behavior of these containers differs. A multiset makes use of red-black trees while an unordered multiset makes use of hash tables. The time complexity of multiset operations is O( log N) while that of unordered multiset operations is O(1). Hence, an unordered multiset tends to be faster than a multiset.
The values stored in an unordered multiset are not organized in any particular fashion, unlike in a multiset where values are stored in a sorted fashion. If performance is the criteria, unordered multisets are a good bet; however, if iterating the values in a sorted fashion is a requirement, then multiset is a good choice.
An unordered multimap works in a manner similar to a multimap, except that the internal behavior of these containers differs. A multimap makes use of red-black trees while an unordered multimap makes use of hash tables. The time complexity of multimap operations is O( log N) while that of unordered multimap operations is O(1); hence, an unordered multimap tends to be faster than a multimap.
The values stored in an unordered multimap are not organized in any particular fashion, unlike in multimaps where values are sorted by keys. If performance is the criteria, then an unordered multimap is a good bet; however, if iterating the values in a sorted fashion is a requirement, then multimap is a good choice.
Container adapters adapt existing containers to provide new containers. In simple terms, STL extension is done with composition instead of inheritance.
STL containers can't be extended by inheritance, as their constructors aren't virtual. Throughout the STL, you can observe that while static polymorphism is used both in terms of operator overloading and templates, dynamic polymorphism is consciously avoided for performance reasons. Hence, extending the STL by subclassing the existing containers isn't a good idea, as it would lead to memory leaks because container classes aren't designed to behave like base classes.
The STL supports the following container adapters:
Let's explore the container adapters in the following subsections.
Stack is not a new container; it is a template adapter class. The adapter containers wrap an existing container and provide high-level functionalities. The stack adapter container offers stack operations while hiding the unnecessary functionalities that are irrelevant for a stack. The STL stack makes use of a deque container by default; however, we can instruct the stack to use any existing container that meets the requirement of the stack during the stack instantiation.
Deques, lists, and vectors meet the requirements of a stack adapter.
A stack operates on the Last In First Out (LIFO) philosophy.
The following table shows commonly used stack APIs:
|
API |
Description |
|
top() |
This returns the top-most value in the stack, that is, the value that was added last |
|
push<data_type>( value ) |
This will push the value provided to the top of the stack |
|
pop() |
This will remove the top-most value from the stack |
|
size() |
This returns the number of values present in the stack |
|
empty() |
This returns true if the stack is empty; otherwise it returns false |
It's time to get our hands dirty; let's write a simple program to use a stack:
#include <iostream>
#include <stack>
#include <iterator>
#include <algorithm>
using namespace std;
int main ( ) {
stack<string> spoken_languages;
spoken_languages.push ( "French" );
spoken_languages.push ( "German" );
spoken_languages.push ( "English" );
spoken_languages.push ( "Hindi" );
spoken_languages.push ( "Sanskrit" );
spoken_languages.push ( "Tamil" );
cout << "\nValues in Stack are ..." << endl;
while ( ! spoken_languages.empty() ) {
cout << spoken_languages.top() << endl;
spoken_languages.pop();
}
cout << endl;
return 0;
}
The program can be compiled and the output can be viewed with the following command:
g++ main.cpp -std=c++17
./a.out
The output of the program is as follows:
Values in Stack are ...
Tamil
Kannada
Telugu
Sanskrit
Hindi
English
German
French
From the preceding output, we can see the LIFO behavior of stack.
A queue works based on the First In First Out (FIFO) principle. A queue is not a new container; it is a templatized adapter class that wraps an existing container and provides the high-level functionalities that are required for queue operations, while hiding the unnecessary functionalities that are irrelevant for a queue. The STL queue makes use of a deque container by default; however, we can instruct the queue to use any existing container that meets the requirement of the queue during the queue instantiation.
In a queue, new values can be added at the back and removed from the front. Deques, lists, and vectors meet the requirements of a queue adapter.
The following table shows the commonly used queue APIs:
|
API |
Description |
|
push() |
This appends a new value at the back of the queue |
|
pop() |
This removes the value at the front of the queue |
|
front() |
This returns the value in the front of the queue |
|
back() |
This returns the value at the back of the queue |
|
empty() |
This returns true when the queue is empty; otherwise it returns false |
|
size() |
This returns the number of values stored in the queue |
Let's use a queue in the following program:
#include <iostream>
#include <queue>
#include <iterator>
#include <algorithm>
using namespace std;
int main () {
queue<int> q;
q.push ( 100 );
q.push ( 200 );
q.push ( 300 );
cout << "\nValues in Queue are ..." << endl;
while ( ! q.empty() ) {
cout << q.front() << endl;
q.pop();
}
return 0;
}
The program can be compiled and the output can be viewed with the following commands:
g++ main.cpp -std=c++17
./a.out
The output of the program is as follows:
Values in Queue are ...
100
200
300
From the preceding output, you can observe that the values were popped out in the same sequence that they were pushed in, that is, FIFO.
A priority queue is not a new container; it is a templatized adapter class that wraps an existing container and provides high-level functionalities that are required for priority queue operations, while hiding the unnecessary functionalities that are irrelevant for a priority queue. A priority queue makes use of a vector container by default; however, a deque container also meets the requirement of the priority queue. Hence, during the priority queue instantiation, you could instruct the priority queue to make use of a deque as well.
A priority queue organizes the data in such a way that the highest priority value appears first; in other words, the values are sorted in a descending order.
The deque and vector meet the requirements of a priority queue adaptor.
The following table shows commonly used priority queue APIs:
|
API |
Description |
|
push() |
This appends a new value at the back of the priority queue |
|
pop() |
This removes the value at the front of the priority queue |
|
empty() |
This returns true when the priority queue is empty; otherwise it returns false |
|
size() |
This returns the number of values stored in the priority queue |
|
top() |
This returns the value in the front of the priority queue |
Let's write a simple program to understand priority_queue:
#include <iostream>
#include <queue>
#include <iterator>
#include <algorithm>
using namespace std;
int main () {
priority_queue<int> q;
q.push( 100 );
q.push( 50 );
q.push( 1000 );
q.push( 800 );
q.push( 300 );
cout << "\nSequence in which value are inserted are ..." << endl;
cout << "100\t50\t1000\t800\t300" << endl;
cout << "Priority queue values are ..." << endl;
while ( ! q.empty() ) {
cout << q.top() << "\t";
q.pop();
}
cout << endl;
return 0;
}
The program can be compiled and the output can be viewed with the following command:
g++ main.cpp -std=c++17
./a.out
The output of the program is as follows:
Sequence in which value are inserted are ...
100 50 1000 800 300
Priority queue values are ...
1000 800 300 100 50
From the preceding output, you can observe that priority_queue is a special type of queue that reorders the inputs in such a way that the highest value appears first.
In this chapter you learned about ready-made generic containers, functors, iterators, and algorithms. You also learned set, map, multiset, and multimap associative containers, their internal data structures, and common algorithms that can be applied on them. Further you learned how to use the various containers with practical hands-on code samples.
In the next chapter, you will learn template programming, which helps you master the essentials of templates.
In this chapter, we will cover the following topics:
Let's now start learning generic programming.
Generic programming is a style of programming that helps you develop reusable code or generic algorithms that can be applied to a wide variety of data types. Whenever a generic algorithm is invoked, the data types will be supplied as parameters with a special syntax.
Let's say we would like to write a sort() function, which takes an array of inputs that needs to be sorted in an ascending order. Secondly, we need the sort() function to sort int, double, char, and string data types. There are a couple of ways this can be solved:
Well, both approaches have their own merits and demerits. The advantage of the first approach is that, since there are dedicated functions for the int, double, char, and string data types, the compiler will be able to perform type checking if an incorrect data type is supplied. The disadvantage of the first approach is that we have to write four different functions even though the logic remains the same across all the functions. If a bug is identified in the algorithm, it must be fixed separately in all four functions; hence, heavy maintenance efforts are required. If we need to support another data type, we will end up writing one more function, and this will keep growing as we need to support more data types.
The advantage of the second approach is that we could just write one macro for all the data types. However, one very discouraging disadvantage is that the compiler will not be able to perform type checking, and this approach is more prone to errors and may invite many unexpected troubles. This approach is dead against object-oriented coding principles.
C++ supports generic programming with templates, which has the following benefits:
However, the disadvantages are as follows:
A function template lets you parameterize a data type. The reason this is referred to as generic programming is that a single template function will support many built-in and user-defined data types. A templatized function works like a C-style macro, except for the fact that the C++ compiler will type check the function when we supply an incompatible data type at the time of invoking the template function.
It will be easier to understand the template concept with a simple example, as follows:
#include <iostream>
#include <algorithm>
#include <iterator>
using namespace std;
template <typename T, int size>
void sort ( T input[] ) {
for ( int i=0; i<size; ++i) {
for (int j=0; j<size; ++j) {
if ( input[i] < input[j] )
swap (input[i], input[j] );
}
}
}
int main () {
int a[10] = { 100, 10, 40, 20, 60, 80, 5, 50, 30, 25 };
cout << "\nValues in the int array before sorting ..." << endl;
copy ( a, a+10, ostream_iterator<int>( cout, "\t" ) );
cout << endl;
::sort<int, 10>( a );
cout << "\nValues in the int array after sorting ..." << endl;
copy ( a, a+10, ostream_iterator<int>( cout, "\t" ) );
cout << endl;
double b[5] = { 85.6d, 76.13d, 0.012d, 1.57d, 2.56d };
cout << "\nValues in the double array before sorting ..." << endl;
copy ( b, b+5, ostream_iterator<double>( cout, "\t" ) );
cout << endl;
::sort<double, 5>( b );
cout << "\nValues in the double array after sorting ..." << endl;
copy ( b, b+5, ostream_iterator<double>( cout, "\t" ) );
cout << endl;
string names[6] = {
"Rishi Kumar Sahay",
"Arun KR",
"Arun CR",
"Ninad",
"Pankaj",
"Nikita"
};
cout << "\nNames before sorting ..." << endl;
copy ( names, names+6, ostream_iterator<string>( cout, "\n" ) );
cout << endl;
::sort<string, 6>( names );
cout << "\nNames after sorting ..." << endl;
copy ( names, names+6, ostream_iterator<string>( cout, "\n" ) );
cout << endl;
return 0;
}
Run the following commands:
g++ main.cpp -std=c++17
./a.out
The output of the preceding program is as follows:
Values in the int array before sorting ...
100 10 40 20 60 80 5 50 30 25
Values in the int array after sorting ...
5 10 20 25 30 40 50 60 80 100
Values in the double array before sorting ...
85.6d 76.13d 0.012d 1.57d 2.56d
Values in the double array after sorting ...
0.012 1.57 2.56 76.13 85.6
Names before sorting ...
Rishi Kumar Sahay
Arun KR
Arun CR
Ninad
Pankaj
Nikita
Names after sorting ...
Arun CR
Arun KR
Nikita
Ninad
Pankaj
Rich Kumar Sahay
Isn't it really interesting to see just one template function doing all the magic? Yes, that's how cool C++ templates are!
The following code defines a function template. The keyword, template <typename T, int size>, tells the compiler that what follows is a function template:
template <typename T, int size>
void sort ( T input[] ) {
for ( int i=0; i<size; ++i) {
for (int j=0; j<size; ++j) {
if ( input[i] < input[j] )
swap (input[i], input[j] );
}
}
}
The line, void sort ( T input[] ), defines a function named sort, which returns void and receives an input array of type T. The T type doesn't indicate any specific data type. T will be deduced at the time of instantiating the function template during compile time.
The following code populates an integer array with some unsorted values and prints the same to the terminal:
int a[10] = { 100, 10, 40, 20, 60, 80, 5, 50, 30, 25 };
cout << "\nValues in the int array before sorting ..." << endl;
copy ( a, a+10, ostream_iterator<int>( cout, "\t" ) );
cout << endl;
The following line will instantiate an instance of a function template for the int data type. At this point, typename T is substituted and a specialized function is created for the int data type. The scope-resolution operator in front of sort, that is, ::sort(), ensures that it invokes our custom function, sort(), defined in the global namespace; otherwise, the C++ compiler will attempt to invoke the sort() algorithm defined in the std namespace, or from any other namespace if such a function exists. The <int, 10> variable tells the compiler to create an instance of a function, substituting typename T with int, and 10 indicates the size of the array used in the template function:
::sort<int, 10>( a );
The following lines will instantiate two additional instances that support a double array of 5 elements and a string array of 6 elements respectively:
::sort<double, 5>( b );
::sort<string, 6>( names );
If you are curious to know some more details about how the C++ compiler instantiates the function templates to support int, double, and string, you could try the Unix utilities, nm and c++filt. The nm Unix utility will list the symbols in the symbol table, as follows:
nm ./a.out | grep sort
00000000000017f1 W _Z4sortIdLi5EEvPT_
0000000000001651 W _Z4sortIiLi10EEvPT_
000000000000199b W _Z4sortINSt7__cxx1112basic_stringIcSt11char_traitsIcESaIcEEELi6EEvPT_
As you can see, there are three different overloaded sort functions in the binary; however, we have defined only one template function. As the C++ compiler has mangled names to deal with function overloading, it is difficult for us to interpret which function among the three functions is meant for the int, double, and string data types.
However, there is a clue: the first function is meant for double, the second is meant for int, and the third is meant for string. The name-mangled function has _Z4sortIdLi5EEvPT_ for double, _Z4sortIiLi10EEvPT_ for int, and _Z4sortINSt7__cxx1112basic_stringIcSt11char_traitsIcESaIcEEELi6EEvPT_ for string. There is another cool Unix utility to help you interpret the function signatures without much struggle. Check the following output of the c++filt utility:
c++filt _Z4sortIdLi5EEvPT_
void sort<double, 5>(double*)
c++filt _Z4sortIiLi10EEvPT_
void sort<int, 10>(int*)
c++filt _Z4sortINSt7__cxx1112basic_stringIcSt11char_traitsIcESaIcEEELi6EEvPT_
void sort<std::__cxx11::basic_string<char, std::char_traits<char>, std::allocator<char> >, 6>(std::__cxx11::basic_string<char, std::char_traits<char>, std::allocator<char> >*)
Hopefully, you will find these utilities useful while working with C++ templates. I'm sure these tools and techniques will help you to debug any C++ application.
Overloading function templates works exactly like regular function overloading in C++. However, I'll help you recollect the C++ function overloading basics.
The function overloading rules and expectations from the C++ compiler are as follows:
If any of these aforementioned rules aren't met, the C++ compiler will not treat them as overloaded functions. If there is any ambiguity in differentiating between the overloaded functions, the C++ compiler will report it promptly as a compilation error.
It is time to explore this with an example, as shown in the following program:
#include <iostream>
#include <array>
using namespace std;
void sort ( array<int,6> data ) {
cout << "Non-template sort function invoked ..." << endl;
int size = data.size();
for ( int i=0; i<size; ++i ) {
for ( int j=0; j<size; ++j ) {
if ( data[i] < data[j] )
swap ( data[i], data[j] );
}
}
}
template <typename T, int size>
void sort ( array<T, size> data ) {
cout << "Template sort function invoked with one argument..." << endl;
for ( int i=0; i<size; ++i ) {
for ( int j=0; j<size; ++j ) {
if ( data[i] < data[j] )
swap ( data[i], data[j] );
}
}
}
template <typename T>
void sort ( T data[], int size ) {
cout << "Template sort function invoked with two arguments..." << endl;
for ( int i=0; i<size; ++i ) {
for ( int j=0; j<size; ++j ) {
if ( data[i] < data[j] )
swap ( data[i], data[j] );
}
}
}
int main() {
//Will invoke the non-template sort function
array<int, 6> a = { 10, 50, 40, 30, 60, 20 };
::sort ( a );
//Will invoke the template function that takes a single argument
array<float,6> b = { 10.6f, 57.9f, 80.7f, 35.1f, 69.3f, 20.0f };
::sort<float,6>( b );
//Will invoke the template function that takes a single argument
array<double,6> c = { 10.6d, 57.9d, 80.7d, 35.1d, 69.3d, 20.0d };
::sort<double,6> ( c );
//Will invoke the template function that takes two arguments
double d[] = { 10.5d, 12.1d, 5.56d, 1.31d, 81.5d, 12.86d };
::sort<double> ( d, 6 );
return 0;
}
Run the following commands:
g++ main.cpp -std=c++17
./a.out
The output of the preceding program is as follows:
Non-template sort function invoked ...
Template sort function invoked with one argument...
Template sort function invoked with one argument...
Template sort function invoked with two arguments...
The following code is a non-template version of our custom sort() function:
void sort ( array<int,6> data ) {
cout << "Non-template sort function invoked ..." << endl;
int size = data.size();
for ( int i=0; i<size; ++i ) {
for ( int j=0; j<size; ++j ) {
if ( data[i] < data[j] )
swap ( data[i], data[j] );
}
}
}
Non-template functions and template functions can coexist and participate in function overloading. One weird behavior of the preceding function is that the size of the array is hardcoded.
The second version of our sort() function is a template function, as shown in the following code snippet. Interestingly, the weird issue that we noticed in the first non-template sort() version is addressed here:
template <typename T, int size>
void sort ( array<T, size> data ) {
cout << "Template sort function invoked with one argument..." << endl;
for ( int i=0; i<size; ++i ) {
for ( int j=0; j<size; ++j ) {
if ( data[i] < data[j] )
swap ( data[i], data[j] );
}
}
}
In the preceding code, both the data type and the size of the array are passed as template arguments, which are then passed to the function call arguments. This approach makes the function generic, as this function can be instantiated for any data type.
The third version of our custom sort() function is also a template function, as shown in the following code snippet:
template <typename T>
void sort ( T data[], int size ) {
cout << "Template sort function invoked with two argument..." << endl;
for ( int i=0; i<size; ++i ) {
for ( int j=0; j<size; ++j ) {
if ( data[i] < data[j] )
swap ( data[i], data[j] );
}
}
}
The preceding template function takes a C-style array; hence, it also expects the user to indicate its size. However, the size of the array could be computed within the function, but for demonstration purposes, I need a function that takes two arguments. The previous function isn't recommended, as it uses a C-style array; ideally, we would use one of the STL containers.
Now, let's understand the main function code. The following code declares and initializes the STL array container with six values, which is then passed to our sort() function defined in the default namespace:
//Will invoke the non-template sort function
array<int, 6> a = { 10, 50, 40, 30, 60, 20 };
::sort ( a );
The preceding code will invoke the non-template sort() function. An important point to note is that, whenever C++ encounters a function call, it first looks for a non-template version; if C++ finds a matching non-template function version, its search for the correct function definition ends there. If the C++ compiler isn't able to identify a non-template function definition that matches the function call signature, then it starts looking for any template function that could support the function call and instantiates a specialized function for the data type required.
Let's understand the following code:
//Will invoke the template function that takes a single argument
array<float,6> b = { 10.6f, 57.9f, 80.7f, 35.1f, 69.3f, 20.0f };
::sort<float,6>( b );
This will invoke the template function that receives a single argument. As there is no non-template sort() function that receives an array<float,6> data type, the C++ compiler will instantiate such a function out of our user-defined sort() template function with a single argument that takes array<float, 6>.
In the same way, the following code triggers the compiler to instantiate a double version of the template sort() function that receives array<double, 6>:
//Will invoke the template function that takes a single argument
array<double,6> c = { 10.6d, 57.9d, 80.7d, 35.1d, 69.3d, 20.0d };
::sort<double,6> ( c );
Finally, the following code will instantiate an instance of the template sort() that receives two arguments and invokes the function:
//Will invoke the template function that takes two arguments
double d[] = { 10.5d, 12.1d, 5.56d, 1.31d, 81.5d, 12.86d };
::sort<double> ( d, 6 );
If you have come this far, I'm sure you like the C++ template topics discussed so far.
C++ templates extend the function template concepts to classes too, and enable us to write object-oriented generic code. In the previous sections, you learned the use of function templates and overloading. In this section, you will learn writing template classes that open up more interesting generic programming concepts.
A class template lets you parameterize the data type on the class level via a template type expression.
Let's understand a class template with the following example:
//myalgorithm.h
#include <iostream>
#include <algorithm>
#include <array>
#include <iterator>
using namespace std;
template <typename T, int size>
class MyAlgorithm {
public:
MyAlgorithm() { }
~MyAlgorithm() { }
void sort( array<T, size> &data ) {
for ( int i=0; i<size; ++i ) {
for ( int j=0; j<size; ++j ) {
if ( data[i] < data[j] )
swap ( data[i], data[j] );
}
}
}
void sort ( T data[size] );
};
template <typename T, int size>
inline void MyAlgorithm<T, size>::sort ( T data[size] ) {
for ( int i=0; i<size; ++i ) {
for ( int j=0; j<size; ++j ) {
if ( data[i] < data[j] )
swap ( data[i], data[j] );
}
}
}
Let's use myalgorithm.h in the following main.cpp program as follows:
#include "myalgorithm.h"
int main() {
MyAlgorithm<int, 10> algorithm1;
array<int, 10> a = { 10, 5, 15, 20, 25, 18, 1, 100, 90, 18 };
cout << "\nArray values before sorting ..." << endl;
copy ( a.begin(), a.end(), ostream_iterator<int>(cout, "\t") );
cout << endl;
algorithm1.sort ( a );
cout << "\nArray values after sorting ..." << endl;
copy ( a.begin(), a.end(), ostream_iterator<int>(cout, "\t") );
cout << endl;
MyAlgorithm<int, 10> algorithm2;
double d[] = { 100.0, 20.5, 200.5, 300.8, 186.78, 1.1 };
cout << "\nArray values before sorting ..." << endl;
copy ( d.begin(), d.end(), ostream_iterator<double>(cout, "\t") );
cout << endl;
algorithm2.sort ( d );
cout << "\nArray values after sorting ..." << endl;
copy ( d.begin(), d.end(), ostream_iterator<double>(cout, "\t") );
cout << endl;
return 0;
}
Let's quickly compile the program using the following command:
g++ main.cpp -std=c++17
./a.out
The output is as follows:
Array values before sorting ...
10 5 15 20 25 18 1 100 90 18
Array values after sorting ...
1 5 10 15 18 18 20 25 90 100
Array values before sorting ...
100 20.5 200.5 300.8 186.78 1.1
Array values after sorting ...
1.1 20.5 100 186.78 200.5 300.8
The following code declares a class template. The keyword, template <typename T, int size>, can be replaced with <class T, int size>. Both keywords can be interchanged in function and class templates; however, as an industry best practice, template<class T> can be used only with class templates to avoid confusion:
template <typename T, int size>
class MyAlgorithm
One of the overloaded sort() methods is defined inline as follows:
void sort( array<T, size> &data ) {
for ( int i=0; i<size; ++i ) {
for ( int j=0; j<size; ++j ) {
if ( data[i] < data[j] )
swap ( data[i], data[j] );
}
}
}
The second overloaded sort() function is just declared within the class scope, without any definition, as follows:
template <typename T, int size>
class MyAlgorithm {
public:
void sort ( T data[size] );
};
The preceding sort() function is defined outside the class scope, as shown in the following code snippet. The weird part is that we need to repeat the template parameters for every member function that is defined outside the class template:
template <typename T, int size>
inline void MyAlgorithm<T, size>::sort ( T data[size] ) {
for ( int i=0; i<size; ++i ) {
for ( int j=0; j<size; ++j ) {
if ( data[i] < data[j] )
swap ( data[i], data[j] );
}
}
}
Otherwise, the class template concepts remain the same as that of function templates.
So far in this chapter, you have learned how to do generic programming with function templates and class templates. As you understand the class template, a single template class can support any built-in and user-defined data types. However, there are times when we need to treat certain data types with some special treatment with respect to the other data types. In such cases, C++ offers us explicit class specialization support to handle selective data types with differential treatment.
Consider the STL deque container; though deque looks fine for storing, let's say, string, int, double, and long, if we decide to use deque to store a bunch of boolean types, the bool data type takes at least one byte, while it may vary as per compiler vendor implementation. While a single bit can efficiently represent true or false, a boolean at least takes one byte, that is, 8 bits, and the remaining 7 bits are not used. This may appear as though it's okay; however, if you have to store a very large deque of booleans, it definitely doesn't appear to be an efficient idea, right? You may think, what's the big deal? We could write another specialized class or template class for bool. But this approach requires end users to use different classes for different data types explicitly, and this doesn't sound like a good design either, right? This is exactly where C++'s explicit class specialization comes in handy.
Never mind if you aren't convinced yet; the following example will help you understand the need for explicit class specialization and how explicit class specialization works.
Let us develop a DynamicArray class to support a dynamic array of any data type. Let's start with a class template, as shown in the following program:
#include <iostream>
#include <deque>
#include <algorithm>
#include <iterator>
using namespace std;
template < class T >
class DynamicArray {
private:
deque< T > dynamicArray;
typename deque< T >::iterator pos;
public:
DynamicArray() { initialize(); }
~DynamicArray() { }
void initialize() {
pos = dynamicArray.begin();
}
void appendValue( T element ) {
dynamicArray.push_back ( element );
}
bool hasNextValue() {
return ( pos != dynamicArray.end() );
}
T getValue() {
return *pos++;
}
};
The preceding DynamicArray template class internally makes use of the STL deque class. Hence, you could consider the DynamicArray template class a custom adapter container. Let's explore how the DynamicArray template class can be used in main.cpp with the following code snippet:
#include "dynamicarray.h"
#include "dynamicarrayforbool.h"
int main () {
DynamicArray<int> intArray;
intArray.appendValue( 100 );
intArray.appendValue( 200 );
intArray.appendValue( 300 );
intArray.appendValue( 400 );
intArray.initialize();
cout << "\nInt DynamicArray values are ..." << endl;
while ( intArray.hasNextValue() )
cout << intArray.getValue() << "\t";
cout << endl;
DynamicArray<char> charArray;
charArray.appendValue( 'H' );
charArray.appendValue( 'e' );
charArray.appendValue( 'l' );
charArray.appendValue( 'l' );
charArray.appendValue( 'o' );
charArray.initialize();
cout << "\nChar DynamicArray values are ..." << endl;
while ( charArray.hasNextValue() )
cout << charArray.getValue() << "\t";
cout << endl;
DynamicArray<bool> boolArray;
boolArray.appendValue ( true );
boolArray.appendValue ( false );
boolArray.appendValue ( true );
boolArray.appendValue ( false );
boolArray.initialize();
cout << "\nBool DynamicArray values are ..." << endl;
while ( boolArray.hasNextValue() )
cout << boolArray.getValue() << "\t";
cout << endl;
return 0;
}
Let's quickly compile the program using the following command:
g++ main.cpp -std=c++17
./a.out
The output is as follows:
Int DynamicArray values are ...
100 200 300 400
Char DynamicArray values are ...
H e l l o
Bool DynamicArray values are ...
1 0 1 0
Great! Our custom adapter container seems to work fine.
Let's zoom in and try to understand how the previous program works. The following code tells the C++ compiler that what follows is a class template:
template < class T >
class DynamicArray {
private:
deque< T > dynamicArray;
typename deque< T >::iterator pos;
As you can see, the DynamicArray class makes use of STL deque internally, and an iterator for deque is declared with the name, pos. This iterator, pos, is utilized by the Dynamic template class to provide high-level methods such as the initialize(), appendValue(), hasNextValue(), and getValue() methods.
The initialize() method initializes the deque iterator pos to the first data element stored within deque. The appendValue( T element ) method lets you add a data element at the end of deque. The hasNextValue() method tells whether the DynamicArray class has further data values stored--true indicates it has further values and false indicates that the DynamicArray navigation has reached the end of deque. The initialize() method can be used to reset the pos iterator to the starting point when required. The getValue() method returns the data element pointed by the pos iterator at that moment. The getValue() method doesn't perform any validation; hence, it must be combined with hasNextValue() before invoking getValue() to safely access the values stored in DynamicArray.
Now, let's understand the main() function. The following code declares a DynamicArray class that stores the int data type; DynamicArray<int> intArray will trigger the C++ compiler to instantiate a DynamicArray class that is specialized for the int data type:
DynamicArray<int> intArray;
intArray.appendValue( 100 );
intArray.appendValue( 200 );
intArray.appendValue( 300 );
intArray.appendValue( 400 );
The values 100, 200, 300, and 400 are stored back to back within the DynamicArray class. The following code ensures that the intArray iterator points to the first element. Once the iterator is initialized, the values stored in the DynamicArray class are printed with the getValue() method, while hasNextValue() ensures that the navigation hasn't reached the end of the DynamicArray class:
intArray.initialize();
cout << "\nInt DynamicArray values are ..." << endl;
while ( intArray.hasNextValue() )
cout << intArray.getValue() << "\t";
cout << endl;
Along the same lines, in the main function, a char DynamicArray class is created, populated with some data, and printed. Let's skip char DynamicArray and directly move on to the DynamicArray class that stores bool.
DynamicArray<bool> boolArray;
boolArray.appendValue ( "1010" );
boolArray.initialize();
cout << "\nBool DynamicArray values are ..." << endl;
while ( boolArray.hasNextValue() )
cout << boolArray.getValue() << "\t";
cout << endl;
From the preceding code snippet, we can see everything looks okay, right? Yes, the preceding code works perfectly fine; however, there is a performance issue with the DynamicArray design approach. While true can be represented by 1 and false can be represented by 0, which requires just 1 bit, the preceding DynamicArray class makes use of 8 bits to represent 1 and 8 bits to represent 0, which we must fix without forcing end users to choose a different DynamicArray class that works efficiently for bool.
Let's fix the issue by using explicit class template specialization with the following code:
#include <iostream>
#include <bitset>
#include <algorithm>
#include <iterator>
using namespace std;
template <>
class DynamicArray<bool> {
private:
deque< bitset<8> *> dynamicArray;
bitset<8> oneByte;
typename deque<bitset<8> * >::iterator pos;
int bitSetIndex;
int getDequeIndex () {
return (bitSetIndex) ? (bitSetIndex/8) : 0;
}
public:
DynamicArray() {
bitSetIndex = 0;
initialize();
}
~DynamicArray() { }
void initialize() {
pos = dynamicArray.begin();
bitSetIndex = 0;
}
void appendValue( bool value) {
int dequeIndex = getDequeIndex();
bitset<8> *pBit = NULL;
if ( ( dynamicArray.size() == 0 ) || ( dequeIndex >= ( dynamicArray.size()) ) ) {
pBit = new bitset<8>();
pBit->reset();
dynamicArray.push_back ( pBit );
}
if ( !dynamicArray.empty() )
pBit = dynamicArray.at( dequeIndex );
pBit->set( bitSetIndex % 8, value );
++bitSetIndex;
}
bool hasNextValue() {
return (bitSetIndex < (( dynamicArray.size() * 8 ) ));
}
bool getValue() {
int dequeIndex = getDequeIndex();
bitset<8> *pBit = dynamicArray.at(dequeIndex);
int index = bitSetIndex % 8;
++bitSetIndex;
return (*pBit)[index] ? true : false;
}
};
Did you notice the template class declaration? The syntax for template class specialization is template <> class DynamicArray<bool> { };. The class template expression is empty <> and the name of the class template that works for all data types and the name of the class that works the for the bool data type are kept the same with the template expression, <bool>.
If you observe closely, the specialized DynamicArray class for bool internally makes use of deque< bitset<8> >, that is, deque of bitsets of 8 bits, and, when required, deque will automatically allocate more bitset<8> bits. The bitset variable is a memory-efficient STL container that consumes just 1 bit to represent true or false.
Let's take a look at the main function:
#include "dynamicarray.h"
#include "dynamicarrayforbool.h"
int main () {
DynamicArray<int> intArray;
intArray.appendValue( 100 );
intArray.appendValue( 200 );
intArray.appendValue( 300 );
intArray.appendValue( 400 );
intArray.initialize();
cout << "\nInt DynamicArray values are ..." << endl;
while ( intArray.hasNextValue() )
cout << intArray.getValue() << "\t";
cout << endl;
DynamicArray<char> charArray;
charArray.appendValue( 'H' );
charArray.appendValue( 'e' );
charArray.appendValue( 'l' );
charArray.appendValue( 'l' );
charArray.appendValue( 'o' );
charArray.initialize();
cout << "\nChar DynamicArray values are ..." << endl;
while ( charArray.hasNextValue() )
cout << charArray.getValue() << "\t";
cout << endl;
DynamicArray<bool> boolArray;
boolArray.appendValue ( true );
boolArray.appendValue ( false );
boolArray.appendValue ( true );
boolArray.appendValue ( false );
boolArray.appendValue ( true );
boolArray.appendValue ( false );
boolArray.appendValue ( true );
boolArray.appendValue ( false );
boolArray.appendValue ( true );
boolArray.appendValue ( true);
boolArray.appendValue ( false);
boolArray.appendValue ( false );
boolArray.appendValue ( true );
boolArray.appendValue ( true);
boolArray.appendValue ( false);
boolArray.appendValue ( false );
boolArray.initialize();
cout << "\nBool DynamicArray values are ..." << endl;
while ( boolArray.hasNextValue() )
cout << boolArray.getValue() ;
cout << endl;
return 0;
}
With the class template specialization in place, we can observe from the following that the main code seems the same for bool, char, and double, although the primary template class, DynamicArray, and the specialized DynamicArray<bool> class are different:
DynamicArray<char> charArray;
charArray.appendValue( 'H' );
charArray.appendValue( 'e' );
charArray.initialize();
cout << "\nChar DynamicArray values are ..." << endl;
while ( charArray.hasNextValue() )
cout << charArray.getValue() << "\t";
cout << endl;
DynamicArray<bool> boolArray;
boolArray.appendValue ( true );
boolArray.appendValue ( false );
boolArray.initialize();
cout << "\nBool DynamicArray values are ..." << endl;
while ( boolArray.hasNextValue() )
cout << boolArray.getValue() ;
cout << endl;
I'm sure you will find this C++ template specialization feature quite useful.
Unlike explicit template specialization, which replaces the primary template class with its own complete definitions for a specific data type, partial template specialization allows us to specialize a certain subset of template parameters supported by the primary template class, while the other generic types can be the same as the primary template class.
When partial template specialization is combined with inheritance, it can do more wonders, as shown in the following example:
#include <iostream>
using namespace std;
template <typename T1, typename T2, typename T3>
class MyTemplateClass {
public:
void F1( T1 t1, T2 t2, T3 t3 ) {
cout << "\nPrimary Template Class - Function F1 invoked ..." << endl;
cout << "Value of t1 is " << t1 << endl;
cout << "Value of t2 is " << t2 << endl;
cout << "Value of t3 is " << t3 << endl;
}
void F2(T1 t1, T2 t2) {
cout << "\nPrimary Tempalte Class - Function F2 invoked ..." << endl;
cout << "Value of t1 is " << t1 << endl;
cout << "Value of t2 is " << 2 * t2 << endl;
}
};
template <typename T1, typename T2, typename T3>
class MyTemplateClass< T1, T2*, T3*> : public MyTemplateClass<T1, T2, T3> {
public:
void F1( T1 t1, T2* t2, T3* t3 ) {
cout << "\nPartially Specialized Template Class - Function F1 invoked ..." << endl;
cout << "Value of t1 is " << t1 << endl;
cout << "Value of t2 is " << *t2 << endl;
cout << "Value of t3 is " << *t3 << endl;
}
};
The main.cpp file will have the following content:
#include "partiallyspecialized.h"
int main () {
int x = 10;
int *y = &x;
int *z = &x;
MyTemplateClass<int, int*, int*> obj;
obj.F1(x, y, z);
obj.F2(x, x);
return 0;
}
From the preceding code, you may have noticed that the primary template class name and the partially specialized class name are the same as in the case of full or explicit template class specialization. However, there are some syntactic changes in the template parameter expression. In the case of a complete template class specialization, the template parameter expression will be empty, whereas, in the case of a partially specialized template class, listed appears, as shown in the following:
template <typename T1, typename T2, typename T3>
class MyTemplateClass< T1, T2*, T3*> : public MyTemplateClass<T1, T2, T3> { };
The expression, template<typename T1, typename T2, typename T3>, is the template parameter expression used in the primary class template class, and MyTemplateClass< T1, T2*, T3*> is the partial specialization done by the second class. As you can see, the second class has done some specialization on typename T2 and typename T3, as they are used as pointers in the second class; however, typename T1 is used as is in the second class.
Apart from the facts discussed so far, the second class also inherits the primary template class, which helps the second class reuse the public and protected methods of the primary template class. However, a partial template specialization doesn't stop the specialized class from supporting other functions.
While the F1 function from the primary template class is replaced by the partially specialized template class, it reuses the F2 function from the primary template class via inheritance.
Let's quickly compile the program using the following command:
g++ main.cpp -std=c++17
./a.out
The output of the program is as follows:
Partially Specialized Template Classs - Function F1 invoked ...
Value of t1 is 10
Value of t2 is 10
Value of t3 is 10
Primary Tempalte Class - Function F2 invoked ...
Value of t1 is 10
Value of t2 is 20
I hope that you find the partially specialized template class useful.
In this chapter, you learned the following:
Congrats! Overall, you have a good understanding of C++'s template programming.
In the next chapter, you will learn smart pointers.
In the previous chapter, you learned about template programming and the benefits of generic programming. In this chapter, you will learn about the following smart pointer topics:
Let's explore the memory management facilities offered by C++.
In C++, memory management is generally a responsibility of the software developers. This is because C++ standard does not enforce garbage collection support in C++ compiler; hence, it is left to the compiler vendor's choice. Exceptionally, the Sun C++ compiler comes with a garbage collection library named libgc.
C++ language has many powerful features. Of these, needless to say, pointers is one of the most powerful and useful features. Having said pointers are very useful, they do come with their own weird issues, hence they must be used responsibly. When memory management is not taken seriously or not done quite right, it leads to many issues, including application crashes, core dumps, segmentation faults, intermittent difficulties to debug issues, performance issues, and so on. Dangling pointers or rogue pointers sometimes mess with other unrelated applications while the culprit application executes silently; in fact, the victim application might be blamed many times. The worst part about memory leaks is that at certain times it gets really tricky and even experienced developers end up debugging the victim code for countless hours while the culprit code is left untouched. Effective memory management helps avoid memory leaks and lets you develop high-performance applications that are memory efficient.
As the memory model of every operating system varies, every OS may behave differently at a different point in time for the same memory leak issue. Memory management is a big topic, and C++ offers many ways to do it well. We'll discuss some of the useful techniques in the following sections.
The majority of the C++ developers have something in common: all of us love to code complex stuff. You ask a developer, "Hey dude, would you like to reuse code that already exists and works or would you like to develop one yourself?" Though diplomatically, most developers will say to reuse what is already there when possible, their heart will say, "I wish I could design and develop it myself." Complex data structure and algorithms tend to call for pointers. Raw pointers are really cool to work with until you get into trouble.
Raw pointers must be allocated with memory before use and require deallocation once done; it is that simple. However, things get complicated in a product where pointer allocation may happen in one place and deallocation might happen in yet another place. If memory management decisions aren't made correctly, people may assume it is either the caller or callee's responsibility to free up memory, and at times, the memory may not be freed up from either place. In yet another possibility, chances are that the same pointer is deleted multiples times from different places, which could lead to application crashes. If this happens in a Windows device driver, it will most likely end up in a blue screen of death.
Just imagine, what if there were an application exception and the function that threw the exception had a bunch of pointers that were allocated with memory before the exception occurred? It is anybody's guess: there will be memory leaks.
Let's take a simple example that makes use of a raw pointer:
#include <iostream>
using namespace std;
class MyClass {
public:
void someMethod() {
int *ptr = new int();
*ptr = 100;
int result = *ptr / 0; //division by zero error expected
delete ptr;
}
};
int main ( ) {
MyClass objMyClass;
objMyClass.someMethod();
return 0;
}
Now, run the following command:
g++ main.cpp -g -std=c++17
Check out the output of this program:
main.cpp: In member function ‘void MyClass::someMethod()’:
main.cpp:12:21: warning: division by zero [-Wdiv-by-zero]
int result = *ptr / 0;
Now, run the following command:
./a.out
[1] 31674 floating point exception (core dumped) ./a.out
C++ compiler is really cool. Look at the warning message, it bangs on in regard to pointing out the issue. I love the Linux operating system. Linux is quite smart in finding rogue applications that misbehave, and it knocks them off right on time before they cause any damage to the rest of the applications or the OS. A core dump is actually good, while it is cursed instead of celebrating the Linux approach. Guess what, Microsoft's Windows operating systems are equally smarter. They do bug check when they find some applications doing fishy memory accesses and Windows OS as well supports mini-dumps and full dumps which are equivalent to core dumps in Linux OS.
Let's take a look at the Valgrind tool output to check the memory leak issue:
valgrind --leak-check=full --show-leak-kinds=all ./a.out
==32857== Memcheck, a memory error detector
==32857== Copyright (C) 2002-2015, and GNU GPL'd, by Julian Seward et al.
==32857== Using Valgrind-3.12.0 and LibVEX; rerun with -h for copyright info
==32857== Command: ./a.out
==32857==
==32857==
==32857== Process terminating with default action of signal 8 (SIGFPE)
==32857== Integer divide by zero at address 0x802D82B86
==32857== at 0x10896A: MyClass::someMethod() (main.cpp:12)
==32857== by 0x1088C2: main (main.cpp:24)
==32857==
==32857== HEAP SUMMARY:
==32857== in use at exit: 4 bytes in 1 blocks
==32857== total heap usage: 2 allocs, 1 frees, 72,708 bytes allocated
==32857==
==32857== 4 bytes in 1 blocks are still reachable in loss record 1 of 1
==32857== at 0x4C2E19F: operator new(unsigned long) (in /usr/lib/valgrind/vgpreload_memcheck-amd64-linux.so)
==32857== by 0x108951: MyClass::someMethod() (main.cpp:8)
==32857== by 0x1088C2: main (main.cpp:24)
==32857==
==32857== LEAK SUMMARY:
==32857== definitely lost: 0 bytes in 0 blocks
==32857== indirectly lost: 0 bytes in 0 blocks
==32857== possibly lost: 0 bytes in 0 blocks
==32857== still reachable: 4 bytes in 1 blocks
==32857== suppressed: 0 bytes in 0 blocks
==32857==
==32857== For counts of detected and suppressed errors, rerun with: -v
==32857== ERROR SUMMARY: 0 errors from 0 contexts (suppressed: 0 from 0)
[1] 32857 floating point exception (core dumped) valgrind --leak-check=full --show-leak-kinds=all ./a.out
In this output, if you pay attention to the bold portion of the text, you will notice the Valgrind tool did point out the source code line number that caused this core dump. Line number 12 from the main.cpp file is as follows:
int result = *ptr / 0; //division by zero error expected
The moment the exception occurs at line number 12 in the main.cpp file, the code that appears below the exception will never get executed. At line number 13 in the main.cpp file, there appears a delete statement that will never get executed due to the exception:
delete ptr;
The memory allocated to the preceding raw pointer isn't released as the memory pointed by pointers is not freed up during the stack unwinding process. Whenever an exception is thrown by a function and the exception isn't handled by the same function, stack unwinding is guaranteed. However, only the automatic local variables will be cleaned up during the stack unwinding process, not the memory pointed by the pointers. This results in memory leaks.
This is one of the weird issues invited by the use of raw pointers; there are many other similar scenarios. Hopefully you are convinced now that the thrill of using raw pointers does come at a cost. But the penalty paid isn't really worth it as there are good alternatives available in C++ to deal with this issue. You are right, using a smart pointer is the solution that offers the benefits of using pointers without paying the cost attached to raw pointers.
Hence, smart pointers are the way to use pointers safely in C++.
In C++, smart pointers let you focus on the problem at hand by freeing you from the worries of dealing with custom garbage collection techniques. Smart pointers let you use raw pointers safely. They take the responsibility of cleaning up the memory used by raw pointers.
C++ supports many types of smart pointers that can be used in different scenarios:
The auto_ptr smart pointer was introduced in C++11. An auto_ptr smart pointer helps release the heap memory automatically when it goes out of scope. However, due to the way auto_ptr transfers ownership from one auto_ptr instance to another, it was deprecated and unique_ptr was introduced as its replacement. The shared_ptr smart pointer helps multiple shared smart pointers reference the same object and takes care of the memory management burden. The weak_ptr smart pointer helps resolve memory leak issues that arise due to the use of shared_ptr when there is a cyclic dependency issue in the application design.
There are other types of smart pointers and related stuff that are not so commonly used, and they are listed in the following bullet list. However, I would highly recommend that you explore them on your own as you never know when you will find them useful:
The owner_less smart pointer helps compare two or more smart pointers if they share the same raw pointed object. The enable_shared_from_this smart pointer helps get a smart pointer of the this pointer. The bad_weak_ptr smart pointer is an exception class that implies that shared_ptr was created using an invalid smart pointer. The default_delete smart pointer refers to the default destruction policy used by unique_ptr, which invokes the delete statement, while partial specialization for array types that use delete[] is also supported.
In this chapter, we will explore auto_ptr, shared_ptr, weak_ptr, and unique-ptr one by one.
The auto_ptr smart pointer takes a raw pointer, wraps it, and ensures the memory pointed by the raw pointer is released back whenever the auto_ptr object goes out of scope. At any time, only one auto_ptr smart pointer can point to an object. Hence, whenever one auto_ptr pointer is assigned to another auto_ptr pointer, the ownership gets transferred to the auto_ptr instance that has received the assignment; the same happens when an auto_ptr smart pointer is copied.
It would be interesting to observe the stuff in action with a simple example, as follows:
#include <iostream>
#include <string>
#include <memory>
#include <sstream>
using namespace std;
class MyClass {
private:
static int count;
string name;
public:
MyClass() {
ostringstream stringStream(ostringstream::ate);
stringStream << "Object";
stringStream << ++count;
name = stringStream.str();
cout << "\nMyClass Default constructor - " << name << endl;
}
~MyClass() {
cout << "\nMyClass destructor - " << name << endl;
}
MyClass ( const MyClass &objectBeingCopied ) {
cout << "\nMyClass copy constructor" << endl;
}
MyClass& operator = ( const MyClass &objectBeingAssigned ) {
cout << "\nMyClass assignment operator" << endl;
}
void sayHello( ) {
cout << "Hello from MyClass " << name << endl;
}
};
int MyClass::count = 0;
int main ( ) {
auto_ptr<MyClass> ptr1( new MyClass() );
auto_ptr<MyClass> ptr2( new MyClass() );
return 0;
}
The compilation output of the preceding program is as follows:
g++ main.cpp -std=c++17
main.cpp: In function ‘int main()’:
main.cpp:40:2: warning: ‘template<class> class std::auto_ptr’ is deprecated [-Wdeprecated-declarations]
auto_ptr<MyClass> ptr1( new MyClass() );
In file included from /usr/include/c++/6/memory:81:0,
from main.cpp:3:
/usr/include/c++/6/bits/unique_ptr.h:49:28: note: declared here
template<typename> class auto_ptr;
main.cpp:41:2: warning: ‘template<class> class std::auto_ptr’ is deprecated [-Wdeprecated-declarations]
auto_ptr<MyClass> ptr2( new MyClass() );
In file included from /usr/include/c++/6/memory:81:0,
from main.cpp:3:
/usr/include/c++/6/bits/unique_ptr.h:49:28: note: declared here
template<typename> class auto_ptr;
As you can see, the C++ compiler warns us as the use of auto_ptr is deprecated. Hence, I don't recommend the use of the auto_ptr smart pointer anymore; it is replaced by unique_ptr.
For now, we can ignore the warnings and move on, as follows:
g++ main.cpp -Wno-deprecated
./a.out
MyClass Default constructor - Object1
MyClass Default constructor - Object2
MyClass destructor - Object2
MyClass destructor - Object1
As you can see in the preceding program output, both Object1 and Object2, allocated in a heap, got deleted automatically. And the credit goes to the auto_ptr smart pointer.
As you may have understood from the MyClass definition, it has defined the default constructor, copy constructor and destructor, an assignment operator, and sayHello() methods, as shown here:
//Definitions removed here to keep it simple
class MyClass {
public:
MyClass() { } //Default constructor
~MyClass() { } //Destructor
MyClass ( const MyClass &objectBeingCopied ) {} //Copy Constructor
MyClass& operator = ( const MyClass &objectBeingAssigned ) { } //Assignment operator
void sayHello();
};
The methods of MyClass have nothing more than a print statement that indicates the methods got invoked; they were purely meant for demonstration purposes.
The main() function creates two auto_ptr smart pointers that point to two different MyClass objects, as shown here:
int main ( ) {
auto_ptr<MyClass> ptr1( new MyClass() );
auto_ptr<MyClass> ptr2( new MyClass() );
return 0;
}
As you can understand, auto_ptr is a local object that wraps a raw pointer, not a pointer. When the control hits the return statement, the stack unwinding process gets initiated, and as part of this, the stack objects, that is, ptr1 and ptr2, get destroyed. This, in turn, invokes the destructor of auto_ptr that ends up deleting the MyClass objects pointed by the stack objects ptr1 and ptr2.
We are not quite done yet. Let's explore more useful functionalities of auto_ptr, as shown in the following main function:
int main ( ) {
auto_ptr<MyClass> ptr1( new MyClass() );
auto_ptr<MyClass> ptr2( new MyClass() );
ptr1->sayHello();
ptr2->sayHello();
//At this point the below stuffs happen
//1. ptr2 smart pointer has given up ownership of MyClass Object 2
//2. MyClass Object 2 will be destructed as ptr2 has given up its
// ownership on Object 2
//3. Ownership of Object 1 will be transferred to ptr2
ptr2 = ptr1;
//The line below if uncommented will result in core dump as ptr1
//has given up its ownership on Object 1 and the ownership of
//Object 1 is transferred to ptr2.
// ptr1->sayHello();
ptr2->sayHello();
return 0;
}
The main() function code we just saw demonstrates many useful techniques and some controversial behaviors of the auto_ptr smart pointer. The following code creates two instances of auto_ptr, namely ptr1 and ptr2, that wrap two objects of MyClass created in a heap:
auto_ptr<MyClass> ptr1( new MyClass() );
auto_ptr<MyClass> ptr2( new MyClass() );
Next, the following code demonstrates how the methods supported by MyClass can be invoked using auto_ptr:
ptr1->sayHello();
ptr2->sayHello();
Hope you observed the ptr1->sayHello() statement. It will make you believe that the auto_ptr ptr1 object is a pointer, but in reality, ptr1 and ptr2 are just auto_ptr objects created in the stack as local variables. As the auto_ptr class has overloaded the -> pointer operator and the * dereferencing operator, it appears like a pointer. As a matter of fact, all the methods exposed by MyClass can only be accessed using the -> pointer operator, while all the auto_ptr methods can be accessed as you would regularly access a stack object.
The following code demonstrates the internal behavior of the auto_ptr smart pointer, so pay close attention; this is going to be really interesting:
ptr2 = ptr1;
It appears as though the preceding code is a simple assignment statement, but it triggers many activities within auto_ptr. The following activities happen due to the preceding assignment statement:
The following commented line has got some facts to tell you:
// ptr1->sayHello();
As the ptr1 smart pointer has released its ownership of object 1, it is illegal to attempt accessing the sayHello() method. This is because ptr1, in reality, isn't pointing to object 1 anymore, and object 1 is owned by ptr2. It is the responsibility of the ptr2 smart pointer to release the memory utilized by object 1 when ptr2 goes out of scope. If the preceding code is uncommented, it would lead to a core dump.
Finally, the following code lets us invoke the sayHello() method on object 1 using the ptr2 smart pointer:
ptr2->sayHello();
return 0;
The return statement we just saw will initiate the stack unwinding process in the main() function. This will end up invoking the destructor of ptr2, which in turn will deallocate the memory utilized by object 1. The beauty is all this happens automatically. The auto_ptr smart pointer works hard for us behind the scenes while we are focusing on the problem at hand.
However, due to the following reasons, auto_ptr is deprecated in C++11 onward:
The unique_ptr smart pointer works in exactly the same way as auto_ptr, except that unique_ptr addresses the issues introduced by auto_ptr. Hence, unique_ptr is a replacement of auto_ptr, starting from C++11. The unique_ptr smart pointer allows only one smart pointer to exclusively own a heap-allocated object. The ownership transfer from one unique_ptr instance to another can be done only via the std::move() function.
Hence, let's refactor our previous example to make use of unique_ptr in place of auto_ptr.
The refactored code sample is as follows:
#include <iostream>
#include <string>
#include <memory>
#include <sstream>
using namespace std;
class MyClass {
private:
static int count;
string name;
public:
MyClass() {
ostringstream stringStream(ostringstream::ate);
stringStream << "Object";
stringStream << ++count;
name = stringStream.str();
cout << "\nMyClass Default constructor - " << name << endl;
}
~MyClass() {
cout << "\nMyClass destructor - " << name << endl;
}
MyClass ( const MyClass &objectBeingCopied ) {
cout << "\nMyClass copy constructor" << endl;
}
MyClass& operator = ( const MyClass &objectBeingAssigned ) {
cout << "\nMyClass assignment operator" << endl;
}
void sayHello( ) {
cout << "\nHello from MyClass" << endl;
}
};
int MyClass::count = 0;
int main ( ) {
unique_ptr<MyClass> ptr1( new MyClass() );
unique_ptr<MyClass> ptr2( new MyClass() );
ptr1->sayHello();
ptr2->sayHello();
//At this point the below stuffs happen
//1. ptr2 smart pointer has given up ownership of MyClass Object 2
//2. MyClass Object 2 will be destructed as ptr2 has given up its
// ownership on Object 2
//3. Ownership of Object 1 will be transferred to ptr2
ptr2 = move( ptr1 );
//The line below if uncommented will result in core dump as ptr1
//has given up its ownership on Object 1 and the ownership of
//Object 1 is transferred to ptr2.
// ptr1->sayHello();
ptr2->sayHello();
return 0;
}
The output of the preceding program is as follows:
g++ main.cpp -std=c++17
./a.out
MyClass Default constructor - Object1
MyClass Default constructor - Object2
MyClass destructor - Object2
MyClass destructor - Object1
In the preceding output, you can notice the compiler doesn't report any warning and the output of the program is the same as that of auto_ptr.
It is important to note the differences in the main() function, between auto_ptr and unique_ptr. Let's check out the main() function, as illustrated in the following code. This code creates two instances of unique_ptr, namely ptr1 and ptr2, that wrap two objects of MyClass created in the heap:
unique_ptr<MyClass> ptr1( new MyClass() );
unique_ptr<MyClass> ptr2( new MyClass() );
Next, the following code demonstrates how the methods supported by MyClass can be invoked using unique_ptr:
ptr1->sayHello();
ptr2->sayHello();
Just like auto_ptr, the unique_ptr smart pointers ptr1 object has overloaded the -> pointer operator and the * dereferencing operator; hence, it appears like a pointer.
The following code demonstrates unique_ptr doesn't support the assignment of one unique_ptr instance to another, and ownership transfer can only be achieved with the std::move() function:
ptr2 = std::move(ptr1);
The move function triggers the following activities:
The following code, if uncommented, will lead to a core dump:
// ptr1->sayHello();
Finally, the following code lets us invoke the sayHello() method on object 1 using the ptr2 smart pointer:
ptr2->sayHello();
return 0;
The return statement we just saw will initiate the stack unwinding process in the main() function. This will end up invoking the destructor of ptr2, which in turn will deallocate the memory utilized by object 1. Note that unique_ptr objects could be stored in STL containers, unlike auto_ptr objects.
The shared_ptr smart pointer is used when a group of shared_ptr objects shares the ownership of a heap-allocated object. The shared_ptr pointer releases the shared object when all the shared_ptr instances are done with the use of the shared object. The shared_ptr pointer uses the reference counting mechanism to check the total references to the shared object; whenever the reference count becomes zero, the last shared_ptr instance deletes the shared object.
Let's check out the use of shared_ptr through an example, as follows:
#include <iostream>
#include <string>
#include <memory>
#include <sstream>
using namespace std;
class MyClass {
private:
static int count;
string name;
public:
MyClass() {
ostringstream stringStream(ostringstream::ate);
stringStream << "Object";
stringStream << ++count;
name = stringStream.str();
cout << "\nMyClass Default constructor - " << name << endl;
}
~MyClass() {
cout << "\nMyClass destructor - " << name << endl;
}
MyClass ( const MyClass &objectBeingCopied ) {
cout << "\nMyClass copy constructor" << endl;
}
MyClass& operator = ( const MyClass &objectBeingAssigned ) {
cout << "\nMyClass assignment operator" << endl;
}
void sayHello() {
cout << "Hello from MyClass " << name << endl;
}
};
int MyClass::count = 0;
int main ( ) {
shared_ptr<MyClass> ptr1( new MyClass() );
ptr1->sayHello();
cout << "\nUse count is " << ptr1.use_count() << endl;
{
shared_ptr<MyClass> ptr2( ptr1 );
ptr2->sayHello();
cout << "\nUse count is " << ptr2.use_count() << endl;
}
shared_ptr<MyClass> ptr3 = ptr1;
ptr3->sayHello();
cout << "\nUse count is " << ptr3.use_count() << endl;
return 0;
}
The output of the preceding program is as follows:
MyClass Default constructor - Object1
Hello from MyClass Object1
Use count is 1
Hello from MyClass Object1
Use count is 2
Number of smart pointers referring to MyClass object after ptr2 is destroyed is 1
Hello from MyClass Object1
Use count is 2
MyClass destructor - Object1
The following code creates an instance of the shared_ptr object that points to the MyClass heap-allocated object. Just like other smart pointers, shared_ptr also has the overloaded -> and * operators. Hence, all the MyClass object methods can be invoked as though you are using a raw pointer. The use_count() method tells the number of smart pointers that refer to the shared object:
shared_ptr<MyClass> ptr1( new MyClass() );
ptr1->sayHello();
cout << "\nNumber of smart pointers referring to MyClass object is "
<< ptr1->use_count() << endl;
In the following code, the scope of the smart pointer ptr2 is wrapped within the block enclosed by flower brackets. Hence, ptr2 will get destroyed at the end of the following code block. The expected use_count function within the code block is 2:
{
shared_ptr<MyClass> ptr2( ptr1 );
ptr2->sayHello();
cout << "\nNumber of smart pointers referring to MyClass object is "
<< ptr2->use_count() << endl;
}
In the following code, the expected use_count value is 1 as ptr2 would have been deleted, which would reduce the reference count by 1:
cout << "\nNumber of smart pointers referring to MyClass object after ptr2 is destroyed is "
<< ptr1->use_count() << endl;
The following code will print a Hello message, followed by use_count as 2. This is due to the fact that ptr1 and ptr3 are now referring to the MyClass shared object in the heap:
shared_ptr<MyClass> ptr3 = ptr2;
ptr3->sayHello();
cout << "\nNumber of smart pointers referring to MyClass object is "
<< ptr2->use_count() << endl;
The return 0; statement at the end of the main function will destroy ptr1 and ptr3, reducing the reference count to zero. Hence, we can observe the MyClass destructor print the statement at the end of the output.
So far, we have discussed the positive side of shared_ptr with examples. However, shared_ptr fails to clean up the memory when there is a circular dependency in the application design. Either the application design must be refactored to avoid cyclic dependency, or we can make use of weak_ptr to resolve the cyclic dependency issue.
Consider there are three classes: A, B, and C. Class A and B have an instance of C, while C has an instance of A and B. There is a design issue here. A depends on C and C depends on A too. Similarly, B depends on C and C depends on B as well.
Consider the following code:
#include <iostream>
#include <string>
#include <memory>
#include <sstream>
using namespace std;
class C;
class A {
private:
shared_ptr<C> ptr;
public:
A() {
cout << "\nA constructor" << endl;
}
~A() {
cout << "\nA destructor" << endl;
}
void setObject ( shared_ptr<C> ptr ) {
this->ptr = ptr;
}
};
class B {
private:
shared_ptr<C> ptr;
public:
B() {
cout << "\nB constructor" << endl;
}
~B() {
cout << "\nB destructor" << endl;
}
void setObject ( shared_ptr<C> ptr ) {
this->ptr = ptr;
}
};
class C {
private:
shared_ptr<A> ptr1;
shared_ptr<B> ptr2;
public:
C(shared_ptr<A> ptr1, shared_ptr<B> ptr2) {
cout << "\nC constructor" << endl;
this->ptr1 = ptr1;
this->ptr2 = ptr2;
}
~C() {
cout << "\nC destructor" << endl;
}
};
int main ( ) {
shared_ptr<A> a( new A() );
shared_ptr<B> b( new B() );
shared_ptr<C> c( new C( a, b ) );
a->setObject ( shared_ptr<C>( c ) );
b->setObject ( shared_ptr<C>( c ) );
return 0;
}
The output of the preceding program is as follows:
g++ problem.cpp -std=c++17
./a.out
A constructor
B constructor
C constructor
In the preceding output, you can observe that even though we used shared_ptr, the memory utilized by objects A, B, and C were never deallocated. This is because we didn't see the destructor of the respective classes being invoked. The reason for this is that shared_ptr internally makes use of the reference counting algorithm to decide whether the shared object has to be destructed. However, it fails here because object A can't be deleted unless object C is deleted. Object C can't be deleted unless object A is deleted. Also, object C can't be deleted unless objects A and B are deleted. Similarly, object A can't be deleted unless object C is deleted and object B can't be deleted unless object C is deleted.
The bottom line is that this is a circular dependency design issue. In order to fix this issue, starting from C++11, C++ introduced weak_ptr. The weak_ptr smart pointer is not a strong reference. Hence, the object referred to could be deleted at any point of time, unlike shared_ptr.
Circular dependency is an issue that occurs if object A depends on B, and object B depends on A. Now let's see how this issue could be fixed with a combination of shared_ptr and weak_ptr, eventually breaking the circular dependency, as follows:
#include <iostream>
#include <string>
#include <memory>
#include <sstream>
using namespace std;
class C;
class A {
private:
weak_ptr<C> ptr;
public:
A() {
cout << "\nA constructor" << endl;
}
~A() {
cout << "\nA destructor" << endl;
}
void setObject ( weak_ptr<C> ptr ) {
this->ptr = ptr;
}
};
class B {
private:
weak_ptr<C> ptr;
public:
B() {
cout << "\nB constructor" << endl;
}
~B() {
cout << "\nB destructor" << endl;
}
void setObject ( weak_ptr<C> ptr ) {
this->ptr = ptr;
}
};
class C {
private:
shared_ptr<A> ptr1;
shared_ptr<B> ptr2;
public:
C(shared_ptr<A> ptr1, shared_ptr<B> ptr2) {
cout << "\nC constructor" << endl;
this->ptr1 = ptr1;
this->ptr2 = ptr2;
}
~C() {
cout << "\nC destructor" << endl;
}
};
int main ( ) {
shared_ptr<A> a( new A() );
shared_ptr<B> b( new B() );
shared_ptr<C> c( new C( a, b ) );
a->setObject ( weak_ptr<C>( c ) );
b->setObject ( weak_ptr<C>( c ) );
return 0;
}
The output of the preceding refactored code is as follows:
g++ solution.cpp -std=c++17
./a.out
A constructor
B constructor
C constructor
C destructor
B destructor
A destructor
In this chapter, you learned about
In the next chapter, you will learn about developing GUI applications in C++.
In this chapter, you will learn the following topics:
Qt is a cross-platform application framework developed in C++. It is supported on various platforms, including Windows, Linux, Mac OS, Android, iOS, Embedded Linux, QNX, VxWorks, Windows CE/RT, Integrity, Wayland, X11, Embedded Devices, and so on. It is primarily used as a human-machine-interface (HMI) or Graphical User Interface (GUI) framework; however, it is also used to develop a command-line interface (CLI) applications. The correct way of pronouncing Qt is cute. The Qt application framework comes in two flavors: open source and with a commercial license.
Qt is the brainchild of Haavard Nord and Eirik Chambe-Eng, the original developers, who developed it back in the year 1991.
As C++ language doesn't support GUI natively, you must have guessed that there is no event management support in C++ language out of the box. Hence, there was a need for Qt to support its own event handling mechanism, which led to the signals and slots technique. Under the hood, signals and slots use the observer design pattern that allows Qt objects to talk to each other. Does this sound too hard to understand? No worries! Signals are nothing but events, such as a button click or window close, and slots are event handlers that can supply a response to these events in the way you wish to respond to them.
To make our life easier in terms of Qt application development, Qt supports various macros and Qt-specific keywords. As these keywords will not be understood by C++, Qt has to translate them and the macros into pure C++ code so that the C++ compiler can do its job as usual. To make this happen in a smoother fashion, Qt supports something called Meta-Object Compiler, also known as moc.
Qt is a natural choice for C++ projects as it is out-and-out C++ code; hence, as a C++ developer, you will feel at home when you use Qt in your application. A typical application will have both complex logic and impressive UI. In small product teams, typically one developer does multiple stuff, which is good and bad.
Generally, professional developers have good problem-solving skills. Problem-solving skills are essential to solve a complex problem in an optimal fashion with a good choice of data structures and algorithms.
Developing an impressive UI requires creative design skills. While there are a countable number of developers who are either good at problem-solving or creative UI design, not all developers are good at both. This is where Qt stands out.
Say a start-up wants to develop an application for their internal purposes. For this, a simple GUI application would suffice, where a decent looking HMI/GUI might work for the team as the application is meant for internal purposes only. In such scenarios, the entire application can be developed in C++ and the Qt Widgets framework. The only prerequisite is that the development team must be proficient in C++.
However, in cases where a mobile app has to be developed, an impressive HMI becomes mandatory. Again, the mobile app can be developed with C++ and Qt Widgets. But now there are two parts to this choice. The good part is that the mobile app team has to be good at just C++. The bad part of this choice is that there is no guarantee that all good C++ developers will be good at designing a mobile app's HMI/GUI.
Let's assume the team has one or two dedicated Photoshop professionals who are good at creating catchy images that can be used in the GUI and one or two UI designers who can make an impressive HMI/GUI with the images created by the Photoshop experts. Typically, UI designers are good at frontend technologies, such as JavaScript, HTML, and CSS. Complex business logic can be developed in the powerful Qt Framework, while the HMI/GUI can be developed in QML.
QML is a declarative scripting language that comes along with the Qt application framework. It is close to JavaScript and has Qt-specific extensions. It is good for rapid application development and allows UI designers to focus on HMI/GUI and C++ developers to focus on the complex business logic that can be developed in Qt Framework.
Since both the C++ Qt Framework and QML are part of the same Qt application framework, they go hand in hand seamlessly.
Qt is a vast and powerful framework; hence this chapter will focus on the basic essentials of Qt to get you started with Qt. If you are curious to learn more, you may want to check out my other upcoming book that I'm working on, namely Mastering Qt and QML Programming.
The Qt Framework is developed in C++, hence it is guaranteed that it would be a cake walk for any good C++ developer. It supports CLI and GUI-based application development. At the time of writing this chapter, the latest version of the Qt application framework is Qt 5.7.0. By the time you read this book, it is possible that a different version of Qt will be available for you to download. You can download the latest version from https://www.qt.io.
Throughout this chapter, I'll be using Ubuntu 16.04 OS; however, the programs that are listed in this chapter should work on any platform that supports Qt.
For detailed installation instructions, refer to https://wiki.qt.io/install_Qt_5_on_Ubuntu.
At this point, you should have a C++ compiler installed on your system. If this is not the case, first ensure that you install a C++ compiler, as follows:
sudo apt-get install build-essential
From the Ubuntu Terminal, you should be able to download Qt 5.7.0, as shown in the following command:
wget http://download.qt.io/official_releases/qt/5.7/5.7.0/qt-
opensource-linux-x64-5.7.0.run
Provide execute permission to the downloaded installer, as shown in the following command:
chmod +x qt-opensource-linux-x64-5.7.0.run
Launch the installer as shown in the following command:
./qt-opensource-linux-x64-5.7.0.run
As Qt makes use of OpenGL, make sure you install the following before you start writing your first program in Qt. To install libfontconfig1, run the following command:
sudo apt-get install libfontconfig1
To install mesa-common-dev, run the following command:
sudo apt-get install mesa-common-dev
At this point, you should have a working Qt setup. You can verify the installation by issuing the following command in the Linux Terminal:
In case the qmake command isn't recognized, make sure you export the bin path of the Qt installation folder, as shown in the preceding screenshot. Additionally, creating a soft link might be useful too. The command for this is as follows:
sudo ln -s /home/jegan/Qt5.7.0/5.7/gcc_64/bin/qmake /usr/bin/qmake
The path where Qt is installed on your system might vary from mine, so please substitute the Qt path accordingly.
Qt Core is one of the modules supported by Qt. This module has loads of useful classes, such as QObject, QCoreApplication, QDebug, and so on. Almost every Qt application will require this module, hence they are linked implicitly by the Qt Framework. Every Qt class inherits from QObject, and the QObject class offers event handling support to Qt applications. QObject is the critical piece that supports the event handling mechanism; interestingly, even console-based applications can support event handling in Qt.
If you get a similar output to that shown in Figure 5.1, you are all set to get your hands dirty. Let's write our first Qt application, as shown in the following screenshot:
In the first line, we have included the QDebug header from the QtCore module. If you observe closely, the qDebug() function resembles the C++ cout ostream operator. The qDebug() function is going to be your good friend in the Qt world while you are debugging your code. The QDebug class has overloaded the C++ ostream operator in order to add support for Qt data types that aren't supported by the C++ compiler.
In old school fashion, I'm kind of obsessed with the Terminal to achieve pretty much anything while coding as opposed to using some fancy Integrated Development Environments (IDEs). You may either love or hate this approach, which is quite natural. The good part is there is nothing going to stand between you and Qt/C++ as you are going to use plain and simple yet powerful text editors, such as Vim, Emacs, Sublime Text, Atom, Brackets, or Neovim, so you will learn almost all the essentials of how Qt projects and qmake work; IDEs make your life easy, but they hide a lot of the essential stuff that every serious developer must know. So it's a trade-off. I leave it to you to decide whether to use your favorite plain text editor or Qt Creator IDE or any other fancy IDE. I'm going to stick with the refactored Vim editor called Neovim, which looks really cool. Figure 5.2 will give you an idea of the Neovim editor's look and feel.
Let's get back to business. Let's see how to compile this code in the command line the geeky way. Well, before that, you may want to know about the qmake tool. It is a proprietary make utility of Qt. The qmake utility is nothing more than a make tool, but it is aware of Qt-specific stuff so it knows about moc, signals, slots, and so on, which a typical make utility will be unaware of.
The following command should help you create a .pro file. The name of the .pro file will be decided by the qmake utility, based on the project folder name. The .pro file is the way the Qt Creator IDE combines related files as a single project. Since we aren't going to use Qt Creator, we will use the .pro file to create Makefile in order to compile our Qt project just like a plain C++ project.
When you issue the qmake -project command, qmake will scan through the current folder and all the subfolders under the current folder and include the headers and source files in Ex1.pro. By the way, the .pro file is a plain text file that can be opened using any text editor, as shown in Figure 5.4:
Now it's time to create Makefile taking Ex1.pro as an input file. As the Ex1.pro file is present in the current directory, we don't have to explicitly supply Ex1.pro as an input file to autogenerate Makefile. The idea is that once we have a .pro file, all we would need to do is generate Makefile from the .pro file issuing command: qmake. This will do all the magic of creating a full-blown Makefile for your project that you can use to build your project with the make utility, as shown in the following screenshot:
This is the point we have been waiting for, right? Yes, let's execute our first Qt Hello World program, as shown in the following screenshot:
Congratulations! You have completed your first Qt application. In this exercise, you learned how to set up and configure Qt in Ubuntu and how to write a simple Qt console application and then build and run it. The best part is you learned all of this from the command line.
Qt Widgets is an interesting module that supports quite a lot of widgets, such as buttons, labels, edit, combo, list, dialog, and so on. QWidget is the base class of all of the widgets, while QObject is the base class of pretty much every Qt class. While many programming languages refer to as UI controls, Qt refers to them as widgets. Though Qt works on many platforms, its home remains Linux; widgets are common in the Linux world.
Our first console application is really cool, isn't it? Let's continue exploring further. This time, let's write a simple GUI-based Hello World program. The procedure will remain almost the same, except for some minor changes in main.cpp. Refer to the following for the complete code:
Wait a minute. Let me explain the need for QApplication in line number 23 and line number 29. Every Qt GUI application must have exactly one instance of the QApplication instance. QApplication provides support for command-line switches for our application, hence the need to supply the argument count (argc) and the argument value (argv). GUI-based applications are event-driven, so they must respond to events or, to be precise, signals in the Qt world. In line number 29, the exec function starts the event loop, which ensures the application waits for user interactions until the user closes the window. The idea is that all the user events will be received by the QApplication instance in an event queue, which will then be notified to its Child widgets. The event queue ensures all the events deposited in the queue are handled in the same sequence that they occur, that is, first in, first out (FIFO).
In case you are curious to check what would happen if you comment line 29, the application will still compile and run but you may not see any window. The reason being the main thread or the main function creates an instance of QWidget in line number 25, which is the window that we see when we launch the application.
In line number 27, the window instance is displayed, but in the absence of line number 29, the main function will terminate the application immediately without giving a chance for you to check your first Qt GUI application. It's worth trying, so go ahead and see what happens with and without line number 29.
Let's generate Makefile, as shown in the following screenshot:
Now let's try to compile our project with the make utility, as shown in the following screenshot:
Interesting, right? Our brand new Qt GUI program fails to compile. Did you notice the fatal error? No big deal; let's understand why this happened. The reason is that we have not yet linked the Qt Widgets module, as the QApplication class is part of the Qt Widgets module. In that case, you may wonder how your first Hello World program compiled without any issue. In our first program, the QDebug class was part of the QtCore module that got linked implicitly, whereas other modules had to be linked explicitly. Let's see how to get this done:
We need to add QT += widgets to the Ex2.pro file so that the qmake utility understands that it needs to link Qt Widgets's shared object (the .so file) in Linux, also known as the Dynamic Link Library (the .dll file) in Windows, while creating the final executable. Once this is taken care of, we must qmake so that Makefile could reflect the new change in our Ex2.pro file, as demonstrated in the following screenshot:
Cool. Let's check our first GUI-based Qt app now. In my system, the application output looks as shown in Figure 5.12; you should get a similar output as well if all goes well at your end:
It would be nice if we set the title of our window as Hello Qt, right? Let's do this right away:
Add the code presented at line number 26 to ensure you build your project with the make utility before you test your new change:
Qt is cross-platform application framework, hence it supports concepts such as layouts for developing applications that look consistent in all platforms, irrespective of the different screen resolutions. When we develop GUI/HMI-based Qt applications, an application developed in one system shouldn't appear different on another system with a different screen size and resolution. This is achieved in the Qt Framework via layouts. Layouts come in different flavors. This helps a developer design a professional-looking HMI/GUI by organizing various widgets within a window or dialog. Layouts differ in the way they arrange their child widgets. While one arranges its child widgets in a horizontal fashion, another will arrange them in a vertical or grid fashion. When a window or dialog gets resized, the layouts resize their child widgets so they don't get truncated or go out of focus.
Let's write a Qt application that has a couple of buttons in the dialog. Qt supports a variety of useful layout managers that act as an invisible canvas where many QWidgets can be arranged before they are attached to a window or dialog. Each dialog or window can have only one layout. Every widget can be added to only one layout; however, many layouts can be combined to design a professional UI.
Let's start writing the code now. In this project, we are going to write code in a modular fashion, hence we are going to create three files with the names MyDlg.h, MyDlg.cpp, and main.cpp.
The game plan is as follows:
It is important that we follow clean code practices so that our code is easy to understand and can be maintained by anyone. As we are going to follow industry best practices, let's declare the dialog in a header file called MyDlg.h, define the dialog in the source file called MyDlg.cpp, and use MyDlg.cpp in main.cpp that has the main function. Every time MyDlg.cpp requires a header file, let's make it a practice to include all the headers only in MyDlg.h; with this, the only header we will see in MyDlg.cpp is MyDlg.h.
By the way, did I tell you Qt follows the camel casing coding convention? Yes, I did mention it right now. By now, you will have observed that all Qt classes start with the letter Q because Qt inventors loved the letter "Q" in Emacs and they were so obsessed with that font type that they decided to use the letter Q everywhere in Qt.
One last suggestion. Wouldn't it be easy for others to locate the dialog class if the name of the file and the name of the class were similar? I can hear you say yes. All set! Let's start coding our Qt application. First, refer to the following screenshot:
In the preceding screenshot, we declared a class with the name MyDlg. It has one layout, three buttons, and a constructor. Now refer to this screenshot:
As you can see in the preceding screenshot, we defined the MyDlg constructor and instantiated the layout and the three buttons. In lines 27 through 29, we added three buttons to the layout. In line number 31, we associated the layout to our dialog. That's all it takes. In the following screenshot, we defined our main function, which creates an instance of QApplication:
We followed this up by creating our custom dialog instance and displaying the dialog. Finally, at line 27, we started the event loop so that MyDlg could respond to user interactions. Refer to the following screenshot:
The preceding screenshot demonstrates the build and execution procedures, and there is our cute application. Actually, you can try playing with the dialog to understand the horizontal layout better. First, stretch the dialog horizontally and notice all the buttons' width increase; then, see whether you can reduce the dialog's width to notice all the buttons' width decrease. That's the job of any layout manager. A layout manager arranges widgets and retrieves the size of the window and divides the height and width equally among all its child widgets. Layout managers keep notifying all their child widgets about any resize events. However, it is up to the respective child widget to decide whether they want to resize themselves or ignore the layout resize signals.
To check this behavior, try stretching out the dialog vertically. As you increase the height of the dialog, the dialog's height should increase, but the buttons will not increase their height. This is because every Qt Widget has its own preferred size policy; as per their size policy, they may respond or ignore certain layout resize signals.
If you want the buttons to stretch vertically as well, QPushButton offers a way to get this done. In fact, QPushButton extends from QWidget just like any other widget. The setSizePolicy() method comes to QPushButton from its base class, that is, QWidget:
Did you notice line number 37? Yes, I have set the window title within the constructor of MyDlg to keep our main function compact and clean.
Make sure you have built your project using the make utility before launching your application:
In the highlighted section, we have overridden the default size policy of all the buttons. In line number 27, the first parameter QSizePolicy::Expanding refers to the horizontal policy and the second parameter refers to the vertical policy. To find other possible values of QSizePolicy, refer to the assistant that comes in handy with the Qt API reference, as shown in the following screenshot:
In the previous section, you learned how to use a horizontal box layout. In this section, you will see how to use a vertical box layout in your application.
As a matter of fact, the horizontal and vertical box layouts vary only in terms of how they arrange the widgets. For instance, the horizontal box layout will arrange its child widgets in a horizontal fashion from left to right, whereas the vertical box layout will arrange its child widgets in a vertical fashion from top to bottom.
You can copy the source code from the previous section, as the changes are minor in nature. Once you have copied the code, your project directory should look as follows:
Let me demonstrate the changes starting from the MyDlg.h header file, as follows:
I have replaced QHBoxLayout with QVBoxLayout; that is all. Yes, let's proceed with file changes related to MyDlg.cpp:
There are no changes to be done in main.cpp; however, I have shown main.cpp for your reference, as follows:
Now all we need to do is autogenerate Makefile and then make and run the program as follows:
Let's execute our brand new program and check the output. The following output demonstrates that QVBoxLayout arranges the widgets in a vertical top to bottom fashion. When the window is stretched, all the buttons' width will increase/decrease depending on whether the window is stretched out or stretched in:
In the previous sections, you learned how to make use of QHBoxLayout and QVBoxLayout. Actually, these two classes are the convenience classes for QBoxLayout. In the case of QHBoxLayout, the QHBoxLayout class has subclassed QBoxLayout and configured QBoxLayout::Direction to QBoxLayout::LeftToRight, whereas the QVBoxLayout class has subclassed QBoxLayout and configured QBoxLayout::Direction to QBoxLayout::TopToBottom.
Apart from these values, QBoxLayout::Direction supports various other values, as follows:
Let's write a simple program using QBoxLayout with five buttons.
Let's start with the MyDlg.h header file. I have declared five button pointers in the MyDlg class and a QBoxLayout pointer:
Let's take a look at our MyDlg.cpp source file. If you notice line number 21 in the following screenshot, the QBoxLayout constructor takes two arguments. The first argument is the direction in which you wish to arrange the widgets and the second argument is an optional argument that expects the parent address of the layout instance.
As you may have guessed, the this pointer refers to the MyDlg instance pointer, which happens to be the parent of the layout.
Again, as you may have guessed, the main.cpp file isn't going to change from our past exercises, as shown in the following screenshot:
Let's compile and run our program, as follows:
If you notice the output, it looks like a horizontal box layout output, right? Exactly, because we have set the direction to QBoxLayout::LeftToRight. If you modify the direction to, say, QBoxLayout::RightToLeft, then Button 1 would appear on the right-hand side, Button 2 would appear on the left-hand side of Button 1, and so on. Hence, the output would look as shown in the following screenshot:
If the direction is set to QBoxLayout::RightToLeft, you'll see the following output:
In all the preceding scenarios, the buttons are added to the layout exactly in the same sequence, starting from Button 1 through Button 5, respectively. However, depending on the direction chosen in the QBoxLayout constructor, the box layout will arrange the buttons, hence the difference in the output.
A grid layout allows us to arrange widgets in a tabular fashion. It is quite easy, just like a box layout. All we need to do is indicate the row and column where each widget must be added to the layout. As the row and column index starts from a zero-based index, the value of row 0 indicates the first row and the value of column 0 indicates the first column. Enough of theory; let's start writing some code.
Let's declare 10 buttons and add them in two rows and five columns. Other than the specific QGridLayout differences, the rest of the stuff will remain the same as the previous exercises, so go ahead and create MyDlg.h, MyDl.cpp, and main.cpp if you have understood the concepts discussed so far.
Let me present the MyDlg.h source code in the following screenshot:
The following is the code snippet of MyDlg.cpp:
The main.cpp source file content will remain the same as our previous exercises; hence, I have skipped the main.cpp code snippet. As you are familiar with the build process, I have skipped it too. If you have forgotten about this, just check the previous sections to understand the build procedure.
If you have typed the code correctly, you should get the following output:
Actually, the grid layout has more stuff to offer. Let's explore how we can make a button span across multiple cells. I guarantee what you are about to see is going to be more interesting.
I'm going to modify MyDlg.h and MyDlg.cpp and keep main.cpp the same as the previous exercises:
Here goes our MyDlg.cpp:
Notice the lines 35 through 38. Let's discuss the addWidget() function in detail now.
In line number 35, the pLayout->addWidget ( pBttn1, 0, 0, 1, 1 ) code does the following things:
In line number 36, the pLayout->addWidget ( pBttn2, 0, 1, 1, 2 ) code does the following:
In line number 37, the pLayout->addWidget ( pBttn3, 0, 3, 2, 1 ) code does the following:
In line number 38, the pLayout->addWidget ( pBttn4, 1, 0, 1, 3 ) code does the following:
Check out the output of the program:
Signals and slots are an integral part of the Qt Framework. So far, we have written some simple but interesting Qt applications, but we haven't handled events. Now it's time to understand how to support events in our application.
Let's write a simple application with just one button. When the button is clicked, check whether we can print something on the console.
The MyDlg.h header demonstrates how the MyDlg class shall be declared:
The following screenshot demonstrates how the MyDlg constructor shall be defined to add a single button to our dialog window:
The main.cpp looks as follows:
Let's build and run our program and later add support for signals and slots. If you have followed the instructions correctly, your output should resemble the following screenshot:
If you click on the button, you will notice that nothing happens, as we are yet to add support for signals and slots in our application. Okay, it's time to reveal the secret instruction that will help you make the button respond to a button-click signal. Hold on, it's time for some more information. Don't worry, it's related to Qt.
Qt signals are nothing but events, and slot functions are event handler functions. Interestingly, both signals and slots are normal C++ functions; only when they are marked as signals or slots, will the Qt Framework understand their purpose and provide the necessary boilerplate code.
Every widget in Qt supports one or more signal and may also optionally support one or more slot. So let's explore which signals QPushButton supports before we write any further code.
Let's make use of the Qt assistant for API reference:
If you observe the preceding screenshot, it has a Contents section that seems to cover Public Slots, but we don't see any signals listed there. That's a lot of information. If the Contents section doesn't list out signals, QPushButton wouldn't support signals directly. However, maybe its base class, that is, QAbstractButton, would support some signals. The QPushButton class section gives loads of useful information, such as the header filename, which Qt module must be linked to the application--that is, qmake entries that must be added to .pro--and so on. It also mentions the base class of QPushButton. If you scroll down further, your Qt assistant window should look like this:
If you observe the highlighted section under Additional Inherited Members, apparently the Qt assistant implies that QPushButton has inherited four signals from QAbstractButton. So we need to explore the signals supported by QAbstractButton in order to support the signals in QPushButton.
With the help of the Qt assistant, as shown in the preceding screenshot, it is evident that the QAbstractButton class supports four signals that are also available for QPushButton, as QPushButton is a child class of QAbstractButton. So let's use the clicked() signal in this exercise.
We need to make some minor changes in MyDlg.h and MyDlg.cpp in order to use the clicked() signal. Hence, I have presented these two files with changes highlighted in the following screenshot:
As you are aware, the QDebug class is used for debugging purposes. It offers functionalities to Qt applications that are similar to cout, but they aren't really required for signals and slots. We are using them here just for debugging purposes. In Figure 5.48, line number 34, void MyDlg::onButtonClicked() is our slot function that we are intending to use as an event handler function that must be invoked in response to the button click.
The following screenshot should give you an idea of what changes you will have to perform in MyDlg.cpp for signal and slot support:
If you observe line 40 through 42 in the preceding screenshot, the MyDlg::onButtonClicked() method is a slot function that must be invoked whenever the button is clicked. But unless the button's clicked() signal is mapped to the MyDlg::onButtonClicked() slot, the Qt Framework wouldn't know that it must invoke MyDlg::onButtonClicked() when the button is clicked. Hence, in line numbers 32 through 37, we have connected the button signal clicked() with the MyDlg instance's onButtonClicked() slot function. The connect function is inherited by MyDlg from QDialog. This, in turn, has inherited the function from its ultimate base class, called QObject.
The mantra is that every class that would like to participate in signal and slot communication must be either QObject or its subclass. QObject offers quite a good amount of signal and slot support, and QObject is part of the QtCore module. What's amazing is that the Qt Framework has made signal and slot available to even command-line applications. This is the reason signals and slots support is built into the ultimate base class QObject, which is part of the QtCore module.
Okay, let's build and run our program and see whether the signals work in our application:
Interestingly, we don't get a compilation error, but when we click on the button, the highlighted warning message appears automatically. This is a hint from the Qt Framework that we have missed out on an important procedure that is mandatory to make signals and slots work.
Let's recollect the procedure we followed to autogenerate Makefile in our headers and source files:
In step 1, the qmake utility scans through all our custom header files and checks whether they need signal and slot support. Any header file that has the Q_OBJECT macro hints the qmake utility that it needs signal and slot support. Hence we must use the Q_OBJECT macro in our MyDlg.h header file:
Once the recommended changes are done in the header file, we need to ensure that the qmake command is issued. Now the qmake utility will open the Ex8.pro file to get our project headers and source files. When qmake parses MyDlg.h and finds the Q_OBJECT macro, it will learn that our MyDlg.h requires signals and slots, then it will ensure that the moc compiler is invoked on MyDlg.h so that the boilerplate code can be autogenerated in a file called moc_MyDlg.cpp. This will then go ahead and add the necessary rules to Makefile so that the autogenerated moc_MyDlg.cpp file gets built along with the other source files.
Now that you know the secrets of Qt signals and slots, go ahead and try out this procedure and check whether your button click prints the Button clicked ... message. I have gone ahead and built our project with the changes recommended. In the following screenshot, I have highlighted the interesting stuff that goes on behind the scenes; these are some of the advantages one would get when working in the command line versus using fancy IDEs:
Now it's time that we test the output of our cool and simple application that supports signals and slots. The output is presented in the following screenshot:
Congratulations! You can pat your back. You have learned enough to do cool stuff in Qt.
As you have learned about signals and slots, in this section, let's explore how to use a stacked layout in an application that has multiple windows; each window could be either a QWidget or QDialog. Each page may have its own child widgets. The application we are about to develop will demonstrate the use of a stacked layout and how to navigate from one window to the other within the stacked layout.
This application is going to require a decent amount of code, hence it is important that we ensure our code is structured carefully so that it meets both the structural and functional quality, avoiding code smells as much as possible.
Let's create four widgets/windows that could be stacked up in a stacked layout, where each page could be developed as a separate class split across two files: HBoxDlg.h and HBoxDlg.cpp and so on.
Let's start with HBoxDlg.h. As you are familiar with layouts, in this exercise, we are going to create each dialog with one layout so that while navigating between the subwindows, you can differentiate between the pages. Otherwise, there will be no connection between the stacked layout and other layouts as such.
The following code snippet is from the HBoxDlg.cpp file:
Similarly, let's write VBoxDlg.h as follows:
Let's create the third dialog BoxDlg.h with a box layout, as follows:
The respective BoxDlg.cpp source file will look as follows:
The fourth dialog that we would like to stack up is GridDlg, so let's see how GridDlg.h can be written, which is illustrated in the following screenshot:
The respective GridDlg.cpp will look like this:
Cool, we are done with creating four widgets that can be stacked up in MainDlg. MainDlg is the one that's going to use QStackedLayout, so the crux of this exercise is understanding how a stacked layout works.
Let's see how MainDlg.h shall be written:
In MainDlg, we have declared three slot functions, one for each button, in order to support the navigation logic among the four windows. A stacked layout is similar to a tabbed widget, except that a tabbed widget will provide its own visual way to switch between the tabs, whereas in the case of a stacked layout, it is up to us to provide the switching logic.
The MainDlg.cpp will look like this:
You can choose a box layout to hold the three buttons, as we prefer buttons aligned to the right. However, in order to ensure that extra spaces are consumed by some invisible glue, we have added a stretch item at line number 44.
Between lines 30 through 33, we have added all the four subwindows in a stacked layout so that windows can be made visible one at a time. The HBox dialog is added at index 0, the VBox dialog is added at index 1, and so on.
Lines 53 through 58 demonstrate how the previous button's clicked signal is wired with its corresponding MainDlg::onPrevPage() slot function. Similar connections must be configured for next and exit buttons:
The if condition in line 78 ensures that the switching logic happens only if we are in the second or later subwindows. As the horizontal dialog is at index 0, we can't navigate to the previous window in cases where the current window happens to be a horizontal dialog. A similar validation is in place for switching to the next subwindow in line 85.
The stacked layout supports the setCurrentIndex() method to switch to a particular index position; alternatively, you could try the setCurrentWidget() method as well if it works better in your scenario.
The main.cpp looks short and simple, as follows:
The best part of our main function is that irrespective of the complexity of the application logic, the main function doesn't have any business logic. This makes our code clean and easily maintainable.
In this section, let's explore how to write a simple math application. As part of this exercise, we will use QLineEdit and QLabel widgets and QFormLayout. We need to design a UI, as shown in the following screenshot:
QLabel is a widget typically used for static text, and QLineEdit will allow a user to supply a single line input. As shown in the preceding screenshot, we will use QVBoxLayout as the main layout in order to arrange QFormLayout and QBoxLayout in a vertical fashion. QFormLayout comes in handy when you need to create a form where there will be a caption on the left-hand side followed by some widget on its right. QGridLayout might also do the job, but QFormLayout is easy to use in such scenarios.
In this exercise, we will create three files, namely MyDlg.h, MyDlg.cpp, and main.cpp. Let's start with the MyDlg.h source code and then move on to other files:
In the preceding figure, three layouts are declared. The vertical box layout is used as the main layout, while the box layout is used to arrange the buttons in the right-aligned fashion. The form layout is used to add the labels, that is, line edit widgets. This exercise will also help you understand how one can combine multiple layouts to design a professional HMI.
Qt doesn't have any documented restriction in the number of layouts that can be combined in a single window. However, when possible, it is a good idea to consider designing an HMI with a minimal number of layouts if you are striving to develop a small memory footprint application. Otherwise, there is certainly no harm in using multiple layouts in your application.
In the following screenshot, you will get an idea of how the MyDlg.cpp source file shall be implemented. In the MyDlg constructor, all the buttons are instantiated and laid out in the box layout for right alignment. The form layout is used to hold the QLineEdit widgets and their corresponding QLabel widgets in a grid-like fashion. QLineEdit widgets typically help supply a single line input; in this particular exercise, they help us supply a number input that must be added, subtracted, and so on, depending on the user's choice.
The best part of our main.cpp source file is that it remains pretty much the same, irrespective of the complexity of our application. In this exercise, I would like to tell you a secret about MyDlg. Did you notice that the MyDlg constructor is instantiated in the stack as opposed to the heap? The idea is that when the main() function exits, the stack used by the main function gets unwinded, eventually freeing up all the stack variables present in the stack. When MyDlg gets freed up, it results in calling the MyDlg destructor. In the Qt Framework, every widget constructor takes an optional parent widget pointer, which is used by the topmost window destructor to free up its child widgets. Interestingly, Qt maintains a tree-like data structure to manage the memory of all its child widgets. So, if all goes well, the Qt Framework will take care of freeing up all its child widgets' memory locations "automagically".
This helps Qt developers focus on the application aspect, while the Qt Framework will take care of memory management.
Aren't you excited to check the output of our new application? If you build and execute the application, then you are supposed to get an output similar to the following screenshot. Of course, we are yet to add signal and slot support, but it's a good idea to design the GUI to our satisfaction and then shift our focus to event handling:
If you observe closely, though the buttons are laid out on QBoxLayout in the right to left direction, the buttons aren't aligned to the right. The reason for this behavior is when the window is stretched out, the box layout seems to have divided and allocated the extra horizontal space available among all the buttons. So let's go ahead and throw in a stretch item to the leftmost position on the box layout such that the stretch will eat up all the extra spaces, leaving the buttons no room to expand. This will get us the right-aligned effect. After adding the stretch, the code will look as shown in the following screenshot:
Go ahead and check whether your output looks as shown in the following screenshot. Sometimes, as developers, we get excited to see the output in a rush and forget to compile our changes, so ensure the project is built again. If you don't see any change in output, no worries; just try to stretch out the window horizontally and you should see the right-aligned effect, as shown in the following screenshot:
Now since we have a decent-looking application, let's add signal and slot support to add the response to button clicks. Let's not rush and include the add and subtract functionalities for now. We will use some qDebug() print statements to check whether the signals and slots are connected properly and then gradually replace them with the actual functionalities.
If you remember the earlier signal and slot exercise, any Qt window that is interested in supporting signals and slots must be QObject and should include the Q_OBJECT macro in the MyDlg.h header file, as shown in the following screenshot:
In lines starting from 41 through 45, four slot methods are declared in the private section. Slot functions are regular C++ functions that could be invoked directly just like other C++ functions. However, in this scenario, the slot functions are intended to be invoked only with MyDlg. Hence they are declared as private functions, but they could be made public if you believe that others might find it useful to connect to your public slot.
Cool, if you have come this far, it says that you have understood the things discussed so far. Alright, let's go ahead and implement the definitions for the slot functions in MyDlg.cpp and then connect the clicked() button's signals with the respective slot functions:
Now it's time to wire up the signals to their respective slots. As you may have guessed, we need to use the connect function in the MyDlg constructor, as shown in the following screenshot, to get the button clicks to the corresponding slots:
We are all set. Yes, it's showtime now. As we have taken care of most of the stuff, let's compile and check the output of our little Qt application:
Oops! We got some linker error. The root cause of this issue is that we forgot to invoke qmake after enabling signal and slot support in our application. No worries, let's invoke qmake and make and run our application:
Great, we have fixed the issue. The make utility doesn't seem to make any noise this time and we are able to launch the application. Let's check whether the signals and slots are working as expected. For this, click on the Add button and see what happens:
Wow! When we click on the Add button, the qDebug() console message confirms that the MyDlg::onAddButtonClicked() slot is invoked. If you are curious to check the slots of other buttons, go ahead and try clicking on the rest of the buttons.
Our application will be incomplete without business logic. So let's add business logic to the MyDlg::onAddButtonClicked() slot function to perform the addition and display the result. Once you learn how to integrate the added business logic, you can follow the same approach and implement the rest of the slot functions:
In the MyDlg::onAddButtonClicked() function, the business logic is integrated. In lines 82 and 83, we are trying to extract the values typed by the user in the QLineEdit widgets. The text() function in QLineEdit returns QString. The QString object provides toInt() that comes in handy to extract the integer value represented by QString. Once the values are added and stored in the result variable, we need to convert the result integer value back to QString, as shown in line number 86, so that the result can be fed into QLineEdit, as shown in line number 88.
Similarly, you can go ahead and integrate the business logic for other math operations. Once you have thoroughly tested the application, you can remove the qDebug() console's output. We added the qDebug() messages for debugging purposes, hence they can be cleaned up now.
In this chapter, you learned developing C++ GUI applications using Qt application framework. The key takeaway points are listed below.
In the next chapter, you will be learning multithread programming and IPC in C++.
This chapter will cover the following topics:
Let's learn these topics with a few interesting, easy-to-understand examples discussed throughout this chapter.
Unix, Linux, and macOS are largely compliant with the POSIX standard. Portable Operating System Interface for Unix (POSIX) is an IEEE standard that helps all Unix and Unix-like operating systems, that is Linux and macOS, communicate with a single interface.
Interestingly, POSIX is also supported by POSIX-compliant tools--Cygwin, MinGW, and Windows subsystem for Linux--that provide a pseudo-Unix-like runtime and development environment on Windows platforms.
Note that pthread is a POSIX-compliant C library used in Unix, Linux, and macOS. Starting from C++11, C++ natively supports threads via the C++ thread support library and concurrent library. In this chapter, we will understand how to use pthreads, thread support, and concurrency library in an object-oriented fashion. Also, we will discuss the merits of using native C++ thread support and concurrency library as opposed to using POSIX pthreads or other third-party threading frameworks.
Let's get straight to business. You need to understand the pthread APIs we'll discuss to get your hands dirty. To start with, this function is used to create a new thread:
#include <pthread.h>
int pthread_create(
pthread_t *thread,
const pthread_attr_t *attr,
void *(*start_routine)(void*),
void *arg
)
The following table briefly explains the arguments used in the preceding function:
|
API arguments |
Comments |
|
pthread_t *thread |
Thread handle pointer |
|
pthread_attr_t *attr |
Thread attribute |
|
void *(*start_routine)(void*) |
Thread function pointer |
|
void * arg |
Thread argument |
This function blocks the caller thread until the thread passed in the first argument exits, as shown in the code:
int pthread_join ( pthread_t *thread, void **retval )
The following table briefly describes the arguments in the preceding function:
|
API arguments |
Comments |
|
pthread_t thread |
Thread handle |
|
void **retval |
Output parameter that indicates the exit code of the thread procedure |
The ensuing function should be used within the thread context. Here, retval is the exit code of the thread that indicates the exit code of the thread that invoked this function:
int pthread_exit ( void *retval )
Here's the argument used in this function:
|
API argument |
Comment |
|
void *retval |
The exit code of the thread procedure |
The following function returns the thread ID:
pthread_t pthread_self(void)
Let's write our first multithreaded application:
#include <pthread.h>
#include <iostream>
using namespace std;
void* threadProc ( void *param ) {
for (int count=0; count<3; ++count)
cout << "Message " << count << " from " << pthread_self()
<< endl;
pthread_exit(0);
}
int main() {
pthread_t thread1, thread2, thread3;
pthread_create ( &thread1, NULL, threadProc, NULL );
pthread_create ( &thread2, NULL, threadProc, NULL );
pthread_create ( &thread3, NULL, threadProc, NULL );
pthread_join( thread1, NULL );
pthread_join( thread2, NULL );
pthread_join( thread3, NULL );
return 0;
}
The program can be compiled with the following command:
g++ main.cpp -lpthread
As you can see, we need to link the POSIX pthread library dynamically.
Check out the following screenshot and visualize the output of the multithreaded program:
The code that is written in ThreadProc runs within the thread context. The preceding program has a total of four threads, including the main thread. I had blocked the main thread with pthread_join to force it to wait for the other three threads to complete their tasks first, failing which the main thread would have exited before them. When the main thread exits, the application exits too, which ends up prematurely destroying newly created threads.
Though we created thread1, thread2, and thread3 in the respective sequence, there is no guarantee that they will be started in the exact same sequence they were created in.
The operating system scheduler decides the sequence in which the threads must be started, based on the algorithm used by the operating system scheduler. Interestingly, the sequence in which the threads get started might vary at different runs in the same system.
Starting from C++11, C++ does support threads natively, and it is generally referred to as the C++ thread support library. The C++ thread support library provides an abstraction over the POSIX pthreads C library. Over time, C++ native thread support has improved to a greater extent.
I highly recommend you make use of the C++ native thread over pthreads. The C++ thread support library is supported on all platforms as it is officially part of standard C++ as opposed to the POSIX pthread library, which is only supported on Unix, Linux, and macOS but not directly on Windows.
The best part is thread support has matured to a new level in C++17, and it is poised to reach the next level in C++20. Hence, it is a good idea to consider using the C++ thread support library in your projects.
Interestingly, it is pretty simple to write a multithreaded application using the C++ thread support library:
#include <thread>
using namespace std;
thread instance ( thread_procedure )
The thread class was introduced in C++11. This function can be used to create a thread. The equivalent of this function is pthread_create in the POSIX pthread library.
|
Argument |
Comment |
|
thread_procedure |
Thread function pointer |
Now a bit about the argument that returns the thread ID in the following code:
this_thread::get_id ()
This function is equivalent to the pthread_self() function in the POSIX pthread library. Refer to the following code:
thread::join()
The join() function is used to block the caller thread or the main thread so it will wait until the thread that has joined completes its task. This is a non-static function, so it has to be invoked on a thread object.
Let's see how to use the preceding functions to write a simple multithreaded program based on C++. Refer to the following program:
#include <thread>
#include <iostream>
using namespace std;
void threadProc() {
for( int count=0; count<3; ++count ) {
cout << "Message => "
<< count
<< " from "
<< this_thread::get_id()
<< endl;
}
}
int main() {
thread thread1 ( threadProc );
thread thread2 ( threadProc );
thread thread3 ( threadProc );
thread1.join();
thread2.join();
thread3.join();
return 0;
}
The C++ version of the multithreaded program looks a lot simpler and cleaner than the C version.
The following command helps you compile the program:
g++ main.cpp -std=c++17 -lpthread
In the previous command, -std=c++17 instructs the C++ compiler to enable the C++17 features; however, the program will compile on any C++ compiler that supports C++11, and you just need to replace c++17 with c++11.
The output of the program will look like this:
All the numbers starting with 140 in the preceding screenshot are thread IDs. Since we created three threads, three unique thread IDs are assigned respectively by the pthread library. If you are really keen on finding the thread IDs assigned by the operating system, you will have to issue the following command in Linux while the application is running:
ps -T -p <process-id>
Probably to your surprise, the thread ID assigned by the pthread library will be different from the one assigned by the operating systems. Hence, technically the thread ID assigned by the pthread library is just a thread handle ID that is different from the thread ID assigned by the OS. The other interesting tool that you may want to consider is the top command to explore the threads that are part of the process:
top -H -p <process-id>
Both the commands require the process ID of your multithreaded application. The following command will help you find this ID:
ps -ef | grep -i <your-application-name>
You may also explore the htop utility in Linux.
If you want to get the thread ID assigned by the OS programmatically, you can use the following function in Linux:
#include <sys/types.h>
pid_t gettid(void)
However, this isn't recommended if you want to write a portable application, as this is supported only in Unix and Linux.
If you have been looking for the C++ thread class that looks similar to the Thread classes in Java or Qt threads, I'm sure you will find this interesting:
#include <iostream>
#include <thread>
using namespace std;
class Thread {
private:
thread *pThread;
bool stopped;
void run();
public:
Thread();
~Thread();
void start();
void stop();
void join();
void detach();
};
This is a wrapper class that works as a convenience class for the C++ thread support library in this book. The Thread::run() method is our user-defined thread procedure. As I don't want the client code to invoke the Thread::run() method directly, I have declared the run method private. In order to start the thread, the client code has to invoke the start method on the thread object.
The corresponding Thread.cpp source file looks like this:
#include "Thread.h"
Thread::Thread() {
pThread = NULL;
stopped = false;
}
Thread::~Thread() {
delete pThread;
pThread = NULL;
}
void Thread::run() {
while ( ! stopped ) {
cout << this_thread::get_id() << endl;
this_thread::sleep_for ( 1s );
}
cout << "\nThread " << this_thread::get_id()
<< " stopped as requested." << endl;
return;
}
void Thread::stop() {
stopped = true;
}
void Thread::start() {
pThread = new thread( &Thread::run, this );
}
void Thread::join() {
pThread->join();
}
void Thread::detach() {
pThread->detach();
}
From the previous Thread.cpp source file, you will have understood that the thread can be stopped when required by invoking the stop method. It is a simple yet decent implementation; however, there are many other corner cases that need to be handled before it can be used in production. Nevertheless, this implementation is good enough to understand the thread concepts in this book.
Cool, let's see how our Thread class can be used in main.cpp:
#include "Thread.h"
int main() {
Thread thread1, thread2, thread3;
thread1.start();
thread2.start();
thread3.start();
thread1.detach();
thread2.detach();
thread3.detach();
this_thread::sleep_for ( 3s );
thread1.stop();
thread2.stop();
thread3.stop();
this_thread::sleep_for ( 3s );
return 0;
}
I have created three threads, and the way the Thread class is designed, the thread will only start when the start function is invoked. The detached threads run in the background; usually, you need to detach a thread if you would like to make the threads daemons. However, these threads are stopped safely before the application quits.
The following command helps compile the program:
g++ Thread.cpp main.cpp -std=c++17 -o threads.exe -lpthread
The output of the program will be as shown in the following screenshot:
Wow! We could start and stop the thread as designed and that too in an object-oriented fashion.
Let's try to recollect what we have discussed so far:
In an ideal world, threads would provide better application performance. But, at times, it isn't uncommon to notice that application performance degrades due to multiple threads. This performance issue may not be really tied to multiple threads; the real culprit could be the design. Too much use of synchronization leads to many thread-related issues that also lead to application performance degradation.
Lock-free thread designs not only avoid thread-related issues, but also improve the overall application performance. However, in a practical world, more than one thread may have to share one or more common resources. Hence, there arises a need to synchronize the critical section of code that accesses or modifies the shared resources. There are a variety of synchronization mechanisms that can be used in specific scenarios. In the following sections, we will explore them one by one with some interesting and practical use cases.
When there are multiple threads that share a common resource within the process boundary, the critical section of the code can be synchronized with a mutex lock. A mutex is a mutually exclusive lock that allows only one thread to access the critical block of code that is secured by a mutex. Let's take a simple example to understand the need for the mutex lock application practically.
Let's take a Bank Savings Account class that allows three simple operations, that is, getBalance, withdraw, and deposit. The Account class can be implemented as shown in the following code. For demonstration purposes, the Account class is designed in a simple fashion neglecting corner cases and validations that are required in the real world. It is simplified to the extent that the Account class doesn't even bother to capture the account number. I'm sure there are many such requirements that are quietly ignored for simplicity. No worries! Our focus is to learn mutex here with the shown example:
#include <iostream>
using namespace std;
class Account {
private:
double balance;
public:
Account( double );
double getBalance( );
void deposit ( double amount );
void withdraw ( double amount ) ;
};
The Account.cpp source file looks like this:
#include "Account.h"
Account::Account(double balance) {
this->balance = balance;
}
double Account::getBalance() {
return balance;
}
void Account::withdraw(double amount) {
if ( balance < amount ) {
cout << "Insufficient balance, withdraw denied." << endl;
return;
}
balance = balance - amount;
}
void Account::deposit(double amount) {
balance = balance + amount;
}
Now, let's create two threads, namely DEPOSITOR and WITHDRAWER. The DEPOSITOR thread is going to deposit INR 2000.00 while the WITHDRAWER thread is going to withdraw INR 1000.00 every alternate second. As per our design, the main.cpp source file can be implemented as follows:
#include <thread>
#include "Account.h"
using namespace std;
enum ThreadType {
DEPOSITOR,
WITHDRAWER
};
Account account(5000.00);
void threadProc ( ThreadType typeOfThread ) {
while ( 1 ) {
switch ( typeOfThread ) {
case DEPOSITOR: {
cout << "Account balance before the deposit is "
<< account.getBalance() << endl;
account.deposit( 2000.00 );
cout << "Account balance after deposit is "
<< account.getBalance() << endl;
this_thread::sleep_for( 1s );
}
break;
case WITHDRAWER: {
cout << "Account balance before withdrawing is "
<< account.getBalance() << endl;
account.deposit( 1000.00 );
cout << "Account balance after withdrawing is "
<< account.getBalance() << endl;
this_thread::sleep_for( 1s );
}
break;
}
}
}
int main( ) {
thread depositor ( threadProc, ThreadType::DEPOSITOR );
thread withdrawer ( threadProc, ThreadType::WITHDRAWER );
depositor.join();
withdrawer.join();
return 0;
}
If you observe the main function, the thread constructor takes two arguments. The first argument is the thread procedure that you would be familiar with by now. The second argument is an optional argument that can be supplied if you would like to pass some arguments to the thread function.
The program can be compiled with the following command:
g++ Account.cpp main.cpp -o account.exe -std=c++17 -lpthread
If you have followed all the steps as instructed, your code should compile successfully.
It's time to execute and observe how our program works!
Don't forget that the WITHDRAWER thread always withdraws INR 1000.00, while the DEPOSITOR thread always deposits INR 2000.00. The following output conveys this at first. The WITHDRAWER thread started withdrawing, followed by the DEPOSITOR thread that seems to have deposited the money.
Though we started the DEPOSITOR thread first and the WITHDRAWER thread next, it looks like the OS scheduler seems to have scheduled the WITHDRAWER thread first. There is no guarantee that this will always happen this way.
Going by the output, by chance, the WITHDRAWER thread and the DEPOSITOR thread seem to do their work alternately. They would continue like this for some time. At some point, both the threads would seem to work simultaneously, and that's when things would fall apart, as shown in the output ahead:
It is very interesting to observe the last four lines of the output. It looks like both the WITHDRAWER and DEPOSITOR threads were checking the balance, and it was INR 9000.00. You may notice that there is an inconsistency in the DEPOSITOR thread's print statements; as per the DEPOSITOR thread, the current balance is INR 9000.00. Therefore, when it deposits INR 2000.00, the balance should total up to INR 11000.00. But in reality, the balance after the deposit is INR 10000.00. The reason for this inconsistency is that the WITHDRAWER thread withdrew INR 1000.00 before the DEPOSITOR thread could deposit money. Though technically the balance seems to total out correctly, things can go wrong shortly; this is when the need for thread synchronization arises.
Now, let's refactor the threadProc function and synchronize the critical section that modifies and accesses the balance. We need a locking mechanism that will only allow one thread to either read or write the balance. The C++ thread support library offers an apt lock called mutex. The mutex lock is an exclusive lock that will only allow one thread to operate the critical section code within the same process boundary. Until the thread that has acquired the lock releases the mutex lock, all other threads will have to wait for their turn. Once a thread acquires the mutex lock, the thread can safely access the shared resource.
The main.cpp file can be refactored as follows; the changes are highlighted in bold:
#include <iostream>
#include <thread>
#include <mutex>
#include "Account.h"
using namespace std;
enum ThreadType {
DEPOSITOR,
WITHDRAWER
};
mutex locker;
Account account(5000.00);
void threadProc ( ThreadType typeOfThread ) {
while ( 1 ) {
switch ( typeOfThread ) {
case DEPOSITOR: {
locker.lock();
cout << "Account balance before the deposit is "
<< account.getBalance() << endl;
account.deposit( 2000.00 );
cout << "Account balance after deposit is "
<< account.getBalance() << endl;
locker.unlock();
this_thread::sleep_for( 1s );
}
break;
case WITHDRAWER: {
locker.lock();
cout << "Account balance before withdrawing is "
<< account.getBalance() << endl;
account.deposit( 1000.00 );
cout << "Account balance after withdrawing is "
<< account.getBalance() << endl;
locker.unlock();
this_thread::sleep_for( 1s );
}
break;
}
}
}
int main( ) {
thread depositor ( threadProc, ThreadType::DEPOSITOR );
thread withdrawer ( threadProc, ThreadType::WITHDRAWER );
depositor.join();
withdrawer.join();
return 0;
}
You may have noticed that the mutex is declared in the global scope. Ideally, we could have declared the mutex inside a class as a static member as opposed to a global variable. As all the threads are supposed to be synchronized by the same mutex, ensure that you use either a global mutex lock or a static mutex lock as a class member.
The refactored threadProc in main.cpp source file looks as follows; the changes are highlighted in bold:
void threadProc ( ThreadType typeOfThread ) {
while ( 1 ) {
switch ( typeOfThread ) {
case DEPOSITOR: {
locker.lock();
cout << "Account balance before the deposit is "
<< account.getBalance() << endl;
account.deposit( 2000.00 );
cout << "Account balance after deposit is "
<< account.getBalance() << endl;
locker.unlock();
this_thread::sleep_for( 1s );
}
break;
case WITHDRAWER: {
locker.lock();
cout << "Account balance before withdrawing is "
<< account.getBalance() << endl;
account.deposit( 1000.00 );
cout << "Account balance after withdrawing is "
<< account.getBalance() << endl;
locker.unlock();
this_thread::sleep_for( 1s );
}
break;
}
}
}
The code that is wrapped between lock() and unlock() is the critical section that is synchronized by the mutex lock.
As you can see, there are two critical section blocks in the threadProc function, so it is important to understand that only one thread can enter the critical section. For instance, if the depositor thread has entered its critical section, then the withdrawal thread has to wait until the depositor thread releases the lock and vice versa.
It is time to check the output of our refactored program:
Great, did you check the balance reported by DEPOSITOR and WITHDRAWER threads? Yep, they are always consistent, aren't they? Yes, the output confirms that the code is synchronized and it is thread-safe now.
Though our code is functionally correct, there is room for improvement. Let's refactor the code to make it object-oriented and efficient.
Let's reuse the Thread class and abstract all the thread-related stuff inside the Thread class and get rid of the global variables and threadProc.
To start with, let's observe the refactored Account.h header, as follows:
#ifndef __ACCOUNT_H
#define __ACCOUNT_H
#include <iostream>
using namespace std;
class Account {
private:
double balance;
public:
Account( double balance );
double getBalance();
void deposit(double amount);
void withdraw(double amount);
};
#endif
As you can see, the Account.h header hasn't changed as it already looks clean.
The respective Account.cpp source file looks as follows:
#include "Account.h"
Account::Account(double balance) {
this->balance = balance;
}
double Account::getBalance() {
return balance;
}
void Account::withdraw(double amount) {
if ( balance < amount ) {
cout << "Insufficient balance, withdraw denied." << endl;
return;
}
balance = balance - amount;
}
void Account::deposit(double amount) {
balance = balance + amount;
}
It is better if the Account class is separated from the thread-related functionalities to keep things neat. Also, let's understand how the Thread class that we wrote could be refactored to use the mutex synchronization mechanism as shown ahead:
#ifndef __THREAD_H
#define __THREAD_H
#include <iostream>
#include <thread>
#include <mutex>
using namespace std;
#include "Account.h"
enum ThreadType {
DEPOSITOR,
WITHDRAWER
};
class Thread {
private:
thread *pThread;
Account *pAccount;
static mutex locker;
ThreadType threadType;
bool stopped;
void run();
public:
Thread(Account *pAccount, ThreadType typeOfThread);
~Thread();
void start();
void stop();
void join();
void detach();
};
#endif
In the Thread.h header file shown previously, a couple of changes are done as part of refactoring. As we would like to synchronize the threads using a mutex, the Thread class includes the mutex header of the C++ thread support library. As all the threads are supposed to use the same mutex lock, the mutex instance is declared static. Since all the threads are going to share the same Account object, the Thread class has a pointer to the Account object as opposed to a stack object.
The Thread::run() method is the Thread function that we are going to supply to the Thread class constructor of the C++ thread support library. As no one is expected to invoke the run method directly, the run method is declared private. As per our Thread class design, which is similar to Java and Qt, the client code would just invoke the start method; when the OS scheduler gives a green signal to run, the run thread procedure will be called automatically. Actually, there is no magic here since the run method address is registered as a Thread function at the time of creating the thread.
The Thread.cpp source can be refactored as follows:
#include "Thread.h"
mutex Thread::locker;
Thread::Thread(Account *pAccount, ThreadType typeOfThread) {
this->pAccount = pAccount;
pThread = NULL;
stopped = false;
threadType = typeOfThread;
}
Thread::~Thread() {
delete pThread;
pThread = NULL;
}
void Thread::run() {
while(1) {
switch ( threadType ) {
case DEPOSITOR:
locker.lock();
cout << "Depositor: current balance is " << pAccount->getBalance() << endl;
pAccount->deposit(2000.00);
cout << "Depositor: post deposit balance is " << pAccount->getBalance() << endl;
locker.unlock();
this_thread::sleep_for(1s);
break;
case WITHDRAWER:
locker.lock();
cout << "Withdrawer: current balance is " <<
pAccount->getBalance() << endl;
pAccount->withdraw(1000.00);
cout << "Withdrawer: post withraw balance is " <<
pAccount->getBalance() << endl;
locker.unlock();
this_thread::sleep_for(1s);
break;
}
}
}
void Thread::start() {
pThread = new thread( &Thread::run, this );
}
void Thread::stop() {
stopped = true;
}
void Thread::join() {
pThread->join();
}
void Thread::detach() {
pThread->detach();
}
The threadProc function that was there in main.cpp has moved inside the Thread class's run method. After all, the main function or the main.cpp source file isn't supposed to have any kind of business logic, hence they are refactored to improve the code quality.
Now let's see how clean is the main.cpp source file after refactoring:
#include "Account.h"
#include "Thread.h"
int main( ) {
Account account(5000.00);
Thread depositor ( &account, ThreadType::DEPOSITOR );
Thread withdrawer ( &account, ThreadType::WITHDRAWER );
depositor.start();
withdrawer.start();
depositor.join();
withdrawer.join();
return 0;
}
The previously shown main() function and the overall main.cpp source file looks short and simple without any nasty complex business logic hanging around.
The following command helps you compile the refactored program:
g++ Thread.cpp Account.cpp main.cpp -o account.exe -std=c++17 -lpthread
Brilliant! If all goes well, the program should compile smoothly without making any noise.
Just take a quick look at the output shown here before we move on to the next topic:
Great! It works fine. The DEPOSITOR and WITHDRAWER threads seem to work cooperatively without messing up the balance and print statements. After all, we have refactored the code to make the code cleaner without modifying the functionality.
In a multithreaded application, everything looks cool and interesting until we get struck with a deadlock. Assume there are two threads, namely READER and WRITER. Deadlocks might happen when the READER thread waits for a lock that is already acquired by WRITER and the WRITER thread waits for the reader to release a lock that is owned by READER and vice versa. Typically, in a deadlock scenario, both the threads will wait for each other endlessly.
Generally, deadlocks are design issues. At times, deadlocks could be detected quickly, but sometimes it might get very tricky to find the root cause. Hence, the bottom line is synchronization mechanisms must be used in the right sense thoughtfully.
Let's understand the concept of a deadlock with a simple yet practical example. I'm going to reuse our Thread class with some slight modifications to create a deadlock scenario.
The modified Thread.h header looks as follows:
#ifndef __THREAD_H
#define __THREAD_H
#include <iostream>
#include <string>
#include <thread>
#include <mutex>
#include <string>
using namespace std;
enum ThreadType {
READER,
WRITER
};
class Thread {
private:
string name;
thread *pThread;
ThreadType threadType;
static mutex commonLock;
static int count;
bool stopped;
void run( );
public:
Thread ( ThreadType typeOfThread );
~Thread( );
void start( );
void stop( );
void join( );
void detach ( );
int getCount( );
int updateCount( );
};
#endif
The ThreadType enumeration helps assign a particular task to a thread. The Thread class has two new methods: Thread::getCount() and Thread::updateCount(). Both the methods will be synchronized with a common mutex lock in such a way that it creates a deadlock scenario.
Okay, let's move on and review the Thread.cpp source file:
#include "Thread.h"
mutex Thread::commonLock;
int Thread::count = 0;
Thread::Thread( ThreadType typeOfThread ) {
pThread = NULL;
stopped = false;
threadType = typeOfThread;
(threadType == READER) ? name = "READER" : name = "WRITER";
}
Thread::~Thread() {
delete pThread;
pThread = NULL;
}
int Thread::getCount( ) {
cout << name << " is waiting for lock in getCount() method ..." <<
endl;
lock_guard<mutex> locker(commonLock);
return count;
}
int Thread::updateCount( ) {
cout << name << " is waiting for lock in updateCount() method ..." << endl;
lock_guard<mutex> locker(commonLock);
int value = getCount();
count = ++value;
return count;
}
void Thread::run( ) {
while ( 1 ) {
switch ( threadType ) {
case READER:
cout << name<< " => value of count from getCount() method is " << getCount() << endl;
this_thread::sleep_for ( 500ms );
break;
case WRITER:
cout << name << " => value of count from updateCount() method is" << updateCount() << endl;
this_thread::sleep_for ( 500ms );
break;
}
}
}
void Thread::start( ) {
pThread = new thread ( &Thread::run, this );
}
void Thread::stop( ) {
stopped = true;
}
void Thread::join( ) {
pThread->join();
}
void Thread::detach( ) {
pThread->detach( );
}
By now, you will be quite familiar with the Thread class. Hence, let's focus our discussion on the Thread::getCount() and Thread::updateCount() methods. The std::lock_guard<std::mutex> is a template class that frees us from calling mutex::unlock(). During the stack unwinding process, the lock_guard destructor will be invoked; this will invoke mutex::unlock().
The bottom line is that from the point the std::lock_guard<std::mutex> instance is created, all the statements that appear until the end of the method are secured by the mutex.
Okay, let's plunge into the main.cpp file:
#include <iostream>
using namespace std;
#include "Thread.h"
int main ( ) {
Thread reader( READER );
Thread writer( WRITER );
reader.start( );
writer.start( );
reader.join( );
writer.join( );
return 0;
}
The main() function is pretty self-explanatory. We have created two threads, namely reader and writer, and they are started after the respective threads are created. The main thread is forced to wait until the reader and writer threads exit.
You can use the following command to compile this program:
g++ Thread.cpp main.cpp -o deadlock.exe -std=c++17 -lpthread
Observe the output of the program, as follows:
Refer to the code snippets of the Thread::getCount() and Thread::updateCount() methods:
int Thread::getCount() {
cout << name << " is waiting for lock in getCount() method ..." << endl;
lock_guard<mutex> locker(commonLock);
cout << name << " has acquired lock in getCount() method ..." << endl;
return count;
}
int Thread::updateCount() {
count << name << " is waiting for lock in updateCount() method ..." << endl;
lock_guard<mutex> locker(commonLock);
cout << name << " has acquired lock in updateCount() method ..." << endl;
int value = getCount();
count = ++value;
return count;
}
From the previous output screenshot image, we can understand the WRITER thread seems to have started first. As per our design, the WRITER thread will invoke the Thread::updateCount() method, which in turn will invoke the Thread::getCount() method.
From the output's screenshot, it is evident from the print statements that the Thread::updateCount() method has acquired the lock first and has then invoked the Thread::getCount() method. But since the Thread::updateCount() method hasn't released the mutex lock, there is no way for the Thread::getCount() method invoked by the WRITER thread to proceed. Meanwhile, the OS scheduler has started the READER thread, which seems to wait for the mutex lock acquired by the WRITER thread. Hence, for the READER thread to complete its task, it has to acquire the lock on the Thread::getCount() method; however, this isn't possible until the WRITER thread releases the lock. To make things even worse, the WRITER thread can't complete its task until its own Thread::getCount() method call completes its task. This is what is called a deadlock.
This is either a design or logical issue. In Unix or Linux, we can make use of the Helgrind tool to find deadlocks by racing similar synchronization issues. The Helgrind tool comes along with the Valgrind tool. The best part is that both Valgrind and Helgrind are open source tools.
In order to get the source line number that leads to a deadlock or race issue, we need to compile our code in debug mode, as shown now with -g flag:
g++ main.cpp Thread.cpp -o deadlock.exe -std=c++17 -lpthread -g
The Helgrind tool can be used to detect deadlock and similar issues, as shown here:
valgrind --tool=helgrind ./deadlock.exe
Here's a short extract of the Valgrind output:
One simple fix to resolve the issue is to refactor the Thread::updateCount() method, as shown here:
int Thread::updateCount() {
int value = getCount();
count << name << " is waiting for lock in updateCount() method ..." << endl;
lock_guard<mutex> locker(commonLock);
cout << name << " has acquired lock in updateCount() method ..." << endl;
count = ++value;
return count;
}
The output of the refactored program is as follows:
Interestingly, for most complex issues, the solution will be generally very simple. In other words, silly mistakes sometimes may lead to serious critical bugs.
Let's summarize the takeaway points:
The shared mutex synchronization primitive supports two modes, namely shared and exclusive. In the shared mode, the shared mutex will allow many threads to share the resource at the same time, without any data race issues. And in the exclusive mode, it works just like regular mutex, that is, it will allow only one thread to access the resource. This is a suitable lock primitive if you have multiple readers that can access the resource safely and you allow only one thread to modify the shared resource. Refer to the chapter on C++17 for more details.
The conditional variable synchronization primitive is used when two or more threads need to communicate with each other and proceed only when they receive a particular signal or event. The thread that waits for a particular signal or event has to acquire a mutex before it starts waiting for the signal or event.
Let's try to understand the use case of a conditional variable with a producer/consumer problem. I'm going to create two threads, namely PRODUCER and CONSUMER. The PRODUCER thread will add a value to the queue and notify the CONSUMER thread. The CONSUMER thread will wait for the notification from PRODUCER. On receipt of the notification from the PRODUCER thread, the CONSUMER thread will remove the entry from the queue and print it.
Let's understand how the Thread.h header shown here makes use of the conditional variable and mutex:
#include <iostream>
#include <thread>
#include <mutex>
#include <condition_variable>
#include <queue>
#include <string>
using namespace std;
enum ThreadType {
PRODUCER,
CONSUMER
};
class Thread {
private:
static mutex locker;
static condition_variable untilReady;
static bool ready;
static queue<int> appQueue;
thread *pThread;
ThreadType threadType;
bool stopped;
string name;
void run();
public:
Thread(ThreadType typeOfThread);
~Thread();
void start();
void stop();
void join();
void detach();
};
As PRODUCER and CONSUMER threads are supposed to use the same mutex and conditional_variable, they are declared static. The conditional variable synchronization primitive expects a predicate function that is going to make use of the ready boolean flag. Hence, I have declared the ready flag as well in the static scope.
Let's move on to the Thread.cpp source file, as follows:
#include "Thread.h"
mutex Thread::locker;
condition_variable Thread::untilReady;
bool Thread::ready = false;
queue<int> Thread::appQueue;
Thread::Thread( ThreadType typeOfThread ) {
pThread = NULL;
stopped = false;
threadType = typeOfThread;
(CONSUMER == typeOfThread) ? name = "CONSUMER" : name = "PRODUCER";
}
Thread::~Thread( ) {
delete pThread;
pThread = NULL;
}
void Thread::run() {
int count = 0;
int data = 0;
while ( 1 ) {
switch ( threadType ) {
case CONSUMER:
{
cout << name << " waiting to acquire mutex ..." << endl;
unique_lock<mutex> uniqueLocker( locker );
cout << name << " acquired mutex ..." << endl;
cout << name << " waiting for conditional variable signal..." << endl;
untilReady.wait ( uniqueLocker, [] { return ready; } );
cout << name << " received conditional variable signal ..." << endl;
data = appQueue.front( ) ;
cout << name << " received data " << data << endl;
appQueue.pop( );
ready = false;
}
cout << name << " released mutex ..." << endl;
break;
case PRODUCER:
{
cout << name << " waiting to acquire mutex ..." << endl;
unique_lock<mutex> uniqueLocker( locker );
cout << name << " acquired mutex ..." << endl;
if ( 32000 == count ) count = 0;
appQueue.push ( ++ count );
ready = true;
uniqueLocker.unlock();
cout << name << " released mutex ..." << endl;
untilReady.notify_one();
cout << name << " notified conditional signal ..." << endl;
}
break;
}
}
}
void Thread::start( ) {
pThread = new thread ( &Thread::run, this );
}
void Thread::stop( ) {
stopped = true;
}
void Thread::join( ) {
pThread->join( );
}
void Thread::detach( ) {
pThread->detach( );
}
In the preceding Thread class, I used unique_lock<std::mutex>. The conditional_variable::wait() method expects unique_lock, hence I'm using unique_lock here. Now, unique_lock<std::mutex> supports ownership transfer, recursive locking, deferred locking, manual locking, and unlocking without deleting unique_lock, unlike lock_guard<std::mutex>. The lock_guard<std::mutex> instance immediately locks the mutex, and the mutex gets unlocked automatically when the lock_guard<std::mutex> instance goes out of the scope. However, lock_guard doesn't support manual unlocking.
Because we haven't created the unique_lock instance with the deferred locking option, unique_lock will lock the mutex immediately, just like lock_guard.
The Thread::run() method is our thread function. Depending on ThreadType supplied to the Thread constructor, the thread instance will behave either as the PRODUCER or CONSUMER thread.
The PRODUCER thread first locks the mutex and appends an integer to the queue, which is shared among PRODUCER and CONSUMER threads. Once the queue is updated, PRODUCER will unlock the mutex before notifying CONSUMER; otherwise, CONSUMER will not be able to acquire the mutex and receive the conditional variable signal.
The CONSUMER thread first acquires the mutex and then waits for the conditional variable signal. On receipt of the conditional signal, the CONSUMER thread retrieves the value from the queue and prints the value and resets the ready flag so that the process can be repeated until the application is terminated.
Now lets look at the code in the main.cpp file:
#include "Thread.h"
int main ( ) {
Thread producer( ThreadType::PRODUCER );
Thread consumer( ThreadType::CONSUMER );
producer.start();
consumer.start();
producer.join();
consumer.join();
return 0;
}
Compile the program with the following command:
g++ Thread.cpp main.cpp -o conditional_variable.exe -std=c++17 -lpthread
The following snapshot demonstrates the output of the program:
Great! Our condition variable demo works as expected. The producer and consumer threads are working together cooperatively with the help of a conditional variable.
Let me summarize the takeaway points that you learned in this section:
Semaphore is yet another useful thread synchronization mechanism. But unlike mutex, semaphore allows more than one thread to access similar shared resources at the same time. Its synchronization primitive supports two types, that is, binary semaphore and counting semaphore.
Binary semaphore works just like a mutex, that is, only one thread can access the shared resource at any point of time. However, the difference is that a mutex lock can only be released by the same thread that owns it; however, a semaphore lock can be released by any thread. The other notable difference is that generally, a mutex works within the process boundary whereas semaphores are used across the process boundary. This is because it is a heavyweight lock, unlike the mutex. However, a mutex can also be used across the process if created in the shared memory region.
Counting semaphores let multiple threads share a limited number of shared resources. While mutex lets one thread access the shared resource at a time, counting semaphores allow multiple threads to share a limited number of resources, which is generally at least two or more. If a shared resource has to be accessed one thread at a time but the threads are across the process boundary, then a binary semaphore can be used. Though the use of a binary semaphore within the same process is a possibility as a binary semaphore is heavy, it isn't efficient, but it works within the same process as well.
Unfortunately, the C++ thread support library doesn't support semaphores and shared memory natively until C++17. C++17 supports lock-free programming using atomic operations, which must ensure atomic operations are thread-safe. Semaphores and shared memory let threads from other processes modify the shared resources, which is quite challenging for the concurrency module to assure thread safety of atomic operations across the process boundary. C++20 seems to bet big on concurrency, hence we need to wait and watch the move.
However, it doesn't stop you from implementing your own semaphore using the mutex and conditional variable offered by the thread support library. Developing a custom semaphore class that shares common resources within the process boundary is comparatively easy, but semaphores come in two flavors: named and unnamed. Named semaphore is used to synchronize common resources across the boundary, which is tricky.
Alternatively, you could write a wrapper class around the POSIX pthreads semaphore primitive, which supports both named and unnamed semaphores. If you are developing a cross-platform application, writing portable code that works across all platforms is a requirement. If you go down this road, you may end up writing platform-specific code for each platform--yes, I heard it; sounds weird, right?
The Qt application framework supports semaphores natively. The use of the Qt Framework is a good choice as it is cross-platform. The downside is that the Qt Framework is a third-party framework.
The bottom line is you may have to choose between pthreads and the Qt Framework or refactor your design and try to solve things with native C++ features. Restricting your application development using only C++ native features is difficult but guarantees portability across all platforms.
Every modern programming language supports concurrency, offering high-level APIs that allow the execution of many tasks simultaneously. C++ supports concurrency starting from C++11 and more sophisticated APIs got added further in C++14 and C++17. Though the C++ thread support library allows multithreading, it requires writing lengthy code using complex synchronizations; however, concurrency lets us execute independent tasks--even loop iterations can run concurrently without writing complex code. The bottom line is parallelization is made more easy with concurrency.
The concurrency support library complements the C++ thread support library. The combined use of these two powerful libraries makes concurrent programming more easy in C++.
Let's write a simple Hello World program using C++ concurrency in the following file named main.cpp:
#include <iostream>
#include <future>
using namespace std;
void sayHello( ) {
cout << endl << "Hello Concurrency support library!" << endl;
}
int main ( ) {
future<void> futureObj = async ( launch::async, sayHello );
futureObj.wait( );
return 0;
}
Let's try to understand the main() function. Future is an object of the concurrency module that helps the caller function retrieve the message passed by the thread in an asynchronous fashion. The void in future<void> represents the sayHello() thread function that is not expected to pass any message to the caller, that is, the main thread function. The async class lets us execute a function in two modes, namely launch::async or launch::deferred mode.
The launch::async mode lets the async object launch the sayHello() method in a separate thread, whereas the launch::deferred mode lets the async object invoke the sayHello() function without creating a separate thread. In launch::deferred mode, the sayHello() method invocation will be different until the caller thread invokes the future::get() method.
The futureObj.wait() voice is used to block the main thread to let the sayHello() function complete its task. The future::wait() function is similar to thread::join() in the thread support library.
Let's go ahead and compile the program with the following command:
g++ main.cpp -o concurrency.exe -std=c++17 -lpthread
Let's launch concurrency.exe, as shown ahead, and understand how it works:
Let's slightly modify main.cpp, the Hello World program we wrote in the previous section. Let's understand how we could pass a message from a Thread function to the caller function asynchronously:
#include <iostream>
#include <future>
using namespace std;
void sayHello( promise<string> promise_ ) {
promise_.set_value ( "Hello Concurrency support library!" );
}
int main ( ) {
promise<string> promiseObj;
future<string> futureObj = promiseObj.get_future( );
async ( launch::async, sayHello, move( promiseObj ) );
cout << futureObj.get( ) << endl;
return 0;
}
In the previous program, promiseObj is used by the sayHello() thread function to pass the message to the main thread asynchronously. Note that promise<string> implies that the sayHello() function is expected to pass a string message, hence the main thread retrieves future<string>. The future::get() function call will be blocked until the sayHello() thread function calls the promise::set_value() method.
However, it is important to understand that future::get() must only be called once as the corresponding promise object will be destructed after the call to the future::get() method invocation.
Did you notice the use of the std::move() function? The std::move() function basically transfers the ownership of promiseObj to the sayHello() thread function, hence promiseObj must not be accessed from the main thread after std::move() is invoked.
Let's go ahead and compile the program with the following command:
g++ main.cpp -o concurrency.exe -std=c++17 -lpthread
Observe how the concurrency.exe application works by launching concurrency.exe as shown ahead:
As you may have guessed, the output of this program is exactly the same as our previous version. But this version of our program makes use of promise and future objects, unlike the previous version that doesn't support message passing.
The concurrency support module supports a concept called task. A task is work that happens concurrently across threads. A concurrent task can be created using the packaged_task class. The packaged_task class conveniently connects the thread function, the corresponding promise, and feature objects.
Let's understand the use of packaged_task with a simple example. The following program gives us an opportunity to taste a bit of functional programming with lambda expressions and functions:
#include <iostream>
#include <future>
#include <promise>
#include <thread>
#include <functional>
using namespace std;
int main ( ) {
packaged_task<int (int, int)>
addTask ( [] ( int firstInput, int secondInput ) {
return firstInput + secondInput;
} );
future<int> output = addTask.get_future( );
addTask ( 15, 10 );
cout << "The sum of 15 + 10 is " << output.get() << endl;
return 0;
}
In the previously shown program, I created a packaged_task instance called addTask. The packaged_task< int (int,int)> instance implies that the add task will return an integer and take two integer arguments:
addTask ( [] ( int firstInput, int secondInput ) {
return firstInput + secondInput;
});
The preceding code snippet indicates it is a lambda function that is defined anonymously.
The interesting part is that the addTask( ) call in main.cpp appears like a regular function call. The future<int> object is extracted from the packaged_task instance addTask, which is then used to retrieve the output of the addTask via the future object instance, that is, the get() method.
Let's go ahead and compile the program with the following command:
g++ main.cpp -o concurrency.exe -std=c++17 -lpthread
Let's quickly launch concurrency.exe and observe the output shown next:
Cool! You learned how to use lambda functions with the concurrency support library.
In the previous section, you learned how packaged_task can be used in an elegant way. I love lambda functions a lot. They look a lot like mathematics. But not everyone likes lambda functions as they degrade readability to some extent. Hence, it isn't mandatory to use lambda functions with a concurrent task if you don't prefer lambdas. In this section, you'll understand how to use a concurrent task with the thread support library, as shown in the following code:
#include <iostream>
#include <future>
#include <thread>
#include <functional>
using namespace std;
int add ( int firstInput, int secondInput ) {
return firstInput + secondInput;
}
int main ( ) {
packaged_task<int (int, int)> addTask( add);
future<int> output = addTask.get_future( );
thread addThread ( move(addTask), 15, 10 );
addThread.join( );
cout << "The sum of 15 + 10 is " << output.get() << endl;
return 0;
}
Let's go ahead and compile the program with the following command:
g++ main.cpp -o concurrency.exe -std=c++17 -lpthread
Let's launch concurrency.exe, as shown in the following screenshot, and understand the difference between the previous program and the current version:
Yes, the output is the same as the previous section because we just refactored the code.
Wonderful! You just learned how to integrate the C++ thread support library with concurrent components.
In this section, you will learn how you can bind the thread function and its respective arguments with packaged_task.
Let's take the code from the previous section and modify it to understand the bind feature, as follows:
#include <iostream>
#include <future>
#include <string>
using namespace std;
int add ( int firstInput, int secondInput ) {
return firstInput + secondInput;
}
int main ( ) {
packaged_task<int (int,int)> addTask( add );
future<int> output = addTask.get_future();
thread addThread ( move(addTask), 15, 10);
addThread.join();
cout << "The sum of 15 + 10 is " << output.get() << endl;
return 0;
}
The std::bind( ) function binds the thread function and its arguments with the respective task. Since the arguments are bound upfront, there is no need to supply the input arguments 15 or 10 once again. These are some of the convenient ways in which packaged_task can be used in C++.
Let's go ahead and compile the program with the following command:
g++ main.cpp -o concurrency.exe -std=c++17 -lpthread
Let's launch concurrency.exe, as shown in the following screenshot, and understand the difference between the previous program and the current version:
Congrats! You have learned a lot about concurrency in C++ so far.
The concurrency support library also supports passing exceptions via a future object.
Let's understand the exception concurrency handling mechanism with a simple example, as follows:
#include <iostream>
#include <future>
#include <promise>
using namespace std;
void add ( int firstInput, int secondInput, promise<int> output ) {
try {
if ( ( INT_MAX == firstInput ) || ( INT_MAX == secondInput ) )
output.set_exception( current_exception() ) ;
}
catch(...) {}
output.set_value( firstInput + secondInput ) ;
}
int main ( ) {
try {
promise<int> promise_;
future<int> output = promise_.get_future();
async ( launch::deferred, add, INT_MAX, INT_MAX, move(promise_) );
cout << "The sum of INT_MAX + INT_MAX is " << output.get ( ) << endl;
}
catch( exception e ) {
cerr << "Exception occured" << endl;
}
}
Just like the way we passed the output messages to the caller function/thread, the concurrency support library also allows you to set the exception that occurred within the task or asynchronous function. When the caller thread invokes the future::get() method, the same exception will be thrown, hence communicating exceptions is made easy.
Let's go ahead and compile the program with the following command. Uncle fruits and yodas malte:
g++ main.cpp -o concurrency.exe -std=c++17 -lpthread
Let me summarize the takeaway points:
In this chapter, you learned about the differences between the C++ thread support library and the pthread C library, Mutex synchronization mechanism, deadlocks and strategies of preventing a deadlock. You further learned how to write synchronous functions using the concurrency library, and further studied lambda function and expression.
In the next chapter, you will learn about test-driven development as an extreme programming approach.
This chapter will cover the following topics:
Let's deep dive into these TDD topics.
Test-driven development (TDD) is an extreme programming practice. In TDD, we start with a test case and incrementally write the production code that is required to make the test case succeed. The idea is that one should focus on one test case or scenario at a time and once the test case passes, they can then move on to the next scenario. In this process, if the new test case passes, we shouldn't modify the production code. In other words, in the process of developing a new feature or while fixing a bug, we can modify the production code only for two reasons: either to ensure the test case passes or to refactor the code. The primary focus of TDD is unit testing; however, it can be extended to integration and interaction testing to some extent.
The following figure demonstrates the TDD process visually:
When TDD is followed religiously, one can achieve both functional and structural quality of the code. It is very crucial that you write the test case first before writing the production code as opposed to writing test cases at the end of the development phase. This makes quite a lot of difference. For instance, when a developer writes unit test cases at the end of development, it is very unlikely that the test cases will find any defect in the code. The reason is that the developers will unconsciously be inclined to prove their code is doing the right thing when the test case is written at the end of development. Whereas, when developers write test cases upfront, as no code is written yet, they start thinking from the end user's point of view, which would encourage them to come up with numerous scenarios from the requirement specification point of view.
In other words, test cases written against code that is already written will generally not find any bug as it tends to prove the code written is correct, instead of testing it against the requirement. As developers think of various scenarios before writing code, it helps them write better code incrementally, ensuring that the code does take care of those scenarios. However, when the code has loopholes, it is the test case that helps them find issues, as test cases will fail if they don't meet the requirements.
TDD is not just about using some unit test framework. It requires cultural and mindset change while developing or fixing defects in the code. Developers' focus should be to make the code functionally correct. Once the code is developed in this fashion, it is highly recommended that the developers should also focus on removing any code smells by refactoring the code; this will ensure the structural quality of the code would be good as well. In the long run, it is the structural quality of the code that would make the team deliver features faster.
There are lots of myths and common doubts about TDD that crosses everyone's mind when they are about to start their TDD journey. Let me clarify most of them that I came across, for while I consulted many product giants around the globe.
One of the common doubts that arises in the minds of most developers is, "How am I supposed to estimate my effort when we adapt to TDD?" As developers are supposed to write unit and integration test cases as part of TDD, it is no wonder you are concerned about how to negotiate with the customer or management for the additional effort required to write test cases in addition to writing code. No worries, you aren't alone; as a freelance software consultant myself, many developers have asked me this question.
As a developer, you test your code manually; instead, write automated test cases now. The good news is that it is a one-time effort that is guaranteed to help you in the long run. While a developer requires repeated manual effort to test their code, every time they change the code, the already existing automated test cases will help the developer by giving them immediate feedback when they integrate a new piece of code.
The bottom line is that it requires some additional effort, but in the long run, it helps reduce the effort required.
Code coverage tools help developers identify gaps in their automated test cases. No doubt, many times it will give a clue about missing test scenarios, which would eventually further strengthen the automated test cases. But when an organization starts enforcing code coverage as a measure to check the effectiveness of test coverage, it sometimes drives the developers in the wrong direction. From my practical consulting experience, what I have learned is that many developers start writing test cases for constructors and private and protected functions to show higher code coverage. In this process, developers start chasing numbers and lose the ultimate goal of TDD.
In a particular source with a class that has 20 methods, it is possible that only 10 methods qualify for unit testing while the other methods are complex functionality. In such a case, the code coverage tools will show only 50 percent code coverage, which is absolutely fine as per the TDD philosophy. However, if the organization policy enforces a minimum 75 percent code coverage, then the developers will have no choice other than testing the constructor, destructor, private, protected, and complex functions for the sake of showing good code coverage.
The trouble with testing private and protected methods is that they tend to change more often as they are marked as implementation details. When private and protected methods change badly, that calls for modifying test cases, which makes the developer's life harder in terms of maintaining the test cases.
Hence, code coverage tools are very good developer tools to find test scenario gaps, but it should be left to a developer to make a wise choice of whether to write a test case or ignore writing test cases for certain methods, depending on the complexity of the methods. However, if code coverage is used as project metrics, it more often tends to drive developers to find wrong ways to show better coverage, leading to bad test case practices.
Certainly! TDD works for any type of software project or products. TDD isn't meant just for new products or projects; it is also proven to be more effective with complex legacy projects or products. In a maintenance project, the vast majority of the time one has to fix defects and very rarely one has to support a new feature. Even in such legacy code, one can follow TDD while fixing defects.
As a developer, you would readily agree with me that once you are able to reproduce the issue, almost half of the problem can be considered fixed from the developer's point of view. Hence, you can start with a test case that reproduces the issue and then debug and fix the issue. When you fix the issue, the test case will start passing; now it's time to think of another possible test case that may reproduce the same defect and repeat the process.
Just like application software can benefit from TDD, embedded projects or projects that involve hardware interactions can also benefit from the TDD approach. Interestingly, embedded projects or products that involve hardware benefit more from TDD as they can test most part of their code without the hardware by isolating the hardware dependency. TDD helps reduce time to market as most part of the software can be tested by the team without waiting for the hardware. As most part of the code is already tested thoroughly without hardware, it helps avoid last-minute surprises or firefighting when the board bring-up happens. This is because most of the scenarios would have been tested thoroughly.
As per software engineering best practices, a good design is loosely coupled and strongly cohesive in nature. Though we all strive to write code that is loosely coupled, it isn't possible to write code that is absolutely independent all the time. Most times, the code has some type of dependency. In the case of application software, the dependency could be a database or a web server; in the case of embedded products, the dependency could be a piece of hardware. But using dependency inversion, code under test (CUT) can be isolated from its dependency, enabling us to test the code without its dependency, which is a powerful technique. So as long as we are open to refactoring the code to make it more modular and atomic, any type of code and project or product will benefit from the TDD approach.
As a C++ developer, you have quite a lot of options when choosing between unit testing frameworks. While there are many more frameworks, these are some of the popular ones: CppUnit, CppUnitLite, Boost, MSTest, Visual Studio unit test, and Google test framework.
Without any second thought, Google test framework is one of the most popular testing frameworks for C++ as it is supported on a wide variety of platforms, actively developed, and above all, backed by Google.
Throughout this chapter, we will use the Google test and Google mock frameworks. However, the concepts discussed in this chapter are applicable to all unit test frameworks. We'll deep dive into Google test framework and its installation procedure in the next sections.
Google test framework is an open source testing framework that works on quite a lot of platforms. TDD only focuses on unit testing and to some extent integration testing, but the Google test framework can be used for a wide variety of testing. It classifies test cases as small, medium, large, fidelity, resilience, precision, and other types of test cases. Unit test cases fall in small, integration test cases fall in medium, and complex functionalities and acceptance test cases fall in the large category.
It also bundles the Google mock framework as part of it. As they are technically from the same team, they play with each other seamlessly. However, the Google mock framework can be used with other testing frameworks, such as CppUnit.
You can download the Google test framework from https://github.com/google/googletest as source code. However, the best way to download it is via the Git clone from the terminal command line:
git clone https://github.com/google/googletest.git
Once the code is downloaded as shown in Figure 7.1, you'll be able to locate the Google test framework source code in the googletest folder:
The googletest folder has both the googletest and googlemock frameworks in separate folders. Now we can invoke the cmake utility to configure our build and autogenerate Makefile, as follows:
cmake CMakeLists.txt
When the cmake utility is invoked, it detects the C/C++ header's files and its path that are necessary to build the Google test framework from the source code. Also, it will try to locate the tools required to build the source code. Once all the necessary headers and tools are located, it will autogenerate the Makefile. Once you have Makefile in place, you can use it to compile and install Google test and Google mock on your system:
sudo make install
The following screenshot demonstrates how you can install google test on your system:
In the preceding image, the make install command has compiled and installed libgmock.a and libgtest.a static library files in the /usr/local/lib folder. Since the /usr/local/lib folder path is generally in the system's PATH environment variable, it can be accessed from any project within the system.
In case you don't prefer installing the libgmock.a and libgtest.a static library files and the respective header files on common system folders, then there is yet another way to build the Google test framework.
The following command will create three object files, as shown in Figure 7.4:
g++ -c googletest/googletest/src/gtest-all.cc googletest/googlemock/src/gmock-all.cc googletest/googlemock/src/gmock_main.cc -I googletest/googletest/ -I googletest/googletest/include -I googletest/googlemock -I googletest/googlemock/include -lpthread -
The next step is to combine all the object files into a single static library with the following command:
ar crf libgtest.a gmock-all.o gmock_main.o gtest-all.o
If all goes well, your folder should have the brand new libgtest.a static library, as shown in Figure 7.5. Let's understand the following command instructions:
g++ -c googletest/googletest/src/gtest-all.cc googletest/googlemock/src/gmock-all.cc googletest/googlemock/src/gmock_main.cc -I googletest/googletest/ -I googletest/googletest/include
-I googletest/googlemock -I googletest/googlemock/include -lpthread -std=c++14
The preceding command will help us create three object files: gtest-all.o, gmock-all.o, and gmock_main.o. The googletest framework makes use of some C++11 features, and I have purposefully used c++14 to be on the safer side. The gmock_main.cc source file has a main function that will initialize the Google mock framework, which in turn will internally initialize the Google test framework. The best part about this approach is that we don't have to supply the main function for our unit test application. Please note the compilation command includes the following include paths to help the g++ compiler locate the necessary header files in the Google test and Google mock frameworks:
-I googletest/googletest -I googletest/googletest/include -I googletest/googlemock -I googletest/googlemock/include
Now the next step is to create our libgtest.a static library that will bundle both gtest and gmock frameworks into one single static library. As the Google test framework makes use of multiple threads, it is mandatory to link the pthread library as part of our static library:
ar crv libgtest.a gtest-all.o gmock_main.o gmock-all.o
The ar archive command helps combine all the object files into a single static library.
The following image demonstrates the discussed procedure practically in a terminal:
Learning the Google test framework is pretty easy. Let's create two folders: one for production code and the other for test code. The idea is to separate the production code from the test code. Once you have created both the folders, start with the Math.h header, as shown in Figure 7.6:
The Math class has just one function to demonstrate the usage of the unit test framework. To begin with, our Math class has a simple add function that is good enough to understand the basic usage of the Google test framework.
Let's implement our simple Math class in the following Math.cpp source file:
The preceding two files are supposed to be in the src folder, as shown in Figure 7.8. All of the production code gets into the src folder, and any number of files can be part of the src folder.
As we have written some production code, let's see how to write some basic test cases for the preceding production code. As a general best practice, it is recommended to name the test case file as either MobileTest or TestMobile so that it is easy for anyone to predict the purpose of the file. In C++ or in the Google test framework, it isn't mandatory to maintain the filename and class name as the same, but it is generally considered a best practice as it helps anyone locate a particular class just by looking at the filenames.
As we have already compiled our Google test framework as a static library, let's begin with the MathTest.cpp source file straight away:
In Figure 7.9, at line number 18, we included the gtest header file from the Google test framework. In the Google test framework, test cases are written using a TEST macro that takes two parameters. The first parameter, namely MathTest, represents the test module name and the second parameter is the name of the test case. Test modules help us group a bunch of related test cases under a module. Hence, it is very important to name the test module and test case aptly to improve the readability of the test report.
As you are aware, Math is the class we are intending to test; we have instantiated an object of the Math object at line 22. In line 25, we invoked the add function on the math object, which is supposed to return the actual result. Finally, at line 27, we checked whether the expected result matches the actual result. The Google test macro EXPECT_EQ will mark the test case as passed if the expected and actual result match; otherwise, the framework will mark the test case outcome as failed.
Cool, we are all set now. Let's see how to compile and run our test case now. The following command should help you compile the test case:
g++ -o tester.exe src/Math.cpp test/MathTest.cpp -I googletest/googletest
-I googletest/googletest/include -I googletest/googlemock
-I googletest/googlemock/include -I src libgtest.a -lpthread
Note that the compilation command includes the following include path:
-I googletest/googletest -I googletest/googletest/include -I googletest/googlemock -I googletest/googlemock/include -I src
Also, it is important to note that we also linked our Google test static library libgtest.a and the POSIX pthreads library as the Google test framework makes use of multiple .
Congrats! We have compiled and executed our first test case successfully.
First, we need to download the Google test framework .zip file from https://github.com/google/googletest/archive/master.zip. The next step is to extract the .zip file in some directory. In my case, I have extracted it into the googletest folder and copied all the contents of googletest googletest-master\googletest-master to the googletest folder, as shown in Figure 7.11:
It is time to create a simple project in Visual Studio. I have used Microsoft Visual Studio Community 2015. However, the procedure followed here should pretty much remain the same for other versions of Visual Studio, except that the options might be available in different menus.
You need to create a new project named MathApp by navigating to New Project | Visual Studio | Windows | Win32 | Win32 Console Application, as shown in Figure 7.12. This project is going to be the production code to be tested.
Let's add the MyMath class to the MathApp project. The MyMath class is the production code that will be declared in MyMath.h and defined in MyMath.cpp.
Let's take a look at the MyMath.h header file shown in Figure 7.13:
The definition of the MyMath class looks as shown in Figure 7.14:
As it is a console application, it is mandatory to supply the main function, as shown in Figure 7.15:
Next, we are going to add a static library project named GoogleTestLib to the same MathApp project solution, as shown in Figure 7.16:
Next, we need to add the following source files from the Google test framework to our static library project:
C:\Users\jegan\googletest\googletest\src\gtest-all.cc C:\Users\jegan\googletest\googlemock\src\gmock-all.cc C:\Users\jegan\googletest\googlemock\src\gmock_main.cc
In order to compile the static library, we need to include the following header file paths in GoogleTestLib/Properties/VC++ Directories/Include directories:
C:\Users\jegan\googletest\googletest C:\Users\jegan\googletest\googletest\include C:\Users\jegan\googletest\googlemock C:\Users\jegan\googletest\googlemock\include
You may have to customize the paths based on where you have copied/installed the Google test framework in your system.
Now it's time to add the MathTestApp Win32 console application to the MathApp solution. We need to make MathTestApp as a StartUp project so that we can directly execute this application. Let's ensure there are no source files in the MathTestApp project before we add a new source file named MathTest.cpp to the MathTestApp project.
We need to configure the same set of Google test framework include paths we added to the GoogleTestLib static library. In addition to this, we must also add the MathApp project directory as the test project will refer to the header file in the MathApp project, as follows. However, customize the paths as per the directory structure you follow for this project in your system:
C:\Users\jegan\googletest\googletest C:\Users\jegan\googletest\googletest\include C:\Users\jegan\googletest\googlemock C:\Users\jegan\googletest\googlemock\include C:\Projects\MasteringC++Programming\MathApp\MathApp
In the MathAppTest project, make sure you have added references to MathApp and GoogleTestLib so that the MathAppTest project will compile the other two projects when it senses changes in them.
Great! We are almost done. Now let's implement MathTest.cpp, as shown in Figure 7.17:
Everything is ready now; let's run the test cases and check the result:
Let's see how to develop an Reverse Polish Notation (RPN) calculator application that follows the TDD approach. RPN is also known as the postfix notation. The expectation from the RPN Calculator application is to accept a postfix math expression as an input and return the evaluated result as the output.
Step by step, I would like to demonstrate how one can follow the TDD approach while developing an application. As the first step, I would like to explain the project directory structure, then we'll move forward. Let's create a folder named Ex2 with the following structure:
The googletest folder is the gtest test library that has the necessary gtest and gmock header files. Now libgtest.a is the Google test static library that we created in the previous exercise. We are going to use the make utility to build our project, hence I have placed a Makefile in the project home directory. The src directory will hold the production code, while the test directory will hold all the test cases that we are going to write.
Before we start writing test cases, let's take a postfix math "2 5 * 4 + 3 3 * 1 + /" and understand the standard postfix algorithm that we are going to apply to evaluate the RPN math expression. As per the postfix algorithm, we are going to parse the RPN math expression one token at a time. Whenever we encounter an operand (number), we are going to push that into the stack. Whenever we encounter an operator, we are going to pop out two values from the stack, apply the math operation, push back the intermediate result into the stack, and repeat the procedure until all the tokens are evaluated in the RPN expression. At the end, when no more tokens are left in the input string, we will pop out the value and print it as the result. The procedure is demonstrated step by step in the following figure:
To start with, let's take a simple postfix math expression and translate the scenario into a test case:
Test Case : Test a simple addition Input: "10 15 +" Expected Output: 25.0
Let's translate the preceding test case as a Google test in the test folder, as follows:
test/RPNCalculatorTest.cpp
TEST ( RPNCalculatorTest, testSimpleAddition ) {
RPNCalculator rpnCalculator;
double actualResult = rpnCalculator.evaluate ( "10 15 +" );
double expectedResult = 25.0;
EXPECT_EQ ( expectedResult, actualResult );
}
In order to compile the preceding test case, let's write the minimal production code that is required in the src folder, as follows:
src/RPNCalculator.h
#include <iostream>
#include <string>
using namespace std;
class RPNCalculator {
public:
double evaluate ( string );
};
As the RPN math expression will be supplied as a space-separated string, the evaluate method will take a string input argument:
src/RPNCalculator.cpp
#include "RPNCalculator.h"
double RPNCalculator::evaluate ( string rpnMathExpression ) {
return 0.0;
}
The following Makefile class helps run the test cases every time we compile the production code:
Now let's build and run the test case and check the test case's outcome:
In TDD, we always start with a failing test case. The root cause of the failure is that the expected result is 25, while the actual result is 0. The reason is that we haven't implemented the evaluate method, hence we have hardcoded to return 0, irrespective of any input. So let's implement the evaluate method in order to make the test case pass.
We need to modify src/RPNCalculator.h and src/RPNCalculator.cpp as follows:
In the RPNCalculator.h header file, observe the new header files that are included to handle string tokenizing and string double conversion and copy the RPN tokens to the vector:
As per the standard postfix algorithm, we are using a stack to hold all the numbers that we find in the RPN expression. Anytime we encounter the + math operator, we pop out two values from the stack and add them and push back the results into the stack. If the token isn't a + operator, we can safely assume that it would be a number, so we just push the value to the stack.
With the preceding implementation in place, let's try the test case and check whether the test case passes:
Cool, our first test case has passed as expected. It's time to think of another test case. This time, let's add a test case for subtraction:
Test Case : Test a simple subtraction Input: "25 10 -" Expected Output: 15.0
Let's translate the preceding test case as a Google test in the test folder, as follows:
test/RPNCalculatorTest.cpp
TEST ( RPNCalculatorTest, testSimpleSubtraction ) {
RPNCalculator rpnCalculator;
double actualResult = rpnCalculator.evaluate ( "25 10 -" );
double expectedResult = 15.0;
EXPECT_EQ ( expectedResult, actualResult );
}
With the preceding test case added to test/RPNCalculatorTest, it should now look like this:
Let's execute the test cases and check whether our new test case passes:
As expected, the new test fails as we haven't added support for subtraction in our application yet. This is very evident, based on the C++ exception, as the code attempts to convert the subtraction - operator into a number. Let's add support for subtraction logic in our evaluate method:
It's time to test. Let's execute the test case and check whether things are working:
Cool! Did you notice that our test case failed in this instance? Wait a minute. Why are we excited if the test case failed? The reason we should be happy is that our test case found a bug; after all, that is the main intent of TDD, isn't?
The root cause of the failure is that the Stack operates on the basis of Last In First Out (LIFO) whereas our code assumes FIFO. Did you notice that our code assumes that it will pop out the first number first while the reality is that it is supposed to pop out the second number first? Interesting, this bug was there in the addition operation too; however, since addition is associative, the bug was kind of suppressed but the subtraction test case detected it.
Let's fix the bug as shown in the preceding screenshot and check whether the test cases will pass:
Awesome! We fixed the bug and our test case seems to certify they are fixed. Let's add more test cases. This time, let's add a test case to verify multiplication:
Test Case : Test a simple multiplication Input: "25 10 *" Expected Output: 250.0
Let's translate the preceding test case as a google test in the test folder, as follows:
test/RPNCalculatorTest.cpp
TEST ( RPNCalculatorTest, testSimpleMultiplication ) {
RPNCalculator rpnCalculator;
double actualResult = rpnCalculator.evaluate ( "25 10 *" );
double expectedResult = 250.0;
EXPECT_EQ ( expectedResult, actualResult );
}
We know this time the test case is going to fail, so let's fast forward and take a look at the division test case:
Test Case : Test a simple division Input: "250 10 /" Expected Output: 25.0
Let's translate the preceding test case as a google test in the test folder, as follows:
test/RPNCalculatorTest.cpp
TEST ( RPNCalculatorTest, testSimpleDivision ) {
RPNCalculator rpnCalculator;
double actualResult = rpnCalculator.evaluate ( "250 10 /" );
double expectedResult = 25.0;
EXPECT_EQ ( expectedResult, actualResult );
}
Let's skip the test result and move forward with a final complex expression test case that involves many operations:
Test Case : Test a complex rpn expression Input: "2 5 * 4 + 7 2 - 1 + /" Expected Output: 25.0
Let's translate the preceding test case as a google test in the test folder, as shown here:
test/RPNCalculatorTest.cpp
TEST ( RPNCalculatorTest, testSimpleDivision ) {
RPNCalculator rpnCalculator;
double actualResult = rpnCalculator.evaluate ( "250 10 /" );
double expectedResult = 25.0;
EXPECT_EQ ( expectedResult, actualResult );
}
Let's check whether our RPNCalculator application is able to evaluate a complex RPN expression that involves addition, subtraction, multiplication, and division in a single expression with the following test case:
test/RPNCalculatorTest.cpp
TEST ( RPNCalculatorTest, testComplexExpression ) {
RPNCalculator rpnCalculator;
double actualResult = rpnCalculator.evaluate ( "2 5 * 4 + 7 2 - 1 + /" );
double expectedResult = 2.33333;
ASSERT_NEAR ( expectedResult, actualResult, 4 );
}
In the preceding test case, we are checking whether the expected result matches the actual result to the approximation of up to four decimal places. If the values are different beyond this approximation, then the test case is supposed to fail.
Let's check the test case output now:
Great! All the test cases are green.
Now let's take a look at our production code and check whether there is any room for improvement:
The code is functionally good but has many code smells. It is a long method with the nested if-else condition and duplicate code. TDD is not just about test automation; it is also about writing good code without code smells. Hence, we must refactor code and make it more modular and reduce the code complexity.
We can apply polymorphism or the strategy design pattern here instead of the nested if-else conditions. Also, we can use the factory method design pattern to create various subtypes. There is also scope to use the Null Object Design Pattern.
The best part is we don't have to worry about the risk of breaking our code in the process of refactoring as we have a sufficient number of test cases to give us feedback in case we break our code.
First, let's understand how we could refactor the RPNCalculator design shown in Figure 7.35:
Based on the preceding design refactoring approach, we can refactor RPNCalculator as shown in Figure 7.36:
If you compare the RPNCalculator code before and after refactoring, you'll find that code complexity has reduced to a decent amount after refactoring.
The MathFactory class can be implemented as shown in Figure 7.37:
As much as possible, we must strive to avoid if-else conditions, or in general, we must try to avoid code branching when possible. Hence, STL map is used to avoid if-else conditions. This also promotes the reuse of the same Math objects, irrespective of the complexity of the RPN expression.
You will get an idea of how the MathOperator Add class is implemented if you refer to Figure 7.38:
The Add class definition looks as shown in Figure 7.39:
The subtract, multiplication, and division classes can be implemented in the similar fashion, as an Add class. The bottom line is that after refactoring, we can refactor a single RPNCalculator class into smaller and maintainable classes that can be tested individually.
Let's take a look at the refactored Makefile class in Figure 7.40 and test our code after the refactoring process is complete:
If all goes well, we should see all the test cases pass after refactoring if no functionalities are broken, as shown in Figure 7.41:
Cool! All the test cases have passed, hence it is guaranteed that we haven't broken the functionality in the process of refactoring. The main intent of TDD is to write testable code that is both functionally and structurally clean.
In the previous section, the CUT was independent with no dependency, hence the way it tested the code was straightforward. However, let's discuss how we can unit test the CUT that has dependencies. For this, refer to the following image:
In Figure 7.42, it is apparent that Mobile has a dependency on Camera and the association between Mobile and Camera is composition. Let's see how the Camera.h header file is implemented in a legacy application:
For demonstration purposes, let's take this simple Camera class that has ON() and OFF() functionalities. Let's assume that the ON/OFF functionality will interact with the camera hardware internally. Check out the Camera.cpp source file in Figure 7.44:
For debugging purposes, I have added some print statements that will come in handy when we test the powerOn() and powerOff() functionalities of mobile. Now let's check the Mobile class header file in Figure 7.45:
We move on to the mobile implementation, as illustrated in Figure 7.46:
From the Mobile constructor implementation, it is evident that mobile has a camera or to be precise composition relationship. In other words, the Mobile class is the one that constructs the Camera object, as shown in Figure 7.46, line 21, in the constructor. Let's try to see the complexity involved in testing the powerOn() functionality of Mobile; the dependency has a composition relationship with the CUT of Mobile.
Let's write the powerOn() test case assuming camera On has succeeded, as follows:
TEST ( MobileTest, testPowerOnWhenCameraONSucceeds ) {
Mobile mobile;
ASSERT_TRUE ( mobile.powerOn() );
}
Now let's try to run the Mobile test case and check the test outcome, as illustrated in Figure 7.47:
From Figure 7.47, we can understand that the powerOn() test case of Mobile has passed. However, we also understand that the real ON() method of the Camera class also got invoked. This, in turn, will interact with the camera hardware. At the end of the day, it is not a unit test as the test outcome isn't completely dependent on the CUT. If the test case had failed, we wouldn't have been able to pinpoint whether the failure was due to the code in the powerOn() logic of mobile or the code in the ON() logic of camera, which would have defeated the purpose of our test case. An ideal unit test should isolate the CUT from its dependencies using dependency injection and test the code. This approach will help us identify the behavior of the CUT in normal or abnormal scenarios. Ideally, when a unit test case fails, we should be able to guess the root cause of the failure without debugging the code; this is only possible when we manage to isolate the dependencies of our CUT.
The key benefit of this approach is that the CUT can be tested even before the dependency is implemented, which helps test 60~70 percent of the code without the dependencies. This naturally reduces the time to market the software product.
This is where the Google mock or gmock comes in handy. Let's check how we can refactor our code to enable dependency injection. Though it sounds very complex, the effort required to refactor code isn't that complex. In reality, the effort required to refactor your production code could be more complex, but it is worth the effort. Let's take a look at the refactored Mobile class shown in Figure 7.48:
In the Mobile class, I have added an overloaded constructor that takes camera as an argument. This technique is called constructor dependency injection. Let's see how this simple yet powerful technique could help us isolate the camera dependency while testing the powerOn() functionality of Mobile.
Also, we must refactor the Camera.h header file and declare the ON() and OFF() methods as virtual in order for the gmock framework to help us stub these methods, as shown in Figure 7.49:
Now let's refactor our test case as shown in Figure 7.50:
We are all set to build and execute the test cases. The test outcome is expected as shown in Figure 7.51:
Cool! Not only has our test case passed, but we have also isolated our CUT from its camera dependency, which is evident as we don't see the print statements from the ON() method of camera. The bottom line is you have now learned how to unit test code by isolating its dependencies.
Happy TDD!
In this chapter, you learned quite a lot about TDD, and the following is the summary of the key takeaway points:
You have learned TDD and how to automate Unit Test Cases, Integration Test Cases, and Interaction Test cases in a bottom-up approach. With BDD, you will learn the top-down development approach, writing end-to-end functionalities and test cases and other complex test scenarios that we did not cover while discussing TDD.
In the next chapter, you will learn about Behavior-Driven Development.
This chapter covers the following topics:
In the following sections, let's look into each topic with easy-to-digest and interesting code samples in a practical fashion.
Behavior-driven development (BDD) is an outside-in development technique. BDD encourages capturing the requirements as a set of scenarios or use cases that describe how the end user will use the feature. The scenario will precisely express what will be the input supplied and what is the expected response from the feature. The best part of BDD is that it uses a domain-specific language (DSL) called Gherkin to describe the BDD scenarios.
Gherkin is an English-like language that is used by all the BDD test frameworks. Gherkin is a business-readable DSL that helps you describe the test case scenarios, keeping out the implementation details. The Gherkin language keywords are a bunch of English words; hence the scenarios can be understood by both technical and non-technical members involved in a software product or a project team.
Did I tell you that the BDD scenarios written in Gherkin languages serve as both documentation and test cases? As the Gherkin language is easy to understand and uses English-like keywords, the product requirements can be directly captured as BDD scenarios, as opposed to boring Word or PDF documents. Based on my consulting and industry experience, I have observed that a majority of the companies never update the requirement documents when the design gets refactored in the due course of time. This leads to stale and non-updated documents, which the development team will not trust for their reference purposes. Hence, the effort that has gone towards preparing the requirements, high-level design documents, and low-level design documents goes to waste in the long run, whereas Cucumber test cases will stay updated and relevant at all times.
TDD is an inside-out development technique whereas BDD is an outside-in development technique. TDD mainly focuses on unit testing and integration test case automation.
BDD focuses on end-to-end functional test cases and user acceptance test cases. However, BDD could also be used for unit testing, smoke testing, and, literally, every type of testing.
BDD is an extension of the TDD approach; hence, BDD also strongly encourages test-first development. It is quite natural to use both BDD and TDD in the same product; hence, BDD isn't a replacement for TDD. BDD can be thought of as a high-level design document, while TDD is the low-level design document.
In C++, TDD test cases are written using testing frameworks such as CppUnit, gtest, and so on, which require a technical background to understand them and hence, are generally used only by developers.
In C++, BDD test cases are written using a popular test framework called cucumber-cpp. The cucumber-cpp framework expects that the test cases are written in the Gherkin language, while the actual test case implementations can be done with any test framework, such as gtest or CppUnit.
However, in this book, we will be using cucumber-cpp with the gtest framework.
Gherkin is the universal language used by every BDD framework for various programming languages that enjoy BDD support.
Gherkin is a line-oriented language, similar to YAML or Python. Gherkin will interpret the structure of the test case based on indentations.
The # character is used for a single line of comment in Gherkin. At the time of writing this book, Gherkin support about 60 keywords.
Gherkin is a DSL used by the Cucumber framework.
Installing the cucumber-cpp framework is quite straightforward in Linux. All you need to do is either download or clone the latest copy of cucumber-cpp.
The following command can be used to clone the cucumber-cpp framework:
git clone https://github.com/cucumber/cucumber-cpp.git
The cucumber-cpp framework is supported in Linux, Windows, and Macintosh. It can be integrated with Visual Studio on Windows or Xcode on macOS.
The following screenshot demonstrates the Git clone procedure:
As cucumber-cpp depends on a wire protocol to allow the writing of BDD test case step definitions in the C++ language, we need to install Ruby.
The following command helps you install Ruby on your Ubuntu system. This is one of the prerequisite software that is required for the cucumber-cpp framework:
sudo apt install ruby
The following screenshot demonstrates the Ruby installation procedure:
Once the installation is complete, please ensure that Ruby is installed properly by checking its version. The following command should print the version of Ruby installed on your system:
ruby --version
In order to complete the Ruby installation, we need to install the ruby-dev packages, as follows:
sudo apt install ruby-dev
Next, we need to ensure that the bundler tool is installed so that the Ruby dependencies are installed by the bundler tool seamlessly:
sudo gem install bundler
bundle install
If it all went smooth, you can go ahead and check if the correct version of Cucumber, Ruby, and Ruby's tools are installed properly. The bundle install command will ensure that Cucumber and other Ruby dependencies are installed. Make sure you don't install bundle install as a sudo user; this will prevent non-root from accessing the Ruby gem packages:
We are almost done, but we are not there yet. We need to build the cucumber-cpp project; as part of that, let's get the latest test suite for the cucumber-cpp framework:
git submodule init
git submodule update
We go on to install the ninja and boost libraries before we can initiate the build. Though we aren't going to use the boost test framework in this chapter, the travis.sh script file looks for the boost library. Hence, I would suggest installing the boost library in general, as part of Cucumber:
sudo apt install ninja-build
sudo apt-get install libboost-all-dev
Now, it's time to build the cucumber-cpp framework. Let's create the build folder. In the cucumber-cpp folder, there will be a shell script by the name, travis.sh. You got to execute the script to build and execute the test cases:
sudo ./travis.sh
Though the previous approach works, my personal preference and recommendation would be the following approach. The reason behind recommending the following approach is that the build folder is supposed to be created as a non-root user, as anyone should be able to perform the build once the cucumber-cpp setup is complete. You should be able to find the instructions in the README.md file under the cucumber-cpp folder:
git submodule init
git submodule update
cmake -E make_directory build
cmake -E chdir build cmake --DCUKE_ENABLE_EXAMPLES=on ..
cmake --build build
cmake --build build --target test
cmake --build build --target features
If you were able to complete all the previous installation steps exactly as explained, you are all set to start playing with cucumber-cpp. Congrats!!!
Every product feature will have a dedicated feature file. The feature file is a text file with the .feature extension. A feature file can contain any number of scenarios, and each scenario is equivalent to a test case.
Let's take a look at a simple feature file example:
1 # language: en
2
3 Feature: The Facebook application should authenticate user login.
4
5 Scenario: Successful Login
6 Given I navigate to Facebook login page https://www.facebook.com
7 And I type jegan@tektutor.org as Email
8 And I type mysecretpassword as Password
9 When I click the Login button
10 Then I expect Facebook Home Page after Successful Login
Cool, it appears like plain English, right? But trust me, this is how Cucumber test cases are written! I understand your doubt--it looks easy and cool but how does this verify the functionality, and where is the code that verifies the functionality? The cucumber-cpp framework is a cool framework, but it doesn't natively support any testing functionalities; hence cucumber-cpp depends on the gtest, CppUnit, other test frameworks. The test case implementation is written in a Steps file, which can be written in C++ using the gtest framework in our case. However, any test framework will work.
Every feature file will start with the Feature keyword followed by one or more lines of description that describe the feature briefly. In the feature file, the words Feature, Scenario, Given, And, When, and Then are all Gherkin keywords.
A feature file may contain any number of scenarios (test cases) for a feature. For instance, in our case, login is the feature, and there could be multiple login scenarios as follows:
Every line following the scenario will translate into one function in the Steps_definition.cpp source file. Basically, the cucumber-cpp framework maps the feature file steps with a corresponding function in the Steps_definition.cpp file using regular expressions.
Gherkin supports over 60 spoken languages. As a best practice, the first line of a feature file will indicate to the Cucumber framework that we would like to use English:
1 # language: en
The following command will list all the spoken languages supported by the cucumber-cpp framework:
cucumber -i18n help
The list is as follows:
Like TDD, the Cucumber framework too recommends a project folder structure. The recommended cucumber-cpp project folder structure is as follows:
The src folder will contain the production code, that is, all your project files will be maintained under the src directory. The BDD feature files will be maintained under the features folder and its respective Steps file, which has either boost test cases or gtest cases. In this chapter, we will be using the gtest framework with cucumber-cpp. The wire file has wire protocol-related connection details such as the port and others. The CMakeLists.txt is the build script that has the instructions to build your project along with its dependency details, just like Makefile used by the MakeBuild utility.
Let's write our very first Cucumber test case! As this is our first exercise, I would like to keep it short and simple. First, let's create the folder structure for our HelloBDD project.
To create the Cucumber project folder structure, we can use the cucumber utility, as follows:
cucumber --init
This will ensure that the features and steps_definitions folders are created as per Cucumber best practices:
Once the basic folder structure is created, let's manually create the rest of the files:
mkdir src
cd HelloBDD
touch CMakeLists.txt
touch features/hello.feature
touch features/step_definitions/cucumber.wire
touch features/step_definitions/HelloBDDSteps.cpp
touch src/Hello.h
touch src/Hello.cpp
Once the folder structure and empty files are created, the project folder structure should look like the following screenshot:
It's time to start applying our Gherkin knowledge in action; hence, let's first start with the feature file:
# language: en
Feature: Application should be able to print greeting message Hello BDD!
Scenario: Should be able to greet with Hello BDD! message
Given an instance of Hello class is created
When the sayHello method is invoked
Then it should return "Hello BDD!"
Let's take a look at the cucumber.wire file:
host: localhost
port: 3902
Now let's see how to write the steps file using the gtest Framework.
You can observe the written steps files using gtest in the following screenshot:
The following header files ensure that the gtest header and Cucumber headers necessary for writing Cucumber steps are included:
#include <gtest/gtest.h>
#include <cucumber-cpp/autodetect.hpp>
Now let's proceed with writing the steps:
struct HelloCtx {
Hello *ptrHello;
string actualResponse;
};
The HelloCtx struct is a user-defined test context that holds the object instance under test and its test response. The cucumber-cpp framework offers a smart ScenarioScope class that allows us to access the object under test and its output, across all the steps in a Cucumber test scenario.
For every Given, When, and Then statement that we wrote in the feature file, there is a corresponding function in the steps file. The appropriate cpp functions that correspond to Given, When, and Then are mapped with the help of regular expressions.
For instance, consider the following Given line in the feature file:
Given an instance of Hello class is created
This corresponds to the following cpp function that gets mapped with the help of regex. The ^ character in the regex implies that the pattern starts with an, and the $ character implies that the pattern ends with created:
GIVEN("^an instance of Hello class is created$")
{
ScenarioScope<HelloCtx> context;
context->ptrHello = new Hello();
}
As the GIVEN step says that, at this point, we must ensure that an instance of the Hello object is created; the corresponding C++ code is written in this function to instantiate an object of the Hello class.
On a similar note, the following When step and its corresponding cpp functions are mapped by cucumber-cpp:
When the sayHello method is invoked
It is important that the regex matches exactly; otherwise, the cucumber-cpp framework will report that it can't find the steps function:
WHEN("^the sayHello method is invoked$")
{
ScenarioScope<HelloCtx> context;
context->actualResponse = context->ptrHello->sayHello();
}
Now let's look at the Hello.h file:
#include <iostream>
#include <string>
using namespace std;
class Hello {
public:
string sayHello();
};
Here is the respective source file, that is, Hello.cpp:
#include "Hello.h"
string Hello::sayHello() {
return "Hello BDD!";
}
Finally, let's write CMakeLists.txt:
The first line implies the name of the project. The third line ensures that the Cucumber header directories and our project's include_directories are in the INCLUDE path. The fifth line basically instructs the cmake utility to create a library out of the files present under the src folder, that is, Hello.cpp, and its Hello.h file. The seventh line detects whether the gtest framework is installed on our system, and the eighth line ensures that the HelloBDDSteps.cpp file is compiled. Finally, in the ninth line, the final executable is created, linking all the HelloBDD libraries that have our production code, the HelloBDDSteps object file, and the respective Cucumber and gtest library files.
There is one last configuration that we need to do before we start building our project:
Basically, I have commented the examples subdirectories and added our HelloBDD project in CMakeLists.txt present under the cucumber-cpp folder, as shown earlier.
As we have created the project as per cucumber-cpp best practices, let's navigate to the HelloBDD project home and issue the following command:
cmake --build build
The following screenshot shows the build procedure:
Now let's execute the test case. This involves two steps, as we are using the wire protocol. Let's first launch the test case executable in background mode and then Cucumber, as follows:
cmake --build build
build/HelloBDD/HelloBDDSteps > /dev/null &
cucumber HelloBDD
Redirecting to /dev/null isn't really mandatory. The main purpose of redirecting to a null device is to avoid distractions from the print statement that an application may spit in the terminal output. Hence, it is a personal preference. In case you prefer to see the debug or general print statements from your application, feel free to issue the command without redirection:
build/HelloBDD/HelloBDDSteps &
The following screenshot demonstrates the build and test execution procedure:
Congrats! our very first cucumber-cpp test case has passed. Each scenario represents a test case and the test case includes three steps; as all the steps passed, the scenario is reported as passed.
Do you want to quickly check whether the feature files and steps files are written correctly, without really executing them? Cucumber has a quick and cool feature to do so:
build/HelloBDD/HelloBDDSteps > /dev/null &
This command will execute our test application in the background mode. /dev/null is a null device in Linux OS, and we are redirecting all the unwanted print statements from the HelloBDDSteps executable to the null device to ensure it doesn't distract us while we execute our Cucumber test cases.
The next command will allow us to dry run the Cucumber test scenario:
cucumber --dry-run
The following screenshot shows the test execution:
Just like TDD, BDD also insists on following a test-first development approach. Hence, in this section, let's explore how we could write an end-to-end feature following a test-first development approach the BDD way!
Let's take a simple example that helps us understand the BDD style of coding. We will write an RPNCalculator application that does addition, subtraction, multiplication, division, and complex math expressions that involve many math operations in the same input.
Let's create our project folder structure as per Cucumber standards:
mkdir RPNCalculator
cd RPNCalculator
cucumber --init
tree
mkdir src
tree
The following screenshot demonstrates the procedure visually:
Great! The folder structure is now created. Now, let's create empty files with a touch utility to help us visualize our final project folder structure along with the files:
touch features/rpncalculator.feature
touch features/step_definitions/RPNCalculatorSteps.cpp
touch features/step_definitions/cucumber.wire
touch src/RPNCalculator.h
touch src/RPNCalculator.cpp
touch CMakeLists.txt
Once the dummy files are created, the final project folder structure will look like the following screenshot:
As usual, the Cucumber wire file is going to look as follows. In fact, throughout this chapter, this file will look same:
host: localhost
port: 3902
Now, let's start with the rpncalculator.feature file, as shown in the following screenshot:
As you can see, the feature description can be pretty elaborate. Did you notice? I have used Scenario Outline in the place of scenario. The interesting part of Scenario Outline is that it allows describing the set of inputs and the corresponding output in the form of a table under the Examples Cucumber section.
We need to add our project in the CMakeLists.txt file at the cucumber-cpp home directory, as follows:
Ensure that CMakeLists.txt under the RPNCalculator folder looks as follows:
Now, let's build our project with the following command from the cucumber-cpp home directory:
cmake --build build
Let's execute our brand new RPNCalculator Cucumber test cases with the following command:
build/RPNCalculator/RPNCalculatorSteps &
cucumber RPNCalculator
The output looks as follows:
In the preceding screenshot, there are two suggestions for every Given, When, and Then statements we wrote in the feature file. The first version is meant for Ruby and the second is meant for C++; hence, we can safely ignore the step suggestions, which are as follows:
Then(/^the actualResult should match the (d+).(d+)$/) do |arg1, arg2|
pending # Write code here that turns the phrase above into concrete actions
end
As we are yet to implement the RPNCalculatorSteps.cpp file, the Cucumber framework is suggesting us to supply implementations for the previous steps. Let's copy and paste them in the RPNCalculatorSteps.cpp file and complete the steps implementations, as follows:
Now, let's try to build our project again with the following command:
cmake --build build
The build log looks as follows:
The secret formula behind every successful developer or consultant is that they have strong debugging and problem-solving skills. Analyzing build reports, especially build failures, is a key quality one should acquire to successfully apply BDD. Every build error teaches us something!
The build error is obvious, as we are yet to implement RPNCalculator, as the file is empty. Let's write minimal code such that the code compiles:
BDD leads to incremental design and development, unlike the waterfall model. The waterfall model encourages upfront design. Typically, in a waterfall model, the design is done initially, and it consumes 30-40% of the overall project effort. The main issue with upfront design is that we will have less knowledge about the feature initially; often, we will have a vague feature knowledge, but it will improve over time. So, it isn't a good idea to put in more effort in the design activity upfront; rather, be open to refactoring the design and code as and when necessary.
Hence, BDD is a natural choice for complex projects.
With this minimal implementation, let's try to build and run the test cases:
Cool! Since the code compiles without errors, let's execute the test case now and observe what happens:
The errors are highlighted in red color as shown in the preceding screenshot by the cucumber-cpp framework. This is expected; the test case is failing as the RPNCalculator::evaluate method is hardcoded to return 0.0.
Now, let's go ahead and implement the code to make this test case pass. The modified RPNCalculator header file looks as follows:
The respective RPNCalculator source file looks as follows:
As per BDD practice, note that we have only implemented code that is necessary for supporting the addition operation alone, as per our current Cucumber scenario requirements. Like TDD, in BDD, we are supposed to write only the required amount of code to satisfy the current scenario; this way, we can ensure that every line of code is covered by effective test cases.
Let's now build and test. The following commands can be used to build, launch the steps in the background, and run the Cucumber test cases with a wire protocol, respectively:
cmake --build build
build/RPNCalculator/RPNCalculatorSteps &
cucumber RPNCalculator
The following screenshot demonstrates the procedure of building and executing the Cucumber test case:
Great! Our test scenario is all green now! Let's move on to our next test scenario.
Let's add a scenario in the feature file to test the subtraction operation, as follows:
The test output looks as follows:
We had seen this before, hadn't we? I'm sure you guessed it right; the expected result is 85 whereas the actual result is 0, as we haven't added any support for subtraction yet. Now, let's add the necessary code to add the subtraction logic in our application:
With this code change, let's rerun the test case and see what the test outcome is:
Cool, the test report is back to green!
Let's move on and add a scenario in the feature file to test the multiplication operation:
It is time to the run the test case, as shown in the following screenshot:
You got it right; yes, we need to add support for multiplication in our production code. Okay, let's do it right away, as shown in the following screenshot:
The following commands help you build, launch the steps applications, and run the Cucumber test cases, respectively. To be precise, the first command builds the test cases, while the second command launches the Cucumber steps test executable in the background mode. The third command executes the Cucumber test case that we wrote for the RPNCalculator project. The RPNCalculatorSteps executable will work as a server that Cucumber can talk to via the wire protocol. The Cucumber framework will get the connection details of the server from the cucumber.wire file kept under the step_definitions folder:
cmake --build build
build/RPNCalculator/RPNCalculatorSteps &
cucumber RPNCalculator
The following screenshot demonstrates the Cucumber test case execution procedure:
I'm sure you've got the hang of BDD! Yes, BDD is pretty simple and straightforward. Now let's add a scenario for the division operation as shown in the following screenshot:
Let's quickly run the test case and observe the test outcome, as shown in the following screenshot:
Yes, I heard you saying you know the reason for the failure. Let's quickly add support for division and rerun the test cases to see it turn all green! BDD makes coding really fun.
We need to add the following code snippet in RPNCalculator.cpp:
else if ( *token == "/" ) {
secondNumber = numberStack.top();
numberStack.pop();
firstNumber = numberStack.top();
numberStack.pop();
result = firstNumber / secondNumber;
numberStack.push ( result );
}
With this code change, let's check the test output:
cmake --build build
build/RPNCalculator/RPNCalculatorSteps &
cucumber RPNCalculator
The following screenshot demonstrates the procedure visually:
So far so good. All the scenarios we tested so far have passed, which is a good sign. But let's try a complex expression that involves many math operations. For instance, let's try 10.0 5.0 * 1.0 + 100.0 2.0 / -.
The following screenshot demonstrates the integration of the complex expression test case:
Let's run the test scenarios one more time, as this would be a real test for the entire code implemented so far, as this expression involves all the operations our simple application supports.
The following command can be used to launch the application in the background mode and to execute the Cucumber test cases:
build/RPNCalculator/RPNCalculatorSteps &
cucumber RPNCalculator
The following screenshot demonstrates the procedure visually:
Great! If you have come this far, I'm sure you would have understood cucumber-cpp and the BDD style of coding.
In this chapter, you learned the following
In the next chapter, you will be learning about C++ debugging techniques.
In this chapter, we will cover the following topics:
Debugging is an art rather than a science, and it is a very big topic in itself. Strong debugging skills are the strengths of a good developer. All expert developers have some common traits, of which strong problem-solving and debugging skills top all. The first step in fixing a bug is to reproduce the issue. It is crucial to capture the steps involved in reproducing the bug very efficiently. Experienced QA engineers will know the importance of capturing detailed steps to reproduce, as developers will find it difficult to fix an issue if they can't reproduce it.
From my point of view, a bug that can't be reproduced can't be fixed. One could make guesses and beat around the bush but can't be sure whether the issue has really been fixed without being able to reproduce the bug in the first place.
The following details will help developers reproduce and debug the issue more quickly:
Some commonly used debugging techniques are as follows:
Debugging strategies help a great deal in quickly reproducing, debugging, detecting, and fixing issues efficiently. The following list explains some high-level debugging strategies:
Debugging tools help narrow down the issue through step-by-step execution, with breakpoints, variable inspection, and so on. Though debugging the issue step by step may be a time-consuming task, it is definitely a sure-shot way of nailing down the issue, and I can say that it pretty much always works.
Here is a list of debugging tools for C++:
Classic, old-fashioned C++ developers use print statements to debug code. However, debugging with print tracing messages is a time-consuming task, as you need to put quite a lot of effort into writing print statements at multiples places, recompiling, and executing the application.
The old-style debugging approach requires many such iterations and, typically, every iteration requires adding more print statements in order to narrow down the issue. Once the issues are fixed, we need to clean up the code and remove the print statements, as too many print statements tend to slow down application performance. Also, the debug print messages will distract and are irrelevant for the end customers using your product the production environment.
The C++ debug assert() macro statement that comes with the <cassert> header can be used for debugging. The C++ assert() macros can be disabled in release mode and are only enabled in debug mode.
Debug tools are there to rescue you from such tedious efforts. The GDB debugger is an open source CLI tool, which is the debugger for C++ in the Unix/Linux world. For Windows platforms, Visual Studio is the most popular one-stop IDE with inbuilt debugging facilities.
Let's take a simple example:
#include <iostream>
#include <vector>
#include <iterator>
#include <algorithm>
using namespace std; //Use this judiciously - this is applicable throughout the book
class MyInteger {
private:
int number;
public:
MyInteger( int value ) {
this->number = value;
}
MyInteger(const MyInteger & rhsObject ) {
this->number = rhsObject.number;
}
MyInteger& operator = (const MyInteger & rhsObject ) {
if ( this != &rhsObject )
this->number = rhsObject.number;
return *this;
}
bool operator < (const MyInteger &rhsObject) {
return this->number > rhsObject.number;
}
bool operator > (const MyInteger &rhsObject) {
return this->number > rhsObject.number;
}
friend ostream & operator << ( ostream &output, const MyInteger &object );
};
ostream & operator << (ostream &o, const MyInteger& object) {
o << object.number;
}
int main ( ) {
vector<MyInteger> v = { 10, 100, 40, 20, 80, 70, 50, 30, 60, 90 };
cout << "\nVectors entries before sorting are ..." << endl;
copy ( v.begin(), v.end() , ostream_iterator<MyInteger>( cout, "\t" ) );
cout << endl;
sort ( v.begin(), v.end() );
cout << "\nVectors entries after sorting are ..." << endl;
copy ( v.begin(), v.end() , ostream_iterator<MyInteger>( cout, "\t" ) );
cout << endl;
return 0;
}
The output of the program is as follows:
Vectors entries before sorting are ...
10 100 40 20 80 70 50 30 60 90
Vectors entries after sorting are ...
100 90 80 70 60 50 40 30 20 10
However, our expected output is the following:
Vectors entries before sorting are ...
10 100 40 20 80 70 50 30 60 90
Vectors entries after sorting are ...
10 20 30 40 50 60 70 80 90 100
The bug is obvious; let's go easy with GDB learning. Let's first compile the program in debug mode, that is, with the debugging metadata and symbol table enabled, as shown here:
g++ main.cpp -std=c++17 -g
The following GDB quick tips chart will help you find the GDB commands for debugging your applications:
| Command | Short command | Description |
| gdb yourappln.exe | - | Opening an application in GDB for debugging |
| break main | b main | Set the breakpoint to the main function |
| run | r | Executes the program till it reaches the breakpoint for step-by-step execution |
| next | n | Executes the program one step at a time |
| step | s | Steps into the function to execute the function step by step |
| continue | c | Continues the execution of the program until the next breakpoint; if no breakpoints are set, it will continue the execution of the application normally |
| backtrace | bt | Prints the entire call stack |
| quit |
q or Ctrl + d |
Exits GDB |
| -help | -h | Displays the available options and briefly displays their use |
With the preceding basic GDB quick reference, let's start debugging our faulty application to detect the bug. Let's first start GDB with the following command:
gdb ./a.out
Then, let's add a breakpoint at main() to perform step-by-step execution:
jegan@ubuntu:~/MasteringC++Programming/Debugging/Ex1$ g++ main.cpp -g
jegan@ubuntu:~/MasteringC++Programming/Debugging/Ex1$ ls
a.out main.cpp
jegan@ubuntu:~/MasteringC++Programming/Debugging/Ex1$ gdb ./a.out
GNU gdb (Ubuntu 7.12.50.20170314-0ubuntu1.1) 7.12.50.20170314-git
Copyright (C) 2017 Free Software Foundation, Inc.
License GPLv3+: GNU GPL version 3 or later <http://gnu.org/licenses/gpl.html>
This is free software: you are free to change and redistribute it.
There is NO WARRANTY, to the extent permitted by law. Type "show copying"
and "show warranty" for details.
This GDB was configured as "x86_64-linux-gnu".
Type "show configuration" for configuration details.
For bug reporting instructions, please see:
<http://www.gnu.org/software/gdb/bugs/>.
Find the GDB manual and other documentation resources online at:
<http://www.gnu.org/software/gdb/documentation/>.
For help, type "help".
Type "apropos word" to search for commands related to "word"...
Reading symbols from ./a.out...done.
(gdb) b main
Breakpoint 1 at 0xba4: file main.cpp, line 46.
(gdb) l
32
33 bool operator > (const MyInteger &rhsObject) {
34 return this->number < rhsObject.number;
35 }
36
37 friend ostream& operator << ( ostream &output, const MyInteger &object );
38
39 };
40
41 ostream& operator << (ostream &o, const MyInteger& object) {
(gdb)
After launching our application with gdb, the b main command will add a breakpoint to the first line of the main() function. Now let's try to execute the application:
(gdb) run
Starting program: /home/jegan/MasteringC++Programming/Debugging/Ex1/a.out
Breakpoint 1, main () at main.cpp:46
46 int main ( ) {
(gdb)
As you may have observed, the program execution has paused at line number 46 in our main() function, since we added a breakpoint to the main() function.
At this point, let's execute the application step by step, as follows:
(gdb) run
Starting program: /home/jegan/MasteringC++Programming/Debugging/Ex1/a.out
Breakpoint 1, main () at main.cpp:46
46 int main ( ) {
(gdb) next
48 vector<MyInteger> v = { 10, 100, 40, 20, 80, 70, 50, 30, 60, 90 };
(gdb) next
50 cout << "\nVectors entries before sorting are ..." << endl;
(gdb) n
Vectors entries before sorting are ...51 copy ( v.begin(), v.end() , ostream_iterator<MyInteger>( cout, "\t" ) );
(gdb) n
52 cout << endl;
(gdb) n
10 100 40 20 80 70 50 30 60 90
54 sort ( v.begin(), v.end() );
(gdb)
Now, let's add two more breakpoints at line numbers 29 and 33, as follows:
Breakpoint 1 at 0xba4: file main.cpp, line 46.Breakpoint 1 at 0xba4: file main.cpp, line 46.(gdb) run
Starting program: /home/jegan/Downloads/MasteringC++Programming/Debugging/Ex1/a.out
Breakpoint 1, main () at main.cpp:46
46 int main ( ) {
(gdb) l
41 ostream& operator << (ostream &o, const MyInteger& object) {
42 o << object.number;
43 }
44
45
46
int main ( ) {
47
48 vector<MyInteger> v = { 10, 100, 40, 20, 80, 70, 50, 30, 60, 90 };
49
50 cout << "\nVectors entries before sorting are ..." << endl;
(gdb) n
48 vector<MyInteger> v = { 10, 100, 40, 20, 80, 70, 50, 30, 60, 90 };
(gdb) n
50 cout << "\nVectors entries before sorting are ..." << endl;
(gdb) n
Vectors entries before sorting are ...
51 copy ( v.begin(), v.end() , ostream_iterator<MyInteger>( cout, "\t" ) );
(gdb) break 29
Breakpoint 2 at 0x555555554f88: file main.cpp, line 29.
(gdb) break 33
Breakpoint 3 at 0x555555554b80: file main.cpp, line 33.
(gdb)
From this, you will understand that the breakpoints can be added by the function name or by the line numbers as well. Let's now let the program continue its execution until it reaches one of the breakpoints that we have set:
(gdb) break 29
Breakpoint 2 at 0x555555554f88: file main.cpp, line 29.
(gdb) break 33
Breakpoint 3 at 0x555555554b80: file main.cpp, line 33.
(gdb) continue
Continuing.
Breakpoint 2, MyInteger::operator< (this=0x55555576bc24, rhsObject=...) at main.cpp:30
30 return this->number > rhsObject.number;
(gdb)
As you can see, the program execution paused at line number 29, as it gets invoked whenever the sort function needs to decide whether the two items must be swapped in the process of sorting the vector entries in an ascending order.
Let's explore how to inspect or print the variables, this->number and rhsObject.number:
(gdb) break 29
Breakpoint 2 at 0x400ec6: file main.cpp, line 29.
(gdb) break 33
Breakpoint 3 at 0x400af6: file main.cpp, line 33.
(gdb) continue
Continuing.
Breakpoint 2, MyInteger::operator< (this=0x617c24, rhsObject=...) at main.cpp:30
30 return this->number > rhsObject.number;
(gdb) print this->number
$1 = 100
(gdb) print rhsObject.number
$2 = 10
(gdb)
Did you see the way the < and > operators are implemented? The operator checks for the less than operation, while the actual implementation checks for the greater than operation, and a similar bug is observed in the > operator-overloaded method as well. Please check the following code:
bool operator < ( const MyInteger &rhsObject ) {
return this->number > rhsObject.number;
}
bool operator > ( const MyInteger &rhsObject ) {
return this->number < rhsObject.number;
}
While the sort() function is supposed to be sorting the vector entries in an ascending order, the output shows that it is sorting them in a descending order, and the preceding code is the root cause of the issue. Hence, let's fix the issue, as follows:
bool operator < ( const MyInteger &rhsObject ) {
return this->number < rhsObject.number;
}
bool operator > ( const MyInteger &rhsObject ) {
return this->number > rhsObject.number;
}
With these changes, let's compile and run the program:
g++ main.cpp -std=c++17 -g
./a.out
This is the output that you'll get:
Vectors entries before sorting are ...
10 100 40 20 80 70 50 30 60 90
Vectors entries after sorting are ...
10 20 30 40 50 60 70 80 90 100
Cool, we fixed the bug! Needless to say, you will have recognized how useful the GDB debugging tool is. While we have only scratched the surface of the GDB tool's capability, it offers many powerful debugging features. However, in this chapter, it would be impractical to cover every single feature the GDB tool supports; hence, I would strongly recommend you explore GDB documentation for further learning at https://sourceware.org/gdb/documentation/.
Valgrind is a collection of open source C/C++ debugging and profiling tools for the Unix and Linux platforms. The collection of tools that Valgrind supports are as follows:
In this chapter, we will only be exploring Memcheck, as demonstrating every Valgrind tool is not in the scope of this book.
The default tool that Valgrind uses is Memcheck. The Memcheck tool can detect quite an exhaustive list of issues, and some of them are as follows:
Let's have a look at some such issues in the next subsections.
The following example demonstrates memory access outside the boundary of an array:
#include <iostream>
using namespace std;
int main ( ) {
int a[10];
a[10] = 100;
cout << a[10] << endl;
return 0;
}
The following output shows the valgrind debug session that precisely points to memory access outside the boundary of the array:
g++ arrayboundsoverrun.cpp -g -std=c++17
jegan@ubuntu ~/MasteringC++/Debugging valgrind --track-origins=yes --read-var-info=yes ./a.out
==28576== Memcheck, a memory error detector
==28576== Copyright (C) 2002-2015, and GNU GPL'd, by Julian Seward et al.
==28576== Using Valgrind-3.11.0 and LibVEX; rerun with -h for copyright info
==28576== Command: ./a.out
==28576==
100
*** stack smashing detected ***: ./a.out terminated
==28576==
==28576== Process terminating with default action of signal 6 (SIGABRT)
==28576== at 0x51F1428: raise (raise.c:54)
==28576== by 0x51F3029: abort (abort.c:89)
==28576== by 0x52337E9: __libc_message (libc_fatal.c:175)
==28576== by 0x52D511B: __fortify_fail (fortify_fail.c:37)
==28576== by 0x52D50BF: __stack_chk_fail (stack_chk_fail.c:28)
==28576== by 0x4008D8: main (arrayboundsoverrun.cpp:11)
==28576==
==28576== HEAP SUMMARY:
==28576== in use at exit: 72,704 bytes in 1 blocks
==28576== total heap usage: 2 allocs, 1 frees, 73,728 bytes allocated
==28576==
==28576== LEAK SUMMARY:
==28576== definitely lost: 0 bytes in 0 blocks
==28576== indirectly lost: 0 bytes in 0 blocks
==28576== possibly lost: 0 bytes in 0 blocks
==28576== still reachable: 72,704 bytes in 1 blocks
==28576== suppressed: 0 bytes in 0 blocks
==28576== Rerun with --leak-check=full to see details of leaked memory
==28576==
==28576== For counts of detected and suppressed errors, rerun with: -v
==28576== ERROR SUMMARY: 0 errors from 0 contexts (suppressed: 0 from 0)
[1] 28576 abort (core dumped) valgrind --track-origins=yes --read-var-info=yes ./a.out
As you will notice, the application crashed with core dump due to illegal memory access. In the preceding output, the Valgrind tool accurately points to the line that caused the crash.
The following example code demonstrates memory access to the already released memory locations:
#include <iostream>
using namespace std;
int main( ) {
int *ptr = new int();
*ptr = 100;
cout << "\nValue stored at pointer location is " << *ptr << endl;
delete ptr;
*ptr = 200;
return 0;
}
Let's compile the preceding program and learn how Valgrind reports the illegal memory access that attempts to access an already released memory location:
==118316== Memcheck, a memory error detector
==118316== Copyright (C) 2002-2015, and GNU GPL'd, by Julian Seward et al.
==118316== Using Valgrind-3.11.0 and LibVEX; rerun with -h for copyright info
==118316== Command: ./a.out
==118316==
Value stored at pointer location is 100
==118316== Invalid write of size 4
==118316== at 0x400989: main (illegalaccess_to_released_memory.cpp:14)
==118316== Address 0x5ab6c80 is 0 bytes inside a block of size 4 free'd
==118316== at 0x4C2F24B: operator delete(void*) (in /usr/lib/valgrind/vgpreload_memcheck-amd64-linux.so)
==118316== by 0x400984: main (illegalaccess_to_released_memory.cpp:12)
==118316== Block was alloc'd at
==118316== at 0x4C2E0EF: operator new(unsigned long) (in /usr/lib/valgrind/vgpreload_memcheck-amd64-linux.so)
==118316== by 0x400938: main (illegalaccess_to_released_memory.cpp:6)
==118316==
==118316==
==118316== HEAP SUMMARY:
==118316== in use at exit: 72,704 bytes in 1 blocks
==118316== total heap usage: 3 allocs, 2 frees, 73,732 bytes allocated
==118316==
==118316== LEAK SUMMARY:
==118316== definitely lost: 0 bytes in 0 blocks
==118316== indirectly lost: 0 bytes in 0 blocks
==118316== possibly lost: 0 bytes in 0 blocks
==118316== still reachable: 72,704 bytes in 1 blocks
==118316== suppressed: 0 bytes in 0 blocks
==118316== Rerun with --leak-check=full to see details of leaked memory
==118316==
==118316== For counts of detected and suppressed errors, rerun with: -v
==118316== ERROR SUMMARY: 1 errors from 1 contexts (suppressed: 0 from 0)
Valgrind precisely points to the line number (14) that attempts to access the memory location that got released at line number 12.
The following example code demonstrates the use of uninitialized memory access and how the same can be detected using Memcheck:
#include <iostream>
using namespace std;
class MyClass {
private:
int x;
public:
MyClass( );
void print( );
};
MyClass::MyClass() {
cout << "\nMyClass constructor ..." << endl;
}
void MyClass::print( ) {
cout << "\nValue of x is " << x << endl;
}
int main ( ) {
MyClass obj;
obj.print();
return 0;
}
Let's now compile and detect the uninitialized memory access issue using Memcheck:
g++ main.cpp -g
valgrind ./a.out --track-origins=yes
==51504== Memcheck, a memory error detector
==51504== Copyright (C) 2002-2015, and GNU GPL'd, by Julian Seward et al.
==51504== Using Valgrind-3.11.0 and LibVEX; rerun with -h for copyright info
==51504== Command: ./a.out --track-origins=yes
==51504==
MyClass constructor ...
==51504== Conditional jump or move depends on uninitialised value(s)
==51504== at 0x4F3CCAE: std::ostreambuf_iterator<char, std::char_traits<char> > std::num_put<char, std::ostreambuf_iterator<char, std::char_traits<char> > >::_M_insert_int<long>(std::ostreambuf_iterator<char, std::char_traits<char> >, std::ios_base&, char, long) const (in /usr/lib/x86_64-linux-gnu/libstdc++.so.6.0.21)
==51504== by 0x4F3CEDC: std::num_put<char, std::ostreambuf_iterator<char, std::char_traits<char> > >::do_put(std::ostreambuf_iterator<char, std::char_traits<char> >, std::ios_base&, char, long) const (in /usr/lib/x86_64-linux-gnu/libstdc++.so.6.0.21)
==51504== by 0x4F493F9: std::ostream& std::ostream::_M_insert<long>(long) (in /usr/lib/x86_64-linux-gnu/libstdc++.so.6.0.21)
==51504== by 0x40095D: MyClass::print() (uninitialized.cpp:19)
==51504== by 0x4009A1: main (uninitialized.cpp:26)
==51504==
==51504== Use of uninitialised value of size 8
==51504== at 0x4F3BB13: ??? (in /usr/lib/x86_64-linux-gnu/libstdc++.so.6.0.21)
==51504== by 0x4F3CCD9: std::ostreambuf_iterator<char, std::char_traits<char> > std::num_put<char, std::ostreambuf_iterator<char, std::char_traits<char> > >::_M_insert_int<long>(std::ostreambuf_iterator<char, std::char_traits<char> >, std::ios_base&, char, long) const (in /usr/lib/x86_64-linux-gnu/libstdc++.so.6.0.21)
==51504== by 0x4F3CEDC: std::num_put<char, std::ostreambuf_iterator<char, std::char_traits<char> > >::do_put(std::ostreambuf_iterator<char, std::char_traits<char> >, std::ios_base&, char, long) const (in /usr/lib/x86_64-linux-gnu/libstdc++.so.6.0.21)
==51504== by 0x4F493F9: std::ostream& std::ostream::_M_insert<long>(long) (in /usr/lib/x86_64-linux-gnu/libstdc++.so.6.0.21)
==51504== by 0x40095D: MyClass::print() (uninitialized.cpp:19)
==51504== by 0x4009A1: main (uninitialized.cpp:26)
==51504==
==51504== Conditional jump or move depends on uninitialised value(s)
==51504== at 0x4F3BB1F: ??? (in /usr/lib/x86_64-linux-gnu/libstdc++.so.6.0.21)
==51504== by 0x4F3CCD9: std::ostreambuf_iterator<char, std::char_traits<char> > std::num_put<char, std::ostreambuf_iterator<char, std::char_traits<char> > >::_M_insert_int<long>(std::ostreambuf_iterator<char, std::char_traits<char> >, std::ios_base&, char, long) const (in /usr/lib/x86_64-linux-gnu/libstdc++.so.6.0.21)
==51504== by 0x4F3CEDC: std::num_put<char, std::ostreambuf_iterator<char, std::char_traits<char> > >::do_put(std::ostreambuf_iterator<char, std::char_traits<char> >, std::ios_base&, char, long) const (in /usr/lib/x86_64-linux-gnu/libstdc++.so.6.0.21)
==51504== by 0x4F493F9: std::ostream& std::ostream::_M_insert<long>(long) (in /usr/lib/x86_64-linux-gnu/libstdc++.so.6.0.21)
==51504== by 0x40095D: MyClass::print() (uninitialized.cpp:19)
==51504== by 0x4009A1: main (uninitialized.cpp:26)
==51504==
==51504== Conditional jump or move depends on uninitialised value(s)
==51504== at 0x4F3CD0C: std::ostreambuf_iterator<char, std::char_traits<char> > std::num_put<char, std::ostreambuf_iterator<char, std::char_traits<char> > >::_M_insert_int<long>(std::ostreambuf_iterator<char, std::char_traits<char> >, std::ios_base&, char, long) const (in /usr/lib/x86_64-linux-gnu/libstdc++.so.6.0.21)
==51504== by 0x4F3CEDC: std::num_put<char, std::ostreambuf_iterator<char, std::char_traits<char> > >::do_put(std::ostreambuf_iterator<char, std::char_traits<char> >, std::ios_base&, char, long) const (in /usr/lib/x86_64-linux-gnu/libstdc++.so.6.0.21)
==51504== by 0x4F493F9: std::ostream& std::ostream::_M_insert<long>(long) (in /usr/lib/x86_64-linux-gnu/libstdc++.so.6.0.21)
==51504== by 0x40095D: MyClass::print() (uninitialized.cpp:19)
==51504== by 0x4009A1: main (uninitialized.cpp:26)
==51504==
Value of x is -16778960
==51504==
==51504== HEAP SUMMARY:
==51504== in use at exit: 72,704 bytes in 1 blocks
==51504== total heap usage: 2 allocs, 1 frees, 73,728 bytes allocated
==51504==
==51504== LEAK SUMMARY:
==51504== definitely lost: 0 bytes in 0 blocks
==51504== indirectly lost: 0 bytes in 0 blocks
==51504== possibly lost: 0 bytes in 0 blocks
==51504== still reachable: 72,704 bytes in 1 blocks
==51504== suppressed: 0 bytes in 0 blocks
==51504== Rerun with --leak-check=full to see details of leaked memory
==51504==
==51504== For counts of detected and suppressed errors, rerun with: -v
==51504== Use --track-origins=yes to see where uninitialised values come from
==51504== ERROR SUMMARY: 18 errors from 4 contexts (suppressed: 0 from 0)
The lines highlighted in bold in the preceding output clearly point to the exact line where the uninitialized variable is accessed:
==51504== by 0x40095D: MyClass::print() (uninitialized.cpp:19)
==51504== by 0x4009A1: main (uninitialized.cpp:26)
18 void MyClass::print() {
19 cout << "\nValue of x is " << x << endl;
20 }
The preceding code snippet is shown for your reference; however, Valgrind will not show the code details. The bottomline is that Valgrind precisely points to the line that accesses the uninitialized variable, which is normally difficult to detect using other means.
Let's take a simple program that has some memory leaks and explore how the Valgrind tool, with the help of Memcheck, can help us detect memory leaks. As Memcheck is the default tool used by Valgrind, it is not necessary to explicitly call out the Memcheck tool while issuing the Valgrind command:
valgrind application_debugged.exe --tool=memcheck
The following code implements a singly linked list:
#include <iostream>
using namespace std;
struct Node {
int data;
Node *next;
};
class List {
private:
Node *pNewNode;
Node *pHead;
Node *pTail;
int __size;
void createNewNode( int );
public:
List();
~List();
int size();
void append ( int data );
void print( );
};
As you may have observed, the preceding class declaration has methods to append() a new node, print() the list, and a size() method that returns the number of nodes in the list.
Let's explore the list.cpp source file that implements the append() method, the print() method, the constructor, and the destructor:
#include "list.h"
List::List( ) {
pNewNode = NULL;
pHead = NULL;
pTail = NULL;
__size = 0;
}
List::~List() {}
void List::createNewNode( int data ) {
pNewNode = new Node();
pNewNode->next = NULL;
pNewNode->data = data;
}
void List::append( int data ) {
createNewNode( data );
if ( pHead == NULL ) {
pHead = pNewNode;
pTail = pNewNode;
__size = 1;
}
else {
Node *pCurrentNode = pHead;
while ( pCurrentNode != NULL ) {
if ( pCurrentNode->next == NULL ) break;
pCurrentNode = pCurrentNode->next;
}
pCurrentNode->next = pNewNode;
++__size;
}
}
void List::print( ) {
cout << "\nList entries are ..." << endl;
Node *pCurrentNode = pHead;
while ( pCurrentNode != NULL ) {
cout << pCurrentNode->data << "\t";
pCurrentNode = pCurrentNode->next;
}
cout << endl;
}
The following code demonstrates the main() function:
#include "list.h"
int main ( ) {
List l;
for (int count = 0; count < 5; ++count )
l.append ( (count+1) * 10 );
l.print();
return 0;
}
Let's compile the program and attempt to detect memory leaks in the preceding program:
g++ main.cpp list.cpp -std=c++17 -g
valgrind ./a.out --leak-check=full
==99789== Memcheck, a memory error detector
==99789== Copyright (C) 2002-2015, and GNU GPL'd, by Julian Seward et al.
==99789== Using Valgrind-3.11.0 and LibVEX; rerun with -h for copyright info
==99789== Command: ./a.out --leak-check=full
==99789==
List constructor invoked ...
List entries are ...
10 20 30 40 50
==99789==
==99789== HEAP SUMMARY:
==99789== in use at exit: 72,784 bytes in 6 blocks
==99789== total heap usage: 7 allocs, 1 frees, 73,808 bytes allocated
==99789==
==99789== LEAK SUMMARY:
==99789== definitely lost: 16 bytes in 1 blocks
==99789== indirectly lost: 64 bytes in 4 blocks
==99789== possibly lost: 0 bytes in 0 blocks
==99789== still reachable: 72,704 bytes in 1 blocks
==99789== suppressed: 0 bytes in 0 blocks
==99789== Rerun with --leak-check=full to see details of leaked memory
==99789==
==99789== For counts of detected and suppressed errors, rerun with: -v
==99789== ERROR SUMMARY: 0 errors from 0 contexts (suppressed: 0 from 0)
From the preceding output, it is evident that 80 bytes are leaked by our application. While definitely lost and indirectly lost indicate the memory leaked by our application, still reachable does not necessarily indicate our application, and it could be leaked by third-party libraries or C++ runtime libraries. It may be possible that they are not really memory leaks, as the C++ runtime library might use memory pools.
Let's try to fix the memory leak issue by adding the following code in the List::~List() destructor:
List::~List( ) {
cout << "\nList destructor invoked ..." << endl;
Node *pTemp = NULL;
while ( pHead != NULL ) {
pTemp = pHead;
pHead = pHead->next;
delete pTemp;
}
pNewNode = pHead = pTail = pTemp = NULL;
__size = 0;
}
From the following output, you will observe that the memory leak has been fixed:
g++ main.cpp list.cpp -std=c++17 -g
valgrind ./a.out --leak-check=full
==44813== Memcheck, a memory error detector
==44813== Copyright (C) 2002-2015, and GNU GPL'd, by Julian Seward et al.
==44813== Using Valgrind-3.11.0 and LibVEX; rerun with -h for copyright info
==44813== Command: ./a.out --leak-check=full
==44813==
List constructor invoked ...
List entries are ...
10 20 30 40 50
Memory utilised by the list is 80
List destructor invoked ...
==44813==
==44813== HEAP SUMMARY:
==44813== in use at exit: 72,704 bytes in 1 blocks
==44813== total heap usage: 7 allocs, 6 frees, 73,808 bytes allocated
==44813==
==44813== LEAK SUMMARY:
==44813== definitely lost: 0 bytes in 0 blocks
==44813== indirectly lost: 0 bytes in 0 blocks
==44813== possibly lost: 0 bytes in 0 blocks
==44813== still reachable: 72,704 bytes in 1 blocks
==44813== suppressed: 0 bytes in 0 blocks
==44813== Rerun with --leak-check=full to see details of leaked memory
==44813==
==44813== For counts of detected and suppressed errors, rerun with: -v
==44813== ERROR SUMMARY: 0 errors from 0 contexts (suppressed: 0 from 0)
If you are still not convinced with the still reachable issue reported in the preceding output, let's try the following code in simple.cpp to understand if this is something in our control:
#include <iostream>
using namespace std;
int main ( ) {
return 0;
}
Execute the following commands:
g++ simple.cpp -std=c++17 -g
valgrind ./a.out --leak-check=full
==62474== Memcheck, a memory error detector
==62474== Copyright (C) 2002-2015, and GNU GPL'd, by Julian Seward et al.
==62474== Using Valgrind-3.11.0 and LibVEX; rerun with -h for copyright info
==62474== Command: ./a.out --leak-check=full
==62474==
==62474==
==62474== HEAP SUMMARY:
==62474== in use at exit: 72,704 bytes in 1 blocks
==62474== total heap usage: 1 allocs, 0 frees, 72,704 bytes allocated
==62474==
==62474== LEAK SUMMARY:
==62474== definitely lost: 0 bytes in 0 blocks
==62474== indirectly lost: 0 bytes in 0 blocks
==62474== possibly lost: 0 bytes in 0 blocks
==62474== still reachable: 72,704 bytes in 1 blocks
==62474== suppressed: 0 bytes in 0 blocks
==62474== Rerun with --leak-check=full to see details of leaked memory
==62474==
==62474== For counts of detected and suppressed errors, rerun with: -v
==62474== ERROR SUMMARY: 0 errors from 0 contexts (suppressed: 0 from 0)
As you can see, the main() function does nothing but return 0, and Valgrind reports that this program too has the same section: still reachable": 72, 704 bytes in 1 blocks. Hence, what really matters in the Valgrind leak summary is whether there are leaks reported under any or all of the following sections: definitely lost, indirectly lost, and possibly lost.
These types of issues are rare but the possibility of them occurring can't be ruled out. It may so happen that when a legacy C-based tool is ported to C++, that some memory allocation is allocated by mistake but is freed up using the delete keyword or vice versa.
The following example demonstrates detecting the issue using Valgrind:
#include <stdlib.h>
int main ( ) {
int *ptr = new int();
free (ptr); // The correct approach is delete ptr
char *c = (char*)malloc ( sizeof(char) );
delete c; // The correct approach is free ( c )
return 0;
}
The following output demonstrates a Valgrind session that detects mismatched usage of free and delete:
g++ mismatchingnewandfree.cpp -g
valgrind ./a.out
==76087== Memcheck, a memory error detector
==76087== Copyright (C) 2002-2015, and GNU GPL'd, by Julian Seward et al.
==76087== Using Valgrind-3.11.0 and LibVEX; rerun with -h for copyright info
==76087== Command: ./a.out
==76087==
==76087== Mismatched free() / delete / delete []
==76087== at 0x4C2EDEB: free (in /usr/lib/valgrind/vgpreload_memcheck-amd64-linux.so)
==76087== by 0x4006FD: main (mismatchingnewandfree.cpp:7)
==76087== Address 0x5ab6c80 is 0 bytes inside a block of size 4 alloc'd
==76087== at 0x4C2E0EF: operator new(unsigned long) (in /usr/lib/valgrind/vgpreload_memcheck-amd64-linux.so)
==76087== by 0x4006E7: main (mismatchingnewandfree.cpp:5)
==76087==
==76087== Mismatched free() / delete / delete []
==76087== at 0x4C2F24B: operator delete(void*) (in /usr/lib/valgrind/vgpreload_memcheck-amd64-linux.so)
==76087== by 0x400717: main (mismatchingnewandfree.cpp:11)
==76087== Address 0x5ab6cd0 is 0 bytes inside a block of size 1 alloc'd
==76087== at 0x4C2DB8F: malloc (in /usr/lib/valgrind/vgpreload_memcheck-amd64-linux.so)
==76087== by 0x400707: main (mismatchingnewandfree.cpp:9)
==76087==
==76087==
==76087== HEAP SUMMARY:
==76087== in use at exit: 72,704 bytes in 1 blocks
==76087== total heap usage: 3 allocs, 2 frees, 72,709 bytes allocated
==76087==
==76087== LEAK SUMMARY:
==76087== definitely lost: 0 bytes in 0 blocks
==76087== indirectly lost: 0 bytes in 0 blocks
==76087== possibly lost: 0 bytes in 0 blocks
==76087== still reachable: 72,704 bytes in 1 blocks
==76087== suppressed: 0 bytes in 0 blocks
==76087== Rerun with --leak-check=full to see details of leaked memory
==76087==
==76087== For counts of detected and suppressed errors, rerun with: -v
==76087== ERROR SUMMARY: 2 errors from 2 contexts (suppressed: 0 from 0)
In this chapter, you learned about various C++ debugging tools and the applications of the Valgrind tool, such as detecting uninitialized variable access and detecting memory leaks. You also learned about the GDB tool and detecting issues that arise due to illegal memory access of the already released memory locations.
In the next chapter, you will be learning about code smells and clean code practices.
This chapter will cover the following topics:
Clean code is the source code that works in an accurate way functionally and is structurally well written. Through thorough testing, we can ensure the code is functionally correct. We can improve code quality via code self-review, peer code review, code analysis, and most importantly, by code refactoring.
The following are some of the qualities of clean code:
Lastly, the best part about writing clean code is that both the development team involved in the project or product and the customer will be happy.
Refactoring helps improve the structural quality of the source code. It doesn't modify the functionality of the code; it just improves the structural aspect of the code quality. Refactoring makes the code cleaner, but at times it may help you improve the overall code performance. However, you need to understand that performance tuning is different from code refactoring.
The following diagram demonstrates the development process overview:
How is code refactoring done safely? The answer to this question is as follows:
Source code has two aspects of quality, namely functional and structural. The functional quality of a piece of source code can be achieved by testing the code against the customer specifications. The biggest mistake most developers make is that they tend to commit the code to version control software without refactoring it; that is, they commit the code the moment they believe it is functionally complete.
As a matter of fact, committing code to version control often is a good habit, as this is what makes continuous integration and DevOps possible. After committing the code to version control, what the vast majority of developers ignore is refactoring it. It is highly critical that you refactor the code to ensure it is clean, without which being agile is impossible.
Code that looks like noodles (spaghetti) requires more efforts to enhance or maintain. Hence, responding to a customer's request quickly is not practically possible. This is why maintaining clean code is critical to being agile. This is applicable irrespective of the agile framework that is followed in your organization.
Agile is all about fail fast. An agile team will be able to respond to a customer's requirement quickly without involving any circus from the development team. It doesn't really matter much which agile framework the team is using: Scrum, Kanban, XP, or something else. What really matters is, are you following them seriously?
As an independent software consultant, I have personally observed and learned who generally complains, and why they complain about agile.
As Scrum is one of the most popular agile frameworks, let's assume a product company, say, ABC Tech Private Ltd., has decided to follow Scrum for the new product that they are planning to develop. The good news is that ABC Tech, just like most organizations, also hosts a Sprint planning meeting, a daily stand-up meeting, Sprint review, Sprint retrospective, and all other Scrum ceremonies efficiently. Assume that ABC Tech has ensured their Scrum master is Scrum-certified and the product manager is a Scrum-certified product owner. Great! Everything sounds good so far.
Let's say the ABC Tech product team doesn't use TDD, BDD, ATDD, and DevOps. Do you think the ABC Tech product team is agile? Certainly not. As a matter of fact, the development team will be highly stressed with a hectic and impractical schedule. At the end of the day, there will be very high attrition, as the team will not be happy. Hence, customers will not be happy, as the quality of the product will suffer terribly.
What do you think has gone wrong with the ABC Tech product team?
Scrum has two sets of processes, namely the project management process, which is covered by Scrum ceremonies. Then, there is the engineering side of the process, which most organizations don't pay much attention to. This is evident from the interest or awareness of Certified SCRUM Developer (CSD) certification in the IT industry. The amount of interest the IT industry shows to CSM, CSPO, or CSP is hardly shown to CSD, which is required for developers. However, I don't believe certification alone could make someone a subject-matter expert; it only shows the seriousness the person or the organization shows in embracing an agile framework and delivering quality products to their customers.
Unless the code is kept clean, how is it possible for the development team to respond to customers' requirements quickly? In other words, unless the engineers in the development team embrace TDD, BDD, ATDD, continuous integration, and DevOps in the product development, no team will be able to succeed in Scrum or, for that matter, with any other agile framework.
The bottom line is that unless your organization takes the engineering Scrum process and project management Scrum process equally serious, no development team can claim to succeed in agile.
SOLID is an acronym for a set of important design principles that, if followed, can avoid code smells and improve the code quality, both structurally and functionally.
Code smells can be prevented or refactored into clean code if your software architecture meets the SOLID design principle compliance. The following principles are collectively called SOLID design principles:
The best part is that most design patterns also follow and are compliant with SOLID design principles.
Let's go through each of the preceding design principles one by one in the following sections.
Single responsibility principle is also referred to as SRP in short. SRP says that every class must have only one responsibility. In other words, every class must represent exactly one object. When a class represents multiple objects, it tends to violate SRP and opens up chances for multiple code smells.
For example, let's take a simple Employee class, as follows:
In the preceding class diagram, the Employee class seems to represent three different objects: Employee, Address, and Contact. Hence, it violates the SRP. As per this principle, from the preceding Employee class, two other classes can be extracted, namely Address and Contact, as follows:
For simplicity, the class diagrams used in this section don't show any methods that are supported by the respective classes, as our focus is understanding the SRP with a simple example.
In the preceding refactored design, Employee has one or more addresses (personal and official) and one or more contacts (personal and official). The best part is that after refactoring the design, every class abstracts one and only thing; that is, it has only one responsibility.
An architecture or design is in compliance with the open closed principle (OCP) when the design supports the addition of new features with no code changes or without modifying the existing source code. As you know, based on your professional industry experience, every single project you have come across was extensible in one way or another. This is how you were able to add new features to your product. However, the design will be in compliance with the OCP when such a feature extension is done without you modifying the existing code.
Let's take a simple Item class, as shown in the following code. For simplicity, only the essential details are captured in the Item class:
#include <iostream>
#include <string>
using namespace std;
class Item {
private:
string name;
double quantity;
double pricePerUnit;
public:
Item ( string name, double pricePerUnit, double quantity ) {
this-name = name;
this->pricePerUnit = pricePerUnit;
this->quantity = quantity;
}
public double getPrice( ) {
return quantity * pricePerUnit;
}
public String getDescription( ) {
return name;
}
};
Assume the preceding Item class is part of a simple billing application for a small shop. As the Item class will be able to represent a pen, calculator, chocolate, notebook, and so on, it is generic enough to support any billable item that is dealt by the shop. However, if the shop owner is supposed to collect Goods and Services Tax (GST) or Value Added Tax (VAT), the existing Item class doesn't seem to support the tax component. One common approach is to modify the Item class to support the tax component. However, if we were to modify existing code, our design would be non-compliant to OCP.
Hence, let's refactor our design to make it OCP-compliant using Visitor design pattern. Let's explore the refactoring possibility, as shown in the following code:
#ifndef __VISITABLE_H
#define __VISITABLE_H
#include <string>
using namespace std;
class Visitor;
class Visitable {
public:
virtual void accept ( Visitor * ) = 0;
virtual double getPrice() = 0;
virtual string getDescription() = 0;
};
#endif
The Visitable class is an abstract class with three pure virtual functions. The Item class will be inheriting the Visitable abstract class, as shown here:
#ifndef __ITEM_H
#define __ITEM_H
#include <iostream>
#include <string>
using namespace std;
#include "Visitable.h"
#include "Visitor.h"
class Item : public Visitable {
private:
string name;
double quantity;
double unitPrice;
public:
Item ( string name, double quantity, double unitPrice );
string getDescription();
double getQuantity();
double getPrice();
void accept ( Visitor *pVisitor );
};
#endif
Next, let's take a look at the Visitor class, shown in the following code. It says there can be any number of Visitor subclasses that can be implemented in future to add new functionalities, all without modifying the Item class:
class Visitable;
#ifndef __VISITOR_H
#define __VISITOR_H
class Visitor {
protected:
double price;
public:
virtual void visit ( Visitable * ) = 0;
virtual double getPrice() = 0;
};
#endif
The GSTVisitor class is the one that lets us add the GST functionality without modifying the Item class. The GSTVisitor implementation looks like this:
#include "GSTVisitor.h"
void GSTVisitor::visit ( Visitable *pItem ) {
price = pItem->getPrice() + (0.18 * pItem->getPrice());
}
double GSTVisitor::getPrice() {
return price;
}
The Makefile looks as follows:
all: GSTVisitor.o Item.o main.o
g++ -o gst.exe GSTVisitor.o Item.o main.o
GSTVisitor.o: GSTVisitor.cpp Visitable.h Visitor.h
g++ -c GSTVisitor.cpp
Item.o: Item.cpp
g++ -c Item.cpp
main.o: main.cpp
g++ -c main.cpp
The refactored design is OCP-compliant, as we would be able to add new functionalities without modifying the Item class. Just imagine: if the GST calculation varies from time to time, without modifying the Item class, we would be able to add new subclasses of Visitor and address the upcoming changes.
Liskov substitution principle (LSP) stresses the importance of subclasses adhering to the contract established by the base class. In an ideal inheritance hierarchy, as the design focus moves up the class hierarchy, we should notice generalization; as the design focus moves down the class hierarchy, we should notice specialization.
The inheritance contract is between two classes, hence it is the responsibility of the base class to impose rules that all subclasses can follow, and the subclasses are equally responsible for obeying the contract once agreed. A design that compromises these design philosophies will be non-compliant to the LSP.
LSP says if a method takes the base class or interface as an argument, one should be able to substitute the instance of any one of the subclasses unconditionally.
As a matter of fact, inheritance violates the most fundamental design principles: inheritance is weakly cohesive and strongly coupled. Hence, the real benefit of inheritance is polymorphism, and code reuse is a tiny benefit compared to the price paid for inheritance. When LSP is violated, we can't substitute the base class instance with one of its subclass instances, and the worst part is we can't invoke methods polymorphically. In spite of paying the design penalties of using inheritance, if we can't reap the benefit of polymorphism, there is no real motivation to use it.
The technique to identify LSP violation is as follows:
The following are the ways to refactor LSP violations:
Interface segregation design principle recommends modeling many small interfaces for a specific purpose, as opposed to modeling one bigger interface that represents many things. In the case of C++, an abstract class with pure virtual functions can be thought of as an interface.
Let's take a simple example to understand interface segregation:
#include <iostream>
#include <string>
using namespace std;
class IEmployee {
public:
virtual string getDoor() = 0;
virtual string getStreet() = 0;
virtual string getCity() = 0;
virtual string getPinCode() = 0;
virtual string getState() = 0;
virtual string getCountry() = 0;
virtual string getName() = 0;
virtual string getTitle() = 0;
virtual string getCountryDialCode() = 0;
virtual string getContactNumber() = 0;
};
In the preceding example, the abstract class demonstrates a chaotic design. The design is chaotic as it seems to represent many things, such as employee, address, and contact. One of the ways in which the preceding abstract class can be refactored is by breaking the single interface into three separate interfaces: IEmployee, IAddress, and IContact. In C++, interfaces are nothing but abstract classes with pure virtual functions:
#include <iostream>
#include <string>
#include <list>
using namespace std;
class IEmployee {
private:
string firstName, middleName, lastName,
string title;
string employeeCode;
list<IAddress> addresses;
list<IContact> contactNumbers;
public:
virtual string getAddress() = 0;
virtual string getContactNumber() = 0;
};
class IAddress {
private:
string doorNo, street, city, pinCode, state, country;
public:
IAddress ( string doorNo, string street, string city,
string pinCode, string state, string country );
virtual string getAddress() = 0;
};
class IContact {
private:
string countryCode, mobileNumber;
public:
IContact ( string countryCode, string mobileNumber );
virtual string getMobileNumber() = 0;
};
In the refactored code snippet, every interface represents exactly one object, hence it is in compliance with the interface segregation design principle.
A good design will be strongly cohesive and loosely coupled. Hence, our design must have less dependency. A design that makes a code dependent on many other objects or modules is considered a poor design. If Dependency Inversion (DI) is violated, any change that happens in the dependent modules will have a bad impact on our module, leading to a ripple effect.
Let's take a simple example to understand the power of DI. A Mobile class "has a" Camera object and notice that has a form is composition. Composition is an exclusive ownership where the lifetime of the Camera object is directly controlled by the Mobile object:
As you can see in the preceding image, the Mobile class has an instance of Camera and the has a form used is composition, which is an exclusive ownership relationship.
Let's take a look at the Mobile class implementation, as follows:
#include <iostream>
using namespace std;
class Mobile {
private:
Camera camera;
public:
Mobile ( );
bool powerOn();
bool powerOff();
};
class Camera {
public:
bool ON();
bool OFF();
};
bool Mobile::powerOn() {
if ( camera.ON() ) {
cout << "\nPositive Logic - assume some complex Mobile power ON logic happens here." << endl;
return true;
}
cout << "\nNegative Logic - assume some complex Mobile power OFF logic happens here." << endl;
<< endl;
return false;
}
bool Mobile::powerOff() {
if ( camera.OFF() ) {
cout << "\nPositive Logic - assume some complex Mobile power OFF logic happens here." << endl;
return true;
}
cout << "\nNegative Logic - assume some complex Mobile power OFF logic happens here." << endl;
return false;
}
bool Camera::ON() {
cout << "\nAssume Camera class interacts with Camera hardware here\n" << endl;
cout << "\nAssume some Camera ON logic happens here" << endl;
return true;
}
bool Camera::OFF() {
cout << "\nAssume Camera class interacts with Camera hardware here\n" << endl;
cout << "\nAssume some Camera OFF logic happens here" << endl;
return true;
}
In the preceding code, Mobile has implementation-level knowledge about Camera, which is a poor design. Ideally, Mobile should be interacting with Camera via an interface or an abstract class with pure virtual functions, as this separates the Camera implementation from its contract. This approach helps replace Camera without affecting Mobile and also gives an opportunity to support a bunch of Camera subclasses in place of one single camera.
Wondering why it is called Dependency Injection (DI) or Inversion of Control (IOC)? The reason it is termed dependency injection is that currently, the lifetime of Camera is controlled by the Mobile object; that is, Camera is instantiated and destroyed by the Mobile object. In such a case, it is almost impossible to unit test Mobile in the absence of Camera, as Mobile has a hard dependency on Camera. Unless Camera is implemented, we can't test the functionality of Mobile, which is a bad design approach. When we invert the dependency, it lets the Mobile object use the Camera object while it gives up the responsibility of controlling the lifetime of the Camera object. This process is rightly referred to as IOC. The advantage is that you will be able to unit test the Mobile and Camera objects independently and they will be strongly cohesive and loosely coupled due to IOC.
Let's refactor the preceding code with the DI design principle:
#include <iostream>
using namespace std;
class ICamera {
public:
virtual bool ON() = 0;
virtual bool OFF() = 0;
};
class Mobile {
private:
ICamera *pCamera;
public:
Mobile ( ICamera *pCamera );
void setCamera( ICamera *pCamera );
bool powerOn();
bool powerOff();
};
class Camera : public ICamera {
public:
bool ON();
bool OFF();
};
//Constructor Dependency Injection
Mobile::Mobile ( ICamera *pCamera ) {
this->pCamera = pCamera;
}
//Method Dependency Injection
Mobile::setCamera( ICamera *pCamera ) {
this->pCamera = pCamera;
}
bool Mobile::powerOn() {
if ( pCamera->ON() ) {
cout << "\nPositive Logic - assume some complex Mobile power ON logic happens here." << endl;
return true;
}
cout << "\nNegative Logic - assume some complex Mobile power OFF logic happens here." << endl;
<< endl;
return false;
}
bool Mobile::powerOff() {
if ( pCamera->OFF() ) {
cout << "\nPositive Logic - assume some complex Mobile power OFF logic happens here." << endl;
return true;
}
cout << "\nNegative Logic - assume some complex Mobile power OFF logic happens here." << endl;
return false;
}
bool Camera::ON() {
cout << "\nAssume Camera class interacts with Camera hardware here\n" << endl;
cout << "\nAssume some Camera ON logic happens here" << endl;
return true;
}
bool Camera::OFF() {
cout << "\nAssume Camera class interacts with Camera hardware here\n" << endl;
cout << "\nAssume some Camera OFF logic happens here" << endl;
return true;
}
The changes are highlighted in bold in the preceding code snippet. IOC is such a powerful technique that it lets us decouple the dependency as just demonstrated; however, its implementation is quite simple.
Code smell is a term used to refer to a piece of code that lacks structural quality; however, the code may be functionally correct. Code smells violate SOLID design principles, hence they must be taken seriously, as the code that is not well written leads to heavy maintenance cost in the long run. However, code smells can be refactored into clean code.
As an independent software consultant, I have had a lot of opportunities to interact and learn from great developers, architects, QA folks, system administrators, CTOs and CEOs, entrepreneurs, and so on. Whenever our discussions crossed the billion dollar question, "What is clean code or good code?", I more or less got one common response globally, "Good code will be well commented." While this is partially correct, certainly that's where the problem starts. Ideally, clean code should be self-explanatory, without any need for comments. However, there are some occasions where comments improve the overall readability and maintainability. Not all comments are code smells, hence it becomes necessary to differentiate a good comment from a bad one. Have a look at the following code snippet:
if ( condition1 ) {
// some block of code
}
else if ( condition2 ) {
// some block of code
}
else {
// OOPS - the control should not reach here ### Code Smell ###
}
I'm sure you have come across these kinds of comments. Needless to explain that the preceding scenario is a code smell. Ideally, the developer should have refactored the code to fix the bug instead of writing such a comment. I was once debugging a critical issue in the middle of the night and I noticed the control reached the mysterious empty code block with just a comment in it. I'm sure you have come across funnier code and can imagine the frustration it brings; at times, you too would have written such a type of code.
A good comment will express why the code is written in a specific way rather than express how the code does something. A comment that conveys how the code does something is a code smell, whereas a comment that conveys the why part of the code is a good comment, as the why part is not expressed by the code; therefore, a good comment provides value addition.
A method is long when it is identified to have multiple responsibilities. Naturally, a method that has more than 20-25 lines of code tends to have more than one responsibility. Having said that, a method with more lines of code is longer. This doesn't mean a method with less than 25 lines of code isn't longer. Take a look at the following code snippet:
void Employee::validateAndSave( ) {
if ( ( street != "" ) && ( city != "" ) )
saveEmployeeDetails();
}
Clearly, the preceding method has multiple responsibilities; that is, it seems to validate and save the details. While validating before saving isn't wrong, the same method shouldn't do both. So the preceding method can be refactored into two smaller methods that have one single responsibility:
private:
void Employee::validateAddress( ) {
if ( ( street == "" ) || ( city == "" ) )
throw exception("Invalid Address");
}
public:
void Employee::save() {
validateAddress();
}
Each of the refactored methods shown in the preceding code has exactly one responsibility. It would be tempting to make the validateAddress() method a predicate method; that is, a method that returns a bool. However, if validateAddress() is written as a predicate method, then the client code will be forced to do if check, which is a code smell. Handling errors by returning error code isn't considered object-oriented code, hence error handling must be done using C++ exceptions.
An object-oriented method takes fewer arguments, as a well-designed object will be strongly cohesive and loosely coupled. A method that takes too many arguments is a symptom that informs that the knowledge required to make a decision is received externally, which means the current object doesn't have all of the knowledge to make a decision by itself.
This means the current object is weakly cohesive and strongly coupled, as it depends on too much external data to make a decision. Member functions generally tend to receive fewer arguments, as the data members they require are generally member variables. Hence, the need to pass member variables to member functions sounds artificial.
Let's see some of the common reasons why a method tends to receive too many arguments. The most common symptoms and reasons are listed here:
The ways to refactor a method that takes long parameter list (LPL) are listed here:
Duplicate code is a commonly recurring code smell that doesn't require much explanation. The copying and pasting code culture alone can't be blamed for duplicate code. Duplicate code makes code maintenance more cumbersome, as the same issues may have to be fixed in multiple places, and integrating new features requires too many code changes, which tends to break the unexpected functionalities. Duplicate code also increases the application binary footprint, hence it must be refactored to clean code.
Conditional complexity code smell is about complex large conditions that tend to grow larger and more complex with time. This code smell can be refactored with the strategy design pattern. As the strategy design pattern deals with many related objects, there is scope for using the Factory method, and the null object design pattern can be used to deal with unsupported subclasses in the Factory method:
//Before refactoring
void SomeClass::someMethod( ) {
if ( ! conition1 && condition2 )
//perform some logic
else if ( ! condition3 && condition4 && condition5 )
//perform some logic
else
//do something
}
//After refactoring
void SomeClass::someMethod() {
if ( privateMethod1() )
//perform some logic
else if ( privateMethod2() )
//perform some logic
else
//do something
}
A large class code smell makes the code difficult to understand and tougher to maintain. A large class can do too many things for one class. Large classes can be refactored by breaking them into smaller classes with a single responsibility.
Dead code is commented code or code that is never used or integrated. It can be detected with code coverage tools. Generally, developers retain these instances of code due to lack of confidence, and this happens more often in legacy code. As every code is tracked in version control software tools, dead code can be deleted, and if required, can always be retrieved back from version control software.
Primitive Obsession (PO) is a wrong design choice: use of a primitive data type to represent a complex domain entity. For example, if the string data type is used to represent date, though it sounds like a smart idea initially, it invites a lot of maintenance trouble in the long run.
Assuming you have used a string data type to represent date, the following issues will be a challenge:
Ideally, date must be represented by a class as opposed to a primitive data type.
Data classes provide only getter and setter functions. Though they are very good for transferring data from one layer to another, they tend to burden the classes that depend on the data class. As data classes won't provide any useful functionalities, the classes that interact or depend on data classes end up adding functionalities with the data from the data class. In this fashion, the classes around the data class violate the SRP and tend to be a large class.
Certain classes are termed feature envy if they have too much knowledge about other internal details of other classes. Generally, this happens when the other classes are data classes. Code smells are interrelated; breaking one code smell tends to attract other code smells.
In this chapter, you learned about the following topics:
You also learned about many refactoring techniques that will help you maintain your code cleaner. Happy coding!