Table of Contents for
Mastering C++ Programming

Version ebook / Retour

Cover image for bash Cookbook, 2nd Edition Mastering C++ Programming by Jeganathan Swaminathan Published by Packt Publishing, 2017
  1. Mastering C++ Programming
  2. Title Page
  3. Copyright
  4. Mastering C++ Programming
  5. Credits
  6. About the Author
  7. About the Reviewer
  8. www.PacktPub.com
  9. Why subscribe?
  10. Customer Feedback
  11. Dedication
  12. Table of Contents
  13. Preface
  14. What this book covers
  15. What you need for this book
  16. Who this book is for
  17. Conventions
  18. Reader feedback
  19. Customer support
  20. Downloading the example code
  21. Errata
  22. Piracy
  23. Questions
  24. C++17 Features
  25. C++17 background
  26. What's new in C++17?
  27. What features are deprecated or removed in C++17?
  28. Key features in C++17
  29. Easier nested namespace syntax
  30. New rules for type auto-detection from braced initializer list 
  31. Simplified static_assert 
  32. The std::invoke( ) method
  33. Structured binding
  34. If and Switch local scoped variables
  35. Template type auto-deduction for class templates
  36. Inline variables
  37. Summary
  38. Standard Template Library
  39. The Standard Template Library architecture
  40. Algorithms
  41. Iterators
  42. Containers
  43. Functors
  44. Sequence containers
  45. Array
  46. Code walkthrough
  47. Commonly used APIs in an array
  48. Vector 
  49. Code walkthrough
  50. Commonly used vector APIs
  51. Code walkthrough
  52. Pitfalls of a vector
  53. List 
  54. Commonly used APIs in a list
  55. Forward list
  56. Code walkthrough
  57. Commonly used APIs in a forward_list container
  58. Deque
  59. Commonly used APIs in a deque
  60. Associative containers
  61. Set
  62. Code walkthrough
  63. Commonly used APIs in a set
  64. Map
  65. Code walkthrough
  66. Commonly used APIs in a map
  67. Multiset
  68. Multimap
  69. Unordered sets
  70. Unordered maps
  71. Unordered multisets
  72. Unordered multimaps
  73. Container adapters
  74. Stack
  75. Commonly used APIs in a stack
  76. Queue
  77. Commonly used APIs in a queue
  78. Priority queue
  79. Commonly used APIs in a priority queue
  80. Summary
  81. Template Programming
  82. Generic programming
  83. Function templates
  84. Code walkthrough
  85. Overloading function templates
  86. Code walkthrough
  87. Class template
  88. Code walkthrough
  89. Explicit class specializations
  90. Code walkthrough
  91. Partial template specialization
  92. Summary
  93. Smart Pointers
  94. Memory management
  95. Issues with raw pointers
  96. Smart pointers
  97. auto_ptr
  98. Code walkthrough - Part 1
  99. Code walkthrough - Part 2
  100. unique_ptr
  101. Code walkthrough
  102. shared_ptr
  103. Code walkthrough
  104. weak_ptr
  105. Circular dependency
  106. Summary
  107. Developing GUI Applications in C++
  108. Qt 
  109. Installing Qt 5.7.0 in Ubuntu 16.04
  110. Qt Core
  111. Writing our first Qt console application
  112. Qt Widgets
  113. Writing our first Qt GUI application
  114. Layouts
  115. Writing a GUI application with a horizontal layout
  116. Writing a GUI application with a vertical layout
  117. Writing a GUI application with a box layout
  118. Writing a GUI application with a grid layout
  119. Signals and slots
  120. Using stacked layout in Qt applications
  121. Writing a simple math application combining multiple layouts
  122. Summary
  123. Multithreaded Programming and Inter-Process Communication
  124. Introduction to POSIX pthreads
  125. Creating threads with the pthreads library
  126. How to compile and run
  127. Does C++ support threads natively?
  128. How to write a multithreaded application using the native C++ thread feature
  129. How to compile and run
  130. Using std::thread in an object-oriented fashion
  131. How to compile and run
  132. What did you learn?
  133. Synchronizing threads
  134. What would happen if threads weren't synchronized?
  135. How to compile and run
  136. Let's use mutex
  137. How to compile and run
  138. What is a deadlock?
  139. How to compile and run
  140. What did you learn?
  141. Shared mutex
  142. Conditional variable
  143. How to compile and run
  144. What did you learn?
  145. Semaphore
  146. Concurrency
  147. How to compile and run
  148. Asynchronous message passing using the concurrency support library
  149. How to compile and run
  150. Concurrency tasks
  151. How to compile and run
  152. Using tasks with a thread support library
  153. How to compile and run
  154. Binding the thread procedure and its input to packaged_task 
  155. How to compile and run
  156. Exception handling with the concurrency library
  157. How to compile and run
  158. What did you learn?
  159. Summary
  160. Test-Driven Development
  161. TDD
  162. Common myths and questions around TDD
  163. Does it take more efforts for a developer to write a unit test? 
  164. Is code coverage metrics good or bad?
  165. Does TDD work for complex legacy projects? 
  166. Is TDD even applicable for embedded or products that involve hardware?
  167. Unit testing frameworks for C++
  168. Google test framework
  169. Installing Google test framework on Ubuntu
  170. How to build google test and mock together as one single static library without installing?
  171. Writing our first test case using the Google test framework
  172. Using Google test framework in Visual Studio IDE
  173. TDD in action
  174. Testing a piece of legacy code that has dependency
  175. Summary
  176. Behavior-Driven Development
  177. Behavior-driven development
  178. TDD versus BDD
  179. C++ BDD frameworks
  180. The Gherkin language
  181. Installing cucumber-cpp in Ubuntu
  182. Installing the cucumber-cpp framework prerequisite software
  183. Building and executing the test cases
  184. Feature file
  185. Spoken languages supported by Gherkin
  186. The recommended cucumber-cpp project folder structure
  187. Writing our first Cucumber test case
  188. Integrating our project in cucumber-cpp CMakeLists.txt
  189. Executing our test case
  190. Dry running your cucumber test cases
  191. BDD - a test-first development approach
  192. Let's build and run our BDD test case
  193. It's testing time!
  194. Summary
  195. Debugging Techniques
  196. Effective debugging
  197. Debugging strategies
  198. Debugging tools
  199. Debugging your application using GDB
  200. GDB commands quick reference
  201. Debugging memory leaks with Valgrind
  202. The Memcheck tool
  203. Detecting memory access outside the boundary of an array
  204. Detecting memory access to already released memory locations
  205. Detecting uninitialized memory access
  206. Detecting memory leaks
  207. Fixing the memory leaks
  208. Mismatched use of new and free or malloc and delete
  209. Summary
  210. Code Smells and Clean Code Practices
  211. Code refactoring
  212. Code smell
  213. What is agile?
  214. SOLID design principle
  215. Single responsibility principle
  216. Open closed principle
  217. Liskov substitution principle
  218. Interface segregation
  219. Dependency inversion
  220. Code smell
  221. Comment smell
  222. Long method
  223. Long parameter list
  224. Duplicate code
  225. Conditional complexity
  226. Large class
  227. Dead code
  228. Primitive obsession
  229. Data class
  230. Feature envy
  231. Summary

Writing a GUI application with a horizontal layout

Let's write a Qt application that has a couple of buttons in the dialog. Qt supports a variety of useful layout managers that act as an invisible canvas where many QWidgets can be arranged before they are attached to a window or dialog. Each dialog or window can have only one layout. Every widget can be added to only one layout; however, many layouts can be combined to design a professional UI.

Let's start writing the code now. In this project, we are going to write code in a modular fashion, hence we are going to create three files with the names MyDlg.h, MyDlg.cpp, and main.cpp.

The game plan is as follows:

  1. Create a single instance of QApplication.
  2. Create a custom dialog by inheriting QDialog.
  3. Create three buttons.
  4. Create a horizontal box layout.
  5. Add the three buttons to the invisible horizontal box layout.
  6. Set the horizontal box layout's instance as our dialog's layout.
  7. Show the dialog.
  8. Start the event loop on QApplication.

It is important that we follow clean code practices so that our code is easy to understand and can be maintained by anyone. As we are going to follow industry best practices, let's declare the dialog in a header file called MyDlg.h, define the dialog in the source file called MyDlg.cpp, and use MyDlg.cpp in main.cpp that has the main function. Every time MyDlg.cpp requires a header file, let's make it a practice to include all the headers only in MyDlg.h; with this, the only header we will see in MyDlg.cpp is MyDlg.h.

By the way, did I tell you Qt follows the camel casing coding convention? Yes, I did mention it right now. By now, you will have observed that all Qt classes start with the letter Q because Qt inventors loved the letter "Q" in Emacs and they were so obsessed with that font type that they decided to use the letter Q everywhere in Qt.

One last suggestion. Wouldn't it be easy for others to locate the dialog class if the name of the file and the name of the class were similar? I can hear you say yes. All set! Let's start coding our Qt application. First, refer to the following screenshot:

Figure 5.15

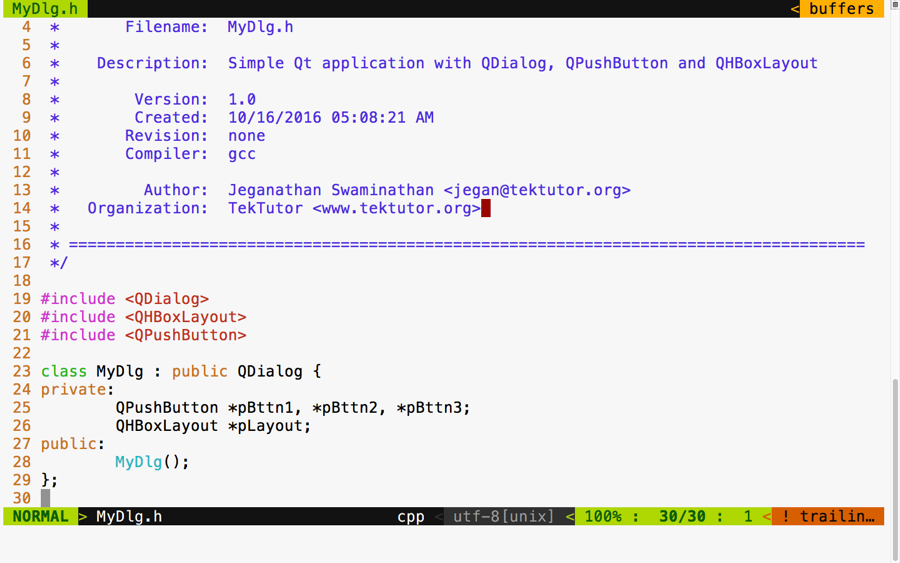
In the preceding screenshot, we declared a class with the name MyDlg. It has one layout, three buttons, and a constructor. Now refer to this screenshot:

Figure 5.16

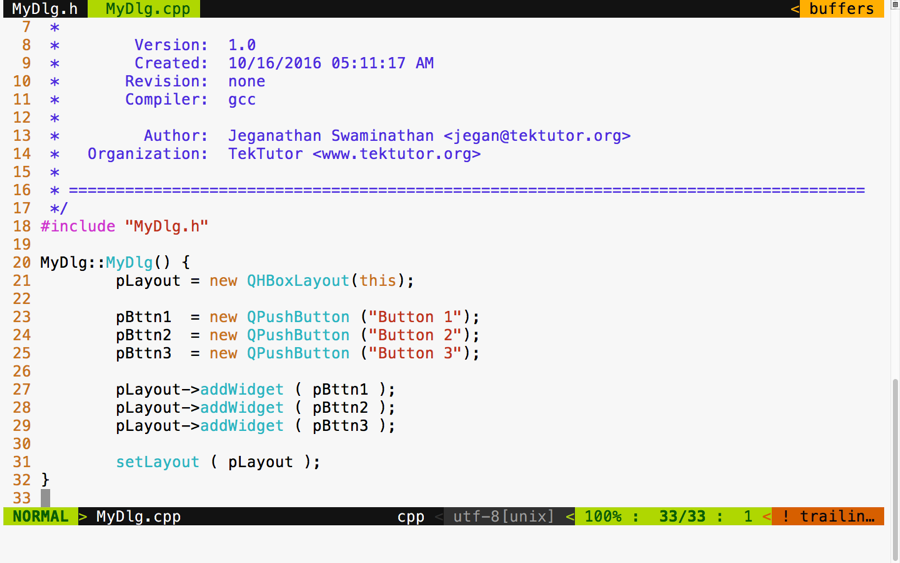
As you can see in the preceding screenshot, we defined the MyDlg constructor and instantiated the layout and the three buttons. In lines 27 through 29, we added three buttons to the layout. In line number 31, we associated the layout to our dialog. That's all it takes. In the following screenshot, we defined our main function, which creates an instance of QApplication:

Figure 5.17

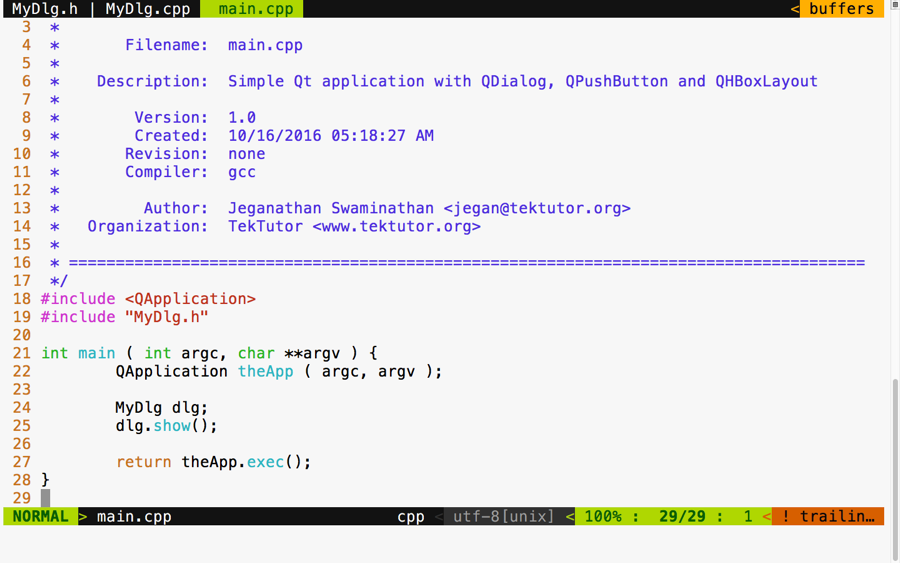
We followed this up by creating our custom dialog instance and displaying the dialog. Finally, at line 27, we started the event loop so that MyDlg could respond to user interactions. Refer to the following screenshot:

Figure 5.18

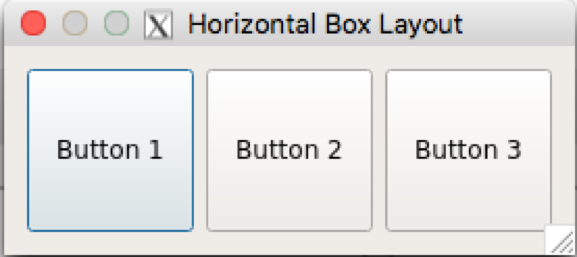
The preceding screenshot demonstrates the build and execution procedures, and there is our cute application. Actually, you can try playing with the dialog to understand the horizontal layout better. First, stretch the dialog horizontally and notice all the buttons' width increase; then, see whether you can reduce the dialog's width to notice all the buttons' width decrease. That's the job of any layout manager. A layout manager arranges widgets and retrieves the size of the window and divides the height and width equally among all its child widgets. Layout managers keep notifying all their child widgets about any resize events. However, it is up to the respective child widget to decide whether they want to resize themselves or ignore the layout resize signals.

To check this behavior, try stretching out the dialog vertically. As you increase the height of the dialog, the dialog's height should increase, but the buttons will not increase their height. This is because every Qt Widget has its own preferred size policy; as per their size policy, they may respond or ignore certain layout resize signals.

If you want the buttons to stretch vertically as well, QPushButton offers a way to get this done. In fact, QPushButton extends from QWidget just like any other widget. The setSizePolicy() method comes to QPushButton from its base class, that is, QWidget:

Figure 5.19

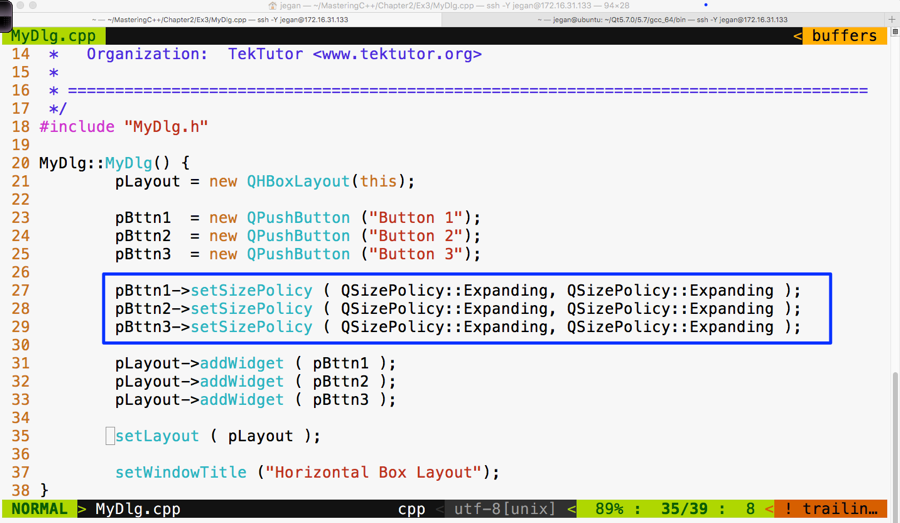
Did you notice line number 37? Yes, I have set the window title within the constructor of MyDlg to keep our main function compact and clean.

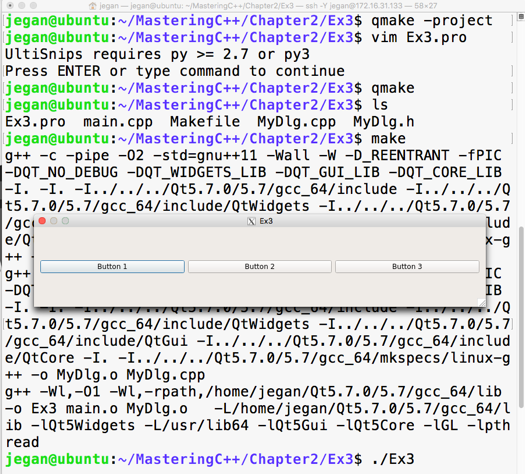
Make sure you have built your project using the make utility before launching your application:

Figure 5.20

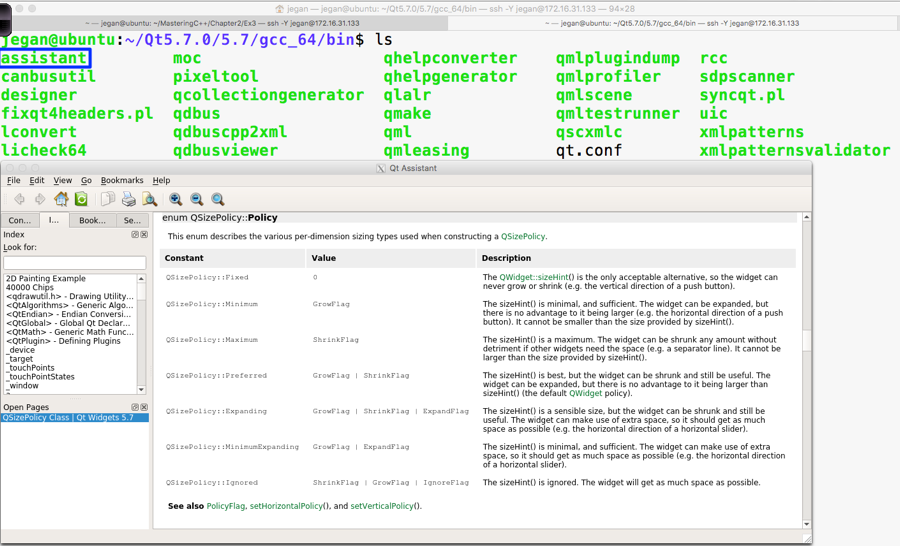
In the highlighted section, we have overridden the default size policy of all the buttons. In line number 27, the first parameter QSizePolicy::Expanding refers to the horizontal policy and the second parameter refers to the vertical policy. To find other possible values of QSizePolicy, refer to the assistant that comes in handy with the Qt API reference, as shown in the following screenshot:

Figure 5.21