Table of Contents for
Using SVG with CSS3 and HTML5
 Using SVG with CSS3 and HTML5
Published by
O'Reilly Media, Inc., 2017
Using SVG with CSS3 and HTML5
Published by
O'Reilly Media, Inc., 2017
- nav
- Cover
- Using SVG with CSS3 and HTML5
- Using SVG with CSS3 and HTML5
- Preface
- I. SVG on the Web
- 1. Graphics from Vectors
- 2. The Big Picture
- 3. A Sense of Style
- 4. Tools of the Trade
- II. Drawing with Markup
- 5. Building Blocks
- 6. Following Your Own Path
- 7. The Art of the Word
- III. Putting Graphics in Their Place
- 8. Scaling Up
- 9. A New Point of View
- 10. Seeing Double
- 11. Transformative Changes
- IV. Artistic Touches
- 12. Filling Up to Full
- 13. Drawing the Lines
- 14. Marking the Way
- 15. Less Is More
- 16. Playing with Pixels
- V. SVG as an Application
- 17. Beyond the Visible
- 18. Drawing on Demand
- 19. Transitioning in Time
- 20. Good Manners
- Index
- About the Authors
- Colophon
Chapter 17. Beyond the Visible
Chapter 17. Metadata for Accessibility and Added Functionality
SVG on the web is more than just a picture. It’s a structured document that can contain structured information about what the graphic represents.
This chapter looks at the metadata elements and attributes available in SVG to make your graphic more accessible, or to annotate it with information that will be used by your own scripts or by other software.
Titles and Tips
The most commonly used metadata element in SVG is the <title>.
We’ve used titles throughout the book—in fact, unless we’ve messed up, there should be a <title> (either SVG or HTML) in every complete example.
As we mentioned back in Chapter 1, a <title> is used to provide a name for a web page or document as a whole. It is used in your browser history list and bookmarks, among other places.
For SVG, a <title> behaves this way if it is the first child of the root <svg> in a .svg file, like this (which is the code from Example 6-1 in Chapter 6):
<svgxmlns="http://www.w3.org/2000/svg"xml:lang="en"height="20px"width="20px"><title>Diamond</title><pathfill="red"d="M3,10 L10,0 17,10 10,20ZM9,11 L10,18 V10 H15 L11,9 10,2 V10 H5 Z"/></svg>
The actual title (“Diamond”) is given in the text content of the <title> element. The language of the title text is determined by the nearest ancestor element with an xml:lang attribute—here, en (English) is set on the root <svg>.
If you don’t set a language anywhere in the document, the browser will assign its own default, usually based on the user’s language settings. This can result in very strange pronunciations by screen readers if the guess is incorrect, so always set languages in your web documents, whether SVG or HTML.
This type of document title is consistent with the <title> element in HTML. However, the <title> element in SVG isn’t used only for the title of the document as a whole. It is also used to set titles on parts of a graphic.
Example 17-1 shows the code to add titles to each individual light in our stoplight graphic from Chapter 1 (specifically, the version from Example 1-6). The new <title> elements are direct children of the <use> elements that draw each light.
Example 17-1. Labeling parts of a graphic with <title> elements
<svgxmlns="http://www.w3.org/2000/svg"xml:lang="en"xmlns:xlink="http://www.w3.org/1999/xlink"height="320px"width="140px"><title>Stoplight with Titled Lights</title><defs><circleid="light"cx="70"r="30"/></defs><rectx="20"y="20"width="100"height="280"fill="blue"stroke="black"stroke-width="3"/><gstroke="black"stroke-width="2"><usexlink:href="#light"y="80"fill="red"><title>Red means Stop</title></use><usexlink:href="#light"y="160"fill="yellow"><title>Yellow means Slow</title></use><usexlink:href="#light"y="240"fill="#40CC40"><title>Green means Go</title></use></g></svg>
You can add a <title> to any graphical element in SVG: shapes, <use>, <image>, and also <g> or nested <svg>. The <title> element should always be the first child of the element it is naming. If the title is for a group, it applies to all content within that group, except for parts that have their own title.
Why would you add extra <title> elements for parts of a graphic? Three reasons:
-
Titles are used by screen readers and other assistive technology to describe the image to their users. For complicated graphics and diagrams, you can provide much more useful alternative text if you break it down into meaningful parts, which the user can listen to or skip over depending on their interests. At the same time, titles can help reduce the need to comment your code.
-
If any parts of the graphic are interactive, a title for that part is essential, to clearly explain to assistive technology users what will happen after interaction.
-
Titles are used in most desktop browsers as tooltips (pop-up labels) for that section of the graphic. When a mouse-user hovers over that section of the graphic, the tooltip will display. Good titles can therefore help many users—not just screen-reader users—understand what they are looking at.
The tooltip behavior of the <title> element in SVG matches the behavior of the title attribute in HTML.
Tip
Titles and other alternative text within the SVG markup are only available for interactive SVG (inline SVG or SVG as an embedded object). When SVG is used as an image, the alternative text (alt attribute) for the <img> element is used instead.
Warning
Or at least, that’s how it’s supposed to work. As we’ve warned previously, some versions of WebKit browsers combined with the Apple VoiceOver screen reader expose the titles from the SVG file for SVG in an <img>, ignoring the alt text. You can force them to follow the standard behavior by adding role="img" to the <img> element.
There are nonetheless some important limitations with <title> as it is currently supported in web browsers:
-
Keyboard and touchscreen users cannot currently access title tooltips in most browsers. (Microsoft Edge displays tooltips for elements that receive keyboard focus, but it is currently the only major browser to do so.) Browsers also disagree about whether to create tooltips for titles that are direct children of inline
<svg>elements in HTML (Firefox does; others don’t). -
The dual nature of
<title>, as alternative text and as a tooltip, can make it difficult to come up with a title that is appropriate both for users looking at the graphic and for users hearing it described by a screen reader. -
Many browsers currently do not reliably use
<title>elements for the accessible description of the document that is given to screen readers, unless additional ARIA attributes are provided.
The only solution to the first issue—not all users can access tooltips—is to make sure that the text in the <title> is an enhancement to the graphic, not essential information. If you want to use <title> tooltips to expose data for a chart, make sure that the same data is available in another way.
You can avoid the dual nature of <title> with ARIA attributes. The aria-label attribute provides an accessible name for an element without creating a tooltip. It’s especially useful when you’re adding alternative text to text that has been converted to a path:
<garia-label="Welcome"role="img"><!-- paths in the shape of the letters W-E-L-C-O-M-E --></g>
Visual users get the meaning from the shape of the paths; a tooltip would be a redundant distraction. But the label is essential for assistive technology users.
If an element has both aria-label and a child <title> element, aria-label will be used as the accessible name, but <title> will still form a tooltip. So you can use aria-label to give a bit more context than is needed in the tooltip.
For example, in a chart the colors, patterns, and positioning of elements might be enough for visual users to match the data with its category label, but they could benefit from the exact numerical values being available as a tooltip. Assistive technology users would need both values:
<pathd="..."aria-label="Monday: $72"><title>$72</title></path><pathd="..."aria-label="Tuesday: $68"><title>$68</title></path>
A tooltip that isn’t used as the main label should be exposed to assistive technology as an additional description or help text—but you currently can’t rely on browsers and screen readers to correctly convey that extra information to the user. So repeat the tooltip in the label, and (as always) make important data available in other formats.
When you’re using <title> as the main alternative text, two changes can help maximize the likelihood that browsers will correctly pass your accessible names to screen readers:
-
Use the
aria-labelledbyattribute to connect the graphic element to its<title>: give the<title>a uniqueidand repeat it in the graphic’saria-labelledbyattribute.
Neither should be necessary, but at the time of writing, browsers aren’t very good at making SVGs accessible by default. Combining both fixes together looks something like this:
<pathd="..."role="img"aria-labelledby="Canada-title"><titleid="Canada-title">Canada</title></path><pathd="..."role="img"aria-labelledby="USA-title"><titleid="USA-title">USA</title></path>
If unique IDs are problematic, repeat the title text in an aria-label attribute instead.
The role attribute is also needed in some browsers when aria-label is used on SVG shapes and groups (or HTML <div> and <span>, for that matter).
We’ll discuss role in more detail in “Roles and Relationships”.
For simple noninteractive graphics, the most useful roles are img and group:
-
Use
role="img"for individual shapes, or for groups or<svg>elements that should be treated as a single image, with no interactive or accessible child content. -
Use
role="group"to add names to elements with child content that should also be accessible:<g>elements and nested<svg>that have labeled or interactive child content, or text elements that need a label in addition to the accessible text.
Tip
Avoid using role="group" on the <svg> that defines the graphic as a whole. Instead, leave it unspecified if you aren’t explicitly changing it to img.
Browsers assign a graphics-specific role to this element, which doesn’t have a well-supported ARIA equivalent. The latest SVG accessibility specs define this as the graphics-document role, but any browser that would recognize that role name should also get the default correct!
Finally, you sometimes need to explicitly tell the browser to ignore parts of your SVG markup when it is building the accessible representation of the document. There are two ways of doing this, which are not interchangeable:
-
role="presentation"tells the browser that this particular element is not meaningful, but its child content might be. Specifically, it says that this element is used for styling and layout of the child content. -
aria-hidden="true"tells the browser that, for accessibility purposes, this element and all its child content should be treated as if they hadvisibility: hidden.
Most of the time, neither attribute should be required. You should only need aria-hidden when you have duplicated text that needs to be ignored (like when we reused a <text> element to draw its shadow in Example 11-11). You should only need role="presentation" when an element that normally has a role is instead being used for decorative effect (like when an SVG is used to style text inside an HTML heading, and the <svg> element itself is really just a styling hook for the text content).
But browsers aren’t very good at holding up their side of the “shoulds” of SVG accessibility, so developers sometimes need to make up the difference.
You don’t need to use either hiding method when a parent element has role="img": the children of an element with the img role are automatically hidden from assistive tech—which is why it’s really important that img is not used when child content should be accessible.
Putting it all together, Example 17-2 enhances Example 17-1 with role and ARIA attributes, so that most browser and screen reader combinations correctly read the three titles. If the graphic and titles were a little more interesting to start out with, this would be a huge help to screen reader users.
Example 17-2. Improving accessibility of SVG titles with ARIA attributes
<svgxmlns="http://www.w3.org/2000/svg"xml:lang="en"xmlns:xlink="http://www.w3.org/1999/xlink"height="320px"width="140px"aria-labelledby="title-main"><titleid="title-main">Stoplight with Titled Lights, Redundant Cross-Browser Compatibility Edition</title><defsaria-hidden="true"><circleid="light"cx="70"r="30"/></defs><rectx="20"y="20"width="100"height="280"fill="blue"stroke="black"stroke-width="3"aria-hidden="true"/><gstroke="black"stroke-width="2"role="presentation"><usexlink:href="#light"y="80"fill="red"role="img"aria-labelledby="title-red"><titleid="title-red">Red means Stop</title></use><usexlink:href="#light"y="160"fill="yellow"role="img"aria-labelledby="title-yellow"><titleid="title-yellow">Yellow means Slow</title></use><usexlink:href="#light"y="240"fill="#40CC40"role="img"aria-labelledby="title-green"><titleid="title-green">Green means Go</title></use></g></svg>
As with all things related to browser support, you will need to run your own tests and decide for yourself whether you need the extra compatibility fixes from Example 17-2, or whether you want to rely on the standard approach in Example 17-1. Browser support for SVG <title> (and SVG accessibility in general) is improving, and is much better than it was a few years ago. But it lags far behind the accessibility of standards-compliant HTML.
Linking Labels
Using aria-labelledby to associate a <title> with its parent is a bit of a hack, and shouldn’t be required. The intended use of aria-labelledby is to link an element with a visible text label.
Tip
For inline SVG, the element referenced by aria-labelledby can be an HTML element in the same document, instead of SVG text.
The value of aria-labelledby is usually the id of a single other element (without any # URL formatting). However, it can also be a whitespace-separated list of multiple element IDs, which are combined—in order—to form the accessible label.
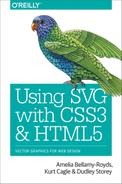
For example, consider the grouped bar chart in Figure 17-1. Each bar has three labels: the category on the x-axis, the date series from the legend, and finally its own text label, which gives the data value. The final aria-labelledby attributes for the bars look like this:
<rectaria-labelledby="group-label-Vancouverseries-label-2013value-label-Vancouver-2013"...otherrectattributes.../>
With matching id values on the correct <text> elements, that bar should be read out as “Vancouver, 2013, 56%.” If you updated the visible text, the alternative text would be automatically updated, too.
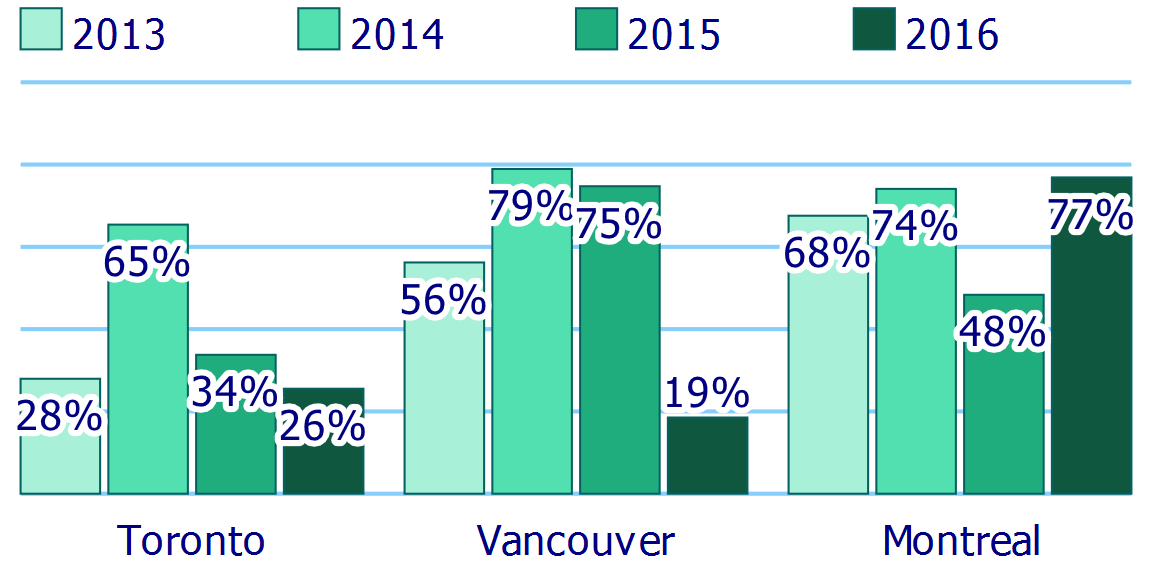
Figure 17-1. An SVG bar chart, where the full meaning of each bar is generated from three different labels
You can even reference an element’s own id to concatenate its normal name (from <title> or aria-label) with a separate label, such as a category value. For example, in a scatterplot the shape and color of symbols might match visible labels in a legend, but the individual data values would be conveyed only by position on an axis, without a matching label:
<useid="data-A-13"aria-label="June 13: 36cm"aria-labelledby="legend-category-A data-A-13"class="data-point category-A"xlink:href="#symbol-A"/><!-- ...somewhere else in the document... --><textid="legend-category-A">Variety A</text>
The final name of the <path> would be “Variety A, June 13: 36cm.”
Of course, if you use <title> instead of aria-label, it is better for browser support to give the <title> element its own id, and use that in the aria-labelledby value.
Example 17-3 shows a complete (but simpler) example of using aria-labelledby in a labeled SVG diagram. The code is for the comparison of stroke-linejoin values in Figure 13-5 in Chapter 13. The <text> elements are grouped separately from the graphics, to share inherited styles, but the aria-labelledby attributes make the connections.
Example 17-3. Associating visible labels with graphics
<svgxmlns="http://www.w3.org/2000/svg"xml:lang="en"xmlns:xlink="http://www.w3.org/1999/xlink"width="390px"height="130px"viewBox="0 0 300 100"><title>Strokes with Different Linejoin Options</title><symbolid="shape"viewBox="-18 -12 36 24"><pathd="M-5,-10 H5 V-5 H10 L15,0 L10,5 H5 V10H-5 V5 H-10 L-15,0 L-10,-5 H-5 V-10 Z"/></symbol><gfill="deepskyblue"stroke="blueViolet"stroke-width="4"stroke-opacity="0.8"><usexlink:href="#shape"width="100"height="75"stroke-linejoin="round"role="img"aria-labelledby="round-label"/><usexlink:href="#shape"width="100"height="75"x="100"stroke-linejoin="bevel"role="img"aria-labelledby="bevel-label"/><usexlink:href="#shape"width="100"height="75"x="200"stroke-linejoin="miter"role="img"aria-labelledby="miter-label"/></g><gfill="blueViolet"font-family="Consolas, monospace"font-size="20"text-anchor="middle"><textid="round-label"x="50"y="95">round</text><textid="bevel-label"x="150"y="95">bevel</text><textid="miter-label"x="250"y="95">miter</text></g></svg>
If you review the code for other figures in the book, you’ll notice that we don’t usually use aria-labelledby for visible labels. Partly that was to keep the code simple when we were discussing other topics. But it is also because aria-labelledby is often more trouble than it’s worth for noninteractive graphics.
A screen reader reading the code from Example 17-3 would read something like: “Graphic: Strokes with Different Linejoin Options; round image; bevel image; miter image; round; bevel; miter.” The text labels get read twice, once as the name of the graphic they are labeling, and then again for themselves.
You could use aria-hidden to hide the labels themselves, but that would cause its own problems: a screen-reader user wouldn’t be able to select and copy the text. So it is often easiest—for noninteractive labeled diagrams—to let the visible labels be the accessible objects, and let the shapes be ignored as decorative content.
Note
This recommendation is based on current screen readers, which don’t do anything with graphics except read out their names and descriptions.
In future, as technology gets smarter, it will become more important to correctly link graphics and labels. For example, someone with partial sight (or full sight but difficulty reading) might want to tap on a graphic on a touchscreen device and have the correct label read out. Other tools like screen magnifiers might zoom in on a labeled item, and also move its label to be visible in the magnified view.
Hopefully, part of “getting smarter” will be not reading labels twice by default, so that will no longer be a concern.
Where aria-labelledby is essential is for interactive graphics. If users need to click (or keyboard-activate) a graphical element, then they and their assistive tech need to be able to correctly associate that element with its visible label.
Roles and Relationships
If you are creating custom interactive components—with SVG or HTML—in web pages, you should probably learn the basics of the Accessible Rich Internet Applications (ARIA, or WAI-ARIA) set of attributes.
The core of ARIA is the role attribute; we’ve already seen a couple of examples of role in action. It is supplemented by various other ARIA attributes. The others all have names that start with aria-*; we’ve discussed a few of them, too!
The role of role, and of ARIA as a whole, is to let assistive technology correctly communicate the structure and function of web pages, when it can’t be fully expressed by the native semantics—the meaning, as opposed to the syntax—of the markup elements (HTML or SVG). It is most important when you’re using JavaScript to create custom widgets and form elements.
ARIA roles are divided into the following categories:
-
Landmark roles, like
mainandnavigation, identify the major regions of a web page so that assistive-tech users can quickly jump to where they need to go. -
Document structure roles describe finer-grained web page structure, like tables, lists, article feeds, and figures.
-
Widget roles describe form elements and other interactive controls.
-
Live region roles identify sections of the web page that will change often, indicating why they are changing and therefore how important changes are to the user: changing text in a countdown timer is less important than new text in an error warning!
Tip
A role only changes how an element is communicated to assistive tech users, not how it behaves. Setting role="checkbox" means that a screen reader will announce an item as a checkbox, but it’s up to the web page author to make sure it also behaves like a checkbox: that it can receive keyboard focus, and that clicking or pressing the space bar causes it to toggle between checked and unchecked states.
In HTML5, the role attribute (and ARIA in general) shouldn’t be used very often. Most roles are equivalent to an HTML element that should be used instead: use <main> instead of <div role="main">; use <button> instead of <a role="button">. As the Using ARIA guide recommends, never use ARIA when HTML will do.
But SVG markup is inherently presentational, not semantic: elements and attributes describe what the content looks like, not what it means. So if your SVG document has complex structure—and especially if it contains interactive widgets—ARIA can help assistive technology users understand how all the individual labeled graphics are related to each other.
The ARIA attributes (including role) were only officially added to SVG in SVG 2, but they have fairly good browser support, at least in inline SVG. We’ve already shown examples of using the good ARIA support to compensate for poor support for native SVG accessibility.
We’ve already discussed the two most common roles you’ll use:
-
imgis for indivisible and noninteractive parts of the graphic. -
groupis for a section of the graphic that should have a shared label, but also have accessible parts inside it.
For more complex graphics, consider adding the following document structure roles:
-
headingindicates that SVG text is equivalent to an HTML heading. Use thearia-levelattribute to indicate which heading element: its value is1,2,3, and so on, to represent<h1>,<h2>,<h3>:<textrole="heading"aria-level="1">The Invention</text><textrole="heading"aria-level="2">Before</text><!-- graphical diagram with labels --><textrole="heading"aria-level="2">After</text><!-- a different graphical diagram with labels -->However, if the heading text is the only content in an inline SVG, consider using an HTML heading element wrapped around the SVG instead:
<h1><svgrole="presentation"><text>...</text></svg></h1> -
regionidentifies large parts of the graphic that are more important than a regular group, similar to an HTML<section>. A region must have a name, and is oftenaria-labelledbyan element with aheadingrole:<grole="region"aria-labelledby="before-heading"><textid="before-heading"role="heading"aria-level="2">Before</text><!-- graphical diagram with labels --></g> -
list(on a<g>) andlistitem(on individual graphics inside that<g>) can turn a group of items into an organized list, equivalent to<ul>or<ol>and<li>in HTML.The benefit of a list over a group is that most screen readers announce how many items are in the list, and which item they are currently reading, so that it is easier for screen-reader users to keep track of where they are. It’s therefore recommended whenever a group has more than four or five labeled graphics within it, if they are all similar items (such as data points in a chart):
<grole="list"aria-label="2017 data"><usexlink:href="#icon-1"role="listitem"aria-label="January: $15.3K"x="20"y="17"/><usexlink:href="#icon-1"role="listitem"aria-label="February: $12.1K"x="40"y="13"/><!-- and 10 more, for the rest of the months --></g> -
contentinfois used for “footer” information, such as credits and sources.
For interactive graphics, you’ll need to use the full suite of ARIA roles and other attributes. Remember that the role doesn’t change behavior: you still need to use JavaScript to make your graphics keyboard accessible, in a way that matches the role.
1,000 Words Are Worth a Picture
A short <title> may tell you what you are looking at, but it doesn’t tell you much about what it looks like.
The SVG <desc> (or description) element is designed for providing more comprehensive alternative text, either about a particular element, or about the SVG document overall. Just like <title>, a <desc> applies to its parent element.
Tip
As with <title>, SVG 2 allows you to provide multiple descriptions in different languages. But that isn’t currently supported in any software.
Ideally, the content of the <desc> element would be available to users of screen readers and similar tools as an optional description, that they can either read or skip over. Unfortunately, support for <desc> is currently even worse than support for <title>. Support for the aria-describedby attribute isn’t much better.
If you want to be sure that the extra descriptive content is available to screen-reader users, you can use the aria-labelledby attribute to concatenate the description after the title. For example, in a line chart you might use the <desc> to provide an accessible description of the shape of the line:
<pathd="..."aria-labelledby="title-3 desc-3"><titleid="title-3">Average Monthly Precipitation</title><descid="desc-3">Values peak at more than 90mm in July, dropping to half that in May and September, and stay below 20mm between November and March.</desc></path>
You should, of course, make the data available as a table, too. Not only are tables easier for screen-reader users to navigate, but they are very useful for anyone else who wants to see the exact numbers! But the prose description of the key patterns in the data is a more direct equivalent to the information that a sighted user gains from a quick look at the chart.
The lack of native accessibility support doesn’t mean that <desc> is completely ignored by software today.
Certain tools, such as Inkscape, may use it to provide summary information, and websites such as Open Clip Art take their descriptions from the primary SVG <desc> element.
Unfortunately, this has meant that some authoring tools use <desc> to provide their own metadata—of the “Made with Software X” variety—which isn’t very helpful as an image description.
An interesting feature of <desc> is that the element can contain markup content from other namespaces, particularly HTML. The markup isn’t used (or expected to be used) in accessible descriptions. It’s allowed as part of a strategy for SVG fallback in browsers that didn’t support SVG graphics—you could use paragraph tags and other structured HTML in the <desc> and in <title>, too:
<p>The following diagram shows the steps:</p><svg><title><h3>Step-by-step instructions</h3></title><g><title>Step 1</title><desc><p>Take the widget with the do-hicky and attach it to the something-or-other<em>carefully</em>...</p></desc><pathd="..."/></g>
This can be a functional fallback for inline SVG in older browsers, which will ignore all the elements they don’t recognize. But beware: by default those old browsers will treat the <title> element like an HTML <title>, and not display it (although you can change this with CSS).
For inline SVG that is processed by a modern HTML parser, content inside <desc> is parsed like content in the main HTML document, meaning it is treated as HTML elements unless it is a <math> (or a <svg>). Only HTML “flow” elements are allowed: no sectioning content or landmarks.
For SVG processed by an XML parser, HTML elements require correct namespacing.
Tip
To create markup that works with either parser, use an xmlns attribute to change the default namespace, instead of an XML prefix—which won’t be recognized by the HTML parser.
The browsers may not use complex content inside a <desc>, but you can always enhance a graphic with JavaScript to display the titles and descriptions, for all users.
Example 17-4 uses an SVG <foreignObject> element to display the alternative text for a section of the graphic when that region is moused-over, focused, or tapped by the user. The script directly clones the HTML markup inside the <desc>, so there is no duplication of content. Figure 17-2 shows one description displayed.
Figure 17-2. SVG title and description, displayed by cloning content into HTML elements
Example 17-4. Associating visible labels with graphics
<svgxmlns="http://www.w3.org/2000/svg"xml:lang="en"xmlns:xlink="http://www.w3.org/1999/xlink"viewBox="0 0 400 400"><title>Displaying Titles and Descs with Scripting and foreignObject</title><styletype="text/css">#display{background:white;padding:1em;box-sizing:border-box;overflow:auto;}</style><defs><gid="gem"><polygonpoints="0,25 35,0 65,0 100,25 50,100"/><gfill="white"fill-opacity="0.3"><polygonpoints="0,25 30,30 50,100"/><polygonpoints="100,25 30,70 50,100"/><polygonpoints="28,5 35,0 65,0 72,5 50,10"/><polygonpoints="50,10 30,30 50,35 70,30"/><polygonpoints="72,5 70,30 100,25"/></g><gstroke="white"stroke-opacity="0.5"fill-opacity="0.5"><polygonpoints="100,25 70,30 50,100"/><polygonpoints="28,5 30,30 0,25"/></g></g></defs><linearGradientid="background"y2="100%"><stopoffset="0"stop-color="#446"/><stopoffset="0.3"stop-color="#333"/><stopoffset="0.8"stop-color="#333"/><stopoffset="1"stop-color="#456"/></linearGradient><rectfill="url(#background)"width="100%"height="100%"/><g><usexlink:href="#gem"x="50"y="10"fill="red"class="gem"tabindex="0"role="img"><title>Red</title><desc><pxmlns="http://www.w3.org/1999/xhtml"><spanstyle="color:red">Red</span>is the color of blood, rubies and strawberries. It is the color of the wavelength of light from approximately 620–740nm on the electromagnetic spectrum.</p></desc></use><usexlink:href="#gem"x="150"y="10"fill="limeGreen"class="gem"tabindex="0"role="img"><title>Green</title><desc><pxmlns="http://www.w3.org/1999/xhtml"><spanstyle="color:green">Green</span>is the color of growing grass and leaves, of emeralds, and of jade. In the continuum of colors of visible light, it is located between yellow and blue. It is the color of the wavelength of light from approximately 520–570nm on the electromagnetic spectrum.</p></desc></use><usexlink:href="#gem"x="250"y="10"fill="blue"class="gem"tabindex="0"role="img"><title>Blue</title><desc><pxmlns="http://www.w3.org/1999/xhtml"><spanstyle="color:blue">Blue</span>is the color of the clear sky and the deep sea. On the optical spectrum, blue is located between violet and green. It is the color of the wavelength of light from approximately 450–495nm on the electromagnetic spectrum.</p></desc></use></g><foreignObjectwidth="380"height="260"x="10"y="120"id="fo"><divxmlns="http://www.w3.org/1999/xhtml"id="display"style="max-height: 260px"></div></foreignObject><script>//<![CDATA[window.onload=function(evt){vargems=document.getElementsByClassName("gem"),fo=document.getElementById("fo"),display=document.getElementById("display"),displayedElement;for(varindex=0;index<gems.length;index++){vargem=gems.item(index);gem.addEventListener("mouseover",showTitle);gem.addEventListener("focus",showTitle);gem.addEventListener("touchStart",showTitle);};functionshowTitle(evt){varelement=evt.currentTarget,title=element.getElementsByTagName("title")[0],desc=element.getElementsByTagName("desc")[0];if(displayedElement){displayedElement.removeAttribute("aria-describedby");}display.innerHTML="<h2>"+title.textContent+"</h2>";display.appendChild(desc.firstElementChild.cloneNode(true));displayedElement=element;element.setAttribute("aria-describedby","display");forceRepaint();}functionforceRepaint(){fo.style.width=fo.style.width;}};//]]></script></svg>
Warning
Something about the HTML elements in the <desc> causes Chrome to stop parsing CDATA markup correctly, if you copy and paste this example into an HTML file. The HTML elements themselves parse fine, and CDATA is usually fine within inline SVG markup.
That was causing the script to break, since the <![CDATA[ part was being treated as the first line of the script. The solution was to add JavaScript comments (//) before the CDATA markup.
The benefit of this approach is that you keep your descriptions of the diagram organized directly with the SVG content that they describe. Imagine a much more complicated technical diagram with multipart instructions, and then imagine having to update that diagram to add a new step, and you can understand why it would be easier to keep both graphic and text together.
Here, we aren’t using much HTML formatting (only a colored span), but the description could just as easily contain multiple paragraphs or numbered lists. However, when using complex markup, remember that the normal SVG <desc> behavior for screen readers (even where supported) is to just read the plain text. For screen readers that do correctly support long descriptions, the aria-describedby attribute is updated whenever we display the descriptions as HTML text, so that they can prompt users to jump to the formatted version of the text.
If you were using inline SVG, the display HTML region could easily be a regular HTML element, outside of the SVG markup, instead of HTML inside a <foreignObject>. (And thereby gain support in Internet Explorer, which doesn’t support <foreignObject>.) The benefit of <foreignObject> is that it can be positioned and scaled within your SVG coordinate system.
The downside of <foreignObject> is that they tend to be a bit buggy. The extra forceRepaint method addresses one of those bugs. It contains a seemingly redundant statement:
fo.style.width=fo.style.width;
The <foreignObject> contents are essentially an escape hatch out of the SVG, but in many cases this means that the SVG renderer and HTML renderer need to coordinate which one is responsible for rendering a certain section of the screen. In older versions of Chrome, the <foreignObject> wasn’t properly refreshing after it was changed. Resetting the width was enough to poke the browser to clean up the screen correctly. It’s not pretty, but it worked.
Machine-Readable Metadata
There is one last metadata element defined in SVG. It has the terribly creative name <metadata>.
The SVG <metadata> element differs from <title> and <desc> in one critical way. While those elements are designed for providing human-readable descriptive content for the SVG drawing or application, the <metadata> element exists primarily to provide machine readable annotations.
The SVG specifications don’t define anything more about <metadata>. Instead, it is a container for content from other XML namespaces. There are a number of XML metadata schemes that are used in digital publishing and on the web, any of which can be embedded inside an SVG <metadata> block.
Warning
The HTML parser does not do anything special for <metadata>. It does not accept foreign-namespaced XML content, nor even HTML <meta> elements.
If you want to add machine-readable metadata to inline SVG content, use HTML metadata elements and attributes elsewhere in the page.
At its simplest, the <metadata> tag can be used to store publishing information about a given drawing—its creator, its title, when it was created and last updated, and so forth. This information is typically contained within the Dublin Core namespace, using a publishing standard that has been around for several years. More context-specific metadata can use the Resource Description Framework (RDF) metadata system.
Many SVG-creating software programs generate <metadata> sections automatically or based on document properties that can be set by the author using the software’s graphical interface. You can also add <metadata> by hand or script later.
Example 17-5 shows one possible structure, containing different types of metadata commonly used for graphics.
Example 17-5. A sample SVG license and other metadata
<svgxmlns="http://www.w3.org/2000/svg"xml:lang="en"xmlns:rdf="http://www.w3.org/1999/02/22-rdf-syntax-ns#"xmlns:dc="http://purl.org/dc/elements/1.1/"xmlns:cc="http://web.resource.org/cc/"><title>SVG with Metadata</title><metadata><rdf:RDF><cc:Work><dc:format>image/svg+xml</dc:format><dc:typerdf:resource="http://purl.org/dc/dcmitype/StillImage"/><cc:licenserdf:resource="http://creativecommons.org/licenses/publicdomain/"/><dc:publisher><cc:Agentrdf:about="http://openclipart.org/"><dc:title>Open Clip Art Library</dc:title></cc:Agent></dc:publisher><dc:title>A Sample Picture</dc:title><dc:date>2013-10-08T04:31:22</dc:date><dc:description>This is a picture of a sample object.</dc:description><dc:source>http://example.com/detail/sample_picture</dc:source><dc:creator><cc:Agent><dc:title>jane_doe</dc:title></cc:Agent></dc:creator><dc:subject><rdf:Bag><rdf:li>thing</rdf:li><rdf:li>sample</rdf:li><rdf:li>object</rdf:li></rdf:Bag></dc:subject></cc:Work><cc:Licenserdf:about="http://creativecommons.org/licenses/publicdomain/"><cc:permitsrdf:resource="http://creativecommons.org/ns#Reproduction"/><cc:permitsrdf:resource="http://creativecommons.org/ns#Distribution"/><cc:permitsrdf:resource="http://creativecommons.org/ns#DerivativeWorks"/></cc:License></rdf:RDF></metadata><!-- actual SVG code here --></svg>
In this case, the metadata defines three distinct namespaces: the RDF (Resource Description Framework) namespace, which gathers metadata; the Creative Commons (CC) namespace, which contains license information; and the Dublin Core (DC) namespace, which provides information about titles, creators, and agents. Each metadata scheme has its own documentation about how to use the elements and attributes.
Note
The Creative Commons logos are themselves available in SVG. These can help people identify quickly what use can be made of a given piece of artwork or other intellectual work.
Integrating metadata directly in the SVG file helps keep your documents organized but still easy to edit. The information is useful for applications that query generic XML/RDF content. SVG editors can read this content to determine the provenance of any given file. But remember: easy to edit means easy to remove. Someone can always copy the file and remove your license and other metadata, the same as for any other file format. Furthermore, when you are optimizing SVG files for the web, you will need to decide for yourself whether the extra data is worth the extra bytes.
On the web, properly formatted metadata may be used by search engines to index files. Many social media tools also look for metadata in the form of HTML <meta> elements when creating previews for a linked document. Just like other metadata elements, the HTML <meta> elements (when correctly namespaced) can be included within an SVG <metadata> section in an SVG file—but you’ll have to test to see whether the social media sites you are trying to support actually look inside the SVG file to find them.
Summary: Metadata for Accessibility and Added Functionality
Metadata elements and attributes allow you to enhance your SVG graphic with structured information about what it means. You can embed any XML-compatible metadata in a <metadata> block, and you can add titles and descriptions for sections of the graphic as well as for the SVG as a whole. ARIA roles and attributes allow you to further annotate the structure and function of different elements, and are particularly important for interactive graphics.
Software support for SVG accessibility, however, has lagged behind support for HTML accessibility. Even where it is supported, there isn’t an established framework for how browsers should describe complex graphical structures (like data charts and maps) to assistive tools like screen readers. Things are slowly getting better, but ensuring optimal accessibility currently requires a lot of redundant ARIA attributes.
For deciding on ARIA roles, you’ll want to return to the list in “Roles and Relationships”. For further information, consult these guides for website authors: