Table of Contents for
Using SVG with CSS3 and HTML5
 Using SVG with CSS3 and HTML5
Published by
O'Reilly Media, Inc., 2017
Using SVG with CSS3 and HTML5
Published by
O'Reilly Media, Inc., 2017
- nav
- Cover
- Using SVG with CSS3 and HTML5
- Using SVG with CSS3 and HTML5
- Preface
- I. SVG on the Web
- 1. Graphics from Vectors
- 2. The Big Picture
- 3. A Sense of Style
- 4. Tools of the Trade
- II. Drawing with Markup
- 5. Building Blocks
- 6. Following Your Own Path
- 7. The Art of the Word
- III. Putting Graphics in Their Place
- 8. Scaling Up
- 9. A New Point of View
- 10. Seeing Double
- 11. Transformative Changes
- IV. Artistic Touches
- 12. Filling Up to Full
- 13. Drawing the Lines
- 14. Marking the Way
- 15. Less Is More
- 16. Playing with Pixels
- V. SVG as an Application
- 17. Beyond the Visible
- 18. Drawing on Demand
- 19. Transitioning in Time
- 20. Good Manners
- Index
- About the Authors
- Colophon
Chapter 7. The Art of the Word
Chapter 7. Graphical Text Layout
Text in SVG is treated very similarly to shapes. Individual letters can be positioned anywhere in the graphic and can be filled or stroked (or both). Instead of using geometric attributes to define this “text shape,” you use the text content of the element itself, combined with font-selection style properties and a few SVG-specific text layout attributes and properties.
The font-selection properties in SVG are entirely borrowed from core CSS. If you’re familiar with styling text with CSS (and we’re assuming you are) you are halfway to styling SVG text. You can even use web fonts declared with an @font-face rule, although external font files—like external stylesheets—are restricted in some SVG contexts.
SVG text layout, in contrast, does not reuse CSS layout. When used to style HTML, CSS lays out text by dividing the page into boxes and then wrapping streams of text within them. If you change the styles of a section of HTML text so that it takes up more space, the rest of the text is pushed out of the way, or wraps to a new line. SVG text doesn’t (yet) work like that.
In SVG, each <text> element is independent, positioned exactly where you place it, even if it overlaps other content. There are ways to make SVG text flow in continuous streams, but it takes much more work than the equivalent CSS layout. SVG text is therefore best reserved for its intended purposes: figure labels and short snippets of precisely positioned decorative text.
Note
Better support for large blocks of automatically wrapping text has long been a requested feature for SVG. A few programs, such as Inkscape, implemented a proposal from the SVG 1.2/SVG Tiny 1.2 specifications, but it is not supported on the web.
A new proposal, with better CSS integration, is part of SVG 2 but has not been implemented in mainstream browsers (as of mid-2017).
There are numerous complexities to SVG text layout, and—unfortunately—numerous areas where browser implementations are incomplete or inconsistent. If you are interested in all the details, we have written a complete book on the subject.1
This chapter briefly introduces the three main types of SVG text layout:
-
short labels positioned around a single anchor point
-
precise character-by-character positioned graphical text
-
text arranged on a path
The features described here are relatively well-supported in web browsers, at least for Western languages. If you are using right-to-left languages such as Hebrew or Arabic, or scripted languages that use complex text shaping (changing or re-arranging the appearance of characters based on their context), beware of browsers making a mess of your text when using character positioning or text on a path.
Warning
The original SVG specifications also included a way to define entire custom fonts as SVG graphics; however, SVG fonts aren’t supported in most browsers and can’t be relied upon for their original purpose of providing consistent, cross-application text rendering.
SVG fonts are not part of the SVG 2 specification. Instead, the SVG in OpenType specification aims to integrate SVG graphics into OpenType, the most commonly used format for defining font metadata.
We’re not going to talk about designing your own fonts here, but we do have some tips on working with web fonts and fallback system fonts.
When Text Isn’t Text
There are many benefits to using SVG for decorative text that you can’t easily create with regular CSS. But those benefits come with some qualifications and complications.
Before starting with SVG text, it’s important to understand how the text will be used on the page, since that will determine the techniques you use to produce the final result. Images behave very differently from objects or inline SVG.
If you embed an SVG with text elements into a web page with a <img> tag, or if you use it as a CSS background image, you should be aware of a few restrictions:
- No web fonts
-
Browsers prevent external file downloads with SVG used as an image, so any
@font-facereferences to web fonts will be ignored. - Loss of accessibility
-
Text in the image won’t be read by screen readers; you must provide an accessible equivalent using the
<img>element’saltattribute (or ARIA attributes). - No text selection
-
Text in the image can’t be selected or copied by the user. This means users cannot easily look up or translate unfamiliar words, and text can’t be searched with browser “Find” commands.
- Lowered editability
-
You won’t be able to edit the text directly when working with the HTML; you’d have to make changes in the SVG document, upload the file, and refresh the HTML page that references it. There is also no way to update the text via script.
Due to these limitations, when an SVG will be used as an image, it’s fairly common to convert text inside it into paths in the shape of the letters. Converting text to paths is particularly useful for logos, where the text must be rendered in exactly the right way every time.
The conversion process must be done by an application that has access to the desired font: in Adobe Illustrator, for example, the option is called “Create Outlines” under the Type menu. Newer versions also allow you to apply the conversion in the SVG export process. In Inkscape, use “Object to Path” in the Path menu.
Naturally, this dramatically alters the editability of the text: with paths, you can move points and change stroke and fill, but can no longer treat the shapes as actual text.
Tip
When converting text to paths, always save a separate copy of the graphic with the editable text, in case you need to change it later.
Converting text to paths can also change the sizing of gradients or patterns, as we’ll discuss in Chapter 12.
In contrast, when SVG markup containing <text> elements is placed inline as part of an HTML page, the disadvantages associated with text-as-image disappear: the text is editable, uses @font-face settings, is fully accessible, and can be copied by users or found with browser page-search features.
The accessibility improvements should also apply for SVG files embedded as interactive <object> or <embed> elements, although browsers have a tendency to be buggy with accessibility of SVG content inside an embedded object—so test carefully! The SVG text remains in a separate file, of course, so must be edited separately from the main web page. Whether this is an advantage or disadvantage depends on whether the test is reused on many pages (logos or advertisements), or specific to the current page (like decorative headings).
Whether inline, image, or object, SVG text retains a number of advantages. Compared to bitmap images of text (which were once commonly used for decorative headings on the web), SVG text remains crisp at any scale, so is accessible to those that need higher magnification. Compared to bitmaps or to text converted to paths, it is easily editable if you need to change it later. These benefits remain even when the text uses highly convoluted layouts, or is enhanced with decorative filters, masks, or gradients.
Working with Web Fonts
Real SVG text requires real fonts to tell the browser how to draw each letter. You have three options:
-
Use only common fonts that will be available on most systems.
-
Use web font files that are linked by a CSS
@font-facerule. -
Use web font data embedded in your SVG.
In the first two cases, you need to think carefully about fallbacks to use if your chosen font isn’t available. If you’re using a graphics editor, they won’t add fallbacks for you. You’ll need to open up your file in a code editor and edit the styles to change the font-family list.
If you’re using web fonts, you’ll also need to add an @font-face rule for each typeface. The format of the @font-face rule is the same as for CSS-styled HTML. Place the rule where you need it:
-
If you’re using inline SVG, it automatically shares the
@font-facerules that apply to the rest of the page. -
If you’re sharing web fonts between your SVG objects and the rest of the website, you can link your existing stylesheet (using the methods discussed in “External stylesheets”, in Chapter 3).
-
Otherwise, create a
<style>element in your SVG, and add the@font-facethere.
If fallback fonts are a design problem, embedding the font data in the SVG can be an attractive option. It means that the complete drawing instructions are contained in a single .svg file, which still uses real, accessible text.
Embedding was one of the goals behind SVG fonts, which defined font data through SVG <font>, <glyph>, and related elements, which could be included in the same file. But SVG fonts had other problems and are now deprecated, with very poor browser support.
Instead, the best approach to embedding fonts today is to use an OpenType font format (such as WOFF), converted to a data URI.
The browser’s final choice of typeface for each character is based on a complicated font-matching and fallback algorithm. However, this algorithm is the same for SVG as it is for other CSS-styled text.
Typewriter Text
The bare minimum for SVG text, as we showed in Chapter 1, is a <text> element with x and/or y attributes. It can be quickly enhanced with CSS rules or presentation attributes to define styles.
Tip
Unlike HTML, SVG will not automatically render text simply typed into the document; text in SVG must appear inside a <text> element.
Example 7-1 shows the basic markup to style some text and include it in an SVG; Figure 7-1 is the output. We’ll discuss the attributes one at a time.

Figure 7-1. SVG text, with minimal style and layout
Example 7-1. Defining basic text in an SVG
<svgxmlns="http://www.w3.org/2000/svg"xml:lang="en"width="500"height="80"><textx="1em"y="60"font-size="64"font-weight="bold"font-family="Brush Script MT, Brush Script,Segoe Script, cursive">Some Test SVG Text</text></svg>
The x,y position you specify is—by default—the position of the baseline of the first letter in the text. The baseline is the invisible line that letters “sit” on, lining up the bottoms of most of the letters. The browser then “types” the rest of the text in a straight line from there.
Tip
As with the geometric attributes for basic shapes, SVG text positioning attributes can have different units, or no units at all. The font-relative em unit is particularly useful for text.
Note that SVG does not wrap text when it runs out of room: words in a <text> element that extend outside the SVG dimensions simply disappear. (Or overflow, if you’re using inline SVG with overflow: visible.)
Disappearing text can also be an issue if you omit the y attribute of a <text> element, as it defaults to 0. In a simple SVG like this, this means your text would be drawn so it is sitting on the top edge of your SVG frame, with only the descenders (the tails of letters like p and y) visible.
Under most circumstances, the y value of a <text> element should be at least (or almost) as large as its font-size, to ensure that the text is seen.
Tip
Starting in Chapter 8, we will introduce another solution: change the coordinate system so 0 isn’t right at the top!
As with HTML text, extra spaces in the markup for an SVG <text> element are normally ignored, and collapse to a single space. Spaces at the beginning or end of an element, however, have more complicated collapsing rules and inconsistent behavior cross-browser, both of which can sometimes throw off your layout.
It often helps to put your start and end tags right up next to the text content:
<textx="50%"y="3em">like this</text><textx="50%"y="5em"font-family="long family name">or like this</text>
The remaining attributes used in Example 7-1 are presentation attributes for standard CSS font properties: font-size, font-weight, and font-family.
The SVG font-family attribute uses the same cascading fallback as the CSS font-family property. Other properties, like font-weight (for boldness) and font-style (for italics), are similarly familiar.
When specified in a presentation attribute, font-size can be given as a plain number and is assumed to be measured in pixels (this is what we did in Example 7-1). In CSS, however, the px must be specified explicitly. Like all other measurements in SVG, font size scales along with the coordinate system, so the actual used font size will depend on how large or small the SVG is drawn.
These presentation attributes map directly to their CSS equivalents. It’s often more efficient to write them in CSS format, as in Example 7-2 (which looks identical to Figure 7-1 when displayed).
Example 7-2. Using CSS rules to style text in an SVG
<svgxmlns="http://www.w3.org/2000/svg"xml:lang="en"width="500"height="80"><title>Sample SVG Text, styled with CSS</title><style>text{font-family:BrushScriptMT,BrushScript,SegoeScript,cursive;font-size:64px;font-weight:bold;}</style><texty="60"x="1em">Some Test SVG Text</text></svg>
If you’re using CSS (but not if you’re using presentation attributes), you can also use the font shorthand to set all these properties. The styles in Example 7-2 could be replaced by one declaration:
text{font:bold64pxBrushScriptMT,BrushScript,SegoeScript,cursive;}
In inline SVG, all the font properties inherit from the surrounding page. For standalone SVG, the browser’s default font settings are used if you don’t change them.
Colorful Language
An important difference between CSS-styled HTML text and SVG text is that color does not change the color of text in SVG. Instead, SVG text uses fill, as either an attribute or a CSS property:
text{fill:red;}
To coordinate inline SVG text with the color of surrounding text, use fill: currentColor. This sets the fill value to match the inherited color value.
Tip
The same trick doesn’t work with embedded images or objects: style values from the main page do not inherit into the external file!
Text can also be stroked in SVG, achieving an effect that cannot yet be reliably recreated in CSS cross-browser:
text{fill:red;stroke:black;stroke-width:2px;}
When those additional styles are added to the code from Examples 7-1 and 7-2, the result is Figure 7-2.

Figure 7-2. SVG text, filled in red and stroked in black
As we showed in Chapter 1, the fill and stroke values can instead reference gradients or other SVG paint server effects, the same as for filling and stroking SVG shapes.
Simple typewriter-style text layout like this may not be particularly artistic, but it still has an important role in graphics. The next section looks at SVG text for labels in a figure or diagram.
Responsive Text Scaling
To demonstrate how SVG text can be used to label a figure, we’re going to add labels to a photograph. Unlike labels that are added directly to a photo with Photoshop or other editors, the SVG labels will remain accessible, easy to edit, and crisp at any scale. But in case that’s not enough, we’re going to expand the show off one of SVG text’s superpowers, using CSS to make the labels responsive.
Tip
A photograph in an SVG? But of course!
We’ll talk more about the <image> element in Chapter 10. For now, just trust that it is similar to the HTML <img> element, and allows you to embed another image file in your SVG document.
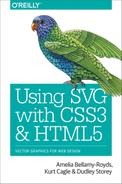
The photograph we’re using is of a Lynskey 2017 Vialé bicycle; we’ll label it to highlight product features.
Example 7-3 gives the code for importing the photograph into an SVG, and adding the <text> labels on top. The original photograph is 1,000×586 pixels, so those are the dimensions we’ve used for the SVG (the image is then set to take up 100% of the SVG dimensions). Figure 7-3 shows the labeled result.
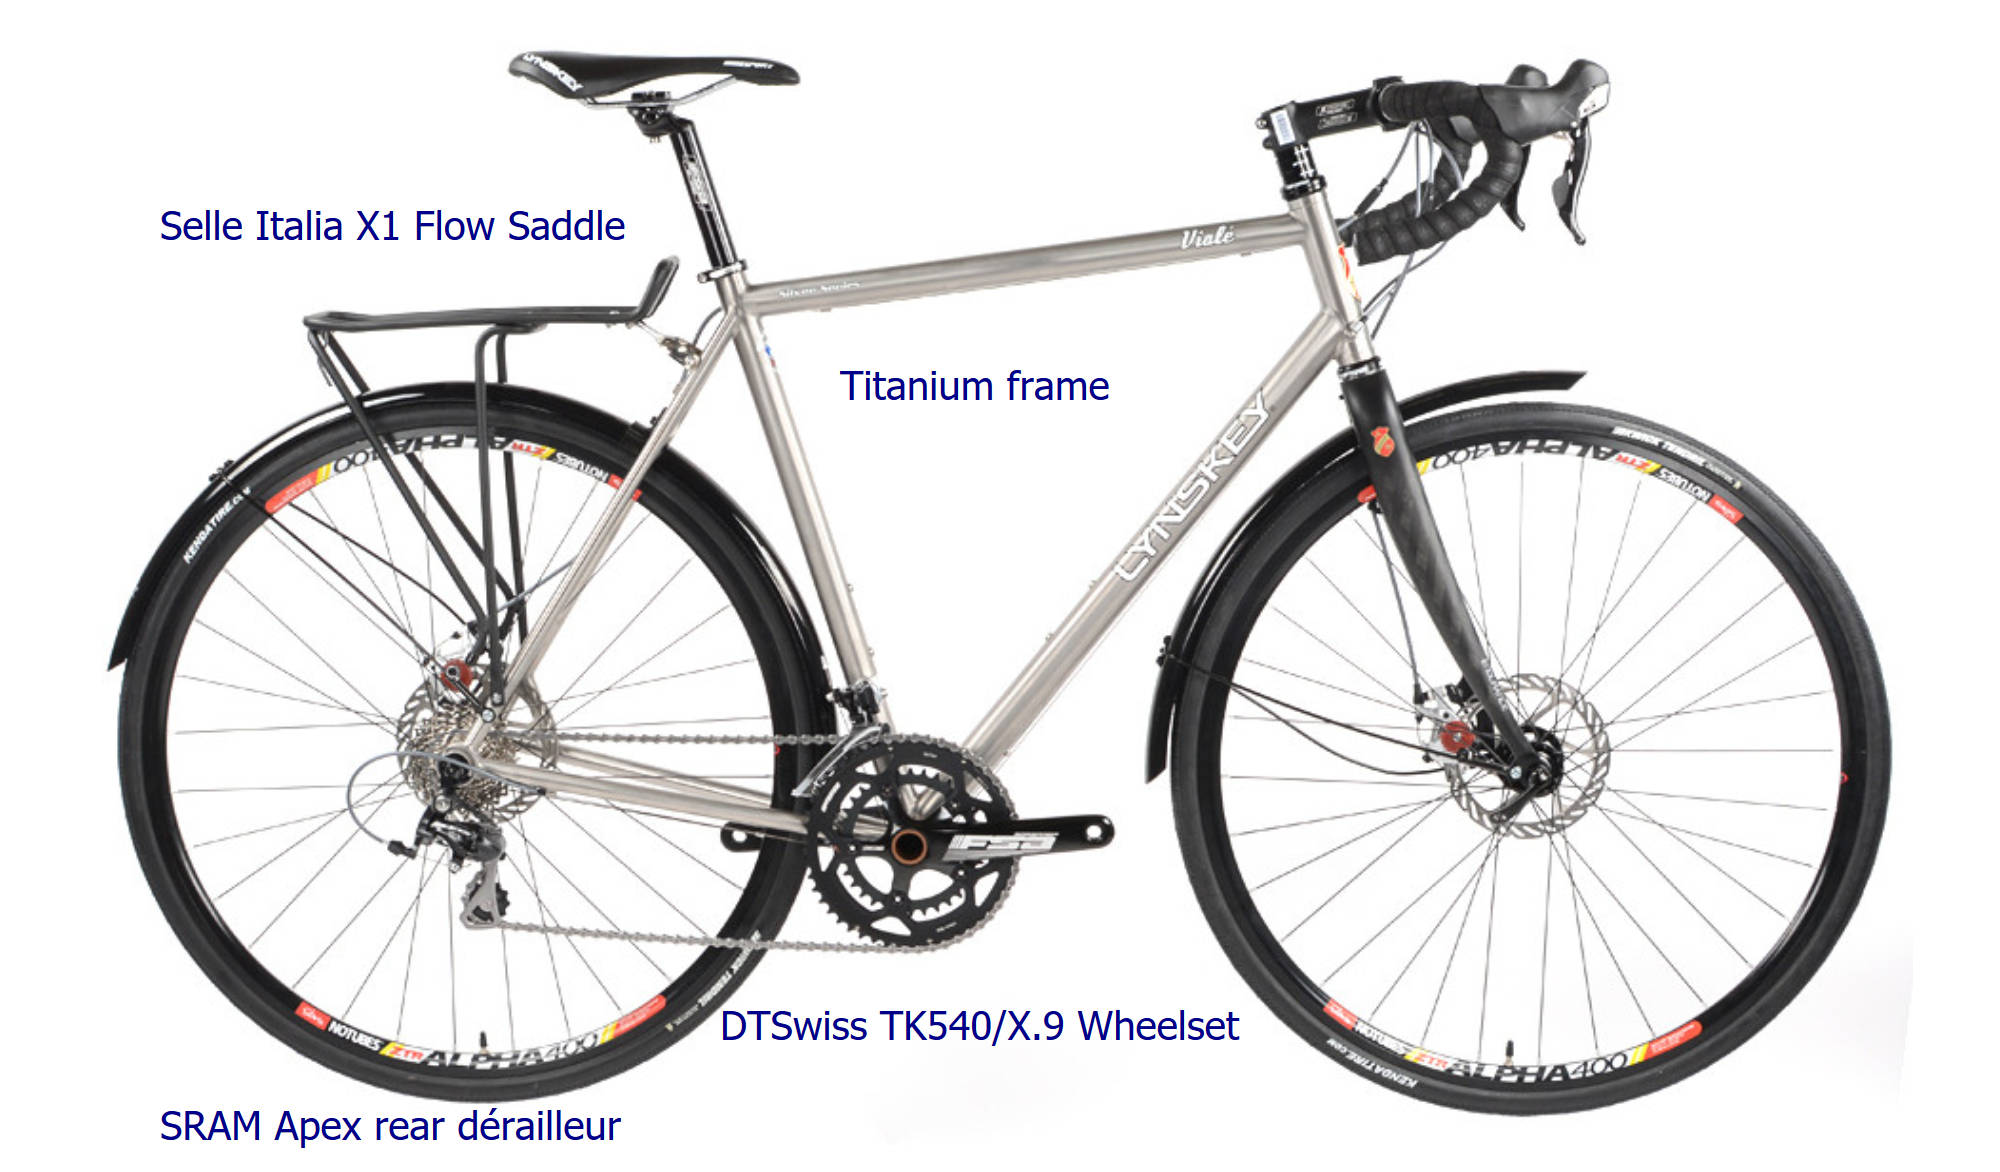
Figure 7-3. The labeled photograph
Example 7-3. Using SVG text to label a photograph
<svgxmlns="http://www.w3.org/2000/svg"xml:lang="en"xmlns:xlink="http://www.w3.org/1999/xlink"width="1000px"height="586px"id="lynskey"><title>Lynskey 2017 Vialé Technical Details</title><style>svgtext{font:20pxsans-serif;fill:darkBlue;}</style><imagewidth="100%"height="100%"xlink:href="viale.jpg"/><textx="360"y="520">DTSwiss TK540/X.9 Wheelset</text><textx="80"y="120">Selle Italia X1 Flow Saddle</text><textx="420"y="200">Titanium frame</text><textx="80"y="570">SRAM Apex rear dérailleur</text></svg>
Figure 7-3 shows the result when the SVG file from Example 7-3 is viewed directly. To add it to a web page, you would need to embed it either by copying the code inline, or by using an HTML <object>. (Or <embed>. Or <iframe>. They are functionally much the same as <object>.)
Using an HTML <img> isn’t an option. As we’ve already mentioned earlier in this chapter, the text labels wouldn’t be accessible in an image. But in this case, there’s an even greater reason: the photograph won’t be shown at all if the SVG is displayed as an <img>, because it’s an external asset file, and external files aren’t loaded when SVG is used as an image.
If we’re going to embed the graphic in a web page, we probably want to be able to control its size, so it can scale down on mobile devices. That means adding a viewBox attribute (which we’ll talk more about in Chapter 8). In the simplest version of a viewBox, the width and height in pixels are used as the third and fourth values in the viewBox attribute:
<svgxmlns="http://www.w3.org/2000/svg"xml:lang="en"xmlns:xlink="http://www.w3.org/1999/xlink"viewBox="0 0 1000 586"id="lynskey">
The viewBox creates a responsive SVG that scales to fit the available space. Now the SVG and the photograph inside it will scale to fit within whatever CSS dimensions we set on the HTML <object> (or on the <svg> itself, if we copy the markup directly into the HTML).
Unfortunately, however, the text will also scale down. The 20px font size that is clear and easy to read full-screen can become miniscule if the SVG is displayed on a mobile screen, or as a preview in a catalogue page.
For this reason, you may want to adjust the used font-size of SVG text at certain breakpoints to make it more readable. When the available space is smaller, the declared font-size (before scaling down) should be larger. Assuming the SVG will be used as an <object>, the following media queries can be added to the code:
@media(max-width:600px),(max-height:342px){svgtext{font-size:28px;}}@media(max-width:400px),(max-height:235px){svgtext{font-size:36px;}}
Tip
As we warned in Chapter 3, the appropriate media queries will be different when the SVG is a standalone document versus when it is inline in an HTML document. With an <object>, the media queries are directly related to the SVG dimensions. In inline SVG, you would need to consider the overall layout.
To make the font-size change a little smoother when the size of the SVG embedded object changes, you can add in a CSS transition effect:
svgtext{transition:font-size0.5s;}
Figure 7-4 shows scaled-down versions of the labeled diagram. On the left is the original scaled-down text, and on the right is the result of adding in the media queries; in this case, the second query is in effect, so the text is at 36px font size, relative to the SVG scale. It’s not perfect, because the text now overlaps the dark lines in the photograph, but it is probably still easier to read for many people.
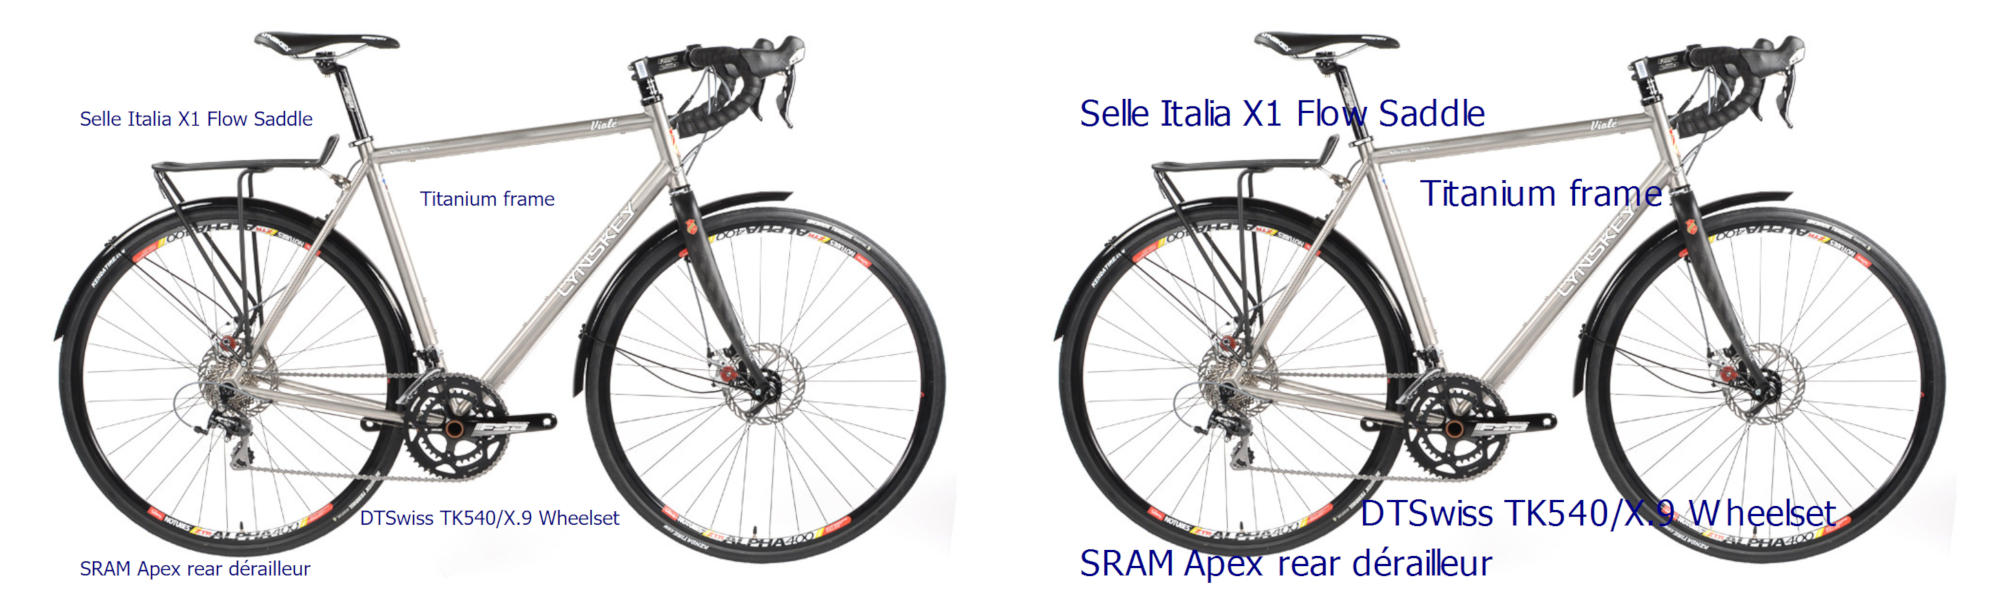
Figure 7-4. The labeled photograph, scaled down, with and without font-size media queries
The displayed font size will never be 36px, of course: the media query only kicks in when the entire SVG is drawn at 40% scale or smaller, so the net font size will be 14px or less.
While interaction and media queries can add a lot of functionality to this diagram, the text labels aren’t particularly artistic. For a simple labeled figure, that’s fine, but not in other cases. Posters, album covers, comic books, and many other graphics need more precise control over lettering. The rest of this chapter looks at the more graphical side of text layout in SVG.
Anchors and Alignment
To demonstrate advanced text layout in a practical setting, the next few sections use text in comic book–style speech bubbles.
Text is, of course, a key aspect of most comic books, and the layout and styles of the text are often used to convey the tone of voice, so we want to get them just right. Many (most) online comic books use bitmap image formats to save the text as part of the drawing, but that means inaccessible text that can’t be selected or found in a search. SVG has the ability to provide the necessary layout control with accessible text, but we’ll need a few more attributes and style properties to do so.
For starters, comic books will often need multiple lines of text to be aligned into a single speech bubble. As we’ve mentioned a few times, SVG (version 1.1) doesn’t support automatically wrapping text, but you can of course position multiple text lines one after another.
A simple approach is shown in Example 7-4. It uses three separate <text> elements to convey a quote from Herman Melville’s Moby Dick, with the result displayed in Figure 7-5.
Figure 7-5. SVG text in a comic book bubble
Example 7-4. Positioning graphical SVG text
<svgxmlns="http://www.w3.org/2000/svg"xml:lang="en"viewBox="0 0 216 175"><title>Moby Dick—Comic Book text</title><style>@font-face{font-family:'SequentialistBB';src:url('fonts/SequentialistBB.woff2')format('woff2'),url('fonts/SequentialistBB.woff')format('woff');font-style:normal;font-weight:400;}path{fill:#fff;stroke:#000;stroke-width:2;}text{font-family:SequentialistBB,cursive;}.gasp-lines{stroke:#000;stroke-width:1px;}</style><pathd="...long path data string omitted..."/><textfont-size="20"y="45"x="30">FROM HELL’s HEART</text><textfont-size="18"y="65"x="80">I STAB</text><textfont-size="14"y="80"x="80">AT THEE…</text><gclass="gasp-lines"aria-label="(gasp)"><linex1="137"y1="72"x2="140"y2="74"/><linex1="144"y1="74"x2="147"y2="72"/><linex1="146"y1="76"x2="150"y2="76"/><linex1="146"y1="78"x2="150"y2="80"/><linex1="137"y1="80"x2="140"y2="78"/><linex1="135"y1="76"x2="140"y2="76"/></g></svg>
The graphic uses a “fainting” text effect, with each line smaller than the last, as set by the font-size presentation attributes. However, each <text> element is still a simple typewriter-style label of matching characters in a single line.
Tip
In the next section, “Switching Styles with <tspan>”, we’ll show how you can modify font styles within a single line of text, without ruining the layout.
Example 7-4 uses a custom font, included with a CSS @font-face rule. If the web font is downloaded and used, Figure 7-5 is the result. However, if the web font isn’t used—because of network issues, because the browser doesn’t support WOFF fonts, or because the user has turned off font downloads—the font-family rule instructs the browser to use its default cursive font.
Figure 7-6 shows what that will look like in the most common cursive fonts in Windows (Comic Sans, on the left) and in Mac (Apple Chancery, on the right).
Figure 7-6. SVG text in a comic book bubble, displayed in default handwriting fonts
Uh oh. Beyond the stylistic differences caused by the change in typeface, the fallback renderings in Figure 7-6 have some serious layout issues: text is getting cut off, and is overlapping graphical details. We can help fix these issues by improving our font stack, and by changing how we lay out the text.
First, the layout fixes.
So far, we’ve been laying out text lines by defining the position of the first character. This is the default, but it’s not the only option. The x,y point we use to layout SVG text is called an anchor point. The text-anchor style property or presentation attribute lets us change whether that point marks the start (default), middle, or end of the line.
Tip
Why not left, center, and right instead of start, middle, and end? Because SVG text was also designed for vertical and right-to-left text layouts: start and end aren’t always left and right.
For a speech bubble effect, you usually want text centered in the middle of the bubble. We can do this by adding text-anchor: middle to the text elements (as a CSS rule or presentation attribute), and adjusting the x attribute accordingly.
For the last line in Example 7-4, however, there’s an extra complication: the “breath mark” (signifying a last gasp or sigh) drawn with SVG lines, which should be aligned right after the text. Moving the lines to fit the text would require JavaScript; it’s easier to right-align the text to the lines with text-anchor: end, so that it never overlaps.
The following changed markup shows those alterations, with the text-anchor for each line set with presentation attributes:
<textfont-size="20"y="45"x="103"text-anchor="middle">FROM HELL’s HEART</text><textfont-size="18"y="65"x="103"text-anchor="middle">I STAB</text><textfont-size="14"y="80"x="127"text-anchor="end">AT THEE…</text>
The x attributes have been adjusted so that there is barely any movement of the text when the web font is used; with our chosen font, it will look almost exactly like Figure 7-5.
Tip
Rather than figure out all the changed positions with trial and error, the browser can do the calculations for you. We outline the most important text-related DOM methods in “Measuring the Message”.
With this new markup, the fallback renderings are improved, as shown in Figure 7-7. The text no longer overlaps the breath mark icon, and it mostly fits in the SVG—although still not completely in the speech bubble!
Figure 7-7. SVG text in a comic book bubble, after text anchors are adjusted, displayed in default handwriting fonts
We’re going to need some better fallback fonts. The font from the original design, Sequentialist BB, is a relatively condensed (narrow) font, at least as far as capital letters go. It took a bit of experimenting to find similarly condensed fonts among those that come preinstalled on common operating systems.
Note
There are a number of websites that list operating system fonts and fallbacks for CSS; unfortunately, many are not kept up to date anymore. The two that were most useful for this example were fontfamily.io, which tells you which fonts would be most likely used for a given font-family declaration, and A Padded Cell’s “Complete Guide to Pre-Installed Fonts in Linux, Mac, and Windows”, which provides a comparison table of available fonts, with screenshots of their appearance.
The final CSS for the font fallbacks is as follows:
text{font-family:SequentialistBB,Papyrus-condensed,Impact,sans-serif-condensed,sans-serif;font-stretch:condensed;}
If the Sequentialist BB web font is available it will be used. Otherwise, the font-family stack is searched in order:
-
Papyrus if it is available in condensed version (it is on most Mac and iPhones);
-
Impact (available on all Windows systems, desktop Mac, and in a common font extension for Linux systems);
-
sans-serif-condensed, which is a special keyword available in Android that usually matches to Roboto Condensed; -
Otherwise, the default sans-serif font (which is likely to be less extravagant than a cursive font). The
font-stretchproperty ensures that a condensed version of that font is used if available.
The net result, on a standard Windows or Mac desktop, is shown in Figure 7-8.
Figure 7-8. SVG text in a comic book bubble, after text anchors are adjusted and fallback fonts are specified
In other operating systems, there is more variation, but it is usually readable, as shown in the mobile browser screenshots in Figure 7-9.2
Figure 7-9. SVG comic book text, with fallback fonts in mobile browsers
There are two more tools you can use to get SVG text to fit:
-
The
font-size-adjuststyle property, which adjusts fallback font sizes to match theexheight instead of theemheight; unfortunately, it’s currently only supported in Firefox. -
The
textLengthSVG attribute, which is best for minor adjustments or for intentionally distorted text; we’ll discuss how it works later in the chapter.
Getting good fallback fonts for a graphic isn’t easy. It’s easy to understand why many designers convert text to paths in their SVG editor, while they still have full control of the fonts. However, for a text-heavy graphic like a comic book, poster, or diagram, having fully accessible, selectable text will be appreciated by many end users.
Switching Styles with <tspan>
Each text element in Example 7-4 uses a different font size. They could have easily also used different font styles or fill colors, just by setting different styles on each element.
In order to change styles—with CSS or with presentation attributes—you need a new element. That was easy enough when we were changing an entire line at a time. But what happens when you only want to style part of a line? For example, to emphasize a word with italic text, like that?
After all the examples of fallback fonts, you should be wise enough not to try to position separate <text> elements side-by-side, pretending to be one continuous line of text. You need a way to switch up the styles without resetting the layout.
The key to this is SVG <tspan> element: much like the HTML <span> element, <tspan> wraps around words, characters, or short phrases to provide a different appearence for part of a <text> element. Also like <span>, a <tspan> makes no difference by itself: some sort of style or attribute must be applied to it to make a change.
Tip
A <tspan> cannot be used on its own: it must be contained inside a <text> element.
Example 7-5 provides the core markup for another comic book bubble, this time containing the “Fe Fi Fo Fum” chant of the giant in Jack and the Beanstalk. Some words are made bold or italic via <tspan>, including nested <tspan> elements. Nonetheless, they are all laid out as a single line of text. Figure 7-10 shows the rendering.
Example 7-5. Using <tspan> to modify text styles
<svgxmlns="http://www.w3.org/2000/svg"xml:lang="en"viewBox="0 0 216 175"><style>/* omitted */</style><pathd="M45,5 l20,20 c60-5 120,-5 125,40s-70,28 -80,30 -100,0 -100-30 10,-40 35-40Z"/><textfont-size="28"y="70"x="100"text-anchor="middle">Fe<tspanfont-style="italic">Fi</tspan>Fo<tspanfont-weight="bold">Fum<tspanfont-style="italic">!</tspan></tspan></text></svg>
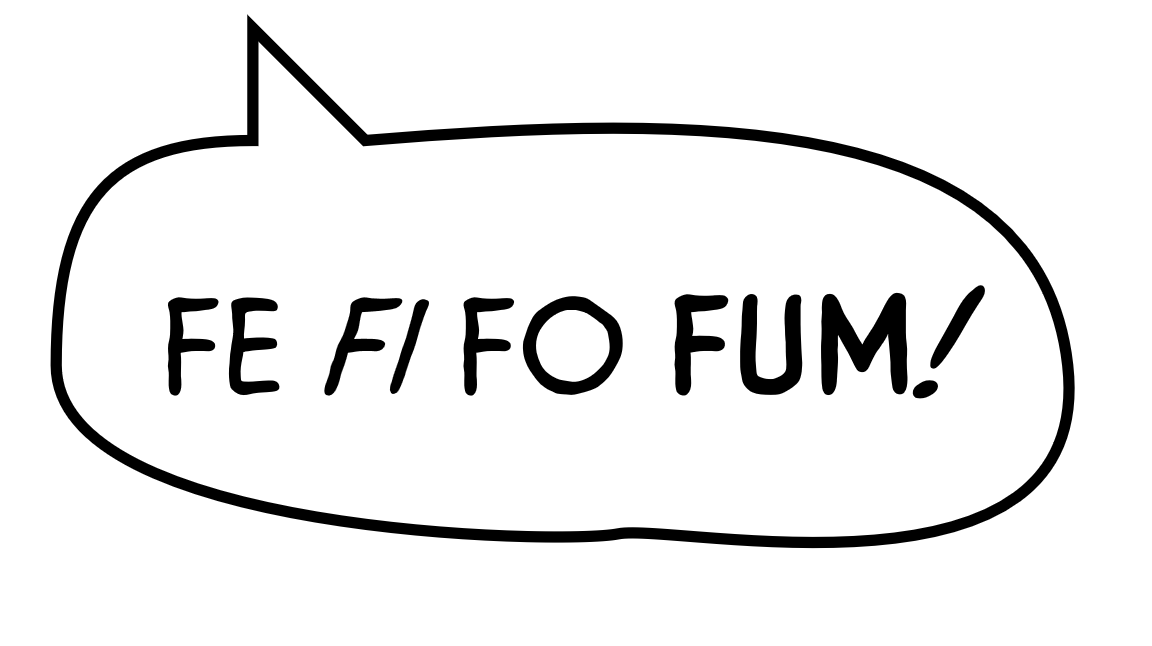
Figure 7-10. Styled SVG text in a comic book bubble
The styles have been excluded from Example 7-5 because they are mostly the same as Example 7-4 (after adding in all the fallback fonts, of course!).
To support the different type styles in Example 7-5, an extra @font-face declaration was added to the <style> block, providing the italic version of the font.
An astute observer will note that Example 7-5 actually uses four different type-faces: regular, italic, bold, and bold italic. The bold versions are synthesized by the browser, essentially by drawing a black stroke around the letters. Synthesized bold type is generally considered a typographic atrocity by designers, but for this particular font family it doesn’t look that bad.
Tip
Why not use stroke: black instead of font-weight: bold, if the end result is the same? Because it won’t be the same for the fallback fonts: for those, we want the browser to use proper bold typefaces.
We applied the actual bold and italic formatting using presentation attributes. There aren’t any semantic (inherently meaningful) text formatting elements in SVG, like <em> and <strong> in HTML. A <tspan> must be used for all formatting changes.
Tip
There is actually one element that provides for meaningful markup within an SVG <text>, and can be styled accordingly: the <a> element for creating hyperlinks, which we’ll discuss in Chapter 18.
Of course, the style changes on the <tspan> elements could have been assigned with CSS rules, instead of attributes.
Adjusting the Typewriter
So far, we’ve been positioning SVG <text> elements as complete blocks, one line at a time. Individual characters follow from wherever the baseline is set with x and y attributes.
Although Example 7-4 created the appearance of multiline text, it was really three independent <text> elements, carefully aligned one after another.
However, by adding positioning attributes to a <tspan>, it is possible to break a single text element into multiple “chunks” for layout purposes. It’s also possible to typeset individual characters to their own positions, which is neccessary for some text special effects that are impossible or very difficult to achieve in standard HTML text.
For <tspan>, the attributes most commonly applied are dx and dy, which provide values for a relative shift in position (horizontal and vertical, respectively) for the associated text, away from the normal, default position.
In contrast, x and y attributes represent absolute positions, measured from the origin of the coordinate system.
You can move the text baseline up and down by wrapping the relevant characters in <tspan> elements with dy values to apply a vertical offset without changing the horizontal flow:
<textfont-size="28"y="55"x="100"text-anchor="middle">Fe<tspandy="10"font-style="italic">Fi</tspan><tspandy="10">Fo</tspan><tspandy="10"font-weight="bold">Fum<tspanfont-style="italic">!</tspan></tspan></text>
The basic y value for the <text> element has been shifted up (relative to Example 7-5), and then each dy value shifts the vertical position of the text down 10 units, as shown in Figure 7-11. The horizontal position, including the text-anchor centering, is not affected.
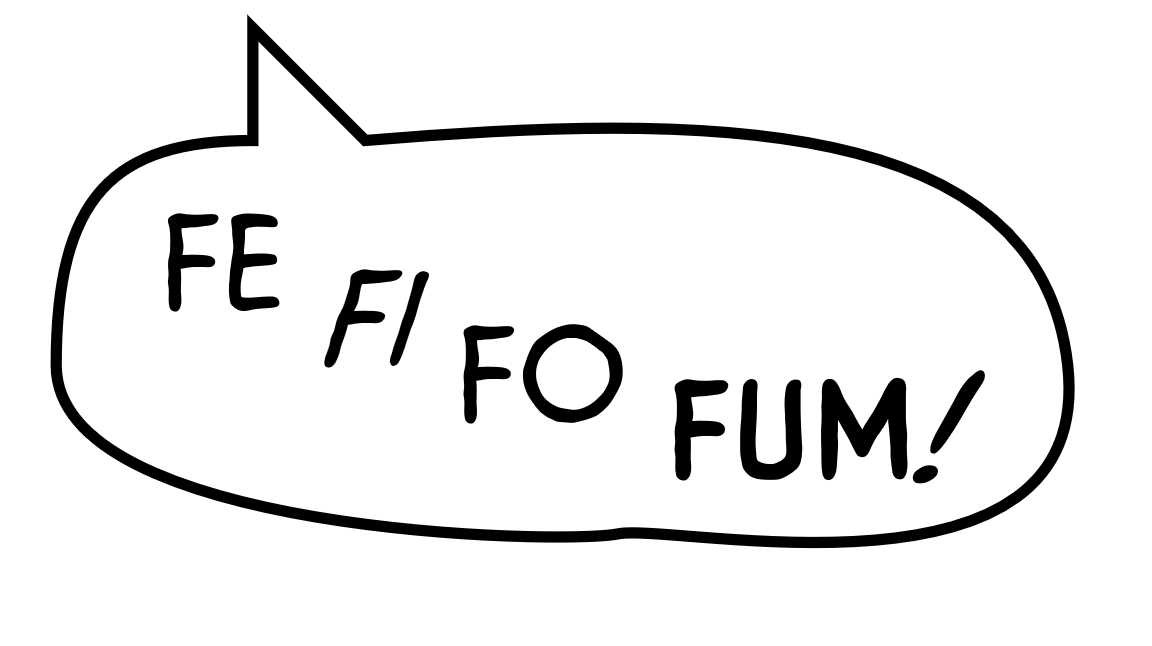
Figure 7-11. Styled and vertically staggered SVG text in a comic book bubble
The dy values are cumulative, even though the <tspan> elements are not nested: the shift in the “typewriter” position persists outside the end of the element with the attribute.
Tip
In contrast, the baseline-shift style property is designed for temporary shifts in position that revert to the original baseline after the affected element is closed. Unfortunately, baseline-shift browser support is still poor.
You can use any combination of default positioning, x or y absolute positioning, and dx or dy relative positioning. A common pattern is to use an absolute x value to reset the horizontal position, and then a dy value to shift the text down a line, in effect creating multiline text.
Note
In the days of electric typewriters, hard line breaks were always encoded this way: a “carriage return” (CR) character to reset the horizontal position, followed by a “line feed” (LF) character to shift the print head down. This legacy still haunts us in the discrepancy between text encodings on Windows (two-character, CRLF line breaks by default) versus Linux/Mac (one-character, LF line breaks).
Using this approach, we can combine the three separate <text> elements from Example 7-4 into a single <text> laid out with <tspan> elements:
<textfont-size="20"y="45"x="103"text-anchor="middle">FROM HELL’s HEART<tspanfont-size="18"dy="1.1em"x="103">I STAB</tspan><tspanfont-size="14"dy="1.1em"x="127"text-anchor="end">AT THEE…</tspan></text>
Each <tspan> in this example has its own alignment anchor, created by the absolute x value, as does the initial line that is positioned with attributes on the <text>. The type of text-anchor (middle versus end) is inherited from the parent <text> element, except where it is explicitly changed on the span.
Full-Control Characters
All this is very well for adjusting the layout of chunks of text. But what if you want to play with the layout of individual characters, like in Figure 7-12?
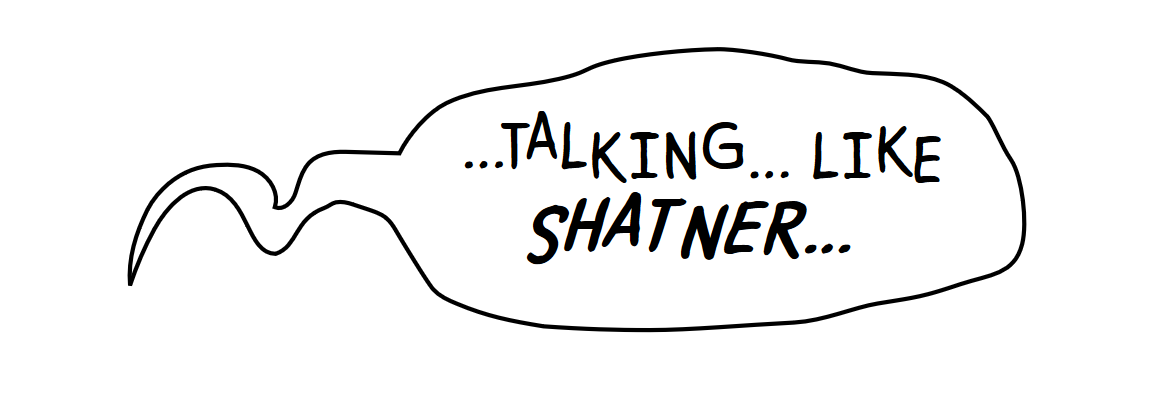
Figure 7-12. SVG text with staggered letters
Note
Figure 7-12 is a double-shot pop culture reference: The “talking like Shatner…” text and its wavery layout are directly borrowed from a frame of the Marvel comic Deadpool. These are real-world text layout requirements!
In order to “stagger” the characters in Figure 7-12 using <tspan> elements, we’d need to wrap each individual character in its own <tspan> element, and provide it with a new y or dy value.
Obviously, this can get tiresome, bloating our markup and making it difficult to read and edit. Thankfully, SVG has a shortcut method to sequentially affect all of the characters in a <text> or <tspan> element, without adding more markup. The text markup for this is provided in Example 7-6; styles would be the same as the last few examples.
Example 7-6. Using multiple values in text positioning attributes
<svgxmlns="http://www.w3.org/2000/svg"xml:lang="en"viewBox="0 0 550 200"><!-- styles and speech-bubble path omitted --><textx="210"y="85"dy="0 0 -5 5 5 0 0 -5 5 0 0 0 -3 5 0 3-3 -3 3 3 -2">…TALKING… LIKE<tspanx="250"y="120"class="shatner">SHATNER…</tspan></text></svg>
The first value for the dy attribute operates on the first glyph—the ellipsis—the second on the T, the third on the A, and so on. The count includes spaces used in the final layout, but extra whitespace characters are collapsed before the dy values are assigned.
The <tspan> resets the absolute x and y positions for the second line of text, but still inherits the dy adjustments specified on the parent <text> element, with the dy adjustment for the S applied after the y value is changed.
A CSS class applies the remaining style changes; the rest of the styles would be the same as the previous comic-book examples:
text{font-size:36px;}.shatner{font-style:italic;font-weight:bolder;font-size:40px;}
You can use per-character list values for any of the positioning attributes: x, y, dx, or dy. However, lists are generally easier to use with dx and dy, because you can always insert a 0 for any character you don’t want to change. Any of the attributes can be set on either the <text> element or a <tspan>.
Tip
If both a <tspan> element and its parent specify x, y, dx, or dy values for a given character, the child element wins out.
The counting of “characters” uses the same rules as for JavaScript strings, based on UTF-16 blocks. Emoji and other multibyte characters will be assigned two (or sometimes more) positioning values from the attribute, but will only use the first value. The same goes for ligatures (multiple characters drawn with a single combined glyph-shape from the font): they get positioned based on the first character in the block.
While it’s not quite as useful as dy (in horizontal text layout), dx can be used to move characters left and right, allowing you to precisely space glyphs exactly where you want and need them. Unlike re-setting the x value, dx doesn’t break the text into separate chunks for text-anchor alignment.
Warning
You should also be able to control character spacing with the CSS letter-spacing and word-spacing properties. Unfortunately, Firefox has a long-standing bug3 such that these properties aren’t supported in SVG.
In vertical text, all these rules are swapped: an absolute y value defines the anchor point for (vertically) aligning text with text-anchor, and dy values can be used to control spacing, while x and dx shift characters in the cross-axis.
Twists and Turns: The <textPath> Element
As the past few examples have shown, SVG text is about more than just adding words to graphics—it’s about using text layout itself as a graphical effect. Informative text on a diagram is often useful, but sometimes text going in a straight line is, well, dull. It’s fun to use text as art: to bend and twist and flow text in circles or spirals, perhaps even track it along the edge of a given image.
Smoothly flowing nonlinear text layouts like this can be accomplished with the <textPath> element. With <textPath>, you don’t control the text layout one character at a time. Instead, you define the overall shape of the line of text, and the browser positions the letters along it.
Not only will the letters be positioned along the path, but each letter’s base is always tangent to the path itself. This makes it possible to wrap text around a circle, have it spiral inward or outward, jump from one region to another, and otherwise behave in a manner more frivolous and fun than any text has a right to.
Warning
Browsers are currently very buggy and inconsistent when using <textPath> for right-to-left languages, or for languages with letters that change shape according to which letters come before and after.
Placing text on a path currently requires four components as follows:
-
A
<path>element, which must have a valididattribute. If you don’t want to draw the path itself, be sure to include it in a<defs>section of the SVG. -
A
<text>element. -
A
<textPath>element, which must appear inside the<text>element. The<textPath>must have anxlink:hrefattribute that links to theidof the<path>you just created. -
Some text inside the
<textPath>element.
In code, your basic text-path boilerplate looks like this:
<defs><pathid="path-for-text"d="M50,100 Q100,0 250,100"/></defs><text><textPathxlink:href="#path-for-text">Text for path</textPath></text>
Add that to boilerplate SVG markup (like Example 1-1) and you have Figure 7-13.
Change the path’s d directions and the text content as required.
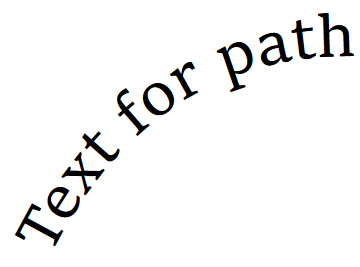
Figure 7-13. Curved text positioned using <textPath>
Tip
You can also have <textPath> inside of <tspan> and <tspan> inside of <textPath>. However, both <textPath> and <tspan> must always be inside a <text>.
The text must fit on the path, when written in the selected font and font size. If the text continues past the path end point, excess characters will not being shown. To accommodate differences from fallback fonts, it is often a good idea to make the path longer than required.
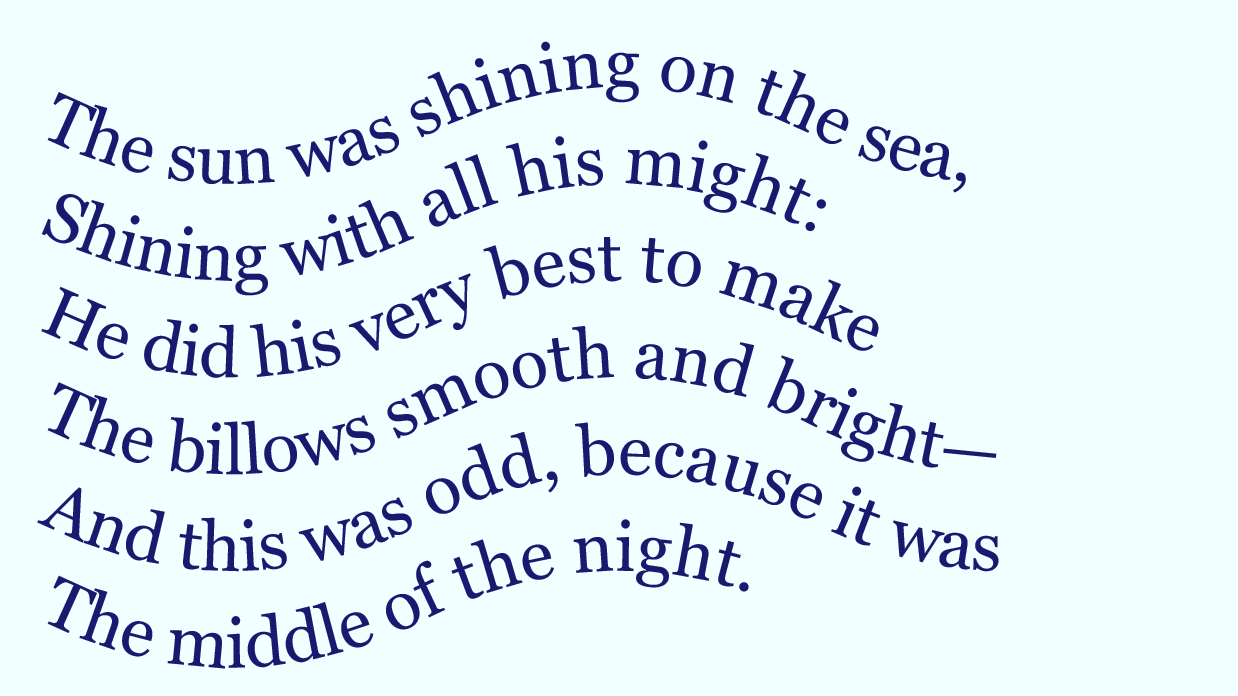
Figure 7-14. Curved text positioned using multiple <textPath> elements
We’re going to create a slightly more creative example for exploring the details of <textPath>.
Example 7-7 uses text paths to set the first verse of Lewis Carroll’s The Walrus and the Carpenter as a series of waves. Each line is a separate <textPath> element, all contained within a single <text>. Figure 7-14 shows the result of the code as written.
Example 7-7. Arranging text using <textPath> elements
<svgxmlns="http://www.w3.org/2000/svg"xml:lang="en"xmlns:xlink="http://www.w3.org/1999/xlink"viewBox="0 0 320 180"><title>The Walrus and the Carpenter—Lewis Carroll</title><defs><pathid="wave1"d="M10,35 q50,25 100,0 t100,0 t100,0"/><pathid="wave2"d="M10,60 q50,25 100,0 t100,0 t100,0"/><pathid="wave3"d="M10,85 q50,25 100,0 t100,0 t100,0"/><pathid="wave4"d="M10,110 q50,25 100,0 t100,0 t100,0"/><pathid="wave5"d="M10,135 q50,25 100,0 t100,0 t100,0"/><pathid="wave6"d="M10,160 q50,25 100,0 t100,0 t100,0"/></defs><rectwidth="100%"height="100%"fill="azure"/><textfont-size="18px"font-family="Georgia, serif"fill="midnightBlue"><textPathxlink:href="#wave1">The sun was shining on the sea,</textPath><textPathxlink:href="#wave2">Shining with all his might:</textPath><textPathxlink:href="#wave3">He did his very best to make</textPath><textPathxlink:href="#wave4">The billows smooth and bright—</textPath><textPathxlink:href="#wave5">And this was odd, because it was</textPath><textPathxlink:href="#wave6">The middle of the night.</textPath></text></svg>
Figure 7-15 shows how it would look if you also drew a stroked version of each path.

Figure 7-15. The paths used to position the curved text
Normally, if you were drawing six identical wavy lines at different points in the page (like in Figure 7-15), you would only define the <path> once, and then would use <use> elements to copy it, repositioning each copy with a y attribute. Unfortunately, there are no attributes available on <textPath> to reposition the path when it is used, so reusing a single <path> element for all six <textPath> elements is not so simple.
Tip
You can use a transform attribute (which we’ll discuss in Chapter 11) to reposition separate chunks of text, after aligning them all to the same path, but you cannot transform the <textPath> itself. You would need to separate out each path into a separate <text> element, and transform each <text> into place.
In previous examples, we created multiline text by using dy on a <tspan> to shift the text to a new line. Why not do that here?
We can, but the result will look rather different.
Applying x and y adjustments on text inside a <textPath> no longer moves letters in simple horizontal and vertical offsets. Instead, dx moves letters along the path, and dy moves them perpendicular to the path. Similarly, an absolute x resets the text anchor position relative to the start of the path. In vertical writing mode, the x and y relationships are reversed: y and dy values are measured along the path, and dx offsets are perpendicular.
Warning
The SVG specifications do not support absolute y values for characters inside a horizontal writing-mode <textPath>, nor absolute x values for vertical writing mode. Some browsers support it, and some don’t.
It’s easier to explain with an example. Example 7-8 gives the code for arranging the verse from The Walrus and the Carpenter as multiline <tspan> elements, with x and dy creating line breaks. All the lines are contained in a single <textPath> that references a single version of the wavy path. For clarity, the <path> itself is drawn with a visible stroke. Figure 7-16 shows the end result.
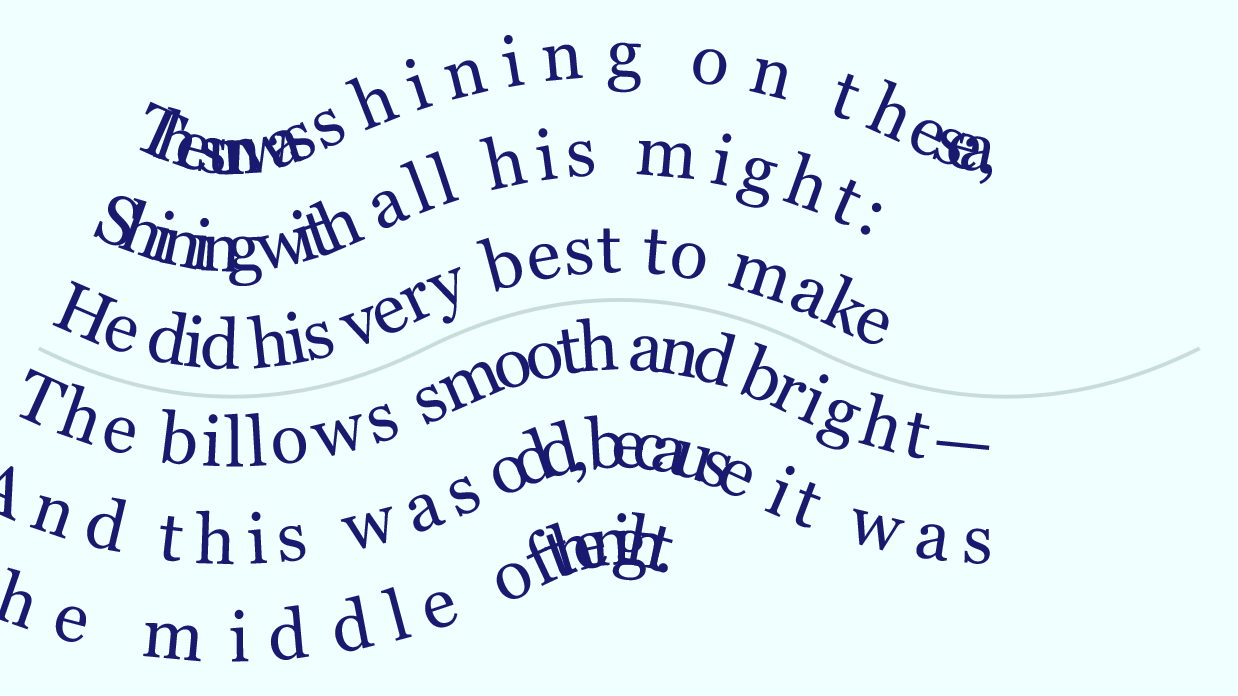
Figure 7-16. Curved text positioned using multiple lines offset from a single <textPath>
Example 7-8. Positioning multiple lines of text above and below the same path
<svgxmlns="http://www.w3.org/2000/svg"xml:lang="en"xmlns:xlink="http://www.w3.org/1999/xlink"viewBox="0 0 320 180"><title>The Walrus and the Carpenter—Lewis Carroll</title><rectwidth="100%"height="100%"fill="azure"/><pathid="wave"d="M10,90 q50,25 100,0 t100,0 t100,0"fill="none"stroke="darkSlateGray"stroke-opacity="0.2"/><textfont-size="18px"font-family="Georgia, serif"fill="midnightBlue"><textPathxlink:href="#wave"><tspanx="0"dy="-3.2em">The sun was shining on the sea,</tspan><tspanx="0"dy="1.4em">Shining with all his might:</tspan><tspanx="0"dy="1.4em">He did his very best to make</tspan><tspanx="0"dy="1.4em">The billows smooth and bright—</tspan><tspanx="0"dy="1.4em">And this was odd, because it was</tspan><tspanx="0"dy="1.4em">The middle of the night.</tspan></textPath></text></svg>
What’s happening? As we mentioned, dy moves letters perpendicular to the path. That’s measured relative to the slope of the path at the particular point. On a curved path like this, the perpendicular lines radiate outward or inward, stretching out or condensing the letters in fan shapes, as they get farther from the original path.
To further complicate matters, you can’t add any of the normal text-positioning attributes (x, y, dx, or dy) to the <textPath> itself: they need to be specified on the parent <text> element or a parent or child <tspan>. For better browser support, use a child <tspan>, as we did in Example 7-8.
Sliding Text Along a Path with startOffset
Although <textPath> does not accept the same positioning attributes as <text> and <tspan>, it has a positioning attribute of its own: startOffset. This defines the point on the path that should be used as the anchor or origin for the text.
Tip
Watch out for the capitalization of startOffset: that’s a capital O.
As with other mixed-case attributes in SVG, the HTML parser will correct it for you, but an incorrectly capitalized attribute won’t have any effect in XML, or if created from JavaScript.
startOffset is a simple XML attribute, not a presentation attribute. It cannot be set with CSS.
In its simplest application, startOffset can be used to indent text relative to the start of the path, without your having to redefine the path shape:
<textPathxlink:href="#wave6"startOffset="1em">The middle of the night.</textPath>
Applying startOffset="1em" adjustments like this to every second <textPath> from Example 7-7 (the version of The Walrus and the Carpenter with six separate <textPath> elements) results in Figure 7-17.
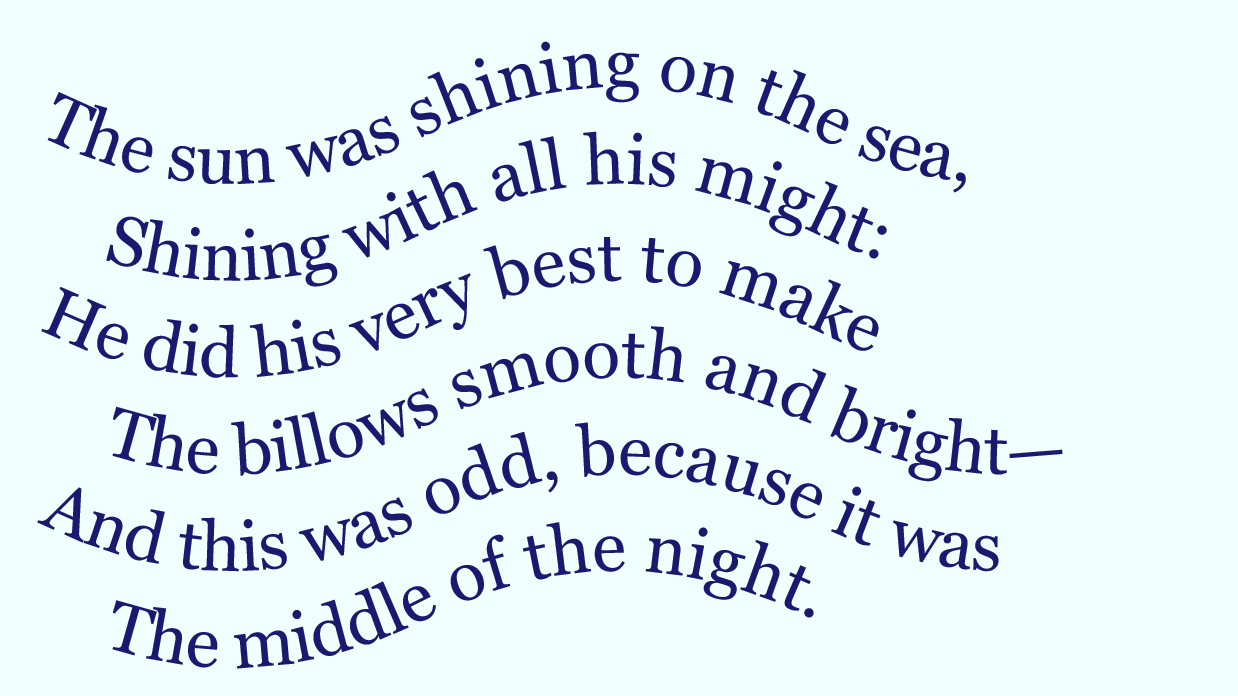
Figure 7-17. <textPath> lines adjusted with startOffset
One advantage of startOffset, compared to dx, is that it accepts percentage values that are calculated as a percent of the path length.
Centering text on a path looks like this:
<textPathstartOffset="50%"text-anchor="middle"xlink:href="#p">...</textPath>
To end-align text on a path, use startOffset="100%" with text-anchor: end.
Warning
Browsers are currently very buggy about the interaction of startOffset with absolute x positions on characters inside a <textPath>. (It wasn’t very well defined in the SVG specifications.) Only use one or the other.
Text paths get a little more complicated if you want to exactly fit text around a closed shape. For one thing, you probably no longer want to overestimate the length of the path in order to be sure the text will fit. Instead, you can use the textLength attribute—with its value set to the length of the path—to force the browser to exactly fit the text to the shape, regardless of the font used.
Tip
textLength is a regular XML attribute, not a style property that can be set in CSS. Its value is always a number, representing a distance in SVG user units (px units).
A matching lengthAdjust attribute tells the browser what parts of the text can be tweaked to make the text fit: the default spacing value means that letter-spacing is adjusted. The alternate spacingAndGlyphs value means that the letters themselves are stretched or compressed.
Warning
Browser support for textLength is currently very inconsistent. It really only works reliably in all browsers if used on a plain <text> element with no children. Test carefully.
You’ll still want to adjust the font size so that it fits nicely in your chosen font, and only use textLength for extra enhancement and fallback.
Measuring the Message
When figuring out many aspects of SVG text layout, it helps to know how much space that text takes up in the graphic. This is essential when you’re dynamically generating text layouts for data charts. Conveniently, the SVG specs define a number of DOM methods that allow the browser to do the calculations for you.
You can use the same methods in your browser’s developer console, when rearranging anchor points or setting textLength values to ensure better fallback layouts.
For creating fallback layouts, use a browser that renders the correct layout, with your preferred fonts installed. Calculate the text positions, then hardcode them to ensure a consistent layout in other browsers or with fallback fonts.
Tip
All these DOM methods are available for any of the SVG text-containing elements: <text>, <tspan>, or <textPath>. They are object methods, called with . notation, like t.method(), where t is a text element.
The most essential method is getComputedTextLength(). It returns the total displacement (horizontally for horizontal text, or vertically for vertical text) of all the characters in the text element, in user units. The computed text length is measured in the current font, font-size, and other typographic style settings. It also includes dx offsets (dy for vertical text), but not absolute (x or y) repositioning values.
In other words, it’s directly comparable to the numbers used in textLength attributes:
vart=document.querySelector("text");if(t.getComputedTextLength()>maxLength)t.setAttribute("textLength",maxLength);
You can also use the computed length to calculate a new absolute anchor (x or y) point when switching from the default start text-anchoring to middle or end anchoring:
varendX=startX+t.getComputedTextLength();//end anchorvarmidX=startX+t.getComputedTextLength()/2;//middle
When dynamically setting text, you’ll often want to split too-long text across multiple <tspan> lines (instead of squishing it with textLength). The getSubStringLength() method lets you test the computed length of a substring of the text, in order to decide where to add a break. It takes two parameters:
-
charIndexis the index (using JavaScript character counting) of the first character in the substring, after collapsing whitespace from the element’s text content -
numCharsis the number of (JavaScript) characters in the substring
To get even more positioning data, other methods help you figure out where individual characters are located. This is useful if you have a <textPath> arrangement that you wish to lock in place, by converting it to an absolute layout with x, y, and rotate, or if you’re trying to position drawing elements to match individual characters. For details, see https://oreillymedia.github.io/Using_SVG/guide/DOM.html.
Finally, for <textPath> elements, you also often want to know the length of the path you’re using. A <path> element has a getTotalLength() method that will answer that question.
Tip
The getTotalLength() method has many other uses. In Chapter 13, we’ll use it to calculate stroke dashing patterns. In Chapter 19, we’ll use it to create motion along a path.
Summary: Graphical Text Layout and Fonts
SVG text layout is a hugely complex topic (which this chapter only lightly touches on). At its most basic, SVG text consists of an instruction to the browser to “type this text here.” At its most complex, it allows you to carefully position individual letters in geometric patterns, with nearly as much control as you position your SVG shapes.
Nearly as much control, but not quite. The individual glyph shapes, their size, and their default spacing are all based on the font. You can provide web fonts, but cannot guarantee they’ll be used. A well-designed font stack and careful use of the text-anchoring options—and lots of testing—is required for fallbacks.
Text is one area where SVG used as images are significantly different from inline SVG or embedded objects. Text in images is isolated from user interaction and from assistive tools such as screen-readers. It also cannot access web font files. For this reason, designers commonly convert text into graphical shapes when creating logo images.
When an SVG is interactive, then the fun begins: text styles can be updated with JavaScript and CSS. For scripted SVG, a set of unique helper functions can help you calculate the dimensions of dynamic text content, and adjust the layout accordingly.
A key feature of SVG text is that it can be filled and stroked like any SVG shape. In this chapter, we only used solid-color stroke and fill. However, as we explore more graphical effects in Part IV, we will see examples of more decorative text. Before we get there, Part III will explore SVG structure, layout, and coordinate systems in detail.
1 Amelia Bellamy-Royds and Kurt Cagle, SVG Text Layout (Sebastopol, CA: O’Reilly, 2015).
2 Mobile screenshots generated using the Cross Browser Testing online service.