Table of Contents for
ARM Assembly Language, 2nd Edition
 ARM Assembly Language, 2nd Edition
Published by
Chapman and Hall/CRC, 2016
ARM Assembly Language, 2nd Edition
Published by
Chapman and Hall/CRC, 2016
- Contents
- ARM Assembly Language: Fundamentals and Techniques, Second Edition
- Preliminaries
- To our families
- Preface
- Acknowledgments
- Authors
- Chapter 1 - An Overview of Computing Systems
- Chapter 2 - The Programmer’s Model
- Chapter 3 - Introduction to Instruction Sets: v4T and v7-M
- Chapter 4 - Assembler Rules and Directives
- Chapter 5 - Loads, Stores, and Addressing
- Chapter 6 - Constants and Literal Pools
- Chapter 7 - Integer Logic and Arithmetic
- Chapter 8 - Branches and Loops
- Chapter 9 - Introduction to Floating-Point: Basics, Data Types, and Data Transfer
- Chapter 10 - Introduction to Floating-Point: Rounding and Exceptions
- Chapter 11 - Floating-Point Data-Processing Instructions
- Chapter 12 - Tables
- Chapter 13 - Subroutines and Stacks
- Chapter 14 - Exception Handling: ARM7TDMI
- Chapter 15 - Exception Handling: v7-M
- Chapter 16 - Memory-Mapped Peripherals
- Chapter 17 - ARM, Thumb and Thumb-2 Instructions
- Chapter 18 - Mixing C and Assembly
- Appendix A: Running Code Composer Studio
- Appendix B: Running Keil Tools
- Appendix C: ASCII Character Codes
- Appendix D
- Glossary
- References
Chapter 18
Mixing C and Assembly
18.1 Introduction
In this last chapter, we’re going to examine a few instances where it may make sense to combine your high-level C or C++ code with assembly. Mixing C and assembly is quite common, especially in deeply embedded applications where programmers work nearly at the hardware level. Doing such a thing is not always trivial, and the programmer is forced to be very mindful of variables, pointers, and function arguments. However, a good programmer will need certain tricks in his or her toolbox, and a point was made in the Preface that optimizing code usually requires the ability to recognize what the compiler is doing, and more importantly, the ability to modify code so that a compiler or an assembler generates the best software for the task at hand. There are two ways to add assembly to your high-level source code: the inline assembler and the embedded assembler.
18.2 Inline Assembler
Normally, the compiler will try to optimize code as much as possible for you (unless you tell it not to). However, for some applications, algorithms must be optimized by hand, especially in instances where data is manipulated in ways that a compiler would normally not understand. Signal and speech processing algorithms tend to fall into this category. If you’re writing an algorithm at a high level, it is possible to give the compiler some assistance by indicating sections of code that should be regarded as important. One way is through a process called inlining, where the __inline keyword is placed in the C or C++ code to notate a function that, when possible, should be placed in the assembly directly, rather than being called as a subroutine. This potentially avoids some of the overhead associated with branching and returning. The compiler will inline as much as possible, given the right optimization settings, but this is an option the user can specify as well. Furthermore, you can even write some functions in your C or C++ code in assembly—this might be placed in a function where you have called for inlining. Using the inline assembler is the easiest way to access instructions that are not supported by the C compiler, for example, saturated math operations, coprocessor instructions, or accessing the PSRs.
Example 18.1
To tie a few ideas together, recall from Chapter 7 that Q notation allows us to work with fractional values easily by introducing an assumed binary point somewhere in the number. If we assume a number is Q31, for example, then a 32-bit value would have a sign bit and 31 bits of fractional data behind the binary point. In Chapters 7 and 13, we discussed saturation math, where the result of a signed addition or subtraction could be driven to either the largest positive or negative number, depending on the operation. In the version 5TE instruction set, new instructions were introduced to specifically work with fractional values and saturation math. A new status bit, the Q flag, was added to the CPSR/APSR to indicate that a value had saturated during an operation. The flag is sticky, meaning that it must be specifically written to a zero to clear it once it has been set.
Suppose that we have four Q15 numbers stored in two registers (each register holds two Q15 values). Recall a Q15 value is represented in 16 bits, the leading bit serving as the sign bit, and the remaining 15 bits are fraction bits. So the format of Q15 data is:
s.f14f13f12f11f10f9f8f7f6f5f4f3f2f1f0
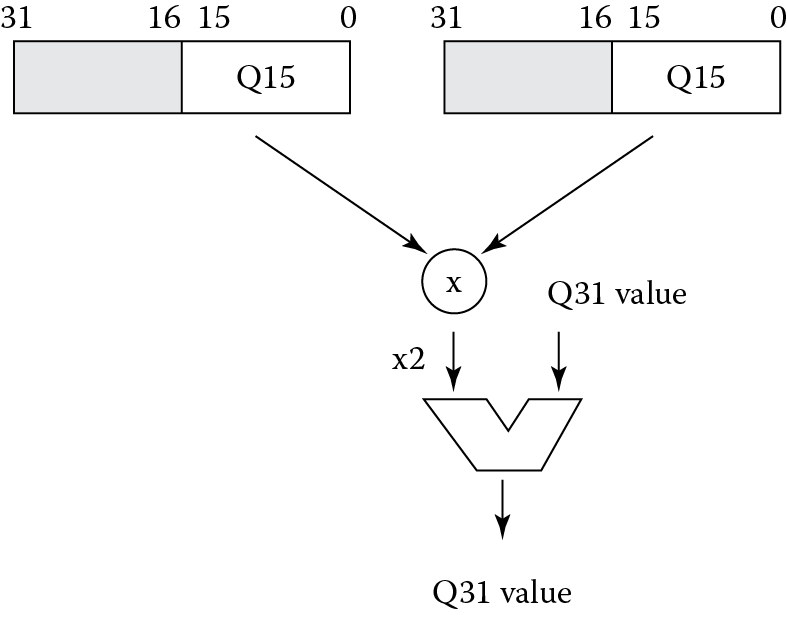
Further suppose that we need a multiply-accumulate operation to multiply two Q15 values and add the product to a Q31 operand. We can inline an assembly function in our C code to do this. Inside this function, the instruction SMULBB takes two Q15 numbers from the lower half of each source register (the B and B in the mnemonic identify the location of the two operands in the lower half of each source register) and multiplies them together as signed values. The value is now in Q30 notation (represented as two sign bits, one superfluous, and 30 fraction bits), and we must shift the result left by one bit to reformat the result in a Q31 representation. The next instruction, QDADD, performs this function by doubling the operand, checking to see if it requires saturation, then adding the accumulated value to the result, again checking to see if it requires saturation. This whole operation is illustrated in Figure 18.1. If either the shift or the add saturates the result, the Q flag, which is bit 27 in the CPSR of a version 5TE processor and the APSR of a v7-M processor, is set. The code on the following page shows this assembly written in an inline block within the function. Notice that register numbers are not used here—C variables are used inside of the assembly code.
Once we have used saturation math somewhere in our C code, we should check the Q flag (see Exercise 5), take some sort of action if we saturated the result, and then clear the Q flag. Clearing the flag requires some instructions that the compiler cannot generate, so again, we can write this small function using the inline assembler. In this example, our test code routine takes two numbers, multiplies them together, then adds a number that will produce a saturated result. You should verify running this code sets the Q flag in your simulation. The function Clear_Q_flag is called afterward to clear the Q flag.
#define Q_Flag 0x08000000 // Bit 27 of the CPSR
__inline int satmac(int a, int x, int y)
{
int i;
__asm
{
SMULBB i, x, y
QDADD a, a, i
}
return a;
}
__inline void Clear_Q_flag (void)
{
int temp;
__asm
{
MRS temp, CPSR
BIC temp, temp, #Q_Flag
MSR CPSR_f, temp
}
}
int main(void)
{
//
// Multiply the two Q15 numbers together, then add a Q31
// number to it, which will saturate the result since it
// effectively overflows the precision allowed. This will
// set the Q flag in the CPSR.
//
unsigned int b = 0x7000; // Q15 number
unsigned int c = 0x7ABC; // Q15 number
unsigned int a = 0x60000000; // Q31 number
unsigned int r;
r = satmac(a, b, c);
// do something with the value here ...
Clear_Q_flag();
return 0;
}
Using inline assembly code has some advantages, such as allowing you to access C variables directly in your code. You can also use C and C++ expressions as operands in the assembler statements. However, you should be aware of some limitations. First, the compiler will automatically optimize the assembly, so the final instructions may not be exactly what you wrote. Second, you cannot use all of the ARM instruction set in your assembly, e.g., BX and SVC instructions are not supported. In fact, Thumb instructions are not supported at all. Third, if you were to change the mode of the machine, the compiler would not be aware of this and consequently, your code may not behave as you expect. Lastly, be aware that you cannot change the Program Counter, you should not change the stack in any way, and you cannot use pseudo-instructions such as ADR in your inline assembly. In general, the inline assembler should not be used to produce better or more efficient code than the compiler. It should be used to accomplish operations that a compiler cannot, such as accessing coprocessors, performing saturated math operations, changing interrupt status, etc.
While the code in the example has been written for the Keil tools, gnu compilers also support inline assembly. Note, though, that the syntax is significantly different. You should consult the compiler guide for whichever tool you happen to be using. More information on ARM’s tools and how to use the inline assembler can be found in the RealView Compilation Tools Compiler User Guide (ARM 2010c).
18.2.1 Inline Assembly Syntax
The inline assembler is invoked with the __asm keyword, which is followed by a list of assembly instructions inside braces. You can specify inline assembly code using either a single line or multiple lines. For example, single lines would be written as
__asm(“instruction[;instruction]”);// Must be a single string
__asm{instruction[;instruction]}
On multiple lines, your code would be written as
__asm
{
...
instruction
...
}
You can use C or C++ comments anywhere in an inline assembly language block, but not the single line structure.
When you use the __asm keyword, be sure to obey the following rules:
- If you include multiple instructions on the same line, you must separate them with a semicolon. If you use double quotes, you must enclose all the instructions within a single set of double quotes.
- If an instruction requires more than one line, you must specify the line continuation with the backslash character (\).
- For the multiple line format, you can use C or C++ comments anywhere in the inline assembly language block. However, you cannot embed comments in a line that contains multiple instructions.
- The comma is used as a separator in assembly language, so C expressions with the comma operator must be enclosed in parentheses to distinguish them, for example,
__asm
{
ADD x, y, (f(), z)
}
- Register names in the inline assembler are treated as C or C++ variables. They do not necessarily relate to the physical register of the same name. If you do not declare the register as a C or C++ variable, then the compiler generates a warning.
- Do not save and restore registers in the line assembler. The compiler does this for you. Also, the inline assembler does not provide direct access to the physical registers.
- If registers other than CPSR, APSR, and SPSR are read without being written to, an error message is issue, for example,
int f(int x)
{
__asm
{
STMFD sp!, {r0} // save r0-illegal:read
// before write
ADD r0, x, 1
EOR x, r0, x
LDMFD sp!, {r0} // restore r0 - not needed.
}
return x;
}
The function must be written as
int f(int x)
{
int r0;
__asm
{
ADD r0, x, 1
EOR x, r0, x
}
return x;
}
18.2.2 Restrictions on Inline Assembly Operations
Earlier we mentioned that the inline assembler has some restrictions, but in general, you can still do nearly everything you need to optimize your code. Restrictions mostly apply to the use of registers and the types of instructions allowed. For example, registers r0 through r3, sp, lr, and the NZCV flags in the CPSR/APSR must be used with caution. Other C or C++ expressions might use these as temporary registers, and the flags could be corrupted by the compiler when evaluating those expressions. Additionally, the following instructions are not supported in the inline assembler:
- BKPT, BX, BXJ, BLX, and SVC instructions
- LDR Rn, = expression pseudo-instruction
- LDRT, LDRBT, STRT, and STRBT instructions
- MUL, MLA, UMULL, UMLAL, SMULL, and SMLAL flag setting instructions
- MOV or MVN flag setting instructions where the second operand is a constant
- User mode LDM instructions
- ADR and ADRL pseudo-instructions
All of the restrictions (and even some workarounds) for the inline assembler are detailed in the RealView Compilation Tools User Guide (ARM 2010c) and on the Keil Tools website (www.keil.com).
18.3 Embedded Assembler
If you have a larger routine that requires optimizing by hand, then you can use the embedded assembler rather than the inline assembler. The embedded assembler allows you to declare assembly functions in C and C++ source modules with full function prototypes, including arguments and a return value. Unlike functions written with the inline assembler, these functions cannot be inlined and will always have the overhead associated with function calls. However, you do have access to the full instruction set, so it is possible to insert Thumb assembly functions in an ARM module, for example.
Example 18.2
To illustrate how the embedded assembler works, we can write a short routine that copies a string from one memory location and stores it to another. Obviously a compiler would do a pretty good job compiling such a function from C, but it’s simple enough to write one just to illustrate the point.
#include <stdio.h >
extern void init_serial (void);
__asm void my_strcopy(const char *src, char *dst)
{
loop
LDRB r2, [r0], #1
STRB r2, [r1], #1
CMP r2, #0
BNE loop
BX lr
}
int main(void)
{
const char *a = “Just saying hello!”;
char b[24];
init_serial();
my_strcopy(a,b);
printf(“Original string: ‘%s’\n”, a);
printf(“Copied string: ‘%s’\n”, b);
return 0;
}
The main routine is written under the assumption that standard I/O routines work, i.e., a printf function call actually prints to an output device. This is left as an exercise to prove it works. The routine my_strcopy is called with the main routine passing the two pointers in memory to our strings. Notice that there is no need to export the function name, but the routine does have to follow AAPCS rules. Arguments will be passed in registers, and values can be pushed and popped to the stack if necessary. The routine has a return sequence (in our case, a simple BX instruction to move the value in the Link Register back to the Program Counter). Be careful when writing embedded assembly routines, as the compiler will not check that your code is AAPCS compliant!
The embedded assembler offers another advantage over the inline assembler in that you can access the C preprocessor directly using the__cpp keyword. This allows access to constant expressions, including the addresses of data or functions with external linkage. Example assembly instructions might look like the following:
LDR r0, = __cpp(&some_variable)
LDR r1, = __cpp(some_function)
BL __cpp(some_function)
MOV r0, #__cpp(some_constant_expr)
When using the__cpp keyword, however, be aware of the following differences between expressions in embedded assembly and in C or C++:
- Assembler expressions are always unsigned. The same expression might have different values between assembler and C or C++. For example,
MOV r0, #(-33554432/2) // result is 0x7f000000
MOV r0, #__cpp(-33554432/2) // result is 0xff000000
- Assembler numbers with leading zeros are still decimal. For example,
MOV r0, #0700 // decimal 700
MOV r0, #__cpp(0700) // octal 0700 == decimal 448
- Assembler operator precedence differs from C and C++. For example,
MOV r0, #(0x23:AND:0xf + 1) //((0x23 & 0xf) + 1) => 4
MOV r0, #__cpp(0x23 & 0xf + 1) //(0x23 & (0xf + 1)) => 0
- Assembler strings are not null-terminated. For example,
DCB “Hello world!” //12 bytes (no trailing null)
DCB __cpp(“Hello world!”) //13 bytes (trailing null)
18.3.1 Embedded Assembly Syntax
Functions declared with __asm can have arguments and return a type. They are called from C and C++ in the same way as normal C and C++ functions. The syntax of an embedded assembly function is:
__asm return-type function-name(parameter-list){
instruction
instruction
etc.
}
The initial state of the embedded assembler (ARM or Thumb) is determined by the initial state of the compiler, as specified on the command line. This means that if the compiler starts in ARM state, the embedded assembler uses __arm. If the compiler starts in Thumb state, the embedded assembler uses __thumb. You can change the state of the embedded assembler within a function by using explicit ARM, THUMB, or CODE16 directives in the embedded assembler function. Such a directive within an __asm function does not affect the ARM or Thumb state of subsequent __asm functions.
Note that argument names are permitted in the parameter list, but they cannot be used in the body of the embedded assembly function. For example, the following function uses integer i in the body of the function, but this is not valid in assembly:
__asm int f(int i)
{
ADD i, i, #1//error
}
Here, you would use r0 instead of i as both the source and destination to be AAPCS compliant.
18.3.2 Restrictions on Embedded Assembly Operations
No return instructions are generated by the compiler for an __asm function. If you want to return from an __asm function, then you must include the return instructions, in assembly code, in the body of the function. Note that this makes it possible to fall through to the next function, because the embedded assembler guarantees to emit the __asm functions in the order you have defined them. However, inlined and template functions behave differently.
All calls between an __asm function and a normal C or C++ function must adhere to the AAPCS rules, even though there are no restrictions on the assembly code that an __asm function can use (for example, changing state).
All of the restrictions for the embedded assembler are detailed in the RealView Compilation Tools Compiler User Guide (ARM 2010c) or at www.keil.com.
18.4 Calling between C and Assembly
You may find it more convenient to write functions in either C or assembly and then mix them later. This can also be done. In fact, it’s downright easy. Functions can be written in assembly and then called from either C or C++, and vice versa; assembly routines can be called from C or C++ source code. Here, we’ll examine mixing C and assembly routines, but refer to the ARM documentation (ARM 2007d) for information on working with C++. When using mixed language programming, you want to ensure that your assembly routines follow the AAPCS standard and your C code uses C calling conventions.
Example 18.3
You may have a function defined in C that you want to use in an assembly routine. The code below shows a simple function that is called in the assembly routine with a BL instruction.
C source code appears as
int g(int a, int b, int c, int d, int e)
{
return a + b + c + d + e;
}
Assembly source code appears as
;int f(int i) {return g(i, 2*i, 3*i, 4*i, 5*i);}
PRESERVE8
EXPORT f
AREA f, CODE, READONLY
IMPORT g ; i is in r0
STR lr, [sp, #4] ; preserve lr
ADD r1, r0, r0 ; compute 2*i (2nd param)
ADD r2, r1, r0 ; compute 3*i (3rd param)
ADD r3, r1, r2 ; compute 5*i
STR r3, [sp, #−4]! ; 5th param on stack
ADD r3, r1, r1 ; compute 4*i (4th param)
BL g ; branch to C function
ADD sp, sp, #4 ; remove 5th param
LDR pc, [sp], #4 ; return
END
Example 18.4
The code below shows an example of calling an assembly language function from C code. The program copies one string over the top of another string, and the copying routine is written entirely in assembly.
C source code appears as
#include <stdio.h >
extern void strcpy(char *d, const char *s);
extern void init_serial(void);
int main()
{
const char *srcstr = “First string - source”;
char dststr[] = “Second string - destination”;
/* dststr is an array since we’re */
/* going to change it */
init_serial();
printf(“Before copying:\n”);
printf(“%s\n %s\n”,srcstr, dststr);
strcopy(dststr, srcstr);
printf(“After copying:\n”);
printf(“%s\n %s\n”,srcstr, dststr);
return(0);
}
Assembly source code appears as
PRESERVE8
AREA SCopy, CODE, READONLY
EXPORT strcopy
strcopy
; r0 points to destination string
; r1 points to source string
LDRB r2, [r1], #1 ; load byte and update address
STRB r2, [r0], #1 ; store byte and update address
CMP r2, #0 ; check for zero terminator
BNE strcopy ; keep going if not
BX lr ; return
END
In some cases, features of the processor are not readily available in C and C++. For example, the conversion instructions in the Cortex-M4 for fixed-point and floating-point values we considered in Chapter 9 are not accessible in C and C++. The example below shows how to use the embedded assembly features to create a set of conversion routines for specific formats that can easily be reused.
Example 18.5
The code below contains two routines for conversion between signed S16 format values and single-precision floating-point values. Recall that the S16 format specifies a short signed integer of 16 bits. In this example, we are simulating sensor data in the form of a signed fixed-point 16-bit format with 8 fraction bits. The range of input data is {−128, 127 + 255/256}, with a numeric separation of 1/256.
The conversion routine utilizing the VCVT.S16,F32 instruction is shown below. Recall that this instruction operates on two FPU registers, so a move from the input source to an FPU register is required.
AREA FixedFloatCvtRoutines, CODE, READONLY
THUMB
EXPORT CvtShorts8x8ToFloat
CvtShorts8x8ToFloat
; Use the VCVT instruction to convert a short in
; signed 8x8 format to a floating-point single-
; precision value and return the float value.
; The input short is in register r0.
; First move it to a float register - no
; format conversion will take place
VMOV.F32 s0, r0 ; transfer the short to a
; floating-point register
VCVT.F32.S16 s0, s0, #8 ; perform the conversion
BX lr ; return
END
A sample C program to use this conversion routine is shown below. The input data is in short integer format representing the signed 8x8 format (check for yourself that these values are correct).
//Input data in S16 format with 8 fraction bits.
#include <stdio.h >
extern void EnableFPU(void);
extern float CvtShorts8x8ToFloat(short i);
int main(void)
{
short Input[10] = {
1408, // 5.5 (0x0580)
384, // 1.5 (0x180)
−672, // −2.625 (0xFD60)
−256, // −1.0 (0xFF00)
641, // 2.50390625 (2.5 + 1/256)(0x0281)
192, // .75 (0x00C0)
−32768, // neg max, −128.0 (0x8000)
32767, // pos max, 127 + 255/256 (0x7FFF)
−32, // −0.125 (0xFFE0)
0
};
int i;
short InVal;
float OutVal;
for (i = 0; i < 11; i + +) {
OutVal = CvtShorts8x8ToFloat(Input[i]);
//Operate on the float value
}
}
The conversion routine is stored in a separate file. Multiple routines may be placed in this file and called as needed by the C program. In this way, a library of routines utilizing functions not readily available from the high-level languages may be created to make use of features in the processor.
For further reading, you should consult the ARM documentation about calling C++ functions from assembly and calling assembly from C++. Examples can be found in the RealView Compilation Tools Developer Guide (ARM 2007a).
18.5 Exercises
- Example 18.1 gives the program necessary to set the Q flag. Run the code using the Keil tools, with the target being the STR910FM32 from STMicroelectronics. Which registers does the compiler use, and what is the value in those registers just before the QDADD instruction is executed?
- Example 18.2 demonstrates the embedded assembler. Compile the code and run it. What is the value in the Program Counter just before the BX instruction executes in the function my_strcopy? In order to compile this example, you will need to target the LPC2101 from NXP and include files from the “Inline” example found in the Keil “Examples” directory. Include the source files serial.c and retarget.c in your own project. Also be sure to include the startup file when asked. When you run the code, you can use the UART #2 window to see the output from the printf statements.
- Write a short C program that declares a variable called TMPTR. Using Example 18.2 as a guide, print out the variable in degrees Celsius, with some initial temperature defined in the main program in degrees Fahrenheit. Write the temperature conversion program as an inline assembly function. You’ll want to use fractional arithmetic to avoid division.
- Using the saturation algorithm discussed in Chapter 13, which performs a logical shift left by m bits and saturates when necessary, write a C routine which calls it as an embedded assembly function. The function should have two parameters: the value to be shifted and the shift count. It should return the shifted value. The small C routine should create a variable with the initial value.
- Modify Example 18.1 so that the function Clear_Q_Flag returns 1 when the function clears a set Q flag; otherwise, if the bit was clear, it returns 0.
- Run Example 18.4 by creating two separate source files in the Keil tools. Once you have saved these files, you can add them to a new project. The Keil tools will compile the C source file and assemble the assembly language file automatically. When you run the code, you can see the output on UART #2. Refer to Exercise 2 for more details.
- Run Example 18.5 by creating three separate source files in the Keil tools. Recall that the FPU must be initialized, and this should be one of the three files. Notice the value of OutVal in the variables window and confirm the converted values match the expected inputs from the sensor (see the comments in the array declaration).
- Expand Example 18.5 by converting the OutVal floating-point value back to S16 8x8 format. Add this routine to the file containing the CvtShorts8x8ToFloat routine and call it CvtFloatToShorts8x8. Verify that the result of the conversion back to S16 8x8 format matches the original value. Experiment with some other formats, such as 9.7 or 7.9, and see what values are produced.