Table of Contents for
The Rootkit Arsenal: Escape and Evasion in the Dark Corners of the System, 2nd Edition
 The Rootkit Arsenal: Escape and Evasion in the Dark Corners of the System, 2nd Edition
Published by
Jones & Bartlett Learning, 2012
The Rootkit Arsenal: Escape and Evasion in the Dark Corners of the System, 2nd Edition
Published by
Jones & Bartlett Learning, 2012
- Cover
- Title Page
- Copyright
- The Rootkit Arsenal: Escape and Evasion in the Dark Corners of the System
- Contents
- Preface
- Part I: Foundations
- Chapter 1 Empty Cup Mind
- Chapter 2 Overview of Anti-Forensics
- Chapter 3 Hardware Briefing
- Chapter 4 System Briefing
- Chapter 5 Tools of the Trade
- Chapter 6 Life in Kernel Space
- Part II: Postmortem
- Chapter 7 Defeating Disk Analysis
- Chapter 8 Defeating Executable Analysis
- Part III: Live Response
- Chapter 9 Defeating Live Response
- Chapter 10 Building Shellcode in C
- Chapter 11 Modifying Call Tables
- Chapter 12 Modifying Code
- Chapter 13 Modifying Kernel Objects
- Chapter 14 Covert Channels
- Chapter 15 Going Out-of-Band
- Part IV: Summation
- Chapter 16 The Tao of Rootkits
- Index
- Photo Credits
Chapter 9 Defeating Live Response
Traditional rootkit tactics directed a significant amount of effort toward concealing disk-based modules (e.g., KMDs, browser helper objects, rogue services, etc.). An exhaustive postmortem analysis will unearth these modules. By staying memory resident, we don’t have to worry about any of this, perhaps with the exception of artifacts that might find their way onto the system page file.
Yet, even if we decide to take the memory-resident route, there are still challenges that we must deal with. I’m referring to:
 Evading live incident response.
Surviving a system restart.
Bypassing network security monitoring.
In this chapter, I’m going to focus on the problems associated with subverting a preemptive live incident response (one that has been initiated in the spirit of an assessment-based security model). What we’ll see is that to undermine incident response, we need to decrease our level of reliance on:
The Windows loader.
The system call API.
In other words, we need to operate in such a fashion that we minimize the amount of bookkeeping entries that our code registers with the system’s internal data structures. At the same time, we want to limit the amount of the forensic data (e.g., log entries, registry entries) that’s created as a result of using general-purpose system services. Why spend so much effort on concealment when it’s easier simply not to create forensic evidence to begin with? This is the power of the data source elimination strategy.
ASIDE
On August 15, 2009, Wired magazine announced that one of its contributing writers, Evan Ratcliff, had voluntarily gone into hiding and that a reward of $5,000 could be claimed by whomever found him. Though Ratcliff was eventually snared less than a month later in New Orleans, this nationwide game of cat-and-mouse is instructive because it demonstrates the hazards of staying on the grid. Using society’s infrastructure in any way will generate an audit trail. Someone who can live outside of society and be completely self-sustaining has a much better chance of remaining hidden over the long run.
Autonomy: The Coin of the Realm
The standard modus operandi of a live incident response is designed successfully to flush out modules that hide in a crowd. This was the approach that early malware used to conceal itself. The basic train of thought was that Windows was so big, and there were so many random processes running in the background, it wouldn’t be too hard to simply blend in with the muddle of executing tasks.
Given the effectiveness of live response with regard to smoking out this sort of malware, attackers responded by altering system binaries to:
Provide better concealment.
Break security software.
The rapid adoption of postmortem forensic tools quickly made patching system binaries on disk untenable. In response, attackers switched to patching constructs in memory (see Figure 9.1). As memory analysis forensic tools have evolved, bleeding-edge rootkits are moving toward self-sustaining microkernel architectures that can exist outside of the targeted operating system altogether.
Nevertheless, memory-based system modification is still a viable option. In fact, this is the current battlefront of the arms race. Step back for a moment and imagine a user-mode forensic tool that possesses the following features:
It doesn’t require installation (e.g., runs off of a CD).
It’s statically linked (doesn’t rely much on local subsystem DLLs).
It streams encrypted output to a remote socket (no need to map a network share).
At first glance, this hypothetical tool may seem ideal. It’s fairly self-contained and has a minimal footprint. Yet it’s also assuming a naïve sense of trust in the underlying system calls. If the tool is using standard Windows API calls to perform operations, these calls will eventually end up invoking code in the kernel (after all, that’s where most of the real work gets done in terms of system services). A rootkit that has access to kernel space can modify kernelmode routines to undermine the forensic tool.
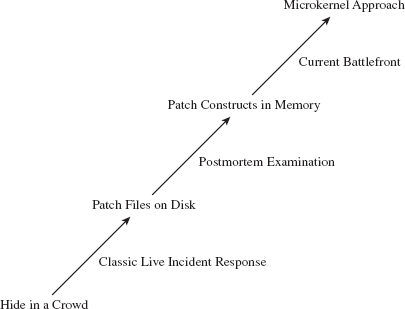
Figure 9.1
There’s a lesson here, a really important one:
Relying on the local API stack and its underlying kernel-mode infrastructure is risky for both the attacker and the defender.
It’s hazardous for the attacker because system call routines can be used to detect his or her presence. It’s also dangerous for the defender because the attacker can subvert this same infrastructure to feed investigators misinformation. Both sides of the playing field can poison the well, so to speak; so be careful when you take a sip!
Learning the Hard Way: DDefy
Here’s a graphic example of the dangers involved when you place too much trust in the integrity of the kernel. In the event that a disk has been formatted with an encrypted file system, the forensic investigator may be forced to create a disk image at runtime, as a part of the live incident response. This is due to the fact that powering down the machine will leave all of the disk’s files in an encrypted state, making any sort of postmortem forensic analysis extremely difficult (if not impossible).
The Windows Encrypted File System (EFS) uses a randomly generated File Encryption Key (FEK) to encipher files using a symmetric algorithm. The EFS protects the FEK associated with a particular file by encrypting it with the public key from a user’s x509 certificate, which is tied to the user’s logon credentials. Encryption and decryption occur transparently, behind the scenes, such that the user doesn’t have to take any additional measures to work with encrypted files.
On a stand-alone Windows machine, there’s no recovery policy by default. If a user “forgets” his password (or refuses to divulge it), his files will be irrevocably garbled once the machine is powered down. To get at these files, an investigator would need to image the drive while the machine is still running. The catch is that, at runtime, a rootkit has an opportunity to interfere with the process.
To create a disk image, many forensic tools leverage the ReadFile() routine specified by the Windows API. This routine is implemented in kernel32.dll, and it calls the NtReadFile() system call stub exported by ntdll.dll.
The actual system call is indexed in the SSDT and is invoked using a protocol that you should be intimately familiar with (at this point in the book). The NtReadFile() call passes it’s read request to the I/O manager, where the call is issued in terms of a logical position, relative to the beginning of a specific file. The I/O manager, via an IRP, passes this request to the file system driver, which maps the file-relative offset to a volume-relative offset. The I/O manager then passes another IRP to the disk driver, which maps the logical volume-relative offset to an actual physical location (i.e., cylinder/track/sector) and parlays with the HDD controller to read the requested data (see Figure 9.2).
As the program’s path of execution makes its way from user space into kernel space, there are plenty of places where we could implement a patch to undermine the imaging process and hide a file. For example, we could hook the IAT in the memory image of the forensic tool. We could also hook the SSDT or perhaps implement a detour patch in NtReadFile(). We could also hook the IRP dispatch table in one of the drivers or implement a filter driver that intercepts IRPs (we’ll look into filter drivers later in the book).
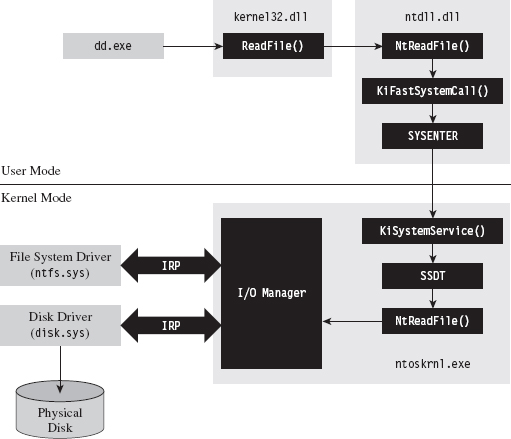
Figure 9.2
Commercial tool vendors tend to downplay this problem (for obvious reasons). For example, Technology Pathways, the company that sells a forensic tool called ProDiscover, has the following to say about this sort of runtime counterattack:1
“Some administrators will suppose that if a rootkit could hook (replace) File I/O request they could simply hook the sector level read commands and foil the approach that applications such as ProDiscover® IR use. While this is true on the most basic level, hooking kernel sector read commands would have a trickle-down effect on all other kernel level file system operations and require a large amount of real-to-Trojaned sector mapping and/or specific sector placement for the rootkit and supporting files. This undertaking would not be a trivial task even for the most accomplished kernel mode rootkit author.”
Note how they admit that the attack is possible and then dismiss it as an unlikely thought experiment. The problem with this outlook is that it’s not just a hypothetical attack. This very approach, the one they scoffed at as implausible, was implemented and presented at the AusCERT2006 conference. So much for armchair critics …
A company called Security-Assessment.com showcased a proof-of-concept tool called DDefy, which uses a filter driver to capture IRP_MJ_READ I/O requests on their way to the disk driver so that requests for certain disk sectors can be modified to return sanitized information. This way, a valid image can be created that excludes specific files (see Figure 9.3).
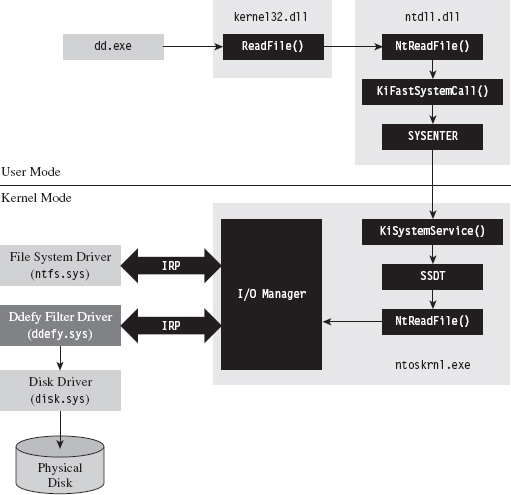
Figure 9.3
As mentioned earlier in the book, one potential option left for a forensic investigator in terms of live disk imaging would be to use a tool that transcends the system’s disk drivers by essentially implementing the functionality with his own dedicated driver. His disk imaging tool would interact with the driver directly (via DeviceIoControl()), perhaps encrypting the information that goes to and from the driver for additional security.
The Vendors Wise Up: Memoryze
As a general rule, it’s not a good idea to underestimate your opponent. This is particularly true of the engineers over at Mandiant. They’ve developed a memory dumping tool called Memoryze that eschews API calls in favor of parsing memory-related data structures manually.2
Specifically, the tool walks through each module’s EPROCESS block in the kernel and traverses its self-balanced virtual address descriptor (VAD) tree. Each node in the tree is represented by what’s known as a memory manager virtual address descriptor (MMVAD). The root of the tree is defined by a field named VadRoot. You can get a better look at the VadRoot in the following kernel debugger command:
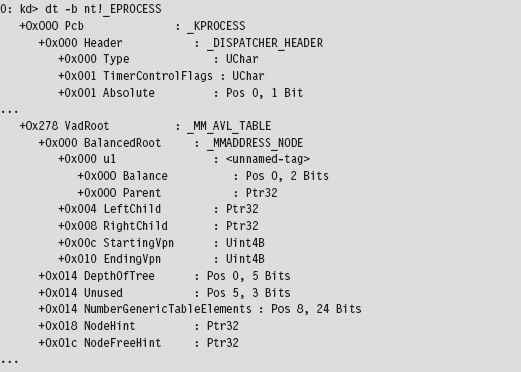
At Black Hat USA 2009, Peter Silberman and Steve Davis demonstrated how Memoryze can be used to recover Metasploit session information. Their slide deck for this presentation contains some low-level details on how Memoryze works.3
9.1 Live Incident Response: The Basic Process
There are many ways to stay memory resident. To understand the trade-offs that will guide us toward an optimal technique, it’s necessary to understand the nature of a live incident response (see Figure 9.4). Recall we’re assuming that we’re facing off against an analyst who is performing a proactive investigation in an effort to evaluate the integrity of the machine under examination.

Figure 9.4
To get an initial snapshot of a system before disturbing the execution environment with additional forensic tools, the first step will normally be to initiate a system-wide dump of memory (e.g., the executive’s address space and all of the user-mode processes). If you have a corporate budget, you could use a tool like HBGary’s Fastdump PRO. Otherwise, you could opt for a free tool like Mandiant’s Memoryze.
Next, the investigator will collect volatile data. This includes metadata related to current network connections, user sessions, running tasks, open files, and so forth. In other words, the sort of stuff that you’d irrevocably lose if someone yanked out the power cable (see Table 9.1 to get an idea of what I’m talking about).
Table 9.1 Volatile Data Collection
| Data | Example Command Line | Tool Suite |
| Host name | hostname.exe | Native Windows tool |
| User ID | whoami.exe | Native Windows tool |
| OS version | Ver | Native Windows tool |
| Time & date | ((date /t) & (time /t)) | Native Windows tool |
| Boot time | systeminfo.exe | find “Boot Time” | Native Windows tool |
| NetBIOS cache | nbtstat.exe --c | Native Windows tool |
| NetBIOS sessions | nbtstat.exe --S | Native Windows tool |
| Open share files | net.exe file | Native Windows tool |
| Network cards | ipconfig.exe /all | Native Windows tool |
| Network endpoints | cports.exe /stext filename.txt | NirSoft |
| Routing table | netstat.exe --rn | Native Windows tool |
| ARP cache | arp.exe --a | Native Windows tool |
| DNS cache | ipconfig.exe /displaydns | Native Windows tool |
| Logged on users | psloggedon.exe /accepteula | Sysinternals |
| Logged on sessions | Logonsessions.exe --p /accepteula | Sysinternals |
| Hosted services | tasklist.exe /svc | Native Windows tool |
| Device drivers | driverquery.exe | Native Windows tool |
| Process tree | pslist.exe /accepteula -t | Sysinternals |
| Process full paths | cprocess /stext filename.txt | NirSoft |
| Loaded DLLs | Listdlls --r | Sysinternals |
| Open handles | handle.exe --a | Sysinternals |
| Auto-start tasks | autorunsc.exe /accepteula -a | Sysinternals |
At CEIC 2010, I sat in on a presentation given by Joe Riggins of Guidance Software where he asserted that a customer had better start buying him drinks if the customer powered down a compromised machine before his response team arrived.
Note: This raises the specter of an interesting forensic countermeasure. Windows is a proprietary platform and, as a result, memory forensic tools have been known to crash machines that they’re running on. If you happen to notice that a well-known forensic tool is currently executing, you could conceivably wipe your address space before initiating a crash dump in hopes of casting blame on the forensic tool.
If the investigator notices a particular process that stands out as suspicious during this stage of the game, he may want a dedicated memory dump of its address space. We saw how to do this earlier with Microsoft’s ADPlus tool. However, given the tool’s reliance on a debugger (i.e., CDB.exe) and the ease with which an attacker can detect and subvert a debugger, it may be worth it to rely on more API-independent tools like Memoryze.
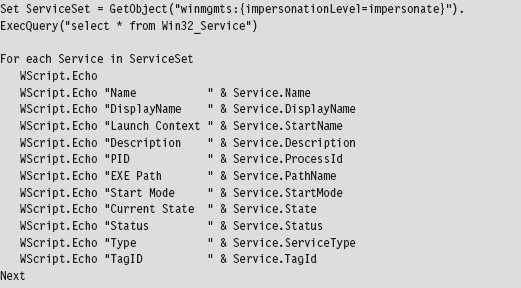
Some volatile data items are easier to collect using scripts. For example, the following Visual Basic Script dumps service properties to the console.
Once all of the volatile data has been collected, the investigator will move on to nonvolatile data. This consists of bits of data that could ostensibly be gleaned postmortem but that are easier to acquire and decipher at runtime. See Table 9.2 for a sample list of commands that could be used to collect this kind of information.
Table 9.2 Nonvolatile Data Collection
| Data | Example Command Line | Tool Suite |
| Installed patches | systeminfo.exe | Native Windows tool |
| Installed software | psinfo.exe -s | Sysinternals |
| File time stamps | find C:\ -printf “%%T@;%%p\n” | UnxUtils |
| Audit policy | auditpol /get /category:* | Native Windows tool |
| Log file names | wevtutil el | Native Windows tool |
| Registry keys | reg export HKLM hklm.reg | Native Windows tool |
| Registry hives | reg save HKLM\SYSTEM system.dat | Native Windows tool |
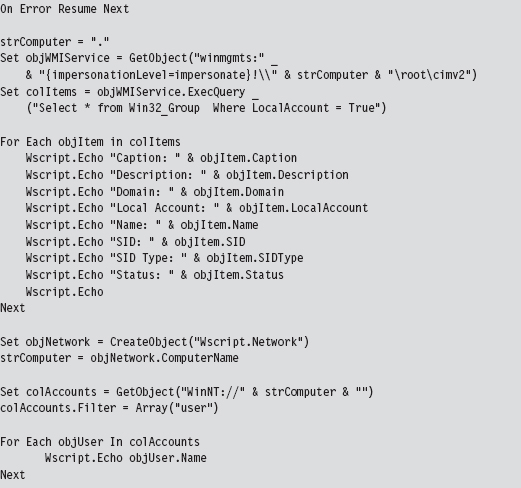
As before, scripts can also be used to extract data (e.g., group and user information) that cannot be accessed using a single preexisting command.
If a machine can’t be powered down because of an existing service level agreement (SLA) or because of financial concerns, the investigator still has the option of imaging the machine’s secondary storage using tools like AccessData’s FTK Imager that enable a runtime capture. Granted, the issue I mentioned earlier will rear its ugly head (i.e., an attacker can interfere). So the forensic integrity of this image should be taken with a grain of salt.
Savvy investigators will often try to find different ways to corroborate what a computer is telling them (e.g., cross-view detection). This is particularly true with regard to network communication. Open ports and active connections can be concealed by rootkit technology on the local host. Hence, it makes sense to scan the machine in question with a tool like nmap for open ports from another machine.
However, because some rootkits use port redirection to enable covert communication through TCP ports opened by existing services, it also might be a good idea to capture network traffic in its entirety with Wireshark or Microsoft’s Network Monitor. This countermeasure can require a bit of preparation (e.g., installing a repeater at a convenient spot or setting up a span port to enable impromptu monitoring). Based on a number of operational factors, the professionals seem to prefer strategically placed line taps as the access mechanism of choice for sniffing packets.4
Assuming that a machine’s logging facilities have been configured to forward event messages to a central repository, an investigator might also take the opportunity to analyze this remote stockpile of information with search tools like Splunk while he pours over other network-related metadata.5 This is not to say that there’s nothing to stop an attacker from patching the kernel so that certain event messages never reach the event log to begin with.
In the event that a machine can be powered down for a postmortem, there may be some merit to initiating a full memory crash dump with a tool like NotMyFault.exe from Sysinternals.6 In skilled hands, a kernel debugger is one of the most powerful and affordable memory analysis tools available.
Some analysts may frown on this option as crash dump files can be of the order gigabytes in size and have the potential to destroy valuable forensic evidence (e.g., Locard’s exchange principle). One way to help mitigate this concern is to create a crash dump file in advance and configure the machine to overwrite the existing dump file when a blue screen occurs. Another alternative is to allocate a dedicated partition for the crash dump file. Even then, a truly devious attacker might stick his rootkit within an existing crash dump file and then generate a kernel bug check if he feels like someone is watching him.
9.2 User-Mode Loaders (UMLs)
By now you should understand how forensic investigators think and have a general picture of their standard operating procedure. This foreknowledge will help to guide us toward a memory-resident solution that provides the investigator with the least amount of useful information.
Looking back on Tables 9.1 and 9.2, you should notice a few things. First, the general granularity is fairly high-level. This will give us leeway to conceal ourselves while conveying the impression that nothing’s wrong. For example, Nir Sofer’s cport.exe command will tell which ports a process has open, but it won’t tell you what exactly within this process has initiated the connection (e.g., an injected thread, or an exploit payload, or a rogue COM object, etc.). As long as the remote address looks kosher, an observer probably won’t raise an eyebrow.
The commands listed in Tables 9.1 and 9.2 also rely heavily on system APIs and data structures to do their job. These various system objects can be manipulated and altered, which is the signature methodology of rootkits like Hacker Defender.
UMLs That Subvert the Existing APIs
The thing about the Windows loader is that it assumes (i.e., demands) that the module to be loaded reside somewhere on disk storage. For instance, if you invoke the LoadLibrary() routine to load a module into the address space of a process, the call will only succeed if the specified module is a file on disk.

Underneath the hood, in kernel space, the LoadLibrary() function relies on the routines given in Table 9.3 to do its job.
Table 9.3 Routines Used by LoadLibrary( )
| Routine | Description |
| NtOpenSection | Opens a handle to an existing section of memory that can be shared |
| NtCreateSection | Creates a section of memory that can be shared |
| NtMapViewOfSection | Maps a section of shared memory into the address space of a process |
| NtQueryAttributesFile | Retrieves metadata for a file object |
| NtOpenFile | Opens an existing file and returns a handle to this file |
I suppose one way around this requirement would be to create a RAM drive and store all of your modules there. The WDK actually ships with sample code for a driver that implements a minimal RAM disk.7 There are also commercial products that offer more bells and whistles.8 For all intents and purposes, however, this approach is way too conspicuous in terms of the footprint that it leaves. So we need to find a better way.
One alternative would be to intercept and patch the system calls in Table 9.3 so that we could load modules from a memory buffer rather than from disk storage. This is exactly the route that the Metasploit Meterpreter originally took.9 The Stuxnet worm that received a lot of press coverage in summer 2010 also used this technique to load DLLs. The fine details of how this can be done have been published online.10
The Argument Against Loader API Mods
There are instances when the absence of an artifact is itself an artifact. We already ran into this when talking about open network ports. Specifically, if you detect that a certain port is open during an external scan and this same port doesn’t show up as open during a local audit from the console, there’s something funny going on.
The same situation holds when enumerating loaded DLLs. If system-level accounting entries indicate, via a tool like Sysinternals listdlls.exe, that a process has loaded a dynamic library that doesn’t correspond to a file on disk, you may be compromised. It’s a well-known telltale sign that someone has patched the native loader to enable memory-resident malware.
An investigator who knows what to look for will spot this in a New York minute. With regard to our current technique, this is unavoidable because we’re still relying on built-in loading facilities, and they’ll do what they normally do: update the operating system’s ledger to reflect the fact that they’ve mapped a module into the address space of a process.
It would be nice if we could get memory resident without leaving these artifacts. To do so we’ll need to sidestep the native loader entirely and build our own. Doing so will require an understanding of the low-level details of the Windows Portable Executable (PE) file format. So let’s take a brief detour and dig down into the minutiae of how Microsoft formats its modules.
The Windows PE File Format at 10,000 Feet
In a nutshell, a Windows PE file/memory image begins with a couple of general-purpose headers that are common to all PE modules (see Figure 9.5). I’m referring to the venerable MS-DOS header, the PE file header, and the PE optional header. These headers contain high-level metadata and pointers to tables used to store more specialized metadata elsewhere in the file.
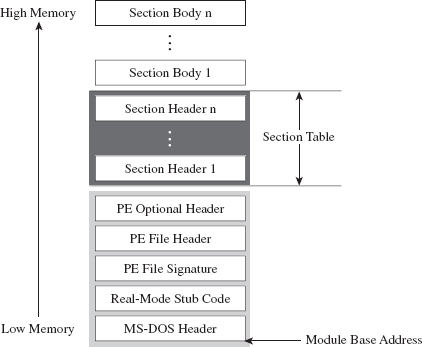
Figure 9.5
Following the general-purpose headers is the file’s section table. To understand what the section table is, you need to recall the nature of a section. The soul of a PE module is its sections (e.g., the .text section, the .data section, the .bss section, the .rsrc section, the .debug section, etc.). I talked a bit about the default executable sections earlier on. Each section consists of a section header (which stores metadata about the section) and a section body (which contains raw machine code or data).
The section table is just an array composed of a PE module’s section headers. Beyond the section table are the section bodies, in all their glory. The section headers and section bodies are ordered according to their position in memory at runtime.
One of the convenient things about the PE format is that it makes life relatively easy for the loader. Specifically, the form that a PE image assumes in memory is almost identical to its organization on disk. There’s not much that needs to be tweaked. It’s like a TV dinner; just stick it in the oven and it’s done.
Relative Virtual Addresses
Before we head down into the nuts and bolts, you should understand what a relative virtual address (RVA) is because you will see this term used everywhere. I’m not joking.
As an alternative to hard-coding memory addresses, elements in a PE file/image are described in terms of a relative offset from a base address.

In English, an RVA is just the number of bytes measured from the start of the PE file/image. Thus, given its RVA, the address of a PE file component in memory can be computed via:

These relationships are exact for a PE module in memory. For a PE file on disk, these calculations require minor fix-ups. Given that we aren’t necessarily concerned with patching a file on disk, this isn’t as much of an issue.
PE File Headers
If you wanted to, you could read the official Windows PE file format specification to get an idea of how things are laid out.11 However, most of the important structures are also spelled out in the Winnt.h header file, and I’ve discovered (the hard way) that this is often a more palatable alternative. You should only fall back on the official spec if something in the header file isn’t clear.
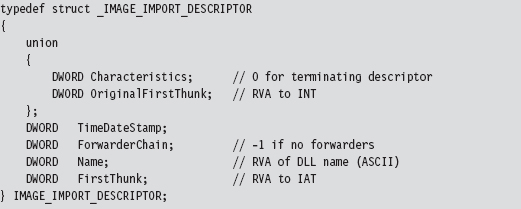
Having said that, let’s take a close look at those general-purpose headers that reside at the beginning of a PE file (see Figure 9.6).
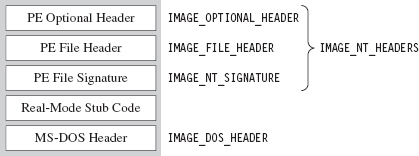
Figure 9.6
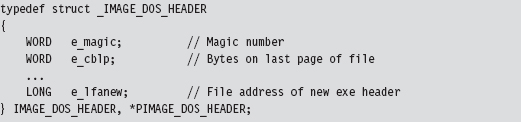
The first 40 bytes of a PE file is populated by a DOS executable header that is defined by the IMAGE_DOS_HEADER structure.
PE-based modules are prefixed with a DOS header and stub program (see Figure 9.6) so that if you try to run them in DOS, they print out a message to the screen that says “This program cannot be run in DOS mode.” That’s backwards compatibility in action.
The fields of the structure that interest us are the first and the last. The first field of the IMAGE_DOS_HEADER structure is a magic number (0x4D5A, or “MZ” in ASCII) that identifies the file as a DOS executable and is homage to Mark Zbikowski, the man who developed this venerable format. The last field is the RVA of the PE’s file header.
Using the RVA supplied in the DOS header, we can jump forward to the PE header. Programmatically speaking, it’s defined by the IMAGE_NT_HEADERS structure.

The first field of this structure is just another magic number. The second field, FileHeader, is a substructure that stores a number of basic file attributes.
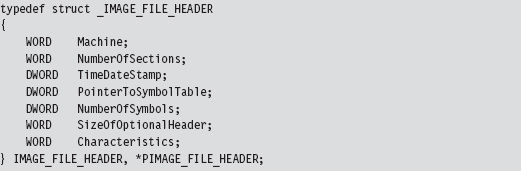
The NumberOfSections field is important for our purposes because it will help us load the module into memory.
There’s also a field named Characteristics that defines a set of binary flags. According to the PE specification, the 14th bit of this field will be set if the module represents a DLL or clear if the module is a plain-old .EXE. From the standpoint of the PE spec, that’s the difference between a DLL and an .EXE: 1 bit.

The OptionalHeader field in the IMAGE_NT_HEADERS32 structure is a misnomer of sorts. It should be called “MandatoryHeader.” It’s a structure defined as:
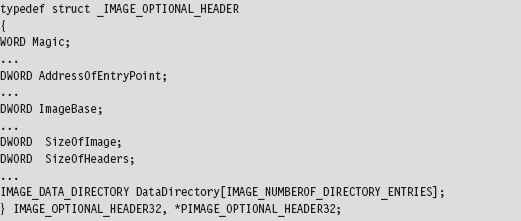
This structure is rather large, so I’ve included only those fields that are immediately useful. The first member of this structure is a magic number (set to 0x10B for normal executables, 0x107 for ROM images, etc.). The AddressOfEntryPoint field will be set to the RVA of the DllMain() routine if this module is a DLL.
The ImageBase field defines the preferred (I repeat, preferred, not actual) load address of the module. For a full-fledged executable, this will normally be 0x00400000. For DLLs, this field will be set to 0x10000000. Executable files are typically loaded at their preferred base address, because they’re the first file that gets mapped into an address space when the corresponding process is created. DLLs don’t have it so easy and tend to be loaded at an address that isn’t their preferred base address.
The SizeOfImage field indicates the number of bytes that the module will consume once it’s loaded into memory (e.g., file headers, the section table, and the sections; the full Monty). The SizeOfHeaders field is set to the combined size of the MS-DOS stub, the PE header, and the section headers.
The last member of interest is an array of 16 IMAGE_DATA_DIRECTORY structures.
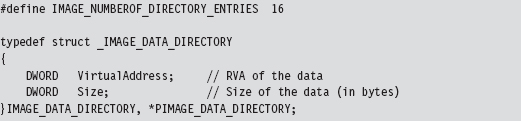
The 16 entries of the array can be referenced individually using integer macros.
Think of the DataDirectory array as a way quickly to get at relevant metadata within different sections. The alternative would be to parse through each section sequentially until you found what you were looking for, and that’s no fun.
For our purposes, we’re interested in data that’s embedded in the import data section (i.e., the .idata section) and the base relocation section (i.e., the .reloc section).
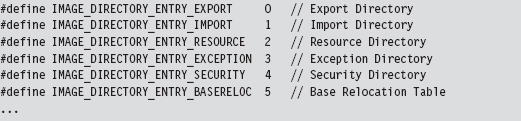
So that’s it. We’re done with our field-expedient survey of the basic PE headers. To help provide you with a mental snapshot of how all of these structures fit together, I’ve merged them all into a single diagram (see Figure 9.7).
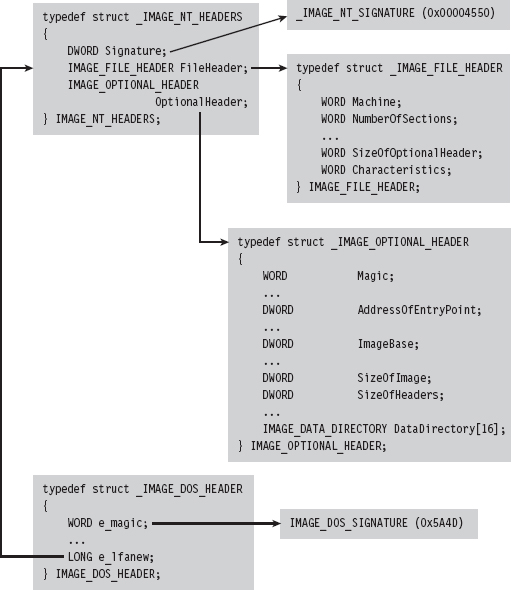
Figure 9.7
The Import Data Section (.idata)
The import data section describes all of the external routines that a DLL uses (which are functions exported by other DLLs). We can get at this metadata using the IMAGE_DIRECTORY_ENTRY_IMPORT macro to identify the second element of the IMAGE_DATA_DIRECTORY array. The VirtualAddress field of this array element specifies the RVA of the import directory, which is an array of structures of type IMAGE_IMPORT_DESCRIPTOR. Each element in this array corresponds to a secondary DLL that the current DLL uses.
How do you know the number of entries in the descriptor array? The last element of the array of IMAGE_IMPORT_DESCRIPTOR structures is denoted by having its fields set to zero. There are three fields of particular importance in this structure.
| The RVA of the import lookup table (ILT). |
| The RVA of a null-terminated ASCII string. |
| The RVA of the import address table (IAT). |
The Name field is just the RVA of a DLL string (e.g., “kernel32.dll”). Both FirstThunk and OriginalFirstThunk point to arrays of IMAGE_THUNK_DATA structures. This data structure is essentially one big union of different members.
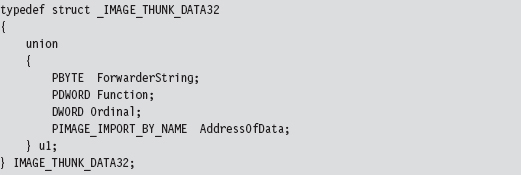
Each function that’s imported by the module (i.e., at load time) will be represented by an IMAGE_THUNK_DATA structure. But why do we need two arrays instead of just one?
As it turns out, one array is used to store the names of the imported routines. This is known as the import lookup table (ILT), or the import name table (INT). The other array stores the addresses of the imported routines, and it’s known as the import address table (IAT). See Figure 9.8 and then Figure 9.9 for even more detail.
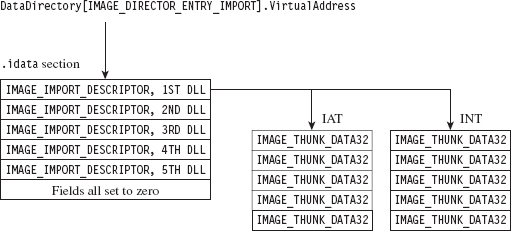
Figure 9.8

Figure 9.9
The IAT uses the u1.Function union field to store the address of the imported routines. The ILT uses the IMAGE_IMPORT_BY_NAME field in the union, which itself has a Name field that points to the first character of a routine name (see Figure 9.9).

The Base Relocation Section (.reloc)
As before, we use the DataDirectory in the optional PE header quickly to get our hands on the metadata in the base relocation section. The metadata in question consists of an array of variable-length relocation blocks, where each relocation block consists of a single structure of type IMAGE_BASE_RELOCATION, followed by an array of RELOC_RECORD structures (see Figure 9.10).

Figure 9.10
Each relocation block describes the address fix-ups that are required for a specific 4-KB page of code when the module cannot be loaded at its preferred address. To get a better idea of how this happens, I’ve enlarged Figure 9.10 to display the composition of the attendant data structures (see Figure 9.11).
The IMAGE_BASE_RELOCATION structure has two fields that describe the RVA of the 4-KB page of code and the total size of the relocation block structure. The second field is used to determine the number of RELOC_RECORD structures in the relocation block.
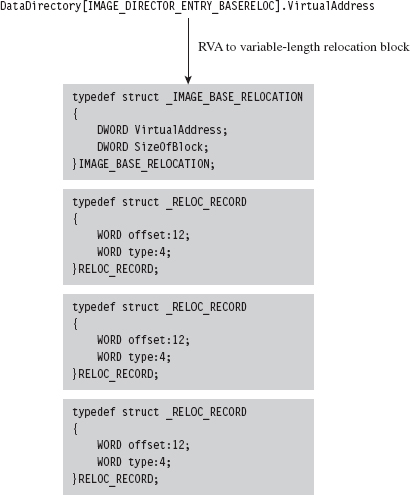
Figure 9.11

The IMAGE_BASE_RELOCATION structure is sort of a global structure. The nitty-gritty specifics needed to correct address values within a 4-KB page of machine code are stored in the relocation records that follow this initial structure.
Each RELOC_RECORD is a WORD-sized bit-field that describes the offset of the address value to be corrected within the 4-KB page of code (relative to the base address of the 4-KB page) and the type of correction that needs to be instituted.

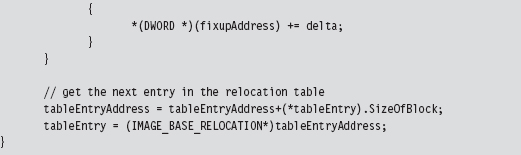
We can get away with a 12-bit offset in the RELOC_RECORD structure because we’re dealing with set locations inside of a 4-KB page. At load time, the operating system’s loader iterates through the array of relocation records, fixing up address literals in the associated 4-KB page as it goes (see Figure 9.12).
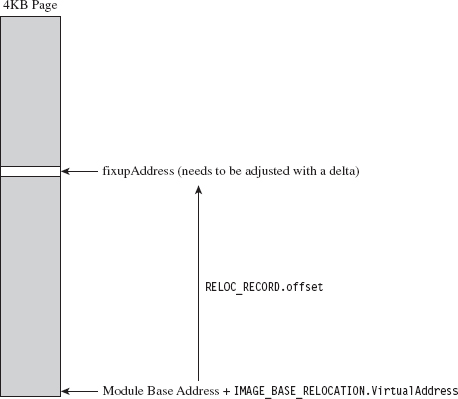
Figure 9.12
Implementing a Stand-Alone UML
Now that we’ve done our homework on the Windows PE file format, we can start moving into the interesting material. To be honest, what you’ll discover is that most of the difficult work has already been done at compile time (e.g., tracking address values, building the import tables and relocation records, etc.). All we need to do is traverse the executable and make the necessary adjustments.
Recall that the native Windows loader takes care of three basic tasks:
Maps a module into memory.
Populates the module’s IAT.
Implements relocation fix-ups.
If we’re going to supplant the Windows loader, then we’ll need to replicate this functionality on our own.
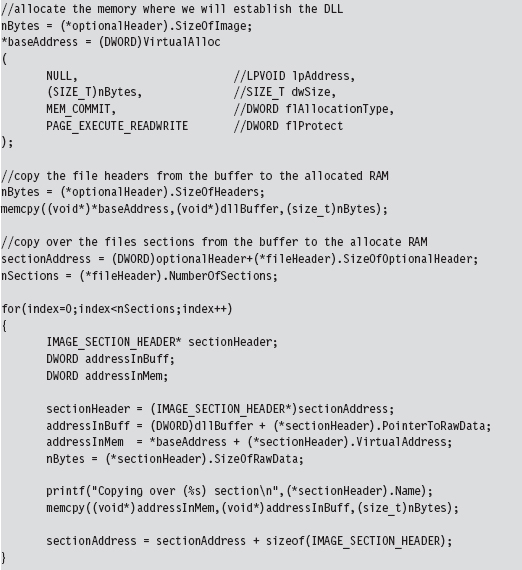
Though the Windows SDK would have you believe that mapping a module into memory is a mystical operation that involves a lot of fancy jargon and system-level voodoo, it’s actually pretty simple. We simply use the SizeOfImage field in the optional PE header to allocate some memory, and then we copy over all of the headers (i.e., everything from the MS-DOS header to the end of the section table).
Once we’ve copied the headers over, we use the section table metadata to load each section into memory.
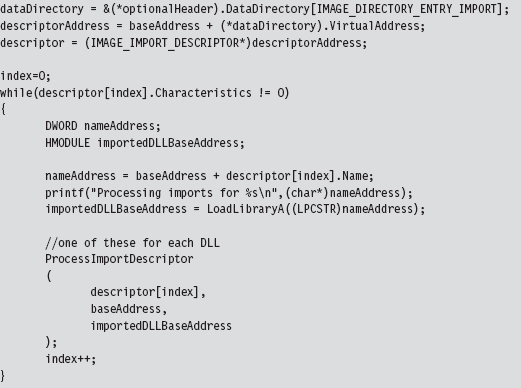
To populate the IAT, we use the DataDirectory array in the PE optional header to process the IMAGE_IMPORT_DESCRIPTOR for each DLL that the current DLL (e.g., the one we want to load) imports.
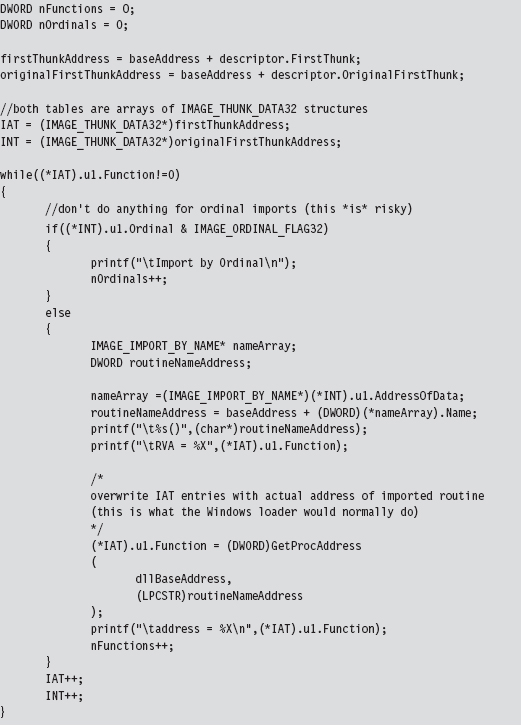
For each import descriptor, we walk in the IAT and update the various Function fields to point toward actual routine addresses.
The hardest part about relocation records is learning how the various data structures are composed and used. Once you have the conceptual foundation laid out in your mind’s eye, the implementation is fairly straightforward.
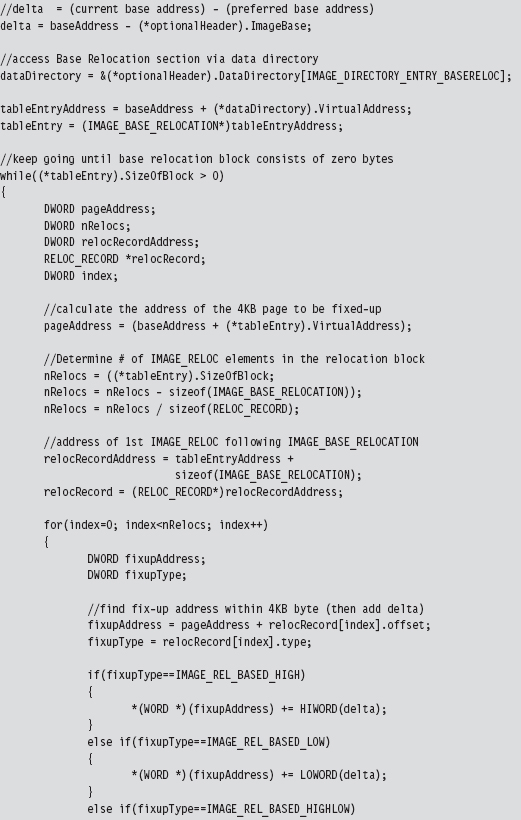
To perform relocation fix-ups, we begin by calculating the delta value, which is just the difference between the loaded DLL’s preferred base address and its actual base address (which is stored in the PE optional header).
Next, as with the IAT, we use the DataDirectory in the PE optional header to get our hands on the base relocation section. Let your pointers do the walking, so to speak. From there on out, we just plow through each base relocation table and apply the delta to the values described by the relocation records. This is an important point worth repeating because it’s subtle. We aren’t modifying the values in the relocation records themselves. We’re modifying values whose location in memory is specified by the relocation records.
9.3 Minimizing Loader Footprint
Well, I’ve got some bad news. There’s something I haven’t told you. Don’t be angry, I did it for your own good. The DLL loader that we just examined in the previous section has a fundamental flaw: It resides on disk.
Sure, the DLLs that it loads can be streamed over a network connection, but the loader itself has been built in such a manner that it must be a disk-resident executable. Any forensic investigator who finds this sort of program on a machine will immediately smell blood. So here’s our problem: How do we implement the loader without touching the disk?
Data Contraception: Ode to The Grugq
One option is to get an existing generic system tool to act as a loader, so that you don’t need to install your own loader on the targeted machine. This is the gist of a strategy called data contraception that was pioneered by The Grugq. The trick is to find a tool that has the built-in ability to map executable code into memory and launch it.
The Grugq did most of his proof-of-concept work on the UNIX platform. Specifically, he constructed an address space server named Remote Exec using a combination of gdb (the GNU Project Debugger) and a custom-built library named ul_exec (as in Userland Exec, a user-mode replacement for the execve() system call).12
The gdb tool is a standard part of most open-source distributions. It can spawn and manage a child process, something that it does by design. It’s stable, versatile, and accepts a wide range of commands in ASCII text. At the same time, it’s prolific enough that it’s less likely to raise an eyebrow during a forensic investigation.
The ul_exec library was published in 2004 by The Grugq as one of his earlier projects.13 It allows an existing executable’s address space to be replaced by a new address space without the assistance of the kernel. This library does most of the heavy lifting in terms of executing a byte stream. It clears out space in memory, maps the program’s segments into memory, loads the dynamic linker if necessary, sets up the stack, and transfers program control to the new entry point.
Furthermore, because ul_exec is a user-mode tool, the structures in the kernel that describe the original process remain unchanged. From the viewpoint of system utilities that use these kernel structures, the process will appear to be the original executable. This explains why this approach is often called process puppeteering. The old program is gutted, leaving only its skin, which we stuff our new program into so that we can make it do funny things on our behalf.
The Next Step: Loading via Exploit
Whereas data contraception is a step in the right direction, there’s still room for improvement. Rather than bet the farm that there will be a certain tool (like a debugger) available on the target, why not include the loader as part of a multistage exploit payload? This is the basic approach used by Metasploit’s Meterpeter (as in meta-interpreter), which is basically an extensible remote shell on steroids.14 I don’t have the necessary real estate in this book to include material on creating and deploying exploits, so I will direct interested readers to more in-depth15 and focused16 books.
9.4 The Argument Against Stand-Alone PE Loaders
Again, with the bad news, I’m afraid. Let’s assume that we’ve successfully implemented a memory-resident stand-alone loader to prevent the creation of bookkeeping entries at the system level. Even if our loader doesn’t rat us out (that we’ve loaded a DLL into the current process), there’s still at least one caveat that can haunt us.
An investigator who’s manually carving through a runtime memory dump may happen upon the file headers and data directories of the DLL that we’ve loaded and uncover our covert library. This is akin to a file-carving tool that eschews file system metadata in favor of manually hunting for internal structures that reside in the files themselves. Regardless of the fact that the operating system itself doesn’t officially know about the DLL, the analyst can use pattern recognition to pinpoint our contraband. Doh!
One solution is to load a module that doesn’t conform to the standard Windows PE file format. The opposition is looking for a pattern; don’t give them one! In other words, we do away with the standard headers and all of the associated section-based organization (e.g., .text, .data, .bss, .idata, .reloc, etc.). This turns out to be an attractive option because it allows us to blend in more easily with standard system entropy.
The question then becomes how do we manage address resolution after doing away with the PE data structures that originally supported it? PE binaries are compiled in a manner that encourages them to use an IAT and relocation records. The answer to this riddle is that we construct our own special address management facilities within the module that we load, such that our code can determine the addresses of external routines and populate its address tables at runtime. In other words, I’m talking about shellcode, and this leads us to the next chapter.
1. Christopher Brown, Suspect Host Incident Verification in Incident Repsonse (IR), Technology Pathways, July 2005.
2. http://www.mandiant.com/products/free_software/memoryze/.
3. http://www.blackhat.com/presentations/bh-usa-09/SILBERMAN/BHUSA09-Silberman-MetasploitAutopsy-SLIDES.pdf.
4. http://taosecurity.blogspot.com/2009/01/why-network-taps.html.
5. http://www.splunk.com/product.
6. http://download.sysinternals.com/Files/Notmyfault.zip.
7. http://msdn.microsoft.com/en-us/library/ff544551%28VS.85%29.aspx.
8. http://www.softperfect.com/products/ramdisk/.
9. Steve Davis and Peter Silberman, Metasploit Autopsy, Reconstructing The Scene of the Crime, Black Hat USA 2009.
10. http://www.nologin.org/Downloads/Papers/remote-library-injection.pdf.
11. http://www.microsoft.com/whdc/system/platform/firmware/pecoff.mspx.
12. The Grugq, “FIST! FIST! FIST! It’s all in the wrist: Remote Exec,” Phrack, Volume 11, Issue 62.
13. The Grugq, “The Design and Implementation of Userland Exec,” http://archive.cert.unistuttgart.de/bugtraq/2004/01/msg00002.html.
14. http://www.nologin.org/Downloads/Papers/meterpreter.pdf.
15. The Shellcoders Handbook, 2nd Edition, Wiley, 2004, ISBN 0764544683.
16. Jon Erickson, Hacking: The Art of Exploitation, 2nd Edition, No Starch Press, ISBN 1593271441.