Blockchain Developer's Guide
Develop smart applications with Blockchain technologies - Ethereum, JavaScript, Hyperledger Fabric, and Corda

BIRMINGHAM - MUMBAI

Copyright © 2018 Packt Publishing
All rights reserved. No part of this book may be reproduced, stored in a retrieval system, or transmitted in any form or by any means, without the prior written permission of the publisher, except in the case of brief quotations embedded in critical articles or reviews.
Every effort has been made in the preparation of this book to ensure the accuracy of the information presented. However, the information contained in this book is sold without warranty, either express or implied. Neither the authors, nor Packt Publishing or its dealers and distributors, will be held liable for any damages caused or alleged to have been caused directly or indirectly by this book.
Packt Publishing has endeavored to provide trademark information about all of the companies and products mentioned in this book by the appropriate use of capitals. However, Packt Publishing cannot guarantee the accuracy of this information.
First Published: December 2018
Production Reference: 1171218
Published by Packt Publishing Ltd.
Livery Place, 35 Livery Street
Birmingham, B3 2PB, U.K.
ISBN 978-1-78995-472-2

Mapt is an online digital library that gives you full access to over 5,000 books and videos, as well as industry leading tools to help you plan your personal development and advance your career. For more information, please visit our website.
Spend less time learning and more time coding with practical eBooks and Videos from over 4,000 industry professionals
Improve your learning with Skill Plans built especially for you
Get a free eBook or video every month
Mapt is fully searchable
Copy and paste, print, and bookmark content
Did you know that Packt offers eBook versions of every book published, with PDF and ePub files available? You can upgrade to the eBook version at www.packt.com and as a print book customer, you are entitled to a discount on the eBook copy. Get in touch with us at customercare@packtpub.com for more details.
At www.packt.com, you can also read a collection of free technical articles, sign up for a range of free newsletters, and receive exclusive discounts and offers on Packt books and eBooks.
Brenn Hill is a senior software engineer who has worked with clients such as NASCAR, PGA Tour, Time Warner Cable, and many others. He has experience leading international teams on cannot fail engineering projects. He strives to work with business to ensure that tech projects achieve good ROI and solve key business problems. He has a master's degree in Information Science from UNC-CH and currently travels the world as a digital nomad.
Samanyu Chopra is a developer, entrepreneur, and Blockchain supporter with wide experience of conceptualizing, developing, and producing computer and mobile software. He has been programming since the age of 11. He is proficient in programming languages such as JavaScript, Scala, C#, C++, Swift, and so on. He has a wide range of experience in developing for computers and mobiles. He has been a supporter of Bitcoin and blockchain since its early days and has been part of wide-ranging decentralized projects for a long time. You can write a tweet to him at @samdonly1.
Paul Valencourt is CFO of BlockSimple Solutions. He currently helps people launch STOs and invest in cryptocurrency mining.
Narayan Prusty is the founder and CTO of BlockCluster, world's first blockchain management system. He has five years of experience in blockchain. He specializes in Blockchain, DevOps, Serverless, and JavaScript. His commitment has led him to build scalable products for start-ups, governments, and enterprises across India, Singapore, USA, and UAE. He is enthusiastic about solving real-world problems. His ability to build scalable applications from top to bottom is what makes him special. Currently, he is on a mission to make things easier, faster, and cheaper using blockchain. Also, he is looking at ways to prevent corruption, fraud, and to bring transparency to the world using blockchain.
If you're interested in becoming an author for Packt, please visit authors.packtpub.com and apply today. We have worked with thousands of developers and tech professionals, just like you, to help them share their insight with the global tech community. You can make a general application, apply for a specific hot topic that we are recruiting an author for, or submit your own idea.
Getting Started with Blockchain takes you through the electrifying world of blockchain technology. It begins with the basic design of a blockchain and elaborates concepts, such as Initial Coin Offerings (ICOs), tokens, smart contracts, and other related terminologies of the blockchain technology. You will then explore the components of Ethereum, such as ether tokens, transactions, and smart contracts that you need to build simple DApps.
This Learning Path also explains why you must specifically use Solidity for Ethereum-based projects and lets you explore different blockchains with easy-to-follow examples. You will learn a wide range of concepts - beginning with cryptography in cryptocurrencies and including ether security, mining, and smart contracts. You will learn how to use web sockets and various API services for Ethereum.
By the end of this Learning Path, you will be able to build efficient decentralized applications.
This Learning Path includes content from the following Packt products:
Getting Started with Blockchain is for you if you want to get to grips with the blockchain technology and develop your own distributed applications. It is also designed for those who want to polish their existing knowledge regarding the various pillars of the blockchain ecosystem. Prior exposure to an object-oriented programming language such as JavaScript is needed.
Chapter 1, Blockchain 101, explains what blockchain technologies are and how they work. We also introduce the concept of the distributed ledger.
Chapter 2, Components and Structure of Blockchain, takes a closer look at the technical underpinnings of a blockchain and peeks under the hood to understand what a block is and how the chain is created.
Chapter 3, Decentralization Versus Distributed Systems, covers different types of decentralized and distributed systems and cover the often-overlooked differences between them.
Chapter 4, Cryptography and Mechanics Behind Blockchain, discusses the fundamentals of cryptographic systems which are critical to the proper functioning of all blockchains.
Chapter 5, Bitcoin, examine Bitcoin, the first blockchain, and it's specific mechanics in depth.
Chapter 6, Altcoins, covers the major non-bitcoin cryptocurrency projects that have gained popularity over the last few years.
Chapter 7, Achieving Consensus, looks into the different ways blockchains help achieve consensus. This is one of the most important aspects of blockchain behavior.
Chapter 8, Advanced Blockchain Concepts, covers the interactions between blockchain technology, privacy, and anonymity along with some of the legal side effects of blockchain technology.
Chapter 9, Cryptocurrency Wallets, covers the different wallet solutions that exist for keeping your cryptocurrency secure.
Chapter 10, Alternate Blockchains, examine blockchain creation technologies such as Tendermint and Graphene, and other non-currency based blockchain technologies.
Chapter 11, Hyperledger and Enterprise Blockchains, examine the Hyperledger family of distributed ledger technologies aimed at corporate and enterprise use.
Chapter 12, Ethereum 101, look at Ethereum, the second most dominant blockchain technology today.
Chapter 13, Solidity 101, cover the basics of Solidity, the Ethereum programming language.
Chapter 14, Smart Contracts, covers the smart contracts, which are enabled in different ways by different blockchain technologies.
Chapter 15, Ethereum Accounts and Ether Tokens, in this chapter, we look at the mechanics of Ethereum accounts and the token itself in the Ethereum system.
Chapter 16, Decentralized Applications, discusses decentralized applications as a whole, including ones that operate without a blockchain or in tandem with blockchain technologies.
Chapter 17, Mining, we cover blockchain mining and how this is used to secure blockchains, the different types of hardware used in mining, and the different protocols involved.
Chapter 18, ICO 101, we cover the basics of launching an Initial Coin Offering or Initial Token Offering.
Chapter 19, Creating Your Own Currency, we cover the creation of your own blockchain based cryptocurrency.
Chapter 20, Scalability and Other Challenges, covers the difficulties and limitations currently facing blockchain technology.
Chapter 21, Future of Blockchain, we examine the possible future developments of the industry technologically, legally, and socially.
Chapter 22, Understanding Decentralized Applications, will explain what DApps are and provide an overview of how they work.
Chapter 23, Understanding How Ethereum Works, explains how Ethereum works.
Chapter 24, Writing Smart Contracts, shows how to write smart contracts and use geth's interactive console to deploy and broadcast transactions using web3.js.
Chapter 25, Getting Started with web3.js, introduces web3js and how to import, connect to geth, and explains use it in Node.js or client-side JavaScript.
Chapter 26, Building a Wallet Service, explains how to build a wallet service that users can create and manage Ethereum Wallets easily, even offline. We will specifically use the LightWallet library to achieve this.
Chapter 27, Building a Smart Contract Deployment Platform, shows how to compile smart contracts using web3.js and deploy it using web3.js and EthereumJS.
Chapter 28, Building a Betting App, explains how to use Oraclize to make HTTP requests from Ethereum smart contracts to access data from World Wide Web. We will also learn how to access files stored in IPFS, use the strings library to work with strings, and more.
Chapter 29, Building Enterprise Level Smart Contracts, explains how to use Truffle, which makes it easy to build enterprise-level DApps. We will learn about Truffle by building an alt-coin.
Chapter 30, Building a Consortium Blockchain, we will discuss consortium blockchain.
To complete this book successfully, students will require computer systems with at least an Intel Core i5 processor or equivalent, 8 GB RAM, and 35 GB available storage space. Along with this, you would require the following software:
You can download the example code files for this book from your account at www.packt.com. If you purchased this book elsewhere, you can visit www.packt.com/support and register to have the files emailed directly to you.
You can download the code files by following these steps:
Once the file is downloaded, please make sure that you unzip or extract the folder using the latest version of:
The code bundle for the book is also hosted on GitHub at https://github.com/TrainingByPackt/Blockchain-Developers-Guide. In case there's an update to the code, it will be updated on the existing GitHub repository.
We also have other code bundles from our rich catalog of books and videos available at https://github.com/PacktPublishing/. Check them out!
There are a number of text conventions used throughout this book.
CodeInText: Indicates code words in text, database table names, folder names, filenames, file extensions, pathnames, dummy URLs, user input, and Twitter handles. Here is an example: "The WebDriver class provides constructors for each browser."
A block of code is set as follows:
difficulty = difficulty_1_target/current_target difficulty_1_target = 0x00000000FFFF0000000000000000000000000000000000000000000000000000
When we wish to draw your attention to a particular part of a code block, the relevant lines or items are set in bold:
COMMANDS:
list Print summary of existing accounts
new Create a new account
update Update an existing account
import Import a private key into a new account
Bold: Indicates a new term, an important word, or words that you see onscreen. For example, words in menus or dialog boxes appear in the text like this. Here is an example: "If a user clicks on the Your Account option on the Home Webpage, the application will check whether they have already logged in."
Feedback from our readers is always welcome.
General feedback: If you have questions about any aspect of this book, mention the book title in the subject of your message and email us at customercare@packtpub.com.
Errata: Although we have taken every care to ensure the accuracy of our content, mistakes do happen. If you have found a mistake in this book, we would be grateful if you would report this to us. Please visit www.packt.com/submit-errata, selecting your book, clicking on the Errata Submission Form link, and entering the details.
Piracy: If you come across any illegal copies of our works in any form on the Internet, we would be grateful if you would provide us with the location address or website name. Please contact us at copyright@packt.com with a link to the material.
If you are interested in becoming an author: If there is a topic that you have expertise in and you are interested in either writing or contributing to a book, please visit authors.packtpub.com.
Please leave a review. Once you have read and used this book, why not leave a review on the site that you purchased it from? Potential readers can then see and use your unbiased opinion to make purchase decisions, we at Packt can understand what you think about our products, and our authors can see your feedback on their book. Thank you!
For more information about Packt, please visit packt.com.
Since its inception in 2008, blockchain has been a keen topic of interest for everyone in finance, technology, and other similar industries. Apart from bringing a new overview to record keeping and consensus, blockchain has enormous potential for disruption in most industries. Early adopters, enthusiasts, and now governments and organizations are exploring the uses of blockchain technology.
In this book, we will discuss the basics of financial transactions using fiat money to create our own cryptocurrency based on Ether tokens, and, in so doing, we will try to cover the majority of topics surrounding blockchain. We will be discussing Ethereum-based blockchains, Hyperledger projects, wallets, altcoins, and other exciting topics necessary to understand the functioning and potential of blockchain.
In this chapter, we will discuss the following:
Let's start by discussing each of the preceding listed topics and other important details surrounding them.
Before we dig deeper into blockchain-based transactions, it is helpful to know about how financial transactions actually happen and the functioning of fiat money.
Fiat money is entirely based on the credit of the economy; by definition, it is the money declared legal tender by the government. Fiat money is worthless without a guarantee from the government.
Another type of money is commodity money; it is derived from the commodity out of which the good money is made. For example, if a silver coin is made, the value of the coin would be its value in terms of silver, rather than the defined value of the coin. Commodity money was a convenient form of trade in comparison to the barter system. However, it is prone to huge fluctuations in price.
Commodity money proved to be difficult to carry around, so, instead, governments introduced printed currency, which could be redeemed from the government-based banks for actual commodity, but then, even that proved to be difficult for the government to manage, and it introduced fiat-based currency, or faith-based currency.
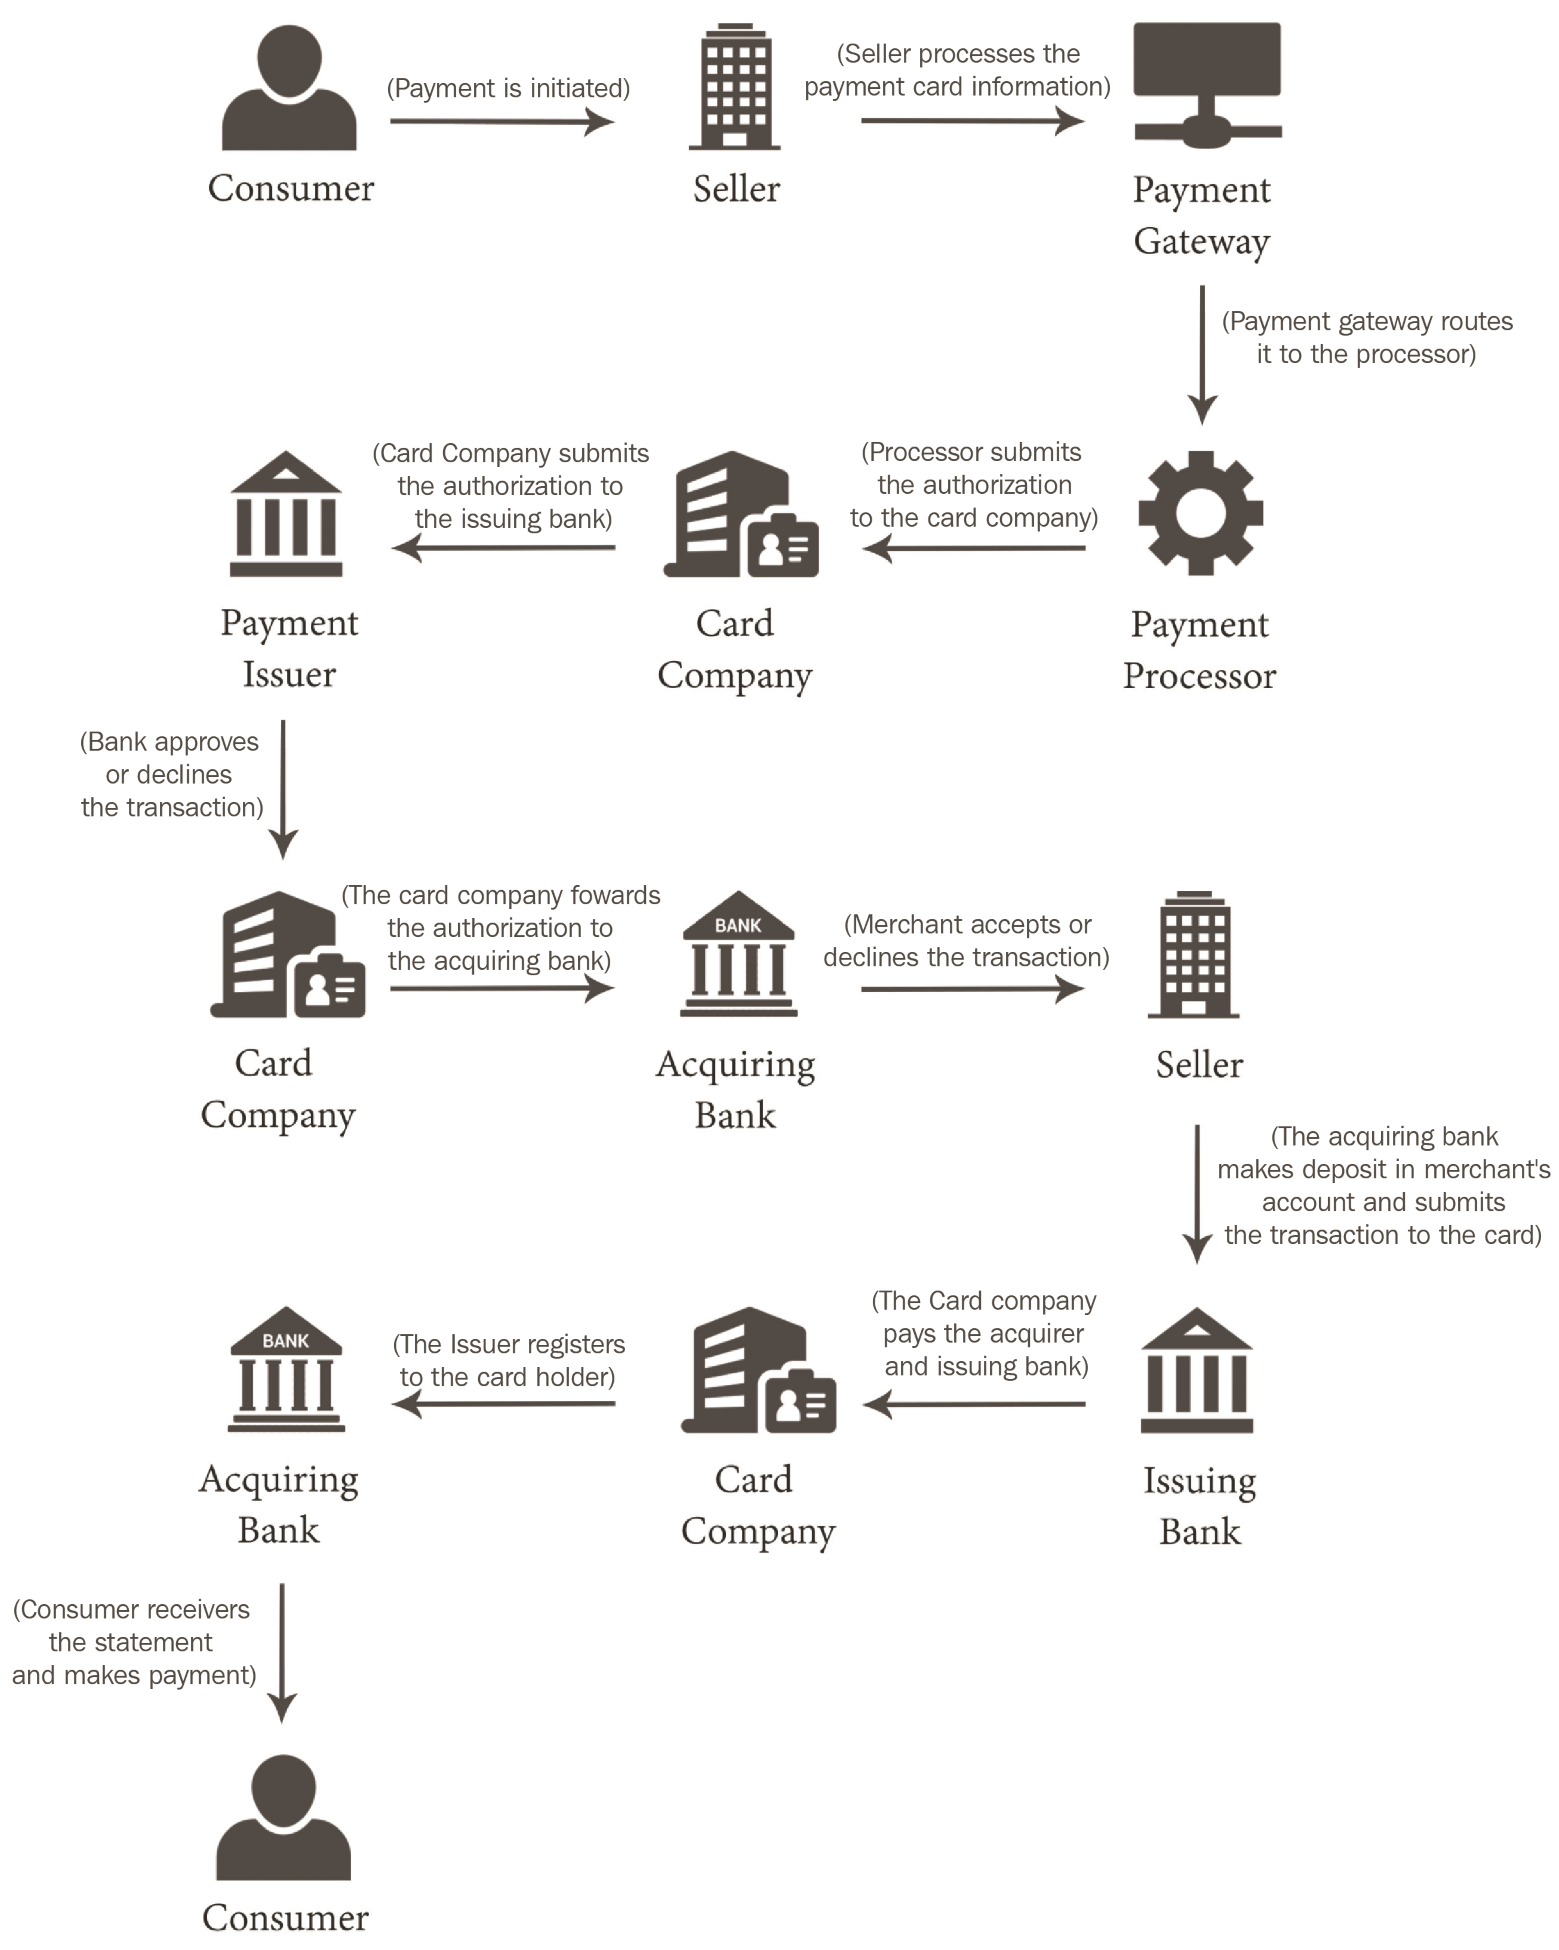
Having fiat-based currencies incurred a lot of third-party consensus during its time; this would help eradicate fraud from the system. It is also necessary to have a stringent consensus process to make sure that the process, as well as the privacy, is maintained within the system. The following diagram depicts the process of a credit card-based payment process:
A ledger is a record for economic transactions that includes cash, accounts receivable, inventory, fixed assets, accounts payable, accrued expenses, debt, equity, revenue, costs, salaries, wages, expenses, depreciation, and so on. In short, the book in which accounts are maintained is called a ledger. It is the primary record used by banks and other financial institutions to reconcile book balances. All the debits and credits during an accounting period are calculated to make the ledger balance.
The financial statements of banks, financial institutions, and enterprises are compiled using ledger accounts.
While doing a financial transaction using fiat currency, we have a third-party ledger that maintains information about every transaction. Some of these third-party trust systems are VISA, MasterCard, banks, and so on.
Blockchain has changed the landscape of this trustless system by making everyone part of the ledger. Hence, it is sometimes even called a distributed ledger; everybody doing a transaction in blockchain has a record of other transactions that have happened or are happening in the blockchain-based Bitcoin system. This decentralized ledger gives multiple authenticity points for every transaction that has happened; plus, the rules are pre-defined and not different for each wallet user.
On a further note, blockchain does not actually eliminate trust; what it does is minimize the amount of trust and distributes it evenly across the network. A specific protocol is defined using various rules that automatically encourage patrons on the basis of the rules followed. We will be discussing this in depth in later chapters.
The whitepaper released by Bitcoin's founder or a group of founders called Satoshi Nakamoto, in 2008, described Bitcoin as a purely peer-to-peer version of electronic cash. Blockchain was introduced along with Bitcoin. During the initial stages, blockchain was only used with Bitcoin for Bitcoin-based financial transactions.
Blockchain not only restricts financial transactions in Bitcoin, but in general any transaction between two parties that is maintained by the open, decentralized ledger. Most importantly, this underlying technology can be separated and can have other applications create a surge in the number of experiments and projects surrounding the same.
Numerous projects inspired by blockchain started, such as Ethereum, Hyperledger, and so on, along with currencies such as Litecoin, Namecoin, Swiftcoin, and so on.
Blockchain at its core is a distributed and decentralized open ledger that is cryptographically managed and updated various consensus protocols and agreements among its peers. People can exchange values using transactions without any third party being involved, and the power of maintaining the ledger is distributed among all the participants of the blockchain or the node of the blockchain, making it a truly distributed and decentralized system.
Some of the industry verticals using blockchain are as follows:
Furthermore, we will be discussing various other elements of blockchain and what other problems blockchain can solve.
It is time to discuss the general elements of blockchain, starting from its basic structure to its formation and further details on the same.
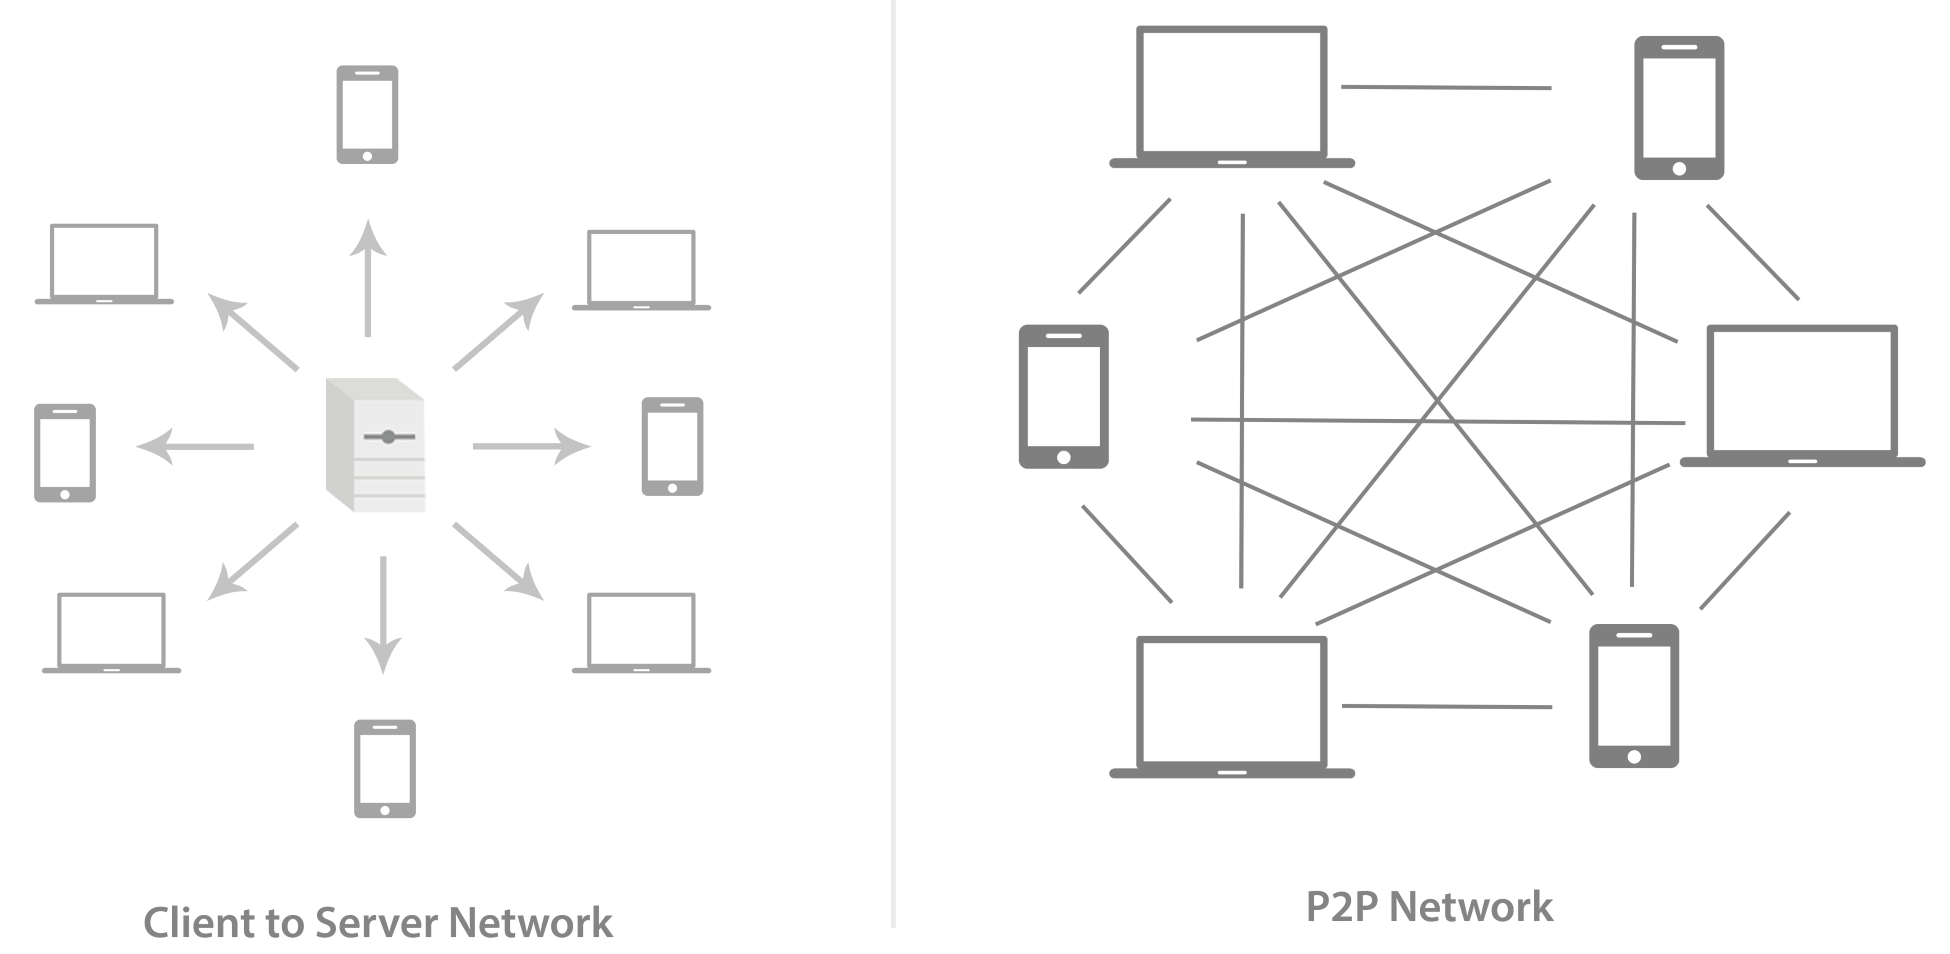
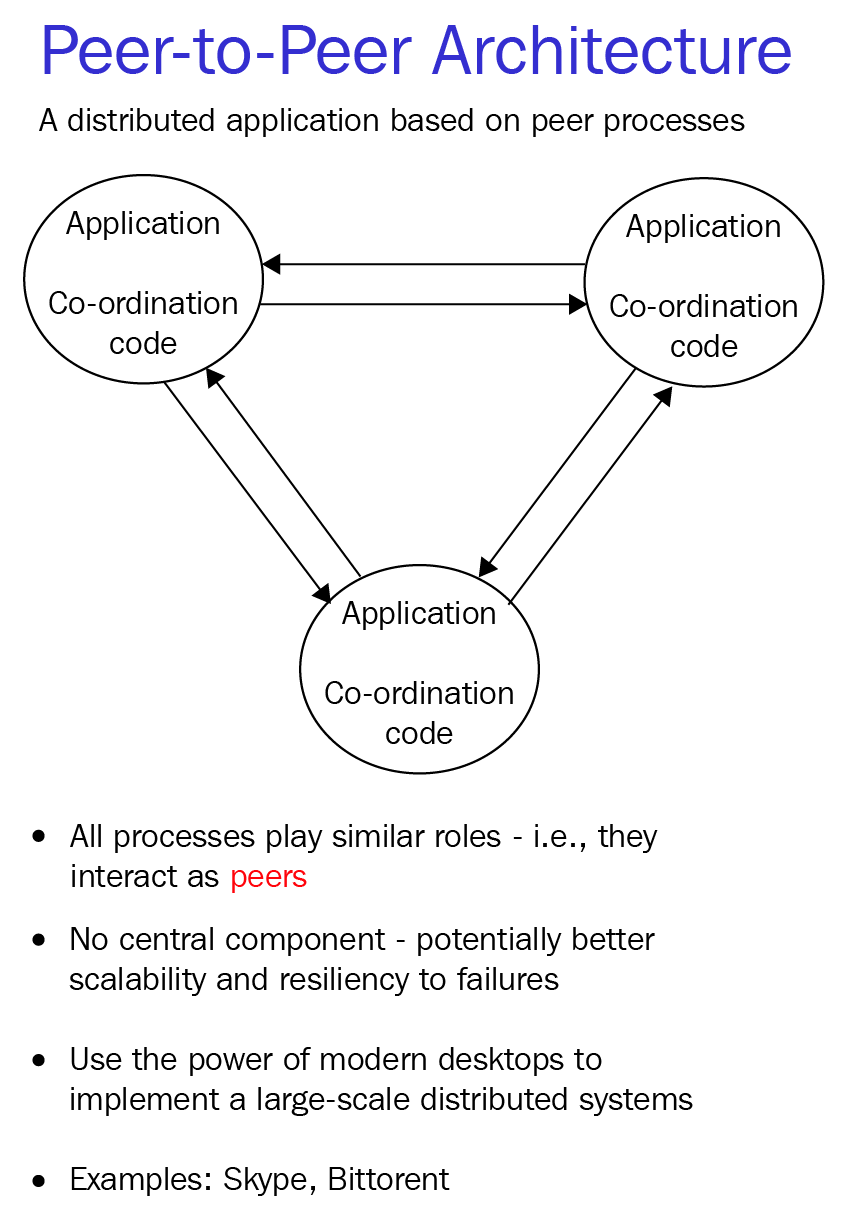
This is a type of network whereby all peers can communicate with one another and are equally entitled, without the need for central coordination by servers or hosts. In conventional networks, the systems are connected to a central server, and this server acts as a central point for communication among the systems. On the other hand, in a peer-to-peer network, all the systems are connected to one another evenly, with no system having central authority. Look at this diagram:
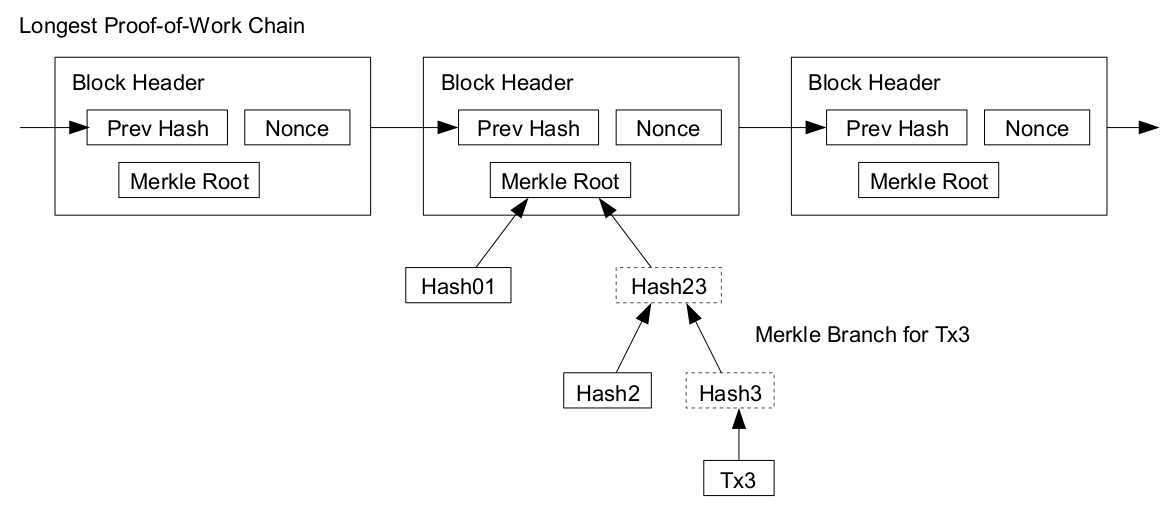
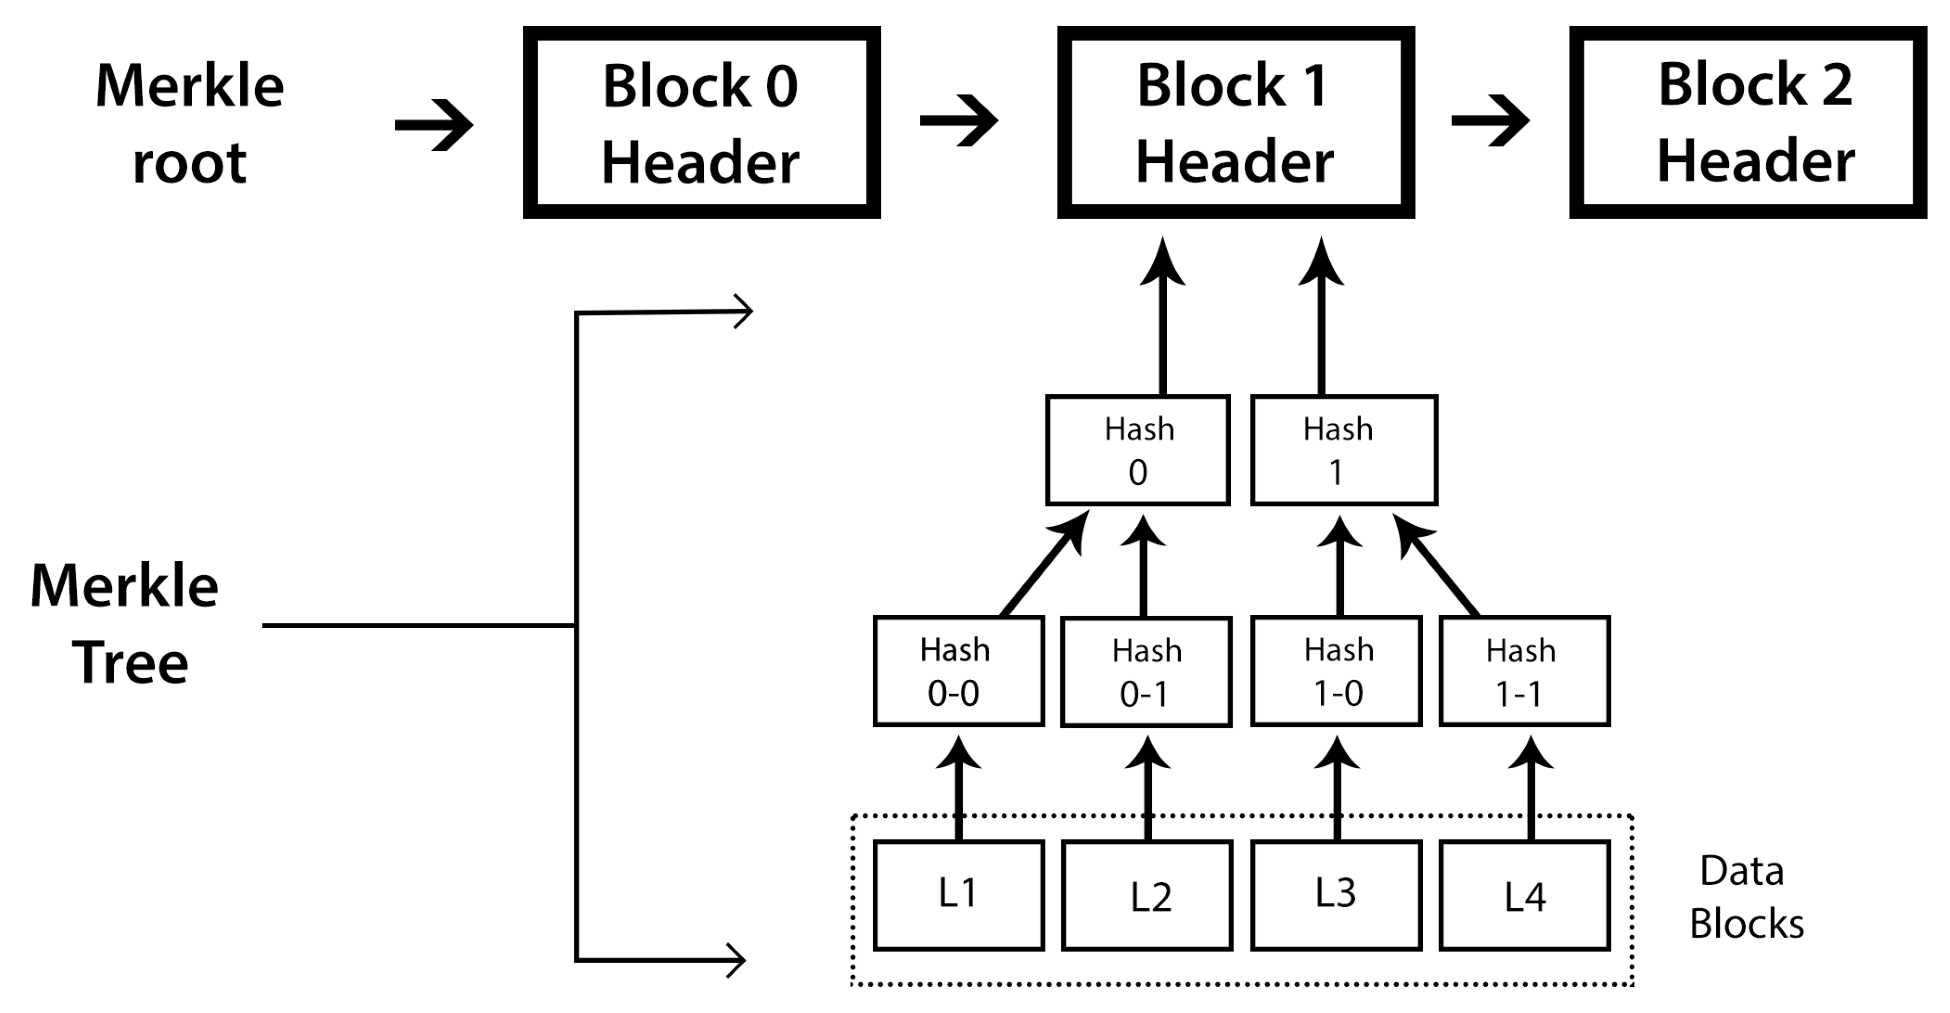
A block is the smallest element of a blockchain; the first block is called the genesis block. Each block contains batches of hashed and encoded transactions. The blocks are stored in a Merkle tree formation. Every block includes the hash of the previous block in the chain that links all blocks to one another. In Bitcoin, a block contains more than 500 transactions on average. The average size of a block is around 1 MB. A block is comprised of a header and a list of transactions.
The block header of a block in Bitcoin comprises of metadata about the block. Consider the following:
Addresses are unique identifiers that are used in a transaction on the blockchain to send data to another address; in the case of Bitcoins, addresses are identifiers that are used to send or receive Bitcoins. Bitcoin blockchain addresses have evolved from time to time. Originally, IP addresses were used as the Bitcoin address, but this method was prone to serious security flaws; hence, it was decided to use P2PKH as a standard format. A P2PKH address consists of 34 characters, and its first character is integer 1. In literal terms, P2PKH means Pay to Public Key Has. This is an example of a Bitcoin address based on P2PKH: 1PNjry6F8p7eaKjjUEJiLuCzabRyGeJXxg.
Now, there is another advanced Bitcoin protocol to create a P2SH address, which means Pay to Script Hash. One major difference with a P2SH address is that it always starts with integer 3 instead of 1.
A wallet is a digital wallet used to store public or private keys along with addresses for a transaction. There are various types of wallets available, each one offering a certain level of security and privacy.
Here is a list of the various types of wallets, based on their functions:
It is important to understand the functioning and the need for various wallets along with the requirement for each.
A transaction is the process of transferring data from one address in blockchain to another address. In Bitcoin, it is about transferring Bitcoins from one address to another address. All the transactions happening in blockchain are registered from the start of the chain till the current time; this information is shared across the network and all the P2P nodes. The transaction is confirmed by miners, who are economically compensated for their work.
Each transaction in a blockchain goes through a number of confirmations, as they are the consensus of a transaction. Without confirmation, no transaction can be validated.
Nodes are part of a blockchain network and perform functions as assigned to them. Any device connected to the Bitcoin network can be called a node. Nodes that are integral components of the network and validate all the rules of the blockchain are called full nodes. Another type of Node is called a super node, which acts as a highly connected redistribution point, as well as a relay station.
A blockchain performs various functions. We will discuss each of them briefly here and in detail later:
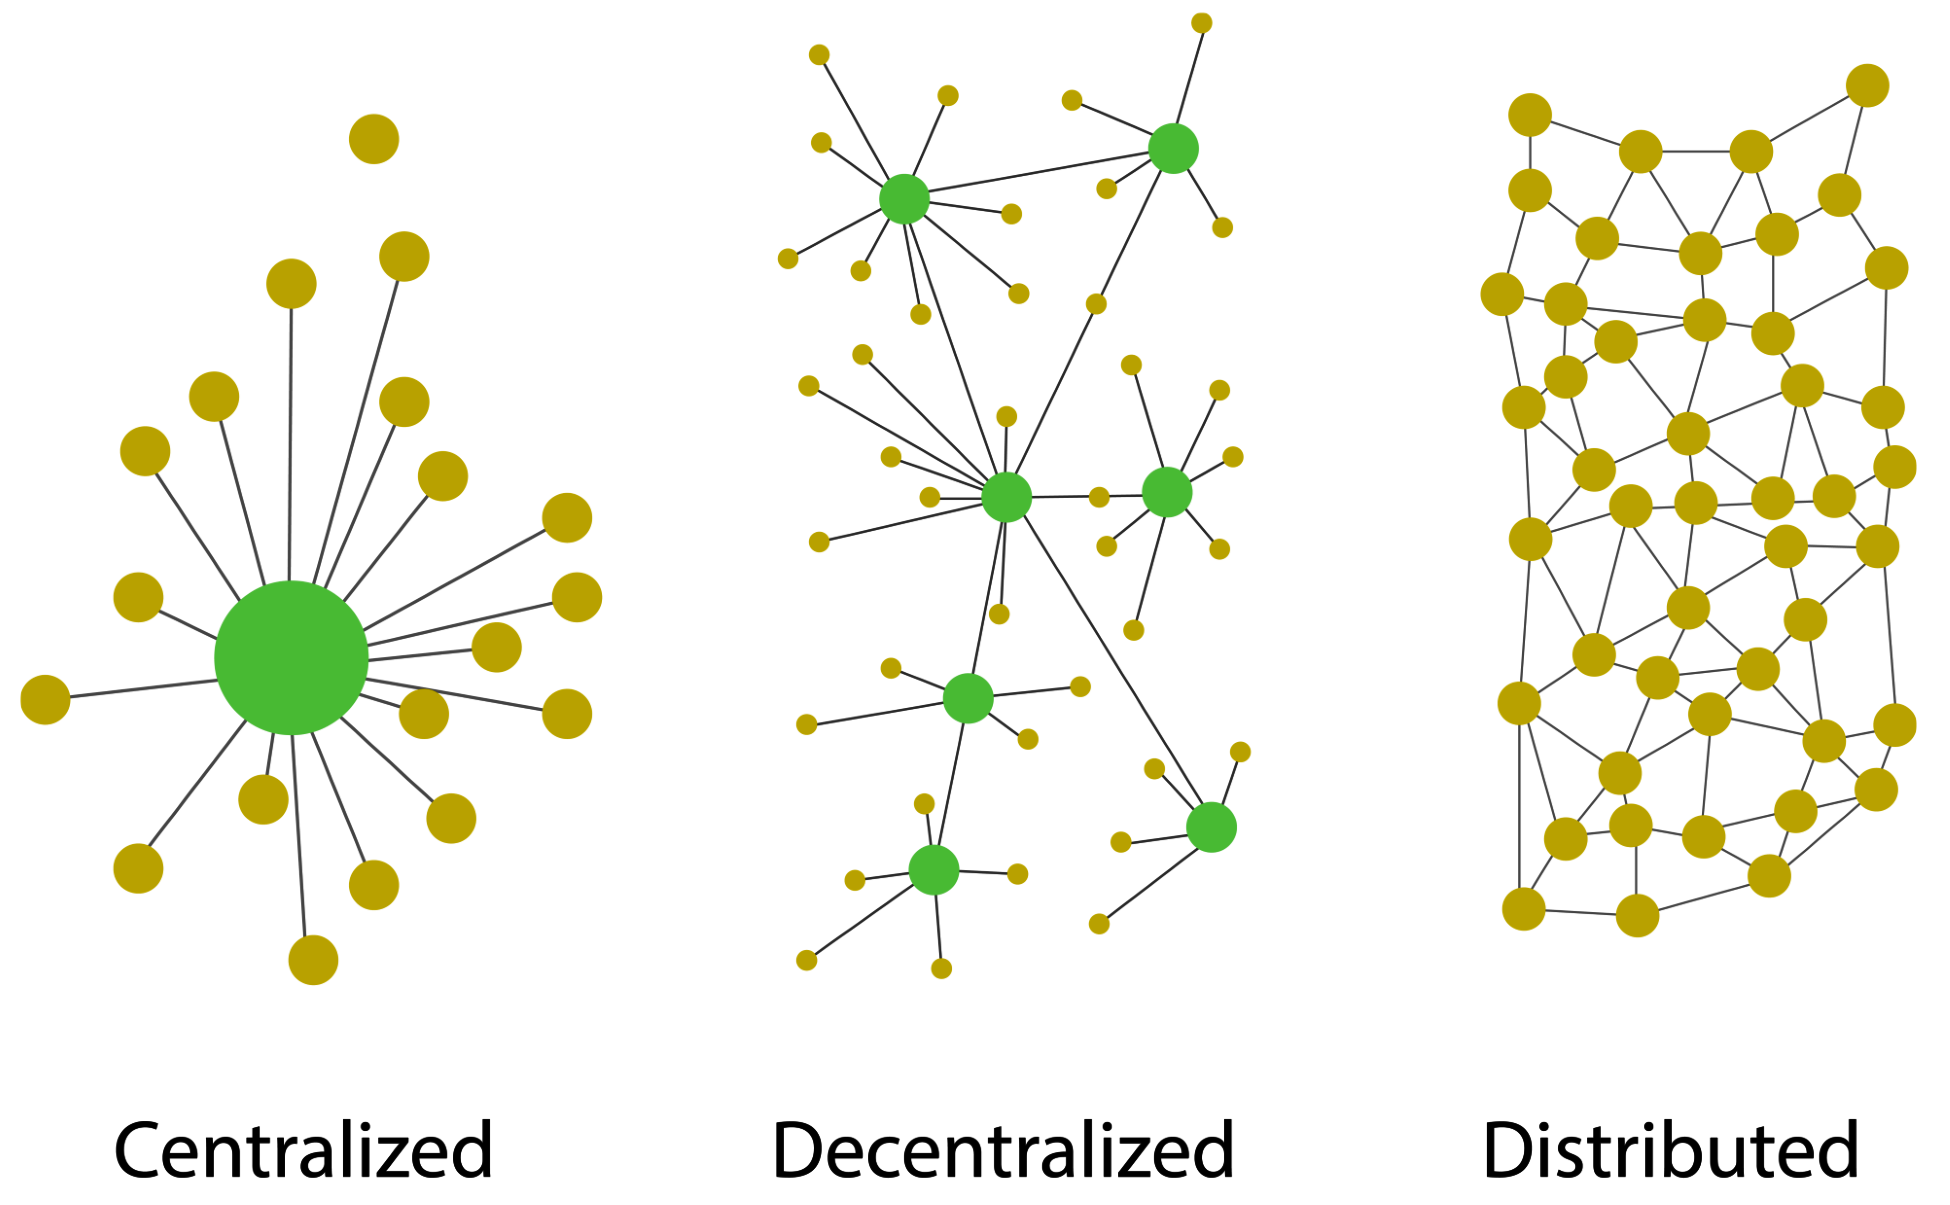
The following diagram depicts the difference between centralized, decentralized, and distributed networks:
Being distributed in nature, blockchain offers lots of out-of-the-box features, such as high stability, security, scalability, and other features discussed previously.
Considering the way blockchain has evolved, we can classify blockchain into multiple types; these types define the course of blockchain and make it go beyond the use of P2P money. The following diagram displays the different types of blockchain networks currently available or proposed.
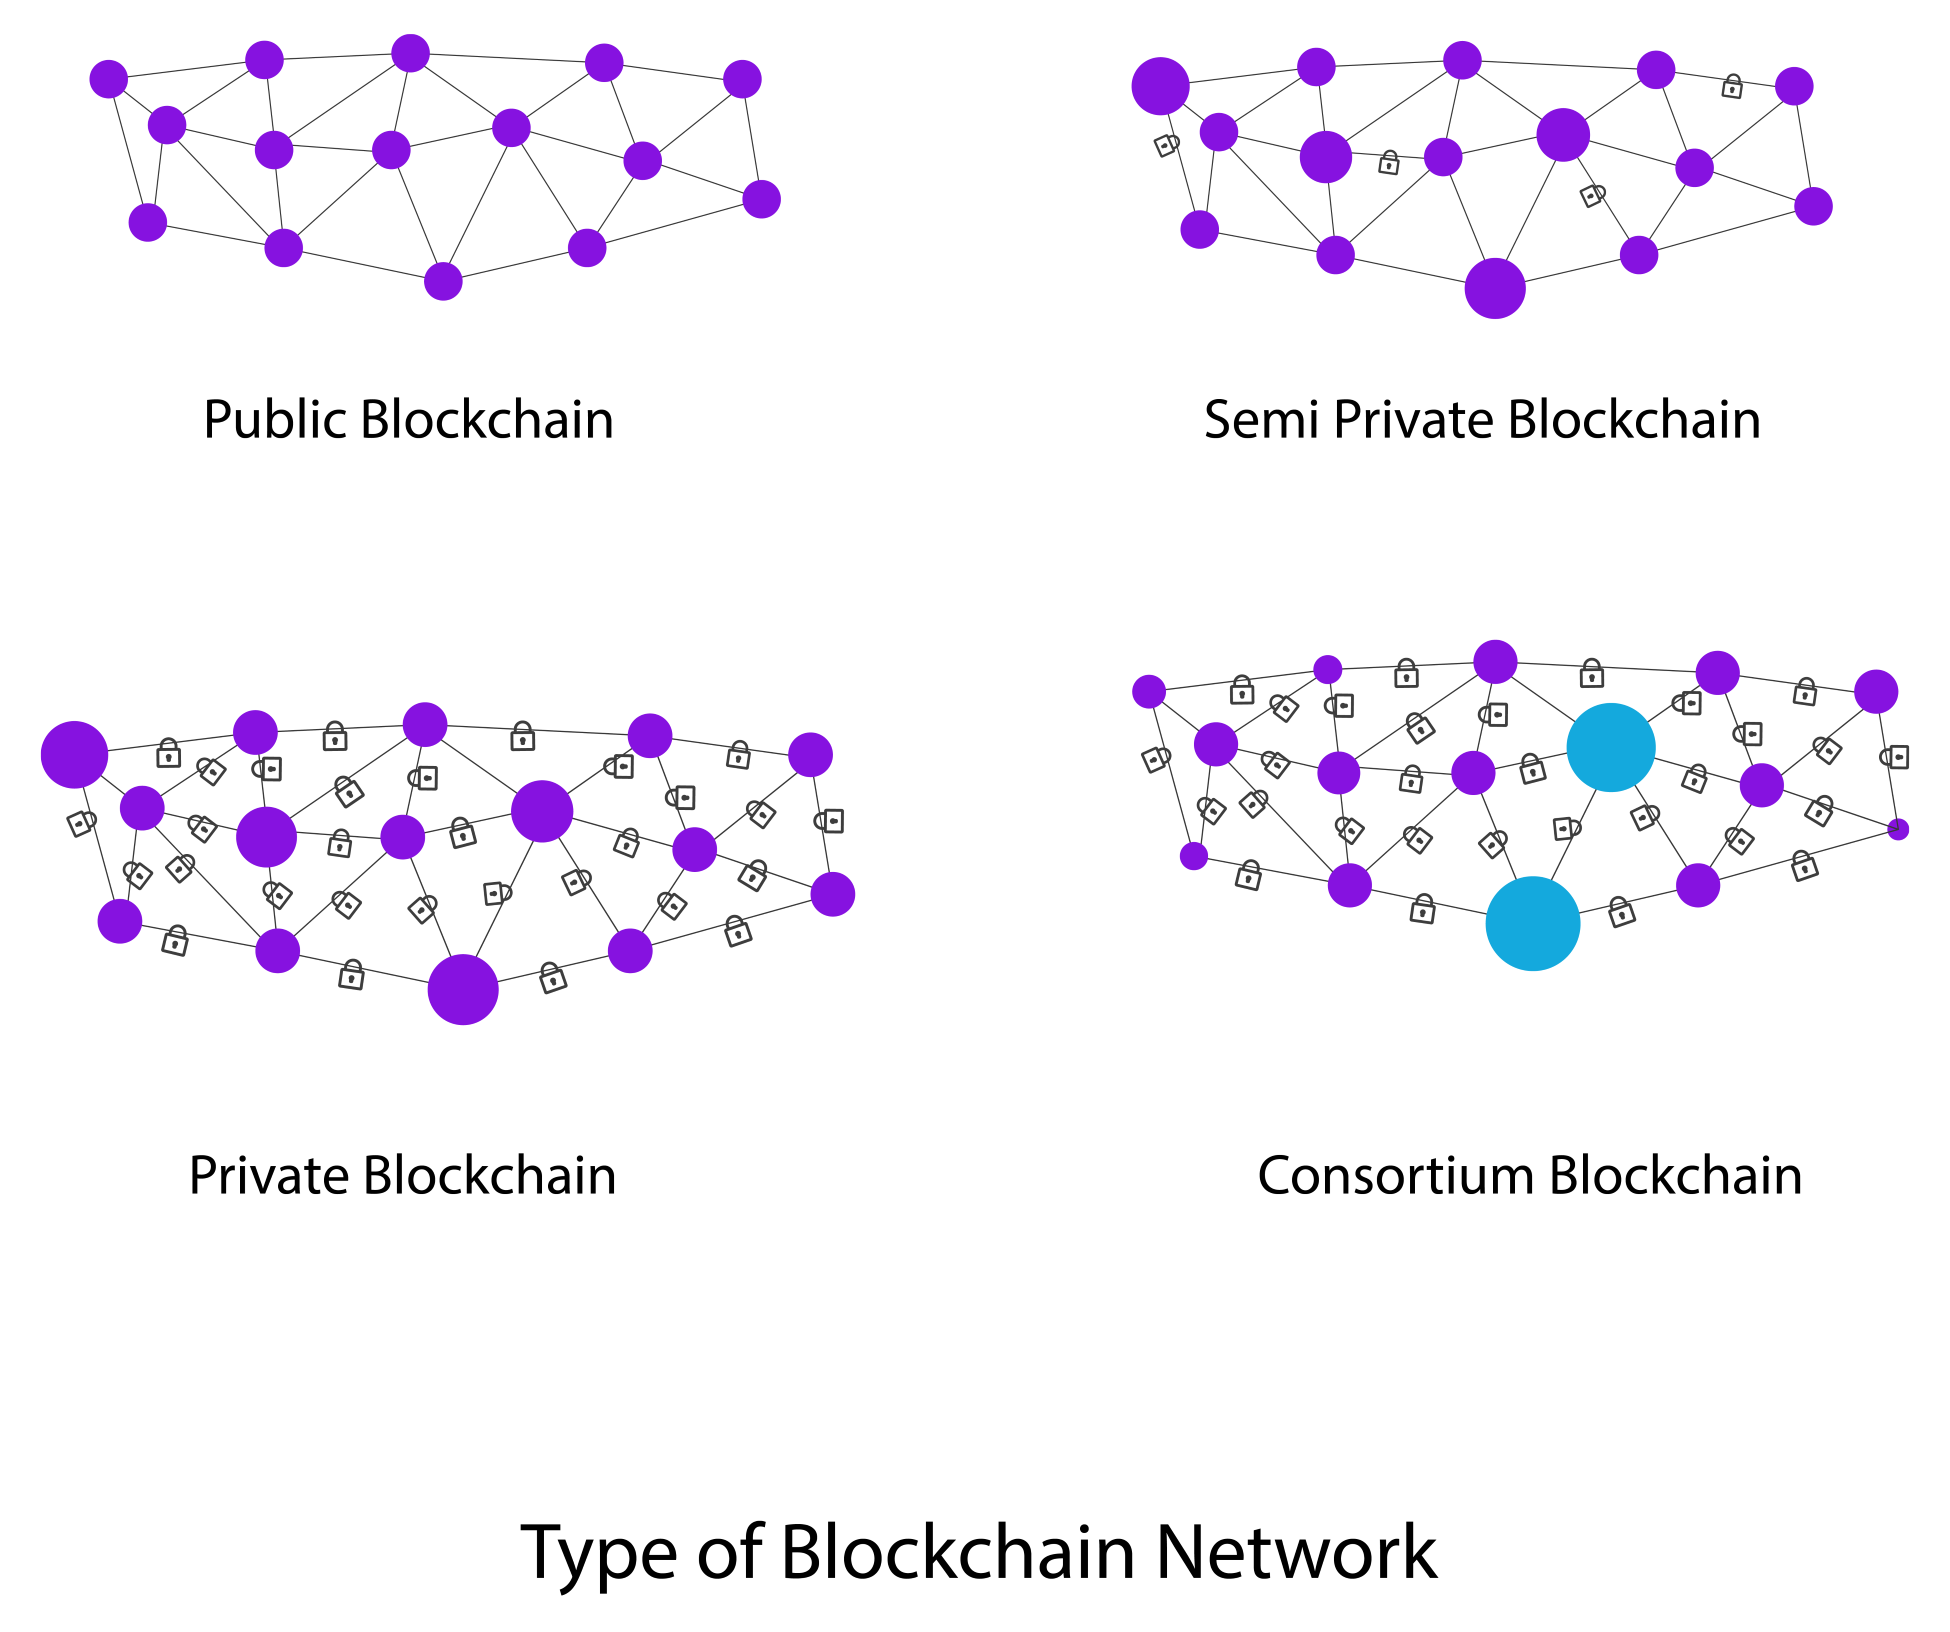
We will now discuss each type of blockchain network in detail.
A public blockchain is a blockchain where anyone in the world can become a node in the transaction process. Economic incentives for cryptographic verification may or may not be present. It is a completely open public ledger system. Public blockchains can also be called permissionless ledgers.
These blockchains are secured by crypto economics, that is, economic incentives and cryptographic verification using mechanisms such as PoW or PoS or any other consensus mechanism. Some popular examples of this type of blockchain are Bitcoin, Ethereum, Litecoin, and so on.
A semi-private blockchain is usually run by a single organization or a group of individuals who grant access to any user, who can either be a direct consumer or for internal organizational purposes. This type of blockchain has a public part exposed to the general audience, which is open for participation by anyone.
In private blockchains, the write permissions are with one organization or with a certain group of individuals. Read permissions are public or restricted to a large set of users. Transactions in this type of blockchain are to be verified by very few nodes in the system.
Some prime examples of private blockchain include Gem Health network, Corda, and so on.
In this type of blockchain, as the name suggests, the consensus power is restricted to a set of people or nodes. It can also be known as a permission private blockchain. Transaction approval time is fast, due to fewer nodes. Economic rewards for mining are not available in these types of blockchains.
A few examples of consortium-based blockchains are Deutsche Boerse and R3 (financial institutions).
This is one of the classic problems faced by various computer networks, which until recently had no concrete solution. This problem is called Byzantine Generals' Problem (BGP). The problem at its root is about consensus, due to mistrust in the nodes of a network.
Let's imagine that various generals are leading the Byzantine army and are planning to attack a city, with each general having his own battalion. They have to attack at the same time to win. The problem is that one or more of generals can be disloyal and communicate a duping message. Hence, there has to be a way of finding an efficient solution that helps to have seamless communication, even with deceptive generals.
This problem was solved by Castro and Liskov, who presented the Practical Byzantine Fault Tolerance (PBFT) algorithm. Later, in 2009, the first practical implementation was made with the invention of Bitcoin by the development of PoW as a system to achieve consensus.
We will be discussing in detail the BGP in later chapters.
Consensus is the process of reaching a general agreement among nodes within a blockchain. There are various algorithms available for this especially when it is a distributed network and an agreement on a single value is required.
Mechanisms of consensus: Every blockchain has to have one mechanism that can handle various nodes present in the network. Some of the prime mechanisms for consensus by blockchain are the following:
All the preceding algorithms and a host of already available or currently under research make sure that the perfect consensus state is achieved and no possible security threats are present on the network.
It is time to discuss the benefits as well as the challenges or limitations faced by blockchain technology, and what steps are being taken by the community as a whole.
If it's all about trust and security, do we really need a trusted system, even after everything is already highly secure and private? Let's go through the limitations of each of the existing ecosystems where blockchain is a perfect fit.
Record keeping and ledger maintenance in the banking sector is a time and resource-consuming process and is still prone to errors. In the current system, it is easy to move funds within a state, but when we have to move funds across borders, the main problems faced are time and high costs.
Even though most money is just an entry in the database, it still incurs high forex costs and is incredibly slow.
There are lot of problems in record keeping, authentication and transferring of records at a global scale, even after having electronic records, are difficult when implemented practically. Due to no common third party, a lot of records are maintained physically and are prone to damage or loss.
During a case of epidemiology, it becomes essential to access and mine medical records of patients pertaining to a specific geography. Blockchain comes as a boon in such situation, since medical records can be easily accessible if stored in the blockchain, and they are also secure and private for the required users.
Any government agency has to deal with a lot of records for all of its departments; new filings can be done on blockchain, making sure that the data remains forever secure and safe in a distributed system.
This transparency and distributed nature of data storage leads to a corruption-free system, since the consensus makes sure the participants in the blockchain are using the required criteria when needed.
Copyright and creative records can be secured and authenticated, keeping a tab on copyright misuse and licensing.
One premier example of this is KodakCoin, which is a photographer-oriented cryptocurrency based on blockchain, launched to be used for payments of licensing photographs.
Verification, authentication, and inspection is hard. It is highly prone to theft and misuse. Blockchain can offer a great semi-private access to the records, making sure signing of degrees is done digitally using blockchain.
Gradual record keeping of degrees and scores will benefit efficient utilization of resources as well as proper distribution and ease in inspection process.
The preceding are just some of the varied use cases of blockchain, apart from Bitcoins and alternative cryptocurrencies. In the coming chapters, we will be discussing these points in much more detail.
As with any technology, there are various challenges and limitations of blockchain technology. It is important to address these challenges and come up with a more robust, reliable, and resourceful solution for all. Let's briefly discuss each of these challenges and their solutions.
Blockchain is complex to understand and easy to implement.
However, with widespread awareness and discussions, this might be made easier in the future.
If a blockchain does not have a robust network with a good grid of nodes, it will be difficult to maintain the blockchain and provide a definite consensus to the ongoing transactions.
Although blockchain-based transactions are very high in speed and also cheaper when compared to any other conventional methods, from time to time, this is becoming difficult, and the speed reduces as the number of transactions per block reduces.
In terms of cost, a lot of hardware is required, which in turn leads to huge network costs and the need for an intermittent network among the nodes.
Various scaling solutions have been presented by the community. The best is increasing the block size to achieve a greater number of transactions per block, or a system of dynamic block size. Apart from this, there are various other solutions also presented to keep the speed reduced and the costs in check.
This is a type of attack on the blockchain network whereby a given set of coins is spent in more than one transaction; one issue that was noted here by the founder/founders of Bitcoin at the time of launch is 51 attacks. In this case, if a certain miner or group of miners takes control of more than half of the computing power of blockchain, being open in nature, anyone can be a part of the node; this triggers a 51 attack, in which, due to majority control of the network, the person can confirm a wrong transaction, leading to the same coin being spent twice.
Another way to achieve this is by having two conflicting transactions in rapid succession in the blockchain network, but if a lot of confirmations are achieved, then this can be avoided.
There are various other features that will be discussed in the coming chapters, it should be noted that all of these features exist in the present systems but considering active community support, all these limitations are being mitigated at a high rate.
This chapter introduced us to blockchain. First, ideas about distributed networks, financial transactions, and P2P networks were discussed. Then, we discussed the history of blockchain and various other topics, such as the elements of blockchain, the types of blockchains, and consensus.
In the coming chapters, we will be discussing blockchain in more detail; we will discuss the mechanics behind blockchain, Bitcoins. We will also learn about achieving consensus in much greater detail, along with diving deep into blockchain-based applications such as wallets, Ethereum, Hyperledger, all the way to creating your own cryptocurrency.
Blockchain is not a single technology, but more of a technique. A blockchain is an architectural concept, and there are many ways that blockchains can be built, and each of the variations will have different effects on how the system operates. In this chapter, we are going to cover the aspects of blockchain technology that are used in all or most of the current implementations.
By the end of this chapter, you should be able to describe the pieces of a blockchain and evaluate the capacities of one blockchain technology against another at the architectural level.
Here are the concepts we will be covering:
Blockchain is a specific technology, but there are many forms and varieties. For instance, Bitcoin and Ethereum are proof-of-work blockchains. Ethereum has smart contracts, and many blockchains allow custom tokens. Blockchains can be differentiated by their consensus algorithm (PoS, PoW, and others)—covered in Chapter 7, Achieving Consensus, and their feature set, such as the ability to run smart contracts and how those smart contracts operate in practice. All of these variations have a common concept: the block. The most basic unit of a blockchain is the block. The simplest way of thinking of a block is to imagine a basic spreadsheet. In it, you might see entries such as this:
| Account | Change | New Balance | Old Balance | Operation |
| Acct-9234222 | −$2,000 | $5,000 | $7,000 | Send funds to account-12345678 |
| Acct-12345678 | $2,000 | $2,000 | 0 | Receive funds from account-9234222 |
| Acct-3456789 | -$200 | $50 | $250 | Send funds to account-68890234 |
| Acct-68890234 | $200 | $800 | $600 | Receive funds from account-3456789 |
A block is a set of transaction entries across the network, stored on computers that act as participants in the blockchain network. Each blockchain network has a block time, or the approximate amount of time that each block represents for transactions, and a block size: the total amount of transactions that a block can handle no matter what. If a network had a block time of two minutes and there were only four transactions during those two minutes, then the block would contain just those four transactions. If a network had 10,000,000 transactions, then there may be too many to fit inside the block size. In this case, transactions would have to wait for their turn for an open block with remaining space. Some blockchains handle this problem with the concept of network fees. A network fee is the amount (denominated in the blockchain's native token) that a sender is willing to pay to have a transaction included in a block. The higher the fee, the greater the priority to be included on the chain immediately.
In addition to the transaction ledger, each block typically contains some additional metadata. The metadata includes the following:
These basics tend to be common for all blockchains. Ethereum, Bitcoin, Litecoin, and others use this common pattern, and this pattern is what makes it a chain. Each chain also tends to include other metadata that is specific to that ecosystem, and those differences will be discussed in future chapters. Here is an example from the Bitcoin blockchain:
If you are asking, What is a Merkle root? that brings us to our next set of key concepts: hashing and signature.
Let's say you have two text files that are 50 pages long. You want to know whether they are the same or different. One way you could do this would be to hash them. Hashing (or a hashing function) is a mathematical procedure by which any input is turned into a fixed-length output. There are many of these functions, the most common being SHA-1, SHA-2, and MD5. For instance, here is the output of a hashing function called MD5 with an input of two pages of text:
9a137a78cf0c364e4d94078af1e221be
What's powerful about hashing functions is what happens when I add a single character to the end and run the same function:
8469c950d50b3394a30df3e0d2d14d74
As you can see, the output is completely different. If you want to quickly prove that some data has not been changed in any way, a hash function will do it. For our discussion, here are the important parts of hashing functions:
This recursive property to hashing is what brings us to the concept of a Merkle tree, named after the man who patented it. A Merkle tree is a data structure that, if your were to draw it on a whiteboard, tends to resemble a tree. At each step of the tree, the root node contains a hash of the data of its children. The following is a diagram of a Merkle tree:

In a blockchain, this means that there is a recursive hashing process happening. A recursive hash is when we take a hash of hashes. For instance, imagine we have the following words and their hashes. Here, we will use the MD5 algorithm, because it is easy to find MD5 hashing code on the web, so you can try for yourself:
Salad: c2e055acd7ea39b9762acfa672a74136
Fork: b2fcb4ba898f479790076dbd5daa133f
Spoon: 4b8e23084e0f4d55a47102da363ef90c
To take the recursive or the root hash, we would add these hashes together, as follows:
c2e055acd7ea39b9762acfa672a74136b2fcb4ba898f479790076dbd5daa133f4b8e23084e0f4d55a47102da363ef90c
Then we would take the hash of that value, which would result in the following:
189d3992be73a5eceb9c6f7cc1ec66e1
This process can happen over and over again. The final hash can then be used to check whether any of the values in the tree have been changed. This root hash is a data efficient and a powerful way to ensure that data is consistent.
Each block contains the root hash of all the transactions. Because of the one-way nature of hashing, anyone can look at this root hash and compare it to the data in the block and know whether all the data is valid and unchanged. This allows anyone to quickly verify that every transaction is correct. Each blockchain has small variations on this pattern (using different functions or storing the data slightly differently), but the basic concept is the same.
Now that we've covered hashing, it's time to go over a related concept: digital signatures. Digital signatures use the properties of hashing to not only prove that data hasn't changed but to provide assurances of who created it. Digital signatures work off the concept of hashing but add a new concept as well: digital keys.
All common approaches to digital signatures use what is called Public Key Cryptography. In Public Key Cryptography, there are two keys: one public and one private. To create a signature, the first hash is produced of the original data, and then the private key is used to encrypt that hash. That encrypted hash, along with other information, such as the encryption method used to become part of the signature, are attached to the original data.
This is where the public key comes into play. The mathematical link between the public key and the private key allows the public key to decrypt the hash, and then the hash can be used to check the data. Thus, two things can now be checked: who signed the data and that the data that was signed has not been altered. The following is a diagrammatic representation of the same:
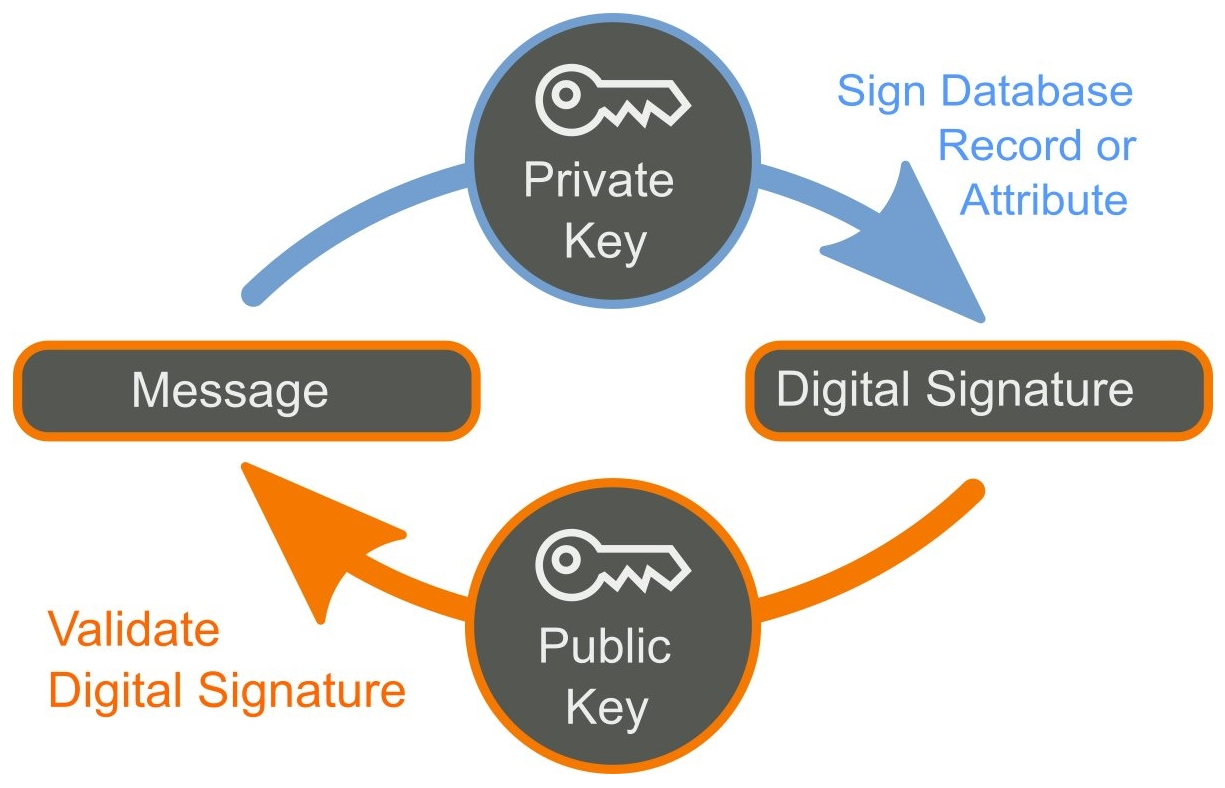
This form of cryptography is critical to blockchain technology. Through hashing and digital signatures, a blockchain is able to record information both on actions (movement of tokens) as well as prove who initiated those actions (via digital signatures).
Let's create an example of how this would look. Jeremy and Nadia wish to send messages to each other securely. Each publishes a public key. Jeremy's will look something as follows (using an RSA algorithm with 1,024 bits):
-----BEGIN PUBLIC KEY-----
MIGeMA0GCSqGSIb3DQEBAQUAA4GMADCBiAKBgH+CYOAgKsHTrMlsaZ32Gpdfo4pw
JRfHu5d+KoOgbmYb0C2y1PiHNGEyXgd0a8iO1KWvzwRUMkPJr7DbVBnfl1YfucNp
OjAsUWT1pq+OVQ599zecpnUpyaLyg/aW9ibjWAGiRDVXemj0UgMUVNHmi+OEuHVQ
ccy5eYVGzz5RYaovAgMBAAE=
-----END PUBLIC KEY-----
With that key, he will keep private another key, which looks as follows:
-----BEGIN RSA PRIVATE KEY-----
MIICWwIBAAKBgH+CYOAgKsHTrMlsaZ32Gpdfo4pwJRfHu5d+KoOgbmYb0C2y1PiH
NGEyXgd0a8iO1KWvzwRUMkPJr7DbVBnfl1YfucNpOjAsUWT1pq+OVQ599zecpnUp
yaLyg/aW9ibjWAGiRDVXemj0UgMUVNHmi+OEuHVQccy5eYVGzz5RYaovAgMBAAEC
gYBR4AQYpk8OOr9+bxC6j2avwIegwzXuOSBpvGfMMV3yTvW0AlriYt7tcowSOV1k
YOKGqYdCflXwVTdtVsh//KSNiFtsLih2FRC+Uj1fEu2zpGzErhFCN2sv1t+2wjlk
TRY78prPNa+3K2Ld3NJse3gmhodYqRkxFFxlCmOxTzc4wQJBAOQ0PtsKCZwxRsyx
GAtULHWFIhV9o0k/DjLw5rreA8H3lb3tYZ5ErYuhS0HlI+7mrPUqzYaltG6QpJQY
YlMgktECQQCPClB1xxoIvccmWGoEvqG07kZ4OBZcBmgCzF6ULQY4JkU4k7LCxG4q
+wAeWteaP+/3HgS9RDQlHGITAmqhW6z/AkBaB16QzYnzC+GxmWAx//g2ONq0fcdw
eybf4/gy2qnC2SlDL6ZmaRPKVUy6Z2rgsjKj2koRB8iCIiA7qM8Jmn0xAkBzi9Vr
DqaNISBabVlW89cUnNX4Dvag59vlRsmv0J8RhHiuN0FT6/FCbvetjZxUUgm6CVmy
ugGVaNQgnvcb2T5pAkEAsSvEW6yq6KaV9NxXn4Ge4b9lQoGlR6xNrvGfoxto79vL
7nR29ZB4yVFo/kMVstU3uQDB0Pnj2fOUmI3MeoHgJg==
-----END RSA PRIVATE KEY-----
In the meantime, Nadia will do the same, resulting in the following two keys:
-----BEGIN PUBLIC KEY-----
MIGfMA0GCSqGSIb3DQEBAQUAA4GNADCBiQKBgQDHWwgTfI5Tic41YjUZqTmiKt+R
s5OMKIEdHPTyM8FZNaOBWIosFQbYk266V+R7k9odTnwCfi370GOt0k5MdTQilb9h
bK/lYiavIltgBd+1Em7xm7UihwO4th5APcg2vG4sppK41b1a9/I5E6P/jpQ320vF
BMuEtcnBoWawWcbXJwIDAQAB
-----END PUBLIC KEY-----
This is her private key:
-----BEGIN RSA PRIVATE KEY-----
MIICXQIBAAKBgQDHWwgTfI5Tic41YjUZqTmiKt+Rs5OMKIEdHPTyM8FZNaOBWIos
FQbYk266V+R7k9odTnwCfi370GOt0k5MdTQilb9hbK/lYiavIltgBd+1Em7xm7Ui
hwO4th5APcg2vG4sppK41b1a9/I5E6P/jpQ320vFBMuEtcnBoWawWcbXJwIDAQAB
AoGBAKz9FCv8qHBbI2H1f0huLQHInEoNftpfh3Jg3ziQqpWj0ub5kqSf9lnWzX3L
qQuHB/zoTvnGzlY1xVlfJex4w6w49Muq2Ggdq23CnSoor8ovgmdUhtikfC6HnXwy
PG6rtoUYRBV3j8vRlSo5PtSRD+H4lt2YGhQoXQemwlw+r5pRAkEA+unxBOj7/sec
3Z998qLWw2wV4p9L/wCCfq5neFndjRfVHfDtVrYKOfVuTO1a8gOal2Tz/QI6YMpJ
exo9OEbleQJBAMtlimh4S95mxGHPVwWvCtmxaFR4RxUpAcYtX3R+ko1kbZ+4Q3Jd
TYD5JGaVBGDodBCRAJALwBv1J/o/BYIhmZ8CQBdtVlKWCkk8i/npVVIdQB4Y7mYt
Z2QUwRpg4EpNYbE1w3E7OH27G3NT5guKsc4c5gcyptE9rwOwf3Hd/k9N10kCQQCV
YsCjNidS81utEuGxVPy9IqWj1KswiWu6KD0BjK0KmAZD1swCxTBVV6c6iJwsqM4G
FNm68kZowkhYbc0X5KG1AkBp3Rqc46WBbpE5lj7nzhagYz5Cb/SbNLSp5AFh3W5c
sjsmYQXfVtw9YuU6dupFU4ysGgLBpvkf0iU4xtGOFvQJ
-----END RSA PRIVATE KEY-----
With these keys, Jeremy decides to send a message to Nadia. He uses her key and encrypts the following message: I love Bitcoin, which results in the following data:
EltHy0s1W1mZi4+Ypccur94pDRHw6GHYnwC+cDgQwa9xB3EggNGHfWBM8mCIOUV3iT1uIzD5dHJwSqLFQOPaHJCSp2/WTSXmWLohm5EAyMOwKv7M4gP3D/914dOBdpZyrsc6+aD/hVqRZfOQq6/6ctP5/3gX7GHrgqbrq/L7FFc=
Nobody can read this, except Nadia. Using the same algorithm, she inputs this data and her private key, and gets the following message:
I love Bitcoin.
We'll discuss more about this topic in Chapter 4, Cryptography and the Mechanics Behind Blockchain.
In this section, we are going to examine the data structures that are used in blockchains. We will be looking primarily at Ethereum, Bitcoin, and Bitshares blockchains to see key commonalities and differences.
Here is the data from an example Ethereum block, from block 5223669:
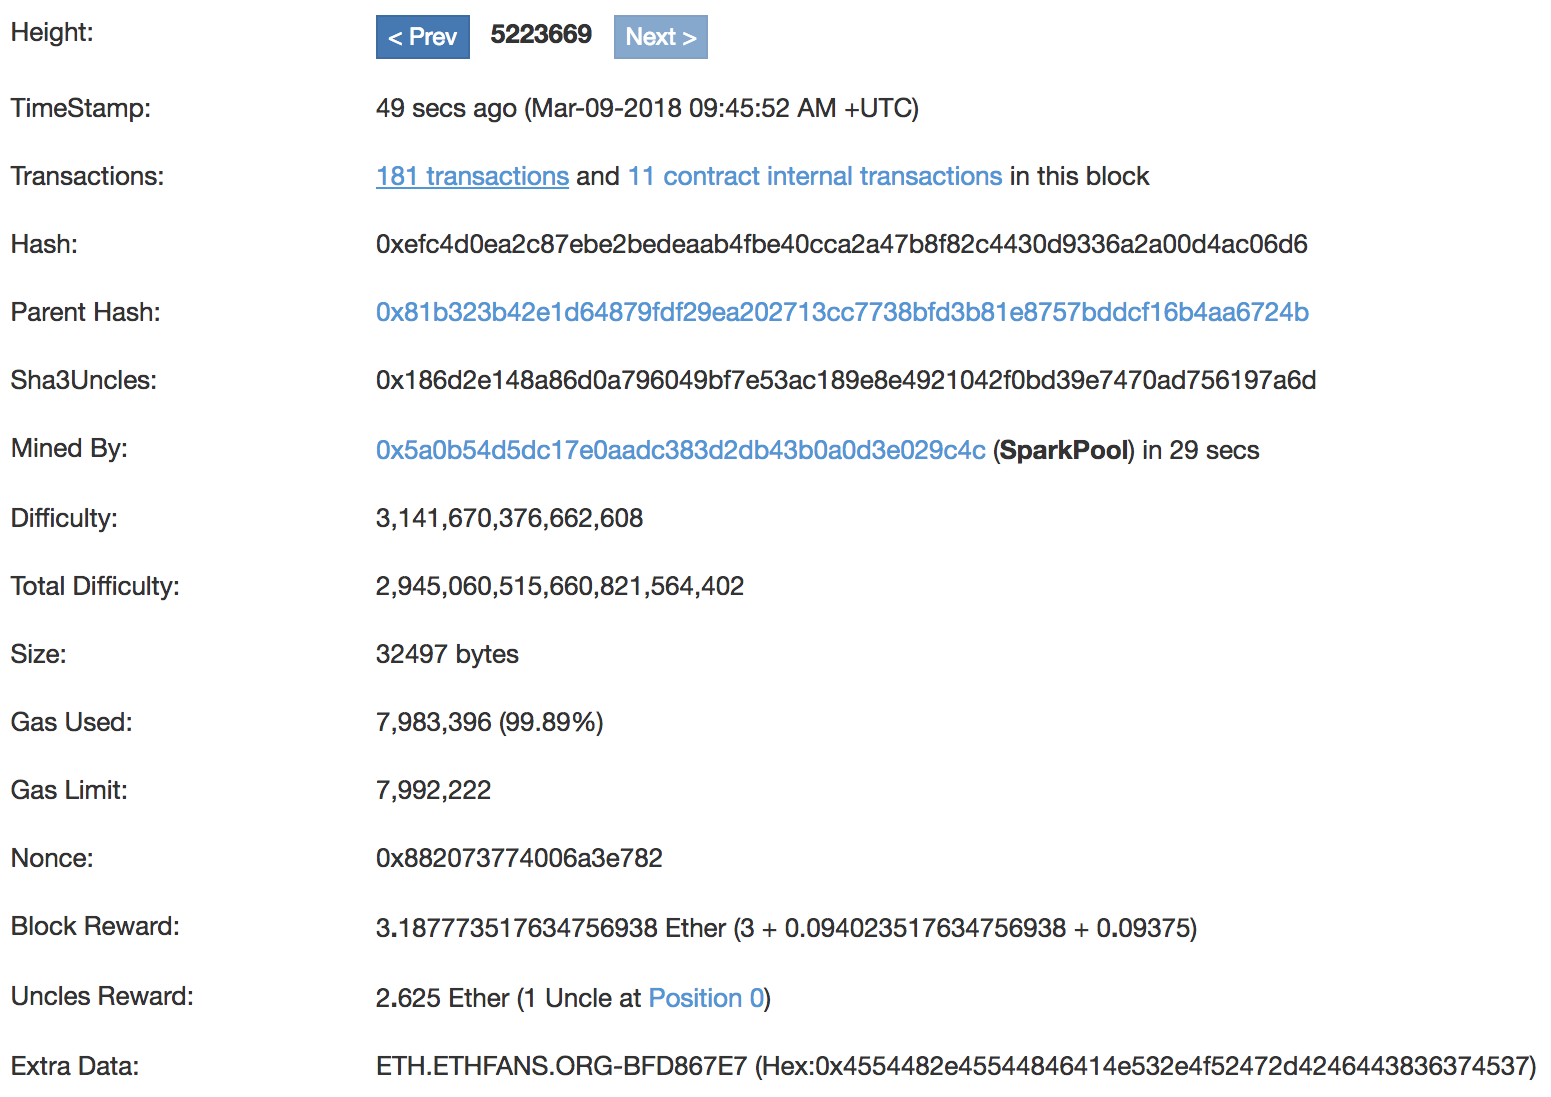
If you remember, at the beginning of the chapter, we said there were three things common to blockchains: the reference to the prior block, the Hash of the transactions in the block, and network-specific metadata. In this block from the Ethereum network, all three are present. The reference to the prior block is contained by the block height and parent hash values. The Hash of the transactions is the hash entry, and the metadata is everything else, which will be network specific.
Here is a snapshot of a Bitcoin block:
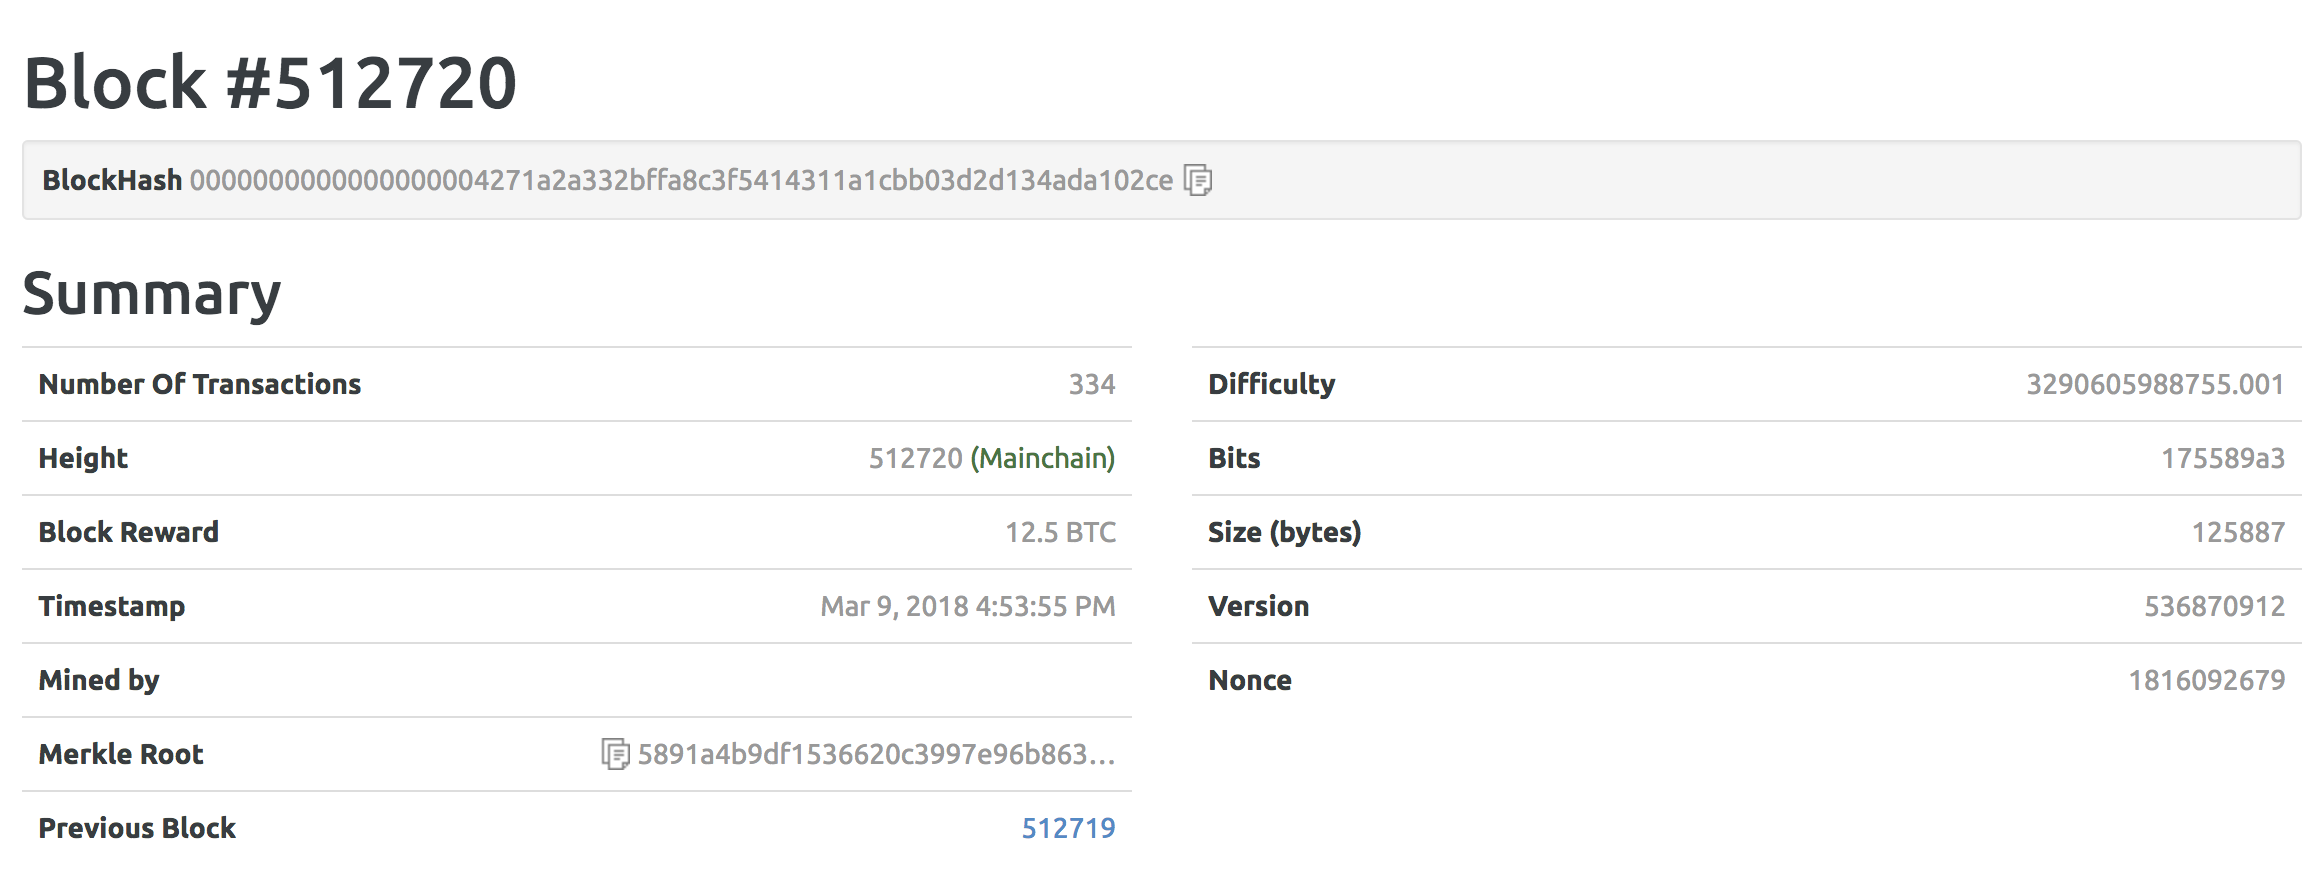
Both Bitcoin and Ethereum are PoW chains; let's look now at a Proof of Stake (POS) ecosystem: Bitshares.
Here is some data from a Bitshares block:
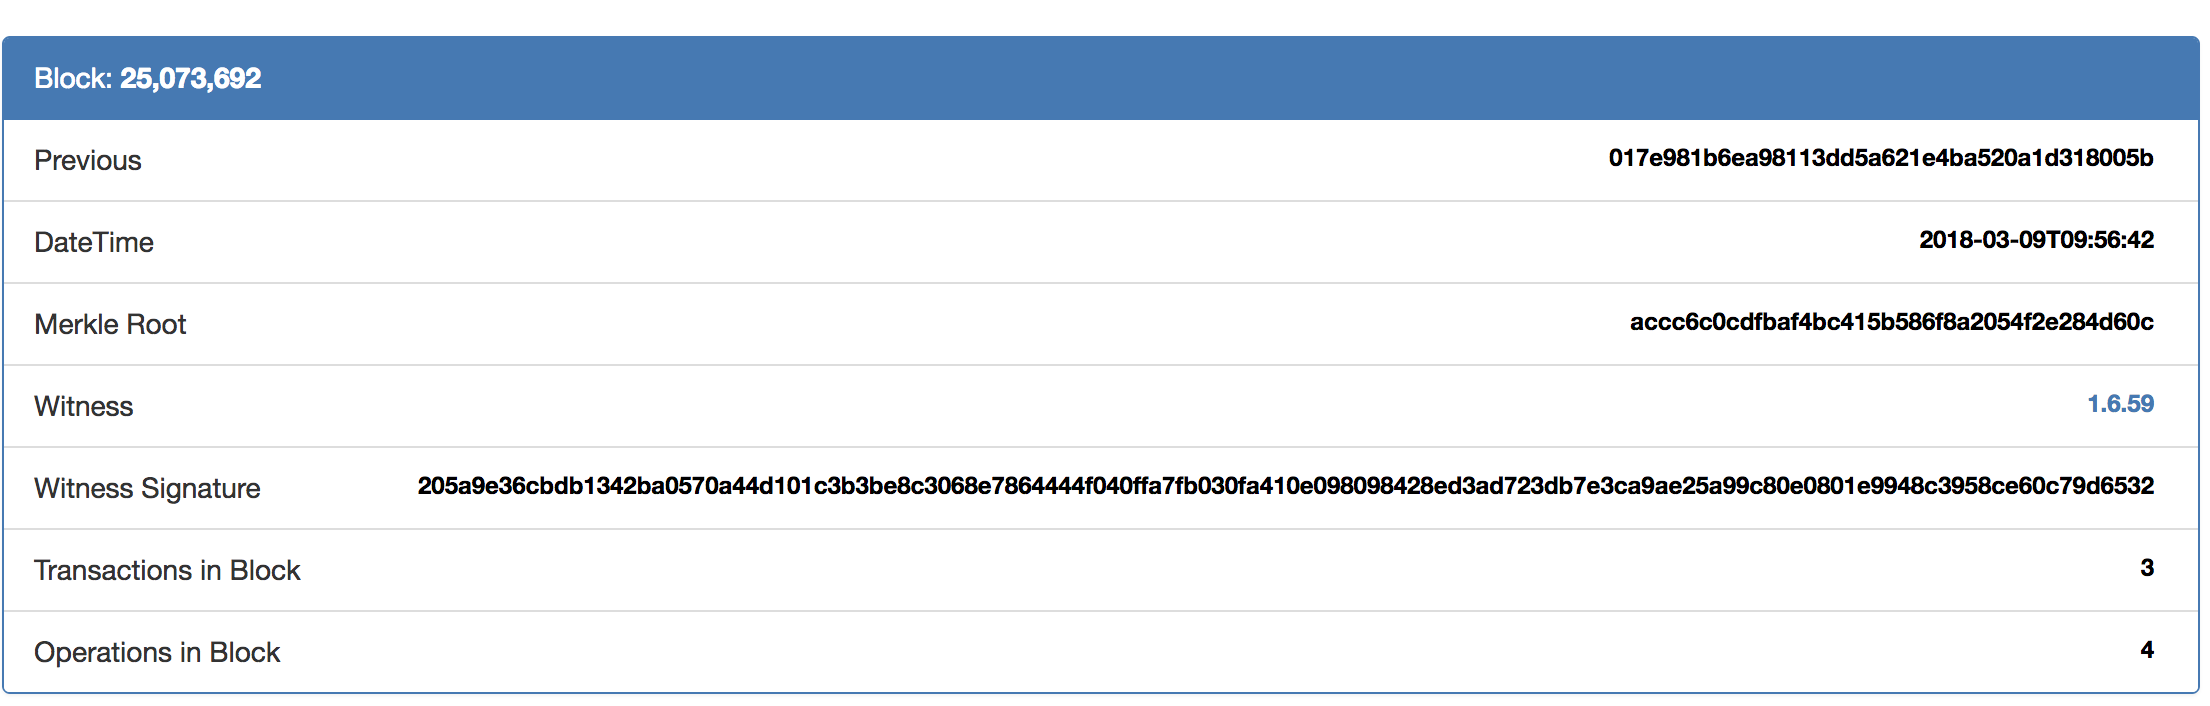
Despite a radically different architecture, the fundamentals remain: references to a previous block, Merkle root, and network metadata. In Bitshares, you can also see that there is a Witness Signature. As a PoS blockchain, Bitshares has validators (they are called witnesses). Here, we see the witness and signature of the computer responsible for calculating this block.
One of the key properties of blockchain technology is that it can act as a trusted global state. There are many applications where a trusted global state is important but difficult, such as financial technology and logistics.
For instance, a few years ago, I ordered some camera equipment online. A few days later, I came home and was surprised to find that my equipment had arrived. I was so thankful that the expensive equipment sitting outside had not been stolen. It was only the next day that I received an email from the seller alerting me that the package had been shipped.
Here is a clear breakdown of the global state. The truth was that the camera was already on a truck, but neither I nor the shipper had that information stored properly. If the camera equipment had been stolen from my porch, it would have been very hard to discover what had happened.
If the seller, the logistics company, and I were all writing and reading data from a blockchain, this would have been impossible. When the logistics company registered the shipment, the state of the object would have changed, and both the seller and I would have known as soon as the next block was finalized.
As discussed before, each blockchain has a block time and a block size. Each network can have very different values and ways of handling block time. In Bitcoin, for instance, the block time is 10 minutes, while with Ethereum the block time is 20 seconds. In Stellar, the block time is about 4 seconds. These block times are determined by the code that runs the network. For networks such as Bitcoin, Litecoin, and Ethereum, the block time is actually an average. Because these are PoW networks, the block is finished once a miner solves the mining puzzle, which allows them to certify the block. In these networks, the difficulty of the puzzle is automatically adjusted so that on average the desired block time is reached.
The block size is the maximum amount of information that can be stored in each block. For Bitcoin, this is 1 MB of data's worth of transactions. For Ethereum, the limit is actually measured in GAS, a special unit of measuring both processing power (since Ethereum has smart contracts) as well as storage. Unlike Bitcoin, the GAS/storage limit for each block is not fixed but is instead adjusted by the miners dynamically.
It's important to note that blocks contain only possible information until they are finalized by the network. For instance, 1,000 transactions might happen, but if only 500 make it on to the next block, then only those 500 are real. The remaining transactions will continue to wait to be included in a future block.
Blockchain miners and blockchain validators (see the upcoming sections) both have to do with consensus, which will be explored in depth in Chapter 7, Achieving Consensus. Generally, blockchain miners are associated with blockchains. A PoW chain functions by having the computers that are miners compete to do the work needed to certify a block in the chain. Currently, the only major PoW blockchains are Bitcoin, Litecoin, and Ethereum. Most other systems use a variation of PoS consensus, which we will discuss in the next Blockchain validators section. We'll cover how mining works in detail in Chapter 17, Mining.
Blockchain validators are used by PoS systems. A PoS system works by requiring computers that wish to participate in the network to have stake—a large number of tokens—to assist in the blockchain. Unlike PoW algorithms, computers cannot join the network and expect to have any say in consensus. Rather, they must buy in through token ownership. Depending on the network, the naming convention for validators might be different. Tendermint has validators, Steemit and Bitshares have witnesses, Cardano has stakeholders, and so on. A validator is a computer with a positive stake (number of tokens) that is allowed to participate in the network and does so. Each chain has its own rules for how this works, and these will be covered more in-depth in Chapter 7, Achieving Consensus.
Some blockchains are said to have smart contracts when they are able to perform actions and behavior in response to changes to the chain. These will be covered in depth in Chapter 14, Smart Contracts and Chapter 16, Decentralized Applications.
One ongoing concern for blockchain systems is performance. Public blockchains are global systems, with their system resources shared by all the users in the world simultaneously. With such a large user base, resource constraints are a real concern and have already caused real problems. For instance, a popular game called CryptoKitties was launched on Ethereum and caused the network to become congested. Other applications became nearly unusable, as the load from CryptoKitties overwhelmed the network.
The quick and dirty way of calculating the throughput of a blockchain is as follows:


For Bitcoin, the transaction throughput is about 7tx/second. This is because of the relatively small block and the very long block time. Ethereum has short block times but very tiny blocks and ends up at about 14tx/second. Blockchains such as Stellar, Bitshares, and Waves can reach speeds of over, 1000tx/second.
VISA is the premier payment-processing network worldwide. In one of the company's blogs, it was revealed that VISA can process over 40,000 transactions a second. This is peak capacity, and it usually processes nowhere near that, except around times such as Christmas. Nevertheless, it should be clear that blockchains have a way to go before they can compete for processing global payments on the same scale as VISA. Newer networks, such as EOS and COSMOS, are trying, however, with innovative multi-threaded designs and segmented blockchain zones.
Now you should understand the basic components of a blockchain. Blocks are groups of transactions grouped together and act as the fundamental unit of a blockchain. Miners are computers that create new blocks on PoW blockchains. Validators, also called witnesses and other names, are computers that create blocks on PoS blockchains. Digital signatures are composed of public and private keys and use mathematics to prove the author of the data.
The key idea of hashing is to use a mathematical function that maps arbitrary data to a single, simple to deal with value. Any change to the data will make the end value very different
In the next chapter, we will learn what these systems are and how blockchain counts as both. We will learn how to differentiate between the two systems and why these concepts are so important to blockchain.
One of the biggest misconceptions in the blockchain space is between distributed systems and decentralized systems. In this chapter, we are going to discuss both types of systems, why they matter, their similarities, their differences, and how blockchain technology can fit into both categories.
By the end of this chapter, you should be able to do the following:
A distributed system is one in which the application and its architecture are distributed over a large number of machines and preferably physical locations. More simply, a distributed system is one where the goal of the system is spread out across multiple sub-systems in different locations. This means that multiple computers in multiple locations must coordinate to achieve the goals of the overall system or application. This is different than monolithic applications, where everything is bundled together.
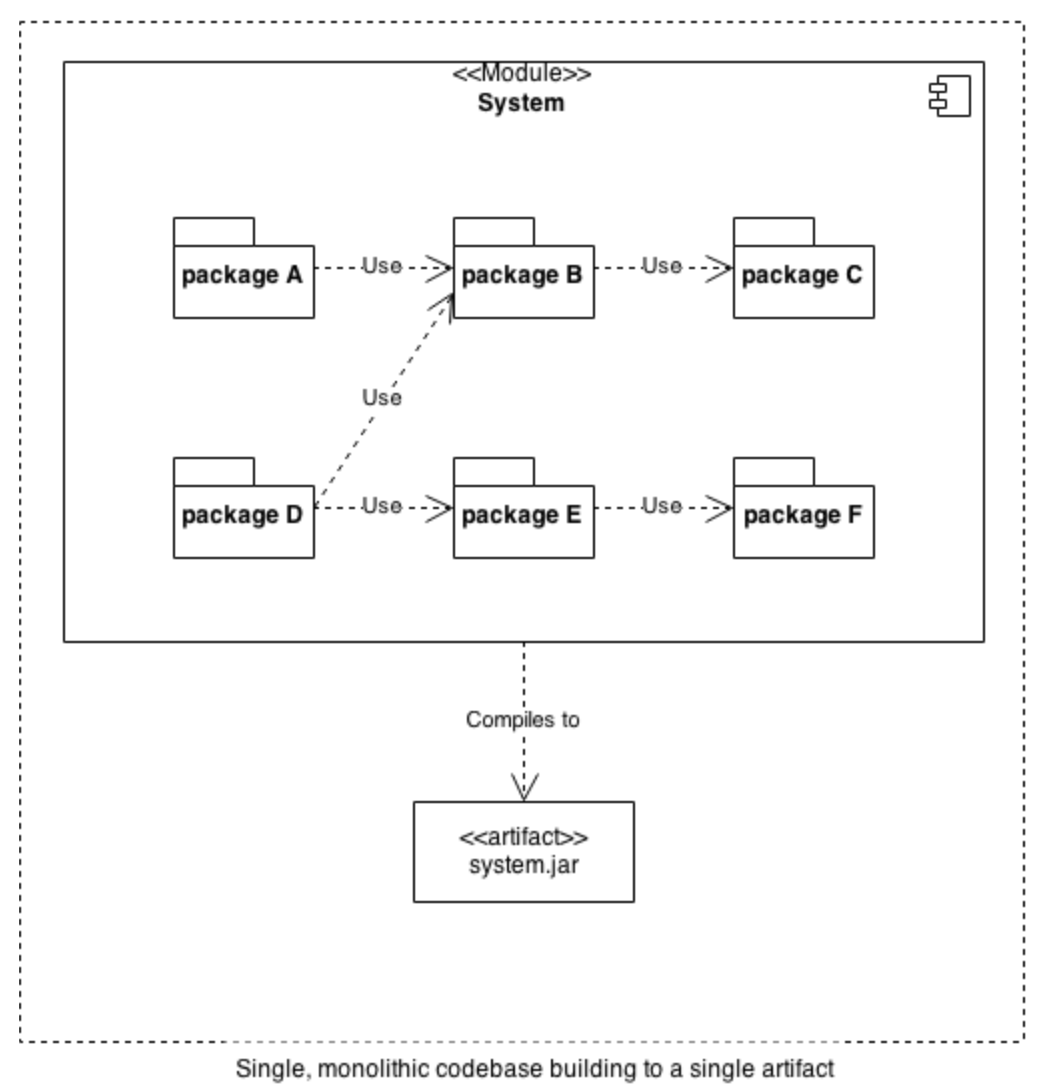
Let's take the example of a simple web application. A basic web application would run with processing, storage, and everything else running on a single web server. The code tends to run as a monolith—everything bundled together. When a user connects to the web application, it accepts the HTTP request, uses code to process the request, accesses a database, and then returns a result.
The advantage is that this is very easy to define and design. The disadvantage is that such a system can only scale so much. To add more users, you have to add processing power. As the load increases, the system owner cannot just add additional machines because the code is not designed to run on multiple machines at once. Instead, the owner must buy more powerful and more expensive computers to keep up. If users are coming from around the globe, there is another problem—some users who are near the server will get fast responses, whereas users farther away will experience some lag. The following diagram illustrates a single, monolithic code base building to a single artifact:
What happens if the computer running this application has a fault, a power outage, or is hacked? The answer is that the entire system goes down entirely. For these reasons, businesses and applications have become more and more distributed. Distributed systems typically fall into one of several basic architectures: client–server, three-tier, n-tier or peer-to-peer. Blockchain systems are typically peer-to-peer, so that is what we will discuss here.
The advantages of a distributed system are many, and they are as follows:
Resiliency is the ability of a system to adapt and keep working in response to changes and challenges. Resiliency can only be discussed in the context of the types of events that a system is resilient towards. A system might be resilient to a few computers getting turned off but may not be resilient to nuclear war.
Resiliency can be broken down into different sub-categories:
We will now discuss fault tolerance in more detail.
A system is said to be fault tolerant when it is capable of operating even if some of the pieces fail or malfunction. Typically, fault tolerance is a matter of degree: where the level of sub-component failure is either countered by other parts of the system or the degradation is gradual rather than an absolute shutdown. Faults can occur on many levels: software, hardware, or networking. A fault tolerant piece of software needs to continue to function in the face of a partial outage along any of these layers.
In a blockchain, fault tolerance on the individual hardware level is handled by the existence of multiple duplicate computers for every function—the miners in bitcoin or proof of work systems or the validators in PoS and related systems. If a computer has a hardware fault, then either it will not validly sign transactions in consensus with the network or it will simply cease to act as a network node—the others will take up the slack.
One of the most important aspects of blockchain is the concept of consensus. We will discuss the different ways blockchains achieve consensus in Chapter 7, Achieving Consensus. For now, it is enough to understand that most blockchain networks have protocols that allow them to function as long as two thirds to slightly over one-half of the computers on the network are functioning properly, though each blockchain network has different ways of ensuring this which will be covered in future chapters.
In most blockchains, each computer acting as a full participant in the network holds a complete copy of all transactions that have ever happened since the launch of the network. This means that even under catastrophic duress, as long as a fraction of the network computers remains functional, a complete backup will exist.
In PoS chains, there tend to be far fewer full participants so the number of backups and distribution is far less. So far, this reduced level of redundancy has not been an issue.
As discussed in prior chapters, hashing and the Merkle root of all transactions and behaviors on the blockchain allow for an easy calculation of consistency. If consistency is broken on a blockchain, it will be noticed instantly. Blockchains are designed to never be inconsistent. However, just because data is consistent does not mean it is accurate. These issues will be discussed in Chapter 20, Scalability and Other Challenges.
Most computer systems in use today are client–server. A good example is your web browser and typical web applications. You load up Google Chrome or another browser, go to a website, and your computer (the client) connects to the server. All communication on the system is between you and the server. Any other connections (such as chatting with a friend on Facebook) happen with your client connected to the server and the server connected to another client with the server acting as the go-between.
Peer-to-peer systems are about cutting out the server. In a peer-to-peer system, your computer and your friend's computer would connect directly, with no server in between them.
The following is a diagram that illustrates the peer-to-peer architecture:
All decentralized systems must be distributed. But distributed systems are not necessarily decentralized. This is confusing to many people. If a distributed system is one spread across many computers, locations, and so on, how could it be centralized?
The difference has to do with location and redundancy versus control. Centralization in this context has to do with control. A good example to showcase the difference between distributed and decentralized systems is Facebook. Facebook is a highly distributed application. It has servers worldwide, running thousands of variations on its software for testing. Any of its data centers could experience failure and most of the site functionality would continue. Its systems are distributed with fault tolerance, extensive coordination, redundancy, and so on.
Yet, those services are still centralized because, with no input from other stakeholders, Facebook can change the rules. Millions of small businesses use and depend on Facebook for advertising. Groups that have migrated to Facebook could suddenly find their old messages, work, and ability to connect revoked—with no recourse. Facebook has become a platform others depend on but with no reciprocal agreement of dependability. This is a terrible situation for all those groups, businesses, and organizations that depend on the Facebook platform in part or on the whole.
The last decade has brought to the forefront a large number of highly distributed yet highly centralized platform companies —Facebook, Alphabet, AirBnB, Uber, and others—that provide a marketplace between peers but are also almost completely unbeholden to their users. Because of this situation, there is a growing desire for decentralized applications and services. In a decentralized system, there is no central overwhelming stakeholder with the ability to make and enforce rules without the permission of other network users.
Like distributed systems, decentralization is a sliding scale more than an absolute state of being. To judge how decentralized a system is, there are a number of factors to consider. We're going to look at factors that have particular relevance to blockchain and decentralized applications and organizations. They are the following:
By definition, any system that is practically or logically closed will be at least somewhat centralized. A system that is closed is automatically centralized to the pre-existing actors. As with all other aspects of decentralized systems, this is not a binary yes/no but more of a sliding scale of possibility.
The early internet was seen as revolutionary in part because of its open access nature and the ability for anyone (with a computer, time, and access) to get online and begin trading information. Similarly, blockchain technologies have so far been open for innovation and access.
A hierarchical system is the one commonly found within companies and organizations. People at the top of a hierarchy have overwhelming power to direct resources and events. A hierarchy comes in different extremes. At one extreme, you could have a system wherein a single arbiter holds absolute power. At the other extreme, you could have a system where each member of the system holds identical direct power and therefore control exists through influence, reputation, or some other form of organizational currency.
In blockchain, a few forms of non-hierarchical patterns have emerged. The first is in proof-of-work mining systems. All miners are fundamentally equal participants in the blockchain, but their influence is proportional to the computing resources they make available to the network.
In PoS blockchain systems, the power is distributed based on the level of investment/stake in the protocol of a specific. In this case, decentralization is achieved both through mass adoption as well as competition with other chains. If one chain becomes too centralized, nothing stops users from migrating to a different one.
How decentralized these systems will remain over time is an open question.
Open access naturally leads to another trait of decentralized systems: diversity. A diverse system stands in opposition to monoculture. In technology, a monoculture is the overwhelming prevalence of a single system, such as the dominance of Windows, which persisted for a long time in corporate America.
One of the ways power can be centralized in a system is through information dominance, where one set of actors in a system has access to more or greater information than other actors. In most current blockchain technology, each participant on the chain gets the same amount of information. There are some exceptions. Hyperledger Fabric, for instance, has the capacity to have information hiding from participants.
The ability to have perfectly enforced transparency is one of the drivers of interest in blockchain systems. By creating transparent and unforgettable records, blockchain has an obvious utility for logistics and legal record keeping. With records on a blockchain, it is possible to know for certain that data was not altered. A transparent blockchain also ensures a level of fairness—participants can all be sure that at a minimum there is a shared level of truth available to all which will not change.
Decentralized systems are not without their downsides. Here are a few key issues with decentralized systems that have specific relevance to blockchain:
Centralized systems and decentralized systems tend to be faster or slower at dealing with certain types of events. Blockchains are decentralized systems of record keeping. One way to think about a basic blockchain such as bitcoin is that it is an append-only database. Bitcoin can handle approximately seven transactions a second. By comparison, Visa and MasterCard are distributed (but not decentralized) transaction-handling systems that can handle more than 40,000 transactions a second. Blockchain systems continue to increase in speed but typically at with the trade-off of some amount of centralization or restrictions on access. Some PoS systems such as Tendermint or Waves have a theoretical throughput of over 1,000 tx/second but are still far from the peak capacity of their traditional counterparts.
Decentralized systems tend to be much harder to censor because of a lack of a central authority to do the censoring. For free-speech and free-information purists, this is not seen as a downside in the slightest. However, some information (child pornography, hate speech, bomb-making instructions) is seen as dangerous or immoral for public dissemination and therefore should be censored. As a technology, anything actually written into the blockchain is immutable once the block holding that information is finished. For instance, Steemit is a blockchain-based social blogging platform where each post is saved to the chain. Once each block is finalized, the data cannot be removed. Clients of the system could choose not to show information, but the information would still be there for those who wanted to look.
The desire for censorship extends to self-censorship. Content written to the change is immutable—even for its author. For instance, financial transactions done via bitcoin can never be hidden from authorities. While bitcoin is anonymous, once a person is attached to a bitcoin wallet, it is possible to easily track every transaction ever done since the beginning of the blockchain.
Because of this, a blockchain-based national currency would allow perfect taxation—due to perfect financial surveillance of the chain. Censorship resistance is thus a double-edged sword.
Decentralized systems tend to be much more chaotic than centralized ones by their nature. In a decentralized system, each actor works according to their own desires and not the demands of an overarching authority. Because of this, decentralized systems are difficult to predict.
In this chapter, we have discussed the difference between distributed systems and decentralized systems and gone over some of the key features. You should now understand how each decentralized system is also a distributed system and some of the key aspects of each concept.
In the next chapter, we will start looking at how these things work in practice.
The use of blockchain hinges on cryptography. Numeric cryptography can be regarded as a recent invention, with the ciphers of the past relying on exchanging words for words and letters for letters. As we'll see, modern cryptography is a very powerful tool for securing communications, and, importantly for our topic, determining the provenance of digital signatures and the authenticity of digital assets.
In this chapter, the following topics will be covered:
Cryptography safeguards the three principles of information security, which can be remembered by the mnemonic device Central Intelligence Agency (CIA):
Confidentiality: Ensures that information is shared with the appropriate parties and that sensitive information (for example, medical information, some financial data) is shared exclusively with the consent of appropriate parties.
Integrity: Ensures that only authorized parties can change data and (depending on the application) that the changes made do not threaten the accuracy or authenticity of the data. This principle is arguably the most relevant to blockchains in general, and especially the public blockchains.
Availability: Ensures authorized users (for example, holders of tokens) have the use of data or resources when they need or want them. The distributed and decentralized nature of blockchain helps with this greatly.
The relevance to blockchain and cryptocurrency is immediately evident: if, for instance, a blockchain did not provide integrity, there would be no certainty as to whether a user had the funds or tokens they were attempting to spend. For the typical application of blockchain, in which the chain may hold the chain of title to real estate or securities, data integrity is very important indeed. In this chapter, we will discuss the relevance of these principles to blockchain and how things such as integrity are assured by cryptography.
Cryptography is the term for any method or technique used to secure information or communication, and specifically for the study of methods and protocols for secure communication. In the past, cryptography was used in reference to encryption, a term that refers to techniques used to encode information.
At its most basic, encryption might take the form of a substitution cipher, in which the letters or words in a message are substituted for others, based on a code shared in advance between the parties. The classic example is that of the Caesar Cipher, in which individual letters are indexed to their place in the alphabet and shifted forward a given number of characters. For example, the letter A might become the letter N, with a key of 13.
This specific form of the Caesar Cipher is known as ROT13, and it’s likely the only substitution cipher that continues to see any regular use—it provides a user with a trivially reversible way of hiding expletives or the solutions to puzzles on static websites (the same, of course, could be implemented very simply in JavaScript).
This very simple example introduces two important concepts. The first is an algorithm, which is a formal description of a specific computation with predictable, deterministic results. Take each character in the message and shift it forward by n positions in the alphabet. The second is a key: the n in that algorithm is 13. The key in this instance is a pre-shared secret, a code that the two (or more) parties have agreed to, but, as we’ll see, that is not the only kind of key.
Cryptography is principally divided into symmetric and asymmetric encryption. Symmetric encryption refers to encryption in which the key is either pre-shared or negotiated. AES, DES, and Blowfish are examples of algorithms used in symmetric encryption.
Most savvy computer users are familiar with WEP, WPA, or WPA2, which are security protocols employed in Wi-Fi connections. These protocols exist to prevent the interception and manipulation of data transmitted over wireless connections (or, phrased differently, to provide confidentiality and integrity to wireless users). Routers now often come with the wireless password printed on them, and this is a very literal example of a pre-shared key.
The algorithms used in symmetric encryption are often very fast, and the amount of computational power needed to generate a new key (or encrypt/decrypt data with it) is relatively limited in comparison to asymmetric encryption.
Asymmetric cryptography (also called public-key cryptography) employs two keys: a public key, which can be shared widely, and a private key, which remains secret. The public key is used to encrypt data for transmission to the holder of the private key. The private key is then used for decryption.
The development of public-key cryptography enabled things such as e-commerce internet banking to grow and supplement very large segments of the economy. It allowed email to have some level of confidentiality, and it made financial statements available via web portals. It also made electronic transmissions of tax returns possible, and it made it possible for us to share our most intimate secrets in confidence with, maybe, perfect strangers—you might say that it brought the whole world closer together.
As the public key does not need to be held in confidence, it allows for things such as certificate authorities and PGP key servers—publishes the key used for encryption, and only the holder of the private key will be able to decrypt data encrypted with that published key. A user could even publish the encrypted text, and that approach would enjoy some anonymity—putting the encrypted text in a newsgroup, an email mailing list, or a group on social media would cause it to be received by numerous people, with any eavesdropper unable to determine the intended recipient. This approach would also be interesting in the blockchain world—thousands or millions of nodes mirroring a cipher text without a known recipient, perhaps forever, irrevocably, and with absolute deniability on the part of the recipient.
Public-key cryptography is more computationally expensive than symmetric cryptography, partly due to the enormous key sizes in use. The NSA currently requires a key size of 3,072 bits or greater in commercial applications for key establishment, which is the principal use of public-key cryptography. By comparison, 128-bit encryption is typically regarded as adequate for most applications of cryptography, with 256-bit being the NSA standard for confidentiality.
For the most part, although it is possible to use the public-key algorithm alone, the most common use of public-key cryptography is to negotiate a symmetric key for the remainder of the session. The symmetric key in most implementations is not transmitted, and, as a consequence, if an attacker were to seize one or both of the private keys, they would be unable to access the actual communications. This property is known as forward secrecy.
Some protocols, such as SSH, which is used to remotely access computers, are very aggressive. Over the course of a session, SSH will change the key at regular intervals. SSH also illustrates the essential property of public-key cryptography—it’s possible to put your public key on the remote server for authentication, without any inherent confidentiality issue.
Most cryptography in use today is not unbreakable, given extremely large (or infinite) computing resources. However, an algorithm suited to the task of protecting data where confidentiality is required is said to be computationally improbable—that is, computing resources to crack the encryption do not exist, and are not expected to exist in the near future.
It is notable that, although when encrypting data to send it to a given recipient, the private key is used for decryption, it is generally possible to do the reverse. For cryptographic signing, private keys are used to generate a signature that can be decrypted (verified) with the public key published for a given user. This inverted use of public-key cryptography allows for users to publish a message in the clear with a high degree of certainty that the signer is the one who wrote it. This again invokes the concept of integrity—if signed by the user’s private key, a message (or transaction) can be assumed to be authentic. Typically, where Blockchains are concerned, when a user wishes to transfer tokens, they sign the transaction with the private key of the wallet. The user then broadcasts that transaction.
It is now also fairly common to have multisignature wallets, and, in that instance, a transaction is most often signed by multiple users and then broadcast, either in the web interface of a hosted wallet service, or in a local client. This is a fairly common use case with software projects with distributed teams.
Distinct from the concept of encryption (and present in many mechanisms used in cryptography, such as cryptographic signatures and authentication) is hashing, which refers to a deterministic algorithm used to map data to a fixed-size string. Aside from determinism, cryptographic hashing algorithms must exhibit several other characteristics, which will be covered in this section.
As we'll see in the following section, a hash function must be difficult to reverse. Most readers who got through high school algebra will remember being tormented with factoring. Multiplication is an operation that is easy to complete, but difficult to reverse—it takes substantially more effort to find the common factors of a large number as opposed to creating that number as a product of multiplication. This simple example actually enjoys the practical application. Suitably large numbers that are the product of the multiplication of two prime numbers—called semiprimes or (less often) biprimes—are employed in RSA, a widely used public-key cryptography algorithm.
RSA is the gold standard in public key cryptography, enabling things such as SSH, SSL, and systems for encrypting email such as PGP. Building on operations such as this — easy to do one way and very hard to do in the other—is what makes cryptography so robust.
A desirable feature of robust hashing algorithms is known as the avalanche effect. A small change in the input should result in a dramatic change in the output. Take for instance the following three examples using output redirection and the GNU md5sum utility present in most distributions of Linux:
$ echo "Hills Like White Elephants by Ernest Hemingway" | md5sum
86db7865e5b6b8be7557c5f1c3391d7a -
$ echo "Bills Like White Elephants by Ernest Hemingway" | md5sum
ccba501e321315c265fe2fa9ed00495c -
$ echo "Bills Like White Buffalo by Ernest Hemingway"| md5sum
37b7556b27b12b55303743bf8ba3c612 -
Changing a word to an entirely different word has the same result as changing a single letter: each hash is entirely different. This is a very desirable property in the case of, say, password hashing. A malicious hacker cannot get it close enough and then try permutations of that similar password. We will see in the following sections, however, that hashes are not perfect.
An ideal hash function is free of collisions. Collisions are instances in which two inputs result in the same output. Collisions weaken a hashing algorithm, as it is possible to get the expected result with the wrong input. As hashing algorithms are used in the digital signatures of root certificates, password storage, and blockchain signing, a hash function having many collisions could allow a malicious hacker to retrieve passwords from password hashes that could be used to access other accounts. A weak hashing algorithm, rife with collisions, could aid in a man-in-the-middle attack, allowing an attacker to spoof a Secure Sockets Layer (SSL) certificate perfectly.
MD5, the algorithm used in the above example, is regarded as inadequate for cryptographic hashing. Blockchains thankfully largely use more secure hash functions, such as SHA-256 and RIPEMD-160.
In the PoW systems, new entries to a blockchain require hashes to be computed. In Bitcoin, miners must compute two SHA-256 hashes on the current transactions in the block—and included therein is the hash of the previous block.
This is pretty straightforward for a hashing algorithm. Let’s briefly reiterate: an ideal hash function takes the expected input and then outputs a unique hash. It is deterministic. There is only one possible output and it is impossible (or computationally improbable) to achieve that output with a different input. These properties ensure that miners can process a block and that each miner can return the same result. It is through hashing that Blockchains attain two properties that are crucial to their adoption and current popularity: decentralization and immutability.
Linking the current block to the previous block and the subsequent block is in part what makes the blockchain an ever-growing linked list of transactions (providing it with the property of immutability), and the deterministic nature of the hash algorithm makes it possible for each node to get the same result without issue (providing it with decentralization).
Aside from proof of work, PoS and DPoS also make use of hashes, and largely for the same purpose. Plenty of discussions have been dedicated to whether PoS will replace PoW and prevent us from running thousands of computers doing megawatts' worth of tedious hashing with enormous carbon footprints.
PoW systems seem to persist in spite of the power consumption and environmental impact of reasonably difficult hashing operations. Arguably, the reason for this is the very simple economics: miners have an incentive to validate transactions by computing hashes because they receive a share of new tokens minted into the system. More complex tokenomics schemes for proof of stake or distributed proof of stake often fail the smell test.
Take, for example, the idea of a stock photo blockchain project—we’ll call it Cannistercoin. Users contribute photos to a stock photo website, and in return they receive tokens. The token is also used to buy stock photos from the website, and this token is traded on exchanges.
This would seem to work, and it’s a complete market—Cannistercoin has identified buyers and sellers and has a mechanism to match them—but it is perhaps not a functional market. The barriers to entry here are significant: a buyer could use any ordinary stock photo site and use their credit card or bank account. In this model, the buyer needs to sign up for an exchange and send cryptocurrency in exchange for the token.
To be truly decentralized, a big piece is missing from this economic model—that is, this system of incentives. What provides an incentive for witnesses or validators to run their machines and validate transactions?
You can give them some share of the tokens, but why wouldn’t many of them sell their tokens immediately in order to recoup the costs of running their machines? It can be reasonably expected that that constant selling pressure holds down the price of tokens in many of these appcoin cryptocurrencies, and this is a shame. Proof of stake systems are often more elegant with regard to processing power (at the expense of less elegant economic models).
Proof of stake (or another mechanism) may well still take over the world, but, one way or the other, you can safely expect the crypto world to do plenty of hashing.
The world of blockchain and cryptocurrency exists thanks largely to the innovations of the last century in cryptography. We've covered how cryptography works conceptually and how cryptographic operations, specifically hashing, form a large part of what happens behind the scenes in a blockchain.
In the next chapter, we'll build on this foundation and introduce Bitcoin, the first (and most notable) blockchain application.
In earlier chapters, we discussed blockchain, its components, and its structure in detail. We also discussed cryptography, the mechanics behind blockchain, and how blockchain is revolutionizing the network world. In this chapter, we will be discussing Bitcoin's origins.
We will discuss the introduction of Bitcoin, its history, and how it became one of the biggest revolutions of financial history in such a short space of time. We will also dive deep into other aspects of Bitcoin, such as its encoding system, transaction process, network nodes, and we'll briefly cover the mining of Bitcoins.
The topics that we will cover in this chapter include the following:
Bitcoin is the first and, to date, the most successful application of blockchain technology. Bitcoins were introduced in 2008, in a paper on Bitcoin called Bitcoin: A Peer-to-Peer Electronic Cash System (https://bitcoin.org/bitcoin.pdf), which was authored by Satoshi Nakamoto.
Bitcoin was the world's first decentralized cryptocurrency; its introduction heralded a revolution, and, in just about a decade, it has proved its strengths, with huge community backing and widespread adoption.
From 2010, certain global businesses have started to accept Bitcoins, with the exception of fiat currencies. A lot of currency exchanges were founded to let people exchange Bitcoin with fiat currency or with other cryptocurrencies. In September 2012, the Bitcoin Foundation was launched to accelerate the global growth of Bitcoin through standardization, protection, and promotion of the open source protocol.
A lot of payment gateways such as BitPay came up to facilitate merchants in accepting Bitcoin as a payment method. The popular service WordPress started accepting Bitcoins in November 2012.
Bitcoin has been growing as a preferred payment option in global payments, especially business-to-business supply chain payments. In 2017, Bitcoin gained more legitimacy among financial companies and government organizations. For example, Russia legalized the use of cryptocurrencies, including Bitcoin, Norway's largest bank announced the inception of a Bitcoin account, and Japan passed a law to accept Bitcoin as a legal payment method. The world's largest free economic zone, Dubai, has started issuing licenses to firms for trading cryptocurrencies.
On August 1, 2017, Bitcoin split into two derivative digital currencies; one kept the legacy name Bitcoin, and the other with an 8 MB block size is known as Bitcoin Cash (BCH). After this, another hard fork happened on October 24, 2017, with a new currency known as Bitcoin Gold (BTG). Then, again, on February 28, 2018, another hard fork happened, with the new currency known as Bitcoin Private (BTCP). There was another hard fork due in November 2017, but this was canceled due to lack of consensus from the community.
However, there is a single major concern of the promoters of Bitcoin, with regards to price volatility and slowing of transaction due to a large number of confirmations required to approve a transaction.
When we say Bitcoin is volatile, we mean the price of Bitcoin is volatile. The spot rate of Bitcoin at various exchanges changes every moment and, moreover, it functions 24/7. Hence, any user or community member of Bitcoin is perturbed by the regularly changing price of Bitcoin. The following chart shows the price fluctuation of Bitcoin over the last financial year:
The volatility of Bitcoin is the most discussed topic and has been a concern for investors, miners, and supporters of Bitcoin since the exchanges of Bitcoin came up. Some prime reasons for this as follows:
The preceding points are just some of the prime points that are causing a huge volatility in the Bitcoin market. There are various other factors that play a vital role in the price fixtures of Bitcoin from time to time.
Bitcoin, being a purely digital currency, can be owned by people by keeping or storing it in files or in a Bitcoin Wallet. Addresses are used to transfer Bitcoins from one wallet to another, and keys are used to secure a transaction.
Keys in Bitcoins are used in pairs. One is a public key, and the other is a private key. The private key is to be kept securely, since it gives you control over a wallet. The keys are stored and controlled by a Bitcoin wallet.
Addresses are alphanumeric strings that are shared for sending or receiving Bitcoins from one wallet to another. The addresses are mostly encoded as Base58Check, which uses a Base58 number for address transcription. A Bitcoin address is also encoded in a QR code for quick transactions and sharing.
Bitcoin has a widely used metric system of denominations that are used as units of Bitcoins. The smallest denomination of Bitcoin is called a Satoshi, after the name of its creator. The following table shows the units of Bitcoin, from its smallest unit, Satoshi, to Megabit:
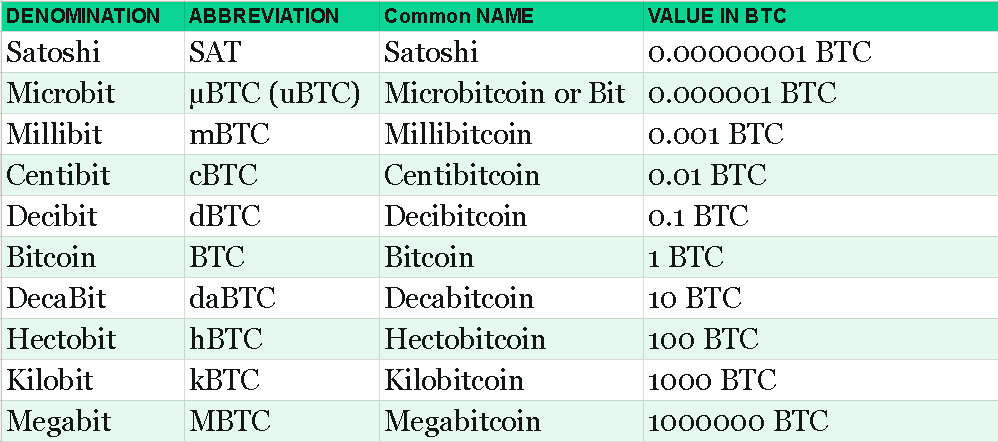
These are valid addresses that contain readable addresses. For example: 1BingoAuXyuSSoYm6rH7XFZc6Hcy98zRZz is a valid address that contains a readable word (Bingo). Generating a vanity address needs creation and testing of millions of private keys, until the desired Base58 letter address is found.
The vanity addresses are used for fun and offer the same level of security as any other address. The search time for a vanity address increases as the desired pattern's length increases.
This encoding takes the binary byte arrays and converts them into a human-readable format. This string is created by using a set of 58 alphanumeric characters.
Instead of Base58, Base64 could also be used, but that would have made some characters look identical, which could have resulted in identical-looking data. The Base58 symbol chart used in Bitcoin is specific to Bitcoins and was used only by Bitcoins at the time of creation. The following table shows the value and the character corresponding to it in the Base58 encoding:
|
Value |
Character |
Value |
Character |
Value |
Character |
Value |
Character |
|
0 |
1 |
1 |
2 |
2 |
3 |
3 |
4 |
|
4 |
5 |
5 |
6 |
6 |
7 |
7 |
8 |
|
8 |
9 |
9 |
A |
10 |
B |
11 |
C |
|
12 |
D |
13 |
E |
14 |
F |
15 |
G |
|
16 |
H |
17 |
J |
18 |
K |
19 |
L |
|
20 |
M |
21 |
N |
22 |
P |
23 |
Q |
|
24 |
R |
25 |
S |
26 |
T |
27 |
U |
|
28 |
V |
29 |
W |
30 |
X |
31 |
Y |
|
32 |
Z |
33 |
a |
34 |
b |
35 |
c |
|
36 |
d |
37 |
e |
38 |
f |
39 |
g |
|
40 |
h |
41 |
i |
42 |
j |
43 |
k |
|
44 |
m |
45 |
n |
46 |
o |
47 |
p |
|
48 |
q |
49 |
r |
50 |
s |
51 |
t |
|
52 |
u |
53 |
v |
54 |
w |
55 |
x |
|
56 |
y |
57 |
z |
- |
- |
- |
- |
This is the primary part of the Bitcoin system. Transactions are not encrypted, since Bitcoin is an open ledger. Any transaction can be publicly seen in the blockchain using any online blockchain explorer. Since addresses are encrypted and encouraged to be unique for every transaction, tracing a user becomes difficult.
Blocks in Bitcoin are made up of transactions that are viewed in a blockchain explorer; each block has the recent transactions that have happened. Every new block goes at the top of the blockchain. Each block has a height number, and the height of the next block is one greater than that of the previous block. The consensus process is commonly known as confirmations on the blockchain explorer.
There are various types of scripts available to manage the value transfer from one wallet to another. Some of the standard types of transactions are discussed here for a clear understanding of address and how transactions differ from one another.
The Pay-to-Public-Key Hash (P2PKH) majority of the transactions on the Bitcoin network happen using this method. This is how the script looks:
OP_DUP OP_HASH160 [Pubkey Hash] OP_EQUALVERIFY OP_CHECKSIG
This is how the signature script looks:
[Sig][PubKey]
These strings are concatenated together to be executed.
The Pay-to-Script Hash (P2SH) process is used to send transactions to a script hash. The addresses to pay using script hash have to start with 3. This is how the script looks:
OP_HASH160 [redeemScriptHash] OP_EQUAL
The signature looks like this:
[Sig]...[Sig][redeemScript]
As with P2PKH, these strings are also concatenated together to create the script signature.
The transaction data is recorded in files, and these files are known as blocks. The blocks are stacked on top of one another, the most recent block being at the top. The following table depicts the structure of the block and the size of the elements in a block:
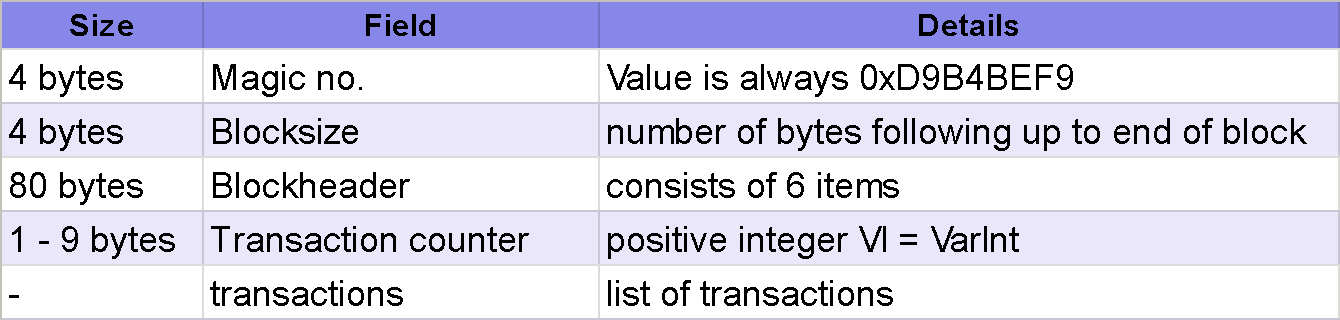
Every block in the Bitcoin network has almost the same structure, and each of the blocks is chained to the most recent block. These are the fields of the block:
The genesis block is the first block in the blockchain of Bitcoin. The creation of the genesis block marked the start of Bitcoin. It is the common ancestor of all the blocks in the blockchain. It is statically encoded within the Bitcoin client software and cannot be altered. Every node in the blockchain of Bitcoin acknowledges the genesis block's hash and structure, the time of its creation, and the single transaction it contains. Following is the static code written in the Bitcoin source code, which describes the creation of the genesis block with static parameters pszTimestamp, genesisOutputScript, nTime, nNonce, nBits, and nVersion. Here is the snippet of this code in the Bitcoin repository:
static CBlock CreateGenesisBlock(uint32_t nTime, uint32_t nNonce, uint32_t nBits, int32_t nVersion, const CAmount& genesisReward)
 {
 const char* pszTimestamp = "The Times 03/Jan/2009 Chancellor on brink of second bailout for banks";
 const CScript genesisOutputScript = CScript() << ParseHex("04678afdb0fe5548271967f1a67130b7105cd6a828e03909a67962e0ea1f61deb649f6bc3f4cef38c4f35504e51ec112de5c384df7ba0b8d578a4c702b6bf11d5f") << OP_CHECKSIG;
 return CreateGenesisBlock(pszTimestamp, genesisOutputScript, nTime, nNonce, nBits, nVersion, genesisReward);
 }
The network is based on a peer-to-peer (P2P) protocol. Various nodes exchange transactions and blocks in this network. Every node in this Bitcoin network is treated equally. One advantage of this is that each node has the option of taking different roles, depending on each person's preference on how they want to participate in the Bitcoin network.
Before we discuss the types of nodes, let's discuss some of the primary functionalities that the nodes perform:
Majorly, there are two types of nodes in the Bitcoin network. We'll now go into some brief details on each.
A full node is made up of the wallet, miner, complete blockchain, and the routing network. These nodes maintain a complete up-to-date record of the blockchain. The full nodes verify every transaction on the blockchain network.
Lightweight nodes perform transactions on the blockchain. They do not contain the entire blockchain, instead just a subset of the blockchain. They verify the transactions using a system called Simplified Payment Verification (SPV). These nodes are also sometimes called SPV nodes.
There are various other nodes on the Bitcoin network, each of them performing a specific set of functionalities from the offered functionalities in the Bitcoin network. Some nodes contain only the blockchain and routing functionalities. Some nodes only work as miners and do not contain the wallet.
There are other nonstandard nodes called pool protocol servers. These Nodes work on alternative protocols such as the stratum protocol. The stratum protocol works on TCP sockets and JSON-RPC to communicate among the nodes.
The network discovery in Bitcoin is required by any node when it is first started; a node has to discover other nodes in the network to participate in the blockchain. At the start of a node, it has to connect with at least one existing node in the network.
For this, the nodes establish a connection over the TCP protocol, over port 8333 or any other port if there is one. Next a handshake is performed by transmitting a certain message. That message is called the version message, which contain basic identification information.
Peers are found in the network primarily by two methods. One is by querying DNS using DNS seeds, which are basically DNS servers that provide a list of the IPs of Bitcoin nodes. The other method is a list of IPs that Bitcoin core tries to connect to. Another method, which was used earlier, was seeding nodes through IRC, but that method was discontinued due to security concerns.
DNS seeds are servers which contains lists of IP addresses. These seeds are custom implementations of Berkeley Internet Name Daemon (BIND) and return random subsets collected by a Bitcoin node. Most of the Bitcoin clients use DNS seeds to connect while trying to establish to first set of connection. It is better to have various seeds present so that a better connection can be established by the client with the peers present over the network. In the Bitcoin core client, the option to use DNS seeds is controlled by the -dnsseed parameter, which is set to 1 by default. Here is how the DNS seeds are represented in the chainparams.cpp file of the Bitcoin source:
 vSeeds.push_back(CDNSSeedData("bitcoin.sipa.be", "seed.bitcoin.sipa.be")); // Pieter Wuille
 vSeeds.push_back(CDNSSeedData("bluematt.me", "dnsseed.bluematt.me")); // Matt Corallo
 vSeeds.push_back(CDNSSeedData("dashjr.org", "dnsseed.bitcoin.dashjr.org")); // Luke Dashjr
 vSeeds.push_back(CDNSSeedData("bitcoinstats.com", "seed.bitcoinstats.com")); // Christian Decker
 vSeeds.push_back(CDNSSeedData("xf2.org", "bitseed.xf2.org")); // Jeff Garzik
 vSeeds.push_back(CDNSSeedData("bitcoin.jonasschnelli.ch", "seed.bitcoin.jonasschnelli.ch")); // Jonas Schnelli
The preceding seeds are currently being used in Bitcoin core, for connecting with the seed client for establishing the connection with the first node.
These are static lists of IP addresses. If the Bitcoin client is successfully able to connect with one IP address, it will be able to connect to other nodes by sharing the node's IPs. The command-line argument -seednode is used to connect to one node. After initial connection to the seed node, the client will discover new seeds using that seed itself.
Bitcoin wallets are an important function of the Bitcoin node; they contain private and/or public keys and Bitcoin addresses. There are various types of Bitcoin wallets and each one offers a varied level of security and functions, as required.
There is a common misconception that an e-wallet can contain Bitcoins but a Bitcoin wallet will only contain keys. Each Bitcoin is recorded on the blockchain in the Bitcoin network. A Bitcoin wallet contains keys, and these keys authorize the use of Bitcoins that are associated with the keys. Users or wallet owners sign a transaction with the keys in the wallet, proving that they own the Bitcoins. In reality, these Bitcoins are stored on the blockchain in the form of transaction outputs that are denoted as txout.
Primarily, there are two types of wallets, which is based on whether the keys contained by the wallets are related to one another.
This is a type of wallet in which all the keys are derived from a single master key, which is also known as a seed. All the keys in this type of wallet are linked with one another and can be easily generated again with the help of a seed. In some cases, a seed allows the creation of public key addresses without the knowledge of private keys. Mostly, seeds are serialized into human-readable words known as a mnemonic phrase.
There are multiple key derivation methods used in deterministic wallets, which are described in the following subsections.
Deterministic wallets hold private keys that are derived from a common seed. A one-way hash function is used for this. In a deterministic wallet, this seed is essential to recover all the derived keys, and hence a single backup at the time of creation is sufficient. The following diagram depicts how a single seed is connected/related to all the keys generated by the wallet:
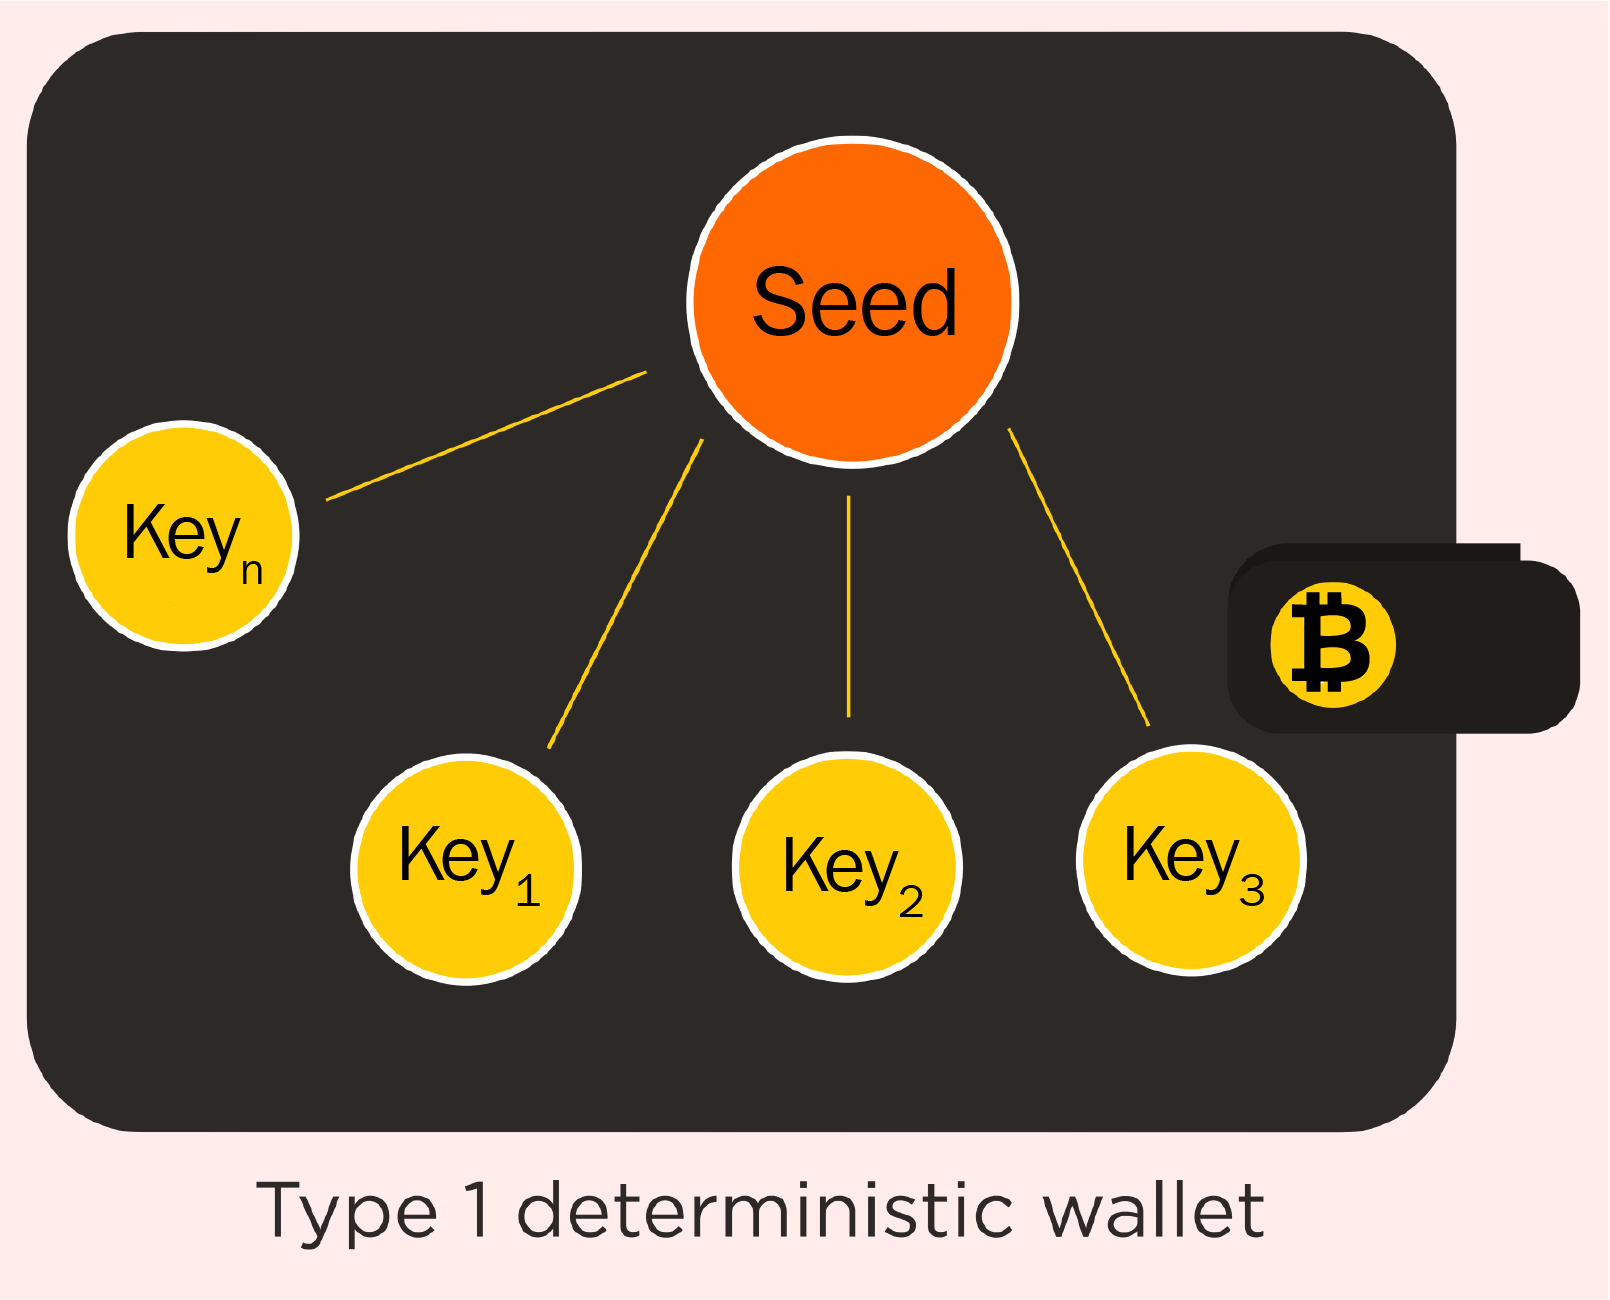
HD wallets are one of the most advanced form of deterministic wallets. They contain keys derived from a tree structure, such that the master key can have multiple level-1 keys that can further contain multiple level-2 keys of up to an infinite depth. The following diagram depicts how a seed generates master keys that further create multiple keys in a hierarchical formation:
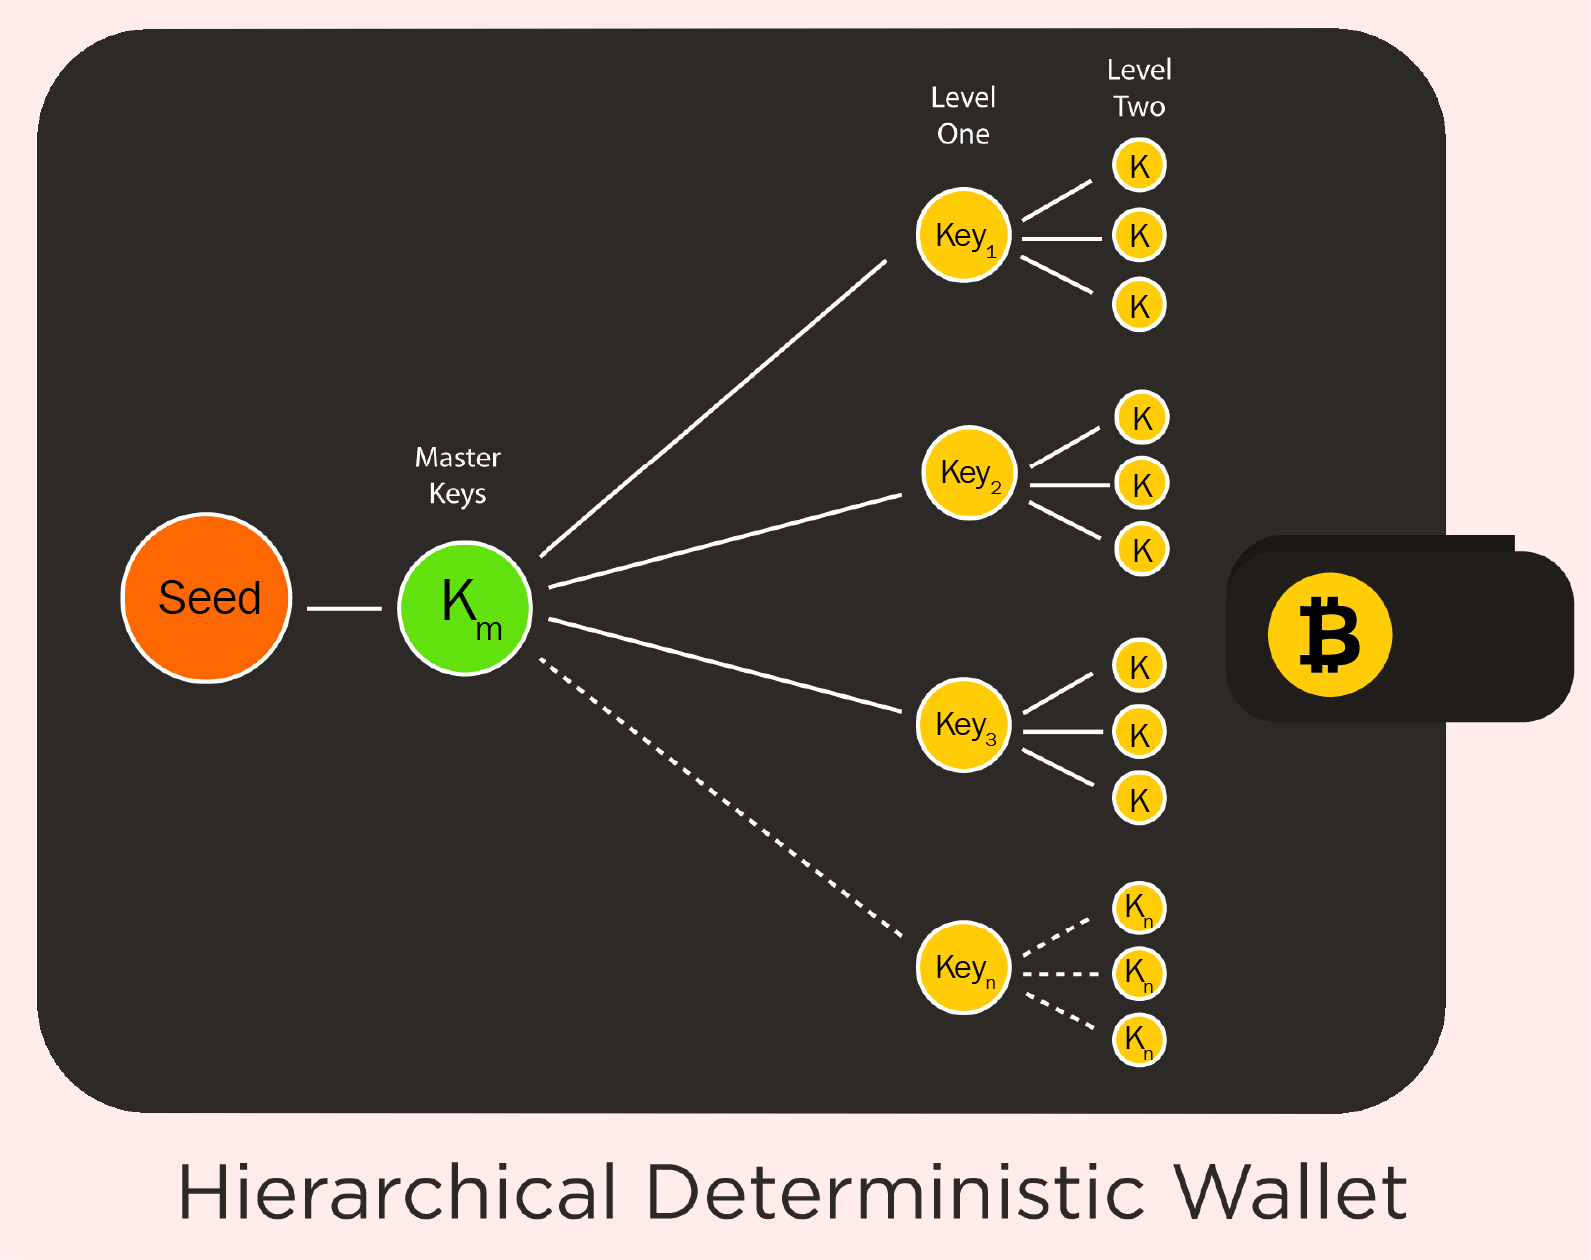
In this type of wallet, each key is independently generated from a random number. The keys generated in this wallet are not related to one another. Due to the difficulty in maintaining multiple non-related keys, it is very important to create regular backups of these keys and protect them to prevent theft or loss.
In this chapter, we discussed the basics of Bitcoin, its history, and its pricing in comparison to fiat currency. We also discussed Bitcoin addresses, their encoding, their transaction types, and blocks. Finally, we discussed the Bitcoin network and the types of nodes the network contains.
Now that we have discussed the world's first cryptocurrency in this chapter, in the next chapter, we will discuss various other cryptocurrencies that were inspired by Bitcoin and are also known as alternative currencies. We will discuss the alt-currencies, which are sometimes also called Altcoins.
After the release of Bitcoin, there has always been a large community supporting cryptocurrencies. Also, since Bitcoin and blockchain are open source, a lot of people within the community started to create their cryptocurrencies offering similar services that provide different consensus methods and so on, in comparison to Bitcoin.
Since Bitcoin is the first and, by far, most dominant cryptocurrency, all other cryptocurrencies are known as Alternative Coins or Altcoins. The first Altcoin was Namecoin, introduced in 2011. After that, a lot of Altcoins have been introduced; a few of them were popular and also started to be used as mainstream coins, whereas others were less popular. As of now, there are more than 1,500 cryptocurrencies in existence. There are two broad categories in the alternative cryptocurrency sphere. If an alternative blockchain platform is to be created, they are commonly called Alternative Chains, but if the purpose of the coin is to introduce a new currency, then it can be known as an Altcoin.
Many of the Altcoins are forked directly from Bitcoin's source, and some are even written from scratch. Altcoins are looking to solve some limitation or other of Bitcoins such as the consensus method, mining limitations, block time, distribution, privacy, or sometimes even adding a feature on top of the coin.
The topics that we will be covering in this chapter are as follows:
There are more than 1,600 cryptocurrencies in circulation; each one of them provides an improvement or a modification over Bitcoins. There are various online exchanges where cryptocurrencies can be exchanged amongst one another or for fiat currencies (such as USD, EUR, GBP, and so on) too, similar to a currency exchange or a stock-exchange portal. Here is a list of some popular Altcoins:
There are two broad categories of Altcoin on the basis of their blockchain, since the blockchain defines features, security, and other aspects of the coin.
It is certain that having so many cryptocurrencies in the market, along with currency exchanges, means that, now, a lot of key financial and market metrics are required to differentiate among the coins. The following are some of the key factors to consider when discussing an Altcoin:
Either an Altcoin can have its own blockchain or it can be built on top of another blockchain, usually known as tokens.
Altcoins built on top of another blockchain are called tokens. Tokens cannot exist without another platform on which they are built. Here is a list of platforms on top of which tokens can be created:
Ethereum is the most widely used option to create tokens; there are more than 600 tokens based on the Ethereum platform that is available. Being public and open source makes it easy for anyone to create tokens based on the Ethereum blockchain; furthermore, being backed by a huge community makes it more secure and easy for any cryptocurrency-based exchange to accept the tokens.
Some of the popular tokens built on the Ethereum platform are EOS, TRON, VeChain, and so on.
Starting out in the form of a MasterCoin in 2013, the Omni Layer protocol is one of the most popular meta-protocols based on the Bitcoin blockchain. The Omni Layer offers a different wallet similar to the Bitcoin client and an Omni Layer similar to the Bitcoin core.
Some of the popular tokens built on the Omni Layer platform are Tether, MaidSafeCoin, Synereo, and so on.
NEO started as Antshares; it was built by Onchain, a company based in China. It started out in early 2014, providing services to the banking and finance sectors. Antshares was rebranded as NEO in June 2017.
Some of the popular tokens built on the NEO platform are Ontology, Gas, DeepBrain Chain, and so on.
Often described as the open blockchain platform, waves is a platform where not just cryptocurrencies but all types of real-world commodities can also be exchanged, issued, and transferred in a completely decentralized way.
Some of the tokens built on the waves platform are Wager, Mercury, Incent, and so on.
Counterparty is another protocol layer implemented on top of Bitcoin Protocol Layer, just like Omni Layer and released in 2014, it claims to offer various features apart from Bitcoin, which makes it a valuable token creation platform.
Some of the tokens built on Counterparty are Triggers, Pepe Cash, Data bits, and so on.
Apart from tokens, which are built on top of existing blockchains, there are various alt currencies fueled by either having their own blockchain and/or any other improvement or differentiating factor.
Here are some of the factors that have been modified on the Altcoins, when compared to Bitcoins:
We will discuss each of these alternatives in detail, and then afterward we will discuss some of the widely used Altcoins and what modifications they have over Bitcoins.
Bitcoin is limited to 21 million coins, and it has a declining issuance rate, including a 10-minute block generation time, which takes a lot of confirmation time; it also takes a lot of time in further coin generation. A lot of Altcoins have modified a number of primary parameters to achieve escalated results. Some of the prime coins that have modified monetary parameters are Litecoin, Dogecoin, Ethereum, NEO, and so on.
A consensus mechanism is the root of transactions of Bitcoins; the mechanism used in Bitcoins is based on proof-of-work, using a SHA256 algorithm. Since the consensus mechanism requires the mining of blocks, it became very computation-intensive, leading to the creation of specified Application-Specific Integrated Circuit Chips (ASICs), which are Bitcoin-mining hardware created specifically to solve Bitcoin blocks.
This led to the creation of Altcoins with innovative algorithms such as these:
Apart from innovative algorithms, there are also a lot of innovative consensus types commonly known as proof types, being used, such as these:
Due to the large amount of Altcoins and larger number of coins being released regularly, it is important to know about the differences each of the coins offers. It is now time to discuss various Altcoins and what each one of them offers.
This is one of the initial Altcoins, released in 2011. The prime modification of Litecoin over Bitcoin is the use of the script algorithm instead of SHA-256 used in Bitcoins. Also, the limit of coins for Litecoin is 84 million, compared to 21 million Bitcoins.
Litecoin was created in October, 2011, by a former Google engineer, with its prime focus to reduce the block generation time from Bitcoins from 10 minutes to 2.5 minutes. Due to faster block generation, the confirmation of a transaction is much faster in Litecoin compared to Bitcoin.
Ether is based on an Ethereum platform, which provides scripting functionality. Represented by the symbol ETH, it has a block time of 14 to 15 seconds. It is based on PoW using the Ethash algorithm. The circulation limit is suggested to be around 120 million coins.
Ripple is a cryptocurrency backed by a company by the name of Ripple, which is a system of Real-Time Gross Settlements (RTGS). It is denoted by the symbol XRP. It uses the Ripple Protocol Consensus Algorithm (RPCA), which is applied every few seconds by all the nodes in the network to maintain the agreement of the network. The organization backing Ripple plans to create no more than 100 billion ripples. As per the plan, half of those will be released for circulation, and the other half will be retained by the company.
On August 1, 2017, the community of Bitcoin developers went ahead and split the blockchain into two. This kind of split is known as a fork and is introduced to add new features to the blockchain. Bitcoin Cash is a result of the first hard fork to split Bitcoins. Bitcoin Cash has a relatively lower transaction fee, as well as a lower mining difficulty, compared to Bitcoin.
There are various ways in which Altcoins or Bitcoins can be obtained; if the coin supports mining, primarily the coins that work on PoW algorithms fall into this category, those coins can be obtained by a mining process. Coins such as Bitcoin, Litecoin, Ether, Bitcoin Cash, Monero, and others support mining. As discussed earlier, there are various exchanges where cryptocurrencies are exchanged, for fiat currency or even other cryptocurrency; this is another widely used method.
Mining is a process by which new blocks are added to the blockchain. Transactions are validated by the mining process by mining nodes and kept in the blocks, then these blocks are added to the blockchain. This is a highly resource-intensive process to ensure the required resources are spent by the miners for the block to be accepted.
Each cryptocurrency has a different mining difficulty, which is defined by the block height, the number of miners mining that cryptocurrency, the total transactions of the currency, and block time.
The block creation time for Bitcoin is 10 minutes. Miners get rewards when new blocks are created and are also paid the transaction fees considering the blocks contain the transactions that are included in the block mined. The block time is maintained at 10 minutes, which makes sure blocks are created at a fixed rate. The reward for the mining of blocks is halved every 210,000 blocks, roughly every four years. When Bitcoins were initially introduced, the block reward was 50 Bitcoins, which was halved in 2012 to 25 Bitcoins. In July 2016, the reward for mining each block was again halved to 12.5 coins. The next date for reducing the block reward is July 2020, which will reduce the coin reward to roughly 6.25 coins.
Due to the halving event, the total number of Bitcoins in existence will not be more than 21 million. The decreasing supply was chosen as it is similar to other commodities such as gold and silver. The last Bitcoin will be mined in 2140, and no new mining reward will be present after that, although the transaction fees would still be awarded for generations of blocks containing transaction fees.
This is a measure of the mining hash rate; the Bitcoin network has a global block difficulty. Valid blocks need to have a hash rate below this target. The difficulty in the network changes every 2,016 blocks. Other coins have their own difficulty or have implemented a modified version of the Bitcoin difficulty algorithm. Here is the difficulty adjustment formula for Bitcoin:
difficulty = difficulty_1_target/current_target
difficulty_1_target = 0x00000000FFFF0000000000000000000000000000000000000000000000000000
Here, difficulty_1_target is the maximum target used by SHA256, which is the highest possible target and is the first difficulty used for mining the genesis block of Bitcoin.
The reason for difficulty regulation in Bitcoin is that 2,016 blocks take around two weeks since block time is maintained at around 10 minutes. If it takes longer than two weeks to mine 2,016 blocks, then there is a need to decrease the difficulty, and if it takes less than two weeks to mine 2,016 blocks, then the difficulty should be increased.
Difficulty of genesis block of Bitcoin, here is the block header:
$ Bitcoin-cli getblockhash 0
000000000019d6689c085ae165831e934ff763ae46a2a6c172b3f1b60a8ce26f

$ Bitcoin-cli getblockheader 000000000019d6689c085ae165831e934ff763ae46a2a6c172b3f1b60a8ce26f
{
 ...
 "height": 0,
 ...
 "bits": "1d00ffff",
 "difficulty": 1,
 ...
}
As you can see, the genesis block has 1 as difficulty and 1d00ffff bits, which is the target hash value. Here is the code for this re-targeting difficulty algorithm in the pow.cpp file in the Bitcoin source:
 // Go back by what we want to be 14 days worth of blocks
 int nHeightFirst = pindexLast->nHeight - (params.DifficultyAdjustmentInterval()-1);
 assert(nHeightFirst >= 0);
 const CBlockIndex* pindexFirst = pindexLast->GetAncestor(nHeightFirst);
 assert(pindexFirst);
Here is the limit adjustment step in the same pow.ccp file of the Bitcoin source code:
 // Limit adjustment step
 int64_t nActualTimespan = pindexLast->GetBlockTime() - nFirstBlockTime;
 if (nActualTimespan < params.nPowTargetTimespan/4)
 nActualTimespan = params.nPowTargetTimespan/4;
 if (nActualTimespan > params.nPowTargetTimespan*4)
 nActualTimespan = params.nPowTargetTimespan*4;


   // Retarget
    const arith_uint256 bnPowLimit = UintToArith256(params.powLimit);
    arith_uint256 bnNew;
    bnNew.SetCompact(pindexLast->nBits);
    bnNew *= nActualTimespan;
    bnNew /= params.nPowTargetTimespan;

    if (bnNew > bnPowLimit)
        bnNew = bnPowLimit;
The re-targeting adjustment should be less than a factor of 4 in a single cycle of two weeks. If the difficulty adjustment is more than a factor of 4, it won't be adjusted by the maximum factor. Further adjustment should be achieved in the next two weeks of the cycle. Hence, very large and sudden hashing rate changes take many two-week cycles to balance in terms of difficulty.
Due to the introduction of ASICs, the hashing power increased exponentially, following which the difficulty of mining increased.
Due to the huge mining hash rate, people from the mining community came together to mine blocks together and decided to split the reward depending on how much hash power each was contributing to the pool. In a mining pool, everyone gets a share of the block reward directly proportional to the resources invested. Many mining pools exist nowadays. Some of the popular mining pools are these:
The following diagram shows the percentage of Bitcoins mined by the various Bitcoin mining pools between June 1 and June 2, 2018:
Apart from the ones we have mentioned, there are many mining pools that actively mine and keep on adding more and more features in the race to become the largest mining pool.
As we have discussed, various Altcoins have different algorithms; each of them has corrections and improvements to increase difficulty and avoid centralization. Currently, apart from Bitcoin mining, various other Altcoins are also mined regularly. Almost every mining pool right now supports Altcoins; some of the most popularly mined Altcoins as of June, 2018, are Ether, Litecoin, Zcash, Dash, Bitcoin Cash, Ethereum classic, and so on.
There are various discussions about mining profitability; due to the very high difficulty of Bitcoin mining, other alt currencies are becoming popular options for miners, as well as mining pools. Nowadays, ASIC miners are also coming up for Altcoins such as Litecoins, Cash, Ether, and so on.
Due to major GPU and resource requirements by Bitcoin and other SHA-256 based coins, this lot of CPU-friendly mining coins were created based on script.
There are many exchanges where users can buy or sell Bitcoins and other Altcoins. Exchanges can deal in fiat money, Bitcoin, Altcoins, commodities, or all of these. These exchanges usually charge a small fee for the trade done on their platform. Some of the popular Cryptocurrency exchanges are these:
Apart from the ones mentioned here, there are many other popular exchanges, some focusing primarily on fiat to cryptocurrency purchase, and others working on only cryptocurrencies. Some other prominent exchanges are Upbit, Bittrex, Lbank, Bit-Z, HitBTC, coinbase, BCEX, GDAX, Gate.io, Bitstamp, EXX, OEX, Poloniex, Kucoin, Cobinhood, Yobit and so on.
A cryptocurrency wallet is a collection of private keys to manage those keys and transfer them from one wallet to another. Bitcoin wallets are compared on the basis of security, anonymity, ease of use, features, platforms available, and coins supported. Usually, all of the cryptocurrencies have their own official wallets, but other third-party wallets can also be chosen based on requirements. Some of the prominent cryptocurrency wallets are these:
Here is a list of some more cryptocurrency wallets which offer multi-currency support:
Apart from the third-party wallets we have mentioned, there are many other wallets offering different features. It should be noted that some wallets charge higher transaction fees, compared to actual network fees, to cover their development cost.
The following screenshot shows the Jaxx cryptocurrency wallet:
In this chapter, we discussed alternative currency and the difference between a coin and a token. We discussed in detail the various platforms, based on which platforms can be created. Furthermore, we discussed various alternatives that Altcoins provide over Bitcoins. We read in detail about currencies such as Litecoin, Ether, Ripple, and Bitcoin Cash.
We also discussed acquiring a cryptocurrency and the various ways to do so. We read about mining a cryptocurrency and the differences between Bitcoin and Altcoins, in terms of mining. We discussed exchanges and how we can store Altcoins other than Bitcoins in wallets. We also learned about the difficulty of re-targeting an algorithm in Bitcoin.
The concept of consensus is straightforward: consensus is when the network agrees on what information stored in the network is true and should be kept, and what is not true and should not be kept. For Bitcoin, achieving consensus is a simple matter of coming to agreement on the set to send and receive of Bitcoin across the network. For other networks, achieving consensus would also involve coming to an agreement on the final state of smart contracts, medical records, or any other network information stored on the blockchain.
Consensus algorithms have been the subject of research for decades. The consensus algorithms for distributed systems have to be resilient to multiple types of failures and issues, such as corrupt messages, parts of a network connecting and disconnecting, delays, and so on. In financial systems, and especially in blockchains, there is a risk of selfish and malicious actors in the system seeking profit. For each algorithm in a blockchain network, achieving consensus ensures that all nodes in the network agree upon a consistent global state of the blockchain. Any distributed consensus protocol has three critical properties:
As it happens, a famous paper by Fischer, Lynch, and Paterson stated that it's impossible for all three to be true in the same asynchronous distributed system. Hence, any and all blockchain designs must make trade-offs between these properties. These trade-offs are typically between safety and liveness, as fault tolerance is generally seen as a must-have for a globally distributed network.
In blockchain systems, there are currently four primary methods of achieving consensus. They are as follows:
These approaches will each be covered in turn in this chapter.
Practical Byzantine fault tolerance (PBFT) algorithm. Many algorithms are called Byzantine fault tolerant. The name comes from the allegory that presented the original problem.
Imagine an ancient Byzantine army moving to capture a city. The idea is to attack from all sides. Once the generals of the army reach the city, they must agree on when and how to attack. The difficulty is in how to agree. The generals can communicate only by messenger, but the messengers could be captured by the enemy, and there is the additional fear that one or more of the generals or their commanders are traitors.
The generals need a method to ensure that all the loyal generals agree on the same plan and that a small number of possible traitors cannot cause the mission to fail.
The loyal generals will all do what the method says they will do, but the traitors might do anything. How can the generals create a method that ensures that, as long as most of them are loyal, their plans will succeed?
This allegory is also sometimes called the Chinese general's problem, as well as a few other names, but the issue remains the same: how can different parties securely communicate and reach an agreement about something when communication channels may not be secure, and when there may even be traitors in their midst.
In the case of blockchain, the generals in the story are the computers that are participating in the distributed network running the blockchain. The messengers represent the digital network that these machines are running on and the message protocols used by those machines. The goal is for the good computers or generals to decide which information on the network is valid while rooting out bad actors and preventing false information from being recorded on the blockchain.
The loyal generals in the story represent the operators of honest nodes that are interested in ensuring the integrity of the blockchain and the applications based on it, and that is therefore invested in making sure that only correct data is recorded. The traitors represent the many bad actors of the world who would love to falsify data (especially financial data) for personal gain or on behalf of some other antagonistic party. The motivations of the bad actors could be varied, from spending Bitcoin they do not truly possess or getting out of contractual obligations, or even trying to destroy the network as a form of currency control by a hostile government.
To understand PBFT and all the other consensus algorithms that come afterward, it's important to first define what a Byzantine fault is. A Byzantine fault is any event or result that would disrupt the consistency of a distributed system, such as the following:
If any of these events happen, a Byzantine fault is said to have occurred. A Byzantine fault tolerant system is, therefore, able to handle some level of inconsistent input but still provide a correct result at the end. The key here is that such systems are fault tolerant, not fault immune. All fault tolerant systems can only tolerate so much before their tolerance is exhausted and the system fails in some way.
Hyperledger is the primary blockchain that uses PBFT. Here is how PBFT works in Hyperledger. Each validating node (a computer running the blockchain software and working to maintain consistency) keeps a copy of the internal state of the blockchain. When a node receives a message, it uses the message in conjunction with their internal state to run a computation on what the new state should be. Then the node decides what it should do with the message in question: treat it as valid, ignore it, or take another course of action. Once a node has reached its decision about the new message, that node shares that decision with all the other nodes in the system. A consensus decision is determined based on the total decisions submitted by all nodes:
This process is repeated for each block. The advantage of PBFT is that it is very fast and scales relatively well. The downside is that the participants must be known—not just anyone can join the network.
The first consensus algorithm used in blockchains was Bitcoin's proof-of-work (PoW). Proof-of-work fundamentally functions by exploiting a feature of certain cryptographic functions: there are mathematical problems that are very hard to solve, but once they are solved, they are very easy to check. As discussed before, one of these problems is hashing: it's very easy to take data and compute a hash from it, but extremely difficult to take a hash and discover the input data. PoW is most notably used by Bitcoin, Litecoin, and Ethereum.
PoW has the following characteristics:
The proof-of-work algorithm maintains network integrity as long as no group of actors controls more than 50% of the overall network computing power. The possibility of bad actors being able to control the chain is called the 51% attack. If a single group ever controls more than half the network power, they can control the network and network transactions by halting payments or even doubling spending. The attacking group would be able to prevent new transactions from being confirmed (halting payments for users as they see fit) and even reverse transactions that happened after they had started controlling the network.
The PoW algorithm starts by taking the longest chain. In Bitcoin, there are multiple ways blocks can be finalized (depending on the included transactions). Thus, there may be multiple available "solved" chains that could be selected as a base by the Bitcoin nodes. As part of the algorithm, Bitcoin takes the chain that is the longest and thus has had the most computing power applied to it. The following diagram illustrates a PoW chain:
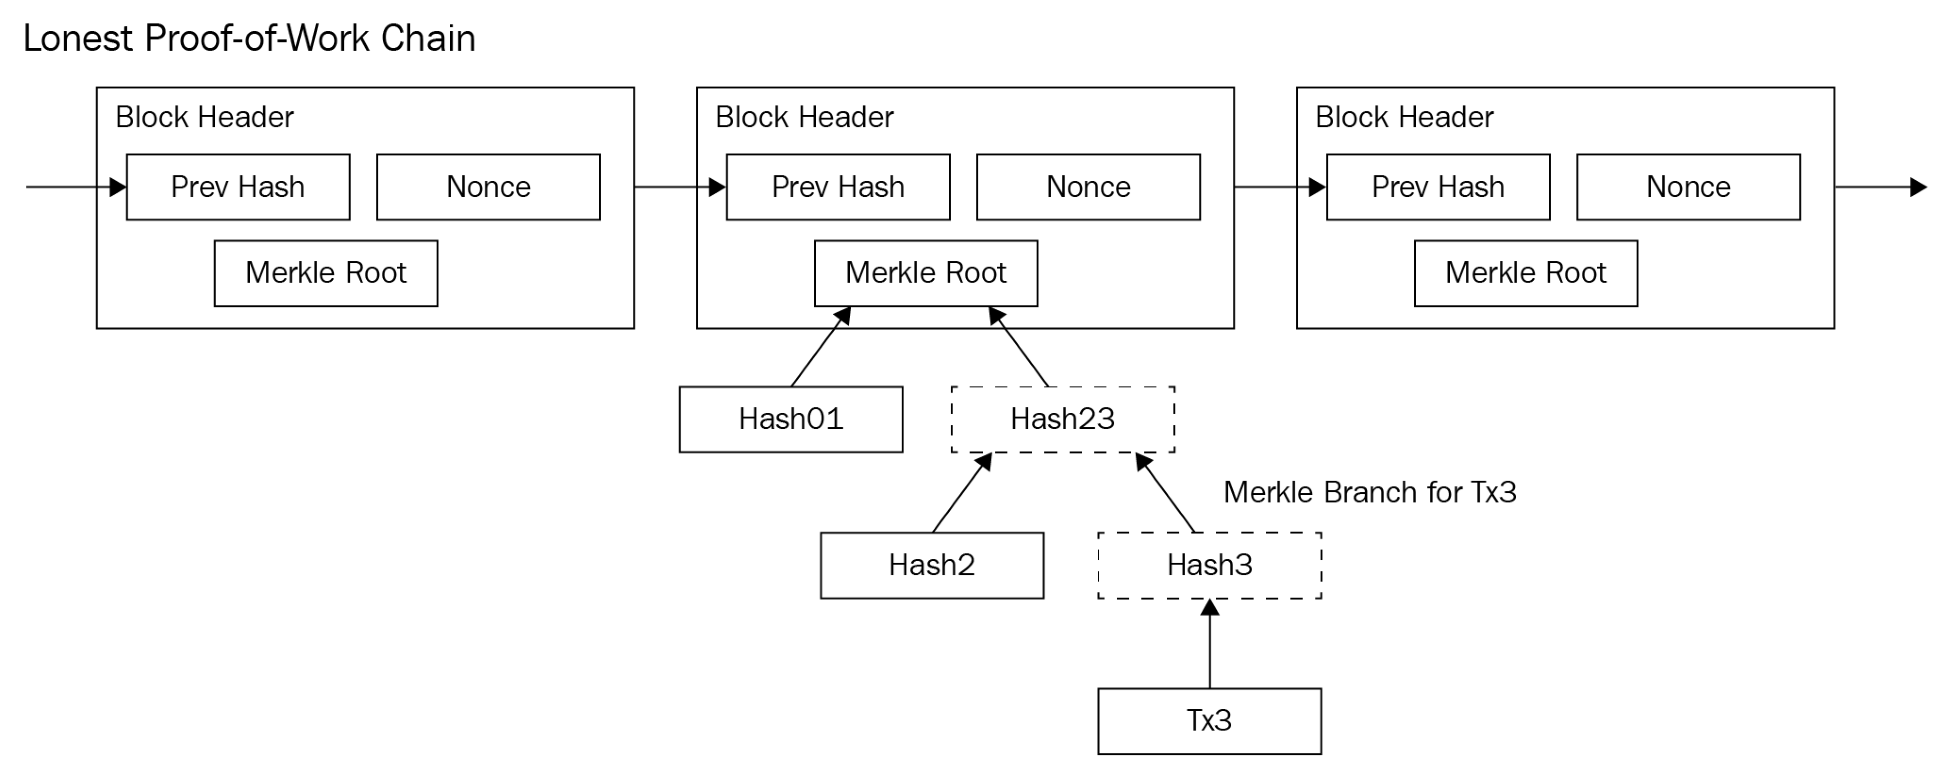
The difficult puzzle in Bitcoin is to find an input that, when added to the prior block hash and the list of transactions, produces a hash that starts with a certain number of zeros.
Typically, the input to the function is the Merkle root of all transactions and the prior block hash. To simplify this for illustrative purposes, imagine that we have a simple input, such as I love Blockchains. Let's also assume that the system has the easiest possible difficulty: a single zero at the start of the hash. The SHA-256 hash of I love Blockchains is as follows:
ef34c91b820b3faf29104f9d8179bfe2c236d1e8252cb3ea6d8cb7c897bb7d96.
As you can see, it does not begin with 0. To solve the block for this input, we need to find a string (called a nonce) that we can add to this string so that hashing the combination (nonce + I love Blockchains) results in a string starting with 0. As it turns out, we can only do this through testing. For instance, if we add 1 to the beginning, we get 1I love Blockchains, and the hash is as follows:
b2fc53e03ea88d69ebd763e4fccad88bdb1d7f2fd35588a35ec6498155c702ed
No luck. What about 2 and 3? These will also fail to solve the puzzle. As it happens, 4I love Blockchains has a hash that starts with 0:
0fd29b2154f84e157d9f816fa8a774121bca253779acb07b07cfbf501825415d
It only took four tries, but this is a very low difficulty. Each additional zero doubles the challenge of finding a proper input that will compute a proper hash. As of writing, a valid Bitcoin block requires 18 zeros to be valid.
This process of trying to find the nonce that results in a proper hash is called mining. Every computer mining a PoW chain is competing to see who can find a proper nonce first. The winner gets to create the next block in the chain and is rewarded in tokens. For more details, see Chapter 17, Mining.
The advantage of PoW is that anyone can join a PoW network, and it is well established as a functional consensus mechanism. The primary downsides of PoW networks are slow speeds and financial costs: running all the computers to do these computations is very expensive, and the output is not put to any real productive use. This is considered bad for the environment and can result in increased energy prices wherever large amounts of blockchain mining are done. In some areas, blockchain mining has been banned for this reason.
As a result of these downsides, proof-of-stake (PoS) was invented.
PoS has the same objectives as PoW to secure the network against attack and to allow consensus to occur in an open network. The first digital currency to use this method was Peercoin, and was followed by many others, such as NXT, Dash, PIVX, and so on. In PoW networks, solving the puzzle is what determines which node gets to create the next block in the chain. In PoS networks, blocks are said to be forged instead of mined, as they are in proof-of-work blockchains. In PoS chains, the validators get rewarded by getting paid the transaction fees for each block, and sometimes in additional coins created automatically each time a block is created. In PoS chains, the chance to be the creator of the next block is determined by the amount of investment a node has in the network.
Have a look at the following example:
There are five nodes in a PoS network. They have the following balances:
The total number of tokens is 35,000 coins. Assuming that each node is staking 100% of their coins, every block and the nodes they contain will have the following likelihoods of being the next block signer:
It should be pretty obvious that, if a single node ever controls the majority of tokens (or even a large fraction), then they will have substantial control over the network. In this case, node #5 would end up creating more than half the blocks. Moreover, because node #5 would be regularly signing blocks, it would also get the majority of the transaction fees and new coins that are created. In a way, PoS rewards validators with interest on their investment in the form of additional tokens. One criticism of PoS networks is that the rich get richer, which can lead to increasing network centralization and control.
One of the issues in PoS systems is the threat of nothing-at-stake attacks. In a nothing-at-stake attack, a validator actually creates multiple blocks in order to spend tokens multiple times. Because of the low cost of creating blocks in PoS systems, there is no financial incentive to the network not to approve all the transactions, causing consensus to break down.
For instance, imagine a bad actor, Cain, who only has 100 tokens. He decides to try and cheat, and sends two messages to the network: one in which he sends his 100 tokens to Sanjay, and another where he sends his 100 tokens to Eliza. The network should accept either transaction, but not accept both. Typically, the nodes would have to come to consensus about which transaction is valid or reject both of them. However, if a validator is cooperating with Cain (or is run by Cain himself), then it turns out it is to their financial advantage to approve both blocks.
In the following diagram, expected value stands for the EV. It shows that if a validator accepts both blocks, it can effectively double spend without penalty:

To avoid this problem, PoS systems have introduced various countermeasures, such as staking deposits. In the case of a blockchain fork or a double-spend attack, the validators that participate risk losing their tokens. Through financial penalties and loss of staked tokens, the incentive to double spend and validate all blocks is thought to be reduced or eliminated.
There are numerous variations on the basic PoS approach. Each variation will have different requirements, such as the minimum balance needed to have a stake, the potential penalties for bad behavior, the rights and abilities of the stakeholders of the network, and modifiers, such as how long an account needs to have had a staked balance in order to be counted.
DPoS is related to PoS consensus, but with some critical differences. This new system is the creation of Dan Larimer of Bitshares, Steemit, and currently EOS. Both these networks and Lisk (another commonly used blockchain) are currently the only major blockchains that use this approach. In DPoS, the holders of tokens are not the ones doing block validation. Instead, they can use their tokens to elect a node to validate on their behalf—their delegate (also called a validator). It is this delegate/validator that helps operate the network. The number of available validator slots tends to be locked to a specific number, typically 21. In order to become a delegate, the owner of the node must convince the other users of the network to trust them to secure the network by delegating their share of the overall tokens on the network to them. Essentially, each token on the network acts as a vote, and the top vote holders are allowed to operate the network. Currently, only Bitshares, Steemit, EOS, and Lisk are the major blockchains that use this approach.
In DPoS, each delegate has a limited, designated time in which to publish a new block. If a delegate continually misses their block creation times or publishes invalid transactions, the token holders using their stake can vote them out and replace them with a better delegate. The following diagram shows what this structure looks as follows:
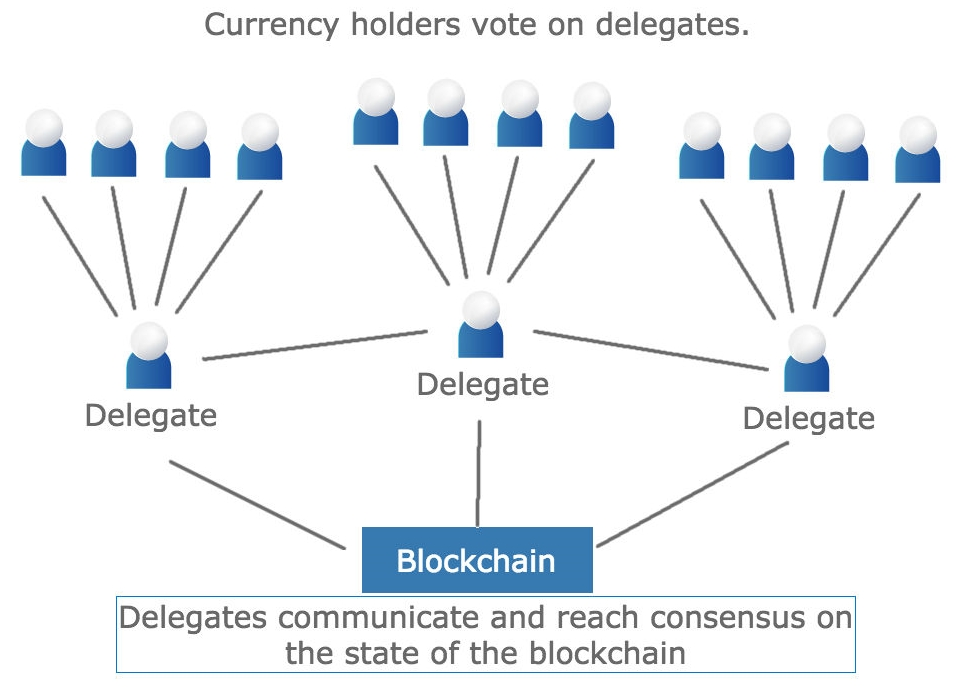
The primary criticism of DPoS is that it is partially centralized and has no real immediate financial penalty for betraying the network. The consequence of violating network rules is to be voted out by the token holders. It is thought that the cost to reputation and the loss from campaigning for delegated shares will outweigh the financial benefit of trying to negatively influence the network. By only having a small number of delegate slots, it is easier for the token holders to pay attention to the behavior of individual validator nodes.
Tendermint uses a custom consensus engine, designed as part of a doctoral thesis by Jae Kwon. It is similar to DPoS in that participants in the network can delegate their voting power to a validating account. However, to do so, they must bond or lock their tokens. To do this, they must issue a special bonding transaction in which their coins are locked to a validating node. In the event that their delegate misbehaves, both the delegate and the accounts lending their coins forfeit some portion of their bonded tokens. To release their tokens, another special unbonding transaction must be posted to the network, and such withdrawals are subject to a long delay.
Let's look at how these transactions happen. The following diagram is from the Tendermint documentation:
 .
.Let's look at the preceding figure in more detail. Delegates signal the next block by signing votes. There are three types of votes: prevotes, precommits, and commits. Each block has a special validator called a proposer. The proposer goes first, suggesting a valid block state based on a prior locked block. This proposal is shared peer-to-peer among the other validators, and if 2/3 or more vote in agreement with the locked block (in the prevote stage) then they move to the next stage: precommit. In the precommit stage, again, if 2/3 agree with the prevote condition, they will signal that they are ready to commit. Finally, the actual commitment of the block takes place: the node must have received the block, and it must have received 2/3 valid votes to precommit.
If this sequence of 2/3 votes seems unusual, it is because of the nature of asynchronous networks, where the validators may receive blocks and votes at different times. This sequence, and the edge cases that are handled when the 2/3 majority is not reached allow for effective and fast consensus on unreliable networks.
Proof-of-authority (PoA) networks are used only when all blockchain participants are known. In proof-of-authority, each participant is known and registered with the blockchain. Such a blockchain is called a permissioned chain, as only computers that are part of this approved list of authorities are able to forge blocks. It is critical, therefore, that none of the authority computers is compromised, and each operator must take pains to ensure the integrity of their validator. This approach was originally shared by Gavin Wood of Parity Technologies as a different way of running an Ethereum-based blockchain.
The three main conditions that must be fulfilled for a validator to be established are as follows:
Once an authority has been established, the right to forge new blocks might be granted by adding the authority to the list of valid validators for the blockchain.
While PoA is mostly used in private chains, it can be used in public chains as well. Two public Ethereum test networks, Rinkleby and Kovan, are public blockchain networks that use PoA as their consensus mechanism.
The obvious downside of PoA is that the identity of each validator operator must be known and trusted, and the penalties for abusing that trust must be real. For global blockchains, this may not be preferred, as one of the appeals of blockchain technology is the ability to anonymously exchange value.
The Hyperledger Sawtooth project introduced a new consensus mechanism called proof-of-elapsed-time or PoET. Hyperledger deals mostly with permissioned blockchains, chains in which only a specified number of participants are allowed on the network, similar to PoA chains.
The basic approach is simple:
There are two things that we must be able to do for this to work. First, we must be able to verify that the waiting time for all participants was actually random, or else a simple attack would be to pretend to wait a random time and then just immediately create a new block. Second, it must be verifiable that not only was the length of time chosen random, but that the node actually waited the full period of time before acting.
The solution to these issues comes from Intel (who created the PoET algorithm), and relies on special CPU instructions to ensure that only trusted code is run. By forcing trusted code to be in charge of handling block timing, the system ensures that the lottery is fair.
At this point, you should have a solid foundation in the different mechanisms that blockchains use to reach consensus. Each consensus algorithm makes certain trade-offs between speed, availability, consistency, and fault tolerance. The most common consensus mechanisms are still PoW and PoS, but blockchain development continues at a very rapid pace, and new and improved approaches are likely to be developed. Improvements to consensus algorithms will improve blockchain scalability and reliability, and the scope of the potential applications for the technology.
Privacy is discussed very frequently in the tech world—especially now that social media executives are grudgingly suiting up and being paraded in front of US Senate committees.
At the same time, as blockchain advocates are happy to see this technology advancing human welfare and decentralizing money transfers, it's natural to wonder whether a user can actually have any privacy, what with all transactions being public on the chain.
In this chapter, the following topics will be covered:
Privacy is sorely needed in the cryptocurrency ecosystem. Cryptocurrencies could help raise people out of poverty in developing countries and boost economies with increased money transfers—or they could be a way for oppressive regimes to track down every transaction and have more opportunities to accuse innocents of wrongdoing.
The appeal of blockchain technology to people with antiauthoritarian streaks is obvious. Many in the US have a bone to pick with the banking system. In the thirties, the Federal Housing Administration, which insures mortgages, drew maps of areas in which it would do business, excluding poor and minority communities. This practice continued for a generation, and it was devastating to the core of many American cities, destroying hundreds of billions of dollars in wealth:
More recently, the 2008 global financial crisis resulted from speculative bets on future derivatives and dodgy lending practices, which drove real-estate prices sky high (and then very low).
Some regulation was passed in response to this malfeasance, but unlike the savings and loan crisis in the 1980s, few faced criminal penalties. Since then, numerous candidates for public office have decried the perceived unfairness in the treatment of the bankers (who were bailed out) relative to others said to have committed crimes against society, such as low-level drug offenders.
Less politically, it's not difficult to find widespread dissatisfaction with the available solutions for banking and payments. Anyone who lives abroad for any length of time will have some difficulty getting access to their money. Anyone who travels will have their credit or debit card locked up with a fraud alert. How about setting up banking for a new business without a domestic office? Good luck. For added difficulty, try sending an international wire transfer from that new business bank account.
It's easy to say that banking hasn't caught up with the times, but that's not quite right. Establishing a business bank account is harder than it has been in the past. As a consequence, some startups have chosen to go unbanked, including some with which several of this book's authors were involved. This approach provides some advantages as far as administrative expense is concerned (no bank fees, no endless declarations and disclosures, no locking out users of payment cards because of fraud alerts). It also carries risk, and as we'll see in subsequent sections, going unbanked will require some development to become a viable alternative.
It seems natural to consider a purely crypto company as the answer to the ills of banking—why not just run the entity with nothing but Bitcoin or Ethereum? As we'll see, most of the solutions involve unacceptable levels of uncertainty.
Access to fiat currency to pay certain expenses is important—most of a business' ultimate expenses are not going to be based on the price of Bitcoin or Ethereum, but the price of one or both of those currencies in US dollars or euros. Until you can pay for power and food in cryptocurrency, it's quite unlikely that the price of cryptocurrency in US dollars or euros will become irrelevant.
Some have heralded the development of a so-called stablecoin as the solution that would fix this problem. Various mechanisms can be used to ensure buying pressure or selling pressure in an asset, such as the backer buying back tokens when the value is below what was promised. Somewhat more simply, however, a token pegged to a currency issued by a sovereign government could be the solution.
A peg is a specific kind of fixed exchange rate system, in which the issuer of a currency asserts that their currency has a value based on that of another currency—and ideally is willing to exchange it for the same.
Economists tend not to speak of pegs favorably. The so-called tequila crisis in Mexico in 1994 is a famous example of a currency being overvalued. The Mexican government had issued bonds in pesos, which were redeemable in US dollars, at a valuation of about 3 pesos per dollar. It is doubtful that anyone believed the Mexican peso was worth that much. Eventually, short selling (borrowing the peso and selling it for dollars) and capital flight (investors unloading their peso-denominated assets) led to a precipitous drop in the value of the peso, and then to a severe recession.
Mexico's central bank attempted to control inflation by raising interest rates. Unlike the US and continental Europe, many mortgages in Mexico were adjustable rate, which meant that interest as a proportion of a homeowner's payment went up drastically, leading in many cases to default and foreclosure.
A handful of countries, such as Cambodia, do continue to use pegs in spite of their downsides, but it's difficult to find many other things so widely regarded as a bad idea.
Attempts to peg cryptocurrency to US dollars invariably raise money in cryptocurrency and then use it to buy sovereign debt. The assertion is that one unit of the token is equal to a dollar, or some fraction of a dollar. The tokens are backed by the debt held by the issuer, and in theory, the issuer is able to make money on the float.
If the issuer tries to minimize risk and only buys treasury bills at 1-3%—well, 1-3% of a few billion dollars is probably enough to pay your staff. The business model is pretty straightforward. PayPal famously also attempted to go fee-free and pay all of their expenses out of the float—and didn't succeed.
The most famous attempt at a stablecoin is Tether (Ticker: USDT), the price of which hovers around $1. Tether retained Friedman LLP, a New York accounting firm, and promised regular audits. These audits didn't materialize, and Friedman (likely owing to respect for the interests of the principal) has not made any statements concerning the validity of Tether's claim that each unit is backed by cash or a cash equivalent.
A peg of this nature would be a little odd in the cryptospace; ultimately underlying this sort of transaction is trust. It is almost antithetical to the idea of a trustless, decentralized ecosystem; but an alternative exists.
It is likely that the exchange-rate risk relative to the dollar or euro will be managed in the future not by a stablecoin but instead by financial options—derivatives giving the user the option, but not the obligation, to buy or sell an asset. Users looking to manage risk will pay a slight premium to buy protective puts against their cryptocurrency positions.
A put is the right to sell an asset at a specific price. A protective put is a put purchased against an asset you already own, for less than it's worth now. In the event that the price of an asset drops below the strike price, which is the price at which an option can be executed, the option can be used to secure a greater price for the underlying asset.
The problem with existing exchanges, where options are concerned, is that there is no mechanism to enforce the option in the event that something goes wrong. Commodities were traditionally considered the most risky sort of investment. You could trade at 20:1 leverage, and if the market moved against you would have only 5% margin call! Either put in more money or lose all of it.
At least in the case of commodities, however, if a producer fails to deliver their contract of wheat or soybeans or oil, the exchange is liable. Options will need to be enforceable by escrow (the exchange holds the crypto against which the option is written) or another mechanism. Buying an option against Ethereum held in someone else's local wallet would have what is known as counterparty risk, or the risk that the other party not live up to their expectations in the event that the market moves against them.
Other contracts, such as shorts and futures, also have counterparty risk, and it might be that, in the future, rather than depending on a Tether or a bit USD to handle our fiat hedges, we have regulated exchanges with crypto or cash in escrow ready to pay out if things don't go our way.
The universe tends towards maximum irony—people want to say damn the man and get away from sovereign currency, but most of the same people agree that government has a legitimate interest in protecting people against fraud and violence.
The trustless nature of cryptocurrency fails at the point of exchanges. If you want to exchange one cryptocurrency for another, that transaction frequently requires you to trust the exchange. Likewise, if you want another party to follow through on a transaction on which they might lose money, the other party either needs to be known to you so you can pursue recourse in the courts, or the law needs to put the onus on the exchange to pay out the claim.
The most likely outcome is that in the US, the SEC or CFTC will begin licensing exchanges, and exchanges will have certain liquidity requirements. This will make unbanked companies a less risky proposition.
We've established a company without a bank account as a possibility (and a legal one—there's no specific requirement in many jurisdictions for a legal entity to have a bank account). But what about an organization without a legal structure, or with a highly unconventional one?
Anyone considering investing in an organization or asset without a legal entity should be very careful, because the assumption is that your personal assets are at risk. In general, people use entities in order to protect their personal assets and attain some sort of organizational or tax benefit.
Without an entity, an organization may not have limited liability, and the law may choose to treat the owners as partners. As far as liability is concerned, partnership without an entity is just about the worst treatment you can ask for. This holds true in both common law jurisdictions (which have LLCs, LLPs, corporations, trusts, foundations, and other forms) and in civil law jurisdictions (which have analogous forms such as the Luxembourgish SARL, the German GmbH, and the French SA).
Under US law, members of a partnership can be jointly and severally liable for transgressions committed by the partnership. People involved in a crypto entity, even a little bit, don't have the benefit of a corporation or other entity that could take the hit and fall over dead if someone else had a claim against it.
Limited liability is just that—your liability is limited to your investment and organizations usually distinguish between people who are passively involved in an entity (limited partners or shareholders) and those who are actively involved (general partners or officers).
Limited liability doesn't protect members of an organization against criminal liability. If the officer of a corporation commits fraud either against a shareholder or against the public, limited liability doesn't protect them.
Given that extreme caution should be exercised in considering whether the operation of any crypto project is legal, regulatory action so far has mainly been concerned with fraudulent raises fleecing investors rather than investors being involved in an organization that fleeced the public. This does not mean the investors are safe.
Consideration should be given to whether the management team is identifiable (for instance, can you at least look at someone's LinkedIn and confirm that they exist?), and whether the entity is identifiable (can you find the jurisdiction the company claims to be registered in so I can check that it really exists?).
The Decentralized Autonomous Organization (DAO) was an attempt at an unbanked entity, though not unincorporated. It was organized as a Swiss SARL, and raised approximately 11.5 million Ethereum (ETH). The DAO was to be a fund that ran on smart contracts, and would make loans to entities that would use the funds in productive ways.
The reasoning behind the DAO was that investors would vote on all decisions, and with governance done entirely with smart contracts for the benefit of investors, it would defeat any perverse incentive that a director or manager might have. All decisions would be in the interest of investors.
A series of vulnerabilities in one of the DAO's smart contracts allowed malicious hackers to steal $50 million in ETH, or a third of the DAO's funds.
The DAO was delisted from major exchanges by the end of 2016, and that was the end of it. In order to recover the funds, the Ethereum blockchain went through a controversial hard fork.
A faction of the Ethereum community was opposed to refunding the funds from the DAO, claiming that a hard fork violated the principle of immutability and the notion that code is law—that users should be made to abide by. This led to the creation of Ethereum Classic.
About a year after delisting, the SEC stated that the raise was probably in violation of US securities law, although it was declining to take action against the DAO. No one suffered criminal penalties.
This was likely the first instance in which professional managers were removed from the process of running an organization. Disintermediating corporate boards and directors and allowing stakeholders to have a say directly seems to be a good idea, at least on the face of it. Blockchain provides a variety of consensus mechanisms, such as proof of stake and delegated proof of stake (discussed in greater detail in the previous chapter), that are natural fits for this sort of problem, as well as the limitless possibilities allowed by smart contracts.
The possibility of running an organization by aid of a smart contract remains. It is likely that the organization would still need one or more directors to carry out the directives of users and otherwise carry out the duties of running an organization. The DAO claimed zero employees, and that may have been true to a point. Given that it's effectively gone, it actually is zero now.
For a decentralized asset organization to be legal, a good start would be for it to have a legal entity, as suggested previously—something to provide limited liability to investors. For it to raise money, it would be a good start for it to admit that it's a securities offering, instead of claiming to be a utility token. The offering would then have to register as a security with the appropriate regulatory authority, or file for an exemption.
Much of the legal trouble with offerings such as the DAO perhaps could have been avoided by adhering to forms—there's nothing inherently wrong with a token as a security, except that to start, we should probably admit that most of the ones that people are buying speculatively are, in fact, securities.
Doing an issue under Rule 506(c) in the US allows unlimited fundraising among accredited investors, and general solicitation is allowed—you can advertise your offering. If you want to raise money among investors other than accredited investors, you can do that with a different exemption, the Reg A+, albeit with certain limitations and substantially more cost.
The core concept of users voting on corporate governance is a good one. The notion that organizations such as the DAO formed legal entities only as compatibility measures with real life speaks to the enormous arrogance of certain elements of the crypto community.
Corporations exist for the benefit of shareholders. In practice, layers of management and pervasive rent-seeking suck tons of productivity out of organizations. The thinking that eliminating people from an organization would fix its problems, however, is fundamentally flawed.
Algorithms are written by people. Smart contracts are written by people. True, an organization with zero employees has no payroll expense but if it's replaced by $50 million in oops-our-money-was-stolen expense, it's hard to say that that's an improvement.
Still, the basic concept of an organization truly run by stakeholders, where every deal is vetted by the people whose capital is supposed to be grown and protected—that really may work in some instances. Much has been written about the popular wisdom averaging out to be quite good.
In much the same way that actively managed mutual funds, net of all fees, tend to underperform index funds, professional managers of a fund that invests in a given asset might not earn their keep. A crypto real estate fund, in which the investors are primarily seasoned real estate investors who had previously been in syndication deals and so forth, would likely yield good results.
The value of blockchain in this instance is that stakeholders, running specialized software or clicking around a web interface, have a fast, consistent, verifiable way to participate in board elections or run the entire organization themselves.
We've discussed blockchain as a mechanism for stakeholders to have greater control over corporate governance. What could shareholders control?
Men like Benjamin Graham delighted in taking over corporations that didn't perform and forcing them to pay dividends. This is an example of shareholder activism. The corporation exists for your benefit—if it's not working for you, make it work for you.
Running a big cash surplus? Make it pay cash dividends.
Executive compensation out of control? Cut compensation, renegotiate, and fire, as the law allows.
Your corporation is a Radio Shack or a Blockbuster, woefully under-equipped to compete today? Liquidate it. Turn it into Ether.
Corporations with activist shareholders tend to outperform those that do not have them. If GE had had activist shareholders with good visibility into company finances, the CEO would not have had an opportunity to have an extra private jet follow his private jet in case his private jet broke down. (Yes, seriously.)
Institutional inertia and the slow death of capital seems less of a risk in an environment in which the shareholders have the option of pulling the entity off of life support at a moment's notice.
Shareholder activism is widely assumed to improve returns, and some evidence exists for this—but what if you have a highly technical business model and don't expect your investors to understand?
Suppose your business involves mortgage-backed securities, distressed debt, swaps, or other contrivances? Some of these involve fiendishly complicated financial models, and there's a real risk that the shareholders (or token holders) won't understand. What does that look like in this brisk, brutal environment? Could the stakeholders kill the entity prematurely?
Fortunately, the tokens need not be shares. No technical barrier exists that would prevent the tokens from being other securities.
A token could be a revshare (a form of debt that represents a share of the entity's revenue until some multiple of the principal is paid back), a note, a bond, or another interest-yielding instrument. The interest could be paid based on a price in fiat or a fixed rate in Ether or another common, fungible cryptocurrency.
It could even represent a share of revenue or profits from a specific asset, a future derivative providing a return from an underlying crypto portfolio, a hard asset portfolio, rents or royalties. At the time of writing, a firm called Swarmsales is currently preparing to create an asset that would take a percentage of the income from the sales of thousands of units of software sales by a large and growing decentralized, freelance sales staff. The expectation is that paying that staff with this instrument will give sales professionals a new source of income, replacing their base salaries and providing a source of income extending even beyond their term of employment. Swarmsales expects to be able to use this approach to create the largest B2B salesforce in the world.
This is what blockchain makes possible. Raises that would involve securities transfer agents, endless meetings, and very specialized, expensive staff can now be accomplished on the internet with a modest amount of technical and legal work and marketing budgets that would be laughable on Wall Street.
There remains a perception that Initial Coin Offerings (ICOs), and increasingly Security Token Offerings (STOs), are a simple, low-cost way to raise money. This may be true for the right team, but budgets have greatly grown. One project, called Financecoin, simply copy-pasted the README file from DogeCoin on BitcoinTalk and succeeded in raising over $4 million. Whether or not they did anything useful with the money is not known to the author, invoking again another problem with the space.
Those days are gone—it's now widely agreed that it costs between $200,000 and $500,000 to do an ICO or STO in this increasingly crowded and regulated space. It's not clear, though, that many of the good projects would have had a problem raising capital anyway.
The great majority of token sales are to support très chic tech projects, some of which would be as well suited to conventional fundraising. It's impossible to do an Initial Public Offering (IPO) or reg A+ without the assistance of an investment bank or brokerage, and those firms largely herd towards tech and healthcare. It's safe to say that blockchain hasn't improved access to capital for projects with strong teams with good concepts and previous startups under their belts.
Certainly DAOs are largely not of interest to investment banks; those remain solely within the purview of distributed teams doing ICOs or STOs.
Some projects with a social purpose have succeeded in raising money via conventional channels—Lemonade, an unconventional insurer organized as a New York B Corp, closed a very successful Series C last year. Benefit corporations seem to be the new darlings of mainstream venture capital firms, such as Andreessen Horowitz and Founders Fund.
This seems to be a good fit for blockchain as well—benefit corporations and charities similarly need cash but may not be suited to the multiple rounds of fundraising and eventual exit required of them by VC. Fidelity Charitable collected $22 million in Bitcoin and other cryptocurrencies in 2017, and that segment of charitable contributions is expected to continue to grow.
As a means of raising capital, blockchain has the potential to improve environmental impacts and long-standing disparities between the haves and the have-nots. An Australian firm called African Palm Corp is working towards launching a cryptocurrency with each unit backed by a metric ton of sustainable-source palm oil.
As this book goes to publication, the EU is preparing to ban the import of Indonesian and Malaysian palm oil—85% of the current supply. The means of farming palm oil causes habitat destruction on a massive scale. Conversely, this STO aims to purchase four million hectares of land on which palm trees already stand, potentially reducing unemployment in four West African countries on a massive scale.
Another project headed by the founder of a Haitian orphanage has the potential to improve tax collection and provide physical security for a great number of vulnerable people. The Caribean Crypto Commission is a project to create a coin employed by a sort of cryptoentity; governments would allow the formation of a crypto corporation with a greatly reduced tax rate in exchange for that entity having public financials. Recording that business' transactions publicly on a blockchain would allow the company to create verifiable balance sheets and income statements. An entity subject to a 15% tax rate would be an improvement over an entity that nominally has a 40% tax rate (and which, in practice, pays nothing).
This concept also provides physical security to people living in temporary housing in earthquake-rattled Haiti, where banks are expensive and cash is kept in tents and houses—putting the occupants in danger of robbery. The alternative? An SMS wallet on your smartphone. Via a gateway, a program on your phone can send and receive text messages that can credit an offline wallet, even without mobile data.
A lack of access to lending and banking lead people to use predatory lenders. Payday loans promise to provide money to address problems needing attention in the immediate term—an impounded car, a bond for release from jail, a mortgage near to foreclosure.
The loans are expensive to the borrower, and to the lender too—it's thought that 25% of principal is lost to default. The right to collect on those defaulted loans is then sold to collection agencies, which enjoy a largely deserved reputation for being nasty and abusive.
Loans paid back on time are likewise not subjected to treatment that could be considered fair or equitable. Rates of interest range from 50% to over 3000% annualized, with some lenders treating each payment as a refinance and writing a new loan, allowing them to again to charge the maximum rate of interest.
Some are said to be altogether unbanked—aside from lending, the fractional reserve model of banking provides the option for the lender to avoid charging fees for some services. People without checking accounts because of prior overdrafts, geographic isolation, or high costs are cut off from this system, and generally have to resort to using check-cashing services and prepaid debit cards. This is another product that is not cheap, with services charging between one and four percent—a hefty sum if a worker is forced to cash his paycheck this way. For the poorest of the poor, after all credits, it is not unusual to pay more in check-cashing fees than in income tax, however hard those same people may rail against taxes.
Some firms are already using alternatives to traditional banking, for better or worse. It is now regrettably not unusual for firms to pitch prepaid debit cards to their employees as a convenient alternative to banking, at substantially greater cost for lesser service.
Another alternative, however, exists in the form of various electronic tenders. DHL now pays its contractors in Kenya with Safaricom, M-PESA, a sort of mobile phone wallet pegged to the Kenyan shilling. This represents a huge leap forward in the case of people for whom the nearest bank may be 50 or 60 miles away.
This is less security than having cryptocurrency—the properties of cryptocurrency, specifically decentralization, ensures that there is no central authority easily able to seize or revoke ownership of funds. This is not the case with what is essentially a bank account used exclusively through an app.
Likewise, a very large part of the promise of cryptocurrency is cash that is free from such specters as asset forfeiture, in which law enforcement agencies may seize property in so-called rem proceedings, in which the onus is on the owner of the property to show that the ownership thereof is legitimate. Blockchain provides not only a means by which ownership can be shown but also that property's chain of title—stretching back, in most instances, to the date at which the asset was created.
The curious contradiction of an emerging technology is that it's simultaneously lauded and condemned. Possibilities good and bad are considered and weighted.
Probably we tend a bit too much toward moralism—almost everyone interested in blockchain has been told that it's just for drugs. There's something to this: many people first heard of Bitcoin as something used on dark net markets, such as the Silk Road, and this use of Bitcoin is arguably responsible for the popularity of cryptocurrency. The same people might then be surprised that you have, in fact, been receiving your salary in Bitcoin for six or seven months.
Each evangelist has to genuinely consider the drawbacks—in Bitcoin, for instance, privacy remains a large problem. As of this writing, this seems very unlikely to change. Take any idea that would do so much for transparency—say, a crypto corporation, with its transactions, or at least its balance sheet, on the record, available for all to see. The idea is conceptually sound, and it would improve tax collection and compliance.
Employees who were previously off the books might enjoy social security credit. Wage parity between people of different racial and ethnic groups might be achieved. Organizations that serve as fronts for money laundering would have to do so under greater scrutiny. Financial statement fraud would be easily detectable. Insurance rates would plummet—or at least my errors and omissions insurance would get cheaper.
All of this sounds pretty great until you consider the obvious drawbacks of everyone being in everyone else's business, and one hopes that the people building and purveying any technology, not just blockchain, stop and carefully consider the value of privacy.
Take another example: electric smart meters offer improvements in efficiency to utility companies. It eliminates obscene amounts of human labor. Rather than having a person come by to read the meter on every single house regularly, the meter transmits data on power usage on a regular basis. In theory, this would also provide benefit to the consumer: unplug your refrigerator for 20 minutes and see how much juice it's using. Less directly (and perhaps out of naïveté), we would also assume that the utility's savings are passed on to the consumer in the form of lower power tariffs.
So, where's the downside? Some of the least sophisticated of these meters could identify, say, the use of a microwave. A sudden increase in power usage in exactly the amount of 1000W for about a minute, for the sake of argument. If you find that a given household uses 1000W right around sundown every day during the month of Ramadan, you've probably identified a Muslim family observing the ancient tradition of fasting. If you find that from Friday night to Saturday night there's no power usage at all, perhaps you've identified an observant Orthodox Jew.
However benevolent an authority may seem now, information tends to stick around, and it is terribly empowering to people with ill intent. Consider that the Holocaust was especially bad in the Netherlands, but killed only a single family in Albania. The former country was great at keeping records. The latter, terrible.
Blockchain as a solution for social problems offers promise. Everything from preventing blood diamonds from entering circulation to guaranteeing a minimum income could be implemented with blockchain. Any tool has the potential for abuse, and this is no different.
Consider the pitch—put a tiny chip in every diamond. It has a little chip with a revocable private key on it, something akin to the EMV chip on a credit card. In theory, this could be used to ensure that each diamond in your rings is not a so-called conflict diamond, one sold to fund a war.
It also may have the effect of freezing everyone else out of the market. Jewelers getting stones certified through organizations such as the Gemological Institute of America (GIA) now have to sign a declaration that they don't knowingly sell blood diamonds, as well as submit personal information related to anti-money laundering regulations.
Purveyors of diamonds not wanting to adhere to this scheme largely don't have to, at the expense of being consigned to the rubbish heap—selling exclusively uncharted diamonds implies a proprietor offering a product of lesser quality. Whatever the expense, businesses go to great lengths to appear legitimate, and it's unlikely that even the savviest of consumers will care much for the proprietor's privacy.
Solutions that respect human limitations, with regard to knowledge or moral character, are more ethical and more robust than the sort of hand-wave everything will be fine attitude that pervades the tech world. It seems far safer to acknowledge that, although some people will abuse the anonymity, cash and barter transactions have taken place for thousands of years without any sort of central authority regulating them, and people often have legitimate reasons for wanting privacy or even anonymity.
Zero-knowledge cryptosystems may offer a solution in some use cases—cryptocurrencies such as Zcash and Monero more truly resemble cash. Bitcoin and (presently) Ethereum do not offer the sort of anonymity and privacy that detractors would have you believe they do.
Blockchain inherently has many desirable properties for people seeking privacy and anonymity, decentralization being the foremost of those. More broadly, outside of blockchain, this author suspects that users will be willing to pay somewhat of a premium for technology that ensures ephemerality, the property of being transitory, temporary, perhaps forgettable.
We've entrusted the most intimate details of our personal lives to mechanisms designed by fallible human beings, and despite the constant data breaches and the occasional happening, the public largely trusts things such as Facebook chats and devices with always-on microphones. However zealous blockchain evangelists may seem, trust in companies with centralized IoT and mobile junk remains the most remarkable arrogance.
Zero-knowledge proofs (and zero-knowledge arguments) allow the network to verify some computation (for example, ownership of tokens) without knowing anything about it. In addition to the properties for which we use blockchain (blockchains are consistent, immutable, and decentralized), specific implementations of zero knowledge may also be deniable, and avoid recording information on a blockchain that may compromise a user's privacy.
Conceptually, a zero-knowledge proof is similar to a randomized response study. Researchers are understandably concerned about whether people will honestly answer a question about a taboo behavior—such as drug use or interactions with sex workers.
In order to eliminate bias, statisticians came up with a method that introduced randomness in individual responses while keeping the meaning of overall results. Imagine you're trying to determine the prevalence of abortion by interviewing women, in a jurisdiction in which abortion is illegal. Have the interviewee flip a coin. If heads, answer the question honestly. If tails, just say Yes.
The researcher doesn't need to know the results of the coin flip, or each individual's true response—they only need to know that, given a sufficient sample size, taking the margin above 50% and doubling it gives you the actual prevalence of the practice. This approach preserves the privacy of the individual respondents while not compromising the quality of the data.
Zero-knowledge proofs (and arguments) are highly technical and the nuts and bolts are beyond the scope of this publication, but they are conceptually similar to what we're discussing. Depending on the specific implementation, zero knowledge might allow a user to spend the contents of their wallet without other users of the network knowing the contents of the wallet. This is one respect in which a cryptocurrency can truly be similar to cash: short of a mugger taking your wallet, there's no way for another person to know what you have until you've revealed it. This approach succeeds in addressing one of the largest problems in cryptocurrencies such as Bitcoin, and at the time of writing, Ethereum.
Blockchain is a transformational technology with an impact similar to that of the internet, vaccinations, or powered flight: the social implications are extensive, subtle, and perhaps in some ways pernicious. It has the potential to further degrade privacy, drastically improve corporate governance, or lift billions out of poverty. The specific application of this technology will define it as a tool that will help to shape the world.
In the next chapter, we will discuss some applications of blockchain, starting with the most fundamental of them, cryptocurrency wallets.
In this chapter, we will discuss cryptocurrency wallets in details. In earlier chapters, we have been introduced to wallets as well as the types of crypto wallets; in this chapter, we will further discuss wallets in detail, their source, and how the security of wallets can be strengthened.
Wallets are used to store private and public keys along with Bitcoin addresses. Coins can be sent or received using wallets. Wallets can store data either in databases or in structured files. For example, the Bitcoin core client wallets use the Berkeley DB file.
The topics we will cover in this chapter are as follows:
A wallet of any cryptocurrency can store multiple public and private keys. The cryptocurrency is itself not contained in the wallet; instead, the cryptocurrency is de-centrally stored and maintained in the public ledger. Every cryptocurrency has a private key with which it is possible to write in the public ledger, which makes spending in the cryptocurrency possible.
It is important to know about the wallets, since keeping the private key secure is crucial in order to keep the currency safe. Wallet is a collection of public and private keys, and each of them is important for the security and anonymity of the currency holder.
Transactions between wallets are not a transfer of value; instead, the wallets store the private key in them, which is used to sign a transaction. The signature of a transaction is generated from the combination of private and public keys. It is important to store the private key securely.
Wallets can store multiple private keys and also generate multiple public keys associated with the private key.
Hence it is important to keep the wallet secure so that the private key is safe; if the private key is lost the coins associated with that private key are lost forever, with no feasible way to recover the coins.
Wallets can be categorized into various types based on their traits. Wallets can be categorized by the number of currencies they support, availability, software or hardware, key derivation method, and so on. We will look at the types of cryptocurrency wallets to be covered in the following subsections.
One primary trait on which the wallets can be distinguished is the number of currencies the wallets support; for example, there can be wallets with single currency support or multiple currency support. Each of the coins has a core client which includes a wallet too.
The official wallets usually support single currencies, but nowadays, a lot of third-party wallets have appeared support multiple wallets, these wallets performing the same functions as regular wallets, the only difference being the number of currencies they support.
Some of the wallets that support multiple currencies are as follows:
The following is a screenshot of the EXODUS wallet, which supports various currencies:

There are various other wallets coming up from time to time that offer multiple currencies. Sometimes, existing wallets that support a single currency start to introduce multiple currencies to increase their popularity or even to support another cryptocurrency.
The wallets can also be differentiated based on whether they are software, hardware, paper, or cloud-based. Let's discuss each of these wallets in detail.
These wallets are based on the local computer or mobile. These can be further divided into desktop or mobile wallets. These wallets are confined within the local machine; they usually download the complete blockchain in order or keep a record of the public ledger:
The core clients of most of the cryptocurrencies offer software wallets to start with, with initial support for desktop wallets.
The private key is to be stored in the most secure location possible. Hardware wallets store the private key in a custom hardware designed to store private keys. It is not possible to export the private key in plain text, which gives it another layer of security. Hardware is connected to a computer only when required, and at all other times the private key is kept secure. Hardware wallets were first introduced in 2012 by Trezor.
Some of the popular hardware wallets currently available are Trezor, Ledger, and KeepKey wallets. The following snap shows an example of a hardware wallet connected to a computer:

Paper wallets, as the name suggests, are simply public and private keys printed together. The keys are usually printed in QR form, also serving as the address. Anybody can create a paper wallet by printing the keys but also making sure they remove the keys from the computer, or anyone could have access to the keys. Paper wallets are meant to be stored only on paper with no backup elsewhere. There are various online services that generate paper wallets such as www.walletgenerator.net. The following screenshot is an example of a paper wallet, the following Image can be printed, to receive payments, public address is shared but the private key marked secret and is to be kept safe:

A brain wallet is a simple wallet that creates addresses by hashing passphrases to generate private and public keys. To generate a brain wallet, we choose a simple passphrase to generate a public and private key pair. The following screenshot shows how the Public Address and Private Key are generated. The passphrase is entered which is to be reminded as shown in the following screenshot:
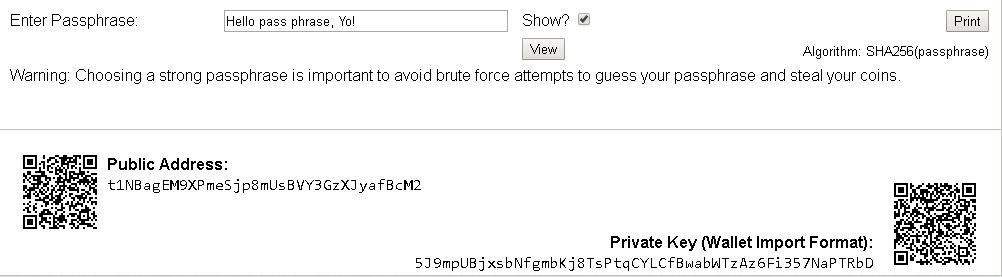
The wallets can also be differentiated on the basis of usage; there are primarily two types of wallets on this basis: cold wallet and hot wallet. In simple terms, cold wallets are not connected to the internet while hot wallets are connected to the internet, at all times and can be used for sending the respective cryptocurrency at any time. Cold wallets can be used to receive the currency even when not connected to the internet but it is not possible to send the currency to other address before connecting it to internet.
A hardware wallet is not connected to the internet unless plugged-in to a device; they can be considered cold wallets.
The private keys are generated by a wallet to be present on the blockchain, and there are primarily two methods by which the key can be generated. The key generation method is crucial for the security of the wallet and also important for recovery of the wallet in case the wallet is lost.
These were the initial iterations of the Bitcoin clients; the wallets had randomly generated private keys. This type of wallet is being discontinued due to a major disadvantage, that the random keys are inaccessible if the wallet is lost. Since it is advisable to use a different address for every transaction in order to maintain anonymity on the network, with so many random keys, it becomes difficult to maintain and, hence, addresses became prone to re-use. Even though in the Bitcoin core-client, there is a wallet that is implemented as a type-0 wallet, its use is widely discouraged.
In these wallets, the keys are derived from a single master key or one can say a common seed. All the private keys in this type of wallet are linked to a common seed. Backup of only the seed is sufficient to recover all the keys derived in this type of wallet.
This is the most advanced form of deterministic wallets. These were introduced in the BIP0032 of the Bitcoin Improvement Proposal system. These wallets follow a tree structure, that is, the seed creates a master key, which further creates child keys, and each of the keys can derive further grandchildren keys. Thus, in these types of wallets, there can be multiple branches of keys, and each key in the branch is capable of creating more keys as required. The following diagram shows the keys and the hierarchy of addresses created in such wallets:
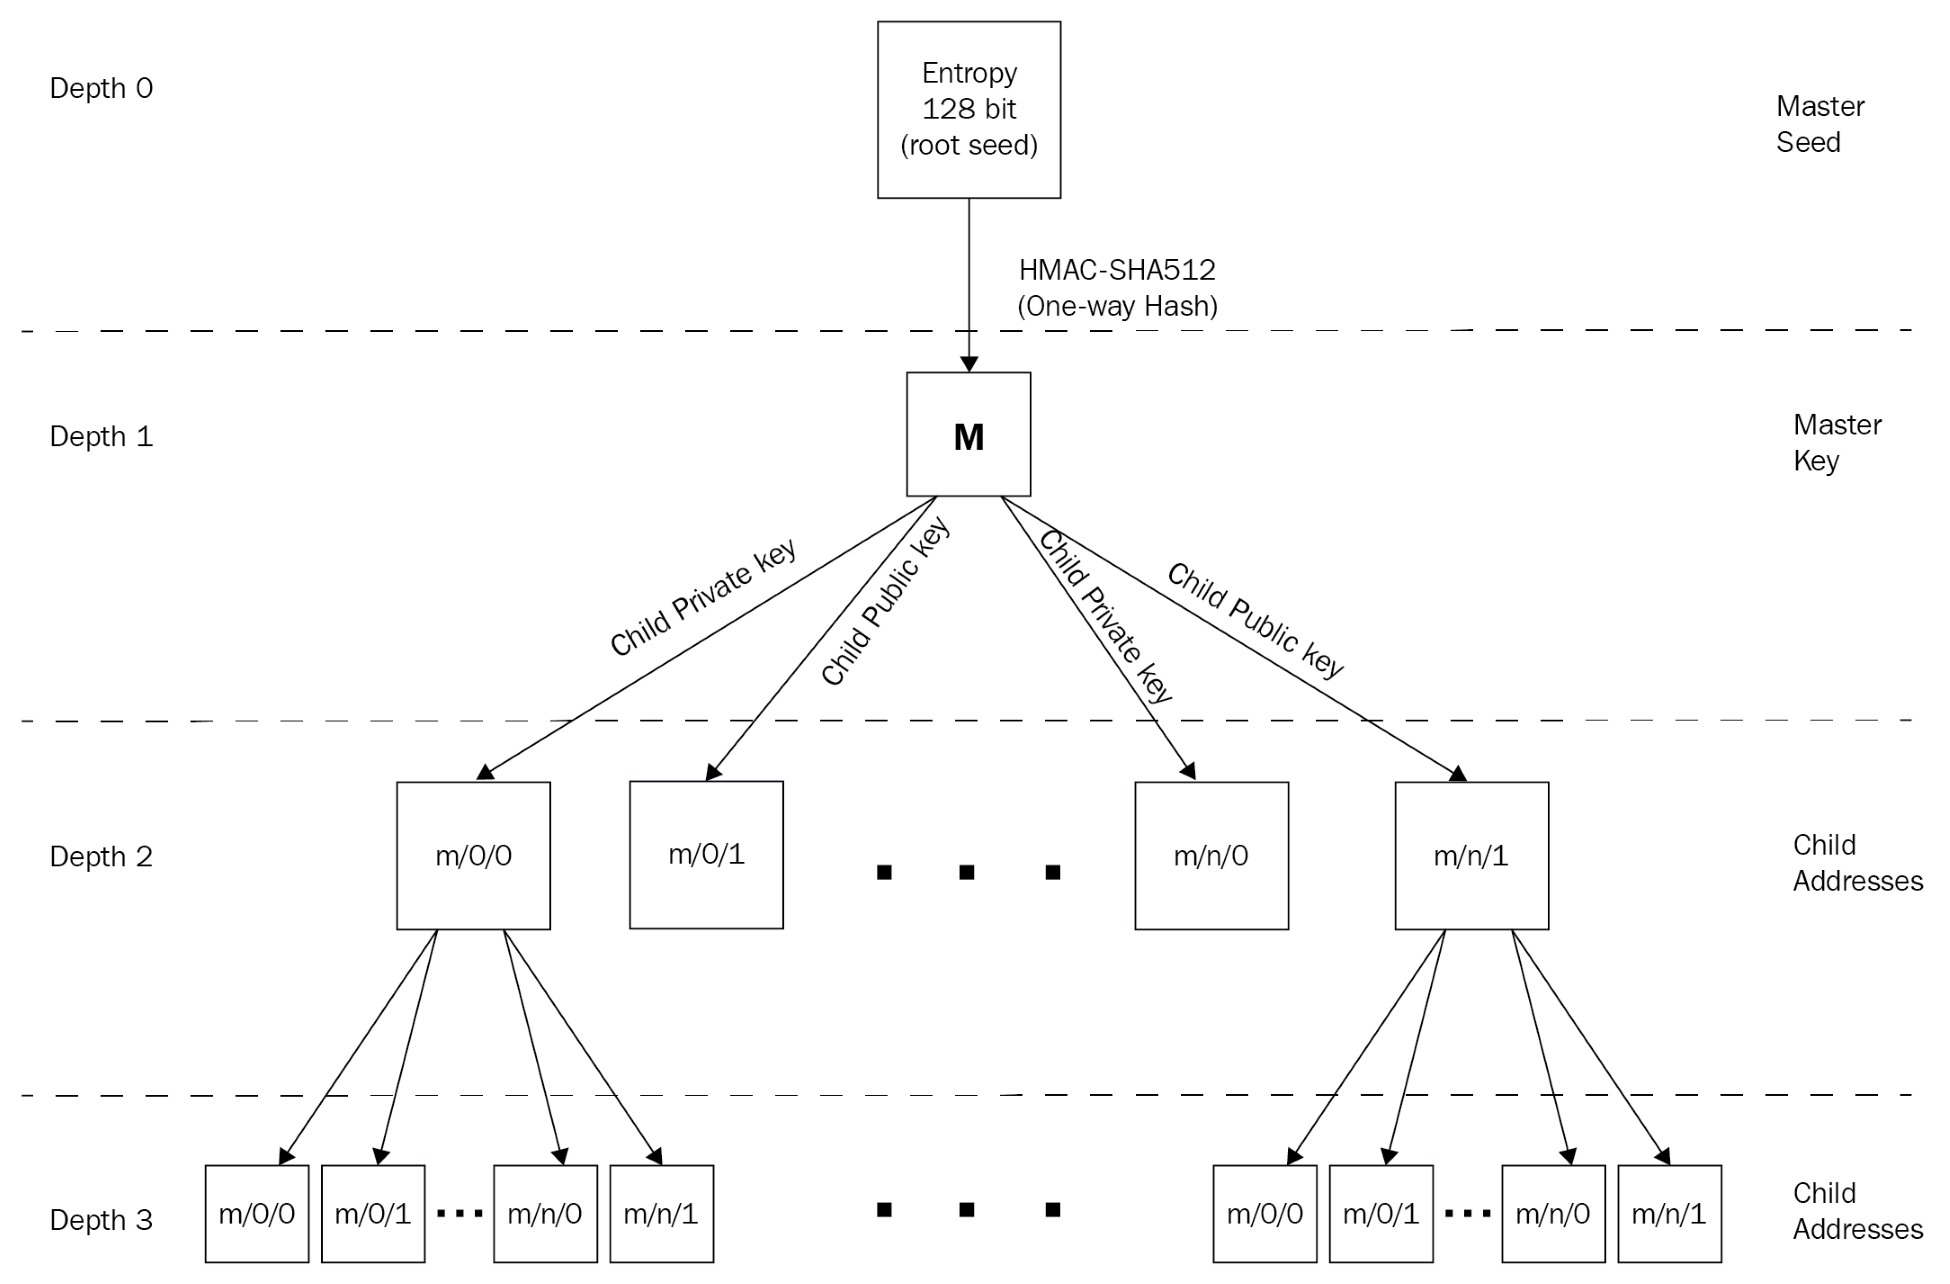
These are English words used to represent the random number used to derive the seed in a deterministic wallet. The words act as a password; the words can help in recovering the seed and subsequently the keys derived from it. The mnemonic codes act as a good backup system for the wallet user.
The wallet shows a list of 12 to 24 words when creating a wallet. This sequence of words is used to back up the wallet and recover all the keys in the event of a wallet becoming inaccessible.
Here is the process of generation of mnemonic code and seed as per the BIP0039 standard:
The length mnemonic code, also known as a mnemonic sentence (MS), is defined by MS = (ENT + CS) / 11. The following screenshot shows the word length and the Entropy associated with that word length:
The seed that is 512 bits is generated from the mnemonic sequence using the PBKDF2 function where the mnemonic sentence is used as the password and the string mnemonic + passphrase is used as a salt. The passphrase is something that a user can use to protect their mnemonic; if it's not set, then "" is used.
The length of the derived key from this process is 512-bits; different wallets can use their own process to create the wordlist and also have any desired wordlist. Although it is advised to use the mnemonic generation process specified in the BIP, wallets can use their own version of wordlist as they require.
We will be discussing key generation processes in detail, starting from master keys through to private keys, and the various addresses a wallet creates for transaction purposes.
The initial process is to create the root seed which is a 128, 256, or 512 bit random. The root seed is represented by the mnemonic sentence, which makes it easier to restore the complete wallet in the case of losing access to the wallet.
Root seed is generated using the mnemonic sentences and the root seed which is of a chosen length between 128 and 512-bits, although 256 bits is advised. Generated using (P) RNG. The resultant hash is used to create the master private key and the master node. Generation of the master key is the depth level 0 in the hierarchy system; subsequent wallets or keys are denoted by depth 1, 2, and so on.
HD wallets extensively use the Child Key derivation (CKD) function to create child keys from the parent keys. Keys are derived using a one-way hash function using the following elements:
There are various ways in which child keys can be generated from already present keys; the following are the key derivation sequences:
Let's discuss each of the previously mentioned sequences in detail.
The parent key, chain code, and index number are combined and hashed with the HMAC-SHA512 algorithm to produce a 512-bit hash using the following formula:
I = HMAC-SHA512(Key = Cpar ,Data = serp (point(kpar )) || ser32 (i))
The resultant hash is split in two hashes, IL and IR The right-hand half of the hash output becomes the chain code for the child, and the left-hand half of the hash and its index number are used to produce the child private key as well as to derive the child public key.
By changing the index, we can create multiple child keys in the sequence.
As discussed a number of child keys can be derived from parent key considering the three required inputs are available. We can also create another type of key, called the extended key, which consists of the parent key and the chain code.
Furthermore, there are two types of extended keys, distinguished by whether the parent key used is a private key or a public key. An extended key can create children which can further create children in the tree structure.
Extended keys are encoded using Base58Check, which helps to easily export and import between wallets. These keys are basically extensions of the parent keys, hence sharing any extended key gives access to the entire branch in the branch.
An extended private key has the xprv prefix in the key's Base58Check, while an extended public key has the xpub prefix in the key's Base58Check. The following diagram show's how extended keys are formed:
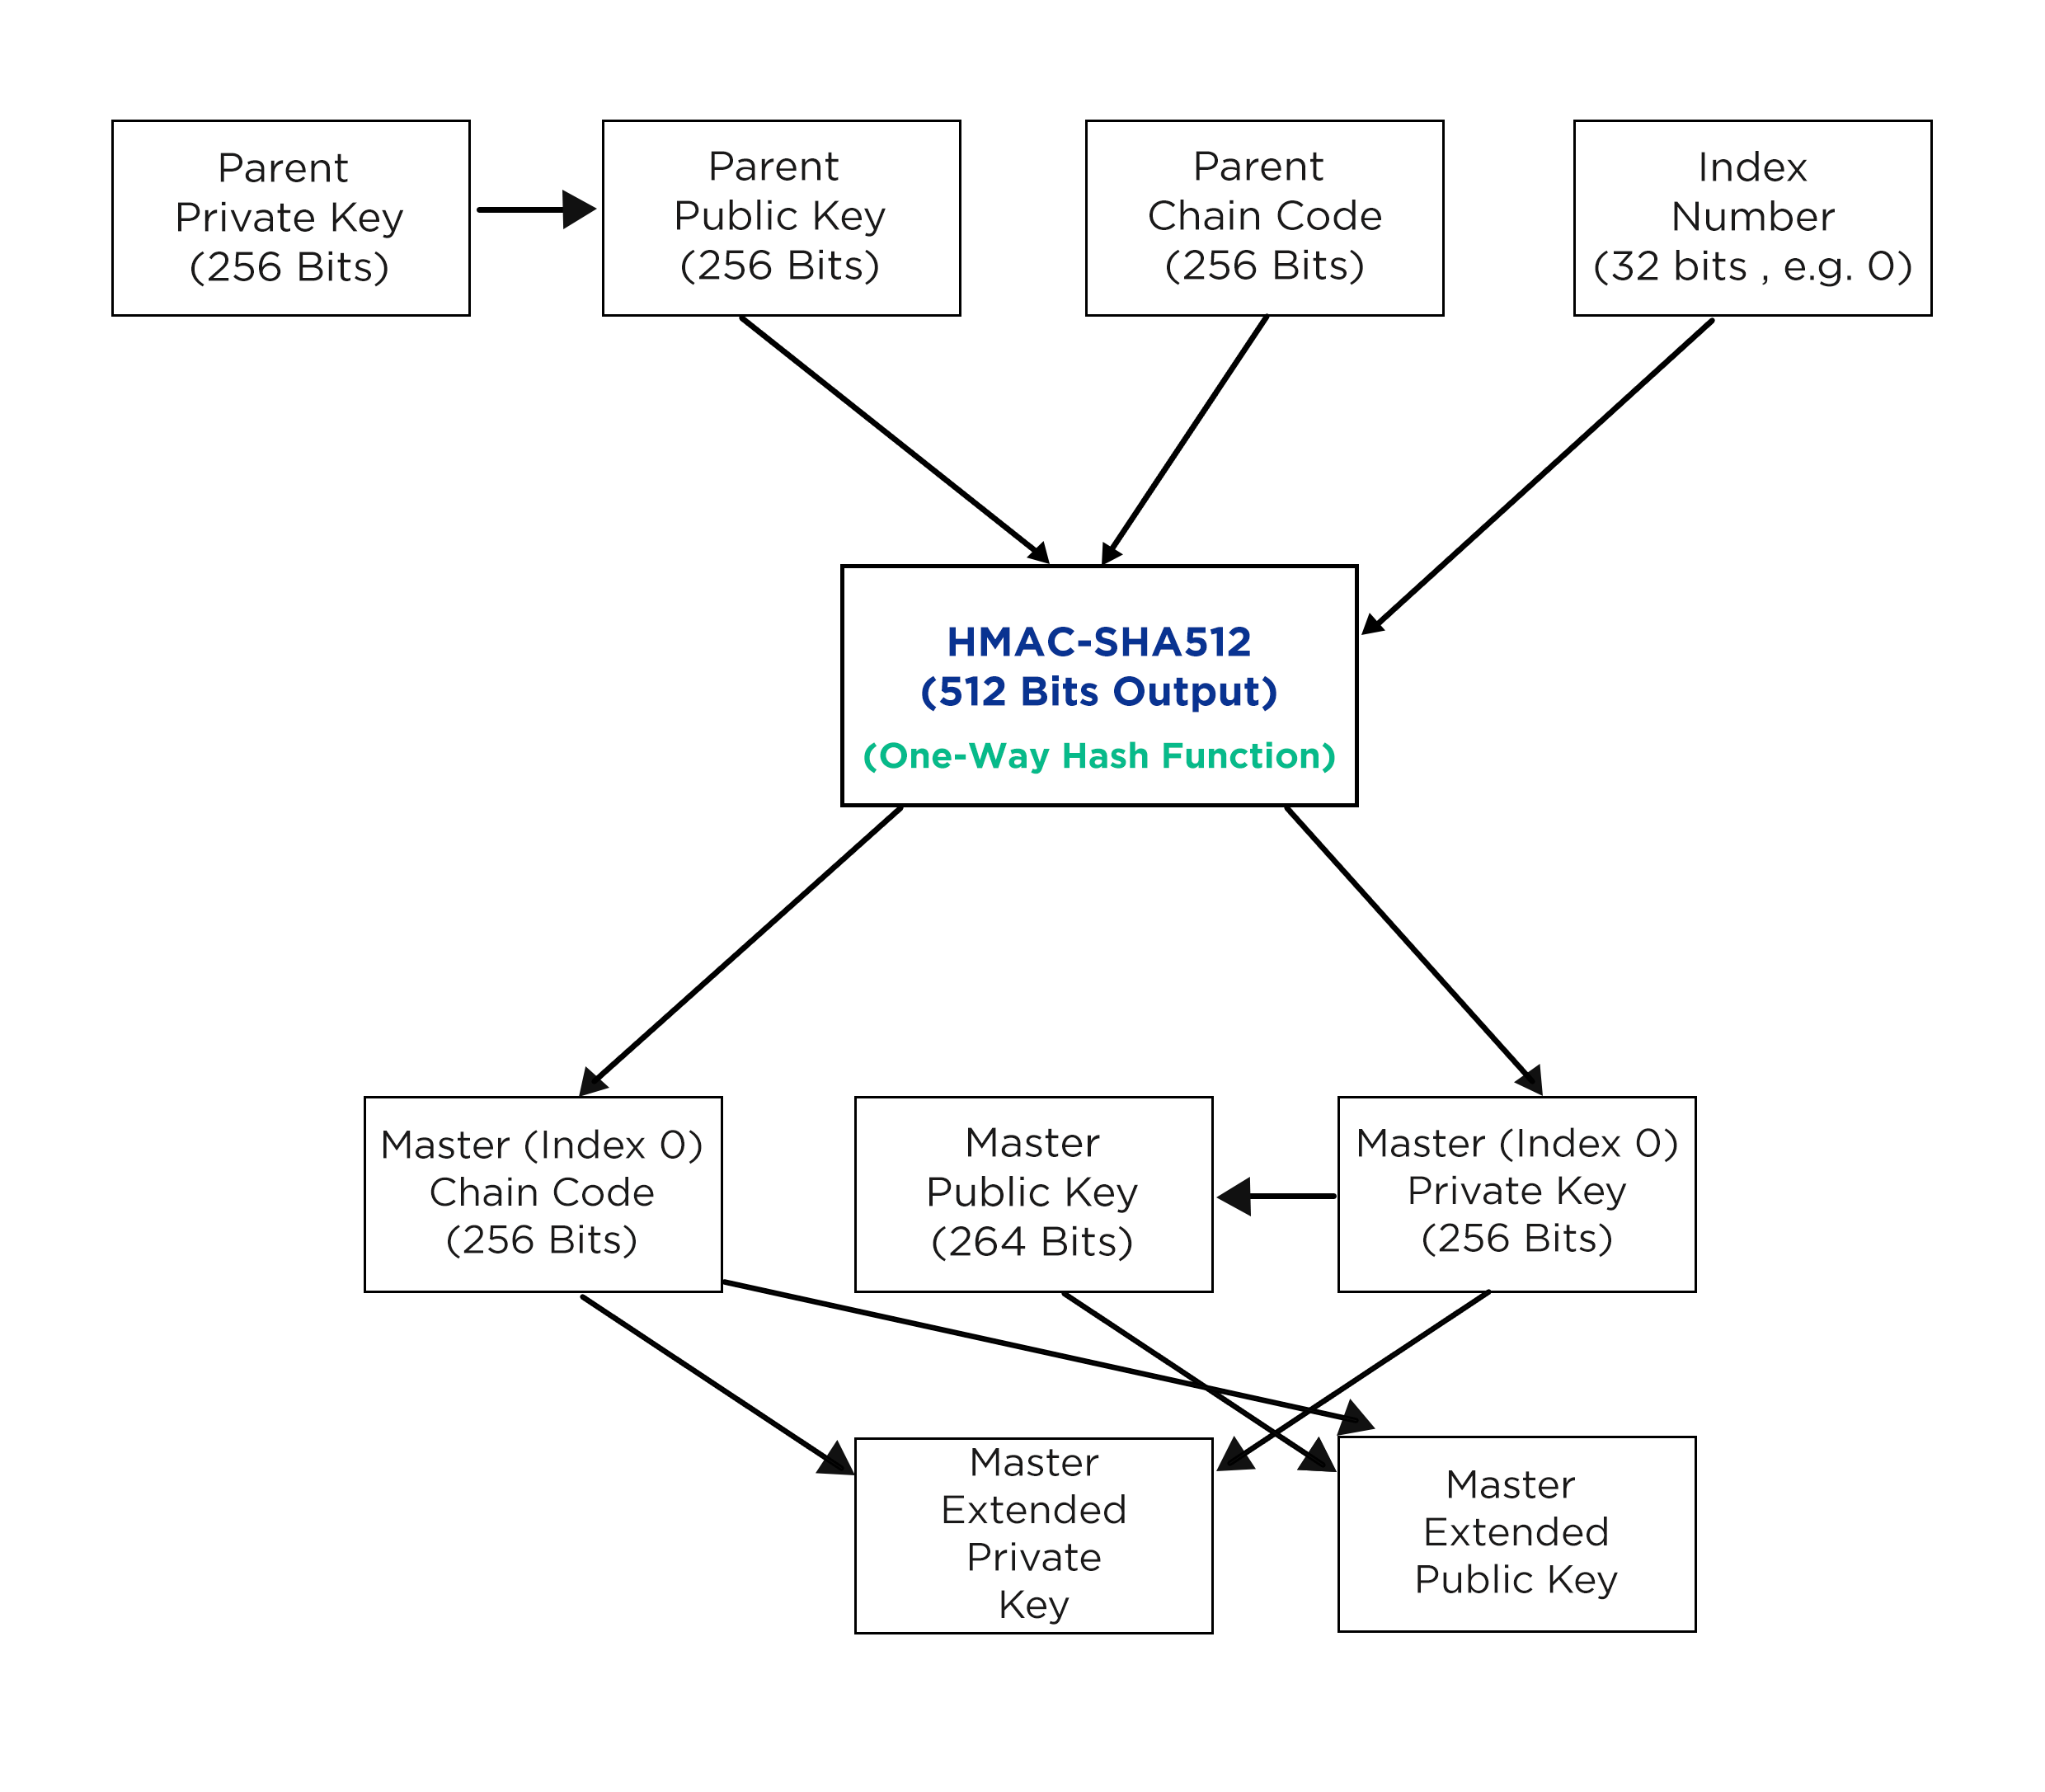
In this chapter we discussed in detail cryptocurrency wallets and various types of crypto wallets, we read about various characteristics based on which the crypto wallets can be distinguished, and we talked about the tenancy of the wallets, benefits of each of the wallet types, and the issues one can face while using the specific wallet type. We discussed key derivation methods and its importance with regard to security, accessibility, and other aspects of a wallet.
In the previous chapters, we learned about blockchain, its structure, components, mechanism and the biggest use case of blockchain, Bitcoins. In the last chapter, we discussed cryptocurrency wallets, and their role and usage with a blockchain. Most of our discussion surrounds Bitcoins and other cryptocurrency.
The success of Bitcoin brought a lot of attention to the technology and the underlying blockchain ledger system, and the community started creating alternate cryptocurrency based on blockchain, making slight modifications to the parameters of Bitcoin, each time trying to improve in one way or another. Subsequently, various organizations started creating alternatives to blockchain by making slight modifications or changes but keeping the core definition of blockchain, that being a public ledger, intact. Some of the projects trying to create alternative blockchain did not gain much attention, but others managed to get a lot of attention and community support.
In this chapter, we will discuss the following topics:
Distributed ledger technology is said to be the biggest revolution in computers after the internet; blockchain is and will be revolutionizing and impacting on each individual in years to come.
Blockchain is used in currency-related applications such as Bitcoins and Altcoins, but, apart from that, there are various other use cases of blockchain in other industries that entail completely different monetary usage. The following diagram depicts some of the industries where blockchain is being used:

Various governments across the globe are using blockchain to store public records or any other information across various government sectors, such as healthcare, identity management, taxation, voting, and financial services.
By having a decentralized database, it will make it easy for the governments to reduce fraud and also introduce certain checks before the data is entered into the distributed ledger system.
Medical records of an individual need authentication for correct information, and it is important to have access to health records that are complete in all aspects. Blockchain can be used in facilitating data sharing and record keeping. Sensitive medical data can become easily accessible to doctors and other relevant people of the healthcare community.
Researchers in the medical community are always thriving to make better innovations and techniques that can improve clinic care. With data being present on blockchain, researchers can access the authentic data with ease and also add theories/results based on an apt approval cycle. The system's interoperability can help in multiple levels, along with offering precision and authenticity.
Supply chain management is one of the most scattered bottlenecks of a business process. There has always been a need for efficiency in supply chain management. There is a lack of compatibility because of the use of multiple software systems, with each one having various data points required for smoother movement. Blockchain can provide each participant in the supply chain process with access to relevant information reducing communication or data errors, as seen in the following diagram:

A blockchain can be used to resolve copyright claims, since any entry in the blockchain-based system can only be introduced after it has been approved by the consensus system, thus making sure that the copyright is maintained.
The art industry depends on the authentication of artwork; although blockchain cannot authenticate artwork or whether a painting is original or forged, it can be used to authenticate ownership.
A number of projects have come up that are using blockchain within the maritime logistics industry to bring transparency in international trade. Various global shippers are using blockchain for the same reason, to introduce blockchain-based techniques and to weed out any bottlenecks that distributed ledger technology solved for the industry.
Blockchain can help to maximize efficiency in the energy distribution sector by keeping a track on energy allocation and implementing efficient distribution. Energy production and research for new sustainable resources can be monitored by using a blockchain to maintain authenticity and consensus in the same sense, as can be seen here:
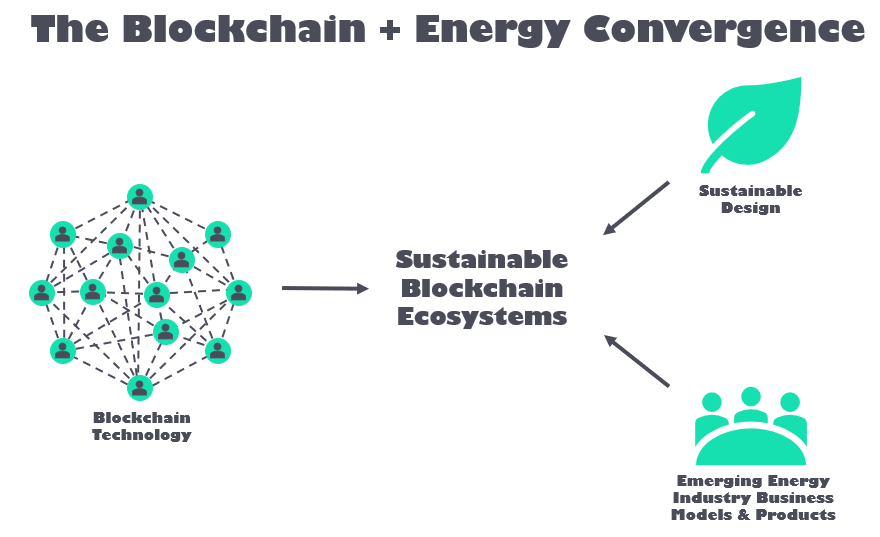
Computation resources get wasted around the globe. Data centers and data lakes are always in need of efficient data maintenance. Using a blockchain can ensure security and improvement.
User identification is an important use case of blockchain being used in governments, but can also be used by other organizations for social security and other identification processes, as required.
Enterprises can use blockchain in various cases such as coordination among departments, intra-office and inter-office communication, data migration, and various other tasks. Microsoft, IBM, Google, Amazon, and other companies have already started beta testing the usage of blockchain in various enterprise departments.
Ripple acts as a real-time gross settlement and remittance network built by Ripple company and founded in 2012. It allows payments between parties in seconds. It operates with its own coin, known as Ripple (XRP), and also supports non-XRP payments. Ripple has proposed a new decentralized global network of banks and payment providers, known as RippleNet. This network uses Ripple's transaction settlement technology at its core. RippleNet is proposed to be independent of banks and payment providers, setting a standardized network for real-time payment settlement.
Ripple networks consist of various nodes that perform each of their own defined tasks. The first nodes that facilitate the system are called user nodes. The user nodes use Ripple for payment and transactions, such as to make and receive payments. The second type of node in Ripple is the validator node. These nodes are part of a consensus mechanism in the Ripple network. Nodes in the unique node list (UNL) are part of the Ripple network and trusted for the consensus mechanism. Anyone can become a validator node or a user node. The following diagram displays the flow of transactions that take place in the Ripple network. The transaction begins in the collection phase and then proceeds to move through the consensus phase. The final phase, which is the ledger closing phase, creates the block of the certain transaction for the next set of transactions to be received:
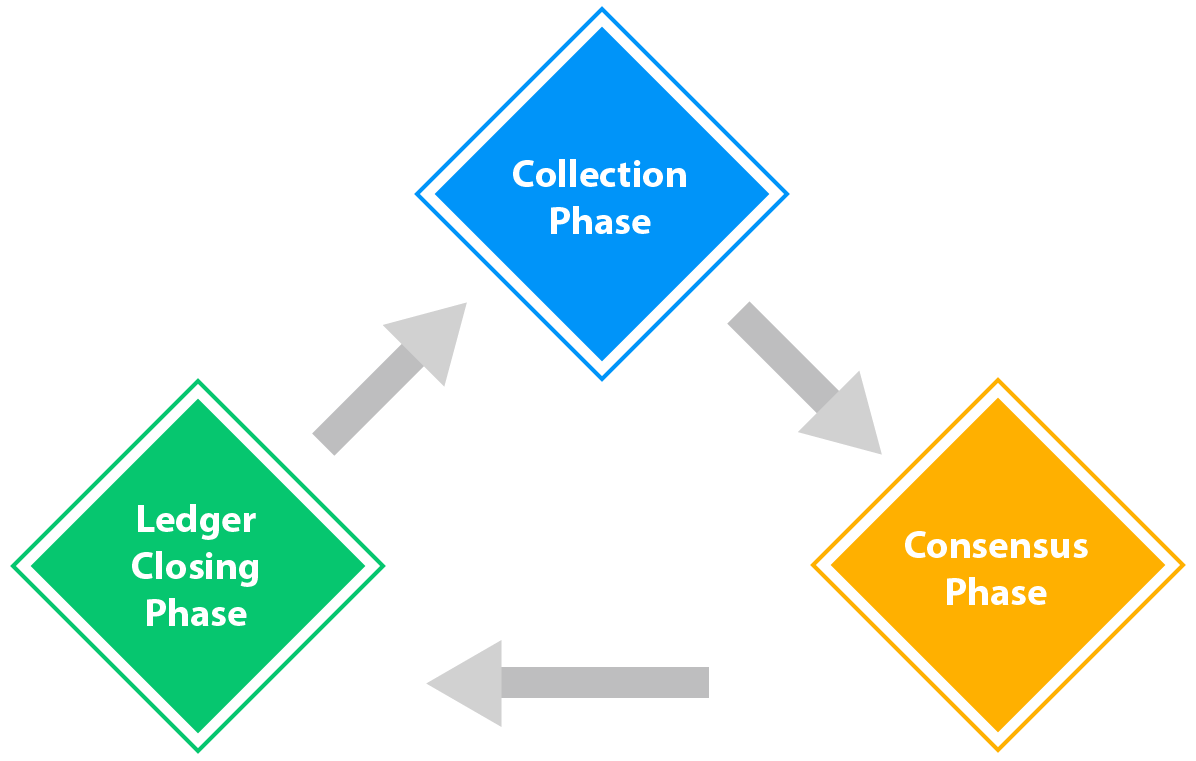
For the consensus mechanism, Ripple uses the Ripple Protocol Consensus Algorithm (RPCA). RPCA works neither on Proof of Work (PoW) nor Proof of Stake (PoS) systems; instead, its consensus mechanism works on a correctness-based system. The consensus process works on a voting system by seeking acceptance from the validator nodes in an iterative manner so that a required number of votes is received. Once the required number of votes is received, the changes are validated and the ledger is closed. Once the change in the ledger is accepted and the ledger is closed, an alert is sent to the network.
A Ripple network consists of various elements, which together make the transactions in Ripple successful:
Transactions are created by the Ripple network nodes in order to update the ledger. A transaction is required to be digitally signed and validated for it to be part of the consensus process. Each transaction costs a small amount of XRP, just like Gas in Ethereum. There are various types of transactions in Ripple Network: payments related, order related, and account related.
There are also various developer APIs available in the Ripple network to work with the transactions and payments, along with integration on RippleNet. Interledger works with RippleNet to enable compatibility with different networks. The following diagram depicts what a block consists of in a Ripple network transaction:
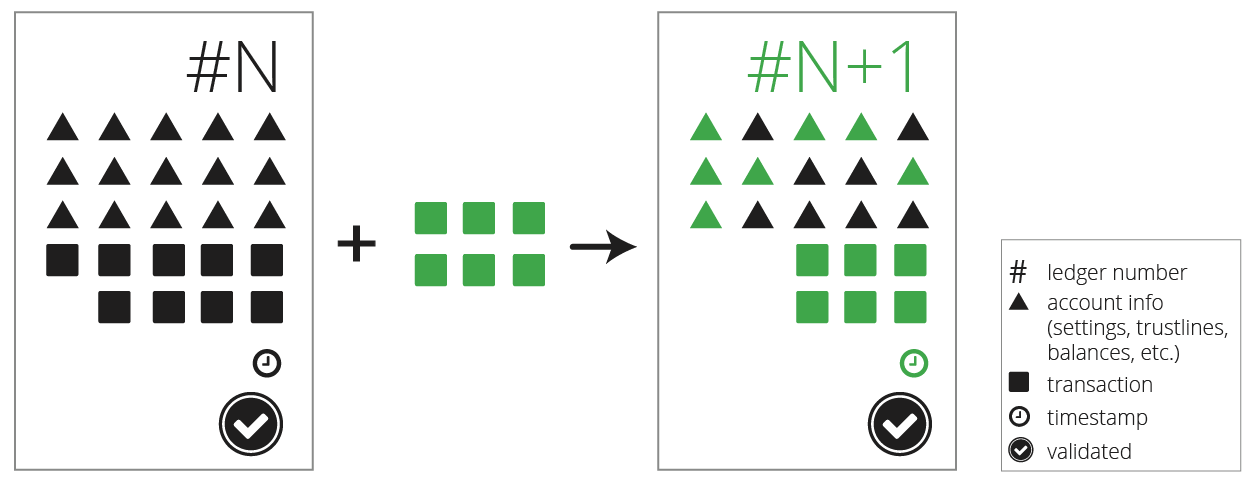
The Stellar network is for the exchange of any currency, including custom tokens. Stellar has a consensus system that is more commonly known as the Stellar consensus protocol (SCP), which is based on the Federated Byzantine Agreement (FBA). SCP is different from PoW and PoS with its prime focus to offer lower latency for faster transactions.
It has four main properties:
The Stellar network maintains a distributed ledger that saves every transaction and is replicated on each Stellar server connected to the network. The consensus is achieved by verifying a transaction among servers and updating the ledger with updates of the very same transaction. The Stellar ledger can also act as a distributed exchange order book as users can store their offers to buy or sell currencies.
Tendermint provides a secure and consistent state machine replication functionality. Its main task is to develop a secure and high-performance, easily replicable state machine. It is Byzantine Fault Tolerant, that is, even if one in three of the machines fail, Tendermint will keep on working.
The two prime components of Tendermint are as follows:
The Tendermint consensus algorithm is a round-based mechanism where validator nodes initiate new blocks in each round is done. A locking mechanism is used to ensure protection against a scenario when two different blocks are selected for closing at the same height of the blockchain. Each validator node syncs a full local replicated ledger of blocks that contain transactions. Each block contains a header that consists of the previous block hash, timestamp of the proposed block, present block height, and the Merkle root hash of all transactions present in that block.
The following diagram shows the flow between the consensus engine and the client apps via the Tendermint Socket protocol:
Participants of the Tendermint protocol are generally referred to as validators. Each validator takes turns to propose blocks of transactions. They also vote on them just like the Ripple voting system discussed previously. If a block is unable to commit, the protocol moves on to the next round. A new validator then proposes a block for that same height. Voting requires two stages to successfully commit a block. These two stages are commonly known as the pre-vote and pre-commit stage. A block is committed only if more than two in three of the validators pre-commit for the same block and in the same round.
Validators are unable to commit a block for a number of reasons. These would include the current proposer being offline, or issues with the quality or speed of the network. Tendermint also allows the validators to confirm if a validator should be skipped. Each validator waits for a small amount of time to receive a proposal block from the concerned proposer. Only after this voting can take place can they move to the next round. This dependence on a time period makes Tendermint a synchronous protocol despite the fact that the rest of the protocol is asynchronous in nature, and validators only progress after hearing from more than two-thirds of the validator sets. One of the simplifying elements of Tendermint is that it uses the same mechanism to commit a block as it does to skip to the next round.
Tendermint guarantees that security is not breached if we assume that less than one-third of the validator nodes are Byzantine. This implies that the validator nodes will never commit conflicting blocks at the same height. There are a few locking rules that modulate the paths that can be followed. Once a validator pre-commits a block, it is locked on that block. In such cases, it must pre-vote for the block it is to be locked on, and it can only unlock and pre-commit for a new block.
Monax is a blockchain and a smart contract technology that was founded in 2014. It started its journey as Eris Industries, but changed its name to Monax in October of 2016.
Monax has a lot to offer. Some of these include various frameworks, SDKs, and tools that allow accelerated development of blockchains and their deployment for businesses. The idea behind the Monax application platform is to enable development of ecosystem applications that use blockchains in their backend. It also allows integration with multiple blockchains and enables various third-party systems to interact with other blockchain systems, and offers a high level of compatibility. This platform makes use of smart contracts written in solidity language. It can interact with blockchains such as Ethereum or Bitcoin. All commands are standardized for different blockchains, and the same commands can be used across the platform.
Monax is being actively used for the following applications:
In this chapter, we were introduced to alternative blockchains. We discussed the various use cases of blockchains other than cryptocurrency. Some of these included government, healthcare, medical research, supply chains, copyright, fine art, shipping, energy, and so on. As well as this, we discussed Ripple, which is a new blockchain used for fast payments and offers various modifications and improvements compared to the Bitcoin blockchain. After that, we discussed the Stellar payment protocol and its prime properties, which help to accelerate payments in Stellar. Tendermint is another blockchain software, which was discussed and brought to our attention.
In the next chapter, we will discuss, in detail, Hyperledger and some of the prominent projects based on the Hyperledger protocol. We will also discuss detailing and other parameters of the Hyperledger protocol.
Unlike most of the other blockchain systems discussed in this book, Hyperledger never had an Initial Coin Offer (ICO) and has no tokens that are publicly traded. This is because Hyperledger isn't a blockchain itself, but instead a collection of technologies used for the creation of new blockchains. Moreover, these blockchain technologies were explicitly designed and built for enterprise use cases and not the public markets.
In this chapter, we will cover the following items:
The Hyperledger name doesn't apply to a single technology, but rather a collection of blockchain technologies all donated to the Linux Foundation under the Hyperledger name.
Members of the Hyperledger project include major blockchain companies such as Consensys, R3, and Onchain, as well as a large number of enterprise-focused technology companies such as Baidu, Cisco, Fujitsu, Hitachi, IBM, Intel NEC, Red Hat, and VMware. In addition to these companies, a number of financial services firms have come on board due to the clear application of blockchain in fintech. Financial services members include ANZ Bank, BYN Mellon, JP Morgan, SWIFT, and Wells Fargo. Seeing the opportunity to be on the next wave of business software consulting, major integrators joined as well—Accenture, CA Technology, PWC, and Wipro, along with many others.
Recently, Amazon, IBM, and Microsoft have all revealed blockchain-as-a-service offerings featuring Hyperledger technology.
The Hyperledger project was founded in 2015, when the Linux Foundation announced the creation of the Hyperledger project. It was founded in conjunction with a number of enterprise players, including IBM, Intel, Fujitsu, and JP Morgan. The goal was to improve and create industry collaboration around blockchain technology so that it would be usable for complex enterprise use cases in the key industries most suitable to blockchain disruption: technology, finance, and supply chain.
The project gained substance in 2016, when the first technology donations were made. IBM donated what was to become known as Hyperledger Fabric, and Intel donated the code base that became Hyperledger Sawtooth.
Unlike most projects in the blockchain space, Hyperledger has never issued its own cryptocurrency. In fact, the executive director of Hyperledger has publicly stated that there never will be one.
As mentioned, a hyperledger isn't a single blockchain technology, but rather a collection of technologies donated by member companies. While there is a long-term goal of greater integration between projects, currently most of the Hyperledger projects function independently. Each project's core code base was donated by one or more of the Hyperledger member organizations, based on problems they were trying to solve internally before open sourcing the code and handing ownership to the Linux Foundation.
Hyperledger Burrow is a re-implementation of the Ethereum Virtual Machine (EVM) and blockchain technology, but with a few key changes. First, instead of using the proof-of-work consensus algorithm used by the public Ethereum chain, Burrow is designed around the Tendermint consensus algorithm (See Chapter 7, Achieving Consensus). This means there are no miners and no mining to be done on Burrow-based projects.
Second, Hyperledger Burrow is permissioned—the computers allowed to participate in a Hyperledger Burrow network are known and granted access, and the computers signing blocks (called validators, as in Tendermint) are all known. This is very different than Ethereum, where anyone can anonymously download the Ethereum software and join the network.
Smart contracts written for the EVM will still mostly work. Due to the change in consensus, there are also changes in the way Gas is used. In the public Ethereum blockchain, each transaction costs Gas, depending on the complexity of the transaction, and each block has a Gas limit. Depending on the network load, participants have to pay a variable cost in Ether for the Gas needed for their transactions. In Burrow, these complexities are mostly dispensed with. Each transaction is gifted a basic amount of Gas automatically. Because the Gas is still limited, Burrow is able to guarantee that all transactions eventually complete—either by succeeding or failing—because they run out of Gas.
For more on the EVM, solidity language, and other aspects of Ethereum shared with Hyperledger Burrow, please see Chapter 12, Ethereum 101.
Hyperledger Sawtooth, like the rest of the Hyperledger family, is built for permissioned (private) networks rather than public networks, such as Ethereum, Bitcoin, and so on. As an enterprise-oriented blockchain system, it is designed around allowing different companies to coordinate using a blockchain and smart contracts. Originally developed by Intel, Sawtooth uses a unique consensus algorithm called Proof of Elapsed Time, or PoET.
PoET uses a lottery-based system for leader election. Using special Intel technology called the Trusted Execution Environment (TEE), along with Software Guard Extensions (SGX), available on some Intel chipsets, the leader is elected by each node generating a random wait time, with the shortest wait time going first. Because the code to generate the wait time is in the TEE, it can be verified that each node is running appropriate code and not skipping in line to become leader by not waiting the amount of time generated by the random time generator. Therefore, the election of the leader (and block issuer) is very fast, which in turn allows the blockchain to operate quickly.
Sawtooth has a pluggable architecture, comprised of the Sawtooth core, the application-level and transaction families, and the consensus mechanism (typically PoET, but hypothetically pluggable with others). We will study them in detail in the following sections.
Because Sawtooth is meant to be a pluggable, enterprise-oriented architecture, the application layer is highly configurable. Each Sawtooth-based blockchain allows transactions to be made based on what are called transaction families. Transaction families determine what sorts of operations are permissible on the Sawtooth blockchain. For instance, it is possible to allow smart contracts, such as with Ethereum, using the Seth transaction family. Under Seth, all possible Ethereum-based contracts and Ethereum contract-based transactions would be permissible, along with all the possible mistakes and issues such freedom creates.
A Sawtooth-based blockchain can have multiple transaction families operating at once. In fact, this is common, as one of the transaction families that ships with Sawtooth is the settings family, which stores system-wide configuration settings directly on to the blockchain. In most cases, this transaction family and a few others, comprised of business use cases, will be operating in parallel. Furthermore, because multiple transaction families can be running at the same time, this means that business logic can be isolated and reused as an independent transaction family across multiple blockchain implementations.
Because many businesses have only a few valid business rules and business outcomes, it is possible to customize the available operations on the blockchain through the creation of a custom transaction family. For instance, a shipping company may use Sawtooth to track the location of packages, and the only valid transactions might be a new package, package accepted, package released, package in transit, update package location, and package delivered. By restricting the available transactions, the number of errors and mistakes can be reduced. Using the shipping company example, network participants could be trucking companies, warehouses, and so on. For a package to move between a truck and a warehouse, the two network participants would issue package released and package accepted transactions, respectively, in a batch on to the blockchain. This brings us to the next concept in Sawtooth: Transaction Batches.
In Sawtooth, transactions are always part of batches. A batch is a set of transactions that come together and either all succeed or all fail. If a transaction needs to process by itself, then it would be in a single batch containing only that one transaction. Using the shipping company example, the transactions package released and package accepted may be programmed so that they only succeed if their counter-transaction is part of the same batch, forcing a successful handoff or throwing an error. The following diagram shows the data structure of a transaction batch:
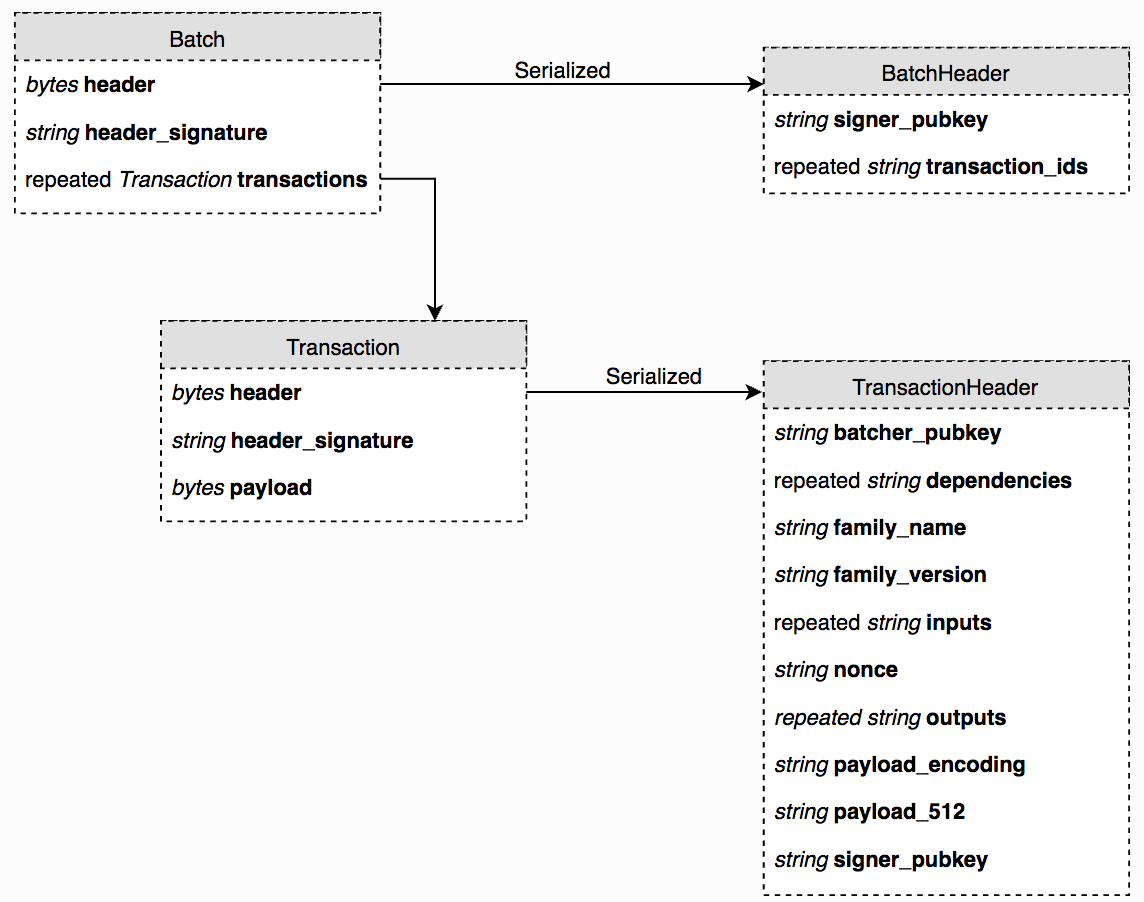
Transactions and batches in Sawtooth are abstracted at a high level so that they can be created by custom transaction families and by arbitrary programming languages. Because of this, it is possible to program smart contracts and transaction families in Java, Python, Go, C++, and JavaScript. To code in any language, there is another restriction on transactions: serialization, or the transition from an in-memory structure on a computer to a fixed binary that can be sent across the network. No matter what the language is, the approach to serialization must have the same output. In Sawtooth, all transactions and batches are encoded in a format called protocol buffers, a format created by Google internally, and released in 2008. Protocol buffers are a solution to having a fixed and high-performance method of data-exchange between computers that is a programming language and computer architecture independent.
Transaction families and transactions in Sawtooth require a few things to be created by developers. Consider the following:
Sawtooth includes Python-based sources to serve as examples in both the settings and identity-based transaction families on GitHub. Next, we'll cover Hyperledger Fabric, another enterprise-oriented blockchain technology.
Hyperledger Fabric, like Sawtooth, is designed to be an enterprise-oriented blockchain solution that is highly modular and customizable. Hyperledger Fabric is both private and permissioned. This means that, like Sawtooth, by default Hyperledger blockchains are not observable to the public at large and are not and will not have tokens that are tradeable on exchanges. Users of the blockchain must have validated identities and join the blockchain by using a Membership Service Provider (MSP). These MSPs are configured on the system, and there can be more than one, but all members must successfully be granted access by one or more MSPs. Fabric also has a number of special tools that make it particularly full-featured, which we will cover later.
Hyperledger Fabric was designed around a few key features and use cases that were seen as critical for enterprise users.
At the core is the ledger itself. The ledger is a set of blocks, and each block holds a set of transactions. A transaction is anything that updates the state of the blockchain. Transactions, in turn, are performed by smart contract code installed on to the blockchain (called Chaincode). Let's look at how blocks and transactions are formed.
Each block is ordered in sequence, and inside each block is a set of transactions. Those transactions are also stored as happening in a specific sequence. Unlike other blockchains, the creation of the transaction and the sequence it is eventually given are not necessarily performed at the same time or on the same computer. This is because the ordering of transactions and the execution of transactions are separated. In Hyperledger Fabric, computers being used to operate the blockchain can run in three different modes (node types); these are as follows:
It is important to note that a single computer can act as up to all three of these node types on a Fabric blockchain, but this is not necessary. While it is possible for the same computer on a Hyperledger network to both execute transactions and order their sequence, Hyperledger is able to scale more by providing these as distinct services. To illustrate, look at the following diagram (from the Hyperledger documentation):
As you can see, incoming transaction first go to peers, who execute transactions using chaincode/smart contracts and then broadcast successful transactions to the ordering service. Once accepted, the ordering service decides on a final order of transactions, and the resulting transactions sets are re-transmitted to peer nodes, which write the final block on to the chain.
As an enterprise-oriented system, Fabric distinguishes between peers and orderers (nodes on a blockchain network) and the organization that owns them. Fabric is meant to create networks between organizations, and the nodes running the blockchain do so as agents of that organization. In this way, each node and its permissions are related to the organization it helps represent. Here is another diagram from Hyperledger:
As you can see, each network node operates the blockchain network on behalf of the contributing organization. This is different than networks such as Ethereum and Bitcoin, where the network is created by a set of computers that contribute resources to the network independently, or at least are perceived by the network as doing so independently, no matter who owns them. In Hyperledger Fabric, it is the organizations that create the shared ledger that contributes to the network by contributing resources in the form of peers and ordering nodes. The distinction is subtle but crucial. In most public networks, the idea is to allow computers to coordinate, but in Fabric the idea is to allow companies to coordinate. Owning organizations provides each of their peers a signed digital certificate proving their membership of a certain organization. This certificate then allows each node to connect to the network through an MSP, granting access to network resources. The organizations versus private computers focus brings us to another enterprise-oriented feature of Hyperledger Fabric, one that is necessary for a number of corporate requirements: Private Channels.
Hyperledger Fabric has a critical and unique functionality called private channels. A private channel allows a subset of members on a Fabric-based blockchain to create a new blockchain that is observable and intractable only for them. This means that, while Fabric is already private and permissioned, members of that private blockchain can create a smaller, yet more exclusive, chain to trade information that cannot be traded across the full membership network. As a result, Fabric is able to support critical use cases (such as legal communications) that would be impossible or inappropriate to broadcast, even on a relatively exclusive network.
For instance, if Hyperledger Fabric were used to set up a logistics network, the primary blockchain could be used for the tracking of packages, but pricing bids could be done on private channels. The participants of the network would be a number of shipping providers, materials providers, and a set of buyers. A buyer could issue to the blockchain a notice that they were accepting bids for a transfer of some supplies, and they could then create private channels between themselves and all transporters and suppliers. The suppliers and shipping companies could give the buyer time and cost prices, without making that information public to their competitors. While private, all of these exchanges would be encoded on to the blockchain for record keeping, legal compliance, and so on. Moreover, if corporate policy were something like taking the second-lowest bid, the entire process could be automatable through smart contracts.
In Hyperledger Fabric, assets are defined as anything that can be given a value. While this could be used to exchange different fiat currencies, an asset could be designed to denote something abstract, such as intellectual property, or something more tangible, such as a shipment of fresh fish.
In Fabric, assets are processed internally as simple key-value pairs, with their state stored on the ledger and modifiable via the chaincode. Assets in Hyperledger can fulfill all the duties performed in Ethereum by ERC-20 and ERC-721 tokens, and beyond. Anything that can be described in a token format can be stored as an asset in Hyperledger Fabric.
In Hyperledger Fabric, Smart Contracts are called chaincode. Unlike Ethereum, chaincode is not embedded directly inside the ledger itself. Instead, chaincode is installed on each peer node and interacts with the ledger to read and update state information about the assets the chaincode controls. Because the chaincode is signed and approved by all peers, and because each peer that uses a piece of chaincode must validate any state changes on the ledger, this system still allows distributed and trusted consensus, using smart contracts. To provide consistency, chaincode itself runs in an isolated Docker container.
Because of the modular nature of both the distributed ledger and the chaincode, multiple programming languages can be used to develop smart contracts; however, currently, the supported options are limited. There are full-featured SDK packages only for Go and Node.js, with eventual plans to add Java.
Fabric is one of the most popular of the Hyperledger projects for good reason. It's highly modular, designed for coordination across companies, and the private channel feature enables secure functionality that's impossible on public chains, and even most private ones. Moreover, Hyperledger Fabric has Composer—a visual tool for architecting blockchain applications. We'll discuss Composer later in the section on Hyperledger tools.
Next, we'll cover Iroha, a Hyperledger project aimed at bringing blockchain to mobile devices.
Hyperledger Iroha is a project written in C++ and contributed to by Sorimitsu. The goals of the project were to provide a portable C++ based blockchain implementation that could be used in mobile devices. Both iOS and Android operating systems, along with small computers such as Raspberry Pi, are all capable of efficiently running tightly written C++ code efficiently. To make things even easier, Iroha provides iOS, Android, and JavaScript libraries for developers.
One major difference from Ethereum, in particular, is that Hyperledger Iroha allows users to perform common functions, such as creating and transferring digital assets, by using prebuilt commands that are in the system. This negates the need to write cumbersome and hard-to-test smart contracts for the most common functionalities, enabling developers to complete simple tasks faster and with less risk. For instance, to create a new token type on Iroha, it takes just a single command—crt_ast. To make things even easier, Iroha has a command-line interface that will guide a new user through creating the asset, without writing code at all.
If the goals of Sawtooth and Fabric are completeness, Iroha is oriented more towards ease of use and device compatibility.
One of the more common use cases for blockchain technology is identity verification and authorization. You have probably experienced the issues around the web, where you either need to remember many usernames and passwords to confirm your identity to another provider, such as Google or Facebook. The problem here is that you must trust Google, Facebook, or other providers to manage your identity and keep it safe. This creates a single point of failure and allows a centralized authority to control whose identities are valid and what rights they have. This ecosystem is an obvious target for disruption and decentralization.
Hyperledger Indy is a blockchain project built around decentralized, self-declared identity. The goal of Indy is to provide tools and libraries for creating digital identities that can be managed on a blockchain and made interoperable with other applications and use cases that require identity verification.
While Fabric, Sawtooth, and Iroha all have some level of identity mechanism built in, Indy is specifically oriented around identity management and for use by applications that may not run on a blockchain. Thus, Indy could be used to provide identity services to web applications, company resources, and so on. Existing companies include Sovrin (who donated the original Indy codebase) and Every.
An often overlooked aspect of any application is the need for helpful tools to manage the lifecycle of that application. Tools, such as software to ease deployment, debugging, and design, can make a tremendous difference in the ease of use of a system, for developers and users alike. Most public blockchains are severely hampered by the lack of high-quality tools and support. The Hyperledger ecosystem, however, continues to invest in building excellent support tools.
One of the common needs of any system is benchmarking. Hyperledger Caliper is a blockchain-oriented benchmarking tool, designed to help blockchain architects ensure that the system can perform fast enough to meet the needs of the hosting organizations. Using a set of pre-defined, common use cases, Hyperledger Caliper will report an assortment of critical performance measurements, such as resource usage, Transactions Per Second (TPS), transaction latency, and so on.
Using Caliper, a team working on blockchain applications can take continuous measurements as they build out smart contracts and transaction logic and use those measurements to monitor performance changes. Caliper is compatible with Sawtooth, Indy, and Fabric blockchain systems.
Hyperledger Composer is a design tool for building smart contracts and business applications on the blockchain. It is designed for rapid prototyping of chaincode and asset data models for use with Hyperledger Fabric. As a Fabric-specific tool (so far), it is primarily designed around helping with Hyperledger Fabric specific concepts, such as assets, identity management, transactions, and the resultant chaincode used to power the business rules between all these items.
It is not designed as a "fire-and-forget" tool, where someone can build an entire ecosystem from scratch to production, rather it is designed for rapid visual prototyping to get testable applications up and running quickly, with finer details iterated directly in the codebase. IBM hosts a demo online at https://composer-playground.mybluemix.net/editor.
The primary users of Composer will be blockchain developers (especially new developers) and some technical business users. It sits well as part of an agile process for developing blockchain applications, allowing developers, network administrators, and technical business users to visualize the network and the code operating on it.
If Composer is used to assist with building aspects of a Fabric-based blockchain, then Cello is a tool to assist with the deployment of that blockchain to various servers and cloud services. Cello can be used to manage the blockchain infrastructure or launch new blockchains in a blockchain-as-a-service approach. Common lifecycle and deployment tasks include starting, stopping, and deleting a blockchain, deploying new nodes to an existing blockchain, and abstracting the blockchain operation so that it can run on local machines, in the cloud, in a virtual machine, and so on. Cello also allows monitoring and analytics.
Cello is primarily a tool for what is called DevOps, or the connection between development teams and production operations. It is primarily aimed at the Hyperledger Fabric project, but support for Sawtooth and Iroha is intended for future development.
Hyperledger Explorer is a blockchain module and one of the Hyperledger projects hosted by the Linux Foundation. Designed to create a user-friendly web application, Hyperledger Explorer can view, invoke, deploy, or query blocks, transactions, and associated data, network information (name, status, list of nodes), chain codes and transaction families, as well as any other relevant information stored in the ledger. Hyperledger Explorer was initially contributed by IBM, Intel, and DTCC.
There are times when it makes sense for multiple blockchains to be able to communicate. This is where Hyperledger Quilt comes in. Quilt is a tool that facilitates cross-Blockchain communication by implementing an Interledger protocol (ILP). The ILP is a generic specification available to all blockchains to allow cross-ledger communication, originally created by ripple labs. With ILP, two ledgers (they do not have to be blockchains) can coordinate, to exchange values from one ledger to the other.
ILP is a protocol that can be implemented using any programming language or technology, as long as it conforms to the standard. Because of this, it can be used to join multiple completely independent ledgers, even ones with radically different architecture. These ledgers do not need to be blockchains but can be any system of accounting. In ILP, cross-ledger communication occurs primarily through actors called connectors. See the following diagram from interledger.org:

The ILP bridges ledgers with a set of connectors. A connector is a system that provides the service of forwarding interledger communications towards their destination, similar to how packets are forwarded across the internet—peer to peer. ILP communication packets are sent from senders to a series of connectors that finally land at receivers.
The connectors are trusted participants in this sequence, and the sender and all intermediate connectors must explicitly trust one another. Unlike other blockchain-oriented technology, ILP does not involve trustless exchange. However, the sender and each connector need trust only their nearest links in the chain for it to work.
Quilt is the implementation of the ILP that has been donated to the Hyperledger project, on behalf of ripple labs, Everis, and NTT DATA. These organizations have also sponsored ongoing dedicated personnel to help improve the Quilt codebase, which is primarily in Java.
The distinctions between Fabric, Cello, Composer, Explorer, and Caliper can be described as follows:
Both Fabric and Composer are going to be principally involved in the development phase of a blockchain project, followed shortly after by Caliper for performance testing:
Finally, Hyperledger Quilt can be used to connect different ledgers and blockchains together. For instance, Quilt could be used to communicate from a Fabric-based system to the public Ethereum network, or to the ACH banking system, or all of the above.
Thus, the Hyperledger project has tools for end-to-end creation, operation, and interoperability of blockchain-based application ecosystems.
Given the numerous sub-projects inside Hyperledger that are all focused on business use cases, it would not be surprising if there was some confusion about which to use. This is understandable, but the good news is that for most cases the proper project to build on is clear.
By far the most popular and well-documented framework is Hyperledger Fabric. Fabric also has blockchain-as-a-service support from Amazon and Microsoft. In addition, Composer, Cello, and Caliper tools all work with the latest versions of Fabric. For the vast majority of projects, Hyperledger Fabric will be the project of most interest.
The second most-obvious choice is Sawtooth. For supply chain solutions, Sawtooth already has a reference implementation. In addition to this, Sawtooth has better support for writing smart contracts in multiple languages, whereas Hyperledger has support only for Go and JavaScript. In addition to this, Sawtooth core is written in Python. Python is a very popular language in data science, a field that is regularly paired with blockchain technology.
The final choices are Burrow, which would make a good match for technologies migrating from Ethereum, or needing to interface with the public Ethereum network, and Iroha, which would be a better match for projects that need to run a blockchain across mobile devices or other small machines.
Like much blockchain technology, the Hyperledger ecosystem is relatively new, and many projects have not even hit a full 1.0 release yet. While there is a large amount of development activity and multiple working systems already in production use, the system as a whole is fractured. For instance, Sawtooth is written in Python, Fabric in Go, Quilt in Java, and so on. Even staying inside the Hyperledger family, it would be difficult to use a homogeneous set of technologies for end-to-end implementations.
Moreover, Hyperledger's focus on private networks is a problem for the projects that may wish to have a public component. One of the appeals of blockchain technology is transparency. A project that seeks maximum transparency through public usage of their technology may need to look elsewhere or find a way to bridge between Hyperledger and public networks—possibly by using Quilt and ILP.
Similarly, projects looking to raise funds through an ICO should probably look elsewhere. Few projects have tried to use Hyperledger as part of an ICO, and, as far as we know, none of those have actually succeeded in fundraising. Hyperledger remains oriented strongly toward private networks—where it has succeeded tremendously.
Now you have a good idea of the different subprojects that make up Hyperledger and an awareness of the tooling you can use to build Hyperledger-based projects. Hyperledger is a set of technologies for building private blockchain networks for enterprises, versus the public and tradeable networks, such as Ethereum and Bitcoin. The Hyperledger family is made of six projects and a set of support tools, all with subtly different focuses and advantages to suit different projects.
Over time, the different projects are expected to become more consistent and interoperable. For instance, Hyperledger Burrow and Hyperledger Sawtooth have already cross-pollinated with the Seth transaction family, which allows Sawtooth to run Ethereum smart contracts. It is expected that tools such as Cello and Composer will be extended to support additional Hyperledger projects in time, leading to an increasingly robust ecosystem.
Next, we will discuss Ethereum in depth. Ethereum is a public blockchain network and the first and most popular of the public networks to support fully-programmable smart contracts.
In the previous chapters, we have studied in detail blockchain, Bitcoin, alternative cryptocurrencies, and crypto wallets. We discussed blockchain usage and benefits in not only currency-based applications, but other similar areas. We also discussed how Bitcoin has changed the landscape of blockchain usage for monetary benefits and how it has shaped the global economy.
In this chapter, we will be studying Ethereum blockchain in depth. It is currently the largest community-backed blockchain project, second to Bitcoin, with supporters and various projects and tokens running on top of it. In this chapter, we will discuss the following topics:
Ethereum is a blockchain-based system with special scripting functionality that allows other developers to build decentralized and distributed applications on top of it. Ethereum is mostly known among developers for the easy development of decentralized applications. There are differences between Ethereum and blockchain. The most important difference is that Ethereum blockchain can run most decentralized applications.
Ethereum was conceptualized in late 2013 by Vitalik Buterin, cryptocurrency researcher and developer. It was funded by a crowd sale between July and August 2014. Ethereum has built-in Turing, a complete programming language, that is, a programming language meant to solve any computation complexity. This programming language is known as Solidity and is used to create contracts that help in creating decentralized applications on top of Ethereum.
Ethereum was made live on July 30, 2015, with 11.9 million coins pre-mined for the crowd sale, to fund Ethereum development. The main internal cryptocurrency of Ethereum is known as Ether. It is known by the initialism ETH.
Let's discuss some general components of Ethereum, its primary currency, network, and other details. This will help in understanding Ethereum in a much better way and also help us see how it is different to Bitcoin and why it has a huge community, currently making it the most important cryptocurrency and blockchain project, second only to the Bitcoin blockchain.
Ethereum accounts play a prime role in the Ethereum blockchain. These accounts contain the wallet address as well as other details. There are two types of accounts: Externally Owned Accounts (EOA), which are controlled by private keys, and Contract Accounts, which are controlled by their contract code.
EOAs are similar to the accounts that are controlled with a private key in Bitcoin. Contract accounts have code associated with them, along with a private key. An externally owned account has an Ether balance and can send transactions, in the form of messages, from one account to another. On the other hand, a contract account can have an Ether balance and a contract code. When a contract account receives a message, the code is triggered to execute read or write functions on the internal storage or to send a message to another contract account.
Two Ethereum nodes can connect only if they have the same genesis block and the same network ID. Based on usage, the Ethereum network is divided into three types:
All of the preceding types are the same, apart from the fact that each of them has a different genesis block and network ID; they help to differentiate between various contract accounts and externally owned accounts, and if any contract is running a different genesis, then they use a different network ID to distinguish it from other contract accounts.
There are some network IDs that are used officially by Ethereum. The rest of the network IDs can be used by contract accounts. Here are some of the known IDs:
The public MainNet has a network ID of 1, but since Ethereum has a very active community backing it, there are various updates and upgrades happening to the Ethereum blockchain; primarily, there are four stages of the Ethereum network; let's discuss each of them in detail:
Clients are implementations of the Ethereum blockchain; they have various features. In addition to having a regular wallet, a user can watch smart contracts, deploy smart contracts, clear multiple Ether accounts, store an Ether balance, and perform mining to be a part of the PoW consensus protocol.
There are various clients in numerous languages, some officially developed by the Ethereum Foundation and some supported by other developers:
The preceding list consists of some of the most prominent Ethereum-specific clients currently in production. There are many other clients apart from these that are not heavily community-backed or are in their development phase. Now let's discuss the most prominent Ethereum client—Geth, or go-ethereum.
This is one of the most widely used Ethereum clients built on Golang; it is a command-line interface for running a full Ethereum node. It was part of the Frontier release and currently also supports Homestead. Geth can allow its user to perform the following various actions:
Geth can be installed using the following commands on Ubuntu systems:
sudo apt-get install software-properties-common
sudo add-apt-repository -y ppa:ethereum/ethereum
sudo apt-get update
sudo apt-get install ethereum
After installation, run geth account new to create an account on your node. Various options and commands can be checked by using the geth --help command.
On Windows-based systems, it is much easier to install Geth by simply downloading the latest version from https://geth.ethereum.org/downloads/ and then downloading the required zip file, post-extracting the zip file, and opening the geth.exe program.
Geth provides account management, using the account command. Some of the most-used commands related to account management on Geth are as follows:
COMMANDS:
 list Print summary of existing accounts
 new Create a new account
 update Update an existing account
 import Import a private key into a new account
The following screenshot is the output that will be generated after executing the preceding code:

When we run the command to create a new account, Geth provides us with an address on our blockchain:
$ geth account new
Your new account is locked with a password. Please give a password. Do not forget this password.
Passphrase:
Repeat Passphrase:
Address: {168bc315a2ee09042d83d7c5811b533620531f67}
When we run the list command, it provides a list of accounts that are associated with the custom keystore directory:
$ geth account list --keystore /tmp/mykeystore/
Account #0: {5afdd78bdacb56ab1dad28741ea2a0e47fe41331} keystore:///tmp/mykeystore/UTC--2017-04-28T08-46-27.437847599Z--5afdd78bdacb56ab1dad28741ea2a0e47fe41331
Account #1: {9acb9ff906641a434803efb474c96a837756287f} keystore:///tmp/mykeystore/UTC--2017-04-28T08-46-52.180688336Z--9acb9ff906641a434803efb474c96a837756287f
We will be discussing mining and contract development in later chapters.
Every transaction on the Ethereum blockchain is required to cover the computation cost; this is done by paying gas to the transaction originator. Each of the operations performed by the transaction has some amount of gas associated with it.
The amount of gas required for each transaction is directly dependent on the number of operations to be performed—basically, to cover the entire computation.
In simple terms, gas is required to pay for every transaction performed on the Ethereum blockchain. The minimum price of gas is 1 Wei (smallest unit of ether), but this increases or decreases based on various factors. The following is a graph that shows the fluctuation in the price of Ethereum gas:

Ethereum virtual machine (EVM) is a simple stack-based execution machine and acts as a runtime environment for smart contracts. The word size of EVM is 256-bits, which is also the size limit for each stack item. The stack has a maximum size of 1,024 elements and works on the Last in First Out (LIFO) queue system. EVM is a Turing-complete machine but is limited by the amount of gas that is required to run any instructions. Gas acts as a propellant with computation credits, which makes sure any faulty code or infinite loops cannot run, as the machine will stop executing instructions once the gas is exhausted. The following diagram illustrates an EVM stack:
EVM supports exception handling in case of an exception occurring, or if there is insufficient gas or invalid instructions. In such cases, the EVM halts and returns an error to the executing node. The exception when gas is exhausted is commonly known as an Out-of-Gas (OOG) exception.
There are two types of storage available to contracts and EVM: one is memory, and the other is called storage. Memory acts just like RAM, and it is cleared when the code is fully executed. Storage is permanently stored on the blockchain. EVM is fully isolated, and the storage is independent in terms of storage or memory access, as shown in the following diagram:
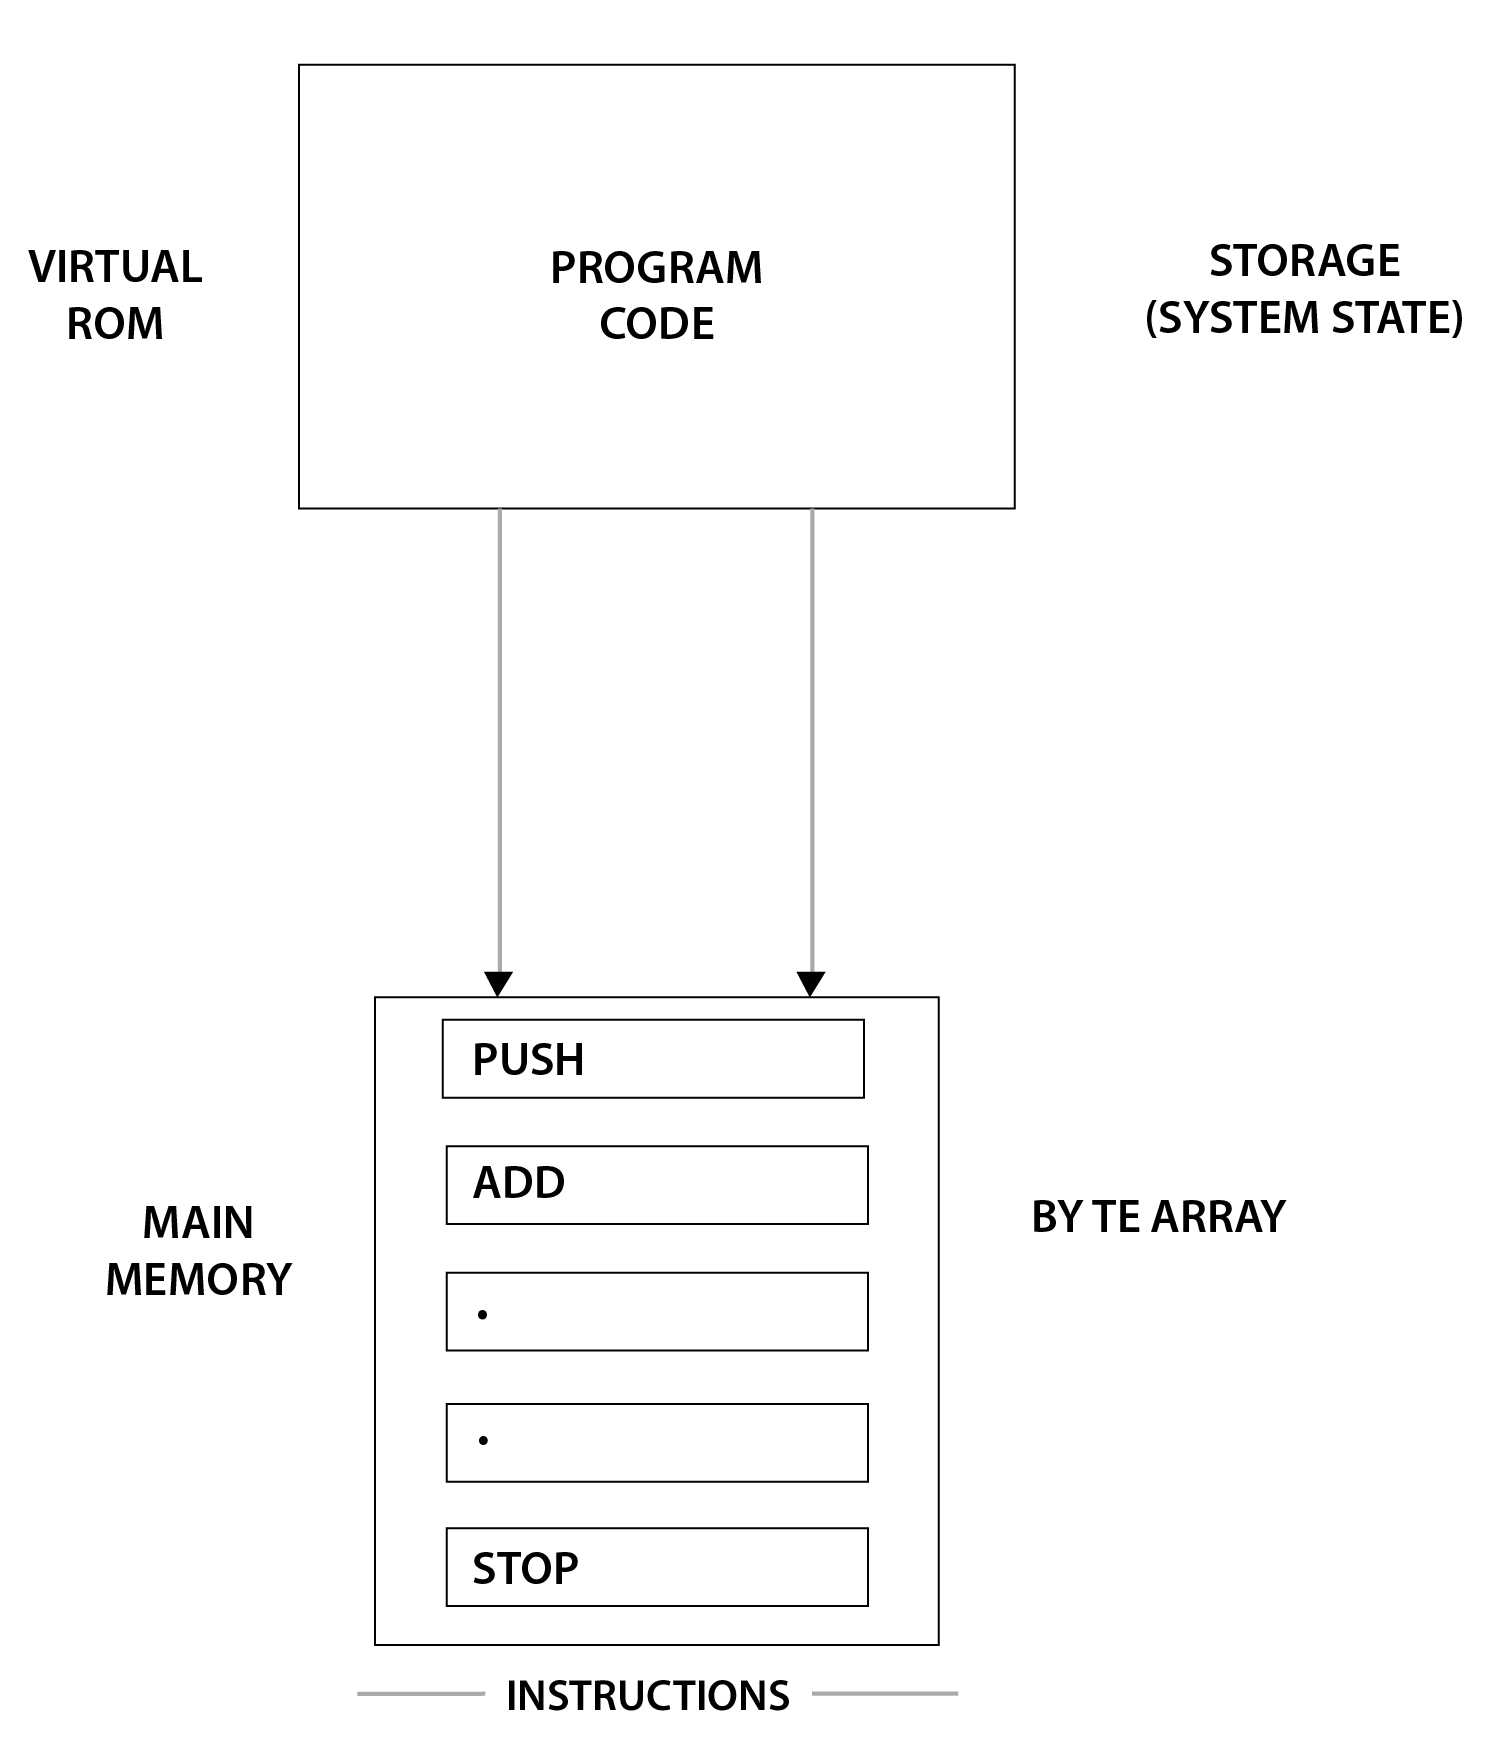
The storage directly accessible by EVM is Word Array, which is non-volatile and is part of the system state. The program code is stored in virtual ROM, which is accessible using the CODECOPY, which basically copies the code from the current environment to the memory.
Apart from system state and gas, there are various other elements and information that is required in the execution environment where the execution node must be provided to the EVM:
The Ethereum blockchain is a collection of required parameters similar to a Bitcoin blockchain; here are the primary elements of an Ethereum block:
A block header is a collection of various valuable information, which defines the existence of the block in the Ethereum blockchain. Take a look at the following:
The following diagram shows the structure of a block's headers:
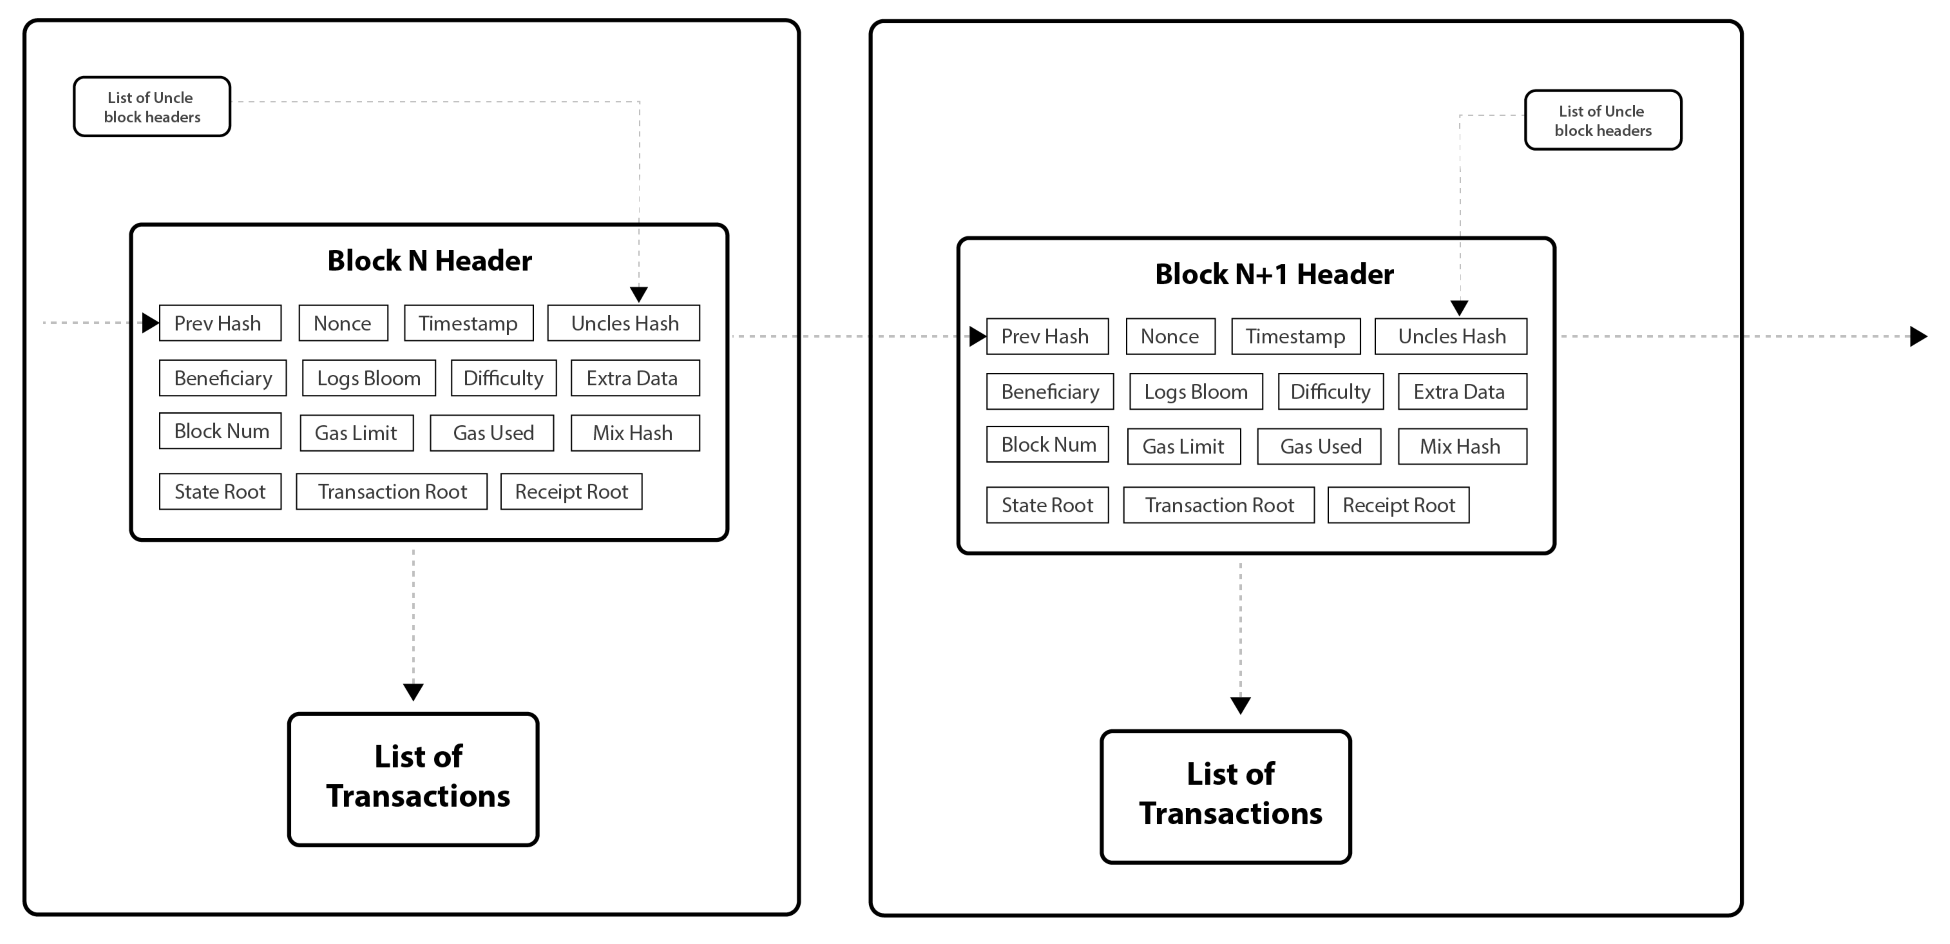
Ethereum incentivizes miners to include a list of uncles or ommers when a block is mined, up to to a certain limit. Although in Bitcoin, if a block is mined at the same height, or if a block contains no transaction, it is considered useless; this is not the case with Ethereum. The main reason to include uncles and have them as an essential part of the Ethereum blockchain is that they decrease the chance of an attack occurring by 51%, because they discourage centralization.
The message is the data and the value that is passed between two accounts. This data packet contains the data and the value (amount of ether). A message can be sent between contract accounts or externally owned accounts in the form of transactions.
Ethash is the Proof of Work (PoW) algorithm used in Ethereum. It is the latest version of the Dagger–Hashimoto algorithm. It is similar to Bitcoin, although there is one difference—Ethash is a memory-intensive algorithm; hence, it is difficult to implement ASICs for the same. Ethash uses the Keccak hash function, which is now standardized to SHA-3.
Ether is the main cryptocurrency associated with the Ethereum blockchain; each of the contract accounts can create their own currency, but Ether is used within the Ethereum blockchain to pay for the execution of the contracts on the EVM. Ether is used for purchasing gas, and the smallest unit of Ether is used as the unit of gas.
Since Wei is the smallest unit of Wei, here is a table, listing the denominations and the name commonly used for them, along with the associated value:
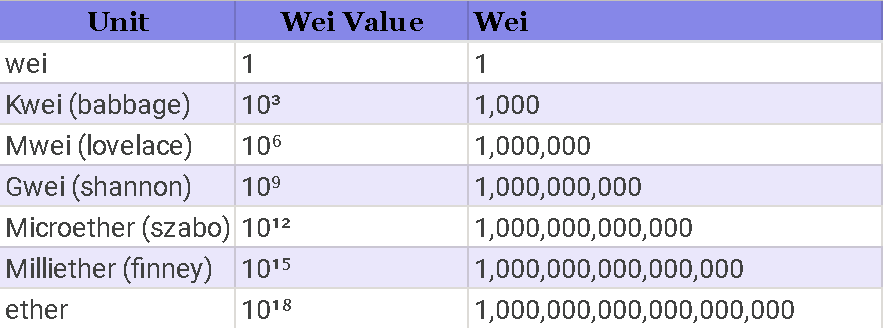
There are various ways by which Ether can be procured for trading, building smart contracts, or decentralized applications:
Due to its vast community support and major active development, Ether has always been a preferred investment opportunity for everyone. There are more than 500 known exchanges that support the exchange of Ether among other cryptocurrencies or fiat currencies. Here is a price chart, showing the fluctuation of Ether price from April 17, 2018 to May 17, 2018:
In this chapter, we discussed various components of Ethereum, its execution, network, and accounts, and there was a detailed study of Ethereum's clients. We also discussed gas and EVM, including its environment and how an execution process works. Finally, we discussed the Ethereum block and its block header, the Ethereum algorithm, and the procurement of ether.
In the next chapter, we will learn about Solidity, the official and standard language for contract writing on Ethereum blockchain. Learning about Solidity will help us gain a better understanding of smart contract development and deployment.
In the previous chapter, we discussed Solidity—the programming language introduced by the Ethereum foundation. Solidity is the language that makes it possible to create decentralized applications on top of Ethereum blockchain, either to be used for creating another cryptocurrency token or for any other use case in which blockchain can have an essential role.
Ethereum runs smart contracts on its platform; these are applications that use blockchain technology to perform the required action, enabling users to create their own blockchain and also issue their own alternative cryptocurrency. This is made possible by coding in Solidity, which is a contract-oriented programming language used for writing smart contracts that are to be executed on the Ethereum blockchain and perform the programmed tasks.
Solidity is a statically typed programming language that runs on the Ethereum virtual machine. It is influenced by C++, Python, and JavaScript, was proposed in August 2014 and developed by the Ethereum project's solidity team. The complete application is deployed on the blockchain, including smart contract, frontend interface, and other modules; this is known as a DApp or a Decentralized Application.
We will be covering the following topics in this chapter:
Solidity is not the only language to work on Ethereum smart contracts; prior to solidity, there were other languages that were not as successful. Here is a brief list of languages currently (as of August 2018) compatible with Ethereum:
Solidity is also known as a contract-oriented language, since contracts are similar to classes in object-oriented languages. The Solidity language is loosely based on ECMAScript (JavaScript); hence, a prior knowledge of the same would be helpful in understanding Solidity. Here are some tools required to develop, test, and deploy smart contracts programmed in Solidity:
Apart from the crucial tools we've already mentioned, there are also various other tools that help in the development of a smart contract to be run on an Ethereum blockchain for tasks such as understanding the contract flow, finding security vulnerabilities, running the test application, writing documentation, and so on. Take a look at the following diagram:
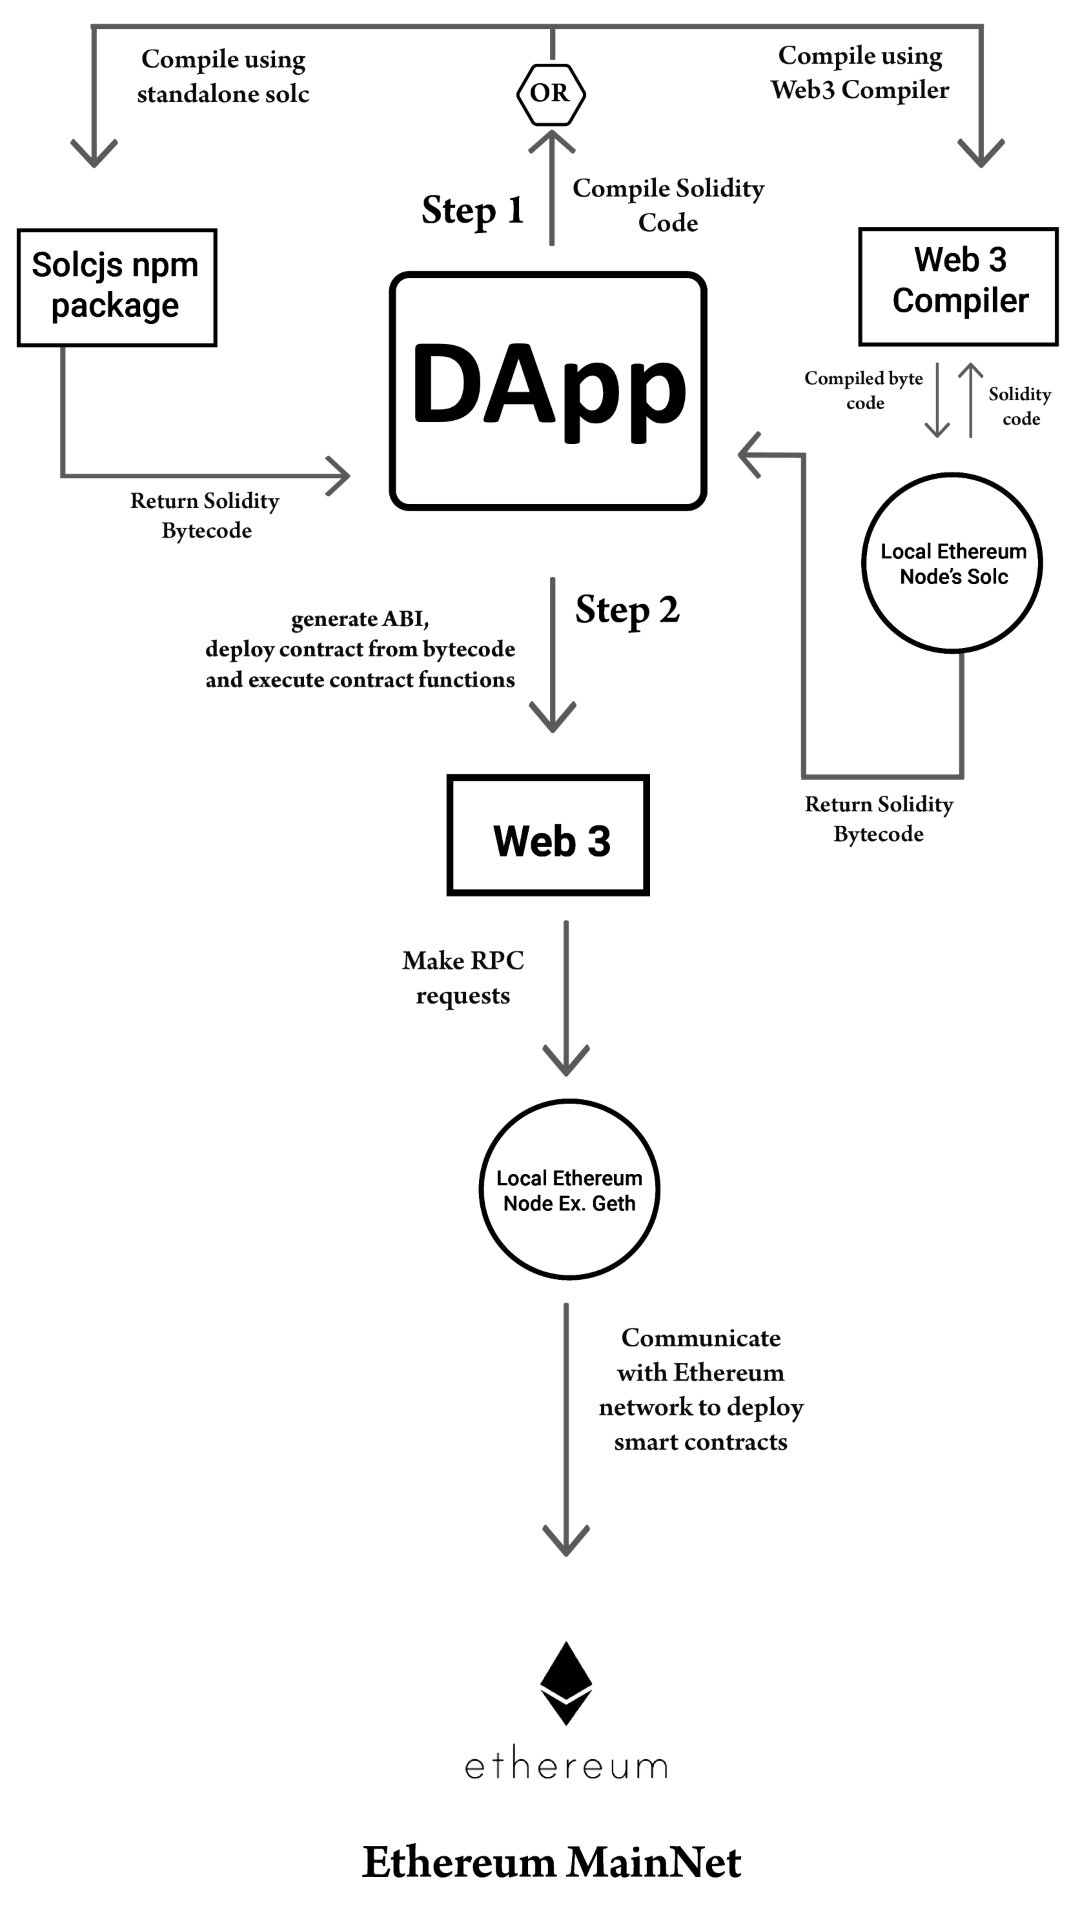
If you program regularly, you are already aware of code editors or Integrated Development Environments (IDEs). There is a list of integrations available for various IDEs already present; apart from this, Ethereum foundation has also released a browser-based IDE with integrated compiler and a Solidity runtime environment, without the server components for writing and testing smart contracts. It can be found at remix.ethereum.org.
For small and learning-based DApps projects, it is suggested to work on the browser-based compiler by the Ethereum foundation: Remix. Another way is to install the Solidity compiler on to your machine. solc can be installed from npm using the following command:
npm install -g solc
Solidity can also be built from the source by cloning the Git repository present on the GitHub link: https://github.com/ethereum/solidity.git.
In this section, we will be discussing the structure and elements of a Solidity source file; we will discuss the layout, structure, data types, its types, units, controls, expressions, and other aspects of Solidity. The format extension of a solidity file is .sol.
Solidity is going through active development and has lot of regular changes and suggestions from a huge community; hence, it is important to specify the version of a solidity file at the start of the source file, to avoid any conflict. This is achieved by the Pragma version. This is defined at the start of the solidity file so that any person looking to run the file knows about the previous version. Take a look at this code:
pragma solidity ^0.4.24;
By specifying a version number, that specific source file will compile with a version earlier or later than the specified version number.
Similar to ECMAScript, a Solidity file is declared using the import statement as follows:
import "filename.sol";
The preceding statement will import all the symbols from the filename.sol file into the current file as global statements.
Paths are also supported while importing a file, so you can use / or . or .. similar to JavaScript.
Single line (//) comments and multi-line(/* ... */) comments are used, although apart from this there is another type of comment style called Natspec Comment, which is also possible; in this type of comment, we either use /// or /** ... */, and they are to be used only earlier function declaration or statements.
Natspec is short for natural specification; these comments as per the latest solidity version (0.4.24) do not apply to variables, even if the variables are public. Here is a small code snippet with an example of such these types of comments:
pragma solidity ^0.4.19;

/// @title A simulator for Batman, Gotham's Hero
/// @author DC-man
/// @notice You can use this contract for only the most basic simulation
/// @dev All function calls are currently implement without side effects
contract Batman {
 /// @author Samanyu Chopra
 /// @notice Determine if Bugs will accept `(_weapons)` to kill
 /// @dev String comparison may be inefficient
 /// @param _weapons The name weapons to save in the repo (English)
 /// @return true if Batman will keep it, false otherwise
 function doesKeep(string _weapons) external pure returns (bool) {
 return keccak256(_weapons) == keccak256("Shotgun");
 }
}
They are used in the Natspec comments; each of the tags has its own context based on its usage, as shown in the following table:
| Tag | Used for |
|
@title |
Title for the Smart Contract |
|
@author |
Author of the Smart Contract |
|
@notice |
Explanation of the function |
|
@dev |
Explanation to developer |
|
@param |
Explanation of a parameter |
|
@return |
Explanation of the return type |
Every contract in Solidity is similar to the concept of classes. Contracts can inherit from other contracts, in a fashion similar to classes. A contract can contain a declaration of the following:
These are the values that are permanently stored in the contract storage, for example:
pragma solidity ^0.4.24;

contract Gotham {
 uint storedData; // State variable
 // ...
}
Functions can be called internally or externally, for example:
pragma solidity ^0.4.24;

contract Gotham {
 function joker() public Bat { // Function
 // ...
 }
}
Function modifiers can be used to amend the semantics of functions in a declaration. That is, they are used to change the behavior of a function. For example, they are used to automatically check a condition before executing the function, or they can unlock a function at a given timeframe as required. They can be overwritten by derived contracts, as shown here:
pragma solidity ^0.4.24;

contract Gotham {
 address public weapons;

modifier Bank() { // Modifier
 require(
     msg.sender == coins,
     "Only coins can call this."
     );
     _;
 }

    function abort() public coinsbuyer { // Modifier usage
 // ...
 }
}
Events allow convenient usage of the EVM, via the frontend of the DApp. Events can be heard and maintained. Take a look at this code:
pragma solidity ^0.4.24;

contract Attendance {
      event Mark_attendance(string name, uint ID); // Event

    function roll_call() public marking {
             // ...
                 emit Mark_attendance(Name, ID); //Triggering event
         }
}
In Solidity, the type of each variable needs to be specified at compile time. Complex types can also be created in Solidity by combining the complex types. There are two categories of data types in Solidity: value types and reference types.
Value types are called value types because the variables of these types hold data within its own allocated memory.
This type of data has two values, either true or false, for example:
bool b = false;
The preceding statement assigns false to boolean data type b.
This value type allocates integers. There are two sub-types of integers, that is int and uint, which are signed integer and unsigned integer types respectively. Memory size is allocated at compile time; it is to be specified using int8 or int256, where the number represents the size allocated in the memory. Allocating memory by just using int or unit, by default assigns the largest memory size.
This value type holds a 20-byte value, which is the size of an Ethereum address (40 hex characters or 160 bits). Take a look at this:
address a = 0xe2793a1b9a149253341cA268057a9EFA42965F83
This type has several members that can be used to interact with the contract. These members are as follows:
balance returns the balance of the address in units of wei, for example:
address a = 0xe2793a1b9a149253341cA268057a9EFA42965F83;
uint bal = a.balance;
transfer is used to transfer from one address to another address, for example:
address a = 0xe2793a1b9a149253341cA268057a9EFA42965F83;
address b = 0x126B3adF2556C7e8B4C3197035D0E4cbec1dBa83;
if (a.balance > b.balance) b.transfer(6);
Almost the same amount of gas is spent when we use transfer, or send members. transfer was introduced from Solidity 0.4.13, as send does not send any gas and also does not propagate exceptions. Transfer is considered a safe way to send ether from one address to another address, as it throws an error and allows someone to propagate the error.
The call, callcode, and delegatecall are used to interact with functions that do not have Application Binary Interface (ABI). call returns a Boolean to indicate whether the function ran successfully or got terminated in the EVM.
When a does call on b, the code runs in the context of b, and the storage of b is used. On the other hand, when a does callcode on b, the code runs in the context of a, and the storage of a is used, but the code of and storage of a is used.
The delegatecall function is used to delegate one contract to use another contract's storage as required.
Solidity has a fixed and dynamic array value type. Keywords range from bytes1 to bytes32 in a fixed-sized byte array. On the other hand, in a dynamic-sized byte array, keywords can contain bytes or strings. bytes are used for raw byte data and strings is used for strings that are encoded in UTF-8.
length is a member that returns the length of the byte array for a fixed-size byte array or for a dynamic-size byte array.
A fixed-size array is initialized as test[10], and a dynamic-size array is initialized as test2[.
Literals are used to represent a fixed value; there are multiple types of literals that are used; they are as follows:
Integer literals are formed with a sequence of numbers from 0 to 9. Octal literals and ones starting with 0 are invalid, since the addresses in Ethereum start with 0. Take a look at this:
int a = 11;
String literals are declared with a pair of double("...") or single('...') quotes, for example:
Test = 'Batman';
Test2 = "Batman";
Hexadecimal literals are prefixed with the keyword hex and are enclosed with double (hex"69ed75") or single (hex'69ed75') quotes.
Hexadecimal literals that pass the address checksum test are of address type literal, for example:
0xe2793a1b9a149253341cA268057a9EFA42965F83;
0x126B3adF2556C7e8B4C3197035D0E4cbec1dBa83;
Enums allow the creation of user-defined type in Solidity. Enums are convertible to and from all integer types. Here is an example of an enum in Solidity:
enum Action {jump, fly, ride, fight};
There are two types of functions: internal and external functions. Internal functions can be called from inside the current contract only. External functions can be called via external function calls.
There are various modifiers available, which you are not required to use, for a Solidity-based function. Take a look at these:
The pure functions can't read or write from the storage; they just return a value based on its content. The constant modifier function cannot write in the storage in any way. Although, the post-Solidity Version 0.4.17 constant is deprecated to make way for pure and view functions. view acts just like constant in that its function cannot change storage in any way. payable allows a function to receive ether while being called.
Multiple modifiers can be used in a function by specifying each by white-space separation; they are evaluated in the order they are written.
These are passed on by reference; these are very memory heavy, due to the allocation of memory they constitute.
A struct is a composite data type that is declared under a logical group. Structs are used to define new types. It is not possible for a struct to contain a member of its own type, although a struct can be the value type of a mapping member. Here is an example of a struct:
struct Gotham {

address Batcave;
uint cars;
uint batcomputer;
uint enemies;
string gordon;
address twoface;

}
This specifies where a particular data type will be stored. It works with arrays and structs. The data location is specified using the storage or memory keyword. There is also a third data location, calldata, which is non-modifiable and non-persistent. Parameters of external functions use calldata memory. By default, parameters of functions are stored in memory; other local variables make use of storage.
Mapping is used for key-to-value mapping. Mappings can be seen as hash tables that are virtually initialized such that every possible key exists and is mapped to a default value. The default value is all zeros. The key is never stored in a mapping, only the keccak256 hash is used for value lookup. Mapping is defined just like any other variable type. Take a look at this code:
contract Gotham {

    struct Batman {
        string friends;
        string foes;
        int funds;
        string fox;
    }

    mapping (address => Batman) Catwoman;
   address[] public Batman_address;
}
The preceding code example shows that Catwoman is being initialized as a mapping.
Global variables can be called by any Solidity smart contract. They are mainly used to return information about the Ethereum blockchain. Some of these variables can also perform various functions. Units of time and ether are also globally available. Ether currency numbers without a suffix are assumed to be wei. Time-related units can also be used and, just like currency, conversion among them is allowed.
In this chapter, we discussed Solidity in detail, we read about the compiler, and we did a detailed study programming in solidity that included studying about the layout of a solidity file, the structure of a contract, and the types of values and reference. We also learned about mapping.
In the next chapter, we will apply our new knowledge from this chapter to develop an actual contract and deploy the same on a test network.
The concept of smart contracts was first conceived by researcher Nick Szabo in the mid 1990s. In his papers, he described smart contracts as a set of promises, specified in digital form, including protocols within which the parties perform these promises. This description can be broken into four pieces:
As you can see, nowhere in this is the blockchain directly specified, as blockchain technology had not yet been invented and would not be invented for another 13 years. However, with the invention of blockchain technology, smart contracts were suddenly much more achievable.
Smart contracts and blockchain technology are independent ideas. A blockchain can exist without smart contracts (Bitcoin, for instance, has no real smart contract ability built in), and smart contracts can be built without a blockchain. However, blockchain is a technology particularly well-suited for the development of smart contracts because it allows trustless, decentralized exchange. Essentially, the blockchain provides two out of the four necessary items for smart contracts: digital form and protocols for the communication and performance of actions between distinct parties.
In this chapter, we will go over some of the different blockchain networks and their approaches to smart contract technology. In this chapter, we will cover the following topics:
In general, the various smart contract approaches can be divided into different types: Turing Complete, Restricted Instructions, Off-Chain Execution, and On-Chain Execution, as shown in the following figure:
The types of smart contracts that are executed on a system determine performance, what can and cannot be executed on the system, the complexity, and of course, the level of security.
Before we go further, let's discuss why smart contracts are desired and even revolutionary.
The world before smart contracts was one that was fraught with uncertainty. Legal contracts, even simple ones, need not be followed, and the cost of recourse using most legal systems was and is extremely expensive, even in countries where the legal system is not corrupt. In many areas of the world, contracts are barely worth the paper they are written on and are usually enforceable only by parties with substantial political or financial power. For weaker actors in an economic or political system, this is a terrible and unfair set of circumstances.
The issues that we mentioned previously come primarily from the human factor. As long as a person is involved in the enforcement of a contract, they can be corrupt, lazy, misinformed, biased, and so on. A smart contract, in contrast, is written in code and is meant to execute faithfully no matter what parties are involved. This provides the opportunity for safer, cheaper, faster, and far more equitable outcomes.
Let's look at the key advantages of smart contracts in more depth in the following subsections.
The most immediate advantage of smart contracts is that they reduce the labor and pain involved in even successful and faithfully carried out agreements. Take for example, a simple purchase order and invoice between companies. Imagine a company called FakeCar Inc. that decides they need 1,000 wheels from their supplier, Wheelmaster. They agree between them that each wheel will cost $20, with payment made when the wheels are delivered to FakeCar. At the beginning, the wheels might be shipped by freight, passing through multiple hands on the way to FakeCar. Once they arrive, FakeCar would need to scan and inspect each wheel, make notes, and then issue a check or wire transfer to Wheelmaster. Depending on the distance involved, the wheels may be in the custody of multiple companies: a trucking company, intercontinental shipping, another trucking company, and finally FakeCar's manufacturing facility. At each stage, there is a chance of damage, loss, or misdelivery. Once delivered, FakeCar would need to issue a transfer to cover the invoice. Even if all goes well, this process can take weeks. In the meantime, both FakeCar and Wheelmaster have to worry whether they will get their wheels or their money, respectively.
Now let's look at how this process might work with smart contracts:
In this scenario, payments and insurance can be verified and handled instantly—even across international boundaries, and across cultures and languages—if all the parties participate in a blockchain-based ecosystem of smart contracts. The result is a great increase in the certainty of outcomes across all parties, and a subsequent increase in efficiency. For instance, if Wheelmaster can be certain that their invoice will be paid, then they can make business decisions with vastly more efficiency.
As of writing, the first major logistics transaction using blockchain and smart contracts was completed on the Corda blockchain between HSBC and ING, and involved the shipment of soybeans from Argentina to Malaysia. According to the banks, such a transfer used to be very time consuming and would take five to ten days. With blockchain, the whole issue of finance was handled in under 24 hours.
The use of smart contracts is still in its infancy, and yet the technology has already resulted in an 80–90% reduction in the cross-border friction of financial services. As the technology and surrounding ecosystem improves, the advantages may become yet more extreme.
As mentioned earlier, one of the negative factors experienced by organizations worldwide is that, for many transactions, trust is a necessity. This is especially true in financial transactions, where purchase orders, invoices, and shipments move between multiple parties. The trust issues here are many. There is a question of not only whether someone will pay, but whether they can pay at all? Do they have a history of on-time payment and, if not, just how bad is their payment history? In many cases, buyers and sellers in any marketplace have very limited information. This is particularly true internationally. This is where blockchain and smart contracts can help.
In the United States, each person has a credit score that is calculated by three large credit agencies. These agencies and their methods are opaque. Neither the buyers of this information nor the people who are reported on are allowed deep insight into how the score is calculated, nor are they able to update this information directly. A mistake by a credit agency can be devastating to someone's ability to finance a home or a car, costing a consumer valuable time and money. Nevertheless, if a consumer finds mistakes on their credit report, they must beg the issuer to update it, and they have few options if that organization refuses. Worse, those same issuers have proven bad stewards of the private financial information they collect. For instance, in 2017, Experian suffered a massive data breach that exposed the records of over 100 million people. If these agencies were replaced by a blockchain system and smart contracts, people would be able to see the rules and update records directly, without having to pay an intermediary that may or not be honest themselves.
Large companies have an advantage in the current marketplace: They can both afford to pay these third-party services for financial data, as well as the personnel and systems needed to track information themselves over time. Smaller companies are not granted such economies of scale, putting them at a competitive disadvantage and increasing their overhead, or even putting them out of business if they make a bad decision because they have less information. However, even larger companies stand to benefit, as the cost and expense of compiling this data add up for them as well. As more data concerning trust becomes public and automated by smart contracts, the playing field will level and, hopefully, will crowd dishonest actors out of the marketplace. This should result in increased confidence across the market, along with reduced overheads and, by extension, higher profits, lower prices, or both.
In the United States, there used to be a process known as red lining, where people of certain ethnic groups were denied loans and access to financial services—particularly mortgages. These unfair practices continue to some extent, as the criteria and process for granting loans and the way interest rates are calculated are hidden inside centralized organizations. This phenomenon is not contained within the USA; there are many areas in the world where ethnic, religious, and other biases distort what are meant to be objective decisions. With a smart-contract-based system, the rules would be public and auditable to ensure fairness and accuracy.
One approach to smart contracts is to allow full-featured software to be embedded either inside or alongside a blockchain, able to respond to blockchain events. This is an approach taken by Hyperledger Fabric, Ethereum, NEO, and other such companies. This approach gives maximum flexibility, as there is essentially nothing that cannot be written into the blockchain system. The downside of this power is the risk of making errors. The more options available, the more possible edge cases and permutations that must be tested, and the higher the risk that there will be an undiscovered vulnerability in the code.
The other approach to smart contracts is to greatly reduce the scope of what is possible in return for making things more secure and costly mistakes more difficult. The trade-off is currently flexibility versus security. For instance, in the Stellar ecosystem, smart contracts are made as sets of operations. In Stellar, there are only eleven operations:
These operations themselves have multiple options and permutations, and so enable quite a large amount of behavior. However, it is not possible to easily use these operations to execute something such as the DAO, or some other on-chain governance organization. Instead, such functionality would have to be hosted off the chain. Similarly, there is no clear way in Stellar to manage the equivalent of ERC-721 tokens, which would track the equivalent of something such as trading cards or even pieces of real estate. Stellar's smart contract system is geared toward the transfer of fungible assets, such as currencies. As a result, it can scale very quickly, easily handle multisignature accounts and escrow, and process transactions in just a few seconds with high throughput. Ethereum is more flexible, but the multisignature capability, the tokens themselves, and so on would need to be created with software written in Solidity. Ethereum is obviously more flexible, but requires more code, and thus runs a higher risk of defects.
The blockchain with the most widespread use of smart contracts is Ethereum. Of all the smart-contract-capable networks presented here, it is not only the one with the largest use, but also has the largest ecosystem of public distributed applications. One of the reasons that Ethereum is so popular is that its representation of smart contracts is relatively intuitive and easy to read. In this section, we are going to look at a common Ethereum-based smart contract that fulfills all four of the preceding criteria and is relatively easy to understand: a token sale contract. The following code will be written in Solidity; for more details, please see Chapter 13, Solidity 101, and Chapter 23, Understanding How Etherum Works.
The first aspect of a smart contract is that it must make a set of programmatic promises. The reason we have chosen a token sale contract to look at is that it has a very simple promise to make: if you send the contract Ethereum, the contract will in turn automatically send your account a new token. Let's look at some basic code, which is explicitly not for production; this is simplified code to make certain concepts clearer. This code comes from the StandardToken contract, part of the OpenZeppelin (You'll find a link for the same in the References section) project on which this is based, which has full-featured and audited code to achieve the same effect but is more complicated to understand.
First, here is an interface contract for an ERC20 token, which we will save as a file called ERC20.sol:
pragma solidity ^0.4.23;
interface ERC20 {
 function totalSupply() public view returns (uint256);
  function balanceOf(address who) public view returns (uint256);
  function transfer(address to, uint256 value) public returns (bool);
  function allowance(address owner, address spender) public view returns (uint256);
  function transferFrom(address from, address to, uint256 value) public returns (bool);
  function approve(address spender, uint256 value) public returns (bool);
  event Transfer(address indexed from, address indexed to, uint256 value);
  event Approval(address indexed _owner, address indexed _spender, uint256 _value);
}
Next, we will reference that token interface in our crowdsale contract, which will send an ERC20 token in response to a payment in ether:
pragma solidity ^0.4.23;
import "./ERC20.sol";

contract Crowdsale {

 // The token being sold, conforms to ERC20 standard.
 ERC20 public token;

 // 1 tokens per Eth, both have 18 decimals.
 uint256 public rate = 1;

 constructor(ERC20 _token) public {
    token = _token;
 }

 function () external payable {
    uint256 _tokenAmount = msg.value * rate;
    token.transfer(msg.sender, _tokenAmount);
 }
}
This is a very simplified contract, but again, it is not sufficient for a complete, real-world Crowdsale. However, it does illustrate the key concepts for a smart contract. Let's look at each piece. The constructor method requires a reference to an ERC20 token, which is the token that will be given to buyers who send in Ethereum, as shown in the following code:
constructor(ERC20 _token) public {
    token = _token;
}
Because of the way Solidity works, this contract cannot function unless a token has been loaded. So this is the first promise implicitly made by this code: there must be an ERC20 token available for purchase. The second promise is the conversion rate, which is placed at the very simple 1. For each wei (the smallest unit of currency in Ethereum), a person buying this token will get 1 unit of the new token. Ethereum has 18 decimal places, and by convention so do most tokens, so it would be presumed that this would make the conversion of Ethereum to this token now 1:1. This brings us to item #4 in the necessary aspects of a smart contract: automatic fulfillment. The following code handles this:
function () external payable {
    uint 256 _tokenAmount = msg.value * rate; //Calculate tokens purchased
    token.transfer(msg.sender, _tokenAmount); //Execute send on token contract.
}
As this is code, the requirement that the smart contract should be in digital form is obvious. The automatic aspect here is also straightforward. In Ethereum, msg.value holds the value of the ether currency that is sent as part of the command. When the contract receives Ethereum, it calculates the number of tokens the purchaser should receive and sends them: no human interaction needed, and no trusted party necessary or possible. Similarly, no one can intervene, as once it is deployed to the network, the code in Ethereum is immutable. Therefore, a sender who is using this smart contract can be absolutely assured that they will receive their tokens.
It is important to understand smart contracts in the domain in which they live: decentralized, asynchronous networks. As a result of living in this ecosystem, there are security considerations that are not always obvious and can lead to issues. To illustrate, we are going to look into two related functions of the ERC20 standard: approve and transferFrom. Here is code for the approve function from OpenZeppelin:
function approve(address _spender, uint256 _value) public returns (bool) {
   allowed[msg.sender][_spender] = _value;
   emit Approval(msg.sender, _spender, _value);
   return true;
 }
The approve function allows a token owner to say that they have approved a transfer of their token to another account. Then, in response to different events, a future transfer can take place. How this happens depends on the application, but such as the token sale, by approving a transfer, a blockchain application can later call transferFrom and move the tokens, perhaps to accept payment and then perform actions. Let's look at that code:
function transferFrom(address _from,address _to,uint256 _value) public returns (bool) {
   require(_to != address(0)); // check to make sure we aren't transfering to nowhere.

   // checks to ensure that the number of tokens being moved is valid.
   require(_value <= balances[_from]);
   require(_value <= allowed[_from][msg.sender]);

   // execute the transfer.
   balances[_from] = balances[_from].sub(_value);
   balances[_to] = balances[_to].add(_value);
   allowed[_from][msg.sender] = allowed[_from][msg.sender].sub(_value);

   //Record the transfer to the blockchain.
   emit Transfer(_from, _to, _value);
   // let the calling code or app know that the transfer was a success.
   return true;
 }
The two functions work together. The user wishing to use the app uses approve to allow payment, and the app calls transferFrom in order to accept. But because of the asynchronous nature of the calls, it is possible for flaws to exist.
Imagine an app where users can pay tokens in order to join a digital club—40 tokens for a basic membership and 60 tokens for an enhanced membership. Users can also trade the tokens to other people or sell them as they wish. The ideal case for these two functions is where a user approves 40 tokens and the application registers this and calls transferFrom to move the 40 tokens, and then grants access as part of the smart contract. So far so good.
It's important to keep in mind that each action here takes time, and the order of events is not fixed. What actually happens is that the user sends a message to the network, triggering approve, the application sends another message, triggering transferFrom, and then everything resolves when the block is mined. If these transactions are out of order (transferFrom executing before approve), the transaction will fail. Moreover, what if the user changes their mind and decides to change their approval from 40 to 60? Here is what the user intends:
In the end, the user paid 60 tokens and got what they wanted. But because each of these events are asynchronous and the order is decided by the miners, this order is not guaranteed. Here, is what might happen instead:
Now the user has paid 100 tokens without meaning to. Here is yet another permutation:
At the end of this sequence, the user still has 20 tokens approved, and the attempt to get the enhanced membership has failed. While an app can and should be written without these issues by doing such things as allowing upgraded membership for 20 tokens and checking the max approval before transferFrom is called, this attention to detail is not guaranteed or automatic on the part of application authors.
The important thing to understand is that race conditions and ordering issues are extremely important in Ethereum. The user does not control the order of events on a blockchain, nor does an app. Instead, it is the miners that decide which transactions occur in which blocks and in which order. In Ethereum, it is the gas price that affects the priority that miners give transactions. Other influences can involve the maximum block gas limit, the number of transactions already in a block, and whether or not a miner that successfully solves a block has even seen the transaction on the network. For these reasons, smart contracts cannot assume that the order of events is what is expected.
Every decentralized network will have to deal with race conditions caused by different orderings. It is critical that smart contracts be carefully evaluated for possible race conditions and other attacks. To know whether a race condition bug is possible is as simple as knowing whether more than one function call is involved, directly or indirectly. In the preceding case, both the user and the app call functions; therefore, a race condition is possible, and so is an attack called front running. It is also possible to have race conditions inside a single method, so smart contract developers should not let their guard down.
Each network has a different model for contract execution, and as a result, each network had different best practices. For Ethereum, Consensys maintains a list of smart contract best practices at https://consensys.github.io/smart-contract-best-practices/.
Before shipping any smart contract, it is strongly suggested that an organization write extensive unit tests and simulation tests, and then audit the smart contracts against the best practices for that network.
Smart contracts hold tremendous power, but they do have limitations. It is important to note that these systems are only as good as the people building them. So far, many smart contract systems have failed due to unforeseen bugs and events that were not part of the initial design. In many cases, these were merely technical flaws that can at least be fixed in time. However, with the recent rush to use blockchain technology for everything, we are likely to start seeing more substantial failures as people fail to understand the limits of the technology. For blockchain to truly have a maximum business impact, both its advantages and limitations have to be addressed.
Like all systems, smart contracts are only as good as the data they act on. A smart contract that receives bad or incorrect information from the network will still execute. On blockchain systems, this can be a huge issue as most transactions initiated by a human or a contract are irrevocable. Thus, if information is placed on a blockchain that is in error, fraudulent, or has some other deficiency, then a smart contract will still execute faithfully. Instead of expediting the proper functioning of the network, the smart contract would now be assisting in propagating an error.
To use the earlier example of shipping tires between FakeCar and Wheelmaster, what if during transit the boxes holding the tires were broken into and the tires replaced? If the worker at the FakeCar building scanned the boxes as received without checking each and every one, the smart contract would see this update and release escrow. The shipper would have their insurance bond returned, Wheelmaster would get paid, and FakeCar would still no longer have the wheels they ordered. To smart contract purists, this is how things should be. But in these cases, companies may instead refuse to use smart contracts or require additional layers of approval—essentially recreating the systems of old.
In designing smart contract systems, it is therefore critical that designers try and imagine every possible way things could go wrong. As with the DAO and other smart contract systems that have been used so far, small mistakes can have big consequences.
Many smart contracts involve some level of human interaction. For instance, multisignature wallets require multiple people to authorize a transaction before they will execute. These touchpoints introduce the same possibility for errors as old systems, but with the possibility of irrevocable consequences.
Smart contracts do what they are programmed to do. If a smart contract is deemed invalid in a court, how is this resolved? The answer right now is that nobody really knows, but it could happen—and probably will. Most countries in the world have limits on what can and cannot be contractually agreed to and the terms that can be legally used in a contract. For instance, in the USA, there is a limit to the amount of interest that can be charged on certain financial products. Other regulations control the conditions and terms of payment in specific industries. Smart contracts that violate local and national laws run the risk of being canceled, resulting in repayment, damages, or other consequences to the participating organizations, and possibly even the contract authors.
In the token sale contract we looked at earlier, a user can be sure that they will receive the tokens they purchase. What they cannot be sure of is that those tokens will be valuable or still be useful in the future. Moreover, if those tokens represent something else (access to a system, real-world assets, or something else), then the mere existence of the tokens does not bring any guarantees that this access will remain, that people will continue to accept the tokens for assets (see the previously mentioned issues with legal validity), and so on. With national currencies, the use and acceptance of that currency is mandated by a government with substantial power. With tokens, the acceptance and use of the token has no mandate. To some, this is the very appeal—that the value of a token is more trustable because it is built not on enforcement by a government, but by social approval and use.
It is likely that over time, legal frameworks and trade will become more stable, and this will be less of an issue.
Smart contracts are agreements written into code between different parties. The critical aspects of smart contracts is that they contain promises that are in digital form. All of these promises can be executed using digital protocols for communication performance. The outcomes of the contracts are triggered automatically.
At this point, you should have a solid understanding of what smart contracts are, how they work, and their strengths and limitations. You should be able to understand the dangers inherent in smart contract ecosystems and be able to gauge possible risks in the development of smart-contract-based systems. At a minimum, you should recognize the need for careful and thorough evaluation of smart contracts for security reasons. Remember, with smart contracts, the code is executed with little or no human intervention. A mistake in a smart contract means the damage done by the mistake will multiply as fast as the code can be run.
Next, we are going to dive into Ethereum further with a chapter devoted to Ethereum accounts and block validation.
In the previous chapter, we discussed about Ethereum blockchain, its uses, and how it has shaped the decentralized technology, not for just currency based uses but also for other industry verticals. Further, we learned about development on top of the Ethereum blockchain, using smart contracts.
In this chapter, we will discuss the Ethereum account in detail and also study an ether token; this discussion will help us to better understand decentralized applications. We will also briefly discuss some popular Ethereum tokens and smart contracts. We will also discuss some important topics such as the transaction sub state, the validation of an Ethereum Block, and the various steps involved in the process of block finalization. Following this, we will briefly discuss some disadvantages of an Ethereum-based smart contract and currencies, toward the end of this chapter.
These are the topics which are covered in this chapter:
The state in Ethereum is made up of objects, each known as an account. Each account in Ethereum contains a 20-byte address. Each state transition is a direct transaction of value and information between various accounts. Each operation performed between or on the accounts is known as a state transition. The state transition in Ethereum is done using the Ethereum state transition function.
The state change in Ethereum blockchain starts from the genesis block of the blockchain, as shown in this diagram:
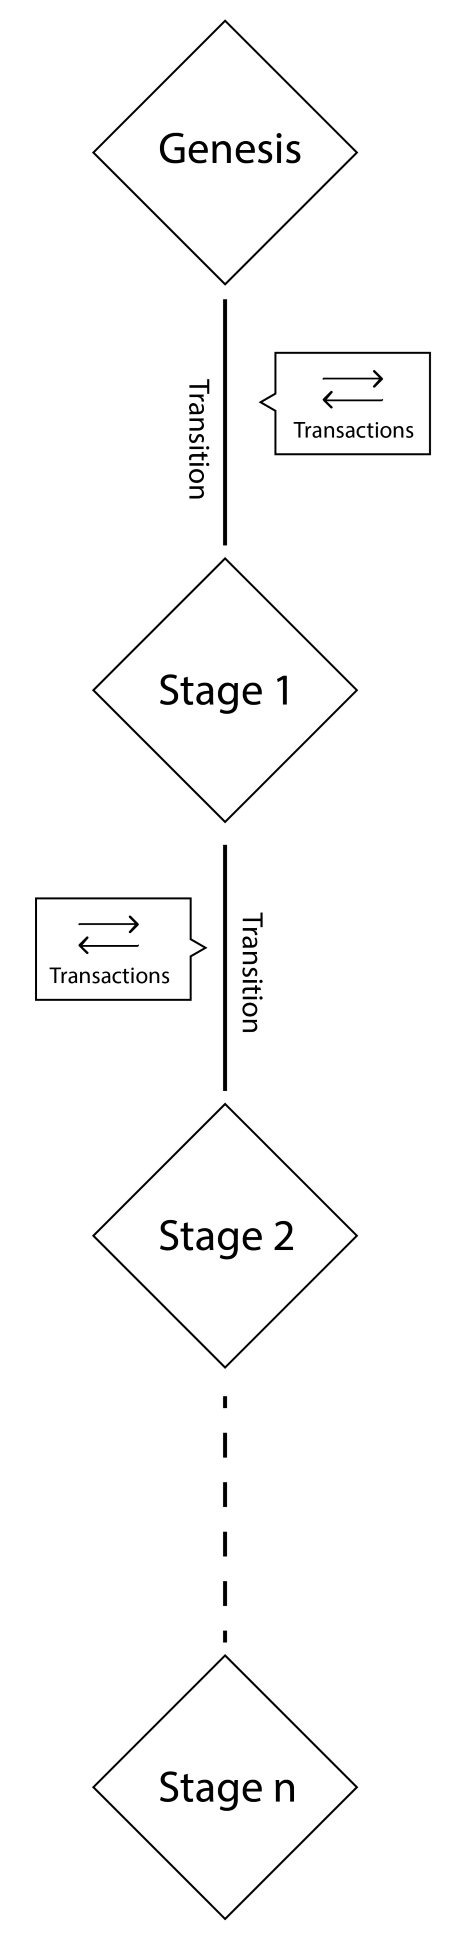
Each block contains a series of transactions, and each block is chained to its previous block. To transition from one state to the next, the transaction has to be valid. The transaction is further validated using consensus techniques, which we have already discussed in previous chapters.
To avoid stale blocks in Ethereum, GHOST (Greedy Heaviest Observed Subtree) protocol was introduced. This was introduced to avoid random forking by any nodes and inapt verification by other nodes. Stale blocks are created when two nodes find a block at the same time. Each node sends the block in the blockchain to be verified. This isn't the case with Bitcoin, since, in Bitcoin, block time is 10 minutes and the propagation of a block to approximately 50% of the network takes roughly 12 seconds. The GHOST protocol includes stale blocks also known as uncles, and these are included in the calculation of the chain.
As discussed in the previous chapters, there are two types of accounts in Ethereum blockchain. Namely, Contract Accounts (CA) and Externally Owned Accounts (EOAs). The contract accounts are the ones that have code associated with them along with a private key. EOA has an ether balance; it is able to send transactions and has no associated code, whereas CA has an ether balance and associated code. The contract account and the externally owned accounts have features of their own, and a new token can only be initiated by the contract account.
In the state transition function, the following is the process that every transaction in Ethereum adheres to:
The following diagram depicts the state transition flow:
The function is implemented independently in each of the Ethereum clients.
This is the first block of the Ethereum blockchain, just like the genesis block of the Bitcoin blockchain. The height of the genesis block is 0.
The Genesis block was mined on Jul 30, 2015 and marks the first block of the Ethereum blockchain. The difficulty of the genesis block was at 17,179,869,184, as shown in the following screenshot:
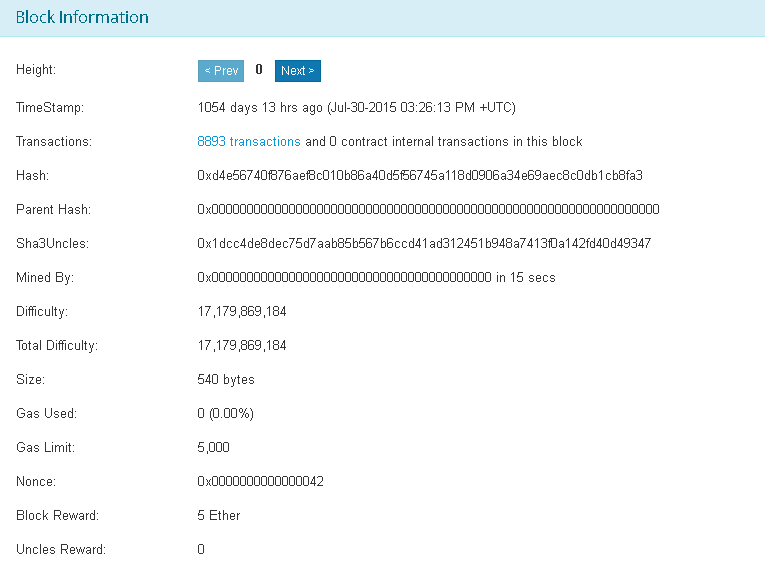
Receipts are used to store the state, after a transaction has been executed. These structures are used to record the outcome of the transaction execution. Receipts are produced after the execution of each transaction. All receipts are stored in an index-eyed trie. This has its root placed in the block header as the receipts root.
Elements is composed of four primary elements; let's discuss each element of Ethereum's transaction receipts, before we look at the structure of a receipt.
Post-transaction state is a trie structure that holds the state, after the transaction has been executed. It is encoded as a byte array.
Gas used represents the total amount of gas used in the block that contains the transaction receipt. It can be zero, but it is not a negative integer.
The set of logs shows the set of log entries created as a result of transaction execution. Logs contain the logger's address, log topics, and other log data.
The bloom filter is created form the information contained in the logs discussed. Log entries are reduced to a hash of 256 bytes, which is then embedded into the header of the block as a logs bloom. Log entries are composed of the logger's address, log topics, and log data. Log topics are encoded as a series of 32-byte data structures, and log data is composed of a few bytes of data.
This is what the structure of a transaction receipt looks like:
  Result: {
    "blockHash": "0xb839c4a9d166705062079903fa8f99c848b5d44e20534d42c75b40bd8667fff7",
      "blockNumber": 5810552,
      "contractAddress": null,
      "cumulativeGasUsed": 68527,
      "from": "0x52bc44d5378309EE2abF1539BF71dE1b7d7bE3b5",
      "gasUsed": 7097057,
      "logs": [
        {
          "address": "0x91067b439e1be22196a5f64ee61e803670ba5be9",
          "blockHash": "0xb839c4a9d166705062079903fa8f99c848b5d44e20534d42c75b40bd8667fff7",
          "blockNumber": 5810552,
          "data": "0x00000000000000000000000000000000000000000000000000000000576eca940000000000000000000000000fd8cd36bebcee2bcb35e24c925af5cf7ea9475d0100000000000000000000000000000000000000000000000000000000000000",
          "logIndex": 0,
          "topics": [
            "0x72d0d212148041614162a44c61fef731170dd7cccc35d1974690989386be0999"
          ],
          "transactionHash": "0x58ac2580d1495572c519d4e0959e74d70af82757f7e9469c5e3d1b65cc2b5b0b",
          "transactionIndex": 0
        }
      ],
      "root": "7583254379574ee8eb2943c3ee41582a0041156215e2c7d82e363098c89fe21b",
      "to": "0x91067b439e1be22196a5f64ee61e803670ba5be9",
      "transactionHash": "0x58ac2580d1495572c519d4e0959e74d70af82757f7e9469c5e3d1b65cc2b5b0b",
      "transactionIndex": 0
    }
    Transaction cost: 7097057 gas.
Also, it is to be noted that the receipt is not available for pending transactions.
A transaction sub state is created during the execution of the transaction. This transaction is processed immediately after the execution is completed. The transaction sub state is composed of the following three sub items.
A suicide set contains the list of accounts that are disposed after a transaction execution.
A log series is an indexed series of checkpoints that allow the monitoring and notification of contract calls to the entities external to the Ethereum environment. Logs are created in response to events in the smart contract. It can also be used as a cheaper form of storage.
A refund balance is the total price of gas in the transaction that initiated the execution of the transaction.
Messages are transactions where data is passed between two accounts. It is a data packet passed between two accounts. A message can be sent via the Contract Account (CA). They can also be an Externally Owned Account (EOA) in the form of a transaction that has been digitally signed by the sender.
Messages are never stored and are similar to transactions. The key components of a message in Ethereum are:
Messages are generated using CALL or DELEGATECALL methods.
A CALL does not broadcast anything in the blockchain; instead, it is a local call to any contract function specified. It runs locally in the node, like a local function call. It does not consume any gas and is a read-only operation. Calls are only executed locally on a node and do not result in any state change. If the destination account has an associated EVM code, then the virtual machine will start upon the receipt of the message to perform the required operations; if the message sender is an independent object, then the call passes any data returned from the EVM.
After being mined by the miners, an Ethereum block goes through several checks before it is considered valid; the following are the checks it goes through:
If any of the preceding checks fails, the block gets rejected.
In this process, the uncles or ommers are validated. Firstly, a block can contain a maximum of two uncles, and, secondly, whether the header is valid and the relationship of the uncle with the current block satisfies the maximum depth of six blocks.
Block difficulty in Ethereum runs parallel to the calculation of block difficulty in the Bitcoin blockchain. The difficulty of the block increases if the time between two blocks decreases. This is required to maintain consistent block generation time. The difficulty adjustment algorithm in the Ethereum Homestead release is as follows:
block_diff = parent_diff + parent_diff // 2048 * max(1 - (block_timestamp - parent_timestamp) // 10, -99) + int(2**((block.number // 100000) - 2))
In this algorithm, the difficulty of the block is adjusted based on the block generation time. According to this algorithm, if the time difference between the generation of the parent block and the current block is less than 10 seconds, the difficulty increases. If the time difference is between 10 and 19 seconds, then the difficulty remains same. The difficulty decreases when the time difference between two block's generation is more than 20 seconds. The decrease in difficulty is directly proportional to the time difference.
Apart from the timestamp-based difficulty increment, as per the algorithm, the difficulty increases exponentially after every 100,000 blocks. This is known as the difficulty time bomb, introduced in the Ethereum network, since this will make it very hard to mine on the Ethereum blockchain network. This is the reason why PoS is the proposed consensus mechanism for Ethereum in the near future.
The finalization of a block in Ethereum involves the following four stages:
We have discussed the advantages and uses of Ethereum and Ethereum blockchain-based currencies throughout the previous chapters; let's now discuss some disadvantages of Ethereum-based tokens:
In this chapter, we discussed the Ethereum state transition function, the genesis block, and transaction receipts. We also discussed the transaction sub state. In addition to these topics, we discussed Ethereum block validation and the steps involved in the same as discussed in the Ethereum Yellow paper. Finally, we briefly discussed a few of the disadvantages of using an Ethereum-based token.
In the next chapter, we will discuss Decentralized Applications, and we will learn how to create a DApp, and how to publish one. We will also discuss the future of DApp and its effects on its users.
Decentralized Applications (DApps) are applications that run across a decentralized network and are not owned or controlled by a centralized authority. They differ from distributed applications primarily in terms of ownership. A distributed application may run on thousands of computers, but those computers and the management of the software running on them are controlled by a central authority—Amazon, Microsoft, and so on. A decentralized application runs on what is typically a peer-to-peer network and is designed in such a way that no one person or organization can control the functioning of the application. A decentralized application does not require a blockchain. There were multiple decentralized applications before blockchain: BitTorrent, Tor, and Mastodon are all decentralized applications that exist without the use of a blockchain.
In this chapter, we are going to cover the following:
The goal of this chapter is to give you an understanding of decentralized applications and their development, as well as making you aware of ecosystems and code that already exists. If you are interested in building a decentralized application, interoperability with the existing ecosystems out there will greatly improve your odds.
Let's start by taking a look at what makes an application decentralized.
Earlier in this book, we discussed distributed versus decentralized systems. A distributed system is one that is made up of a number of computers, with the work of the system distributed across all of these machines. Typically, the computers in a distributed network are placed in different geographical regions to protect the system from outages such as power failures, natural disasters, or military events. A decentralized network is not only distributed geographically but also in terms of authority and control. A distributed system such as the Amazon cloud can be worldwide in scope but still under the control of a central authority. A decentralized system has no central authority.
A well-known resource to blockchain-based decentralized applications is the whitepaper written by David Johnson entitled The General Theory of Decentralized Applications, DApps. In this whitepaper, he identifies four key criteria to be a DApp:
The application must be completely open source; it must operate autonomously, and with no entity controlling the majority of its tokens. The application may adapt its protocol in response to proposed improvements and market feedback, but all changes must be decided by consensus of its users.
The application's data and records of operation must be cryptographically stored in a public, decentralized blockchain, so as to avoid any central points of failure.
The application must use a cryptographic token (Bitcoin or a token native to its system) that is necessary for access to the application and any contribution of value from miners/farmers should be rewarded with the application's tokens.
The application must generate tokens according to a standard cryptographic algorithm acting as proof of the value that the nodes are contributing to the application (Bitcoin uses the PoW algorithm).
However, this definition is very limited. David is thinking only of decentralized applications running on a blockchain, and only ones that can be incentivized through a token. There are a number of decentralized applications that predate blockchain that do not use or require tokens. In this chapter, we will discuss both blockchain and non-blockchain decentralized applications, but with a focus on those that are relevant to the blockchain ecosystem. We will also discuss blockchain applications that are not decentralized, despite running on top of a decentralized network.
For this book, we will use the following four criteria to describe a decentralized application:
As you can see, this simplified definition retains all the key principles of decentralization without relying on a blockchain or tokens, as there are many ways that decentralized applications can be structured or used with or without blockchain. As we will see when we look at IPFS, it is entirely possible to have a decentralized application without blockchain, and incentives without having tokens.
A decentralized application is a purpose-specific decentralized system. For instance, while Ethereum is a decentralized network because anyone can join and the nodes are all peer-to-peer, a decentralized application will run on top of the network to provide a specific service or set of services to users. To some extent, the distinction is moot—you could see Ethereum as a distributed application that provides smart contract services and native token transfers. In any case, the key distinction is about power.
The more a single entity or small group maintains power over the application, the more centralized it is. The less any one group is able to control the fate of the application and its functioning, the more decentralized it is. Just as decentralized applications do not require a blockchain, running on a blockchain does not make an application decentralized. This means that many applications running on blockchains today may still not be true decentralized applications. This is true, even if the application is entirely open source.
To illustrate, let's consider a small sample application called SpecialClub, written in Solidity. It is very simple, merely keeping a list of members (stored as addresses) that are part of the Special Club:
pragma solidity ^0.4.23;

contract SpecialClub {
    // Centralized owner of this application
    address public owner;
    // we set members to true if they are a member, false otherwise.
    mapping(address => bool) public members;
    mapping(address => bool) internal requests;

    constructor() public {
        owner = msg.sender;
    }

    modifier onlyOwner() {
      require(msg.sender == owner);
      _;
    }

    function approveMembership(address _address) onlyOwner external {
        members[_address] = true;
        requests[_address] = false;
        emit GrantedMembership(_address);
    }

    function requestOwnership() external {
        requests[msg.sender] = true;
        emit RequestToJoin(msg.sender);
    }

    event RequestToJoin(address _address);
    event GrantedMembership(address _address);
}
Despite being written in Solidity and deployed on a blockchain, this code is entirely centralized. It is still distributed, as the list of members will be publicly distributed across the entire Ethereum network if deployed. However, control remains with a single address—the owner. The owner address has absolute control over who is allowed to be added to the membership list of SpecialClub. Any further functionality based on this membership list will generally be centralized as a result. One advantage that continues to exist over traditional applications is transparency—by having both the code and its state written to the blockchain, everyone is clear about the rules and the list of members. However, to be a truly decentralized application, this app would need to be modified so that, for example, existing members could vote on who to accept or reject.
Here is a very basic example of how that might look:
pragma solidity ^0.4.23;

contract SpecialClub {
    address public owner;
    // we set members to true if they are a member, false otherwise.
    mapping(address => bool) public members;
    mapping(address => bool) internal requests;
    mapping(address => mapping(address => bool)) votedOn;
    mapping(address => uint8) votes;

    constructor() public {
        owner = msg.sender;
    }

    modifier onlyOwner() {
      require(msg.sender == owner);
      _;
    }

    modifier onlyMember() {
        require(members[msg.sender] == true);
        _;
    }

    function approveMembership(address _address) onlyOwner external {
        members[_address] = true;
        requests[_address] = false;
        emit GrantedMembership(_address);
    }

    function requestOwnership() external {
        requests[msg.sender] = true;
        emit RequestToJoin(msg.sender);
    }

    function voteInMember(address _address) onlyMember external {
        //don't allow re-votes
        require(!votedOn[_address][msg.sender]);
        votedOn[_address][msg.sender] = true;
        votes[_address] = votes[_address] + 1;
        if (votes[_address] >= 5) {
            members[_address] = true;
            requests[_address] = false;
            emit GrantedMembership(_address);
        }
    }

    event RequestToJoin(address _address);
   event GrantedMembership(address _address);
}
This version allows new members to be added if at least five existing members vote to make it happen. While such an application would start out centralized, after five members, the owner would no longer be able to exert any control over the membership list. Over time, the level of decentralization would grow.
It is assumed the reader of this book may be contemplating launching their own decentralized application project or contributing to an existing one. When building new decentralized applications, it is important to be aware of what already exists so that your application can take advantage of the existing functionality. There are a number of existing decentralized applications that are running and in production and that have already undergone substantial development. In general, these applications provide services to help other decentralized applications flourish. In addition, these applications are all open source. If you evaluate one of these projects and find it is missing something, substantially less effort is likely required to either contribute to or for existing functionality.
Aragon is a project oriented around Distributed Autonomous Organizations, or DAOs. Here is an excerpt from the Aragon whitepaper:
The districtOx network is built on top of Ethereum, Aragon, and IPFS. It takes the capabilities of all of those systems and extends them for more specific functionality. In this case, districtOx provides core functionalities that are necessary to operate an online marketplace or community in a decentralized manner using the Ethereum blockchain and decentralized governance.
A district is a decentralized marketplace/community that is built on top of the districtOx d0xINFRA code base. The d0xINFRA code base is comprised of a set of Ethereum smart contracts and browser-based tools that can interact with both Ethereum and IPFS. These two code bases interact and present a set of key functionalities necessary for experiences people are used to on the centralized web: posting and listing content, searching, reputation management, payments, and invoicing.
Every district build on top of d0xINFRA will have these basic functionalities. This baseline code base makes it much easier and faster for future projects to develop into full-featured products.
Ethereum addresses are usually written as a hexadecimal string, for instance, 0x86fa049857e0209aa7d9e616f7eb3b3b78ecfdb0. This is not very readable for a human and would be very prone to error if you had to read it to someone over the phone, type it, and so on. It would also be easy to replace with another address without someone knowing. In fact, this is what has happened in a few ICO attacks. The Ethereum name service, or ENS, is a smart contract-based system for resolving human-readable names such as mytoken.ens to addresses. By registering an ENS address, compatible applications and wallets on the Ethereum network could map a readable name, such as MyTokenContract.eth, to an Ethereum address, similar to the way DNS maps domain names to IP addresses on the internet.
It is strongly recommended that any project built on Ethereum secures an appropriate ENS name. Not only does it look cleaner for users, but it will help to prevent hackers from using the name to attempt to steal from your users.
Civic and uPort are both identity provider DApps on Ethereum. Currently, your identity information is generally held by a centralized entity: a government, Facebook, Google, and so on. On many places throughout the web, you can be asked to log in by using Facebook or Google. Behind the scenes, the website reaches out to one of these providers, it hands over identity credentials, and then the site lets you in. The downside to this is that the information that you relinquish is under the control and management of a third-party. If one of these providers decided to stop serving you, or provided false information, there would be little you could do about it.
Civic and uPort are both decentralized solutions to identity where the identity owner manages their identity on the blockchain and can grant and revoke permissions through a provider service under their control.
Many upcoming DApps have a blend of blockchain behavior, web activity, and mobile application behaviors. By using one of these providers, you can plug into the emerging decentralized identity ecosystem in addition to supporting centralized providers.
Gnosis was the first major decentralized application to launch on Ethereum. Gnosis provides a decentralized prediction market and governance tool. Prediction markets can work in various industries, such as stock markets, event betting, and so on. By using a decentralized approach to prediction, the hope is that such predictions are more accurate because of a greater variety of information entering the market to adjust projections.
As one of the earliest adopters of Ethereum, the Gnosis team also puts a lot of energy into various tools such as multi-signature wallets.
Steemit is a social blogging application, similar to Blogger or Tumblr. However, content, comments, and votes are stored and secured on the blockchain itself. Steemit is a DApp that has its own blockchain. The core is adapted from Bitshares v2.0, but substantially modified to be purpose-suited to the application.
In Steemit, users are rewarded tokens for submitting and voting on content. Each user's vote carries power equal to their shares in the network, called Steem Power. If a user attracts a large following, or a following of users with a large amount of Steem Power, then the rewards can be substantial. Rewards are typically small (from pennies to a few dollars), but some authors have been able to get payouts in the thousands because they attracted the favor of power users referred to as whales. In some cases, the vote of a whale can be worth hundreds or thousands of dollars on its own.
As mentioned earlier, Steemit is not on Ethereum and cannot be programmed with Solidity. It does, however, have a growing ecosystem of apps that talk to the Steemit blockchain and are used to curate, display, and monetize Steemit content in different ways. Anyone considering blogging, social media, or a similar content app, should carefully evaluate Steemit and its code base. It is all open source and a few modified clones have already been created, such as Golos (for the Russian market) and Serey (for the Cambodian market).
CryptoKitties is another Ethereum-based decentralized application. CryptoKitties is a virtual pet simulator, where users can buy, trade, and breed kitties on the blockchain. CryptoKitties was an important landmark for Ethereum, as the techniques developed for CryptoKitties have applications for all video games that may use blockchain. Using techniques similar to Cryptokitties, player equipment, characters, and so on, can be stored on a blockchain.
This is important, because many online video games, such as Minecraft, World of Warcraft, and so on, have suffered from bugs where certain equipment in the games could be duped, and people could make unlimited clones. Using blockchain, each item is assigned a unique reference and can be tracked and traded just like real goods.
Inspired by CryptoKitties, a number of video games are coming to market using these systems to create worlds with genuine scarcity and real economies.
You should now understand the difference between a decentralized application and a distributed application. A distributed application is one that is spread across many servers and systems, and ideally, the computers involved are also spread across multiple geographic regions for purposes of backup, processing, and availability. A DApp is one in which no single company, person, or group has control over the operation of the application.
While there are many blockchain applications coming to market, not all of them are truly decentralized. In many cases, these applications are merely distributed differently than prior applications by piggybacking on a public blockchain network. If a company or a few key users still control the operation and function of an application, then that application is not truly decentralized, even if it runs on a decentralized network.
You should now be aware of many of the largest blockchain-oriented decentralized applications currently in existence, their interrelationships, and you should be able to use this knowledge to inform future projects and avoid the re-invention of existing code.
Next, we'll discuss in detail how the two largest blockchain networks—Bitcoin and Ethereum—secure the network in Chapter 17, Mining.
In the previous chapters, we discussed the Proof of Work (PoW) consensus system and the importance of mining. We also discussed Bitcoin and other Altcoins, and how miners play an important role in PoW-based coins.
In this chapter, we will discuss mining in depth, and the need for mining in PoW-based coins and tokens. Then, we will discuss mining pools and how they brought a revolution to the mining ecosystem. Further, we will go ahead with learning how to start mining using the various miners that are available. We will learn in depth about CPU and GPU mining, along with researching about setting up a mining rig and the concept of dual mining. Finally, we will study each of the PoW algorithms available for mining, and discuss those best chosen based on hardware resources available.
In this chapter, we will cover the following topics:
Cryptocurrency mining is performed by full nodes, that are part of the blockchain; mining is performed only by blockchains with a PoW based consensus system. Transactions are confirmed by the consensus system, and blocks of these transactions are created to be added to the blockchain; once a new block is added to the blockchain, which is commonly known as block is found, there is a certain reward, which is given to the miner for performing the task of adding the block in the blockchain; the process is not that simple, though. These blocks are added after performing a resource-intensive validation process to validate a transaction. The resource-intensive task is basically the hashing of certain algorithms associated with the currency.
Since the block generation time is kept to around 10 minutes, when the hashing power of miners increases, the difficulty has to be increased in the same proportion. This is done by difficulty adjustment and re-targeting algorithms, as discussed in the previous chapters.
When a miner connects with the network, there are various tasks that the miner performs to keep up with the network. Each coin has a different specification for miners; shown here, in the context of Bitcoins, are some of the prime tasks performed by the miners:
Let's discuss each of these steps in detail, as well as the process involved in mining cryptocurrency.
Mining is mostly done in PoW-based blockchains, but as discussed earlier, PoW is not the only consensus system that is in use; there are various other consensus mechanisms as well. Proof of Work, however, is the most widely used consensus system used in cryptocurrencies.
The concept of PoW existed long before its use in Bitcoin. These systems were used previously to restrain denial-of-service attacks, spams, and other networking-related issues that currently persist in the system since they require proof of computational work from the requester before delivering the required service. This makes such networking-related attacks infeasible.
For PoW systems to be cost-effective enough, the computational task is moderately difficult to perform by the service requester but easy to check by the service provider. Hashcash is one of the systems that first started using PoW-based protocols utilizing the SHA-256 algorithm. With it, users had to submit the proof of calculating thousands of hashing operations before providing them the required service; this, in turn, limited DoS and spam attacks.
Bitcoin also uses the SHA-256 hashing algorithm, although it is a random algorithm, and is deterministic in nature, which means for any given input the output will always be the same and can be easily verified by anyone using the same algorithm and the same input.
In cryptocurrency mining, the miner needs two things to get the input for the SHA-256 hashing algorithm:
The miner uses the brute force method until the hash output matches the difficulty target; it is a 256-bit number that serves as an upper limit, and the SHA-256 output must be lower than or equal to the current difficulty target for the block so that it can be accepted by the network. For example, this is the hash of a block at height 528499 of a Bitcoin blockchain:
00000000000000000021524523382d300c985b91d0a895e7c73ec9d440899946
The first transaction in every block is the mining reward, hence it does not have the input address from which funds are to be deducted in the transaction, these are the coins that are created to be a part of the blockchain network. This unique type of transaction is known as a coinbase transaction. Also, in a Bitcoin blockchain, the coins created in the coinbase transaction cannot be spent until it receives at least 100 confirmations in the blockchain. Since the block time is 10 mins, 100 transactions would roughly take 16 hours and 40 minutes. The coinbase transaction can happen on the miner's own address only.
Bitcoin uses SHA-256, but there are various algorithms that can be used in PoW consensus types, and some of these algorithms are listed as follows and illustrated in the next screenshot:
Each of these algorithms has had specific modifications over other algorithms.
The cryptocurrency mining community has gone through a lot of innovation and resistance hand-in-hand to take care of the core principles of blockchain. Mining can be done using home-based computers and specialized hardware. The types of hardware commonly used for cryptocurrency mining are discussed in the following sections.
This was the first type of mining available in the official Bitcoin client. During the initial days of Bitcoin, home-based computers were able to mine coins. With the advent of more powerful and specialized hardware, Bitcoin mining is no longer preferred for mining Bitcoins. Other coins still support CPU mining, but as the coins' difficulty grows with time, mining of those types of coins also becomes infeasible.
Since the difficulty of the blockchain network increases incrementally over time, CPU mining becomes infeasible, or it sometimes becomes impossible to mine the coin using a CPU. Considering this, miners started to use GPUs since they offer faster and much higher parallel processing. GPU manufacturing companies such as AMD and Nvidia are releasing new hardware from time to time, which can produce excellent mining results apart from gaming performance:

The field-programmable gate array (FPGA) consists of integrated circuits that can be configured after manufacture. The programming for configuration is specified using hardware description language (HDL). A field-programmable device can be modified without disassembling the device; this device contains a series of gate arrays that create truth tables to calculate inputs from a data stream as shown in the following screenshot:
As FPGAs support parallelism from the core, they are claimed to be fifteen times more efficient compared to GPU-based mining.
Application-specific integrated circuit (ASIC) miners are a lot better compared to CPU-, GPU-, and FPGA-based mining since they are designed to perform one specific task only, that is, the mining of cryptocurrencies. An ASIC miner, pictured below, is algorithm-specific:

These hardwares are specifically built to produce high hashing rates. There are various companies that are popular in producing some of the best-performing miners, such as Bitmain, Avalon, Pangolin, ASICminer, and so on.
There are two types of miners these days—classified on the basis of procuring the hardware themselves, or on purchasing the hashing power online.
In this type of mining, the miners do not own the hardware, and instead they purchase hashing power remotely from other miners. Cloud mining has various pros over mining by procuring one's own hardware, such as low cost of entry, and minimal risks. For people who want to invest in cryptocurrency but do not want to purchase from an exchange or have enough technical knowledge, this is the best possible option for them. Now, there are various organizations that have large data centers at various places with GPU-, ASIC-, and FPGA-based miners available for people to purchase. Some of these organizations are Genesis Mining, SkyCoinLabs, Nicehash, hashflare, and so on.
Enthusiasts are always interested in setting up self-hosted hardware for mining; mining can be done by a high-end home computer or acquiring an ASIC or FPGA device. Nowadays, people are also setting up mining rigs that are specialized setups with options to connect multiple GPUs, ASICs, or FPGAs to a single machine. People mostly make a rig from scratch by purchasing extended casings, and attaching multiple hardware together to achieve the required results. The best part of a rig is you can add more hardware and try out a new ASIC to see if the desired results are achieved.
Since a lot of GPUs or ASICs are rigged together, they tend to produce a large amount of heat, hence it is important to have proper airflow available. Here are the requirements of a basic rig, which one can set up on their own:
Nowadays, pre-built mining rigs are also available; these rigs are of plug-and-play types, with no setup required. Here are some of the most widely used pre-built rigs:

As more and more miners start to mine for coins, the difficulty of the coin increases. Pools are groups of miners who come together to mine a block, and once a reward is given for successfully mining the block, the reward is split among the miners who mined in the pool; there are various ways in which the payment of the reward is split, and we will be discussing these methods in the next section. The reason for having various reward split methods is because hashing is a purely brute-force-based mechanism, hence it is pure luck for any miner to find the correct nonce and then go ahead with the process of successfully submitting a block in the blockchain, so it would be unfair for other miners in the pool if their hashing and mining efforts go unaccounted for. Hence, on the basis of hashing power, the reward is split, but still there are various methods by which the exact calculation of each miner's share is done.
PPS is a method that transfers the risk to the mining pools. It is the most-preferred method for miners as they are paid on the number of shares of hashes they mine; the reward of the share mined is guaranteed for each and every share, and nowadays very few pools support this system. The miners are paid from the pool's existing balance of coins.
This is known as the proportional approach and, as the name suggests, in this method the reward is proportionally distributed among the miners based on the number of shares of blocks each miner has found.
PPLNS is similar to the proportional method, although instead of counting all the shares in a round, in this method the last N shares are looked, irrespective of the total shares contributed by the miner.
DGM is a hybrid approach in which risk is divided between the pool and the miners. In this, the pool receives part of the mining reward when short rounds are going on, and the same is returned when longer rounds are underway.
SMPPS is similar to PPS, but the pool does not pay more than the total coins rewarded to the pool in a single round. This removes the risk that the pool takes in the PPS method.
ESMPPS is similar to SMPPS; it distributes payments equally among all the miners who are part of the pool and were mining for the current round.
RSMPPS is similar to SMPPS, but this method prioritizes the recent miners first.
CPPSRB uses a Maximum Pay per Share such as system in such a way that it pays the miners the maximum reward using the income from the block rewards, considering that no backup funds are required by the pool.
BPM is also known as slush's system, since it was first used in the mining pool called slush's pool. In this payment calculation method, the older shares from the beginning of the block round are given less significance as compared to the recent shares. This system was introduced as community members started reporting that miners were able to cheat the mining pools by switching pools when a round was underway.
POT is a high-variance PPS such as system which pays out based on the difficulty of work returned to the pool by a miner, instead of the difficulty of work done by the whole pool miners mining the block.
This is a proportional reward system, based on the time a share was submitted. This process makes later shares worth a lot more than the earlier shares; these shares are scored by time, and the rewards that are to be given to individual miners are calculated based on the proportion of the scores and not the shares submitted in the system.
Apart from these, there are still new reward systems being proposed by mining pools and the community; systems such as ELIGUIS, Triplemining, and so on still exist and are being used by various developers.
There are various mining pools present, and anyone can be part of an interested pool and start mining right away. Pools can support anyone cryptocurrency or multiple currencies at a time. Here is a list of mining pools, along with the currencies they support:
Apart from the listed pools, there are various other pools, some supporting a single coin and some supporting multiple coins. Some of them are BTCC, Bitfury, BW Pool, Bitclub.network, Suprnova, minergate, and so on. The following diagram shows the Hashrate distribution of the Bitcoin Network among the various mining pools, and it can be found at www.Blockchain.info/pools:
Mining hardware takes care of the mining process, but it is also important to have efficient software for the best results and the removal of bottlenecks if any.
The task of the mining software is to share the mining task of the hardware over the network. Apart from this, its task is to receive work from other miners on the network. Based on the operating system the hardware is running, there are various mining software available, such as BTCMiner, CGMiner, BFGMiner, Nheqminer, and so on:
Mining software should be chosen on the basis of the operating system, hardware type, and other factors. Most mining software is open source and has a large amount of active community to clarify any doubts in choosing the correct software for the available hardware to the miner.
In this chapter, we learned about the mining of cryptocurrency; starting with studying various algorithms, we discussed mining hardware and the various types available. Then, we discussed mining pools, how the pools split rewards among miners, and various popular pools currently available.
In the next chapter, we will discuss Initial Coin offering (ICO), which is the process of raising funds for a coin or token that is launched. ICO is an important part of the blockchain community and helps the blockchain project stakeholder to raise funds from the community itself.
ICO stands for Initial Coin Offering, also called a token sale or initial token offering. An ICO is an event where a new blockchain project raises money by offering network tokens to potential buyers. Unlike IPOs, no equity is for sale. Buyers receive tokens on the network but do not own the underlying project intellectual property, legal ownership, or other traditional equity traits unless specifically promised as part of the sale. The expectation of profit (if there is one) comes from holding the token itself. If demand for use of the new network increases, then presumably so will the value of owning the token.
In this chapter, we are going to cover ICOs, how they came about, and the critical aspects that happen as part of executing one. ICOs continue to evolve, but many events and deliverables have become expected and even mandatory for success.
The first ICO was developed in 2013 by Mastercoin. Mastercoin held that their token, such as bitcoin, would increase in value and at least a few others agreed. Mastercoin held a month-long fundraiser and ended up raising about $500,000, while afterwards the Mastercoin overall market cap appreciated to as high as $50 million. The ability to raise substantial capital without going through traditional channels began to spark a flurry of activity.
The following year, the Ethereum network was conceived and held its token sale. Wth the birth of this network, the difficulty of launching a new token decreased substantially. Once the Ethereum network was stable and had established a critical mass, ICOs began to happen regularly. During the next two years, ICOs began to happen more and more frequently.
Some notable projects from this early period include:
In 2017 the pace of ICOs accelerated, as did the amount of money raised. Here are some of the major projects from 2017:
There are now over, 1500 cryptocurrencies and more are released regularly. New projects being released at a rate of around 100/month. The topics that we will be covering in this chapter are as follows:
The difference between the early ICO market and the current state of the industry is stark. In the beginning, there were only a few ICOs and those were held by teams that were relatively well known inside the blockchain community that spent considerable time and effort bringing a project to life before running the ICO. After the launch of Ethereum, the barrier to entry for doing an ICO fell substantially and the number of new tokens swelled.
Before the Ethereum network, most ICOs were for a new blockchain. With Ethereum, tokens could now launch using smart contracts instead of creating the entire blockchain infrastructure from scratch. For more on how this is done, see the chapters on Solidity and Smart Contracts (See Chapter 13, Solidity 101, and Chapter 14, Smart Contracts).
Currently, 2018 is on track to have over 1,000 new ICOs:
Most ICOs have a typical trajectory for their marketing activities. Each of these activities exists to attract interest and investment in the company and present the project to the world at large.
For most projects, the most critical piece is the whitepaper. The project whitepaper introduces the purpose of the project, the problems it tries to solve, and how it goes about solving it.
A good white paper will discuss the utility of the token and the market. Key sections of most whitepapers include:
Most whitepapers will include sections such as these, as well as others, depending on the exact nature of the project and the target market. The whitepaper will be used extensively for all future marketing efforts, as it will be the source of information for slide decks, pitches, and so on.
Private placement is the art of selling large blocks of tokens to private investors, usually before those tokens are available on the common market. There are a number of reasons for this practice. First, private investors tend to be more sophisticated and are able to place large buys. The literal buy-in of a well-established investor, especially one with a successful track record, will encourage future buying as the highest risk purchase is the first.
Private buyers also provide early funds, possibly before the whitepaper is finalized if they really believe in the strength of the team. In addition, accredited larger investors also have a special legal status in many jurisdictions, including in the United States. This status makes it much safer to sell to them in the uncertain legal environment that faces ICOs.
Private placements can happen in a number of ways:
If the founders do not have an extensive network, they will need to build one as best they can. This can be done by going to conferences, giving talks, attending meetups, and building genuine relationships. This process can take a long time, and founders are encouraged to begin this activity immediately. Networking such as this should happen if you are even considering a blockchain startup or ICO, even before the company is founded. It's also important that a genuine relationship is formed—once these people buy in, they are essentially partners. Their success is the company's success, so they will be highly motivated to help promote the company. At the same time, the company's failure is their failure and loss, so they will want to have a strong trust in the abilities of the founders. Relationships such as this are rarely made instantly.
One step removed from this process is finding the right advisors. Advisors who have access to investors will absolutely wish to be paid for their services, often up front and with a percentage of the raise. Too many people want access to investors to be worth bothering with anyone with no resources at all. Moreover, these advisors must also believe in the project. For an advisor to bring investors bad projects is to lose access to that investor and sour their relationship. Responsible advisors will, therefore, refuse to introduce projects until those projects are truly ready for investment.
The last way for private sales to happen is for a project to get enough interest publicly that investors seek out the project. Because project hype corresponds strongly to token prices, buying into a token with a lot of hype and PR is seen as a safer investment. Smart investors will still strongly vet the project and team, but this evidence of early traction makes things much easier.
Many teams start their fundraising approach with a private placement round. In a few cases, this may be all the team needs.
Well known funds that do private placement are the Crypto Capital Group, the Digital Currency Group, Blockchain Capital, Draper Associates, Novotron Capital, and Outlier Ventures.
A token pre-sale is usually done before the official launch date of the public token sale. It is half-way between private placement and a full public sale. Tokens are typically sold at some level of discount from the official public price and there may be a higher minimum purchase amount than the public sale.
Such as private placement sales, pre-sales are often somewhat restricted in terms of who is allowed to buy. If a project has been able to build up some community engagement, the pre-sale is typically offered to that community first.
For instance, if the public sale per token will be $0.10, with a minimum purchase of $300 (or equivalent in Ethereum or Bitcoin), the private sale price may be $0.08, but with a minimum purchase of $1,000.
In an ideal world, a token project doing a pre-sale should have the following:
Projects that have all of these are in a stronger position for a successful pre-sale. Projects that also have well-known private investors or funds behind them have an additional advantage.
The public sale is the end stage of an ICO. By this point, a team should have spent substantial time in community building, early fundraising, PR activities (see in the succeeding sections), and so on. The reason for all this is that the most successful ICOs tend to be over very fast, selling out in minutes or hours. There are three major different approaches to structuring the sale.
The capped sale is the most common ICO structure. In a capped sale, there is typically a soft cap and a hard cap. The soft cap is the minimum raise the team is looking for to build their project. The hard cap is the maximum they will accept as part of the raise. Once the token sale begins, it is usually executed on a first come, first served basis. Tokens are sold at a pre-set rate. In some cases, that rate may include bonuses. For example, the first 20 buyers (or first $20,000) receives a 10% bonus in terms of the number of tokens purchased. As the sale continues, the bonus drops. This structure is designed to reward initial movers and inspire FOMO (fear of missing out).
The uncapped sale is designed to raise as much capital as possible. This is done by fixing the time of the sale and, typically, the number of tokens available. As people buy in, they receive a share of tokens equal to their share of the total capital invested. The number of tokens each person receives is often not known until the end of the ICO. For instance, if, on day 1 an investor puts in $10,000 and no one else bids, they would own all of the available tokens. However, the next day, another investor puts in $10,000 as well. If this were the end of the sale, the two investors would each own half the available tokens.
Such as the capped sale, there are many variations. The EOS token sale is probably the best-known version of the uncapped sale. The EOS token was sold over 341 days, with a few more tokens being made available for purchase each day.
The Dutch auction is the rarest form of ICO offering, but one of the fairest. A Dutch auction works with the auction beginning at a high price, with the price slowly lowered until participants jump in or a reserve is hit. A reverse Dutch auction starts at a low price, and the price is then slowly raised over time at fixed intervals. Either approach is good for finding a proper market price for a token, provided that there are a sufficient number of buyers. The most famous ICO to use the Dutch auction approach was the Gnosis project.
The Gnosis team did not set out to sell a fixed percentage of the total tokens. Instead, the number of tokens released would increase the longer the auction took to hit the cap of $9 million GNO tokens sold, or $12.5 million raised. Despite the auction setup designed to slow down participation, the sale was over in under 15 minutes.
Blockchain is a new technology and startups are, by nature, quite risky. For both of these reasons, investors often seek out the input, advice, and viewpoints of established experts in the field. In a field this new, an expert is typically just someone well known, or someone who has made a few, very public correct predictions in the recent past.
In an era of social media, a multitude of YouTube channels, podcasts, and other organizations have sprung up to act as gatekeepers and commentators on the ICO ecosystem. The more successful of these shows have over 100,000 subscribers interested in cryptocurrencies and ICO projects.
Successful ICOs are therefore highly motivated to get on these shows to raise awareness of their project. In turn, the operators of these shows can charge whatever the market will bear in order to get a presence. It's not unusual for high-visibility shows and podcasts to charge $5-20,000 USD for a single appearance, paid in a combination of fiat, crypto, and project tokens.
Mainstream press attention helps every project. PR can be one of the more time-consuming aspects of ICO marketing because few ICO teams already have the requisite media contacts. PR agencies can help but tend to be expensive. Whether or not a PR agency is used, an ICO should have everything else carefully lined up first. Mainstream media attention will bring a lot of attention, which also means a lot more people looking for flaws. A well-executed whitepaper, solid website, a good and clear plan, and fantastic team bios are all important.
Some PR outreach should generally start as soon as the project is solid. Typically, smaller venues and publications are more welcoming than larger ones. A smart ICO team will work with local media, local podcasts, regional business hubs, newsletters, and so on to start with. Once an ICO has some media exposure, it will be easier to interest larger publications.
Naturally, this PR activity needs to go hand-in-hand with content marketing and community building activities.
ICOs usually have at least one person, and often the whole team, doing at least some level of content marketing. The goal of content marketing is to provide information about the project, its goals, and how it will impact the world in a way that is relevant but rarely about sales. Content marketing is usually done through company blogs and platforms, such as Medium or Steemit, where there will be many casual users who may get introduced to the project through different articles.
Another aspect of content marketing is social content—Tweeter, LinkedIn posts, Facebook, and so on. The purpose is the same—to connect with people who may not otherwise know about the project and build a sense of connection, trust, and purpose.
Content marketing is usually published as coming from the team members, whether or not they actually wrote the content. Doing this helps make the team feel accessible and real—a serious problem when some ICO scams have made up team members.
Good content marketing also helps drive community growth and engagement. ICO teams that have excellent content marketing are much more likely to succeed than ones who do not.
As ICO marketing grew, and the number of projects increased, the market started looking for better ways to evaluate projects. A number of companies sprang up to offer impartial reviews of ICO projects. Self-described experts rate projects on different scales to recommend how good a project is for technical and investment success. However, many projects have taken to paying reviewers or at least offering to pay, in order to get a higher rating.
While there are a large number of ICO rating sites, the two best known are currently ICOBench and ICORating. Many projects work hard to get a high score on these sites so that they can feature this rating in their marketing materials. Whether or not these ratings are accurate or not is still being worked out and will change. However, every marker of trust an ICO can get surely helps so many projects work hard (fairly or unfairly) to get good ratings.
At the start of the ICO frenzy, it was common for projects to be able to raise money with only a whitepaper, a team, and an idea that involved the blockchain. Very quickly, a number of projects raised money and either failed or were drawn into protracted legal disputes. As a result, the market matured and, increasingly, investors wish to see some level of working prototype before they will buy into an ICO. In many jurisdictions, having a working product makes the case for a utility token versus a security token more plausible and reduces the potential for legal issues later on.
The need for prototypes creates a barrier to entry for under-funded or non-funded projects, making them closer to traditional fundraising with VC and angel investors. In many cases, such projects need to get angel or seed funding before they are in a position to do an ICO.
Because of the demand for prototypes, a number of firms have begun offering blockchain prototyping services where they work with business stakeholders who do not have their own development team to build something they can take to market.
Depending on the blockchain system being used, there is also the need for smart contract and token development work. With Ethereum in particular, there is a need for careful testing because once deployed, the code is immutable—bugs cannot be fixed.
For many Ethereum ICOs, one of the final steps is a code audit. In a code audit, a trusted third-party is brought in to inspect the code for any possible security issues or violations of best practices. Typically, this audit is publicly released, along with the updated code that fixes any important issues found.
A bounty campaign is when a project promises payment for services in their native tokens. These services are typically promotional in some way, such as translating the whitepaper into different languages, writing articles on medium or Steemit, or other tasks to help spread the word. By offering a bounty, the team both spreads the token (and thus the ecosystem), as well as incentivizes people to evangelize the project. After all, by holding the token, the people performing the bounties stand to benefit if the project takes off.
There is no real limit to what can and can't be a bounty. The important part for every team is to make sure that the people who perform the bounties are rewarded, otherwise it's easy to turn a supporter into an enemy.
Airdrops are a promotional approach where a team sends free tokens to all accounts on a network that meet certain criteria, typically involving minimum balance and activity requirements. The airdrop is meant to achieve two goals: spread awareness and interest in the project, and also build a userbase for the ecosystem.
One of the reasons Airdrops became popular is that they were also seen as a way to distribute tokens without being seen as a security, since no money changed hands. This approach is still untested legally.
A road show is when the core team for a project travels from conference to conference and to other events across the world promoting their project. The goal is to put the project in front of as many people as possible and to meet as many investors and other influencers as possible. A road show is draining and expensive, but often necessary for projects to gain strong investor support. Many investors, especially large investors, want to get to know the founders and see what they are made of. If investors and influencers have strong confidence in project leadership, they are more likely to invest. Building relationships in person is one way to do that, and the easiest way for many projects to meet investors is through attending multiple events over time, sometimes months. Ideally, this process begins long before the ICO, to give the project team members a long time to build these relationships and get feedback on ideas without seeming needy or asking for money.
The ICO market is going through growing pains. As a global, mostly unregulated market, there are numerous issues and challenges that do not exist with traditional fundraising. There have been a number of criticisms of ICO projects.
In more traditional VC-backed or bootstrapped projects, it would be necessary for a project to show value through some form of traction. Typically, this would involve having customers, revenue, and growth, if not profitability. However, with ICOs, the money is raised before most projects launch or show an MVP. In many cases, there is no proof of the team's ability to deliver whatsoever. Because of this, it is impossible for ICO buyers to be sure that the project will address a real problem in the market successfully.
The result of all these weak projects is a high rate of failure. A survey from bitcoin.com found that almost half of all projects had already failed, ceased operations, or simply vanished in 2017 alone.
One of the attractions to ICOs is that traditional VC funding is very hard to come by for most of the world. If someone does not live in New York City, San Francisco, or some other major technology hub, then they are far less likely to have access to a serious investor network. With ICOs, it is possible for anyone, anywhere, to attempt to attract early-stage investment. The downside, however, is that the level of due diligence and skill of those doing the investment is questionable and the amount of credible information is low.
An ICO typically starts with the release of a whitepaper, a relatively short document going over the value of the network, the token, and future plans. Because the technology is new, and a typical ICO campaign is short (3-4 months), there is very little time and opportunity for investors to do extensive due diligence. Moreover, because blockchain based startups are not required to show financials (they don't have any), traction, or product-market fit (there is no product yet), there would be little data on which to base evaluations.
In time, consistent standards for evaluating blockchain startups and ICOs may evolve, but, currently, they do not exist.
Because of the low barrier to entry and the large amounts of available capital, there is strong financial pressure on companies to do an ICO if at all possible. The ability to raise substantial capital without issuing equity, and without well-defined legal obligations, is an opportunity that's seen as too good to pass up.
In many cases, projects don't truly need a blockchain or a token. In fact, unless the features of blockchain are absolutely vital to a project, it is cheaper and easier to go forward without it. To require a blockchain, a project will need to make quality use of blockchain-enabled features: decentralized governance, immutability, true digital scarcity, and so on. Similarly, projects that release tokens on public blockchains must sacrifice privacy and speed. It is imperative that anyone evaluating blockchain projects keeps these issues in mind.
Despite ICO and IPO being similar from the point of view of their names, there is no real connection between blockchain tokens and company shares. Ownership of a blockchain token backed by a company provides no ownership, influence, or rights to the company's profits, behavior, or business in any way. The value of the token is instead driven entirely by the value of the network itself and what that network enables. Moreover, if a company creates a blockchain project and then abandons it, the token holders likely have no recourse.
Because of this, the way tokens are released can have a huge effect on how a company supports a blockchain project. For instance, if a team were to sell 90% of network tokens in an ICO, then in the future, they will receive only 10% of the benefit of the rise in value of the token. In comparison, they may have millions of dollars in cash on hand. Because of this, the team may decide to give only a limited amount of attention to the blockchain project and feel little urgency in terms of having improved the network. A small team with tens of millions of dollars could pay themselves large salaries until they die and be very secure.
On the other hand, a team releasing only 10% of tokens would be strongly incentivized to increase the value of the token, but there would be a different issue: centralization. A small group would overwhelmingly control the network. In most cases, this would defeat most of the purpose of blockchain technology, leading to the preceding issue—do they really need a blockchain to begin with?
Another problematic issue with tokens is their liquidity. With high token liquidity, a team of investors may be more incentivized to create hype for the network rather than substance. If a project can create enough buzz, the value of their token may increase tenfold. If the token is then liquid, team members and early investors could dump the token for a huge profit and then move on. No longer having anything at stake, the project might be abandoned.
For these reasons, high-quality projects often have some system of investor and team lockup, preventing team members and large investors from selling the token at all for a period of time followed, by a slow vesting where tokens are released over time. By preventing liquidity, the team must focus on long-term value versus short-term manipulation.
Before we discuss the legalities of blockchain ICOs, it's important to make clear that none of the authors of this book are lawyers and that nothing in this book can constitute or replace quality legal advice. The rules around blockchain technology vary radically between countries and continue to evolve rapidly. For any blockchain project, we suggest that you consult with a skilled local lawyer who has experience in the sector.
The creation of blockchain tokens resulted in an entirely new asset class, one that did not fit well into the existing categories of stock, currency, or equity. Moreover, because public blockchains are global, it is not clear how to apply local laws to the use of blockchains.
In the United States, there is a distinction between a token that is a utility and one that is a security. A utility token could be described as something such as a carnival token, a comic book, or a baseball card. While the market value of the item may go up or down, the fundamental reason for purchasing it (and the way it is advertised) is not directly related to profit-seeking. Someone buys a carnival token to play a game, a comic book to read, and a baseball card to collect.
Many tokens try to position themselves as utilities in order to avoid invoking US securities law which greatly restricts sales and requires formal registration with the SEC along with requirements for other disclosures to investors.
In other cases, ICOs issue a SAFT or Simple Agreement for Future Tokens. The SAFT is absolutely a security and tissuers accept this in order to sell to accredited investors before the launch of the network. Once the network has launched, these SAFT agreements are converted to tokens on the network.
The security versus utility token classification has been complicated by statements from the SEC, that a token can become more or less of a security over time—beginning life as a security or utility and then drifting into the other category. For projects trying to stay on the right side of the law, such fuzzy definitions can be maddening.
Security laws aside, blockchain projects can also be seen as currency and thus run into another set of laws: those governing banks and other money-handling businesses. In the United States and elsewhere, companies that deal with remittances, payments, and other common blockchain use-cases could be seen as money transmitters. In the United States, such businesses must be licensed on a state-by-state basis. Other use cases may require a banking license.
For a global enterprise using blockchain, the regulatory burden to fully comply with the mix of laws and regulations—know-your-customer laws, anti-money laundering laws, money transmitter laws, banking laws, security sales and marketing laws, and so on can be immense.
For these reasons, many blockchain companies tend to defensively headquarter themselves in friendly jurisdictions with the hope of being legal in their primary home and dealing with the rest of the world later, if ever.
Projects in the ICO space, such as blockchain itself, operate in a unique fashion. Depending on the project, they may operate along the lines of a traditional business, but also as a central bank—adding and removing currency from circulation. For a traditional company, profitability is paramount and straightforward, in that a company offers a product and earns a return from sales. However, if you are also creating a currency from nothing and selling and trading it for some other product, or if this currency IS the product, then the situation is more complicated. If the sustainability of the project comes from selling currency, then a downturn can be catastrophic as currency buyers dry up and immense swings in the value of the network can take place nearly instantly. Just as was the case with failed state economy, trust in the currency could evaporate and, as a result, hyperinflation ensues as individual tokens become nearly worthless as a medium of exchange.
Because company-based blockchain projects are so new, it's still not clear what the long-term sustainable models look like for these companies. Earlier projects, such as Bitcoin and Ethereum, did not need to turn a traditional project but just attract enough currency interest to pay the small team of developers.
Despite all the issues, ICOs have advantages that traditional fundraising does not. Indeed, one of the takeaways from the booming ICO market is that traditional avenues to capital for startups have been far too restrictive. There is a clear hunger for access to early-stage tech companies.
The biggest advantage for ICO investors is potential liquidity. In traditional equity funding, backers needed to wait for a liquidity event—either a merger or acquisition or a public offering. Any of these options could be a long time coming if ever they arrived at all. It was not unusual for years and years to pass with no liquidity. With tokens, the sale can happen rapidly after the initial raise is finished. Many tokens would come onto the market mere months after the initial offering. This allowed successful investors to exit part of their position, collect profit, and reinvest. The ability to exit also allowed those investors to re-enter, increasing the pool of available early-stage money overall.
Traditional equity investment is highly regulated. This is meant to protect investors but also acts as a barrier to entry for smaller actors who may have spare capital to invest, but cannot because they are insufficiently wealthy. As a result, those investors cannot invest at all until a company goes public. As a result, smaller investors miss out on the high-risk, high-return options that venture capitalists have access to.
The ability of smaller investors to become involved means that investor-fans, people who invest for reasons other than a pure profit motive, can be a far more powerful force. It's worth asking which is the better investment—a company that can convince a VC to give them $10 million, or a company that can convince 1,000 people to part with $10,000.
Many ICOs have a minimum investment size in the hundreds of dollars or even the low thousands. This is far, far below the hundreds of thousands or millions needed at even the seed level in traditional equity raises. As a result, the pool of possible investors increases exponentially. Moreover, by spreading the investment over a much larger pool of people, the risk to any one investor is more limited. Overall, ICOs provide a funding model that is more prone to scams but also more democratic and better suited to projects that may not have profit motive as their #1 priority. Projects for the social good, which could never make economic sense to a venture capitalist, might still find support in an ICO from people who wish to support the cause and take the opportunity for profit as just a bonus.
The ability to raise vast sums of money in only a few months with nothing more than a whitepaper and some advertising naturally gave rise to bad actors looking to cash in. Numerous ICOs began to spring up with fake teams, fake projects, and projects that were questionable at best. Once the projects had collected the money, the teams would vanish. There have been a number of arrests, but there are still plenty of scammers and frauds who have so far escaped with investor money.
Onecoin was an international Ponzi scheme posing as a blockchain project. The project was labeled a scheme by India, while authorities from China, Bulgaria, Italy, Vietnam, Thailand, Finland, and Norway have warned investors about the project. There have been a number of arrests and seizures throughout the world but the Onecoin (https://www.onecoin.eu/en/) website continues to operate.
Pincoin and iFan were two projects claiming to be from Singapore and India, but were secretly backed by a company in Vietnam called Modern Tech, based out of Ho Chi Minh City. It is currently believed to be the largest scam in ICO history, having managed to scam 32,000 people for over $660 million dollars. The leaders of the scam held events and conferences and went to extreme lengths to convince investors of the viability of the projects. In truth, it was a massive Ponzi scheme with early investors paid with the money from later investors. Once the money had been gathered, the team vanished, along with the money.
Bitconnect was long accused of being a Ponzi scam, as they promised tremendous returns to the owners of their BCC coin. Bitconnect operated an exchange and lending program where users could lend BCC coins to other users in order to make interest off the loans. The company ceased operations after cease-and-desist letters from state lawmakers. The scheme collapsed, along with the value of the coin, leaving most investors with massive losses. A class-action lawsuit is in progress.
Beyond outright fraud, ICOs have been plagued with other issues. Because of the amount of money involved and the fact that most funds are raised via cryptocurrency transactions that cannot be reversed or intercepted, ICOs are a perfect target for hackers.
To the author Please add something here
One of the earliest decentralized projects was known as the DAO, or Decentralized Autonomous Organization. The DAO was meant to function as a VC fund of sorts for blockchain projects and was built so that people could buy a stake in the organization (and its profits) using Ethereum. The project itself was run using the Ethereum blockchain and smart contracts to control funds and manage voting. The project was a massive success, managing to raise about $250 million in funds at a time when Ethereum was trading for around $20.
Unfortunately, a flaw in the smart contract code used to operate the DAO resulted in a loophole that a hacker was able to exploit. Because of the subtle bugs in the smart contracts, the attacker was able to withdraw funds multiple times before balances would update. The hacker was then able to withdraw as much as they liked, quickly draining the DAO of tens of millions of dollars worth of ether. This hack radically affected the course of the Ethereum project by causing a hard fork—the majority of users voted to split the network and refund the stolen funds. The minority started Ethereum classic, where all the attackers, actions were allowed to stand. Both networks still operate independently.
The Parity team is one of the most respected in the entire Ethereum ecosystem. Led by Gavin Wood, one of the founders of Ethereum, they are some of the most experienced and skilled blockchain developers in the world. Unfortunately, everyone is human and the Parity wallet product had a flaw. This flaw allowed an attacker to drain wallets remotely, resulting in millions of dollars of ether being stolen. Thankfully, the attack was not automated, which gave the ecosystem time to notice and respond.
The flaw was fixed, but the fix itself created a new bug. This bug allowed a new attacker to issue a kill command to the wallet, freezing all funds. As of the time of writing, over $260 million in ether remains locked. The community is still trying to figure out a way to rescue the funds.
The moral of the story with the Parity wallet hacks is that even the best teams can make mistakes and that it's vital that any code on Ethereum has some sort of upgrade path. It's also clear that until the ecosystem improves, any code running on Ethereum should be seen as risky. If even the founders aren't perfect, that should tell you the difficulty involved in doing it right.
If contemplating an ICO, it is critical that every effort is made to secure the funds against attack. Here, we will discuss some common attacks and how to defend against them.
Ideally, all servers used by an ICO team should have login access restricted to a known whitelist of ssh keys. This means that only the computers known to the team can log into the server. Even better is if these same machines remain shut down and disconnected from the internet immediately prior to and during the ICO. Thus, even if that computer were compromised, it could not be used to hack the ICO.
One of the ways that ICOs have been hacked is by attackers creating a clone of the ICO website and then hacking DNS to redirect the domain name to a computer the attackers control. The new site looks exactly such as the official one, except the address where to send funds is changed. Because most addresses are hexadecimal and not effortlessly human distinguishable, this is an easy detail to overlook. If this happens for even a few minutes during a busy ICO, hackers can make off with hundreds of thousands or millions of dollars.
Many DNS providers have different ways of locking DNS, and these security measures should all be enabled. Moreover, a DNS checking service where such as DNS Spy, should be used to regularly check for any changes in real time. Taking these countermeasures helps ensure that attackers trying to hijack DNS to steal funds will not be successful.
Any machines used to run the website for an ICO should have some level of intrusion detection software installed as a backup. If for some reason, something was missed, it's critical that the team be notified of any suspicious behavior on key servers. There are numerous intrusion detection products on the market. Key features to look for are modifications of permissions detection and file change detection (for instance, altering an HTML file to change the Ethereum address as to where to send funds).
Another way ICOs can be attacked is through the purchase of similar sounding or looking domains. For instance, if a team is running on myIcoDomain.io, the attacker might buy myIcoDomain.net. It's important for teams to make this harder by buying as many related domains as they can, especially with the most common extensions. If an attacker owns one of these related domains, they can easily send emails to possible buyers, post messages on social media, and so on, in a way that may confuse some buyers. Just as with DNS attacks, attackers will often put up an identical looking site except for the critical payment details.
Moreover, ICO teams should make very clear what the official domain is and regularly and proactively warn users to mistrust anything else.
Attackers also may try and steal funds by injecting messages into Facebook groups, telegram groups, discord channels, and other communication platforms to steal funds. For instance, a user may show up and declare that they are helping the team and could everyone please fill out some survey or other. The survey collects email addresses and, naturally, those email addresses are then sent emails that look as though they are coming from a related domain to send funds or get a special sale.
Who can and cannot speak for the ICO should be extremely clear, and anyone who claims to speak for the ICO team but doesn't should be flagged and banned immediately.
Funds collected by an ICO should be moved into a multi-signature wallet. This is because another possible attack is to compromise the wallet holding the funds, allowing the attacker to transfer everything to themselves. Multi-signature wallets exist for most major crypto ecosystems and radically increase the difficulty for attackers. Instead of stealing the private key for one person, they must now steal multiple keys from multiple computers and use them all simultaneously. In the Ethereum ecosystem, the Gnosis wallet has proven robust and capable here, used by multiple successful teams without incident.
While a best practice in general, having a public code audit for any crowd sale code helps to decrease the likelihood of a hack. By being proactive in looking for and removing vulnerabilities with the help of skilled third-parties, a team both increases trust in the project and decreases the chance that something has been missed that a hacker could exploit.
By now, you should have a good idea of what goes into an ICO and some idea of the immense work that goes into it. A typical ICO can go for minutes to months, but it takes an incredible amount of prep work to get marketing materials done for public and private investors. Any ICO project should be extremely careful about security, as an ICO that gets hacked and loses funds will find it very hard to inspire confidence in the project and in future projects.
Many ICOs fail, either because of a lack of marketing, the wrong team, or an inability to engage the community. The early days of easy money are over. Still, ICOs are, on average, vastly more successful than traditional approaches to gaining funds, such as approaching Venture Capitalists.
In the next chapter, we will be looking into how to create your own token or cryptocurrency.
Up until now, we have talked extensively about blockchain, Bitcoin's, and Altcoins. We have discussed various intricacies involved in Bitcoin's, its blockchain, and other elements that form the blockchain. Ethereum has been a good topic of interest for most parts of the book so far. We have also read about other blockchain-based projects that comprise currency-based projects.
Ethereum has made it possible to make decentralized applications despite having little development knowledge. There are various tokens available at exchanges that are built on top of Ethereum and other similar projects, and are being recognized by backers and the community.
In this chapter, we will be discussing the following topics:
There are three ways in which one's own cryptocurrency can be created. Each has its own benefits over the other. Prior to creating a currency, it is important to know all the intricacies involved, and what your coin offers compared to other existing coins currently available at exchanges. A list of popular coins can be found at https://coinmarketcap.com.
These are the tokens that are based on existing blockchain platforms, such as Ethereum, Omni, NEO, and so on. A token helps in creating a coin faster, and supports a quick go-to market strategy so that most of the time can be invested in further development of a self-hosted blockchain.
There are examples of various blockchain projects, which start as a token and post a successful ICO once they start their own fully supported blockchain complete with a coin. Since it is faster and easier to develop a token as compared to a coin, it becomes easy for such projects to gain traction and also get launched in no time, and most of the time can be invested in other important tasks such as whitepaper creation, ICO, and so on.
In this method, creation of one's own blockchain from scratch can be done. Taking hints from Bitcoin and other blockchain platforms will be helpful to create the coin, which will allow you to integrate new features and also to use different consensus techniques.
Our prime focus in this chapter is about this type of coin development; we will be creating our own coin complete with its own blockchain, after the introduction of Platforms such as Ethereum, Counterparty, NEO, and so on. There have been limited resources with creating one's own blockchain by taking fork of an existing coin such as Bitcoin, Litecoin, etc. and work on that to create own cryptocurrency.
Litecoin is one of the first cryptocurrencies built on top of Bitcoin. Litecoin's source was forked from Bitcoin's core code, including the wallet and other sources of Bitcoin. The major change that Litecoin has over Bitcoin is that the PoW algorithm is script instead of Bitcoin's SHA-256. Apart from this, Litecoin has a coin supply limit of 84,000,000 LTC, and the block time is 2.5 minutes.
In this chapter, we will be forking Litecoin source code and working on top of that. Here is a brief overview of the steps involved:
Once the previously listed parameters are defined, it is time to work on the source code and make the required changes, as needed.
It is important to set up the Litecoin environment in our local machine; the source code is available on GitHub here: https://github.com/litecoin-project/litecoin.
It is important to select the build platform on which the environment is to be set up. You can find the required build instruction in the doc subfolder of the source code. There, required instruction files for the preferred platforms are present for you to follow the steps to install the Litecoin core and the Wallet.
In this section, we will be working on Max OS X build instructions, although instructions for other platforms are also available in the suggested instruction path.
Installation of xcode is necessary for compilation of required dependencies. The following command should be executed in the terminal:
xcode-select --install
Installation of brew, which is a package manager for macOS, is needed next. The following command is used to install brew:
/usr/bin/ruby -e "$(curl -fsSL https://raw.githubusercontent.com/Homebrew/install/master/install)"
Once brew is installed, the next step is to install the required dependencies using the following command:
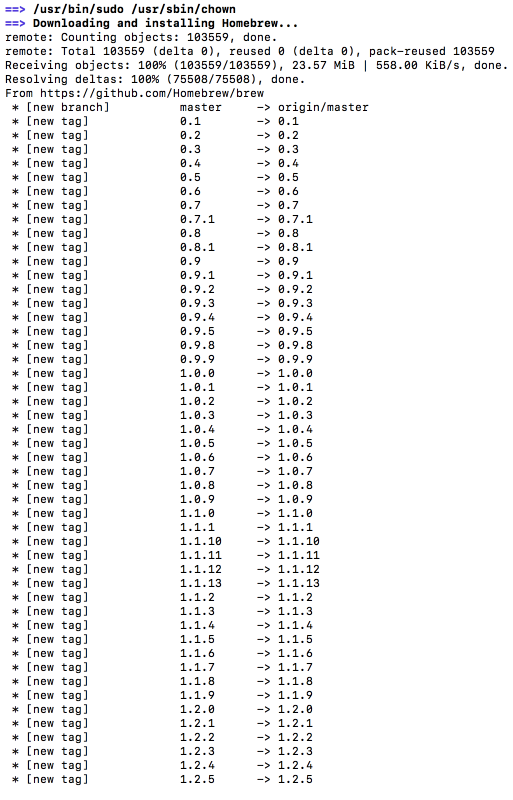
brew install automake berkeley-db4 libtool boost miniupnpc openssl pkg-config protobuf python3 qt libevent
The preceding command will install all the required dependencies, as needed:
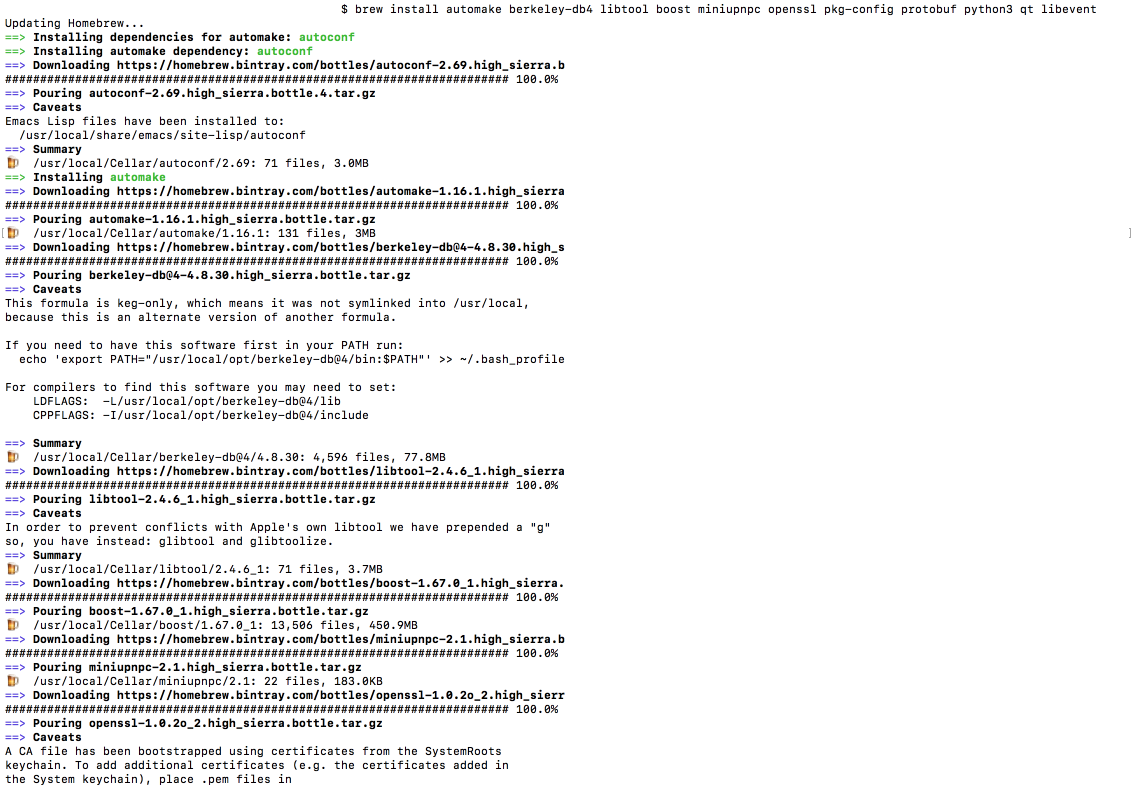
The first step is to clone the Litecoin in the root or any other directory:
git clone https://github.com/litecoin-project/litecoin
cd Litecoin
Installation of BerkleyDb is performed with the following command:
./contrib/install_db4.sh .
Building of Litecoin-core uses the following make command:
./autogen.sh
./configure
make
You can run unit tests to make sure the build is successful without any errors:
make check
Deployment of the .dmg which contains the .app bundles, is shown here:
make deploy
Now, it is time to work on our own coin; for this, it is important to check out the clone directory and Litecoin, and make a copy in case any of the steps turn out to be fatal.
As per the parameters we have listed in one of the previous sections, it is time to replace the parameters at the requisite locations.
The src directory contains the Litecoin core source code where most of the parameters are to be set. In the chainparams.cpp file, change the abbreviation from LTC to the abbreviation of our choice. Similarly, all other files where the abbreviation seems fit is to be changed as suggested.
Now, the ports need to be changed, so that our blockchain works at the relevant port for all the nodes in the network.
The connection port should be changed in the init.cpp file.
The RPC port should be changed in the bitcoinrpc.cpp file.
In the validation.cpp file, the following parameters should be edited:
The block value should be changed in the GetBlockSubsidy() function:
CAmount GetBlockSubsidy(int nHeight, const Consensus::Params& consensusParams)
{
 int halvings = nHeight / consensusParams.nSubsidyHalvingInterval;
 // Force block reward to zero when right shift is undefined.
 if (halvings >= 64)
 return 0;

 CAmount nSubsidy = 50 * COIN;
 // Subsidy is cut in half every 210,000 blocks which will occur approximately every 4 years.
 nSubsidy >>= halvings;
 return nSubsidy;
}
Now, it is time to set the coin limit and the minimum value, and the same can be done in the amount.h file:
typedef int64_t CAmount;

static const CAmount COIN = 100000000;
static const CAmount CENT = 1000000;

static const CAmount MAX_MONEY = 84000000 * COIN;
inline bool MoneyRange(const CAmount& nValue) { return (nValue >= 0 && nValue <= MAX_MONEY); }

#endif // BITCOIN_AMOUNT_H
To change the coinbase maturity, in the qt subfolder, the transactionrecord.cpp file should be changed to set the required number of blocks that are to be found before the mined coins can be spent:
  if (nNet > 0 || wtx.IsCoinBase())
    {
        //
        // Credit
        //
        for(unsigned int i = 0; i < wtx.tx->vout.size(); i++)
        {
            const CTxOut& txout = wtx.tx->vout[i];
            isminetype mine = wallet->IsMine(txout);
            if(mine)
            {
                TransactionRecord sub(hash, nTime);
                CTxDestination address;
                sub.idx = i; // vout index
                sub.credit = txout.nValue;
                sub.involvesWatchAddress = mine & ISMINE_WATCH_ONLY;
                if (ExtractDestination(txout.scriptPubKey, address) && IsMine(*wallet, address))
                {
                    // Received by Bitcoin Address
                    sub.type = TransactionRecord::RecvWithAddress;
                    sub.address = EncodeDestination(address);
                }
                else
                {
                    // Received by IP connection (deprecated features), or a multisignature or other non-simple transaction
                    sub.type = TransactionRecord::RecvFromOther;
                    sub.address = mapValue["from"];
                }
                if (wtx.IsCoinBase())
                {
                    // Generated
                    sub.type = TransactionRecord::Generated;
                }

                parts.append(sub);
            }
        }
    }
    else
    {
        bool involvesWatchAddress = false;
        isminetype fAllFromMe = ISMINE_SPENDABLE;
        for (const CTxIn& txin : wtx.tx->vin)
        {
            isminetype mine = wallet->IsMine(txin);
            if(mine & ISMINE_WATCH_ONLY) involvesWatchAddress = true;
            if(fAllFromMe > mine) fAllFromMe = mine;
        }

        isminetype fAllToMe = ISMINE_SPENDABLE;
        for (const CTxOut& txout : wtx.tx->vout)
        {
            isminetype mine = wallet->IsMine(txout);
            if(mine & ISMINE_WATCH_ONLY) involvesWatchAddress = true;
            if(fAllToMe > mine) fAllToMe = mine;
        }

        if (fAllFromMe && fAllToMe)
        {
            // Payment to self
            CAmount nChange = wtx.GetChange();

            parts.append(TransactionRecord(hash, nTime, TransactionRecord::SendToSelf, "",
                            -(nDebit - nChange), nCredit - nChange));
            parts.last().involvesWatchAddress = involvesWatchAddress; // maybe pass to TransactionRecord as constructor argument
        }
We have to change the transaction confirm count in the transactionrecord.cpp file to set this parameter, as per our requirements.
The genesis block is created from the LoadBlockIndex() function, which is present inside the validation.cpp file:
bool CChainState::LoadBlockIndex(const Consensus::Params& consensus_params, CBlockTreeDB& blocktree)
{
    if (!blocktree.LoadBlockIndexGuts(consensus_params, [this](const uint256& hash){ return this->InsertBlockIndex(hash); }))
        return false;

    boost::this_thread::interruption_point();

    // Calculate nChainWork
    std::vector<std::pair<int, CBlockIndex*> > vSortedByHeight;
    vSortedByHeight.reserve(mapBlockIndex.size());
    for (const std::pair<uint256, CBlockIndex*>& item : mapBlockIndex)
    {
        CBlockIndex* pindex = item.second;
        vSortedByHeight.push_back(std::make_pair(pindex->nHeight, pindex));
    }
    sort(vSortedByHeight.begin(), vSortedByHeight.end());
    for (const std::pair<int, CBlockIndex*>& item : vSortedByHeight)
    {
        CBlockIndex* pindex = item.second;
        pindex->nChainWork = (pindex->pprev ? pindex->pprev->nChainWork : 0) + GetBlockProof(*pindex);
        pindex->nTimeMax = (pindex->pprev ? std::max(pindex->pprev->nTimeMax, pindex->nTime) : pindex->nTime);
        // We can link the chain of blocks for which we've received transactions at some point.
        // Pruned nodes may have deleted the block.
        if (pindex->nTx > 0) {
            if (pindex->pprev) {
                if (pindex->pprev->nChainTx) {
                    pindex->nChainTx = pindex->pprev->nChainTx + pindex->nTx;
                } else {
                    pindex->nChainTx = 0;
                    mapBlocksUnlinked.insert(std::make_pair(pindex->pprev, pindex));
                }
            } else {
                pindex->nChainTx = pindex->nTx;
            }
        }
        if (!(pindex->nStatus & BLOCK_FAILED_MASK) && pindex->pprev && (pindex->pprev->nStatus & BLOCK_FAILED_MASK)) {
            pindex->nStatus |= BLOCK_FAILED_CHILD;
            setDirtyBlockIndex.insert(pindex);
        }
        if (pindex->IsValid(BLOCK_VALID_TRANSACTIONS) && (pindex->nChainTx || pindex->pprev == nullptr))
            setBlockIndexCandidates.insert(pindex);
        if (pindex->nStatus & BLOCK_FAILED_MASK && (!pindexBestInvalid || pindex->nChainWork > pindexBestInvalid->nChainWork))
            pindexBestInvalid = pindex;
        if (pindex->pprev)
            pindex->BuildSkip();
        if (pindex->IsValid(BLOCK_VALID_TREE) && (pindexBestHeader == nullptr || CBlockIndexWorkComparator()(pindexBestHeader, pindex)))
            pindexBestHeader = pindex;
    }

    return true;
}
Further, in chainparams.cpp, the paraphrase is to be changed to the requisite parameter of choice. In Litecoin, the following parameter is used:
const char* pszTimestamp = "NY Times 05/Oct/2011 Steve Jobs, Apple’s Visionary, Dies at 56";
The wallet address is an important part of the blockchain, as without having correct private and public keys it is not possible to perform the relevant changes on the source of Litecoin. The starting letter can be set in the base58.cpp file.
Checkpoints are hardcoded into the Litecoin Core client. With checkpoints set, all transactions are valid up to the checkpoint condition valid. This is set in case anyone wants to fork the blockchain and start from the very same block; the checkpoint will render false and won't accept any further transactions. The checkpoints.cpp file helps in managing the checkpoints in a blockchain source code:
namespace Checkpoints {

    CBlockIndex* GetLastCheckpoint(const CCheckpointData& data)
    {
        const MapCheckpoints& checkpoints = data.mapCheckpoints;

        for (const MapCheckpoints::value_type& i : reverse_iterate(checkpoints))
        {
            const uint256& hash = i.second;
            BlockMap::const_iterator t = mapBlockIndex.find(hash);
            if (t != mapBlockIndex.end())
                return t->second;
        }
        return nullptr;
   }
Icons and other graphics can be set and replaced from the src/qt/res/icons directory, which contains all the images and the main logo of the coin.
The files bitcoin.png and about.png contain the logo for the specific coin.
By following the preceding points, the coin can be created and made to work by using the Litecoin source; once the coin is created and made to work, the next steps will be to test for actual production level usage. Further steps include compiling the coin source and using the QT-based wallet:
In this chapter, we discussed the creation of our own cryptocurrency and worked on the creation of our own blockchain, by taking a fork of Litecoin, and then making the required changes to create the desired coin with the relevant parameters.
In the following chapters, we will address both sides of the coin in terms of blockchain's future, that is, scalability and other challenges that blockchain is facing. Furthermore, we will discuss the future of blockchain, and how it is going to shape the future of the internet and technology, not just in terms of currency-based industries, but also in terms of other industries in which blockchain acts as a game changer.
While the blockchain technology has been hailed as a major breakthrough, it is not without its own issues. Blockchain technology is still in the early stages of its development, and a number of problems have cropped up that are still awaiting some level of resolution. Decentralized networks such as blockchains have their own unique challenges.
In this chapter, we'll look at the following key issues in blockchain:
One of the key advantages of blockchain is decentralization, which is the removal of any single authority to control the network. Unfortunately, this has a downside, which is its effect on the performance of a system. Blockchain systems work by keeping all the nodes of the network in sync by trying to achieve consensus so that every computer running a blockchain sees the same system state. More nodes on the network typically result in less centralization. This also means that more work must be done to ensure that all the network participants are in agreement with each other, which limits performance and scalability.
There are a few reasons why a larger number of nodes hinders performance:
There have been a few attempts at increasing the performance of blockchain systems. Most of these involve some level of reduced decentralization. For instance, the Bitshares-derived set of systems uses a restricted set of full nodes called witnesses, of which there are only 21. Only these computers are used to process and approve transactions; other machines on the network merely submit transactions to the network or observe. As well as many other performance optimizations made by the Bitshares team, they claim a theoretical throughput of up to 100,000 transactions a second. This leads to a second issue with blockchains, which is the cost compared to traditional approaches.
While the Bitshares team suggests a theoretical limit of 100,000 transactions a second, they are using technologies and lessons from the LMAX exchange, which claims to be able to process over 6 million transactions a second. Most blockchains do not achieve a performance that is anywhere near the theoretical performance, with most blockchains achieving well under 1,000 transactions a second in practice. For instance, Bitcoin achieves approximately seven transactions a second, and Ethereum around 14. A decent server running MySQL can process 10,000–20,000 transactions a second of similar complexity. Thus, traditional approaches are much easier to scale to larger transaction volumes than blockchain systems.
The cost per performance of traditional database systems, including distributed database systems, is vastly cheaper on every level than blockchain systems. For any business, hiring experienced personnel for these systems is cheaper, easier, and less risky because they are so much better known and documented. Businesses considering blockchain must ask if a blockchain-based system provides a must-have feature in some way, because if not, other approaches are cheaper, easier, faster, or all of the preceding.
A business that is evaluating blockchain should pay close attention to their scaling requirements and cost models when using blockchain. In time, costs and performance may improve, but there are no guarantees that they will improve fast enough if current approaches aren't sufficient.
Current blockchain systems are relatively difficult to use in comparison to other systems. For instance, the use of any Ethereum-based DApp requires either the installation of a special browser or the MetaMask plugin for Chrome, or the purchase and transfer of Ethereum on one of the public markets and then learning the interface of the desired application. Each action taken requires the expenditure of Ethereum, the exact amount not necessarily known in advance and varying depending on network load.
Once set up, sending a value via a blockchain-based system is relatively easy, but prone to mistakes in the addresses. It is not easy for a human to know whether they are sending the value to 0x36F9050bb22d0D0d1BE34df787D476577563C4fC or 0xF973EE1Bcc92d924Af3Fc4f2ce4616C73b58e5Cc. Indeed, ICOs have been hacked by attackers gaining access to the ICO main website and simply changing the destination address, thereby siphoning away millions.
Some blockchains, such as Bitshares and Stellar, have provisions for named accounts that are intuitive and human readable. Hopefully, this trend will continue and the usability will improve.
When blockchain networks get hacked, users typically have no recourse. This is true whether or not the user is at fault in any way. When centralized exchanges have been hacked, one of the responses is the users should not have trusted a centralized authority. However, with events such as the parity wallet hack and the DAO, users could lose access to their funds even when they did not trust a centralized authority. While one response could be they should have chosen a better wallet or project, it is unclear how users can realistically be expected to do that. For any Parity wallet hack, the Parity team involves some of the most renowned developers of the Ethereum world. The more likely response to such continued issues is to not use blockchain. To achieve mainstream acceptance, blockchain systems will need to be easier to use and provide some sort of advanced protection in the case of attacks, hacks, and other losses.
All blockchains can suffer from consensus attacks, often referred to as 51% attacks because of the original consensus attack possible in Bitcoin. Every blockchain relies on the majority of its users or stakeholders being good actors, or at least not coordinating against the rest of the network. If the majority (or even a large minority) of the powerful network actors in a blockchain system coordinate against the rest, they will be able to launch double-spend attacks and extract large amounts of value from the network against its will.
While once theoretical, there have recently been a number of successful 51% attacks against different blockchains, such as Verge (find the link in the references). In systems that are more centralized, such as proof-of-stake systems where there may be a small number of extremely large stakeholders, it is entirely possible that similar coordination's could occur with something as simple as a few phone calls if concerned stakeholders have sufficient incentives. Such incentives do not necessarily need to be economic or on-chain at all: Politics or international relations could cause a set of patriotic stakeholders to collude for or against other users. For instance, a large amount of mining hardware and network gear originates in China, as does a lot of blockchain development. If the Chinese stakeholders discovered that they held a majority stake during an international fight with a regional rival, these stakeholders might be able to use their network power to punish network users that belong to the rival region, unilaterally.
Another issue for public blockchains is the existence of network forks. Bitcoin has been forked twice, splitting into Bitcoin and Bitcoin cash, then again into Bitcoin Gold. There are now three independent networks claiming the Bitcoin mantle. While the original network is still by far the most dominant, all the forks were a result of a breakdown in agreement among the key network participants about the future of the technology.
Ethereum suffered a similar fate, splitting into Ethereum, and Ethereum Classic over how to respond to the DAO hack. The majority felt that the DAO should have the hacked funds restored, but a strong minority disagreed, asking why should this hack get special treatment over others?. The result was two networks, one with the hacked funds restored (Ethereum) and one where the network protocol was the rule no matter what (Ethereum Classic).
The upside of an immutable ledger is that nothing can be hidden or altered. The downside of an immutable ledger is that nothing can be hidden or altered—including bugs. In the case where networks such as Ethereum write the smart contract code into the chain itself, this means that code bugs cannot be fixed easily; the original code will remain on the blockchain forever. The only workaround is the modular code where each section references some other section, and these pointers have programmatic ways of being updated. This allows the authors of a DApp to upload a new piece of code and adjust the pointers appropriately. However, this method too has issues. Making these updates requires a specific authority to update the code.
Having a central authority that is necessary for updates just creates new problems. Either that authority has centralized control over the decentralized app (which means it is no longer decentralized) or a governing system must be written onto the blockchain as well. Both these options have security trade-offs. A centralized authority might be hacked or have their private keys stolen, resulting in a catastrophic loss to the system. A decentralized governing system requires substantially more code, and is itself at risk of a hack, with the DAO hack being exactly such an event.
Current blockchain technologies do not easily interoperate. While it is possible to write an application that can communicate with multiple blockchains, those blockchains do not have the natural capability to communicate with each other. In many cases, the fundamental approach to transactions and governance may not be compatible. For instance, in the Ethereum network, any user can send any token to any other user, no permission required by the recipient. The recipient is free to ignore the new tokens if they wish, but they still have them (which results in some interesting tax questions). In the Stellar network, however, a user must issue a trustline to another in order to receive custom tokens issued by that user.
Similarly, many networks offer multisignature and multiuser wallets on-chain. However, without a centralized application sitting outside the blockchains themselves, there is no way for users to easily manage all of these networks in one place. This is part of the appeal of centralized exchanges to begin with—no matter what the underlying protocol is, users get a predictable, universal interface that is able to send and receive tokens without regard for the underlying technology.
As with any new technology, the number of skilled personnel will be limited. In the case of blockchain, this natural order is made far worse because of the large and growing number of systems. Looking only at the major chains, systems are written in C, C++, Java, Scala, Golang, and Python. All of these systems have different architectures and protocols. The blockchains that have smart contracts have different contract models, contract APIs, and even completely different programming languages, such as Solidity and Serpent.
On the security front, each blockchain system has subtly different security models and challenges. The simpler the system, the easier those requirements are, but the less the blockchain will be able to do. Moreover, because of the recent surge of interest, blockchain skills are very expensive on the open market. In particular, top talent with a proven track record is very hard to find.
One of the supposed advantages of blockchains is that they can be run anonymously. However, if this anonymity is ever broken, the immutable ledger means that every transaction throughout time can now be traced perfectly. Maintaining perfect anonymity is extremely hard, and even if one person is successful, if the people they do business with are not also anonymous as well, then statistical techniques can be used to narrow down the possibilities of their identity considerably.
While many people think about anonymity in terms of avoiding law enforcement or taxation, it is not only governments that might be interested in this information. For instance, plenty of criminal organizations would love to be able to identify wealthy but unassuming people. An organization could trace large holdings or transactions of cryptoassets to a specific person and use that as a targeting method for kidnapping or extortion. Add the immutability of cryptotransactions and this could make such attacks very attractive.
There are some projects that attempt to address this, such as Zcash and Dash, which hide transaction sources and endpoints. Hopefully, more systems will add well thought out protocols to address safety and privacy.
Some of the largest blockchains, such as Bitcoin and Ethereum, still work on a proof-of-work model. The proof-of-work approach is extremely power hungry and inefficient. One news report suggested that the Bitcoin network alone already consumes more power than the nation of Ireland. Other sources considered this an exaggeration, but even so, it illustrates the tremendous cost of running these systems.
However, more and more systems are moving from proof-of-work systems to other systems for this exact reason. New consensus algorithms, such as proof-of-stake and delegated-proof-of-stake, make such extreme energy costs unnecessary.
In this chapter, we have covered the current major challenges of using and implementing blockchain systems. Businesses looking to use blockchains should be aware of the current state of the technology, the costs in comparison to other technological approaches, and the security and staffing issues that exist in the blockchain world.
The good news is that none of these issues are insurmountable, and many of them will certainly improve with time. Numerous projects are underway to improve the usability and security of different blockchain networks. Additional tooling and training resources reduce the difficulty of programming new blockchain applications.
In this chapter, we are going to discuss the future of the blockchain technology. There are a number of trends and developments that are likely to drive the development of the blockchain technology and its adoption in the coming years. As with any sort of prognostication, none of the things that we will discuss are set in stone.
In particular, blockchain will be driven by a few key themes:
Blockchain began with only a single implementation: Bitcoin. Now there are thousands of blockchains and hundreds of blockchain technologies. In such a crowded marketplace, it is only natural that the technology will begin to have more purpose-driven implementations. Many of the drawbacks of blockchain systems, such as the speed, ease of use, and so on, are easier to solve with a purpose-specific blockchain system.
We've already seen the beginnings of this. Steemit is a blockchain-based social network built from bitshares/graphene technology. It has a consensus algorithm based on witnesses and voting, and the whole operation is designed around hosting social and blogging content. While still having many of the features of a public blockchain, by being purpose specific, the Steem blockchain is better able to function in its desired ecosystem.
We expect more purpose-specific chain technologies to emerge. Forks of blockchain specifically aimed at logistics, tracking the providence of artistic works, legal work, and so on are all fertile ground for a good team to provide a market-specific blockchain product that is easy to use and integrate into existing systems.
The companies that successfully provide a cost-saving, effective solution for traditional businesses will find the easiest success. In this section, we will look at some specific use cases that are already evolving.
Some of the most popular games in the world are online role-playing games, such as World of Warcraft. In many of these games, players can accumulate and trade equipment. A common issue for game creators has been the in-game economy: How do you enforce the scarcity of rare items online? Many games have been subject to duping bugs, where a player can duplicate a rare item over and over again and then sell it, thereby making a substantial profit. Blockchain technology solves the issue of digital scarcity.
There are already a few video games experimenting with blockchain technology. However, while there are a few Ethereum-based tokens for gaming, there are no blockchains just for video games yet. We expect this to change, as some of the most lucrative games around make their money through the sale of in-game items.
Real estate is another domain where the blockchain technology makes absolute sense. There are already a number of real-estate-based projects under way. However, the world of real estate is complex, and the laws concerning title ownership and transfer vary widely from jurisdiction to jurisdiction. It is likely that a chain built for managing the private/public interaction of land transference will be able to successfully supplant the existing legacy systems. Such a system would greatly increase the efficiency of property markets. Current markets rely on a large number of distinct factors with incomplete information government agencies holding land title records, insurance companies checking flood zones and other issues, issuing prices, and real-estate sales companies carrying out price discovery and advertising. The need for multiple disconnected parties to share in a trusted system is a perfect fit for blockchain technology. Improving real estate would be difficult, but possibly very lucrative for the company that is successful.
There are already a large number of well-funded logistics projects in the blockchain field. Most of these are running on a public network such as Ethereum or NEO. However, it is likely that industry-specific blockchains will evolve, as the legal needs and requirements of a regional trucking company are quite different than those of international cross-border shipping. The system requirements for each space may be very different, yet these systems would need to communicate and coordinate. Here is a space where federated, multichain networks might be a good fit. The technology to handle cross-chain transfers is still developing. However, despite the difficulty of tracking tokens across multiple blockchains, teams such as the Tendermint team (the developers of Cosmos) are hard at work enabling precisely that.
Currently, software licenses and other rights to intellectual property are managed and transferred using a large number of proprietary systems, or even old-fashioned paperwork. It can be difficult or even impossible to ascertain the ownership of certain intellectual property. In the US, you automatically own any IP you create; however, this ownership is not recorded anywhere. It is possible to register your ownership, but it's far from effortless. A blockchain-powered IP system would enable sites such as YouTube, DeviantArt, and ModelMayhem to create the ability to automatically register works on behalf of their users. Once registered, those same sites could assist users in seamlessly issuing and revoking licenses. Such a scheme would require the cooperation of these large internet sites, but this would not be the first time such a thing has happened; many of the technical underpinnings of the web were created through industry consortiums looking to increase efficiency and interoperability throughout the industry.
While the blockchain technology has become increasingly fragmented, there will come an inevitable consolidation. One of the ways that blockchain will consolidate is within different industries. As with other standard processes, it is likely that each industry in which finds a profitable use for blockchain will begin to standardize on one or two key technologies or implementations that will then become the default. For instance, in the logistics industry, there are many competing projects and standards for the tracking and delivery of packages. Some of these projects are being built on Ethereum, others on NEO, and yet more on their own private chains. One of these approaches, or a new one not yet seen, will hit an industry sweet spot and become a standard. This is because blockchain technology is ideally suited for uniting different factors that may not trust each other. This sweet spot technology will almost certainly be the result of a collection of companies, not a startup. A consortium has a much easier time in not feeling such as a threatening competitor, and will instead have an opportunity to pool resources and be part of a winning team.
Likely consortium's to use blockchain include the banking, insurance, package delivery, and tracking industries. Industries such as document and legal tracking, on the other hand, are more likely to have multiple private competitors because of the different market forces. Medical tracking would greatly benefit from a standardized approach, but market forces and regulatory issues make this more difficult.
The current state of the blockchain ecosystem has been compared to the dotcom boom in the '90s. The result will likely be similar: A few key projects survive and thrive, whereas the others fail and become liabilities for investors. However, unlike the dotcom boom, blockchain projects have taken vastly more investment from the general public. This could lead to interesting results. One possibility is an event similar to the dotcom crash: funding dries up for quite some time, regardless of project quality. With retail investors taking some of the damage, as well as having the opportunity to continue to invest anyway, the fallout from a blockchain crash may not be as bad. However, a harsh crash that may severely harm retail investors is more likely to draw a regulatory reaction.
A certain near-term change in the blockchain technology will come from regulation. Nearly every major country is looking at the ICO landscape and working out how best to regulate or capitalize on blockchain. In the USA, the SEC seems to be looking at ICOs more and more as a securities offering that will necessitate companies to carry out an ICO to provide financial and other documentation more typically related to stock offerings.
Other countries, such as Belarus, are taking a very hands-on approach in the hopes of luring blockchain companies and investment to their countries.
In response to the continued SEC action and the failure of a large number of blockchain projects, an increasing number of projects that are seeking funding will issue security tokens. Investors will inevitably start seeking and demanding higher-quality projects, as the low hanging fruit will have been taken and barriers to entry will increase. In addition, security offerings tend to come with financial disclosure rules and other requirements that will act as a gatekeeper to projects that are simply not ready to be funded. The downside, of course, is that it will be harder for unknown players without independent access to funds to even attempt entry into the market.
Currently, there are no exchanges dedicated to security tokens, and, in fact, many existing exchanges do not wish to trade in such tokens in order to avoid security laws themselves. Once the security tokens become a larger part of the market, STO trading platforms will emerge or potentially be added to the existing stock-trading platforms of major exchanges and banks.
One of the common criticisms of blockchain tokens is the high volatility of individual assets. To counter this, there have already been a few attempts at creating token pools, or tokens that represent a basket of other tokens in order to reduce volatility and risk, much like ETFs and mutual funds do for stocks.
We expect further attempts at building more stable and better-hedged token products. One possibility would be a new insurance product, protecting against negative volatility in return for a fee. While in practical terms a similar effect can be achieved with futures and options, insurance is a concept more familiar to ordinary consumers and retail investors who have taken an interest in the token markets. We expect that there will be attempts to bring all of these to the market.
Technologies tend to go in waves. There is usually a period of growth and experimentation followed by consolidation and standardization before the cycle begins again. Currently, there are a few technologies that are clearly in the lead for being standardization targets.
Ethereum, Neo, and Hyperledger are all technologies that have already attracted substantial traction from different projects. Any newcomers will have to not only offer a superior technology at the blockchain level but will also contend with the host of tools and existing libraries and tutorials that are already being developed. In particular, the Ethereum and Hyperledger ecosystems have a tremendous amount of investment dedicated to them, as well as the substantial corporate support. Both projects are the only ones to be offered by Microsoft and Amazon as blockchain-as-a-service offerings.
As the blockchain technology has grown, so have the number of companies offering blockchain services. Just like with individual blockchain projects, we can expect that many of these companies will go away and the more successful ones will become dominant inside of their ecosystems. In some cases, this was the original economic play: IBM wrote much of the Hyperledger fabric and provided it as open source, and now provides an extensive consulting service in the space.
As with Amazon and Microsoft offering blockchain services, there will be an increase in the number of off-the-shelf products for businesses. Currently, custom blockchain development is prohibitively expensive for many businesses, as well as risky. Once standard and dominant players become more clear, it will be easier for startups to provide targeted blockchain-as-a-service and blockchain integration to existing enterprises. It will be at this stage that blockchain adoption genuinely becomes mainstream.
One of the big challenges in the blockchain world is communicating across blockchains. Some projects, such as Cosmos, have this problem at the center of their approach. Efficient and accurate cross-chain communication is a critical capability to enable blockchains to scale, as well as provide the customized services that different ecosystems will demand. While a few approaches are under development, none of them have really been proven out in the real world under typical business conditions. Once a good solution is found, that blockchain ecosystem will have a huge advantage over others.
The two other major technological buzz-phrases of the moment are AI and IoT. There are a number of ways that these technologies could overlap and intersect.
Artificial intelligence requires a vast amount of data to be effective. This is part of why so many big companies are pursuing AI projects with such fervor. Larger companies have access to more data and are therefore able to produce superior AI results than companies that have less data. Thus, larger companies have a vast competitive advantage over small ones if they are able to leverage AI expertise effectively. Public blockchains remove this advantage because the same data is available to all. In this realm, smaller startups that are more nimble and have nothing to lose could leverage this public data to provide new services and offerings through proprietary or highly targeted offerings.
Similarly, it is expected that consortium blockchains will further strengthen incumbents who can share data among one another to keep out new competitors. The existing cartel would have vast data troves larger than any of the individual actors, creating a defensive perimeter around their industry. While the consortium members might still compete among themselves, their data advantage would help shield them from new market entrants.
One of the ongoing threats to the internet of things is security. Millions of network devices result in millions of potentially vulnerable items that could be co-opted by attackers. Using a blockchain to deliver software updates, along with systems such as trusted computing modules, IoT devices could be at least partially shielded from attacks by requiring an attacker to disrupt the entire chain, not just a specific device. However, this would take careful engineering, and the first few attempts at this form of security will likely fail due to implementation bugs.
Other interactions with blockchain include logistics, where companies tie the movements of their delivery vehicles to a consortium network that broadcasts each package movement across the entire network, improving delivery and identifying issues. For instance, a truck hitting a roadblock and updating its travel across a consortium of logistics firms would allow other trucks to route around, thereby improving deliverability.
In this chapter, we've discussed the near-term likely future of blockchain technology. It is impossible to know the future, but from what can be gauged, these are the industry trends and forces shaping the technology as it exists today. For those businesses investigating blockchain, each of these three major trends will act to either encourage blockchain adoption or cause avoidance. We hope that the governments of the world issue clear and well thought out regulation as soon as possible, as well as put in place safeguards to prevent fraud. With this in place, this technological evolution will have more guidance in terms of how to bring blockchain products to market safely and with less risk.
Blockchains, in general, will continue to be applied to different industries. It is unknown what new networks such as EOS and Cosmos will bring to the table, as no major chain has yet had the extensive governance models that these systems seek to provide. If large-scale, decentralized governance is able to perform well, it would be an encouraging development for many systems. For instance, the government of Estonia is already doing trials with blockchain for some of their government functions.
Most likely, the current blockchain systems will not be the dominant ones in the end. As with most technologies, the dominant systems will be the ones built on the lessons learned from the current crop of failures.
Almost all of the Internet-based applications we have been using are centralized, that is, the servers of each application are owned by a particular company or person. Developers have been building centralized applications and users have been using them for a pretty long time. But there are a few concerns with centralized applications that make it next to impossible to build certain types of apps and every app ends up having some common issues. Some issues with centralized apps are that they are less transparent, they have a single point of failure, they fail to prevent net censorship, and so on. Due to these concerns, a new technology emerged for the building of Internet-based apps called decentralized applications (DApps).
In this chapter, we'll cover the following topics:
Typically, signed papers represent organizations, and the government has influence over them. Depending on the type of organization, the organization may or may not have shareholders.
Decentralized autonomous organization (DAO) is an organization that is represented by a computer program (that is, the organization runs according to the rules written in the program), is completely transparent, and has total shareholder control and no influence of the government.
To achieve these goals, we need to develop a DAO as a DApp. Therefore, we can say that DAO is a subclass of DApp.
Dash, and the DAC are a few example of DAOs.
One of the major advantages of DApps is that it generally guarantees user anonymity. But many applications require the process of verifying user identity to use the app. As there is no central authority in a DApp, it become a challenge to verify the user identity.
In centralized applications, humans verify user identity by requesting the user to submit certain scanned documents, OTP verification, and so on. This process is called know your customer (KYC). But as there is no human to verify user identity in DApps, the DApp has to verify the user identity itself. Obviously, DApps cannot understand and verify scanned documents, nor can they send SMSes; therefore, we need to feed them with digital identities that they can understand and verify. The major problem is that hardly any DApps have digital identities and only a few people know how to get a digital identity.
There are various forms of digital identities. Currently, the most recommended and popular form is a digital certificate. A digital certificate (also called a public key certificate or identity certificate) is an electronic document used to prove ownership of a public key. Basically, a user owns a private key, public key, and digital certificate. The private key is secret and the user shouldn't share it with anyone. The public key can be shared with anyone. The digital certificate holds the public key and information about who owns the public key. Obviously, it's not difficult to produce this kind of certificate; therefore, a digital certificate is always issued by an authorized entity that you can trust. The digital certificate has an encrypted field that's encrypted by the private key of the certificate authority. To verify the authenticity of the certificate, we just need to decrypt the field using the public key of the certificate authority, and if it decrypts successfully, then we know that the certificate is valid.
Even if users successfully get digital identities and they are verified by the DApp, there is a still a major issue; that is, there are various digital certificate issuing authorities, and to verify a digital certificate, we need the public key of the issuing authority. It is really difficult to include the public keys of all the authorities and update/add new ones. Due to this issue, the procedure of digital identity verification is usually included on the client side so that it can be easily updated. Just moving this verification procedure to the client side doesn't completely solve this issue because there are lots of authorities issuing digital certificates and keeping track of all of them, and adding them to the client side, is cumbersome.
Due to these issues, the only option we are currently left with is verifying user identity manually by an authorized person of the company that provides the client. For example, to create a Bitcoin account, we don't need an identification, but while withdrawing Bitcoin to flat currency, the exchanges ask for proof of identification. Clients can omit the unverified users and not let them use the client. And they can keep the client open for users whose identity has been verified by them. This solution also ends up with minor issues; that is, if you switch the client, you will not find the same set of users to interact with because different clients have different sets of verified users. Due to this, all users may decide to use a particular client only, thus creating a monopoly among clients. But this isn't a major issue because if the client fails to properly verify users, then users can easily move to another client without losing their critical data, as they are stored as decentralized.
Many applications need user accounts' functionality. Data associated with an account should be modifiable by the account owner only. DApps simply cannot have the same username- and password-based account functionality as do centralized applications because passwords cannot prove that the data change for an account has been requested by the owner.
There are quite a few ways to implement user accounts in DApps. But the most popular way is using a public-private key pair to represent an account. The hash of the public key is the unique identifier of the account. To make a change to the account's data, the user needs to sign the change using his/her private key. We need to assume that users will store their private keys safely. If users lose their private keys, then they lose access to their account forever.
A DApp shouldn't depend on centralized apps because of a single point of failure. But in some cases, there is no other option. For example, if a DApp wants to read a football score, then where will it get the data from? Although a DApp can depend on another DApp, why will FIFA create a DApp? FIFA will not create a DApp just because other DApps want the data. This is because a DApp to provide scores is of no benefit as it will ultimately be controlled by FIFA completely.
So in some cases, a DApp needs to fetch data from a centralized application. But the major problem is how the DApp knows that the data fetched from a domain is not tampered by a middle service/man and is the actual response. Well, there are various ways to resolve this depending on the DApp architecture. For example, in Ethereum, for the smart contracts to access centralized APIs, they can use the Oraclize service as a middleman as smart contracts cannot make direct HTTP requests. Oraclize provides a TLSNotary proof for the data it fetches for the smart contract from centralized services.
For a centralized application to sustain for a long time, the owner of the app needs to make a profit in order to keep it running. DApps don't have an owner, but still, like any other centralized app, the nodes of a DApp need hardware and network resources to keep it running. So the nodes of a DApp need something useful in return to keep the DApp running. That's where internal currency comes into play. Most DApps have a built-in internal currency, or we can say that most successful DApps have a built-in internal currency.
The consensus protocol is what decides how much currency a node receives. Depending on the consensus protocol, only certain kinds of nodes earn currency. We can also say that the nodes that contribute to keeping the DApp secure and running are the ones that earn currency. Nodes that only read data are not rewarded with anything. For example, in Bitcoin, only miners earn Bitcoins for successfully mining blocks.
The biggest question is since this is a digital currency, why would someone value it? Well, according to economics, anything that has demand and whose supply is insufficient will have value.
Making users pay to use the DApp using the internal currency solves the demand problem. As more and more users use the DApp, the demand also increases and, therefore, the value of the internal currency increases as well.
Setting a fixed amount of currency that can be produced makes the currency scarce, giving it a higher value.
The currency is supplied over time instead of supplying all the currency at a go. This is done so that new nodes that enter the network to keep it secure and running also earn the currency.
The only demerit of having internal currency in DApps is that the DApps are not free for use anymore. This is one of the places where centralized applications get the upper hand as centralized applications can be monetized using ads, providing premium APIs for third-party apps, and so and can be made free for users.
In DApps, we cannot integrate ads because there is no one to check the advertising standards; the clients may not display ads because there is no benefit for them in displaying ads.
Until now, we have been learning about DApps, which are completely open and permissionless; that is, anyone can participate without establishing an identity.
On the other hand, permissioned DApps are not open for everyone to participate. Permissioned DApps inherit all properties of permissionless DApps, except that you need permission to participate in the network. Permission systems vary between permissioned DApps.
To join a permissioned DApp, you need permission, so consensus protocols of permissionless DApps may not work very well in permissioned DApps; therefore, they have different consensus protocols than permissionless DApps. Permissioned DApps don't have internal currency.
Now that we have some high-level knowledge about what DApps are and how they are different from centralized apps, let's explore some of the popular and useful DApps. While exploring these DApps, we will explore them at a level that is enough to understand how they work and tackle various issues instead of diving too deep.
Bitcoin is a decentralized currency. Bitcoin is the most popular DApp and its success is what showed how powerful DApps can be and encouraged people to build other DApps.
Before we get into further details about how Bitcoin works and why people and the government consider it to be a currency, we need to learn what ledgers and blockchains are.
A ledger is basically a list of transactions. A database is different from a ledger. In a ledger, we can only append new transactions, whereas in a database, we can append, modify, and delete transactions. A database can be used to implement a ledger.
A blockchain is a data structure used to create a decentralized ledger. A blockchain is composed of blocks in a serialized manner. A block contains a set of transactions, a hash of the previous block, timestamp (indicating when the block was created), block reward, block number, and so on. Every block contains a hash of the previous block, thus creating a chain of blocks linked with each other. Every node in the network holds a copy of the blockchain.
Proof-of-work, proof-of-stake, and so on are various consensus protocols used to keep the blockchain secure. Depending on the consensus protocol, the blocks are created and added to the blockchain differently. In proof-of-work, blocks are created by a procedure called mining, which keeps the blockchain safe. In the proof-of-work protocol, mining involves solving complex puzzles. We will learn more about blockchain and its consensus protocols later in this book.
The blockchain in the Bitcoin network holds Bitcoin transactions. Bitcoins are supplied to the network by rewarding new Bitcoins to the nodes that successfully mine blocks.
The major advantage of blockchain data structure is that it automates auditing and makes an application transparent yet secure. It can prevent fraud and corruption. It can be used to solve many other problems depending on how you implement and use it.
First of all, Bitcoin is not an internal currency; rather, it's a decentralized currency. Internal currencies are mostly legal because they are an asset and their use is obvious.
The main question is whether currency-only DApps are legal or not. The straight answer is that it's legal in many countries. Very few countries have made it illegal and most are yet to decide.
Here are a few reasons why some countries have made it illegal and most are yet to decide:
The Bitcoin network is used to only send/receive Bitcoins and nothing else. So you must be wondering why there would be demand for Bitcoin.
Here are some reasons why people use Bitcoin:
Ethereum is a decentralized platform that allows us to run DApps on top of it. These DApps are written using smart contracts. One or more smart contracts can form a DApp together. An Ethereum smart contract is a program that runs on Ethereum. A smart contract runs exactly as programmed without any possibility of downtime, censorship, fraud, and third-party interference.
The main advantage of using Ethereum to run smart contracts is that it makes it easy for smart contracts to interact with each other. Also, you don't have to worry about integrating consensus protocol and other things; instead, you just need to write the application logic. Obviously, you cannot build any kind of DApp using Ethereum; you can build only those kinds of DApps whose features are supported by Ethereum.
Ethereum has an internal currency called ether. To deploy smart contracts or execute functions of the smart contracts, you need ether.
This book is dedicated to building DApps using Ethereum. Throughout this book, you will learn every bit of Ethereum in depth.
Hyperledger is a project dedicated to building technologies to build permissioned DApps. Hyperledger fabric (or simply fabric) is an implementation of the Hyperledger project. Other implementations include Intel Sawtooth and R3 Corda.
Fabric is a permissioned decentralized platform that allows us to run permissioned DApps (called chaincodes) on top of it. We need to deploy our own instance of fabric and then deploy our permissioned DApps on top of it. Every node in the network runs an instance of fabric. Fabric is a plug-and-play system where you can easily plug and play various consensus protocols and features.
Hyperledger uses the blockchain data structure. Hyperledger-based blockchains can currently choose to have no consensus protocols (that is, the NoOps protocol) or else use the PBFT (Practical Byzantine Fault Tolerance) consensus protocol. It has a special node called certificate authority, which controls who can join the network and what they can do.
IPFS (InterPlanetary File System) is a decentralized filesystem. IPFS uses DHT (distributed hash table) and Merkle DAG (directed acyclic graph) data structures. It uses a protocol similar to BitTorrent to decide how to move data around the network. One of the advanced features of IPFS is that it supports file versioning. To achieve file versioning, it uses data structures similar to Git.
Although it called a decentralized filesystem, it doesn't adhere to a major property of a filesystem; that is, when we store something in a filesystem, it is guaranteed to be there until deleted. But IPFS doesn't work that way. Every node doesn't hold all files; it stores the files it needs. Therefore, if a file is less popular, then obviously many nodes won't have it; therefore, there is a huge chance of the file disappearing from the network. Due to this, many people prefer to call IPFS a decentralized peer-to-peer file-sharing application. Or else, you can think of IPFS as BitTorrent, which is completely decentralized; that is, it doesn't have a tracker and has some advanced features.
Let's look at an overview of how IPFS works. When we store a file in IPFS, it's split into chunks < 256 KB and hashes of each of these chunks are generated. Nodes in the network hold the IPFS files they need and their hashes in a hash table.
There are four types of IPFS files: blob, list, tree, and commit. A blob represents a chunk of an actual file that's stored in IPFS. A list represents a complete file as it holds the list of blobs and other lists. As lists can hold other lists, it helps in data compression over the network. A tree represents a directory as it holds a list of blobs, lists, other trees, and commits. And a commit file represents a snapshot in the version history of any other file. As lists, trees, and commits have links to other IPFS files, they form a Merkle DAG.
So when we want to download a file from the network, we just need the hash of the IPFS list file. Or if we want to download a directory, then we just need the hash of the IPFS tree file.
As every file is identified by a hash, the names are not easy to remember. If we update a file, then we need to share a new hash with everyone that wants to download that file. To tackle this issue, IPFS uses the IPNS feature, which allows IPFS files to be pointed using self-certified names or human-friendly names.
The major reason that is stopping IPFS from becoming a decentralized filesystem is that nodes only store the files they need. Filecoin is a decentralized filesystem similar to IPFS with an internal currency to incentivize nodes to store files, thus increasing file availability and making it more like a filesystem.
Nodes in the network will earn Filecoins to rent disk space and to store/retrieve files, you need to spend Filecoins.
Along with IPFS technologies, Filecoin uses the blockchain data structure and the proof-of- retrievability consensus protocol.
At the time of writing this, Filecoin is still under development, so many things are still unclear.
Namecoin is a decentralized key-value database. It has an internal currency too, called Namecoins. Namecoin uses the blockchain data structure and the proof-of-work consensus protocol.
In Namecoin, you can store key-value pairs of data. To register a key-value pair, you need to spend Namecoins. Once you register, you need to update it once in every 35,999 blocks; otherwise, the value associated with the key will expire. To update, you need Namecoins as well. There is no need to renew the keys; that is, you don't need to spend any Namecoins to keep the key after you have registered it.
Namecoin has a namespace feature that allows users to organize different kinds of keys. Anyone can create namespaces or use existing ones to organize keys.
Some of the most popular namespaces are a (application specific data), d (domain name specifications), ds (secure domain name), id (identity), is (secure identity), p (product), and so on.
To access a website, a browser first finds the IP address associated with the domain. These domain name and IP address mappings are stored in DNS servers, which are controlled by large companies and governments. Therefore, domain names are prone to censorship. Governments and companies usually block domain names if the website is doing something illegal or making loss for them or due to some other reason.
Due to this, there was a need for a decentralized domain name database. As Namecoin stores key-value data just like DNS servers, Namecoin can be used to implement a decentralized DNS, and this is what it has already been used for. The d and ds namespaces contain keys ending with .bit, representing .bit domain names. Technically, a namespace doesn't have any naming convention for the keys but all the nodes and clients of Namecoin agree to this naming convention. If we try to store invalid keys in d and ds namespaces, then clients will filter invalid keys.
A browser that supports .bit domains needs to look up in the Namecoin's d and ds namespace to find the IP address associated with the .bit domain.
The difference between the d and ds namespaces is that ds stores domains that support TLS and d stores the ones that don't support TLS. We have made DNS decentralized; similarly, we can also make the issuing of TLS certificates decentralized.
This is how TLS works in Namecoin. Users create self-signed certificates and store the certificate hash in Namecoin. When a client that supports TLS for .bit domains tries to access a secured .bit domain, it will match the hash of the certificate returned by the server with the hash stored in Namecoin, and if they match, then they proceed with further communication with the server.
Dash is a decentralized currency similar to Bitcoin. Dash uses the blockchain data structure and the proof-of-work consensus protocol. Dash solves some of the major issues that are caused by Bitcoin. Here are some issues related to Bitcoin:
Dash aims to solve these problems by making transactions settle almost instantly and making it impossible to identify the real person behind an account. It also prevents your ISP from tracking you.
In the Bitcoin network, there are two kinds of nodes, that is, miners and ordinary nodes. But in Dash, there are three kinds of nodes, that is, miners, masternodes, and ordinary nodes. Masternodes are what makes Dash so special.
To host a masternode, you need to have 1,000 Dashes and a static IP address. In the Dash network, both masternodes and miners earn Dashes. When a block is mined, 45% reward goes to the miner, 45% goes to the masternodes, and 10% is reserved for the budget system.
Masternodes enable decentralized governance and budgeting. Due to the decentralized governance and budgeting system, Dash is called a DAO because that's exactly what it is.
Masternodes in the network act like shareholders; that is, they have rights to take decisions regarding where the 10% Dash goes. This 10% Dash is usually used to funds other projects. Each masternode is given the ability to use one vote to approve a project.
Discussions on project proposals happen out of the network. But the voting happens in the network.
Instead of just approving or rejecting a proposal, masternodes also form a service layer that provides various services. The reason that masternodes provide services is that the more services they provide, the more feature-rich the network becomes, thus increasing users and transactions, which increases prices for Dash currency and the block reward also gets high, therefore helping masternodes earn more profit.
Masternodes provide services such as PrivateSend (a coin-mixing service that provides anonymity), InstantSend (a service that provides almost instant transactions), DAPI (a service that provides a decentralized API so that users don't need to run a node), and so on.
At a given time, only 10 masternodes are selected. The selection algorithm uses the current block hash to select the masternodes. Then, we request a service from them. The response that's received from the majority of nodes is said to be the correct one. This is how consensus is achieved for services provided by the masternodes.
The proof-of-service consensus protocol is used to make sure that the masternodes are online, are responding, and have their blockchain up-to-date.
BigChainDB allows you to deploy your own permissioned or permissionless decentralized database. It uses the blockchain data structure along with various other database-specific data structures. BigChainDB, at the time of writing this, is still under development, so many things are not clear yet.
It also provides many other features, such as rich permissions, querying, linear scaling, and native support for multi-assets and the federation consensus protocol.
OpenBazaar is a decentralized e-commerce platform. You can buy or sell goods using OpenBazaar. Users are not anonymous in the OpenBazaar network as their IP address is recorded. A node can be a buyer, seller, or a moderator.
It uses a Kademlia-style distributed hash table data structure. A seller must host a node and keep it running in order to make the items visible in the network.
It prevents account spam by using the proof-of-work consensus protocol. It prevents ratings and reviews spam using proof-of-burn, CHECKLOCKTIMEVERIFY, and security deposit consensus protocols.
Buyers and sellers trade using Bitcoins. A buyer can add a moderator while making a purchase. The moderator is responsible for resolving a dispute if anything happens between the buyer and the seller. Anyone can be a moderator in the network. Moderators earn commission by resolving disputes.
Ripple is decentralized remittance platform. It lets us transfer fiat currencies, digital currencies, and commodities. It uses the blockchain data structure and has its own consensus protocol. In ripple docs, you will not find the term blocks and blockchain; they use the term ledger instead.
In ripple, money and commodity transfer happens via a trust chain in a manner similar to how it happens in a hawala network. In ripple, there are two kinds of nodes, that is, gateways and regular nodes. Gateways support deposit and withdrawal of one or more currencies and/or commodities. To become a gateway in a ripple network, you need permission as gateways to form a trust chain. Gateways are usually registered financial institutions, exchanges, merchants, and so on.
Every user and gateway has an account address. Every user needs to add a list of gateways they trust by adding the gateway addresses to the trust list. There is no consensus to find whom to trust; it all depends on the user, and the user takes the risk of trusting a gateway. Even gateways can add the list of gateways they trust.
Let's look at an example of how user X living in India can send 500 USD to user Y living in the USA. Assuming that there is a gateway XX in India, which takes cash (physical cash or card payments on their website) and gives you only the INR balance on ripple, X will visit the XX office or website and deposit 30,000 INR and then XX will broadcast a transaction saying I owe X 30,000 INR. Now assume that there is a gateway YY in the USA, which allows only USD transactions and Y trusts YY gateway. Now, say, gateways XX and YY don't trust each other. As X and Y don't trust a common gateway, XX and YY don't trust each other, and finally, XX and YY don't support the same currency. Therefore, for X to send money to Y, he needs to find intermediary gateways to form a trust chain. Assume there is another gateway, ZZ, that is trusted by both XX and YY and it supports USD and INR. So now X can send a transaction by transferring 50,000 INR from XX to ZZ and it gets converted to USD by ZZ and then ZZ sends the money to YY, asking YY to give the money to Y. Now instead of X owing Y $500, YY owes $500 to Y, ZZ owes $500 to YY, and XX owes 30,000 INR to ZZ. But it's all fine because they trust each other, whereas earlier, X and Y didn't trust each other. But XX, YY, and ZZ can transfer the money outside of ripple whenever they want to, or else a reverse transaction will deduct this value.
Ripple also has an internal currency called XRP (or ripples). Every transaction sent to the network costs some ripples. As XRP is the ripple's native currency, it can be sent to anyone in the network without trust. XRP can also be used while forming a trust chain. Remember that every gateway has its own currency exchange rate. XRP isn't generated by a mining process; instead, there are total of 100 billion XRPs generated in the beginning and owned by the ripple company itself. XRP is supplied manually depending on various factors.
All the transactions are recorded in the decentralized ledger, which forms an immutable history. Consensus is required to make sure that all nodes have the same ledger at a given point of time. In ripple, there is a third kind of node called validators, which are part of the consensus protocol. Validators are responsible for validating transactions. Anyone can become a validator. But other nodes keep a list of validators that can be actually trusted. This list is known as UNL (unique node list). A validator also has a UNL; that is, the validators it trusts as validators also want to reach a consensus. Currently, ripple decides the list of validators that can be trusted, but if the network thinks that validators selected by ripple are not trustworthy, then they can modify the list in their node software.
You can form a ledger by taking the previous ledger and applying all the transactions that have happened since then. So to agree on the current ledger, nodes must agree on the previous ledger and the set of transactions that have happened since then. After a new ledger is created, a node (both regular nodes and validators) starts a timer (of a few seconds, approximately 5 seconds) and collects the new transactions that arrived during the creation of the previous ledger. When the timer expires, it takes those transactions that are valid according to at least 80% of the UNLs and forms the next ledger. Validators broadcast a proposal (a set of transactions they think are valid to form the next ledger) to the network. Validators can broadcast proposals for the same ledger multiple times with a different set of transactions if they decide to change the list of valid transactions depending on proposals from their UNLs and other factors. So you only need to wait 5-10 seconds for your transaction to be confirmed by the network.
Some people wonder whether this can lead to many different versions of the ledger since each node may have a different UNL. As long as there is a minimal degree of inter-connectivity between UNLs, a consensus will rapidly be reached. This is primarily because every honest node's primary goal is to achieve a consensus.
In this chapter, we learned what DApps are and got an overview of how they work. We looked at some of the challenges faced by DApps and the various solutions to these issues. Finally, we saw some of the popular DApps and had an overview of what makes them special and how they work. Now you should be comfortable explaining what a DApp is and how it works.
In the previous chapter, we saw what DApps are. We also saw an overview of some of the popular DApps. One of them was Ethereum. At present, Ethereum is the most popular DApp after bitcoin. In this chapter, we will learn in depth about how Ethereum works and what we can develop using Ethereum. We will also see the important Ethereum clients and node implementations.
In this chapter, we will cover the following topics:
A transaction is a signed data package to transfer ether from an account to another account or to a contract, invoke methods of a contract, or deploy a new contract. A transaction is signed using ECDSA (Elliptic Curve Digital Signature Algorithm), which is a digital signature algorithm based on ECC. A transaction contains the recipient of the message, a signature identifying the sender and proving their intention, the amount of ether to transfer, the maximum number of computational steps the transaction execution is allowed to take (called the gas limit), and the cost the sender of the transaction is willing to pay for each computational step (called the gas price).
If the transaction's intention is to invoke a method of a contract, it also contains input data, or if its intention is to deploy a contract, then it can contain the initialization code. The product of gas used and gas price is called transaction fees. To send ether or to execute a contract method, you need to broadcast a transaction to the network. The sender needs to sign the transaction with its private key.
The formula to calculate the target of a block requires the current timestamp, and also every block has the current timestamp attached to its header. Nothing can stop a miner from using some other timestamp instead of the current timestamp while mining a new block, but they don't usually because timestamp validation would fail and other nodes won't accept the block, and it would be a waste of resources of the miner. When a miner broadcasts a newly mined block, its timestamp is validated by checking whether the timestamp is greater than the timestamp of the previous block. If a miner uses a timestamp greater than the current timestamp, the difficulty will be low as difficulty is inversely proportional to the current timestamp; therefore, the miner whose block timestamp is the current timestamp would be accepted by the network as it would have a higher difficulty. If a miner uses a timestamp greater than the previous block timestamp and less than the current timestamp, the difficulty would be higher, and therefore, it would take more time to mine the block; by the time the block is mined, the network would have produced more blocks, therefore, this block will get rejected as the blockchain of the malicious miner will have a lower difficulty than the blockchain the network has. Due to these reasons, miners always use accurate timestamps, otherwise, they gain nothing.
The nonce is a 64-bit unsigned integer. The nonce is the solution to the puzzle. A miner keeps incrementing the nonce until it finds the solution. Now you must be wondering if there is a miner who has hash power more than any other miner in the network, would the miner always find nonce first? Well, it wouldn't.
The hash of the block that the miners are mining is different for every miner because the hash depends on things such as the timestamp, miner address, and so on, and it's unlikely that it will be the same for all miners. Therefore, it's not a race to solve the puzzle; rather, it's a lottery system. But of course, a miner is likely to get lucky depending on its hash power, but that doesn't mean the miner will always find the next block.
The block difficulty formula we saw earlier uses a 10-second threshold to make sure that the difference between the time a parent and child block mines is in is between 10-20 seconds. But why is it 10-20 seconds and not some other value? And why there is such a constant time difference restriction instead of a constant difficulty?
Imagine that we have constant difficulty, and miners just need to find a nonce to get the hash of the block less and equal to the difficulty. Suppose the difficulty is high; then, in this case, users will have no way to find out how long it will take to send ether to another user. It may take a very long time if the computational power of the network is not enough to find the nonce to satisfy the difficulty quickly. Sometimes the network may get lucky and find the nonce quickly. But this kind of system will find it difficult to gain attraction from users as users will always want to know how much time it should take for a transaction to be completed, just like when we transfer money from one bank account to another bank account, we are given a time period within which it should get completed. If the constant difficulty is low, it will harm the security of the blockchain because large miners can mine blocks much faster than small miners, and the largest miner in the network will have the ability to control the DApp. It is not possible to find a constant difficulty value that can make the network stable because the network's computational power is not constant.
Now we know why we should always have an average time for how long it should take for the network to mine a block. Now the question is what the most suitable average time is as it can be anything from 1 second to infinite seconds. A smaller average time can be achieved by lowering the difficulty, and higher average time can be achieved by increasing the difficulty. But what are the merits and demerits of a lower and higher average time? Before we discuss this, we need to first know what stale blocks are.
What happens if two miners mine the next block at nearly the same time? Both the blocks will be valid for sure, but the blockchain cannot hold two blocks with the same block number, and also, both the miners cannot be awarded. Although this is a common issue, the solution is simple. In the end, the blockchain with the higher difficulty will be the one accepted by the network. So the valid blocks that are finally left out are called stale blocks.
The total number of stale blocks produced in the network is inversely proportional to the average time it takes to generate a new block. Shorter block generation time means there would be less time for the newly mined block to propagate throughout the network and a bigger chance of more than one miner finding a solution to the puzzle, so by the time the block is propagated through the network, some other miner would have also solved the puzzle and broadcasted it, thereby creating stales. But if the average block generation time is bigger, there is less chance that multiple miners will be able to solve the puzzle, and even if they solve it, there is likely to be time gap between when they solved it, during which the first solved block can be propagated and the other miners can stop mining that block and proceed towards mining the next block. If stale blocks occur frequently in the network, they cause major issues, but if they occur rarely, they do no harm.
But what's the problem with stale blocks? Well, they delay the confirmation of a transaction. When two miners mine a block at nearly the same time, they may not have the same set of transactions, so if our transactions appear in one of them, we cannot say that it's confirmed as the block in which the transaction appeared may be stale. And we should wait for a few more blocks to be mined. Due to stale blocks, the average confirmation time is not equal to average block generation time.
Do stale blocks impact blockchain security? Yes, they do. We know that the network's security is measured by the total computation power of the miners in the network. When computation power increases, the difficulty is increased to make sure that blocks aren't generated earlier than the average block time. So more difficulty means a more secure blockchain, as for a node to tamper, the blockchain will need much more hash power now, which makes it more difficult to tamper with the blockchain; therefore, the blockchain is said to be more secure. When two blocks are mined at nearly the same time, we will have the network parted in two, working on two different blockchains, but one is going to be the final blockchain. So the part of the network working on the stale block mines the next block on top of the stale block, which ends up in loss of hash power of the network as hash power is being used for something unnecessary. The two parts of the network are likely to take longer than the average block time to mine the next block as they have lost hash power; therefore, after mining the next block, there will be a decrease in difficulty as it took more time than the average block time to mine the block. The decrease in difficulty impacts the overall blockchain security. If the stale rate is too high, it will affect the blockchain security by a huge margin.
Ethereum tackles the security issue caused by stale blocks using something known as ghost protocol. Ethereum uses a modified version of the actual ghost protocol. The ghost protocol covers up the security issue by simply adding the stale blocks into the main blockchain, thereby increasing the overall difficulty of the blockchain, as overall difficulty of the blockchain also includes the sum of difficulties of the stale blocks. But how are stale blocks inserted into the main blockchain without transactions conflicting? Well, any block can specify 0 or more stales. To incentivize miners to include stale blocks, the miners are rewarded for including stale blocks. And also, the miners of the stale blocks are rewarded. The transactions in the stale blocks are not used for calculating confirmations, and also, the stale block miners don't receive the transaction fees of the transactions included in the stale blocks. Note that Ethereum calls stale blocks uncle blocks.
Here is the formula to calculate how much reward a miner of a stale block receives. The rest of the reward goes to the nephew block, that is, the block that includes the orphan block:
(uncle_block_number + 8 - block_number) * 5 / 8
As not rewarding the miners of stale blocks doesn't harm any security, you must be wondering why miners of stale blocks get rewarded? Well, there is another issue caused when stale blocks occur frequently in the network, which is solved by rewarding the miners of stale blocks. A miner should earn a percentage of reward similar to the percentage of hash power it contributes to the network. When a block is mined at nearly the same time by two different miners, then the block mined by the miner with more hash power is more likely to get added to the final blockchain because of the miner's efficiency to mine the next block; therefore, the small miner will lose the reward. If the stale rate is low, it's not a big issue because the big miner will get a little increase in reward; but if the stale rate is high, it causes a big issue, that is, the big miner in the network will end up taking much more rewards than it should receive. The ghost protocol balances this by rewarding the miners of stale blocks. As the big miner doesn't take all the rewards but much more than it should get, we don't award stale block miners the same as the nephew block; instead, we award a lesser amount to balance it. The preceding formula balances it pretty well.
Ghost limits the total number of stale blocks a nephew can reference so that miners don't simply mine stale blocks and stall the blockchain.
So wherever a stale block appears in the network, it somewhat affects the network. The more the frequency of stale blocks, the more the network is affected by it.
A fork is said to have happened when there is a conflict among the nodes regarding the validity of a blockchain, that is, more than one blockchain happens to be in the network, and every blockchain is validated for some miners. There are three kinds of forks: regular forks, soft fork, and hard fork.
A regular fork is a temporary conflict occurring due to two or more miners finding a block at nearly the same time. It's resolved when one of them has more difficulty than the other.
A change to the source code could cause conflicts. Depending on the type of conflict, it may require miners with more than 50% of hash power to upgrade or all miners to upgrade to resolve the conflict. When it requires miners with more than 50% of hash power to upgrade to resolve the conflict, its called a soft fork, whereas when it requires all the miners to upgrade to resolve the conflict, its called a hard fork. An example of a soft fork would be if an update to the source code invalidates subset of old blocks/transactions, then it can be resolved when miners more than 50% of hash power have upgraded so that the new blockchain will have more difficulty and finally get accepted by the whole network. An example of a hard fork would be if an update in the source code was to change the rewards for miners, then all the miners need to upgrade to resolve the conflict.
Ethereum has gone through various hard and soft forks since its release.
A genesis block is the first block of the blockchain. It's assigned to block number 0. It's the only block in the blockchain that doesn't refer to a previous block because there isn't any. It doesn't hold any transactions because there isn't any ether produced yet.
Two nodes in a network will only pair with each other if they both have the same genesis block, that is, blocks synchronization will only happen if both peers have the same genesis block, otherwise they both will reject each other. A different genesis block of high difficulty cannot replace a lower difficult one. Every node generates its own genesis block. For various networks, the genesis block is hardcoded into the client.
For a node to be part of the network, it needs to connect to some other nodes in the network so that it can broadcast transactions/blocks and listen to new transactions/blocks. A node doesn't need to connect to every node in the network; instead, a node connects to a few other nodes. And these nodes connect to a few other nodes. In this way, the whole network is connected to each other.
But how does a node find some other nodes in the network as there is no central server that everyone can connect to so as to exchange their information? Ethereum has its own node discovery protocol to solve this problem, which is based on the Kadelima protocol. In the node discovery protocol, we have special kind of nodes called Bootstrap nodes. Bootstrap nodes maintain a list of all nodes that are connected to them over a period of time. They don't hold the blockchain itself. When peers connect to the Ethereum network, they first connect to the Bootstrap nodes, which share the lists of peers that have connected to them in the last predefined time period. The connecting peers then connect and synchronize with the peers.
There can be various Ethereum instances, that is, various networks, each having its own network ID. The two major Ethereum networks are mainnet and testnet. The mainnet one is the one whose ether is traded on exchanges, whereas testnet is used by developers to test. Until now, we have learned everything with regards to the mainnet blockchain.
Whisper and Swarm are a decentralized communication protocol and a decentralized storage platform respectively, being developed by Ethereum developers. Whisper is a decentralized communication protocol, whereas Swarm is a decentralized filesystem.
Whisper lets nodes in the network to communicate with each other. It supports broadcasting, user-to-user, encrypted messages, and so on. It's not designed to transfer bulk data. You can learn more about Whisper at https://github.com/ethereum/wiki/wiki/Whisper, and you can see a code example overview at https://github.com/ethereum/wiki/wiki/Whisper-Overview.
Swarm is similar to Filecoin, that is, it differs mostly in terms of technicalities and incentives. Filecoin doesn't penalize stores, whereas Swarm penalizes stores; therefore, this increases the file availability further. You must be wondering how incentive works in swarm. Does it have an internal currency? Actually, Swarm doesn't have an internal currency, rather it uses ether for incentives. There is a smart contract in Ethereum, which keeps track of incentives. Obviously, the smart contract cannot communicate with Swarm; instead, swarm communicates with the smart contract. So basically, you pay the stores via the smart contract, and the payment is released to the stores after the expiry date. You can also report file missing to the smart contract, in which case it can penalize the respective stores. You can learn more about the difference between Swarm and IPFS/Filecoin at https://github.com/ethersphere/go-ethereum/wiki/IPFS-&-SWARM and see the smart contract code at https://github.com/ethersphere/go-ethereum/blob/bzz-config/bzz/bzzcontract/swarm.sol.
At the time of writing this book, Whisper and Swarm are still under development; so, many things are still not clear.
Ethereum Wallet is an Ethereum UI client that lets you create account, send ether, deploy contracts, invoke methods of contracts, and much more.
Ethereum Wallet comes with geth bundled. When you run Ethereum, it tries to find a local geth instance and connects to it, and if it cannot find geth running, it launches its own geth node. Ethereum Wallet communicates with geth using IPC. Geth supports file-based IPC.
Visit https://github.com/ethereum/mist/releases to download Ethereum Wallet. It's available for Linux, OS X, and Windows. Just like geth, it has two installation modes: binary and scripted installation.
Here is an image that shows what Ethereum Wallet looks like:
Serenity is the name of the next major update for Ethereum. At the time of writing this book, serenity is still under development. This update will require a hard fork. Serenity will change the consensus protocol to casper, and will integrate state channels and sharding. Complete details of how these will work are still unclear at this point of time. Let's see a high-level overview of what these are.
Before getting into state channels, we need to know what payment channels are. A payment channel is a feature that allows us to combine more than two transactions of sending ether to another account into two transactions. Here is how it works. Suppose X is the owner of a video streaming website, and Y is a user. X charges one ether for every minute. Now X wants Y to pay after every minute while watching the video. Of course, Y can broadcast a transaction every minute, but there are few issues here, such as X has to wait for confirmation, so the video will be paused for some time, and so on. This is the problem payment channels solve. Using payment channels, Y can lock some ether (maybe 100 ether) for a period of time (maybe 24 hours) for X by broadcasting a lock transaction. Now after watching a 1-minute video, Y will send a signed record indicating that the lock can be unlocked and one ether will go to X's account and the rest to Y's account. After another minute, Y will send a signed record indicating that the lock can be unlocked, and two ether will go to X's account, and the rest will go to Y's account. This process will keep going as Y watches the video on X's website. Now once Y has watched 100 hours of video or 24 hours of time is about to be reached, X will broadcast the final signed record to the network to withdraw funds to his account. If X fails to withdraw in 24 hours, the complete refund is made to Y. So in the blockchain, we will see only two transactions: lock and unlock.
Payment channel is for transactions related to sending ether. Similarly, a state channel allows us to combine transactions related to smart contracts.
Before we get into what the casper consensus protocol is, we need to understand how the proof-of-stake consensus protocol works.
Proof-of-stake is the most common alternative to proof-of-work. Proof-of-work wastes too many computational resources. The difference between POW and POS is that in POS, a miner doesn't need to solve the puzzle; instead, the miner needs to prove ownership of the stake to mine the block. In the POS system, ether in accounts is treated as a stake, and the probability of a miner mining the block is directly proportional to the stake the miner holds. So if the miner holds 10% of the stake in the network, it will mine 10% of the blocks.
But the question is how will we know who will mine the next block? We cannot simply let the miner with the highest stake always mine the next block because this will create centralization. There are various algorithms for next block selection, such as randomized block selection, and coin-age-based selection.
Casper is a modified version of POS that tackles various problems of POS.
At present, every node needs to download all transactions, which is huge. At the rate at which blockchain size is increasing, in the next few years, it will be very difficult to download the whole blockchain and keep it in sync.
If you are familiar with distributed database architecture, you must be familiar with sharding. If not, then sharding is a method of distributing data across multiple computers. Ethereum will implement sharding to partition and distribute the blockchain across nodes.
You can learn more about sharding a blockchain at https://github.com/ethereum/wiki/wiki/Sharding-FAQ.
In this chapter, we learned how block time affects security. We also saw what an Ethereum Wallet is and how to install it. Finally, we learned what is going to be new in Serenity updates for Ethereum.
In the next chapter, we will learn about the various ways to store and protect ether.
In the previous chapter, we learned how the Ethereum blockchain works. Now it's time to start writing smart contracts as we have have a good grasp of how Ethereum works. There are various languages to write Ethereum smart contracts in, but Solidity is the most popular one. In this chapter, we will learn the Solidity programming language. We will finally build a DApp for proof of existence, integrity, and ownership at given a time, that is, a DApp that can prove that a file was with a particular owner at a specific time.
In this chapter, we'll cover the following topics:
A Solidity source file is indicated using the .sol extension. Just like any other programming language, there are various versions of Solidity. The latest version at the time of writing this book is 0.4.2.
In the source file, you can mention the compiler version for which the code is written for using the pragma Solidity directive.
For example, take a look at the following:
pragma Solidity ^0.4.2;
Now the source file will not compile with a compiler earlier than version 0.4.2, and it will also not work on a compiler starting from version 0.5.0 (this second condition is added using ^). Compiler versions between 0.4.2 to 0.5.0 are most likely to include bug fixes instead of breaking anything.
A contract is like a class. A contract contains state variables, functions, function modifiers, events, structures, and enums. Contracts also support inheritance. Inheritance is implemented by copying code at the time of compiling. Smart contracts also support polymorphism.
Let's look at an example of a smart contract to get an idea about what it looks like:
contract Sample
{
    //state variables
    uint256 data;
    address owner;

    //event definition
    event logData(uint256 dataToLog);

    //function modifier
    modifier onlyOwner() {
        if (msg.sender != owner) throw;
        _;
    }

    //constructor
    function Sample(uint256 initData, address initOwner){
        data = initData;
        owner = initOwner;
    }

    //functions
    function getData() returns (uint256 returnedData){
        return data;
    }

    function setData(uint256 newData) onlyOwner{
        logData(newData);
        data = newData;
    }
}
Here is how the preceding code works:
Before getting any further deeper into the features of smart contracts, let's learn some other important things related to Solidity. And then we will come back to contracts.
All programming languages you would have learned so far store their variables in memory. But in Solidity, variables are stored in the memory and the filesystem depending on the context.
Depending on the context, there is always a default location. But for complex data types, such as strings, arrays, and structs, it can be overridden by appending either storage or memory to the type. The default for function parameters (including return parameters) is memory, the default for local variables is storage. and the location is forced to storage, for state variables (obviously).
Data locations are important because they change how assignments behave:
Solidity is a statically typed language; the type of data a variable holds needs to be predefined. By default, all bits of the variables are assigned to 0. In Solidity, variables are function scoped; that is, a variable declared anywhere within a function will be in scope for the entire function regardless of where it is declared.
Now let's look at the various data types provided by Solidity:
Solidity supports both generic and byte arrays. It supports both fixed size and dynamic arrays. It also supports multidimensional arrays.
bytes1, bytes2, bytes3, ..., bytes32 are types for byte arrays. byte is an alias for bytes1.
Here is an example that shows generic array syntaxes:
contract sample{
    //dynamic size array
    //wherever an array literal is seen a new array is created. If the array literal is in state than it's stored in storage and if it's found inside function than its stored in memory
    //Here myArray stores [0, 0] array. The type of [0, 0] is decided based on its values.
    //Therefore you cannot assign an empty array literal.
    int[] myArray = [0, 0];

    function sample(uint index, int value){

        //index of an array should be uint256 type
        myArray[index] = value;

        //myArray2 holds pointer to myArray
        int[] myArray2 = myArray;

        //a fixed size array in memory
        //here we are forced to use uint24 because 99999 is the max value and 24 bits is the max size required to hold it.
        //This restriction is applied to literals in memory because memory is expensive. As [1, 2, 99999] is of type uint24 therefore myArray3 also has to be the same type to store pointer to it.
        uint24[3] memory myArray3 = [1, 2, 99999]; //array literal

        //throws exception while compiling as myArray4 cannot be assigned to complex type stored in memory
        uint8[2] myArray4 = [1, 2];
    }
}
Here are some important things you need to know about arrays:
In Solidity, there are two ways to create strings: using bytes and string. bytes is used to create a raw string, whereas string is used to create a UTF-8 string. The length of string is always dynamic.
Here is an example that shows string syntaxes:
contract sample{
    //wherever a string literal is seen a new string is created. If the string literal is in state than it's stored in storage and if it's found inside function than its stored in memory
    //Here myString stores "" string.
    string myString = "";  //string literal
    bytes myRawString;

    function sample(string initString, bytes rawStringInit){
        myString = initString;

        //myString2 holds a pointer to myString
        string myString2 = myString;

        //myString3 is a string in memory
        string memory myString3 = "ABCDE";

        //here the length and content changes
        myString3 = "XYZ";

        myRawString = rawStringInit;

        //incrementing the length of myRawString
        myRawString.length++;

        //throws exception while compiling
        string myString4 = "Example";

        //throws exception while compiling
        string myString5 = initString;
    }
}
Solidity also supports structs. Here is an example that shows struct syntaxes:
contract sample{
    struct myStruct {
        bool myBool;
        string myString;
    }

    myStruct s1;

    //wherever a struct method is seen a new struct is created. If the struct method is in state than it's stored in storage and if it's found inside function than its stored in memory
    myStruct s2 = myStruct(true, ""); //struct method syntax

    function sample(bool initBool, string initString){

        //create a instance of struct
        s1 = myStruct(initBool, initString);

        //myStruct(initBool, initString) creates a instance in memory
        myStruct memory s3 = myStruct(initBool, initString);
    }
}
Solidity also supports enums. Here is an example that shows enum syntaxes:
contract sample {

    //The integer type which can hold all enum values and is the smallest is chosen to hold enum values
    enum OS { Windows, Linux, OSX, UNIX }

    OS choice;

    function sample(OS chosen){
        choice = chosen;
    }

    function setLinuxOS(){
        choice = OS.Linux;
    }

    function getChoice() returns (OS chosenOS){
        return choice;
    }
}
A mapping data type is a hash table. Mappings can only live in storage, not in memory. Therefore, they are declared only as state variables. A mapping can be thought of as consisting of key/value pairs. The key is not actually stored; instead, the keccak256 hash of the key is used to look up for the value. Mappings don't have a length. Mappings cannot be assigned to another mapping.
Here is an example of how to create and use a mapping:
contract sample{
    mapping (int => string) myMap;

    function sample(int key, string value){
        myMap[key] = value;

        //myMap2 is a reference to myMap
        mapping (int => string) myMap2 = myMap;
    }
}
The delete operator can be applied to any variable to reset it to its default value. The default value is all bits assigned to 0.
If we apply delete to a dynamic array, then it deletes all of its elements and the length becomes 0. And if we apply it to a static array, then all of its indices are reset. You can also apply delete to specific indices, in which case the indices are reset.
Nothing happens if you apply delete to a map type. But if you apply delete to a key of a map, then the value associated with the key is deleted.
Here is an example to demonstrate the delete operator:
contract sample {

    struct Struct {
        mapping (int => int) myMap;
        int myNumber;
    }

    int[] myArray;
    Struct myStruct;

    function sample(int key, int value, int number, int[] array) {

        //maps cannot be assigned so while constructing struct we ignore the maps
        myStruct = Struct(number);

        //here set the map key/value
        myStruct.myMap[key] = value;

        myArray = array;
    }

    function reset(){

        //myArray length is now 0
        delete myArray;

        //myNumber is now 0 and myMap remains as it is
        delete myStruct;
    }

    function deleteKey(int key){

        //here we are deleting the key
        delete myStruct.myMap[key];
    }

}
Other than arrays, strings, structs, enums, and maps, everything else is called elementary types.
If an operator is applied to different types, the compiler tries to implicitly convert one of the operands into the type of the other. In general, an implicit conversion between value-types is possible if it makes sense semantically and no information is lost: uint8 is convertible to uint16 and int128 to int256, but int8 is not convertible to uint256 (because uint256 cannot hold, for example, -1). Furthermore, unsigned integers can be converted into bytes of the same or larger size, but not vice versa. Any type that can be converted into uint160 can also be converted into address.
Solidity also supports explicit conversion. So if the compiler doesn't allow implicit conversion between two data types, then you can go for explicit conversion. It is always recommended that you avoid explicit conversion because it may give you unexpected results.
Let's look at an example of explicit conversion:
uint32 a = 0x12345678;
uint16 b = uint16(a); // b will be 0x5678 now
Here we are converting uint32 type to uint16 explicitly, that is, converting a large type to a smaller type; therefore, higher-order bits are cut-off.
Solidity provides the var keyword to declare variables. The type of the variable in this case is decided dynamically depending on the first value assigned to it. Once a value is assigned, the type is fixed, so if you assign another type to it, it will cause type conversion.
Here is an example to demonstrate var:
int256 x = 12;

//y type is int256
var y = x;

uint256 z= 9;

//exception because implicit conversion not possible
y = z;
Solidity supports if, else, while, for, break, continue, return, ? : control structures.
Here is an example to demonstrate the control structures:
contract sample{
    int a = 12;
    int[] b;

    function sample()
    {
        //"==" throws exception for complex types
        if(a == 12)
        {
        }
        else if(a == 34)
        {
        }
        else
        {
        }

        var temp = 10;

        while(temp < 20)
        {
            if(temp == 17)
            {
                break;
            }
            else
            {
                continue;
            }

            temp++;
        }

        for(var iii = 0; iii < b.length; iii++)
        {

        }
    }
}
A contract can create a new contract using the new keyword. The complete code of the contract being created has to be known.
Here is an example to demonstrate this:
contract sample1
{
    int a;

    function assign(int b)
    {
        a = b;
    }
}


contract sample2{
    function sample2()
    {
        sample1 s = new sample1();
        s.assign(12);
    }
}
There are some cases where exceptions are thrown automatically. You can use throw to throw an exception manually. The effect of an exception is that the currently executing call is stopped and reverted (that is, all changes to the state and balances are undone). Catching exceptions is not possible:
contract sample
{
    function myFunction()
    {
        throw;
    }
}
There are two kinds of function calls in Solidity: internal and external function calls. An internal function call is when a function calls another function in the same contract.
An external function call is when a function calls a function of another contract. Let's look at an example:
contract sample1
{
    int a;

    //"payable" is a built-in modifier
    //This modifier is required if another contract is sending Ether while calling the method
    function sample1(int b) payable
    {
        a = b;
    }

    function assign(int c)
    {
        a = c;
    }

    function makePayment(int d) payable
    {
        a = d;
    }
}


contract sample2{

    function hello()
    {
    }

    function sample2(address addressOfContract)
    {
        //send 12 wei while creating contract instance
        sample1 s = (new sample1).value(12)(23);

        s.makePayment(22);

        //sending Ether also
        s.makePayment.value(45)(12);

        //specifying the amount of gas to use
        s.makePayment.gas(895)(12);

        //sending Ether and also specifying gas
        s.makePayment.value(4).gas(900)(12);

        //hello() is internal call whereas this.hello() is external call
        this.hello();

        //pointing a contract that's already deployed
        sample1 s2 = sample1(addressOfContract);

        s2.makePayment(112);

    }
}
Now it's time to get deeper into contracts. We will look at some new features and also get deeper into the features we have already seen.
The visibility of a state variable or a function defines who can see it. There are four kinds of visibilities for function and state variables: external, public, internal, and private.
By default, the visibility of functions is public and the visibility of state variables is internal. Let's look at what each of these visibility functions mean:
Here is a code example to demonstrate visibility and accessors:
contract sample1
{
    int public b = 78;
    int internal c = 90;

    function sample1()
    {
        //external access
        this.a();

        //compiler error
        a();

        //internal access
        b = 21;

        //external access
        this.b;

        //external access
        this.b();

        //compiler error
        this.b(8);

        //compiler error
        this.c();

        //internal access
        c = 9;
    }

    function a() external
    {

    }
}

contract sample2
{
    int internal d = 9;
    int private e = 90;
}

//sample3 inherits sample2
contract sample3 is sample2
{
    sample1 s;

    function sample3()
    {
        s = new sample1();

        //external access
        s.a();

        //external access
        var f = s.b;

        //compiler error as accessor cannot used to assign a value
        s.b = 18;

        //compiler error
        s.c();

        //internal access
        d = 8;

        //compiler error
        e = 7;
    }
}
We saw earlier what a function modifier is, and we wrote a basic function modifier. Now let's look at modifiers in depth.
Modifiers are inherited by child contracts, and child contracts can override them. Multiple modifiers can be applied to a function by specifying them in a whitespace-separated list and will be evaluated in order. You can also pass arguments to modifiers.
Inside the modifier, the next modifier body or function body, whichever comes next, is inserted where _; appears.
Let's take a look at a complex code example of function modifiers:
contract sample
{
    int a = 90;

    modifier myModifier1(int b) {
        int c = b;
        _;
        c = a;
        a = 8;
    }

    modifier myModifier2 {
        int c = a;
        _;
    }

    modifier myModifier3 {
        a = 96;
        return;
        _;
        a = 99;
    }

    modifier myModifier4 {
        int c = a;
        _;
    }

    function myFunction() myModifier1(a) myModifier2 myModifier3 returns (int d)
    {
        a = 1;
        return a;
    }
}
This is how myFunction() is executed:
int c = b;
    int c = a;
        a = 96;
        return;
            int c = a;
                a = 1;
                return a;
        a = 99;
c = a;
a = 8;
Here, when you call the myFunction method, it will return 0. But after that, when you try to access the state variable a, you will get 8.
return in a modifier or function body immediately leaves the whole function and the return value is assigned to whatever variable it needs to be.
In the case of functions, the code after return is executed after the caller's code execution is finished. And in the case of modifiers, the code after _; in the previous modifier is executed after the caller's code execution is finished. In the earlier example, line numbers 5, 6, and 7 are never executed. After line number 4, the execution starts from line numbers 8 to 10.
return inside modifiers cannot have a value associated with it. It always returns 0 bits.
A contract can have exactly one unnamed function called the fallback function. This function cannot have arguments and cannot return anything. It is executed on a call to the contract if none of the other functions match the given function identifier.
This function is also executed whenever the contract receives Ether without any function call; that is, the transaction sends Ether to the contracts and doesn't invoke any method. In such a context, there is usually very little gas available to the function call (to be precise, 2,300 gas), so it is important to make fallback functions as cheap as possible.
Contracts that receive Ether but do not define a fallback function throw an exception, sending back the Ether. So if you want your contract to receive Ether, you have to implement a fallback function.
Here is an example of a fallback function:
contract sample
{
    function() payable
    {
        //keep a note of how much Ether has been sent by whom
    }
}
Solidity supports multiple inheritance by copying code including polymorphism. Even if a contract inherits from multiple other contracts, only a single contract is created on the blockchain; the code from the parent contracts is always copied into the final contract.
Here is an example to demonstrate inheritance:
contract sample1
{
    function a(){}

    function b(){}
}


//sample2 inherits sample1
contract sample2 is sample1
{
    function b(){}
}

contract sample3
{
    function sample3(int b)
    {

    }
}

//sample4 inherits from sample1 and sample2
//Note that sample1 is also parent of sample2, yet there is only a single instance of sample1
contract sample4 is sample1, sample2
{
    function a(){}

    function c(){

        //this executes the "a" method of sample3 contract
        a();

        //this executes the 'a" method of sample1 contract
        sample1.a();

        //calls sample2.b() because it's in last in the parent contracts list and therefore it overrides sample1.b()
        b();
    }
}

//If a constructor takes an argument, it needs to be provided at the constructor of the child contract.
//In Solidity child constructor doesn't call parent constructor instead parent is initialized and copied to child
contract sample5 is sample3(122)
{

}
The super keyword is used to refer to the next contract in the final inheritance chain. Let's take a look at an example to understand this:
contract sample1
{
}

contract sample2
{
}

contract sample3 is sample2
{
}

contract sample4 is sample2
{
}

contract sample5 is sample4
{
    function myFunc()
    {
    }
}

contract sample6 is sample1, sample2, sample3, sample5
{
    function myFunc()
    {
        //sample5.myFunc()
        super.myFunc();
    }
}
The final inheritance chain with respect to the sample6 contract is sample6, sample5, sample4, sample2, sample3, sample1. The inheritance chain starts with the most derived contracts and ends with the least derived contract.
Contracts that only contain the prototype of functions instead of implementation are called abstract contracts. Such contracts cannot be compiled (even if they contain implemented functions alongside nonimplemented functions). If a contract inherits from an abstract contract and does not implement all nonimplemented functions by overriding, it will itself be abstract.
These abstract contracts are only provided to make the interface known to the compiler. This is useful when you are referring to a deployed contract and calling its functions.
Here is an example to demonstrate this:
contract sample1
{
    function a() returns (int b);
}


contract sample2
{
    function myFunc()
    {
        sample1 s = sample1(0xd5f9d8d94886e70b06e474c3fb14fd43e2f23970);

        //without abstract contract this wouldn't have compiled
        s.a();
    }
}
Libraries are similar to contracts, but their purpose is that they are deployed only once at a specific address and their code is reused by various contracts. This means that if library functions are called, their code is executed in the context of the calling contract; that is, this points to the calling contract, and especially, the storage from the calling contract can be accessed. As a library is an isolated piece of source code, it can only access state variables of the calling contract if they are explicitly supplied (it would have no way to name them otherwise).
Libraries cannot have state variables; they don't support inheritance and they cannot receive Ether. Libraries can contain structs and enums.
Once a Solidity library is deployed to the blockchain, it can be used by anyone, assuming you know its address and have the source code (with only prototypes or complete implementation). The source code is required by the Solidity compiler so that it can make sure that the methods you are trying to access actually exist in the library.
Let's take a look at an example:
library math
{
    function addInt(int a, int b) returns (int c)
    {
        return a + b;
    }
}

contract sample
{
    function data() returns (int d)
    {
        return math.addInt(1, 2);
    }
}
We cannot add the address of the library in the contract source code; instead, we need to provide the library address during compilation to the compiler.
Libraries have many use cases. The two major use cases of libraries are as follows:
The using A for B; directive can be used to attach library functions (from the library A to any type B). These functions will receive the object they are called on as their first parameter.
The effect of using A for *; is that the functions from the library A are attached to all types.
Here is an example to demonstrate for:
library math
{
    struct myStruct1 {
        int a;
    }

    struct myStruct2 {
        int a;
    }

    //Here we have to make 's' location storage so that we get a reference.
    //Otherwise addInt will end up accessing/modifying a different instance of myStruct1 than the one on which its invoked
    function addInt(myStruct1 storage s, int b) returns (int c)
    {
        return s.a + b;
    }

    function subInt(myStruct2 storage s, int b) returns (int c)
    {
        return s.a + b;
    }
}

contract sample
{
    //"*" attaches the functions to all the structs
    using math for *;
    math.myStruct1 s1;
    math.myStruct2 s2;

    function sample()
    {
        s1 = math.myStruct1(9);
        s2 = math.myStruct2(9);

        s1.addInt(2);

        //compiler error as the first parameter of addInt is of type myStruct1 so addInt is not attached to myStruct2
        s2.addInt(1);
    }
}
Solidity allows functions to return multiple values. Here is an example to demonstrate this:
contract sample
{
    function a() returns (int a, string c)
    {
        return (1, "ss");
    }

    function b()
    {
        int A;
        string memory B;

        //A is 1 and B is "ss"
        (A, B) = a();

        //A is 1
        (A,) = a();

        //B is "ss"
        (, B) = a();
    }
}
Solidity allows a source file to import other source files. Here is an example to demonstrate this:
//This statement imports all global symbols from "filename" (and symbols imported there) into the current global scope. "filename" can be a absolute or relative path. It can only be a HTTP URL
import "filename";

//creates a new global symbol symbolName whose members are all the global symbols from "filename".
import * as symbolName from "filename";

//creates new global symbols alias and symbol2 which reference symbol1 and symbol2 from "filename", respectively.
import {symbol1 as alias, symbol2} from "filename";

//this is equivalent to import * as symbolName from "filename";.
import "filename" as symbolName;
There are special variables and functions that always exist globally. They are discussed in the upcoming sections.
The block and transaction properties are as follows:
The address type related variables are as follows:
The contract related variables are as follows:
A literal number can take a suffix of wei, finney, szabo, or Ether to convert between the subdenominations of Ether, where Ether currency numbers without a postfix are assumed to be wei; for example, 2 Ether == 2000 finney evaluates to true.
Let's write a Solidity contract that can prove file ownership without revealing the actual file. It can prove that the file existed at a particular time and finally check for document integrity.
We will achieve proof of ownership by storing the hash of the file and the owner's name as pairs. We will achieve proof of existence by storing the hash of the file and the block timestamp as pairs. Finally, storing the hash itself proves the file integrity; that is, if the file was modified, then its hash will change and the contract won't be able to find any such file, therefore proving that the file was modified.
Here is the code for the smart contract to achieve all this:
contract Proof
{
    struct FileDetails
    {
        uint timestamp;
        string owner;
    }

    mapping (string => FileDetails) files;

    event logFileAddedStatus(bool status, uint timestamp, string owner, string fileHash);

    //this is used to store the owner of file at the block timestamp
    function set(string owner, string fileHash)
    {
        //There is no proper way to check if a key already exists or not therefore we are checking for default value i.e., all bits are 0
        if(files[fileHash].timestamp == 0)
        {
            files[fileHash] = FileDetails(block.timestamp, owner);

            //we are triggering an event so that the frontend of our app knows that the file's existence and ownership details have been stored
            logFileAddedStatus(true, block.timestamp, owner, fileHash);
        }
        else
        {
            //this tells to the frontend that file's existence and ownership details couldn't be stored because the file's details had already been stored earlier
            logFileAddedStatus(false, block.timestamp, owner, fileHash);
        }
    }

    //this is used to get file information
    function get(string fileHash) returns (uint timestamp, string owner)
    {
        return (files[fileHash].timestamp, files[fileHash].owner);
    }
}
Ethereum provides the solc compiler, which provides a command-line interface to compile .sol files. Visit http://solidity.readthedocs.io/en/develop/installing-solidity.html#binary-packages to find instructions to install it and visit https://Solidity.readthedocs.io/en/develop/using-the-compiler.html to find instructions on how to use it. We won't be using the solc compiler directly; instead, we will be using solcjs and Solidity browser. Solcjs allows us to compile Solidity programmatically in Node.js, whereas browser Solidity is an IDE, which is suitable for small contracts.
For now, let's just compile the preceding contract using a browser Solidity provided by Ethereum. Learn more about it at https://Ethereum.github.io/browser-Solidity/. You can also download this browser Solidity source code and use it offline. Visit https://github.com/Ethereum/browser-Solidity/tree/gh-pages to download it.
A major advantage of using this browser Solidity is that it provides an editor and also generates code to deploy the contract.
In the editor, copy and paste the preceding contract code. You will see that it compiles and gives you the web3.js code to deploy it using the geth interactive console.
You will get this output:
var proofContract = web3.eth.contract([{"constant":false,"inputs":[{"name":"fileHash","type":"string"}],"name":"get","outputs":[{"name":"timestamp","type":"uint256"},{"name":"owner","type":"string"}],"payable":false,"type":"function"},{"constant":false,"inputs":[{"name":"owner","type":"string"},{"name":"fileHash","type":"string"}],"name":"set","outputs":[],"payable":false,"type":"function"},{"anonymous":false,"inputs":[{"indexed":false,"name":"status","type":"bool"},{"indexed":false,"name":"timestamp","type":"uint256"},{"indexed":false,"name":"owner","type":"string"},{"indexed":false,"name":"fileHash","type":"string"}],"name":"logFileAddedStatus","type":"event"}]);
var proof = proofContract.new(
  {
    from: web3.eth.accounts[0],
    data: '60606040526......,
    gas: 4700000
  }, function (e, contract){
   console.log(e, contract);
  if (typeof contract.address !== 'undefined') {
    console.log('Contract mined! address: ' + contract.address + ' transactionHash: ' + contract.transactionHash);
  }
})
data represents the compiled version of the contract (bytecode) that the EVM understands. The source code is first converted into opcode, and then opcode are converted into bytecode. Each opcode has gas associated with it.
The first argument to the web3.eth.contract is the ABI definition. The ABI definition is used when creating transactions, as it contains the prototype of all the methods.
Now run geth in the developer mode with the mining enabled. To do this, run the following command:
geth --dev --mine
Now open another command-line window and in that, enter this command to open geth's interactive JavaScript console:
geth attach
This should connect the JS console to the geth instance running in the other window.
On the right-hand side panel of the browser Solidity, copy everything that's there in the web3 deploy textarea and paste it in the interactive console. Now press Enter. You will first get the transaction hash, and after waiting for some time, you will get the contract address after the transaction is mined. The transaction hash is the hash of the transaction, which is unique for every transaction. Every deployed contract has a unique contract address to identity the contract in the blockchain.
The contract address is deterministically computed from the address of its creator (the from address) and the number of transactions the creator has sent (the transaction nonce). These two are RLP-encoded and then hashed using the keccak-256 hashing algorithm. We will learn more about the transaction nonce later. You can learn more about RLP at https://github.com/Ethereum/wiki/wiki/RLP.
Now let's store the file details and retrieve them.
Place this code to broadcast a transaction to store a file's details:
var contract_obj = proofContract.at("0x9220c8ec6489a4298b06c2183cf04fb7e8fbd6d4");
contract_obj.set.sendTransaction("Owner Name", "e3b0c44298fc1c149afbf4c8996fb92427ae41e4649b934ca495991b7852b855", {
 from: web3.eth.accounts[0],
}, function(error, transactionHash){
  if (!err)
    console.log(transactionHash);
})
Here, replace the contract address with the contract address you got. The first argument of the proofContract.at method is the contract address. Here, we didn't provide the gas, in which case, it's automatically calculated.
Now let's find the file's details. Run this code in order to find the file's details:
contract_obj.get.call("e3b0c44298fc1c149afbf4c8996fb92427ae41e4649b934ca495991b7852b855");
You will get this output:
[1477591434, "Owner Name"]
The call method is used to call a contract's method on EVM with the current state. It doesn't broadcast a transaction. To read data, we don't need to broadcast because we will have our own copy of the blockchain.
We will learn more about web3.js in the coming chapters.
In this chapter, we learned the Solidity programming language. We learned about data location, data types, and advanced features of contracts. We also learned the quickest and easiest way to compile and deploy a smart contract. Now you should be comfortable with writing smart contracts.
In the next chapter, we will build a frontend for the smart contract, which will make it easy to deploy the smart contract and run transactions.
In this chapter, we will learn web3.js and how to import, connect to geth, and use it in Node.js or client-side JavaScript. We will also learn how to build a web client using web3.js for the smart contract that we created in the previous chapter.
In this chapter, we'll cover the following topics:
web3.js provides us with JavaScript APIs to communicate with geth. It uses JSON-RPC internally to communicate with geth. web3.js can also communicate with any other kind of Ethereum node that supports JSON-RPC. It exposes all JSON-RPC APIs as JavaScript APIs; that is, it doesn't just support all the Ethereum-related APIs; it also supports APIs related to Whisper and Swarm.
You will learn more and more about web3.js as we build various projects, but for now, let's go through some of the most used APIs of web3.js and then we will build a frontend for our ownership smart contract using web3.js.
At the time of writing this, the latest version of web3.js is 0.16.0. We will learn everything with respect to this version.
web3.js is hosted at https://github.com/ethereum/web3.js and the complete documentation is hosted at https://github.com/ethereum/wiki/wiki/JavaScript-API.
To use web3.js in Node.js, you can simply run npm install web3 inside your project directory, and in the source code, you can import it using require("web3");.
To use web3.js in client-side JavaScript, you can enqueue the web3.js file, which can be found inside the dist directory of the project source code. Now you will have the Web3 object available globally.
web3.js can communicate with nodes using HTTP or IPC. We will use HTTP to set up communication with nodes. web3.js allows us to establish connections with multiple nodes. An instance of web3 represents a connection with a node. The instance exposes the APIs.
When an app is running inside Mist, it automatically makes an instance of web3 available that's connected to the mist node. The variable name of the instance is web3.
Here is the basic code to connect to a node:
if (typeof web3 !== 'undefined') {
  web3 = new Web3(new Web3.providers.HttpProvider("http://localhost:8545"));
}
At first, we check here whether the code is running inside mist by checking whether web3 is undefined or not. If web3 is defined, then we use the already available instance; otherwise, we create an instance by connecting to our custom node. If you want to connect to the custom node regardless of whether the app is running inside mist or not, then remove the if condition form the preceding code. Here, we are assuming that our custom node is running locally on port number 8545.
The Web3.providers object exposes constructors (called providers in this context) to establish a connection and transfer messages using various protocols. Web3.providers.HttpProvider lets us establish an HTTP connection, whereas Web3.providers.IpcProvider lets us establish an IPC connection.
The web3.currentProvider property is automatically assigned to the current provider instance. After creating a web3 instance, you can change its provider using the web3.setProvider() method. It takes one argument, that is, the instance of the new provider.
web3 exposes a isConnected() method, which can be used to check whether it's connected to the node or not. It returns true or false depending on the connection status.
web3 contains an eth object (web3.eth) specifically for Ethereum blockchain interactions and an shh object (web3.shh) for whisper interaction. Most APIs of web3.js are inside these two objects.
All the APIs are synchronous by default. If you want to make an asynchronous request, you can pass an optional callback as the last parameter to most functions. All callbacks use an error-first callback style.
Some APIs have an alias for asynchronous requests. For example, web3.eth.coinbase() is synchronous, whereas web3.eth.getCoinbase() is asynchronous.
Here is an example:
//sync request
try
{
  console.log(web3.eth.getBlock(48));
}
catch(e)
{
  console.log(e);
}

//async request
web3.eth.getBlock(48, function(error, result){
    if(!error)
        console.log(result)
    else
        console.error(error);
})
getBlock is used to get information on a block using its number or hash. Or, it can take a string such as "earliest" (the genesis block), "latest" (the top block of the blockchain), or "pending" (the block that's being mined). If you don't pass an argument, then the default is web3.eth.defaultBlock, which is assigned to "latest" by default.
All the APIs that need a block identification as input can take a number, hash, or one of the readable strings. These APIs use web3.eth.defaultBlock by default if the value is not passed.
JavaScript is natively poor at handling big numbers correctly. Therefore, applications that require you to deal with big numbers and need perfect calculations use the BigNumber.js library to work with big numbers.
web3.js also depends on BigNumber.js. It adds it automatically. web3.js always returns the BigNumber object for number values. It can take JavaScript numbers, number strings, and BigNumber instances as input.
Here is an example to demonstrate this:
web3.eth.getBalance("0x27E829fB34d14f3384646F938165dfcD30cFfB7c").toString();
Here, we use the web3.eth.getBalance() method to get the balance of an address. This method returns a BigNumber object. We need to call toString() on a BigNumber object to convert it into a number string.
BigNumber.js fails to correctly handle numbers with more than 20 floating point digits; therefore, it is recommended that you store the balance in a wei unit and while displaying, convert it to other units. web3.js itself always returns and takes the balance in wei. For example, the getBalance() method returns the balance of the address in the wei unit.
web3.js provides APIs to convert the wei balance into any other unit and any other unit balance into wei.
The web3.fromWei() method is used to convert a wei number into any other unit, whereas the web3.toWei() method is used to convert a number in any other unit into wei. Here is example to demonstrate this:
web3.fromWei("1000000000000000000", "ether");
web3.toWei("0.000000000000000001", "ether");
In the first line, we convert wei into ether, and in the second line, we convert ether into wei. The second argument in both methods can be one of these strings:
Let's take a look at the APIs to retrieve the gas price, the balance of an address, and information on a mined transaction:
//It's sync. For async use getGasPrice
console.log(web3.eth.gasPrice.toString());

console.log(web3.eth.getBalance("0x407d73d8a49eeb85d32cf465507dd71d507100c1", 45).toString());

console.log(web3.eth.getTransactionReceipt("0x9fc76417374aa880d4449a1f7f31ec597f00b1f6f3dd2d66f4c9c6c445836d8b"));
The output will be of this form:
20000000000
30000000000
{
  "transactionHash": "0x9fc76417374aa880d4449a1f7f31ec597f00b1f6f3dd2d66f4c9c6c445836d8b ",
  "transactionIndex": 0,
  "blockHash": "0xef95f2f1ed3ca60b048b4bf67cde2195961e0bba6f70bcbea9a2c4e133e34b46",
  "blockNumber": 3,
  "contractAddress": "0xa94f5374fce5edbc8e2a8697c15331677e6ebf0b",
  "cumulativeGasUsed": 314159,
  "gasUsed": 30234
}
Here is how the preceding method works:
Let's look at how to send ether to any address. To send ether, you need to use the web3.eth.sendTransaction() method. This method can be used to send any kind of transaction but is mostly used to send ether because deploying a contract or calling a method of contract using this method is cumbersome as it requires you to generate the data of the transaction rather than automatically generating it. It takes a transaction object that has the following properties:
Let's look at an example of how to send ether to an address:
var txnHash = web3.eth.sendTransaction({
  from: web3.eth.accounts[0],
  to: web3.eth.accounts[1],
  value: web3.toWei("1", "ether")
});
Here, we send one ether from account number 0 to account number 1. Make sure that both the accounts are unlocked using the unlock option while running geth. In the geth interactive console, it prompts for passwords, but the web3.js API outside of the interactive console will throw an error if the account is locked. This method returns the transaction hash of the transaction. You can then check whether the transaction is mined or not using the getTransactionReceipt() method.
You can also use the web3.personal.listAccounts(), web3.personal.unlockAccount(addr, pwd), and web3.personal.newAccount(pwd) APIs to manage accounts at runtime.
Let's learn how to deploy a new contract, get a reference to a deployed contract using its address, send ether to a contract, send a transaction to invoke a contract method, and estimate the gas of a method call.
To deploy a new contract or to get a reference to an already deployed contract, you need to first create a contract object using the web3.eth.contract() method. It takes the contract ABI as an argument and returns the contract object.
Here is the code to create a contract object:
var proofContract = web3.eth.contract([{"constant":false,"inputs":[{"name":"fileHash","type":"string"}],"name":"get","outputs":[{"name":"timestamp","type":"uint256"},{"name":"owner","type":"string"}],"payable":false,"type":"function"},{"constant":false,"inputs":[{"name":"owner","type":"string"},{"name":"fileHash","type":"string"}],"name":"set","outputs":[],"payable":false,"type":"function"},{"anonymous":false,"inputs":[{"indexed":false,"name":"status","type":"bool"},{"indexed":false,"name":"timestamp","type":"uint256"},{"indexed":false,"name":"owner","type":"string"},{"indexed":false,"name":"fileHash","type":"string"}],"name":"logFileAddedStatus","type":"event"}]);
Once you have the contract, you can deploy it using the new method of the contract object or get a reference to an already deployed contract that matches the ABI using the at method.
Let's take a look at an example of how to deploy a new contract:
var proof = proofContract.new({
     from: web3.eth.accounts[0],
     data: "0x606060405261068...",
     gas: "4700000"
    },
    function (e, contract){
    if(e)
    {
    console.log("Error " + e);
}
else if(contract.address != undefined)
  {
    console.log("Contract Address: " + contract.address);
   }
else
  {
    console.log("Txn Hash: " + contract.transactionHash)
  }
})
Here, the new method is called asynchronously, so the callback is fired twice if the transaction was created and broadcasted successfully. The first time, it's called after the transaction is broadcasted, and the second time, it's called after the transaction is mined. If you don't provide a callback, then the proof variable will have the address property set to undefined. Once the contract is mined, the address property will be set.
In the proof contract, there is no constructor, but if there is a constructor, then the arguments for the constructor should be placed at the beginning of the new method. The object we passed contains the from address, the byte code of the contract, and the maximum gas to use. These three properties must be present; otherwise, the transaction won't be created. This object can have the properties that are present in the object passed to the sendTransaction() method, but here, data is the contract byte code and the to property is ignored.
You can use the at method to get a reference to an already deployed contract. Here is the code to demonstrate this:
var proof = proofContract.at("0xd45e541ca2622386cd820d1d3be74a86531c14a1");
Now let's look at how to send a transaction to invoke a method of a contract. Here is an example to demonstrate this:
proof.set.sendTransaction("Owner Name", "e3b0c44298fc1c149afbf4c8996fb92427ae41e4649b934ca495991b7852b855", {

from: web3.eth.accounts[0],
}, function(error, transactionHash){

if (!err)

console.log(transactionHash);
})
Here, we call the sendTransaction method of the object of the method namesake. The object passed to this sendTransaction method has the same properties as web3.eth.sendTransaction(), except that the data and to properties are ignored.
If you want to invoke a method on the node itself instead of creating a transaction and broadcasting it, then you can use call instead of sendTransaction. Here is an example to demonstrate this:
var returnValue = proof.get.call("e3b0c44298fc1c149afbf4c8996fb92427ae41e4649b934ca495991b7852b855");
Sometimes, it is necessary to find out the gas that would be required to invoke a method so that you can decide whether to invoke it or not. web3.eth.estimateGas can be used for this purpose. However, using web3.eth.estimateGas() directly requires you to generate the data of the transaction; therefore, we can use the estimateGas() method of the object of the method namesake. Here is an example to demonstrate this:
var estimatedGas = proof.get.estimateGas("e3b0c44298fc1c149afbf4c8996fb92427ae41e4649b934ca495991b7852b855");
Now let's look at how to watch for events from a contract. Watching for events is very important because the result of method invocations by transactions are usually returned by triggering events.
event logFileAddedStatus(bool indexed status, uint indexed timestamp, string owner, string indexed fileHash);
Here is an example to demonstrate how to listen to contract events:
var event = proof.logFileAddedStatus(null, {
fromBlock: 0,
toBlock: "latest"
});
event.get(function(error, result){
if(!error)
{
  console.log(result);
}
else
{
  console.log(error);
}
})
event.watch(function(error, result){
if(!error)
{
  console.log(result.args.status);
}
else
{
  console.log(error);
}
})
setTimeout(function(){
event.stopWatching();
}, 60000)
 var events = proof.allEvents({
fromBlock: 0,
 toBlock: "latest"
});
events.get(function(error, result){
if(!error)
{
  console.log(result);
}
else
{
  console.log(error);
}
})
events.watch(function(error, result){
if(!error)
{
  console.log(result.args.status);
}
else
{
  console.log(error);
}
})
setTimeout(function(){
events.stopWatching();
}, 60000)
This is how the preceding code works:
In this chapter, we learned web3.js and how to invoke the methods of the contract using web3.js. Now, it's time to build a client for our smart contract so that users can use it easily.
We will build a client where a user selects a file and enters owner details and then clicks on Submit to broadcast a transaction to invoke the contract's set method with the file hash and the owner's details. Once the transaction is successfully broadcasted, we will display the transaction hash. The user will also be able to select a file and get the owner's details from the smart contract. The client will also display the recent set transactions mined in real time.
We will use sha1.js to get the hash of the file on the frontend, jQuery for DOM manipulation, and Bootstrap 4 to create a responsive layout. We will use express.js and web3.js on the backend. We will use socket.io so that the backend pushes recently mined transactions to the frontend without the frontend requesting for data after every equal interval of time.
In the exercise files of this chapter, you will find two directories: Final and Initial. Final contains the final source code of the project, whereas Initial contains the empty source code files and libraries to get started with building the application quickly.
In the Initial directory, you will find a public directory and two files named app.js and package.json. package.json contains the backend dependencies of our app, and app.js is where you will place the backend source code.
The public directory contains files related to the frontend. Inside public/css, you will find bootstrap.min.css, which is the Bootstrap library; inside public/html, you will find index.html, where you will place the HTML code of our app; and in the public/js directory, you will find JS files for jQuery, sha1, and socket.io. Inside public/js, you will also find a main.js file, where you will place the frontend JS code of our app.
Let's first build the backend of the app. First of all, run npm install inside the Initial directory to install the required dependencies for our backend. Before we get into coding the backend, make sure geth is running with rpc enabled. If you are running geth on a private network, then make sure mining is also enabled. Finally, make sure that account 0 exists and is unlocked. You can run geth on a private network with rpc and mining enabled and also unlocking account 0:
geth --dev --mine --rpc --unlock=0
One final thing you need to do before getting started with coding is to deploy the ownership contract using the code we saw in the previous chapter and copy the contract address.
Now let's create a single server, which will serve the HTML to the browser and also accept socket.io connections:
var express = require("express");
var app = express();
var server = require("http").createServer(app);
var io = require("socket.io")(server);
server.listen(8080);
Here, we are integrating both the express and socket.io servers into one server running on port 8080.
Now let's create the routes to serve the static files and also the home page of the app. Here is the code to do this:
app.use(express.static("public"));
app.get("/", function(req, res){
  res.sendFile(__dirname + "/public/html/index.html");
})
Here, we are using the express.static middleware to serve static files. We are asking it to find static files in the public directory.
Now let's connect to the geth node and also get a reference to the deployed contract so that we can send transactions and watch for events. Here is the code to do this:
var Web3 = require("web3");

web3 = new Web3(new Web3.providers.HttpProvider("http://localhost:8545"));

var proofContract = web3.eth.contract([{"constant":false,"inputs":[{"name":"fileHash","type":"string"}],"name":"get","outputs":[{"name":"timestamp","type":"uint256"},{"name":"owner","type":"string"}],"payable":false,"type":"function"},{"constant":false,"inputs":[{"name":"owner","type":"string"},{"name":"fileHash","type":"string"}],"name":"set","outputs":[],"payable":false,"type":"function"},{"anonymous":false,"inputs":[{"indexed":false,"name":"status","type":"bool"},{"indexed":false,"name":"timestamp","type":"uint256"},{"indexed":false,"name":"owner","type":"string"},{"indexed":false,"name":"fileHash","type":"string"}],"name":"logFileAddedStatus","type":"event"}]);

var proof = proofContract.at("0xf7f02f65d5cd874d180c3575cb8813a9e7736066");
The code is self-explanatory. Just replace the contract address with the one you got.
Now let's create routes to broadcast transactions and get information about a file. Here is the code to do this:
app.get("/submit", function(req, res){
var fileHash = req.query.hash;
var owner = req.query.owner;
proof.set.sendTransaction(owner, fileHash, {
from: web3.eth.accounts[0],
}, function(error, transactionHash){
if (!error)
{
  res.send(transactionHash);
}
else
{
  res.send("Error");
}
})
})
app.get("/getInfo", function(req, res){
var fileHash = req.query.hash;
var details = proof.get.call(fileHash);
res.send(details);
})
Here, the /submit route is used to create and broadcast transactions. Once we get the transaction hash, we send it to the client. We are not doing anything to wait for the transaction to mine. The /getInfo route calls the get method of the contract on the node itself instead of creating a transaction. It simply sends back whatever response it got.
Now let's watch for the events from the contract and broadcast it to all the clients. Here is the code to do this:
proof.logFileAddedStatus().watch(function(error, result){
if(!error)
{
  if(result.args.status == true)
  {
    io.send(result);
  }
}
})
Here, we check whether the status is true, and if it's true, only then do we broadcast the event to all the connected socket.io clients.
Let's begin with the HTML of the app. Put this code in the index.html file:
<!DOCTYPE html>
<html lang="en">
    <head>
        <meta name="viewport" content="width=device-width, initial-scale=1, shrink-to-fit=no">
        <link rel="stylesheet" href="/css/bootstrap.min.css">
    </head>
    <body>
        <div class="container">
            <div class="row">
                <div class="col-md-6 offset-md-3 text-xs-center">
                    <br>
                    <h3>Upload any file</h3>
                    <br>
                    <div>
                        <div class="form-group">
                            <label class="custom-file text-xs-left">
                                <input type="file" id="file" class="custom-file-input">
                                <span class="custom-file-control"></span>
                            </label>
                        </div>
                        <div class="form-group">
                            <label for="owner">Enter owner name</label>
                            <input type="text" class="form-control" id="owner">
                        </div>
                        <button onclick="submit()" class="btn btn-primary">Submit</button>
                        <button onclick="getInfo()" class="btn btn-primary">Get Info</button>
                        <br><br>
                        <div class="alert alert-info" role="alert" id="message">
                            You can either submit file's details or get information about it.
                        </div>
                    </div>
                </div>
            </div>
            <div class="row">
                <div class="col-md-6 offset-md-3 text-xs-center">
                    <br>
                    <h3>Live Transactions Mined</h3>
                    <br>
                    <ol id="events_list">No Transaction Found</ol>
                </div>
            </div>
        </div>
        <script type="text/javascript" src="/js/sha1.min.js"></script>
        <script type="text/javascript" src="/js/jquery.min.js"></script>
        <script type="text/javascript" src="/js/socket.io.min.js"></script>
        <script type="text/javascript" src="/js/main.js"></script>
    </body>
</html>
Here is how the code works:
Now let's write the implementation for the getInfo() and submit() methods, establish a socket.io connect with the server, and listen for socket.io messages from the server. Here is the code to this. Place this code in the main.js file:
  function submit()
  {
    var file = document.getElementById("file").files[0];
    if(file)
  {
   var owner = document.getElementById("owner").value;
   if(owner == "")
  {
   alert("Please enter owner name");
  }
 else
 {
  var reader = new FileReader();
  reader.onload = function (event) {
  var hash = sha1(event.target.result);
  $.get("/submit?hash=" + hash + "&owner=" + owner, function(data){
  if(data == "Error")
  {
    $("#message").text("An error occured.");
  }
  else
  {
    $("#message").html("Transaction hash: " + data);
  }
  });
  };
  reader.readAsArrayBuffer(file);
   }
}
  else
  {
    alert("Please select a file");
  }
}
function getInfo()
{
  var file = document.getElementById("file").files[0];
  if(file)
  {
    var reader = new FileReader();
    reader.onload = function (event) {
    var hash = sha1(event.target.result);
    $.get("/getInfo?hash=" + hash, function(data){
    if(data[0] == 0 && data[1] == "")
    {
      $("#message").html("File not found");
    }
    else
    {
      $("#message").html("Timestamp: " + data[0] + " Owner: " + data[1]);
    }
  });
};
reader.readAsArrayBuffer(file);
}
else
  {
    alert("Please select a file");
  }
}
var socket = io("http://localhost:8080");
socket.on("connect", function () {
socket.on("message", function (msg) {
if($("#events_list").text() == "No Transaction Found")
{
    $("#events_list").html("<li>Txn Hash: " + msg.transactionHash + "nOwner: " + msg.args.owner + "nFile Hash: " + msg.args.fileHash + "</li>");
}
else
{
  $("#events_list").prepend("<li>Txn Hash: " + msg.transactionHash + "nOwner: " + msg.args.owner + "nFile Hash: " + msg.args.fileHash + "</li>");
}
  });
});
This is how the preceding code works:
Now run the app.js node to run the application server. Open your favorite browser and visit http://localhost:8080/. You will see this output in the browser:
Now select a file and enter the owner's name and click on Submit. The screen will change to this:
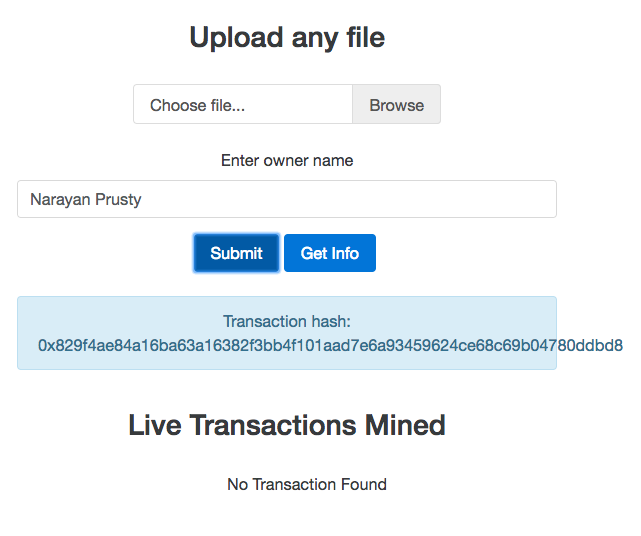
Here, you can see that the transaction hash is displayed. Now, wait until the transaction is mined. Once the transaction is mined, you will be able to see the transaction in the live transactions list. Here is how the screen would look:

Now select the same file again and click on the Get Info button. You will see this output:
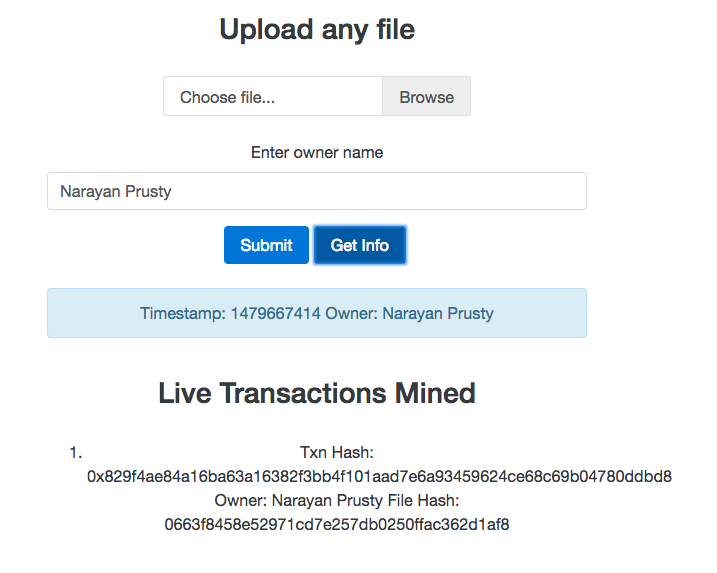
Here, you can see the timestamp and the owner's details. Now we have finished building the client for our first DApp.
In this chapter, we first learned about the fundamentals of web3.js with examples. We learned how to connect to a node, basic APIs, sending various kinds of transactions, and watching for events. Finally, we built a proper production use client for our ownership contract. Now you will be comfortable with writing smart contracts and building UI clients for them in order to ease their use.
In the next chapter, we will build a wallet service, where users can create and manage Ethereum Wallets easily, and that too is offline. We will specifically use the LightWallet library to achieve this.
A wallet service is used to send and receive funds. Major challenges for building a wallet service are security and trust. Users must feel that their funds are secure and the administrator of the wallet service doesn't steal their funds. The wallet service we will build in this chapter will tackle both these issues.
In this chapter, we'll cover the following topics:
Until now, all the examples of Web3.js library's sendTransaction() method we saw were using the from address that's present in the Ethereum node; therefore, the Ethereum node was able to sign the transactions before broadcasting. But if you have the private key of a wallet stored somewhere else, then geth cannot find it. Therefore, in this case, you will need to use the web3.eth.sendRawTransaction() method to broadcast transactions.
web3.eth.sendRawTransaction() is used to broadcast raw transactions, that is, you will have to write code to create and sign raw transactions. The Ethereum node will directly broadcast it without doing anything else to the transaction. But writing code to broadcast transactions using web3.eth.sendRawTransaction() is difficult because it requires generating the data part, creating raw transactions, and also signing the transactions.
The Hooked-Web3-Provider library provides us with a custom provider, which communicates with geth using HTTP; but the uniqueness of this provider is that it lets us sign the sendTransaction() calls of contract instances using our keys. Therefore, we don't need to create data part of the transactions anymore. The custom provider actually overrides the implementation of the web3.eth.sendTransaction() method. So basically, it lets us sign both the sendTransaction() calls of contract instances and also the web3.eth.sendTransaction() calls. The sendTransaction() method of contract instances internally generate data of the transaction and calls web3.eth.sendTransaction() to broadcast the transaction.
EthereumJS is a collection of those libraries related to Ethereum. ethereumjs-tx is one of those that provide various APIs related to transactions. For example, it lets us create raw transactions, sign the raw transactions, check whether transactions are signed using proper keys or not, and so on.
Both of these libraries are available for Node.js and client-side JavaScript. Download the Hooked-Web3-Provider from https://www.npmjs.com/package/hooked-web3-provider, and download ethereumjs-tx from https://www.npmjs.com/package/ethereumjs-tx.
At the time of writing this book, the latest version of Hooked-Web3-Provider is 1.0.0 and the latest version of ethereumjs-tx is 1.1.4.
Let's see how to use these libraries together to send a transaction from an account that's not managed by geth.
var provider = new HookedWeb3Provider({
 host: "http://localhost:8545",
 transaction_signer: {
  hasAddress: function(address, callback){
   callback(null, true);
  },
  signTransaction: function(tx_params, callback){
   var rawTx = {
          gasPrice: web3.toHex(tx_params.gasPrice),
          gasLimit: web3.toHex(tx_params.gas),
          value: web3.toHex(tx_params.value)
          from: tx_params.from,
          to: tx_params.to,
          nonce: web3.toHex(tx_params.nonce)
      };

   var privateKey = EthJS.Util.toBuffer('0x1a56e47492bf3df9c9563fa7f66e4e032c661de9d68c3f36f358e6bc9a9f69f2', 'hex');
   var tx = new EthJS.Tx(rawTx);
   tx.sign(privateKey);

   callback(null, tx.serialize().toString('hex'));
  }
 }
});

var web3 = new Web3(provider);

web3.eth.sendTransaction({
 from: "0xba6406ddf8817620393ab1310ab4d0c2deda714d",
 to: "0x2bdbec0ccd70307a00c66de02789e394c2c7d549",
 value: web3.toWei("0.1", "ether"),
 gasPrice: "20000000000",
 gas: "21000"
}, function(error, result){
 console.log(error, result)
})
Here is how the code works:
LightWallet is an HD wallet that implements BIP32, BIP39, and BIP44. LightWallet provides APIs to create and sign transactions or encrypt and decrypt data using the addresses and keys generated using it.
LightWallet API is divided into four namespaces, that is, keystore, signing, encryption, and txutils. signing, encrpytion, and txutils provide APIs to sign transactions, asymmetric cryptography, and create transactions respectively, whereas a keystore namespace is used to create a keystore, generated seed, and so on. keystore is an object that holds the seed and keys encrypted. The keystore namespace implements transaction signer methods that requires signing the we3.eth.sendTransaction() calls if we are using Hooked-Web3-Provider. Therefore the keystore namespace can automatically create and sign transactions for the addresses that it can find in it. Actually, LightWallet is primarily intended to be a signing provider for the Hooked-Web3-Provider.
A keystore instance can be configured to either create and sign transactions or encrypt and decrypt data. For signing transactions, it uses the secp256k1 parameter, and for encryption and decryption, it uses the curve25519 parameter.
The seed of LightWallet is a 12-word mnemonic, which is easy to remember yet difficult to hack. It cannot be any 12 words; instead, it should be a seed generated by LightWallet. A seed generated by LightWallet has certain properties in terms of selection of words and other things.
The HD derivation path is a string that makes it easy to handle multiple cryptocurrencies (assuming they all use the same signature algorithms), multiple blockchains, multiple accounts, and so on.
HD derivation path can have as many parameters as needed, and using different values for the parameters, we can produce different group of addresses and their associated keys.
By default, LightWallet uses the m/0'/0'/0' derivation path. Here, /n' is a parameter, and n is the parameter value.
Every HD derivation path has a curve, and purpose. purpose can be either sign or asymEncrypt. sign indicates that the path is used for signing transactions, and asymEncrypt indicates that the path is used for encryption and decryption. curve indicates the parameters of ECC. For signing, the parameter must be secp256k1, and for asymmetric encryption, the curve must be curve25591 because LightWallet forces us to use these parameters due to their benefits in those purposes.
Now we have learned enough theory about LightWallet, it's time to build a wallet service using LightWallet and hooked-web3-provider. Our wallet service will let users generate a unique seed, display addresses, and their associated balance, and finally, the service will let users send ether to other accounts. All the operations will be done on the client side so that users can trust us easily. Users will either have to remember the seed or store it somewhere.
Before you start building the wallet service, make sure that you are running the geth development instance, which is mining, has the HTTP-RPC server enabled, allows client-side requests from any domain, and finally has account 0 unlocked. You can do all these by running this:
geth --dev --rpc --rpccorsdomain "*" --rpcaddr "0.0.0.0" --rpcport "8545" --mine --unlock=0
Here, --rpccorsdomain is used to allow certain domains to communicate with geth. We need to provide a list of domains space separated, such as "http://localhost:8080 https://mySite.com *". It also supports the * wildcard character. --rpcaddr indicates to which IP address the geth server is reachable. The default for this is 127.0.0.1, so if it's a hosted server, you won't be able to reach it using the public IP address of the server. Therefore, we changed it's value to 0.0.0.0, which indicates that the server can be reached using any IP address.
In the exercise files of this chapter, you will find two directories, that is, Final and Initial. Final contains the final source code of the project, whereas Initial contains the empty source code files and libraries to get started with building the application quickly.
In the Initial directory, you will find a public directory and two files named app.js and package.json. package.json contains the backend dependencies. Our app, app.js, is where you will place the backend source code.
The public directory contains files related to the frontend. Inside public/css, you will find bootstrap.min.css, which is the bootstrap library. Inside public/html, you will find index.html, where you will place the HTML code of our app, and finally, in the public/js directory, you will find .js files for Hooked-Web3-Provider, web3js, and LightWallet. Inside public/js, you will also find a main.js file where you will place the frontend JS code of our app.
Let's first build the backend of the app. First of all, run npm install inside the initial directory to install the required dependencies for our backend.
Here is the complete backend code to run an express service and serve the index.html file and static files:
var express = require("express");
var app = express();

app.use(express.static("public"));

app.get("/", function(req, res){
 res.sendFile(__dirname + "/public/html/index.html");
})

app.listen(8080);
The preceding code is self-explanatory.
Now let's build the frontend of the app. The frontend will consist of the major functionalities, that is, generating seed, displaying addresses of a seed, and sending ether.
Now let's write the HTML code of the app. Place this code in the index.html file:
<!DOCTYPE html>
 <html lang="en">
     <head>
         <meta charset="utf-8">
         <meta name="viewport" content="width=device-width, initial-scale=1, shrink-to-fit=no">
         <meta http-equiv="x-ua-compatible" content="ie=edge">
         <link rel="stylesheet" href="/css/bootstrap.min.css">
     </head>
     <body>
         <div class="container">
             <div class="row">
                 <div class="col-md-6 offset-md-3">
                     <br>
                     <div class="alert alert-info" id="info" role="alert">
                           Create or use your existing wallet.
                     </div>
                     <form>
                         <div class="form-group">
                             <label for="seed">Enter 12-word seed</label>
                             <input type="text" class="form-control" id="seed">
                         </div>
                         <button type="button" class="btn btn-primary" onclick="generate_addresses()">Generate Details</button>
                         <button type="button" class="btn btn-primary" onclick="generate_seed()">Generate New Seed</button>
                     </form>
                     <hr>
                     <h2 class="text-xs-center">Address, Keys and Balances of the seed</h2>
                     <ol id="list">
                     </ol>
                     <hr>
                     <h2 class="text-xs-center">Send ether</h2>
                     <form>
                         <div class="form-group">
                             <label for="address1">From address</label>
                             <input type="text" class="form-control" id="address1">
                         </div>
                         <div class="form-group">
                             <label for="address2">To address</label>
                             <input type="text" class="form-control" id="address2">
                         </div>
                         <div class="form-group">
                             <label for="ether">Ether</label>
                             <input type="text" class="form-control" id="ether">
                         </div>
                         <button type="button" class="btn btn-primary" onclick="send_ether()">Send Ether</button>
                     </form>
                 </div>
             </div>
         </div>

            <script src="/js/web3.min.js"></script>
            <script src="/js/hooked-web3-provider.min.js"></script>
         <script src="/js/lightwallet.min.js"></script>
         <script src="/js/main.js"></script>
     </body>
 </html>
Here is how the code works:
Now let's write the implementation of each of the functions that the HTML code calls. At first, let's write the code to generate a new seed. Place this code in the main.js file:
function generate_seed()
{
 var new_seed = lightwallet.keystore.generateRandomSeed();

 document.getElementById("seed").value = new_seed;

 generate_addresses(new_seed);
}
The generateRandomSeed() method of the keystore namespace is used to generate a random seed. It takes an optional parameter, which is a string that indicates the extra entropy.
To produce a unique seed, we need really high entropy. LightWallet is already built with methods to produce unique seeds. The algorithm LightWallet uses to produce entropy depends on the environment. But if you feel you can generate better entropy, you can pass the generated entropy to the generateRandomSeed() method, and it will get concatenated with the entropy generated by generateRandomSeed() internally.
After generating a random seed, we call the generate_addresses method. This method takes a seed and displays addresses in it. Before generating addresses, it prompts the user to ask how many addresses they want.
Here is the implementation of the generate_addresses() method. Place this code in the main.js file:
var totalAddresses = 0;

function generate_addresses(seed)
{
 if(seed == undefined)
 {
  seed = document.getElementById("seed").value;
 }

 if(!lightwallet.keystore.isSeedValid(seed))
 {
  document.getElementById("info").innerHTML = "Please enter a valid seed";
  return;
 }

 totalAddresses = prompt("How many addresses do you want to generate");

 if(!Number.isInteger(parseInt(totalAddresses)))
 {
  document.getElementById("info").innerHTML = "Please enter valid number of addresses";
  return;
 }

 var password = Math.random().toString();

 lightwallet.keystore.createVault({
  password: password,
    seedPhrase: seed
 }, function (err, ks) {
    ks.keyFromPassword(password, function (err, pwDerivedKey) {
      if(err)
      {
       document.getElementById("info").innerHTML = err;
      }
      else
      {
       ks.generateNewAddress(pwDerivedKey, totalAddresses);
       var addresses = ks.getAddresses();

       var web3 = new Web3(new Web3.providers.HttpProvider("http://localhost:8545"));

       var html = "";

       for(var count = 0; count < addresses.length; count++)
       {
     var address = addresses[count];
     var private_key = ks.exportPrivateKey(address, pwDerivedKey);
     var balance = web3.eth.getBalance("0x" + address);

     html = html + "<li>";
     html = html + "<p><b>Address: </b>0x" + address + "</p>";
     html = html + "<p><b>Private Key: </b>0x" + private_key + "</p>";
     html = html + "<p><b>Balance: </b>" + web3.fromWei(balance, "ether") + " ether</p>";
        html = html + "</li>";
       }

       document.getElementById("list").innerHTML = html;
      }
    });
 });
}
Here is how the code works:
Now we know how to generate the address and their private keys from a seed. Now let's write the implementation of the send_ether() method, which is used to send ether from one of the addresses generated from the seed.
Here is the code for this. Place this code in the main.js file:
function send_ether()
{
 var seed = document.getElementById("seed").value;

 if(!lightwallet.keystore.isSeedValid(seed))
 {
  document.getElementById("info").innerHTML = "Please enter a valid seed";
  return;
 }

 var password = Math.random().toString();

 lightwallet.keystore.createVault({
  password: password,
    seedPhrase: seed
 }, function (err, ks) {
    ks.keyFromPassword(password, function (err, pwDerivedKey) {
      if(err)
      {
       document.getElementById("info").innerHTML = err;
      }
      else
      {
       ks.generateNewAddress(pwDerivedKey, totalAddresses);

       ks.passwordProvider = function (callback) {
          callback(null, password);
       };

       var provider = new HookedWeb3Provider({
       host: "http://localhost:8545",
       transaction_signer: ks
    });

       var web3 = new Web3(provider);

       var from = document.getElementById("address1").value;
    var to = document.getElementById("address2").value;
       var value = web3.toWei(document.getElementById("ether").value, "ether");

       web3.eth.sendTransaction({
        from: from,
        to: to,
        value: value,
        gas: 21000
       }, function(error, result){
        if(error)
        {
         document.getElementById("info").innerHTML = error;
        }
        else
        {
         document.getElementById("info").innerHTML = "Txn hash: " + result;
        }
       })
      }
    });
 });
}
Here, the code up and until generating addresses from the seed is self-explanatory. After that, we assign a callback to the passwordProvider property of ks. This callback is invoked during transaction signing to get the password to decrypt the private key. If we don't provide this, LightWallet prompts the user to enter the password. And then, we create a HookedWeb3Provider instance by passing the keystore as the transaction signer. Now when the custom provider wants a transaction to be signed, it calls the hasAddress and signTransactions methods of ks. If the address to be signed is not among the generated addresses, ks will give an error to the custom provider. And finally, we send some ether using the web3.eth.sendTransaction method.
Now that we have finished building our wallet service, let's test it to make sure it works as expected. First, run node app.js inside the initial directory, and then visit http://localhost:8080 in your favorite browser. You will see this screen:
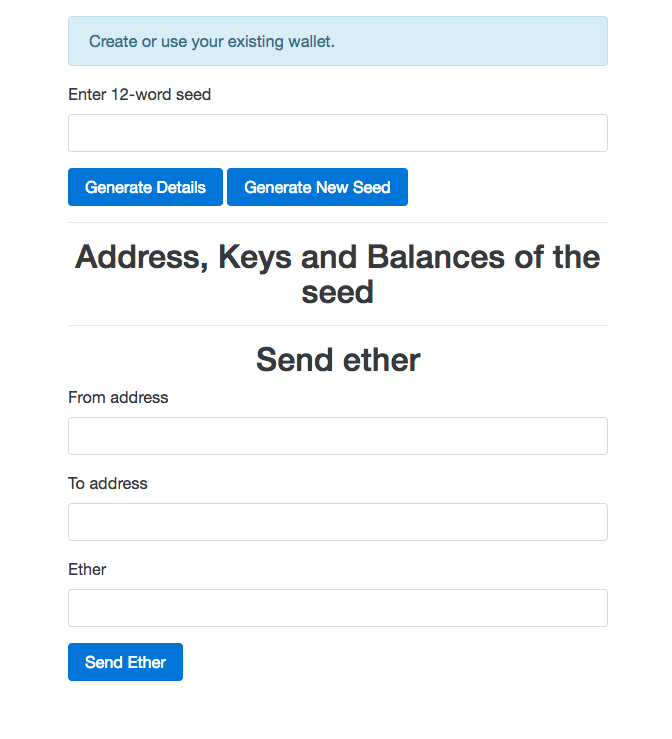
Now click on the Generate New Seed button to generate a new seed. You will be prompted to enter a number indicating the number of addresses to generate. You can provide any number, but for testing purposes, provide a number greater than 1. Now the screen will look something like this:
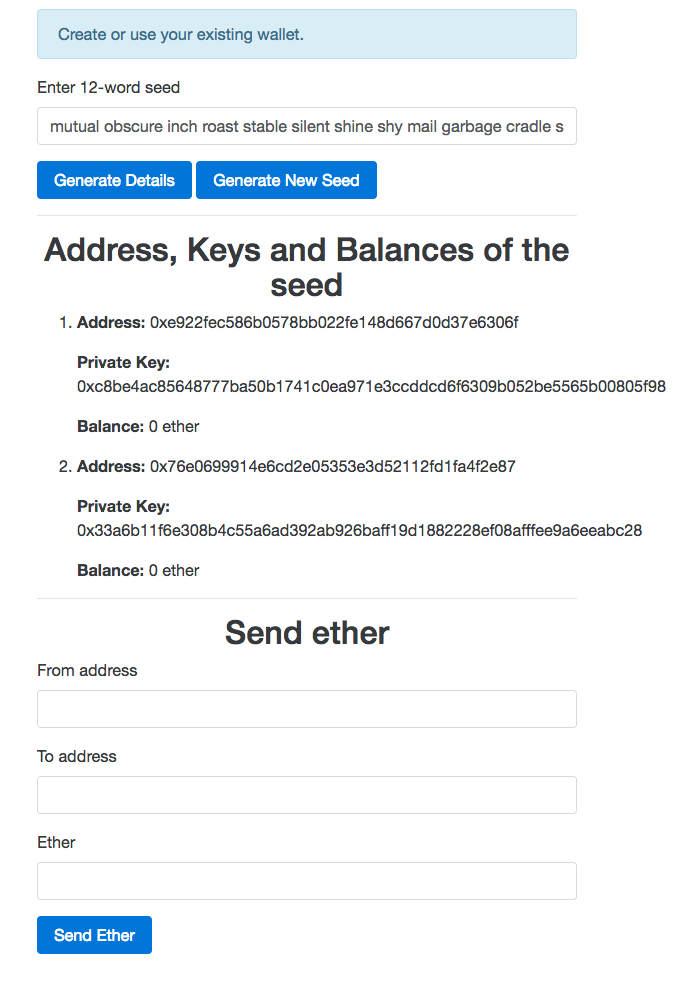
Now to test sending ether, you need to send some ether to one of the generated addresses from the coinbase account. Once you have sent some ether to one of the generated addresses, click on the Generate Details button to refresh the UI, although it's not necessary to test sending ether using the wallet service. Make sure the same address is generated again. Now the screen will look something like this:
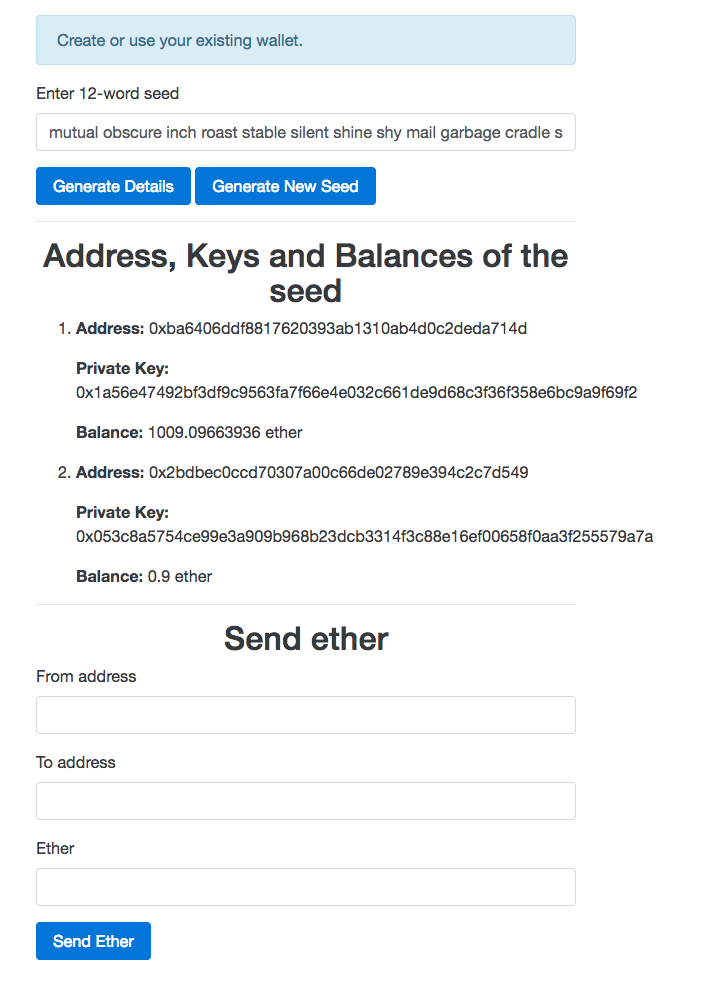
Now in the from address field, enter the account address from the list that has the balance in the from address field. Then enter another address in the to address field. For testing purposes, you can enter any of the other addresses displayed. Then enter some ether amount that is less than or equal to the ether balance of the from address account. Now your screen will look something like this:
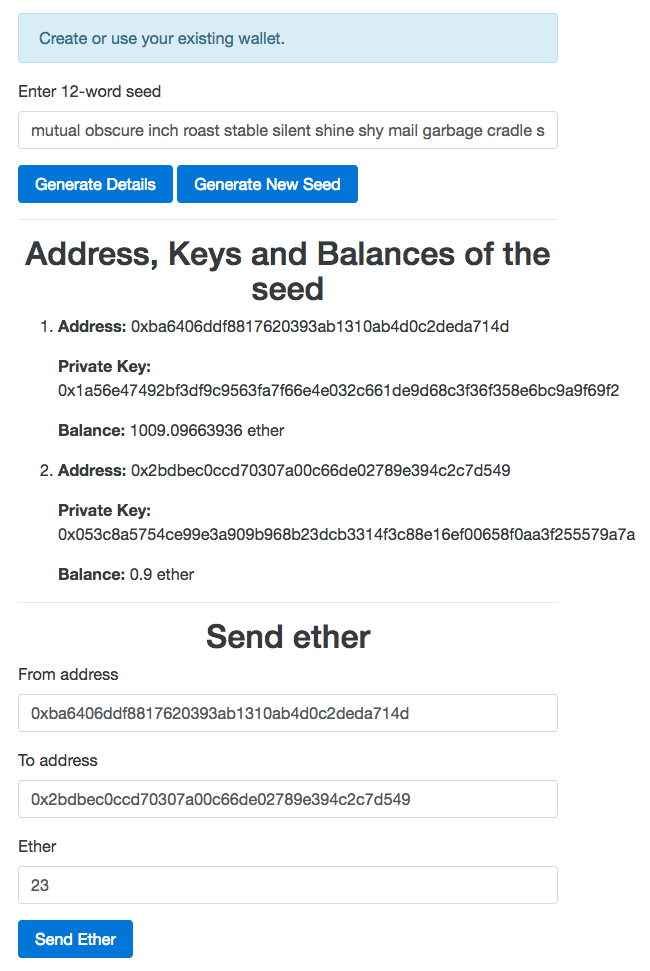
Now click on the Send Ether button, and you will see the transaction hash in the information box. Wait for sometime for it to get mined. Meanwhile, you can check whether the transactions got mined or not by clicking on the Generate Details button in a very short span of time. Once the transaction is mined, your screen will look something like this:
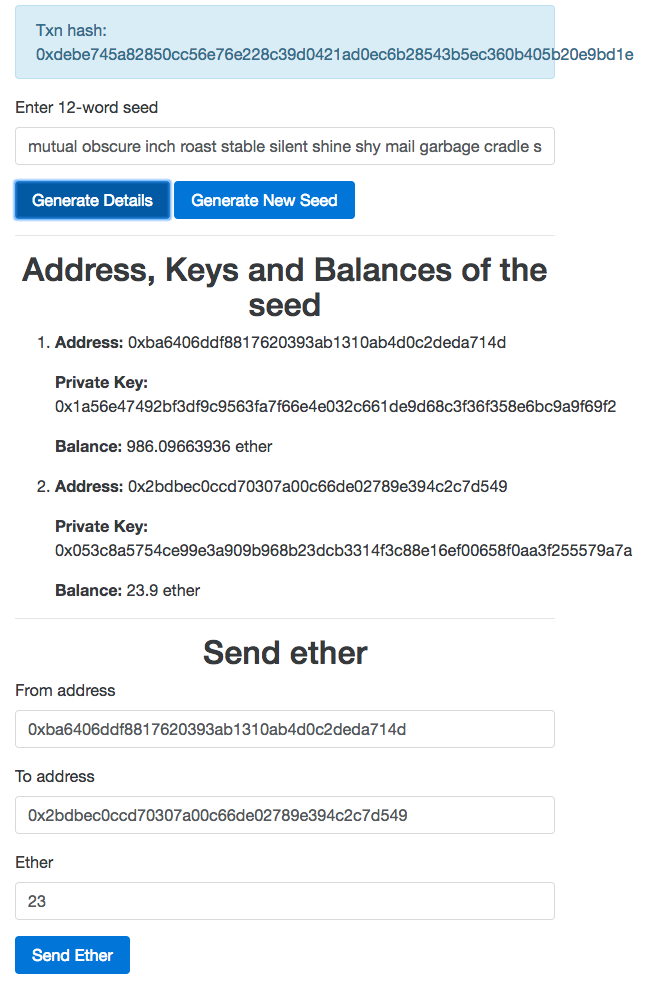
If everything goes the same way as explained, your wallet service is ready. You can actually deploy this service to a custom domain and make it available for use publicly. It's completely secure, and users will trust it.
In this chapter, you learned about three important Ethereum libraries: Hooked-Web3-Provider, ethereumjs-tx, and LightWallet. These libraries can be used to manage accounts and sign transactions outside of the Ethereum node. While developing clients for most kinds of DApps, you will find these libraries useful.
And finally, we created a wallet service that lets users manage their accounts that share private keys or any other information related to their wallet with the backend of the service.
In the next chapter, we will build a platform to build and deploy smart contracts.
Some clients may need to compile and deploy contracts at runtime. In our proof-of-ownership DApp, we deployed the smart contract manually and hardcoded the contract address in the client-side code. But some clients may need to deploy smart contracts at runtime. For example, if a client lets schools record students' attendance in the blockchain, then it will need to deploy a smart contract every time a new school is registered so that each school has complete control over their smart contract. In this chapter, we will learn how to compile smart contracts using web3.js and deploy it using web3.js and EthereumJS.
In this chapter, we'll cover the following topics:
For the accounts maintained by geth, we don't need to worry about the transaction nonce because geth can add the correct nonce to the transactions and sign them. While using accounts that aren't managed by geth, we need to calculate the nonce ourselves.
To calculate the nonce ourselves, we can use the getTransactionCount method provided by geth. The first argument should be the address whose transaction count we need and the second argument is the block until we need the transaction count. We can provide the "pending" string as the block to include transactions from the block that's currently being mined. As we discussed in an earlier chapter, geth maintains a transaction pool in which it keeps pending and queued transactions. To mine a block, geth takes the pending transactions from the transaction pool and starts mining the new block. Until the block is not mined, the pending transactions remain in the transaction pool and once mined, the mined transactions are removed from the transaction pool. The new incoming transactions received while a block is being mined are put in the transaction pool and are mined in the next block. So when we provide "pending" as the second argument while calling getTransactionCount, it doesn't look inside the transaction pool; instead, it just considers the transactions in the pending block.
So if you are trying to send transactions from accounts not managed by geth, then count the total number of transactions of the account in the blockchain and add it with the transactions pending in the transaction pool. If you try to use pending transactions from the pending block, then you will fail to get the correct nonce if transactions are sent to geth within a few seconds of the interval because it takes 12 seconds on average to include a transaction in the blockchain.
In the previous chapter, we relied on the hooked-web3-provider to add nonce to the transaction. Unfortunately, the hooked-web3-provider doesn't try to get the nonce the correct way. It maintains a counter for every account and increments it every time you send a transaction from that account. And if the transaction is invalid (for example, if the transaction is trying to send more ether than it has), then it doesn't decrement the counter. Therefore, the rest of the transactions from that account will be queued and never be mined until the hooked-web3-provider is reset, that is, the client is restarted. And if you create multiple instances of the hooked-web3-provider, then these instances cannot sync the nonce of an account with each other, so you may end up with the incorrect nonce. But before you add the nonce to the transaction, the hooked-web3-provider always gets the transaction count until the pending block and compares it with its counter and uses whichever is greater. So if the transaction from an account managed by the hooked-web3-provider is sent from another node in the network and is included in the pending block, then the hooked-web3-provider can see it. But the overall hooked-web3-provider cannot be relied on to calculate the nonce. It's great for quick prototyping of client-side apps and is fit to use in apps where the user can see and resend transactions if they aren't broadcasted to the network and the hooked-web3-provider is reset frequently. For example, in our wallet service, the user will frequently load the page, so a new hooked-web3-provider instance is created frequently. And if the transaction is not broadcasted, not valid, or not mined, then the user can refresh the page and resend transactions.
solcjs is a Node.js library and command-line tool that is used to compile solidity files. It doesn't use the solc command-line compiler; instead, it compiles purely using JavaScript, so it's much easier to install than solc.
Solc is the actual Solidity compiler. Solc is written in C++. The C++ code is compiled to JavaScript using emscripten. Every version of solc is compiled to JavaScript. At https://github.com/ethereum/solc-bin/tree/gh-pages/bin, you can find the JavaScript-based compilers of each solidity version. solcjs just uses one of these JavaScript-based compilers to compile the solidity source code. These JavaScript-based compilers can run in both browser and Node.js environments.
solcjs is available as an npm package with the name solc. You can install the solcjs npm package locally or globally just like any other npm package. If this package is installed globally, then solcjs, a command-line tool, will be available. So, in order to install the command-line tool, run this command:
npm install -g solc
Now go ahead and run this command to see how to compile solidity files using the command-line compiler:
solcjs -help
We won't be exploring the solcjs command-line tool; instead, we will learn about the solcjs APIs to compile solidity files.
solcjs provides a compiler method, which is used to compile solidity code. This method can be used in two different ways depending on whether the source code has any imports or not. If the source code doesn't have any imports, then it takes two arguments; that is, the first argument is solidity source code as a string and a Boolean indicating whether to optimize the byte code or not. If the source string contains multiple contracts, then it will compile all of them.
Here is an example to demonstrate this:
var solc = require("solc");
var input = "contract x { function g() {} }";
var output = solc.compile(input, 1); // 1 activates the optimiser
for (var contractName in output.contracts) {
    // logging code and ABI
    console.log(contractName + ": " + output.contracts[contractName].bytecode);
    console.log(contractName + "; " + JSON.parse(output.contracts[contractName].interface));
}
If your source code contains imports, then the first argument will be an object whose keys are filenames and values are the contents of the files. So whenever the compiler sees an import statement, it doesn't look for the file in the filesystem; instead, it looks for the file contents in the object by matching the filename with the keys. Here is an example to demonstrate this:
var solc = require("solc");
var input = {
    "lib.sol": "library L { function f() returns (uint) { return 7; } }",
    "cont.sol": "import 'lib.sol'; contract x { function g() { L.f(); } }"
};
var output = solc.compile({sources: input}, 1);
for (var contractName in output.contracts)
    console.log(contractName + ": " + output.contracts[contractName].bytecode);
If you want to read the imported file contents from the filesystem during compilation or resolve the file contents during compilation, then the compiler method supports a third argument, which is a method that takes the filename and should return the file content. Here is an example to demonstrate this:
var solc = require("solc");
var input = {
    "cont.sol": "import 'lib.sol'; contract x { function g() { L.f(); } }"
};
function findImports(path) {
    if (path === "lib.sol")
        return { contents: "library L { function f() returns (uint) { return 7; } }" }
    else
        return { error: "File not found" }
}
var output = solc.compile({sources: input}, 1, findImports);
for (var contractName in output.contracts)
    console.log(contractName + ": " + output.contracts[contractName].bytecode);
In order to compile contracts using a different version of solidity, you need to use the useVersion method to get a reference of a different compiler. useVersion takes a string that indicates the JavaScript filename that holds the compiler, and it looks for the file in the /node_modules/solc/bin directory.
solcjs also provides another method called loadRemoteVersion, which takes the compiler filename that matches the filename in the solc-bin/bin directory of the solc-bin repository (https://github.com/ethereum/solc-bin) and downloads and uses it.
Finally, solcjs also provides another method called setupMethods, which is similar to useVersion but can load the compiler from any directory.
Here is an example to demonstrate all three methods:
var solc = require("solc");

var solcV047 = solc.useVersion("v0.4.7.commit.822622cf");
var output = solcV011.compile("contract t { function g() {} }", 1);

solc.loadRemoteVersion('soljson-v0.4.5.commit.b318366e', function(err, solcV045) {
    if (err) {
        // An error was encountered, display and quit
    }

    var output = solcV045.compile("contract t { function g() {} }", 1);
});

var solcV048 = solc.setupMethods(require("/my/local/0.4.8.js"));
var output = solcV048.compile("contract t { function g() {} }", 1);

solc.loadRemoteVersion('latest', function(err, latestVersion) {
    if (err) {
        // An error was encountered, display and quit
    }
    var output = latestVersion.compile("contract t { function g() {} }", 1);
});
To run the preceding code, you need to first download the v0.4.7.commit.822622cf.js file from the solc-bin repository and place it in the node_modules/solc/bin directory. And then you need to download the compiler file of solidity version 0.4.8 and place it somewhere in the filesystem and point the path in the setupMethods call to that directory.
If your solidity source code references libraries, then the generated byte code will contain placeholders for the real addresses of the referenced libraries. These have to be updated via a process called linking before deploying the contract.
solcjs provides the linkByteCode method to link library addresses to the generated byte code.
Here is an example to demonstrate this:
var solc = require("solc");

var input = {
    "lib.sol": "library L { function f() returns (uint) { return 7; } }",
    "cont.sol": "import 'lib.sol'; contract x { function g() { L.f(); } }"
};

var output = solc.compile({sources: input}, 1);

var finalByteCode = solc.linkBytecode(output.contracts["x"].bytecode, { 'L': '0x123456...' });
The ABI of a contract provides various kinds of information about the contract other than implementation. The ABI generated by two different versions of compilers may not match as higher versions support more solidity features than lower versions; therefore, they will include extra things in the ABI. For example, the fallback function was introduced in the 0.4.0 version of Solidity so the ABI generated using compilers whose version is less than 0.4.0 will have no information about fallback functions, and these smart contracts behave like they have a fallback function with an empty body and a payable modifier. So, the API should be updated so that applications that depend on the ABI of newer solidity versions can have better information about the contract.
solcjs provides an API to update the ABI. Here is an example code to demonstrate this:
var abi = require("solc/abi");

var inputABI = [{"constant":false,"inputs":[],"name":"hello","outputs":[{"name":"","type":"string"}],"payable":false,"type":"function"}];
var outputABI = abi.update("0.3.6", inputABI)
Here, 0.3.6 indicates that the ABI was generated using the 0.3.6 version of the compiler. As we are using solcjs version 0.4.8, the ABI will be updated to match the ABI generated by the 0.4.8 compiler version, not above it.
The output of the preceding code will be as follows:
[{"constant":false,"inputs":[],"name":"hello","outputs":[{"name":"","type":"string"}],"payable":true,"type":"function"},{"type":"fallback","payable":true}]
Now that we have learned how to use solcjs to compile solidity source code, it's time to build a platform that lets us write, compile, and deploy contracts. Our platform will let users provide their account address and private key, using which our platform will deploy contracts.
Before you start building the application, make sure that you are running the geth development instance, which is mining, has rpc enabled, and exposes eth, web3, and txpool APIs over the HTTP-RPC server. You can do all these by running this:
geth --dev --rpc --rpccorsdomain "*" --rpcaddr "0.0.0.0" --rpcport "8545" --mine --rpcapi "eth,txpool,web3"
In the exercise files of this chapter, you will find two directories, that is, Final and Initial. Final contains the final source code of the project, whereas Initial contains the empty source code files and libraries to get started with building the application quickly.
In the Initial directory, you will find a public directory and two files named app.js and package.json. The package.json file contains the backend dependencies on our app. app.js is where you will place the backend source code.
The public directory contains files related to the frontend. Inside public/css, you will find bootstrap.min.css, which is the bootstrap library, and you will also find the codemirror.css file, which is CSS of the codemirror library. Inside public/html, you will find index.html, where you will place the HTML code of our app and in the public/js directory, you will find .js files for codemirror and web3.js. Inside public/js, you will also find a main.js file, where you will place the frontend JS code of our app.
Let's first build the backend of the app. First of all, run npm install inside the Initial directory to install the required dependencies for our backend.
Here is the backend code to run an express service and serve the index.html file and static files:
var express = require("express");
var app = express();

app.use(express.static("public"));

app.get("/", function(req, res){
 res.sendFile(__dirname + "/public/html/index.html");
})

app.listen(8080);
The preceding code is self-explanatory. Now let's proceed further. Our app will have two buttons, that is, Compile and Deploy. When the user clicks on the compile button, the contract will be compiled and when the deploy button is clicked on, the contract will be deployed.
We will be compiling and deploying contracts in the backend. Although this can be done in the frontend, we will do it in the backend because solcjs is available only for Node.js (although the JavaScript-based compilers it uses work on the frontend).
When the user clicks on the compile button, the frontend will make a GET request to the /compile path by passing the contract source code. Here is the code for the route:
var solc = require("solc");

app.get("/compile", function(req, res){
 var output = solc.compile(req.query.code, 1);
 res.send(output);
})
At first, we import the solcjs library here. Then, we define the /compile route and inside the route callback, we simply compile the source code sent by the client with the optimizer enabled. And then we just send the solc.compile method's return value to the frontend and let the client check whether the compilation was successful or not.
When the user clicks on the deploy button, the frontend will make a GET request to the /deploy path by passing the contract source code and constructor arguments from the address and private key. When the user clicks on this button, the contract will be deployed and the transaction hash will be returned to the user.
Here is the code for this:
var Web3 = require("web3");
var BigNumber = require("bignumber.js");
var ethereumjsUtil = require("ethereumjs-util");
var ethereumjsTx = require("ethereumjs-tx");

var web3 = new Web3(new Web3.providers.HttpProvider("http://localhost:8545"));

function etherSpentInPendingTransactions(address, callback)
{
 web3.currentProvider.sendAsync({
    method: "txpool_content",
    params: [],
    jsonrpc: "2.0",
    id: new Date().getTime()
 }, function (error, result) {
  if(result.result.pending)
  {
   if(result.result.pending[address])
   {
    var txns = result.result.pending[address];
    var cost = new BigNumber(0);

    for(var txn in txns)
    {
     cost = cost.add((new BigNumber(parseInt(txns[txn].value))).add((new BigNumber(parseInt(txns[txn].gas))).mul(new BigNumber(parseInt(txns[txn].gasPrice)))));
    }

    callback(null, web3.fromWei(cost, "ether"));
   }
   else
   {
    callback(null, "0");
   }
  }
  else
  {
   callback(null, "0");
  }
 })
}

function getNonce(address, callback)
{
 web3.eth.getTransactionCount(address, function(error, result){
  var txnsCount = result;

  web3.currentProvider.sendAsync({
     method: "txpool_content",
     params: [],
     jsonrpc: "2.0",
     id: new Date().getTime()
  }, function (error, result) {
   if(result.result.pending)
   {
    if(result.result.pending[address])
    {
     txnsCount = txnsCount + Object.keys(result.result.pending[address]).length;
     callback(null, txnsCount);
    }
    else
    {
     callback(null, txnsCount);
    }
   }
   else
   {
    callback(null, txnsCount);
   }
  })
 })
}

app.get("/deploy", function(req, res){
 var code = req.query.code;
 var arguments = JSON.parse(req.query.arguments);
 var address = req.query.address;

 var output = solc.compile(code, 1);

 var contracts = output.contracts;

 for(var contractName in contracts)
 {
  var abi = JSON.parse(contracts[contractName].interface);
  var byteCode = contracts[contractName].bytecode;

  var contract = web3.eth.contract(abi);

  var data = contract.new.getData.call(null, ...arguments, {
   data: byteCode
  });

  var gasRequired = web3.eth.estimateGas({
      data: "0x" + data
  });

  web3.eth.getBalance(address, function(error, balance){
   var etherAvailable = web3.fromWei(balance, "ether");
   etherSpentInPendingTransactions(address, function(error, balance){
    etherAvailable = etherAvailable.sub(balance)
    if(etherAvailable.gte(web3.fromWei(new BigNumber(web3.eth.gasPrice).mul(gasRequired), "ether")))
    {
     getNonce(address, function(error, nonce){
      var rawTx = {
             gasPrice: web3.toHex(web3.eth.gasPrice),
             gasLimit: web3.toHex(gasRequired),
             from: address,
             nonce: web3.toHex(nonce),
             data: "0x" + data
         };

      var privateKey = ethereumjsUtil.toBuffer(req.query.key, 'hex');
      var tx = new ethereumjsTx(rawTx);
      tx.sign(privateKey);

      web3.eth.sendRawTransaction("0x" + tx.serialize().toString('hex'), function(err, hash) {
       res.send({result: {
        hash: hash,
       }});
      });
     })
    }
    else
    {
     res.send({error: "Insufficient Balance"});
    }
   })
  })

     break;
 }
})
This is how the preceding code works:
Now let's build the frontend of our application. Our frontend will contain an editor, using which the user writes code. And when the user clicks on the compile button, we will dynamically display input boxes where each input box will represent a constructor argument. When the deploy button is clicked on, the constructor argument values are taken from these input boxes. The user will need to enter the JSON string in these input boxes.
Here is the frontend HTML code of our app. Place this code in the index.html file:
<!DOCTYPE html>
<html lang="en">
    <head>
        <meta charset="utf-8">
        <meta name="viewport" content="width=device-width, initial-scale=1, shrink-to-fit=no">
        <meta http-equiv="x-ua-compatible" content="ie=edge">
        <link rel="stylesheet" href="/css/bootstrap.min.css">
        <link rel="stylesheet" href="/css/codemirror.css">
        <style type="text/css">
            .CodeMirror
            {
                height: auto;
            }
        </style>
    </head>
    <body>
        <div class="container">
            <div class="row">
                <div class="col-md-6">
                    <br>
                    <textarea id="editor"></textarea>
                    <br>
                    <span id="errors"></span>
                    <button type="button" id="compile" class="btn btn-primary">Compile</button>
                </div>
                <div class="col-md-6">
                    <br>
                    <form>
                        <div class="form-group">
                            <label for="address">Address</label>
                            <input type="text" class="form-control" id="address" placeholder="Prefixed with 0x">
                        </div>
                        <div class="form-group">
                            <label for="key">Private Key</label>
                            <input type="text" class="form-control" id="key" placeholder="Prefixed with 0x">
                        </div>
                        <hr>
                        <div id="arguments"></div>
                        <hr>
                        <button type="button" id="deploy" class="btn btn-primary">Deploy</button>
                    </form>
                </div>
            </div>
        </div>
        <script src="/js/codemirror.js"></script>
        <script src="/js/main.js"></script>
    </body>
</html>
Here, you can see that we have a textarea. The textarea tag will hold whatever the user will enter in the codemirror editor. Everything else in the preceding code is self-explanatory.
Here is the complete frontend JavaScript code. Place this code in the main.js file:
var editor = CodeMirror.fromTextArea(document.getElementById("editor"), {
    lineNumbers: true,
});

var argumentsCount = 0;

document.getElementById("compile").addEventListener("click", function(){
 editor.save();
 var xhttp = new XMLHttpRequest();

 xhttp.onreadystatechange = function() {
     if (this.readyState == 4 && this.status == 200) {
      if(JSON.parse(xhttp.responseText).errors != undefined)
      {
       document.getElementById("errors").innerHTML = JSON.parse(xhttp.responseText).errors + "<br><br>";
      }
      else
      {
       document.getElementById("errors").innerHTML = "";
      }

      var contracts = JSON.parse(xhttp.responseText).contracts;

      for(var contractName in contracts)
      {
       var abi = JSON.parse(contracts[contractName].interface);

       document.getElementById("arguments").innerHTML = "";

       for(var count1 = 0; count1 < abi.length; count1++)
       {
        if(abi[count1].type == "constructor")
        {
         argumentsCount = abi[count1].inputs.length;

         document.getElementById("arguments").innerHTML = '<label>Arguments</label>';

         for(var count2 = 0; count2 < abi[count1].inputs.length; count2++)
         {
          var inputElement = document.createElement("input");
          inputElement.setAttribute("type", "text");
          inputElement.setAttribute("class", "form-control");
          inputElement.setAttribute("placeholder", abi[count1].inputs[count2].type);
          inputElement.setAttribute("id", "arguments-" + (count2 + 1));

          var br = document.createElement("br");

          document.getElementById("arguments").appendChild(br);
          document.getElementById("arguments").appendChild(inputElement);
         }

         break;
        }
       }

       break;
      }
     }
 };

 xhttp.open("GET", "/compile?code=" + encodeURIComponent(document.getElementById("editor").value), true);
 xhttp.send();
})

document.getElementById("deploy").addEventListener("click", function(){
 editor.save();

 var arguments = [];

 for(var count = 1; count <= argumentsCount; count++)
 {
  arguments[count - 1] = JSON.parse(document.getElementById("arguments-" + count).value);
 }

 var xhttp = new XMLHttpRequest();

 xhttp.onreadystatechange = function() {
     if (this.readyState == 4 && this.status == 200)
     {
      var res = JSON.parse(xhttp.responseText);

      if(res.error)
      {
       alert("Error: " + res.error)
      }
      else
      {
       alert("Txn Hash: " + res.result.hash);
      }
     }
     else if(this.readyState == 4)
     {
      alert("An error occured.");
     }
 };

 xhttp.open("GET", "/deploy?code=" + encodeURIComponent(document.getElementById("editor").value) + "&arguments=" + encodeURIComponent(JSON.stringify(arguments)) + "&address=" + document.getElementById("address").value + "&key=" + document.getElementById("key").value, true);
 xhttp.send();
})
Here is how the preceding code works:
To test the app, run the app.js node inside the Initial directory and visit localhost:8080. You will see what is shown in the following screenshot:
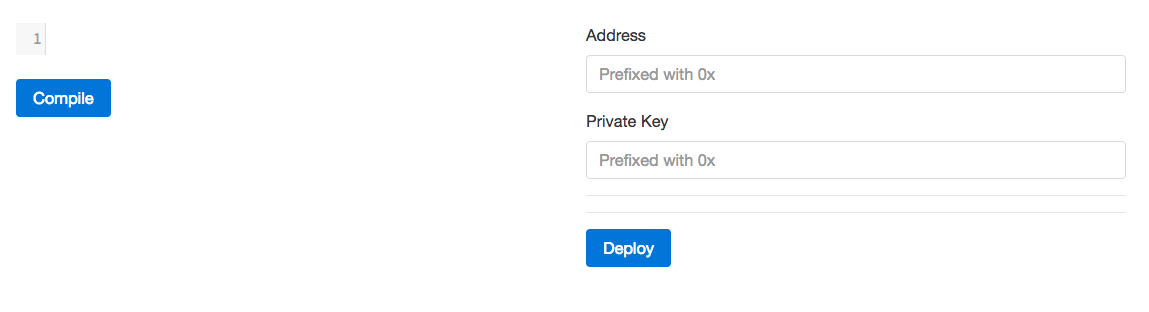
Now enter some solidity contract code and press the compile button. Then, you will be able to see new input boxes appearing on the right-hand side. For example, take a look at the following screenshot:
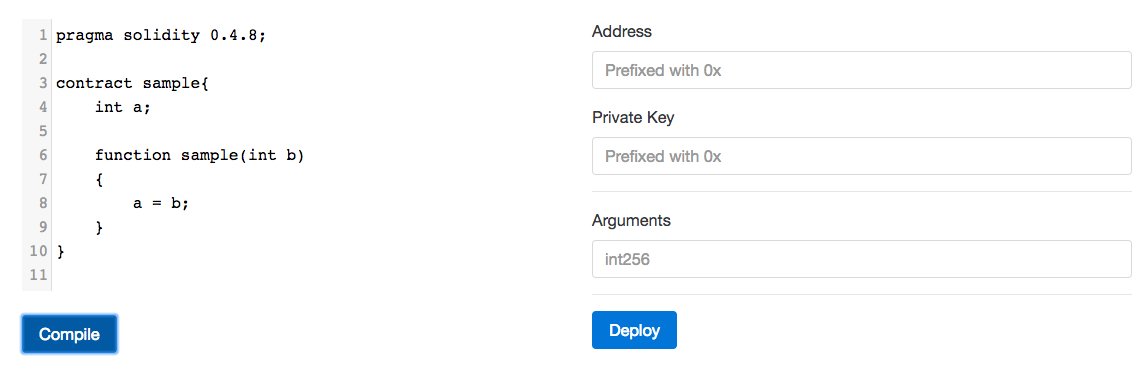
Now enter a valid address and its associated private key. And then enter values for the constructor arguments and click on deploy. If everything goes right, then you will see an alert box with the transaction hash. For example, take a look at the following screenshot:

In this chapter, we learned how to use the transaction pool API, how to calculate a proper nonce, calculate a spendable balance, generate the data of a transaction, compile contracts, and so on. We then built a complete contract compilation and deployment platform. Now you can go ahead and enhance the application we have built to deploy all the contracts found in the editor, handle imports, add libraries, and so on.
In the next chapter, we will learn about Oraclize by building a decentralized betting app.
Sometimes, it is necessary for smart contracts to access data from other dapps or from the World Wide Web. But it's really complicated to let smart contracts access outside data due to technical and consensus challenges. Therefore, currently, Ethereum smart contracts don't have native support to access outside data. But there are third-party solutions for Ethereum smart contracts to access data from some popular dapps and from the World Wide Web. In this chapter, we will learn how to use Oraclize to make HTTP requests from Ethereum smart contracts to access data from the World Wide Web. We will also learn how to access files stored in IPFS, use the strings library to work with strings, and so on. We will learn all this by building a football-betting smart contract and a client for it.
In this chapter, we'll cover the following topics:
Oraclize is a service that aims to enable smart contracts to access data from other blockchains and the World Wide Web. This service is currently live on bitcoin and Ethereum's testnet and mainnet. What makes Oraclize so special is that you don't need to trust it because it provides proof of authenticity of all data it provides to smart contracts.
In this chapter, our aim is to learn how Ethereum smart contracts can use the Oraclize service to fetch data from the World Wide Web.
Let's look at the process by which an Ethereum smart contract can fetch data from other blockchains and the World Wide Web using Oraclize.
To fetch data that exists outside of the Ethereum blockchain, an Ethereum smart contract needs to send a query to Oraclize, mentioning the data source (representing where to fetch the data from) and the input for the data source (representing what to fetch).
Sending a query to Oraclize Oraclize means sending a contract call (that is, an internal transaction) to the Oraclize contract present in the Ethereum blockchain.
The Oraclize server keeps looking for new incoming queries to its smart contract. Whenever it sees a new query, it fetches the result and sends it back to your contract by calling the _callback method of your contract.
Here is a list of sources from which Oraclize lets smart contracts fetch data:
These data sources are available at the time of writing this book. But many more data sources are likely to be available in the future.
Although Oraclize is a trusted service, you may still want to check whether the data returned by Oraclize is authentic or not, that is, whether it was manipulated by Oraclize or someone else in transit.
Optionally, Oraclize provides the TLSNotary proof of result that's returned from the URL, blockchain, and nested and computation data sources. This proof is not available for WolframAlpha and IPFS data sources. Currently, Oraclize only supports the TLSNotary proof, but in the future, they may support some other ways to authenticate. Currently, the TLSNotary proof needs to be validated manually, but Oraclize is already working on on-chain proof verification; that is, your smart contract code can verify the TLSNotary proof on its own while receiving the data from Oraclize so that this data is discarded if the proof turns out to be invalid.
This tool (https://github.com/Oraclize/proof-verification-tool) is an open source tool provided by Oraclize to validate the TLSNotary proof in case you want to.
Let's look at a high-level overview of how TLSNotary works. To understand how TLSNotary works, you need to first understand how TLS works. The TLS protocol provides a way for the client and server to create an encrypted session so that no one else can read or manipulate what is transferred between the client and server. The server first sends its certificate (issued to the domain owner by a trusted CA) to the client. The certificate will contain the public key of the server. The client uses the CA's public key to decrypt the certificate so that it can verify that the certificate is actually issued by the CA and get the server's public key. Then, the client generates a symmetric encryption key and a MAC key and encrypts them using the server's public key and sends it to the server. The server can only decrypt this message as it has the private key to decrypt it. Now the client and server share the same symmetric and MAC keys and no one else knows about these keys and they can start sending and receiving data from each other. The symmetric key is used to encrypt and decrypt the data where the MAC key and the symmetric key together are used to generate a signature for the encrypted message so that in case the message is modified by an attacker, the other party can know about it.
TLSNotary is a modification of TLS, which is used by Oraclize to provide cryptography proof showing that the data they provided to your smart contract was really the one the data source gave to Oraclize at a specific time. Actually, the TLSNotary protocol is an open source technology, developed and used by the PageSigner project.
TLSNotary works by splitting the symmetric key and the MAC key among three parties, that is, the server, an auditee, and an auditor. The basic idea of TLSNotary is that the auditee can prove to the auditor that a particular result was returned by the server at a given time.
So here is an overview of how exactly TLSNotary lets us achieve this. The auditor calculates the symmetric key and MAC key and gives only the symmetric key to the auditee. The MAC key is not needed by the auditee as the MAC signature check ensures that the TLS data from the server was not modified in transit. With the symmetric encryption key, the auditee can now decrypt data from the server. Because all messages are "signed" by the bank using the MAC key and only the server and the auditor know the MAC key, a correct MAC signature can serve as proof that certain messages came from the bank and were not spoofed by the auditee.
In the case of the Oraclize service, Oraclize is the auditee, while a locked-down AWS instance of a specially designed, open source Amazon machine image acts as the auditor.
The proof data they provide are the signed attestations of this AWS instance that a proper TLSnotary proof did occur. They also provide some additional proof regarding the software running in the AWS instance, that is, whether it has been modified since being initialized.
The first Oraclize query call coming from any Ethereum address is completely free of charge. Oraclize calls are free when used on testnets! This works for moderate usage in test environments only.
From the second call onward, you have to pay in ether for queries. While sending a query to Oraclize (that is, while making an internal transaction call), a fee is deducted by transferring ether from the calling contract to the Oraclize contract. The amount of ether to deduct depends on the data source and proof type.
Here is a table that shows the number of ether that is deducted while sending a query:
| Data source | Without proof | With TLSNotary proof |
| URL | $0.01 | $0.05 |
| Blockchain | $0.01 | $0.05 |
| WolframAlpha | $0.03 | $0.03 |
| IPFS | $0.01 | $0.01 |
So if you are making an HTTP request and you want the TLSNotary proof too, then the calling contract must have an ether worth of $0.05; otherwise, an exception is thrown.
For a contract to use the Oraclize service, it needs to inherit the usingOraclize contract. You can find this contract at https://github.com/Oraclize/Ethereum-api.
The usingOraclize contract acts as the proxy for the OraclizeI and OraclizeAddrResolverI contracts. Actually, usingOraclize makes it easy to make calls to the OraclizeI and OraclizeAddrResolverI contracts, that is, it provides simpler APIs. You can also directly make calls to the OraclizeI and OraclizeAddrResolverI contracts if you feel comfortable. You can go through the source code of these contracts to find all the available APIs. We will only learn the most necessary ones.
Let's look at how to set proof type, set proof storage location, make queries, find the cost of a query, and so on.
Whether you need the TLSNotary proof from Oraclize or not, you have to specify the proof type and proof storage location before making queries.
If you don't want proof, then put this code in your contract:
oraclize_setProof(proofType_NONE)
And if you want proof, then put this code in your contract:
oraclize_setProof(proofType_TLSNotary | proofStorage_IPFS)
Currently, proofStorage_IPFS is the only proof storage location available; that is, TLSNotary proof is only stored in IPFS.
You may execute any of these methods just once, for instance, in the constructor or at any other time if, for instance, you need the proof for certain queries only.
To send a query to Oraclize, you will need to call the oraclize_query function. This function expects at least two arguments, that is, the data source and the input for the given data source. The data source argument is not case-sensitive.
Here are some basic examples of the oraclize_query function:
oraclize_query("WolframAlpha", "random number between 0 and 100");

oraclize_query("URL", "https://api.kraken.com/0/public/Ticker?pair=ETHXBT");

oraclize_query("IPFS", "QmdEJwJG1T9rzHvBD8i69HHuJaRgXRKEQCP7Bh1BVttZbU");

oraclize_query("URL", "https://xyz.io/makePayment", '{"currency": "USD", "amount": "1"}');
Here is how the preceding code works:
If you want Oraclize to execute your query at a scheduled future time, just specify the delay (in seconds) from the current time as the first argument.
Here is an example:
oraclize_query(60, "WolframAlpha", "random number between 0 and 100");
The preceding query will be executed by Oraclize 60 seconds after it's been seen. So if the first argument is a number, then it's assumed that we are scheduling a query.
The transaction originating from Oraclize to your __callback function costs gas, just like any other transaction. You need to pay Oraclize the gas cost. The ether oraclize_query charges to make a query are also used to provide gas while calling the __callback function. By default, Oraclize provides 200,000 gas while calling the __callback function.
This return gas cost is actually in your control since you write the code in the __callback method and as such, can estimate it. So, when placing a query with Oraclize, you can also specify how much the gasLimit should be on the __callback transaction. Note, however, that since Oraclize sends the transaction, any unspent gas is returned to Oraclize, not you.
If the default, and minimum, value of 200,000 gas is not enough, you can increase it by specifying a different gasLimit in this way:
oraclize_query("WolframAlpha", "random number between 0 and 100", 500000);
Here, you can see that if the last argument is a number, then it's assumed to be the custom gas. In the preceding code, Oraclize will use a 500k gasLimit for the callback transaction instead of 200k. Because we are asking Oraclize to provide more gas, Oraclize will deduct more ether (depending on how much gas is required) while calling oraclize_query.
Once your result is ready, Oraclize will send a transaction back to your contract address and invoke one of these three methods:
Here is an example of the __callback function:
function __callback(bytes32 myid, string result) {
    if (msg.sender != oraclize_cbAddress()) throw; // just to be sure the calling address is the Oraclize authorized one

    //now doing something with the result..
}
The result returned from an HTTP request can be HTML, JSON, XML, binary, and so on. In Solidity, it is difficult and expensive to parse the result. Due to this, Oraclize provides parsing helpers to let it handle the parsing on its servers, and you get only the part of the result that you need.
To ask Oraclize to parse the result, you need to wrap the URL with one of these parsing helpers:
If you would like to know how much a query would cost before making the actual query, then you can use the Oraclize.getPrice() function to get the amount of wei required. The first argument it takes is the data source, and the second argument is optional, which is the custom gas.
One popular use case of this is to notify the client to add ether to the contract if there isn't enough to make the query.
Sometimes, you may not want to reveal the data source and/or the input for the data source. For example, you may not want to reveal the API key in the URL if there is any. Therefore, Oraclize provides a way to store queries encrypted in the smart contract and only Oraclize's server has the key to decrypt it.
Oraclize provides a Python tool (https://github.com/Oraclize/encrypted-queries), which can be used to encrypt the data source and/or the data input. It generates a non-deterministic encrypted string.
The CLI command to encrypt an arbitrary string of text is as follows:
python encrypted_queries_tools.py -e -p 044992e9473b7d90ca54d2886c7addd14a61109af202f1c95e218b0c99eb060c7134c4ae46345d0383ac996185762f04997d6fd6c393c86e4325c469741e64eca9 "YOUR DATASOURCE or INPUT"
The long hexadecimal string you see is the public key of Oraclize's server. Now you can use the output of the preceding command in place of the data source and/or the input for the data source.
There is another data source called decrypt. It is used to decrypt an encrypted string. But this data source doesn't return any result; otherwise, anyone would have the ability to decrypt the data source and input for the data source.
It was specifically designed to be used within the nested data source to enable partial query encryption. It is its only use case.
Oraclize provides a web IDE, using which you can write, compile, and test Oraclize-based applications. You can find it at http://dapps.Oraclize.it/browser-Solidity/.
If you visit the link, then you will notice that it looks exactly the same as browser Solidity. And it's actually browser Solidity with one extra feature. To understand what that feature is, we need to understand browser Solidity more in-depth.
Browser Solidity not only lets us write, compile, and generate web3.js code for our contracts, but it also lets us test those contracts there itself. Until now, in order to test our contract, we were setting up an Ethereum node and sending transactions to it. But browser Solidity can execute contracts without connecting to any node and everything happens in memory. It achieves this using ethereumjs-vm, which is a JavaScript implementation of EVM. Using ethereumjs-vm, you can create our own EVM and run byte code. If we want, we can configure browser Solidity to use the Ethereum node by providing the URL to connect to. The UI is very informative; therefore, you can try all these by yourself.
What's special about the Oraclize web IDE is that it deploys the Oraclize contract in the in-memory execution environment so that you don't have to connect to the testnet or mainnet node, but if you use browser Solidity, then you have to connect to the testnet or mainnet node to test Oraclize APIs.
Working with strings in Solidity is not as easy as working with strings in other high-level programming languages, such as JavaScript, Python, and so on. Therefore, many Solidity programmers have come up with various libraries and contracts to make it easy to work with strings.
The strings library is the most popular strings utility library. It lets us join, concatenate, split, compare, and so on by converting a string to something called a slice. A slice is a struct that holds the length of the string and the address of the string. Since a slice only has to specify an offset and a length, copying and manipulating slices is a lot less expensive than copying and manipulating the strings they reference.
To further reduce gas costs, most functions on slice that need to return a slice modify the original one instead of allocating a new one; for instance, s.split(".") will return the text up to the first ".", modifying s to only contain the remainder of the string after the ".". In situations where you do not want to modify the original slice, you can make a copy with .copy(), for example, s.copy().split("."). Try and avoid using this idiom in loops; since Solidity has no memory management, it will result in allocating many short-lived slices that are later discarded.
Functions that have to copy string data will return strings rather than slices; these can be cast back to slices for further processing if required.
Let's look at a few examples of working with strings using the strings library:
pragma Solidity ^0.4.0;

import "github.com/Arachnid/Solidity-stringutils/strings.sol";

contract Contract
{
    using strings for *;

    function Contract()
    {
        //convert string to slice
        var slice = "xyz abc".toSlice();

        //length of string
        var length = slice.len();

        //split a string
        //subslice = xyz
        //slice = abc
        var subslice = slice.split(" ".toSlice());

        //split a string into an array
        var s = "www.google.com".toSlice();
        var delim = ".".toSlice();
        var parts = new string[](s.count(delim));
        for(uint i = 0; i < parts.length; i++) {
            parts[i] = s.split(delim).toString();
        }

        //Converting a slice back to a string
        var myString = slice.toString();

        //Concatenating strings
        var finalSlice = subslice.concat(slice);

        //check if two strings are equal
        if(slice.equals(subslice))
        {

        }
    }
}
The preceding code is self-explanatory.
Functions that return two slices come in two versions: a nonallocating version that takes the second slice as an argument, modifying it in place, and an allocating version that allocates and returns the second slice; for example, let's take a look at the following:
var slice1 = "abc".toSlice();

//moves the string pointer of slice1 to point to the next rune (letter)
//and returns a slice containing only the first rune
var slice2 = slice1.nextRune();

var slice3 = "abc".toSlice();
var slice4 = "".toSlice();

//Extracts the first rune from slice3 into slice4, advancing the slice to point to the next rune and returns slice4.
var slice5 = slice3.nextRune(slice4);
In our betting application, two people can choose to bet on a football match with one person supporting the home team and the other person supporting the away team. They both should bet the same amount of money, and the winner takes all the money. If the match is a draw, then they both will take back their money.
We will use the FastestLiveScores API to find out the result of matches. It provides a free API, which lets us make 100 requests per hour for free. First, go ahead and create an account and then generate an API key. To create an account, visit https://customer.fastestlivescores.com/register, and once the account is created, you will have the API key visible at https://customer.fastestlivescores.com/. You can find the API documentation at https://docs.crowdscores.com/.
For every bet between two people in our application, a betting contract will be deployed. The contract will contain the match ID retrieved from the FastestLiveScores API, the amount of wei each of the parties need to invest, and the addresses of the parties. Once both parties have invested in the contract, they will find out the result of the match. If the match is not yet finished, then they will try to check the result after every 24 hours.
Here is the code for the contract:
pragma Solidity ^0.4.0;

import "github.com/Oraclize/Ethereum-api/oraclizeAPI.sol";
import "github.com/Arachnid/Solidity-stringutils/strings.sol";

contract Betting is usingOraclize
{
    using strings for *;

    string public matchId;
    uint public amount;
    string public url;

    address public homeBet;
    address public awayBet;

    function Betting(string _matchId, uint _amount, string _url)
    {
        matchId = _matchId;
        amount = _amount;
        url = _url;

        oraclize_setProof(proofType_TLSNotary | proofStorage_IPFS);
    }

    //1 indicates home team
    //2 indicates away team
    function betOnTeam(uint team) payable
    {

        if(team == 1)
        {
            if(homeBet == 0)
            {
                if(msg.value == amount)
                {
                    homeBet = msg.sender;
                    if(homeBet != 0 && awayBet != 0)
                    {
                        oraclize_query("URL", url);
                    }
                }
                else
                {
                    throw;
                }
            }
            else
            {
                throw;
            }
        }
        else if(team == 2)
        {
            if(awayBet == 0)
            {
                if(msg.value == amount)
                {
                    awayBet = msg.sender;

                    if(homeBet != 0 && awayBet != 0)
                    {
                        oraclize_query("URL", url);
                    }
                }
                else
                {
                    throw;
                }
            }
            else
            {
                throw;
            }
        }
        else
        {
            throw;
        }
    }

    function __callback(bytes32 myid, string result, bytes proof) {
        if (msg.sender != oraclize_cbAddress())
        {
            throw;
        }
        else
        {
            if(result.toSlice().equals("home".toSlice()))
            {
                homeBet.send(this.balance);
            }
            else if(result.toSlice().equals("away".toSlice()))
            {
                awayBet.send(this.balance);
            }
            else if(result.toSlice().equals("draw".toSlice()))
            {
                homeBet.send(this.balance / 2);
                awayBet.send(this.balance / 2);
            }
            else
            {
                if (Oraclize.getPrice("URL") < this.balance)
                {
                    oraclize_query(86400, "URL", url);
                }
            }
        }
    }
}
The contract code is self-explanatory. Now compile the preceding code using solc.js or browser Solidity depending on whatever you are comfortable with. You will not need to link the strings library because all the functions in it are set to the internal visibility.
To make it easy to find match's IDs, deploy, and invest in contracts, we need to build a UI client. So let's get started with building a client, which will have two paths, that is, the home path to deploy contracts and bet on matches and the other path to find the list of matches. We will let users deploy and bet using their own offline accounts so that the entire process of betting happens in a decentralized manner and nobody can cheat.
Before we start building our client, make sure that you have testnet synced because Oraclize works only on Ethereum's testnet/mainnet and not on private networks. You can switch to testnet and start downloading the testnet blockchain by replacing the --dev option with the --testnet option. For example, take a look at the following:
geth --testnet --rpc --rpccorsdomain "*" --rpcaddr "0.0.0.0" --rpcport "8545"
In the exercise files of this chapter, you will find two directories, that is, Final and Initial. Final contains the final source code of the project, whereas Initial contains the empty source code files and libraries to get started with building the application quickly.
In the Initial directory, you will find a public directory and two files named app.js and package.json. The package.json file contains the backend dependencies of our app, and app.js is where you will place the backend source code.
The public directory contains files related to the frontend. Inside public/css, you will find bootstrap.min.css, which is the bootstrap library. Inside public/html, you will find the index.html and matches.ejs files, where you will place the HTML code of our app, and in the public/js directory, you will find js files for web3.js, and ethereumjs-tx. Inside public/js, you will also find a main.js file, where you will place the frontend JS code of our app. You will also find the Oraclize Python tool to encrypt queries.
Let's first build the backend of the app. First of all, run npm install inside the Initial directory to install the required dependencies for our backend.
Here is the backend code to run an express service and serve the index.html file and static files and set the view engine:
var express = require("express");
var app = express();

app.set("view engine", "ejs");

app.use(express.static("public"));

app.listen(8080);

app.get("/", function(req, res) {
    res.sendFile(__dirname + "/public/html/index.html");
})
The preceding code is self-explanatory. Now let's proceed further. Our app will have another page, which will display a list of recent matches with matches' IDs and result if a match has finished. Here is the code for the endpoint:
var request = require("request");
var moment = require("moment");

app.get("/matches", function(req, res) {
    request("https://api.crowdscores.com/v1/matches?api_key=7b7a988932de4eaab4ed1b4dcdc1a82a", function(error, response, body) {
        if (!error && response.statusCode == 200) {
            body = JSON.parse(body);

            for (var i = 0; i < body.length; i++) {
             body[i].start = moment.unix(body[i].start /
               1000).format("YYYY MMM DD hh:mm:ss");
            }

            res.render(__dirname + "/public/html/matches.ejs", {
                matches: body
            });
        } else {
            res.send("An error occured");
        }
    })
})
Here, we are making the API request to fetch the list of recent matches and then we are passing the result to the matches.ejs file so that it can render the result in a user-friendly UI. The API results give us the match start time as a timestamp; therefore, we are using moment to convert it to a human readable format. We make this request from the backend and not from the frontend so that we don't expose the API key to the users.
Our backend will provide an API to the frontend, using which the frontend can encrypt the query before deploying the contract. Our application will not prompt users to create an API key, as it would be a bad UX practice. The application's developer controlling the API key will cause no harm as the developer cannot modify the result from the API servers; therefore, users will still trust the app even after the application's developer knows the API key.
Here is code for the encryption endpoint:
var PythonShell = require("python-shell");

app.get("/getURL", function(req, res) {
    var matchId = req.query.matchId;

    var options = {
        args: ["-e", "-p", "044992e9473b7d90ca54d2886c7addd14a61109af202f1c95e218b0c99eb060c7134c4ae46345d0383ac996185762f04997d6fd6c393c86e4325c469741e64eca9", "json(https://api.crowdscores.com/v1/matches/" + matchId + "?api_key=7b7a988932de4eaab4ed1b4dcdc1a82a).outcome.winner"],
        scriptPath: __dirname
    };

    PythonShell.run("encrypted_queries_tools.py", options, function
      (err, results) {
        if(err)
        {
            res.send("An error occured");
        }
        else
        {
            res.send(results[0]);
        }
    });
})
We have already seen how to use this tool. To run this endpoint successfully, make sure that Python is installed on your system. Even if Python is installed, this endpoint may show errors, indicating that Python's cryptography and base58 modules aren't installed. So make sure you install these modules if the tool prompts you to.
Now let's build the frontend of our application. Our frontend will let users see the list of recent matches, deploy the betting contract, bet on a game, and let them see information about a betting contract.
Let's first implement the matches.ejs file, which will display the list of recent matches. Here is the code for this:
<!DOCTYPE html>
<html lang="en">
    <head>
         <meta charset="utf-8">
         <meta name="viewport" content="width=device-width, initial-scale=1, shrink-to-fit=no">
         <meta http-equiv="x-ua-compatible" content="ie=edge">
         <link rel="stylesheet" href="/css/bootstrap.min.css">
     </head>
     <body>
         <div class="container">
             <br>
             <div class="row m-t-1">
                 <div class="col-md-12">
                     <a href="/">Home</a>
                 </div>
             </div>
             <br>
             <div class="row">
                 <div class="col-md-12">
                     <table class="table table-inverse">
                           <thead>
                             <tr>
                                 <th>Match ID</th>
                                 <th>Start Time</th>
                                 <th>Home Team</th>
                                 <th>Away Team</th>
                                 <th>Winner</th>
                             </tr>
                           </thead>
                           <tbody>
                               <% for(var i=0; i < matches.length; i++) { %>
                                   <tr>
                                       <td><%= matches[i].dbid %></td>
                                       <% if (matches[i].start) { %>
                                        <td><%= matches[i].start %></td>
                                     <% } else { %>
                                         <td>Time not finalized</td>
                                     <% } %>
                                       <td><%= matches[i].homeTeam.name %></td>
                                       <td><%= matches[i].awayTeam.name %></td>
                                       <% if (matches[i].outcome) { %>
                                        <td><%= matches[i].outcome.winner %></td>
                                     <% } else { %>
                                         <td>Match not finished</td>
                                     <% } %>
                                 </tr>
                             <% } %>
                           </tbody>
                     </table>
                 </div>
             </div>
         </div>
     </body>
 </html>
The preceding code is self-explanatory. Now let's write the HTML code for our home page. Our homepage will display three forms. The first form is to deploy a betting contract, the second form is to invest in a betting contract, and the third form is to display information on a deployed betting contract.
Here is the HTML code for the home page. Place this code in the index.html page:
<!DOCTYPE html>
 <html lang="en">
     <head>
         <meta charset="utf-8">
         <meta name="viewport" content="width=device-width, initial-scale=1, shrink-to-fit=no">
         <meta http-equiv="x-ua-compatible" content="ie=edge">
         <link rel="stylesheet" href="/css/bootstrap.min.css">
     </head>
     <body>
         <div class="container">
             <br>
             <div class="row m-t-1">
                 <div class="col-md-12">
                     <a href="/matches">Matches</a>
                 </div>
             </div>
             <br>
             <div class="row">
                 <div class="col-md-4">
                     <h3>Deploy betting contract</h3>
                     <form id="deploy">
                         <div class="form-group">
                             <label>From address: </label>
                             <input type="text" class="form-control" id="fromAddress">
                         </div>
                         <div class="form-group">
                             <label>Private Key: </label>
                             <input type="text" class="form-control" id="privateKey">
                         </div>
                         <div class="form-group">
                             <label>Match ID: </label>
                             <input type="text" class="form-control" id="matchId">
                         </div>
                         <div class="form-group">
                             <label>Bet Amount (in ether): </label>
                             <input type="text" class="form-control" id="betAmount">
                         </div>
                         <p id="message" style="word-wrap: break-word"></p>
                         <input type="submit" value="Deploy" class="btn btn-primary" />
                     </form>
                 </div>
                 <div class="col-md-4">
                     <h3>Bet on a contract</h3>
                     <form id="bet">
                         <div class="form-group">
                             <label>From address: </label>
                             <input type="text" class="form-control" id="fromAddress">
                         </div>
                         <div class="form-group">
                             <label>Private Key: </label>
                             <input type="text" class="form-control" id="privateKey">
                         </div>
                         <div class="form-group">
                             <label>Contract Address: </label>
                             <input type="text" class="form-control"
id="contractAddress">
                         </div>
                         <div class="form-group">
                             <label>Team: </label>
                             <select class="form-control" id="team">
                                 <option>Home</option>
                                 <option>Away</option>
                             </select>
                         </div>
                         <p id="message" style="word-wrap: break-word"></p>
                         <input type="submit" value="Bet" class="btn btn-primary" />
                     </form>
                 </div>
                 <div class="col-md-4">
                     <h3>Display betting contract</h3>
                     <form id="find">
                         <div class="form-group">
                             <label>Contract Address: </label>
                             <input type="text" class="form-control"
 d="contractAddress">
                         </div>
                         <p id="message"></p>
                         <input type="submit" value="Find" class="btn btn-primary" />
                     </form>
                 </div>
             </div>
         </div>

         <script type="text/javascript" src="/js/web3.min.js"></script>
         <script type="text/javascript" src="/js/ethereumjs-tx.js"></script>
         <script type="text/javascript" src="/js/main.js"></script>
     </body>
</html>
The preceding code is self-explanatory. Now let's write JavaScript code to actually deploy the contract, invest in contracts, and display information on contracts. Here is the code for all this. Place this code in the main.js file:
var bettingContractByteCode = "6060604...";
var bettingContractABI = [{"constant":false,"inputs":[{"name":"team","type":"uint256"}],"name":"betOnTeam","outputs":[],"payable":true,"type":"function"},{"constant":false,"inputs":[{"name":"myid","type":"bytes32"},{"name":"result","type":"string"}],"name":"__callback","outputs":[],"payable":false,"type":"function"},{"constant":false,"inputs":[{"name":"myid","type":"bytes32"},{"name":"result","type":"string"},{"name":"proof","type":"bytes"}],"name":"__callback","outputs":[],"payable":false,"type":"function"},{"constant":true,"inputs":[],"name":"url","outputs":[{"name":"","type":"string"}],"payable":false,"type":"function"},{"constant":true,"inputs":[],"name":"matchId","outputs":[{"name":"","type":"string"}],"payable":false,"type":"function"},{"constant":true,"inputs":[],"name":"amount","outputs":[{"name":"","type":"uint256"}],"payable":false,"type":"function"},{"constant":true,"inputs":[],"name":"homeBet","outputs":[{"name":"","type":"address"}],"payable":false,"type":"function"},{"constant":true,"inputs":[],"name":"awayBet","outputs":[{"name":"","type":"address"}],"payable":false,"type":"function"},{"inputs":[{"name":"_matchId","type":"string"},{"name":"_amount","type":"uint256"},{"name":"_url","type":"string"}],"payable":false,"type":"constructor"}];

var web3 = new Web3(new Web3.providers.HttpProvider("http://localhost:8545"));

function getAJAXObject()
{
   var request;
   if (window.XMLHttpRequest) {
       request = new XMLHttpRequest();
   } else if (window.ActiveXObject) {
       try {
           request = new ActiveXObject("Msxml2.XMLHTTP");
       } catch (e) {
           try {
               request = new ActiveXObject("Microsoft.XMLHTTP");
           } catch (e) {}
       }
   }

   return request;
}

document.getElementById("deploy").addEventListener("submit", function(e){
   e.preventDefault();

   var fromAddress = document.querySelector("#deploy #fromAddress").value;
   var privateKey = document.querySelector("#deploy #privateKey").value;
   var matchId = document.querySelector("#deploy #matchId").value;
   var betAmount = document.querySelector("#deploy #betAmount").value;

   var url = "/getURL?matchId=" + matchId;

   var request = getAJAXObject();

   request.open("GET", url);

   request.onreadystatechange = function() {
       if (request.readyState == 4) {
           if (request.status == 200) {
               if(request.responseText != "An error occured")
               {
           var queryURL = request.responseText;

           var contract = web3.eth.contract(bettingContractABI);
           var data = contract.new.getData(matchId,
             web3.toWei(betAmount, "ether"), queryURL, {
               data: bettingContractByteCode
                });

           var gasRequired = web3.eth.estimateGas({ data: "0x" + data
             });

      web3.eth.getTransactionCount(fromAddress, function(error, nonce){

       var rawTx = {
            gasPrice: web3.toHex(web3.eth.gasPrice),
             gasLimit: web3.toHex(gasRequired),
              from: fromAddress,
               nonce: web3.toHex(nonce),
                data: "0x" + data,
                 };

      privateKey = EthJS.Util.toBuffer(privateKey, "hex");

       var tx = new EthJS.Tx(rawTx);
       tx.sign(privateKey);

      web3.eth.sendRawTransaction("0x" +
       tx.serialize().toString("hex"), function(err, hash) {
            if(!err)
                {document.querySelector("#deploy #message").
                   innerHTML = "Transaction Hash: " + hash + ".
                     Transaction is mining...";

            var timer = window.setInterval(function(){
            web3.eth.getTransactionReceipt(hash, function(err, result){
            if(result)
             {window.clearInterval(timer);
       document.querySelector("#deploy #message").innerHTML =
         "Transaction Hash: " + hash + " and contract address is: " +
             result.contractAddress;}
               })
                }, 10000)
                 }
             else
           {document.querySelector("#deploy #message").innerHTML = err;
             }
           });
          })

          }
           }
       }
   };

   request.send(null);

}, false)

document.getElementById("bet").addEventListener("submit", function(e){
   e.preventDefault();

   var fromAddress = document.querySelector("#bet #fromAddress").value;
   var privateKey = document.querySelector("#bet #privateKey").value;
   var contractAddress = document.querySelector("#bet #contractAddress").value;
   var team = document.querySelector("#bet #team").value;

   if(team == "Home")
   {
         team = 1;
   }
   else
   {
         team = 2;
   }

   var contract = web3.eth.contract(bettingContractABI).at(contractAddress);
   var amount = contract.amount();

   var data = contract.betOnTeam.getData(team);

   var gasRequired = contract.betOnTeam.estimateGas(team, {
         from: fromAddress,
         value: amount,
         to: contractAddress
   })

   web3.eth.getTransactionCount(fromAddress, function(error, nonce){

         var rawTx = {
           gasPrice: web3.toHex(web3.eth.gasPrice),
           gasLimit: web3.toHex(gasRequired),
           from: fromAddress,
           nonce: web3.toHex(nonce),
           data: data,
           to: contractAddress,
           value: web3.toHex(amount)
       };

       privateKey = EthJS.Util.toBuffer(privateKey, "hex");

       var tx = new EthJS.Tx(rawTx);
         tx.sign(privateKey);

         web3.eth.sendRawTransaction("0x" + tx.serialize().toString("hex"), function(err, hash) {
               if(!err)
               {
    document.querySelector("#bet #message").innerHTML = "Transaction
      Hash: " + hash;
        }
      else
       {
       document.querySelector("#bet #message").innerHTML = err;
      }
     })
   })
    }, false)

document.getElementById("find").addEventListener("submit", function(e){
   e.preventDefault();

   var contractAddress = document.querySelector("#find
     #contractAddress").value;
   var contract =
      web3.eth.contract(bettingContractABI).at(contractAddress);

   var matchId = contract.matchId();
   var amount = contract.amount();
   var homeAddress = contract.homeBet();
   var awayAddress = contract.awayBet();

   document.querySelector("#find #message").innerHTML = "Contract balance is: " + web3.fromWei(web3.eth.getBalance(contractAddress), "ether") + ", Match ID is: " + matchId + ", bet amount is: " + web3.fromWei(amount, "ether") + " ETH, " + homeAddress + " has placed bet on home team and " + awayAddress + " has placed bet on away team";
}, false)
This is how the preceding code works:
Now that we have finished building our betting platform, it's time to test it. Before testing, make sure the testnet blockchain is completely downloaded and is looking for new incoming blocks.
Now using our wallet service we built earlier, generate three accounts. Add one ether to each of the accounts using http://faucet.ropsten.be:3001/.
Then, run node app.js inside the Initial directory and then visit http://localhost:8080/matches, and you will see what is shown in this screenshot:
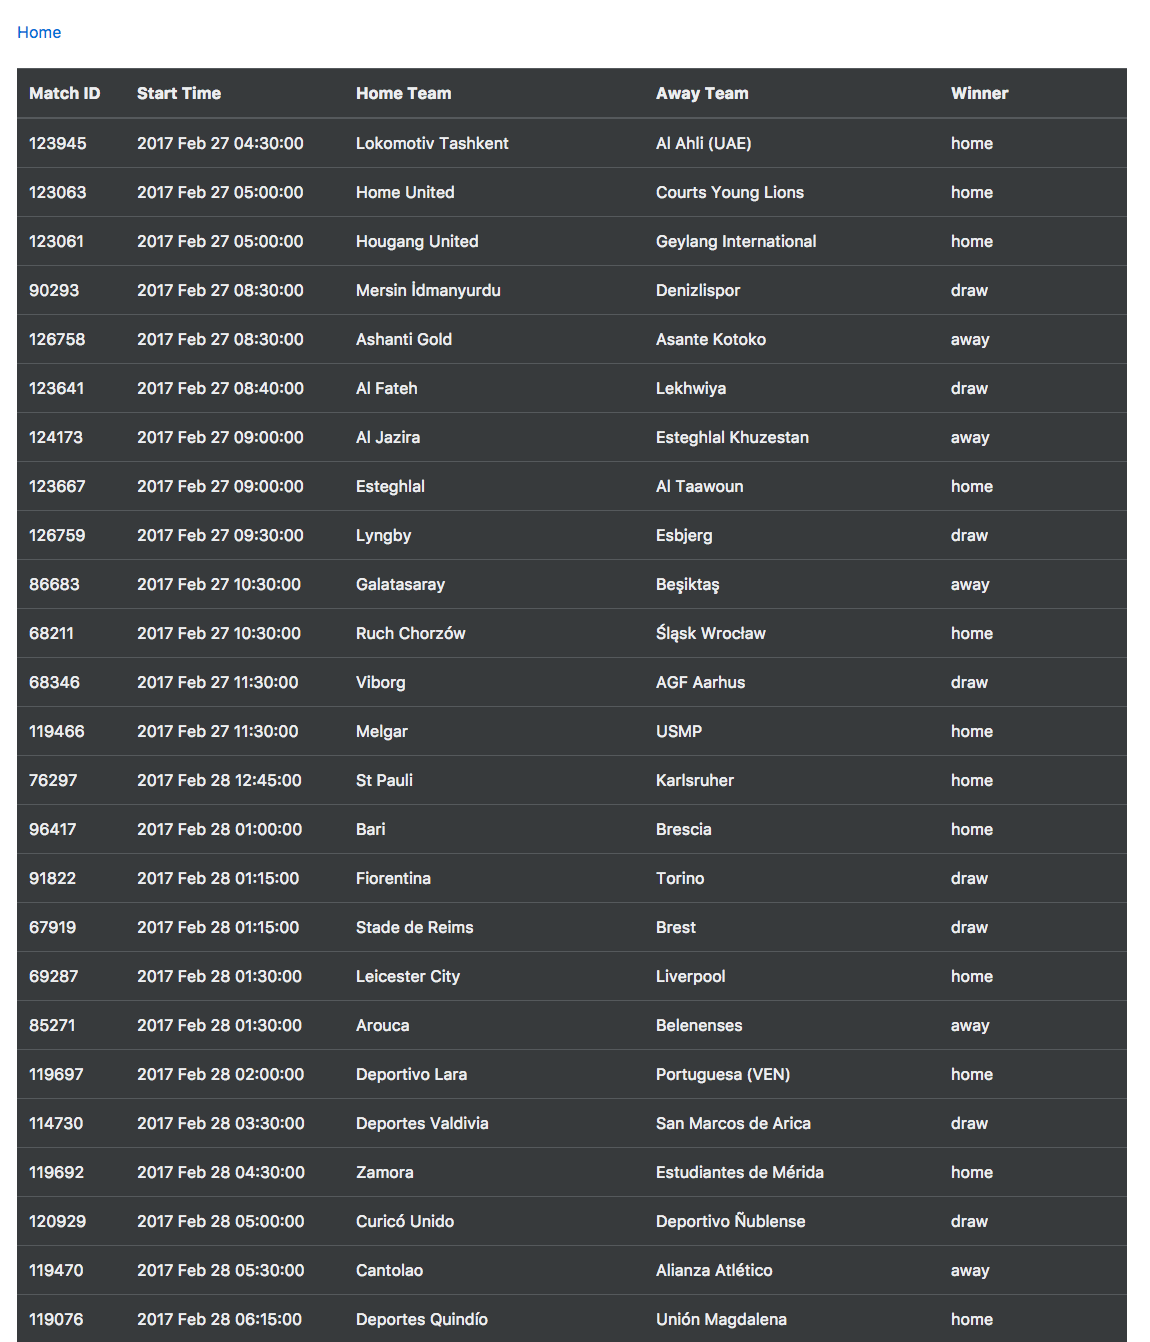
Here, you can copy any match ID. Let's assume you want to test with the first match, that is, 123945. Now visit http://localhost:8080 and you will see what is shown in this screenshot:
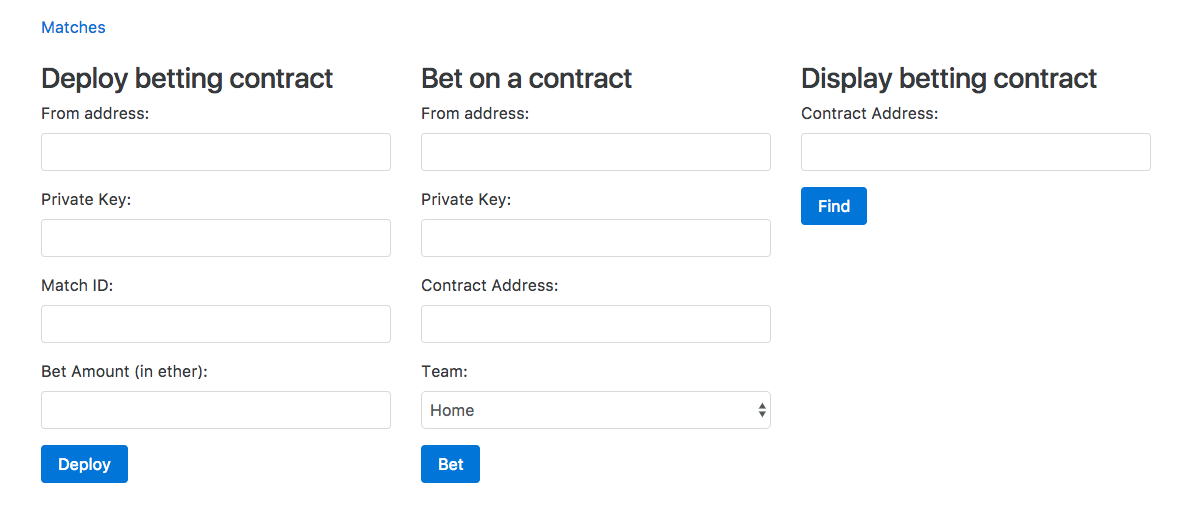
Now deploy the contract by filling the input fields in the first form and clicking on the Deploy button, as shown here. Use your first account to deploy the contract.
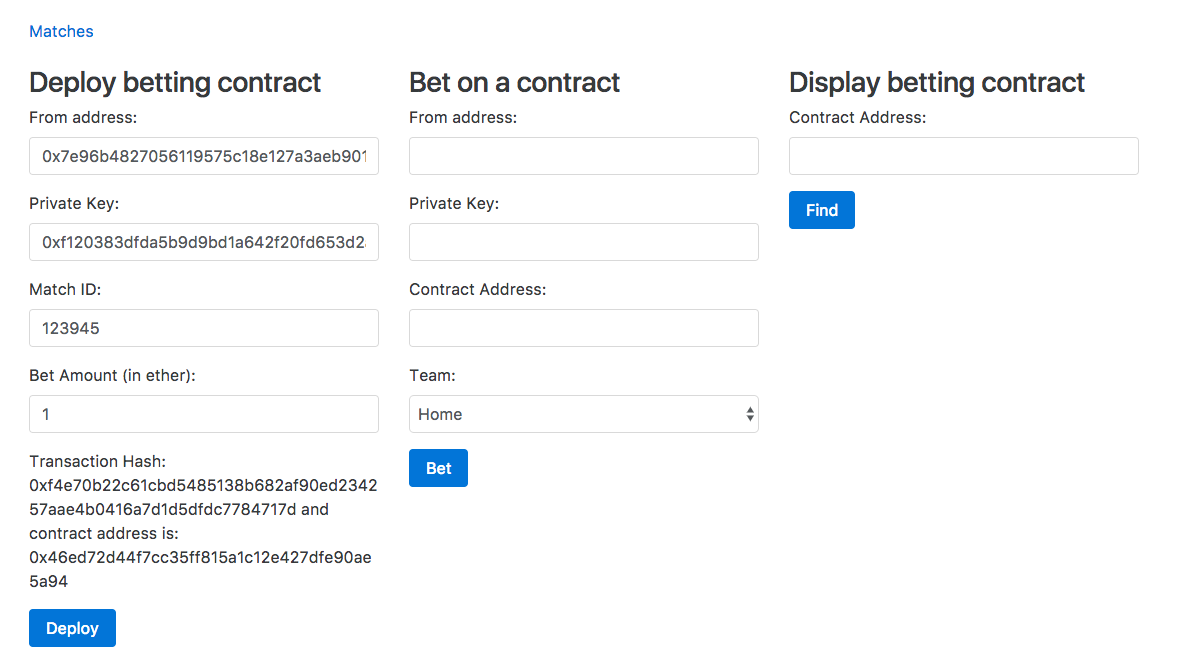
Now bet on the contract's home team from the second account and the away team from the third account, as shown in the following screenshot:
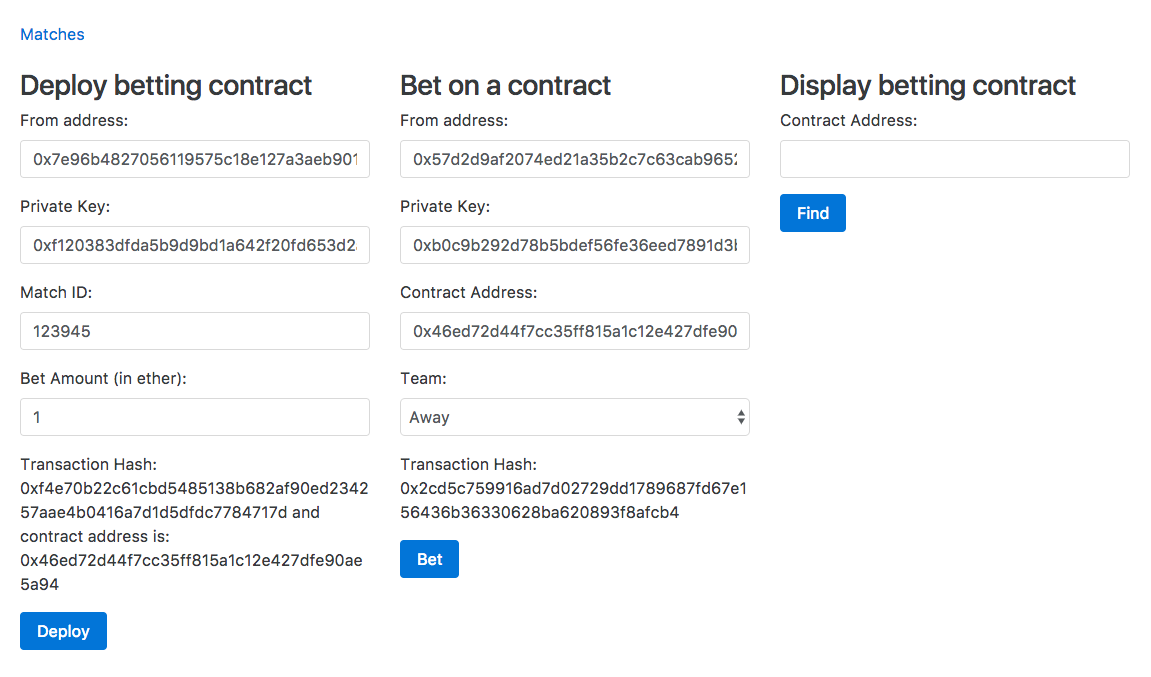
Now put the contract address on the third form and click on the Find button to see the details about the contract. You will see something similar to what is shown in the following screenshot:
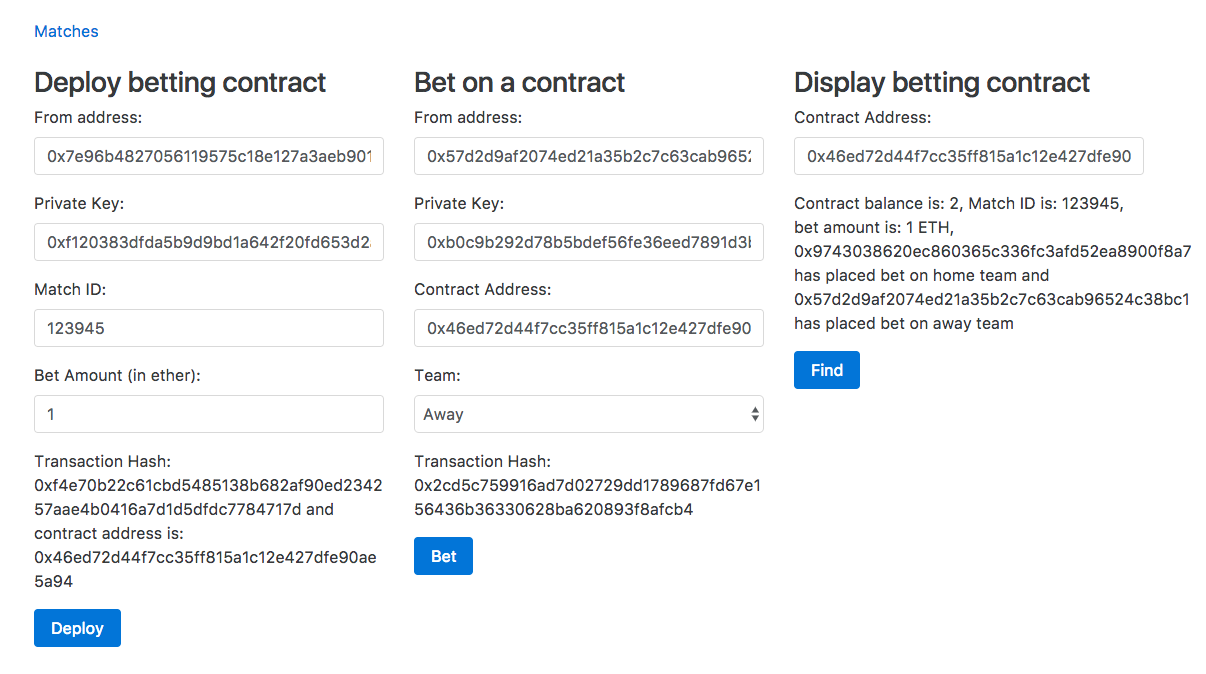
Once both the transactions are mined, check the details of the contract again, and you will see something similar to what is shown in the following screenshot:

Here, you can see that the contract doesn't have any ether and all the ether was transferred to the account that put the bet on the home team.
In this chapter, we learned about Oraclize and the strings library in depth. We used them together to build a decentralized betting platform. Now you can go ahead and customize the contract and the client based on your requirements. To enhance the app, you can add events to the contract and display notifications on the client. The objective was to understand the basic architecture of a decentralized betting app.
In the next chapter, we will learn how to build enterprise-level Ethereum smart contracts using truffle by building our own crypto currency.
Until now, we were using browser Solidity to write and compile Solidity code. And we were testing our contracts using web3.js. We could have also used the Solidity online IDE to test them. This seemed alright as we were only compiling a single small contract and it had very few imports. As you start building large and complicated smart contracts, you will start facing problems with compiling and testing using the current procedure. In this chapter, we will learn about truffle, which makes it easy to build enterprise-level DApps, by building an altcoin. All the crypto currencies other than bitcoin are called altcoins.
In this chapter, we'll cover the following topics:
ethereumjs-testrpc is a Node.js-based Ethereum node used for testing and development. It simulates full-node behavior and makes the development of Ethereum applications much faster. It also includes all popular RPC functions and features (such as events) and can be run deterministically to make development a breeze.
It's written in JavaScript and is distributed as an npm package. At the time of writing this, the latest version of ethereumjs-testrpc is 3.0.3 and requires at least Node.js version 6.9.1 to run properly.
There are three ways to simulate an Ethereum node using ethereumjs-testrpc. Each of these ways has its own use cases. Let's explore them.
The testrpc command can be used to simulate an Ethereum node. To install this command-line app, you need to install ethereumjs-testrpc globally:
npm install -g ethereumjs-testrpc
Here are the various options that can be provided:
Note that private keys are 64 characters long and must be input as a 0x-prefixed hex string. The balance can either be input as an integer or a 0x-prefixed hex value specifying the amount of wei in that account.
You can use ethereumjs-testrpc as a web3 provider like this:
var TestRPC = require("ethereumjs-testrpc");
web3.setProvider(TestRPC.provider());
You can use ethereumjs-testrpc as a general HTTP server like this:
var TestRPC = require("ethereumjs-testrpc");
var server = TestRPC.server();
server.listen(port, function(err, blockchain) {});
Both provider() and server() take a single object that allows you to specify the behavior of the ethereumjs-testrpc. This parameter is optional. The available options are as follows:
Here is the list of RPC methods made available with ethereumjs-testrpc:
There are also special nonstandard methods that aren't included within the original RPC specification:
Topics are values used for indexing events. You cannot search for events without topics. Whenever an event is invoked, a default topic is generated, which is considered the first topic of the event. There can be up to four topics for an event. Topics are always generated in the same order. You can search for an event using one or more of its topics.
The first topic is the signature of the event. The rest of the three topics are the values of indexed parameters. If the index parameter is string, bytes, or array, then the keccak-256 hash of it is the topic instead.
Let's take an example to understand topics. Suppose there is an event of this form:
event ping(string indexed a, int indexed b, uint256 indexed c, string d, int e);

//invocation of event
ping("Random String", 12, 23, "Random String", 45);
Here, these four topics are generated. They are as follows:
Internally, your Ethereum node will build indexes using topics so that you can easily find events based on signatures and indexed values.
Suppose you want to get event calls of the preceding event, where the first argument is Random String and the third argument is either 23 or 78; then, you can find them using web3.eth.getFilter this way:
var filter = web3.eth.filter({
   fromBlock: 0,
   toBlock: "latest",
   address: "0x853cdcb4af7a6995808308b08bb78a74de1ef899",
   topics: ["0xb62a11697c0f56e93f3957c088d492b505b9edd7fb6e7872a93b41cdb2020644", "0x30ee7c926ebaf578d95b278d78bc0cde445887b0638870a26dcab901ba21d3f2", null, [EthJS.Util.bufferToHex(EthJS.Util.setLengthLeft(23, 32)), EthJS.Util.bufferToHex(EthJS.Util.setLengthLeft(78, 32))]]
});

filter.get(function(error, result){
 if (!error)
   console.log(result);
});
So here, we are asking the node to return all events from the blockchain that have been fired by the 0x853cdcb4af7a6995808308b08bb78a74de1ef899 contract address, whose first topic is 0xb62a11697c0f56e93f3957c088d492b505b9edd7fb6e7872a93b41cdb2020644, the second topic is 0x30ee7c926ebaf578d95b278d78bc0cde445887b0638870a26dcab901ba21d3f2, and the third topic is either 0x0000000000000000000000000000000000000000000000000000000000000017 or 0x000000000000000000000000000000000000000000000000000000000000004e.
It is important to learn truffle-contract before learning truffle because truffle-contract is tightly integrated into truffle. Truffle tests, code to interact with contracts in truffle, deployment code, and so on are written using truffle-contract.
The truffle-contract API is a JavaScript and Node.js library, which makes it easy to work with ethereum smart contracts. Until now, we have been using web3.js to deploy and call smart contracts functions, which is fine, but truffle-contract aims to make it even easier to work with ethereum smart contracts. Here are some features of truffle-contract that make it a better choice then web3.js in order to work with smart contracts:
Before we get into truffle-contract, you need to know that it doesn't allow us to sign transactions using accounts stored outside of the ethereum node; that is, it doesn't have anything similar to sendRawTransaction. The truffle-contract API assumes that every user of your DApp has their own ethereum node running and they have their accounts stored in that node. Actually this is how DApps should work because if every DApp's client starts letting users create and manage accounts, then it will be a concern for users to manage so many accounts and painful for developers to develop a wallet manager every time for every client they build. Now, the question is how will clients know where the user has stored the accounts and in what format? So, for portability reasons, it's recommended that you assume that users have their accounts stored in their personal node, and to manage the account, they use something like the ethereum Wallet app. As accounts stored in the Ethereum node are signed by the ethereum node itself, there is no need for sendRawTransaction anymore. Every user needs to have their own node and cannot share a node because when an account is unlocked, it will be open for anyone to use it, which will enable users to steal other's ether and make transactions from others' accounts.
If your applications require the functionality of creating and signing raw transactions, then you can use truffle-contract just to develop and test smart contracts, and in your application, you can interact with contracts just like we were doing earlier.
At the time of writing this, the latest version of the truffle-contract API is 1.1.10. Before importing truffle-contract, you need to first import web3.js as you will need to create a provider to work with the truffle-contract APIs so that truffle-contract will internally use the provider to make JSON-RPC calls.
To install truffle-contract in the Node.js app, you need to simply run this in your app directory:
npm install truffle-contract
And then use this code to import it:
var TruffleContract = require("truffle-contract");
To use truffle-contract in a browser, you can find the browser distribution inside the dist directory in the https://github.com/trufflesuite/truffle-contract repository.
In HTML, you can enqueue it this way:
<script type="text/javascript" src="./dist/truffle-contract.min.js"></script>
Now you will have a TruffleContract global variable available.
Before we start learning about truffle-contract APIs, we need to set up a testing environment, which will help us test our code while learning.
First of all, run the ethereumjs-testrpc node representing network ID 10 by just running the testrpc --networkId 10 command. We have randomly chosen network ID 10 for development purposes, but you are free to choose any other network ID. Just make sure it's not 1 as mainnet is always used in live apps and not for development and testing purposes.
Then, create an HTML file and place this code in it:
<!doctype html>
<html>
   <body>
         <script type="text/javascript" src="./web3.min.js"></script>
         <script type="text/javascript" src="./truffle-
            contract.min.js"></script>
         <script type="text/javascript">
               //place your code here
         </script>
   </body>
</html>
Download web3.min.js and truffle-contract.min.js. You can find the truffle-contract browser build at https://github.com/trufflesuite/truffle-contract/tree/master/dist.
Now let's explore truffle-contract APIs. Basically, truffle-contract has two APIs, that is, the contract abstraction API and the contract instance API. A contract abstraction API represents various kinds of information about the contract (or a library), such: as its ABI; unlinked byte code; if the contract is already deployed, then its address in various ethereum networks; addresses of the libraries it depends on for various ethereum networks if deployed; and events of the contract. The abstraction API is a set of functions that exist for all contract abstractions. A contract instance represents a deployed contract in a specific network. The instance API is the API available to contract instances. It is created dynamically based on functions available in your Solidity source file. A contract instance for a specific contract is created from a contract abstraction that represents the same contract.
The contract abstraction API is something that makes truffle-contract very special compared to web3.js. Here is why it's special:
Before we get into how to create a contract abstraction and its methods, let's write a sample contract, which the contract abstraction will represent. Here is the sample contract:
pragma Solidity ^0.4.0;

import "github.com/pipermerriam/ethereum-string-utils/contracts/StringLib.sol";

contract Sample
{
    using StringLib for *;

    event ping(string status);

    function Sample()
    {
        uint a = 23;
        bytes32 b = a.uintToBytes();

        bytes32 c = "12";
        uint d = c.bytesToUInt();

        ping("Conversion Done");
    }
}
This contract converts uint into bytes32 and bytes32 into uint using the StringLib library. StringLib is available at the 0xcca8353a18e7ab7b3d094ee1f9ddc91bdf2ca6a4 address on the main network, but on other networks, we need to deploy it to test the contract. Before you proceed further, compile it using browser Solidity, as you will need the ABI and byte code.
Now let's create a contract abstraction representing the Sample contract and the StringLib library. Here is the code for this. Place it in the HTML file:
var provider = new Web3.providers.HttpProvider("http://localhost:8545");
var web3 = new Web3(provider);

var SampleContract = TruffleContract({
   abi: [{"inputs":[],"payable":false,"type":"constructor"},{"anonymous":false,"inputs":[{"indexed":false,"name":"status","type":"string"}],"name":"ping","type":"event"}],
   unlinked_binary: "6060604052341561000c57fe5b5b6000600060006000601793508373__StringLib__6394e8767d90916000604051602001526040518263ffffffff167c01000000000000000000000000000000000000000000000000000000000281526004018082815260200191505060206040518083038186803b151561008b57fe5b60325a03f4151561009857fe5b5050506040518051905092507f31320000000000000000000000000000000000000000000000000000000000009150816000191673__StringLib__6381a33a6f90916000604051602001526040518263ffffffff167c010000000000000000000000000000000000000000000000000000000002815260040180826000191660001916815260200191505060206040518083038186803b151561014557fe5b60325a03f4151561015257fe5b5050506040518051905090507f3adb191b3dee3c3ccbe8c657275f608902f13e3a020028b12c0d825510439e5660405180806020018281038252600f8152602001807f436f6e76657273696f6e20446f6e65000000000000000000000000000000000081525060200191505060405180910390a15b505050505b6033806101da6000396000f30060606040525bfe00a165627a7a7230582056ebda5c1e4ba935e5ad61a271ce8d59c95e0e4bca4ad20e7f07d804801e95c60029",
   networks: {
         1: {
         links: {
       "StringLib": "0xcca8353a18e7ab7b3d094ee1f9ddc91bdf2ca6a4"
               },
        events: {
                  "0x3adb191b3dee3c3ccbe8c657275f608902f13e3a020028b12c0d825510439e56": {
                "anonymous": false,
                "inputs": [
                         {
                          "indexed": false,
                          "name": "status",
                          "type": "string"
                         }
                           ],
                           "name": "ping",
                           "type": "event"
                     }
               }
         },
         10: {
               events: {
                  "0x3adb191b3dee3c3ccbe8c657275f608902f13e3a020028b12c0d825510439e56": {
                           "anonymous": false,
                           "inputs": [
                                 {
                                       "indexed": false,
                                       "name": "status",
                                       "type": "string"
                                 }
                           ],
                           "name": "ping",
                           "type": "event"
                     }
               }
         }
   },
   contract_name: "SampleContract",
});

SampleContract.setProvider(provider);
SampleContract.detectNetwork();

SampleContract.defaults({
   from: web3.eth.accounts[0],
   gas: "900000",
   gasPrice: web3.eth.gasPrice,
})

var StringLib = TruffleContract({
   abi: [{"constant":true,"inputs":[{"name":"v","type":"bytes32"}],"name":"bytesToUInt","outputs":[{"name":"ret","type":"uint256"}],"payable":false,"type":"function"},{"constant":true,"inputs":[{"name":"v","type":"uint256"}],"name":"uintToBytes","outputs":[{"name":"ret","type":"bytes32"}],"payable":false,"type":"function"}],
   unlinked_binary: "6060604052341561000c57fe5b5b6102178061001c6000396000f30060606040526000357c0100000000000000000000000000000000000000000000000000000000900463ffffffff16806381a33a6f1461004657806394e8767d14610076575bfe5b6100606004808035600019169060200190919050506100aa565b6040518082815260200191505060405180910390f35b61008c6004808035906020019091905050610140565b60405180826000191660001916815260200191505060405180910390f35b6000600060006000600102846000191614156100c557610000565b600090505b60208110156101355760ff81601f0360080260020a85600190048115156100ed57fe5b0416915060008214156100ff57610135565b603082108061010e5750603982115b1561011857610000565b5b600a8302925060308203830192505b80806001019150506100ca565b8292505b5050919050565b60006000821415610173577f300000000000000000000000000000000000000000000000000000000000000090506101e2565b5b60008211156101e157610100816001900481151561018e57fe5b0460010290507f01000000000000000000000000000000000000000000000000000000000000006030600a848115156101c357fe5b06010260010281179050600a828115156101d957fe5b049150610174565b5b8090505b9190505600a165627a7a72305820d2897c98df4e1a3a71aefc5c486aed29c47c80cfe77e38328ef5f4cb5efcf2f10029",
   networks: {
         1: {
               address: "0xcca8353a18e7ab7b3d094ee1f9ddc91bdf2ca6a4"
         }
   },
   contract_name: "StringLib",
})


StringLib.setProvider(provider);
StringLib.detectNetwork();

StringLib.defaults({
   from: web3.eth.accounts[0],
   gas: "900000",
   gasPrice: web3.eth.gasPrice,
})
Here is how the preceding code works:
A contract instance represents a deployed contract in a particular network. Using a contract abstraction instance, we need to create a contract instance. There are three methods to create a contract instance:
Let's deploy and get a contract instance of the Sample contract. In network ID 10, we need to use new() to deploy the StringLib library first and then add the deployed address of the StringLib library to the StringLib abstraction, link the StringLib abstraction to the SampleContract abstraction, and then deploy the Sample contract using new() to get an instance of the Sample contract. But in network ID 1, we just need to deploy SampleContract and get its instance, as we already have StringLib deployed there. Here is the code to do all this:
web3.version.getNetwork(function(err, network_id) {
   if(network_id == 1)
   {
         var SampleContract_Instance = null;

         SampleContract.new().then(function(instance){
               SampleContract.networks[SampleContract.network_id]
                  ["address"] = instance.address;
               SampleContract_Instance = instance;
         })
   }
   else if(network_id == 10)
   {
         var StringLib_Instance = null;
         var SampleContract_Instance = null;

         StringLib.new().then(function(instance){
               StringLib_Instance = instance;
         }).then(function(){
               StringLib.networks[StringLib.network_id] = {};
               StringLib.networks[StringLib.network_id]["address"] =
                 StringLib_Instance.address;
               SampleContract.link(StringLib);
         }).then(function(result){
               return SampleContract.new();
         }).then(function(instance){
               SampleContract.networks[SampleContract.network_id]
                 ["address"] = instance.address;
               SampleContract_Instance = instance;
         })
   }
});
This is how the preceding code works:
Each contract instance is different based on the source Solidity contract, and the API is created dynamically. Here are the various the APIs of a contract instance:
Truffle is a development environment (providing a command-line tool to compile, deploy, test, and build), framework (providing various packages to make it easy to write tests, deployment code, build clients, and so on) and asset pipeline (publishing packages and using packages published by others) to build ethereum-based DApps.
Truffle works on OS X, Linux, and Windows. Truffle requires you to have Node.js version 5.0+ installed. At the time of writing this, the latest stable version of truffle is 3.1.2, and we will be using this version. To install truffle, you just need to run this command:
npm install -g truffle
Before we go ahead, make sure you are running testrpc with network ID 10. The reason is the same as the one discussed earlier.
First, you need to create a directory for your app. Name the directory altcoin. Inside the altcoin directory, run this command to initialize your project:
truffle init
Once completed, you'll have a project structure with the following items:
By default, truffle init gives you a set of example contracts (MetaCoin and ConvertLib), which act like a simple altcoin built on top of ethereum.
Here is the source code of the MetaCoin smart contract just for reference:
pragma Solidity ^0.4.4;

import "./ConvertLib.sol";

contract MetaCoin {
   mapping (address => uint) balances;

   event Transfer(address indexed _from, address indexed _to, uint256 _value);

   function MetaCoin() {
         balances[tx.origin] = 10000;
   }

   function sendCoin(address receiver, uint amount) returns(bool sufficient) {
         if (balances[msg.sender] < amount) return false;
         balances[msg.sender] -= amount;
         balances[receiver] += amount;
         Transfer(msg.sender, receiver, amount);
         return true;
   }

   function getBalanceInEth(address addr) returns(uint){
         return ConvertLib.convert(getBalance(addr),2);
   }

   function getBalance(address addr) returns(uint) {
         return balances[addr];
   }
}
MetaCoin assigns 10 k metacoins to the account address that deployed the contract. 10 k is the total amount of bitcoins that exists. Now this user can send these metacoins to anyone using the sendCoin() function. You can find the balance of your account using getBalance()anytime. Assuming that one metacoin is equal to two ethers, you can get the balance in ether using getBalanceInEth().
The ConvertLib library is used to calculate the value of metacoins in ether. For this purpose, it provides the convert() method.
Compiling contracts in truffle results in generating artifact objects with the abi and unlinked_binary set. To compile, run this command:
truffle compile
Truffle will compile only the contracts that have been changed since the last compilation in order to avoid any unnecessary compilation. If you'd like to override this behavior, run the preceding command with the --all option.
You can find the artifacts in the build/contracts directory. You are free to edit these files according to your needs. These files get modified at the time of running the compile and migrate commands.
Here are a few things you need to take care of before compiling:
The truffle.js file is a JavaScript file used to configure the project. This file can execute any code necessary to create the configuration for the project. It must export an object representing your project configuration. Here is the default content of the file:
module.exports = {
  networks: {
    development: {
      host: "localhost",
      port: 8545,
      network_id: "*" // Match any network id
    }
  }
};
There are various properties this object can contain. But the most basic one is networks. The networks property specifies which networks are available for deployment as well as specific transaction parameters when interacting with each network (such as gasPrice, from, gas, and so on). The default gasPrice is 100,000,000,000, gas is 4712388, and from is the first available contract in the ethereum client.
You can specify as many networks as you want. Go ahead and edit the configuration file to this:
module.exports = {
  networks: {
    development: {
      host: "localhost",
      port: 8545,
      network_id: "10"
    },
    live: {
         host: "localhost",
      port: 8545,
      network_id: "1"
    }
  }
};
In the preceding code, we are defining two networks with the names development and live.
Even the smallest project will interact with at least two blockchains: one on the developer's machine, such as the EthereumJS TestRPC, and the other representing the network where the developer will eventually deploy their application (this could be the main ethereum network or a private consortium network, for instance).
Because the network is auto-detected by the contract abstractions at runtime, it means that you only need to deploy your application or frontend once. When your application is run, the running ethereum client will determine which artifacts are used, and this will make your application very flexible.
JavaScript files that contain code to deploy contracts to the ethereum network are called migrations. These files are responsible for staging your deployment tasks, and they're written under the assumption that your deployment needs will change over time. As your project evolves, you'll create new migration scripts to further this evolution on the blockchain. A history of previously run migrations is recorded on the blockchain through a special Migrations contract. If you have seen the contents of the contracts and build/contracts directory, then you would have noticed the Migrations contract's existence there. This contract should always be there and shouldn't be touched unless you know what you are doing.
In the migrations directory, you will notice that the filenames are prefixed with a number; that is, you will find 1_initial_migration.js and 2_deploy_contracts.js files. The numbered prefix is required in order to record whether the migration ran successfully.
The Migrations contract stores (in last_completed_migration) a number that corresponds to the last applied migration script found in the migrations folder. The Migrations contract is always deployed first. The numbering convention is x_script_name.js, with x starting at 1. Your app contracts would typically come in scripts starting at 2.
So, as this Migrations contract stores the number of the last deployment script applied, truffle will not run these scripts again. On the other hand, in future, your app may need to have a modified, or new, contract deployed. For that to happen, you create a new script with an increased number that describes the steps that need to take place. Then, again, after they have run once, they will not run again.
At the beginning of a migration file, we tell truffle which contracts we'd like to interact with via the artifacts.require() method. This method is similar to Node's require, but in our case, it specifically returns a contract abstraction that we can use within the rest of our deployment script.
All migrations must export a function via the module.exports syntax. The function exported by each migration should accept a deployer object as its first parameter. This object assists in deployment both by providing a clear API to deploy smart contracts as well as performing some of the deployment's more mundane duties, such as saving deployed artifacts in the artifacts files for later use, linking libraries, and so on. The deployer object is your main interface for the staging of deployment tasks.
Here are the methods of the deployer object. All the methods are synchronous:
It is possible to run the deployment steps conditionally based on the network being deployed to. To conditionally stage the deployment steps, write your migrations so that they accept a second parameter called network. One example use case can be that many of the popular libraries are already deployed to the main network; therefore, when using these networks, we will not deploy the libraries again and just link them instead. Here is a code example:
module.exports = function(deployer, network) {
  if (network != "live") {
   // Perform a different step otherwise.
  } else {
    // Do something specific to the network named "live".
  }
}
In the project, you will find two migration files, that is, 1_initial_migration.js and 2_deploy_contracts.js. The first file shouldn't be edited unless you know what you are doing. You are free to do anything with the other file. Here is the code for the 2_deploy_contracts.js file:
var ConvertLib = artifacts.require("./ConvertLib.sol");
var MetaCoin = artifacts.require("./MetaCoin.sol");

module.exports = function(deployer) {
  deployer.deploy(ConvertLib);
  deployer.link(ConvertLib, MetaCoin);
  deployer.deploy(MetaCoin);
};
Here, we are creating abstractions for the CovertLib library and the MetaCoin contract at first. Regardless of which network is being used, we are deploying the ConvertLib library and then linking the library to the MetaCoin network and finally deploying the MetaCoin network.
To run the migrations, that is, to deploy the contracts, run this command:
truffle migrate --network development
Here, we are telling truffle to run migrations on the development network. If we don't provide the --network option, then it will use the network with the name development by default.
After you run the preceding command, you will notice that truffle will automatically update the ConvertLib library and MetaCoin contract addresses in the artifacts files and also update the links.
Here are some other important options you can provide to the migrate sub-command:
Unit testing is a type of testing an app. It is a process in which the smallest testable parts of an application, called units, are individually and independently examined for proper operation. Unit testing can be done manually but is often automated.
Truffle comes with a unit testing framework by default to automate the testing of your contracts. It provides a clean room environment when running your test files; that is, truffle will rerun all of your migrations at the beginning of every test file to ensure you have a fresh set of contracts to test against.
Truffle lets you write simple and manageable tests in two different ways:
Both styles of tests have their advantages and drawbacks. We will learn both ways of writing tests.
All test files should be located in the ./test directory. Truffle will run test files only with these file extensions: .js, .es, .es6, and .jsx, and .sol. All other files are ignored.
Truffle's JavaScript testing framework is built on top of mocha. Mocha is a JavaScript framework to write tests, whereas chai is an assertion library.
Testing frameworks are used to organize and execute tests, whereas assertion libraries provide utilities to verify that things are correct. Assertion libraries make it a lot easier to test your code so you don't have to perform thousands of if statements. Most of the testing frameworks don't have an assertion library included and let the user plug which one they want to use.
Your tests should exist in the ./test directory, and they should end with a .js extension.
Contract abstractions are the basis for making contract interaction possible from JavaScript. Because truffle has no way of detecting which contracts you'll need to interact with within your tests, you'll need to ask for these contracts explicitly. You do this by using the artifacts.require() method. So the first thing that should be done in test files is to create abstractions for the contracts that you want to test.
Then, the actual tests should be written. Structurally, your tests should remain largely unchanged from those of mocha. The test files should contain code that mocha will recognize as an automated test. What makes truffle tests different from mocha is the contract() function: this function works exactly like describe(), except that it signals truffle to run all migrations. The contract() function works like this:
Here is the default test code generated by truffle to test the MetaCoin contract. You will find this code in the metacoin.js file:
// Specifically request an abstraction for MetaCoin.sol
var MetaCoin = artifacts.require("./MetaCoin.sol");

contract('MetaCoin', function(accounts) {
  it("should put 10000 MetaCoin in the first account", function() {
    return MetaCoin.deployed().then(function(instance) {
      return instance.getBalance.call(accounts[0]);
    }).then(function(balance) {
      assert.equal(balance.valueOf(), 10000, "10000 wasn't in the first account");
    });
  });
  it("should send coin correctly", function() {
    var meta;

    // Get initial balances of first and second account.
    var account_one = accounts[0];
    var account_two = accounts[1];

    var account_one_starting_balance;
    var account_two_starting_balance;
    var account_one_ending_balance;
    var account_two_ending_balance;

    var amount = 10;

    return MetaCoin.deployed().then(function(instance) {
      meta = instance;
      return meta.getBalance.call(account_one);
    }).then(function(balance) {
      account_one_starting_balance = balance.toNumber();
      return meta.getBalance.call(account_two);
    }).then(function(balance) {
      account_two_starting_balance = balance.toNumber();
      return meta.sendCoin(account_two, amount, {from: account_one});
    }).then(function() {
      return meta.getBalance.call(account_one);
    }).then(function(balance) {
      account_one_ending_balance = balance.toNumber();
      return meta.getBalance.call(account_two);
    }).then(function(balance) {
      account_two_ending_balance = balance.toNumber();

      assert.equal(account_one_ending_balance, account_one_starting_balance - amount, "Amount wasn't correctly taken from the sender");
      assert.equal(account_two_ending_balance, account_two_starting_balance + amount, "Amount wasn't correctly sent to the receiver");
    });
  });
});
In the preceding code, you can see that all the contract's interaction code is written using the truffle-contract library. The code is self-explanatory.
Finally, truffle gives you access to mocha's configuration so you can change how mocha behaves. mocha's configuration is placed under a mocha property in the truffle.js file's exported object. For example, take a look at this:
mocha: {
  useColors: true
}
Solidity test code is put in .sol files. Here are the things you need to note about Solidity tests before writing tests using Solidity:
To learn how to write tests in Solidity, let's explore the default Solidity test code generated by truffle. This is the code, and it can be found in the TestMetacoin.sol file:
pragma Solidity ^0.4.2;

import "truffle/Assert.sol";
import "truffle/DeployedAddresses.sol";
import "../contracts/MetaCoin.sol";

contract TestMetacoin {

  function testInitialBalanceUsingDeployedContract() {
    MetaCoin meta = MetaCoin(DeployedAddresses.MetaCoin());

    uint expected = 10000;

    Assert.equal(meta.getBalance(tx.origin), expected, "Owner should have 10000 MetaCoin initially");
  }

  function testInitialBalanceWithNewMetaCoin() {
    MetaCoin meta = new MetaCoin();

    uint expected = 10000;

    Assert.equal(meta.getBalance(tx.origin), expected, "Owner should have 10000 MetaCoin initially");
  }

}
Here is how the preceding code works:
import "truffle/Assert.sol";

contract TestHooks {
  uint someValue;

  function beforeEach() {
    someValue = 5;
  }

  function beforeEachAgain() {
    someValue += 1;
  }

  function testSomeValueIsSix() {
    uint expected = 6;

    Assert.equal(someValue, expected, "someValue should have been 6");
  }
}
To send ether to your Solidity test contract, it should have a public function that returns uint, called initialBalance in that contract. This can be written directly as a function or a public variable. When your test contract is deployed to the network, truffle will send that amount of ether from your test account to your test contract. Your test contract can then use that ether to script ether interactions within your contract under test. Note that initialBalance is optional and not required. For example, take a look at the following code:
import "truffle/Assert.sol";
import "truffle/DeployedAddresses.sol";
import "../contracts/MyContract.sol";

contract TestContract {
  // Truffle will send the TestContract one Ether after deploying the contract.
  public uint initialBalance = 1 ether;

  function testInitialBalanceUsingDeployedContract() {
    MyContract myContract = MyContract(DeployedAddresses.MyContract());

    // perform an action which sends value to myContract, then assert.
    myContract.send(...);
  }

  function () {
    // This will NOT be executed when Ether is sent. o/
  }
}
To run your test scripts, just run this command:
truffle test
Alternatively, you can specify a path to a specific file you want to run. For example, take a look at this:
truffle test ./path/to/test/file.js
A truffle package is a collection of smart contracts and their artifacts. A package can depend on zero or more packages, that is, you use the package's smart contracts and artifacts. When using a package within your own project, it is important to note that there are two places where you will be using the package's contracts and artifacts: within your project's contracts and within your project's JavaScript code (migrations and tests).
Projects created with truffle have a specific layout by default, which enables them to be used as packages. The most important directories in a truffle package are the following:
The first directory is your contracts directory, which includes your raw Solidity contracts. The second directory is the /build/contracts directory, which holds build artifacts in the form of .json files.
Truffle supports two kinds of package builds: npm and ethpm packages. You must know what npm packages are, but let's look at what ethpm packages are. Ethpm is a package registry for ethereum. You can find all ethpm packages at https://www.ethpm.com/. It follows the ERC190 (https://github.com/ethereum/EIPs/issues/190) spec for publishing and consuming smart contract packages.
Truffle comes with npm integration by default and is aware of the node_modules directory in your project, if it exists. This means that you can use and distribute contracts or libraries via npm, making your code available to others and other's code available to you. You can also have a package.json file in your project. You can simply install any npm package in your project and import it in any of the JavaScript files, but it would be called a truffle package only if it contains the two directories mentioned earlier. Installing an npm package in a truffle project is the same as installing an npm package in any Node.js app.
When installing EthPM packages, an installed_contracts directory is created if it doesn't exist. This directory can be treated in a manner similar to the node_modules directory.
Installing a package from EthPM is nearly as easy as installing a package via NPM. You can simply run the following command:
truffle install <package name>
You can also install a package at a specific version:
truffle install <package name>@<version>
Like NPM, EthPM versions follow semver. Your project can also define an ethpm.json file, which is similar to package.json for npm packages. To install all dependencies listed in the ethpm.json file, run the following:
truffle install
An example ethpm.json file looks like this:
{
  "package_name": "adder",
  "version": "0.0.3",
  "description": "Simple contract to add two numbers",
  "authors": [
    "Tim Coulter <tim.coulter@consensys.net>"
  ],
  "keywords": [
    "ethereum",
    "addition"
  ],
  "dependencies": {
    "owned": "^0.0.1"
  },
  "license": "MIT"
}
To use a package's contracts within your contracts, it can be as simple as Solidity's import statement. When your import path isn't explicitly relative or absolute, it signifies to truffle that you're looking for a file from a specific named package. Consider this example using the example-truffle-library (https://github.com/ConsenSys/example-truffle-library):
import "example-truffle-library/contracts/SimpleNameRegistry.sol";
Since the path didn't start with ./, truffle knows to look in your project's node_modules or installed_contracts directory for the example-truffle-library folder. From there, it resolves the path to provide you with the contract you requested.
To interact with a package's artifacts within JavaScript code, you simply need to require that package's .json files and then use truffle-contract to turn them into usable abstractions:
var contract = require("truffle-contract");
var data = require("example-truffle-library/build/contracts/SimpleNameRegistry.json");
var SimpleNameRegistry = contract(data);
Sometimes, you may want your contracts to interact with the package's previously deployed contracts. Since the deployed addresses exist within the package's .json files, Solidity code cannot directly read contents of these files. So, the flow of making Solidity code access the addresses in .json files is by defining functions in Solidity code to set dependent contract addresses, and after the contract is deployed, call those functions using JavaScript to set the dependent contract addresses.
So you can define your contract code like this:
import "example-truffle-library/contracts/SimpleNameRegistry.sol";

contract MyContract {
  SimpleNameRegistry registry;
  address public owner;

  function MyContract {
    owner = msg.sender;
  }

  // Simple example that uses the deployed registry from the package.
  function getModule(bytes32 name) returns (address) {
    return registry.names(name);
  }

  // Set the registry if you're the owner.
  function setRegistry(address addr) {
    if (msg.sender != owner) throw;

    registry = SimpleNameRegistry(addr);
  }
}
This is what your migration should look like:
var SimpleNameRegistry = artifacts.require("example-truffle-library/contracts/SimpleNameRegistry.sol");

module.exports = function(deployer) {
  // Deploy our contract, then set the address of the registry.
  deployer.deploy(MyContract).then(function() {
    return MyContract.deployed();
  }).then(function(deployed) {
    return deployed.setRegistry(SimpleNameRegistry.address);
  });
};
Sometimes, it's nice to work with your contracts interactively for testing and debugging purposes or to execute transactions by hand. Truffle provides you with an easy way to do this via an interactive console, with your contracts available and ready to use.
To open the console, run this command:
truffle console
The console connects to an ethereum node based on your project configuration. The preceding command also takes a --network option to specify a specific node to connect to.
Here are the features of the console:
Often, you may want to run external scripts that interact with your contracts. Truffle provides an easy way to do this, bootstrapping your contracts based on your desired network and connecting to your ethereum node automatically as per your project configuration.
To run an external script, run this command:
truffle exec <path/to/file.js>
In order for external scripts to be run correctly, truffle expects them to export a function that takes a single parameter as a callback. You can do anything you'd like within this script as long as the callback is called when the script finishes. The callback accepts an error as its first and only parameter. If an error is provided, execution will halt and the process will return a nonzero exit code.
This is the structure external scripts must follow:
module.exports = function(callback) {
  // perform actions
  callback();
}
Now that you know how to compile, deploy, and test smart contracts using truffle, it's time to build a client for our altcoin. Before we get into how to build a client using truffle, you need to know that it doesn't allow us to sign transactions using accounts stored outside of the ethereum node; that is, it doesn't have anything similar to sendRawTransaction and the reasons are the same as those for truffle-contract.
Building a client using truffle means first integrating truffle's artifacts in your client source code and then preparing the client's source code for deployment.
To build a client, you need to run this command:
truffle build
When this command is run, truffle will check how to build the client by inspecting the build property in the project's configuration file.
A command-line tool can be used to build a client. When the build property is a string, truffle assumes that we want to run a command to build the client, so it runs the string as a command. The command is given ample environment variables with which to integrate with truffle.
You can make truffle run a command-line tool to build the client using similar configuration code:
module.exports = {
  // This will run the `webpack` command on each build.
  //
  // The following environment variables will be set when running the command:
  // WORKING_DIRECTORY: root location of the project
  // BUILD_DESTINATION_DIRECTORY: expected destination of built assets
  // BUILD_CONTRACTS_DIRECTORY: root location of your build contract files (.sol.js)
  //
  build: "webpack"
}
A JavaScript function can be used to build a client. When the build property is a function, truffle will run that function whenever we want to build the client. The function is given a lot of information about the project with which to integrate with truffle.
You can make truffle run a function to build the client using similar configuration code:
module.exports = {
  build: function(options, callback) {
     // Do something when a build is required. `options` contains these values:
     //
     // working_directory: root location of the project
     // contracts_directory: root directory of .sol files
     // destination_directory: directory where truffle expects the built assets (important for `truffle serve`)
  }
}
Truffle provides the truffle-default-builder npm package, which is termed the default builder for truffle. This builder exports an object, which has a build method, which works exactly like the previously mentioned method.
The default builder can be used to build a web client for your DApp, whose server only serves static files, and all the functionality is on the frontend.
Before we get further into how to use the default builder, first install it using this command:
npm install truffle-default-builder --save
Now change your configuration file to this:
var DefaultBuilder = require("truffle-default-builder");

module.exports = {
  networks: {
    development: {
      host: "localhost",
      port: 8545,
      network_id: "10"
    },
    live: {
         host: "localhost",
      port: 8545,
      network_id: "1"
    }
  },
  build: new DefaultBuilder({
    "index.html": "index.html",
    "app.js": [
      "javascripts/index.js"
    ],
    "bootstrap.min.css": "stylesheets/bootstrap.min.css"
  })
};
The default builder gives you complete control over how you want to organize the files and folders of your client.
This configuration describes targets (left-hand side) with files, folders, and arrays of files that make up the targets contents (right-hand side). Each target will be produced by processing the files on the right-hand side based on their file extension, concatenating the results together, and then saving the resultant file (the target) into the build destination. Here, a string is specified on the right-hand side instead of an array, and that file will be processed, if needed, and then copied over directly. If the string ends in a "/", it will be interpreted as a directory and the directory will be copied over without further processing. All paths specified on the right-hand side are relative to the app/ directory.
You can change this configuration and directory structure at any time. You aren't required to have a javascripts and stylesheets directory, for example, but make sure you edit your configuration accordingly.
Here are the features of the default builder:
Now let's write a client for our DApp and build it using truffle's default builder. First of all, create files and directories based on the preceding configuration we set: create an app directory and inside it, create an index.html file and two directories called javascripts and styelsheets. Inside the javascripts directory, create a file called index.js and in the stylesheets directory, download and place the CSS file of Bootstrap 4. You can find it at https://v4-alpha.getbootstrap.com/getting-started/download/#bootstrap-css-and-js.
In the index.html file, place this code:
<!doctype html>
<html>
   <head>
         <link rel="stylesheet" type="text/css" href="bootstrap.min.css">
   </head>
   <body>
   <div class="container">
         <div class="row">
         <div class="col-md-6">
         <br>
         <h2>Send Metacoins</h2>
         <hr>
         <form id="sendForm">
         <div class="form-group">
               <label for="fromAddress">Select Account Address</label>
         <select class="form-control" id="fromAddress">
         </select>
         </div>
         <div class="form-group">
         <label for="amount">How much metacoin do you want to send?
         </label>
         <input type="text" class="form-control" id="amount">
         </div>
         <div class="form-group">
         <label for="toAddress">Enter the address to which you want to
           send matacoins</label>
         <input type="text" class="form-control" id="toAddress"
             placeholder="Prefixed with 0x">
         </div>
         <button type="submit" class="btn btn-primary">Submit</button>
         </form>
         </div>
         <div class="col-md-6">
         <br>
         <h2>Find Balance</h2>
         <hr>
         <form id="findBalanceForm">
         <div class="form-group">
               <label for="address">Select Account Address</label>
               <select class="form-control" id="address">
               </select>
         </div>
         <button type="submit" class="btn btn-primary">Check
            Balance</button>
         </form>
         </div>
         </div>
         </div>
         <script type="text/javascript" src="/app.js"></script>
   </body>
</html>
<!doctype html>
 <html>
     <head>
         <link rel="stylesheet" type="text/css" href="bootstrap.min.css">
     </head>
     <body>
         <div class="container">
             <div class="row">
                 <div class="col-md-6">
                     <br>
                     <h2>Send Metacoins</h2>
                     <hr>
                     <form id="sendForm">
                         <div class="form-group">
                             <label for="fromAddress">Select Account Address</label>
                             <select class="form-control" id="fromAddress">
                             </select>
                           </div>
                           <div class="form-group">
                             <label for="amount">How much metacoin you want to send?</label>
                             <input type="text" class="form-control" id="amount">
                           </div>
                           <div class="form-group">
                             <label for="toAddress">Enter the address to which you want to send matacoins</label>
                             <input type="text" class="form-control" id="toAddress" placeholder="Prefixed with 0x">
                           </div>
                           <button type="submit" class="btn btn-primary">Submit</button>
                     </form>
                 </div>
                 <div class="col-md-6">
                     <br>
                     <h2>Find Balance</h2>
                     <hr>
                     <form id="findBalanceForm">
                         <div class="form-group">
                             <label for="address">Select Account Address</label>
                             <select class="form-control" id="address">
                             </select>
                           </div>
                           <button type="submit" class="btn btn-primary">Check Balance</button>
                     </form>
                 </div>
             </div>
         </div>
         <script type="text/javascript" src="/app.js"></script>
     </body>
 </html>
In the preceding code, we are loading the bootstrap.min.css and app.js files. We have two forms: one is to send metacoins to a different account and the other one is to check the metacoins balance of an account. In the first form, the user has to select an account and then enter the amount of metacoin to send and the address that it wants to send to. And in the second form, the user simply has to select the address whose metacoin balance it wants to check.
In the index.js file, place this code:
window.addEventListener("load", function(){
   var accounts = web3.eth.accounts;

   var html = "";

   for(var count = 0; count < accounts.length; count++)
   {
         html = html + "<option>" + accounts[count] + "</option>";
   }

   document.getElementById("fromAddress").innerHTML = html;
   document.getElementById("address").innerHTML = html;

   MetaCoin.detectNetwork();
})

document.getElementById("sendForm").addEventListener("submit", function(e){
   e.preventDefault();

   MetaCoin.deployed().then(function(instance){
         return instance.sendCoin(document.getElementById("toAddress").value, document.getElementById("amount").value, {
               from: document.getElementById("fromAddress").options[document.getElementById("fromAddress").selectedIndex].value
         });
   }).then(function(result){
         alert("Transaction mined successfully. Txn Hash: " + result.tx);
   }).catch(function(e){
         alert("An error occured");
   })
})

document.getElementById("findBalanceForm").addEventListener("submit", function(e){
   e.preventDefault();

   MetaCoin.deployed().then(function(instance){
         return instance.getBalance.call(document.getElementById("address").value);
   }).then(function(result){
         console.log(result);
         alert("Balance is: " + result.toString() + " metacoins");
   }).catch(function(e){
         alert("An error occured");
   })
})
Here is how the code works:
Now go ahead and run the truffle build command, and you will notice that truffle will create index.html, app.js, and bootstrap.min.css files in the build directory and put the client's final deployment code in them.
Truffle comes with an inbuilt web server. This web server simply serves the files in the build directory with a proper MIME type set. Apart from this, it's not configured to do anything else.
To run the web server, run this command:
truffle serve
The server runs on port number 8080 by default. But you can use the -p option to specify a different port number.
Similar to truffle watch, this web server also watches for changes in the contracts directory, the app directory, and the configuration file. When there's a change, it recompiles the contracts and generates new artifacts files and then rebuilds the client. But it doesn't run migrations and tests.
As the truffle-default-builder places the final deployable code in the build directory, you can simply run truffle serve to serve the files via the Web.
Let's test our web client. Visit http://localhost:8080, and you will see this screenshot:
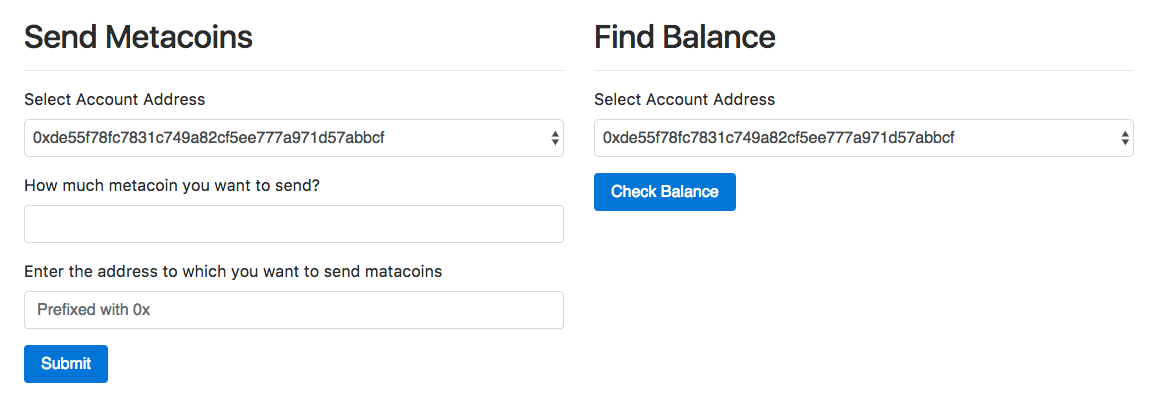
The account addresses in the selected boxes will differ for you. Now at the time of deploying the contract, the contract assigns all the metacoins to the address that deploys the contract; so here, the first account will have a balance of 10,000 metacoins. Now send five metacoins from the first account to the second account and click on Submit. You will see a screen similar to what is shown in the following screenshot:
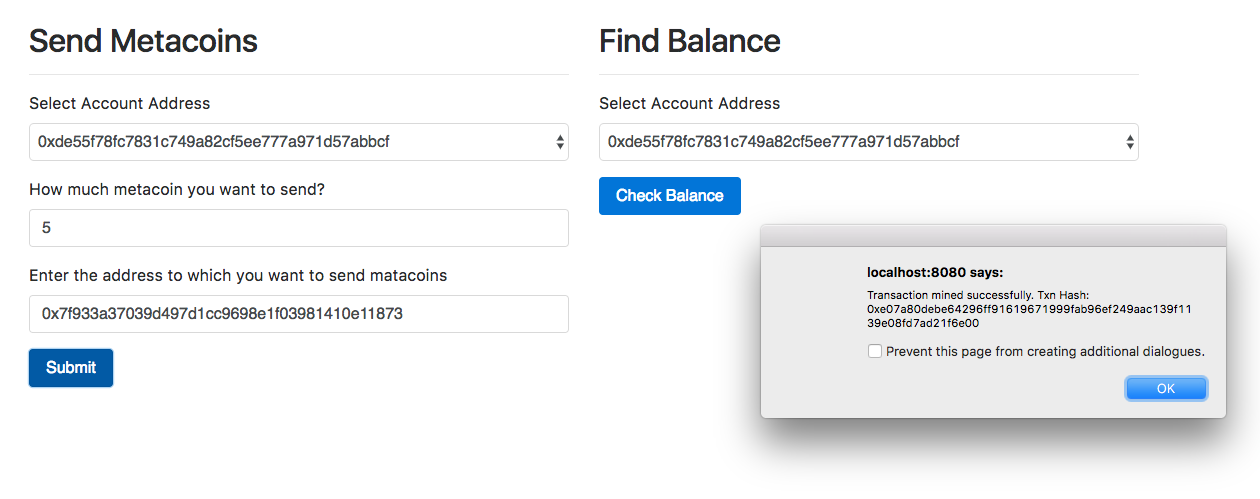
Now check the balance of the second account by selecting the second account in the select box of the second form and then click on the Check Balance button. You will see a screen similar to what is shown in the following screenshot:
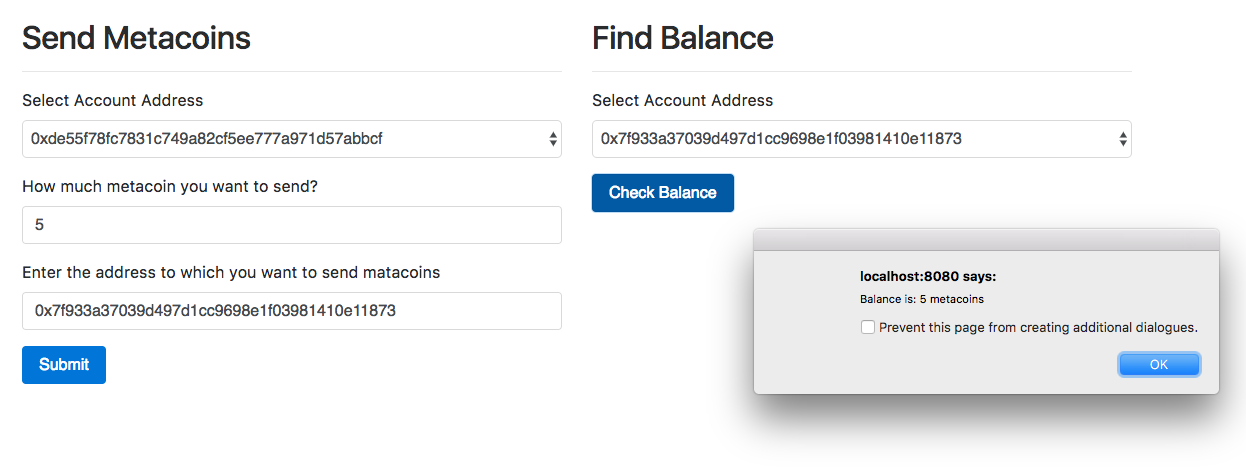
In this chapter, we learned in depth how to build DApps and their respective clients using truffle. We look at how truffle makes it really easy to write, compile, deploy, and test DApps. We also saw how easy it is to switch between networks in clients using truffle-contract without touching the source code. Now you are ready to start building enterprise-level DApps using truffle.
In the next chapter, we will build a decentralized alarm clock app that pays you to wake up on time using the truffle and ethereum alarm clock DApp.
Just replace the i.e. with a colon ":".
Consortiums (an association, typically of several participants such as banks, e-commerce sites, government entities, hospitals, and so on) can use blockchain technology to solve many problems and make things faster and cheaper. Although they figure out how blockchain can help them, an Ethereum implementation of blockchain doesn't specifically fit them for all cases. Although there are other implementations of blockchain (for example, Hyperledger) that are built specially for consortium, as we learned Ethereum throughout the book, we will see how we can hack Ethereum to build a consortium blockchain. Basically, we will be using parity to build a consortium blockchain. Although there are other alternatives to parity, such as J.P. Morgan's quorum, we will use parity as at the time of writing this book, it has been in existence for some time, and many enterprises are already using it, whereas other alternatives are yet to be used by any enterprise. But for your requirements, parity may not be the best solution; therefore, investigate all the others too before deciding which one to use.
In this chapter, we'll cover the following topics:
To understand what a consortium blockchain is, or, in other words, what kind of blockchain implementation consortiums need, let's check out an example. Banks want to build a blockchain to make money transfers easier, faster, and cheaper. In this case, here are the things they need:
Overall, in this chapter, we will learn how to solve these issues in Ethereum.
PoA is a consensus mechanism for blockchain in which consensus is achieved by referring to a list of validators (referred to as authorities when they are linked to physical entities). Validators are a group of accounts/nodes that are allowed to participate in the consensus; they validate the transactions and blocks.
Unlike PoW or PoS, there is no mining mechanism involved. There are various types of PoA protocols, and they vary depending on how they actually work. Hyperledger and Ripple are based on PoA. Hyperledger is based on PBFT, whereas ripple uses an iterative process.
Parity is an Ethereum node written from the ground up for correctness/verifiability, modularization, low footprint, and high performance. It is written in Rust programming language, a hybrid imperative/OO/functional language with an emphasis on efficiency. It is professionally developed by Parity Technologies. At the time of writing this book, the latest version of parity is 1.7.0, and we will be using this version. We will learn as much as is required to build a consortium blockchain. To learn parity in depth, you can refer to the official documentation.
It has a lot more features than go-ethereum, such as web3 dapp browser, much more advanced account management, and so on. But what makes it special is that it supports Proof-of-Authority (PoA) along with PoW. Parity currently supports Aura and Tendermint PoA protocols. In the future, it may support some more PoA protocols. Currently, parity recommends the use of Aura instead of Tendermint as Tendermint is still under development.
Aura is a much better solution for permissioned blockchains than PoW as it has better block time and provides much better security in private networks.
Let's see at a high level how Aura works. Aura requires the same list of validators to be specified in each node. This is a list of account addresses that participate in the consensus. A node may or may not be a validating node. Even a validating node needs to have this list so that it can itself reach a consensus.
This list can either be provided as a static list in the genesis file if the list of validators is going to remain the same forever, or be provided in a smart contract so that it can be dynamically updated and every node knows about it. In a smart contract, you can configure various strategies regarding who can add new validators.
The block time is configurable in the genesis file. It's up to you to decide the block time. In private networks, a block time as low as three seconds works well. In Aura, after every three seconds, one of the validators is selected and this validator is responsible for creating, verifying, signing, and broadcasting the block. We don't need to understand much about the actual selection algorithm as it won't impact our dapp development. But this is the formula to calculate the next validator, (UNIX_TIMESTAMP / BLOCK_TIME % NUMBER_OF_TOTAL_VALIDATORS). The selection algorithm is smart enough to give equal chances to everyone When other nodes receive a block, they check whether it's from the next valid validator or not; and if not, they reject it. Unlike PoW, when a validator creates a block, it is not rewarded with ether. In Aura, it's up to us to decide whether to generate empty blocks or not when there are no transactions.
You must be wondering what will happen if the next validator node, due to some reason, fails to create and broadcast the next block. To understand this, let's take an example: suppose A is the validator for the next block, which is the fifth block, and B is the validator for the sixth block. Assume block time is five seconds. If A fails to broadcast a block, then after five seconds when B's turn arrives, it will broadcast a block. So nothing serious happens actually. The block timestamp will reveal these details.
You might also be wondering whether there are chances of networks ending up with multiple different blockchains as it happens in PoW when two miners mine at the same time. Yes, there are many ways this can happen. Let's take an example and understand one way in which this can happen and how the network resolves it automatically. Suppose there are five validators: A, B, C, D, and E. Block time is five seconds. Suppose A is selected first and it broadcasts a block, but the block doesn't reach D and E due to some reason; so they will think A didn't broadcast the block. Now suppose the selection algorithm selects B to generate the next block; then B will generate the next block on top of A's block and broadcast to all the nodes. D and E will reject it because the previous block hash will not match. Due to this, D and E will form a different chain, and A, B, and C will form a different chain. A, B, and C will reject blocks from D and E, and D and E will reject blocks from A, B, and C. This issue is resolved among the nodes as the blockchain that is with A, B and C is more accurate than the blockchain with D and E; therefore D and E will replace their version of blockchain with the blockchain held with A, B, and C. Both these versions of the blockchain will have different accuracy scores, and the score of the first blockchain will be more than the second one. When B broadcasts its block, it will also provide the score of its blockchain, and as its score is higher, D and E will have replaced their blockchain with B's blockchain. This is how conflicts are resolved. The chain score of blockchain is calculated using (U128_max * BLOCK_NUMBER_OF_LATEST_BLOCK - (UNIX_TIMESTAMP_OF_LATEST_BLOCK / BLOCK_TIME)). Chains are scored first by their length (the more blocks, the better). For chains of equal length, the chain whose last block is older is chosen.
You can learn more about Aura in depth at https://github.com/paritytech/parity/wiki/Aura.
Parity requires Rust version 1.16.0 to build. It is recommended to install Rust through rustup.
If you don't already have rustup, you can install it like this.
On Linux-based operating systems, run this command:
curl https://sh.rustup.rs -sSf | sh
Parity also requires the gcc, g++, libssl-dev/openssl, libudev-dev, and pkg-config packages to be installed.
On OS X, run this command:
curl https://sh.rustup.rs -sSf | sh
Parity also requires clang. Clang comes with Xcode command-line tools or can be installed with Homebrew.
Make sure you have Visual Studio 2015 with C++ support installed. Next, download and run the rustup installer from https://static.rust-lang.org/rustup/dist/x86_64-pc-windows-msvc/rustup-init.exe, start "VS2015 x64 Native Tools Command Prompt", and use the following command to install and set up the msvc toolchain:
rustup default stable-x86_64-pc-windows-msvc
Now, once you have rust installed on your operating system, you can run this simple one-line command to install parity:
cargo install --git https://github.com/paritytech/parity.git parity
To check whether parity is installed or not, run this command:
parity --help
If parity is installed successfully, then you will see a list of sub-commands and options.
Now it's time to set up our consortium blockchain. We will create two validating nodes connected to each other using Aura for consensus. We will set up both on the same computer.
First, open two shell windows. The first one is for the first validator and the second one is for the second validator. The first node will contain two accounts and the second node will contain one account. The second account of first node will be assigned to some initial ether so that the network will have some ether.
In the first shell, run this command twice:
parity account new -d ./validator0
Both the times it will ask you to enter a password. For now just put the same password for both accounts.
In the second shell, run this command once only:
parity account new -d ./validator1
Just as before, enter the password.
Nodes of every network share a common specification file. This file tells the node about the genesis block, who the validators are, and so on. We will create a smart contract, which will contain the validators list. There are two types of validator contracts: non-reporting contract and reporting contract. We have to provide only one.
The difference is that non-reporting contract only returns a list of validators, whereas reporting contract can take action for benign (benign misbehaviour may be simply not receiving a block from a designated validator) and malicious misbehavior (malicious misbehaviour would be releasing two different blocks for the same step).
The non-reporting contract should have at least this interface:
{"constant":true,"inputs":[],"name":"getValidators","outputs":[{"name":"","type":"address[]"}],"payable":false,"type":"function"}
The getValidators function will be called on every block to determine the current list. The switching rules are then determined by the contract implementing that method.
A reporting contract should have at least this interface:
[
    {"constant":true,"inputs":[],"name":"getValidators","outputs":[{"name":"","type":"address[]"}],"payable":false,"type":"function"},
    {"constant":false,"inputs":[{"name":"validator","type":"address"}],"name":"reportMalicious","outputs":[],"payable":false,"type":"function"},
    {"constant":false,"inputs":[{"name":"validator","type":"address"}],"name":"reportBenign","outputs":[],"payable":false,"type":"function"}
]
When there is benign or malicious behavior, the consensus engine calls the reportBenign and reportMalicious functions respectively.
Let's create a reporting contract. Here is a basic example:
contract ReportingContract {
   address[] public validators = [0x831647ec69be4ca44ea4bd1b9909debfbaaef55c, 0x12a6bda0d5f58538167b2efce5519e316863f9fd];
   mapping(address => uint) indices;
   address public disliked;

   function ReportingContract() {
       for (uint i = 0; i < validators.length; i++) {
           indices[validators[i]] = i;
       }
   }

   // Called on every block to update node validator list.
    function getValidators() constant returns (address[]) {
      return validators;
   }

   // Expand the list of validators.
   function addValidator(address validator) {
      validators.push(validator);
   }

   // Remove a validator from the list.
   function reportMalicious(address validator) {
      validators[indices[validator]] = validators[validators.length-1];
      delete indices[validator];
      delete validators[validators.length-1];
      validators.length--;
   }

   function reportBenign(address validator) {
       disliked = validator;
   }
}
This code is self-explanatory. Make sure that in the validators array replaces the addresses with the first address of validator 1 and validator 2 nodes as we will be using those addresses for validation. Now compile the preceding contract using whatever you feel comfortable with.
Now let's create the specification file. Create a file named spec.json, and place this code in it:
{
    "name": "ethereum",
    "engine": {
        "authorityRound": {
            "params": {
               "gasLimitBoundDivisor": "0x400",
               "stepDuration": "5",
               "validators" : {
               "contract": "0x0000000000000000000000000000000000000005"
                }
            }
        }
    },
    "params": {
        "maximumExtraDataSize": "0x20",
        "minGasLimit": "0x1388",
        "networkID" : "0x2323"
    },
    "genesis": {
      "seal": {
       "authorityRound": {
         "step": "0x0",
          "signature": "0x00000000000000000000000000000000000000000
             000000000000000000000000000000000000000000000000000000
                00000000000000000000000000000000000"
            }
        },
        "difficulty": "0x20000",
        "gasLimit": "0x5B8D80"
    },
    "accounts": {
        "0x0000000000000000000000000000000000000001": { "balance": "1", "builtin": { "name": "ecrecover", "pricing": { "linear": { "base": 3000, "word": 0 } } } },
        "0x0000000000000000000000000000000000000002": { "balance": "1", "builtin": { "name": "sha256", "pricing": { "linear": { "base": 60, "word": 12 } } } },
        "0x0000000000000000000000000000000000000003": { "balance": "1", "builtin": { "name": "ripemd160", "pricing": { "linear": { "base": 600, "word": 120 } } } },
        "0x0000000000000000000000000000000000000004": { "balance": "1", "builtin": { "name": "identity", "pricing": { "linear": { "base": 15, "word": 3 } } } },
        "0x0000000000000000000000000000000000000005": { "balance": "1", "constructor" : "0x606060405260406040519081016040528073831647" },
        "0x004ec07d2329997267Ec62b4166639513386F32E": { "balance": "10000000000000000000000" }
    }
}
Here is how the preceding file works:
Before we proceed further, create another file called as node.pwds. In that file, place the password of the accounts you created. This file will be used by the validators to unlock the accounts to sign the blocks.
Now we have all basic requirements ready to launch our validating nodes. In the first shell, run this command to launch the first validating node:
parity --chain spec.json -d ./validator0 --force-sealing --engine-signer "0x831647ec69be4ca44ea4bd1b9909debfbaaef55c" --port 30300 --jsonrpc-port 8540 --ui-port 8180 --dapps-port 8080 --ws-port 8546 --jsonrpc-apis web3,eth,net,personal,parity,parity_set,traces,rpc,parity_accounts --password "node.pwds"
Here is how the preceding command works:
In the second shell, run this command to launch second validating node:
parity --chain spec.json -d ./validator1 --force-sealing --engine-signer "0x12a6bda0d5f58538167b2efce5519e316863f9fd" --port 30301 --jsonrpc-port 8541 --ui-port 8181 --dapps-port 8081 --ws-port 8547 --jsonrpc-apis web3,eth,net,personal,parity,parity_set,traces,rpc,parity_accounts --password "/Users/narayanprusty/Desktop/node.pwds"
Here, make sure you change the address to the one you generated that is, the address generated on this shell.
Now finally, we need to connect both the nodes. Open a new shell window and run this command to find the URL to connect to the second node:
curl --data '{"jsonrpc":"2.0","method":"parity_enode","params":[],"id":0}' -H "Content-Type: application/json" -X POST localhost:8541
You will get this sort of output:
{"jsonrpc":"2.0","result":"enode://7bac3c8cf914903904a408ecd71635966331990c5c9f7c7a291b531d5912ac3b52e8b174994b93cab1bf14118c2f24a16f75c49e83b93e0864eb099996ec1af9@[::0.0.1.0]:30301","id":0}
Now run this command by replacing the encode URL and IP address in the enode URL to 127.0.0.1:
curl --data '{"jsonrpc":"2.0","method":"parity_addReservedPeer","params":["enode://7ba..."],"id":0}' -H "Content-Type: application/json" -X POST localhost:8540
You should get this output:
{"jsonrpc":"2.0","result":true,"id":0}
The nodes should indicate 0/1/25 peers in the console, which means they are connected to each other. Here is a reference image:
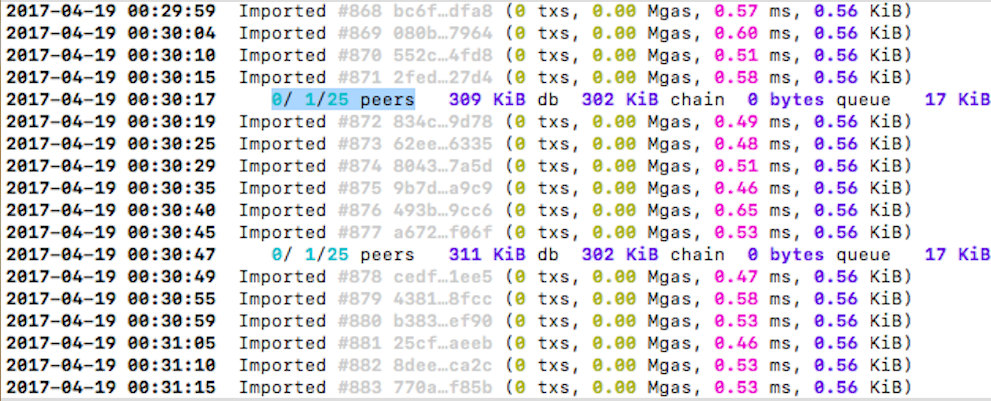
We saw how parity solves the issues of speed and security. Parity currently doesn't provide anything specific to permissioning and privacy. Let's see how to achieve this in parity:
Overall in this chapter, we learned how to use parity and how aura works and some techniques to achieve permissioning and privacy in parity. Now you must be confident enough to at least build a proof-of-concept for a consortium using blockchain. Now you can go ahead and explore other solutions, such as Hyperledger 1.0 and quorum for building consortium blockchains. Currently, Ethereum is officially working on making more suitable for consortiums; therefore, keep a close eye on various blockchain information sources to learn about anything new that comes in the market.
If you enjoyed this book, you may be interested in these other books by Packt:

Hands-On Data Science and Python Machine Learning
Frank Kane
ISBN: 978-1-78728-074-8
Kali Linux Cookbook - Second Edition
Corey P. Schultz, Bob Perciaccante
ISBN: 978-1-78439-030-3
Please share your thoughts on this book with others by leaving a review on the site that you bought it from. If you purchased the book from Amazon, please leave us an honest review on this book's Amazon page. This is vital so that other potential readers can see and use your unbiased opinion to make purchasing decisions, we can understand what our customers think about our products, and our authors can see your feedback on the title that they have worked with Packt to create. It will only take a few minutes of your time, but is valuable to other potential customers, our authors, and Packt. Thank you!
Copyright © 2018 Packt Publishing
All rights reserved. No part of this book may be reproduced, stored in a retrieval system, or transmitted in any form or by any means, without the prior written permission of the publisher, except in the case of brief quotations embedded in critical articles or reviews.
Every effort has been made in the preparation of this book to ensure the accuracy of the information presented. However, the information contained in this book is sold without warranty, either express or implied. Neither the authors, nor Packt Publishing or its dealers and distributors, will be held liable for any damages caused or alleged to have been caused directly or indirectly by this book.
Packt Publishing has endeavored to provide trademark information about all of the companies and products mentioned in this book by the appropriate use of capitals. However, Packt Publishing cannot guarantee the accuracy of this information.
First Published: December 2018
Production Reference: 1171218
Published by Packt Publishing Ltd.
Livery Place, 35 Livery Street
Birmingham, B3 2PB, U.K.
ISBN 978-1-78995-472-2
Mapt is an online digital library that gives you full access to over 5,000 books and videos, as well as industry leading tools to help you plan your personal development and advance your career. For more information, please visit our website.
Spend less time learning and more time coding with practical eBooks and Videos from over 4,000 industry professionals
Improve your learning with Skill Plans built especially for you
Get a free eBook or video every month
Mapt is fully searchable
Copy and paste, print, and bookmark content
Did you know that Packt offers eBook versions of every book published, with PDF and ePub files available? You can upgrade to the eBook version at www.packt.com and as a print book customer, you are entitled to a discount on the eBook copy. Get in touch with us at customercare@packtpub.com for more details.
At www.packt.com, you can also read a collection of free technical articles, sign up for a range of free newsletters, and receive exclusive discounts and offers on Packt books and eBooks.
Brenn Hill is a senior software engineer who has worked with clients such as NASCAR, PGA Tour, Time Warner Cable, and many others. He has experience leading international teams on cannot fail engineering projects. He strives to work with business to ensure that tech projects achieve good ROI and solve key business problems. He has a master's degree in Information Science from UNC-CH and currently travels the world as a digital nomad.
Samanyu Chopra is a developer, entrepreneur, and Blockchain supporter with wide experience of conceptualizing, developing, and producing computer and mobile software. He has been programming since the age of 11. He is proficient in programming languages such as JavaScript, Scala, C#, C++, Swift, and so on. He has a wide range of experience in developing for computers and mobiles. He has been a supporter of Bitcoin and blockchain since its early days and has been part of wide-ranging decentralized projects for a long time. You can write a tweet to him at @samdonly1.
Paul Valencourt is CFO of BlockSimple Solutions. He currently helps people launch STOs and invest in cryptocurrency mining.
Narayan Prusty is the founder and CTO of BlockCluster, world's first blockchain management system. He has five years of experience in blockchain. He specializes in Blockchain, DevOps, Serverless, and JavaScript. His commitment has led him to build scalable products for start-ups, governments, and enterprises across India, Singapore, USA, and UAE. He is enthusiastic about solving real-world problems. His ability to build scalable applications from top to bottom is what makes him special. Currently, he is on a mission to make things easier, faster, and cheaper using blockchain. Also, he is looking at ways to prevent corruption, fraud, and to bring transparency to the world using blockchain.
If you're interested in becoming an author for Packt, please visit authors.packtpub.com and apply today. We have worked with thousands of developers and tech professionals, just like you, to help them share their insight with the global tech community. You can make a general application, apply for a specific hot topic that we are recruiting an author for, or submit your own idea.
Getting Started with Blockchain takes you through the electrifying world of blockchain technology. It begins with the basic design of a blockchain and elaborates concepts, such as Initial Coin Offerings (ICOs), tokens, smart contracts, and other related terminologies of the blockchain technology. You will then explore the components of Ethereum, such as ether tokens, transactions, and smart contracts that you need to build simple DApps.
This Learning Path also explains why you must specifically use Solidity for Ethereum-based projects and lets you explore different blockchains with easy-to-follow examples. You will learn a wide range of concepts - beginning with cryptography in cryptocurrencies and including ether security, mining, and smart contracts. You will learn how to use web sockets and various API services for Ethereum.
By the end of this Learning Path, you will be able to build efficient decentralized applications.
This Learning Path includes content from the following Packt products:
Getting Started with Blockchain is for you if you want to get to grips with the blockchain technology and develop your own distributed applications. It is also designed for those who want to polish their existing knowledge regarding the various pillars of the blockchain ecosystem. Prior exposure to an object-oriented programming language such as JavaScript is needed.
Chapter 1, Blockchain 101, explains what blockchain technologies are and how they work. We also introduce the concept of the distributed ledger.
Chapter 2, Components and Structure of Blockchain, takes a closer look at the technical underpinnings of a blockchain and peeks under the hood to understand what a block is and how the chain is created.
Chapter 3, Decentralization Versus Distributed Systems, covers different types of decentralized and distributed systems and cover the often-overlooked differences between them.
Chapter 4, Cryptography and Mechanics Behind Blockchain, discusses the fundamentals of cryptographic systems which are critical to the proper functioning of all blockchains.
Chapter 5, Bitcoin, examine Bitcoin, the first blockchain, and it's specific mechanics in depth.
Chapter 6, Altcoins, covers the major non-bitcoin cryptocurrency projects that have gained popularity over the last few years.
Chapter 7, Achieving Consensus, looks into the different ways blockchains help achieve consensus. This is one of the most important aspects of blockchain behavior.
Chapter 8, Advanced Blockchain Concepts, covers the interactions between blockchain technology, privacy, and anonymity along with some of the legal side effects of blockchain technology.
Chapter 9, Cryptocurrency Wallets, covers the different wallet solutions that exist for keeping your cryptocurrency secure.
Chapter 10, Alternate Blockchains, examine blockchain creation technologies such as Tendermint and Graphene, and other non-currency based blockchain technologies.
Chapter 11, Hyperledger and Enterprise Blockchains, examine the Hyperledger family of distributed ledger technologies aimed at corporate and enterprise use.
Chapter 12, Ethereum 101, look at Ethereum, the second most dominant blockchain technology today.
Chapter 13, Solidity 101, cover the basics of Solidity, the Ethereum programming language.
Chapter 14, Smart Contracts, covers the smart contracts, which are enabled in different ways by different blockchain technologies.
Chapter 15, Ethereum Accounts and Ether Tokens, in this chapter, we look at the mechanics of Ethereum accounts and the token itself in the Ethereum system.
Chapter 16, Decentralized Applications, discusses decentralized applications as a whole, including ones that operate without a blockchain or in tandem with blockchain technologies.
Chapter 17, Mining, we cover blockchain mining and how this is used to secure blockchains, the different types of hardware used in mining, and the different protocols involved.
Chapter 18, ICO 101, we cover the basics of launching an Initial Coin Offering or Initial Token Offering.
Chapter 19, Creating Your Own Currency, we cover the creation of your own blockchain based cryptocurrency.
Chapter 20, Scalability and Other Challenges, covers the difficulties and limitations currently facing blockchain technology.
Chapter 21, Future of Blockchain, we examine the possible future developments of the industry technologically, legally, and socially.
Chapter 22, Understanding Decentralized Applications, will explain what DApps are and provide an overview of how they work.
Chapter 23, Understanding How Ethereum Works, explains how Ethereum works.
Chapter 24, Writing Smart Contracts, shows how to write smart contracts and use geth's interactive console to deploy and broadcast transactions using web3.js.
Chapter 25, Getting Started with web3.js, introduces web3js and how to import, connect to geth, and explains use it in Node.js or client-side JavaScript.
Chapter 26, Building a Wallet Service, explains how to build a wallet service that users can create and manage Ethereum Wallets easily, even offline. We will specifically use the LightWallet library to achieve this.
Chapter 27, Building a Smart Contract Deployment Platform, shows how to compile smart contracts using web3.js and deploy it using web3.js and EthereumJS.
Chapter 28, Building a Betting App, explains how to use Oraclize to make HTTP requests from Ethereum smart contracts to access data from World Wide Web. We will also learn how to access files stored in IPFS, use the strings library to work with strings, and more.
Chapter 29, Building Enterprise Level Smart Contracts, explains how to use Truffle, which makes it easy to build enterprise-level DApps. We will learn about Truffle by building an alt-coin.
Chapter 30, Building a Consortium Blockchain, we will discuss consortium blockchain.
To complete this book successfully, students will require computer systems with at least an Intel Core i5 processor or equivalent, 8 GB RAM, and 35 GB available storage space. Along with this, you would require the following software:
You can download the example code files for this book from your account at www.packt.com. If you purchased this book elsewhere, you can visit www.packt.com/support and register to have the files emailed directly to you.
You can download the code files by following these steps:
Once the file is downloaded, please make sure that you unzip or extract the folder using the latest version of:
The code bundle for the book is also hosted on GitHub at https://github.com/TrainingByPackt/Blockchain-Developers-Guide. In case there's an update to the code, it will be updated on the existing GitHub repository.
We also have other code bundles from our rich catalog of books and videos available at https://github.com/PacktPublishing/. Check them out!
There are a number of text conventions used throughout this book.
CodeInText: Indicates code words in text, database table names, folder names, filenames, file extensions, pathnames, dummy URLs, user input, and Twitter handles. Here is an example: "The WebDriver class provides constructors for each browser."
A block of code is set as follows:
difficulty = difficulty_1_target/current_target difficulty_1_target = 0x00000000FFFF0000000000000000000000000000000000000000000000000000
When we wish to draw your attention to a particular part of a code block, the relevant lines or items are set in bold:
COMMANDS:
list Print summary of existing accounts
new Create a new account
update Update an existing account
import Import a private key into a new account
Bold: Indicates a new term, an important word, or words that you see onscreen. For example, words in menus or dialog boxes appear in the text like this. Here is an example: "If a user clicks on the Your Account option on the Home Webpage, the application will check whether they have already logged in."
Feedback from our readers is always welcome.
General feedback: If you have questions about any aspect of this book, mention the book title in the subject of your message and email us at customercare@packtpub.com.
Errata: Although we have taken every care to ensure the accuracy of our content, mistakes do happen. If you have found a mistake in this book, we would be grateful if you would report this to us. Please visit www.packt.com/submit-errata, selecting your book, clicking on the Errata Submission Form link, and entering the details.
Piracy: If you come across any illegal copies of our works in any form on the Internet, we would be grateful if you would provide us with the location address or website name. Please contact us at copyright@packt.com with a link to the material.
If you are interested in becoming an author: If there is a topic that you have expertise in and you are interested in either writing or contributing to a book, please visit authors.packtpub.com.
Please leave a review. Once you have read and used this book, why not leave a review on the site that you purchased it from? Potential readers can then see and use your unbiased opinion to make purchase decisions, we at Packt can understand what you think about our products, and our authors can see your feedback on their book. Thank you!
For more information about Packt, please visit packt.com.
Since its inception in 2008, blockchain has been a keen topic of interest for everyone in finance, technology, and other similar industries. Apart from bringing a new overview to record keeping and consensus, blockchain has enormous potential for disruption in most industries. Early adopters, enthusiasts, and now governments and organizations are exploring the uses of blockchain technology.
In this book, we will discuss the basics of financial transactions using fiat money to create our own cryptocurrency based on Ether tokens, and, in so doing, we will try to cover the majority of topics surrounding blockchain. We will be discussing Ethereum-based blockchains, Hyperledger projects, wallets, altcoins, and other exciting topics necessary to understand the functioning and potential of blockchain.
In this chapter, we will discuss the following:
Let's start by discussing each of the preceding listed topics and other important details surrounding them.
Before we dig deeper into blockchain-based transactions, it is helpful to know about how financial transactions actually happen and the functioning of fiat money.
Fiat money is entirely based on the credit of the economy; by definition, it is the money declared legal tender by the government. Fiat money is worthless without a guarantee from the government.
Another type of money is commodity money; it is derived from the commodity out of which the good money is made. For example, if a silver coin is made, the value of the coin would be its value in terms of silver, rather than the defined value of the coin. Commodity money was a convenient form of trade in comparison to the barter system. However, it is prone to huge fluctuations in price.
Commodity money proved to be difficult to carry around, so, instead, governments introduced printed currency, which could be redeemed from the government-based banks for actual commodity, but then, even that proved to be difficult for the government to manage, and it introduced fiat-based currency, or faith-based currency.
Having fiat-based currencies incurred a lot of third-party consensus during its time; this would help eradicate fraud from the system. It is also necessary to have a stringent consensus process to make sure that the process, as well as the privacy, is maintained within the system. The following diagram depicts the process of a credit card-based payment process:
A ledger is a record for economic transactions that includes cash, accounts receivable, inventory, fixed assets, accounts payable, accrued expenses, debt, equity, revenue, costs, salaries, wages, expenses, depreciation, and so on. In short, the book in which accounts are maintained is called a ledger. It is the primary record used by banks and other financial institutions to reconcile book balances. All the debits and credits during an accounting period are calculated to make the ledger balance.
The financial statements of banks, financial institutions, and enterprises are compiled using ledger accounts.
While doing a financial transaction using fiat currency, we have a third-party ledger that maintains information about every transaction. Some of these third-party trust systems are VISA, MasterCard, banks, and so on.
Blockchain has changed the landscape of this trustless system by making everyone part of the ledger. Hence, it is sometimes even called a distributed ledger; everybody doing a transaction in blockchain has a record of other transactions that have happened or are happening in the blockchain-based Bitcoin system. This decentralized ledger gives multiple authenticity points for every transaction that has happened; plus, the rules are pre-defined and not different for each wallet user.
On a further note, blockchain does not actually eliminate trust; what it does is minimize the amount of trust and distributes it evenly across the network. A specific protocol is defined using various rules that automatically encourage patrons on the basis of the rules followed. We will be discussing this in depth in later chapters.
The whitepaper released by Bitcoin's founder or a group of founders called Satoshi Nakamoto, in 2008, described Bitcoin as a purely peer-to-peer version of electronic cash. Blockchain was introduced along with Bitcoin. During the initial stages, blockchain was only used with Bitcoin for Bitcoin-based financial transactions.
Blockchain not only restricts financial transactions in Bitcoin, but in general any transaction between two parties that is maintained by the open, decentralized ledger. Most importantly, this underlying technology can be separated and can have other applications create a surge in the number of experiments and projects surrounding the same.
Numerous projects inspired by blockchain started, such as Ethereum, Hyperledger, and so on, along with currencies such as Litecoin, Namecoin, Swiftcoin, and so on.
Blockchain at its core is a distributed and decentralized open ledger that is cryptographically managed and updated various consensus protocols and agreements among its peers. People can exchange values using transactions without any third party being involved, and the power of maintaining the ledger is distributed among all the participants of the blockchain or the node of the blockchain, making it a truly distributed and decentralized system.
Some of the industry verticals using blockchain are as follows:
Furthermore, we will be discussing various other elements of blockchain and what other problems blockchain can solve.
It is time to discuss the general elements of blockchain, starting from its basic structure to its formation and further details on the same.
This is a type of network whereby all peers can communicate with one another and are equally entitled, without the need for central coordination by servers or hosts. In conventional networks, the systems are connected to a central server, and this server acts as a central point for communication among the systems. On the other hand, in a peer-to-peer network, all the systems are connected to one another evenly, with no system having central authority. Look at this diagram:
A block is the smallest element of a blockchain; the first block is called the genesis block. Each block contains batches of hashed and encoded transactions. The blocks are stored in a Merkle tree formation. Every block includes the hash of the previous block in the chain that links all blocks to one another. In Bitcoin, a block contains more than 500 transactions on average. The average size of a block is around 1 MB. A block is comprised of a header and a list of transactions.
The block header of a block in Bitcoin comprises of metadata about the block. Consider the following:
Addresses are unique identifiers that are used in a transaction on the blockchain to send data to another address; in the case of Bitcoins, addresses are identifiers that are used to send or receive Bitcoins. Bitcoin blockchain addresses have evolved from time to time. Originally, IP addresses were used as the Bitcoin address, but this method was prone to serious security flaws; hence, it was decided to use P2PKH as a standard format. A P2PKH address consists of 34 characters, and its first character is integer 1. In literal terms, P2PKH means Pay to Public Key Has. This is an example of a Bitcoin address based on P2PKH: 1PNjry6F8p7eaKjjUEJiLuCzabRyGeJXxg.
Now, there is another advanced Bitcoin protocol to create a P2SH address, which means Pay to Script Hash. One major difference with a P2SH address is that it always starts with integer 3 instead of 1.
A wallet is a digital wallet used to store public or private keys along with addresses for a transaction. There are various types of wallets available, each one offering a certain level of security and privacy.
Here is a list of the various types of wallets, based on their functions:
It is important to understand the functioning and the need for various wallets along with the requirement for each.
A transaction is the process of transferring data from one address in blockchain to another address. In Bitcoin, it is about transferring Bitcoins from one address to another address. All the transactions happening in blockchain are registered from the start of the chain till the current time; this information is shared across the network and all the P2P nodes. The transaction is confirmed by miners, who are economically compensated for their work.
Each transaction in a blockchain goes through a number of confirmations, as they are the consensus of a transaction. Without confirmation, no transaction can be validated.
Nodes are part of a blockchain network and perform functions as assigned to them. Any device connected to the Bitcoin network can be called a node. Nodes that are integral components of the network and validate all the rules of the blockchain are called full nodes. Another type of Node is called a super node, which acts as a highly connected redistribution point, as well as a relay station.
A blockchain performs various functions. We will discuss each of them briefly here and in detail later:
The following diagram depicts the difference between centralized, decentralized, and distributed networks:
Being distributed in nature, blockchain offers lots of out-of-the-box features, such as high stability, security, scalability, and other features discussed previously.
Considering the way blockchain has evolved, we can classify blockchain into multiple types; these types define the course of blockchain and make it go beyond the use of P2P money. The following diagram displays the different types of blockchain networks currently available or proposed.
We will now discuss each type of blockchain network in detail.
A public blockchain is a blockchain where anyone in the world can become a node in the transaction process. Economic incentives for cryptographic verification may or may not be present. It is a completely open public ledger system. Public blockchains can also be called permissionless ledgers.
These blockchains are secured by crypto economics, that is, economic incentives and cryptographic verification using mechanisms such as PoW or PoS or any other consensus mechanism. Some popular examples of this type of blockchain are Bitcoin, Ethereum, Litecoin, and so on.
A semi-private blockchain is usually run by a single organization or a group of individuals who grant access to any user, who can either be a direct consumer or for internal organizational purposes. This type of blockchain has a public part exposed to the general audience, which is open for participation by anyone.
In private blockchains, the write permissions are with one organization or with a certain group of individuals. Read permissions are public or restricted to a large set of users. Transactions in this type of blockchain are to be verified by very few nodes in the system.
Some prime examples of private blockchain include Gem Health network, Corda, and so on.
In this type of blockchain, as the name suggests, the consensus power is restricted to a set of people or nodes. It can also be known as a permission private blockchain. Transaction approval time is fast, due to fewer nodes. Economic rewards for mining are not available in these types of blockchains.
A few examples of consortium-based blockchains are Deutsche Boerse and R3 (financial institutions).
This is one of the classic problems faced by various computer networks, which until recently had no concrete solution. This problem is called Byzantine Generals' Problem (BGP). The problem at its root is about consensus, due to mistrust in the nodes of a network.
Let's imagine that various generals are leading the Byzantine army and are planning to attack a city, with each general having his own battalion. They have to attack at the same time to win. The problem is that one or more of generals can be disloyal and communicate a duping message. Hence, there has to be a way of finding an efficient solution that helps to have seamless communication, even with deceptive generals.
This problem was solved by Castro and Liskov, who presented the Practical Byzantine Fault Tolerance (PBFT) algorithm. Later, in 2009, the first practical implementation was made with the invention of Bitcoin by the development of PoW as a system to achieve consensus.
We will be discussing in detail the BGP in later chapters.
Consensus is the process of reaching a general agreement among nodes within a blockchain. There are various algorithms available for this especially when it is a distributed network and an agreement on a single value is required.
Mechanisms of consensus: Every blockchain has to have one mechanism that can handle various nodes present in the network. Some of the prime mechanisms for consensus by blockchain are the following:
All the preceding algorithms and a host of already available or currently under research make sure that the perfect consensus state is achieved and no possible security threats are present on the network.
It is time to discuss the benefits as well as the challenges or limitations faced by blockchain technology, and what steps are being taken by the community as a whole.
If it's all about trust and security, do we really need a trusted system, even after everything is already highly secure and private? Let's go through the limitations of each of the existing ecosystems where blockchain is a perfect fit.
Record keeping and ledger maintenance in the banking sector is a time and resource-consuming process and is still prone to errors. In the current system, it is easy to move funds within a state, but when we have to move funds across borders, the main problems faced are time and high costs.
Even though most money is just an entry in the database, it still incurs high forex costs and is incredibly slow.
There are lot of problems in record keeping, authentication and transferring of records at a global scale, even after having electronic records, are difficult when implemented practically. Due to no common third party, a lot of records are maintained physically and are prone to damage or loss.
During a case of epidemiology, it becomes essential to access and mine medical records of patients pertaining to a specific geography. Blockchain comes as a boon in such situation, since medical records can be easily accessible if stored in the blockchain, and they are also secure and private for the required users.
Any government agency has to deal with a lot of records for all of its departments; new filings can be done on blockchain, making sure that the data remains forever secure and safe in a distributed system.
This transparency and distributed nature of data storage leads to a corruption-free system, since the consensus makes sure the participants in the blockchain are using the required criteria when needed.
Copyright and creative records can be secured and authenticated, keeping a tab on copyright misuse and licensing.
One premier example of this is KodakCoin, which is a photographer-oriented cryptocurrency based on blockchain, launched to be used for payments of licensing photographs.
Verification, authentication, and inspection is hard. It is highly prone to theft and misuse. Blockchain can offer a great semi-private access to the records, making sure signing of degrees is done digitally using blockchain.
Gradual record keeping of degrees and scores will benefit efficient utilization of resources as well as proper distribution and ease in inspection process.
The preceding are just some of the varied use cases of blockchain, apart from Bitcoins and alternative cryptocurrencies. In the coming chapters, we will be discussing these points in much more detail.
As with any technology, there are various challenges and limitations of blockchain technology. It is important to address these challenges and come up with a more robust, reliable, and resourceful solution for all. Let's briefly discuss each of these challenges and their solutions.
Blockchain is complex to understand and easy to implement.
However, with widespread awareness and discussions, this might be made easier in the future.
If a blockchain does not have a robust network with a good grid of nodes, it will be difficult to maintain the blockchain and provide a definite consensus to the ongoing transactions.
Although blockchain-based transactions are very high in speed and also cheaper when compared to any other conventional methods, from time to time, this is becoming difficult, and the speed reduces as the number of transactions per block reduces.
In terms of cost, a lot of hardware is required, which in turn leads to huge network costs and the need for an intermittent network among the nodes.
Various scaling solutions have been presented by the community. The best is increasing the block size to achieve a greater number of transactions per block, or a system of dynamic block size. Apart from this, there are various other solutions also presented to keep the speed reduced and the costs in check.
This is a type of attack on the blockchain network whereby a given set of coins is spent in more than one transaction; one issue that was noted here by the founder/founders of Bitcoin at the time of launch is 51 attacks. In this case, if a certain miner or group of miners takes control of more than half of the computing power of blockchain, being open in nature, anyone can be a part of the node; this triggers a 51 attack, in which, due to majority control of the network, the person can confirm a wrong transaction, leading to the same coin being spent twice.
Another way to achieve this is by having two conflicting transactions in rapid succession in the blockchain network, but if a lot of confirmations are achieved, then this can be avoided.
There are various other features that will be discussed in the coming chapters, it should be noted that all of these features exist in the present systems but considering active community support, all these limitations are being mitigated at a high rate.
This chapter introduced us to blockchain. First, ideas about distributed networks, financial transactions, and P2P networks were discussed. Then, we discussed the history of blockchain and various other topics, such as the elements of blockchain, the types of blockchains, and consensus.
In the coming chapters, we will be discussing blockchain in more detail; we will discuss the mechanics behind blockchain, Bitcoins. We will also learn about achieving consensus in much greater detail, along with diving deep into blockchain-based applications such as wallets, Ethereum, Hyperledger, all the way to creating your own cryptocurrency.
Blockchain is not a single technology, but more of a technique. A blockchain is an architectural concept, and there are many ways that blockchains can be built, and each of the variations will have different effects on how the system operates. In this chapter, we are going to cover the aspects of blockchain technology that are used in all or most of the current implementations.
By the end of this chapter, you should be able to describe the pieces of a blockchain and evaluate the capacities of one blockchain technology against another at the architectural level.
Here are the concepts we will be covering:
Blockchain is a specific technology, but there are many forms and varieties. For instance, Bitcoin and Ethereum are proof-of-work blockchains. Ethereum has smart contracts, and many blockchains allow custom tokens. Blockchains can be differentiated by their consensus algorithm (PoS, PoW, and others)—covered in Chapter 7, Achieving Consensus, and their feature set, such as the ability to run smart contracts and how those smart contracts operate in practice. All of these variations have a common concept: the block. The most basic unit of a blockchain is the block. The simplest way of thinking of a block is to imagine a basic spreadsheet. In it, you might see entries such as this:
| Account | Change | New Balance | Old Balance | Operation |
| Acct-9234222 | −$2,000 | $5,000 | $7,000 | Send funds to account-12345678 |
| Acct-12345678 | $2,000 | $2,000 | 0 | Receive funds from account-9234222 |
| Acct-3456789 | -$200 | $50 | $250 | Send funds to account-68890234 |
| Acct-68890234 | $200 | $800 | $600 | Receive funds from account-3456789 |
A block is a set of transaction entries across the network, stored on computers that act as participants in the blockchain network. Each blockchain network has a block time, or the approximate amount of time that each block represents for transactions, and a block size: the total amount of transactions that a block can handle no matter what. If a network had a block time of two minutes and there were only four transactions during those two minutes, then the block would contain just those four transactions. If a network had 10,000,000 transactions, then there may be too many to fit inside the block size. In this case, transactions would have to wait for their turn for an open block with remaining space. Some blockchains handle this problem with the concept of network fees. A network fee is the amount (denominated in the blockchain's native token) that a sender is willing to pay to have a transaction included in a block. The higher the fee, the greater the priority to be included on the chain immediately.
In addition to the transaction ledger, each block typically contains some additional metadata. The metadata includes the following:
These basics tend to be common for all blockchains. Ethereum, Bitcoin, Litecoin, and others use this common pattern, and this pattern is what makes it a chain. Each chain also tends to include other metadata that is specific to that ecosystem, and those differences will be discussed in future chapters. Here is an example from the Bitcoin blockchain:
If you are asking, What is a Merkle root? that brings us to our next set of key concepts: hashing and signature.
Let's say you have two text files that are 50 pages long. You want to know whether they are the same or different. One way you could do this would be to hash them. Hashing (or a hashing function) is a mathematical procedure by which any input is turned into a fixed-length output. There are many of these functions, the most common being SHA-1, SHA-2, and MD5. For instance, here is the output of a hashing function called MD5 with an input of two pages of text:
9a137a78cf0c364e4d94078af1e221be
What's powerful about hashing functions is what happens when I add a single character to the end and run the same function:
8469c950d50b3394a30df3e0d2d14d74
As you can see, the output is completely different. If you want to quickly prove that some data has not been changed in any way, a hash function will do it. For our discussion, here are the important parts of hashing functions:
This recursive property to hashing is what brings us to the concept of a Merkle tree, named after the man who patented it. A Merkle tree is a data structure that, if your were to draw it on a whiteboard, tends to resemble a tree. At each step of the tree, the root node contains a hash of the data of its children. The following is a diagram of a Merkle tree:
In a blockchain, this means that there is a recursive hashing process happening. A recursive hash is when we take a hash of hashes. For instance, imagine we have the following words and their hashes. Here, we will use the MD5 algorithm, because it is easy to find MD5 hashing code on the web, so you can try for yourself:
Salad: c2e055acd7ea39b9762acfa672a74136
Fork: b2fcb4ba898f479790076dbd5daa133f
Spoon: 4b8e23084e0f4d55a47102da363ef90c
To take the recursive or the root hash, we would add these hashes together, as follows:
c2e055acd7ea39b9762acfa672a74136b2fcb4ba898f479790076dbd5daa133f4b8e23084e0f4d55a47102da363ef90c
Then we would take the hash of that value, which would result in the following:
189d3992be73a5eceb9c6f7cc1ec66e1
This process can happen over and over again. The final hash can then be used to check whether any of the values in the tree have been changed. This root hash is a data efficient and a powerful way to ensure that data is consistent.
Each block contains the root hash of all the transactions. Because of the one-way nature of hashing, anyone can look at this root hash and compare it to the data in the block and know whether all the data is valid and unchanged. This allows anyone to quickly verify that every transaction is correct. Each blockchain has small variations on this pattern (using different functions or storing the data slightly differently), but the basic concept is the same.
Now that we've covered hashing, it's time to go over a related concept: digital signatures. Digital signatures use the properties of hashing to not only prove that data hasn't changed but to provide assurances of who created it. Digital signatures work off the concept of hashing but add a new concept as well: digital keys.
All common approaches to digital signatures use what is called Public Key Cryptography. In Public Key Cryptography, there are two keys: one public and one private. To create a signature, the first hash is produced of the original data, and then the private key is used to encrypt that hash. That encrypted hash, along with other information, such as the encryption method used to become part of the signature, are attached to the original data.
This is where the public key comes into play. The mathematical link between the public key and the private key allows the public key to decrypt the hash, and then the hash can be used to check the data. Thus, two things can now be checked: who signed the data and that the data that was signed has not been altered. The following is a diagrammatic representation of the same:
This form of cryptography is critical to blockchain technology. Through hashing and digital signatures, a blockchain is able to record information both on actions (movement of tokens) as well as prove who initiated those actions (via digital signatures).
Let's create an example of how this would look. Jeremy and Nadia wish to send messages to each other securely. Each publishes a public key. Jeremy's will look something as follows (using an RSA algorithm with 1,024 bits):
-----BEGIN PUBLIC KEY-----
MIGeMA0GCSqGSIb3DQEBAQUAA4GMADCBiAKBgH+CYOAgKsHTrMlsaZ32Gpdfo4pw
JRfHu5d+KoOgbmYb0C2y1PiHNGEyXgd0a8iO1KWvzwRUMkPJr7DbVBnfl1YfucNp
OjAsUWT1pq+OVQ599zecpnUpyaLyg/aW9ibjWAGiRDVXemj0UgMUVNHmi+OEuHVQ
ccy5eYVGzz5RYaovAgMBAAE=
-----END PUBLIC KEY-----
With that key, he will keep private another key, which looks as follows:
-----BEGIN RSA PRIVATE KEY-----
MIICWwIBAAKBgH+CYOAgKsHTrMlsaZ32Gpdfo4pwJRfHu5d+KoOgbmYb0C2y1PiH
NGEyXgd0a8iO1KWvzwRUMkPJr7DbVBnfl1YfucNpOjAsUWT1pq+OVQ599zecpnUp
yaLyg/aW9ibjWAGiRDVXemj0UgMUVNHmi+OEuHVQccy5eYVGzz5RYaovAgMBAAEC
gYBR4AQYpk8OOr9+bxC6j2avwIegwzXuOSBpvGfMMV3yTvW0AlriYt7tcowSOV1k
YOKGqYdCflXwVTdtVsh//KSNiFtsLih2FRC+Uj1fEu2zpGzErhFCN2sv1t+2wjlk
TRY78prPNa+3K2Ld3NJse3gmhodYqRkxFFxlCmOxTzc4wQJBAOQ0PtsKCZwxRsyx
GAtULHWFIhV9o0k/DjLw5rreA8H3lb3tYZ5ErYuhS0HlI+7mrPUqzYaltG6QpJQY
YlMgktECQQCPClB1xxoIvccmWGoEvqG07kZ4OBZcBmgCzF6ULQY4JkU4k7LCxG4q
+wAeWteaP+/3HgS9RDQlHGITAmqhW6z/AkBaB16QzYnzC+GxmWAx//g2ONq0fcdw
eybf4/gy2qnC2SlDL6ZmaRPKVUy6Z2rgsjKj2koRB8iCIiA7qM8Jmn0xAkBzi9Vr
DqaNISBabVlW89cUnNX4Dvag59vlRsmv0J8RhHiuN0FT6/FCbvetjZxUUgm6CVmy
ugGVaNQgnvcb2T5pAkEAsSvEW6yq6KaV9NxXn4Ge4b9lQoGlR6xNrvGfoxto79vL
7nR29ZB4yVFo/kMVstU3uQDB0Pnj2fOUmI3MeoHgJg==
-----END RSA PRIVATE KEY-----
In the meantime, Nadia will do the same, resulting in the following two keys:
-----BEGIN PUBLIC KEY-----
MIGfMA0GCSqGSIb3DQEBAQUAA4GNADCBiQKBgQDHWwgTfI5Tic41YjUZqTmiKt+R
s5OMKIEdHPTyM8FZNaOBWIosFQbYk266V+R7k9odTnwCfi370GOt0k5MdTQilb9h
bK/lYiavIltgBd+1Em7xm7UihwO4th5APcg2vG4sppK41b1a9/I5E6P/jpQ320vF
BMuEtcnBoWawWcbXJwIDAQAB
-----END PUBLIC KEY-----
This is her private key:
-----BEGIN RSA PRIVATE KEY-----
MIICXQIBAAKBgQDHWwgTfI5Tic41YjUZqTmiKt+Rs5OMKIEdHPTyM8FZNaOBWIos
FQbYk266V+R7k9odTnwCfi370GOt0k5MdTQilb9hbK/lYiavIltgBd+1Em7xm7Ui
hwO4th5APcg2vG4sppK41b1a9/I5E6P/jpQ320vFBMuEtcnBoWawWcbXJwIDAQAB
AoGBAKz9FCv8qHBbI2H1f0huLQHInEoNftpfh3Jg3ziQqpWj0ub5kqSf9lnWzX3L
qQuHB/zoTvnGzlY1xVlfJex4w6w49Muq2Ggdq23CnSoor8ovgmdUhtikfC6HnXwy
PG6rtoUYRBV3j8vRlSo5PtSRD+H4lt2YGhQoXQemwlw+r5pRAkEA+unxBOj7/sec
3Z998qLWw2wV4p9L/wCCfq5neFndjRfVHfDtVrYKOfVuTO1a8gOal2Tz/QI6YMpJ
exo9OEbleQJBAMtlimh4S95mxGHPVwWvCtmxaFR4RxUpAcYtX3R+ko1kbZ+4Q3Jd
TYD5JGaVBGDodBCRAJALwBv1J/o/BYIhmZ8CQBdtVlKWCkk8i/npVVIdQB4Y7mYt
Z2QUwRpg4EpNYbE1w3E7OH27G3NT5guKsc4c5gcyptE9rwOwf3Hd/k9N10kCQQCV
YsCjNidS81utEuGxVPy9IqWj1KswiWu6KD0BjK0KmAZD1swCxTBVV6c6iJwsqM4G
FNm68kZowkhYbc0X5KG1AkBp3Rqc46WBbpE5lj7nzhagYz5Cb/SbNLSp5AFh3W5c
sjsmYQXfVtw9YuU6dupFU4ysGgLBpvkf0iU4xtGOFvQJ
-----END RSA PRIVATE KEY-----
With these keys, Jeremy decides to send a message to Nadia. He uses her key and encrypts the following message: I love Bitcoin, which results in the following data:
EltHy0s1W1mZi4+Ypccur94pDRHw6GHYnwC+cDgQwa9xB3EggNGHfWBM8mCIOUV3iT1uIzD5dHJwSqLFQOPaHJCSp2/WTSXmWLohm5EAyMOwKv7M4gP3D/914dOBdpZyrsc6+aD/hVqRZfOQq6/6ctP5/3gX7GHrgqbrq/L7FFc=
Nobody can read this, except Nadia. Using the same algorithm, she inputs this data and her private key, and gets the following message:
I love Bitcoin.
We'll discuss more about this topic in Chapter 4, Cryptography and the Mechanics Behind Blockchain.
In this section, we are going to examine the data structures that are used in blockchains. We will be looking primarily at Ethereum, Bitcoin, and Bitshares blockchains to see key commonalities and differences.
Here is the data from an example Ethereum block, from block 5223669:
If you remember, at the beginning of the chapter, we said there were three things common to blockchains: the reference to the prior block, the Hash of the transactions in the block, and network-specific metadata. In this block from the Ethereum network, all three are present. The reference to the prior block is contained by the block height and parent hash values. The Hash of the transactions is the hash entry, and the metadata is everything else, which will be network specific.
Here is a snapshot of a Bitcoin block:
Both Bitcoin and Ethereum are PoW chains; let's look now at a Proof of Stake (POS) ecosystem: Bitshares.
Here is some data from a Bitshares block:
Despite a radically different architecture, the fundamentals remain: references to a previous block, Merkle root, and network metadata. In Bitshares, you can also see that there is a Witness Signature. As a PoS blockchain, Bitshares has validators (they are called witnesses). Here, we see the witness and signature of the computer responsible for calculating this block.
One of the key properties of blockchain technology is that it can act as a trusted global state. There are many applications where a trusted global state is important but difficult, such as financial technology and logistics.
For instance, a few years ago, I ordered some camera equipment online. A few days later, I came home and was surprised to find that my equipment had arrived. I was so thankful that the expensive equipment sitting outside had not been stolen. It was only the next day that I received an email from the seller alerting me that the package had been shipped.
Here is a clear breakdown of the global state. The truth was that the camera was already on a truck, but neither I nor the shipper had that information stored properly. If the camera equipment had been stolen from my porch, it would have been very hard to discover what had happened.
If the seller, the logistics company, and I were all writing and reading data from a blockchain, this would have been impossible. When the logistics company registered the shipment, the state of the object would have changed, and both the seller and I would have known as soon as the next block was finalized.
As discussed before, each blockchain has a block time and a block size. Each network can have very different values and ways of handling block time. In Bitcoin, for instance, the block time is 10 minutes, while with Ethereum the block time is 20 seconds. In Stellar, the block time is about 4 seconds. These block times are determined by the code that runs the network. For networks such as Bitcoin, Litecoin, and Ethereum, the block time is actually an average. Because these are PoW networks, the block is finished once a miner solves the mining puzzle, which allows them to certify the block. In these networks, the difficulty of the puzzle is automatically adjusted so that on average the desired block time is reached.
The block size is the maximum amount of information that can be stored in each block. For Bitcoin, this is 1 MB of data's worth of transactions. For Ethereum, the limit is actually measured in GAS, a special unit of measuring both processing power (since Ethereum has smart contracts) as well as storage. Unlike Bitcoin, the GAS/storage limit for each block is not fixed but is instead adjusted by the miners dynamically.
It's important to note that blocks contain only possible information until they are finalized by the network. For instance, 1,000 transactions might happen, but if only 500 make it on to the next block, then only those 500 are real. The remaining transactions will continue to wait to be included in a future block.
Blockchain miners and blockchain validators (see the upcoming sections) both have to do with consensus, which will be explored in depth in Chapter 7, Achieving Consensus. Generally, blockchain miners are associated with blockchains. A PoW chain functions by having the computers that are miners compete to do the work needed to certify a block in the chain. Currently, the only major PoW blockchains are Bitcoin, Litecoin, and Ethereum. Most other systems use a variation of PoS consensus, which we will discuss in the next Blockchain validators section. We'll cover how mining works in detail in Chapter 17, Mining.
Blockchain validators are used by PoS systems. A PoS system works by requiring computers that wish to participate in the network to have stake—a large number of tokens—to assist in the blockchain. Unlike PoW algorithms, computers cannot join the network and expect to have any say in consensus. Rather, they must buy in through token ownership. Depending on the network, the naming convention for validators might be different. Tendermint has validators, Steemit and Bitshares have witnesses, Cardano has stakeholders, and so on. A validator is a computer with a positive stake (number of tokens) that is allowed to participate in the network and does so. Each chain has its own rules for how this works, and these will be covered more in-depth in Chapter 7, Achieving Consensus.
Some blockchains are said to have smart contracts when they are able to perform actions and behavior in response to changes to the chain. These will be covered in depth in Chapter 14, Smart Contracts and Chapter 16, Decentralized Applications.
One ongoing concern for blockchain systems is performance. Public blockchains are global systems, with their system resources shared by all the users in the world simultaneously. With such a large user base, resource constraints are a real concern and have already caused real problems. For instance, a popular game called CryptoKitties was launched on Ethereum and caused the network to become congested. Other applications became nearly unusable, as the load from CryptoKitties overwhelmed the network.
The quick and dirty way of calculating the throughput of a blockchain is as follows:
For Bitcoin, the transaction throughput is about 7tx/second. This is because of the relatively small block and the very long block time. Ethereum has short block times but very tiny blocks and ends up at about 14tx/second. Blockchains such as Stellar, Bitshares, and Waves can reach speeds of over, 1000tx/second.
VISA is the premier payment-processing network worldwide. In one of the company's blogs, it was revealed that VISA can process over 40,000 transactions a second. This is peak capacity, and it usually processes nowhere near that, except around times such as Christmas. Nevertheless, it should be clear that blockchains have a way to go before they can compete for processing global payments on the same scale as VISA. Newer networks, such as EOS and COSMOS, are trying, however, with innovative multi-threaded designs and segmented blockchain zones.
Now you should understand the basic components of a blockchain. Blocks are groups of transactions grouped together and act as the fundamental unit of a blockchain. Miners are computers that create new blocks on PoW blockchains. Validators, also called witnesses and other names, are computers that create blocks on PoS blockchains. Digital signatures are composed of public and private keys and use mathematics to prove the author of the data.
The key idea of hashing is to use a mathematical function that maps arbitrary data to a single, simple to deal with value. Any change to the data will make the end value very different
In the next chapter, we will learn what these systems are and how blockchain counts as both. We will learn how to differentiate between the two systems and why these concepts are so important to blockchain.
One of the biggest misconceptions in the blockchain space is between distributed systems and decentralized systems. In this chapter, we are going to discuss both types of systems, why they matter, their similarities, their differences, and how blockchain technology can fit into both categories.
By the end of this chapter, you should be able to do the following:
A distributed system is one in which the application and its architecture are distributed over a large number of machines and preferably physical locations. More simply, a distributed system is one where the goal of the system is spread out across multiple sub-systems in different locations. This means that multiple computers in multiple locations must coordinate to achieve the goals of the overall system or application. This is different than monolithic applications, where everything is bundled together.
Let's take the example of a simple web application. A basic web application would run with processing, storage, and everything else running on a single web server. The code tends to run as a monolith—everything bundled together. When a user connects to the web application, it accepts the HTTP request, uses code to process the request, accesses a database, and then returns a result.
The advantage is that this is very easy to define and design. The disadvantage is that such a system can only scale so much. To add more users, you have to add processing power. As the load increases, the system owner cannot just add additional machines because the code is not designed to run on multiple machines at once. Instead, the owner must buy more powerful and more expensive computers to keep up. If users are coming from around the globe, there is another problem—some users who are near the server will get fast responses, whereas users farther away will experience some lag. The following diagram illustrates a single, monolithic code base building to a single artifact:
What happens if the computer running this application has a fault, a power outage, or is hacked? The answer is that the entire system goes down entirely. For these reasons, businesses and applications have become more and more distributed. Distributed systems typically fall into one of several basic architectures: client–server, three-tier, n-tier or peer-to-peer. Blockchain systems are typically peer-to-peer, so that is what we will discuss here.
The advantages of a distributed system are many, and they are as follows:
Resiliency is the ability of a system to adapt and keep working in response to changes and challenges. Resiliency can only be discussed in the context of the types of events that a system is resilient towards. A system might be resilient to a few computers getting turned off but may not be resilient to nuclear war.
Resiliency can be broken down into different sub-categories:
We will now discuss fault tolerance in more detail.
A system is said to be fault tolerant when it is capable of operating even if some of the pieces fail or malfunction. Typically, fault tolerance is a matter of degree: where the level of sub-component failure is either countered by other parts of the system or the degradation is gradual rather than an absolute shutdown. Faults can occur on many levels: software, hardware, or networking. A fault tolerant piece of software needs to continue to function in the face of a partial outage along any of these layers.
In a blockchain, fault tolerance on the individual hardware level is handled by the existence of multiple duplicate computers for every function—the miners in bitcoin or proof of work systems or the validators in PoS and related systems. If a computer has a hardware fault, then either it will not validly sign transactions in consensus with the network or it will simply cease to act as a network node—the others will take up the slack.
One of the most important aspects of blockchain is the concept of consensus. We will discuss the different ways blockchains achieve consensus in Chapter 7, Achieving Consensus. For now, it is enough to understand that most blockchain networks have protocols that allow them to function as long as two thirds to slightly over one-half of the computers on the network are functioning properly, though each blockchain network has different ways of ensuring this which will be covered in future chapters.
In most blockchains, each computer acting as a full participant in the network holds a complete copy of all transactions that have ever happened since the launch of the network. This means that even under catastrophic duress, as long as a fraction of the network computers remains functional, a complete backup will exist.
In PoS chains, there tend to be far fewer full participants so the number of backups and distribution is far less. So far, this reduced level of redundancy has not been an issue.
As discussed in prior chapters, hashing and the Merkle root of all transactions and behaviors on the blockchain allow for an easy calculation of consistency. If consistency is broken on a blockchain, it will be noticed instantly. Blockchains are designed to never be inconsistent. However, just because data is consistent does not mean it is accurate. These issues will be discussed in Chapter 20, Scalability and Other Challenges.
Most computer systems in use today are client–server. A good example is your web browser and typical web applications. You load up Google Chrome or another browser, go to a website, and your computer (the client) connects to the server. All communication on the system is between you and the server. Any other connections (such as chatting with a friend on Facebook) happen with your client connected to the server and the server connected to another client with the server acting as the go-between.
Peer-to-peer systems are about cutting out the server. In a peer-to-peer system, your computer and your friend's computer would connect directly, with no server in between them.
The following is a diagram that illustrates the peer-to-peer architecture:
All decentralized systems must be distributed. But distributed systems are not necessarily decentralized. This is confusing to many people. If a distributed system is one spread across many computers, locations, and so on, how could it be centralized?
The difference has to do with location and redundancy versus control. Centralization in this context has to do with control. A good example to showcase the difference between distributed and decentralized systems is Facebook. Facebook is a highly distributed application. It has servers worldwide, running thousands of variations on its software for testing. Any of its data centers could experience failure and most of the site functionality would continue. Its systems are distributed with fault tolerance, extensive coordination, redundancy, and so on.
Yet, those services are still centralized because, with no input from other stakeholders, Facebook can change the rules. Millions of small businesses use and depend on Facebook for advertising. Groups that have migrated to Facebook could suddenly find their old messages, work, and ability to connect revoked—with no recourse. Facebook has become a platform others depend on but with no reciprocal agreement of dependability. This is a terrible situation for all those groups, businesses, and organizations that depend on the Facebook platform in part or on the whole.
The last decade has brought to the forefront a large number of highly distributed yet highly centralized platform companies —Facebook, Alphabet, AirBnB, Uber, and others—that provide a marketplace between peers but are also almost completely unbeholden to their users. Because of this situation, there is a growing desire for decentralized applications and services. In a decentralized system, there is no central overwhelming stakeholder with the ability to make and enforce rules without the permission of other network users.
Like distributed systems, decentralization is a sliding scale more than an absolute state of being. To judge how decentralized a system is, there are a number of factors to consider. We're going to look at factors that have particular relevance to blockchain and decentralized applications and organizations. They are the following:
By definition, any system that is practically or logically closed will be at least somewhat centralized. A system that is closed is automatically centralized to the pre-existing actors. As with all other aspects of decentralized systems, this is not a binary yes/no but more of a sliding scale of possibility.
The early internet was seen as revolutionary in part because of its open access nature and the ability for anyone (with a computer, time, and access) to get online and begin trading information. Similarly, blockchain technologies have so far been open for innovation and access.
A hierarchical system is the one commonly found within companies and organizations. People at the top of a hierarchy have overwhelming power to direct resources and events. A hierarchy comes in different extremes. At one extreme, you could have a system wherein a single arbiter holds absolute power. At the other extreme, you could have a system where each member of the system holds identical direct power and therefore control exists through influence, reputation, or some other form of organizational currency.
In blockchain, a few forms of non-hierarchical patterns have emerged. The first is in proof-of-work mining systems. All miners are fundamentally equal participants in the blockchain, but their influence is proportional to the computing resources they make available to the network.
In PoS blockchain systems, the power is distributed based on the level of investment/stake in the protocol of a specific. In this case, decentralization is achieved both through mass adoption as well as competition with other chains. If one chain becomes too centralized, nothing stops users from migrating to a different one.
How decentralized these systems will remain over time is an open question.
Open access naturally leads to another trait of decentralized systems: diversity. A diverse system stands in opposition to monoculture. In technology, a monoculture is the overwhelming prevalence of a single system, such as the dominance of Windows, which persisted for a long time in corporate America.
One of the ways power can be centralized in a system is through information dominance, where one set of actors in a system has access to more or greater information than other actors. In most current blockchain technology, each participant on the chain gets the same amount of information. There are some exceptions. Hyperledger Fabric, for instance, has the capacity to have information hiding from participants.
The ability to have perfectly enforced transparency is one of the drivers of interest in blockchain systems. By creating transparent and unforgettable records, blockchain has an obvious utility for logistics and legal record keeping. With records on a blockchain, it is possible to know for certain that data was not altered. A transparent blockchain also ensures a level of fairness—participants can all be sure that at a minimum there is a shared level of truth available to all which will not change.
Decentralized systems are not without their downsides. Here are a few key issues with decentralized systems that have specific relevance to blockchain:
Centralized systems and decentralized systems tend to be faster or slower at dealing with certain types of events. Blockchains are decentralized systems of record keeping. One way to think about a basic blockchain such as bitcoin is that it is an append-only database. Bitcoin can handle approximately seven transactions a second. By comparison, Visa and MasterCard are distributed (but not decentralized) transaction-handling systems that can handle more than 40,000 transactions a second. Blockchain systems continue to increase in speed but typically at with the trade-off of some amount of centralization or restrictions on access. Some PoS systems such as Tendermint or Waves have a theoretical throughput of over 1,000 tx/second but are still far from the peak capacity of their traditional counterparts.
Decentralized systems tend to be much harder to censor because of a lack of a central authority to do the censoring. For free-speech and free-information purists, this is not seen as a downside in the slightest. However, some information (child pornography, hate speech, bomb-making instructions) is seen as dangerous or immoral for public dissemination and therefore should be censored. As a technology, anything actually written into the blockchain is immutable once the block holding that information is finished. For instance, Steemit is a blockchain-based social blogging platform where each post is saved to the chain. Once each block is finalized, the data cannot be removed. Clients of the system could choose not to show information, but the information would still be there for those who wanted to look.
The desire for censorship extends to self-censorship. Content written to the change is immutable—even for its author. For instance, financial transactions done via bitcoin can never be hidden from authorities. While bitcoin is anonymous, once a person is attached to a bitcoin wallet, it is possible to easily track every transaction ever done since the beginning of the blockchain.
Because of this, a blockchain-based national currency would allow perfect taxation—due to perfect financial surveillance of the chain. Censorship resistance is thus a double-edged sword.
Decentralized systems tend to be much more chaotic than centralized ones by their nature. In a decentralized system, each actor works according to their own desires and not the demands of an overarching authority. Because of this, decentralized systems are difficult to predict.
In this chapter, we have discussed the difference between distributed systems and decentralized systems and gone over some of the key features. You should now understand how each decentralized system is also a distributed system and some of the key aspects of each concept.
In the next chapter, we will start looking at how these things work in practice.
The use of blockchain hinges on cryptography. Numeric cryptography can be regarded as a recent invention, with the ciphers of the past relying on exchanging words for words and letters for letters. As we'll see, modern cryptography is a very powerful tool for securing communications, and, importantly for our topic, determining the provenance of digital signatures and the authenticity of digital assets.
In this chapter, the following topics will be covered:
Cryptography safeguards the three principles of information security, which can be remembered by the mnemonic device Central Intelligence Agency (CIA):
Confidentiality: Ensures that information is shared with the appropriate parties and that sensitive information (for example, medical information, some financial data) is shared exclusively with the consent of appropriate parties.
Integrity: Ensures that only authorized parties can change data and (depending on the application) that the changes made do not threaten the accuracy or authenticity of the data. This principle is arguably the most relevant to blockchains in general, and especially the public blockchains.
Availability: Ensures authorized users (for example, holders of tokens) have the use of data or resources when they need or want them. The distributed and decentralized nature of blockchain helps with this greatly.
The relevance to blockchain and cryptocurrency is immediately evident: if, for instance, a blockchain did not provide integrity, there would be no certainty as to whether a user had the funds or tokens they were attempting to spend. For the typical application of blockchain, in which the chain may hold the chain of title to real estate or securities, data integrity is very important indeed. In this chapter, we will discuss the relevance of these principles to blockchain and how things such as integrity are assured by cryptography.
Cryptography is the term for any method or technique used to secure information or communication, and specifically for the study of methods and protocols for secure communication. In the past, cryptography was used in reference to encryption, a term that refers to techniques used to encode information.
At its most basic, encryption might take the form of a substitution cipher, in which the letters or words in a message are substituted for others, based on a code shared in advance between the parties. The classic example is that of the Caesar Cipher, in which individual letters are indexed to their place in the alphabet and shifted forward a given number of characters. For example, the letter A might become the letter N, with a key of 13.
This specific form of the Caesar Cipher is known as ROT13, and it’s likely the only substitution cipher that continues to see any regular use—it provides a user with a trivially reversible way of hiding expletives or the solutions to puzzles on static websites (the same, of course, could be implemented very simply in JavaScript).
This very simple example introduces two important concepts. The first is an algorithm, which is a formal description of a specific computation with predictable, deterministic results. Take each character in the message and shift it forward by n positions in the alphabet. The second is a key: the n in that algorithm is 13. The key in this instance is a pre-shared secret, a code that the two (or more) parties have agreed to, but, as we’ll see, that is not the only kind of key.
Cryptography is principally divided into symmetric and asymmetric encryption. Symmetric encryption refers to encryption in which the key is either pre-shared or negotiated. AES, DES, and Blowfish are examples of algorithms used in symmetric encryption.
Most savvy computer users are familiar with WEP, WPA, or WPA2, which are security protocols employed in Wi-Fi connections. These protocols exist to prevent the interception and manipulation of data transmitted over wireless connections (or, phrased differently, to provide confidentiality and integrity to wireless users). Routers now often come with the wireless password printed on them, and this is a very literal example of a pre-shared key.
The algorithms used in symmetric encryption are often very fast, and the amount of computational power needed to generate a new key (or encrypt/decrypt data with it) is relatively limited in comparison to asymmetric encryption.
Asymmetric cryptography (also called public-key cryptography) employs two keys: a public key, which can be shared widely, and a private key, which remains secret. The public key is used to encrypt data for transmission to the holder of the private key. The private key is then used for decryption.
The development of public-key cryptography enabled things such as e-commerce internet banking to grow and supplement very large segments of the economy. It allowed email to have some level of confidentiality, and it made financial statements available via web portals. It also made electronic transmissions of tax returns possible, and it made it possible for us to share our most intimate secrets in confidence with, maybe, perfect strangers—you might say that it brought the whole world closer together.
As the public key does not need to be held in confidence, it allows for things such as certificate authorities and PGP key servers—publishes the key used for encryption, and only the holder of the private key will be able to decrypt data encrypted with that published key. A user could even publish the encrypted text, and that approach would enjoy some anonymity—putting the encrypted text in a newsgroup, an email mailing list, or a group on social media would cause it to be received by numerous people, with any eavesdropper unable to determine the intended recipient. This approach would also be interesting in the blockchain world—thousands or millions of nodes mirroring a cipher text without a known recipient, perhaps forever, irrevocably, and with absolute deniability on the part of the recipient.
Public-key cryptography is more computationally expensive than symmetric cryptography, partly due to the enormous key sizes in use. The NSA currently requires a key size of 3,072 bits or greater in commercial applications for key establishment, which is the principal use of public-key cryptography. By comparison, 128-bit encryption is typically regarded as adequate for most applications of cryptography, with 256-bit being the NSA standard for confidentiality.
For the most part, although it is possible to use the public-key algorithm alone, the most common use of public-key cryptography is to negotiate a symmetric key for the remainder of the session. The symmetric key in most implementations is not transmitted, and, as a consequence, if an attacker were to seize one or both of the private keys, they would be unable to access the actual communications. This property is known as forward secrecy.
Some protocols, such as SSH, which is used to remotely access computers, are very aggressive. Over the course of a session, SSH will change the key at regular intervals. SSH also illustrates the essential property of public-key cryptography—it’s possible to put your public key on the remote server for authentication, without any inherent confidentiality issue.
Most cryptography in use today is not unbreakable, given extremely large (or infinite) computing resources. However, an algorithm suited to the task of protecting data where confidentiality is required is said to be computationally improbable—that is, computing resources to crack the encryption do not exist, and are not expected to exist in the near future.
It is notable that, although when encrypting data to send it to a given recipient, the private key is used for decryption, it is generally possible to do the reverse. For cryptographic signing, private keys are used to generate a signature that can be decrypted (verified) with the public key published for a given user. This inverted use of public-key cryptography allows for users to publish a message in the clear with a high degree of certainty that the signer is the one who wrote it. This again invokes the concept of integrity—if signed by the user’s private key, a message (or transaction) can be assumed to be authentic. Typically, where Blockchains are concerned, when a user wishes to transfer tokens, they sign the transaction with the private key of the wallet. The user then broadcasts that transaction.
It is now also fairly common to have multisignature wallets, and, in that instance, a transaction is most often signed by multiple users and then broadcast, either in the web interface of a hosted wallet service, or in a local client. This is a fairly common use case with software projects with distributed teams.
Distinct from the concept of encryption (and present in many mechanisms used in cryptography, such as cryptographic signatures and authentication) is hashing, which refers to a deterministic algorithm used to map data to a fixed-size string. Aside from determinism, cryptographic hashing algorithms must exhibit several other characteristics, which will be covered in this section.
As we'll see in the following section, a hash function must be difficult to reverse. Most readers who got through high school algebra will remember being tormented with factoring. Multiplication is an operation that is easy to complete, but difficult to reverse—it takes substantially more effort to find the common factors of a large number as opposed to creating that number as a product of multiplication. This simple example actually enjoys the practical application. Suitably large numbers that are the product of the multiplication of two prime numbers—called semiprimes or (less often) biprimes—are employed in RSA, a widely used public-key cryptography algorithm.
RSA is the gold standard in public key cryptography, enabling things such as SSH, SSL, and systems for encrypting email such as PGP. Building on operations such as this — easy to do one way and very hard to do in the other—is what makes cryptography so robust.
A desirable feature of robust hashing algorithms is known as the avalanche effect. A small change in the input should result in a dramatic change in the output. Take for instance the following three examples using output redirection and the GNU md5sum utility present in most distributions of Linux:
$ echo "Hills Like White Elephants by Ernest Hemingway" | md5sum
86db7865e5b6b8be7557c5f1c3391d7a -
$ echo "Bills Like White Elephants by Ernest Hemingway" | md5sum
ccba501e321315c265fe2fa9ed00495c -
$ echo "Bills Like White Buffalo by Ernest Hemingway"| md5sum
37b7556b27b12b55303743bf8ba3c612 -
Changing a word to an entirely different word has the same result as changing a single letter: each hash is entirely different. This is a very desirable property in the case of, say, password hashing. A malicious hacker cannot get it close enough and then try permutations of that similar password. We will see in the following sections, however, that hashes are not perfect.
An ideal hash function is free of collisions. Collisions are instances in which two inputs result in the same output. Collisions weaken a hashing algorithm, as it is possible to get the expected result with the wrong input. As hashing algorithms are used in the digital signatures of root certificates, password storage, and blockchain signing, a hash function having many collisions could allow a malicious hacker to retrieve passwords from password hashes that could be used to access other accounts. A weak hashing algorithm, rife with collisions, could aid in a man-in-the-middle attack, allowing an attacker to spoof a Secure Sockets Layer (SSL) certificate perfectly.
MD5, the algorithm used in the above example, is regarded as inadequate for cryptographic hashing. Blockchains thankfully largely use more secure hash functions, such as SHA-256 and RIPEMD-160.
In the PoW systems, new entries to a blockchain require hashes to be computed. In Bitcoin, miners must compute two SHA-256 hashes on the current transactions in the block—and included therein is the hash of the previous block.
This is pretty straightforward for a hashing algorithm. Let’s briefly reiterate: an ideal hash function takes the expected input and then outputs a unique hash. It is deterministic. There is only one possible output and it is impossible (or computationally improbable) to achieve that output with a different input. These properties ensure that miners can process a block and that each miner can return the same result. It is through hashing that Blockchains attain two properties that are crucial to their adoption and current popularity: decentralization and immutability.
Linking the current block to the previous block and the subsequent block is in part what makes the blockchain an ever-growing linked list of transactions (providing it with the property of immutability), and the deterministic nature of the hash algorithm makes it possible for each node to get the same result without issue (providing it with decentralization).
Aside from proof of work, PoS and DPoS also make use of hashes, and largely for the same purpose. Plenty of discussions have been dedicated to whether PoS will replace PoW and prevent us from running thousands of computers doing megawatts' worth of tedious hashing with enormous carbon footprints.
PoW systems seem to persist in spite of the power consumption and environmental impact of reasonably difficult hashing operations. Arguably, the reason for this is the very simple economics: miners have an incentive to validate transactions by computing hashes because they receive a share of new tokens minted into the system. More complex tokenomics schemes for proof of stake or distributed proof of stake often fail the smell test.
Take, for example, the idea of a stock photo blockchain project—we’ll call it Cannistercoin. Users contribute photos to a stock photo website, and in return they receive tokens. The token is also used to buy stock photos from the website, and this token is traded on exchanges.
This would seem to work, and it’s a complete market—Cannistercoin has identified buyers and sellers and has a mechanism to match them—but it is perhaps not a functional market. The barriers to entry here are significant: a buyer could use any ordinary stock photo site and use their credit card or bank account. In this model, the buyer needs to sign up for an exchange and send cryptocurrency in exchange for the token.
To be truly decentralized, a big piece is missing from this economic model—that is, this system of incentives. What provides an incentive for witnesses or validators to run their machines and validate transactions?
You can give them some share of the tokens, but why wouldn’t many of them sell their tokens immediately in order to recoup the costs of running their machines? It can be reasonably expected that that constant selling pressure holds down the price of tokens in many of these appcoin cryptocurrencies, and this is a shame. Proof of stake systems are often more elegant with regard to processing power (at the expense of less elegant economic models).
Proof of stake (or another mechanism) may well still take over the world, but, one way or the other, you can safely expect the crypto world to do plenty of hashing.
The world of blockchain and cryptocurrency exists thanks largely to the innovations of the last century in cryptography. We've covered how cryptography works conceptually and how cryptographic operations, specifically hashing, form a large part of what happens behind the scenes in a blockchain.
In the next chapter, we'll build on this foundation and introduce Bitcoin, the first (and most notable) blockchain application.
In earlier chapters, we discussed blockchain, its components, and its structure in detail. We also discussed cryptography, the mechanics behind blockchain, and how blockchain is revolutionizing the network world. In this chapter, we will be discussing Bitcoin's origins.
We will discuss the introduction of Bitcoin, its history, and how it became one of the biggest revolutions of financial history in such a short space of time. We will also dive deep into other aspects of Bitcoin, such as its encoding system, transaction process, network nodes, and we'll briefly cover the mining of Bitcoins.
The topics that we will cover in this chapter include the following:
Bitcoin is the first and, to date, the most successful application of blockchain technology. Bitcoins were introduced in 2008, in a paper on Bitcoin called Bitcoin: A Peer-to-Peer Electronic Cash System (https://bitcoin.org/bitcoin.pdf), which was authored by Satoshi Nakamoto.
Bitcoin was the world's first decentralized cryptocurrency; its introduction heralded a revolution, and, in just about a decade, it has proved its strengths, with huge community backing and widespread adoption.
From 2010, certain global businesses have started to accept Bitcoins, with the exception of fiat currencies. A lot of currency exchanges were founded to let people exchange Bitcoin with fiat currency or with other cryptocurrencies. In September 2012, the Bitcoin Foundation was launched to accelerate the global growth of Bitcoin through standardization, protection, and promotion of the open source protocol.
A lot of payment gateways such as BitPay came up to facilitate merchants in accepting Bitcoin as a payment method. The popular service WordPress started accepting Bitcoins in November 2012.
Bitcoin has been growing as a preferred payment option in global payments, especially business-to-business supply chain payments. In 2017, Bitcoin gained more legitimacy among financial companies and government organizations. For example, Russia legalized the use of cryptocurrencies, including Bitcoin, Norway's largest bank announced the inception of a Bitcoin account, and Japan passed a law to accept Bitcoin as a legal payment method. The world's largest free economic zone, Dubai, has started issuing licenses to firms for trading cryptocurrencies.
On August 1, 2017, Bitcoin split into two derivative digital currencies; one kept the legacy name Bitcoin, and the other with an 8 MB block size is known as Bitcoin Cash (BCH). After this, another hard fork happened on October 24, 2017, with a new currency known as Bitcoin Gold (BTG). Then, again, on February 28, 2018, another hard fork happened, with the new currency known as Bitcoin Private (BTCP). There was another hard fork due in November 2017, but this was canceled due to lack of consensus from the community.
However, there is a single major concern of the promoters of Bitcoin, with regards to price volatility and slowing of transaction due to a large number of confirmations required to approve a transaction.
When we say Bitcoin is volatile, we mean the price of Bitcoin is volatile. The spot rate of Bitcoin at various exchanges changes every moment and, moreover, it functions 24/7. Hence, any user or community member of Bitcoin is perturbed by the regularly changing price of Bitcoin. The following chart shows the price fluctuation of Bitcoin over the last financial year:
The volatility of Bitcoin is the most discussed topic and has been a concern for investors, miners, and supporters of Bitcoin since the exchanges of Bitcoin came up. Some prime reasons for this as follows:
The preceding points are just some of the prime points that are causing a huge volatility in the Bitcoin market. There are various other factors that play a vital role in the price fixtures of Bitcoin from time to time.
Bitcoin, being a purely digital currency, can be owned by people by keeping or storing it in files or in a Bitcoin Wallet. Addresses are used to transfer Bitcoins from one wallet to another, and keys are used to secure a transaction.
Keys in Bitcoins are used in pairs. One is a public key, and the other is a private key. The private key is to be kept securely, since it gives you control over a wallet. The keys are stored and controlled by a Bitcoin wallet.
Addresses are alphanumeric strings that are shared for sending or receiving Bitcoins from one wallet to another. The addresses are mostly encoded as Base58Check, which uses a Base58 number for address transcription. A Bitcoin address is also encoded in a QR code for quick transactions and sharing.
Bitcoin has a widely used metric system of denominations that are used as units of Bitcoins. The smallest denomination of Bitcoin is called a Satoshi, after the name of its creator. The following table shows the units of Bitcoin, from its smallest unit, Satoshi, to Megabit:
These are valid addresses that contain readable addresses. For example: 1BingoAuXyuSSoYm6rH7XFZc6Hcy98zRZz is a valid address that contains a readable word (Bingo). Generating a vanity address needs creation and testing of millions of private keys, until the desired Base58 letter address is found.
The vanity addresses are used for fun and offer the same level of security as any other address. The search time for a vanity address increases as the desired pattern's length increases.
This encoding takes the binary byte arrays and converts them into a human-readable format. This string is created by using a set of 58 alphanumeric characters.
Instead of Base58, Base64 could also be used, but that would have made some characters look identical, which could have resulted in identical-looking data. The Base58 symbol chart used in Bitcoin is specific to Bitcoins and was used only by Bitcoins at the time of creation. The following table shows the value and the character corresponding to it in the Base58 encoding:
|
Value |
Character |
Value |
Character |
Value |
Character |
Value |
Character |
|
0 |
1 |
1 |
2 |
2 |
3 |
3 |
4 |
|
4 |
5 |
5 |
6 |
6 |
7 |
7 |
8 |
|
8 |
9 |
9 |
A |
10 |
B |
11 |
C |
|
12 |
D |
13 |
E |
14 |
F |
15 |
G |
|
16 |
H |
17 |
J |
18 |
K |
19 |
L |
|
20 |
M |
21 |
N |
22 |
P |
23 |
Q |
|
24 |
R |
25 |
S |
26 |
T |
27 |
U |
|
28 |
V |
29 |
W |
30 |
X |
31 |
Y |
|
32 |
Z |
33 |
a |
34 |
b |
35 |
c |
|
36 |
d |
37 |
e |
38 |
f |
39 |
g |
|
40 |
h |
41 |
i |
42 |
j |
43 |
k |
|
44 |
m |
45 |
n |
46 |
o |
47 |
p |
|
48 |
q |
49 |
r |
50 |
s |
51 |
t |
|
52 |
u |
53 |
v |
54 |
w |
55 |
x |
|
56 |
y |
57 |
z |
- |
- |
- |
- |
This is the primary part of the Bitcoin system. Transactions are not encrypted, since Bitcoin is an open ledger. Any transaction can be publicly seen in the blockchain using any online blockchain explorer. Since addresses are encrypted and encouraged to be unique for every transaction, tracing a user becomes difficult.
Blocks in Bitcoin are made up of transactions that are viewed in a blockchain explorer; each block has the recent transactions that have happened. Every new block goes at the top of the blockchain. Each block has a height number, and the height of the next block is one greater than that of the previous block. The consensus process is commonly known as confirmations on the blockchain explorer.
There are various types of scripts available to manage the value transfer from one wallet to another. Some of the standard types of transactions are discussed here for a clear understanding of address and how transactions differ from one another.
The Pay-to-Public-Key Hash (P2PKH) majority of the transactions on the Bitcoin network happen using this method. This is how the script looks:
OP_DUP OP_HASH160 [Pubkey Hash] OP_EQUALVERIFY OP_CHECKSIG
This is how the signature script looks:
[Sig][PubKey]
These strings are concatenated together to be executed.
The Pay-to-Script Hash (P2SH) process is used to send transactions to a script hash. The addresses to pay using script hash have to start with 3. This is how the script looks:
OP_HASH160 [redeemScriptHash] OP_EQUAL
The signature looks like this:
[Sig]...[Sig][redeemScript]
As with P2PKH, these strings are also concatenated together to create the script signature.
The transaction data is recorded in files, and these files are known as blocks. The blocks are stacked on top of one another, the most recent block being at the top. The following table depicts the structure of the block and the size of the elements in a block:
Every block in the Bitcoin network has almost the same structure, and each of the blocks is chained to the most recent block. These are the fields of the block:
The genesis block is the first block in the blockchain of Bitcoin. The creation of the genesis block marked the start of Bitcoin. It is the common ancestor of all the blocks in the blockchain. It is statically encoded within the Bitcoin client software and cannot be altered. Every node in the blockchain of Bitcoin acknowledges the genesis block's hash and structure, the time of its creation, and the single transaction it contains. Following is the static code written in the Bitcoin source code, which describes the creation of the genesis block with static parameters pszTimestamp, genesisOutputScript, nTime, nNonce, nBits, and nVersion. Here is the snippet of this code in the Bitcoin repository:
static CBlock CreateGenesisBlock(uint32_t nTime, uint32_t nNonce, uint32_t nBits, int32_t nVersion, const CAmount& genesisReward)
 {
 const char* pszTimestamp = "The Times 03/Jan/2009 Chancellor on brink of second bailout for banks";
 const CScript genesisOutputScript = CScript() << ParseHex("04678afdb0fe5548271967f1a67130b7105cd6a828e03909a67962e0ea1f61deb649f6bc3f4cef38c4f35504e51ec112de5c384df7ba0b8d578a4c702b6bf11d5f") << OP_CHECKSIG;
 return CreateGenesisBlock(pszTimestamp, genesisOutputScript, nTime, nNonce, nBits, nVersion, genesisReward);
 }
The network is based on a peer-to-peer (P2P) protocol. Various nodes exchange transactions and blocks in this network. Every node in this Bitcoin network is treated equally. One advantage of this is that each node has the option of taking different roles, depending on each person's preference on how they want to participate in the Bitcoin network.
Before we discuss the types of nodes, let's discuss some of the primary functionalities that the nodes perform:
Majorly, there are two types of nodes in the Bitcoin network. We'll now go into some brief details on each.
A full node is made up of the wallet, miner, complete blockchain, and the routing network. These nodes maintain a complete up-to-date record of the blockchain. The full nodes verify every transaction on the blockchain network.
Lightweight nodes perform transactions on the blockchain. They do not contain the entire blockchain, instead just a subset of the blockchain. They verify the transactions using a system called Simplified Payment Verification (SPV). These nodes are also sometimes called SPV nodes.
There are various other nodes on the Bitcoin network, each of them performing a specific set of functionalities from the offered functionalities in the Bitcoin network. Some nodes contain only the blockchain and routing functionalities. Some nodes only work as miners and do not contain the wallet.
There are other nonstandard nodes called pool protocol servers. These Nodes work on alternative protocols such as the stratum protocol. The stratum protocol works on TCP sockets and JSON-RPC to communicate among the nodes.
The network discovery in Bitcoin is required by any node when it is first started; a node has to discover other nodes in the network to participate in the blockchain. At the start of a node, it has to connect with at least one existing node in the network.
For this, the nodes establish a connection over the TCP protocol, over port 8333 or any other port if there is one. Next a handshake is performed by transmitting a certain message. That message is called the version message, which contain basic identification information.
Peers are found in the network primarily by two methods. One is by querying DNS using DNS seeds, which are basically DNS servers that provide a list of the IPs of Bitcoin nodes. The other method is a list of IPs that Bitcoin core tries to connect to. Another method, which was used earlier, was seeding nodes through IRC, but that method was discontinued due to security concerns.
DNS seeds are servers which contains lists of IP addresses. These seeds are custom implementations of Berkeley Internet Name Daemon (BIND) and return random subsets collected by a Bitcoin node. Most of the Bitcoin clients use DNS seeds to connect while trying to establish to first set of connection. It is better to have various seeds present so that a better connection can be established by the client with the peers present over the network. In the Bitcoin core client, the option to use DNS seeds is controlled by the -dnsseed parameter, which is set to 1 by default. Here is how the DNS seeds are represented in the chainparams.cpp file of the Bitcoin source:
 vSeeds.push_back(CDNSSeedData("bitcoin.sipa.be", "seed.bitcoin.sipa.be")); // Pieter Wuille
 vSeeds.push_back(CDNSSeedData("bluematt.me", "dnsseed.bluematt.me")); // Matt Corallo
 vSeeds.push_back(CDNSSeedData("dashjr.org", "dnsseed.bitcoin.dashjr.org")); // Luke Dashjr
 vSeeds.push_back(CDNSSeedData("bitcoinstats.com", "seed.bitcoinstats.com")); // Christian Decker
 vSeeds.push_back(CDNSSeedData("xf2.org", "bitseed.xf2.org")); // Jeff Garzik
 vSeeds.push_back(CDNSSeedData("bitcoin.jonasschnelli.ch", "seed.bitcoin.jonasschnelli.ch")); // Jonas Schnelli
The preceding seeds are currently being used in Bitcoin core, for connecting with the seed client for establishing the connection with the first node.
These are static lists of IP addresses. If the Bitcoin client is successfully able to connect with one IP address, it will be able to connect to other nodes by sharing the node's IPs. The command-line argument -seednode is used to connect to one node. After initial connection to the seed node, the client will discover new seeds using that seed itself.
Bitcoin wallets are an important function of the Bitcoin node; they contain private and/or public keys and Bitcoin addresses. There are various types of Bitcoin wallets and each one offers a varied level of security and functions, as required.
There is a common misconception that an e-wallet can contain Bitcoins but a Bitcoin wallet will only contain keys. Each Bitcoin is recorded on the blockchain in the Bitcoin network. A Bitcoin wallet contains keys, and these keys authorize the use of Bitcoins that are associated with the keys. Users or wallet owners sign a transaction with the keys in the wallet, proving that they own the Bitcoins. In reality, these Bitcoins are stored on the blockchain in the form of transaction outputs that are denoted as txout.
Primarily, there are two types of wallets, which is based on whether the keys contained by the wallets are related to one another.
This is a type of wallet in which all the keys are derived from a single master key, which is also known as a seed. All the keys in this type of wallet are linked with one another and can be easily generated again with the help of a seed. In some cases, a seed allows the creation of public key addresses without the knowledge of private keys. Mostly, seeds are serialized into human-readable words known as a mnemonic phrase.
There are multiple key derivation methods used in deterministic wallets, which are described in the following subsections.
Deterministic wallets hold private keys that are derived from a common seed. A one-way hash function is used for this. In a deterministic wallet, this seed is essential to recover all the derived keys, and hence a single backup at the time of creation is sufficient. The following diagram depicts how a single seed is connected/related to all the keys generated by the wallet:
HD wallets are one of the most advanced form of deterministic wallets. They contain keys derived from a tree structure, such that the master key can have multiple level-1 keys that can further contain multiple level-2 keys of up to an infinite depth. The following diagram depicts how a seed generates master keys that further create multiple keys in a hierarchical formation:
In this type of wallet, each key is independently generated from a random number. The keys generated in this wallet are not related to one another. Due to the difficulty in maintaining multiple non-related keys, it is very important to create regular backups of these keys and protect them to prevent theft or loss.
In this chapter, we discussed the basics of Bitcoin, its history, and its pricing in comparison to fiat currency. We also discussed Bitcoin addresses, their encoding, their transaction types, and blocks. Finally, we discussed the Bitcoin network and the types of nodes the network contains.
Now that we have discussed the world's first cryptocurrency in this chapter, in the next chapter, we will discuss various other cryptocurrencies that were inspired by Bitcoin and are also known as alternative currencies. We will discuss the alt-currencies, which are sometimes also called Altcoins.
After the release of Bitcoin, there has always been a large community supporting cryptocurrencies. Also, since Bitcoin and blockchain are open source, a lot of people within the community started to create their cryptocurrencies offering similar services that provide different consensus methods and so on, in comparison to Bitcoin.
Since Bitcoin is the first and, by far, most dominant cryptocurrency, all other cryptocurrencies are known as Alternative Coins or Altcoins. The first Altcoin was Namecoin, introduced in 2011. After that, a lot of Altcoins have been introduced; a few of them were popular and also started to be used as mainstream coins, whereas others were less popular. As of now, there are more than 1,500 cryptocurrencies in existence. There are two broad categories in the alternative cryptocurrency sphere. If an alternative blockchain platform is to be created, they are commonly called Alternative Chains, but if the purpose of the coin is to introduce a new currency, then it can be known as an Altcoin.
Many of the Altcoins are forked directly from Bitcoin's source, and some are even written from scratch. Altcoins are looking to solve some limitation or other of Bitcoins such as the consensus method, mining limitations, block time, distribution, privacy, or sometimes even adding a feature on top of the coin.
The topics that we will be covering in this chapter are as follows:
There are more than 1,600 cryptocurrencies in circulation; each one of them provides an improvement or a modification over Bitcoins. There are various online exchanges where cryptocurrencies can be exchanged amongst one another or for fiat currencies (such as USD, EUR, GBP, and so on) too, similar to a currency exchange or a stock-exchange portal. Here is a list of some popular Altcoins:
There are two broad categories of Altcoin on the basis of their blockchain, since the blockchain defines features, security, and other aspects of the coin.
It is certain that having so many cryptocurrencies in the market, along with currency exchanges, means that, now, a lot of key financial and market metrics are required to differentiate among the coins. The following are some of the key factors to consider when discussing an Altcoin:
Either an Altcoin can have its own blockchain or it can be built on top of another blockchain, usually known as tokens.
Altcoins built on top of another blockchain are called tokens. Tokens cannot exist without another platform on which they are built. Here is a list of platforms on top of which tokens can be created:
Ethereum is the most widely used option to create tokens; there are more than 600 tokens based on the Ethereum platform that is available. Being public and open source makes it easy for anyone to create tokens based on the Ethereum blockchain; furthermore, being backed by a huge community makes it more secure and easy for any cryptocurrency-based exchange to accept the tokens.
Some of the popular tokens built on the Ethereum platform are EOS, TRON, VeChain, and so on.
Starting out in the form of a MasterCoin in 2013, the Omni Layer protocol is one of the most popular meta-protocols based on the Bitcoin blockchain. The Omni Layer offers a different wallet similar to the Bitcoin client and an Omni Layer similar to the Bitcoin core.
Some of the popular tokens built on the Omni Layer platform are Tether, MaidSafeCoin, Synereo, and so on.
NEO started as Antshares; it was built by Onchain, a company based in China. It started out in early 2014, providing services to the banking and finance sectors. Antshares was rebranded as NEO in June 2017.
Some of the popular tokens built on the NEO platform are Ontology, Gas, DeepBrain Chain, and so on.
Often described as the open blockchain platform, waves is a platform where not just cryptocurrencies but all types of real-world commodities can also be exchanged, issued, and transferred in a completely decentralized way.
Some of the tokens built on the waves platform are Wager, Mercury, Incent, and so on.
Counterparty is another protocol layer implemented on top of Bitcoin Protocol Layer, just like Omni Layer and released in 2014, it claims to offer various features apart from Bitcoin, which makes it a valuable token creation platform.
Some of the tokens built on Counterparty are Triggers, Pepe Cash, Data bits, and so on.
Apart from tokens, which are built on top of existing blockchains, there are various alt currencies fueled by either having their own blockchain and/or any other improvement or differentiating factor.
Here are some of the factors that have been modified on the Altcoins, when compared to Bitcoins:
We will discuss each of these alternatives in detail, and then afterward we will discuss some of the widely used Altcoins and what modifications they have over Bitcoins.
Bitcoin is limited to 21 million coins, and it has a declining issuance rate, including a 10-minute block generation time, which takes a lot of confirmation time; it also takes a lot of time in further coin generation. A lot of Altcoins have modified a number of primary parameters to achieve escalated results. Some of the prime coins that have modified monetary parameters are Litecoin, Dogecoin, Ethereum, NEO, and so on.
A consensus mechanism is the root of transactions of Bitcoins; the mechanism used in Bitcoins is based on proof-of-work, using a SHA256 algorithm. Since the consensus mechanism requires the mining of blocks, it became very computation-intensive, leading to the creation of specified Application-Specific Integrated Circuit Chips (ASICs), which are Bitcoin-mining hardware created specifically to solve Bitcoin blocks.
This led to the creation of Altcoins with innovative algorithms such as these:
Apart from innovative algorithms, there are also a lot of innovative consensus types commonly known as proof types, being used, such as these:
Due to the large amount of Altcoins and larger number of coins being released regularly, it is important to know about the differences each of the coins offers. It is now time to discuss various Altcoins and what each one of them offers.
This is one of the initial Altcoins, released in 2011. The prime modification of Litecoin over Bitcoin is the use of the script algorithm instead of SHA-256 used in Bitcoins. Also, the limit of coins for Litecoin is 84 million, compared to 21 million Bitcoins.
Litecoin was created in October, 2011, by a former Google engineer, with its prime focus to reduce the block generation time from Bitcoins from 10 minutes to 2.5 minutes. Due to faster block generation, the confirmation of a transaction is much faster in Litecoin compared to Bitcoin.
Ether is based on an Ethereum platform, which provides scripting functionality. Represented by the symbol ETH, it has a block time of 14 to 15 seconds. It is based on PoW using the Ethash algorithm. The circulation limit is suggested to be around 120 million coins.
Ripple is a cryptocurrency backed by a company by the name of Ripple, which is a system of Real-Time Gross Settlements (RTGS). It is denoted by the symbol XRP. It uses the Ripple Protocol Consensus Algorithm (RPCA), which is applied every few seconds by all the nodes in the network to maintain the agreement of the network. The organization backing Ripple plans to create no more than 100 billion ripples. As per the plan, half of those will be released for circulation, and the other half will be retained by the company.
On August 1, 2017, the community of Bitcoin developers went ahead and split the blockchain into two. This kind of split is known as a fork and is introduced to add new features to the blockchain. Bitcoin Cash is a result of the first hard fork to split Bitcoins. Bitcoin Cash has a relatively lower transaction fee, as well as a lower mining difficulty, compared to Bitcoin.
There are various ways in which Altcoins or Bitcoins can be obtained; if the coin supports mining, primarily the coins that work on PoW algorithms fall into this category, those coins can be obtained by a mining process. Coins such as Bitcoin, Litecoin, Ether, Bitcoin Cash, Monero, and others support mining. As discussed earlier, there are various exchanges where cryptocurrencies are exchanged, for fiat currency or even other cryptocurrency; this is another widely used method.
Mining is a process by which new blocks are added to the blockchain. Transactions are validated by the mining process by mining nodes and kept in the blocks, then these blocks are added to the blockchain. This is a highly resource-intensive process to ensure the required resources are spent by the miners for the block to be accepted.
Each cryptocurrency has a different mining difficulty, which is defined by the block height, the number of miners mining that cryptocurrency, the total transactions of the currency, and block time.
The block creation time for Bitcoin is 10 minutes. Miners get rewards when new blocks are created and are also paid the transaction fees considering the blocks contain the transactions that are included in the block mined. The block time is maintained at 10 minutes, which makes sure blocks are created at a fixed rate. The reward for the mining of blocks is halved every 210,000 blocks, roughly every four years. When Bitcoins were initially introduced, the block reward was 50 Bitcoins, which was halved in 2012 to 25 Bitcoins. In July 2016, the reward for mining each block was again halved to 12.5 coins. The next date for reducing the block reward is July 2020, which will reduce the coin reward to roughly 6.25 coins.
Due to the halving event, the total number of Bitcoins in existence will not be more than 21 million. The decreasing supply was chosen as it is similar to other commodities such as gold and silver. The last Bitcoin will be mined in 2140, and no new mining reward will be present after that, although the transaction fees would still be awarded for generations of blocks containing transaction fees.
This is a measure of the mining hash rate; the Bitcoin network has a global block difficulty. Valid blocks need to have a hash rate below this target. The difficulty in the network changes every 2,016 blocks. Other coins have their own difficulty or have implemented a modified version of the Bitcoin difficulty algorithm. Here is the difficulty adjustment formula for Bitcoin:
difficulty = difficulty_1_target/current_target
difficulty_1_target = 0x00000000FFFF0000000000000000000000000000000000000000000000000000
Here, difficulty_1_target is the maximum target used by SHA256, which is the highest possible target and is the first difficulty used for mining the genesis block of Bitcoin.
The reason for difficulty regulation in Bitcoin is that 2,016 blocks take around two weeks since block time is maintained at around 10 minutes. If it takes longer than two weeks to mine 2,016 blocks, then there is a need to decrease the difficulty, and if it takes less than two weeks to mine 2,016 blocks, then the difficulty should be increased.
Difficulty of genesis block of Bitcoin, here is the block header:
$ Bitcoin-cli getblockhash 0
000000000019d6689c085ae165831e934ff763ae46a2a6c172b3f1b60a8ce26f

$ Bitcoin-cli getblockheader 000000000019d6689c085ae165831e934ff763ae46a2a6c172b3f1b60a8ce26f
{
 ...
 "height": 0,
 ...
 "bits": "1d00ffff",
 "difficulty": 1,
 ...
}
As you can see, the genesis block has 1 as difficulty and 1d00ffff bits, which is the target hash value. Here is the code for this re-targeting difficulty algorithm in the pow.cpp file in the Bitcoin source:
 // Go back by what we want to be 14 days worth of blocks
 int nHeightFirst = pindexLast->nHeight - (params.DifficultyAdjustmentInterval()-1);
 assert(nHeightFirst >= 0);
 const CBlockIndex* pindexFirst = pindexLast->GetAncestor(nHeightFirst);
 assert(pindexFirst);
Here is the limit adjustment step in the same pow.ccp file of the Bitcoin source code:
 // Limit adjustment step
 int64_t nActualTimespan = pindexLast->GetBlockTime() - nFirstBlockTime;
 if (nActualTimespan < params.nPowTargetTimespan/4)
 nActualTimespan = params.nPowTargetTimespan/4;
 if (nActualTimespan > params.nPowTargetTimespan*4)
 nActualTimespan = params.nPowTargetTimespan*4;


   // Retarget
    const arith_uint256 bnPowLimit = UintToArith256(params.powLimit);
    arith_uint256 bnNew;
    bnNew.SetCompact(pindexLast->nBits);
    bnNew *= nActualTimespan;
    bnNew /= params.nPowTargetTimespan;

    if (bnNew > bnPowLimit)
        bnNew = bnPowLimit;
The re-targeting adjustment should be less than a factor of 4 in a single cycle of two weeks. If the difficulty adjustment is more than a factor of 4, it won't be adjusted by the maximum factor. Further adjustment should be achieved in the next two weeks of the cycle. Hence, very large and sudden hashing rate changes take many two-week cycles to balance in terms of difficulty.
Due to the introduction of ASICs, the hashing power increased exponentially, following which the difficulty of mining increased.
Due to the huge mining hash rate, people from the mining community came together to mine blocks together and decided to split the reward depending on how much hash power each was contributing to the pool. In a mining pool, everyone gets a share of the block reward directly proportional to the resources invested. Many mining pools exist nowadays. Some of the popular mining pools are these:
The following diagram shows the percentage of Bitcoins mined by the various Bitcoin mining pools between June 1 and June 2, 2018:
Apart from the ones we have mentioned, there are many mining pools that actively mine and keep on adding more and more features in the race to become the largest mining pool.
As we have discussed, various Altcoins have different algorithms; each of them has corrections and improvements to increase difficulty and avoid centralization. Currently, apart from Bitcoin mining, various other Altcoins are also mined regularly. Almost every mining pool right now supports Altcoins; some of the most popularly mined Altcoins as of June, 2018, are Ether, Litecoin, Zcash, Dash, Bitcoin Cash, Ethereum classic, and so on.
There are various discussions about mining profitability; due to the very high difficulty of Bitcoin mining, other alt currencies are becoming popular options for miners, as well as mining pools. Nowadays, ASIC miners are also coming up for Altcoins such as Litecoins, Cash, Ether, and so on.
Due to major GPU and resource requirements by Bitcoin and other SHA-256 based coins, this lot of CPU-friendly mining coins were created based on script.
There are many exchanges where users can buy or sell Bitcoins and other Altcoins. Exchanges can deal in fiat money, Bitcoin, Altcoins, commodities, or all of these. These exchanges usually charge a small fee for the trade done on their platform. Some of the popular Cryptocurrency exchanges are these:
Apart from the ones mentioned here, there are many other popular exchanges, some focusing primarily on fiat to cryptocurrency purchase, and others working on only cryptocurrencies. Some other prominent exchanges are Upbit, Bittrex, Lbank, Bit-Z, HitBTC, coinbase, BCEX, GDAX, Gate.io, Bitstamp, EXX, OEX, Poloniex, Kucoin, Cobinhood, Yobit and so on.
A cryptocurrency wallet is a collection of private keys to manage those keys and transfer them from one wallet to another. Bitcoin wallets are compared on the basis of security, anonymity, ease of use, features, platforms available, and coins supported. Usually, all of the cryptocurrencies have their own official wallets, but other third-party wallets can also be chosen based on requirements. Some of the prominent cryptocurrency wallets are these:
Here is a list of some more cryptocurrency wallets which offer multi-currency support:
Apart from the third-party wallets we have mentioned, there are many other wallets offering different features. It should be noted that some wallets charge higher transaction fees, compared to actual network fees, to cover their development cost.
The following screenshot shows the Jaxx cryptocurrency wallet:
In this chapter, we discussed alternative currency and the difference between a coin and a token. We discussed in detail the various platforms, based on which platforms can be created. Furthermore, we discussed various alternatives that Altcoins provide over Bitcoins. We read in detail about currencies such as Litecoin, Ether, Ripple, and Bitcoin Cash.
We also discussed acquiring a cryptocurrency and the various ways to do so. We read about mining a cryptocurrency and the differences between Bitcoin and Altcoins, in terms of mining. We discussed exchanges and how we can store Altcoins other than Bitcoins in wallets. We also learned about the difficulty of re-targeting an algorithm in Bitcoin.
The concept of consensus is straightforward: consensus is when the network agrees on what information stored in the network is true and should be kept, and what is not true and should not be kept. For Bitcoin, achieving consensus is a simple matter of coming to agreement on the set to send and receive of Bitcoin across the network. For other networks, achieving consensus would also involve coming to an agreement on the final state of smart contracts, medical records, or any other network information stored on the blockchain.
Consensus algorithms have been the subject of research for decades. The consensus algorithms for distributed systems have to be resilient to multiple types of failures and issues, such as corrupt messages, parts of a network connecting and disconnecting, delays, and so on. In financial systems, and especially in blockchains, there is a risk of selfish and malicious actors in the system seeking profit. For each algorithm in a blockchain network, achieving consensus ensures that all nodes in the network agree upon a consistent global state of the blockchain. Any distributed consensus protocol has three critical properties:
As it happens, a famous paper by Fischer, Lynch, and Paterson stated that it's impossible for all three to be true in the same asynchronous distributed system. Hence, any and all blockchain designs must make trade-offs between these properties. These trade-offs are typically between safety and liveness, as fault tolerance is generally seen as a must-have for a globally distributed network.
In blockchain systems, there are currently four primary methods of achieving consensus. They are as follows:
These approaches will each be covered in turn in this chapter.
Practical Byzantine fault tolerance (PBFT) algorithm. Many algorithms are called Byzantine fault tolerant. The name comes from the allegory that presented the original problem.
Imagine an ancient Byzantine army moving to capture a city. The idea is to attack from all sides. Once the generals of the army reach the city, they must agree on when and how to attack. The difficulty is in how to agree. The generals can communicate only by messenger, but the messengers could be captured by the enemy, and there is the additional fear that one or more of the generals or their commanders are traitors.
The generals need a method to ensure that all the loyal generals agree on the same plan and that a small number of possible traitors cannot cause the mission to fail.
The loyal generals will all do what the method says they will do, but the traitors might do anything. How can the generals create a method that ensures that, as long as most of them are loyal, their plans will succeed?
This allegory is also sometimes called the Chinese general's problem, as well as a few other names, but the issue remains the same: how can different parties securely communicate and reach an agreement about something when communication channels may not be secure, and when there may even be traitors in their midst.
In the case of blockchain, the generals in the story are the computers that are participating in the distributed network running the blockchain. The messengers represent the digital network that these machines are running on and the message protocols used by those machines. The goal is for the good computers or generals to decide which information on the network is valid while rooting out bad actors and preventing false information from being recorded on the blockchain.
The loyal generals in the story represent the operators of honest nodes that are interested in ensuring the integrity of the blockchain and the applications based on it, and that is therefore invested in making sure that only correct data is recorded. The traitors represent the many bad actors of the world who would love to falsify data (especially financial data) for personal gain or on behalf of some other antagonistic party. The motivations of the bad actors could be varied, from spending Bitcoin they do not truly possess or getting out of contractual obligations, or even trying to destroy the network as a form of currency control by a hostile government.
To understand PBFT and all the other consensus algorithms that come afterward, it's important to first define what a Byzantine fault is. A Byzantine fault is any event or result that would disrupt the consistency of a distributed system, such as the following:
If any of these events happen, a Byzantine fault is said to have occurred. A Byzantine fault tolerant system is, therefore, able to handle some level of inconsistent input but still provide a correct result at the end. The key here is that such systems are fault tolerant, not fault immune. All fault tolerant systems can only tolerate so much before their tolerance is exhausted and the system fails in some way.
Hyperledger is the primary blockchain that uses PBFT. Here is how PBFT works in Hyperledger. Each validating node (a computer running the blockchain software and working to maintain consistency) keeps a copy of the internal state of the blockchain. When a node receives a message, it uses the message in conjunction with their internal state to run a computation on what the new state should be. Then the node decides what it should do with the message in question: treat it as valid, ignore it, or take another course of action. Once a node has reached its decision about the new message, that node shares that decision with all the other nodes in the system. A consensus decision is determined based on the total decisions submitted by all nodes:
This process is repeated for each block. The advantage of PBFT is that it is very fast and scales relatively well. The downside is that the participants must be known—not just anyone can join the network.
The first consensus algorithm used in blockchains was Bitcoin's proof-of-work (PoW). Proof-of-work fundamentally functions by exploiting a feature of certain cryptographic functions: there are mathematical problems that are very hard to solve, but once they are solved, they are very easy to check. As discussed before, one of these problems is hashing: it's very easy to take data and compute a hash from it, but extremely difficult to take a hash and discover the input data. PoW is most notably used by Bitcoin, Litecoin, and Ethereum.
PoW has the following characteristics:
The proof-of-work algorithm maintains network integrity as long as no group of actors controls more than 50% of the overall network computing power. The possibility of bad actors being able to control the chain is called the 51% attack. If a single group ever controls more than half the network power, they can control the network and network transactions by halting payments or even doubling spending. The attacking group would be able to prevent new transactions from being confirmed (halting payments for users as they see fit) and even reverse transactions that happened after they had started controlling the network.
The PoW algorithm starts by taking the longest chain. In Bitcoin, there are multiple ways blocks can be finalized (depending on the included transactions). Thus, there may be multiple available "solved" chains that could be selected as a base by the Bitcoin nodes. As part of the algorithm, Bitcoin takes the chain that is the longest and thus has had the most computing power applied to it. The following diagram illustrates a PoW chain:
The difficult puzzle in Bitcoin is to find an input that, when added to the prior block hash and the list of transactions, produces a hash that starts with a certain number of zeros.
Typically, the input to the function is the Merkle root of all transactions and the prior block hash. To simplify this for illustrative purposes, imagine that we have a simple input, such as I love Blockchains. Let's also assume that the system has the easiest possible difficulty: a single zero at the start of the hash. The SHA-256 hash of I love Blockchains is as follows:
ef34c91b820b3faf29104f9d8179bfe2c236d1e8252cb3ea6d8cb7c897bb7d96.
As you can see, it does not begin with 0. To solve the block for this input, we need to find a string (called a nonce) that we can add to this string so that hashing the combination (nonce + I love Blockchains) results in a string starting with 0. As it turns out, we can only do this through testing. For instance, if we add 1 to the beginning, we get 1I love Blockchains, and the hash is as follows:
b2fc53e03ea88d69ebd763e4fccad88bdb1d7f2fd35588a35ec6498155c702ed
No luck. What about 2 and 3? These will also fail to solve the puzzle. As it happens, 4I love Blockchains has a hash that starts with 0:
0fd29b2154f84e157d9f816fa8a774121bca253779acb07b07cfbf501825415d
It only took four tries, but this is a very low difficulty. Each additional zero doubles the challenge of finding a proper input that will compute a proper hash. As of writing, a valid Bitcoin block requires 18 zeros to be valid.
This process of trying to find the nonce that results in a proper hash is called mining. Every computer mining a PoW chain is competing to see who can find a proper nonce first. The winner gets to create the next block in the chain and is rewarded in tokens. For more details, see Chapter 17, Mining.
The advantage of PoW is that anyone can join a PoW network, and it is well established as a functional consensus mechanism. The primary downsides of PoW networks are slow speeds and financial costs: running all the computers to do these computations is very expensive, and the output is not put to any real productive use. This is considered bad for the environment and can result in increased energy prices wherever large amounts of blockchain mining are done. In some areas, blockchain mining has been banned for this reason.
As a result of these downsides, proof-of-stake (PoS) was invented.
PoS has the same objectives as PoW to secure the network against attack and to allow consensus to occur in an open network. The first digital currency to use this method was Peercoin, and was followed by many others, such as NXT, Dash, PIVX, and so on. In PoW networks, solving the puzzle is what determines which node gets to create the next block in the chain. In PoS networks, blocks are said to be forged instead of mined, as they are in proof-of-work blockchains. In PoS chains, the validators get rewarded by getting paid the transaction fees for each block, and sometimes in additional coins created automatically each time a block is created. In PoS chains, the chance to be the creator of the next block is determined by the amount of investment a node has in the network.
Have a look at the following example:
There are five nodes in a PoS network. They have the following balances:
The total number of tokens is 35,000 coins. Assuming that each node is staking 100% of their coins, every block and the nodes they contain will have the following likelihoods of being the next block signer:
It should be pretty obvious that, if a single node ever controls the majority of tokens (or even a large fraction), then they will have substantial control over the network. In this case, node #5 would end up creating more than half the blocks. Moreover, because node #5 would be regularly signing blocks, it would also get the majority of the transaction fees and new coins that are created. In a way, PoS rewards validators with interest on their investment in the form of additional tokens. One criticism of PoS networks is that the rich get richer, which can lead to increasing network centralization and control.
One of the issues in PoS systems is the threat of nothing-at-stake attacks. In a nothing-at-stake attack, a validator actually creates multiple blocks in order to spend tokens multiple times. Because of the low cost of creating blocks in PoS systems, there is no financial incentive to the network not to approve all the transactions, causing consensus to break down.
For instance, imagine a bad actor, Cain, who only has 100 tokens. He decides to try and cheat, and sends two messages to the network: one in which he sends his 100 tokens to Sanjay, and another where he sends his 100 tokens to Eliza. The network should accept either transaction, but not accept both. Typically, the nodes would have to come to consensus about which transaction is valid or reject both of them. However, if a validator is cooperating with Cain (or is run by Cain himself), then it turns out it is to their financial advantage to approve both blocks.
In the following diagram, expected value stands for the EV. It shows that if a validator accepts both blocks, it can effectively double spend without penalty:
To avoid this problem, PoS systems have introduced various countermeasures, such as staking deposits. In the case of a blockchain fork or a double-spend attack, the validators that participate risk losing their tokens. Through financial penalties and loss of staked tokens, the incentive to double spend and validate all blocks is thought to be reduced or eliminated.
There are numerous variations on the basic PoS approach. Each variation will have different requirements, such as the minimum balance needed to have a stake, the potential penalties for bad behavior, the rights and abilities of the stakeholders of the network, and modifiers, such as how long an account needs to have had a staked balance in order to be counted.
DPoS is related to PoS consensus, but with some critical differences. This new system is the creation of Dan Larimer of Bitshares, Steemit, and currently EOS. Both these networks and Lisk (another commonly used blockchain) are currently the only major blockchains that use this approach. In DPoS, the holders of tokens are not the ones doing block validation. Instead, they can use their tokens to elect a node to validate on their behalf—their delegate (also called a validator). It is this delegate/validator that helps operate the network. The number of available validator slots tends to be locked to a specific number, typically 21. In order to become a delegate, the owner of the node must convince the other users of the network to trust them to secure the network by delegating their share of the overall tokens on the network to them. Essentially, each token on the network acts as a vote, and the top vote holders are allowed to operate the network. Currently, only Bitshares, Steemit, EOS, and Lisk are the major blockchains that use this approach.
In DPoS, each delegate has a limited, designated time in which to publish a new block. If a delegate continually misses their block creation times or publishes invalid transactions, the token holders using their stake can vote them out and replace them with a better delegate. The following diagram shows what this structure looks as follows:
The primary criticism of DPoS is that it is partially centralized and has no real immediate financial penalty for betraying the network. The consequence of violating network rules is to be voted out by the token holders. It is thought that the cost to reputation and the loss from campaigning for delegated shares will outweigh the financial benefit of trying to negatively influence the network. By only having a small number of delegate slots, it is easier for the token holders to pay attention to the behavior of individual validator nodes.
Tendermint uses a custom consensus engine, designed as part of a doctoral thesis by Jae Kwon. It is similar to DPoS in that participants in the network can delegate their voting power to a validating account. However, to do so, they must bond or lock their tokens. To do this, they must issue a special bonding transaction in which their coins are locked to a validating node. In the event that their delegate misbehaves, both the delegate and the accounts lending their coins forfeit some portion of their bonded tokens. To release their tokens, another special unbonding transaction must be posted to the network, and such withdrawals are subject to a long delay.
Let's look at how these transactions happen. The following diagram is from the Tendermint documentation:
.Let's look at the preceding figure in more detail. Delegates signal the next block by signing votes. There are three types of votes: prevotes, precommits, and commits. Each block has a special validator called a proposer. The proposer goes first, suggesting a valid block state based on a prior locked block. This proposal is shared peer-to-peer among the other validators, and if 2/3 or more vote in agreement with the locked block (in the prevote stage) then they move to the next stage: precommit. In the precommit stage, again, if 2/3 agree with the prevote condition, they will signal that they are ready to commit. Finally, the actual commitment of the block takes place: the node must have received the block, and it must have received 2/3 valid votes to precommit.
If this sequence of 2/3 votes seems unusual, it is because of the nature of asynchronous networks, where the validators may receive blocks and votes at different times. This sequence, and the edge cases that are handled when the 2/3 majority is not reached allow for effective and fast consensus on unreliable networks.
Proof-of-authority (PoA) networks are used only when all blockchain participants are known. In proof-of-authority, each participant is known and registered with the blockchain. Such a blockchain is called a permissioned chain, as only computers that are part of this approved list of authorities are able to forge blocks. It is critical, therefore, that none of the authority computers is compromised, and each operator must take pains to ensure the integrity of their validator. This approach was originally shared by Gavin Wood of Parity Technologies as a different way of running an Ethereum-based blockchain.
The three main conditions that must be fulfilled for a validator to be established are as follows:
Once an authority has been established, the right to forge new blocks might be granted by adding the authority to the list of valid validators for the blockchain.
While PoA is mostly used in private chains, it can be used in public chains as well. Two public Ethereum test networks, Rinkleby and Kovan, are public blockchain networks that use PoA as their consensus mechanism.
The obvious downside of PoA is that the identity of each validator operator must be known and trusted, and the penalties for abusing that trust must be real. For global blockchains, this may not be preferred, as one of the appeals of blockchain technology is the ability to anonymously exchange value.
The Hyperledger Sawtooth project introduced a new consensus mechanism called proof-of-elapsed-time or PoET. Hyperledger deals mostly with permissioned blockchains, chains in which only a specified number of participants are allowed on the network, similar to PoA chains.
The basic approach is simple:
There are two things that we must be able to do for this to work. First, we must be able to verify that the waiting time for all participants was actually random, or else a simple attack would be to pretend to wait a random time and then just immediately create a new block. Second, it must be verifiable that not only was the length of time chosen random, but that the node actually waited the full period of time before acting.
The solution to these issues comes from Intel (who created the PoET algorithm), and relies on special CPU instructions to ensure that only trusted code is run. By forcing trusted code to be in charge of handling block timing, the system ensures that the lottery is fair.
At this point, you should have a solid foundation in the different mechanisms that blockchains use to reach consensus. Each consensus algorithm makes certain trade-offs between speed, availability, consistency, and fault tolerance. The most common consensus mechanisms are still PoW and PoS, but blockchain development continues at a very rapid pace, and new and improved approaches are likely to be developed. Improvements to consensus algorithms will improve blockchain scalability and reliability, and the scope of the potential applications for the technology.
Privacy is discussed very frequently in the tech world—especially now that social media executives are grudgingly suiting up and being paraded in front of US Senate committees.
At the same time, as blockchain advocates are happy to see this technology advancing human welfare and decentralizing money transfers, it's natural to wonder whether a user can actually have any privacy, what with all transactions being public on the chain.
In this chapter, the following topics will be covered:
Privacy is sorely needed in the cryptocurrency ecosystem. Cryptocurrencies could help raise people out of poverty in developing countries and boost economies with increased money transfers—or they could be a way for oppressive regimes to track down every transaction and have more opportunities to accuse innocents of wrongdoing.
The appeal of blockchain technology to people with antiauthoritarian streaks is obvious. Many in the US have a bone to pick with the banking system. In the thirties, the Federal Housing Administration, which insures mortgages, drew maps of areas in which it would do business, excluding poor and minority communities. This practice continued for a generation, and it was devastating to the core of many American cities, destroying hundreds of billions of dollars in wealth:
More recently, the 2008 global financial crisis resulted from speculative bets on future derivatives and dodgy lending practices, which drove real-estate prices sky high (and then very low).
Some regulation was passed in response to this malfeasance, but unlike the savings and loan crisis in the 1980s, few faced criminal penalties. Since then, numerous candidates for public office have decried the perceived unfairness in the treatment of the bankers (who were bailed out) relative to others said to have committed crimes against society, such as low-level drug offenders.
Less politically, it's not difficult to find widespread dissatisfaction with the available solutions for banking and payments. Anyone who lives abroad for any length of time will have some difficulty getting access to their money. Anyone who travels will have their credit or debit card locked up with a fraud alert. How about setting up banking for a new business without a domestic office? Good luck. For added difficulty, try sending an international wire transfer from that new business bank account.
It's easy to say that banking hasn't caught up with the times, but that's not quite right. Establishing a business bank account is harder than it has been in the past. As a consequence, some startups have chosen to go unbanked, including some with which several of this book's authors were involved. This approach provides some advantages as far as administrative expense is concerned (no bank fees, no endless declarations and disclosures, no locking out users of payment cards because of fraud alerts). It also carries risk, and as we'll see in subsequent sections, going unbanked will require some development to become a viable alternative.
It seems natural to consider a purely crypto company as the answer to the ills of banking—why not just run the entity with nothing but Bitcoin or Ethereum? As we'll see, most of the solutions involve unacceptable levels of uncertainty.
Access to fiat currency to pay certain expenses is important—most of a business' ultimate expenses are not going to be based on the price of Bitcoin or Ethereum, but the price of one or both of those currencies in US dollars or euros. Until you can pay for power and food in cryptocurrency, it's quite unlikely that the price of cryptocurrency in US dollars or euros will become irrelevant.
Some have heralded the development of a so-called stablecoin as the solution that would fix this problem. Various mechanisms can be used to ensure buying pressure or selling pressure in an asset, such as the backer buying back tokens when the value is below what was promised. Somewhat more simply, however, a token pegged to a currency issued by a sovereign government could be the solution.
A peg is a specific kind of fixed exchange rate system, in which the issuer of a currency asserts that their currency has a value based on that of another currency—and ideally is willing to exchange it for the same.
Economists tend not to speak of pegs favorably. The so-called tequila crisis in Mexico in 1994 is a famous example of a currency being overvalued. The Mexican government had issued bonds in pesos, which were redeemable in US dollars, at a valuation of about 3 pesos per dollar. It is doubtful that anyone believed the Mexican peso was worth that much. Eventually, short selling (borrowing the peso and selling it for dollars) and capital flight (investors unloading their peso-denominated assets) led to a precipitous drop in the value of the peso, and then to a severe recession.
Mexico's central bank attempted to control inflation by raising interest rates. Unlike the US and continental Europe, many mortgages in Mexico were adjustable rate, which meant that interest as a proportion of a homeowner's payment went up drastically, leading in many cases to default and foreclosure.
A handful of countries, such as Cambodia, do continue to use pegs in spite of their downsides, but it's difficult to find many other things so widely regarded as a bad idea.
Attempts to peg cryptocurrency to US dollars invariably raise money in cryptocurrency and then use it to buy sovereign debt. The assertion is that one unit of the token is equal to a dollar, or some fraction of a dollar. The tokens are backed by the debt held by the issuer, and in theory, the issuer is able to make money on the float.
If the issuer tries to minimize risk and only buys treasury bills at 1-3%—well, 1-3% of a few billion dollars is probably enough to pay your staff. The business model is pretty straightforward. PayPal famously also attempted to go fee-free and pay all of their expenses out of the float—and didn't succeed.
The most famous attempt at a stablecoin is Tether (Ticker: USDT), the price of which hovers around $1. Tether retained Friedman LLP, a New York accounting firm, and promised regular audits. These audits didn't materialize, and Friedman (likely owing to respect for the interests of the principal) has not made any statements concerning the validity of Tether's claim that each unit is backed by cash or a cash equivalent.
A peg of this nature would be a little odd in the cryptospace; ultimately underlying this sort of transaction is trust. It is almost antithetical to the idea of a trustless, decentralized ecosystem; but an alternative exists.
It is likely that the exchange-rate risk relative to the dollar or euro will be managed in the future not by a stablecoin but instead by financial options—derivatives giving the user the option, but not the obligation, to buy or sell an asset. Users looking to manage risk will pay a slight premium to buy protective puts against their cryptocurrency positions.
A put is the right to sell an asset at a specific price. A protective put is a put purchased against an asset you already own, for less than it's worth now. In the event that the price of an asset drops below the strike price, which is the price at which an option can be executed, the option can be used to secure a greater price for the underlying asset.
The problem with existing exchanges, where options are concerned, is that there is no mechanism to enforce the option in the event that something goes wrong. Commodities were traditionally considered the most risky sort of investment. You could trade at 20:1 leverage, and if the market moved against you would have only 5% margin call! Either put in more money or lose all of it.
At least in the case of commodities, however, if a producer fails to deliver their contract of wheat or soybeans or oil, the exchange is liable. Options will need to be enforceable by escrow (the exchange holds the crypto against which the option is written) or another mechanism. Buying an option against Ethereum held in someone else's local wallet would have what is known as counterparty risk, or the risk that the other party not live up to their expectations in the event that the market moves against them.
Other contracts, such as shorts and futures, also have counterparty risk, and it might be that, in the future, rather than depending on a Tether or a bit USD to handle our fiat hedges, we have regulated exchanges with crypto or cash in escrow ready to pay out if things don't go our way.
The universe tends towards maximum irony—people want to say damn the man and get away from sovereign currency, but most of the same people agree that government has a legitimate interest in protecting people against fraud and violence.
The trustless nature of cryptocurrency fails at the point of exchanges. If you want to exchange one cryptocurrency for another, that transaction frequently requires you to trust the exchange. Likewise, if you want another party to follow through on a transaction on which they might lose money, the other party either needs to be known to you so you can pursue recourse in the courts, or the law needs to put the onus on the exchange to pay out the claim.
The most likely outcome is that in the US, the SEC or CFTC will begin licensing exchanges, and exchanges will have certain liquidity requirements. This will make unbanked companies a less risky proposition.
We've established a company without a bank account as a possibility (and a legal one—there's no specific requirement in many jurisdictions for a legal entity to have a bank account). But what about an organization without a legal structure, or with a highly unconventional one?
Anyone considering investing in an organization or asset without a legal entity should be very careful, because the assumption is that your personal assets are at risk. In general, people use entities in order to protect their personal assets and attain some sort of organizational or tax benefit.
Without an entity, an organization may not have limited liability, and the law may choose to treat the owners as partners. As far as liability is concerned, partnership without an entity is just about the worst treatment you can ask for. This holds true in both common law jurisdictions (which have LLCs, LLPs, corporations, trusts, foundations, and other forms) and in civil law jurisdictions (which have analogous forms such as the Luxembourgish SARL, the German GmbH, and the French SA).
Under US law, members of a partnership can be jointly and severally liable for transgressions committed by the partnership. People involved in a crypto entity, even a little bit, don't have the benefit of a corporation or other entity that could take the hit and fall over dead if someone else had a claim against it.
Limited liability is just that—your liability is limited to your investment and organizations usually distinguish between people who are passively involved in an entity (limited partners or shareholders) and those who are actively involved (general partners or officers).
Limited liability doesn't protect members of an organization against criminal liability. If the officer of a corporation commits fraud either against a shareholder or against the public, limited liability doesn't protect them.
Given that extreme caution should be exercised in considering whether the operation of any crypto project is legal, regulatory action so far has mainly been concerned with fraudulent raises fleecing investors rather than investors being involved in an organization that fleeced the public. This does not mean the investors are safe.
Consideration should be given to whether the management team is identifiable (for instance, can you at least look at someone's LinkedIn and confirm that they exist?), and whether the entity is identifiable (can you find the jurisdiction the company claims to be registered in so I can check that it really exists?).
The Decentralized Autonomous Organization (DAO) was an attempt at an unbanked entity, though not unincorporated. It was organized as a Swiss SARL, and raised approximately 11.5 million Ethereum (ETH). The DAO was to be a fund that ran on smart contracts, and would make loans to entities that would use the funds in productive ways.
The reasoning behind the DAO was that investors would vote on all decisions, and with governance done entirely with smart contracts for the benefit of investors, it would defeat any perverse incentive that a director or manager might have. All decisions would be in the interest of investors.
A series of vulnerabilities in one of the DAO's smart contracts allowed malicious hackers to steal $50 million in ETH, or a third of the DAO's funds.
The DAO was delisted from major exchanges by the end of 2016, and that was the end of it. In order to recover the funds, the Ethereum blockchain went through a controversial hard fork.
A faction of the Ethereum community was opposed to refunding the funds from the DAO, claiming that a hard fork violated the principle of immutability and the notion that code is law—that users should be made to abide by. This led to the creation of Ethereum Classic.
About a year after delisting, the SEC stated that the raise was probably in violation of US securities law, although it was declining to take action against the DAO. No one suffered criminal penalties.
This was likely the first instance in which professional managers were removed from the process of running an organization. Disintermediating corporate boards and directors and allowing stakeholders to have a say directly seems to be a good idea, at least on the face of it. Blockchain provides a variety of consensus mechanisms, such as proof of stake and delegated proof of stake (discussed in greater detail in the previous chapter), that are natural fits for this sort of problem, as well as the limitless possibilities allowed by smart contracts.
The possibility of running an organization by aid of a smart contract remains. It is likely that the organization would still need one or more directors to carry out the directives of users and otherwise carry out the duties of running an organization. The DAO claimed zero employees, and that may have been true to a point. Given that it's effectively gone, it actually is zero now.
For a decentralized asset organization to be legal, a good start would be for it to have a legal entity, as suggested previously—something to provide limited liability to investors. For it to raise money, it would be a good start for it to admit that it's a securities offering, instead of claiming to be a utility token. The offering would then have to register as a security with the appropriate regulatory authority, or file for an exemption.
Much of the legal trouble with offerings such as the DAO perhaps could have been avoided by adhering to forms—there's nothing inherently wrong with a token as a security, except that to start, we should probably admit that most of the ones that people are buying speculatively are, in fact, securities.
Doing an issue under Rule 506(c) in the US allows unlimited fundraising among accredited investors, and general solicitation is allowed—you can advertise your offering. If you want to raise money among investors other than accredited investors, you can do that with a different exemption, the Reg A+, albeit with certain limitations and substantially more cost.
The core concept of users voting on corporate governance is a good one. The notion that organizations such as the DAO formed legal entities only as compatibility measures with real life speaks to the enormous arrogance of certain elements of the crypto community.
Corporations exist for the benefit of shareholders. In practice, layers of management and pervasive rent-seeking suck tons of productivity out of organizations. The thinking that eliminating people from an organization would fix its problems, however, is fundamentally flawed.
Algorithms are written by people. Smart contracts are written by people. True, an organization with zero employees has no payroll expense but if it's replaced by $50 million in oops-our-money-was-stolen expense, it's hard to say that that's an improvement.
Still, the basic concept of an organization truly run by stakeholders, where every deal is vetted by the people whose capital is supposed to be grown and protected—that really may work in some instances. Much has been written about the popular wisdom averaging out to be quite good.
In much the same way that actively managed mutual funds, net of all fees, tend to underperform index funds, professional managers of a fund that invests in a given asset might not earn their keep. A crypto real estate fund, in which the investors are primarily seasoned real estate investors who had previously been in syndication deals and so forth, would likely yield good results.
The value of blockchain in this instance is that stakeholders, running specialized software or clicking around a web interface, have a fast, consistent, verifiable way to participate in board elections or run the entire organization themselves.
We've discussed blockchain as a mechanism for stakeholders to have greater control over corporate governance. What could shareholders control?
Men like Benjamin Graham delighted in taking over corporations that didn't perform and forcing them to pay dividends. This is an example of shareholder activism. The corporation exists for your benefit—if it's not working for you, make it work for you.
Running a big cash surplus? Make it pay cash dividends.
Executive compensation out of control? Cut compensation, renegotiate, and fire, as the law allows.
Your corporation is a Radio Shack or a Blockbuster, woefully under-equipped to compete today? Liquidate it. Turn it into Ether.
Corporations with activist shareholders tend to outperform those that do not have them. If GE had had activist shareholders with good visibility into company finances, the CEO would not have had an opportunity to have an extra private jet follow his private jet in case his private jet broke down. (Yes, seriously.)
Institutional inertia and the slow death of capital seems less of a risk in an environment in which the shareholders have the option of pulling the entity off of life support at a moment's notice.
Shareholder activism is widely assumed to improve returns, and some evidence exists for this—but what if you have a highly technical business model and don't expect your investors to understand?
Suppose your business involves mortgage-backed securities, distressed debt, swaps, or other contrivances? Some of these involve fiendishly complicated financial models, and there's a real risk that the shareholders (or token holders) won't understand. What does that look like in this brisk, brutal environment? Could the stakeholders kill the entity prematurely?
Fortunately, the tokens need not be shares. No technical barrier exists that would prevent the tokens from being other securities.
A token could be a revshare (a form of debt that represents a share of the entity's revenue until some multiple of the principal is paid back), a note, a bond, or another interest-yielding instrument. The interest could be paid based on a price in fiat or a fixed rate in Ether or another common, fungible cryptocurrency.
It could even represent a share of revenue or profits from a specific asset, a future derivative providing a return from an underlying crypto portfolio, a hard asset portfolio, rents or royalties. At the time of writing, a firm called Swarmsales is currently preparing to create an asset that would take a percentage of the income from the sales of thousands of units of software sales by a large and growing decentralized, freelance sales staff. The expectation is that paying that staff with this instrument will give sales professionals a new source of income, replacing their base salaries and providing a source of income extending even beyond their term of employment. Swarmsales expects to be able to use this approach to create the largest B2B salesforce in the world.
This is what blockchain makes possible. Raises that would involve securities transfer agents, endless meetings, and very specialized, expensive staff can now be accomplished on the internet with a modest amount of technical and legal work and marketing budgets that would be laughable on Wall Street.
There remains a perception that Initial Coin Offerings (ICOs), and increasingly Security Token Offerings (STOs), are a simple, low-cost way to raise money. This may be true for the right team, but budgets have greatly grown. One project, called Financecoin, simply copy-pasted the README file from DogeCoin on BitcoinTalk and succeeded in raising over $4 million. Whether or not they did anything useful with the money is not known to the author, invoking again another problem with the space.
Those days are gone—it's now widely agreed that it costs between $200,000 and $500,000 to do an ICO or STO in this increasingly crowded and regulated space. It's not clear, though, that many of the good projects would have had a problem raising capital anyway.
The great majority of token sales are to support très chic tech projects, some of which would be as well suited to conventional fundraising. It's impossible to do an Initial Public Offering (IPO) or reg A+ without the assistance of an investment bank or brokerage, and those firms largely herd towards tech and healthcare. It's safe to say that blockchain hasn't improved access to capital for projects with strong teams with good concepts and previous startups under their belts.
Certainly DAOs are largely not of interest to investment banks; those remain solely within the purview of distributed teams doing ICOs or STOs.
Some projects with a social purpose have succeeded in raising money via conventional channels—Lemonade, an unconventional insurer organized as a New York B Corp, closed a very successful Series C last year. Benefit corporations seem to be the new darlings of mainstream venture capital firms, such as Andreessen Horowitz and Founders Fund.
This seems to be a good fit for blockchain as well—benefit corporations and charities similarly need cash but may not be suited to the multiple rounds of fundraising and eventual exit required of them by VC. Fidelity Charitable collected $22 million in Bitcoin and other cryptocurrencies in 2017, and that segment of charitable contributions is expected to continue to grow.
As a means of raising capital, blockchain has the potential to improve environmental impacts and long-standing disparities between the haves and the have-nots. An Australian firm called African Palm Corp is working towards launching a cryptocurrency with each unit backed by a metric ton of sustainable-source palm oil.
As this book goes to publication, the EU is preparing to ban the import of Indonesian and Malaysian palm oil—85% of the current supply. The means of farming palm oil causes habitat destruction on a massive scale. Conversely, this STO aims to purchase four million hectares of land on which palm trees already stand, potentially reducing unemployment in four West African countries on a massive scale.
Another project headed by the founder of a Haitian orphanage has the potential to improve tax collection and provide physical security for a great number of vulnerable people. The Caribean Crypto Commission is a project to create a coin employed by a sort of cryptoentity; governments would allow the formation of a crypto corporation with a greatly reduced tax rate in exchange for that entity having public financials. Recording that business' transactions publicly on a blockchain would allow the company to create verifiable balance sheets and income statements. An entity subject to a 15% tax rate would be an improvement over an entity that nominally has a 40% tax rate (and which, in practice, pays nothing).
This concept also provides physical security to people living in temporary housing in earthquake-rattled Haiti, where banks are expensive and cash is kept in tents and houses—putting the occupants in danger of robbery. The alternative? An SMS wallet on your smartphone. Via a gateway, a program on your phone can send and receive text messages that can credit an offline wallet, even without mobile data.
A lack of access to lending and banking lead people to use predatory lenders. Payday loans promise to provide money to address problems needing attention in the immediate term—an impounded car, a bond for release from jail, a mortgage near to foreclosure.
The loans are expensive to the borrower, and to the lender too—it's thought that 25% of principal is lost to default. The right to collect on those defaulted loans is then sold to collection agencies, which enjoy a largely deserved reputation for being nasty and abusive.
Loans paid back on time are likewise not subjected to treatment that could be considered fair or equitable. Rates of interest range from 50% to over 3000% annualized, with some lenders treating each payment as a refinance and writing a new loan, allowing them to again to charge the maximum rate of interest.
Some are said to be altogether unbanked—aside from lending, the fractional reserve model of banking provides the option for the lender to avoid charging fees for some services. People without checking accounts because of prior overdrafts, geographic isolation, or high costs are cut off from this system, and generally have to resort to using check-cashing services and prepaid debit cards. This is another product that is not cheap, with services charging between one and four percent—a hefty sum if a worker is forced to cash his paycheck this way. For the poorest of the poor, after all credits, it is not unusual to pay more in check-cashing fees than in income tax, however hard those same people may rail against taxes.
Some firms are already using alternatives to traditional banking, for better or worse. It is now regrettably not unusual for firms to pitch prepaid debit cards to their employees as a convenient alternative to banking, at substantially greater cost for lesser service.
Another alternative, however, exists in the form of various electronic tenders. DHL now pays its contractors in Kenya with Safaricom, M-PESA, a sort of mobile phone wallet pegged to the Kenyan shilling. This represents a huge leap forward in the case of people for whom the nearest bank may be 50 or 60 miles away.
This is less security than having cryptocurrency—the properties of cryptocurrency, specifically decentralization, ensures that there is no central authority easily able to seize or revoke ownership of funds. This is not the case with what is essentially a bank account used exclusively through an app.
Likewise, a very large part of the promise of cryptocurrency is cash that is free from such specters as asset forfeiture, in which law enforcement agencies may seize property in so-called rem proceedings, in which the onus is on the owner of the property to show that the ownership thereof is legitimate. Blockchain provides not only a means by which ownership can be shown but also that property's chain of title—stretching back, in most instances, to the date at which the asset was created.
The curious contradiction of an emerging technology is that it's simultaneously lauded and condemned. Possibilities good and bad are considered and weighted.
Probably we tend a bit too much toward moralism—almost everyone interested in blockchain has been told that it's just for drugs. There's something to this: many people first heard of Bitcoin as something used on dark net markets, such as the Silk Road, and this use of Bitcoin is arguably responsible for the popularity of cryptocurrency. The same people might then be surprised that you have, in fact, been receiving your salary in Bitcoin for six or seven months.
Each evangelist has to genuinely consider the drawbacks—in Bitcoin, for instance, privacy remains a large problem. As of this writing, this seems very unlikely to change. Take any idea that would do so much for transparency—say, a crypto corporation, with its transactions, or at least its balance sheet, on the record, available for all to see. The idea is conceptually sound, and it would improve tax collection and compliance.
Employees who were previously off the books might enjoy social security credit. Wage parity between people of different racial and ethnic groups might be achieved. Organizations that serve as fronts for money laundering would have to do so under greater scrutiny. Financial statement fraud would be easily detectable. Insurance rates would plummet—or at least my errors and omissions insurance would get cheaper.
All of this sounds pretty great until you consider the obvious drawbacks of everyone being in everyone else's business, and one hopes that the people building and purveying any technology, not just blockchain, stop and carefully consider the value of privacy.
Take another example: electric smart meters offer improvements in efficiency to utility companies. It eliminates obscene amounts of human labor. Rather than having a person come by to read the meter on every single house regularly, the meter transmits data on power usage on a regular basis. In theory, this would also provide benefit to the consumer: unplug your refrigerator for 20 minutes and see how much juice it's using. Less directly (and perhaps out of naïveté), we would also assume that the utility's savings are passed on to the consumer in the form of lower power tariffs.
So, where's the downside? Some of the least sophisticated of these meters could identify, say, the use of a microwave. A sudden increase in power usage in exactly the amount of 1000W for about a minute, for the sake of argument. If you find that a given household uses 1000W right around sundown every day during the month of Ramadan, you've probably identified a Muslim family observing the ancient tradition of fasting. If you find that from Friday night to Saturday night there's no power usage at all, perhaps you've identified an observant Orthodox Jew.
However benevolent an authority may seem now, information tends to stick around, and it is terribly empowering to people with ill intent. Consider that the Holocaust was especially bad in the Netherlands, but killed only a single family in Albania. The former country was great at keeping records. The latter, terrible.
Blockchain as a solution for social problems offers promise. Everything from preventing blood diamonds from entering circulation to guaranteeing a minimum income could be implemented with blockchain. Any tool has the potential for abuse, and this is no different.
Consider the pitch—put a tiny chip in every diamond. It has a little chip with a revocable private key on it, something akin to the EMV chip on a credit card. In theory, this could be used to ensure that each diamond in your rings is not a so-called conflict diamond, one sold to fund a war.
It also may have the effect of freezing everyone else out of the market. Jewelers getting stones certified through organizations such as the Gemological Institute of America (GIA) now have to sign a declaration that they don't knowingly sell blood diamonds, as well as submit personal information related to anti-money laundering regulations.
Purveyors of diamonds not wanting to adhere to this scheme largely don't have to, at the expense of being consigned to the rubbish heap—selling exclusively uncharted diamonds implies a proprietor offering a product of lesser quality. Whatever the expense, businesses go to great lengths to appear legitimate, and it's unlikely that even the savviest of consumers will care much for the proprietor's privacy.
Solutions that respect human limitations, with regard to knowledge or moral character, are more ethical and more robust than the sort of hand-wave everything will be fine attitude that pervades the tech world. It seems far safer to acknowledge that, although some people will abuse the anonymity, cash and barter transactions have taken place for thousands of years without any sort of central authority regulating them, and people often have legitimate reasons for wanting privacy or even anonymity.
Zero-knowledge cryptosystems may offer a solution in some use cases—cryptocurrencies such as Zcash and Monero more truly resemble cash. Bitcoin and (presently) Ethereum do not offer the sort of anonymity and privacy that detractors would have you believe they do.
Blockchain inherently has many desirable properties for people seeking privacy and anonymity, decentralization being the foremost of those. More broadly, outside of blockchain, this author suspects that users will be willing to pay somewhat of a premium for technology that ensures ephemerality, the property of being transitory, temporary, perhaps forgettable.
We've entrusted the most intimate details of our personal lives to mechanisms designed by fallible human beings, and despite the constant data breaches and the occasional happening, the public largely trusts things such as Facebook chats and devices with always-on microphones. However zealous blockchain evangelists may seem, trust in companies with centralized IoT and mobile junk remains the most remarkable arrogance.
Zero-knowledge proofs (and zero-knowledge arguments) allow the network to verify some computation (for example, ownership of tokens) without knowing anything about it. In addition to the properties for which we use blockchain (blockchains are consistent, immutable, and decentralized), specific implementations of zero knowledge may also be deniable, and avoid recording information on a blockchain that may compromise a user's privacy.
Conceptually, a zero-knowledge proof is similar to a randomized response study. Researchers are understandably concerned about whether people will honestly answer a question about a taboo behavior—such as drug use or interactions with sex workers.
In order to eliminate bias, statisticians came up with a method that introduced randomness in individual responses while keeping the meaning of overall results. Imagine you're trying to determine the prevalence of abortion by interviewing women, in a jurisdiction in which abortion is illegal. Have the interviewee flip a coin. If heads, answer the question honestly. If tails, just say Yes.
The researcher doesn't need to know the results of the coin flip, or each individual's true response—they only need to know that, given a sufficient sample size, taking the margin above 50% and doubling it gives you the actual prevalence of the practice. This approach preserves the privacy of the individual respondents while not compromising the quality of the data.
Zero-knowledge proofs (and arguments) are highly technical and the nuts and bolts are beyond the scope of this publication, but they are conceptually similar to what we're discussing. Depending on the specific implementation, zero knowledge might allow a user to spend the contents of their wallet without other users of the network knowing the contents of the wallet. This is one respect in which a cryptocurrency can truly be similar to cash: short of a mugger taking your wallet, there's no way for another person to know what you have until you've revealed it. This approach succeeds in addressing one of the largest problems in cryptocurrencies such as Bitcoin, and at the time of writing, Ethereum.
Blockchain is a transformational technology with an impact similar to that of the internet, vaccinations, or powered flight: the social implications are extensive, subtle, and perhaps in some ways pernicious. It has the potential to further degrade privacy, drastically improve corporate governance, or lift billions out of poverty. The specific application of this technology will define it as a tool that will help to shape the world.
In the next chapter, we will discuss some applications of blockchain, starting with the most fundamental of them, cryptocurrency wallets.
In this chapter, we will discuss cryptocurrency wallets in details. In earlier chapters, we have been introduced to wallets as well as the types of crypto wallets; in this chapter, we will further discuss wallets in detail, their source, and how the security of wallets can be strengthened.
Wallets are used to store private and public keys along with Bitcoin addresses. Coins can be sent or received using wallets. Wallets can store data either in databases or in structured files. For example, the Bitcoin core client wallets use the Berkeley DB file.
The topics we will cover in this chapter are as follows:
A wallet of any cryptocurrency can store multiple public and private keys. The cryptocurrency is itself not contained in the wallet; instead, the cryptocurrency is de-centrally stored and maintained in the public ledger. Every cryptocurrency has a private key with which it is possible to write in the public ledger, which makes spending in the cryptocurrency possible.
It is important to know about the wallets, since keeping the private key secure is crucial in order to keep the currency safe. Wallet is a collection of public and private keys, and each of them is important for the security and anonymity of the currency holder.
Transactions between wallets are not a transfer of value; instead, the wallets store the private key in them, which is used to sign a transaction. The signature of a transaction is generated from the combination of private and public keys. It is important to store the private key securely.
Wallets can store multiple private keys and also generate multiple public keys associated with the private key.
Hence it is important to keep the wallet secure so that the private key is safe; if the private key is lost the coins associated with that private key are lost forever, with no feasible way to recover the coins.
Wallets can be categorized into various types based on their traits. Wallets can be categorized by the number of currencies they support, availability, software or hardware, key derivation method, and so on. We will look at the types of cryptocurrency wallets to be covered in the following subsections.
One primary trait on which the wallets can be distinguished is the number of currencies the wallets support; for example, there can be wallets with single currency support or multiple currency support. Each of the coins has a core client which includes a wallet too.
The official wallets usually support single currencies, but nowadays, a lot of third-party wallets have appeared support multiple wallets, these wallets performing the same functions as regular wallets, the only difference being the number of currencies they support.
Some of the wallets that support multiple currencies are as follows:
The following is a screenshot of the EXODUS wallet, which supports various currencies:
There are various other wallets coming up from time to time that offer multiple currencies. Sometimes, existing wallets that support a single currency start to introduce multiple currencies to increase their popularity or even to support another cryptocurrency.
The wallets can also be differentiated based on whether they are software, hardware, paper, or cloud-based. Let's discuss each of these wallets in detail.
These wallets are based on the local computer or mobile. These can be further divided into desktop or mobile wallets. These wallets are confined within the local machine; they usually download the complete blockchain in order or keep a record of the public ledger:
The core clients of most of the cryptocurrencies offer software wallets to start with, with initial support for desktop wallets.
The private key is to be stored in the most secure location possible. Hardware wallets store the private key in a custom hardware designed to store private keys. It is not possible to export the private key in plain text, which gives it another layer of security. Hardware is connected to a computer only when required, and at all other times the private key is kept secure. Hardware wallets were first introduced in 2012 by Trezor.
Some of the popular hardware wallets currently available are Trezor, Ledger, and KeepKey wallets. The following snap shows an example of a hardware wallet connected to a computer:
Paper wallets, as the name suggests, are simply public and private keys printed together. The keys are usually printed in QR form, also serving as the address. Anybody can create a paper wallet by printing the keys but also making sure they remove the keys from the computer, or anyone could have access to the keys. Paper wallets are meant to be stored only on paper with no backup elsewhere. There are various online services that generate paper wallets such as www.walletgenerator.net. The following screenshot is an example of a paper wallet, the following Image can be printed, to receive payments, public address is shared but the private key marked secret and is to be kept safe:
A brain wallet is a simple wallet that creates addresses by hashing passphrases to generate private and public keys. To generate a brain wallet, we choose a simple passphrase to generate a public and private key pair. The following screenshot shows how the Public Address and Private Key are generated. The passphrase is entered which is to be reminded as shown in the following screenshot:
The wallets can also be differentiated on the basis of usage; there are primarily two types of wallets on this basis: cold wallet and hot wallet. In simple terms, cold wallets are not connected to the internet while hot wallets are connected to the internet, at all times and can be used for sending the respective cryptocurrency at any time. Cold wallets can be used to receive the currency even when not connected to the internet but it is not possible to send the currency to other address before connecting it to internet.
A hardware wallet is not connected to the internet unless plugged-in to a device; they can be considered cold wallets.
The private keys are generated by a wallet to be present on the blockchain, and there are primarily two methods by which the key can be generated. The key generation method is crucial for the security of the wallet and also important for recovery of the wallet in case the wallet is lost.
These were the initial iterations of the Bitcoin clients; the wallets had randomly generated private keys. This type of wallet is being discontinued due to a major disadvantage, that the random keys are inaccessible if the wallet is lost. Since it is advisable to use a different address for every transaction in order to maintain anonymity on the network, with so many random keys, it becomes difficult to maintain and, hence, addresses became prone to re-use. Even though in the Bitcoin core-client, there is a wallet that is implemented as a type-0 wallet, its use is widely discouraged.
In these wallets, the keys are derived from a single master key or one can say a common seed. All the private keys in this type of wallet are linked to a common seed. Backup of only the seed is sufficient to recover all the keys derived in this type of wallet.
This is the most advanced form of deterministic wallets. These were introduced in the BIP0032 of the Bitcoin Improvement Proposal system. These wallets follow a tree structure, that is, the seed creates a master key, which further creates child keys, and each of the keys can derive further grandchildren keys. Thus, in these types of wallets, there can be multiple branches of keys, and each key in the branch is capable of creating more keys as required. The following diagram shows the keys and the hierarchy of addresses created in such wallets:
These are English words used to represent the random number used to derive the seed in a deterministic wallet. The words act as a password; the words can help in recovering the seed and subsequently the keys derived from it. The mnemonic codes act as a good backup system for the wallet user.
The wallet shows a list of 12 to 24 words when creating a wallet. This sequence of words is used to back up the wallet and recover all the keys in the event of a wallet becoming inaccessible.
Here is the process of generation of mnemonic code and seed as per the BIP0039 standard:
The length mnemonic code, also known as a mnemonic sentence (MS), is defined by MS = (ENT + CS) / 11. The following screenshot shows the word length and the Entropy associated with that word length:
The seed that is 512 bits is generated from the mnemonic sequence using the PBKDF2 function where the mnemonic sentence is used as the password and the string mnemonic + passphrase is used as a salt. The passphrase is something that a user can use to protect their mnemonic; if it's not set, then "" is used.
The length of the derived key from this process is 512-bits; different wallets can use their own process to create the wordlist and also have any desired wordlist. Although it is advised to use the mnemonic generation process specified in the BIP, wallets can use their own version of wordlist as they require.
We will be discussing key generation processes in detail, starting from master keys through to private keys, and the various addresses a wallet creates for transaction purposes.
The initial process is to create the root seed which is a 128, 256, or 512 bit random. The root seed is represented by the mnemonic sentence, which makes it easier to restore the complete wallet in the case of losing access to the wallet.
Root seed is generated using the mnemonic sentences and the root seed which is of a chosen length between 128 and 512-bits, although 256 bits is advised. Generated using (P) RNG. The resultant hash is used to create the master private key and the master node. Generation of the master key is the depth level 0 in the hierarchy system; subsequent wallets or keys are denoted by depth 1, 2, and so on.
HD wallets extensively use the Child Key derivation (CKD) function to create child keys from the parent keys. Keys are derived using a one-way hash function using the following elements:
There are various ways in which child keys can be generated from already present keys; the following are the key derivation sequences:
Let's discuss each of the previously mentioned sequences in detail.
The parent key, chain code, and index number are combined and hashed with the HMAC-SHA512 algorithm to produce a 512-bit hash using the following formula:
I = HMAC-SHA512(Key = Cpar ,Data = serp (point(kpar )) || ser32 (i))
The resultant hash is split in two hashes, IL and IR The right-hand half of the hash output becomes the chain code for the child, and the left-hand half of the hash and its index number are used to produce the child private key as well as to derive the child public key.
By changing the index, we can create multiple child keys in the sequence.
As discussed a number of child keys can be derived from parent key considering the three required inputs are available. We can also create another type of key, called the extended key, which consists of the parent key and the chain code.
Furthermore, there are two types of extended keys, distinguished by whether the parent key used is a private key or a public key. An extended key can create children which can further create children in the tree structure.
Extended keys are encoded using Base58Check, which helps to easily export and import between wallets. These keys are basically extensions of the parent keys, hence sharing any extended key gives access to the entire branch in the branch.
An extended private key has the xprv prefix in the key's Base58Check, while an extended public key has the xpub prefix in the key's Base58Check. The following diagram show's how extended keys are formed:
In this chapter we discussed in detail cryptocurrency wallets and various types of crypto wallets, we read about various characteristics based on which the crypto wallets can be distinguished, and we talked about the tenancy of the wallets, benefits of each of the wallet types, and the issues one can face while using the specific wallet type. We discussed key derivation methods and its importance with regard to security, accessibility, and other aspects of a wallet.
In the previous chapters, we learned about blockchain, its structure, components, mechanism and the biggest use case of blockchain, Bitcoins. In the last chapter, we discussed cryptocurrency wallets, and their role and usage with a blockchain. Most of our discussion surrounds Bitcoins and other cryptocurrency.
The success of Bitcoin brought a lot of attention to the technology and the underlying blockchain ledger system, and the community started creating alternate cryptocurrency based on blockchain, making slight modifications to the parameters of Bitcoin, each time trying to improve in one way or another. Subsequently, various organizations started creating alternatives to blockchain by making slight modifications or changes but keeping the core definition of blockchain, that being a public ledger, intact. Some of the projects trying to create alternative blockchain did not gain much attention, but others managed to get a lot of attention and community support.
In this chapter, we will discuss the following topics:
Distributed ledger technology is said to be the biggest revolution in computers after the internet; blockchain is and will be revolutionizing and impacting on each individual in years to come.
Blockchain is used in currency-related applications such as Bitcoins and Altcoins, but, apart from that, there are various other use cases of blockchain in other industries that entail completely different monetary usage. The following diagram depicts some of the industries where blockchain is being used:
Various governments across the globe are using blockchain to store public records or any other information across various government sectors, such as healthcare, identity management, taxation, voting, and financial services.
By having a decentralized database, it will make it easy for the governments to reduce fraud and also introduce certain checks before the data is entered into the distributed ledger system.
Medical records of an individual need authentication for correct information, and it is important to have access to health records that are complete in all aspects. Blockchain can be used in facilitating data sharing and record keeping. Sensitive medical data can become easily accessible to doctors and other relevant people of the healthcare community.
Researchers in the medical community are always thriving to make better innovations and techniques that can improve clinic care. With data being present on blockchain, researchers can access the authentic data with ease and also add theories/results based on an apt approval cycle. The system's interoperability can help in multiple levels, along with offering precision and authenticity.
Supply chain management is one of the most scattered bottlenecks of a business process. There has always been a need for efficiency in supply chain management. There is a lack of compatibility because of the use of multiple software systems, with each one having various data points required for smoother movement. Blockchain can provide each participant in the supply chain process with access to relevant information reducing communication or data errors, as seen in the following diagram:
A blockchain can be used to resolve copyright claims, since any entry in the blockchain-based system can only be introduced after it has been approved by the consensus system, thus making sure that the copyright is maintained.
The art industry depends on the authentication of artwork; although blockchain cannot authenticate artwork or whether a painting is original or forged, it can be used to authenticate ownership.
A number of projects have come up that are using blockchain within the maritime logistics industry to bring transparency in international trade. Various global shippers are using blockchain for the same reason, to introduce blockchain-based techniques and to weed out any bottlenecks that distributed ledger technology solved for the industry.
Blockchain can help to maximize efficiency in the energy distribution sector by keeping a track on energy allocation and implementing efficient distribution. Energy production and research for new sustainable resources can be monitored by using a blockchain to maintain authenticity and consensus in the same sense, as can be seen here:
Computation resources get wasted around the globe. Data centers and data lakes are always in need of efficient data maintenance. Using a blockchain can ensure security and improvement.
User identification is an important use case of blockchain being used in governments, but can also be used by other organizations for social security and other identification processes, as required.
Enterprises can use blockchain in various cases such as coordination among departments, intra-office and inter-office communication, data migration, and various other tasks. Microsoft, IBM, Google, Amazon, and other companies have already started beta testing the usage of blockchain in various enterprise departments.
Ripple acts as a real-time gross settlement and remittance network built by Ripple company and founded in 2012. It allows payments between parties in seconds. It operates with its own coin, known as Ripple (XRP), and also supports non-XRP payments. Ripple has proposed a new decentralized global network of banks and payment providers, known as RippleNet. This network uses Ripple's transaction settlement technology at its core. RippleNet is proposed to be independent of banks and payment providers, setting a standardized network for real-time payment settlement.
Ripple networks consist of various nodes that perform each of their own defined tasks. The first nodes that facilitate the system are called user nodes. The user nodes use Ripple for payment and transactions, such as to make and receive payments. The second type of node in Ripple is the validator node. These nodes are part of a consensus mechanism in the Ripple network. Nodes in the unique node list (UNL) are part of the Ripple network and trusted for the consensus mechanism. Anyone can become a validator node or a user node. The following diagram displays the flow of transactions that take place in the Ripple network. The transaction begins in the collection phase and then proceeds to move through the consensus phase. The final phase, which is the ledger closing phase, creates the block of the certain transaction for the next set of transactions to be received:
For the consensus mechanism, Ripple uses the Ripple Protocol Consensus Algorithm (RPCA). RPCA works neither on Proof of Work (PoW) nor Proof of Stake (PoS) systems; instead, its consensus mechanism works on a correctness-based system. The consensus process works on a voting system by seeking acceptance from the validator nodes in an iterative manner so that a required number of votes is received. Once the required number of votes is received, the changes are validated and the ledger is closed. Once the change in the ledger is accepted and the ledger is closed, an alert is sent to the network.
A Ripple network consists of various elements, which together make the transactions in Ripple successful:
Transactions are created by the Ripple network nodes in order to update the ledger. A transaction is required to be digitally signed and validated for it to be part of the consensus process. Each transaction costs a small amount of XRP, just like Gas in Ethereum. There are various types of transactions in Ripple Network: payments related, order related, and account related.
There are also various developer APIs available in the Ripple network to work with the transactions and payments, along with integration on RippleNet. Interledger works with RippleNet to enable compatibility with different networks. The following diagram depicts what a block consists of in a Ripple network transaction:
The Stellar network is for the exchange of any currency, including custom tokens. Stellar has a consensus system that is more commonly known as the Stellar consensus protocol (SCP), which is based on the Federated Byzantine Agreement (FBA). SCP is different from PoW and PoS with its prime focus to offer lower latency for faster transactions.
It has four main properties:
The Stellar network maintains a distributed ledger that saves every transaction and is replicated on each Stellar server connected to the network. The consensus is achieved by verifying a transaction among servers and updating the ledger with updates of the very same transaction. The Stellar ledger can also act as a distributed exchange order book as users can store their offers to buy or sell currencies.
Tendermint provides a secure and consistent state machine replication functionality. Its main task is to develop a secure and high-performance, easily replicable state machine. It is Byzantine Fault Tolerant, that is, even if one in three of the machines fail, Tendermint will keep on working.
The two prime components of Tendermint are as follows:
The Tendermint consensus algorithm is a round-based mechanism where validator nodes initiate new blocks in each round is done. A locking mechanism is used to ensure protection against a scenario when two different blocks are selected for closing at the same height of the blockchain. Each validator node syncs a full local replicated ledger of blocks that contain transactions. Each block contains a header that consists of the previous block hash, timestamp of the proposed block, present block height, and the Merkle root hash of all transactions present in that block.
The following diagram shows the flow between the consensus engine and the client apps via the Tendermint Socket protocol:
Participants of the Tendermint protocol are generally referred to as validators. Each validator takes turns to propose blocks of transactions. They also vote on them just like the Ripple voting system discussed previously. If a block is unable to commit, the protocol moves on to the next round. A new validator then proposes a block for that same height. Voting requires two stages to successfully commit a block. These two stages are commonly known as the pre-vote and pre-commit stage. A block is committed only if more than two in three of the validators pre-commit for the same block and in the same round.
Validators are unable to commit a block for a number of reasons. These would include the current proposer being offline, or issues with the quality or speed of the network. Tendermint also allows the validators to confirm if a validator should be skipped. Each validator waits for a small amount of time to receive a proposal block from the concerned proposer. Only after this voting can take place can they move to the next round. This dependence on a time period makes Tendermint a synchronous protocol despite the fact that the rest of the protocol is asynchronous in nature, and validators only progress after hearing from more than two-thirds of the validator sets. One of the simplifying elements of Tendermint is that it uses the same mechanism to commit a block as it does to skip to the next round.
Tendermint guarantees that security is not breached if we assume that less than one-third of the validator nodes are Byzantine. This implies that the validator nodes will never commit conflicting blocks at the same height. There are a few locking rules that modulate the paths that can be followed. Once a validator pre-commits a block, it is locked on that block. In such cases, it must pre-vote for the block it is to be locked on, and it can only unlock and pre-commit for a new block.
Monax is a blockchain and a smart contract technology that was founded in 2014. It started its journey as Eris Industries, but changed its name to Monax in October of 2016.
Monax has a lot to offer. Some of these include various frameworks, SDKs, and tools that allow accelerated development of blockchains and their deployment for businesses. The idea behind the Monax application platform is to enable development of ecosystem applications that use blockchains in their backend. It also allows integration with multiple blockchains and enables various third-party systems to interact with other blockchain systems, and offers a high level of compatibility. This platform makes use of smart contracts written in solidity language. It can interact with blockchains such as Ethereum or Bitcoin. All commands are standardized for different blockchains, and the same commands can be used across the platform.
Monax is being actively used for the following applications:
In this chapter, we were introduced to alternative blockchains. We discussed the various use cases of blockchains other than cryptocurrency. Some of these included government, healthcare, medical research, supply chains, copyright, fine art, shipping, energy, and so on. As well as this, we discussed Ripple, which is a new blockchain used for fast payments and offers various modifications and improvements compared to the Bitcoin blockchain. After that, we discussed the Stellar payment protocol and its prime properties, which help to accelerate payments in Stellar. Tendermint is another blockchain software, which was discussed and brought to our attention.
In the next chapter, we will discuss, in detail, Hyperledger and some of the prominent projects based on the Hyperledger protocol. We will also discuss detailing and other parameters of the Hyperledger protocol.
Unlike most of the other blockchain systems discussed in this book, Hyperledger never had an Initial Coin Offer (ICO) and has no tokens that are publicly traded. This is because Hyperledger isn't a blockchain itself, but instead a collection of technologies used for the creation of new blockchains. Moreover, these blockchain technologies were explicitly designed and built for enterprise use cases and not the public markets.
In this chapter, we will cover the following items:
The Hyperledger name doesn't apply to a single technology, but rather a collection of blockchain technologies all donated to the Linux Foundation under the Hyperledger name.
Members of the Hyperledger project include major blockchain companies such as Consensys, R3, and Onchain, as well as a large number of enterprise-focused technology companies such as Baidu, Cisco, Fujitsu, Hitachi, IBM, Intel NEC, Red Hat, and VMware. In addition to these companies, a number of financial services firms have come on board due to the clear application of blockchain in fintech. Financial services members include ANZ Bank, BYN Mellon, JP Morgan, SWIFT, and Wells Fargo. Seeing the opportunity to be on the next wave of business software consulting, major integrators joined as well—Accenture, CA Technology, PWC, and Wipro, along with many others.
Recently, Amazon, IBM, and Microsoft have all revealed blockchain-as-a-service offerings featuring Hyperledger technology.
The Hyperledger project was founded in 2015, when the Linux Foundation announced the creation of the Hyperledger project. It was founded in conjunction with a number of enterprise players, including IBM, Intel, Fujitsu, and JP Morgan. The goal was to improve and create industry collaboration around blockchain technology so that it would be usable for complex enterprise use cases in the key industries most suitable to blockchain disruption: technology, finance, and supply chain.
The project gained substance in 2016, when the first technology donations were made. IBM donated what was to become known as Hyperledger Fabric, and Intel donated the code base that became Hyperledger Sawtooth.
Unlike most projects in the blockchain space, Hyperledger has never issued its own cryptocurrency. In fact, the executive director of Hyperledger has publicly stated that there never will be one.
As mentioned, a hyperledger isn't a single blockchain technology, but rather a collection of technologies donated by member companies. While there is a long-term goal of greater integration between projects, currently most of the Hyperledger projects function independently. Each project's core code base was donated by one or more of the Hyperledger member organizations, based on problems they were trying to solve internally before open sourcing the code and handing ownership to the Linux Foundation.
Hyperledger Burrow is a re-implementation of the Ethereum Virtual Machine (EVM) and blockchain technology, but with a few key changes. First, instead of using the proof-of-work consensus algorithm used by the public Ethereum chain, Burrow is designed around the Tendermint consensus algorithm (See Chapter 7, Achieving Consensus). This means there are no miners and no mining to be done on Burrow-based projects.
Second, Hyperledger Burrow is permissioned—the computers allowed to participate in a Hyperledger Burrow network are known and granted access, and the computers signing blocks (called validators, as in Tendermint) are all known. This is very different than Ethereum, where anyone can anonymously download the Ethereum software and join the network.
Smart contracts written for the EVM will still mostly work. Due to the change in consensus, there are also changes in the way Gas is used. In the public Ethereum blockchain, each transaction costs Gas, depending on the complexity of the transaction, and each block has a Gas limit. Depending on the network load, participants have to pay a variable cost in Ether for the Gas needed for their transactions. In Burrow, these complexities are mostly dispensed with. Each transaction is gifted a basic amount of Gas automatically. Because the Gas is still limited, Burrow is able to guarantee that all transactions eventually complete—either by succeeding or failing—because they run out of Gas.
For more on the EVM, solidity language, and other aspects of Ethereum shared with Hyperledger Burrow, please see Chapter 12, Ethereum 101.
Hyperledger Sawtooth, like the rest of the Hyperledger family, is built for permissioned (private) networks rather than public networks, such as Ethereum, Bitcoin, and so on. As an enterprise-oriented blockchain system, it is designed around allowing different companies to coordinate using a blockchain and smart contracts. Originally developed by Intel, Sawtooth uses a unique consensus algorithm called Proof of Elapsed Time, or PoET.
PoET uses a lottery-based system for leader election. Using special Intel technology called the Trusted Execution Environment (TEE), along with Software Guard Extensions (SGX), available on some Intel chipsets, the leader is elected by each node generating a random wait time, with the shortest wait time going first. Because the code to generate the wait time is in the TEE, it can be verified that each node is running appropriate code and not skipping in line to become leader by not waiting the amount of time generated by the random time generator. Therefore, the election of the leader (and block issuer) is very fast, which in turn allows the blockchain to operate quickly.
Sawtooth has a pluggable architecture, comprised of the Sawtooth core, the application-level and transaction families, and the consensus mechanism (typically PoET, but hypothetically pluggable with others). We will study them in detail in the following sections.
Because Sawtooth is meant to be a pluggable, enterprise-oriented architecture, the application layer is highly configurable. Each Sawtooth-based blockchain allows transactions to be made based on what are called transaction families. Transaction families determine what sorts of operations are permissible on the Sawtooth blockchain. For instance, it is possible to allow smart contracts, such as with Ethereum, using the Seth transaction family. Under Seth, all possible Ethereum-based contracts and Ethereum contract-based transactions would be permissible, along with all the possible mistakes and issues such freedom creates.
A Sawtooth-based blockchain can have multiple transaction families operating at once. In fact, this is common, as one of the transaction families that ships with Sawtooth is the settings family, which stores system-wide configuration settings directly on to the blockchain. In most cases, this transaction family and a few others, comprised of business use cases, will be operating in parallel. Furthermore, because multiple transaction families can be running at the same time, this means that business logic can be isolated and reused as an independent transaction family across multiple blockchain implementations.
Because many businesses have only a few valid business rules and business outcomes, it is possible to customize the available operations on the blockchain through the creation of a custom transaction family. For instance, a shipping company may use Sawtooth to track the location of packages, and the only valid transactions might be a new package, package accepted, package released, package in transit, update package location, and package delivered. By restricting the available transactions, the number of errors and mistakes can be reduced. Using the shipping company example, network participants could be trucking companies, warehouses, and so on. For a package to move between a truck and a warehouse, the two network participants would issue package released and package accepted transactions, respectively, in a batch on to the blockchain. This brings us to the next concept in Sawtooth: Transaction Batches.
In Sawtooth, transactions are always part of batches. A batch is a set of transactions that come together and either all succeed or all fail. If a transaction needs to process by itself, then it would be in a single batch containing only that one transaction. Using the shipping company example, the transactions package released and package accepted may be programmed so that they only succeed if their counter-transaction is part of the same batch, forcing a successful handoff or throwing an error. The following diagram shows the data structure of a transaction batch:
Transactions and batches in Sawtooth are abstracted at a high level so that they can be created by custom transaction families and by arbitrary programming languages. Because of this, it is possible to program smart contracts and transaction families in Java, Python, Go, C++, and JavaScript. To code in any language, there is another restriction on transactions: serialization, or the transition from an in-memory structure on a computer to a fixed binary that can be sent across the network. No matter what the language is, the approach to serialization must have the same output. In Sawtooth, all transactions and batches are encoded in a format called protocol buffers, a format created by Google internally, and released in 2008. Protocol buffers are a solution to having a fixed and high-performance method of data-exchange between computers that is a programming language and computer architecture independent.
Transaction families and transactions in Sawtooth require a few things to be created by developers. Consider the following:
Sawtooth includes Python-based sources to serve as examples in both the settings and identity-based transaction families on GitHub. Next, we'll cover Hyperledger Fabric, another enterprise-oriented blockchain technology.
Hyperledger Fabric, like Sawtooth, is designed to be an enterprise-oriented blockchain solution that is highly modular and customizable. Hyperledger Fabric is both private and permissioned. This means that, like Sawtooth, by default Hyperledger blockchains are not observable to the public at large and are not and will not have tokens that are tradeable on exchanges. Users of the blockchain must have validated identities and join the blockchain by using a Membership Service Provider (MSP). These MSPs are configured on the system, and there can be more than one, but all members must successfully be granted access by one or more MSPs. Fabric also has a number of special tools that make it particularly full-featured, which we will cover later.
Hyperledger Fabric was designed around a few key features and use cases that were seen as critical for enterprise users.
At the core is the ledger itself. The ledger is a set of blocks, and each block holds a set of transactions. A transaction is anything that updates the state of the blockchain. Transactions, in turn, are performed by smart contract code installed on to the blockchain (called Chaincode). Let's look at how blocks and transactions are formed.
Each block is ordered in sequence, and inside each block is a set of transactions. Those transactions are also stored as happening in a specific sequence. Unlike other blockchains, the creation of the transaction and the sequence it is eventually given are not necessarily performed at the same time or on the same computer. This is because the ordering of transactions and the execution of transactions are separated. In Hyperledger Fabric, computers being used to operate the blockchain can run in three different modes (node types); these are as follows:
It is important to note that a single computer can act as up to all three of these node types on a Fabric blockchain, but this is not necessary. While it is possible for the same computer on a Hyperledger network to both execute transactions and order their sequence, Hyperledger is able to scale more by providing these as distinct services. To illustrate, look at the following diagram (from the Hyperledger documentation):
As you can see, incoming transaction first go to peers, who execute transactions using chaincode/smart contracts and then broadcast successful transactions to the ordering service. Once accepted, the ordering service decides on a final order of transactions, and the resulting transactions sets are re-transmitted to peer nodes, which write the final block on to the chain.
As an enterprise-oriented system, Fabric distinguishes between peers and orderers (nodes on a blockchain network) and the organization that owns them. Fabric is meant to create networks between organizations, and the nodes running the blockchain do so as agents of that organization. In this way, each node and its permissions are related to the organization it helps represent. Here is another diagram from Hyperledger:
As you can see, each network node operates the blockchain network on behalf of the contributing organization. This is different than networks such as Ethereum and Bitcoin, where the network is created by a set of computers that contribute resources to the network independently, or at least are perceived by the network as doing so independently, no matter who owns them. In Hyperledger Fabric, it is the organizations that create the shared ledger that contributes to the network by contributing resources in the form of peers and ordering nodes. The distinction is subtle but crucial. In most public networks, the idea is to allow computers to coordinate, but in Fabric the idea is to allow companies to coordinate. Owning organizations provides each of their peers a signed digital certificate proving their membership of a certain organization. This certificate then allows each node to connect to the network through an MSP, granting access to network resources. The organizations versus private computers focus brings us to another enterprise-oriented feature of Hyperledger Fabric, one that is necessary for a number of corporate requirements: Private Channels.
Hyperledger Fabric has a critical and unique functionality called private channels. A private channel allows a subset of members on a Fabric-based blockchain to create a new blockchain that is observable and intractable only for them. This means that, while Fabric is already private and permissioned, members of that private blockchain can create a smaller, yet more exclusive, chain to trade information that cannot be traded across the full membership network. As a result, Fabric is able to support critical use cases (such as legal communications) that would be impossible or inappropriate to broadcast, even on a relatively exclusive network.
For instance, if Hyperledger Fabric were used to set up a logistics network, the primary blockchain could be used for the tracking of packages, but pricing bids could be done on private channels. The participants of the network would be a number of shipping providers, materials providers, and a set of buyers. A buyer could issue to the blockchain a notice that they were accepting bids for a transfer of some supplies, and they could then create private channels between themselves and all transporters and suppliers. The suppliers and shipping companies could give the buyer time and cost prices, without making that information public to their competitors. While private, all of these exchanges would be encoded on to the blockchain for record keeping, legal compliance, and so on. Moreover, if corporate policy were something like taking the second-lowest bid, the entire process could be automatable through smart contracts.
In Hyperledger Fabric, assets are defined as anything that can be given a value. While this could be used to exchange different fiat currencies, an asset could be designed to denote something abstract, such as intellectual property, or something more tangible, such as a shipment of fresh fish.
In Fabric, assets are processed internally as simple key-value pairs, with their state stored on the ledger and modifiable via the chaincode. Assets in Hyperledger can fulfill all the duties performed in Ethereum by ERC-20 and ERC-721 tokens, and beyond. Anything that can be described in a token format can be stored as an asset in Hyperledger Fabric.
In Hyperledger Fabric, Smart Contracts are called chaincode. Unlike Ethereum, chaincode is not embedded directly inside the ledger itself. Instead, chaincode is installed on each peer node and interacts with the ledger to read and update state information about the assets the chaincode controls. Because the chaincode is signed and approved by all peers, and because each peer that uses a piece of chaincode must validate any state changes on the ledger, this system still allows distributed and trusted consensus, using smart contracts. To provide consistency, chaincode itself runs in an isolated Docker container.
Because of the modular nature of both the distributed ledger and the chaincode, multiple programming languages can be used to develop smart contracts; however, currently, the supported options are limited. There are full-featured SDK packages only for Go and Node.js, with eventual plans to add Java.
Fabric is one of the most popular of the Hyperledger projects for good reason. It's highly modular, designed for coordination across companies, and the private channel feature enables secure functionality that's impossible on public chains, and even most private ones. Moreover, Hyperledger Fabric has Composer—a visual tool for architecting blockchain applications. We'll discuss Composer later in the section on Hyperledger tools.
Next, we'll cover Iroha, a Hyperledger project aimed at bringing blockchain to mobile devices.
Hyperledger Iroha is a project written in C++ and contributed to by Sorimitsu. The goals of the project were to provide a portable C++ based blockchain implementation that could be used in mobile devices. Both iOS and Android operating systems, along with small computers such as Raspberry Pi, are all capable of efficiently running tightly written C++ code efficiently. To make things even easier, Iroha provides iOS, Android, and JavaScript libraries for developers.
One major difference from Ethereum, in particular, is that Hyperledger Iroha allows users to perform common functions, such as creating and transferring digital assets, by using prebuilt commands that are in the system. This negates the need to write cumbersome and hard-to-test smart contracts for the most common functionalities, enabling developers to complete simple tasks faster and with less risk. For instance, to create a new token type on Iroha, it takes just a single command—crt_ast. To make things even easier, Iroha has a command-line interface that will guide a new user through creating the asset, without writing code at all.
If the goals of Sawtooth and Fabric are completeness, Iroha is oriented more towards ease of use and device compatibility.
One of the more common use cases for blockchain technology is identity verification and authorization. You have probably experienced the issues around the web, where you either need to remember many usernames and passwords to confirm your identity to another provider, such as Google or Facebook. The problem here is that you must trust Google, Facebook, or other providers to manage your identity and keep it safe. This creates a single point of failure and allows a centralized authority to control whose identities are valid and what rights they have. This ecosystem is an obvious target for disruption and decentralization.
Hyperledger Indy is a blockchain project built around decentralized, self-declared identity. The goal of Indy is to provide tools and libraries for creating digital identities that can be managed on a blockchain and made interoperable with other applications and use cases that require identity verification.
While Fabric, Sawtooth, and Iroha all have some level of identity mechanism built in, Indy is specifically oriented around identity management and for use by applications that may not run on a blockchain. Thus, Indy could be used to provide identity services to web applications, company resources, and so on. Existing companies include Sovrin (who donated the original Indy codebase) and Every.
An often overlooked aspect of any application is the need for helpful tools to manage the lifecycle of that application. Tools, such as software to ease deployment, debugging, and design, can make a tremendous difference in the ease of use of a system, for developers and users alike. Most public blockchains are severely hampered by the lack of high-quality tools and support. The Hyperledger ecosystem, however, continues to invest in building excellent support tools.
One of the common needs of any system is benchmarking. Hyperledger Caliper is a blockchain-oriented benchmarking tool, designed to help blockchain architects ensure that the system can perform fast enough to meet the needs of the hosting organizations. Using a set of pre-defined, common use cases, Hyperledger Caliper will report an assortment of critical performance measurements, such as resource usage, Transactions Per Second (TPS), transaction latency, and so on.
Using Caliper, a team working on blockchain applications can take continuous measurements as they build out smart contracts and transaction logic and use those measurements to monitor performance changes. Caliper is compatible with Sawtooth, Indy, and Fabric blockchain systems.
Hyperledger Composer is a design tool for building smart contracts and business applications on the blockchain. It is designed for rapid prototyping of chaincode and asset data models for use with Hyperledger Fabric. As a Fabric-specific tool (so far), it is primarily designed around helping with Hyperledger Fabric specific concepts, such as assets, identity management, transactions, and the resultant chaincode used to power the business rules between all these items.
It is not designed as a "fire-and-forget" tool, where someone can build an entire ecosystem from scratch to production, rather it is designed for rapid visual prototyping to get testable applications up and running quickly, with finer details iterated directly in the codebase. IBM hosts a demo online at https://composer-playground.mybluemix.net/editor.
The primary users of Composer will be blockchain developers (especially new developers) and some technical business users. It sits well as part of an agile process for developing blockchain applications, allowing developers, network administrators, and technical business users to visualize the network and the code operating on it.
If Composer is used to assist with building aspects of a Fabric-based blockchain, then Cello is a tool to assist with the deployment of that blockchain to various servers and cloud services. Cello can be used to manage the blockchain infrastructure or launch new blockchains in a blockchain-as-a-service approach. Common lifecycle and deployment tasks include starting, stopping, and deleting a blockchain, deploying new nodes to an existing blockchain, and abstracting the blockchain operation so that it can run on local machines, in the cloud, in a virtual machine, and so on. Cello also allows monitoring and analytics.
Cello is primarily a tool for what is called DevOps, or the connection between development teams and production operations. It is primarily aimed at the Hyperledger Fabric project, but support for Sawtooth and Iroha is intended for future development.
Hyperledger Explorer is a blockchain module and one of the Hyperledger projects hosted by the Linux Foundation. Designed to create a user-friendly web application, Hyperledger Explorer can view, invoke, deploy, or query blocks, transactions, and associated data, network information (name, status, list of nodes), chain codes and transaction families, as well as any other relevant information stored in the ledger. Hyperledger Explorer was initially contributed by IBM, Intel, and DTCC.
There are times when it makes sense for multiple blockchains to be able to communicate. This is where Hyperledger Quilt comes in. Quilt is a tool that facilitates cross-Blockchain communication by implementing an Interledger protocol (ILP). The ILP is a generic specification available to all blockchains to allow cross-ledger communication, originally created by ripple labs. With ILP, two ledgers (they do not have to be blockchains) can coordinate, to exchange values from one ledger to the other.
ILP is a protocol that can be implemented using any programming language or technology, as long as it conforms to the standard. Because of this, it can be used to join multiple completely independent ledgers, even ones with radically different architecture. These ledgers do not need to be blockchains but can be any system of accounting. In ILP, cross-ledger communication occurs primarily through actors called connectors. See the following diagram from interledger.org:
The ILP bridges ledgers with a set of connectors. A connector is a system that provides the service of forwarding interledger communications towards their destination, similar to how packets are forwarded across the internet—peer to peer. ILP communication packets are sent from senders to a series of connectors that finally land at receivers.
The connectors are trusted participants in this sequence, and the sender and all intermediate connectors must explicitly trust one another. Unlike other blockchain-oriented technology, ILP does not involve trustless exchange. However, the sender and each connector need trust only their nearest links in the chain for it to work.
Quilt is the implementation of the ILP that has been donated to the Hyperledger project, on behalf of ripple labs, Everis, and NTT DATA. These organizations have also sponsored ongoing dedicated personnel to help improve the Quilt codebase, which is primarily in Java.
The distinctions between Fabric, Cello, Composer, Explorer, and Caliper can be described as follows:
Both Fabric and Composer are going to be principally involved in the development phase of a blockchain project, followed shortly after by Caliper for performance testing:
Finally, Hyperledger Quilt can be used to connect different ledgers and blockchains together. For instance, Quilt could be used to communicate from a Fabric-based system to the public Ethereum network, or to the ACH banking system, or all of the above.
Thus, the Hyperledger project has tools for end-to-end creation, operation, and interoperability of blockchain-based application ecosystems.
Given the numerous sub-projects inside Hyperledger that are all focused on business use cases, it would not be surprising if there was some confusion about which to use. This is understandable, but the good news is that for most cases the proper project to build on is clear.
By far the most popular and well-documented framework is Hyperledger Fabric. Fabric also has blockchain-as-a-service support from Amazon and Microsoft. In addition, Composer, Cello, and Caliper tools all work with the latest versions of Fabric. For the vast majority of projects, Hyperledger Fabric will be the project of most interest.
The second most-obvious choice is Sawtooth. For supply chain solutions, Sawtooth already has a reference implementation. In addition to this, Sawtooth has better support for writing smart contracts in multiple languages, whereas Hyperledger has support only for Go and JavaScript. In addition to this, Sawtooth core is written in Python. Python is a very popular language in data science, a field that is regularly paired with blockchain technology.
The final choices are Burrow, which would make a good match for technologies migrating from Ethereum, or needing to interface with the public Ethereum network, and Iroha, which would be a better match for projects that need to run a blockchain across mobile devices or other small machines.
Like much blockchain technology, the Hyperledger ecosystem is relatively new, and many projects have not even hit a full 1.0 release yet. While there is a large amount of development activity and multiple working systems already in production use, the system as a whole is fractured. For instance, Sawtooth is written in Python, Fabric in Go, Quilt in Java, and so on. Even staying inside the Hyperledger family, it would be difficult to use a homogeneous set of technologies for end-to-end implementations.
Moreover, Hyperledger's focus on private networks is a problem for the projects that may wish to have a public component. One of the appeals of blockchain technology is transparency. A project that seeks maximum transparency through public usage of their technology may need to look elsewhere or find a way to bridge between Hyperledger and public networks—possibly by using Quilt and ILP.
Similarly, projects looking to raise funds through an ICO should probably look elsewhere. Few projects have tried to use Hyperledger as part of an ICO, and, as far as we know, none of those have actually succeeded in fundraising. Hyperledger remains oriented strongly toward private networks—where it has succeeded tremendously.
Now you have a good idea of the different subprojects that make up Hyperledger and an awareness of the tooling you can use to build Hyperledger-based projects. Hyperledger is a set of technologies for building private blockchain networks for enterprises, versus the public and tradeable networks, such as Ethereum and Bitcoin. The Hyperledger family is made of six projects and a set of support tools, all with subtly different focuses and advantages to suit different projects.
Over time, the different projects are expected to become more consistent and interoperable. For instance, Hyperledger Burrow and Hyperledger Sawtooth have already cross-pollinated with the Seth transaction family, which allows Sawtooth to run Ethereum smart contracts. It is expected that tools such as Cello and Composer will be extended to support additional Hyperledger projects in time, leading to an increasingly robust ecosystem.
Next, we will discuss Ethereum in depth. Ethereum is a public blockchain network and the first and most popular of the public networks to support fully-programmable smart contracts.
In the previous chapters, we have studied in detail blockchain, Bitcoin, alternative cryptocurrencies, and crypto wallets. We discussed blockchain usage and benefits in not only currency-based applications, but other similar areas. We also discussed how Bitcoin has changed the landscape of blockchain usage for monetary benefits and how it has shaped the global economy.
In this chapter, we will be studying Ethereum blockchain in depth. It is currently the largest community-backed blockchain project, second to Bitcoin, with supporters and various projects and tokens running on top of it. In this chapter, we will discuss the following topics:
Ethereum is a blockchain-based system with special scripting functionality that allows other developers to build decentralized and distributed applications on top of it. Ethereum is mostly known among developers for the easy development of decentralized applications. There are differences between Ethereum and blockchain. The most important difference is that Ethereum blockchain can run most decentralized applications.
Ethereum was conceptualized in late 2013 by Vitalik Buterin, cryptocurrency researcher and developer. It was funded by a crowd sale between July and August 2014. Ethereum has built-in Turing, a complete programming language, that is, a programming language meant to solve any computation complexity. This programming language is known as Solidity and is used to create contracts that help in creating decentralized applications on top of Ethereum.
Ethereum was made live on July 30, 2015, with 11.9 million coins pre-mined for the crowd sale, to fund Ethereum development. The main internal cryptocurrency of Ethereum is known as Ether. It is known by the initialism ETH.
Let's discuss some general components of Ethereum, its primary currency, network, and other details. This will help in understanding Ethereum in a much better way and also help us see how it is different to Bitcoin and why it has a huge community, currently making it the most important cryptocurrency and blockchain project, second only to the Bitcoin blockchain.
Ethereum accounts play a prime role in the Ethereum blockchain. These accounts contain the wallet address as well as other details. There are two types of accounts: Externally Owned Accounts (EOA), which are controlled by private keys, and Contract Accounts, which are controlled by their contract code.
EOAs are similar to the accounts that are controlled with a private key in Bitcoin. Contract accounts have code associated with them, along with a private key. An externally owned account has an Ether balance and can send transactions, in the form of messages, from one account to another. On the other hand, a contract account can have an Ether balance and a contract code. When a contract account receives a message, the code is triggered to execute read or write functions on the internal storage or to send a message to another contract account.
Two Ethereum nodes can connect only if they have the same genesis block and the same network ID. Based on usage, the Ethereum network is divided into three types:
All of the preceding types are the same, apart from the fact that each of them has a different genesis block and network ID; they help to differentiate between various contract accounts and externally owned accounts, and if any contract is running a different genesis, then they use a different network ID to distinguish it from other contract accounts.
There are some network IDs that are used officially by Ethereum. The rest of the network IDs can be used by contract accounts. Here are some of the known IDs:
The public MainNet has a network ID of 1, but since Ethereum has a very active community backing it, there are various updates and upgrades happening to the Ethereum blockchain; primarily, there are four stages of the Ethereum network; let's discuss each of them in detail:
Clients are implementations of the Ethereum blockchain; they have various features. In addition to having a regular wallet, a user can watch smart contracts, deploy smart contracts, clear multiple Ether accounts, store an Ether balance, and perform mining to be a part of the PoW consensus protocol.
There are various clients in numerous languages, some officially developed by the Ethereum Foundation and some supported by other developers:
The preceding list consists of some of the most prominent Ethereum-specific clients currently in production. There are many other clients apart from these that are not heavily community-backed or are in their development phase. Now let's discuss the most prominent Ethereum client—Geth, or go-ethereum.
This is one of the most widely used Ethereum clients built on Golang; it is a command-line interface for running a full Ethereum node. It was part of the Frontier release and currently also supports Homestead. Geth can allow its user to perform the following various actions:
Geth can be installed using the following commands on Ubuntu systems:
sudo apt-get install software-properties-common
sudo add-apt-repository -y ppa:ethereum/ethereum
sudo apt-get update
sudo apt-get install ethereum
After installation, run geth account new to create an account on your node. Various options and commands can be checked by using the geth --help command.
On Windows-based systems, it is much easier to install Geth by simply downloading the latest version from https://geth.ethereum.org/downloads/ and then downloading the required zip file, post-extracting the zip file, and opening the geth.exe program.
Geth provides account management, using the account command. Some of the most-used commands related to account management on Geth are as follows:
COMMANDS:
 list Print summary of existing accounts
 new Create a new account
 update Update an existing account
 import Import a private key into a new account
The following screenshot is the output that will be generated after executing the preceding code:
When we run the command to create a new account, Geth provides us with an address on our blockchain:
$ geth account new
Your new account is locked with a password. Please give a password. Do not forget this password.
Passphrase:
Repeat Passphrase:
Address: {168bc315a2ee09042d83d7c5811b533620531f67}
When we run the list command, it provides a list of accounts that are associated with the custom keystore directory:
$ geth account list --keystore /tmp/mykeystore/
Account #0: {5afdd78bdacb56ab1dad28741ea2a0e47fe41331} keystore:///tmp/mykeystore/UTC--2017-04-28T08-46-27.437847599Z--5afdd78bdacb56ab1dad28741ea2a0e47fe41331
Account #1: {9acb9ff906641a434803efb474c96a837756287f} keystore:///tmp/mykeystore/UTC--2017-04-28T08-46-52.180688336Z--9acb9ff906641a434803efb474c96a837756287f
We will be discussing mining and contract development in later chapters.
Every transaction on the Ethereum blockchain is required to cover the computation cost; this is done by paying gas to the transaction originator. Each of the operations performed by the transaction has some amount of gas associated with it.
The amount of gas required for each transaction is directly dependent on the number of operations to be performed—basically, to cover the entire computation.
In simple terms, gas is required to pay for every transaction performed on the Ethereum blockchain. The minimum price of gas is 1 Wei (smallest unit of ether), but this increases or decreases based on various factors. The following is a graph that shows the fluctuation in the price of Ethereum gas:
Ethereum virtual machine (EVM) is a simple stack-based execution machine and acts as a runtime environment for smart contracts. The word size of EVM is 256-bits, which is also the size limit for each stack item. The stack has a maximum size of 1,024 elements and works on the Last in First Out (LIFO) queue system. EVM is a Turing-complete machine but is limited by the amount of gas that is required to run any instructions. Gas acts as a propellant with computation credits, which makes sure any faulty code or infinite loops cannot run, as the machine will stop executing instructions once the gas is exhausted. The following diagram illustrates an EVM stack:
EVM supports exception handling in case of an exception occurring, or if there is insufficient gas or invalid instructions. In such cases, the EVM halts and returns an error to the executing node. The exception when gas is exhausted is commonly known as an Out-of-Gas (OOG) exception.
There are two types of storage available to contracts and EVM: one is memory, and the other is called storage. Memory acts just like RAM, and it is cleared when the code is fully executed. Storage is permanently stored on the blockchain. EVM is fully isolated, and the storage is independent in terms of storage or memory access, as shown in the following diagram:
The storage directly accessible by EVM is Word Array, which is non-volatile and is part of the system state. The program code is stored in virtual ROM, which is accessible using the CODECOPY, which basically copies the code from the current environment to the memory.
Apart from system state and gas, there are various other elements and information that is required in the execution environment where the execution node must be provided to the EVM:
The Ethereum blockchain is a collection of required parameters similar to a Bitcoin blockchain; here are the primary elements of an Ethereum block:
A block header is a collection of various valuable information, which defines the existence of the block in the Ethereum blockchain. Take a look at the following:
The following diagram shows the structure of a block's headers:
Ethereum incentivizes miners to include a list of uncles or ommers when a block is mined, up to to a certain limit. Although in Bitcoin, if a block is mined at the same height, or if a block contains no transaction, it is considered useless; this is not the case with Ethereum. The main reason to include uncles and have them as an essential part of the Ethereum blockchain is that they decrease the chance of an attack occurring by 51%, because they discourage centralization.
The message is the data and the value that is passed between two accounts. This data packet contains the data and the value (amount of ether). A message can be sent between contract accounts or externally owned accounts in the form of transactions.
Ethash is the Proof of Work (PoW) algorithm used in Ethereum. It is the latest version of the Dagger–Hashimoto algorithm. It is similar to Bitcoin, although there is one difference—Ethash is a memory-intensive algorithm; hence, it is difficult to implement ASICs for the same. Ethash uses the Keccak hash function, which is now standardized to SHA-3.
Ether is the main cryptocurrency associated with the Ethereum blockchain; each of the contract accounts can create their own currency, but Ether is used within the Ethereum blockchain to pay for the execution of the contracts on the EVM. Ether is used for purchasing gas, and the smallest unit of Ether is used as the unit of gas.
Since Wei is the smallest unit of Wei, here is a table, listing the denominations and the name commonly used for them, along with the associated value:
There are various ways by which Ether can be procured for trading, building smart contracts, or decentralized applications:
Due to its vast community support and major active development, Ether has always been a preferred investment opportunity for everyone. There are more than 500 known exchanges that support the exchange of Ether among other cryptocurrencies or fiat currencies. Here is a price chart, showing the fluctuation of Ether price from April 17, 2018 to May 17, 2018:
In this chapter, we discussed various components of Ethereum, its execution, network, and accounts, and there was a detailed study of Ethereum's clients. We also discussed gas and EVM, including its environment and how an execution process works. Finally, we discussed the Ethereum block and its block header, the Ethereum algorithm, and the procurement of ether.
In the next chapter, we will learn about Solidity, the official and standard language for contract writing on Ethereum blockchain. Learning about Solidity will help us gain a better understanding of smart contract development and deployment.
In the previous chapter, we discussed Solidity—the programming language introduced by the Ethereum foundation. Solidity is the language that makes it possible to create decentralized applications on top of Ethereum blockchain, either to be used for creating another cryptocurrency token or for any other use case in which blockchain can have an essential role.
Ethereum runs smart contracts on its platform; these are applications that use blockchain technology to perform the required action, enabling users to create their own blockchain and also issue their own alternative cryptocurrency. This is made possible by coding in Solidity, which is a contract-oriented programming language used for writing smart contracts that are to be executed on the Ethereum blockchain and perform the programmed tasks.
Solidity is a statically typed programming language that runs on the Ethereum virtual machine. It is influenced by C++, Python, and JavaScript, was proposed in August 2014 and developed by the Ethereum project's solidity team. The complete application is deployed on the blockchain, including smart contract, frontend interface, and other modules; this is known as a DApp or a Decentralized Application.
We will be covering the following topics in this chapter:
Solidity is not the only language to work on Ethereum smart contracts; prior to solidity, there were other languages that were not as successful. Here is a brief list of languages currently (as of August 2018) compatible with Ethereum:
Solidity is also known as a contract-oriented language, since contracts are similar to classes in object-oriented languages. The Solidity language is loosely based on ECMAScript (JavaScript); hence, a prior knowledge of the same would be helpful in understanding Solidity. Here are some tools required to develop, test, and deploy smart contracts programmed in Solidity:
Apart from the crucial tools we've already mentioned, there are also various other tools that help in the development of a smart contract to be run on an Ethereum blockchain for tasks such as understanding the contract flow, finding security vulnerabilities, running the test application, writing documentation, and so on. Take a look at the following diagram:
If you program regularly, you are already aware of code editors or Integrated Development Environments (IDEs). There is a list of integrations available for various IDEs already present; apart from this, Ethereum foundation has also released a browser-based IDE with integrated compiler and a Solidity runtime environment, without the server components for writing and testing smart contracts. It can be found at remix.ethereum.org.
For small and learning-based DApps projects, it is suggested to work on the browser-based compiler by the Ethereum foundation: Remix. Another way is to install the Solidity compiler on to your machine. solc can be installed from npm using the following command:
npm install -g solc
Solidity can also be built from the source by cloning the Git repository present on the GitHub link: https://github.com/ethereum/solidity.git.
In this section, we will be discussing the structure and elements of a Solidity source file; we will discuss the layout, structure, data types, its types, units, controls, expressions, and other aspects of Solidity. The format extension of a solidity file is .sol.
Solidity is going through active development and has lot of regular changes and suggestions from a huge community; hence, it is important to specify the version of a solidity file at the start of the source file, to avoid any conflict. This is achieved by the Pragma version. This is defined at the start of the solidity file so that any person looking to run the file knows about the previous version. Take a look at this code:
pragma solidity ^0.4.24;
By specifying a version number, that specific source file will compile with a version earlier or later than the specified version number.
Similar to ECMAScript, a Solidity file is declared using the import statement as follows:
import "filename.sol";
The preceding statement will import all the symbols from the filename.sol file into the current file as global statements.
Paths are also supported while importing a file, so you can use / or . or .. similar to JavaScript.
Single line (//) comments and multi-line(/* ... */) comments are used, although apart from this there is another type of comment style called Natspec Comment, which is also possible; in this type of comment, we either use /// or /** ... */, and they are to be used only earlier function declaration or statements.
Natspec is short for natural specification; these comments as per the latest solidity version (0.4.24) do not apply to variables, even if the variables are public. Here is a small code snippet with an example of such these types of comments:
pragma solidity ^0.4.19;

/// @title A simulator for Batman, Gotham's Hero
/// @author DC-man
/// @notice You can use this contract for only the most basic simulation
/// @dev All function calls are currently implement without side effects
contract Batman {
 /// @author Samanyu Chopra
 /// @notice Determine if Bugs will accept `(_weapons)` to kill
 /// @dev String comparison may be inefficient
 /// @param _weapons The name weapons to save in the repo (English)
 /// @return true if Batman will keep it, false otherwise
 function doesKeep(string _weapons) external pure returns (bool) {
 return keccak256(_weapons) == keccak256("Shotgun");
 }
}
They are used in the Natspec comments; each of the tags has its own context based on its usage, as shown in the following table:
| Tag | Used for |
|
@title |
Title for the Smart Contract |
|
@author |
Author of the Smart Contract |
|
@notice |
Explanation of the function |
|
@dev |
Explanation to developer |
|
@param |
Explanation of a parameter |
|
@return |
Explanation of the return type |
Every contract in Solidity is similar to the concept of classes. Contracts can inherit from other contracts, in a fashion similar to classes. A contract can contain a declaration of the following:
These are the values that are permanently stored in the contract storage, for example:
pragma solidity ^0.4.24;

contract Gotham {
 uint storedData; // State variable
 // ...
}
Functions can be called internally or externally, for example:
pragma solidity ^0.4.24;

contract Gotham {
 function joker() public Bat { // Function
 // ...
 }
}
Function modifiers can be used to amend the semantics of functions in a declaration. That is, they are used to change the behavior of a function. For example, they are used to automatically check a condition before executing the function, or they can unlock a function at a given timeframe as required. They can be overwritten by derived contracts, as shown here:
pragma solidity ^0.4.24;

contract Gotham {
 address public weapons;

modifier Bank() { // Modifier
 require(
     msg.sender == coins,
     "Only coins can call this."
     );
     _;
 }

    function abort() public coinsbuyer { // Modifier usage
 // ...
 }
}
Events allow convenient usage of the EVM, via the frontend of the DApp. Events can be heard and maintained. Take a look at this code:
pragma solidity ^0.4.24;

contract Attendance {
      event Mark_attendance(string name, uint ID); // Event

    function roll_call() public marking {
             // ...
                 emit Mark_attendance(Name, ID); //Triggering event
         }
}
In Solidity, the type of each variable needs to be specified at compile time. Complex types can also be created in Solidity by combining the complex types. There are two categories of data types in Solidity: value types and reference types.
Value types are called value types because the variables of these types hold data within its own allocated memory.
This type of data has two values, either true or false, for example:
bool b = false;
The preceding statement assigns false to boolean data type b.
This value type allocates integers. There are two sub-types of integers, that is int and uint, which are signed integer and unsigned integer types respectively. Memory size is allocated at compile time; it is to be specified using int8 or int256, where the number represents the size allocated in the memory. Allocating memory by just using int or unit, by default assigns the largest memory size.
This value type holds a 20-byte value, which is the size of an Ethereum address (40 hex characters or 160 bits). Take a look at this:
address a = 0xe2793a1b9a149253341cA268057a9EFA42965F83
This type has several members that can be used to interact with the contract. These members are as follows:
balance returns the balance of the address in units of wei, for example:
address a = 0xe2793a1b9a149253341cA268057a9EFA42965F83;
uint bal = a.balance;
transfer is used to transfer from one address to another address, for example:
address a = 0xe2793a1b9a149253341cA268057a9EFA42965F83;
address b = 0x126B3adF2556C7e8B4C3197035D0E4cbec1dBa83;
if (a.balance > b.balance) b.transfer(6);
Almost the same amount of gas is spent when we use transfer, or send members. transfer was introduced from Solidity 0.4.13, as send does not send any gas and also does not propagate exceptions. Transfer is considered a safe way to send ether from one address to another address, as it throws an error and allows someone to propagate the error.
The call, callcode, and delegatecall are used to interact with functions that do not have Application Binary Interface (ABI). call returns a Boolean to indicate whether the function ran successfully or got terminated in the EVM.
When a does call on b, the code runs in the context of b, and the storage of b is used. On the other hand, when a does callcode on b, the code runs in the context of a, and the storage of a is used, but the code of and storage of a is used.
The delegatecall function is used to delegate one contract to use another contract's storage as required.
Solidity has a fixed and dynamic array value type. Keywords range from bytes1 to bytes32 in a fixed-sized byte array. On the other hand, in a dynamic-sized byte array, keywords can contain bytes or strings. bytes are used for raw byte data and strings is used for strings that are encoded in UTF-8.
length is a member that returns the length of the byte array for a fixed-size byte array or for a dynamic-size byte array.
A fixed-size array is initialized as test[10], and a dynamic-size array is initialized as test2[.
Literals are used to represent a fixed value; there are multiple types of literals that are used; they are as follows:
Integer literals are formed with a sequence of numbers from 0 to 9. Octal literals and ones starting with 0 are invalid, since the addresses in Ethereum start with 0. Take a look at this:
int a = 11;
String literals are declared with a pair of double("...") or single('...') quotes, for example:
Test = 'Batman';
Test2 = "Batman";
Hexadecimal literals are prefixed with the keyword hex and are enclosed with double (hex"69ed75") or single (hex'69ed75') quotes.
Hexadecimal literals that pass the address checksum test are of address type literal, for example:
0xe2793a1b9a149253341cA268057a9EFA42965F83;
0x126B3adF2556C7e8B4C3197035D0E4cbec1dBa83;
Enums allow the creation of user-defined type in Solidity. Enums are convertible to and from all integer types. Here is an example of an enum in Solidity:
enum Action {jump, fly, ride, fight};
There are two types of functions: internal and external functions. Internal functions can be called from inside the current contract only. External functions can be called via external function calls.
There are various modifiers available, which you are not required to use, for a Solidity-based function. Take a look at these:
The pure functions can't read or write from the storage; they just return a value based on its content. The constant modifier function cannot write in the storage in any way. Although, the post-Solidity Version 0.4.17 constant is deprecated to make way for pure and view functions. view acts just like constant in that its function cannot change storage in any way. payable allows a function to receive ether while being called.
Multiple modifiers can be used in a function by specifying each by white-space separation; they are evaluated in the order they are written.
These are passed on by reference; these are very memory heavy, due to the allocation of memory they constitute.
A struct is a composite data type that is declared under a logical group. Structs are used to define new types. It is not possible for a struct to contain a member of its own type, although a struct can be the value type of a mapping member. Here is an example of a struct:
struct Gotham {

address Batcave;
uint cars;
uint batcomputer;
uint enemies;
string gordon;
address twoface;

}
This specifies where a particular data type will be stored. It works with arrays and structs. The data location is specified using the storage or memory keyword. There is also a third data location, calldata, which is non-modifiable and non-persistent. Parameters of external functions use calldata memory. By default, parameters of functions are stored in memory; other local variables make use of storage.
Mapping is used for key-to-value mapping. Mappings can be seen as hash tables that are virtually initialized such that every possible key exists and is mapped to a default value. The default value is all zeros. The key is never stored in a mapping, only the keccak256 hash is used for value lookup. Mapping is defined just like any other variable type. Take a look at this code:
contract Gotham {

    struct Batman {
        string friends;
        string foes;
        int funds;
        string fox;
    }

    mapping (address => Batman) Catwoman;
   address[] public Batman_address;
}
The preceding code example shows that Catwoman is being initialized as a mapping.
Global variables can be called by any Solidity smart contract. They are mainly used to return information about the Ethereum blockchain. Some of these variables can also perform various functions. Units of time and ether are also globally available. Ether currency numbers without a suffix are assumed to be wei. Time-related units can also be used and, just like currency, conversion among them is allowed.
In this chapter, we discussed Solidity in detail, we read about the compiler, and we did a detailed study programming in solidity that included studying about the layout of a solidity file, the structure of a contract, and the types of values and reference. We also learned about mapping.
In the next chapter, we will apply our new knowledge from this chapter to develop an actual contract and deploy the same on a test network.
The concept of smart contracts was first conceived by researcher Nick Szabo in the mid 1990s. In his papers, he described smart contracts as a set of promises, specified in digital form, including protocols within which the parties perform these promises. This description can be broken into four pieces:
As you can see, nowhere in this is the blockchain directly specified, as blockchain technology had not yet been invented and would not be invented for another 13 years. However, with the invention of blockchain technology, smart contracts were suddenly much more achievable.
Smart contracts and blockchain technology are independent ideas. A blockchain can exist without smart contracts (Bitcoin, for instance, has no real smart contract ability built in), and smart contracts can be built without a blockchain. However, blockchain is a technology particularly well-suited for the development of smart contracts because it allows trustless, decentralized exchange. Essentially, the blockchain provides two out of the four necessary items for smart contracts: digital form and protocols for the communication and performance of actions between distinct parties.
In this chapter, we will go over some of the different blockchain networks and their approaches to smart contract technology. In this chapter, we will cover the following topics:
In general, the various smart contract approaches can be divided into different types: Turing Complete, Restricted Instructions, Off-Chain Execution, and On-Chain Execution, as shown in the following figure:
The types of smart contracts that are executed on a system determine performance, what can and cannot be executed on the system, the complexity, and of course, the level of security.
Before we go further, let's discuss why smart contracts are desired and even revolutionary.
The world before smart contracts was one that was fraught with uncertainty. Legal contracts, even simple ones, need not be followed, and the cost of recourse using most legal systems was and is extremely expensive, even in countries where the legal system is not corrupt. In many areas of the world, contracts are barely worth the paper they are written on and are usually enforceable only by parties with substantial political or financial power. For weaker actors in an economic or political system, this is a terrible and unfair set of circumstances.
The issues that we mentioned previously come primarily from the human factor. As long as a person is involved in the enforcement of a contract, they can be corrupt, lazy, misinformed, biased, and so on. A smart contract, in contrast, is written in code and is meant to execute faithfully no matter what parties are involved. This provides the opportunity for safer, cheaper, faster, and far more equitable outcomes.
Let's look at the key advantages of smart contracts in more depth in the following subsections.
The most immediate advantage of smart contracts is that they reduce the labor and pain involved in even successful and faithfully carried out agreements. Take for example, a simple purchase order and invoice between companies. Imagine a company called FakeCar Inc. that decides they need 1,000 wheels from their supplier, Wheelmaster. They agree between them that each wheel will cost $20, with payment made when the wheels are delivered to FakeCar. At the beginning, the wheels might be shipped by freight, passing through multiple hands on the way to FakeCar. Once they arrive, FakeCar would need to scan and inspect each wheel, make notes, and then issue a check or wire transfer to Wheelmaster. Depending on the distance involved, the wheels may be in the custody of multiple companies: a trucking company, intercontinental shipping, another trucking company, and finally FakeCar's manufacturing facility. At each stage, there is a chance of damage, loss, or misdelivery. Once delivered, FakeCar would need to issue a transfer to cover the invoice. Even if all goes well, this process can take weeks. In the meantime, both FakeCar and Wheelmaster have to worry whether they will get their wheels or their money, respectively.
Now let's look at how this process might work with smart contracts:
In this scenario, payments and insurance can be verified and handled instantly—even across international boundaries, and across cultures and languages—if all the parties participate in a blockchain-based ecosystem of smart contracts. The result is a great increase in the certainty of outcomes across all parties, and a subsequent increase in efficiency. For instance, if Wheelmaster can be certain that their invoice will be paid, then they can make business decisions with vastly more efficiency.
As of writing, the first major logistics transaction using blockchain and smart contracts was completed on the Corda blockchain between HSBC and ING, and involved the shipment of soybeans from Argentina to Malaysia. According to the banks, such a transfer used to be very time consuming and would take five to ten days. With blockchain, the whole issue of finance was handled in under 24 hours.
The use of smart contracts is still in its infancy, and yet the technology has already resulted in an 80–90% reduction in the cross-border friction of financial services. As the technology and surrounding ecosystem improves, the advantages may become yet more extreme.
As mentioned earlier, one of the negative factors experienced by organizations worldwide is that, for many transactions, trust is a necessity. This is especially true in financial transactions, where purchase orders, invoices, and shipments move between multiple parties. The trust issues here are many. There is a question of not only whether someone will pay, but whether they can pay at all? Do they have a history of on-time payment and, if not, just how bad is their payment history? In many cases, buyers and sellers in any marketplace have very limited information. This is particularly true internationally. This is where blockchain and smart contracts can help.
In the United States, each person has a credit score that is calculated by three large credit agencies. These agencies and their methods are opaque. Neither the buyers of this information nor the people who are reported on are allowed deep insight into how the score is calculated, nor are they able to update this information directly. A mistake by a credit agency can be devastating to someone's ability to finance a home or a car, costing a consumer valuable time and money. Nevertheless, if a consumer finds mistakes on their credit report, they must beg the issuer to update it, and they have few options if that organization refuses. Worse, those same issuers have proven bad stewards of the private financial information they collect. For instance, in 2017, Experian suffered a massive data breach that exposed the records of over 100 million people. If these agencies were replaced by a blockchain system and smart contracts, people would be able to see the rules and update records directly, without having to pay an intermediary that may or not be honest themselves.
Large companies have an advantage in the current marketplace: They can both afford to pay these third-party services for financial data, as well as the personnel and systems needed to track information themselves over time. Smaller companies are not granted such economies of scale, putting them at a competitive disadvantage and increasing their overhead, or even putting them out of business if they make a bad decision because they have less information. However, even larger companies stand to benefit, as the cost and expense of compiling this data add up for them as well. As more data concerning trust becomes public and automated by smart contracts, the playing field will level and, hopefully, will crowd dishonest actors out of the marketplace. This should result in increased confidence across the market, along with reduced overheads and, by extension, higher profits, lower prices, or both.
In the United States, there used to be a process known as red lining, where people of certain ethnic groups were denied loans and access to financial services—particularly mortgages. These unfair practices continue to some extent, as the criteria and process for granting loans and the way interest rates are calculated are hidden inside centralized organizations. This phenomenon is not contained within the USA; there are many areas in the world where ethnic, religious, and other biases distort what are meant to be objective decisions. With a smart-contract-based system, the rules would be public and auditable to ensure fairness and accuracy.
One approach to smart contracts is to allow full-featured software to be embedded either inside or alongside a blockchain, able to respond to blockchain events. This is an approach taken by Hyperledger Fabric, Ethereum, NEO, and other such companies. This approach gives maximum flexibility, as there is essentially nothing that cannot be written into the blockchain system. The downside of this power is the risk of making errors. The more options available, the more possible edge cases and permutations that must be tested, and the higher the risk that there will be an undiscovered vulnerability in the code.
The other approach to smart contracts is to greatly reduce the scope of what is possible in return for making things more secure and costly mistakes more difficult. The trade-off is currently flexibility versus security. For instance, in the Stellar ecosystem, smart contracts are made as sets of operations. In Stellar, there are only eleven operations:
These operations themselves have multiple options and permutations, and so enable quite a large amount of behavior. However, it is not possible to easily use these operations to execute something such as the DAO, or some other on-chain governance organization. Instead, such functionality would have to be hosted off the chain. Similarly, there is no clear way in Stellar to manage the equivalent of ERC-721 tokens, which would track the equivalent of something such as trading cards or even pieces of real estate. Stellar's smart contract system is geared toward the transfer of fungible assets, such as currencies. As a result, it can scale very quickly, easily handle multisignature accounts and escrow, and process transactions in just a few seconds with high throughput. Ethereum is more flexible, but the multisignature capability, the tokens themselves, and so on would need to be created with software written in Solidity. Ethereum is obviously more flexible, but requires more code, and thus runs a higher risk of defects.
The blockchain with the most widespread use of smart contracts is Ethereum. Of all the smart-contract-capable networks presented here, it is not only the one with the largest use, but also has the largest ecosystem of public distributed applications. One of the reasons that Ethereum is so popular is that its representation of smart contracts is relatively intuitive and easy to read. In this section, we are going to look at a common Ethereum-based smart contract that fulfills all four of the preceding criteria and is relatively easy to understand: a token sale contract. The following code will be written in Solidity; for more details, please see Chapter 13, Solidity 101, and Chapter 23, Understanding How Etherum Works.
The first aspect of a smart contract is that it must make a set of programmatic promises. The reason we have chosen a token sale contract to look at is that it has a very simple promise to make: if you send the contract Ethereum, the contract will in turn automatically send your account a new token. Let's look at some basic code, which is explicitly not for production; this is simplified code to make certain concepts clearer. This code comes from the StandardToken contract, part of the OpenZeppelin (You'll find a link for the same in the References section) project on which this is based, which has full-featured and audited code to achieve the same effect but is more complicated to understand.
First, here is an interface contract for an ERC20 token, which we will save as a file called ERC20.sol:
pragma solidity ^0.4.23;
interface ERC20 {
 function totalSupply() public view returns (uint256);
  function balanceOf(address who) public view returns (uint256);
  function transfer(address to, uint256 value) public returns (bool);
  function allowance(address owner, address spender) public view returns (uint256);
  function transferFrom(address from, address to, uint256 value) public returns (bool);
  function approve(address spender, uint256 value) public returns (bool);
  event Transfer(address indexed from, address indexed to, uint256 value);
  event Approval(address indexed _owner, address indexed _spender, uint256 _value);
}
Next, we will reference that token interface in our crowdsale contract, which will send an ERC20 token in response to a payment in ether:
pragma solidity ^0.4.23;
import "./ERC20.sol";

contract Crowdsale {

 // The token being sold, conforms to ERC20 standard.
 ERC20 public token;

 // 1 tokens per Eth, both have 18 decimals.
 uint256 public rate = 1;

 constructor(ERC20 _token) public {
    token = _token;
 }

 function () external payable {
    uint256 _tokenAmount = msg.value * rate;
    token.transfer(msg.sender, _tokenAmount);
 }
}
This is a very simplified contract, but again, it is not sufficient for a complete, real-world Crowdsale. However, it does illustrate the key concepts for a smart contract. Let's look at each piece. The constructor method requires a reference to an ERC20 token, which is the token that will be given to buyers who send in Ethereum, as shown in the following code:
constructor(ERC20 _token) public {
    token = _token;
}
Because of the way Solidity works, this contract cannot function unless a token has been loaded. So this is the first promise implicitly made by this code: there must be an ERC20 token available for purchase. The second promise is the conversion rate, which is placed at the very simple 1. For each wei (the smallest unit of currency in Ethereum), a person buying this token will get 1 unit of the new token. Ethereum has 18 decimal places, and by convention so do most tokens, so it would be presumed that this would make the conversion of Ethereum to this token now 1:1. This brings us to item #4 in the necessary aspects of a smart contract: automatic fulfillment. The following code handles this:
function () external payable {
    uint 256 _tokenAmount = msg.value * rate; //Calculate tokens purchased
    token.transfer(msg.sender, _tokenAmount); //Execute send on token contract.
}
As this is code, the requirement that the smart contract should be in digital form is obvious. The automatic aspect here is also straightforward. In Ethereum, msg.value holds the value of the ether currency that is sent as part of the command. When the contract receives Ethereum, it calculates the number of tokens the purchaser should receive and sends them: no human interaction needed, and no trusted party necessary or possible. Similarly, no one can intervene, as once it is deployed to the network, the code in Ethereum is immutable. Therefore, a sender who is using this smart contract can be absolutely assured that they will receive their tokens.
It is important to understand smart contracts in the domain in which they live: decentralized, asynchronous networks. As a result of living in this ecosystem, there are security considerations that are not always obvious and can lead to issues. To illustrate, we are going to look into two related functions of the ERC20 standard: approve and transferFrom. Here is code for the approve function from OpenZeppelin:
function approve(address _spender, uint256 _value) public returns (bool) {
   allowed[msg.sender][_spender] = _value;
   emit Approval(msg.sender, _spender, _value);
   return true;
 }
The approve function allows a token owner to say that they have approved a transfer of their token to another account. Then, in response to different events, a future transfer can take place. How this happens depends on the application, but such as the token sale, by approving a transfer, a blockchain application can later call transferFrom and move the tokens, perhaps to accept payment and then perform actions. Let's look at that code:
function transferFrom(address _from,address _to,uint256 _value) public returns (bool) {
   require(_to != address(0)); // check to make sure we aren't transfering to nowhere.

   // checks to ensure that the number of tokens being moved is valid.
   require(_value <= balances[_from]);
   require(_value <= allowed[_from][msg.sender]);

   // execute the transfer.
   balances[_from] = balances[_from].sub(_value);
   balances[_to] = balances[_to].add(_value);
   allowed[_from][msg.sender] = allowed[_from][msg.sender].sub(_value);

   //Record the transfer to the blockchain.
   emit Transfer(_from, _to, _value);
   // let the calling code or app know that the transfer was a success.
   return true;
 }
The two functions work together. The user wishing to use the app uses approve to allow payment, and the app calls transferFrom in order to accept. But because of the asynchronous nature of the calls, it is possible for flaws to exist.
Imagine an app where users can pay tokens in order to join a digital club—40 tokens for a basic membership and 60 tokens for an enhanced membership. Users can also trade the tokens to other people or sell them as they wish. The ideal case for these two functions is where a user approves 40 tokens and the application registers this and calls transferFrom to move the 40 tokens, and then grants access as part of the smart contract. So far so good.
It's important to keep in mind that each action here takes time, and the order of events is not fixed. What actually happens is that the user sends a message to the network, triggering approve, the application sends another message, triggering transferFrom, and then everything resolves when the block is mined. If these transactions are out of order (transferFrom executing before approve), the transaction will fail. Moreover, what if the user changes their mind and decides to change their approval from 40 to 60? Here is what the user intends:
In the end, the user paid 60 tokens and got what they wanted. But because each of these events are asynchronous and the order is decided by the miners, this order is not guaranteed. Here, is what might happen instead:
Now the user has paid 100 tokens without meaning to. Here is yet another permutation:
At the end of this sequence, the user still has 20 tokens approved, and the attempt to get the enhanced membership has failed. While an app can and should be written without these issues by doing such things as allowing upgraded membership for 20 tokens and checking the max approval before transferFrom is called, this attention to detail is not guaranteed or automatic on the part of application authors.
The important thing to understand is that race conditions and ordering issues are extremely important in Ethereum. The user does not control the order of events on a blockchain, nor does an app. Instead, it is the miners that decide which transactions occur in which blocks and in which order. In Ethereum, it is the gas price that affects the priority that miners give transactions. Other influences can involve the maximum block gas limit, the number of transactions already in a block, and whether or not a miner that successfully solves a block has even seen the transaction on the network. For these reasons, smart contracts cannot assume that the order of events is what is expected.
Every decentralized network will have to deal with race conditions caused by different orderings. It is critical that smart contracts be carefully evaluated for possible race conditions and other attacks. To know whether a race condition bug is possible is as simple as knowing whether more than one function call is involved, directly or indirectly. In the preceding case, both the user and the app call functions; therefore, a race condition is possible, and so is an attack called front running. It is also possible to have race conditions inside a single method, so smart contract developers should not let their guard down.
Each network has a different model for contract execution, and as a result, each network had different best practices. For Ethereum, Consensys maintains a list of smart contract best practices at https://consensys.github.io/smart-contract-best-practices/.
Before shipping any smart contract, it is strongly suggested that an organization write extensive unit tests and simulation tests, and then audit the smart contracts against the best practices for that network.
Smart contracts hold tremendous power, but they do have limitations. It is important to note that these systems are only as good as the people building them. So far, many smart contract systems have failed due to unforeseen bugs and events that were not part of the initial design. In many cases, these were merely technical flaws that can at least be fixed in time. However, with the recent rush to use blockchain technology for everything, we are likely to start seeing more substantial failures as people fail to understand the limits of the technology. For blockchain to truly have a maximum business impact, both its advantages and limitations have to be addressed.
Like all systems, smart contracts are only as good as the data they act on. A smart contract that receives bad or incorrect information from the network will still execute. On blockchain systems, this can be a huge issue as most transactions initiated by a human or a contract are irrevocable. Thus, if information is placed on a blockchain that is in error, fraudulent, or has some other deficiency, then a smart contract will still execute faithfully. Instead of expediting the proper functioning of the network, the smart contract would now be assisting in propagating an error.
To use the earlier example of shipping tires between FakeCar and Wheelmaster, what if during transit the boxes holding the tires were broken into and the tires replaced? If the worker at the FakeCar building scanned the boxes as received without checking each and every one, the smart contract would see this update and release escrow. The shipper would have their insurance bond returned, Wheelmaster would get paid, and FakeCar would still no longer have the wheels they ordered. To smart contract purists, this is how things should be. But in these cases, companies may instead refuse to use smart contracts or require additional layers of approval—essentially recreating the systems of old.
In designing smart contract systems, it is therefore critical that designers try and imagine every possible way things could go wrong. As with the DAO and other smart contract systems that have been used so far, small mistakes can have big consequences.
Many smart contracts involve some level of human interaction. For instance, multisignature wallets require multiple people to authorize a transaction before they will execute. These touchpoints introduce the same possibility for errors as old systems, but with the possibility of irrevocable consequences.
Smart contracts do what they are programmed to do. If a smart contract is deemed invalid in a court, how is this resolved? The answer right now is that nobody really knows, but it could happen—and probably will. Most countries in the world have limits on what can and cannot be contractually agreed to and the terms that can be legally used in a contract. For instance, in the USA, there is a limit to the amount of interest that can be charged on certain financial products. Other regulations control the conditions and terms of payment in specific industries. Smart contracts that violate local and national laws run the risk of being canceled, resulting in repayment, damages, or other consequences to the participating organizations, and possibly even the contract authors.
In the token sale contract we looked at earlier, a user can be sure that they will receive the tokens they purchase. What they cannot be sure of is that those tokens will be valuable or still be useful in the future. Moreover, if those tokens represent something else (access to a system, real-world assets, or something else), then the mere existence of the tokens does not bring any guarantees that this access will remain, that people will continue to accept the tokens for assets (see the previously mentioned issues with legal validity), and so on. With national currencies, the use and acceptance of that currency is mandated by a government with substantial power. With tokens, the acceptance and use of the token has no mandate. To some, this is the very appeal—that the value of a token is more trustable because it is built not on enforcement by a government, but by social approval and use.
It is likely that over time, legal frameworks and trade will become more stable, and this will be less of an issue.
Smart contracts are agreements written into code between different parties. The critical aspects of smart contracts is that they contain promises that are in digital form. All of these promises can be executed using digital protocols for communication performance. The outcomes of the contracts are triggered automatically.
At this point, you should have a solid understanding of what smart contracts are, how they work, and their strengths and limitations. You should be able to understand the dangers inherent in smart contract ecosystems and be able to gauge possible risks in the development of smart-contract-based systems. At a minimum, you should recognize the need for careful and thorough evaluation of smart contracts for security reasons. Remember, with smart contracts, the code is executed with little or no human intervention. A mistake in a smart contract means the damage done by the mistake will multiply as fast as the code can be run.
Next, we are going to dive into Ethereum further with a chapter devoted to Ethereum accounts and block validation.
In the previous chapter, we discussed about Ethereum blockchain, its uses, and how it has shaped the decentralized technology, not for just currency based uses but also for other industry verticals. Further, we learned about development on top of the Ethereum blockchain, using smart contracts.
In this chapter, we will discuss the Ethereum account in detail and also study an ether token; this discussion will help us to better understand decentralized applications. We will also briefly discuss some popular Ethereum tokens and smart contracts. We will also discuss some important topics such as the transaction sub state, the validation of an Ethereum Block, and the various steps involved in the process of block finalization. Following this, we will briefly discuss some disadvantages of an Ethereum-based smart contract and currencies, toward the end of this chapter.
These are the topics which are covered in this chapter:
The state in Ethereum is made up of objects, each known as an account. Each account in Ethereum contains a 20-byte address. Each state transition is a direct transaction of value and information between various accounts. Each operation performed between or on the accounts is known as a state transition. The state transition in Ethereum is done using the Ethereum state transition function.
The state change in Ethereum blockchain starts from the genesis block of the blockchain, as shown in this diagram:
Each block contains a series of transactions, and each block is chained to its previous block. To transition from one state to the next, the transaction has to be valid. The transaction is further validated using consensus techniques, which we have already discussed in previous chapters.
To avoid stale blocks in Ethereum, GHOST (Greedy Heaviest Observed Subtree) protocol was introduced. This was introduced to avoid random forking by any nodes and inapt verification by other nodes. Stale blocks are created when two nodes find a block at the same time. Each node sends the block in the blockchain to be verified. This isn't the case with Bitcoin, since, in Bitcoin, block time is 10 minutes and the propagation of a block to approximately 50% of the network takes roughly 12 seconds. The GHOST protocol includes stale blocks also known as uncles, and these are included in the calculation of the chain.
As discussed in the previous chapters, there are two types of accounts in Ethereum blockchain. Namely, Contract Accounts (CA) and Externally Owned Accounts (EOAs). The contract accounts are the ones that have code associated with them along with a private key. EOA has an ether balance; it is able to send transactions and has no associated code, whereas CA has an ether balance and associated code. The contract account and the externally owned accounts have features of their own, and a new token can only be initiated by the contract account.
In the state transition function, the following is the process that every transaction in Ethereum adheres to:
The following diagram depicts the state transition flow:
The function is implemented independently in each of the Ethereum clients.
This is the first block of the Ethereum blockchain, just like the genesis block of the Bitcoin blockchain. The height of the genesis block is 0.
The Genesis block was mined on Jul 30, 2015 and marks the first block of the Ethereum blockchain. The difficulty of the genesis block was at 17,179,869,184, as shown in the following screenshot:
Receipts are used to store the state, after a transaction has been executed. These structures are used to record the outcome of the transaction execution. Receipts are produced after the execution of each transaction. All receipts are stored in an index-eyed trie. This has its root placed in the block header as the receipts root.
Elements is composed of four primary elements; let's discuss each element of Ethereum's transaction receipts, before we look at the structure of a receipt.
Post-transaction state is a trie structure that holds the state, after the transaction has been executed. It is encoded as a byte array.
Gas used represents the total amount of gas used in the block that contains the transaction receipt. It can be zero, but it is not a negative integer.
The set of logs shows the set of log entries created as a result of transaction execution. Logs contain the logger's address, log topics, and other log data.
The bloom filter is created form the information contained in the logs discussed. Log entries are reduced to a hash of 256 bytes, which is then embedded into the header of the block as a logs bloom. Log entries are composed of the logger's address, log topics, and log data. Log topics are encoded as a series of 32-byte data structures, and log data is composed of a few bytes of data.
This is what the structure of a transaction receipt looks like:
  Result: {
    "blockHash": "0xb839c4a9d166705062079903fa8f99c848b5d44e20534d42c75b40bd8667fff7",
      "blockNumber": 5810552,
      "contractAddress": null,
      "cumulativeGasUsed": 68527,
      "from": "0x52bc44d5378309EE2abF1539BF71dE1b7d7bE3b5",
      "gasUsed": 7097057,
      "logs": [
        {
          "address": "0x91067b439e1be22196a5f64ee61e803670ba5be9",
          "blockHash": "0xb839c4a9d166705062079903fa8f99c848b5d44e20534d42c75b40bd8667fff7",
          "blockNumber": 5810552,
          "data": "0x00000000000000000000000000000000000000000000000000000000576eca940000000000000000000000000fd8cd36bebcee2bcb35e24c925af5cf7ea9475d0100000000000000000000000000000000000000000000000000000000000000",
          "logIndex": 0,
          "topics": [
            "0x72d0d212148041614162a44c61fef731170dd7cccc35d1974690989386be0999"
          ],
          "transactionHash": "0x58ac2580d1495572c519d4e0959e74d70af82757f7e9469c5e3d1b65cc2b5b0b",
          "transactionIndex": 0
        }
      ],
      "root": "7583254379574ee8eb2943c3ee41582a0041156215e2c7d82e363098c89fe21b",
      "to": "0x91067b439e1be22196a5f64ee61e803670ba5be9",
      "transactionHash": "0x58ac2580d1495572c519d4e0959e74d70af82757f7e9469c5e3d1b65cc2b5b0b",
      "transactionIndex": 0
    }
    Transaction cost: 7097057 gas.
Also, it is to be noted that the receipt is not available for pending transactions.
A transaction sub state is created during the execution of the transaction. This transaction is processed immediately after the execution is completed. The transaction sub state is composed of the following three sub items.
A suicide set contains the list of accounts that are disposed after a transaction execution.
A log series is an indexed series of checkpoints that allow the monitoring and notification of contract calls to the entities external to the Ethereum environment. Logs are created in response to events in the smart contract. It can also be used as a cheaper form of storage.
A refund balance is the total price of gas in the transaction that initiated the execution of the transaction.
Messages are transactions where data is passed between two accounts. It is a data packet passed between two accounts. A message can be sent via the Contract Account (CA). They can also be an Externally Owned Account (EOA) in the form of a transaction that has been digitally signed by the sender.
Messages are never stored and are similar to transactions. The key components of a message in Ethereum are:
Messages are generated using CALL or DELEGATECALL methods.
A CALL does not broadcast anything in the blockchain; instead, it is a local call to any contract function specified. It runs locally in the node, like a local function call. It does not consume any gas and is a read-only operation. Calls are only executed locally on a node and do not result in any state change. If the destination account has an associated EVM code, then the virtual machine will start upon the receipt of the message to perform the required operations; if the message sender is an independent object, then the call passes any data returned from the EVM.
After being mined by the miners, an Ethereum block goes through several checks before it is considered valid; the following are the checks it goes through:
If any of the preceding checks fails, the block gets rejected.
In this process, the uncles or ommers are validated. Firstly, a block can contain a maximum of two uncles, and, secondly, whether the header is valid and the relationship of the uncle with the current block satisfies the maximum depth of six blocks.
Block difficulty in Ethereum runs parallel to the calculation of block difficulty in the Bitcoin blockchain. The difficulty of the block increases if the time between two blocks decreases. This is required to maintain consistent block generation time. The difficulty adjustment algorithm in the Ethereum Homestead release is as follows:
block_diff = parent_diff + parent_diff // 2048 * max(1 - (block_timestamp - parent_timestamp) // 10, -99) + int(2**((block.number // 100000) - 2))
In this algorithm, the difficulty of the block is adjusted based on the block generation time. According to this algorithm, if the time difference between the generation of the parent block and the current block is less than 10 seconds, the difficulty increases. If the time difference is between 10 and 19 seconds, then the difficulty remains same. The difficulty decreases when the time difference between two block's generation is more than 20 seconds. The decrease in difficulty is directly proportional to the time difference.
Apart from the timestamp-based difficulty increment, as per the algorithm, the difficulty increases exponentially after every 100,000 blocks. This is known as the difficulty time bomb, introduced in the Ethereum network, since this will make it very hard to mine on the Ethereum blockchain network. This is the reason why PoS is the proposed consensus mechanism for Ethereum in the near future.
The finalization of a block in Ethereum involves the following four stages:
We have discussed the advantages and uses of Ethereum and Ethereum blockchain-based currencies throughout the previous chapters; let's now discuss some disadvantages of Ethereum-based tokens:
In this chapter, we discussed the Ethereum state transition function, the genesis block, and transaction receipts. We also discussed the transaction sub state. In addition to these topics, we discussed Ethereum block validation and the steps involved in the same as discussed in the Ethereum Yellow paper. Finally, we briefly discussed a few of the disadvantages of using an Ethereum-based token.
In the next chapter, we will discuss Decentralized Applications, and we will learn how to create a DApp, and how to publish one. We will also discuss the future of DApp and its effects on its users.
Decentralized Applications (DApps) are applications that run across a decentralized network and are not owned or controlled by a centralized authority. They differ from distributed applications primarily in terms of ownership. A distributed application may run on thousands of computers, but those computers and the management of the software running on them are controlled by a central authority—Amazon, Microsoft, and so on. A decentralized application runs on what is typically a peer-to-peer network and is designed in such a way that no one person or organization can control the functioning of the application. A decentralized application does not require a blockchain. There were multiple decentralized applications before blockchain: BitTorrent, Tor, and Mastodon are all decentralized applications that exist without the use of a blockchain.
In this chapter, we are going to cover the following:
The goal of this chapter is to give you an understanding of decentralized applications and their development, as well as making you aware of ecosystems and code that already exists. If you are interested in building a decentralized application, interoperability with the existing ecosystems out there will greatly improve your odds.
Let's start by taking a look at what makes an application decentralized.
Earlier in this book, we discussed distributed versus decentralized systems. A distributed system is one that is made up of a number of computers, with the work of the system distributed across all of these machines. Typically, the computers in a distributed network are placed in different geographical regions to protect the system from outages such as power failures, natural disasters, or military events. A decentralized network is not only distributed geographically but also in terms of authority and control. A distributed system such as the Amazon cloud can be worldwide in scope but still under the control of a central authority. A decentralized system has no central authority.
A well-known resource to blockchain-based decentralized applications is the whitepaper written by David Johnson entitled The General Theory of Decentralized Applications, DApps. In this whitepaper, he identifies four key criteria to be a DApp:
The application must be completely open source; it must operate autonomously, and with no entity controlling the majority of its tokens. The application may adapt its protocol in response to proposed improvements and market feedback, but all changes must be decided by consensus of its users.
The application's data and records of operation must be cryptographically stored in a public, decentralized blockchain, so as to avoid any central points of failure.
The application must use a cryptographic token (Bitcoin or a token native to its system) that is necessary for access to the application and any contribution of value from miners/farmers should be rewarded with the application's tokens.
The application must generate tokens according to a standard cryptographic algorithm acting as proof of the value that the nodes are contributing to the application (Bitcoin uses the PoW algorithm).
However, this definition is very limited. David is thinking only of decentralized applications running on a blockchain, and only ones that can be incentivized through a token. There are a number of decentralized applications that predate blockchain that do not use or require tokens. In this chapter, we will discuss both blockchain and non-blockchain decentralized applications, but with a focus on those that are relevant to the blockchain ecosystem. We will also discuss blockchain applications that are not decentralized, despite running on top of a decentralized network.
For this book, we will use the following four criteria to describe a decentralized application:
As you can see, this simplified definition retains all the key principles of decentralization without relying on a blockchain or tokens, as there are many ways that decentralized applications can be structured or used with or without blockchain. As we will see when we look at IPFS, it is entirely possible to have a decentralized application without blockchain, and incentives without having tokens.
A decentralized application is a purpose-specific decentralized system. For instance, while Ethereum is a decentralized network because anyone can join and the nodes are all peer-to-peer, a decentralized application will run on top of the network to provide a specific service or set of services to users. To some extent, the distinction is moot—you could see Ethereum as a distributed application that provides smart contract services and native token transfers. In any case, the key distinction is about power.
The more a single entity or small group maintains power over the application, the more centralized it is. The less any one group is able to control the fate of the application and its functioning, the more decentralized it is. Just as decentralized applications do not require a blockchain, running on a blockchain does not make an application decentralized. This means that many applications running on blockchains today may still not be true decentralized applications. This is true, even if the application is entirely open source.
To illustrate, let's consider a small sample application called SpecialClub, written in Solidity. It is very simple, merely keeping a list of members (stored as addresses) that are part of the Special Club:
pragma solidity ^0.4.23;

contract SpecialClub {
    // Centralized owner of this application
    address public owner;
    // we set members to true if they are a member, false otherwise.
    mapping(address => bool) public members;
    mapping(address => bool) internal requests;

    constructor() public {
        owner = msg.sender;
    }

    modifier onlyOwner() {
      require(msg.sender == owner);
      _;
    }

    function approveMembership(address _address) onlyOwner external {
        members[_address] = true;
        requests[_address] = false;
        emit GrantedMembership(_address);
    }

    function requestOwnership() external {
        requests[msg.sender] = true;
        emit RequestToJoin(msg.sender);
    }

    event RequestToJoin(address _address);
    event GrantedMembership(address _address);
}
Despite being written in Solidity and deployed on a blockchain, this code is entirely centralized. It is still distributed, as the list of members will be publicly distributed across the entire Ethereum network if deployed. However, control remains with a single address—the owner. The owner address has absolute control over who is allowed to be added to the membership list of SpecialClub. Any further functionality based on this membership list will generally be centralized as a result. One advantage that continues to exist over traditional applications is transparency—by having both the code and its state written to the blockchain, everyone is clear about the rules and the list of members. However, to be a truly decentralized application, this app would need to be modified so that, for example, existing members could vote on who to accept or reject.
Here is a very basic example of how that might look:
pragma solidity ^0.4.23;

contract SpecialClub {
    address public owner;
    // we set members to true if they are a member, false otherwise.
    mapping(address => bool) public members;
    mapping(address => bool) internal requests;
    mapping(address => mapping(address => bool)) votedOn;
    mapping(address => uint8) votes;

    constructor() public {
        owner = msg.sender;
    }

    modifier onlyOwner() {
      require(msg.sender == owner);
      _;
    }

    modifier onlyMember() {
        require(members[msg.sender] == true);
        _;
    }

    function approveMembership(address _address) onlyOwner external {
        members[_address] = true;
        requests[_address] = false;
        emit GrantedMembership(_address);
    }

    function requestOwnership() external {
        requests[msg.sender] = true;
        emit RequestToJoin(msg.sender);
    }

    function voteInMember(address _address) onlyMember external {
        //don't allow re-votes
        require(!votedOn[_address][msg.sender]);
        votedOn[_address][msg.sender] = true;
        votes[_address] = votes[_address] + 1;
        if (votes[_address] >= 5) {
            members[_address] = true;
            requests[_address] = false;
            emit GrantedMembership(_address);
        }
    }

    event RequestToJoin(address _address);
   event GrantedMembership(address _address);
}
This version allows new members to be added if at least five existing members vote to make it happen. While such an application would start out centralized, after five members, the owner would no longer be able to exert any control over the membership list. Over time, the level of decentralization would grow.
It is assumed the reader of this book may be contemplating launching their own decentralized application project or contributing to an existing one. When building new decentralized applications, it is important to be aware of what already exists so that your application can take advantage of the existing functionality. There are a number of existing decentralized applications that are running and in production and that have already undergone substantial development. In general, these applications provide services to help other decentralized applications flourish. In addition, these applications are all open source. If you evaluate one of these projects and find it is missing something, substantially less effort is likely required to either contribute to or for existing functionality.
Aragon is a project oriented around Distributed Autonomous Organizations, or DAOs. Here is an excerpt from the Aragon whitepaper:
The districtOx network is built on top of Ethereum, Aragon, and IPFS. It takes the capabilities of all of those systems and extends them for more specific functionality. In this case, districtOx provides core functionalities that are necessary to operate an online marketplace or community in a decentralized manner using the Ethereum blockchain and decentralized governance.
A district is a decentralized marketplace/community that is built on top of the districtOx d0xINFRA code base. The d0xINFRA code base is comprised of a set of Ethereum smart contracts and browser-based tools that can interact with both Ethereum and IPFS. These two code bases interact and present a set of key functionalities necessary for experiences people are used to on the centralized web: posting and listing content, searching, reputation management, payments, and invoicing.
Every district build on top of d0xINFRA will have these basic functionalities. This baseline code base makes it much easier and faster for future projects to develop into full-featured products.
Ethereum addresses are usually written as a hexadecimal string, for instance, 0x86fa049857e0209aa7d9e616f7eb3b3b78ecfdb0. This is not very readable for a human and would be very prone to error if you had to read it to someone over the phone, type it, and so on. It would also be easy to replace with another address without someone knowing. In fact, this is what has happened in a few ICO attacks. The Ethereum name service, or ENS, is a smart contract-based system for resolving human-readable names such as mytoken.ens to addresses. By registering an ENS address, compatible applications and wallets on the Ethereum network could map a readable name, such as MyTokenContract.eth, to an Ethereum address, similar to the way DNS maps domain names to IP addresses on the internet.
It is strongly recommended that any project built on Ethereum secures an appropriate ENS name. Not only does it look cleaner for users, but it will help to prevent hackers from using the name to attempt to steal from your users.
Civic and uPort are both identity provider DApps on Ethereum. Currently, your identity information is generally held by a centralized entity: a government, Facebook, Google, and so on. On many places throughout the web, you can be asked to log in by using Facebook or Google. Behind the scenes, the website reaches out to one of these providers, it hands over identity credentials, and then the site lets you in. The downside to this is that the information that you relinquish is under the control and management of a third-party. If one of these providers decided to stop serving you, or provided false information, there would be little you could do about it.
Civic and uPort are both decentralized solutions to identity where the identity owner manages their identity on the blockchain and can grant and revoke permissions through a provider service under their control.
Many upcoming DApps have a blend of blockchain behavior, web activity, and mobile application behaviors. By using one of these providers, you can plug into the emerging decentralized identity ecosystem in addition to supporting centralized providers.
Gnosis was the first major decentralized application to launch on Ethereum. Gnosis provides a decentralized prediction market and governance tool. Prediction markets can work in various industries, such as stock markets, event betting, and so on. By using a decentralized approach to prediction, the hope is that such predictions are more accurate because of a greater variety of information entering the market to adjust projections.
As one of the earliest adopters of Ethereum, the Gnosis team also puts a lot of energy into various tools such as multi-signature wallets.
Steemit is a social blogging application, similar to Blogger or Tumblr. However, content, comments, and votes are stored and secured on the blockchain itself. Steemit is a DApp that has its own blockchain. The core is adapted from Bitshares v2.0, but substantially modified to be purpose-suited to the application.
In Steemit, users are rewarded tokens for submitting and voting on content. Each user's vote carries power equal to their shares in the network, called Steem Power. If a user attracts a large following, or a following of users with a large amount of Steem Power, then the rewards can be substantial. Rewards are typically small (from pennies to a few dollars), but some authors have been able to get payouts in the thousands because they attracted the favor of power users referred to as whales. In some cases, the vote of a whale can be worth hundreds or thousands of dollars on its own.
As mentioned earlier, Steemit is not on Ethereum and cannot be programmed with Solidity. It does, however, have a growing ecosystem of apps that talk to the Steemit blockchain and are used to curate, display, and monetize Steemit content in different ways. Anyone considering blogging, social media, or a similar content app, should carefully evaluate Steemit and its code base. It is all open source and a few modified clones have already been created, such as Golos (for the Russian market) and Serey (for the Cambodian market).
CryptoKitties is another Ethereum-based decentralized application. CryptoKitties is a virtual pet simulator, where users can buy, trade, and breed kitties on the blockchain. CryptoKitties was an important landmark for Ethereum, as the techniques developed for CryptoKitties have applications for all video games that may use blockchain. Using techniques similar to Cryptokitties, player equipment, characters, and so on, can be stored on a blockchain.
This is important, because many online video games, such as Minecraft, World of Warcraft, and so on, have suffered from bugs where certain equipment in the games could be duped, and people could make unlimited clones. Using blockchain, each item is assigned a unique reference and can be tracked and traded just like real goods.
Inspired by CryptoKitties, a number of video games are coming to market using these systems to create worlds with genuine scarcity and real economies.
You should now understand the difference between a decentralized application and a distributed application. A distributed application is one that is spread across many servers and systems, and ideally, the computers involved are also spread across multiple geographic regions for purposes of backup, processing, and availability. A DApp is one in which no single company, person, or group has control over the operation of the application.
While there are many blockchain applications coming to market, not all of them are truly decentralized. In many cases, these applications are merely distributed differently than prior applications by piggybacking on a public blockchain network. If a company or a few key users still control the operation and function of an application, then that application is not truly decentralized, even if it runs on a decentralized network.
You should now be aware of many of the largest blockchain-oriented decentralized applications currently in existence, their interrelationships, and you should be able to use this knowledge to inform future projects and avoid the re-invention of existing code.
Next, we'll discuss in detail how the two largest blockchain networks—Bitcoin and Ethereum—secure the network in Chapter 17, Mining.
In the previous chapters, we discussed the Proof of Work (PoW) consensus system and the importance of mining. We also discussed Bitcoin and other Altcoins, and how miners play an important role in PoW-based coins.
In this chapter, we will discuss mining in depth, and the need for mining in PoW-based coins and tokens. Then, we will discuss mining pools and how they brought a revolution to the mining ecosystem. Further, we will go ahead with learning how to start mining using the various miners that are available. We will learn in depth about CPU and GPU mining, along with researching about setting up a mining rig and the concept of dual mining. Finally, we will study each of the PoW algorithms available for mining, and discuss those best chosen based on hardware resources available.
In this chapter, we will cover the following topics:
Cryptocurrency mining is performed by full nodes, that are part of the blockchain; mining is performed only by blockchains with a PoW based consensus system. Transactions are confirmed by the consensus system, and blocks of these transactions are created to be added to the blockchain; once a new block is added to the blockchain, which is commonly known as block is found, there is a certain reward, which is given to the miner for performing the task of adding the block in the blockchain; the process is not that simple, though. These blocks are added after performing a resource-intensive validation process to validate a transaction. The resource-intensive task is basically the hashing of certain algorithms associated with the currency.
Since the block generation time is kept to around 10 minutes, when the hashing power of miners increases, the difficulty has to be increased in the same proportion. This is done by difficulty adjustment and re-targeting algorithms, as discussed in the previous chapters.
When a miner connects with the network, there are various tasks that the miner performs to keep up with the network. Each coin has a different specification for miners; shown here, in the context of Bitcoins, are some of the prime tasks performed by the miners:
Let's discuss each of these steps in detail, as well as the process involved in mining cryptocurrency.
Mining is mostly done in PoW-based blockchains, but as discussed earlier, PoW is not the only consensus system that is in use; there are various other consensus mechanisms as well. Proof of Work, however, is the most widely used consensus system used in cryptocurrencies.
The concept of PoW existed long before its use in Bitcoin. These systems were used previously to restrain denial-of-service attacks, spams, and other networking-related issues that currently persist in the system since they require proof of computational work from the requester before delivering the required service. This makes such networking-related attacks infeasible.
For PoW systems to be cost-effective enough, the computational task is moderately difficult to perform by the service requester but easy to check by the service provider. Hashcash is one of the systems that first started using PoW-based protocols utilizing the SHA-256 algorithm. With it, users had to submit the proof of calculating thousands of hashing operations before providing them the required service; this, in turn, limited DoS and spam attacks.
Bitcoin also uses the SHA-256 hashing algorithm, although it is a random algorithm, and is deterministic in nature, which means for any given input the output will always be the same and can be easily verified by anyone using the same algorithm and the same input.
In cryptocurrency mining, the miner needs two things to get the input for the SHA-256 hashing algorithm:
The miner uses the brute force method until the hash output matches the difficulty target; it is a 256-bit number that serves as an upper limit, and the SHA-256 output must be lower than or equal to the current difficulty target for the block so that it can be accepted by the network. For example, this is the hash of a block at height 528499 of a Bitcoin blockchain:
00000000000000000021524523382d300c985b91d0a895e7c73ec9d440899946
The first transaction in every block is the mining reward, hence it does not have the input address from which funds are to be deducted in the transaction, these are the coins that are created to be a part of the blockchain network. This unique type of transaction is known as a coinbase transaction. Also, in a Bitcoin blockchain, the coins created in the coinbase transaction cannot be spent until it receives at least 100 confirmations in the blockchain. Since the block time is 10 mins, 100 transactions would roughly take 16 hours and 40 minutes. The coinbase transaction can happen on the miner's own address only.
Bitcoin uses SHA-256, but there are various algorithms that can be used in PoW consensus types, and some of these algorithms are listed as follows and illustrated in the next screenshot:
Each of these algorithms has had specific modifications over other algorithms.
The cryptocurrency mining community has gone through a lot of innovation and resistance hand-in-hand to take care of the core principles of blockchain. Mining can be done using home-based computers and specialized hardware. The types of hardware commonly used for cryptocurrency mining are discussed in the following sections.
This was the first type of mining available in the official Bitcoin client. During the initial days of Bitcoin, home-based computers were able to mine coins. With the advent of more powerful and specialized hardware, Bitcoin mining is no longer preferred for mining Bitcoins. Other coins still support CPU mining, but as the coins' difficulty grows with time, mining of those types of coins also becomes infeasible.
Since the difficulty of the blockchain network increases incrementally over time, CPU mining becomes infeasible, or it sometimes becomes impossible to mine the coin using a CPU. Considering this, miners started to use GPUs since they offer faster and much higher parallel processing. GPU manufacturing companies such as AMD and Nvidia are releasing new hardware from time to time, which can produce excellent mining results apart from gaming performance:
The field-programmable gate array (FPGA) consists of integrated circuits that can be configured after manufacture. The programming for configuration is specified using hardware description language (HDL). A field-programmable device can be modified without disassembling the device; this device contains a series of gate arrays that create truth tables to calculate inputs from a data stream as shown in the following screenshot:
As FPGAs support parallelism from the core, they are claimed to be fifteen times more efficient compared to GPU-based mining.
Application-specific integrated circuit (ASIC) miners are a lot better compared to CPU-, GPU-, and FPGA-based mining since they are designed to perform one specific task only, that is, the mining of cryptocurrencies. An ASIC miner, pictured below, is algorithm-specific:
These hardwares are specifically built to produce high hashing rates. There are various companies that are popular in producing some of the best-performing miners, such as Bitmain, Avalon, Pangolin, ASICminer, and so on.
There are two types of miners these days—classified on the basis of procuring the hardware themselves, or on purchasing the hashing power online.
In this type of mining, the miners do not own the hardware, and instead they purchase hashing power remotely from other miners. Cloud mining has various pros over mining by procuring one's own hardware, such as low cost of entry, and minimal risks. For people who want to invest in cryptocurrency but do not want to purchase from an exchange or have enough technical knowledge, this is the best possible option for them. Now, there are various organizations that have large data centers at various places with GPU-, ASIC-, and FPGA-based miners available for people to purchase. Some of these organizations are Genesis Mining, SkyCoinLabs, Nicehash, hashflare, and so on.
Enthusiasts are always interested in setting up self-hosted hardware for mining; mining can be done by a high-end home computer or acquiring an ASIC or FPGA device. Nowadays, people are also setting up mining rigs that are specialized setups with options to connect multiple GPUs, ASICs, or FPGAs to a single machine. People mostly make a rig from scratch by purchasing extended casings, and attaching multiple hardware together to achieve the required results. The best part of a rig is you can add more hardware and try out a new ASIC to see if the desired results are achieved.
Since a lot of GPUs or ASICs are rigged together, they tend to produce a large amount of heat, hence it is important to have proper airflow available. Here are the requirements of a basic rig, which one can set up on their own:
Nowadays, pre-built mining rigs are also available; these rigs are of plug-and-play types, with no setup required. Here are some of the most widely used pre-built rigs:
As more and more miners start to mine for coins, the difficulty of the coin increases. Pools are groups of miners who come together to mine a block, and once a reward is given for successfully mining the block, the reward is split among the miners who mined in the pool; there are various ways in which the payment of the reward is split, and we will be discussing these methods in the next section. The reason for having various reward split methods is because hashing is a purely brute-force-based mechanism, hence it is pure luck for any miner to find the correct nonce and then go ahead with the process of successfully submitting a block in the blockchain, so it would be unfair for other miners in the pool if their hashing and mining efforts go unaccounted for. Hence, on the basis of hashing power, the reward is split, but still there are various methods by which the exact calculation of each miner's share is done.
PPS is a method that transfers the risk to the mining pools. It is the most-preferred method for miners as they are paid on the number of shares of hashes they mine; the reward of the share mined is guaranteed for each and every share, and nowadays very few pools support this system. The miners are paid from the pool's existing balance of coins.
This is known as the proportional approach and, as the name suggests, in this method the reward is proportionally distributed among the miners based on the number of shares of blocks each miner has found.
PPLNS is similar to the proportional method, although instead of counting all the shares in a round, in this method the last N shares are looked, irrespective of the total shares contributed by the miner.
DGM is a hybrid approach in which risk is divided between the pool and the miners. In this, the pool receives part of the mining reward when short rounds are going on, and the same is returned when longer rounds are underway.
SMPPS is similar to PPS, but the pool does not pay more than the total coins rewarded to the pool in a single round. This removes the risk that the pool takes in the PPS method.
ESMPPS is similar to SMPPS; it distributes payments equally among all the miners who are part of the pool and were mining for the current round.
RSMPPS is similar to SMPPS, but this method prioritizes the recent miners first.
CPPSRB uses a Maximum Pay per Share such as system in such a way that it pays the miners the maximum reward using the income from the block rewards, considering that no backup funds are required by the pool.
BPM is also known as slush's system, since it was first used in the mining pool called slush's pool. In this payment calculation method, the older shares from the beginning of the block round are given less significance as compared to the recent shares. This system was introduced as community members started reporting that miners were able to cheat the mining pools by switching pools when a round was underway.
POT is a high-variance PPS such as system which pays out based on the difficulty of work returned to the pool by a miner, instead of the difficulty of work done by the whole pool miners mining the block.
This is a proportional reward system, based on the time a share was submitted. This process makes later shares worth a lot more than the earlier shares; these shares are scored by time, and the rewards that are to be given to individual miners are calculated based on the proportion of the scores and not the shares submitted in the system.
Apart from these, there are still new reward systems being proposed by mining pools and the community; systems such as ELIGUIS, Triplemining, and so on still exist and are being used by various developers.
There are various mining pools present, and anyone can be part of an interested pool and start mining right away. Pools can support anyone cryptocurrency or multiple currencies at a time. Here is a list of mining pools, along with the currencies they support:
Apart from the listed pools, there are various other pools, some supporting a single coin and some supporting multiple coins. Some of them are BTCC, Bitfury, BW Pool, Bitclub.network, Suprnova, minergate, and so on. The following diagram shows the Hashrate distribution of the Bitcoin Network among the various mining pools, and it can be found at www.Blockchain.info/pools:
Mining hardware takes care of the mining process, but it is also important to have efficient software for the best results and the removal of bottlenecks if any.
The task of the mining software is to share the mining task of the hardware over the network. Apart from this, its task is to receive work from other miners on the network. Based on the operating system the hardware is running, there are various mining software available, such as BTCMiner, CGMiner, BFGMiner, Nheqminer, and so on:
Mining software should be chosen on the basis of the operating system, hardware type, and other factors. Most mining software is open source and has a large amount of active community to clarify any doubts in choosing the correct software for the available hardware to the miner.
In this chapter, we learned about the mining of cryptocurrency; starting with studying various algorithms, we discussed mining hardware and the various types available. Then, we discussed mining pools, how the pools split rewards among miners, and various popular pools currently available.
In the next chapter, we will discuss Initial Coin offering (ICO), which is the process of raising funds for a coin or token that is launched. ICO is an important part of the blockchain community and helps the blockchain project stakeholder to raise funds from the community itself.
ICO stands for Initial Coin Offering, also called a token sale or initial token offering. An ICO is an event where a new blockchain project raises money by offering network tokens to potential buyers. Unlike IPOs, no equity is for sale. Buyers receive tokens on the network but do not own the underlying project intellectual property, legal ownership, or other traditional equity traits unless specifically promised as part of the sale. The expectation of profit (if there is one) comes from holding the token itself. If demand for use of the new network increases, then presumably so will the value of owning the token.
In this chapter, we are going to cover ICOs, how they came about, and the critical aspects that happen as part of executing one. ICOs continue to evolve, but many events and deliverables have become expected and even mandatory for success.
The first ICO was developed in 2013 by Mastercoin. Mastercoin held that their token, such as bitcoin, would increase in value and at least a few others agreed. Mastercoin held a month-long fundraiser and ended up raising about $500,000, while afterwards the Mastercoin overall market cap appreciated to as high as $50 million. The ability to raise substantial capital without going through traditional channels began to spark a flurry of activity.
The following year, the Ethereum network was conceived and held its token sale. Wth the birth of this network, the difficulty of launching a new token decreased substantially. Once the Ethereum network was stable and had established a critical mass, ICOs began to happen regularly. During the next two years, ICOs began to happen more and more frequently.
Some notable projects from this early period include:
In 2017 the pace of ICOs accelerated, as did the amount of money raised. Here are some of the major projects from 2017:
There are now over, 1500 cryptocurrencies and more are released regularly. New projects being released at a rate of around 100/month. The topics that we will be covering in this chapter are as follows:
The difference between the early ICO market and the current state of the industry is stark. In the beginning, there were only a few ICOs and those were held by teams that were relatively well known inside the blockchain community that spent considerable time and effort bringing a project to life before running the ICO. After the launch of Ethereum, the barrier to entry for doing an ICO fell substantially and the number of new tokens swelled.
Before the Ethereum network, most ICOs were for a new blockchain. With Ethereum, tokens could now launch using smart contracts instead of creating the entire blockchain infrastructure from scratch. For more on how this is done, see the chapters on Solidity and Smart Contracts (See Chapter 13, Solidity 101, and Chapter 14, Smart Contracts).
Currently, 2018 is on track to have over 1,000 new ICOs:
Most ICOs have a typical trajectory for their marketing activities. Each of these activities exists to attract interest and investment in the company and present the project to the world at large.
For most projects, the most critical piece is the whitepaper. The project whitepaper introduces the purpose of the project, the problems it tries to solve, and how it goes about solving it.
A good white paper will discuss the utility of the token and the market. Key sections of most whitepapers include:
Most whitepapers will include sections such as these, as well as others, depending on the exact nature of the project and the target market. The whitepaper will be used extensively for all future marketing efforts, as it will be the source of information for slide decks, pitches, and so on.
Private placement is the art of selling large blocks of tokens to private investors, usually before those tokens are available on the common market. There are a number of reasons for this practice. First, private investors tend to be more sophisticated and are able to place large buys. The literal buy-in of a well-established investor, especially one with a successful track record, will encourage future buying as the highest risk purchase is the first.
Private buyers also provide early funds, possibly before the whitepaper is finalized if they really believe in the strength of the team. In addition, accredited larger investors also have a special legal status in many jurisdictions, including in the United States. This status makes it much safer to sell to them in the uncertain legal environment that faces ICOs.
Private placements can happen in a number of ways:
If the founders do not have an extensive network, they will need to build one as best they can. This can be done by going to conferences, giving talks, attending meetups, and building genuine relationships. This process can take a long time, and founders are encouraged to begin this activity immediately. Networking such as this should happen if you are even considering a blockchain startup or ICO, even before the company is founded. It's also important that a genuine relationship is formed—once these people buy in, they are essentially partners. Their success is the company's success, so they will be highly motivated to help promote the company. At the same time, the company's failure is their failure and loss, so they will want to have a strong trust in the abilities of the founders. Relationships such as this are rarely made instantly.
One step removed from this process is finding the right advisors. Advisors who have access to investors will absolutely wish to be paid for their services, often up front and with a percentage of the raise. Too many people want access to investors to be worth bothering with anyone with no resources at all. Moreover, these advisors must also believe in the project. For an advisor to bring investors bad projects is to lose access to that investor and sour their relationship. Responsible advisors will, therefore, refuse to introduce projects until those projects are truly ready for investment.
The last way for private sales to happen is for a project to get enough interest publicly that investors seek out the project. Because project hype corresponds strongly to token prices, buying into a token with a lot of hype and PR is seen as a safer investment. Smart investors will still strongly vet the project and team, but this evidence of early traction makes things much easier.
Many teams start their fundraising approach with a private placement round. In a few cases, this may be all the team needs.
Well known funds that do private placement are the Crypto Capital Group, the Digital Currency Group, Blockchain Capital, Draper Associates, Novotron Capital, and Outlier Ventures.
A token pre-sale is usually done before the official launch date of the public token sale. It is half-way between private placement and a full public sale. Tokens are typically sold at some level of discount from the official public price and there may be a higher minimum purchase amount than the public sale.
Such as private placement sales, pre-sales are often somewhat restricted in terms of who is allowed to buy. If a project has been able to build up some community engagement, the pre-sale is typically offered to that community first.
For instance, if the public sale per token will be $0.10, with a minimum purchase of $300 (or equivalent in Ethereum or Bitcoin), the private sale price may be $0.08, but with a minimum purchase of $1,000.
In an ideal world, a token project doing a pre-sale should have the following:
Projects that have all of these are in a stronger position for a successful pre-sale. Projects that also have well-known private investors or funds behind them have an additional advantage.
The public sale is the end stage of an ICO. By this point, a team should have spent substantial time in community building, early fundraising, PR activities (see in the succeeding sections), and so on. The reason for all this is that the most successful ICOs tend to be over very fast, selling out in minutes or hours. There are three major different approaches to structuring the sale.
The capped sale is the most common ICO structure. In a capped sale, there is typically a soft cap and a hard cap. The soft cap is the minimum raise the team is looking for to build their project. The hard cap is the maximum they will accept as part of the raise. Once the token sale begins, it is usually executed on a first come, first served basis. Tokens are sold at a pre-set rate. In some cases, that rate may include bonuses. For example, the first 20 buyers (or first $20,000) receives a 10% bonus in terms of the number of tokens purchased. As the sale continues, the bonus drops. This structure is designed to reward initial movers and inspire FOMO (fear of missing out).
The uncapped sale is designed to raise as much capital as possible. This is done by fixing the time of the sale and, typically, the number of tokens available. As people buy in, they receive a share of tokens equal to their share of the total capital invested. The number of tokens each person receives is often not known until the end of the ICO. For instance, if, on day 1 an investor puts in $10,000 and no one else bids, they would own all of the available tokens. However, the next day, another investor puts in $10,000 as well. If this were the end of the sale, the two investors would each own half the available tokens.
Such as the capped sale, there are many variations. The EOS token sale is probably the best-known version of the uncapped sale. The EOS token was sold over 341 days, with a few more tokens being made available for purchase each day.
The Dutch auction is the rarest form of ICO offering, but one of the fairest. A Dutch auction works with the auction beginning at a high price, with the price slowly lowered until participants jump in or a reserve is hit. A reverse Dutch auction starts at a low price, and the price is then slowly raised over time at fixed intervals. Either approach is good for finding a proper market price for a token, provided that there are a sufficient number of buyers. The most famous ICO to use the Dutch auction approach was the Gnosis project.
The Gnosis team did not set out to sell a fixed percentage of the total tokens. Instead, the number of tokens released would increase the longer the auction took to hit the cap of $9 million GNO tokens sold, or $12.5 million raised. Despite the auction setup designed to slow down participation, the sale was over in under 15 minutes.
Blockchain is a new technology and startups are, by nature, quite risky. For both of these reasons, investors often seek out the input, advice, and viewpoints of established experts in the field. In a field this new, an expert is typically just someone well known, or someone who has made a few, very public correct predictions in the recent past.
In an era of social media, a multitude of YouTube channels, podcasts, and other organizations have sprung up to act as gatekeepers and commentators on the ICO ecosystem. The more successful of these shows have over 100,000 subscribers interested in cryptocurrencies and ICO projects.
Successful ICOs are therefore highly motivated to get on these shows to raise awareness of their project. In turn, the operators of these shows can charge whatever the market will bear in order to get a presence. It's not unusual for high-visibility shows and podcasts to charge $5-20,000 USD for a single appearance, paid in a combination of fiat, crypto, and project tokens.
Mainstream press attention helps every project. PR can be one of the more time-consuming aspects of ICO marketing because few ICO teams already have the requisite media contacts. PR agencies can help but tend to be expensive. Whether or not a PR agency is used, an ICO should have everything else carefully lined up first. Mainstream media attention will bring a lot of attention, which also means a lot more people looking for flaws. A well-executed whitepaper, solid website, a good and clear plan, and fantastic team bios are all important.
Some PR outreach should generally start as soon as the project is solid. Typically, smaller venues and publications are more welcoming than larger ones. A smart ICO team will work with local media, local podcasts, regional business hubs, newsletters, and so on to start with. Once an ICO has some media exposure, it will be easier to interest larger publications.
Naturally, this PR activity needs to go hand-in-hand with content marketing and community building activities.
ICOs usually have at least one person, and often the whole team, doing at least some level of content marketing. The goal of content marketing is to provide information about the project, its goals, and how it will impact the world in a way that is relevant but rarely about sales. Content marketing is usually done through company blogs and platforms, such as Medium or Steemit, where there will be many casual users who may get introduced to the project through different articles.
Another aspect of content marketing is social content—Tweeter, LinkedIn posts, Facebook, and so on. The purpose is the same—to connect with people who may not otherwise know about the project and build a sense of connection, trust, and purpose.
Content marketing is usually published as coming from the team members, whether or not they actually wrote the content. Doing this helps make the team feel accessible and real—a serious problem when some ICO scams have made up team members.
Good content marketing also helps drive community growth and engagement. ICO teams that have excellent content marketing are much more likely to succeed than ones who do not.
As ICO marketing grew, and the number of projects increased, the market started looking for better ways to evaluate projects. A number of companies sprang up to offer impartial reviews of ICO projects. Self-described experts rate projects on different scales to recommend how good a project is for technical and investment success. However, many projects have taken to paying reviewers or at least offering to pay, in order to get a higher rating.
While there are a large number of ICO rating sites, the two best known are currently ICOBench and ICORating. Many projects work hard to get a high score on these sites so that they can feature this rating in their marketing materials. Whether or not these ratings are accurate or not is still being worked out and will change. However, every marker of trust an ICO can get surely helps so many projects work hard (fairly or unfairly) to get good ratings.
At the start of the ICO frenzy, it was common for projects to be able to raise money with only a whitepaper, a team, and an idea that involved the blockchain. Very quickly, a number of projects raised money and either failed or were drawn into protracted legal disputes. As a result, the market matured and, increasingly, investors wish to see some level of working prototype before they will buy into an ICO. In many jurisdictions, having a working product makes the case for a utility token versus a security token more plausible and reduces the potential for legal issues later on.
The need for prototypes creates a barrier to entry for under-funded or non-funded projects, making them closer to traditional fundraising with VC and angel investors. In many cases, such projects need to get angel or seed funding before they are in a position to do an ICO.
Because of the demand for prototypes, a number of firms have begun offering blockchain prototyping services where they work with business stakeholders who do not have their own development team to build something they can take to market.
Depending on the blockchain system being used, there is also the need for smart contract and token development work. With Ethereum in particular, there is a need for careful testing because once deployed, the code is immutable—bugs cannot be fixed.
For many Ethereum ICOs, one of the final steps is a code audit. In a code audit, a trusted third-party is brought in to inspect the code for any possible security issues or violations of best practices. Typically, this audit is publicly released, along with the updated code that fixes any important issues found.
A bounty campaign is when a project promises payment for services in their native tokens. These services are typically promotional in some way, such as translating the whitepaper into different languages, writing articles on medium or Steemit, or other tasks to help spread the word. By offering a bounty, the team both spreads the token (and thus the ecosystem), as well as incentivizes people to evangelize the project. After all, by holding the token, the people performing the bounties stand to benefit if the project takes off.
There is no real limit to what can and can't be a bounty. The important part for every team is to make sure that the people who perform the bounties are rewarded, otherwise it's easy to turn a supporter into an enemy.
Airdrops are a promotional approach where a team sends free tokens to all accounts on a network that meet certain criteria, typically involving minimum balance and activity requirements. The airdrop is meant to achieve two goals: spread awareness and interest in the project, and also build a userbase for the ecosystem.
One of the reasons Airdrops became popular is that they were also seen as a way to distribute tokens without being seen as a security, since no money changed hands. This approach is still untested legally.
A road show is when the core team for a project travels from conference to conference and to other events across the world promoting their project. The goal is to put the project in front of as many people as possible and to meet as many investors and other influencers as possible. A road show is draining and expensive, but often necessary for projects to gain strong investor support. Many investors, especially large investors, want to get to know the founders and see what they are made of. If investors and influencers have strong confidence in project leadership, they are more likely to invest. Building relationships in person is one way to do that, and the easiest way for many projects to meet investors is through attending multiple events over time, sometimes months. Ideally, this process begins long before the ICO, to give the project team members a long time to build these relationships and get feedback on ideas without seeming needy or asking for money.
The ICO market is going through growing pains. As a global, mostly unregulated market, there are numerous issues and challenges that do not exist with traditional fundraising. There have been a number of criticisms of ICO projects.
In more traditional VC-backed or bootstrapped projects, it would be necessary for a project to show value through some form of traction. Typically, this would involve having customers, revenue, and growth, if not profitability. However, with ICOs, the money is raised before most projects launch or show an MVP. In many cases, there is no proof of the team's ability to deliver whatsoever. Because of this, it is impossible for ICO buyers to be sure that the project will address a real problem in the market successfully.
The result of all these weak projects is a high rate of failure. A survey from bitcoin.com found that almost half of all projects had already failed, ceased operations, or simply vanished in 2017 alone.
One of the attractions to ICOs is that traditional VC funding is very hard to come by for most of the world. If someone does not live in New York City, San Francisco, or some other major technology hub, then they are far less likely to have access to a serious investor network. With ICOs, it is possible for anyone, anywhere, to attempt to attract early-stage investment. The downside, however, is that the level of due diligence and skill of those doing the investment is questionable and the amount of credible information is low.
An ICO typically starts with the release of a whitepaper, a relatively short document going over the value of the network, the token, and future plans. Because the technology is new, and a typical ICO campaign is short (3-4 months), there is very little time and opportunity for investors to do extensive due diligence. Moreover, because blockchain based startups are not required to show financials (they don't have any), traction, or product-market fit (there is no product yet), there would be little data on which to base evaluations.
In time, consistent standards for evaluating blockchain startups and ICOs may evolve, but, currently, they do not exist.
Because of the low barrier to entry and the large amounts of available capital, there is strong financial pressure on companies to do an ICO if at all possible. The ability to raise substantial capital without issuing equity, and without well-defined legal obligations, is an opportunity that's seen as too good to pass up.
In many cases, projects don't truly need a blockchain or a token. In fact, unless the features of blockchain are absolutely vital to a project, it is cheaper and easier to go forward without it. To require a blockchain, a project will need to make quality use of blockchain-enabled features: decentralized governance, immutability, true digital scarcity, and so on. Similarly, projects that release tokens on public blockchains must sacrifice privacy and speed. It is imperative that anyone evaluating blockchain projects keeps these issues in mind.
Despite ICO and IPO being similar from the point of view of their names, there is no real connection between blockchain tokens and company shares. Ownership of a blockchain token backed by a company provides no ownership, influence, or rights to the company's profits, behavior, or business in any way. The value of the token is instead driven entirely by the value of the network itself and what that network enables. Moreover, if a company creates a blockchain project and then abandons it, the token holders likely have no recourse.
Because of this, the way tokens are released can have a huge effect on how a company supports a blockchain project. For instance, if a team were to sell 90% of network tokens in an ICO, then in the future, they will receive only 10% of the benefit of the rise in value of the token. In comparison, they may have millions of dollars in cash on hand. Because of this, the team may decide to give only a limited amount of attention to the blockchain project and feel little urgency in terms of having improved the network. A small team with tens of millions of dollars could pay themselves large salaries until they die and be very secure.
On the other hand, a team releasing only 10% of tokens would be strongly incentivized to increase the value of the token, but there would be a different issue: centralization. A small group would overwhelmingly control the network. In most cases, this would defeat most of the purpose of blockchain technology, leading to the preceding issue—do they really need a blockchain to begin with?
Another problematic issue with tokens is their liquidity. With high token liquidity, a team of investors may be more incentivized to create hype for the network rather than substance. If a project can create enough buzz, the value of their token may increase tenfold. If the token is then liquid, team members and early investors could dump the token for a huge profit and then move on. No longer having anything at stake, the project might be abandoned.
For these reasons, high-quality projects often have some system of investor and team lockup, preventing team members and large investors from selling the token at all for a period of time followed, by a slow vesting where tokens are released over time. By preventing liquidity, the team must focus on long-term value versus short-term manipulation.
Before we discuss the legalities of blockchain ICOs, it's important to make clear that none of the authors of this book are lawyers and that nothing in this book can constitute or replace quality legal advice. The rules around blockchain technology vary radically between countries and continue to evolve rapidly. For any blockchain project, we suggest that you consult with a skilled local lawyer who has experience in the sector.
The creation of blockchain tokens resulted in an entirely new asset class, one that did not fit well into the existing categories of stock, currency, or equity. Moreover, because public blockchains are global, it is not clear how to apply local laws to the use of blockchains.
In the United States, there is a distinction between a token that is a utility and one that is a security. A utility token could be described as something such as a carnival token, a comic book, or a baseball card. While the market value of the item may go up or down, the fundamental reason for purchasing it (and the way it is advertised) is not directly related to profit-seeking. Someone buys a carnival token to play a game, a comic book to read, and a baseball card to collect.
Many tokens try to position themselves as utilities in order to avoid invoking US securities law which greatly restricts sales and requires formal registration with the SEC along with requirements for other disclosures to investors.
In other cases, ICOs issue a SAFT or Simple Agreement for Future Tokens. The SAFT is absolutely a security and tissuers accept this in order to sell to accredited investors before the launch of the network. Once the network has launched, these SAFT agreements are converted to tokens on the network.
The security versus utility token classification has been complicated by statements from the SEC, that a token can become more or less of a security over time—beginning life as a security or utility and then drifting into the other category. For projects trying to stay on the right side of the law, such fuzzy definitions can be maddening.
Security laws aside, blockchain projects can also be seen as currency and thus run into another set of laws: those governing banks and other money-handling businesses. In the United States and elsewhere, companies that deal with remittances, payments, and other common blockchain use-cases could be seen as money transmitters. In the United States, such businesses must be licensed on a state-by-state basis. Other use cases may require a banking license.
For a global enterprise using blockchain, the regulatory burden to fully comply with the mix of laws and regulations—know-your-customer laws, anti-money laundering laws, money transmitter laws, banking laws, security sales and marketing laws, and so on can be immense.
For these reasons, many blockchain companies tend to defensively headquarter themselves in friendly jurisdictions with the hope of being legal in their primary home and dealing with the rest of the world later, if ever.
Projects in the ICO space, such as blockchain itself, operate in a unique fashion. Depending on the project, they may operate along the lines of a traditional business, but also as a central bank—adding and removing currency from circulation. For a traditional company, profitability is paramount and straightforward, in that a company offers a product and earns a return from sales. However, if you are also creating a currency from nothing and selling and trading it for some other product, or if this currency IS the product, then the situation is more complicated. If the sustainability of the project comes from selling currency, then a downturn can be catastrophic as currency buyers dry up and immense swings in the value of the network can take place nearly instantly. Just as was the case with failed state economy, trust in the currency could evaporate and, as a result, hyperinflation ensues as individual tokens become nearly worthless as a medium of exchange.
Because company-based blockchain projects are so new, it's still not clear what the long-term sustainable models look like for these companies. Earlier projects, such as Bitcoin and Ethereum, did not need to turn a traditional project but just attract enough currency interest to pay the small team of developers.
Despite all the issues, ICOs have advantages that traditional fundraising does not. Indeed, one of the takeaways from the booming ICO market is that traditional avenues to capital for startups have been far too restrictive. There is a clear hunger for access to early-stage tech companies.
The biggest advantage for ICO investors is potential liquidity. In traditional equity funding, backers needed to wait for a liquidity event—either a merger or acquisition or a public offering. Any of these options could be a long time coming if ever they arrived at all. It was not unusual for years and years to pass with no liquidity. With tokens, the sale can happen rapidly after the initial raise is finished. Many tokens would come onto the market mere months after the initial offering. This allowed successful investors to exit part of their position, collect profit, and reinvest. The ability to exit also allowed those investors to re-enter, increasing the pool of available early-stage money overall.
Traditional equity investment is highly regulated. This is meant to protect investors but also acts as a barrier to entry for smaller actors who may have spare capital to invest, but cannot because they are insufficiently wealthy. As a result, those investors cannot invest at all until a company goes public. As a result, smaller investors miss out on the high-risk, high-return options that venture capitalists have access to.
The ability of smaller investors to become involved means that investor-fans, people who invest for reasons other than a pure profit motive, can be a far more powerful force. It's worth asking which is the better investment—a company that can convince a VC to give them $10 million, or a company that can convince 1,000 people to part with $10,000.
Many ICOs have a minimum investment size in the hundreds of dollars or even the low thousands. This is far, far below the hundreds of thousands or millions needed at even the seed level in traditional equity raises. As a result, the pool of possible investors increases exponentially. Moreover, by spreading the investment over a much larger pool of people, the risk to any one investor is more limited. Overall, ICOs provide a funding model that is more prone to scams but also more democratic and better suited to projects that may not have profit motive as their #1 priority. Projects for the social good, which could never make economic sense to a venture capitalist, might still find support in an ICO from people who wish to support the cause and take the opportunity for profit as just a bonus.
The ability to raise vast sums of money in only a few months with nothing more than a whitepaper and some advertising naturally gave rise to bad actors looking to cash in. Numerous ICOs began to spring up with fake teams, fake projects, and projects that were questionable at best. Once the projects had collected the money, the teams would vanish. There have been a number of arrests, but there are still plenty of scammers and frauds who have so far escaped with investor money.
Onecoin was an international Ponzi scheme posing as a blockchain project. The project was labeled a scheme by India, while authorities from China, Bulgaria, Italy, Vietnam, Thailand, Finland, and Norway have warned investors about the project. There have been a number of arrests and seizures throughout the world but the Onecoin (https://www.onecoin.eu/en/) website continues to operate.
Pincoin and iFan were two projects claiming to be from Singapore and India, but were secretly backed by a company in Vietnam called Modern Tech, based out of Ho Chi Minh City. It is currently believed to be the largest scam in ICO history, having managed to scam 32,000 people for over $660 million dollars. The leaders of the scam held events and conferences and went to extreme lengths to convince investors of the viability of the projects. In truth, it was a massive Ponzi scheme with early investors paid with the money from later investors. Once the money had been gathered, the team vanished, along with the money.
Bitconnect was long accused of being a Ponzi scam, as they promised tremendous returns to the owners of their BCC coin. Bitconnect operated an exchange and lending program where users could lend BCC coins to other users in order to make interest off the loans. The company ceased operations after cease-and-desist letters from state lawmakers. The scheme collapsed, along with the value of the coin, leaving most investors with massive losses. A class-action lawsuit is in progress.
Beyond outright fraud, ICOs have been plagued with other issues. Because of the amount of money involved and the fact that most funds are raised via cryptocurrency transactions that cannot be reversed or intercepted, ICOs are a perfect target for hackers.
To the author Please add something here
One of the earliest decentralized projects was known as the DAO, or Decentralized Autonomous Organization. The DAO was meant to function as a VC fund of sorts for blockchain projects and was built so that people could buy a stake in the organization (and its profits) using Ethereum. The project itself was run using the Ethereum blockchain and smart contracts to control funds and manage voting. The project was a massive success, managing to raise about $250 million in funds at a time when Ethereum was trading for around $20.
Unfortunately, a flaw in the smart contract code used to operate the DAO resulted in a loophole that a hacker was able to exploit. Because of the subtle bugs in the smart contracts, the attacker was able to withdraw funds multiple times before balances would update. The hacker was then able to withdraw as much as they liked, quickly draining the DAO of tens of millions of dollars worth of ether. This hack radically affected the course of the Ethereum project by causing a hard fork—the majority of users voted to split the network and refund the stolen funds. The minority started Ethereum classic, where all the attackers, actions were allowed to stand. Both networks still operate independently.
The Parity team is one of the most respected in the entire Ethereum ecosystem. Led by Gavin Wood, one of the founders of Ethereum, they are some of the most experienced and skilled blockchain developers in the world. Unfortunately, everyone is human and the Parity wallet product had a flaw. This flaw allowed an attacker to drain wallets remotely, resulting in millions of dollars of ether being stolen. Thankfully, the attack was not automated, which gave the ecosystem time to notice and respond.
The flaw was fixed, but the fix itself created a new bug. This bug allowed a new attacker to issue a kill command to the wallet, freezing all funds. As of the time of writing, over $260 million in ether remains locked. The community is still trying to figure out a way to rescue the funds.
The moral of the story with the Parity wallet hacks is that even the best teams can make mistakes and that it's vital that any code on Ethereum has some sort of upgrade path. It's also clear that until the ecosystem improves, any code running on Ethereum should be seen as risky. If even the founders aren't perfect, that should tell you the difficulty involved in doing it right.
If contemplating an ICO, it is critical that every effort is made to secure the funds against attack. Here, we will discuss some common attacks and how to defend against them.
Ideally, all servers used by an ICO team should have login access restricted to a known whitelist of ssh keys. This means that only the computers known to the team can log into the server. Even better is if these same machines remain shut down and disconnected from the internet immediately prior to and during the ICO. Thus, even if that computer were compromised, it could not be used to hack the ICO.
One of the ways that ICOs have been hacked is by attackers creating a clone of the ICO website and then hacking DNS to redirect the domain name to a computer the attackers control. The new site looks exactly such as the official one, except the address where to send funds is changed. Because most addresses are hexadecimal and not effortlessly human distinguishable, this is an easy detail to overlook. If this happens for even a few minutes during a busy ICO, hackers can make off with hundreds of thousands or millions of dollars.
Many DNS providers have different ways of locking DNS, and these security measures should all be enabled. Moreover, a DNS checking service where such as DNS Spy, should be used to regularly check for any changes in real time. Taking these countermeasures helps ensure that attackers trying to hijack DNS to steal funds will not be successful.
Any machines used to run the website for an ICO should have some level of intrusion detection software installed as a backup. If for some reason, something was missed, it's critical that the team be notified of any suspicious behavior on key servers. There are numerous intrusion detection products on the market. Key features to look for are modifications of permissions detection and file change detection (for instance, altering an HTML file to change the Ethereum address as to where to send funds).
Another way ICOs can be attacked is through the purchase of similar sounding or looking domains. For instance, if a team is running on myIcoDomain.io, the attacker might buy myIcoDomain.net. It's important for teams to make this harder by buying as many related domains as they can, especially with the most common extensions. If an attacker owns one of these related domains, they can easily send emails to possible buyers, post messages on social media, and so on, in a way that may confuse some buyers. Just as with DNS attacks, attackers will often put up an identical looking site except for the critical payment details.
Moreover, ICO teams should make very clear what the official domain is and regularly and proactively warn users to mistrust anything else.
Attackers also may try and steal funds by injecting messages into Facebook groups, telegram groups, discord channels, and other communication platforms to steal funds. For instance, a user may show up and declare that they are helping the team and could everyone please fill out some survey or other. The survey collects email addresses and, naturally, those email addresses are then sent emails that look as though they are coming from a related domain to send funds or get a special sale.
Who can and cannot speak for the ICO should be extremely clear, and anyone who claims to speak for the ICO team but doesn't should be flagged and banned immediately.
Funds collected by an ICO should be moved into a multi-signature wallet. This is because another possible attack is to compromise the wallet holding the funds, allowing the attacker to transfer everything to themselves. Multi-signature wallets exist for most major crypto ecosystems and radically increase the difficulty for attackers. Instead of stealing the private key for one person, they must now steal multiple keys from multiple computers and use them all simultaneously. In the Ethereum ecosystem, the Gnosis wallet has proven robust and capable here, used by multiple successful teams without incident.
While a best practice in general, having a public code audit for any crowd sale code helps to decrease the likelihood of a hack. By being proactive in looking for and removing vulnerabilities with the help of skilled third-parties, a team both increases trust in the project and decreases the chance that something has been missed that a hacker could exploit.
By now, you should have a good idea of what goes into an ICO and some idea of the immense work that goes into it. A typical ICO can go for minutes to months, but it takes an incredible amount of prep work to get marketing materials done for public and private investors. Any ICO project should be extremely careful about security, as an ICO that gets hacked and loses funds will find it very hard to inspire confidence in the project and in future projects.
Many ICOs fail, either because of a lack of marketing, the wrong team, or an inability to engage the community. The early days of easy money are over. Still, ICOs are, on average, vastly more successful than traditional approaches to gaining funds, such as approaching Venture Capitalists.
In the next chapter, we will be looking into how to create your own token or cryptocurrency.
Up until now, we have talked extensively about blockchain, Bitcoin's, and Altcoins. We have discussed various intricacies involved in Bitcoin's, its blockchain, and other elements that form the blockchain. Ethereum has been a good topic of interest for most parts of the book so far. We have also read about other blockchain-based projects that comprise currency-based projects.
Ethereum has made it possible to make decentralized applications despite having little development knowledge. There are various tokens available at exchanges that are built on top of Ethereum and other similar projects, and are being recognized by backers and the community.
In this chapter, we will be discussing the following topics:
There are three ways in which one's own cryptocurrency can be created. Each has its own benefits over the other. Prior to creating a currency, it is important to know all the intricacies involved, and what your coin offers compared to other existing coins currently available at exchanges. A list of popular coins can be found at https://coinmarketcap.com.
These are the tokens that are based on existing blockchain platforms, such as Ethereum, Omni, NEO, and so on. A token helps in creating a coin faster, and supports a quick go-to market strategy so that most of the time can be invested in further development of a self-hosted blockchain.
There are examples of various blockchain projects, which start as a token and post a successful ICO once they start their own fully supported blockchain complete with a coin. Since it is faster and easier to develop a token as compared to a coin, it becomes easy for such projects to gain traction and also get launched in no time, and most of the time can be invested in other important tasks such as whitepaper creation, ICO, and so on.
In this method, creation of one's own blockchain from scratch can be done. Taking hints from Bitcoin and other blockchain platforms will be helpful to create the coin, which will allow you to integrate new features and also to use different consensus techniques.
Our prime focus in this chapter is about this type of coin development; we will be creating our own coin complete with its own blockchain, after the introduction of Platforms such as Ethereum, Counterparty, NEO, and so on. There have been limited resources with creating one's own blockchain by taking fork of an existing coin such as Bitcoin, Litecoin, etc. and work on that to create own cryptocurrency.
Litecoin is one of the first cryptocurrencies built on top of Bitcoin. Litecoin's source was forked from Bitcoin's core code, including the wallet and other sources of Bitcoin. The major change that Litecoin has over Bitcoin is that the PoW algorithm is script instead of Bitcoin's SHA-256. Apart from this, Litecoin has a coin supply limit of 84,000,000 LTC, and the block time is 2.5 minutes.
In this chapter, we will be forking Litecoin source code and working on top of that. Here is a brief overview of the steps involved:
Once the previously listed parameters are defined, it is time to work on the source code and make the required changes, as needed.
It is important to set up the Litecoin environment in our local machine; the source code is available on GitHub here: https://github.com/litecoin-project/litecoin.
It is important to select the build platform on which the environment is to be set up. You can find the required build instruction in the doc subfolder of the source code. There, required instruction files for the preferred platforms are present for you to follow the steps to install the Litecoin core and the Wallet.
In this section, we will be working on Max OS X build instructions, although instructions for other platforms are also available in the suggested instruction path.
Installation of xcode is necessary for compilation of required dependencies. The following command should be executed in the terminal:
xcode-select --install
Installation of brew, which is a package manager for macOS, is needed next. The following command is used to install brew:
/usr/bin/ruby -e "$(curl -fsSL https://raw.githubusercontent.com/Homebrew/install/master/install)"
Once brew is installed, the next step is to install the required dependencies using the following command:
brew install automake berkeley-db4 libtool boost miniupnpc openssl pkg-config protobuf python3 qt libevent
The preceding command will install all the required dependencies, as needed:
The first step is to clone the Litecoin in the root or any other directory:
git clone https://github.com/litecoin-project/litecoin
cd Litecoin
Installation of BerkleyDb is performed with the following command:
./contrib/install_db4.sh .
Building of Litecoin-core uses the following make command:
./autogen.sh
./configure
make
You can run unit tests to make sure the build is successful without any errors:
make check
Deployment of the .dmg which contains the .app bundles, is shown here:
make deploy
Now, it is time to work on our own coin; for this, it is important to check out the clone directory and Litecoin, and make a copy in case any of the steps turn out to be fatal.
As per the parameters we have listed in one of the previous sections, it is time to replace the parameters at the requisite locations.
The src directory contains the Litecoin core source code where most of the parameters are to be set. In the chainparams.cpp file, change the abbreviation from LTC to the abbreviation of our choice. Similarly, all other files where the abbreviation seems fit is to be changed as suggested.
Now, the ports need to be changed, so that our blockchain works at the relevant port for all the nodes in the network.
The connection port should be changed in the init.cpp file.
The RPC port should be changed in the bitcoinrpc.cpp file.
In the validation.cpp file, the following parameters should be edited:
The block value should be changed in the GetBlockSubsidy() function:
CAmount GetBlockSubsidy(int nHeight, const Consensus::Params& consensusParams)
{
 int halvings = nHeight / consensusParams.nSubsidyHalvingInterval;
 // Force block reward to zero when right shift is undefined.
 if (halvings >= 64)
 return 0;

 CAmount nSubsidy = 50 * COIN;
 // Subsidy is cut in half every 210,000 blocks which will occur approximately every 4 years.
 nSubsidy >>= halvings;
 return nSubsidy;
}
Now, it is time to set the coin limit and the minimum value, and the same can be done in the amount.h file:
typedef int64_t CAmount;

static const CAmount COIN = 100000000;
static const CAmount CENT = 1000000;

static const CAmount MAX_MONEY = 84000000 * COIN;
inline bool MoneyRange(const CAmount& nValue) { return (nValue >= 0 && nValue <= MAX_MONEY); }

#endif // BITCOIN_AMOUNT_H
To change the coinbase maturity, in the qt subfolder, the transactionrecord.cpp file should be changed to set the required number of blocks that are to be found before the mined coins can be spent:
  if (nNet > 0 || wtx.IsCoinBase())
    {
        //
        // Credit
        //
        for(unsigned int i = 0; i < wtx.tx->vout.size(); i++)
        {
            const CTxOut& txout = wtx.tx->vout[i];
            isminetype mine = wallet->IsMine(txout);
            if(mine)
            {
                TransactionRecord sub(hash, nTime);
                CTxDestination address;
                sub.idx = i; // vout index
                sub.credit = txout.nValue;
                sub.involvesWatchAddress = mine & ISMINE_WATCH_ONLY;
                if (ExtractDestination(txout.scriptPubKey, address) && IsMine(*wallet, address))
                {
                    // Received by Bitcoin Address
                    sub.type = TransactionRecord::RecvWithAddress;
                    sub.address = EncodeDestination(address);
                }
                else
                {
                    // Received by IP connection (deprecated features), or a multisignature or other non-simple transaction
                    sub.type = TransactionRecord::RecvFromOther;
                    sub.address = mapValue["from"];
                }
                if (wtx.IsCoinBase())
                {
                    // Generated
                    sub.type = TransactionRecord::Generated;
                }

                parts.append(sub);
            }
        }
    }
    else
    {
        bool involvesWatchAddress = false;
        isminetype fAllFromMe = ISMINE_SPENDABLE;
        for (const CTxIn& txin : wtx.tx->vin)
        {
            isminetype mine = wallet->IsMine(txin);
            if(mine & ISMINE_WATCH_ONLY) involvesWatchAddress = true;
            if(fAllFromMe > mine) fAllFromMe = mine;
        }

        isminetype fAllToMe = ISMINE_SPENDABLE;
        for (const CTxOut& txout : wtx.tx->vout)
        {
            isminetype mine = wallet->IsMine(txout);
            if(mine & ISMINE_WATCH_ONLY) involvesWatchAddress = true;
            if(fAllToMe > mine) fAllToMe = mine;
        }

        if (fAllFromMe && fAllToMe)
        {
            // Payment to self
            CAmount nChange = wtx.GetChange();

            parts.append(TransactionRecord(hash, nTime, TransactionRecord::SendToSelf, "",
                            -(nDebit - nChange), nCredit - nChange));
            parts.last().involvesWatchAddress = involvesWatchAddress; // maybe pass to TransactionRecord as constructor argument
        }
We have to change the transaction confirm count in the transactionrecord.cpp file to set this parameter, as per our requirements.
The genesis block is created from the LoadBlockIndex() function, which is present inside the validation.cpp file:
bool CChainState::LoadBlockIndex(const Consensus::Params& consensus_params, CBlockTreeDB& blocktree)
{
    if (!blocktree.LoadBlockIndexGuts(consensus_params, [this](const uint256& hash){ return this->InsertBlockIndex(hash); }))
        return false;

    boost::this_thread::interruption_point();

    // Calculate nChainWork
    std::vector<std::pair<int, CBlockIndex*> > vSortedByHeight;
    vSortedByHeight.reserve(mapBlockIndex.size());
    for (const std::pair<uint256, CBlockIndex*>& item : mapBlockIndex)
    {
        CBlockIndex* pindex = item.second;
        vSortedByHeight.push_back(std::make_pair(pindex->nHeight, pindex));
    }
    sort(vSortedByHeight.begin(), vSortedByHeight.end());
    for (const std::pair<int, CBlockIndex*>& item : vSortedByHeight)
    {
        CBlockIndex* pindex = item.second;
        pindex->nChainWork = (pindex->pprev ? pindex->pprev->nChainWork : 0) + GetBlockProof(*pindex);
        pindex->nTimeMax = (pindex->pprev ? std::max(pindex->pprev->nTimeMax, pindex->nTime) : pindex->nTime);
        // We can link the chain of blocks for which we've received transactions at some point.
        // Pruned nodes may have deleted the block.
        if (pindex->nTx > 0) {
            if (pindex->pprev) {
                if (pindex->pprev->nChainTx) {
                    pindex->nChainTx = pindex->pprev->nChainTx + pindex->nTx;
                } else {
                    pindex->nChainTx = 0;
                    mapBlocksUnlinked.insert(std::make_pair(pindex->pprev, pindex));
                }
            } else {
                pindex->nChainTx = pindex->nTx;
            }
        }
        if (!(pindex->nStatus & BLOCK_FAILED_MASK) && pindex->pprev && (pindex->pprev->nStatus & BLOCK_FAILED_MASK)) {
            pindex->nStatus |= BLOCK_FAILED_CHILD;
            setDirtyBlockIndex.insert(pindex);
        }
        if (pindex->IsValid(BLOCK_VALID_TRANSACTIONS) && (pindex->nChainTx || pindex->pprev == nullptr))
            setBlockIndexCandidates.insert(pindex);
        if (pindex->nStatus & BLOCK_FAILED_MASK && (!pindexBestInvalid || pindex->nChainWork > pindexBestInvalid->nChainWork))
            pindexBestInvalid = pindex;
        if (pindex->pprev)
            pindex->BuildSkip();
        if (pindex->IsValid(BLOCK_VALID_TREE) && (pindexBestHeader == nullptr || CBlockIndexWorkComparator()(pindexBestHeader, pindex)))
            pindexBestHeader = pindex;
    }

    return true;
}
Further, in chainparams.cpp, the paraphrase is to be changed to the requisite parameter of choice. In Litecoin, the following parameter is used:
const char* pszTimestamp = "NY Times 05/Oct/2011 Steve Jobs, Apple’s Visionary, Dies at 56";
The wallet address is an important part of the blockchain, as without having correct private and public keys it is not possible to perform the relevant changes on the source of Litecoin. The starting letter can be set in the base58.cpp file.
Checkpoints are hardcoded into the Litecoin Core client. With checkpoints set, all transactions are valid up to the checkpoint condition valid. This is set in case anyone wants to fork the blockchain and start from the very same block; the checkpoint will render false and won't accept any further transactions. The checkpoints.cpp file helps in managing the checkpoints in a blockchain source code:
namespace Checkpoints {

    CBlockIndex* GetLastCheckpoint(const CCheckpointData& data)
    {
        const MapCheckpoints& checkpoints = data.mapCheckpoints;

        for (const MapCheckpoints::value_type& i : reverse_iterate(checkpoints))
        {
            const uint256& hash = i.second;
            BlockMap::const_iterator t = mapBlockIndex.find(hash);
            if (t != mapBlockIndex.end())
                return t->second;
        }
        return nullptr;
   }
Icons and other graphics can be set and replaced from the src/qt/res/icons directory, which contains all the images and the main logo of the coin.
The files bitcoin.png and about.png contain the logo for the specific coin.
By following the preceding points, the coin can be created and made to work by using the Litecoin source; once the coin is created and made to work, the next steps will be to test for actual production level usage. Further steps include compiling the coin source and using the QT-based wallet:
In this chapter, we discussed the creation of our own cryptocurrency and worked on the creation of our own blockchain, by taking a fork of Litecoin, and then making the required changes to create the desired coin with the relevant parameters.
In the following chapters, we will address both sides of the coin in terms of blockchain's future, that is, scalability and other challenges that blockchain is facing. Furthermore, we will discuss the future of blockchain, and how it is going to shape the future of the internet and technology, not just in terms of currency-based industries, but also in terms of other industries in which blockchain acts as a game changer.
While the blockchain technology has been hailed as a major breakthrough, it is not without its own issues. Blockchain technology is still in the early stages of its development, and a number of problems have cropped up that are still awaiting some level of resolution. Decentralized networks such as blockchains have their own unique challenges.
In this chapter, we'll look at the following key issues in blockchain:
One of the key advantages of blockchain is decentralization, which is the removal of any single authority to control the network. Unfortunately, this has a downside, which is its effect on the performance of a system. Blockchain systems work by keeping all the nodes of the network in sync by trying to achieve consensus so that every computer running a blockchain sees the same system state. More nodes on the network typically result in less centralization. This also means that more work must be done to ensure that all the network participants are in agreement with each other, which limits performance and scalability.
There are a few reasons why a larger number of nodes hinders performance:
There have been a few attempts at increasing the performance of blockchain systems. Most of these involve some level of reduced decentralization. For instance, the Bitshares-derived set of systems uses a restricted set of full nodes called witnesses, of which there are only 21. Only these computers are used to process and approve transactions; other machines on the network merely submit transactions to the network or observe. As well as many other performance optimizations made by the Bitshares team, they claim a theoretical throughput of up to 100,000 transactions a second. This leads to a second issue with blockchains, which is the cost compared to traditional approaches.
While the Bitshares team suggests a theoretical limit of 100,000 transactions a second, they are using technologies and lessons from the LMAX exchange, which claims to be able to process over 6 million transactions a second. Most blockchains do not achieve a performance that is anywhere near the theoretical performance, with most blockchains achieving well under 1,000 transactions a second in practice. For instance, Bitcoin achieves approximately seven transactions a second, and Ethereum around 14. A decent server running MySQL can process 10,000–20,000 transactions a second of similar complexity. Thus, traditional approaches are much easier to scale to larger transaction volumes than blockchain systems.
The cost per performance of traditional database systems, including distributed database systems, is vastly cheaper on every level than blockchain systems. For any business, hiring experienced personnel for these systems is cheaper, easier, and less risky because they are so much better known and documented. Businesses considering blockchain must ask if a blockchain-based system provides a must-have feature in some way, because if not, other approaches are cheaper, easier, faster, or all of the preceding.
A business that is evaluating blockchain should pay close attention to their scaling requirements and cost models when using blockchain. In time, costs and performance may improve, but there are no guarantees that they will improve fast enough if current approaches aren't sufficient.
Current blockchain systems are relatively difficult to use in comparison to other systems. For instance, the use of any Ethereum-based DApp requires either the installation of a special browser or the MetaMask plugin for Chrome, or the purchase and transfer of Ethereum on one of the public markets and then learning the interface of the desired application. Each action taken requires the expenditure of Ethereum, the exact amount not necessarily known in advance and varying depending on network load.
Once set up, sending a value via a blockchain-based system is relatively easy, but prone to mistakes in the addresses. It is not easy for a human to know whether they are sending the value to 0x36F9050bb22d0D0d1BE34df787D476577563C4fC or 0xF973EE1Bcc92d924Af3Fc4f2ce4616C73b58e5Cc. Indeed, ICOs have been hacked by attackers gaining access to the ICO main website and simply changing the destination address, thereby siphoning away millions.
Some blockchains, such as Bitshares and Stellar, have provisions for named accounts that are intuitive and human readable. Hopefully, this trend will continue and the usability will improve.
When blockchain networks get hacked, users typically have no recourse. This is true whether or not the user is at fault in any way. When centralized exchanges have been hacked, one of the responses is the users should not have trusted a centralized authority. However, with events such as the parity wallet hack and the DAO, users could lose access to their funds even when they did not trust a centralized authority. While one response could be they should have chosen a better wallet or project, it is unclear how users can realistically be expected to do that. For any Parity wallet hack, the Parity team involves some of the most renowned developers of the Ethereum world. The more likely response to such continued issues is to not use blockchain. To achieve mainstream acceptance, blockchain systems will need to be easier to use and provide some sort of advanced protection in the case of attacks, hacks, and other losses.
All blockchains can suffer from consensus attacks, often referred to as 51% attacks because of the original consensus attack possible in Bitcoin. Every blockchain relies on the majority of its users or stakeholders being good actors, or at least not coordinating against the rest of the network. If the majority (or even a large minority) of the powerful network actors in a blockchain system coordinate against the rest, they will be able to launch double-spend attacks and extract large amounts of value from the network against its will.
While once theoretical, there have recently been a number of successful 51% attacks against different blockchains, such as Verge (find the link in the references). In systems that are more centralized, such as proof-of-stake systems where there may be a small number of extremely large stakeholders, it is entirely possible that similar coordination's could occur with something as simple as a few phone calls if concerned stakeholders have sufficient incentives. Such incentives do not necessarily need to be economic or on-chain at all: Politics or international relations could cause a set of patriotic stakeholders to collude for or against other users. For instance, a large amount of mining hardware and network gear originates in China, as does a lot of blockchain development. If the Chinese stakeholders discovered that they held a majority stake during an international fight with a regional rival, these stakeholders might be able to use their network power to punish network users that belong to the rival region, unilaterally.
Another issue for public blockchains is the existence of network forks. Bitcoin has been forked twice, splitting into Bitcoin and Bitcoin cash, then again into Bitcoin Gold. There are now three independent networks claiming the Bitcoin mantle. While the original network is still by far the most dominant, all the forks were a result of a breakdown in agreement among the key network participants about the future of the technology.
Ethereum suffered a similar fate, splitting into Ethereum, and Ethereum Classic over how to respond to the DAO hack. The majority felt that the DAO should have the hacked funds restored, but a strong minority disagreed, asking why should this hack get special treatment over others?. The result was two networks, one with the hacked funds restored (Ethereum) and one where the network protocol was the rule no matter what (Ethereum Classic).
The upside of an immutable ledger is that nothing can be hidden or altered. The downside of an immutable ledger is that nothing can be hidden or altered—including bugs. In the case where networks such as Ethereum write the smart contract code into the chain itself, this means that code bugs cannot be fixed easily; the original code will remain on the blockchain forever. The only workaround is the modular code where each section references some other section, and these pointers have programmatic ways of being updated. This allows the authors of a DApp to upload a new piece of code and adjust the pointers appropriately. However, this method too has issues. Making these updates requires a specific authority to update the code.
Having a central authority that is necessary for updates just creates new problems. Either that authority has centralized control over the decentralized app (which means it is no longer decentralized) or a governing system must be written onto the blockchain as well. Both these options have security trade-offs. A centralized authority might be hacked or have their private keys stolen, resulting in a catastrophic loss to the system. A decentralized governing system requires substantially more code, and is itself at risk of a hack, with the DAO hack being exactly such an event.
Current blockchain technologies do not easily interoperate. While it is possible to write an application that can communicate with multiple blockchains, those blockchains do not have the natural capability to communicate with each other. In many cases, the fundamental approach to transactions and governance may not be compatible. For instance, in the Ethereum network, any user can send any token to any other user, no permission required by the recipient. The recipient is free to ignore the new tokens if they wish, but they still have them (which results in some interesting tax questions). In the Stellar network, however, a user must issue a trustline to another in order to receive custom tokens issued by that user.
Similarly, many networks offer multisignature and multiuser wallets on-chain. However, without a centralized application sitting outside the blockchains themselves, there is no way for users to easily manage all of these networks in one place. This is part of the appeal of centralized exchanges to begin with—no matter what the underlying protocol is, users get a predictable, universal interface that is able to send and receive tokens without regard for the underlying technology.
As with any new technology, the number of skilled personnel will be limited. In the case of blockchain, this natural order is made far worse because of the large and growing number of systems. Looking only at the major chains, systems are written in C, C++, Java, Scala, Golang, and Python. All of these systems have different architectures and protocols. The blockchains that have smart contracts have different contract models, contract APIs, and even completely different programming languages, such as Solidity and Serpent.
On the security front, each blockchain system has subtly different security models and challenges. The simpler the system, the easier those requirements are, but the less the blockchain will be able to do. Moreover, because of the recent surge of interest, blockchain skills are very expensive on the open market. In particular, top talent with a proven track record is very hard to find.
One of the supposed advantages of blockchains is that they can be run anonymously. However, if this anonymity is ever broken, the immutable ledger means that every transaction throughout time can now be traced perfectly. Maintaining perfect anonymity is extremely hard, and even if one person is successful, if the people they do business with are not also anonymous as well, then statistical techniques can be used to narrow down the possibilities of their identity considerably.
While many people think about anonymity in terms of avoiding law enforcement or taxation, it is not only governments that might be interested in this information. For instance, plenty of criminal organizations would love to be able to identify wealthy but unassuming people. An organization could trace large holdings or transactions of cryptoassets to a specific person and use that as a targeting method for kidnapping or extortion. Add the immutability of cryptotransactions and this could make such attacks very attractive.
There are some projects that attempt to address this, such as Zcash and Dash, which hide transaction sources and endpoints. Hopefully, more systems will add well thought out protocols to address safety and privacy.
Some of the largest blockchains, such as Bitcoin and Ethereum, still work on a proof-of-work model. The proof-of-work approach is extremely power hungry and inefficient. One news report suggested that the Bitcoin network alone already consumes more power than the nation of Ireland. Other sources considered this an exaggeration, but even so, it illustrates the tremendous cost of running these systems.
However, more and more systems are moving from proof-of-work systems to other systems for this exact reason. New consensus algorithms, such as proof-of-stake and delegated-proof-of-stake, make such extreme energy costs unnecessary.
In this chapter, we have covered the current major challenges of using and implementing blockchain systems. Businesses looking to use blockchains should be aware of the current state of the technology, the costs in comparison to other technological approaches, and the security and staffing issues that exist in the blockchain world.
The good news is that none of these issues are insurmountable, and many of them will certainly improve with time. Numerous projects are underway to improve the usability and security of different blockchain networks. Additional tooling and training resources reduce the difficulty of programming new blockchain applications.
In this chapter, we are going to discuss the future of the blockchain technology. There are a number of trends and developments that are likely to drive the development of the blockchain technology and its adoption in the coming years. As with any sort of prognostication, none of the things that we will discuss are set in stone.
In particular, blockchain will be driven by a few key themes:
Blockchain began with only a single implementation: Bitcoin. Now there are thousands of blockchains and hundreds of blockchain technologies. In such a crowded marketplace, it is only natural that the technology will begin to have more purpose-driven implementations. Many of the drawbacks of blockchain systems, such as the speed, ease of use, and so on, are easier to solve with a purpose-specific blockchain system.
We've already seen the beginnings of this. Steemit is a blockchain-based social network built from bitshares/graphene technology. It has a consensus algorithm based on witnesses and voting, and the whole operation is designed around hosting social and blogging content. While still having many of the features of a public blockchain, by being purpose specific, the Steem blockchain is better able to function in its desired ecosystem.
We expect more purpose-specific chain technologies to emerge. Forks of blockchain specifically aimed at logistics, tracking the providence of artistic works, legal work, and so on are all fertile ground for a good team to provide a market-specific blockchain product that is easy to use and integrate into existing systems.
The companies that successfully provide a cost-saving, effective solution for traditional businesses will find the easiest success. In this section, we will look at some specific use cases that are already evolving.
Some of the most popular games in the world are online role-playing games, such as World of Warcraft. In many of these games, players can accumulate and trade equipment. A common issue for game creators has been the in-game economy: How do you enforce the scarcity of rare items online? Many games have been subject to duping bugs, where a player can duplicate a rare item over and over again and then sell it, thereby making a substantial profit. Blockchain technology solves the issue of digital scarcity.
There are already a few video games experimenting with blockchain technology. However, while there are a few Ethereum-based tokens for gaming, there are no blockchains just for video games yet. We expect this to change, as some of the most lucrative games around make their money through the sale of in-game items.
Real estate is another domain where the blockchain technology makes absolute sense. There are already a number of real-estate-based projects under way. However, the world of real estate is complex, and the laws concerning title ownership and transfer vary widely from jurisdiction to jurisdiction. It is likely that a chain built for managing the private/public interaction of land transference will be able to successfully supplant the existing legacy systems. Such a system would greatly increase the efficiency of property markets. Current markets rely on a large number of distinct factors with incomplete information government agencies holding land title records, insurance companies checking flood zones and other issues, issuing prices, and real-estate sales companies carrying out price discovery and advertising. The need for multiple disconnected parties to share in a trusted system is a perfect fit for blockchain technology. Improving real estate would be difficult, but possibly very lucrative for the company that is successful.
There are already a large number of well-funded logistics projects in the blockchain field. Most of these are running on a public network such as Ethereum or NEO. However, it is likely that industry-specific blockchains will evolve, as the legal needs and requirements of a regional trucking company are quite different than those of international cross-border shipping. The system requirements for each space may be very different, yet these systems would need to communicate and coordinate. Here is a space where federated, multichain networks might be a good fit. The technology to handle cross-chain transfers is still developing. However, despite the difficulty of tracking tokens across multiple blockchains, teams such as the Tendermint team (the developers of Cosmos) are hard at work enabling precisely that.
Currently, software licenses and other rights to intellectual property are managed and transferred using a large number of proprietary systems, or even old-fashioned paperwork. It can be difficult or even impossible to ascertain the ownership of certain intellectual property. In the US, you automatically own any IP you create; however, this ownership is not recorded anywhere. It is possible to register your ownership, but it's far from effortless. A blockchain-powered IP system would enable sites such as YouTube, DeviantArt, and ModelMayhem to create the ability to automatically register works on behalf of their users. Once registered, those same sites could assist users in seamlessly issuing and revoking licenses. Such a scheme would require the cooperation of these large internet sites, but this would not be the first time such a thing has happened; many of the technical underpinnings of the web were created through industry consortiums looking to increase efficiency and interoperability throughout the industry.
While the blockchain technology has become increasingly fragmented, there will come an inevitable consolidation. One of the ways that blockchain will consolidate is within different industries. As with other standard processes, it is likely that each industry in which finds a profitable use for blockchain will begin to standardize on one or two key technologies or implementations that will then become the default. For instance, in the logistics industry, there are many competing projects and standards for the tracking and delivery of packages. Some of these projects are being built on Ethereum, others on NEO, and yet more on their own private chains. One of these approaches, or a new one not yet seen, will hit an industry sweet spot and become a standard. This is because blockchain technology is ideally suited for uniting different factors that may not trust each other. This sweet spot technology will almost certainly be the result of a collection of companies, not a startup. A consortium has a much easier time in not feeling such as a threatening competitor, and will instead have an opportunity to pool resources and be part of a winning team.
Likely consortium's to use blockchain include the banking, insurance, package delivery, and tracking industries. Industries such as document and legal tracking, on the other hand, are more likely to have multiple private competitors because of the different market forces. Medical tracking would greatly benefit from a standardized approach, but market forces and regulatory issues make this more difficult.
The current state of the blockchain ecosystem has been compared to the dotcom boom in the '90s. The result will likely be similar: A few key projects survive and thrive, whereas the others fail and become liabilities for investors. However, unlike the dotcom boom, blockchain projects have taken vastly more investment from the general public. This could lead to interesting results. One possibility is an event similar to the dotcom crash: funding dries up for quite some time, regardless of project quality. With retail investors taking some of the damage, as well as having the opportunity to continue to invest anyway, the fallout from a blockchain crash may not be as bad. However, a harsh crash that may severely harm retail investors is more likely to draw a regulatory reaction.
A certain near-term change in the blockchain technology will come from regulation. Nearly every major country is looking at the ICO landscape and working out how best to regulate or capitalize on blockchain. In the USA, the SEC seems to be looking at ICOs more and more as a securities offering that will necessitate companies to carry out an ICO to provide financial and other documentation more typically related to stock offerings.
Other countries, such as Belarus, are taking a very hands-on approach in the hopes of luring blockchain companies and investment to their countries.
In response to the continued SEC action and the failure of a large number of blockchain projects, an increasing number of projects that are seeking funding will issue security tokens. Investors will inevitably start seeking and demanding higher-quality projects, as the low hanging fruit will have been taken and barriers to entry will increase. In addition, security offerings tend to come with financial disclosure rules and other requirements that will act as a gatekeeper to projects that are simply not ready to be funded. The downside, of course, is that it will be harder for unknown players without independent access to funds to even attempt entry into the market.
Currently, there are no exchanges dedicated to security tokens, and, in fact, many existing exchanges do not wish to trade in such tokens in order to avoid security laws themselves. Once the security tokens become a larger part of the market, STO trading platforms will emerge or potentially be added to the existing stock-trading platforms of major exchanges and banks.
One of the common criticisms of blockchain tokens is the high volatility of individual assets. To counter this, there have already been a few attempts at creating token pools, or tokens that represent a basket of other tokens in order to reduce volatility and risk, much like ETFs and mutual funds do for stocks.
We expect further attempts at building more stable and better-hedged token products. One possibility would be a new insurance product, protecting against negative volatility in return for a fee. While in practical terms a similar effect can be achieved with futures and options, insurance is a concept more familiar to ordinary consumers and retail investors who have taken an interest in the token markets. We expect that there will be attempts to bring all of these to the market.
Technologies tend to go in waves. There is usually a period of growth and experimentation followed by consolidation and standardization before the cycle begins again. Currently, there are a few technologies that are clearly in the lead for being standardization targets.
Ethereum, Neo, and Hyperledger are all technologies that have already attracted substantial traction from different projects. Any newcomers will have to not only offer a superior technology at the blockchain level but will also contend with the host of tools and existing libraries and tutorials that are already being developed. In particular, the Ethereum and Hyperledger ecosystems have a tremendous amount of investment dedicated to them, as well as the substantial corporate support. Both projects are the only ones to be offered by Microsoft and Amazon as blockchain-as-a-service offerings.
As the blockchain technology has grown, so have the number of companies offering blockchain services. Just like with individual blockchain projects, we can expect that many of these companies will go away and the more successful ones will become dominant inside of their ecosystems. In some cases, this was the original economic play: IBM wrote much of the Hyperledger fabric and provided it as open source, and now provides an extensive consulting service in the space.
As with Amazon and Microsoft offering blockchain services, there will be an increase in the number of off-the-shelf products for businesses. Currently, custom blockchain development is prohibitively expensive for many businesses, as well as risky. Once standard and dominant players become more clear, it will be easier for startups to provide targeted blockchain-as-a-service and blockchain integration to existing enterprises. It will be at this stage that blockchain adoption genuinely becomes mainstream.
One of the big challenges in the blockchain world is communicating across blockchains. Some projects, such as Cosmos, have this problem at the center of their approach. Efficient and accurate cross-chain communication is a critical capability to enable blockchains to scale, as well as provide the customized services that different ecosystems will demand. While a few approaches are under development, none of them have really been proven out in the real world under typical business conditions. Once a good solution is found, that blockchain ecosystem will have a huge advantage over others.
The two other major technological buzz-phrases of the moment are AI and IoT. There are a number of ways that these technologies could overlap and intersect.
Artificial intelligence requires a vast amount of data to be effective. This is part of why so many big companies are pursuing AI projects with such fervor. Larger companies have access to more data and are therefore able to produce superior AI results than companies that have less data. Thus, larger companies have a vast competitive advantage over small ones if they are able to leverage AI expertise effectively. Public blockchains remove this advantage because the same data is available to all. In this realm, smaller startups that are more nimble and have nothing to lose could leverage this public data to provide new services and offerings through proprietary or highly targeted offerings.
Similarly, it is expected that consortium blockchains will further strengthen incumbents who can share data among one another to keep out new competitors. The existing cartel would have vast data troves larger than any of the individual actors, creating a defensive perimeter around their industry. While the consortium members might still compete among themselves, their data advantage would help shield them from new market entrants.
One of the ongoing threats to the internet of things is security. Millions of network devices result in millions of potentially vulnerable items that could be co-opted by attackers. Using a blockchain to deliver software updates, along with systems such as trusted computing modules, IoT devices could be at least partially shielded from attacks by requiring an attacker to disrupt the entire chain, not just a specific device. However, this would take careful engineering, and the first few attempts at this form of security will likely fail due to implementation bugs.
Other interactions with blockchain include logistics, where companies tie the movements of their delivery vehicles to a consortium network that broadcasts each package movement across the entire network, improving delivery and identifying issues. For instance, a truck hitting a roadblock and updating its travel across a consortium of logistics firms would allow other trucks to route around, thereby improving deliverability.
In this chapter, we've discussed the near-term likely future of blockchain technology. It is impossible to know the future, but from what can be gauged, these are the industry trends and forces shaping the technology as it exists today. For those businesses investigating blockchain, each of these three major trends will act to either encourage blockchain adoption or cause avoidance. We hope that the governments of the world issue clear and well thought out regulation as soon as possible, as well as put in place safeguards to prevent fraud. With this in place, this technological evolution will have more guidance in terms of how to bring blockchain products to market safely and with less risk.
Blockchains, in general, will continue to be applied to different industries. It is unknown what new networks such as EOS and Cosmos will bring to the table, as no major chain has yet had the extensive governance models that these systems seek to provide. If large-scale, decentralized governance is able to perform well, it would be an encouraging development for many systems. For instance, the government of Estonia is already doing trials with blockchain for some of their government functions.
Most likely, the current blockchain systems will not be the dominant ones in the end. As with most technologies, the dominant systems will be the ones built on the lessons learned from the current crop of failures.
Almost all of the Internet-based applications we have been using are centralized, that is, the servers of each application are owned by a particular company or person. Developers have been building centralized applications and users have been using them for a pretty long time. But there are a few concerns with centralized applications that make it next to impossible to build certain types of apps and every app ends up having some common issues. Some issues with centralized apps are that they are less transparent, they have a single point of failure, they fail to prevent net censorship, and so on. Due to these concerns, a new technology emerged for the building of Internet-based apps called decentralized applications (DApps).
In this chapter, we'll cover the following topics:
Typically, signed papers represent organizations, and the government has influence over them. Depending on the type of organization, the organization may or may not have shareholders.
Decentralized autonomous organization (DAO) is an organization that is represented by a computer program (that is, the organization runs according to the rules written in the program), is completely transparent, and has total shareholder control and no influence of the government.
To achieve these goals, we need to develop a DAO as a DApp. Therefore, we can say that DAO is a subclass of DApp.
Dash, and the DAC are a few example of DAOs.
One of the major advantages of DApps is that it generally guarantees user anonymity. But many applications require the process of verifying user identity to use the app. As there is no central authority in a DApp, it become a challenge to verify the user identity.
In centralized applications, humans verify user identity by requesting the user to submit certain scanned documents, OTP verification, and so on. This process is called know your customer (KYC). But as there is no human to verify user identity in DApps, the DApp has to verify the user identity itself. Obviously, DApps cannot understand and verify scanned documents, nor can they send SMSes; therefore, we need to feed them with digital identities that they can understand and verify. The major problem is that hardly any DApps have digital identities and only a few people know how to get a digital identity.
There are various forms of digital identities. Currently, the most recommended and popular form is a digital certificate. A digital certificate (also called a public key certificate or identity certificate) is an electronic document used to prove ownership of a public key. Basically, a user owns a private key, public key, and digital certificate. The private key is secret and the user shouldn't share it with anyone. The public key can be shared with anyone. The digital certificate holds the public key and information about who owns the public key. Obviously, it's not difficult to produce this kind of certificate; therefore, a digital certificate is always issued by an authorized entity that you can trust. The digital certificate has an encrypted field that's encrypted by the private key of the certificate authority. To verify the authenticity of the certificate, we just need to decrypt the field using the public key of the certificate authority, and if it decrypts successfully, then we know that the certificate is valid.
Even if users successfully get digital identities and they are verified by the DApp, there is a still a major issue; that is, there are various digital certificate issuing authorities, and to verify a digital certificate, we need the public key of the issuing authority. It is really difficult to include the public keys of all the authorities and update/add new ones. Due to this issue, the procedure of digital identity verification is usually included on the client side so that it can be easily updated. Just moving this verification procedure to the client side doesn't completely solve this issue because there are lots of authorities issuing digital certificates and keeping track of all of them, and adding them to the client side, is cumbersome.
Due to these issues, the only option we are currently left with is verifying user identity manually by an authorized person of the company that provides the client. For example, to create a Bitcoin account, we don't need an identification, but while withdrawing Bitcoin to flat currency, the exchanges ask for proof of identification. Clients can omit the unverified users and not let them use the client. And they can keep the client open for users whose identity has been verified by them. This solution also ends up with minor issues; that is, if you switch the client, you will not find the same set of users to interact with because different clients have different sets of verified users. Due to this, all users may decide to use a particular client only, thus creating a monopoly among clients. But this isn't a major issue because if the client fails to properly verify users, then users can easily move to another client without losing their critical data, as they are stored as decentralized.
Many applications need user accounts' functionality. Data associated with an account should be modifiable by the account owner only. DApps simply cannot have the same username- and password-based account functionality as do centralized applications because passwords cannot prove that the data change for an account has been requested by the owner.
There are quite a few ways to implement user accounts in DApps. But the most popular way is using a public-private key pair to represent an account. The hash of the public key is the unique identifier of the account. To make a change to the account's data, the user needs to sign the change using his/her private key. We need to assume that users will store their private keys safely. If users lose their private keys, then they lose access to their account forever.
A DApp shouldn't depend on centralized apps because of a single point of failure. But in some cases, there is no other option. For example, if a DApp wants to read a football score, then where will it get the data from? Although a DApp can depend on another DApp, why will FIFA create a DApp? FIFA will not create a DApp just because other DApps want the data. This is because a DApp to provide scores is of no benefit as it will ultimately be controlled by FIFA completely.
So in some cases, a DApp needs to fetch data from a centralized application. But the major problem is how the DApp knows that the data fetched from a domain is not tampered by a middle service/man and is the actual response. Well, there are various ways to resolve this depending on the DApp architecture. For example, in Ethereum, for the smart contracts to access centralized APIs, they can use the Oraclize service as a middleman as smart contracts cannot make direct HTTP requests. Oraclize provides a TLSNotary proof for the data it fetches for the smart contract from centralized services.
For a centralized application to sustain for a long time, the owner of the app needs to make a profit in order to keep it running. DApps don't have an owner, but still, like any other centralized app, the nodes of a DApp need hardware and network resources to keep it running. So the nodes of a DApp need something useful in return to keep the DApp running. That's where internal currency comes into play. Most DApps have a built-in internal currency, or we can say that most successful DApps have a built-in internal currency.
The consensus protocol is what decides how much currency a node receives. Depending on the consensus protocol, only certain kinds of nodes earn currency. We can also say that the nodes that contribute to keeping the DApp secure and running are the ones that earn currency. Nodes that only read data are not rewarded with anything. For example, in Bitcoin, only miners earn Bitcoins for successfully mining blocks.
The biggest question is since this is a digital currency, why would someone value it? Well, according to economics, anything that has demand and whose supply is insufficient will have value.
Making users pay to use the DApp using the internal currency solves the demand problem. As more and more users use the DApp, the demand also increases and, therefore, the value of the internal currency increases as well.
Setting a fixed amount of currency that can be produced makes the currency scarce, giving it a higher value.
The currency is supplied over time instead of supplying all the currency at a go. This is done so that new nodes that enter the network to keep it secure and running also earn the currency.
The only demerit of having internal currency in DApps is that the DApps are not free for use anymore. This is one of the places where centralized applications get the upper hand as centralized applications can be monetized using ads, providing premium APIs for third-party apps, and so and can be made free for users.
In DApps, we cannot integrate ads because there is no one to check the advertising standards; the clients may not display ads because there is no benefit for them in displaying ads.
Until now, we have been learning about DApps, which are completely open and permissionless; that is, anyone can participate without establishing an identity.
On the other hand, permissioned DApps are not open for everyone to participate. Permissioned DApps inherit all properties of permissionless DApps, except that you need permission to participate in the network. Permission systems vary between permissioned DApps.
To join a permissioned DApp, you need permission, so consensus protocols of permissionless DApps may not work very well in permissioned DApps; therefore, they have different consensus protocols than permissionless DApps. Permissioned DApps don't have internal currency.
Now that we have some high-level knowledge about what DApps are and how they are different from centralized apps, let's explore some of the popular and useful DApps. While exploring these DApps, we will explore them at a level that is enough to understand how they work and tackle various issues instead of diving too deep.
Bitcoin is a decentralized currency. Bitcoin is the most popular DApp and its success is what showed how powerful DApps can be and encouraged people to build other DApps.
Before we get into further details about how Bitcoin works and why people and the government consider it to be a currency, we need to learn what ledgers and blockchains are.
A ledger is basically a list of transactions. A database is different from a ledger. In a ledger, we can only append new transactions, whereas in a database, we can append, modify, and delete transactions. A database can be used to implement a ledger.
A blockchain is a data structure used to create a decentralized ledger. A blockchain is composed of blocks in a serialized manner. A block contains a set of transactions, a hash of the previous block, timestamp (indicating when the block was created), block reward, block number, and so on. Every block contains a hash of the previous block, thus creating a chain of blocks linked with each other. Every node in the network holds a copy of the blockchain.
Proof-of-work, proof-of-stake, and so on are various consensus protocols used to keep the blockchain secure. Depending on the consensus protocol, the blocks are created and added to the blockchain differently. In proof-of-work, blocks are created by a procedure called mining, which keeps the blockchain safe. In the proof-of-work protocol, mining involves solving complex puzzles. We will learn more about blockchain and its consensus protocols later in this book.
The blockchain in the Bitcoin network holds Bitcoin transactions. Bitcoins are supplied to the network by rewarding new Bitcoins to the nodes that successfully mine blocks.
The major advantage of blockchain data structure is that it automates auditing and makes an application transparent yet secure. It can prevent fraud and corruption. It can be used to solve many other problems depending on how you implement and use it.
First of all, Bitcoin is not an internal currency; rather, it's a decentralized currency. Internal currencies are mostly legal because they are an asset and their use is obvious.
The main question is whether currency-only DApps are legal or not. The straight answer is that it's legal in many countries. Very few countries have made it illegal and most are yet to decide.
Here are a few reasons why some countries have made it illegal and most are yet to decide:
The Bitcoin network is used to only send/receive Bitcoins and nothing else. So you must be wondering why there would be demand for Bitcoin.
Here are some reasons why people use Bitcoin:
Ethereum is a decentralized platform that allows us to run DApps on top of it. These DApps are written using smart contracts. One or more smart contracts can form a DApp together. An Ethereum smart contract is a program that runs on Ethereum. A smart contract runs exactly as programmed without any possibility of downtime, censorship, fraud, and third-party interference.
The main advantage of using Ethereum to run smart contracts is that it makes it easy for smart contracts to interact with each other. Also, you don't have to worry about integrating consensus protocol and other things; instead, you just need to write the application logic. Obviously, you cannot build any kind of DApp using Ethereum; you can build only those kinds of DApps whose features are supported by Ethereum.
Ethereum has an internal currency called ether. To deploy smart contracts or execute functions of the smart contracts, you need ether.
This book is dedicated to building DApps using Ethereum. Throughout this book, you will learn every bit of Ethereum in depth.
Hyperledger is a project dedicated to building technologies to build permissioned DApps. Hyperledger fabric (or simply fabric) is an implementation of the Hyperledger project. Other implementations include Intel Sawtooth and R3 Corda.
Fabric is a permissioned decentralized platform that allows us to run permissioned DApps (called chaincodes) on top of it. We need to deploy our own instance of fabric and then deploy our permissioned DApps on top of it. Every node in the network runs an instance of fabric. Fabric is a plug-and-play system where you can easily plug and play various consensus protocols and features.
Hyperledger uses the blockchain data structure. Hyperledger-based blockchains can currently choose to have no consensus protocols (that is, the NoOps protocol) or else use the PBFT (Practical Byzantine Fault Tolerance) consensus protocol. It has a special node called certificate authority, which controls who can join the network and what they can do.
IPFS (InterPlanetary File System) is a decentralized filesystem. IPFS uses DHT (distributed hash table) and Merkle DAG (directed acyclic graph) data structures. It uses a protocol similar to BitTorrent to decide how to move data around the network. One of the advanced features of IPFS is that it supports file versioning. To achieve file versioning, it uses data structures similar to Git.
Although it called a decentralized filesystem, it doesn't adhere to a major property of a filesystem; that is, when we store something in a filesystem, it is guaranteed to be there until deleted. But IPFS doesn't work that way. Every node doesn't hold all files; it stores the files it needs. Therefore, if a file is less popular, then obviously many nodes won't have it; therefore, there is a huge chance of the file disappearing from the network. Due to this, many people prefer to call IPFS a decentralized peer-to-peer file-sharing application. Or else, you can think of IPFS as BitTorrent, which is completely decentralized; that is, it doesn't have a tracker and has some advanced features.
Let's look at an overview of how IPFS works. When we store a file in IPFS, it's split into chunks < 256 KB and hashes of each of these chunks are generated. Nodes in the network hold the IPFS files they need and their hashes in a hash table.
There are four types of IPFS files: blob, list, tree, and commit. A blob represents a chunk of an actual file that's stored in IPFS. A list represents a complete file as it holds the list of blobs and other lists. As lists can hold other lists, it helps in data compression over the network. A tree represents a directory as it holds a list of blobs, lists, other trees, and commits. And a commit file represents a snapshot in the version history of any other file. As lists, trees, and commits have links to other IPFS files, they form a Merkle DAG.
So when we want to download a file from the network, we just need the hash of the IPFS list file. Or if we want to download a directory, then we just need the hash of the IPFS tree file.
As every file is identified by a hash, the names are not easy to remember. If we update a file, then we need to share a new hash with everyone that wants to download that file. To tackle this issue, IPFS uses the IPNS feature, which allows IPFS files to be pointed using self-certified names or human-friendly names.
The major reason that is stopping IPFS from becoming a decentralized filesystem is that nodes only store the files they need. Filecoin is a decentralized filesystem similar to IPFS with an internal currency to incentivize nodes to store files, thus increasing file availability and making it more like a filesystem.
Nodes in the network will earn Filecoins to rent disk space and to store/retrieve files, you need to spend Filecoins.
Along with IPFS technologies, Filecoin uses the blockchain data structure and the proof-of- retrievability consensus protocol.
At the time of writing this, Filecoin is still under development, so many things are still unclear.
Namecoin is a decentralized key-value database. It has an internal currency too, called Namecoins. Namecoin uses the blockchain data structure and the proof-of-work consensus protocol.
In Namecoin, you can store key-value pairs of data. To register a key-value pair, you need to spend Namecoins. Once you register, you need to update it once in every 35,999 blocks; otherwise, the value associated with the key will expire. To update, you need Namecoins as well. There is no need to renew the keys; that is, you don't need to spend any Namecoins to keep the key after you have registered it.
Namecoin has a namespace feature that allows users to organize different kinds of keys. Anyone can create namespaces or use existing ones to organize keys.
Some of the most popular namespaces are a (application specific data), d (domain name specifications), ds (secure domain name), id (identity), is (secure identity), p (product), and so on.
To access a website, a browser first finds the IP address associated with the domain. These domain name and IP address mappings are stored in DNS servers, which are controlled by large companies and governments. Therefore, domain names are prone to censorship. Governments and companies usually block domain names if the website is doing something illegal or making loss for them or due to some other reason.
Due to this, there was a need for a decentralized domain name database. As Namecoin stores key-value data just like DNS servers, Namecoin can be used to implement a decentralized DNS, and this is what it has already been used for. The d and ds namespaces contain keys ending with .bit, representing .bit domain names. Technically, a namespace doesn't have any naming convention for the keys but all the nodes and clients of Namecoin agree to this naming convention. If we try to store invalid keys in d and ds namespaces, then clients will filter invalid keys.
A browser that supports .bit domains needs to look up in the Namecoin's d and ds namespace to find the IP address associated with the .bit domain.
The difference between the d and ds namespaces is that ds stores domains that support TLS and d stores the ones that don't support TLS. We have made DNS decentralized; similarly, we can also make the issuing of TLS certificates decentralized.
This is how TLS works in Namecoin. Users create self-signed certificates and store the certificate hash in Namecoin. When a client that supports TLS for .bit domains tries to access a secured .bit domain, it will match the hash of the certificate returned by the server with the hash stored in Namecoin, and if they match, then they proceed with further communication with the server.
Dash is a decentralized currency similar to Bitcoin. Dash uses the blockchain data structure and the proof-of-work consensus protocol. Dash solves some of the major issues that are caused by Bitcoin. Here are some issues related to Bitcoin:
Dash aims to solve these problems by making transactions settle almost instantly and making it impossible to identify the real person behind an account. It also prevents your ISP from tracking you.
In the Bitcoin network, there are two kinds of nodes, that is, miners and ordinary nodes. But in Dash, there are three kinds of nodes, that is, miners, masternodes, and ordinary nodes. Masternodes are what makes Dash so special.
To host a masternode, you need to have 1,000 Dashes and a static IP address. In the Dash network, both masternodes and miners earn Dashes. When a block is mined, 45% reward goes to the miner, 45% goes to the masternodes, and 10% is reserved for the budget system.
Masternodes enable decentralized governance and budgeting. Due to the decentralized governance and budgeting system, Dash is called a DAO because that's exactly what it is.
Masternodes in the network act like shareholders; that is, they have rights to take decisions regarding where the 10% Dash goes. This 10% Dash is usually used to funds other projects. Each masternode is given the ability to use one vote to approve a project.
Discussions on project proposals happen out of the network. But the voting happens in the network.
Instead of just approving or rejecting a proposal, masternodes also form a service layer that provides various services. The reason that masternodes provide services is that the more services they provide, the more feature-rich the network becomes, thus increasing users and transactions, which increases prices for Dash currency and the block reward also gets high, therefore helping masternodes earn more profit.
Masternodes provide services such as PrivateSend (a coin-mixing service that provides anonymity), InstantSend (a service that provides almost instant transactions), DAPI (a service that provides a decentralized API so that users don't need to run a node), and so on.
At a given time, only 10 masternodes are selected. The selection algorithm uses the current block hash to select the masternodes. Then, we request a service from them. The response that's received from the majority of nodes is said to be the correct one. This is how consensus is achieved for services provided by the masternodes.
The proof-of-service consensus protocol is used to make sure that the masternodes are online, are responding, and have their blockchain up-to-date.
BigChainDB allows you to deploy your own permissioned or permissionless decentralized database. It uses the blockchain data structure along with various other database-specific data structures. BigChainDB, at the time of writing this, is still under development, so many things are not clear yet.
It also provides many other features, such as rich permissions, querying, linear scaling, and native support for multi-assets and the federation consensus protocol.
OpenBazaar is a decentralized e-commerce platform. You can buy or sell goods using OpenBazaar. Users are not anonymous in the OpenBazaar network as their IP address is recorded. A node can be a buyer, seller, or a moderator.
It uses a Kademlia-style distributed hash table data structure. A seller must host a node and keep it running in order to make the items visible in the network.
It prevents account spam by using the proof-of-work consensus protocol. It prevents ratings and reviews spam using proof-of-burn, CHECKLOCKTIMEVERIFY, and security deposit consensus protocols.
Buyers and sellers trade using Bitcoins. A buyer can add a moderator while making a purchase. The moderator is responsible for resolving a dispute if anything happens between the buyer and the seller. Anyone can be a moderator in the network. Moderators earn commission by resolving disputes.
Ripple is decentralized remittance platform. It lets us transfer fiat currencies, digital currencies, and commodities. It uses the blockchain data structure and has its own consensus protocol. In ripple docs, you will not find the term blocks and blockchain; they use the term ledger instead.
In ripple, money and commodity transfer happens via a trust chain in a manner similar to how it happens in a hawala network. In ripple, there are two kinds of nodes, that is, gateways and regular nodes. Gateways support deposit and withdrawal of one or more currencies and/or commodities. To become a gateway in a ripple network, you need permission as gateways to form a trust chain. Gateways are usually registered financial institutions, exchanges, merchants, and so on.
Every user and gateway has an account address. Every user needs to add a list of gateways they trust by adding the gateway addresses to the trust list. There is no consensus to find whom to trust; it all depends on the user, and the user takes the risk of trusting a gateway. Even gateways can add the list of gateways they trust.
Let's look at an example of how user X living in India can send 500 USD to user Y living in the USA. Assuming that there is a gateway XX in India, which takes cash (physical cash or card payments on their website) and gives you only the INR balance on ripple, X will visit the XX office or website and deposit 30,000 INR and then XX will broadcast a transaction saying I owe X 30,000 INR. Now assume that there is a gateway YY in the USA, which allows only USD transactions and Y trusts YY gateway. Now, say, gateways XX and YY don't trust each other. As X and Y don't trust a common gateway, XX and YY don't trust each other, and finally, XX and YY don't support the same currency. Therefore, for X to send money to Y, he needs to find intermediary gateways to form a trust chain. Assume there is another gateway, ZZ, that is trusted by both XX and YY and it supports USD and INR. So now X can send a transaction by transferring 50,000 INR from XX to ZZ and it gets converted to USD by ZZ and then ZZ sends the money to YY, asking YY to give the money to Y. Now instead of X owing Y $500, YY owes $500 to Y, ZZ owes $500 to YY, and XX owes 30,000 INR to ZZ. But it's all fine because they trust each other, whereas earlier, X and Y didn't trust each other. But XX, YY, and ZZ can transfer the money outside of ripple whenever they want to, or else a reverse transaction will deduct this value.
Ripple also has an internal currency called XRP (or ripples). Every transaction sent to the network costs some ripples. As XRP is the ripple's native currency, it can be sent to anyone in the network without trust. XRP can also be used while forming a trust chain. Remember that every gateway has its own currency exchange rate. XRP isn't generated by a mining process; instead, there are total of 100 billion XRPs generated in the beginning and owned by the ripple company itself. XRP is supplied manually depending on various factors.
All the transactions are recorded in the decentralized ledger, which forms an immutable history. Consensus is required to make sure that all nodes have the same ledger at a given point of time. In ripple, there is a third kind of node called validators, which are part of the consensus protocol. Validators are responsible for validating transactions. Anyone can become a validator. But other nodes keep a list of validators that can be actually trusted. This list is known as UNL (unique node list). A validator also has a UNL; that is, the validators it trusts as validators also want to reach a consensus. Currently, ripple decides the list of validators that can be trusted, but if the network thinks that validators selected by ripple are not trustworthy, then they can modify the list in their node software.
You can form a ledger by taking the previous ledger and applying all the transactions that have happened since then. So to agree on the current ledger, nodes must agree on the previous ledger and the set of transactions that have happened since then. After a new ledger is created, a node (both regular nodes and validators) starts a timer (of a few seconds, approximately 5 seconds) and collects the new transactions that arrived during the creation of the previous ledger. When the timer expires, it takes those transactions that are valid according to at least 80% of the UNLs and forms the next ledger. Validators broadcast a proposal (a set of transactions they think are valid to form the next ledger) to the network. Validators can broadcast proposals for the same ledger multiple times with a different set of transactions if they decide to change the list of valid transactions depending on proposals from their UNLs and other factors. So you only need to wait 5-10 seconds for your transaction to be confirmed by the network.
Some people wonder whether this can lead to many different versions of the ledger since each node may have a different UNL. As long as there is a minimal degree of inter-connectivity between UNLs, a consensus will rapidly be reached. This is primarily because every honest node's primary goal is to achieve a consensus.
In this chapter, we learned what DApps are and got an overview of how they work. We looked at some of the challenges faced by DApps and the various solutions to these issues. Finally, we saw some of the popular DApps and had an overview of what makes them special and how they work. Now you should be comfortable explaining what a DApp is and how it works.
In the previous chapter, we saw what DApps are. We also saw an overview of some of the popular DApps. One of them was Ethereum. At present, Ethereum is the most popular DApp after bitcoin. In this chapter, we will learn in depth about how Ethereum works and what we can develop using Ethereum. We will also see the important Ethereum clients and node implementations.
In this chapter, we will cover the following topics:
A transaction is a signed data package to transfer ether from an account to another account or to a contract, invoke methods of a contract, or deploy a new contract. A transaction is signed using ECDSA (Elliptic Curve Digital Signature Algorithm), which is a digital signature algorithm based on ECC. A transaction contains the recipient of the message, a signature identifying the sender and proving their intention, the amount of ether to transfer, the maximum number of computational steps the transaction execution is allowed to take (called the gas limit), and the cost the sender of the transaction is willing to pay for each computational step (called the gas price).
If the transaction's intention is to invoke a method of a contract, it also contains input data, or if its intention is to deploy a contract, then it can contain the initialization code. The product of gas used and gas price is called transaction fees. To send ether or to execute a contract method, you need to broadcast a transaction to the network. The sender needs to sign the transaction with its private key.
The formula to calculate the target of a block requires the current timestamp, and also every block has the current timestamp attached to its header. Nothing can stop a miner from using some other timestamp instead of the current timestamp while mining a new block, but they don't usually because timestamp validation would fail and other nodes won't accept the block, and it would be a waste of resources of the miner. When a miner broadcasts a newly mined block, its timestamp is validated by checking whether the timestamp is greater than the timestamp of the previous block. If a miner uses a timestamp greater than the current timestamp, the difficulty will be low as difficulty is inversely proportional to the current timestamp; therefore, the miner whose block timestamp is the current timestamp would be accepted by the network as it would have a higher difficulty. If a miner uses a timestamp greater than the previous block timestamp and less than the current timestamp, the difficulty would be higher, and therefore, it would take more time to mine the block; by the time the block is mined, the network would have produced more blocks, therefore, this block will get rejected as the blockchain of the malicious miner will have a lower difficulty than the blockchain the network has. Due to these reasons, miners always use accurate timestamps, otherwise, they gain nothing.
The nonce is a 64-bit unsigned integer. The nonce is the solution to the puzzle. A miner keeps incrementing the nonce until it finds the solution. Now you must be wondering if there is a miner who has hash power more than any other miner in the network, would the miner always find nonce first? Well, it wouldn't.
The hash of the block that the miners are mining is different for every miner because the hash depends on things such as the timestamp, miner address, and so on, and it's unlikely that it will be the same for all miners. Therefore, it's not a race to solve the puzzle; rather, it's a lottery system. But of course, a miner is likely to get lucky depending on its hash power, but that doesn't mean the miner will always find the next block.
The block difficulty formula we saw earlier uses a 10-second threshold to make sure that the difference between the time a parent and child block mines is in is between 10-20 seconds. But why is it 10-20 seconds and not some other value? And why there is such a constant time difference restriction instead of a constant difficulty?
Imagine that we have constant difficulty, and miners just need to find a nonce to get the hash of the block less and equal to the difficulty. Suppose the difficulty is high; then, in this case, users will have no way to find out how long it will take to send ether to another user. It may take a very long time if the computational power of the network is not enough to find the nonce to satisfy the difficulty quickly. Sometimes the network may get lucky and find the nonce quickly. But this kind of system will find it difficult to gain attraction from users as users will always want to know how much time it should take for a transaction to be completed, just like when we transfer money from one bank account to another bank account, we are given a time period within which it should get completed. If the constant difficulty is low, it will harm the security of the blockchain because large miners can mine blocks much faster than small miners, and the largest miner in the network will have the ability to control the DApp. It is not possible to find a constant difficulty value that can make the network stable because the network's computational power is not constant.
Now we know why we should always have an average time for how long it should take for the network to mine a block. Now the question is what the most suitable average time is as it can be anything from 1 second to infinite seconds. A smaller average time can be achieved by lowering the difficulty, and higher average time can be achieved by increasing the difficulty. But what are the merits and demerits of a lower and higher average time? Before we discuss this, we need to first know what stale blocks are.
What happens if two miners mine the next block at nearly the same time? Both the blocks will be valid for sure, but the blockchain cannot hold two blocks with the same block number, and also, both the miners cannot be awarded. Although this is a common issue, the solution is simple. In the end, the blockchain with the higher difficulty will be the one accepted by the network. So the valid blocks that are finally left out are called stale blocks.
The total number of stale blocks produced in the network is inversely proportional to the average time it takes to generate a new block. Shorter block generation time means there would be less time for the newly mined block to propagate throughout the network and a bigger chance of more than one miner finding a solution to the puzzle, so by the time the block is propagated through the network, some other miner would have also solved the puzzle and broadcasted it, thereby creating stales. But if the average block generation time is bigger, there is less chance that multiple miners will be able to solve the puzzle, and even if they solve it, there is likely to be time gap between when they solved it, during which the first solved block can be propagated and the other miners can stop mining that block and proceed towards mining the next block. If stale blocks occur frequently in the network, they cause major issues, but if they occur rarely, they do no harm.
But what's the problem with stale blocks? Well, they delay the confirmation of a transaction. When two miners mine a block at nearly the same time, they may not have the same set of transactions, so if our transactions appear in one of them, we cannot say that it's confirmed as the block in which the transaction appeared may be stale. And we should wait for a few more blocks to be mined. Due to stale blocks, the average confirmation time is not equal to average block generation time.
Do stale blocks impact blockchain security? Yes, they do. We know that the network's security is measured by the total computation power of the miners in the network. When computation power increases, the difficulty is increased to make sure that blocks aren't generated earlier than the average block time. So more difficulty means a more secure blockchain, as for a node to tamper, the blockchain will need much more hash power now, which makes it more difficult to tamper with the blockchain; therefore, the blockchain is said to be more secure. When two blocks are mined at nearly the same time, we will have the network parted in two, working on two different blockchains, but one is going to be the final blockchain. So the part of the network working on the stale block mines the next block on top of the stale block, which ends up in loss of hash power of the network as hash power is being used for something unnecessary. The two parts of the network are likely to take longer than the average block time to mine the next block as they have lost hash power; therefore, after mining the next block, there will be a decrease in difficulty as it took more time than the average block time to mine the block. The decrease in difficulty impacts the overall blockchain security. If the stale rate is too high, it will affect the blockchain security by a huge margin.
Ethereum tackles the security issue caused by stale blocks using something known as ghost protocol. Ethereum uses a modified version of the actual ghost protocol. The ghost protocol covers up the security issue by simply adding the stale blocks into the main blockchain, thereby increasing the overall difficulty of the blockchain, as overall difficulty of the blockchain also includes the sum of difficulties of the stale blocks. But how are stale blocks inserted into the main blockchain without transactions conflicting? Well, any block can specify 0 or more stales. To incentivize miners to include stale blocks, the miners are rewarded for including stale blocks. And also, the miners of the stale blocks are rewarded. The transactions in the stale blocks are not used for calculating confirmations, and also, the stale block miners don't receive the transaction fees of the transactions included in the stale blocks. Note that Ethereum calls stale blocks uncle blocks.
Here is the formula to calculate how much reward a miner of a stale block receives. The rest of the reward goes to the nephew block, that is, the block that includes the orphan block:
(uncle_block_number + 8 - block_number) * 5 / 8
As not rewarding the miners of stale blocks doesn't harm any security, you must be wondering why miners of stale blocks get rewarded? Well, there is another issue caused when stale blocks occur frequently in the network, which is solved by rewarding the miners of stale blocks. A miner should earn a percentage of reward similar to the percentage of hash power it contributes to the network. When a block is mined at nearly the same time by two different miners, then the block mined by the miner with more hash power is more likely to get added to the final blockchain because of the miner's efficiency to mine the next block; therefore, the small miner will lose the reward. If the stale rate is low, it's not a big issue because the big miner will get a little increase in reward; but if the stale rate is high, it causes a big issue, that is, the big miner in the network will end up taking much more rewards than it should receive. The ghost protocol balances this by rewarding the miners of stale blocks. As the big miner doesn't take all the rewards but much more than it should get, we don't award stale block miners the same as the nephew block; instead, we award a lesser amount to balance it. The preceding formula balances it pretty well.
Ghost limits the total number of stale blocks a nephew can reference so that miners don't simply mine stale blocks and stall the blockchain.
So wherever a stale block appears in the network, it somewhat affects the network. The more the frequency of stale blocks, the more the network is affected by it.
A fork is said to have happened when there is a conflict among the nodes regarding the validity of a blockchain, that is, more than one blockchain happens to be in the network, and every blockchain is validated for some miners. There are three kinds of forks: regular forks, soft fork, and hard fork.
A regular fork is a temporary conflict occurring due to two or more miners finding a block at nearly the same time. It's resolved when one of them has more difficulty than the other.
A change to the source code could cause conflicts. Depending on the type of conflict, it may require miners with more than 50% of hash power to upgrade or all miners to upgrade to resolve the conflict. When it requires miners with more than 50% of hash power to upgrade to resolve the conflict, its called a soft fork, whereas when it requires all the miners to upgrade to resolve the conflict, its called a hard fork. An example of a soft fork would be if an update to the source code invalidates subset of old blocks/transactions, then it can be resolved when miners more than 50% of hash power have upgraded so that the new blockchain will have more difficulty and finally get accepted by the whole network. An example of a hard fork would be if an update in the source code was to change the rewards for miners, then all the miners need to upgrade to resolve the conflict.
Ethereum has gone through various hard and soft forks since its release.
A genesis block is the first block of the blockchain. It's assigned to block number 0. It's the only block in the blockchain that doesn't refer to a previous block because there isn't any. It doesn't hold any transactions because there isn't any ether produced yet.
Two nodes in a network will only pair with each other if they both have the same genesis block, that is, blocks synchronization will only happen if both peers have the same genesis block, otherwise they both will reject each other. A different genesis block of high difficulty cannot replace a lower difficult one. Every node generates its own genesis block. For various networks, the genesis block is hardcoded into the client.
For a node to be part of the network, it needs to connect to some other nodes in the network so that it can broadcast transactions/blocks and listen to new transactions/blocks. A node doesn't need to connect to every node in the network; instead, a node connects to a few other nodes. And these nodes connect to a few other nodes. In this way, the whole network is connected to each other.
But how does a node find some other nodes in the network as there is no central server that everyone can connect to so as to exchange their information? Ethereum has its own node discovery protocol to solve this problem, which is based on the Kadelima protocol. In the node discovery protocol, we have special kind of nodes called Bootstrap nodes. Bootstrap nodes maintain a list of all nodes that are connected to them over a period of time. They don't hold the blockchain itself. When peers connect to the Ethereum network, they first connect to the Bootstrap nodes, which share the lists of peers that have connected to them in the last predefined time period. The connecting peers then connect and synchronize with the peers.
There can be various Ethereum instances, that is, various networks, each having its own network ID. The two major Ethereum networks are mainnet and testnet. The mainnet one is the one whose ether is traded on exchanges, whereas testnet is used by developers to test. Until now, we have learned everything with regards to the mainnet blockchain.
Whisper and Swarm are a decentralized communication protocol and a decentralized storage platform respectively, being developed by Ethereum developers. Whisper is a decentralized communication protocol, whereas Swarm is a decentralized filesystem.
Whisper lets nodes in the network to communicate with each other. It supports broadcasting, user-to-user, encrypted messages, and so on. It's not designed to transfer bulk data. You can learn more about Whisper at https://github.com/ethereum/wiki/wiki/Whisper, and you can see a code example overview at https://github.com/ethereum/wiki/wiki/Whisper-Overview.
Swarm is similar to Filecoin, that is, it differs mostly in terms of technicalities and incentives. Filecoin doesn't penalize stores, whereas Swarm penalizes stores; therefore, this increases the file availability further. You must be wondering how incentive works in swarm. Does it have an internal currency? Actually, Swarm doesn't have an internal currency, rather it uses ether for incentives. There is a smart contract in Ethereum, which keeps track of incentives. Obviously, the smart contract cannot communicate with Swarm; instead, swarm communicates with the smart contract. So basically, you pay the stores via the smart contract, and the payment is released to the stores after the expiry date. You can also report file missing to the smart contract, in which case it can penalize the respective stores. You can learn more about the difference between Swarm and IPFS/Filecoin at https://github.com/ethersphere/go-ethereum/wiki/IPFS-&-SWARM and see the smart contract code at https://github.com/ethersphere/go-ethereum/blob/bzz-config/bzz/bzzcontract/swarm.sol.
At the time of writing this book, Whisper and Swarm are still under development; so, many things are still not clear.
Ethereum Wallet is an Ethereum UI client that lets you create account, send ether, deploy contracts, invoke methods of contracts, and much more.
Ethereum Wallet comes with geth bundled. When you run Ethereum, it tries to find a local geth instance and connects to it, and if it cannot find geth running, it launches its own geth node. Ethereum Wallet communicates with geth using IPC. Geth supports file-based IPC.
Visit https://github.com/ethereum/mist/releases to download Ethereum Wallet. It's available for Linux, OS X, and Windows. Just like geth, it has two installation modes: binary and scripted installation.
Here is an image that shows what Ethereum Wallet looks like:
Serenity is the name of the next major update for Ethereum. At the time of writing this book, serenity is still under development. This update will require a hard fork. Serenity will change the consensus protocol to casper, and will integrate state channels and sharding. Complete details of how these will work are still unclear at this point of time. Let's see a high-level overview of what these are.
Before getting into state channels, we need to know what payment channels are. A payment channel is a feature that allows us to combine more than two transactions of sending ether to another account into two transactions. Here is how it works. Suppose X is the owner of a video streaming website, and Y is a user. X charges one ether for every minute. Now X wants Y to pay after every minute while watching the video. Of course, Y can broadcast a transaction every minute, but there are few issues here, such as X has to wait for confirmation, so the video will be paused for some time, and so on. This is the problem payment channels solve. Using payment channels, Y can lock some ether (maybe 100 ether) for a period of time (maybe 24 hours) for X by broadcasting a lock transaction. Now after watching a 1-minute video, Y will send a signed record indicating that the lock can be unlocked and one ether will go to X's account and the rest to Y's account. After another minute, Y will send a signed record indicating that the lock can be unlocked, and two ether will go to X's account, and the rest will go to Y's account. This process will keep going as Y watches the video on X's website. Now once Y has watched 100 hours of video or 24 hours of time is about to be reached, X will broadcast the final signed record to the network to withdraw funds to his account. If X fails to withdraw in 24 hours, the complete refund is made to Y. So in the blockchain, we will see only two transactions: lock and unlock.
Payment channel is for transactions related to sending ether. Similarly, a state channel allows us to combine transactions related to smart contracts.
Before we get into what the casper consensus protocol is, we need to understand how the proof-of-stake consensus protocol works.
Proof-of-stake is the most common alternative to proof-of-work. Proof-of-work wastes too many computational resources. The difference between POW and POS is that in POS, a miner doesn't need to solve the puzzle; instead, the miner needs to prove ownership of the stake to mine the block. In the POS system, ether in accounts is treated as a stake, and the probability of a miner mining the block is directly proportional to the stake the miner holds. So if the miner holds 10% of the stake in the network, it will mine 10% of the blocks.
But the question is how will we know who will mine the next block? We cannot simply let the miner with the highest stake always mine the next block because this will create centralization. There are various algorithms for next block selection, such as randomized block selection, and coin-age-based selection.
Casper is a modified version of POS that tackles various problems of POS.
At present, every node needs to download all transactions, which is huge. At the rate at which blockchain size is increasing, in the next few years, it will be very difficult to download the whole blockchain and keep it in sync.
If you are familiar with distributed database architecture, you must be familiar with sharding. If not, then sharding is a method of distributing data across multiple computers. Ethereum will implement sharding to partition and distribute the blockchain across nodes.
You can learn more about sharding a blockchain at https://github.com/ethereum/wiki/wiki/Sharding-FAQ.
In this chapter, we learned how block time affects security. We also saw what an Ethereum Wallet is and how to install it. Finally, we learned what is going to be new in Serenity updates for Ethereum.
In the next chapter, we will learn about the various ways to store and protect ether.
In the previous chapter, we learned how the Ethereum blockchain works. Now it's time to start writing smart contracts as we have have a good grasp of how Ethereum works. There are various languages to write Ethereum smart contracts in, but Solidity is the most popular one. In this chapter, we will learn the Solidity programming language. We will finally build a DApp for proof of existence, integrity, and ownership at given a time, that is, a DApp that can prove that a file was with a particular owner at a specific time.
In this chapter, we'll cover the following topics:
A Solidity source file is indicated using the .sol extension. Just like any other programming language, there are various versions of Solidity. The latest version at the time of writing this book is 0.4.2.
In the source file, you can mention the compiler version for which the code is written for using the pragma Solidity directive.
For example, take a look at the following:
pragma Solidity ^0.4.2;
Now the source file will not compile with a compiler earlier than version 0.4.2, and it will also not work on a compiler starting from version 0.5.0 (this second condition is added using ^). Compiler versions between 0.4.2 to 0.5.0 are most likely to include bug fixes instead of breaking anything.
A contract is like a class. A contract contains state variables, functions, function modifiers, events, structures, and enums. Contracts also support inheritance. Inheritance is implemented by copying code at the time of compiling. Smart contracts also support polymorphism.
Let's look at an example of a smart contract to get an idea about what it looks like:
contract Sample
{
    //state variables
    uint256 data;
    address owner;

    //event definition
    event logData(uint256 dataToLog);

    //function modifier
    modifier onlyOwner() {
        if (msg.sender != owner) throw;
        _;
    }

    //constructor
    function Sample(uint256 initData, address initOwner){
        data = initData;
        owner = initOwner;
    }

    //functions
    function getData() returns (uint256 returnedData){
        return data;
    }

    function setData(uint256 newData) onlyOwner{
        logData(newData);
        data = newData;
    }
}
Here is how the preceding code works:
Before getting any further deeper into the features of smart contracts, let's learn some other important things related to Solidity. And then we will come back to contracts.
All programming languages you would have learned so far store their variables in memory. But in Solidity, variables are stored in the memory and the filesystem depending on the context.
Depending on the context, there is always a default location. But for complex data types, such as strings, arrays, and structs, it can be overridden by appending either storage or memory to the type. The default for function parameters (including return parameters) is memory, the default for local variables is storage. and the location is forced to storage, for state variables (obviously).
Data locations are important because they change how assignments behave:
Solidity is a statically typed language; the type of data a variable holds needs to be predefined. By default, all bits of the variables are assigned to 0. In Solidity, variables are function scoped; that is, a variable declared anywhere within a function will be in scope for the entire function regardless of where it is declared.
Now let's look at the various data types provided by Solidity:
Solidity supports both generic and byte arrays. It supports both fixed size and dynamic arrays. It also supports multidimensional arrays.
bytes1, bytes2, bytes3, ..., bytes32 are types for byte arrays. byte is an alias for bytes1.
Here is an example that shows generic array syntaxes:
contract sample{
    //dynamic size array
    //wherever an array literal is seen a new array is created. If the array literal is in state than it's stored in storage and if it's found inside function than its stored in memory
    //Here myArray stores [0, 0] array. The type of [0, 0] is decided based on its values.
    //Therefore you cannot assign an empty array literal.
    int[] myArray = [0, 0];

    function sample(uint index, int value){

        //index of an array should be uint256 type
        myArray[index] = value;

        //myArray2 holds pointer to myArray
        int[] myArray2 = myArray;

        //a fixed size array in memory
        //here we are forced to use uint24 because 99999 is the max value and 24 bits is the max size required to hold it.
        //This restriction is applied to literals in memory because memory is expensive. As [1, 2, 99999] is of type uint24 therefore myArray3 also has to be the same type to store pointer to it.
        uint24[3] memory myArray3 = [1, 2, 99999]; //array literal

        //throws exception while compiling as myArray4 cannot be assigned to complex type stored in memory
        uint8[2] myArray4 = [1, 2];
    }
}
Here are some important things you need to know about arrays:
In Solidity, there are two ways to create strings: using bytes and string. bytes is used to create a raw string, whereas string is used to create a UTF-8 string. The length of string is always dynamic.
Here is an example that shows string syntaxes:
contract sample{
    //wherever a string literal is seen a new string is created. If the string literal is in state than it's stored in storage and if it's found inside function than its stored in memory
    //Here myString stores "" string.
    string myString = "";  //string literal
    bytes myRawString;

    function sample(string initString, bytes rawStringInit){
        myString = initString;

        //myString2 holds a pointer to myString
        string myString2 = myString;

        //myString3 is a string in memory
        string memory myString3 = "ABCDE";

        //here the length and content changes
        myString3 = "XYZ";

        myRawString = rawStringInit;

        //incrementing the length of myRawString
        myRawString.length++;

        //throws exception while compiling
        string myString4 = "Example";

        //throws exception while compiling
        string myString5 = initString;
    }
}
Solidity also supports structs. Here is an example that shows struct syntaxes:
contract sample{
    struct myStruct {
        bool myBool;
        string myString;
    }

    myStruct s1;

    //wherever a struct method is seen a new struct is created. If the struct method is in state than it's stored in storage and if it's found inside function than its stored in memory
    myStruct s2 = myStruct(true, ""); //struct method syntax

    function sample(bool initBool, string initString){

        //create a instance of struct
        s1 = myStruct(initBool, initString);

        //myStruct(initBool, initString) creates a instance in memory
        myStruct memory s3 = myStruct(initBool, initString);
    }
}
Solidity also supports enums. Here is an example that shows enum syntaxes:
contract sample {

    //The integer type which can hold all enum values and is the smallest is chosen to hold enum values
    enum OS { Windows, Linux, OSX, UNIX }

    OS choice;

    function sample(OS chosen){
        choice = chosen;
    }

    function setLinuxOS(){
        choice = OS.Linux;
    }

    function getChoice() returns (OS chosenOS){
        return choice;
    }
}
A mapping data type is a hash table. Mappings can only live in storage, not in memory. Therefore, they are declared only as state variables. A mapping can be thought of as consisting of key/value pairs. The key is not actually stored; instead, the keccak256 hash of the key is used to look up for the value. Mappings don't have a length. Mappings cannot be assigned to another mapping.
Here is an example of how to create and use a mapping:
contract sample{
    mapping (int => string) myMap;

    function sample(int key, string value){
        myMap[key] = value;

        //myMap2 is a reference to myMap
        mapping (int => string) myMap2 = myMap;
    }
}
The delete operator can be applied to any variable to reset it to its default value. The default value is all bits assigned to 0.
If we apply delete to a dynamic array, then it deletes all of its elements and the length becomes 0. And if we apply it to a static array, then all of its indices are reset. You can also apply delete to specific indices, in which case the indices are reset.
Nothing happens if you apply delete to a map type. But if you apply delete to a key of a map, then the value associated with the key is deleted.
Here is an example to demonstrate the delete operator:
contract sample {

    struct Struct {
        mapping (int => int) myMap;
        int myNumber;
    }

    int[] myArray;
    Struct myStruct;

    function sample(int key, int value, int number, int[] array) {

        //maps cannot be assigned so while constructing struct we ignore the maps
        myStruct = Struct(number);

        //here set the map key/value
        myStruct.myMap[key] = value;

        myArray = array;
    }

    function reset(){

        //myArray length is now 0
        delete myArray;

        //myNumber is now 0 and myMap remains as it is
        delete myStruct;
    }

    function deleteKey(int key){

        //here we are deleting the key
        delete myStruct.myMap[key];
    }

}
Other than arrays, strings, structs, enums, and maps, everything else is called elementary types.
If an operator is applied to different types, the compiler tries to implicitly convert one of the operands into the type of the other. In general, an implicit conversion between value-types is possible if it makes sense semantically and no information is lost: uint8 is convertible to uint16 and int128 to int256, but int8 is not convertible to uint256 (because uint256 cannot hold, for example, -1). Furthermore, unsigned integers can be converted into bytes of the same or larger size, but not vice versa. Any type that can be converted into uint160 can also be converted into address.
Solidity also supports explicit conversion. So if the compiler doesn't allow implicit conversion between two data types, then you can go for explicit conversion. It is always recommended that you avoid explicit conversion because it may give you unexpected results.
Let's look at an example of explicit conversion:
uint32 a = 0x12345678;
uint16 b = uint16(a); // b will be 0x5678 now
Here we are converting uint32 type to uint16 explicitly, that is, converting a large type to a smaller type; therefore, higher-order bits are cut-off.
Solidity provides the var keyword to declare variables. The type of the variable in this case is decided dynamically depending on the first value assigned to it. Once a value is assigned, the type is fixed, so if you assign another type to it, it will cause type conversion.
Here is an example to demonstrate var:
int256 x = 12;

//y type is int256
var y = x;

uint256 z= 9;

//exception because implicit conversion not possible
y = z;
Solidity supports if, else, while, for, break, continue, return, ? : control structures.
Here is an example to demonstrate the control structures:
contract sample{
int a = 12;
int[] b;
function sample()
{
//"==" throws exception for complex types
if(a == 12)
{
}
else if(a == 34)
{
}
else
{
}
var temp = 10;
while(temp < 20)
{
if(temp == 17)
{
break;
}
else
{
continue;
}
temp++;
}
for(var iii = 0; iii < b.length; iii++)
{
}
}
}
A contract can create a new contract using the new keyword. The complete code of the contract being created has to be known.
Here is an example to demonstrate this:
contract sample1
{
int a;
function assign(int b)
{
a = b;
}
}
contract sample2{
function sample2()
{
sample1 s = new sample1();
s.assign(12);
}
}
There are some cases where exceptions are thrown automatically. You can use throw to throw an exception manually. The effect of an exception is that the currently executing call is stopped and reverted (that is, all changes to the state and balances are undone). Catching exceptions is not possible:
contract sample
{
function myFunction()
{
throw;
}
}
There are two kinds of function calls in Solidity: internal and external function calls. An internal function call is when a function calls another function in the same contract.
An external function call is when a function calls a function of another contract. Let's look at an example:
contract sample1
{
int a;
//"payable" is a built-in modifier
//This modifier is required if another contract is sending Ether while calling the method
function sample1(int b) payable
{
a = b;
}
function assign(int c)
{
a = c;
}
function makePayment(int d) payable
{
a = d;
}
}
contract sample2{
function hello()
{
}
function sample2(address addressOfContract)
{
//send 12 wei while creating contract instance
sample1 s = (new sample1).value(12)(23);
s.makePayment(22);
//sending Ether also
s.makePayment.value(45)(12);
//specifying the amount of gas to use
s.makePayment.gas(895)(12);
//sending Ether and also specifying gas
s.makePayment.value(4).gas(900)(12);
//hello() is internal call whereas this.hello() is external call
this.hello();
//pointing a contract that's already deployed
sample1 s2 = sample1(addressOfContract);
s2.makePayment(112);
}
}
Now it's time to get deeper into contracts. We will look at some new features and also get deeper into the features we have already seen.
The visibility of a state variable or a function defines who can see it. There are four kinds of visibilities for function and state variables: external, public, internal, and private.
By default, the visibility of functions is public and the visibility of state variables is internal. Let's look at what each of these visibility functions mean:
Here is a code example to demonstrate visibility and accessors:
contract sample1
{
int public b = 78;
int internal c = 90;
function sample1()
{
//external access
this.a();
//compiler error
a();
//internal access
b = 21;
//external access
this.b;
//external access
this.b();
//compiler error
this.b(8);
//compiler error
this.c();
//internal access
c = 9;
}
function a() external
{
}
}
contract sample2
{
int internal d = 9;
int private e = 90;
}
//sample3 inherits sample2
contract sample3 is sample2
{
sample1 s;
function sample3()
{
s = new sample1();
//external access
s.a();
//external access
var f = s.b;
//compiler error as accessor cannot used to assign a value
s.b = 18;
//compiler error
s.c();
//internal access
d = 8;
//compiler error
e = 7;
}
}
We saw earlier what a function modifier is, and we wrote a basic function modifier. Now let's look at modifiers in depth.
Modifiers are inherited by child contracts, and child contracts can override them. Multiple modifiers can be applied to a function by specifying them in a whitespace-separated list and will be evaluated in order. You can also pass arguments to modifiers.
Inside the modifier, the next modifier body or function body, whichever comes next, is inserted where _; appears.
Let's take a look at a complex code example of function modifiers:
contract sample
{
int a = 90;
modifier myModifier1(int b) {
int c = b;
_;
c = a;
a = 8;
}
modifier myModifier2 {
int c = a;
_;
}
modifier myModifier3 {
a = 96;
return;
_;
a = 99;
}
modifier myModifier4 {
int c = a;
_;
}
function myFunction() myModifier1(a) myModifier2 myModifier3 returns (int d)
{
a = 1;
return a;
}
}
This is how myFunction() is executed:
int c = b;
int c = a;
a = 96;
return;
int c = a;
a = 1;
return a;
a = 99;
c = a;
a = 8;
Here, when you call the myFunction method, it will return 0. But after that, when you try to access the state variable a, you will get 8.
return in a modifier or function body immediately leaves the whole function and the return value is assigned to whatever variable it needs to be.
In the case of functions, the code after return is executed after the caller's code execution is finished. And in the case of modifiers, the code after _; in the previous modifier is executed after the caller's code execution is finished. In the earlier example, line numbers 5, 6, and 7 are never executed. After line number 4, the execution starts from line numbers 8 to 10.
return inside modifiers cannot have a value associated with it. It always returns 0 bits.
A contract can have exactly one unnamed function called the fallback function. This function cannot have arguments and cannot return anything. It is executed on a call to the contract if none of the other functions match the given function identifier.
This function is also executed whenever the contract receives Ether without any function call; that is, the transaction sends Ether to the contracts and doesn't invoke any method. In such a context, there is usually very little gas available to the function call (to be precise, 2,300 gas), so it is important to make fallback functions as cheap as possible.
Contracts that receive Ether but do not define a fallback function throw an exception, sending back the Ether. So if you want your contract to receive Ether, you have to implement a fallback function.
Here is an example of a fallback function:
contract sample
{
function() payable
{
//keep a note of how much Ether has been sent by whom
}
}
Solidity supports multiple inheritance by copying code including polymorphism. Even if a contract inherits from multiple other contracts, only a single contract is created on the blockchain; the code from the parent contracts is always copied into the final contract.
Here is an example to demonstrate inheritance:
contract sample1
{
function a(){}
function b(){}
}
//sample2 inherits sample1
contract sample2 is sample1
{
function b(){}
}
contract sample3
{
function sample3(int b)
{
}
}
//sample4 inherits from sample1 and sample2
//Note that sample1 is also parent of sample2, yet there is only a single instance of sample1
contract sample4 is sample1, sample2
{
function a(){}
function c(){
//this executes the "a" method of sample3 contract
a();
//this executes the 'a" method of sample1 contract
sample1.a();
//calls sample2.b() because it's in last in the parent contracts list and therefore it overrides sample1.b()
b();
}
}
//If a constructor takes an argument, it needs to be provided at the constructor of the child contract.
//In Solidity child constructor doesn't call parent constructor instead parent is initialized and copied to child
contract sample5 is sample3(122)
{
}
The super keyword is used to refer to the next contract in the final inheritance chain. Let's take a look at an example to understand this:
contract sample1
{
}
contract sample2
{
}
contract sample3 is sample2
{
}
contract sample4 is sample2
{
}
contract sample5 is sample4
{
function myFunc()
{
}
}
contract sample6 is sample1, sample2, sample3, sample5
{
function myFunc()
{
//sample5.myFunc()
super.myFunc();
}
}
The final inheritance chain with respect to the sample6 contract is sample6, sample5, sample4, sample2, sample3, sample1. The inheritance chain starts with the most derived contracts and ends with the least derived contract.
Contracts that only contain the prototype of functions instead of implementation are called abstract contracts. Such contracts cannot be compiled (even if they contain implemented functions alongside nonimplemented functions). If a contract inherits from an abstract contract and does not implement all nonimplemented functions by overriding, it will itself be abstract.
These abstract contracts are only provided to make the interface known to the compiler. This is useful when you are referring to a deployed contract and calling its functions.
Here is an example to demonstrate this:
contract sample1
{
function a() returns (int b);
}
contract sample2
{
function myFunc()
{
sample1 s = sample1(0xd5f9d8d94886e70b06e474c3fb14fd43e2f23970);
//without abstract contract this wouldn't have compiled
s.a();
}
}
Libraries are similar to contracts, but their purpose is that they are deployed only once at a specific address and their code is reused by various contracts. This means that if library functions are called, their code is executed in the context of the calling contract; that is, this points to the calling contract, and especially, the storage from the calling contract can be accessed. As a library is an isolated piece of source code, it can only access state variables of the calling contract if they are explicitly supplied (it would have no way to name them otherwise).
Libraries cannot have state variables; they don't support inheritance and they cannot receive Ether. Libraries can contain structs and enums.
Once a Solidity library is deployed to the blockchain, it can be used by anyone, assuming you know its address and have the source code (with only prototypes or complete implementation). The source code is required by the Solidity compiler so that it can make sure that the methods you are trying to access actually exist in the library.
Let's take a look at an example:
library math
{
function addInt(int a, int b) returns (int c)
{
return a + b;
}
}
contract sample
{
function data() returns (int d)
{
return math.addInt(1, 2);
}
}
We cannot add the address of the library in the contract source code; instead, we need to provide the library address during compilation to the compiler.
Libraries have many use cases. The two major use cases of libraries are as follows:
The using A for B; directive can be used to attach library functions (from the library A to any type B). These functions will receive the object they are called on as their first parameter.
The effect of using A for *; is that the functions from the library A are attached to all types.
Here is an example to demonstrate for:
library math
{
struct myStruct1 {
int a;
}
struct myStruct2 {
int a;
}
//Here we have to make 's' location storage so that we get a reference.
//Otherwise addInt will end up accessing/modifying a different instance of myStruct1 than the one on which its invoked
function addInt(myStruct1 storage s, int b) returns (int c)
{
return s.a + b;
}
function subInt(myStruct2 storage s, int b) returns (int c)
{
return s.a + b;
}
}
contract sample
{
//"*" attaches the functions to all the structs
using math for *;
math.myStruct1 s1;
math.myStruct2 s2;
function sample()
{
s1 = math.myStruct1(9);
s2 = math.myStruct2(9);
s1.addInt(2);
//compiler error as the first parameter of addInt is of type myStruct1 so addInt is not attached to myStruct2
s2.addInt(1);
}
}
Solidity allows functions to return multiple values. Here is an example to demonstrate this:
contract sample
{
function a() returns (int a, string c)
{
return (1, "ss");
}
function b()
{
int A;
string memory B;
//A is 1 and B is "ss"
(A, B) = a();
//A is 1
(A,) = a();
//B is "ss"
(, B) = a();
}
}
Solidity allows a source file to import other source files. Here is an example to demonstrate this:
//This statement imports all global symbols from "filename" (and symbols imported there) into the current global scope. "filename" can be a absolute or relative path. It can only be a HTTP URL
import "filename";
//creates a new global symbol symbolName whose members are all the global symbols from "filename".
import * as symbolName from "filename";
//creates new global symbols alias and symbol2 which reference symbol1 and symbol2 from "filename", respectively.
import {symbol1 as alias, symbol2} from "filename";
//this is equivalent to import * as symbolName from "filename";.
import "filename" as symbolName;
There are special variables and functions that always exist globally. They are discussed in the upcoming sections.
The block and transaction properties are as follows:
The address type related variables are as follows:
The contract related variables are as follows:
A literal number can take a suffix of wei, finney, szabo, or Ether to convert between the subdenominations of Ether, where Ether currency numbers without a postfix are assumed to be wei; for example, 2 Ether == 2000 finney evaluates to true.
Let's write a Solidity contract that can prove file ownership without revealing the actual file. It can prove that the file existed at a particular time and finally check for document integrity.
We will achieve proof of ownership by storing the hash of the file and the owner's name as pairs. We will achieve proof of existence by storing the hash of the file and the block timestamp as pairs. Finally, storing the hash itself proves the file integrity; that is, if the file was modified, then its hash will change and the contract won't be able to find any such file, therefore proving that the file was modified.
Here is the code for the smart contract to achieve all this:
contract Proof
{
struct FileDetails
{
uint timestamp;
string owner;
}
mapping (string => FileDetails) files;
event logFileAddedStatus(bool status, uint timestamp, string owner, string fileHash);
//this is used to store the owner of file at the block timestamp
function set(string owner, string fileHash)
{
//There is no proper way to check if a key already exists or not therefore we are checking for default value i.e., all bits are 0
if(files[fileHash].timestamp == 0)
{
files[fileHash] = FileDetails(block.timestamp, owner);
//we are triggering an event so that the frontend of our app knows that the file's existence and ownership details have been stored
logFileAddedStatus(true, block.timestamp, owner, fileHash);
}
else
{
//this tells to the frontend that file's existence and ownership details couldn't be stored because the file's details had already been stored earlier
logFileAddedStatus(false, block.timestamp, owner, fileHash);
}
}
//this is used to get file information
function get(string fileHash) returns (uint timestamp, string owner)
{
return (files[fileHash].timestamp, files[fileHash].owner);
}
}
Ethereum provides the solc compiler, which provides a command-line interface to compile .sol files. Visit http://solidity.readthedocs.io/en/develop/installing-solidity.html#binary-packages to find instructions to install it and visit https://Solidity.readthedocs.io/en/develop/using-the-compiler.html to find instructions on how to use it. We won't be using the solc compiler directly; instead, we will be using solcjs and Solidity browser. Solcjs allows us to compile Solidity programmatically in Node.js, whereas browser Solidity is an IDE, which is suitable for small contracts.
For now, let's just compile the preceding contract using a browser Solidity provided by Ethereum. Learn more about it at https://Ethereum.github.io/browser-Solidity/. You can also download this browser Solidity source code and use it offline. Visit https://github.com/Ethereum/browser-Solidity/tree/gh-pages to download it.
A major advantage of using this browser Solidity is that it provides an editor and also generates code to deploy the contract.
In the editor, copy and paste the preceding contract code. You will see that it compiles and gives you the web3.js code to deploy it using the geth interactive console.
You will get this output:
var proofContract = web3.eth.contract([{"constant":false,"inputs":[{"name":"fileHash","type":"string"}],"name":"get","outputs":[{"name":"timestamp","type":"uint256"},{"name":"owner","type":"string"}],"payable":false,"type":"function"},{"constant":false,"inputs":[{"name":"owner","type":"string"},{"name":"fileHash","type":"string"}],"name":"set","outputs":[],"payable":false,"type":"function"},{"anonymous":false,"inputs":[{"indexed":false,"name":"status","type":"bool"},{"indexed":false,"name":"timestamp","type":"uint256"},{"indexed":false,"name":"owner","type":"string"},{"indexed":false,"name":"fileHash","type":"string"}],"name":"logFileAddedStatus","type":"event"}]);
var proof = proofContract.new(
{
from: web3.eth.accounts[0],
data: '60606040526......,
gas: 4700000
}, function (e, contract){
console.log(e, contract);
if (typeof contract.address !== 'undefined') {
console.log('Contract mined! address: ' + contract.address + ' transactionHash: ' + contract.transactionHash);
}
})
data represents the compiled version of the contract (bytecode) that the EVM understands. The source code is first converted into opcode, and then opcode are converted into bytecode. Each opcode has gas associated with it.
The first argument to the web3.eth.contract is the ABI definition. The ABI definition is used when creating transactions, as it contains the prototype of all the methods.
Now run geth in the developer mode with the mining enabled. To do this, run the following command:
geth --dev --mine
Now open another command-line window and in that, enter this command to open geth's interactive JavaScript console:
geth attach
This should connect the JS console to the geth instance running in the other window.
On the right-hand side panel of the browser Solidity, copy everything that's there in the web3 deploy textarea and paste it in the interactive console. Now press Enter. You will first get the transaction hash, and after waiting for some time, you will get the contract address after the transaction is mined. The transaction hash is the hash of the transaction, which is unique for every transaction. Every deployed contract has a unique contract address to identity the contract in the blockchain.
The contract address is deterministically computed from the address of its creator (the from address) and the number of transactions the creator has sent (the transaction nonce). These two are RLP-encoded and then hashed using the keccak-256 hashing algorithm. We will learn more about the transaction nonce later. You can learn more about RLP at https://github.com/Ethereum/wiki/wiki/RLP.
Now let's store the file details and retrieve them.
Place this code to broadcast a transaction to store a file's details:
var contract_obj = proofContract.at("0x9220c8ec6489a4298b06c2183cf04fb7e8fbd6d4");
contract_obj.set.sendTransaction("Owner Name", "e3b0c44298fc1c149afbf4c8996fb92427ae41e4649b934ca495991b7852b855", {
from: web3.eth.accounts[0],
}, function(error, transactionHash){
if (!err)
console.log(transactionHash);
})
Here, replace the contract address with the contract address you got. The first argument of the proofContract.at method is the contract address. Here, we didn't provide the gas, in which case, it's automatically calculated.
Now let's find the file's details. Run this code in order to find the file's details:
contract_obj.get.call("e3b0c44298fc1c149afbf4c8996fb92427ae41e4649b934ca495991b7852b855");
You will get this output:
[1477591434, "Owner Name"]
The call method is used to call a contract's method on EVM with the current state. It doesn't broadcast a transaction. To read data, we don't need to broadcast because we will have our own copy of the blockchain.
We will learn more about web3.js in the coming chapters.
In this chapter, we learned the Solidity programming language. We learned about data location, data types, and advanced features of contracts. We also learned the quickest and easiest way to compile and deploy a smart contract. Now you should be comfortable with writing smart contracts.
In the next chapter, we will build a frontend for the smart contract, which will make it easy to deploy the smart contract and run transactions.
In this chapter, we will learn web3.js and how to import, connect to geth, and use it in Node.js or client-side JavaScript. We will also learn how to build a web client using web3.js for the smart contract that we created in the previous chapter.
In this chapter, we'll cover the following topics:
web3.js provides us with JavaScript APIs to communicate with geth. It uses JSON-RPC internally to communicate with geth. web3.js can also communicate with any other kind of Ethereum node that supports JSON-RPC. It exposes all JSON-RPC APIs as JavaScript APIs; that is, it doesn't just support all the Ethereum-related APIs; it also supports APIs related to Whisper and Swarm.
You will learn more and more about web3.js as we build various projects, but for now, let's go through some of the most used APIs of web3.js and then we will build a frontend for our ownership smart contract using web3.js.
At the time of writing this, the latest version of web3.js is 0.16.0. We will learn everything with respect to this version.
web3.js is hosted at https://github.com/ethereum/web3.js and the complete documentation is hosted at https://github.com/ethereum/wiki/wiki/JavaScript-API.
To use web3.js in Node.js, you can simply run npm install web3 inside your project directory, and in the source code, you can import it using require("web3");.
To use web3.js in client-side JavaScript, you can enqueue the web3.js file, which can be found inside the dist directory of the project source code. Now you will have the Web3 object available globally.
web3.js can communicate with nodes using HTTP or IPC. We will use HTTP to set up communication with nodes. web3.js allows us to establish connections with multiple nodes. An instance of web3 represents a connection with a node. The instance exposes the APIs.
When an app is running inside Mist, it automatically makes an instance of web3 available that's connected to the mist node. The variable name of the instance is web3.
Here is the basic code to connect to a node:
if (typeof web3 !== 'undefined') {
web3 = new Web3(new Web3.providers.HttpProvider("http://localhost:8545"));
}
At first, we check here whether the code is running inside mist by checking whether web3 is undefined or not. If web3 is defined, then we use the already available instance; otherwise, we create an instance by connecting to our custom node. If you want to connect to the custom node regardless of whether the app is running inside mist or not, then remove the if condition form the preceding code. Here, we are assuming that our custom node is running locally on port number 8545.
The Web3.providers object exposes constructors (called providers in this context) to establish a connection and transfer messages using various protocols. Web3.providers.HttpProvider lets us establish an HTTP connection, whereas Web3.providers.IpcProvider lets us establish an IPC connection.
The web3.currentProvider property is automatically assigned to the current provider instance. After creating a web3 instance, you can change its provider using the web3.setProvider() method. It takes one argument, that is, the instance of the new provider.
web3 exposes a isConnected() method, which can be used to check whether it's connected to the node or not. It returns true or false depending on the connection status.
web3 contains an eth object (web3.eth) specifically for Ethereum blockchain interactions and an shh object (web3.shh) for whisper interaction. Most APIs of web3.js are inside these two objects.
All the APIs are synchronous by default. If you want to make an asynchronous request, you can pass an optional callback as the last parameter to most functions. All callbacks use an error-first callback style.
Some APIs have an alias for asynchronous requests. For example, web3.eth.coinbase() is synchronous, whereas web3.eth.getCoinbase() is asynchronous.
Here is an example:
//sync request
try
{
console.log(web3.eth.getBlock(48));
}
catch(e)
{
console.log(e);
}
//async request
web3.eth.getBlock(48, function(error, result){
if(!error)
console.log(result)
else
console.error(error);
})
getBlock is used to get information on a block using its number or hash. Or, it can take a string such as "earliest" (the genesis block), "latest" (the top block of the blockchain), or "pending" (the block that's being mined). If you don't pass an argument, then the default is web3.eth.defaultBlock, which is assigned to "latest" by default.
All the APIs that need a block identification as input can take a number, hash, or one of the readable strings. These APIs use web3.eth.defaultBlock by default if the value is not passed.
JavaScript is natively poor at handling big numbers correctly. Therefore, applications that require you to deal with big numbers and need perfect calculations use the BigNumber.js library to work with big numbers.
web3.js also depends on BigNumber.js. It adds it automatically. web3.js always returns the BigNumber object for number values. It can take JavaScript numbers, number strings, and BigNumber instances as input.
Here is an example to demonstrate this:
web3.eth.getBalance("0x27E829fB34d14f3384646F938165dfcD30cFfB7c").toString();
Here, we use the web3.eth.getBalance() method to get the balance of an address. This method returns a BigNumber object. We need to call toString() on a BigNumber object to convert it into a number string.
BigNumber.js fails to correctly handle numbers with more than 20 floating point digits; therefore, it is recommended that you store the balance in a wei unit and while displaying, convert it to other units. web3.js itself always returns and takes the balance in wei. For example, the getBalance() method returns the balance of the address in the wei unit.
web3.js provides APIs to convert the wei balance into any other unit and any other unit balance into wei.
The web3.fromWei() method is used to convert a wei number into any other unit, whereas the web3.toWei() method is used to convert a number in any other unit into wei. Here is example to demonstrate this:
web3.fromWei("1000000000000000000", "ether");
web3.toWei("0.000000000000000001", "ether");
In the first line, we convert wei into ether, and in the second line, we convert ether into wei. The second argument in both methods can be one of these strings:
Let's take a look at the APIs to retrieve the gas price, the balance of an address, and information on a mined transaction:
//It's sync. For async use getGasPrice
console.log(web3.eth.gasPrice.toString());
console.log(web3.eth.getBalance("0x407d73d8a49eeb85d32cf465507dd71d507100c1", 45).toString());
console.log(web3.eth.getTransactionReceipt("0x9fc76417374aa880d4449a1f7f31ec597f00b1f6f3dd2d66f4c9c6c445836d8b"));
The output will be of this form:
20000000000
30000000000
{
"transactionHash": "0x9fc76417374aa880d4449a1f7f31ec597f00b1f6f3dd2d66f4c9c6c445836d8b ",
"transactionIndex": 0,
"blockHash": "0xef95f2f1ed3ca60b048b4bf67cde2195961e0bba6f70bcbea9a2c4e133e34b46",
"blockNumber": 3,
"contractAddress": "0xa94f5374fce5edbc8e2a8697c15331677e6ebf0b",
"cumulativeGasUsed": 314159,
"gasUsed": 30234
}
Here is how the preceding method works:
Let's look at how to send ether to any address. To send ether, you need to use the web3.eth.sendTransaction() method. This method can be used to send any kind of transaction but is mostly used to send ether because deploying a contract or calling a method of contract using this method is cumbersome as it requires you to generate the data of the transaction rather than automatically generating it. It takes a transaction object that has the following properties:
Let's look at an example of how to send ether to an address:
var txnHash = web3.eth.sendTransaction({
from: web3.eth.accounts[0],
to: web3.eth.accounts[1],
value: web3.toWei("1", "ether")
});
Here, we send one ether from account number 0 to account number 1. Make sure that both the accounts are unlocked using the unlock option while running geth. In the geth interactive console, it prompts for passwords, but the web3.js API outside of the interactive console will throw an error if the account is locked. This method returns the transaction hash of the transaction. You can then check whether the transaction is mined or not using the getTransactionReceipt() method.
You can also use the web3.personal.listAccounts(), web3.personal.unlockAccount(addr, pwd), and web3.personal.newAccount(pwd) APIs to manage accounts at runtime.
Let's learn how to deploy a new contract, get a reference to a deployed contract using its address, send ether to a contract, send a transaction to invoke a contract method, and estimate the gas of a method call.
To deploy a new contract or to get a reference to an already deployed contract, you need to first create a contract object using the web3.eth.contract() method. It takes the contract ABI as an argument and returns the contract object.
Here is the code to create a contract object:
var proofContract = web3.eth.contract([{"constant":false,"inputs":[{"name":"fileHash","type":"string"}],"name":"get","outputs":[{"name":"timestamp","type":"uint256"},{"name":"owner","type":"string"}],"payable":false,"type":"function"},{"constant":false,"inputs":[{"name":"owner","type":"string"},{"name":"fileHash","type":"string"}],"name":"set","outputs":[],"payable":false,"type":"function"},{"anonymous":false,"inputs":[{"indexed":false,"name":"status","type":"bool"},{"indexed":false,"name":"timestamp","type":"uint256"},{"indexed":false,"name":"owner","type":"string"},{"indexed":false,"name":"fileHash","type":"string"}],"name":"logFileAddedStatus","type":"event"}]);
Once you have the contract, you can deploy it using the new method of the contract object or get a reference to an already deployed contract that matches the ABI using the at method.
Let's take a look at an example of how to deploy a new contract:
var proof = proofContract.new({
from: web3.eth.accounts[0],
data: "0x606060405261068...",
gas: "4700000"
},
function (e, contract){
if(e)
{
console.log("Error " + e);
}
else if(contract.address != undefined)
{
console.log("Contract Address: " + contract.address);
}
else
{
console.log("Txn Hash: " + contract.transactionHash)
}
})
Here, the new method is called asynchronously, so the callback is fired twice if the transaction was created and broadcasted successfully. The first time, it's called after the transaction is broadcasted, and the second time, it's called after the transaction is mined. If you don't provide a callback, then the proof variable will have the address property set to undefined. Once the contract is mined, the address property will be set.
In the proof contract, there is no constructor, but if there is a constructor, then the arguments for the constructor should be placed at the beginning of the new method. The object we passed contains the from address, the byte code of the contract, and the maximum gas to use. These three properties must be present; otherwise, the transaction won't be created. This object can have the properties that are present in the object passed to the sendTransaction() method, but here, data is the contract byte code and the to property is ignored.
You can use the at method to get a reference to an already deployed contract. Here is the code to demonstrate this:
var proof = proofContract.at("0xd45e541ca2622386cd820d1d3be74a86531c14a1");
Now let's look at how to send a transaction to invoke a method of a contract. Here is an example to demonstrate this:
proof.set.sendTransaction("Owner Name", "e3b0c44298fc1c149afbf4c8996fb92427ae41e4649b934ca495991b7852b855", {
from: web3.eth.accounts[0],
}, function(error, transactionHash){
if (!err)
console.log(transactionHash);
})
Here, we call the sendTransaction method of the object of the method namesake. The object passed to this sendTransaction method has the same properties as web3.eth.sendTransaction(), except that the data and to properties are ignored.
If you want to invoke a method on the node itself instead of creating a transaction and broadcasting it, then you can use call instead of sendTransaction. Here is an example to demonstrate this:
var returnValue = proof.get.call("e3b0c44298fc1c149afbf4c8996fb92427ae41e4649b934ca495991b7852b855");
Sometimes, it is necessary to find out the gas that would be required to invoke a method so that you can decide whether to invoke it or not. web3.eth.estimateGas can be used for this purpose. However, using web3.eth.estimateGas() directly requires you to generate the data of the transaction; therefore, we can use the estimateGas() method of the object of the method namesake. Here is an example to demonstrate this:
var estimatedGas = proof.get.estimateGas("e3b0c44298fc1c149afbf4c8996fb92427ae41e4649b934ca495991b7852b855");
Now let's look at how to watch for events from a contract. Watching for events is very important because the result of method invocations by transactions are usually returned by triggering events.
event logFileAddedStatus(bool indexed status, uint indexed timestamp, string owner, string indexed fileHash);
Here is an example to demonstrate how to listen to contract events:
var event = proof.logFileAddedStatus(null, {
fromBlock: 0,
toBlock: "latest"
});
event.get(function(error, result){
if(!error)
{
console.log(result);
}
else
{
console.log(error);
}
})
event.watch(function(error, result){
if(!error)
{
console.log(result.args.status);
}
else
{
console.log(error);
}
})
setTimeout(function(){
event.stopWatching();
}, 60000)
var events = proof.allEvents({
fromBlock: 0,
toBlock: "latest"
});
events.get(function(error, result){
if(!error)
{
console.log(result);
}
else
{
console.log(error);
}
})
events.watch(function(error, result){
if(!error)
{
console.log(result.args.status);
}
else
{
console.log(error);
}
})
setTimeout(function(){
events.stopWatching();
}, 60000)
This is how the preceding code works:
In this chapter, we learned web3.js and how to invoke the methods of the contract using web3.js. Now, it's time to build a client for our smart contract so that users can use it easily.
We will build a client where a user selects a file and enters owner details and then clicks on Submit to broadcast a transaction to invoke the contract's set method with the file hash and the owner's details. Once the transaction is successfully broadcasted, we will display the transaction hash. The user will also be able to select a file and get the owner's details from the smart contract. The client will also display the recent set transactions mined in real time.
We will use sha1.js to get the hash of the file on the frontend, jQuery for DOM manipulation, and Bootstrap 4 to create a responsive layout. We will use express.js and web3.js on the backend. We will use socket.io so that the backend pushes recently mined transactions to the frontend without the frontend requesting for data after every equal interval of time.
In the exercise files of this chapter, you will find two directories: Final and Initial. Final contains the final source code of the project, whereas Initial contains the empty source code files and libraries to get started with building the application quickly.
In the Initial directory, you will find a public directory and two files named app.js and package.json. package.json contains the backend dependencies of our app, and app.js is where you will place the backend source code.
The public directory contains files related to the frontend. Inside public/css, you will find bootstrap.min.css, which is the Bootstrap library; inside public/html, you will find index.html, where you will place the HTML code of our app; and in the public/js directory, you will find JS files for jQuery, sha1, and socket.io. Inside public/js, you will also find a main.js file, where you will place the frontend JS code of our app.
Let's first build the backend of the app. First of all, run npm install inside the Initial directory to install the required dependencies for our backend. Before we get into coding the backend, make sure geth is running with rpc enabled. If you are running geth on a private network, then make sure mining is also enabled. Finally, make sure that account 0 exists and is unlocked. You can run geth on a private network with rpc and mining enabled and also unlocking account 0:
geth --dev --mine --rpc --unlock=0
One final thing you need to do before getting started with coding is to deploy the ownership contract using the code we saw in the previous chapter and copy the contract address.
Now let's create a single server, which will serve the HTML to the browser and also accept socket.io connections:
var express = require("express");
var app = express();
var server = require("http").createServer(app);
var io = require("socket.io")(server);
server.listen(8080);
Here, we are integrating both the express and socket.io servers into one server running on port 8080.
Now let's create the routes to serve the static files and also the home page of the app. Here is the code to do this:
app.use(express.static("public"));
app.get("/", function(req, res){
res.sendFile(__dirname + "/public/html/index.html");
})
Here, we are using the express.static middleware to serve static files. We are asking it to find static files in the public directory.
Now let's connect to the geth node and also get a reference to the deployed contract so that we can send transactions and watch for events. Here is the code to do this:
var Web3 = require("web3");
web3 = new Web3(new Web3.providers.HttpProvider("http://localhost:8545"));
var proofContract = web3.eth.contract([{"constant":false,"inputs":[{"name":"fileHash","type":"string"}],"name":"get","outputs":[{"name":"timestamp","type":"uint256"},{"name":"owner","type":"string"}],"payable":false,"type":"function"},{"constant":false,"inputs":[{"name":"owner","type":"string"},{"name":"fileHash","type":"string"}],"name":"set","outputs":[],"payable":false,"type":"function"},{"anonymous":false,"inputs":[{"indexed":false,"name":"status","type":"bool"},{"indexed":false,"name":"timestamp","type":"uint256"},{"indexed":false,"name":"owner","type":"string"},{"indexed":false,"name":"fileHash","type":"string"}],"name":"logFileAddedStatus","type":"event"}]);
var proof = proofContract.at("0xf7f02f65d5cd874d180c3575cb8813a9e7736066");
The code is self-explanatory. Just replace the contract address with the one you got.
Now let's create routes to broadcast transactions and get information about a file. Here is the code to do this:
app.get("/submit", function(req, res){
var fileHash = req.query.hash;
var owner = req.query.owner;
proof.set.sendTransaction(owner, fileHash, {
from: web3.eth.accounts[0],
}, function(error, transactionHash){
if (!error)
{
res.send(transactionHash);
}
else
{
res.send("Error");
}
})
})
app.get("/getInfo", function(req, res){
var fileHash = req.query.hash;
var details = proof.get.call(fileHash);
res.send(details);
})
Here, the /submit route is used to create and broadcast transactions. Once we get the transaction hash, we send it to the client. We are not doing anything to wait for the transaction to mine. The /getInfo route calls the get method of the contract on the node itself instead of creating a transaction. It simply sends back whatever response it got.
Now let's watch for the events from the contract and broadcast it to all the clients. Here is the code to do this:
proof.logFileAddedStatus().watch(function(error, result){
if(!error)
{
if(result.args.status == true)
{
io.send(result);
}
}
})
Here, we check whether the status is true, and if it's true, only then do we broadcast the event to all the connected socket.io clients.
Let's begin with the HTML of the app. Put this code in the index.html file:
<!DOCTYPE html>
<html lang="en">
<head>
<meta name="viewport" content="width=device-width, initial-scale=1, shrink-to-fit=no">
<link rel="stylesheet" href="/css/bootstrap.min.css">
</head>
<body>
<div class="container">
<div class="row">
<div class="col-md-6 offset-md-3 text-xs-center">
<br>
<h3>Upload any file</h3>
<br>
<div>
<div class="form-group">
<label class="custom-file text-xs-left">
<input type="file" id="file" class="custom-file-input">
<span class="custom-file-control"></span>
</label>
</div>
<div class="form-group">
<label for="owner">Enter owner name</label>
<input type="text" class="form-control" id="owner">
</div>
<button onclick="submit()" class="btn btn-primary">Submit</button>
<button onclick="getInfo()" class="btn btn-primary">Get Info</button>
<br><br>
<div class="alert alert-info" role="alert" id="message">
You can either submit file's details or get information about it.
</div>
</div>
</div>
</div>
<div class="row">
<div class="col-md-6 offset-md-3 text-xs-center">
<br>
<h3>Live Transactions Mined</h3>
<br>
<ol id="events_list">No Transaction Found</ol>
</div>
</div>
</div>
<script type="text/javascript" src="/js/sha1.min.js"></script>
<script type="text/javascript" src="/js/jquery.min.js"></script>
<script type="text/javascript" src="/js/socket.io.min.js"></script>
<script type="text/javascript" src="/js/main.js"></script>
</body>
</html>
Here is how the code works:
Now let's write the implementation for the getInfo() and submit() methods, establish a socket.io connect with the server, and listen for socket.io messages from the server. Here is the code to this. Place this code in the main.js file:
function submit()
{
var file = document.getElementById("file").files[0];
if(file)
{
var owner = document.getElementById("owner").value;
if(owner == "")
{
alert("Please enter owner name");
}
else
{
var reader = new FileReader();
reader.onload = function (event) {
var hash = sha1(event.target.result);
$.get("/submit?hash=" + hash + "&owner=" + owner, function(data){
if(data == "Error")
{
$("#message").text("An error occured.");
}
else
{
$("#message").html("Transaction hash: " + data);
}
});
};
reader.readAsArrayBuffer(file);
}
}
else
{
alert("Please select a file");
}
}
function getInfo()
{
var file = document.getElementById("file").files[0];
if(file)
{
var reader = new FileReader();
reader.onload = function (event) {
var hash = sha1(event.target.result);
$.get("/getInfo?hash=" + hash, function(data){
if(data[0] == 0 && data[1] == "")
{
$("#message").html("File not found");
}
else
{
$("#message").html("Timestamp: " + data[0] + " Owner: " + data[1]);
}
});
};
reader.readAsArrayBuffer(file);
}
else
{
alert("Please select a file");
}
}
var socket = io("http://localhost:8080");
socket.on("connect", function () {
socket.on("message", function (msg) {
if($("#events_list").text() == "No Transaction Found")
{
$("#events_list").html("<li>Txn Hash: " + msg.transactionHash + "nOwner: " + msg.args.owner + "nFile Hash: " + msg.args.fileHash + "</li>");
}
else
{
$("#events_list").prepend("<li>Txn Hash: " + msg.transactionHash + "nOwner: " + msg.args.owner + "nFile Hash: " + msg.args.fileHash + "</li>");
}
});
});
This is how the preceding code works:
Now run the app.js node to run the application server. Open your favorite browser and visit http://localhost:8080/. You will see this output in the browser:
Now select a file and enter the owner's name and click on Submit. The screen will change to this:
Here, you can see that the transaction hash is displayed. Now, wait until the transaction is mined. Once the transaction is mined, you will be able to see the transaction in the live transactions list. Here is how the screen would look:
Now select the same file again and click on the Get Info button. You will see this output:
Here, you can see the timestamp and the owner's details. Now we have finished building the client for our first DApp.
In this chapter, we first learned about the fundamentals of web3.js with examples. We learned how to connect to a node, basic APIs, sending various kinds of transactions, and watching for events. Finally, we built a proper production use client for our ownership contract. Now you will be comfortable with writing smart contracts and building UI clients for them in order to ease their use.
In the next chapter, we will build a wallet service, where users can create and manage Ethereum Wallets easily, and that too is offline. We will specifically use the LightWallet library to achieve this.
A wallet service is used to send and receive funds. Major challenges for building a wallet service are security and trust. Users must feel that their funds are secure and the administrator of the wallet service doesn't steal their funds. The wallet service we will build in this chapter will tackle both these issues.
In this chapter, we'll cover the following topics:
Until now, all the examples of Web3.js library's sendTransaction() method we saw were using the from address that's present in the Ethereum node; therefore, the Ethereum node was able to sign the transactions before broadcasting. But if you have the private key of a wallet stored somewhere else, then geth cannot find it. Therefore, in this case, you will need to use the web3.eth.sendRawTransaction() method to broadcast transactions.
web3.eth.sendRawTransaction() is used to broadcast raw transactions, that is, you will have to write code to create and sign raw transactions. The Ethereum node will directly broadcast it without doing anything else to the transaction. But writing code to broadcast transactions using web3.eth.sendRawTransaction() is difficult because it requires generating the data part, creating raw transactions, and also signing the transactions.
The Hooked-Web3-Provider library provides us with a custom provider, which communicates with geth using HTTP; but the uniqueness of this provider is that it lets us sign the sendTransaction() calls of contract instances using our keys. Therefore, we don't need to create data part of the transactions anymore. The custom provider actually overrides the implementation of the web3.eth.sendTransaction() method. So basically, it lets us sign both the sendTransaction() calls of contract instances and also the web3.eth.sendTransaction() calls. The sendTransaction() method of contract instances internally generate data of the transaction and calls web3.eth.sendTransaction() to broadcast the transaction.
EthereumJS is a collection of those libraries related to Ethereum. ethereumjs-tx is one of those that provide various APIs related to transactions. For example, it lets us create raw transactions, sign the raw transactions, check whether transactions are signed using proper keys or not, and so on.
Both of these libraries are available for Node.js and client-side JavaScript. Download the Hooked-Web3-Provider from https://www.npmjs.com/package/hooked-web3-provider, and download ethereumjs-tx from https://www.npmjs.com/package/ethereumjs-tx.
At the time of writing this book, the latest version of Hooked-Web3-Provider is 1.0.0 and the latest version of ethereumjs-tx is 1.1.4.
Let's see how to use these libraries together to send a transaction from an account that's not managed by geth.
var provider = new HookedWeb3Provider({
host: "http://localhost:8545",
transaction_signer: {
hasAddress: function(address, callback){
callback(null, true);
},
signTransaction: function(tx_params, callback){
var rawTx = {
gasPrice: web3.toHex(tx_params.gasPrice),
gasLimit: web3.toHex(tx_params.gas),
value: web3.toHex(tx_params.value)
from: tx_params.from,
to: tx_params.to,
nonce: web3.toHex(tx_params.nonce)
};
var privateKey = EthJS.Util.toBuffer('0x1a56e47492bf3df9c9563fa7f66e4e032c661de9d68c3f36f358e6bc9a9f69f2', 'hex');
var tx = new EthJS.Tx(rawTx);
tx.sign(privateKey);
callback(null, tx.serialize().toString('hex'));
}
}
});
var web3 = new Web3(provider);
web3.eth.sendTransaction({
from: "0xba6406ddf8817620393ab1310ab4d0c2deda714d",
to: "0x2bdbec0ccd70307a00c66de02789e394c2c7d549",
value: web3.toWei("0.1", "ether"),
gasPrice: "20000000000",
gas: "21000"
}, function(error, result){
console.log(error, result)
})
Here is how the code works:
LightWallet is an HD wallet that implements BIP32, BIP39, and BIP44. LightWallet provides APIs to create and sign transactions or encrypt and decrypt data using the addresses and keys generated using it.
LightWallet API is divided into four namespaces, that is, keystore, signing, encryption, and txutils. signing, encrpytion, and txutils provide APIs to sign transactions, asymmetric cryptography, and create transactions respectively, whereas a keystore namespace is used to create a keystore, generated seed, and so on. keystore is an object that holds the seed and keys encrypted. The keystore namespace implements transaction signer methods that requires signing the we3.eth.sendTransaction() calls if we are using Hooked-Web3-Provider. Therefore the keystore namespace can automatically create and sign transactions for the addresses that it can find in it. Actually, LightWallet is primarily intended to be a signing provider for the Hooked-Web3-Provider.
A keystore instance can be configured to either create and sign transactions or encrypt and decrypt data. For signing transactions, it uses the secp256k1 parameter, and for encryption and decryption, it uses the curve25519 parameter.
The seed of LightWallet is a 12-word mnemonic, which is easy to remember yet difficult to hack. It cannot be any 12 words; instead, it should be a seed generated by LightWallet. A seed generated by LightWallet has certain properties in terms of selection of words and other things.
The HD derivation path is a string that makes it easy to handle multiple cryptocurrencies (assuming they all use the same signature algorithms), multiple blockchains, multiple accounts, and so on.
HD derivation path can have as many parameters as needed, and using different values for the parameters, we can produce different group of addresses and their associated keys.
By default, LightWallet uses the m/0'/0'/0' derivation path. Here, /n' is a parameter, and n is the parameter value.
Every HD derivation path has a curve, and purpose. purpose can be either sign or asymEncrypt. sign indicates that the path is used for signing transactions, and asymEncrypt indicates that the path is used for encryption and decryption. curve indicates the parameters of ECC. For signing, the parameter must be secp256k1, and for asymmetric encryption, the curve must be curve25591 because LightWallet forces us to use these parameters due to their benefits in those purposes.
Now we have learned enough theory about LightWallet, it's time to build a wallet service using LightWallet and hooked-web3-provider. Our wallet service will let users generate a unique seed, display addresses, and their associated balance, and finally, the service will let users send ether to other accounts. All the operations will be done on the client side so that users can trust us easily. Users will either have to remember the seed or store it somewhere.
Before you start building the wallet service, make sure that you are running the geth development instance, which is mining, has the HTTP-RPC server enabled, allows client-side requests from any domain, and finally has account 0 unlocked. You can do all these by running this:
geth --dev --rpc --rpccorsdomain "*" --rpcaddr "0.0.0.0" --rpcport "8545" --mine --unlock=0
Here, --rpccorsdomain is used to allow certain domains to communicate with geth. We need to provide a list of domains space separated, such as "http://localhost:8080 https://mySite.com *". It also supports the * wildcard character. --rpcaddr indicates to which IP address the geth server is reachable. The default for this is 127.0.0.1, so if it's a hosted server, you won't be able to reach it using the public IP address of the server. Therefore, we changed it's value to 0.0.0.0, which indicates that the server can be reached using any IP address.
In the exercise files of this chapter, you will find two directories, that is, Final and Initial. Final contains the final source code of the project, whereas Initial contains the empty source code files and libraries to get started with building the application quickly.
In the Initial directory, you will find a public directory and two files named app.js and package.json. package.json contains the backend dependencies. Our app, app.js, is where you will place the backend source code.
The public directory contains files related to the frontend. Inside public/css, you will find bootstrap.min.css, which is the bootstrap library. Inside public/html, you will find index.html, where you will place the HTML code of our app, and finally, in the public/js directory, you will find .js files for Hooked-Web3-Provider, web3js, and LightWallet. Inside public/js, you will also find a main.js file where you will place the frontend JS code of our app.
Let's first build the backend of the app. First of all, run npm install inside the initial directory to install the required dependencies for our backend.
Here is the complete backend code to run an express service and serve the index.html file and static files:
var express = require("express");
var app = express();
app.use(express.static("public"));
app.get("/", function(req, res){
res.sendFile(__dirname + "/public/html/index.html");
})
app.listen(8080);
The preceding code is self-explanatory.
Now let's build the frontend of the app. The frontend will consist of the major functionalities, that is, generating seed, displaying addresses of a seed, and sending ether.
Now let's write the HTML code of the app. Place this code in the index.html file:
<!DOCTYPE html>
<html lang="en">
<head>
<meta charset="utf-8">
<meta name="viewport" content="width=device-width, initial-scale=1, shrink-to-fit=no">
<meta http-equiv="x-ua-compatible" content="ie=edge">
<link rel="stylesheet" href="/css/bootstrap.min.css">
</head>
<body>
<div class="container">
<div class="row">
<div class="col-md-6 offset-md-3">
<br>
<div class="alert alert-info" id="info" role="alert">
Create or use your existing wallet.
</div>
<form>
<div class="form-group">
<label for="seed">Enter 12-word seed</label>
<input type="text" class="form-control" id="seed">
</div>
<button type="button" class="btn btn-primary" onclick="generate_addresses()">Generate Details</button>
<button type="button" class="btn btn-primary" onclick="generate_seed()">Generate New Seed</button>
</form>
<hr>
<h2 class="text-xs-center">Address, Keys and Balances of the seed</h2>
<ol id="list">
</ol>
<hr>
<h2 class="text-xs-center">Send ether</h2>
<form>
<div class="form-group">
<label for="address1">From address</label>
<input type="text" class="form-control" id="address1">
</div>
<div class="form-group">
<label for="address2">To address</label>
<input type="text" class="form-control" id="address2">
</div>
<div class="form-group">
<label for="ether">Ether</label>
<input type="text" class="form-control" id="ether">
</div>
<button type="button" class="btn btn-primary" onclick="send_ether()">Send Ether</button>
</form>
</div>
</div>
</div>
<script src="/js/web3.min.js"></script>
<script src="/js/hooked-web3-provider.min.js"></script>
<script src="/js/lightwallet.min.js"></script>
<script src="/js/main.js"></script>
</body>
</html>
Here is how the code works:
Now let's write the implementation of each of the functions that the HTML code calls. At first, let's write the code to generate a new seed. Place this code in the main.js file:
function generate_seed()
{
var new_seed = lightwallet.keystore.generateRandomSeed();
document.getElementById("seed").value = new_seed;
generate_addresses(new_seed);
}
The generateRandomSeed() method of the keystore namespace is used to generate a random seed. It takes an optional parameter, which is a string that indicates the extra entropy.
To produce a unique seed, we need really high entropy. LightWallet is already built with methods to produce unique seeds. The algorithm LightWallet uses to produce entropy depends on the environment. But if you feel you can generate better entropy, you can pass the generated entropy to the generateRandomSeed() method, and it will get concatenated with the entropy generated by generateRandomSeed() internally.
After generating a random seed, we call the generate_addresses method. This method takes a seed and displays addresses in it. Before generating addresses, it prompts the user to ask how many addresses they want.
Here is the implementation of the generate_addresses() method. Place this code in the main.js file:
var totalAddresses = 0;
function generate_addresses(seed)
{
if(seed == undefined)
{
seed = document.getElementById("seed").value;
}
if(!lightwallet.keystore.isSeedValid(seed))
{
document.getElementById("info").innerHTML = "Please enter a valid seed";
return;
}
totalAddresses = prompt("How many addresses do you want to generate");
if(!Number.isInteger(parseInt(totalAddresses)))
{
document.getElementById("info").innerHTML = "Please enter valid number of addresses";
return;
}
var password = Math.random().toString();
lightwallet.keystore.createVault({
password: password,
seedPhrase: seed
}, function (err, ks) {
ks.keyFromPassword(password, function (err, pwDerivedKey) {
if(err)
{
document.getElementById("info").innerHTML = err;
}
else
{
ks.generateNewAddress(pwDerivedKey, totalAddresses);
var addresses = ks.getAddresses();
var web3 = new Web3(new Web3.providers.HttpProvider("http://localhost:8545"));
var html = "";
for(var count = 0; count < addresses.length; count++)
{
var address = addresses[count];
var private_key = ks.exportPrivateKey(address, pwDerivedKey);
var balance = web3.eth.getBalance("0x" + address);
html = html + "<li>";
html = html + "<p><b>Address: </b>0x" + address + "</p>";
html = html + "<p><b>Private Key: </b>0x" + private_key + "</p>";
html = html + "<p><b>Balance: </b>" + web3.fromWei(balance, "ether") + " ether</p>";
html = html + "</li>";
}
document.getElementById("list").innerHTML = html;
}
});
});
}
Here is how the code works:
Now we know how to generate the address and their private keys from a seed. Now let's write the implementation of the send_ether() method, which is used to send ether from one of the addresses generated from the seed.
Here is the code for this. Place this code in the main.js file:
function send_ether()
{
var seed = document.getElementById("seed").value;
if(!lightwallet.keystore.isSeedValid(seed))
{
document.getElementById("info").innerHTML = "Please enter a valid seed";
return;
}
var password = Math.random().toString();
lightwallet.keystore.createVault({
password: password,
seedPhrase: seed
}, function (err, ks) {
ks.keyFromPassword(password, function (err, pwDerivedKey) {
if(err)
{
document.getElementById("info").innerHTML = err;
}
else
{
ks.generateNewAddress(pwDerivedKey, totalAddresses);
ks.passwordProvider = function (callback) {
callback(null, password);
};
var provider = new HookedWeb3Provider({
host: "http://localhost:8545",
transaction_signer: ks
});
var web3 = new Web3(provider);
var from = document.getElementById("address1").value;
var to = document.getElementById("address2").value;
var value = web3.toWei(document.getElementById("ether").value, "ether");
web3.eth.sendTransaction({
from: from,
to: to,
value: value,
gas: 21000
}, function(error, result){
if(error)
{
document.getElementById("info").innerHTML = error;
}
else
{
document.getElementById("info").innerHTML = "Txn hash: " + result;
}
})
}
});
});
}
Here, the code up and until generating addresses from the seed is self-explanatory. After that, we assign a callback to the passwordProvider property of ks. This callback is invoked during transaction signing to get the password to decrypt the private key. If we don't provide this, LightWallet prompts the user to enter the password. And then, we create a HookedWeb3Provider instance by passing the keystore as the transaction signer. Now when the custom provider wants a transaction to be signed, it calls the hasAddress and signTransactions methods of ks. If the address to be signed is not among the generated addresses, ks will give an error to the custom provider. And finally, we send some ether using the web3.eth.sendTransaction method.
Now that we have finished building our wallet service, let's test it to make sure it works as expected. First, run node app.js inside the initial directory, and then visit http://localhost:8080 in your favorite browser. You will see this screen:
Now click on the Generate New Seed button to generate a new seed. You will be prompted to enter a number indicating the number of addresses to generate. You can provide any number, but for testing purposes, provide a number greater than 1. Now the screen will look something like this:
Now to test sending ether, you need to send some ether to one of the generated addresses from the coinbase account. Once you have sent some ether to one of the generated addresses, click on the Generate Details button to refresh the UI, although it's not necessary to test sending ether using the wallet service. Make sure the same address is generated again. Now the screen will look something like this:
Now in the from address field, enter the account address from the list that has the balance in the from address field. Then enter another address in the to address field. For testing purposes, you can enter any of the other addresses displayed. Then enter some ether amount that is less than or equal to the ether balance of the from address account. Now your screen will look something like this:
Now click on the Send Ether button, and you will see the transaction hash in the information box. Wait for sometime for it to get mined. Meanwhile, you can check whether the transactions got mined or not by clicking on the Generate Details button in a very short span of time. Once the transaction is mined, your screen will look something like this:
If everything goes the same way as explained, your wallet service is ready. You can actually deploy this service to a custom domain and make it available for use publicly. It's completely secure, and users will trust it.
In this chapter, you learned about three important Ethereum libraries: Hooked-Web3-Provider, ethereumjs-tx, and LightWallet. These libraries can be used to manage accounts and sign transactions outside of the Ethereum node. While developing clients for most kinds of DApps, you will find these libraries useful.
And finally, we created a wallet service that lets users manage their accounts that share private keys or any other information related to their wallet with the backend of the service.
In the next chapter, we will build a platform to build and deploy smart contracts.
Some clients may need to compile and deploy contracts at runtime. In our proof-of-ownership DApp, we deployed the smart contract manually and hardcoded the contract address in the client-side code. But some clients may need to deploy smart contracts at runtime. For example, if a client lets schools record students' attendance in the blockchain, then it will need to deploy a smart contract every time a new school is registered so that each school has complete control over their smart contract. In this chapter, we will learn how to compile smart contracts using web3.js and deploy it using web3.js and EthereumJS.
In this chapter, we'll cover the following topics:
For the accounts maintained by geth, we don't need to worry about the transaction nonce because geth can add the correct nonce to the transactions and sign them. While using accounts that aren't managed by geth, we need to calculate the nonce ourselves.
To calculate the nonce ourselves, we can use the getTransactionCount method provided by geth. The first argument should be the address whose transaction count we need and the second argument is the block until we need the transaction count. We can provide the "pending" string as the block to include transactions from the block that's currently being mined. As we discussed in an earlier chapter, geth maintains a transaction pool in which it keeps pending and queued transactions. To mine a block, geth takes the pending transactions from the transaction pool and starts mining the new block. Until the block is not mined, the pending transactions remain in the transaction pool and once mined, the mined transactions are removed from the transaction pool. The new incoming transactions received while a block is being mined are put in the transaction pool and are mined in the next block. So when we provide "pending" as the second argument while calling getTransactionCount, it doesn't look inside the transaction pool; instead, it just considers the transactions in the pending block.
So if you are trying to send transactions from accounts not managed by geth, then count the total number of transactions of the account in the blockchain and add it with the transactions pending in the transaction pool. If you try to use pending transactions from the pending block, then you will fail to get the correct nonce if transactions are sent to geth within a few seconds of the interval because it takes 12 seconds on average to include a transaction in the blockchain.
In the previous chapter, we relied on the hooked-web3-provider to add nonce to the transaction. Unfortunately, the hooked-web3-provider doesn't try to get the nonce the correct way. It maintains a counter for every account and increments it every time you send a transaction from that account. And if the transaction is invalid (for example, if the transaction is trying to send more ether than it has), then it doesn't decrement the counter. Therefore, the rest of the transactions from that account will be queued and never be mined until the hooked-web3-provider is reset, that is, the client is restarted. And if you create multiple instances of the hooked-web3-provider, then these instances cannot sync the nonce of an account with each other, so you may end up with the incorrect nonce. But before you add the nonce to the transaction, the hooked-web3-provider always gets the transaction count until the pending block and compares it with its counter and uses whichever is greater. So if the transaction from an account managed by the hooked-web3-provider is sent from another node in the network and is included in the pending block, then the hooked-web3-provider can see it. But the overall hooked-web3-provider cannot be relied on to calculate the nonce. It's great for quick prototyping of client-side apps and is fit to use in apps where the user can see and resend transactions if they aren't broadcasted to the network and the hooked-web3-provider is reset frequently. For example, in our wallet service, the user will frequently load the page, so a new hooked-web3-provider instance is created frequently. And if the transaction is not broadcasted, not valid, or not mined, then the user can refresh the page and resend transactions.
solcjs is a Node.js library and command-line tool that is used to compile solidity files. It doesn't use the solc command-line compiler; instead, it compiles purely using JavaScript, so it's much easier to install than solc.
Solc is the actual Solidity compiler. Solc is written in C++. The C++ code is compiled to JavaScript using emscripten. Every version of solc is compiled to JavaScript. At https://github.com/ethereum/solc-bin/tree/gh-pages/bin, you can find the JavaScript-based compilers of each solidity version. solcjs just uses one of these JavaScript-based compilers to compile the solidity source code. These JavaScript-based compilers can run in both browser and Node.js environments.
solcjs is available as an npm package with the name solc. You can install the solcjs npm package locally or globally just like any other npm package. If this package is installed globally, then solcjs, a command-line tool, will be available. So, in order to install the command-line tool, run this command:
npm install -g solc
Now go ahead and run this command to see how to compile solidity files using the command-line compiler:
solcjs -help
We won't be exploring the solcjs command-line tool; instead, we will learn about the solcjs APIs to compile solidity files.
solcjs provides a compiler method, which is used to compile solidity code. This method can be used in two different ways depending on whether the source code has any imports or not. If the source code doesn't have any imports, then it takes two arguments; that is, the first argument is solidity source code as a string and a Boolean indicating whether to optimize the byte code or not. If the source string contains multiple contracts, then it will compile all of them.
Here is an example to demonstrate this:
var solc = require("solc");
var input = "contract x { function g() {} }";
var output = solc.compile(input, 1); // 1 activates the optimiser
for (var contractName in output.contracts) {
// logging code and ABI
console.log(contractName + ": " + output.contracts[contractName].bytecode);
console.log(contractName + "; " + JSON.parse(output.contracts[contractName].interface));
}
If your source code contains imports, then the first argument will be an object whose keys are filenames and values are the contents of the files. So whenever the compiler sees an import statement, it doesn't look for the file in the filesystem; instead, it looks for the file contents in the object by matching the filename with the keys. Here is an example to demonstrate this:
var solc = require("solc");
var input = {
"lib.sol": "library L { function f() returns (uint) { return 7; } }",
"cont.sol": "import 'lib.sol'; contract x { function g() { L.f(); } }"
};
var output = solc.compile({sources: input}, 1);
for (var contractName in output.contracts)
console.log(contractName + ": " + output.contracts[contractName].bytecode);
If you want to read the imported file contents from the filesystem during compilation or resolve the file contents during compilation, then the compiler method supports a third argument, which is a method that takes the filename and should return the file content. Here is an example to demonstrate this:
var solc = require("solc");
var input = {
"cont.sol": "import 'lib.sol'; contract x { function g() { L.f(); } }"
};
function findImports(path) {
if (path === "lib.sol")
return { contents: "library L { function f() returns (uint) { return 7; } }" }
else
return { error: "File not found" }
}
var output = solc.compile({sources: input}, 1, findImports);
for (var contractName in output.contracts)
console.log(contractName + ": " + output.contracts[contractName].bytecode);
In order to compile contracts using a different version of solidity, you need to use the useVersion method to get a reference of a different compiler. useVersion takes a string that indicates the JavaScript filename that holds the compiler, and it looks for the file in the /node_modules/solc/bin directory.
solcjs also provides another method called loadRemoteVersion, which takes the compiler filename that matches the filename in the solc-bin/bin directory of the solc-bin repository (https://github.com/ethereum/solc-bin) and downloads and uses it.
Finally, solcjs also provides another method called setupMethods, which is similar to useVersion but can load the compiler from any directory.
Here is an example to demonstrate all three methods:
var solc = require("solc");
var solcV047 = solc.useVersion("v0.4.7.commit.822622cf");
var output = solcV011.compile("contract t { function g() {} }", 1);
solc.loadRemoteVersion('soljson-v0.4.5.commit.b318366e', function(err, solcV045) {
if (err) {
// An error was encountered, display and quit
}
var output = solcV045.compile("contract t { function g() {} }", 1);
});
var solcV048 = solc.setupMethods(require("/my/local/0.4.8.js"));
var output = solcV048.compile("contract t { function g() {} }", 1);
solc.loadRemoteVersion('latest', function(err, latestVersion) {
if (err) {
// An error was encountered, display and quit
}
var output = latestVersion.compile("contract t { function g() {} }", 1);
});
To run the preceding code, you need to first download the v0.4.7.commit.822622cf.js file from the solc-bin repository and place it in the node_modules/solc/bin directory. And then you need to download the compiler file of solidity version 0.4.8 and place it somewhere in the filesystem and point the path in the setupMethods call to that directory.
If your solidity source code references libraries, then the generated byte code will contain placeholders for the real addresses of the referenced libraries. These have to be updated via a process called linking before deploying the contract.
solcjs provides the linkByteCode method to link library addresses to the generated byte code.
Here is an example to demonstrate this:
var solc = require("solc");
var input = {
"lib.sol": "library L { function f() returns (uint) { return 7; } }",
"cont.sol": "import 'lib.sol'; contract x { function g() { L.f(); } }"
};
var output = solc.compile({sources: input}, 1);
var finalByteCode = solc.linkBytecode(output.contracts["x"].bytecode, { 'L': '0x123456...' });
The ABI of a contract provides various kinds of information about the contract other than implementation. The ABI generated by two different versions of compilers may not match as higher versions support more solidity features than lower versions; therefore, they will include extra things in the ABI. For example, the fallback function was introduced in the 0.4.0 version of Solidity so the ABI generated using compilers whose version is less than 0.4.0 will have no information about fallback functions, and these smart contracts behave like they have a fallback function with an empty body and a payable modifier. So, the API should be updated so that applications that depend on the ABI of newer solidity versions can have better information about the contract.
solcjs provides an API to update the ABI. Here is an example code to demonstrate this:
var abi = require("solc/abi");
var inputABI = [{"constant":false,"inputs":[],"name":"hello","outputs":[{"name":"","type":"string"}],"payable":false,"type":"function"}];
var outputABI = abi.update("0.3.6", inputABI)
Here, 0.3.6 indicates that the ABI was generated using the 0.3.6 version of the compiler. As we are using solcjs version 0.4.8, the ABI will be updated to match the ABI generated by the 0.4.8 compiler version, not above it.
The output of the preceding code will be as follows:
[{"constant":false,"inputs":[],"name":"hello","outputs":[{"name":"","type":"string"}],"payable":true,"type":"function"},{"type":"fallback","payable":true}]
Now that we have learned how to use solcjs to compile solidity source code, it's time to build a platform that lets us write, compile, and deploy contracts. Our platform will let users provide their account address and private key, using which our platform will deploy contracts.
Before you start building the application, make sure that you are running the geth development instance, which is mining, has rpc enabled, and exposes eth, web3, and txpool APIs over the HTTP-RPC server. You can do all these by running this:
geth --dev --rpc --rpccorsdomain "*" --rpcaddr "0.0.0.0" --rpcport "8545" --mine --rpcapi "eth,txpool,web3"
In the exercise files of this chapter, you will find two directories, that is, Final and Initial. Final contains the final source code of the project, whereas Initial contains the empty source code files and libraries to get started with building the application quickly.
In the Initial directory, you will find a public directory and two files named app.js and package.json. The package.json file contains the backend dependencies on our app. app.js is where you will place the backend source code.
The public directory contains files related to the frontend. Inside public/css, you will find bootstrap.min.css, which is the bootstrap library, and you will also find the codemirror.css file, which is CSS of the codemirror library. Inside public/html, you will find index.html, where you will place the HTML code of our app and in the public/js directory, you will find .js files for codemirror and web3.js. Inside public/js, you will also find a main.js file, where you will place the frontend JS code of our app.
Let's first build the backend of the app. First of all, run npm install inside the Initial directory to install the required dependencies for our backend.
Here is the backend code to run an express service and serve the index.html file and static files:
var express = require("express");
var app = express();
app.use(express.static("public"));
app.get("/", function(req, res){
res.sendFile(__dirname + "/public/html/index.html");
})
app.listen(8080);
The preceding code is self-explanatory. Now let's proceed further. Our app will have two buttons, that is, Compile and Deploy. When the user clicks on the compile button, the contract will be compiled and when the deploy button is clicked on, the contract will be deployed.
We will be compiling and deploying contracts in the backend. Although this can be done in the frontend, we will do it in the backend because solcjs is available only for Node.js (although the JavaScript-based compilers it uses work on the frontend).
When the user clicks on the compile button, the frontend will make a GET request to the /compile path by passing the contract source code. Here is the code for the route:
var solc = require("solc");
app.get("/compile", function(req, res){
var output = solc.compile(req.query.code, 1);
res.send(output);
})
At first, we import the solcjs library here. Then, we define the /compile route and inside the route callback, we simply compile the source code sent by the client with the optimizer enabled. And then we just send the solc.compile method's return value to the frontend and let the client check whether the compilation was successful or not.
When the user clicks on the deploy button, the frontend will make a GET request to the /deploy path by passing the contract source code and constructor arguments from the address and private key. When the user clicks on this button, the contract will be deployed and the transaction hash will be returned to the user.
Here is the code for this:
var Web3 = require("web3");
var BigNumber = require("bignumber.js");
var ethereumjsUtil = require("ethereumjs-util");
var ethereumjsTx = require("ethereumjs-tx");
var web3 = new Web3(new Web3.providers.HttpProvider("http://localhost:8545"));
function etherSpentInPendingTransactions(address, callback)
{
web3.currentProvider.sendAsync({
method: "txpool_content",
params: [],
jsonrpc: "2.0",
id: new Date().getTime()
}, function (error, result) {
if(result.result.pending)
{
if(result.result.pending[address])
{
var txns = result.result.pending[address];
var cost = new BigNumber(0);
for(var txn in txns)
{
cost = cost.add((new BigNumber(parseInt(txns[txn].value))).add((new BigNumber(parseInt(txns[txn].gas))).mul(new BigNumber(parseInt(txns[txn].gasPrice)))));
}
callback(null, web3.fromWei(cost, "ether"));
}
else
{
callback(null, "0");
}
}
else
{
callback(null, "0");
}
})
}
function getNonce(address, callback)
{
web3.eth.getTransactionCount(address, function(error, result){
var txnsCount = result;
web3.currentProvider.sendAsync({
method: "txpool_content",
params: [],
jsonrpc: "2.0",
id: new Date().getTime()
}, function (error, result) {
if(result.result.pending)
{
if(result.result.pending[address])
{
txnsCount = txnsCount + Object.keys(result.result.pending[address]).length;
callback(null, txnsCount);
}
else
{
callback(null, txnsCount);
}
}
else
{
callback(null, txnsCount);
}
})
})
}
app.get("/deploy", function(req, res){
var code = req.query.code;
var arguments = JSON.parse(req.query.arguments);
var address = req.query.address;
var output = solc.compile(code, 1);
var contracts = output.contracts;
for(var contractName in contracts)
{
var abi = JSON.parse(contracts[contractName].interface);
var byteCode = contracts[contractName].bytecode;
var contract = web3.eth.contract(abi);
var data = contract.new.getData.call(null, ...arguments, {
data: byteCode
});
var gasRequired = web3.eth.estimateGas({
data: "0x" + data
});
web3.eth.getBalance(address, function(error, balance){
var etherAvailable = web3.fromWei(balance, "ether");
etherSpentInPendingTransactions(address, function(error, balance){
etherAvailable = etherAvailable.sub(balance)
if(etherAvailable.gte(web3.fromWei(new BigNumber(web3.eth.gasPrice).mul(gasRequired), "ether")))
{
getNonce(address, function(error, nonce){
var rawTx = {
gasPrice: web3.toHex(web3.eth.gasPrice),
gasLimit: web3.toHex(gasRequired),
from: address,
nonce: web3.toHex(nonce),
data: "0x" + data
};
var privateKey = ethereumjsUtil.toBuffer(req.query.key, 'hex');
var tx = new ethereumjsTx(rawTx);
tx.sign(privateKey);
web3.eth.sendRawTransaction("0x" + tx.serialize().toString('hex'), function(err, hash) {
res.send({result: {
hash: hash,
}});
});
})
}
else
{
res.send({error: "Insufficient Balance"});
}
})
})
break;
}
})
This is how the preceding code works:
Now let's build the frontend of our application. Our frontend will contain an editor, using which the user writes code. And when the user clicks on the compile button, we will dynamically display input boxes where each input box will represent a constructor argument. When the deploy button is clicked on, the constructor argument values are taken from these input boxes. The user will need to enter the JSON string in these input boxes.
Here is the frontend HTML code of our app. Place this code in the index.html file:
<!DOCTYPE html>
<html lang="en">
<head>
<meta charset="utf-8">
<meta name="viewport" content="width=device-width, initial-scale=1, shrink-to-fit=no">
<meta http-equiv="x-ua-compatible" content="ie=edge">
<link rel="stylesheet" href="/css/bootstrap.min.css">
<link rel="stylesheet" href="/css/codemirror.css">
<style type="text/css">
.CodeMirror
{
height: auto;
}
</style>
</head>
<body>
<div class="container">
<div class="row">
<div class="col-md-6">
<br>
<textarea id="editor"></textarea>
<br>
<span id="errors"></span>
<button type="button" id="compile" class="btn btn-primary">Compile</button>
</div>
<div class="col-md-6">
<br>
<form>
<div class="form-group">
<label for="address">Address</label>
<input type="text" class="form-control" id="address" placeholder="Prefixed with 0x">
</div>
<div class="form-group">
<label for="key">Private Key</label>
<input type="text" class="form-control" id="key" placeholder="Prefixed with 0x">
</div>
<hr>
<div id="arguments"></div>
<hr>
<button type="button" id="deploy" class="btn btn-primary">Deploy</button>
</form>
</div>
</div>
</div>
<script src="/js/codemirror.js"></script>
<script src="/js/main.js"></script>
</body>
</html>
Here, you can see that we have a textarea. The textarea tag will hold whatever the user will enter in the codemirror editor. Everything else in the preceding code is self-explanatory.
Here is the complete frontend JavaScript code. Place this code in the main.js file:
var editor = CodeMirror.fromTextArea(document.getElementById("editor"), {
lineNumbers: true,
});
var argumentsCount = 0;
document.getElementById("compile").addEventListener("click", function(){
editor.save();
var xhttp = new XMLHttpRequest();
xhttp.onreadystatechange = function() {
if (this.readyState == 4 && this.status == 200) {
if(JSON.parse(xhttp.responseText).errors != undefined)
{
document.getElementById("errors").innerHTML = JSON.parse(xhttp.responseText).errors + "<br><br>";
}
else
{
document.getElementById("errors").innerHTML = "";
}
var contracts = JSON.parse(xhttp.responseText).contracts;
for(var contractName in contracts)
{
var abi = JSON.parse(contracts[contractName].interface);
document.getElementById("arguments").innerHTML = "";
for(var count1 = 0; count1 < abi.length; count1++)
{
if(abi[count1].type == "constructor")
{
argumentsCount = abi[count1].inputs.length;
document.getElementById("arguments").innerHTML = '<label>Arguments</label>';
for(var count2 = 0; count2 < abi[count1].inputs.length; count2++)
{
var inputElement = document.createElement("input");
inputElement.setAttribute("type", "text");
inputElement.setAttribute("class", "form-control");
inputElement.setAttribute("placeholder", abi[count1].inputs[count2].type);
inputElement.setAttribute("id", "arguments-" + (count2 + 1));
var br = document.createElement("br");
document.getElementById("arguments").appendChild(br);
document.getElementById("arguments").appendChild(inputElement);
}
break;
}
}
break;
}
}
};
xhttp.open("GET", "/compile?code=" + encodeURIComponent(document.getElementById("editor").value), true);
xhttp.send();
})
document.getElementById("deploy").addEventListener("click", function(){
editor.save();
var arguments = [];
for(var count = 1; count <= argumentsCount; count++)
{
arguments[count - 1] = JSON.parse(document.getElementById("arguments-" + count).value);
}
var xhttp = new XMLHttpRequest();
xhttp.onreadystatechange = function() {
if (this.readyState == 4 && this.status == 200)
{
var res = JSON.parse(xhttp.responseText);
if(res.error)
{
alert("Error: " + res.error)
}
else
{
alert("Txn Hash: " + res.result.hash);
}
}
else if(this.readyState == 4)
{
alert("An error occured.");
}
};
xhttp.open("GET", "/deploy?code=" + encodeURIComponent(document.getElementById("editor").value) + "&arguments=" + encodeURIComponent(JSON.stringify(arguments)) + "&address=" + document.getElementById("address").value + "&key=" + document.getElementById("key").value, true);
xhttp.send();
})
Here is how the preceding code works:
To test the app, run the app.js node inside the Initial directory and visit localhost:8080. You will see what is shown in the following screenshot:
Now enter some solidity contract code and press the compile button. Then, you will be able to see new input boxes appearing on the right-hand side. For example, take a look at the following screenshot:
Now enter a valid address and its associated private key. And then enter values for the constructor arguments and click on deploy. If everything goes right, then you will see an alert box with the transaction hash. For example, take a look at the following screenshot:
In this chapter, we learned how to use the transaction pool API, how to calculate a proper nonce, calculate a spendable balance, generate the data of a transaction, compile contracts, and so on. We then built a complete contract compilation and deployment platform. Now you can go ahead and enhance the application we have built to deploy all the contracts found in the editor, handle imports, add libraries, and so on.
In the next chapter, we will learn about Oraclize by building a decentralized betting app.
Sometimes, it is necessary for smart contracts to access data from other dapps or from the World Wide Web. But it's really complicated to let smart contracts access outside data due to technical and consensus challenges. Therefore, currently, Ethereum smart contracts don't have native support to access outside data. But there are third-party solutions for Ethereum smart contracts to access data from some popular dapps and from the World Wide Web. In this chapter, we will learn how to use Oraclize to make HTTP requests from Ethereum smart contracts to access data from the World Wide Web. We will also learn how to access files stored in IPFS, use the strings library to work with strings, and so on. We will learn all this by building a football-betting smart contract and a client for it.
In this chapter, we'll cover the following topics:
Oraclize is a service that aims to enable smart contracts to access data from other blockchains and the World Wide Web. This service is currently live on bitcoin and Ethereum's testnet and mainnet. What makes Oraclize so special is that you don't need to trust it because it provides proof of authenticity of all data it provides to smart contracts.
In this chapter, our aim is to learn how Ethereum smart contracts can use the Oraclize service to fetch data from the World Wide Web.
Let's look at the process by which an Ethereum smart contract can fetch data from other blockchains and the World Wide Web using Oraclize.
To fetch data that exists outside of the Ethereum blockchain, an Ethereum smart contract needs to send a query to Oraclize, mentioning the data source (representing where to fetch the data from) and the input for the data source (representing what to fetch).
Sending a query to Oraclize Oraclize means sending a contract call (that is, an internal transaction) to the Oraclize contract present in the Ethereum blockchain.
The Oraclize server keeps looking for new incoming queries to its smart contract. Whenever it sees a new query, it fetches the result and sends it back to your contract by calling the _callback method of your contract.
Here is a list of sources from which Oraclize lets smart contracts fetch data:
These data sources are available at the time of writing this book. But many more data sources are likely to be available in the future.
Although Oraclize is a trusted service, you may still want to check whether the data returned by Oraclize is authentic or not, that is, whether it was manipulated by Oraclize or someone else in transit.
Optionally, Oraclize provides the TLSNotary proof of result that's returned from the URL, blockchain, and nested and computation data sources. This proof is not available for WolframAlpha and IPFS data sources. Currently, Oraclize only supports the TLSNotary proof, but in the future, they may support some other ways to authenticate. Currently, the TLSNotary proof needs to be validated manually, but Oraclize is already working on on-chain proof verification; that is, your smart contract code can verify the TLSNotary proof on its own while receiving the data from Oraclize so that this data is discarded if the proof turns out to be invalid.
This tool (https://github.com/Oraclize/proof-verification-tool) is an open source tool provided by Oraclize to validate the TLSNotary proof in case you want to.
Let's look at a high-level overview of how TLSNotary works. To understand how TLSNotary works, you need to first understand how TLS works. The TLS protocol provides a way for the client and server to create an encrypted session so that no one else can read or manipulate what is transferred between the client and server. The server first sends its certificate (issued to the domain owner by a trusted CA) to the client. The certificate will contain the public key of the server. The client uses the CA's public key to decrypt the certificate so that it can verify that the certificate is actually issued by the CA and get the server's public key. Then, the client generates a symmetric encryption key and a MAC key and encrypts them using the server's public key and sends it to the server. The server can only decrypt this message as it has the private key to decrypt it. Now the client and server share the same symmetric and MAC keys and no one else knows about these keys and they can start sending and receiving data from each other. The symmetric key is used to encrypt and decrypt the data where the MAC key and the symmetric key together are used to generate a signature for the encrypted message so that in case the message is modified by an attacker, the other party can know about it.
TLSNotary is a modification of TLS, which is used by Oraclize to provide cryptography proof showing that the data they provided to your smart contract was really the one the data source gave to Oraclize at a specific time. Actually, the TLSNotary protocol is an open source technology, developed and used by the PageSigner project.
TLSNotary works by splitting the symmetric key and the MAC key among three parties, that is, the server, an auditee, and an auditor. The basic idea of TLSNotary is that the auditee can prove to the auditor that a particular result was returned by the server at a given time.
So here is an overview of how exactly TLSNotary lets us achieve this. The auditor calculates the symmetric key and MAC key and gives only the symmetric key to the auditee. The MAC key is not needed by the auditee as the MAC signature check ensures that the TLS data from the server was not modified in transit. With the symmetric encryption key, the auditee can now decrypt data from the server. Because all messages are "signed" by the bank using the MAC key and only the server and the auditor know the MAC key, a correct MAC signature can serve as proof that certain messages came from the bank and were not spoofed by the auditee.
In the case of the Oraclize service, Oraclize is the auditee, while a locked-down AWS instance of a specially designed, open source Amazon machine image acts as the auditor.
The proof data they provide are the signed attestations of this AWS instance that a proper TLSnotary proof did occur. They also provide some additional proof regarding the software running in the AWS instance, that is, whether it has been modified since being initialized.
The first Oraclize query call coming from any Ethereum address is completely free of charge. Oraclize calls are free when used on testnets! This works for moderate usage in test environments only.
From the second call onward, you have to pay in ether for queries. While sending a query to Oraclize (that is, while making an internal transaction call), a fee is deducted by transferring ether from the calling contract to the Oraclize contract. The amount of ether to deduct depends on the data source and proof type.
Here is a table that shows the number of ether that is deducted while sending a query:
| Data source | Without proof | With TLSNotary proof |
| URL | $0.01 | $0.05 |
| Blockchain | $0.01 | $0.05 |
| WolframAlpha | $0.03 | $0.03 |
| IPFS | $0.01 | $0.01 |
So if you are making an HTTP request and you want the TLSNotary proof too, then the calling contract must have an ether worth of $0.05; otherwise, an exception is thrown.
For a contract to use the Oraclize service, it needs to inherit the usingOraclize contract. You can find this contract at https://github.com/Oraclize/Ethereum-api.
The usingOraclize contract acts as the proxy for the OraclizeI and OraclizeAddrResolverI contracts. Actually, usingOraclize makes it easy to make calls to the OraclizeI and OraclizeAddrResolverI contracts, that is, it provides simpler APIs. You can also directly make calls to the OraclizeI and OraclizeAddrResolverI contracts if you feel comfortable. You can go through the source code of these contracts to find all the available APIs. We will only learn the most necessary ones.
Let's look at how to set proof type, set proof storage location, make queries, find the cost of a query, and so on.
Whether you need the TLSNotary proof from Oraclize or not, you have to specify the proof type and proof storage location before making queries.
If you don't want proof, then put this code in your contract:
oraclize_setProof(proofType_NONE)
And if you want proof, then put this code in your contract:
oraclize_setProof(proofType_TLSNotary | proofStorage_IPFS)
Currently, proofStorage_IPFS is the only proof storage location available; that is, TLSNotary proof is only stored in IPFS.
You may execute any of these methods just once, for instance, in the constructor or at any other time if, for instance, you need the proof for certain queries only.
To send a query to Oraclize, you will need to call the oraclize_query function. This function expects at least two arguments, that is, the data source and the input for the given data source. The data source argument is not case-sensitive.
Here are some basic examples of the oraclize_query function:
oraclize_query("WolframAlpha", "random number between 0 and 100");
oraclize_query("URL", "https://api.kraken.com/0/public/Ticker?pair=ETHXBT");
oraclize_query("IPFS", "QmdEJwJG1T9rzHvBD8i69HHuJaRgXRKEQCP7Bh1BVttZbU");
oraclize_query("URL", "https://xyz.io/makePayment", '{"currency": "USD", "amount": "1"}');
Here is how the preceding code works:
If you want Oraclize to execute your query at a scheduled future time, just specify the delay (in seconds) from the current time as the first argument.
Here is an example:
oraclize_query(60, "WolframAlpha", "random number between 0 and 100");
The preceding query will be executed by Oraclize 60 seconds after it's been seen. So if the first argument is a number, then it's assumed that we are scheduling a query.
The transaction originating from Oraclize to your __callback function costs gas, just like any other transaction. You need to pay Oraclize the gas cost. The ether oraclize_query charges to make a query are also used to provide gas while calling the __callback function. By default, Oraclize provides 200,000 gas while calling the __callback function.
This return gas cost is actually in your control since you write the code in the __callback method and as such, can estimate it. So, when placing a query with Oraclize, you can also specify how much the gasLimit should be on the __callback transaction. Note, however, that since Oraclize sends the transaction, any unspent gas is returned to Oraclize, not you.
If the default, and minimum, value of 200,000 gas is not enough, you can increase it by specifying a different gasLimit in this way:
oraclize_query("WolframAlpha", "random number between 0 and 100", 500000);
Here, you can see that if the last argument is a number, then it's assumed to be the custom gas. In the preceding code, Oraclize will use a 500k gasLimit for the callback transaction instead of 200k. Because we are asking Oraclize to provide more gas, Oraclize will deduct more ether (depending on how much gas is required) while calling oraclize_query.
Once your result is ready, Oraclize will send a transaction back to your contract address and invoke one of these three methods:
Here is an example of the __callback function:
function __callback(bytes32 myid, string result) {
if (msg.sender != oraclize_cbAddress()) throw; // just to be sure the calling address is the Oraclize authorized one
//now doing something with the result..
}
The result returned from an HTTP request can be HTML, JSON, XML, binary, and so on. In Solidity, it is difficult and expensive to parse the result. Due to this, Oraclize provides parsing helpers to let it handle the parsing on its servers, and you get only the part of the result that you need.
To ask Oraclize to parse the result, you need to wrap the URL with one of these parsing helpers:
If you would like to know how much a query would cost before making the actual query, then you can use the Oraclize.getPrice() function to get the amount of wei required. The first argument it takes is the data source, and the second argument is optional, which is the custom gas.
One popular use case of this is to notify the client to add ether to the contract if there isn't enough to make the query.
Sometimes, you may not want to reveal the data source and/or the input for the data source. For example, you may not want to reveal the API key in the URL if there is any. Therefore, Oraclize provides a way to store queries encrypted in the smart contract and only Oraclize's server has the key to decrypt it.
Oraclize provides a Python tool (https://github.com/Oraclize/encrypted-queries), which can be used to encrypt the data source and/or the data input. It generates a non-deterministic encrypted string.
The CLI command to encrypt an arbitrary string of text is as follows:
python encrypted_queries_tools.py -e -p 044992e9473b7d90ca54d2886c7addd14a61109af202f1c95e218b0c99eb060c7134c4ae46345d0383ac996185762f04997d6fd6c393c86e4325c469741e64eca9 "YOUR DATASOURCE or INPUT"
The long hexadecimal string you see is the public key of Oraclize's server. Now you can use the output of the preceding command in place of the data source and/or the input for the data source.
There is another data source called decrypt. It is used to decrypt an encrypted string. But this data source doesn't return any result; otherwise, anyone would have the ability to decrypt the data source and input for the data source.
It was specifically designed to be used within the nested data source to enable partial query encryption. It is its only use case.
Oraclize provides a web IDE, using which you can write, compile, and test Oraclize-based applications. You can find it at http://dapps.Oraclize.it/browser-Solidity/.
If you visit the link, then you will notice that it looks exactly the same as browser Solidity. And it's actually browser Solidity with one extra feature. To understand what that feature is, we need to understand browser Solidity more in-depth.
Browser Solidity not only lets us write, compile, and generate web3.js code for our contracts, but it also lets us test those contracts there itself. Until now, in order to test our contract, we were setting up an Ethereum node and sending transactions to it. But browser Solidity can execute contracts without connecting to any node and everything happens in memory. It achieves this using ethereumjs-vm, which is a JavaScript implementation of EVM. Using ethereumjs-vm, you can create our own EVM and run byte code. If we want, we can configure browser Solidity to use the Ethereum node by providing the URL to connect to. The UI is very informative; therefore, you can try all these by yourself.
What's special about the Oraclize web IDE is that it deploys the Oraclize contract in the in-memory execution environment so that you don't have to connect to the testnet or mainnet node, but if you use browser Solidity, then you have to connect to the testnet or mainnet node to test Oraclize APIs.
Working with strings in Solidity is not as easy as working with strings in other high-level programming languages, such as JavaScript, Python, and so on. Therefore, many Solidity programmers have come up with various libraries and contracts to make it easy to work with strings.
The strings library is the most popular strings utility library. It lets us join, concatenate, split, compare, and so on by converting a string to something called a slice. A slice is a struct that holds the length of the string and the address of the string. Since a slice only has to specify an offset and a length, copying and manipulating slices is a lot less expensive than copying and manipulating the strings they reference.
To further reduce gas costs, most functions on slice that need to return a slice modify the original one instead of allocating a new one; for instance, s.split(".") will return the text up to the first ".", modifying s to only contain the remainder of the string after the ".". In situations where you do not want to modify the original slice, you can make a copy with .copy(), for example, s.copy().split("."). Try and avoid using this idiom in loops; since Solidity has no memory management, it will result in allocating many short-lived slices that are later discarded.
Functions that have to copy string data will return strings rather than slices; these can be cast back to slices for further processing if required.
Let's look at a few examples of working with strings using the strings library:
pragma Solidity ^0.4.0;
import "github.com/Arachnid/Solidity-stringutils/strings.sol";
contract Contract
{
using strings for *;
function Contract()
{
//convert string to slice
var slice = "xyz abc".toSlice();
//length of string
var length = slice.len();
//split a string
//subslice = xyz
//slice = abc
var subslice = slice.split(" ".toSlice());
//split a string into an array
var s = "www.google.com".toSlice();
var delim = ".".toSlice();
var parts = new string[](s.count(delim));
for(uint i = 0; i < parts.length; i++) {
parts[i] = s.split(delim).toString();
}
//Converting a slice back to a string
var myString = slice.toString();
//Concatenating strings
var finalSlice = subslice.concat(slice);
//check if two strings are equal
if(slice.equals(subslice))
{
}
}
}
The preceding code is self-explanatory.
Functions that return two slices come in two versions: a nonallocating version that takes the second slice as an argument, modifying it in place, and an allocating version that allocates and returns the second slice; for example, let's take a look at the following:
var slice1 = "abc".toSlice();
//moves the string pointer of slice1 to point to the next rune (letter)
//and returns a slice containing only the first rune
var slice2 = slice1.nextRune();
var slice3 = "abc".toSlice();
var slice4 = "".toSlice();
//Extracts the first rune from slice3 into slice4, advancing the slice to point to the next rune and returns slice4.
var slice5 = slice3.nextRune(slice4);
In our betting application, two people can choose to bet on a football match with one person supporting the home team and the other person supporting the away team. They both should bet the same amount of money, and the winner takes all the money. If the match is a draw, then they both will take back their money.
We will use the FastestLiveScores API to find out the result of matches. It provides a free API, which lets us make 100 requests per hour for free. First, go ahead and create an account and then generate an API key. To create an account, visit https://customer.fastestlivescores.com/register, and once the account is created, you will have the API key visible at https://customer.fastestlivescores.com/. You can find the API documentation at https://docs.crowdscores.com/.
For every bet between two people in our application, a betting contract will be deployed. The contract will contain the match ID retrieved from the FastestLiveScores API, the amount of wei each of the parties need to invest, and the addresses of the parties. Once both parties have invested in the contract, they will find out the result of the match. If the match is not yet finished, then they will try to check the result after every 24 hours.
Here is the code for the contract:
pragma Solidity ^0.4.0;
import "github.com/Oraclize/Ethereum-api/oraclizeAPI.sol";
import "github.com/Arachnid/Solidity-stringutils/strings.sol";
contract Betting is usingOraclize
{
using strings for *;
string public matchId;
uint public amount;
string public url;
address public homeBet;
address public awayBet;
function Betting(string _matchId, uint _amount, string _url)
{
matchId = _matchId;
amount = _amount;
url = _url;
oraclize_setProof(proofType_TLSNotary | proofStorage_IPFS);
}
//1 indicates home team
//2 indicates away team
function betOnTeam(uint team) payable
{
if(team == 1)
{
if(homeBet == 0)
{
if(msg.value == amount)
{
homeBet = msg.sender;
if(homeBet != 0 && awayBet != 0)
{
oraclize_query("URL", url);
}
}
else
{
throw;
}
}
else
{
throw;
}
}
else if(team == 2)
{
if(awayBet == 0)
{
if(msg.value == amount)
{
awayBet = msg.sender;
if(homeBet != 0 && awayBet != 0)
{
oraclize_query("URL", url);
}
}
else
{
throw;
}
}
else
{
throw;
}
}
else
{
throw;
}
}
function __callback(bytes32 myid, string result, bytes proof) {
if (msg.sender != oraclize_cbAddress())
{
throw;
}
else
{
if(result.toSlice().equals("home".toSlice()))
{
homeBet.send(this.balance);
}
else if(result.toSlice().equals("away".toSlice()))
{
awayBet.send(this.balance);
}
else if(result.toSlice().equals("draw".toSlice()))
{
homeBet.send(this.balance / 2);
awayBet.send(this.balance / 2);
}
else
{
if (Oraclize.getPrice("URL") < this.balance)
{
oraclize_query(86400, "URL", url);
}
}
}
}
}
The contract code is self-explanatory. Now compile the preceding code using solc.js or browser Solidity depending on whatever you are comfortable with. You will not need to link the strings library because all the functions in it are set to the internal visibility.
To make it easy to find match's IDs, deploy, and invest in contracts, we need to build a UI client. So let's get started with building a client, which will have two paths, that is, the home path to deploy contracts and bet on matches and the other path to find the list of matches. We will let users deploy and bet using their own offline accounts so that the entire process of betting happens in a decentralized manner and nobody can cheat.
Before we start building our client, make sure that you have testnet synced because Oraclize works only on Ethereum's testnet/mainnet and not on private networks. You can switch to testnet and start downloading the testnet blockchain by replacing the --dev option with the --testnet option. For example, take a look at the following:
geth --testnet --rpc --rpccorsdomain "*" --rpcaddr "0.0.0.0" --rpcport "8545"
In the exercise files of this chapter, you will find two directories, that is, Final and Initial. Final contains the final source code of the project, whereas Initial contains the empty source code files and libraries to get started with building the application quickly.
In the Initial directory, you will find a public directory and two files named app.js and package.json. The package.json file contains the backend dependencies of our app, and app.js is where you will place the backend source code.
The public directory contains files related to the frontend. Inside public/css, you will find bootstrap.min.css, which is the bootstrap library. Inside public/html, you will find the index.html and matches.ejs files, where you will place the HTML code of our app, and in the public/js directory, you will find js files for web3.js, and ethereumjs-tx. Inside public/js, you will also find a main.js file, where you will place the frontend JS code of our app. You will also find the Oraclize Python tool to encrypt queries.
Let's first build the backend of the app. First of all, run npm install inside the Initial directory to install the required dependencies for our backend.
Here is the backend code to run an express service and serve the index.html file and static files and set the view engine:
var express = require("express");
var app = express();
app.set("view engine", "ejs");
app.use(express.static("public"));
app.listen(8080);
app.get("/", function(req, res) {
res.sendFile(__dirname + "/public/html/index.html");
})
The preceding code is self-explanatory. Now let's proceed further. Our app will have another page, which will display a list of recent matches with matches' IDs and result if a match has finished. Here is the code for the endpoint:
var request = require("request");
var moment = require("moment");
app.get("/matches", function(req, res) {
request("https://api.crowdscores.com/v1/matches?api_key=7b7a988932de4eaab4ed1b4dcdc1a82a", function(error, response, body) {
if (!error && response.statusCode == 200) {
body = JSON.parse(body);
for (var i = 0; i < body.length; i++) {
body[i].start = moment.unix(body[i].start /
1000).format("YYYY MMM DD hh:mm:ss");
}
res.render(__dirname + "/public/html/matches.ejs", {
matches: body
});
} else {
res.send("An error occured");
}
})
})
Here, we are making the API request to fetch the list of recent matches and then we are passing the result to the matches.ejs file so that it can render the result in a user-friendly UI. The API results give us the match start time as a timestamp; therefore, we are using moment to convert it to a human readable format. We make this request from the backend and not from the frontend so that we don't expose the API key to the users.
Our backend will provide an API to the frontend, using which the frontend can encrypt the query before deploying the contract. Our application will not prompt users to create an API key, as it would be a bad UX practice. The application's developer controlling the API key will cause no harm as the developer cannot modify the result from the API servers; therefore, users will still trust the app even after the application's developer knows the API key.
Here is code for the encryption endpoint:
var PythonShell = require("python-shell");
app.get("/getURL", function(req, res) {
var matchId = req.query.matchId;
var options = {
args: ["-e", "-p", "044992e9473b7d90ca54d2886c7addd14a61109af202f1c95e218b0c99eb060c7134c4ae46345d0383ac996185762f04997d6fd6c393c86e4325c469741e64eca9", "json(https://api.crowdscores.com/v1/matches/" + matchId + "?api_key=7b7a988932de4eaab4ed1b4dcdc1a82a).outcome.winner"],
scriptPath: __dirname
};
PythonShell.run("encrypted_queries_tools.py", options, function
(err, results) {
if(err)
{
res.send("An error occured");
}
else
{
res.send(results[0]);
}
});
})
We have already seen how to use this tool. To run this endpoint successfully, make sure that Python is installed on your system. Even if Python is installed, this endpoint may show errors, indicating that Python's cryptography and base58 modules aren't installed. So make sure you install these modules if the tool prompts you to.
Now let's build the frontend of our application. Our frontend will let users see the list of recent matches, deploy the betting contract, bet on a game, and let them see information about a betting contract.
Let's first implement the matches.ejs file, which will display the list of recent matches. Here is the code for this:
<!DOCTYPE html>
<html lang="en">
<head>
<meta charset="utf-8">
<meta name="viewport" content="width=device-width, initial-scale=1, shrink-to-fit=no">
<meta http-equiv="x-ua-compatible" content="ie=edge">
<link rel="stylesheet" href="/css/bootstrap.min.css">
</head>
<body>
<div class="container">
<br>
<div class="row m-t-1">
<div class="col-md-12">
<a href="/">Home</a>
</div>
</div>
<br>
<div class="row">
<div class="col-md-12">
<table class="table table-inverse">
<thead>
<tr>
<th>Match ID</th>
<th>Start Time</th>
<th>Home Team</th>
<th>Away Team</th>
<th>Winner</th>
</tr>
</thead>
<tbody>
<% for(var i=0; i < matches.length; i++) { %>
<tr>
<td><%= matches[i].dbid %></td>
<% if (matches[i].start) { %>
<td><%= matches[i].start %></td>
<% } else { %>
<td>Time not finalized</td>
<% } %>
<td><%= matches[i].homeTeam.name %></td>
<td><%= matches[i].awayTeam.name %></td>
<% if (matches[i].outcome) { %>
<td><%= matches[i].outcome.winner %></td>
<% } else { %>
<td>Match not finished</td>
<% } %>
</tr>
<% } %>
</tbody>
</table>
</div>
</div>
</div>
</body>
</html>
The preceding code is self-explanatory. Now let's write the HTML code for our home page. Our homepage will display three forms. The first form is to deploy a betting contract, the second form is to invest in a betting contract, and the third form is to display information on a deployed betting contract.
Here is the HTML code for the home page. Place this code in the index.html page:
<!DOCTYPE html>
<html lang="en">
<head>
<meta charset="utf-8">
<meta name="viewport" content="width=device-width, initial-scale=1, shrink-to-fit=no">
<meta http-equiv="x-ua-compatible" content="ie=edge">
<link rel="stylesheet" href="/css/bootstrap.min.css">
</head>
<body>
<div class="container">
<br>
<div class="row m-t-1">
<div class="col-md-12">
<a href="/matches">Matches</a>
</div>
</div>
<br>
<div class="row">
<div class="col-md-4">
<h3>Deploy betting contract</h3>
<form id="deploy">
<div class="form-group">
<label>From address: </label>
<input type="text" class="form-control" id="fromAddress">
</div>
<div class="form-group">
<label>Private Key: </label>
<input type="text" class="form-control" id="privateKey">
</div>
<div class="form-group">
<label>Match ID: </label>
<input type="text" class="form-control" id="matchId">
</div>
<div class="form-group">
<label>Bet Amount (in ether): </label>
<input type="text" class="form-control" id="betAmount">
</div>
<p id="message" style="word-wrap: break-word"></p>
<input type="submit" value="Deploy" class="btn btn-primary" />
</form>
</div>
<div class="col-md-4">
<h3>Bet on a contract</h3>
<form id="bet">
<div class="form-group">
<label>From address: </label>
<input type="text" class="form-control" id="fromAddress">
</div>
<div class="form-group">
<label>Private Key: </label>
<input type="text" class="form-control" id="privateKey">
</div>
<div class="form-group">
<label>Contract Address: </label>
<input type="text" class="form-control"
id="contractAddress">
</div>
<div class="form-group">
<label>Team: </label>
<select class="form-control" id="team">
<option>Home</option>
<option>Away</option>
</select>
</div>
<p id="message" style="word-wrap: break-word"></p>
<input type="submit" value="Bet" class="btn btn-primary" />
</form>
</div>
<div class="col-md-4">
<h3>Display betting contract</h3>
<form id="find">
<div class="form-group">
<label>Contract Address: </label>
<input type="text" class="form-control"
d="contractAddress">
</div>
<p id="message"></p>
<input type="submit" value="Find" class="btn btn-primary" />
</form>
</div>
</div>
</div>
<script type="text/javascript" src="/js/web3.min.js"></script>
<script type="text/javascript" src="/js/ethereumjs-tx.js"></script>
<script type="text/javascript" src="/js/main.js"></script>
</body>
</html>
The preceding code is self-explanatory. Now let's write JavaScript code to actually deploy the contract, invest in contracts, and display information on contracts. Here is the code for all this. Place this code in the main.js file:
var bettingContractByteCode = "6060604...";
var bettingContractABI = [{"constant":false,"inputs":[{"name":"team","type":"uint256"}],"name":"betOnTeam","outputs":[],"payable":true,"type":"function"},{"constant":false,"inputs":[{"name":"myid","type":"bytes32"},{"name":"result","type":"string"}],"name":"__callback","outputs":[],"payable":false,"type":"function"},{"constant":false,"inputs":[{"name":"myid","type":"bytes32"},{"name":"result","type":"string"},{"name":"proof","type":"bytes"}],"name":"__callback","outputs":[],"payable":false,"type":"function"},{"constant":true,"inputs":[],"name":"url","outputs":[{"name":"","type":"string"}],"payable":false,"type":"function"},{"constant":true,"inputs":[],"name":"matchId","outputs":[{"name":"","type":"string"}],"payable":false,"type":"function"},{"constant":true,"inputs":[],"name":"amount","outputs":[{"name":"","type":"uint256"}],"payable":false,"type":"function"},{"constant":true,"inputs":[],"name":"homeBet","outputs":[{"name":"","type":"address"}],"payable":false,"type":"function"},{"constant":true,"inputs":[],"name":"awayBet","outputs":[{"name":"","type":"address"}],"payable":false,"type":"function"},{"inputs":[{"name":"_matchId","type":"string"},{"name":"_amount","type":"uint256"},{"name":"_url","type":"string"}],"payable":false,"type":"constructor"}];
var web3 = new Web3(new Web3.providers.HttpProvider("http://localhost:8545"));
function getAJAXObject()
{
var request;
if (window.XMLHttpRequest) {
request = new XMLHttpRequest();
} else if (window.ActiveXObject) {
try {
request = new ActiveXObject("Msxml2.XMLHTTP");
} catch (e) {
try {
request = new ActiveXObject("Microsoft.XMLHTTP");
} catch (e) {}
}
}
return request;
}
document.getElementById("deploy").addEventListener("submit", function(e){
e.preventDefault();
var fromAddress = document.querySelector("#deploy #fromAddress").value;
var privateKey = document.querySelector("#deploy #privateKey").value;
var matchId = document.querySelector("#deploy #matchId").value;
var betAmount = document.querySelector("#deploy #betAmount").value;
var url = "/getURL?matchId=" + matchId;
var request = getAJAXObject();
request.open("GET", url);
request.onreadystatechange = function() {
if (request.readyState == 4) {
if (request.status == 200) {
if(request.responseText != "An error occured")
{
var queryURL = request.responseText;
var contract = web3.eth.contract(bettingContractABI);
var data = contract.new.getData(matchId,
web3.toWei(betAmount, "ether"), queryURL, {
data: bettingContractByteCode
});
var gasRequired = web3.eth.estimateGas({ data: "0x" + data
});
web3.eth.getTransactionCount(fromAddress, function(error, nonce){
var rawTx = {
gasPrice: web3.toHex(web3.eth.gasPrice),
gasLimit: web3.toHex(gasRequired),
from: fromAddress,
nonce: web3.toHex(nonce),
data: "0x" + data,
};
privateKey = EthJS.Util.toBuffer(privateKey, "hex");
var tx = new EthJS.Tx(rawTx);
tx.sign(privateKey);
web3.eth.sendRawTransaction("0x" +
tx.serialize().toString("hex"), function(err, hash) {
if(!err)
{document.querySelector("#deploy #message").
innerHTML = "Transaction Hash: " + hash + ".
Transaction is mining...";
var timer = window.setInterval(function(){
web3.eth.getTransactionReceipt(hash, function(err, result){
if(result)
{window.clearInterval(timer);
document.querySelector("#deploy #message").innerHTML =
"Transaction Hash: " + hash + " and contract address is: " +
result.contractAddress;}
})
}, 10000)
}
else
{document.querySelector("#deploy #message").innerHTML = err;
}
});
})
}
}
}
};
request.send(null);
}, false)
document.getElementById("bet").addEventListener("submit", function(e){
e.preventDefault();
var fromAddress = document.querySelector("#bet #fromAddress").value;
var privateKey = document.querySelector("#bet #privateKey").value;
var contractAddress = document.querySelector("#bet #contractAddress").value;
var team = document.querySelector("#bet #team").value;
if(team == "Home")
{
team = 1;
}
else
{
team = 2;
}
var contract = web3.eth.contract(bettingContractABI).at(contractAddress);
var amount = contract.amount();
var data = contract.betOnTeam.getData(team);
var gasRequired = contract.betOnTeam.estimateGas(team, {
from: fromAddress,
value: amount,
to: contractAddress
})
web3.eth.getTransactionCount(fromAddress, function(error, nonce){
var rawTx = {
gasPrice: web3.toHex(web3.eth.gasPrice),
gasLimit: web3.toHex(gasRequired),
from: fromAddress,
nonce: web3.toHex(nonce),
data: data,
to: contractAddress,
value: web3.toHex(amount)
};
privateKey = EthJS.Util.toBuffer(privateKey, "hex");
var tx = new EthJS.Tx(rawTx);
tx.sign(privateKey);
web3.eth.sendRawTransaction("0x" + tx.serialize().toString("hex"), function(err, hash) {
if(!err)
{
document.querySelector("#bet #message").innerHTML = "Transaction
Hash: " + hash;
}
else
{
document.querySelector("#bet #message").innerHTML = err;
}
})
})
}, false)
document.getElementById("find").addEventListener("submit", function(e){
e.preventDefault();
var contractAddress = document.querySelector("#find
#contractAddress").value;
var contract =
web3.eth.contract(bettingContractABI).at(contractAddress);
var matchId = contract.matchId();
var amount = contract.amount();
var homeAddress = contract.homeBet();
var awayAddress = contract.awayBet();
document.querySelector("#find #message").innerHTML = "Contract balance is: " + web3.fromWei(web3.eth.getBalance(contractAddress), "ether") + ", Match ID is: " + matchId + ", bet amount is: " + web3.fromWei(amount, "ether") + " ETH, " + homeAddress + " has placed bet on home team and " + awayAddress + " has placed bet on away team";
}, false)
This is how the preceding code works:
Now that we have finished building our betting platform, it's time to test it. Before testing, make sure the testnet blockchain is completely downloaded and is looking for new incoming blocks.
Now using our wallet service we built earlier, generate three accounts. Add one ether to each of the accounts using http://faucet.ropsten.be:3001/.
Then, run node app.js inside the Initial directory and then visit http://localhost:8080/matches, and you will see what is shown in this screenshot:
Here, you can copy any match ID. Let's assume you want to test with the first match, that is, 123945. Now visit http://localhost:8080 and you will see what is shown in this screenshot:
Now deploy the contract by filling the input fields in the first form and clicking on the Deploy button, as shown here. Use your first account to deploy the contract.
Now bet on the contract's home team from the second account and the away team from the third account, as shown in the following screenshot:
Now put the contract address on the third form and click on the Find button to see the details about the contract. You will see something similar to what is shown in the following screenshot:
Once both the transactions are mined, check the details of the contract again, and you will see something similar to what is shown in the following screenshot:
Here, you can see that the contract doesn't have any ether and all the ether was transferred to the account that put the bet on the home team.
In this chapter, we learned about Oraclize and the strings library in depth. We used them together to build a decentralized betting platform. Now you can go ahead and customize the contract and the client based on your requirements. To enhance the app, you can add events to the contract and display notifications on the client. The objective was to understand the basic architecture of a decentralized betting app.
In the next chapter, we will learn how to build enterprise-level Ethereum smart contracts using truffle by building our own crypto currency.
Until now, we were using browser Solidity to write and compile Solidity code. And we were testing our contracts using web3.js. We could have also used the Solidity online IDE to test them. This seemed alright as we were only compiling a single small contract and it had very few imports. As you start building large and complicated smart contracts, you will start facing problems with compiling and testing using the current procedure. In this chapter, we will learn about truffle, which makes it easy to build enterprise-level DApps, by building an altcoin. All the crypto currencies other than bitcoin are called altcoins.
In this chapter, we'll cover the following topics:
ethereumjs-testrpc is a Node.js-based Ethereum node used for testing and development. It simulates full-node behavior and makes the development of Ethereum applications much faster. It also includes all popular RPC functions and features (such as events) and can be run deterministically to make development a breeze.
It's written in JavaScript and is distributed as an npm package. At the time of writing this, the latest version of ethereumjs-testrpc is 3.0.3 and requires at least Node.js version 6.9.1 to run properly.
There are three ways to simulate an Ethereum node using ethereumjs-testrpc. Each of these ways has its own use cases. Let's explore them.
The testrpc command can be used to simulate an Ethereum node. To install this command-line app, you need to install ethereumjs-testrpc globally:
npm install -g ethereumjs-testrpc
Here are the various options that can be provided:
Note that private keys are 64 characters long and must be input as a 0x-prefixed hex string. The balance can either be input as an integer or a 0x-prefixed hex value specifying the amount of wei in that account.
You can use ethereumjs-testrpc as a web3 provider like this:
var TestRPC = require("ethereumjs-testrpc");
web3.setProvider(TestRPC.provider());
You can use ethereumjs-testrpc as a general HTTP server like this:
var TestRPC = require("ethereumjs-testrpc");
var server = TestRPC.server();
server.listen(port, function(err, blockchain) {});
Both provider() and server() take a single object that allows you to specify the behavior of the ethereumjs-testrpc. This parameter is optional. The available options are as follows:
Here is the list of RPC methods made available with ethereumjs-testrpc:
There are also special nonstandard methods that aren't included within the original RPC specification:
Topics are values used for indexing events. You cannot search for events without topics. Whenever an event is invoked, a default topic is generated, which is considered the first topic of the event. There can be up to four topics for an event. Topics are always generated in the same order. You can search for an event using one or more of its topics.
The first topic is the signature of the event. The rest of the three topics are the values of indexed parameters. If the index parameter is string, bytes, or array, then the keccak-256 hash of it is the topic instead.
Let's take an example to understand topics. Suppose there is an event of this form:
event ping(string indexed a, int indexed b, uint256 indexed c, string d, int e);
//invocation of event
ping("Random String", 12, 23, "Random String", 45);
Here, these four topics are generated. They are as follows:
Internally, your Ethereum node will build indexes using topics so that you can easily find events based on signatures and indexed values.
Suppose you want to get event calls of the preceding event, where the first argument is Random String and the third argument is either 23 or 78; then, you can find them using web3.eth.getFilter this way:
var filter = web3.eth.filter({
fromBlock: 0,
toBlock: "latest",
address: "0x853cdcb4af7a6995808308b08bb78a74de1ef899",
topics: ["0xb62a11697c0f56e93f3957c088d492b505b9edd7fb6e7872a93b41cdb2020644", "0x30ee7c926ebaf578d95b278d78bc0cde445887b0638870a26dcab901ba21d3f2", null, [EthJS.Util.bufferToHex(EthJS.Util.setLengthLeft(23, 32)), EthJS.Util.bufferToHex(EthJS.Util.setLengthLeft(78, 32))]]
});
filter.get(function(error, result){
if (!error)
console.log(result);
});
So here, we are asking the node to return all events from the blockchain that have been fired by the 0x853cdcb4af7a6995808308b08bb78a74de1ef899 contract address, whose first topic is 0xb62a11697c0f56e93f3957c088d492b505b9edd7fb6e7872a93b41cdb2020644, the second topic is 0x30ee7c926ebaf578d95b278d78bc0cde445887b0638870a26dcab901ba21d3f2, and the third topic is either 0x0000000000000000000000000000000000000000000000000000000000000017 or 0x000000000000000000000000000000000000000000000000000000000000004e.
It is important to learn truffle-contract before learning truffle because truffle-contract is tightly integrated into truffle. Truffle tests, code to interact with contracts in truffle, deployment code, and so on are written using truffle-contract.
The truffle-contract API is a JavaScript and Node.js library, which makes it easy to work with ethereum smart contracts. Until now, we have been using web3.js to deploy and call smart contracts functions, which is fine, but truffle-contract aims to make it even easier to work with ethereum smart contracts. Here are some features of truffle-contract that make it a better choice then web3.js in order to work with smart contracts:
Before we get into truffle-contract, you need to know that it doesn't allow us to sign transactions using accounts stored outside of the ethereum node; that is, it doesn't have anything similar to sendRawTransaction. The truffle-contract API assumes that every user of your DApp has their own ethereum node running and they have their accounts stored in that node. Actually this is how DApps should work because if every DApp's client starts letting users create and manage accounts, then it will be a concern for users to manage so many accounts and painful for developers to develop a wallet manager every time for every client they build. Now, the question is how will clients know where the user has stored the accounts and in what format? So, for portability reasons, it's recommended that you assume that users have their accounts stored in their personal node, and to manage the account, they use something like the ethereum Wallet app. As accounts stored in the Ethereum node are signed by the ethereum node itself, there is no need for sendRawTransaction anymore. Every user needs to have their own node and cannot share a node because when an account is unlocked, it will be open for anyone to use it, which will enable users to steal other's ether and make transactions from others' accounts.
If your applications require the functionality of creating and signing raw transactions, then you can use truffle-contract just to develop and test smart contracts, and in your application, you can interact with contracts just like we were doing earlier.
At the time of writing this, the latest version of the truffle-contract API is 1.1.10. Before importing truffle-contract, you need to first import web3.js as you will need to create a provider to work with the truffle-contract APIs so that truffle-contract will internally use the provider to make JSON-RPC calls.
To install truffle-contract in the Node.js app, you need to simply run this in your app directory:
npm install truffle-contract
And then use this code to import it:
var TruffleContract = require("truffle-contract");
To use truffle-contract in a browser, you can find the browser distribution inside the dist directory in the https://github.com/trufflesuite/truffle-contract repository.
In HTML, you can enqueue it this way:
<script type="text/javascript" src="./dist/truffle-contract.min.js"></script>
Now you will have a TruffleContract global variable available.
Before we start learning about truffle-contract APIs, we need to set up a testing environment, which will help us test our code while learning.
First of all, run the ethereumjs-testrpc node representing network ID 10 by just running the testrpc --networkId 10 command. We have randomly chosen network ID 10 for development purposes, but you are free to choose any other network ID. Just make sure it's not 1 as mainnet is always used in live apps and not for development and testing purposes.
Then, create an HTML file and place this code in it:
<!doctype html>
<html>
<body>
<script type="text/javascript" src="./web3.min.js"></script>
<script type="text/javascript" src="./truffle-
contract.min.js"></script>
<script type="text/javascript">
//place your code here
</script>
</body>
</html>
Download web3.min.js and truffle-contract.min.js. You can find the truffle-contract browser build at https://github.com/trufflesuite/truffle-contract/tree/master/dist.
Now let's explore truffle-contract APIs. Basically, truffle-contract has two APIs, that is, the contract abstraction API and the contract instance API. A contract abstraction API represents various kinds of information about the contract (or a library), such: as its ABI; unlinked byte code; if the contract is already deployed, then its address in various ethereum networks; addresses of the libraries it depends on for various ethereum networks if deployed; and events of the contract. The abstraction API is a set of functions that exist for all contract abstractions. A contract instance represents a deployed contract in a specific network. The instance API is the API available to contract instances. It is created dynamically based on functions available in your Solidity source file. A contract instance for a specific contract is created from a contract abstraction that represents the same contract.
The contract abstraction API is something that makes truffle-contract very special compared to web3.js. Here is why it's special:
Before we get into how to create a contract abstraction and its methods, let's write a sample contract, which the contract abstraction will represent. Here is the sample contract:
pragma Solidity ^0.4.0;
import "github.com/pipermerriam/ethereum-string-utils/contracts/StringLib.sol";
contract Sample
{
using StringLib for *;
event ping(string status);
function Sample()
{
uint a = 23;
bytes32 b = a.uintToBytes();
bytes32 c = "12";
uint d = c.bytesToUInt();
ping("Conversion Done");
}
}
This contract converts uint into bytes32 and bytes32 into uint using the StringLib library. StringLib is available at the 0xcca8353a18e7ab7b3d094ee1f9ddc91bdf2ca6a4 address on the main network, but on other networks, we need to deploy it to test the contract. Before you proceed further, compile it using browser Solidity, as you will need the ABI and byte code.
Now let's create a contract abstraction representing the Sample contract and the StringLib library. Here is the code for this. Place it in the HTML file:
var provider = new Web3.providers.HttpProvider("http://localhost:8545");
var web3 = new Web3(provider);
var SampleContract = TruffleContract({
abi: [{"inputs":[],"payable":false,"type":"constructor"},{"anonymous":false,"inputs":[{"indexed":false,"name":"status","type":"string"}],"name":"ping","type":"event"}],
unlinked_binary: "6060604052341561000c57fe5b5b6000600060006000601793508373__StringLib__6394e8767d90916000604051602001526040518263ffffffff167c01000000000000000000000000000000000000000000000000000000000281526004018082815260200191505060206040518083038186803b151561008b57fe5b60325a03f4151561009857fe5b5050506040518051905092507f31320000000000000000000000000000000000000000000000000000000000009150816000191673__StringLib__6381a33a6f90916000604051602001526040518263ffffffff167c010000000000000000000000000000000000000000000000000000000002815260040180826000191660001916815260200191505060206040518083038186803b151561014557fe5b60325a03f4151561015257fe5b5050506040518051905090507f3adb191b3dee3c3ccbe8c657275f608902f13e3a020028b12c0d825510439e5660405180806020018281038252600f8152602001807f436f6e76657273696f6e20446f6e65000000000000000000000000000000000081525060200191505060405180910390a15b505050505b6033806101da6000396000f30060606040525bfe00a165627a7a7230582056ebda5c1e4ba935e5ad61a271ce8d59c95e0e4bca4ad20e7f07d804801e95c60029",
networks: {
1: {
links: {
"StringLib": "0xcca8353a18e7ab7b3d094ee1f9ddc91bdf2ca6a4"
},
events: {
"0x3adb191b3dee3c3ccbe8c657275f608902f13e3a020028b12c0d825510439e56": {
"anonymous": false,
"inputs": [
{
"indexed": false,
"name": "status",
"type": "string"
}
],
"name": "ping",
"type": "event"
}
}
},
10: {
events: {
"0x3adb191b3dee3c3ccbe8c657275f608902f13e3a020028b12c0d825510439e56": {
"anonymous": false,
"inputs": [
{
"indexed": false,
"name": "status",
"type": "string"
}
],
"name": "ping",
"type": "event"
}
}
}
},
contract_name: "SampleContract",
});
SampleContract.setProvider(provider);
SampleContract.detectNetwork();
SampleContract.defaults({
from: web3.eth.accounts[0],
gas: "900000",
gasPrice: web3.eth.gasPrice,
})
var StringLib = TruffleContract({
abi: [{"constant":true,"inputs":[{"name":"v","type":"bytes32"}],"name":"bytesToUInt","outputs":[{"name":"ret","type":"uint256"}],"payable":false,"type":"function"},{"constant":true,"inputs":[{"name":"v","type":"uint256"}],"name":"uintToBytes","outputs":[{"name":"ret","type":"bytes32"}],"payable":false,"type":"function"}],
unlinked_binary: "6060604052341561000c57fe5b5b6102178061001c6000396000f30060606040526000357c0100000000000000000000000000000000000000000000000000000000900463ffffffff16806381a33a6f1461004657806394e8767d14610076575bfe5b6100606004808035600019169060200190919050506100aa565b6040518082815260200191505060405180910390f35b61008c6004808035906020019091905050610140565b60405180826000191660001916815260200191505060405180910390f35b6000600060006000600102846000191614156100c557610000565b600090505b60208110156101355760ff81601f0360080260020a85600190048115156100ed57fe5b0416915060008214156100ff57610135565b603082108061010e5750603982115b1561011857610000565b5b600a8302925060308203830192505b80806001019150506100ca565b8292505b5050919050565b60006000821415610173577f300000000000000000000000000000000000000000000000000000000000000090506101e2565b5b60008211156101e157610100816001900481151561018e57fe5b0460010290507f01000000000000000000000000000000000000000000000000000000000000006030600a848115156101c357fe5b06010260010281179050600a828115156101d957fe5b049150610174565b5b8090505b9190505600a165627a7a72305820d2897c98df4e1a3a71aefc5c486aed29c47c80cfe77e38328ef5f4cb5efcf2f10029",
networks: {
1: {
address: "0xcca8353a18e7ab7b3d094ee1f9ddc91bdf2ca6a4"
}
},
contract_name: "StringLib",
})
StringLib.setProvider(provider);
StringLib.detectNetwork();
StringLib.defaults({
from: web3.eth.accounts[0],
gas: "900000",
gasPrice: web3.eth.gasPrice,
})
Here is how the preceding code works:
A contract instance represents a deployed contract in a particular network. Using a contract abstraction instance, we need to create a contract instance. There are three methods to create a contract instance:
Let's deploy and get a contract instance of the Sample contract. In network ID 10, we need to use new() to deploy the StringLib library first and then add the deployed address of the StringLib library to the StringLib abstraction, link the StringLib abstraction to the SampleContract abstraction, and then deploy the Sample contract using new() to get an instance of the Sample contract. But in network ID 1, we just need to deploy SampleContract and get its instance, as we already have StringLib deployed there. Here is the code to do all this:
web3.version.getNetwork(function(err, network_id) {
if(network_id == 1)
{
var SampleContract_Instance = null;
SampleContract.new().then(function(instance){
SampleContract.networks[SampleContract.network_id]
["address"] = instance.address;
SampleContract_Instance = instance;
})
}
else if(network_id == 10)
{
var StringLib_Instance = null;
var SampleContract_Instance = null;
StringLib.new().then(function(instance){
StringLib_Instance = instance;
}).then(function(){
StringLib.networks[StringLib.network_id] = {};
StringLib.networks[StringLib.network_id]["address"] =
StringLib_Instance.address;
SampleContract.link(StringLib);
}).then(function(result){
return SampleContract.new();
}).then(function(instance){
SampleContract.networks[SampleContract.network_id]
["address"] = instance.address;
SampleContract_Instance = instance;
})
}
});
This is how the preceding code works:
Each contract instance is different based on the source Solidity contract, and the API is created dynamically. Here are the various the APIs of a contract instance:
Truffle is a development environment (providing a command-line tool to compile, deploy, test, and build), framework (providing various packages to make it easy to write tests, deployment code, build clients, and so on) and asset pipeline (publishing packages and using packages published by others) to build ethereum-based DApps.
Truffle works on OS X, Linux, and Windows. Truffle requires you to have Node.js version 5.0+ installed. At the time of writing this, the latest stable version of truffle is 3.1.2, and we will be using this version. To install truffle, you just need to run this command:
npm install -g truffle
Before we go ahead, make sure you are running testrpc with network ID 10. The reason is the same as the one discussed earlier.
First, you need to create a directory for your app. Name the directory altcoin. Inside the altcoin directory, run this command to initialize your project:
truffle init
Once completed, you'll have a project structure with the following items:
By default, truffle init gives you a set of example contracts (MetaCoin and ConvertLib), which act like a simple altcoin built on top of ethereum.
Here is the source code of the MetaCoin smart contract just for reference:
pragma Solidity ^0.4.4;
import "./ConvertLib.sol";
contract MetaCoin {
mapping (address => uint) balances;
event Transfer(address indexed _from, address indexed _to, uint256 _value);
function MetaCoin() {
balances[tx.origin] = 10000;
}
function sendCoin(address receiver, uint amount) returns(bool sufficient) {
if (balances[msg.sender] < amount) return false;
balances[msg.sender] -= amount;
balances[receiver] += amount;
Transfer(msg.sender, receiver, amount);
return true;
}
function getBalanceInEth(address addr) returns(uint){
return ConvertLib.convert(getBalance(addr),2);
}
function getBalance(address addr) returns(uint) {
return balances[addr];
}
}
MetaCoin assigns 10 k metacoins to the account address that deployed the contract. 10 k is the total amount of bitcoins that exists. Now this user can send these metacoins to anyone using the sendCoin() function. You can find the balance of your account using getBalance()anytime. Assuming that one metacoin is equal to two ethers, you can get the balance in ether using getBalanceInEth().
The ConvertLib library is used to calculate the value of metacoins in ether. For this purpose, it provides the convert() method.
Compiling contracts in truffle results in generating artifact objects with the abi and unlinked_binary set. To compile, run this command:
truffle compile
Truffle will compile only the contracts that have been changed since the last compilation in order to avoid any unnecessary compilation. If you'd like to override this behavior, run the preceding command with the --all option.
You can find the artifacts in the build/contracts directory. You are free to edit these files according to your needs. These files get modified at the time of running the compile and migrate commands.
Here are a few things you need to take care of before compiling:
The truffle.js file is a JavaScript file used to configure the project. This file can execute any code necessary to create the configuration for the project. It must export an object representing your project configuration. Here is the default content of the file:
module.exports = {
networks: {
development: {
host: "localhost",
port: 8545,
network_id: "*" // Match any network id
}
}
};
There are various properties this object can contain. But the most basic one is networks. The networks property specifies which networks are available for deployment as well as specific transaction parameters when interacting with each network (such as gasPrice, from, gas, and so on). The default gasPrice is 100,000,000,000, gas is 4712388, and from is the first available contract in the ethereum client.
You can specify as many networks as you want. Go ahead and edit the configuration file to this:
module.exports = {
networks: {
development: {
host: "localhost",
port: 8545,
network_id: "10"
},
live: {
host: "localhost",
port: 8545,
network_id: "1"
}
}
};
In the preceding code, we are defining two networks with the names development and live.
Even the smallest project will interact with at least two blockchains: one on the developer's machine, such as the EthereumJS TestRPC, and the other representing the network where the developer will eventually deploy their application (this could be the main ethereum network or a private consortium network, for instance).
Because the network is auto-detected by the contract abstractions at runtime, it means that you only need to deploy your application or frontend once. When your application is run, the running ethereum client will determine which artifacts are used, and this will make your application very flexible.
JavaScript files that contain code to deploy contracts to the ethereum network are called migrations. These files are responsible for staging your deployment tasks, and they're written under the assumption that your deployment needs will change over time. As your project evolves, you'll create new migration scripts to further this evolution on the blockchain. A history of previously run migrations is recorded on the blockchain through a special Migrations contract. If you have seen the contents of the contracts and build/contracts directory, then you would have noticed the Migrations contract's existence there. This contract should always be there and shouldn't be touched unless you know what you are doing.
In the migrations directory, you will notice that the filenames are prefixed with a number; that is, you will find 1_initial_migration.js and 2_deploy_contracts.js files. The numbered prefix is required in order to record whether the migration ran successfully.
The Migrations contract stores (in last_completed_migration) a number that corresponds to the last applied migration script found in the migrations folder. The Migrations contract is always deployed first. The numbering convention is x_script_name.js, with x starting at 1. Your app contracts would typically come in scripts starting at 2.
So, as this Migrations contract stores the number of the last deployment script applied, truffle will not run these scripts again. On the other hand, in future, your app may need to have a modified, or new, contract deployed. For that to happen, you create a new script with an increased number that describes the steps that need to take place. Then, again, after they have run once, they will not run again.
At the beginning of a migration file, we tell truffle which contracts we'd like to interact with via the artifacts.require() method. This method is similar to Node's require, but in our case, it specifically returns a contract abstraction that we can use within the rest of our deployment script.
All migrations must export a function via the module.exports syntax. The function exported by each migration should accept a deployer object as its first parameter. This object assists in deployment both by providing a clear API to deploy smart contracts as well as performing some of the deployment's more mundane duties, such as saving deployed artifacts in the artifacts files for later use, linking libraries, and so on. The deployer object is your main interface for the staging of deployment tasks.
Here are the methods of the deployer object. All the methods are synchronous:
It is possible to run the deployment steps conditionally based on the network being deployed to. To conditionally stage the deployment steps, write your migrations so that they accept a second parameter called network. One example use case can be that many of the popular libraries are already deployed to the main network; therefore, when using these networks, we will not deploy the libraries again and just link them instead. Here is a code example:
module.exports = function(deployer, network) {
if (network != "live") {
// Perform a different step otherwise.
} else {
// Do something specific to the network named "live".
}
}
In the project, you will find two migration files, that is, 1_initial_migration.js and 2_deploy_contracts.js. The first file shouldn't be edited unless you know what you are doing. You are free to do anything with the other file. Here is the code for the 2_deploy_contracts.js file:
var ConvertLib = artifacts.require("./ConvertLib.sol");
var MetaCoin = artifacts.require("./MetaCoin.sol");
module.exports = function(deployer) {
deployer.deploy(ConvertLib);
deployer.link(ConvertLib, MetaCoin);
deployer.deploy(MetaCoin);
};
Here, we are creating abstractions for the CovertLib library and the MetaCoin contract at first. Regardless of which network is being used, we are deploying the ConvertLib library and then linking the library to the MetaCoin network and finally deploying the MetaCoin network.
To run the migrations, that is, to deploy the contracts, run this command:
truffle migrate --network development
Here, we are telling truffle to run migrations on the development network. If we don't provide the --network option, then it will use the network with the name development by default.
After you run the preceding command, you will notice that truffle will automatically update the ConvertLib library and MetaCoin contract addresses in the artifacts files and also update the links.
Here are some other important options you can provide to the migrate sub-command:
Unit testing is a type of testing an app. It is a process in which the smallest testable parts of an application, called units, are individually and independently examined for proper operation. Unit testing can be done manually but is often automated.
Truffle comes with a unit testing framework by default to automate the testing of your contracts. It provides a clean room environment when running your test files; that is, truffle will rerun all of your migrations at the beginning of every test file to ensure you have a fresh set of contracts to test against.
Truffle lets you write simple and manageable tests in two different ways:
Both styles of tests have their advantages and drawbacks. We will learn both ways of writing tests.
All test files should be located in the ./test directory. Truffle will run test files only with these file extensions: .js, .es, .es6, and .jsx, and .sol. All other files are ignored.
Truffle's JavaScript testing framework is built on top of mocha. Mocha is a JavaScript framework to write tests, whereas chai is an assertion library.
Testing frameworks are used to organize and execute tests, whereas assertion libraries provide utilities to verify that things are correct. Assertion libraries make it a lot easier to test your code so you don't have to perform thousands of if statements. Most of the testing frameworks don't have an assertion library included and let the user plug which one they want to use.
Your tests should exist in the ./test directory, and they should end with a .js extension.
Contract abstractions are the basis for making contract interaction possible from JavaScript. Because truffle has no way of detecting which contracts you'll need to interact with within your tests, you'll need to ask for these contracts explicitly. You do this by using the artifacts.require() method. So the first thing that should be done in test files is to create abstractions for the contracts that you want to test.
Then, the actual tests should be written. Structurally, your tests should remain largely unchanged from those of mocha. The test files should contain code that mocha will recognize as an automated test. What makes truffle tests different from mocha is the contract() function: this function works exactly like describe(), except that it signals truffle to run all migrations. The contract() function works like this:
Here is the default test code generated by truffle to test the MetaCoin contract. You will find this code in the metacoin.js file:
// Specifically request an abstraction for MetaCoin.sol
var MetaCoin = artifacts.require("./MetaCoin.sol");
contract('MetaCoin', function(accounts) {
it("should put 10000 MetaCoin in the first account", function() {
return MetaCoin.deployed().then(function(instance) {
return instance.getBalance.call(accounts[0]);
}).then(function(balance) {
assert.equal(balance.valueOf(), 10000, "10000 wasn't in the first account");
});
});
it("should send coin correctly", function() {
var meta;
// Get initial balances of first and second account.
var account_one = accounts[0];
var account_two = accounts[1];
var account_one_starting_balance;
var account_two_starting_balance;
var account_one_ending_balance;
var account_two_ending_balance;
var amount = 10;
return MetaCoin.deployed().then(function(instance) {
meta = instance;
return meta.getBalance.call(account_one);
}).then(function(balance) {
account_one_starting_balance = balance.toNumber();
return meta.getBalance.call(account_two);
}).then(function(balance) {
account_two_starting_balance = balance.toNumber();
return meta.sendCoin(account_two, amount, {from: account_one});
}).then(function() {
return meta.getBalance.call(account_one);
}).then(function(balance) {
account_one_ending_balance = balance.toNumber();
return meta.getBalance.call(account_two);
}).then(function(balance) {
account_two_ending_balance = balance.toNumber();
assert.equal(account_one_ending_balance, account_one_starting_balance - amount, "Amount wasn't correctly taken from the sender");
assert.equal(account_two_ending_balance, account_two_starting_balance + amount, "Amount wasn't correctly sent to the receiver");
});
});
});
In the preceding code, you can see that all the contract's interaction code is written using the truffle-contract library. The code is self-explanatory.
Finally, truffle gives you access to mocha's configuration so you can change how mocha behaves. mocha's configuration is placed under a mocha property in the truffle.js file's exported object. For example, take a look at this:
mocha: {
useColors: true
}
Solidity test code is put in .sol files. Here are the things you need to note about Solidity tests before writing tests using Solidity:
To learn how to write tests in Solidity, let's explore the default Solidity test code generated by truffle. This is the code, and it can be found in the TestMetacoin.sol file:
pragma Solidity ^0.4.2;
import "truffle/Assert.sol";
import "truffle/DeployedAddresses.sol";
import "../contracts/MetaCoin.sol";
contract TestMetacoin {
function testInitialBalanceUsingDeployedContract() {
MetaCoin meta = MetaCoin(DeployedAddresses.MetaCoin());
uint expected = 10000;
Assert.equal(meta.getBalance(tx.origin), expected, "Owner should have 10000 MetaCoin initially");
}
function testInitialBalanceWithNewMetaCoin() {
MetaCoin meta = new MetaCoin();
uint expected = 10000;
Assert.equal(meta.getBalance(tx.origin), expected, "Owner should have 10000 MetaCoin initially");
}
}
Here is how the preceding code works:
import "truffle/Assert.sol";
contract TestHooks {
uint someValue;
function beforeEach() {
someValue = 5;
}
function beforeEachAgain() {
someValue += 1;
}
function testSomeValueIsSix() {
uint expected = 6;
Assert.equal(someValue, expected, "someValue should have been 6");
}
}
To send ether to your Solidity test contract, it should have a public function that returns uint, called initialBalance in that contract. This can be written directly as a function or a public variable. When your test contract is deployed to the network, truffle will send that amount of ether from your test account to your test contract. Your test contract can then use that ether to script ether interactions within your contract under test. Note that initialBalance is optional and not required. For example, take a look at the following code:
import "truffle/Assert.sol";
import "truffle/DeployedAddresses.sol";
import "../contracts/MyContract.sol";
contract TestContract {
// Truffle will send the TestContract one Ether after deploying the contract.
public uint initialBalance = 1 ether;
function testInitialBalanceUsingDeployedContract() {
MyContract myContract = MyContract(DeployedAddresses.MyContract());
// perform an action which sends value to myContract, then assert.
myContract.send(...);
}
function () {
// This will NOT be executed when Ether is sent. o/
}
}
To run your test scripts, just run this command:
truffle test
Alternatively, you can specify a path to a specific file you want to run. For example, take a look at this:
truffle test ./path/to/test/file.js
A truffle package is a collection of smart contracts and their artifacts. A package can depend on zero or more packages, that is, you use the package's smart contracts and artifacts. When using a package within your own project, it is important to note that there are two places where you will be using the package's contracts and artifacts: within your project's contracts and within your project's JavaScript code (migrations and tests).
Projects created with truffle have a specific layout by default, which enables them to be used as packages. The most important directories in a truffle package are the following:
The first directory is your contracts directory, which includes your raw Solidity contracts. The second directory is the /build/contracts directory, which holds build artifacts in the form of .json files.
Truffle supports two kinds of package builds: npm and ethpm packages. You must know what npm packages are, but let's look at what ethpm packages are. Ethpm is a package registry for ethereum. You can find all ethpm packages at https://www.ethpm.com/. It follows the ERC190 (https://github.com/ethereum/EIPs/issues/190) spec for publishing and consuming smart contract packages.
Truffle comes with npm integration by default and is aware of the node_modules directory in your project, if it exists. This means that you can use and distribute contracts or libraries via npm, making your code available to others and other's code available to you. You can also have a package.json file in your project. You can simply install any npm package in your project and import it in any of the JavaScript files, but it would be called a truffle package only if it contains the two directories mentioned earlier. Installing an npm package in a truffle project is the same as installing an npm package in any Node.js app.
When installing EthPM packages, an installed_contracts directory is created if it doesn't exist. This directory can be treated in a manner similar to the node_modules directory.
Installing a package from EthPM is nearly as easy as installing a package via NPM. You can simply run the following command:
truffle install <package name>
You can also install a package at a specific version:
truffle install <package name>@<version>
Like NPM, EthPM versions follow semver. Your project can also define an ethpm.json file, which is similar to package.json for npm packages. To install all dependencies listed in the ethpm.json file, run the following:
truffle install
An example ethpm.json file looks like this:
{
"package_name": "adder",
"version": "0.0.3",
"description": "Simple contract to add two numbers",
"authors": [
"Tim Coulter <tim.coulter@consensys.net>"
],
"keywords": [
"ethereum",
"addition"
],
"dependencies": {
"owned": "^0.0.1"
},
"license": "MIT"
}
To use a package's contracts within your contracts, it can be as simple as Solidity's import statement. When your import path isn't explicitly relative or absolute, it signifies to truffle that you're looking for a file from a specific named package. Consider this example using the example-truffle-library (https://github.com/ConsenSys/example-truffle-library):
import "example-truffle-library/contracts/SimpleNameRegistry.sol";
Since the path didn't start with ./, truffle knows to look in your project's node_modules or installed_contracts directory for the example-truffle-library folder. From there, it resolves the path to provide you with the contract you requested.
To interact with a package's artifacts within JavaScript code, you simply need to require that package's .json files and then use truffle-contract to turn them into usable abstractions:
var contract = require("truffle-contract");
var data = require("example-truffle-library/build/contracts/SimpleNameRegistry.json");
var SimpleNameRegistry = contract(data);
Sometimes, you may want your contracts to interact with the package's previously deployed contracts. Since the deployed addresses exist within the package's .json files, Solidity code cannot directly read contents of these files. So, the flow of making Solidity code access the addresses in .json files is by defining functions in Solidity code to set dependent contract addresses, and after the contract is deployed, call those functions using JavaScript to set the dependent contract addresses.
So you can define your contract code like this:
import "example-truffle-library/contracts/SimpleNameRegistry.sol";
contract MyContract {
SimpleNameRegistry registry;
address public owner;
function MyContract {
owner = msg.sender;
}
// Simple example that uses the deployed registry from the package.
function getModule(bytes32 name) returns (address) {
return registry.names(name);
}
// Set the registry if you're the owner.
function setRegistry(address addr) {
if (msg.sender != owner) throw;
registry = SimpleNameRegistry(addr);
}
}
This is what your migration should look like:
var SimpleNameRegistry = artifacts.require("example-truffle-library/contracts/SimpleNameRegistry.sol");
module.exports = function(deployer) {
// Deploy our contract, then set the address of the registry.
deployer.deploy(MyContract).then(function() {
return MyContract.deployed();
}).then(function(deployed) {
return deployed.setRegistry(SimpleNameRegistry.address);
});
};
Sometimes, it's nice to work with your contracts interactively for testing and debugging purposes or to execute transactions by hand. Truffle provides you with an easy way to do this via an interactive console, with your contracts available and ready to use.
To open the console, run this command:
truffle console
The console connects to an ethereum node based on your project configuration. The preceding command also takes a --network option to specify a specific node to connect to.
Here are the features of the console:
Often, you may want to run external scripts that interact with your contracts. Truffle provides an easy way to do this, bootstrapping your contracts based on your desired network and connecting to your ethereum node automatically as per your project configuration.
To run an external script, run this command:
truffle exec <path/to/file.js>
In order for external scripts to be run correctly, truffle expects them to export a function that takes a single parameter as a callback. You can do anything you'd like within this script as long as the callback is called when the script finishes. The callback accepts an error as its first and only parameter. If an error is provided, execution will halt and the process will return a nonzero exit code.
This is the structure external scripts must follow:
module.exports = function(callback) {
// perform actions
callback();
}
Now that you know how to compile, deploy, and test smart contracts using truffle, it's time to build a client for our altcoin. Before we get into how to build a client using truffle, you need to know that it doesn't allow us to sign transactions using accounts stored outside of the ethereum node; that is, it doesn't have anything similar to sendRawTransaction and the reasons are the same as those for truffle-contract.
Building a client using truffle means first integrating truffle's artifacts in your client source code and then preparing the client's source code for deployment.
To build a client, you need to run this command:
truffle build
When this command is run, truffle will check how to build the client by inspecting the build property in the project's configuration file.
A command-line tool can be used to build a client. When the build property is a string, truffle assumes that we want to run a command to build the client, so it runs the string as a command. The command is given ample environment variables with which to integrate with truffle.
You can make truffle run a command-line tool to build the client using similar configuration code:
module.exports = {
// This will run the `webpack` command on each build.
//
// The following environment variables will be set when running the command:
// WORKING_DIRECTORY: root location of the project
// BUILD_DESTINATION_DIRECTORY: expected destination of built assets
// BUILD_CONTRACTS_DIRECTORY: root location of your build contract files (.sol.js)
//
build: "webpack"
}
A JavaScript function can be used to build a client. When the build property is a function, truffle will run that function whenever we want to build the client. The function is given a lot of information about the project with which to integrate with truffle.
You can make truffle run a function to build the client using similar configuration code:
module.exports = {
build: function(options, callback) {
// Do something when a build is required. `options` contains these values:
//
// working_directory: root location of the project
// contracts_directory: root directory of .sol files
// destination_directory: directory where truffle expects the built assets (important for `truffle serve`)
}
}
Truffle provides the truffle-default-builder npm package, which is termed the default builder for truffle. This builder exports an object, which has a build method, which works exactly like the previously mentioned method.
The default builder can be used to build a web client for your DApp, whose server only serves static files, and all the functionality is on the frontend.
Before we get further into how to use the default builder, first install it using this command:
npm install truffle-default-builder --save
Now change your configuration file to this:
var DefaultBuilder = require("truffle-default-builder");
module.exports = {
networks: {
development: {
host: "localhost",
port: 8545,
network_id: "10"
},
live: {
host: "localhost",
port: 8545,
network_id: "1"
}
},
build: new DefaultBuilder({
"index.html": "index.html",
"app.js": [
"javascripts/index.js"
],
"bootstrap.min.css": "stylesheets/bootstrap.min.css"
})
};
The default builder gives you complete control over how you want to organize the files and folders of your client.
This configuration describes targets (left-hand side) with files, folders, and arrays of files that make up the targets contents (right-hand side). Each target will be produced by processing the files on the right-hand side based on their file extension, concatenating the results together, and then saving the resultant file (the target) into the build destination. Here, a string is specified on the right-hand side instead of an array, and that file will be processed, if needed, and then copied over directly. If the string ends in a "/", it will be interpreted as a directory and the directory will be copied over without further processing. All paths specified on the right-hand side are relative to the app/ directory.
You can change this configuration and directory structure at any time. You aren't required to have a javascripts and stylesheets directory, for example, but make sure you edit your configuration accordingly.
Here are the features of the default builder:
Now let's write a client for our DApp and build it using truffle's default builder. First of all, create files and directories based on the preceding configuration we set: create an app directory and inside it, create an index.html file and two directories called javascripts and styelsheets. Inside the javascripts directory, create a file called index.js and in the stylesheets directory, download and place the CSS file of Bootstrap 4. You can find it at https://v4-alpha.getbootstrap.com/getting-started/download/#bootstrap-css-and-js.
In the index.html file, place this code:
<!doctype html>
<html>
<head>
<link rel="stylesheet" type="text/css" href="bootstrap.min.css">
</head>
<body>
<div class="container">
<div class="row">
<div class="col-md-6">
<br>
<h2>Send Metacoins</h2>
<hr>
<form id="sendForm">
<div class="form-group">
<label for="fromAddress">Select Account Address</label>
<select class="form-control" id="fromAddress">
</select>
</div>
<div class="form-group">
<label for="amount">How much metacoin do you want to send?
</label>
<input type="text" class="form-control" id="amount">
</div>
<div class="form-group">
<label for="toAddress">Enter the address to which you want to
send matacoins</label>
<input type="text" class="form-control" id="toAddress"
placeholder="Prefixed with 0x">
</div>
<button type="submit" class="btn btn-primary">Submit</button>
</form>
</div>
<div class="col-md-6">
<br>
<h2>Find Balance</h2>
<hr>
<form id="findBalanceForm">
<div class="form-group">
<label for="address">Select Account Address</label>
<select class="form-control" id="address">
</select>
</div>
<button type="submit" class="btn btn-primary">Check
Balance</button>
</form>
</div>
</div>
</div>
<script type="text/javascript" src="/app.js"></script>
</body>
</html>
<!doctype html>
<html>
<head>
<link rel="stylesheet" type="text/css" href="bootstrap.min.css">
</head>
<body>
<div class="container">
<div class="row">
<div class="col-md-6">
<br>
<h2>Send Metacoins</h2>
<hr>
<form id="sendForm">
<div class="form-group">
<label for="fromAddress">Select Account Address</label>
<select class="form-control" id="fromAddress">
</select>
</div>
<div class="form-group">
<label for="amount">How much metacoin you want to send?</label>
<input type="text" class="form-control" id="amount">
</div>
<div class="form-group">
<label for="toAddress">Enter the address to which you want to send matacoins</label>
<input type="text" class="form-control" id="toAddress" placeholder="Prefixed with 0x">
</div>
<button type="submit" class="btn btn-primary">Submit</button>
</form>
</div>
<div class="col-md-6">
<br>
<h2>Find Balance</h2>
<hr>
<form id="findBalanceForm">
<div class="form-group">
<label for="address">Select Account Address</label>
<select class="form-control" id="address">
</select>
</div>
<button type="submit" class="btn btn-primary">Check Balance</button>
</form>
</div>
</div>
</div>
<script type="text/javascript" src="/app.js"></script>
</body>
</html>
In the preceding code, we are loading the bootstrap.min.css and app.js files. We have two forms: one is to send metacoins to a different account and the other one is to check the metacoins balance of an account. In the first form, the user has to select an account and then enter the amount of metacoin to send and the address that it wants to send to. And in the second form, the user simply has to select the address whose metacoin balance it wants to check.
In the index.js file, place this code:
window.addEventListener("load", function(){
var accounts = web3.eth.accounts;
var html = "";
for(var count = 0; count < accounts.length; count++)
{
html = html + "<option>" + accounts[count] + "</option>";
}
document.getElementById("fromAddress").innerHTML = html;
document.getElementById("address").innerHTML = html;
MetaCoin.detectNetwork();
})
document.getElementById("sendForm").addEventListener("submit", function(e){
e.preventDefault();
MetaCoin.deployed().then(function(instance){
return instance.sendCoin(document.getElementById("toAddress").value, document.getElementById("amount").value, {
from: document.getElementById("fromAddress").options[document.getElementById("fromAddress").selectedIndex].value
});
}).then(function(result){
alert("Transaction mined successfully. Txn Hash: " + result.tx);
}).catch(function(e){
alert("An error occured");
})
})
document.getElementById("findBalanceForm").addEventListener("submit", function(e){
e.preventDefault();
MetaCoin.deployed().then(function(instance){
return instance.getBalance.call(document.getElementById("address").value);
}).then(function(result){
console.log(result);
alert("Balance is: " + result.toString() + " metacoins");
}).catch(function(e){
alert("An error occured");
})
})
Here is how the code works:
Now go ahead and run the truffle build command, and you will notice that truffle will create index.html, app.js, and bootstrap.min.css files in the build directory and put the client's final deployment code in them.
Truffle comes with an inbuilt web server. This web server simply serves the files in the build directory with a proper MIME type set. Apart from this, it's not configured to do anything else.
To run the web server, run this command:
truffle serve
The server runs on port number 8080 by default. But you can use the -p option to specify a different port number.
Similar to truffle watch, this web server also watches for changes in the contracts directory, the app directory, and the configuration file. When there's a change, it recompiles the contracts and generates new artifacts files and then rebuilds the client. But it doesn't run migrations and tests.
As the truffle-default-builder places the final deployable code in the build directory, you can simply run truffle serve to serve the files via the Web.
Let's test our web client. Visit http://localhost:8080, and you will see this screenshot:
The account addresses in the selected boxes will differ for you. Now at the time of deploying the contract, the contract assigns all the metacoins to the address that deploys the contract; so here, the first account will have a balance of 10,000 metacoins. Now send five metacoins from the first account to the second account and click on Submit. You will see a screen similar to what is shown in the following screenshot:
Now check the balance of the second account by selecting the second account in the select box of the second form and then click on the Check Balance button. You will see a screen similar to what is shown in the following screenshot:
In this chapter, we learned in depth how to build DApps and their respective clients using truffle. We look at how truffle makes it really easy to write, compile, deploy, and test DApps. We also saw how easy it is to switch between networks in clients using truffle-contract without touching the source code. Now you are ready to start building enterprise-level DApps using truffle.
In the next chapter, we will build a decentralized alarm clock app that pays you to wake up on time using the truffle and ethereum alarm clock DApp.
Just replace the i.e. with a colon ":".
Consortiums (an association, typically of several participants such as banks, e-commerce sites, government entities, hospitals, and so on) can use blockchain technology to solve many problems and make things faster and cheaper. Although they figure out how blockchain can help them, an Ethereum implementation of blockchain doesn't specifically fit them for all cases. Although there are other implementations of blockchain (for example, Hyperledger) that are built specially for consortium, as we learned Ethereum throughout the book, we will see how we can hack Ethereum to build a consortium blockchain. Basically, we will be using parity to build a consortium blockchain. Although there are other alternatives to parity, such as J.P. Morgan's quorum, we will use parity as at the time of writing this book, it has been in existence for some time, and many enterprises are already using it, whereas other alternatives are yet to be used by any enterprise. But for your requirements, parity may not be the best solution; therefore, investigate all the others too before deciding which one to use.
In this chapter, we'll cover the following topics:
To understand what a consortium blockchain is, or, in other words, what kind of blockchain implementation consortiums need, let's check out an example. Banks want to build a blockchain to make money transfers easier, faster, and cheaper. In this case, here are the things they need:
Overall, in this chapter, we will learn how to solve these issues in Ethereum.
PoA is a consensus mechanism for blockchain in which consensus is achieved by referring to a list of validators (referred to as authorities when they are linked to physical entities). Validators are a group of accounts/nodes that are allowed to participate in the consensus; they validate the transactions and blocks.
Unlike PoW or PoS, there is no mining mechanism involved. There are various types of PoA protocols, and they vary depending on how they actually work. Hyperledger and Ripple are based on PoA. Hyperledger is based on PBFT, whereas ripple uses an iterative process.
Parity is an Ethereum node written from the ground up for correctness/verifiability, modularization, low footprint, and high performance. It is written in Rust programming language, a hybrid imperative/OO/functional language with an emphasis on efficiency. It is professionally developed by Parity Technologies. At the time of writing this book, the latest version of parity is 1.7.0, and we will be using this version. We will learn as much as is required to build a consortium blockchain. To learn parity in depth, you can refer to the official documentation.
It has a lot more features than go-ethereum, such as web3 dapp browser, much more advanced account management, and so on. But what makes it special is that it supports Proof-of-Authority (PoA) along with PoW. Parity currently supports Aura and Tendermint PoA protocols. In the future, it may support some more PoA protocols. Currently, parity recommends the use of Aura instead of Tendermint as Tendermint is still under development.
Aura is a much better solution for permissioned blockchains than PoW as it has better block time and provides much better security in private networks.
Let's see at a high level how Aura works. Aura requires the same list of validators to be specified in each node. This is a list of account addresses that participate in the consensus. A node may or may not be a validating node. Even a validating node needs to have this list so that it can itself reach a consensus.
This list can either be provided as a static list in the genesis file if the list of validators is going to remain the same forever, or be provided in a smart contract so that it can be dynamically updated and every node knows about it. In a smart contract, you can configure various strategies regarding who can add new validators.
The block time is configurable in the genesis file. It's up to you to decide the block time. In private networks, a block time as low as three seconds works well. In Aura, after every three seconds, one of the validators is selected and this validator is responsible for creating, verifying, signing, and broadcasting the block. We don't need to understand much about the actual selection algorithm as it won't impact our dapp development. But this is the formula to calculate the next validator, (UNIX_TIMESTAMP / BLOCK_TIME % NUMBER_OF_TOTAL_VALIDATORS). The selection algorithm is smart enough to give equal chances to everyone When other nodes receive a block, they check whether it's from the next valid validator or not; and if not, they reject it. Unlike PoW, when a validator creates a block, it is not rewarded with ether. In Aura, it's up to us to decide whether to generate empty blocks or not when there are no transactions.
You must be wondering what will happen if the next validator node, due to some reason, fails to create and broadcast the next block. To understand this, let's take an example: suppose A is the validator for the next block, which is the fifth block, and B is the validator for the sixth block. Assume block time is five seconds. If A fails to broadcast a block, then after five seconds when B's turn arrives, it will broadcast a block. So nothing serious happens actually. The block timestamp will reveal these details.
You might also be wondering whether there are chances of networks ending up with multiple different blockchains as it happens in PoW when two miners mine at the same time. Yes, there are many ways this can happen. Let's take an example and understand one way in which this can happen and how the network resolves it automatically. Suppose there are five validators: A, B, C, D, and E. Block time is five seconds. Suppose A is selected first and it broadcasts a block, but the block doesn't reach D and E due to some reason; so they will think A didn't broadcast the block. Now suppose the selection algorithm selects B to generate the next block; then B will generate the next block on top of A's block and broadcast to all the nodes. D and E will reject it because the previous block hash will not match. Due to this, D and E will form a different chain, and A, B, and C will form a different chain. A, B, and C will reject blocks from D and E, and D and E will reject blocks from A, B, and C. This issue is resolved among the nodes as the blockchain that is with A, B and C is more accurate than the blockchain with D and E; therefore D and E will replace their version of blockchain with the blockchain held with A, B, and C. Both these versions of the blockchain will have different accuracy scores, and the score of the first blockchain will be more than the second one. When B broadcasts its block, it will also provide the score of its blockchain, and as its score is higher, D and E will have replaced their blockchain with B's blockchain. This is how conflicts are resolved. The chain score of blockchain is calculated using (U128_max * BLOCK_NUMBER_OF_LATEST_BLOCK - (UNIX_TIMESTAMP_OF_LATEST_BLOCK / BLOCK_TIME)). Chains are scored first by their length (the more blocks, the better). For chains of equal length, the chain whose last block is older is chosen.
You can learn more about Aura in depth at https://github.com/paritytech/parity/wiki/Aura.
Parity requires Rust version 1.16.0 to build. It is recommended to install Rust through rustup.
If you don't already have rustup, you can install it like this.
On Linux-based operating systems, run this command:
curl https://sh.rustup.rs -sSf | sh
Parity also requires the gcc, g++, libssl-dev/openssl, libudev-dev, and pkg-config packages to be installed.
On OS X, run this command:
curl https://sh.rustup.rs -sSf | sh
Parity also requires clang. Clang comes with Xcode command-line tools or can be installed with Homebrew.
Make sure you have Visual Studio 2015 with C++ support installed. Next, download and run the rustup installer from https://static.rust-lang.org/rustup/dist/x86_64-pc-windows-msvc/rustup-init.exe, start "VS2015 x64 Native Tools Command Prompt", and use the following command to install and set up the msvc toolchain:
rustup default stable-x86_64-pc-windows-msvc
Now, once you have rust installed on your operating system, you can run this simple one-line command to install parity:
cargo install --git https://github.com/paritytech/parity.git parity
To check whether parity is installed or not, run this command:
parity --help
If parity is installed successfully, then you will see a list of sub-commands and options.
Now it's time to set up our consortium blockchain. We will create two validating nodes connected to each other using Aura for consensus. We will set up both on the same computer.
First, open two shell windows. The first one is for the first validator and the second one is for the second validator. The first node will contain two accounts and the second node will contain one account. The second account of first node will be assigned to some initial ether so that the network will have some ether.
In the first shell, run this command twice:
parity account new -d ./validator0
Both the times it will ask you to enter a password. For now just put the same password for both accounts.
In the second shell, run this command once only:
parity account new -d ./validator1
Just as before, enter the password.
Nodes of every network share a common specification file. This file tells the node about the genesis block, who the validators are, and so on. We will create a smart contract, which will contain the validators list. There are two types of validator contracts: non-reporting contract and reporting contract. We have to provide only one.
The difference is that non-reporting contract only returns a list of validators, whereas reporting contract can take action for benign (benign misbehaviour may be simply not receiving a block from a designated validator) and malicious misbehavior (malicious misbehaviour would be releasing two different blocks for the same step).
The non-reporting contract should have at least this interface:
{"constant":true,"inputs":[],"name":"getValidators","outputs":[{"name":"","type":"address[]"}],"payable":false,"type":"function"}
The getValidators function will be called on every block to determine the current list. The switching rules are then determined by the contract implementing that method.
A reporting contract should have at least this interface:
[
{"constant":true,"inputs":[],"name":"getValidators","outputs":[{"name":"","type":"address[]"}],"payable":false,"type":"function"},
{"constant":false,"inputs":[{"name":"validator","type":"address"}],"name":"reportMalicious","outputs":[],"payable":false,"type":"function"},
{"constant":false,"inputs":[{"name":"validator","type":"address"}],"name":"reportBenign","outputs":[],"payable":false,"type":"function"}
]
When there is benign or malicious behavior, the consensus engine calls the reportBenign and reportMalicious functions respectively.
Let's create a reporting contract. Here is a basic example:
contract ReportingContract {
address[] public validators = [0x831647ec69be4ca44ea4bd1b9909debfbaaef55c, 0x12a6bda0d5f58538167b2efce5519e316863f9fd];
mapping(address => uint) indices;
address public disliked;
function ReportingContract() {
for (uint i = 0; i < validators.length; i++) {
indices[validators[i]] = i;
}
}
// Called on every block to update node validator list.
function getValidators() constant returns (address[]) {
return validators;
}
// Expand the list of validators.
function addValidator(address validator) {
validators.push(validator);
}
// Remove a validator from the list.
function reportMalicious(address validator) {
validators[indices[validator]] = validators[validators.length-1];
delete indices[validator];
delete validators[validators.length-1];
validators.length--;
}
function reportBenign(address validator) {
disliked = validator;
}
}
This code is self-explanatory. Make sure that in the validators array replaces the addresses with the first address of validator 1 and validator 2 nodes as we will be using those addresses for validation. Now compile the preceding contract using whatever you feel comfortable with.
Now let's create the specification file. Create a file named spec.json, and place this code in it:
{
"name": "ethereum",
"engine": {
"authorityRound": {
"params": {
"gasLimitBoundDivisor": "0x400",
"stepDuration": "5",
"validators" : {
"contract": "0x0000000000000000000000000000000000000005"
}
}
}
},
"params": {
"maximumExtraDataSize": "0x20",
"minGasLimit": "0x1388",
"networkID" : "0x2323"
},
"genesis": {
"seal": {
"authorityRound": {
"step": "0x0",
"signature": "0x00000000000000000000000000000000000000000
000000000000000000000000000000000000000000000000000000
00000000000000000000000000000000000"
}
},
"difficulty": "0x20000",
"gasLimit": "0x5B8D80"
},
"accounts": {
"0x0000000000000000000000000000000000000001": { "balance": "1", "builtin": { "name": "ecrecover", "pricing": { "linear": { "base": 3000, "word": 0 } } } },
"0x0000000000000000000000000000000000000002": { "balance": "1", "builtin": { "name": "sha256", "pricing": { "linear": { "base": 60, "word": 12 } } } },
"0x0000000000000000000000000000000000000003": { "balance": "1", "builtin": { "name": "ripemd160", "pricing": { "linear": { "base": 600, "word": 120 } } } },
"0x0000000000000000000000000000000000000004": { "balance": "1", "builtin": { "name": "identity", "pricing": { "linear": { "base": 15, "word": 3 } } } },
"0x0000000000000000000000000000000000000005": { "balance": "1", "constructor" : "0x606060405260406040519081016040528073831647" },
"0x004ec07d2329997267Ec62b4166639513386F32E": { "balance": "10000000000000000000000" }
}
}
Here is how the preceding file works:
Before we proceed further, create another file called as node.pwds. In that file, place the password of the accounts you created. This file will be used by the validators to unlock the accounts to sign the blocks.
Now we have all basic requirements ready to launch our validating nodes. In the first shell, run this command to launch the first validating node:
parity --chain spec.json -d ./validator0 --force-sealing --engine-signer "0x831647ec69be4ca44ea4bd1b9909debfbaaef55c" --port 30300 --jsonrpc-port 8540 --ui-port 8180 --dapps-port 8080 --ws-port 8546 --jsonrpc-apis web3,eth,net,personal,parity,parity_set,traces,rpc,parity_accounts --password "node.pwds"
Here is how the preceding command works:
In the second shell, run this command to launch second validating node:
parity --chain spec.json -d ./validator1 --force-sealing --engine-signer "0x12a6bda0d5f58538167b2efce5519e316863f9fd" --port 30301 --jsonrpc-port 8541 --ui-port 8181 --dapps-port 8081 --ws-port 8547 --jsonrpc-apis web3,eth,net,personal,parity,parity_set,traces,rpc,parity_accounts --password "/Users/narayanprusty/Desktop/node.pwds"
Here, make sure you change the address to the one you generated that is, the address generated on this shell.
Now finally, we need to connect both the nodes. Open a new shell window and run this command to find the URL to connect to the second node:
curl --data '{"jsonrpc":"2.0","method":"parity_enode","params":[],"id":0}' -H "Content-Type: application/json" -X POST localhost:8541
You will get this sort of output:
{"jsonrpc":"2.0","result":"enode://7bac3c8cf914903904a408ecd71635966331990c5c9f7c7a291b531d5912ac3b52e8b174994b93cab1bf14118c2f24a16f75c49e83b93e0864eb099996ec1af9@[::0.0.1.0]:30301","id":0}
Now run this command by replacing the encode URL and IP address in the enode URL to 127.0.0.1:
curl --data '{"jsonrpc":"2.0","method":"parity_addReservedPeer","params":["enode://7ba..."],"id":0}' -H "Content-Type: application/json" -X POST localhost:8540
You should get this output:
{"jsonrpc":"2.0","result":true,"id":0}
The nodes should indicate 0/1/25 peers in the console, which means they are connected to each other. Here is a reference image:
We saw how parity solves the issues of speed and security. Parity currently doesn't provide anything specific to permissioning and privacy. Let's see how to achieve this in parity:
Overall in this chapter, we learned how to use parity and how aura works and some techniques to achieve permissioning and privacy in parity. Now you must be confident enough to at least build a proof-of-concept for a consortium using blockchain. Now you can go ahead and explore other solutions, such as Hyperledger 1.0 and quorum for building consortium blockchains. Currently, Ethereum is officially working on making more suitable for consortiums; therefore, keep a close eye on various blockchain information sources to learn about anything new that comes in the market.
If you enjoyed this book, you may be interested in these other books by Packt:
Hands-On Data Science and Python Machine Learning
Frank Kane
ISBN: 978-1-78728-074-8
Kali Linux Cookbook - Second Edition
Corey P. Schultz, Bob Perciaccante
ISBN: 978-1-78439-030-3
Please share your thoughts on this book with others by leaving a review on the site that you bought it from. If you purchased the book from Amazon, please leave us an honest review on this book's Amazon page. This is vital so that other potential readers can see and use your unbiased opinion to make purchasing decisions, we can understand what our customers think about our products, and our authors can see your feedback on the title that they have worked with Packt to create. It will only take a few minutes of your time, but is valuable to other potential customers, our authors, and Packt. Thank you!