
Now, let's learn how to send checks from a Ripple account. In order to send checks, we need to accomplish the following three things. The process is similar to sending money:
- Prepare transaction: Here we define the destination address, amount to be paid, and so on.
- Sign transaction: You need to sign the transaction cryptographically with your secret key. This proves that you own this account.
- Submit transaction: Once you sign the transaction, you need to submit it to the Ripple network for validation. Your check would become valid only when the validators approve your transaction.
In order to create a check, we would be using the "CheckCreate" method. The following code takes the destination and amount to be paid as input and generates the transaction JSON as output. You need to own the recipient account since we would be using it to cash out the check later. You need to create another Ripple account from the Ripple test net faucet as we did earlier:
api.prepareCheckCreate(sender, {
    "destination": receiver,
    "sendMax": {
      "currency": "XRP",
      "value": "100"
    }
}, options);
We would be using the following code to sign and submit the transaction to the network. It's the same methods we used to send money:
const {signedTransaction} = api.sign(prepared.txJSON, secret);
api.submit(signedTransaction).then(onSuccess,onFailure);
Once we submit the transaction to the network, we need to calculate the check ID. You need to communicate the check ID to the recipient so that they can use it to cash out the check. Here's the code to calculate check ID:
const checkIDhasher = createHash('sha512')
checkIDhasher.update(Buffer.from('0043', 'hex'))
checkIDhasher.update(new Buffer(decodeAddress(sender)))
const seqBuf = Buffer.alloc(4)
seqBuf.writeUInt32BE(message['tx_json']['Sequence'], 0)
checkIDhasher.update(seqBuf)
const checkID = checkIDhasher.digest('hex').slice(0,64).toUpperCase()
Let's put everything together:
'use strict';
const RippleAPI = require('ripple-lib').RippleAPI;
const decodeAddress = require('ripple-address-codec').decodeAddress;
const createHash = require('crypto').createHash;

const sender = 'r41sFTd4rftxY1VCn5ZDDipb4KaV5VLFy2';
const receiver = 'r42Qv8NwggeMWnpKcxMkx7qTtB23GYLHBX';
const secret = 'sptkAoSPzHq8mKLWrjU33EDj7v96u';
const options = {};

const api = new RippleAPI({server: 'wss://s.altnet.rippletest.net:51233'});
api.connect().then(() => {
  console.log('Connected to the test network.');
  return api.prepareCheckCreate(sender, {
    "destination": receiver,
    "sendMax": {
      "currency": "XRP",
      "value": "100"
    }
  }, options);

}).then(prepared => {
  console.log("Transaction JSON:", prepared.txJSON);
  const {signedTransaction} = api.sign(prepared.txJSON, secret);
  console.log("Transaction Signed.")
  api.submit(signedTransaction).then(onSuccess,onFailure);
});

function onSuccess(message){
  console.log(message);
  console.log("Transaction Successfully Submitted.");
  const checkIDhasher = createHash('sha512');
  checkIDhasher.update(Buffer.from('0043', 'hex'));
  checkIDhasher.update(new Buffer(decodeAddress(sender)));
  const seqBuf = Buffer.alloc(4);
  seqBuf.writeUInt32BE(message['tx_json']['Sequence'], 0);
  checkIDhasher.update(seqBuf);
  const checkID = checkIDhasher.digest('hex').slice(0,64).toUpperCase();
  console.log("CheckID:", checkID);
  disconnect();
}

function onFailure(message){
  console.log("Transaction Submission Failed.");
  console.log(message);
  disconnect();
}

function disconnect(){
  api.disconnect().then(()=> {
    console.log("Disconnected from test network.")
  });
}
Save this as send_check.js. Let's execute the code by running the following command:
./node_modules/.bin/babel-node send_check.js
If everything goes fine, you'll get the following output:
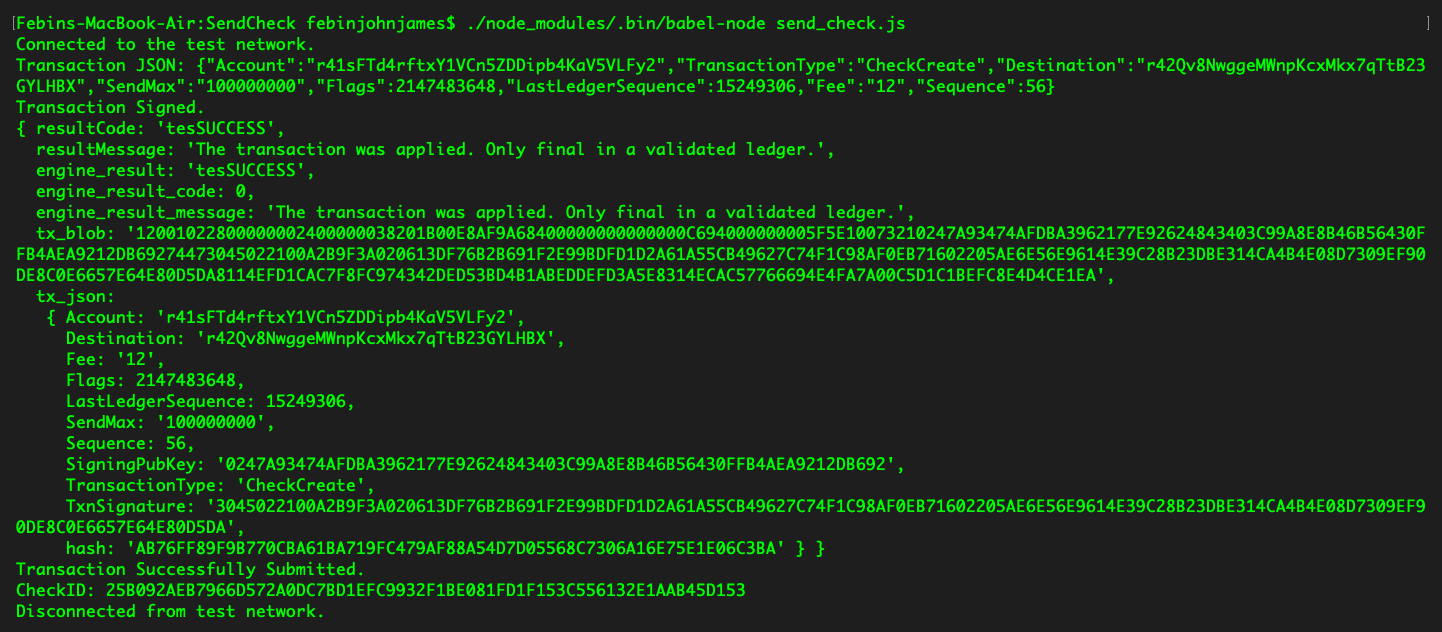
Make a note of the check ID, as we'll be using it later in this chapter to cash the check. If you have noticed, no money has been deducted from our account. The money is only deducted when someone cashes the check.
Now, let's build a web app that allows users to log in and create checks.
In this app, we'll be using a few npm packages, hence we need browserify to compile these dependencies into one file. You can install browserify with the following command:
npm install -g browserify
We would be using the same modal we used for sending money. In this application, we'll be separating the JavaScript to a different file, app.js, so that we can use browserify to get all of the dependencies to one file:
const RippleAPI = require('ripple-lib').RippleAPI;
const decodeAddress = require('ripple-address-codec').decodeAddress;
const createHash = require('crypto').createHash;

var api = new RippleAPI({server:'wss://s.altnet.rippletest.net:51233'});
var fetchBalance;
  $('document').ready(function(){
    login();
    $('.progress').hide();
    $('#sendCheckButton').click(function(){
        showsendCheckModal();
    });
    $('#logoutButton').click(function(){
        logout();
    });
    $("#loginButton").click(function(){
        storeCredentials();
    });
    $("#createCheckButton").click(function(){
      createCheck();
    });
  });

  function login(){
    if(!localStorage.getItem("loggedIn")){
      $('#loginModal').modal('show');
    } else{
      updateAccount();
    }
  }

  function logout(){
    localStorage.clear();
    clearInterval(fetchBalance);
    location.reload();
  }

  function updateAccount(){
    $('#rippleAddress').text(localStorage.getItem('rippleAddress'));
    updateBalance();
  }

  function storeCredentials(){
    localStorage.setItem("rippleAddress", $('#inputRippleAddress').val());
    localStorage.setItem("secret", $('#inputSecret').val());
    localStorage.setItem("loggedIn", true);
    $('#loginModal').modal('hide');
    updateAccount();
  }

  $("form").submit(function(e) {
    e.preventDefault();
  });

  function updateBalance(){
    api.connect().then(() => {
      const accountAddress = localStorage.getItem("rippleAddress");
      return api.getAccountInfo(accountAddress);
    }).then(info => {
      $('#balance').text("Account Balance : " + info.xrpBalance+ " XRP");
    }).then(() => {
      return api.disconnect();
    }).catch(console.error);
  }

  function showsendCheckModal(){
    $('#sendCheckModal').modal('show');
  }

  function createCheck(){
    $('.progress').show();
    const instructions = {};
    const sourceAddress = localStorage.getItem('rippleAddress');
    const sourceSecret = localStorage.getItem('secret');
    const destinationAddress = $('#inputDestinationRippleAddress').val();
    const options = {};

    api.connect().then(() => {

    return api.prepareCheckCreate(sourceAddress, {
          "destination": destinationAddress,
          "sendMax": {
            "currency": "XRP",
            "value": "100"
          }
        }, options).then(prepared => {
        $('.progress-bar').css('width', 40+'%').attr('aria-valuenow', 40);
        const {signedTransaction} = api.sign(prepared.txJSON, sourceSecret);
        api.submit(signedTransaction).then(onSuccess,onFailure);
      });
    });
  }

  function calculateCheckID(transaction){
    const checkIDhasher = createHash('sha512');
    checkIDhasher.update(Buffer.from('0043', 'hex'));
    checkIDhasher.update(new Buffer(decodeAddress(localStorage.getItem('rippleAddress'))));
    const seqBuf = Buffer.alloc(4);
    seqBuf.writeUInt32BE(transaction['tx_json']['Sequence'], 0);
    checkIDhasher.update(seqBuf);
    const checkID = checkIDhasher.digest('hex').slice(0,64).toUpperCase();
    $('#checkOutput').text("Check ID : "+checkID);
  }

  function onSuccess(message){
    $('.progress-bar').css('width', 100+'%').attr('aria-valuenow', 100);
    bootstrap_alert.success('Transaction Submitted Successfully');
    calculateCheckID(message);
    clear();
  }

  function onFailure(message){
    $('.progress-bar').css('width', 100+'%').attr('aria-valuenow', 100);
    bootstrap_alert.danger('Transaction Submission Failed');
    clear();
  }

  function clear(){
    disconnect();
    $('#sendCheckModal').modal('hide');
    $('.progress-bar').css('width', 0+'%').attr('aria-valuenow', 0);
    $(".progress").hide();
  }

  function disconnect(){
    api.disconnect().then(()=> {
    })
  }

  bootstrap_alert = function() {}

  bootstrap_alert.success = function(message) {
    $('#alert').html('<div role="alert" id="success-alert" class="alert alert-success"><p>'+message+'</p></div>');
    $("#success-alert").fadeTo(2000, 500).slideUp(500, function(){
        $("#success-alert").slideUp(500);
    });
  }
  bootstrap_alert.danger = function(message) {
      $('#alert').html('<div role="alert" id="danger-alert" class="alert alert-danger"><p>'+message+'</p></div>');
      $("#danger-alert").fadeTo(2000, 500).slideUp(500, function(){
    $("#danger-alert").slideUp(500);
});
}
Save this file as app.js. Now let's use the following command to bundle all dependencies to one file:
browserify app.js -o bundle.js
Make sure, these files are save in the js folder. Let's now have a look at the HTML code; we've made some modifications:
<!DOCTYPE html>
<html>
<title> Send Check </title>
<head>
<link rel="stylesheet" href="css/bootstrap.min.css">
</head>
<body>
<nav class="navbar navbar-expand-lg navbar-dark bg-dark">
<a class="navbar-brand" href="#">Send Check</a>
</nav>
<br/><br/><br/>
<center>
<p class="lead">Ripple Address : <span id="rippleAddress"> </span> </p>
<p id="balance"> Please wait, fetching account details...</p>
<button id="sendCheckButton" class="btn btn-primary">Send Check</button>
<button id="logoutButton" class="btn btn-primary">Logout</button>
<br/>
<br/>
<br/>
<div id="checkOutput"> </div>
<div id="alert" style="width:30%"></div>
</center>
<div class="modal fade" id="loginModal" tabindex="-1" role="dialog" aria-labelledby="loginModalLabel" aria-hidden="true">
<div class="modal-dialog" role="document">
<div class="modal-content">
<div class="modal-header">
<h5 class="modal-title" id="loginModalLabel">Login</h5>
<button type="button" class="close" data-dismiss="modal" aria-label="Close">
<span aria-hidden="true">×</span>
</button>
</div>
<div class="modal-body">
<form>
<div class="form-group">
<label for="inputRippleAddress">Ripple Address</label>
<input type="text" class="form-control" id="inputRippleAddress" aria-describedby="rippleAddressHelp" placeholder="Enter Ripple Address">
</div>
<div class="form-group">
<label for="inputSecret">Secret</label>
<input type="password" class="form-control" id="inputSecret" placeholder="Secret">
</div>
<button id="loginButton" class="btn btn-primary">Login</button>
</form>
</div>
</div>
</div>
</div>
<div class="modal fade" id="sendCheckModal" tabindex="-1" role="dialog" aria-labelledby="sendCheckModalLabel" aria-hidden="true">
<div class="modal-dialog" role="document">
<div class="modal-content">
<div class="modal-header">
<h5 class="modal-title" id="sendCheckModalLabel">Send Check </h5>
<button type="button" class="close" data-dismiss="modal" aria-label="Close">
<span aria-hidden="true">×</span>
</button>
</div>
<div class="modal-body">
<form>
<div class="form-group">
<label for="inputDestinationRippleAddress">Ripple Address</label>
<input type="text" class="form-control" id="inputDestinationRippleAddress" aria-describedby="destinationRippleAddressHelp" placeholder="Destination Ripple Address">
</div>
<div class="form-group">
<label for="inputAmount">Amount</label>
<input type="number" class="form-control" id="inputAmount" placeholder="Amount">
</div>
<button id="createCheckButton" class="btn btn-primary">Create Check</button>
<br/> <br/>
<div class="progress">
<div class="progress-bar progress-bar-striped bg-info" role="progressbar" style="width: 0%" aria-valuenow="0" aria-valuemin="0" aria-valuemax="100"></div>
</div>
</form>
</div>
</div>
</div>
</div>
</body>
<script src="js/jquery.min.js"></script>
<script src="js/bootstrap.min.js"></script>
<script src="js/bundle.js"></script>
</html>
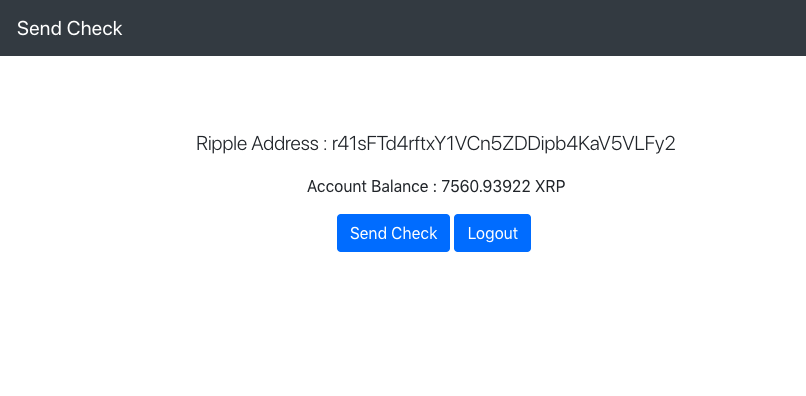
Save this file as send_check.html. You can now open the file in the browser to create a check:
- Once you login you should be able to see the Send Check button as shown in the following screenshot:
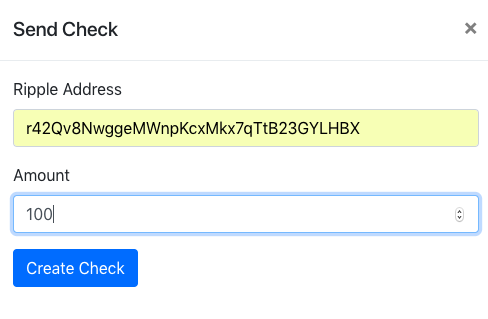
- Once you click on the Send Check button, you'll be asked to fill the destination address and the check amount:
- If everything goes well, the transaction will be submitted successfully and a check ID will be created:
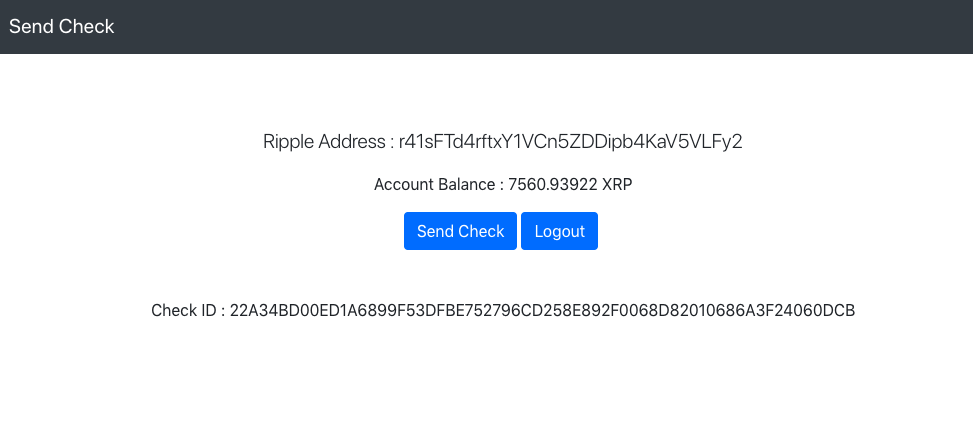
- Make a note of the check ID; we'll be using it later to cash the check. This is the second check ID you should making note of.
Great job! In the next section, we'll learn how to cash this check.