Table of Contents for
Ripple Quick Start Guide

Version ebook / Retour

Cover image for bash Cookbook, 2nd Edition Ripple Quick Start Guide by Febin John James Published by Packt Publishing, 2018
  1. Ripple Quick Start Guide
  2. Title Page
  3. Copyright and Credits
  4. Ripple Quick Start Guide
  5. Dedication
  6. About Packt
  7. Why subscribe?
  8. Packt.com
  9. Contributors
  10. About the author
  11. About the reviewer
  12. Packt is searching for authors like you
  13. Table of Contents
  14. Preface
  15. Who this book is for
  16. What this book covers
  17. To get the most out of this book
  18. Download the example code files
  19. Conventions used
  20. Get in touch
  21. Reviews
  22. Getting Started with Ripple
  23. The need for decentralization
  24. Introduction to blockchain
  25. Introduction to Bitcoin
  26. Inefficiencies in payment systems
  27. International money transfer through Bitcoin
  28. Disadvantages of Bitcoin
  29. Ripple
  30. International money transfer through Ripple
  31. The Ripple Protocol
  32. Account creation
  33. Reserve
  34. Transactions
  35. Multisigning
  36. Consensus
  37. Important properties of the consensus protocol
  38. Ledger versions
  39. Validation
  40. Advantages of Ripple
  41. Currency agnostic
  42. Simplified consensus
  43. Low fee
  44. Reduced foreign exchange cost
  45. Pathfinding algorithm
  46. Adaptable cryptography
  47. Anti-spam mechanism
  48. Potential risks of Ripple
  49. Regulatory issues
  50. Trust Issues
  51. Security vulnerabilities
  52. Problems of being an open protocol
  53. Summary
  54. Working with Ripple Currency XRP
  55. Types of wallets
  56. Online wallets
  57. Desktop/mobile wallets
  58. Offline wallets
  59. Hardware wallets
  60. Paper wallets
  61. How do I choose my wallet?
  62. Setting up a Ripple account
  63. Activating the Ripple account
  64. Making an international transfer
  65. Trading XRP
  66. Importing an existing wallet
  67. Setting up an offline wallet
  68. Protecting your Ripples
  69. Don't leave your Ripples on centralized exchanges
  70. Make backups 
  71. Use antivirus software
  72. Disable browser plugins
  73. Store Ripples in multiple wallets 
  74. For big sums, use cold wallets
  75. Use reputable wallets
  76. Important things you must remember
  77. Summary
  78. Applications of Ripple
  79. High speed and low-cost payments 
  80. xCurrent
  81. How does it work?
  82. Advanced payment applications
  83. Cross-currency payments
  84. How does it work?
  85. Checks
  86. How does it work?
  87. Payment channels
  88. How does it work?
  89. Escrow
  90. How does it work?
  91. Initial coin offering
  92. Decentralized exchange
  93. Debunking misconceptions about Ripple
  94. Ripple and XRP are not the same
  95. Funds lockup
  96. No mining
  97. Limited smart contracts
  98. Important things to remember
  99. Summary
  100. Getting Started with the Ripple API
  101. Connecting to the Ripple test network
  102. Setting up the development environment
  103. First Ripple application
  104. Sending money 
  105. Prepare transaction
  106. Sign transaction
  107. Submit transaction
  108. Summary
  109. Developing Applications Using the Ripple API
  110. Sending checks
  111. Cashing checks
  112. Creating a time-held escrow
  113. Creating a conditionally-held escrow
  114. Important things you must remember
  115. Summary
  116. Other Books You May Enjoy
  117. Leave a review - let other readers know what you think

Setting up an offline wallet

An offline wallet can help you set up a Ripple account without storing any records digitally. Since the keys are generated offline, you can be assured that the generated keys don't leave your machine. Offline wallets can provide high security because no one can hack something that doesn't exist digitally. However, they are prone to physical theft. This section is only for your reference.

If you are happy with the desktop/mobile wallet you created earlier, you can skip this part. 

Navigate to Exarpy, as shown in the following screenshot, to generate an offline wallet. It would be better to use private browsing mode, where plugins are generally disabled. This is to prevent browser plugins spying on you:

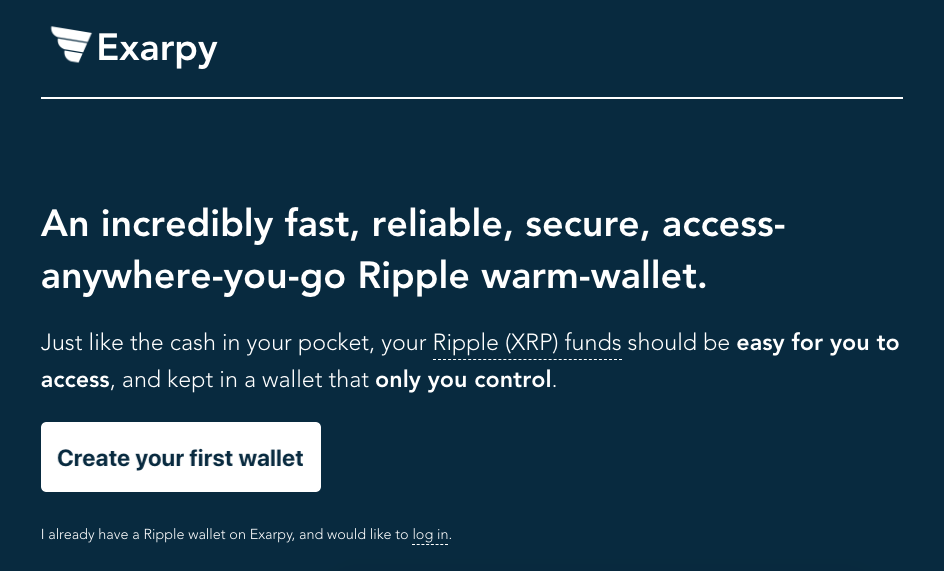
Click on Create your first wallet; you will be asked to go offline. If you are given additional recommendations, please follow them to make the process safer. Ensure that you disconnect yourself from the internet. 

Once you are offline, you are given a brief about your PIN. Your PIN is the recovery phrase of your Ripple wallet. If you lose your secret key, you will still be able to regenerate it using your PIN. However, if you lose your recovery phrase, you will lose your funds forever. Once you agree to the terms, click on Choose your Pin.

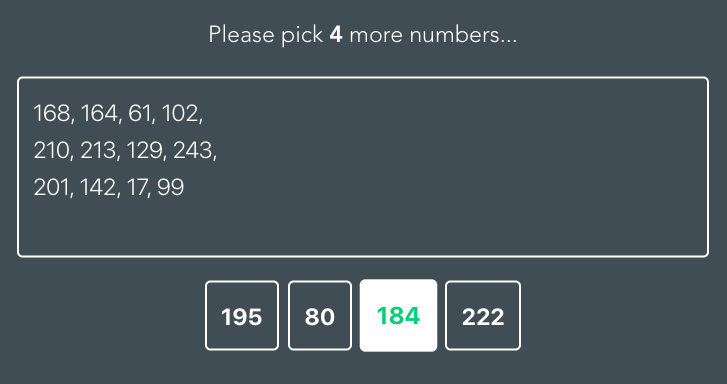
You will be taken to another screen, where you will be asked to select 16 numbers, as shown in the following screenshot. Make sure you finish this process:

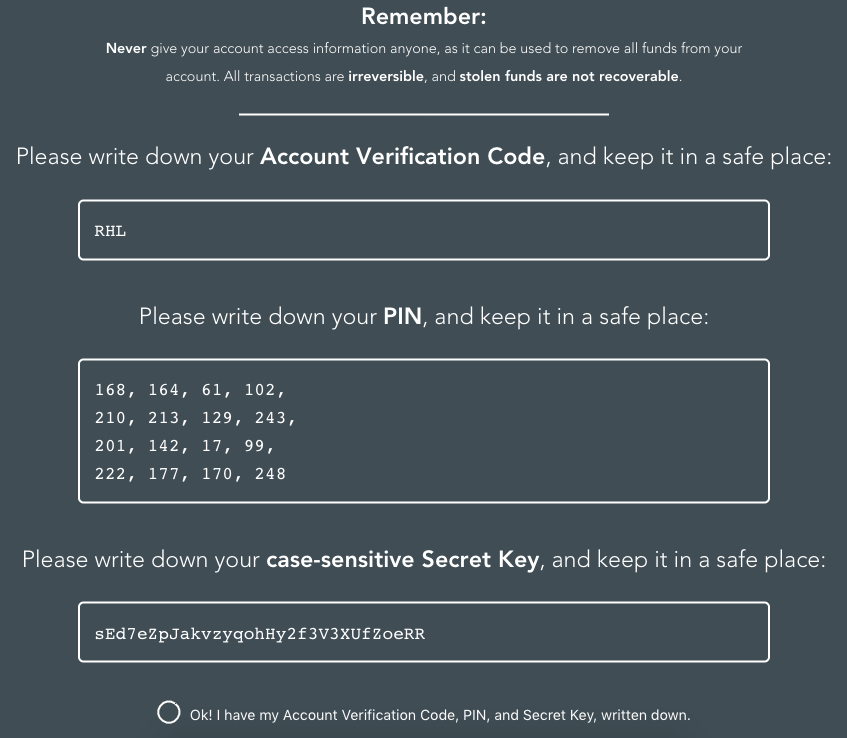
After you complete the PIN generation process, you will be shown your account credentials.

Please note that this is the first and the last time you are shown these credentials. No records are stored online or in your computer, so make sure you write them down. 

The Account Verification Code and Pin are required for you to log in through Exarpy. They also provide you with a secret key. Hence, if Exarpy shuts down, you can continue using your Ripple account through other wallets by using the secret key. Once you write them down, check the radio button and click on Great, let's log in and activate your wallet. Please don't go online yet. The following screenshot explains the same:

You will be asked to provide your PIN and account verification code. Once you input those values, click on Login. Now, Exarpy will request you to go online. You would be then requested to activate your wallet. We covered this topic earlier in this chapter in the "Activating the Ripple account" section.

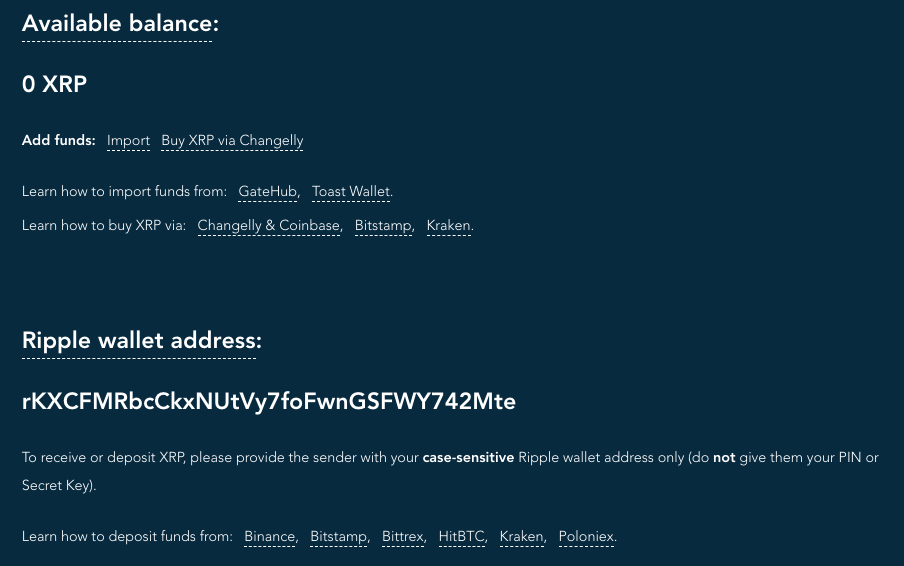
To see your wallet address, just click on the skip these tutorials,... link on the bottom of the page. You will be shown your Ripple account's dashboard. Check the radio button and agree to the terms. You will then be shown your wallet's public address, as shown in the following screenshot. You can send 20 XRP to this public address and activate your account: