
Conditionally-held escrows are similar to time-held escrows. However, you need to send the condition and the fulfillment after the release time for the escrow to be released. Ripple makes use of crypto conditions. For the purpose of this tutorial, we'll be generating a random fulfillment and condition. You need to keep the fulfillment secret, otherwise, anyone with the fulfillment code will be able to release the escrow.
Let's generate a random fulfillment and condition. You'll need to install the five-bells-condition npm library. You can do that using the following command:
npm install five-bells-condition
Use the following code to generate a random fulfillment and condition:
const cc = require('five-bells-condition')
const crypto = require('crypto')

const preimageData = crypto.randomBytes(32);
const myFulfillment = new cc.PreimageSha256();
myFulfillment.setPreimage(preimageData);

const condition = myFulfillment.getConditionBinary().toString('hex').toUpperCase();
console.log('Condition:', condition);

const fulfillment = myFulfillment.serializeBinary().toString('hex').toUpperCase();
console.log('Fulfillment:', fulfillment);
Save this to file and name it generate_fulfillment.js.
You can run the code using the following command:
./node_modules/.bin/babel-node generate_fulfillment.js
You should be able to see the following output on execution of the previous command:

Make sure you save the condition and the fulfillment. The creation process of the conditionally-held escrow is the same three-step process of prepare, sign, and submit. However, we would be passing the additional parameter, "condition".
Here's what the code to create a conditional escrow would look like:
'use strict';
const RippleAPI = require('ripple-lib').RippleAPI;
const sender = 'r41sFTd4rftxY1VCn5ZDDipb4KaV5VLFy2';
const secret = 'sptkAoSPzHq8mKLWrjU33EDj7v96u';
const options = {};
const release_date = new Date("2018-12-16T22:05:00Z");

const api = new RippleAPI({server: 'wss://s.altnet.rippletest.net:51233'});
api.connect().then(() => {
  console.log('Connected');
  return api.prepareEscrowCreation(sender, {
      "destination": "r42Qv8NwggeMWnpKcxMkx7qTtB23GYLHBX",
      "amount": '50',
      "allowExecuteAfter": release_date.toISOString(),
      "condition": "A025802010BE1D1DE61FE69A9EE99689CB79820326BF6CA8A725F6631A0CE00A07B134DA810120"
  }, options);

}).then(prepared => {
  console.log("txJSON:", prepared.txJSON);
  const {signedTransaction} = api.sign(prepared.txJSON, secret);
  api.submit(signedTransaction).then(onSuccess,onFailure);
});

function onSuccess(message){
  console.log(message);
  console.log("Transaction Successfully Submitted.");
  disconnect();
}

function onFailure(message){
  console.log("Transaction Submission Failed.");
  console.log(message);
  disconnect();
}

function disconnect(){
  api.disconnect().then(()=> {
    console.log("Disconnected from test network.")
  });
}
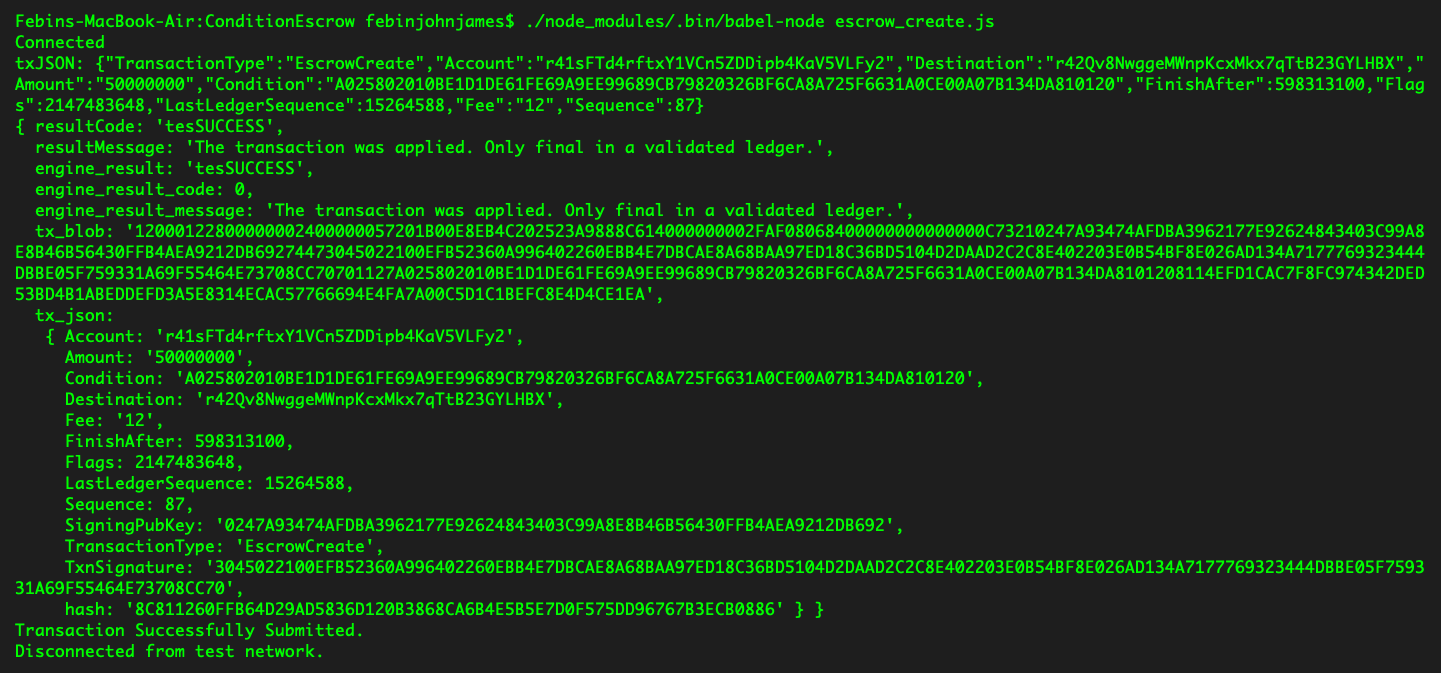
Save this as escrow_create.js. Run it using the following command:
./node_modules/.bin/babel-node escrow_create.js
If everything goes well, you should be able to see the following output:
In order to release the escrow, we need to send both the condition and fulfillment. Here's the code to release the conditionally-held escrow:
'use strict';
const RippleAPI = require('ripple-lib').RippleAPI;

const sender = 'r41sFTd4rftxY1VCn5ZDDipb4KaV5VLFy2';
const secret = 'sptkAoSPzHq8mKLWrjU33EDj7v96u';
const options = {};
const release_date = new Date("2018-12-16T14:10:00Z");

const api = new RippleAPI({server: 'wss://s.altnet.rippletest.net:51233'});
api.connect().then(() => {
  console.log('Connected');
  return api.prepareEscrowExecution(sender, {
      "owner": sender,
      "escrowSequence": 87,
      "condition": "A025802010BE1D1DE61FE69A9EE99689CB79820326BF6CA8A725F6631A0CE00A07B134DA810120",
      "fulfillment": "A022802021EB4CB44AD71E3B2A23B4AAF6A546EA208960737C23F29F0645499968664404"
  }, options);

}).then(prepared => {
  console.log("txJSON:", prepared.txJSON);
  const {signedTransaction} = api.sign(prepared.txJSON, secret);
  api.submit(signedTransaction).then(onSuccess,onFailure);
});

function onSuccess(message){
  console.log(message);
  console.log("Transaction Successfully Submitted.");
  disconnect();
}

function onFailure(message){
  console.log("Transaction Submission Failed.");
  console.log(message);
  disconnect();
}

function disconnect(){
  api.disconnect().then(()=> {
    console.log("Disconnected from test network.")
  });
}
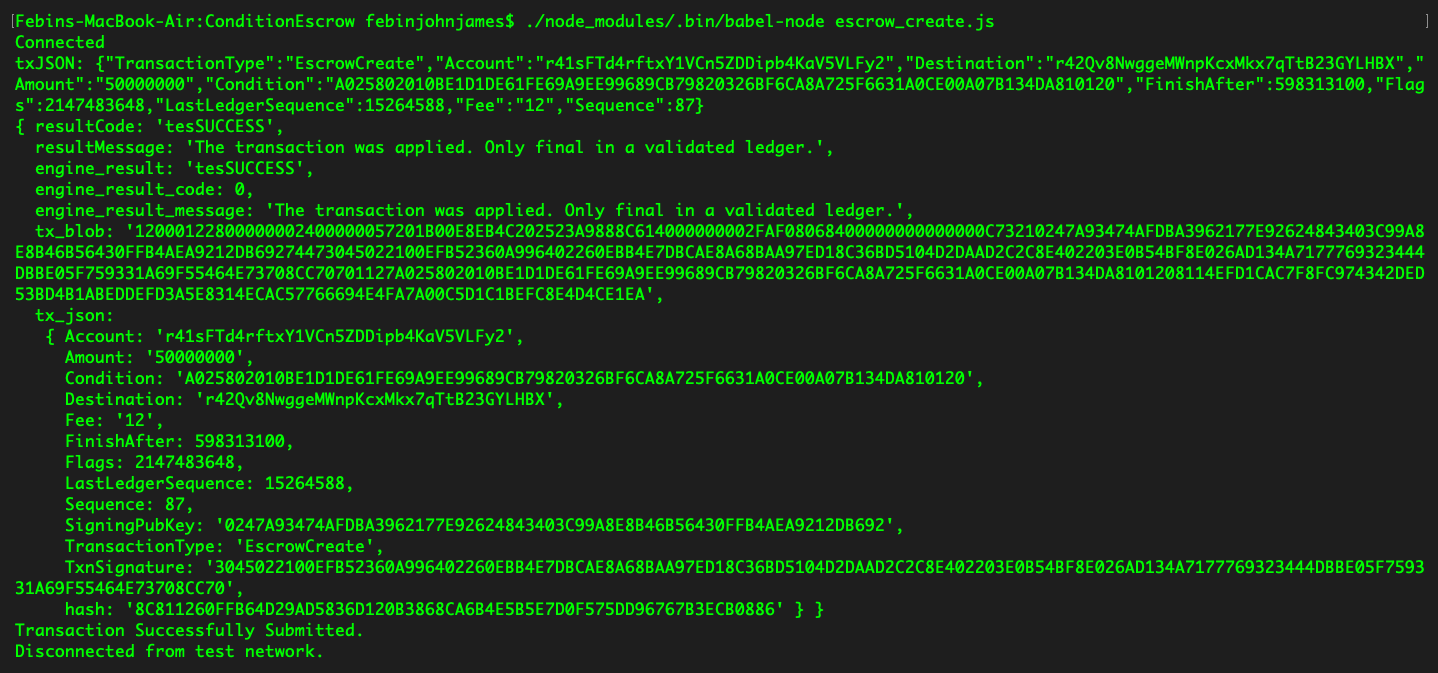
Save this as escrow_release.js. You can run it using the following command:
./node_modules/.bin/babel-node escrow_release.js
If everything goes well, you should be able to see the following output:
Once the transaction is confirmed by validators, the escrow will be released.
Let's now integrate this into our web app. The only change here is to the inputting of the condition and fulfillment. Here's what the JavaScript file should look like:
const RippleAPI = require('ripple-lib').RippleAPI;

  var api = new RippleAPI({server:'wss://s.altnet.rippletest.net:51233'});
  var fetchBalance;
  $('document').ready(function(){
    login();
    $('.progress').hide();
    $('#showCreateEscrowButton').click(function(){
        showcreateEscrowModal();
    });
    $('#logoutButton').click(function(){
        logout();
    });
    $("#loginButton").click(function(){
        storeCredentials();
    });
    $("#createEscrowButton").click(function(){
      createEscrow();
    });
    $("#releaseEscrowButton").click(function(){
      releaseEscrow();
    });
    $("#showReleaseEscrowButton").click(function(){
       showReleaseEscrowModal();
    });
  });

  function login(){
    if(!localStorage.getItem("loggedIn")){
      $('#loginModal').modal('show');
    } else{
      updateAccount();
    }
  }

  function logout(){
    localStorage.clear();
    clearInterval(fetchBalance);
    location.reload();
  }

  function updateAccount(){
    $('#rippleAddress').text(localStorage.getItem('rippleAddress'));
    updateBalance();
  }

  function storeCredentials(){
    localStorage.setItem("rippleAddress", $('#inputRippleAddress').val());
    localStorage.setItem("secret", $('#inputSecret').val());
    localStorage.setItem("loggedIn", true);
    $('#loginModal').modal('hide');
    updateAccount();
  }

  $("form").submit(function(e) {
    e.preventDefault();
  });

  function updateBalance(){
    api.connect().then(() => {
      const accountAddress = localStorage.getItem("rippleAddress");
      return api.getAccountInfo(accountAddress);
    }).then(info => {
      $('#balance').text("Account Balance : " + info.xrpBalance+ " XRP");
    }).then(() => {
      return api.disconnect();
    }).catch(console.error);
  }

  function showcreateEscrowModal(){
    $('#createEscrowModal').modal('show');
  }

  function showReleaseEscrowModal(){
    $('#releaseEscrowModal').modal('show');
  }

  function createEscrow(){
    $('.progress').show();
    const instructions = {};
    const sourceAddress = localStorage.getItem('rippleAddress');
    const sourceSecret = localStorage.getItem('secret');
    const releaseDateTime = new Date($("#inputDate").val()+"T"+$("#inputTime").val()+"Z");
    const options = {};

    api.connect().then(() => {

    return api.prepareEscrowCreation(sourceAddress, {
        "destination": $("#inputDestinationAddress").val(),
        "amount": $("#inputAmount").val(),
        "allowExecuteAfter": releaseDateTime.toISOString(),
        "condition": $("#inputCondition").val()
    }, options).then(prepared => {
        $('.progress-bar').css('width', 40+'%').attr('aria-valuenow', 40);
        const {signedTransaction} = api.sign(prepared.txJSON, sourceSecret);
        api.submit(signedTransaction).then(onSuccess,onFailure);
      });
    });
  }

  function releaseEscrow(){
      $('.progress').show();
      const instructions = {};
      const sourceAddress = localStorage.getItem('rippleAddress');
      const sourceSecret = localStorage.getItem('secret');
      const options = {};

      api.connect().then(() => {

      return api.prepareEscrowExecution(sourceAddress, {
          "owner": $("#inputOwnerAddress").val(),
          "escrowSequence": parseInt($("#inputSequence").val()),
          "condition": $("#inputReleaseCondition").val(),
          "fulfillment": $("#inputFulFillment").val()
      }, options).then(prepared => {
          $('.progress-bar').css('width', 40+'%').attr('aria-valuenow', 40);
          const {signedTransaction} = api.sign(prepared.txJSON, sourceSecret);
          api.submit(signedTransaction).then(onSuccessRelease,onFailure);
        });
      });
  }

  function onSuccessRelease(message){
    $('.progress-bar').css('width', 100+'%').attr('aria-valuenow', 100);
    bootstrap_alert.success('Transaction Submitted Successfully');
    clear();
  }

  function onSuccess(message){
    console.log(message);
    $('.progress-bar').css('width', 100+'%').attr('aria-valuenow', 100);
    bootstrap_alert.success('Transaction Submitted Successfully');
    $('#escrowOutput').text("Created Escrow Sequence : "+message['tx_json']['Sequence']);
    $('#balance').text("Fetching updated balance, please wait.");
    clear();
    setTimeout(updateBalance,6000);
  }

  function onFailure(message){
    console.log(message);
    $('.progress-bar').css('width', 100+'%').attr('aria-valuenow', 100);
    bootstrap_alert.danger('Transaction Submission Failed');
    clear();
  }

  function clear(){
    disconnect();
    $('#createEscrowModal').modal('hide');
    $('#releaseEscrowModal').modal('hide');
    $('.progress-bar').css('width', 0+'%').attr('aria-valuenow', 0);
    $(".progress").hide();
  }

  function disconnect(){
    api.disconnect().then(()=> {
    })
  }

  bootstrap_alert = function() {}

  bootstrap_alert.success = function(message) {
    $('#alert').html('<div role="alert" id="success-alert" class="alert alert-success"><p>'+message+'</p></div>');
    $("#success-alert").fadeTo(2000, 500).slideUp(500, function(){
        $("#success-alert").slideUp(500);
    });
  }
  bootstrap_alert.danger = function(message) {
      $('#alert').html('<div role="alert" id="danger-alert" class="alert alert-danger"><p>'+message+'</p></div>');
      $("#danger-alert").fadeTo(2000, 500).slideUp(500, function(){
    $("#danger-alert").slideUp(500);
});
}
Save this file as app.js. Let's browserify it using the following command:
browserify app.js -o bundle.js
Here's what the file should look like:
<!DOCTYPE html>
<html>
<title> Condition Escrow </title>
<head>
<link rel="stylesheet" href="css/bootstrap.min.css">
</head>
<body>
<nav class="navbar navbar-expand-lg navbar-dark bg-dark">
<a class="navbar-brand" href="#">Condition Escrow</a>
</nav>
<br/><br/><br/>
<center>
<p class="lead">Ripple Address : <span id="rippleAddress"> </span> </p>
<p id="balance"> Please wait, fetching account details...</p>
<button id="showCreateEscrowButton" class="btn btn-primary">Create Time-Held Escrow</button>
<button id="showReleaseEscrowButton" class="btn btn-primary">Release Escrow</button>
<button id="logoutButton" class="btn btn-primary">Logout</button>
<br/>
<br/>
<br/>
<div id="escrowOutput"> </div>
<div id="alert" style="width:30%"></div>
</center>
<div class="modal fade" id="loginModal" tabindex="-1" role="dialog" aria-labelledby="loginModalLabel" aria-hidden="true">
<div class="modal-dialog" role="document">
<div class="modal-content">
<div class="modal-header">
<h5 class="modal-title" id="loginModalLabel">Login</h5>
<button type="button" class="close" data-dismiss="modal" aria-label="Close">
<span aria-hidden="true">×</span>
</button>
</div>
<div class="modal-body">
<form>
<div class="form-group">
<label for="inputRippleAddress">Ripple Address</label>
<input type="text" class="form-control" id="inputRippleAddress" aria-describedby="rippleAddressHelp" placeholder="Enter Ripple Address">
</div>
<div class="form-group">
<label for="inputSecret">Secret</label>
<input type="password" class="form-control" id="inputSecret" placeholder="Secret">
</div>
<button id="loginButton" class="btn btn-primary">Login</button>
</form>
</div>
</div>
</div>
</div>
<div class="modal fade" id="createEscrowModal" tabindex="-1" role="dialog" aria-labelledby="createEscrowModalLabel" aria-hidden="true">
<div class="modal-dialog" role="document">
<div class="modal-content">
<div class="modal-header">
<h5 class="modal-title" id="createEscrowModalLabel">Create Escrow </h5>
<button type="button" class="close" data-dismiss="modal" aria-label="Close">
<span aria-hidden="true">×</span>
</button>
</div>
<div class="modal-body">
<form>
<div class="form-group">
<label for="inputDestinationAddress">Destination</label>
<input type="text" class="form-control" id="inputDestinationAddress" aria-describedby="inputDestinationAddressHelp" placeholder="Destination Address">
</div>
<div class="form-group">
<label for="inputCondition">Condition</label>
<input type="text" class="form-control" id="inputCondition" aria-describedby="inputConditionHelp" placeholder="Condition">
</div>
<div class="form-group">
<label for="inputAmount">Amount</label>
<input type="number" class="form-control" id="inputAmount" placeholder="Amount">
</div>
<div class="form-group">
<label for="inputDate">Release Date (UTC)</label>
<input type="date" class="form-control" id="inputDate" placeholder="Date">
</div>
<div class="form-group">
<label for="inputTime">Release Time (UTC)</label>
<input type="time" class="form-control" id="inputTime" placeholder="Time">
</div>
<button id="createEscrowButton" class="btn btn-primary">Create Escrow</button>
<br/> <br/>
<div class="progress">
<div class="progress-bar progress-bar-striped bg-info" role="progressbar" style="width: 0%" aria-valuenow="0" aria-valuemin="0" aria-valuemax="100"></div>
</div>
</form>
</div>
</div>
</div>
</div>
<div class="modal fade" id="releaseEscrowModal" tabindex="-1" role="dialog" aria-labelledby="releaseEscrowModalLabel" aria-hidden="true">
<div class="modal-dialog" role="document">
<div class="modal-content">
<div class="modal-header">
<h5 class="modal-title" id="releaseEscrowModalLabel">Release Escrow </h5>
<button type="button" class="close" data-dismiss="modal" aria-label="Close">
<span aria-hidden="true">×</span>
</button>
</div>
<div class="modal-body">
<form>
<div class="form-group">
<label for="inputOwnerAddress">Owner</label>
<input type="text" class="form-control" id="inputOwnerAddress" aria-describedby="inputOwnerAddressHelp" placeholder="Owner Address">
</div>
<div class="form-group">
<label for="inputSequence">Sequence</label>
<input type="number" class="form-control" id="inputSequence" placeholder="Sequence">
</div>
<div class="form-group">
<label for="inputReleaseCondition">Condition</label>
<input type="text" class="form-control" id="inputReleaseCondition" aria-describedby="inputReleaseConditionHelp" placeholder="Condition">
</div>
<div class="form-group">
<label for="inputFulFillment">Fulfillment</label>
<input type="text" class="form-control" id="inputFulFillment" aria-describedby="inputFulFillmentHelp" placeholder="Fulfillment">
</div>
<button id="releaseEscrowButton" class="btn btn-primary">Release Escrow</button>
<br/> <br/>
<div class="progress">
<div class="progress-bar progress-bar-striped bg-info" role="progressbar" style="width: 0%" aria-valuenow="0" aria-valuemin="0" aria-valuemax="100"></div>
</div>
</form>
</div>
</div>
</div>
</div>
</body>
<script src="js/jquery.min.js"></script>
<script src="js/bootstrap.min.js"></script>
<script src="js/bundle.js"></script>
</html>
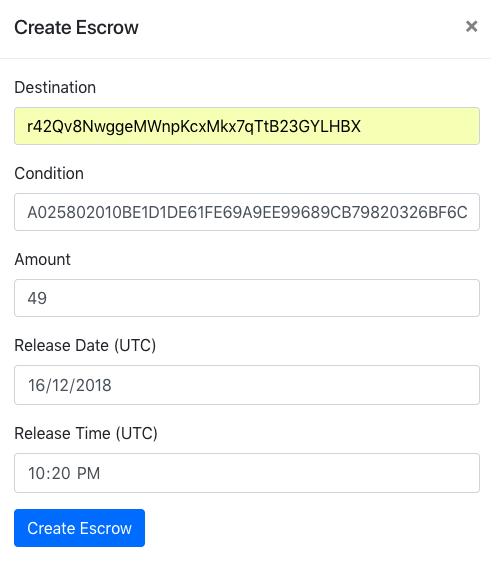
Save the file as escrow_create.html. Now you can run it on the browser and you should be able to see a screen similar to the following one to create the conditionally-held escrow:
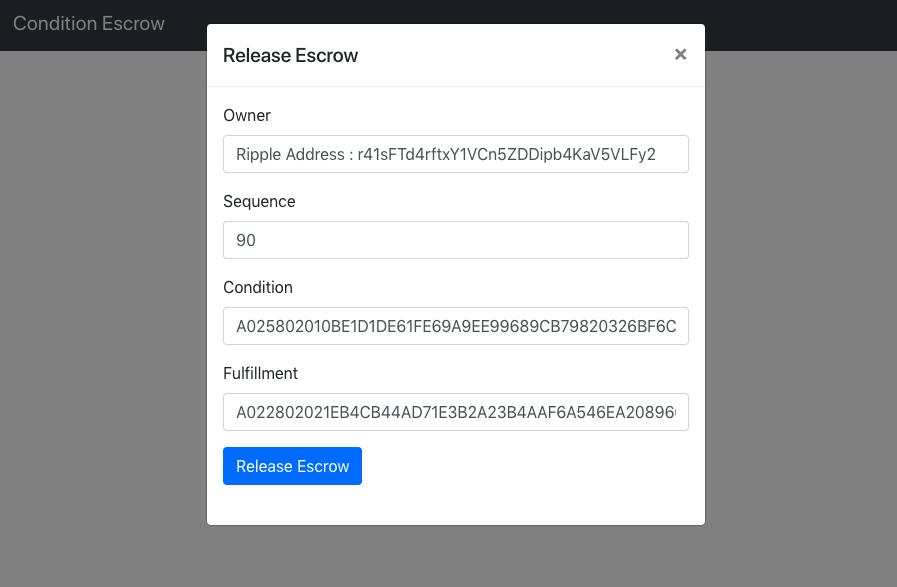
The release escrow form should be similar to the following screenshot:
Great job! You've completed building an app that allows users to create their own conditionally-held escrows.