
We'll again go with the same step of steps as before to create a time-held escrow:
- Prepare transaction: Here, we define the destination account to which money should be released, escrow release time, amount, and so on.
- Sign transaction: You need to sign the transaction cryptographically with your secret key. This proves that you own the source account.
- Submit transaction: Once you sign the transaction, you need to submit it to the Ripple network for validation. The escrow would be only created when the validators approve the transaction.
We prepare the create escrow transaction with the following code. As you can see, we've defined the destination and amount and passed the release time to "allowExecuteAfter" parameter:
const sender = 'r41sFTd4rftxY1VCn5ZDDipb4KaV5VLFy2';
const secret = 'sptkAoSPzHq8mKLWrjU33EDj7v96u';
const options = {};
const release_date = new Date("2018-12-16T14:10:00Z");

const api = new RippleAPI({server: 'wss://s.altnet.rippletest.net:51233'});
api.connect().then(() => {
  console.log('Connected');
  return api.prepareEscrowCreation(sender, {
      "destination": "r42Qv8NwggeMWnpKcxMkx7qTtB23GYLHBX",
      "amount": '50',
      "allowExecuteAfter": release_date.toISOString()
  }, options);
Later, we sign and submit the transaction to the network using the following code:
  const {signedTransaction} = api.sign(prepared.txJSON, secret);
  api.submit(signedTransaction).then(onSuccess,onFailure);
Now, let's put everything together and see what the code looks like. You'll need to change the time to somewhere in the near future since you'll also be writing code to release the same escrow. Remember, the escrow cannot be released until the release time is passed:
'use strict';
const RippleAPI = require('ripple-lib').RippleAPI;

const sender = 'r41sFTd4rftxY1VCn5ZDDipb4KaV5VLFy2';
const secret = 'sptkAoSPzHq8mKLWrjU33EDj7v96u';
const options = {};
const release_date = new Date("2018-12-16T14:10:00Z");

const api = new RippleAPI({server: 'wss://s.altnet.rippletest.net:51233'});
api.connect().then(() => {
  console.log('Connected');
  return api.prepareEscrowCreation(sender, {
      "destination": "r42Qv8NwggeMWnpKcxMkx7qTtB23GYLHBX",
      "amount": '50',
      "allowExecuteAfter": release_date.toISOString()
  }, options);

}).then(prepared => {
  console.log("txJSON:", prepared.txJSON);
  const {signedTransaction} = api.sign(prepared.txJSON, secret);
  api.submit(signedTransaction).then(onSuccess,onFailure);
});

function onSuccess(message){
  console.log(message);
  console.log("Transaction Successfully Submitted.");
  disconnect();
}

function onFailure(message){
  console.log("Transaction Submission Failed.");
  console.log(message);
  disconnect();
}

function disconnect(){
  api.disconnect().then(()=> {
    console.log("Disconnected from test network.")
  });
}
Save this to a file and name it escrow_create.js.
Let's run the code using the following command:
./node_modules/.bin/babel-node escrow_release.js
If everything goes well, the following output will be displayed:
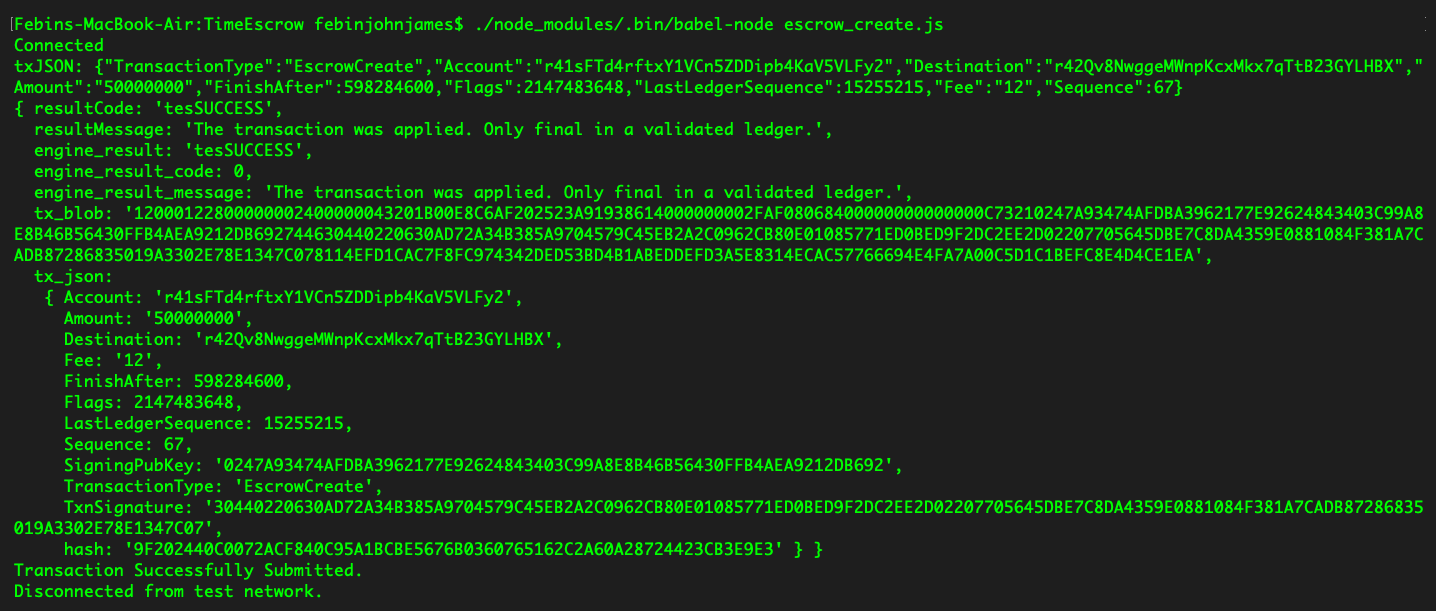
You've successfully created the escrow. Make a note of the sequence parameter in the output; we'll be using it to release the escrow. Now, in order to release the escrow, we need to follow the same three steps that're given in the following:
- Prepare transaction: Here, we define the owner account that created the escrow and the sequence parameter we received from escrow creation.
- Sign transaction: Escrow can be signed by anyone. However, the release amount will only go to the designated account specified during the creation of the escrow.
- Submit transaction: Once you sign the transaction, you need to submit it to the Ripple network for validation. The escrow will only be released when the validators approve the transaction.
Here's the code to prepare, sign, and submit the "escrowFinish" transaction. Please note in the code that's given below, the owner of the escrow is releasing it, hence the owner and sender are the same address. However, this need not be the case—anyone can release an escrow. You'll need to replace this "escrowSequence" parameter:
api.prepareEscrowExecution(sender, {
      "owner": sender,
      "escrowSequence": 67,
  }, options);

  const {signedTransaction} = api.sign(prepared.txJSON, secret);
  api.submit(signedTransaction).then(onSuccess,onFailure);
Let's use the following code to connect to the Ripple network and release the escrow:
'use strict';
const RippleAPI = require('ripple-lib').RippleAPI;


const sender = 'r41sFTd4rftxY1VCn5ZDDipb4KaV5VLFy2';
const secret = 'sptkAoSPzHq8mKLWrjU33EDj7v96u';
const options = {};
const release_date = new Date("2018-12-16T14:10:00Z");

const api = new RippleAPI({server: 'wss://s.altnet.rippletest.net:51233'});
api.connect().then(() => {
  console.log('Connected');
  return api.prepareEscrowExecution(sender, {
      "owner": sender,
      "escrowSequence": 67,
  }, options);

}).then(prepared => {
  console.log("txJSON:", prepared.txJSON);
  const {signedTransaction} = api.sign(prepared.txJSON, secret);
  api.submit(signedTransaction).then(onSuccess,onFailure);
});

function onSuccess(message){
  console.log(message);
  console.log("Transaction Successfully Submitted.");
  disconnect();
}

function onFailure(message){
  console.log("Transaction Submission Failed.");
  console.log(message);
  disconnect();
}

function disconnect(){
  api.disconnect().then(()=> {
    console.log("Disconnected from test network.")
  });
}
Save this file as escrow_release.js. Let's run the code by using the following command:
./node_modules/.bin/babel-node escrow_release.js
Please note, this code would only work if the escrow release time mentioned during the time of creation has passed. Otherwise, you'll receive a permission error.
If everything goes well, the following output will be displayed:
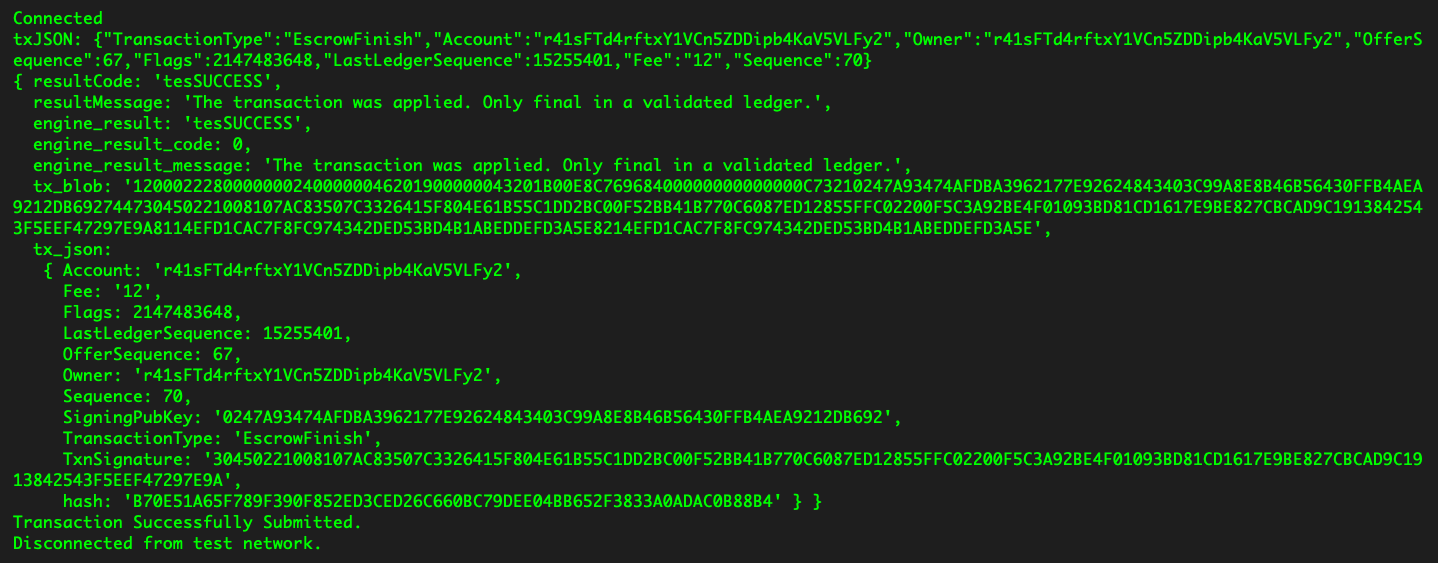
Once the validators confirm the transaction, the destination account will be credited with the escrow amount. Let's now see how we can use this code to build a web app that'll allow users to easily create time-held escrows.
We'll need two forms, one to create the escrow and another to release it.
Here's the code that inputs the necessary fields to create an escrow:
<div class="modal fade" id="createEscrowModal" tabindex="-1" role="dialog" aria-labelledby="createEscrowModalLabel" aria-hidden="true">
<div class="modal-dialog" role="document">
<div class="modal-content">
<div class="modal-header">
<h5 class="modal-title" id="createEscrowModalLabel">Create Escrow </h5>
<button type="button" class="close" data-dismiss="modal" aria-label="Close">
<span aria-hidden="true">×</span>
</button>
</div>
<div class="modal-body">
<form>
<div class="form-group">
<label for="inputDestinationAddress">Destination</label>
<input type="text" class="form-control" id="inputDestinationAddress" aria-describedby="inputDestinationAddressHelp" placeholder="Destination Address">
</div>
<div class="form-group">
<label for="inputAmount">Amount</label>
<input type="number" class="form-control" id="inputAmount" placeholder="Amount">
</div>
<div class="form-group">
<label for="inputDate">Release Date (UTC)</label>
<input type="date" class="form-control" id="inputDate" placeholder="Date">
</div>
<div class="form-group">
<label for="inputTime">Release Time (UTC)</label>
<input type="time" class="form-control" id="inputTime" placeholder="Time">
</div>
<button id="createEscrowButton" class="btn btn-primary">Create Escrow</button>
<br/> <br/>
<div class="progress">
<div class="progress-bar progress-bar-striped bg-info" role="progressbar" style="width: 0%" aria-valuenow="0" aria-valuemin="0" aria-valuemax="100"></div>
</div>
</form>
</div>
</div>
</div>
</div>
Here's the code to the form that takes input to release an escrow:
<div class="modal fade" id="releaseEscrowModal" tabindex="-1" role="dialog" aria-labelledby="releaseEscrowModalLabel" aria-hidden="true">
<div class="modal-dialog" role="document">
<div class="modal-content">
<div class="modal-header">
<h5 class="modal-title" id="releaseEscrowModalLabel">Release Escrow </h5>
<button type="button" class="close" data-dismiss="modal" aria-label="Close">
<span aria-hidden="true">×</span>
</button>
</div>
<div class="modal-body">
<form>
<div class="form-group">
<label for="inputOwnerAddress">Owner</label>
<input type="text" class="form-control" id="inputOwnerAddress" aria-describedby="inputOwnerAddressHelp" placeholder="Owner Address">
</div>
<div class="form-group">
<label for="inputSequence">Sequence</label>
<input type="number" class="form-control" id="inputSequence" placeholder="Sequence">
</div>
<button id="releaseEscrowButton" class="btn btn-primary">Release Escrow</button>
<br/> <br/>
<div class="progress">
<div class="progress-bar progress-bar-striped bg-info" role="progressbar" style="width: 0%" aria-valuenow="0" aria-valuemin="0" aria-valuemax="100"></div>
</div>
</form>
</div>
</div>
</div>
</div>
On the JavaScript code, we've added two functions, one to create an and another to release it:
function createEscrow(){
    $('.progress').show();
    const instructions = {};
    const sourceAddress = localStorage.getItem('rippleAddress');
    const sourceSecret = localStorage.getItem('secret');
    const releaseDateTime = new Date($("#inputDate").val()+"T"+$("#inputTime").val()+"Z");
    const options = {};

    api.connect().then(() => {

    return api.prepareEscrowCreation(sourceAddress, {
        "destination": $("#inputDestinationAddress").val(),
        "amount": $("#inputAmount").val(),
        "allowExecuteAfter": releaseDateTime.toISOString()
    }, options).then(prepared => {
        $('.progress-bar').css('width', 40+'%').attr('aria-valuenow', 40);
        const {signedTransaction} = api.sign(prepared.txJSON, sourceSecret);
        api.submit(signedTransaction).then(onSuccess,onFailure);
      });
    });
  }

  function releaseEscrow(){
      $('.progress').show();
      const instructions = {};
      const sourceAddress = localStorage.getItem('rippleAddress');
      const sourceSecret = localStorage.getItem('secret');
      const options = {};

      api.connect().then(() => {

      return api.prepareEscrowExecution(sourceAddress, {
          "owner": $("#inputOwnerAddress").val(),
          "escrowSequence": parseInt($("#inputSequence").val()),
      }, options).then(prepared => {
          $('.progress-bar').css('width', 40+'%').attr('aria-valuenow', 40);
          const {signedTransaction} = api.sign(prepared.txJSON, sourceSecret);
          api.submit(signedTransaction).then(onSuccessRelease,onFailure);
        });
      });
  }
When we put together our HTML code, here's what it should look like:
<!DOCTYPE html>
<html>
<title> Time Escrow </title>
<head>
<link rel="stylesheet" href="css/bootstrap.min.css">
</head>
<body>
<nav class="navbar navbar-expand-lg navbar-dark bg-dark">
<a class="navbar-brand" href="#">Time Escrow</a>
</nav>
<br/><br/><br/>
<center>
<p class="lead">Ripple Address : <span id="rippleAddress"> </span> </p>
<p id="balance"> Please wait, fetching account details...</p>
<button id="showCreateEscrowButton" class="btn btn-primary">Create Time-Held Escrow</button>
<button id="showReleaseEscrowButton" class="btn btn-primary">Release Escrow</button>
<button id="logoutButton" class="btn btn-primary">Logout</button>
<br/>
<br/>
<br/>
<div id="escrowOutput"> </div>
<div id="alert" style="width:30%"></div>
</center>
<div class="modal fade" id="loginModal" tabindex="-1" role="dialog" aria-labelledby="loginModalLabel" aria-hidden="true">
<div class="modal-dialog" role="document">
<div class="modal-content">
<div class="modal-header">
<h5 class="modal-title" id="loginModalLabel">Login</h5>
<button type="button" class="close" data-dismiss="modal" aria-label="Close">
<span aria-hidden="true">×</span>
</button>
</div>
<div class="modal-body">
<form>
<div class="form-group">
<label for="inputRippleAddress">Ripple Address</label>
<input type="text" class="form-control" id="inputRippleAddress" aria-describedby="rippleAddressHelp" placeholder="Enter Ripple Address">
</div>
<div class="form-group">
<label for="inputSecret">Secret</label>
<input type="password" class="form-control" id="inputSecret" placeholder="Secret">
</div>
<button id="loginButton" class="btn btn-primary">Login</button>
</form>
</div>
</div>
</div>
</div>
<div class="modal fade" id="createEscrowModal" tabindex="-1" role="dialog" aria-labelledby="createEscrowModalLabel" aria-hidden="true">
<div class="modal-dialog" role="document">
<div class="modal-content">
<div class="modal-header">
<h5 class="modal-title" id="createEscrowModalLabel">Create Escrow </h5>
<button type="button" class="close" data-dismiss="modal" aria-label="Close">
<span aria-hidden="true">×</span>
</button>
</div>
<div class="modal-body">
<form>
<div class="form-group">
<label for="inputDestinationAddress">Destination</label>
<input type="text" class="form-control" id="inputDestinationAddress" aria-describedby="inputDestinationAddressHelp" placeholder="Destination Address">
</div>
<div class="form-group">
<label for="inputAmount">Amount</label>
<input type="number" class="form-control" id="inputAmount" placeholder="Amount">
</div>
<div class="form-group">
<label for="inputDate">Release Date (UTC)</label>
<input type="date" class="form-control" id="inputDate" placeholder="Date">
</div>
<div class="form-group">
<label for="inputTime">Release Time (UTC)</label>
<input type="time" class="form-control" id="inputTime" placeholder="Time">
</div>
<button id="createEscrowButton" class="btn btn-primary">Create Escrow</button>
<br/> <br/>
<div class="progress">
<div class="progress-bar progress-bar-striped bg-info" role="progressbar" style="width: 0%" aria-valuenow="0" aria-valuemin="0" aria-valuemax="100"></div>
</div>
</form>
</div>
</div>
</div>
</div>
<div class="modal fade" id="releaseEscrowModal" tabindex="-1" role="dialog" aria-labelledby="releaseEscrowModalLabel" aria-hidden="true">
<div class="modal-dialog" role="document">
<div class="modal-content">
<div class="modal-header">
<h5 class="modal-title" id="releaseEscrowModalLabel">Release Escrow </h5>
<button type="button" class="close" data-dismiss="modal" aria-label="Close">
<span aria-hidden="true">×</span>
</button>
</div>
<div class="modal-body">
<form>
<div class="form-group">
<label for="inputOwnerAddress">Owner</label>
<input type="text" class="form-control" id="inputOwnerAddress" aria-describedby="inputOwnerAddressHelp" placeholder="Owner Address">
</div>
<div class="form-group">
<label for="inputSequence">Sequence</label>
<input type="number" class="form-control" id="inputSequence" placeholder="Sequence">
</div>
<button id="releaseEscrowButton" class="btn btn-primary">Release Escrow</button>
<br/> <br/>
<div class="progress">
<div class="progress-bar progress-bar-striped bg-info" role="progressbar" style="width: 0%" aria-valuenow="0" aria-valuemin="0" aria-valuemax="100"></div>
</div>
</form>
</div>
</div>
</div>
</div>
</body>
<script src="js/jquery.min.js"></script>
<script src="js/bootstrap.min.js"></script>
<script src="js/bundle.js"></script>
</html>
Save the previous code to escrow_create.html. Here's what the JavaScript code should look like:
const RippleAPI = require('ripple-lib').RippleAPI;


  var api = new RippleAPI({server:'wss://s.altnet.rippletest.net:51233'});
  var fetchBalance;
  $('document').ready(function(){
    login();
    $('.progress').hide();
    $('#showCreateEscrowButton').click(function(){
        showcreateEscrowModal();
    });
    $('#logoutButton').click(function(){
        logout();
    });
    $("#loginButton").click(function(){
        storeCredentials();
    });
    $("#createEscrowButton").click(function(){
      createEscrow();
    });
    $("#releaseEscrowButton").click(function(){
      releaseEscrow();
    });
    $("#showReleaseEscrowButton").click(function(){
       showReleaseEscrowModal();
    });
  });

  function login(){
    if(!localStorage.getItem("loggedIn")){
      $('#loginModal').modal('show');
    } else{
      updateAccount();
    }
  }

  function logout(){
    localStorage.clear();
    clearInterval(fetchBalance);
    location.reload();
  }

  function updateAccount(){
    $('#rippleAddress').text(localStorage.getItem('rippleAddress'));
    updateBalance();
  }

  function storeCredentials(){
    localStorage.setItem("rippleAddress", $('#inputRippleAddress').val());
    localStorage.setItem("secret", $('#inputSecret').val());
    localStorage.setItem("loggedIn", true);
    $('#loginModal').modal('hide');
    updateAccount();
  }

  $("form").submit(function(e) {
    e.preventDefault();
  });

  function updateBalance(){
    api.connect().then(() => {
      const accountAddress = localStorage.getItem("rippleAddress");
      return api.getAccountInfo(accountAddress);
    }).then(info => {
      $('#balance').text("Account Balance : " + info.xrpBalance+ " XRP");
    }).then(() => {
      return api.disconnect();
    }).catch(console.error);
  }

  function showcreateEscrowModal(){
    $('#createEscrowModal').modal('show');
  }

  function showReleaseEscrowModal(){
    $('#releaseEscrowModal').modal('show');
  }

  function createEscrow(){
    $('.progress').show();
    const instructions = {};
    const sourceAddress = localStorage.getItem('rippleAddress');
    const sourceSecret = localStorage.getItem('secret');
    const releaseDateTime = new Date($("#inputDate").val()+"T"+$("#inputTime").val()+"Z");
    const options = {};

    api.connect().then(() => {

    return api.prepareEscrowCreation(sourceAddress, {
        "destination": $("#inputDestinationAddress").val(),
        "amount": $("#inputAmount").val(),
        "allowExecuteAfter": releaseDateTime.toISOString()
    }, options).then(prepared => {
        $('.progress-bar').css('width', 40+'%').attr('aria-valuenow', 40);
        const {signedTransaction} = api.sign(prepared.txJSON, sourceSecret);
        api.submit(signedTransaction).then(onSuccess,onFailure);
      });
    });
  }

  function releaseEscrow(){
      $('.progress').show();
      const instructions = {};
      const sourceAddress = localStorage.getItem('rippleAddress');
      const sourceSecret = localStorage.getItem('secret');
      const options = {};

      api.connect().then(() => {

      return api.prepareEscrowExecution(sourceAddress, {
          "owner": $("#inputOwnerAddress").val(),
          "escrowSequence": parseInt($("#inputSequence").val()),
      }, options).then(prepared => {
          $('.progress-bar').css('width', 40+'%').attr('aria-valuenow', 40);
          const {signedTransaction} = api.sign(prepared.txJSON, sourceSecret);
          api.submit(signedTransaction).then(onSuccessRelease,onFailure);
        });
      });
  }

  function onSuccessRelease(message){
    $('.progress-bar').css('width', 100+'%').attr('aria-valuenow', 100);
    bootstrap_alert.success('Transaction Submitted Successfully');
    clear();
  }

  function onSuccess(message){
    console.log(message);
    $('.progress-bar').css('width', 100+'%').attr('aria-valuenow', 100);
    bootstrap_alert.success('Transaction Submitted Successfully');
    $('#escrowOutput').text("Created Escrow Sequence : "+message['tx_json']['Sequence']);
    $('#balance').text("Fetching updated balance, please wait.");
    clear();
    setTimeout(updateBalance,6000);
  }

  function onFailure(message){
    console.log(message);
    $('.progress-bar').css('width', 100+'%').attr('aria-valuenow', 100);
    bootstrap_alert.danger('Transaction Submission Failed');
    clear();
  }

  function clear(){
    disconnect();
    $('#createEscrowModal').modal('hide');
    $('#releaseEscrowModal').modal('hide');
    $('.progress-bar').css('width', 0+'%').attr('aria-valuenow', 0);
    $(".progress").hide();
  }

  function disconnect(){
    api.disconnect().then(()=> {
    })
  }

  bootstrap_alert = function() {}

  bootstrap_alert.success = function(message) {
    $('#alert').html('<div role="alert" id="success-alert" class="alert alert-success"><p>'+message+'</p></div>');
    $("#success-alert").fadeTo(2000, 500).slideUp(500, function(){
        $("#success-alert").slideUp(500);
    });
  }
  bootstrap_alert.danger = function(message) {
      $('#alert').html('<div role="alert" id="danger-alert" class="alert alert-danger"><p>'+message+'</p></div>');
      $("#danger-alert").fadeTo(2000, 500).slideUp(500, function(){
    $("#danger-alert").slideUp(500);
});
    }
Save the previous code to app.js. We should browserify it using the following command:
browserify app.js -o bundle.js
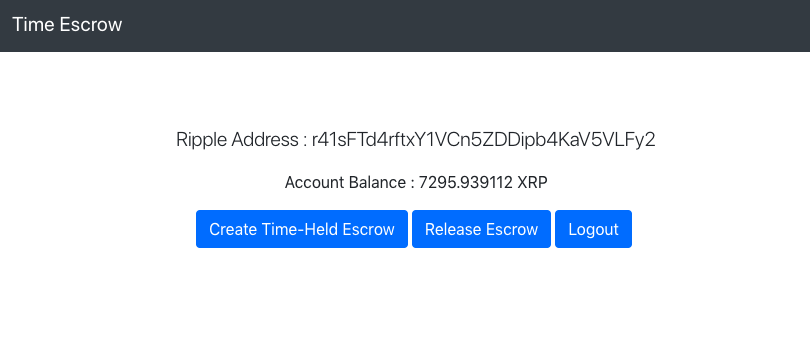
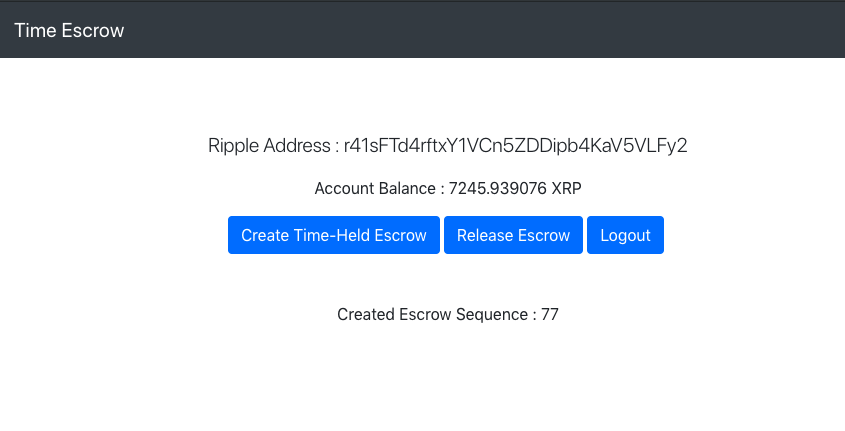
Make sure the created bundle.js is saved in the js directory. Let's open the HTML on a browser. If everything goes well, the following screen will be displayed:
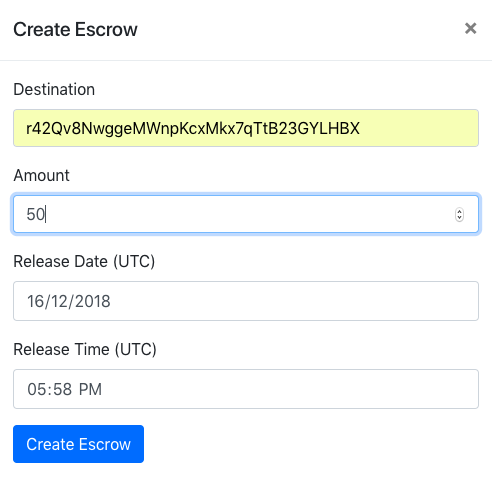
You can create the escrow by specifying the destination address, amount, and release time in UTC as shown in the following screenshot. Please select a nearby time, because you can release the escrow only when the time has lapsed:
Once you create the escrow, your account balance will be deducted. The sequence will be output on the screen as shown in the following—make a note of it. We need this to release the escrow:
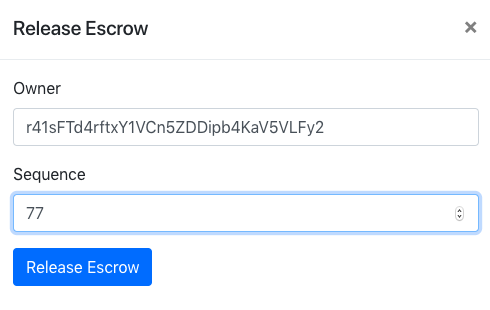
Finally, you can release the escrow using the release escrow form by inputting the sequence and the address of the owner of the escrow as shown in the following screenshot:
Once the transaction is confirmed, the destination account should be credited with the respective amount.
Great work!
You've learned how to create a time-held escrow. Now, let's learn how to create a conditionally-held escrow.