Table of Contents for
React Quickly: Painless web apps with React, JSX, Redux, and GraphQL
 React Quickly: Painless web apps with React, JSX, Redux, and GraphQL
Published by
Manning Publications, 2017
React Quickly: Painless web apps with React, JSX, Redux, and GraphQL
Published by
Manning Publications, 2017
- Cover
- React Quickly: Painless web apps with React, JSX, Redux, and GraphQL
- Copyright
- React Quickly: Painless web apps with React, JSX, Redux, and GraphQL
- Brief Table of Contents
- Table of Contents
- Praise for React Quickly
- Foreword
- Preface
- Acknowledgments
- About This Book
- About the Author
- About the Cover
- Part 1. React foundation
- Chapter 1. Meeting React
- Chapter 2. Baby steps with React
- Chapter 3. Introduction to JSX
- Chapter 4. Making React interactive with states
- Chapter 5. React component lifecycle events
- Chapter 6. Handling events in React
- Chapter 7. Working with forms in React
- Chapter 8. Scaling React components
- Chapter 9. Project: Menu component
- Chapter 10. Project: Tooltip component
- Chapter 11. Project: Timer component
- Part 2. React architecture
- Chapter 12. The Webpack build tool
- Chapter 13. React routing
- Chapter 14. Working with data using Redux
- Chapter 15. Working with data using GraphQL
- Chapter 16. Unit testing React with Jest
- Chapter 17. React on Node and Universal JavaScript
- Chapter 18. Project: Building a bookstore with React Router
- Chapter 19. Project: Checking passwords with Jest
- Chapter 20. Project: Implementing autocomplete with Jest, Express, and MongoDB
- Appendix A. Installing applications used in this book
- Appendix B. React cheatsheet
- Appendix C. Express.js cheatsheet
- Appendix D. MongoDB and Mongoose cheatsheet
- Appendix E. ES6 for success
- React Cheatsheet
- Index
- List of Figures
- List of Tables
- List of Listings
Chapter 19. Project: Checking passwords with Jest
This chapter covers
- Project structure and Webpack configuration
- The host HTML file
- Implementing a strong password module
- Creating Jest tests
- Implementing the Password component and UI
This project focuses on building a UI, working with modules, and testing with Jest, along with other React-related techniques such as component composition, ES6 syntax, state, properties, and so on. Recall that chapter 16 dealt with testing; you used a password widget as an example of unit testing and UI testing. In this project, you’ll build the widget itself to check, verify, and generate new passwords. Along the way, I’ll explain testing again, here and there, in an expanded format.
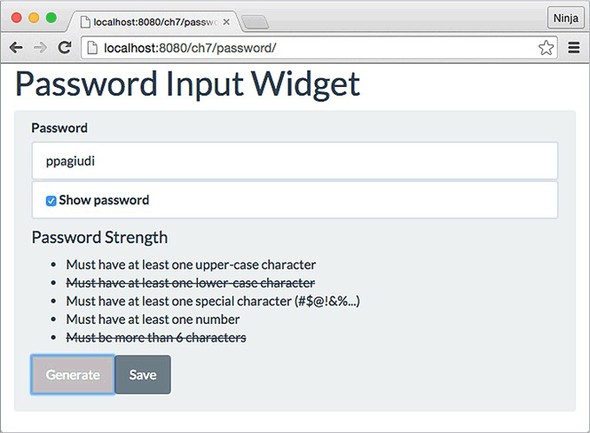
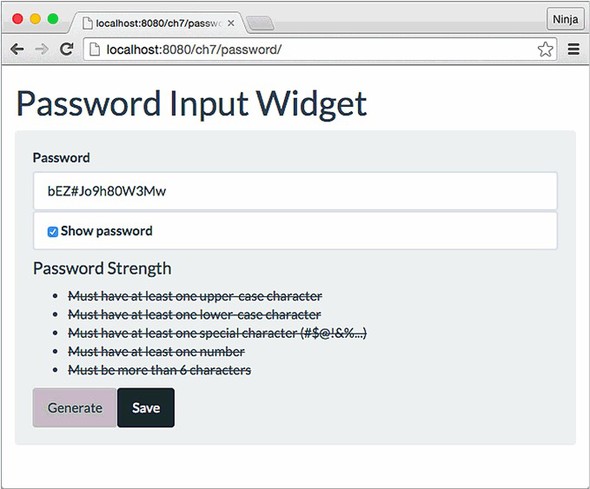
The widget has a Save button that’s disabled by default but becomes enabled when the password is strong enough (according to the preset rules), as shown in figure 19.1. In addition, the Generate button lets you create a strong (according to the criteria) password. As each rule is satisfied, it’s crossed out. There’s also a Show Password check box that hides/shows the password, just as in most macOS interfaces (see figure 19.2).
Figure 19.1. Password widget that lets you enter a password or autogenerate one that meets the given strength criteria
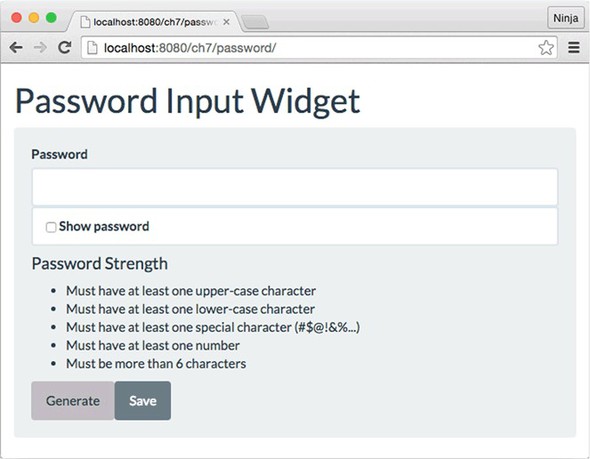
Figure 19.2. The widget with some of the criteria fulfilled and the password visible
The parent component is called Password, and the child components are listed here:
- PasswordInput—Input field for the password
- PasswordVisibility—Check box to toggle the password’s visibility
- PasswordInfo—List of criteria that must be met before you can save the password
- PasswordGenerate—Button to generate a password that satisfies all the criteria
The widget is built using a single parent component. You provide the password-strength rules to the component as properties, so the component is highly customizable. I’ll bet you can use it in your own apps with some customization!
Note
To follow along with this project, you’ll need to install Node.js and npm to compile JSX. This example also uses Webpack as a build tool and, of course, Jest as the test engine. Appendix A covers how to install everything.
Note
Because parts of this project were first introduced in chapter 16, the source code is in the ch16 folder; you can find it at www.manning.com/books/react-quickly and https://github.com/azat-co/react-quickly/tree/master/ch16. You can also find some demos at http://reactquickly.co/demos.
Let’s start by setting up the project.
19.1. Project structure and Webpack configuration
This is what the complete folder structure looks like. Begin by creating a new project folder named password:
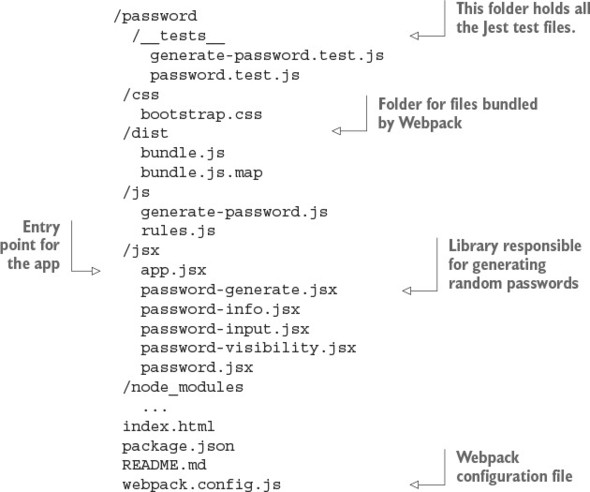
The __tests__ folder is for Jest tests. The css folder contains my Twitter Bootstrap theme, called Flatly (https://bootswatch.com/flatly). The js and jsx folders have libraries and components, respectively. And js/generate-password.js is the library responsible for generating random passwords.
The dist folder contains the compiled JSX files with source maps. That’s where Webpack will put the concatenated file and its source map. Here, dist is short for distribution; it’s a commonly used name, along with js or build. I used it here to introduce some variety and show you how to customize Webpack configs.
Don’t forget that to avoid having to install each dependency with the exact version manually, you can copy package.json from the following listing to the password folder and then run npm install in it (ch16/password/package.json).
Listing 19.1. Dependencies and setup for the project
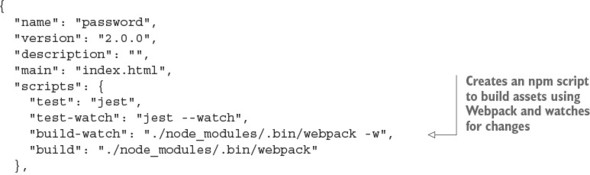
The interesting thing here is the scripts section, which you’ll use for testing, compilation, and bundling:
  "scripts": {
    "test": "jest",
    "test-watch": "jest --watch",
    "build-watch": "./node_modules/.bin/webpack -w",
    "build": "./node_modules/.bin/webpack"
  },
Recall that in the Nile store in chapter 18, you used transform-react-jsx:
  "babel": {
    "plugins": [
      "transform-react-jsx"
    ],
But in this project, you use the React preset. It’s just another way to accomplish the same thing. You can use a preset or a plug-in. Presets are a more modern approach and are used in more docs and projects.
The test script (npm test) is for running Jest tests manually. Conversely, the test-watch script keeps Jest running in the background. test-watch is launched with npm run test-watch because only test and start don’t require run. You run test-watch once, and Jest (in watch mode) will notice any source code changes and rerun the tests. Here’s an example of the output:
PASS  __tests__/password.test.js
 PASS  __tests__/generate-password.test.js

Test Suites: 2 passed, 2 total
Tests:       3 passed, 3 total
Snapshots:   0 total
Time:        1.502s
Ran all test suites.

Watch Usage
 > Press o to only run tests related to changed files.
 > Press p to filter by a filename regex pattern.
 > Press t to filter by a test name regex pattern.
 > Press q to quit watch mode.
 > Press Enter to trigger a test run.
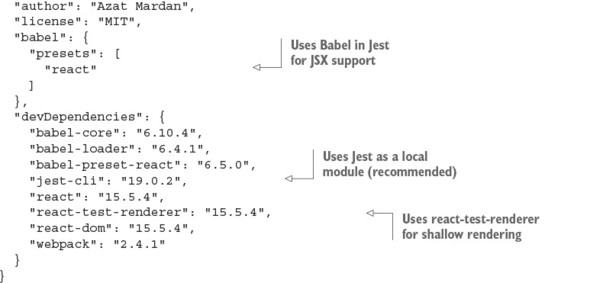
So far, you’ve defined the project dependencies. Next, you need to set up the Webpack build process so you can transform JSX to JS. To do this, create the webpack .config.js file in the root directory with the following code (ch16/password/webpack.config.js).
Listing 19.2. Webpack configuration
Now you can define configs to build your project in webpack.config.js. The entry point is the app.js JSX file in the jsx folder, and the destination is the dist folder. Also, configs will set the source maps and the Babel loader (to convert JSX into JS).
The build will be called with ./node_modules/.bin/webpack, or with ./node_modules/.bin/webpack -w if you want the tool to monitor file changes. Yes, with -w (watch), you can make Webpack rebuild on every file change—that is, each time you click Save in Notepad (I don’t like IDEs). Watch is great for active development!
You can create more than one webpack.config.js by specifying a different filename with --config:
$ ./node_modules/.bin/webpack --config production.config.js
Each config file can use a new script in package.json for convenience.
The bottom line is that Webpack is easy and fun to work with because it supports CommonJS/Node modules by default. There’s no need for Browserify or any other module loaders. With Webpack, it’s like writing a Node program for browser JavaScript!
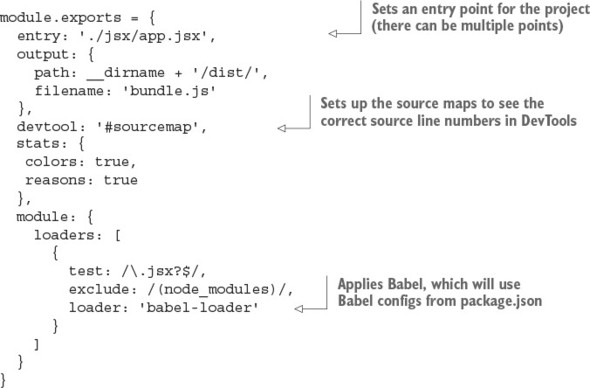
19.2. The host HTML file
Next, create the index.html file. It has a container with ID content and includes dist/bundle.js (ch16/password/index.html).
Listing 19.3. Host HTML file
Now you should be set up and ready to start developing. It’s a good idea to test in increments during development so the area in which you look for bugs is as small as possible. So, perform a quick test to see if the setup is working correctly, just as you did in chapter 18. Do something along these lines:
- Install all the dependencies with npm install. Do this just once.
- Put console.log('Painless JavaScript password!') into jsx/app.jsx.
- Run the app with npm start. You can leave it running, because -w will rebuild the file when there are changes.
- Start a local web server from the project root.
- Open the browser at http://localhost:8080.
- Open the browser console (such as Chrome DevTools). You should see the “Painless JavaScript password!” message.
19.3. Implementing a strong password module
The strong-password module is a generate-password.js file sitting in password/js. The test for the file will be in password/__tests__/generate-password.test.js. This module will return random passwords when invoked. The passwords will contain a good mix of different types of characters:
- Special characters—!@\#$%^&*()_+{}:“<>?\|[]\’,./`~
- Lowercase—abcdefghijklmnopqrstuvwxyz
- Uppercase—ABCDEFGHIJKLMNOPQRSTUVWXYZ
- Numbers—0123456789
These categories, along with length and randomness, will ensure that the password is secure enough. Using TDD/BDD, let’s implement the tests first.
19.3.1. The tests
Begin with the tests in generate-password.test.js. Remember that you store them in the __tests__ folder so Jest can find them (ch16/password/__tests__/generate-password.test.js).
Listing 19.4. Tests for the password module
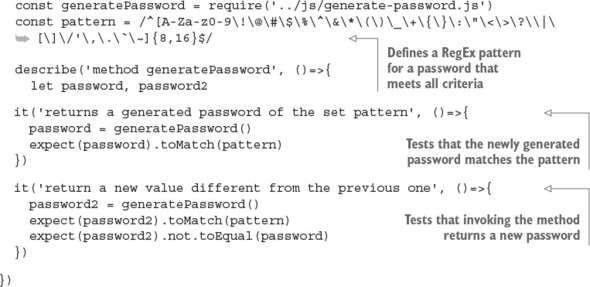
You start by declaring the password variable and importing generate-password.js. The regular expression checks the content and length of the password. It’s not perfect, because you don’t check that each password has at least one of those characters, but it’ll do for now:
let password,
  password2,
  pattern = /^[A-Za-z0-9\!\@\#\$\%\^\&\*\(\)\_\+\{\}\:\"\<\>\?\\|
   \[\]\/'\,\.\`\~]{8,16}$/
Write in the test suite describe the noun method generatePassword. That’s what you’re going to test: it’s the function exported in the generate-password.js module.
Implement the test suite it with the code to unit-test via the BDD-style expect statements, as described in chapter 16. At a minimum, check against a regular-expression pattern for the password:
describe('method generatePassword', () => {
  it('returns a generated password of the set pattern', ()=>{
    password = generatePassword()
    expect(password).toMatch(pattern)
  })
  it('returns a new value different from the previous one', ()=>{
    password2 = generatePassword()
    expect(password2).not.toEqual(password)
  })
})
What if the password isn’t different each time you invoke generatePassword()? What if it’s hardcoded in generate-password.js? That would be bad! So, the second test suite expects the second generated password to be different.
19.3.2. The code
You’ll implement a strong-password module in js/generate-password.js so you can TDD/BDD it right away—that is, you’ll write the test first and only then write the code. Here’s a versatile password generator that uses three sets of characters to satisfy the strong-password criteria:

The exported function (assigned to module.exports) calls the shuffle() method, which randomly moves characters around in the string. shuffle() takes the password generated by pick(), which uses sets of characters to make sure the generated password includes at least one of a certain group of characters (numbers, uppercase letters, specials, and so on). The final part of the password consists of more random elements from the union set ALL.
You can run the unit test for password/__tests__/generate-password.js with the command jest __tests__/generate-password.test.js or npm test __tests__/ generate-password.test.js executed from the project root (password folder). It should pass with a message similar to the following:
jest  __tests__/generate-password.test.js
 PASS  __tests__/generate-password.test.js
  method generatePassword
    ✓ returns a generated password of the set pattern (4ms)
    ✓ return a new value different from the previous one (2ms)
Test Suites: 1 passed, 1 total
Tests:       2 passed, 2 total
Snapshots:   0 total
Time:        1.14s
Ran all test suites matching "__tests__/generate-password.test.js".
19.4. Implementing the Password component
The next logical thing is to work on the main component, Password. According to TDD, you again must start with a test: a UI test, in this case, because you want to test behavior like clicking.
19.4.1. The tests
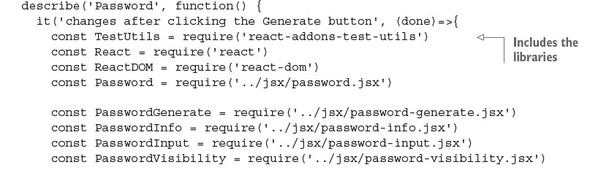
Create a UI test file called __tests__/password.test.js. We already covered this file in chapter 16, so I’ll present the full example here with some comments (ch16/password/__tests__/password.test.js).
Listing 19.5. Spec for the Password component
You can extend this test case to check that all the properties and rules pass; this is homework (see the “Homework” section at the end of this chapter for more ideas). It’s a good idea to have another suite and provide a different mix of properties, and then test for that as well.
That’s it! Your test should fail (npm test or jest) with an error:
Error: Cannot find module '../jsx/password.jsx' from 'password.test.js'
That’s normal for test-driven development because we write tests before apps. The main thing you need to do now is to implement the Password component.
19.4.2. The code
Next, you’ll create the Password component with some initial state. The state variables are as follows:
- strength—The object with the strength “meter” (that is, the set of rules, each of which is set to true or false depending on whether the criterion is met)
- password—The current password
- visible—Whether the password input field is visible
- ok—Whether the password meets all the rules and you can allow the user to save it (enables the Save button)
Imagine that a few days after you implement this widget, a developer from another team wants to use your component but with slightly stricter password criteria. The best approach is to abstract (a fancy word for copy and paste) the code with the password criteria (rules) into a separate file. You’ll do this before proceeding with password.jsx.
Create a file called rules.js (ch16/password/js/rules.js). This file will implement password rules that you can use in password.jsx to perform validation and show warning messages. Keeping the rules separate will make it straightforward to change, add, or remove rules in the future.
Listing 19.6. Rules for password strength
module.exports =  {
  upperCase: {
    message:  'Must have at least one upper-case character',
    pattern: /([A-Z]+)/
  },
  lowerCase: {
    message: 'Must have at least one lower-case character',
    pattern: /([a-z]+)/
  },
  special:{
    message: 'Must have at least one special character (#$@!&%...)',
    pattern: /([\!\@\#\$\%\^\&\*\(\)\_\+\{\}\:\"\<\>\?\\|\[\]\/'\,\.\`\~]+)/
  },
  number: {
    message: 'Must have at least one number',
    pattern: /([0-9]+)/
  },
  'over6': {
    message: 'Must be more than 6 characters',
    pattern: /(.{6,})/
  }
}
Basically, you have a bunch of rules, each of which has the following:
- A key, such as over6
- A message, such as Must be more than 6 characters
- A regular-expression pattern, such as /(.{6,})/
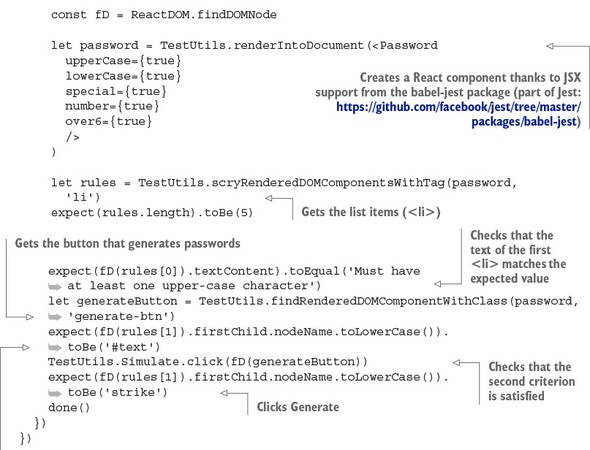
Now, on to password.jsx. You need to do the following:
- Render with the upperCase, lowerCase, special, number, and over6 rules.
- Check that the rules have been rendered (length is 5).
- See that rule 1 isn’t satisfied.
- Click the Generate button.
- See that rule 2 is satisfied.
Let’s implement the component. You import dependencies and create the component with initial state (ch16/password/jsx/password.jsx).
Listing 19.7. Implementing the Password component
const React = require('react')
const ReactDOM = require('react-dom')
const generatePassword = require('../js/generate-password.js')

const rules = require('../js/rules.js')

const PasswordGenerate = require('./password-generate.jsx')
const PasswordInfo = require('./password-info.jsx')
const PasswordInput = require('./password-input.jsx')
const PasswordVisibility = require('./password-visibility.jsx')

class Password extends React.Component {
  constructor(props) {
    super(props)
    this.state = {strength: {}, password: '', visible: false, ok: false}
    this.generate = this.generate.bind(this)
    this.checkStrength = this.checkStrength.bind(this)
    this.toggleVisibility = this.toggleVisibility.bind(this)
  }
  ...
}
Next, you implement a method to check for the password strength:
  checkStrength(event) {
    let password = event.target.value
    this.setState({password: password})
    let strength = {}
The following code block goes through each property (upperCase, over6, and so on) and checks the current password using the regular-expression pattern in rules. If the criterion is met, the property in the strength object is set to true:
  Object.keys(this.props).forEach((key, index, list)=>{
    if (this.props[key] && rules[key].pattern.test(password)) {
      strength[key] = true
    }
  })
this.setState() is asynchronous, so you use a callback to provide logic that relies on the updated state. In this case, you check that the number of properties in the strength object (this.state.strength) is equal to the number of rules (props). It’s a rudimentary check; checking each property in a loop would be a more robust solution, but this code works for now. You set ok to true if the numbers match (that is, if all the rules for password strength are satisfied):
  this.setState({strength: strength}, ()=>{
    if (Object.keys(this.state.strength).length ==
      Object.keys(this.props).length) {
      this.setState({ok: true})
    } else {
      this.setState({ok: false})
    }
  })
The next method hides and shows the password field. This is a useful feature when you’re generating a new password, because you may want to save the password (or need help remembering it):
  toggleVisibility() {
    this.setState({visible: !this.state.visible}, ()=>{
    })
  }
Next is the generate() method, which creates random passwords using the js/generate-password.js module. Setting visible to true ensures that users can see the newly generated password. Right after the password is generated, you call checkStrength() to check its strength. Typically, the conditions will be satisfied, and users will be able to proceed by clicking Save:
  generate() {
    this.setState({visible: true, password: generatePassword()}, ()=>{
      this.checkStrength({target: {value: this.state.password}})
    )
  }
In the render() function, Password processes the rules and renders a few other React components:
- PasswordInput—Password input field (input)
- PasswordVisibility—Password visibility toggle (input with type checkbox)
- PasswordInfo—The list of rules for password strength (ul)
- PasswordGenerate—Password-generation button (button)
You begin by processing the rules and determining which of them are satisfied (isCompleted). Instead of passing the context in _this or using the bind(this) pattern, you use fat-arrow functions ()=>{}. There’s no big difference; choose one approach or the other, and use it.
Object.keys flattens your hash table into an array by giving you an array of keys of that object. You can iterate over that array of keys with map() and construct a new array with objects that have key, rule, and isCompleted:
  render() {
    var processedRules = Object.keys(this.props).map((key)=>{
      if (this.props[key]) {
        return {
          key: key,
          rule: rules[key],
          isCompleted: this.state.strength[key] || false
        }
      }
    })
    // return ...
Implementing Password’s render() function
Once your array of processed rules is ready, you can begin rendering the components. Remember that for is a special word in JavaScript. That’s why you need to use className, not class (ch16/password/jsx/password.jsx).
Listing 19.8. Implementing render()
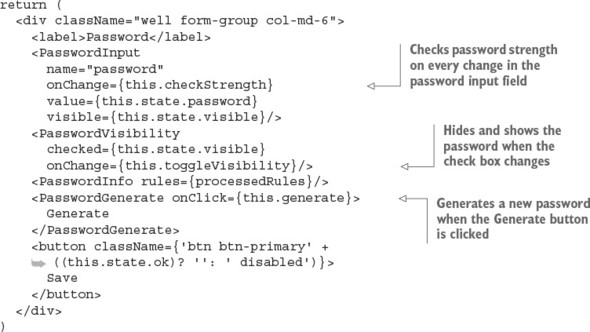
Let’s cover the most important parts in more detail. PasswordInput is a controlled component (for a detailed comparison between controlled and uncontrolled components, see chapter 5). You listen on every change with the this.checkStrength callback, which uses e.target.value, so there’s no need for refs:
<PasswordInput name="password" onChange={this.checkStrength}
 value={this.state.password}  visible={this.state.visible}/>
Similar to PasswordInput, PasswordVisibility is a controlled component, and the event handler for change is this.toggleVisibility:
<PasswordVisibility checked={this.state.visible}
 onChange={this.toggleVisibility}/>
You pass the processedRules object to the list of rules, and the PasswordGenerate button triggers this.generate:
<PasswordInfo rules={processedRules}/>
<PasswordGenerate onClick={this.generate}>Generate</PasswordGenerate>
The Save button is disabled and enabled based on the this.state.ok value. Don’t forget the space before disabled, or you’ll get the btn-primarydisabled class instead of two classes, btn-primary and disabled:
<button className={'btn btn-primary' +
          ((this.state.ok)? '': ' disabled')}>Save</button>
      </div>
    )
}})
The other components, in listings 19.9 (ch16/password/jsx/password-generate.jsx), 19.10 (ch16/password/jsx/password-input.jsx), and 19.11 (ch16/password/jsx/password-visibility.jsx), are dumb components. They just render classes and pass properties.
Listing 19.9. PasswordGenerate component
const React = require('react')
class PasswordGenerate extends React.Component{
  render() {
    return (
      <button {...this.props} className="btn generate-btn">
        {this.props.children}</button>
    )
  }
}
module.exports = PasswordGenerate
Listing 19.10. PasswordInput component
const React = require('react')
class PasswordInput extends React.Component {
  render() {
    return (
      <input className="form-control"
        type={this.props.visible ? 'text' : 'password'}
        name={this.props.name}
        value={this.props.value}
        onChange={this.props.onChange}/>
    )
  }
}
module.exports = PasswordInput
Listing 19.11. PasswordVisibility component

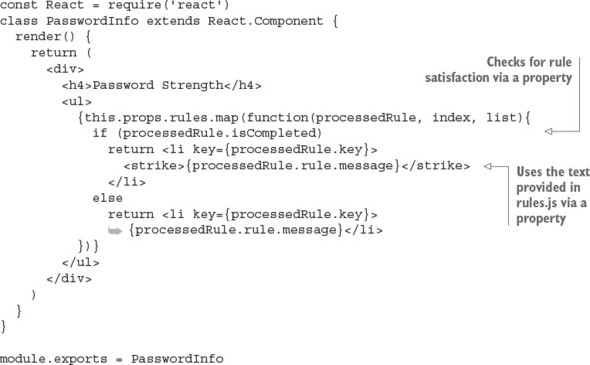
Let’s look at PasswordInfo for a moment (ch16/password/jsx/password-info.jsx). It takes the processed rules array and iterates over that property. If isCompleted is true, you add <strike> to the <li>. <strike> is an HTML tag that applies a strikethrough line to text. This is what you check for in the password.test.js test, too.
Listing 19.12. PasswordInfo component
You’re finished with the password.jsx file! Now you have everything ready to rerun the test. Don’t forget to recompile with npm run build or npm run build-watch. If you followed everything to a T, you should see something like this after you run npm test:
Using Jest CLI v0.5.10
 PASS  __tests__/generate-password.test.js (0.03s)
 PASS  __tests__/password.test.js (1.367s)
2 tests passed (2 total)
Run time: 2.687s
Good job—you can pat yourself on the back!
19.5. Putting it into action
To see the widget in action, you need to do one more tiny step: create jsx/app.jsx, which is an example file for the component. Here’s how to render the Password widget in your app:
const React = require('react')
const ReactDOM = require('react-dom')
const Password = require('./password.jsx')
ReactDOM.render(<Password
    upperCase={true}
    lowerCase={true}
    special={true}
    number={true}
    over6={true}/>,
  document.getElementById('password'))
You can run the files like any other front-end app. I prefer node-static (https://github.com/cloudhead/node-static), or you can see an online demo at http://reactquickly.co/demos. Notice how the Save button becomes active when all the rules are satisfied, as shown in figure 19.3.
Figure 19.3. The Save button is enabled when all the strength criteria are met.
The best software engineering practice doesn’t stop at writing and running tests locally. The tests are much more valuable when combined with the deployment process and automated. These processes, called continuous integration (CI) and continuous deployment (CD), are great for speeding up and automating software delivery.
I highly recommend setting up CI/CD for anything more than a prototype. There are plenty of good software-as-a-service (SaaS) and self-hosted solutions out there. With the tests in this project, setting up a CI/CD environment won’t take long. For example, with AWS, Travis CI, or CircleCI, all you need to do is configure your project in terms of the environment it should run in and then provide a test command such as npm test. You can even integrate those SaaS CIs with GitHub so that you and your team can see CI messages (pass, fail, how many failures, and where) on GitHub pull requests.
Amazon Web Services offers its own managed services: CodeDeploy, CodePipeline, and CodeBuild. For more information on these AWS services, refer to Node University: https://node.university/p/aws-intermediate. If you prefer a self-hosted solution instead of a managed solution, take a look at Jenkins (https://jenkins.io) and Drone (https://github.com/drone/drone).
19.6. Homework
For bonus points, try the following:
- Test any scenario you can think of: for example, enter only a lowercase character (such as r), and see that the lowercase criterion has been satisfied but not the other criteria.
- Sign up for a free account with a cloud SaaS CI provider (AWS, Travis CI, CircleCI, and so on), and set up the project to run in the cloud CI environment.
Submit your code in a new folder under ch16 as a pull request to this book’s GitHub repository: https://github.com/azat-co/react-quickly.
19.7. Summary
- Jest test files are stored in the __tests__ folder by convention.
- You can use regular or shallow rendering with either react-dom/test-utils or react-test-renderer/shallow.
- Jest (v19) tests can be written using JSX because Jest will convert JSX automatically.
- To enable automatic test reruns (recommended for development), use jest --watch.