Table of Contents for
React Quickly: Painless web apps with React, JSX, Redux, and GraphQL
 React Quickly: Painless web apps with React, JSX, Redux, and GraphQL
Published by
Manning Publications, 2017
React Quickly: Painless web apps with React, JSX, Redux, and GraphQL
Published by
Manning Publications, 2017
- Cover
- React Quickly: Painless web apps with React, JSX, Redux, and GraphQL
- Copyright
- React Quickly: Painless web apps with React, JSX, Redux, and GraphQL
- Brief Table of Contents
- Table of Contents
- Praise for React Quickly
- Foreword
- Preface
- Acknowledgments
- About This Book
- About the Author
- About the Cover
- Part 1. React foundation
- Chapter 1. Meeting React
- Chapter 2. Baby steps with React
- Chapter 3. Introduction to JSX
- Chapter 4. Making React interactive with states
- Chapter 5. React component lifecycle events
- Chapter 6. Handling events in React
- Chapter 7. Working with forms in React
- Chapter 8. Scaling React components
- Chapter 9. Project: Menu component
- Chapter 10. Project: Tooltip component
- Chapter 11. Project: Timer component
- Part 2. React architecture
- Chapter 12. The Webpack build tool
- Chapter 13. React routing
- Chapter 14. Working with data using Redux
- Chapter 15. Working with data using GraphQL
- Chapter 16. Unit testing React with Jest
- Chapter 17. React on Node and Universal JavaScript
- Chapter 18. Project: Building a bookstore with React Router
- Chapter 19. Project: Checking passwords with Jest
- Chapter 20. Project: Implementing autocomplete with Jest, Express, and MongoDB
- Appendix A. Installing applications used in this book
- Appendix B. React cheatsheet
- Appendix C. Express.js cheatsheet
- Appendix D. MongoDB and Mongoose cheatsheet
- Appendix E. ES6 for success
- React Cheatsheet
- Index
- List of Figures
- List of Tables
- List of Listings
Chapter 11. Project: Timer component
This chapter covers
- Understanding the project structure and scaffolding
- Building the app’s architecture
Studies have shown that meditation is great for health (calming) and productivity (focus).[1] Who doesn’t want to be healthier and more productive, especially with minimal monetary investment?
See “Research on Meditation,” Wikipedia, https://en.wikipedia.org/wiki/Research_on_meditation; “Meditation: In Depth,” National Institutes of Health, http://mng.bz/01om; “Harvard Neuroscientist: Meditation Not Only Reduces Stress, Here’s How It Changes Your Brain,” The Washington Post, May 26, 2015, http://mng.bz/1ljZ; and “Benefits of Meditation,” Yoga Journal, http://mng.bz/7Hp7.
Gurus recommend starting with as little as 5 minutes of meditation and progressing to 10 minutes and then 15 minutes over the span of a few weeks. The target is 30–60 minutes of meditation per day, but some people notice improvements with as little as 10 minutes per day. I can attest to that: after meditating 10 minutes per day every day for 3 years, I am more focused, and it has also helped me in other areas.
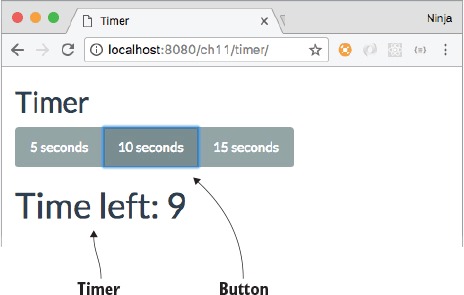
But how do you know when you’ve reached your daily meditation goal? You need a timer! So in this chapter, you’ll put your React and HTML5 skills to the test and create a web timer (see figure 11.1). To make it easy for testing purposes, this timer will only run for 5, 10, or 15 seconds.
Figure 11.1. The timer example in action, with 14 seconds remaining. The selected 15 Seconds button was clicked a second ago.

The idea is to have three controls that set a countdown timer (n to 0). Think of a typical kitchen timer, but instead of minutes, it will count seconds. Click a button, and the timer starts. Click it again, or click another button, and the timer starts over.
Note
To follow along with this project, you’ll need to download the unminified version of React and install node.js and npm for compiling JSX. In this example, I also use a theme called Flatly from Bootswatch (https://bootswatch.com/flatly). This theme depends on Twitter Bootstrap. Appendix A covers how to install everything.
Note
The source code for the example in this chapter is at www.manning.com/books/react-quickly and https://github.com/azat-co/react-quickly/tree/master/ch11 (in the ch11 folder of the GitHub repository https://github.com/azat-co/react-quickly). You can also find some demos at http://reactquickly.co/demos.
11.1. Project structure and scaffolding
The project structure for the Timer component, not unlike Tooltip and Menu, is as follows:
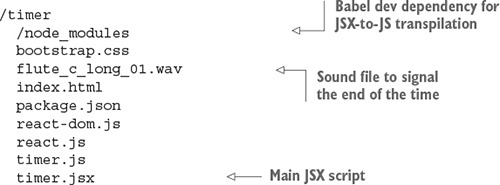
As before, there’s a node_modules folder for developer dependencies such as Babel, which is used for JSX-to-JS transpilation. The structure is flat, with styles and scripts in the same folder. I did this to keep things simple; in a real app, you’ll put styles and scripts in separate folders.
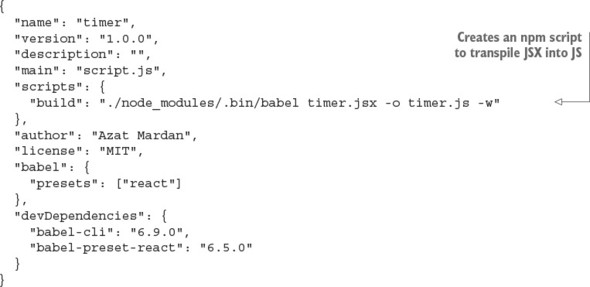
The key parts of package.json are the npm script to build, the Babel configuration, dependencies, and other metadata.
Listing 11.1. Timer project package.json file
After you’ve created package.json, either by copying and pasting or by typing, be sure to run npm i or npm install.
The HTML for this project is very basic (ch11/timer/index.html). It includes the react.js and react-dom.js files, which, for the sake of simplicity, are in the same folder as the HTML file.
Listing 11.2. Timer project index.html file
<!DOCTYPE html>
<html>
  <head>
    <meta charset="utf-8">
    <title>Timer</title>
    <script src="react.js" type="text/javascript"></script>
    <script src="react-dom.js" type="text/javascript"></script>
    <link href="bootstrap.css" rel="stylesheet" type="text/css"/>
  </head>
  <body class="container-fluid">
    <div id="timer-app"/>
  </body>
  <script src="timer.js" type="text/javascript"></script>
</html>
This file only includes the library and points to timer.js, which you’ll create from timer.jsx. To do so, you’ll need the Babel CLI (see chapter 3).
11.2. App architecture
The timer.jsx file will have three components:
- TimerWrapper—Primary component that will do most of the work and render other components
- Timer—Component to display the number of seconds remaining
- Button—Component to render three buttons and trigger (reset) the timer
Figure 11.2 shows how they’ll look on the page. You can see the Timer and Button components; TimerWrapper has all three buttons and Timer inside it. TimerWrapper is a container (smart) component, whereas the other two are representational (dumb).
Figure 11.2. Timer and Button components
We’re breaking the app into three pieces because in software engineering, things tend to change quickly with each new release. By separating the presentation (Button and Timer) and logic (TimerWrapper), you can make the app more adaptable. Moreover, you’ll be able to reuse elements like buttons in other apps. The bottom line is that keeping representation and business logic separate is a best practice when working with React.
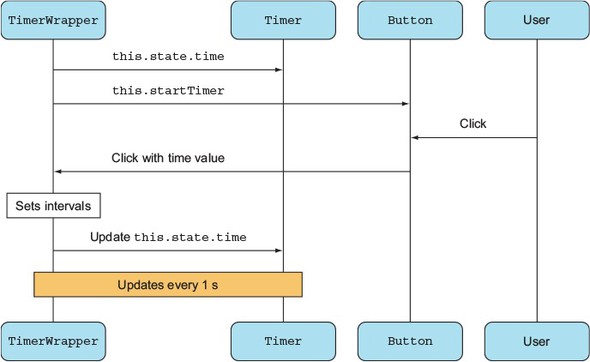
You need TimerWrapper to communicate between Timer and Buttons. The interaction between these three components and a user is shown in figure 11.3:
- TimerWrapper renders Timer and the Buttons by passing TimerWrapper’s states as properties.
- The user interacts with a button, which triggers an event in the button.
- The event in the button calls the function in TimerWrapper with the time value in seconds.
- TimerWrapper sets the interval and updates Timer.
- Updates continue until there are 0 seconds left.
Figure 11.3. Timer app execution, starting at the top
For simplicity, you’ll keep all three components in the timer.jsx file.
Listing 11.3. Outline of timer.jsx
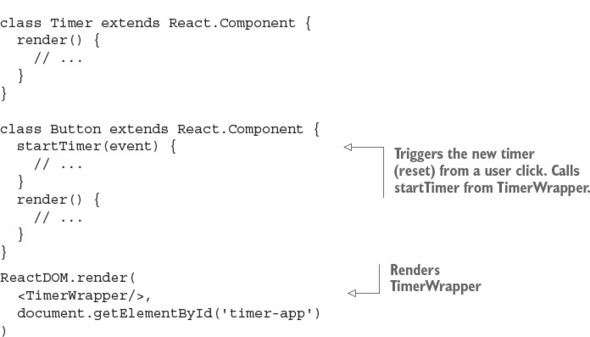
Let’s start from the bottom of the timer.jsx file and render the main component (TimerWrapper) into the <div> with ID timer-app:
ReactDOM.render(
  <TimerWrapper/>,
  document.getElementById('timer-app')
)
ReactDOM.render() will be the last call in the file. It uses TimerWrapper, so let’s define this component next.
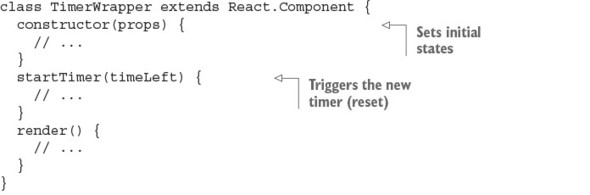
11.3. The TimerWrapper component
TimerWrapper is where all the fun happens! This is the high-level overview of the component:
class TimerWrapper extends React.Component {
  constructor(props) {
    // ...
  }
  startTimer(timeLeft) {
    // ...
  }
  render() {
    // ...
  }
}
First, you need to be able to save the time left (using timeLeft) and reset the timer (using timer). Therefore, you’ll use two states: timeLeft and timer.
On the first app load, the timer shouldn’t be running; so, in the constructor of TimerWrapper, you need to set the time (timeLeft) state to null. This will come in handy in Timer, because you’ll be able to tell the difference between the first load (timeLeft is null) and when the time is up (timeLeft is 0).
You also set the timer state property to null. This property holds a reference to the setInterval() function that will do the countdown. But right now there’s no running timer—thus, the null value.
Finally, bind the startTimer() method, because you’ll be using it as an event handler (for buttons):
class TimerWrapper extends React.Component {
  constructor(props) {
    super(props)
    this.state =  {timeLeft: null, timer: null}

    this.startTimer = this.startTimer.bind(this)
  }
  ...
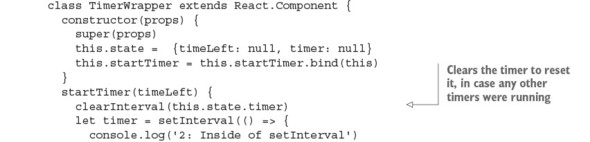
Next is the startTimer event handler. It’s called each time a user clicks a button. If a user clicks a button when the timer is already running, then you need to clear the previous interval and start anew. You definitely don’t want multiple timers running at the same time. For this reason, the first thing the startTimer() method does is stop the previous countdown by clearing the result of setInterval(). The current timer’s setInterval object is stored in the this.state.timer variable.
To remove the result of setInterval(), there’s a clearInterval() method. Both clearInterval() (http://mng.bz/7104) and setInterval() (http://mng.bz/P2d6) are browser API methods; that is, they’re available from a window object without additional libraries or even prefixes. (window.clearInterval() will also work for browser code, but it will break in Node.js.) Call clearInterval() on the first line of the event handler for the buttons:
class TimerWrapper extends React.Component {
  constructor(props) {
    // ...
  }
  startTimer(timeLeft) {
    clearInterval(this.state.timer)
    // ...
  }
After you clear the previous timer, you can set a new one with setInterval(). The code passed to setInterval() will be called every second. For this code, let’s use a fat-arrow function to bind the this context. This will allow you to use TimerWrapper state, properties, and methods in this function (closure/callback) of setInterval():
class TimerWrapper extends React.Component {
  constructor(props) {
    // ...
  }
  startTimer(timeLeft) {
    clearInterval(this.state.timer)
    let timer = setInterval(() => {
      // ...
    }, 1000)
    // ...
  }
  render() {
    // ...
  }
}
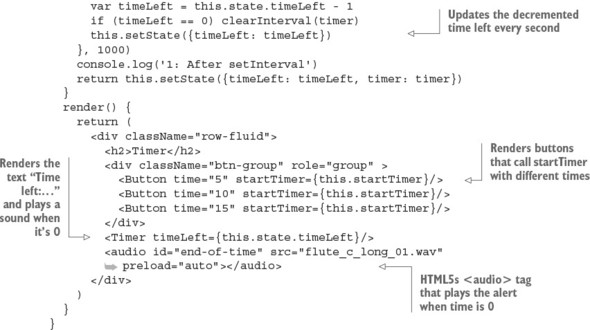
Now, you’ll implement the function. The timeLeft variable stands for the amount of time left on the timer. You use it to save the current value minus 1 and check whether it reached 0. If it did, then you remove the timer by invoking clearInterval() with a reference to the timer object (created by setInterval()), which is stored in the timer variable. The reference to timer is saved in setInterval()’s closure even for future function calls (each second that passes). This is the way JavaScript scoping works. So, there’s no need to pull the value of the timer object from the state (although you could).
Next, save timeLeft during every interval cycle. And finally, save timeLeft and the timer object when the button is clicked:
  //...
  startTimer(timeLeft) {
    clearInterval(this.state.timer)
    let timer = setInterval(() => {
      var timeLeft = this.state.timeLeft - 1
      if (timeLeft == 0) clearInterval(timer)
      this.setState({timeLeft: timeLeft})
    }, 1000)
    return this.setState({timeLeft: timeLeft, timer: timer})
  }
  //...
You set the states to the new values using setState(), which is asynchronous. The setInterval() interval length is 1,000 ms, or 1 second. You need to set the state to the new values of timeLeft and timer because the app needs to update those values, and you can’t use simple variables or properties for that.
setInterval() is scheduled to be executed asynchronously in the JavaScript event loop. The returned setState() will fire before the first setInterval() callback. You can easily test it by putting console logs in your code. For example, the following code will print 1 and then 2, not 2 and then 1:
  ...
  startTimer(timeLeft) {
    clearInterval(this.state.timer)
    let timer = setInterval(() => {
      console.log('2: Inside of setInterval')
      var timeLeft = this.state.timeLeft - 1
      if (timeLeft == 0) clearInterval(timer)
      this.setState({timeLeft: timeLeft})
    }, 1000)
    console.log('1: After setInterval')
    return this.setState({timeLeft: timeLeft, timer: timer})
  }
  ...
Last is the mandatory render() function for TimerWrapper. It returns <h2>, three buttons, and the Timer component. row-fluid and btn-group are Twitter Bootstrap classes—they make buttons look better and aren’t essential to React:
  render() {
    return (
      <div className="row-fluid">
        <h2>Timer</h2>
        <div className="btn-group" role="group" >
          <Button time="5" startTimer={this.startTimer}/>
          <Button time="10" startTimer={this.startTimer}/>
          <Button time="15" startTimer={this.startTimer}/>
        </div>
This code shows how you can reuse the Button component by providing different values for the time property. These time property values allow buttons to display different times in their labels and to set different timers. The startTimer property of Button has the same value for all three buttons. The value is this.startTimer from TimerWrapper, which starts/resets the timer, as you know.
Next, you display the text “Time left: ...,” which is rendered by the Timer component. To do so, you pass the time state as a property to Timer. To adhere to the best React practice, Timer is stateless. React updates the text on the page (Timer) automatically when the property (Timer) is updated by the change of the state (TimerWrapper). You’ll implement Timer later. For now, use it like this:
<Timer time={this.state.timeLeft}/>
In addition, the <audio> tag (an HTML5 tag that points to a file) alerts you when the time is up:
        <audio id="end-of-time" src="flute_c_long_01.wav" preload="auto">
         </audio>
      </div>
    )
  }
}
</audio>
</div>
)
}
}
For your reference and better understanding (sometimes it’s nice to see the entire component), here’s the meat—or tofu, for my vegetarian readers—of the timer app: the full code for TimerWrapper (ch11/timer/timer.jsx).
Listing 11.4. TimerWrapper component
TimerWrapper has a lot of logic. Other components are stateless and basically clueless. Nevertheless, you need to implement the other two components. Remember the <audio> tag in TimerWrapper, which will play sounds when the time remaining reaches 0? Let’s implement the Timer component next.
11.4. The Timer component
The goal of the Timer component is to show the time left and to play a sound when the time is up. It’s a stateless component. Implement the class, and check whether the timeLeft property equals 0:
class Timer extends React.Component {
  render() {
    if (this.props.timeLeft == 0) {
      // ...
    }
    // ...
  }
}
To play the sound (file flute_c_long_01.wav), this project uses the special HTML5 <audio> element; you defined it in TimerWrapper, with src pointing to the WAV file and id set to end-of-time. All you need to do is get the DOM node (the vanilla JavaScript getElementById() will work fine) and invoke play() (also vanilla JavaScript from HTML5). This again shows how well React plays with other JavaScripty things like HTML5, jQuery 3,[2] and even Angular 4, if you’re brave enough:
For examples of integration with browser events and jQuery, see chapter 6.
class Timer extends React.Component {
  render() {
    if (this.props.timeLeft == 0) {
      document.getElementById('end-of-time').play()
    }
    // ...
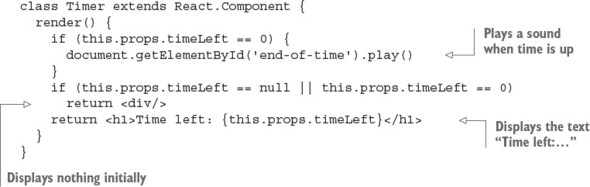
As explained earlier, you don’t want the timer’s text to say “0” at first, because the timer has never run. So, in TimerWrapper (listing 11.4), you set the timeLeft value to null initially. If timeLeft is null or 0, then the Timer component renders an empty <div>. In other words, the app won’t display 0:
    if (this.props.timeLeft == null || this.props.timeLeft == 0)
      return <div/>
Otherwise, when timeLeft is greater than 0, an <h1> element shows the time remaining. In other words, now you need to show the time left when the timer is running:
return <h1>Time left: {this.props.timeLeft}</h1>
For your reference, the following listing shows the Timer component in full (ch11/timer/timer.jsx).
Listing 11.5. Timer component, showing time remaining
For Timer to show a number of seconds, you need to start the timer first. This happens when you click the buttons. Onward to those cute little buttons!
11.5. The Button component
To follow the DRY (don’t repeat yourself) principle,[3] you’ll create one Button component and use it three times to show three different buttons. Button is another stateless (and very simple) component, as it should be in accordance with a Reactive mindset, but Button is not as straightforward as Timer, because Button has an event handler.
The DRY principle is as follows: “Every piece of knowledge must have a single, unambiguous, authoritative representation within a system”; see “Don’t Repeat Yourself,” Wikipedia, http://mng.bz/1K5k; and The Pragmatic Programmer: From Journeyman to Master by Andrew Hunt (Addison-Wesley Professional, 1999), http://amzn.to/2ojjXoY.
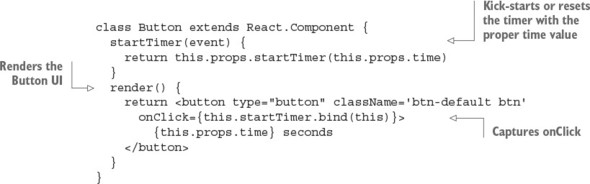
Buttons must have an onClick event handler to capture users’ button clicks. Those clicks trigger the timer countdown. The function to start the timer isn’t implemented in Button: it’s implemented in TimerWrapper and is passed down to the Button component from its parent, TimerWrapper, in this.props.startTimer. But how do you pass time (5, 10, or 15) to TimerWrapper’s startTimer? Look at this code from TimerWrapper, which passes time-period values as properties:
<Button time="5" startTimer={this.startTimer}/>
<Button time="10" startTimer={this.startTimer}/>
<Button time="15" startTimer={this.startTimer}/>
The idea is to render three buttons using this component (code reuse—yay!). To know what time the user selected, though, you need the value in this.props.time, which you pass as an argument to this.props.startTimer.
If you write the following code, it won’t work:
// Won't work. Must be a definition.
<button type="button" className='btn-default btn'
  onClick={this.props.startTimer(this.props.time)}>
  {this.props.time} seconds
</button>
The function passed to onClick must be a definition, not an invocation. How about this?
// Yep. You are on the right path young man.
<button type="button" className='btn-default btn'
  onClick={()=>{this.props.startTimer(this.props.time)}}>
  {this.props.time} seconds
</button>
Yes. This snippet has the right code to pass the value. This is the correct approach: a middle step (function) passes the different time values. You can make it more elegant by creating a class method. Another way would be to use a currying bind() instead of an interim function:
onClick = {this.props.startTimer.bind(null, this.props.time)}
Recall that bind() returns a function definition. As long as you pass a function definition to onClick (or any other event handler), you’re good.
Let’s get back to the Button component. The event handler onClick calls the class method this.startTimer, which in turn calls a function from the property this.props.startTimer. You can use the this object (this.props.startTimer) in this.startTimer because you applied bind(this).
The Button component is stateless, which you can confirm by looking at the full code (ch11/timer/timer.jsx). What does that mean? It means you can refactor it into a function instead of it being a class.
Listing 11.6. Button component that triggers the countdown
Obviously, you don’t need to use the same names for methods (such as startTimer()) in Button and TimerWrapper. A lot of people get confused during my React workshops when I use the same names; others find it easier to trace the chain of calls when they use the same names. Just know that you can name Button’s method something like handleStartTimer(), for example. Personally, I find that using the same name helps me to mentally link properties, methods, and states from different components.
Note that Timer could also be named TimerLabel, if not for the audio play() method. Is there room for improvement and refactoring? Absolutely! Check the “Homework” section of this chapter.
Congrats—you’re officially finished coding. Now, to get this thing running so you can begin using this timer for work[4] or hobbies.
Try the Pomodoro technique (https://cirillocompany.de/pages/pomodoro-technique) for increasing your productivity.
11.6. Getting it running
Compile the JSX into JavaScript with the following Babel 6.9.5 command, assuming you have the Babel CLI and its presets installed (hint: package.json!):
$ ./node_modules/.bin/babel timer.jsx -o timer.js -w
If you copied my build npm script from package.json at the beginning of this chapter, then you can run npm run build.
If you’ve done everything correctly, enjoy your beautiful timer application, shown in figure 11.4! Turn off your music to hear the alarm when the time is up.
Figure 11.4. Clicking 15 Seconds launched the timer. Now it says that 14 seconds remain.
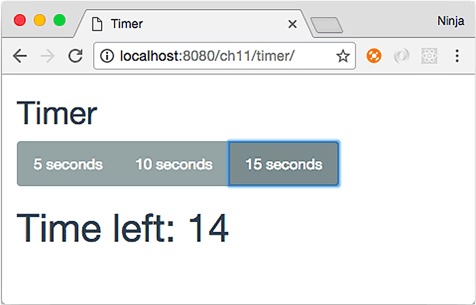
Make sure the app works properly: you should see a time-remaining number that changes every second. When you click the button, a new countdown should begin; that is, the timer is interrupted and starts over on each click of a button.
11.7. Homework
For bonus points, do the following:
- Convert Timer to a stateless component implemented by a fat-arrow function.
- Implement a Pause/Resume button that stops/resumes the timer.
- Implement a Cancel button that stops the countdown and hides the time remaining.
- Implement a Reset button that resets the time remaining to the original value (5, 10, or 15 seconds).
- Modify the final version of this project to use 5, 10, and 15 minutes, rather than seconds.
- Decouple the <audio> tag in TimerWrapper from play() in Timer.
- Refactor the project to have four files—timer.jsx, timer-label.jsx, timer-button.jsx, and timer-sound.jsx—with as much loose coupling as possible.
- Implement a slider button that changes with every time interval (chapter 6 discusses slider integration).
Submit your code in a new folder under ch11 as a pull request to this book’s GitHub repository: https://github.com/azat-co/react-quickly.
11.8. Summary
- Keep components simple and as close to representational as possible.
- Pass functions as values of properties, not just data.
- Two components can exchange data between each other via a parent.