Table of Contents for
React Quickly: Painless web apps with React, JSX, Redux, and GraphQL
 React Quickly: Painless web apps with React, JSX, Redux, and GraphQL
Published by
Manning Publications, 2017
React Quickly: Painless web apps with React, JSX, Redux, and GraphQL
Published by
Manning Publications, 2017
- Cover
- React Quickly: Painless web apps with React, JSX, Redux, and GraphQL
- Copyright
- React Quickly: Painless web apps with React, JSX, Redux, and GraphQL
- Brief Table of Contents
- Table of Contents
- Praise for React Quickly
- Foreword
- Preface
- Acknowledgments
- About This Book
- About the Author
- About the Cover
- Part 1. React foundation
- Chapter 1. Meeting React
- Chapter 2. Baby steps with React
- Chapter 3. Introduction to JSX
- Chapter 4. Making React interactive with states
- Chapter 5. React component lifecycle events
- Chapter 6. Handling events in React
- Chapter 7. Working with forms in React
- Chapter 8. Scaling React components
- Chapter 9. Project: Menu component
- Chapter 10. Project: Tooltip component
- Chapter 11. Project: Timer component
- Part 2. React architecture
- Chapter 12. The Webpack build tool
- Chapter 13. React routing
- Chapter 14. Working with data using Redux
- Chapter 15. Working with data using GraphQL
- Chapter 16. Unit testing React with Jest
- Chapter 17. React on Node and Universal JavaScript
- Chapter 18. Project: Building a bookstore with React Router
- Chapter 19. Project: Checking passwords with Jest
- Chapter 20. Project: Implementing autocomplete with Jest, Express, and MongoDB
- Appendix A. Installing applications used in this book
- Appendix B. React cheatsheet
- Appendix C. Express.js cheatsheet
- Appendix D. MongoDB and Mongoose cheatsheet
- Appendix E. ES6 for success
- React Cheatsheet
- Index
- List of Figures
- List of Tables
- List of Listings
Chapter 14. Working with data using Redux
This chapter covers
- Understanding unidirectional data flow in React
- Understanding the Flux data architecture
- Working with the Redux data library
So far, you’ve been using React to create user interfaces. This is the most common use case for React. But most UIs need to work with data. This data comes from either a server (back end) or another browser component.
When it comes to working with data, React offers many options:
- Integrating with MVC-like frameworks—This option is ideal if you’re already using or are planning to use an MVC-like framework for a single-page application: for example, using Backbone and Backbone models.
- Writing your own data method or a library—This option is well suited for small UI components: for example, fetching a list of accounts for a List of Accounts grid.
- Using the React stack (a.k.a. React and friends)—This option offers the most compatibility (your code will integrate with less friction) and the most adherence to the React philosophy.
This chapter covers one of the most popular options for the third approach: Redux. Let’s start by outlining how data flows in React components.
Note
There’s the Flux architecture, and then there’s the flux library from Facebook. I’ll be showing you Redux rather than the flux library, because Redux is more actively used in projects. flux serves as more of a proof of concept for the Flux architecture that Redux adheres to and implements. Think of Redux and flux (the library) as the two implementations of the Flux architecture. (I’ll cover the Flux architecture but not the library.)
Note
The source code for the examples in this chapter is at www.manning.com/books/react-quickly and https://github.com/azat-co/react-quickly/tree/master/ch14 (in the ch14 folder of the GitHub repository https://github.com/azat-co/react-quickly). You can also find some demos at http://reactquickly.co/demos.
14.1. React support for unidirectional data flow
React is a view layer that’s designed to work with unidirectional data flow (see figure 14.1). A unidirectional data pattern (a.k.a. one-way binding) exists when there are no mutable (or two-way) references between concerns. Concerns are parts with different functionality. For example, a view and a model can’t have two-way references. I’ll talk about bidirectional flow again in a few moments.
Figure 14.1. Unidirectional vs. bidirectional data flow
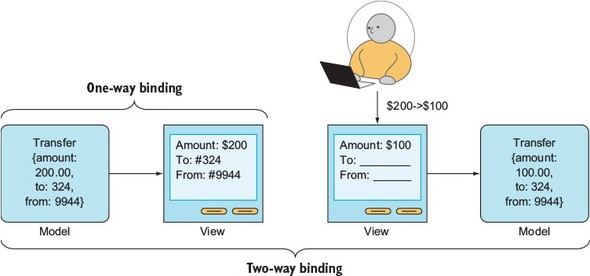
To illustrate, if you have an account model and an account view, then data can flow only from the account model to the account view and not vice versa. In other words, changes in the model will cause changes in the view (see figure 14.2). The key to understanding this is that views can’t modify models directly.
Figure 14.2. A simplified view of unidirectional data flow, in which views can’t modify models directly
Unidirectional data flow ensures that for any given input into your components, you’ll get the same predictable result: a render() expression. This React pattern is in stark contrast to the bidirectional, two-way binding pattern of Angular.js and some other frameworks.
For example, in bidirectional data flow, changes in models cause changes in views and changes in views (user input) cause changes in models. For this reason, with bidirectional data flow, the state of a view is less predictable, making it harder to understand, debug, and maintain (see figure 14.3). The key to remember is that views can modify models directly. This is in stark contrast to unidirectional flow.
Figure 14.3. A simplified view of the bidirectional data flow typical for an MVC-like architecture
Interestingly enough, bidirectional data flow (two-way binding) is considered a benefit by some Angular developers. Without getting into a debate, it’s true that with bidirectional flow, you can write less code.
For example, let’s say you have an input field like the one shown in figure 14.1. All you need to do is define a variable in the template, and the value will be updated in the model when the user types in the field. At the same time, the value on the web page will be updated if there’s a change in the model (as a result of an XHR GET request, for example). Therefore, changes are possible in two directions: from view to model and from model to view. This is great for prototyping, but not so great for complex UIs when it comes to performance, debugging, development scaling, and so on. This may sound controversial—please bear with me.
I’ve built a lot of complex UI applications with MVC and MVW frameworks that have bidirectional flows, and they’ll do the job. In a nutshell, problems arise because various views can manipulate various models, and vice versa. That’s fine when you have one or two models and views in isolation; but the bigger the application, the more models and views are updating each other. It becomes harder and harder to figure out why one model or view is in a given state, because you can’t easily determine which models/views updated it and in which order. Traceability becomes a huge issue, as does finding bugs. That’s why the bidirectional data flow in MVC frameworks (such as Angular) isn’t favored by many developers: they find this antipattern difficult to debug and scale.
On the other hand, with unidirectional flow, the model updates the view, and that’s that. As an added bonus, unidirectional data flow allows for server-side rendering, because views are an immutable function of state (that is, isomorphic/universal JavaScript).
For now, keep in mind that unidirectional data flow is a major selling point of React:
- Code readability and reasoning due to one source of truth (state/model → view).
- Debuggable code with time travel;[1] for example, it’s trivial to send a dump with history to the server on exceptions and bugs.
Dan Abramov, “Live React: Hot Reloading with Time Travel” (presentation, ReactEurope 2015), http://mng.bz/uSxq.
- Server-side rendering without a headless browser: isomorphic,[2] or universal,[3] JavaScript, as some call it.
Spike Brehm, “Isomorphic JavaScript: The Future of WebAir Apps,” Airbnb Engineering & Data Science, November 11, 2013, http://mng.bz/i34M.Michael Jackson, “Universal JavaScript,” June 8, 2015, http://mng.bz/7GXE.
Here’s my personal experience with Angular, in case you’re curious. I worked only a little bit with Angular 1 because I thought it was lacking, but then I took a course on Angular 2—and then I realized how wrong I was. I corrected my mistake. Now I completely avoid any Angular code.
14.2. Understanding the Flux data architecture
Flux (https://facebook.github.io/flux) is an architecture pattern for data flow developed by Facebook to be used in React apps. The gist of Flux is unidirectional data flow and elimination of the complexity of MVC-like patterns.
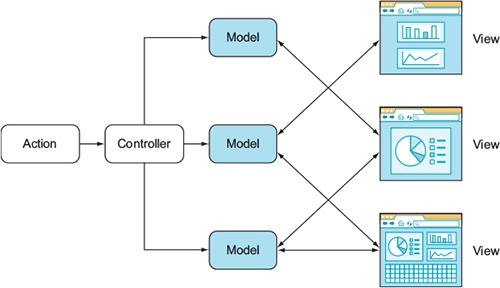
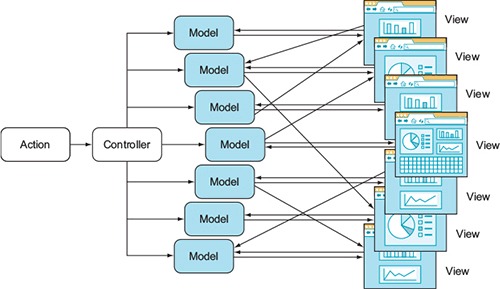
Let’s consider a typical MVC-like pattern, shown in figure 14.4. Actions trigger events in the controller, which handles models. Then, according to the models, the app renders the views, and the madness begins. Each view updates the models—not just its own model, but the other models too—and the models update the views (bidirectional data flow). It’s easy to get lost in this architecture. The architecture is difficult to understand and debug.
Figure 14.4. An MVC-like architecture introduces complexity by allowing views to trigger changes on any model, and vice versa.
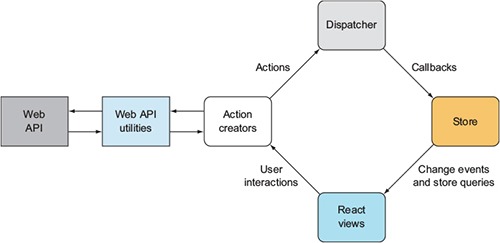
Conversely, Flux suggests using a unidirectional data flow, as shown in figure 14.5. In this case, you have actions from views going through a dispatcher, which in turn calls the data store. (Flux is a replacement for MVC. This isn’t just new terminology.) The store is responsible for the data and the representation in the views. Views don’t modify the data but have actions that go through the dispatcher again.
Figure 14.5. The Flux architecture simplifies the data flow by having it go in one direction (from store to view).
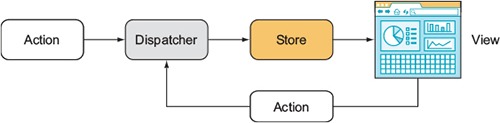
The unidirectional data flow enables better testing and debugging. A more detailed diagram of the Flux architecture is shown in figure 14.6.
Figure 14.6. The Flux architecture in a nutshell: actions trigger the dispatcher, which triggers the store, which renders views.
Historically, Flux was an architecture. Only later did the Facebook team release the flux module (www.npmjs.com/package/flux, https://github.com/facebook/flux) that can be used with React to implement Flux. The flux module is more or less a proof of concept for the Flux architecture, and React developers rarely use it.
Tip
There’s no reason for me to duplicate the great minds who have already spoken about Flux. I suggest that you watch the video “Hacker Way: Rethinking Web App Development at Facebook,” from the official Flux website: http://mng.bz/wygf.
Personally, I find Flux confusing—and I’m not alone. There are many implementations of Flux, including Redux, Reflux, and other libraries. Early Manning Access Program readers of this book know that Reflux was included in the first version of the book, but I omitted it from this version. My anecdotal evidence, David Waller’s “React.js architecture - Flux vs. Reflux” at http://mng.bz/5GHx, and the hard data from numbers of npm downloads all indicate that Redux is more popular than Flux or Reflux. In this book, I use Redux, which some argue is a better alternative to Flux.
14.3. Using the Redux data library
Redux (redux, www.npmjs.com/package/redux) is one of the most popular implementations of the Flux architecture. Redux has these qualities:
- Rich ecosystem—See, for example, Awesome Redux (https://github.com/xgrommx/awesome-redux).
- Simplicity—No dispatcher or store registration is required, and the minimal version has only 99 lines of code (http://mng.bz/00Ap).
- Good developer experience (DX)—For example, you can do hot reloading with time travel (see the video “Live React: Hot Reloading with Time Travel,” http://mng.bz/uSxq).
- Reducer composition—For example, the undo/redo higher-order component requires minimal code (https://github.com/omnidan/redux-undo).
- Support for server-side rendering.
I won’t take time to go over all the details of why Redux is better than Flux. If you’re interested, you can read some thoughts by the author of Redux: “Why Use Redux over Facebook Flux?” at http://mng.bz/z9ok.
Redux is a standalone library that implements a state container. It’s like a huge variable that contains all the data your application works with, stores, and changes in the runtime. You can use Redux alone or on the server. As already mentioned, Redux is also popular in combination with React; this combination is implemented in another library, react-redux (https://github.com/reactjs/react-redux).
A few moving parts are involved when you use Redux in your React apps:
- A store that stores all the data and provides methods to manipulate this data. The store is created with the createStore() function.
- A Provider component that makes it possible for any components to take data from the store.
- A connect() function that wraps any component and lets you map certain parts of your application state from the store to the component’s properties.
Look back at the Flux architecture diagram in figure 14.5: you can see why there’s a store. The only way to mutate the internal state is to dispatch an action, and actions are in the store.
Every change in the store is performed via actions. Each action tells your application what happened and what part of the store should be changed. Actions can also provide data; you’ll find this useful because, well, every app works with data that changes.
The way the data in the store changes is specified by reducers that are pure functions. They have a (state, action) ⇒ state signature. In other words, by applying an action to the current state, you get a new state. This allows for predictability and the ability to rewind actions (via undo and debugging) to previous states.
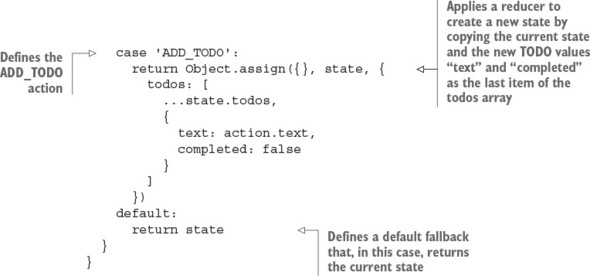
Here’s the reducer file for a Todo list app in which SET_VISIBILITY_FILTER and ADD_TODO are actions:[4]
Object.assign(), http://mng.bz/O6pl.

You may have one or many reducers (or none) in your Redux application. Every time you call an action, every reducer is called. Reducers are responsible for changing the data in the store; this is why you need to be careful about what they do during certain types of actions.
Typically, a reducer is a function with state and an action as arguments. For example, an action can be “to fetch a movie” (FETCH_MOVIE), which you get by using a reducer. The action code describes how an action transforms the state into the next state (adds a movie to the state). This reducer function contains a huge switch/case statement to process actions. But there’s a handy library that makes reducers more functional and—surprise!—easier to read. The library is called redux-actions, and you’ll see how to use it instead of switch/case.
Tip
Redux creator Dan Abramov (https://github.com/gaearon) suggests the following before-bed reading about Redux: “Why Use Redux Over Facebook Flux?” (http://mng.bz/9syg) and “What Could Be the Downsides of Using Redux Instead of Flux” (http://mng.bz/Ux9l).
14.3.1. Redux Netflix clone
We all like good old Hollywood movies, right? Let’s make an app that shows a list of classic movies: that is, a Netflix clone (but only the home page—no streaming or anything like that). The app will display a grid of movies (see figure 14.7); and when you click a movie’s image, you’ll see a detailed view (figure 14.8).
Figure 14.7. The Netflix clone will show a grid of movies on the home page.

Figure 14.8. Details of a movie are shown when you click its poster.

The goal of this tutorial is to learn how to use Redux in a real-life scenario to feed data to React components. This data will come from a JSON file to keep things simple. Each individual movie’s detail view will be facilitated with React Router, which you learned about in the previous chapter.
The project will have three components: App, Movies, and Movie. Each component will have a CSS file and live in its own folder for better code organization (that’s the best practice to encapsulate React components together with styles). The project structure is as follows:

Now that the project’s folder structure is ready, let’s look at the dependencies and build configuration.
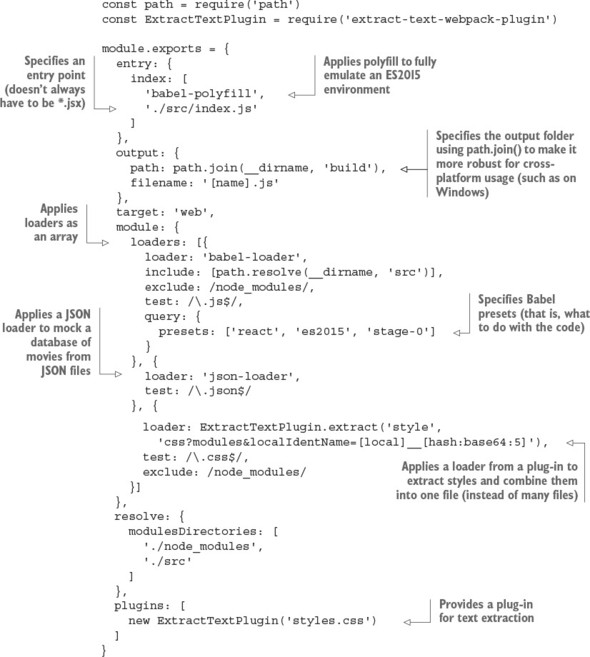
14.3.2. Dependencies and configs
You need to set up a number of dependencies for this project. You’ll use Webpack (https://github.com/webpack/webpack) to bundle all the files for live use and an additional plug-in called extract-text-webpack-plugin to bundle styles from multiple <style> includes (inline) into one style.css. Webpack loaders are also used in the project:
- json-loader
- style-loader
- css-loader
- babel-loader
Other project development dependencies modules include the following:
- Babel (https://github.com/babel/babel) and its presets transpile ECMAScript 6 into browser-friendly, old-school JavaScript (a.k.a. ECMAScript 5): babel-polyfill emulates a full ES2015 environment, babel-preset-es2015 is for ES6/ES2015, babel-preset-stage-0 provides cutting-edge new ES7+ features, and babel-preset-react is for JSX.
- react-router (https://github.com/reactjs/react-router) shows a hierarchy of components based on their current location. It also helps arrange components into a hierarchy based on URL location.
- redux-actions (https://github.com/acdlite/redux-actions) organizes the reducers.
- ESLint (http://eslint.org) and its plug-ins maintain proper JavaScript/JSX style.
- concurrently (www.npmjs.com/package/concurrently) is a Node tool to make processes such as Webpack builds run concurrently (at the same time).
The package.json file lists all dependencies, Babel configs, and npm scripts and should contain at least the data shown in the following listing (ch14/redux-netflix/package.json). As always, you can install modules manually with npm i NAME, type package.json, and run npm i, or copy package.json and run npm i. Make sure you use the exact versions of the libraries from package.json; otherwise, your code might break.
Listing 14.1. Dependences for the Netflix clone


Because you use Webpack to bundle the dependencies, all of the necessary packages are in bundle.js. For this reason, you put all the dependencies in devDependencies. (I’m picky about what’s deployed—I don’t want any unused modules in my deployment environment just sitting idly and causing security vulnerabilities.) npm ignores devDependencies when the --production flag is used, as in npm i --production.
Next, let’s define the build process by creating webpack.config.js (ch14/redux-netflix/webpack.config.js).
Listing 14.2. Netflix clone Webpack configuration file

Enough with configurations. In the next section, you’ll start working with Redux.
14.3.3. Enabling Redux
To make Redux work in your React application, the hierarchy of components needs the Provider component at the top level. This component comes from the react-redux package and injects data from the store into components. That’s right: using Provider as the top-level component means all children will have the store. Neat.
To make Provider work, you need to provide the store to its store property. The Store is an object that represents the application state. Redux (react-redux) comes with a createStore() function that takes reducer(s) from ch14/redux-netflix/scr/modules/index.js and returns the Store object.
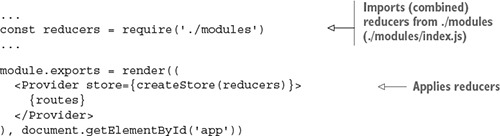
To render the Provider component and its entire subtree of components, you use react-dom’s render(). It takes the first argument (<Provider>) and mounts it into the element you pass as the second argument (document.getElementById('app')).
Combining all of this, the entry point of your application should now look like the following listing (ch14/redux-netflix/index.js). You define Provider by passing a Store instance (with reducers) in a JSX format.
Listing 14.3. Main app entry point
const React = require('react')
const { render } = require('react-dom')
const { Provider } = require('react-redux')
const { createStore } = require('react-redux')
const reducers = require('./modules')
const routes = require('./routes')

module.exports = render((
  <Provider store={createStore(reducers)}>
    {routes}
  </Provider>
), document.getElementById('app'))
For the entire application to be able to use Redux features, you need to implement some code in child components, such as connecting the store. The connect() function from the same react-redux package accepts a few arguments. It returns a function that then wraps your component so it can receive certain parts of the store into its properties. You’ll see it in a bit.
You’re finished with index.js. The Provider component takes care of delivering data from the store to all the connected components, so there’s no need to pass properties directly. But a few parts are missing, such as routes, reducers, and actions. Let’s look at them one by one.
14.3.4. Routes
With react-router, you can declare a hierarchy of components per browser location. I covered React Router in chapter 13, so it should be familiar; you used it for client-side routing. React routing is not strictly connected with server-side routes, but sometimes you may want to use it for that, especially in conjunction with techniques discussed in chapter 16.
The gist of React Router is that every route can be declared by a couple of nested Route components, each of which takes two properties:
- path—URL path or location that can contain URL parameters: for example, /movies:/id for localhost:8080/movies/1021. Using / can define a path regardless of the parent route path: for example, /:id for localhost:8080/1012.
- component—Reference to the component that will be rendered when a user goes to a path/location. All the parent components up to Provider will be rendered as well. For example, going to localhost:8080/movies/1021 in listing 14.4 will render Movie, Movies, and App.
You need to show a collection of movie covers at both the root and /movies locations. In addition, you need to show the details of a given movie at the /movies/:id location. The route configuration uses IndexRoute, as shown next (ch14/redux-netflix/src/routes.js).
Listing 14.4. Defining URL routing with React Router
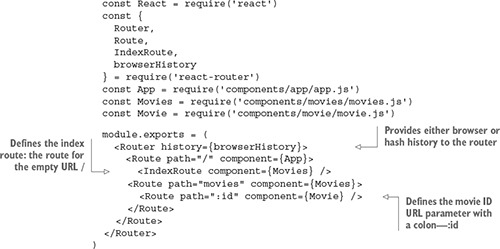
Both IndexRoute and Route are nested into the topmost route. This makes the Movies component render for both the root and /movies locations. The individual movie view needs a movie ID to fetch info about that particular movie from the Redux store, so you define the path with a URL parameter. To do so, use the colon syntax: path=":id". Figure 14.9 shows how the individual view and its URL look on a small screen, thanks to responsive CSS. Notice that the URL is movies/8, where 8 is a movie ID. Next, you’ll see how to fetch the data with Redux reducers.
Figure 14.9. Individual movie view on a small screen. The URL includes the movie ID.

14.3.5. Combining reducers
Let’s look at the modules the createStore() function in src/index.js is applied to:
What does this do? You need to store movie data in the store. Perhaps in the future you’ll implement additional parts of the store, such as user accounts or other entities. So let’s use Redux’s feature that allows you to create as many distinct parts of the store as you need, although you need only one at the moment. In a way, you’re creating a better architecture by performing this middle step of combining reducers so that later, you can extend your app effortlessly by adding more reducers to ./modules/index.js (or ./modules), using the plug-in Node pattern.[5] This approach is also called splitting reducers (http://mng.bz/Wprj).
Azat Mardan, “Node Patterns: From Callbacks to Observer,” webapplog, http://mng.bz/p9vd.
Each reducer can change data in the store; but to make this operation safe, you may need to divide the application state into separate parts and then combine them into a single store. This divide-and-conquer approach is recommended for larger apps in which you’ll have increasing numbers of reducers and actions. You can easily combine multiple reducers with the combineReducers() function from redux (ch14/redux-netflix/src/modules/index.js).
Listing 14.5. Combining reducers
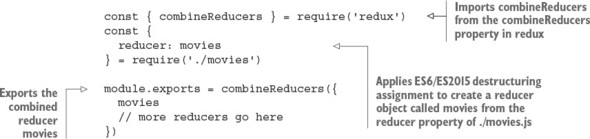
You can pass as many reducers as you like and create independent branches in the store. You can name them as you like. In this case, the movies reducer is imported and then passed into the combineReducers() function as a property of a plain object with the key "movies".
This way, you declare a separate part of the store and call it “movies.” Every action that the reducer from ./movies is responsible for will touch only this part and nothing else.
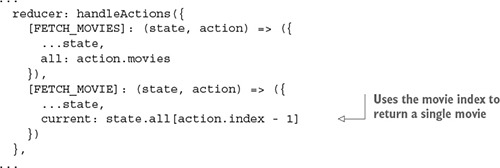
14.3.6. Reducer for movies
Next, let’s implement the “movies” reducer. A reducer, in Redux, is a function that runs every time any action is dispatched. It’s executed with two arguments:
- The first argument, state, is a reference to the part of the state that this reducer manages.
- The second argument, action, is an object that represents the action that has just been dispatched.
In other words, the reducer inputs are results of previous actions: the current state (state) and a current action (action). The reducer takes the current state and applies the action. The result of a reducer is a new state. If your reducers are pure functions without side effects (which they should be), you get all the benefits of using Redux with React, such as hot reloading and time travel.
The term reducers comes from functional programming. JavaScript has a somewhat functional nature, so it has Array.reduce().
In a nutshell, a reduce method is an operation that summarizes a list of items so that the input has multiple values and the output has a single value. The list on which a reducer works can be an array, as is the case with JavaScript, or it can be another data structure like a list, as is the case outside of JavaScript.
For example, you can return the number of occurrences of a name in a list of names. The list of names is the input, and the number of occurrences is the output.
To use a reducer, you call a method and pass a reducing function that accepts the following:
- Accumulator value—What is passed to the next iteration and what will eventually become the output
- Current value—Item from the list
With each iteration over the items in the list (or array in JS), the reducer function gets the accumulator value. In JavaScript, the method is Array.reduce(). For example, to get a name frequency, you can run the following reducer code, which uses a ternary if the current value (curr) is “azat” and then adds 1 to the accumulator (acc):[6]
For detailed documentation of Array.prototype.reduce(), see the Mozilla Developer Network, http://mng.bz/Z55j.
const users = ['azat', 'peter', 'wiliam','azat','azat']
console.log(users
  .reduce((acc, curr)=>(
    (curr == 'azat') ? ++acc : acc
  ), 0)
)
In Redux reducers, the accumulator value is the state object, and the current value is the current action. The function result is the new state.
Tip
Avoid putting API calls into reducers. Remember, reducers are supposed to be pure functions with no side effects. They’re state machines; they shouldn’t do asynchronous operations such as HTTP calls to an API. The best place to put these types of async calls is in middleware (http://redux.js.org/docs/advanced/Middleware.html) or the dispatch() action creator (http://mng.bz/S31I; an action creator is a function that creates actions). You’ll see dispatch() in a component later in this chapter.
A typical reducer is a function containing a huge switch/case statement:
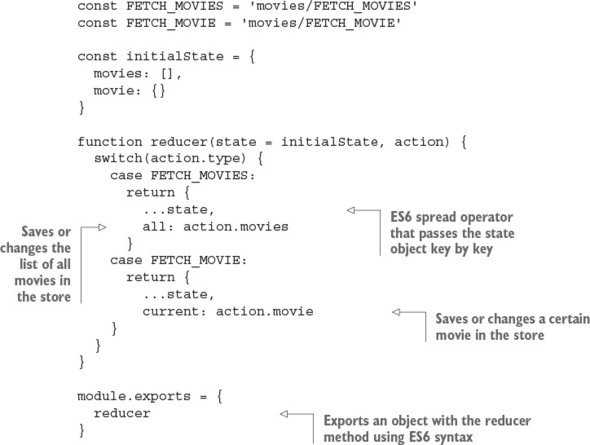
But using switch/case is considered a bad practice by the luminary Douglas Crockford in his classic JavaScript: The Good Parts (O’Reilly Media, 2008). There’s a handy redux-actions library (https://github.com/acdlite/redux-actions) that can bring this reducer function into a cleaner, more functional form. Instead of a huge switch/case statement, you can use a more robust object.
Let’s use handleActions from redux-actions. It takes a map-like plain object, where keys are action types and values are functions. This way, only a single function is called per action type; in other words, this function is cherry-picked by action type.
The function from the previous snippet can be rewritten with redux-actions and handleActions as shown next (ch14/redux-netflix/src/modules/movies.js).
Listing 14.6. Using the redux-actions library
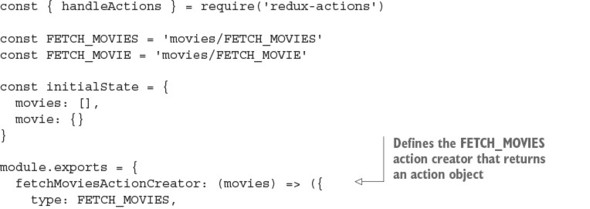
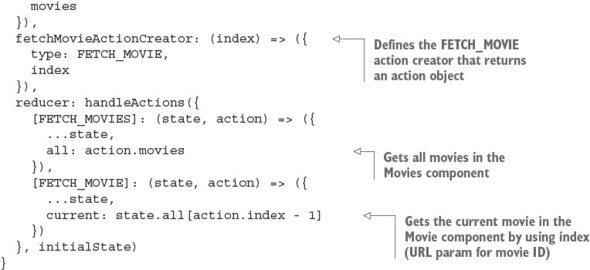
This code looks similar to switch/case, but it’s more about mapping functions to actions than selecting them in a potentially huge conditional statement.
14.3.7. Actions
To change data in the store, you use actions. To clarify, an action can be anything, not just user input in a browser. For example, it could be the result of an async operation. Basically, any code can become an action. Actions are the only sources of information for the store; this data is sent from an app to the store. Actions are executed via store.dispatch(), which I mentioned earlier, or via a connect() helper. But before we look at how to call an action, let’s cover its type.
Every action is represented by a plain object that has at least one property: type. It can have as many other properties as you want, usually to pass data into the store. So, every action has a type, like this:
{
  type: 'movies/I_AM_A_VALID_ACTION'
}
Here, the action type is a string.
Note
It’s common to name actions using uppercase letters preceded by the module name in lowercase letters. You can omit the module name if you’re sure duplicates will never occur.
In modern Redux development, action types are declared as constant strings:
const FETCH_MOVIES = 'movies/FETCH_MOVIES'
const FETCH_MOVIE = 'movies/FETCH_MOVIE'
Here, two action types are declared. Both are strings that consist of two parts: the name of the Redux module and the name of the action type. This practice may be useful when you have different reducers with similarly named actions.
Every time you want to change the application state, you need to dispatch a corresponding action. An appropriate reducer function is executed, and you end up with the updated application state. Think about data that you receive from an API or a form a user fills in: it all can be placed or updated in the store. Here’s an example:
this.props.dispatch({
  type: FETCH_MOVIE,
  movie: {}
})
This is the series of steps:
- Invoke dispatch() with an action object that has a type property and has data, if needed, in a component.
- Execute the corresponding reducer in the reducer module.
- Update the new state in the store, which is available in components.
More on dispatching later. Let’s see how you can avoid passing/using action types in your components.
14.3.8. Action creators
To change anything in the store, you need to run an action through all the reducers. A reducer then changes the application state based on the action type. For this reason, you always need to know the action type. But a shortcut lets you conceal action types under action creators. Overall, the steps are as follows:
- Invoke the action creator with data (if needed). The action creator can be defined in the reducer module.
- Dispatch the action in a component. No action type is needed.
- Execute the corresponding reducer in the reducer module.
- Update the new state in the store.
Check this out:
this.props.dispatch(fetchMoviesActionCreator({movie: {}}))
Simply put, an action creator is a function that returns an action. It’s as straightforward as this:
function fetchMoviesActionCreator(movies) {
  return {
    type: FETCH_MOVIES,
    movies
  }
}
With action creators, you can hide complex logic in a single function call. In this case, though, there’s no logic. The only operation this function performs is returning an action: a plain object with a type property that defines this action and also a movies property that has the value of an array of movies. If you were to extend the Netflix clone so it could add a movie, you’d need an addMovie() action creator:
function addMovie(movie) {
  return {
    type: ADD_MOVIE,
    movie
  }
}
Or how about watchMovie()?
function watchMovie(movie, watchMovieIndex, rating) {
  return {
    type: WATCH_MOVIE,
    movie,
    index: watchMovieIndex,
    rating: rating,
    receivedAt: Date.now()
  }
}
Remember, an action must have the type property!
To be able to dispatch actions, you must connect components to the store. This is getting more interesting, because you’re close to state updates.
14.3.9. Connecting components to the store
Now that you’ve learned how to put data into the store, let’s see how you can access store data from components. Luckily, the Provider component has a feature to bring the data into your components in properties. But to access the data, you’ll need to connect your component to the store explicitly.
By default, a component isn’t connected to a data store; and having it somewhere in the hierarchy of the topmost Provider component isn’t enough. Why? Well, think of connecting as an explicit opt-in for certain components.
If you remember, there are two types of components, according to React best practices: presentational (dumb) and container (smart), as discussed in chapter 8. Presentational components should not need the store; they should just consume properties. At the same time, container components need the store and the dispatcher. Even the definition of container components in the Redux documentation specifies that they subscribe to the store (http://mng.bz/p4f9). All Provider is doing is providing a store for all components automatically so that some of them can subscribe/connect to it. Thus, for container components, you need both Provider and the store.
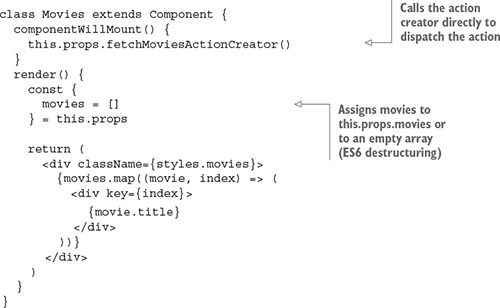
To sum up, a connected component can access any data from the store in its properties. How do you connect components to the store? With the connect() method, of course! Confused? Let’s look at an example. Think about your root component, App. It will use Movies, which at minimum should have this code to display the list of movies (the actual Movies component has a bit more code):
class Movies extends React.Component {
  render() {
    const {
      movies = []
    } = this.props
    return (
      <div className={styles.movies}>
        {movies.map((movie, index) => (
          <div key={index}>
            {movie.title}
          </div>
        ))}
      </div>
    )
  }
}
Currently, the Movies component isn’t connected to the store despite having Provider as a parent. Let’s connect it by adding the following snippet. The connect() function comes with the react-redux package and accepts up to four arguments, but you’ll use just one at the moment:
const { connect } = require('react-redux')
class Movies extends React.Component {
  ...
}
module.exports = connect()(Movies)
The connect() function returns a function that’s then applied to the Movies component. As a result not of exporting Movies but of calling connect() with Movies, and having Provider as a parent, the Movies component becomes connected to the store.
Now the Movies component can receive any data from the store and dispatch actions (you didn’t see this coming, did you?). But to receive the data in the format you need, you must map the state to component properties by creating a simple mapper function (expression is a more precise term, because you need to return the result).
In some tutorials, you may see a function called mapStateToProps(), although it doesn’t have to be an explicitly declared function. Using an anonymous arrow function is just as clean and straightforward. This mapper function goes into a special method, connect(), from your favorite react-redux. Remember, state is the first argument of connect():
module.exports = connect(function(state) {
  return state
})(Movies)
Or, here’s the fancy, hipster, ESNext React-friendly implicit return style:
module.exports = connect(state => state)(Movies)
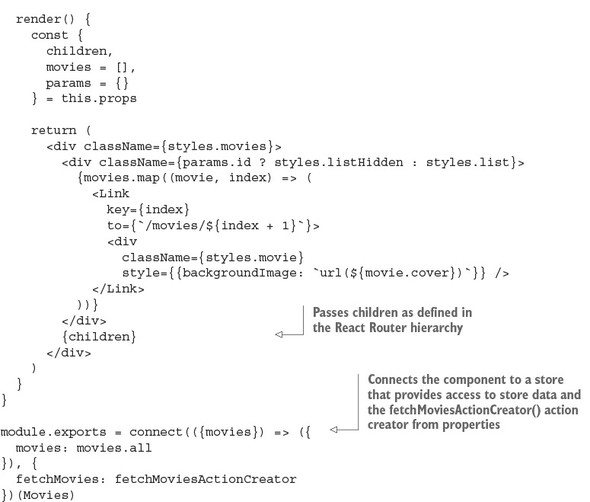
With this setup, you take the entire application state from the store and put it into the properties of the Movies component. You’ll find that, usually, you need only a limited subset of the state. In the example, Movies only needs movies.all:
class Movies extends React.Component {
  render() {
    const {
      children,
      movies = [],
      params = {}
    } = this.props
    ...

module.exports = connect(({movies}) => ({
  movies: movies.all
}), {
  fetchMoviesActionCreator
})(Movies)
And this is the Movie snippet, which only maps movies.current from the state:
class Movie extends React.Component {
  render() {
    const {
      movie = {
        starring: []
      }
    } = this.props
    ...

module.exports = connect(({movies}) => ({
  movie: movies.current
}), {
  fetchMovieActionCreator
})(Movie)
You’ll also see that if the store is empty, the component won’t receive any extra properties, because, well, there aren’t any.
Some Redux magic happens next: every time part of the store is updated, all components that depend on that part receive new properties and therefore are re-rendered. This happens when you dispatch an action, which means your components are now loosely interdependent and update only when the store is updated. Any component can cause this update by dispatching a proper action. There’s no need to use classic callback functions passed as properties and stream them from the topmost component down to the most deeply nested; just connect your components to the store.
14.3.10. Dispatching an action
To apply changes to data in the store, you need to dispatch an action. Once you’ve connected the component to the store, you can receive properties mapped to certain properties of the application state, and you also receive the dispatch property.
The dispatch() method is a function that takes an action as an argument and dispatches (sends) it into the store. Hence, you can dispatch an action by invoking this.props.dispatch() with an action:
componentWillMount() {
  this.props.dispatch({
    type: FETCH_MOVIE,
    movie: {}
  })
}
type is a string value that the Redux library applies to all reducers matching this type. After the action has been dispatched, which usually means you’ve changed the store, all components that are connected to the store and that have properties mapped from the updated part of the application state are rerendered. There’s no need to check whether components should update or do anything at all. You can rely on new properties in components’ render() function:
class Movie extends React.Component {
  render() {
    const {
      movie = {
        starring: []
      }
    } = this.props
  ...
You can replace a bare action (an object with type) with an action creator (the fetchMovieActionCreator() function):
const fetchMovieActionCreator = (response) => {
  type: FETCH_MOVIE,
  movie: response.data.data.movie
}
...
  componentWillMount() {
    ... // Make AJAX/XHR request
    this.props.dispatch(fetchMovieActionCreator(response))
  }
Because fetchMovieActionCreator() returns a plain object that’s identical to the object in the previous example (type and movie keys), you can call this action-creator fetchMovieActionCreator() function and pass the result to dispatch():
- Fetch data asynchronously (response).
- Create an action (fetchMovieActionCreator()).
- Dispatch the action (this.props.dispatch()).
- Execute the reducer.
- Update the new state in properties (this.props.movie).
14.3.11. Passing action creators into component properties
You can define action creators as functions right in the component file, but there’s another way to use action creators: you can define them in a module, import them, and put them into component properties. To do that, you can use the second argument of the connect() function and pass your action creator as a method:

Now you can refer to fetchMovieActionCreator() via properties and pass an action without using dispatch(), like this:
This new action creator is automatically wrapped in a valid dispatch() call. You don’t need to worry about doing it yourself. Awesome! This is how the Movies component is implemented in ch14/redux-netflix/src/components/movies/movies.js.
For clarity, you can rename fetchMoviesActionCreator() as fetchMovies() or do this:

The first argument to connect(), which is a function that maps state to component properties, takes the entire state (state) as the only argument and returns a plain object with a single property, movies:
...
module.exports = connect(state => ({
  movies: state.movies.all
}), {
  fetchMoviesActionCreator
})(Movies)
You can make the code more eloquent by destructuring state.movies:
module.exports = connect(({movies}) => ({
  movies: movies.all
}), {
  fetchMoviesActionCreator
})(Movies)
In the render() function of the Movies component, the value of movies is obtained from properties and is rendered into a collection of sibling DOM elements. Each is a div element with its inner text set to movie.title. This is a typical approach to rendering an array into a fragment of sibling DOM elements.
Wonder what the final Movies component looks like? Here’s the code (ch14/redux-netflix/src/components/movies/movies.js).
Listing 14.7. Passing action creators into Movies properties
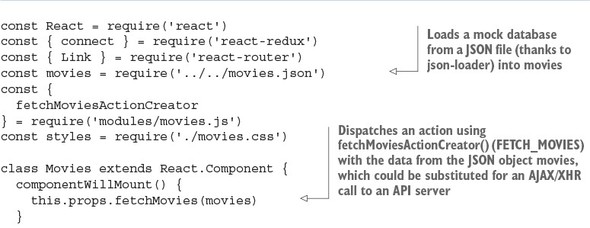
As you can see, swapping for async data is straightforward: make an async call (using the fetch() API, axios, and so on), and then dispatch an action in componentWillMount(). Or even better, let’s use componentDidMount(), which is recommended by the React team for AJAX/XHR calls:

And you can do the same thing with POST, PUT, and other HTTP calls that you did with GET. You’ll be making some of these calls in the next chapter.
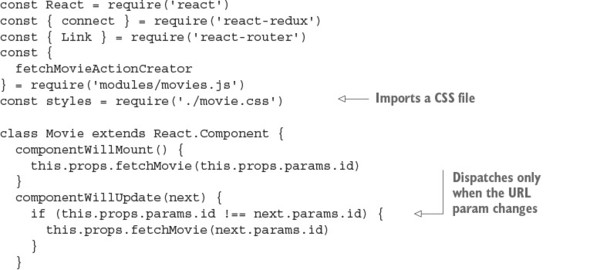
We’re finished with Movies. Next, we’ll cover the Movie component—but only briefly, because much of the Redux wiring is similar to that in Movies. What’s different is that Movie will get the URL parameter’s movie ID. React Router puts it in this.props.params.id. This ID will be sent via action dispatch and used in the reducer to filter out only a single movie. As a reminder, these are the reducers from src/modules/movies.js:
Now, let’s look at the implementation of Movie, which uses a different state-to-properties mapping by taking a movie ID from a React Router’s URL parameter and using it as an index (src/components/movie/movie.js).
Listing 14.8. Movie implementation

14.3.12. Running the Netflix clone
It’s time to run the project. Of course, you could have done it in the beginning, because the start script is in package.json. This script uses an npm library concurrently to run two processes at the same time: Webpack build in watch mode and Webpack development server (port 8080):
"start": "concurrently \"webpack --watch --config webpack.config.js\"\"webpack-dev-server\""
Navigate to the project root (ch14/redux-netflix). Install the dependencies with npm i, and run the project from the project folder: npm start. Open your favorite browser at http://localhost:8080.
Click around to see that the routing is working and the images are loading regardless of whether you used mock data (require()) or loaded it via the GET request. Notice that if you’re at http://localhost:8080/movies/1 and refresh the page, you don’t see anything. You’ll take care of that in the next chapter, where you’ll implement Node and Express server to support hash-less URLs. Now it’s time to wrap up this chapter.
14.3.13. Redux wrap-up
Redux provides a single place to store an entire application’s data; the only way to change the data is through actions. This makes Redux universal—you can use it anywhere, not only in React apps. But with the react-redux library, you can use the connect() function to connect any component to the store and make it react to any change there.
This is the basic idea of reactive programming: an entity A that observes changes in entity B reacts to those changes as they occur, but the opposite is not true. Here, A is any of your components, and B is the store.
As you connect (connect()) the component and map properties of the store to a component’s properties (this.props), you can refer to the latter in the render() function. Usually, you need to first update the store with data to refer to that data. This is why you call an action in a component’s componentWillMount() function. By the time the component is mounted for the first time and render() is called, the part of the store that the component refers to may be empty. But once the store data is updated, it’s preserved. This is why in the Netflix clone example, the list of movies remains intact even after you navigate across the app’s locations (pages or views). Yes. Data doesn’t disappear from the store after a component is unmounted, unlike when you use the component’s state (remember this.state() and this.setState()?). Thus, your Redux store can serve different parts of your application that require the same data without the data having to be reloaded.
It’s also safe to update component properties in the render() function via the store by dispatching an action, because this operation is deferred. On the other hand, without Redux, you can’t use setState() at any point when the component may be updated: render(), componentWillMount(), or componentWillUpdate(). This feature of Redux adds to its flexibility.
14.4. Quiz
Name the two main arguments of a reducing function (callback) to the Array.reduce() method in JavaScript.
Redux offers simplicity, a larger ecosystem, and a better developer experience than Facebook Flux (flux). True or false?
Which of the following would you use to create a store and provider? new Provider (createStore(reducers)), <Provider store={createStore(reducers)}>, or provider(createStore(reducers))
Redux needs a dispatcher because that’s what Flux defines. True or false?
In this project, movies.all fetches all movies, and movies.current fetches the current movie. They’re used in the Movies and Movie components, respectively, in the connect call. Where do you define the logic of movies.all and movies.current?
14.5. Summary
- Unidirectional data flow provides predictability and ease of maintenance for React apps.
- Flux is the recommended architecture when working with React and unidirectional data flow.
- Redux is one of the most popular implementations of the Flux architecture.
- With Redux, you can dispatch an action or put in into the properties object.
- Redux’s connect() lets you access store data and dispatch actions—necessary features for container (smart) components.
- The Redux Provider component provides access to the store to children so you don’t have to pass the store in properties manually.
- A reducer is a file with a reducing function that uses (typically) a switch/case statement or handleActions to apply actions to a new state: that is, the current state and actions are input, and the new state is output.
- Redux combineReducers conveniently merges multiple reducers, letting you split the code for those reducers into various modules/files.
14.6. Quiz answers
The accumulator value and the current value are the two primary arguments. Without them, you can’t summarize a list.
True. See the introduction to this chapter and Dan Abramov’s post “Why Use Redux over Facebook Flux?” on Stack Overflow (http://mng.bz/z9ok).
<Provider store={createStore(reducers)}>
False. Redux adheres to Flux but doesn’t require a dispatcher, so Redux is simpler to implement.
In src/modules/movies.js, in reducers.