Table of Contents for
React Quickly: Painless web apps with React, JSX, Redux, and GraphQL
 React Quickly: Painless web apps with React, JSX, Redux, and GraphQL
Published by
Manning Publications, 2017
React Quickly: Painless web apps with React, JSX, Redux, and GraphQL
Published by
Manning Publications, 2017
- Cover
- React Quickly: Painless web apps with React, JSX, Redux, and GraphQL
- Copyright
- React Quickly: Painless web apps with React, JSX, Redux, and GraphQL
- Brief Table of Contents
- Table of Contents
- Praise for React Quickly
- Foreword
- Preface
- Acknowledgments
- About This Book
- About the Author
- About the Cover
- Part 1. React foundation
- Chapter 1. Meeting React
- Chapter 2. Baby steps with React
- Chapter 3. Introduction to JSX
- Chapter 4. Making React interactive with states
- Chapter 5. React component lifecycle events
- Chapter 6. Handling events in React
- Chapter 7. Working with forms in React
- Chapter 8. Scaling React components
- Chapter 9. Project: Menu component
- Chapter 10. Project: Tooltip component
- Chapter 11. Project: Timer component
- Part 2. React architecture
- Chapter 12. The Webpack build tool
- Chapter 13. React routing
- Chapter 14. Working with data using Redux
- Chapter 15. Working with data using GraphQL
- Chapter 16. Unit testing React with Jest
- Chapter 17. React on Node and Universal JavaScript
- Chapter 18. Project: Building a bookstore with React Router
- Chapter 19. Project: Checking passwords with Jest
- Chapter 20. Project: Implementing autocomplete with Jest, Express, and MongoDB
- Appendix A. Installing applications used in this book
- Appendix B. React cheatsheet
- Appendix C. Express.js cheatsheet
- Appendix D. MongoDB and Mongoose cheatsheet
- Appendix E. ES6 for success
- React Cheatsheet
- Index
- List of Figures
- List of Tables
- List of Listings
Chapter 3. Introduction to JSX
This chapter covers
- Understanding JSX and its benefits
- Setting up JSX transpilers with Babel
- Being aware of React and JSX gotchas
Welcome to JSX! It’s one of the greatest things about React, in my opinion—and one of the most controversial subjects related to React in the minds of a few developers I spoke with (who, not surprisingly, haven’t yet built anything large in React).
Thus far, we’ve covered how to create elements and components so that you can use custom elements and better organize your UIs. You used JavaScript to create React elements, instead of working with HTML. But there’s a problem. Look at this code, and see if you can tell what’s happening:
render() {
  return React.createElement(
    'div',
    { style: this.styles },
    React.createElement(
      'p',
      null,
      React.createElement(
        reactRouter.Link,
        { to: this.props.returnTo },
        'Back'
      )
    ),
    this.props.children
  );
}
Were you able to tell that there are three elements, that they’re nested, and that the code uses a component from React Router? How readable is this code, compared to standard HTML? Do you think this code is eloquent? The React team agrees that reading (and typing, for that matter) a bunch of React.createElement() statements isn’t fun. JSX is the solution to this problem.
Note
The source code for the examples in this chapter is at www.manning.com/books/react-quickly and https://github.com/azat-co/react-quickly/tree/master/ch03 (in the ch03 folder of the GitHub repository https://github.com/azat-co/react-quickly). You can also find some demos at http://reactquickly.co/demos.
3.1. What is JSX, and what are its benefits?
JSX is a JavaScript extension that provides syntactic sugar (sugar-coating) for function calls and object construction, particularly React.createElement(). It may look like a template engine or HTML, but it isn’t. JSX produces React elements while allowing you to harness the full power of JavaScript.
JSX is a great way to write React components. Its benefits include the following:
- Improved developer experience (DX)—Code is easier to read because it’s more eloquent, thanks to an XML-like syntax that’s better at representing nested declarative structures.
- More-productive team members—Casual developers (such as designers) can modify code more easily, because JSX looks like HTML, which is already familiar to them.
- Fewer wrist injuries and syntax errors—Developers have less code to type (that is, less sugar-coating), which means they make fewer mistakes and are less likely to develop repetitive-stress injuries.
Although JSX isn’t required for React, it fits in nicely and is highly recommended by me and React’s creators. The official “Introducing JSX” page[1] states, “We recommend using [JSX] with React.”
To demonstrate the eloquence of JSX, this is the code to create HelloWorld and an a link element:
<div>
  <HelloWorld/>
  <br/>
  <a href="http://webapplog.com">Great JS Resources</a>
</div>
That’s analogous to the following JavaScript:
React.createElement(
  "div",
  null,
  React.createElement(HelloWorld, null),
  React.createElement("br", null),
  React.createElement(
    "a",
    { href: "http://webapplog.com" },
    "Great JS Resources"
  )
)
And if you use Babel v6 (one of the tools for JSX; more on Babel in a few pages), the JS code becomes this:
"use strict";

React.createElement(
  "div",
  null,
  " ",
  React.createElement(HelloWorld, null),
  " ",
  React.createElement("br", null),
  " ",
  React.createElement(
    "a",
    { href: "http://webapplog.com" },
    "Great JS Resources"
  ),
  " "
);
In essence, JSX is a small language with an XML-like syntax; but it has changed the way people write UI components. Previously, developers wrote HTML—and JS code for controllers and views—in an MVC-like manner, jumping between various files. That stemmed from the separation of concerns in the early days. This approach served the web well when it consisted of static HTML, a little CSS, and a tiny bit of JS to make text blink.
This is no longer the case; today, we build highly interactive UIs, and JS and HTML are tightly coupled to implement various pieces of functionality. React fixes the broken separation of concerns (SoC) principle by bringing together the description of the UI and the JS logic; and with JSX, the code looks like HTML and is easier to read and write. If for no other reason, I’d use React and JSX just for this new approach to writing UIs.
JSX is compiled by various transformers (tools) into standard ECMAScript (see figure 3.1). You probably know that JavaScript is ECMAScript, too; but JSX isn’t part of the specification, and it doesn’t have any defined semantics.
Figure 3.1. JSX is transpiled into regular JavaScript.

Note
According to https://en.wikipedia.org/wiki/Source-to-source_compiler, “A source-to-source compiler, transcompiler, or transpiler is a type of compiler that takes the source code of a program written in one programming language as its input and produces the equivalent source code in another programming language.”
You may wonder, “Why should I bother with JSX?” That’s a great question. Considering how counterintuitive JSX code looks to begin with, it’s no surprise that many developers are turned off by this amazing technology. For example, this JSX shows that there are angle brackets in the JavaScript code, which looks bizarre at first:
ReactDOM.render(<h1>Hello</h1>, document.getElementById('content'))
What makes JSX amazing are the shortcuts to React.createElement(NAME, ...). Instead of writing that function call over and over, you can instead use <NAME/>. And as I said earlier, the less you type, the fewer mistakes you make. With JSX, DX is as important as user experience (UX).
The main reason to use JSX is that many people find code with angle brackets (< >) easier to read than code with a lot of React.createElement() statements (even when they’re aliased). And once you get into the habit of thinking about <NAME/> not as XML, but as an alias to JavaScript code, you’ll get over the perceived weirdness of JSX syntax. Knowing and using JSX can make a big difference when you’re developing React components and, subsequently, React-powered applications.
To be fair, there are a few alternatives to JSX when it comes to avoiding typing verbose React.createElement() calls. One of them is to use the alias React.DOM.*. For example, instead of creating an <h1/> element with
React.createElement('h1', null, 'Hey')
the following will also suffice and requires less space and time to implement:
React.DOM.h1(null, 'Hey')
You have access to all the standard HTML elements in the React.DOM object, which you can inspect like any other object:
console.log(React.DOM)
You can also type React.DOM and press Enter in the Chrome DevTools console. (Note that React.DOM and ReactDOM are two completely different objects and shouldn’t be confused or used interchangeably.)
Another alternative, recommended by the official React documentation for situations where JSX is impractical (for example, when there’s no build process), is to use a short variable. For example, you can create a variable E as follows:
const E = React.createElement
E('h1', null, 'Hey')
As I mentioned earlier, JSX needs to be transpiled (or compiled, as it’s often called) into regular JavaScript before browsers can execute its code. We’ll explore various available methods for doing so, as well as the recommended method, in section 3.3.
3.2. Understanding JSX
Let’s explore how to work with JSX. You can read this section and keep it bookmarked for your reference, or (if you prefer to have some of the code examples running on your computer) you have the following options:
- Set up a JSX transpiler with Babel on your computer, as shown in section 3.3.
- Use the online Babel REPL service (https://babeljs.io/repl), which transpiles JSX into JavaScript in the browser.
The choice is up to you. I recommend reading about the main JSX concepts first, and then doing the proper Babel setup on your computer.
3.2.1. Creating elements with JSX
Creating ReactElement objects with JSX is straightforward. For example, instead of writing the following JavaScript (where name is a string—h1—or component class object—HelloWorld)
React.createElement(
  name,
  {key1: value1, key2: value2, ...},
  child1, child2, child3, ..., childN
)
you can write this JSX:
<name key1=value1 key2=value2 ...>
  <child1/>
  <child2/>
  <child3/>
  ...
  <childN/>
</name>
In the JSX code, the attributes and their values (for example, key1=value1) come from the second argument of createElement(). We’ll focus on working with properties later in this chapter. For now, let’s look at an example of a JSX element without properties. Here’s our old friend Hello World in JavaScript (ch03/hello-world/index.html).
Listing 3.1. Hello World in JavaScript
ReactDOM.render(
  React.createElement('h1', null, 'Hello world!'),
  document.getElementById('content')
)
The JSX version is much more compact (ch03/hello-world-jsx/js/script.jsx).
Listing 3.2. Hello World in JSX
ReactDOM.render(
  <h1>Hello world!</h1>,
  document.getElementById('content')
)
You can also store objects created with JSX syntax in variables, because JSX is just a syntactic improvement of React.createElement(). This example stores the reference to the Element object in a variable:
let helloWorldReactElement = <h1>Hello world!</h1>
ReactDOM.render(
  helloWorldReactElement,
  document.getElementById('content')
)
3.2.2. Working with JSX in components
The previous example used the <h1> JSX tag, which is also a standard HTML tag name. When working with components, you apply the same syntax. The only difference is that the component class name must start with a capital letter, as in <HelloWorld/>.
Here’s a more advanced iteration of Hello World, rewritten in JSX. In this case, you create a new component class and use JSX to create an element from it.
Listing 3.3. Creating a HelloWorld class in JSX
class HelloWorld extends React.Component {
  render() {
    return (
      <div>
        <h1>1. Hello world!</h1>
        <h1>2. Hello world!</h1>
      </div>
    )
  }
}
ReactDOM.render(
  <HelloWorld/>,
  document.getElementById('content')
)
Can you read listing 3.3 more easily than the following JavaScript code?
class HelloWorld extends React.Component {
  render() {
    return React.createElement('div',
      null,
      React.createElement('h1', null, '1. Hello world!'),
      React.createElement('h1', null, '2. Hello world!'))
  }
}
ReactDOM.render(
  React.createElement(HelloWorld, null),
  document.getElementById('content')
)
Note
As I said earlier, seeing angle brackets in JavaScript code may be strange for experienced JavaScript developers. My brain went bananas when I first saw this, because for years I trained myself to spot JS syntax errors! The brackets are the primary controversy regarding JSX and one of the most frequent objections I hear; this is why we dive into JSX early in the book, so you can get as much experience with it as possible.
Notice the parentheses after return in the JSX code in listing 3.3; you must include them if you don’t type anything on the same line after return. For example, if you start your top element, <div>, on a new line, you must put parentheses (()) around it. Otherwise, JavaScript will finish the return with nothing. This style is as follows:
render() {
  return (
    <div>
    </div>
  )
}
Alternatively, you can start your top element on the same line as return and avoid the necessary (). For example, this is valid as well:
render() {
  return <div>
  </div>
}
A downside of the second approach is the reduced visibility of the opening <div> tag: it may be easy to miss in the code.[2] The choice is up to you. I use both styles in this book to give you a deeper perspective.
For more about this behavior in JavaScript, see James Nelson, “Why Use Parenthesis [sic] on JavaScript Return Statements?” August 11, 2016, http://jamesknelson.com/javascript-return-parenthesis; and “Automated Semicolon Insertion,” Annotated ECMAScript 5.1, http://es5.github.io/#x7.9.
3.2.3. Outputting variables in JSX
When you compose components, you want them to be smart enough to change the view based on some code. For example, it would be useful if a current date-time component used a current date and time, not a hardcoded value.
When working with JavaScript-only React, you have to resort to concatenation (+) or, if you’re using ES6+/ES2015+, string templates marked by a backtick and ${varName}, where varName is the name of a variable. The official name for this feature is template literal, according to the specification.[3] For example, to use a property in text in a DateTimeNow component in regular JavaScript React, you’d write this code:
“Template Literals,” ECMAScript 2015 Language Specification, June 2015, http://mng.bz/i8Bw.
class DateTimeNow extends React.Component {
  render() {
    let dateTimeNow = new Date().toLocaleString()
    return React.createElement(
      'span',
      null,
      `Current date and time is ${dateTimeNow}.`
    )
  }
}
Conversely, in JSX, you can use curly braces {} notation to output variables dynamically, which reduces code bloat substantially:
class DateTimeNow extends React.Component {
  render() {
    let dateTimeNow = new Date().toLocaleString()
    return <span>Current date and time is {dateTimeNow}.</span>
    )
  }
}
The variables can be properties, not just locally defined variables:
<span>Hello {this.props.userName}, your current date and time is
 {dateTimeNow}.</span>
Moreover, you can execute JavaScript expressions or any JS code inside of {}. For example, you can format a date:
<p>Current time in your locale is
Now, you can rewrite the HelloWorld class in JSX using the dynamic data that JSX stores in a variable (ch03/hello-world-class-jsx).
Listing 3.4. Outputting variables in JSX
let helloWorldReactElement = <h1>Hello world!</h1>
class HelloWorld extends React.Component {
  render() {
    return <div>
      {helloWorldReactElement}
      {helloWorldReactElement}
    </div>
  }
}
ReactDOM.render(
  <HelloWorld/>,
  document.getElementById('content')
)
Let’s discuss how you work with properties in JSX.
3.2.4. Working with properties in JSX
I touched on this topic earlier, when I introduced JSX: element properties are defined using attribute syntax. That is, you use key1=value1 key2=value2... notation inside of the JSX tag to define both HTML attributes and React component properties. This is similar to attribute syntax in HTML/XML.
In other words, if you need to pass properties, write them in JSX as you would in normal HTML. Also, you render standard HTML attributes by setting element properties (discussed in section 2.3). For example, this code sets a standard HTML attribute href for the anchor element <a>:
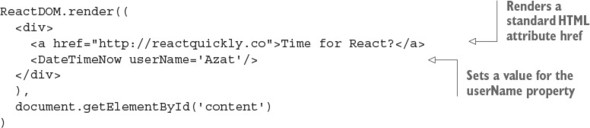
Using hardcoded values for attributes isn’t flexible. If you want to reuse the link component, then the href must change to reflect a different address each time. This is called dynamically setting values versus hardcoding them. So, next we’ll go a step further and consider a component that can use dynamically generated values for attributes. Those values can come from component properties (this.props). After that, everything’s easy. All you need to do is use curly braces ({}) inside angle braces (<>) to pass dynamic values of properties to elements.
For example, suppose you’re building a component that will be used to link to user accounts. href and title must be different and not hardcoded. A dynamic component ProfileLink renders a link <a> using the properties url and label for href and title, respectively. In ProfileLink, you pass the properties to <a> using {}:
class ProfileLink extends React.Component {
  render() {
    return <a href={this.props.url}
      title={this.props.label}
      target="_blank">Profile
    </a>
  }
}
Where do the property values come from? They’re defined when the ProfileLink is created—that is, in the component that creates ProfileLink, a.k.a. its parent. For example, this is how the values for url and label are passed when a ProfileLink instance is created, which results in the render of the <a> tag with those values:
<ProfileLink url='/users/azat' label='Profile for Azat'/>
From the previous chapter, you should remember that when rendering standard elements (<h>, <p>, <div>, <a>, and so on), React renders all attributes from the HTML specification and omits all other attributes that aren’t part of the specification. This isn’t a JSX gotcha; it’s React’s behavior.
But sometimes you want to add custom data as an attribute. Let’s say you have a list item; there’s some information that’s essential to your app but not needed by users. A common pattern is to put this information in the DOM element as an attribute. This example uses the attributes react-is-awesome and id:
<li react-is-awesome="true" id="320">React is awesome!</li>
Storing data in custom HTML attributes in the DOM is generally considered an antipattern, because you don’t want the DOM to be your database or a front-end data store. Getting data from the DOM is slower than getting it from a virtual/in-memory store.
In cases when you must store data as elements’ attributes, and you use JSX, you need to use the data-NAME prefix. For example, to render the <li> element with a value of this.reactIsAwesome in an attribute, you can write this:
<li data-react-is-awesome={this.reactIsAwesome}>React is awesome!</li>
Let’s say this.reactIsAwesome is true. Then, the resulting HTML is
<li data-react-is-awesome="true">React is awesome!</li>
But if you attempt to pass a nonstandard HTML attribute to a standard HTML element, the attribute won’t render (as covered in section 2.3). For example, this code
<li react-is-awesome={this.reactIsAwesome}>React is orange</li>
and this code
<li reactIsAwesome={this.reactIsAwesome}>React is orange</li>
both produce only the following:
<li>React is orange</li>
Obviously, because custom elements (component classes) don’t have built-in renderers and rely on standard HTML elements or other custom elements, this issue of using data- isn’t important for them. They get all attributes as properties in this.props.
Speaking of component classes, this is the code from Hello World (section 2.3) written in regular JavaScript:
class HelloWorld extends React.Component {
  render() {
    return React.createElement(
      'h1',
      this.props,
      'Hello ' + this.props.frameworkName + ' world!!!'
    )
  }
}
In the HelloWorld components, you pass the properties through to <h1> no matter what properties are there. How can you do this in JSX? You don’t want to pass each property individually, because that’s more code; and when you need to change a property, you’ll have tightly coupled code that you’ll need to update as well. Imagine having to pass each property manually—and what if you have two or three levels of components to pass through? That’s an antipattern. Don’t do this:
class HelloWorld extends React.Component {
  render() {
    return <h1 title={this.props.title} id={this.props.id}>
      Hello {this.props.frameworkName} world!!!
    </h1>
  }
}
Don’t pass the properties individually when your intention is to pass all of them; JSX offers a spread solution that looks like ellipses, ..., as you can see in the following listing (ch03/jsx/hello-js-world-jsx).
Listing 3.5. Working with properties
class HelloWorld extends React.Component {
  render() {
    return <h1 {...this.properties}>
      Hello {this.props.frameworkName} world!!!
    </h1>
  }
}

ReactDOM.render(
  <div>
    <HelloWorld
      id='ember'
      frameworkName='Ember.js'
      title='A framework for creating ambitious web applications.'/>,
    <HelloWorld
      id='backbone'
      frameworkName= 'Backbone.js'
      title= 'Backbone.js gives structure to web applications...'/>
    <HelloWorld
      id= 'angular'
      frameworkName= 'Angular.js'
      title= 'Superheroic JavaScript MVW Framework'/>
  </div>,
  document.getElementById('content')
)
With {...this.props}, you can pass every property to the child. The rest of the code is just converted to the JSX example from section 2.3.
Speaking of ellipses, there are similar-looking operators in ES6+, called destructuring, spread, and rest. This is one of the reasons React’s JSX uses ellipses!
If you’ve ever used or written a JavaScript function with a variable or unlimited number of arguments, you know the arguments object. This object contains all parameters passed to the function. The problem is that this arguments object isn’t a real array. You have to convert it to an array if you want to use functions like sort() and map() explicitly. For example, this request function converts arguments using call():
function request(url, options, callback) {
  var args = Array.prototype.slice.call(arguments, request.length)
  var url = args[0]
  var callback = args[2]
  // ...
}
Is there a better way in ES6 to access an indefinite number of arguments as an array? Yes! It’s the rest parameter syntax, defined with ellipses (...). For example, following is the ES6 function signature with the rest parameter callbacks, which become an array (a real array, not the arguments pseudoarray) with the rest of the parameters:[4]
In the rest array, the first parameter is the one that doesn’t have a name: for example, the callback is at index 0, not 2, as in ES5’s arguments. Also, putting other named arguments after the rest parameter will cause a syntax error.
function(url, options, ...callbacks) {
  var callback1 = callbacks[0]
  var callback2 = callbacks[1]
  // ...
}
Rest parameters can be destructured, meaning they can be extracted into separate variables:
function(url, options, ...[error, success]) {
  if (!url) return error(new Error('ooops'))
  // ...
  success(data)
}
What about spread? In brief, spread allows you to expand arguments or variables in the following places:
- Function calls—For example, push() method: arr1.push(...arr2)
- Array literals—For example, array2 = [...array1, x, y, z]
- new function calls (constructors)—For example, var d = new Date(...dates)
In ES5, if you wanted to use an array as an argument to a function, you’d have to use the apply() function:
function request(url, options, callback) {
  // ...
}
var requestArgs = ['http://azat.co', {...}, function(){...}]
request.apply(null, requestArgs)
In ES6, you can use the spread parameter, which looks similar to the rest parameter in syntax and uses ellipses (...):
function request(url, options, callback) {
  // ...
}
var requestArgs = ['http://azat.co', {...}, function(){...}]
request(...requestArgs)
The spread operator’s syntax is similar to that of the rest parameter’s, but rest is used in a function definition/declaration, and spread is used in calls and literals. They save you from typing extra lines of imperative code, so knowing and using them is a valuable skill.
3.2.5. Creating React component methods
As a developer, you’re free to write any component methods for your applications, because a React component is a class. For example, you can create a helper method, getUrl():
class Content extends React.Component {
  getUrl() {
    return 'http://webapplog.com'
  }
  render() {
    ...
  }
}
The getUrl() method isn’t sophisticated, but you get the idea: you can create your own arbitrary methods, not just render(). You can use the getUrl() method to abstract a URL to your API server. Helper methods can have reusable logic, and you can call them anywhere within other methods of the component, including render().
If you want to output the return from the custom method in JSX, use {}, just as you would with variables (see the following listing, ch03/method/jsx/scrch03/meipt.jsx). In this case, the helper method is invoked in render, and the method’s return values will be used in the view. Remember to invoke the method with ().
Listing 3.6. Invoking a component method to get a URL
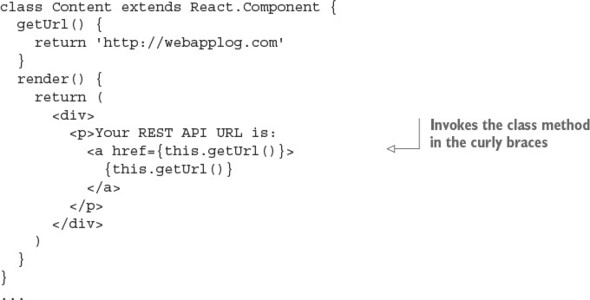
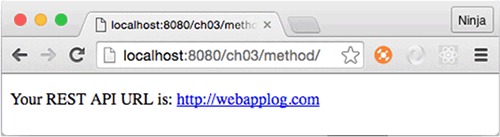
Once again, it’s possible to invoke component methods directly from {} and JSX. For example, using {this.getUrl()} in the helper method getUrl: when you use the method in listing 3.6, you’ll see http://webapplog.com as its returned value in the link in the paragraph <p> (see figure 3.2).
Figure 3.2. Results of rendering a link with the value from a method
You should now understand component methods. My apologies if you found this section too banal; these methods are important as a foundation for React event handlers.
3.2.6. if/else in JSX
Akin to rendering dynamic variables, developers need to compose their components so that components can change views based on the results of if/else conditions. Let’s start with a simple example that renders the elements in a component class; the elements depend on a condition. For example, some link text and a URL are determined by the user.session value. This is how you can code this in plain JS:
...
render() {
  if (user.session)
    return React.createElement('a', {href: '/logout'}, 'Logout')
  else
    return React.createElement('a', {href: '/login'}, 'Login')
}
...
You can use a similar approach and rewrite this with JSX like so:
...
render() {
  if (this.props.user.session)
    return <a href="/logout">Logout</a>
  else
    return <a href="/login">Login</a>
}
...
Let’s say there are other elements, such as a <div> wrapper. In this case, in plain JS, you’d have to create a variable or use an expression or a ternary operator (also known as the Elvis operator by the younger generation of JavaScript developers; see http://mng.bz/92Zg), because you can’t use an if condition inside the <div>’s createElement(). The idea is that you must get the value at runtime.
The following ternary condition works such that if userAuth is true, then msg will be set to welcome. Otherwise, the value will be restricted:
let msg = (userAuth) ? 'welcome' : 'restricted'
This statement is equivalent to the following:
let session = '' if (userAuth) {
  session = 'welcome'
} else {
  session = 'restricted'
}
In some cases, the ternary (?) operator is a shorter version of if/else. But there’s a big difference between them if you try to use the ternary operator as an expression (where it returns a value). This code is valid JS:
let msg = (userAuth) ? 'welcome' : 'restricted'
But if/else won’t work because this isn’t an expression, but a statement:
let msg = if (userAuth) {'welcome'} else {'restricted'} // Not valid
You can use this quality of a ternary operator to get a value from it at runtime in JSX.
To demonstrate the three different styles (variable, expression, and ternary operator), look at the following regular JavaScript code before it’s converted to JSX:
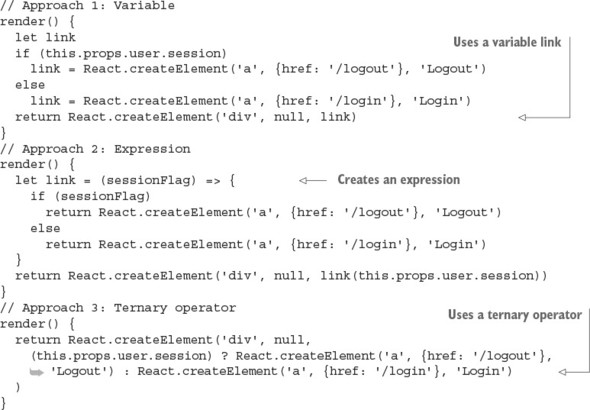
Not bad, but kind of clunky. Would you agree? With JSX, the {} notation can print variables and execute JS code. Let’s use it to achieve better syntax:
// Approach 1: Variable
render() {
  let link
  if (this.props.user.session)
    link = <a href='/logout'>Logout</a>
  else
    link = <a href='/login'>Login</a>
  return <div>{link}</div>
}
// Approach 2: Expression
render() {
  let link = (sessionFlag) => {
    if (sessionFlag)
      return <a href='/logout'>Logout</a>
    else
      return <a href='/login'>Login</a>
  }
  return <div>{link(this.props.user.session)}</div>
}
// Approach 3: Ternary operator
render() {
  return <div>
    {(this.props.user.session) ? <a href='/logout'>Logout</a> :
     <a href='/login'>Login</a>}
  </div>
}
If you look more closely at the expression/function style example (Approach 2: a function outside the JSX before return), you can come up with an alternative. You can define the same function using an immediately invoked function expression (IIFE, http://mng.bz/387u) inside the JSX. This lets you avoid having an extra variable (such as link) and execute the if/else at runtime:

Furthermore, you can use the same principles for rendering not just entire elements (<a>, in these examples), but also text and the values of properties. All you need to do is use one of the approaches shown here, inside curly braces. For example, you can augment the URL and text and not duplicate the code for element creation. Personally, this is my favorite approach, because I can use a single <a>:
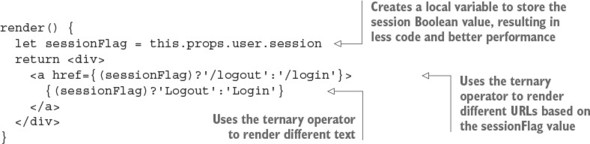
As you can see, unlike in template engines, there’s no special syntax for these conditions in JSX—you just use JavaScript. Most often, you’ll use a ternary operator, because it’s one of the most compact styles. To summarize, when it comes to implementing if/else logic in JSX, you can use these options:
- Variable defined outside of JSX (before return) and printed with {} in JSX
- Expression (function that returns a value) defined outside of JSX (before return) and invoked in {} in JSX
- Conditional ternary operator
- IIFE in JSX
This is my rule of thumb when it comes to conditions and JSX: use if/else outside of JSX (before return) to generate a variable that you’ll print in JSX with {}. Or, skip the variable, and print the results of the Elvis operator (?) or expressions using {} in JSX:
class MyReactComponent extends React.Component {
  render() {
    // Not JSX: Use a variable and if/else or ternary
    return (
      // JSX: Print result of ternary or expression with {}
    )
  }
}
We’ve covered the important conditions for building interactive UIs with React and JSX. Occasionally, you may want to narrate the functionality of your beautiful, intelligent code so that other people can quickly understand it. To do so, you use comments.
3.2.7. Comments in JSX
Comments in JSX work similar to comments in regular JavaScript. To add JSX comments, you can wrap standard JavaScript comments in {}, like this:
let content = (
  <div>
    {/* Just like a JS comment */}
  </div>
)
Or, you can use comments like this:
let content = (
  <div>
    <Post
      /* I
      am
      multi
      line */
      name={window.isLoggedIn ? window.name : ''} // We are inside of JSX
    />
  </div>
)
You’ve now had a taste of JSX and its benefits. The rest of this chapter is dedicated to JSX tools and potential traps to avoid. That’s right: tools and gotchas.
Because before we can continue, you must understand that for any JSX project to function properly, the JSX needs to be compiled. Browsers can’t run JSX—they can run only JavaScript, so you need to take the JSX and transpile it to normal JS (see figure 3.1).
3.3. Setting up a JSX transpiler with Babel
As I mentioned, in order to execute JSX, you need to convert it to regular JavaScript code. This process is called transpilation (from compilation and transformation), and various tools are available to do the job. Here are some recommended ways to do this:
- Babel command-line interface (CLI) tool—The babel-cli package provides a command for transpilation. This approach requires less setup and is the easiest to start.
- Node.js or browser JavaScript script (API approach)—A script can import the babel-core package and transpile JSX programmatically (babel.transform). This allows for low-level control and removes abstractions and dependencies on the build tools and their plug-ins.
- Build tool—A tool such as Grunt, Gulp, or Webpack can use the Babel plug-in. This is the most popular approach.
All of these use Babel in one way or another. Babel is mostly an ES6+/ES2015+ compiler, but it also can convert JSX to JavaScript. In fact, the React team stopped development on its own JSX transformer and recommends using Babel.
Although there are various tools to transpile JSX, the most frequently used tool—and the one recommended by the React team on the official React website, as of August 2016—is Babel (formerly, 5to6). Historically, the React team maintained react-tools and JSXTransformer (transpilation in the browser); but, since version 0.13, the team has recommended Babel and stopped evolving react-tools and JSXTransformer.[5]
Paul O’Shannessy, “Deprecating JSTransform and react-tools,” React, June 12, 2015, http://mng.bz/8yGc.
For in-browser runtime transpilation, Babel version 5.x has browser.js, which is a ready-to-use distribution. You can drop it in the browser, like JSXTransformer, and it will convert any <script> code into JS (use type="text/babel"). The latest Babel version that has browser.js is 5.8.34, and you can include it from the CDN directly (https://cdnjs.com/libraries/babel-core/5.8.34).
Babel 6.x switched to not having default presets/configs (such as JSX) and removed browser.js. The Babel team encourages developers to create their own distributions or use the Babel API. There’s also a babel-standalone library (https://github.com/Daniel15/babel-standalone), but you still have to tell it which presets/configs to use.
Traceur (https://github.com/google/traceur-compiler) is another tool that you can use as a replacement for Babel.
Finally, TypeScript (www.typescriptlang.org) seems to support JSX compilation via jsx-typescript (https://github.com/fdecampredon/jsx-typescript),[6] but that’s a whole new toolchain and language (a superset of regular JavaScript).
You probably can use the JSXTransformer, Babel v5, babel-standalone, TypeScript, and Traceur tools with the examples in this book (I use React v15). TypeScript and Traceur should be relatively safe bets, because they’re supported as of the time of this writing. But if you end up using anything other than Babel 6 for the book’s examples, you do so at your own risk. Manning’s tech reviewers and I didn’t test the code in this book to see if it works with these tools!
By using Babel for React, you can get extra ES6/ES2015 features to streamline your development just by adding an extra configuration and a module for ES6. The sixth iteration of the ECMAScript standard has a myriad of improvements, and is mostly available as of this writing in all modern browsers. But, older browsers will have a hard time interpreting the new ES6 code. Also, if you want to use ES7, ES8, or ES27, then some browsers might not have all the features implemented yet.
To solve the lag in ES6 or ES.Next (collective name for the most cutting-edge features) implementation by browsers, Babel comes to the rescue. It offers support for the next generation of JavaScript languages (many languages ... get the hint from the name?). This section covers the recommended approach used in the next few chapters—the Babel CLI—because it involves minimal setup and doesn’t require knowledge of Babel’s API (unlike the API approach).
To use the Babel CLI (http://babeljs.io), you need Node v6.2.0, npm v3.8.9, babel-cli v6.9.0 (www.npmjs.com/package/babel-cli), and babel-preset-react v6.5.0 (www.npmjs.com/package/babel-preset-react). Other versions aren’t guaranteed to work with this book’s code, due to the fast-changing nature of Node and React development.
If you need to install Node and npm, the easiest way to do so is to download the installer (just one for both Node and npm) from the official website: http://nodejs.org. For more options and detailed installation instructions regarding Babel installation, please see appendix A.
If you think you have these tools installed, or you’re not sure, check the versions of Node and npm with these shell/terminal/command prompt commands:
node -v
npm -v
You need to have the Babel CLI and React preset locally. Using the Babel CLI globally (-g, when installing with npm) is discouraged, because you might run into conflict when your projects rely on different versions of the tool. Here’s a short version of the instructions found in appendix A:
- Create a new folder, such as ch03/babel-jsx-test.
- Create a package.json file in the new folder and enter an empty object {} in it, or use npm init to generate the file.
- Define your Babel presets in package.json (used in this book and explained in the next section) or .babelrc (not used in this book).
- Optionally, fill package.json with information such as the project name, license, GitHub repository, and so on.
- Install the Babel CLI and React preset locally, using npm i babel-cli@6.9.0 babel-preset-react@6.5.0 --save-dev to save these dependencies in devDependencies in package.json.
- Optionally, create an npm script with one of the Babel commands described shortly.
In the unfortunate event that you have to support an older browser such as IE9, but you still want to write in ES6+/ES2015+ because that’s the future standard, you can add the babel-preset-es2015 (www.npmjs.com/package/babel-preset-es2015) transpiler. It will convert your ES6 into ES5 code. To do so, install the library:
npm i babel-preset-es2015 --save-dev
Then, add it to the presets configuration next to react:
{
  "presets": ["react", "es2015"]
}
I don’t recommend using this ES2015 transpiler if you don’t have to support older browsers, for several reasons. First, you’ll be running old ES5 code, which is less optimized than ES6 code. Second, you’re adding an additional dependency and more complexity. And third, if most people continue to run ES5 code in their browser, why did we—meaning browser teams and regular JavaScript developers—bother with ES6? You could use TypeScript (www.typescriptlang.org), ClojureScript (http://clojurescript.org), or CoffeeScript (http://coffeescript.org), which give you more bang for your buck!
To repeat what’s written in appendix A, you need a package.json file with at least this preset:
{
  ...
  "babel": {
    "presets": ["react"]
  },
  ...
}
Then, running this command (from your newly created project folder) to check the version should work:
$ ./node_modules/.bin/babel --version
After installation, issue a command to process your js/script.jsx JSX into js/script.js JavaScript:
$ ./node_modules/.bin/babel js/script.jsx -o js/script.js
This command is long because you’re using a path to Babel. You can store this command in a package.json file to use a shorter version: npm run build. Open the file with your editor, and add this line to scripts:
"build": "./node_modules/.bin/babel js/script.jsx -o js/script.js"
You can automate this command with the watch option (-w or --watch):
$ ./node_modules/.bin/babel js/script.jsx -o js/script.js -w
The Babel command watches for any changes in script.jsx and compiles it to script.js when you save the updated JSX. When this happens, the terminal/command prompt will display the following:
change js/script.jsx
As you accumulate more JSX files, use the command with -d (--out-dir) and folder names to compile JSX source files (source) into many regular JS files (build):
$ ./node_modules/.bin/babel source --d build
Often, having a single file to load is better for the performance of a front-end app than loading many files. This is because each request adds a delay. You can compile all the files in the source directory into a single regular JS file with -o (--out-file):
$ ./node_modules/.bin/babel src -o script-compiled.js
Depending on the path configuration on your computer, you may be able to run babel instead of ./node_modules/.bin/babel. In both cases, you’re executing locally. If you have an older babel-cli installed globally, delete it with npm rm -g babel-cli.
If you’re unable to run babel when you install babel-cli locally in your project, then consider adding either one of these path statements into your shell profile: ~/.bash_profile, ~/.bashrc, or ~/.zsh, depending on your shell (bash, zsh, and so on) if you’re on POSIX (Unix, Linux, macOS, and the like).
This shell statement will add a path—so you can launch locally installed npm CLI packages without typing the path—if there’s ./node_modules/.bin in the current folder:
if [ -d "$PWD/node_modules/.bin" ]; then
    PATH="$PWD/node_modules/.bin"
fi
The shell script checks whether there’s a ./node_modules/.bin folder in your terminal bash environment current folder, and then adds that folder to the path to enable npm CLI tools like Babel, Webpack, and so on by name: babel, webpack, and so on.
You can opt to have the path set all the time, not just when there’s a subfolder. This shell statement will always add the path ./node_modules/.bin to your PATH environment variable (also in profile):
export PATH="./node_modules/.bin:$PATH"
Bonus: This setting will also allow you to run any npm CLI tool locally with just its name, not the path and the name.
Tip
For working examples of Babel package.json configurations, open the projects in the ch03 folder in the source code accompanying this book. They follow the same approach used in the chapters that follow. The package.json file in ch03 has npm build scripts for each project (subfolder) that needs compilation, unless the project has its own package.json.
When you run a build script—for example, npm run build-hello-world—it’ll compile the JSX from ch03/PROJECT_NAME/jsx into regular JavaScript and put that compiled file into ch03/PROJECT_NAME/js. Therefore, all you need to do is install the necessary dependencies with npm i (it will create a ch03/node_modules folder), check whether a build script exists in package.json, and then run npm run build-PROJECT_NAME.
Thus far, you’ve learned the easiest way to transpile JSX into regular JS, in my humble opinion. But I want you to be aware of some tricky parts when it comes to React and JSX.
3.4. React and JSX gotchas
This section covers some edge cases. There are a few gotchas to be aware of when you use JSX.
For instance, JSX requires you to have a closing slash (/) either in the closing tag or, if you don’t have any children and use a single tag, in the end of that single tag. For example, this is correct:
<a href="http://azat.co">Azat, the master of callbacks</a>
<button label="Save" className="btn" onClick={this.handleSave}/>
This is not correct, because the slashes are missing:
<a href="http://azat.co">Azat<a>
<button label="Save" className="btn" onClick={this.handleSave}>
Conversely, HTML is more fault tolerant. Most browsers will ignore the missing slash and render the element just fine without it. Go ahead: try <button>Press me for yourself!
There are other differences between HTML and JSX, as well.
3.4.1. Special characters
HTML entities are codes that display special characters such as copyright symbols, em dashes, quotation marks, and so on. Here are some examples:
©
—
“
You can render those codes as any string in <span> or in the string attribute <input>. For example, this is static JSX (text defined in code without variables or properties):
<span>©—“</span> <input value="©—“"/>
But if you want to dynamically output HTML entities (from a variable or a property) with <span>, all you’ll get is the direct output (©—“), not the special characters. Thus, the following code won’t work:
// Anti-pattern. Will NOT work!
var specialChars = '©—“'

<span>{specialChars}</span>
<input value={specialChars}/>
React/JSX will auto-escape the dangerous HTML, which is convenient in terms of security (security by default rocks!). To output special characters, you need to use one of these approaches:
- Break them into multiple strings by outputting an array; for example, <span>{[<span>©—“</span>]}</span>. You can also set key, as in key="specialChars", to suppress a warning about the missing key.
- Copy the special character directly into your source code (make sure you use a UTF-8 character set).
- Escape the special character with \u, and use a unicode number (search www.fileformat.info/info/unicode/char/search.htm, if you don’t remember it; who does?).
- Convert from a character code to a character number with String.fromCharCode(charCodeNumber).
- Use the internal method __html to dangerously set inner HTML (http://mng.bz/TplO; not recommended).
To illustrate the last approach (as a last resort—when all else fails on the Titanic, run for the boats!), look at this code:
var specialChars = {__html: '©—“'}

<span dangerouslySetInnerHTML={specialChars}/>
Obviously, the React team has a sense of humor, to name a property dangerouslySetInnerHTML. Sometimes React naming makes me laugh to myself!
3.4.2. data-attributes
Section 2.3 covered properties in a non-JSX way, but let’s look at how to create custom attributes in HTML one more time (this time with JSX). Chiefly, React will blissfully ignore any nonstandard HTML attributes that you add to components. It doesn’t matter whether you use JSX or native JavaScript—that’s React’s behavior.
But sometimes, you want to pass additional data using DOM nodes. This is an antipattern because your DOM shouldn’t be used as a database or local storage. If you still want to create custom attributes and get them rendered, use the data- prefix.
For example, this is a valid custom data-object-id attribute that React will render in the view (HTML will be the same as this JSX):
<li data-object-id="097F4E4F">...</li>
If the input is the following React/JSX element, React won’t render object-id, because it’s not a standard HTML attribute (HTML will miss object-id, unlike this JSX):
<li object-id="097F4E4F">...</li>
3.4.3. style attribute
The style attribute in JSX works differently than in plain HTML. With JSX, instead of a string, you need to pass a JavaScript object, and CSS properties need to be in camelCase. For example:
- background-image becomes backgroundImage.
- font-size becomes fontSize.
- font-family becomes fontFamily.
You can save the JavaScript object in a variable or render it inline with double curly braces ({{...}}). The double braces are needed because one set is for JSX and the other is for the JavaScript object literal.
Suppose you have an object with this font size:
let smallFontSize = {fontSize: '10pt'}
In your JSX, you can use the smallFontSize object:
<input style={smallFontSize} />
Or you can settle for a larger font (30 point) by passing the values directly without an extra variable:
<input style={{fontSize: '30pt'}} />
Let’s look at another example of passing styles directly. This time, you’re setting a red border on <span>:
<span style={{borderColor: 'red',
  borderWidth: 1,
  borderStyle: 'solid'}}>Hey</span>
Alternatively, the following border value will also work:
<span style={{border: '1px red solid'}}>Hey</span>
The main reason classes are not opaque strings but JavaScript objects is so React can work with them more quickly when it applies changes to views.
3.4.4. class and for
React and JSX accept any attribute that’s a standard HTML attribute, except class and for. Those names are reserved words in JavaScript/ECMAScript, and JSX is converted into regular JavaScript. Use className and htmlFor instead. For example, if you have a class hidden, you can define it in a <div> this way:
<div className="hidden">...</div>
If you need to create a label for a form element, use htmlFor:
<div>
    <input type="radio" name={this.props.name} id={this.props.id}>
    </input>
    <label htmlFor={this.props.id}>
      {this.props.label}
    </label>
</div>
3.4.5. Boolean attribute values
Last but not least, some attributes (such as disabled, required, checked, autofocus, and readOnly) are specific only to form elements. The most important thing to remember here is that the attribute value must be set in the JavaScript expression (that is, inside {}) and not set in strings.
For example, use {false} to enable the input:
<input disabled={false} />
But don’t use a "false" value, because it’ll pass the truthy check (a non-empty string is truthy in JavaScript—see the sidebar) and render the input as disabled (disabled will be true):
<input disabled="false" />
In JavaScript/Node, a truthy value translates to true when evaluated as a Boolean; for example, in an if statement. The value is truthy if it’s not falsy. (That’s the official definition. Brilliant, right?) And there are only six falsy values:
- false
- 0
- "" (empty string)
- null
- Undefined
- NaN (not a number)
I hope you can see that the string "false" is a non-empty string, which is truthy and translates to true. Hence, you’ll get disabled=true in HTML.
If you omit the value, React will assume the value is true:
<input disabled />
The subsequent chapters use JSX exclusively. But knowing the underlying regular JavaScript that will be run by browsers is a great skill to have in your toolbox.
3.5. Quiz
To output a JavaScript variable in JSX, which of the following do you use? =, <%= %>, {}, or <?= ?>
The class attribute isn’t allowed in JSX. True or false?
The default value for an attribute without a value is false. True or false?
The inline style attribute in JSX is a JavaScript object and not a string like other attributes. True or false?
If you need to have if/else logic in JSX, you can use it inside {}. For example, class={if (!this.props.admin) return 'hide'} is valid JSX code. True or false?
3.6. Summary
- JSX is just syntactic sugar for React methods like createElement.
- You should use className and htmlFor instead of the standard HTML class and for attributes.
- The style attribute takes a JavaScript object, not a string like normal HTML.
- Ternary operators and IIFE are the best ways to implement if/else statements.
- Outputting variables, comments, and HTML entities, and compiling JSX code into native JavaScript are easy.
- There are a few choices to turn JSX into regular JavaScript; compiling with the Babel CLI requires minimal setup compared to configuring build processing with a tool like Gulp or Webpack or writing Node/JavaScript scripts to use the Babel API.
3.7. Quiz answers
You use {} for variables and expressions.
True. class is a reserved or special JavaScript statement. For this reason, you use className in JSX.
False. It’s recommended that you use attribute_name={false/true} to set the Boolean values explicitly.
True. style is an object for performance reasons.
False. First, class isn’t a proper attribute. Then, instead of if return (not valid), you should use a ternary operator.