Table of Contents for
React Quickly: Painless web apps with React, JSX, Redux, and GraphQL
 React Quickly: Painless web apps with React, JSX, Redux, and GraphQL
Published by
Manning Publications, 2017
React Quickly: Painless web apps with React, JSX, Redux, and GraphQL
Published by
Manning Publications, 2017
- Cover
- React Quickly: Painless web apps with React, JSX, Redux, and GraphQL
- Copyright
- React Quickly: Painless web apps with React, JSX, Redux, and GraphQL
- Brief Table of Contents
- Table of Contents
- Praise for React Quickly
- Foreword
- Preface
- Acknowledgments
- About This Book
- About the Author
- About the Cover
- Part 1. React foundation
- Chapter 1. Meeting React
- Chapter 2. Baby steps with React
- Chapter 3. Introduction to JSX
- Chapter 4. Making React interactive with states
- Chapter 5. React component lifecycle events
- Chapter 6. Handling events in React
- Chapter 7. Working with forms in React
- Chapter 8. Scaling React components
- Chapter 9. Project: Menu component
- Chapter 10. Project: Tooltip component
- Chapter 11. Project: Timer component
- Part 2. React architecture
- Chapter 12. The Webpack build tool
- Chapter 13. React routing
- Chapter 14. Working with data using Redux
- Chapter 15. Working with data using GraphQL
- Chapter 16. Unit testing React with Jest
- Chapter 17. React on Node and Universal JavaScript
- Chapter 18. Project: Building a bookstore with React Router
- Chapter 19. Project: Checking passwords with Jest
- Chapter 20. Project: Implementing autocomplete with Jest, Express, and MongoDB
- Appendix A. Installing applications used in this book
- Appendix B. React cheatsheet
- Appendix C. Express.js cheatsheet
- Appendix D. MongoDB and Mongoose cheatsheet
- Appendix E. ES6 for success
- React Cheatsheet
- Index
- List of Figures
- List of Tables
- List of Listings
Chapter 6. Handling events in React
This chapter covers
- Working with DOM events in React
- Responding to DOM events that aren’t supported by React
- Integrating React with other libraries: jQuery UI events
So far, you’ve learned how to render UIs that have zero user interaction. In other words, you’re just displaying data. For example, you’ve built a clock that doesn’t accept user inputs, such as setting the time zone.
Most of the time, you don’t have static UIs; you need to build elements that are smart enough to respond to user actions. How do you respond to user actions such as clicking and dragging a mouse?
This chapter provides the solution to how to handle events in React. Then, in chapter 7, you’ll apply this knowledge of events to working with web forms and their elements. I’ve mentioned that React supports only certain events; in this chapter, I’ll show you how to work with events that aren’t supported by React.
Note
The source code for the examples in this chapter is at https://www.manning.com/books/react-quickly and https://github.com/azat-co/react-quickly/tree/master/ch06 (in the ch06 folder of the GitHub repository https://github.com/azat-co/react-quickly). You can also find some demos at http://reactquickly.co/demos.
6.1. Working with DOM events in React
Let’s look how you can make React elements respond to user actions by defining event handlers for those actions. You do this by defining the event handler (function definition) as the value of an element attribute in JSX and as an element property in plain JavaScript (when createElement() is called directly without JSX). For attributes that are event names, you use standard W3C DOM event names in camelCase, such as onClick or onMouseOver, as in
onClick={function() {...}}
or
onClick={() => {...}}
For example, in React, you can define an event listener that’s triggered when a user clicks a button. In the event listener, you’re logging the this context. The event object is an enhanced version of a native DOM event object (called SyntheticEvent):
<button onClick={(function(event) {
    console.log(this, event)
  }).bind(this)}>
  Save
</button>
bind() is needed so that in the event-handler function, you get a reference to the instance of the class (React element). If you don’t bind, this will be null (use strict mode). You don’t bind the context to the class using bind(this) in the following cases:
- When you don’t need to refer to this class by using this
- When you’re using the older style, React.createClass(), instead of the newer ES6+ class style, because createClass() autobinds it for you
- When you’re using fat arrows (()⇒{})
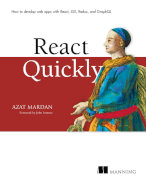
You can also make things neater by using a class method as event handler (let’s name it handleSave()) for the onClick event. Consider a SaveButton component that, when clicked, prints the value of this and event, but uses a class method as shown in figure 6.1 and the following listing (ch06/button/jsx/button.jsx).
Listing 6.1. Declaring an event handler as a class method
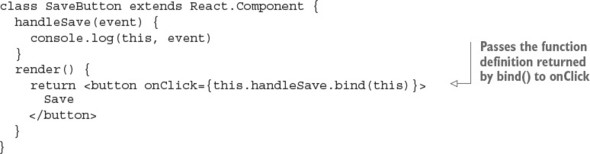
This is how the save button will log the output of this and event.
Figure 6.1. Clicking the button prints the value of this: SaveButton.
Moreover, you can bind an event handler to the class in the class’s constructor. Functionally, there’s no difference; but if you’re using the same method more than once in render(), then you can reduce duplication by using the constructor binding. Here’s the same button, but with constructor binding for the event handler:

Binding event handlers is my favorite and recommended approach, because it eliminates duplication and puts all the binding neatly in one place.
Table 6.1 lists the current event types supported by React v15. Notice the use of camelCase in the event names, to be consistent with other attribute names in React.
Table 6.1. DOM events supported by React v15
As you can see, React supports several types of normalized events. If you contrast this with the list of standard events at https://developer.mozilla.org/en-US/docs/Web/Events, you’ll see that React’s support is extensive—and you can be sure that team React will add more events in the future! For more information and event names, visit the documentation page at http://facebook.github.io/react/docs/events.html.
6.1.1. Capture and bubbling phases
As I’ve noted, React is declarative, not imperative, which removes the need to manipulate objects; and you don’t attach events to your code as you would with jQuery (for example, $('.btn').click(handleSave)). Instead, you declare an event in the JSX as an attribute (for instance, onClick={handleSave}). If you’re declaring mouse events, the attribute name can be any of the supported events from table 6.1. The value of the attribute is your event handler.
For example, if you want to define a mouse-hover event, you can use onMouseOver, as shown in the following code. Hovering will display “mouse is over” in your DevTools or Firebug console when you move your cursor over the <div>’s red border:
<div
  style={{border: '1px solid red'}}
  onMouseOver={()=>{console.log('mouse is over')}} >
    Open DevTools and move your mouse cursor over here
</div>
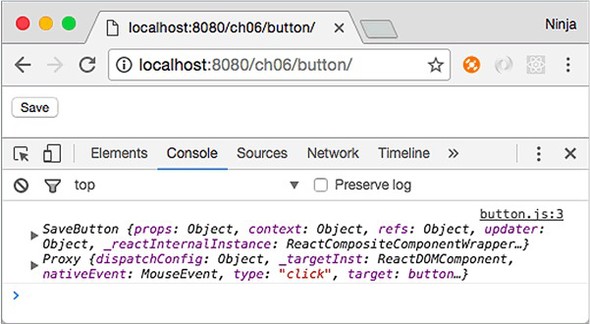
The events shown previously, such as onMouseOver, are triggered by an event in the bubbling phase (bubble up). As you know, there’s also a capture phase (trickle down), which precedes the bubbling and target phases. First is the capture phase, from the window down to the target element; next is the target phase; and only then comes the bubbling phase, when an event travels up the tree back to the window, as shown in figure 6.2.
Figure 6.2. Capture, target, and bubbling phases
The distinction between phases becomes important when you have the same event on an element and its ancestor(s). In bubbling mode, the event is first captured and handled by the innermost element (target) and then propagated to outer elements (ancestors, starting with the target’s parent). In capture mode, the event is first captured by the outermost element and then propagated to the inner elements.
To register an event listener for the capture phase, append Capture to an event name. For example, instead of using onMouseOver, you use onMouseOverCapture to handle the mouseover event in the capture phase. This applies to all the event names listed in table 6.1.
To illustrate, suppose you have a <div> with a regular (bubbling) event and a capture event. Those events are defined with onMouseOver and onMouseOverCapture, respectively (ch06/mouse-capture/jsx/mouse.jsx).
Listing 6.2. Capture event following by bubbling event
class Mouse extends React.Component {
  render() {
    return <div>
      <div
        style={{border: '1px solid red'}}
        onMouseOverCapture={((event)=>{
          console.log('mouse over on capture event')
          console.dir(event, this)}).bind(this)}
        onMouseOver={((event)=>{
          console.log('mouse over on bubbling event')
          console.dir(event, this)}).bind(this)} >
          Open DevTools and move your mouse cursor over here
        </div>
    </div>
  }
}
The container has a red border 1 pixel wide; it contains some text, as shown in figure 6.3, so you know where to hover the cursor. Each mouseover event will log what type of event it is as well as the event object (hidden under Proxy in DevTools in figure 6.3 due to the use of console.dir()).
Figure 6.3. The capture event happens before the regular event.
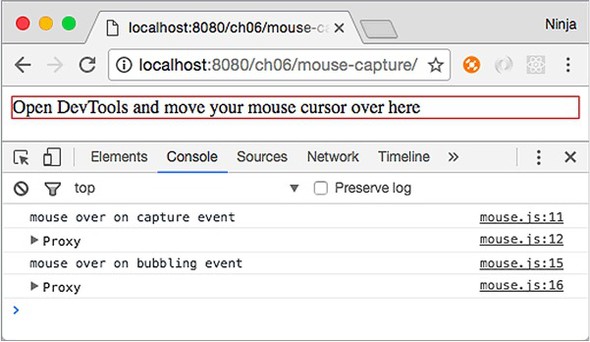
Not surprisingly, the capture event is logged first. You can use this behavior to stop propagation and set priorities between events.
It’s important to understand how React implements events, because events are the cornerstone of UIs. Chapter 7 dives deeper into React events.
6.1.2. React events under the hood
Events work differently in React than in jQuery or plain JavaScript, which typically put the event listener directly on the DOM node. When you put events directly on nodes, there may be problems removing and adding events during the UI lifecycle. For example, suppose you have a list of accounts, and each can be removed or edited, or new accounts can be added to the list. The HTML might look something like this, with each account element <li> uniquely identified by ID:
<ul id="account-list">
    <li id="account-1">Account #1</li>
    <li id="account-2">Account #2</li>
    <li id="account-3">Account #3</li>
    <li id="account-4">Account #4</li>
    <li id="account-5">Account #5</li>
    <li id="account-6">Account #6</li>
</ul>
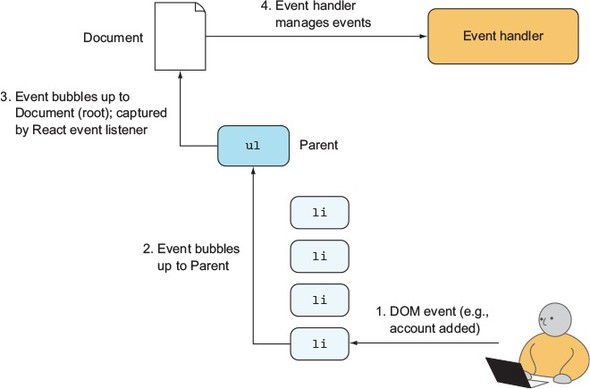
If accounts are removed from or added to the list frequently, then managing events will become difficult. A better approach is to have one event listener on a parent (account-list) and to listen for bubbled-up events (an event bubbles higher up the DOM tree if nothing catches it on a lower level). Internally, React keeps track of events attached to higher elements and target elements in a mapping. This allows React to trace the target from the parent (document), as shown in figure 6.4.
Figure 6.4. A DOM event (1) bubbling to its ancestors (2-3), where it’s captured by a regular (bubblingstage) React event listener (4), because in React, events are captured at the root (Document)
Let’s see how this event delegation to the parent looks in action in the example Mouse component from listing 6.2. There’s a <div> element with the mouseover React event. You want to inspect the events on this element.
If you open Chrome DevTools or Firefox Tools and select the data-reactroot element in the Elements or Inspector tab (or use Inspect in the Chrome context menu or Inspect Element in the Firefox context menu), then you can refer to the <div> in the console (another tab in DevTools/Firebug) by typing $0 and pressing Enter. This is a nice little trick.
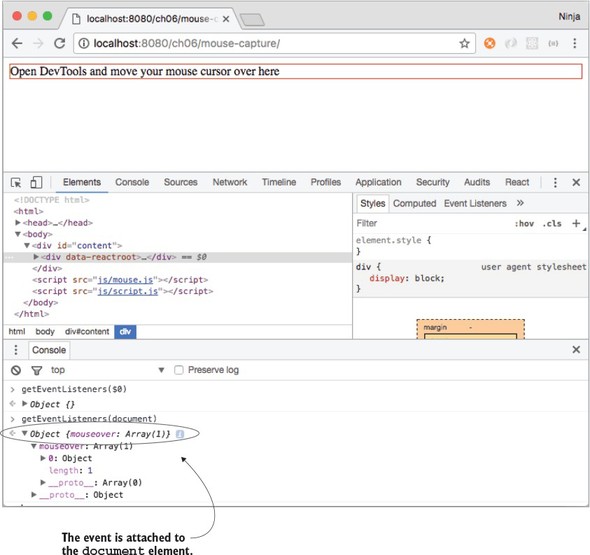
Interestingly, this DOM node <div> doesn’t have any event listeners. $0 is the <div> and a reactroot element; see figure 6.5. Therefore, you can check what events are attached to this particular element (DOM node) by using the global getEventListeners() method in the DevTools console:
getEventListeners($0)
Figure 6.5. Inspecting events on the <div> element (there are none)

The result is an empty object {}. React didn’t attach event listeners to the reactroot node <div>. Hovering the mouse on the element logs the statements—you can clearly see that the event is being captured! Where did it go?
Feel free to repeat the procedure with <div id="content"> or perhaps with the red-bordered <div> element (child of reactroot). For each currently selected element on the Elements tab, $0 will be the selected element, so select a new element and repeat getEventListeners($0). Still nothing?
Okay. Let’s examine the events on document by calling this code from the console:
getEventListeners(document)
Boom! You have your event: Object {mouseover: Array[1]}, as shown in figure 6.6. Now you know that React attached the event listener to the ultimate parent, the granddaddy of them all—the document element. The event was not attached to an individual node like <div> or an element with the data-reactroot attribute.
Figure 6.6. Inspecting events on the document element (there is one)
Next, you can remove this event by invoking the following line in the console:
getEventListeners(document).mouseover[0].remove()
Now the message “mouse is over” won’t appear when you move the cursor. The event listener that was attached to document is gone, illustrating that React attaches events to document, not to each element. This allows React to be faster, especially when working with lists. This is contrary to how jQuery works: with that library, events are attached to individual elements. Kudos to React for thinking about performance.
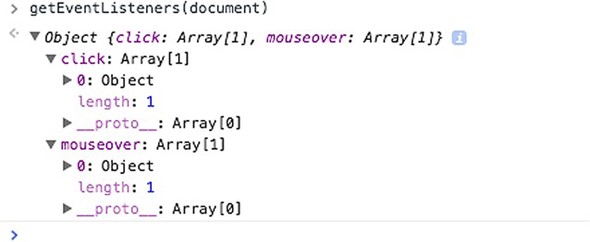
If you have other elements with the same type of event—for example, two mouse-overs—then they’re attached to one event and handled by React’s internal mapping to the correct child (target element), as shown in figure 6.7. And speaking of target elements, you can get information about the target node (where the event originated) from the event object.
Figure 6.7. React reuses event listeners on the root, so you see only one of each type even when you have one or more elements with mouseover.
6.1.3. Working with the React SyntheticEvent event object
Browsers can differ in their implementations of the W3C specification (see www.w3.org/TR/DOM-Level-3-Events). When you’re working with DOM events, the event object passed to the event handler may have different properties and methods. This can lead to cross-browser issues when you’re writing event-handling code. For example, to get the target element in IE version 8, you’d need to access event.srcElement, whereas in Chrome, Safari, and Firefox, you’d use event.target:
var target = event.target || event.srcElement
console.log(target.value)
Of course, things are better in terms of cross-browser issues in 2016 than in 2006. But still, do you want to spend time reading specs and debugging issues due to obscure discrepancies between browser implementations? I don’t.
Cross-browser issues aren’t good because users should have the same experience on different browsers. Typically, you need to add extra code, such as if/else statements, to account for the difference in browser APIs. You also have to perform more testing in different browsers. In short, working around and fixing cross-browser issues is worse on the annoyance scale than CSS issues, IE8 issues, or scrupulous designers in hipster glasses.
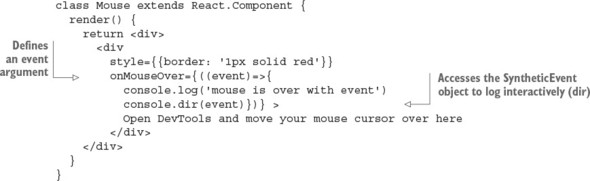
React has a solution: a wrapper around browsers’ native events. This makes events consistent with the W3C specification regardless of the browser on which you run your pages. Under the hood, React uses its own special class for synthetic events (Synthetic-Event). Instances of this SyntheticEvent class are passed to the event handler. For example, to get access to a synthetic event object, you can add an argument event to the event-handler function, as shown in the following listing (ch06/mouse/jsx/mouse.jsx). This way, the event object is output in the console, as shown in figure 6.8.
Figure 6.8. Hovering the mouse over the box prints the event object in the DevTools console.
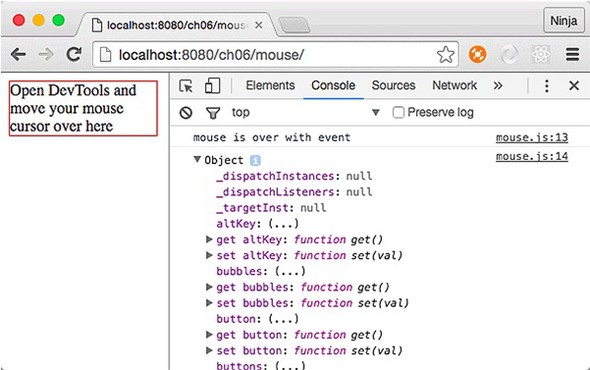
Listing 6.3. Event handler receiving a synthetic event
As you’ve seen before, you can move the event-handler code into a component method or a standalone function. For example, you can create a handleMouseOver() method using ES6+/ES2015+ class method syntax and refer to it from the return of render() with {this.handleMouseOver.bind(this)}. The bind() is needed to transfer the proper value of this into the function. When you use fat-arrow syntax as you did in the previous example, this happens automatically. It also happens automatically with createClass() syntax. Not with class, though. Of course, if you don’t use this in the method, you don’t have to bind it; just use onMouseOver={this.handleMouseOver}.
The name handleMouseOver() is arbitrary (unlike the names of lifecycle events, covered in chapter 5) and doesn’t have to follow any convention as long as you and your team understand it. Most of the time in React, you prefix an event handler with handle to distinguish it from a regular class method, and you include either an event name (such as mouseOver) or the name of the operation (such as save).
Listing 6.4. Event handler as a class method; binding in render()
class Mouse extends React.Component {
  handleMouseOver(event) {
    console.log('mouse is over with event')
    console.dir(event.target)
  }
  render(){
    return <div>
      <div
        style={{border: '1px solid red'}}
        onMouseOver={this.handleMouseOver.bind(this)} >
          Open DevTools and move your mouse cursor over here
        </div>
    </div>
  }
}
The event has the same properties and methods as most native browser events, such as stopPropagation(), preventDefault(), target, and currentTarget. If you can’t find a native property or method, you can access a native browser event with nativeEvent:
event.nativeEvent
Following is a list of some of the attributes and methods of React’s v15.x Synthetic-Event interface:
- currentTarget—DOMEventTarget of the element that’s capturing the event (can be a target or the parent of a target)
- target—DOMEventTarget, the element where the event was triggered
- nativeEvent—DOMEvent, the native browser event object
- preventDefault()—Prevents the default behavior, such as a link or a form-submit button
- isDefaultPrevented()—A Boolean that’s true if the default behavior was prevented
- stopPropagation()—Stops propagation of the event
- isPropagationStopped()—A Boolean that’s true if propagation was stopped
- type—A string tag name
- persist()—Removes the synthetic event from the pool and allows references to the event to be retained by user code
- isPersistent—A Boolean that’s true if SyntheticEvent was taken out of the pool
The aforementioned target property of the event object has the DOM node of the object on which the event happened, not where it was captured, as with currentTarget (https://developer.mozilla.org/en-US/docs/Web/API/Event/target). Most often, when you build UIs, in addition to capturing, you need to get the text of an input field. You can get it from event.target.value.
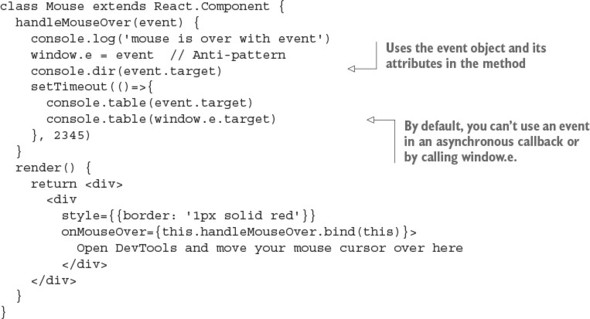
The synthetic event is nullified (meaning it becomes unavailable) once the event handler is done. So you can use the same event reference in a variable to access it later or to access it asynchronously (in the future) in a callback function. For example, you can save the reference of the event object in a global e as follows (ch06/mouse-event/jsx/mouse.jsx).
Listing 6.5. Nullifying a synthetic event
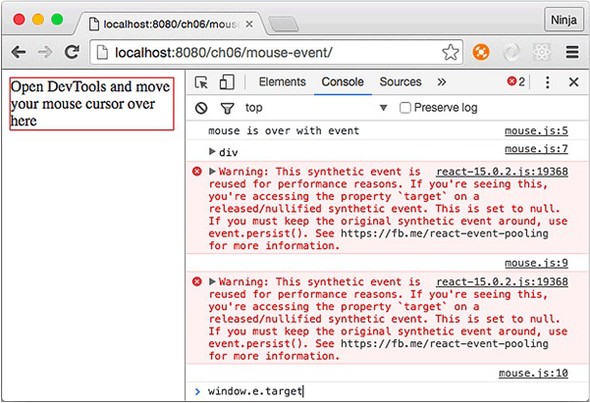
You’ll get a warning saying that React is reusing the synthetic event for performance reasons (see figure 6.9):
This synthetic event is reused for performance reasons. If you're seeing this,you're accessing the property `target` on a released/nullified synthetic
Figure 6.9. Saving a synthetic event object for later use isn’t possible by default—hence, the warning.
If you need to keep the synthetic event after the event handler is over, use the event.persist() method. When you apply it, the event object won’t be reused and nullified.
You’ve seen that React will even synthesize (or normalize) a browser event for you, meaning that React will create a cross-browser wrapper around the native event objects. The benefit of this is that events work identically in virtually all browsers. And in most cases, you have all the native methods on the React event, including event.stopPropagation() and event.preventDefault(). But if you still need to access a native event, it’s in the event.nativeEvent property of the synthetic event object. Obviously, if you work with native events directly, you’ll need to know about and work with any cross-browser differences you encounter.
6.1.4. Using events and state
Using states with events, or, to put it differently, being able to change a component’s state in response to an event, will give you interactive UIs that respond to user actions. This is going to be fun, because you’ll be able to capture any events and change views based on these events and your app logic. This will make your components self-contained, because they won’t need any external code or representation.
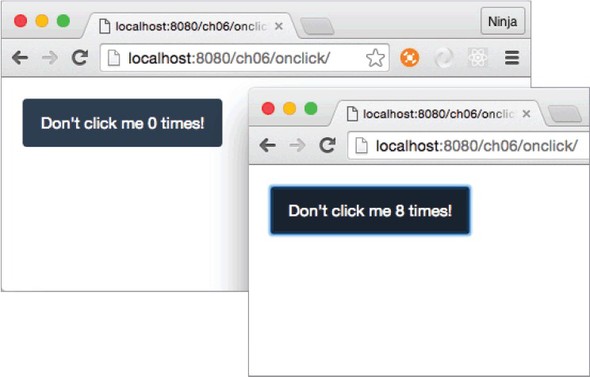
For example, let’s implement a button with a label that has a counter starting at 0, as shown in figure 6.10. Each click of the button increments the number shown on a button (1, 2, 3, and so on).
Figure 6.10. Clicking the button increments the counter, which has an initial value of 0.
You start by implementing the following:
- constructor()—this.state equals 1 because you must set the counter to 0 before you can use it in the view.
- handleClick()—Event handler that increments the counter.
- render()—Render method that returns the button JSX.
The click() method is not unlike any other React component method. Remember getUrl() in chapter 3 and handleMouseOver() earlier in this chapter? This component method is declared similarly, except that you have to manually bind the this context. The handleClick() method sets the counter state to the current value of counter, incremented by 1 (ch06/onclick/jsx/content.jsx).
Listing 6.6. Updating state as a result of a click action
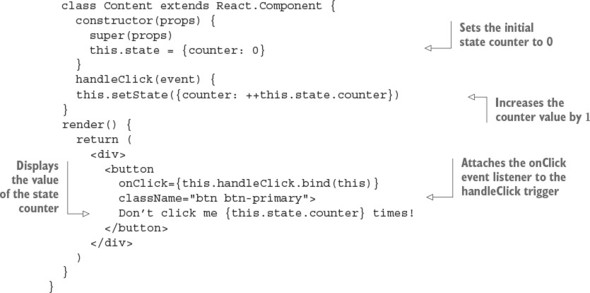
Just a reminder: did you notice that although this.handleClick() is a method in listing 6.6, you don’t invoke it in JSX when you assign it to onClick (that is, <button onClick={this.handleClick})? In other words, there are no parentheses (()) after this.handleClick() inside the curly braces. That’s because you need to pass a function definition, not invoke it. Functions are first-class citizens in JavaScript, and in this case, you pass the function definition as a value to the onClick attribute.
On the other hand, bind() is invoked because it lets you use the proper value of this, but bind() returns a function definition. So you still get the function definition as the value of onClick.
Keep in mind, as noted previously, onClick isn’t a real HTML attribute, but syntactically it looks just like any other JSX declaration (for example, className={btnClassName} or href={this.props.url}).
When you click the button, you’ll see the counter increment with each click. Figure 6.10 shows that I clicked the button eight times: the counter is now at 8 but initially was at 0. Brilliant, isn’t it?
Analogous to onClick or onMouseOver, you can use any DOM events supported by React. In essence, you define the view and an event handler that changes the state. You don’t imperatively modify the representation. This is the power of declarative style!
The next section will teach you how to pass event handlers and other objects to children elements.
6.1.5. Passing event handlers as properties
Consider this scenario: you have a button that’s a stateless component. All it has is styling. How do you attach an event listener so this button can trigger some code?
Let’s go back to properties for a moment. Properties are immutable, which means they don’t change. They’re passed by parent components to their children. Because functions are first-class citizens in JavaScript, you can have a property in a child element that’s a function and use it as an event handler.
The solution to the problem outlined earlier—triggering an event from a stateless component—is to pass the event handler as a property to this stateless component and use the property (event-handler function) in the stateless component (invoke the function). For example, let’s break down the functionality of the previous example into two components: ClickCounterButton and Content. The first will be dumb (stateless) and the second smart (stateful).
Dumb and smart components are sometimes called presentational and container components, respectively. This dichotomy is related to statelessness and statefulness but isn’t always exactly the same.
Most of the time, presentational components don’t have states and can be stateless or function components. That’s not always the case, because you may need to have some state that relates to the presentation.
Presentational/dumb components often use this.props.children and render DOM elements. On the other hand, container/smart components describe how things work without DOM elements, have states, typically use higher-order component patterns, and connect to data sources.
Using a combination of dumb and smart components is the best practice. Doing so keeps things clean and allows for better separation of concerns.
When you run the code, the counter increases with each click. Visually, nothing has changed from the previous example with the button and the counter (figure 6.10); but internally, there’s an extra component ClickCounterButton (stateless and pretty much logic-less) in addition to Content, which still has all the logic.
ClickCounterButton doesn’t have its own onClick event handler (that is, it has no this.handler or this.handleClick). It uses the handler passed down to it by its parent in a this.props.handler property. Generally, using this approach is beneficial for handling events in a button, because the button is a stateless presentational/dumb component. You can reuse this button in other UIs.
The following listing shows the code for the presentational component that renders the button (ch06/onclick-props/jsx/click-counter-button.jsx); the Content parent that renders this element is shown shortly, in listing 6.8.
Listing 6.7. Stateless button component
class ClickCounterButton extends React.Component {
  render() {
    return <button
      onClick={this.props.handler}
      className="btn btn-danger">
      Increase Volume (Current volume is {this.props.counter})
    </button>
  }
}
The ClickCounterButton component, shown in figure 6.11, is dumber than Dumb & Dumber,[1] but that’s what’s good about this architecture. The component is simple and easy to grasp.
Figure 6.11. Passing an event handler as a property to a button (presentational component) enables the incrementing of the counter in the button label, which is also a property of a button.

The ClickCounterButton component also uses the counter property, which is rendered with {this.props.counter}. Supplying properties to children like ClickCounterButton is straightforward if you remember the examples from chapter 2. You use the standard attribute syntax: name=VALUE.
For example, to provide counter and handler properties to the ClickCounterButton component, specify the attributes in the JSX declaration of the parent’s render parameter (the parent here is Content):
<div>
  <ClickCounterButton
    counter={this.state.counter}
    handler={this.handleClick}/>
</div>
counter in ClickCounterButton is a property and thus immutable; but in the Content parent, it’s a state and thus mutable. (For a refresher on properties versus state, see chapter 4.) Obviously, the names can differ. You don’t have to keep the names the same when you pass properties to children. But I find that keeping the same name helps me understand that the data is related between different components.
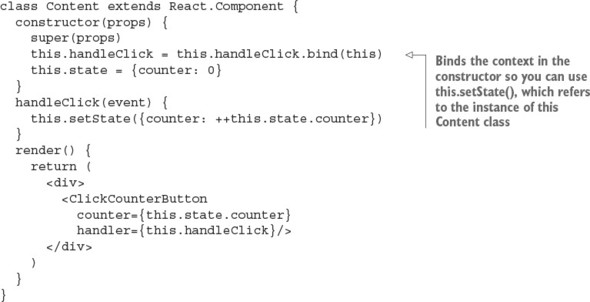
What’s happening? The initial counter (the state) is set to 0 in the Content parent. The event handler is defined in the parent as well. Therefore, the child (Click-CounterButton) triggers the event on a parent. The code for the Content parent com ponent with constructor() and handleClick() is shown next (ch06/onclick-props/jsx/content.jsx).
Listing 6.8. Passing an event handler as a property
As I said earlier, in JavaScript, functions are first-class citizens, and you can pass them as variables or properties. Thus, there should be no big surprises here. Now the question arises, where do you put logic such as event handlers—in a child or parent?
6.1.6. Exchanging data between components
In the previous example, the click event handler was in the parent element. You can put the event handler in the child, but using the parent allows you to exchange information among child components.
Let’s use a button as an example but this time remove the counter value from render() (1, 2, 3, and so on). The components are single-minded, granular pieces of representation (remember?), so the counter will be in another component: Counter. Thus, you’ll have three components in total: ClickCounterButton, Content, and Counter.
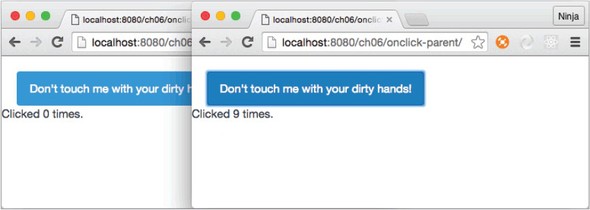
As you can see in figure 6.12, there are now two components: the button and the text below it. Each has properties that are states in the Content parent. In contrast to the previous example (figure 6.11), here you need to communicate between the button and the text to count clicks. In other words, ClickCounterButton and Counter need to talk to each other. They’ll do it via Content, not directly (communicating directly would be a bad pattern because it would create tight coupling).
Figure 6.12. Splitting state and working with two stateless child components (by allowing them to exchange data via a parent): one for the counter (text) and another for the button
ClickCounterButton remains stateless as in the previous example, just like most React components should be: no thrills, just properties and JSX.
Listing 6.9. Button component using an event handler from Content
class ClickCounterButton extends React.Component {
  render() {
    return <button
      onClick={this.props.handler}
      className="btn btn-info">
      Don't touch me with your dirty hands!
    </button>
  }
}
Of course, you can also write ClickCounterButton as a function instead of a class to simplify the syntax a little:
const ClickCounterButton = (props) => {
  return <button
    onClick={props.handler}
    className="btn btn-info">
    Don't touch me with your dirty hands!
  </button>
}
The following new component, Counter, displays the value property that’s the counter (names can be different—you don’t have to always use counter):
class Counter extends React.Component {
  render() {
    return <span>Clicked {this.props.value} times.</span>
  }
}
Finally, we get to the parent component that provides the properties: one is the event handler, and the other is a counter. You need to update the render parameter accordingly, but the rest of the code remains intact (ch06/onclick-parent/jsx/content.jsx).
Listing 6.10. Passing an event handler and state to two components
class Content extends React.Component {
  constructor(props) {
    super(props)
    this.handleClick = this.handleClick.bind(this)
    this.state = {counter: 0}
  }
  handleClick(event) {
    this.setState({counter: ++this.state.counter})
  }
  render() {
    return (
      <div>
        <ClickCounterButton handler={this.handleClick}/>
        <br/>
        <Counter value={this.state.counter}/>
      </div>
    )
  }
}
To answer the initial question of where to put the event-handling logic, the rule of thumb is to put it in the parent or wrapper component if you need interaction between child components. If the event concerns only the child components, there’s no need to pollute the components higher up the parent chain with event-handling methods.
6.2. Responding to DOM events not supported by React
Table 6.1 listed events supported by React. You may wonder about DOM events not supported by React. For example, suppose you’re tasked with creating a scalable UI that needs to become bigger or smaller depending on a window size (resize) event. But this event isn’t supported! There’s a way to capture resize and any other event, and you already know the React feature to implement it: lifecycle events.
In this example, you’ll implement radio buttons. As you may know, standard HTML radio button elements scale (become larger or smaller) badly and inconsistently across browsers. For this reason, back when I worked at DocuSign, I implemented scalable CSS radio buttons (http://mng.bz/kPMu) to replace standard HTML radio inputs. I did that in jQuery. These CSS buttons can be scaled via jQuery by manipulating their CSS. Let’s see how to create a scalable radio button UI in React. You’ll make the same CSS buttons scale with React when you resize the screen, as shown in figure 6.13.
Figure 6.13. Scalable CSS radio buttons managed by React, which is listening to a window resize event. As the window size changes, so does the size of the radio buttons.

As I said earlier, the resize event isn’t supported by React—adding it to the element as shown here won’t work:
...
  render() {
    return <div>
      <div onResize={this.handleResize}
        className="radio-tagger"
        style={this.state.taggerStyle}>
    ...
There’s a simple way to attach unsupported events like resize and most custom elements you need to support: using React component lifecycle events. Listing 6.11 (ch06/radio/jsx/radio.jsx) adds resize event listeners to window in componentDidMount() and then removes the same event listeners in componentWillUnmount() to make sure nothing is left after this component is gone from the DOM. Leaving event listeners hanging after their components are removed is a great way to introduce memory leaks that might crash your app at some point. Believe me, memory leaks can be a source of sleepless, red-eyed, Red Bull–fueled nights spent debugging and cursing.
Listing 6.11. Using lifecycle events to listen to DOM events
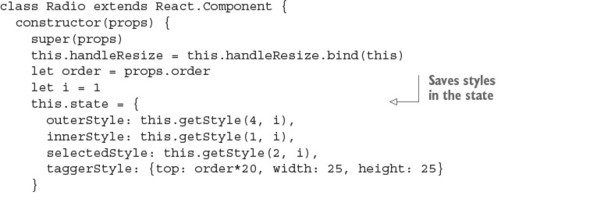
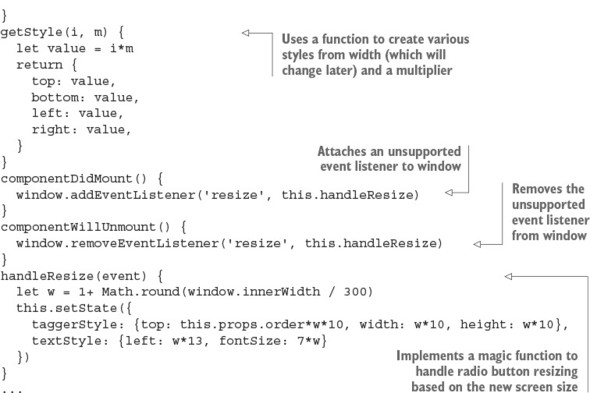
The helper function getStyle() abstracts some of the styling because there’s repetition in the CSS, such as top, bottom, left, and right, but with different values that depend on the width of the window. Hence, getStyle() takes the value and the multiplier m and returns pixels. (Numbers in React’s CSS become pixels.)
The rest of the code is easy. All you need to do is implement the render() method, which uses the states and properties to render four <div/> elements. Each one has a special style, defined earlier in constructor().
Listing 6.12. Using state values for styles to resize elements
...
  render() {
    return <div>
      <div className="radio-tagger" style={this.state.taggerStyle}>
        <input type="radio" name={this.props.name} id={this.props.id}>
        </input>
        <label htmlFor={this.props.id}>
          <div className="radio-text" style={this.state.textStyle}>
           {this.props.label}</div>
          <div className="radio-outer" style={this.state.outerStyle}>
            <div className="radio-inner" style={this.state.innerStyle}>
              <div className="radio-selected"
               style={this.state.selectedStyle}>
              </div>
            </div>
          </div>
        </label>
      </div>
    </div>
  }
}
That’s it for the Radio component implementation. The gist of this example is that by using lifecycle events in your components, you can create custom event listeners. In this example, you did so by using window. This is similar to how React’s event listeners work: React attaches events to document, as you remember from the beginning of this chapter. And don’t forget to remove the custom event listeners on the unmount event.
If you’re interested in the scalable radio buttons and their non-React implementation (jQuery), I wrote a separate blog post at http://mng.bz/kPMu and created an online demo at http://jsfiddle.net/DSYz7/8. Of course, you can find the React implementation in the source code for this book.
This brings us to the topic of integrating React with other UI libraries, such as jQuery.
6.3. Integrating React with other libraries: jQuery UI events
As you’ve seen, React provides standard DOM events; but what if you need to integrate with another library that uses (triggers or listens to) nonstandard events? For example, suppose you have jQuery components that use slide (as in the slider control element). You want to integrate a React widget into your jQuery app. You can attach any DOM events not provided by React, using the component lifecycle events componentDidMount and componentWillUnmount.
As you may have guessed from the choice of the lifecycle events, you’ll be attaching an event listener when the component is mounted and detaching the event listener when the component is unmounted. Detaching (you can think of it as a cleanup) is important so that no event listeners are causing conflicts or performance issues by hanging around as orphans. (Orphaned event handlers are handlers that don’t have DOM nodes that created them—potential memory leaks.)
For example, suppose you’re working at a music-streaming company, and you’re tasked with implementing volume controls on the new version of the web player (think Spotify or iTunes). You need to add a label and buttons in addition to the legacy jQuery slider (http://plugins.jquery.com/ui.slider).
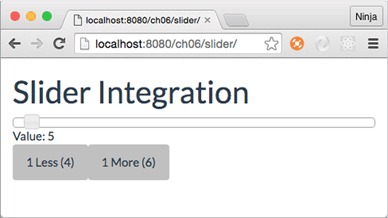
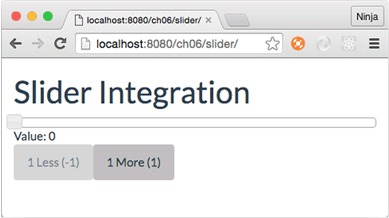
You want to implement a label with a numeric value, and two buttons to decrease and increase the value by 1. The idea is to make these pieces work together: when a user slides the pin (the square peg on a slider) left or right, the numeric value and the values on the buttons should change accordingly. In the same fashion, the user should be able to click either button, and the slider pin should move left or right correspondingly. In essence, you want to create not just a slider, but the widget shown in figure 6.14.
Figure 6.14. React components (buttons and the text “Value: ...”) can be integrated with other libraries, such as jQuery Slider, to make all elements from all libraries communicate with each other.
6.3.1. Integrating buttons
You have at least two options when it comes to integration: first, attaching events for jQuery Slider in a React component; and second, using window. Let’s start with the first approach and use it for buttons.
Note
This approach for integrating buttons is tightly coupled. Objects depend on each other. Generally, you should avoid tightly coupled patterns. The other, more loosely coupled option, will be implemented for integrating labels after we cover this approach.
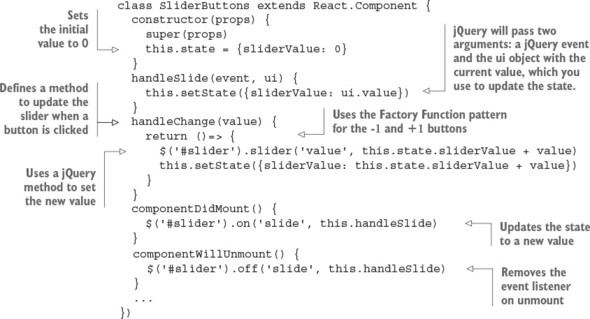
When there’s a slide event on the jQuery slider (meaning there’s a change in that value), you want to update the button values (text on buttons). You can attach an event listener to the jQuery slider in componentDidMount and trigger a method on a React component (handleSlide) when there’s a slide event. With every slide and change in value, you’ll update the state (sliderValue). SliderButtons implements this approach, as shown in the following listing (ch06/slider/jsx/slider-buttons.jsx).
Listing 6.13. Integrating with a jQuery plug-in via its events
The render() method of SliderButtons has two buttons with onClick events; a dynamic disabled attribute so you don’t set values less than 0 (see figure 6.15) or greater than 100; and Twitter Bootstrap classes for buttons (ch06/slider/jsx/slider-buttons.jsx).
Figure 6.15. Programmatically disabling the Less button to prevent negative values
Listing 6.14. Rendering slider buttons
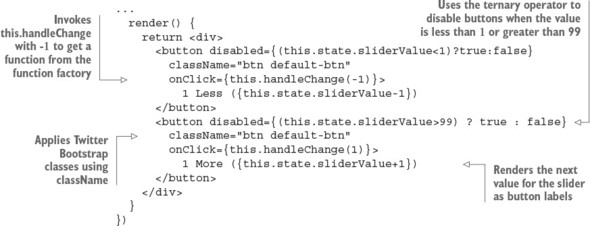
The end result is that if the value is less than or greater than the set range (minimum of 0, maximum of 100), the buttons become disabled. For example, when the value is 0, the Less button is disabled, as shown in figure 6.15.
Dragging the slider changes the text on the buttons and disables/enables them as needed. Thanks to the call to the slider in handleChange(), clicking the buttons moves the slider left or right. Next, you’ll implement the Value label, which is a SliderValue React component.
6.3.2. Integrating labels
You read about calling jQuery directly from React methods. At the same time, you can decouple jQuery and React by using another object to catch events. This is a loosely coupled pattern and is often preferable, because it helps avoid extra dependencies. In other words, different components don’t need to know the details of each others’ implementation. Thus, the SliderValue React component won’t know how to call a jQuery slider. This is good, because later you can more easily change Slider to Slider 2.0 with a different interface.
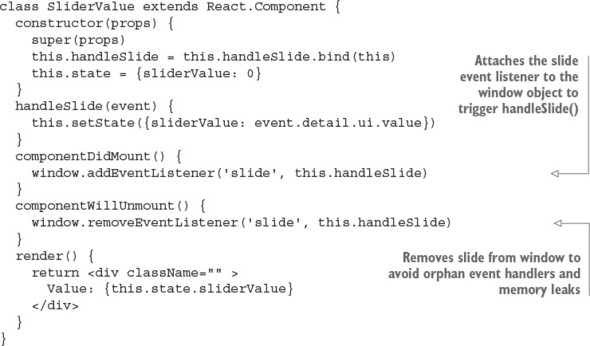
You can implement this by dispatching events to window in jQuery events and defining event listeners for window in React component lifecycle methods. The following listing shows SliderValue (ch06/slider/jsx/slider-value.jsx).
Listing 6.15. Integrating with a jQuery plug-in via window
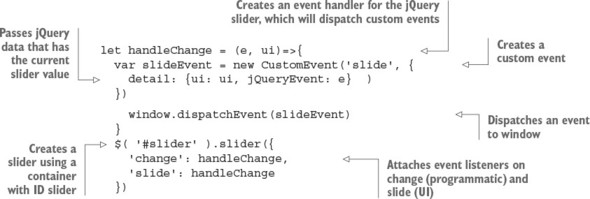
In addition, you need to dispatch a custom event. In the first approach (Slider-Buttons), you didn’t need to do this, because you used existing plug-in events. In this implementation, you have to create an event and dispatch it to window with data. You can implement the dispatchers of the slide custom event alongside the code that creates the jQuery slider object, which is a script tag in index.html (ch06/slider/index.html).
Listing 6.16. Setting up event listeners on a jQuery UI plug-in
When you run the code, both buttons and the value label will work seamlessly. You used two approaches: one loosely coupled and the other tightly coupled. The latter’s implementation is shorter, but the former is preferable because it will allow you to modify the code more easily in the future.
As you can see from this integration, React can work nicely with other libraries by listening to events in its componentDidMount() lifecycle method. React acts in a very un-opinionated way. React can play nicely with others! React’s easy integration with other libraries is a great advantage because developers can switch to React gradually instead of rewriting an entire application from scratch, or they can just continue to use their favorite good-old libraries with React indefinitely.
6.4. Quiz
Select the correct syntax for the event declaration: onClick=this.doStuff, onclick={this.doStuff}, onClick="this.doStuff", onClick={this.doStuff}, or onClick={this.doStuff()}
componentDidMount() won’t be triggered during server-side rendering of the React component on which it’s declared. True or false?
One way to exchange information among child components is to move the object to the parent of the children. True or false?
You can use event.target asynchronously and outside the event handler by default. True or false?
You can integrate with third-party libraries and events not supported by React by setting up event listeners in the component lifecycle events. True or false?
6.5. Summary
- onClick is for capturing mouse and trackpad clicks.
- The JSX syntax for event listeners is <a onNAME={this.METHOD}>.
- Bind event handlers with bind() in constructor() or in JSX if you want to use this in the event handler as the value of the component class instance.
- componentDidMount() is triggered only on the browser. componentWillMount() is triggered on both the browser and the server.
- React supports most of the standard HTML DOM events by providing and using synthetic event objects.
- componentDidMount() and componentWillUnmount() can be used to integrate React with other frameworks and events not supported by React.
6.6. Quiz answers
onClick={this.doStuff} is correct because only the function definition must be passed to onClick, not the invocation (the result of the invocation, to be precise).
True. componentDidMount() is only executed for browser React (React in the browser), not for server-side React. That’s why developers use componentDid-Mount() for AJAX/XHR requests. See chapter 5 for a refresher on component lifecycle events.
True. Moving data up the tree hierarchy of components lets you pass it to different child components.
False. This object is reused, so you can’t use it in an asynchronous operation unless persist() is called on SyntheticEvent.
True. Component lifecycle events are one of the best places to do this, because they let you do the prep work before a component is active and before it’s removed.