Table of Contents for
React Quickly: Painless web apps with React, JSX, Redux, and GraphQL
 React Quickly: Painless web apps with React, JSX, Redux, and GraphQL
Published by
Manning Publications, 2017
React Quickly: Painless web apps with React, JSX, Redux, and GraphQL
Published by
Manning Publications, 2017
- Cover
- React Quickly: Painless web apps with React, JSX, Redux, and GraphQL
- Copyright
- React Quickly: Painless web apps with React, JSX, Redux, and GraphQL
- Brief Table of Contents
- Table of Contents
- Praise for React Quickly
- Foreword
- Preface
- Acknowledgments
- About This Book
- About the Author
- About the Cover
- Part 1. React foundation
- Chapter 1. Meeting React
- Chapter 2. Baby steps with React
- Chapter 3. Introduction to JSX
- Chapter 4. Making React interactive with states
- Chapter 5. React component lifecycle events
- Chapter 6. Handling events in React
- Chapter 7. Working with forms in React
- Chapter 8. Scaling React components
- Chapter 9. Project: Menu component
- Chapter 10. Project: Tooltip component
- Chapter 11. Project: Timer component
- Part 2. React architecture
- Chapter 12. The Webpack build tool
- Chapter 13. React routing
- Chapter 14. Working with data using Redux
- Chapter 15. Working with data using GraphQL
- Chapter 16. Unit testing React with Jest
- Chapter 17. React on Node and Universal JavaScript
- Chapter 18. Project: Building a bookstore with React Router
- Chapter 19. Project: Checking passwords with Jest
- Chapter 20. Project: Implementing autocomplete with Jest, Express, and MongoDB
- Appendix A. Installing applications used in this book
- Appendix B. React cheatsheet
- Appendix C. Express.js cheatsheet
- Appendix D. MongoDB and Mongoose cheatsheet
- Appendix E. ES6 for success
- React Cheatsheet
- Index
- List of Figures
- List of Tables
- List of Listings
Chapter 2. Baby steps with React
This chapter covers
- Nesting elements
- Creating a component class
- Working with properties
This chapter will teach you how to take baby steps with React and lays the foundation for the following chapters. It’s crucial for understanding React concepts such as elements and components. In a nutshell, elements are instances of components (also called component classes). What are their use cases, and why do you use them? Read on!
Note
The source code for the examples in this chapter is at www.manning.com/books/react-quickly and https://github.com/azat-co/react-quickly/tree/master/ch02 (in the ch02 folder of the GitHub repository https://github.com/azat-co/react-quickly). You can also find some demos at http://reactquickly.co/demos.
2.1. Nesting elements
In the last chapter, you learned how to create a React element. As a reminder, the method you use is React.createElement(). For example, you can create a link element like this:
let linkReactElement = React.createElement('a',
  {href: 'http://webapplog.com'},
  'Webapplog.com'
)
The problem is that most UIs have more than one element (such as a link inside a menu). For example, in figure 2.1, there are buttons in the section, video thumbnails, and a YouTube player.
Figure 2.1. The React Quickly website has many nested UI elements.

The solution to creating more-complex structures in a hierarchical manner is nesting elements. In the previous chapter, you implemented your first React code by creating an h1 React element and rendering it in the DOM with ReactDOM.render():
let h1 = React.createElement('h1', null, 'Hello world!')
ReactDOM.render(
  h1,
  document.getElementById('content')
)
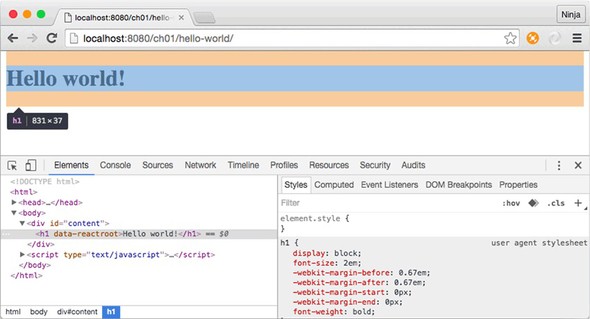
It’s important to note that ReactDOM.render() takes only one element as an argument, which is h1 in the example (the view is shown in figure 2.2).
Figure 2.2. Rendering a single heading element
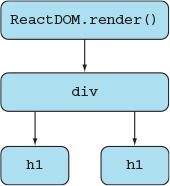
As I mentioned at the beginning of this section, the problem arises when you need to render two same-level elements (for example, two h1 elements). In this case, you can wrap the elements in a visually neutral element, as shown in figure 2.3. The <div> container is usually a good choice, as is <span>.
Figure 2.3. Structuring a React render by using a wrapper <div> container to render sibling headings
You can pass an unlimited number of parameters to createElement(). All the parameters after the second one become child elements. Those child elements (h1, in this case) are siblings—that is, they’re on the same level relative to each other, as you can see in figure 2.4, which shows DevTools open in Chrome.
Figure 2.4. React DevTools shows a <div> wrapper for nested sibling h1 elements.
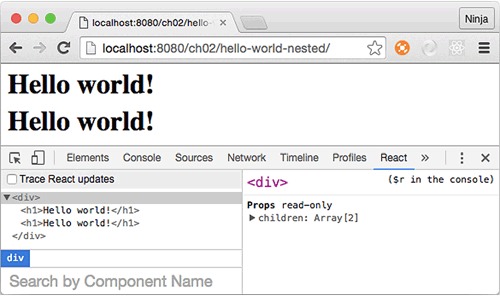
In addition to the Elements tab, which is included by default in Chrome DevTools, you can install an extension (or plug-in) called React Developer Tools. It’s the last tab in figure 2.4. React Developer Tools is available for Firefox as well. It lets you inspect the results of React rendering closely, including the component’s hierarchy, name, properties, states, and more.
Here’s the GitHub repository: https://github.com/facebook/react-devtools. You can also find React Developer Tools for Chrome at http://mng.bz/V276 and for Firefox at http://mng.bz/59V9.
Knowing this, let’s use createElement() to create the <div> element with two <h1> child elements (ch02/hello-world-nested/index.html).
Listing 2.1. Creating a <div> element with two <h1> children

The HTML code can stay the same as in the Hello World example from chapter 1, as long as you include the necessary React and ReactDOM libraries and have the content node (ch02/hello-world-nested/index.html).
Listing 2.2. HTML for the nested elements example without the React code
<!DOCTYPE html>
<html>
  <head>
    <script src="js/react.js"></script>
    <script src="js/react-dom.js"></script>
  </head>
  <body>
    <div id="content"></div>
    <script type="text/javascript">
    ...
    </script>
  </body>
</html>
So far, you’ve only provided string values as the first parameter of createElement(). But the first parameter can have two types of input:
- Standard HTML tag as a string; for example, 'h1', 'div', or 'p' (without the angle brackets). The name is lowercase.
- React component classes as an object; for example, HelloWorld. The name is capitalized.
The first approach renders standard HTML elements. React goes through its list of standard HTML elements and, when and if it finds a match, uses it as a type for the React element. For example, when you pass 'p', React will find a match because p is a paragraph tag name. This will produce <p> in the DOM when/if you render this React element.
Now let’s look at the second type of input: creating and providing custom component classes.
2.2. Creating component classes
After nesting elements with React, you’ll stumble across the next problem: soon, there are a lot of elements. You need to use the component-based architecture described in chapter 1, which lets you reuse code by separating the functionality into loosely coupled parts. Meet component classes, or just components, as they’re often called for brevity (not to be confused with web components).
Think of standard HTML tags as building blocks. You can use them to compose your own React component classes, which you can use to create custom elements (instances of classes). By using custom elements, you can encapsulate and abstract logic in portable classes (composable reusable components). This abstraction allows teams to reuse UIs in large, complex applications as well as in different projects. Examples include autocomplete components, toolboxes, menus, and so on.
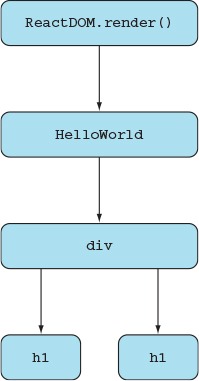
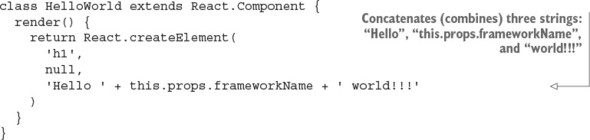
Creating the 'Hello world!' element with an HTML tag in the createElement() method was straightforward: (createElement('h1', null, 'Hello World!'). But what if you need to separate Hello World into its own class, as shown in figure 2.5? Let’s say you need to reuse Hello World in 10 different projects! (You probably wouldn’t use it that many times, but a good autocomplete component will definitely be reused.)
Figure 2.5. Rendering a <div> element created from a custom component class instead of rendering it directly
Interestingly, you create a React component class by extending the React.Component class with class CHILD extends PARENT ES6 syntax. Let’s create a custom Hello-World component class using class HelloWorld extends React.Component.
The one mandatory thing you must implement for this new class is the render() method. This method must return a single React element, createElement(), which is created from another custom component class or an HTML tag. Both can have nested elements.
Listing 2.3 (ch02/hello-world-class/js/script.js) shows how you can refactor the nested Hello World example (listing 2.1) into an app with a custom React component class, HelloWorld. The benefit is that with a custom class, you can reuse this UI better. The mandatory render() method of the HelloWorld component returns the same <div> element from the previous example. Once you’ve created the custom HelloWorld class, you can pass it as an object (not as a string) to ReactDOM.render().
Listing 2.3. Creating and rendering a React component class
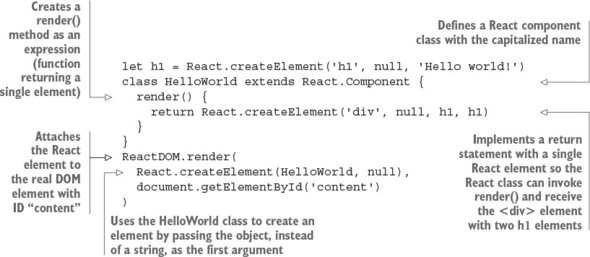
By convention, the names of variables containing React components are capitalized. This isn’t required in regular JS (you can use the lowercase variable name helloWorld); but because it’s necessary in JSX, you apply this convention here. (In JSX, React uses uppercase and lowercase to differentiate a custom component like <HelloWorld/> from a regular HTML element such as <h1/>. But in regular JS, it’s differentiated by passing either a variable such as HelloWorld or a string such as 'h1'. It’s a good idea to start using capitalization convention for custom components now.) More about JSX in chapter 3.
The component class example defines render() using ES6 style, in which you omit the colon and the word function. It’s exactly the same as defining an attribute (a.k.a. key or object property) with a value that’s a function: that is, typing render: function(). My personal preference, and my recommendation to you, is to use the ES6 method style because it’s shorter (the less you type, the fewer mistakes you make).
Historically, React had its own method to create a component class: React.createClass(). There are slight differences between using the ES6 class to extend React.Component and using React.createClass(). Typically, you’d use either class (recommended) or createClass(), but not both. Moreover, in React 15.5.4, createClass() is deprecated (that is, no longer supported).
Although you may still see the React.createClass() method used by some teams, the general tendency in the React world is to move toward a common standard: using the ES6 class approach. This book is forward thinking and uses the most popular tools and approaches, so it focuses on ES6. You can find ES5 examples for some of this book’s projects in the GitHub repository, prefixed with -es5; they were for an early version of the book.
As of August 2016, most modern browsers support these ES6 (and almost all other) features natively (without extra tools),[1] so I assume you’re familiar with it. If you’re not, or if you need a refresher or more information on ES6+/ES2015+ and its primary features as they relate to React, see appendix E or a comprehensive book such as Exploring ES6 by Dr. Axel Rauschmayer (free online version: http://exploringjs.com/es6).
ECMAScript 6 Compatibility Table, https://kangax.github.io/compat-table/es6.
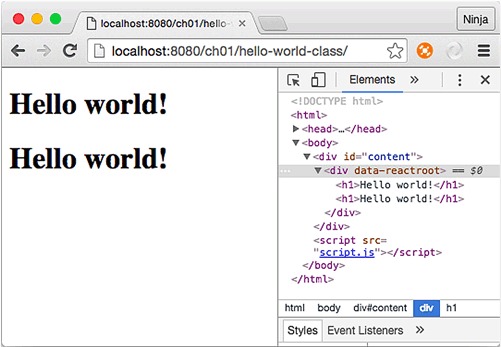
Analogous to ReactDOM.render(), the render() method in createClass() can only return a single element. If you need to return multiple same-level elements, wrap them in a <div> container or another unobtrusive element such as <span>. You can run the code in your browser; the result is shown in figure 2.6.
Figure 2.6. Rendering an element created from a custom HelloWorld component class
You may think you didn’t gain much with the refactoring; but what if you need to print more Hello World statements? You can do so by reusing the HelloWorld component multiple times and wrapping them in a <div> container:
...
ReactDOM.render(
  React.createElement(
    'div',
    null,
    React.createElement(HelloWorld),
    React.createElement(HelloWorld),
    React.createElement(HelloWorld)
  ),
  document.getElementById('content')
)
This is the power of component reusability! It leads to faster development and fewer bugs. Components also have lifecycle events, states, DOM events, and other features that let you make them interactive and self-contained; these are covered in the following chapters.
Right now, the HelloWorld elements will all be the same. Is there a way to customize them? What if you could set element attributes and modify their content and/or behavior? Meet properties.
2.3. Working with properties
Properties are a cornerstone of the declarative style that React uses. Think of properties as unchangeable values within an element. They allow elements to have different variations if used in a view, such as changing a link URL by passing a new value for a property:
React.createElement('a', {href: 'http://node.university'})
One thing to remember is that properties are immutable within their components. A parent assigns properties to its children upon their creation. The child element isn’t supposed to modify its properties. (A child is an element nested inside another element; for example, <h1/> is a child of <HelloWorld/>.) For instance, you can pass a property PROPERTY_NAME with the value VALUE, like this:
<TAG_NAME PROPERTY_NAME=VALUE/>
Properties closely resemble HTML attributes. This is one of their purposes, but they also have another: you can use the properties of an element in your code as you wish. Properties can be used as follows:
- To render standard HTML attributes of an element: href, title, style, class, and so on
- In the JavaScript code of a React component class via this.props values; for example, this.props.PROPERTY_NAME (replacing PROPERTY_NAME with your arbitrary name)
Under the hood, React will match the property name (PROPERTY_NAME) with the list of standard attributes. If there’s a match, the property will be rendered as an attribute of an element (the first scenario). The value of this attribute is also accessible in this.props.PROPERTY_NAME in the component class code.
If there’s no match with any of the standard HTML attribute names (the second scenario), then the property name isn’t a standard attribute. It won’t be rendered as an attribute of an element. But the value will still be accessible in the this.props object; for example, this.props.PROPERTY_NAME. It can be used in your code or rendered explicitly in the render() method. This way, you can pass different data to different instances of the same class. This allows you to reuse components, because you can programmatically change how elements are rendered by providing different properties.
Internally, React uses Object.freeze()[2] from the ES5 standard to make the this.props object immutable. To check whether an object is frozen, you can use the Object.isFrozen() method.[3] For example, you can determine whether this statement will return true:
Mozilla Developer Network, Object.freeze(), http://mng.bz/p6Nr.
Mozilla Developer Network, Object.isFrozen(), http://mng.bz/0P75.
class HelloWorld extends React.Component {
  render() {
    console.log(Object.isFrozen(this.props))
    return React.createElement('div', null, h1, h1)
  }
}
If you’re interested in more details, I encourage you to read the React changelog[4] and search on React’s GitHub repository.[5]
GitHub, 2016-04-07-react-v15, http://mng.bz/j6c3.
GitHub, “freeze” search results, http://mng.bz/2l0Z.
You can even take this feature of properties a step further and completely modify the rendered elements based on the value of a property. For example, if this.props.heading is true, you render “Hello” as a heading. If it’s false, you render “Hello” as a normal paragraph:
render() {
  if (this.props.heading) return <h1>Hello</h1>
  else return <p>Hello</p>
}
In other words, you can use the same component—but provided with different properties, the elements rendered by the component can be different. Properties can be rendered by render(), used in components’ code, or used as HTML attributes.
To demonstrate the properties of components, let’s slightly modify HelloWorld with props. The goal is to reuse the HelloWorld component such that each instance of this class renders different text and different HTML attributes. You’ll enhance the HelloWorld headings (<h1> tag) with three properties (see figure 2.7):
- id—Matches the standard attribute id and is automatically rendered by React
- frameworkName—Doesn’t match any standard attributes for <h1>, but is explicitly printed in the text of headings
- title—Matches the standard attribute title and is automatically rendered by React
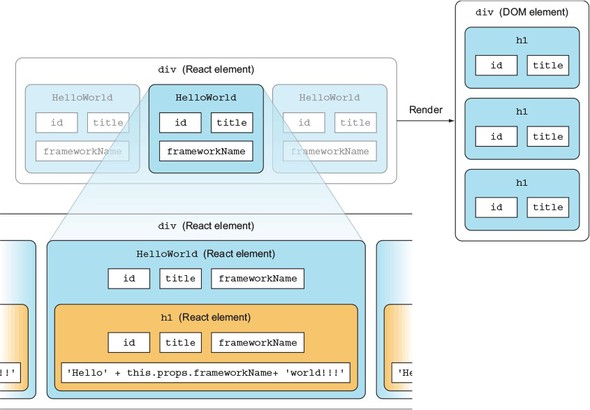
Figure 2.7. The component class HelloWorld renders properties that are standard HTML attributes, but not frameworkName.
If a property’s name matches a standard HTML attribute, it will be rendered as an attribute of the <h1> element, as shown in figure 2.7. So the two properties id and title will be rendered as <h1> attributes, but not frameworkName. You may even get a warning about the unknown frameworkName property (because it’s not in the HTML specification). How nice!
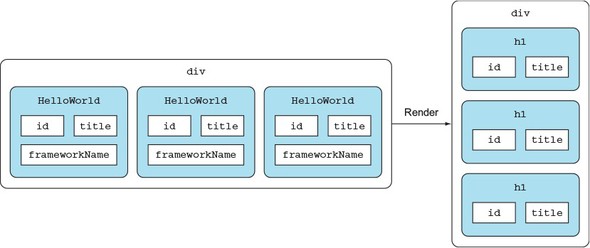
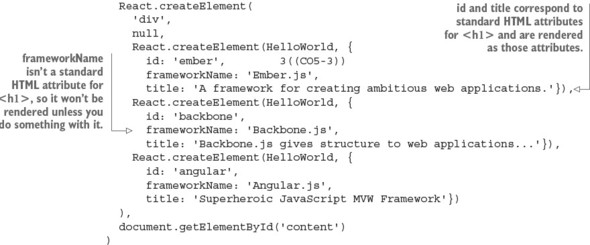
Let’s zoom in on the <div> element implementation (figure 2.8). Obviously, it needs to render three child elements of the HelloWorld class, but the text and attributes of the resulting headings (<h1/>) must be different. For example, you pass id, frameworkName, and title. They’ll be part of the HelloWorld class.
Figure 2.8. The HelloWorld class is used three times to generate three h1 elements that have different attributes and innerHTML.
Before you implement <h1/>, you need to pass the properties to HelloWorld. How do you do this? By passing these properties in an object literal in the second argument to createElement() when you create HelloWorld elements in the <div> container:
ReactDOM.render(
  React.createElement(
    'div',
    null,
    React.createElement(HelloWorld, {
      id: 'ember',
      frameworkName: 'Ember.js',
      title: 'A framework for creating ambitious web applications.'}),
    React.createElement(HelloWorld, {
      id: 'backbone',
      frameworkName: 'Backbone.js',
      title: 'Backbone.js gives structure to web applications...'}),
    React.createElement(HelloWorld, {
      id: 'angular',
      frameworkName: 'Angular.js',
      title: 'Superheroic JavaScript MVW Framework'})
  ),
  document.getElementById('content')
)
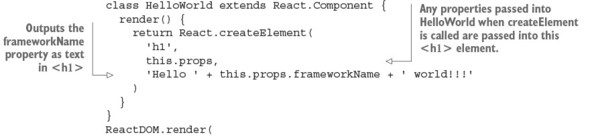
Now let’s look at the HelloWorld component implementation. The way React works is that the second parameter to createElement() (for example, {id: 'ember'...}) is an object whose properties are accessible via the this.props object inside the component’s render() method. Therefore, you can access the value of frameworkName as shown in the following listing.
Listing 2.4. Using the frameworkName property in the render() method
The keys of the this.props object are exactly the same as the keys of the object passed to createElement() as the second parameter. That is, this.props has id, frameworkName, and title keys. The number of key/value pairs you can pass in the second argument to React.createElement() is unlimited.
In addition, you may have already guessed that it’s possible to pass all the properties of HelloWorld to its child <h1/>. This can be extremely useful when you don’t know what properties are passed to a component; for example, in HelloWorld, you want to leave the style attribute value up to a developer instantiating HelloWorld. Therefore, you don’t limit what attributes to render in <h1/>.
Listing 2.5. Passing all the properties from HelloWorld to <h1>

Then, you render three HelloWorld elements into the <div> with the ID content, as shown in the following listing (ch02/hello-js-world/js/script.js) and figure 2.9.
Figure 2.9. Result of reusing HelloWorld with different properties to render three different headings

Listing 2.6. Using properties passed during element creation
As usual, you can run this code via a local HTTP web server. The result of reusing the HelloWorld component class is three different headings (see figure 2.9).
You used this.props to render different text for the headings. You used properties to render different titles and IDs. Thus, you effectively reused most of the code, which makes you the master of React HelloWorld component classes!
We’ve covered several permutations of Hello World. Yes, I know, it’s still the boring, good-old Hello World. But by starting small, we’re building a solid foundation for future, more-advanced topics. Believe me, you can achieve a lot of great things with component classes.
It’s very important to know how React works in regular JavaScript events if you (like many React engineers) plan to use JSX. This is because in the end, browsers will still run regular JS, and you’ll need to understand the results of the JSX-to-JS transpilation from time to time. Going forward, we’ll be using JSX, which is covered in the next chapter.
2.4. Quiz
A React component class can be created with which of the following? createComponent(), createElement(), class NAME extends React.Component, class NAME extends React.Class
The only mandatory attribute or method of a React component is which of the following? function, return, name, render, class
To access the url property of a component, you use which of the following? this.properties.url, this.data.url, this.props.url, url
React properties are immutable in a context of a current component. True or false?
React component classes allows developers to create reusable UIs. True or false?
2.5. Summary
- You can nest React elements using third, fourth, and so on arguments in createElement().
- Create elements from custom component classes.
- Modify the resulting elements using properties.
- You can pass properties to child element(s).
- To use a component-based architecture (one of the features of React), you create components.
2.6. Quiz answers
class NAME extends React.Component, because there’s no React.Class and others will fail due to ReferenceError (not defined).
render() because it’s the only required method; also, because function, return, render, and class are not valid, and name is optional.
this.props.url because only this.props gives the properties object.
True. It’s impossible to change a property.
True. Developers use new components to create reusable UIs.