Table of Contents for
React Quickly: Painless web apps with React, JSX, Redux, and GraphQL
 React Quickly: Painless web apps with React, JSX, Redux, and GraphQL
Published by
Manning Publications, 2017
React Quickly: Painless web apps with React, JSX, Redux, and GraphQL
Published by
Manning Publications, 2017
- Cover
- React Quickly: Painless web apps with React, JSX, Redux, and GraphQL
- Copyright
- React Quickly: Painless web apps with React, JSX, Redux, and GraphQL
- Brief Table of Contents
- Table of Contents
- Praise for React Quickly
- Foreword
- Preface
- Acknowledgments
- About This Book
- About the Author
- About the Cover
- Part 1. React foundation
- Chapter 1. Meeting React
- Chapter 2. Baby steps with React
- Chapter 3. Introduction to JSX
- Chapter 4. Making React interactive with states
- Chapter 5. React component lifecycle events
- Chapter 6. Handling events in React
- Chapter 7. Working with forms in React
- Chapter 8. Scaling React components
- Chapter 9. Project: Menu component
- Chapter 10. Project: Tooltip component
- Chapter 11. Project: Timer component
- Part 2. React architecture
- Chapter 12. The Webpack build tool
- Chapter 13. React routing
- Chapter 14. Working with data using Redux
- Chapter 15. Working with data using GraphQL
- Chapter 16. Unit testing React with Jest
- Chapter 17. React on Node and Universal JavaScript
- Chapter 18. Project: Building a bookstore with React Router
- Chapter 19. Project: Checking passwords with Jest
- Chapter 20. Project: Implementing autocomplete with Jest, Express, and MongoDB
- Appendix A. Installing applications used in this book
- Appendix B. React cheatsheet
- Appendix C. Express.js cheatsheet
- Appendix D. MongoDB and Mongoose cheatsheet
- Appendix E. ES6 for success
- React Cheatsheet
- Index
- List of Figures
- List of Tables
- List of Listings
Chapter 9. Project: Menu component
This chapter covers
- Understanding the project structure and scaffolding
- Building the Menu component without JSX
- Building the Menu component in JSX
The next three chapters will walk you through several projects, gradually building on the concepts you’ve learned in chapters 1–8. These projects will also reinforce the material by repeating some of the techniques and ideas that are most important in React. The first project is minimal, but don’t skip it.
Imagine that you’re working on a unified visual framework that will be used in all of your company’s apps. Having the same look and feel in various apps is important. Think about how Twitter Bootstrap for many Twitter apps and Google’s Material UI[1] are used across many properties that belong to Google: AdWords, Analytics, Search, Drive, Docs, and so on.
Twitter Bootstrap: http://getbootstrap.com. React components that implement Twitter Bootstrap: https://react-bootstrap.github.io. Google Material Design: https://material.io. React Components that implement Material Design: www.material-ui.com.
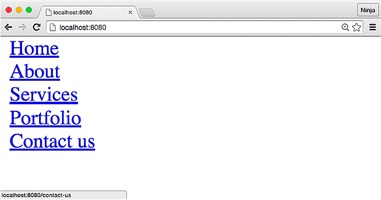
Your first task is to implement a menu like the one shown in figure 9.1. It will be used in the layout’s header across many pages in various applications. The menu items need to change based on the user role and what part of the application is currently being viewed. For example, admins and managers should see a Manage Users menu option. At the same time, this layout will be used in a customer-relationship app that needs its own unique set of menu options. You get the idea. The menu needs to be generated dynamically, meaning you’ll have some React code that generates menu options.
Figure 9.1. The menu you’re going to build
For simplicity, the menu items will just be <a> tags. You’ll create two custom React components, Menu and Link, in a way that’s similar to the way you created the Hello-World component in chapter 1—or how you create any component, for that matter.
This project will show you how to render programmatically nested elements. Manually hardcoding menu items isn’t a great idea; what happens when you need to change an item? It’s not dynamic! You’ll use the map() function to do this.
Note
To follow along with the project, you’ll need to download the unminified version of React (so that you can take advantage of the helpful warnings it returns if something goes wrong). You can also download and install Node.js and npm. They aren’t strictly necessary for this project, but they’re useful for compiling JSX later in this chapter. Appendix A covers the installation of both tools.
Note
The source code for the examples in this chapter is at www.manning.com/books/react-quickly and https://github.com/azat-co/react-quickly/tree/master/ch09 (in the ch09 folder of the GitHub repository https://github.com/azat-co/react-quickly). You can also find some demos at http://reactquickly.co/demos.
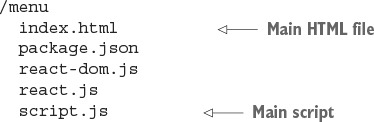
9.1. Project structure and scaffolding
Let’s start with an overview of the project structure. It’s flat, to keep it simple:
Keep in mind that this is what you’ll have by the end of this walk-through. You should begin with an empty folder. So, let’s create a new folder and start implementing the project:
$ mkdir menu
$ cd menu
Download react.js and react-dom.js version 15, and drop them into the folder.
Next is the HTML file:
<!DOCTYPE html>
<html>
  <head>
    <script src="react.js"></script>
    <script src="react-dom.js"></script>
  </head>
The HTML for this project is very basic. It includes the react.js and react-dom.js files, which, for simplicity, are in the same folder as the HTML file. Of course, later you’ll want to have your *.js files in some other folder, like js or src.
The body has just two elements. One element is a <div> container with the ID menu; this is where the menu will be rendered. The second element is a <script> tag with your React application code:
<body>
    <div id="menu"></div>
    <script src="script.js"></script>
  </body>
</html>
You’re finished with the scaffolding. This is the foundation on which you’ll build the menu—first, without JSX.
9.2. Building the menu without JSX
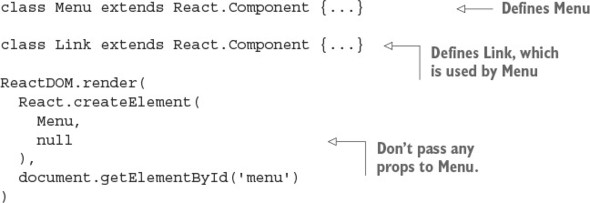
script.js is your main application file. It contains ReactDOM.render() as well as two components (ch09/menu/script.js).
Listing 9.1. Basic skeleton of the Menu script
Of course, it’s possible to make Menu dependent on an external list of menu items, provided in a property such as menuOptions that’s defined elsewhere:
const menuOptions = [...]
//...
ReactDOM.render(
  React.createElement(
    Menu,
    {menus: menuOptions}
  ),
  document.getElementById('menu')
)
These two approaches are both valid, and you’ll need to choose one depending on your answer to this question: do you want Menu to be just about structure and styling or also about getting information? We’ll continue with the latter approach in this chapter and make Menu self-sustained.
9.2.1. The Menu component
Now to create the Menu component. Let’s step through the code. To create it, you extend React.Component():
class Menu extends React.Component {...}
The Menu component will render the individual menu items, which are link tags. Before you can render them, you need to define the menu items. They’re hardcoded in the menus array as follows (you could get them from a data model, store, or server in a more complex scenario):
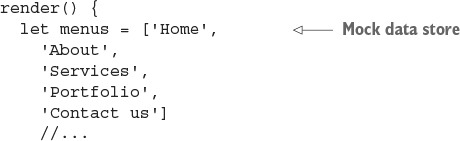
Next, you’ll return the menu Link elements (four of them). Recall that return can have only one element. For this reason, you wrap <div> around the four links. This is the start of the wrapper <div> element with no attributes:
    return React.createElement('div',
      null,
      //... we will render links later
It’s worth mentioning that {} can output not just a variable or an expression, but an array as well. This comes in handy when you have a list of items. Basically, to render every element of an array, you can pass that array to {}. Although JSX and React can output arrays, they don’t output objects. So, the objects must be converted to an array.
Knowing that you can output an array, you can proceed to generate an array of React elements. The map() function is a good method to use because it returns an array. You can implement map() so that each element is the result of the expression React.createElement(Link, {label: v}) wrapped in <div>. In this expression, v is a value of the menus array item (Home, About, Services, and so on), and i is its index number (0, 1, 2, 3, and so on):
      menus.map((v, i) => {
        return React.createElement('div',
          {key: i},
          React.createElement(Link, {label: v})
        )
      }
    )
  )
}})
Did you notice that the key property is set to the index i? This is needed so React can access each <div> element in a list more quickly. If you don’t set key, you’ll see the following warning (at least, in React 15, 0.14 and 0.13):
Warning: Each child in an array or iterator should have a unique "key" prop.
Check the render method of `Menu`. See https://fb.me/react-warning-keys for
more information.
    in div (created by Menu)
    in Menu
Again, kudos to React for good error and warning messages.
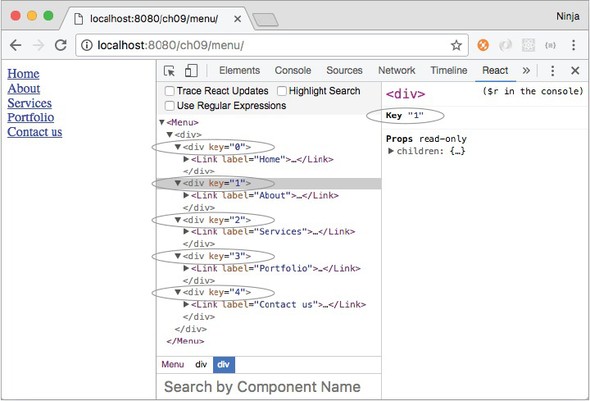
So each element of a list must have a unique value for a key attribute. They don’t have to be unique across the entire app and other components, just within this list. Interestingly, since React v15, you won’t see the key attributes in HTML (and that’s a good thing—let’s not pollute HTML). But React DevTools shows the keys, as you can see in figure 9.2.
Figure 9.2. React DevTools show you the keys of the list elements.
The mapping function from the Array class is used frequently in React components to represent lists of data. This is because when you create UIs, you do so from data represented as an array. The UI is also an array, but with slightly different elements (React elements!).
map() is invoked on an array, and it returns new array elements that are transformed from the original array by the function. At a minimum, when working with map(), you need to pass this function:
[1, 2, 3].map( value => <p>value</p>)// <p>1</p><p>2</p><p>3</p>
You can use two more arguments in addition to the value of the item (value)—index and list:
[1, 2, 3].map( (value, index, list) => {
  return <p id={index}>{list[index]}</p>
}) // <p id="0">1</p><p id="1">2</p><p id="2">3</p>
The <div> has a key attribute, which is important. It allows React to optimize rendering of lists by converting them to hashes, and access time for hashes is better than that for lists or arrays. Basically, you create numerous Link components in an array, and each of them takes the property label with a value from the menus array.
Here’s the full code for Menu (ch09/menu/script.js); it’s simple and straightforward.
Listing 9.2. Menu component that uses map() to render links
class Menu extends React.Component {
  render() {
    let menus = ['Home',
      'About',
      'Services',
      'Portfolio',
      'Contact us']
    return React.createElement('div',
      null,
      menus.map((v, i) => {
        return React.createElement('div',
          {key: i},
          React.createElement(Link, {label: v})
        )
      })
    )
}}
Now let’s move on to the Link implementation.
9.2.2. The Link component
The call to map() creates a Link component for each item in the menus array. Let’s look at the code for Link and see what happens when each Link component is rendered.
In the Link component’s render code, you write an expression to create a URL. That URL will be used in the href attribute of the <a> tag. The this.props.label value is passed to Link from Menu when Link is created. In the render() function of the Menu component, Link elements are created in the map’s closure/iterator function using React.createElement(Link, {label: v}).
The label property is used to construct the URL slug (must be lowercase and should not include spaces):
class Link extends React.Component {
  render() {
    const url='/'
      + this.props.label
        .toLowerCase()
        .trim()
        .replace(' ', '-')
The methods toLowerCase(), trim(), and replace() are standard JavaScript string functions. They perform conversion to lowercase, trim white space at edges, and replace white spaces with dashes, respectively.
The URL expression produces the following URLs:
- /home for Home
- /about for About
- /services for Services
- /portfolio for Portfolio
- /contact-us for Contact us
Now you can implement Link’s UI: the render() return value. In the render function’s return of the Link component, you pass this.props.label as a third argument to createElement(). It becomes part of the <a> tag content (link text). Link could render this element:
    //...
    return React.createElement(
      'a',
      {href: url},
      this.props.label
    )
  }
}
But it’s better to separate each link with a line-break element (<br>). And because the component must return only one element, you’d have to wrap the anchor element (<a>) and line break (<br>) in a div container (<div>). Therefore, you start the return in the Link component’s render() with div, without attributes:
    //...
    return React.createElement('div',
      null,
      //...
Each argument after the second to createElement() (for example, the third, fourth, and fifth) will be used as content (children). To create the link element, you pass it as the second argument. And to create a break element after each link, you pass the line-break element <br> as the fourth argument:
    //...
    return React.createElement('div',
      null,
      React.createElement(
        'a',
        {href: url},
        this.props.label
      ),
      React.createElement('br')
    )
  }
})
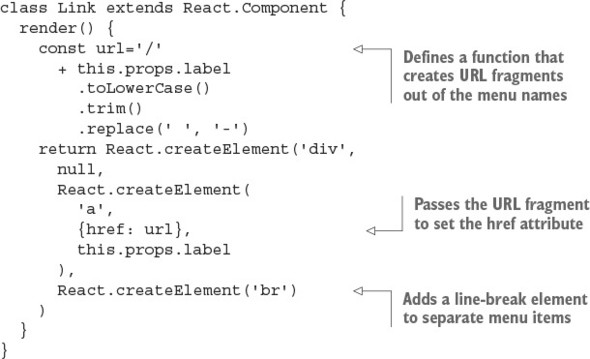
Here’s the code for the full Link component for your reference (ch09/menu/script.js). The url function can be created as a class method or as a method outside of the component.
Listing 9.3. Link component
Let’s get this menu running.
9.2.3. Getting it running
To view the page, shown in figure 9.3, open it as a file in Chrome, Firefox, Safari, or (maybe) Internet Explorer. That’s it. No compilation is needed for this project.
Figure 9.3. React menu showing rendering of nested components
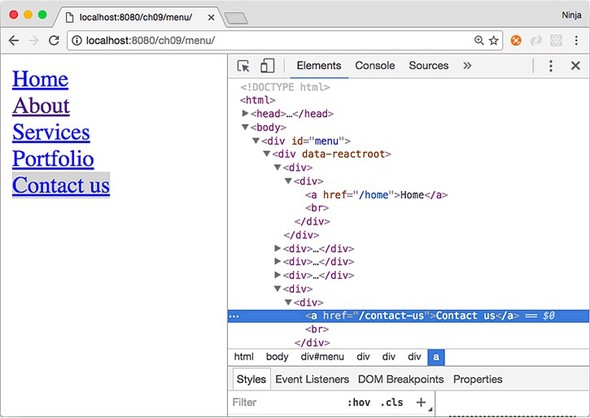
No thrills here, but the page should display five links (or more, if you add items to the menus array), as shown earlier in figure 9.1. This is much better than copying and pasting five <a> elements and then ending up with multiple places to modify the labels and URLs. And the project can be even better with JSX.
When you open the example page, the protocol in the address bar will be file://.... This isn’t ideal but will do for this project. For real development, you’ll need a web server; with a web server, the protocol is http://... or https://..., as in figure 9.3.
Yes, even for a simple web page like this one, I prefer to use a local web server. It makes the running code more closely resemble how it would be in production. Plus, you can use AJAX/XHR, which you can’t use if you’re opening an HTML file in a browser.
The easiest way to run a local web server is to use node-static (www.npmjs.com/package/node-static) or a similar Node.js tool like http-server (www.npmjs.com/package/http-server). This is true even for Windows, although I stopped using that OS many years ago. If you’re hell-bent on not using Node.js, then alternatives include IIS, Apache HTTP Server, NGINX, MAMP, LAMP, and other variations of web servers. Needless to say, Node.js tools are highly recommended for their minimalist, lightweight approach.
To install node-static, use npm:
$ npm install -g node-static@0.7.6
Once it’s installed, run this command from your project’s root folder (or from a parent folder) to make the file available on http://localhost:8080. This isn’t an external link—run the following command before clicking the link:
$ static
If you run static in react-quickly/ch09/menu, then the URL will be http://localhost:8080. Conversely, if you run static from react-quickly, then the URL needs to be http://localhost:8080/ch09/menu.
To stop the server on macOS or Unix/Linux (POSIX systems), press Ctrl-C. As for Windows, I don’t know!
9.3. Building the menu in JSX
This project is more extensive, containing node_modules, package.json, and JSX:
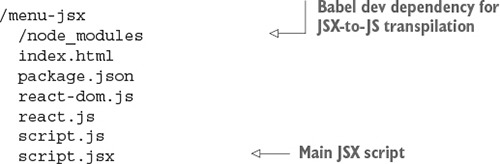
As you can see, there’s a node_modules folder for developer dependencies such as Babel, which is used for JSX-to-JS transpilation.
Note
Although it’s possible to install react and react-dom as npm modules instead of having them as files, doing so leads to additional complexity if you decide to deploy. Right now, to deploy this app, you can just copy the files in the project folder without node_modules. If you install React and ReactDOM with npm, then you have to include that folder as well, use a bundler, or copy the JS files from dist into root (where you already have them). So, for this example, we’ll use the files in root. I cover bundlers in part 2 of this book, but for now let’s keep things simple.
Create a new folder:
$ mkdir menu-jsx
$ cd menu-jsx
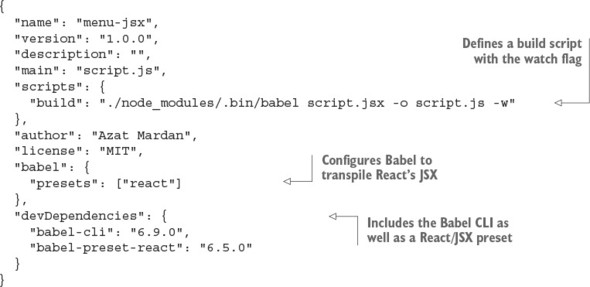
Then, create the package.json file in it using npm init -y. Add the following code to package.json to install and configure Babel (ch09/menu-jsx/package.json).
Listing 9.4. package.json for Menu in JSX
Install the developer dependencies packages with npm i or npm install. Your setup should be ready now.
Let’s look at script.jsx. At a higher level, it has these parts:
class Menu extends React.Component {
  render() {
    //...
  }
}
class Link extends React.Component {
  render() {
    //...
  }
}
ReactDOM.render(<Menu />, document.getElementById('menu'))
Looks familiar, right? It’s the same structure as in Menu without JSX. The primary change in this high-level listing is replacing createElement() for the Menu component in ReactDOM.render() with this line:
ReactDOM.render(<Menu />, document.getElementById('menu'))
Next, you’ll refactor the components.
9.3.1. Refactoring the Menu component
The beginning of Menu is the same:
class Menu extends React.Component {
  render() {
    let menus = ['Home',
      'About',
      'Services',
      'Portfolio',
      'Contact us']
    return //...
  }
}
In the refactoring example for the Menu component, you need to output the value v as a label’s attribute value (that is, label={v}). In other words, you assign the value v as a property for label. So the line to create the Link element changes from
React.createElement(Link, {label: v})
to this JSX code:
<Link label={v}/>
The label property of the second argument ({label: v}) becomes the attribute label={v}. The attribute’s value v is declared with {} to make it dynamic (versus a hardcoded value).
Note
When you use curly braces to assign property values, you don’t need double quotes ("").
React also needs the key={i} attribute to access the list more efficiently. Therefore, the final Menu component is restructured as this JSX code (ch09/menu-jsx/script.jsx).
Listing 9.5. Menu with JSX
class Menu extends React.Component {
  render() {
    let menus = ['Home',
      'About',
      'Services',
      'Portfolio',
      'Contact us']
    return <div>
      {menus.map((v, i) => {
        return <div key={i}><Link label={v}/></div>
      })}
    </div>
}}
Do you see the increase in readability? I do!
In Menu’s render(), if you prefer to start the <div> on a new line, you can do so by putting () around it. For example, this code is identical to listing 9.5, but <div> starts on a new line, which may be more visually appealing:
  //...
    return (
      <div>
        {menus.map((v, i) => {
          return <div key={i}><Link label={v}/></div>
        })}
      </div>
    )
}})
9.3.2. Refactoring the Link component
The <a> and <br> tags in the Link component also need to be refactored from this
  //...
    return React.createElement('div',
      null,
      React.createElement(
        'a',
        {href: url},
        this.props.label),
      React.createElement('br')
      )
  //...
to this JSX code:
  //...
    return <div>
      <a href={url}>
      {this.props.label}
      </a>
      <br/>
    </div>
  //...
The entire JSX version of the Link component should look something like this (ch09/menu-jsx/script.jsx).
Listing 9.6. JSX version of Link
class Link extends React.Component {
  render() {
    const url='/'
      + this.props.label
        .toLowerCase()
        .trim()
        .replace(' ', '-')
    return <div>
      <a href={url}>
      {this.props.label}
      </a>
      <br/>
    </div>
  }
}
Phew. You’re finished! Let’s run the JSX project.
9.3.3. Running the JSX project
Open your Terminal, iTerm, or Command Prompt app. In the project’s folder (ch09/menu-jsx or whatever you named it when you downloaded the source code), install dependencies with npm i (short for npm install) following the entries in package.json.
Then, run the npm build script with npm run build. The npm script will launch the Babel command with a watch flag (-w), which will keep Webpack running so it can watch for any file changes and recompile code from JSX to JS if there are changes to the JSX source code.
Needless to say, watch mode is a time-saver because it eliminates the need to recompile each time there’s a change to the source code. Hot module replacement is even better for development (so good that it could easily be the only reason to use React); I’ll cover it in chapter 12.
The actual command in the build script is as follows (but who wants to type it? It’s too long!):
./node_modules/.bin/babel script.jsx -o script.js -w
If you need a refresher on the Babel CLI, refer to chapter 3. You’ll find all the details there.
On my computer, I got this message from the Babel CLI (on yours, the path will differ):
> menu-jsx@1.0.0 build /Users/azat/Documents/Code/react-quickly/ch09/menu-jsx
> babel script.jsx -o script.js -w
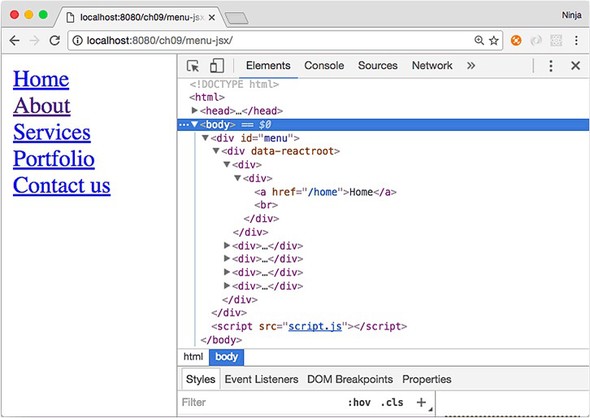
You’re good to go. With script.js generated, you can use static (node-static on npm: npm i -g node-static) to serve the files over HTTP on localhost. The application should look and work exactly like its regular JavaScript brethren, as shown in figure 9.4.
Figure 9.4. The menu created with JSX
9.4. Homework
For bonus points, do the following:
- Load menu from menus.json via the Fetch API. See chapter 5 for inspiration about how to load data.
- Create an npm script that will grab react.js from the react npm package installed in node_modules and copy it into the project folder to be used by index.html. This will replace the need to manually download react.js for future versions; instead, you can use npm i react and then run your script.
Submit your code in a new folder under ch09 as a pull request to this book’s GitHub repository: https://github.com/azat-co/react-quickly.