Table of Contents for
React Quickly: Painless web apps with React, JSX, Redux, and GraphQL
 React Quickly: Painless web apps with React, JSX, Redux, and GraphQL
Published by
Manning Publications, 2017
React Quickly: Painless web apps with React, JSX, Redux, and GraphQL
Published by
Manning Publications, 2017
- Cover
- React Quickly: Painless web apps with React, JSX, Redux, and GraphQL
- Copyright
- React Quickly: Painless web apps with React, JSX, Redux, and GraphQL
- Brief Table of Contents
- Table of Contents
- Praise for React Quickly
- Foreword
- Preface
- Acknowledgments
- About This Book
- About the Author
- About the Cover
- Part 1. React foundation
- Chapter 1. Meeting React
- Chapter 2. Baby steps with React
- Chapter 3. Introduction to JSX
- Chapter 4. Making React interactive with states
- Chapter 5. React component lifecycle events
- Chapter 6. Handling events in React
- Chapter 7. Working with forms in React
- Chapter 8. Scaling React components
- Chapter 9. Project: Menu component
- Chapter 10. Project: Tooltip component
- Chapter 11. Project: Timer component
- Part 2. React architecture
- Chapter 12. The Webpack build tool
- Chapter 13. React routing
- Chapter 14. Working with data using Redux
- Chapter 15. Working with data using GraphQL
- Chapter 16. Unit testing React with Jest
- Chapter 17. React on Node and Universal JavaScript
- Chapter 18. Project: Building a bookstore with React Router
- Chapter 19. Project: Checking passwords with Jest
- Chapter 20. Project: Implementing autocomplete with Jest, Express, and MongoDB
- Appendix A. Installing applications used in this book
- Appendix B. React cheatsheet
- Appendix C. Express.js cheatsheet
- Appendix D. MongoDB and Mongoose cheatsheet
- Appendix E. ES6 for success
- React Cheatsheet
- Index
- List of Figures
- List of Tables
- List of Listings
Chapter 18. Project: Building a bookstore with React Router
This chapter covers
- Project structure and Webpack configuration
- The host HTML file
- Creating components
- Launching the project
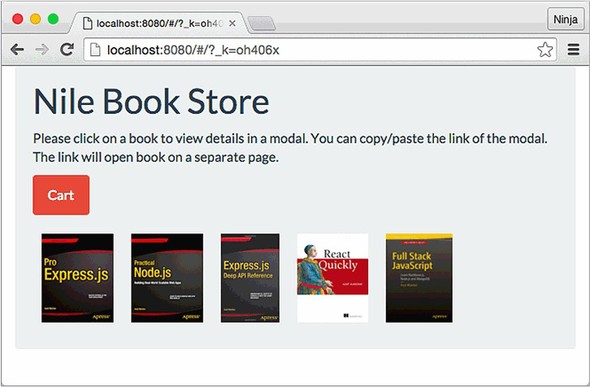
The project in this chapter focuses mainly on demonstrating how to use React Router, some ES6 features, and Webpack. In this project, you’ll build a simple e-commerce storefront for a bookstore (figure 18.1).
Figure 18.1. Nile Book Store home page with a list of books
You’ll learn how to create browser routing, as well as the following techniques for working with React Router:
- How to pass data to a route and access it
- How to access URL parameters
- How to create modal windows with changing URLs
- How to use layouts by nesting routes
To illustrate these techniques, the project includes several screens with different routes:
- Home (/)—The storefront with a book list
- Product page (/product/:id)—A separate product page
- Cart (/cart)—A web page showing the quantities and titles selected by the user
- Checkout (/checkout)—A print-ready invoice with the list of books
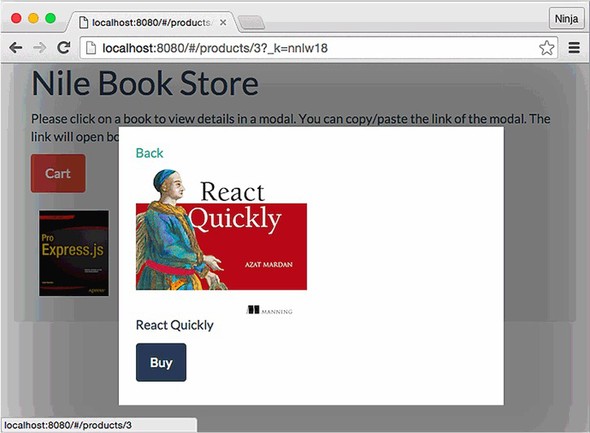
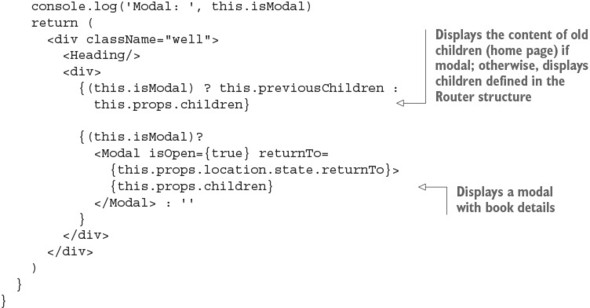
The product information will come from an array of data set in one of the files (ch18/nile/jsx/app.js; refer to the project structure in the next section). The product page can act as a modal dialog or as a separate page. When you click a product image on the home page, a modal dialog will open; for example, figure 18.2 shows a modal dialog with the detailed view of React Quickly.
Figure 18.2. Product view in a modal window of the Nile bookstore
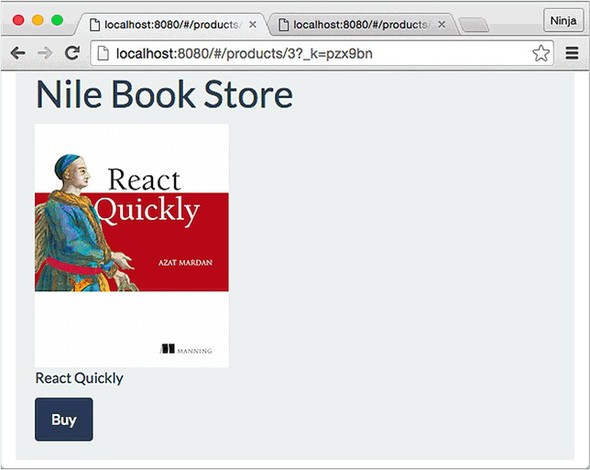
The URL is /products/3 followed by the hash token to keep track of the state. The link is shareable: if you open it in a new window/tab, it’s a normal screen, not a modal dialog (see figure 18.3). Modals are useful when you’re navigating through a list and don’t want to lose the context by going to a new page. But when you share a direct product link, there’s no context or list—you want to focus attention on the product.
Figure 18.3. A direct link opens the product view in a new window rather than a modal.
The roadmap to implementing the bookstore front end consists of the following steps:
- Setting up the project with npm, Babel, and Webpack
- Creating the HTML file
- Creating the components
- Launching the project
I encourage you to implement the items listed in the “Homework” section at the end of the chapter and submit your code to the book’s GitHub repository: https://github.com/azat-co/react-quickly.
Note
To follow along with the project, you’ll need to download the unminified version of React and install node.js and npm for compiling JSX. I’m also using Webpack as the build tool. Appendix A covers how to install everything.
Note
The source code for the project in this chapter is at www.manning.com/books/react-quickly and https://github.com/azat-co/react-quickly/tree/master/ch18. You can also find some demos at http://reactquickly.co/demos.
Let’s start with setting up the project.
18.1. Project structure and Webpack configuration
You have a basic understanding of the end result of this project: a front-end web app with URL routing. Time to jump in to the project structure. This is what the folder structure will look like:
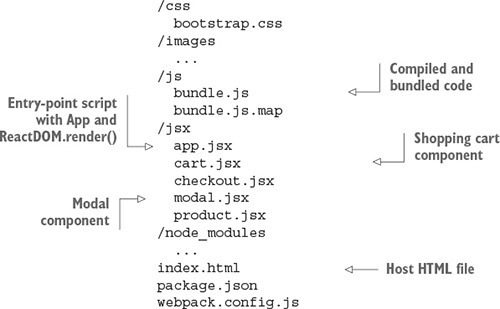
I’ve abridged the contents of the images and node_modules folders for the sake of brevity. This is a front-end-only application, but you need package.json to install dependencies and tell Babel what to do. The following listing shows those dependencies in full, in package.json.
Listing 18.1. Nile Book Store project dependencies and setup
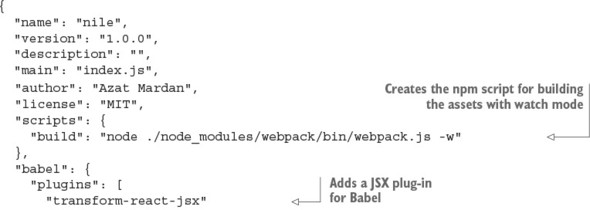
After starting with the standard project properties, the scripts command points to the local installation of Webpack. This way, you’re using the same version as in the devDependencies property. The build creates the bundle.js file and starts the Webpack development server on port 8080. You don’t have to use it; you can instead build manually each time there’s a change and use node-static (https://github.com/cloudhead/node-static) or a similar local web server:
"scripts": {
    "build": "node ./node_modules/webpack/bin/webpack.js -w"
  },
The next line is required for Babel v6.x, because without it Babel won’t do much. You’re telling Babel to use the JSX transformer and ES2015 presets:
  "babel": {
    "plugins": [
      "transform-react-jsx"
    ],
    "presets": [
      "es2015"
    ],
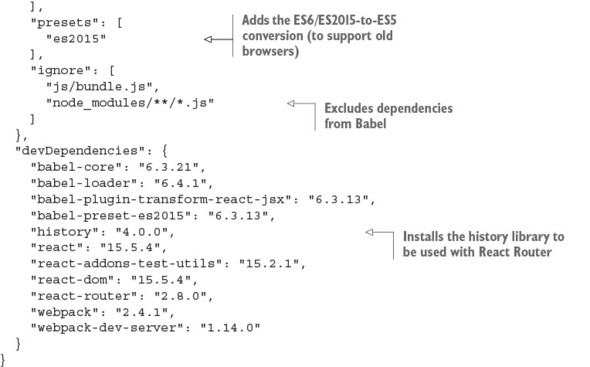
The next Babel config isn’t optional. It excludes some files from the Babel loader, such as certain node_modules folders and files:
    "ignore": [
      "js/bundle.js",
      "node_modules/**/*.js"
    ]
  },
Note
Next, you’ll define dependencies. You need to use the exact version numbers shown here, because I can’t guarantee that future versions will work. Given the speed at which React and Babel are developing, there will most likely be changes. But there’s nothing wrong with using slightly older versions to learn the concepts, as you’re doing in this book.
The devDependencies are for development, as the name suggests, and aren’t part of production deployment. This is where you put Webpack, Webpack Dev Server, Babel, and other packages. Please double-check that you’re using the exact versions listed here:
  ...
  "devDependencies": {
    "babel-core": "6.3.21",
    "babel-loader": "6.4.1",
    "babel-plugin-transform-react-jsx": "6.3.13",
    "babel-preset-es2015": "6.3.13",
    "history": "4.0.0",
    "react": "15.5.4",
    "react-addons-test-utils": "15.2.1",
    "react-dom": "15.5.4",
    "react-router": "2.8.0",
    "webpack": "2.4.1",
    "webpack-dev-server": "1.14.0"
  }
}
Now that you’ve defined the project dependencies, you need to set up the Webpack build process so you can use ES6 and transform JSX. To do this, create the file webpack.config.js in the root directory, with the following code (ch18/nile/webpack.config.js).
Listing 18.2. Webpack configuration for the Nile store
module.exports = {
  entry: "./jsx/app.jsx",
  output: {
    path: __dirname + '/js',
    filename: "bundle.js"
  },
  devtool: '#sourcemap',
  stats: {
   colors: true,
   reasons: true
  },
  module: {
    loaders: [
      {
        test: /\.jsx?$/,
        exclude: /(node_modules)/,
        loader: 'babel-loader'
      }
    ]
  }
}
Run npm i (short for npm install), and you’re finished with the setup. Next, you’ll create an HTML file that will hold skeleton <div> elements for React components.
18.2. The host HTML file
The HTML for this project is very basic. It has a container with the ID content and includes js/bundle.js (ch18/nile/index.html).
Listing 18.3. Host HTML file
<!DOCTYPE html>
<html>
  <head>
    <link href="css/bootstrap.css" type="text/css" rel="stylesheet"/>
  </head>
  <body>
    <div class="container-fluid">
      <div id="content" class=""></div>
    </div>
    <script src="js/bundle.js"></script>
  </body>
</html>
Now you can do a quick test to see whether the build and development processes work:
- Install all the dependencies with $ npm install. Do this just once.
- Put console.log('Hey Nile!') in jsx/app.jsx.
- Run the app with $ npm run build. You can leave it running, because the -w will rebuild the file on changes.
- Start your local web server from the project root. You can use node-static or webpack-dev-server, which you included in package.json.
- Open the browser at http://localhost:8080.
- Open the browser console (such as Chrome DevTools). You should see the “Hey Nile!” message.
18.3. Creating components
Onward to building the app, assuming you were able to see the message. You’ll begin by importing the modules using ES6 modules and destructuring. Simply put, destructuring is a way to define a variable from an object by using the same name as one of the object’s properties. For example, if you want to import accounts from user.accounts and declare accounts (see the repetition?), then you can use {accounts} = user. If you’re not sure about destructuring, refer to the ES6 cheatsheet in appendix E.
18.3.1. Main file: app.jsx
The first file to write is app.jsx, where you set up the main imports, book information, and routes. Minus the component code, which we’ll get to in a moment, app.jsx looks like this (ch18/nile/jsx/app.jsx).
Listing 18.4. Main app file
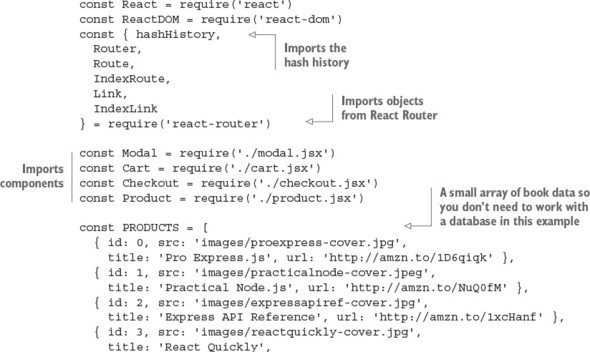
After you import everything at the top of the file, you hardcode the products into an array; each object has id, src, title, and url. Obviously, in the real world you’d get this data from the server, not have it in the browser JavaScript file:
const PRODUCTS = [
  { id: 0, src: 'images/proexpress-cover.jpg',
    title: 'Pro Express.js', url: 'http://amzn.to/1D6qiqk' },
  { id: 1, src: 'images/practicalnode-cover.jpeg',
    title: 'Practical Node.js', url: 'http://amzn.to/NuQ0fM' },
  { id: 2, src: 'images/expressapiref-cover.jpg',
    title: 'Express API Reference', url: 'http://amzn.to/1xcHanf' },
  { id: 3, src: 'images/reactquickly-cover.jpg',
    title: 'React Quickly',
    url: 'https://www.manning.com/books/react-quickly'},
  { id: 4, src: 'images/fullstack-cover.png',
    title: 'Full Stack JavaScript',
    url: 'http://www.apress.com/9781484217504'}
]
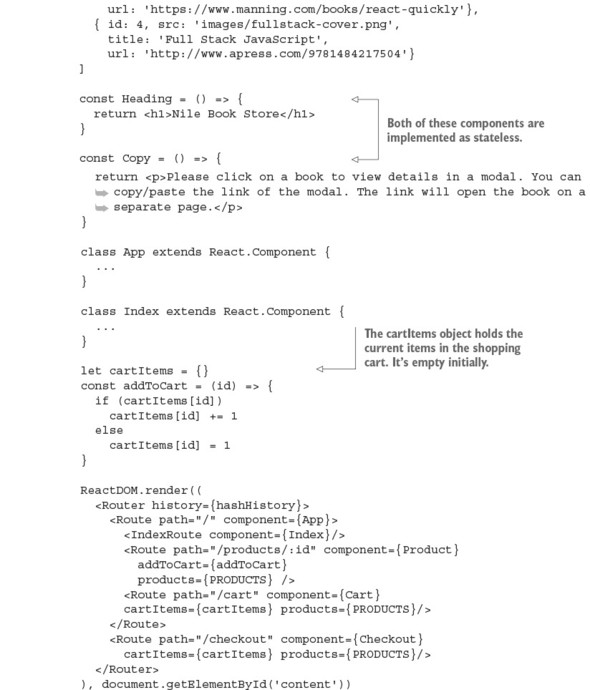
You implement the next component as stateless using ES6 fat arrows. Why not have it as an <h1> in a render? Because doing it this way, you can use it on multiple screens. You use the same stateless style for Copy. It’s just static HTML, so you don’t need anything extra, not even properties:
const Heading = () => {
  return <h1>Nile Book Store</h1>
}
const Copy = () => {
  return <p>Please click on a book to view details in a modal. You can
   copy/paste the link of the modal. The link will open the book on a
   separate page.</p>
}
copy/paste the link of the modal. The link will open the book on a
separate page.</p>
}
The two main components, App and Index, come next, followed by the cartItems object, which holds the current items in the shopping cart. It’s empty initially. addToCart() is a simple function—in a server-side version, you’d use Redux to persist the data to the server and sessions so a user could come back to the shopping cart later:
let cartItems = {}
const addToCart = (id) => {
  if (cartItems[id])
    cartItems[id] += 1
  else
    cartItems[id] = 1
}
Finally, here’s the ReactDOM.render() method you use to mount the Router component. You need to pass the history library to React Router. As I mentioned earlier, it can be the browser or hash history (this project is using the latter):
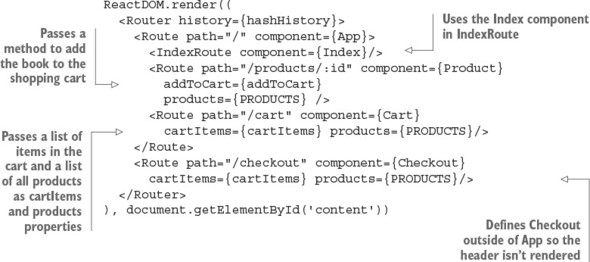
For the /products/:id route, the Product component route gets the addToCart() function to facilitate buying a book. The function will be available in this.props.route.addToCart because whatever property you pass to Route will be available in this.props.route.NAME in the component. For example, products will become this.props.route.products in Product:
<Route path="/products/:id" component={Product} addToCart={addToCart}
  products={PRODUCTS} />
The /checkout route is outside of App, so it doesn’t have a header (see figure 18.4). If you recall, path and the route structure can be independent:
<Route path="/checkout" component={Checkout}
  cartItems={cartItems} products={PRODUCTS}/>
Figure 18.4. An invoice shouldn’t have the header shown on other views.
In this case, by putting Checkout outside of App, Checkout isn’t App’s child. You can click Back to navigate back to the app from the invoice/checkout screen.
The App component
Now you can implement the App component! It’s the main component because it’s the entry point for Webpack and because it provides the layout for most of the views; renders child components such as Product, the product list, and Cart; and shows a modal dialog. Remember ReactDOM.render()? Here’s the gist, which shows that App is the root component of the app:
Unlike the stateless components, which were just functions, this component is the real deal (ch18/nile/jsx/app.jsx).
Listing 18.5. App component
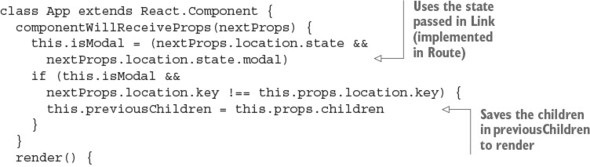
Recall that componentWillReceiveProps() takes the following properties as its argument. This method is a good place to determine whether this view is modal:
class App extends React.Component {
  componentWillReceiveProps(nextProps) {
    this.isModal = (nextProps.location.state &&
      nextProps.location.state.modal)
The following condition checks whether you’re on a modal screen or a nonmodal screen. If it’s modal, you assign children as previous children. The isModal Boolean determines whether the screen is modal based on state, which comes from the location property set in the Link element (you’ll see an example in the Index component):
    if (this.isModal &&
      nextProps.location.key !== this.props.location.key) {
      this.previousChildren = this.props.children
    }
  }
In the render() function, note that it doesn’t matter whether Heading is just a function (stateless component). You can render it like any other React component:
  render() {
    console.log('Modal: ', this.isModal)
    return (
      <div className="well">
        <Heading/>
And the ternary expression renders either this.previousChildren or this.props.children. React Router populates this.props.children from other nested routes/components, such as Index and Product. Remember that App is used by almost all of the app’s screens. By default, you want to render this.props.children when working with React Router:
<div>
  {(this.isModal) ? this.previousChildren: this.props.children}
If you didn’t have the isModal condition, and you output this.props.children every time, then when you clicked a book image to open the modal, you’d always see the same content, as shown in figure 18.5. Obviously, this behavior isn’t what you intend. For this reason, you render the previous children, which in the case of a modal window is the home page. You can reuse a modal link with state.modal equal to true (shown later, in the Index component). As a result, you’ll see the modal on top of the current context.
Figure 18.5. If you don’t check for isModal and use previousChildren, the list of books isn’t shown.
Finally, you can render the modal in another ternary expression. You’re passing isOpen and returnTo:
          {(isModal)?
            <Modal isOpen={true} returnTo={this.props.location.state.returnTo}>
              {this.props.children}
            </Modal> : ''
          }
        </div>
      </div>
    )
  }
}
The Index component
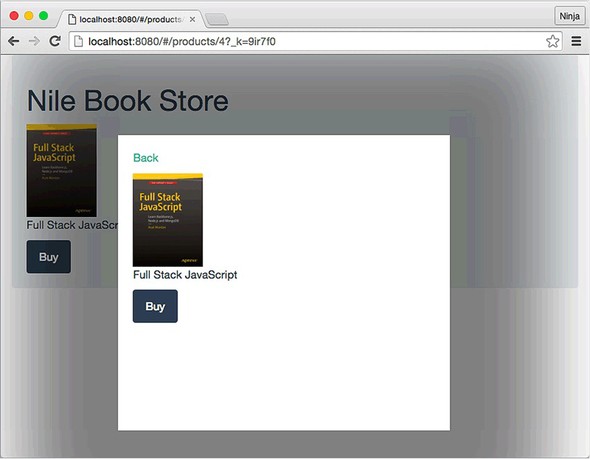
Continuing with nile/jsx/app.jsx, the next component is the home page. If you’ll recall, it shows the full list of books. The code is shown next (ch18/nile/jsx/app.jsx).
Listing 18.6. Index component for the home page
In the map() iterator, you render links to the book modals. These links will open in a separate, nonmodal view when you navigate to them directly:
{PRODUCTS.map(picture => (
    <Link key={picture.id}
      to={{pathname: `/products/${picture.id}`,
        state: { modal: true,
          returnTo: this.props.location.pathname }
        }
      }>
You can pass any property to the component associated with the /products/:id route (that is, Product and its parent, App). The properties are accessible in this.props.location.NAME, where NAME is the name of the property. You used state.modal earlier, in the Modal component.
The <img> tag uses the src attribute to render the book image:
              <img style={{ margin: 10 }} src={picture.src} height="100" />
            </Link>
          ))}
        </div>
      </div>
    )
  }
}
That’s it for the app.jsx file. The next component to implement is the Cart component; it will live in its own file, because it’s not closely related to the application the way App is a layout of the bookstore.
18.3.2. The Cart component
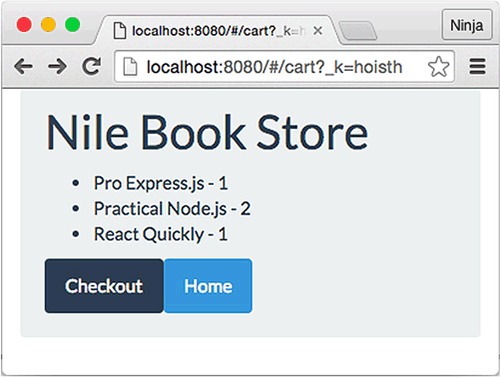
The /cart route, rendered by Cart, displays the list of books and their quantity in the shopping cart, as shown in figure 18.6. The Cart component uses cartItems to get the list of books and their quantity. Notice the ES6 style for the render() function (nile/jsx/cart.jsx).
Figure 18.6. Shopping cart
Listing 18.7. Cart component
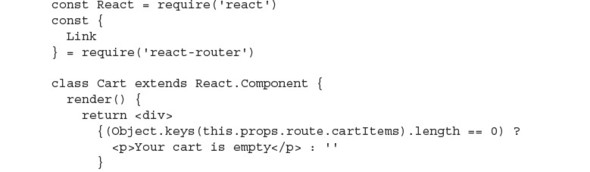
Cart uses this.props.route.products, which is a list of products. This works because in app.js, you defined the route property:
<Route path="/cart" component={Cart}
  cartItems={cartItems} products={PRODUCTS}/>
If you’re using Redux (chapter 14), you won’t need to manually pass properties such as products, because Provider will populate the data store in children automatically.
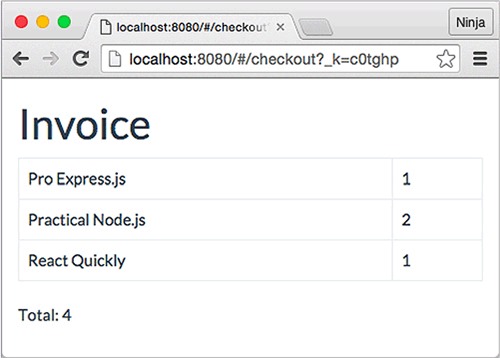
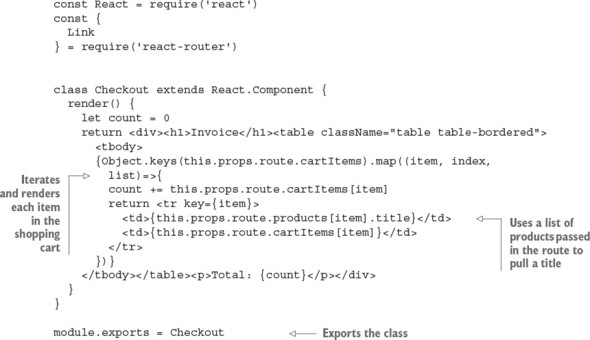
18.3.3. The Checkout component
Next is Checkout, shown in figure 18.7. This is the only component outside the App route. To refresh your memory, this is the routing from app.js:
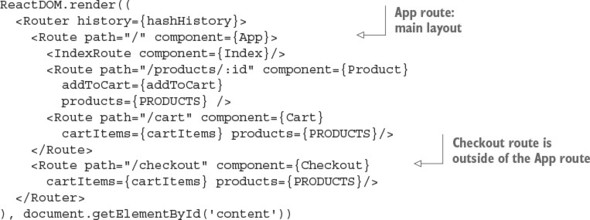
Figure 18.7. Checkout doesn’t need a header.
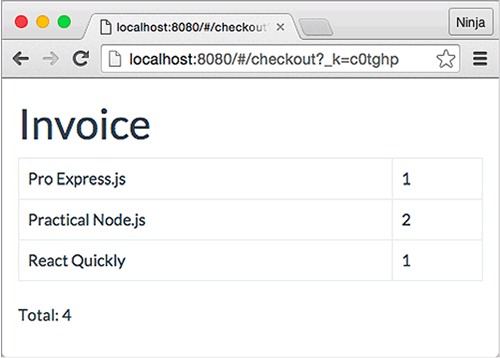
As you can see, App and Checkout are on the same level of the hierarchy. Thus, when you navigate to /checkout, the App route is not triggered. There’s no layout. (Interestingly, it’s possible to nest the URLs but keep the components out of the nested structure: for example, by setting /cart/checkout. You won’t do that here, though.)
The print-ready invoice uses a Twitter Bootstrap table and table-bordered styles. Again, you use ES6’s const (remember, object properties can change) and function syntax (nile/jsx/checkout.jsx).
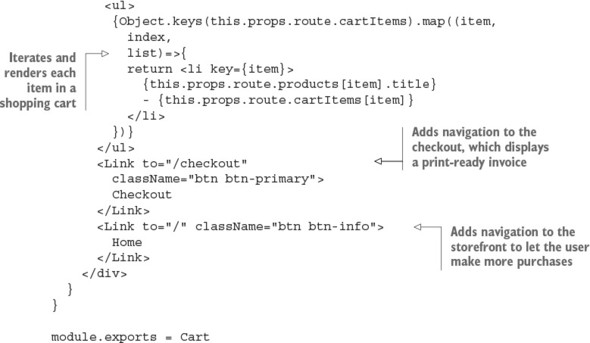
Listing 18.8. Checkout component
Now you need to implement the Modal component.
18.3.4. The Modal component
This component renders its children in a modal dialog. Recall that in App, the code uses Modal like this:
{(this.isModal) ?
  <Modal isOpen={true} returnTo={this.props.location.state.returnTo}>
    {this.props.children}
  </Modal> : ''
}
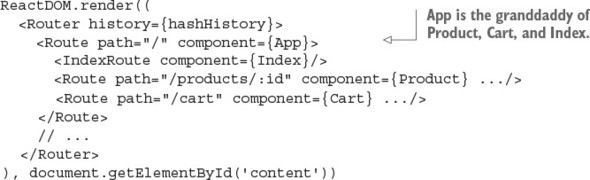
Modal takes children from App’s this.props.children, which in turn is defined in app.js, in <Route>. Here’s a reminder of the routing structure:
ReactDOM.render((
  <Router history={hashHistory}>
    <Route path="/" component={App}>
      <IndexRoute component={Index}/>
      <Route path="/products/:id" component={Product}
        addToCart={addToCart}
        products={PRODUCTS} />
      <Route path="/cart" component={Cart}
        cartItems={cartItems} products={PRODUCTS}/>
    </Route>
    <Route path="/checkout" component={Checkout}
      cartItems={cartItems} products={PRODUCTS}/>
  </Router>
), document.getElementById('content'))
This is how you can view a product page both as a standalone and as a modal. Components nested under the App route are its children, depending on the URL (nile/jsx/modal.jsx).
Listing 18.9. Modal component
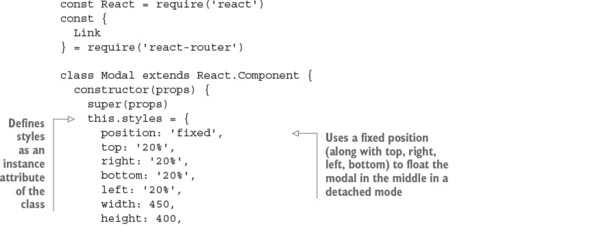
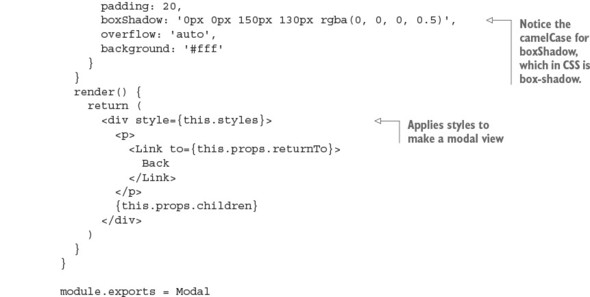
The modal window displays an individual Product component because that’s what’s nested under App in routing and because the Product route has the URL path /product/:id, which you used along with state set to modal true in Index (product list).
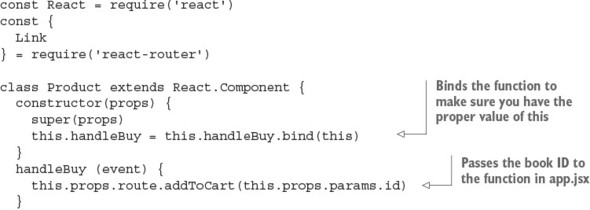
18.3.5. The Product component
The Product component uses the property from its route to trigger actions (this.props.route.addToCart). The addToCart() method in app.js puts a specific book in the shopping cart (if you’re using Redux, then this dispatches the action). You trigger addToCart() with the browser onClick event handler and a local method in Product called handleBuy(), which triggers the method addToCart from app.js. To summarize: onClick → this.handleBuy → this.props.route.addToCart → addToCart() (app.js). As a reminder, addToCart() is as follows:
let cartItems = {}
const addToCart = (id) => {
  if (cartItems[id])
    cartItems[id] += 1
  else
    cartItems[id] = 1
}
Of course, if you’re using Redux or Relay, then you’ll use their methods. This example keeps things simple with a plain array acting as a data store and a single method.
Now let’s look at the Product component itself. As always, you start by importing React and defining the class; then you take care of the event and render. Here’s the full code for Product (nile/jsx/product.jsx) with the most interesting parts noted.
Listing 18.10. Individual product information
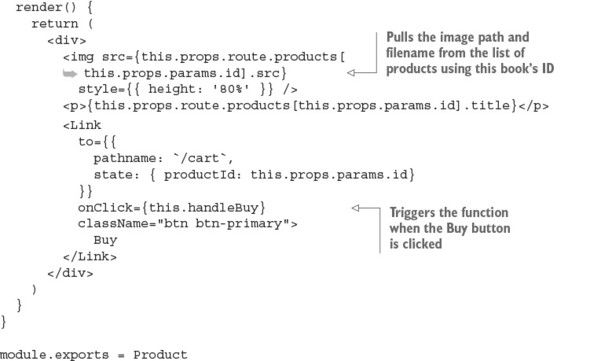
You can also send a state to Cart in the Link component:
<Link
  to={{
    pathname: `/cart`,
    state: { productId: this.props.params.id}
  }}
  onClick={this.handleBuy}
  className="btn btn-primary">
    Buy
</Link>
Recall that Product is used by the modal indirectly: Modal doesn’t render Product. Instead, Modal uses this.props.children, which has Product. Thus, Modal can be considered a passthrough component. (See chapter 8 for more about this.props.children and passthrough components that use it.)
18.4. Launching the project
That’s all for the bookstore. You’ve used some ES6 features and passed around states with React Router. Now, run the project by building it with npm run build, starting a local web server (WDS or node-static), and navigating to http://localhost:8080/nile, assuming you have a static web server running in a parent folder that has a nile folder (the URL path depends on where you launched the static web server).
You should see the home page with a grid of book covers. When you click a cover, a modal window appears; click the Buy button to add the book to the cart, which appears on the /cart and /checkout pages. Enjoy!
18.5. Homework
For bonus points, do the following:
- Abstract (copy/paste) Index and App into separate files, away from app.js, and rename App as Layout.
- Move the data to persistent storage such as MongoDB or PostgreSQL.
- Change the hash URL to hash-less by using a history API alongside the custom Express server (which you’ll need to implement). Refer to the Netflix clone with hash-less URLs in chapter 15 for inspiration.
- Add unit tests for Product and Checkout using Jest.
Submit your code in a new folder under ch18 as a pull request to this book’s GitHub repository: https://github.com/azat-co/react-quickly/.
18.6. Summary
- The Link component is imported from react-router and can be used to pass state, as in <Link to={{pathname: '/product', state: { modal: true }}}>.
- The React Router state is available in this.props.location.state.
- You can pass properties defined in <Route name={value}>, and they’ll be available in this.props.route.name.