Table of Contents for
React Quickly: Painless web apps with React, JSX, Redux, and GraphQL
 React Quickly: Painless web apps with React, JSX, Redux, and GraphQL
Published by
Manning Publications, 2017
React Quickly: Painless web apps with React, JSX, Redux, and GraphQL
Published by
Manning Publications, 2017
- Cover
- React Quickly: Painless web apps with React, JSX, Redux, and GraphQL
- Copyright
- React Quickly: Painless web apps with React, JSX, Redux, and GraphQL
- Brief Table of Contents
- Table of Contents
- Praise for React Quickly
- Foreword
- Preface
- Acknowledgments
- About This Book
- About the Author
- About the Cover
- Part 1. React foundation
- Chapter 1. Meeting React
- Chapter 2. Baby steps with React
- Chapter 3. Introduction to JSX
- Chapter 4. Making React interactive with states
- Chapter 5. React component lifecycle events
- Chapter 6. Handling events in React
- Chapter 7. Working with forms in React
- Chapter 8. Scaling React components
- Chapter 9. Project: Menu component
- Chapter 10. Project: Tooltip component
- Chapter 11. Project: Timer component
- Part 2. React architecture
- Chapter 12. The Webpack build tool
- Chapter 13. React routing
- Chapter 14. Working with data using Redux
- Chapter 15. Working with data using GraphQL
- Chapter 16. Unit testing React with Jest
- Chapter 17. React on Node and Universal JavaScript
- Chapter 18. Project: Building a bookstore with React Router
- Chapter 19. Project: Checking passwords with Jest
- Chapter 20. Project: Implementing autocomplete with Jest, Express, and MongoDB
- Appendix A. Installing applications used in this book
- Appendix B. React cheatsheet
- Appendix C. Express.js cheatsheet
- Appendix D. MongoDB and Mongoose cheatsheet
- Appendix E. ES6 for success
- React Cheatsheet
- Index
- List of Figures
- List of Tables
- List of Listings
Chapter 4. Making React interactive with states
This chapter covers
- Understanding React component states
- Working with states
- States versus properties
- Stateful versus stateless components
If you read only one chapter in this book, this should be it! Without states, your React components are just glorified static templates. I hope you’re as excited as I am, because understanding the concepts in this chapter will allow you to build much more interesting applications.
Imagine that you’re building an autocomplete input field (see figure 4.1). When you type in it, you want to make a request to the server to fetch information about matches to show on the web page. So far, you’ve worked with properties, and you’ve learned that by changing properties, you can get different views. But properties can’t change in the context of the current component, because they’re passed on this component’s creation.
Figure 4.1. The react-autocomplete component in action
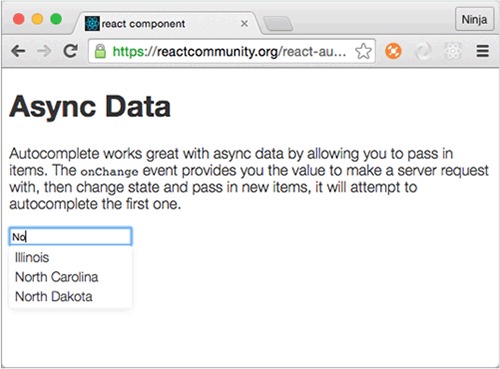
To put it another way, properties are immutable in the current component, meaning you don’t change properties in this component unless you re-create the component by passing new values from a parent (figure 4.2). But you must store the information you receive from the server somewhere and then display the new list of matches in the view. How do you update the view if the properties are unchangeable?
Figure 4.2. We need another data type that’s mutable in the component to make the view change.

One solution is to render an element with new properties each time you get the new server response. But then you’ll have to have logic outside the component—the component stops being self-contained. Clearly, if you can’t change the values of properties, and the autocomplete needs to be self-contained, you can’t use properties. Thus the question is, how do you update views in response to events without re-creating a component (createElement() or JSX <NAME/>)? This is the problem that states solve.
Once the response from the server is ready, your callback code will augment the component state accordingly. You’ll have to write this code yourself. Once the state is updated, though, React will intelligently update the view for you (only in the places where it needs to be updated; that’s where you use the state data).
With React component states, you can build meaningful, interactive React applications. State is the core concept that lets you build React components that can store data and automagically augment views based on data changes.
Note
The source code for the examples in this chapter is at www.manning.com/books/react-quickly and at https://github.com/azat-co/react-quickly/tree/master/ch04 (in the ch04 folder of the GitHub repository https://github.com/azat-co/react-quickly). You can also find some demos at http://reactquickly.co/demos.
4.1. What are React component states?
A React state is a mutable data store of components—self-contained, functionality-centric blocks of UI and logic. Mutable means state values can change. By using state in a view (render()) and changing values later, you can affect the view’s representation.
Here’s a metaphor: if you think of a component as a function that has properties and state as its input, then the result of this function is the UI description (view). Or, as React teams phrase it, “Components are state machines.” Properties and state both augment views, but they’re used for different purposes (see section 4.3).
To work with states, you access them by name. This name is an attribute (a.k.a. an object key or an object property—not a component property) of the this.state object: for example, this.state.autocompleMatches or this.state.inputFieldValue.
Note
Generally speaking, the word states refers to the attributes of the this.state object in a component. Depending on the context, state (singular) can refer to the this.state object or an individual attribute (such as this.state.inputFieldValue). Conversely, states (plural) almost always refers to the multiple attributes of the state object in a single component.
State data is often used to display dynamic information in a view to augment the rendering of views. Going back to the earlier example of an autocomplete field, the state changes in response to the XHR request to the server, which is, in turn, triggered by a user typing in the field. React takes care of keeping views up to date when the state used in the views changes. In essence, when state changes, only the corresponding parts of views change (down to single elements or even an attribute value of a single element).
Everything else in the DOM remains intact. This is possible due to the virtual DOM (see section 1.1.1), which React uses to determine the delta using the reconciliation process. This is how you can write declaratively. React does all the magic for you. The steps in the view change and how it happens are discussed in chapter 5.
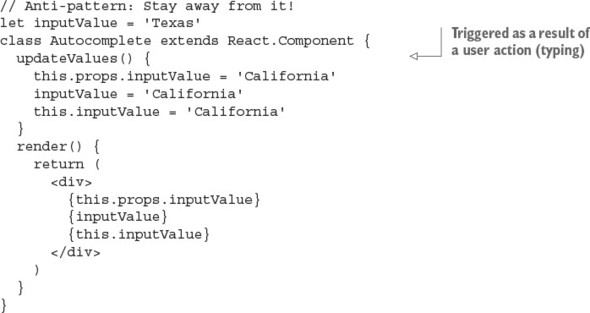
React developers use states to generate new UIs. Component properties (this.props), regular variables (inputValue), and class attributes (this.inputValue) won’t do it, because they don’t trigger a view change when you alter their values (in the current component context). For instance, the following is an antipattern, showing that if you change a value in anything except the state, you won’t get view updates:
Next, you’ll see how to work with React component states.
Note
As mentioned earlier (repetition is the mother of skills), properties will change the view if you pass a new value from a parent, which in turn will create a new instance of the component you’re currently working with. In the context of a given component, changing properties as in this.props.inputValue = 'California' won’t cut it.
4.2. Working with states
To be able to work with states, you need to know how to access values, update them, and set the initial values. Let’s start with accessing states in React components.
4.2.1. Accessing states
The state object is an attribute of a component and can be accessed with a this reference; for example, this.state.name. You’ll recall that you can access and print variables in JSX with curly braces ({}). Similarly, you can render this.state (like any other variable or custom component class attribute) in render(); for example, {this.state.inputFieldValue}. This syntax is similar to the way you access properties with this.props.name.
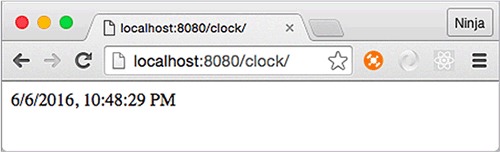
Let’s use what you’ve learned so far to implement a clock, as shown in figure 4.3. The goal is to have a self-contained component class that anyone can import and use in their application without having to jump through hoops. The clock must render the current time.
Figure 4.3. The clock component shows the current time in digital format and is updated every second.
The structure of the clock project is as follows:
/clock
  index.html
  /jsx
    script.jsx
    clock.jsx
  /js
    script.js
    clock.js
    react.js
    react-dom.js
I’m using the Babel CLI with a watch (-w) and a directory flag (-d) to compile all source JSX files from clock/jsx to a destination folder, clock/js, and recompile on changes. Moreover, I have the command saved as an npm script in my package.json in a parent folder, ch04, in order to run npm run build-clock from ch04:
"scripts": {
    "build-clock": "./node_modules/.bin/babel clock/jsx -d clock/js -w"
},
Obviously, time is always changing (for good or for bad). Because of that, you’ll need to update the view—and you can do so by using state. Give it the name currentTime, and try to render this state as shown in the following listing.
Listing 4.1. Rendering state in JSX
class Clock extends React.Component {
  render() {
    return <div>{this.state.currentTime}</div>
  }
}

ReactDOM.render(
  <Clock />,
  document.getElementById('content')
)
You’ll get an error: Uncaught TypeError: Cannot read property 'currentTime' of null. Normally, JavaScript error messages are as helpful as a glass of cold water to a drowning man. It’s good that, at least in this case, JavaScript gives you a helpful message. This one means you don’t have a value for currentTime. Unlike properties, states aren’t set on a parent. You can’t setState in render() either, because it’ll create a circular (setState → render → setState...) loop—and, in this case, React will throw an error.
4.2.2. Setting the initial state
Thus far, you’ve seen that before you use state data in render(), you must initialize the state. To set the initial state, use this.state in the constructor with your ES6 class React.Component syntax. Don’t forget to invoke super() with properties; otherwise, the logic in the parent (React.Component) won’t work:
class MyFancyComponent extends React.Component {
  constructor(props) {
    super(props)
    this.state = {...}
  }
  render() {
    ...
  }
}
You can also add other logic while you’re setting the initial state. For example, you can set the value of currentTime using new Date(). You can even use toLocaleString() to get the proper date and time format for the user’s location, as shown next (ch04/clock).
Listing 4.2. Clock component constructor
class Clock extends React.Component {
  constructor(props) {
    super(props)
    this.state = {currentTime: (new Date()).toLocaleString()}
  }
  ...
}
The value of this.state must be an object. We won’t get into a lot of detail here about the ES6 constructor(); see appendix E and the ES6 cheatsheet at https://github.com/azat-co/cheatsheets/tree/master/es6. The gist is that as with other OOP languages, constructor() is invoked when an instance of this class is created. The constructor method name must be exactly constructor. Think of it as an ES6 convention. Furthermore, if you create a constructor() method, you’ll almost always need to invoke super() inside it; otherwise, the parent’s constructor won’t be executed. On the other hand, if you don’t define a constructor() method, then the call to super() will be assumed under the hood.
Hopefully, Technical Committee 39 (TC39: the people behind the ECMAScript standard) will add attributes to the class syntax in future versions of ECMAScript! This way, we’ll be able to set state not just in the constructor, but also in the body of a class:
class Clock extends React.Component {
  state = {
    ...
  }
}
The proposal for class fields/attributes/properties is at https://github.com/jeffmo/es-class-fields-and-static-properties. It’s been there for many years, but as of this writing (March 2017), it’s only a stage 2 proposal (stage 4 means final and in the standard), meaning it’s not widely available in browsers. That is, this feature won’t work natively. (As of this writing, exactly zero browsers support class fields.)
Most likely, you’ll have to use a transpiler (such as Babel, Traceur, or TypeScript) to ensure that the code will work in all browsers. Check out the current compatibility of class properties in the ECMAScript compatibility table (http://kangax.github.io/compat-table/esnext), and, if needed, use the ES.Next Babel preset.
Here, currentTime is an arbitrary name; you’ll need to use the same name later when accessing and updating this state. You can name the state anything you want, as long as you refer to it later using this name.
The state object can have nested objects or arrays. This example adds an array of my books to the state:
class Content extends React.Component {
  constructor(props) {
    super(props)
    this.state = {
      githubName: 'azat-co',
      books: [
        'pro express.js',
        'practical node.js',
        'rapid prototyping with js'
      ]
    }
  }
  render() {
    ...
  }
}
The constructor() method is called just once, when a React element is created from this class. This way, you can set state directly by using this.state just once, in the constructor() method. Avoid setting and updating state directly with this.state = ... anywhere else, because doing so may lead to unintended consequences.
Note
With React’s own createClass() method to define a component, you’ll need to use getInitialState(). For more information on createClass() and an example in ES5, see the sidebar in section 2.2, “ES6+/ES2015+ and React.”
This will only get you the first value, which will be outdated very soon—like, in 1 second. What’s the point of a clock that doesn’t show the current time? Luckily, there’s a way to update the state.
4.2.3. Updating states
You change state with the this.setState(data, callback) class method. When this method is invoked, React merges the data with current states and calls render(). After that, React calls callback.
Having the callback in setState() is important because the method works asynchronously. If you’re relying on the new state, you can use the callback to make sure this new state is available.
If you rely on a new state without waiting for setState() to finish its work—that is, working synchronously with an asynchronous operation—then you may have a bug when you rely on new state values to be updated, but the state is still an old state with old values.
So far, you’ve rendered the time from a state. You also set the initial state, but you need to update the time every second, right? To do so, you can use a browser timer function, setInterval() (http://mng.bz/P2d6), which will execute the state update every n milliseconds. The setInterval() method is implemented in virtually all modern browsers as a global, which means you can use it without any libraries or prefixes. Here’s an example:
setInterval(()=>{
  console.log('Updating time...')
  this.setState({
    currentTime: (new Date()).toLocaleString()
  })
}, 1000)
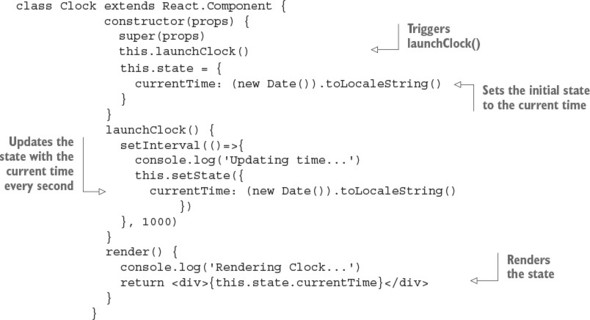
To kick-start the clock, you need to invoke setInterval() once. Let’s create a launchClock() method to do just that; you’ll call launchClock() in the constructor. The final clock is shown in the following listing (ch04/clock/jsx/clock.jsx).
Listing 4.3. Implementing a clock with state
You can use setState() anywhere, not just in launchClock() (which is invoked by constructor), as shown in the example. Typically, setState() is called from the event handler or as a callback for incoming data or data updates.
Tip
Changing a state value in your code using this.state.name= 'new name' won’t do any good. This won’t trigger a rerender and a possible real DOM update, which you want. For the most part, changing state directly without setState() is an antipattern and should be avoided.
It’s important to note that setState() updates only the states you pass to it (partially or merged, but not a complete replace). It doesn’t replace the entire state object each time. So, if you have three states and change one, the other two will remain unchanged. In the following example, userEmail and userId will remain intact:
constructor(props) {
  super(props)
  this.state = {
    userName: 'Azat Mardan',
    userEmail: 'hi@azat.co',
    userId: 3967
  }
}
updateValues() {
  this.setState({userName: 'Azat'})
}
If your intention is to update all three states, you need to do so explicitly by passing the new values for these states to setState(). (Another method you may still see in old React code but that’s no longer working and has been deprecated is the this.replaceState() method.[1] As you can guess from the name, it replaced the entire state object with all its attributes.)
Keep in mind that setState() triggers render(). It works in most cases. In some edge-case scenarios where the code depends on external data, you can trigger a rerender with this.forceUpdate(). But this approach should be avoided as a bad practice, because relying on external data and not state makes components more fragile and depends on external factors (tight coupling).
As mentioned earlier, you can access the state object with this.state. As you’ll recall, you output values with curly braces ({}) in JSX; therefore, to declare a state property in the view (that is, render’s return statement), apply {this.state.NAME}.
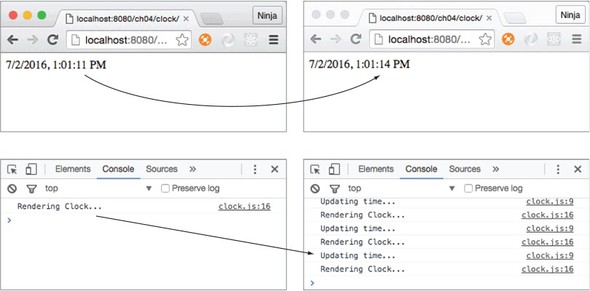
React magic happens when you use state data in a view (for example, to print, in an if/else statement, as a value of an attribute, or as a child’s property value) and then give setState() new values. Boom! React updates the necessary HTML for you. You can see this in your DevTools console. It should show cycles of “Updating ...” and then “Rendering ....” And the best part is that only the absolute minimum required DOM elements will be affected.
In JavaScript, this mutates (changes) its value depending on the place from which a function is called. To ensure that this refers to your component class, you need to bind the function to the proper context (this value: your component class).
If you’re using ES6+/ES2015+, as I do in this book, you can use fat-arrow function syntax to create a function with autobinding:
setInterval(()=>{
  this.setState({
    currentTime: (new Date()).toLocaleString()
  })
}, 1000)
Autobinding means the function created with a fat arrow gets the current value of this, which in this case is Clock.
The manual approach uses the bind(this) method on the closure:
function() {...}.bind(this)
It looks like this for your clock:
setInterval(function(){
  this.setState({
    currentTime: (new Date()).toLocaleString()
  })
}.bind(this), 1000)
This behavior isn’t exclusive to React. The this keyword mutates in a function’s closure, so you need do some sort of binding; you can also save the context (this) value so you can use it later.
Typically, you’ll see variables like self, that, and _this used to save the value of the original this. You’ve probably seen statements like the following:
var that = this
var _this = this
var self = this
The idea is straightforward: you create a variable and use it in the closure instead of referring to this. The new variable isn’t a copy but rather a reference to the original this value. Here’s setInterval():
var _this = this
setInterval(function(){
  _this.setState({
    currentTime: (new Date()).toLocaleString()
  })
}, 1000)
You have a clock, and it’s working, as shown in figure 4.4. Tadaaa!
Figure 4.4. The Clock is ticking.
One more quick thing before we move on. You can see how React is reusing the same DOM <div> element and only changes the text inside it. Go ahead and use DevTools to modify the CSS of this element. I added a style to make the text blue: color: blue, as shown in figure 4.5 (you can see the color in electronic versions of the book). I created an inline style, not a class. The element and its new inline style stayed the same (blue) while the time kept ticking.
Figure 4.5. React is updating the time’s text, not the <div> element (I manually added color: blue, and the <div> remained blue).
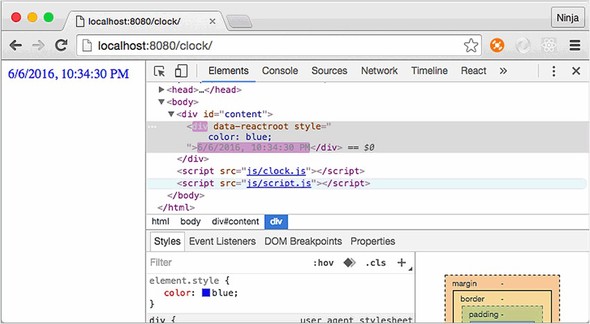
React will only update the inner HTML (the content of the second <div> container). The <div> itself, as well as all other elements on this page, remain intact. Neat.
4.3. States and properties
States and properties are both attributes of a class, meaning they’re this.state and this.props. That’s the only similarity! One of the primary differences between states and properties is that the former are mutable, whereas the latter are immutable.
Another difference between properties and states is that you pass properties from parent components, whereas you define states in the component itself, not its parent. The philosophy is that you can only change the value of a property from the parent, not the component. So properties determine the view upon creation, and then they remain static (they don’t change). The state, on the other hand, is set and updated by the object.
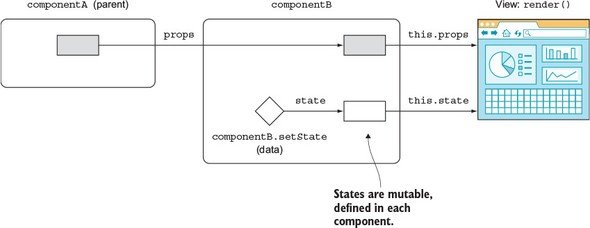
Properties and states serve different purposes, but both are accessible as attributes of the component class, and both help you to compose components with a different representation (view). There are differences between properties and states when it comes to the component lifecycle (more in chapter 5). Think of properties and states as inputs for a function that produces different outputs. Those outputs are views. So you can have different UIs (views) for each set of different properties and states (see figure 4.6).
Figure 4.6. New values for properties and states can change the UI. New property values come from a parent, and new state values come from the component.
Not all components need to have state. In the next section, you’ll see how to use properties with stateless components.
4.4. Stateless components
A stateless component has no states or components or any other React lifecycle events/methods (see chapter 5). The purpose of a stateless component is just to render the view. The only thing it can do is take properties and do something with them—it’s a simple function with the input (properties) and the output (UI element).
The benefit of using stateless components is that they’re predictable, because you have one input that determines the output. Predictability means they’re easier to understand, maintain, and debug. In fact, not having a state is the most desired React practice—the more stateless components you use and the fewer stateful ones you use, the better.
You wrote a lot of stateless components in the first three chapters of this book. For example, Hello World is a stateless component (ch03/hello-js-world-jsx/jsx/script.jsx).
Listing 4.4. Stateless Hello World
class HelloWorld extends React.Component {
  render() {
    return <h1 {...this.props}>Hello {this.props.frameworkName} world!!!
     </h1>
  }
}
</h1>
}
}
To provide a smaller syntax for stateless components, React uses this function style: you create a function that takes properties as an argument and returns the view. A stateless component renders like any other component. For example, the HelloWorld component can be rewritten as a function that returns <h1>:
const HelloWorld = function(props){
  return <h1 {...props}>Hello {props.frameworkName} world!!!</h1>
}
You can use ES6+/ES2015+ arrow functions for stateless components. The following snippet is analogous to the previous one (return can be omitted too, but I like to include it):
const HelloWorld = (props)=>{
  return <h1 {...props}>Hello {props.frameworkName} world!!!</h1>
}
As you can see, you can also define functions as React components when there’s no need for state. In other words, to create a stateless component, define it as a function. Here’s an example in which Link is a stateless component:
function Link (props) {
  return <a href={props.href} target="_blank" className="btn btn-primary">
   {props.text}</a>
}
ReactDOM.render(
  <Link text='Buy React Quickly'
   href='https://www.manning.com/books/react-quickly'/>,
  document.getElementById('content')
)
Although there’s no need for autobinding, you can use the fat-arrow function syntax for brevity (when there’s a single statement, the notation can be a one-liner):
const Link = props => <a href={props.href}
  target="_blank"
  className="btn btn-primary">
    {props.text}
  </a>
Or you can use the same arrow function but with curly braces ({}), explicit return, and parentheses (()) to make it subjectively more readable:
const Link = (props)=> {
  return (
    <a href={props.href}
      target="_blank"
      className="btn btn-primary">
        {props.text}
    </a>
  )
}
In a stateless component, you can’t have a state, but you can have two properties: propTypes and defaultProps (see sections 8.1 and 8.2, respectively). You set them on the object. And, by the way, it’s okay to not have an opening parenthesis after return as long as you start an element on the same line:
function Link (props) {
  return <a href={props.href}
    target="_blank"
    className="btn btn-primary">
      {props.text}
  </a>
}
Link.propTypes = {...}
Link.defaultProps = {...}
You also cannot use references (refs) with stateless components (functions).[2] If you need to use refs, you can wrap a stateless component in a normal React component. More about references in section 7.2.3.
“React stateless component this.refs..value?” http://mng.bz/Eb91.
4.5. Stateful vs. stateless components
Why use stateless components? They’re more declarative and work better when all you need to do is render some HTML without creating a backing instance or lifecycle components. Basically, stateless components reduce duplication and provide better syntax and more simplicity when all you need to do is mesh together some properties and elements into HTML.
My suggested approach, and the best practice according to the React team, is to use stateless components instead of normal components as often as possible. But as you saw in the clock example, it’s not always possible; sometimes you have to resort to using states. So, you have a handful of stateful components on top of the hierarchy to handle the UI states, interactions, and other application logic (such as loading data from a server).
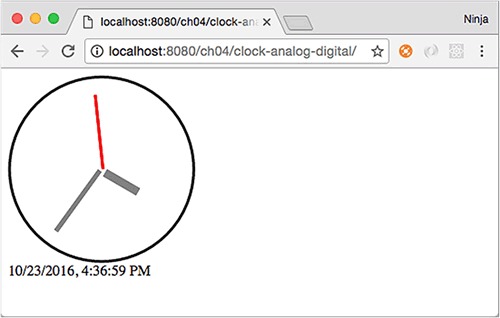
Don’t think that stateless components must be static. By providing different properties for them, you can change their representation. Let’s look at an example that refactors and enhances Clock into three components: a stateful clock that has the state and the logic to update it; and two stateless components, DigitalDisplay and AnalogDisplay, which only output time (but do it in different ways). The goal is something like figure 4.7. Pretty, right?
Figure 4.7. Clock with two ways to show time: analog and digital
The structure of the project is as follows:
/clock-analog-digital
  /jsx
    analog-display.jsx
    clock.jsx
    digital-display.jsx
    script.jsx
  /js
    analog-display.js
    clock.js
    digital-display.js
    script.js
    react.js
    react-dom.js
  index.html
The code for Clock renders the two child elements and passes the time property with the value of the currentTime state. The state of a parent becomes a property of a child.
Listing 4.5. Passing state to children
...
  render() {
    console.log('Rendering...')
    return <div>
      <AnalogDisplay time={this.state.currentTime}/>
      <DigitalDisplay time={this.state.currentTime}/>
    </div>
  }
Now, you need to create DigitalDisplay, which is simple. It’s a function that takes the properties and displays time from that property argument (props.time), as shown next (ch04/clock-analog-digital/jsx/digital-display.jsx).
Listing 4.6. Stateless digital display component
const DigitalDisplay = function(props) {
  return <div>{props.time}</div>
}
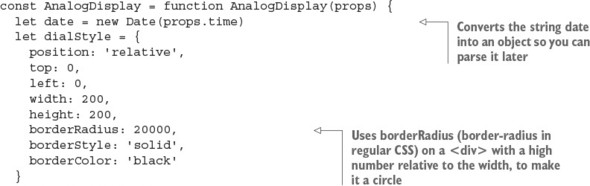
AnalogDisplay is also a function that implements a stateless component; but in its body is some fancy animation to rotate the hands. The animation works based on the time property, not based on any state. The idea is to take the time as a string; convert it to a Date object; get minutes, hours, and seconds; and convert those to degrees. For example, here’s how to get seconds as angle degrees:
let date = new Date('1/9/2007, 9:46:15 AM')
console.log((date.getSeconds()/60)*360 )  // 90
Once you have the degrees, you can use them in CSS, written as an object literal. The difference is that in the React CSS, the style properties are camelCased, whereas in regular CSS, the dashes (-) make style properties invalid JavaScript. As mentioned earlier, having objects for styles allows React to more quickly determine the difference between the old element and the new element. See section 3.4.3. for more about style and CSS in React.
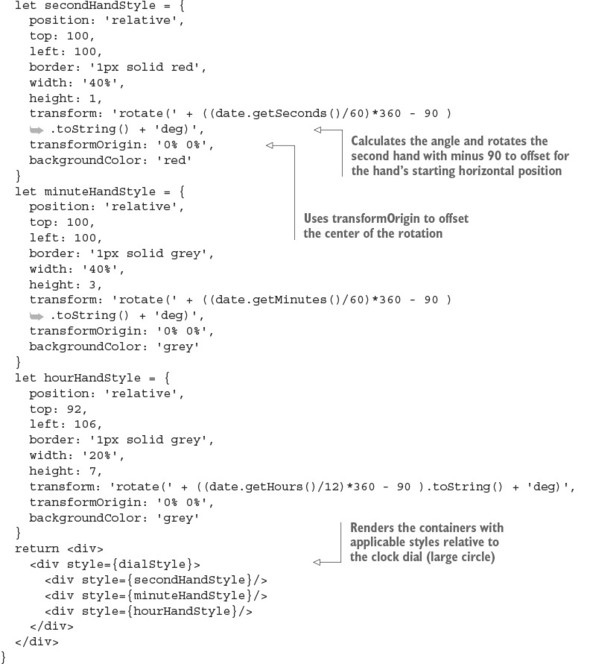
The following listing shows the stateless analog display component with CSS that uses values from the time property (ch04/clock-analog-digital/jsx/analog-display.jsx).
Listing 4.7. Stateless analog display component
If you have React Developer Tools for Chrome or Firefox (available at http://mng.bz/mt5P and http://mng.bz/DANq), you can open the React pane in your DevTools (or an analog in Firefox). Mine shows that the <Clock> element has two children (see figure 4.8). Notice that React DevTools tells you the names of the components along with the state, currentTime. What a great tool for debugging!
Figure 4.8. React DevTools v0.15.4 shows two components.

Note that in this example, I used anonymous expressions stored as const variables. Another approach is to use a syntax with named function declarations:
function AnalogDisplay(props) {...}
Or you can use the named function declaration referenced from a variable:
const AnalogDisplay = function AnalogDisplay(props) {...}
In JavaScript, there are several way to define a function. You can write an anonymous function expression that’s used right away (typically as a callback):
function() { return 'howdy'}
Or you can create an IIFE:
(function() {
  return('howdy')
})()
An anonymous function expression can be referenced in a variable:
let sayHelloInMandarin = function() { return 'ni hao'}
This is a named or hoisted function expression:
function sayHelloInTatar() { return 'sälam'}
And this is a named or hoisted function expression referenced in a variable:
let sayHelloInSpanish = function digaHolaEnEspanol() { return 'hola'}
Finally, you can use an immediately invoked, named function expression:
(function sayHelloInTexan() {
    return('howdy')
})()
There’s no fat-arrow syntax for named/hoisted functions.
As you can see, the AnalogDisplay and DigitalDisplay components are stateless: they have no states. They also don’t have any methods, except for the body of the function, which is not like render() in a normal React class definition. All the logic and states of the app are in Clock.
In contrast, the only logic you put into the stateless components is the animation, but that’s closely related to the analog display. Clearly, it would have been a bad design to include analog animation in Clock. Now, you have two components, and you can render either or both of them from Clock. Using stateless components properly with a handful of stateful components allows for more flexible, simpler, better design.
Usually, when React developers say stateless, they mean a component created with a function or fat-arrow syntax. It’s possible to have a stateless component created with a class, but this approach isn’t recommended because then it’s too easy for someone else (or you in six months) to add a state. No temptation, no way to complicate code!
You may be wondering whether a stateless component can have methods. Obviously, if you use classes, then yes, they can have methods; but as I mentioned, most developers use functions. Although you can attach methods to functions (they’re also objects in JavaScript), the code isn’t elegant, because you can’t use this in a function (the value isn’t the component; it’s window):
// Anti-pattern: Don't do this.
const DigitalDisplay = function(props) {
  return <div>{DigitalDisplay.locale(props.time)}</div>
}
DigitalDisplay.locale = (time)=>{
  return (new Date(time)).toLocaleString('EU')
}
If you need to perform some logic related to the view, create a new function right in the stateless component:
// Good pattern
const DigitalDisplay = function(props) {
  const locale = time => (new Date(time)).toLocaleString('EU')
  return <div>{locale(props.time)}</div>
}
Keep your stateless components simple: no states and no methods. In particular, don’t have any calls to external methods or functions, because their results may break predictability (and violate the concept of purity).
4.6. Quiz
You can set state in a component method (not a constructor) with which syntax? this.setState(a), this.state = a, or this.a = a
If you want to update the render process, it’s normal practice to change properties in components like this: this.props.a=100. True or false?
States are mutable, and properties are immutable. True or false?
Stateless components can be implemented as functions. True or false?
How do you define the first state variables when an element is created? setState(), initialState(), this.state =... in the constructor, or setInitialState()
4.7. Summary
- States are mutable; properties are immutable.
- getInitialState allows components to have an initial state object.
- this.setState updates only the properties you pass to it, not all state object properties.
- {} is a way to render variables and execute JavaScript in JSX code.
- this.state.NAME is the way to access state variables.
- Stateless components are the preferred way of working with React.
4.8. Quiz answers
this.setState(a), because we never, never, never assign this.state directly except in constructor(). this.a will not do anything with state. It’ll only create an instance field/attribute/property.
False. Changing a property in the component won’t trigger a rerender.
True. There’s no way to change a property from a component—only from its parent. Conversely, states are changed only by the component.
True. You can use the arrow function or the traditional function() {} definition, but both must return an element (single element).
this.state = ... in the constructor, or getInitialState() if you’re using createClass().