
![]()
For online information and ordering of this and other Manning books, please visit www.manning.com. The publisher offers discounts on this book when ordered in quantity. For more information, please contact
       Special Sales Department
       Manning Publications Co.
       20 Baldwin Road
       PO Box 761
       Shelter Island, NY 11964
       Email: orders@manning.com
©2017 by Manning Publications Co. All rights reserved.
No part of this publication may be reproduced, stored in a retrieval system, or transmitted, in any form or by means electronic, mechanical, photocopying, or otherwise, without prior written permission of the publisher.
Many of the designations used by manufacturers and sellers to distinguish their products are claimed as trademarks. Where those designations appear in the book, and Manning Publications was aware of a trademark claim, the designations have been printed in initial caps or all caps.
 Recognizing the importance of preserving what has been written, it is Manning’s policy to have the books we publish printed
on acid-free paper, and we exert our best efforts to that end. Recognizing also our responsibility to conserve the resources
of our planet, Manning books are printed on paper that is at least 15 percent recycled and processed without the use of elemental
chlorine.
Recognizing the importance of preserving what has been written, it is Manning’s policy to have the books we publish printed
on acid-free paper, and we exert our best efforts to that end. Recognizing also our responsibility to conserve the resources
of our planet, Manning books are printed on paper that is at least 15 percent recycled and processed without the use of elemental
chlorine.
 |
Manning Publications Co. 20 Baldwin Road PO Box 761 Shelter Island, NY 11964 |
Development editor: Dan Maharry
Technical development editor: Anto Aravinth
Review editor: Ivan Martinović
Project editor: Tiffany Taylor
Copyeditor: Tiffany Taylor
Proofreader: Katie Tennant
Technical proofreader: German Frigerio
Typesetter: Gordan Salinovic
Cover designer: Leslie Haimes
ISBN 9781617293344
Printed in the United States of America
1 2 3 4 5 6 7 8 9 10 – EBM – 22 21 20 19 18 17
To my grandfather, Khalit Khamitov. Thank you for being such a kind and just person. You will always stay in my memory, along with the crafts you taught me, the trips we took to the dacha, and the chess games we played.
Chapter 2. Baby steps with React
Chapter 3. Introduction to JSX
Chapter 4. Making React interactive with states
Chapter 5. React component lifecycle events
Chapter 6. Handling events in React
Chapter 7. Working with forms in React
Chapter 8. Scaling React components
Chapter 9. Project: Menu component
Chapter 12. The Webpack build tool
Chapter 14. Working with data using Redux
Chapter 15. Working with data using GraphQL
Chapter 16. Unit testing React with Jest
Chapter 17. React on Node and Universal JavaScript
Chapter 18. Project: Building a bookstore with React Router
Chapter 19. Project: Checking passwords with Jest
Chapter 20. Project: Implementing autocomplete with Jest, Express, and MongoDB
Appendix A. Installing applications used in this book
Appendix C. Express.js cheatsheet
1.2. The problem that React solves
1.5. How React can fit into your web applications
1.5.1. React libraries and rendering targets
Chapter 2. Baby steps with React
Chapter 3. Introduction to JSX
3.1. What is JSX, and what are its benefits?
3.2.1. Creating elements with JSX
3.2.2. Working with JSX in components
3.2.3. Outputting variables in JSX
3.2.4. Working with properties in JSX
3.3. Setting up a JSX transpiler with Babel
Chapter 4. Making React interactive with states
4.1. What are React component states?
Chapter 5. React component lifecycle events
5.1. A bird’s-eye view of React component lifecycle events
5.4. Executing all events together
5.6.1. componentWillReceiveProps(newProps)
Chapter 6. Handling events in React
6.1. Working with DOM events in React
6.1.1. Capture and bubbling phases
6.1.2. React events under the hood
6.1.3. Working with the React SyntheticEvent event object
6.2. Responding to DOM events not supported by React
6.3. Integrating React with other libraries: jQuery UI events
Chapter 7. Working with forms in React
7.1. The recommended way to work with forms in React
7.2. Alternative ways to work with forms
7.2.1. Uncontrolled elements with change capturing
7.2.2. Uncontrolled elements without capturing changes
Chapter 8. Scaling React components
8.1. Default properties in components
8.2. React property types and validation
8.4. Creating React higher-order components for code reuse
8.4.1. Using displayName: distinguishing child components from their parent
8.4.2. Using the spread operator: passing all of your attributes
8.5. Best practices: presentational vs. container components
Chapter 9. Project: Menu component
9.1. Project structure and scaffolding
9.2. Building the menu without JSX
9.3.1. Refactoring the Menu component
Chapter 10. Project: Tooltip component
10.1. Project structure and scaffolding
Chapter 11. Project: Timer component
11.1. Project structure and scaffolding
Chapter 12. The Webpack build tool
12.2. Adding Webpack to a project
12.4. Running Webpack and testing the build
13.1. Implementing a router from scratch
13.1.1. Setting up the project
13.2.1. React Router’s JSX style
13.3.1. Accessing router with the withRouter higher-order component
13.3.2. Navigating programmatically
Chapter 14. Working with data using Redux
14.1. React support for unidirectional data flow
14.2. Understanding the Flux data architecture
14.3. Using the Redux data library
14.3.2. Dependencies and configs
14.3.9. Connecting components to the store
14.3.10. Dispatching an action
14.3.11. Passing action creators into component properties
Chapter 15. Working with data using GraphQL
15.2. Adding a server to the Netflix clone
15.2.1. Installing GraphQL on a server
15.2.4. Querying the API and saving the response into the store
Chapter 16. Unit testing React with Jest
16.2. Why Jest (vs. Mocha or others)?
16.4. UI testing React with Jest and TestUtils
16.4.1. Finding elements with TestUtils
Chapter 17. React on Node and Universal JavaScript
17.1. Why React on the server? And what is Universal JavaScript?
17.1.2. Better performance with faster loading times
17.3. React and Express: rendering on the server side from components
17.4. Universal JavaScript with Express and React
17.4.1. Project structure and configuration
17.4.3. Server-side layout templates with Handlebars
17.4.4. Composing React components on the server
Chapter 18. Project: Building a bookstore with React Router
18.1. Project structure and Webpack configuration
Chapter 19. Project: Checking passwords with Jest
19.1. Project structure and Webpack configuration
19.3. Implementing a strong password module
19.4. Implementing the Password component
Chapter 20. Project: Implementing autocomplete with Jest, Express, and MongoDB
20.1. Project structure and Webpack configuration
20.2. Implementing the web server
20.3. Adding the browser script
20.4. Creating the server template
20.5. Implementing the Autocomplete component
Appendix A. Installing applications used in this book
Using Babel to compile JSX and ES6
Sequence of lifecycle events (inspired by http://react.tips)
Component properties and methods
Appendix C. Express.js cheatsheet
Appendix D. MongoDB and Mongoose cheatsheet
“React Quickly is a one-stop shop for anyone who wants a guided introduction to React and the ecosystem of tools, concepts, and libraries around it. Follow Azat’s walkthroughs, work on the projects given, and you’ll soon understand React, Redux, GraphQL, Webpack, and Jest, as well as how to put them to work.”
Peter Cooper, editor of JavaScript Weekly
“React Quickly teaches the reader the most valuable and buzz-worthy concepts in building modern web applications with React including GraphQL, Webpack, and server-side rendering. After reading React Quickly, you should feel confident in your ability to create a production-grade web application with React.”
Stan Bershadskiy, author of React Native Cookbook
“Azat is one of the most authoritative voices in the programming space. This book goes far beyond the basics by deep diving into React’s foundation and architecture. It’s a must read for any developer!”
Erik Hanchett, author of Ember.js Cookbook
“This book is simple to follow. It uses very basic language that makes you understand each concept step by step.”
Israel Morales, front-end developer and web designer at SavvyCard
“Simple language with simple logical examples to get you up and running quickly is why this book truly justifies its title, React Quickly. This book covers all the major topics that any developer new to React needs in order to start writing apps using React. And the author’s sense of humor will keep you engaged until the end. I am thankful Azat took time to share his React journey with us.”
Suhas Deshpande, software engineer at Capital One
“React Quickly is a great resource for coming up to speed with React. Very thorough and relevant. I’ll be using it as a reference for my next app.”
Nathan Bailey, full stack developer at SpringboardAuto.com
“Azat is great at what he does—teaching people how to code. React Quickly contains fundamental knowledge as well as practical examples to get you started using React quickly.”
Shu Liu, IT consultant
“Since being open sourced by Facebook in 2013, React.js has rapidly become a widely adopted JS library and one of the most starred projects on GitHub. In his new book, React Quickly, Azat Mardan has, in his typical lucid style, laid out everything you need to learn about the React ecosystem in order to build performant SPA applications quickly. Just the chapters on React state and Universal JavaScript are worth the price of the book.”
Prakash Sarma, New Star Online
“React Quickly will ease your adoption of React by giving you a clear foundation, and it will have you building applications that thoroughly embrace the benefits of using React.
Allan Von Schenkel, VP of Technology & Strategy at FoundHuman
“React Quickly covers all the important aspects of React in an easy-to-consume fashion. This book is like all of Azat’s work: clear and concise, and it covers what’s needed to become productive quickly. If you are interested in adding React to your skill set, I say start here.”
Bruno Watt, consulting architect at hypermedia.tech
“React Quickly is an incredibly comprehensive book on full-stack web development with React.js, covering not just React itself but the ecosystem surrounding it. I’ve always been mystified by server-side React and found that Azat’s book really helped me finally understand it. If you’re new to React and would like to truly master it, I would look no further than this book.”
Richard Kho, software engineer at Capital One
I keep hoping that JavaScript will die. Seriously. Die brutally and painfully.
It’s not that I completely dislike JavaScript—it has improved quite a bit over the years. It’s that I have a severe distaste for complexity—so much so that I named my blog and my business Simple Programmer. My tagline has always been, “Making the complex simple.”
Making the complex simple isn’t easy. It takes a special set of skills. You have to be able to understand the complex, and understand it so well that you can distill it down to the core—because everything is simple at the core. This is exactly what Azat has done with this book, React Quickly.
Now, I’ll admit Azat had a little help. You see, one of the reasons I personally like ReactJS so much is that it’s simple. It was designed to be simple. It was designed to deal with the increasing complexity of JavaScript frameworks and reduce that complexity by going back to the basics: plain old JavaScript. (At least, for the most part. ReactJS does have a JSX language that’s compiled into JavaScript, but I’ll let Azat tell you about that.)
The point is, although I like Angular, Backbone, and some other JavaScript frameworks because they’ve helped make it much easier for web developers to create asynchronous web applications and single-page applications, they’ve also added a great deal of complexity. Using templates and understanding the syntax and subtleties of these frameworks increased productivity, but they moved the complexity from the backend to the frontend. ReactJS starts over, gets rid of templates, and gives you a way to apply component-based architecture to your UI using JavaScript. I like this. It’s simple. But even the simplest thing can be difficult to explain—or worse yet, made complex by a teacher who lacks this skill.
This is where Azat comes in. He knows how to teach. He knows how to simplify. He begins this book by explaining React through contrasting it with something you probably already know: Angular. Even if you don’t know Angular, his explanation of ReactJS will quickly help you understand the basics and its purpose. Then Azat quickly demonstrates how to create a basic ReactJS application, so you can see and do it for yourself. After that, he takes you through the 20% you need to know in order to accomplish 80% of what you’ll do in React, using real-world examples that anyone can grasp easily. Finally—and this is my favorite part—he includes examples and projects galore. The absolute best way to learn is by doing, and Azat walks you through creating six—yes, six—nontrivial projects using ReactJS.
In keeping with my theme of simplicity, I’ll leave off here by saying that React Quickly is simply the best way I know of to learn ReactJS.
JOHN SONMEZ
AUTHOR OF Soft Skills (http://amzn.to/2hFHXAu)
AND FOUNDER OF Simple Programmer (https://simpleprogrammer.com)
It was 2008, and banks were closing left and right. I was working at the Federal Deposit Insurance Corporation (FDIC), whose primary task is to pay back depositors of closed, failed, and insolvent banks. I admit that, in terms of job security, my job was on par with working at Lehman Brothers or being a ticket salesman for the Titanic. But when my department’s eventual budget cuts were still far in the future, I had the chance to work on an app called Electronic Deposit Insurance Estimator (EDIE). The app became hugely popular for a simple reason: people were anxious to find out how much of their savings was insured by the United States federal government, and EDIE estimated that amount.
But there was a catch: people don’t like to tell the government about their private accounts. To protect their privacy, the app was made entirely in front-end JavaScript, HTML, and CSS, without any back-end technologies. This way, the FDIC wasn’t collecting any financial information.
The app was a hot mess of spaghetti code left by dozens of iterations of consultants. Developers came and went, leaving no documentation and nothing resembling any logical, simple algorithms. It was like trying to use the New York City subway without a map. There were myriads of functions to call other functions, strange data structures, and more functions. In modern terminology, the app was pure user interface (UI), because it had no backend.
I wish I’d had React.js back then. React brings joy. It’s a new way of thinking—a new way of developing. The simplicity of having your core functionality in one place, as opposed to splitting it into HTML and JS, is liberating. It reignited my passion for front-end development.
React is a fresh way of looking at developing UI components. It’s a new generation of presentation layer libraries. Together with a model and routing library, React can replace Angular, Backbone, or Ember in the web and mobile tech stack. This is the reason I wrote this book. I never liked Angular: it’s too complex and opinionated. The template engine is very domain specific, to the point that it’s not JavaScript anymore; it’s another language. I have used Backbone.js and like it for its simplicity and DIY approach. Backbone.js is mature and more like a foundation for your own framework than a full-blown, opinionated framework in itself. The problem with Backbone is the increased complexity of interactions between models and views: multiple views update various models, which update other views, which trigger events on models.
My personal experience from doing a Kickstarter campaign for my React.js online course (http://mng.bz/XgkO) and from going to various conferences and events has shown me that developers are hungry for a better way to develop UIs. Most business value now lies in UIs. The backend is a commodity. In the Bay Area, where I live and work, most job openings in software engineering are for front-end or (a trendy new title) generalist/fullstack developers. Only a few big companies like Google, Amazon, and Capital One still have relatively strong demand for data scientists and back-end engineers.
The best way to ensure job security or get a great job in the first place is to become a generalist. The fastest way to do so is to use an isomorphic, scalable, developer-friendly library like React on the front end, paired with Node.js on the backend in case you ever need to mess with server-side code.
For mobile developers, HTML5 was a dirty word two or three years ago. Facebook dropped its HTML5 app in favor of a more performant native implementation. But this unfavorable view is quickly changing. With React Native, you can render for mobile apps: you can keep your UI components but tailor them to different environments, another point in favor of learning React.
Programming can be creative. Don’t get bogged down by mundane tasks, complexity, and fake separation of concerns. Cut out all the unnecessary junk, and unleash your creative power with the simplistic beauty of modular, component-based UIs powered by React. Throw in some Node for isomorphic/universal JavaScript, and you’ll achieve Zen.
Happy reading, and let me know how you like the book by leaving a review on Amazon.com (http://amzn.to/2gPxv9Q).
I’d like to acknowledge the internet, the universe, and the human ingenuity that brought us to the point that telepathy is possible. Without opening my mouth, I can share my thoughts with millions of people around the globe via social media such as Twitter, Facebook, and Instagram. Hurray!
I feel humongous gratitude to my teachers, both intentional at schools and universities, and accidental and occasional, whose wisdom I grasped from books and from learning by osmosis.
As Stephen King once wrote, “To write is human, to edit is divine.” Thus, my endless gratitude to the editors of this book and even more so to the readers who will have to deal with the inevitable typos and bugs they’ll encounter in this volume. This is my 14th book, and I know there will be typos, no mater what [sic].
I thank the people at Manning who made this book possible: publisher Marjan Bace and everyone on the editorial and production teams, including Janet Vail, Kevin Sullivan, Tiffany Taylor, Katie Tennant, Gordan Salinovic, Dan Maharry, and many others who worked behind the scenes.
I can’t thank enough the amazing group of technical peer reviewers led by Ivan Martinovic: James Anaipakos, Dane Balia, Art Bergquist, Joel Goldfinger, Peter Hampton, Luis Matthew Heck, Ruben J. Leon, Gerald Mack, Kamal Raj, and Lucas Tettamanti. Their contributions included catching technical mistakes, errors in terminology, and typos, and making topic suggestions. Each pass through the review process and each piece of feedback implemented through the forum topics shaped and molded the manuscript.
On the technical side, special thanks go to Anto Aravinth, who served as the book’s technical editor; and German Frigerio, who served as the book’s technical proofreader. They are the best technical editors I could have hoped for.
Many thanks go to John Sonmez of Pluralsight, Manning, and SimpleProgrammer.com fame, for writing the foreword to this book. Thank you, Peter Cooper, Erik Hanchett, and Stan Bershadskiy for your reviews and for giving the book extra credibility. Readers who haven’t heard of John, Peter, Erik, or Stan should subscribe and follow their work around software engineering.
Finally, a thank you to all the MEAP readers for your feedback. Revising the book based on your reviews delayed publication by a year, but the result is the best book currently available about React.
This book is intended to cure the troubles of front-end developers, make their lives more meaningful and happier, and help them earn more money by introducing them to React.js—and doing so in a fast manner (hence the word Quickly in the title). It’s the work of one and a half years and about a dozen people. At the very least, the book is meant to open your mind to some unusual concepts like JSX, unidirectional data flow, and declarative programming.
The book is split into two parts: “Core React” (chapters 1–11) and “React and friends” (chapters 12–20). Each chapter includes descriptive text supplemented with code examples and diagrams where they’re applicable. Each chapter also has an optional introductory video that will help you decide whether you need to read the chapter or can skip it. Chapters are written in a standalone manner, meaning you should have no trouble if you don’t read the book in order—although I do recommend reading it sequentially. At the end of each chapter is a quiz, to reinforce your retention of the material, and a summary.
Each part ends with a series of larger projects that will give you more experience with React and solidify your new understanding by building on the concepts and knowledge introduced in the previous chapters. The projects are supplemented by optional screencast videos to reinforce your learning and show you dynamic things like creating files and installing dependencies (there are a lot of moving parts in web development!). These projects are an integral part of the book’s flow—avoid skipping them. I encourage you to type each line of code yourself and abstain from copying and pasting. Studies have shown that typing and writing increase learning effectiveness.
The book ends with five appendixes that provide supplemental material. Check them out, along with the table of contents, before you begin reading.
The websites for this book are www.manning.com/books/react-quickly and http://reactquickly.co. If you need up-to-date information, most likely you’ll find it there.
The source code is available on the Manning website (www.manning.com/books/react-quickly) and on GitHub (https://github.com/azat-co/react-quickly). See the “Source code” section for more details. I show full listings of the code in the book—this is more convenient than jumping to GitHub or a code editor to look at the files.
This book is for web and mobile developers and software engineers with two to three years of experience, who want to start learning and using React.js for web or mobile development. Basically, it’s for people who know the shortcut for the Developer Tools by heart (Cmd-Opt-J or Cmd-Opt-I on Macs). The book targets readers who know and are on a first-name basis with these concepts:
Having experience with jQuery, Angular, Ember.js, Backbone.js, or other MVC-like frameworks is a plus, because you’ll be able to contrast them with the React way. But it’s not necessary and to some degree may be detrimental, because you’ll need to unlearn certain patterns. React is not exactly MVC.
You’ll be using command-line tools, so if you’re afraid of them, this is the best time to fight your phobia of the command line/Terminal/command prompt. Typically, CLIs are more powerful and versatile than their visual (GUI) versions (for example, the Git command line versus the GitHub desktop—the latter confuses the heck out of me).
Having some familiarity with Node.js will allow you to learn React much more quickly than someone who’s never heard of Node.js, npm, Browserify, CommonJS, Gulp, or Express.js. I’ve authored several books on Node.js for those who want to brush up on it, the most popular being Practical Node.js (http://practicalnodebook.com). Or, you can go online for a free NodeSchool adventure (http://nodeschool.io) (free does not always mean worse).
This book is not a comprehensive guide to web or mobile development. I assume that you already know about those. If you want help with basic programming concepts or JavaScript fundamentals, there are plenty of good books on those topics. You Don’t Know JS by Kyle Simpson (free to read at https://github.com/getify/You-Dont-Know-JS), Secrets of the JavaScript Ninja, Second Edition (www.manning.com/books/secrets-of-the-javascript-ninja-second-edition), and Eloquent JavaScript by Marijn Haverbeke (free to read at http://eloquentjavascript.net) come to mind. So, there’s no need for me to duplicate existing content with this book.
First of all, you should read this book. That is not a joke. Most people buy books but never read them. It’s even easier to do so with digital copies, because they hide on drives and in the cloud. Read the book, and work through the projects, chapter by chapter.
Each chapter covers either a topic or a series of topics that build on each other. For this reason, I recommend that you read this book from beginning to end and then go back to individual chapters for reference. But as I said earlier, you can also read individual chapters out of order, because the projects in the chapters stand alone.
There are many links to external resources. Most of them are optional and provide additional details about topics. Therefore, I suggest that you read the book at your computer, so you can open links as I refer to them.
Some text appears in a monospace font, like this: getAccounts(). That means it’s code, inline or in blocks. Sometimes you’ll see code with weird indentation:
       document.getElementById('end-of-time').play()
     }
This means I’m annotating a large chunk of code and broke it into pieces. This piece belongs to a bigger listing that started from position 0; this small chunk won’t run by itself.
Other times, code blocks aren’t indented. In such cases, it’s generally safe to assume that the snippet is the whole thing:
ReactDOM.render(
<Content />,
  document.getElementById('content')
)
If you see a dollar sign ($), it’s a Terminal/command prompt command. For example:
$ npm install -g babel@5.8.34
The most important thing to know and remember while using this book is that you must have fun. If it’s not fun, it’s not JavaScript!
All of the book’s code is available at www.manning.com/books/react-quickly and https://github.com/azat-co/react-quickly. Follow the folder-naming convention chNN, where NN is the chapter number with a leading 0 if needed (for example, ch02 for chapter 2’s code). The source code in the GitHub repository will evolve by including patches, bug fixes, and maybe even new versions and styles (ES2020?).
I’m sure there are typos in this book. Yes, I had editors—a bunch of them, all professionals provided by Manning. But thanks for finding that typo. No need to leave nasty Amazon reviews or send me hate mail about it, or about grammar.
Please don’t email me bugs and typos. Instead, you can report them on the book’s forum at https://forums.manning.com/forums/react-quickly or create a GitHub issue at https://github.com/azat-co/react-quickly/issues. This way, other people can benefit from your findings.
Also, please don’t email me technical questions or errata. Post them on the book’s forum, the book’s GitHub page (https://github.com/azat-co/react-quickly), or Stack Overflow. Other people may help you more quickly (and better) than I can.
Purchase of React Quickly includes free access to a private web forum run by Manning Publications where you can make comments about the book, ask technical questions, and receive help from the author and from other users. To access the forum, go to https://forums.manning.com/forums/react-quickly. You can also learn more about Manning’s forums and the rules of conduct at https://forums.manning.com/forums/about.
Manning’s commitment to our readers is to provide a venue where a meaningful dialogue between individual readers, and between readers and the author, can take place. It is not a commitment to any specific amount of participation on the part of the author, whose contribution to the forum remains voluntary (and unpaid). We suggest you try asking the author some challenging questions lest his interest stray! The forum and the archives of previous discussions will be accessible from the publisher’s website as long as the book is in print.

I’ve published more than 14 books and 17 online courses (https://node.university), most of them on the cloud, React, JavaScript, and Node.js. (One book is about how to write books, and another is about what to do after you’ve written a few books.) Before focusing on Node, I programmed in other languages (Java, C, Perl, PHP, Ruby), pretty much ever since high school (more than a dozen years ago) and definitely more than the 10,000 hours prescribed.[1]
Right now, I’m a Technology Fellow at one of the top 10 U.S. banks, which is also a Fortune 500 company: Capital One Financial Corporation, in beautiful San Francisco. Before that, I worked for small startups, giant corporations, and even the U.S. federal government, writing desktop, web, and mobile apps; teaching; and doing developer evangelism and project management.
I don’t want to take too much of your time telling you about myself; you can read more on my blog (http://webapplog.com/about) and social media (www.linkedin.com/in/azatm). Instead, I want to write about my experience that’s relevant to this book.
When I moved to the sunny state of California in 2011 to join a startup and go through a business accelerator (if you’re curious, it was 500 Startups), I started to use modern JavaScript. I learned Backbone.js to build a few apps for the startup, and I was impressed. The framework was a huge improvement in code organization over other SPAs I’d built in prior years. It had routes and models. Yay!
I had another chance to see the astounding power of Backbone and isomorphic JavaScript during my work as software engineering team lead at DocuSign, the Google of e-signatures (it has a 70% market share). We reengineered a seven-year-old monolithic ASP.NET web app that took four weeks for each minor release into a snappy Backbone-Node-CoffeeScript-Express app that had great user experience and took only one or two weeks for its release. The design team did great work with usability. Needless to say, there were boatloads of UI views with various degrees of interactivity.
The end app was isomorphic before such a term even existed. We used Backbone models on the server to prefetch the data from APIs and cache it. We used the same Jade templates on the browser and the server.
It was a fun project that made me even more convinced of the power of having one language across the entire stack. Developers versed in C# and front-end JavaScript (mostly jQuery) from the old app would spend a sprint (one release cycle, typically a week or two) and fall in love with the clear structure of CoffeeScript, the organization of Backbone, and the speed of Node (both the development and the running speed).
My decade in web development exposed me to the good, the bad, and the ugly (mostly ugly) of front-end development. This turned out to be a blessing in disguise, because I came to appreciate React even more, once I switched to it.
If you’d like to receive updates, news, and tips, then connect with me online by following, subscribing, friending, stalking, whatever:
For in-person workshops and courses, visit http://NodeProgram.com or https://Node.University, or send me a message via https://webapplog.com/azat.
An email from an early reader asked about the dervish on the cover. Yes, the character could easily be a Persian or any one of many Turko-nomadic people inhabiting the Middle East and central Asia. This is due to the fact that trade and travel were highly developed and frequent among those regions for many centuries. But, according to the illustrator who drew this picture, he was depicting a Siberian Bashkir. Most of the modern-day Bashkirs live in the Republic of Bashkortostan (a.k.a. Bashkiria). Bashkirs are close ethnic and geographical neighbors of the Volga Bulgars (improperly named Tatars); Bashkirs and Tatars are the second-most-populous ethnic group in the Russian Federation. (The first is Russians, if you’re curious.)
The figure comes from an eighteenth-century illustration, “Gravure Homme Baschkir,” by Jacques Grasset de Saint-Sauveur. Fascination with faraway lands and travel for pleasure were relatively new phenomena at the time, and collections of drawings such as this one were popular, introducing both the tourist as well as the armchair traveler to the inhabitants of other countries. The rich variety of drawings reminds us vividly of how culturally apart the world’s regions, towns, villages, and neighborhoods were just 200 years ago. Isolated from each other, people spoke different dialects and languages. In the streets or in the countryside, it was easy to identify where they lived and what their trade or station in life was, just by their dress.
Dress codes have changed since then and the diversity by region, so rich at the time, has faded away. It is now hard to tell apart the inhabitants of different continents, let alone different towns or regions. Perhaps we have traded cultural diversity for a more varied personal life—certainly for a more varied and fast-paced technological life.
At a time when it is hard to tell one computer book from another, Manning celebrates the inventiveness and initiative of the computer business with book covers based on the rich diversity of regional life of two centuries ago, brought back to life by pictures such as this one.
Hello! My name is Azat Mardan, and I’m going to take you on a journey into the wonderful world of React. It will make your front-end development more enjoyable and your code easier to write and maintain, and your users will be delighted at the speed of your web apps. React is a game changer in web development: the React community has pioneered many approaches, terms, and design patterns, and other libraries have followed the path forged by React.
I’ve taught this material more than 20 times in my live-online and in-person workshops to hundreds of software engineers from very different backgrounds and varied levels of seniority. Thus, this material has been battle tested on my students: you’re getting the distilled, most effective version of my React foundation course in a written format. These chapters are critical to get you on familiar terms with React.
Chapters 1–11 are the result of almost two years of work by several people, but they read as a fast sequence of topics that build on each other. The best way to consume these chapters is to start with chapter 1 and proceed in order. Each chapter includes a video message from me; chapters 1–8 have a quiz at the end; and chapters 9–11, which are projects, contain homework for self-guided development.
All in all, this part of the book builds a solid foundation of React concepts, patterns, and features. Can you go to a foreign country and understand the language without studying? No—and that’s why you must learn the React “language” before you attempt to build complex apps. Thus, it’s paramount that you study these basic React concepts—that you learn the React language—which is exactly what you’ll do in the next 11 chapters.
Let’s get started with React—and learn to speak fluent React-ese.
This chapter covers
When I began working on web development in early 2000, all I needed was some HTML and a server-side language like Perl or PHP. Ah, the good old days of putting in alert() boxes just to debug your front-end code. It’s a fact that as the internet has evolved, the complexity of building websites has increased dramatically. Websites have become web applications with complex user interfaces, business logic, and data layers that require changes and updates over time—and often in real time.
Many JavaScript template libraries have been written to try to solve the problems of dealing with complex user interfaces (UIs). But they still require developers to adhere to the old separation of concerns—which splits style (CSS), data and structure (HTML), and dynamic interactions (JavaScript)—and they don’t meet modern-day needs. (Remember the term DHTML?)
In contrast, React offers a new approach that streamlines front-end development. React is a powerful UI library that offers an alternative that many big firms such as Facebook, Netflix, and Airbnb have adopted and see as the way forward. Instead of defining a one-off template for your UIs, React allows you to create reusable UI components in JavaScript that you can use again and again in your sites.
Do you need a captcha control or date picker? Then use React to define a <Captcha /> or <DatePicker /> component that you can add to your form: a simple drop-in component with all the functionality and logic to communicate with the back end. Do you need an autocomplete box that asynchronously queries a database once the user has typed four or more letters? Define an <Autocomplete charNum="4"/> component to make that asynchronous query. You can choose whether it has a text box UI or has no UI and instead uses another custom form element—perhaps <Autocomplete textbox="..." />.
This approach isn’t new. Creating composable UIs has been around for a long time, but React is the first to use pure JavaScript without templates to make this possible. And this approach has proven easier to maintain, reuse, and extend.
React is a great library for UIs, and it should be part of your front-end web toolkit; but it isn’t a complete solution for all front-end web development. In this chapter, we’ll look at the pros and cons of using React in your applications and how you might fit it into your existing web-development stack.
Part 1 of the book focuses on React’s primary concepts and features, and part 2 looks at working with libraries related to React to build more-complex front-end apps (a.k.a. React stack or React and friends). Each part demonstrates both greenfield and brownfield development[1] with React and the most popular libraries, so you can get an idea of how to approach working with it in real-world scenarios.
Brownfield is a project with legacy code and existing systems, while greenfield is a project without any legacy code or systems; see https://en.wikipedia.org/wiki/Brownfield_(software_development).
We all learn differently. Some people prefer text and others video, and others learn best via in-person instruction. Each chapter of this book includes a short video that explains the chapter’s gist in less than 5 minutes. Watching them is totally optional. They’ll give you a summary if you prefer a video format or need a refresher. After watching each video, you can decide whether you need to read the chapter or can skip to the next one.
The source code for the examples in this chapter is at www.manning.com/books/reactquickly and at https://github.com/azat-co/react-quickly/tree/master/ch01 (in the ch01 folder of the GitHub repository https://github.com/azat-co/react-quickly). You can also find some demos at http://reactquickly.co/demos.
To introduce React.js properly, I first need to define it. So, what is React? It’s a UI component library. The UI components are created with React using JavaScript, not a special template language. This approach is called creating composable UIs, and it’s fundamental to React’s philosophy.
React UI components are highly self-contained, concern-specific blocks of functionality. For example, there could be components for date-picker, captcha, address, and ZIP code elements. Such components have both a visual representation and dynamic logic. Some components can even talk to the server on their own: for example, an autocomplete component might fetch the autocompletion list from the server.
In a broad sense, a user interface[2] is everything that facilitates communication between computers and humans. Think of a punch card or a mouse: they’re both UIs. When it comes to software, engineers talk about graphical user interfaces (GUIs), which were pioneered for early personal computers such as Macs and PCs. A GUI consists of menus, text, icons, pictures, borders, and other elements. Web elements are a narrow subset of the GUI: they reside in browsers, but there are also elements for desktop applications in Windows, OS X, and other operating systems.
Every time I mention a UI in this book, I mean a web GUI.
Component-based architecture (CBA)—not to be confused with web components, which are just one of the most recent implementations of CBA—existed before React. Such architectures generally tend to be easier to reuse, maintain, and extend than monolithic UIs. What React brings to the table is the use of pure JavaScript (without templates) and a new way to look at composing components.
What problem does React solve? Looking at the last few years of web development, note the problems in building and managing complex web UIs for front-end applications: React was born primarily to address those. Think of large web apps like Facebook: one of the most painful tasks when developing such applications is managing how the views change in response to data changes.
Let’s refer to the official React website for more hints about the problem React addresses: “We built React to solve one problem: building large applications with data that changes over time.”[3] Interesting! We can also look at the history of React for more information. A discussion on the React Podcast[4] mentions that the creator of React—Jordan Walke—was solving a problem at Facebook: having multiple data sources update an autocomplete field. The data came asynchronously from a back end. It was becoming more and more complicated to determine where to insert new rows in order to reuse DOM elements. Walke decided to generate the field representation (DOM elements) anew each time. This solution was elegant in its simplicity: UIs as functions. Call them with data, and you get rendered views predictably.
React official website, “Why React?” March 24, 2016, http://bit.ly/2mdCJKM.
React Podcast, “8. React, GraphQL, Immutable & Bow-Ties with Special Guest Lee Byron,” December 31, 2015, http://mng.bz/W1X6.
Later, it turned out that generating elements in memory is extremely fast and that the actual bottleneck is rendering in the DOM. But the React team came up with an algorithm that avoids unnecessary DOM pain. This made React very fast (and cheap in terms of performance). React’s splendid performance and developer-friendly, component-based architecture are a winning combination. These and other benefits of React are described in the next section.
React solved Facebook’s original problem, and many large firms agreed with this approach. React adoption is solid, and its popularity is growing every month. React emerged from Facebook[5] and is now used not only by Facebook but also by Instagram, PayPal, Uber, Sberbank, Asana,[6] Khan Academy,[7] HipChat,[8] Flipboard,[9] and Atom,[10] to name just a few.[11] Most of these applications originally used something else (typically, template engines with Angular or Backbone) but switched to React and are extremely happy about it.
“Introduction to React.js,” July 8, 2013, http://mng.bz/86XF.
Malcolm Handley and Phips Peter, “Why Asana Is Switching to TypeScript,” Asana Blog, November 14, 2014, http://mng.bz/zXKo.
Joel Burget, “Backbone to React,” http://mng.bz/WGEQ.
Rich Manalang, “Rebuilding HipChat with React.js,” Atlassian Developers, February 10, 2015, http://mng.bz/r0w6.
Michael Johnston, “60 FPS on the Mobile Web,” Flipboard, February 10, 2015, http://mng.bz/N5F0.
Nathan Sobo, “Moving Atom to React,” Atom, July 2, 2014, http://mng.bz/K94N.
See also the JavaScript usage stats at http://libscore.com/#React.
Every new library or framework claims to be better than its predecessors in some respect. In the beginning, we had jQuery, and it was leaps and bounds better for writing cross-browser code in native JavaScript. If you remember, a single AJAX call taking many lines of code had to account for Internet Explorer and WebKit-like browsers. With jQuery, this takes only a single call: $.ajax(), for example. Back in the day, jQuery was called a framework—but not anymore! Now a framework is something bigger and more powerful.
Similarly with Backbone and then Angular, each new generation of JavaScript frameworks has brought something new to the table. React isn’t unique in this. What is new is that React challenges some of the core concepts used by most popular front-end frameworks: for example, the idea that you need to have templates.
The following list highlights some of the benefits of React versus other libraries and frameworks:
Many features make React simpler to work with than most other front-end frameworks. Let’s unpack these items one by one, starting with its simplicity.
The concept of simplicity in computer science is highly valued by developers and users. It doesn’t equate to ease of use. Something simple can be hard to implement, but in the end it will be more elegant and efficient. And often, an easy thing will end up being complex. Simplicity is closely related to the KISS principle (keep it simple, stupid).[12] The gist is that simpler systems work better.
React’s approach allows for simpler solutions via a dramatically better web-development experience for software engineers. When I began working with React, it was a considerable shift in a positive direction that reminded me of switching from using plain, no-framework JavaScript to jQuery.
In React, this simplicity is achieved with the following features:
Let’s cover these one by one.
First, React embraces declarative style over imperative. Declarative style means developers write how it should be, not what to do, step-by-step (imperative). But why is declarative style a better choice? The benefit is that declarative style reduces complexity and makes your code easier to read and understand.
Consider this short JavaScript example, which illustrates the difference between declarative and imperative programming. Let’s say you need to create an array (arr2) whose elements are the result of doubling the elements of another array (arr). You can use a for loop to iterate over an array and tell the system to multiply by 2 and create a new element (arr2[i]=):
var arr = [1, 2, 3, 4, 5],
  arr2 = []
for (var i=0; i<arr.length; i++) {
  arr2[i] = arr[i]*2
}
console.log('a', arr2)
The result of this snippet, where each element is multiplied by 2, is printed on the console as follows:
a [2, 4, 6, 8, 10]
This illustrates imperative programming, and it works—until it doesn’t work, due to the complexity of the code. It becomes too difficult to understand what the end result is supposed to be when you have too many imperative statements. Fortunately, you can rewrite the same logic in declarative style with map():
var arr = [1, 2, 3, 4, 5],
  arr2 = arr.map(function(v, i){ return v*2 })
console.log('b', arr2)
The output is b [2, 4, 6, 8, 10]; the variable arr2 is the same as in the previous example. Which code snippet is easier to read and understand? In my humble opinion, the declarative example.
Look at the following imperative code for getting a nested value of an object. The expression needs to return a value based on a string such as account or account.number in such a manner that these statements print true:
var profile = {account: '47574416'}
var profileDeep = {account: { number: 47574416 }}
console.log(getNestedValueImperatively(profile, 'account') === '47574416')
console.log(getNestedValueImperatively(profileDeep, 'account.number')
 === 47574416)
This imperative style literally tells the system what to do to get the results you need:
var getNestedValueImperatively = function getNestedValueImperatively
Contrast this with declarative style (focused on the result), which reduces the number of local variables and thus simplifies the logic:
var getValue = function getValue(object, propertyName) {
  return typeof object === 'undefined' ? undefined : object[propertyName]
}

var getNestedValueDeclaratively = function getNestedValueDeclaratively(object,
 propertyName) {
  return propertyName.split('.').reduce(getValue, object)
}
console.log(getNestedValueDeclaratively({bar: 'baz'}, 'bar') === 'baz')
console.log(getNestedValueDeclaratively({bar: { baz: 1 }}, 'bar.baz')=== 1)
Most programmers have been trained to code imperatively, but usually the declarative code is simpler. In this example, having fewer variables and statements makes the declarative code easier to grasp at first glance.
That was just some JavaScript code. What about React? It takes the same declarative approach when you compose UIs. First, React developers describe UI elements in a declarative style. Then, when there are changes to views generated by those UI elements, React takes care of the updates. Yay!
The convenience of React’s declarative style fully shines when you need to make changes to the view. Those are called changes of the internal state. When the state changes, React updates the view accordingly.
I cover how states work in chapter 4.
Under the hood, React uses a virtual DOM to find differences (the delta) between what’s already in the browser and the new view. This process is called DOM diffing or reconciliation of state and view (bringing them back to similarity). This means developers don’t need to worry about explicitly changing the view; all they need to do is update the state, and the view will be updated automatically as needed.
Conversely, with jQuery, you’d need to implement updates imperatively. By manipulating the DOM, developers can programmatically modify the web page or parts of the web page (a more likely scenario) without rerendering the entire page. DOM manipulation is what you do when you invoke jQuery methods.
Some frameworks, such as Angular, can perform automatic view updates. In Angular, it’s called two-way data binding, which basically means views and models have two-way communication/syncing of data between them.
The jQuery and Angular approaches aren’t great, for two reasons. Think about them as two extremes. At one extreme, the library (jQuery) isn’t doing anything, and a developer (you!) needs to implement all the updates manually. At the other extreme, the framework (Angular) is doing everything.
The jQuery approach is prone to mistakes and takes more work to implement. Also, this approach of directly manipulating the regular DOM works fine with simple UIs, but it’s limiting when you’re dealing with a lot of elements in the DOM tree. This is the case because it’s harder to see the results of imperative functions than declarative statements.
The Angular approach is difficult to reason about because with its two-way binding, things can spiral out of control quickly. You insert more and more logic, and all of a sudden, different views are updating models, and those models update other views.
Yes, the Angular approach is somewhat more readable than imperative jQuery (and requires less manual coding!), but there’s another issue. Angular relies on templates and a DSL that uses ng directives (for example, ng-if). I discuss its drawbacks in the next section.
Component-based architecture[13] existed before React came on the scene. Separation of concerns, loose coupling, and code reuse are at the heart of this approach because it provides many benefits; software engineers, including web developers, love CBA. A building block of CBA in React is the component class. As with other CBAs, it has many benefits, with code reuse being the main one (you can write less code!).
What was lacking before React was a pure JavaScript implementation of this architecture. When you’re working with Angular, Backbone, Ember, or most of the other MVC-like front-end frameworks, you have one file for JavaScript and another for the template. (Angular uses the term directives for components.) There are a few issues with having two languages (and two or more files) for a single component.
The HTML and JavaScript separation worked well when you had to render HTML on the server, and JavaScript was only used to make your text blink. Now, single page applications (SPAs) handle complex user input and perform rendering on the browser. This means HTML and JavaScript are closely coupled functionally. For developers, it makes more sense if they don’t need to separate between HTML and JavaScript when working on a piece of a project (component).
Consider this Angular code, which displays different links based on the value of userSession:
<a ng-if="user.session" href="/logout">Logout</a>
<a ng-if="!user.session" href="/login">Login</a>
You can read it, but you may have doubts about what ng-if takes: a Boolean or a string. And will it hide the element or not render it at all? In the Angular case, you can’t be sure whether the element will be hidden on true or false, unless you’re familiar with how this particular ng-if directive works.
Compare the previous snippet with the following React code, which uses JavaScript if/else to implement conditional rendering. It’s absolutely clear what the value of user.session must be and what element (logout or login) is rendered if the value is true. Why? Because it’s just JavaScript:
if (user.session) return React.createElement('a', {href: '/logout'}, 'Logout')
else return React.createElement('a', {href: '/login'}, 'Login')
Templates are useful when you need to iterate over an array of data and print a property. We work with lists of data all the time! Let’s look at a for loop in Angular. As mentioned earlier, in Angular, you need to use a DSL with directives. The directive for a for loop is ng-repeat:
<div ng-repeat="account in accounts">
  {{account.name}}
</div>
One of the problems with templates is that developers often have to learn yet another language. In React, you use pure JavaScript, which means you don’t need to learn a new language! Here’s an example of composing a UI for a list of account names with pure JavaScript:[14]

Imagine a situation where you’re making some changes to the list of accounts. You need to display the account number and other fields. How do you know what fields the account has in addition to name?
You need to open the corresponding JavaScript file that calls and uses this template, and then you have to find accounts to see its properties. So the second problem with templates is that the logic about the data and the description of how that data should be rendered are separated.
It’s much better to have the JavaScript and the markup in one place so you don’t have to switch between file and languages. This is exactly how React works; and you’ll see how React renders elements shortly in a Hello World example.
Separation of concerns generally is a good pattern. In a nutshell, it means separation of different functions such as the data service, the view layer, and so on. When you’re working with template markup and corresponding JavaScript code, you’re working on one functionality. That’s why having two files (.js and .html) isn’t a separation of concerns.
Now, if you want to explicitly set the method by which to keep track of items (for example, to ensure there are no duplicates) in the rendered list, you can use Angular’s track by feature:
<div ng-repeat="account in accounts track by account._id">
  {{account.name}}
</div>
If you want to track by an index of the array, there’s $index:
<div ng-repeat="account in accounts track by $index">
  {{account.name}}
</div>
But what concerns me and many other developers is, what is this magic $index? In React, you use an argument from map() for the value of the key attribute:
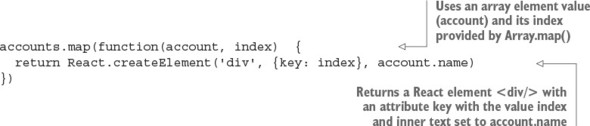
It’s worth noting that map() isn’t exclusive to React. You can use it with other frameworks because it’s part of the language. But the declarative nature of map() makes it and React a perfect pair.
I’m not picking on Angular—it’s a great framework. But the bottom line is that if a framework uses a DSL, you need to learn its magic variables and methods. In React, you can use pure JavaScript.
If you use React, you can carry your knowledge to the next project even if it’s not in React. On the other hand, if you use an X template engine (or a Y framework with a built-in DSL template engine), you’re locked into that system and have to describe yourself as an X/Y developer. Your knowledge isn’t transferable to projects that don’t use X/Y. To summarize, the pure JavaScript component-based architecture is about using discrete, well-encapsulated, reusable components that ensure better separation of concerns based on functionality without the need for DSLs, templates, or directives.
Working with many developer teams, I’ve observed another factor related to simplicity. React has a better, shallower, more gradual learning curve compared to MVC frameworks (well, React isn’t an MVC, so I’ll stop comparing them) and template engines that have special syntax—for example, Angular directives or Jade/Pug. The reason is that instead of using the power of JavaScript, most template engines build abstractions with their own DSL, in a way reinventing things like an if condition or a for loop.
React has a powerful abstraction of the document model. In other words, it hides the underlying interfaces and provides normalized/synthesized methods and properties. For example, when you create an onClick event in React, the event handler will receive not a native browser-specific event object, but a synthetic event object that’s a wrapper around native event objects. You can expect the same behavior from synthetic events regardless of the browser in which you run the code. React also has a set of synthetic events for touch events, which are great for building web apps for mobile devices.
Another example of React’s DOM abstraction is that you can render React elements on the server. This can be handy for better search engine optimization (SEO) and/or improving performance.
There are more options when it comes to rendering React components than just DOM or HTML strings for the server back end. We’ll cover them in section 1.5.1. And, speaking of the DOM, one of the most sought-after benefits of React is its splendid performance.
In addition to the necessary DOM updates, your framework may perform unnecessary updates, which makes the performance of complex UIs even worse. This becomes especially noticeable and painful for users when you have a lot of dynamic UI elements on your web page.
On the other hand, React’s virtual DOM exists only in the JavaScript memory. Every time there’s a data change, React first compares the differences using its virtual DOM; only when the library knows there has been a change in the rendering will it update the actual DOM. Figure 1.1 shows a high-level overview of how React’s virtual DOM works when there are data changes.

Ultimately, React updates only those parts that are absolutely necessary so that the internal state (virtual DOM) and the view (real DOM) are the same. For example, if there’s a <p> element and you augment the text via the state of the component, only the text will be updated (that is, innerHTML), not the element itself. This results in increased performance compared to rerendering entire sets of elements or, even more so, entire pages (server-side rendering).
If you like to geek out on algorithms and Big Os, these two articles do a great job of explaining how the React team managed to turn an O(n3) problem into an O(n) one: “Reconciliation,” on the React website (http://mng.bz/PQ9X) and “React’s Diff Algorithm” by Christopher Chedeau (http://mng.bz/68L4).
The added benefit of the virtual DOM is that you can do unit testing without headless browsers like PhantomJS (http://phantomjs.org). There’s a Jasmine (http://jasmine.github.io) layer called Jest (https://facebook.github.io/jest) that lets you test React components right on the command line!
Last, but not least, React is supported by the developers of a juggernaut web application called Facebook, as well as by their peers at Instagram. As with Angular and some other libraries, having a big company behind the technology provides a sound testing ground (it’s deployed to millions of browsers), reassurance about the future, and an increase in contribution velocity.
The React community is incredible. Most of the time, developers don’t even have to implement much of the code. Look at these community resources:
My personal anecdotal experience with open source taught me that the marketing of open source projects is as important to its wide adoption and success as the code itself. By that, I mean that if a project has a poor website, lacks documentation and examples, and has an ugly logo, most developers won’t take it seriously—especially now, when there are so many JavaScript libraries. Developers are picky, and they won’t use an ugly duckling library.
My teacher used to say, “Don’t judge a book by its cover.” This might sound controversial; but, sadly, most people, including software engineers, are prone to biases such as good branding. Luckily, React has a great engineering reputation backing it. And, speaking of book covers, I hope you didn’t buy this book just for its cover!
Of course, almost everything has its drawbacks. This is true with React, but the full list of cons depends on whom you ask. Some of the differences, like declarative versus imperative, are highly subjective. So, they can be both pros and cons. Here’s my list of React disadvantages (as with any such list, it may be biased because it’s based on opinions I’ve heard from other developers):
To continue with this introduction to React, let’s look at how it fits into a web application.
In a way, the React library by itself, without React Router or a data library, is less comparable to frameworks (like Backbone, Ember, and Angular) and more comparable to libraries for working with UIs, like template engines (Handlebars, Blaze) and DOM-manipulation libraries (jQuery, Zepto). In fact, many teams have swapped traditional template engines like Underscore in Backbone or Blaze in Meteor for React, with great success. For example, PayPal switched from Dust to Angular, as did many other companies listed earlier in this chapter.
You can use React for just part of your UI. For example, let’s say you have a load-application form on a web page built with jQuery. You can gradually begin to convert this front-end app to React by first converting the city and state fields to populate automatically based on the ZIP code. The rest of the form can keep using jQuery. Then, if you want to proceed, you can convert the rest of the form elements from jQuery to React, until your entire page is built on React. Taking a similar approach, many teams successfully integrated React with Backbone, Angular, or other existing front-end frameworks.
React is back-end agnostic for the purposes of front-end development. In other words, you don’t have to rely on a Node.js back end or MERN (MongoDB, Express.js, React.js, and Node.js) to use React. It’s fine to use React with any other back-end technology like Java, Ruby, Go, or Python. React is a UI library, after all. You can integrate it with any back end and any front-end data library (Backbone, Angular, Meteor, and so on).
To summarize how React fits into a web app, it’s most often used in these scenarios:
React works nicely with other front-end technologies, but it’s mostly used as part of single-page architecture because SPA seems to be the most advantageous and popular approach to building web apps. I cover how React fits into an SPA in section 1.5.2.
In some extreme scenarios, you can even use React only on the server as a template engine of sorts. For example, there’s an express-react-views library (https://github.com/reactjs/express-react-views). It renders the view server-side from React components. This server-side rendering is possible because React lets you use different rendering targets.
In versions 0.14 and higher, the React team split the library into two packages: React Core (react package on npm) and ReactDOM (react-dom package on npm). By doing so, the maintainers of React made it clear that React is on a path to become not just a library for the web, but a universal (sometimes called isomorphic because it can be used in different environments) library for describing UIs.
For example, in version 0.13, React had a React.render() method to mount an element to a web page’s DOM node. In versions 0.14 and higher, you need to include react-dom and call ReactDOM.render() instead of React.render().
Having multiple packages created by the community to support various rendering targets made this approach of separating writing components and rendering logical. Some of these modules are as follows:
In addition to the support of these libraries, the separation of React Core from ReactDOM makes it easier to share code between React and React Native libraries (used for native mobile iOS and Android development). In essence, when using React for web development, you’ll need to include at least React Core and ReactDOM.
Moreover, there are additional React utility libraries in React and npm. (Before React v15.5, some of them were part of React as React add-ons.[15] These utility libraries allow you to enhance functionality, work with immutable data (https://github.com/kolodny/immutability-helper), and perform testing.
See the version 15.5 change log with the list of add-ons and npm libraries: https://facebook.github.io/react/blog/2017/04/07/react-v15.5.0.html. See also the page on add-ons: https://facebook.github.io/react/docs/addons.html.
Finally, React is almost always used with JSX—a tiny language that lets developers write React UIs more eloquently. You can transpile JSX into regular JavaScript by using Babel or a similar tool.
As you can see, there’s a lot of modularity—the functionality of React-related things is split into different packages. This gives you power and choice, which is a good thing. No monolith or opinionated library dictates to you the only possible way to implement things. More on this in section 1.5.3.
If you’re a web developer reading this book, you probably use SPA architecture. Either you already have a web app built using this and want to reengineer it with React (brownfield), or you’re starting a new project from scratch (greenfield). Next, we’ll zoom in on React’s place in SPAs as the most popular approach to building web apps.
Another name for SPA architecture is thick client, because the browser, being a client, holds more logic and performs functions such as rendering of the HTML, validation, UI changes, and so on. Figure 1.2 is basic: it shows a bird’s-eye view of a typical SPA architecture with a user, a browser, and a server. The figure depicts a user making a request, and input actions like clicking a button, drag-and-drop, mouse hovering, and so on:
“What does it mean to hydrate an object?” Stack Overflow, http://mng.bz/uP25.
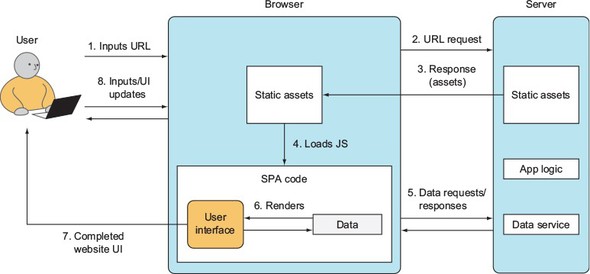
To summarize, in the SPA approach, most rendering for UIs happens on the browser. Only data travels to and from the browser. Contrast that with a thick-server approach, where all the rendering happens on the server. (Here I mean rendering as in generating HTML from templates or UI code, not as in rendering that HTML in the browser, which is sometimes called painting or drawing the DOM.)
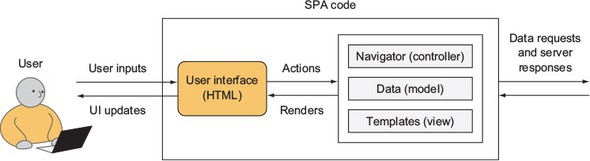
Note that the MVC-like architecture is the most popular approach, but it isn’t the only one. React doesn’t require you to use an MVC-like architecture; but, for the sake of simplicity, let’s assume that your SPA is using an MVC-like architecture. You can see its possible distinct parts in figure 1.3. A navigator or routing library acts as a controller of sorts in the MVC paradigm; it dictates what data to fetch and what template to use. The navigator/controller makes a request to get data and then hydrates/populates the templates (views) with this data to render the UI in the form of the HTML. The UI sends actions back to the SPA code: clicks, mouse hovers, keystrokes, and so on.
In an SPA architecture, data is interpreted and processed in the browser (browser rendering) and is used by the SPA to render additional HTML or to change existing HTML. This makes for nice interactive web applications that rival desktop apps. Angular.js, Backbone.js, and Ember.js are examples of front-end frameworks for building SPAs.
Different frameworks implement navigators, data, and templates differently, so figure 1.3 isn’t applicable to all frameworks. Rather, it illustrates the most widespread separation of concerns in a typical SPA.
React’s place in the SPA diagram in figure 1.3 is in the Templates block. React is a view layer, so you can use it to render HTML by providing it with data. Of course, React does much more than a typical template engine. The difference between React and other template engines like Underscore, Handlebars, and Mustache is in the way you develop UIs, update them, and manage their states. We’ll talk about states in chapter 4 in more detail. For now, think of states as data that can change and that’s related to the UI.
React isn’t a full-blown, front-end JavaScript framework. React is minimalistic. It doesn’t enforce a particular way of doing things like data modeling, styling, or routing (it’s non-opinionated). Because of that, developers need to pair React with a routing and/or modeling library.
For example, a project that already uses Backbone.js and the Underscore.js template engine can switch to Underscore for React and keep existing data models and routing from Backbone. (Underscore also has utilities, not just template methods. You can use these Underscore utilities with React as a solution for a clear declarative style.) Other times, developers opt to use the React stack, which consists of data and routing libraries created to be used specifically with React:
The ecosystem of libraries for React is growing every day. Also, React’s ability to describe composable components (self-contained chunks of the UI) is helpful in reusing code. There are many components packaged as npm modules. Just to illustrate the point that having small composable components is good for code reuse, here are some popular React components:
Then there’s JSX, which is probably the most frequent argument for not using React. If you’re familiar with Angular, then you’ve already had to write a lot of JavaScript in your template code. This is because in modern web development, plain HTML is too static and is hardly any use by itself. My advice: give React the benefit of the doubt, and give JSX a fair run.
JSX is a little syntax for writing React objects in JavaScript using <> as in XML/HTML. React pairs nicely with JSX because developers can better implement and read the code. Think of JSX as a mini-language that’s compiled into native JavaScript. So, JSX isn’t run on the browser but is used as the source code for compilation. Here’s a compact snippet written in JSX:
if (user.session)
  return <a href="/logout">Logout</a>
else
  return <a href="/login">Login</a>
Even if you load a JSX file in your browser with the runtime transformer library that compiles JSX into native JavaScript on the run, you still don’t run the JSX; you run JavaScript instead. In this sense, JSX is akin to CoffeeScript. You compile these languages into native JavaScript to get better syntax and features than that provided by regular JavaScript.
I know that to some of you, it looks bizarre to have XML interspersed with JavaScript code. It took me a while to adjust, because I was expecting an avalanche of syntax error messages. And yes, using JSX is optional. For these two reasons, I’m not covering JSX until chapter 3; but trust me, it’s powerful once you get a handle on it.
By now, you have an understanding of what React is, its stack, and its place in the higher-level SPA. It’s time to get your hands dirty and write your first React code.
Let’s explore your first React code—the quintessential example used for learning programming languages—the Hello World application. (If we don’t do this, the gods of programming might punish us!) You won’t be using JSX yet, just plain JavaScript. The project will print a “Hello world!!!” heading (<h1>) on a web page. Figure 1.4 shows how it will look when you’re finished (unless you’re not quite that enthusiastic and prefer a single exclamation point).

Although most React developers write in JSX, browsers will only run standard JavaScript. That’s why it’s beneficial to be able to understand React code in pure JavaScript. Another reason we’re starting with plain JS is to show that JSX is optional, albeit the de facto standard language for React. Finally, preprocessing JSX requires some tooling.
I want to get you started with React as soon as possible without spending too much time on setup in this chapter. You’ll perform all the necessary setup for JSX in chapter 3.
The folder structure of the project is simple. It consists of two JavaScript files in the js folder and one HTML file, index.html:
/hello-world
  /js
    react.js
    react-dom.js
  index.html
The two files in the js folder are for the React library version 15.5.4:[17] react-dom.js (web browser DOM renderer) and react.js (React Core package). First, you need to download the aforementioned React Core and ReactDOM libraries. There are many ways to do it. I recommend using the files provided in the source code for this book, which you can find at www.manning.com/books/react-quickly and https://github.com/azat-co/react-quickly/tree/master/ch01/hello-world. This is the most reliable and easiest approach, because it doesn’t require a dependency on any other service or tool. You can find more ways to download React in appendix A.
v15.5.4 is the latest as of this writing. Typically, major releases like 14, 15, and 16 incorporate significant differences, whereas minor releases like 15.5.3 and 15.5.4 have fewer breaking changes and conflicts. The code for this book was tested for v15.5.4. The code may work with future versions, but I can’t guarantee that it will work because no one knows what will be in the future versions—not even the core contributors.
Prior to version 0.14, these two libraries were bundled together. For example, for version 0.13.3, all you needed was react.js. This book uses React and React DOM version 15.5.4 (the latest as of this writing) unless noted otherwise. For most of the projects in part 1, you’ll need two files: react.js and react-com.js. In chapter 8, you’ll need prop-types (www.npmjs.com/package/prop-types), which was part of React until version 15.5.4 but is now a separate module.
After you place the React files in the js folder, create the index.html file in the hello-world project folder. This HTML file will be the entry point of the Hello World application (meaning you’ll need to open it in the browser).
The code for index.html is simple and starts with the inclusion of the libraries in <head>. In the <body> element, you create a <div> container with the ID content and a <script> element (that’s where the app’s code will go later), as shown in the following listing.
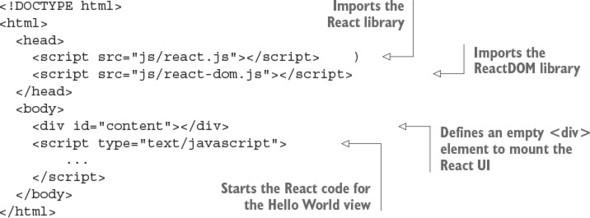
Why not render the React element directly in the <body> element? Because doing so can lead to conflict with other libraries and browser extensions that manipulate the document body. In fact, if you try attaching an element directly to the body, you’ll get this warning:
Rendering components directly into document.body is discouraged...
This is another good thing about React: it has great warning and error messages!
React warning and error messages aren’t part of the production build, in order to reduce noise, increase security, and minimize the distribution size. The production build is the minified file from the React Core library: for example, react.min.js. The development version with the warnings and error messages is the unminified version: for example, react.js.
By including the libraries in the HTML file, you get access to the React and ReactDOM global objects: window.React and window.ReactDOM. You’ll need two methods from those objects: one to create an element (React) and another to render it in the <div> container (ReactDOM), as shown in listing 1.2.
To create a React element, all you need to do is call React.createElement(element-Name, data, child) with three arguments that have the following meanings:

This listing gets a React element of the h1 type and stores the reference to this object into the h1 variable. The h1 variable isn’t an actual DOM node; rather, it’s an instantiation of the React h1 component (element). You can name it any way you want: helloWorldHeading, for example. In other words, React provides an abstraction over the DOM.
The h1 variable name is arbitrary. You can name this variable anything you want (such as bananza), as long as you use the same variable in ReactDOM.render().
Once the element is created and stored in h1, you render it to the DOM node/element with ID content using the ReactDOM.render() method shown in listing 1.2. If you prefer, you can move the h1 variable to the render call. The result is the same, except you don’t use an extra variable:
ReactDOM.render(
  React.createElement('h1', null, 'Hello world!'),
  document.getElementById('content')
)
Now, open the index.html file served by a static HTTP web server in your favorite browser. I recommend using an up-to-date version of Chrome, Safari, or Firefox. You should see the “Hello world!” message on the web page, as shown in figure 1.5.
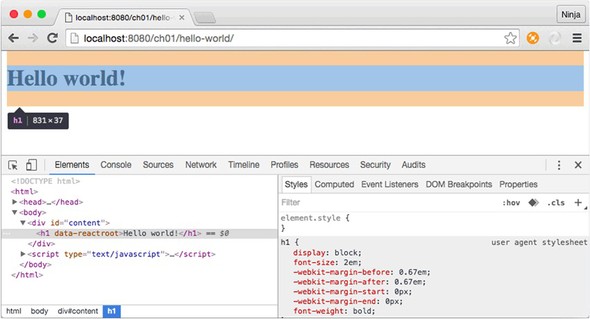
This figure shows the Elements tab in Chrome DevTools with the <h1> element selected. You can observe the data-reactroot attribute; it indicates that this element was rendered by ReactDOM.
One quick note: you can abstract the React code (listing 1.2) into a separate file instead of creating elements and rendering them with ReactDOM.render() all in the index.html file (listing 1.1). For example, you can create script.js and copy and paste the h1 element and ReactDOM.render() call into that file. Then, in index.html, you need to include script.js after the <div> with ID content, like this:
<div id="content"></div>
<script src="script.js"></script>
It’s better to use a local web server instead of opening an index.html file in the browser directly, because with a web server, your JavaScript apps will be able to make AJAX/XHR requests. You can tell whether it’s a server or a file by looking at the URL in the address bar. If the address starts with file, then it’s a file; and if the address starts with http, then it’s a server. You’ll need this feature for future projects. Typically, a local HTTP web server listens to incoming requests on 127.0.0.1 or localhost.
You can get any open source web server, such as Apache, MAMP, or (my favorites because they’re written in Node.js) node-static (https://github.com/cloud-head/node-static) or http-server (www.npmjs.com/package/http-server). To install node-static or http-server, you must have Node.js and npm installed. If you don’t have them, you can find installation instructions for Node and npm in appendix A or by going to http://nodejs.org.
Assuming you have Node.js and npm on your machine, run npm i -g node-static or npm i -g http-server in your terminal or command prompt. Then, navigate to the folder with the source code, and run static or http-server. In my case, I’m launching static from the react-quickly folder, so I need to put the path to Hello World in my browser URL bar: http://localhost:8080/ch01/hello-world/ (see figure 1.5).
Congratulations! You’ve just implemented your first React code!
The declarative style of programming doesn’t allow for mutation of stored values. It’s “this is what I want” versus the imperative style’s “this is how to do it.” True or false?
React components are rendered into the DOM with which of the following methods? (Beware, it’s a tricky question!) ReactDOM.renderComponent, React.render, ReactDOM.append, or ReactDOM.render
You have to use Node.js on the server to be able to use React in your SPA. True or false?
You must include react-com.js in order to render React elements on a web page. True or false?
The problem React solves is that of updating views based on data changes. True or false?
True. Declarative is a “what I want” style, and imperative is a “this is how to do it” style.
ReactDOM.render.
False. You can use any back-end technology.
True. You need the ReactDOM library.
True. This is the primary problem that React solves.
This chapter covers
This chapter will teach you how to take baby steps with React and lays the foundation for the following chapters. It’s crucial for understanding React concepts such as elements and components. In a nutshell, elements are instances of components (also called component classes). What are their use cases, and why do you use them? Read on!
The source code for the examples in this chapter is at www.manning.com/books/react-quickly and https://github.com/azat-co/react-quickly/tree/master/ch02 (in the ch02 folder of the GitHub repository https://github.com/azat-co/react-quickly). You can also find some demos at http://reactquickly.co/demos.
In the last chapter, you learned how to create a React element. As a reminder, the method you use is React.createElement(). For example, you can create a link element like this:
let linkReactElement = React.createElement('a',
  {href: 'http://webapplog.com'},
  'Webapplog.com'
)
The problem is that most UIs have more than one element (such as a link inside a menu). For example, in figure 2.1, there are buttons in the section, video thumbnails, and a YouTube player.

The solution to creating more-complex structures in a hierarchical manner is nesting elements. In the previous chapter, you implemented your first React code by creating an h1 React element and rendering it in the DOM with ReactDOM.render():
let h1 = React.createElement('h1', null, 'Hello world!')
ReactDOM.render(
  h1,
  document.getElementById('content')
)
It’s important to note that ReactDOM.render() takes only one element as an argument, which is h1 in the example (the view is shown in figure 2.2).
As I mentioned at the beginning of this section, the problem arises when you need to render two same-level elements (for example, two h1 elements). In this case, you can wrap the elements in a visually neutral element, as shown in figure 2.3. The <div> container is usually a good choice, as is <span>.
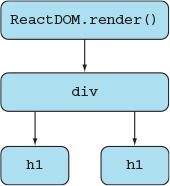
You can pass an unlimited number of parameters to createElement(). All the parameters after the second one become child elements. Those child elements (h1, in this case) are siblings—that is, they’re on the same level relative to each other, as you can see in figure 2.4, which shows DevTools open in Chrome.
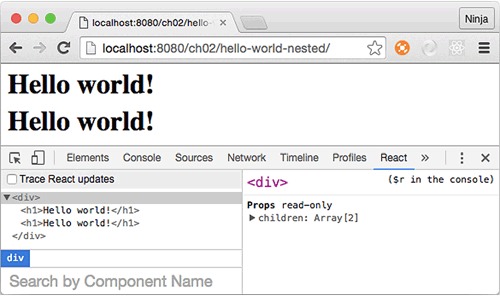
In addition to the Elements tab, which is included by default in Chrome DevTools, you can install an extension (or plug-in) called React Developer Tools. It’s the last tab in figure 2.4. React Developer Tools is available for Firefox as well. It lets you inspect the results of React rendering closely, including the component’s hierarchy, name, properties, states, and more.
Here’s the GitHub repository: https://github.com/facebook/react-devtools. You can also find React Developer Tools for Chrome at http://mng.bz/V276 and for Firefox at http://mng.bz/59V9.
Knowing this, let’s use createElement() to create the <div> element with two <h1> child elements (ch02/hello-world-nested/index.html).

The HTML code can stay the same as in the Hello World example from chapter 1, as long as you include the necessary React and ReactDOM libraries and have the content node (ch02/hello-world-nested/index.html).
<!DOCTYPE html>
<html>
  <head>
    <script src="js/react.js"></script>
    <script src="js/react-dom.js"></script>
  </head>
  <body>
    <div id="content"></div>
    <script type="text/javascript">
    ...
    </script>
  </body>
</html>
So far, you’ve only provided string values as the first parameter of createElement(). But the first parameter can have two types of input:
The first approach renders standard HTML elements. React goes through its list of standard HTML elements and, when and if it finds a match, uses it as a type for the React element. For example, when you pass 'p', React will find a match because p is a paragraph tag name. This will produce <p> in the DOM when/if you render this React element.
Now let’s look at the second type of input: creating and providing custom component classes.
After nesting elements with React, you’ll stumble across the next problem: soon, there are a lot of elements. You need to use the component-based architecture described in chapter 1, which lets you reuse code by separating the functionality into loosely coupled parts. Meet component classes, or just components, as they’re often called for brevity (not to be confused with web components).
Think of standard HTML tags as building blocks. You can use them to compose your own React component classes, which you can use to create custom elements (instances of classes). By using custom elements, you can encapsulate and abstract logic in portable classes (composable reusable components). This abstraction allows teams to reuse UIs in large, complex applications as well as in different projects. Examples include autocomplete components, toolboxes, menus, and so on.
Creating the 'Hello world!' element with an HTML tag in the createElement() method was straightforward: (createElement('h1', null, 'Hello World!'). But what if you need to separate Hello World into its own class, as shown in figure 2.5? Let’s say you need to reuse Hello World in 10 different projects! (You probably wouldn’t use it that many times, but a good autocomplete component will definitely be reused.)
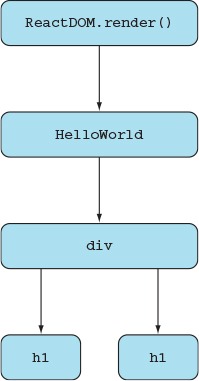
Interestingly, you create a React component class by extending the React.Component class with class CHILD extends PARENT ES6 syntax. Let’s create a custom Hello-World component class using class HelloWorld extends React.Component.
The one mandatory thing you must implement for this new class is the render() method. This method must return a single React element, createElement(), which is created from another custom component class or an HTML tag. Both can have nested elements.
Listing 2.3 (ch02/hello-world-class/js/script.js) shows how you can refactor the nested Hello World example (listing 2.1) into an app with a custom React component class, HelloWorld. The benefit is that with a custom class, you can reuse this UI better. The mandatory render() method of the HelloWorld component returns the same <div> element from the previous example. Once you’ve created the custom HelloWorld class, you can pass it as an object (not as a string) to ReactDOM.render().
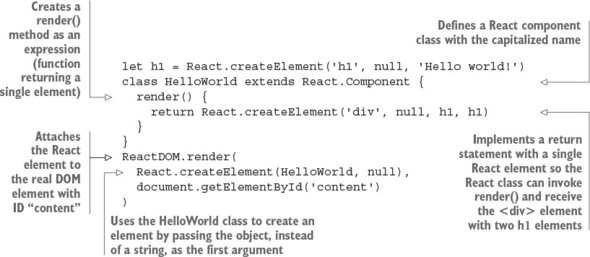
By convention, the names of variables containing React components are capitalized. This isn’t required in regular JS (you can use the lowercase variable name helloWorld); but because it’s necessary in JSX, you apply this convention here. (In JSX, React uses uppercase and lowercase to differentiate a custom component like <HelloWorld/> from a regular HTML element such as <h1/>. But in regular JS, it’s differentiated by passing either a variable such as HelloWorld or a string such as 'h1'. It’s a good idea to start using capitalization convention for custom components now.) More about JSX in chapter 3.
The component class example defines render() using ES6 style, in which you omit the colon and the word function. It’s exactly the same as defining an attribute (a.k.a. key or object property) with a value that’s a function: that is, typing render: function(). My personal preference, and my recommendation to you, is to use the ES6 method style because it’s shorter (the less you type, the fewer mistakes you make).
Historically, React had its own method to create a component class: React.createClass(). There are slight differences between using the ES6 class to extend React.Component and using React.createClass(). Typically, you’d use either class (recommended) or createClass(), but not both. Moreover, in React 15.5.4, createClass() is deprecated (that is, no longer supported).
Although you may still see the React.createClass() method used by some teams, the general tendency in the React world is to move toward a common standard: using the ES6 class approach. This book is forward thinking and uses the most popular tools and approaches, so it focuses on ES6. You can find ES5 examples for some of this book’s projects in the GitHub repository, prefixed with -es5; they were for an early version of the book.
As of August 2016, most modern browsers support these ES6 (and almost all other) features natively (without extra tools),[1] so I assume you’re familiar with it. If you’re not, or if you need a refresher or more information on ES6+/ES2015+ and its primary features as they relate to React, see appendix E or a comprehensive book such as Exploring ES6 by Dr. Axel Rauschmayer (free online version: http://exploringjs.com/es6).
ECMAScript 6 Compatibility Table, https://kangax.github.io/compat-table/es6.
Analogous to ReactDOM.render(), the render() method in createClass() can only return a single element. If you need to return multiple same-level elements, wrap them in a <div> container or another unobtrusive element such as <span>. You can run the code in your browser; the result is shown in figure 2.6.
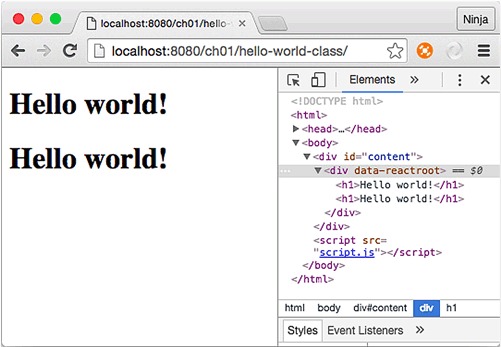
You may think you didn’t gain much with the refactoring; but what if you need to print more Hello World statements? You can do so by reusing the HelloWorld component multiple times and wrapping them in a <div> container:
...
ReactDOM.render(
  React.createElement(
    'div',
    null,
    React.createElement(HelloWorld),
    React.createElement(HelloWorld),
    React.createElement(HelloWorld)
  ),
  document.getElementById('content')
)
This is the power of component reusability! It leads to faster development and fewer bugs. Components also have lifecycle events, states, DOM events, and other features that let you make them interactive and self-contained; these are covered in the following chapters.
Right now, the HelloWorld elements will all be the same. Is there a way to customize them? What if you could set element attributes and modify their content and/or behavior? Meet properties.
Properties are a cornerstone of the declarative style that React uses. Think of properties as unchangeable values within an element. They allow elements to have different variations if used in a view, such as changing a link URL by passing a new value for a property:
React.createElement('a', {href: 'http://node.university'})
One thing to remember is that properties are immutable within their components. A parent assigns properties to its children upon their creation. The child element isn’t supposed to modify its properties. (A child is an element nested inside another element; for example, <h1/> is a child of <HelloWorld/>.) For instance, you can pass a property PROPERTY_NAME with the value VALUE, like this:
<TAG_NAME PROPERTY_NAME=VALUE/>
Properties closely resemble HTML attributes. This is one of their purposes, but they also have another: you can use the properties of an element in your code as you wish. Properties can be used as follows:
Under the hood, React will match the property name (PROPERTY_NAME) with the list of standard attributes. If there’s a match, the property will be rendered as an attribute of an element (the first scenario). The value of this attribute is also accessible in this.props.PROPERTY_NAME in the component class code.
If there’s no match with any of the standard HTML attribute names (the second scenario), then the property name isn’t a standard attribute. It won’t be rendered as an attribute of an element. But the value will still be accessible in the this.props object; for example, this.props.PROPERTY_NAME. It can be used in your code or rendered explicitly in the render() method. This way, you can pass different data to different instances of the same class. This allows you to reuse components, because you can programmatically change how elements are rendered by providing different properties.
Internally, React uses Object.freeze()[2] from the ES5 standard to make the this.props object immutable. To check whether an object is frozen, you can use the Object.isFrozen() method.[3] For example, you can determine whether this statement will return true:
Mozilla Developer Network, Object.freeze(), http://mng.bz/p6Nr.
Mozilla Developer Network, Object.isFrozen(), http://mng.bz/0P75.
class HelloWorld extends React.Component {
  render() {
    console.log(Object.isFrozen(this.props))
    return React.createElement('div', null, h1, h1)
  }
}
If you’re interested in more details, I encourage you to read the React changelog[4] and search on React’s GitHub repository.[5]
GitHub, 2016-04-07-react-v15, http://mng.bz/j6c3.
GitHub, “freeze” search results, http://mng.bz/2l0Z.
You can even take this feature of properties a step further and completely modify the rendered elements based on the value of a property. For example, if this.props.heading is true, you render “Hello” as a heading. If it’s false, you render “Hello” as a normal paragraph:
render() {
  if (this.props.heading) return <h1>Hello</h1>
  else return <p>Hello</p>
}
In other words, you can use the same component—but provided with different properties, the elements rendered by the component can be different. Properties can be rendered by render(), used in components’ code, or used as HTML attributes.
To demonstrate the properties of components, let’s slightly modify HelloWorld with props. The goal is to reuse the HelloWorld component such that each instance of this class renders different text and different HTML attributes. You’ll enhance the HelloWorld headings (<h1> tag) with three properties (see figure 2.7):
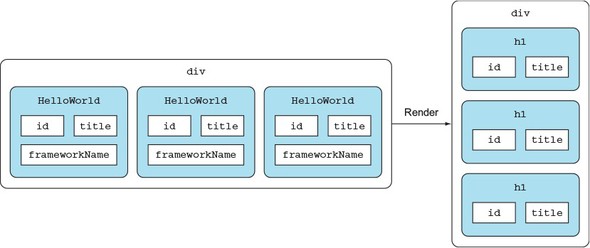
If a property’s name matches a standard HTML attribute, it will be rendered as an attribute of the <h1> element, as shown in figure 2.7. So the two properties id and title will be rendered as <h1> attributes, but not frameworkName. You may even get a warning about the unknown frameworkName property (because it’s not in the HTML specification). How nice!
Let’s zoom in on the <div> element implementation (figure 2.8). Obviously, it needs to render three child elements of the HelloWorld class, but the text and attributes of the resulting headings (<h1/>) must be different. For example, you pass id, frameworkName, and title. They’ll be part of the HelloWorld class.
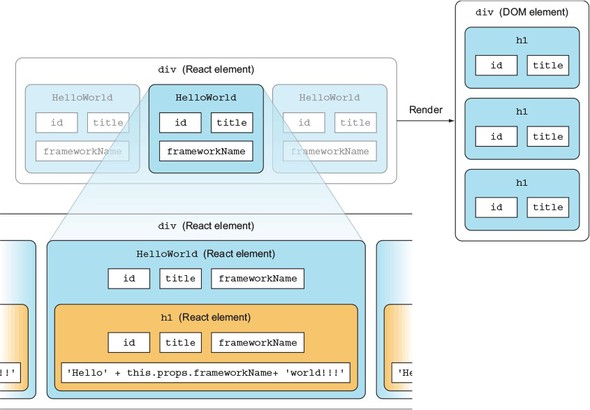
Before you implement <h1/>, you need to pass the properties to HelloWorld. How do you do this? By passing these properties in an object literal in the second argument to createElement() when you create HelloWorld elements in the <div> container:
ReactDOM.render(
  React.createElement(
    'div',
    null,
    React.createElement(HelloWorld, {
      id: 'ember',
      frameworkName: 'Ember.js',
      title: 'A framework for creating ambitious web applications.'}),
    React.createElement(HelloWorld, {
      id: 'backbone',
      frameworkName: 'Backbone.js',
      title: 'Backbone.js gives structure to web applications...'}),
    React.createElement(HelloWorld, {
      id: 'angular',
      frameworkName: 'Angular.js',
      title: 'Superheroic JavaScript MVW Framework'})
  ),
  document.getElementById('content')
)
Now let’s look at the HelloWorld component implementation. The way React works is that the second parameter to createElement() (for example, {id: 'ember'...}) is an object whose properties are accessible via the this.props object inside the component’s render() method. Therefore, you can access the value of frameworkName as shown in the following listing.
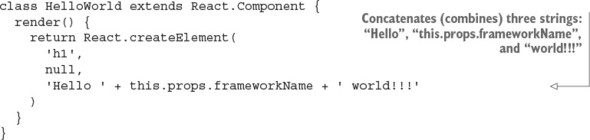
The keys of the this.props object are exactly the same as the keys of the object passed to createElement() as the second parameter. That is, this.props has id, frameworkName, and title keys. The number of key/value pairs you can pass in the second argument to React.createElement() is unlimited.
In addition, you may have already guessed that it’s possible to pass all the properties of HelloWorld to its child <h1/>. This can be extremely useful when you don’t know what properties are passed to a component; for example, in HelloWorld, you want to leave the style attribute value up to a developer instantiating HelloWorld. Therefore, you don’t limit what attributes to render in <h1/>.

Then, you render three HelloWorld elements into the <div> with the ID content, as shown in the following listing (ch02/hello-js-world/js/script.js) and figure 2.9.

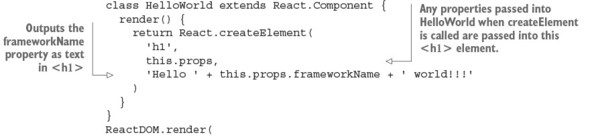
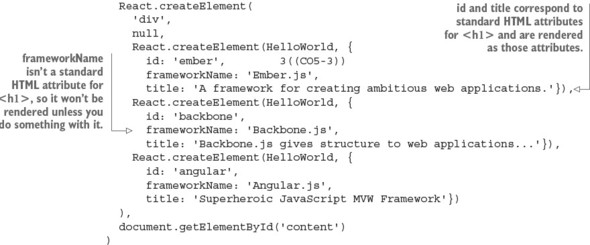
As usual, you can run this code via a local HTTP web server. The result of reusing the HelloWorld component class is three different headings (see figure 2.9).
You used this.props to render different text for the headings. You used properties to render different titles and IDs. Thus, you effectively reused most of the code, which makes you the master of React HelloWorld component classes!
We’ve covered several permutations of Hello World. Yes, I know, it’s still the boring, good-old Hello World. But by starting small, we’re building a solid foundation for future, more-advanced topics. Believe me, you can achieve a lot of great things with component classes.
It’s very important to know how React works in regular JavaScript events if you (like many React engineers) plan to use JSX. This is because in the end, browsers will still run regular JS, and you’ll need to understand the results of the JSX-to-JS transpilation from time to time. Going forward, we’ll be using JSX, which is covered in the next chapter.
A React component class can be created with which of the following? createComponent(), createElement(), class NAME extends React.Component, class NAME extends React.Class
The only mandatory attribute or method of a React component is which of the following? function, return, name, render, class
To access the url property of a component, you use which of the following? this.properties.url, this.data.url, this.props.url, url
React properties are immutable in a context of a current component. True or false?
React component classes allows developers to create reusable UIs. True or false?
class NAME extends React.Component, because there’s no React.Class and others will fail due to ReferenceError (not defined).
render() because it’s the only required method; also, because function, return, render, and class are not valid, and name is optional.
this.props.url because only this.props gives the properties object.
True. It’s impossible to change a property.
True. Developers use new components to create reusable UIs.
This chapter covers
Welcome to JSX! It’s one of the greatest things about React, in my opinion—and one of the most controversial subjects related to React in the minds of a few developers I spoke with (who, not surprisingly, haven’t yet built anything large in React).
Thus far, we’ve covered how to create elements and components so that you can use custom elements and better organize your UIs. You used JavaScript to create React elements, instead of working with HTML. But there’s a problem. Look at this code, and see if you can tell what’s happening:
render() {
  return React.createElement(
    'div',
    { style: this.styles },
    React.createElement(
      'p',
      null,
      React.createElement(
        reactRouter.Link,
        { to: this.props.returnTo },
        'Back'
      )
    ),
    this.props.children
  );
}
Were you able to tell that there are three elements, that they’re nested, and that the code uses a component from React Router? How readable is this code, compared to standard HTML? Do you think this code is eloquent? The React team agrees that reading (and typing, for that matter) a bunch of React.createElement() statements isn’t fun. JSX is the solution to this problem.
The source code for the examples in this chapter is at www.manning.com/books/react-quickly and https://github.com/azat-co/react-quickly/tree/master/ch03 (in the ch03 folder of the GitHub repository https://github.com/azat-co/react-quickly). You can also find some demos at http://reactquickly.co/demos.
JSX is a JavaScript extension that provides syntactic sugar (sugar-coating) for function calls and object construction, particularly React.createElement(). It may look like a template engine or HTML, but it isn’t. JSX produces React elements while allowing you to harness the full power of JavaScript.
JSX is a great way to write React components. Its benefits include the following:
Although JSX isn’t required for React, it fits in nicely and is highly recommended by me and React’s creators. The official “Introducing JSX” page[1] states, “We recommend using [JSX] with React.”
To demonstrate the eloquence of JSX, this is the code to create HelloWorld and an a link element:
<div>
  <HelloWorld/>
  <br/>
  <a href="http://webapplog.com">Great JS Resources</a>
</div>
That’s analogous to the following JavaScript:
React.createElement(
  "div",
  null,
  React.createElement(HelloWorld, null),
  React.createElement("br", null),
  React.createElement(
    "a",
    { href: "http://webapplog.com" },
    "Great JS Resources"
  )
)
And if you use Babel v6 (one of the tools for JSX; more on Babel in a few pages), the JS code becomes this:
"use strict";

React.createElement(
  "div",
  null,
  " ",
  React.createElement(HelloWorld, null),
  " ",
  React.createElement("br", null),
  " ",
  React.createElement(
    "a",
    { href: "http://webapplog.com" },
    "Great JS Resources"
  ),
  " "
);
In essence, JSX is a small language with an XML-like syntax; but it has changed the way people write UI components. Previously, developers wrote HTML—and JS code for controllers and views—in an MVC-like manner, jumping between various files. That stemmed from the separation of concerns in the early days. This approach served the web well when it consisted of static HTML, a little CSS, and a tiny bit of JS to make text blink.
This is no longer the case; today, we build highly interactive UIs, and JS and HTML are tightly coupled to implement various pieces of functionality. React fixes the broken separation of concerns (SoC) principle by bringing together the description of the UI and the JS logic; and with JSX, the code looks like HTML and is easier to read and write. If for no other reason, I’d use React and JSX just for this new approach to writing UIs.
JSX is compiled by various transformers (tools) into standard ECMAScript (see figure 3.1). You probably know that JavaScript is ECMAScript, too; but JSX isn’t part of the specification, and it doesn’t have any defined semantics.

According to https://en.wikipedia.org/wiki/Source-to-source_compiler, “A source-to-source compiler, transcompiler, or transpiler is a type of compiler that takes the source code of a program written in one programming language as its input and produces the equivalent source code in another programming language.”
You may wonder, “Why should I bother with JSX?” That’s a great question. Considering how counterintuitive JSX code looks to begin with, it’s no surprise that many developers are turned off by this amazing technology. For example, this JSX shows that there are angle brackets in the JavaScript code, which looks bizarre at first:
ReactDOM.render(<h1>Hello</h1>, document.getElementById('content'))
What makes JSX amazing are the shortcuts to React.createElement(NAME, ...). Instead of writing that function call over and over, you can instead use <NAME/>. And as I said earlier, the less you type, the fewer mistakes you make. With JSX, DX is as important as user experience (UX).
The main reason to use JSX is that many people find code with angle brackets (< >) easier to read than code with a lot of React.createElement() statements (even when they’re aliased). And once you get into the habit of thinking about <NAME/> not as XML, but as an alias to JavaScript code, you’ll get over the perceived weirdness of JSX syntax. Knowing and using JSX can make a big difference when you’re developing React components and, subsequently, React-powered applications.
To be fair, there are a few alternatives to JSX when it comes to avoiding typing verbose React.createElement() calls. One of them is to use the alias React.DOM.*. For example, instead of creating an <h1/> element with
React.createElement('h1', null, 'Hey')
the following will also suffice and requires less space and time to implement:
React.DOM.h1(null, 'Hey')
You have access to all the standard HTML elements in the React.DOM object, which you can inspect like any other object:
console.log(React.DOM)
You can also type React.DOM and press Enter in the Chrome DevTools console. (Note that React.DOM and ReactDOM are two completely different objects and shouldn’t be confused or used interchangeably.)
Another alternative, recommended by the official React documentation for situations where JSX is impractical (for example, when there’s no build process), is to use a short variable. For example, you can create a variable E as follows:
const E = React.createElement
E('h1', null, 'Hey')
As I mentioned earlier, JSX needs to be transpiled (or compiled, as it’s often called) into regular JavaScript before browsers can execute its code. We’ll explore various available methods for doing so, as well as the recommended method, in section 3.3.
Let’s explore how to work with JSX. You can read this section and keep it bookmarked for your reference, or (if you prefer to have some of the code examples running on your computer) you have the following options:
The choice is up to you. I recommend reading about the main JSX concepts first, and then doing the proper Babel setup on your computer.
Creating ReactElement objects with JSX is straightforward. For example, instead of writing the following JavaScript (where name is a string—h1—or component class object—HelloWorld)
React.createElement(
  name,
  {key1: value1, key2: value2, ...},
  child1, child2, child3, ..., childN
)
you can write this JSX:
<name key1=value1 key2=value2 ...>
  <child1/>
  <child2/>
  <child3/>
  ...
  <childN/>
</name>
In the JSX code, the attributes and their values (for example, key1=value1) come from the second argument of createElement(). We’ll focus on working with properties later in this chapter. For now, let’s look at an example of a JSX element without properties. Here’s our old friend Hello World in JavaScript (ch03/hello-world/index.html).
ReactDOM.render(
  React.createElement('h1', null, 'Hello world!'),
  document.getElementById('content')
)
The JSX version is much more compact (ch03/hello-world-jsx/js/script.jsx).
ReactDOM.render(
  <h1>Hello world!</h1>,
  document.getElementById('content')
)
You can also store objects created with JSX syntax in variables, because JSX is just a syntactic improvement of React.createElement(). This example stores the reference to the Element object in a variable:
let helloWorldReactElement = <h1>Hello world!</h1>
ReactDOM.render(
  helloWorldReactElement,
  document.getElementById('content')
)
The previous example used the <h1> JSX tag, which is also a standard HTML tag name. When working with components, you apply the same syntax. The only difference is that the component class name must start with a capital letter, as in <HelloWorld/>.
Here’s a more advanced iteration of Hello World, rewritten in JSX. In this case, you create a new component class and use JSX to create an element from it.
class HelloWorld extends React.Component {
  render() {
    return (
      <div>
        <h1>1. Hello world!</h1>
        <h1>2. Hello world!</h1>
      </div>
    )
  }
}
ReactDOM.render(
  <HelloWorld/>,
  document.getElementById('content')
)
Can you read listing 3.3 more easily than the following JavaScript code?
class HelloWorld extends React.Component {
  render() {
    return React.createElement('div',
      null,
      React.createElement('h1', null, '1. Hello world!'),
      React.createElement('h1', null, '2. Hello world!'))
  }
}
ReactDOM.render(
  React.createElement(HelloWorld, null),
  document.getElementById('content')
)
As I said earlier, seeing angle brackets in JavaScript code may be strange for experienced JavaScript developers. My brain went bananas when I first saw this, because for years I trained myself to spot JS syntax errors! The brackets are the primary controversy regarding JSX and one of the most frequent objections I hear; this is why we dive into JSX early in the book, so you can get as much experience with it as possible.
Notice the parentheses after return in the JSX code in listing 3.3; you must include them if you don’t type anything on the same line after return. For example, if you start your top element, <div>, on a new line, you must put parentheses (()) around it. Otherwise, JavaScript will finish the return with nothing. This style is as follows:
render() {
  return (
    <div>
    </div>
  )
}
Alternatively, you can start your top element on the same line as return and avoid the necessary (). For example, this is valid as well:
render() {
  return <div>
  </div>
}
A downside of the second approach is the reduced visibility of the opening <div> tag: it may be easy to miss in the code.[2] The choice is up to you. I use both styles in this book to give you a deeper perspective.
For more about this behavior in JavaScript, see James Nelson, “Why Use Parenthesis [sic] on JavaScript Return Statements?” August 11, 2016, http://jamesknelson.com/javascript-return-parenthesis; and “Automated Semicolon Insertion,” Annotated ECMAScript 5.1, http://es5.github.io/#x7.9.
When you compose components, you want them to be smart enough to change the view based on some code. For example, it would be useful if a current date-time component used a current date and time, not a hardcoded value.
When working with JavaScript-only React, you have to resort to concatenation (+) or, if you’re using ES6+/ES2015+, string templates marked by a backtick and ${varName}, where varName is the name of a variable. The official name for this feature is template literal, according to the specification.[3] For example, to use a property in text in a DateTimeNow component in regular JavaScript React, you’d write this code:
“Template Literals,” ECMAScript 2015 Language Specification, June 2015, http://mng.bz/i8Bw.
class DateTimeNow extends React.Component {
  render() {
    let dateTimeNow = new Date().toLocaleString()
    return React.createElement(
      'span',
      null,
      `Current date and time is ${dateTimeNow}.`
    )
  }
}
Conversely, in JSX, you can use curly braces {} notation to output variables dynamically, which reduces code bloat substantially:
class DateTimeNow extends React.Component {
  render() {
    let dateTimeNow = new Date().toLocaleString()
    return <span>Current date and time is {dateTimeNow}.</span>
    )
  }
}
The variables can be properties, not just locally defined variables:
<span>Hello {this.props.userName}, your current date and time is
 {dateTimeNow}.</span>
Moreover, you can execute JavaScript expressions or any JS code inside of {}. For example, you can format a date:
<p>Current time in your locale is
Now, you can rewrite the HelloWorld class in JSX using the dynamic data that JSX stores in a variable (ch03/hello-world-class-jsx).
let helloWorldReactElement = <h1>Hello world!</h1>
class HelloWorld extends React.Component {
  render() {
    return <div>
      {helloWorldReactElement}
      {helloWorldReactElement}
    </div>
  }
}
ReactDOM.render(
  <HelloWorld/>,
  document.getElementById('content')
)
Let’s discuss how you work with properties in JSX.
I touched on this topic earlier, when I introduced JSX: element properties are defined using attribute syntax. That is, you use key1=value1 key2=value2... notation inside of the JSX tag to define both HTML attributes and React component properties. This is similar to attribute syntax in HTML/XML.
In other words, if you need to pass properties, write them in JSX as you would in normal HTML. Also, you render standard HTML attributes by setting element properties (discussed in section 2.3). For example, this code sets a standard HTML attribute href for the anchor element <a>:
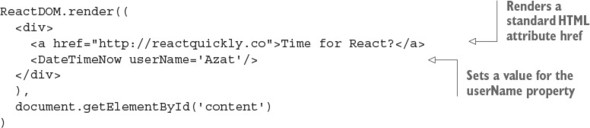
Using hardcoded values for attributes isn’t flexible. If you want to reuse the link component, then the href must change to reflect a different address each time. This is called dynamically setting values versus hardcoding them. So, next we’ll go a step further and consider a component that can use dynamically generated values for attributes. Those values can come from component properties (this.props). After that, everything’s easy. All you need to do is use curly braces ({}) inside angle braces (<>) to pass dynamic values of properties to elements.
For example, suppose you’re building a component that will be used to link to user accounts. href and title must be different and not hardcoded. A dynamic component ProfileLink renders a link <a> using the properties url and label for href and title, respectively. In ProfileLink, you pass the properties to <a> using {}:
class ProfileLink extends React.Component {
  render() {
    return <a href={this.props.url}
      title={this.props.label}
      target="_blank">Profile
    </a>
  }
}
Where do the property values come from? They’re defined when the ProfileLink is created—that is, in the component that creates ProfileLink, a.k.a. its parent. For example, this is how the values for url and label are passed when a ProfileLink instance is created, which results in the render of the <a> tag with those values:
<ProfileLink url='/users/azat' label='Profile for Azat'/>
From the previous chapter, you should remember that when rendering standard elements (<h>, <p>, <div>, <a>, and so on), React renders all attributes from the HTML specification and omits all other attributes that aren’t part of the specification. This isn’t a JSX gotcha; it’s React’s behavior.
But sometimes you want to add custom data as an attribute. Let’s say you have a list item; there’s some information that’s essential to your app but not needed by users. A common pattern is to put this information in the DOM element as an attribute. This example uses the attributes react-is-awesome and id:
<li react-is-awesome="true" id="320">React is awesome!</li>
Storing data in custom HTML attributes in the DOM is generally considered an antipattern, because you don’t want the DOM to be your database or a front-end data store. Getting data from the DOM is slower than getting it from a virtual/in-memory store.
In cases when you must store data as elements’ attributes, and you use JSX, you need to use the data-NAME prefix. For example, to render the <li> element with a value of this.reactIsAwesome in an attribute, you can write this:
<li data-react-is-awesome={this.reactIsAwesome}>React is awesome!</li>
Let’s say this.reactIsAwesome is true. Then, the resulting HTML is
<li data-react-is-awesome="true">React is awesome!</li>
But if you attempt to pass a nonstandard HTML attribute to a standard HTML element, the attribute won’t render (as covered in section 2.3). For example, this code
<li react-is-awesome={this.reactIsAwesome}>React is orange</li>
and this code
<li reactIsAwesome={this.reactIsAwesome}>React is orange</li>
both produce only the following:
<li>React is orange</li>
Obviously, because custom elements (component classes) don’t have built-in renderers and rely on standard HTML elements or other custom elements, this issue of using data- isn’t important for them. They get all attributes as properties in this.props.
Speaking of component classes, this is the code from Hello World (section 2.3) written in regular JavaScript:
class HelloWorld extends React.Component {
  render() {
    return React.createElement(
      'h1',
      this.props,
      'Hello ' + this.props.frameworkName + ' world!!!'
    )
  }
}
In the HelloWorld components, you pass the properties through to <h1> no matter what properties are there. How can you do this in JSX? You don’t want to pass each property individually, because that’s more code; and when you need to change a property, you’ll have tightly coupled code that you’ll need to update as well. Imagine having to pass each property manually—and what if you have two or three levels of components to pass through? That’s an antipattern. Don’t do this:
class HelloWorld extends React.Component {
  render() {
    return <h1 title={this.props.title} id={this.props.id}>
      Hello {this.props.frameworkName} world!!!
    </h1>
  }
}
Don’t pass the properties individually when your intention is to pass all of them; JSX offers a spread solution that looks like ellipses, ..., as you can see in the following listing (ch03/jsx/hello-js-world-jsx).
class HelloWorld extends React.Component {
  render() {
    return <h1 {...this.properties}>
      Hello {this.props.frameworkName} world!!!
    </h1>
  }
}

ReactDOM.render(
  <div>
    <HelloWorld
      id='ember'
      frameworkName='Ember.js'
      title='A framework for creating ambitious web applications.'/>,
    <HelloWorld
      id='backbone'
      frameworkName= 'Backbone.js'
      title= 'Backbone.js gives structure to web applications...'/>
    <HelloWorld
      id= 'angular'
      frameworkName= 'Angular.js'
      title= 'Superheroic JavaScript MVW Framework'/>
  </div>,
  document.getElementById('content')
)
With {...this.props}, you can pass every property to the child. The rest of the code is just converted to the JSX example from section 2.3.
Speaking of ellipses, there are similar-looking operators in ES6+, called destructuring, spread, and rest. This is one of the reasons React’s JSX uses ellipses!
If you’ve ever used or written a JavaScript function with a variable or unlimited number of arguments, you know the arguments object. This object contains all parameters passed to the function. The problem is that this arguments object isn’t a real array. You have to convert it to an array if you want to use functions like sort() and map() explicitly. For example, this request function converts arguments using call():
function request(url, options, callback) {
  var args = Array.prototype.slice.call(arguments, request.length)
  var url = args[0]
  var callback = args[2]
  // ...
}
Is there a better way in ES6 to access an indefinite number of arguments as an array? Yes! It’s the rest parameter syntax, defined with ellipses (...). For example, following is the ES6 function signature with the rest parameter callbacks, which become an array (a real array, not the arguments pseudoarray) with the rest of the parameters:[4]
In the rest array, the first parameter is the one that doesn’t have a name: for example, the callback is at index 0, not 2, as in ES5’s arguments. Also, putting other named arguments after the rest parameter will cause a syntax error.
function(url, options, ...callbacks) {
  var callback1 = callbacks[0]
  var callback2 = callbacks[1]
  // ...
}
Rest parameters can be destructured, meaning they can be extracted into separate variables:
function(url, options, ...[error, success]) {
  if (!url) return error(new Error('ooops'))
  // ...
  success(data)
}
What about spread? In brief, spread allows you to expand arguments or variables in the following places:
In ES5, if you wanted to use an array as an argument to a function, you’d have to use the apply() function:
function request(url, options, callback) {
  // ...
}
var requestArgs = ['http://azat.co', {...}, function(){...}]
request.apply(null, requestArgs)
In ES6, you can use the spread parameter, which looks similar to the rest parameter in syntax and uses ellipses (...):
function request(url, options, callback) {
  // ...
}
var requestArgs = ['http://azat.co', {...}, function(){...}]
request(...requestArgs)
The spread operator’s syntax is similar to that of the rest parameter’s, but rest is used in a function definition/declaration, and spread is used in calls and literals. They save you from typing extra lines of imperative code, so knowing and using them is a valuable skill.
As a developer, you’re free to write any component methods for your applications, because a React component is a class. For example, you can create a helper method, getUrl():
class Content extends React.Component {
  getUrl() {
    return 'http://webapplog.com'
  }
  render() {
    ...
  }
}
The getUrl() method isn’t sophisticated, but you get the idea: you can create your own arbitrary methods, not just render(). You can use the getUrl() method to abstract a URL to your API server. Helper methods can have reusable logic, and you can call them anywhere within other methods of the component, including render().
If you want to output the return from the custom method in JSX, use {}, just as you would with variables (see the following listing, ch03/method/jsx/scrch03/meipt.jsx). In this case, the helper method is invoked in render, and the method’s return values will be used in the view. Remember to invoke the method with ().
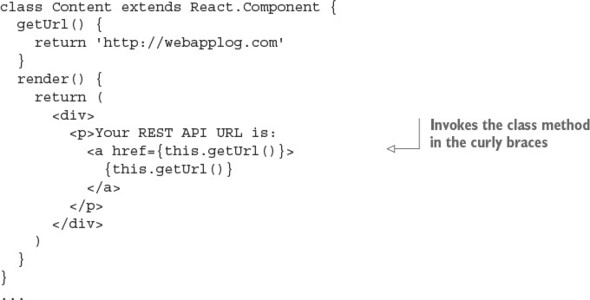
Once again, it’s possible to invoke component methods directly from {} and JSX. For example, using {this.getUrl()} in the helper method getUrl: when you use the method in listing 3.6, you’ll see http://webapplog.com as its returned value in the link in the paragraph <p> (see figure 3.2).
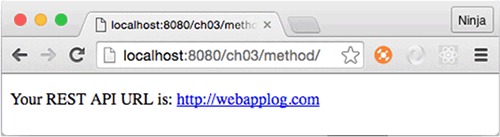
You should now understand component methods. My apologies if you found this section too banal; these methods are important as a foundation for React event handlers.
Akin to rendering dynamic variables, developers need to compose their components so that components can change views based on the results of if/else conditions. Let’s start with a simple example that renders the elements in a component class; the elements depend on a condition. For example, some link text and a URL are determined by the user.session value. This is how you can code this in plain JS:
...
render() {
  if (user.session)
    return React.createElement('a', {href: '/logout'}, 'Logout')
  else
    return React.createElement('a', {href: '/login'}, 'Login')
}
...
You can use a similar approach and rewrite this with JSX like so:
...
render() {
  if (this.props.user.session)
    return <a href="/logout">Logout</a>
  else
    return <a href="/login">Login</a>
}
...
Let’s say there are other elements, such as a <div> wrapper. In this case, in plain JS, you’d have to create a variable or use an expression or a ternary operator (also known as the Elvis operator by the younger generation of JavaScript developers; see http://mng.bz/92Zg), because you can’t use an if condition inside the <div>’s createElement(). The idea is that you must get the value at runtime.
The following ternary condition works such that if userAuth is true, then msg will be set to welcome. Otherwise, the value will be restricted:
let msg = (userAuth) ? 'welcome' : 'restricted'
This statement is equivalent to the following:
let session = '' if (userAuth) {
  session = 'welcome'
} else {
  session = 'restricted'
}
In some cases, the ternary (?) operator is a shorter version of if/else. But there’s a big difference between them if you try to use the ternary operator as an expression (where it returns a value). This code is valid JS:
let msg = (userAuth) ? 'welcome' : 'restricted'
But if/else won’t work because this isn’t an expression, but a statement:
let msg = if (userAuth) {'welcome'} else {'restricted'} // Not valid
You can use this quality of a ternary operator to get a value from it at runtime in JSX.
To demonstrate the three different styles (variable, expression, and ternary operator), look at the following regular JavaScript code before it’s converted to JSX:
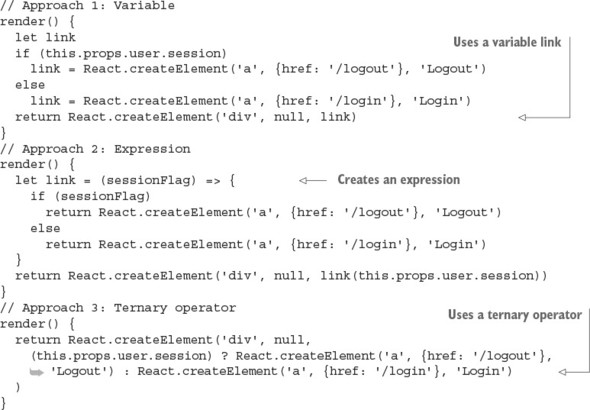
Not bad, but kind of clunky. Would you agree? With JSX, the {} notation can print variables and execute JS code. Let’s use it to achieve better syntax:
// Approach 1: Variable
render() {
  let link
  if (this.props.user.session)
    link = <a href='/logout'>Logout</a>
  else
    link = <a href='/login'>Login</a>
  return <div>{link}</div>
}
// Approach 2: Expression
render() {
  let link = (sessionFlag) => {
    if (sessionFlag)
      return <a href='/logout'>Logout</a>
    else
      return <a href='/login'>Login</a>
  }
  return <div>{link(this.props.user.session)}</div>
}
// Approach 3: Ternary operator
render() {
  return <div>
    {(this.props.user.session) ? <a href='/logout'>Logout</a> :
     <a href='/login'>Login</a>}
  </div>
}
If you look more closely at the expression/function style example (Approach 2: a function outside the JSX before return), you can come up with an alternative. You can define the same function using an immediately invoked function expression (IIFE, http://mng.bz/387u) inside the JSX. This lets you avoid having an extra variable (such as link) and execute the if/else at runtime:

Furthermore, you can use the same principles for rendering not just entire elements (<a>, in these examples), but also text and the values of properties. All you need to do is use one of the approaches shown here, inside curly braces. For example, you can augment the URL and text and not duplicate the code for element creation. Personally, this is my favorite approach, because I can use a single <a>:
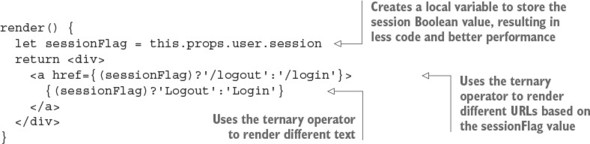
As you can see, unlike in template engines, there’s no special syntax for these conditions in JSX—you just use JavaScript. Most often, you’ll use a ternary operator, because it’s one of the most compact styles. To summarize, when it comes to implementing if/else logic in JSX, you can use these options:
This is my rule of thumb when it comes to conditions and JSX: use if/else outside of JSX (before return) to generate a variable that you’ll print in JSX with {}. Or, skip the variable, and print the results of the Elvis operator (?) or expressions using {} in JSX:
class MyReactComponent extends React.Component {
  render() {
    // Not JSX: Use a variable and if/else or ternary
    return (
      // JSX: Print result of ternary or expression with {}
    )
  }
}
We’ve covered the important conditions for building interactive UIs with React and JSX. Occasionally, you may want to narrate the functionality of your beautiful, intelligent code so that other people can quickly understand it. To do so, you use comments.
Comments in JSX work similar to comments in regular JavaScript. To add JSX comments, you can wrap standard JavaScript comments in {}, like this:
let content = (
  <div>
    {/* Just like a JS comment */}
  </div>
)
Or, you can use comments like this:
let content = (
  <div>
    <Post
      /* I
      am
      multi
      line */
      name={window.isLoggedIn ? window.name : ''} // We are inside of JSX
    />
  </div>
)
You’ve now had a taste of JSX and its benefits. The rest of this chapter is dedicated to JSX tools and potential traps to avoid. That’s right: tools and gotchas.
Because before we can continue, you must understand that for any JSX project to function properly, the JSX needs to be compiled. Browsers can’t run JSX—they can run only JavaScript, so you need to take the JSX and transpile it to normal JS (see figure 3.1).
As I mentioned, in order to execute JSX, you need to convert it to regular JavaScript code. This process is called transpilation (from compilation and transformation), and various tools are available to do the job. Here are some recommended ways to do this:
All of these use Babel in one way or another. Babel is mostly an ES6+/ES2015+ compiler, but it also can convert JSX to JavaScript. In fact, the React team stopped development on its own JSX transformer and recommends using Babel.
Although there are various tools to transpile JSX, the most frequently used tool—and the one recommended by the React team on the official React website, as of August 2016—is Babel (formerly, 5to6). Historically, the React team maintained react-tools and JSXTransformer (transpilation in the browser); but, since version 0.13, the team has recommended Babel and stopped evolving react-tools and JSXTransformer.[5]
Paul O’Shannessy, “Deprecating JSTransform and react-tools,” React, June 12, 2015, http://mng.bz/8yGc.
For in-browser runtime transpilation, Babel version 5.x has browser.js, which is a ready-to-use distribution. You can drop it in the browser, like JSXTransformer, and it will convert any <script> code into JS (use type="text/babel"). The latest Babel version that has browser.js is 5.8.34, and you can include it from the CDN directly (https://cdnjs.com/libraries/babel-core/5.8.34).
Babel 6.x switched to not having default presets/configs (such as JSX) and removed browser.js. The Babel team encourages developers to create their own distributions or use the Babel API. There’s also a babel-standalone library (https://github.com/Daniel15/babel-standalone), but you still have to tell it which presets/configs to use.
Traceur (https://github.com/google/traceur-compiler) is another tool that you can use as a replacement for Babel.
Finally, TypeScript (www.typescriptlang.org) seems to support JSX compilation via jsx-typescript (https://github.com/fdecampredon/jsx-typescript),[6] but that’s a whole new toolchain and language (a superset of regular JavaScript).
You probably can use the JSXTransformer, Babel v5, babel-standalone, TypeScript, and Traceur tools with the examples in this book (I use React v15). TypeScript and Traceur should be relatively safe bets, because they’re supported as of the time of this writing. But if you end up using anything other than Babel 6 for the book’s examples, you do so at your own risk. Manning’s tech reviewers and I didn’t test the code in this book to see if it works with these tools!
By using Babel for React, you can get extra ES6/ES2015 features to streamline your development just by adding an extra configuration and a module for ES6. The sixth iteration of the ECMAScript standard has a myriad of improvements, and is mostly available as of this writing in all modern browsers. But, older browsers will have a hard time interpreting the new ES6 code. Also, if you want to use ES7, ES8, or ES27, then some browsers might not have all the features implemented yet.
To solve the lag in ES6 or ES.Next (collective name for the most cutting-edge features) implementation by browsers, Babel comes to the rescue. It offers support for the next generation of JavaScript languages (many languages ... get the hint from the name?). This section covers the recommended approach used in the next few chapters—the Babel CLI—because it involves minimal setup and doesn’t require knowledge of Babel’s API (unlike the API approach).
To use the Babel CLI (http://babeljs.io), you need Node v6.2.0, npm v3.8.9, babel-cli v6.9.0 (www.npmjs.com/package/babel-cli), and babel-preset-react v6.5.0 (www.npmjs.com/package/babel-preset-react). Other versions aren’t guaranteed to work with this book’s code, due to the fast-changing nature of Node and React development.
If you need to install Node and npm, the easiest way to do so is to download the installer (just one for both Node and npm) from the official website: http://nodejs.org. For more options and detailed installation instructions regarding Babel installation, please see appendix A.
If you think you have these tools installed, or you’re not sure, check the versions of Node and npm with these shell/terminal/command prompt commands:
node -v
npm -v
You need to have the Babel CLI and React preset locally. Using the Babel CLI globally (-g, when installing with npm) is discouraged, because you might run into conflict when your projects rely on different versions of the tool. Here’s a short version of the instructions found in appendix A:
In the unfortunate event that you have to support an older browser such as IE9, but you still want to write in ES6+/ES2015+ because that’s the future standard, you can add the babel-preset-es2015 (www.npmjs.com/package/babel-preset-es2015) transpiler. It will convert your ES6 into ES5 code. To do so, install the library:
npm i babel-preset-es2015 --save-dev
Then, add it to the presets configuration next to react:
{
  "presets": ["react", "es2015"]
}
I don’t recommend using this ES2015 transpiler if you don’t have to support older browsers, for several reasons. First, you’ll be running old ES5 code, which is less optimized than ES6 code. Second, you’re adding an additional dependency and more complexity. And third, if most people continue to run ES5 code in their browser, why did we—meaning browser teams and regular JavaScript developers—bother with ES6? You could use TypeScript (www.typescriptlang.org), ClojureScript (http://clojurescript.org), or CoffeeScript (http://coffeescript.org), which give you more bang for your buck!
To repeat what’s written in appendix A, you need a package.json file with at least this preset:
{
  ...
  "babel": {
    "presets": ["react"]
  },
  ...
}
Then, running this command (from your newly created project folder) to check the version should work:
$ ./node_modules/.bin/babel --version
After installation, issue a command to process your js/script.jsx JSX into js/script.js JavaScript:
$ ./node_modules/.bin/babel js/script.jsx -o js/script.js
This command is long because you’re using a path to Babel. You can store this command in a package.json file to use a shorter version: npm run build. Open the file with your editor, and add this line to scripts:
"build": "./node_modules/.bin/babel js/script.jsx -o js/script.js"
You can automate this command with the watch option (-w or --watch):
$ ./node_modules/.bin/babel js/script.jsx -o js/script.js -w
The Babel command watches for any changes in script.jsx and compiles it to script.js when you save the updated JSX. When this happens, the terminal/command prompt will display the following:
change js/script.jsx
As you accumulate more JSX files, use the command with -d (--out-dir) and folder names to compile JSX source files (source) into many regular JS files (build):
$ ./node_modules/.bin/babel source --d build
Often, having a single file to load is better for the performance of a front-end app than loading many files. This is because each request adds a delay. You can compile all the files in the source directory into a single regular JS file with -o (--out-file):
$ ./node_modules/.bin/babel src -o script-compiled.js
Depending on the path configuration on your computer, you may be able to run babel instead of ./node_modules/.bin/babel. In both cases, you’re executing locally. If you have an older babel-cli installed globally, delete it with npm rm -g babel-cli.
If you’re unable to run babel when you install babel-cli locally in your project, then consider adding either one of these path statements into your shell profile: ~/.bash_profile, ~/.bashrc, or ~/.zsh, depending on your shell (bash, zsh, and so on) if you’re on POSIX (Unix, Linux, macOS, and the like).
This shell statement will add a path—so you can launch locally installed npm CLI packages without typing the path—if there’s ./node_modules/.bin in the current folder:
if [ -d "$PWD/node_modules/.bin" ]; then
    PATH="$PWD/node_modules/.bin"
fi
The shell script checks whether there’s a ./node_modules/.bin folder in your terminal bash environment current folder, and then adds that folder to the path to enable npm CLI tools like Babel, Webpack, and so on by name: babel, webpack, and so on.
You can opt to have the path set all the time, not just when there’s a subfolder. This shell statement will always add the path ./node_modules/.bin to your PATH environment variable (also in profile):
export PATH="./node_modules/.bin:$PATH"
Bonus: This setting will also allow you to run any npm CLI tool locally with just its name, not the path and the name.
For working examples of Babel package.json configurations, open the projects in the ch03 folder in the source code accompanying this book. They follow the same approach used in the chapters that follow. The package.json file in ch03 has npm build scripts for each project (subfolder) that needs compilation, unless the project has its own package.json.
When you run a build script—for example, npm run build-hello-world—it’ll compile the JSX from ch03/PROJECT_NAME/jsx into regular JavaScript and put that compiled file into ch03/PROJECT_NAME/js. Therefore, all you need to do is install the necessary dependencies with npm i (it will create a ch03/node_modules folder), check whether a build script exists in package.json, and then run npm run build-PROJECT_NAME.
Thus far, you’ve learned the easiest way to transpile JSX into regular JS, in my humble opinion. But I want you to be aware of some tricky parts when it comes to React and JSX.
This section covers some edge cases. There are a few gotchas to be aware of when you use JSX.
For instance, JSX requires you to have a closing slash (/) either in the closing tag or, if you don’t have any children and use a single tag, in the end of that single tag. For example, this is correct:
<a href="http://azat.co">Azat, the master of callbacks</a>
<button label="Save" className="btn" onClick={this.handleSave}/>
This is not correct, because the slashes are missing:
<a href="http://azat.co">Azat<a>
<button label="Save" className="btn" onClick={this.handleSave}>
Conversely, HTML is more fault tolerant. Most browsers will ignore the missing slash and render the element just fine without it. Go ahead: try <button>Press me for yourself!
There are other differences between HTML and JSX, as well.
HTML entities are codes that display special characters such as copyright symbols, em dashes, quotation marks, and so on. Here are some examples:
©
—
“
You can render those codes as any string in <span> or in the string attribute <input>. For example, this is static JSX (text defined in code without variables or properties):
<span>©—“</span> <input value="©—“"/>
But if you want to dynamically output HTML entities (from a variable or a property) with <span>, all you’ll get is the direct output (©—“), not the special characters. Thus, the following code won’t work:
// Anti-pattern. Will NOT work!
var specialChars = '©—“'

<span>{specialChars}</span>
<input value={specialChars}/>
React/JSX will auto-escape the dangerous HTML, which is convenient in terms of security (security by default rocks!). To output special characters, you need to use one of these approaches:
To illustrate the last approach (as a last resort—when all else fails on the Titanic, run for the boats!), look at this code:
var specialChars = {__html: '©—“'}

<span dangerouslySetInnerHTML={specialChars}/>
Obviously, the React team has a sense of humor, to name a property dangerouslySetInnerHTML. Sometimes React naming makes me laugh to myself!
Section 2.3 covered properties in a non-JSX way, but let’s look at how to create custom attributes in HTML one more time (this time with JSX). Chiefly, React will blissfully ignore any nonstandard HTML attributes that you add to components. It doesn’t matter whether you use JSX or native JavaScript—that’s React’s behavior.
But sometimes, you want to pass additional data using DOM nodes. This is an antipattern because your DOM shouldn’t be used as a database or local storage. If you still want to create custom attributes and get them rendered, use the data- prefix.
For example, this is a valid custom data-object-id attribute that React will render in the view (HTML will be the same as this JSX):
<li data-object-id="097F4E4F">...</li>
If the input is the following React/JSX element, React won’t render object-id, because it’s not a standard HTML attribute (HTML will miss object-id, unlike this JSX):
<li object-id="097F4E4F">...</li>
The style attribute in JSX works differently than in plain HTML. With JSX, instead of a string, you need to pass a JavaScript object, and CSS properties need to be in camelCase. For example:
You can save the JavaScript object in a variable or render it inline with double curly braces ({{...}}). The double braces are needed because one set is for JSX and the other is for the JavaScript object literal.
Suppose you have an object with this font size:
let smallFontSize = {fontSize: '10pt'}
In your JSX, you can use the smallFontSize object:
<input style={smallFontSize} />
Or you can settle for a larger font (30 point) by passing the values directly without an extra variable:
<input style={{fontSize: '30pt'}} />
Let’s look at another example of passing styles directly. This time, you’re setting a red border on <span>:
<span style={{borderColor: 'red',
  borderWidth: 1,
  borderStyle: 'solid'}}>Hey</span>
Alternatively, the following border value will also work:
<span style={{border: '1px red solid'}}>Hey</span>
The main reason classes are not opaque strings but JavaScript objects is so React can work with them more quickly when it applies changes to views.
React and JSX accept any attribute that’s a standard HTML attribute, except class and for. Those names are reserved words in JavaScript/ECMAScript, and JSX is converted into regular JavaScript. Use className and htmlFor instead. For example, if you have a class hidden, you can define it in a <div> this way:
<div className="hidden">...</div>
If you need to create a label for a form element, use htmlFor:
<div>
    <input type="radio" name={this.props.name} id={this.props.id}>
    </input>
    <label htmlFor={this.props.id}>
      {this.props.label}
    </label>
</div>
Last but not least, some attributes (such as disabled, required, checked, autofocus, and readOnly) are specific only to form elements. The most important thing to remember here is that the attribute value must be set in the JavaScript expression (that is, inside {}) and not set in strings.
For example, use {false} to enable the input:
<input disabled={false} />
But don’t use a "false" value, because it’ll pass the truthy check (a non-empty string is truthy in JavaScript—see the sidebar) and render the input as disabled (disabled will be true):
<input disabled="false" />
In JavaScript/Node, a truthy value translates to true when evaluated as a Boolean; for example, in an if statement. The value is truthy if it’s not falsy. (That’s the official definition. Brilliant, right?) And there are only six falsy values:
I hope you can see that the string "false" is a non-empty string, which is truthy and translates to true. Hence, you’ll get disabled=true in HTML.
If you omit the value, React will assume the value is true:
<input disabled />
The subsequent chapters use JSX exclusively. But knowing the underlying regular JavaScript that will be run by browsers is a great skill to have in your toolbox.
To output a JavaScript variable in JSX, which of the following do you use? =, <%= %>, {}, or <?= ?>
The class attribute isn’t allowed in JSX. True or false?
The default value for an attribute without a value is false. True or false?
The inline style attribute in JSX is a JavaScript object and not a string like other attributes. True or false?
If you need to have if/else logic in JSX, you can use it inside {}. For example, class={if (!this.props.admin) return 'hide'} is valid JSX code. True or false?
You use {} for variables and expressions.
True. class is a reserved or special JavaScript statement. For this reason, you use className in JSX.
False. It’s recommended that you use attribute_name={false/true} to set the Boolean values explicitly.
True. style is an object for performance reasons.
False. First, class isn’t a proper attribute. Then, instead of if return (not valid), you should use a ternary operator.
This chapter covers
If you read only one chapter in this book, this should be it! Without states, your React components are just glorified static templates. I hope you’re as excited as I am, because understanding the concepts in this chapter will allow you to build much more interesting applications.
Imagine that you’re building an autocomplete input field (see figure 4.1). When you type in it, you want to make a request to the server to fetch information about matches to show on the web page. So far, you’ve worked with properties, and you’ve learned that by changing properties, you can get different views. But properties can’t change in the context of the current component, because they’re passed on this component’s creation.
To put it another way, properties are immutable in the current component, meaning you don’t change properties in this component unless you re-create the component by passing new values from a parent (figure 4.2). But you must store the information you receive from the server somewhere and then display the new list of matches in the view. How do you update the view if the properties are unchangeable?

One solution is to render an element with new properties each time you get the new server response. But then you’ll have to have logic outside the component—the component stops being self-contained. Clearly, if you can’t change the values of properties, and the autocomplete needs to be self-contained, you can’t use properties. Thus the question is, how do you update views in response to events without re-creating a component (createElement() or JSX <NAME/>)? This is the problem that states solve.
Once the response from the server is ready, your callback code will augment the component state accordingly. You’ll have to write this code yourself. Once the state is updated, though, React will intelligently update the view for you (only in the places where it needs to be updated; that’s where you use the state data).
With React component states, you can build meaningful, interactive React applications. State is the core concept that lets you build React components that can store data and automagically augment views based on data changes.
The source code for the examples in this chapter is at www.manning.com/books/react-quickly and at https://github.com/azat-co/react-quickly/tree/master/ch04 (in the ch04 folder of the GitHub repository https://github.com/azat-co/react-quickly). You can also find some demos at http://reactquickly.co/demos.
A React state is a mutable data store of components—self-contained, functionality-centric blocks of UI and logic. Mutable means state values can change. By using state in a view (render()) and changing values later, you can affect the view’s representation.
Here’s a metaphor: if you think of a component as a function that has properties and state as its input, then the result of this function is the UI description (view). Or, as React teams phrase it, “Components are state machines.” Properties and state both augment views, but they’re used for different purposes (see section 4.3).
To work with states, you access them by name. This name is an attribute (a.k.a. an object key or an object property—not a component property) of the this.state object: for example, this.state.autocompleMatches or this.state.inputFieldValue.
Generally speaking, the word states refers to the attributes of the this.state object in a component. Depending on the context, state (singular) can refer to the this.state object or an individual attribute (such as this.state.inputFieldValue). Conversely, states (plural) almost always refers to the multiple attributes of the state object in a single component.
State data is often used to display dynamic information in a view to augment the rendering of views. Going back to the earlier example of an autocomplete field, the state changes in response to the XHR request to the server, which is, in turn, triggered by a user typing in the field. React takes care of keeping views up to date when the state used in the views changes. In essence, when state changes, only the corresponding parts of views change (down to single elements or even an attribute value of a single element).
Everything else in the DOM remains intact. This is possible due to the virtual DOM (see section 1.1.1), which React uses to determine the delta using the reconciliation process. This is how you can write declaratively. React does all the magic for you. The steps in the view change and how it happens are discussed in chapter 5.
React developers use states to generate new UIs. Component properties (this.props), regular variables (inputValue), and class attributes (this.inputValue) won’t do it, because they don’t trigger a view change when you alter their values (in the current component context). For instance, the following is an antipattern, showing that if you change a value in anything except the state, you won’t get view updates:
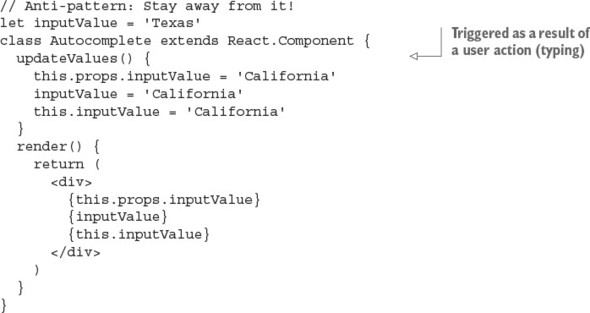
Next, you’ll see how to work with React component states.
As mentioned earlier (repetition is the mother of skills), properties will change the view if you pass a new value from a parent, which in turn will create a new instance of the component you’re currently working with. In the context of a given component, changing properties as in this.props.inputValue = 'California' won’t cut it.
To be able to work with states, you need to know how to access values, update them, and set the initial values. Let’s start with accessing states in React components.
The state object is an attribute of a component and can be accessed with a this reference; for example, this.state.name. You’ll recall that you can access and print variables in JSX with curly braces ({}). Similarly, you can render this.state (like any other variable or custom component class attribute) in render(); for example, {this.state.inputFieldValue}. This syntax is similar to the way you access properties with this.props.name.
Let’s use what you’ve learned so far to implement a clock, as shown in figure 4.3. The goal is to have a self-contained component class that anyone can import and use in their application without having to jump through hoops. The clock must render the current time.
The structure of the clock project is as follows:
/clock
  index.html
  /jsx
    script.jsx
    clock.jsx
  /js
    script.js
    clock.js
    react.js
    react-dom.js
I’m using the Babel CLI with a watch (-w) and a directory flag (-d) to compile all source JSX files from clock/jsx to a destination folder, clock/js, and recompile on changes. Moreover, I have the command saved as an npm script in my package.json in a parent folder, ch04, in order to run npm run build-clock from ch04:
"scripts": {
    "build-clock": "./node_modules/.bin/babel clock/jsx -d clock/js -w"
},
Obviously, time is always changing (for good or for bad). Because of that, you’ll need to update the view—and you can do so by using state. Give it the name currentTime, and try to render this state as shown in the following listing.
class Clock extends React.Component {
  render() {
    return <div>{this.state.currentTime}</div>
  }
}

ReactDOM.render(
  <Clock />,
  document.getElementById('content')
)
You’ll get an error: Uncaught TypeError: Cannot read property 'currentTime' of null. Normally, JavaScript error messages are as helpful as a glass of cold water to a drowning man. It’s good that, at least in this case, JavaScript gives you a helpful message. This one means you don’t have a value for currentTime. Unlike properties, states aren’t set on a parent. You can’t setState in render() either, because it’ll create a circular (setState → render → setState...) loop—and, in this case, React will throw an error.
Thus far, you’ve seen that before you use state data in render(), you must initialize the state. To set the initial state, use this.state in the constructor with your ES6 class React.Component syntax. Don’t forget to invoke super() with properties; otherwise, the logic in the parent (React.Component) won’t work:
class MyFancyComponent extends React.Component {
  constructor(props) {
    super(props)
    this.state = {...}
  }
  render() {
    ...
  }
}
You can also add other logic while you’re setting the initial state. For example, you can set the value of currentTime using new Date(). You can even use toLocaleString() to get the proper date and time format for the user’s location, as shown next (ch04/clock).
class Clock extends React.Component {
  constructor(props) {
    super(props)
    this.state = {currentTime: (new Date()).toLocaleString()}
  }
  ...
}
The value of this.state must be an object. We won’t get into a lot of detail here about the ES6 constructor(); see appendix E and the ES6 cheatsheet at https://github.com/azat-co/cheatsheets/tree/master/es6. The gist is that as with other OOP languages, constructor() is invoked when an instance of this class is created. The constructor method name must be exactly constructor. Think of it as an ES6 convention. Furthermore, if you create a constructor() method, you’ll almost always need to invoke super() inside it; otherwise, the parent’s constructor won’t be executed. On the other hand, if you don’t define a constructor() method, then the call to super() will be assumed under the hood.
Hopefully, Technical Committee 39 (TC39: the people behind the ECMAScript standard) will add attributes to the class syntax in future versions of ECMAScript! This way, we’ll be able to set state not just in the constructor, but also in the body of a class:
class Clock extends React.Component {
  state = {
    ...
  }
}
The proposal for class fields/attributes/properties is at https://github.com/jeffmo/es-class-fields-and-static-properties. It’s been there for many years, but as of this writing (March 2017), it’s only a stage 2 proposal (stage 4 means final and in the standard), meaning it’s not widely available in browsers. That is, this feature won’t work natively. (As of this writing, exactly zero browsers support class fields.)
Most likely, you’ll have to use a transpiler (such as Babel, Traceur, or TypeScript) to ensure that the code will work in all browsers. Check out the current compatibility of class properties in the ECMAScript compatibility table (http://kangax.github.io/compat-table/esnext), and, if needed, use the ES.Next Babel preset.
Here, currentTime is an arbitrary name; you’ll need to use the same name later when accessing and updating this state. You can name the state anything you want, as long as you refer to it later using this name.
The state object can have nested objects or arrays. This example adds an array of my books to the state:
class Content extends React.Component {
  constructor(props) {
    super(props)
    this.state = {
      githubName: 'azat-co',
      books: [
        'pro express.js',
        'practical node.js',
        'rapid prototyping with js'
      ]
    }
  }
  render() {
    ...
  }
}
The constructor() method is called just once, when a React element is created from this class. This way, you can set state directly by using this.state just once, in the constructor() method. Avoid setting and updating state directly with this.state = ... anywhere else, because doing so may lead to unintended consequences.
With React’s own createClass() method to define a component, you’ll need to use getInitialState(). For more information on createClass() and an example in ES5, see the sidebar in section 2.2, “ES6+/ES2015+ and React.”
This will only get you the first value, which will be outdated very soon—like, in 1 second. What’s the point of a clock that doesn’t show the current time? Luckily, there’s a way to update the state.
You change state with the this.setState(data, callback) class method. When this method is invoked, React merges the data with current states and calls render(). After that, React calls callback.
Having the callback in setState() is important because the method works asynchronously. If you’re relying on the new state, you can use the callback to make sure this new state is available.
If you rely on a new state without waiting for setState() to finish its work—that is, working synchronously with an asynchronous operation—then you may have a bug when you rely on new state values to be updated, but the state is still an old state with old values.
So far, you’ve rendered the time from a state. You also set the initial state, but you need to update the time every second, right? To do so, you can use a browser timer function, setInterval() (http://mng.bz/P2d6), which will execute the state update every n milliseconds. The setInterval() method is implemented in virtually all modern browsers as a global, which means you can use it without any libraries or prefixes. Here’s an example:
setInterval(()=>{
  console.log('Updating time...')
  this.setState({
    currentTime: (new Date()).toLocaleString()
  })
}, 1000)
To kick-start the clock, you need to invoke setInterval() once. Let’s create a launchClock() method to do just that; you’ll call launchClock() in the constructor. The final clock is shown in the following listing (ch04/clock/jsx/clock.jsx).
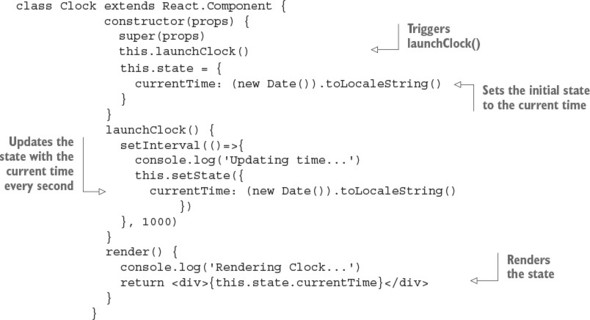
You can use setState() anywhere, not just in launchClock() (which is invoked by constructor), as shown in the example. Typically, setState() is called from the event handler or as a callback for incoming data or data updates.
Changing a state value in your code using this.state.name= 'new name' won’t do any good. This won’t trigger a rerender and a possible real DOM update, which you want. For the most part, changing state directly without setState() is an antipattern and should be avoided.
It’s important to note that setState() updates only the states you pass to it (partially or merged, but not a complete replace). It doesn’t replace the entire state object each time. So, if you have three states and change one, the other two will remain unchanged. In the following example, userEmail and userId will remain intact:
constructor(props) {
  super(props)
  this.state = {
    userName: 'Azat Mardan',
    userEmail: 'hi@azat.co',
    userId: 3967
  }
}
updateValues() {
  this.setState({userName: 'Azat'})
}
If your intention is to update all three states, you need to do so explicitly by passing the new values for these states to setState(). (Another method you may still see in old React code but that’s no longer working and has been deprecated is the this.replaceState() method.[1] As you can guess from the name, it replaced the entire state object with all its attributes.)
Keep in mind that setState() triggers render(). It works in most cases. In some edge-case scenarios where the code depends on external data, you can trigger a rerender with this.forceUpdate(). But this approach should be avoided as a bad practice, because relying on external data and not state makes components more fragile and depends on external factors (tight coupling).
As mentioned earlier, you can access the state object with this.state. As you’ll recall, you output values with curly braces ({}) in JSX; therefore, to declare a state property in the view (that is, render’s return statement), apply {this.state.NAME}.
React magic happens when you use state data in a view (for example, to print, in an if/else statement, as a value of an attribute, or as a child’s property value) and then give setState() new values. Boom! React updates the necessary HTML for you. You can see this in your DevTools console. It should show cycles of “Updating ...” and then “Rendering ....” And the best part is that only the absolute minimum required DOM elements will be affected.
In JavaScript, this mutates (changes) its value depending on the place from which a function is called. To ensure that this refers to your component class, you need to bind the function to the proper context (this value: your component class).
If you’re using ES6+/ES2015+, as I do in this book, you can use fat-arrow function syntax to create a function with autobinding:
setInterval(()=>{
  this.setState({
    currentTime: (new Date()).toLocaleString()
  })
}, 1000)
Autobinding means the function created with a fat arrow gets the current value of this, which in this case is Clock.
The manual approach uses the bind(this) method on the closure:
function() {...}.bind(this)
It looks like this for your clock:
setInterval(function(){
  this.setState({
    currentTime: (new Date()).toLocaleString()
  })
}.bind(this), 1000)
This behavior isn’t exclusive to React. The this keyword mutates in a function’s closure, so you need do some sort of binding; you can also save the context (this) value so you can use it later.
Typically, you’ll see variables like self, that, and _this used to save the value of the original this. You’ve probably seen statements like the following:
var that = this
var _this = this
var self = this
The idea is straightforward: you create a variable and use it in the closure instead of referring to this. The new variable isn’t a copy but rather a reference to the original this value. Here’s setInterval():
var _this = this
setInterval(function(){
  _this.setState({
    currentTime: (new Date()).toLocaleString()
  })
}, 1000)
You have a clock, and it’s working, as shown in figure 4.4. Tadaaa!
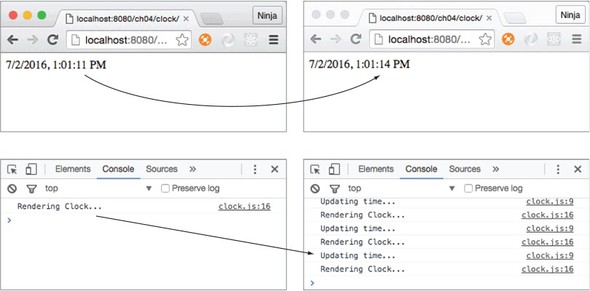
One more quick thing before we move on. You can see how React is reusing the same DOM <div> element and only changes the text inside it. Go ahead and use DevTools to modify the CSS of this element. I added a style to make the text blue: color: blue, as shown in figure 4.5 (you can see the color in electronic versions of the book). I created an inline style, not a class. The element and its new inline style stayed the same (blue) while the time kept ticking.
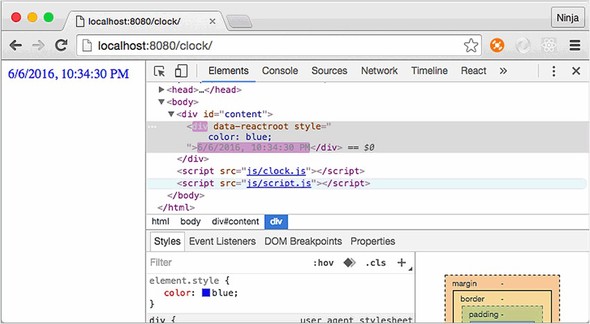
React will only update the inner HTML (the content of the second <div> container). The <div> itself, as well as all other elements on this page, remain intact. Neat.
States and properties are both attributes of a class, meaning they’re this.state and this.props. That’s the only similarity! One of the primary differences between states and properties is that the former are mutable, whereas the latter are immutable.
Another difference between properties and states is that you pass properties from parent components, whereas you define states in the component itself, not its parent. The philosophy is that you can only change the value of a property from the parent, not the component. So properties determine the view upon creation, and then they remain static (they don’t change). The state, on the other hand, is set and updated by the object.
Properties and states serve different purposes, but both are accessible as attributes of the component class, and both help you to compose components with a different representation (view). There are differences between properties and states when it comes to the component lifecycle (more in chapter 5). Think of properties and states as inputs for a function that produces different outputs. Those outputs are views. So you can have different UIs (views) for each set of different properties and states (see figure 4.6).
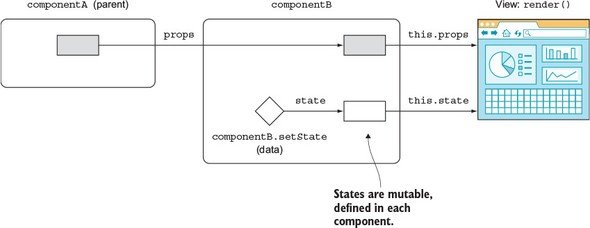
Not all components need to have state. In the next section, you’ll see how to use properties with stateless components.
A stateless component has no states or components or any other React lifecycle events/methods (see chapter 5). The purpose of a stateless component is just to render the view. The only thing it can do is take properties and do something with them—it’s a simple function with the input (properties) and the output (UI element).
The benefit of using stateless components is that they’re predictable, because you have one input that determines the output. Predictability means they’re easier to understand, maintain, and debug. In fact, not having a state is the most desired React practice—the more stateless components you use and the fewer stateful ones you use, the better.
You wrote a lot of stateless components in the first three chapters of this book. For example, Hello World is a stateless component (ch03/hello-js-world-jsx/jsx/script.jsx).
class HelloWorld extends React.Component {
  render() {
    return <h1 {...this.props}>Hello {this.props.frameworkName} world!!!
     </h1>
  }
}
To provide a smaller syntax for stateless components, React uses this function style: you create a function that takes properties as an argument and returns the view. A stateless component renders like any other component. For example, the HelloWorld component can be rewritten as a function that returns <h1>:
const HelloWorld = function(props){
  return <h1 {...props}>Hello {props.frameworkName} world!!!</h1>
}
You can use ES6+/ES2015+ arrow functions for stateless components. The following snippet is analogous to the previous one (return can be omitted too, but I like to include it):
const HelloWorld = (props)=>{
  return <h1 {...props}>Hello {props.frameworkName} world!!!</h1>
}
As you can see, you can also define functions as React components when there’s no need for state. In other words, to create a stateless component, define it as a function. Here’s an example in which Link is a stateless component:
function Link (props) {
  return <a href={props.href} target="_blank" className="btn btn-primary">
   {props.text}</a>
}
ReactDOM.render(
  <Link text='Buy React Quickly'
   href='https://www.manning.com/books/react-quickly'/>,
  document.getElementById('content')
)
Although there’s no need for autobinding, you can use the fat-arrow function syntax for brevity (when there’s a single statement, the notation can be a one-liner):
const Link = props => <a href={props.href}
  target="_blank"
  className="btn btn-primary">
    {props.text}
  </a>
Or you can use the same arrow function but with curly braces ({}), explicit return, and parentheses (()) to make it subjectively more readable:
const Link = (props)=> {
  return (
    <a href={props.href}
      target="_blank"
      className="btn btn-primary">
        {props.text}
    </a>
  )
}
In a stateless component, you can’t have a state, but you can have two properties: propTypes and defaultProps (see sections 8.1 and 8.2, respectively). You set them on the object. And, by the way, it’s okay to not have an opening parenthesis after return as long as you start an element on the same line:
function Link (props) {
  return <a href={props.href}
    target="_blank"
    className="btn btn-primary">
      {props.text}
  </a>
}
Link.propTypes = {...}
Link.defaultProps = {...}
You also cannot use references (refs) with stateless components (functions).[2] If you need to use refs, you can wrap a stateless component in a normal React component. More about references in section 7.2.3.
“React stateless component this.refs..value?” http://mng.bz/Eb91.
Why use stateless components? They’re more declarative and work better when all you need to do is render some HTML without creating a backing instance or lifecycle components. Basically, stateless components reduce duplication and provide better syntax and more simplicity when all you need to do is mesh together some properties and elements into HTML.
My suggested approach, and the best practice according to the React team, is to use stateless components instead of normal components as often as possible. But as you saw in the clock example, it’s not always possible; sometimes you have to resort to using states. So, you have a handful of stateful components on top of the hierarchy to handle the UI states, interactions, and other application logic (such as loading data from a server).
Don’t think that stateless components must be static. By providing different properties for them, you can change their representation. Let’s look at an example that refactors and enhances Clock into three components: a stateful clock that has the state and the logic to update it; and two stateless components, DigitalDisplay and AnalogDisplay, which only output time (but do it in different ways). The goal is something like figure 4.7. Pretty, right?
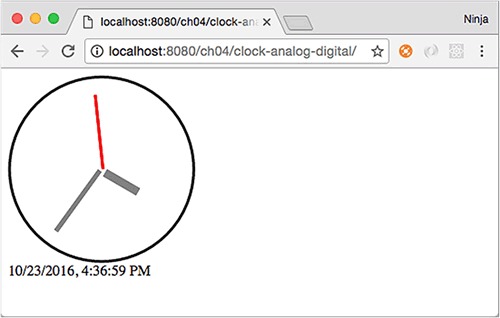
The structure of the project is as follows:
/clock-analog-digital
  /jsx
    analog-display.jsx
    clock.jsx
    digital-display.jsx
    script.jsx
  /js
    analog-display.js
    clock.js
    digital-display.js
    script.js
    react.js
    react-dom.js
  index.html
The code for Clock renders the two child elements and passes the time property with the value of the currentTime state. The state of a parent becomes a property of a child.
...
  render() {
    console.log('Rendering...')
    return <div>
      <AnalogDisplay time={this.state.currentTime}/>
      <DigitalDisplay time={this.state.currentTime}/>
    </div>
  }
Now, you need to create DigitalDisplay, which is simple. It’s a function that takes the properties and displays time from that property argument (props.time), as shown next (ch04/clock-analog-digital/jsx/digital-display.jsx).
const DigitalDisplay = function(props) {
  return <div>{props.time}</div>
}
AnalogDisplay is also a function that implements a stateless component; but in its body is some fancy animation to rotate the hands. The animation works based on the time property, not based on any state. The idea is to take the time as a string; convert it to a Date object; get minutes, hours, and seconds; and convert those to degrees. For example, here’s how to get seconds as angle degrees:
let date = new Date('1/9/2007, 9:46:15 AM')
console.log((date.getSeconds()/60)*360 )  // 90
Once you have the degrees, you can use them in CSS, written as an object literal. The difference is that in the React CSS, the style properties are camelCased, whereas in regular CSS, the dashes (-) make style properties invalid JavaScript. As mentioned earlier, having objects for styles allows React to more quickly determine the difference between the old element and the new element. See section 3.4.3. for more about style and CSS in React.
The following listing shows the stateless analog display component with CSS that uses values from the time property (ch04/clock-analog-digital/jsx/analog-display.jsx).
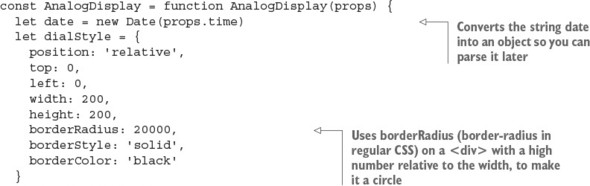
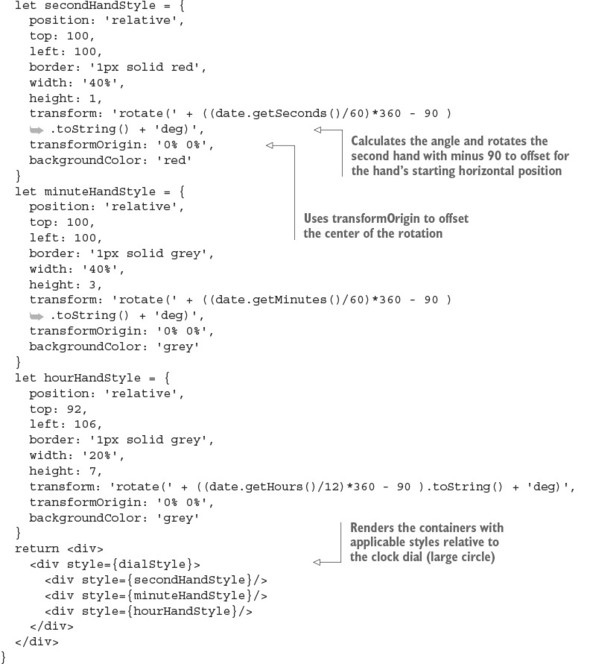
If you have React Developer Tools for Chrome or Firefox (available at http://mng.bz/mt5P and http://mng.bz/DANq), you can open the React pane in your DevTools (or an analog in Firefox). Mine shows that the <Clock> element has two children (see figure 4.8). Notice that React DevTools tells you the names of the components along with the state, currentTime. What a great tool for debugging!

Note that in this example, I used anonymous expressions stored as const variables. Another approach is to use a syntax with named function declarations:
function AnalogDisplay(props) {...}
Or you can use the named function declaration referenced from a variable:
const AnalogDisplay = function AnalogDisplay(props) {...}
In JavaScript, there are several way to define a function. You can write an anonymous function expression that’s used right away (typically as a callback):
function() { return 'howdy'}
Or you can create an IIFE:
(function() {
  return('howdy')
})()
An anonymous function expression can be referenced in a variable:
let sayHelloInMandarin = function() { return 'ni hao'}
This is a named or hoisted function expression:
function sayHelloInTatar() { return 'sälam'}
And this is a named or hoisted function expression referenced in a variable:
let sayHelloInSpanish = function digaHolaEnEspanol() { return 'hola'}
Finally, you can use an immediately invoked, named function expression:
(function sayHelloInTexan() {
    return('howdy')
})()
There’s no fat-arrow syntax for named/hoisted functions.
As you can see, the AnalogDisplay and DigitalDisplay components are stateless: they have no states. They also don’t have any methods, except for the body of the function, which is not like render() in a normal React class definition. All the logic and states of the app are in Clock.
In contrast, the only logic you put into the stateless components is the animation, but that’s closely related to the analog display. Clearly, it would have been a bad design to include analog animation in Clock. Now, you have two components, and you can render either or both of them from Clock. Using stateless components properly with a handful of stateful components allows for more flexible, simpler, better design.
Usually, when React developers say stateless, they mean a component created with a function or fat-arrow syntax. It’s possible to have a stateless component created with a class, but this approach isn’t recommended because then it’s too easy for someone else (or you in six months) to add a state. No temptation, no way to complicate code!
You may be wondering whether a stateless component can have methods. Obviously, if you use classes, then yes, they can have methods; but as I mentioned, most developers use functions. Although you can attach methods to functions (they’re also objects in JavaScript), the code isn’t elegant, because you can’t use this in a function (the value isn’t the component; it’s window):
// Anti-pattern: Don't do this.
const DigitalDisplay = function(props) {
  return <div>{DigitalDisplay.locale(props.time)}</div>
}
DigitalDisplay.locale = (time)=>{
  return (new Date(time)).toLocaleString('EU')
}
If you need to perform some logic related to the view, create a new function right in the stateless component:
// Good pattern
const DigitalDisplay = function(props) {
  const locale = time => (new Date(time)).toLocaleString('EU')
  return <div>{locale(props.time)}</div>
}
Keep your stateless components simple: no states and no methods. In particular, don’t have any calls to external methods or functions, because their results may break predictability (and violate the concept of purity).
You can set state in a component method (not a constructor) with which syntax? this.setState(a), this.state = a, or this.a = a
If you want to update the render process, it’s normal practice to change properties in components like this: this.props.a=100. True or false?
States are mutable, and properties are immutable. True or false?
Stateless components can be implemented as functions. True or false?
How do you define the first state variables when an element is created? setState(), initialState(), this.state =... in the constructor, or setInitialState()
this.setState(a), because we never, never, never assign this.state directly except in constructor(). this.a will not do anything with state. It’ll only create an instance field/attribute/property.
False. Changing a property in the component won’t trigger a rerender.
True. There’s no way to change a property from a component—only from its parent. Conversely, states are changed only by the component.
True. You can use the arrow function or the traditional function() {} definition, but both must return an element (single element).
this.state = ... in the constructor, or getInitialState() if you’re using createClass().
This chapter covers
Chapter 2 provided information about how to create components, but there are certain situations in which you need more granular control over a component. For instance, you may be building a custom radio button component that can change in size depending on the screen width. Or perhaps you’re building a menu that needs to get information from the server by sending an XHR request.
One approach would be to implement the necessary logic before instantiating a component and then re-create it by providing different properties. Unfortunately, this won’t create a self-contained component, and thus you’ll lose React’s benefit of providing a component-based architecture.
The best approach is to use component lifecycle events. By mounting events, you can inject the necessary logic into components. Moreover, you can use other events to make components smarter by providing specific logic about whether or not to rerender their views (overwriting React’s default algorithm).
Going back to the examples of a custom radio button and menu, the button can attach event listeners to window (onResize) when the button component is created, and detach them when the component is removed. And the menu can fetch data from the server when the React element is mounted (inserted) into the real DOM.
Onward to learning about component lifecycle events!
The source code for the examples in this chapter is at www.manning.com/books/react-quickly and https://github.com/azat-co/react-quickly/tree/master/ch05 (in the ch05 folder of the GitHub repository https://github.com/azat-co/react-quickly). You can also find some demos at http://reactquickly.co/demos.
React provides a way for you to control and customize a component’s behavior based on its lifecycle events (think of hooking [https://en.wikipedia.org/wiki/Hooking] in computer programming). These events belong to the following categories:
Each and every React component has lifecycle events that are triggered at certain moments depending on what a component has done or will do. Some of them execute just once, whereas others can be executed continuously.
Lifecycle events allow you to implement custom logic that will enhance what components can do. You can also use them to modify the behavior of components: for example, to decide when to rerender. This enhances performance, because unnecessary operations are eliminated. Another usage is to fetch data from the back end or integrate with DOM events or other front-end libraries. Let’s look more closely at how categories of events operate, what events they possess, and in what sequence those events are executed.
React defines several component events in three categories (see figure 5.1 and also table 5.1, later in the chapter). Each category can fire events various number of times:
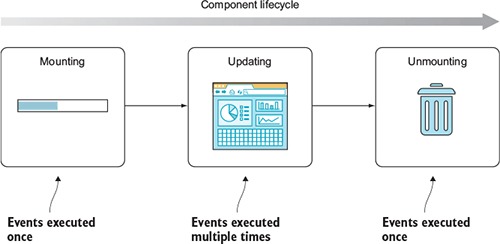
In addition to lifecycle events, I’ll include constructor(), to illustrate the order of execution from start to finish during the component’s lifecycle (updating can happen multiple times):
Usually, an event’s name makes clear to developers when the event is triggered. For example, componentDidUpdate() is fired when the component is updated. In other cases, there are subtle differences. Table 5.1 shows the sequence of lifecycle events (from top to bottom) and how some of them depend on changes of properties or state (the Component Properties and Component State columns).
|
Mounting |
Updating component properties |
Updating component state |
Updating using |
Unmounting |
|---|---|---|---|---|
| constructor() | ||||
| componentWillMount() | ||||
| componentWillReceiveProps() | ||||
| shouldComponentUpdate() | shouldComponentUpdate() | |||
| componentWillUpdate() | componentWillUpdate() | componentWillUpdate() | ||
| render() | render() | render() | render() | |
| componentDidUpdate() | componentDidUpdate() | componentDidUpdate() | ||
| componentDidMount() | ||||
| componentWillUnmount() |
There’s one more case in which a component might be rerendered: when this.forceUpdate() is called. As you can guess from the name, it forces updates. You may need to resort to using it when, for one reason or another, updating state or properties won’t trigger a desired rerender. For example, this might happen when you use data in render() that isn’t part of the state or properties, and that data changes—hence, the need to manually trigger an update. Generally (and according to the React core team), the this.forceUpdate() method (http://mng.bz/v5sU) should be avoided, because it makes components impure (see the following sidebar).
Next, let’s define an event to see it in action.
In computer science in general—not just in React—a pure function is a function that
For example, here’s a pure function that doubles the value of the input: f(x) = 2x or, in JavaScript/Node, let f= (n)⇒2*n. Here it is in action:
let f = (n)=>2*n
consoleg.log(f(7))
An impure function to double numbers looks like this in action (adding curly braces removes the implicit return of the one-liner fat-arrow function):
let sharedStateNumber = 7
let double
let f = ()=> {double =2*sharedStateNumber}
f()
console.log(double)
Pure functions are the cornerstone of functional programming (FP), which minimizes state as much as possible. Developers (especially functional programmers) prefer pure functions primarily because their usage mitigates shared state, which in turn simplifies development and decouples different pieces of logic. In addition, using them makes testing easier. When it comes to React, you already know that having more stateless components and fewer dependencies is better; that’s why the best practice is to create pure functions.
In some ways, FP contradicts OOP (or is it OOP that contradicts FP?), with FP fans saying that Fortran and Java were programming dead ends and that Lisp (and nowadays, Clojure and Elm) is the way to go. It’s a fascinating debate to follow. Personally, I’m slightly biased toward the functional approach.
Many good books have been written about FP, because the concept has been around for decades. For this reason, I won’t get into much detail here; but I highly recommend learning more about FP, because it will make you a better programmer even if you never plan to use it at your job.
To implement lifecycle events, you define them on a class as methods (see section 3.2.5)—this is a convention that React expects you to follow. React checks to see whether there’s a method with an event name; if React finds a method, it will call that method. Otherwise, React will continue its normal flow. Obviously, event names are case sensitive like any name in JavaScript.
To put it differently, under the hood, React calls certain methods during a component’s lifecycle if they’re defined. For example, if you define componentDidMount(), then React will call this method when an element of this component class is mounted. componentDidMount() belongs to the mounting category listed in table 5.1, and it will be called once per instance of the component class:
class Clock extends React.Component {
  componentDidMount() {
  }
  ...
}
If no componentDidMount() method is defined, React won’t execute any code for this event. Thus, the name of the method must match the name of the event. Going forward, I’ll use the terms event, event handler, and method interchangeably in this chapter.
As you might have guessed from its name, the componentDidMount() method is invoked when a component is inserted into the DOM. This method is a recommended place to put code to integrate with other front-end frameworks and libraries as well as to send XHR requests to a server, because at this point in the lifecycle, the component’s element is in the real DOM and you get access to all of its elements, including children.
Let’s go back to the issues I mentioned at the beginning of the chapter: resizing, and fetching data from a server. For the first, you can create an event listener in componentDidMount() that will listen for window.resize events. For the second, you can make an XHR call in componentDidMount() and update the state when you have a response from the server.
Equally important, componentDidMount() comes in handy in isomorphic/universal code (where the same components are used on the server and in the browser). You can put browser-only logic in this method and rest assured that it’ll only be called for browser rendering, and not on the server side. There’s more on isomorphic JavaScript with React in chapter 16.
Most developers learn best by looking at examples. For this reason, let’s consider a trivial case that uses componentDidMount() to print the DOM information to the console. This is feasible because this event is fired after all the rendering has happened; thus, you have access to the DOM elements.
Creating event listeners for component lifecycle events is straightforward: you define a method on the component/class. For the fun of it, let’s add componentWillMount() to contrast the absence of the real DOM for this element at this stage.
The DOM node information is obtained via the React DOM’s utility function ReactDOM.findDOMNode(), to which you pass the class. Note that DOM isn’t camelCase, but rather is in all-caps:

The result is this output in the developer console, which reassures you that componentDidMount() is executed when you have real DOM elements (see figure 5.2):
html
null
div
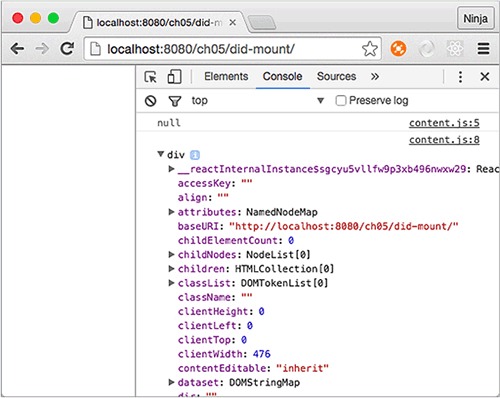
Listing 5.1 (ch05/logger/jsx/content.jsx) and listing 5.2 (ch05/logger/jsx/logger.jsx) show all the events in action at once. For now, all you need to know is that they’re like classes in the sense that they allow you to reuse code. This logger mixin can be useful for debugging; it displays all the events, properties, and state when the component is about to be rerendered and after it’s been rerendered.
class Content extends React.Component {
  constructor(props) {
    super(props)
    this.launchClock()
    this.state = {
      counter: 0,
      currentTime: (new Date()).toLocaleString()
    }
  }
  launchClock() {
    setInterval(()=>{
      this.setState({
        counter: ++this.state.counter,
        currentTime: (new Date()).toLocaleString()
      })
    }, 1000)
  }
  render() {
    if (this.state.counter > 2) return
    return <Logger time="{this.state.currentTime}"></Logger>
  }
}
class Logger extends React.Component {
  constructor(props) {
    super(props)
    console.log('constructor')
  }
  componentWillMount() {
    console.log('componentWillMount is triggered')
  }
  componentDidMount(e) {
    console.log('componentDidMount is triggered')
    console.log('DOM node: ', ReactDOM.findDOMNode(this))
  }
  componentWillReceiveProps(newProps) {
    console.log('componentWillReceiveProps is triggered')
    console.log('new props: ', newProps)
  }
  shouldComponentUpdate(newProps, newState) {
    console.log('shouldComponentUpdate is triggered')
    console.log('new props: ', newProps)
    console.log('new state: ', newState)
    return true
  }
  componentWillUpdate(newProps, newState) {
    console.log('componentWillUpdate is triggered')
    console.log('new props: ', newProps)
    console.log('new state: ', newState)
  }
  componentDidUpdate(oldProps, oldState) {
    console.log('componentDidUpdate is triggered')
    console.log('new props: ', oldProps)
    console.log('old props: ', oldState)
  }
  componentWillUnmount() {
    console.log('componentWillUnmount')
  }
  render() {
    // console.log('rendering... Display')
    return (
      {this.props.time}
    )
  }
}
The functions and lifecycle events from the Display component give you console logs when you run this web page. Don’t forget to open your browser console, because all the logging happens there, as shown in figure 5.3!
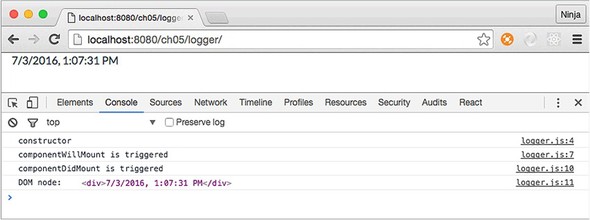
As noted in the text and shown in the figure, the mounting event fires only once. You can clearly see this in the logs. After the counter in Context reaches 3, the render function won’t use Display anymore, and the component is unmounted (see figure 5.4).
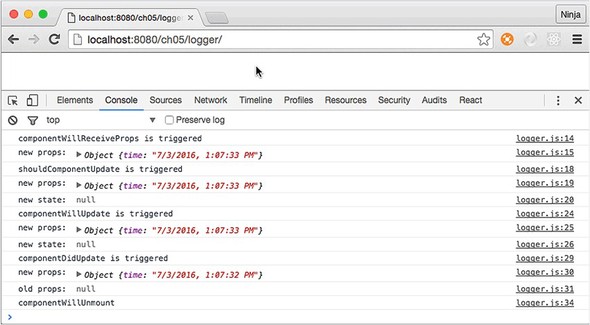
Now that you’ve learned about component lifecycle events, you can use them when you need to implement logic for components, such as fetching data.
The mounting category of events is all about a component being attached to the real DOM. Think of mounting as a way for a React element to see itself in the DOM. This typically happens when you use a component in ReactDOM.render() or in the render() of another, higher-order component that will be rendered to the DOM. The mounting events are as follows:
constructor() execution happens prior to componentWillMount(). Also, React first renders and then mounts elements. (Rendering in this context means calling a class’s render(), not painting the DOM.) Refer to table 5.1 for events in between componentWillMount() and componentDidMount().
It’s worth mentioning that componentWillMount() is invoked only once in the component’s lifecycle. The timing of the execution is just before the initial rendering.
The lifecycle event componentWillMount() is executed when you render a React element on the browser by calling ReactDOM.render(). Think of it as attaching (or mounting) a React element to a real DOM node. This happens in the browser: the front end.
If you render a React component on a server (the back end, using isomorphic/universal JavaScript; see chapter 16), which basically gets an HTML string, then—even though there’s no DOM on the server or mounting in that case—this event will also be invoked!
You saw in chapter 4 how to update the currentTime state using Date and setInterval(). You triggered the series of updates in constructor() by calling launchClock(). You can do so in componentWillMount() as well.
Typically, a state change triggers a rerender, right? At the same time, if you update the state with setState() in the componentWillMount() method or trigger updates as you did with Clock, then render() will get the updated state. The best thing is that even if the new state is different, there will be no rerendering because render() will get the new state. To put it another way, you can invoke setState() in componentWillMount(). render() will get the new values, if any, and there will be no extra rerendering.
In contrast, componentDidMount() is invoked after the initial rendering. It’s executed only once and only in the browser, not on the server. This comes in handy when you need to implement code that runs only for browsers, such as XHR requests.
In this lifecycle event, you can access any references to children (for example, to access the corresponding DOM representation). Note that the componentDidMount() method of child components is invoked before that of parent components.
As mentioned earlier, the componentDidMount() event is the best place to integrate with other JavaScript libraries. You can fetch a JSON payload that has a list of users with their info. Then, you can print that information, using a Twitter Bootstrap table to get the page shown in figure 5.5.

The structure of the project is as follows:
/users
  /css
    bootstrap.css
  /js
    react.js
    react-dom.js
    script.js
    - users.js
  /jsx
    script.jsx
    users.jsx
  index.html
  real-user-data.json
You have the DOM element in the event, and you can send XHR/AJAX requests to fetch the data with the new fetch() API:
fetch(this.props['data-url'])
  .then((response)=>response.json())
  .then((users)=>this.setState({users: users}))
The Fetch API (http://mng.bz/mbMe) lets you make XHR request using promises in a unifying manner. It’s available in most modern browsers, but refer to the specs (https://fetch.spec.whatwg.org) and the standard (https://github.com/whatwg/fetch) to find out if the browsers you need to support for your apps implement it. The usage is straightforward—you pass the URL and define as many promise then statements as needed:
fetch('http://node.university/api/credit_cards/')
  .then(function(response) {
    return response.blob()
  })
  .then(function(blob) {
    // Process blob
  })
  .catch(function(error) {
    console.log('A problem with your fetch operation: ' +
      error.message)
})
If the browser you develop for doesn’t support fetch() yet, you can shim it, or use any other HTTP agent library such as superagent (https://github.com/visionmedia/superagent); request (https://github.com/request/request); axios (https://github.com/mzabriskie/axios); or even jQuery’s $.ajax() (http://api.jquery.com/jquery.ajax) or $.get().
You can put your XHR fetch request in componentDidMount(). You may think that by putting the code in componentWillMount(), you can optimize loading, but there are two issues: if you get data from the server faster than your rendering finishes, you may trigger rerender on an unmounted element, which could lead to unintended consequences. Also, if you’re planning to use a component on the server, then component-WillMount() will fire there as well.
Now, let’s look at the entire component, with fetch happening in componentDidMount() (ch05/users/jsx/users.jsx).

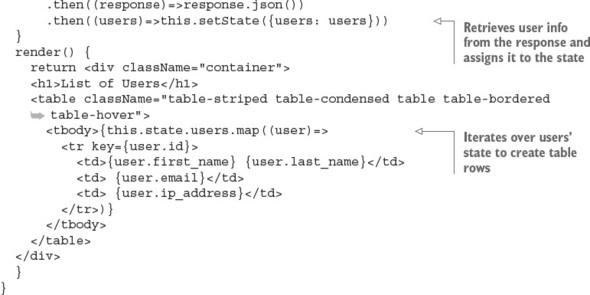
Notice that users is set to an empty array ([]) in the constructor. This gets around the need to check for existence later in render(). Repetitive checks and bugs due to undefined values—what a great way to waste time and get a repetitive-stress injury from excessive typing. Setting your initial values will help you avoid lots of pain later! In other words, this is an antipattern:
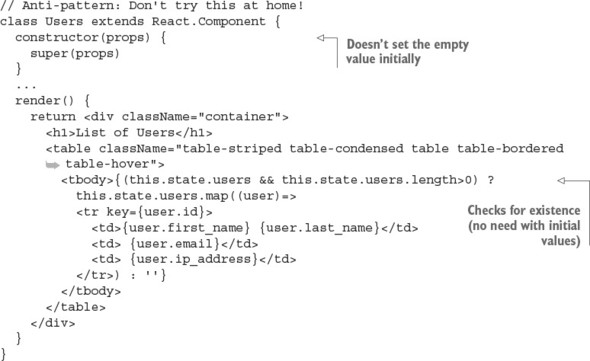
As noted earlier, mounting events are often used to integrate React with the outside world: other frameworks, libraries, or data stores. Updating events are associated with updating components. These events are as follows, in order from the component lifecycle’s beginning to its end (see table 5.2 for just the updating lifecycle events and table 5.1 for all events).
|
Updating component properties |
Updating component state |
Updating using forceUpdate() |
|---|---|---|
| componentWillReceiveProps() | ||
| shouldComponentUpdate() | shouldComponentUpdate() | |
| componentWillUpdate() | componentWillUpdate() | componentWillUpdate() |
| render() | render() | render() |
| componentDidUpdate() | componentDidUpdate() | componentDidUpdate() |
componentWillReceiveProps(newProps) is triggered when a component receives new properties. This stage is called an incoming property transition. This event allows you to intercept the component at the stage between getting new properties and before render(), in order to add some logic.
The componentWillReceiveProps(newProps) method takes the new prop(s) as an argument. It isn’t invoked on the initial render of the component. This method is useful if you want to capture the new property and set the state accordingly before the rerender. The old property value is in the this.props object. For example, the following snippet sets the opacity state, which in CSS is 0 or 1, depending on the Boolean property isVisible (1 = true, 0 = false):
componentWillReceiveProps(newProps) {
  this.setState({
    opacity: (newProps.isVisible) ? 1 : 0
  })
}
Generally speaking, the setState() method in componentWillReceiveProps(newProps) won’t trigger extra rerendering.
In spite of receiving new properties, these properties may not necessarily have new values (meaning values different from current properties), because React has no way of knowing whether the property values have changed. Therefore, componentWillReceiveProps(NewProps) is invoked each time there’s a rerendering (of a parent structure or a call), regardless of property-value changes. Thus, you can’t assume that newProps always has values that are different from the current properties.
At the same time, rerendering (invoking render()) doesn’t necessarily mean changes in the real DOM. The decision whether to update and what to update in the real DOM is delegated to shouldComponentUpdate() and the reconciliation process.[1]
For more reasons why React can’t perform smarter checks before calling componentWillReceiveProps(newProps), read the extensive article “(A ⇒ B) !⇒ (B ⇒ A),” by Jim Sproch, React, January 8, 2016, http://mng.bz/3WpG.
Next is the shouldComponentUpdate() event, which is invoked right before rendering. Rendering is preceded by the receipt of new properties or state. The should-ComponentUpdate() event isn’t triggered for the initial render or for forceUpdate() (see table 5.1).
You can implement the shouldComponentUpdate() event with return false to prohibit React from rerendering. This is useful when you’re checking that there are no changes and you want to avoid an unnecessary performance hit (when dealing with hundreds of components). For example, this snippet uses the + binary operator to convert the Boolean isVisible into a number and compare that to the opacity value:
shouldComponentUpdate(newProps, newState) {
  return this.state.opacity !== + newProps.isVisible
}
When isVisible is false and this.state.opacity is 0, the entire render() is skipped; also, componentWillUpdate() and componentDidUpdate() aren’t called. In essence, you can control whether a component is rerendered.
Speaking of componentWillUpdate(), this event is called just before rendering, preceded by the receipt of new properties or state. This method isn’t called for the initial render. Use the componentWillUpdate() method as an opportunity to perform preparations before an update occurs, and avoid using this.setState() in this method! Why? Well, can you imagine trying to trigger a new update while the component is being updated? It sounds like a bad idea to me!
If shouldComponentUpdate() returns false, then componentWillUpdate() isn’t invoked.
The componentDidUpdate() event is triggered immediately after the component’s updates are reflected in the DOM. Again, this method isn’t called for the initial render. componentDidUpdate() is useful for writing code that works with the DOM and its other elements after the component has been updated, because at this stage you’ll get all the updates rendered in the DOM.
Every time something is mounted or updated, there should be a way to unmount it. The next event provides a place for you to put logic for unmounting.
In React, unmounting means detaching or removing an element from the DOM. There’s only one event in this category, and this is the last category in the component lifecycle.
The componentWillUnmount() event is called just before a component is unmounted from the DOM. You can add any necessary cleanup to this method; for example, invalidating timers, cleaning up any DOM elements, or detaching events that were created in componentDidMount.
Suppose you’re tasked with creating a Note web app (to save text online). You’ve implemented the component, but initial feedback from users is that they lose their progress if they close the window (or a tab) unintentionally. Let’s implement the confirmation dialog shown in figure 5.6.
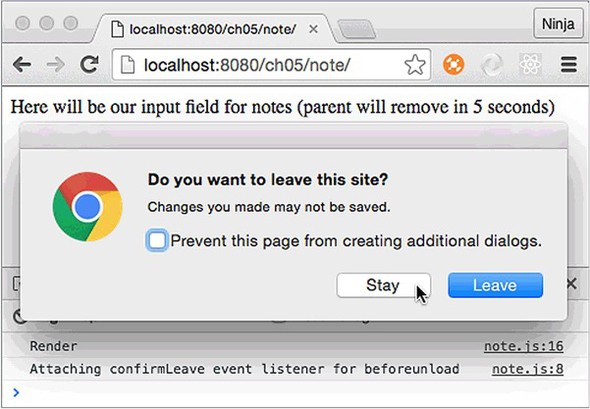
To implement a dialog like that, we need to listen to a special window event. The tricky part is to clean up after the element is no longer needed, because if the element is removed but its event is not, memory leaks could be the result! The best way to approach this problem is to attach the event on mounting and remove the event on dismounting.
The structure of the project is as follows:
/note
  /jsx
    note.jsx
    script.jsx
  /js
    note.jsx
    react.js
    react-dom.js
    script.js
  index.html
The window.onbeforeunload native browser event (with additional code for cross-browser support) is straightforward:
window.addEventListener('beforeunload',function () {
  let confirmationMessage = 'Do you really want to close?'
  e.returnValue = confirmationMessage     // Gecko, Trident, Chrome 34+
  return confirmationMessage              // Gecko, WebKit, Chrome < 34
})
The following approach will work, too:
window.onbeforeunload = function () {
  ...
  return confirmationMessage
}
Let’s put this code in an event listener in componentDidMount() and remove the event listener in componentWillUnmount() (ch05/note/jsx/note.jsx).
class Note extends React.Component {
  confirmLeave(e) {
    let confirmationMessage = 'Do you really want to close?'
    e.returnValue = confirmationMessage     // Gecko, Trident, Chrome 34+
    return confirmationMessage              // Gecko, WebKit, Chrome <34
  }
  componentDidMount() {
    console.log('Attaching confirmLeave event listener for beforeunload')
    window.addEventListener('beforeunload', this.confirmLeave)
  }
  componentWillUnmount() {
    console.log('Removing confirmLeave event listener for beforeunload')
    window.removeEventListener('beforeunload', this.confirmLeave)
  }
  render() {
    console.log('Render')
    return Here will be our input field for notes (parent will remove in
     {this.props.secondsLeft} seconds)
  }
}
You want to check how your code works when the Note element is removed, right? For this reason, you need to remove the Note element so that it’s dismounted. Therefore, the next step is to implement the parent in which you not only create Note but remove it. Let’s use a timer for that (setInterval() all the way!), as shown in the following listing (ch05/note/jsx/script.jsx) and figure 5.7.
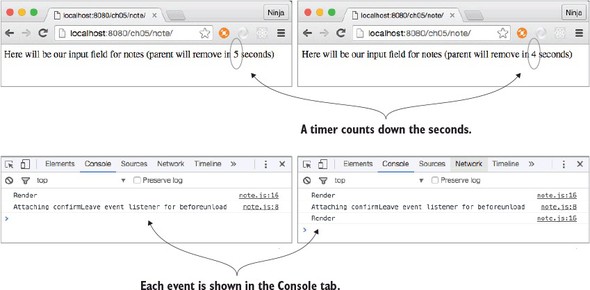
let secondsLeft = 5
let interval = setInterval(()=>{
  if (secondsLeft == 0) {
    ReactDOM.render(
      <div>
        Note was removed after {secondsLeft} seconds.
      </div>,
      document.getElementById('content')
    )
    clearInterval(interval)
  } else {
    ReactDOM.render(
      <div>
        <Note secondsLeft={secondsLeft}/>
      </div>,
      document.getElementById('content')
    )
  }
  secondsLeft--
}, 1000)
Figure 5.8 shows the result (with console logs): render, attach event listener, render four more times, remove event listener.
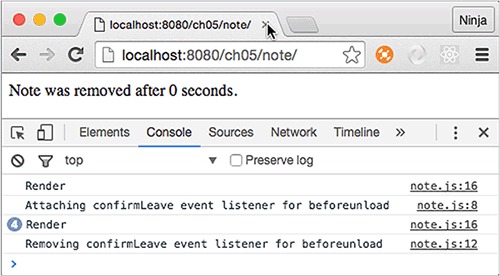
If you don’t remove the event listener in componentWillUnmount() (you can comment out this method to see), the page will still have a pesky dialog even though the Note element is long gone, as shown in figure 5.9. This isn’t a good UX and may lead to bugs. You can use this lifecycle event to clean up after components.
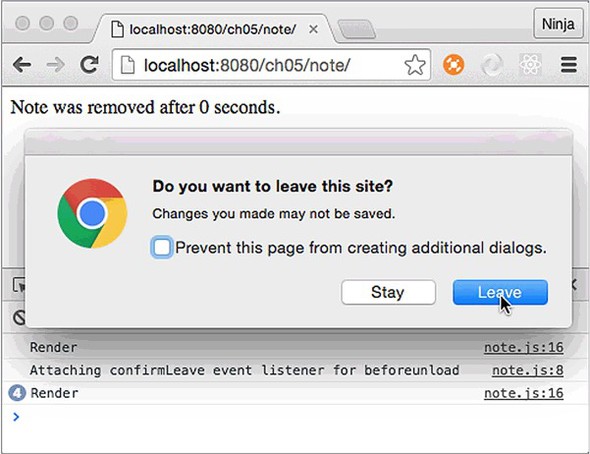
The React team is listening to feedback from React developers. Most of these lifecycle events allow developers to tweak the behavior of their components. Think of lifecycle events as black-belt-Ninja-Matrix-Jedi skills. You can code without them, but boy your code will be more powerful with them. What’s interesting is that there’s still conversation about the best practices and usage. React is still evolving, and there may be changes or additions to the lifecycle events in the future. If you need to refer to the official documentation, see https://facebook.github.io/react/docs/react-component.html.
componentWillMount() will be rendered on the server. True or false?
Which event will fire first, componentWillMount() or componentDidMount()?
Which of the following is a good place to put an AJAX call to the server to get some data for a component? componentWillUnmount(), componentHasMounted(), componentDidMount(), componentWillReceiveData(), or componentWillMount()
componentWillReceiveProps() means there was a rerendering of this element (from a parent structure), and you know for sure that you have new values for the properties. True or false?
Mounting events happen multiple times on each rerendering. True or false?
True. Although there’s no DOM, this event will be triggered on the server rendering, but componentDidMount() won’t.
componentWillMount is first, followed by componentDidMount().
componentDidMount(), because it won’t be triggered on the server.
False. You can’t guarantee new values. React doesn’t know if the values have been changed.
False. Mounting isn’t triggered on rerender to optimize performance, because excessive mounting is a relatively expensive operation.
This chapter covers
So far, you’ve learned how to render UIs that have zero user interaction. In other words, you’re just displaying data. For example, you’ve built a clock that doesn’t accept user inputs, such as setting the time zone.
Most of the time, you don’t have static UIs; you need to build elements that are smart enough to respond to user actions. How do you respond to user actions such as clicking and dragging a mouse?
This chapter provides the solution to how to handle events in React. Then, in chapter 7, you’ll apply this knowledge of events to working with web forms and their elements. I’ve mentioned that React supports only certain events; in this chapter, I’ll show you how to work with events that aren’t supported by React.
The source code for the examples in this chapter is at https://www.manning.com/books/react-quickly and https://github.com/azat-co/react-quickly/tree/master/ch06 (in the ch06 folder of the GitHub repository https://github.com/azat-co/react-quickly). You can also find some demos at http://reactquickly.co/demos.
Let’s look how you can make React elements respond to user actions by defining event handlers for those actions. You do this by defining the event handler (function definition) as the value of an element attribute in JSX and as an element property in plain JavaScript (when createElement() is called directly without JSX). For attributes that are event names, you use standard W3C DOM event names in camelCase, such as onClick or onMouseOver, as in
onClick={function() {...}}
or
onClick={() => {...}}
For example, in React, you can define an event listener that’s triggered when a user clicks a button. In the event listener, you’re logging the this context. The event object is an enhanced version of a native DOM event object (called SyntheticEvent):
<button onClick={(function(event) {
    console.log(this, event)
  }).bind(this)}>
  Save
</button>
bind() is needed so that in the event-handler function, you get a reference to the instance of the class (React element). If you don’t bind, this will be null (use strict mode). You don’t bind the context to the class using bind(this) in the following cases:
You can also make things neater by using a class method as event handler (let’s name it handleSave()) for the onClick event. Consider a SaveButton component that, when clicked, prints the value of this and event, but uses a class method as shown in figure 6.1 and the following listing (ch06/button/jsx/button.jsx).
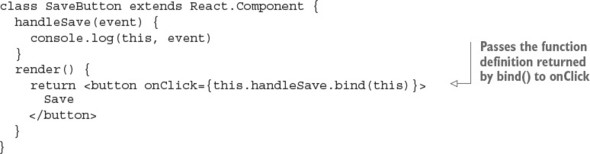
This is how the save button will log the output of this and event.
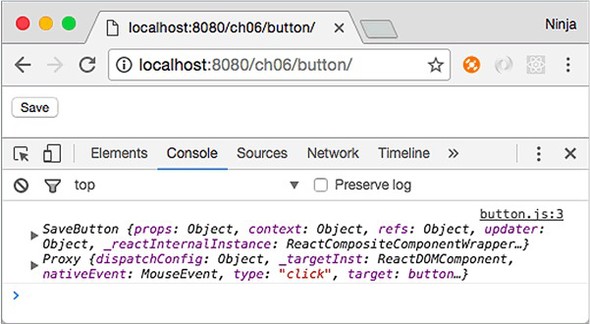
Moreover, you can bind an event handler to the class in the class’s constructor. Functionally, there’s no difference; but if you’re using the same method more than once in render(), then you can reduce duplication by using the constructor binding. Here’s the same button, but with constructor binding for the event handler:

Binding event handlers is my favorite and recommended approach, because it eliminates duplication and puts all the binding neatly in one place.
Table 6.1 lists the current event types supported by React v15. Notice the use of camelCase in the event names, to be consistent with other attribute names in React.
As you can see, React supports several types of normalized events. If you contrast this with the list of standard events at https://developer.mozilla.org/en-US/docs/Web/Events, you’ll see that React’s support is extensive—and you can be sure that team React will add more events in the future! For more information and event names, visit the documentation page at http://facebook.github.io/react/docs/events.html.
As I’ve noted, React is declarative, not imperative, which removes the need to manipulate objects; and you don’t attach events to your code as you would with jQuery (for example, $('.btn').click(handleSave)). Instead, you declare an event in the JSX as an attribute (for instance, onClick={handleSave}). If you’re declaring mouse events, the attribute name can be any of the supported events from table 6.1. The value of the attribute is your event handler.
For example, if you want to define a mouse-hover event, you can use onMouseOver, as shown in the following code. Hovering will display “mouse is over” in your DevTools or Firebug console when you move your cursor over the <div>’s red border:
<div
  style={{border: '1px solid red'}}
  onMouseOver={()=>{console.log('mouse is over')}} >
    Open DevTools and move your mouse cursor over here
</div>
The events shown previously, such as onMouseOver, are triggered by an event in the bubbling phase (bubble up). As you know, there’s also a capture phase (trickle down), which precedes the bubbling and target phases. First is the capture phase, from the window down to the target element; next is the target phase; and only then comes the bubbling phase, when an event travels up the tree back to the window, as shown in figure 6.2.
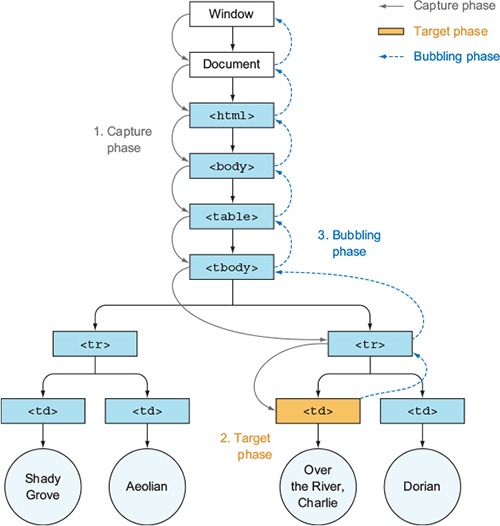
The distinction between phases becomes important when you have the same event on an element and its ancestor(s). In bubbling mode, the event is first captured and handled by the innermost element (target) and then propagated to outer elements (ancestors, starting with the target’s parent). In capture mode, the event is first captured by the outermost element and then propagated to the inner elements.
To register an event listener for the capture phase, append Capture to an event name. For example, instead of using onMouseOver, you use onMouseOverCapture to handle the mouseover event in the capture phase. This applies to all the event names listed in table 6.1.
To illustrate, suppose you have a <div> with a regular (bubbling) event and a capture event. Those events are defined with onMouseOver and onMouseOverCapture, respectively (ch06/mouse-capture/jsx/mouse.jsx).
class Mouse extends React.Component {
  render() {
    return <div>
      <div
        style={{border: '1px solid red'}}
        onMouseOverCapture={((event)=>{
          console.log('mouse over on capture event')
          console.dir(event, this)}).bind(this)}
        onMouseOver={((event)=>{
          console.log('mouse over on bubbling event')
          console.dir(event, this)}).bind(this)} >
          Open DevTools and move your mouse cursor over here
        </div>
    </div>
  }
}
The container has a red border 1 pixel wide; it contains some text, as shown in figure 6.3, so you know where to hover the cursor. Each mouseover event will log what type of event it is as well as the event object (hidden under Proxy in DevTools in figure 6.3 due to the use of console.dir()).
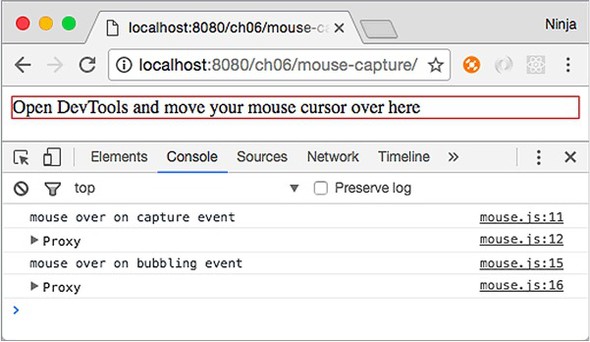
Not surprisingly, the capture event is logged first. You can use this behavior to stop propagation and set priorities between events.
It’s important to understand how React implements events, because events are the cornerstone of UIs. Chapter 7 dives deeper into React events.
Events work differently in React than in jQuery or plain JavaScript, which typically put the event listener directly on the DOM node. When you put events directly on nodes, there may be problems removing and adding events during the UI lifecycle. For example, suppose you have a list of accounts, and each can be removed or edited, or new accounts can be added to the list. The HTML might look something like this, with each account element <li> uniquely identified by ID:
<ul id="account-list">
    <li id="account-1">Account #1</li>
    <li id="account-2">Account #2</li>
    <li id="account-3">Account #3</li>
    <li id="account-4">Account #4</li>
    <li id="account-5">Account #5</li>
    <li id="account-6">Account #6</li>
</ul>
If accounts are removed from or added to the list frequently, then managing events will become difficult. A better approach is to have one event listener on a parent (account-list) and to listen for bubbled-up events (an event bubbles higher up the DOM tree if nothing catches it on a lower level). Internally, React keeps track of events attached to higher elements and target elements in a mapping. This allows React to trace the target from the parent (document), as shown in figure 6.4.
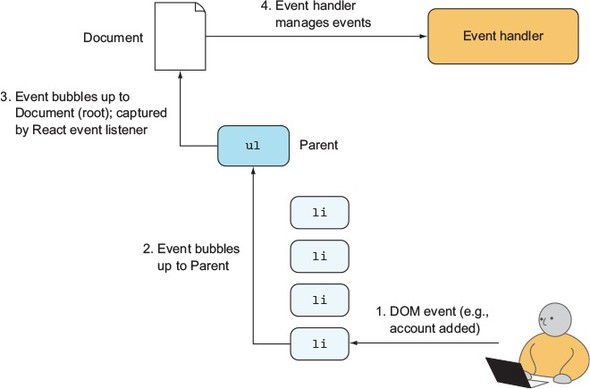
Let’s see how this event delegation to the parent looks in action in the example Mouse component from listing 6.2. There’s a <div> element with the mouseover React event. You want to inspect the events on this element.
If you open Chrome DevTools or Firefox Tools and select the data-reactroot element in the Elements or Inspector tab (or use Inspect in the Chrome context menu or Inspect Element in the Firefox context menu), then you can refer to the <div> in the console (another tab in DevTools/Firebug) by typing $0 and pressing Enter. This is a nice little trick.
Interestingly, this DOM node <div> doesn’t have any event listeners. $0 is the <div> and a reactroot element; see figure 6.5. Therefore, you can check what events are attached to this particular element (DOM node) by using the global getEventListeners() method in the DevTools console:
getEventListeners($0)

The result is an empty object {}. React didn’t attach event listeners to the reactroot node <div>. Hovering the mouse on the element logs the statements—you can clearly see that the event is being captured! Where did it go?
Feel free to repeat the procedure with <div id="content"> or perhaps with the red-bordered <div> element (child of reactroot). For each currently selected element on the Elements tab, $0 will be the selected element, so select a new element and repeat getEventListeners($0). Still nothing?
Okay. Let’s examine the events on document by calling this code from the console:
getEventListeners(document)
Boom! You have your event: Object {mouseover: Array[1]}, as shown in figure 6.6. Now you know that React attached the event listener to the ultimate parent, the granddaddy of them all—the document element. The event was not attached to an individual node like <div> or an element with the data-reactroot attribute.
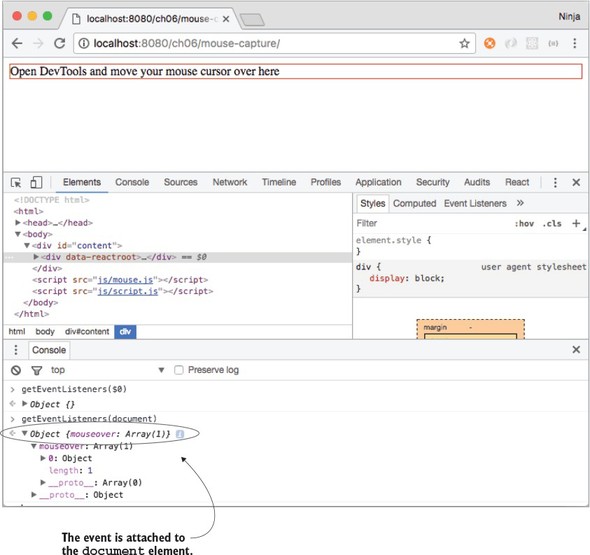
Next, you can remove this event by invoking the following line in the console:
getEventListeners(document).mouseover[0].remove()
Now the message “mouse is over” won’t appear when you move the cursor. The event listener that was attached to document is gone, illustrating that React attaches events to document, not to each element. This allows React to be faster, especially when working with lists. This is contrary to how jQuery works: with that library, events are attached to individual elements. Kudos to React for thinking about performance.
If you have other elements with the same type of event—for example, two mouse-overs—then they’re attached to one event and handled by React’s internal mapping to the correct child (target element), as shown in figure 6.7. And speaking of target elements, you can get information about the target node (where the event originated) from the event object.
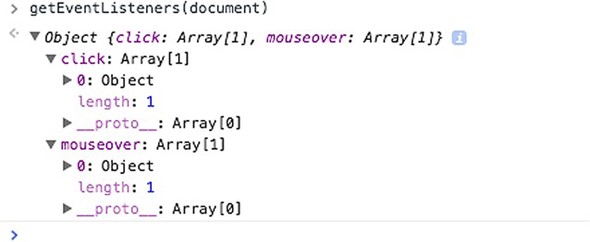
Browsers can differ in their implementations of the W3C specification (see www.w3.org/TR/DOM-Level-3-Events). When you’re working with DOM events, the event object passed to the event handler may have different properties and methods. This can lead to cross-browser issues when you’re writing event-handling code. For example, to get the target element in IE version 8, you’d need to access event.srcElement, whereas in Chrome, Safari, and Firefox, you’d use event.target:
var target = event.target || event.srcElement
console.log(target.value)
Of course, things are better in terms of cross-browser issues in 2016 than in 2006. But still, do you want to spend time reading specs and debugging issues due to obscure discrepancies between browser implementations? I don’t.
Cross-browser issues aren’t good because users should have the same experience on different browsers. Typically, you need to add extra code, such as if/else statements, to account for the difference in browser APIs. You also have to perform more testing in different browsers. In short, working around and fixing cross-browser issues is worse on the annoyance scale than CSS issues, IE8 issues, or scrupulous designers in hipster glasses.
React has a solution: a wrapper around browsers’ native events. This makes events consistent with the W3C specification regardless of the browser on which you run your pages. Under the hood, React uses its own special class for synthetic events (Synthetic-Event). Instances of this SyntheticEvent class are passed to the event handler. For example, to get access to a synthetic event object, you can add an argument event to the event-handler function, as shown in the following listing (ch06/mouse/jsx/mouse.jsx). This way, the event object is output in the console, as shown in figure 6.8.
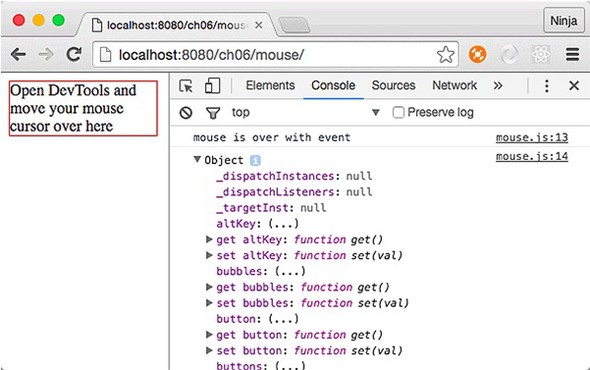
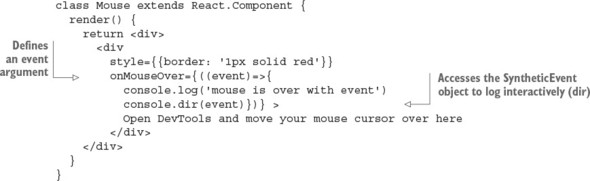
As you’ve seen before, you can move the event-handler code into a component method or a standalone function. For example, you can create a handleMouseOver() method using ES6+/ES2015+ class method syntax and refer to it from the return of render() with {this.handleMouseOver.bind(this)}. The bind() is needed to transfer the proper value of this into the function. When you use fat-arrow syntax as you did in the previous example, this happens automatically. It also happens automatically with createClass() syntax. Not with class, though. Of course, if you don’t use this in the method, you don’t have to bind it; just use onMouseOver={this.handleMouseOver}.
The name handleMouseOver() is arbitrary (unlike the names of lifecycle events, covered in chapter 5) and doesn’t have to follow any convention as long as you and your team understand it. Most of the time in React, you prefix an event handler with handle to distinguish it from a regular class method, and you include either an event name (such as mouseOver) or the name of the operation (such as save).
class Mouse extends React.Component {
  handleMouseOver(event) {
    console.log('mouse is over with event')
    console.dir(event.target)
  }
  render(){
    return <div>
      <div
        style={{border: '1px solid red'}}
        onMouseOver={this.handleMouseOver.bind(this)} >
          Open DevTools and move your mouse cursor over here
        </div>
    </div>
  }
}
The event has the same properties and methods as most native browser events, such as stopPropagation(), preventDefault(), target, and currentTarget. If you can’t find a native property or method, you can access a native browser event with nativeEvent:
event.nativeEvent
Following is a list of some of the attributes and methods of React’s v15.x Synthetic-Event interface:
The aforementioned target property of the event object has the DOM node of the object on which the event happened, not where it was captured, as with currentTarget (https://developer.mozilla.org/en-US/docs/Web/API/Event/target). Most often, when you build UIs, in addition to capturing, you need to get the text of an input field. You can get it from event.target.value.
The synthetic event is nullified (meaning it becomes unavailable) once the event handler is done. So you can use the same event reference in a variable to access it later or to access it asynchronously (in the future) in a callback function. For example, you can save the reference of the event object in a global e as follows (ch06/mouse-event/jsx/mouse.jsx).
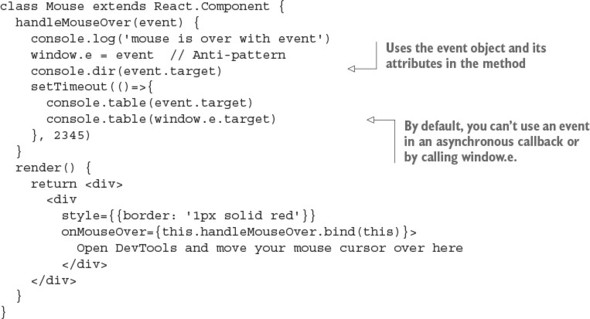
You’ll get a warning saying that React is reusing the synthetic event for performance reasons (see figure 6.9):
This synthetic event is reused for performance reasons. If you're seeing this,
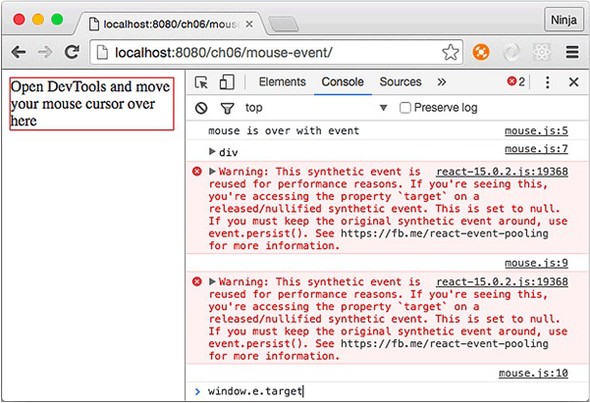
If you need to keep the synthetic event after the event handler is over, use the event.persist() method. When you apply it, the event object won’t be reused and nullified.
You’ve seen that React will even synthesize (or normalize) a browser event for you, meaning that React will create a cross-browser wrapper around the native event objects. The benefit of this is that events work identically in virtually all browsers. And in most cases, you have all the native methods on the React event, including event.stopPropagation() and event.preventDefault(). But if you still need to access a native event, it’s in the event.nativeEvent property of the synthetic event object. Obviously, if you work with native events directly, you’ll need to know about and work with any cross-browser differences you encounter.
Using states with events, or, to put it differently, being able to change a component’s state in response to an event, will give you interactive UIs that respond to user actions. This is going to be fun, because you’ll be able to capture any events and change views based on these events and your app logic. This will make your components self-contained, because they won’t need any external code or representation.
For example, let’s implement a button with a label that has a counter starting at 0, as shown in figure 6.10. Each click of the button increments the number shown on a button (1, 2, 3, and so on).
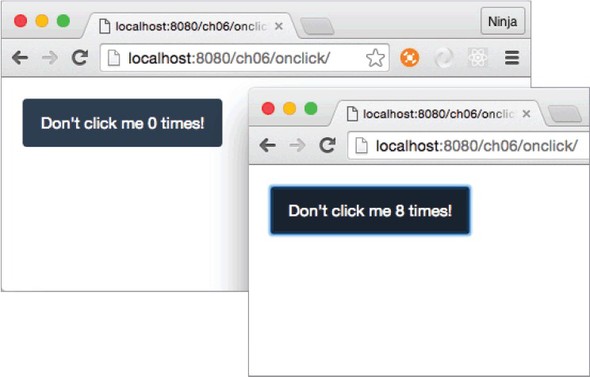
You start by implementing the following:
The click() method is not unlike any other React component method. Remember getUrl() in chapter 3 and handleMouseOver() earlier in this chapter? This component method is declared similarly, except that you have to manually bind the this context. The handleClick() method sets the counter state to the current value of counter, incremented by 1 (ch06/onclick/jsx/content.jsx).
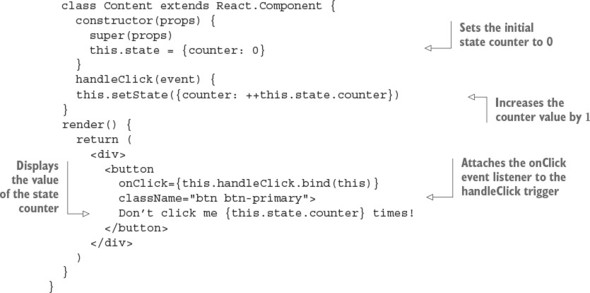
Just a reminder: did you notice that although this.handleClick() is a method in listing 6.6, you don’t invoke it in JSX when you assign it to onClick (that is, <button onClick={this.handleClick})? In other words, there are no parentheses (()) after this.handleClick() inside the curly braces. That’s because you need to pass a function definition, not invoke it. Functions are first-class citizens in JavaScript, and in this case, you pass the function definition as a value to the onClick attribute.
On the other hand, bind() is invoked because it lets you use the proper value of this, but bind() returns a function definition. So you still get the function definition as the value of onClick.
Keep in mind, as noted previously, onClick isn’t a real HTML attribute, but syntactically it looks just like any other JSX declaration (for example, className={btnClassName} or href={this.props.url}).
When you click the button, you’ll see the counter increment with each click. Figure 6.10 shows that I clicked the button eight times: the counter is now at 8 but initially was at 0. Brilliant, isn’t it?
Analogous to onClick or onMouseOver, you can use any DOM events supported by React. In essence, you define the view and an event handler that changes the state. You don’t imperatively modify the representation. This is the power of declarative style!
The next section will teach you how to pass event handlers and other objects to children elements.
Consider this scenario: you have a button that’s a stateless component. All it has is styling. How do you attach an event listener so this button can trigger some code?
Let’s go back to properties for a moment. Properties are immutable, which means they don’t change. They’re passed by parent components to their children. Because functions are first-class citizens in JavaScript, you can have a property in a child element that’s a function and use it as an event handler.
The solution to the problem outlined earlier—triggering an event from a stateless component—is to pass the event handler as a property to this stateless component and use the property (event-handler function) in the stateless component (invoke the function). For example, let’s break down the functionality of the previous example into two components: ClickCounterButton and Content. The first will be dumb (stateless) and the second smart (stateful).
Dumb and smart components are sometimes called presentational and container components, respectively. This dichotomy is related to statelessness and statefulness but isn’t always exactly the same.
Most of the time, presentational components don’t have states and can be stateless or function components. That’s not always the case, because you may need to have some state that relates to the presentation.
Presentational/dumb components often use this.props.children and render DOM elements. On the other hand, container/smart components describe how things work without DOM elements, have states, typically use higher-order component patterns, and connect to data sources.
Using a combination of dumb and smart components is the best practice. Doing so keeps things clean and allows for better separation of concerns.
When you run the code, the counter increases with each click. Visually, nothing has changed from the previous example with the button and the counter (figure 6.10); but internally, there’s an extra component ClickCounterButton (stateless and pretty much logic-less) in addition to Content, which still has all the logic.
ClickCounterButton doesn’t have its own onClick event handler (that is, it has no this.handler or this.handleClick). It uses the handler passed down to it by its parent in a this.props.handler property. Generally, using this approach is beneficial for handling events in a button, because the button is a stateless presentational/dumb component. You can reuse this button in other UIs.
The following listing shows the code for the presentational component that renders the button (ch06/onclick-props/jsx/click-counter-button.jsx); the Content parent that renders this element is shown shortly, in listing 6.8.
class ClickCounterButton extends React.Component {
  render() {
    return <button
      onClick={this.props.handler}
      className="btn btn-danger">
      Increase Volume (Current volume is {this.props.counter})
    </button>
  }
}
The ClickCounterButton component, shown in figure 6.11, is dumber than Dumb & Dumber,[1] but that’s what’s good about this architecture. The component is simple and easy to grasp.

The ClickCounterButton component also uses the counter property, which is rendered with {this.props.counter}. Supplying properties to children like ClickCounterButton is straightforward if you remember the examples from chapter 2. You use the standard attribute syntax: name=VALUE.
For example, to provide counter and handler properties to the ClickCounterButton component, specify the attributes in the JSX declaration of the parent’s render parameter (the parent here is Content):
<div>
  <ClickCounterButton
    counter={this.state.counter}
    handler={this.handleClick}/>
</div>
counter in ClickCounterButton is a property and thus immutable; but in the Content parent, it’s a state and thus mutable. (For a refresher on properties versus state, see chapter 4.) Obviously, the names can differ. You don’t have to keep the names the same when you pass properties to children. But I find that keeping the same name helps me understand that the data is related between different components.
What’s happening? The initial counter (the state) is set to 0 in the Content parent. The event handler is defined in the parent as well. Therefore, the child (Click-CounterButton) triggers the event on a parent. The code for the Content parent com ponent with constructor() and handleClick() is shown next (ch06/onclick-props/jsx/content.jsx).
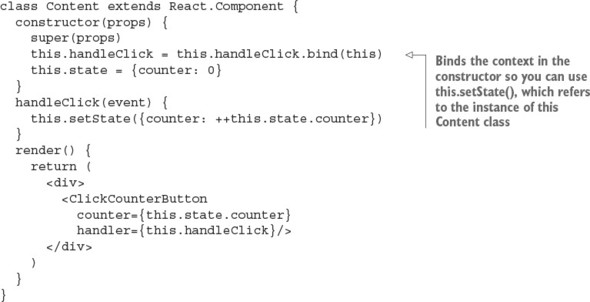
As I said earlier, in JavaScript, functions are first-class citizens, and you can pass them as variables or properties. Thus, there should be no big surprises here. Now the question arises, where do you put logic such as event handlers—in a child or parent?
In the previous example, the click event handler was in the parent element. You can put the event handler in the child, but using the parent allows you to exchange information among child components.
Let’s use a button as an example but this time remove the counter value from render() (1, 2, 3, and so on). The components are single-minded, granular pieces of representation (remember?), so the counter will be in another component: Counter. Thus, you’ll have three components in total: ClickCounterButton, Content, and Counter.
As you can see in figure 6.12, there are now two components: the button and the text below it. Each has properties that are states in the Content parent. In contrast to the previous example (figure 6.11), here you need to communicate between the button and the text to count clicks. In other words, ClickCounterButton and Counter need to talk to each other. They’ll do it via Content, not directly (communicating directly would be a bad pattern because it would create tight coupling).
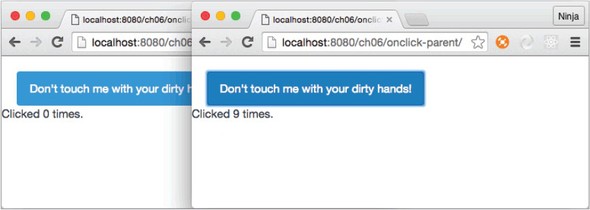
ClickCounterButton remains stateless as in the previous example, just like most React components should be: no thrills, just properties and JSX.
class ClickCounterButton extends React.Component {
  render() {
    return <button
      onClick={this.props.handler}
      className="btn btn-info">
      Don't touch me with your dirty hands!
    </button>
  }
}
Of course, you can also write ClickCounterButton as a function instead of a class to simplify the syntax a little:
const ClickCounterButton = (props) => {
  return <button
    onClick={props.handler}
    className="btn btn-info">
    Don't touch me with your dirty hands!
  </button>
}
The following new component, Counter, displays the value property that’s the counter (names can be different—you don’t have to always use counter):
class Counter extends React.Component {
  render() {
    return <span>Clicked {this.props.value} times.</span>
  }
}
Finally, we get to the parent component that provides the properties: one is the event handler, and the other is a counter. You need to update the render parameter accordingly, but the rest of the code remains intact (ch06/onclick-parent/jsx/content.jsx).
class Content extends React.Component {
  constructor(props) {
    super(props)
    this.handleClick = this.handleClick.bind(this)
    this.state = {counter: 0}
  }
  handleClick(event) {
    this.setState({counter: ++this.state.counter})
  }
  render() {
    return (
      <div>
        <ClickCounterButton handler={this.handleClick}/>
        <br/>
        <Counter value={this.state.counter}/>
      </div>
    )
  }
}
To answer the initial question of where to put the event-handling logic, the rule of thumb is to put it in the parent or wrapper component if you need interaction between child components. If the event concerns only the child components, there’s no need to pollute the components higher up the parent chain with event-handling methods.
Table 6.1 listed events supported by React. You may wonder about DOM events not supported by React. For example, suppose you’re tasked with creating a scalable UI that needs to become bigger or smaller depending on a window size (resize) event. But this event isn’t supported! There’s a way to capture resize and any other event, and you already know the React feature to implement it: lifecycle events.
In this example, you’ll implement radio buttons. As you may know, standard HTML radio button elements scale (become larger or smaller) badly and inconsistently across browsers. For this reason, back when I worked at DocuSign, I implemented scalable CSS radio buttons (http://mng.bz/kPMu) to replace standard HTML radio inputs. I did that in jQuery. These CSS buttons can be scaled via jQuery by manipulating their CSS. Let’s see how to create a scalable radio button UI in React. You’ll make the same CSS buttons scale with React when you resize the screen, as shown in figure 6.13.

As I said earlier, the resize event isn’t supported by React—adding it to the element as shown here won’t work:
...
  render() {
    return <div>
      <div onResize={this.handleResize}
        className="radio-tagger"
        style={this.state.taggerStyle}>
    ...
There’s a simple way to attach unsupported events like resize and most custom elements you need to support: using React component lifecycle events. Listing 6.11 (ch06/radio/jsx/radio.jsx) adds resize event listeners to window in componentDidMount() and then removes the same event listeners in componentWillUnmount() to make sure nothing is left after this component is gone from the DOM. Leaving event listeners hanging after their components are removed is a great way to introduce memory leaks that might crash your app at some point. Believe me, memory leaks can be a source of sleepless, red-eyed, Red Bull–fueled nights spent debugging and cursing.
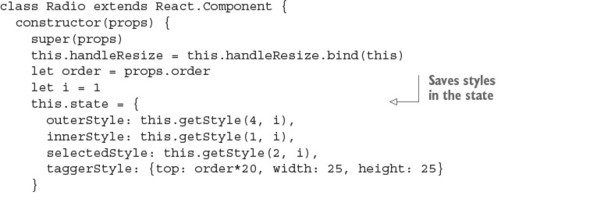
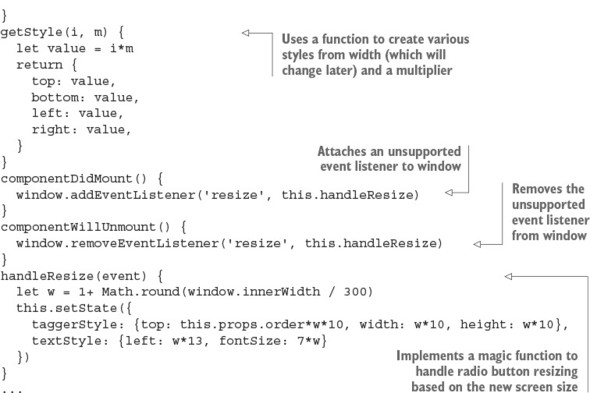
The helper function getStyle() abstracts some of the styling because there’s repetition in the CSS, such as top, bottom, left, and right, but with different values that depend on the width of the window. Hence, getStyle() takes the value and the multiplier m and returns pixels. (Numbers in React’s CSS become pixels.)
The rest of the code is easy. All you need to do is implement the render() method, which uses the states and properties to render four <div/> elements. Each one has a special style, defined earlier in constructor().
...
  render() {
    return <div>
      <div className="radio-tagger" style={this.state.taggerStyle}>
        <input type="radio" name={this.props.name} id={this.props.id}>
        </input>
        <label htmlFor={this.props.id}>
          <div className="radio-text" style={this.state.textStyle}>
           {this.props.label}</div>
          <div className="radio-outer" style={this.state.outerStyle}>
            <div className="radio-inner" style={this.state.innerStyle}>
              <div className="radio-selected"
               style={this.state.selectedStyle}>
              </div>
            </div>
          </div>
        </label>
      </div>
    </div>
  }
}
That’s it for the Radio component implementation. The gist of this example is that by using lifecycle events in your components, you can create custom event listeners. In this example, you did so by using window. This is similar to how React’s event listeners work: React attaches events to document, as you remember from the beginning of this chapter. And don’t forget to remove the custom event listeners on the unmount event.
If you’re interested in the scalable radio buttons and their non-React implementation (jQuery), I wrote a separate blog post at http://mng.bz/kPMu and created an online demo at http://jsfiddle.net/DSYz7/8. Of course, you can find the React implementation in the source code for this book.
This brings us to the topic of integrating React with other UI libraries, such as jQuery.
As you’ve seen, React provides standard DOM events; but what if you need to integrate with another library that uses (triggers or listens to) nonstandard events? For example, suppose you have jQuery components that use slide (as in the slider control element). You want to integrate a React widget into your jQuery app. You can attach any DOM events not provided by React, using the component lifecycle events componentDidMount and componentWillUnmount.
As you may have guessed from the choice of the lifecycle events, you’ll be attaching an event listener when the component is mounted and detaching the event listener when the component is unmounted. Detaching (you can think of it as a cleanup) is important so that no event listeners are causing conflicts or performance issues by hanging around as orphans. (Orphaned event handlers are handlers that don’t have DOM nodes that created them—potential memory leaks.)
For example, suppose you’re working at a music-streaming company, and you’re tasked with implementing volume controls on the new version of the web player (think Spotify or iTunes). You need to add a label and buttons in addition to the legacy jQuery slider (http://plugins.jquery.com/ui.slider).
You want to implement a label with a numeric value, and two buttons to decrease and increase the value by 1. The idea is to make these pieces work together: when a user slides the pin (the square peg on a slider) left or right, the numeric value and the values on the buttons should change accordingly. In the same fashion, the user should be able to click either button, and the slider pin should move left or right correspondingly. In essence, you want to create not just a slider, but the widget shown in figure 6.14.

You have at least two options when it comes to integration: first, attaching events for jQuery Slider in a React component; and second, using window. Let’s start with the first approach and use it for buttons.
This approach for integrating buttons is tightly coupled. Objects depend on each other. Generally, you should avoid tightly coupled patterns. The other, more loosely coupled option, will be implemented for integrating labels after we cover this approach.
When there’s a slide event on the jQuery slider (meaning there’s a change in that value), you want to update the button values (text on buttons). You can attach an event listener to the jQuery slider in componentDidMount and trigger a method on a React component (handleSlide) when there’s a slide event. With every slide and change in value, you’ll update the state (sliderValue). SliderButtons implements this approach, as shown in the following listing (ch06/slider/jsx/slider-buttons.jsx).
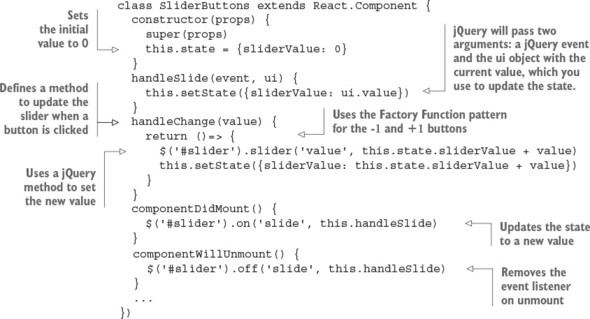
The render() method of SliderButtons has two buttons with onClick events; a dynamic disabled attribute so you don’t set values less than 0 (see figure 6.15) or greater than 100; and Twitter Bootstrap classes for buttons (ch06/slider/jsx/slider-buttons.jsx).
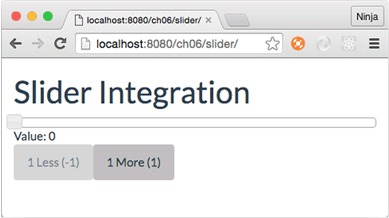
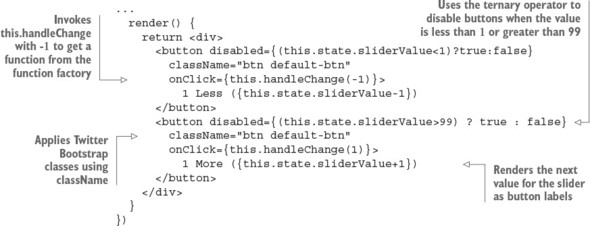
The end result is that if the value is less than or greater than the set range (minimum of 0, maximum of 100), the buttons become disabled. For example, when the value is 0, the Less button is disabled, as shown in figure 6.15.
Dragging the slider changes the text on the buttons and disables/enables them as needed. Thanks to the call to the slider in handleChange(), clicking the buttons moves the slider left or right. Next, you’ll implement the Value label, which is a SliderValue React component.
You read about calling jQuery directly from React methods. At the same time, you can decouple jQuery and React by using another object to catch events. This is a loosely coupled pattern and is often preferable, because it helps avoid extra dependencies. In other words, different components don’t need to know the details of each others’ implementation. Thus, the SliderValue React component won’t know how to call a jQuery slider. This is good, because later you can more easily change Slider to Slider 2.0 with a different interface.
You can implement this by dispatching events to window in jQuery events and defining event listeners for window in React component lifecycle methods. The following listing shows SliderValue (ch06/slider/jsx/slider-value.jsx).
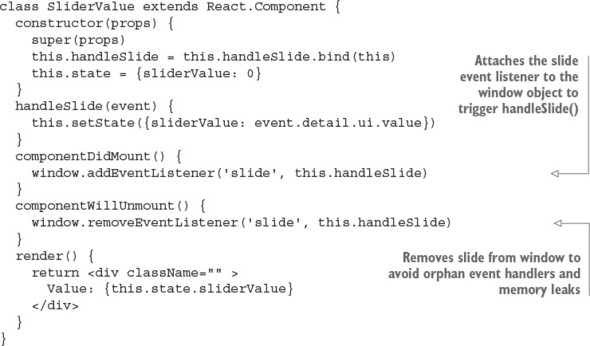
In addition, you need to dispatch a custom event. In the first approach (Slider-Buttons), you didn’t need to do this, because you used existing plug-in events. In this implementation, you have to create an event and dispatch it to window with data. You can implement the dispatchers of the slide custom event alongside the code that creates the jQuery slider object, which is a script tag in index.html (ch06/slider/index.html).
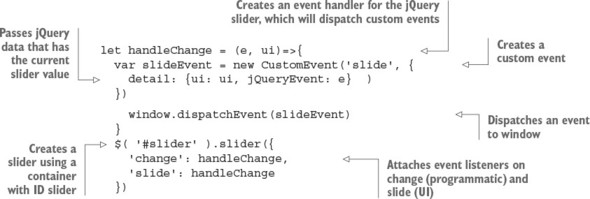
When you run the code, both buttons and the value label will work seamlessly. You used two approaches: one loosely coupled and the other tightly coupled. The latter’s implementation is shorter, but the former is preferable because it will allow you to modify the code more easily in the future.
As you can see from this integration, React can work nicely with other libraries by listening to events in its componentDidMount() lifecycle method. React acts in a very un-opinionated way. React can play nicely with others! React’s easy integration with other libraries is a great advantage because developers can switch to React gradually instead of rewriting an entire application from scratch, or they can just continue to use their favorite good-old libraries with React indefinitely.
Select the correct syntax for the event declaration: onClick=this.doStuff, onclick={this.doStuff}, onClick="this.doStuff", onClick={this.doStuff}, or onClick={this.doStuff()}
componentDidMount() won’t be triggered during server-side rendering of the React component on which it’s declared. True or false?
One way to exchange information among child components is to move the object to the parent of the children. True or false?
You can use event.target asynchronously and outside the event handler by default. True or false?
You can integrate with third-party libraries and events not supported by React by setting up event listeners in the component lifecycle events. True or false?
onClick={this.doStuff} is correct because only the function definition must be passed to onClick, not the invocation (the result of the invocation, to be precise).
True. componentDidMount() is only executed for browser React (React in the browser), not for server-side React. That’s why developers use componentDid-Mount() for AJAX/XHR requests. See chapter 5 for a refresher on component lifecycle events.
True. Moving data up the tree hierarchy of components lets you pass it to different child components.
False. This object is reused, so you can’t use it in an asynchronous operation unless persist() is called on SyntheticEvent.
True. Component lifecycle events are one of the best places to do this, because they let you do the prep work before a component is active and before it’s removed.
This chapter covers
Thus far, you’ve learned about events, states, component composition, and other important React topics, features, and concepts. But aside from capturing user events, I haven’t covered how to capture text input and input via other form elements like input, textarea, and option. Working with them is paramount to web development, because they allow your applications to receive data (such as text) and actions (such as clicks) from users.
This chapter refers to pretty much everything I’ve covered so far. You’ll begin to see how everything fits together.
The source code for the examples in this chapter is at www.manning.com/books/react-quickly and https://github.com/azat-co/react-quickly/tree/master/ch07 (in the ch07 folder of the GitHub repository https://github.com/azat-co/react-quickly). You can also find some demos at http://reactquickly.co/demos.
In regular HTML, when you’re working with an input element, the page’s DOM maintains that element’s value in its DOM node. It’s possible to access the value via methods like document.getElementById('email').value or by using jQuery methods. In essence, the DOM is your storage.
In React, when you’re working with forms or any other user-input fields such as standalone text fields or buttons, you have an interesting problem to solve. The React documentation says, “React components must represent the state of the view at any point in time and not only at initialization time.” React is all about keeping things simple by using declarative style to describe UIs. React describes the UI: its end stage, how it should look.
Can you spot a conflict? In traditional HTML form elements, the states of elements change with user input. But React uses a declarative approach to describe UIs. Input needs to be dynamic to reflect the state properly.
Thus, opting not to maintain the component state (in JavaScript) and not to sync it with the view adds problems; there may be a situation when the internal state and view are different. React won’t know about the changed state. This can lead to all sorts of trouble and bugs, and negates React’s simple philosophy. The best practice is to keep React’s render() as close to the real DOM as possible—and that includes the data in the form elements.
Consider the following example of a text-input field. React must include the new value in its render() for that component. Consequently, you need to set the value for the element to a new value using value. But if you implement an <input> field as in HTML, React will always keep render() in sync with the real DOM. React won’t allow users to change the value. Try it yourself. It’s peculiar, but that’s the appropriate behavior for React!
render() {
  return <input type="text" name="title" value="Mr." />
}
This code represents the view at any state, so the value will always be Mr.. On the other hand, input fields must change in response to the user clicking or typing. Given these points, let’s make the value dynamic. This is a better implementation, because it’ll be updated from the state:
render() {
  return <input type="text" name="title" value={this.state.title} />
}
But what’s the value of state? React can’t know about users typing in the form elements. You need to implement an event handler to capture changes with onChange:
handleChange(event) {
  this.setState({title: event.target.value})
}
render() {
  return <input type="text" name="title" value={this.state.title}
   onChange={this.handleChange.bind(this)}/>
}
Given these points, the best practice is to implement these things to sync the internal state with the view (see figure 7.1):
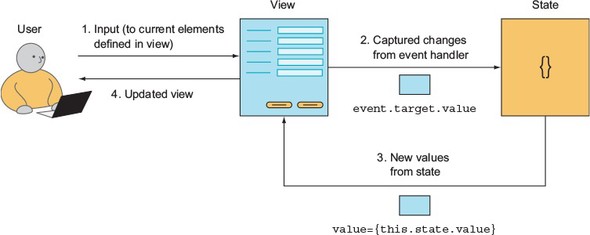
It may seem like a lot of work at first glance, but I hope that when you’ve used React more, you’ll appreciate this approach. It’s called one-way binding because the state changes views, and that’s it. There’s no trip back: only a one-way trip from state to view. With one-way binding, a library won’t update the state (or the model) automatically. One of the main benefits of one-way binding is that it removes complexity when you’re working with large apps where many views implicitly can update many states (data models) and vice versa (see figure 7.2).

Simple doesn’t always mean writing less code. Sometimes, as in this case, you’ll have to write extra code to manually set the data from event handlers to the state (which is rendered to the view); but this approach tends to be superior when it comes to complex UIs and single-page applications with myriads of views and states. Simple isn’t always easy.
Conversely, two-way binding makes it possible for views to change states automatically without you explicitly implementing the process. Two-way binding is how Angular 1 works. Interestingly, Angular 2 borrowed the concept of one-way binding from React and made it the default (you can still have two-way binding explicitly).
For this reason, I’ll first cover the recommended approach of working with forms. It’s called using controlled components, and it ensures that the internal component state is always in sync with the view. Controlled form elements are called that because React controls or sets the values. The alternative approach is uncontrolled components, which I’ll discuss in section 7.2.
You’ve learned the best practice of working with input fields in React: capturing the change and applying it to the state as shown in figure 7.1 (input to changed view). Next, let’s look at how you define a form and its elements.
Let’s start with the <form> element. Typically, you don’t want input elements hanging around randomly in the DOM. This situation can turn bad if you have many functionally different sets of inputs. Instead, you wrap input elements that share a common purpose in a <form></form> element.
Having a <form> wrapper isn’t required. It’s fine to use form elements by themselves in simple UIs. In more-complex UIs, where you may have multiple groups of elements on a single page, it’s wise to use <form> for each such group. React’s <form> is rendered like an HTML <form>, so whatever rules you have for the HTML form will apply to React’s <form> element, too. For example, according to the HTML5 spec, you should not nest forms.[1]
The specification says content must be flow content, but with no <form> element descendants. See www.w3.org/TR/html5/forms.html#the-form-element.
The <form> element can have events. React supports three events for forms in addition to the standard React DOM events (as outlined in table 6.1):
React’s onChange fires on every change, in contrast to the DOM’s change event (http://mng.bz/lJ37), which may not fire on each value change but fires on lost focus. For example, for <input type="text">, a user can be typing with no onChange; only after the user presses Tab or clicks away with their mouse to another element (lost focus) is onChange fired in HTML (regular browser event). As mentioned earlier, in React, onChange fires on each keystroke, not just on lost focus. On the other hand, onInput in React is a wrapper for the DOM’s onInput, which fires on each change.
The bottom line is that React’s onChange works differently than onChange in HTML: it’s more consistent and more like HTML’s onInput. The recommended approach is to use onChange in React and to use onInput only when you need to access native behavior for the onInput event. The reason is that React’s onChange wrapper behavior provides consistency and thus sanity.
In addition to the three events already listed, <form> can have standard React events such as onKeyUp and onClick. Using form events may come in handy when you need to capture a specific event for the entire form (that is, a group of input elements).
For example, it helps provide a good UX if you allow users to submit data when they press Enter (assuming they’re not in a textarea field, in which case Enter should create a new line). You can listen to the form-submit event by creating an event listener that triggers this.handleSubmit():
handleSubmit(event) {
  ...
}
render() {
  <form onSubmit={this.handleSubmit}>
    <input type="text" name="email" />
  </form>
}
You need to implement the handleSubmit() function outside of render(), just as you’d do with any other event. React doesn’t require a naming convention, so you can name the event handler however you wish as long as the name is understandable and somewhat consistent. This book sticks with the most popular convention: prefixing event handlers with the word handle to distinguish them from regular class methods.
As a reminder, don’t invoke a method (don’t put parentheses) and don’t use double quotes around curly braces (correct: EVENT={this.METHOD}) when setting the event handler. For some of you, this is basic JavaScript and straightforward, but you wouldn’t believe how many times I’ve seen errors related to these two misunderstandings in React code: you pass the definition of the function, not its result; and you use curly braces as values of the JSX attributes.
Another way to implement form submission on Enter is to manually listen to the key-up event (onKeyUp) and check for the key code (13 for Enter):
handleKeyUp(event) {
  if (event.keyCode == 13) return this.sendData()
}
render() {
  return <form onKeyUp={this.handleKeyUp}>
  ...
  </form>
}
Note that the sendData() method is implemented somewhere else in the class/component. Also, for this.sendData() to work, you’ll need to use bind(this) to bind the context to the event handler in constructor().
To summarize, you can have events on the form element, not just on individual elements in the form. Next, we’ll look at how to define form elements.
You implement almost all input fields in HTML with just four elements: <input>, <textarea>, <select>, and <option>. Do you remember that in React, properties are immutable? Well, form elements are special because users need to interact with the elements and change these properties. For all other elements, this is impossible.
React made these elements special by giving them the mutable properties value, checked, and selected. These special mutable properties are also called interactive properties.
React DOM also supports other elements related to building forms, such as <keygen>, <datalist>, <fieldset>, and <label>. These elements don’t possess superpowers like a mutable value attribute/property. They’re rendered as the corresponding HTML tags. For this reason, this book focuses only on the four main elements with superpowers.
Here’s a list of the interactive properties/fields (ones that can change) you can read from events like onChange attached to form elements (covered in section 6.1.3):
You can read the values and change them by working with these interactive (mutable) properties. Let’s look at some examples of how to define each of the elements.
The <input> element renders multiple fields by using different values for its type attribute:
The main use case for all <input> type elements—except check boxes and radio buttons—is to use value as the element’s interactive/changeable property. For example, an email input field can use the email state and onChange event handler:
<input
  type="text"
  name="email"
  value={this.state.email}
  onChange={this.handleEmailChange}/>
The two exceptions that don’t have value as their primary mutable attribute are inputs with the types checkbox and radio. They use checked because these two types have one value per HTML element, and thus the value doesn’t change, but the state of checked/selected does. For example, you can define three radio buttons in one group (radioGroup) by defining these three elements, as shown in figure 7.3.
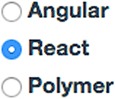
As mentioned earlier, the values (value) are hardcoded because you don’t need to change them. What changes with user actions is the element’s checked attribute, as shown in the following listing (ch07/elements/jsx/content.jsx).
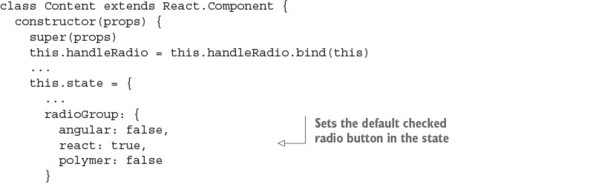
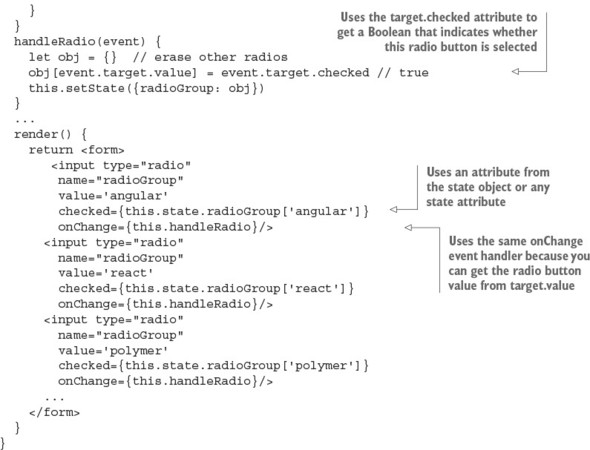
For check boxes, you follow an approach similar to that for radio buttons: using the checked attribute and Boolean values for states. Those Booleans can be stored in a checkboxGroup state:
class Content extends React.Component {
  constructor(props) {
    super(props)
    this.handleCheckbox = this.handleCheckbox.bind(this)
    // ...
    this.state = {
      // ...
      checkboxGroup: {
        node: false,
        react: true,
        express: false,
        mongodb: false
      }
    }
  }
Then the event handler (which you bind in the constructor) grabs the current values, adds true or false from event.target.value, and sets the state:

There’s no need for the assignment from the state in radio, because radio buttons can have only one selected value. Thus, you use an empty object. This isn’t the case with check boxes: they can have multiple values selected, so you need a merge, not a replace.
In JavaScript, objects are passed and assigned by references. So in the statement obj = this.state.checkboxGroup, obj is really a state. As you’ll recall, you aren’t supposed to change the state directly. To avoid any potential conflicts, it’s better to assign by value with Object.assign(). This technique is also called cloning. Another, less effective and more hacky way to assign by value is to use JSON:
clonedData = JSON.parse(JSON.stringify(originalData))
When you’re using state arrays instead of objects and need to assign by value, use clonedArray = Array.from(originArray) or clonedArray = originArray.slice().
You can use the handleCheckbox() event handler to get the value from event.target.value. The next listing shows render() (ch07/elements/jsx/content.jsx), which uses the state values for four check boxes, as shown in figure 7.4.
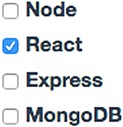
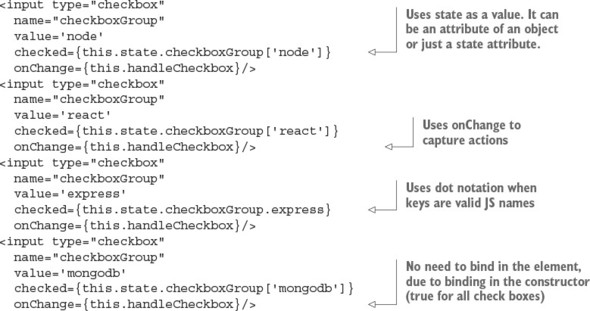
In essence, when you’re using check boxes or radio buttons, you can hardcode the value in each individual element and use checked as your mutable attribute. Let’s see how to work with other input elements.
<textarea> elements are for capturing and displaying long text inputs such as notes, blog posts, code snippets, and so on. In regular HTML, <textarea> uses inner HTML (that is, children) for the value:
<textarea>
  With the right pattern, applications...
</textarea>
Figure 7.5 shows an example.
In contrast, React uses the value attribute. In view of this, setting a value as inner HTML/text is an antipattern. React will convert any children (if you use them) of <textarea> to the default value (more on default values in section 7.2.4):
<!-- Anti-pattern: AVOID doing this! -->
<textarea name="description">{this.state.description}</textarea>
Instead, it’s recommended that you use the value attribute (or property) for <textarea>:
render() {
  return <textarea name="description" value={this.state.description}/>
}
To listen for the changes, use onChange as you would for <input> elements.
Select and option fields are great UX-wise for allowing users to select a single value or multiple values from a prepopulated list of values. The list of values is compactly hidden behind the element until users expand it (in the case of a single select), as shown in figure 7.6.

<select> is another element whose behavior is different in React compared to regular HTML. For instance, in regular HTML, you might use selectDOMNode.selectedIndex to get the index of the selected element, or selectDOMNode.selectedOptions. In React, you use value for <select>, as in the following example (ch07/elements/jsx/content.jsx).
...
constructor(props) {
  super(props)
  this.state = {selectedValue: 'node'}
}
handleSelectChange(event) {
  this.setState({selectedValue: event.target.value})
}
...
render() {
  return <form>
    <select
      value={this.state.selectedValue}
      onChange={this.handleSelectChange}>
        <option value="ruby">Ruby</option>
        <option value="node">Node</option>
        <option value="python">Python</option>
    </select>
  </form>
}
...
This code renders a drop-down menu and preselects the node value (which must be set in constructor(), as shown in figure 7.6). Yay for Node!
Sometimes you need to use a multiselect element. You can do so in JSX/React by providing the multiple attribute without any value (React defaults to true) or with the value {true}.
Remember that for consistency, and to avoid confusion, I recommend wrapping all Boolean values in curly braces {} and not "". Sure, "true" and {true} produce the same result. But "false" will also produce true. This is because the string "false" is treated as true in JavaScript (truthy).
To preselect multiple items, you can pass an array of options to <select> via its value attribute. For example, this code preselects Meteor and React:
<select multiple={true} value={['meteor', 'react']}>
  <option value="meteor">Meteor</option>
  <option value="react">React</option>
  <option value="jQuery">jQuery</option>
</select>
multiple={true} renders the multiselect element, and the Meteor and React values are preselected as shown in figure 7.7.
Overall, defining form elements in React isn’t much different than doing so in regular HTML, except that you use value more often. I like this consistency. But defining is half the work; the other half is capturing the values. You did a little of that in the previous examples. Let’s zoom in on event captures.
As mentioned earlier, to capture changes to a form element, you set up an onChange event listener. This event supersedes the normal DOM’s onInput. In other words, if you need the regular HTML DOM behavior of onInput, you can use React’s onInput. On the other hand, React’s onChange isn’t exactly the same as the regular DOM onChange. The regular DOM onChange may be fired only when the element loses focus, whereas React’s onChange fires on all new input. What triggers onChange varies for each element:
Based on this mapping, the approach to reading the value varies. As an argument of the event handler, you’re getting a SyntheticEvent. It has a target property of value, checked, or selected, depending on the element.
To listen for changes, you define the event handler somewhere in your component (you can define it inline too, meaning in the JSX’s {}) and create the onChange attribute pointing to your event handler. For example, this code captures changes from an email field (ch07/elements/jsx/content.jsx).
handleChange(event) {
  console.log(event.target.value)
}
render() {
  return <input
    type="text"
    onChange={this.handleChange}
    defaultValue="hi@azat.co"/>
}
Interestingly, if you don’t define onChange but provide value, React will issue a warning and make the element read-only. If your intention is to have a read-only field, it’s better to define it explicitly by providing readOnly. This will not only remove the warning, but also ensure that other programmers who read this code know this is a read-only field by design. To set the value explicitly, set the readOnly value to {true}—that is, readOnly={true}—or add the readOnly attribute by itself without the value, and React by default will add the value of true to the attribute.
Once you capture changes in elements, you can store them in the component’s state:
handleChange(event) {
  this.setState({emailValue: event.target.value})
}
Sooner or later, you’ll need to send this information to a server or another component. In this case, you’ll have the values neatly organized in the state.
For example, suppose you want to create a loan application form that includes the user’s name, address, telephone number, and Social Security number. Each input field handles its own changes. At the bottom of this form, you’ll put a Submit button to send the state to the server. The following listing shows the name field with onChange, which keeps all input in the state (ch07/elements/jsx/content.jsx).
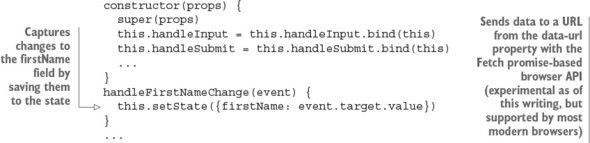
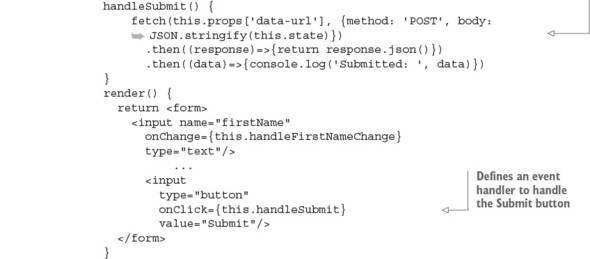
Fetch is an experimental native browser method to perform promise-based AJAX/XHR requests. You can read about its usage and support (it’s supported by most modern browsers as of this writing) at http://mng.bz/mbMe.
You’ve learned how to define elements, capture changes with events, and update the state (which you use to display values). The next section walks through an example.
Continuing with the loan application scenario, once the loan is approved, users need to be able to type in the number of the account to which they want their loan money transferred. Let’s implement an account field component using your new skills. This is a controlled element, which is the best practice when it comes to working with forms in React.
In the component shown in listing 7.6 (ch07/account/jsx/content.jsx), you have an account number input field that needs to accept numbers only (see figure 7.8). To limit the input to a number (0–9), you can use a controlled component to weed out all non-numeric values. The event handler sets state only after filtering the input.

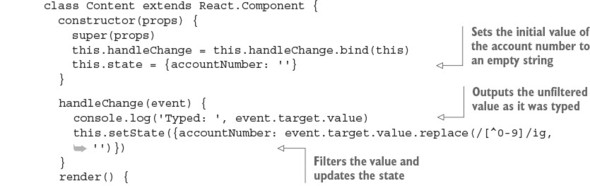
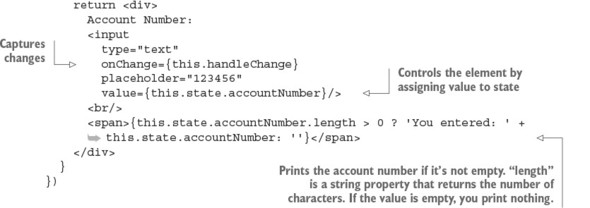
You use a regular expression (http://mng.bz/r7sq), /[^0-9]/ig, and the string function replace (http://mng.bz/2Qon) to remove all non-digits. replace(/[^0-9]/ig, '') is an uncomplicated regular expression function that replaces anything but numbers with an empty space. ig stands for case insensitive and global (in other words, find all matches).
render() has the input field, which is a controlled component because value={this.state.accountNumber}. When you try this example, you’ll be able to type in only numbers because React sets the new state to the filtered number-only value (see figure 7.9).
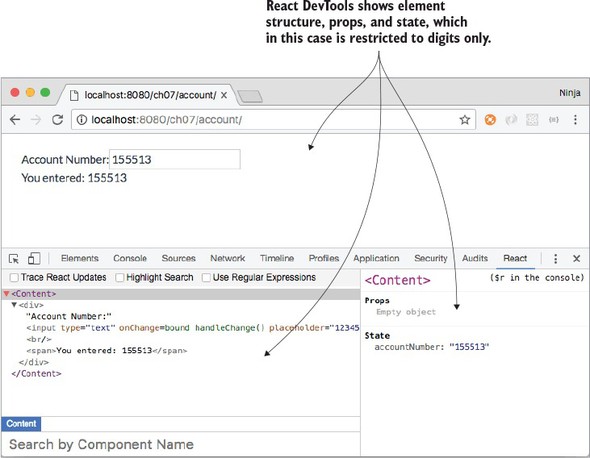
By following React’s best practice for working with input elements and forms, you can implement validation and enforce that the representation is what the app wants it to be.
Obviously, in the account component, you’re implementing a front-end validation, which won’t prevent a hacker from inputting malicious data into your XHR request sent to the server. Therefore, make sure you have proper validation on the back-end/server and/or business layer, such as ORM/ODM (https://en.wikipedia.org/wiki/Object-relational_mapping).
So far, you’ve learned about the best practice for working with forms: creating controlled components. Let’s cover some alternatives.
Using controlled form elements is best practice. But as you’ve seen, this approach requires additional work, because you need to manually capture changes and update states. In essence, if you define the value of the attributes value, checked, and selected using strings, properties, or states, then an element is controlled (by React).
At the same time, form elements can be uncontrolled when the value attributes aren’t set (neither to a state nor to a static value). Even though this is discouraged for the reasons listed at the beginning of this chapter (the view’s DOM state may be different than React’s internal state), uncontrolled elements can be useful when you’re building a simple form that will be submitted to the server. In other words, consider using the uncontrolled pattern when you’re not building a complex UI element with a lot of mutations and user actions; it’s a hack that you should avoid most of the time.
Typically, to use uncontrolled components, you define a form-submit event, which is typically onClick on a button and/or onSubmit on a form. Once you have this event handler, you have two options:
The first approach is straightforward. It’s about having the same event listeners and updating the states. That’s too much coding if you’re using the state only at the final stage (for form submission).
React is still relatively new, and the best practices are still being formed through real-life experiences of not just writing but also maintaining apps. Recommendations may change based on a few years of maintaining a large React app. The topic of uncontrolled components is a grey area for which there’s no clear consensus. You may hear that this is an antipattern and should be avoided completely. I don’t take sides but present you with enough information to make your own judgment. I do so because I believe you should have all the available knowledge and are smart enough to act on it. The bottom line is this: consider the rest of the chapter optional reading—a tool you may or may not use.
As you’ve seen, in React, an uncontrolled component means the value property isn’t set by the React library. When this happens, the component’s internal value (or state) may differ from the value in the component’s representation (or view). Basically, there’s a dissonance between internal state and representation. The component state can have some logic (such as validation); and with an uncontrolled component pattern, your view will accept any user input in a form element, thus creating the disparity between view and state.
For example, this text-input field is uncontrolled because React doesn’t set the value:
render() {
  return <input type="text" />
}
Any user input will be immediately rendered in the view. Is this good or bad? Bear with me; I’ll walk you through this scenario.
To capture changes in an uncontrolled component, you use onChange. For example, the input field in figure 7.10 has an onChange event handler (this.handleChange), a reference (textbook), and a placeholder, which yields a grey text box when the field is empty.
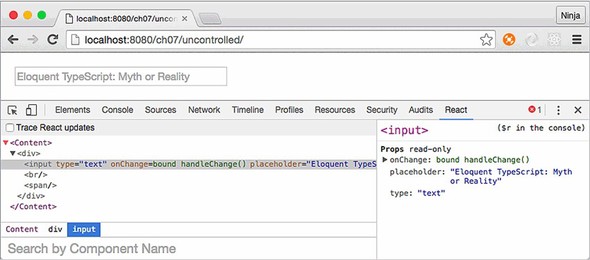
Here’s the handleChange() method that prints the values in the console and updates the state using event.target.value (ch07/uncontrolled/jsx/content.jsx).
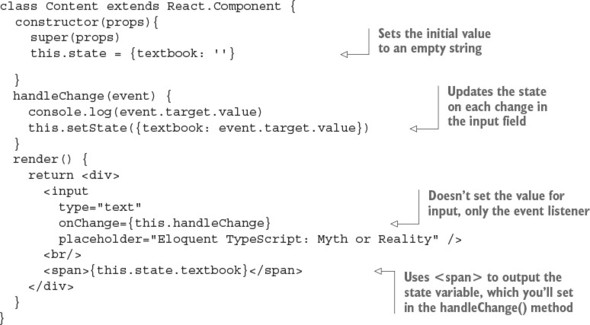
The idea is that users can enter whatever they want because React has no control over the value of the input field. All React is doing is capturing new values (onChange) and setting the state. The change in state will, in turn, update <span> (see figure 7.11).
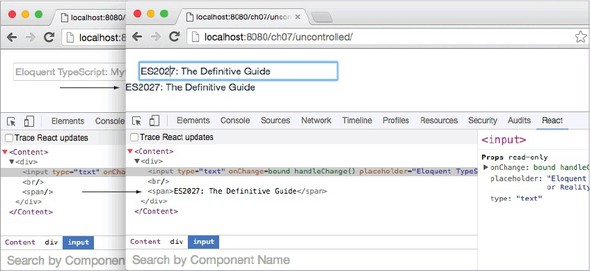
In this approach, you implement an event handler for the input field. Can you skip capturing events completely?
Let’s look at a second approach. There’s a problem with having all the values ready when you want to use them (on form submit, for example). In the approach with change capturing, you have all the data in states. When you opt to not capture changes with uncontrolled elements, the data is still in the DOM. To get the data into a JavaScript object, the solution is to use references, as shown in figure 7.12. Contrast how uncontrolled elements work in figure 7.12 with the controlled elements flow in figure 7.1, which shows how controlled elements function.

When you’re working with controlled components or with uncontrolled components that capture data, the data is in the state all the time. This isn’t the case with the approach discussed in this subsection.
To sum up, in order for the approach of using uncontrolled elements without capturing changes to work, you need a way to access other elements to get data from them.
You use references to access values when working with uncontrolled components that don’t capture events, such as onChange, but the references aren’t exclusive to this particular pattern. You can use references in any other scenario you see fit, although using references is frowned on as an antipattern. The reason is that when React elements are defined properly, with each element using internal state in sync with the view’s state (DOM), the need for references is almost nonexistent. But you need to understand references, so I’ll cover them here.
With references, you can get the DOM element (or a node) of a React.js component. This comes in handy when you need to get form element values, but you don’t capture changes in the elements.
To use a reference, you need to do two things:
this.refs.NAME will give you an instance of a React component, but how do you get the value? It’s more useful to have the DOM node! You can access the component’s DOM node by calling ReactDOM.findDOMNode(this.refs.NAME):
let emailNode = ReactDOM.findDOMNode(this.refs.email)
let email = emailNode.value
I find this method a bit clunky to write (too lengthy), so with this in mind you can use an alias:
let fD = ReactDOM.findDOMNode
let email = fD(this.refs.email).value
Consider the example shown in figure 7.13, which captures user email addresses and comments. The values are output to the browser console.
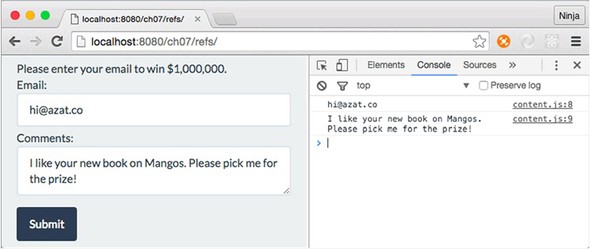
The project structure is very different from other project structures. It looks like this:
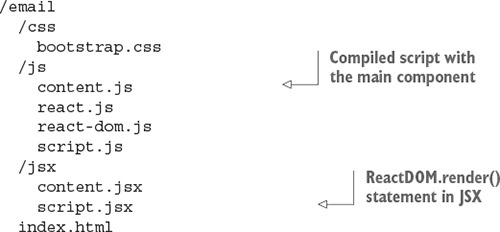
When the Submit button is clicked, you can access the emailAddress and comments references and output the values to two logs, as shown next (ch07/email/jsx/content.jsx).
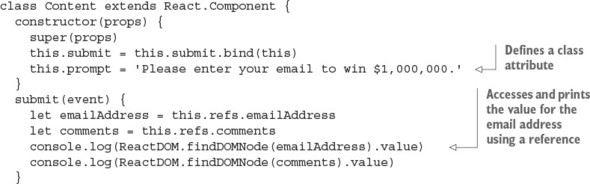
Next, you have the mandatory render() function, which uses the Twitter Bootstrap classes to style the intake form (ch07/email/jsx/content.jsx). Remember to use className for the class attribute!
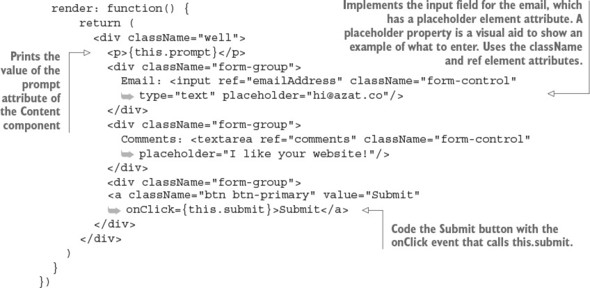
A regular HTML DOM node for <textarea> uses innerHTML as its value. As mentioned earlier, in React you can use value for this element:
ReactDOM.findDOMNode(comments).value
This is because React implements the value property. It’s just one of the nice features you get with a more consistent API for form elements. At the same time, because the ReactDOM.findDOMNode() method returns a DOM node, you have access to other regular HTML attributes (like innerHTML) and methods (like getAttribute()).
Now you know how to access elements and their values from pretty much any component method, not just from an event handler for that particular element. Again, references are only for the rare cases when you use uncontrolled elements. The overuse of references is frowned on as a bad practice. Most of the time, you won’t need to use references with controlled elements, because you can use component states instead.
It’s also possible to assign a function to the ref attribute in JSX. This function is called just once, on the mounting of the element. In the function, you can save the DOM node in an instance attribute this.emailInput:
<input ref={(input) => { this.emailInput = input }}
  className="form-control"
  type="text"
  placeholder="hi@azat.co"/>
Uncontrolled components require less coding (state updates and capturing changes are optional), but they raise another issue: you can’t set values to states or hardcoded values because then you’ll have controlled elements (for example, you can’t use value={this.state.email}). How do you set the initial value? Let’s say the loan application has been partly filled out and saved, and the user resumes the session. You need to show the information that has already been filled in, but you can’t use the value attribute. Let’s look at how you set default values.
Suppose you want the example loan application to prepopulate certain fields with existing data. In normal HTML, you define a form field with value, and users can modify the element on a page. But React uses value, checked, and selected to maintain consistency between the view and the internal state of elements. In React, if you hardcode the value like
<input type="text" name="new-book-title" value="Node: The Best Parts"/>
it’ll be a read-only input field. That isn’t what you need in most cases. Therefore, in React, the special attribute defaultValue sets the value and lets users modify form elements.
For example, assume the form was saved earlier, and you want to fill in the <input> field for the user. In this case, you need to use the defaultValue property for the form elements. You can set the initial value of the input field like this:
<input type="text" name="new-book-title" defaultValue="Node: The Best Parts"/>
If you use the value attribute (value="JSX") instead of defaultValue, this element becomes read-only. Not only will it be controlled, but the value won’t change when the user types in the <input> element, as shown in figure 7.14. This is because the value is hardcoded, and React will maintain that value. Probably not what you want. Obviously, in real-life applications, you get values programmatically, which in React means using properties (this.props.name)
<input type="text" name="new-book-title" defaultValue={this.props.title}/>

or states:
<input type="text" name="new-book-title" defaultValue={this.state.title}/>
The defaultValue React feature is most often used with uncontrolled components; but, as with references, default values can be used with controlled components or in any other scenario. You don’t need default values as much in controlled components because you can define those values in the state in the constructor; for example, this.state = { defaultName: 'Abe Lincoln'}.
As you’ve seen, most UI work is done in handy form elements. You need to make them beautiful, yet easy to understand and use. And you must also have user-friendly error messages, front-end validation, and other nontrivial things like tooltips, scalable radio buttons, default values, and placeholders. Building a UI can be complicated and can quickly spiral out of control! Fortunately, React makes your job easier by letting you use a cross-browser API for form elements.
An uncontrolled component sets a value, and a controlled component doesn’t. True or false?
The correct syntax for default values is which of the following? default-value, defaultValue, or defVal
The React team recommends using onChange over onInput. True or false?
You set a value for the text area with which of the following? Children, inner HTML, or value
In a form, selected applies to which of the following? <input>, <textarea>, or <option>
Which of the following is the best way to extract the DOM node by reference? React.findDomNode(this.refs.email), this.refs.email, this.refs.email.getDOMNode, ReactDOM.findDOMNode(this.refs.email), or this.refs.email.getDomNode
False. The definition of a controlled component/element is that it sets the value.
defaultValue. The other options are invalid names.
True. In regular HTML, onChange might not fire on every change, but in React it always does.
In React, you set a value with value for consistency. But in vanilla HTML, you use inner HTML.
<option>.
Use ReactDOM.findDOMNode(reference) or a callback (not listed as an answer).
This chapter covers
Thus far, we’ve covered how to create components and make them interactive, and work with user input (events and input elements). Using this knowledge will take you a long way in building sites with React components, but you’ll notice that certain annoyances keep cropping up. This is especially true for large projects when you rely on components created by other software engineers (open source contributors or your teammates).
For example, when you consume a component someone else wrote, how do you know whether you’re providing the right properties for it? Also, how can you use an existing component with a little added functionality (which is also applied to other components)? These are developmental scalability issues: how to scale your code, meaning how to work with your code when the code base grows larger. Certain features and patterns in React can help with that.
These topics are important if you’d like to learn how to effectively build a complex React application. For example, higher-order components allow you to enhance the functionality of a component, and property types provide the security of type checking and no small measure of sanity.
By the end of this chapter, you’ll be familiar with most features of React. You’ll become adept at making your code more developer friendly (using property types) and your work more efficient (using component names and higher-order components). Your teammates may even marvel at your elegant solutions. These features will help you use React effectively, so let’s dive in without further ado.
The source code for the examples in this chapter is at www.manning.com/books/react-quickly and https://github.com/azat-co/react-quickly/tree/master/ch08 (in the ch08 folder of the GitHub repository https://github.com/azat-co/react-quickly). You can also find some demos at http://reactquickly.co/demos.
Imagine that you’re building a Datepicker component that takes a few required properties such as number of rows, locale, and current date:
<Datepicker currentDate={Date()} locale="US" rows={4}/>
What will happen if a new team member tries to use your component but forgets to pass the essential currentDate property? Then, what if another coworker passes a "4" string instead of a 4 number? Your component will do nothing (values undefined) or worse: it may crash, and they may blame you (ReferenceError anyone?). Oops.
Sadly, this isn’t an uncommon situation in web development, because JavaScript is a loosely typed language. Fortunately, React provides a feature that lets you set default values for properties: the defaultProps static attribute. We’ll return to flagging issues with property types in the next section.
The key benefit of defaultProps is that if a property is missing, a default value is rendered. To set a default property value on the component class, you define defaultProps. For example, in the aforementioned Datepicker component definition, you can add a static class attribute (not an instance attribute, because that won’t work—instance attributes are set in constructor()):
class Datepicker extends React.Component {
  ...
}
Datepicker.defaultProps = {
  currentDate: Date(),
  rows: 4,
  locale: 'US'
}
To illustrate defaultProps further, let’s say you have a component that renders a button. Typically, buttons have labels, but those labels need to be customizable. In case the custom value is omitted, it’s good to have a default value.
The button’s label is the buttonLabel property, which you use in render()’s return attribute. You want this property to always include Submit, even if the value isn’t set from above. To do this, you implement the defaultProps static class attribute, which is an object containing the property buttonLabel with a default value:
class Button extends React.Component {
  render() {
    return <button className="btn" >{this.props.buttonLabel}</button>
  }
}
Button.defaultProps = {buttonLabel: 'Submit'}
The parent component Content renders four buttons. But three of these four button components are missing properties:
class Content extends React.Component {
  render() {
    return (
      <div>
        <Button buttonLabel="Start"/>
        <Button />
        <Button />
        <Button />
      </div>
    )
  }
}
Can you guess the result? The first button will have the label Start, and the rest of the buttons will have the label Submit (see figure 8.1).
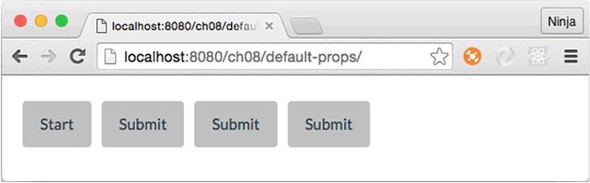
Setting default property values is almost always a good idea, because doing so makes your components more fault tolerant. In other words, your components become smarter because they have a baseline look and behavior even when nothing is supplied.
Looking at it another way, having a default value means you can skip declaring the same old value over and over again. If you use a single property value most of the time but still want to provide a way to modify this value (override the default), the defaultProps feature is the way to go. Overriding a default value doesn’t cause any issues, as you saw with the first button element in the example.
Going back to the earlier example with the Datepicker component and coworkers who aren’t aware of property types ("5" versus 5), you can set property types to use with React.js component classes. You do so via the propTypes static attribute. This feature of property types doesn’t enforce data types on property values and instead gives you a warning. That is, if you’re in development mode, and a type doesn’t match, you’ll get a warning message in the console and in production; nothing will be done to prevent the wrong type from being used. In essence, React.js suppresses this warning in production mode. Thus, propTypes is mostly a convenience feature to warn you about mismatches in data types at a developmental stage.
The React.js team defines development mode as using the unminified (uncompressed) version of React and production mode as using the minified version. From the React authors:
For React 15.5 and later versions (most of the examples in this book use React v15.5), type definitions come from a separate package called prop-types (www.npmjs.com/package/prop-types). You need to include prop-types in your HTML file. The package will become a global object (window.PropTypes):
<!-- development version -->
<script src="https://unpkg.com/prop-types/prop-types.js"></script>

<!-- production version -->
<script src="https://unpkg.com/prop-types/prop-types.min.js"></script>
If you’re using React 15.4 and earlier, there’s no need to include prop-types, because the types are in React: React.propTypes.
Here’s a basic example of defining a static propTypes attribute on a Datepicker class with types string, number, and enumerator. The example uses React v15.5 and includes prop-types in HTML (not shown here):
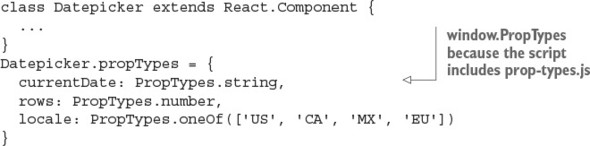
Never rely on front-end user-input validation, because it can be easily bypassed. Use it only for a better UX, and check everything on the server side.
To validate property types, use the propTypes property with the object containing the properties as keys and types as values. React.js types are in the PropTypes object:
To demonstrate, let’s enhance the defaultProps example by adding some property types in addition to default property values. The structure of this project is similar: content.jsx, button.jsx, and script.jsx. The index.html file has a reference to prop-types.js:
<!DOCTYPE html>
<html>

  <head>
    <script src="js/react.js"></script>
    <script src="js/prop-types.js"></script>
    <script src="js/react-dom.js"></script>
    <link href="css/bootstrap.css" type="text/css" rel="stylesheet"/>
    <link href="css/style.css" type="text/css" rel="stylesheet"/>

  </head>

  <body>
    <div id="content" class="container"></div>
    <script src="js/button.js"></script>
    <script src="js/content.js"></script>
    <script src="js/script.js"></script>
  </body>

</html>
Let’s define a Button class with an optional title with a string type. To implement it, you define a static class attribute (a property of that class) propTypes with key title and PropTypes.string as a value of that key. This code goes into button.js:
Button.propTypes = {
  title: PropTypes.string
}
You can also require properties. To do so, add isRequired to the type. For example, the title property is mandatory and of type string:
Button.propTypes = {
  title: PropTypes.string.isRequired
}
This button also requires a handler property, which must have a function as a value. (Last time I checked, buttons without actions were useless.)
Button.propTypes = {
  handler: PropTypes.func.isRequired
}
What’s also nice is that you can define your own custom validation. To implement custom validation, all you need to do is create an expression that returns an instance of Error. Then, you use that expression in propTypes: {..} as the value of the property. For example, the following code validates the email property with the regex from emailRegularExpression (which I copied from the internet—that means it has to be correct, right?):[1]
There are many versions of the email regex, depending on strictness, domain zones, and other criteria. See “Email Address Regular Expression That 99.99% Works,” http://emailregex.com; “Validate email address in JavaScript?” (question on Stack Overflow), http://mng.bz/zm37; and Regular Expression Library, http://regexlib.com/Search.aspx?k=email.
...
propTypes = {
    email: function(props, propName, componentName) {
      var emailRegularExpression =
    /^([\w-]+(?:\.[\w-]+)*)@((?:[\w-]+\.)*\w[\w-]{0,66})\.([a-z]{2,6}(?:\.
     [a-z]{2})?)$/i
      if (!emailRegularExpression.test(props[propName])) {
        return new Error('Email validation failed!')
      }
    }
}
...
Now let’s put everything together. The Button component will be called with and without a property title (string) and a handler (required function). The following listing (ch08/prop-types) uses property types to ensure that handler is a function, title is a string, and email adheres to the provided regular expression.

Next, let’s implement the parent component Content, which renders six buttons to test the warning messages produced from property types (ch08/prop-types/jsx/content.jsx).
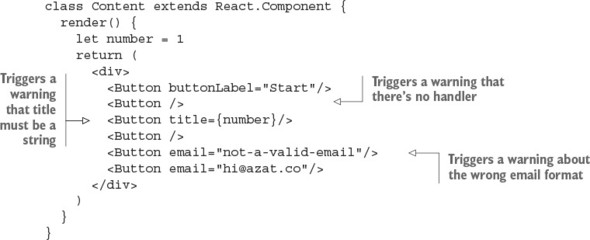
Running this code results in three warning messages being displayed on your console (don’t forget to open it); mine are shown here and in figure 8.2. The first warning is about the handler function that must be specified, which I omitted in a few buttons:
Warning: Failed propType: Required prop `handler` was not specified in
`Button`. Check the render method of `Content`.
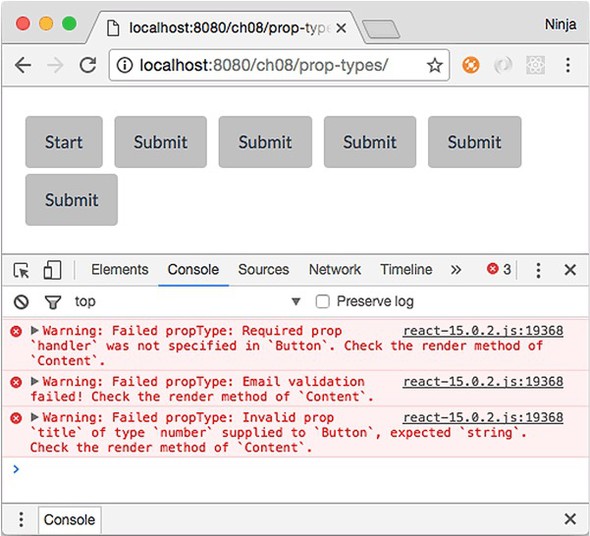
The second warning is about the wrong email format for the fourth button:
Warning: Failed propType: Email validation failed! Check the render method
of `Content`.
The third warning is about the wrong type for the title, which should be a string (I provided a number for one button):
Warning: Failed propType: Invalid prop `title` of type `number` supplied to
`Button`, expected `string`. Check the render method of `Content`.
The interesting thing is that more than one button is missing handler, but you see only one warning. React warns about each property only once per single render() of Content.
What I love about React is that it tells you what parent component to check. It’s Content in the example. Imagine if you had hundreds of components. This is useful!
Conveniently, if you expand the message in DevTools, you can spot a line number for the Button element that’s causing trouble and that resulted in the warning. In figure 8.3, I first expanded the message and then located my file (content.js). The message said that the issue was on line 9.
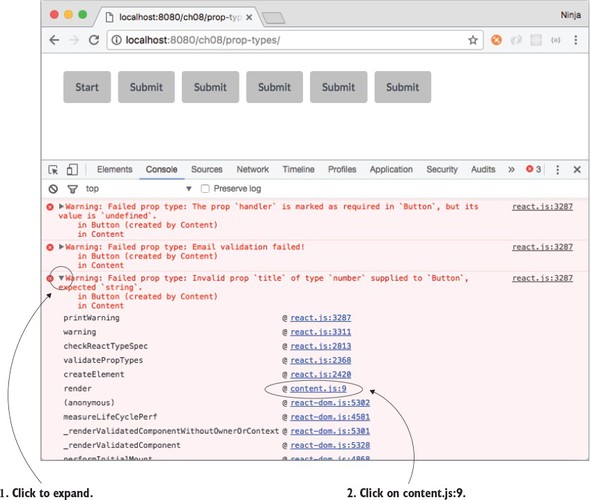
By clicking content.js:9 in the console, you can open the Source tab at that line, as shown in figure 8.4. It clearly shows what’s to blame:
React.createElement(Button, { title: number }),
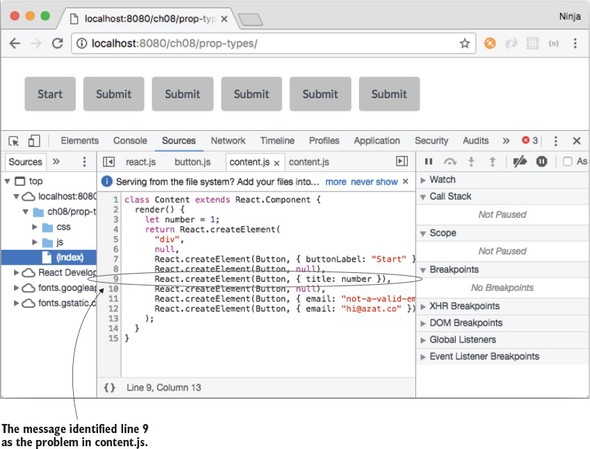
You don’t need source maps (although you’ll set them up and use them in part 2 of the book) to know that the third button is causing the problem.
I’ll repeat it again: only the unminified or uncompressed version (that is, development mode) of React shows these warnings.
Try playing with the property types and validation. It’s a neat feature. Consider that this code uses the same Button component as before:
<Button title={number}/>
Can you spot the problem? How many warnings do you think you’ll get? (Hint: handler and title properties.)
I got the warnings shown in figure 8.2 because of the poorly written Content (I wrote it that way on purpose, to show how defaultProps and propTypes work). The warning messages identify the component and where in the component the problem is happening.
But the line numbers won’t match your source code, because they refer to compiled JavaScript, not JSX. To get the correct line numbers, you’ll need to use a source-map plug-in like source-map-support (https://github.com/evanw/node-source-map-support) or Webpack. Chapter 12 discusses Webpack.
You can get support for source maps with pure non-Webpack Babel by adding --sourceMaps=true to the command and/or the package.json build script. For more Babel options, see https://babeljs.io/docs/usage/options/#options.
It’s important to know and use propTypes (property types and custom validation) in large projects or open source components. Of course, property types don’t have strict enforcement or error exceptions, but the benefit is that when you use someone else’s component, you can verify that the supplied properties are of the right type. Same applies when other software engineers use your components. They’ll appreciate that you provided correct property types. That leads to a better developer experience for everyone!
Finally, there are many additional types and helper methods. To see the full reference, please refer to the documentation at http://mng.bz/4Lep.
Let’s continue with the fictional React project; but instead of a Datepicker (which is now robust and warns you about any missing or incorrect properties), you’re tasked with creating a component that’s universal enough to use with any children you pass to it. It’s a blog post Content component that may consist of a heading and a paragraph of text:
<Content>
  <h1>React.js</h1>
  <p>Rocks</p>
</Content>
Another blog post may consist of an image (think Instagram or Tumblr):
<Content>
  <img src="images/azat.jpg" width="100"/>
</Content>
Both posts use Content, but they pass different children to it. Wouldn’t it be great to have a special way to render any children (<p> or <img>)? Meet children.
The children property is an easy way to render all children with {this.props.children}. You can also do more than rendering. For example, add a <div> and pass along child elements:
class Content extends React.Component {
  render() {
    return (
      <div className="content">
        {this.props.children}
      </div>
    )
  }
}
The parent of Content has the children <h1> and <p>:
ReactDOM.render(
  <div>
    <Content>
      <h1>React</h1>
      <p>Rocks</p>
    </Content>
  </div>,
  document.getElementById('content')
)
The end result is that <h1> and <p> are wrapped in the <div> container with a content class, as shown in figure 8.5. Remember, for class attributes, you use className in React.
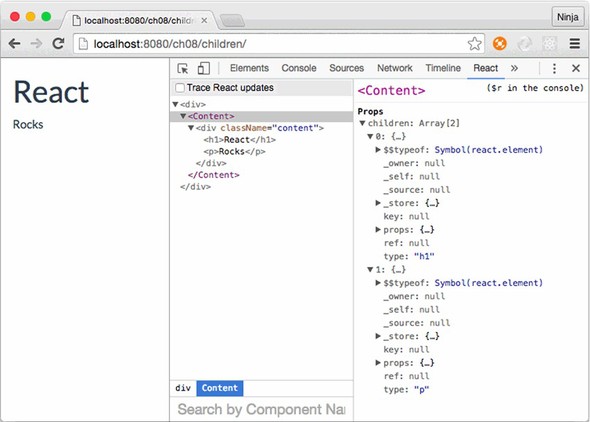
Obviously, you can add many more things to a component like Content; for example, more classes for styling, layouts, and even access properties and interactivity with events and states. With this.props.children, you can create pass-through components that are flexible, powerful, and universal.
Let’s say you need to display a link or a button in addition to text and images, as shown in the previous example. The Content component will still be the wrapper <div> with the CSS class content (className property), but now there will be more different children. The benefit is that Content can be children-agnostic.[2] You don’t need to change the Content class.
“Agnostic, in an information technology (IT) context, refers to something that is generalized so that it is interoperable among various systems.” From http://whatis.techtarget.com/definition/agnostic.
Put the children in Content when you instantiate the class (ch08/children/jsx/script.jsx).
ReactDOM.render(
  <div>
    <Content>
      <h1>React</h1>
      <p>Rocks</p>
    </Content>
    <Content>
      <img src="images/azat.jpg" width="100"/>
    </Content>
    <Content>
      <a href="http://react.rocks">http://react.rocks</a>
    </Content>
    <Content>
      <a className="btn btn-danger"
       href="http://react.rocks">http://react.rocks</a>
    </Content>
  </div>,
  document.getElementById('content')
)
The resulting HTML will have two <div> elements with content CSS classes. Your layouts! One will have <h1> and <p> and the other will have <span>, as shown in DevTools in figure 8.6.
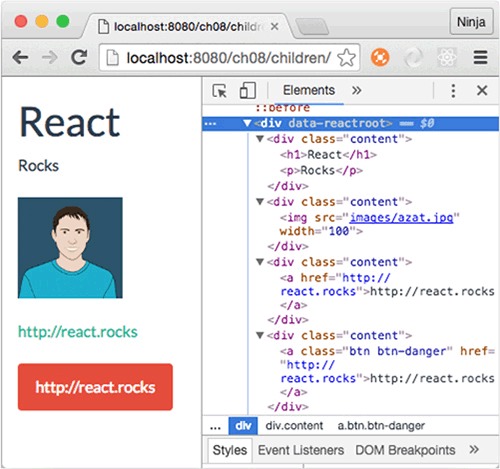
What’s interesting about the children property is that it can be an array if there’s more than one child element (as seen in figure 8.5). You can access individual elements like this:
{this.props.children[0]}
{this.props.children[1]}
Be careful when validating children. When there’s only one child element, this.props.children isn’t an array. If you use this.props.children.length and the single child node is a string, this can lead to bugs because length is a valid string property. Instead, use React.Children.count(this.props.children) to get an accurate count of child elements.
React has other helpers like React.Children.count. The most interesting (in my opinion) are these:
There’s no reason to duplicate the ever-changing list; you can find the official documentation at http://mng.bz/Oi2W.
We’ll continue to suppose that you work on a large team and create components that other developers use in their projects. Let’s say you’re working on a piece of an interface. Three of your teammates ask you to implement a way to load a resource (the React.js website), but each of them wants to use their own visual representation for the button, image, and link. Perhaps you could implement a method and call it from an event handler, but there’s a more elegant solution: higher-order components.
A higher-order component (HOC) lets you enhance a component with additional logic (see figure 8.7). You can think of this pattern as components inheriting functionality when used with HOCs. In other words, HOCs let you reuse code. This allows you and your team to share functionality among React.js components. By doing so, you can avoid repeating yourselves (DRY, http://mng.bz/1K5k).
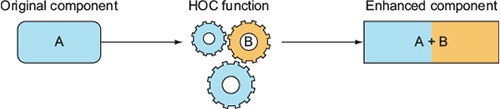
In essence, HOCs are React component classes that render the original classes while adding extra functionality along the way. Defining an HOC is straightforward, because it’s only a function. You declare it with a fat arrow:
const LoadWebsite = (Component) => {
  ...
}
The name LoadWebsite is arbitrary; you can name the HOC anything, as long as you use the same name when you enhance a component. The same is true for the argument to the function (LoadWebsite); it’s the original (not yet enhanced) component.
To demonstrate, let’s set up a project for your three coworkers. The project structure is as follows, with three stateless components, Button, Link, and Logo in elements.jsx, and the HOC function in load-website.jsx:
/hi-order
  /css
    bootstrap.css
    style.css
  /js
    content.js
    elements.js
    load-website.js
    react.js
    react-dom.js
    script.js
  /jsx
    content.jsx
    elements.jsx
    load-website.jsx
    script.jsx
  index.html
  logo.png
Your coworkers need a label and a click event handler. Let’s set the label and define the handleClick() method. The mounting events demonstrate the component lifecycle (ch08/hi-order/jsx/load-website.jsx).
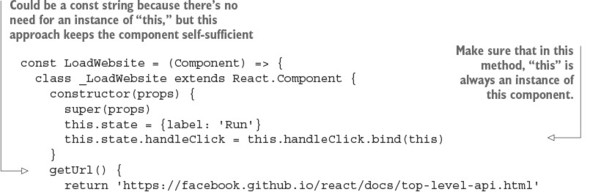
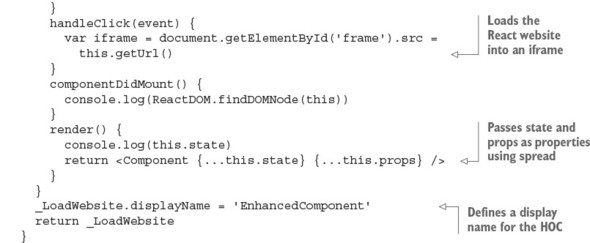
Nothing complex, right? There are two new techniques not covered previously in this book: displayName and the spread operator .... Let’s quickly (as the title of this book suggests) examine them now.
By default, JSX uses the class name as the name of the instance (element). Thus elements created with an HOC in the example have _LoadWebsite names.
In JavaScript, an underscore (_) is a valid character for a name (the Lodash and Underscore libraries use it). In addition, an underscore as the start of a name of a variable or method typically means it’s a private attribute, variable, or method that isn’t intended for use as a public interface (for example, by another module, class, object, function, and so on). Using private APIs is highly discouraged because they’re likely to change more often and contain undocumented behavior.
An underscore at the beginning of a name is a convention, meaning it’s not enforced by the engine or platform. It’s solely a common pattern used and recognized by JavaScript software engineers. In other words, methods and variables don’t become private automatically when _ is used in their names. To make a variable/method private, use a closure. See http://developer.mozilla.org/en/docs/Web/JavaScript/Closures and http://javascript.crockford.com/private.html.
When you want to change this name, there’s the displayName static attribute. As you may know, static class attributes in ES6 must be defined outside of the class definition. (As of this writing, the standard for static attributes hasn’t been finalized.)
To sum up, displayName is necessary to set React element names when they need to be different from the component class name, as shown in figure 8.8. You can see how useful it is to use displayName in the load-website.jsx HOC to augment the name, because by default the component name is the function name (which may not always be the name you want).
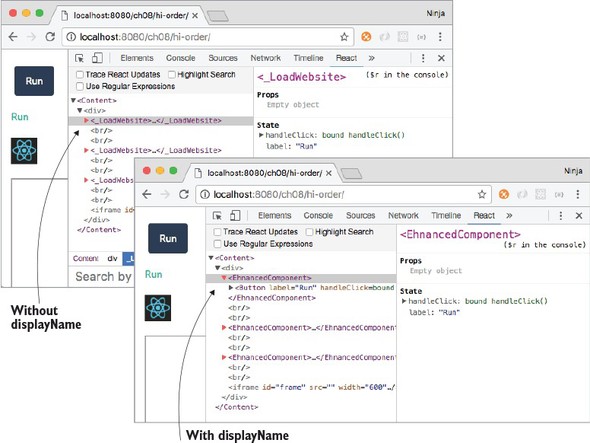
Next, let’s look at the spread operator (...). It’s part of ES6+/ES2015+ for arrays (http://mng.bz/8fjN); as of the time of this writing, there’s a proposal to use spreads for objects (https://github.com/sebmarkbage/ecmascript-rest-spread). It’s only natural that the React team added support for spreads to JSX.
The idea isn’t complicated. The spread operator lets you pass all the attributes of an object (obj) as properties when used in the element:
<Component {...obj}/>
You used spread in load-website.jsx to pass state and property variables to the original component when you were rendering it. You needed it because you didn’t know ahead of time all the properties the function would take as arguments; thus, the spread operator is a blanket statement to pass all of your data (in that variable or an object).
In React and JSX, you can have more than one spread operator or mix them with traditional key=value property declarations. For example, you can pass all states and all properties from a current class as well as className to a new element Component:
<Component {...this.state} {...this.props} className="main" />
Let’s consider an example with children. In this scenario, using the spread operator with this.props will pass all the properties of DoneLink to the anchor element <a>:
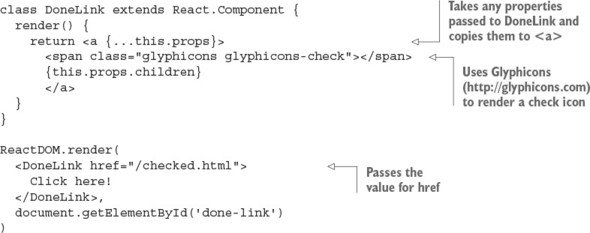
In the HOC, you pass all properties and states to the original component when you render it. By doing so, you don’t have to manually add properties to or remove them from render() each time you want to pass something new or stop passing existing data from Content, where you instantiate LoadWebsite/EnhancedComponent for each original element.
You’ve learned more about displayName and ... in JSX and React. Now we can look at how to use HOCs.
Let’s go back to Content and content.jsx, where you’re using LoadWebsite. After defining the HOC, you need to create components using it in content.jsx:
const EnhancedButton = LoadWebsite(Button)
const EnhancedLink = LoadWebsite(Link)
const EnhancedLogo = LoadWebsite(Logo)
Now, you’ll implement three components—Button, Link, and Logo—to reuse the code with the HOC pattern. The Button component is created via LoadWebsite and as a result magically inherits its properties (this.props.handleClick and this.props.label):
class Button extends React.Component {
  render() {
    return <button
      className="btn btn-primary"
      onClick={this.props.handleClick}>
      {this.props.label}
    </button>
  }
}
The Link component is created by the HOC, which is why you can also use handleClick and label properties:
class Link extends React.Component {
  render() {
    return <a onClick={this.props.handleClick} href="#">
     {this.props.label}</a>
  }
}
And finally, the Logo component also uses the same properties. You guessed it: they’re magically there because you used a spread operator when you created Logo in content.jsx:
class Logo extends React.Component {
  render() {
    return <img onClick={this.props.handleClick} width="40" src="logo.png"
     href="#"/>
  }
}
The three components have different renderings, but they all get this.props.handleClick and this.props.label from LoadWebsite. The parent component Content renders the elements as shown in the following listing (ch08/hi-order/jsx/content.jsx).
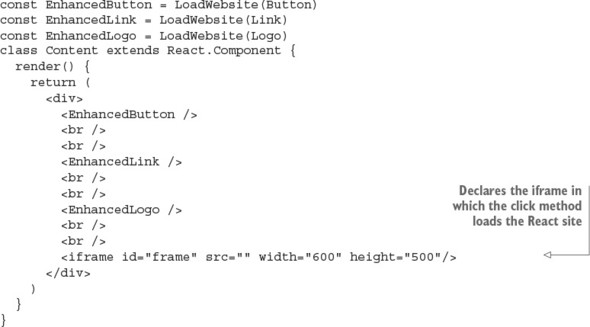
Finally, let’s not forget to render Content on the last lines of script.jsx:
ReactDOM.render(
  <Content />,
  document.getElementById('content')
)
When you open the page, it has the three elements (Button, Link, and Logo). The elements have the same functionality: they load the IFrame when a click happens, as shown in figure 8.9.
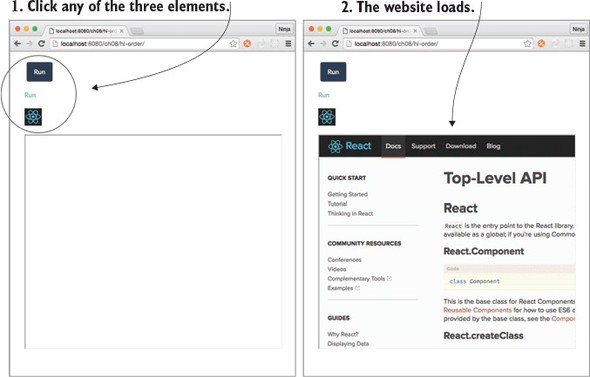
As you’ve seen, HOCs are great for abstracting code. You can use them to write your own mini-modules, which are reusable React components. HOCs, along with property types, are excellent tools for creating developer-friendly components that others will love to use.
There’s a distinction that lets you scale your React code in terms of code and team size: presentational versus container components. We’ve touched on them in previous chapters, but now, because you know about passing children and HOCs, it’ll be easier to reason about container components.
Generally speaking, splitting your code into two types makes it simpler and more maintainable. Presentational components typically only add structure to DOM and styling. They take properties but often don’t have their own states. Most of the time, you can use functions for stateless presentational components. For example, Logo is a good illustration of a presentational component in a class style
class Logo extends React.Component {
  render() {
    return <img onClick={this.props.handleClick} width="40" src="logo.png"
     href="#"/>
  }
}
or in a functional style:
const Logo = (props)=>{
    return <img onClick={props.handleClick} width="40" src="logo.png"
     href="#"/>
}
Presentational components often use this.props.children when they act as wrappers to style child components. Examples are Button, Content, Layout, Post, and so on. But they rarely deal with data or states; that’s the job of container components.
Container components are often generated by HOCs to inject data sources. They have states. Examples are SaveButton, ImagePostContent, and so on. Both presentational and container components can contain other presentational or container components; but when you’re starting out, you’ll generally use presentational components containing only other presentational components. Container components contain either other container components or presentational ones.
The best approach is to start with components that solve your needs. If you begin to see repeating patterns or properties that you’re passing over multiple layers of nested components but aren’t using in the interim components, introduce a container component or two.
You may hear terms such as dumb or skinny and smart or fat components. These are synonyms for presentational and container components, with the latter being more recent additions to React terminology.
React provides robust validation, which eliminates the necessity to check input on the server side. True or false?
In addition to setting properties with defaultProps, you can set them in constructor using this.prop.NAME = VALUE. True or false?
The children property can be an array or a node. True or false?
A higher-order component pattern is implemented via a function. True or false?
The main difference between the minified development and unminified production versions of the React library file is that the minified version has warnings and the unminified version has optimized code. True or false?
False. Front-end validation isn’t a substitute for back-end validation. Front-end code is exposed to anyone, and anyone can bypass it by reverse-engineering how the front-end app communicates with the server and send any data directly to the server.
False. React needs defaultProps as a static class field/attribute when an element is created, but this.props is an instance attribute.
True. If there’s only one child, then this.props.children is a single node.
True. The HOC pattern is implemented as a function that takes a component and creates another component class with enhanced functionality. This new class renders the original component while passing properties and states to it.
True. The minified version doesn’t show warnings.
This chapter covers
The next three chapters will walk you through several projects, gradually building on the concepts you’ve learned in chapters 1–8. These projects will also reinforce the material by repeating some of the techniques and ideas that are most important in React. The first project is minimal, but don’t skip it.
Imagine that you’re working on a unified visual framework that will be used in all of your company’s apps. Having the same look and feel in various apps is important. Think about how Twitter Bootstrap for many Twitter apps and Google’s Material UI[1] are used across many properties that belong to Google: AdWords, Analytics, Search, Drive, Docs, and so on.
Twitter Bootstrap: http://getbootstrap.com. React components that implement Twitter Bootstrap: https://react-bootstrap.github.io. Google Material Design: https://material.io. React Components that implement Material Design: www.material-ui.com.
Your first task is to implement a menu like the one shown in figure 9.1. It will be used in the layout’s header across many pages in various applications. The menu items need to change based on the user role and what part of the application is currently being viewed. For example, admins and managers should see a Manage Users menu option. At the same time, this layout will be used in a customer-relationship app that needs its own unique set of menu options. You get the idea. The menu needs to be generated dynamically, meaning you’ll have some React code that generates menu options.

For simplicity, the menu items will just be <a> tags. You’ll create two custom React components, Menu and Link, in a way that’s similar to the way you created the Hello-World component in chapter 1—or how you create any component, for that matter.
This project will show you how to render programmatically nested elements. Manually hardcoding menu items isn’t a great idea; what happens when you need to change an item? It’s not dynamic! You’ll use the map() function to do this.
To follow along with the project, you’ll need to download the unminified version of React (so that you can take advantage of the helpful warnings it returns if something goes wrong). You can also download and install Node.js and npm. They aren’t strictly necessary for this project, but they’re useful for compiling JSX later in this chapter. Appendix A covers the installation of both tools.
The source code for the examples in this chapter is at www.manning.com/books/react-quickly and https://github.com/azat-co/react-quickly/tree/master/ch09 (in the ch09 folder of the GitHub repository https://github.com/azat-co/react-quickly). You can also find some demos at http://reactquickly.co/demos.
Let’s start with an overview of the project structure. It’s flat, to keep it simple:
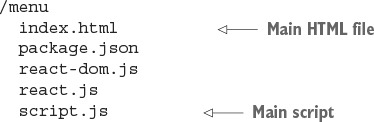
Keep in mind that this is what you’ll have by the end of this walk-through. You should begin with an empty folder. So, let’s create a new folder and start implementing the project:
$ mkdir menu
$ cd menu
Download react.js and react-dom.js version 15, and drop them into the folder.
Next is the HTML file:
<!DOCTYPE html>
<html>
  <head>
    <script src="react.js"></script>
    <script src="react-dom.js"></script>
  </head>
The HTML for this project is very basic. It includes the react.js and react-dom.js files, which, for simplicity, are in the same folder as the HTML file. Of course, later you’ll want to have your *.js files in some other folder, like js or src.
The body has just two elements. One element is a <div> container with the ID menu; this is where the menu will be rendered. The second element is a <script> tag with your React application code:
<body>
    <div id="menu"></div>
    <script src="script.js"></script>
  </body>
</html>
You’re finished with the scaffolding. This is the foundation on which you’ll build the menu—first, without JSX.
script.js is your main application file. It contains ReactDOM.render() as well as two components (ch09/menu/script.js).
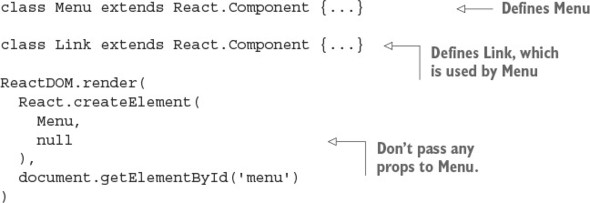
Of course, it’s possible to make Menu dependent on an external list of menu items, provided in a property such as menuOptions that’s defined elsewhere:
const menuOptions = [...]
//...
ReactDOM.render(
  React.createElement(
    Menu,
    {menus: menuOptions}
  ),
  document.getElementById('menu')
)
These two approaches are both valid, and you’ll need to choose one depending on your answer to this question: do you want Menu to be just about structure and styling or also about getting information? We’ll continue with the latter approach in this chapter and make Menu self-sustained.
Now to create the Menu component. Let’s step through the code. To create it, you extend React.Component():
class Menu extends React.Component {...}
The Menu component will render the individual menu items, which are link tags. Before you can render them, you need to define the menu items. They’re hardcoded in the menus array as follows (you could get them from a data model, store, or server in a more complex scenario):
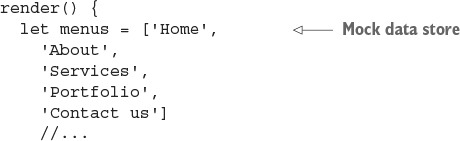
Next, you’ll return the menu Link elements (four of them). Recall that return can have only one element. For this reason, you wrap <div> around the four links. This is the start of the wrapper <div> element with no attributes:
    return React.createElement('div',
      null,
      //... we will render links later
It’s worth mentioning that {} can output not just a variable or an expression, but an array as well. This comes in handy when you have a list of items. Basically, to render every element of an array, you can pass that array to {}. Although JSX and React can output arrays, they don’t output objects. So, the objects must be converted to an array.
Knowing that you can output an array, you can proceed to generate an array of React elements. The map() function is a good method to use because it returns an array. You can implement map() so that each element is the result of the expression React.createElement(Link, {label: v}) wrapped in <div>. In this expression, v is a value of the menus array item (Home, About, Services, and so on), and i is its index number (0, 1, 2, 3, and so on):
      menus.map((v, i) => {
        return React.createElement('div',
          {key: i},
          React.createElement(Link, {label: v})
        )
      }
    )
  )
}})
Did you notice that the key property is set to the index i? This is needed so React can access each <div> element in a list more quickly. If you don’t set key, you’ll see the following warning (at least, in React 15, 0.14 and 0.13):
Warning: Each child in an array or iterator should have a unique "key" prop.
Check the render method of `Menu`. See https://fb.me/react-warning-keys for
more information.
    in div (created by Menu)
    in Menu
Again, kudos to React for good error and warning messages.
So each element of a list must have a unique value for a key attribute. They don’t have to be unique across the entire app and other components, just within this list. Interestingly, since React v15, you won’t see the key attributes in HTML (and that’s a good thing—let’s not pollute HTML). But React DevTools shows the keys, as you can see in figure 9.2.
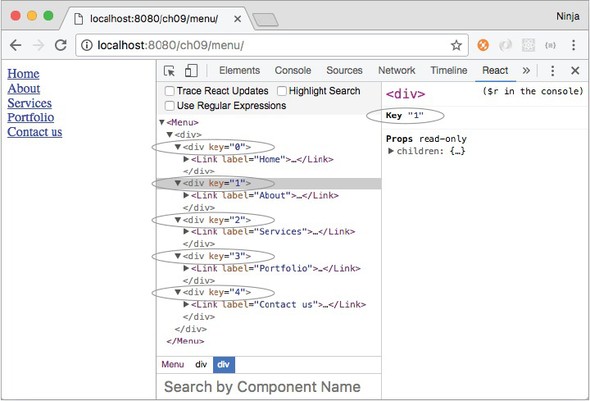
The mapping function from the Array class is used frequently in React components to represent lists of data. This is because when you create UIs, you do so from data represented as an array. The UI is also an array, but with slightly different elements (React elements!).
map() is invoked on an array, and it returns new array elements that are transformed from the original array by the function. At a minimum, when working with map(), you need to pass this function:
[1, 2, 3].map( value => <p>value</p>)
You can use two more arguments in addition to the value of the item (value)—index and list:
[1, 2, 3].map( (value, index, list) => {
  return <p id={index}>{list[index]}</p>
}) // <p id="0">1</p><p id="1">2</p><p id="2">3</p>
The <div> has a key attribute, which is important. It allows React to optimize rendering of lists by converting them to hashes, and access time for hashes is better than that for lists or arrays. Basically, you create numerous Link components in an array, and each of them takes the property label with a value from the menus array.
Here’s the full code for Menu (ch09/menu/script.js); it’s simple and straightforward.
class Menu extends React.Component {
  render() {
    let menus = ['Home',
      'About',
      'Services',
      'Portfolio',
      'Contact us']
    return React.createElement('div',
      null,
      menus.map((v, i) => {
        return React.createElement('div',
          {key: i},
          React.createElement(Link, {label: v})
        )
      })
    )
}}
Now let’s move on to the Link implementation.
The call to map() creates a Link component for each item in the menus array. Let’s look at the code for Link and see what happens when each Link component is rendered.
In the Link component’s render code, you write an expression to create a URL. That URL will be used in the href attribute of the <a> tag. The this.props.label value is passed to Link from Menu when Link is created. In the render() function of the Menu component, Link elements are created in the map’s closure/iterator function using React.createElement(Link, {label: v}).
The label property is used to construct the URL slug (must be lowercase and should not include spaces):
class Link extends React.Component {
  render() {
    const url='/'
      + this.props.label
        .toLowerCase()
        .trim()
        .replace(' ', '-')
The methods toLowerCase(), trim(), and replace() are standard JavaScript string functions. They perform conversion to lowercase, trim white space at edges, and replace white spaces with dashes, respectively.
The URL expression produces the following URLs:
Now you can implement Link’s UI: the render() return value. In the render function’s return of the Link component, you pass this.props.label as a third argument to createElement(). It becomes part of the <a> tag content (link text). Link could render this element:
    //...
    return React.createElement(
      'a',
      {href: url},
      this.props.label
    )
  }
}
But it’s better to separate each link with a line-break element (<br>). And because the component must return only one element, you’d have to wrap the anchor element (<a>) and line break (<br>) in a div container (<div>). Therefore, you start the return in the Link component’s render() with div, without attributes:
    //...
    return React.createElement('div',
      null,
      //...
Each argument after the second to createElement() (for example, the third, fourth, and fifth) will be used as content (children). To create the link element, you pass it as the second argument. And to create a break element after each link, you pass the line-break element <br> as the fourth argument:
    //...
    return React.createElement('div',
      null,
      React.createElement(
        'a',
        {href: url},
        this.props.label
      ),
      React.createElement('br')
    )
  }
})
Here’s the code for the full Link component for your reference (ch09/menu/script.js). The url function can be created as a class method or as a method outside of the component.
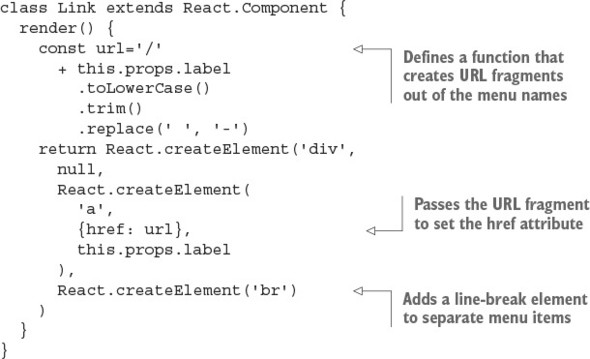
Let’s get this menu running.
To view the page, shown in figure 9.3, open it as a file in Chrome, Firefox, Safari, or (maybe) Internet Explorer. That’s it. No compilation is needed for this project.
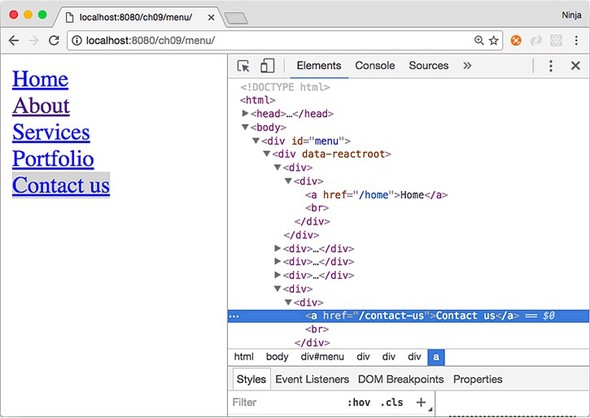
No thrills here, but the page should display five links (or more, if you add items to the menus array), as shown earlier in figure 9.1. This is much better than copying and pasting five <a> elements and then ending up with multiple places to modify the labels and URLs. And the project can be even better with JSX.
When you open the example page, the protocol in the address bar will be file://.... This isn’t ideal but will do for this project. For real development, you’ll need a web server; with a web server, the protocol is http://... or https://..., as in figure 9.3.
Yes, even for a simple web page like this one, I prefer to use a local web server. It makes the running code more closely resemble how it would be in production. Plus, you can use AJAX/XHR, which you can’t use if you’re opening an HTML file in a browser.
The easiest way to run a local web server is to use node-static (www.npmjs.com/package/node-static) or a similar Node.js tool like http-server (www.npmjs.com/package/http-server). This is true even for Windows, although I stopped using that OS many years ago. If you’re hell-bent on not using Node.js, then alternatives include IIS, Apache HTTP Server, NGINX, MAMP, LAMP, and other variations of web servers. Needless to say, Node.js tools are highly recommended for their minimalist, lightweight approach.
To install node-static, use npm:
$ npm install -g node-static@0.7.6
Once it’s installed, run this command from your project’s root folder (or from a parent folder) to make the file available on http://localhost:8080. This isn’t an external link—run the following command before clicking the link:
$ static
If you run static in react-quickly/ch09/menu, then the URL will be http://localhost:8080. Conversely, if you run static from react-quickly, then the URL needs to be http://localhost:8080/ch09/menu.
To stop the server on macOS or Unix/Linux (POSIX systems), press Ctrl-C. As for Windows, I don’t know!
This project is more extensive, containing node_modules, package.json, and JSX:
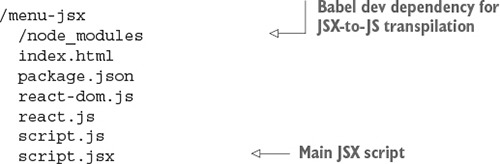
As you can see, there’s a node_modules folder for developer dependencies such as Babel, which is used for JSX-to-JS transpilation.
Although it’s possible to install react and react-dom as npm modules instead of having them as files, doing so leads to additional complexity if you decide to deploy. Right now, to deploy this app, you can just copy the files in the project folder without node_modules. If you install React and ReactDOM with npm, then you have to include that folder as well, use a bundler, or copy the JS files from dist into root (where you already have them). So, for this example, we’ll use the files in root. I cover bundlers in part 2 of this book, but for now let’s keep things simple.
Create a new folder:
$ mkdir menu-jsx
$ cd menu-jsx
Then, create the package.json file in it using npm init -y. Add the following code to package.json to install and configure Babel (ch09/menu-jsx/package.json).
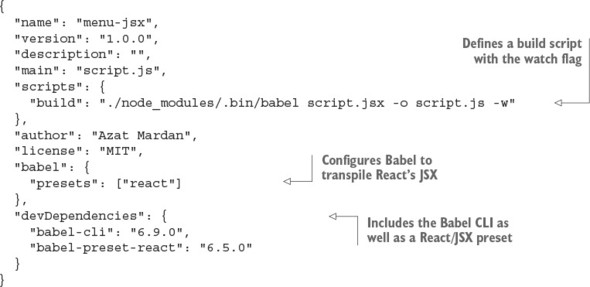
Install the developer dependencies packages with npm i or npm install. Your setup should be ready now.
Let’s look at script.jsx. At a higher level, it has these parts:
class Menu extends React.Component {
  render() {
    //...
  }
}
class Link extends React.Component {
  render() {
    //...
  }
}
ReactDOM.render(<Menu />, document.getElementById('menu'))
Looks familiar, right? It’s the same structure as in Menu without JSX. The primary change in this high-level listing is replacing createElement() for the Menu component in ReactDOM.render() with this line:
ReactDOM.render(<Menu />, document.getElementById('menu'))
Next, you’ll refactor the components.
The beginning of Menu is the same:
class Menu extends React.Component {
  render() {
    let menus = ['Home',
      'About',
      'Services',
      'Portfolio',
      'Contact us']
    return //...
  }
}
In the refactoring example for the Menu component, you need to output the value v as a label’s attribute value (that is, label={v}). In other words, you assign the value v as a property for label. So the line to create the Link element changes from
React.createElement(Link, {label: v})
to this JSX code:
<Link label={v}/>
The label property of the second argument ({label: v}) becomes the attribute label={v}. The attribute’s value v is declared with {} to make it dynamic (versus a hardcoded value).
When you use curly braces to assign property values, you don’t need double quotes ("").
React also needs the key={i} attribute to access the list more efficiently. Therefore, the final Menu component is restructured as this JSX code (ch09/menu-jsx/script.jsx).
class Menu extends React.Component {
  render() {
    let menus = ['Home',
      'About',
      'Services',
      'Portfolio',
      'Contact us']
    return <div>
      {menus.map((v, i) => {
        return <div key={i}><Link label={v}/></div>
      })}
    </div>
}}
Do you see the increase in readability? I do!
In Menu’s render(), if you prefer to start the <div> on a new line, you can do so by putting () around it. For example, this code is identical to listing 9.5, but <div> starts on a new line, which may be more visually appealing:
  //...
    return (
      <div>
        {menus.map((v, i) => {
          return <div key={i}><Link label={v}/></div>
        })}
      </div>
    )
}})
The <a> and <br> tags in the Link component also need to be refactored from this
  //...
    return React.createElement('div',
      null,
      React.createElement(
        'a',
        {href: url},
        this.props.label),
      React.createElement('br')
      )
  //...
to this JSX code:
  //...
    return <div>
      <a href={url}>
      {this.props.label}
      </a>
      <br/>
    </div>
  //...
The entire JSX version of the Link component should look something like this (ch09/menu-jsx/script.jsx).
class Link extends React.Component {
  render() {
    const url='/'
      + this.props.label
        .toLowerCase()
        .trim()
        .replace(' ', '-')
    return <div>
      <a href={url}>
      {this.props.label}
      </a>
      <br/>
    </div>
  }
}
Phew. You’re finished! Let’s run the JSX project.
Open your Terminal, iTerm, or Command Prompt app. In the project’s folder (ch09/menu-jsx or whatever you named it when you downloaded the source code), install dependencies with npm i (short for npm install) following the entries in package.json.
Then, run the npm build script with npm run build. The npm script will launch the Babel command with a watch flag (-w), which will keep Webpack running so it can watch for any file changes and recompile code from JSX to JS if there are changes to the JSX source code.
Needless to say, watch mode is a time-saver because it eliminates the need to recompile each time there’s a change to the source code. Hot module replacement is even better for development (so good that it could easily be the only reason to use React); I’ll cover it in chapter 12.
The actual command in the build script is as follows (but who wants to type it? It’s too long!):
./node_modules/.bin/babel script.jsx -o script.js -w
If you need a refresher on the Babel CLI, refer to chapter 3. You’ll find all the details there.
On my computer, I got this message from the Babel CLI (on yours, the path will differ):
> menu-jsx@1.0.0 build /Users/azat/Documents/Code/react-quickly/ch09/menu-jsx > babel script.jsx -o script.js -w
You’re good to go. With script.js generated, you can use static (node-static on npm: npm i -g node-static) to serve the files over HTTP on localhost. The application should look and work exactly like its regular JavaScript brethren, as shown in figure 9.4.
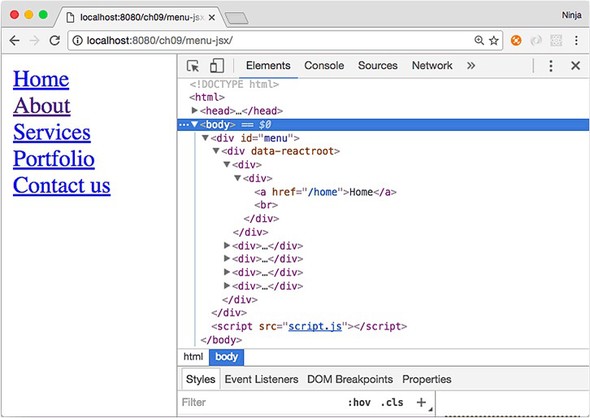
For bonus points, do the following:
Submit your code in a new folder under ch09 as a pull request to this book’s GitHub repository: https://github.com/azat-co/react-quickly.
This chapter covers
When you’re working on websites that have a lot of text, such as Wikipedia, it’s a great idea to allow users to get additional information without losing their position and context. For example, you can give them an extra hint in a box when they hover the cursor (see figure 10.1). This hint hover box is called a tooltip.
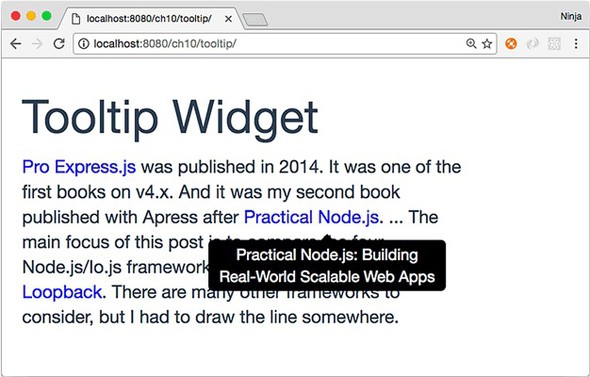
React is all about UIs and a better UX, so it’s a good fit for a tooltip implementation. Let’s build a component to display helpful text on a mouse-over event.
There are a few out-of-the-box tooltip solutions, including react-tooltip (www.npmjs.com/package/react-tooltip), but the goal here is to learn about React. Building a tooltip from scratch is a really good exercise. Maybe you’ll use this example in your daily work by making it a part of your app, or extend it into a new open source React component!
The key to creating the Tooltip component is to be able to take any text, hide it with CSS, and make it visible again on mouse-over. You’ll use if/else conditions, JSX, and other programming elements for this project. For the CSS part, you’ll use Twitter Bootstrap classes and a special Twitter Bootstrap theme to make the tooltip look nice in a short amount of time.
To follow along with this project, you’ll need to download the unminified version of React and install node.js and npm for compiling JSX. In this example, I also use a theme called Flatly from Bootswatch (https://bootswatch.com/flatly). This theme depends on Twitter Bootstrap. Appendix A covers how to install everything.
The source code for the example in this chapter is at www.manning.com/books/react-quickly and https://github.com/azat-co/react-quickly/tree/master/ch10 (in the ch10 folder of the GitHub repository https://github.com/azat-co/react-quickly). You can also find some demos at http://reactquickly.co/demos.
The project structure for the Tooltip component is as follows:
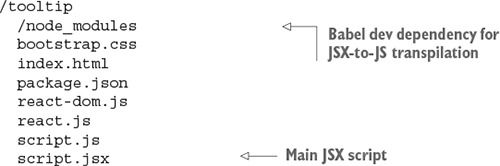
As in chapter 9, there’s a node_modules folder for developer dependencies such as Babel, which is used for JSX-to-JS transpilation. The structure is flat, with styles and scripts in the same folder. I did this to keep everything simple. Of course, in a real app, you’ll put styles and scripts in separate folders.
The key parts in package.json are the npm script to build, the Babel configuration, dependencies, and other metadata.
{
"name": "tooltip",
"version": "1.0.0",
"description": "",
"main": "script.js",
"scripts": {
"build": "./node_modules/.bin/babel script.jsx -o script.js -w"
},
"author": "Azat Mardan",
"license": "MIT",
"babel": {
"presets": ["react"]
},
"devDependencies": {
"babel-cli": "6.9.0",
"babel-preset-react": "6.5.0"
}
}
After you’ve created package.json, be sure to run npm i or npm install.
Next, you’ll start on the HTML. Create index.html, as shown in the following listing (ch10/tooltip/index.html).

In <head>, you include React, React DOM files, and Twitter Bootstrap styles. body is minimal: it contains a <div> with ID tooltip and the application’s script.js file.
Next, you’ll create script.jsx. That’s right—this isn’t a typo. The source code is in script.jsx, but you include the script.js file in your HTML. That’s because you’ll be using the command-line Babel tool.
Let’s look at script.jsx (ch10/tooltip/script.jsx). It’s pretty much just the code for the component and the tooltip text you want to render. The tooltip text is a property that you set when you create Tooltip in ReactDOM.render().
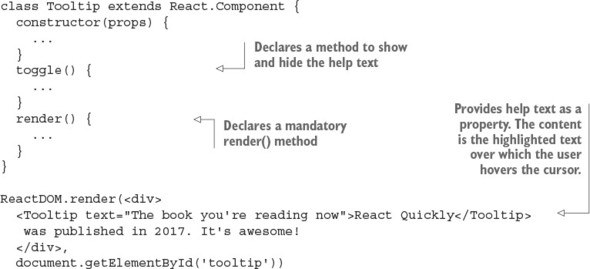
Let’s implement Tooltip and declare the component with an initial state of opacity: false. This state commands the help text to be hidden or shown. (Chapter 4 covered states in more detail.) Here’s the constructor() method in action:
class Tooltip extends React.Component {
constructor(props) {
super(props)
this.state = {opacity: false}
this.toggle = this.toggle.bind(this)
}
...
}
The initial state hides the help text. Toggling changes this state and the visibility of the tooltip—that is, whether the help text is shown. Let’s implement toggle().
Now you’ll define the toggle() function that switches the visibility of the tooltip by changing the opacity state to the opposite of what it was before (true to false, or false to true):
toggle() {
const tooltipNode = ReactDOM.findDOMNode(this)
this.setState({
opacity: !this.state.opacity,
...
})
}
To change opacity, you use the this.setState() method, which you learned about in chapter 4.
A tricky thing about tooltip help text is that you must place the help text close to the element the mouse is hovering over. To do so, you need to get the position of the component using tooltipNode. You position the tooltip text using offsetTop and offsetLeft on the DOM node. These are DOM Node properties from the HTML standard (https://developer.mozilla.org/en-US/docs/Web/API/Node), not a React thing:
top: tooltipNode.offsetTop,
left: tooltipNode.offsetLeft
})
},
Here’s the full code for toggle() (ch10/tooltip/script.jsx).
toggle() {
const tooltipNode = ReactDOM.findDOMNode(this)
this.setState({
opacity: !this.state.opacity,
top: tooltipNode.offsetTop,
left: tooltipNode.offsetLeft
})
}
Here it is using ES destructuring:
toggle() {
const {offsetTop: top, offsetLeft: left} = ReactDOM.findDOMNode(this)
this.setState({
opacity: !this.state.opacity,
top,
left
})
}
Looking at the code, you can see that it changes the state and position. Do you need to rerender the view now? No, because React will update the view for you. setState() will invoke a rerender automatically. It may or may not result in DOM changes, depending on whether the state was used in render()—which you’ll implement next.
The render() function holds the CSS style object for the help text and also holds Twitter Bootstrap styles. First, you need to define the style object. You’ll set the opacity and z-index CSS styles depending on the value of this.state.opacity. You need z-index to float the help text above any other elements, so set the value reasonably high—1000 when the text is visible and -1000 when it’s not:
zIndex: (this.state.opacity) ? 1000 : -1000,
For z-index, you need to use zIndex (note the camelCase). Figure 10.2 shows how the styles are applied at mouse-over (opacity is true).

Remember to use camelCase with React instead of dash syntax. The CSS property z-index becomes the React style property zIndex; background-color becomes backgroundColor; font-family becomes fontFamily, and so on. When you use valid JavaScript names, React can update the real DOM from the virtual one more quickly.
State opacity this.state.opacity is a Boolean true or false, but CSS opacity is a binary 0 or 1. If state opacity is false, CSS opacity is 0; and if state opacity is true, CSS opacity is 1. You need to convert, using a binary operator (+):
opacity: +this.state.opacity,
As far as the position of the tooltip goes, you want to place the help text near the text over which the mouse is hovering by adding 20 pixels to top (the distance from the top edge of the window to the element) and subtracting 30 pixels from left (the distance from the left edge of the window to the element). The values were chosen visually; feel free to adjust the logic as you see fit:
render() {
const style = {
zIndex: (this.state.opacity) ? 1000 : -1000,
opacity: +this.state.opacity,
top: (this.state.top || 0) + 20,
left: (this.state.left || 0) -30
}
Next is return. The component will render both the text over which to hover and the help text. I’m using Twitter Bootstrap classes along with my style object to hide the help text and to show it later.
The text over which users can hover to see a tooltip is colored blue, so they can tell it apart visually from other text. It has two mouse events for when the cursor enters and leaves the span:

Next is the code for the help text. It’s static-like, except for {style}. React will change the state, and that will trigger the change in the UI:
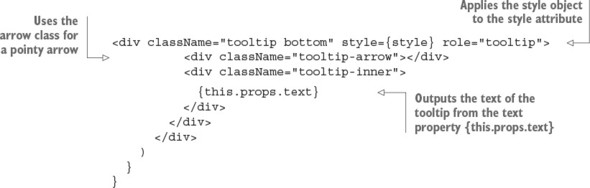
The next listing shows the Tooltip component’s full render() method.
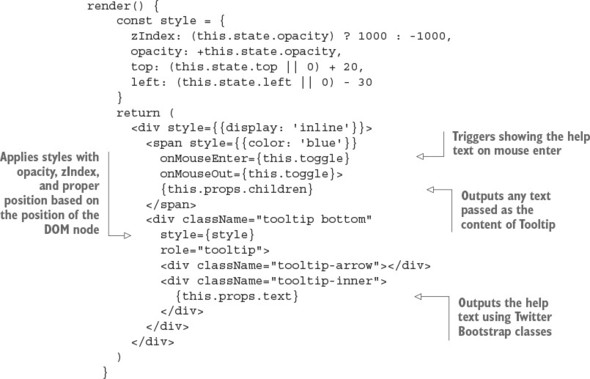
That’s it. You’re finished with the Tooltip component!
Try this component or use it in your projects by compiling the JSX with npm:
$ npm run build
This Tooltip component is pretty cool, thanks to Twitter Bootstrap styles. Maybe it’s not as versatile as some other modules out there, but you built it yourself from scratch. That’s what I’m talking about! With the help of Twitter Bootstrap classes and React, you were able to create a good tooltip (see figure 10.3) in almost no time. It’s even responsive: it adapts to various screen sizes, thanks to dynamic positioning!
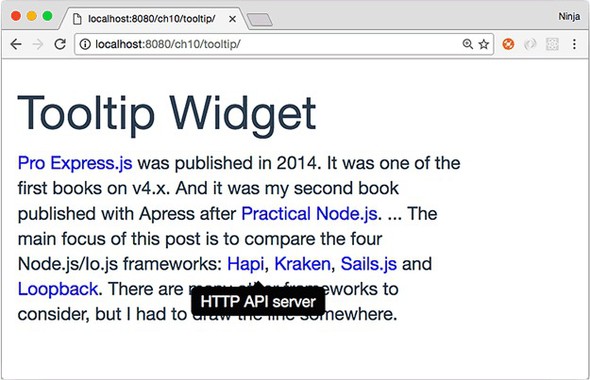
For bonus points, do the following:
Submit your code in a new folder under ch10 as a pull request to this book’s GitHub repository: https://github.com/azat-co/react-quickly.
This chapter covers
Studies have shown that meditation is great for health (calming) and productivity (focus).[1] Who doesn’t want to be healthier and more productive, especially with minimal monetary investment?
See “Research on Meditation,” Wikipedia, https://en.wikipedia.org/wiki/Research_on_meditation; “Meditation: In Depth,” National Institutes of Health, http://mng.bz/01om; “Harvard Neuroscientist: Meditation Not Only Reduces Stress, Here’s How It Changes Your Brain,” The Washington Post, May 26, 2015, http://mng.bz/1ljZ; and “Benefits of Meditation,” Yoga Journal, http://mng.bz/7Hp7.
Gurus recommend starting with as little as 5 minutes of meditation and progressing to 10 minutes and then 15 minutes over the span of a few weeks. The target is 30–60 minutes of meditation per day, but some people notice improvements with as little as 10 minutes per day. I can attest to that: after meditating 10 minutes per day every day for 3 years, I am more focused, and it has also helped me in other areas.
But how do you know when you’ve reached your daily meditation goal? You need a timer! So in this chapter, you’ll put your React and HTML5 skills to the test and create a web timer (see figure 11.1). To make it easy for testing purposes, this timer will only run for 5, 10, or 15 seconds.

The idea is to have three controls that set a countdown timer (n to 0). Think of a typical kitchen timer, but instead of minutes, it will count seconds. Click a button, and the timer starts. Click it again, or click another button, and the timer starts over.
To follow along with this project, you’ll need to download the unminified version of React and install node.js and npm for compiling JSX. In this example, I also use a theme called Flatly from Bootswatch (https://bootswatch.com/flatly). This theme depends on Twitter Bootstrap. Appendix A covers how to install everything.
The source code for the example in this chapter is at www.manning.com/books/react-quickly and https://github.com/azat-co/react-quickly/tree/master/ch11 (in the ch11 folder of the GitHub repository https://github.com/azat-co/react-quickly). You can also find some demos at http://reactquickly.co/demos.
The project structure for the Timer component, not unlike Tooltip and Menu, is as follows:
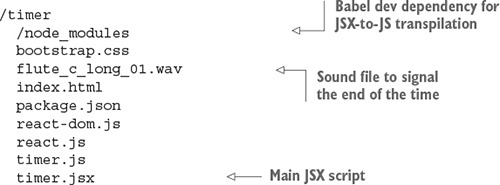
As before, there’s a node_modules folder for developer dependencies such as Babel, which is used for JSX-to-JS transpilation. The structure is flat, with styles and scripts in the same folder. I did this to keep things simple; in a real app, you’ll put styles and scripts in separate folders.
The key parts of package.json are the npm script to build, the Babel configuration, dependencies, and other metadata.
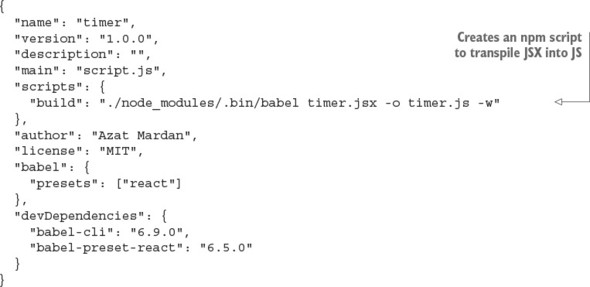
After you’ve created package.json, either by copying and pasting or by typing, be sure to run npm i or npm install.
The HTML for this project is very basic (ch11/timer/index.html). It includes the react.js and react-dom.js files, which, for the sake of simplicity, are in the same folder as the HTML file.
<!DOCTYPE html>
<html>
<head>
<meta charset="utf-8">
<title>Timer</title>
<script src="react.js" type="text/javascript"></script>
<script src="react-dom.js" type="text/javascript"></script>
<link href="bootstrap.css" rel="stylesheet" type="text/css"/>
</head>
<body class="container-fluid">
<div id="timer-app"/>
</body>
<script src="timer.js" type="text/javascript"></script>
</html>
This file only includes the library and points to timer.js, which you’ll create from timer.jsx. To do so, you’ll need the Babel CLI (see chapter 3).
The timer.jsx file will have three components:
Figure 11.2 shows how they’ll look on the page. You can see the Timer and Button components; TimerWrapper has all three buttons and Timer inside it. TimerWrapper is a container (smart) component, whereas the other two are representational (dumb).
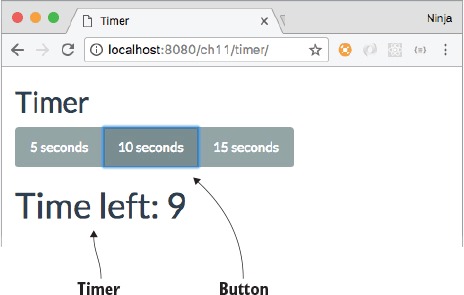
We’re breaking the app into three pieces because in software engineering, things tend to change quickly with each new release. By separating the presentation (Button and Timer) and logic (TimerWrapper), you can make the app more adaptable. Moreover, you’ll be able to reuse elements like buttons in other apps. The bottom line is that keeping representation and business logic separate is a best practice when working with React.
You need TimerWrapper to communicate between Timer and Buttons. The interaction between these three components and a user is shown in figure 11.3:
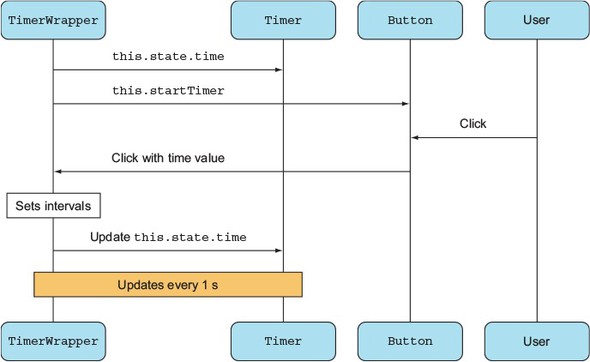
For simplicity, you’ll keep all three components in the timer.jsx file.
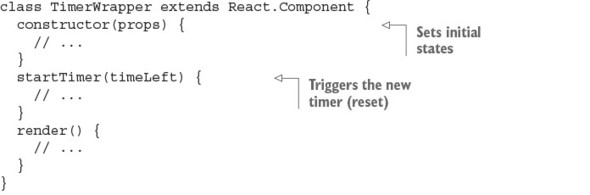
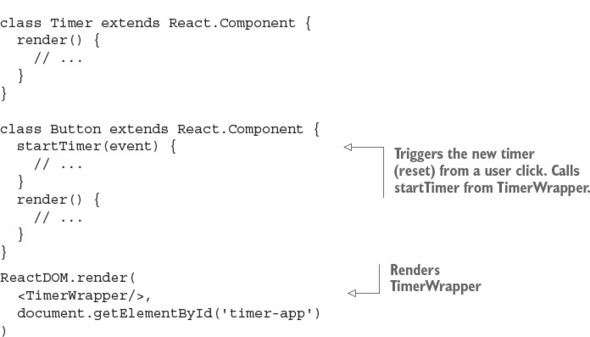
Let’s start from the bottom of the timer.jsx file and render the main component (TimerWrapper) into the <div> with ID timer-app:
ReactDOM.render(
<TimerWrapper/>,
document.getElementById('timer-app')
)
ReactDOM.render() will be the last call in the file. It uses TimerWrapper, so let’s define this component next.
TimerWrapper is where all the fun happens! This is the high-level overview of the component:
class TimerWrapper extends React.Component {
constructor(props) {
// ...
}
startTimer(timeLeft) {
// ...
}
render() {
// ...
}
}
First, you need to be able to save the time left (using timeLeft) and reset the timer (using timer). Therefore, you’ll use two states: timeLeft and timer.
On the first app load, the timer shouldn’t be running; so, in the constructor of TimerWrapper, you need to set the time (timeLeft) state to null. This will come in handy in Timer, because you’ll be able to tell the difference between the first load (timeLeft is null) and when the time is up (timeLeft is 0).
You also set the timer state property to null. This property holds a reference to the setInterval() function that will do the countdown. But right now there’s no running timer—thus, the null value.
Finally, bind the startTimer() method, because you’ll be using it as an event handler (for buttons):
class TimerWrapper extends React.Component {
constructor(props) {
super(props)
this.state = {timeLeft: null, timer: null}
this.startTimer = this.startTimer.bind(this)
}
...
Next is the startTimer event handler. It’s called each time a user clicks a button. If a user clicks a button when the timer is already running, then you need to clear the previous interval and start anew. You definitely don’t want multiple timers running at the same time. For this reason, the first thing the startTimer() method does is stop the previous countdown by clearing the result of setInterval(). The current timer’s setInterval object is stored in the this.state.timer variable.
To remove the result of setInterval(), there’s a clearInterval() method. Both clearInterval() (http://mng.bz/7104) and setInterval() (http://mng.bz/P2d6) are browser API methods; that is, they’re available from a window object without additional libraries or even prefixes. (window.clearInterval() will also work for browser code, but it will break in Node.js.) Call clearInterval() on the first line of the event handler for the buttons:
class TimerWrapper extends React.Component {
constructor(props) {
// ...
}
startTimer(timeLeft) {
clearInterval(this.state.timer)
// ...
}
After you clear the previous timer, you can set a new one with setInterval(). The code passed to setInterval() will be called every second. For this code, let’s use a fat-arrow function to bind the this context. This will allow you to use TimerWrapper state, properties, and methods in this function (closure/callback) of setInterval():
class TimerWrapper extends React.Component {
constructor(props) {
// ...
}
startTimer(timeLeft) {
clearInterval(this.state.timer)
let timer = setInterval(() => {
// ...
}, 1000)
// ...
}
render() {
// ...
}
}
Now, you’ll implement the function. The timeLeft variable stands for the amount of time left on the timer. You use it to save the current value minus 1 and check whether it reached 0. If it did, then you remove the timer by invoking clearInterval() with a reference to the timer object (created by setInterval()), which is stored in the timer variable. The reference to timer is saved in setInterval()’s closure even for future function calls (each second that passes). This is the way JavaScript scoping works. So, there’s no need to pull the value of the timer object from the state (although you could).
Next, save timeLeft during every interval cycle. And finally, save timeLeft and the timer object when the button is clicked:
//...
startTimer(timeLeft) {
clearInterval(this.state.timer)
let timer = setInterval(() => {
var timeLeft = this.state.timeLeft - 1
if (timeLeft == 0) clearInterval(timer)
this.setState({timeLeft: timeLeft})
}, 1000)
return this.setState({timeLeft: timeLeft, timer: timer})
}
//...
You set the states to the new values using setState(), which is asynchronous. The setInterval() interval length is 1,000 ms, or 1 second. You need to set the state to the new values of timeLeft and timer because the app needs to update those values, and you can’t use simple variables or properties for that.
setInterval() is scheduled to be executed asynchronously in the JavaScript event loop. The returned setState() will fire before the first setInterval() callback. You can easily test it by putting console logs in your code. For example, the following code will print 1 and then 2, not 2 and then 1:
...
startTimer(timeLeft) {
clearInterval(this.state.timer)
let timer = setInterval(() => {
console.log('2: Inside of setInterval')
var timeLeft = this.state.timeLeft - 1
if (timeLeft == 0) clearInterval(timer)
this.setState({timeLeft: timeLeft})
}, 1000)
console.log('1: After setInterval')
return this.setState({timeLeft: timeLeft, timer: timer})
}
...
Last is the mandatory render() function for TimerWrapper. It returns <h2>, three buttons, and the Timer component. row-fluid and btn-group are Twitter Bootstrap classes—they make buttons look better and aren’t essential to React:
render() {
return (
<div className="row-fluid">
<h2>Timer</h2>
<div className="btn-group" role="group" >
<Button time="5" startTimer={this.startTimer}/>
<Button time="10" startTimer={this.startTimer}/>
<Button time="15" startTimer={this.startTimer}/>
</div>
This code shows how you can reuse the Button component by providing different values for the time property. These time property values allow buttons to display different times in their labels and to set different timers. The startTimer property of Button has the same value for all three buttons. The value is this.startTimer from TimerWrapper, which starts/resets the timer, as you know.
Next, you display the text “Time left: ...,” which is rendered by the Timer component. To do so, you pass the time state as a property to Timer. To adhere to the best React practice, Timer is stateless. React updates the text on the page (Timer) automatically when the property (Timer) is updated by the change of the state (TimerWrapper). You’ll implement Timer later. For now, use it like this:
<Timer time={this.state.timeLeft}/>
In addition, the <audio> tag (an HTML5 tag that points to a file) alerts you when the time is up:
<audio id="end-of-time" src="flute_c_long_01.wav" preload="auto">
</audio>
</div>
)
}
}
For your reference and better understanding (sometimes it’s nice to see the entire component), here’s the meat—or tofu, for my vegetarian readers—of the timer app: the full code for TimerWrapper (ch11/timer/timer.jsx).

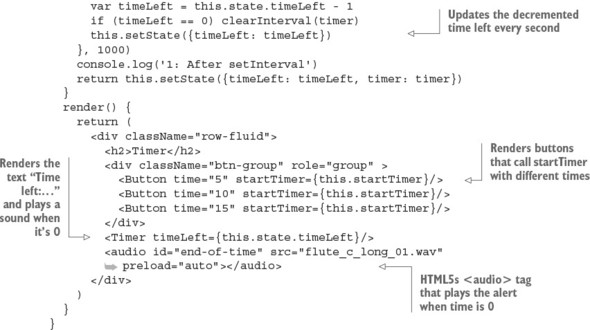
TimerWrapper has a lot of logic. Other components are stateless and basically clueless. Nevertheless, you need to implement the other two components. Remember the <audio> tag in TimerWrapper, which will play sounds when the time remaining reaches 0? Let’s implement the Timer component next.
The goal of the Timer component is to show the time left and to play a sound when the time is up. It’s a stateless component. Implement the class, and check whether the timeLeft property equals 0:
class Timer extends React.Component {
render() {
if (this.props.timeLeft == 0) {
// ...
}
// ...
}
}
To play the sound (file flute_c_long_01.wav), this project uses the special HTML5 <audio> element; you defined it in TimerWrapper, with src pointing to the WAV file and id set to end-of-time. All you need to do is get the DOM node (the vanilla JavaScript getElementById() will work fine) and invoke play() (also vanilla JavaScript from HTML5). This again shows how well React plays with other JavaScripty things like HTML5, jQuery 3,[2] and even Angular 4, if you’re brave enough:
For examples of integration with browser events and jQuery, see chapter 6.
class Timer extends React.Component {
render() {
if (this.props.timeLeft == 0) {
document.getElementById('end-of-time').play()
}
// ...
As explained earlier, you don’t want the timer’s text to say “0” at first, because the timer has never run. So, in TimerWrapper (listing 11.4), you set the timeLeft value to null initially. If timeLeft is null or 0, then the Timer component renders an empty <div>. In other words, the app won’t display 0:
if (this.props.timeLeft == null || this.props.timeLeft == 0)
return <div/>
Otherwise, when timeLeft is greater than 0, an <h1> element shows the time remaining. In other words, now you need to show the time left when the timer is running:
return <h1>Time left: {this.props.timeLeft}</h1>
For your reference, the following listing shows the Timer component in full (ch11/timer/timer.jsx).
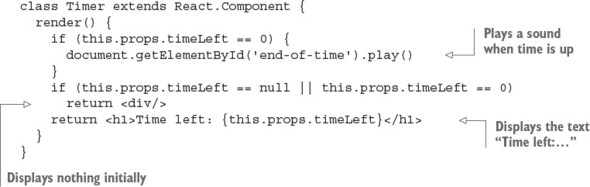
For Timer to show a number of seconds, you need to start the timer first. This happens when you click the buttons. Onward to those cute little buttons!
To follow the DRY (don’t repeat yourself) principle,[3] you’ll create one Button component and use it three times to show three different buttons. Button is another stateless (and very simple) component, as it should be in accordance with a Reactive mindset, but Button is not as straightforward as Timer, because Button has an event handler.
The DRY principle is as follows: “Every piece of knowledge must have a single, unambiguous, authoritative representation within a system”; see “Don’t Repeat Yourself,” Wikipedia, http://mng.bz/1K5k; and The Pragmatic Programmer: From Journeyman to Master by Andrew Hunt (Addison-Wesley Professional, 1999), http://amzn.to/2ojjXoY.
Buttons must have an onClick event handler to capture users’ button clicks. Those clicks trigger the timer countdown. The function to start the timer isn’t implemented in Button: it’s implemented in TimerWrapper and is passed down to the Button component from its parent, TimerWrapper, in this.props.startTimer. But how do you pass time (5, 10, or 15) to TimerWrapper’s startTimer? Look at this code from TimerWrapper, which passes time-period values as properties:
<Button time="5" startTimer={this.startTimer}/>
<Button time="10" startTimer={this.startTimer}/>
<Button time="15" startTimer={this.startTimer}/>
The idea is to render three buttons using this component (code reuse—yay!). To know what time the user selected, though, you need the value in this.props.time, which you pass as an argument to this.props.startTimer.
If you write the following code, it won’t work:
// Won't work. Must be a definition.
<button type="button" className='btn-default btn'
onClick={this.props.startTimer(this.props.time)}>
{this.props.time} seconds
</button>
The function passed to onClick must be a definition, not an invocation. How about this?
// Yep. You are on the right path young man.
<button type="button" className='btn-default btn'
onClick={()=>{this.props.startTimer(this.props.time)}}>
{this.props.time} seconds
</button>
Yes. This snippet has the right code to pass the value. This is the correct approach: a middle step (function) passes the different time values. You can make it more elegant by creating a class method. Another way would be to use a currying bind() instead of an interim function:
onClick = {this.props.startTimer.bind(null, this.props.time)}
Recall that bind() returns a function definition. As long as you pass a function definition to onClick (or any other event handler), you’re good.
Let’s get back to the Button component. The event handler onClick calls the class method this.startTimer, which in turn calls a function from the property this.props.startTimer. You can use the this object (this.props.startTimer) in this.startTimer because you applied bind(this).
The Button component is stateless, which you can confirm by looking at the full code (ch11/timer/timer.jsx). What does that mean? It means you can refactor it into a function instead of it being a class.
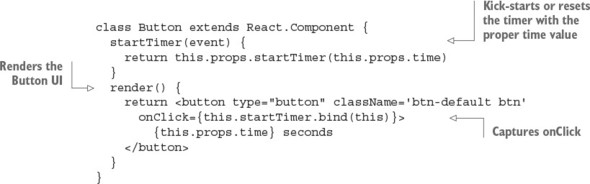
Obviously, you don’t need to use the same names for methods (such as startTimer()) in Button and TimerWrapper. A lot of people get confused during my React workshops when I use the same names; others find it easier to trace the chain of calls when they use the same names. Just know that you can name Button’s method something like handleStartTimer(), for example. Personally, I find that using the same name helps me to mentally link properties, methods, and states from different components.
Note that Timer could also be named TimerLabel, if not for the audio play() method. Is there room for improvement and refactoring? Absolutely! Check the “Homework” section of this chapter.
Congrats—you’re officially finished coding. Now, to get this thing running so you can begin using this timer for work[4] or hobbies.
Try the Pomodoro technique (https://cirillocompany.de/pages/pomodoro-technique) for increasing your productivity.
Compile the JSX into JavaScript with the following Babel 6.9.5 command, assuming you have the Babel CLI and its presets installed (hint: package.json!):
$ ./node_modules/.bin/babel timer.jsx -o timer.js -w
If you copied my build npm script from package.json at the beginning of this chapter, then you can run npm run build.
If you’ve done everything correctly, enjoy your beautiful timer application, shown in figure 11.4! Turn off your music to hear the alarm when the time is up.
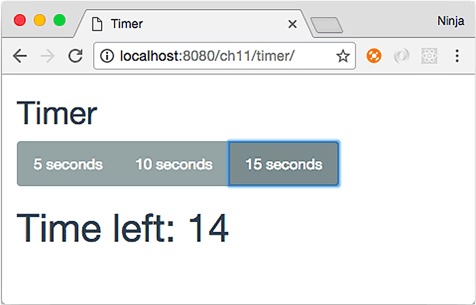
Make sure the app works properly: you should see a time-remaining number that changes every second. When you click the button, a new countdown should begin; that is, the timer is interrupted and starts over on each click of a button.
For bonus points, do the following:
Submit your code in a new folder under ch11 as a pull request to this book’s GitHub repository: https://github.com/azat-co/react-quickly.
Welcome to part 2. Now that you know the most important concepts, features, and patterns of React, you’re ready to embark on your own React journey. Part 1 prepared you to build simple UI elements; and the bottom line is, if you’re building web UIs, core React is sufficient. But to build full-blown, front-end apps, React developers rely on open source modules written by the React community. Most of these modules are hosted on GitHub and npm, so they’re within easy reach—you can grab them and go.
These chapters cover the most-popular, most-used, mature libraries that, together with core React, form the React stack (or React and friends, as some developers jokingly call this ensemble). To get started, in chapters 12–17, you’ll learn about using Webpack for asset pipelines, React Router for URL routing, Redux and GraphQL for data flow, Jest for testing, and Express and Node for Universal React. Then, as in part 1, chapters 18–20 present real-world projects.
This may seem like a lot, but my experience with reading and writing books has shown me that baby steps and textbook examples don’t provide good value for readers and don’t show how things work in real life. So, in this part of the book, you’ll both learn about and work with the React stack. Interesting, complex projects await you. When you’ve finished, you’ll be knowledgeable about data flow, skilled in setting up the monstrosity called Webpack, and able to talk like a know-it-all at local meetups.
Read on.
This chapter covers
Before we go any further with the React stack (a.k.a. React and friends), let’s look at a tool that’s essential to most modern web development: a build tool (or bundler). You’ll use this tool in subsequent chapters to bundle your many code files into the minimum number of files needed to run your applications and prepare them for easy deployment. The build tool you’ll be using is Webpack (https://webpack.js.org).
If you’ve not come across a build tool before, or if you’ve used another one such as Grunt, Gulp, or Bower, this chapter is for you. You’ll learn how to set up Webpack, configure it, and get it running against a project.
This chapter also covers hot module replacement (HMR), a feature of Webpack that enables you to hot-swap updated modules for those running on a live server. First, though, we’ll look at what Webpack can do for you.
Code generators such as create-react-app (https://github.com/facebookincubator/create-react-app) create boilerplate/scaffolding code and help you start projects quickly. create-react-app also uses Webpack and Babel, along with other modules. But this book primarily teaches fundamentals, so you won’t use a code generator; instead, you’ll do the setup yourself to make sure you understand each part. If you’re interested, you can learn how to use a code generator for yourself—it just takes a few commands.
The source code for the examples in this chapter is at www.manning.com/books/react-quickly and https://github.com/azat-co/react-quickly/tree/master/ch12 (in the ch12 folder of the GitHub repository https://github.com/azat-co/react-quickly). You can also find some demos at http://reactquickly.co/demos.
Have you ever wondered why (in web development) everyone and their mother are talking about Webpack? Webpack’s core focus is optimizing the JavaScript you write so that it’s contained in as few files as possible for a client to request. This reduces the strain on the servers for popular sites and also reduces the client’s page-load time. Of course, it’s not as simple as that. JavaScript is often written in modules that are easy to reuse. But they often depend on other modules that may depend on other modules, and so on; and keeping track of what needs to be loaded when so that all the dependencies resolve quickly can be a headache.
Let’s say you have a utility module myUtil, and you use it in many React components—accounts.jsx, transactions.jsx, and so on. Without a tool like Webpack, you’d have to manually keep track of the fact that each time you use one of those components, you need to include myUtil as a dependency. Additionally, you might be loading myUtil unnecessarily for a second or third time, because another component that depends on myUtil has already loaded it. Of course, this is a simplified example; real projects have dozens or even hundreds of dependencies that are used in other dependencies. Webpack can help.
Webpack knows how to deal with all three types of JavaScript module—CommonJS (www.commonjs.org), AMD (https://github.com/amdjs/amdjs-api/wiki/AMD), and ES6 (http://mng.bz/VjyO)—so you don’t need to worry if you’re working with a hodgepodge of module types. Webpack will analyze the dependencies for all the JavaScript in your project and do the following:
Webpack also supports code splitting and asset hashing, which let you identify blocks of code that are required only under certain circumstances. These blocks are split out to be loaded on demand rather than bundled in with everything else. You must opt in to use these features and further optimize your JavaScript and its deployment.
Code splitting and asset hashing are outside the scope of this book. Check out the Webpack website for more information: https://webpack.github.io/docs/code-splitting.html.
Webpack isn’t just about JavaScript, though. It supports the preprocessing of other static files through the use of loaders. For example, you can do the following before any bundling takes place:
Many loaders are available for all sorts of file types. In addition, plug-ins that modify Webpack’s behavior are catalogued on the Webpack homepage. If you can’t find what you’re looking for, there’s documentation about how to write your own plug-in.
For the rest of this book, you’ll be using Webpack to do the following:
As you’ll see, you can configure the order in which Webpack loads, precompiles, and bundles your files using its webpack.config.js file. But first, let’s look at how to install Webpack and get it working with a project.
To illustrate how you can get starting working with Webpack, let’s slightly modify the project from chapter 7 shown in figure 12.1. It has email and comment input fields, two style sheets, and one Content component.

Here’s the new project structure. I’ve pointed out where it differs from the project in chapter 7:
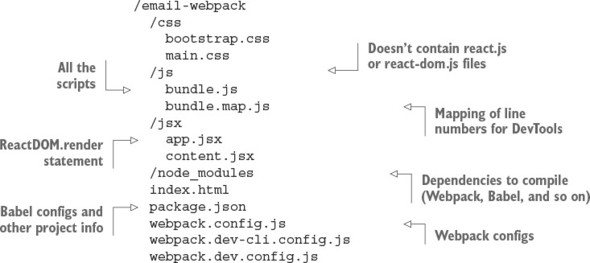
Contrast that with the non-Webpack setup from chapter 7:
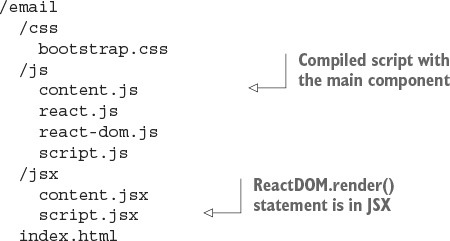
Do you have Node.js and npm? This is the best time to install them—you’ll need them, in order to proceed. Appendix A covers installation.
This section walks you through the following steps:
Let’s get started.
To use Webpack, you’ll need a few additional dependencies, as noted in package.json:
You can install each module manually, but I recommend copying the package.json file shown in listing 12.1 (ch12/email-webpack/package.json) from the GitHub repository to your project root (see the project structure shown in section 12.2). Then, run npm i or npm install from the project root (where you have package.json) to install the dependencies. This will ensure that you don’t forget any of the 10 modules (a synonym for package in Node). It also ensures that your versions are close to the ones I used. Using wildly different versions is a fantastic way to break the app!
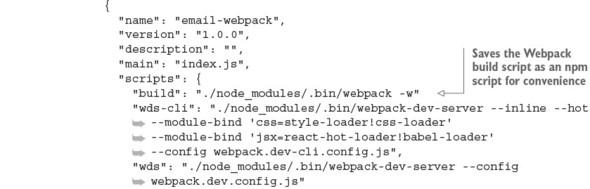
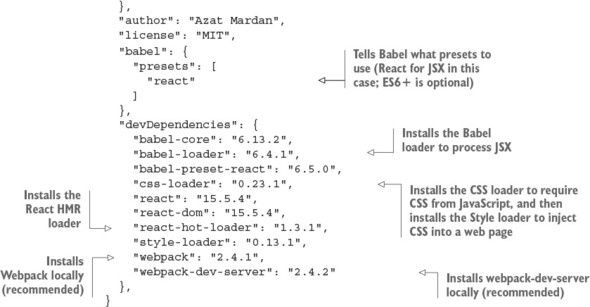
The babel property in package.json should be familiar to you from part 1 of this book, so I won’t spend time repeating myself. As a reminder, you need this property to configure Babel to convert JSX to JS. If you need to support browsers that can’t work with ES6, you can add the es2015 preset to presets:
"babel": {
"presets": [
"react",
"es2015"
]
},
Also add babel-preset-es2015 to devDependencies:
"devDependencies": {
"babel-preset-es2015": "6.18.0",
...
}
In addition to new dependencies, there are new npm scripts. The commands in scripts in package.json are optional but highly recommended, because using npm scripts for launching and building is a best practice when working with React and Node. Of course, you can run all the builds manually without using npm scripts, but why type extra characters?
You can either run Webpack with npm run build or run it directly with ./node_modules/.bin/webpack -w. The -w flag means watch—that is, continue to monitor for any source code changes, and rebuild bundles if there are any. In other words, Webpack will keep running to automatically make changes. Of course, you must have all the necessary modules installed with npm i.
The webpack -w command looks for webpack.config.js by default. You can’t run Webpack with this configuration file. Let’s create it next.
The wds and wds-cli npm scripts in package.json are explained in section 12.5.
Webpack needs to know what to process (the source code) and how to do it (with the loaders). That’s why there’s webpack.config.js in the root of the project structure. In a nutshell, in this project, you’re using Webpack to do the following:
Webpack needs its own configuration file: email-webpack/webpack.config.js.
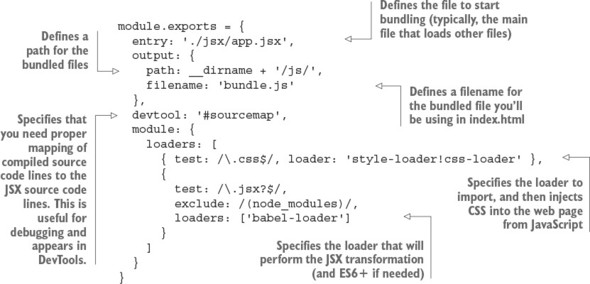
The devtool property is useful during development because it provides source maps that show you the line numbers in source—not compiled—code. You’re now ready to run Webpack for this project and also bootstrap any Webpack-based projects in the future.
If you wish, you can have more than one configuration file. These files can come in handy for development, production, testing, and other builds. In the example’s project structure, I created these files:
webpack.dev-cli.config.js webpack.dev.config.js
Naming doesn’t matter as long as you and your teammates can understand the meaning of each file. The name is passed to Webpack with --config. You’ll learn more about these configuration files in section 12.4.
Webpack has a lot of features, and we’ve only covered the basics; but they’re enough to compile JSX, provide source maps, inject and import CSS, and bundle JavaScript. When you need more Webpack functionality, you can consult the documentation or a book like SurviveJS by Juho Vepsäläinen (https://survivejs.com).
Now you’re ready to use some of Webpack’s power in JSX.
As you’ll recall, in chapter 7, the email app used global objects and <script>. That’s fine for this book or a small app. But in large apps, using globals is frowned on because you may run into trouble with name collisions or managing multiple <script> tags with duplicate inclusions. You can let Webpack do all the dependency management by using CommonJS syntax. Webpack will include only needed dependencies and package them into a single bundle.js file (based on the configs in webpack.config.js).
Organizing your code by modularizing it is a best practice not only for React but also for software engineering in general. You can use Browserify, SystemJS, or another bundler/module loader and still use CommonJS/Node.js syntax (require and module.exports). Thus, the code in this section is transferable to other systems, once you refactor it away from primitive globals.
As of this writing, import (http://mng.bz/VjyO) is supported by only one browser—Edge—and isn’t supported by Node.js. ES6 modules with import syntax will need more work in the Webpack setup. It isn’t an exact replacement for CommonJS require/module.exports syntax, because those commands work differently. For this reason, the following listing (ch12/email-webpack/app.jsx) refactors app.jsx to use require() and module.exports instead of global objects and HTML <script>. Due to the use of style-loader, you can require CSS files as well. And because of the Babel loader, you can require JSX files.
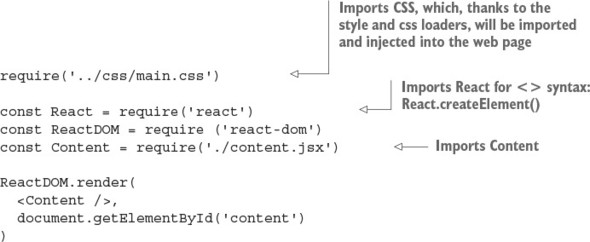
In contrast, ch07/email/jsx/script.jsx looks like this:
ReactDOM.render(
<Content />,
document.getElementById('content')
)
The old file is smaller, but this is one of the rare cases in which less isn’t more. It relies on the global Content, ReactDOM, and React objects, which, as I just explained, is a bad practice.
In content.jsx, you can use require() in a similar way. The code for constructor(), submit(), and render() doesn’t change:

The index.html file needs to point to the bundle that Webpack creates for you: the js/bundle.js file. Its name is specified in webpack.config.js, and now you need to add it. It will be created after you run npm run build. Here’s the new index.html code:
<!DOCTYPE html>
<html>
<head>
<link href="css/bootstrap.css" type="text/css" rel="stylesheet"/>
</head>
<body>
<div id="content" class="container"></div>
<script src="js/bundle.js"></script>
</body>
</html>
Note that you also remove the reference to the stylesheet main.css from index.html. Webpack will inject a <style> element with a reference to main.css into index.html for you, because of require('main.css') in app.jsx. You can use require() for bootstrap.css as well.
That’s the last step in refactoring your project.
This is the moment of truth. Run $ npm run build, and compare your output with the following:
> email-webpack@1.0.0 build
If there are no errors and you can see newly created bundle.js and bundle.js.map files in the js folder, bingo! Now spin up your favorite web server (perhaps node-static or http-server), and check the web app. You’ll see that it’s logging emails and comments in the console.
As you can see, incorporating Webpack into a project is straightforward and yields great results.
There are 177 modules in ch12/email-webpack/js/bundle.js! You can open the file and search for webpack_require(1), webpack_require(2), and so on, through webpack_require(176), which is the Content component. The followed compiled code from app.jsx imports Content (lines 49–53 in bundle.js):
const React = __webpack_require__(5); const ReactDOM = __webpack_require__(38); const Content = __webpack_require__(176); ReactDOM.render(React.createElement(Content, null),
At a bare minimum, you’re ready to use Webpack for the rest of this book. But I strongly recommend that you set up one more thing: hot module replacement (HMR), which can speed up development dramatically. Before we proceed with React development, let’s look at this great Webpack feature.
I want to mention two other useful development tools. Obviously, they’re optional, but they’re a pretty big deal.
ESLint (http://eslint.org, npm name eslint) can take predefined rules or sets of rules and make sure your code (JS or JSX) adheres to the same standards. For example, how many spaces is an indent—four or two? Or, what if you accidentally put a semicolon in your code? (Semicolons are optional in JavaScript, and I prefer not to use them.) ESLint will even give you a warning about unused variables. It can prevent bugs from sneaking into your code! (Not all of them, of course.)
Check out “Getting Started with ESLint” (http://eslint.org/docs/user-guide/getting-started). You’ll also need eslint-plugin-react (https://github.com/yannickcr/eslint-plugin-react). Make sure you add the React rules to .eslintrc.json (the full code is in the ch12/email-webpack-eslint-flow folder):
"rules": {
"react/jsx-uses-react": "error",
"react/jsx-uses-vars": "error",
}
Here’s an example of some warnings from running ESLint React on ch12/email-web-pack-lint-flow/jsx/content.jsx:
/Users/azat/Documents/Code/react-quickly/ch12/
Next, Flow (https://flowtype.org, npm name flow-bin) is a static type-checking tool you can use to add a special comment (// @flow) to your scripts and types. Yes! Types in JavaScript! Rejoice, if you’re a software engineer with a preference for strongly typed languages like Java, Python, and C. Once you’ve added the comment, you can run a Flow check to see whether there are any issues. Again, this tool can prevent some pesky bugs:
// @flow var bookName: string = 13 console.log(bookName) // number. This type is incompatible with string
Flow has extensive documentation: see “Getting started with Flow” (https://flowtype.org/docs/getting-started.html) and “Flow for React” (https://flowtype.org/docs/react.html).
You can configure Atom or any other modern code editor to work with ESLint and Flow to catch problems on the fly.
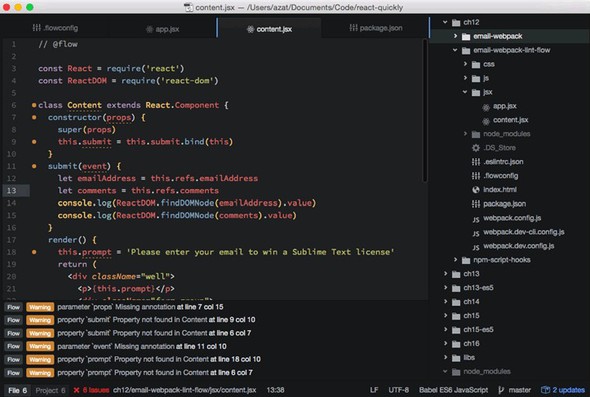
The Atom code editor supports Flow, which shows issues in the bottom pane and marks on the code line during development.
You can find the email project code with ESLint v3.8.1 and Flow v0.33.0 in the ch12/email-webpack-eslint-flow folder.
Hot module replacement (HMR) is one of the coolest features of Webpack and React. It lets you write code and test it more quickly by updating the browser with changes while preserving the app’s state.
Say you’re working on a complex single-page web application, and getting to the current page you’re working on takes 12 clicks. If you upload new code to the site, then to get it running, you have to click Reload/Refresh in your browser and repeat those 12 clicks. If you’re using HMR, on the other hand, there are no page reloads, and your changes are reflected on the page.
HMR’s primary benefit is that you can iterate (write, test, write, test, and so on) more quickly, because your app will save state when you make changes. Some developers consider HMR so groundbreaking that if React didn’t have any other features, they would still use it just for HMR!
For the nitty-gritty details of how the HMR process works, see the documentation at http://mng.bz/L9d5. This section covers the practical application of this technology as it pertains to the example email form.
The process of hot-updating code requires multiple steps, shown in a simplified form in figure 12.2. Webpack HMR and the dev server use WebSockets to monitor update notifications from the server. If there are any, the front end gets chunks (JavaScript code) and an update manifest (JSON), which are basically the delta of the changes. The front-end app preserves its state (such as data in an input field or a screen position), but the UI and code change. Magic.
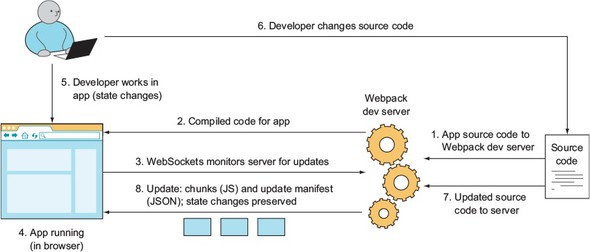
To see HMR in an example, you’ll use a new configuration file and webpack-dev-server (WDS). It’s possible to use HMR with your own server, built with Express/Node; WDS is optional, but it’s provided by Webpack as a separate webpack-dev-server module, so I’ll cover it here.
Once everything is configured, you’ll enter an email in the form and make a few changes in the code. Thanks to HMR, you’ll see that the entered email remains on the form and your changes are propagated to the web app.
First, duplicate webpack.config.js by creating a copy named webpack.dev.config.js:
$ cp webpack.config.js webpack.dev.config.js
Next, open the newly created webpack.dev.config.js file. You need to add a few things such as new entry points, a public path, and the HMR plug-in, and set the dev-server flag to true. The following listing shows the final file (ch12/email-webpack/webpack.dev.config.js).

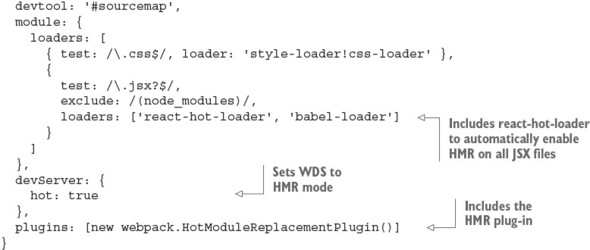
You need to tell WDS to use this new configuration file by providing the --config option:
./node_modules/.bin/webpack-dev-server --config webpack.dev.config.js
Save this in package.json for convenience, if you don’t have it there already. As you’ll recall, react-hot-loader is in the dependencies. This module enables HMR for all JSX files (which are in turn converted to JS).
I prefer to enable HMR for all files with react-hot-loader. But if you want to have HMR only for certain modules, not all of them, don’t use react-hot-loader; instead, opt in manually by adding the module.hot.accept() statement to the JSX/JS modules you want to cherry-pick for HMR. This module.hot magic comes from Webpack. It’s recommended that you check whether module.hot is available:
if(module.hot) {
module.hot.accept()
}
That’s a lot of configurations! But there’s another way to use and configure Webpack: you can use command-line options and pack some configs in the commands.
If you prefer to use the command line, be my guest. Your config file will be smaller, but the commands will be bigger. For example, this webpack.dev-cli.config.js file has fewer configs:
module.exports = {
entry: './jsx/app.jsx',
output: {
publicPath: 'js/',
path: __dirname + '/js/',
filename: 'bundle.js'
},
devtool: '#sourcemap',
module: {
loaders: [
{
test: /\.jsx?$/,
exclude: /(node_modules)/,
loaders: []
}
]
}
}
But it uses more CLI options:
./node_modules/.bin/webpack-dev-server --inline --hot
Several things are happening here. First, --inline and --hot include the entries enabling WDS and HMR mode. Then, you pass your loaders with --module-bind using the following syntax:
fileExtension=loader1!loader2!...
Make sure react-hot is before babel; otherwise, you’ll get an error.
When it comes to using the CLI or a full config file, the choice is yours. I find the CLI approach better for simpler builds. To avoid crying later when you discover that you mistyped this monstrosity of a command, you should save the command as an npm script in package.json. And no, batch/shell scripts/Make scripts aren’t cool anymore. Use npm scripts, like all the cool kids do! (Disclaimer: This is a joke. I’m not advocating fashion-driven development.)
npm scripts offer certain advantages, and they’re commonly used in Node and React projects. They’ve become a de facto standard, and you’ll generally find them when you first learn about a project. When I start working on a new project or library, the npm scripts are the first place I look, after readme.md—and sometimes instead of readme.md, which may be out of date.
npm scripts offer a flexible way to save essential scripts for testing, building, seeding with data, and running in development or other environments. In other words, any work that’s performed via the CLI and related to the app but that isn’t the app itself can be saved to npm scripts. They function as documentation, as well, to show others how building and testing work. You can call other npm scripts from npm scripts, thus simplifying your project further. The following example includes different versions of builds:
"scripts": {
"test": "echo \"Error: no test specified\" && exit 1",
"build": "./node_modules/.bin/babel -w",
"build:method": " npm run build -- method/jsx/script.jsx -o
method/js/script.js",
"build:hello-js-world-jsx": "npm run build --
hello-js-world-jsx/jsx/script.jsx -o
hello-js-world-jsx/js/script.js",
"build:hello-world-jsx": "npm run build --
hello-world-jsx/jsx/script.jsx -o
hello-world-jsx/js/script.js",
"build:hello-world-class-jsx": "npm run build --
hello-world-class-jsx/jsx/script.jsx -o
hello-world-class-jsx/js/script.js"
},
npm scripts also support pre and post hooks, which makes them even more versatile. In general, a hook is a pattern in which some code is triggered when another event happens. For example, you can create a learn-react task along with two tasks that have pre and post hooks: prelearn-react and postlearn-react. As you may guess, the pre hook will be executed before learn-react, and the post hook will be executed after learn-react. For example, these bash scripts
"scripts": {
"prelearn-react": "echo \"Purchasing React Quickly\"",
"learn-react": "echo \"Reading React Quickly\" ",
"postlearn-react": "echo \"Creating my own React app\""
},
print the following output, based on the pre / post order:
... Purchasing React Quickly ... Reading React Quickly ... Creating my own React app
With pre and post hooks, npm can easily replace some build steps performed by Webpack, Gulp, or Grunt.
See the documentation at https://docs.npmjs.com/misc/scripts and Keith Cirkel’s article “How to Use npm as a Build Tool” (www.keithcirkel.co.uk/how-to-use-npm-asa-build-tool) for more npm tips, including parameters and arguments. Any functionality that’s missing with npm scripts can be implemented from scratch as a Node script. The advantage is that you’ll have fewer dependencies on plug-ins for your project.
Go ahead and start WDS with npm run wds or npm run wds-cli. Then, go to http://localhost:8080 and open the DevTools console. You’ll see messages from HMR and WDS, as follows:
[HMR] Waiting for update signal from WDS... [WDS] Hot Module Replacement enabled.
Enter some text in the email or comment field, and then change content.jsx. You can modify something in render()—for example, change the form text from Email to Your Email:
Your Email: <input ref="emailAddress" className="form-control" type="text"
You’ll see some logging:
[WDS] App updated. Recompiling... ... [HMR] App is up to date.
Then your changes will appear on the web page, as shown in figure 12.3, along with the text you entered previously. Great—you no longer need to waste time entering test data or navigating deep inside nested UIs! You can spend more time doing important things instead of typing and clicking around the front-end app. Development is faster with HMR!
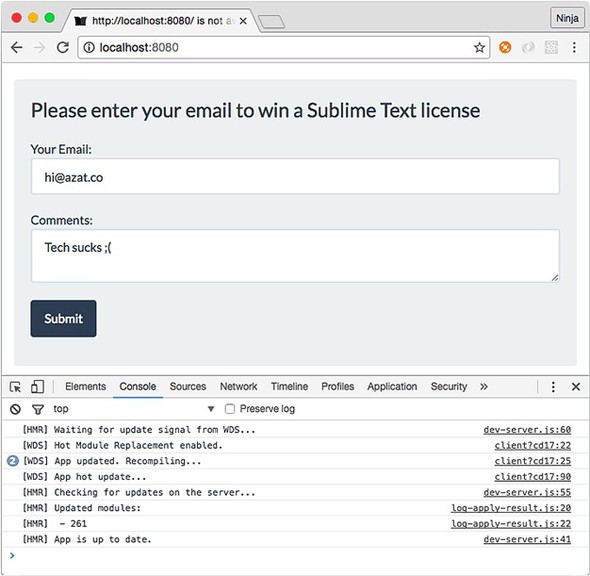
HMR isn’t bulletproof. It won’t update or fail in some situations. WDS will reload the page (live reload) when that happens. This behavior is controlled by webpack/hot/dev-server; another option is to reload manually using webpack/hot/only-dev-server.
Webpack is a nice tool to use with React to streamline and enhance your bundling. It’s great not only for optimizing code, images, styles, and other assets when you deploy, but also for development, thanks to WDS and HMR.
What is the command to run the dev npm script ("dev": "./node_modules/.bin/webpack-dev-server --config webpack.dev.config.js")? npm dev, npm run dev, NODE_ENV=dev npm run, or npm run development
HMR is just a React term for live reloading. True or false?
WDS will write compiled files to disk, just like the webpack command. True or false?
webpack.config.js must be a valid JSON file, just like package.json. True or false?
What loaders do you need to use in order to import and then inject CSS into a web page using Webpack?
npm run dev. Only start and test npm scripts can be run without run. All other scripts follow npm run NAME syntax.
False. HMR can replace live reloading and fall back to it when HMR fails; but HMR is more advanced and offers more benefits, such as updating only parts of your app and preserving the app’s state.
False. WDS only serves files without writing them to disk.
False. webpack.config.js is a default Webpack configuration file. It must be a Node.js/JavaScript file with the CommonJS/Node.js module exporting the object literal for configurations (the object can have double quotes, akin to JSON).
The style loader imports, and the CSS loader injects.
This chapter covers
In the past, in many single-page applications, the URL rarely, if ever, changed as you progressed through the app. There was no reason to go to the server, thanks to browser rendering! Only the content on part of the page changed. This approach had some unfortunate consequences:
Fortunately, today we have browser URL routing. URL routing lets you configure an application to accept request URLs that don’t map to physical files. Instead, you can define URLs that are semantically meaningful to users, that can help with search-engine optimization (SEO), and that can reflect your application’s state. For example, a URL for a page that displays product information might be
https://www.manning.com/books/react-quickly
This is neatly mapped behind the scenes to a single page that displays the product with ID react-quickly. As you browse various products, the URL can change, and both the browser and search engines will be able to interact with the product pages as you’d expect. If you want to avoid complete page reloads, you can use a hash (#) in your URLs, as these well-known sites do:
https://mail.google.com/mail/u/0/#inbox https://en.todoist.com/app?v=816#agenda%2Foverdue%2C%20today https://calendar.google.com/calendar/render?tab=mc#main_7
URL routing is a requirement for a user-friendly, well-designed web app. Without specific URLs, users can’t save or share links without losing the state of the application, be it a single-page application (SPA) or a traditional web app with server rendering.
In this chapter, you’ll build a simple React website and learn about a couple of different options for implementing routing within it. I’ll introduce the React Router library later in the chapter; first, let’s build some simple routing from scratch.
The source code for the examples in this chapter is at www.manning.com/books/react-quickly and https://github.com/azat-co/react-quickly/tree/master/ch13 (in the ch13 folder of the GitHub repository https://github.com/azat-co/react-quickly). You can also find some demos at http://reactquickly.co/demos.
Although there are existing libraries that implement routing for React, let’s start by implementing a simple router to see how easy it is. This project will also help you understand how other routers work under the hood.
The end goal of this project is to have three pages that change along with the URL when you navigate around. You’ll use hash URLs (#) to keep things simple; non-hash URLs require a special server configuration. These are the pages you’ll create:
Figure 13.1 shows the navigation from the home page to the Profile page.

To implement this project, which will demonstrate and use a URL router, you’ll create a router component (router.jsx), a mapping, and an HTML page. The router component will take information from the URL and update the web page accordingly. The implementation of the project breaks down into these steps:
You’ll use JSX to create React elements for the markup. Obviously, Router doesn’t have to be a React component; it can be a regular function or a class. But using a React component reinforces concepts you’ve learned about in this book, such as event lifecycles and taking advantage of React’s rendering and handling of the DOM. In addition, your implementation will be closer to the React Router implementation, which will help you understand React Router better when we discuss it later.
The structure of the project (which you can call a simple or naive router) is as follows:
/naive-router
/css
bootstrap.css
main.css
/js
bundle.js
/jsx
app.jsx
router.jsx
/node_modules
index.html
package.json
webpack.config.js
You’ll begin by installing dependencies. I put them in package.json; you can copy the dependencies as well as the babel config and scripts, and run npm install (ch13/naive-router/package.json).
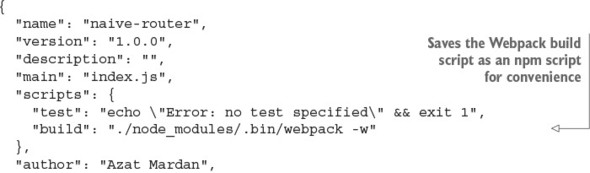
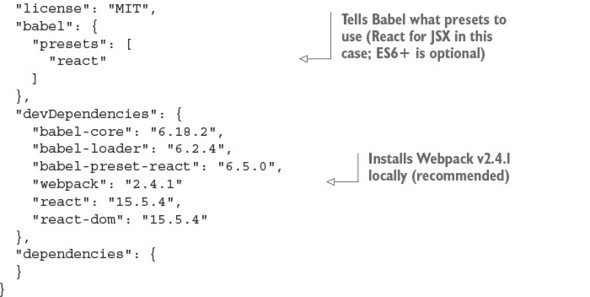
This isn’t all. Webpack needs its own configuration file, webpack.config.js (as explained in chapter 9). The key is to configure the source (entry) and the desired destination (output). You also need to provide the loader.
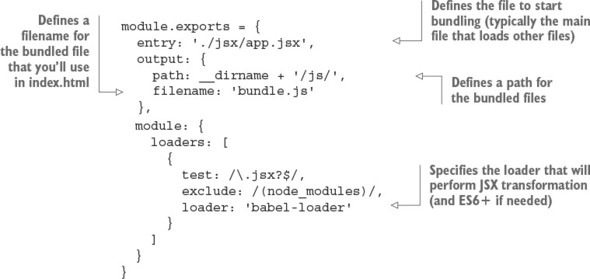
First, you’ll create a mapping with a mapping object, where the keys are URL fragments and the values are the content of the individual pages. A mapping takes a value and ties/connects it to another value. In this case, the key (URL fragment) will map to JSX. You could create a separate file for each page, but for now let’s keep them all in app.jsx.
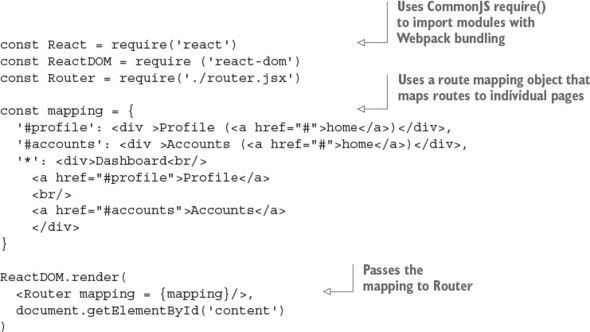
Next, you’ll implement Router in router.jsx.
In a nutshell, Router needs to take information from the URL (#profile) and map it to JSX using the mapping property provided to it. You can access the URL from the window.location.hash of the browser API:
const React = require('react')
module.exports = class Router extends React.Component {
constructor(props) {
super(props)
this.state = {hash: window.location.hash}
this.updateHash = this.updateHash.bind(this)
}
render() {
...
}
}
Next, you need to listen for any URL changes with hashchange. If you don’t implement listening to new URLs, then your router will work only once: when the entire page reloads and the Router element is created. The best places to attach and remove listeners for hashchange are the componentDidMount() and componentWillUnmount() lifecycle event listeners:
updateHash(event) {
this.setState({hash: window.location.hash})
}
componentDidMount() {
window.addEventListener('hashchange', this.updateHash, false)
}
componentWillUnmount() {
window.removeEventListener('hashchange', this.updateHash, false)
}
Chapter 5 discusses lifecycle events, but here’s a refresher. componentDidMount() is fired when an element is mounted and appears in the real DOM node (you can say that an element has a real DOM node). For this reason, this is the safest place to attach events that integrate with other DOM objects, and also to make AJAX/XHR calls (not used here).
On the other hand, componentWillUnmount() is the best place to remove event listeners; your element will be unmounted, and you need to remove whatever you created outside of this element (such as an event listener on window). Leaving a lot of event listeners hanging around without the elements that created and used them is a bad practice: it leads to performance issues such as memory leaks.
In render(), you use if/else to see whether there’s a match with the current URL value (this.state.hash) and the keys/attributes/properties in the mapping property. If so, you access mapping again to get the content of the individual page (JSX). If not, you fall back to * for all other URLs, including the empty value (home page). Here’s the complete code (ch13/naive-router/jsx/router.jsx).
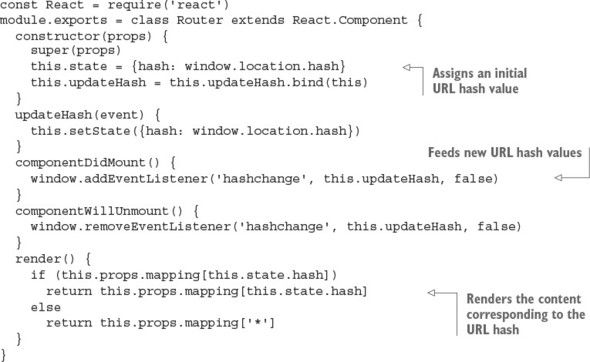
Finally, in index.html, you include the CSS file and bundle.js that Webpack will produce when you run npm run build (which in turn runs ./node_modules/.bin/webpack -w):
<!DOCTYPE html>
<html>
<head>
<link href="css/bootstrap.css" type="text/css" rel="stylesheet"/>
<link href="css/main.css" type="text/css" rel="stylesheet"/>
</head>
<body>
<div id="content" class="container"></div>
<script src="js/bundle.js"></script>
</body>
</html>
Run the bundler to get bundle.js, and open the web page in a browser. Clicking the links changes the URL as well as the content of the page, as shown earlier in figure 13.1.
As you can see, building your own router with React is straightforward; you can use lifecycle methods to listen for changes in the hash and render the appropriate content. But although this is a viable option, things become more complex if you need nested routes, use route parsing (extracting URL parameters), or use “nice” URLs without #. You could use a router from Backbone or another front-end, MVC-like framework, but there’s a solution designed for React specifically (hint: it uses JSX).
React is amazing at building UIs. If I haven’t convinced you yet, go back and reread the previous chapters! It can also be used to implement simple URL routing from scratch, as you’ve seen with router.jsx.
But for more-sophisticated SPAs, you’ll need more features. For instance, passing a URL parameter is a common feature to signify an individual item rather than a list of items: for example, /posts/57b0ed12fa81dea5362e5e98, where 57b0ed12-fa81dea5362e5e98 is a unique post ID. You could extract this URL parameter using a regular expression; but sooner or later, if your application grows in complexity, you may find yourself reinventing existing implementations for front-end URL routing.
Semantic or nice URLS (https://en.wikipedia.org/wiki/Semantic_URL) are aimed at improving the usability and accessibility of a website or web app by decoupling the internal implementation from the UI. A non-semantic approach might use query strings and/or script filenames. On the other hand, the semantic way embraces using the path only in a manner that helps users interpret the structure and manipulate the URLs. Here are some examples:
Major frameworks such as Ember, Backbone, and Angular have routing built in to them. When it comes to routing and React, React Router (react-router; https://github.com/reactjs/react-router) is a ready-to-go, off-the-shelf solution. Section 13.4 covers a Backbone implementation and illustrates how nicely React plays with this MVC-like framework that many people use for SPAs. Right now, let’s focus on React Router.
React Router isn’t part of the official React core library. It came from the community, but it’s mature and popular enough that a third of React projects use it.[1] It’s a default option for most React engineers I’ve talked to.
React.js Conf 2015, “React Router Increases Your Productivity,” https://youtube.com/watch?v=XZfvW1a8Xac.
The syntax of React Router uses JSX, which is another plus because it allows you to create more-readable hierarchical definitions than you can with a mapping object (as you saw in the previous project). Like the naive Router implementation, React Router has a Router React component (React Router inspired my implementation!). Here are the steps you’ll follow:
You’ll use JSX to create a Route for each page, and nest them either in another Route or in Router. The Router object goes in the ReactDOM.render() function, like any other React element:
ReactDOM.render((
<Router ...>
<Route ...>
<Route ../>
...
</Route>
<Route .../>
</Router>
), document.getElementById('content'))
Each Route has at least two properties: path, which is the URL pattern to match to trigger this route; and component, which fetches and renders the necessary component. You can have more properties for a Route, such as event handlers and data. They’ll be accessible in props.route in that Route component. This is how you pass data to route components.
To illustrate, let’s consider an example of an SPA with routing to a few pages: About, Posts (like a blog), an individual Post, Contact Us, and Login. They have different paths and render from different components:
The About, Posts, Post, and Contact Us pages will use the same layout (Content component) and render inside it. Here’s the initial React Router code (not the complete, final version):
<Router>
<Route path="/" component={Content} >
<Route path="/about" component={About} />
<Route path="/about/company" .../>
<Route path="/about/author" .../>
<Route path="/posts" component={Posts} />
<Route path="/posts/:id" component={Post}/>
<Route path="/contact" component={Contact} />
</Route>
</Router>
Interestingly, you can nest routes to reuse layouts from parents, and their URLs can be independent of nesting. For instance, it’s possible to have a nested About component with the /about URL, even though the “parent” layout route Content uses /app. About will still have the Content layout (implemented by this.props.children in Content):
<Router>
<Route path="/app" component={Content} >
<Route path="/about" component={About} />
...
In other words, About doesn’t need the nested URL /app/about unless you want it to be this way. This gives you more flexibility in terms of paths and layouts.
To navigate, you’ll implement a menu as shown in figure 13.2. The menu and the header will be rendered from Content and reused on the About, Posts, Post, and Contact Us pages. In the figure, several things are happening: the About page is rendered, the menu button is active, the URL reflects that you’re on the About page by showing you /#/about, and the text Node.University reflects what’s in the About component (you’ll see it later).
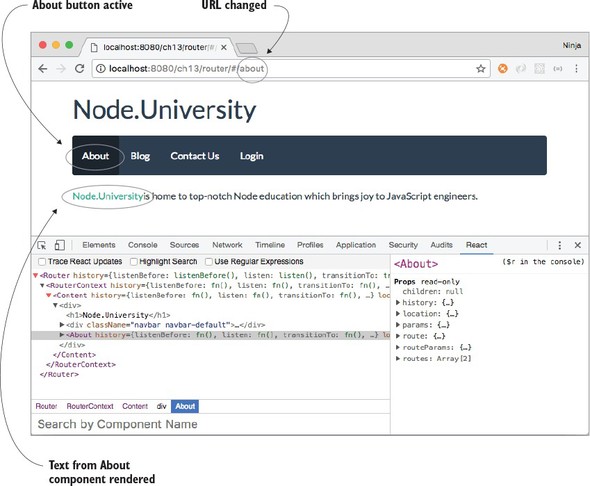
As I mentioned earlier, you’ll use JSX to create the Router element and Route elements nested within it (and each other). Each element (Router or Route) has at least two properties, path and component, that tell the router the URL path and the React component class to create and render. It’s possible to have additional custom properties/attributes to pass data; you’ll use that approach to pass a posts array.
Let’s put your knowledge to work by importing the React Router objects and using them in ReactDOM.render() to define the routing behavior (ch13/router/jsx/app.jsx). In addition to About, Posts, Post, and Contact Us, you’ll create a Login page.
const ReactRouter = require('react-router')
let { Router,
Route,
Link
} = ReactRouter
ReactDOM.render((
<Router history={hashHistory}>
<Route path="/" component={Content} >
<Route path="/about" component={About} />
<Route path="/posts" component={Posts} posts={posts}/>
<Route path="/posts/:id" component={Post} posts={posts}/>
<Route path="/contact" component={Contact} />
</Route>
<Route path="/login" component={Login}/>
</Router>
), document.getElementById('content'))
This last route, Login (/login, shown in figure 13.3), lives outside of the Content route and doesn’t have the menu (which is in Content). Anything that doesn’t need the common interface provided in Content can be left out of the Content route. This behavior is determined by the hierarchy of the nested routes.

The Post component renders blog post information based on the post slug (part of the URL—think ID), which it gets from the URL (for example, /posts/http2) via the props.params.id variable. By using a special syntax with a colon in the path, you tell the router to parse that value and populate it into props.params.
Router is passed to the ReactDOM.render() method. Notice that you pass history to Router. Starting with version 2 of React Router, you must supply a history implementation. You have two choices: bundling with the React Router history or using a standalone history implementation.
The hash history, as you can probably guess, relies on the hash symbol #, which is how you navigate on the page without reloading it; for example, router/#/posts/http2. Most SPAs use hashes because they need to reflect changes in context within the app without causing a complete refresh (request to the server). You did this when you implemented a router from scratch.
The proper term for a hash is fragment identifier (https://en.wikipedia.org/wiki/Fragment_identifier).
In this example, you’ll also uses hashes, which come standalone from the history library (http://npmjs.org/history). You’ll import the library, initialize it, and pass it to React Router.
You need to set queryKey to false when you initialize history, because you want to disable the pesky query string (for example, ?_k=vl8reh) that’s there by default to support older browsers and transfer states when navigating:
const ReactRouter = require('react-router')
const History = require('history')
let hashHistory = ReactRouter.useRouterHistory(History.createHashHistory)({
queryKey: false
})
<Router history={hashHistory}/>
To use a bundled hash history, import it from React Router like this:
const { hashHistory } = require('react-router')
<Router history={hashHistory} />
You can use a different history implementation with React Router if you prefer. Old browsers love hash history, but that means you’ll see the # hashtag. If you need URLs without hash signs, you can do that, too. You just need to switch to the browser history and implement some server modifications, which are simple if you use Node as your HTTP server back end. To keep this project simple, you’ll use hash history, but we’ll go over the browser history briefly.
An alternative to hash history is the browser HTML5 pushState history. For example, a browser history URL might be router/posts/http2 rather than router/#/posts/http2. Browser history URLs are also called real URLs.
Browser history uses regular, unfragmented URLs, so each request triggers a server request. That’s why this approach requires some server-side configuration that I won’t cover here. Typically, SPAs should use fragmented/hash URLs, especially if you need to support older browsers, because browser history requires a more complex implementation.
You can use browser history in a way similar to hash history. You import the module, plug it in, and finally configure the server to serve the same file (not the file from your SPA’s routing).
Browser implementations come from a standalone custom package (like history) or from the implementation in React Router (ReactRouter.browserHistory). After you import the browser history library, apply it to Router:
const { browserHistory } = require('react-router')
<Router history={browserHistory} />
Next, you need to modify the server to respond with the same file no matter what the URL is. This example is just one possible implementation; it uses Node.js and Express:
const express = require('express')
const path = require('path')
const port = process.env.PORT || 8080
const app = express()
app.use(express.static(__dirname + '/public'))
app.get('*', function (request, response){
response.sendFile(path.resolve(__dirname, 'public', 'index.html'))
})
app.listen(port)
console.log("server started on port " + port)
The reason for the required server-side behavior of the HTTP server is that once you switch to real URLs without the hash sign, they’ll start hitting the HTTP server. The server needs to serve the same SPA JavaScript code to every request. For example, requests to /posts/57b0ed12fa81dea5362e5e98 and /about should resolve in index.html, not posts/57b0ed12fa81dea5362e5e98.html or about.html (which will probably result in 404: Not Found).
Because hash history is the preferred way to implement URL routing when support for older browsers is needed, and to keep this example simple without having to implement the back-end server, we’ll use hash history in this chapter.
When you’re working with React Router, there are libraries you need to use and import as well as the JSX compilation to run. Let’s look at the development setup for React Router using Webpack, which will perform these tasks.
The following listing shows devDependencies from package.json (ch13/router/package.json). Most of this should be familiar to you already. New packages include history and react-router. As always, make sure you’re using the exact versions shown; otherwise, you can’t be sure the code will run.
{
...
"devDependencies": {
"babel-core": "6.11.4",
"babel-loader": "6.2.4",
"babel-preset-react": "6.5.0",
"history": "2.1.2",
"react": "15.2.1",
"react-dom": "15.2.1",
"react-router": "2.6.0",
"webpack": "1.12.9"
}
}
In addition to devDependencies, package.json must have a babel configuration. I also recommend adding npm scripts:
{
...
"scripts": {
"test": "echo \"Error: no test specified\" && exit 1",
"build": "./node_modules/.bin/webpack -w",
"i": "rm -rf ./node_modules && npm cache clean && npm install"
},
"babel": {
"presets": [
"react"
]
},
...
}
Note that because the JSX will be converted to React.createClass(), you’ll need to import and define React in files that use JSX even when they don’t use React. To illustrate, in listing 13.7, it looks as though the About component (which is stateless—that is, a function) doesn’t use React. But when this code is transpiled, it will use React in the form of React.createElement() calls. In chapters 1 and 2, React was defined as a global window.React; but with a modular, nonglobal approach, it isn’t. Hence, you need to define React explicitly (ch13/router/jsx/about.jsx).
const React = require('react')
module.exports = function About() {
return <div>
<a href="http://Node.University" target="_blank">Node.University</a>
is home to top-notch Node education which brings joy to JavaScript
engineers.
</div>
}
The rest of the files and the project as whole will use this structure:
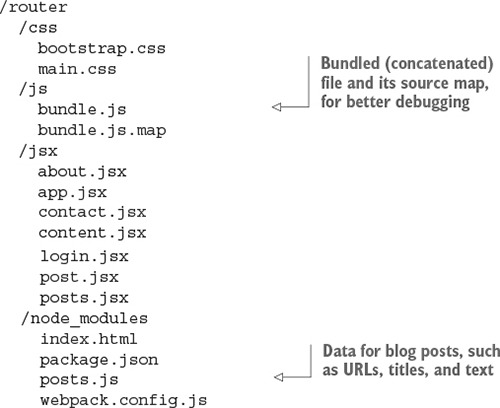
The index.html file is bare-bones because it includes only the bundled file.
<!DOCTYPE html>
<html>
<head>
<link href="css/bootstrap.css" type="text/css" rel="stylesheet"/>
<link href="css/main.css" type="text/css" rel="stylesheet"/>
</head>
<body>
<div id="content" class="container"></div>
<script src="js/bundle.js"></script>
</body>
</html>
webpack.config.js needs to have at least an entry-point app.jsx, babel-loader, and source maps (ch13/router/webpack.config.js).
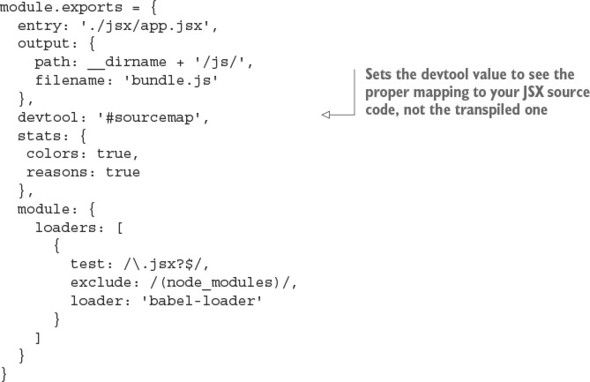
Next, let’s implement the Content layout component.
The Content component, which is defined as a parent Route, will serve as a layout for the About, Posts, Post, and Contact components. Figure 13.4 shows how it’s implemented.

First, you’ll import React and Link from React Router. The latter is a special component to render navigation links. Link is a special wrapper for <a>; it has some magic attributes that the normal anchor tag doesn’t, such as activeClassName="active", which adds the active class when this route is active.
The Content component’s structure looks something like this, with the omission of a few pieces (the complete code is shown later):
const React = require('react')
const {Link} = require('react-router')
class Content extends React.Component {
render() {
return (
<div>
...
</div>
)
}
}
...
module.exports = Content
In render(), you use the amazing Twitter Bootstrap UI library (http://getbootstrap.com) to declare the menu with the proper classes. The menu can be created using ready-made CSS classes, such as these:
<div className="navbar navbar-default">
<ul className="nav nav-pills navbar-nav ">
<li ...>
<Link to="/about" activeClassName="active">
About
</Link>
</li>
<li ...>
<Link to="/posts" activeClassName="active">
Blog
</Link>
</li>
...
</ul>
</div>
You’ll access the isActive() method, which returns true or false. This way, an active menu link will be visually different from other links:
<li className={(this.context.router.isActive('/about'))? 'active': ''}>
<Link to="/about" activeClassName="active">
About
</Link>
</li>
Notice the activeClassName attribute of Link. When you set this attribute to a value, Link will apply the class to an active element (the selected link). But you need to set the style on <li>, not just on Link. That’s why you also access router.isActive().
After you’re finished with the Content class definition (full implementation shown shortly), you define a static field/attribute contextTypes that enables the use of this.context.router. If you’re using ES2017+/ES8+,[2] you may have support for static fields, but that’s not the case in ES2015/ES6 or ES2016/ES7. They don’t have this feature. The ES2017/ES8 standard isn’t final yet, but as of this writing it doesn’t have this feature either. Be sure to check the current list of finished proposals/features,[3] or consider using ES Next (collection of stage 0 proposals).
Learn more about ES2016/ES7 and ES2017/ES8 features at https://node.university/blog/498412/es7-es8 and https://node.university/p/es7-es8.
For the current list of stage 0–3 and finished proposals, see the TC39 documents on GitHub: https://github.com/tc39/proposals/blob/master/README.md and https://github.com/tc39/proposals/blob/master/finished-proposals.md.
This static attribute will be used by React Router such that if it’s required, React Router populates this.context (from which you can access router.isActive() and other methods):
Content.contextTypes = {
router: React.PropTypes.object.isRequired
}
Having contextType and router set to required gives you access to this.context.router.isActive('/about'), which in turn will tell you when this particular route is active.
Phew! Here’s the full implementation of the Content layout.
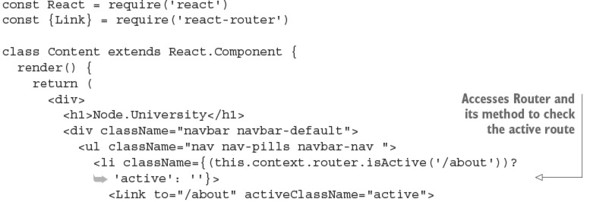
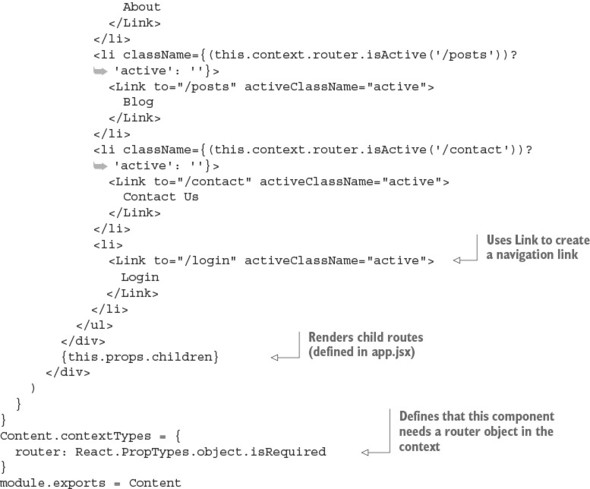
The children statement enables you to reuse the menu on every subroute (route nested in the / route), such as /posts, /post, /about, and /contact:
{this.props.children}
Let’s look at another way to access a router in an individual route, other than using contextTypes.
To learn more about React Router’s features and patterns, let’s look at another way to access a router from child components and how to navigate programmatically within those components. And, of course, the chapter wouldn’t be complete if I didn’t cover how to parse URL parameters and pass data.
Using router allows you to navigate programmatically and access the current route, among other things. It’s good to include access to router in your components.
You’ve seen how to access router from this.context.router by setting the static class attribute contextTypes:
Content.contextTypes = {
router: React.PropTypes.object.isRequired
}
In a way, you’re using the validation mechanism to define the API; that is, the component must have the router. The Content component used this approach.
But context depends on React’s context, which is an experimental approach; its use is discouraged by the React team. Fortunately, there’s another way (some might argue it’s simpler and better; see http://mng.bz/Xhb9): withRouter.
withRouter is a higher-order component (HOC; more about these in chapter 8) that takes a component as an argument, injects router, and returns another HOC. For example, you can inject router into Contact like this:
const {withRouter} = require('react-router')
...
<Router ...>
...
<Route path="/contact" component={withRouter(Contact)} />
</Router>
When you look at the Contact component implementation (a function), the router object is accessible from the properties (argument object to the function):
const React = require('react')
module.exports = function Contact(props) {
// props.router - GOOD!
return <div>
...
</div>
}
The advantage of withRouter is that it works with regular, stateful React classes as well as with stateless functions.
Even though there’s no direct (visible) use of React, you must require React because this code will be converted to code with React.createElement() statements that depend on the React object. For more information, see chapter 3.
A popular use of router is to navigate programmatically: changing the URL (location) from within your code based on logic, not user actions. To demonstrate, suppose you have an app in which the user types a message on a contact form and then submits the form. Based on the server response, the app navigates to an Error page, a Thank-you page, or an About page.
Once you have router, you can navigate programmatically if you need to by calling router.push(URL), where URL must be a defined route path. For instance, you can navigate to About from Contact after 1 second.
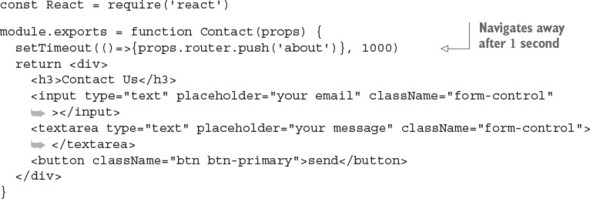
Navigating programmatically is an important feature because it lets you change the state of the application. Let’s see how you access URL parameters such as a post ID.
As you’ve seen, having contextTypes and router will give you the this.context.router object. It’s an instance of <Router/> defined in app.jsx, and it can be used to navigate, get the active path, and so on. On the other hand, there’s other interesting information in this.props, and you don’t need a static attribute to access it:
The this.props.location and this.props.params objects contain data about the current route, such as path name, URL parameters (names defined with a colon [:]), and so on.
Let’s use params.id in post.jsx for the Post component in Array.find() to find the post corresponding to a URL path such as router/#/posts/http2 (ch13/router/jsx/post.jsx).

When you navigate to the Posts page (see figure 13.5), there’s a list of posts. As a reminder, the route definition is as follows:
<Route path="/posts" component={Posts} posts={posts}/>

Clicking a post navigates to #/posts/ID. That page reuses the layout of the Content component.
Now, let’s move on and work with data.
You often need to pass data to nested routes, and it’s easy to do. In the example, Posts needs to get data about posts. In listing 13.13, Posts accesses a property passed to you in <Route/> in app.jsx: posts, from the posts.js file. It’s possible to pass any data to a route as an attribute; for example, <Route path="/posts" component={Posts} posts={posts}/>. You can then access the data in props.route; for example, props.route.posts is a list of posts.
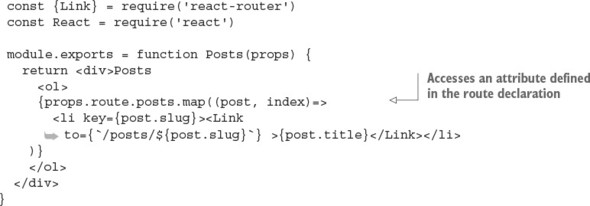
Of course, the value of this data can be a function. That way, you can pass event handlers to stateless components and implement them only in the main component, such as app.jsx.
You’re finished with all the major parts and ready to launch this project! You can do so by running an npm script (npm run build) or using ./node_modules/.bin/webpack -w directly. Wait for the build to finish, and you’ll see something like this:
> router@1.0.0 build /Users/azat/Documents/Code/react-quickly/ch13/router
> webpack -w
Hash: 07dc6eca0c3210dec8aa
Version: webpack 1.12.9
Time: 2596ms
Asset Size Chunks Chunk Names
bundle.js 976 kB 0 [emitted] main
bundle.js.map 1.14 MB 0 [emitted] main
+ 264 hidden modules
In a new window, open your favorite static server (I use node-static, but you can create your own using Express), and navigate to the location in your browser. Try going to / and /#/about; the exact URL will depend on whether you’re running your static server from the same folder or a parent folder.
The full source code for this example isn’t included here, for space reasons. If you want to play with it or use it as boilerplate, or if you found the preceding snippets confusing when taken out of context, you can find the complete code at www.manning.com/books/react-quickly or https://github.com/azat-co/react-quickly/tree/master/ch13/router.
When you need routing for a single-page application, it’s straightforward to use React with other routing or MVC-like libraries. For example, Backbone is one of the most popular front-end frameworks that has front-end URL routing built in. Let’s look at how you can easily use the Backbone router to render React components by doing the following:
This is the project structure:
/backbone-router
/css
bootstrap.css
main.css
/js
bundle.js
bundle.map.js
/jsx
about.jsx
app.jsx
contact.jsx
content.jsx
login.jsx
post.jsx
posts.jsx
/node_modules
...
index.html
package.json
posts.js
webpack.config.js
package.json includes Backbone v1.3.3 in addition to the usual suspects, such as Webpack v2.4.1, React v15.5.4, and Babel v6.11:
{
"name": "backbone-router",
"version": "1.0.0",
"description": "",
"main": "index.js",
"scripts": {
"test": "echo \"Error: no test specified\" && exit 1",
"build": "./node_modules/.bin/webpack -w",
"i": "rm -rf ./node_modules && npm cache clean && npm install"
},
"author": "Azat Mardan",
"license": "MIT",
"babel": {
"presets": [
"react"
]
},
"devDependencies": {
"babel-core": "6.11.4",
"babel-loader": "6.4.1",
"babel-preset-react": "6.5.0",
"backbone": "1.3.3",
"jquery": "3.1.0",
"react": "15.5.4",
"react-dom": "15.5.4",
"webpack": "2.4.1"
}
}
The main logic’s source is in app.jsx, where you perform all three of the aforementioned tasks:
const Backbone = require ('backbone')
// Include other libraries
const Router = Backbone.Router.extend({
routes: {
'' : 'index',
'about' : 'about',
'posts' : 'posts',
'posts/:id' : 'post',
'contact' : 'contact',
'login': 'login'
},
...
})
Once the routes object is defined, you can define the methods. The values in routes must be used as method names:
// Include libraries
const Router = Backbone.Router.extend({
routes: {
'' : 'index',
'about' : 'about',
'posts' : 'posts',
'posts/:id' : 'post',
'contact' : 'contact',
'login': 'login'
},
index: function() {
...
},
about: function() {
...
}
...
})
Each URL fragment maps to a function. For example, #/about will trigger about. Thus, you can define these functions and render your React components in them. The data will be passed as a property (router or posts):
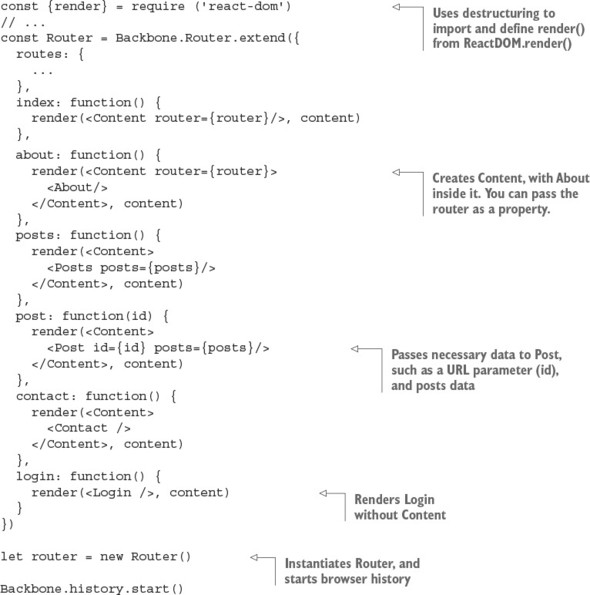
The content variable is a DOM node (which you declare before the router):
let content = document.getElementById('content')
Compared to the React Router example, nested components such as Post get their data not in props.params or props.route.posts, but in props.id and props.posts. In my opinion, that means less magic—which is always good. On the other hand, you don’t get to use declarative JSX syntax and must use a more imperative style.
The complete code for this project is available at www.manning.com/books/react-quickly and https://github.com/azat-co/react-quickly/tree/master/ch13/backbone-router. This example will give you a head start if you have a Backbone system or are planning to use Backbone. And even if you’re not planning to use Backbone, it’s shown you yet again that React is amazing at working with other libraries.
You must provide a history implementation for React Router v2.x (the one covered in this chapter) because by default it doesn’t use one. True or false?
What history implementation is better supported by older browsers: hash history or browser HTML5 pushState history?
What do you need to implement to have access to the router object in a route component when using React Router v2.x ?
How would you access URL parameters in a route component (stateless or stateful) when using React Router v2.x?
React Router requires the use of Babel and Webpack. True or false?
True. Version 1.x of React Router loaded a history implementation by default; but in version 2.x, you must provide a library, either from a standalone package or one bundled with the router library.
Hash history is better supported by older browsers.
The static class attribute contextTypes, with router as a required object.
From props.params or props.routeParams.
False. You can use it plain and/or with other build tools such as Gulp and Browserify.
This chapter covers
So far, you’ve been using React to create user interfaces. This is the most common use case for React. But most UIs need to work with data. This data comes from either a server (back end) or another browser component.
When it comes to working with data, React offers many options:
This chapter covers one of the most popular options for the third approach: Redux. Let’s start by outlining how data flows in React components.
There’s the Flux architecture, and then there’s the flux library from Facebook. I’ll be showing you Redux rather than the flux library, because Redux is more actively used in projects. flux serves as more of a proof of concept for the Flux architecture that Redux adheres to and implements. Think of Redux and flux (the library) as the two implementations of the Flux architecture. (I’ll cover the Flux architecture but not the library.)
The source code for the examples in this chapter is at www.manning.com/books/react-quickly and https://github.com/azat-co/react-quickly/tree/master/ch14 (in the ch14 folder of the GitHub repository https://github.com/azat-co/react-quickly). You can also find some demos at http://reactquickly.co/demos.
React is a view layer that’s designed to work with unidirectional data flow (see figure 14.1). A unidirectional data pattern (a.k.a. one-way binding) exists when there are no mutable (or two-way) references between concerns. Concerns are parts with different functionality. For example, a view and a model can’t have two-way references. I’ll talk about bidirectional flow again in a few moments.
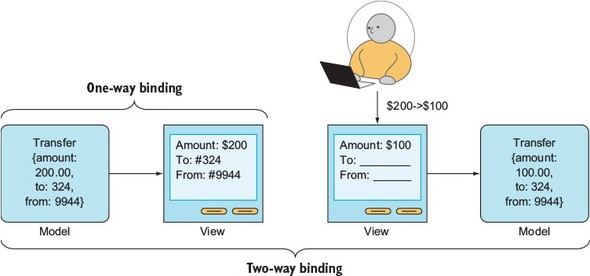
To illustrate, if you have an account model and an account view, then data can flow only from the account model to the account view and not vice versa. In other words, changes in the model will cause changes in the view (see figure 14.2). The key to understanding this is that views can’t modify models directly.
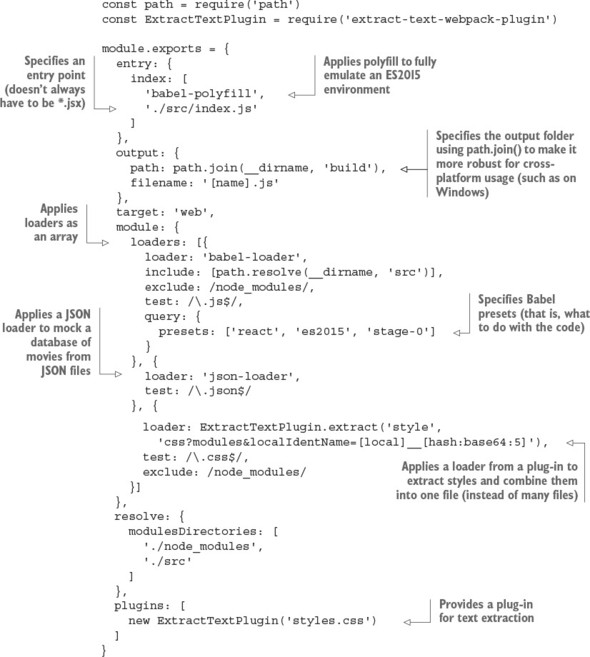
Unidirectional data flow ensures that for any given input into your components, you’ll get the same predictable result: a render() expression. This React pattern is in stark contrast to the bidirectional, two-way binding pattern of Angular.js and some other frameworks.
For example, in bidirectional data flow, changes in models cause changes in views and changes in views (user input) cause changes in models. For this reason, with bidirectional data flow, the state of a view is less predictable, making it harder to understand, debug, and maintain (see figure 14.3). The key to remember is that views can modify models directly. This is in stark contrast to unidirectional flow.
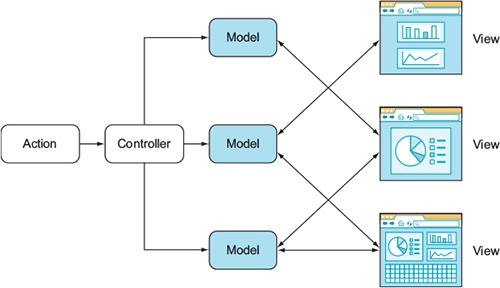
Interestingly enough, bidirectional data flow (two-way binding) is considered a benefit by some Angular developers. Without getting into a debate, it’s true that with bidirectional flow, you can write less code.
For example, let’s say you have an input field like the one shown in figure 14.1. All you need to do is define a variable in the template, and the value will be updated in the model when the user types in the field. At the same time, the value on the web page will be updated if there’s a change in the model (as a result of an XHR GET request, for example). Therefore, changes are possible in two directions: from view to model and from model to view. This is great for prototyping, but not so great for complex UIs when it comes to performance, debugging, development scaling, and so on. This may sound controversial—please bear with me.
I’ve built a lot of complex UI applications with MVC and MVW frameworks that have bidirectional flows, and they’ll do the job. In a nutshell, problems arise because various views can manipulate various models, and vice versa. That’s fine when you have one or two models and views in isolation; but the bigger the application, the more models and views are updating each other. It becomes harder and harder to figure out why one model or view is in a given state, because you can’t easily determine which models/views updated it and in which order. Traceability becomes a huge issue, as does finding bugs. That’s why the bidirectional data flow in MVC frameworks (such as Angular) isn’t favored by many developers: they find this antipattern difficult to debug and scale.
On the other hand, with unidirectional flow, the model updates the view, and that’s that. As an added bonus, unidirectional data flow allows for server-side rendering, because views are an immutable function of state (that is, isomorphic/universal JavaScript).
For now, keep in mind that unidirectional data flow is a major selling point of React:
Dan Abramov, “Live React: Hot Reloading with Time Travel” (presentation, ReactEurope 2015), http://mng.bz/uSxq.
Spike Brehm, “Isomorphic JavaScript: The Future of WebAir Apps,” Airbnb Engineering & Data Science, November 11, 2013, http://mng.bz/i34M.
Michael Jackson, “Universal JavaScript,” June 8, 2015, http://mng.bz/7GXE.
Here’s my personal experience with Angular, in case you’re curious. I worked only a little bit with Angular 1 because I thought it was lacking, but then I took a course on Angular 2—and then I realized how wrong I was. I corrected my mistake. Now I completely avoid any Angular code.
Flux (https://facebook.github.io/flux) is an architecture pattern for data flow developed by Facebook to be used in React apps. The gist of Flux is unidirectional data flow and elimination of the complexity of MVC-like patterns.
Let’s consider a typical MVC-like pattern, shown in figure 14.4. Actions trigger events in the controller, which handles models. Then, according to the models, the app renders the views, and the madness begins. Each view updates the models—not just its own model, but the other models too—and the models update the views (bidirectional data flow). It’s easy to get lost in this architecture. The architecture is difficult to understand and debug.
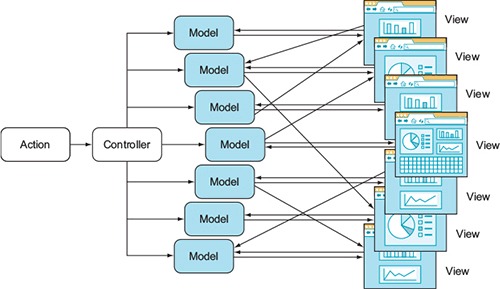
Conversely, Flux suggests using a unidirectional data flow, as shown in figure 14.5. In this case, you have actions from views going through a dispatcher, which in turn calls the data store. (Flux is a replacement for MVC. This isn’t just new terminology.) The store is responsible for the data and the representation in the views. Views don’t modify the data but have actions that go through the dispatcher again.
The unidirectional data flow enables better testing and debugging. A more detailed diagram of the Flux architecture is shown in figure 14.6.
Historically, Flux was an architecture. Only later did the Facebook team release the flux module (www.npmjs.com/package/flux, https://github.com/facebook/flux) that can be used with React to implement Flux. The flux module is more or less a proof of concept for the Flux architecture, and React developers rarely use it.
There’s no reason for me to duplicate the great minds who have already spoken about Flux. I suggest that you watch the video “Hacker Way: Rethinking Web App Development at Facebook,” from the official Flux website: http://mng.bz/wygf.
Personally, I find Flux confusing—and I’m not alone. There are many implementations of Flux, including Redux, Reflux, and other libraries. Early Manning Access Program readers of this book know that Reflux was included in the first version of the book, but I omitted it from this version. My anecdotal evidence, David Waller’s “React.js architecture - Flux vs. Reflux” at http://mng.bz/5GHx, and the hard data from numbers of npm downloads all indicate that Redux is more popular than Flux or Reflux. In this book, I use Redux, which some argue is a better alternative to Flux.
Redux (redux, www.npmjs.com/package/redux) is one of the most popular implementations of the Flux architecture. Redux has these qualities:
I won’t take time to go over all the details of why Redux is better than Flux. If you’re interested, you can read some thoughts by the author of Redux: “Why Use Redux over Facebook Flux?” at http://mng.bz/z9ok.
Redux is a standalone library that implements a state container. It’s like a huge variable that contains all the data your application works with, stores, and changes in the runtime. You can use Redux alone or on the server. As already mentioned, Redux is also popular in combination with React; this combination is implemented in another library, react-redux (https://github.com/reactjs/react-redux).
A few moving parts are involved when you use Redux in your React apps:
Look back at the Flux architecture diagram in figure 14.5: you can see why there’s a store. The only way to mutate the internal state is to dispatch an action, and actions are in the store.
Every change in the store is performed via actions. Each action tells your application what happened and what part of the store should be changed. Actions can also provide data; you’ll find this useful because, well, every app works with data that changes.
The way the data in the store changes is specified by reducers that are pure functions. They have a (state, action) ⇒ state signature. In other words, by applying an action to the current state, you get a new state. This allows for predictability and the ability to rewind actions (via undo and debugging) to previous states.
Here’s the reducer file for a Todo list app in which SET_VISIBILITY_FILTER and ADD_TODO are actions:[4]
Object.assign(), http://mng.bz/O6pl.

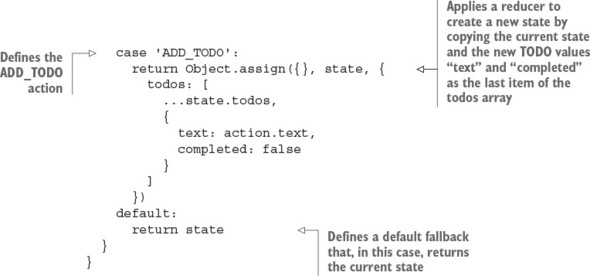
You may have one or many reducers (or none) in your Redux application. Every time you call an action, every reducer is called. Reducers are responsible for changing the data in the store; this is why you need to be careful about what they do during certain types of actions.
Typically, a reducer is a function with state and an action as arguments. For example, an action can be “to fetch a movie” (FETCH_MOVIE), which you get by using a reducer. The action code describes how an action transforms the state into the next state (adds a movie to the state). This reducer function contains a huge switch/case statement to process actions. But there’s a handy library that makes reducers more functional and—surprise!—easier to read. The library is called redux-actions, and you’ll see how to use it instead of switch/case.
Redux creator Dan Abramov (https://github.com/gaearon) suggests the following before-bed reading about Redux: “Why Use Redux Over Facebook Flux?” (http://mng.bz/9syg) and “What Could Be the Downsides of Using Redux Instead of Flux” (http://mng.bz/Ux9l).
We all like good old Hollywood movies, right? Let’s make an app that shows a list of classic movies: that is, a Netflix clone (but only the home page—no streaming or anything like that). The app will display a grid of movies (see figure 14.7); and when you click a movie’s image, you’ll see a detailed view (figure 14.8).
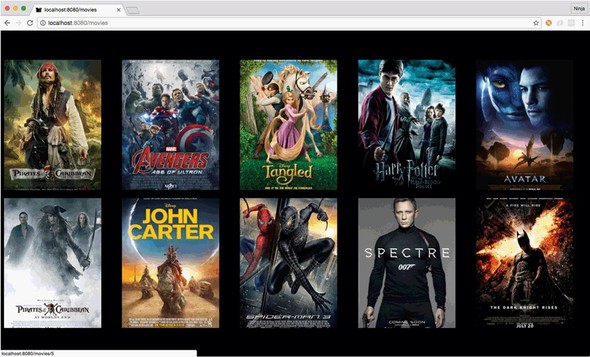
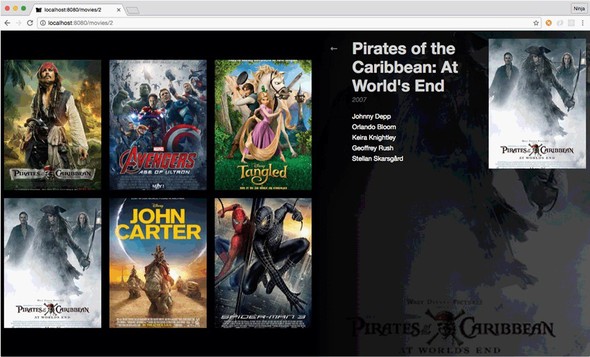
The goal of this tutorial is to learn how to use Redux in a real-life scenario to feed data to React components. This data will come from a JSON file to keep things simple. Each individual movie’s detail view will be facilitated with React Router, which you learned about in the previous chapter.
The project will have three components: App, Movies, and Movie. Each component will have a CSS file and live in its own folder for better code organization (that’s the best practice to encapsulate React components together with styles). The project structure is as follows:

Now that the project’s folder structure is ready, let’s look at the dependencies and build configuration.
You need to set up a number of dependencies for this project. You’ll use Webpack (https://github.com/webpack/webpack) to bundle all the files for live use and an additional plug-in called extract-text-webpack-plugin to bundle styles from multiple <style> includes (inline) into one style.css. Webpack loaders are also used in the project:
Other project development dependencies modules include the following:
The package.json file lists all dependencies, Babel configs, and npm scripts and should contain at least the data shown in the following listing (ch14/redux-netflix/package.json). As always, you can install modules manually with npm i NAME, type package.json, and run npm i, or copy package.json and run npm i. Make sure you use the exact versions of the libraries from package.json; otherwise, your code might break.

Because you use Webpack to bundle the dependencies, all of the necessary packages are in bundle.js. For this reason, you put all the dependencies in devDependencies. (I’m picky about what’s deployed—I don’t want any unused modules in my deployment environment just sitting idly and causing security vulnerabilities.) npm ignores devDependencies when the --production flag is used, as in npm i --production.
Next, let’s define the build process by creating webpack.config.js (ch14/redux-netflix/webpack.config.js).

Enough with configurations. In the next section, you’ll start working with Redux.
To make Redux work in your React application, the hierarchy of components needs the Provider component at the top level. This component comes from the react-redux package and injects data from the store into components. That’s right: using Provider as the top-level component means all children will have the store. Neat.
To make Provider work, you need to provide the store to its store property. The Store is an object that represents the application state. Redux (react-redux) comes with a createStore() function that takes reducer(s) from ch14/redux-netflix/scr/modules/index.js and returns the Store object.
To render the Provider component and its entire subtree of components, you use react-dom’s render(). It takes the first argument (<Provider>) and mounts it into the element you pass as the second argument (document.getElementById('app')).
Combining all of this, the entry point of your application should now look like the following listing (ch14/redux-netflix/index.js). You define Provider by passing a Store instance (with reducers) in a JSX format.
const React = require('react')
const { render } = require('react-dom')
const { Provider } = require('react-redux')
const { createStore } = require('react-redux')
const reducers = require('./modules')
const routes = require('./routes')
module.exports = render((
<Provider store={createStore(reducers)}>
{routes}
</Provider>
), document.getElementById('app'))
For the entire application to be able to use Redux features, you need to implement some code in child components, such as connecting the store. The connect() function from the same react-redux package accepts a few arguments. It returns a function that then wraps your component so it can receive certain parts of the store into its properties. You’ll see it in a bit.
You’re finished with index.js. The Provider component takes care of delivering data from the store to all the connected components, so there’s no need to pass properties directly. But a few parts are missing, such as routes, reducers, and actions. Let’s look at them one by one.
With react-router, you can declare a hierarchy of components per browser location. I covered React Router in chapter 13, so it should be familiar; you used it for client-side routing. React routing is not strictly connected with server-side routes, but sometimes you may want to use it for that, especially in conjunction with techniques discussed in chapter 16.
The gist of React Router is that every route can be declared by a couple of nested Route components, each of which takes two properties:
You need to show a collection of movie covers at both the root and /movies locations. In addition, you need to show the details of a given movie at the /movies/:id location. The route configuration uses IndexRoute, as shown next (ch14/redux-netflix/src/routes.js).
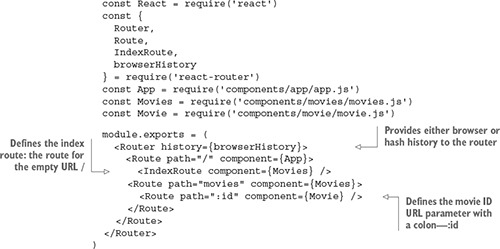
Both IndexRoute and Route are nested into the topmost route. This makes the Movies component render for both the root and /movies locations. The individual movie view needs a movie ID to fetch info about that particular movie from the Redux store, so you define the path with a URL parameter. To do so, use the colon syntax: path=":id". Figure 14.9 shows how the individual view and its URL look on a small screen, thanks to responsive CSS. Notice that the URL is movies/8, where 8 is a movie ID. Next, you’ll see how to fetch the data with Redux reducers.

Let’s look at the modules the createStore() function in src/index.js is applied to:
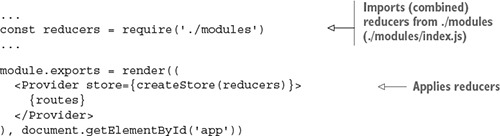
What does this do? You need to store movie data in the store. Perhaps in the future you’ll implement additional parts of the store, such as user accounts or other entities. So let’s use Redux’s feature that allows you to create as many distinct parts of the store as you need, although you need only one at the moment. In a way, you’re creating a better architecture by performing this middle step of combining reducers so that later, you can extend your app effortlessly by adding more reducers to ./modules/index.js (or ./modules), using the plug-in Node pattern.[5] This approach is also called splitting reducers (http://mng.bz/Wprj).
Azat Mardan, “Node Patterns: From Callbacks to Observer,” webapplog, http://mng.bz/p9vd.
Each reducer can change data in the store; but to make this operation safe, you may need to divide the application state into separate parts and then combine them into a single store. This divide-and-conquer approach is recommended for larger apps in which you’ll have increasing numbers of reducers and actions. You can easily combine multiple reducers with the combineReducers() function from redux (ch14/redux-netflix/src/modules/index.js).
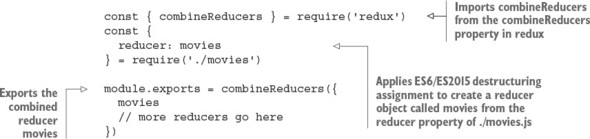
You can pass as many reducers as you like and create independent branches in the store. You can name them as you like. In this case, the movies reducer is imported and then passed into the combineReducers() function as a property of a plain object with the key "movies".
This way, you declare a separate part of the store and call it “movies.” Every action that the reducer from ./movies is responsible for will touch only this part and nothing else.
Next, let’s implement the “movies” reducer. A reducer, in Redux, is a function that runs every time any action is dispatched. It’s executed with two arguments:
In other words, the reducer inputs are results of previous actions: the current state (state) and a current action (action). The reducer takes the current state and applies the action. The result of a reducer is a new state. If your reducers are pure functions without side effects (which they should be), you get all the benefits of using Redux with React, such as hot reloading and time travel.
The term reducers comes from functional programming. JavaScript has a somewhat functional nature, so it has Array.reduce().
In a nutshell, a reduce method is an operation that summarizes a list of items so that the input has multiple values and the output has a single value. The list on which a reducer works can be an array, as is the case with JavaScript, or it can be another data structure like a list, as is the case outside of JavaScript.
For example, you can return the number of occurrences of a name in a list of names. The list of names is the input, and the number of occurrences is the output.
To use a reducer, you call a method and pass a reducing function that accepts the following:
With each iteration over the items in the list (or array in JS), the reducer function gets the accumulator value. In JavaScript, the method is Array.reduce(). For example, to get a name frequency, you can run the following reducer code, which uses a ternary if the current value (curr) is “azat” and then adds 1 to the accumulator (acc):[6]
For detailed documentation of Array.prototype.reduce(), see the Mozilla Developer Network, http://mng.bz/Z55j.
const users = ['azat', 'peter', 'wiliam','azat','azat']
console.log(users
.reduce((acc, curr)=>(
(curr == 'azat') ? ++acc : acc
), 0)
)
In Redux reducers, the accumulator value is the state object, and the current value is the current action. The function result is the new state.
Avoid putting API calls into reducers. Remember, reducers are supposed to be pure functions with no side effects. They’re state machines; they shouldn’t do asynchronous operations such as HTTP calls to an API. The best place to put these types of async calls is in middleware (http://redux.js.org/docs/advanced/Middleware.html) or the dispatch() action creator (http://mng.bz/S31I; an action creator is a function that creates actions). You’ll see dispatch() in a component later in this chapter.
A typical reducer is a function containing a huge switch/case statement:
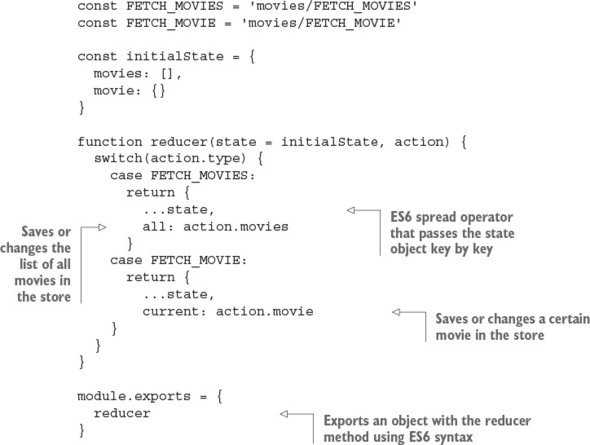
But using switch/case is considered a bad practice by the luminary Douglas Crockford in his classic JavaScript: The Good Parts (O’Reilly Media, 2008). There’s a handy redux-actions library (https://github.com/acdlite/redux-actions) that can bring this reducer function into a cleaner, more functional form. Instead of a huge switch/case statement, you can use a more robust object.
Let’s use handleActions from redux-actions. It takes a map-like plain object, where keys are action types and values are functions. This way, only a single function is called per action type; in other words, this function is cherry-picked by action type.
The function from the previous snippet can be rewritten with redux-actions and handleActions as shown next (ch14/redux-netflix/src/modules/movies.js).
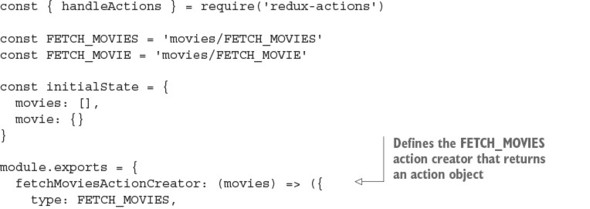
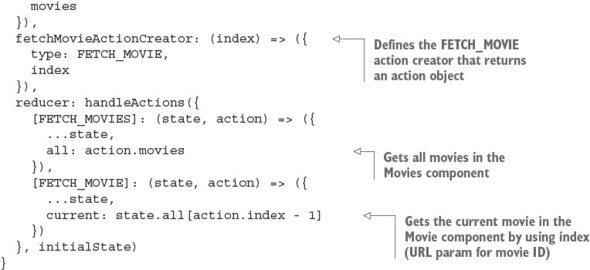
This code looks similar to switch/case, but it’s more about mapping functions to actions than selecting them in a potentially huge conditional statement.
To change data in the store, you use actions. To clarify, an action can be anything, not just user input in a browser. For example, it could be the result of an async operation. Basically, any code can become an action. Actions are the only sources of information for the store; this data is sent from an app to the store. Actions are executed via store.dispatch(), which I mentioned earlier, or via a connect() helper. But before we look at how to call an action, let’s cover its type.
Every action is represented by a plain object that has at least one property: type. It can have as many other properties as you want, usually to pass data into the store. So, every action has a type, like this:
{
type: 'movies/I_AM_A_VALID_ACTION'
}
Here, the action type is a string.
It’s common to name actions using uppercase letters preceded by the module name in lowercase letters. You can omit the module name if you’re sure duplicates will never occur.
In modern Redux development, action types are declared as constant strings:
const FETCH_MOVIES = 'movies/FETCH_MOVIES' const FETCH_MOVIE = 'movies/FETCH_MOVIE'
Here, two action types are declared. Both are strings that consist of two parts: the name of the Redux module and the name of the action type. This practice may be useful when you have different reducers with similarly named actions.
Every time you want to change the application state, you need to dispatch a corresponding action. An appropriate reducer function is executed, and you end up with the updated application state. Think about data that you receive from an API or a form a user fills in: it all can be placed or updated in the store. Here’s an example:
this.props.dispatch({
type: FETCH_MOVIE,
movie: {}
})
This is the series of steps:
More on dispatching later. Let’s see how you can avoid passing/using action types in your components.
To change anything in the store, you need to run an action through all the reducers. A reducer then changes the application state based on the action type. For this reason, you always need to know the action type. But a shortcut lets you conceal action types under action creators. Overall, the steps are as follows:
Check this out:
this.props.dispatch(fetchMoviesActionCreator({movie: {}}))
Simply put, an action creator is a function that returns an action. It’s as straightforward as this:
function fetchMoviesActionCreator(movies) {
return {
type: FETCH_MOVIES,
movies
}
}
With action creators, you can hide complex logic in a single function call. In this case, though, there’s no logic. The only operation this function performs is returning an action: a plain object with a type property that defines this action and also a movies property that has the value of an array of movies. If you were to extend the Netflix clone so it could add a movie, you’d need an addMovie() action creator:
function addMovie(movie) {
return {
type: ADD_MOVIE,
movie
}
}
Or how about watchMovie()?
function watchMovie(movie, watchMovieIndex, rating) {
return {
type: WATCH_MOVIE,
movie,
index: watchMovieIndex,
rating: rating,
receivedAt: Date.now()
}
}
Remember, an action must have the type property!
To be able to dispatch actions, you must connect components to the store. This is getting more interesting, because you’re close to state updates.
Now that you’ve learned how to put data into the store, let’s see how you can access store data from components. Luckily, the Provider component has a feature to bring the data into your components in properties. But to access the data, you’ll need to connect your component to the store explicitly.
By default, a component isn’t connected to a data store; and having it somewhere in the hierarchy of the topmost Provider component isn’t enough. Why? Well, think of connecting as an explicit opt-in for certain components.
If you remember, there are two types of components, according to React best practices: presentational (dumb) and container (smart), as discussed in chapter 8. Presentational components should not need the store; they should just consume properties. At the same time, container components need the store and the dispatcher. Even the definition of container components in the Redux documentation specifies that they subscribe to the store (http://mng.bz/p4f9). All Provider is doing is providing a store for all components automatically so that some of them can subscribe/connect to it. Thus, for container components, you need both Provider and the store.
To sum up, a connected component can access any data from the store in its properties. How do you connect components to the store? With the connect() method, of course! Confused? Let’s look at an example. Think about your root component, App. It will use Movies, which at minimum should have this code to display the list of movies (the actual Movies component has a bit more code):
class Movies extends React.Component {
render() {
const {
movies = []
} = this.props
return (
<div className={styles.movies}>
{movies.map((movie, index) => (
<div key={index}>
{movie.title}
</div>
))}
</div>
)
}
}
Currently, the Movies component isn’t connected to the store despite having Provider as a parent. Let’s connect it by adding the following snippet. The connect() function comes with the react-redux package and accepts up to four arguments, but you’ll use just one at the moment:
const { connect } = require('react-redux')
class Movies extends React.Component {
...
}
module.exports = connect()(Movies)
The connect() function returns a function that’s then applied to the Movies component. As a result not of exporting Movies but of calling connect() with Movies, and having Provider as a parent, the Movies component becomes connected to the store.
Now the Movies component can receive any data from the store and dispatch actions (you didn’t see this coming, did you?). But to receive the data in the format you need, you must map the state to component properties by creating a simple mapper function (expression is a more precise term, because you need to return the result).
In some tutorials, you may see a function called mapStateToProps(), although it doesn’t have to be an explicitly declared function. Using an anonymous arrow function is just as clean and straightforward. This mapper function goes into a special method, connect(), from your favorite react-redux. Remember, state is the first argument of connect():
module.exports = connect(function(state) {
return state
})(Movies)
Or, here’s the fancy, hipster, ESNext React-friendly implicit return style:
module.exports = connect(state => state)(Movies)
With this setup, you take the entire application state from the store and put it into the properties of the Movies component. You’ll find that, usually, you need only a limited subset of the state. In the example, Movies only needs movies.all:
class Movies extends React.Component {
render() {
const {
children,
movies = [],
params = {}
} = this.props
...
module.exports = connect(({movies}) => ({
movies: movies.all
}), {
fetchMoviesActionCreator
})(Movies)
And this is the Movie snippet, which only maps movies.current from the state:
class Movie extends React.Component {
render() {
const {
movie = {
starring: []
}
} = this.props
...
module.exports = connect(({movies}) => ({
movie: movies.current
}), {
fetchMovieActionCreator
})(Movie)
You’ll also see that if the store is empty, the component won’t receive any extra properties, because, well, there aren’t any.
Some Redux magic happens next: every time part of the store is updated, all components that depend on that part receive new properties and therefore are re-rendered. This happens when you dispatch an action, which means your components are now loosely interdependent and update only when the store is updated. Any component can cause this update by dispatching a proper action. There’s no need to use classic callback functions passed as properties and stream them from the topmost component down to the most deeply nested; just connect your components to the store.
To apply changes to data in the store, you need to dispatch an action. Once you’ve connected the component to the store, you can receive properties mapped to certain properties of the application state, and you also receive the dispatch property.
The dispatch() method is a function that takes an action as an argument and dispatches (sends) it into the store. Hence, you can dispatch an action by invoking this.props.dispatch() with an action:
componentWillMount() {
this.props.dispatch({
type: FETCH_MOVIE,
movie: {}
})
}
type is a string value that the Redux library applies to all reducers matching this type. After the action has been dispatched, which usually means you’ve changed the store, all components that are connected to the store and that have properties mapped from the updated part of the application state are rerendered. There’s no need to check whether components should update or do anything at all. You can rely on new properties in components’ render() function:
class Movie extends React.Component {
render() {
const {
movie = {
starring: []
}
} = this.props
...
You can replace a bare action (an object with type) with an action creator (the fetchMovieActionCreator() function):
const fetchMovieActionCreator = (response) => {
type: FETCH_MOVIE,
movie: response.data.data.movie
}
...
componentWillMount() {
... // Make AJAX/XHR request
this.props.dispatch(fetchMovieActionCreator(response))
}
Because fetchMovieActionCreator() returns a plain object that’s identical to the object in the previous example (type and movie keys), you can call this action-creator fetchMovieActionCreator() function and pass the result to dispatch():
You can define action creators as functions right in the component file, but there’s another way to use action creators: you can define them in a module, import them, and put them into component properties. To do that, you can use the second argument of the connect() function and pass your action creator as a method:

Now you can refer to fetchMovieActionCreator() via properties and pass an action without using dispatch(), like this:
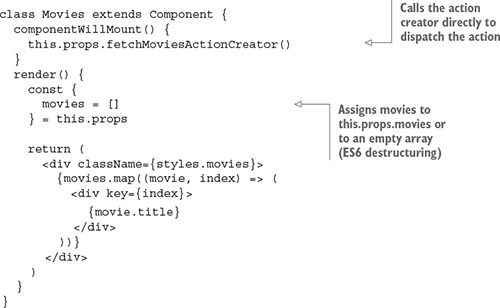
This new action creator is automatically wrapped in a valid dispatch() call. You don’t need to worry about doing it yourself. Awesome! This is how the Movies component is implemented in ch14/redux-netflix/src/components/movies/movies.js.
For clarity, you can rename fetchMoviesActionCreator() as fetchMovies() or do this:

The first argument to connect(), which is a function that maps state to component properties, takes the entire state (state) as the only argument and returns a plain object with a single property, movies:
...
module.exports = connect(state => ({
movies: state.movies.all
}), {
fetchMoviesActionCreator
})(Movies)
You can make the code more eloquent by destructuring state.movies:
module.exports = connect(({movies}) => ({
movies: movies.all
}), {
fetchMoviesActionCreator
})(Movies)
In the render() function of the Movies component, the value of movies is obtained from properties and is rendered into a collection of sibling DOM elements. Each is a div element with its inner text set to movie.title. This is a typical approach to rendering an array into a fragment of sibling DOM elements.
Wonder what the final Movies component looks like? Here’s the code (ch14/redux-netflix/src/components/movies/movies.js).
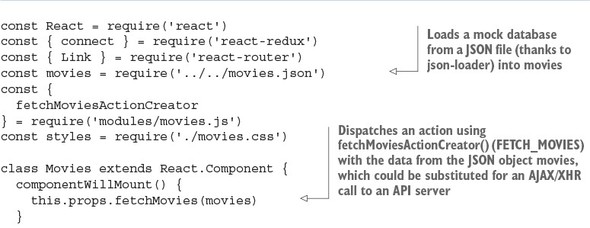
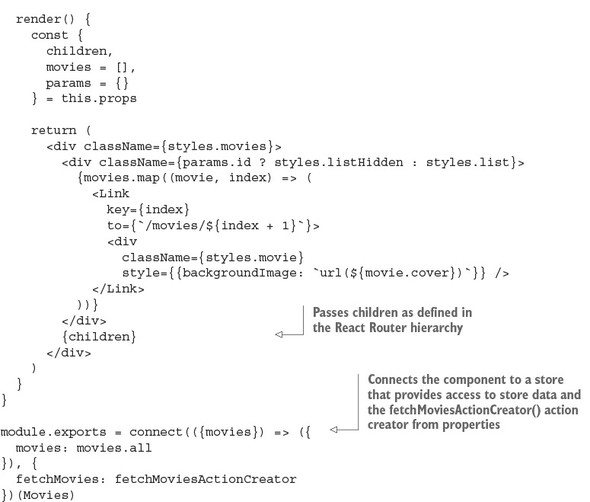
As you can see, swapping for async data is straightforward: make an async call (using the fetch() API, axios, and so on), and then dispatch an action in componentWillMount(). Or even better, let’s use componentDidMount(), which is recommended by the React team for AJAX/XHR calls:
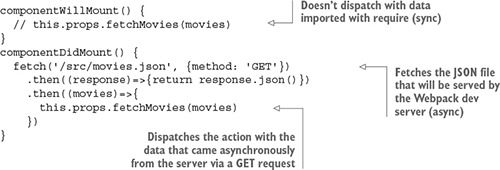
And you can do the same thing with POST, PUT, and other HTTP calls that you did with GET. You’ll be making some of these calls in the next chapter.
We’re finished with Movies. Next, we’ll cover the Movie component—but only briefly, because much of the Redux wiring is similar to that in Movies. What’s different is that Movie will get the URL parameter’s movie ID. React Router puts it in this.props.params.id. This ID will be sent via action dispatch and used in the reducer to filter out only a single movie. As a reminder, these are the reducers from src/modules/movies.js:
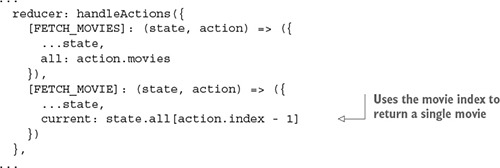
Now, let’s look at the implementation of Movie, which uses a different state-to-properties mapping by taking a movie ID from a React Router’s URL parameter and using it as an index (src/components/movie/movie.js).
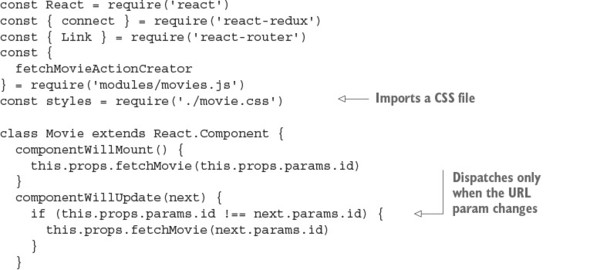
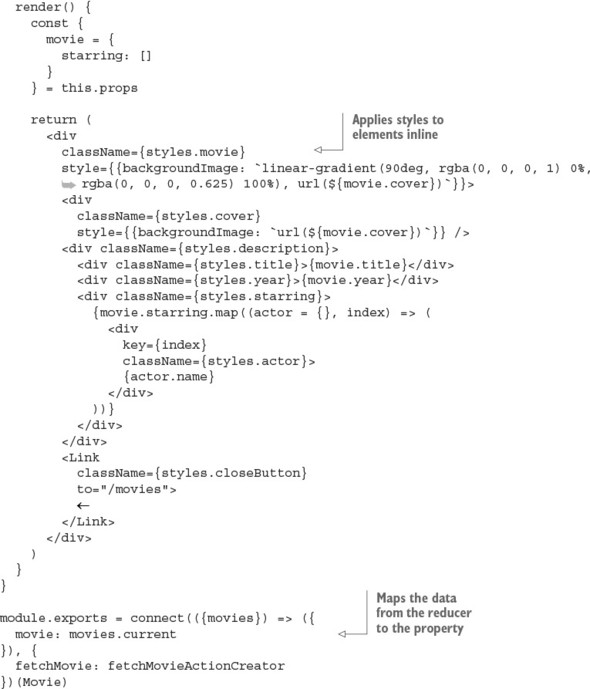
It’s time to run the project. Of course, you could have done it in the beginning, because the start script is in package.json. This script uses an npm library concurrently to run two processes at the same time: Webpack build in watch mode and Webpack development server (port 8080):
"start": "concurrently \"webpack --watch --config webpack.config.js\"
Navigate to the project root (ch14/redux-netflix). Install the dependencies with npm i, and run the project from the project folder: npm start. Open your favorite browser at http://localhost:8080.
Click around to see that the routing is working and the images are loading regardless of whether you used mock data (require()) or loaded it via the GET request. Notice that if you’re at http://localhost:8080/movies/1 and refresh the page, you don’t see anything. You’ll take care of that in the next chapter, where you’ll implement Node and Express server to support hash-less URLs. Now it’s time to wrap up this chapter.
Redux provides a single place to store an entire application’s data; the only way to change the data is through actions. This makes Redux universal—you can use it anywhere, not only in React apps. But with the react-redux library, you can use the connect() function to connect any component to the store and make it react to any change there.
This is the basic idea of reactive programming: an entity A that observes changes in entity B reacts to those changes as they occur, but the opposite is not true. Here, A is any of your components, and B is the store.
As you connect (connect()) the component and map properties of the store to a component’s properties (this.props), you can refer to the latter in the render() function. Usually, you need to first update the store with data to refer to that data. This is why you call an action in a component’s componentWillMount() function. By the time the component is mounted for the first time and render() is called, the part of the store that the component refers to may be empty. But once the store data is updated, it’s preserved. This is why in the Netflix clone example, the list of movies remains intact even after you navigate across the app’s locations (pages or views). Yes. Data doesn’t disappear from the store after a component is unmounted, unlike when you use the component’s state (remember this.state() and this.setState()?). Thus, your Redux store can serve different parts of your application that require the same data without the data having to be reloaded.
It’s also safe to update component properties in the render() function via the store by dispatching an action, because this operation is deferred. On the other hand, without Redux, you can’t use setState() at any point when the component may be updated: render(), componentWillMount(), or componentWillUpdate(). This feature of Redux adds to its flexibility.
Name the two main arguments of a reducing function (callback) to the Array.reduce() method in JavaScript.
Redux offers simplicity, a larger ecosystem, and a better developer experience than Facebook Flux (flux). True or false?
Which of the following would you use to create a store and provider? new Provider (createStore(reducers)), <Provider store={createStore(reducers)}>, or provider(createStore(reducers))
Redux needs a dispatcher because that’s what Flux defines. True or false?
In this project, movies.all fetches all movies, and movies.current fetches the current movie. They’re used in the Movies and Movie components, respectively, in the connect call. Where do you define the logic of movies.all and movies.current?
The accumulator value and the current value are the two primary arguments. Without them, you can’t summarize a list.
True. See the introduction to this chapter and Dan Abramov’s post “Why Use Redux over Facebook Flux?” on Stack Overflow (http://mng.bz/z9ok).
<Provider store={createStore(reducers)}>
False. Redux adheres to Flux but doesn’t require a dispatcher, so Redux is simpler to implement.
In src/modules/movies.js, in reducers.
This chapter covers
In chapter 14, you implemented a Netflix clone with Redux. The data came from a JSON file, but you could instead have used a RESTful API call using axios or fetch(). This chapter covers one of the most popular options for providing data to a front-end app: GraphQL.
Thus far, you’ve been importing a JSON file as your back-end data store or making RESTful calls to fetch the same file to emulate a GET RESTful endpoint. Ah, mocking APIs. This approach is good for prototyping, because you have the front end ready; when you need persistent storage, you can replace mocks with a back-end server, which is typically a REST API (or, if you really have to, SOAP[1]).
Imagine that the Netflix clone API has to be developed by another team. You agree on the JSON (or XML) data format over the course of a few meetings. They deliver. The handshake is working, and your front-end app gets all the data. Then, the product owners talk to the clients and decide they want a new field to show stars and ratings for movies. What happens when you need an extra field? You must implement a new movies/:id/ratings endpoint, or the back-end team needs to bump up the version of the old endpoint and add an extra field.
Maybe the app is still in the prototyping phase. If so, the field could probably be added to the existing movies/:id. It’s easy to see that over time, you’ll get more requests to change formats and structure. What if ratings must appear in movies as well? Or, what if you need new nested fields from other collections, such as friend recommendations? In the age of rapid agile development and lean startup methodology, flexibility is an advantage. The faster these fields and data can be adapted to the end product, the better. An elegant solution called GraphQL clears many of these hurdles.
The source code for the examples in this chapter is at www.manning.com/books/react-quickly and https://github.com/azat-co/react-quickly/tree/master/ch15. You can also find some demos at http://reactquickly.co/demos.
In this chapter, you’ll continue developing the Netflix clone by adding a server to it. This server will provide a GraphQL API, a modern way of exposing data to React apps. GraphQL is often used with Relay; but as you’ll see in this example, you can use it with Redux or any other browser data library. You’ll use axios for the AJAX/XHR/HTTP requests.
When you work with GraphQL and Redux, the server (back end and web server) can be built using anything (Ruby, Python, Java, Go, Perl), not necessarily Node.js; but Node is what I recommend, and that’s what you’ll use in this section because it lets you use JavaScript across the entire development tech stack.
In a nutshell, GraphQL (https://github.com/graphql/graphql-js) uses query strings that are interpreted by a server (typically Node), which in turn returns data in a format specified by those queries. The queries are written in a JSON-like format:
{
user(id: 734903) {
id,
name,
isViewerFriend,
profilePicture(size: 50) {
uri,
width,
height
}
}
}
And the response is good-old JSON:
{
"user" : {
"id": 734903,
"name": "Michael Jackson",
"isViewerFriend": true,
"profilePicture": {
"uri": "https://twitter.com/mjackson",
"width": 50,
"height": 50
}
}
}
The Netflix clone server could use REST or older SOAP standards. But with the newer GraphQL pattern, you can reverse control by letting clients (front-end or mobile apps) dictate what data they need instead of coding this logic into server endpoints/routes. Some of the advantages of this inverted approach are as follows:[2]
For more on the advantages of GraphQL, such as strong typing, see Nick Schrock, “GraphQL Introduction,” React, May 1, 2015, http://mng.bz/DS65.
You can also consume a GraphQL API in a React application using Relay (https://facebook.github.io/relay; graphql-relay-js and react-relay on npm). Some developers prefer to use Relay instead of Redux when working with a GraphQL back end. If you look at the examples provided in the documentation, you may see a similarity to how Redux connects components; and instead of a store, you have a remote GraphQL API.
Whereas React allows you to define views as components (UI) by composing many simple components to build complex UIs and apps, Relay lets components specify what data they need so the data requirements become localized. React components don’t care about the logic and rendering of other components.
The same is true with Relay: components keep their data closer to themselves, which allows for easier composition (building complex UIs and apps from simple components).
Relay Modern is the latest version of Relay. It’s easier to use and more extensible.[3] If you or your team plan to use GraphQL seriously, then I highly recommend looking into Relay/Relay Modern as well.
To deliver data to your React app, you’ll use a simple server made with Express (https://github.com/expressjs/express) and GraphQL. Express is great at organizing and exposing API endpoints, and GraphQL takes care of making your data accessible in a browser-friendly way, as JSON.
The project structure is as follows (you’ll reuse a lot of code from redux-netflix):
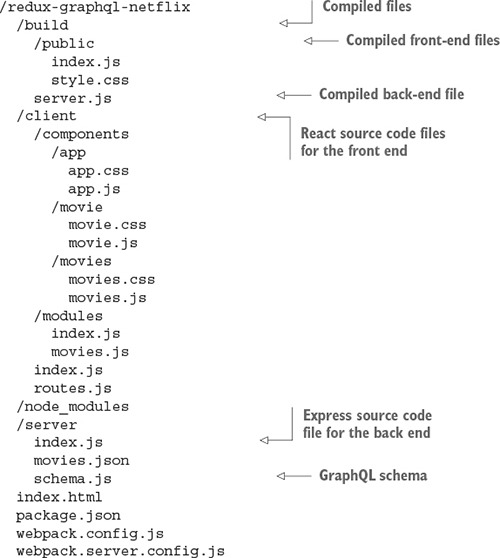
The data will still be taken from a JSON file, but this time it’s a server file. You can easily replace the JSON file movies.json with database calls in server/schema.js. But before we discuss schemas, let’s install all the dependencies, including Express.
The following listing shows the package.json file (ch15/redux-graphql-netflix/package.json). Do you know what to do? Copy it and run npm i, of course!
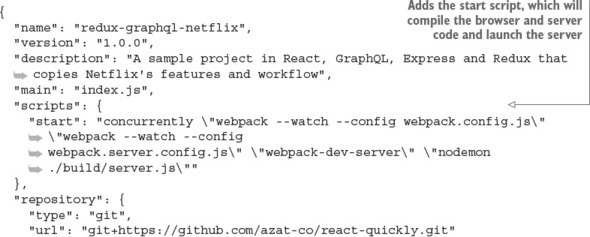
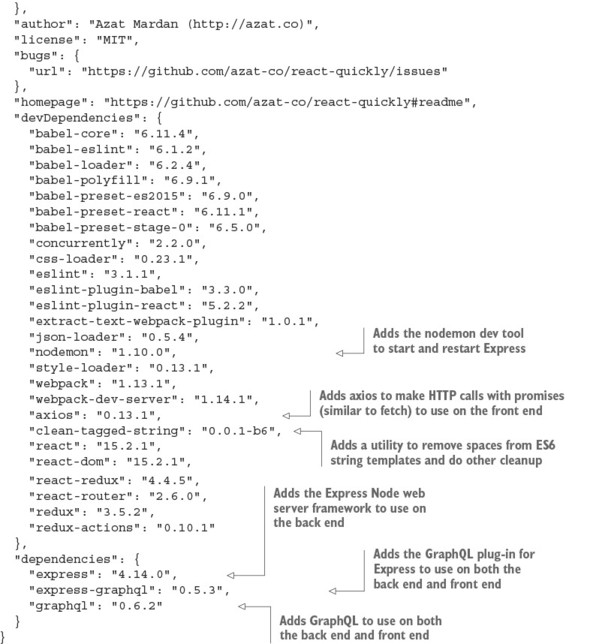
Next, you’ll implement the main server file server/index.js.
The powerhouse of the web server implemented with Express and Node is its starting point (sometime referred to as an entry point): index.js. This file is in the server folder because it’s used only on the back end and must not be exposed to clients, for security concerns (it can contain API keys and passwords). The file’s high-level structure is as follows:
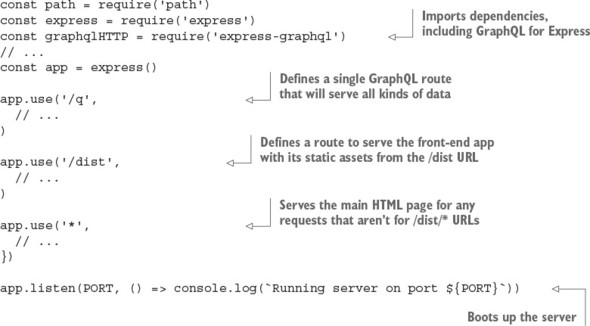
Let’s fill in the missing pieces. First, keep in mind that you need to deliver the same file, index.html, for every route except the API endpoint and bundle files. This is necessary because when you use the HTML5 History API and go to a location using a hash-less URL like /movies/8, refreshing the page will make the browser query that exact location.
You’ve probably noticed that in the previous Netflix clone version, when you refreshed/reloaded the page on an individual movie (such as /movies/8), it didn’t show you anything. The reason is that you need to implement something additional for browser history to work. This code must be on the server, and it’s responsible for sending out the main index.html file on all requests (even /movies/8/).
In Express, when you need to declare a single operation for every route, you can use * (asterisk):
app.use('*', (req, res) => {
res.sendFile('index.html', {
root: PWD
})
})
Sending the HTML file per any location (* URL pattern) doesn’t do the trick. You’ll end up with 404 errors, because this HTML includes references to compiled CSS and JS files (/dist/styles.css and /dist/index.js). So, you need to catch those locations first:
app.use('/dist/:file', (req, res) => {
res.sendFile(req.params.file, {
root: path.resolve(PWD, 'build', 'public')
})
})
As an alternative, I recommend that you use using a piece of Express middleware called express.static(), like this:
app.use('/dist',
express.static(path.resolve(PWD, 'build', 'public'))
)
For more information about middleware and tips on Express, refer to appendix c and my books Pro Express.js (Apress, 2014) and Express Deep API Reference (Apress, 2014).
The importance of having the public folder inside build cannot be overstated. If you don’t restrict the act of serving resources (such as files) to a subfolder (such as dist or public), then all of your code will be exposed to anyone who visits the server. Even back-end code such as server.js can be exposed if you forego using a subfolder. For example, this
// Anti-pattern. Don't do this or you'll be fired
app.use('/dist',
express.static(path.resolve(PWD, 'build'))
)
will expose server.js to attackers—and it might contain secrets, API keys, passwords, and the details of implementation over the /dist/server.js URL.
By using a subfolder such as dist or public, exposing only it to the world (over HTTP), and putting only the front-end files in this exposed subfolder, you can restrict unauthorized access to other files.
For the GraphQL API to work, you need to set up one more route (/q) in which you use the graphqlHTTP library along with a schema (server/schema.js) and session (req.session) to respond with data:
app.use('/q', graphqlHTTP(req => ({
schema,
context: req.session
})))
And finally, to make the server work, you need to make it listen to incoming requests on a certain port:
app.listen(PORT, () => console.log(`Running server on port ${PORT}`))
Here, PORT is an environment variable. It’s a variable that you can pass into the process from the command-line interface, like this:
PORT=3000 node ./build/server.js
Recall that in package.json, you use nodemon:
nodemon ./build/server.js
Using nodemon is the same as running node, but nodemon will restart the code if you made changes to it.
In chapter 14, you used port 8080, because that’s the default value for the Webpack Development Server. There’s nothing wrong with using 8080 for this example’s Express server, but for some weird historical reason, the convention emerged that Express apps run on port 3000. Maybe we can blame Rails for that!
The server also uses another variable declared in uppercase: PWD. It’s an environment variable, too, but it’s set by Node to the project directory: that is, the path to the folder where the package.json file is located, which is the root folder of your project.
And finally, you use the graphqlHTTP and schema variables. You receive graphqlHTTP from the express-graphql package, and schema is your data schema built using GraphQL definitions.
The following listing shows the complete server setup (ch15/redux-graphql-netflix/server/index.js).

GraphQL is strongly typed, meaning it uses schemas as you saw in /q. The schema is defined in server/schema.js, as you saw in the project structure. Let’s see what the data looks like: the structure of the data will determine the schema you’ll use.
The app is a UI that displays data about movies. Therefore, you need to have this data somewhere. The easiest option is to save it in a JSON file (server/movies.json). The file contains all the movies, and each movie can be represented by a plain object with a bunch of properties, so the entire file is an array of objects:
[{
"title": "Pirates of the Caribbean: On Stranger Tides"
...
}, {
"title": "Pirates of the Caribbean: At World's End"
...
}, {
"title": "Avengers: Age of Ultron"
...
}, {
"title": "John Carter"
...
}, {
"title": "Tangled"
...
}, {
"title": "Spider-Man 3"
...
}, {
"title": "Harry Potter and the Half-Blood Prince"
...
}, {
"title": "Spectre"
...
}, {
"title": "Avatar"
...
}, {
"title": "The Dark Knight Rises"
...
}]
The example uses data for 10 of the most expensive movies according to Wikipedia (https://en.wikipedia.org/wiki/List_of_most_expensive_films).
Each object contains information such as the movie’s title, cover URL, year released, production cost in millions of dollars, and starring actors. For example, Pirates of the Caribbean has this data:
{
"title": "Pirates of the Caribbean: On Stranger Tides",
"cover": "/dist/images/On_Stranger_Tides_Poster.jpg",
"year": "2011",
"cost": 378.5,
"starring": [{
"name": "Johnny Depp"
}, {
"name": "Penélope Cruz"
}, {
"name": "Ian McShane"
}, {
"name": "Kevin R. McNally"
}, {
"name": "Geoffrey Rush"
}]
}
Currently, each movie is an object that only has a title. Later, you can add as many properties as you want; but right now let’s focus on the data schema.
You can use any data source with GraphQL: an SQL database, an object store, a bunch of files, or a remote API. Two things matter:
You have the list of movies stored in a JSON file, so you can import it:
const movies = require('./movies.json')
A typical GraphQL schema defines a query with fields and arguments. The example data schema has only a list of objects, and each object has only a single property: title. The schema definition is shown next. This is a basic example—you’ll see the full schema later:
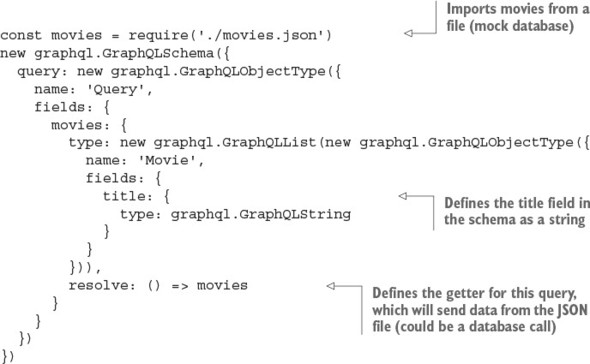
The core idea is that when the query is performed, the function assigned to the resolve key is executed. After that, only properties of objects that are requested are picked from the result of this function call. These properties will be in the resulting objects, and fields that aren’t listed won’t appear. Thus you need to specify what properties you want to receive every time you perform a query. This makes your API flexible and efficient: you can arrange parts of the data as you want them in the runtime.
The example has two types of queries and more fields. The following listing shows how you can implement them (ch15/redux-graphql-netflix/server/schema.js).
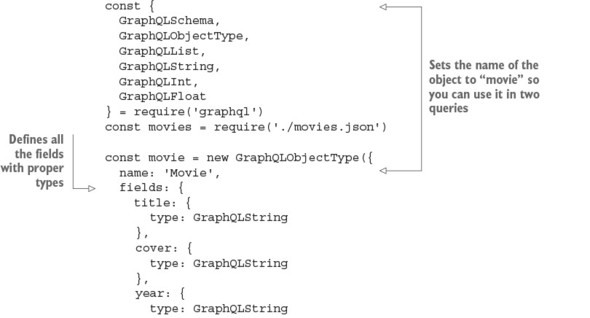
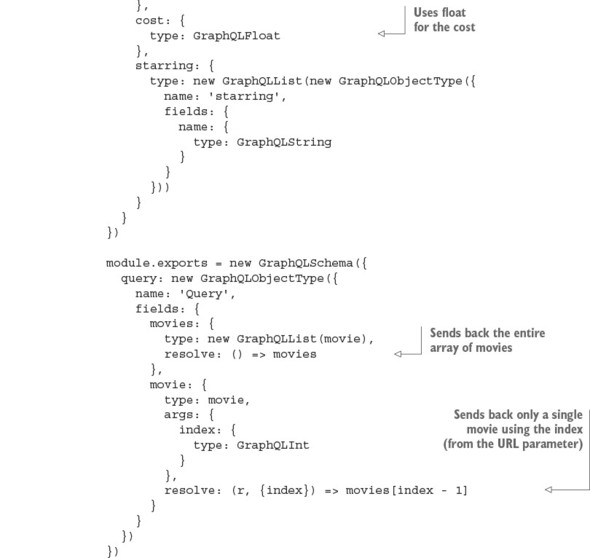
Phew! Now let’s move to the front end and see how to query this neat little server.
To get the list of movies, you need to query the server. And after the response has been received, you must pass it to the store. This operation is asynchronous and involves an HTTP request, so it’s time to unveil axios.
The axios library implements promise-based HTTP requests. This means it returns a promise immediately after calling a function. Because an HTTP request isn’t guaranteed to be performed immediately, you need to wait until this promise is resolved.
To get data from a promise once it’s resolved, you use its then property. It accepts a function as a callback, which is called with a single argument; and this argument is the result of the initial operation—in this case, an HTTP call:
getPromise(options)
.then((data)=>{
console.log(data)
})
Using a promise and a callback (in then) is an alternative to using just a callback, in the sense that the previous code can be rewritten without promises:
getResource(options, (data)=>{
console.log(data)
})
There’s a controversy associated with promises. Although some people prefer promises and callbacks over plain callbacks due to the convenience of the promise catch.all syntax, others feel promises aren’t worth the hassle (I’m in this camp), especially considering that promises can bury errors and fail silently. Nevertheless, promises are part of ES6/ES2015 and are here to stay. At the same time, new patterns such as generators and async/await are emerging as part of the next evolution of writing async code.[4]
See my courses on ES6 and ES7+ES8 at https://node.university/p/es6 and https://node.university/p/es7-es8.
Rest assured, you can do any asynchronous coding with plain callbacks. But most modern (especially front-end) code uses (or will use) promises or async/await. For this reason, this book uses promises with fetch() and axios.
For more information on the promise API, refer to the documentation at MDN (http://mng.bz/7DcO) and my article “Top 10 ES6 Features Every Busy JavaScript Developer Must Know” (https://webapplog.com/es6).
axios uses promise-based requests, not unlike fetch(). To perform a GET HTTP call, use the get property of axios:
axios.get('/q')
Because axios returns a promise, you can immediately access its then property:
axios.get('/q').then(response => response)
The function you pass as the argument to then returns into the context of the promise and not the context of your component’s method. You need to call an action creator to deliver new data into the store:
axios.get('/q').then(response => this.props.fetchMovie(response))
Now, let’s build a proper query against your GraphQL API. To do that, you can use a multiline template string (notice that it uses backticks instead of single quotes):
axios.get(`/q?query={
movie(index:1) {
title,
cover
}
}`).then(response => this.props.fetchMovie(response))
Using a multiline template literal (the backticks) preserves line breaks, so the query string will have new lines. Not good. New lines in a query string might break the API endpoint URLs. For this reason, you need to remove unnecessary spaces and line breaks in the HTTP calls but keep them in the source code. The clean-tagged-string library (https://github.com/taxigy/clean-tagged-string) does only that: it transforms a huge, multiline template string into a smaller, single-line string resulting in this
clean`/q?query={
movie(index:1) {
title,
cover
}
}`
looking like this:
'/q?query={ movie(index:1) { title, cover } }'
Notice the syntax: there are no parentheses (round brackets) after clean, and it’s attached to the template string. This is valid syntax and is called using tagged strings (http://mng.bz/9CqH).
Now, let’s get the first movie, with an index of 1:
const clean = require('clean-tagged-string').default
axios.get(clean`/q?query={
movie(index:1) {
title,
cover
}
}`).then(response => this.props.fetchMovie(response))

Next, you need to implement code to get any movie based on its ID. You also want to request more fields, not just title and cover, so you can display the view shown in figure 15.1. It’s good to know that the single-movie page won’t be lost on reload, because you added the special server code to sendFile() for * to catch all routes that send index.html.
You can fetch the data for a single movie from the API in the lifecycle component using your favorite promise-based HTTP agent, axios:
componentWillMount() {
const query = clean`{
movie(index:${id}) {
title,
cover,
year,
starring {
name
}
}
}`
axios.get(`/q?query=${query}`)
.then(response =>
this.props.fetchMovie(response)
)
}
The list of requested properties for a movie entity is a little longer: not just title and cover, but also year and starring. Because starring is itself an array of objects, you also need to declare which properties of those objects you want to request. In this case, you only want name.
The response from the API goes to the fetchMovie action creator. After that, the store is updated with the movie the user wants to see.
Connect it:
const {
fetchMovieActionCreator
} = require('modules/movies.js')
...
module.exports = connect(({movies}) => ({
movie: movies.current
}), {
fetchMovie: fetchMovieActionCreator
})(Movie)
And render it:
render() {
const {
movie = {
starring: []
}
} = this.props;
return (
<div>
<img src={`url(${movie.cover})`} alt={movie.title} />
<div>
<div>{movie.title}</div>
<div>{movie.year}</div>
{movie.starring.map((actor = {}, index) => (
<div key={index}>
{actor.name}
</div>
))}
</div>
<Link to="/movies">
←
</Link>
</div>
)
}
To better organize the code, let’s add a fetchMovie() method to the Movie component that’s already familiar to you from chapter 14 (ch14/redux-netflix/src/components/movie/movie.js). This new method will be used to make AJAX-y calls that will, in turn, dispatch actions. The method is in the Movie component (ch15/redux-graphql-netflix/client/components/movie/movie.js).
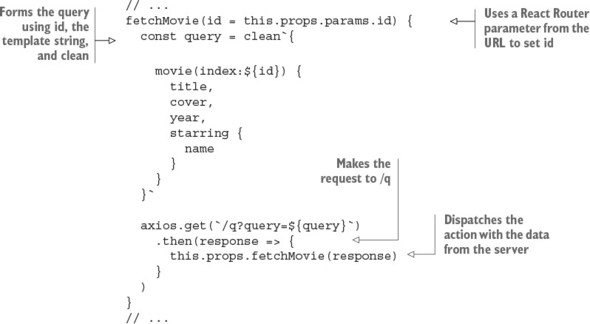
Next, let’s move on to getting the list of movies.
When you show a list of movies, the query to the API is different, and it’s rendered in a different way than when you fetch a single movie. You fetched the data from the GraphQL server using a valid GraphQL query, via an asynchronous GET request performed with the axios library, and you put this data into the store via an action. The next thing to do is show this data to the user: time to render it.
You already know that, to take data from the store, a component needs to be connected: wrapped with a connect() function call that maps state and actions to properties. In the component’s render() function, you use component properties. But these properties need values; that’s why you make AJAX/XHR calls, usually after the component has been mounted for the first time (lifecycle events!).
Let’s declare a component to pick the data from the store, take it from properties, and render it. First, connect the component to the store (this snippet is from ch15/redux-graphql-netflix/client/components/movies/movies.js):
const React = require('react')
const { connect } = require('react-redux')
const {
fetchMoviesActionCreator
} = require('modules/movies')
class Movies extends Component {
// ...
}
module.exports = connect(({movies}) => ({
movies: movies.all
}), {
fetchMovies: fetchMoviesActionCreator
})(Movies)
The connect() function takes two arguments: the first maps the store to component properties, and the second maps action creators to component properties. After that, the component has two new properties: this.props.movies and this.props.fetchMovies().
Next, let’s fetch those movies and, as the data is received, place it in the store via the action creator (dispatch an action). Usually, data may be requested from a remote API when the component starts its lifecycle (componentWillMount() or componentDidMount()):
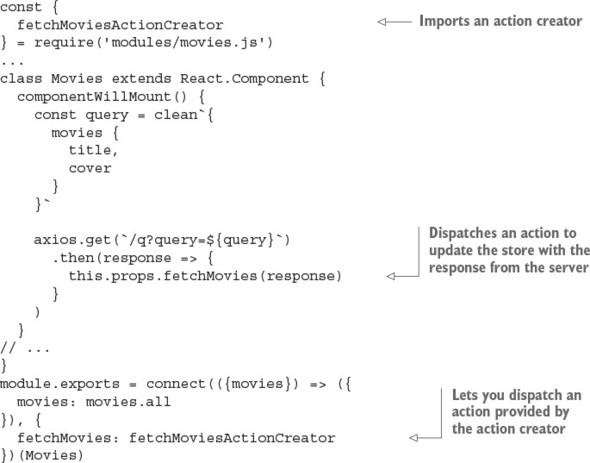
Finally, render the Movies component using data from properties, which comes from the Redux store:
// ...
render() {
const {
movies = []
} = this.props
return (
<div>
{movies.map((movie, index) => (
<Link
key={index}
to={`/movies/${index + 1}`}>
<img src={`url(${movie.cover})`} alt={movie.title} />
</Link>
))}
</div>
)
}
// ...
Every movie has cover and title properties. A link to a movie is basically a reference to its position in the array of movies. This setup isn’t stable when you have thousands of elements in a collection, because, well, the order is never guaranteed, but for now it’s okay. (A better way would be to use a unique ID, which is typically autogenerated by a database like MongoDB.)
The component now renders the list of movies, although it lacks styles. Check out this chapter’s source code to see how it works with styles and a three-level hierarchy of components.
Adding GraphQL support on a basic level is straightforward and transparent. GraphQL works differently than a typical RESTful API: you can query any property, at any nesting level, for any subset of entities the API provides. This makes GraphQL efficient for datasets of complex objects, whereas a REST design usually requires multiple requests to get the same data.
GraphQL is a promising pattern for implementing server-client handshakes. It allows for more control from the client, which can dictate the structure of the data to the REST API. This inversion of control allows front-end developers to request only the data they need and not have to modify back-end code (or ask a back-end team to do so).
Which command creates a GraphQL schema? new graphql.GraphQLSchema(), graphql.GraphQLSchema(), or graphql.getGraphQLSchema()
It’s okay to put API calls into reducers. True or false? (Hint: See a Tip in chapter 14.)
Where do you make the GraphQL call to fetch a movie? componentDidUnmount(), componentWillMount(), or componentDidMount()
You used this URL for GraphQL: `/q?query=${query}`. What does this syntax refer to? Inline Markdown, comments, template literal, string template, or string interpolation
GraphQLString is a special GraphQL schema type, and you can pull this class from the graphql package. True or false?
new graphql.GraphQLSchema()
False. Avoid putting API calls in reducers. It’s better to put them in components (container/smart components, to be specific).
componentWillMount(), but componentDidMount() is also a good location. componentDidUnmount() isn’t a valid method.
Template literal, string template, and string interpolation are all valid names to define the query with a variable.
True. This is valid code: const {GraphQLString} = require('graphql'). See listing 15.3.
This chapter covers
In modern software engineering, testing is important. It’s at least as important as using Agile methods, writing well-documented code, and having enough coffee on hand—sometimes even more so. Proper testing will save you from many hours of debugging later. The code isn’t an asset, it’s a liability, so your goal is to make it as easy to maintain as possible.
Googling the phrase “Code isn’t an asset, it’s a liability” gives 191 million results, which makes it hard to pinpoint its origins. Although I can’t find an author, I can tell you the gist of the idea: when you write software, you’re building apps/products/ services that are assets, but your code is not one of them.
Assets are things that generate income. Code does not generate any income by itself. Yes, code enables products, but the code is a tool to make the products (which are assets). The code itself isn’t an asset—it’s more of a necessary evil to get to the end goal of having a working application.
Thus, code is a liability, because you have to maintain it. More code does not automatically translate into more revenue or better product quality; but more code almost always increases complexity and the cost of maintenance. Some of the best ways to minimize the cost of maintaining code are to make it simple, robust, and flexible for future changes and enhancements. And testing—especially automated testing—helps when you’re making changes, because you have more assurance that the changes didn’t break your app.
Using test-driven/behavior-driven development (TDD/BDD) can make maintenance easier. It can also make your company more competitive by letting you iterate more quickly and make you more productive by giving you the confidence that your code works.
The source code for the examples in this chapter is at www.manning.com/books/react-quickly and https://github.com/azat-co/react-quickly/tree/master/ch16. You can also find some demos at http://reactquickly.co/demos.
There are multiple types of testing. Most commonly, they can be separated into three categories: unit, service, and UI testing, as shown in figure 16.1. Here’s an overview of each category, from lowest to highest level:

This chapter covers unit testing of React apps with a bit of UI testing of React components, using the mock DOM rendering of React and Jest. You’ll also use the standard toolchain of Node, npm, Babel, and Webpack. To begin unit testing, let’s investigate Jest.
Jest (https://facebook.github.io/jest) is a command-line tool based on Jasmine. It has a Jasmine-like interface. If you’ve worked with Mocha, you’ll find that Jest looks similar to it and is easy to learn. Jest is developed by Facebook and is often used together with React; the API documentation is at https://facebook.github.io/jest/docs/api.html#content.
Jest offers these features:
Christopher Poher, “JavaScript Unit Testing Performance,” Jest, March 11, 2016, http://mng.bz/YfXz.
The term mocking means faking a certain part of a dependency so you can test the current code. Automocking means mocking is done for you automatically. In Jest before v15,[2] every imported dependency is automocked, which can be useful if you frequently rely on mocking. Most developers don’t need automocking, so in Jest v15+ it’s off by default—but automocking can be turned on if necessary.
See Christoph Pojer, “Jest 15.0: New Defaults for Jest,” September 1, 2016, http://mng.bz/p20n.
Static analysis means the code can be analyzed before you run it, which typically involves type checking. Flow is a library that adds type checking to otherwise typeless (more or less) JavaScript.
Jasmine is a feature-rich testing framework that comes with an assertion language. Jest extends and builds on Jasmine under the hood so you don’t need to import or configure anything. Thus, you have the best of both worlds: you can tap into the common interface of Jasmine without needing extra dependencies or setup.
There are many opinions about what test framework is better for what job. Most projects use Mocha, which has a lot of features. Jasmine arose from front-end development but is interchangeable with Mocha and Jest. All of them use the same constructs to define test suites and tests:
Without getting into a heated debate in this book about what framework is the best, I encourage you to keep an open mind and explore Jest because of the features I’ve listed and because it comes from the same community that develops React. This way, you can make a better judgment about which framework to use for your next React project.
Most modern frameworks like Mocha, Jasmine, and Jest are similar for most tasks. Any difference will depend on your preferred style (maybe you like automocking, or maybe you don’t) and on the edge cases of your particular project (do you need all the features Mocha provides, or you need something lightweight like the Test Anything Protocol’s [TAP, https://testanything.org] node-tap [www.node-tap.org]?). Jest is a good place to start, because once you learn how to use Jest with React utilities and methods, you can use other test runners and testing frameworks such as Mocha, Jasmine, and node-tap.
If you’ve never worked with any of the testing frameworks I’ve been discussing, don’t worry; Jest is straightforward to learn. The main statement is describe, which is a test suite that acts as a wrapper for tests; and it, which is an individual test called a test case. Test cases are nested within the test suite.
Other constructs such as before, after, and their Each brethren beforeEach and afterEach execute either before or after the test suite or test case. Adding Each executes a piece of code many times as compared to just one time.
Writing tests consists of creating test suites, cases, and assertions. Assertions are like true or false questions, but in a nice readable format (BDD).
Here’s an example, without assertions for now:
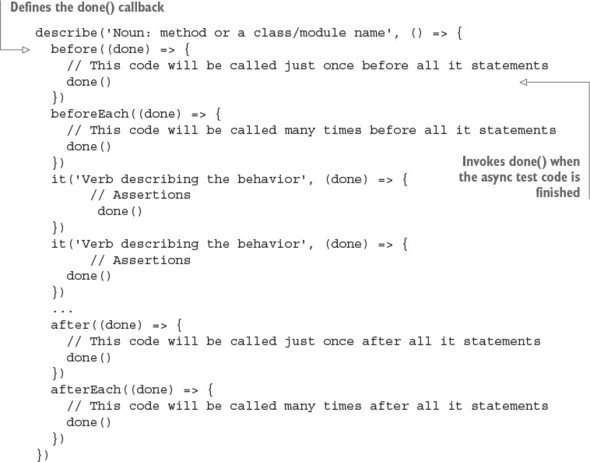
You must have at least one describe and one it, but their number isn’t limited. Everything else, such as before and after, is optional.
You won’t be testing any React components yet. Before you can work with React components, you need to learn a little more about Jest by working on a Jest example that doesn’t have a UI.
In this section, you’ll create and unit-test a module that generates random passwords. Imagine you’re working on a sign-up page for a cool new chat app. You need the ability to generate passwords, right? This module will automatically generate random passwords. To keep things simple, the format will be eight alphanumeric characters. The project (module) structure is as follows:
/generate-password
/__test__
generate-password.test.js
/node_modules
generate-password.js
package.json
You’ll use the CommonJS/Node module syntax, which is widely supported in Node (duh) and also in browser development via Browserify and Webpack. Here’s the module in the ch16/generate-password.js file.

Just as a refresher, in this file you export the function via the module.exports global. This is Node.js and CommonJS notation. You can use it on the browser with extra tools like Webpack and Browserify (http://browserify.org).
The function uses Math.random() to generate a number and convert it to a string. The string length is eight characters, as specified by slice(-8).
To test the module, you can run this eval Node command from the terminal. It imports the module, invokes its function, and prints the result:
node -e \"console.log(require('./generate-password.js')())\"
You could improve this module by making it work with different numbers of characters, not just eight.
To begin using Jest, you need to create a new project folder and npm init it to create package.json. If you don’t have npm, this is the best time to install it; follow the instructions in appendix B.
Once you’ve created the package.json file in a new folder, install Jest:
$ npm install jest-cli@19.0.2 --save-dev --save-exact
I’m using jest-cli version 19.0.2; make sure your version is the same or compatible. --save-dev adds the entry to the package.json file. Open the file, and manually change the test entry to jest as shown next (ch16/jest/package.json). This will add the testing command. Also add the start script.

Now, create a folder named __tests__. The name is important because Jest will pick up tests from that folder. Then, create your first Jest test in __tests__/generate-password.js.
Typically, you only mock dependencies that you don’t need to isolate the library you’re currently unit testing. Jest prior to v15 automatically mocks every required file, so you need to use dontMock() or jest.autoMockOff() to avoid this for the main module you test (generate-password.js). This is one way to do it:
jest.dontMock('../generate-password.js')
Luckily, for the version of Jest used in this chapter (v19), you don’t need to disable automock, because it’s disabled by default. So, you can skip this dontMock() line of code or leave it commented out.
The test file has a single suite (only one describe), which expects the value to match the /^[a-z0-9]{8}$/ regular-expression pattern—only alphanumerics and exactly eight characters—to satisfy your condition for a strong password (ch16/generate- password/__tests__/generate-password.test.js). You don’t want your chat users to be hacked by brute force!
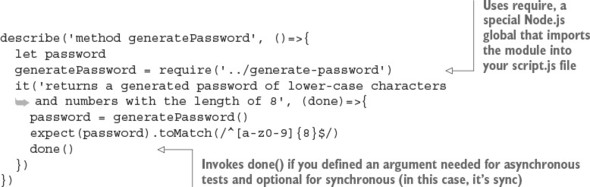
You can run the test with $ npm test. You’ll see something like this as the terminal output:

By default, Jest uses BDD syntax (https://en.wikipedia.org/wiki/Behavior-driven_development) powered by Expect syntax (https://facebook.github.io/jest/docs/api.html). Expect is a popular language that’s a replacement for TDD assertions. It has many flavors, and Jest uses a somewhat simplified version (in my opinion). Unlike other frameworks, such as Mocha, where you need to install additional modules for syntax support, in Jest it’s automatic.
TDD can mean test-driven development or TDD syntax with assertions. Briefly, during test-driven development you write a test, then run it (failing), then make it work (passing), and then make it right (refactor).
You most certainly can perform test-driven development with BDD. The main benefit of BDD style is that it’s intended for communicating with every member of a cross-functional team, not just software engineers. TDD is more of a techie language. BDD format makes it easier to read tests—ideally the spec title should tell you what you’re testing, as in this example:
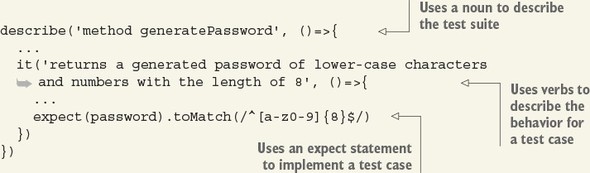
Here’s a list of the main Expect methods that Jest supports (there are many more). You pass the actual values—returned by the program—to expect() and use the following methods to compare those values with expected values that are hardcoded in the tests:
See “Equality Comparisons and Sameness,” Mozilla Developer Network, http://mng.bz/kliO.
Deep equality compares objects, including all their properties and values, to the last level of nestedness (going deep). There’s no standard API for it in JavaScript, but there are implementations like Node’s core assert module (http://mng.bz/rhoX) and deep-equal (www.npmjs.com/package/deep-equal).
In JavaScript/Node, a truthy value translates to true when evaluated as a Boolean in an if/else statement. A falsy value, on the other hand, evaluates to else in an if/else.
The official definition is that a value is truthy if it’s not falsy, and there are only six falsy values:
Everything not listed here is truthy.
To summarize, Jest can be used for unit tests, which should be the most numerous of your tests. They’re lower level, and for this reason they’re more solid and less brittle, which makes them less costly to maintain.
Thus far, you’ve created a module and tested its method with Jest. This is a typical unit test. There are no dependencies involved—only the tested module itself. This skill should prepare you to continue with testing React components. Next, let’s look at more-complicated UI testing. The following section deals with the React testing utility, which enables you to perform UI testing.
Generally speaking, in UI testing (recommended to make up only 10% of your tests), you test entire components, their behavior, and even entire DOM trees. You can test components manually, which is a terrible idea! Humans make mistakes and take a long time to perform tests. Manual UI testing should be minimal or nonexistent.
What about automated UI testing? You can test automatically using headless browsers (https://en.wikipedia.org/wiki/Headless_browser), which are like real browsers but without a GUI. That’s how most Angular 1 apps are tested. It’s possible to use this process with React, but it isn’t easy, it’s often slow, and it requires a lot of processing power.
Another automated UI testing approach uses React’s virtual DOM, which is accessible via a browser-like testing JavaScript environment implemented by jsdom (https://github.com/tmpvar/jsdom). To use React’s virtual DOM, you’ll need a utility that’s closely related to the React Core library but not part of it: TestUtils, which is a React utility to test its components. Simply put, TestUtils allows you to create components and render them into the fake DOM. Then you can poke around, looking at the elements by tags or classes. It’s all done from the command line, without the need for browsers (headless or not).
There are other React add-ons, listed at https://facebook.github.io/react/docs/addons.html. Most of them are no longer in development or are still in the experimental stage, which in practice means the React team may change their interface or stop supporting them. All of them follow the naming convention react-addons-NAME. TestUtils is an add-on, and, like other React add-ons, it’s installed via npm. (You can’t use TestUtils without npm; if you haven’t already, you can get npm by following the instructions in appendix A.)
For versions of React before v15.5.4, TestUtils was in an npm package react-addons-test-utils (https://facebook.github.io/react/docs/test-utils.html). For example, if you’re using React version 15.2.1, you can install react-addons-test-utils v15.2.1 with npm using the following command:
$ npm install react-addons-test-utils@15.2.1 --save-dev --save-exact
And this goes in your test source code (React prior to v15.5.4):
const TestUtils = require('react-addons-test-utils')
In React v15.5.4, things are somewhat easier, because TestUtils is in ReactDOM (react-dom on npm). You don’t have to install a separate package for this example, because you’re using the newer v15.5.4:
const TestUtils = require('react-dom/test-utils')
TestUtils has a few primary methods for rendering components; simulating events such as click, mouseOver, and so on; and finding elements in a rendered component. You’ll begin by rendering a component and learn about other methods as you need them.
To illustrate the TestUtils render() method, the following listing renders an element into a div variable without using a headless (or real, for that matter) browser (ch16/testutils/__tests__/render-props.js).
describe('HelloWorld', ()=>{
const TestUtils = require('react-dom/test-utils')
const React = require('react')
it('has props', (done)=>{
class HelloWorld extends React.Component {
render() {
return <div>{this.props.children}</div>
}
}
let hello = TestUtils.renderIntoDocument(<HelloWorld>Hello Node!
</HelloWorld>)
expect(hello.props).toBeDefined()
console.log('my hello props:', hello.props) // my div: Hello Node!
done()
})
})
And package.json for ch16/testutils example looks like this with Babel, Jest CLI, React, and React DOM:
{
"name": "password",
"version": "2.0.0",
"description": "",
"main": "index.html",
"scripts": {
"test": "jest",
"test-watch": "jest --watch",
"build-watch": "./node_modules/.bin/webpack -w",
"build": "./node_modules/.bin/webpack"
},
"author": "Azat Mardan",
"license": "MIT",
"babel": {
"presets": [
"react"
]
},
"devDependencies": {
"babel-jest": "19.0.0",
"babel-preset-react": "6.24.1",
"jest-cli": "19.0.2",
"react": "15.5.4",
"react-dom": "15.5.4"
}
}
renderIntoDocument() only works on custom components, not standard DOM components like <p>, <div>, <section>, and so on. So if you see an error like Error: Invariant Violation: findAllInRenderedTree(...): instance must be a composite component, make sure you’re rendering a custom (your own) component class and not a standard class. See the commit at http://mng.bz/8AOc and the https://github.com/facebook/react/issues/4692 thread on GitHub for more information.
Once you have hello, which has the value of the React component tree (includes all child components), you can look inside it with one of the find-element methods. For example, you can get the <div> from within the <HelloWorld/> element, as shown next (ch16/testutils/__tests__/scry-div.js).
describe('HelloWorld', ()=>{
const TestUtils = require('react-dom/test-utils')
const React = require('react')
it('has a div', (done)=>{
class HelloWorld extends React.Component {
render() {
return <div>{this.props.children}</div>
}
}
let hello = TestUtils.renderIntoDocument(
<HelloWorld>Hello Node!</HelloWorld>
)
expect(TestUtils.scryRenderedDOMComponentsWithTag(
hello, 'div'
).length).toBe(1)
console.log('found this many divs: ',
TestUtils.scryRenderedDOMComponentsWithTag(hello, 'div').length)
done()
})
})
...
scryRenderedDOMComponentsWithTag() allows you to get an array of elements by their tag names (such as div). Are there any other ways to get elements? Yes!
In addition to scryRenderedDOMComponentsWithTag(), there are a few other ways to get either a list of elements (prefixed with scry, plural Components) or a single element (prefixed with find, singular Component). Both use an element class, not a component class, which is a different thing. For example, btn, main, and so on.
In addition to tag names, you can get elements by type (component class) or by their CSS classes. For example, HelloWorld is a type, whereas div is a tag name (you used it to pull the list of criteria).
You can mix and match scry and find with Class, Type, and Tag to get six methods, depending on your needs. Here’s what each method returns:
As you can see, there’s no shortage of methods when it comes to pulling the necessary element(s) from your components. If you need some guidance, I suggest using classes or types (component classes), because they let you target elements more robustly. For instance, suppose you use tag names now because there’s just one <div>. If you decide to add elements with the same tag names to your code (more than one <div>), you’ll need to rewrite your test. If you use an HTML class to test a <div>, your test will work fine after you add more <div> element to the tested component.
The only case when using tag names might be appropriate is when you need to test all the elements with a specific tag name (scryRenderedDOMComponentsWithTag()) or your component is so small that there are no other elements with the same tag name (findRenderedDOMComponentWithTag()). For example, if you have a stateless component that wraps an anchor tag <a> and you add a few HTML classes to it, there will be no additional anchor tags.
Consider a UI widget that can be used on a sign-up page to automatically generate passwords of a certain strength. As shown in figure 16.2, it has an input field, a Generate button, and a list of criteria.
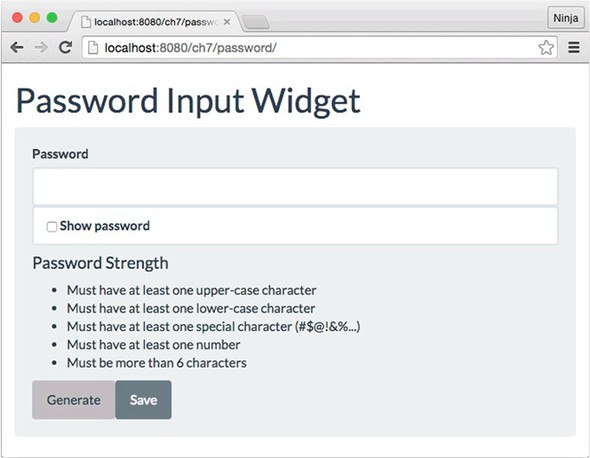
The following section walks through the entire project. For now, we’re focusing on using TestUtils and its interface. Once TestUtils and other dependencies (such as Jest) are installed, you can create the Jest test file to UI-test your widget; let’s call it password/__tests__/password.test.js, because you’re testing a password component. The structure of this test is as follows:
describe('Password', function() {
it('changes after clicking the Generate button', (done)=>{
// Importations
// Perform rendering
// Perform assertions on content and behavior
done()
})
})
Let’s define the dependencies in describe. Note that I’ve created the shortcut fD for ReactDOM.findDOMNode() because you’ll use it a lot:
const TestUtils = require('react-dom/test-utils')
const React = require('react')
const ReactDOM = require('react-dom')
const Password = require('../jsx/password.jsx')
const fD = ReactDOM.findDOMNode
To render a component, you need to use renderIntoDocument(). For example, this is how you can render a Password component and save a reference to the object in the password variable. The properties you’re passing will be the keys of the rules for the password strength. For example, upperCase requires at least one uppercase character:
let password = TestUtils.renderIntoDocument(<Password
upperCase={true}
lowerCase={true}
special={true}
number={true}
over6={true}
/>
)
This example is in JSX because Jest automatically uses babel-jest when you have installed this module (npm i babel-jest --save-dev) and sets the Babel configuration to use "presets": ["react"]. You cannot use JSX in Jest if you don’t want to include babel-jest. In this case, call createElement():
let password = TestUtils.renderIntoDocument(
React.createElement(Password, {
upperCase: true,
lowerCase: true,
special: true,
number: true,
over6: true
})
)
Once you’ve rendered the component with renderIntoDocument(), it’s straightforward to extract the needed elements—children of Password—and execute assertions to see how your widget is working. Think of the extraction calls as your jQuery; you can use tags or classes. At the bare minimum, your test should check for these things:
Clicking Generate fulfills all criteria and makes the password visible (so users can memorize it), but you won’t see the test code for that feature in this book. That’s your homework for next week.
Let’s start with item 1. TestUtils.scryRenderedDOMComponentsWithTag() gets all elements from a particular class. In this case, the class is li for the <li> elements because that’s what the criteria list will use: <ul><li>. toBe(), which works like the triple equal (===), can be used to validate the list length as 5:
let rules = TestUtils.scryRenderedDOMComponentsWithTag(password, 'li')
expect(rules.length).toBe(5)
For item 2, which checks that the first list item has specific text, you use toEqual(). You expect the first item to say that an uppercase character is required. This will be one of the rules for password strength:
expect(fD(rules[0]).textContent).toEqual('Must have
at least one uppercase character')
To check items 3, 4, and 5, you find a button, click it, and compare the values of the second criteria (it must change from text to strikethrough).
toBe() and toEqual() aren’t the same in Jest. They behave differently. The easiest way to remember is that toBe() is === (strict equal), whereas toEqual() checks that two objects have the same value. Thus both assertions will be correct:
const copy1 = {
name: 'React Quickly',
chapters: 19,
}
const copy2 = {
name: 'React Quickly',
chapters: 19,
}
describe('Two copies of my books', () => {
it('have all the same properties', () => {
expect(copy1).toEqual(copy2) // correct
})
it('are not the same object', () => {
expect(copy1).not.toBe(copy2) // correct
})
})
But when you’re comparing literals such as the number 5 and the string “Must have at least one uppercase character,” toBe() and toEqual() will produce the same results:
expect(rules.length).toBe(5) // correct
expect(rules.length).toEqual(5) // correct
expect(fD(rules[0]).textContent).toEqual('Must have
at least one upper-case character') // correct
expect(fD(rules[0]).textContent).toBe('Must have
at least one upper-case character') // correct
There’s a TestUtils.findRenderedDOMComponentWithClass() method that’s similar to TestUtils.scryRenderedDOMComponentsWithTag() but returns only one element; it’ll throw an error if you have more than one element. And to simulate user actions, there’s a TestUtils.Simulate object that has methods with the names of events in camelCase: for example, Simulate.click, Simulate.keyDown, and Simulate.change.
Let’s use findRenderedDOMComponentWithClass() to get the button and then use Simulate.click to click it. All this is done in the code without a browser:
let generateButton =
TestUtils.findRenderedDOMComponentWithClass(password, 'generate-btn')
expect(fD(rules[1]).firstChild.nodeName.toLowerCase()).toBe('#text')
TestUtils.Simulate.click(fD(generateButton))
expect(fD(rules[1]).firstChild.nodeName.toLowerCase()).toBe('strike')
This test checks that the <li> component has a <strike> element (to make the text strikethrough) when the button is clicked. The button generates a random password that satisfies the second (rules[1]) criterion (as well as others), which is to have at least one lowercase character. You’re finished here; let’s move on to the next tests.
You’ve seen TestUtils.Simulate in action. It can trigger not just clicks, but other interactions as well, such as a change of value in an input field or an Enter keystroke (keyCode 13):
ReactTestUtils.Simulate.change(node)
ReactTestUtils.Simulate.keyDown(node, {
key: "Enter",
keyCode: 13,
which: 13})
You must manually pass data that will be used in the component, such as key or keyCode, because TestUtils won’t autogenerate it. There are methods in TestUtils for every user action supported by React.
For your reference, following is the project manifest file, package.json. It also includes the shallow-rendering library we’ll cover next. To run the examples from ch16/password, install dependencies with npm i and then execute npm test:
{
"name": "password",
"version": "2.0.0",
"description": "",
"main": "index.html",
"scripts": {
"test": "jest",
"test-watch": "jest --watch",
"build-watch": "./node_modules/.bin/webpack -w",
"build": "./node_modules/.bin/webpack"
},
"author": "Azat Mardan",
"license": "MIT",
"babel": {
"presets": [
"react"
]
},
"devDependencies": {
"babel-core": "6.10.4",
"babel-jest": "13.2.2",
"babel-loader": "6.4.1",
"babel-preset-react": "6.5.0",
"jest-cli": "19.0.2",
"react": "15.5.4",
"react-dom": "15.5.4",
"react-test-renderer": "15.5.4",
"webpack": "2.4.1"
}
}
Next, let’s look at another way to render React elements.
In some cases, you may want to test a single level of rendering: that is, the result of render() in a component without rendering its children (if any). This simplifies testing because it doesn’t require having a DOM—the system creates an element, and you can assert facts about it. First, you must have a package called react-test-renderer v15.5.4 (for older versions of React, this class was part of TestUtils, but it’s not as of v15.5.4):
npm i react-test-renderer -SE
To illustrate, here’s the same password element being tested with the shallow-rendering approach. This code can go in the same test file ch16/password/__tests__/password.test.js. In this case, you create a renderer and then pass a component to it to get its shallow rendering:
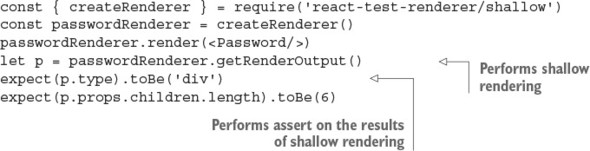
Now, if you log p as in console.log(p), the result contains the children but object p isn’t a React instance. Look at this result of shallow rendering:
{ '$$typeof': Symbol(react.element),
type: 'div',
key: null,
ref: null,
props:
{ className: 'well form-group col-md-6',
children: [ [Object], [Object], [Object], [Object],
[Object], [Object] ] },
_owner: null,
_store: {} }
Contrast that with the logs of the results of renderIntoDocument(<Password/>), which produces an instance of the Password React element with state. Look at this full rendering (not shallow):
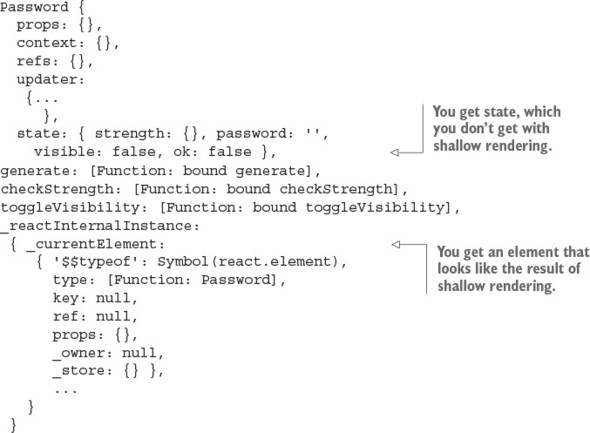
Needless to say, you can’t test user behavior and nested elements with shallow rendering. But shallow rendering can be used to test the first level of children in a component as well as the component’s type. You can use this feature for custom (composable) component classes.
In the real world, you’d use shallow rendering for highly targeted (almost unit-like) testing of a single component and its rendering. You can use it when there’s no need to test children, user behavior, or changing states of a component—in other words, when you only need to test the render() function of a single element. As a rule of thumb, start with shallow rendering and then, if that’s not enough, continue with regular rendering.
Standard HTML classes can inspect and assert el.props, so there’s no need for a shallow renderer. For example, this is how you can create an anchor element and test that it has the expected class name and tag name:
let el = <a className='btn'/>
expect(el.props.className).toBe('btn')
expect(el.type).toBe('a')
You’ve learned a lot about TestUtils and Jest—enough to begin using them in your projects. That’s exactly what you’ll be doing in the projects in part 2 of this book: using Jest and TestUtils for behavior-driven development (BDD) of React components. (chapters 18–20). The password widget is in chapter 19, if you want to look at the Webpack setup and all the dependencies used in the real world.
For more information on TestUtils, refer to the official documentation at https://facebook.github.io/react/docs/test-utils.html. Jest is an extensive topic, and full coverage is outside the scope of this book. Feel free to consult the official API documentation to learn more: https://facebook.github.io/jest/docs/api.html#content.
Finally, the Enzyme library (https://github.com/airbnb/enzyme, http://mng.bz/Uy4H) provides a few more features and methods than TestUtils as well as more-compact names for methods. It’s developed by AirBnb and requires Test-Utils as well as jsdom (which comes with Jest, so you’ll need jsdom only if you’re not using Jest).
Testing is a beast. It’s so frightful that some developers skip it—but not you. You stuck it out to the end. Congratulations! Your code will be better quality, and you’ll develop more quickly and live a happier life. You won’t have to wake up in the middle of the night to fix a broken server—or at least, not as frequently as someone without tests.
Jest tests must be in a folder named which of the following? tests, __test__, or __tests__
TestUtils is installed with npm from react-addons-test-utils. True or false?
What TestUtils method allows you to find a single component by its HTML class?
What is the expect expression to compare objects (deep comparison)?
How do you test the behavior when the user hovers with a mouse? TestUtils .Simulate.mouseOver(node), TestUtils.Simulate.onMouseOver(node), or TestUtils.Simulate.mouseDown(node)
__tests__. This is the convention Jest follows.
True. TestUtils is a separate npm module.
findRenderedDOMComponentWithClass()
expect(OBJECT).toEqual(value) compares objects on sameness without comparing that they’re the same objects (which is done with === or toBe()).
TestUtils.Simulate.mouseOver(node). The mouseOver event is triggered by hovering the cursor.
This chapter covers
React is primarily a front-end library to build full-blown, single-page applications or simple UIs on the browser. So why should we concern ourselves with using it on the server? Isn’t rendering HTML on the server the old way to do things? Well, yes and no. It turns out that when you build web apps that always render on the browser, they miss out on a few key goodies. In fact, they miss out to the point of not being able to rank high in Google search results and maybe even losing millions of dollars in revenue. Arghhh.
Read on to find out why. You can skip this chapter in only one case: if you’re oblivious to the performance of your apps (that is, if you’re a newbie developer). All others, please proceed. You’ll gain precious knowledge that you can use to build amazing apps and that will make you look smart during developers’ happy hour when you use the term Universal JavaScript. You’ll also learn how to use React with Node and build Node servers, and by the end of the chapter you’ll understand how to build Universal JavaScript apps with React.js and Express.js (the most popular Node.js framework).
If you haven’t come across Express before, check out my book Pro Express.js (Apress, 2014), which covers the current v4; it’s comprehensive and still very relevant. See also Express in Action, by Evan Hahn (Manning, 2015). You can also check out my online course Express Foundation: https://node.university/p/express-foundation. If you’re familiar with Express but need a refresher, you can find an Express.js cheatsheet in appendix c, and Express installation is covered in appendix A.
The source code for the examples in this chapter is at www.manning.com/books/react-quickly and https://github.com/azat-co/react-quickly/tree/master/ch17. You can also find some demos at http://reactquickly.co/demos.
You may have heard about Universal JavaScript in relation to web development. It’s become such a buzzword that it seems as though every web tech conference in 2016 had not one but several presentations about it. There are even a few synonyms for Universal JavaScript, such as isomorphic JavaScript and full stack JavaScript. For simplicity, I’ll stick with Universal for this chapter. This section will help you understand what isomorphic/Universal JavaScript is about.
But before I define Universal JavaScript, let’s discuss some of the issues you face when building SPAs. The three main problems are these:
Let’s take a closer look at each of these problems.
SPAs built with frameworks like Backbone.js, Angular.js, Ember.js, and others are widely used for protected apps—that is, apps that require the user to enter a username and password in order to gain access (for example, see figure 17.1). Most SPAs serve protected resources and don’t need indexing, but the vast majority of websites aren’t protected behind logins.
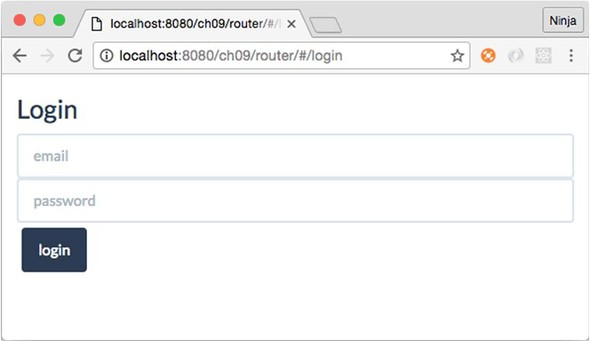
For such public apps, SEO is important and mandatory, because their business depends heavily on search indexing and organic traffic. The majority of websites fall in this category.
Unfortunately, when you try to use SPA architecture for public-facing websites, which should have good search engine indexing, it’s not straightforward. SPAs rely on browser rendering, so you need to either reimplement the templates on the server or pre-generate static HTML pages using headless browsers just for the search engine crawlers.
Recently, Google added a JavaScript rendering capability to its crawlers. You may think this means that browser-rendered HTML will be indexed correctly now. You may think that by using Angular with a REST API server, you don’t need server-side rendering. Unfortunately, this may not be the case.
The following comes from the Google Webmaster Central Blog post “Understanding Web Pages Better” (http://mng.bz/Yv3B): “Sometimes things don’t go perfectly during rendering, which may negatively impact search results for your site.” The gist is that Google doesn’t advocate that we rely on its indexing of SPAs. Google can’t guarantee that what’s in its cache, index, and search results is exactly what your SPA rendered. So, to be on the safe side, you need to render without JavaScript as closely as possible to the JavaScript-enabled rendering.
With Universal JavaScript and React, in particular, you can generate HTML on the server for crawlers from the same components that browsers use to generate HTML for users. No need for bulky headless browsers to generate HTML on the server. Win-win!
Although some applications must have proper search engine indexing, others thrive on faster performance. Websites like http://mobile.walmart.com[1] and http://twitter.com[2] have done research that showed that they needed to render the first page (first load) on the server to improve performance. Companies lose millions of dollars because users will leave if the first page doesn’t load quickly enough.
Kevin Decker, “Mobile Server Side Rendering,” GitHub Gist, 2014, http://mng.bz/2B6P.
Dan Webb, “Improving Performance on twitter.com,” Twitter, May 29, 2012, http://mng.bz/2st9.
Being a web developer, and working and living with good internet connection speeds, you might forget that your website may be accessed via a slow connection. What loads in a split second for you might take half a minute in other cases. Suddenly, a bundle that’s more than 1 MB is too large. And loading the bundled file is just half the story: the SPA needs to make AJAX requests to the server to load the data, while your users patiently stare at the Loading... spinner. Yeah, right. Some of them already left, and others are frustrated.
You want to show users a functional web page as fast as you possibly can, not just some skeleton HTML and Loading.... Other code can be loaded later while the user browses the web page.
With Universal JavaScript, it’s easy to generate HTML to show the first page on the server. As a result, when users load the first page, they won’t see the obstructing Loading... message. The data is in the HTML for users to enjoy. They see a functional page and thus have a better user experience.
The performance boost comes from the fact that users don’t have to wait for AJAX calls to resolve. There are other opportunities to optimize performance as well, such as preloading data and caching it on the server before AJAX calls come to the server (that’s exactly what we did at DocuSign by implementing a data router).[3]
Ben Buckman, “The New DocuSign Experience, All in Javascript,” DocuSign Dev, March 30, 2014, http://mng.bz/4773.
Code is a liability. The more code you have, the more you and your team will need to support it. For these reasons, you want to avoid having different templates and logic for the same pages. Avoid duplication. Don’t repeat yourself (DRY).
Fortunately, Node.js, which is an essential part of Universal JavaScript, makes it effortless to use front-end/browser modules on the server. Many template engines, such as Handlebars.js, Mustache, Dust.js, and others, can be used on the server.
Given these problems, and knowing that Universal JavaScript can solve them, what’s a practical application?
Universal, in regard to web development, means using the same code (typically written in JavaScript) on both the server side and the client side. A narrow use case for Universal JavaScript is rendering on the server and client from the same source. Universal JavaScript often implies the use of JavaScript and Node.js, because this language and platform combination allows for the reuse of the libraries.
Browser JavaScript code can be run in the Node.js environment with few modifications. As a consequence of this interchangeability, the Node.js and JavaScript ecosystem has a wide variety of isomorphic frameworks, such as React.js (http://facebook.github.io/react), Next.js (https://github.com/zeit/next.js), Catberry (http://catberry.org/), LazoJS (https://github.com/lazojs/lazo), Rendr (https://github.com/rendrjs/rendr), Meteor (https://meteor.com), and others. Figure 17.2 shows how an universal/isomorphic stack works: isomorphic code is shared between server and client.
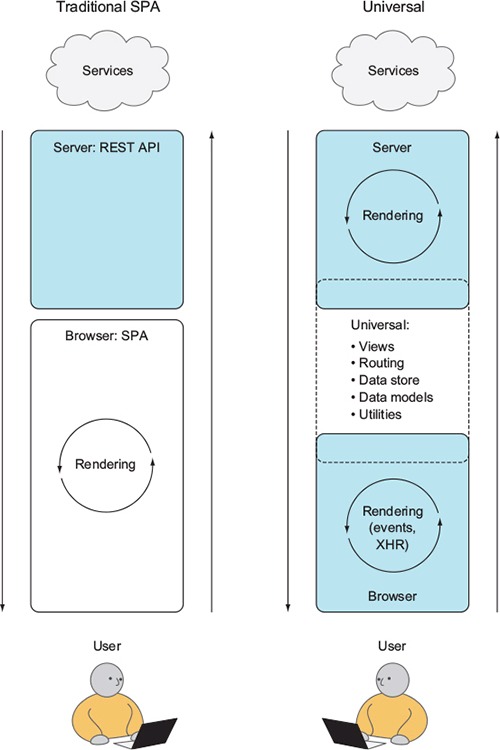
In a practical application, Universal JavaScript architecture consists of the following:
Figure 17.3 shows the model.
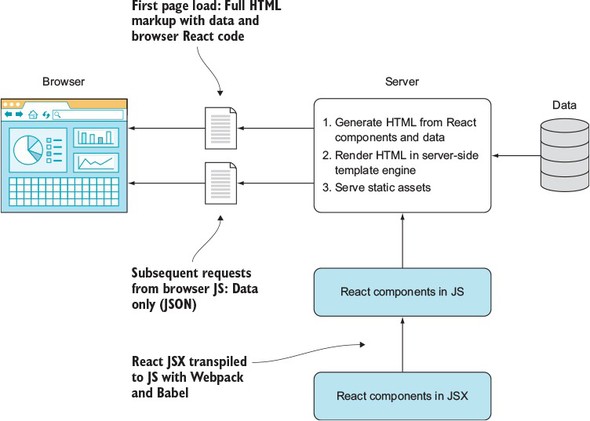
You may be thinking, “Show me how to use this wonder, Universal JavaScript, already!” All right, let’s look at a hands-on example of rendering React components on the server. We’ll do so in a gradual way, because several components (as in parts, not React components) are involved in using the Universal JavaScript pattern. You’ll need to learn how to do these things:
In the end, you’ll use React to generate server-side HTML while loading browser React at the same time—the Holy Grail of Universal JavaScript. But before you can fly, you need to learn to walk!
Let’s start with a basic use case: generating HTML from a Node script. This example doesn’t include servers or anything complex, just importing components and generating HTML. Make sure your Node version is at least 6 and your npm version is at least 3.
You need to learn only a handful of methods to generate HTML from React components on the server. First, you need the npm modules react and react-dom. You can install React and npm following the instructions in appendix A. This example uses React and React DOM version 15.
If you’re new to writing server-side Node code, you might wonder where this server-side code goes. It goes in a plain text file; name it index.js. The React component is in email.js (I’ll cover non-JSX plain JavaScript for now). Those two files must be in the same folder (ch17/node).
The project structure looks like this:
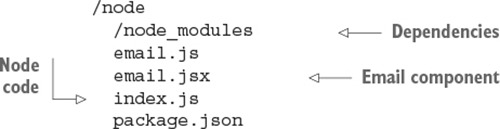
First, include the modules in your server-side code in node/index.js.

What’s up with createFactory()? Well, if you just imported email.js, that would be a component class; but you need a React element. Thus you can use JSX: createElement() or createFactory(). The latter gives a function that, when invoked, will give you an element.
Once you’ve imported your components, run renderToString() from ReactDOMServer:
const emailString = ReactDOMServer.renderToString(Email())
Here’s the code fragment from index.js:
const ReactDOMServer = require('react-dom/server')
const React = require('react')
const Email = React.createFactory(require('./email.js'))
const emailString = ReactDOMServer.renderToString(Email())
console.log(emailString)
// ...
Another approach to use JSX is to convert it on the fly. The babel-register library will enhance require to do just that so you can configure your require once and then import JSX like any other JS files.
To import JSX, you can use babel-register as shown here in its index.js, in addition to installing babel-register and babel-preset-react (use npm to install them):
require('babel-register')({
presets: [ 'react' ]
})
Is email.js regular JavaScript? In this case, it has to be. You can “build” JSX into regular JS with Webpack.
const React = require('react')
const Email = (props)=> {
return (
<div>
<h1>Thank you {(props.name) ? props.name: '' }
for signing up!</h1>
<p>If you have any questions, please contact support</p>
</div>
)
}
module.exports = Email
You’ll get strings rendered by React components. You can use these strings in your favorite template engine to show on a web page or somewhere else (such as HTML email). In my case, email.js (ch17/node/email.js) with a heading and a paragraph renders into the following HTML strings with Universal React attributes.
<div data-reactroot="" data-reactid="1" data-react-checksum="1319067066">
<h1 data-reactid="2">
<!-- react-text: 3 -->Thank you <!-- /react-text -->
<!-- react-text: 4 -->
<!-- /react-text -->
<!-- react-text: 5 -->for signing up!<!-- /react-text -->
</h1>
<p data-reactid="6">If you have any questions, please contact support</p>
</div>
What’s happening with the attributes data-reactroot, data-reactid, and data-react-checksum? You didn’t put them in there; React did. Why? For browser React and Universal JavaScript (discussed in the next section).
If you won’t need the React markup that browser React needs (for example, if you’re creating an HTML email), use the ReactDOMServer.renderToStaticMarkup() method. It works similarly to renderToString() but strips out all the data-reactroot, data-reactid, and data-react-checksum attributes. In this case, React is just like any other static template engine.
For example, you can load the component from email.js and generate HTML with renderToStaticMarkup() instead of renderToString():
const emailStaticMarkup = ReactDOMServer.renderToStaticMarkup(Email())
The resulting emailStaticMarkup doesn’t have React attributes:
<div><h1>Thank you for signing up!</h1><p>If you have any questions,
Although you won’t need the browser React for email, you use the original renderToString() for the Universal JavaScript architecture with React. Server-side React adds some secret sauce to the HTML in the form of checksums (data-react-checksum HTML attributes). Those checksums are compared by the browser React, and if they match, browser components won’t regenerate/repaint/rerender unnecessarily. There’s no flash of content (which often happens due to rerendering). The checksums will match if the data supplied to the server-side components is exactly the same as that on the browser. But how do you supply the data to the components created on the server? As properties!
If you need to pass some properties, pass them as object parameters. For example, you can provide a name (Johny Pineappleseed) to the Email component:
const emailStringWithName = ReactDOMServer.renderToString(Email({
name: 'Johny Pineappleseed'
}))
The full ch17/node/index.js is shown next, with three ways to render HTML—static, string, and string with a property:
const ReactDOMServer = require('react-dom/server')
const React = require('react')
const Email = React.createFactory(require('./email.js'))
const emailString = ReactDOMServer.renderToString(Email())
const emailStaticMarkup = ReactDOMServer.renderToStaticMarkup(Email())
console.log(emailString)
console.log(emailStaticMarkup)
const emailStringWithName =
ReactDOMServer.renderToString(Email({name: 'Johny Pineappleseed'}))
console.log(emailStringWithName)
That’s how you render React components into HTML in plain Node—no servers and no thrills. Next, let’s look at using React in an Express server.
Express.js is one of the most popular Node.js frameworks—maybe the most popular. It’s simple yet highly configurable. There are hundreds of plug-ins called middleware that you can use with Express.js.
In a bird’s-eye view of the tech stack, Express and Node take the place of an HTTP(S) server, effectively replacing technologies like Microsoft IIS (www.iis.net) Apache httpd (https://httpd.apache.org), nginx (www.nginx.com), and Apache Tomcat (http://tomcat.apache.org). What’s unique about Express and Node is that they allow you to build highly scalable, performant systems, thanks to the non-blocking I/O nature of Node (http://github.com/azat-co/you-dont-know-node). Express’s advantages are its vast ecosystem of middleware and its mature, stable codebase.
Unfortunately, a detailed overview of the framework is out of the scope of this book, but you’ll create a small Express app and render React in it. In no way is this is a deep dive into Express.js, but it’ll get you started with the most widely used Node.js web framework. Call it an express course in Express if you wish.
As mentioned earlier, appendix A covers how to install both node.js and Express, if you want to follow along with this example.
Let’s build HTTP and HTTPS servers using Express and then generate HTML on the server side using React, as shown schematically in figure 17.4. The most basic example of using React in Express as a view engine is to generate an HTML string without markup (checksums) and send it as a response to the request. Listing 17.4 illustrates the /about page rendered from a React component about.js.
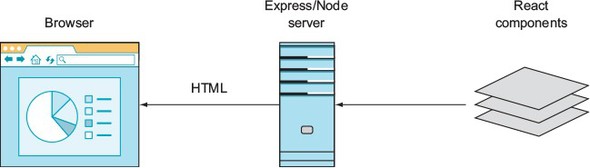
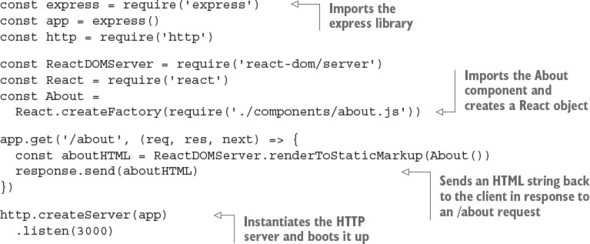
This will work, but /about won’t be a complete page with <head> and <body>. It’s better to use a proper template engine (like Handlebars) for the layout and top HTML elements. You also may wonder what app.get() and app.listen() are. Let’s look at another example, and all will be revealed.
This is a more interesting example in which you’ll use some external plug-ins and a template engine. The idea for the app is the same: serve HTML generated from React using Express. The page will display some text that’s generated from about.jsx (see figure 17.5). No thrills, but it’s simple, and starting with simple is good.

Create a folder called react-express. (This example is in ch17/react-express.) The end project structure is as follows:
/react-express
/components
about.jsx
/views
about.hbs
index.js
package.json
Create package.json with npm init -y, and then install Express with npm like this:
$ npm install express@4.14.0 --save
As with any Node application, open an editor and create a file. Typically, you create a server file named index.js, app.js, or server.js, which you’ll later start with the node command. In this case, name it index.js.
The file has these parts:
Here’s a high-level overview of the Express and Node server file:
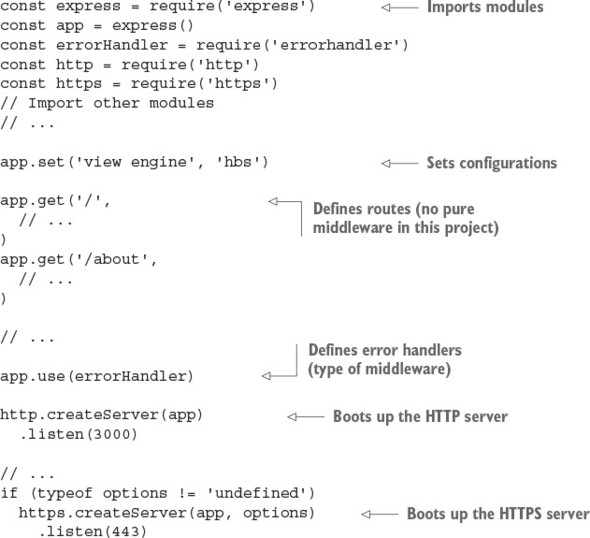
Now let’s go deeper. The imports section is straightforward. In it, you require dependencies and instantiate objects. For example, to import the Express.js framework and to create an instance, write these lines:
var express = require('express')
var app = express()
You set configurations with app.set(), where the first argument is a string and the second is a value. For example, to set the template engine to hbs (www.npmjs.com/package/hbs), use this configuration view engine:
app.set('view engine', 'hbs')
hbs (no affiliation with Harvard Business School) is an Express template (or view) engine for the Handlebars template language (http://handlebarsjs.com). You may have worked with Handlebars or a close relative of it, such as Mustache, Blaze, and so on. Ember also uses Handlebars (http://mng.bz/90Q2). It’s a common, easy-to-get-started template, which is why you’ll use it here.
One caveat: you must install the hbs package in order for Express to properly use the view engine. Do so by executing npm i hbs --save.
The next section sets up middleware. For example, to enable the app to serve static assets, use the static middleware:
app.use(express.static(path.join(__dirname, 'public')))
The static middleware is great because it turns Express into a static HTTP(S) server that proxies requests to files in a specified folder (public in this example), just as NGINX or Apache httpd would.
Next are routes, also known as endpoints, resources, pages, and many other names. You define a URL pattern that will be matched by Express against real URLs of incoming requests. If there’s a match, Express will execute the logic associated with this URL pattern; this is called handling a request. It can involve anything from displaying static HTML for a 404 Not Found page to making a request to another service and caching the response before sending it back to the client.
Routes are the most important part of a web application because they define URL routing and in a way act as controllers in your good-old model-view-controller (MVC) pattern. In Express, you define routes using the app.NAME() pattern, where NAME is the name of an HTTP method in lowercase. For example, this is a syntax to GET the / (home page or empty URL) endpoint, which will send back the string “Hello”:
app.get('/', (request, response, next) => {
response.send('Hello!')
})
For the /about page/route, you can change the first argument (the URL pattern). You can also render the HTML string:
app.get('/about', (req, res, next) => {
response.send(`<div>
<a href="https://node.university" target="_blank">Node.University</a>
is home to top-notch Node education which brings joy to JavaScript engineers.
</div>`)
})
Next you want to render React HTML from the Handlebars template, because Handlebars will provide you with an overall layout including such things as <html> and <body>. In other words, you have React for UI elements and Handlebars for the layout.
Create a new views folder containing this template, called about.hbs:
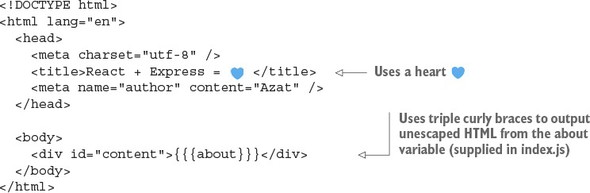
In the route (in the file ch17/react-express/index.js), change response.send() to response.render():
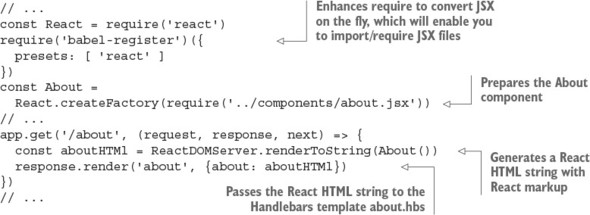
Express routes can render from Handlebars templates, with data such as the about string variable, or send a response in a string format.
It’s possible to use React for layouts, instead of Handlebars. There’s an express-react-views library to do that (www.npmjs.com/package/express-react-views). It’s only for static markup, not for browser React.
I won’t cover it here, because it requires extensive use of dangerouslySetInnerHTML,[4] doesn’t support all HTML, and often confuses beginner Express-React developers. In my humble opinion, there’s little benefit to using React for layouts.
Error handlers are similar to middleware. For example, they can be imported from a package such as errorhandler (www.npmjs.org/package/errorhandler):
const errorHandler = require('errorhandler')
...
app.use(errorHandler)
Or you can create them in index.js:
app.use((error, request, response, next) => {
console.error(request.url, error)
response.send('Wonderful, something went wrong...')
})
You trigger an error handler by invoking next(error) in a request handler or middleware. error is an error object, which you can create with new Error('Ooops'), where “Ooops” will become the error message. Here’s an example in /about:
app.get('/about', (request, response, next) => {
// ... do weird stuff
let somethingWeirdHappened = true
if (somethingWeirdHappened) return next(new Error('Ooops'))
})
Don’t forget to use return. For more about error handling in Node and Express, check out the Node Patterns course (http://node.university/p/node-patterns) or my post “Node Patterns: From Callbacks to Observer” (http://webapplog.com/node-patterns).
Finally, to start your app, run listen() by passing a port number and a callback (optional):
http.createServer(app).listen(portNumber, callback)
In this example, it looks like this:
http.createServer(app) .listen(3000)
Here’s the full server code for ch17/react-express/index.js, to make sure nothing has slipped through the cracks.
You can look up how to generate them in my post “Easy HTTP/2 Server with Node.js and Express.js,” https://webapplog.com/http2-node.
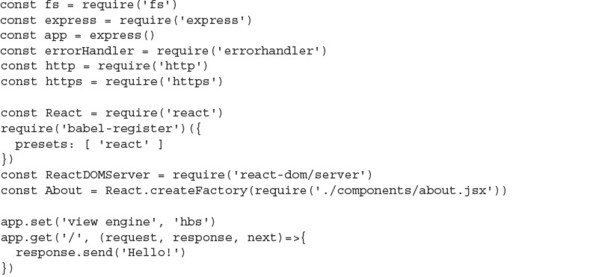
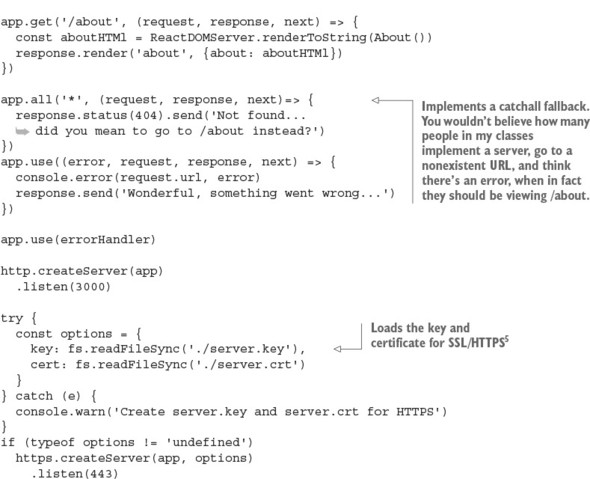
Now everything should be ready to run the server with node index.js or its shortcut (node .) to see the server response when you navigate to http://localhost:3000/about. If something is missing or you get errors when you start the server and navigate to the address, refer to the project source code in ch17/react-express.
The SSL key and certificate are needed for SSL and HTTPS to work. The GitHub code for this example purposely doesn’t include server.key and server.crt, because sensitive information like keys shouldn’t be committed to a version-control system. You should create your own keys by following the instructions at https://webapplog.com/http2-node. If you don’t have them, then the example code will only create an HTTP server.
The end result should be a proper HTML page with a header and body. In the body should be React markup such as data-react-checksum and data-reactroot, as shown in figure 17.6.
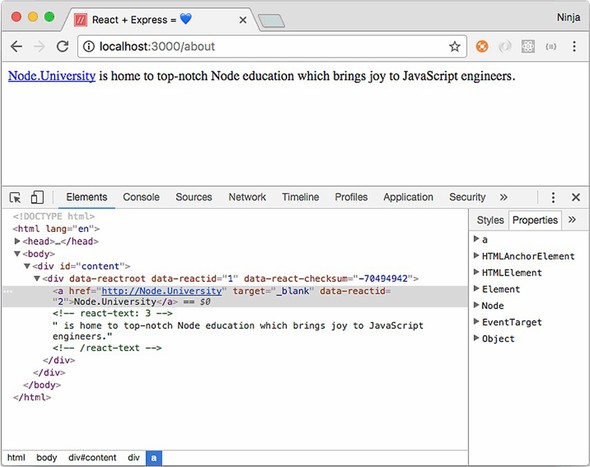
Why does this example use markup rendering and not static HTML strings or express-react-views? You’ll need this markup with checksums later, for the browser React; that’s the Universal JavaScript architecture.
In the next section, you’ll put together all you’ve learned about React on the browser, Express, and React on Node to implement a Universal JavaScript architecture.
This section combines all the skills from this chapter (and most of the book!). You’ll render component(s) on the server, plug them in the template, and enable browser React.
To learn about Universal JavaScript, you’ll build a message board with three components: Header, Footer, and MessageBoard (see figure 17.7). The Header and Footer components will have static HTML to display some text, and MessageBoard will have a form to post messages on the board and a list of messages. This app will use AJAX calls to get the list of messages and post new messages to the back-end server, which in turn will use a MongoDB NoSQL database.
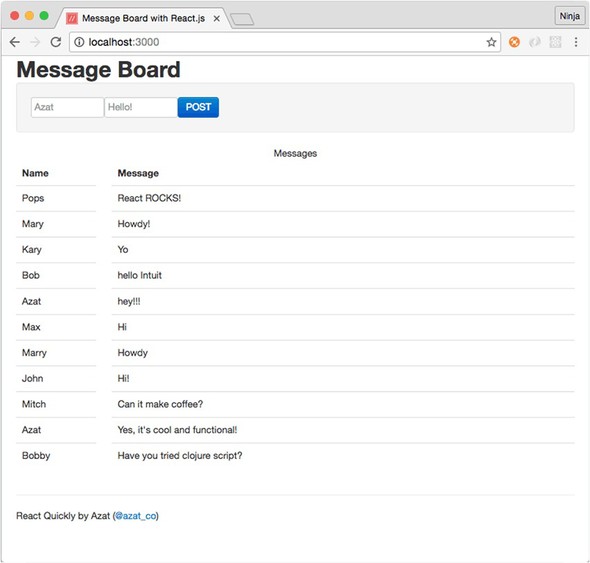
Concisely, for Universal React, you’ll need to follow these steps:
A few parts interact with each other: server, components, data, and browser. Figure 17.8 shows a diagram of how they’re connected in the message board example. The server acts as a static-assets HTTP server and as an app that renders server-side HTML (first page load only). Browser React code enables interactivity of browser events and subsequent persistence (via HTTP requests to the server) after the initial page load.

You also need to install and launch MongoDB in order for this example to work. You can read about installation on its website or in appendix D. After you install MongoDB, run mongod and leave it running. This will allow your Express server to connect to it using the magic URL mongodb://localhost:27017/board.
The project structure is as follows:

The server dependencies include these packages (quoted from package.json):
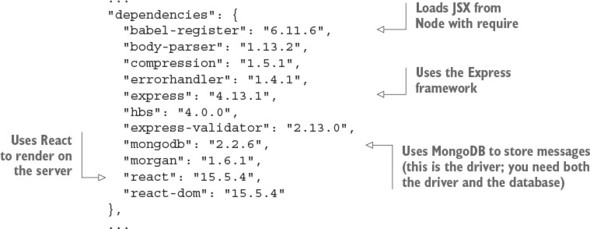
Now you can set up the server in message-board/index.js.
I want to say a few words about the middleware used in this project, in case you’re new to Express. Express isn’t a large framework that does almost everything for you. On the contrary, it’s a base foundation layer on top of which Node engineers build custom systems that are virtually their own frameworks. They are fit precisely to the task at hand, which isn’t always the case with all-in-one frameworks. You get only what you need with Express and its ecosystem of plug-ins. Those plug-ins are called middleware because they use the middleware pattern, with Express implementing the middleware manager.
Every Express engineer has favorite middleware packages that they use from project to project. I tend to start with the following and then add more packages if and when I need them:
For information about compression, body-parser, and errorhandler, as well as a list of additional Express middleware, see appendix c, https://github.com/azatco/cheatsheets/tree/master/express4, or Pro Express.js (http://proexpressjs.com).
Just as you did in the previous examples, you’ll implement the server side of things in index.js and then work through the five sections so you can see how it breaks down. First, the following listing shows it in full (ch17/message-board/index.js).
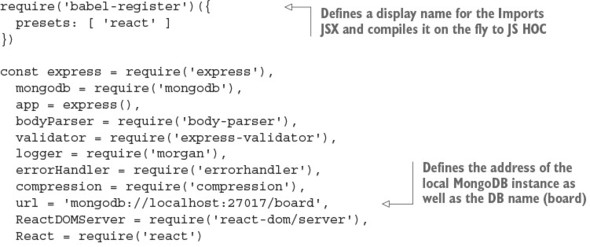
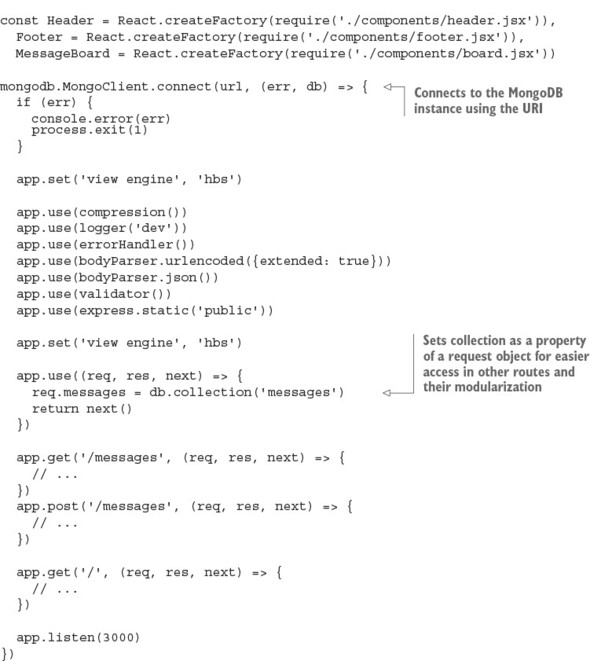
Again, you need to use babel-register to import JSX, after installing babel-register and babel-preset-react with npm:
require('babel-register')({
presets: [ 'react' ]
})
In index.js, you implement your Express server. Let’s import the components using the relative path ./components/:
const Header = React.createFactory(require('./components/header.jsx')),
Footer = React.createFactory(require('./components/footer.jsx')),
MessageBoard = React.createFactory(require('./components/board.jsx'))
For the purpose of rendering React apps, you need to know that Express.js can use pretty much any template engine. Let’s consider Handlebars, which is close to regular HTML. You can enable Handlebars with this statement, assuming app is the Express.js instance:
app.set('view engine', 'hbs')
The hbs module must be installed (I have it in package.json).
Middleware provides a lot of functionality for your server that you’d otherwise have to implement yourself. The following are the most essential for this project:

In your route—let’s say, /—you call render on views/index.handlebars (res.render ('index')), because the default template folder is views:
app.get('/', (req, res, next) => {
req.messages.find({}, {sort: {_id: -1}}).toArray((err, docs) => {
if (err) return next(err)
res.render('index', data)
})
})
The req.message.find() call is a MongoDB method to fetch documents. Although you must have MongoDB installed and running for this example to work verbatim (without any changes), I don’t like to enforce my database preference on you. It’s easy to replace calls to MongoDB with whatever you want. Most modern RDBMS and NoSQL databases have Node drivers; most of them even have ORM/ODM libraries written in Node. Therefore, you can safely ignore my DB call, if you’re not planning to use MongoDB. If you do want to use MongoDB, appendix D has a cheatsheet for you. The idea is that in the request handler, you can make a call to an external service (for example, using axios to get Facebook user information) or use a database (MongoDB, PostgreSQL, and so on). How you get the data in Node isn’t the focus of this chapter.
The most important thing here with regard to Universal React is res.render() (ch17/message-board/index.js), shown in listing 17.7. This render() method is a special Express feature for templates. It has two arguments. The first is the name of the template: index.hbs, which is in the views directory. The second argument to res.render() is the locals: data that will be used in the templates. All the data is sent (or combined with or hydrated) to the ch17/message-board/view/index.hbs template (the .hbs extension is optional).
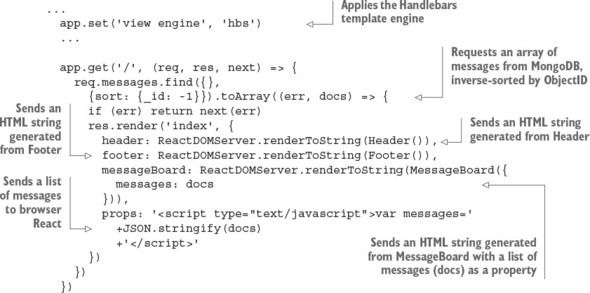
At this point, you have an Express server that renders a Handlebars template with three HTML strings from React components. This isn’t exciting by itself; you could have done this without React. You could have used Handlebars or Pug or Mustache or any other template engine to render everything, not just the layout. Why do you need React? Well, you’ll be using React on the browser, and browser React will take your server HTML and add all the events and states—all the magic. That’s why!
You aren’t finished with the server yet. You need to implement the two APIs for this example:
These routes will be used by browser React when it makes AJAX/XHR requests to GET and POST data. The code for the routes goes in Express, in index.js:
app.get('/messages', (req, res, next) => {
req.messages.find({},
{sort: {_id: -1}}).toArray((err, docs) => {
if (err) return next(err)
return res.json(docs)
})
})
The route to handle creation of messages (POST /messages) will use express-validator to make sure the incoming data is present (notEmpty()). express-validator is convenient middleware because you can set up all kinds of validation rules.
Input validation is paramount to securing your apps. Developers work with the code and the system: they wrote it, they know how it works, and they know what data it supports. Thus they unconsciously become biased about the data they feed the app, which can lead to loopholes. Always sanitize your data server-side. You should consider every user to be potentially either a malicious attacker or a negligent person who never reads your instructions and always sends weird data.
The route will also use the reference to the database from req.messages to insert a new message:
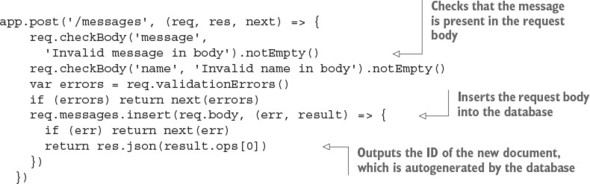
As mentioned earlier, I recommend using the nodemon tool or something similar, such as node-dev. node-dev monitors for file changes and restarts the server when changes are detected. It can save you hours of work! To install node-dev, run this command:
npm i node-dev@3.1.3 --save-dev
In package.json, you can add the command node-dev . to the start npm script:
...
"scripts": {
...
"start": "./node_modules/.bin/webpack && node-dev ."
},
...
The bootup call is primitive compared to the previous section, when you used HTTPS:
app.listen(3000)
Obviously, you can add HTTPS to it and change the port number or take the port number from environment variables.
Remember, the root / route handles all the GET requests to / or to http://localhost:3000/, in this case. It’s implemented in listing 17.7 (ch17/message-board/view/index.hbs). The route uses a template called index in res.render(). Now, let’s implement the template.
You can use any template engine on the server to render React HTML. Handlebars is a good option because it’s similar to HTML, which means little modification is needed when transitioning from HTML to this template engine. Following is the Handlebars index.hbs file:
<!DOCTYPE html>
<html lang="en">
<head>
<!-- meta tags and CSS -->
</head>
<body>
<div class="container-fluid">
<!-- header -->
<!-- props -->
<!-- messageBoard -->
<!-- footer -->
</div>
<script type="text/javascript" src="/js/bundle.js"></script>
</body>
</html>
You use triple curly braces ({{{...}}}) to output components and properties (unescaped output) such as HTML. For example, {{{props}}} will output a <script/> script tag so you can define a messages variable in it. The index.hbs code to render unescaped HTML string for props is
<div>{{{props}}}</div>
The rest of the locals (data) are outputted similarly:
<div id="header">{{{header}}}</div>
...
<div>{{{props}}}</div>
...
<div class="row-fluid" id="message-board" />{{{messageBoard}}}</div>
...
<div id="footer">{{{footer}}}</div>
Here’s how you output an HTML string from the Header component in Handlebars (ch17/message-board/views/index.hbs).
...
<div class="container-fluid">
<div class="row-fluid">
<div class="span12">
<div id="header">{{{header}}}</div>
</div>
</div>
...
What about the data? In order to get the benefit of server-side React working together with browser React, you must use the same data on the browser and server when you create React elements. You can pass the data from the server to browser React without needing AJAX calls by embedding the data as a JS variable right in the HTML!
When you pass header, footer, and messageBoard, you can add props in the / Express route. In index.hbs, print the values with triple curly braces and include the js/bundle.js script, which will be generated by Webpack later (ch17/message-board/views/index.hbs).
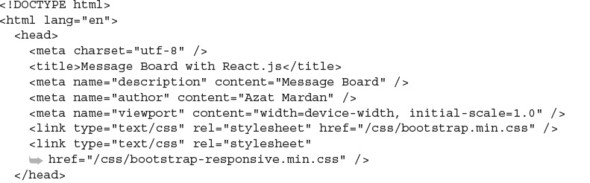

This template includes some Twitter Bootstrap styling, but it’s not essential for the project or the Universal JavaScript example. You use a few variables (a.k.a. locals: header, messageBoard, props, and footer) in your templates, which you need to provide in the render() of an Express request handler. As a reminder, this is index.js code that you implemented earlier (listing 17.7, ch17/message-board/view/index.hbs) and that uses the previous template by calling it index, which is a convention for index.hbs:
res.render('index', {
header: ReactDOMServer.renderToString(Header()),
footer: ReactDOMServer.renderToString(Footer()),
messageBoard:
ReactDOMServer.renderToString(MessageBoard({messages: docs})),
props: '<script type="text/javascript">var messages='+JSON.stringify(docs)+
'</script>'
})
The values will be generated from React components. This way, you’ll be using the same components on the server and on the browser. The ability to easily render on the server (with Node) is the beauty of React.
Next, let’s move on to variables: props, header, footer, and so on.
You’re finally doing what you did in all the previous chapters: creating React components. Isn’t it good to get back to something familiar once in a while? Yes. But where do the components come from? They live in the components folder. As I mentioned earlier, the components will be used on the browser and the server; that’s why you’re putting them in a separate components folder and not creating them in client. (Other options for component folder names are shared and common.)
To expose these components, each of them must have module.exports, which is assigned a value of the component class or a stateless function. For example, you require React, implement the class or a function, and then export Header as follows:
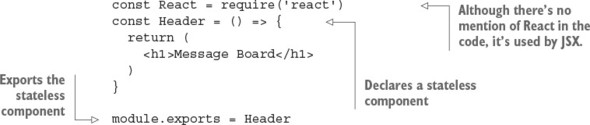
The message board will use AJAX/XHR calls to get a list of messages and post a new message. The calls are in board.jsx. The file will include MessageBoard. It’s your container (smart) component, so the calls are in that component.
It’s interesting to look at where you make AJAX calls in MessageBoard: in componentDidMount(), because this lifecycle event will never be called on the server (ch17/message-board/components/board.jsx)!

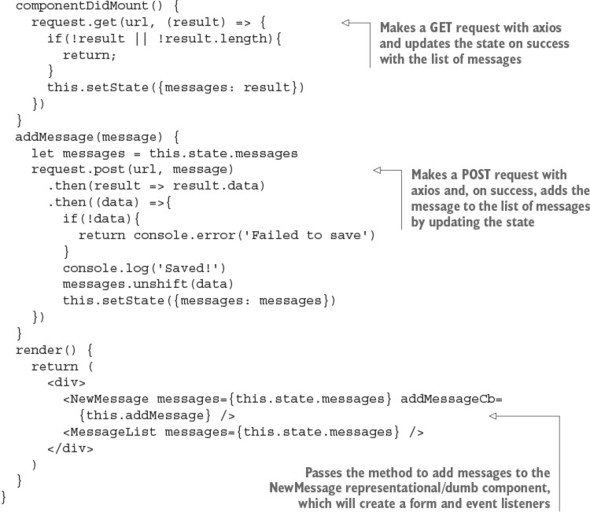
You can look up the implementation of NewMessage and MessageList in the same file (ch17/message-board/components/board.jsx); I won’t bore you here. They’re representational components with little or no logic—just the description of the UI in the form of JSX.
You’re done with rendering React (and layout) HTML on the server. Now, let’s sync up the markup with the browser React; otherwise, no messages would be added—there would be no interactive browser JavaScript events!
If you stopped the implementation at this point, there would be only static markup from the rendering of React components on the server. New messages wouldn’t be saved, because the onClick event for the POST button wouldn’t work. You need to plug in the browser React to take over where the server’s static markup rendering left off.
You create app.jsx as a browser-only file. It won’t be executed on the server (unlike the components). This is the place to put ReactDOM.render() calls to enable browser React:
ReactDOM.render(<MessageBoard messages={messages}/>,
document.getElementById('message-board')
)
You also need to use the global messages as a property for MessageBoard. The messages property value will be populated by the server-side template and {{{props}}} data (see section 17.4.3). In other words, the messages array of messages will be populated from index.hbs when the template gets data (called locals) from the props variable in the Express.js route /.
Failure to provide the same messages property to MessageBoard on the server and on the browser will result in browser React repainting the entire component, because browser React will consider the views to be different. Under the hood, React will use the checksum attribute to compare the data that’s already in the DOM (from the server-side rendering) with whatever browser React comes up with. React uses checksum because it’s quicker than doing an actual tree comparison (which could take a while).
In the app.js file, you need to require some front-end libraries and then render out components in the DOM (ch17/message-board/client/app.jsx).
const React = require('react')
const ReactDOM = require('react-dom')
const Header = require('../components/header.jsx')
const Footer = require('../components/footer.jsx')
const MessageBoard = require('../components/board.jsx')
ReactDOM.render(<Header />, document.getElementById('header'))
ReactDOM.render(<Footer />, document.getElementById('footer'))
ReactDOM.render(<MessageBoard messages={messages}/>,
document.getElementById('message-board'))
The browser code is tiny!
The final step is setting up Webpack to bundle the browser code into one file, manage dependencies, and convert JSX code. First you need to configure Webpack as follows, with the entry point client/app.jsx, with output set to public/js in the project folder, and using Babel loaders. The devtool setting gets the proper source code lines in Chrome DevTools (not the lines from the compiled JS code):
module.exports = {
entry: './client/app.jsx',
output: {
path: __dirname + '/public/js/',
filename: 'bundle.js'
},
devtool: '#sourcemap',
stats: {
colors: true,
reasons: true
},
module: {
loaders: [
{
test: /\.jsx?$/,
exclude: /(node_modules)/,
loader: 'babel-loader'
}
]
}
}
To convert JSX to JS, you can use babel-preset-react and specify the Babel configs in package.json:
...
"babel": {
"presets": [
"react"
]
},
...
The client-side dependencies (for browser React) like Babel and Webpack in package .json will be development dependencies, because Webpack will bundle everything that’s needed into bundle.js. Thus you won’t need them at runtime:
{
...
"devDependencies": {
"axios": "0.13.1",
"babel-core": "6.10.4",
"babel-jest": "13.2.2",
"babel-loader": "6.2.4",
"babel-preset-react": "6.5.0",
"node-dev": "3.1.3",
"webpack": "1.13.1"
}
}
Be sure you use the exact versions provided here. Otherwise, all the new stuff that will come out when I’m done writing this paragraph will break the project—and I’m only half joking!
Also, while you’re in package.json, add an npm build script (it’s optional but more convenient):
...
"scripts": {
...
"build": "./node_modules/.bin/webpack"
},
...
I personally love to use watch for Webpack (-w). In package.json, you can add the option -w to the npm build script:
...
"scripts": {
"build": "./node_modules/.bin/webpack -w",
...
},
...
Consequently, every time you run npm run build, Webpack will use Babel to convert JSX into JS and stitch all the files with their dependencies into a giant ball. In this case, it will be put in /public/js/app.js.
Thanks to the include in the views/index.hbs template, right before the ending </body> tag, the browser code is working (the following line is what’s in the template):
<script type="text/javascript" src="/js/bundle.js"></script>
When I run this default task with npm run build, I see these logs:
Hash: 1d4cfcb6db55f1438550
Version: webpack 1.13.1
Time: 733ms
Asset Size Chunks Chunk Names
bundle.js 782 kB 0 [emitted] main
bundle.js.map 918 kB 0 [emitted] main
+ 200 hidden modules
That’s a good sign. If you see another message or errors, compare your project with the code on at www.manning.com/books/react-quickly or https://github.com/azat-co/react-quickly/tree/master/ch17.
That’s it as far as rendering React.js components in Express.js apps goes. Typically, all you need are the following (assuming you have a build process and components):
Are you still confused about Universal Express and React? If so, get the tested, working code for the project from www.manning.com/books/react-quickly or https://github.com/azat-co/react-quickly/tree/master/ch17/message-board and poke around. You can remove code in app.js to disable browser React (so there’s no interactivity such as mouse clicks), or remove code in index.js to disable server React (slight delay when loading a page).
To run the project, have MongoDB running ($ mongod; for more instructions see appendix D). In the project folder, run these commands:
$ npm install $ npm start
Don’t forget to either have Webpack running builds in watch mode (npm run build) or restart the app every time you make a change to the browser code.
Open http://localhost:3000 in your browser, and you’ll see the message board (see figure 17.9). If you look closely at the way the page is loaded (Chrome DevTools), you’ll see that the first load is fast because the HTML is rendered on the server.
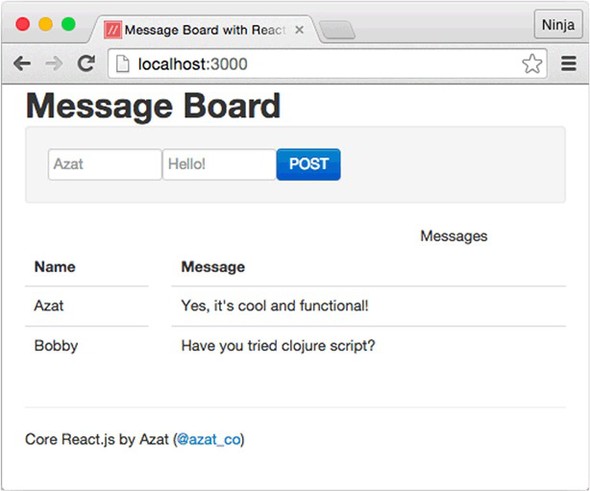
When you comment out the code in ch17/message-board/index.js that’s responsible for server-side rendering, you can compare the timing by looking at the Network tab. There, notice the localhost resource (first page load and server-side rendering) and the GET XHR call to /messages. My results for the localhost are much faster, as shown in figure 17.10.
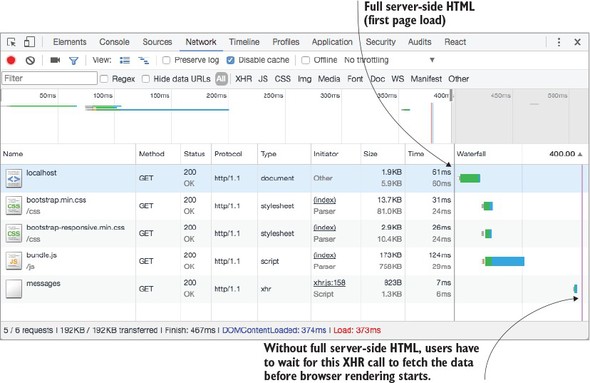
Of course, the bulk of the total loading time is taken up by bundle.js. After all, it has more than 200 modules! GET /messages doesn’t take too long—just a few milliseconds. But still, users will see everything on the page when the localhost call happens. Conversely, without isomorphic/universal code, users will see fully formed HTML only after GET /messages, plus some for browser React to render the HTML client-side.
Let’s inspect the app from a different perspective by comparing Universal versus browser rendering side by side. Figure 17.11 shows the results for localhost. With the Universal approach, localhost has all the data, and it loads in a mere 20–30 ms. With browser-only React, localhost has only bare-bones, skeleton HTML. So, users will have to wait about 10 times as long. Anything greater than 150 ms is usually noticeable by humans.
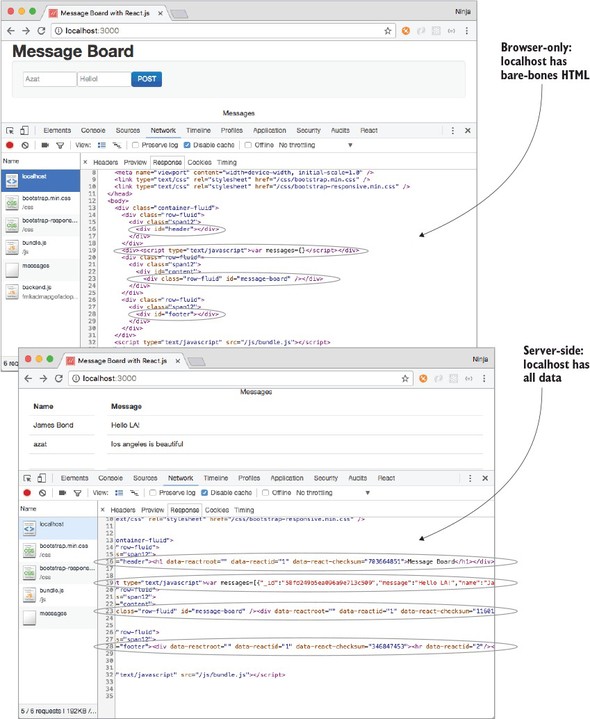
You can play around by commenting out the rendering statements in index.js (Express.js) or app.jsx (browser React). For example, if you comment out the server-side Header but leave the browser render for Header intact, then you may not see Header for a few moments before it appears.
Also, if you comment out passing the props variable on the server or modify its value, browser React will update the DOM after getting the list of messages for axios. React will give you a warning that checksums don’t match.
Sooner or later, your application will grow, and you’ll need to use libraries such as React Router and Redux to route data (covered in chapters 13 and 14). Interestingly, these libraries already support Node, and React Router even supports Express. For example, you can pass React Router routes to Express for server-side support via match and RouterContext, to render components on the server side:
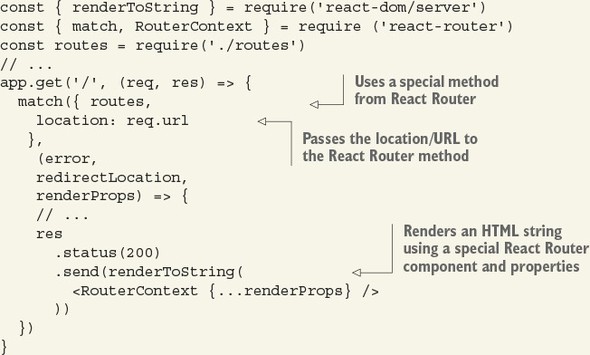
Redux has the createStore() method (chapter 14), which you can use server-side in Express middleware to provide a data store. For example, for an App component, the server-side code with Redux will look like this:
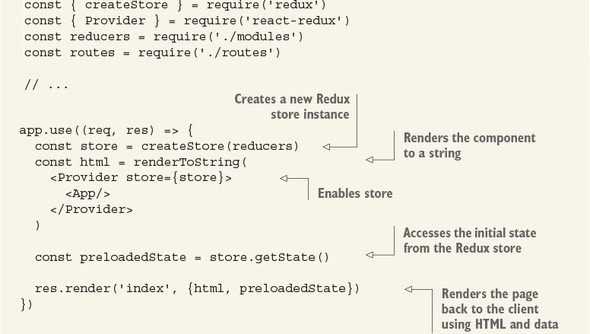
The index template looks like this:
<div id="root">${html}</div>
<script>
window.__PRELOADED_STATE__ = ${JSON.stringify(preloadedState)}
</script>
<script src="/static/bundle.js"></script>
Redux uses the same approach that you used for the message board: rendering HTML and data in a <script> tag.
The full example with explanations is at http://mng.bz/F5pb and http://mng.bz/Edyx.
This concludes the discussion of isomorphic or Universal JavaScript. The uniformity and code reuse it provides are tremendous benefits that help developers be more productive and live happier work lives!
What is the method used to render a React component on the server?
Rendering the first page on the server improves performance. True or false?
CommonJS and Node.js module syntax, using require() (along with Webpack), lets you “require” or import npm modules in browser code. True or false?
Which of the following is used to output unescaped strings in Handlebars? <%...%>, {{...}}, {{{...}}} or dangerouslySetInnerHTML=...
What is the best place to put AJAX/XHR calls in browser React so they won’t be triggered on the server?
ReactDOMServer.renderToString(). renderToStaticMarkup() won’t render checksums.
True. You get all the data on the first page load without having to wait for bundle.js and AJAX requests.
True. You can use the require() and module.exports syntax right out of the box with Webpack. Just by setting an entry point in the webpack.config.js, you can make Webpack traverse all the dependencies from there and include only the needed ones.
{{{...}}} is the correct syntax. For escaped variables, use {{data}} to ensure safer usage.
componentDidMount(), because it will never be called on server rendering.
This chapter covers
The project in this chapter focuses mainly on demonstrating how to use React Router, some ES6 features, and Webpack. In this project, you’ll build a simple e-commerce storefront for a bookstore (figure 18.1).
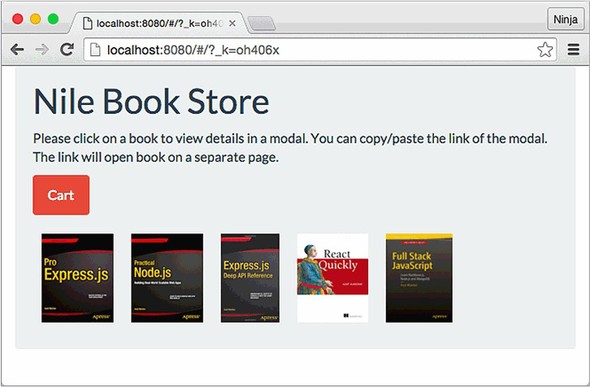
You’ll learn how to create browser routing, as well as the following techniques for working with React Router:
To illustrate these techniques, the project includes several screens with different routes:
The product information will come from an array of data set in one of the files (ch18/nile/jsx/app.js; refer to the project structure in the next section). The product page can act as a modal dialog or as a separate page. When you click a product image on the home page, a modal dialog will open; for example, figure 18.2 shows a modal dialog with the detailed view of React Quickly.
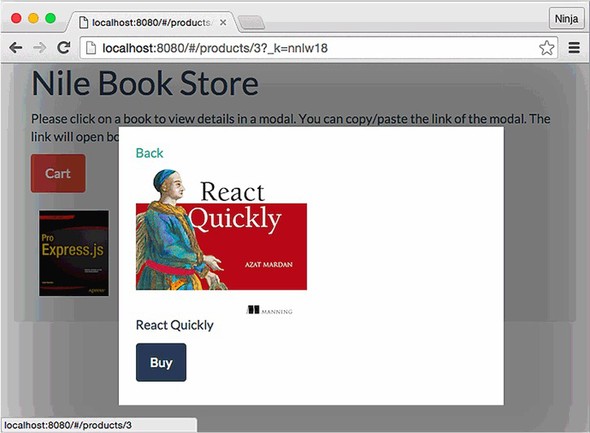
The URL is /products/3 followed by the hash token to keep track of the state. The link is shareable: if you open it in a new window/tab, it’s a normal screen, not a modal dialog (see figure 18.3). Modals are useful when you’re navigating through a list and don’t want to lose the context by going to a new page. But when you share a direct product link, there’s no context or list—you want to focus attention on the product.
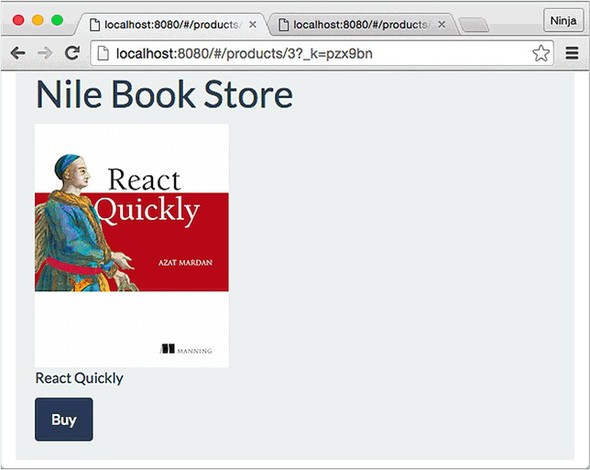
The roadmap to implementing the bookstore front end consists of the following steps:
I encourage you to implement the items listed in the “Homework” section at the end of the chapter and submit your code to the book’s GitHub repository: https://github.com/azat-co/react-quickly.
To follow along with the project, you’ll need to download the unminified version of React and install node.js and npm for compiling JSX. I’m also using Webpack as the build tool. Appendix A covers how to install everything.
The source code for the project in this chapter is at www.manning.com/books/react-quickly and https://github.com/azat-co/react-quickly/tree/master/ch18. You can also find some demos at http://reactquickly.co/demos.
Let’s start with setting up the project.
You have a basic understanding of the end result of this project: a front-end web app with URL routing. Time to jump in to the project structure. This is what the folder structure will look like:
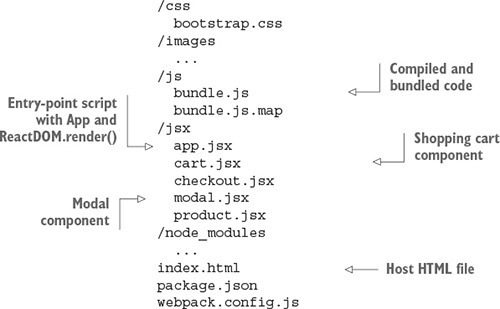
I’ve abridged the contents of the images and node_modules folders for the sake of brevity. This is a front-end-only application, but you need package.json to install dependencies and tell Babel what to do. The following listing shows those dependencies in full, in package.json.
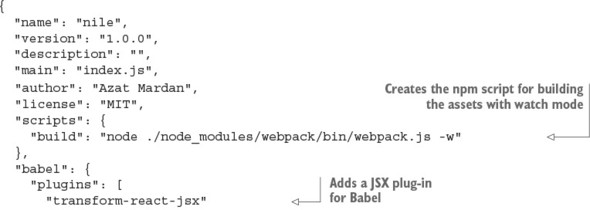
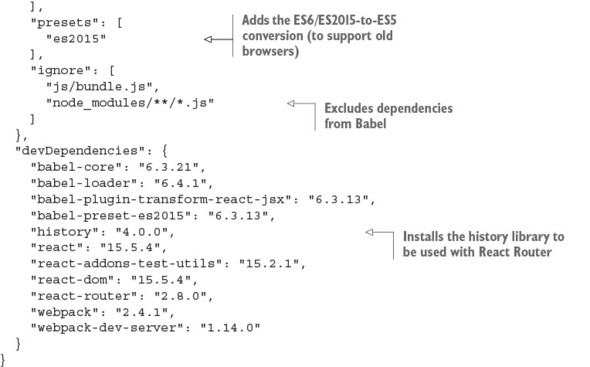
After starting with the standard project properties, the scripts command points to the local installation of Webpack. This way, you’re using the same version as in the devDependencies property. The build creates the bundle.js file and starts the Webpack development server on port 8080. You don’t have to use it; you can instead build manually each time there’s a change and use node-static (https://github.com/cloudhead/node-static) or a similar local web server:
"scripts": {
"build": "node ./node_modules/webpack/bin/webpack.js -w"
},
The next line is required for Babel v6.x, because without it Babel won’t do much. You’re telling Babel to use the JSX transformer and ES2015 presets:
"babel": {
"plugins": [
"transform-react-jsx"
],
"presets": [
"es2015"
],
The next Babel config isn’t optional. It excludes some files from the Babel loader, such as certain node_modules folders and files:
"ignore": [
"js/bundle.js",
"node_modules/**/*.js"
]
},
Next, you’ll define dependencies. You need to use the exact version numbers shown here, because I can’t guarantee that future versions will work. Given the speed at which React and Babel are developing, there will most likely be changes. But there’s nothing wrong with using slightly older versions to learn the concepts, as you’re doing in this book.
The devDependencies are for development, as the name suggests, and aren’t part of production deployment. This is where you put Webpack, Webpack Dev Server, Babel, and other packages. Please double-check that you’re using the exact versions listed here:
...
"devDependencies": {
"babel-core": "6.3.21",
"babel-loader": "6.4.1",
"babel-plugin-transform-react-jsx": "6.3.13",
"babel-preset-es2015": "6.3.13",
"history": "4.0.0",
"react": "15.5.4",
"react-addons-test-utils": "15.2.1",
"react-dom": "15.5.4",
"react-router": "2.8.0",
"webpack": "2.4.1",
"webpack-dev-server": "1.14.0"
}
}
Now that you’ve defined the project dependencies, you need to set up the Webpack build process so you can use ES6 and transform JSX. To do this, create the file webpack.config.js in the root directory, with the following code (ch18/nile/webpack.config.js).
module.exports = {
entry: "./jsx/app.jsx",
output: {
path: __dirname + '/js',
filename: "bundle.js"
},
devtool: '#sourcemap',
stats: {
colors: true,
reasons: true
},
module: {
loaders: [
{
test: /\.jsx?$/,
exclude: /(node_modules)/,
loader: 'babel-loader'
}
]
}
}
Run npm i (short for npm install), and you’re finished with the setup. Next, you’ll create an HTML file that will hold skeleton <div> elements for React components.
The HTML for this project is very basic. It has a container with the ID content and includes js/bundle.js (ch18/nile/index.html).
<!DOCTYPE html>
<html>
<head>
<link href="css/bootstrap.css" type="text/css" rel="stylesheet"/>
</head>
<body>
<div class="container-fluid">
<div id="content" class=""></div>
</div>
<script src="js/bundle.js"></script>
</body>
</html>
Now you can do a quick test to see whether the build and development processes work:
Onward to building the app, assuming you were able to see the message. You’ll begin by importing the modules using ES6 modules and destructuring. Simply put, destructuring is a way to define a variable from an object by using the same name as one of the object’s properties. For example, if you want to import accounts from user.accounts and declare accounts (see the repetition?), then you can use {accounts} = user. If you’re not sure about destructuring, refer to the ES6 cheatsheet in appendix E.
The first file to write is app.jsx, where you set up the main imports, book information, and routes. Minus the component code, which we’ll get to in a moment, app.jsx looks like this (ch18/nile/jsx/app.jsx).
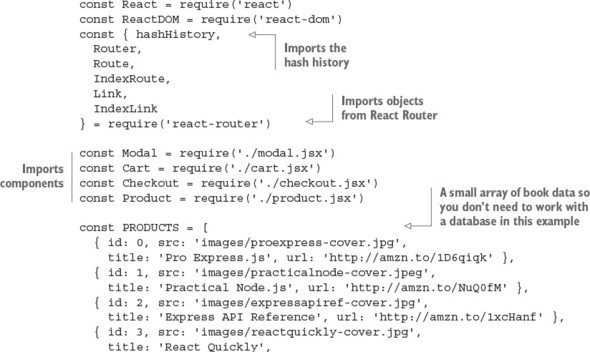
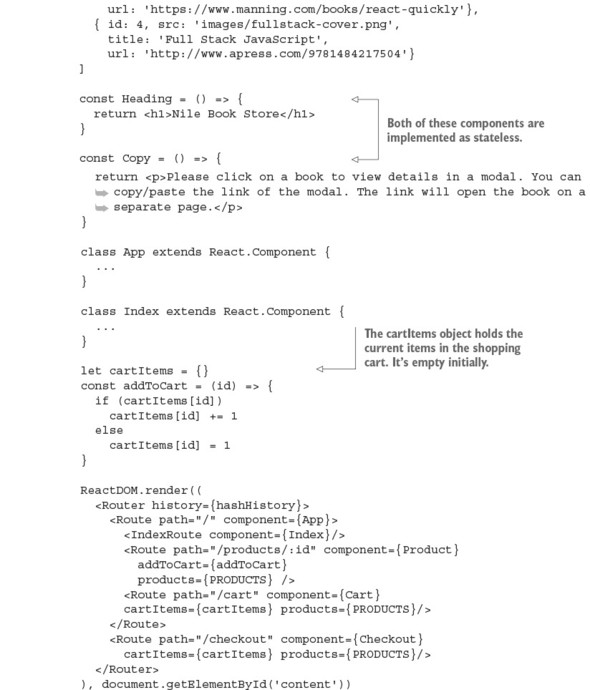
After you import everything at the top of the file, you hardcode the products into an array; each object has id, src, title, and url. Obviously, in the real world you’d get this data from the server, not have it in the browser JavaScript file:
const PRODUCTS = [
{ id: 0, src: 'images/proexpress-cover.jpg',
title: 'Pro Express.js', url: 'http://amzn.to/1D6qiqk' },
{ id: 1, src: 'images/practicalnode-cover.jpeg',
title: 'Practical Node.js', url: 'http://amzn.to/NuQ0fM' },
{ id: 2, src: 'images/expressapiref-cover.jpg',
title: 'Express API Reference', url: 'http://amzn.to/1xcHanf' },
{ id: 3, src: 'images/reactquickly-cover.jpg',
title: 'React Quickly',
url: 'https://www.manning.com/books/react-quickly'},
{ id: 4, src: 'images/fullstack-cover.png',
title: 'Full Stack JavaScript',
url: 'http://www.apress.com/9781484217504'}
]
You implement the next component as stateless using ES6 fat arrows. Why not have it as an <h1> in a render? Because doing it this way, you can use it on multiple screens. You use the same stateless style for Copy. It’s just static HTML, so you don’t need anything extra, not even properties:
const Heading = () => {
return <h1>Nile Book Store</h1>
}
const Copy = () => {
return <p>Please click on a book to view details in a modal. You can
copy/paste the link of the modal. The link will open the book on a
separate page.</p>
}
The two main components, App and Index, come next, followed by the cartItems object, which holds the current items in the shopping cart. It’s empty initially. addToCart() is a simple function—in a server-side version, you’d use Redux to persist the data to the server and sessions so a user could come back to the shopping cart later:
let cartItems = {}
const addToCart = (id) => {
if (cartItems[id])
cartItems[id] += 1
else
cartItems[id] = 1
}
Finally, here’s the ReactDOM.render() method you use to mount the Router component. You need to pass the history library to React Router. As I mentioned earlier, it can be the browser or hash history (this project is using the latter):
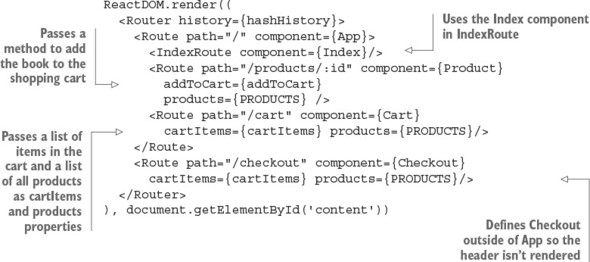
For the /products/:id route, the Product component route gets the addToCart() function to facilitate buying a book. The function will be available in this.props.route.addToCart because whatever property you pass to Route will be available in this.props.route.NAME in the component. For example, products will become this.props.route.products in Product:
<Route path="/products/:id" component={Product} addToCart={addToCart}
products={PRODUCTS} />
The /checkout route is outside of App, so it doesn’t have a header (see figure 18.4). If you recall, path and the route structure can be independent:
<Route path="/checkout" component={Checkout}
cartItems={cartItems} products={PRODUCTS}/>
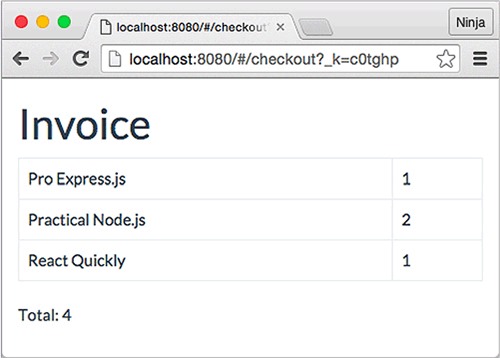
In this case, by putting Checkout outside of App, Checkout isn’t App’s child. You can click Back to navigate back to the app from the invoice/checkout screen.
Now you can implement the App component! It’s the main component because it’s the entry point for Webpack and because it provides the layout for most of the views; renders child components such as Product, the product list, and Cart; and shows a modal dialog. Remember ReactDOM.render()? Here’s the gist, which shows that App is the root component of the app:
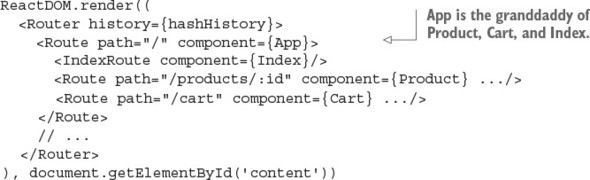
Unlike the stateless components, which were just functions, this component is the real deal (ch18/nile/jsx/app.jsx).
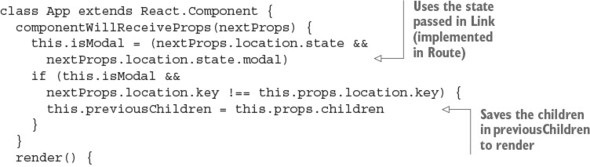
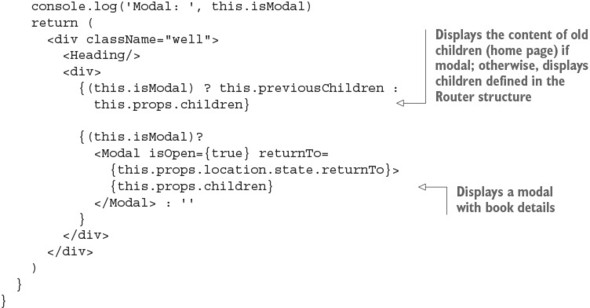
Recall that componentWillReceiveProps() takes the following properties as its argument. This method is a good place to determine whether this view is modal:
class App extends React.Component {
componentWillReceiveProps(nextProps) {
this.isModal = (nextProps.location.state &&
nextProps.location.state.modal)
The following condition checks whether you’re on a modal screen or a nonmodal screen. If it’s modal, you assign children as previous children. The isModal Boolean determines whether the screen is modal based on state, which comes from the location property set in the Link element (you’ll see an example in the Index component):
if (this.isModal &&
nextProps.location.key !== this.props.location.key) {
this.previousChildren = this.props.children
}
}
In the render() function, note that it doesn’t matter whether Heading is just a function (stateless component). You can render it like any other React component:
render() {
console.log('Modal: ', this.isModal)
return (
<div className="well">
<Heading/>
And the ternary expression renders either this.previousChildren or this.props.children. React Router populates this.props.children from other nested routes/components, such as Index and Product. Remember that App is used by almost all of the app’s screens. By default, you want to render this.props.children when working with React Router:
<div>
{(this.isModal) ? this.previousChildren: this.props.children}
If you didn’t have the isModal condition, and you output this.props.children every time, then when you clicked a book image to open the modal, you’d always see the same content, as shown in figure 18.5. Obviously, this behavior isn’t what you intend. For this reason, you render the previous children, which in the case of a modal window is the home page. You can reuse a modal link with state.modal equal to true (shown later, in the Index component). As a result, you’ll see the modal on top of the current context.
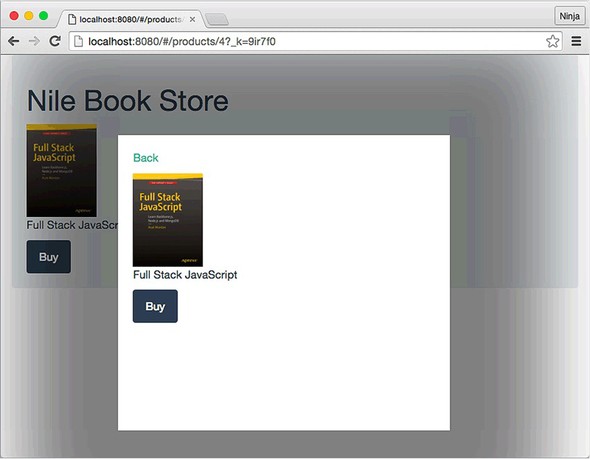
Finally, you can render the modal in another ternary expression. You’re passing isOpen and returnTo:
{(isModal)?
<Modal isOpen={true} returnTo={this.props.location.state.returnTo}>
{this.props.children}
</Modal> : ''
}
</div>
</div>
)
}
}
Continuing with nile/jsx/app.jsx, the next component is the home page. If you’ll recall, it shows the full list of books. The code is shown next (ch18/nile/jsx/app.jsx).
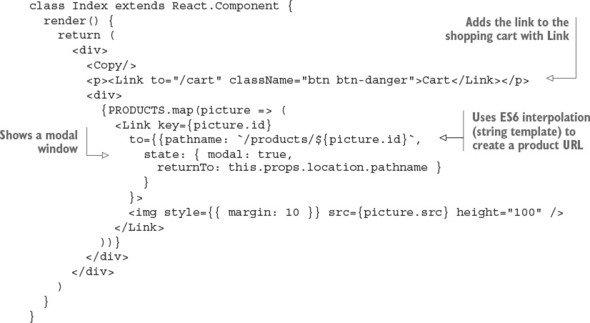
In the map() iterator, you render links to the book modals. These links will open in a separate, nonmodal view when you navigate to them directly:
{PRODUCTS.map(picture => (
<Link key={picture.id}
to={{pathname: `/products/${picture.id}`,
state: { modal: true,
returnTo: this.props.location.pathname }
}
}>
You can pass any property to the component associated with the /products/:id route (that is, Product and its parent, App). The properties are accessible in this.props.location.NAME, where NAME is the name of the property. You used state.modal earlier, in the Modal component.
The <img> tag uses the src attribute to render the book image:
<img style={{ margin: 10 }} src={picture.src} height="100" />
</Link>
))}
</div>
</div>
)
}
}
That’s it for the app.jsx file. The next component to implement is the Cart component; it will live in its own file, because it’s not closely related to the application the way App is a layout of the bookstore.
The /cart route, rendered by Cart, displays the list of books and their quantity in the shopping cart, as shown in figure 18.6. The Cart component uses cartItems to get the list of books and their quantity. Notice the ES6 style for the render() function (nile/jsx/cart.jsx).
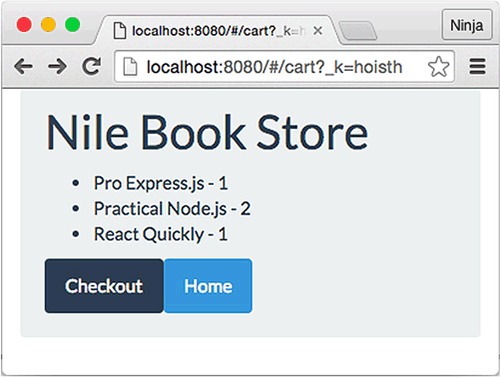
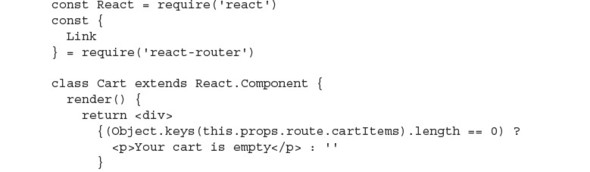
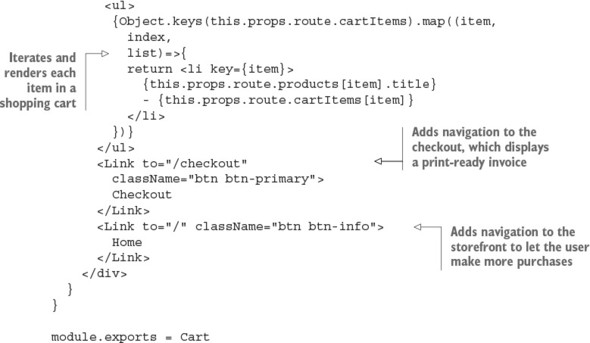
Cart uses this.props.route.products, which is a list of products. This works because in app.js, you defined the route property:
<Route path="/cart" component={Cart}
cartItems={cartItems} products={PRODUCTS}/>
If you’re using Redux (chapter 14), you won’t need to manually pass properties such as products, because Provider will populate the data store in children automatically.
Next is Checkout, shown in figure 18.7. This is the only component outside the App route. To refresh your memory, this is the routing from app.js:
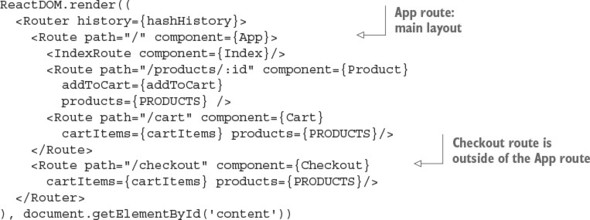
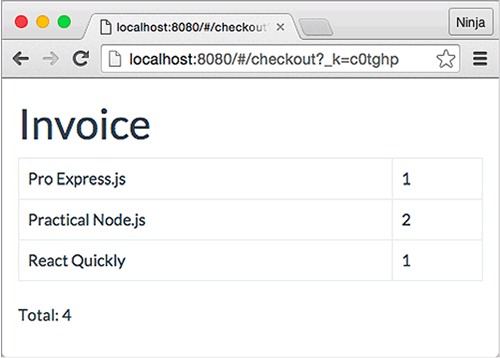
As you can see, App and Checkout are on the same level of the hierarchy. Thus, when you navigate to /checkout, the App route is not triggered. There’s no layout. (Interestingly, it’s possible to nest the URLs but keep the components out of the nested structure: for example, by setting /cart/checkout. You won’t do that here, though.)
The print-ready invoice uses a Twitter Bootstrap table and table-bordered styles. Again, you use ES6’s const (remember, object properties can change) and function syntax (nile/jsx/checkout.jsx).
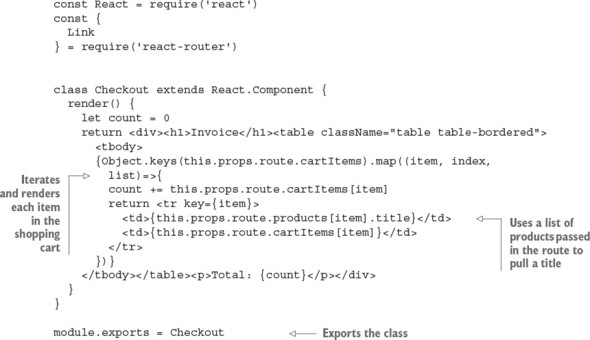
Now you need to implement the Modal component.
This component renders its children in a modal dialog. Recall that in App, the code uses Modal like this:
{(this.isModal) ?
<Modal isOpen={true} returnTo={this.props.location.state.returnTo}>
{this.props.children}
</Modal> : ''
}
Modal takes children from App’s this.props.children, which in turn is defined in app.js, in <Route>. Here’s a reminder of the routing structure:
ReactDOM.render((
<Router history={hashHistory}>
<Route path="/" component={App}>
<IndexRoute component={Index}/>
<Route path="/products/:id" component={Product}
addToCart={addToCart}
products={PRODUCTS} />
<Route path="/cart" component={Cart}
cartItems={cartItems} products={PRODUCTS}/>
</Route>
<Route path="/checkout" component={Checkout}
cartItems={cartItems} products={PRODUCTS}/>
</Router>
), document.getElementById('content'))
This is how you can view a product page both as a standalone and as a modal. Components nested under the App route are its children, depending on the URL (nile/jsx/modal.jsx).
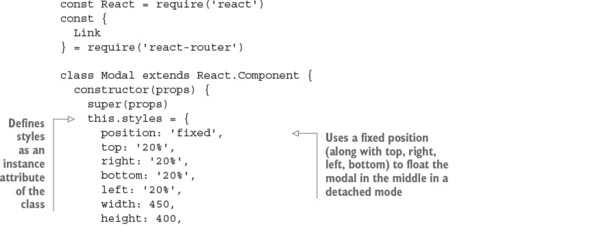
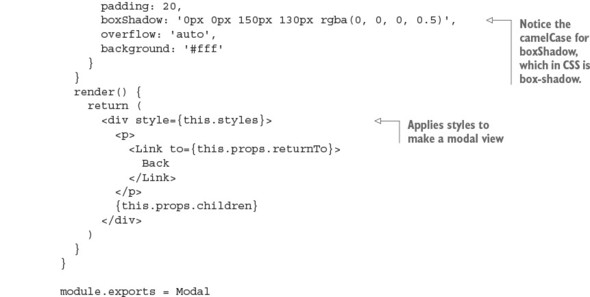
The modal window displays an individual Product component because that’s what’s nested under App in routing and because the Product route has the URL path /product/:id, which you used along with state set to modal true in Index (product list).
The Product component uses the property from its route to trigger actions (this.props.route.addToCart). The addToCart() method in app.js puts a specific book in the shopping cart (if you’re using Redux, then this dispatches the action). You trigger addToCart() with the browser onClick event handler and a local method in Product called handleBuy(), which triggers the method addToCart from app.js. To summarize: onClick → this.handleBuy → this.props.route.addToCart → addToCart() (app.js). As a reminder, addToCart() is as follows:
let cartItems = {}
const addToCart = (id) => {
if (cartItems[id])
cartItems[id] += 1
else
cartItems[id] = 1
}
Of course, if you’re using Redux or Relay, then you’ll use their methods. This example keeps things simple with a plain array acting as a data store and a single method.
Now let’s look at the Product component itself. As always, you start by importing React and defining the class; then you take care of the event and render. Here’s the full code for Product (nile/jsx/product.jsx) with the most interesting parts noted.
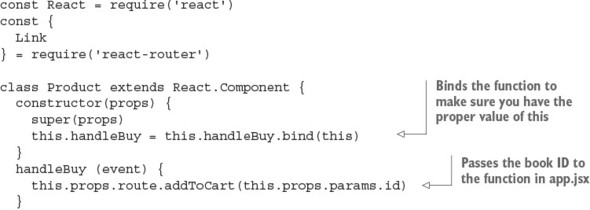
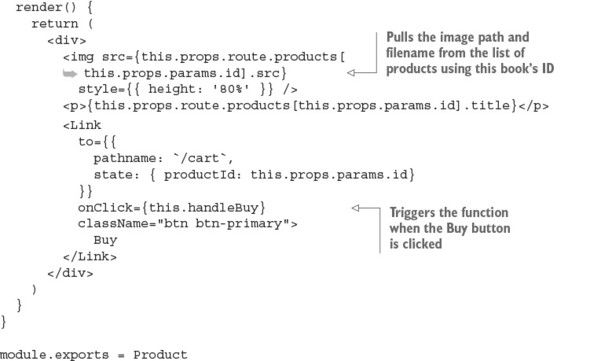
You can also send a state to Cart in the Link component:
<Link
to={{
pathname: `/cart`,
state: { productId: this.props.params.id}
}}
onClick={this.handleBuy}
className="btn btn-primary">
Buy
</Link>
Recall that Product is used by the modal indirectly: Modal doesn’t render Product. Instead, Modal uses this.props.children, which has Product. Thus, Modal can be considered a passthrough component. (See chapter 8 for more about this.props.children and passthrough components that use it.)
That’s all for the bookstore. You’ve used some ES6 features and passed around states with React Router. Now, run the project by building it with npm run build, starting a local web server (WDS or node-static), and navigating to http://localhost:8080/nile, assuming you have a static web server running in a parent folder that has a nile folder (the URL path depends on where you launched the static web server).
You should see the home page with a grid of book covers. When you click a cover, a modal window appears; click the Buy button to add the book to the cart, which appears on the /cart and /checkout pages. Enjoy!
For bonus points, do the following:
Submit your code in a new folder under ch18 as a pull request to this book’s GitHub repository: https://github.com/azat-co/react-quickly/.
This chapter covers
This project focuses on building a UI, working with modules, and testing with Jest, along with other React-related techniques such as component composition, ES6 syntax, state, properties, and so on. Recall that chapter 16 dealt with testing; you used a password widget as an example of unit testing and UI testing. In this project, you’ll build the widget itself to check, verify, and generate new passwords. Along the way, I’ll explain testing again, here and there, in an expanded format.
The widget has a Save button that’s disabled by default but becomes enabled when the password is strong enough (according to the preset rules), as shown in figure 19.1. In addition, the Generate button lets you create a strong (according to the criteria) password. As each rule is satisfied, it’s crossed out. There’s also a Show Password check box that hides/shows the password, just as in most macOS interfaces (see figure 19.2).
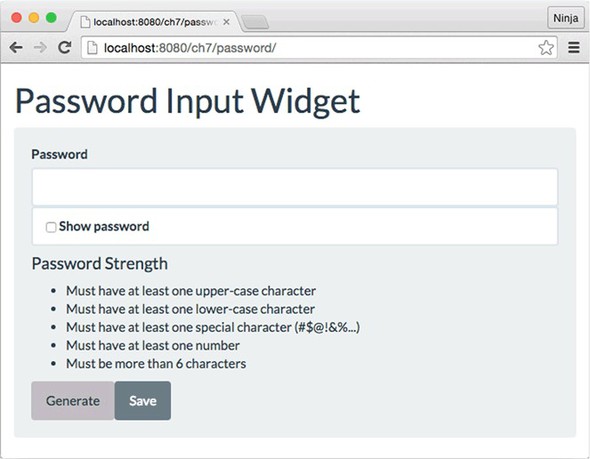
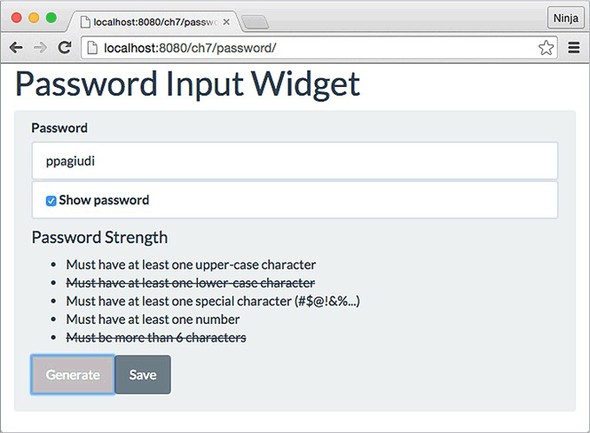
The parent component is called Password, and the child components are listed here:
The widget is built using a single parent component. You provide the password-strength rules to the component as properties, so the component is highly customizable. I’ll bet you can use it in your own apps with some customization!
To follow along with this project, you’ll need to install Node.js and npm to compile JSX. This example also uses Webpack as a build tool and, of course, Jest as the test engine. Appendix A covers how to install everything.
Because parts of this project were first introduced in chapter 16, the source code is in the ch16 folder; you can find it at www.manning.com/books/react-quickly and https://github.com/azat-co/react-quickly/tree/master/ch16. You can also find some demos at http://reactquickly.co/demos.
Let’s start by setting up the project.
This is what the complete folder structure looks like. Begin by creating a new project folder named password:

The __tests__ folder is for Jest tests. The css folder contains my Twitter Bootstrap theme, called Flatly (https://bootswatch.com/flatly). The js and jsx folders have libraries and components, respectively. And js/generate-password.js is the library responsible for generating random passwords.
The dist folder contains the compiled JSX files with source maps. That’s where Webpack will put the concatenated file and its source map. Here, dist is short for distribution; it’s a commonly used name, along with js or build. I used it here to introduce some variety and show you how to customize Webpack configs.
Don’t forget that to avoid having to install each dependency with the exact version manually, you can copy package.json from the following listing to the password folder and then run npm install in it (ch16/password/package.json).
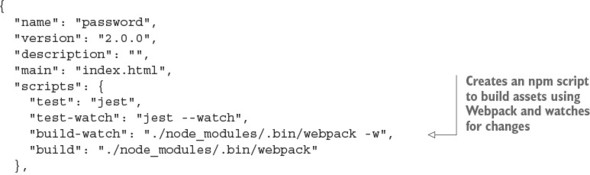
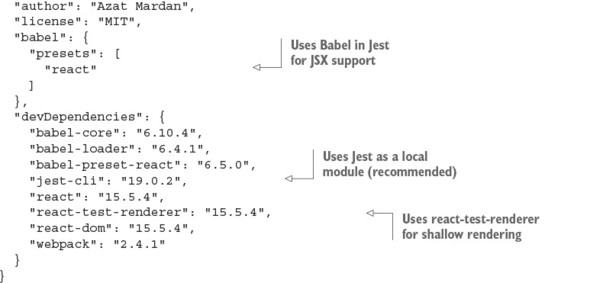
The interesting thing here is the scripts section, which you’ll use for testing, compilation, and bundling:
"scripts": {
"test": "jest",
"test-watch": "jest --watch",
"build-watch": "./node_modules/.bin/webpack -w",
"build": "./node_modules/.bin/webpack"
},
Recall that in the Nile store in chapter 18, you used transform-react-jsx:
"babel": {
"plugins": [
"transform-react-jsx"
],
But in this project, you use the React preset. It’s just another way to accomplish the same thing. You can use a preset or a plug-in. Presets are a more modern approach and are used in more docs and projects.
The test script (npm test) is for running Jest tests manually. Conversely, the test-watch script keeps Jest running in the background. test-watch is launched with npm run test-watch because only test and start don’t require run. You run test-watch once, and Jest (in watch mode) will notice any source code changes and rerun the tests. Here’s an example of the output:
PASS __tests__/password.test.js PASS __tests__/generate-password.test.js Test Suites: 2 passed, 2 total Tests: 3 passed, 3 total Snapshots: 0 total Time: 1.502s Ran all test suites. Watch Usage > Press o to only run tests related to changed files. > Press p to filter by a filename regex pattern. > Press t to filter by a test name regex pattern. > Press q to quit watch mode. > Press Enter to trigger a test run.
So far, you’ve defined the project dependencies. Next, you need to set up the Webpack build process so you can transform JSX to JS. To do this, create the webpack .config.js file in the root directory with the following code (ch16/password/webpack.config.js).
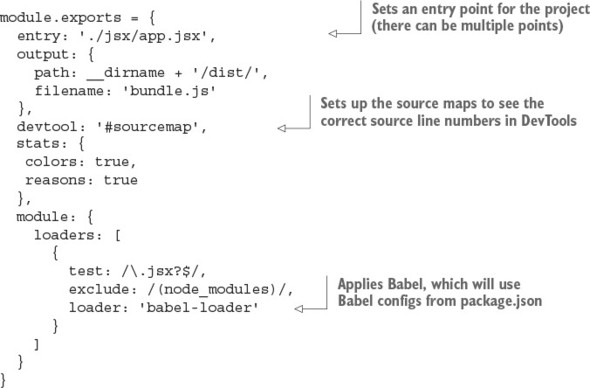
Now you can define configs to build your project in webpack.config.js. The entry point is the app.js JSX file in the jsx folder, and the destination is the dist folder. Also, configs will set the source maps and the Babel loader (to convert JSX into JS).
The build will be called with ./node_modules/.bin/webpack, or with ./node_modules/.bin/webpack -w if you want the tool to monitor file changes. Yes, with -w (watch), you can make Webpack rebuild on every file change—that is, each time you click Save in Notepad (I don’t like IDEs). Watch is great for active development!
You can create more than one webpack.config.js by specifying a different filename with --config:
$ ./node_modules/.bin/webpack --config production.config.js
Each config file can use a new script in package.json for convenience.
The bottom line is that Webpack is easy and fun to work with because it supports CommonJS/Node modules by default. There’s no need for Browserify or any other module loaders. With Webpack, it’s like writing a Node program for browser JavaScript!
Next, create the index.html file. It has a container with ID content and includes dist/bundle.js (ch16/password/index.html).
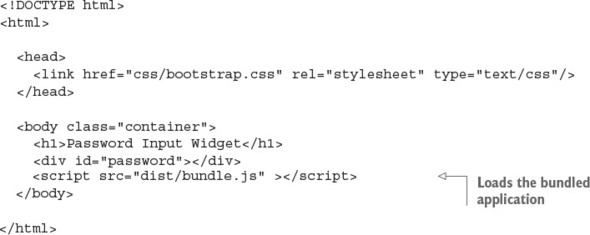
Now you should be set up and ready to start developing. It’s a good idea to test in increments during development so the area in which you look for bugs is as small as possible. So, perform a quick test to see if the setup is working correctly, just as you did in chapter 18. Do something along these lines:
The strong-password module is a generate-password.js file sitting in password/js. The test for the file will be in password/__tests__/generate-password.test.js. This module will return random passwords when invoked. The passwords will contain a good mix of different types of characters:
These categories, along with length and randomness, will ensure that the password is secure enough. Using TDD/BDD, let’s implement the tests first.
Begin with the tests in generate-password.test.js. Remember that you store them in the __tests__ folder so Jest can find them (ch16/password/__tests__/generate-password.test.js).

You start by declaring the password variable and importing generate-password.js. The regular expression checks the content and length of the password. It’s not perfect, because you don’t check that each password has at least one of those characters, but it’ll do for now:
let password,
password2,
pattern = /^[A-Za-z0-9\!\@\#\$\%\^\&\*\(\)\_\+\{\}\:\"\<\>\?\\|
\[\]\/'\,\.\`\~]{8,16}$/
Write in the test suite describe the noun method generatePassword. That’s what you’re going to test: it’s the function exported in the generate-password.js module.
Implement the test suite it with the code to unit-test via the BDD-style expect statements, as described in chapter 16. At a minimum, check against a regular-expression pattern for the password:
describe('method generatePassword', () => {
it('returns a generated password of the set pattern', ()=>{
password = generatePassword()
expect(password).toMatch(pattern)
})
it('returns a new value different from the previous one', ()=>{
password2 = generatePassword()
expect(password2).not.toEqual(password)
})
})
What if the password isn’t different each time you invoke generatePassword()? What if it’s hardcoded in generate-password.js? That would be bad! So, the second test suite expects the second generated password to be different.
You’ll implement a strong-password module in js/generate-password.js so you can TDD/BDD it right away—that is, you’ll write the test first and only then write the code. Here’s a versatile password generator that uses three sets of characters to satisfy the strong-password criteria:

The exported function (assigned to module.exports) calls the shuffle() method, which randomly moves characters around in the string. shuffle() takes the password generated by pick(), which uses sets of characters to make sure the generated password includes at least one of a certain group of characters (numbers, uppercase letters, specials, and so on). The final part of the password consists of more random elements from the union set ALL.
You can run the unit test for password/__tests__/generate-password.js with the command jest __tests__/generate-password.test.js or npm test __tests__/ generate-password.test.js executed from the project root (password folder). It should pass with a message similar to the following:
jest __tests__/generate-password.test.js
PASS __tests__/generate-password.test.js
method generatePassword
✓ returns a generated password of the set pattern (4ms)
✓ return a new value different from the previous one (2ms)
Test Suites: 1 passed, 1 total
Tests: 2 passed, 2 total
Snapshots: 0 total
Time: 1.14s
Ran all test suites matching "__tests__/generate-password.test.js".
The next logical thing is to work on the main component, Password. According to TDD, you again must start with a test: a UI test, in this case, because you want to test behavior like clicking.
Create a UI test file called __tests__/password.test.js. We already covered this file in chapter 16, so I’ll present the full example here with some comments (ch16/password/__tests__/password.test.js).
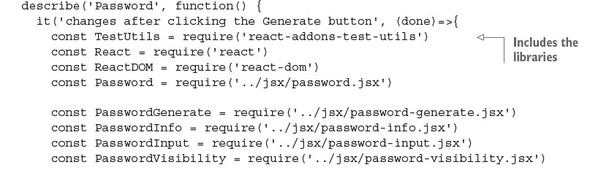
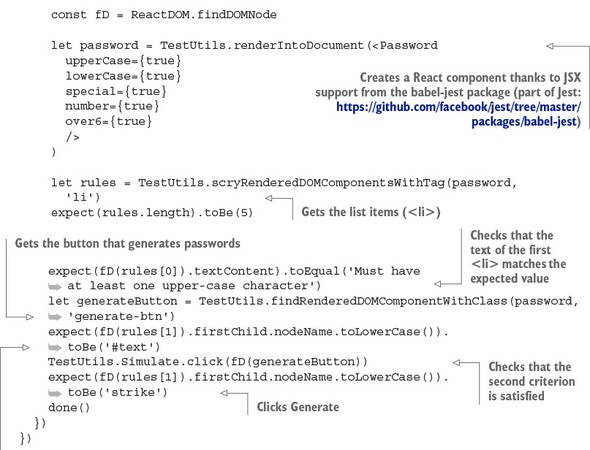
You can extend this test case to check that all the properties and rules pass; this is homework (see the “Homework” section at the end of this chapter for more ideas). It’s a good idea to have another suite and provide a different mix of properties, and then test for that as well.
That’s it! Your test should fail (npm test or jest) with an error:
Error: Cannot find module '../jsx/password.jsx' from 'password.test.js'
That’s normal for test-driven development because we write tests before apps. The main thing you need to do now is to implement the Password component.
Next, you’ll create the Password component with some initial state. The state variables are as follows:
Imagine that a few days after you implement this widget, a developer from another team wants to use your component but with slightly stricter password criteria. The best approach is to abstract (a fancy word for copy and paste) the code with the password criteria (rules) into a separate file. You’ll do this before proceeding with password.jsx.
Create a file called rules.js (ch16/password/js/rules.js). This file will implement password rules that you can use in password.jsx to perform validation and show warning messages. Keeping the rules separate will make it straightforward to change, add, or remove rules in the future.
module.exports = {
upperCase: {
message: 'Must have at least one upper-case character',
pattern: /([A-Z]+)/
},
lowerCase: {
message: 'Must have at least one lower-case character',
pattern: /([a-z]+)/
},
special:{
message: 'Must have at least one special character (#$@!&%...)',
pattern: /([\!\@\#\$\%\^\&\*\(\)\_\+\{\}\:\"\<\>\?\\|\[\]\/'\,\.\`\~]+)/
},
number: {
message: 'Must have at least one number',
pattern: /([0-9]+)/
},
'over6': {
message: 'Must be more than 6 characters',
pattern: /(.{6,})/
}
}
Basically, you have a bunch of rules, each of which has the following:
Now, on to password.jsx. You need to do the following:
Let’s implement the component. You import dependencies and create the component with initial state (ch16/password/jsx/password.jsx).
const React = require('react')
const ReactDOM = require('react-dom')
const generatePassword = require('../js/generate-password.js')
const rules = require('../js/rules.js')
const PasswordGenerate = require('./password-generate.jsx')
const PasswordInfo = require('./password-info.jsx')
const PasswordInput = require('./password-input.jsx')
const PasswordVisibility = require('./password-visibility.jsx')
class Password extends React.Component {
constructor(props) {
super(props)
this.state = {strength: {}, password: '', visible: false, ok: false}
this.generate = this.generate.bind(this)
this.checkStrength = this.checkStrength.bind(this)
this.toggleVisibility = this.toggleVisibility.bind(this)
}
...
}
Next, you implement a method to check for the password strength:
checkStrength(event) {
let password = event.target.value
this.setState({password: password})
let strength = {}
The following code block goes through each property (upperCase, over6, and so on) and checks the current password using the regular-expression pattern in rules. If the criterion is met, the property in the strength object is set to true:
Object.keys(this.props).forEach((key, index, list)=>{
if (this.props[key] && rules[key].pattern.test(password)) {
strength[key] = true
}
})
this.setState() is asynchronous, so you use a callback to provide logic that relies on the updated state. In this case, you check that the number of properties in the strength object (this.state.strength) is equal to the number of rules (props). It’s a rudimentary check; checking each property in a loop would be a more robust solution, but this code works for now. You set ok to true if the numbers match (that is, if all the rules for password strength are satisfied):
this.setState({strength: strength}, ()=>{
if (Object.keys(this.state.strength).length ==
Object.keys(this.props).length) {
this.setState({ok: true})
} else {
this.setState({ok: false})
}
})
The next method hides and shows the password field. This is a useful feature when you’re generating a new password, because you may want to save the password (or need help remembering it):
toggleVisibility() {
this.setState({visible: !this.state.visible}, ()=>{
})
}
Next is the generate() method, which creates random passwords using the js/generate-password.js module. Setting visible to true ensures that users can see the newly generated password. Right after the password is generated, you call checkStrength() to check its strength. Typically, the conditions will be satisfied, and users will be able to proceed by clicking Save:
generate() {
this.setState({visible: true, password: generatePassword()}, ()=>{
this.checkStrength({target: {value: this.state.password}})
)
}
In the render() function, Password processes the rules and renders a few other React components:
You begin by processing the rules and determining which of them are satisfied (isCompleted). Instead of passing the context in _this or using the bind(this) pattern, you use fat-arrow functions ()=>{}. There’s no big difference; choose one approach or the other, and use it.
Object.keys flattens your hash table into an array by giving you an array of keys of that object. You can iterate over that array of keys with map() and construct a new array with objects that have key, rule, and isCompleted:
render() {
var processedRules = Object.keys(this.props).map((key)=>{
if (this.props[key]) {
return {
key: key,
rule: rules[key],
isCompleted: this.state.strength[key] || false
}
}
})
// return ...
Once your array of processed rules is ready, you can begin rendering the components. Remember that for is a special word in JavaScript. That’s why you need to use className, not class (ch16/password/jsx/password.jsx).
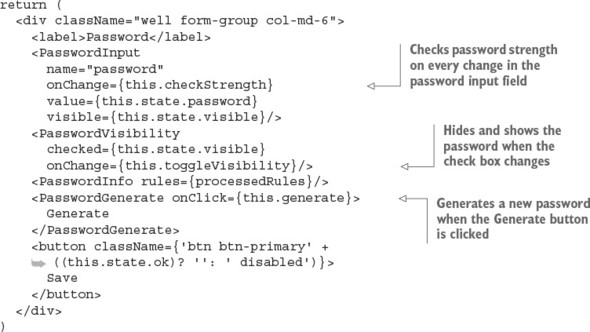
Let’s cover the most important parts in more detail. PasswordInput is a controlled component (for a detailed comparison between controlled and uncontrolled components, see chapter 5). You listen on every change with the this.checkStrength callback, which uses e.target.value, so there’s no need for refs:
<PasswordInput name="password" onChange={this.checkStrength}
value={this.state.password} visible={this.state.visible}/>
Similar to PasswordInput, PasswordVisibility is a controlled component, and the event handler for change is this.toggleVisibility:
<PasswordVisibility checked={this.state.visible}
onChange={this.toggleVisibility}/>
You pass the processedRules object to the list of rules, and the PasswordGenerate button triggers this.generate:
<PasswordInfo rules={processedRules}/>
<PasswordGenerate onClick={this.generate}>Generate</PasswordGenerate>
The Save button is disabled and enabled based on the this.state.ok value. Don’t forget the space before disabled, or you’ll get the btn-primarydisabled class instead of two classes, btn-primary and disabled:
<button className={'btn btn-primary' +
((this.state.ok)? '': ' disabled')}>Save</button>
</div>
)
}})
The other components, in listings 19.9 (ch16/password/jsx/password-generate.jsx), 19.10 (ch16/password/jsx/password-input.jsx), and 19.11 (ch16/password/jsx/password-visibility.jsx), are dumb components. They just render classes and pass properties.
const React = require('react')
class PasswordGenerate extends React.Component{
render() {
return (
<button {...this.props} className="btn generate-btn">
{this.props.children}</button>
)
}
}
module.exports = PasswordGenerate
const React = require('react')
class PasswordInput extends React.Component {
render() {
return (
<input className="form-control"
type={this.props.visible ? 'text' : 'password'}
name={this.props.name}
value={this.props.value}
onChange={this.props.onChange}/>
)
}
}
module.exports = PasswordInput

Let’s look at PasswordInfo for a moment (ch16/password/jsx/password-info.jsx). It takes the processed rules array and iterates over that property. If isCompleted is true, you add <strike> to the <li>. <strike> is an HTML tag that applies a strikethrough line to text. This is what you check for in the password.test.js test, too.
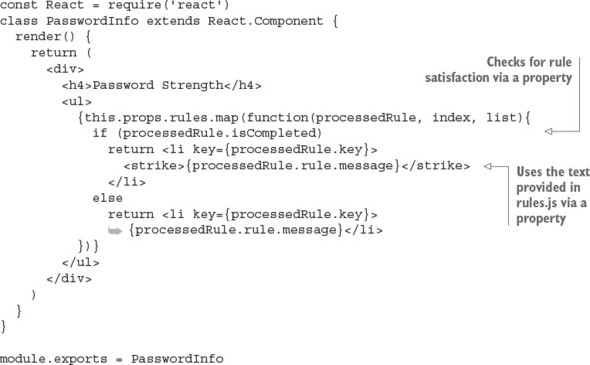
You’re finished with the password.jsx file! Now you have everything ready to rerun the test. Don’t forget to recompile with npm run build or npm run build-watch. If you followed everything to a T, you should see something like this after you run npm test:
Using Jest CLI v0.5.10 PASS __tests__/generate-password.test.js (0.03s) PASS __tests__/password.test.js (1.367s) 2 tests passed (2 total) Run time: 2.687s
Good job—you can pat yourself on the back!
To see the widget in action, you need to do one more tiny step: create jsx/app.jsx, which is an example file for the component. Here’s how to render the Password widget in your app:
const React = require('react')
const ReactDOM = require('react-dom')
const Password = require('./password.jsx')
ReactDOM.render(<Password
upperCase={true}
lowerCase={true}
special={true}
number={true}
over6={true}/>,
document.getElementById('password'))
You can run the files like any other front-end app. I prefer node-static (https://github.com/cloudhead/node-static), or you can see an online demo at http://reactquickly.co/demos. Notice how the Save button becomes active when all the rules are satisfied, as shown in figure 19.3.
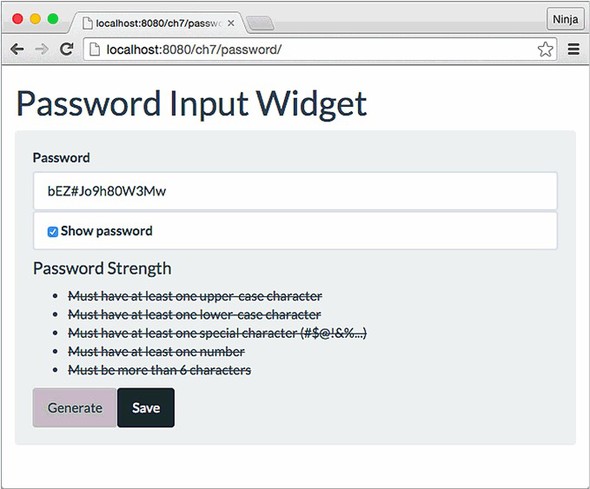
The best software engineering practice doesn’t stop at writing and running tests locally. The tests are much more valuable when combined with the deployment process and automated. These processes, called continuous integration (CI) and continuous deployment (CD), are great for speeding up and automating software delivery.
I highly recommend setting up CI/CD for anything more than a prototype. There are plenty of good software-as-a-service (SaaS) and self-hosted solutions out there. With the tests in this project, setting up a CI/CD environment won’t take long. For example, with AWS, Travis CI, or CircleCI, all you need to do is configure your project in terms of the environment it should run in and then provide a test command such as npm test. You can even integrate those SaaS CIs with GitHub so that you and your team can see CI messages (pass, fail, how many failures, and where) on GitHub pull requests.
Amazon Web Services offers its own managed services: CodeDeploy, CodePipeline, and CodeBuild. For more information on these AWS services, refer to Node University: https://node.university/p/aws-intermediate. If you prefer a self-hosted solution instead of a managed solution, take a look at Jenkins (https://jenkins.io) and Drone (https://github.com/drone/drone).
For bonus points, try the following:
Submit your code in a new folder under ch16 as a pull request to this book’s GitHub repository: https://github.com/azat-co/react-quickly.
This chapter covers
The goal of this project is first of all to combine many of the techniques you’ve learned throughout this book, such as component composition, states, form elements, and testing, as well as how to fetch data from an API server and store and how to implement a simple Express server and Universal React rendering. You’ve already done most of these things in the book, but repetition is the mother of learning—especially intermittent repetition!
In this chapter, you’ll build a well-rounded component and supply it with a back end. This little project is close to the sort of real-life projects you’ll most likely perform on the job.
In a nutshell, this project will guide you through building an autocomplete component that’s visually and functionally similar to the one in Slack (a popular messaging app) and Google (a popular search engine), as shown in figure 20.1. For simplicity’s sake, the widget will work with the names of rooms in a chat application.
The autocomplete widget, shown in figure 20.2, has the following:

Room names are filtered using the entered characters as the first characters of each option. A simple comparison autocompletes the name of a room (see figure 20.3). For example, if you have rooms named angular, angular2, and react, and you type angu, then only angular and angular2 will be shown as a match, not the react option.
What if there are no matches? There’s a way to add a new option using the Add button. For convenience, the Add button is shown only when there are no matches (see figure 20.4). This button lets you persist (save permanently in the database) the new input.
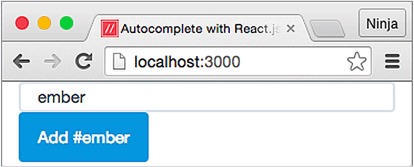
The new option is saved to the database via an XHR call to the REST API. You can use this new room name in future matches (see figure 20.5), just like the initial list of room names.
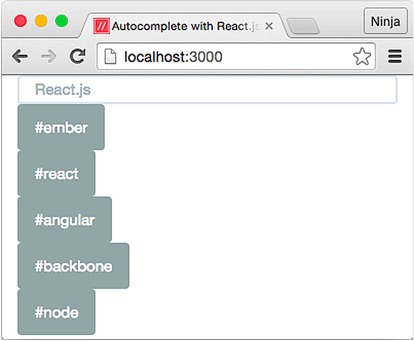
To implement this autocomplete widget, you need to do the following:
You’ll render the React components on the server, test them with Jest, and make AJAX/XHR requests with axios.
The source code for the examples in this chapter is at www.manning.com/books/react-quickly and https://github.com/azat-co/react-quickly/tree/master/ch20. You can also find some demos at http://reactquickly.co/demos.
Let’s start by setting up the project.
To give you an overview of the tech stack, in this project you’ll use the following technologies and libraries:
I prefer to use Handlebars for the layout for several reasons. First, React makes it painstakingly difficult to output unescaped HTML; it uses a weird syntax that involves the word dangerously. But this is what you need to do for Universal React and server-side rendering. Yes, the unescaped HTML can expose an app to cross-site scripting attacks,[1] but you’re rendering on the server, so you control the HTML string.
A cross-site scripting (XSS) attack is characterized by attackers injecting malicious code into legitimate websites that users trust but that contain XSS vulnerabilities. For example, an attacker can post a message with some bad code that includes <script> elements on a vulnerable forum that isn’t sanitizing and/or escaping the post text. All visitors to the forum will end up executing the malicious code. For more on XSS, see Jakob Kallin and Irene Lobo Valbuena, “Excess XSS: A Comprehensive Tutorial on Cross-Site Scripting,” https://excess-xss.com.
The second reason is that Handlebars more naturally renders things like <!DOCTYPE html>. React can’t do it as naturally because React is meant more for individual elements than entire pages.
Third, React is for managing state and automatically maintaining the view in accordance with the state. If all you’re doing is rendering a static HTML string from a React component, why bother with React? It’s overkill. Handlebars is similar to HTML, so it’s easy to copy and paste existing HTML code without having to think twice about JSX and React gotchas that may bite you in the tail when you’re converting HTML to React.
Finally, my personal experience explaining code functionality to other developers and to students in my courses and workshops has shown that some people have a harder time understanding the structure when React components are used for layout on the server and other React components are used for views on both the client and server.
Appendix A covers the installation of these tools, so I won’t bore you by duplicating that information. Go ahead and create a new project folder named autocomplete. This is what the folder structure will look like:
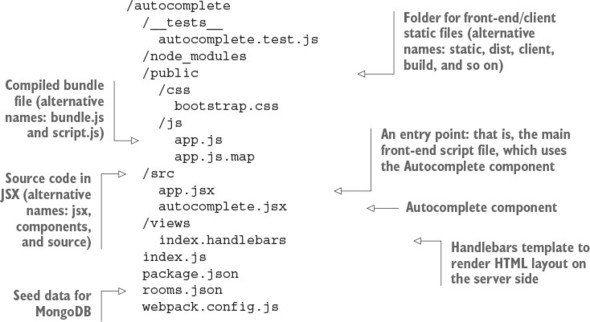
The __tests__ folder is for Jest tests. As should now be familiar to you, the node_modules folder is for Node.js dependencies (from npm’s package.json). The public, public/css, and public/js folders contain the static files for the application.
Naming is paramount to good software engineering because a good name provides a crucial piece of information. It can tell you a lot about the script, file, module, or component without you having to read the source code, tests, or documentation (which may not exist!).
Just as you’ve gotten familiar with putting JSX files into the jsx folder and using build as a destination folder for compiled files, I’ve started to use other names. That’s because you’ll encounter many different conventions. Each project will probably have a different structure; the structure may vary a lot or a little. As a developer, it’s your job to be comfortable with configuring tools such as Webpack and libraries such as Express to work with any names. For that reason, and to add variety, in this chapter I use public instead of build (plus public is a convention for static files served by Express), src instead of jsx (you may have other source files, not just JSX, right?), and so on.
The public/js/app.js file will be bundled by Webpack from the dependencies and the JSX source code src/app.jsx. The source code for the Autocomplete component is in the src/autocomplete.jsx file.
The views folder is for Handlebars templates. If you feel confident about your React skills, you don’t have to use a template engine; you can use React as the Node.js template engine!
In the root of the project, you’ll find these files:
Don’t forget that to avoid installing each dependency with the exact version manually, you can copy the package.json file from the following listing (ch20/autocomplete/package.json) to the root folder, and run npm install.
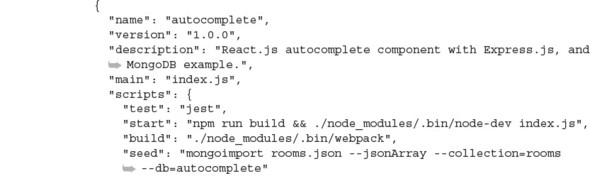
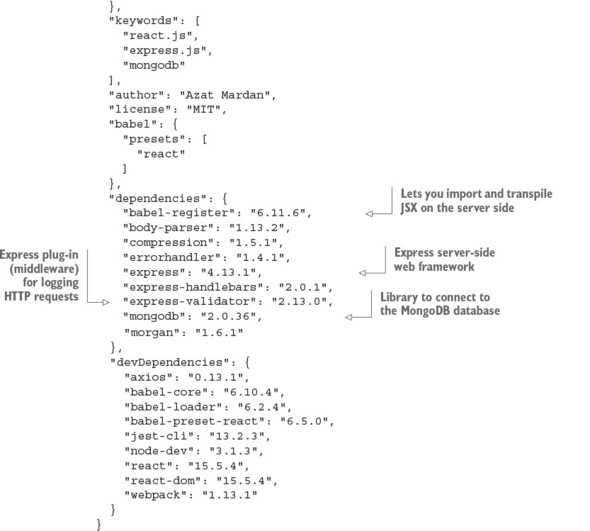
Of course, using the same versions as in this book is important if you want to have a working app in the end. Also, don’t forget to install the dependencies from package .json using npm i.
The scripts section is interesting:
"scripts": {
"test": "jest",
"start": "./node_modules/.bin/node-dev index.js",
"build": "./node_modules/.bin/webpack",
"seed": "mongoimport rooms.json --jsonArray --collection=rooms
--db=autocomplete"
},
test is for running Jest tests, and start is for building and launching your server. You also add seed data for the room names, which you can run with $ npm run seed. The database name is autocomplete, and the collection name is rooms. This is the content of the rooms.json file:
[ {"name": "react"},
{"name": "node"},
{"name": "angular"},
{"name": "backbone"}]
When you run the seed command, it prints something like this (MongoDB must be running as a separate process):
> autocomplete@1.0.0 seed /Users/azat/Documents/Code/
You’ve defined the project dependencies, and now you need to set up your Web-pack build process so you can use ES6 and transform JSX. To do this, create the webpack.config.js file in the root directory with the following code (ch20/autocomplete/webpack.config.js).
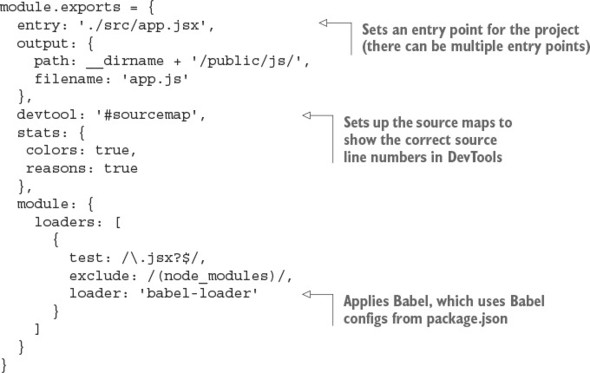
There’s no difference between this Webpack config file and those in the other projects you’ve built so far. It sets up Babel for transpiling JSX files and identifying where the bundled JavaScript will be saved.
In this project, rather than a host HTML file, you need to write a simple web server to receive requests based on what the reader has typed so far and respond with a list of suggestions. It will also render the control on the server side and send the respective HTML to the client. As noted earlier, the example uses Express as the web server. The index.js file defines the web server and has three sections:
We’ll look at each section in turn. First is the most straightforward bit: the imports. The following listing shows the components and libraries the server needs (ch20/autocomplete/index.js).
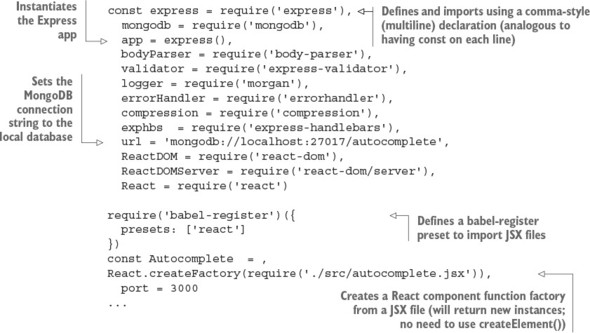
The next section continues with index.js and discusses connecting to the database and middleware.
The index.js file has GET and POST routes for /rooms. They provide RESTful API endpoints for your front-end app to supply the data. The data in turn will come from a MongoDB database, which you can see with an npm script (npm run seed), assuming that you have it in package.json and that you have the rooms.json file. But before fetching data from the database, you need to connect to it and define the Express routes (ch20/autocomplete/index.js).
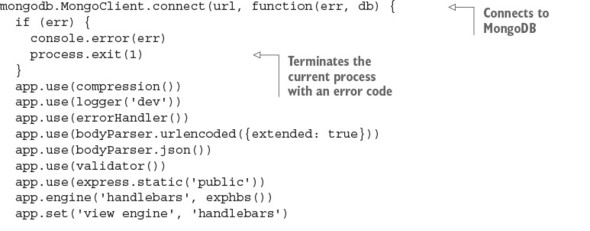
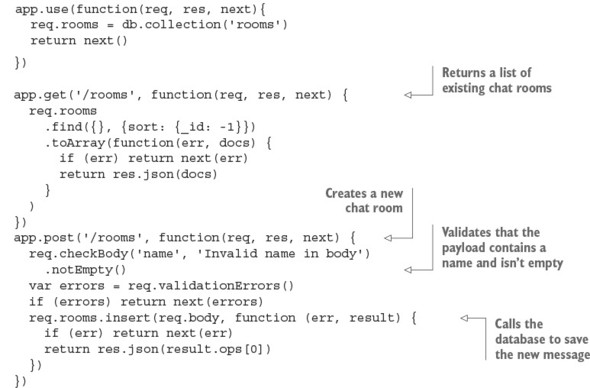
If you need to brush up on the Express.js API, there’s a convenient cheatsheet in appendix c.
Finally, index.js contains the / route, where you render React on the server by hydrating components with the room objects (ch20/autocomplete/index.js).
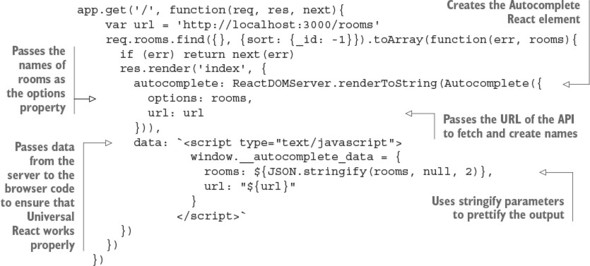
There are two properties for the Autocomplete component: options and url. options contains the names of the chat rooms, and url is the URL of the API server (http://localhost:3000/rooms in this case). The Autocomplete component will be rendered on the browser as well.
The browser script is an example of how someone might use the autocomplete widget; it will be run only on the browser. The file is very short. You just create an element with options and url properties (ch20/autocomplete/src/app.jsx).
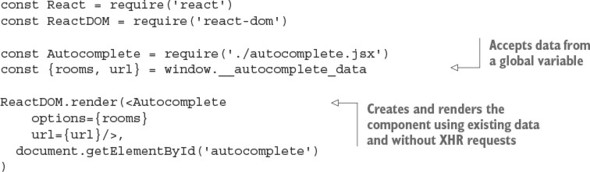
The global __autocomplete_data is provided via the data local (local is the term for template data in Express lingo) using the <script> tag in the / route.
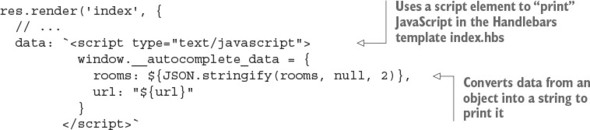
The <script> HTML tag is injected into the index.hbs template (the .hbs file extension is assumed by Express, so it’s optional). Next, you’ll implement this template.
In the index.handlebars file, you can see the props and autocomplete locals being output.
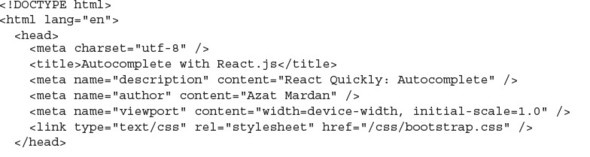
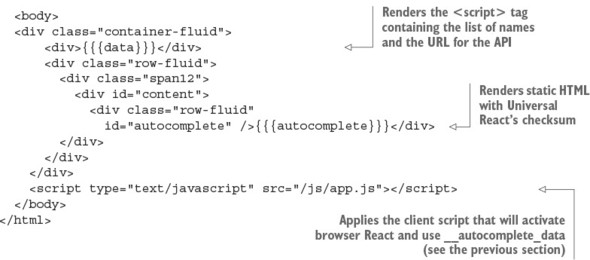
The work for running the autocomplete example is done. Obviously, it will be powered by the Autocomplete component. Next, you’ll finally start implementing it.
The Autocomplete component is self-sufficient, meaning it isn’t just a view component but can also fetch from and save to the REST API. It has two properties: options and url. In accordance with TDD, let’s start coding the Autocomplete component with tests.
According to the principles of TDD/BDD, you should begin with tests. The __tests__/autocomplete.test.js file lists room names and then renders the component into autocomplete:
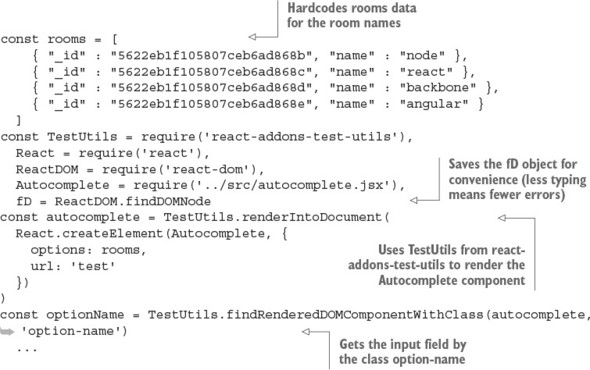
You get the input field, which has an option-name class. These room options will match the input-field value.
Now you can write the actual tests. You can get all the option-name elements from the widget and compare them against the number 4, which is the number of rooms in the rooms array:
describe('Autocomplete', () => {
it('have four initial options', () => {
var options = TestUtils.scryRenderedDOMComponentsWithClass(
autocomplete,
'option-list-item'
)
expect(options.length).toBe(4)
})
The next test changes the input-field value and then checks for that value and the number of the offered autocomplete option. There should be only one match, which is react:
it('change options based on the input', () => {
expect(fD(optionName).value).toBe('')
fD(optionName).value = 'r'
TestUtils.Simulate.change(fD(optionName))
expect(fD(optionName).value).toBe('r')
options = TestUtils.scryRenderedDOMComponentsWithClass(autocomplete,
'option-list-item')
expect(options.length).toBe(1)
expect(fD(options[0]).textContent).toBe('#react')
})
The last test changes the room name field to ember. There should be no matches, only the Add button:
it('offer to save option when there are no matches', () => {
fD(optionName).value = 'ember'
TestUtils.Simulate.change(fD(optionName))
options = TestUtils.scryRenderedDOMComponentsWithClass(
autocomplete,
'option-list-item'
)
expect(options.length).toBe(0)
var optionAdd = TestUtils.findRenderedDOMComponentWithClass(
autocomplete,
'option-add'
)
expect(fD(optionAdd).textContent).toBe('Add #ember')
})
})
Finally, it’s time to write the Autocomplete component (ch20/autocomplete/src/autocomplete.jsx). It includes the input field, the list of matching options, and the Add button to add a new option when there are no matches. The component performs two AJAX/XHR calls: to retrieve a list of options and to create a new option. There are two methods:
This is how the Autocomplete component looks at a high level:
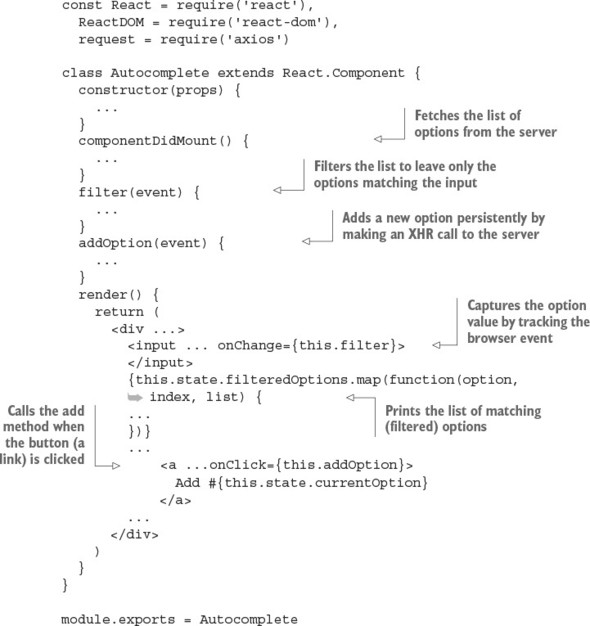
Now let’s start from the beginning of the file. Begin by importing the libraries in the CommonJS/Node.js style; thanks to Webpack, this is bundled for the browser’s consumption. The fD alias is for convenience:
const React = require('react'),
ReactDOM = require('react-dom'),
request = require('axios')
const fD = ReactDOM.findDOMNode
constructor sets the state and bindings. You set options from properties. filteredOptions will initially be the same as all the options, and the current option (input-field value) is empty. As the user types characters, filteredOptions will become narrower and narrower, to match the entered letters.
In componentDidMount(), you perform the GET request using the axios (request variable) library. It’s similar to jQuery’s $.get(), but with promises:
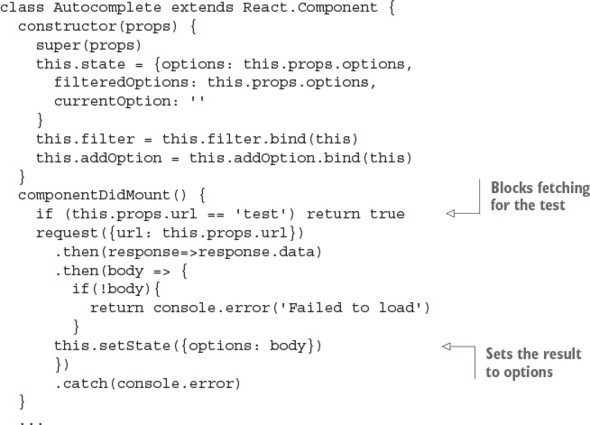
The filter() method is called on every change of the <input> field. The goal is to leave only the options that match user input:
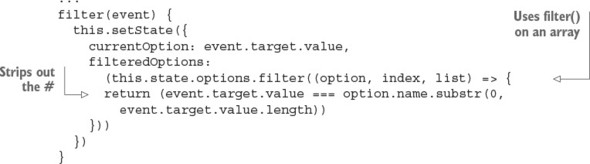
The addOption() method handles the addition of a new option, in the event that there are no matches, by invoking the store’s action:
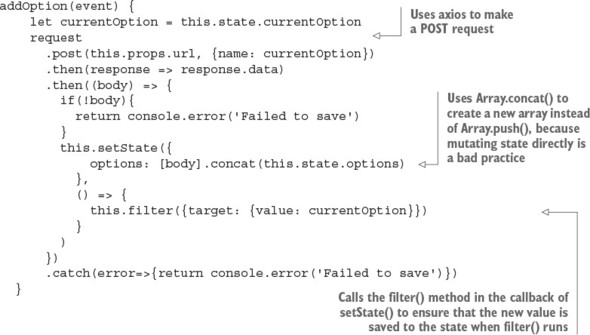
Finally, the render() method has a controlled component, <input>, with an onChange event listener, this.filter:
...
render() {
return (
<div className="form-group">
<input type="text"
onKeyUp={(event) => (event.keyCode==13) ? this.addOption() : ''}
className="form-control option-name"
onChange={this.filter}
value={this.currentOption}
placeholder="React.js">
</input>
onKeyUp can be written as a method, not necessarily as an anonymous inline function, right in {}.
The list of filtered options is powered by the filteredOptions state, which is updated in the filter() method. You iterate over it and print _id as keys and links with option.name:
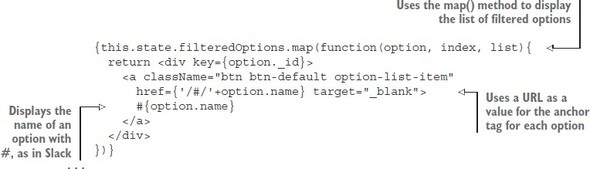
The last element is the Add button, which is shown only when there’s no filtered-Options (no matches):
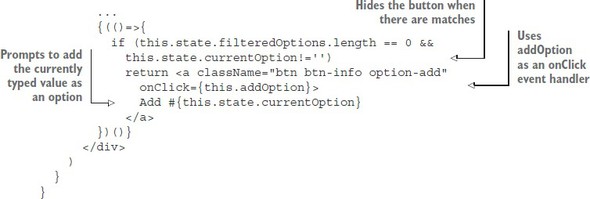
You’re using CommonJS syntax, so you can declare the Autocomplete component and export it like this:
module.exports = Autocomplete
You’re finished. Good job, mate!
If you’ve followed along through the steps, you should be able to install the dependencies with this command (if you haven’t done so already):
$ npm install
Then, launch the app as follows (you must have started MongoDB first with $ mongod):
$ npm start
The tests will pass after you run this command:
$ npm test
There’s also npm run build, without the watch (you’ll need to rerun it on changes). npm start runs npm run build for you.
Optionally, you can seed the database with $ npm run seed. Doing so populates MongoDB with names from ch20/autocomplete/rooms.json:
[ {"name": "react"},
{"name": "node"},
{"name": "angular"},
{"name": "backbone"}]
That’s all for the Autocomplete component. Now, run the project by building it with npm run build and navigating to http://localhost:3000, assuming you have MongoDB running in a separate terminal. Although 127.0.0.1 is an alias, you must use the same domain localhost as the browser location to avoid CORS/Access-Control-Allow-Origin issues, because JavaScript will call the localhost server.
You should see the component with names (if you seeded the database) on the page. When you type characters in the input field, the selection will be filtered according to matches in the input. When there are no matches, click the Add button to add the room to the database; it will immediately appear in the list.
If you ever need to manipulate the data in MongoDB directly, the mongo shell (a.k.a. REPL) is available via the mongo command in the terminal. It automatically connects to the locally running instance on port 27017 (you must have one running; to do so, use mongod). Once in the mongo shell, you can perform all kinds of operations like creating a new document, querying a collection, dropping a database, and so on. The advantage is that you can use the mongo shell anywhere, even on a remote server without a GUI.
But there’s a lot of typing involved when working with the mongo shell, and typing is slow and error-prone. Therefore, I built a better tool called MongoUI (https://github.com/azat-co/mongoui), which you can use to query, edit, add documents, remove documents, and do other things in a browser by clicking with your trackpad instead of typing copious amounts of JSON (MongoDB is JavaScript and JSON-based).
MongoUI allows you to work with MongoDB via a user-friendly web interface. This figure shows the names of the rooms in my rooms collection in the autocomplete data-base.
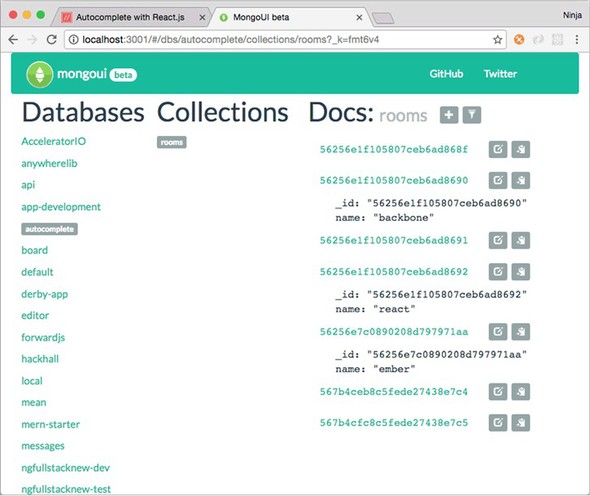
The MongoDB web interface
Install MongoUI with npm i -g mongoui, launch it with mongoui, and then open in the browser at http://localhost:3001. Oh, and MongoUI is built with React, Express, and Webpack. Enjoy!
The end result of this autocomplete example is shown in figure 20.6. You can open the Network tab and click Localhost to make sure the server-side rendering is working (that is, that the data and HTML for names are there).
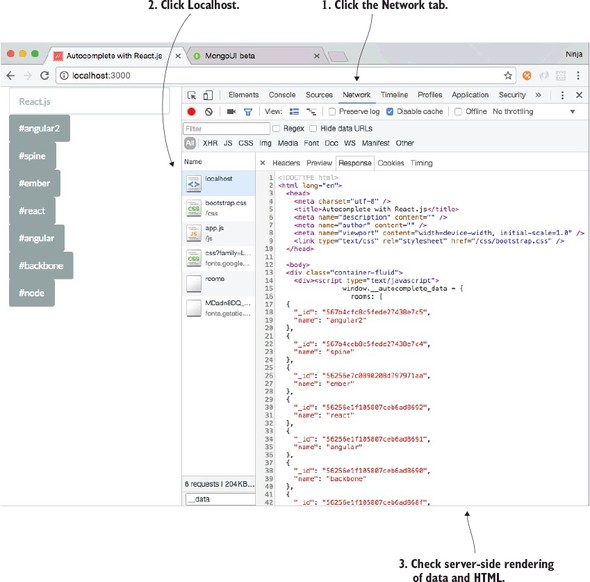
If for some reason your project isn’t working, there may be a new version or a typo in your code. Refer to the working code at www.manning.com/books/react-quickly or https://github.com/azat-co/react-quickly/tree/master/ch20.
For bonus points, do the following:
Submit your code in a new folder under ch20 as a pull request to this book’s GitHub repository: https://github.com/azat-co/react-quickly.
In this appendix, you’ll find installation instructions for the following applications (valid as of May 2017):
You can download React in a myriad of ways:
If you’re unsure whether you have Node.js and npm, or you don’t know what version you have, run these commands in your Terminal/iTerm/bash/zsh/command line:
$ node -v $ npm -v
Most of the time, npm comes with Node.js, so follow the instructions for Node.js to install npm. The easiest way to install Node and npm is to go to the website and pick the right architecture for your computer (Windows, macOS, and so on): https://nodejs.org/en/download.
For macOS users who already have Ruby (which typically comes with Mac computers), I highly recommend using Homebrew. That’s what I use, because it allows me to install other developer tools like databases and servers. To get brew on your Mac, run this Ruby code in your terminal (I promise this will be the last time we use Ruby in this book!):
$ ruby -e "$(curl -fsSL
Now you should have brew installed; go ahead and update its registry and install Node.js along with npm. The latter comes with Node.js, so as I mentioned earlier, no additional commands are necessary:
$ brew update $ brew install node
Another great tool that will let you switch between Node versions effortlessly is Node Version Manager (nvm, https://github.com/creationix/nvm):
$ curl -o- https://raw.githubusercontent.com/creationix/nvm/v0.32.1/install.sh
That’s it. You should be able to see the versions of Node and npm. If you want to upgrade your npm, use the npm command:
$ npm i -g npm@latest
To upgrade Node, use nvm or a similar tool like nave or n. For example, in nvm this command will also reinstall packages to the new version:
$ nvm install node --reinstall-packages-from=node
If npm gives you permission errors when you install a module/package, then make sure the npm folder has the proper permissions (be sure you understand what this command does before you run it):
$ sudo chown -R $USER /usr/local/{share/man,bin,lib/node,include/node}
Express is a local dependency just like React, meaning each project must install it. The only way to install Express is with npm:
npm i express@4 -S
The -S adds the entry to package.json.
In no way is this is a deep dive into Express.js, but it’ll get you started with the most widely used Node.js web framework. First, install it with npm, like this:
$ npm install express@4.13.3
Typically, you’d create the server file index.js, app.js, or server.js, which you’ll later start with the node command (for example, node index.js). The file has these parts:
The imports section is trivial. In it, you require dependencies and instantiate objects. For example, to import the Express.js framework and create an instance, write these lines:
var express = require('express')
var app = express()
In the configurations section, you set configurations with app.set(), where the first argument is a string and the second is a value. For example, to set the template engine to Jade, use the configuration view engine:
app.set('view engine', 'jade')
The next section is for setting up middleware, which is similar to plug-ins. For example, to enable the app to serve static assets, use the static middleware:
app.use(express.static(path.join(__dirname, 'public')))
Most important, you define routes with the app.NAME() pattern. For example, this is the syntax for the GET /rooms endpoint taken from ch20/autocomplete:
app.get('/rooms', function(req, res, next) {
req.rooms.find({}, {sort: {_id: -1}}).toArray(function(err, docs){
if (err) return next(err)
return res.json(docs)
})
})
Error handlers are similar to middleware:
var errorHandler = require('errorhandler')
app.use(errorHandler)
Finally, to start your app, run listen():
http.createServer(app).listen(portNumber, callback)
Of course, there’s more to Express.js than this brief introduction. Otherwise, I wouldn’t have written a 350-page book on the framework (Pro Express.js; Apress, 2014, http://proexpressjs.com)! If you want to hear from a different author(s), then consider Express in Action by Evan M. Hahn (Manning, 2016, www.manning.com/books/express-in-action). The framework is powerful but flexible and can be configured without requiring much magic.
If building Express.js apps isn’t your core competency, or if you know how to do it but need a refresher, check out my Express.js cheatsheet in appendix C or view a graphical version of it at http://reactquickly.co/resources.
You can get Twitter Bootstrap from the official website: http://getbootstrap.com. This book uses v3.3.5. You have several options:
To link from a CDN, include these tags in your HTML file:
<!-- Latest compiled and minified CSS --> <link rel="stylesheet" href="https://maxcdn.bootstrapcdn.com/bootstrap/3.3.5/css/bootstrap.min.css"> <!-- Optional theme --> <link rel="stylesheet" href="https://maxcdn.bootstrapcdn.com/bootstrap/3.3.5/css/
For Bower, npm, and Composer, run these terminal commands, respectively, in your project folder (one for each package manager):
$ bower install bootstrap $ npm install bootstrap $ composer require twbs/bootstrap
For more information, see http://getbootstrap.com/getting-started.
Browserify lets you package npm modules into front-end bundles, ready for use in the browser. Basically, you can turn any npm module (usually only for Node) into a front-end module.
If you’re using Webpack, you won’t need Browserify.
First, install Browserify with npm:
$ npm install -g browserify
As an example, let’s use ch16/jest. Go to that folder, and create a script.js file to include the generate-password.js library. The contents of script.js can be as minimal as this:
var generatePassword = require('generate-password')
console.log(generatePassword())
console.log(generatePassword())
Save script.js, and run this command in your terminal or command prompt:
$ browserify script.js -o bundle.js
Inspect bundle.js, or include it in index.html:
<script src="bundle.js"></script>
Open the index.html file in your browser, and inspect the console; it will show two random passwords. The source code is in ch16/jest.
The easiest way to install MongoDB is to go to www.mongodb.org/downloads#production and choose the appropriate package for your system.
On macOS, you can use brew and run these commands:
$ brew update $ brew install mongodb
Don’t install mongodb globally with npm. It’s a driver, not a database, so it belongs with other dependencies in the local node_modules folder.
This book uses version 3.0.6, so use later (or older) versions at your own risk. They haven’t been tested to work with the book’s examples.
Most often, you’ll need to create a /data/db folder with the proper permissions. You can do that or pass any other custom folder to the mongod command with --dbpath. For example:
$ mongod --dbpath ./data
Once the database is running (mongod), play with code in the shell, which is mongo:
$ mongo > 1+1 > use autocomplete > db.rooms.find()
Here’s an explanation of some of the most commonly used shell commands:
Check out my MongoDB cheatsheet in appendix D, or view a graphical version of it at http://reactquickly.co/resources. In addition to the most-used MongoDB commands, it includes Mongoose (Node.js ODM) methods. Enjoy!
Babel is mostly for ES6+/ES2015+, but it can also convert JSX to JavaScript. By using Babel for React, you can get extra ES6 features to streamline your development.
ES6 is finalized, but its features—as well as the features of future versions of ECMAScript—may not be fully supported by all browsers. To use cutting-edge new features like ES Next (https://github.com/esnext/esnext) or to use ES6 in older browsers (IE9), get a compiler like Babel (https://babeljs.io). You can run it as a standalone tool or use with your build system.
To use Babel as a standalone CLI tool, first create a new folder. Assuming you have Node.js and npm installed, run this command to create package.json:
$ npm init
Open the package.json file, and add babel lines in JSON. You can place them in any order as long as babel is a top-level property. This tells Babel to use React and JSX to transform the source files. The setting is called a preset. Without it, the Babel CLI won’t do anything:
"babel": {
"presets": ["react"]
},
Install both Babel CLI v6.9.0 and React preset v6.5.0 with npm. In your terminal, command prompt, or shell, execute these commands:
$ npm i babel-cli@6.9.0 --save-dev $ npm i babel-preset-react@6.5.0 --save-dev
You can use this command to check the version:
$ babel --version
There are Babel plug-ins for Grunt, Gulp, and Webpack (http://babeljs.io/docs/setup). Here’s a Gulp example. Install the plug-in:
$ npm install --save-dev gulp-babel
In gulpfile.js, define a build task that compiles src/app.js into the build folder:
var gulp = require('gulp'),
babel = require('gulp-babel')
gulp.task('build', function () {
return gulp.src('src/app.js')
.pipe(babel())
.pipe(gulp.dest('build'))
})
For more about Webpack and Babel, see chapter 12.
You can compile Node.js files with a build tool or use the standalone Babel module babel-core. Install it as follows:
$ npm install --save-dev babel-core@6
Then, in Node.js, call this function:
require('babel-core').transform(es5Code, options)
Babel v5.x has a standalone browser file that you can use for in-browser transformation (development only). It was removed in 6.x, but some folks created a babel-standalone module to fill the gap (https://github.com/Daniel15/babel-standalone). You can use that or the older version’s files—for example, from Cloudflare CDN:
Or you can build your own standalone browser file using a build tool like Gulp or Webpack. This way, you can pick only the things you need, such as the React transformer plug-in and ES2015 presets.
When you develop your own projects, searching on the internet for React documentation and APIs or going back to this book’s chapters to find a single method isn’t efficient. If you’d like to save time and avoid the distractions lurking everywhere on the Net, use this React cheatsheet as a quick reference.
In addition to the text version presented here, I’ve created a free beautifully designed, print-ready PDF version of this cheatsheet. You can request this PDF at http://reactquickly.co/resources.

ReactDOM.render(
React.createElement(
Link,
{href: 'https://Node.University'}
)
),
document.getElementById('menu')
)
ReactDOM.render(
<Link href='https://Node.University'/>,
document.getElementById('menu')
)
const ReactDOMServer = require('react-dom/server')
ReactDOMServer.renderToString(Link, {href: 'https://Node.University'})
ReactDOMServer.renderToStaticMarkup(Link, {href: 'https://Node.University'})
var Link = React.createClass({
displayName: 'Link',
render: function() {
return React.createElement('a',
{className: 'btn', href: this.props.href}, 'Click ->', this.props.href)
}
})
var Link = React.createClass({
render: function() {
return <a className='btn' href={this.props.href}>Click ->
this.props.href</a>
}
})
class Link extends React.Component {
render() {
return <a className='btn' href={this.props.href}>Click ->
this.props.href</a>
}
}
var Link = React.createClass ({
propTypes: { href: React.PropTypes.string },
getDefaultProps: function() {
return { initialCount: 0 }
},
getInitialState: function() {
return {count: this.props.initialCount}
},
tick: function() {
this.setState({count: this.state.count + 1})
},
render: function() {
return React.createElement(
'a',
{className: 'btn', href: '#', href: this.props.href,
onClick: this.tick.bind(this)},
'Click ->',
(this.props.href ? this.props.href : 'https://webapplog.com'),
' (Clicked: ' + this.state.count+')'
)
}
})
var Link = React.createClass ({
propTypes: { href: React.PropTypes.string },
getDefaultProps: function() {
return { initialCount: 0 }
},
getInitialState: function() {
return {count: this.props.initialCount};
},
tick: function() {
this.setState({count: this.state.count + 1})
},
render: function() {
return (
<a onClick={this.tick.bind(this)} href="#" className="btn"
href={this.props.href}>
Click -> {(this.props.href ? this.props.href :
'https://webapplog.com')}
(Clicked: {this.state.count})
</a>
)
}
})
export class Link extends React.Component {
constructor(props) {
super(props);
this.state = {count: props.initialCount};
}
tick() {
this.setState({count: this.state.count + 1});
}
render() {
return (
<a onClick={this.tick.bind(this)} href="#" className="btn"
href={this.props.href}>
Click -> {(this.props.href ? this.props.href :
'https://webapplog.com')}
(Clicked: {this.state.count})
</a>
)
}
}
Link.propTypes = { initialCount: React.PropTypes.number }
Link.defaultProps = { initialCount: 0 }
|
Mounting |
Updating component properties |
Updating component state |
Using forceUpdate() |
Unmounting |
|---|---|---|---|---|
| getDefaultProps() | ||||
| getInitialState() | ||||
| componentWillMount() | ||||
| componentWillReceiveProps() | ||||
| shouldComponentUpdate() | shouldComponentUpdate() | |||
| componentWillUpdate() | componentWillUpdate() | componentWillUpdate() | ||
| render() | render() | render() | render() | |
| componentDidUpdate() | componentDidUpdate() | componentDidUpdate() | ||
| componentDidMount() | ||||
| componentWillUnmount() |
Types available under React.PropTypes:
To make a property required (warning only), append .isRequired.
More methods:
propTypes: {
customProp: function(props, propName, componentName) {
if (!/regExPattern/.test(props[propName])) {
return new Error('Validation failed!');
}
}
}
As npm modules:
When you develop your own projects, searching on the internet for React documentation and APIs or going back to this book’s chapters to find a single method isn’t efficient. If you’d like to save time and avoid the distractions lurking everywhere on the Net, use this Express cheatsheet as a quick reference.
In addition to the text version presented here, I’ve created a free beautifully designed, print-ready PDF version of this cheatsheet. You can request this PDF at http://reactquickly.co/resources.

$ express [options] [dir]
Install Jade and Stylus:
$ npm i -SE stylus jade
Apply the Jade template engine:
app.set('views', path.join(__dirname, 'views'))
app.set('view engine', 'jade')
Apply the Stylus CSS processor:
app.use(require('stylus').middleware(path.join(__dirname, 'public')))
var bodyParser = require('body-parser')
app.use(bodyParser.json())
app.use(bodyParser.urlencoded({
extended: true
}))
app.use(express.static(path.join(__dirname, 'public')))
$ sudo npm install <package_name> --save
When you develop your own projects, searching on the internet for React documentation and APIs or going back to this book’s chapters to find a single method isn’t efficient. If you’d like to save time and avoid the distractions lurking everywhere on the Net, use this MongoDB cheatsheet as a quick reference.
In addition to the text version presented here, I’ve created a free beautifully designed, print-ready PDF version of this cheatsheet. You can request this PDF at http://reactquickly.co/resources.

var mongoose = require('mongoose')
var dbUri = 'mongodb://localhost:27017/api'
var dbConnection = mongoose.createConnection(dbUri)
var Schema = mongoose.Schema
var postSchema = new Schema ({
title: String,
text: String
})
var Post = dbConnection.model('Post', postSchema, 'posts')
Post.find({},function(error, posts){
console.log(posts)
process.exit(1)
})
// Create
var post = new Post({title: 'a', text: 'b')
post.save(function(error, document){
...
})
// Read
Post.findOne(criteria, function(error, post) {
...
})
// Update
Post.findOne(criteria, function(error, post) {
post.set()
post.save(function(error, document){
...
})
})
// Delete
Post.findOne(criteria, function(error, post) {
post.remove(function(error){
...
})
})
This appendix provides a quick introduction to ES6. It describes the 10 best features of the new generation of the most popular programming language—JavaScript:
This list if highly subjective. It’s in no way intended to diminish the usefulness of other ES6 features that didn’t make it on the list only because I wanted to limit the number to 10.
Remember when we had to use statements like these to define default parameters?
var link = function (height, color, url) {
var height = height || 50
var color = color || 'red'
var url = url || 'http://azat.co'
...
}
In addition to this essay, I’ve created a free beautifully designed, print-ready ES6/ES2015 cheatsheet. You can request this PDF at http://reactquickly.co/resources.

This approach was fine until the value wasn’t 0. When you have 0, there may be a bug. A 0 value defaults to the hardcoded value instead of becoming the value itself, because 0 is falsy in JavaScript. Of course, who needs 0 as a value (#sarcasmfont)? So we ignored this flaw and used the logical OR. No more! In ES6, you can put the default value right in the signature of the function:
var link = function(height = 50, color = 'red', url = 'http://azat.co') {
...
}
This syntax is similar to Ruby. My favorite, CoffeeScript, has this feature, as well—and has had it for many years.
Template literals or interpolation in other languages is a way to output variables in a string. In ES5, you had to break the string like this:
var name = 'Your name is ' + first + ' ' + last + '.' var url = 'http://localhost:3000/api/messages/' + id
In ES6, you can use the new syntax ${NAME} in the back-ticked string:
var name = `Your name is ${first} ${last}.`
var url = `http://localhost:3000/api/messages/${id}`
Do you wonder if you still can use template-literal syntax with Markdown? Markdown uses back-ticks for inline code blocks. That’s a problem! The solution is to use two, three, or more back-ticks for Markdown code that has back-ticks for string templates.
Another bit of yummy syntactic sugar is the multiline string. In ES5, you had to use one of these approaches:
var roadPoem = 'Then took the other, as just as fair,\n\t'
+ 'And having perhaps the better claim\n\t'
+ 'Because it was grassy and wanted wear,\n\t'
+ 'Though as for that the passing there\n\t'
+ 'Had worn them really about the same,\n\t'
var fourAgreements = 'You have the right to be you.\n\
You can only be you when you do your best.'
In ES6, you can use back-ticks:
var roadPoem = `Then took the other, as just as fair,
And having perhaps the better claim
Because it was grassy and wanted wear,
Though as for that the passing there
Had worn them really about the same,`
var fourAgreements = `You have the right to be you.
You can only be you when you do your best.`
Destructuring can be a harder concept to grasp, because some magic is going on. Let’s say you have simple assignments where the keys/objects properties/attributes house and mouse are the variables house and mouse:

Here are some other examples of destructuring assignments (from Node.js):

In ES6, you can replace the previous ES5 code with these statements:

This also works with arrays. Crazy!
var [col1, col2] = $('.column'),
[line1, line2, line3, , line5] = file.split('\n')
The first line assigns the 0 element to col1 and the 1 element to col2. The second statement (yes, the missing line4 is intentional) produces the following assignment, where fileSplitArray is the result of file.split('\n'):
var line1 = fileSplitArray[0] var line2 = fileSplitArray[1] var line3 = fileSplitArray[2] var line5 = fileSplitArray[4]
It may take you some time to get used to the destructuring assignment syntax, but it’s a sweet sugarcoating—no doubt about that.
What you can now do with object literals is mind blowing! We went from a glorified version of JSON in ES5 to something closely resembling classes in ES6.
Here’s a typical ES5 object literal with some methods and attributes/properties:
var serviceBase = {port: 3000, url: 'azat.co'},
getAccounts = function(){return [1,2,3]}
var accountServiceES5 = {
port: serviceBase.port,
url: serviceBase.url,
getAccounts: getAccounts,
toString: function() {
return JSON.stringify(this.valueOf())
},
getUrl: function() {return "http://" + this.url + ':' + this.port},
valueOf_1_2_3: getAccounts()
}
If you want to be fancy, you can inherit from serviceBase by making it the prototype with the Object.create() method:
var accountServiceES5ObjectCreate = Object.create(serviceBase)
var accountServiceES5ObjectCreate = {
getAccounts: getAccounts,
toString: function() {
return JSON.stringify(this.valueOf())
},
getUrl: function() {return "http://" + this.url + ':' + this.port},
valueOf_1_2_3: getAccounts()
}
I know, accountServiceES5ObjectCreate and accountServiceES5 are not identical, because one object (accountServiceES5) has the properties in the proto object (see figure E.1). But for the sake of the example, we’ll consider them similar. In the ES6 object literal, there are shorthands for assignment: getAccounts: getAccounts, becomes just getAccounts, without the colon.
Also, you set the prototype in the __proto__ property, which makes sense (not '__proto__' though—that would be just a property):
var serviceBase = {port: 3000, url: 'azat.co'},
getAccounts = function(){return [1,2,3]}
var accountService = {
__proto__: serviceBase,
getAccounts,
In addition, you can invoke super in toString():
toString() {
return JSON.stringify((super.valueOf()))
},
getUrl() {return "http://" + this.url + ':' + this.port},
And you can dynamically create keys, object properties, and attributes such as valueOf_1_2_3 with the [ 'valueOf_' + getAccounts().join('_') ] construct:
[ 'valueOf_' + getAccounts().join('_') ]: getAccounts()
}
console.log(accountService)
The resulting ES6 object with __proto__ as the serviceBase object is shown in figure E.2. This is a great enhancement to good-old object literals!
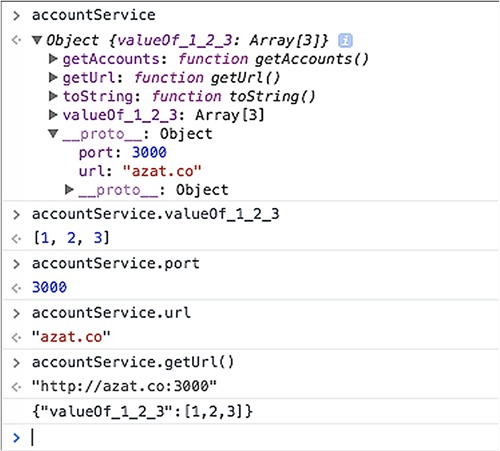
This is probably the feature I wanted the most. I love the fat arrows in CoffeeScript, and now we have them in ES6. First, arrow functions save space and time because they’re short:
const sum = (a, b, c) => {
return a + b + c
}
Fat arrows are also amazing because they make this behave properly. this has the same value as in the context of a function—this doesn’t mutate. The mutation typically happens each time you create a closure.
Using arrow functions in ES6 means you don’t have to use that = this, self = this, _this = this, and .bind(this). For example, this code in ES5 is ugly:
var _this = this
$('.btn').click(function(event){
_this.sendData()
})
This ES6 code is better:
$('.btn').click((event) => {
this.sendData()
})
Sadly, the ES6 committee decided that having skinny arrows is too much of a good thing, and they left us with a verbose function() instead. (Skinny arrows in CoffeeScript work like the regular function in ES5 and ES6.)
Here’s another example that uses call to pass the context to the logUpperCase() function in ES5:
var logUpperCase = function() {
var _this = this
this.string = this.string.toUpperCase()
return function () {
return console.log(_this.string)
}
}
logUpperCase.call({ string: 'es6 rocks' })()
In ES6, you don’t need to mess around with _this:
var logUpperCase = function() {
this.string = this.string.toUpperCase()
return () => console.log(this.string)
}
logUpperCase.call({ string: 'es6 rocks' })()
Note that you can mix and match the old function with => in ES6 as you see fit. And when an arrow function is used with a one-line statement, it becomes an expression: that is, it will implicitly return the result of that single statement. If you have more than one line, you need to use return explicitly.
This ES5 code, which creates an array from the messages array,

becomes this in ES6:

Notice that this code uses string templates. Another feature I love from CoffeeScript!
Parentheses (()) are optional for single parameters in an arrow function’s signature. You need them when you use more than one parameter. In ES5, the following code has function() with an explicit return:

And the more eloquent version of the code in ES6 uses parentheses around the parameters and an implicit return:

Promises have historically been a controversial topic. There were many promise implementations with slightly different syntaxes: Q, Bluebird, Deferred.js, Vow, Avow, and jQuery Deferred, to name just a few. Other developers said we didn’t need promises and could use async, generators, callbacks, and so on. Fortunately, ES6 now has a standard Promise implementation.
Let’s consider a trivial example of delayed asynchronous execution with setTimeout():
setTimeout(function(){
console.log('Yay!')
}, 1000)
This code can be rewritten in ES6 with Promise:
var wait1000 = new Promise(function(resolve, reject) {
setTimeout(resolve, 1000)
}).then(function() {
console.log('Yay!')
})
It can also use ES6 arrow functions:
var wait1000 = new Promise((resolve, reject)=> {
setTimeout(resolve, 1000)
}).then(()=> {
console.log('Yay!')
})
So far, we’ve increased the number of lines of code from three to five without any obvious benefit. The benefit comes if you have more nested logic in the setTimeout() callback. The following code
setTimeout(function(){
console.log('Yay!')
setTimeout(function(){
console.log('Wheeyee!')
}, 1000)
}, 1000)
can be rewritten with ES6 promises:
var wait1000 = ()=> new Promise((resolve, reject)=>
{setTimeout(resolve, 1000)})
wait1000()
.then(function() {
console.log('Yay!')
return wait1000()
})
.then(function() {
console.log('Wheeyee!')
});
Still not convinced that promises are better than regular callbacks? Me neither. I think that once you get the idea of callbacks, there’s no need for the additional complexity of promises. Nevertheless, promises are available in ES6 for those who adore them; and they do have a fail-and-catch-all callback, which is a nice feature. See James Nelson’s post “Introduction to ES6 Promises: The Four Functions You Need to Avoid Callback Hell” for more about promises (http://mng.bz/3OAP).
You may have already seen the weird-sounding let in ES6 code. It isn’t a sugarcoating feature; it’s more intricate. let is a new var that lets you scope a variable to blocks. You define blocks with curly braces. In ES5, blocks did nothing to variables:
function calculateTotalAmount (vip) {
var amount = 0
if (vip) {
var amount = 1
}
{ // More crazy blocks!
var amount = 100
{
var amount = 1000
}
}
return amount
}
console.log(calculateTotalAmount(true))
The result is 1,000. Wow! That’s a bad bug. In ES6, you use let to restrict the scope to the blocks. Variables are function-scoped:
function calculateTotalAmount (vip) {
var amount = 0 // Probably should also be let, but you can mix var and let
if (vip) {
let amount = 1 // First amount is still 0
}
{ // more crazy blocks!
let amount = 100 // First amount is still 0
{
let amount = 1000 // First amount is still 0
}
}
return amount
}
console.log(calculateTotalAmount(true))
The value is 0, because the if block also has let. If it had nothing (amount=1), then the expression would have been 1.
When it comes to const, things are easier; it creates a read-only reference, and it’s block-scoped like let. (Read-only means you can’t reassign the variable identifier.) const works on objects as well; their properties can change.
Suppose you have a constant url, like this: const url="http://webapplog.com". Reassigning it with const url="http://azat.co" will fail in most browsers—although the documentation states that const doesn’t mean immutability, if you try to change the value, it won’t change.
To demonstrate, here’s a bunch of constants that are okay because they belong to different blocks:
function calculateTotalAmount (vip) {
const amount = 0
if (vip) {
const amount = 1
}
{ // More crazy blocks!
const amount = 100
{
const amount = 1000
}
}
return amount
}
console.log(calculateTotalAmount(true))
In my humble opinion, let and const overcomplicate the language. Without them, we had only one behavior; but now there are multiple scenarios to consider.
If you love object-oriented programming, then you’ll love this feature. It makes writing classes and inheriting from them as easy as liking a comment on Facebook.
Creating and using classes in ES5 was a pain because there was no class keyword (it was reserved but did nothing). In addition, lots of inheritance patterns like pseudo-classical,[1] classical,[2] and functional just added to the confusion, pouring gasoline on the fire of the JavaScript wars.
See Ilya Kantor, “Class Patterns,” http://javascript.info/class-patterns.
See Douglas Crockford, “Classical Inheritance in JavaScript,” www.crockford.com/javascript/inheritance.html.
I won’t show you how to write a class (yes, there are classes; objects inherit from objects) in ES5, because there are many flavors. Let’s look at an ES6 example. The ES6 class uses prototypes, not the function factory approach. Here’s a baseModel class in which you can define a constructor and a getName() method:
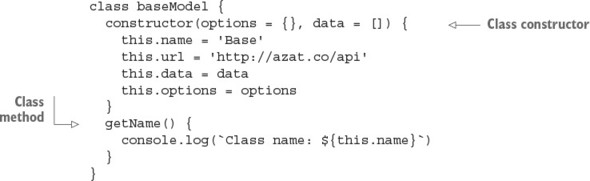
Notice that this code uses default parameter values for options and data. Also, method names no longer need to include the word function or a colon (:). The other big difference is that you can’t assign properties (this.NAME) the same way as methods—that is, you can’t say name at the same indentation level as a method. To set the value of a property, assign a value in the constructor.
AccountModel inherits from baseModel with class NAME extends PARENT_NAME. To call the parent constructor, you can effortlessly invoke super() with parameters:

If you want to be fancy, you can set up a getter like this, and accountsData will be a property:
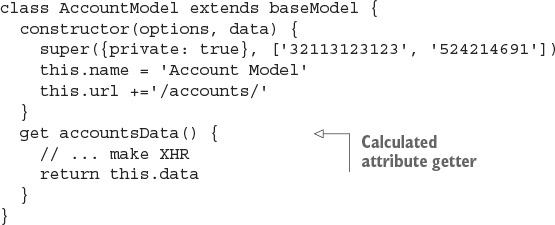
How do you use this abracadabra? It’s easy:
let accounts = new AccountModel(5)
accounts.getName()
console.log('Data is %s', accounts.accountsData)
In case you’re wondering, the output is
Class name: Account Model Data is %s 32113123123,524214691
As you may know, JavaScript had no support for native modules before ES6. People came up with AMD, RequireJS, CommonJS, and other workarounds. Now there are modules with import and export operands.
In ES5, you use <script> tags with an immediately invoked function expression or a library like AMD, whereas in ES6 you can expose a class with export. I’m a Node.js guy, so I use CommonJS, which is also a Node.js module syntax.
It’s straightforward to use CommonJS on the browser with the Browserify bundler (http://browserify.org). Let’s say you have a port variable and a getAccounts method in an ES5 module.js file:
module.exports = {
port: 3000,
getAccounts: function() {
...
}
}
In the ES5 main.js file, you’d require('module') that dependency:
var service = require('module.js')
console.log(service.port) // 3000
In ES6, you use export and import. For example, this is the library in the ES6 module.js file:
export var port = 3000
export function getAccounts(url) {
...
}
In the ES6 main.js importer file, you use the syntax import {name} from 'my-module':
import {port, getAccounts} from 'module'
console.log(port) // 3000
Or you can import everything as a service variable in main.js:
import * as service from 'module' console.log(service.port) // 3000
Personally, I find ES6 modules confusing. Yes, they’re more eloquent, but Node.js modules won’t change anytime soon. It’s better to have only one style for browser and server JavaScript, so I’ll stick with CommonJS/Node.js style for now. In addition, support for ES6 modules in browsers isn’t available as of this writing, so you’ll need something like jspm (http://jspm.io) to use ES6 modules.
For more information and examples, see http://exploringjs.com/es6/ch_modules.html. And no matter what, write modular JavaScript!
To use ES6 today, use Babel as part of your build process. There’s more information on Babel in chapter 3.
There are many other noteworthy ES6 features that you probably won’t use (at least, not right away). Here they are, in no particular order:
ECMAScript improves productivity and reduces mistakes. It will continue to evolve. Learning never stops. Take advantage of these resources:
| INSTALLATION |
| React
<script src="https://unpkg.com/react@15/dist/react.js"></script> $ $ npm install react --save $ $ bower install react --save React DOM <script src="https://unpkg.com/react-dom@15/dist/react-dom.js"></script>$ npm install react-dom $ bower install react-dom --save |
| RENDERING |
| ES5
ReactDOM.render( React.createElement( Link, {href: 'https://Node.University'} ) ), document.getElementById('menu') ) ES5+JSX ReactDOM.render(<Link href='https://Node.University'/>, document.getElementById('menu') ) Server-side rendering const ReactDOMServer = require('react-dom/server')ReactDOMServer.renderToString(Link, {href: 'https://Node.University'}) ReactDOMServer.renderToStaticMarkup(Link, {href: |
| propTypes |
| Types available under React.PropTypes:
any array bool element func node number object string To make a property required (warning only), append .isRequired. More methods instanceOf(constructor)oneOf (['News', 'Photos']) oneOfType([propType, propType]) Custom validation propTypes: {customProp: function(props, propName, componentName) { if (!/regExPattern/.test(props[propName])) { return new Error('Validation failed!'); } } } |
| SPECIAL PROPERTIES |
| key—Unique identifier for an element to turn arrays/lists into hashes for better performance. For example: key={id}.
ref—Reference to an element via this.refs.NAME. For example: ref="email" will create a this.refs.email DOM node or ReactDOM.findDOMNode(this.refs.email). style—Accepts an object for camelCased CSS styles instead of a string (immutable since v0.14). For example: style={{color: red}}. className—HTML class attribute. For example: className="btn". htmlFor—HTML for attribute. For example: htmlFor="email". dangerouslySetInnerHTML—Sets inner HTML to raw HTML by providing an object with the key __html. children—Sets the content of the element via this.props.children. For example: this.props.children[0]. data-NAME—Custom attribute. For example: data-tooltip-text="...". |
| LIFECYCLE EVENTS |
|
componentWillMount function() componentDidMount function() componentWillReceiveProps function(nextProps) shouldComponentUpdate function(nextProps, nextState) -> bool componentWillUpdate function(nextProps, nextState) componentDidUpdate function(prevProps, prevState) componentWillUnmount function() |
| COMPONENT PROPERTIES AND METHODS |
| Properties this.refs—Lists components with a ref property. this.props—Lists any properties passed to an element (immutable). this.state—Lists states set by setState and getInitialState (mutable). Avoid setting state manually with this.state=... this.isMounted—Flags whether the element has a corresponding DOM node. Methods setState(changes)—Changes state (partially) to this.state, and triggers a rerender replaceState(newState)—Replaces this.state, and triggers a rerender forceUpdate()—Triggers an immediate DOM rerender |
| REACT ADDONS |
| As npm modules:
react-addons-css-transition-group react-addons-perf react-addons-test-utils react-addons-pure-render-mixin react-addons-linked-state-mixin react-addons-clone-with-props react-addons-create-fragment react-addons-css-transition-group react-addons-linked-state-mixin react-addons-pure-render-mixin react-addons-shallow-compare react-addons-transition-group react-addons-update |
| COMPONENTS |
| ES5
var Link = React.createClass({ displayName: 'Link', render: function() { return React.createElement('a', {className: 'btn', href: this.props.href}, 'Click ->', } }) ES5 + JSX var Link = React.createClass({render: function() { return <a className='btn' href={this.props.href}>Click -> this.props.href</a> } }) ES6 + JSX class Link extends React.Component {render() { return <a className='btn' href={this.props.href}>Click -> this.props.href</a> } } |
| ADVANCED COMPONENTS |
| Options (ES5)
Type validation in development mode—propTypes object Object of default properties—getDefaultProps function() Object of the initial state—getInitialState function() ES5 var Link = React.createClass ({propTypes: { href: React.PropTypes.string }, getDefaultProps: function() { return { initialCount: 0 } }, getInitialState: function() { return {count: this.props.initialCount} }, tick: function() { this.setState({count: this.state.count + 1}) }, render: function() { return React.createElement( 'a', {className: 'btn', href: '#', href: this.props.href, onClick: this.tick.bind(this)}, 'Click ->', (this.props.href ? this.props.href : 'https://webapplog.com'), ' (Clicked: ' + this.state.count+')' ) } }) ES5 + JSX var Link = React.createClass ({propTypes: { href: React.PropTypes.string }, getDefaultProps: function() { return { initialCount: 0 } }, getInitialState: function() { return {count: this.props.initialCount}; }, tick: function() { this.setState({count: this.state.count + 1}) }, render: function() { return ( <a onClick={this.tick.bind(this)} href="#" className="btn" href={this.props.href}> Click -> {(this.props.href ? this.props.href : (Clicked: {this.state.count}) </a> ) } }) ES6 + JSX export class Link extends React.Component {constructor(props) { super(props); this.state = {count: props.initialCount}; } tick() { this.setState({count: this.state.count + 1}); } render() { return ( <a onClick={this.tick.bind(this)} href="#" className="btn" href={this.props.href}> Click -> {(this.props.href ? this.props.href : 'https://webapplog.com')} (Clicked: {this.state.count}) </a> ) } } Link.propTypes = { initialCount: React.PropTypes.number } Link.defaultProps = { initialCount: 0 } |
[SYMBOL][A][B][C][D][E][F][G][H][I][J][K][L][M][N][O][P][Q][R][S][T][U][V][W][X][Z]
_ (underscore) character
... operator
{} (curly braces), 2nd, 3rd
* (asterisk) character
# (hash) symbol
about variable
abstractions, powerful
accountsData property
accumulator value
action argument
action creators
overview
passing into component properties
actions
dispatching
overview, 2nd
activeClassName attribute
add-ons
addOption() function, 2nd
addToCart() function, 2nd
ancestors
Angular, 2nd
animation events
Apache Tomcat
API (application program interface)
querying
saving responses into stores
App component, 2nd
app.get() function
app.jsx files
creating route mapping in
writing
App component
Index component
app.listen() function
app.NAME() function
app.set() function, 2nd
apps, running in Express
arbitrary code
Array class
Array.find() function
Array.reduce() function
arrow class
arrow functions
in ES6
overview
assert module
assertions
asset hashing
asterisk character
attributes, passing with spread operators
autobinding
Autocomplete component
code for
implementing
adding browser scripts
Autocomplete component
web servers
rendering on server side from
tests for
automocking
axios library, 2nd
Babel compiler
compiling
ES6
JSX
Node.js
standalone browser
using with ES6
babel property, 2nd
Babel tool, setting up JSX transpiler using
babel-core
babel-loader
babel-preset-react
babel-register, 2nd
Backbone framework
overview
routing with
backticks
baseModel class
BDD (behavior-driven development), 2nd
before statement
beforeEach statement
binary operator
bind() function, 2nd, 3rd
block-scoped constructs
const
let
body-parser, 2nd
bookstore, building with React Router
creating components
Host HTML files
project structure
Webpack configuration
Boolean attribute values, in JSX
booting servers
Bootstrap framework, installing
bootup
browser scripts, adding
Browserify tool
installing
overview
browsers
history
standalone, in Babel
btn-group class
btn-primarydisabled class
bubbling phases, in DOM events
build tool
Button component, Timer component and
Button form element
buttonLabel property
buttons, integrating
Cancel button
capture phases, in DOM events
capturing
changes, of uncontrolled elements
form changes
Cart component
CartItems object
CD (continuous deployment)
CDN (content-delivery network)
change() method
cheatsheet
for Express.js
basic usage
connect middleware
generator
handler signatures
HTTP verbs
installing
Jade
middleware
request-header shortcuts
requests
resources
response
routes
Stylus
for MongoDB database
for Mongoose
document methods
installing
model methods
schema
for React
add-ons
components, 2nd
installing
lifecycle events
methods
properties
propTypes
Checkbox element
checkboxGroup state
checked attribute
checked property
Checkout component
children
distinguishing from their parents
rendering
children property, 2nd, 3rd
CI (continuous integration)
class attribute
classes, in ES6
className
clean-tagged-string library
clearInterval() function
click event
click() method
ClickCounterButton, 2nd
client-side code
client-specific queries
clipboard events
cloning
Cloudflare
code
for Autocomplete component
for Password component
for password modules
maintainability of
modularizing with Webpack build tool
reusing with higher-order components
using displayName
using spread operator
splitting
code generators
CodeBuild
CodeDeploy
CodePipeline
combineReducers() function
comments, in JSX
community
compiling
ES6
JSX
Node.js
component classes, creating
component lifecycle events
categories of
example
executing all events together
implementing
mounting
componentDidMount()
componentWillMount()
overview
unmounting
updating
componentDidUpdate()
componentWillReceive-Props(newProps)
componentWillUpdate()
shouldComponentUpdate()
component-based architecture, using pure JavaScript
componentDidMount() function, 2nd, 3rd, 4th, 5th, 6th, 7th
componentDidUpdate() function, 2nd
components
composing on servers
connecting to stores
creating
writing app.jsx files
default properties in
distinguishing children from their parents
ES5, options
exchanging data between
higher-order
for code reuse
withRouter
in JSX
layout, creating
passing action creators into
presentational vs. container
rendering on server side from
HTML pages
simple text
scaling
property types
rendering children
validation.
See Button component; Menu component; Timer component; TimerWrapper component; Tooltip component.
componentWillMount() function, 2nd, 3rd, 4th, 5th
componentWillReceiveProps() function, 2nd
componentWillUnmount() function, 2nd, 3rd
componentWillUpdate() function, 2nd
compression, 2nd
concurrently tool, Node
configurations
configuring
Express
HMR
Redux data library
servers
Webpack, 2nd, 3rd
connect-cors
connect-multiparty
connect-redis
connect-timeout
connect() function, 2nd, 3rd, 4th, 5th, 6th
consoles, in MongoDB database
const construct
const variables
constructor() function, 2nd, 3rd, 4th
container components, vs. presentational
Content class
Content component
content-delivery network..
See CDN.
contextType
continuous integration.
See CD; ; CI.
controlled components
cookie-parser
cookie-session
cookies
count method
counter property
cover property
create method
create-react-app
createClass() function, 2nd, 3rd
createElement() function, 2nd, 3rd, 4th, 5th
createFactory() function
createStore() function, 2nd
cross-site scripting attack.
See XSS.
csurf
curly braces, 2nd, 3rd
current value
currentDate property
currentTarget
custom validation
dangerouslySetInnerHTML, 2nd
dashes
data
exchanging between components
Flux, architecture of
routes
unidirectional flow of, support for
using GraphQL
adding servers to Netflix clone
overview
using Redux
action creators
actions
combining reducers
configuration
connecting components to stores
dependencies
dispatching an action
enabling Redux
Netflix clone
passing action creators into component properties
React support for unidirectional data flow
reducer for movies
routes
running Netflix clone
understanding Flux data architecture
data structure, in GraphQL
data- attributes, in JSX
data-NAME attribute
data-react-checksum attribute, 2nd
data-reactid attribute
data-reactroot attribute, 2nd, 3rd
Datepicker
declarative style
default parameters, in ES6
default properties, in components
defaultProps attribute, 2nd, 3rd
defaultValue attribute
DELETE method requests
dependencies, in Redux data library
describe statement
destructuring
in ES6
overview
devDependencies property, 2nd, 3rd
developer experience.
See DX.
development mode
devtool property, 2nd
DevTools
directory flag
disabled attribute
disadvantages of React
dispatch() function, 2nd, 3rd, 4th
dispatching actions
Display component
displayName, distinguishing child components from their parents
distribution
div element, 2nd
document element
document methods, in Mongoose
DOM (document object model), events
bubbling phases
capture phases
exchanging data between components
not supported by React, responding to
overview
passing event handlers as properties
SyntheticEvent event objects
using states with
DOMEventTarget
DoneLink
dontMock() function
double quotes
DRY (don’t repeat yourself) principle, 2nd
DX (developer experience)
ECMAScript 5.
See ES5 language specification.
ECMAScript 6.
See ES6 language specification.
ecosystem
elements
creating with JSX
finding with TestUtils
nesting
of forms
<input> element
<option> element
<select> element
<textarea> element
uncontrolled with change capturing
uncontrolled without capturing changes
else statement
emailStaticMarkup
Ember
empty array, 2nd
enabling Redux
endpoints
enhanced object literals, in ES6
Enter keystroke
entry point
environment variables
Enzyme library
errors, handling, 2nd, 3rd, 4th
ES5 language specification
ES6 language specification
arrow functions
classes
compiling
default parameters
destructuring
enhanced object literals
features of
modules
multiline strings
promises
template literals
using with Babel
ESLint
event handlers, passing as properties
event objects, with SyntheticEvent
, 14th.
See component lifecycle events.
DOM
bubbling phases
capture phases
exchanging data between components
not supported by React, responding to
overview
passing event handlers as properties
SyntheticEvent event objects
using states with
in forms
integrating with jQuery UI
integrating buttons
integrating labels
exchanging data between components
Expect syntax
expect() function
expect(OBJECT).toBe(value)
expect(OBJECT).toBeDefined()
expect(OBJECT).toBeFalsy()
expect(OBJECT).toBeNull()
expect(OBJECT).toBeTruthy()
expect(OBJECT).toBe-Undefined()
expect(OBJECT).toEqual(value)
expect(OBJECT).toMatch (regexp)
Express framework
cheatsheet
basics
connect middleware
generator
handler signatures
HTTP verbs
installing
Jade
middleware
request-header shortcuts
requests
resources
response
routes
Stylus
implementing Autocomplete component
code for
tests for
implementing autocomplete with
adding browser scripts
creating server templates
implementing web servers
installing
Node and, rendering on the server side from components
with Universal JavaScript
client-side React code
composing React components on the server
running apps
server-side layout templates with Handlebars
setting up servers
setting up Webpack
express-graphql package
express-react-views library, 2nd
express-session
express-validator, 2nd, 3rd
express.static() function
extract-text-webpack-plugin
fat arrows
fat-arrow functions, 2nd
features, of ES6
fetch() function, 2nd, 3rd
fetchMovieActionCreator() function
fileSplitArray
filter() function, 2nd
filteredOptions
find method
findAndModify method
findById method
findByIdAndRemove method
findByIdAndUpdate method
findOne method
findOneAndUpdate method
findRenderedComponentWithType() function
findRenderedDOMComponent-WithClass() function, 2nd
findRenderedDOMComponent-WithTag() function
Flatly, 2nd, 3rd
flow-bin tool
flux module, Facebook
Flux, data architecture of
focus events
Footer component
for attribute
forceUpdate() function
form events
forms
capturing changes
default values
defining
defining elements of
<input> element
<option> element
<select> element
<textarea> element
defining its events
uncontrolled elements with change capturing
uncontrolled elements without capturing changes
using references to access values
fragment identifier
Generate Password module
generate() method
generatePassword() function
generator, in Express.js
GET endpoint
get method
GET method requests
getAccounts() method
getAttribute() method
getElementById() function
getEventListeners() method
getStyle() function
Glyphicons
Google Webmaster Central Blog
GraphQL
installing on servers
schema of
working with data
adding servers to Netflix clone
overview
graphqlHTTP library
handleActions
Handlebars templating engine
layouts with
server-side layout templates with
handleCheckbox() method
handleClick() method, 2nd, 3rd
handleMouseOver() method
handler property
handler signatures, in Express.js
handleSlide
handleStartTimer() method
handleSubmit() method
hash symbol
hash token
hash, history
hbs template
Header component
headless browsers
Hello World program
helmet
hierarchical queries
higher-order components
for code reuse, 2nd
using displayName
using spread operator
withRouter, accessing routers with
history library
HMR (hot module replacement), 2nd, 3rd, 4th
HOC (higher-order component)
hoisted function
Host HTML files, 2nd
href attribute
html attribute
HTML pages, rendering
booting up servers
configuration
handling errors
layout with Handlebars
middleware
routes
HTTP verbs, in Express.js
hydrating data
idempotent
if statement
if/else condition, in JSX
IFrame
ig (case insensitive and global)
image events
immutable state
implementing routers
creating route mapping in app.jsx
creating Router component in router.jsx
imports
incoming property transition
Index component, 2nd
index template
indexing pages
IndexRoute
innerHTML value
<input> element
inputValue
installing
Bootstrap
Browserify
Express
Express.js
GraphQL on servers
MongoDB
Mongoose
Node.js
React
React DOM
Webpack build tool
interactive properties
isActive() method
isDefaultPrevented() method
isModal condition
isModified() method
isPersistent
isPropagationStopped() method
isRequired property
isVisible
IT (information technology)
it statement
Jade templating engine, Express.js and
JavaScript XML.
See JSX.
JavaScript, component-based architecture using
Jest
assertions
checking passwords with
Host HTML files
implementing Password component
implementing password modules
implementing Autocomplete component
implementing autocomplete with
adding browser scripts
creating server templates
implementing web servers
UI testing with
finding elements with TestUtils
shallow rendering
UI-testing password widget
unit testing with
advantages of
Jest assertions
types of
UI testing with
writing tests
jest.autoMockOff() function
jQuery Slider
jQuery UI (user interface)
integrating with events
integrating buttons
integrating labels
JS.Coach
JSX (JavaScript XML)
attributes not accepted by
Boolean attribute values
building Menu component in
refactoring Link component
refactoring Menu component
running JSX projects
building Menu component without
comments
creating elements with
data-attributes
if/else condition
in components
outputting variables in
overview
properties
React component methods, creating
running projects in
special characters in
style attribute
tags, compiling
transpiler, setting up using Babel
with React Router
key attribute
key property, 2nd
keyboard events
keyCode
Khan Academy
label property
labels, integrating
launchClock() method
layout components, creating
layouts
server-side templates with Handlebars
with Handlebars
LESS files
let construct
libraries
lifecycle events, 2nd
Link component
overview
refactoring
listen() function, 2nd
loaders
loading times
LoadWebsite
local
Logo component
logUpperCase() function
maintainability
map() function, 2nd, 3rd, 4th
mapping object
mapping routes in app.jsx
mapStateToProps() function
Markdown
Material-UI
Math.random() function
Menu component
building in JSX
refactoring Link component
refactoring Menu component
running JSX projects
building without JSX
refactoring
scaffolding
structure
menuOptions property
menus array, 2nd
MessageBoard, 2nd
MessageList
messages array
messages property
method requests
method-override
methods
middleware, 2nd, 3rd, 4th, 5th
mocking
Modal component
model methods, in Mongoose
modularizing code with Webpack build tool
module.export global
module.exports
module.hot.accept() function
modules, in ES6
mongo command, 2nd
mongod command, 2nd
MongoDB database
cheatsheet
implementing Autocomplete component
code
tests
implementing autocomplete with
adding browser scripts
creating server templates
implementing web servers
installing
Mongoose library, cheatsheet
document methods
installing
model methods
schema
morgan, 2nd
mounting component lifecycle events
componentDidMount()
componentWillMount()
mounting events
mouse events
mouseOver event
Mozilla Developer Network
multiline strings, in ES6
multiple attribute
mutable state, 2nd
myUtil module
nativeEvent
nave
navigating programmatically
nesting elements
Netflix clone
adding servers to
data structure
GraphQL schema
installing GraphQL on servers
querying API and saving responses into stores
showing list of movies
Redux with
running
new Data() method
NewMessage
Node
Express and, rendering on the server side from components
React on
Universal JavaScript with
node command, 2nd
Node Patterns course
Node platform
compiling
installing
node value
node-dev
node-static
nodemon tool, 2nd
Note element
notEmpty() function
npm command
npm install, 2nd, 3rd, 4th
npm run build, 2nd, 3rd, 4th
nullified
nvm (Node Version Manager)
object literals, enhanced
Object.assign() function
Object.create() method
offsetLeft
onChange() method, 2nd, 3rd
onClick event, 2nd
one-way binding, 2nd
onInput event
onKeyUp() method, 2nd
onMouseOver
onMouseOverCapture
onResize
onSubmit event
opacity state, 2nd
<option> element
option-name class
options property
orphaned event handlers
parentheses
passport
Password component, implementing
code
render () function
tests
Password element
password field
password modules, implementing
password variable, 2nd, 3rd
Password widget
PasswordGenerate, 2nd
PasswordInfo, 2nd
PasswordInput, 2nd
passwords
checking with Jest
Host HTML files
implementing Password component
implementing password modules
UI-testing widgets
PasswordVisibility, 2nd
Pause/Resume button
performance, improving
persist() method
pick() function
placeholder property
play() method
populate() method
post hook
POST method requests
postlearn-react
posts array
pre hook
prelearn-react
presentational components, vs. container
preventDefault() method
processedRules object
Product component
--production flag
promises, in ES6
prop-types package
properties, 2nd
default in components
in JSX
passing event handlers as
passing in React Router
states and
types of
props
propTypes property, 2nd, 3rd
proto property
prototyping
Provider component, 2nd
publicPath
pushState
PUT method requests
PWD variable
query strings
querying API
queryKey
radio buttons
radioGroup
raw-body
React
advantages of using
better code maintainability
better performance
faster loading times
proper page indexing
benefits of
ecosystem and community
simplicity
speed and testability
cheatsheet
add-ons
components, 2nd
installing
lifecycle events
methods
properties
propTypes
disadvantages of
installing, 2nd
overview
problem solved by
rendering on servers
web applications and
React libraries and rendering targets
React stack
single-page applications
React component methods, creating
in JSX
React DOM (document object model)
React Rocks
React Router
browser history
building bookstores with
project structure
Webpack configuration
creating components
Cart component
Checkout component
Modal component
Product component
writing app.jsx files
creating layout components
development setup with Webpack
features of
accessing routers with withRouter higher-order component
navigating programmatically
route data
URL parameters
hash history
Host HTML files
JSX style
passing properties in
React stack
react-addons-test-utils package
react-dom
react-hot-loader
react-redux package
react-router
react-test-renderer package
React.Component() function
React.createClass() function
React.createElement() function
ReactDOM.findDOMNode() function
ReactDOM.render() function, 2nd, 3rd, 4th, 5th
ReactDOMServer
ReactJSX.com
readOnly
reduce method
reducers
combining
for movies
Redux container
enabling
working with data
React support for unidirectional data flow
understanding Flux data architecture
working with data library
action creators
actions
combining reducers
configuration
connecting components to stores
dependencies
dispatching an action
enabling Redux
Netflix clone
passing action creators into component properties
reducer for movies
routes
running Netflix clone
redux-actions library, 2nd, 3rd
redux-netflix
ref attribute
ref property
refactoring
Link component
Menu component
references, using to access values
regular-expression pattern
remove method
render() function, of Password component
rendering
children
HTML pages
booting up servers
configuration
handling errors
layout with Handlebars
middleware
routes
on the server side from components
HTML pages
simple text
React on servers
shallow
text
renderIntoDocument() function, 2nd
renderToStaticMarkup() function
renderToString() function
replace() method
replaceState() method
representational components
req.message.find() function
request-header, shortcuts in Express.js
request.accepts(type) shortcut
request.acceptsCharset(charset) shortcut
request.acceptsLanguage(language) shortcut
request.body shortcut
request.cookies shortcut
request.fresh shortcut
request.get(headerKey) shortcut
request.host shortcut
request.ip shortcut
request.ips shortcut
request.is(type) shortcut
request.originalUrl shortcut
request.params shortcut
request.path shortcut
request.protocol shortcut
request.query shortcut
request.route shortcut
request.secure shortcut
request.signedCookies shortcut
request.stale shortcut
request.subdomains shortcut
request.xhr shortcut
request/param
requests, in Express.js
require() function, 2nd
required properties
res.render() function
Reset button
resize event
resolve key
resources, in Express.js
response-time
response.render() function
response.send() function
responses, in Express.js
RESTful APIs (application program interfaces)
rooms array
route property
Router class
Router component, creating in router.jsx
router.jsx, creating Router component in
router.push(URL)
RouterContext
routers
accessing with withRouter higher-order component
implementing
creating route mapping in app.jsx
creating Router component in router.jsx
routes
data
in Express.js
in Redux data library
mapping in app.jsx
server-side
routing, with Backbone
row-fluid class
rules array
SaaS (software-as-a-service)
save method
save operation
SaveButton
scaffolding
of Menu component
of Timer component
of Tooltip component
scaling components
property types
rendering children
validation
schema, of Mongoose
scripts block
scryRenderedComponentsWithType() function
scryRenderedDOMComponents-WithClass() function
scryRenderedDOM-ComponentsWithTag() function
seed command
<select> element
selected property
selection events
sendData() method
sendFile() function
SEO (search engine optimization), 2nd
serve-favicon
serve-index
serve-static
server templates, creating
server-side layout templates, with Handlebars
server-side rendering, from components
HTML pages
simple text
server-side routes
servers
adding to Netflix clone
data structure
GraphQL schema
installing GraphQL on servers
querying API and saving responses into stores
showing list of movies
booting
composing components on
installing GraphQL on
rendering React on
setting up
configuration
middleware
server-side routes.
See web servers.
service testing
serviceBase
set method
SET_VISIBILITY_FILTER action
setInterval() function, 2nd
setState() function, 2nd, 3rd, 4th, 5th
setTimeout() function
shallow rendering
shouldComponentUpdate() lifecycle event
shuffle() method
signatures.
See handler signatures.
simplicity
component-based architecture using pure JavaScript
declarative over imperative style
powerful abstractions
skinny arrows
slider button
slider control element
SliderButtons
sliderValue state
SOAP protocol
software-as-a-service.
See SaaS.
SPA (single-page application), 2nd, 3rd
special characters, in JSX
speed
spread operators, passing attributes with
standalone browser, in Babel
startTimer() method, 2nd
state argument
states
accessing
overview
properties and
setting initial state
stateless components
general discussion
stateful vs.
updating
using with events
static assets
static files
static middleware
stopPropagation() method
store property
store.dispatch() function
stores
connecting components to
saving API responses into
strength variable
strings, multiline
strong typing
strong-password module
style attribute, in JSX
style property
style-loader
Stylus stylesheet language, Express.js and
super() method
switch/case statement, 2nd
SyntheticEvent, event objects
tagged strings
target property
TDD (test-driven development)
template literals, in ES6
test cases
testability
testing
for Autocomplete component
of Password component
of password modules
UI with Jest
finding elements with TestUtils
shallow rendering
UI-testing password widget
UI with TestUtils
finding elements with
shallow rendering
UI-testing password widget
UI-password widgets
units with Jest
advantages of
Jest assertions
types of
UI testing with
UI testing with TestUtils
writing unit tests in Jest
Webpack builds
TestUtils
finding elements with
UI testing with
finding elements with
shallow rendering
UI-testing password widget
TestUtils.findRenderedDOMComponentWithClass() function
TestUtils.scryRenderedDOMComponentsWithTag() function
text field
text, rendering
<textarea> element
then property
this.isMounted property
this.props property
this.props,children
this.props.dispatch()function
this.refs property
this.setState() function, 2nd
this.state property
time property, 2nd
timeLeft variable
Timer component
Button component and
scaffolding
structure
TimerWrapper component and
TimerWrapper component
title property, 2nd
toBe() function
toEqual() function
toggle() function
toJSON() method
toLocaleString() method
toLowerCase() method
tooltip
Tooltip component
render( ) function
scaffolding
structure
toggle( ) function
tooltipNode
toString() function
touch events
transform-react-jsx
transition events
transpiler, JSX
trim() method
triple curly braces
two-way binding, 2nd
type attribute
type property
UI (acceptance) testing
UI (user interface)
testing password widgets
testing with Jest
finding elements with TestUtils
shallow rendering
UI-testing password widget
testing with TestUtils
finding elements with
shallow rendering
UI-testing password widget
uncontrolled elements, of forms
with change capturing
without capturing changes
underscore character
unidirectional data flow, support for
unit testing
units, testing with Jest
advantages of
Jest assertions
types of
UI testing with
UI testing with TestUtils
writing tests
Universal JavaScript
Express with
client-side React code
composing React components on the server
running apps
server-side layout templates with Handlebars
setting up servers
setting up Webpack
with Node
with React
unmounting events, 2nd
update method
updating
component lifecycle events
componentDidUpdate( )
componentWillReceive-Props(newProps)
componentWillUpdate( )
shouldComponent-Update( )
states
upperCase property
url function
URL parameters, 2nd
URL path
url property
URL routing
urlencoded data format
user interface.
See UI.
-V option
v property
validate method
validation
value attribute
value property, 2nd
values
default
using references to access
variables, outputting in JSX
vhost
visibilityFilter value
visible variable
wds script
wds-cli script
web applications
React libraries and rendering targets
React stack
single-page applications
web servers, implementing
defining RESTful APIs
rendering React on servers
webpack -w command
Webpack build tool
configuring, 2nd, 3rd
development setup with
HMR
installing
installing dependencies of
modularizing code with
overview
running
testing builds
webpack-dev-server, 2nd, 3rd
wheel events
withRouter component, accessing routers with
XSS (cross-site scripting) attack
Chapter 1. Meeting React
Figure 1.2. A typical SPA architecture
Figure 1.3. Inside a single-page application
Figure 1.5. Inspecting the Hello World app as rendered by React
Chapter 2. Baby steps with React
Figure 2.1. The React Quickly website has many nested UI elements.
Figure 2.2. Rendering a single heading element
Figure 2.3. Structuring a React render by using a wrapper <div> container to render sibling headings
Figure 2.4. React DevTools shows a <div> wrapper for nested sibling h1 elements.
Figure 2.6. Rendering an element created from a custom HelloWorld component class
Chapter 3. Introduction to JSX
Figure 3.1. JSX is transpiled into regular JavaScript.
Figure 3.2. Results of rendering a link with the value from a method
Chapter 4. Making React interactive with states
Figure 4.1. The react-autocomplete component in action
Figure 4.2. We need another data type that’s mutable in the component to make the view change.
Figure 4.4. The Clock is ticking.
Figure 4.7. Clock with two ways to show time: analog and digital
Chapter 5. React component lifecycle events
Figure 5.3. The logger has been mounted.
Figure 5.5. Showing a list of users (fetched from a data store) styled with Twitter Bootstrap
Figure 5.6. A dialog confirmation when the user tries to leave the page
Figure 5.7. Note will be replaced by another element in 5, 4, ... seconds.
Figure 5.9. Dialog confirmation when the user tries to leave the page
Chapter 6. Handling events in React
Figure 6.1. Clicking the button prints the value of SaveButtonthis: SaveButton.
Figure 6.2. Capture, target, and bubbling phases
Figure 6.3. The capture event happens before the regular event.
Figure 6.5. Inspecting events on the <div> element (there are none)
Figure 6.6. Inspecting events on the document elementdocument element (there is one)
Figure 6.8. Hovering the mouse over the box prints the event object in the DevTools console.
Figure 6.10. Clicking the button increments the counter, which has an initial value of 0.
Figure 6.15. Programmatically disabling the Less button to prevent negative values
Chapter 7. Working with forms in React
Figure 7.3. Radio button group
Figure 7.4. Rendering check boxes with React as the preselected option
Figure 7.5. Defining and rendering the <textarea> element
Figure 7.6. Rendering and preselecting the value of a drop-down
Figure 7.7. Rendering and preselecting multiselect elements
Figure 7.9. The controlled element filters input by setting state to digits only.
Figure 7.10. This uncontrolled component has no value set by the application.
Figure 7.13. Uncontrolled form that gets data from two fields and prints it in logs
Chapter 8. Scaling React components
Figure 8.2. Warnings due to wrong property types
Figure 8.3. Expanding a warning revealed the problematic line number: 9.
Figure 8.4. Inspecting the compiled source code is often enough to understand the problem.
Figure 8.6. Rendering four elements with different content using a single component class
Chapter 9. Project: Menu component
Figure 9.1. The menu you’re going to build
Figure 9.2. React DevTools show you the keys of the list elements.
Figure 9.3. React menu showing rendering of nested components
Chapter 10. Project: Tooltip component
Figure 10.1. A tooltip appears when a user hovers their cursor over the marked text.
Chapter 11. Project: Timer component
Figure 11.2. Timer and Button components
Figure 11.3. Timer app execution, starting at the top
Figure 11.4. Clicking 15 Seconds launched the timer. Now it says that 14 seconds remain.
Chapter 12. The Webpack build tool
Chapter 13. React routing
Figure 13.4. The Content component as the Home page (no children)
Chapter 14. Working with data using Redux
Figure 14.1. Unidirectional vs. bidirectional data flow
Figure 14.3. A simplified view of the bidirectional data flow typical for an MVC-like architecture
Figure 14.7. The Netflix clone will show a grid of movies on the home page.
Figure 14.8. Details of a movie are shown when you click its poster.
Figure 14.9. Individual movie view on a small screen. The URL includes the movie ID.
Chapter 15. Working with data using GraphQL
Chapter 16. Unit testing React with Jest
Figure 16.1. Testing pyramid according to software engineering’s best practices
Figure 16.2. Password widget that autogenerates a password according to the given strength criteria
Chapter 17. React on Node and Universal JavaScript
Figure 17.1. SPA that doesn’t need SEO support because it’s behind a login screen
Figure 17.3. Practical application of Universal JavaScript with React, Node, and Express
Figure 17.4. The Express/Node server will generate HTML and send it to the browser.
Figure 17.5. Rendering from the React component on the server side
Figure 17.6. Rendering React markup from a Handlebars layout using Express gives you an HTML page.
Figure 17.7. Message board app with a form to post a message and a list of existing messages
Figure 17.8. Gist of Universal JavaScript with React and Express
Figure 17.9. Universal app in action, with server and browser rendering
Chapter 18. Project: Building a bookstore with React Router
Figure 18.1. Nile Book Store home page with a list of books
Figure 18.2. Product view in a modal window of the Nile bookstore
Figure 18.3. A direct link opens the product view in a new window rather than a modal.
Figure 18.4. An invoice shouldn’t have the header shown on other views.
Figure 18.5. If you don’t check for isModal and use previousChildren, the list of books isn’t shown.
Chapter 19. Project: Checking passwords with Jest
Figure 19.2. The widget with some of the criteria fulfilled and the password visible
Figure 19.3. The Save button is enabled when all the strength criteria are met.
Chapter 20. Project: Implementing autocomplete with Jest, Express, and MongoDB
Figure 20.1. In Slack, when you start typing, the widget offers matches.
Figure 20.2. Autocomplete form with an empty field
Figure 20.3. Typing angu filters the matches and shows only angular and angular2.
Figure 20.4. The Add button is shown only when there are no matches.
Figure 20.5. The room name has been saved and now appears in the list.
Appendix E. ES6 for success
Figure E.2. The ES6 object literal extends from serviceBase and defines methods and attributes.
Chapter 5. React component lifecycle events
Table 5.1. Lifecycle events (and their relation with state and properties)
Table 5.2. Lifecycle events invoked/called on component update
Chapter 6. Handling events in React
Chapter 1. Meeting React
Listing 1.1. Loading React libraries and code (index.html)
Listing 1.2. Creating and rendering an h1 element (index.html)
Chapter 2. Baby steps with React
Listing 2.1. Creating a <div> element with two <h1> children
Listing 2.2. HTML for the nested elements example without the React code
Listing 2.3. Creating and rendering a React component class
Listing 2.4. Using the frameworkName property in the render() method
Listing 2.5. Passing all the properties from HelloWorld to <h1>
Listing 2.6. Using properties passed during element creation
Chapter 3. Introduction to JSX
Listing 3.1. Hello World in JavaScript
Listing 3.2. Hello World in JSX
Listing 3.3. Creating a HelloWorld class in JSX
Listing 3.4. Outputting variables in JSX
Chapter 4. Making React interactive with states
Listing 4.1. Rendering state in JSX
Listing 4.2. Clock component constructor
Listing 4.3. Implementing a clock with state
Listing 4.4. Stateless Hello World
Listing 4.5. Passing state to children
Chapter 5. React component lifecycle events
Listing 5.1. Rendering and updating a Logger component three times
Listing 5.2. Observing component lifecycle events
Listing 5.3. Fetching data to display in a table
Chapter 6. Handling events in React
Listing 6.1. Declaring an event handler as a class method
Listing 6.2. Capture event following by bubbling event
Listing 6.3. Event handler receiving a synthetic event
Listing 6.4. Event handler as a class method; binding in render()
Listing 6.5. Nullifying a synthetic event
Listing 6.6. Updating state as a result of a click action
Listing 6.7. Stateless button component
Listing 6.8. Passing an event handler as a property
Listing 6.9. Button component using an event handler from Content
Listing 6.10. Passing an event handler and state to two components
Listing 6.11. Using lifecycle events to listen to DOM events
Listing 6.12. Using state values for styles to resize elements
Listing 6.13. Integrating with a jQuery plug-in via its events
Listing 6.14. Rendering slider buttons
Listing 6.15. Integrating with a jQuery plug-in via window
Listing 6.16. Setting up event listeners on a jQuery UI plug-in
Chapter 7. Working with forms in React
Listing 7.1. Rendering radio buttons and handling changes
Listing 7.2. Defining check boxes
Listing 7.3. Rendering form elements
Listing 7.4. Rendering form elements and capturing changes
Listing 7.5. Rendering form elements
Listing 7.6. Implementing a controlled component
Listing 7.7. Uncontrolled element that captures changes
Listing 7.8. Beginning of the email form
Listing 7.9. placeholder propertyrender() method of the email form
Chapter 8. Scaling React components
Listing 8.1. Using propTypes and defaultProps
Listing 8.2. Rendering six buttons
Listing 8.3. Rendering elements using Content
Chapter 9. Project: Menu component
Listing 9.1. Basic skeleton of the Menu script
Listing 9.2. Menu component that uses map() to render links
Chapter 10. Project: Tooltip component
Listing 10.1. Tooltip project package.json file
Listing 10.2. Tooltip project index.html file
Listing 10.3. Tooltip component and text
Chapter 11. Project: Timer component
Listing 11.1. Timer project package.json file
Listing 11.2. Timer project index.html file
Listing 11.3. Outline of timer.jsx
Listing 11.4. TimerWrapper component
Chapter 12. The Webpack build tool
Listing 12.1. Setting up the dev environment
Listing 12.2. Webpack configuration file
Chapter 13. React routing
Listing 13.1. Setting up the dev environment
Listing 13.2. webpack.config.js
Listing 13.3. require() functionRoute mapping (app.jsx)
Listing 13.4. Implementing a URL router
Listing 13.6. Dependencies to use Webpack v1, React Router v2.6, React v15.2, and JSX
Listing 13.7. Defining React explicitly
Listing 13.9. Configuring Webpack
Listing 13.10. Complete Content component
Listing 13.11. Calling router.push() to navigate
Listing 13.12. Rendering post data
Listing 13.13. Posts implementation with data from props.route
Chapter 14. Working with data using Redux
Listing 14.1. Dependences for the Netflix clone
Listing 14.2. Netflix clone Webpack configuration file
Listing 14.3. Main app entry point
Listing 14.4. Defining URL routing with React Router
Listing 14.5. Combining reducers
Listing 14.6. Using the redux-actions library
Listing 14.7. Passing action creators into Movies properties
Chapter 15. Working with data using GraphQL
Listing 15.1. Netflix clone package.json
Listing 15.2. Express server to provide data and static assets
Chapter 16. Unit testing React with Jest
Listing 16.1. Module for generating passwords
Listing 16.2. Saving a test CLI command
Listing 16.3. Test file for the password-generating module
Chapter 17. React on Node and Universal JavaScript
Listing 17.1. ReactDOMServerServer-side setup code
Listing 17.2. Server-side Email (node/email.jsx)
Listing 17.3. node/email.jsx rendered into strings
Listing 17.4. Using React on Express to show HTML on a page
Listing 17.5. Full code for React, Express, hbs server
Listing 17.6. Server side of the message board app
Listing 17.7. Rendering HTML generated from React components
Listing 17.8. Outputting HTML generated by React in Handlebars
Listing 17.9. Server-side layout to render HTML from React components
Listing 17.10. Fetching messages and sending a message
Listing 17.11. Rendering client React components on the browser
Chapter 18. Project: Building a bookstore with React Router
Listing 18.1. Nile Book Store project dependencies and setup
Listing 18.2. Webpack configuration for the Nile store
Listing 18.6. Index component for the home page
Chapter 19. Project: Checking passwords with Jest
Listing 19.1. Dependencies and setup for the project
Listing 19.2. Webpack configuration
Listing 19.4. testingof password modulesTests for the password module
Listing 19.5. testingof Password componentSpec for the Password component
Listing 19.6. Rules for password strength
Listing 19.7. Implementing the Password component
Listing 19.8. Implementing render()
Listing 19.9. PasswordGenerate component
Listing 19.10. PasswordInput component
Chapter 20. Project: Implementing autocomplete with Jest, Express, and MongoDB
Listing 20.1. Dependencies and setup for the project
Listing 20.2. Webpack configuration
Listing 20.3. Components and libraries for the web server
Listing 20.4. RESTful API routes
Listing 20.5. Server-side React
Listing 20.6. Main client-side script
![]()
For online information and ordering of this and other Manning books, please visit www.manning.com. The publisher offers discounts on this book when ordered in quantity. For more information, please contact
Special Sales Department Manning Publications Co. 20 Baldwin Road PO Box 761 Shelter Island, NY 11964 Email: orders@manning.com
©2017 by Manning Publications Co. All rights reserved.
No part of this publication may be reproduced, stored in a retrieval system, or transmitted, in any form or by means electronic, mechanical, photocopying, or otherwise, without prior written permission of the publisher.
Many of the designations used by manufacturers and sellers to distinguish their products are claimed as trademarks. Where those designations appear in the book, and Manning Publications was aware of a trademark claim, the designations have been printed in initial caps or all caps.
Recognizing the importance of preserving what has been written, it is Manning’s policy to have the books we publish printed
on acid-free paper, and we exert our best efforts to that end. Recognizing also our responsibility to conserve the resources
of our planet, Manning books are printed on paper that is at least 15 percent recycled and processed without the use of elemental
chlorine.
|
Manning Publications Co. 20 Baldwin Road PO Box 761 Shelter Island, NY 11964 |
Development editor: Dan Maharry Technical development editor: Anto Aravinth Review editor: Ivan Martinović Project editor: Tiffany Taylor Copyeditor: Tiffany Taylor Proofreader: Katie Tennant Technical proofreader: German Frigerio Typesetter: Gordan Salinovic Cover designer: Leslie Haimes
ISBN 9781617293344
Printed in the United States of America
1 2 3 4 5 6 7 8 9 10 – EBM – 22 21 20 19 18 17
To my grandfather, Khalit Khamitov. Thank you for being such a kind and just person. You will always stay in my memory, along with the crafts you taught me, the trips we took to the dacha, and the chess games we played.
Chapter 2. Baby steps with React
Chapter 3. Introduction to JSX
Chapter 4. Making React interactive with states
Chapter 5. React component lifecycle events
Chapter 6. Handling events in React
Chapter 7. Working with forms in React
Chapter 8. Scaling React components
Chapter 9. Project: Menu component
Chapter 12. The Webpack build tool
Chapter 14. Working with data using Redux
Chapter 15. Working with data using GraphQL
Chapter 16. Unit testing React with Jest
Chapter 17. React on Node and Universal JavaScript
Chapter 18. Project: Building a bookstore with React Router
Chapter 19. Project: Checking passwords with Jest
Chapter 20. Project: Implementing autocomplete with Jest, Express, and MongoDB
Appendix A. Installing applications used in this book
Appendix C. Express.js cheatsheet
1.2. The problem that React solves
1.5. How React can fit into your web applications
1.5.1. React libraries and rendering targets
Chapter 2. Baby steps with React
Chapter 3. Introduction to JSX
3.1. What is JSX, and what are its benefits?
3.2.1. Creating elements with JSX
3.2.2. Working with JSX in components
3.2.3. Outputting variables in JSX
3.2.4. Working with properties in JSX
3.3. Setting up a JSX transpiler with Babel
Chapter 4. Making React interactive with states
4.1. What are React component states?
Chapter 5. React component lifecycle events
5.1. A bird’s-eye view of React component lifecycle events
5.4. Executing all events together
5.6.1. componentWillReceiveProps(newProps)
Chapter 6. Handling events in React
6.1. Working with DOM events in React
6.1.1. Capture and bubbling phases
6.1.2. React events under the hood
6.1.3. Working with the React SyntheticEvent event object
6.2. Responding to DOM events not supported by React
6.3. Integrating React with other libraries: jQuery UI events
Chapter 7. Working with forms in React
7.1. The recommended way to work with forms in React
7.2. Alternative ways to work with forms
7.2.1. Uncontrolled elements with change capturing
7.2.2. Uncontrolled elements without capturing changes
Chapter 8. Scaling React components
8.1. Default properties in components
8.2. React property types and validation
8.4. Creating React higher-order components for code reuse
8.4.1. Using displayName: distinguishing child components from their parent
8.4.2. Using the spread operator: passing all of your attributes
8.5. Best practices: presentational vs. container components
Chapter 9. Project: Menu component
9.1. Project structure and scaffolding
9.2. Building the menu without JSX
9.3.1. Refactoring the Menu component
Chapter 10. Project: Tooltip component
10.1. Project structure and scaffolding
Chapter 11. Project: Timer component
11.1. Project structure and scaffolding
Chapter 12. The Webpack build tool
12.2. Adding Webpack to a project
12.4. Running Webpack and testing the build
13.1. Implementing a router from scratch
13.1.1. Setting up the project
13.2.1. React Router’s JSX style
13.3.1. Accessing router with the withRouter higher-order component
13.3.2. Navigating programmatically
Chapter 14. Working with data using Redux
14.1. React support for unidirectional data flow
14.2. Understanding the Flux data architecture
14.3. Using the Redux data library
14.3.2. Dependencies and configs
14.3.9. Connecting components to the store
14.3.10. Dispatching an action
14.3.11. Passing action creators into component properties
Chapter 15. Working with data using GraphQL
15.2. Adding a server to the Netflix clone
15.2.1. Installing GraphQL on a server
15.2.4. Querying the API and saving the response into the store
Chapter 16. Unit testing React with Jest
16.2. Why Jest (vs. Mocha or others)?
16.4. UI testing React with Jest and TestUtils
16.4.1. Finding elements with TestUtils
Chapter 17. React on Node and Universal JavaScript
17.1. Why React on the server? And what is Universal JavaScript?
17.1.2. Better performance with faster loading times
17.3. React and Express: rendering on the server side from components
17.4. Universal JavaScript with Express and React
17.4.1. Project structure and configuration
17.4.3. Server-side layout templates with Handlebars
17.4.4. Composing React components on the server
Chapter 18. Project: Building a bookstore with React Router
18.1. Project structure and Webpack configuration
Chapter 19. Project: Checking passwords with Jest
19.1. Project structure and Webpack configuration
19.3. Implementing a strong password module
19.4. Implementing the Password component
Chapter 20. Project: Implementing autocomplete with Jest, Express, and MongoDB
20.1. Project structure and Webpack configuration
20.2. Implementing the web server
20.3. Adding the browser script
20.4. Creating the server template
20.5. Implementing the Autocomplete component
Appendix A. Installing applications used in this book
Using Babel to compile JSX and ES6
Sequence of lifecycle events (inspired by http://react.tips)
Component properties and methods
Appendix C. Express.js cheatsheet
Appendix D. MongoDB and Mongoose cheatsheet
“React Quickly is a one-stop shop for anyone who wants a guided introduction to React and the ecosystem of tools, concepts, and libraries around it. Follow Azat’s walkthroughs, work on the projects given, and you’ll soon understand React, Redux, GraphQL, Webpack, and Jest, as well as how to put them to work.”
Peter Cooper, editor of JavaScript Weekly
“React Quickly teaches the reader the most valuable and buzz-worthy concepts in building modern web applications with React including GraphQL, Webpack, and server-side rendering. After reading React Quickly, you should feel confident in your ability to create a production-grade web application with React.”
Stan Bershadskiy, author of React Native Cookbook
“Azat is one of the most authoritative voices in the programming space. This book goes far beyond the basics by deep diving into React’s foundation and architecture. It’s a must read for any developer!”
Erik Hanchett, author of Ember.js Cookbook
“This book is simple to follow. It uses very basic language that makes you understand each concept step by step.”
Israel Morales, front-end developer and web designer at SavvyCard
“Simple language with simple logical examples to get you up and running quickly is why this book truly justifies its title, React Quickly. This book covers all the major topics that any developer new to React needs in order to start writing apps using React. And the author’s sense of humor will keep you engaged until the end. I am thankful Azat took time to share his React journey with us.”
Suhas Deshpande, software engineer at Capital One
“React Quickly is a great resource for coming up to speed with React. Very thorough and relevant. I’ll be using it as a reference for my next app.”
Nathan Bailey, full stack developer at SpringboardAuto.com
“Azat is great at what he does—teaching people how to code. React Quickly contains fundamental knowledge as well as practical examples to get you started using React quickly.”
Shu Liu, IT consultant
“Since being open sourced by Facebook in 2013, React.js has rapidly become a widely adopted JS library and one of the most starred projects on GitHub. In his new book, React Quickly, Azat Mardan has, in his typical lucid style, laid out everything you need to learn about the React ecosystem in order to build performant SPA applications quickly. Just the chapters on React state and Universal JavaScript are worth the price of the book.”
Prakash Sarma, New Star Online
“React Quickly will ease your adoption of React by giving you a clear foundation, and it will have you building applications that thoroughly embrace the benefits of using React.
Allan Von Schenkel, VP of Technology & Strategy at FoundHuman
“React Quickly covers all the important aspects of React in an easy-to-consume fashion. This book is like all of Azat’s work: clear and concise, and it covers what’s needed to become productive quickly. If you are interested in adding React to your skill set, I say start here.”
Bruno Watt, consulting architect at hypermedia.tech
“React Quickly is an incredibly comprehensive book on full-stack web development with React.js, covering not just React itself but the ecosystem surrounding it. I’ve always been mystified by server-side React and found that Azat’s book really helped me finally understand it. If you’re new to React and would like to truly master it, I would look no further than this book.”
Richard Kho, software engineer at Capital One
I keep hoping that JavaScript will die. Seriously. Die brutally and painfully.
It’s not that I completely dislike JavaScript—it has improved quite a bit over the years. It’s that I have a severe distaste for complexity—so much so that I named my blog and my business Simple Programmer. My tagline has always been, “Making the complex simple.”
Making the complex simple isn’t easy. It takes a special set of skills. You have to be able to understand the complex, and understand it so well that you can distill it down to the core—because everything is simple at the core. This is exactly what Azat has done with this book, React Quickly.
Now, I’ll admit Azat had a little help. You see, one of the reasons I personally like ReactJS so much is that it’s simple. It was designed to be simple. It was designed to deal with the increasing complexity of JavaScript frameworks and reduce that complexity by going back to the basics: plain old JavaScript. (At least, for the most part. ReactJS does have a JSX language that’s compiled into JavaScript, but I’ll let Azat tell you about that.)
The point is, although I like Angular, Backbone, and some other JavaScript frameworks because they’ve helped make it much easier for web developers to create asynchronous web applications and single-page applications, they’ve also added a great deal of complexity. Using templates and understanding the syntax and subtleties of these frameworks increased productivity, but they moved the complexity from the backend to the frontend. ReactJS starts over, gets rid of templates, and gives you a way to apply component-based architecture to your UI using JavaScript. I like this. It’s simple. But even the simplest thing can be difficult to explain—or worse yet, made complex by a teacher who lacks this skill.
This is where Azat comes in. He knows how to teach. He knows how to simplify. He begins this book by explaining React through contrasting it with something you probably already know: Angular. Even if you don’t know Angular, his explanation of ReactJS will quickly help you understand the basics and its purpose. Then Azat quickly demonstrates how to create a basic ReactJS application, so you can see and do it for yourself. After that, he takes you through the 20% you need to know in order to accomplish 80% of what you’ll do in React, using real-world examples that anyone can grasp easily. Finally—and this is my favorite part—he includes examples and projects galore. The absolute best way to learn is by doing, and Azat walks you through creating six—yes, six—nontrivial projects using ReactJS.
In keeping with my theme of simplicity, I’ll leave off here by saying that React Quickly is simply the best way I know of to learn ReactJS.
JOHN SONMEZ
AUTHOR OF Soft Skills (http://amzn.to/2hFHXAu)
AND FOUNDER OF Simple Programmer (https://simpleprogrammer.com)
It was 2008, and banks were closing left and right. I was working at the Federal Deposit Insurance Corporation (FDIC), whose primary task is to pay back depositors of closed, failed, and insolvent banks. I admit that, in terms of job security, my job was on par with working at Lehman Brothers or being a ticket salesman for the Titanic. But when my department’s eventual budget cuts were still far in the future, I had the chance to work on an app called Electronic Deposit Insurance Estimator (EDIE). The app became hugely popular for a simple reason: people were anxious to find out how much of their savings was insured by the United States federal government, and EDIE estimated that amount.
But there was a catch: people don’t like to tell the government about their private accounts. To protect their privacy, the app was made entirely in front-end JavaScript, HTML, and CSS, without any back-end technologies. This way, the FDIC wasn’t collecting any financial information.
The app was a hot mess of spaghetti code left by dozens of iterations of consultants. Developers came and went, leaving no documentation and nothing resembling any logical, simple algorithms. It was like trying to use the New York City subway without a map. There were myriads of functions to call other functions, strange data structures, and more functions. In modern terminology, the app was pure user interface (UI), because it had no backend.
I wish I’d had React.js back then. React brings joy. It’s a new way of thinking—a new way of developing. The simplicity of having your core functionality in one place, as opposed to splitting it into HTML and JS, is liberating. It reignited my passion for front-end development.
React is a fresh way of looking at developing UI components. It’s a new generation of presentation layer libraries. Together with a model and routing library, React can replace Angular, Backbone, or Ember in the web and mobile tech stack. This is the reason I wrote this book. I never liked Angular: it’s too complex and opinionated. The template engine is very domain specific, to the point that it’s not JavaScript anymore; it’s another language. I have used Backbone.js and like it for its simplicity and DIY approach. Backbone.js is mature and more like a foundation for your own framework than a full-blown, opinionated framework in itself. The problem with Backbone is the increased complexity of interactions between models and views: multiple views update various models, which update other views, which trigger events on models.
My personal experience from doing a Kickstarter campaign for my React.js online course (http://mng.bz/XgkO) and from going to various conferences and events has shown me that developers are hungry for a better way to develop UIs. Most business value now lies in UIs. The backend is a commodity. In the Bay Area, where I live and work, most job openings in software engineering are for front-end or (a trendy new title) generalist/fullstack developers. Only a few big companies like Google, Amazon, and Capital One still have relatively strong demand for data scientists and back-end engineers.
The best way to ensure job security or get a great job in the first place is to become a generalist. The fastest way to do so is to use an isomorphic, scalable, developer-friendly library like React on the front end, paired with Node.js on the backend in case you ever need to mess with server-side code.
For mobile developers, HTML5 was a dirty word two or three years ago. Facebook dropped its HTML5 app in favor of a more performant native implementation. But this unfavorable view is quickly changing. With React Native, you can render for mobile apps: you can keep your UI components but tailor them to different environments, another point in favor of learning React.
Programming can be creative. Don’t get bogged down by mundane tasks, complexity, and fake separation of concerns. Cut out all the unnecessary junk, and unleash your creative power with the simplistic beauty of modular, component-based UIs powered by React. Throw in some Node for isomorphic/universal JavaScript, and you’ll achieve Zen.
Happy reading, and let me know how you like the book by leaving a review on Amazon.com (http://amzn.to/2gPxv9Q).
I’d like to acknowledge the internet, the universe, and the human ingenuity that brought us to the point that telepathy is possible. Without opening my mouth, I can share my thoughts with millions of people around the globe via social media such as Twitter, Facebook, and Instagram. Hurray!
I feel humongous gratitude to my teachers, both intentional at schools and universities, and accidental and occasional, whose wisdom I grasped from books and from learning by osmosis.
As Stephen King once wrote, “To write is human, to edit is divine.” Thus, my endless gratitude to the editors of this book and even more so to the readers who will have to deal with the inevitable typos and bugs they’ll encounter in this volume. This is my 14th book, and I know there will be typos, no mater what [sic].
I thank the people at Manning who made this book possible: publisher Marjan Bace and everyone on the editorial and production teams, including Janet Vail, Kevin Sullivan, Tiffany Taylor, Katie Tennant, Gordan Salinovic, Dan Maharry, and many others who worked behind the scenes.
I can’t thank enough the amazing group of technical peer reviewers led by Ivan Martinovic: James Anaipakos, Dane Balia, Art Bergquist, Joel Goldfinger, Peter Hampton, Luis Matthew Heck, Ruben J. Leon, Gerald Mack, Kamal Raj, and Lucas Tettamanti. Their contributions included catching technical mistakes, errors in terminology, and typos, and making topic suggestions. Each pass through the review process and each piece of feedback implemented through the forum topics shaped and molded the manuscript.
On the technical side, special thanks go to Anto Aravinth, who served as the book’s technical editor; and German Frigerio, who served as the book’s technical proofreader. They are the best technical editors I could have hoped for.
Many thanks go to John Sonmez of Pluralsight, Manning, and SimpleProgrammer.com fame, for writing the foreword to this book. Thank you, Peter Cooper, Erik Hanchett, and Stan Bershadskiy for your reviews and for giving the book extra credibility. Readers who haven’t heard of John, Peter, Erik, or Stan should subscribe and follow their work around software engineering.
Finally, a thank you to all the MEAP readers for your feedback. Revising the book based on your reviews delayed publication by a year, but the result is the best book currently available about React.
This book is intended to cure the troubles of front-end developers, make their lives more meaningful and happier, and help them earn more money by introducing them to React.js—and doing so in a fast manner (hence the word Quickly in the title). It’s the work of one and a half years and about a dozen people. At the very least, the book is meant to open your mind to some unusual concepts like JSX, unidirectional data flow, and declarative programming.
The book is split into two parts: “Core React” (chapters 1–11) and “React and friends” (chapters 12–20). Each chapter includes descriptive text supplemented with code examples and diagrams where they’re applicable. Each chapter also has an optional introductory video that will help you decide whether you need to read the chapter or can skip it. Chapters are written in a standalone manner, meaning you should have no trouble if you don’t read the book in order—although I do recommend reading it sequentially. At the end of each chapter is a quiz, to reinforce your retention of the material, and a summary.
Each part ends with a series of larger projects that will give you more experience with React and solidify your new understanding by building on the concepts and knowledge introduced in the previous chapters. The projects are supplemented by optional screencast videos to reinforce your learning and show you dynamic things like creating files and installing dependencies (there are a lot of moving parts in web development!). These projects are an integral part of the book’s flow—avoid skipping them. I encourage you to type each line of code yourself and abstain from copying and pasting. Studies have shown that typing and writing increase learning effectiveness.
The book ends with five appendixes that provide supplemental material. Check them out, along with the table of contents, before you begin reading.
The websites for this book are www.manning.com/books/react-quickly and http://reactquickly.co. If you need up-to-date information, most likely you’ll find it there.
The source code is available on the Manning website (www.manning.com/books/react-quickly) and on GitHub (https://github.com/azat-co/react-quickly). See the “Source code” section for more details. I show full listings of the code in the book—this is more convenient than jumping to GitHub or a code editor to look at the files.
This book is for web and mobile developers and software engineers with two to three years of experience, who want to start learning and using React.js for web or mobile development. Basically, it’s for people who know the shortcut for the Developer Tools by heart (Cmd-Opt-J or Cmd-Opt-I on Macs). The book targets readers who know and are on a first-name basis with these concepts:
Having experience with jQuery, Angular, Ember.js, Backbone.js, or other MVC-like frameworks is a plus, because you’ll be able to contrast them with the React way. But it’s not necessary and to some degree may be detrimental, because you’ll need to unlearn certain patterns. React is not exactly MVC.
You’ll be using command-line tools, so if you’re afraid of them, this is the best time to fight your phobia of the command line/Terminal/command prompt. Typically, CLIs are more powerful and versatile than their visual (GUI) versions (for example, the Git command line versus the GitHub desktop—the latter confuses the heck out of me).
Having some familiarity with Node.js will allow you to learn React much more quickly than someone who’s never heard of Node.js, npm, Browserify, CommonJS, Gulp, or Express.js. I’ve authored several books on Node.js for those who want to brush up on it, the most popular being Practical Node.js (http://practicalnodebook.com). Or, you can go online for a free NodeSchool adventure (http://nodeschool.io) (free does not always mean worse).
This book is not a comprehensive guide to web or mobile development. I assume that you already know about those. If you want help with basic programming concepts or JavaScript fundamentals, there are plenty of good books on those topics. You Don’t Know JS by Kyle Simpson (free to read at https://github.com/getify/You-Dont-Know-JS), Secrets of the JavaScript Ninja, Second Edition (www.manning.com/books/secrets-of-the-javascript-ninja-second-edition), and Eloquent JavaScript by Marijn Haverbeke (free to read at http://eloquentjavascript.net) come to mind. So, there’s no need for me to duplicate existing content with this book.
First of all, you should read this book. That is not a joke. Most people buy books but never read them. It’s even easier to do so with digital copies, because they hide on drives and in the cloud. Read the book, and work through the projects, chapter by chapter.
Each chapter covers either a topic or a series of topics that build on each other. For this reason, I recommend that you read this book from beginning to end and then go back to individual chapters for reference. But as I said earlier, you can also read individual chapters out of order, because the projects in the chapters stand alone.
There are many links to external resources. Most of them are optional and provide additional details about topics. Therefore, I suggest that you read the book at your computer, so you can open links as I refer to them.
Some text appears in a monospace font, like this: getAccounts(). That means it’s code, inline or in blocks. Sometimes you’ll see code with weird indentation:
document.getElementById('end-of-time').play()
}
This means I’m annotating a large chunk of code and broke it into pieces. This piece belongs to a bigger listing that started from position 0; this small chunk won’t run by itself.
Other times, code blocks aren’t indented. In such cases, it’s generally safe to assume that the snippet is the whole thing:
ReactDOM.render(
<Content />,
document.getElementById('content')
)
If you see a dollar sign ($), it’s a Terminal/command prompt command. For example:
$ npm install -g babel@5.8.34
The most important thing to know and remember while using this book is that you must have fun. If it’s not fun, it’s not JavaScript!
All of the book’s code is available at www.manning.com/books/react-quickly and https://github.com/azat-co/react-quickly. Follow the folder-naming convention chNN, where NN is the chapter number with a leading 0 if needed (for example, ch02 for chapter 2’s code). The source code in the GitHub repository will evolve by including patches, bug fixes, and maybe even new versions and styles (ES2020?).
I’m sure there are typos in this book. Yes, I had editors—a bunch of them, all professionals provided by Manning. But thanks for finding that typo. No need to leave nasty Amazon reviews or send me hate mail about it, or about grammar.
Please don’t email me bugs and typos. Instead, you can report them on the book’s forum at https://forums.manning.com/forums/react-quickly or create a GitHub issue at https://github.com/azat-co/react-quickly/issues. This way, other people can benefit from your findings.
Also, please don’t email me technical questions or errata. Post them on the book’s forum, the book’s GitHub page (https://github.com/azat-co/react-quickly), or Stack Overflow. Other people may help you more quickly (and better) than I can.
Purchase of React Quickly includes free access to a private web forum run by Manning Publications where you can make comments about the book, ask technical questions, and receive help from the author and from other users. To access the forum, go to https://forums.manning.com/forums/react-quickly. You can also learn more about Manning’s forums and the rules of conduct at https://forums.manning.com/forums/about.
Manning’s commitment to our readers is to provide a venue where a meaningful dialogue between individual readers, and between readers and the author, can take place. It is not a commitment to any specific amount of participation on the part of the author, whose contribution to the forum remains voluntary (and unpaid). We suggest you try asking the author some challenging questions lest his interest stray! The forum and the archives of previous discussions will be accessible from the publisher’s website as long as the book is in print.
I’ve published more than 14 books and 17 online courses (https://node.university), most of them on the cloud, React, JavaScript, and Node.js. (One book is about how to write books, and another is about what to do after you’ve written a few books.) Before focusing on Node, I programmed in other languages (Java, C, Perl, PHP, Ruby), pretty much ever since high school (more than a dozen years ago) and definitely more than the 10,000 hours prescribed.[1]
Right now, I’m a Technology Fellow at one of the top 10 U.S. banks, which is also a Fortune 500 company: Capital One Financial Corporation, in beautiful San Francisco. Before that, I worked for small startups, giant corporations, and even the U.S. federal government, writing desktop, web, and mobile apps; teaching; and doing developer evangelism and project management.
I don’t want to take too much of your time telling you about myself; you can read more on my blog (http://webapplog.com/about) and social media (www.linkedin.com/in/azatm). Instead, I want to write about my experience that’s relevant to this book.
When I moved to the sunny state of California in 2011 to join a startup and go through a business accelerator (if you’re curious, it was 500 Startups), I started to use modern JavaScript. I learned Backbone.js to build a few apps for the startup, and I was impressed. The framework was a huge improvement in code organization over other SPAs I’d built in prior years. It had routes and models. Yay!
I had another chance to see the astounding power of Backbone and isomorphic JavaScript during my work as software engineering team lead at DocuSign, the Google of e-signatures (it has a 70% market share). We reengineered a seven-year-old monolithic ASP.NET web app that took four weeks for each minor release into a snappy Backbone-Node-CoffeeScript-Express app that had great user experience and took only one or two weeks for its release. The design team did great work with usability. Needless to say, there were boatloads of UI views with various degrees of interactivity.
The end app was isomorphic before such a term even existed. We used Backbone models on the server to prefetch the data from APIs and cache it. We used the same Jade templates on the browser and the server.
It was a fun project that made me even more convinced of the power of having one language across the entire stack. Developers versed in C# and front-end JavaScript (mostly jQuery) from the old app would spend a sprint (one release cycle, typically a week or two) and fall in love with the clear structure of CoffeeScript, the organization of Backbone, and the speed of Node (both the development and the running speed).
My decade in web development exposed me to the good, the bad, and the ugly (mostly ugly) of front-end development. This turned out to be a blessing in disguise, because I came to appreciate React even more, once I switched to it.
If you’d like to receive updates, news, and tips, then connect with me online by following, subscribing, friending, stalking, whatever:
For in-person workshops and courses, visit http://NodeProgram.com or https://Node.University, or send me a message via https://webapplog.com/azat.
An email from an early reader asked about the dervish on the cover. Yes, the character could easily be a Persian or any one of many Turko-nomadic people inhabiting the Middle East and central Asia. This is due to the fact that trade and travel were highly developed and frequent among those regions for many centuries. But, according to the illustrator who drew this picture, he was depicting a Siberian Bashkir. Most of the modern-day Bashkirs live in the Republic of Bashkortostan (a.k.a. Bashkiria). Bashkirs are close ethnic and geographical neighbors of the Volga Bulgars (improperly named Tatars); Bashkirs and Tatars are the second-most-populous ethnic group in the Russian Federation. (The first is Russians, if you’re curious.)
The figure comes from an eighteenth-century illustration, “Gravure Homme Baschkir,” by Jacques Grasset de Saint-Sauveur. Fascination with faraway lands and travel for pleasure were relatively new phenomena at the time, and collections of drawings such as this one were popular, introducing both the tourist as well as the armchair traveler to the inhabitants of other countries. The rich variety of drawings reminds us vividly of how culturally apart the world’s regions, towns, villages, and neighborhoods were just 200 years ago. Isolated from each other, people spoke different dialects and languages. In the streets or in the countryside, it was easy to identify where they lived and what their trade or station in life was, just by their dress.
Dress codes have changed since then and the diversity by region, so rich at the time, has faded away. It is now hard to tell apart the inhabitants of different continents, let alone different towns or regions. Perhaps we have traded cultural diversity for a more varied personal life—certainly for a more varied and fast-paced technological life.
At a time when it is hard to tell one computer book from another, Manning celebrates the inventiveness and initiative of the computer business with book covers based on the rich diversity of regional life of two centuries ago, brought back to life by pictures such as this one.
Hello! My name is Azat Mardan, and I’m going to take you on a journey into the wonderful world of React. It will make your front-end development more enjoyable and your code easier to write and maintain, and your users will be delighted at the speed of your web apps. React is a game changer in web development: the React community has pioneered many approaches, terms, and design patterns, and other libraries have followed the path forged by React.
I’ve taught this material more than 20 times in my live-online and in-person workshops to hundreds of software engineers from very different backgrounds and varied levels of seniority. Thus, this material has been battle tested on my students: you’re getting the distilled, most effective version of my React foundation course in a written format. These chapters are critical to get you on familiar terms with React.
Chapters 1–11 are the result of almost two years of work by several people, but they read as a fast sequence of topics that build on each other. The best way to consume these chapters is to start with chapter 1 and proceed in order. Each chapter includes a video message from me; chapters 1–8 have a quiz at the end; and chapters 9–11, which are projects, contain homework for self-guided development.
All in all, this part of the book builds a solid foundation of React concepts, patterns, and features. Can you go to a foreign country and understand the language without studying? No—and that’s why you must learn the React “language” before you attempt to build complex apps. Thus, it’s paramount that you study these basic React concepts—that you learn the React language—which is exactly what you’ll do in the next 11 chapters.
Let’s get started with React—and learn to speak fluent React-ese.
This chapter covers
When I began working on web development in early 2000, all I needed was some HTML and a server-side language like Perl or PHP. Ah, the good old days of putting in alert() boxes just to debug your front-end code. It’s a fact that as the internet has evolved, the complexity of building websites has increased dramatically. Websites have become web applications with complex user interfaces, business logic, and data layers that require changes and updates over time—and often in real time.
Many JavaScript template libraries have been written to try to solve the problems of dealing with complex user interfaces (UIs). But they still require developers to adhere to the old separation of concerns—which splits style (CSS), data and structure (HTML), and dynamic interactions (JavaScript)—and they don’t meet modern-day needs. (Remember the term DHTML?)
In contrast, React offers a new approach that streamlines front-end development. React is a powerful UI library that offers an alternative that many big firms such as Facebook, Netflix, and Airbnb have adopted and see as the way forward. Instead of defining a one-off template for your UIs, React allows you to create reusable UI components in JavaScript that you can use again and again in your sites.
Do you need a captcha control or date picker? Then use React to define a <Captcha /> or <DatePicker /> component that you can add to your form: a simple drop-in component with all the functionality and logic to communicate with the back end. Do you need an autocomplete box that asynchronously queries a database once the user has typed four or more letters? Define an <Autocomplete charNum="4"/> component to make that asynchronous query. You can choose whether it has a text box UI or has no UI and instead uses another custom form element—perhaps <Autocomplete textbox="..." />.
This approach isn’t new. Creating composable UIs has been around for a long time, but React is the first to use pure JavaScript without templates to make this possible. And this approach has proven easier to maintain, reuse, and extend.
React is a great library for UIs, and it should be part of your front-end web toolkit; but it isn’t a complete solution for all front-end web development. In this chapter, we’ll look at the pros and cons of using React in your applications and how you might fit it into your existing web-development stack.
Part 1 of the book focuses on React’s primary concepts and features, and part 2 looks at working with libraries related to React to build more-complex front-end apps (a.k.a. React stack or React and friends). Each part demonstrates both greenfield and brownfield development[1] with React and the most popular libraries, so you can get an idea of how to approach working with it in real-world scenarios.
Brownfield is a project with legacy code and existing systems, while greenfield is a project without any legacy code or systems; see https://en.wikipedia.org/wiki/Brownfield_(software_development).
We all learn differently. Some people prefer text and others video, and others learn best via in-person instruction. Each chapter of this book includes a short video that explains the chapter’s gist in less than 5 minutes. Watching them is totally optional. They’ll give you a summary if you prefer a video format or need a refresher. After watching each video, you can decide whether you need to read the chapter or can skip to the next one.
The source code for the examples in this chapter is at www.manning.com/books/reactquickly and at https://github.com/azat-co/react-quickly/tree/master/ch01 (in the ch01 folder of the GitHub repository https://github.com/azat-co/react-quickly). You can also find some demos at http://reactquickly.co/demos.
To introduce React.js properly, I first need to define it. So, what is React? It’s a UI component library. The UI components are created with React using JavaScript, not a special template language. This approach is called creating composable UIs, and it’s fundamental to React’s philosophy.
React UI components are highly self-contained, concern-specific blocks of functionality. For example, there could be components for date-picker, captcha, address, and ZIP code elements. Such components have both a visual representation and dynamic logic. Some components can even talk to the server on their own: for example, an autocomplete component might fetch the autocompletion list from the server.
In a broad sense, a user interface[2] is everything that facilitates communication between computers and humans. Think of a punch card or a mouse: they’re both UIs. When it comes to software, engineers talk about graphical user interfaces (GUIs), which were pioneered for early personal computers such as Macs and PCs. A GUI consists of menus, text, icons, pictures, borders, and other elements. Web elements are a narrow subset of the GUI: they reside in browsers, but there are also elements for desktop applications in Windows, OS X, and other operating systems.
Every time I mention a UI in this book, I mean a web GUI.
Component-based architecture (CBA)—not to be confused with web components, which are just one of the most recent implementations of CBA—existed before React. Such architectures generally tend to be easier to reuse, maintain, and extend than monolithic UIs. What React brings to the table is the use of pure JavaScript (without templates) and a new way to look at composing components.
What problem does React solve? Looking at the last few years of web development, note the problems in building and managing complex web UIs for front-end applications: React was born primarily to address those. Think of large web apps like Facebook: one of the most painful tasks when developing such applications is managing how the views change in response to data changes.
Let’s refer to the official React website for more hints about the problem React addresses: “We built React to solve one problem: building large applications with data that changes over time.”[3] Interesting! We can also look at the history of React for more information. A discussion on the React Podcast[4] mentions that the creator of React—Jordan Walke—was solving a problem at Facebook: having multiple data sources update an autocomplete field. The data came asynchronously from a back end. It was becoming more and more complicated to determine where to insert new rows in order to reuse DOM elements. Walke decided to generate the field representation (DOM elements) anew each time. This solution was elegant in its simplicity: UIs as functions. Call them with data, and you get rendered views predictably.
React official website, “Why React?” March 24, 2016, http://bit.ly/2mdCJKM.
React Podcast, “8. React, GraphQL, Immutable & Bow-Ties with Special Guest Lee Byron,” December 31, 2015, http://mng.bz/W1X6.
Later, it turned out that generating elements in memory is extremely fast and that the actual bottleneck is rendering in the DOM. But the React team came up with an algorithm that avoids unnecessary DOM pain. This made React very fast (and cheap in terms of performance). React’s splendid performance and developer-friendly, component-based architecture are a winning combination. These and other benefits of React are described in the next section.
React solved Facebook’s original problem, and many large firms agreed with this approach. React adoption is solid, and its popularity is growing every month. React emerged from Facebook[5] and is now used not only by Facebook but also by Instagram, PayPal, Uber, Sberbank, Asana,[6] Khan Academy,[7] HipChat,[8] Flipboard,[9] and Atom,[10] to name just a few.[11] Most of these applications originally used something else (typically, template engines with Angular or Backbone) but switched to React and are extremely happy about it.
“Introduction to React.js,” July 8, 2013, http://mng.bz/86XF.
Malcolm Handley and Phips Peter, “Why Asana Is Switching to TypeScript,” Asana Blog, November 14, 2014, http://mng.bz/zXKo.
Joel Burget, “Backbone to React,” http://mng.bz/WGEQ.
Rich Manalang, “Rebuilding HipChat with React.js,” Atlassian Developers, February 10, 2015, http://mng.bz/r0w6.
Michael Johnston, “60 FPS on the Mobile Web,” Flipboard, February 10, 2015, http://mng.bz/N5F0.
Nathan Sobo, “Moving Atom to React,” Atom, July 2, 2014, http://mng.bz/K94N.
See also the JavaScript usage stats at http://libscore.com/#React.
Every new library or framework claims to be better than its predecessors in some respect. In the beginning, we had jQuery, and it was leaps and bounds better for writing cross-browser code in native JavaScript. If you remember, a single AJAX call taking many lines of code had to account for Internet Explorer and WebKit-like browsers. With jQuery, this takes only a single call: $.ajax(), for example. Back in the day, jQuery was called a framework—but not anymore! Now a framework is something bigger and more powerful.
Similarly with Backbone and then Angular, each new generation of JavaScript frameworks has brought something new to the table. React isn’t unique in this. What is new is that React challenges some of the core concepts used by most popular front-end frameworks: for example, the idea that you need to have templates.
The following list highlights some of the benefits of React versus other libraries and frameworks:
Many features make React simpler to work with than most other front-end frameworks. Let’s unpack these items one by one, starting with its simplicity.
The concept of simplicity in computer science is highly valued by developers and users. It doesn’t equate to ease of use. Something simple can be hard to implement, but in the end it will be more elegant and efficient. And often, an easy thing will end up being complex. Simplicity is closely related to the KISS principle (keep it simple, stupid).[12] The gist is that simpler systems work better.
React’s approach allows for simpler solutions via a dramatically better web-development experience for software engineers. When I began working with React, it was a considerable shift in a positive direction that reminded me of switching from using plain, no-framework JavaScript to jQuery.
In React, this simplicity is achieved with the following features:
Let’s cover these one by one.
First, React embraces declarative style over imperative. Declarative style means developers write how it should be, not what to do, step-by-step (imperative). But why is declarative style a better choice? The benefit is that declarative style reduces complexity and makes your code easier to read and understand.
Consider this short JavaScript example, which illustrates the difference between declarative and imperative programming. Let’s say you need to create an array (arr2) whose elements are the result of doubling the elements of another array (arr). You can use a for loop to iterate over an array and tell the system to multiply by 2 and create a new element (arr2[i]=):
var arr = [1, 2, 3, 4, 5],
arr2 = []
for (var i=0; i<arr.length; i++) {
arr2[i] = arr[i]*2
}
console.log('a', arr2)
The result of this snippet, where each element is multiplied by 2, is printed on the console as follows:
a [2, 4, 6, 8, 10]
This illustrates imperative programming, and it works—until it doesn’t work, due to the complexity of the code. It becomes too difficult to understand what the end result is supposed to be when you have too many imperative statements. Fortunately, you can rewrite the same logic in declarative style with map():
var arr = [1, 2, 3, 4, 5],
arr2 = arr.map(function(v, i){ return v*2 })
console.log('b', arr2)
The output is b [2, 4, 6, 8, 10]; the variable arr2 is the same as in the previous example. Which code snippet is easier to read and understand? In my humble opinion, the declarative example.
Look at the following imperative code for getting a nested value of an object. The expression needs to return a value based on a string such as account or account.number in such a manner that these statements print true:
var profile = {account: '47574416'}
var profileDeep = {account: { number: 47574416 }}
console.log(getNestedValueImperatively(profile, 'account') === '47574416')
console.log(getNestedValueImperatively(profileDeep, 'account.number')
=== 47574416)
This imperative style literally tells the system what to do to get the results you need:
var getNestedValueImperatively = function getNestedValueImperatively
Contrast this with declarative style (focused on the result), which reduces the number of local variables and thus simplifies the logic:
var getValue = function getValue(object, propertyName) {
return typeof object === 'undefined' ? undefined : object[propertyName]
}
var getNestedValueDeclaratively = function getNestedValueDeclaratively(object,
propertyName) {
return propertyName.split('.').reduce(getValue, object)
}
console.log(getNestedValueDeclaratively({bar: 'baz'}, 'bar') === 'baz')
console.log(getNestedValueDeclaratively({bar: { baz: 1 }}, 'bar.baz')=== 1)
Most programmers have been trained to code imperatively, but usually the declarative code is simpler. In this example, having fewer variables and statements makes the declarative code easier to grasp at first glance.
That was just some JavaScript code. What about React? It takes the same declarative approach when you compose UIs. First, React developers describe UI elements in a declarative style. Then, when there are changes to views generated by those UI elements, React takes care of the updates. Yay!
The convenience of React’s declarative style fully shines when you need to make changes to the view. Those are called changes of the internal state. When the state changes, React updates the view accordingly.
I cover how states work in chapter 4.
Under the hood, React uses a virtual DOM to find differences (the delta) between what’s already in the browser and the new view. This process is called DOM diffing or reconciliation of state and view (bringing them back to similarity). This means developers don’t need to worry about explicitly changing the view; all they need to do is update the state, and the view will be updated automatically as needed.
Conversely, with jQuery, you’d need to implement updates imperatively. By manipulating the DOM, developers can programmatically modify the web page or parts of the web page (a more likely scenario) without rerendering the entire page. DOM manipulation is what you do when you invoke jQuery methods.
Some frameworks, such as Angular, can perform automatic view updates. In Angular, it’s called two-way data binding, which basically means views and models have two-way communication/syncing of data between them.
The jQuery and Angular approaches aren’t great, for two reasons. Think about them as two extremes. At one extreme, the library (jQuery) isn’t doing anything, and a developer (you!) needs to implement all the updates manually. At the other extreme, the framework (Angular) is doing everything.
The jQuery approach is prone to mistakes and takes more work to implement. Also, this approach of directly manipulating the regular DOM works fine with simple UIs, but it’s limiting when you’re dealing with a lot of elements in the DOM tree. This is the case because it’s harder to see the results of imperative functions than declarative statements.
The Angular approach is difficult to reason about because with its two-way binding, things can spiral out of control quickly. You insert more and more logic, and all of a sudden, different views are updating models, and those models update other views.
Yes, the Angular approach is somewhat more readable than imperative jQuery (and requires less manual coding!), but there’s another issue. Angular relies on templates and a DSL that uses ng directives (for example, ng-if). I discuss its drawbacks in the next section.
Component-based architecture[13] existed before React came on the scene. Separation of concerns, loose coupling, and code reuse are at the heart of this approach because it provides many benefits; software engineers, including web developers, love CBA. A building block of CBA in React is the component class. As with other CBAs, it has many benefits, with code reuse being the main one (you can write less code!).
What was lacking before React was a pure JavaScript implementation of this architecture. When you’re working with Angular, Backbone, Ember, or most of the other MVC-like front-end frameworks, you have one file for JavaScript and another for the template. (Angular uses the term directives for components.) There are a few issues with having two languages (and two or more files) for a single component.
The HTML and JavaScript separation worked well when you had to render HTML on the server, and JavaScript was only used to make your text blink. Now, single page applications (SPAs) handle complex user input and perform rendering on the browser. This means HTML and JavaScript are closely coupled functionally. For developers, it makes more sense if they don’t need to separate between HTML and JavaScript when working on a piece of a project (component).
Consider this Angular code, which displays different links based on the value of userSession:
<a ng-if="user.session" href="/logout">Logout</a> <a ng-if="!user.session" href="/login">Login</a>
You can read it, but you may have doubts about what ng-if takes: a Boolean or a string. And will it hide the element or not render it at all? In the Angular case, you can’t be sure whether the element will be hidden on true or false, unless you’re familiar with how this particular ng-if directive works.
Compare the previous snippet with the following React code, which uses JavaScript if/else to implement conditional rendering. It’s absolutely clear what the value of user.session must be and what element (logout or login) is rendered if the value is true. Why? Because it’s just JavaScript:
if (user.session) return React.createElement('a', {href: '/logout'}, 'Logout')
else return React.createElement('a', {href: '/login'}, 'Login')
Templates are useful when you need to iterate over an array of data and print a property. We work with lists of data all the time! Let’s look at a for loop in Angular. As mentioned earlier, in Angular, you need to use a DSL with directives. The directive for a for loop is ng-repeat:
<div ng-repeat="account in accounts">
{{account.name}}
</div>
One of the problems with templates is that developers often have to learn yet another language. In React, you use pure JavaScript, which means you don’t need to learn a new language! Here’s an example of composing a UI for a list of account names with pure JavaScript:[14]
Imagine a situation where you’re making some changes to the list of accounts. You need to display the account number and other fields. How do you know what fields the account has in addition to name?
You need to open the corresponding JavaScript file that calls and uses this template, and then you have to find accounts to see its properties. So the second problem with templates is that the logic about the data and the description of how that data should be rendered are separated.
It’s much better to have the JavaScript and the markup in one place so you don’t have to switch between file and languages. This is exactly how React works; and you’ll see how React renders elements shortly in a Hello World example.
Separation of concerns generally is a good pattern. In a nutshell, it means separation of different functions such as the data service, the view layer, and so on. When you’re working with template markup and corresponding JavaScript code, you’re working on one functionality. That’s why having two files (.js and .html) isn’t a separation of concerns.
Now, if you want to explicitly set the method by which to keep track of items (for example, to ensure there are no duplicates) in the rendered list, you can use Angular’s track by feature:
<div ng-repeat="account in accounts track by account._id">
{{account.name}}
</div>
If you want to track by an index of the array, there’s $index:
<div ng-repeat="account in accounts track by $index">
{{account.name}}
</div>
But what concerns me and many other developers is, what is this magic $index? In React, you use an argument from map() for the value of the key attribute:
It’s worth noting that map() isn’t exclusive to React. You can use it with other frameworks because it’s part of the language. But the declarative nature of map() makes it and React a perfect pair.
I’m not picking on Angular—it’s a great framework. But the bottom line is that if a framework uses a DSL, you need to learn its magic variables and methods. In React, you can use pure JavaScript.
If you use React, you can carry your knowledge to the next project even if it’s not in React. On the other hand, if you use an X template engine (or a Y framework with a built-in DSL template engine), you’re locked into that system and have to describe yourself as an X/Y developer. Your knowledge isn’t transferable to projects that don’t use X/Y. To summarize, the pure JavaScript component-based architecture is about using discrete, well-encapsulated, reusable components that ensure better separation of concerns based on functionality without the need for DSLs, templates, or directives.
Working with many developer teams, I’ve observed another factor related to simplicity. React has a better, shallower, more gradual learning curve compared to MVC frameworks (well, React isn’t an MVC, so I’ll stop comparing them) and template engines that have special syntax—for example, Angular directives or Jade/Pug. The reason is that instead of using the power of JavaScript, most template engines build abstractions with their own DSL, in a way reinventing things like an if condition or a for loop.
React has a powerful abstraction of the document model. In other words, it hides the underlying interfaces and provides normalized/synthesized methods and properties. For example, when you create an onClick event in React, the event handler will receive not a native browser-specific event object, but a synthetic event object that’s a wrapper around native event objects. You can expect the same behavior from synthetic events regardless of the browser in which you run the code. React also has a set of synthetic events for touch events, which are great for building web apps for mobile devices.
Another example of React’s DOM abstraction is that you can render React elements on the server. This can be handy for better search engine optimization (SEO) and/or improving performance.
There are more options when it comes to rendering React components than just DOM or HTML strings for the server back end. We’ll cover them in section 1.5.1. And, speaking of the DOM, one of the most sought-after benefits of React is its splendid performance.
In addition to the necessary DOM updates, your framework may perform unnecessary updates, which makes the performance of complex UIs even worse. This becomes especially noticeable and painful for users when you have a lot of dynamic UI elements on your web page.
On the other hand, React’s virtual DOM exists only in the JavaScript memory. Every time there’s a data change, React first compares the differences using its virtual DOM; only when the library knows there has been a change in the rendering will it update the actual DOM. Figure 1.1 shows a high-level overview of how React’s virtual DOM works when there are data changes.
Ultimately, React updates only those parts that are absolutely necessary so that the internal state (virtual DOM) and the view (real DOM) are the same. For example, if there’s a <p> element and you augment the text via the state of the component, only the text will be updated (that is, innerHTML), not the element itself. This results in increased performance compared to rerendering entire sets of elements or, even more so, entire pages (server-side rendering).
If you like to geek out on algorithms and Big Os, these two articles do a great job of explaining how the React team managed to turn an O(n3) problem into an O(n) one: “Reconciliation,” on the React website (http://mng.bz/PQ9X) and “React’s Diff Algorithm” by Christopher Chedeau (http://mng.bz/68L4).
The added benefit of the virtual DOM is that you can do unit testing without headless browsers like PhantomJS (http://phantomjs.org). There’s a Jasmine (http://jasmine.github.io) layer called Jest (https://facebook.github.io/jest) that lets you test React components right on the command line!
Last, but not least, React is supported by the developers of a juggernaut web application called Facebook, as well as by their peers at Instagram. As with Angular and some other libraries, having a big company behind the technology provides a sound testing ground (it’s deployed to millions of browsers), reassurance about the future, and an increase in contribution velocity.
The React community is incredible. Most of the time, developers don’t even have to implement much of the code. Look at these community resources:
My personal anecdotal experience with open source taught me that the marketing of open source projects is as important to its wide adoption and success as the code itself. By that, I mean that if a project has a poor website, lacks documentation and examples, and has an ugly logo, most developers won’t take it seriously—especially now, when there are so many JavaScript libraries. Developers are picky, and they won’t use an ugly duckling library.
My teacher used to say, “Don’t judge a book by its cover.” This might sound controversial; but, sadly, most people, including software engineers, are prone to biases such as good branding. Luckily, React has a great engineering reputation backing it. And, speaking of book covers, I hope you didn’t buy this book just for its cover!
Of course, almost everything has its drawbacks. This is true with React, but the full list of cons depends on whom you ask. Some of the differences, like declarative versus imperative, are highly subjective. So, they can be both pros and cons. Here’s my list of React disadvantages (as with any such list, it may be biased because it’s based on opinions I’ve heard from other developers):
To continue with this introduction to React, let’s look at how it fits into a web application.
In a way, the React library by itself, without React Router or a data library, is less comparable to frameworks (like Backbone, Ember, and Angular) and more comparable to libraries for working with UIs, like template engines (Handlebars, Blaze) and DOM-manipulation libraries (jQuery, Zepto). In fact, many teams have swapped traditional template engines like Underscore in Backbone or Blaze in Meteor for React, with great success. For example, PayPal switched from Dust to Angular, as did many other companies listed earlier in this chapter.
You can use React for just part of your UI. For example, let’s say you have a load-application form on a web page built with jQuery. You can gradually begin to convert this front-end app to React by first converting the city and state fields to populate automatically based on the ZIP code. The rest of the form can keep using jQuery. Then, if you want to proceed, you can convert the rest of the form elements from jQuery to React, until your entire page is built on React. Taking a similar approach, many teams successfully integrated React with Backbone, Angular, or other existing front-end frameworks.
React is back-end agnostic for the purposes of front-end development. In other words, you don’t have to rely on a Node.js back end or MERN (MongoDB, Express.js, React.js, and Node.js) to use React. It’s fine to use React with any other back-end technology like Java, Ruby, Go, or Python. React is a UI library, after all. You can integrate it with any back end and any front-end data library (Backbone, Angular, Meteor, and so on).
To summarize how React fits into a web app, it’s most often used in these scenarios:
React works nicely with other front-end technologies, but it’s mostly used as part of single-page architecture because SPA seems to be the most advantageous and popular approach to building web apps. I cover how React fits into an SPA in section 1.5.2.
In some extreme scenarios, you can even use React only on the server as a template engine of sorts. For example, there’s an express-react-views library (https://github.com/reactjs/express-react-views). It renders the view server-side from React components. This server-side rendering is possible because React lets you use different rendering targets.
In versions 0.14 and higher, the React team split the library into two packages: React Core (react package on npm) and ReactDOM (react-dom package on npm). By doing so, the maintainers of React made it clear that React is on a path to become not just a library for the web, but a universal (sometimes called isomorphic because it can be used in different environments) library for describing UIs.
For example, in version 0.13, React had a React.render() method to mount an element to a web page’s DOM node. In versions 0.14 and higher, you need to include react-dom and call ReactDOM.render() instead of React.render().
Having multiple packages created by the community to support various rendering targets made this approach of separating writing components and rendering logical. Some of these modules are as follows:
In addition to the support of these libraries, the separation of React Core from ReactDOM makes it easier to share code between React and React Native libraries (used for native mobile iOS and Android development). In essence, when using React for web development, you’ll need to include at least React Core and ReactDOM.
Moreover, there are additional React utility libraries in React and npm. (Before React v15.5, some of them were part of React as React add-ons.[15] These utility libraries allow you to enhance functionality, work with immutable data (https://github.com/kolodny/immutability-helper), and perform testing.
See the version 15.5 change log with the list of add-ons and npm libraries: https://facebook.github.io/react/blog/2017/04/07/react-v15.5.0.html. See also the page on add-ons: https://facebook.github.io/react/docs/addons.html.
Finally, React is almost always used with JSX—a tiny language that lets developers write React UIs more eloquently. You can transpile JSX into regular JavaScript by using Babel or a similar tool.
As you can see, there’s a lot of modularity—the functionality of React-related things is split into different packages. This gives you power and choice, which is a good thing. No monolith or opinionated library dictates to you the only possible way to implement things. More on this in section 1.5.3.
If you’re a web developer reading this book, you probably use SPA architecture. Either you already have a web app built using this and want to reengineer it with React (brownfield), or you’re starting a new project from scratch (greenfield). Next, we’ll zoom in on React’s place in SPAs as the most popular approach to building web apps.
Another name for SPA architecture is thick client, because the browser, being a client, holds more logic and performs functions such as rendering of the HTML, validation, UI changes, and so on. Figure 1.2 is basic: it shows a bird’s-eye view of a typical SPA architecture with a user, a browser, and a server. The figure depicts a user making a request, and input actions like clicking a button, drag-and-drop, mouse hovering, and so on:
“What does it mean to hydrate an object?” Stack Overflow, http://mng.bz/uP25.
To summarize, in the SPA approach, most rendering for UIs happens on the browser. Only data travels to and from the browser. Contrast that with a thick-server approach, where all the rendering happens on the server. (Here I mean rendering as in generating HTML from templates or UI code, not as in rendering that HTML in the browser, which is sometimes called painting or drawing the DOM.)
Note that the MVC-like architecture is the most popular approach, but it isn’t the only one. React doesn’t require you to use an MVC-like architecture; but, for the sake of simplicity, let’s assume that your SPA is using an MVC-like architecture. You can see its possible distinct parts in figure 1.3. A navigator or routing library acts as a controller of sorts in the MVC paradigm; it dictates what data to fetch and what template to use. The navigator/controller makes a request to get data and then hydrates/populates the templates (views) with this data to render the UI in the form of the HTML. The UI sends actions back to the SPA code: clicks, mouse hovers, keystrokes, and so on.
In an SPA architecture, data is interpreted and processed in the browser (browser rendering) and is used by the SPA to render additional HTML or to change existing HTML. This makes for nice interactive web applications that rival desktop apps. Angular.js, Backbone.js, and Ember.js are examples of front-end frameworks for building SPAs.
Different frameworks implement navigators, data, and templates differently, so figure 1.3 isn’t applicable to all frameworks. Rather, it illustrates the most widespread separation of concerns in a typical SPA.
React’s place in the SPA diagram in figure 1.3 is in the Templates block. React is a view layer, so you can use it to render HTML by providing it with data. Of course, React does much more than a typical template engine. The difference between React and other template engines like Underscore, Handlebars, and Mustache is in the way you develop UIs, update them, and manage their states. We’ll talk about states in chapter 4 in more detail. For now, think of states as data that can change and that’s related to the UI.
React isn’t a full-blown, front-end JavaScript framework. React is minimalistic. It doesn’t enforce a particular way of doing things like data modeling, styling, or routing (it’s non-opinionated). Because of that, developers need to pair React with a routing and/or modeling library.
For example, a project that already uses Backbone.js and the Underscore.js template engine can switch to Underscore for React and keep existing data models and routing from Backbone. (Underscore also has utilities, not just template methods. You can use these Underscore utilities with React as a solution for a clear declarative style.) Other times, developers opt to use the React stack, which consists of data and routing libraries created to be used specifically with React:
The ecosystem of libraries for React is growing every day. Also, React’s ability to describe composable components (self-contained chunks of the UI) is helpful in reusing code. There are many components packaged as npm modules. Just to illustrate the point that having small composable components is good for code reuse, here are some popular React components:
Then there’s JSX, which is probably the most frequent argument for not using React. If you’re familiar with Angular, then you’ve already had to write a lot of JavaScript in your template code. This is because in modern web development, plain HTML is too static and is hardly any use by itself. My advice: give React the benefit of the doubt, and give JSX a fair run.
JSX is a little syntax for writing React objects in JavaScript using <> as in XML/HTML. React pairs nicely with JSX because developers can better implement and read the code. Think of JSX as a mini-language that’s compiled into native JavaScript. So, JSX isn’t run on the browser but is used as the source code for compilation. Here’s a compact snippet written in JSX:
if (user.session) return <a href="/logout">Logout</a> else return <a href="/login">Login</a>
Even if you load a JSX file in your browser with the runtime transformer library that compiles JSX into native JavaScript on the run, you still don’t run the JSX; you run JavaScript instead. In this sense, JSX is akin to CoffeeScript. You compile these languages into native JavaScript to get better syntax and features than that provided by regular JavaScript.
I know that to some of you, it looks bizarre to have XML interspersed with JavaScript code. It took me a while to adjust, because I was expecting an avalanche of syntax error messages. And yes, using JSX is optional. For these two reasons, I’m not covering JSX until chapter 3; but trust me, it’s powerful once you get a handle on it.
By now, you have an understanding of what React is, its stack, and its place in the higher-level SPA. It’s time to get your hands dirty and write your first React code.
Let’s explore your first React code—the quintessential example used for learning programming languages—the Hello World application. (If we don’t do this, the gods of programming might punish us!) You won’t be using JSX yet, just plain JavaScript. The project will print a “Hello world!!!” heading (<h1>) on a web page. Figure 1.4 shows how it will look when you’re finished (unless you’re not quite that enthusiastic and prefer a single exclamation point).
Although most React developers write in JSX, browsers will only run standard JavaScript. That’s why it’s beneficial to be able to understand React code in pure JavaScript. Another reason we’re starting with plain JS is to show that JSX is optional, albeit the de facto standard language for React. Finally, preprocessing JSX requires some tooling.
I want to get you started with React as soon as possible without spending too much time on setup in this chapter. You’ll perform all the necessary setup for JSX in chapter 3.
The folder structure of the project is simple. It consists of two JavaScript files in the js folder and one HTML file, index.html:
/hello-world
/js
react.js
react-dom.js
index.html
The two files in the js folder are for the React library version 15.5.4:[17] react-dom.js (web browser DOM renderer) and react.js (React Core package). First, you need to download the aforementioned React Core and ReactDOM libraries. There are many ways to do it. I recommend using the files provided in the source code for this book, which you can find at www.manning.com/books/react-quickly and https://github.com/azat-co/react-quickly/tree/master/ch01/hello-world. This is the most reliable and easiest approach, because it doesn’t require a dependency on any other service or tool. You can find more ways to download React in appendix A.
v15.5.4 is the latest as of this writing. Typically, major releases like 14, 15, and 16 incorporate significant differences, whereas minor releases like 15.5.3 and 15.5.4 have fewer breaking changes and conflicts. The code for this book was tested for v15.5.4. The code may work with future versions, but I can’t guarantee that it will work because no one knows what will be in the future versions—not even the core contributors.
Prior to version 0.14, these two libraries were bundled together. For example, for version 0.13.3, all you needed was react.js. This book uses React and React DOM version 15.5.4 (the latest as of this writing) unless noted otherwise. For most of the projects in part 1, you’ll need two files: react.js and react-com.js. In chapter 8, you’ll need prop-types (www.npmjs.com/package/prop-types), which was part of React until version 15.5.4 but is now a separate module.
After you place the React files in the js folder, create the index.html file in the hello-world project folder. This HTML file will be the entry point of the Hello World application (meaning you’ll need to open it in the browser).
The code for index.html is simple and starts with the inclusion of the libraries in <head>. In the <body> element, you create a <div> container with the ID content and a <script> element (that’s where the app’s code will go later), as shown in the following listing.
Why not render the React element directly in the <body> element? Because doing so can lead to conflict with other libraries and browser extensions that manipulate the document body. In fact, if you try attaching an element directly to the body, you’ll get this warning:
Rendering components directly into document.body is discouraged...
This is another good thing about React: it has great warning and error messages!
React warning and error messages aren’t part of the production build, in order to reduce noise, increase security, and minimize the distribution size. The production build is the minified file from the React Core library: for example, react.min.js. The development version with the warnings and error messages is the unminified version: for example, react.js.
By including the libraries in the HTML file, you get access to the React and ReactDOM global objects: window.React and window.ReactDOM. You’ll need two methods from those objects: one to create an element (React) and another to render it in the <div> container (ReactDOM), as shown in listing 1.2.
To create a React element, all you need to do is call React.createElement(element-Name, data, child) with three arguments that have the following meanings:
This listing gets a React element of the h1 type and stores the reference to this object into the h1 variable. The h1 variable isn’t an actual DOM node; rather, it’s an instantiation of the React h1 component (element). You can name it any way you want: helloWorldHeading, for example. In other words, React provides an abstraction over the DOM.
The h1 variable name is arbitrary. You can name this variable anything you want (such as bananza), as long as you use the same variable in ReactDOM.render().
Once the element is created and stored in h1, you render it to the DOM node/element with ID content using the ReactDOM.render() method shown in listing 1.2. If you prefer, you can move the h1 variable to the render call. The result is the same, except you don’t use an extra variable:
ReactDOM.render(
React.createElement('h1', null, 'Hello world!'),
document.getElementById('content')
)
Now, open the index.html file served by a static HTTP web server in your favorite browser. I recommend using an up-to-date version of Chrome, Safari, or Firefox. You should see the “Hello world!” message on the web page, as shown in figure 1.5.
This figure shows the Elements tab in Chrome DevTools with the <h1> element selected. You can observe the data-reactroot attribute; it indicates that this element was rendered by ReactDOM.
One quick note: you can abstract the React code (listing 1.2) into a separate file instead of creating elements and rendering them with ReactDOM.render() all in the index.html file (listing 1.1). For example, you can create script.js and copy and paste the h1 element and ReactDOM.render() call into that file. Then, in index.html, you need to include script.js after the <div> with ID content, like this:
<div id="content"></div> <script src="script.js"></script>
It’s better to use a local web server instead of opening an index.html file in the browser directly, because with a web server, your JavaScript apps will be able to make AJAX/XHR requests. You can tell whether it’s a server or a file by looking at the URL in the address bar. If the address starts with file, then it’s a file; and if the address starts with http, then it’s a server. You’ll need this feature for future projects. Typically, a local HTTP web server listens to incoming requests on 127.0.0.1 or localhost.
You can get any open source web server, such as Apache, MAMP, or (my favorites because they’re written in Node.js) node-static (https://github.com/cloud-head/node-static) or http-server (www.npmjs.com/package/http-server). To install node-static or http-server, you must have Node.js and npm installed. If you don’t have them, you can find installation instructions for Node and npm in appendix A or by going to http://nodejs.org.
Assuming you have Node.js and npm on your machine, run npm i -g node-static or npm i -g http-server in your terminal or command prompt. Then, navigate to the folder with the source code, and run static or http-server. In my case, I’m launching static from the react-quickly folder, so I need to put the path to Hello World in my browser URL bar: http://localhost:8080/ch01/hello-world/ (see figure 1.5).
Congratulations! You’ve just implemented your first React code!
The declarative style of programming doesn’t allow for mutation of stored values. It’s “this is what I want” versus the imperative style’s “this is how to do it.” True or false?
React components are rendered into the DOM with which of the following methods? (Beware, it’s a tricky question!) ReactDOM.renderComponent, React.render, ReactDOM.append, or ReactDOM.render
You have to use Node.js on the server to be able to use React in your SPA. True or false?
You must include react-com.js in order to render React elements on a web page. True or false?
The problem React solves is that of updating views based on data changes. True or false?
True. Declarative is a “what I want” style, and imperative is a “this is how to do it” style.
ReactDOM.render.
False. You can use any back-end technology.
True. You need the ReactDOM library.
True. This is the primary problem that React solves.
This chapter covers
This chapter will teach you how to take baby steps with React and lays the foundation for the following chapters. It’s crucial for understanding React concepts such as elements and components. In a nutshell, elements are instances of components (also called component classes). What are their use cases, and why do you use them? Read on!
The source code for the examples in this chapter is at www.manning.com/books/react-quickly and https://github.com/azat-co/react-quickly/tree/master/ch02 (in the ch02 folder of the GitHub repository https://github.com/azat-co/react-quickly). You can also find some demos at http://reactquickly.co/demos.
In the last chapter, you learned how to create a React element. As a reminder, the method you use is React.createElement(). For example, you can create a link element like this:
let linkReactElement = React.createElement('a',
{href: 'http://webapplog.com'},
'Webapplog.com'
)
The problem is that most UIs have more than one element (such as a link inside a menu). For example, in figure 2.1, there are buttons in the section, video thumbnails, and a YouTube player.
The solution to creating more-complex structures in a hierarchical manner is nesting elements. In the previous chapter, you implemented your first React code by creating an h1 React element and rendering it in the DOM with ReactDOM.render():
let h1 = React.createElement('h1', null, 'Hello world!')
ReactDOM.render(
h1,
document.getElementById('content')
)
It’s important to note that ReactDOM.render() takes only one element as an argument, which is h1 in the example (the view is shown in figure 2.2).
As I mentioned at the beginning of this section, the problem arises when you need to render two same-level elements (for example, two h1 elements). In this case, you can wrap the elements in a visually neutral element, as shown in figure 2.3. The <div> container is usually a good choice, as is <span>.
You can pass an unlimited number of parameters to createElement(). All the parameters after the second one become child elements. Those child elements (h1, in this case) are siblings—that is, they’re on the same level relative to each other, as you can see in figure 2.4, which shows DevTools open in Chrome.
In addition to the Elements tab, which is included by default in Chrome DevTools, you can install an extension (or plug-in) called React Developer Tools. It’s the last tab in figure 2.4. React Developer Tools is available for Firefox as well. It lets you inspect the results of React rendering closely, including the component’s hierarchy, name, properties, states, and more.
Here’s the GitHub repository: https://github.com/facebook/react-devtools. You can also find React Developer Tools for Chrome at http://mng.bz/V276 and for Firefox at http://mng.bz/59V9.
Knowing this, let’s use createElement() to create the <div> element with two <h1> child elements (ch02/hello-world-nested/index.html).
The HTML code can stay the same as in the Hello World example from chapter 1, as long as you include the necessary React and ReactDOM libraries and have the content node (ch02/hello-world-nested/index.html).
<!DOCTYPE html>
<html>
<head>
<script src="js/react.js"></script>
<script src="js/react-dom.js"></script>
</head>
<body>
<div id="content"></div>
<script type="text/javascript">
...
</script>
</body>
</html>
So far, you’ve only provided string values as the first parameter of createElement(). But the first parameter can have two types of input:
The first approach renders standard HTML elements. React goes through its list of standard HTML elements and, when and if it finds a match, uses it as a type for the React element. For example, when you pass 'p', React will find a match because p is a paragraph tag name. This will produce <p> in the DOM when/if you render this React element.
Now let’s look at the second type of input: creating and providing custom component classes.
After nesting elements with React, you’ll stumble across the next problem: soon, there are a lot of elements. You need to use the component-based architecture described in chapter 1, which lets you reuse code by separating the functionality into loosely coupled parts. Meet component classes, or just components, as they’re often called for brevity (not to be confused with web components).
Think of standard HTML tags as building blocks. You can use them to compose your own React component classes, which you can use to create custom elements (instances of classes). By using custom elements, you can encapsulate and abstract logic in portable classes (composable reusable components). This abstraction allows teams to reuse UIs in large, complex applications as well as in different projects. Examples include autocomplete components, toolboxes, menus, and so on.
Creating the 'Hello world!' element with an HTML tag in the createElement() method was straightforward: (createElement('h1', null, 'Hello World!'). But what if you need to separate Hello World into its own class, as shown in figure 2.5? Let’s say you need to reuse Hello World in 10 different projects! (You probably wouldn’t use it that many times, but a good autocomplete component will definitely be reused.)
Interestingly, you create a React component class by extending the React.Component class with class CHILD extends PARENT ES6 syntax. Let’s create a custom Hello-World component class using class HelloWorld extends React.Component.
The one mandatory thing you must implement for this new class is the render() method. This method must return a single React element, createElement(), which is created from another custom component class or an HTML tag. Both can have nested elements.
Listing 2.3 (ch02/hello-world-class/js/script.js) shows how you can refactor the nested Hello World example (listing 2.1) into an app with a custom React component class, HelloWorld. The benefit is that with a custom class, you can reuse this UI better. The mandatory render() method of the HelloWorld component returns the same <div> element from the previous example. Once you’ve created the custom HelloWorld class, you can pass it as an object (not as a string) to ReactDOM.render().
By convention, the names of variables containing React components are capitalized. This isn’t required in regular JS (you can use the lowercase variable name helloWorld); but because it’s necessary in JSX, you apply this convention here. (In JSX, React uses uppercase and lowercase to differentiate a custom component like <HelloWorld/> from a regular HTML element such as <h1/>. But in regular JS, it’s differentiated by passing either a variable such as HelloWorld or a string such as 'h1'. It’s a good idea to start using capitalization convention for custom components now.) More about JSX in chapter 3.
The component class example defines render() using ES6 style, in which you omit the colon and the word function. It’s exactly the same as defining an attribute (a.k.a. key or object property) with a value that’s a function: that is, typing render: function(). My personal preference, and my recommendation to you, is to use the ES6 method style because it’s shorter (the less you type, the fewer mistakes you make).
Historically, React had its own method to create a component class: React.createClass(). There are slight differences between using the ES6 class to extend React.Component and using React.createClass(). Typically, you’d use either class (recommended) or createClass(), but not both. Moreover, in React 15.5.4, createClass() is deprecated (that is, no longer supported).
Although you may still see the React.createClass() method used by some teams, the general tendency in the React world is to move toward a common standard: using the ES6 class approach. This book is forward thinking and uses the most popular tools and approaches, so it focuses on ES6. You can find ES5 examples for some of this book’s projects in the GitHub repository, prefixed with -es5; they were for an early version of the book.
As of August 2016, most modern browsers support these ES6 (and almost all other) features natively (without extra tools),[1] so I assume you’re familiar with it. If you’re not, or if you need a refresher or more information on ES6+/ES2015+ and its primary features as they relate to React, see appendix E or a comprehensive book such as Exploring ES6 by Dr. Axel Rauschmayer (free online version: http://exploringjs.com/es6).
ECMAScript 6 Compatibility Table, https://kangax.github.io/compat-table/es6.
Analogous to ReactDOM.render(), the render() method in createClass() can only return a single element. If you need to return multiple same-level elements, wrap them in a <div> container or another unobtrusive element such as <span>. You can run the code in your browser; the result is shown in figure 2.6.
You may think you didn’t gain much with the refactoring; but what if you need to print more Hello World statements? You can do so by reusing the HelloWorld component multiple times and wrapping them in a <div> container:
...
ReactDOM.render(
React.createElement(
'div',
null,
React.createElement(HelloWorld),
React.createElement(HelloWorld),
React.createElement(HelloWorld)
),
document.getElementById('content')
)
This is the power of component reusability! It leads to faster development and fewer bugs. Components also have lifecycle events, states, DOM events, and other features that let you make them interactive and self-contained; these are covered in the following chapters.
Right now, the HelloWorld elements will all be the same. Is there a way to customize them? What if you could set element attributes and modify their content and/or behavior? Meet properties.
Properties are a cornerstone of the declarative style that React uses. Think of properties as unchangeable values within an element. They allow elements to have different variations if used in a view, such as changing a link URL by passing a new value for a property:
React.createElement('a', {href: 'http://node.university'})
One thing to remember is that properties are immutable within their components. A parent assigns properties to its children upon their creation. The child element isn’t supposed to modify its properties. (A child is an element nested inside another element; for example, <h1/> is a child of <HelloWorld/>.) For instance, you can pass a property PROPERTY_NAME with the value VALUE, like this:
<TAG_NAME PROPERTY_NAME=VALUE/>
Properties closely resemble HTML attributes. This is one of their purposes, but they also have another: you can use the properties of an element in your code as you wish. Properties can be used as follows:
Under the hood, React will match the property name (PROPERTY_NAME) with the list of standard attributes. If there’s a match, the property will be rendered as an attribute of an element (the first scenario). The value of this attribute is also accessible in this.props.PROPERTY_NAME in the component class code.
If there’s no match with any of the standard HTML attribute names (the second scenario), then the property name isn’t a standard attribute. It won’t be rendered as an attribute of an element. But the value will still be accessible in the this.props object; for example, this.props.PROPERTY_NAME. It can be used in your code or rendered explicitly in the render() method. This way, you can pass different data to different instances of the same class. This allows you to reuse components, because you can programmatically change how elements are rendered by providing different properties.
Internally, React uses Object.freeze()[2] from the ES5 standard to make the this.props object immutable. To check whether an object is frozen, you can use the Object.isFrozen() method.[3] For example, you can determine whether this statement will return true:
Mozilla Developer Network, Object.freeze(), http://mng.bz/p6Nr.
Mozilla Developer Network, Object.isFrozen(), http://mng.bz/0P75.
class HelloWorld extends React.Component {
render() {
console.log(Object.isFrozen(this.props))
return React.createElement('div', null, h1, h1)
}
}
If you’re interested in more details, I encourage you to read the React changelog[4] and search on React’s GitHub repository.[5]
GitHub, 2016-04-07-react-v15, http://mng.bz/j6c3.
GitHub, “freeze” search results, http://mng.bz/2l0Z.
You can even take this feature of properties a step further and completely modify the rendered elements based on the value of a property. For example, if this.props.heading is true, you render “Hello” as a heading. If it’s false, you render “Hello” as a normal paragraph:
render() {
if (this.props.heading) return <h1>Hello</h1>
else return <p>Hello</p>
}
In other words, you can use the same component—but provided with different properties, the elements rendered by the component can be different. Properties can be rendered by render(), used in components’ code, or used as HTML attributes.
To demonstrate the properties of components, let’s slightly modify HelloWorld with props. The goal is to reuse the HelloWorld component such that each instance of this class renders different text and different HTML attributes. You’ll enhance the HelloWorld headings (<h1> tag) with three properties (see figure 2.7):
If a property’s name matches a standard HTML attribute, it will be rendered as an attribute of the <h1> element, as shown in figure 2.7. So the two properties id and title will be rendered as <h1> attributes, but not frameworkName. You may even get a warning about the unknown frameworkName property (because it’s not in the HTML specification). How nice!
Let’s zoom in on the <div> element implementation (figure 2.8). Obviously, it needs to render three child elements of the HelloWorld class, but the text and attributes of the resulting headings (<h1/>) must be different. For example, you pass id, frameworkName, and title. They’ll be part of the HelloWorld class.
Before you implement <h1/>, you need to pass the properties to HelloWorld. How do you do this? By passing these properties in an object literal in the second argument to createElement() when you create HelloWorld elements in the <div> container:
ReactDOM.render(
React.createElement(
'div',
null,
React.createElement(HelloWorld, {
id: 'ember',
frameworkName: 'Ember.js',
title: 'A framework for creating ambitious web applications.'}),
React.createElement(HelloWorld, {
id: 'backbone',
frameworkName: 'Backbone.js',
title: 'Backbone.js gives structure to web applications...'}),
React.createElement(HelloWorld, {
id: 'angular',
frameworkName: 'Angular.js',
title: 'Superheroic JavaScript MVW Framework'})
),
document.getElementById('content')
)
Now let’s look at the HelloWorld component implementation. The way React works is that the second parameter to createElement() (for example, {id: 'ember'...}) is an object whose properties are accessible via the this.props object inside the component’s render() method. Therefore, you can access the value of frameworkName as shown in the following listing.
The keys of the this.props object are exactly the same as the keys of the object passed to createElement() as the second parameter. That is, this.props has id, frameworkName, and title keys. The number of key/value pairs you can pass in the second argument to React.createElement() is unlimited.
In addition, you may have already guessed that it’s possible to pass all the properties of HelloWorld to its child <h1/>. This can be extremely useful when you don’t know what properties are passed to a component; for example, in HelloWorld, you want to leave the style attribute value up to a developer instantiating HelloWorld. Therefore, you don’t limit what attributes to render in <h1/>.
Then, you render three HelloWorld elements into the <div> with the ID content, as shown in the following listing (ch02/hello-js-world/js/script.js) and figure 2.9.
As usual, you can run this code via a local HTTP web server. The result of reusing the HelloWorld component class is three different headings (see figure 2.9).
You used this.props to render different text for the headings. You used properties to render different titles and IDs. Thus, you effectively reused most of the code, which makes you the master of React HelloWorld component classes!
We’ve covered several permutations of Hello World. Yes, I know, it’s still the boring, good-old Hello World. But by starting small, we’re building a solid foundation for future, more-advanced topics. Believe me, you can achieve a lot of great things with component classes.
It’s very important to know how React works in regular JavaScript events if you (like many React engineers) plan to use JSX. This is because in the end, browsers will still run regular JS, and you’ll need to understand the results of the JSX-to-JS transpilation from time to time. Going forward, we’ll be using JSX, which is covered in the next chapter.
A React component class can be created with which of the following? createComponent(), createElement(), class NAME extends React.Component, class NAME extends React.Class
The only mandatory attribute or method of a React component is which of the following? function, return, name, render, class
To access the url property of a component, you use which of the following? this.properties.url, this.data.url, this.props.url, url
React properties are immutable in a context of a current component. True or false?
React component classes allows developers to create reusable UIs. True or false?
class NAME extends React.Component, because there’s no React.Class and others will fail due to ReferenceError (not defined).
render() because it’s the only required method; also, because function, return, render, and class are not valid, and name is optional.
this.props.url because only this.props gives the properties object.
True. It’s impossible to change a property.
True. Developers use new components to create reusable UIs.
This chapter covers
Welcome to JSX! It’s one of the greatest things about React, in my opinion—and one of the most controversial subjects related to React in the minds of a few developers I spoke with (who, not surprisingly, haven’t yet built anything large in React).
Thus far, we’ve covered how to create elements and components so that you can use custom elements and better organize your UIs. You used JavaScript to create React elements, instead of working with HTML. But there’s a problem. Look at this code, and see if you can tell what’s happening:
render() {
return React.createElement(
'div',
{ style: this.styles },
React.createElement(
'p',
null,
React.createElement(
reactRouter.Link,
{ to: this.props.returnTo },
'Back'
)
),
this.props.children
);
}
Were you able to tell that there are three elements, that they’re nested, and that the code uses a component from React Router? How readable is this code, compared to standard HTML? Do you think this code is eloquent? The React team agrees that reading (and typing, for that matter) a bunch of React.createElement() statements isn’t fun. JSX is the solution to this problem.
The source code for the examples in this chapter is at www.manning.com/books/react-quickly and https://github.com/azat-co/react-quickly/tree/master/ch03 (in the ch03 folder of the GitHub repository https://github.com/azat-co/react-quickly). You can also find some demos at http://reactquickly.co/demos.
JSX is a JavaScript extension that provides syntactic sugar (sugar-coating) for function calls and object construction, particularly React.createElement(). It may look like a template engine or HTML, but it isn’t. JSX produces React elements while allowing you to harness the full power of JavaScript.
JSX is a great way to write React components. Its benefits include the following:
Although JSX isn’t required for React, it fits in nicely and is highly recommended by me and React’s creators. The official “Introducing JSX” page[1] states, “We recommend using [JSX] with React.”
To demonstrate the eloquence of JSX, this is the code to create HelloWorld and an a link element:
<div> <HelloWorld/> <br/> <a href="http://webapplog.com">Great JS Resources</a> </div>
That’s analogous to the following JavaScript:
React.createElement(
"div",
null,
React.createElement(HelloWorld, null),
React.createElement("br", null),
React.createElement(
"a",
{ href: "http://webapplog.com" },
"Great JS Resources"
)
)
And if you use Babel v6 (one of the tools for JSX; more on Babel in a few pages), the JS code becomes this:
"use strict";
React.createElement(
"div",
null,
" ",
React.createElement(HelloWorld, null),
" ",
React.createElement("br", null),
" ",
React.createElement(
"a",
{ href: "http://webapplog.com" },
"Great JS Resources"
),
" "
);
In essence, JSX is a small language with an XML-like syntax; but it has changed the way people write UI components. Previously, developers wrote HTML—and JS code for controllers and views—in an MVC-like manner, jumping between various files. That stemmed from the separation of concerns in the early days. This approach served the web well when it consisted of static HTML, a little CSS, and a tiny bit of JS to make text blink.
This is no longer the case; today, we build highly interactive UIs, and JS and HTML are tightly coupled to implement various pieces of functionality. React fixes the broken separation of concerns (SoC) principle by bringing together the description of the UI and the JS logic; and with JSX, the code looks like HTML and is easier to read and write. If for no other reason, I’d use React and JSX just for this new approach to writing UIs.
JSX is compiled by various transformers (tools) into standard ECMAScript (see figure 3.1). You probably know that JavaScript is ECMAScript, too; but JSX isn’t part of the specification, and it doesn’t have any defined semantics.
According to https://en.wikipedia.org/wiki/Source-to-source_compiler, “A source-to-source compiler, transcompiler, or transpiler is a type of compiler that takes the source code of a program written in one programming language as its input and produces the equivalent source code in another programming language.”
You may wonder, “Why should I bother with JSX?” That’s a great question. Considering how counterintuitive JSX code looks to begin with, it’s no surprise that many developers are turned off by this amazing technology. For example, this JSX shows that there are angle brackets in the JavaScript code, which looks bizarre at first:
ReactDOM.render(<h1>Hello</h1>, document.getElementById('content'))
What makes JSX amazing are the shortcuts to React.createElement(NAME, ...). Instead of writing that function call over and over, you can instead use <NAME/>. And as I said earlier, the less you type, the fewer mistakes you make. With JSX, DX is as important as user experience (UX).
The main reason to use JSX is that many people find code with angle brackets (< >) easier to read than code with a lot of React.createElement() statements (even when they’re aliased). And once you get into the habit of thinking about <NAME/> not as XML, but as an alias to JavaScript code, you’ll get over the perceived weirdness of JSX syntax. Knowing and using JSX can make a big difference when you’re developing React components and, subsequently, React-powered applications.
To be fair, there are a few alternatives to JSX when it comes to avoiding typing verbose React.createElement() calls. One of them is to use the alias React.DOM.*. For example, instead of creating an <h1/> element with
React.createElement('h1', null, 'Hey')
the following will also suffice and requires less space and time to implement:
React.DOM.h1(null, 'Hey')
You have access to all the standard HTML elements in the React.DOM object, which you can inspect like any other object:
console.log(React.DOM)
You can also type React.DOM and press Enter in the Chrome DevTools console. (Note that React.DOM and ReactDOM are two completely different objects and shouldn’t be confused or used interchangeably.)
Another alternative, recommended by the official React documentation for situations where JSX is impractical (for example, when there’s no build process), is to use a short variable. For example, you can create a variable E as follows:
const E = React.createElement
E('h1', null, 'Hey')
As I mentioned earlier, JSX needs to be transpiled (or compiled, as it’s often called) into regular JavaScript before browsers can execute its code. We’ll explore various available methods for doing so, as well as the recommended method, in section 3.3.
Let’s explore how to work with JSX. You can read this section and keep it bookmarked for your reference, or (if you prefer to have some of the code examples running on your computer) you have the following options:
The choice is up to you. I recommend reading about the main JSX concepts first, and then doing the proper Babel setup on your computer.
Creating ReactElement objects with JSX is straightforward. For example, instead of writing the following JavaScript (where name is a string—h1—or component class object—HelloWorld)
React.createElement(
name,
{key1: value1, key2: value2, ...},
child1, child2, child3, ..., childN
)
you can write this JSX:
<name key1=value1 key2=value2 ...> <child1/> <child2/> <child3/> ... <childN/> </name>
In the JSX code, the attributes and their values (for example, key1=value1) come from the second argument of createElement(). We’ll focus on working with properties later in this chapter. For now, let’s look at an example of a JSX element without properties. Here’s our old friend Hello World in JavaScript (ch03/hello-world/index.html).
ReactDOM.render(
React.createElement('h1', null, 'Hello world!'),
document.getElementById('content')
)
The JSX version is much more compact (ch03/hello-world-jsx/js/script.jsx).
ReactDOM.render(
<h1>Hello world!</h1>,
document.getElementById('content')
)
You can also store objects created with JSX syntax in variables, because JSX is just a syntactic improvement of React.createElement(). This example stores the reference to the Element object in a variable:
let helloWorldReactElement = <h1>Hello world!</h1>
ReactDOM.render(
helloWorldReactElement,
document.getElementById('content')
)
The previous example used the <h1> JSX tag, which is also a standard HTML tag name. When working with components, you apply the same syntax. The only difference is that the component class name must start with a capital letter, as in <HelloWorld/>.
Here’s a more advanced iteration of Hello World, rewritten in JSX. In this case, you create a new component class and use JSX to create an element from it.
class HelloWorld extends React.Component {
render() {
return (
<div>
<h1>1. Hello world!</h1>
<h1>2. Hello world!</h1>
</div>
)
}
}
ReactDOM.render(
<HelloWorld/>,
document.getElementById('content')
)
Can you read listing 3.3 more easily than the following JavaScript code?
class HelloWorld extends React.Component {
render() {
return React.createElement('div',
null,
React.createElement('h1', null, '1. Hello world!'),
React.createElement('h1', null, '2. Hello world!'))
}
}
ReactDOM.render(
React.createElement(HelloWorld, null),
document.getElementById('content')
)
As I said earlier, seeing angle brackets in JavaScript code may be strange for experienced JavaScript developers. My brain went bananas when I first saw this, because for years I trained myself to spot JS syntax errors! The brackets are the primary controversy regarding JSX and one of the most frequent objections I hear; this is why we dive into JSX early in the book, so you can get as much experience with it as possible.
Notice the parentheses after return in the JSX code in listing 3.3; you must include them if you don’t type anything on the same line after return. For example, if you start your top element, <div>, on a new line, you must put parentheses (()) around it. Otherwise, JavaScript will finish the return with nothing. This style is as follows:
render() {
return (
<div>
</div>
)
}
Alternatively, you can start your top element on the same line as return and avoid the necessary (). For example, this is valid as well:
render() {
return <div>
</div>
}
A downside of the second approach is the reduced visibility of the opening <div> tag: it may be easy to miss in the code.[2] The choice is up to you. I use both styles in this book to give you a deeper perspective.
For more about this behavior in JavaScript, see James Nelson, “Why Use Parenthesis [sic] on JavaScript Return Statements?” August 11, 2016, http://jamesknelson.com/javascript-return-parenthesis; and “Automated Semicolon Insertion,” Annotated ECMAScript 5.1, http://es5.github.io/#x7.9.
When you compose components, you want them to be smart enough to change the view based on some code. For example, it would be useful if a current date-time component used a current date and time, not a hardcoded value.
When working with JavaScript-only React, you have to resort to concatenation (+) or, if you’re using ES6+/ES2015+, string templates marked by a backtick and ${varName}, where varName is the name of a variable. The official name for this feature is template literal, according to the specification.[3] For example, to use a property in text in a DateTimeNow component in regular JavaScript React, you’d write this code:
“Template Literals,” ECMAScript 2015 Language Specification, June 2015, http://mng.bz/i8Bw.
class DateTimeNow extends React.Component {
render() {
let dateTimeNow = new Date().toLocaleString()
return React.createElement(
'span',
null,
`Current date and time is ${dateTimeNow}.`
)
}
}
Conversely, in JSX, you can use curly braces {} notation to output variables dynamically, which reduces code bloat substantially:
class DateTimeNow extends React.Component {
render() {
let dateTimeNow = new Date().toLocaleString()
return <span>Current date and time is {dateTimeNow}.</span>
)
}
}
The variables can be properties, not just locally defined variables:
<span>Hello {this.props.userName}, your current date and time is
{dateTimeNow}.</span>
Moreover, you can execute JavaScript expressions or any JS code inside of {}. For example, you can format a date:
<p>Current time in your locale is
Now, you can rewrite the HelloWorld class in JSX using the dynamic data that JSX stores in a variable (ch03/hello-world-class-jsx).
let helloWorldReactElement = <h1>Hello world!</h1>
class HelloWorld extends React.Component {
render() {
return <div>
{helloWorldReactElement}
{helloWorldReactElement}
</div>
}
}
ReactDOM.render(
<HelloWorld/>,
document.getElementById('content')
)
Let’s discuss how you work with properties in JSX.
I touched on this topic earlier, when I introduced JSX: element properties are defined using attribute syntax. That is, you use key1=value1 key2=value2... notation inside of the JSX tag to define both HTML attributes and React component properties. This is similar to attribute syntax in HTML/XML.
In other words, if you need to pass properties, write them in JSX as you would in normal HTML. Also, you render standard HTML attributes by setting element properties (discussed in section 2.3). For example, this code sets a standard HTML attribute href for the anchor element <a>:
Using hardcoded values for attributes isn’t flexible. If you want to reuse the link component, then the href must change to reflect a different address each time. This is called dynamically setting values versus hardcoding them. So, next we’ll go a step further and consider a component that can use dynamically generated values for attributes. Those values can come from component properties (this.props). After that, everything’s easy. All you need to do is use curly braces ({}) inside angle braces (<>) to pass dynamic values of properties to elements.
For example, suppose you’re building a component that will be used to link to user accounts. href and title must be different and not hardcoded. A dynamic component ProfileLink renders a link <a> using the properties url and label for href and title, respectively. In ProfileLink, you pass the properties to <a> using {}:
class ProfileLink extends React.Component {
render() {
return <a href={this.props.url}
title={this.props.label}
target="_blank">Profile
</a>
}
}
Where do the property values come from? They’re defined when the ProfileLink is created—that is, in the component that creates ProfileLink, a.k.a. its parent. For example, this is how the values for url and label are passed when a ProfileLink instance is created, which results in the render of the <a> tag with those values:
<ProfileLink url='/users/azat' label='Profile for Azat'/>
From the previous chapter, you should remember that when rendering standard elements (<h>, <p>, <div>, <a>, and so on), React renders all attributes from the HTML specification and omits all other attributes that aren’t part of the specification. This isn’t a JSX gotcha; it’s React’s behavior.
But sometimes you want to add custom data as an attribute. Let’s say you have a list item; there’s some information that’s essential to your app but not needed by users. A common pattern is to put this information in the DOM element as an attribute. This example uses the attributes react-is-awesome and id:
<li react-is-awesome="true" id="320">React is awesome!</li>
Storing data in custom HTML attributes in the DOM is generally considered an antipattern, because you don’t want the DOM to be your database or a front-end data store. Getting data from the DOM is slower than getting it from a virtual/in-memory store.
In cases when you must store data as elements’ attributes, and you use JSX, you need to use the data-NAME prefix. For example, to render the <li> element with a value of this.reactIsAwesome in an attribute, you can write this:
<li data-react-is-awesome={this.reactIsAwesome}>React is awesome!</li>
Let’s say this.reactIsAwesome is true. Then, the resulting HTML is
<li data-react-is-awesome="true">React is awesome!</li>
But if you attempt to pass a nonstandard HTML attribute to a standard HTML element, the attribute won’t render (as covered in section 2.3). For example, this code
<li react-is-awesome={this.reactIsAwesome}>React is orange</li>
and this code
<li reactIsAwesome={this.reactIsAwesome}>React is orange</li>
both produce only the following:
<li>React is orange</li>
Obviously, because custom elements (component classes) don’t have built-in renderers and rely on standard HTML elements or other custom elements, this issue of using data- isn’t important for them. They get all attributes as properties in this.props.
Speaking of component classes, this is the code from Hello World (section 2.3) written in regular JavaScript:
class HelloWorld extends React.Component {
render() {
return React.createElement(
'h1',
this.props,
'Hello ' + this.props.frameworkName + ' world!!!'
)
}
}
In the HelloWorld components, you pass the properties through to <h1> no matter what properties are there. How can you do this in JSX? You don’t want to pass each property individually, because that’s more code; and when you need to change a property, you’ll have tightly coupled code that you’ll need to update as well. Imagine having to pass each property manually—and what if you have two or three levels of components to pass through? That’s an antipattern. Don’t do this:
class HelloWorld extends React.Component {
render() {
return <h1 title={this.props.title} id={this.props.id}>
Hello {this.props.frameworkName} world!!!
</h1>
}
}
Don’t pass the properties individually when your intention is to pass all of them; JSX offers a spread solution that looks like ellipses, ..., as you can see in the following listing (ch03/jsx/hello-js-world-jsx).
class HelloWorld extends React.Component {
render() {
return <h1 {...this.properties}>
Hello {this.props.frameworkName} world!!!
</h1>
}
}
ReactDOM.render(
<div>
<HelloWorld
id='ember'
frameworkName='Ember.js'
title='A framework for creating ambitious web applications.'/>,
<HelloWorld
id='backbone'
frameworkName= 'Backbone.js'
title= 'Backbone.js gives structure to web applications...'/>
<HelloWorld
id= 'angular'
frameworkName= 'Angular.js'
title= 'Superheroic JavaScript MVW Framework'/>
</div>,
document.getElementById('content')
)
With {...this.props}, you can pass every property to the child. The rest of the code is just converted to the JSX example from section 2.3.
Speaking of ellipses, there are similar-looking operators in ES6+, called destructuring, spread, and rest. This is one of the reasons React’s JSX uses ellipses!
If you’ve ever used or written a JavaScript function with a variable or unlimited number of arguments, you know the arguments object. This object contains all parameters passed to the function. The problem is that this arguments object isn’t a real array. You have to convert it to an array if you want to use functions like sort() and map() explicitly. For example, this request function converts arguments using call():
function request(url, options, callback) {
var args = Array.prototype.slice.call(arguments, request.length)
var url = args[0]
var callback = args[2]
// ...
}
Is there a better way in ES6 to access an indefinite number of arguments as an array? Yes! It’s the rest parameter syntax, defined with ellipses (...). For example, following is the ES6 function signature with the rest parameter callbacks, which become an array (a real array, not the arguments pseudoarray) with the rest of the parameters:[4]
In the rest array, the first parameter is the one that doesn’t have a name: for example, the callback is at index 0, not 2, as in ES5’s arguments. Also, putting other named arguments after the rest parameter will cause a syntax error.
function(url, options, ...callbacks) {
var callback1 = callbacks[0]
var callback2 = callbacks[1]
// ...
}
Rest parameters can be destructured, meaning they can be extracted into separate variables:
function(url, options, ...[error, success]) {
if (!url) return error(new Error('ooops'))
// ...
success(data)
}
What about spread? In brief, spread allows you to expand arguments or variables in the following places:
In ES5, if you wanted to use an array as an argument to a function, you’d have to use the apply() function:
function request(url, options, callback) {
// ...
}
var requestArgs = ['http://azat.co', {...}, function(){...}]
request.apply(null, requestArgs)
In ES6, you can use the spread parameter, which looks similar to the rest parameter in syntax and uses ellipses (...):
function request(url, options, callback) {
// ...
}
var requestArgs = ['http://azat.co', {...}, function(){...}]
request(...requestArgs)
The spread operator’s syntax is similar to that of the rest parameter’s, but rest is used in a function definition/declaration, and spread is used in calls and literals. They save you from typing extra lines of imperative code, so knowing and using them is a valuable skill.
As a developer, you’re free to write any component methods for your applications, because a React component is a class. For example, you can create a helper method, getUrl():
class Content extends React.Component {
getUrl() {
return 'http://webapplog.com'
}
render() {
...
}
}
The getUrl() method isn’t sophisticated, but you get the idea: you can create your own arbitrary methods, not just render(). You can use the getUrl() method to abstract a URL to your API server. Helper methods can have reusable logic, and you can call them anywhere within other methods of the component, including render().
If you want to output the return from the custom method in JSX, use {}, just as you would with variables (see the following listing, ch03/method/jsx/scrch03/meipt.jsx). In this case, the helper method is invoked in render, and the method’s return values will be used in the view. Remember to invoke the method with ().
Once again, it’s possible to invoke component methods directly from {} and JSX. For example, using {this.getUrl()} in the helper method getUrl: when you use the method in listing 3.6, you’ll see http://webapplog.com as its returned value in the link in the paragraph <p> (see figure 3.2).
You should now understand component methods. My apologies if you found this section too banal; these methods are important as a foundation for React event handlers.
Akin to rendering dynamic variables, developers need to compose their components so that components can change views based on the results of if/else conditions. Let’s start with a simple example that renders the elements in a component class; the elements depend on a condition. For example, some link text and a URL are determined by the user.session value. This is how you can code this in plain JS:
...
render() {
if (user.session)
return React.createElement('a', {href: '/logout'}, 'Logout')
else
return React.createElement('a', {href: '/login'}, 'Login')
}
...
You can use a similar approach and rewrite this with JSX like so:
...
render() {
if (this.props.user.session)
return <a href="/logout">Logout</a>
else
return <a href="/login">Login</a>
}
...
Let’s say there are other elements, such as a <div> wrapper. In this case, in plain JS, you’d have to create a variable or use an expression or a ternary operator (also known as the Elvis operator by the younger generation of JavaScript developers; see http://mng.bz/92Zg), because you can’t use an if condition inside the <div>’s createElement(). The idea is that you must get the value at runtime.
The following ternary condition works such that if userAuth is true, then msg will be set to welcome. Otherwise, the value will be restricted:
let msg = (userAuth) ? 'welcome' : 'restricted'
This statement is equivalent to the following:
let session = '' if (userAuth) {
session = 'welcome'
} else {
session = 'restricted'
}
In some cases, the ternary (?) operator is a shorter version of if/else. But there’s a big difference between them if you try to use the ternary operator as an expression (where it returns a value). This code is valid JS:
let msg = (userAuth) ? 'welcome' : 'restricted'
But if/else won’t work because this isn’t an expression, but a statement:
let msg = if (userAuth) {'welcome'} else {'restricted'} // Not valid
You can use this quality of a ternary operator to get a value from it at runtime in JSX.
To demonstrate the three different styles (variable, expression, and ternary operator), look at the following regular JavaScript code before it’s converted to JSX:
Not bad, but kind of clunky. Would you agree? With JSX, the {} notation can print variables and execute JS code. Let’s use it to achieve better syntax:
// Approach 1: Variable
render() {
let link
if (this.props.user.session)
link = <a href='/logout'>Logout</a>
else
link = <a href='/login'>Login</a>
return <div>{link}</div>
}
// Approach 2: Expression
render() {
let link = (sessionFlag) => {
if (sessionFlag)
return <a href='/logout'>Logout</a>
else
return <a href='/login'>Login</a>
}
return <div>{link(this.props.user.session)}</div>
}
// Approach 3: Ternary operator
render() {
return <div>
{(this.props.user.session) ? <a href='/logout'>Logout</a> :
<a href='/login'>Login</a>}
</div>
}
If you look more closely at the expression/function style example (Approach 2: a function outside the JSX before return), you can come up with an alternative. You can define the same function using an immediately invoked function expression (IIFE, http://mng.bz/387u) inside the JSX. This lets you avoid having an extra variable (such as link) and execute the if/else at runtime:
Furthermore, you can use the same principles for rendering not just entire elements (<a>, in these examples), but also text and the values of properties. All you need to do is use one of the approaches shown here, inside curly braces. For example, you can augment the URL and text and not duplicate the code for element creation. Personally, this is my favorite approach, because I can use a single <a>:
As you can see, unlike in template engines, there’s no special syntax for these conditions in JSX—you just use JavaScript. Most often, you’ll use a ternary operator, because it’s one of the most compact styles. To summarize, when it comes to implementing if/else logic in JSX, you can use these options:
This is my rule of thumb when it comes to conditions and JSX: use if/else outside of JSX (before return) to generate a variable that you’ll print in JSX with {}. Or, skip the variable, and print the results of the Elvis operator (?) or expressions using {} in JSX:
class MyReactComponent extends React.Component {
render() {
// Not JSX: Use a variable and if/else or ternary
return (
// JSX: Print result of ternary or expression with {}
)
}
}
We’ve covered the important conditions for building interactive UIs with React and JSX. Occasionally, you may want to narrate the functionality of your beautiful, intelligent code so that other people can quickly understand it. To do so, you use comments.
Comments in JSX work similar to comments in regular JavaScript. To add JSX comments, you can wrap standard JavaScript comments in {}, like this:
let content = (
<div>
{/* Just like a JS comment */}
</div>
)
Or, you can use comments like this:
let content = (
<div>
<Post
/* I
am
multi
line */
name={window.isLoggedIn ? window.name : ''} // We are inside of JSX
/>
</div>
)
You’ve now had a taste of JSX and its benefits. The rest of this chapter is dedicated to JSX tools and potential traps to avoid. That’s right: tools and gotchas.
Because before we can continue, you must understand that for any JSX project to function properly, the JSX needs to be compiled. Browsers can’t run JSX—they can run only JavaScript, so you need to take the JSX and transpile it to normal JS (see figure 3.1).
As I mentioned, in order to execute JSX, you need to convert it to regular JavaScript code. This process is called transpilation (from compilation and transformation), and various tools are available to do the job. Here are some recommended ways to do this:
All of these use Babel in one way or another. Babel is mostly an ES6+/ES2015+ compiler, but it also can convert JSX to JavaScript. In fact, the React team stopped development on its own JSX transformer and recommends using Babel.
Although there are various tools to transpile JSX, the most frequently used tool—and the one recommended by the React team on the official React website, as of August 2016—is Babel (formerly, 5to6). Historically, the React team maintained react-tools and JSXTransformer (transpilation in the browser); but, since version 0.13, the team has recommended Babel and stopped evolving react-tools and JSXTransformer.[5]
Paul O’Shannessy, “Deprecating JSTransform and react-tools,” React, June 12, 2015, http://mng.bz/8yGc.
For in-browser runtime transpilation, Babel version 5.x has browser.js, which is a ready-to-use distribution. You can drop it in the browser, like JSXTransformer, and it will convert any <script> code into JS (use type="text/babel"). The latest Babel version that has browser.js is 5.8.34, and you can include it from the CDN directly (https://cdnjs.com/libraries/babel-core/5.8.34).
Babel 6.x switched to not having default presets/configs (such as JSX) and removed browser.js. The Babel team encourages developers to create their own distributions or use the Babel API. There’s also a babel-standalone library (https://github.com/Daniel15/babel-standalone), but you still have to tell it which presets/configs to use.
Traceur (https://github.com/google/traceur-compiler) is another tool that you can use as a replacement for Babel.
Finally, TypeScript (www.typescriptlang.org) seems to support JSX compilation via jsx-typescript (https://github.com/fdecampredon/jsx-typescript),[6] but that’s a whole new toolchain and language (a superset of regular JavaScript).
You probably can use the JSXTransformer, Babel v5, babel-standalone, TypeScript, and Traceur tools with the examples in this book (I use React v15). TypeScript and Traceur should be relatively safe bets, because they’re supported as of the time of this writing. But if you end up using anything other than Babel 6 for the book’s examples, you do so at your own risk. Manning’s tech reviewers and I didn’t test the code in this book to see if it works with these tools!
By using Babel for React, you can get extra ES6/ES2015 features to streamline your development just by adding an extra configuration and a module for ES6. The sixth iteration of the ECMAScript standard has a myriad of improvements, and is mostly available as of this writing in all modern browsers. But, older browsers will have a hard time interpreting the new ES6 code. Also, if you want to use ES7, ES8, or ES27, then some browsers might not have all the features implemented yet.
To solve the lag in ES6 or ES.Next (collective name for the most cutting-edge features) implementation by browsers, Babel comes to the rescue. It offers support for the next generation of JavaScript languages (many languages ... get the hint from the name?). This section covers the recommended approach used in the next few chapters—the Babel CLI—because it involves minimal setup and doesn’t require knowledge of Babel’s API (unlike the API approach).
To use the Babel CLI (http://babeljs.io), you need Node v6.2.0, npm v3.8.9, babel-cli v6.9.0 (www.npmjs.com/package/babel-cli), and babel-preset-react v6.5.0 (www.npmjs.com/package/babel-preset-react). Other versions aren’t guaranteed to work with this book’s code, due to the fast-changing nature of Node and React development.
If you need to install Node and npm, the easiest way to do so is to download the installer (just one for both Node and npm) from the official website: http://nodejs.org. For more options and detailed installation instructions regarding Babel installation, please see appendix A.
If you think you have these tools installed, or you’re not sure, check the versions of Node and npm with these shell/terminal/command prompt commands:
node -v npm -v
You need to have the Babel CLI and React preset locally. Using the Babel CLI globally (-g, when installing with npm) is discouraged, because you might run into conflict when your projects rely on different versions of the tool. Here’s a short version of the instructions found in appendix A:
In the unfortunate event that you have to support an older browser such as IE9, but you still want to write in ES6+/ES2015+ because that’s the future standard, you can add the babel-preset-es2015 (www.npmjs.com/package/babel-preset-es2015) transpiler. It will convert your ES6 into ES5 code. To do so, install the library:
npm i babel-preset-es2015 --save-dev
Then, add it to the presets configuration next to react:
{
"presets": ["react", "es2015"]
}
I don’t recommend using this ES2015 transpiler if you don’t have to support older browsers, for several reasons. First, you’ll be running old ES5 code, which is less optimized than ES6 code. Second, you’re adding an additional dependency and more complexity. And third, if most people continue to run ES5 code in their browser, why did we—meaning browser teams and regular JavaScript developers—bother with ES6? You could use TypeScript (www.typescriptlang.org), ClojureScript (http://clojurescript.org), or CoffeeScript (http://coffeescript.org), which give you more bang for your buck!
To repeat what’s written in appendix A, you need a package.json file with at least this preset:
{
...
"babel": {
"presets": ["react"]
},
...
}
Then, running this command (from your newly created project folder) to check the version should work:
$ ./node_modules/.bin/babel --version
After installation, issue a command to process your js/script.jsx JSX into js/script.js JavaScript:
$ ./node_modules/.bin/babel js/script.jsx -o js/script.js
This command is long because you’re using a path to Babel. You can store this command in a package.json file to use a shorter version: npm run build. Open the file with your editor, and add this line to scripts:
"build": "./node_modules/.bin/babel js/script.jsx -o js/script.js"
You can automate this command with the watch option (-w or --watch):
$ ./node_modules/.bin/babel js/script.jsx -o js/script.js -w
The Babel command watches for any changes in script.jsx and compiles it to script.js when you save the updated JSX. When this happens, the terminal/command prompt will display the following:
change js/script.jsx
As you accumulate more JSX files, use the command with -d (--out-dir) and folder names to compile JSX source files (source) into many regular JS files (build):
$ ./node_modules/.bin/babel source --d build
Often, having a single file to load is better for the performance of a front-end app than loading many files. This is because each request adds a delay. You can compile all the files in the source directory into a single regular JS file with -o (--out-file):
$ ./node_modules/.bin/babel src -o script-compiled.js
Depending on the path configuration on your computer, you may be able to run babel instead of ./node_modules/.bin/babel. In both cases, you’re executing locally. If you have an older babel-cli installed globally, delete it with npm rm -g babel-cli.
If you’re unable to run babel when you install babel-cli locally in your project, then consider adding either one of these path statements into your shell profile: ~/.bash_profile, ~/.bashrc, or ~/.zsh, depending on your shell (bash, zsh, and so on) if you’re on POSIX (Unix, Linux, macOS, and the like).
This shell statement will add a path—so you can launch locally installed npm CLI packages without typing the path—if there’s ./node_modules/.bin in the current folder:
if [ -d "$PWD/node_modules/.bin" ]; then
PATH="$PWD/node_modules/.bin"
fi
The shell script checks whether there’s a ./node_modules/.bin folder in your terminal bash environment current folder, and then adds that folder to the path to enable npm CLI tools like Babel, Webpack, and so on by name: babel, webpack, and so on.
You can opt to have the path set all the time, not just when there’s a subfolder. This shell statement will always add the path ./node_modules/.bin to your PATH environment variable (also in profile):
export PATH="./node_modules/.bin:$PATH"
Bonus: This setting will also allow you to run any npm CLI tool locally with just its name, not the path and the name.
For working examples of Babel package.json configurations, open the projects in the ch03 folder in the source code accompanying this book. They follow the same approach used in the chapters that follow. The package.json file in ch03 has npm build scripts for each project (subfolder) that needs compilation, unless the project has its own package.json.
When you run a build script—for example, npm run build-hello-world—it’ll compile the JSX from ch03/PROJECT_NAME/jsx into regular JavaScript and put that compiled file into ch03/PROJECT_NAME/js. Therefore, all you need to do is install the necessary dependencies with npm i (it will create a ch03/node_modules folder), check whether a build script exists in package.json, and then run npm run build-PROJECT_NAME.
Thus far, you’ve learned the easiest way to transpile JSX into regular JS, in my humble opinion. But I want you to be aware of some tricky parts when it comes to React and JSX.
This section covers some edge cases. There are a few gotchas to be aware of when you use JSX.
For instance, JSX requires you to have a closing slash (/) either in the closing tag or, if you don’t have any children and use a single tag, in the end of that single tag. For example, this is correct:
<a href="http://azat.co">Azat, the master of callbacks</a>
<button label="Save" className="btn" onClick={this.handleSave}/>
This is not correct, because the slashes are missing:
<a href="http://azat.co">Azat<a>
<button label="Save" className="btn" onClick={this.handleSave}>
Conversely, HTML is more fault tolerant. Most browsers will ignore the missing slash and render the element just fine without it. Go ahead: try <button>Press me for yourself!
There are other differences between HTML and JSX, as well.
HTML entities are codes that display special characters such as copyright symbols, em dashes, quotation marks, and so on. Here are some examples:
© — “
You can render those codes as any string in <span> or in the string attribute <input>. For example, this is static JSX (text defined in code without variables or properties):
<span>©—“</span> <input value="©—“"/>
But if you want to dynamically output HTML entities (from a variable or a property) with <span>, all you’ll get is the direct output (©—“), not the special characters. Thus, the following code won’t work:
// Anti-pattern. Will NOT work!
var specialChars = '©—“'
<span>{specialChars}</span>
<input value={specialChars}/>
React/JSX will auto-escape the dangerous HTML, which is convenient in terms of security (security by default rocks!). To output special characters, you need to use one of these approaches:
To illustrate the last approach (as a last resort—when all else fails on the Titanic, run for the boats!), look at this code:
var specialChars = {__html: '©—“'}
<span dangerouslySetInnerHTML={specialChars}/>
Obviously, the React team has a sense of humor, to name a property dangerouslySetInnerHTML. Sometimes React naming makes me laugh to myself!
Section 2.3 covered properties in a non-JSX way, but let’s look at how to create custom attributes in HTML one more time (this time with JSX). Chiefly, React will blissfully ignore any nonstandard HTML attributes that you add to components. It doesn’t matter whether you use JSX or native JavaScript—that’s React’s behavior.
But sometimes, you want to pass additional data using DOM nodes. This is an antipattern because your DOM shouldn’t be used as a database or local storage. If you still want to create custom attributes and get them rendered, use the data- prefix.
For example, this is a valid custom data-object-id attribute that React will render in the view (HTML will be the same as this JSX):
<li data-object-id="097F4E4F">...</li>
If the input is the following React/JSX element, React won’t render object-id, because it’s not a standard HTML attribute (HTML will miss object-id, unlike this JSX):
<li object-id="097F4E4F">...</li>
The style attribute in JSX works differently than in plain HTML. With JSX, instead of a string, you need to pass a JavaScript object, and CSS properties need to be in camelCase. For example:
You can save the JavaScript object in a variable or render it inline with double curly braces ({{...}}). The double braces are needed because one set is for JSX and the other is for the JavaScript object literal.
Suppose you have an object with this font size:
let smallFontSize = {fontSize: '10pt'}
In your JSX, you can use the smallFontSize object:
<input style={smallFontSize} />
Or you can settle for a larger font (30 point) by passing the values directly without an extra variable:
<input style={{fontSize: '30pt'}} />
Let’s look at another example of passing styles directly. This time, you’re setting a red border on <span>:
<span style={{borderColor: 'red',
borderWidth: 1,
borderStyle: 'solid'}}>Hey</span>
Alternatively, the following border value will also work:
<span style={{border: '1px red solid'}}>Hey</span>
The main reason classes are not opaque strings but JavaScript objects is so React can work with them more quickly when it applies changes to views.
React and JSX accept any attribute that’s a standard HTML attribute, except class and for. Those names are reserved words in JavaScript/ECMAScript, and JSX is converted into regular JavaScript. Use className and htmlFor instead. For example, if you have a class hidden, you can define it in a <div> this way:
<div className="hidden">...</div>
If you need to create a label for a form element, use htmlFor:
<div>
<input type="radio" name={this.props.name} id={this.props.id}>
</input>
<label htmlFor={this.props.id}>
{this.props.label}
</label>
</div>
Last but not least, some attributes (such as disabled, required, checked, autofocus, and readOnly) are specific only to form elements. The most important thing to remember here is that the attribute value must be set in the JavaScript expression (that is, inside {}) and not set in strings.
For example, use {false} to enable the input:
<input disabled={false} />
But don’t use a "false" value, because it’ll pass the truthy check (a non-empty string is truthy in JavaScript—see the sidebar) and render the input as disabled (disabled will be true):
<input disabled="false" />
In JavaScript/Node, a truthy value translates to true when evaluated as a Boolean; for example, in an if statement. The value is truthy if it’s not falsy. (That’s the official definition. Brilliant, right?) And there are only six falsy values:
I hope you can see that the string "false" is a non-empty string, which is truthy and translates to true. Hence, you’ll get disabled=true in HTML.
If you omit the value, React will assume the value is true:
<input disabled />
The subsequent chapters use JSX exclusively. But knowing the underlying regular JavaScript that will be run by browsers is a great skill to have in your toolbox.
To output a JavaScript variable in JSX, which of the following do you use? =, <%= %>, {}, or <?= ?>
The class attribute isn’t allowed in JSX. True or false?
The default value for an attribute without a value is false. True or false?
The inline style attribute in JSX is a JavaScript object and not a string like other attributes. True or false?
If you need to have if/else logic in JSX, you can use it inside {}. For example, class={if (!this.props.admin) return 'hide'} is valid JSX code. True or false?
You use {} for variables and expressions.
True. class is a reserved or special JavaScript statement. For this reason, you use className in JSX.
False. It’s recommended that you use attribute_name={false/true} to set the Boolean values explicitly.
True. style is an object for performance reasons.
False. First, class isn’t a proper attribute. Then, instead of if return (not valid), you should use a ternary operator.
This chapter covers
If you read only one chapter in this book, this should be it! Without states, your React components are just glorified static templates. I hope you’re as excited as I am, because understanding the concepts in this chapter will allow you to build much more interesting applications.
Imagine that you’re building an autocomplete input field (see figure 4.1). When you type in it, you want to make a request to the server to fetch information about matches to show on the web page. So far, you’ve worked with properties, and you’ve learned that by changing properties, you can get different views. But properties can’t change in the context of the current component, because they’re passed on this component’s creation.
To put it another way, properties are immutable in the current component, meaning you don’t change properties in this component unless you re-create the component by passing new values from a parent (figure 4.2). But you must store the information you receive from the server somewhere and then display the new list of matches in the view. How do you update the view if the properties are unchangeable?
One solution is to render an element with new properties each time you get the new server response. But then you’ll have to have logic outside the component—the component stops being self-contained. Clearly, if you can’t change the values of properties, and the autocomplete needs to be self-contained, you can’t use properties. Thus the question is, how do you update views in response to events without re-creating a component (createElement() or JSX <NAME/>)? This is the problem that states solve.
Once the response from the server is ready, your callback code will augment the component state accordingly. You’ll have to write this code yourself. Once the state is updated, though, React will intelligently update the view for you (only in the places where it needs to be updated; that’s where you use the state data).
With React component states, you can build meaningful, interactive React applications. State is the core concept that lets you build React components that can store data and automagically augment views based on data changes.
The source code for the examples in this chapter is at www.manning.com/books/react-quickly and at https://github.com/azat-co/react-quickly/tree/master/ch04 (in the ch04 folder of the GitHub repository https://github.com/azat-co/react-quickly). You can also find some demos at http://reactquickly.co/demos.
A React state is a mutable data store of components—self-contained, functionality-centric blocks of UI and logic. Mutable means state values can change. By using state in a view (render()) and changing values later, you can affect the view’s representation.
Here’s a metaphor: if you think of a component as a function that has properties and state as its input, then the result of this function is the UI description (view). Or, as React teams phrase it, “Components are state machines.” Properties and state both augment views, but they’re used for different purposes (see section 4.3).
To work with states, you access them by name. This name is an attribute (a.k.a. an object key or an object property—not a component property) of the this.state object: for example, this.state.autocompleMatches or this.state.inputFieldValue.
Generally speaking, the word states refers to the attributes of the this.state object in a component. Depending on the context, state (singular) can refer to the this.state object or an individual attribute (such as this.state.inputFieldValue). Conversely, states (plural) almost always refers to the multiple attributes of the state object in a single component.
State data is often used to display dynamic information in a view to augment the rendering of views. Going back to the earlier example of an autocomplete field, the state changes in response to the XHR request to the server, which is, in turn, triggered by a user typing in the field. React takes care of keeping views up to date when the state used in the views changes. In essence, when state changes, only the corresponding parts of views change (down to single elements or even an attribute value of a single element).
Everything else in the DOM remains intact. This is possible due to the virtual DOM (see section 1.1.1), which React uses to determine the delta using the reconciliation process. This is how you can write declaratively. React does all the magic for you. The steps in the view change and how it happens are discussed in chapter 5.
React developers use states to generate new UIs. Component properties (this.props), regular variables (inputValue), and class attributes (this.inputValue) won’t do it, because they don’t trigger a view change when you alter their values (in the current component context). For instance, the following is an antipattern, showing that if you change a value in anything except the state, you won’t get view updates:
Next, you’ll see how to work with React component states.
As mentioned earlier (repetition is the mother of skills), properties will change the view if you pass a new value from a parent, which in turn will create a new instance of the component you’re currently working with. In the context of a given component, changing properties as in this.props.inputValue = 'California' won’t cut it.
To be able to work with states, you need to know how to access values, update them, and set the initial values. Let’s start with accessing states in React components.
The state object is an attribute of a component and can be accessed with a this reference; for example, this.state.name. You’ll recall that you can access and print variables in JSX with curly braces ({}). Similarly, you can render this.state (like any other variable or custom component class attribute) in render(); for example, {this.state.inputFieldValue}. This syntax is similar to the way you access properties with this.props.name.
Let’s use what you’ve learned so far to implement a clock, as shown in figure 4.3. The goal is to have a self-contained component class that anyone can import and use in their application without having to jump through hoops. The clock must render the current time.
The structure of the clock project is as follows:
/clock
index.html
/jsx
script.jsx
clock.jsx
/js
script.js
clock.js
react.js
react-dom.js
I’m using the Babel CLI with a watch (-w) and a directory flag (-d) to compile all source JSX files from clock/jsx to a destination folder, clock/js, and recompile on changes. Moreover, I have the command saved as an npm script in my package.json in a parent folder, ch04, in order to run npm run build-clock from ch04:
"scripts": {
"build-clock": "./node_modules/.bin/babel clock/jsx -d clock/js -w"
},
Obviously, time is always changing (for good or for bad). Because of that, you’ll need to update the view—and you can do so by using state. Give it the name currentTime, and try to render this state as shown in the following listing.
class Clock extends React.Component {
render() {
return <div>{this.state.currentTime}</div>
}
}
ReactDOM.render(
<Clock />,
document.getElementById('content')
)
You’ll get an error: Uncaught TypeError: Cannot read property 'currentTime' of null. Normally, JavaScript error messages are as helpful as a glass of cold water to a drowning man. It’s good that, at least in this case, JavaScript gives you a helpful message. This one means you don’t have a value for currentTime. Unlike properties, states aren’t set on a parent. You can’t setState in render() either, because it’ll create a circular (setState → render → setState...) loop—and, in this case, React will throw an error.
Thus far, you’ve seen that before you use state data in render(), you must initialize the state. To set the initial state, use this.state in the constructor with your ES6 class React.Component syntax. Don’t forget to invoke super() with properties; otherwise, the logic in the parent (React.Component) won’t work:
class MyFancyComponent extends React.Component {
constructor(props) {
super(props)
this.state = {...}
}
render() {
...
}
}
You can also add other logic while you’re setting the initial state. For example, you can set the value of currentTime using new Date(). You can even use toLocaleString() to get the proper date and time format for the user’s location, as shown next (ch04/clock).
class Clock extends React.Component {
constructor(props) {
super(props)
this.state = {currentTime: (new Date()).toLocaleString()}
}
...
}
The value of this.state must be an object. We won’t get into a lot of detail here about the ES6 constructor(); see appendix E and the ES6 cheatsheet at https://github.com/azat-co/cheatsheets/tree/master/es6. The gist is that as with other OOP languages, constructor() is invoked when an instance of this class is created. The constructor method name must be exactly constructor. Think of it as an ES6 convention. Furthermore, if you create a constructor() method, you’ll almost always need to invoke super() inside it; otherwise, the parent’s constructor won’t be executed. On the other hand, if you don’t define a constructor() method, then the call to super() will be assumed under the hood.
Hopefully, Technical Committee 39 (TC39: the people behind the ECMAScript standard) will add attributes to the class syntax in future versions of ECMAScript! This way, we’ll be able to set state not just in the constructor, but also in the body of a class:
class Clock extends React.Component {
state = {
...
}
}
The proposal for class fields/attributes/properties is at https://github.com/jeffmo/es-class-fields-and-static-properties. It’s been there for many years, but as of this writing (March 2017), it’s only a stage 2 proposal (stage 4 means final and in the standard), meaning it’s not widely available in browsers. That is, this feature won’t work natively. (As of this writing, exactly zero browsers support class fields.)
Most likely, you’ll have to use a transpiler (such as Babel, Traceur, or TypeScript) to ensure that the code will work in all browsers. Check out the current compatibility of class properties in the ECMAScript compatibility table (http://kangax.github.io/compat-table/esnext), and, if needed, use the ES.Next Babel preset.
Here, currentTime is an arbitrary name; you’ll need to use the same name later when accessing and updating this state. You can name the state anything you want, as long as you refer to it later using this name.
The state object can have nested objects or arrays. This example adds an array of my books to the state:
class Content extends React.Component {
constructor(props) {
super(props)
this.state = {
githubName: 'azat-co',
books: [
'pro express.js',
'practical node.js',
'rapid prototyping with js'
]
}
}
render() {
...
}
}
The constructor() method is called just once, when a React element is created from this class. This way, you can set state directly by using this.state just once, in the constructor() method. Avoid setting and updating state directly with this.state = ... anywhere else, because doing so may lead to unintended consequences.
With React’s own createClass() method to define a component, you’ll need to use getInitialState(). For more information on createClass() and an example in ES5, see the sidebar in section 2.2, “ES6+/ES2015+ and React.”
This will only get you the first value, which will be outdated very soon—like, in 1 second. What’s the point of a clock that doesn’t show the current time? Luckily, there’s a way to update the state.
You change state with the this.setState(data, callback) class method. When this method is invoked, React merges the data with current states and calls render(). After that, React calls callback.
Having the callback in setState() is important because the method works asynchronously. If you’re relying on the new state, you can use the callback to make sure this new state is available.
If you rely on a new state without waiting for setState() to finish its work—that is, working synchronously with an asynchronous operation—then you may have a bug when you rely on new state values to be updated, but the state is still an old state with old values.
So far, you’ve rendered the time from a state. You also set the initial state, but you need to update the time every second, right? To do so, you can use a browser timer function, setInterval() (http://mng.bz/P2d6), which will execute the state update every n milliseconds. The setInterval() method is implemented in virtually all modern browsers as a global, which means you can use it without any libraries or prefixes. Here’s an example:
setInterval(()=>{
console.log('Updating time...')
this.setState({
currentTime: (new Date()).toLocaleString()
})
}, 1000)
To kick-start the clock, you need to invoke setInterval() once. Let’s create a launchClock() method to do just that; you’ll call launchClock() in the constructor. The final clock is shown in the following listing (ch04/clock/jsx/clock.jsx).
You can use setState() anywhere, not just in launchClock() (which is invoked by constructor), as shown in the example. Typically, setState() is called from the event handler or as a callback for incoming data or data updates.
Changing a state value in your code using this.state.name= 'new name' won’t do any good. This won’t trigger a rerender and a possible real DOM update, which you want. For the most part, changing state directly without setState() is an antipattern and should be avoided.
It’s important to note that setState() updates only the states you pass to it (partially or merged, but not a complete replace). It doesn’t replace the entire state object each time. So, if you have three states and change one, the other two will remain unchanged. In the following example, userEmail and userId will remain intact:
constructor(props) {
super(props)
this.state = {
userName: 'Azat Mardan',
userEmail: 'hi@azat.co',
userId: 3967
}
}
updateValues() {
this.setState({userName: 'Azat'})
}
If your intention is to update all three states, you need to do so explicitly by passing the new values for these states to setState(). (Another method you may still see in old React code but that’s no longer working and has been deprecated is the this.replaceState() method.[1] As you can guess from the name, it replaced the entire state object with all its attributes.)
Keep in mind that setState() triggers render(). It works in most cases. In some edge-case scenarios where the code depends on external data, you can trigger a rerender with this.forceUpdate(). But this approach should be avoided as a bad practice, because relying on external data and not state makes components more fragile and depends on external factors (tight coupling).
As mentioned earlier, you can access the state object with this.state. As you’ll recall, you output values with curly braces ({}) in JSX; therefore, to declare a state property in the view (that is, render’s return statement), apply {this.state.NAME}.
React magic happens when you use state data in a view (for example, to print, in an if/else statement, as a value of an attribute, or as a child’s property value) and then give setState() new values. Boom! React updates the necessary HTML for you. You can see this in your DevTools console. It should show cycles of “Updating ...” and then “Rendering ....” And the best part is that only the absolute minimum required DOM elements will be affected.
In JavaScript, this mutates (changes) its value depending on the place from which a function is called. To ensure that this refers to your component class, you need to bind the function to the proper context (this value: your component class).
If you’re using ES6+/ES2015+, as I do in this book, you can use fat-arrow function syntax to create a function with autobinding:
setInterval(()=>{
this.setState({
currentTime: (new Date()).toLocaleString()
})
}, 1000)
Autobinding means the function created with a fat arrow gets the current value of this, which in this case is Clock.
The manual approach uses the bind(this) method on the closure:
function() {...}.bind(this)
It looks like this for your clock:
setInterval(function(){
this.setState({
currentTime: (new Date()).toLocaleString()
})
}.bind(this), 1000)
This behavior isn’t exclusive to React. The this keyword mutates in a function’s closure, so you need do some sort of binding; you can also save the context (this) value so you can use it later.
Typically, you’ll see variables like self, that, and _this used to save the value of the original this. You’ve probably seen statements like the following:
var that = this var _this = this var self = this
The idea is straightforward: you create a variable and use it in the closure instead of referring to this. The new variable isn’t a copy but rather a reference to the original this value. Here’s setInterval():
var _this = this
setInterval(function(){
_this.setState({
currentTime: (new Date()).toLocaleString()
})
}, 1000)
You have a clock, and it’s working, as shown in figure 4.4. Tadaaa!
One more quick thing before we move on. You can see how React is reusing the same DOM <div> element and only changes the text inside it. Go ahead and use DevTools to modify the CSS of this element. I added a style to make the text blue: color: blue, as shown in figure 4.5 (you can see the color in electronic versions of the book). I created an inline style, not a class. The element and its new inline style stayed the same (blue) while the time kept ticking.
React will only update the inner HTML (the content of the second <div> container). The <div> itself, as well as all other elements on this page, remain intact. Neat.
States and properties are both attributes of a class, meaning they’re this.state and this.props. That’s the only similarity! One of the primary differences between states and properties is that the former are mutable, whereas the latter are immutable.
Another difference between properties and states is that you pass properties from parent components, whereas you define states in the component itself, not its parent. The philosophy is that you can only change the value of a property from the parent, not the component. So properties determine the view upon creation, and then they remain static (they don’t change). The state, on the other hand, is set and updated by the object.
Properties and states serve different purposes, but both are accessible as attributes of the component class, and both help you to compose components with a different representation (view). There are differences between properties and states when it comes to the component lifecycle (more in chapter 5). Think of properties and states as inputs for a function that produces different outputs. Those outputs are views. So you can have different UIs (views) for each set of different properties and states (see figure 4.6).
Not all components need to have state. In the next section, you’ll see how to use properties with stateless components.
A stateless component has no states or components or any other React lifecycle events/methods (see chapter 5). The purpose of a stateless component is just to render the view. The only thing it can do is take properties and do something with them—it’s a simple function with the input (properties) and the output (UI element).
The benefit of using stateless components is that they’re predictable, because you have one input that determines the output. Predictability means they’re easier to understand, maintain, and debug. In fact, not having a state is the most desired React practice—the more stateless components you use and the fewer stateful ones you use, the better.
You wrote a lot of stateless components in the first three chapters of this book. For example, Hello World is a stateless component (ch03/hello-js-world-jsx/jsx/script.jsx).
class HelloWorld extends React.Component {
render() {
return <h1 {...this.props}>Hello {this.props.frameworkName} world!!!
</h1>
}
}
To provide a smaller syntax for stateless components, React uses this function style: you create a function that takes properties as an argument and returns the view. A stateless component renders like any other component. For example, the HelloWorld component can be rewritten as a function that returns <h1>:
const HelloWorld = function(props){
return <h1 {...props}>Hello {props.frameworkName} world!!!</h1>
}
You can use ES6+/ES2015+ arrow functions for stateless components. The following snippet is analogous to the previous one (return can be omitted too, but I like to include it):
const HelloWorld = (props)=>{
return <h1 {...props}>Hello {props.frameworkName} world!!!</h1>
}
As you can see, you can also define functions as React components when there’s no need for state. In other words, to create a stateless component, define it as a function. Here’s an example in which Link is a stateless component:
function Link (props) {
return <a href={props.href} target="_blank" className="btn btn-primary">
{props.text}</a>
}
ReactDOM.render(
<Link text='Buy React Quickly'
href='https://www.manning.com/books/react-quickly'/>,
document.getElementById('content')
)
Although there’s no need for autobinding, you can use the fat-arrow function syntax for brevity (when there’s a single statement, the notation can be a one-liner):
const Link = props => <a href={props.href}
target="_blank"
className="btn btn-primary">
{props.text}
</a>
Or you can use the same arrow function but with curly braces ({}), explicit return, and parentheses (()) to make it subjectively more readable:
const Link = (props)=> {
return (
<a href={props.href}
target="_blank"
className="btn btn-primary">
{props.text}
</a>
)
}
In a stateless component, you can’t have a state, but you can have two properties: propTypes and defaultProps (see sections 8.1 and 8.2, respectively). You set them on the object. And, by the way, it’s okay to not have an opening parenthesis after return as long as you start an element on the same line:
function Link (props) {
return <a href={props.href}
target="_blank"
className="btn btn-primary">
{props.text}
</a>
}
Link.propTypes = {...}
Link.defaultProps = {...}
You also cannot use references (refs) with stateless components (functions).[2] If you need to use refs, you can wrap a stateless component in a normal React component. More about references in section 7.2.3.
“React stateless component this.refs..value?” http://mng.bz/Eb91.
Why use stateless components? They’re more declarative and work better when all you need to do is render some HTML without creating a backing instance or lifecycle components. Basically, stateless components reduce duplication and provide better syntax and more simplicity when all you need to do is mesh together some properties and elements into HTML.
My suggested approach, and the best practice according to the React team, is to use stateless components instead of normal components as often as possible. But as you saw in the clock example, it’s not always possible; sometimes you have to resort to using states. So, you have a handful of stateful components on top of the hierarchy to handle the UI states, interactions, and other application logic (such as loading data from a server).
Don’t think that stateless components must be static. By providing different properties for them, you can change their representation. Let’s look at an example that refactors and enhances Clock into three components: a stateful clock that has the state and the logic to update it; and two stateless components, DigitalDisplay and AnalogDisplay, which only output time (but do it in different ways). The goal is something like figure 4.7. Pretty, right?
The structure of the project is as follows:
/clock-analog-digital
/jsx
analog-display.jsx
clock.jsx
digital-display.jsx
script.jsx
/js
analog-display.js
clock.js
digital-display.js
script.js
react.js
react-dom.js
index.html
The code for Clock renders the two child elements and passes the time property with the value of the currentTime state. The state of a parent becomes a property of a child.
...
render() {
console.log('Rendering...')
return <div>
<AnalogDisplay time={this.state.currentTime}/>
<DigitalDisplay time={this.state.currentTime}/>
</div>
}
Now, you need to create DigitalDisplay, which is simple. It’s a function that takes the properties and displays time from that property argument (props.time), as shown next (ch04/clock-analog-digital/jsx/digital-display.jsx).
const DigitalDisplay = function(props) {
return <div>{props.time}</div>
}
AnalogDisplay is also a function that implements a stateless component; but in its body is some fancy animation to rotate the hands. The animation works based on the time property, not based on any state. The idea is to take the time as a string; convert it to a Date object; get minutes, hours, and seconds; and convert those to degrees. For example, here’s how to get seconds as angle degrees:
let date = new Date('1/9/2007, 9:46:15 AM')
console.log((date.getSeconds()/60)*360 ) // 90
Once you have the degrees, you can use them in CSS, written as an object literal. The difference is that in the React CSS, the style properties are camelCased, whereas in regular CSS, the dashes (-) make style properties invalid JavaScript. As mentioned earlier, having objects for styles allows React to more quickly determine the difference between the old element and the new element. See section 3.4.3. for more about style and CSS in React.
The following listing shows the stateless analog display component with CSS that uses values from the time property (ch04/clock-analog-digital/jsx/analog-display.jsx).
If you have React Developer Tools for Chrome or Firefox (available at http://mng.bz/mt5P and http://mng.bz/DANq), you can open the React pane in your DevTools (or an analog in Firefox). Mine shows that the <Clock> element has two children (see figure 4.8). Notice that React DevTools tells you the names of the components along with the state, currentTime. What a great tool for debugging!
Note that in this example, I used anonymous expressions stored as const variables. Another approach is to use a syntax with named function declarations:
function AnalogDisplay(props) {...}
Or you can use the named function declaration referenced from a variable:
const AnalogDisplay = function AnalogDisplay(props) {...}
In JavaScript, there are several way to define a function. You can write an anonymous function expression that’s used right away (typically as a callback):
function() { return 'howdy'}
Or you can create an IIFE:
(function() {
return('howdy')
})()
An anonymous function expression can be referenced in a variable:
let sayHelloInMandarin = function() { return 'ni hao'}
This is a named or hoisted function expression:
function sayHelloInTatar() { return 'sälam'}
And this is a named or hoisted function expression referenced in a variable:
let sayHelloInSpanish = function digaHolaEnEspanol() { return 'hola'}
Finally, you can use an immediately invoked, named function expression:
(function sayHelloInTexan() {
return('howdy')
})()
There’s no fat-arrow syntax for named/hoisted functions.
As you can see, the AnalogDisplay and DigitalDisplay components are stateless: they have no states. They also don’t have any methods, except for the body of the function, which is not like render() in a normal React class definition. All the logic and states of the app are in Clock.
In contrast, the only logic you put into the stateless components is the animation, but that’s closely related to the analog display. Clearly, it would have been a bad design to include analog animation in Clock. Now, you have two components, and you can render either or both of them from Clock. Using stateless components properly with a handful of stateful components allows for more flexible, simpler, better design.
Usually, when React developers say stateless, they mean a component created with a function or fat-arrow syntax. It’s possible to have a stateless component created with a class, but this approach isn’t recommended because then it’s too easy for someone else (or you in six months) to add a state. No temptation, no way to complicate code!
You may be wondering whether a stateless component can have methods. Obviously, if you use classes, then yes, they can have methods; but as I mentioned, most developers use functions. Although you can attach methods to functions (they’re also objects in JavaScript), the code isn’t elegant, because you can’t use this in a function (the value isn’t the component; it’s window):
// Anti-pattern: Don't do this.
const DigitalDisplay = function(props) {
return <div>{DigitalDisplay.locale(props.time)}</div>
}
DigitalDisplay.locale = (time)=>{
return (new Date(time)).toLocaleString('EU')
}
If you need to perform some logic related to the view, create a new function right in the stateless component:
// Good pattern
const DigitalDisplay = function(props) {
const locale = time => (new Date(time)).toLocaleString('EU')
return <div>{locale(props.time)}</div>
}
Keep your stateless components simple: no states and no methods. In particular, don’t have any calls to external methods or functions, because their results may break predictability (and violate the concept of purity).
You can set state in a component method (not a constructor) with which syntax? this.setState(a), this.state = a, or this.a = a
If you want to update the render process, it’s normal practice to change properties in components like this: this.props.a=100. True or false?
States are mutable, and properties are immutable. True or false?
Stateless components can be implemented as functions. True or false?
How do you define the first state variables when an element is created? setState(), initialState(), this.state =... in the constructor, or setInitialState()
this.setState(a), because we never, never, never assign this.state directly except in constructor(). this.a will not do anything with state. It’ll only create an instance field/attribute/property.
False. Changing a property in the component won’t trigger a rerender.
True. There’s no way to change a property from a component—only from its parent. Conversely, states are changed only by the component.
True. You can use the arrow function or the traditional function() {} definition, but both must return an element (single element).
this.state = ... in the constructor, or getInitialState() if you’re using createClass().
This chapter covers
Chapter 2 provided information about how to create components, but there are certain situations in which you need more granular control over a component. For instance, you may be building a custom radio button component that can change in size depending on the screen width. Or perhaps you’re building a menu that needs to get information from the server by sending an XHR request.
One approach would be to implement the necessary logic before instantiating a component and then re-create it by providing different properties. Unfortunately, this won’t create a self-contained component, and thus you’ll lose React’s benefit of providing a component-based architecture.
The best approach is to use component lifecycle events. By mounting events, you can inject the necessary logic into components. Moreover, you can use other events to make components smarter by providing specific logic about whether or not to rerender their views (overwriting React’s default algorithm).
Going back to the examples of a custom radio button and menu, the button can attach event listeners to window (onResize) when the button component is created, and detach them when the component is removed. And the menu can fetch data from the server when the React element is mounted (inserted) into the real DOM.
Onward to learning about component lifecycle events!
The source code for the examples in this chapter is at www.manning.com/books/react-quickly and https://github.com/azat-co/react-quickly/tree/master/ch05 (in the ch05 folder of the GitHub repository https://github.com/azat-co/react-quickly). You can also find some demos at http://reactquickly.co/demos.
React provides a way for you to control and customize a component’s behavior based on its lifecycle events (think of hooking [https://en.wikipedia.org/wiki/Hooking] in computer programming). These events belong to the following categories:
Each and every React component has lifecycle events that are triggered at certain moments depending on what a component has done or will do. Some of them execute just once, whereas others can be executed continuously.
Lifecycle events allow you to implement custom logic that will enhance what components can do. You can also use them to modify the behavior of components: for example, to decide when to rerender. This enhances performance, because unnecessary operations are eliminated. Another usage is to fetch data from the back end or integrate with DOM events or other front-end libraries. Let’s look more closely at how categories of events operate, what events they possess, and in what sequence those events are executed.
React defines several component events in three categories (see figure 5.1 and also table 5.1, later in the chapter). Each category can fire events various number of times:
In addition to lifecycle events, I’ll include constructor(), to illustrate the order of execution from start to finish during the component’s lifecycle (updating can happen multiple times):
Usually, an event’s name makes clear to developers when the event is triggered. For example, componentDidUpdate() is fired when the component is updated. In other cases, there are subtle differences. Table 5.1 shows the sequence of lifecycle events (from top to bottom) and how some of them depend on changes of properties or state (the Component Properties and Component State columns).
|
Mounting |
Updating component properties |
Updating component state |
Updating using |
Unmounting |
|---|---|---|---|---|
| constructor() | ||||
| componentWillMount() | ||||
| componentWillReceiveProps() | ||||
| shouldComponentUpdate() | shouldComponentUpdate() | |||
| componentWillUpdate() | componentWillUpdate() | componentWillUpdate() | ||
| render() | render() | render() | render() | |
| componentDidUpdate() | componentDidUpdate() | componentDidUpdate() | ||
| componentDidMount() | ||||
| componentWillUnmount() |
There’s one more case in which a component might be rerendered: when this.forceUpdate() is called. As you can guess from the name, it forces updates. You may need to resort to using it when, for one reason or another, updating state or properties won’t trigger a desired rerender. For example, this might happen when you use data in render() that isn’t part of the state or properties, and that data changes—hence, the need to manually trigger an update. Generally (and according to the React core team), the this.forceUpdate() method (http://mng.bz/v5sU) should be avoided, because it makes components impure (see the following sidebar).
Next, let’s define an event to see it in action.
In computer science in general—not just in React—a pure function is a function that
For example, here’s a pure function that doubles the value of the input: f(x) = 2x or, in JavaScript/Node, let f= (n)⇒2*n. Here it is in action:
let f = (n)=>2*n consoleg.log(f(7))
An impure function to double numbers looks like this in action (adding curly braces removes the implicit return of the one-liner fat-arrow function):
let sharedStateNumber = 7
let double
let f = ()=> {double =2*sharedStateNumber}
f()
console.log(double)
Pure functions are the cornerstone of functional programming (FP), which minimizes state as much as possible. Developers (especially functional programmers) prefer pure functions primarily because their usage mitigates shared state, which in turn simplifies development and decouples different pieces of logic. In addition, using them makes testing easier. When it comes to React, you already know that having more stateless components and fewer dependencies is better; that’s why the best practice is to create pure functions.
In some ways, FP contradicts OOP (or is it OOP that contradicts FP?), with FP fans saying that Fortran and Java were programming dead ends and that Lisp (and nowadays, Clojure and Elm) is the way to go. It’s a fascinating debate to follow. Personally, I’m slightly biased toward the functional approach.
Many good books have been written about FP, because the concept has been around for decades. For this reason, I won’t get into much detail here; but I highly recommend learning more about FP, because it will make you a better programmer even if you never plan to use it at your job.
To implement lifecycle events, you define them on a class as methods (see section 3.2.5)—this is a convention that React expects you to follow. React checks to see whether there’s a method with an event name; if React finds a method, it will call that method. Otherwise, React will continue its normal flow. Obviously, event names are case sensitive like any name in JavaScript.
To put it differently, under the hood, React calls certain methods during a component’s lifecycle if they’re defined. For example, if you define componentDidMount(), then React will call this method when an element of this component class is mounted. componentDidMount() belongs to the mounting category listed in table 5.1, and it will be called once per instance of the component class:
class Clock extends React.Component {
componentDidMount() {
}
...
}
If no componentDidMount() method is defined, React won’t execute any code for this event. Thus, the name of the method must match the name of the event. Going forward, I’ll use the terms event, event handler, and method interchangeably in this chapter.
As you might have guessed from its name, the componentDidMount() method is invoked when a component is inserted into the DOM. This method is a recommended place to put code to integrate with other front-end frameworks and libraries as well as to send XHR requests to a server, because at this point in the lifecycle, the component’s element is in the real DOM and you get access to all of its elements, including children.
Let’s go back to the issues I mentioned at the beginning of the chapter: resizing, and fetching data from a server. For the first, you can create an event listener in componentDidMount() that will listen for window.resize events. For the second, you can make an XHR call in componentDidMount() and update the state when you have a response from the server.
Equally important, componentDidMount() comes in handy in isomorphic/universal code (where the same components are used on the server and in the browser). You can put browser-only logic in this method and rest assured that it’ll only be called for browser rendering, and not on the server side. There’s more on isomorphic JavaScript with React in chapter 16.
Most developers learn best by looking at examples. For this reason, let’s consider a trivial case that uses componentDidMount() to print the DOM information to the console. This is feasible because this event is fired after all the rendering has happened; thus, you have access to the DOM elements.
Creating event listeners for component lifecycle events is straightforward: you define a method on the component/class. For the fun of it, let’s add componentWillMount() to contrast the absence of the real DOM for this element at this stage.
The DOM node information is obtained via the React DOM’s utility function ReactDOM.findDOMNode(), to which you pass the class. Note that DOM isn’t camelCase, but rather is in all-caps:
The result is this output in the developer console, which reassures you that componentDidMount() is executed when you have real DOM elements (see figure 5.2):
html null div
Listing 5.1 (ch05/logger/jsx/content.jsx) and listing 5.2 (ch05/logger/jsx/logger.jsx) show all the events in action at once. For now, all you need to know is that they’re like classes in the sense that they allow you to reuse code. This logger mixin can be useful for debugging; it displays all the events, properties, and state when the component is about to be rerendered and after it’s been rerendered.
class Content extends React.Component {
constructor(props) {
super(props)
this.launchClock()
this.state = {
counter: 0,
currentTime: (new Date()).toLocaleString()
}
}
launchClock() {
setInterval(()=>{
this.setState({
counter: ++this.state.counter,
currentTime: (new Date()).toLocaleString()
})
}, 1000)
}
render() {
if (this.state.counter > 2) return
return <Logger time="{this.state.currentTime}"></Logger>
}
}
class Logger extends React.Component {
constructor(props) {
super(props)
console.log('constructor')
}
componentWillMount() {
console.log('componentWillMount is triggered')
}
componentDidMount(e) {
console.log('componentDidMount is triggered')
console.log('DOM node: ', ReactDOM.findDOMNode(this))
}
componentWillReceiveProps(newProps) {
console.log('componentWillReceiveProps is triggered')
console.log('new props: ', newProps)
}
shouldComponentUpdate(newProps, newState) {
console.log('shouldComponentUpdate is triggered')
console.log('new props: ', newProps)
console.log('new state: ', newState)
return true
}
componentWillUpdate(newProps, newState) {
console.log('componentWillUpdate is triggered')
console.log('new props: ', newProps)
console.log('new state: ', newState)
}
componentDidUpdate(oldProps, oldState) {
console.log('componentDidUpdate is triggered')
console.log('new props: ', oldProps)
console.log('old props: ', oldState)
}
componentWillUnmount() {
console.log('componentWillUnmount')
}
render() {
// console.log('rendering... Display')
return (
{this.props.time}
)
}
}
The functions and lifecycle events from the Display component give you console logs when you run this web page. Don’t forget to open your browser console, because all the logging happens there, as shown in figure 5.3!
As noted in the text and shown in the figure, the mounting event fires only once. You can clearly see this in the logs. After the counter in Context reaches 3, the render function won’t use Display anymore, and the component is unmounted (see figure 5.4).
Now that you’ve learned about component lifecycle events, you can use them when you need to implement logic for components, such as fetching data.
The mounting category of events is all about a component being attached to the real DOM. Think of mounting as a way for a React element to see itself in the DOM. This typically happens when you use a component in ReactDOM.render() or in the render() of another, higher-order component that will be rendered to the DOM. The mounting events are as follows:
constructor() execution happens prior to componentWillMount(). Also, React first renders and then mounts elements. (Rendering in this context means calling a class’s render(), not painting the DOM.) Refer to table 5.1 for events in between componentWillMount() and componentDidMount().
It’s worth mentioning that componentWillMount() is invoked only once in the component’s lifecycle. The timing of the execution is just before the initial rendering.
The lifecycle event componentWillMount() is executed when you render a React element on the browser by calling ReactDOM.render(). Think of it as attaching (or mounting) a React element to a real DOM node. This happens in the browser: the front end.
If you render a React component on a server (the back end, using isomorphic/universal JavaScript; see chapter 16), which basically gets an HTML string, then—even though there’s no DOM on the server or mounting in that case—this event will also be invoked!
You saw in chapter 4 how to update the currentTime state using Date and setInterval(). You triggered the series of updates in constructor() by calling launchClock(). You can do so in componentWillMount() as well.
Typically, a state change triggers a rerender, right? At the same time, if you update the state with setState() in the componentWillMount() method or trigger updates as you did with Clock, then render() will get the updated state. The best thing is that even if the new state is different, there will be no rerendering because render() will get the new state. To put it another way, you can invoke setState() in componentWillMount(). render() will get the new values, if any, and there will be no extra rerendering.
In contrast, componentDidMount() is invoked after the initial rendering. It’s executed only once and only in the browser, not on the server. This comes in handy when you need to implement code that runs only for browsers, such as XHR requests.
In this lifecycle event, you can access any references to children (for example, to access the corresponding DOM representation). Note that the componentDidMount() method of child components is invoked before that of parent components.
As mentioned earlier, the componentDidMount() event is the best place to integrate with other JavaScript libraries. You can fetch a JSON payload that has a list of users with their info. Then, you can print that information, using a Twitter Bootstrap table to get the page shown in figure 5.5.
The structure of the project is as follows:
/users
/css
bootstrap.css
/js
react.js
react-dom.js
script.js
- users.js
/jsx
script.jsx
users.jsx
index.html
real-user-data.json
You have the DOM element in the event, and you can send XHR/AJAX requests to fetch the data with the new fetch() API:
fetch(this.props['data-url'])
.then((response)=>response.json())
.then((users)=>this.setState({users: users}))
The Fetch API (http://mng.bz/mbMe) lets you make XHR request using promises in a unifying manner. It’s available in most modern browsers, but refer to the specs (https://fetch.spec.whatwg.org) and the standard (https://github.com/whatwg/fetch) to find out if the browsers you need to support for your apps implement it. The usage is straightforward—you pass the URL and define as many promise then statements as needed:
fetch('http://node.university/api/credit_cards/')
.then(function(response) {
return response.blob()
})
.then(function(blob) {
// Process blob
})
.catch(function(error) {
console.log('A problem with your fetch operation: ' +
error.message)
})
If the browser you develop for doesn’t support fetch() yet, you can shim it, or use any other HTTP agent library such as superagent (https://github.com/visionmedia/superagent); request (https://github.com/request/request); axios (https://github.com/mzabriskie/axios); or even jQuery’s $.ajax() (http://api.jquery.com/jquery.ajax) or $.get().
You can put your XHR fetch request in componentDidMount(). You may think that by putting the code in componentWillMount(), you can optimize loading, but there are two issues: if you get data from the server faster than your rendering finishes, you may trigger rerender on an unmounted element, which could lead to unintended consequences. Also, if you’re planning to use a component on the server, then component-WillMount() will fire there as well.
Now, let’s look at the entire component, with fetch happening in componentDidMount() (ch05/users/jsx/users.jsx).
Notice that users is set to an empty array ([]) in the constructor. This gets around the need to check for existence later in render(). Repetitive checks and bugs due to undefined values—what a great way to waste time and get a repetitive-stress injury from excessive typing. Setting your initial values will help you avoid lots of pain later! In other words, this is an antipattern:
As noted earlier, mounting events are often used to integrate React with the outside world: other frameworks, libraries, or data stores. Updating events are associated with updating components. These events are as follows, in order from the component lifecycle’s beginning to its end (see table 5.2 for just the updating lifecycle events and table 5.1 for all events).
|
Updating component properties |
Updating component state |
Updating using forceUpdate() |
|---|---|---|
| componentWillReceiveProps() | ||
| shouldComponentUpdate() | shouldComponentUpdate() | |
| componentWillUpdate() | componentWillUpdate() | componentWillUpdate() |
| render() | render() | render() |
| componentDidUpdate() | componentDidUpdate() | componentDidUpdate() |
componentWillReceiveProps(newProps) is triggered when a component receives new properties. This stage is called an incoming property transition. This event allows you to intercept the component at the stage between getting new properties and before render(), in order to add some logic.
The componentWillReceiveProps(newProps) method takes the new prop(s) as an argument. It isn’t invoked on the initial render of the component. This method is useful if you want to capture the new property and set the state accordingly before the rerender. The old property value is in the this.props object. For example, the following snippet sets the opacity state, which in CSS is 0 or 1, depending on the Boolean property isVisible (1 = true, 0 = false):
componentWillReceiveProps(newProps) {
this.setState({
opacity: (newProps.isVisible) ? 1 : 0
})
}
Generally speaking, the setState() method in componentWillReceiveProps(newProps) won’t trigger extra rerendering.
In spite of receiving new properties, these properties may not necessarily have new values (meaning values different from current properties), because React has no way of knowing whether the property values have changed. Therefore, componentWillReceiveProps(NewProps) is invoked each time there’s a rerendering (of a parent structure or a call), regardless of property-value changes. Thus, you can’t assume that newProps always has values that are different from the current properties.
At the same time, rerendering (invoking render()) doesn’t necessarily mean changes in the real DOM. The decision whether to update and what to update in the real DOM is delegated to shouldComponentUpdate() and the reconciliation process.[1]
For more reasons why React can’t perform smarter checks before calling componentWillReceiveProps(newProps), read the extensive article “(A ⇒ B) !⇒ (B ⇒ A),” by Jim Sproch, React, January 8, 2016, http://mng.bz/3WpG.
Next is the shouldComponentUpdate() event, which is invoked right before rendering. Rendering is preceded by the receipt of new properties or state. The should-ComponentUpdate() event isn’t triggered for the initial render or for forceUpdate() (see table 5.1).
You can implement the shouldComponentUpdate() event with return false to prohibit React from rerendering. This is useful when you’re checking that there are no changes and you want to avoid an unnecessary performance hit (when dealing with hundreds of components). For example, this snippet uses the + binary operator to convert the Boolean isVisible into a number and compare that to the opacity value:
shouldComponentUpdate(newProps, newState) {
return this.state.opacity !== + newProps.isVisible
}
When isVisible is false and this.state.opacity is 0, the entire render() is skipped; also, componentWillUpdate() and componentDidUpdate() aren’t called. In essence, you can control whether a component is rerendered.
Speaking of componentWillUpdate(), this event is called just before rendering, preceded by the receipt of new properties or state. This method isn’t called for the initial render. Use the componentWillUpdate() method as an opportunity to perform preparations before an update occurs, and avoid using this.setState() in this method! Why? Well, can you imagine trying to trigger a new update while the component is being updated? It sounds like a bad idea to me!
If shouldComponentUpdate() returns false, then componentWillUpdate() isn’t invoked.
The componentDidUpdate() event is triggered immediately after the component’s updates are reflected in the DOM. Again, this method isn’t called for the initial render. componentDidUpdate() is useful for writing code that works with the DOM and its other elements after the component has been updated, because at this stage you’ll get all the updates rendered in the DOM.
Every time something is mounted or updated, there should be a way to unmount it. The next event provides a place for you to put logic for unmounting.
In React, unmounting means detaching or removing an element from the DOM. There’s only one event in this category, and this is the last category in the component lifecycle.
The componentWillUnmount() event is called just before a component is unmounted from the DOM. You can add any necessary cleanup to this method; for example, invalidating timers, cleaning up any DOM elements, or detaching events that were created in componentDidMount.
Suppose you’re tasked with creating a Note web app (to save text online). You’ve implemented the component, but initial feedback from users is that they lose their progress if they close the window (or a tab) unintentionally. Let’s implement the confirmation dialog shown in figure 5.6.
To implement a dialog like that, we need to listen to a special window event. The tricky part is to clean up after the element is no longer needed, because if the element is removed but its event is not, memory leaks could be the result! The best way to approach this problem is to attach the event on mounting and remove the event on dismounting.
The structure of the project is as follows:
/note
/jsx
note.jsx
script.jsx
/js
note.jsx
react.js
react-dom.js
script.js
index.html
The window.onbeforeunload native browser event (with additional code for cross-browser support) is straightforward:
window.addEventListener('beforeunload',function () {
let confirmationMessage = 'Do you really want to close?'
e.returnValue = confirmationMessage // Gecko, Trident, Chrome 34+
return confirmationMessage // Gecko, WebKit, Chrome < 34
})
The following approach will work, too:
window.onbeforeunload = function () {
...
return confirmationMessage
}
Let’s put this code in an event listener in componentDidMount() and remove the event listener in componentWillUnmount() (ch05/note/jsx/note.jsx).
class Note extends React.Component {
confirmLeave(e) {
let confirmationMessage = 'Do you really want to close?'
e.returnValue = confirmationMessage // Gecko, Trident, Chrome 34+
return confirmationMessage // Gecko, WebKit, Chrome <34
}
componentDidMount() {
console.log('Attaching confirmLeave event listener for beforeunload')
window.addEventListener('beforeunload', this.confirmLeave)
}
componentWillUnmount() {
console.log('Removing confirmLeave event listener for beforeunload')
window.removeEventListener('beforeunload', this.confirmLeave)
}
render() {
console.log('Render')
return Here will be our input field for notes (parent will remove in
{this.props.secondsLeft} seconds)
}
}
You want to check how your code works when the Note element is removed, right? For this reason, you need to remove the Note element so that it’s dismounted. Therefore, the next step is to implement the parent in which you not only create Note but remove it. Let’s use a timer for that (setInterval() all the way!), as shown in the following listing (ch05/note/jsx/script.jsx) and figure 5.7.
let secondsLeft = 5
let interval = setInterval(()=>{
if (secondsLeft == 0) {
ReactDOM.render(
<div>
Note was removed after {secondsLeft} seconds.
</div>,
document.getElementById('content')
)
clearInterval(interval)
} else {
ReactDOM.render(
<div>
<Note secondsLeft={secondsLeft}/>
</div>,
document.getElementById('content')
)
}
secondsLeft--
}, 1000)
Figure 5.8 shows the result (with console logs): render, attach event listener, render four more times, remove event listener.
If you don’t remove the event listener in componentWillUnmount() (you can comment out this method to see), the page will still have a pesky dialog even though the Note element is long gone, as shown in figure 5.9. This isn’t a good UX and may lead to bugs. You can use this lifecycle event to clean up after components.
The React team is listening to feedback from React developers. Most of these lifecycle events allow developers to tweak the behavior of their components. Think of lifecycle events as black-belt-Ninja-Matrix-Jedi skills. You can code without them, but boy your code will be more powerful with them. What’s interesting is that there’s still conversation about the best practices and usage. React is still evolving, and there may be changes or additions to the lifecycle events in the future. If you need to refer to the official documentation, see https://facebook.github.io/react/docs/react-component.html.
componentWillMount() will be rendered on the server. True or false?
Which event will fire first, componentWillMount() or componentDidMount()?
Which of the following is a good place to put an AJAX call to the server to get some data for a component? componentWillUnmount(), componentHasMounted(), componentDidMount(), componentWillReceiveData(), or componentWillMount()
componentWillReceiveProps() means there was a rerendering of this element (from a parent structure), and you know for sure that you have new values for the properties. True or false?
Mounting events happen multiple times on each rerendering. True or false?
True. Although there’s no DOM, this event will be triggered on the server rendering, but componentDidMount() won’t.
componentWillMount is first, followed by componentDidMount().
componentDidMount(), because it won’t be triggered on the server.
False. You can’t guarantee new values. React doesn’t know if the values have been changed.
False. Mounting isn’t triggered on rerender to optimize performance, because excessive mounting is a relatively expensive operation.
This chapter covers
So far, you’ve learned how to render UIs that have zero user interaction. In other words, you’re just displaying data. For example, you’ve built a clock that doesn’t accept user inputs, such as setting the time zone.
Most of the time, you don’t have static UIs; you need to build elements that are smart enough to respond to user actions. How do you respond to user actions such as clicking and dragging a mouse?
This chapter provides the solution to how to handle events in React. Then, in chapter 7, you’ll apply this knowledge of events to working with web forms and their elements. I’ve mentioned that React supports only certain events; in this chapter, I’ll show you how to work with events that aren’t supported by React.
The source code for the examples in this chapter is at https://www.manning.com/books/react-quickly and https://github.com/azat-co/react-quickly/tree/master/ch06 (in the ch06 folder of the GitHub repository https://github.com/azat-co/react-quickly). You can also find some demos at http://reactquickly.co/demos.
Let’s look how you can make React elements respond to user actions by defining event handlers for those actions. You do this by defining the event handler (function definition) as the value of an element attribute in JSX and as an element property in plain JavaScript (when createElement() is called directly without JSX). For attributes that are event names, you use standard W3C DOM event names in camelCase, such as onClick or onMouseOver, as in
onClick={function() {...}}
or
onClick={() => {...}}
For example, in React, you can define an event listener that’s triggered when a user clicks a button. In the event listener, you’re logging the this context. The event object is an enhanced version of a native DOM event object (called SyntheticEvent):
<button onClick={(function(event) {
console.log(this, event)
}).bind(this)}>
Save
</button>
bind() is needed so that in the event-handler function, you get a reference to the instance of the class (React element). If you don’t bind, this will be null (use strict mode). You don’t bind the context to the class using bind(this) in the following cases:
You can also make things neater by using a class method as event handler (let’s name it handleSave()) for the onClick event. Consider a SaveButton component that, when clicked, prints the value of this and event, but uses a class method as shown in figure 6.1 and the following listing (ch06/button/jsx/button.jsx).
This is how the save button will log the output of this and event.
Moreover, you can bind an event handler to the class in the class’s constructor. Functionally, there’s no difference; but if you’re using the same method more than once in render(), then you can reduce duplication by using the constructor binding. Here’s the same button, but with constructor binding for the event handler:
Binding event handlers is my favorite and recommended approach, because it eliminates duplication and puts all the binding neatly in one place.
Table 6.1 lists the current event types supported by React v15. Notice the use of camelCase in the event names, to be consistent with other attribute names in React.
As you can see, React supports several types of normalized events. If you contrast this with the list of standard events at https://developer.mozilla.org/en-US/docs/Web/Events, you’ll see that React’s support is extensive—and you can be sure that team React will add more events in the future! For more information and event names, visit the documentation page at http://facebook.github.io/react/docs/events.html.
As I’ve noted, React is declarative, not imperative, which removes the need to manipulate objects; and you don’t attach events to your code as you would with jQuery (for example, $('.btn').click(handleSave)). Instead, you declare an event in the JSX as an attribute (for instance, onClick={handleSave}). If you’re declaring mouse events, the attribute name can be any of the supported events from table 6.1. The value of the attribute is your event handler.
For example, if you want to define a mouse-hover event, you can use onMouseOver, as shown in the following code. Hovering will display “mouse is over” in your DevTools or Firebug console when you move your cursor over the <div>’s red border:
<div
style={{border: '1px solid red'}}
onMouseOver={()=>{console.log('mouse is over')}} >
Open DevTools and move your mouse cursor over here
</div>
The events shown previously, such as onMouseOver, are triggered by an event in the bubbling phase (bubble up). As you know, there’s also a capture phase (trickle down), which precedes the bubbling and target phases. First is the capture phase, from the window down to the target element; next is the target phase; and only then comes the bubbling phase, when an event travels up the tree back to the window, as shown in figure 6.2.
The distinction between phases becomes important when you have the same event on an element and its ancestor(s). In bubbling mode, the event is first captured and handled by the innermost element (target) and then propagated to outer elements (ancestors, starting with the target’s parent). In capture mode, the event is first captured by the outermost element and then propagated to the inner elements.
To register an event listener for the capture phase, append Capture to an event name. For example, instead of using onMouseOver, you use onMouseOverCapture to handle the mouseover event in the capture phase. This applies to all the event names listed in table 6.1.
To illustrate, suppose you have a <div> with a regular (bubbling) event and a capture event. Those events are defined with onMouseOver and onMouseOverCapture, respectively (ch06/mouse-capture/jsx/mouse.jsx).
class Mouse extends React.Component {
render() {
return <div>
<div
style={{border: '1px solid red'}}
onMouseOverCapture={((event)=>{
console.log('mouse over on capture event')
console.dir(event, this)}).bind(this)}
onMouseOver={((event)=>{
console.log('mouse over on bubbling event')
console.dir(event, this)}).bind(this)} >
Open DevTools and move your mouse cursor over here
</div>
</div>
}
}
The container has a red border 1 pixel wide; it contains some text, as shown in figure 6.3, so you know where to hover the cursor. Each mouseover event will log what type of event it is as well as the event object (hidden under Proxy in DevTools in figure 6.3 due to the use of console.dir()).
Not surprisingly, the capture event is logged first. You can use this behavior to stop propagation and set priorities between events.
It’s important to understand how React implements events, because events are the cornerstone of UIs. Chapter 7 dives deeper into React events.
Events work differently in React than in jQuery or plain JavaScript, which typically put the event listener directly on the DOM node. When you put events directly on nodes, there may be problems removing and adding events during the UI lifecycle. For example, suppose you have a list of accounts, and each can be removed or edited, or new accounts can be added to the list. The HTML might look something like this, with each account element <li> uniquely identified by ID:
<ul id="account-list">
<li id="account-1">Account #1</li>
<li id="account-2">Account #2</li>
<li id="account-3">Account #3</li>
<li id="account-4">Account #4</li>
<li id="account-5">Account #5</li>
<li id="account-6">Account #6</li>
</ul>
If accounts are removed from or added to the list frequently, then managing events will become difficult. A better approach is to have one event listener on a parent (account-list) and to listen for bubbled-up events (an event bubbles higher up the DOM tree if nothing catches it on a lower level). Internally, React keeps track of events attached to higher elements and target elements in a mapping. This allows React to trace the target from the parent (document), as shown in figure 6.4.
Let’s see how this event delegation to the parent looks in action in the example Mouse component from listing 6.2. There’s a <div> element with the mouseover React event. You want to inspect the events on this element.
If you open Chrome DevTools or Firefox Tools and select the data-reactroot element in the Elements or Inspector tab (or use Inspect in the Chrome context menu or Inspect Element in the Firefox context menu), then you can refer to the <div> in the console (another tab in DevTools/Firebug) by typing $0 and pressing Enter. This is a nice little trick.
Interestingly, this DOM node <div> doesn’t have any event listeners. $0 is the <div> and a reactroot element; see figure 6.5. Therefore, you can check what events are attached to this particular element (DOM node) by using the global getEventListeners() method in the DevTools console:
getEventListeners($0)
The result is an empty object {}. React didn’t attach event listeners to the reactroot node <div>. Hovering the mouse on the element logs the statements—you can clearly see that the event is being captured! Where did it go?
Feel free to repeat the procedure with <div id="content"> or perhaps with the red-bordered <div> element (child of reactroot). For each currently selected element on the Elements tab, $0 will be the selected element, so select a new element and repeat getEventListeners($0). Still nothing?
Okay. Let’s examine the events on document by calling this code from the console:
getEventListeners(document)
Boom! You have your event: Object {mouseover: Array[1]}, as shown in figure 6.6. Now you know that React attached the event listener to the ultimate parent, the granddaddy of them all—the document element. The event was not attached to an individual node like <div> or an element with the data-reactroot attribute.
Next, you can remove this event by invoking the following line in the console:
getEventListeners(document).mouseover[0].remove()
Now the message “mouse is over” won’t appear when you move the cursor. The event listener that was attached to document is gone, illustrating that React attaches events to document, not to each element. This allows React to be faster, especially when working with lists. This is contrary to how jQuery works: with that library, events are attached to individual elements. Kudos to React for thinking about performance.
If you have other elements with the same type of event—for example, two mouse-overs—then they’re attached to one event and handled by React’s internal mapping to the correct child (target element), as shown in figure 6.7. And speaking of target elements, you can get information about the target node (where the event originated) from the event object.
Browsers can differ in their implementations of the W3C specification (see www.w3.org/TR/DOM-Level-3-Events). When you’re working with DOM events, the event object passed to the event handler may have different properties and methods. This can lead to cross-browser issues when you’re writing event-handling code. For example, to get the target element in IE version 8, you’d need to access event.srcElement, whereas in Chrome, Safari, and Firefox, you’d use event.target:
var target = event.target || event.srcElement console.log(target.value)
Of course, things are better in terms of cross-browser issues in 2016 than in 2006. But still, do you want to spend time reading specs and debugging issues due to obscure discrepancies between browser implementations? I don’t.
Cross-browser issues aren’t good because users should have the same experience on different browsers. Typically, you need to add extra code, such as if/else statements, to account for the difference in browser APIs. You also have to perform more testing in different browsers. In short, working around and fixing cross-browser issues is worse on the annoyance scale than CSS issues, IE8 issues, or scrupulous designers in hipster glasses.
React has a solution: a wrapper around browsers’ native events. This makes events consistent with the W3C specification regardless of the browser on which you run your pages. Under the hood, React uses its own special class for synthetic events (Synthetic-Event). Instances of this SyntheticEvent class are passed to the event handler. For example, to get access to a synthetic event object, you can add an argument event to the event-handler function, as shown in the following listing (ch06/mouse/jsx/mouse.jsx). This way, the event object is output in the console, as shown in figure 6.8.
As you’ve seen before, you can move the event-handler code into a component method or a standalone function. For example, you can create a handleMouseOver() method using ES6+/ES2015+ class method syntax and refer to it from the return of render() with {this.handleMouseOver.bind(this)}. The bind() is needed to transfer the proper value of this into the function. When you use fat-arrow syntax as you did in the previous example, this happens automatically. It also happens automatically with createClass() syntax. Not with class, though. Of course, if you don’t use this in the method, you don’t have to bind it; just use onMouseOver={this.handleMouseOver}.
The name handleMouseOver() is arbitrary (unlike the names of lifecycle events, covered in chapter 5) and doesn’t have to follow any convention as long as you and your team understand it. Most of the time in React, you prefix an event handler with handle to distinguish it from a regular class method, and you include either an event name (such as mouseOver) or the name of the operation (such as save).
class Mouse extends React.Component {
handleMouseOver(event) {
console.log('mouse is over with event')
console.dir(event.target)
}
render(){
return <div>
<div
style={{border: '1px solid red'}}
onMouseOver={this.handleMouseOver.bind(this)} >
Open DevTools and move your mouse cursor over here
</div>
</div>
}
}
The event has the same properties and methods as most native browser events, such as stopPropagation(), preventDefault(), target, and currentTarget. If you can’t find a native property or method, you can access a native browser event with nativeEvent:
event.nativeEvent
Following is a list of some of the attributes and methods of React’s v15.x Synthetic-Event interface:
The aforementioned target property of the event object has the DOM node of the object on which the event happened, not where it was captured, as with currentTarget (https://developer.mozilla.org/en-US/docs/Web/API/Event/target). Most often, when you build UIs, in addition to capturing, you need to get the text of an input field. You can get it from event.target.value.
The synthetic event is nullified (meaning it becomes unavailable) once the event handler is done. So you can use the same event reference in a variable to access it later or to access it asynchronously (in the future) in a callback function. For example, you can save the reference of the event object in a global e as follows (ch06/mouse-event/jsx/mouse.jsx).
You’ll get a warning saying that React is reusing the synthetic event for performance reasons (see figure 6.9):
This synthetic event is reused for performance reasons. If you're seeing this,
If you need to keep the synthetic event after the event handler is over, use the event.persist() method. When you apply it, the event object won’t be reused and nullified.
You’ve seen that React will even synthesize (or normalize) a browser event for you, meaning that React will create a cross-browser wrapper around the native event objects. The benefit of this is that events work identically in virtually all browsers. And in most cases, you have all the native methods on the React event, including event.stopPropagation() and event.preventDefault(). But if you still need to access a native event, it’s in the event.nativeEvent property of the synthetic event object. Obviously, if you work with native events directly, you’ll need to know about and work with any cross-browser differences you encounter.
Using states with events, or, to put it differently, being able to change a component’s state in response to an event, will give you interactive UIs that respond to user actions. This is going to be fun, because you’ll be able to capture any events and change views based on these events and your app logic. This will make your components self-contained, because they won’t need any external code or representation.
For example, let’s implement a button with a label that has a counter starting at 0, as shown in figure 6.10. Each click of the button increments the number shown on a button (1, 2, 3, and so on).
You start by implementing the following:
The click() method is not unlike any other React component method. Remember getUrl() in chapter 3 and handleMouseOver() earlier in this chapter? This component method is declared similarly, except that you have to manually bind the this context. The handleClick() method sets the counter state to the current value of counter, incremented by 1 (ch06/onclick/jsx/content.jsx).
Just a reminder: did you notice that although this.handleClick() is a method in listing 6.6, you don’t invoke it in JSX when you assign it to onClick (that is, <button onClick={this.handleClick})? In other words, there are no parentheses (()) after this.handleClick() inside the curly braces. That’s because you need to pass a function definition, not invoke it. Functions are first-class citizens in JavaScript, and in this case, you pass the function definition as a value to the onClick attribute.
On the other hand, bind() is invoked because it lets you use the proper value of this, but bind() returns a function definition. So you still get the function definition as the value of onClick.
Keep in mind, as noted previously, onClick isn’t a real HTML attribute, but syntactically it looks just like any other JSX declaration (for example, className={btnClassName} or href={this.props.url}).
When you click the button, you’ll see the counter increment with each click. Figure 6.10 shows that I clicked the button eight times: the counter is now at 8 but initially was at 0. Brilliant, isn’t it?
Analogous to onClick or onMouseOver, you can use any DOM events supported by React. In essence, you define the view and an event handler that changes the state. You don’t imperatively modify the representation. This is the power of declarative style!
The next section will teach you how to pass event handlers and other objects to children elements.
Consider this scenario: you have a button that’s a stateless component. All it has is styling. How do you attach an event listener so this button can trigger some code?
Let’s go back to properties for a moment. Properties are immutable, which means they don’t change. They’re passed by parent components to their children. Because functions are first-class citizens in JavaScript, you can have a property in a child element that’s a function and use it as an event handler.
The solution to the problem outlined earlier—triggering an event from a stateless component—is to pass the event handler as a property to this stateless component and use the property (event-handler function) in the stateless component (invoke the function). For example, let’s break down the functionality of the previous example into two components: ClickCounterButton and Content. The first will be dumb (stateless) and the second smart (stateful).
Dumb and smart components are sometimes called presentational and container components, respectively. This dichotomy is related to statelessness and statefulness but isn’t always exactly the same.
Most of the time, presentational components don’t have states and can be stateless or function components. That’s not always the case, because you may need to have some state that relates to the presentation.
Presentational/dumb components often use this.props.children and render DOM elements. On the other hand, container/smart components describe how things work without DOM elements, have states, typically use higher-order component patterns, and connect to data sources.
Using a combination of dumb and smart components is the best practice. Doing so keeps things clean and allows for better separation of concerns.
When you run the code, the counter increases with each click. Visually, nothing has changed from the previous example with the button and the counter (figure 6.10); but internally, there’s an extra component ClickCounterButton (stateless and pretty much logic-less) in addition to Content, which still has all the logic.
ClickCounterButton doesn’t have its own onClick event handler (that is, it has no this.handler or this.handleClick). It uses the handler passed down to it by its parent in a this.props.handler property. Generally, using this approach is beneficial for handling events in a button, because the button is a stateless presentational/dumb component. You can reuse this button in other UIs.
The following listing shows the code for the presentational component that renders the button (ch06/onclick-props/jsx/click-counter-button.jsx); the Content parent that renders this element is shown shortly, in listing 6.8.
class ClickCounterButton extends React.Component {
render() {
return <button
onClick={this.props.handler}
className="btn btn-danger">
Increase Volume (Current volume is {this.props.counter})
</button>
}
}
The ClickCounterButton component, shown in figure 6.11, is dumber than Dumb & Dumber,[1] but that’s what’s good about this architecture. The component is simple and easy to grasp.
The ClickCounterButton component also uses the counter property, which is rendered with {this.props.counter}. Supplying properties to children like ClickCounterButton is straightforward if you remember the examples from chapter 2. You use the standard attribute syntax: name=VALUE.
For example, to provide counter and handler properties to the ClickCounterButton component, specify the attributes in the JSX declaration of the parent’s render parameter (the parent here is Content):
<div>
<ClickCounterButton
counter={this.state.counter}
handler={this.handleClick}/>
</div>
counter in ClickCounterButton is a property and thus immutable; but in the Content parent, it’s a state and thus mutable. (For a refresher on properties versus state, see chapter 4.) Obviously, the names can differ. You don’t have to keep the names the same when you pass properties to children. But I find that keeping the same name helps me understand that the data is related between different components.
What’s happening? The initial counter (the state) is set to 0 in the Content parent. The event handler is defined in the parent as well. Therefore, the child (Click-CounterButton) triggers the event on a parent. The code for the Content parent com ponent with constructor() and handleClick() is shown next (ch06/onclick-props/jsx/content.jsx).
As I said earlier, in JavaScript, functions are first-class citizens, and you can pass them as variables or properties. Thus, there should be no big surprises here. Now the question arises, where do you put logic such as event handlers—in a child or parent?
In the previous example, the click event handler was in the parent element. You can put the event handler in the child, but using the parent allows you to exchange information among child components.
Let’s use a button as an example but this time remove the counter value from render() (1, 2, 3, and so on). The components are single-minded, granular pieces of representation (remember?), so the counter will be in another component: Counter. Thus, you’ll have three components in total: ClickCounterButton, Content, and Counter.
As you can see in figure 6.12, there are now two components: the button and the text below it. Each has properties that are states in the Content parent. In contrast to the previous example (figure 6.11), here you need to communicate between the button and the text to count clicks. In other words, ClickCounterButton and Counter need to talk to each other. They’ll do it via Content, not directly (communicating directly would be a bad pattern because it would create tight coupling).
ClickCounterButton remains stateless as in the previous example, just like most React components should be: no thrills, just properties and JSX.
class ClickCounterButton extends React.Component {
render() {
return <button
onClick={this.props.handler}
className="btn btn-info">
Don't touch me with your dirty hands!
</button>
}
}
Of course, you can also write ClickCounterButton as a function instead of a class to simplify the syntax a little:
const ClickCounterButton = (props) => {
return <button
onClick={props.handler}
className="btn btn-info">
Don't touch me with your dirty hands!
</button>
}
The following new component, Counter, displays the value property that’s the counter (names can be different—you don’t have to always use counter):
class Counter extends React.Component {
render() {
return <span>Clicked {this.props.value} times.</span>
}
}
Finally, we get to the parent component that provides the properties: one is the event handler, and the other is a counter. You need to update the render parameter accordingly, but the rest of the code remains intact (ch06/onclick-parent/jsx/content.jsx).
class Content extends React.Component {
constructor(props) {
super(props)
this.handleClick = this.handleClick.bind(this)
this.state = {counter: 0}
}
handleClick(event) {
this.setState({counter: ++this.state.counter})
}
render() {
return (
<div>
<ClickCounterButton handler={this.handleClick}/>
<br/>
<Counter value={this.state.counter}/>
</div>
)
}
}
To answer the initial question of where to put the event-handling logic, the rule of thumb is to put it in the parent or wrapper component if you need interaction between child components. If the event concerns only the child components, there’s no need to pollute the components higher up the parent chain with event-handling methods.
Table 6.1 listed events supported by React. You may wonder about DOM events not supported by React. For example, suppose you’re tasked with creating a scalable UI that needs to become bigger or smaller depending on a window size (resize) event. But this event isn’t supported! There’s a way to capture resize and any other event, and you already know the React feature to implement it: lifecycle events.
In this example, you’ll implement radio buttons. As you may know, standard HTML radio button elements scale (become larger or smaller) badly and inconsistently across browsers. For this reason, back when I worked at DocuSign, I implemented scalable CSS radio buttons (http://mng.bz/kPMu) to replace standard HTML radio inputs. I did that in jQuery. These CSS buttons can be scaled via jQuery by manipulating their CSS. Let’s see how to create a scalable radio button UI in React. You’ll make the same CSS buttons scale with React when you resize the screen, as shown in figure 6.13.
As I said earlier, the resize event isn’t supported by React—adding it to the element as shown here won’t work:
...
render() {
return <div>
<div onResize={this.handleResize}
className="radio-tagger"
style={this.state.taggerStyle}>
...
There’s a simple way to attach unsupported events like resize and most custom elements you need to support: using React component lifecycle events. Listing 6.11 (ch06/radio/jsx/radio.jsx) adds resize event listeners to window in componentDidMount() and then removes the same event listeners in componentWillUnmount() to make sure nothing is left after this component is gone from the DOM. Leaving event listeners hanging after their components are removed is a great way to introduce memory leaks that might crash your app at some point. Believe me, memory leaks can be a source of sleepless, red-eyed, Red Bull–fueled nights spent debugging and cursing.
The helper function getStyle() abstracts some of the styling because there’s repetition in the CSS, such as top, bottom, left, and right, but with different values that depend on the width of the window. Hence, getStyle() takes the value and the multiplier m and returns pixels. (Numbers in React’s CSS become pixels.)
The rest of the code is easy. All you need to do is implement the render() method, which uses the states and properties to render four <div/> elements. Each one has a special style, defined earlier in constructor().
...
render() {
return <div>
<div className="radio-tagger" style={this.state.taggerStyle}>
<input type="radio" name={this.props.name} id={this.props.id}>
</input>
<label htmlFor={this.props.id}>
<div className="radio-text" style={this.state.textStyle}>
{this.props.label}</div>
<div className="radio-outer" style={this.state.outerStyle}>
<div className="radio-inner" style={this.state.innerStyle}>
<div className="radio-selected"
style={this.state.selectedStyle}>
</div>
</div>
</div>
</label>
</div>
</div>
}
}
That’s it for the Radio component implementation. The gist of this example is that by using lifecycle events in your components, you can create custom event listeners. In this example, you did so by using window. This is similar to how React’s event listeners work: React attaches events to document, as you remember from the beginning of this chapter. And don’t forget to remove the custom event listeners on the unmount event.
If you’re interested in the scalable radio buttons and their non-React implementation (jQuery), I wrote a separate blog post at http://mng.bz/kPMu and created an online demo at http://jsfiddle.net/DSYz7/8. Of course, you can find the React implementation in the source code for this book.
This brings us to the topic of integrating React with other UI libraries, such as jQuery.
As you’ve seen, React provides standard DOM events; but what if you need to integrate with another library that uses (triggers or listens to) nonstandard events? For example, suppose you have jQuery components that use slide (as in the slider control element). You want to integrate a React widget into your jQuery app. You can attach any DOM events not provided by React, using the component lifecycle events componentDidMount and componentWillUnmount.
As you may have guessed from the choice of the lifecycle events, you’ll be attaching an event listener when the component is mounted and detaching the event listener when the component is unmounted. Detaching (you can think of it as a cleanup) is important so that no event listeners are causing conflicts or performance issues by hanging around as orphans. (Orphaned event handlers are handlers that don’t have DOM nodes that created them—potential memory leaks.)
For example, suppose you’re working at a music-streaming company, and you’re tasked with implementing volume controls on the new version of the web player (think Spotify or iTunes). You need to add a label and buttons in addition to the legacy jQuery slider (http://plugins.jquery.com/ui.slider).
You want to implement a label with a numeric value, and two buttons to decrease and increase the value by 1. The idea is to make these pieces work together: when a user slides the pin (the square peg on a slider) left or right, the numeric value and the values on the buttons should change accordingly. In the same fashion, the user should be able to click either button, and the slider pin should move left or right correspondingly. In essence, you want to create not just a slider, but the widget shown in figure 6.14.
You have at least two options when it comes to integration: first, attaching events for jQuery Slider in a React component; and second, using window. Let’s start with the first approach and use it for buttons.
This approach for integrating buttons is tightly coupled. Objects depend on each other. Generally, you should avoid tightly coupled patterns. The other, more loosely coupled option, will be implemented for integrating labels after we cover this approach.
When there’s a slide event on the jQuery slider (meaning there’s a change in that value), you want to update the button values (text on buttons). You can attach an event listener to the jQuery slider in componentDidMount and trigger a method on a React component (handleSlide) when there’s a slide event. With every slide and change in value, you’ll update the state (sliderValue). SliderButtons implements this approach, as shown in the following listing (ch06/slider/jsx/slider-buttons.jsx).
The render() method of SliderButtons has two buttons with onClick events; a dynamic disabled attribute so you don’t set values less than 0 (see figure 6.15) or greater than 100; and Twitter Bootstrap classes for buttons (ch06/slider/jsx/slider-buttons.jsx).
The end result is that if the value is less than or greater than the set range (minimum of 0, maximum of 100), the buttons become disabled. For example, when the value is 0, the Less button is disabled, as shown in figure 6.15.
Dragging the slider changes the text on the buttons and disables/enables them as needed. Thanks to the call to the slider in handleChange(), clicking the buttons moves the slider left or right. Next, you’ll implement the Value label, which is a SliderValue React component.
You read about calling jQuery directly from React methods. At the same time, you can decouple jQuery and React by using another object to catch events. This is a loosely coupled pattern and is often preferable, because it helps avoid extra dependencies. In other words, different components don’t need to know the details of each others’ implementation. Thus, the SliderValue React component won’t know how to call a jQuery slider. This is good, because later you can more easily change Slider to Slider 2.0 with a different interface.
You can implement this by dispatching events to window in jQuery events and defining event listeners for window in React component lifecycle methods. The following listing shows SliderValue (ch06/slider/jsx/slider-value.jsx).
In addition, you need to dispatch a custom event. In the first approach (Slider-Buttons), you didn’t need to do this, because you used existing plug-in events. In this implementation, you have to create an event and dispatch it to window with data. You can implement the dispatchers of the slide custom event alongside the code that creates the jQuery slider object, which is a script tag in index.html (ch06/slider/index.html).
When you run the code, both buttons and the value label will work seamlessly. You used two approaches: one loosely coupled and the other tightly coupled. The latter’s implementation is shorter, but the former is preferable because it will allow you to modify the code more easily in the future.
As you can see from this integration, React can work nicely with other libraries by listening to events in its componentDidMount() lifecycle method. React acts in a very un-opinionated way. React can play nicely with others! React’s easy integration with other libraries is a great advantage because developers can switch to React gradually instead of rewriting an entire application from scratch, or they can just continue to use their favorite good-old libraries with React indefinitely.
Select the correct syntax for the event declaration: onClick=this.doStuff, onclick={this.doStuff}, onClick="this.doStuff", onClick={this.doStuff}, or onClick={this.doStuff()}
componentDidMount() won’t be triggered during server-side rendering of the React component on which it’s declared. True or false?
One way to exchange information among child components is to move the object to the parent of the children. True or false?
You can use event.target asynchronously and outside the event handler by default. True or false?
You can integrate with third-party libraries and events not supported by React by setting up event listeners in the component lifecycle events. True or false?
onClick={this.doStuff} is correct because only the function definition must be passed to onClick, not the invocation (the result of the invocation, to be precise).
True. componentDidMount() is only executed for browser React (React in the browser), not for server-side React. That’s why developers use componentDid-Mount() for AJAX/XHR requests. See chapter 5 for a refresher on component lifecycle events.
True. Moving data up the tree hierarchy of components lets you pass it to different child components.
False. This object is reused, so you can’t use it in an asynchronous operation unless persist() is called on SyntheticEvent.
True. Component lifecycle events are one of the best places to do this, because they let you do the prep work before a component is active and before it’s removed.
This chapter covers
Thus far, you’ve learned about events, states, component composition, and other important React topics, features, and concepts. But aside from capturing user events, I haven’t covered how to capture text input and input via other form elements like input, textarea, and option. Working with them is paramount to web development, because they allow your applications to receive data (such as text) and actions (such as clicks) from users.
This chapter refers to pretty much everything I’ve covered so far. You’ll begin to see how everything fits together.
The source code for the examples in this chapter is at www.manning.com/books/react-quickly and https://github.com/azat-co/react-quickly/tree/master/ch07 (in the ch07 folder of the GitHub repository https://github.com/azat-co/react-quickly). You can also find some demos at http://reactquickly.co/demos.
In regular HTML, when you’re working with an input element, the page’s DOM maintains that element’s value in its DOM node. It’s possible to access the value via methods like document.getElementById('email').value or by using jQuery methods. In essence, the DOM is your storage.
In React, when you’re working with forms or any other user-input fields such as standalone text fields or buttons, you have an interesting problem to solve. The React documentation says, “React components must represent the state of the view at any point in time and not only at initialization time.” React is all about keeping things simple by using declarative style to describe UIs. React describes the UI: its end stage, how it should look.
Can you spot a conflict? In traditional HTML form elements, the states of elements change with user input. But React uses a declarative approach to describe UIs. Input needs to be dynamic to reflect the state properly.
Thus, opting not to maintain the component state (in JavaScript) and not to sync it with the view adds problems; there may be a situation when the internal state and view are different. React won’t know about the changed state. This can lead to all sorts of trouble and bugs, and negates React’s simple philosophy. The best practice is to keep React’s render() as close to the real DOM as possible—and that includes the data in the form elements.
Consider the following example of a text-input field. React must include the new value in its render() for that component. Consequently, you need to set the value for the element to a new value using value. But if you implement an <input> field as in HTML, React will always keep render() in sync with the real DOM. React won’t allow users to change the value. Try it yourself. It’s peculiar, but that’s the appropriate behavior for React!
render() {
return <input type="text" name="title" value="Mr." />
}
This code represents the view at any state, so the value will always be Mr.. On the other hand, input fields must change in response to the user clicking or typing. Given these points, let’s make the value dynamic. This is a better implementation, because it’ll be updated from the state:
render() {
return <input type="text" name="title" value={this.state.title} />
}
But what’s the value of state? React can’t know about users typing in the form elements. You need to implement an event handler to capture changes with onChange:
handleChange(event) {
this.setState({title: event.target.value})
}
render() {
return <input type="text" name="title" value={this.state.title}
onChange={this.handleChange.bind(this)}/>
}
Given these points, the best practice is to implement these things to sync the internal state with the view (see figure 7.1):
It may seem like a lot of work at first glance, but I hope that when you’ve used React more, you’ll appreciate this approach. It’s called one-way binding because the state changes views, and that’s it. There’s no trip back: only a one-way trip from state to view. With one-way binding, a library won’t update the state (or the model) automatically. One of the main benefits of one-way binding is that it removes complexity when you’re working with large apps where many views implicitly can update many states (data models) and vice versa (see figure 7.2).
Simple doesn’t always mean writing less code. Sometimes, as in this case, you’ll have to write extra code to manually set the data from event handlers to the state (which is rendered to the view); but this approach tends to be superior when it comes to complex UIs and single-page applications with myriads of views and states. Simple isn’t always easy.
Conversely, two-way binding makes it possible for views to change states automatically without you explicitly implementing the process. Two-way binding is how Angular 1 works. Interestingly, Angular 2 borrowed the concept of one-way binding from React and made it the default (you can still have two-way binding explicitly).
For this reason, I’ll first cover the recommended approach of working with forms. It’s called using controlled components, and it ensures that the internal component state is always in sync with the view. Controlled form elements are called that because React controls or sets the values. The alternative approach is uncontrolled components, which I’ll discuss in section 7.2.
You’ve learned the best practice of working with input fields in React: capturing the change and applying it to the state as shown in figure 7.1 (input to changed view). Next, let’s look at how you define a form and its elements.
Let’s start with the <form> element. Typically, you don’t want input elements hanging around randomly in the DOM. This situation can turn bad if you have many functionally different sets of inputs. Instead, you wrap input elements that share a common purpose in a <form></form> element.
Having a <form> wrapper isn’t required. It’s fine to use form elements by themselves in simple UIs. In more-complex UIs, where you may have multiple groups of elements on a single page, it’s wise to use <form> for each such group. React’s <form> is rendered like an HTML <form>, so whatever rules you have for the HTML form will apply to React’s <form> element, too. For example, according to the HTML5 spec, you should not nest forms.[1]
The specification says content must be flow content, but with no <form> element descendants. See www.w3.org/TR/html5/forms.html#the-form-element.
The <form> element can have events. React supports three events for forms in addition to the standard React DOM events (as outlined in table 6.1):
React’s onChange fires on every change, in contrast to the DOM’s change event (http://mng.bz/lJ37), which may not fire on each value change but fires on lost focus. For example, for <input type="text">, a user can be typing with no onChange; only after the user presses Tab or clicks away with their mouse to another element (lost focus) is onChange fired in HTML (regular browser event). As mentioned earlier, in React, onChange fires on each keystroke, not just on lost focus. On the other hand, onInput in React is a wrapper for the DOM’s onInput, which fires on each change.
The bottom line is that React’s onChange works differently than onChange in HTML: it’s more consistent and more like HTML’s onInput. The recommended approach is to use onChange in React and to use onInput only when you need to access native behavior for the onInput event. The reason is that React’s onChange wrapper behavior provides consistency and thus sanity.
In addition to the three events already listed, <form> can have standard React events such as onKeyUp and onClick. Using form events may come in handy when you need to capture a specific event for the entire form (that is, a group of input elements).
For example, it helps provide a good UX if you allow users to submit data when they press Enter (assuming they’re not in a textarea field, in which case Enter should create a new line). You can listen to the form-submit event by creating an event listener that triggers this.handleSubmit():
handleSubmit(event) {
...
}
render() {
<form onSubmit={this.handleSubmit}>
<input type="text" name="email" />
</form>
}
You need to implement the handleSubmit() function outside of render(), just as you’d do with any other event. React doesn’t require a naming convention, so you can name the event handler however you wish as long as the name is understandable and somewhat consistent. This book sticks with the most popular convention: prefixing event handlers with the word handle to distinguish them from regular class methods.
As a reminder, don’t invoke a method (don’t put parentheses) and don’t use double quotes around curly braces (correct: EVENT={this.METHOD}) when setting the event handler. For some of you, this is basic JavaScript and straightforward, but you wouldn’t believe how many times I’ve seen errors related to these two misunderstandings in React code: you pass the definition of the function, not its result; and you use curly braces as values of the JSX attributes.
Another way to implement form submission on Enter is to manually listen to the key-up event (onKeyUp) and check for the key code (13 for Enter):
handleKeyUp(event) {
if (event.keyCode == 13) return this.sendData()
}
render() {
return <form onKeyUp={this.handleKeyUp}>
...
</form>
}
Note that the sendData() method is implemented somewhere else in the class/component. Also, for this.sendData() to work, you’ll need to use bind(this) to bind the context to the event handler in constructor().
To summarize, you can have events on the form element, not just on individual elements in the form. Next, we’ll look at how to define form elements.
You implement almost all input fields in HTML with just four elements: <input>, <textarea>, <select>, and <option>. Do you remember that in React, properties are immutable? Well, form elements are special because users need to interact with the elements and change these properties. For all other elements, this is impossible.
React made these elements special by giving them the mutable properties value, checked, and selected. These special mutable properties are also called interactive properties.
React DOM also supports other elements related to building forms, such as <keygen>, <datalist>, <fieldset>, and <label>. These elements don’t possess superpowers like a mutable value attribute/property. They’re rendered as the corresponding HTML tags. For this reason, this book focuses only on the four main elements with superpowers.
Here’s a list of the interactive properties/fields (ones that can change) you can read from events like onChange attached to form elements (covered in section 6.1.3):
You can read the values and change them by working with these interactive (mutable) properties. Let’s look at some examples of how to define each of the elements.
The <input> element renders multiple fields by using different values for its type attribute:
The main use case for all <input> type elements—except check boxes and radio buttons—is to use value as the element’s interactive/changeable property. For example, an email input field can use the email state and onChange event handler:
<input
type="text"
name="email"
value={this.state.email}
onChange={this.handleEmailChange}/>
The two exceptions that don’t have value as their primary mutable attribute are inputs with the types checkbox and radio. They use checked because these two types have one value per HTML element, and thus the value doesn’t change, but the state of checked/selected does. For example, you can define three radio buttons in one group (radioGroup) by defining these three elements, as shown in figure 7.3.
As mentioned earlier, the values (value) are hardcoded because you don’t need to change them. What changes with user actions is the element’s checked attribute, as shown in the following listing (ch07/elements/jsx/content.jsx).
For check boxes, you follow an approach similar to that for radio buttons: using the checked attribute and Boolean values for states. Those Booleans can be stored in a checkboxGroup state:
class Content extends React.Component {
constructor(props) {
super(props)
this.handleCheckbox = this.handleCheckbox.bind(this)
// ...
this.state = {
// ...
checkboxGroup: {
node: false,
react: true,
express: false,
mongodb: false
}
}
}
Then the event handler (which you bind in the constructor) grabs the current values, adds true or false from event.target.value, and sets the state:
There’s no need for the assignment from the state in radio, because radio buttons can have only one selected value. Thus, you use an empty object. This isn’t the case with check boxes: they can have multiple values selected, so you need a merge, not a replace.
In JavaScript, objects are passed and assigned by references. So in the statement obj = this.state.checkboxGroup, obj is really a state. As you’ll recall, you aren’t supposed to change the state directly. To avoid any potential conflicts, it’s better to assign by value with Object.assign(). This technique is also called cloning. Another, less effective and more hacky way to assign by value is to use JSON:
clonedData = JSON.parse(JSON.stringify(originalData))
When you’re using state arrays instead of objects and need to assign by value, use clonedArray = Array.from(originArray) or clonedArray = originArray.slice().
You can use the handleCheckbox() event handler to get the value from event.target.value. The next listing shows render() (ch07/elements/jsx/content.jsx), which uses the state values for four check boxes, as shown in figure 7.4.
In essence, when you’re using check boxes or radio buttons, you can hardcode the value in each individual element and use checked as your mutable attribute. Let’s see how to work with other input elements.
<textarea> elements are for capturing and displaying long text inputs such as notes, blog posts, code snippets, and so on. In regular HTML, <textarea> uses inner HTML (that is, children) for the value:
<textarea> With the right pattern, applications... </textarea>
Figure 7.5 shows an example.
In contrast, React uses the value attribute. In view of this, setting a value as inner HTML/text is an antipattern. React will convert any children (if you use them) of <textarea> to the default value (more on default values in section 7.2.4):
<!-- Anti-pattern: AVOID doing this! -->
<textarea name="description">{this.state.description}</textarea>
Instead, it’s recommended that you use the value attribute (or property) for <textarea>:
render() {
return <textarea name="description" value={this.state.description}/>
}
To listen for the changes, use onChange as you would for <input> elements.
Select and option fields are great UX-wise for allowing users to select a single value or multiple values from a prepopulated list of values. The list of values is compactly hidden behind the element until users expand it (in the case of a single select), as shown in figure 7.6.
<select> is another element whose behavior is different in React compared to regular HTML. For instance, in regular HTML, you might use selectDOMNode.selectedIndex to get the index of the selected element, or selectDOMNode.selectedOptions. In React, you use value for <select>, as in the following example (ch07/elements/jsx/content.jsx).
...
constructor(props) {
super(props)
this.state = {selectedValue: 'node'}
}
handleSelectChange(event) {
this.setState({selectedValue: event.target.value})
}
...
render() {
return <form>
<select
value={this.state.selectedValue}
onChange={this.handleSelectChange}>
<option value="ruby">Ruby</option>
<option value="node">Node</option>
<option value="python">Python</option>
</select>
</form>
}
...
This code renders a drop-down menu and preselects the node value (which must be set in constructor(), as shown in figure 7.6). Yay for Node!
Sometimes you need to use a multiselect element. You can do so in JSX/React by providing the multiple attribute without any value (React defaults to true) or with the value {true}.
Remember that for consistency, and to avoid confusion, I recommend wrapping all Boolean values in curly braces {} and not "". Sure, "true" and {true} produce the same result. But "false" will also produce true. This is because the string "false" is treated as true in JavaScript (truthy).
To preselect multiple items, you can pass an array of options to <select> via its value attribute. For example, this code preselects Meteor and React:
<select multiple={true} value={['meteor', 'react']}>
<option value="meteor">Meteor</option>
<option value="react">React</option>
<option value="jQuery">jQuery</option>
</select>
multiple={true} renders the multiselect element, and the Meteor and React values are preselected as shown in figure 7.7.
Overall, defining form elements in React isn’t much different than doing so in regular HTML, except that you use value more often. I like this consistency. But defining is half the work; the other half is capturing the values. You did a little of that in the previous examples. Let’s zoom in on event captures.
As mentioned earlier, to capture changes to a form element, you set up an onChange event listener. This event supersedes the normal DOM’s onInput. In other words, if you need the regular HTML DOM behavior of onInput, you can use React’s onInput. On the other hand, React’s onChange isn’t exactly the same as the regular DOM onChange. The regular DOM onChange may be fired only when the element loses focus, whereas React’s onChange fires on all new input. What triggers onChange varies for each element:
Based on this mapping, the approach to reading the value varies. As an argument of the event handler, you’re getting a SyntheticEvent. It has a target property of value, checked, or selected, depending on the element.
To listen for changes, you define the event handler somewhere in your component (you can define it inline too, meaning in the JSX’s {}) and create the onChange attribute pointing to your event handler. For example, this code captures changes from an email field (ch07/elements/jsx/content.jsx).
handleChange(event) {
console.log(event.target.value)
}
render() {
return <input
type="text"
onChange={this.handleChange}
defaultValue="hi@azat.co"/>
}
Interestingly, if you don’t define onChange but provide value, React will issue a warning and make the element read-only. If your intention is to have a read-only field, it’s better to define it explicitly by providing readOnly. This will not only remove the warning, but also ensure that other programmers who read this code know this is a read-only field by design. To set the value explicitly, set the readOnly value to {true}—that is, readOnly={true}—or add the readOnly attribute by itself without the value, and React by default will add the value of true to the attribute.
Once you capture changes in elements, you can store them in the component’s state:
handleChange(event) {
this.setState({emailValue: event.target.value})
}
Sooner or later, you’ll need to send this information to a server or another component. In this case, you’ll have the values neatly organized in the state.
For example, suppose you want to create a loan application form that includes the user’s name, address, telephone number, and Social Security number. Each input field handles its own changes. At the bottom of this form, you’ll put a Submit button to send the state to the server. The following listing shows the name field with onChange, which keeps all input in the state (ch07/elements/jsx/content.jsx).
Fetch is an experimental native browser method to perform promise-based AJAX/XHR requests. You can read about its usage and support (it’s supported by most modern browsers as of this writing) at http://mng.bz/mbMe.
You’ve learned how to define elements, capture changes with events, and update the state (which you use to display values). The next section walks through an example.
Continuing with the loan application scenario, once the loan is approved, users need to be able to type in the number of the account to which they want their loan money transferred. Let’s implement an account field component using your new skills. This is a controlled element, which is the best practice when it comes to working with forms in React.
In the component shown in listing 7.6 (ch07/account/jsx/content.jsx), you have an account number input field that needs to accept numbers only (see figure 7.8). To limit the input to a number (0–9), you can use a controlled component to weed out all non-numeric values. The event handler sets state only after filtering the input.
You use a regular expression (http://mng.bz/r7sq), /[^0-9]/ig, and the string function replace (http://mng.bz/2Qon) to remove all non-digits. replace(/[^0-9]/ig, '') is an uncomplicated regular expression function that replaces anything but numbers with an empty space. ig stands for case insensitive and global (in other words, find all matches).
render() has the input field, which is a controlled component because value={this.state.accountNumber}. When you try this example, you’ll be able to type in only numbers because React sets the new state to the filtered number-only value (see figure 7.9).
By following React’s best practice for working with input elements and forms, you can implement validation and enforce that the representation is what the app wants it to be.
Obviously, in the account component, you’re implementing a front-end validation, which won’t prevent a hacker from inputting malicious data into your XHR request sent to the server. Therefore, make sure you have proper validation on the back-end/server and/or business layer, such as ORM/ODM (https://en.wikipedia.org/wiki/Object-relational_mapping).
So far, you’ve learned about the best practice for working with forms: creating controlled components. Let’s cover some alternatives.
Using controlled form elements is best practice. But as you’ve seen, this approach requires additional work, because you need to manually capture changes and update states. In essence, if you define the value of the attributes value, checked, and selected using strings, properties, or states, then an element is controlled (by React).
At the same time, form elements can be uncontrolled when the value attributes aren’t set (neither to a state nor to a static value). Even though this is discouraged for the reasons listed at the beginning of this chapter (the view’s DOM state may be different than React’s internal state), uncontrolled elements can be useful when you’re building a simple form that will be submitted to the server. In other words, consider using the uncontrolled pattern when you’re not building a complex UI element with a lot of mutations and user actions; it’s a hack that you should avoid most of the time.
Typically, to use uncontrolled components, you define a form-submit event, which is typically onClick on a button and/or onSubmit on a form. Once you have this event handler, you have two options:
The first approach is straightforward. It’s about having the same event listeners and updating the states. That’s too much coding if you’re using the state only at the final stage (for form submission).
React is still relatively new, and the best practices are still being formed through real-life experiences of not just writing but also maintaining apps. Recommendations may change based on a few years of maintaining a large React app. The topic of uncontrolled components is a grey area for which there’s no clear consensus. You may hear that this is an antipattern and should be avoided completely. I don’t take sides but present you with enough information to make your own judgment. I do so because I believe you should have all the available knowledge and are smart enough to act on it. The bottom line is this: consider the rest of the chapter optional reading—a tool you may or may not use.
As you’ve seen, in React, an uncontrolled component means the value property isn’t set by the React library. When this happens, the component’s internal value (or state) may differ from the value in the component’s representation (or view). Basically, there’s a dissonance between internal state and representation. The component state can have some logic (such as validation); and with an uncontrolled component pattern, your view will accept any user input in a form element, thus creating the disparity between view and state.
For example, this text-input field is uncontrolled because React doesn’t set the value:
render() {
return <input type="text" />
}
Any user input will be immediately rendered in the view. Is this good or bad? Bear with me; I’ll walk you through this scenario.
To capture changes in an uncontrolled component, you use onChange. For example, the input field in figure 7.10 has an onChange event handler (this.handleChange), a reference (textbook), and a placeholder, which yields a grey text box when the field is empty.
Here’s the handleChange() method that prints the values in the console and updates the state using event.target.value (ch07/uncontrolled/jsx/content.jsx).
The idea is that users can enter whatever they want because React has no control over the value of the input field. All React is doing is capturing new values (onChange) and setting the state. The change in state will, in turn, update <span> (see figure 7.11).
In this approach, you implement an event handler for the input field. Can you skip capturing events completely?
Let’s look at a second approach. There’s a problem with having all the values ready when you want to use them (on form submit, for example). In the approach with change capturing, you have all the data in states. When you opt to not capture changes with uncontrolled elements, the data is still in the DOM. To get the data into a JavaScript object, the solution is to use references, as shown in figure 7.12. Contrast how uncontrolled elements work in figure 7.12 with the controlled elements flow in figure 7.1, which shows how controlled elements function.
When you’re working with controlled components or with uncontrolled components that capture data, the data is in the state all the time. This isn’t the case with the approach discussed in this subsection.
To sum up, in order for the approach of using uncontrolled elements without capturing changes to work, you need a way to access other elements to get data from them.
You use references to access values when working with uncontrolled components that don’t capture events, such as onChange, but the references aren’t exclusive to this particular pattern. You can use references in any other scenario you see fit, although using references is frowned on as an antipattern. The reason is that when React elements are defined properly, with each element using internal state in sync with the view’s state (DOM), the need for references is almost nonexistent. But you need to understand references, so I’ll cover them here.
With references, you can get the DOM element (or a node) of a React.js component. This comes in handy when you need to get form element values, but you don’t capture changes in the elements.
To use a reference, you need to do two things:
this.refs.NAME will give you an instance of a React component, but how do you get the value? It’s more useful to have the DOM node! You can access the component’s DOM node by calling ReactDOM.findDOMNode(this.refs.NAME):
let emailNode = ReactDOM.findDOMNode(this.refs.email) let email = emailNode.value
I find this method a bit clunky to write (too lengthy), so with this in mind you can use an alias:
let fD = ReactDOM.findDOMNode let email = fD(this.refs.email).value
Consider the example shown in figure 7.13, which captures user email addresses and comments. The values are output to the browser console.
The project structure is very different from other project structures. It looks like this:
When the Submit button is clicked, you can access the emailAddress and comments references and output the values to two logs, as shown next (ch07/email/jsx/content.jsx).
Next, you have the mandatory render() function, which uses the Twitter Bootstrap classes to style the intake form (ch07/email/jsx/content.jsx). Remember to use className for the class attribute!
A regular HTML DOM node for <textarea> uses innerHTML as its value. As mentioned earlier, in React you can use value for this element:
ReactDOM.findDOMNode(comments).value
This is because React implements the value property. It’s just one of the nice features you get with a more consistent API for form elements. At the same time, because the ReactDOM.findDOMNode() method returns a DOM node, you have access to other regular HTML attributes (like innerHTML) and methods (like getAttribute()).
Now you know how to access elements and their values from pretty much any component method, not just from an event handler for that particular element. Again, references are only for the rare cases when you use uncontrolled elements. The overuse of references is frowned on as a bad practice. Most of the time, you won’t need to use references with controlled elements, because you can use component states instead.
It’s also possible to assign a function to the ref attribute in JSX. This function is called just once, on the mounting of the element. In the function, you can save the DOM node in an instance attribute this.emailInput:
<input ref={(input) => { this.emailInput = input }}
className="form-control"
type="text"
placeholder="hi@azat.co"/>
Uncontrolled components require less coding (state updates and capturing changes are optional), but they raise another issue: you can’t set values to states or hardcoded values because then you’ll have controlled elements (for example, you can’t use value={this.state.email}). How do you set the initial value? Let’s say the loan application has been partly filled out and saved, and the user resumes the session. You need to show the information that has already been filled in, but you can’t use the value attribute. Let’s look at how you set default values.
Suppose you want the example loan application to prepopulate certain fields with existing data. In normal HTML, you define a form field with value, and users can modify the element on a page. But React uses value, checked, and selected to maintain consistency between the view and the internal state of elements. In React, if you hardcode the value like
<input type="text" name="new-book-title" value="Node: The Best Parts"/>
it’ll be a read-only input field. That isn’t what you need in most cases. Therefore, in React, the special attribute defaultValue sets the value and lets users modify form elements.
For example, assume the form was saved earlier, and you want to fill in the <input> field for the user. In this case, you need to use the defaultValue property for the form elements. You can set the initial value of the input field like this:
<input type="text" name="new-book-title" defaultValue="Node: The Best Parts"/>
If you use the value attribute (value="JSX") instead of defaultValue, this element becomes read-only. Not only will it be controlled, but the value won’t change when the user types in the <input> element, as shown in figure 7.14. This is because the value is hardcoded, and React will maintain that value. Probably not what you want. Obviously, in real-life applications, you get values programmatically, which in React means using properties (this.props.name)
<input type="text" name="new-book-title" defaultValue={this.props.title}/>
or states:
<input type="text" name="new-book-title" defaultValue={this.state.title}/>
The defaultValue React feature is most often used with uncontrolled components; but, as with references, default values can be used with controlled components or in any other scenario. You don’t need default values as much in controlled components because you can define those values in the state in the constructor; for example, this.state = { defaultName: 'Abe Lincoln'}.
As you’ve seen, most UI work is done in handy form elements. You need to make them beautiful, yet easy to understand and use. And you must also have user-friendly error messages, front-end validation, and other nontrivial things like tooltips, scalable radio buttons, default values, and placeholders. Building a UI can be complicated and can quickly spiral out of control! Fortunately, React makes your job easier by letting you use a cross-browser API for form elements.
An uncontrolled component sets a value, and a controlled component doesn’t. True or false?
The correct syntax for default values is which of the following? default-value, defaultValue, or defVal
The React team recommends using onChange over onInput. True or false?
You set a value for the text area with which of the following? Children, inner HTML, or value
In a form, selected applies to which of the following? <input>, <textarea>, or <option>
Which of the following is the best way to extract the DOM node by reference? React.findDomNode(this.refs.email), this.refs.email, this.refs.email.getDOMNode, ReactDOM.findDOMNode(this.refs.email), or this.refs.email.getDomNode
False. The definition of a controlled component/element is that it sets the value.
defaultValue. The other options are invalid names.
True. In regular HTML, onChange might not fire on every change, but in React it always does.
In React, you set a value with value for consistency. But in vanilla HTML, you use inner HTML.
<option>.
Use ReactDOM.findDOMNode(reference) or a callback (not listed as an answer).
This chapter covers
Thus far, we’ve covered how to create components and make them interactive, and work with user input (events and input elements). Using this knowledge will take you a long way in building sites with React components, but you’ll notice that certain annoyances keep cropping up. This is especially true for large projects when you rely on components created by other software engineers (open source contributors or your teammates).
For example, when you consume a component someone else wrote, how do you know whether you’re providing the right properties for it? Also, how can you use an existing component with a little added functionality (which is also applied to other components)? These are developmental scalability issues: how to scale your code, meaning how to work with your code when the code base grows larger. Certain features and patterns in React can help with that.
These topics are important if you’d like to learn how to effectively build a complex React application. For example, higher-order components allow you to enhance the functionality of a component, and property types provide the security of type checking and no small measure of sanity.
By the end of this chapter, you’ll be familiar with most features of React. You’ll become adept at making your code more developer friendly (using property types) and your work more efficient (using component names and higher-order components). Your teammates may even marvel at your elegant solutions. These features will help you use React effectively, so let’s dive in without further ado.
The source code for the examples in this chapter is at www.manning.com/books/react-quickly and https://github.com/azat-co/react-quickly/tree/master/ch08 (in the ch08 folder of the GitHub repository https://github.com/azat-co/react-quickly). You can also find some demos at http://reactquickly.co/demos.
Imagine that you’re building a Datepicker component that takes a few required properties such as number of rows, locale, and current date:
<Datepicker currentDate={Date()} locale="US" rows={4}/>
What will happen if a new team member tries to use your component but forgets to pass the essential currentDate property? Then, what if another coworker passes a "4" string instead of a 4 number? Your component will do nothing (values undefined) or worse: it may crash, and they may blame you (ReferenceError anyone?). Oops.
Sadly, this isn’t an uncommon situation in web development, because JavaScript is a loosely typed language. Fortunately, React provides a feature that lets you set default values for properties: the defaultProps static attribute. We’ll return to flagging issues with property types in the next section.
The key benefit of defaultProps is that if a property is missing, a default value is rendered. To set a default property value on the component class, you define defaultProps. For example, in the aforementioned Datepicker component definition, you can add a static class attribute (not an instance attribute, because that won’t work—instance attributes are set in constructor()):
class Datepicker extends React.Component {
...
}
Datepicker.defaultProps = {
currentDate: Date(),
rows: 4,
locale: 'US'
}
To illustrate defaultProps further, let’s say you have a component that renders a button. Typically, buttons have labels, but those labels need to be customizable. In case the custom value is omitted, it’s good to have a default value.
The button’s label is the buttonLabel property, which you use in render()’s return attribute. You want this property to always include Submit, even if the value isn’t set from above. To do this, you implement the defaultProps static class attribute, which is an object containing the property buttonLabel with a default value:
class Button extends React.Component {
render() {
return <button className="btn" >{this.props.buttonLabel}</button>
}
}
Button.defaultProps = {buttonLabel: 'Submit'}
The parent component Content renders four buttons. But three of these four button components are missing properties:
class Content extends React.Component {
render() {
return (
<div>
<Button buttonLabel="Start"/>
<Button />
<Button />
<Button />
</div>
)
}
}
Can you guess the result? The first button will have the label Start, and the rest of the buttons will have the label Submit (see figure 8.1).
Setting default property values is almost always a good idea, because doing so makes your components more fault tolerant. In other words, your components become smarter because they have a baseline look and behavior even when nothing is supplied.
Looking at it another way, having a default value means you can skip declaring the same old value over and over again. If you use a single property value most of the time but still want to provide a way to modify this value (override the default), the defaultProps feature is the way to go. Overriding a default value doesn’t cause any issues, as you saw with the first button element in the example.
Going back to the earlier example with the Datepicker component and coworkers who aren’t aware of property types ("5" versus 5), you can set property types to use with React.js component classes. You do so via the propTypes static attribute. This feature of property types doesn’t enforce data types on property values and instead gives you a warning. That is, if you’re in development mode, and a type doesn’t match, you’ll get a warning message in the console and in production; nothing will be done to prevent the wrong type from being used. In essence, React.js suppresses this warning in production mode. Thus, propTypes is mostly a convenience feature to warn you about mismatches in data types at a developmental stage.
The React.js team defines development mode as using the unminified (uncompressed) version of React and production mode as using the minified version. From the React authors:
For React 15.5 and later versions (most of the examples in this book use React v15.5), type definitions come from a separate package called prop-types (www.npmjs.com/package/prop-types). You need to include prop-types in your HTML file. The package will become a global object (window.PropTypes):
<!-- development version --> <script src="https://unpkg.com/prop-types/prop-types.js"></script> <!-- production version --> <script src="https://unpkg.com/prop-types/prop-types.min.js"></script>
If you’re using React 15.4 and earlier, there’s no need to include prop-types, because the types are in React: React.propTypes.
Here’s a basic example of defining a static propTypes attribute on a Datepicker class with types string, number, and enumerator. The example uses React v15.5 and includes prop-types in HTML (not shown here):
Never rely on front-end user-input validation, because it can be easily bypassed. Use it only for a better UX, and check everything on the server side.
To validate property types, use the propTypes property with the object containing the properties as keys and types as values. React.js types are in the PropTypes object:
To demonstrate, let’s enhance the defaultProps example by adding some property types in addition to default property values. The structure of this project is similar: content.jsx, button.jsx, and script.jsx. The index.html file has a reference to prop-types.js:
<!DOCTYPE html>
<html>
<head>
<script src="js/react.js"></script>
<script src="js/prop-types.js"></script>
<script src="js/react-dom.js"></script>
<link href="css/bootstrap.css" type="text/css" rel="stylesheet"/>
<link href="css/style.css" type="text/css" rel="stylesheet"/>
</head>
<body>
<div id="content" class="container"></div>
<script src="js/button.js"></script>
<script src="js/content.js"></script>
<script src="js/script.js"></script>
</body>
</html>
Let’s define a Button class with an optional title with a string type. To implement it, you define a static class attribute (a property of that class) propTypes with key title and PropTypes.string as a value of that key. This code goes into button.js:
Button.propTypes = {
title: PropTypes.string
}
You can also require properties. To do so, add isRequired to the type. For example, the title property is mandatory and of type string:
Button.propTypes = {
title: PropTypes.string.isRequired
}
This button also requires a handler property, which must have a function as a value. (Last time I checked, buttons without actions were useless.)
Button.propTypes = {
handler: PropTypes.func.isRequired
}
What’s also nice is that you can define your own custom validation. To implement custom validation, all you need to do is create an expression that returns an instance of Error. Then, you use that expression in propTypes: {..} as the value of the property. For example, the following code validates the email property with the regex from emailRegularExpression (which I copied from the internet—that means it has to be correct, right?):[1]
There are many versions of the email regex, depending on strictness, domain zones, and other criteria. See “Email Address Regular Expression That 99.99% Works,” http://emailregex.com; “Validate email address in JavaScript?” (question on Stack Overflow), http://mng.bz/zm37; and Regular Expression Library, http://regexlib.com/Search.aspx?k=email.
...
propTypes = {
email: function(props, propName, componentName) {
var emailRegularExpression =
/^([\w-]+(?:\.[\w-]+)*)@((?:[\w-]+\.)*\w[\w-]{0,66})\.([a-z]{2,6}(?:\.
[a-z]{2})?)$/i
if (!emailRegularExpression.test(props[propName])) {
return new Error('Email validation failed!')
}
}
}
...
Now let’s put everything together. The Button component will be called with and without a property title (string) and a handler (required function). The following listing (ch08/prop-types) uses property types to ensure that handler is a function, title is a string, and email adheres to the provided regular expression.
Next, let’s implement the parent component Content, which renders six buttons to test the warning messages produced from property types (ch08/prop-types/jsx/content.jsx).
Running this code results in three warning messages being displayed on your console (don’t forget to open it); mine are shown here and in figure 8.2. The first warning is about the handler function that must be specified, which I omitted in a few buttons:
Warning: Failed propType: Required prop `handler` was not specified in `Button`. Check the render method of `Content`.
The second warning is about the wrong email format for the fourth button:
Warning: Failed propType: Email validation failed! Check the render method of `Content`.
The third warning is about the wrong type for the title, which should be a string (I provided a number for one button):
Warning: Failed propType: Invalid prop `title` of type `number` supplied to `Button`, expected `string`. Check the render method of `Content`.
The interesting thing is that more than one button is missing handler, but you see only one warning. React warns about each property only once per single render() of Content.
What I love about React is that it tells you what parent component to check. It’s Content in the example. Imagine if you had hundreds of components. This is useful!
Conveniently, if you expand the message in DevTools, you can spot a line number for the Button element that’s causing trouble and that resulted in the warning. In figure 8.3, I first expanded the message and then located my file (content.js). The message said that the issue was on line 9.
By clicking content.js:9 in the console, you can open the Source tab at that line, as shown in figure 8.4. It clearly shows what’s to blame:
React.createElement(Button, { title: number }),
You don’t need source maps (although you’ll set them up and use them in part 2 of the book) to know that the third button is causing the problem.
I’ll repeat it again: only the unminified or uncompressed version (that is, development mode) of React shows these warnings.
Try playing with the property types and validation. It’s a neat feature. Consider that this code uses the same Button component as before:
<Button title={number}/>
Can you spot the problem? How many warnings do you think you’ll get? (Hint: handler and title properties.)
I got the warnings shown in figure 8.2 because of the poorly written Content (I wrote it that way on purpose, to show how defaultProps and propTypes work). The warning messages identify the component and where in the component the problem is happening.
But the line numbers won’t match your source code, because they refer to compiled JavaScript, not JSX. To get the correct line numbers, you’ll need to use a source-map plug-in like source-map-support (https://github.com/evanw/node-source-map-support) or Webpack. Chapter 12 discusses Webpack.
You can get support for source maps with pure non-Webpack Babel by adding --sourceMaps=true to the command and/or the package.json build script. For more Babel options, see https://babeljs.io/docs/usage/options/#options.
It’s important to know and use propTypes (property types and custom validation) in large projects or open source components. Of course, property types don’t have strict enforcement or error exceptions, but the benefit is that when you use someone else’s component, you can verify that the supplied properties are of the right type. Same applies when other software engineers use your components. They’ll appreciate that you provided correct property types. That leads to a better developer experience for everyone!
Finally, there are many additional types and helper methods. To see the full reference, please refer to the documentation at http://mng.bz/4Lep.
Let’s continue with the fictional React project; but instead of a Datepicker (which is now robust and warns you about any missing or incorrect properties), you’re tasked with creating a component that’s universal enough to use with any children you pass to it. It’s a blog post Content component that may consist of a heading and a paragraph of text:
<Content> <h1>React.js</h1> <p>Rocks</p> </Content>
Another blog post may consist of an image (think Instagram or Tumblr):
<Content> <img src="images/azat.jpg" width="100"/> </Content>
Both posts use Content, but they pass different children to it. Wouldn’t it be great to have a special way to render any children (<p> or <img>)? Meet children.
The children property is an easy way to render all children with {this.props.children}. You can also do more than rendering. For example, add a <div> and pass along child elements:
class Content extends React.Component {
render() {
return (
<div className="content">
{this.props.children}
</div>
)
}
}
The parent of Content has the children <h1> and <p>:
ReactDOM.render(
<div>
<Content>
<h1>React</h1>
<p>Rocks</p>
</Content>
</div>,
document.getElementById('content')
)
The end result is that <h1> and <p> are wrapped in the <div> container with a content class, as shown in figure 8.5. Remember, for class attributes, you use className in React.
Obviously, you can add many more things to a component like Content; for example, more classes for styling, layouts, and even access properties and interactivity with events and states. With this.props.children, you can create pass-through components that are flexible, powerful, and universal.
Let’s say you need to display a link or a button in addition to text and images, as shown in the previous example. The Content component will still be the wrapper <div> with the CSS class content (className property), but now there will be more different children. The benefit is that Content can be children-agnostic.[2] You don’t need to change the Content class.
“Agnostic, in an information technology (IT) context, refers to something that is generalized so that it is interoperable among various systems.” From http://whatis.techtarget.com/definition/agnostic.
Put the children in Content when you instantiate the class (ch08/children/jsx/script.jsx).
ReactDOM.render(
<div>
<Content>
<h1>React</h1>
<p>Rocks</p>
</Content>
<Content>
<img src="images/azat.jpg" width="100"/>
</Content>
<Content>
<a href="http://react.rocks">http://react.rocks</a>
</Content>
<Content>
<a className="btn btn-danger"
href="http://react.rocks">http://react.rocks</a>
</Content>
</div>,
document.getElementById('content')
)
The resulting HTML will have two <div> elements with content CSS classes. Your layouts! One will have <h1> and <p> and the other will have <span>, as shown in DevTools in figure 8.6.
What’s interesting about the children property is that it can be an array if there’s more than one child element (as seen in figure 8.5). You can access individual elements like this:
{this.props.children[0]}
{this.props.children[1]}
Be careful when validating children. When there’s only one child element, this.props.children isn’t an array. If you use this.props.children.length and the single child node is a string, this can lead to bugs because length is a valid string property. Instead, use React.Children.count(this.props.children) to get an accurate count of child elements.
React has other helpers like React.Children.count. The most interesting (in my opinion) are these:
There’s no reason to duplicate the ever-changing list; you can find the official documentation at http://mng.bz/Oi2W.
We’ll continue to suppose that you work on a large team and create components that other developers use in their projects. Let’s say you’re working on a piece of an interface. Three of your teammates ask you to implement a way to load a resource (the React.js website), but each of them wants to use their own visual representation for the button, image, and link. Perhaps you could implement a method and call it from an event handler, but there’s a more elegant solution: higher-order components.
A higher-order component (HOC) lets you enhance a component with additional logic (see figure 8.7). You can think of this pattern as components inheriting functionality when used with HOCs. In other words, HOCs let you reuse code. This allows you and your team to share functionality among React.js components. By doing so, you can avoid repeating yourselves (DRY, http://mng.bz/1K5k).
In essence, HOCs are React component classes that render the original classes while adding extra functionality along the way. Defining an HOC is straightforward, because it’s only a function. You declare it with a fat arrow:
const LoadWebsite = (Component) => {
...
}
The name LoadWebsite is arbitrary; you can name the HOC anything, as long as you use the same name when you enhance a component. The same is true for the argument to the function (LoadWebsite); it’s the original (not yet enhanced) component.
To demonstrate, let’s set up a project for your three coworkers. The project structure is as follows, with three stateless components, Button, Link, and Logo in elements.jsx, and the HOC function in load-website.jsx:
/hi-order
/css
bootstrap.css
style.css
/js
content.js
elements.js
load-website.js
react.js
react-dom.js
script.js
/jsx
content.jsx
elements.jsx
load-website.jsx
script.jsx
index.html
logo.png
Your coworkers need a label and a click event handler. Let’s set the label and define the handleClick() method. The mounting events demonstrate the component lifecycle (ch08/hi-order/jsx/load-website.jsx).
Nothing complex, right? There are two new techniques not covered previously in this book: displayName and the spread operator .... Let’s quickly (as the title of this book suggests) examine them now.
By default, JSX uses the class name as the name of the instance (element). Thus elements created with an HOC in the example have _LoadWebsite names.
In JavaScript, an underscore (_) is a valid character for a name (the Lodash and Underscore libraries use it). In addition, an underscore as the start of a name of a variable or method typically means it’s a private attribute, variable, or method that isn’t intended for use as a public interface (for example, by another module, class, object, function, and so on). Using private APIs is highly discouraged because they’re likely to change more often and contain undocumented behavior.
An underscore at the beginning of a name is a convention, meaning it’s not enforced by the engine or platform. It’s solely a common pattern used and recognized by JavaScript software engineers. In other words, methods and variables don’t become private automatically when _ is used in their names. To make a variable/method private, use a closure. See http://developer.mozilla.org/en/docs/Web/JavaScript/Closures and http://javascript.crockford.com/private.html.
When you want to change this name, there’s the displayName static attribute. As you may know, static class attributes in ES6 must be defined outside of the class definition. (As of this writing, the standard for static attributes hasn’t been finalized.)
To sum up, displayName is necessary to set React element names when they need to be different from the component class name, as shown in figure 8.8. You can see how useful it is to use displayName in the load-website.jsx HOC to augment the name, because by default the component name is the function name (which may not always be the name you want).
Next, let’s look at the spread operator (...). It’s part of ES6+/ES2015+ for arrays (http://mng.bz/8fjN); as of the time of this writing, there’s a proposal to use spreads for objects (https://github.com/sebmarkbage/ecmascript-rest-spread). It’s only natural that the React team added support for spreads to JSX.
The idea isn’t complicated. The spread operator lets you pass all the attributes of an object (obj) as properties when used in the element:
<Component {...obj}/>
You used spread in load-website.jsx to pass state and property variables to the original component when you were rendering it. You needed it because you didn’t know ahead of time all the properties the function would take as arguments; thus, the spread operator is a blanket statement to pass all of your data (in that variable or an object).
In React and JSX, you can have more than one spread operator or mix them with traditional key=value property declarations. For example, you can pass all states and all properties from a current class as well as className to a new element Component:
<Component {...this.state} {...this.props} className="main" />
Let’s consider an example with children. In this scenario, using the spread operator with this.props will pass all the properties of DoneLink to the anchor element <a>:
In the HOC, you pass all properties and states to the original component when you render it. By doing so, you don’t have to manually add properties to or remove them from render() each time you want to pass something new or stop passing existing data from Content, where you instantiate LoadWebsite/EnhancedComponent for each original element.
You’ve learned more about displayName and ... in JSX and React. Now we can look at how to use HOCs.
Let’s go back to Content and content.jsx, where you’re using LoadWebsite. After defining the HOC, you need to create components using it in content.jsx:
const EnhancedButton = LoadWebsite(Button) const EnhancedLink = LoadWebsite(Link) const EnhancedLogo = LoadWebsite(Logo)
Now, you’ll implement three components—Button, Link, and Logo—to reuse the code with the HOC pattern. The Button component is created via LoadWebsite and as a result magically inherits its properties (this.props.handleClick and this.props.label):
class Button extends React.Component {
render() {
return <button
className="btn btn-primary"
onClick={this.props.handleClick}>
{this.props.label}
</button>
}
}
The Link component is created by the HOC, which is why you can also use handleClick and label properties:
class Link extends React.Component {
render() {
return <a onClick={this.props.handleClick} href="#">
{this.props.label}</a>
}
}
And finally, the Logo component also uses the same properties. You guessed it: they’re magically there because you used a spread operator when you created Logo in content.jsx:
class Logo extends React.Component {
render() {
return <img onClick={this.props.handleClick} width="40" src="logo.png"
href="#"/>
}
}
The three components have different renderings, but they all get this.props.handleClick and this.props.label from LoadWebsite. The parent component Content renders the elements as shown in the following listing (ch08/hi-order/jsx/content.jsx).
Finally, let’s not forget to render Content on the last lines of script.jsx:
ReactDOM.render(
<Content />,
document.getElementById('content')
)
When you open the page, it has the three elements (Button, Link, and Logo). The elements have the same functionality: they load the IFrame when a click happens, as shown in figure 8.9.
As you’ve seen, HOCs are great for abstracting code. You can use them to write your own mini-modules, which are reusable React components. HOCs, along with property types, are excellent tools for creating developer-friendly components that others will love to use.
There’s a distinction that lets you scale your React code in terms of code and team size: presentational versus container components. We’ve touched on them in previous chapters, but now, because you know about passing children and HOCs, it’ll be easier to reason about container components.
Generally speaking, splitting your code into two types makes it simpler and more maintainable. Presentational components typically only add structure to DOM and styling. They take properties but often don’t have their own states. Most of the time, you can use functions for stateless presentational components. For example, Logo is a good illustration of a presentational component in a class style
class Logo extends React.Component {
render() {
return <img onClick={this.props.handleClick} width="40" src="logo.png"
href="#"/>
}
}
or in a functional style:
const Logo = (props)=>{
return <img onClick={props.handleClick} width="40" src="logo.png"
href="#"/>
}
Presentational components often use this.props.children when they act as wrappers to style child components. Examples are Button, Content, Layout, Post, and so on. But they rarely deal with data or states; that’s the job of container components.
Container components are often generated by HOCs to inject data sources. They have states. Examples are SaveButton, ImagePostContent, and so on. Both presentational and container components can contain other presentational or container components; but when you’re starting out, you’ll generally use presentational components containing only other presentational components. Container components contain either other container components or presentational ones.
The best approach is to start with components that solve your needs. If you begin to see repeating patterns or properties that you’re passing over multiple layers of nested components but aren’t using in the interim components, introduce a container component or two.
You may hear terms such as dumb or skinny and smart or fat components. These are synonyms for presentational and container components, with the latter being more recent additions to React terminology.
React provides robust validation, which eliminates the necessity to check input on the server side. True or false?
In addition to setting properties with defaultProps, you can set them in constructor using this.prop.NAME = VALUE. True or false?
The children property can be an array or a node. True or false?
A higher-order component pattern is implemented via a function. True or false?
The main difference between the minified development and unminified production versions of the React library file is that the minified version has warnings and the unminified version has optimized code. True or false?
False. Front-end validation isn’t a substitute for back-end validation. Front-end code is exposed to anyone, and anyone can bypass it by reverse-engineering how the front-end app communicates with the server and send any data directly to the server.
False. React needs defaultProps as a static class field/attribute when an element is created, but this.props is an instance attribute.
True. If there’s only one child, then this.props.children is a single node.
True. The HOC pattern is implemented as a function that takes a component and creates another component class with enhanced functionality. This new class renders the original component while passing properties and states to it.
True. The minified version doesn’t show warnings.
This chapter covers
The next three chapters will walk you through several projects, gradually building on the concepts you’ve learned in chapters 1–8. These projects will also reinforce the material by repeating some of the techniques and ideas that are most important in React. The first project is minimal, but don’t skip it.
Imagine that you’re working on a unified visual framework that will be used in all of your company’s apps. Having the same look and feel in various apps is important. Think about how Twitter Bootstrap for many Twitter apps and Google’s Material UI[1] are used across many properties that belong to Google: AdWords, Analytics, Search, Drive, Docs, and so on.
Twitter Bootstrap: http://getbootstrap.com. React components that implement Twitter Bootstrap: https://react-bootstrap.github.io. Google Material Design: https://material.io. React Components that implement Material Design: www.material-ui.com.
Your first task is to implement a menu like the one shown in figure 9.1. It will be used in the layout’s header across many pages in various applications. The menu items need to change based on the user role and what part of the application is currently being viewed. For example, admins and managers should see a Manage Users menu option. At the same time, this layout will be used in a customer-relationship app that needs its own unique set of menu options. You get the idea. The menu needs to be generated dynamically, meaning you’ll have some React code that generates menu options.
For simplicity, the menu items will just be <a> tags. You’ll create two custom React components, Menu and Link, in a way that’s similar to the way you created the Hello-World component in chapter 1—or how you create any component, for that matter.
This project will show you how to render programmatically nested elements. Manually hardcoding menu items isn’t a great idea; what happens when you need to change an item? It’s not dynamic! You’ll use the map() function to do this.
To follow along with the project, you’ll need to download the unminified version of React (so that you can take advantage of the helpful warnings it returns if something goes wrong). You can also download and install Node.js and npm. They aren’t strictly necessary for this project, but they’re useful for compiling JSX later in this chapter. Appendix A covers the installation of both tools.
The source code for the examples in this chapter is at www.manning.com/books/react-quickly and https://github.com/azat-co/react-quickly/tree/master/ch09 (in the ch09 folder of the GitHub repository https://github.com/azat-co/react-quickly). You can also find some demos at http://reactquickly.co/demos.
Let’s start with an overview of the project structure. It’s flat, to keep it simple:
Keep in mind that this is what you’ll have by the end of this walk-through. You should begin with an empty folder. So, let’s create a new folder and start implementing the project:
$ mkdir menu $ cd menu
Download react.js and react-dom.js version 15, and drop them into the folder.
Next is the HTML file:
<!DOCTYPE html>
<html>
<head>
<script src="react.js"></script>
<script src="react-dom.js"></script>
</head>
The HTML for this project is very basic. It includes the react.js and react-dom.js files, which, for simplicity, are in the same folder as the HTML file. Of course, later you’ll want to have your *.js files in some other folder, like js or src.
The body has just two elements. One element is a <div> container with the ID menu; this is where the menu will be rendered. The second element is a <script> tag with your React application code:
<body>
<div id="menu"></div>
<script src="script.js"></script>
</body>
</html>
You’re finished with the scaffolding. This is the foundation on which you’ll build the menu—first, without JSX.
script.js is your main application file. It contains ReactDOM.render() as well as two components (ch09/menu/script.js).
Of course, it’s possible to make Menu dependent on an external list of menu items, provided in a property such as menuOptions that’s defined elsewhere:
const menuOptions = [...]
//...
ReactDOM.render(
React.createElement(
Menu,
{menus: menuOptions}
),
document.getElementById('menu')
)
These two approaches are both valid, and you’ll need to choose one depending on your answer to this question: do you want Menu to be just about structure and styling or also about getting information? We’ll continue with the latter approach in this chapter and make Menu self-sustained.
Now to create the Menu component. Let’s step through the code. To create it, you extend React.Component():
class Menu extends React.Component {...}
The Menu component will render the individual menu items, which are link tags. Before you can render them, you need to define the menu items. They’re hardcoded in the menus array as follows (you could get them from a data model, store, or server in a more complex scenario):
Next, you’ll return the menu Link elements (four of them). Recall that return can have only one element. For this reason, you wrap <div> around the four links. This is the start of the wrapper <div> element with no attributes:
return React.createElement('div',
null,
//... we will render links later
It’s worth mentioning that {} can output not just a variable or an expression, but an array as well. This comes in handy when you have a list of items. Basically, to render every element of an array, you can pass that array to {}. Although JSX and React can output arrays, they don’t output objects. So, the objects must be converted to an array.
Knowing that you can output an array, you can proceed to generate an array of React elements. The map() function is a good method to use because it returns an array. You can implement map() so that each element is the result of the expression React.createElement(Link, {label: v}) wrapped in <div>. In this expression, v is a value of the menus array item (Home, About, Services, and so on), and i is its index number (0, 1, 2, 3, and so on):
menus.map((v, i) => {
return React.createElement('div',
{key: i},
React.createElement(Link, {label: v})
)
}
)
)
}})
Did you notice that the key property is set to the index i? This is needed so React can access each <div> element in a list more quickly. If you don’t set key, you’ll see the following warning (at least, in React 15, 0.14 and 0.13):
Warning: Each child in an array or iterator should have a unique "key" prop.
Check the render method of `Menu`. See https://fb.me/react-warning-keys for
more information.
in div (created by Menu)
in Menu
Again, kudos to React for good error and warning messages.
So each element of a list must have a unique value for a key attribute. They don’t have to be unique across the entire app and other components, just within this list. Interestingly, since React v15, you won’t see the key attributes in HTML (and that’s a good thing—let’s not pollute HTML). But React DevTools shows the keys, as you can see in figure 9.2.
The mapping function from the Array class is used frequently in React components to represent lists of data. This is because when you create UIs, you do so from data represented as an array. The UI is also an array, but with slightly different elements (React elements!).
map() is invoked on an array, and it returns new array elements that are transformed from the original array by the function. At a minimum, when working with map(), you need to pass this function:
[1, 2, 3].map( value => <p>value</p>)
You can use two more arguments in addition to the value of the item (value)—index and list:
[1, 2, 3].map( (value, index, list) => {
return <p id={index}>{list[index]}</p>
}) // <p id="0">1</p><p id="1">2</p><p id="2">3</p>
The <div> has a key attribute, which is important. It allows React to optimize rendering of lists by converting them to hashes, and access time for hashes is better than that for lists or arrays. Basically, you create numerous Link components in an array, and each of them takes the property label with a value from the menus array.
Here’s the full code for Menu (ch09/menu/script.js); it’s simple and straightforward.
class Menu extends React.Component {
render() {
let menus = ['Home',
'About',
'Services',
'Portfolio',
'Contact us']
return React.createElement('div',
null,
menus.map((v, i) => {
return React.createElement('div',
{key: i},
React.createElement(Link, {label: v})
)
})
)
}}
Now let’s move on to the Link implementation.
The call to map() creates a Link component for each item in the menus array. Let’s look at the code for Link and see what happens when each Link component is rendered.
In the Link component’s render code, you write an expression to create a URL. That URL will be used in the href attribute of the <a> tag. The this.props.label value is passed to Link from Menu when Link is created. In the render() function of the Menu component, Link elements are created in the map’s closure/iterator function using React.createElement(Link, {label: v}).
The label property is used to construct the URL slug (must be lowercase and should not include spaces):
class Link extends React.Component {
render() {
const url='/'
+ this.props.label
.toLowerCase()
.trim()
.replace(' ', '-')
The methods toLowerCase(), trim(), and replace() are standard JavaScript string functions. They perform conversion to lowercase, trim white space at edges, and replace white spaces with dashes, respectively.
The URL expression produces the following URLs:
Now you can implement Link’s UI: the render() return value. In the render function’s return of the Link component, you pass this.props.label as a third argument to createElement(). It becomes part of the <a> tag content (link text). Link could render this element:
//...
return React.createElement(
'a',
{href: url},
this.props.label
)
}
}
But it’s better to separate each link with a line-break element (<br>). And because the component must return only one element, you’d have to wrap the anchor element (<a>) and line break (<br>) in a div container (<div>). Therefore, you start the return in the Link component’s render() with div, without attributes:
//...
return React.createElement('div',
null,
//...
Each argument after the second to createElement() (for example, the third, fourth, and fifth) will be used as content (children). To create the link element, you pass it as the second argument. And to create a break element after each link, you pass the line-break element <br> as the fourth argument:
//...
return React.createElement('div',
null,
React.createElement(
'a',
{href: url},
this.props.label
),
React.createElement('br')
)
}
})
Here’s the code for the full Link component for your reference (ch09/menu/script.js). The url function can be created as a class method or as a method outside of the component.
Let’s get this menu running.
To view the page, shown in figure 9.3, open it as a file in Chrome, Firefox, Safari, or (maybe) Internet Explorer. That’s it. No compilation is needed for this project.
No thrills here, but the page should display five links (or more, if you add items to the menus array), as shown earlier in figure 9.1. This is much better than copying and pasting five <a> elements and then ending up with multiple places to modify the labels and URLs. And the project can be even better with JSX.
When you open the example page, the protocol in the address bar will be file://.... This isn’t ideal but will do for this project. For real development, you’ll need a web server; with a web server, the protocol is http://... or https://..., as in figure 9.3.
Yes, even for a simple web page like this one, I prefer to use a local web server. It makes the running code more closely resemble how it would be in production. Plus, you can use AJAX/XHR, which you can’t use if you’re opening an HTML file in a browser.
The easiest way to run a local web server is to use node-static (www.npmjs.com/package/node-static) or a similar Node.js tool like http-server (www.npmjs.com/package/http-server). This is true even for Windows, although I stopped using that OS many years ago. If you’re hell-bent on not using Node.js, then alternatives include IIS, Apache HTTP Server, NGINX, MAMP, LAMP, and other variations of web servers. Needless to say, Node.js tools are highly recommended for their minimalist, lightweight approach.
To install node-static, use npm:
$ npm install -g node-static@0.7.6
Once it’s installed, run this command from your project’s root folder (or from a parent folder) to make the file available on http://localhost:8080. This isn’t an external link—run the following command before clicking the link:
$ static
If you run static in react-quickly/ch09/menu, then the URL will be http://localhost:8080. Conversely, if you run static from react-quickly, then the URL needs to be http://localhost:8080/ch09/menu.
To stop the server on macOS or Unix/Linux (POSIX systems), press Ctrl-C. As for Windows, I don’t know!
This project is more extensive, containing node_modules, package.json, and JSX:
As you can see, there’s a node_modules folder for developer dependencies such as Babel, which is used for JSX-to-JS transpilation.
Although it’s possible to install react and react-dom as npm modules instead of having them as files, doing so leads to additional complexity if you decide to deploy. Right now, to deploy this app, you can just copy the files in the project folder without node_modules. If you install React and ReactDOM with npm, then you have to include that folder as well, use a bundler, or copy the JS files from dist into root (where you already have them). So, for this example, we’ll use the files in root. I cover bundlers in part 2 of this book, but for now let’s keep things simple.
Create a new folder:
$ mkdir menu-jsx $ cd menu-jsx
Then, create the package.json file in it using npm init -y. Add the following code to package.json to install and configure Babel (ch09/menu-jsx/package.json).
Install the developer dependencies packages with npm i or npm install. Your setup should be ready now.
Let’s look at script.jsx. At a higher level, it has these parts:
class Menu extends React.Component {
render() {
//...
}
}
class Link extends React.Component {
render() {
//...
}
}
ReactDOM.render(<Menu />, document.getElementById('menu'))
Looks familiar, right? It’s the same structure as in Menu without JSX. The primary change in this high-level listing is replacing createElement() for the Menu component in ReactDOM.render() with this line:
ReactDOM.render(<Menu />, document.getElementById('menu'))
Next, you’ll refactor the components.
The beginning of Menu is the same:
class Menu extends React.Component {
render() {
let menus = ['Home',
'About',
'Services',
'Portfolio',
'Contact us']
return //...
}
}
In the refactoring example for the Menu component, you need to output the value v as a label’s attribute value (that is, label={v}). In other words, you assign the value v as a property for label. So the line to create the Link element changes from
React.createElement(Link, {label: v})
to this JSX code:
<Link label={v}/>
The label property of the second argument ({label: v}) becomes the attribute label={v}. The attribute’s value v is declared with {} to make it dynamic (versus a hardcoded value).
When you use curly braces to assign property values, you don’t need double quotes ("").
React also needs the key={i} attribute to access the list more efficiently. Therefore, the final Menu component is restructured as this JSX code (ch09/menu-jsx/script.jsx).
class Menu extends React.Component {
render() {
let menus = ['Home',
'About',
'Services',
'Portfolio',
'Contact us']
return <div>
{menus.map((v, i) => {
return <div key={i}><Link label={v}/></div>
})}
</div>
}}
Do you see the increase in readability? I do!
In Menu’s render(), if you prefer to start the <div> on a new line, you can do so by putting () around it. For example, this code is identical to listing 9.5, but <div> starts on a new line, which may be more visually appealing:
//...
return (
<div>
{menus.map((v, i) => {
return <div key={i}><Link label={v}/></div>
})}
</div>
)
}})
The <a> and <br> tags in the Link component also need to be refactored from this
//...
return React.createElement('div',
null,
React.createElement(
'a',
{href: url},
this.props.label),
React.createElement('br')
)
//...
to this JSX code:
//...
return <div>
<a href={url}>
{this.props.label}
</a>
<br/>
</div>
//...
The entire JSX version of the Link component should look something like this (ch09/menu-jsx/script.jsx).
class Link extends React.Component {
render() {
const url='/'
+ this.props.label
.toLowerCase()
.trim()
.replace(' ', '-')
return <div>
<a href={url}>
{this.props.label}
</a>
<br/>
</div>
}
}
Phew. You’re finished! Let’s run the JSX project.
Open your Terminal, iTerm, or Command Prompt app. In the project’s folder (ch09/menu-jsx or whatever you named it when you downloaded the source code), install dependencies with npm i (short for npm install) following the entries in package.json.
Then, run the npm build script with npm run build. The npm script will launch the Babel command with a watch flag (-w), which will keep Webpack running so it can watch for any file changes and recompile code from JSX to JS if there are changes to the JSX source code.
Needless to say, watch mode is a time-saver because it eliminates the need to recompile each time there’s a change to the source code. Hot module replacement is even better for development (so good that it could easily be the only reason to use React); I’ll cover it in chapter 12.
The actual command in the build script is as follows (but who wants to type it? It’s too long!):
./node_modules/.bin/babel script.jsx -o script.js -w
If you need a refresher on the Babel CLI, refer to chapter 3. You’ll find all the details there.
On my computer, I got this message from the Babel CLI (on yours, the path will differ):
> menu-jsx@1.0.0 build /Users/azat/Documents/Code/react-quickly/ch09/menu-jsx > babel script.jsx -o script.js -w
You’re good to go. With script.js generated, you can use static (node-static on npm: npm i -g node-static) to serve the files over HTTP on localhost. The application should look and work exactly like its regular JavaScript brethren, as shown in figure 9.4.
For bonus points, do the following:
Submit your code in a new folder under ch09 as a pull request to this book’s GitHub repository: https://github.com/azat-co/react-quickly.
This chapter covers
When you’re working on websites that have a lot of text, such as Wikipedia, it’s a great idea to allow users to get additional information without losing their position and context. For example, you can give them an extra hint in a box when they hover the cursor (see figure 10.1). This hint hover box is called a tooltip.
React is all about UIs and a better UX, so it’s a good fit for a tooltip implementation. Let’s build a component to display helpful text on a mouse-over event.
There are a few out-of-the-box tooltip solutions, including react-tooltip (www.npmjs.com/package/react-tooltip), but the goal here is to learn about React. Building a tooltip from scratch is a really good exercise. Maybe you’ll use this example in your daily work by making it a part of your app, or extend it into a new open source React component!
The key to creating the Tooltip component is to be able to take any text, hide it with CSS, and make it visible again on mouse-over. You’ll use if/else conditions, JSX, and other programming elements for this project. For the CSS part, you’ll use Twitter Bootstrap classes and a special Twitter Bootstrap theme to make the tooltip look nice in a short amount of time.
To follow along with this project, you’ll need to download the unminified version of React and install node.js and npm for compiling JSX. In this example, I also use a theme called Flatly from Bootswatch (https://bootswatch.com/flatly). This theme depends on Twitter Bootstrap. Appendix A covers how to install everything.
The source code for the example in this chapter is at www.manning.com/books/react-quickly and https://github.com/azat-co/react-quickly/tree/master/ch10 (in the ch10 folder of the GitHub repository https://github.com/azat-co/react-quickly). You can also find some demos at http://reactquickly.co/demos.
The project structure for the Tooltip component is as follows:
As in chapter 9, there’s a node_modules folder for developer dependencies such as Babel, which is used for JSX-to-JS transpilation. The structure is flat, with styles and scripts in the same folder. I did this to keep everything simple. Of course, in a real app, you’ll put styles and scripts in separate folders.
The key parts in package.json are the npm script to build, the Babel configuration, dependencies, and other metadata.
{
"name": "tooltip",
"version": "1.0.0",
"description": "",
"main": "script.js",
"scripts": {
"build": "./node_modules/.bin/babel script.jsx -o script.js -w"
},
"author": "Azat Mardan",
"license": "MIT",
"babel": {
"presets": ["react"]
},
"devDependencies": {
"babel-cli": "6.9.0",
"babel-preset-react": "6.5.0"
}
}
After you’ve created package.json, be sure to run npm i or npm install.
Next, you’ll start on the HTML. Create index.html, as shown in the following listing (ch10/tooltip/index.html).
In <head>, you include React, React DOM files, and Twitter Bootstrap styles. body is minimal: it contains a <div> with ID tooltip and the application’s script.js file.
Next, you’ll create script.jsx. That’s right—this isn’t a typo. The source code is in script.jsx, but you include the script.js file in your HTML. That’s because you’ll be using the command-line Babel tool.
Let’s look at script.jsx (ch10/tooltip/script.jsx). It’s pretty much just the code for the component and the tooltip text you want to render. The tooltip text is a property that you set when you create Tooltip in ReactDOM.render().
Let’s implement Tooltip and declare the component with an initial state of opacity: false. This state commands the help text to be hidden or shown. (Chapter 4 covered states in more detail.) Here’s the constructor() method in action:
class Tooltip extends React.Component {
constructor(props) {
super(props)
this.state = {opacity: false}
this.toggle = this.toggle.bind(this)
}
...
}
The initial state hides the help text. Toggling changes this state and the visibility of the tooltip—that is, whether the help text is shown. Let’s implement toggle().
Now you’ll define the toggle() function that switches the visibility of the tooltip by changing the opacity state to the opposite of what it was before (true to false, or false to true):
toggle() {
const tooltipNode = ReactDOM.findDOMNode(this)
this.setState({
opacity: !this.state.opacity,
...
})
}
To change opacity, you use the this.setState() method, which you learned about in chapter 4.
A tricky thing about tooltip help text is that you must place the help text close to the element the mouse is hovering over. To do so, you need to get the position of the component using tooltipNode. You position the tooltip text using offsetTop and offsetLeft on the DOM node. These are DOM Node properties from the HTML standard (https://developer.mozilla.org/en-US/docs/Web/API/Node), not a React thing:
top: tooltipNode.offsetTop,
left: tooltipNode.offsetLeft
})
},
Here’s the full code for toggle() (ch10/tooltip/script.jsx).
toggle() {
const tooltipNode = ReactDOM.findDOMNode(this)
this.setState({
opacity: !this.state.opacity,
top: tooltipNode.offsetTop,
left: tooltipNode.offsetLeft
})
}
Here it is using ES destructuring:
toggle() {
const {offsetTop: top, offsetLeft: left} = ReactDOM.findDOMNode(this)
this.setState({
opacity: !this.state.opacity,
top,
left
})
}
Looking at the code, you can see that it changes the state and position. Do you need to rerender the view now? No, because React will update the view for you. setState() will invoke a rerender automatically. It may or may not result in DOM changes, depending on whether the state was used in render()—which you’ll implement next.
The render() function holds the CSS style object for the help text and also holds Twitter Bootstrap styles. First, you need to define the style object. You’ll set the opacity and z-index CSS styles depending on the value of this.state.opacity. You need z-index to float the help text above any other elements, so set the value reasonably high—1000 when the text is visible and -1000 when it’s not:
zIndex: (this.state.opacity) ? 1000 : -1000,
For z-index, you need to use zIndex (note the camelCase). Figure 10.2 shows how the styles are applied at mouse-over (opacity is true).
Remember to use camelCase with React instead of dash syntax. The CSS property z-index becomes the React style property zIndex; background-color becomes backgroundColor; font-family becomes fontFamily, and so on. When you use valid JavaScript names, React can update the real DOM from the virtual one more quickly.
State opacity this.state.opacity is a Boolean true or false, but CSS opacity is a binary 0 or 1. If state opacity is false, CSS opacity is 0; and if state opacity is true, CSS opacity is 1. You need to convert, using a binary operator (+):
opacity: +this.state.opacity,
As far as the position of the tooltip goes, you want to place the help text near the text over which the mouse is hovering by adding 20 pixels to top (the distance from the top edge of the window to the element) and subtracting 30 pixels from left (the distance from the left edge of the window to the element). The values were chosen visually; feel free to adjust the logic as you see fit:
render() {
const style = {
zIndex: (this.state.opacity) ? 1000 : -1000,
opacity: +this.state.opacity,
top: (this.state.top || 0) + 20,
left: (this.state.left || 0) -30
}
Next is return. The component will render both the text over which to hover and the help text. I’m using Twitter Bootstrap classes along with my style object to hide the help text and to show it later.
The text over which users can hover to see a tooltip is colored blue, so they can tell it apart visually from other text. It has two mouse events for when the cursor enters and leaves the span:
Next is the code for the help text. It’s static-like, except for {style}. React will change the state, and that will trigger the change in the UI:
The next listing shows the Tooltip component’s full render() method.
That’s it. You’re finished with the Tooltip component!
Try this component or use it in your projects by compiling the JSX with npm:
$ npm run build
This Tooltip component is pretty cool, thanks to Twitter Bootstrap styles. Maybe it’s not as versatile as some other modules out there, but you built it yourself from scratch. That’s what I’m talking about! With the help of Twitter Bootstrap classes and React, you were able to create a good tooltip (see figure 10.3) in almost no time. It’s even responsive: it adapts to various screen sizes, thanks to dynamic positioning!
For bonus points, do the following:
Submit your code in a new folder under ch10 as a pull request to this book’s GitHub repository: https://github.com/azat-co/react-quickly.
This chapter covers
Studies have shown that meditation is great for health (calming) and productivity (focus).[1] Who doesn’t want to be healthier and more productive, especially with minimal monetary investment?
See “Research on Meditation,” Wikipedia, https://en.wikipedia.org/wiki/Research_on_meditation; “Meditation: In Depth,” National Institutes of Health, http://mng.bz/01om; “Harvard Neuroscientist: Meditation Not Only Reduces Stress, Here’s How It Changes Your Brain,” The Washington Post, May 26, 2015, http://mng.bz/1ljZ; and “Benefits of Meditation,” Yoga Journal, http://mng.bz/7Hp7.
Gurus recommend starting with as little as 5 minutes of meditation and progressing to 10 minutes and then 15 minutes over the span of a few weeks. The target is 30–60 minutes of meditation per day, but some people notice improvements with as little as 10 minutes per day. I can attest to that: after meditating 10 minutes per day every day for 3 years, I am more focused, and it has also helped me in other areas.
But how do you know when you’ve reached your daily meditation goal? You need a timer! So in this chapter, you’ll put your React and HTML5 skills to the test and create a web timer (see figure 11.1). To make it easy for testing purposes, this timer will only run for 5, 10, or 15 seconds.
The idea is to have three controls that set a countdown timer (n to 0). Think of a typical kitchen timer, but instead of minutes, it will count seconds. Click a button, and the timer starts. Click it again, or click another button, and the timer starts over.
To follow along with this project, you’ll need to download the unminified version of React and install node.js and npm for compiling JSX. In this example, I also use a theme called Flatly from Bootswatch (https://bootswatch.com/flatly). This theme depends on Twitter Bootstrap. Appendix A covers how to install everything.
The source code for the example in this chapter is at www.manning.com/books/react-quickly and https://github.com/azat-co/react-quickly/tree/master/ch11 (in the ch11 folder of the GitHub repository https://github.com/azat-co/react-quickly). You can also find some demos at http://reactquickly.co/demos.
The project structure for the Timer component, not unlike Tooltip and Menu, is as follows:
As before, there’s a node_modules folder for developer dependencies such as Babel, which is used for JSX-to-JS transpilation. The structure is flat, with styles and scripts in the same folder. I did this to keep things simple; in a real app, you’ll put styles and scripts in separate folders.
The key parts of package.json are the npm script to build, the Babel configuration, dependencies, and other metadata.
After you’ve created package.json, either by copying and pasting or by typing, be sure to run npm i or npm install.
The HTML for this project is very basic (ch11/timer/index.html). It includes the react.js and react-dom.js files, which, for the sake of simplicity, are in the same folder as the HTML file.
<!DOCTYPE html>
<html>
<head>
<meta charset="utf-8">
<title>Timer</title>
<script src="react.js" type="text/javascript"></script>
<script src="react-dom.js" type="text/javascript"></script>
<link href="bootstrap.css" rel="stylesheet" type="text/css"/>
</head>
<body class="container-fluid">
<div id="timer-app"/>
</body>
<script src="timer.js" type="text/javascript"></script>
</html>
This file only includes the library and points to timer.js, which you’ll create from timer.jsx. To do so, you’ll need the Babel CLI (see chapter 3).
The timer.jsx file will have three components:
Figure 11.2 shows how they’ll look on the page. You can see the Timer and Button components; TimerWrapper has all three buttons and Timer inside it. TimerWrapper is a container (smart) component, whereas the other two are representational (dumb).
We’re breaking the app into three pieces because in software engineering, things tend to change quickly with each new release. By separating the presentation (Button and Timer) and logic (TimerWrapper), you can make the app more adaptable. Moreover, you’ll be able to reuse elements like buttons in other apps. The bottom line is that keeping representation and business logic separate is a best practice when working with React.
You need TimerWrapper to communicate between Timer and Buttons. The interaction between these three components and a user is shown in figure 11.3:
For simplicity, you’ll keep all three components in the timer.jsx file.
Let’s start from the bottom of the timer.jsx file and render the main component (TimerWrapper) into the <div> with ID timer-app:
ReactDOM.render(
<TimerWrapper/>,
document.getElementById('timer-app')
)
ReactDOM.render() will be the last call in the file. It uses TimerWrapper, so let’s define this component next.
TimerWrapper is where all the fun happens! This is the high-level overview of the component:
class TimerWrapper extends React.Component {
constructor(props) {
// ...
}
startTimer(timeLeft) {
// ...
}
render() {
// ...
}
}
First, you need to be able to save the time left (using timeLeft) and reset the timer (using timer). Therefore, you’ll use two states: timeLeft and timer.
On the first app load, the timer shouldn’t be running; so, in the constructor of TimerWrapper, you need to set the time (timeLeft) state to null. This will come in handy in Timer, because you’ll be able to tell the difference between the first load (timeLeft is null) and when the time is up (timeLeft is 0).
You also set the timer state property to null. This property holds a reference to the setInterval() function that will do the countdown. But right now there’s no running timer—thus, the null value.
Finally, bind the startTimer() method, because you’ll be using it as an event handler (for buttons):
class TimerWrapper extends React.Component {
constructor(props) {
super(props)
this.state = {timeLeft: null, timer: null}
this.startTimer = this.startTimer.bind(this)
}
...
Next is the startTimer event handler. It’s called each time a user clicks a button. If a user clicks a button when the timer is already running, then you need to clear the previous interval and start anew. You definitely don’t want multiple timers running at the same time. For this reason, the first thing the startTimer() method does is stop the previous countdown by clearing the result of setInterval(). The current timer’s setInterval object is stored in the this.state.timer variable.
To remove the result of setInterval(), there’s a clearInterval() method. Both clearInterval() (http://mng.bz/7104) and setInterval() (http://mng.bz/P2d6) are browser API methods; that is, they’re available from a window object without additional libraries or even prefixes. (window.clearInterval() will also work for browser code, but it will break in Node.js.) Call clearInterval() on the first line of the event handler for the buttons:
class TimerWrapper extends React.Component {
constructor(props) {
// ...
}
startTimer(timeLeft) {
clearInterval(this.state.timer)
// ...
}
After you clear the previous timer, you can set a new one with setInterval(). The code passed to setInterval() will be called every second. For this code, let’s use a fat-arrow function to bind the this context. This will allow you to use TimerWrapper state, properties, and methods in this function (closure/callback) of setInterval():
class TimerWrapper extends React.Component {
constructor(props) {
// ...
}
startTimer(timeLeft) {
clearInterval(this.state.timer)
let timer = setInterval(() => {
// ...
}, 1000)
// ...
}
render() {
// ...
}
}
Now, you’ll implement the function. The timeLeft variable stands for the amount of time left on the timer. You use it to save the current value minus 1 and check whether it reached 0. If it did, then you remove the timer by invoking clearInterval() with a reference to the timer object (created by setInterval()), which is stored in the timer variable. The reference to timer is saved in setInterval()’s closure even for future function calls (each second that passes). This is the way JavaScript scoping works. So, there’s no need to pull the value of the timer object from the state (although you could).
Next, save timeLeft during every interval cycle. And finally, save timeLeft and the timer object when the button is clicked:
//...
startTimer(timeLeft) {
clearInterval(this.state.timer)
let timer = setInterval(() => {
var timeLeft = this.state.timeLeft - 1
if (timeLeft == 0) clearInterval(timer)
this.setState({timeLeft: timeLeft})
}, 1000)
return this.setState({timeLeft: timeLeft, timer: timer})
}
//...
You set the states to the new values using setState(), which is asynchronous. The setInterval() interval length is 1,000 ms, or 1 second. You need to set the state to the new values of timeLeft and timer because the app needs to update those values, and you can’t use simple variables or properties for that.
setInterval() is scheduled to be executed asynchronously in the JavaScript event loop. The returned setState() will fire before the first setInterval() callback. You can easily test it by putting console logs in your code. For example, the following code will print 1 and then 2, not 2 and then 1:
...
startTimer(timeLeft) {
clearInterval(this.state.timer)
let timer = setInterval(() => {
console.log('2: Inside of setInterval')
var timeLeft = this.state.timeLeft - 1
if (timeLeft == 0) clearInterval(timer)
this.setState({timeLeft: timeLeft})
}, 1000)
console.log('1: After setInterval')
return this.setState({timeLeft: timeLeft, timer: timer})
}
...
Last is the mandatory render() function for TimerWrapper. It returns <h2>, three buttons, and the Timer component. row-fluid and btn-group are Twitter Bootstrap classes—they make buttons look better and aren’t essential to React:
render() {
return (
<div className="row-fluid">
<h2>Timer</h2>
<div className="btn-group" role="group" >
<Button time="5" startTimer={this.startTimer}/>
<Button time="10" startTimer={this.startTimer}/>
<Button time="15" startTimer={this.startTimer}/>
</div>
This code shows how you can reuse the Button component by providing different values for the time property. These time property values allow buttons to display different times in their labels and to set different timers. The startTimer property of Button has the same value for all three buttons. The value is this.startTimer from TimerWrapper, which starts/resets the timer, as you know.
Next, you display the text “Time left: ...,” which is rendered by the Timer component. To do so, you pass the time state as a property to Timer. To adhere to the best React practice, Timer is stateless. React updates the text on the page (Timer) automatically when the property (Timer) is updated by the change of the state (TimerWrapper). You’ll implement Timer later. For now, use it like this:
<Timer time={this.state.timeLeft}/>
In addition, the <audio> tag (an HTML5 tag that points to a file) alerts you when the time is up:
<audio id="end-of-time" src="flute_c_long_01.wav" preload="auto">
</audio>
</div>
)
}
}
For your reference and better understanding (sometimes it’s nice to see the entire component), here’s the meat—or tofu, for my vegetarian readers—of the timer app: the full code for TimerWrapper (ch11/timer/timer.jsx).
TimerWrapper has a lot of logic. Other components are stateless and basically clueless. Nevertheless, you need to implement the other two components. Remember the <audio> tag in TimerWrapper, which will play sounds when the time remaining reaches 0? Let’s implement the Timer component next.
The goal of the Timer component is to show the time left and to play a sound when the time is up. It’s a stateless component. Implement the class, and check whether the timeLeft property equals 0:
class Timer extends React.Component {
render() {
if (this.props.timeLeft == 0) {
// ...
}
// ...
}
}
To play the sound (file flute_c_long_01.wav), this project uses the special HTML5 <audio> element; you defined it in TimerWrapper, with src pointing to the WAV file and id set to end-of-time. All you need to do is get the DOM node (the vanilla JavaScript getElementById() will work fine) and invoke play() (also vanilla JavaScript from HTML5). This again shows how well React plays with other JavaScripty things like HTML5, jQuery 3,[2] and even Angular 4, if you’re brave enough:
For examples of integration with browser events and jQuery, see chapter 6.
class Timer extends React.Component {
render() {
if (this.props.timeLeft == 0) {
document.getElementById('end-of-time').play()
}
// ...
As explained earlier, you don’t want the timer’s text to say “0” at first, because the timer has never run. So, in TimerWrapper (listing 11.4), you set the timeLeft value to null initially. If timeLeft is null or 0, then the Timer component renders an empty <div>. In other words, the app won’t display 0:
if (this.props.timeLeft == null || this.props.timeLeft == 0)
return <div/>
Otherwise, when timeLeft is greater than 0, an <h1> element shows the time remaining. In other words, now you need to show the time left when the timer is running:
return <h1>Time left: {this.props.timeLeft}</h1>
For your reference, the following listing shows the Timer component in full (ch11/timer/timer.jsx).
For Timer to show a number of seconds, you need to start the timer first. This happens when you click the buttons. Onward to those cute little buttons!
To follow the DRY (don’t repeat yourself) principle,[3] you’ll create one Button component and use it three times to show three different buttons. Button is another stateless (and very simple) component, as it should be in accordance with a Reactive mindset, but Button is not as straightforward as Timer, because Button has an event handler.
The DRY principle is as follows: “Every piece of knowledge must have a single, unambiguous, authoritative representation within a system”; see “Don’t Repeat Yourself,” Wikipedia, http://mng.bz/1K5k; and The Pragmatic Programmer: From Journeyman to Master by Andrew Hunt (Addison-Wesley Professional, 1999), http://amzn.to/2ojjXoY.
Buttons must have an onClick event handler to capture users’ button clicks. Those clicks trigger the timer countdown. The function to start the timer isn’t implemented in Button: it’s implemented in TimerWrapper and is passed down to the Button component from its parent, TimerWrapper, in this.props.startTimer. But how do you pass time (5, 10, or 15) to TimerWrapper’s startTimer? Look at this code from TimerWrapper, which passes time-period values as properties:
<Button time="5" startTimer={this.startTimer}/>
<Button time="10" startTimer={this.startTimer}/>
<Button time="15" startTimer={this.startTimer}/>
The idea is to render three buttons using this component (code reuse—yay!). To know what time the user selected, though, you need the value in this.props.time, which you pass as an argument to this.props.startTimer.
If you write the following code, it won’t work:
// Won't work. Must be a definition.
<button type="button" className='btn-default btn'
onClick={this.props.startTimer(this.props.time)}>
{this.props.time} seconds
</button>
The function passed to onClick must be a definition, not an invocation. How about this?
// Yep. You are on the right path young man.
<button type="button" className='btn-default btn'
onClick={()=>{this.props.startTimer(this.props.time)}}>
{this.props.time} seconds
</button>
Yes. This snippet has the right code to pass the value. This is the correct approach: a middle step (function) passes the different time values. You can make it more elegant by creating a class method. Another way would be to use a currying bind() instead of an interim function:
onClick = {this.props.startTimer.bind(null, this.props.time)}
Recall that bind() returns a function definition. As long as you pass a function definition to onClick (or any other event handler), you’re good.
Let’s get back to the Button component. The event handler onClick calls the class method this.startTimer, which in turn calls a function from the property this.props.startTimer. You can use the this object (this.props.startTimer) in this.startTimer because you applied bind(this).
The Button component is stateless, which you can confirm by looking at the full code (ch11/timer/timer.jsx). What does that mean? It means you can refactor it into a function instead of it being a class.
Obviously, you don’t need to use the same names for methods (such as startTimer()) in Button and TimerWrapper. A lot of people get confused during my React workshops when I use the same names; others find it easier to trace the chain of calls when they use the same names. Just know that you can name Button’s method something like handleStartTimer(), for example. Personally, I find that using the same name helps me to mentally link properties, methods, and states from different components.
Note that Timer could also be named TimerLabel, if not for the audio play() method. Is there room for improvement and refactoring? Absolutely! Check the “Homework” section of this chapter.
Congrats—you’re officially finished coding. Now, to get this thing running so you can begin using this timer for work[4] or hobbies.
Try the Pomodoro technique (https://cirillocompany.de/pages/pomodoro-technique) for increasing your productivity.
Compile the JSX into JavaScript with the following Babel 6.9.5 command, assuming you have the Babel CLI and its presets installed (hint: package.json!):
$ ./node_modules/.bin/babel timer.jsx -o timer.js -w
If you copied my build npm script from package.json at the beginning of this chapter, then you can run npm run build.
If you’ve done everything correctly, enjoy your beautiful timer application, shown in figure 11.4! Turn off your music to hear the alarm when the time is up.
Make sure the app works properly: you should see a time-remaining number that changes every second. When you click the button, a new countdown should begin; that is, the timer is interrupted and starts over on each click of a button.
For bonus points, do the following:
Submit your code in a new folder under ch11 as a pull request to this book’s GitHub repository: https://github.com/azat-co/react-quickly.
Welcome to part 2. Now that you know the most important concepts, features, and patterns of React, you’re ready to embark on your own React journey. Part 1 prepared you to build simple UI elements; and the bottom line is, if you’re building web UIs, core React is sufficient. But to build full-blown, front-end apps, React developers rely on open source modules written by the React community. Most of these modules are hosted on GitHub and npm, so they’re within easy reach—you can grab them and go.
These chapters cover the most-popular, most-used, mature libraries that, together with core React, form the React stack (or React and friends, as some developers jokingly call this ensemble). To get started, in chapters 12–17, you’ll learn about using Webpack for asset pipelines, React Router for URL routing, Redux and GraphQL for data flow, Jest for testing, and Express and Node for Universal React. Then, as in part 1, chapters 18–20 present real-world projects.
This may seem like a lot, but my experience with reading and writing books has shown me that baby steps and textbook examples don’t provide good value for readers and don’t show how things work in real life. So, in this part of the book, you’ll both learn about and work with the React stack. Interesting, complex projects await you. When you’ve finished, you’ll be knowledgeable about data flow, skilled in setting up the monstrosity called Webpack, and able to talk like a know-it-all at local meetups.
Read on.
This chapter covers
Before we go any further with the React stack (a.k.a. React and friends), let’s look at a tool that’s essential to most modern web development: a build tool (or bundler). You’ll use this tool in subsequent chapters to bundle your many code files into the minimum number of files needed to run your applications and prepare them for easy deployment. The build tool you’ll be using is Webpack (https://webpack.js.org).
If you’ve not come across a build tool before, or if you’ve used another one such as Grunt, Gulp, or Bower, this chapter is for you. You’ll learn how to set up Webpack, configure it, and get it running against a project.
This chapter also covers hot module replacement (HMR), a feature of Webpack that enables you to hot-swap updated modules for those running on a live server. First, though, we’ll look at what Webpack can do for you.
Code generators such as create-react-app (https://github.com/facebookincubator/create-react-app) create boilerplate/scaffolding code and help you start projects quickly. create-react-app also uses Webpack and Babel, along with other modules. But this book primarily teaches fundamentals, so you won’t use a code generator; instead, you’ll do the setup yourself to make sure you understand each part. If you’re interested, you can learn how to use a code generator for yourself—it just takes a few commands.
The source code for the examples in this chapter is at www.manning.com/books/react-quickly and https://github.com/azat-co/react-quickly/tree/master/ch12 (in the ch12 folder of the GitHub repository https://github.com/azat-co/react-quickly). You can also find some demos at http://reactquickly.co/demos.
Have you ever wondered why (in web development) everyone and their mother are talking about Webpack? Webpack’s core focus is optimizing the JavaScript you write so that it’s contained in as few files as possible for a client to request. This reduces the strain on the servers for popular sites and also reduces the client’s page-load time. Of course, it’s not as simple as that. JavaScript is often written in modules that are easy to reuse. But they often depend on other modules that may depend on other modules, and so on; and keeping track of what needs to be loaded when so that all the dependencies resolve quickly can be a headache.
Let’s say you have a utility module myUtil, and you use it in many React components—accounts.jsx, transactions.jsx, and so on. Without a tool like Webpack, you’d have to manually keep track of the fact that each time you use one of those components, you need to include myUtil as a dependency. Additionally, you might be loading myUtil unnecessarily for a second or third time, because another component that depends on myUtil has already loaded it. Of course, this is a simplified example; real projects have dozens or even hundreds of dependencies that are used in other dependencies. Webpack can help.
Webpack knows how to deal with all three types of JavaScript module—CommonJS (www.commonjs.org), AMD (https://github.com/amdjs/amdjs-api/wiki/AMD), and ES6 (http://mng.bz/VjyO)—so you don’t need to worry if you’re working with a hodgepodge of module types. Webpack will analyze the dependencies for all the JavaScript in your project and do the following:
Webpack also supports code splitting and asset hashing, which let you identify blocks of code that are required only under certain circumstances. These blocks are split out to be loaded on demand rather than bundled in with everything else. You must opt in to use these features and further optimize your JavaScript and its deployment.
Code splitting and asset hashing are outside the scope of this book. Check out the Webpack website for more information: https://webpack.github.io/docs/code-splitting.html.
Webpack isn’t just about JavaScript, though. It supports the preprocessing of other static files through the use of loaders. For example, you can do the following before any bundling takes place:
Many loaders are available for all sorts of file types. In addition, plug-ins that modify Webpack’s behavior are catalogued on the Webpack homepage. If you can’t find what you’re looking for, there’s documentation about how to write your own plug-in.
For the rest of this book, you’ll be using Webpack to do the following:
As you’ll see, you can configure the order in which Webpack loads, precompiles, and bundles your files using its webpack.config.js file. But first, let’s look at how to install Webpack and get it working with a project.
To illustrate how you can get starting working with Webpack, let’s slightly modify the project from chapter 7 shown in figure 12.1. It has email and comment input fields, two style sheets, and one Content component.
Here’s the new project structure. I’ve pointed out where it differs from the project in chapter 7:
Contrast that with the non-Webpack setup from chapter 7:
Do you have Node.js and npm? This is the best time to install them—you’ll need them, in order to proceed. Appendix A covers installation.
This section walks you through the following steps:
Let’s get started.
To use Webpack, you’ll need a few additional dependencies, as noted in package.json:
You can install each module manually, but I recommend copying the package.json file shown in listing 12.1 (ch12/email-webpack/package.json) from the GitHub repository to your project root (see the project structure shown in section 12.2). Then, run npm i or npm install from the project root (where you have package.json) to install the dependencies. This will ensure that you don’t forget any of the 10 modules (a synonym for package in Node). It also ensures that your versions are close to the ones I used. Using wildly different versions is a fantastic way to break the app!
The babel property in package.json should be familiar to you from part 1 of this book, so I won’t spend time repeating myself. As a reminder, you need this property to configure Babel to convert JSX to JS. If you need to support browsers that can’t work with ES6, you can add the es2015 preset to presets:
"babel": {
"presets": [
"react",
"es2015"
]
},
Also add babel-preset-es2015 to devDependencies:
"devDependencies": {
"babel-preset-es2015": "6.18.0",
...
}
In addition to new dependencies, there are new npm scripts. The commands in scripts in package.json are optional but highly recommended, because using npm scripts for launching and building is a best practice when working with React and Node. Of course, you can run all the builds manually without using npm scripts, but why type extra characters?
You can either run Webpack with npm run build or run it directly with ./node_modules/.bin/webpack -w. The -w flag means watch—that is, continue to monitor for any source code changes, and rebuild bundles if there are any. In other words, Webpack will keep running to automatically make changes. Of course, you must have all the necessary modules installed with npm i.
The webpack -w command looks for webpack.config.js by default. You can’t run Webpack with this configuration file. Let’s create it next.
The wds and wds-cli npm scripts in package.json are explained in section 12.5.
Webpack needs to know what to process (the source code) and how to do it (with the loaders). That’s why there’s webpack.config.js in the root of the project structure. In a nutshell, in this project, you’re using Webpack to do the following:
Webpack needs its own configuration file: email-webpack/webpack.config.js.
The devtool property is useful during development because it provides source maps that show you the line numbers in source—not compiled—code. You’re now ready to run Webpack for this project and also bootstrap any Webpack-based projects in the future.
If you wish, you can have more than one configuration file. These files can come in handy for development, production, testing, and other builds. In the example’s project structure, I created these files:
webpack.dev-cli.config.js webpack.dev.config.js
Naming doesn’t matter as long as you and your teammates can understand the meaning of each file. The name is passed to Webpack with --config. You’ll learn more about these configuration files in section 12.4.
Webpack has a lot of features, and we’ve only covered the basics; but they’re enough to compile JSX, provide source maps, inject and import CSS, and bundle JavaScript. When you need more Webpack functionality, you can consult the documentation or a book like SurviveJS by Juho Vepsäläinen (https://survivejs.com).
Now you’re ready to use some of Webpack’s power in JSX.
As you’ll recall, in chapter 7, the email app used global objects and <script>. That’s fine for this book or a small app. But in large apps, using globals is frowned on because you may run into trouble with name collisions or managing multiple <script> tags with duplicate inclusions. You can let Webpack do all the dependency management by using CommonJS syntax. Webpack will include only needed dependencies and package them into a single bundle.js file (based on the configs in webpack.config.js).
Organizing your code by modularizing it is a best practice not only for React but also for software engineering in general. You can use Browserify, SystemJS, or another bundler/module loader and still use CommonJS/Node.js syntax (require and module.exports). Thus, the code in this section is transferable to other systems, once you refactor it away from primitive globals.
As of this writing, import (http://mng.bz/VjyO) is supported by only one browser—Edge—and isn’t supported by Node.js. ES6 modules with import syntax will need more work in the Webpack setup. It isn’t an exact replacement for CommonJS require/module.exports syntax, because those commands work differently. For this reason, the following listing (ch12/email-webpack/app.jsx) refactors app.jsx to use require() and module.exports instead of global objects and HTML <script>. Due to the use of style-loader, you can require CSS files as well. And because of the Babel loader, you can require JSX files.
In contrast, ch07/email/jsx/script.jsx looks like this:
ReactDOM.render(
<Content />,
document.getElementById('content')
)
The old file is smaller, but this is one of the rare cases in which less isn’t more. It relies on the global Content, ReactDOM, and React objects, which, as I just explained, is a bad practice.
In content.jsx, you can use require() in a similar way. The code for constructor(), submit(), and render() doesn’t change:
The index.html file needs to point to the bundle that Webpack creates for you: the js/bundle.js file. Its name is specified in webpack.config.js, and now you need to add it. It will be created after you run npm run build. Here’s the new index.html code:
<!DOCTYPE html>
<html>
<head>
<link href="css/bootstrap.css" type="text/css" rel="stylesheet"/>
</head>
<body>
<div id="content" class="container"></div>
<script src="js/bundle.js"></script>
</body>
</html>
Note that you also remove the reference to the stylesheet main.css from index.html. Webpack will inject a <style> element with a reference to main.css into index.html for you, because of require('main.css') in app.jsx. You can use require() for bootstrap.css as well.
That’s the last step in refactoring your project.
This is the moment of truth. Run $ npm run build, and compare your output with the following:
> email-webpack@1.0.0 build
If there are no errors and you can see newly created bundle.js and bundle.js.map files in the js folder, bingo! Now spin up your favorite web server (perhaps node-static or http-server), and check the web app. You’ll see that it’s logging emails and comments in the console.
As you can see, incorporating Webpack into a project is straightforward and yields great results.
There are 177 modules in ch12/email-webpack/js/bundle.js! You can open the file and search for webpack_require(1), webpack_require(2), and so on, through webpack_require(176), which is the Content component. The followed compiled code from app.jsx imports Content (lines 49–53 in bundle.js):
const React = __webpack_require__(5); const ReactDOM = __webpack_require__(38); const Content = __webpack_require__(176); ReactDOM.render(React.createElement(Content, null),
At a bare minimum, you’re ready to use Webpack for the rest of this book. But I strongly recommend that you set up one more thing: hot module replacement (HMR), which can speed up development dramatically. Before we proceed with React development, let’s look at this great Webpack feature.
I want to mention two other useful development tools. Obviously, they’re optional, but they’re a pretty big deal.
ESLint (http://eslint.org, npm name eslint) can take predefined rules or sets of rules and make sure your code (JS or JSX) adheres to the same standards. For example, how many spaces is an indent—four or two? Or, what if you accidentally put a semicolon in your code? (Semicolons are optional in JavaScript, and I prefer not to use them.) ESLint will even give you a warning about unused variables. It can prevent bugs from sneaking into your code! (Not all of them, of course.)
Check out “Getting Started with ESLint” (http://eslint.org/docs/user-guide/getting-started). You’ll also need eslint-plugin-react (https://github.com/yannickcr/eslint-plugin-react). Make sure you add the React rules to .eslintrc.json (the full code is in the ch12/email-webpack-eslint-flow folder):
"rules": {
"react/jsx-uses-react": "error",
"react/jsx-uses-vars": "error",
}
Here’s an example of some warnings from running ESLint React on ch12/email-web-pack-lint-flow/jsx/content.jsx:
/Users/azat/Documents/Code/react-quickly/ch12/
Next, Flow (https://flowtype.org, npm name flow-bin) is a static type-checking tool you can use to add a special comment (// @flow) to your scripts and types. Yes! Types in JavaScript! Rejoice, if you’re a software engineer with a preference for strongly typed languages like Java, Python, and C. Once you’ve added the comment, you can run a Flow check to see whether there are any issues. Again, this tool can prevent some pesky bugs:
// @flow var bookName: string = 13 console.log(bookName) // number. This type is incompatible with string
Flow has extensive documentation: see “Getting started with Flow” (https://flowtype.org/docs/getting-started.html) and “Flow for React” (https://flowtype.org/docs/react.html).
You can configure Atom or any other modern code editor to work with ESLint and Flow to catch problems on the fly.
The Atom code editor supports Flow, which shows issues in the bottom pane and marks on the code line during development.
You can find the email project code with ESLint v3.8.1 and Flow v0.33.0 in the ch12/email-webpack-eslint-flow folder.
Hot module replacement (HMR) is one of the coolest features of Webpack and React. It lets you write code and test it more quickly by updating the browser with changes while preserving the app’s state.
Say you’re working on a complex single-page web application, and getting to the current page you’re working on takes 12 clicks. If you upload new code to the site, then to get it running, you have to click Reload/Refresh in your browser and repeat those 12 clicks. If you’re using HMR, on the other hand, there are no page reloads, and your changes are reflected on the page.
HMR’s primary benefit is that you can iterate (write, test, write, test, and so on) more quickly, because your app will save state when you make changes. Some developers consider HMR so groundbreaking that if React didn’t have any other features, they would still use it just for HMR!
For the nitty-gritty details of how the HMR process works, see the documentation at http://mng.bz/L9d5. This section covers the practical application of this technology as it pertains to the example email form.
The process of hot-updating code requires multiple steps, shown in a simplified form in figure 12.2. Webpack HMR and the dev server use WebSockets to monitor update notifications from the server. If there are any, the front end gets chunks (JavaScript code) and an update manifest (JSON), which are basically the delta of the changes. The front-end app preserves its state (such as data in an input field or a screen position), but the UI and code change. Magic.
To see HMR in an example, you’ll use a new configuration file and webpack-dev-server (WDS). It’s possible to use HMR with your own server, built with Express/Node; WDS is optional, but it’s provided by Webpack as a separate webpack-dev-server module, so I’ll cover it here.
Once everything is configured, you’ll enter an email in the form and make a few changes in the code. Thanks to HMR, you’ll see that the entered email remains on the form and your changes are propagated to the web app.
First, duplicate webpack.config.js by creating a copy named webpack.dev.config.js:
$ cp webpack.config.js webpack.dev.config.js
Next, open the newly created webpack.dev.config.js file. You need to add a few things such as new entry points, a public path, and the HMR plug-in, and set the dev-server flag to true. The following listing shows the final file (ch12/email-webpack/webpack.dev.config.js).
You need to tell WDS to use this new configuration file by providing the --config option:
./node_modules/.bin/webpack-dev-server --config webpack.dev.config.js
Save this in package.json for convenience, if you don’t have it there already. As you’ll recall, react-hot-loader is in the dependencies. This module enables HMR for all JSX files (which are in turn converted to JS).
I prefer to enable HMR for all files with react-hot-loader. But if you want to have HMR only for certain modules, not all of them, don’t use react-hot-loader; instead, opt in manually by adding the module.hot.accept() statement to the JSX/JS modules you want to cherry-pick for HMR. This module.hot magic comes from Webpack. It’s recommended that you check whether module.hot is available:
if(module.hot) {
module.hot.accept()
}
That’s a lot of configurations! But there’s another way to use and configure Webpack: you can use command-line options and pack some configs in the commands.
If you prefer to use the command line, be my guest. Your config file will be smaller, but the commands will be bigger. For example, this webpack.dev-cli.config.js file has fewer configs:
module.exports = {
entry: './jsx/app.jsx',
output: {
publicPath: 'js/',
path: __dirname + '/js/',
filename: 'bundle.js'
},
devtool: '#sourcemap',
module: {
loaders: [
{
test: /\.jsx?$/,
exclude: /(node_modules)/,
loaders: []
}
]
}
}
But it uses more CLI options:
./node_modules/.bin/webpack-dev-server --inline --hot
Several things are happening here. First, --inline and --hot include the entries enabling WDS and HMR mode. Then, you pass your loaders with --module-bind using the following syntax:
fileExtension=loader1!loader2!...
Make sure react-hot is before babel; otherwise, you’ll get an error.
When it comes to using the CLI or a full config file, the choice is yours. I find the CLI approach better for simpler builds. To avoid crying later when you discover that you mistyped this monstrosity of a command, you should save the command as an npm script in package.json. And no, batch/shell scripts/Make scripts aren’t cool anymore. Use npm scripts, like all the cool kids do! (Disclaimer: This is a joke. I’m not advocating fashion-driven development.)
npm scripts offer certain advantages, and they’re commonly used in Node and React projects. They’ve become a de facto standard, and you’ll generally find them when you first learn about a project. When I start working on a new project or library, the npm scripts are the first place I look, after readme.md—and sometimes instead of readme.md, which may be out of date.
npm scripts offer a flexible way to save essential scripts for testing, building, seeding with data, and running in development or other environments. In other words, any work that’s performed via the CLI and related to the app but that isn’t the app itself can be saved to npm scripts. They function as documentation, as well, to show others how building and testing work. You can call other npm scripts from npm scripts, thus simplifying your project further. The following example includes different versions of builds:
"scripts": {
"test": "echo \"Error: no test specified\" && exit 1",
"build": "./node_modules/.bin/babel -w",
"build:method": " npm run build -- method/jsx/script.jsx -o
method/js/script.js",
"build:hello-js-world-jsx": "npm run build --
hello-js-world-jsx/jsx/script.jsx -o
hello-js-world-jsx/js/script.js",
"build:hello-world-jsx": "npm run build --
hello-world-jsx/jsx/script.jsx -o
hello-world-jsx/js/script.js",
"build:hello-world-class-jsx": "npm run build --
hello-world-class-jsx/jsx/script.jsx -o
hello-world-class-jsx/js/script.js"
},
npm scripts also support pre and post hooks, which makes them even more versatile. In general, a hook is a pattern in which some code is triggered when another event happens. For example, you can create a learn-react task along with two tasks that have pre and post hooks: prelearn-react and postlearn-react. As you may guess, the pre hook will be executed before learn-react, and the post hook will be executed after learn-react. For example, these bash scripts
"scripts": {
"prelearn-react": "echo \"Purchasing React Quickly\"",
"learn-react": "echo \"Reading React Quickly\" ",
"postlearn-react": "echo \"Creating my own React app\""
},
print the following output, based on the pre / post order:
... Purchasing React Quickly ... Reading React Quickly ... Creating my own React app
With pre and post hooks, npm can easily replace some build steps performed by Webpack, Gulp, or Grunt.
See the documentation at https://docs.npmjs.com/misc/scripts and Keith Cirkel’s article “How to Use npm as a Build Tool” (www.keithcirkel.co.uk/how-to-use-npm-asa-build-tool) for more npm tips, including parameters and arguments. Any functionality that’s missing with npm scripts can be implemented from scratch as a Node script. The advantage is that you’ll have fewer dependencies on plug-ins for your project.
Go ahead and start WDS with npm run wds or npm run wds-cli. Then, go to http://localhost:8080 and open the DevTools console. You’ll see messages from HMR and WDS, as follows:
[HMR] Waiting for update signal from WDS... [WDS] Hot Module Replacement enabled.
Enter some text in the email or comment field, and then change content.jsx. You can modify something in render()—for example, change the form text from Email to Your Email:
Your Email: <input ref="emailAddress" className="form-control" type="text"
You’ll see some logging:
[WDS] App updated. Recompiling... ... [HMR] App is up to date.
Then your changes will appear on the web page, as shown in figure 12.3, along with the text you entered previously. Great—you no longer need to waste time entering test data or navigating deep inside nested UIs! You can spend more time doing important things instead of typing and clicking around the front-end app. Development is faster with HMR!
HMR isn’t bulletproof. It won’t update or fail in some situations. WDS will reload the page (live reload) when that happens. This behavior is controlled by webpack/hot/dev-server; another option is to reload manually using webpack/hot/only-dev-server.
Webpack is a nice tool to use with React to streamline and enhance your bundling. It’s great not only for optimizing code, images, styles, and other assets when you deploy, but also for development, thanks to WDS and HMR.
What is the command to run the dev npm script ("dev": "./node_modules/.bin/webpack-dev-server --config webpack.dev.config.js")? npm dev, npm run dev, NODE_ENV=dev npm run, or npm run development
HMR is just a React term for live reloading. True or false?
WDS will write compiled files to disk, just like the webpack command. True or false?
webpack.config.js must be a valid JSON file, just like package.json. True or false?
What loaders do you need to use in order to import and then inject CSS into a web page using Webpack?
npm run dev. Only start and test npm scripts can be run without run. All other scripts follow npm run NAME syntax.
False. HMR can replace live reloading and fall back to it when HMR fails; but HMR is more advanced and offers more benefits, such as updating only parts of your app and preserving the app’s state.
False. WDS only serves files without writing them to disk.
False. webpack.config.js is a default Webpack configuration file. It must be a Node.js/JavaScript file with the CommonJS/Node.js module exporting the object literal for configurations (the object can have double quotes, akin to JSON).
The style loader imports, and the CSS loader injects.
This chapter covers
In the past, in many single-page applications, the URL rarely, if ever, changed as you progressed through the app. There was no reason to go to the server, thanks to browser rendering! Only the content on part of the page changed. This approach had some unfortunate consequences:
Fortunately, today we have browser URL routing. URL routing lets you configure an application to accept request URLs that don’t map to physical files. Instead, you can define URLs that are semantically meaningful to users, that can help with search-engine optimization (SEO), and that can reflect your application’s state. For example, a URL for a page that displays product information might be
https://www.manning.com/books/react-quickly
This is neatly mapped behind the scenes to a single page that displays the product with ID react-quickly. As you browse various products, the URL can change, and both the browser and search engines will be able to interact with the product pages as you’d expect. If you want to avoid complete page reloads, you can use a hash (#) in your URLs, as these well-known sites do:
https://mail.google.com/mail/u/0/#inbox https://en.todoist.com/app?v=816#agenda%2Foverdue%2C%20today https://calendar.google.com/calendar/render?tab=mc#main_7
URL routing is a requirement for a user-friendly, well-designed web app. Without specific URLs, users can’t save or share links without losing the state of the application, be it a single-page application (SPA) or a traditional web app with server rendering.
In this chapter, you’ll build a simple React website and learn about a couple of different options for implementing routing within it. I’ll introduce the React Router library later in the chapter; first, let’s build some simple routing from scratch.
The source code for the examples in this chapter is at www.manning.com/books/react-quickly and https://github.com/azat-co/react-quickly/tree/master/ch13 (in the ch13 folder of the GitHub repository https://github.com/azat-co/react-quickly). You can also find some demos at http://reactquickly.co/demos.
Although there are existing libraries that implement routing for React, let’s start by implementing a simple router to see how easy it is. This project will also help you understand how other routers work under the hood.
The end goal of this project is to have three pages that change along with the URL when you navigate around. You’ll use hash URLs (#) to keep things simple; non-hash URLs require a special server configuration. These are the pages you’ll create:
Figure 13.1 shows the navigation from the home page to the Profile page.
To implement this project, which will demonstrate and use a URL router, you’ll create a router component (router.jsx), a mapping, and an HTML page. The router component will take information from the URL and update the web page accordingly. The implementation of the project breaks down into these steps:
You’ll use JSX to create React elements for the markup. Obviously, Router doesn’t have to be a React component; it can be a regular function or a class. But using a React component reinforces concepts you’ve learned about in this book, such as event lifecycles and taking advantage of React’s rendering and handling of the DOM. In addition, your implementation will be closer to the React Router implementation, which will help you understand React Router better when we discuss it later.
The structure of the project (which you can call a simple or naive router) is as follows:
/naive-router
/css
bootstrap.css
main.css
/js
bundle.js
/jsx
app.jsx
router.jsx
/node_modules
index.html
package.json
webpack.config.js
You’ll begin by installing dependencies. I put them in package.json; you can copy the dependencies as well as the babel config and scripts, and run npm install (ch13/naive-router/package.json).
This isn’t all. Webpack needs its own configuration file, webpack.config.js (as explained in chapter 9). The key is to configure the source (entry) and the desired destination (output). You also need to provide the loader.
First, you’ll create a mapping with a mapping object, where the keys are URL fragments and the values are the content of the individual pages. A mapping takes a value and ties/connects it to another value. In this case, the key (URL fragment) will map to JSX. You could create a separate file for each page, but for now let’s keep them all in app.jsx.
Next, you’ll implement Router in router.jsx.
In a nutshell, Router needs to take information from the URL (#profile) and map it to JSX using the mapping property provided to it. You can access the URL from the window.location.hash of the browser API:
const React = require('react')
module.exports = class Router extends React.Component {
constructor(props) {
super(props)
this.state = {hash: window.location.hash}
this.updateHash = this.updateHash.bind(this)
}
render() {
...
}
}
Next, you need to listen for any URL changes with hashchange. If you don’t implement listening to new URLs, then your router will work only once: when the entire page reloads and the Router element is created. The best places to attach and remove listeners for hashchange are the componentDidMount() and componentWillUnmount() lifecycle event listeners:
updateHash(event) {
this.setState({hash: window.location.hash})
}
componentDidMount() {
window.addEventListener('hashchange', this.updateHash, false)
}
componentWillUnmount() {
window.removeEventListener('hashchange', this.updateHash, false)
}
Chapter 5 discusses lifecycle events, but here’s a refresher. componentDidMount() is fired when an element is mounted and appears in the real DOM node (you can say that an element has a real DOM node). For this reason, this is the safest place to attach events that integrate with other DOM objects, and also to make AJAX/XHR calls (not used here).
On the other hand, componentWillUnmount() is the best place to remove event listeners; your element will be unmounted, and you need to remove whatever you created outside of this element (such as an event listener on window). Leaving a lot of event listeners hanging around without the elements that created and used them is a bad practice: it leads to performance issues such as memory leaks.
In render(), you use if/else to see whether there’s a match with the current URL value (this.state.hash) and the keys/attributes/properties in the mapping property. If so, you access mapping again to get the content of the individual page (JSX). If not, you fall back to * for all other URLs, including the empty value (home page). Here’s the complete code (ch13/naive-router/jsx/router.jsx).
Finally, in index.html, you include the CSS file and bundle.js that Webpack will produce when you run npm run build (which in turn runs ./node_modules/.bin/webpack -w):
<!DOCTYPE html>
<html>
<head>
<link href="css/bootstrap.css" type="text/css" rel="stylesheet"/>
<link href="css/main.css" type="text/css" rel="stylesheet"/>
</head>
<body>
<div id="content" class="container"></div>
<script src="js/bundle.js"></script>
</body>
</html>
Run the bundler to get bundle.js, and open the web page in a browser. Clicking the links changes the URL as well as the content of the page, as shown earlier in figure 13.1.
As you can see, building your own router with React is straightforward; you can use lifecycle methods to listen for changes in the hash and render the appropriate content. But although this is a viable option, things become more complex if you need nested routes, use route parsing (extracting URL parameters), or use “nice” URLs without #. You could use a router from Backbone or another front-end, MVC-like framework, but there’s a solution designed for React specifically (hint: it uses JSX).
React is amazing at building UIs. If I haven’t convinced you yet, go back and reread the previous chapters! It can also be used to implement simple URL routing from scratch, as you’ve seen with router.jsx.
But for more-sophisticated SPAs, you’ll need more features. For instance, passing a URL parameter is a common feature to signify an individual item rather than a list of items: for example, /posts/57b0ed12fa81dea5362e5e98, where 57b0ed12-fa81dea5362e5e98 is a unique post ID. You could extract this URL parameter using a regular expression; but sooner or later, if your application grows in complexity, you may find yourself reinventing existing implementations for front-end URL routing.
Semantic or nice URLS (https://en.wikipedia.org/wiki/Semantic_URL) are aimed at improving the usability and accessibility of a website or web app by decoupling the internal implementation from the UI. A non-semantic approach might use query strings and/or script filenames. On the other hand, the semantic way embraces using the path only in a manner that helps users interpret the structure and manipulate the URLs. Here are some examples:
Major frameworks such as Ember, Backbone, and Angular have routing built in to them. When it comes to routing and React, React Router (react-router; https://github.com/reactjs/react-router) is a ready-to-go, off-the-shelf solution. Section 13.4 covers a Backbone implementation and illustrates how nicely React plays with this MVC-like framework that many people use for SPAs. Right now, let’s focus on React Router.
React Router isn’t part of the official React core library. It came from the community, but it’s mature and popular enough that a third of React projects use it.[1] It’s a default option for most React engineers I’ve talked to.
React.js Conf 2015, “React Router Increases Your Productivity,” https://youtube.com/watch?v=XZfvW1a8Xac.
The syntax of React Router uses JSX, which is another plus because it allows you to create more-readable hierarchical definitions than you can with a mapping object (as you saw in the previous project). Like the naive Router implementation, React Router has a Router React component (React Router inspired my implementation!). Here are the steps you’ll follow:
You’ll use JSX to create a Route for each page, and nest them either in another Route or in Router. The Router object goes in the ReactDOM.render() function, like any other React element:
ReactDOM.render((
<Router ...>
<Route ...>
<Route ../>
...
</Route>
<Route .../>
</Router>
), document.getElementById('content'))
Each Route has at least two properties: path, which is the URL pattern to match to trigger this route; and component, which fetches and renders the necessary component. You can have more properties for a Route, such as event handlers and data. They’ll be accessible in props.route in that Route component. This is how you pass data to route components.
To illustrate, let’s consider an example of an SPA with routing to a few pages: About, Posts (like a blog), an individual Post, Contact Us, and Login. They have different paths and render from different components:
The About, Posts, Post, and Contact Us pages will use the same layout (Content component) and render inside it. Here’s the initial React Router code (not the complete, final version):
<Router>
<Route path="/" component={Content} >
<Route path="/about" component={About} />
<Route path="/about/company" .../>
<Route path="/about/author" .../>
<Route path="/posts" component={Posts} />
<Route path="/posts/:id" component={Post}/>
<Route path="/contact" component={Contact} />
</Route>
</Router>
Interestingly, you can nest routes to reuse layouts from parents, and their URLs can be independent of nesting. For instance, it’s possible to have a nested About component with the /about URL, even though the “parent” layout route Content uses /app. About will still have the Content layout (implemented by this.props.children in Content):
<Router>
<Route path="/app" component={Content} >
<Route path="/about" component={About} />
...
In other words, About doesn’t need the nested URL /app/about unless you want it to be this way. This gives you more flexibility in terms of paths and layouts.
To navigate, you’ll implement a menu as shown in figure 13.2. The menu and the header will be rendered from Content and reused on the About, Posts, Post, and Contact Us pages. In the figure, several things are happening: the About page is rendered, the menu button is active, the URL reflects that you’re on the About page by showing you /#/about, and the text Node.University reflects what’s in the About component (you’ll see it later).
As I mentioned earlier, you’ll use JSX to create the Router element and Route elements nested within it (and each other). Each element (Router or Route) has at least two properties, path and component, that tell the router the URL path and the React component class to create and render. It’s possible to have additional custom properties/attributes to pass data; you’ll use that approach to pass a posts array.
Let’s put your knowledge to work by importing the React Router objects and using them in ReactDOM.render() to define the routing behavior (ch13/router/jsx/app.jsx). In addition to About, Posts, Post, and Contact Us, you’ll create a Login page.
const ReactRouter = require('react-router')
let { Router,
Route,
Link
} = ReactRouter
ReactDOM.render((
<Router history={hashHistory}>
<Route path="/" component={Content} >
<Route path="/about" component={About} />
<Route path="/posts" component={Posts} posts={posts}/>
<Route path="/posts/:id" component={Post} posts={posts}/>
<Route path="/contact" component={Contact} />
</Route>
<Route path="/login" component={Login}/>
</Router>
), document.getElementById('content'))
This last route, Login (/login, shown in figure 13.3), lives outside of the Content route and doesn’t have the menu (which is in Content). Anything that doesn’t need the common interface provided in Content can be left out of the Content route. This behavior is determined by the hierarchy of the nested routes.
The Post component renders blog post information based on the post slug (part of the URL—think ID), which it gets from the URL (for example, /posts/http2) via the props.params.id variable. By using a special syntax with a colon in the path, you tell the router to parse that value and populate it into props.params.
Router is passed to the ReactDOM.render() method. Notice that you pass history to Router. Starting with version 2 of React Router, you must supply a history implementation. You have two choices: bundling with the React Router history or using a standalone history implementation.
The hash history, as you can probably guess, relies on the hash symbol #, which is how you navigate on the page without reloading it; for example, router/#/posts/http2. Most SPAs use hashes because they need to reflect changes in context within the app without causing a complete refresh (request to the server). You did this when you implemented a router from scratch.
The proper term for a hash is fragment identifier (https://en.wikipedia.org/wiki/Fragment_identifier).
In this example, you’ll also uses hashes, which come standalone from the history library (http://npmjs.org/history). You’ll import the library, initialize it, and pass it to React Router.
You need to set queryKey to false when you initialize history, because you want to disable the pesky query string (for example, ?_k=vl8reh) that’s there by default to support older browsers and transfer states when navigating:
const ReactRouter = require('react-router')
const History = require('history')
let hashHistory = ReactRouter.useRouterHistory(History.createHashHistory)({
queryKey: false
})
<Router history={hashHistory}/>
To use a bundled hash history, import it from React Router like this:
const { hashHistory } = require('react-router')
<Router history={hashHistory} />
You can use a different history implementation with React Router if you prefer. Old browsers love hash history, but that means you’ll see the # hashtag. If you need URLs without hash signs, you can do that, too. You just need to switch to the browser history and implement some server modifications, which are simple if you use Node as your HTTP server back end. To keep this project simple, you’ll use hash history, but we’ll go over the browser history briefly.
An alternative to hash history is the browser HTML5 pushState history. For example, a browser history URL might be router/posts/http2 rather than router/#/posts/http2. Browser history URLs are also called real URLs.
Browser history uses regular, unfragmented URLs, so each request triggers a server request. That’s why this approach requires some server-side configuration that I won’t cover here. Typically, SPAs should use fragmented/hash URLs, especially if you need to support older browsers, because browser history requires a more complex implementation.
You can use browser history in a way similar to hash history. You import the module, plug it in, and finally configure the server to serve the same file (not the file from your SPA’s routing).
Browser implementations come from a standalone custom package (like history) or from the implementation in React Router (ReactRouter.browserHistory). After you import the browser history library, apply it to Router:
const { browserHistory } = require('react-router')
<Router history={browserHistory} />
Next, you need to modify the server to respond with the same file no matter what the URL is. This example is just one possible implementation; it uses Node.js and Express:
const express = require('express')
const path = require('path')
const port = process.env.PORT || 8080
const app = express()
app.use(express.static(__dirname + '/public'))
app.get('*', function (request, response){
response.sendFile(path.resolve(__dirname, 'public', 'index.html'))
})
app.listen(port)
console.log("server started on port " + port)
The reason for the required server-side behavior of the HTTP server is that once you switch to real URLs without the hash sign, they’ll start hitting the HTTP server. The server needs to serve the same SPA JavaScript code to every request. For example, requests to /posts/57b0ed12fa81dea5362e5e98 and /about should resolve in index.html, not posts/57b0ed12fa81dea5362e5e98.html or about.html (which will probably result in 404: Not Found).
Because hash history is the preferred way to implement URL routing when support for older browsers is needed, and to keep this example simple without having to implement the back-end server, we’ll use hash history in this chapter.
When you’re working with React Router, there are libraries you need to use and import as well as the JSX compilation to run. Let’s look at the development setup for React Router using Webpack, which will perform these tasks.
The following listing shows devDependencies from package.json (ch13/router/package.json). Most of this should be familiar to you already. New packages include history and react-router. As always, make sure you’re using the exact versions shown; otherwise, you can’t be sure the code will run.
{
...
"devDependencies": {
"babel-core": "6.11.4",
"babel-loader": "6.2.4",
"babel-preset-react": "6.5.0",
"history": "2.1.2",
"react": "15.2.1",
"react-dom": "15.2.1",
"react-router": "2.6.0",
"webpack": "1.12.9"
}
}
In addition to devDependencies, package.json must have a babel configuration. I also recommend adding npm scripts:
{
...
"scripts": {
"test": "echo \"Error: no test specified\" && exit 1",
"build": "./node_modules/.bin/webpack -w",
"i": "rm -rf ./node_modules && npm cache clean && npm install"
},
"babel": {
"presets": [
"react"
]
},
...
}
Note that because the JSX will be converted to React.createClass(), you’ll need to import and define React in files that use JSX even when they don’t use React. To illustrate, in listing 13.7, it looks as though the About component (which is stateless—that is, a function) doesn’t use React. But when this code is transpiled, it will use React in the form of React.createElement() calls. In chapters 1 and 2, React was defined as a global window.React; but with a modular, nonglobal approach, it isn’t. Hence, you need to define React explicitly (ch13/router/jsx/about.jsx).
const React = require('react')
module.exports = function About() {
return <div>
<a href="http://Node.University" target="_blank">Node.University</a>
is home to top-notch Node education which brings joy to JavaScript
engineers.
</div>
}
The rest of the files and the project as whole will use this structure:
The index.html file is bare-bones because it includes only the bundled file.
<!DOCTYPE html>
<html>
<head>
<link href="css/bootstrap.css" type="text/css" rel="stylesheet"/>
<link href="css/main.css" type="text/css" rel="stylesheet"/>
</head>
<body>
<div id="content" class="container"></div>
<script src="js/bundle.js"></script>
</body>
</html>
webpack.config.js needs to have at least an entry-point app.jsx, babel-loader, and source maps (ch13/router/webpack.config.js).
Next, let’s implement the Content layout component.
The Content component, which is defined as a parent Route, will serve as a layout for the About, Posts, Post, and Contact components. Figure 13.4 shows how it’s implemented.
First, you’ll import React and Link from React Router. The latter is a special component to render navigation links. Link is a special wrapper for <a>; it has some magic attributes that the normal anchor tag doesn’t, such as activeClassName="active", which adds the active class when this route is active.
The Content component’s structure looks something like this, with the omission of a few pieces (the complete code is shown later):
const React = require('react')
const {Link} = require('react-router')
class Content extends React.Component {
render() {
return (
<div>
...
</div>
)
}
}
...
module.exports = Content
In render(), you use the amazing Twitter Bootstrap UI library (http://getbootstrap.com) to declare the menu with the proper classes. The menu can be created using ready-made CSS classes, such as these:
<div className="navbar navbar-default">
<ul className="nav nav-pills navbar-nav ">
<li ...>
<Link to="/about" activeClassName="active">
About
</Link>
</li>
<li ...>
<Link to="/posts" activeClassName="active">
Blog
</Link>
</li>
...
</ul>
</div>
You’ll access the isActive() method, which returns true or false. This way, an active menu link will be visually different from other links:
<li className={(this.context.router.isActive('/about'))? 'active': ''}>
<Link to="/about" activeClassName="active">
About
</Link>
</li>
Notice the activeClassName attribute of Link. When you set this attribute to a value, Link will apply the class to an active element (the selected link). But you need to set the style on <li>, not just on Link. That’s why you also access router.isActive().
After you’re finished with the Content class definition (full implementation shown shortly), you define a static field/attribute contextTypes that enables the use of this.context.router. If you’re using ES2017+/ES8+,[2] you may have support for static fields, but that’s not the case in ES2015/ES6 or ES2016/ES7. They don’t have this feature. The ES2017/ES8 standard isn’t final yet, but as of this writing it doesn’t have this feature either. Be sure to check the current list of finished proposals/features,[3] or consider using ES Next (collection of stage 0 proposals).
Learn more about ES2016/ES7 and ES2017/ES8 features at https://node.university/blog/498412/es7-es8 and https://node.university/p/es7-es8.
For the current list of stage 0–3 and finished proposals, see the TC39 documents on GitHub: https://github.com/tc39/proposals/blob/master/README.md and https://github.com/tc39/proposals/blob/master/finished-proposals.md.
This static attribute will be used by React Router such that if it’s required, React Router populates this.context (from which you can access router.isActive() and other methods):
Content.contextTypes = {
router: React.PropTypes.object.isRequired
}
Having contextType and router set to required gives you access to this.context.router.isActive('/about'), which in turn will tell you when this particular route is active.
Phew! Here’s the full implementation of the Content layout.
The children statement enables you to reuse the menu on every subroute (route nested in the / route), such as /posts, /post, /about, and /contact:
{this.props.children}
Let’s look at another way to access a router in an individual route, other than using contextTypes.
To learn more about React Router’s features and patterns, let’s look at another way to access a router from child components and how to navigate programmatically within those components. And, of course, the chapter wouldn’t be complete if I didn’t cover how to parse URL parameters and pass data.
Using router allows you to navigate programmatically and access the current route, among other things. It’s good to include access to router in your components.
You’ve seen how to access router from this.context.router by setting the static class attribute contextTypes:
Content.contextTypes = {
router: React.PropTypes.object.isRequired
}
In a way, you’re using the validation mechanism to define the API; that is, the component must have the router. The Content component used this approach.
But context depends on React’s context, which is an experimental approach; its use is discouraged by the React team. Fortunately, there’s another way (some might argue it’s simpler and better; see http://mng.bz/Xhb9): withRouter.
withRouter is a higher-order component (HOC; more about these in chapter 8) that takes a component as an argument, injects router, and returns another HOC. For example, you can inject router into Contact like this:
const {withRouter} = require('react-router')
...
<Router ...>
...
<Route path="/contact" component={withRouter(Contact)} />
</Router>
When you look at the Contact component implementation (a function), the router object is accessible from the properties (argument object to the function):
const React = require('react')
module.exports = function Contact(props) {
// props.router - GOOD!
return <div>
...
</div>
}
The advantage of withRouter is that it works with regular, stateful React classes as well as with stateless functions.
Even though there’s no direct (visible) use of React, you must require React because this code will be converted to code with React.createElement() statements that depend on the React object. For more information, see chapter 3.
A popular use of router is to navigate programmatically: changing the URL (location) from within your code based on logic, not user actions. To demonstrate, suppose you have an app in which the user types a message on a contact form and then submits the form. Based on the server response, the app navigates to an Error page, a Thank-you page, or an About page.
Once you have router, you can navigate programmatically if you need to by calling router.push(URL), where URL must be a defined route path. For instance, you can navigate to About from Contact after 1 second.
Navigating programmatically is an important feature because it lets you change the state of the application. Let’s see how you access URL parameters such as a post ID.
As you’ve seen, having contextTypes and router will give you the this.context.router object. It’s an instance of <Router/> defined in app.jsx, and it can be used to navigate, get the active path, and so on. On the other hand, there’s other interesting information in this.props, and you don’t need a static attribute to access it:
The this.props.location and this.props.params objects contain data about the current route, such as path name, URL parameters (names defined with a colon [:]), and so on.
Let’s use params.id in post.jsx for the Post component in Array.find() to find the post corresponding to a URL path such as router/#/posts/http2 (ch13/router/jsx/post.jsx).
When you navigate to the Posts page (see figure 13.5), there’s a list of posts. As a reminder, the route definition is as follows:
<Route path="/posts" component={Posts} posts={posts}/>
Clicking a post navigates to #/posts/ID. That page reuses the layout of the Content component.
Now, let’s move on and work with data.
You often need to pass data to nested routes, and it’s easy to do. In the example, Posts needs to get data about posts. In listing 13.13, Posts accesses a property passed to you in <Route/> in app.jsx: posts, from the posts.js file. It’s possible to pass any data to a route as an attribute; for example, <Route path="/posts" component={Posts} posts={posts}/>. You can then access the data in props.route; for example, props.route.posts is a list of posts.
Of course, the value of this data can be a function. That way, you can pass event handlers to stateless components and implement them only in the main component, such as app.jsx.
You’re finished with all the major parts and ready to launch this project! You can do so by running an npm script (npm run build) or using ./node_modules/.bin/webpack -w directly. Wait for the build to finish, and you’ll see something like this:
> router@1.0.0 build /Users/azat/Documents/Code/react-quickly/ch13/router
> webpack -w
Hash: 07dc6eca0c3210dec8aa
Version: webpack 1.12.9
Time: 2596ms
Asset Size Chunks Chunk Names
bundle.js 976 kB 0 [emitted] main
bundle.js.map 1.14 MB 0 [emitted] main
+ 264 hidden modules
In a new window, open your favorite static server (I use node-static, but you can create your own using Express), and navigate to the location in your browser. Try going to / and /#/about; the exact URL will depend on whether you’re running your static server from the same folder or a parent folder.
The full source code for this example isn’t included here, for space reasons. If you want to play with it or use it as boilerplate, or if you found the preceding snippets confusing when taken out of context, you can find the complete code at www.manning.com/books/react-quickly or https://github.com/azat-co/react-quickly/tree/master/ch13/router.
When you need routing for a single-page application, it’s straightforward to use React with other routing or MVC-like libraries. For example, Backbone is one of the most popular front-end frameworks that has front-end URL routing built in. Let’s look at how you can easily use the Backbone router to render React components by doing the following:
This is the project structure:
/backbone-router
/css
bootstrap.css
main.css
/js
bundle.js
bundle.map.js
/jsx
about.jsx
app.jsx
contact.jsx
content.jsx
login.jsx
post.jsx
posts.jsx
/node_modules
...
index.html
package.json
posts.js
webpack.config.js
package.json includes Backbone v1.3.3 in addition to the usual suspects, such as Webpack v2.4.1, React v15.5.4, and Babel v6.11:
{
"name": "backbone-router",
"version": "1.0.0",
"description": "",
"main": "index.js",
"scripts": {
"test": "echo \"Error: no test specified\" && exit 1",
"build": "./node_modules/.bin/webpack -w",
"i": "rm -rf ./node_modules && npm cache clean && npm install"
},
"author": "Azat Mardan",
"license": "MIT",
"babel": {
"presets": [
"react"
]
},
"devDependencies": {
"babel-core": "6.11.4",
"babel-loader": "6.4.1",
"babel-preset-react": "6.5.0",
"backbone": "1.3.3",
"jquery": "3.1.0",
"react": "15.5.4",
"react-dom": "15.5.4",
"webpack": "2.4.1"
}
}
The main logic’s source is in app.jsx, where you perform all three of the aforementioned tasks:
const Backbone = require ('backbone')
// Include other libraries
const Router = Backbone.Router.extend({
routes: {
'' : 'index',
'about' : 'about',
'posts' : 'posts',
'posts/:id' : 'post',
'contact' : 'contact',
'login': 'login'
},
...
})
Once the routes object is defined, you can define the methods. The values in routes must be used as method names:
// Include libraries
const Router = Backbone.Router.extend({
routes: {
'' : 'index',
'about' : 'about',
'posts' : 'posts',
'posts/:id' : 'post',
'contact' : 'contact',
'login': 'login'
},
index: function() {
...
},
about: function() {
...
}
...
})
Each URL fragment maps to a function. For example, #/about will trigger about. Thus, you can define these functions and render your React components in them. The data will be passed as a property (router or posts):
The content variable is a DOM node (which you declare before the router):
let content = document.getElementById('content')
Compared to the React Router example, nested components such as Post get their data not in props.params or props.route.posts, but in props.id and props.posts. In my opinion, that means less magic—which is always good. On the other hand, you don’t get to use declarative JSX syntax and must use a more imperative style.
The complete code for this project is available at www.manning.com/books/react-quickly and https://github.com/azat-co/react-quickly/tree/master/ch13/backbone-router. This example will give you a head start if you have a Backbone system or are planning to use Backbone. And even if you’re not planning to use Backbone, it’s shown you yet again that React is amazing at working with other libraries.
You must provide a history implementation for React Router v2.x (the one covered in this chapter) because by default it doesn’t use one. True or false?
What history implementation is better supported by older browsers: hash history or browser HTML5 pushState history?
What do you need to implement to have access to the router object in a route component when using React Router v2.x ?
How would you access URL parameters in a route component (stateless or stateful) when using React Router v2.x?
React Router requires the use of Babel and Webpack. True or false?
True. Version 1.x of React Router loaded a history implementation by default; but in version 2.x, you must provide a library, either from a standalone package or one bundled with the router library.
Hash history is better supported by older browsers.
The static class attribute contextTypes, with router as a required object.
From props.params or props.routeParams.
False. You can use it plain and/or with other build tools such as Gulp and Browserify.
This chapter covers
So far, you’ve been using React to create user interfaces. This is the most common use case for React. But most UIs need to work with data. This data comes from either a server (back end) or another browser component.
When it comes to working with data, React offers many options:
This chapter covers one of the most popular options for the third approach: Redux. Let’s start by outlining how data flows in React components.
There’s the Flux architecture, and then there’s the flux library from Facebook. I’ll be showing you Redux rather than the flux library, because Redux is more actively used in projects. flux serves as more of a proof of concept for the Flux architecture that Redux adheres to and implements. Think of Redux and flux (the library) as the two implementations of the Flux architecture. (I’ll cover the Flux architecture but not the library.)
The source code for the examples in this chapter is at www.manning.com/books/react-quickly and https://github.com/azat-co/react-quickly/tree/master/ch14 (in the ch14 folder of the GitHub repository https://github.com/azat-co/react-quickly). You can also find some demos at http://reactquickly.co/demos.
React is a view layer that’s designed to work with unidirectional data flow (see figure 14.1). A unidirectional data pattern (a.k.a. one-way binding) exists when there are no mutable (or two-way) references between concerns. Concerns are parts with different functionality. For example, a view and a model can’t have two-way references. I’ll talk about bidirectional flow again in a few moments.
To illustrate, if you have an account model and an account view, then data can flow only from the account model to the account view and not vice versa. In other words, changes in the model will cause changes in the view (see figure 14.2). The key to understanding this is that views can’t modify models directly.
Unidirectional data flow ensures that for any given input into your components, you’ll get the same predictable result: a render() expression. This React pattern is in stark contrast to the bidirectional, two-way binding pattern of Angular.js and some other frameworks.
For example, in bidirectional data flow, changes in models cause changes in views and changes in views (user input) cause changes in models. For this reason, with bidirectional data flow, the state of a view is less predictable, making it harder to understand, debug, and maintain (see figure 14.3). The key to remember is that views can modify models directly. This is in stark contrast to unidirectional flow.
Interestingly enough, bidirectional data flow (two-way binding) is considered a benefit by some Angular developers. Without getting into a debate, it’s true that with bidirectional flow, you can write less code.
For example, let’s say you have an input field like the one shown in figure 14.1. All you need to do is define a variable in the template, and the value will be updated in the model when the user types in the field. At the same time, the value on the web page will be updated if there’s a change in the model (as a result of an XHR GET request, for example). Therefore, changes are possible in two directions: from view to model and from model to view. This is great for prototyping, but not so great for complex UIs when it comes to performance, debugging, development scaling, and so on. This may sound controversial—please bear with me.
I’ve built a lot of complex UI applications with MVC and MVW frameworks that have bidirectional flows, and they’ll do the job. In a nutshell, problems arise because various views can manipulate various models, and vice versa. That’s fine when you have one or two models and views in isolation; but the bigger the application, the more models and views are updating each other. It becomes harder and harder to figure out why one model or view is in a given state, because you can’t easily determine which models/views updated it and in which order. Traceability becomes a huge issue, as does finding bugs. That’s why the bidirectional data flow in MVC frameworks (such as Angular) isn’t favored by many developers: they find this antipattern difficult to debug and scale.
On the other hand, with unidirectional flow, the model updates the view, and that’s that. As an added bonus, unidirectional data flow allows for server-side rendering, because views are an immutable function of state (that is, isomorphic/universal JavaScript).
For now, keep in mind that unidirectional data flow is a major selling point of React:
Dan Abramov, “Live React: Hot Reloading with Time Travel” (presentation, ReactEurope 2015), http://mng.bz/uSxq.
Spike Brehm, “Isomorphic JavaScript: The Future of WebAir Apps,” Airbnb Engineering & Data Science, November 11, 2013, http://mng.bz/i34M.
Michael Jackson, “Universal JavaScript,” June 8, 2015, http://mng.bz/7GXE.
Here’s my personal experience with Angular, in case you’re curious. I worked only a little bit with Angular 1 because I thought it was lacking, but then I took a course on Angular 2—and then I realized how wrong I was. I corrected my mistake. Now I completely avoid any Angular code.
Flux (https://facebook.github.io/flux) is an architecture pattern for data flow developed by Facebook to be used in React apps. The gist of Flux is unidirectional data flow and elimination of the complexity of MVC-like patterns.
Let’s consider a typical MVC-like pattern, shown in figure 14.4. Actions trigger events in the controller, which handles models. Then, according to the models, the app renders the views, and the madness begins. Each view updates the models—not just its own model, but the other models too—and the models update the views (bidirectional data flow). It’s easy to get lost in this architecture. The architecture is difficult to understand and debug.
Conversely, Flux suggests using a unidirectional data flow, as shown in figure 14.5. In this case, you have actions from views going through a dispatcher, which in turn calls the data store. (Flux is a replacement for MVC. This isn’t just new terminology.) The store is responsible for the data and the representation in the views. Views don’t modify the data but have actions that go through the dispatcher again.
The unidirectional data flow enables better testing and debugging. A more detailed diagram of the Flux architecture is shown in figure 14.6.
Historically, Flux was an architecture. Only later did the Facebook team release the flux module (www.npmjs.com/package/flux, https://github.com/facebook/flux) that can be used with React to implement Flux. The flux module is more or less a proof of concept for the Flux architecture, and React developers rarely use it.
There’s no reason for me to duplicate the great minds who have already spoken about Flux. I suggest that you watch the video “Hacker Way: Rethinking Web App Development at Facebook,” from the official Flux website: http://mng.bz/wygf.
Personally, I find Flux confusing—and I’m not alone. There are many implementations of Flux, including Redux, Reflux, and other libraries. Early Manning Access Program readers of this book know that Reflux was included in the first version of the book, but I omitted it from this version. My anecdotal evidence, David Waller’s “React.js architecture - Flux vs. Reflux” at http://mng.bz/5GHx, and the hard data from numbers of npm downloads all indicate that Redux is more popular than Flux or Reflux. In this book, I use Redux, which some argue is a better alternative to Flux.
Redux (redux, www.npmjs.com/package/redux) is one of the most popular implementations of the Flux architecture. Redux has these qualities:
I won’t take time to go over all the details of why Redux is better than Flux. If you’re interested, you can read some thoughts by the author of Redux: “Why Use Redux over Facebook Flux?” at http://mng.bz/z9ok.
Redux is a standalone library that implements a state container. It’s like a huge variable that contains all the data your application works with, stores, and changes in the runtime. You can use Redux alone or on the server. As already mentioned, Redux is also popular in combination with React; this combination is implemented in another library, react-redux (https://github.com/reactjs/react-redux).
A few moving parts are involved when you use Redux in your React apps:
Look back at the Flux architecture diagram in figure 14.5: you can see why there’s a store. The only way to mutate the internal state is to dispatch an action, and actions are in the store.
Every change in the store is performed via actions. Each action tells your application what happened and what part of the store should be changed. Actions can also provide data; you’ll find this useful because, well, every app works with data that changes.
The way the data in the store changes is specified by reducers that are pure functions. They have a (state, action) ⇒ state signature. In other words, by applying an action to the current state, you get a new state. This allows for predictability and the ability to rewind actions (via undo and debugging) to previous states.
Here’s the reducer file for a Todo list app in which SET_VISIBILITY_FILTER and ADD_TODO are actions:[4]
Object.assign(), http://mng.bz/O6pl.
You may have one or many reducers (or none) in your Redux application. Every time you call an action, every reducer is called. Reducers are responsible for changing the data in the store; this is why you need to be careful about what they do during certain types of actions.
Typically, a reducer is a function with state and an action as arguments. For example, an action can be “to fetch a movie” (FETCH_MOVIE), which you get by using a reducer. The action code describes how an action transforms the state into the next state (adds a movie to the state). This reducer function contains a huge switch/case statement to process actions. But there’s a handy library that makes reducers more functional and—surprise!—easier to read. The library is called redux-actions, and you’ll see how to use it instead of switch/case.
Redux creator Dan Abramov (https://github.com/gaearon) suggests the following before-bed reading about Redux: “Why Use Redux Over Facebook Flux?” (http://mng.bz/9syg) and “What Could Be the Downsides of Using Redux Instead of Flux” (http://mng.bz/Ux9l).
We all like good old Hollywood movies, right? Let’s make an app that shows a list of classic movies: that is, a Netflix clone (but only the home page—no streaming or anything like that). The app will display a grid of movies (see figure 14.7); and when you click a movie’s image, you’ll see a detailed view (figure 14.8).
The goal of this tutorial is to learn how to use Redux in a real-life scenario to feed data to React components. This data will come from a JSON file to keep things simple. Each individual movie’s detail view will be facilitated with React Router, which you learned about in the previous chapter.
The project will have three components: App, Movies, and Movie. Each component will have a CSS file and live in its own folder for better code organization (that’s the best practice to encapsulate React components together with styles). The project structure is as follows:
Now that the project’s folder structure is ready, let’s look at the dependencies and build configuration.
You need to set up a number of dependencies for this project. You’ll use Webpack (https://github.com/webpack/webpack) to bundle all the files for live use and an additional plug-in called extract-text-webpack-plugin to bundle styles from multiple <style> includes (inline) into one style.css. Webpack loaders are also used in the project:
Other project development dependencies modules include the following:
The package.json file lists all dependencies, Babel configs, and npm scripts and should contain at least the data shown in the following listing (ch14/redux-netflix/package.json). As always, you can install modules manually with npm i NAME, type package.json, and run npm i, or copy package.json and run npm i. Make sure you use the exact versions of the libraries from package.json; otherwise, your code might break.
Because you use Webpack to bundle the dependencies, all of the necessary packages are in bundle.js. For this reason, you put all the dependencies in devDependencies. (I’m picky about what’s deployed—I don’t want any unused modules in my deployment environment just sitting idly and causing security vulnerabilities.) npm ignores devDependencies when the --production flag is used, as in npm i --production.
Next, let’s define the build process by creating webpack.config.js (ch14/redux-netflix/webpack.config.js).
Enough with configurations. In the next section, you’ll start working with Redux.
To make Redux work in your React application, the hierarchy of components needs the Provider component at the top level. This component comes from the react-redux package and injects data from the store into components. That’s right: using Provider as the top-level component means all children will have the store. Neat.
To make Provider work, you need to provide the store to its store property. The Store is an object that represents the application state. Redux (react-redux) comes with a createStore() function that takes reducer(s) from ch14/redux-netflix/scr/modules/index.js and returns the Store object.
To render the Provider component and its entire subtree of components, you use react-dom’s render(). It takes the first argument (<Provider>) and mounts it into the element you pass as the second argument (document.getElementById('app')).
Combining all of this, the entry point of your application should now look like the following listing (ch14/redux-netflix/index.js). You define Provider by passing a Store instance (with reducers) in a JSX format.
const React = require('react')
const { render } = require('react-dom')
const { Provider } = require('react-redux')
const { createStore } = require('react-redux')
const reducers = require('./modules')
const routes = require('./routes')
module.exports = render((
<Provider store={createStore(reducers)}>
{routes}
</Provider>
), document.getElementById('app'))
For the entire application to be able to use Redux features, you need to implement some code in child components, such as connecting the store. The connect() function from the same react-redux package accepts a few arguments. It returns a function that then wraps your component so it can receive certain parts of the store into its properties. You’ll see it in a bit.
You’re finished with index.js. The Provider component takes care of delivering data from the store to all the connected components, so there’s no need to pass properties directly. But a few parts are missing, such as routes, reducers, and actions. Let’s look at them one by one.
With react-router, you can declare a hierarchy of components per browser location. I covered React Router in chapter 13, so it should be familiar; you used it for client-side routing. React routing is not strictly connected with server-side routes, but sometimes you may want to use it for that, especially in conjunction with techniques discussed in chapter 16.
The gist of React Router is that every route can be declared by a couple of nested Route components, each of which takes two properties:
You need to show a collection of movie covers at both the root and /movies locations. In addition, you need to show the details of a given movie at the /movies/:id location. The route configuration uses IndexRoute, as shown next (ch14/redux-netflix/src/routes.js).
Both IndexRoute and Route are nested into the topmost route. This makes the Movies component render for both the root and /movies locations. The individual movie view needs a movie ID to fetch info about that particular movie from the Redux store, so you define the path with a URL parameter. To do so, use the colon syntax: path=":id". Figure 14.9 shows how the individual view and its URL look on a small screen, thanks to responsive CSS. Notice that the URL is movies/8, where 8 is a movie ID. Next, you’ll see how to fetch the data with Redux reducers.
Let’s look at the modules the createStore() function in src/index.js is applied to:
What does this do? You need to store movie data in the store. Perhaps in the future you’ll implement additional parts of the store, such as user accounts or other entities. So let’s use Redux’s feature that allows you to create as many distinct parts of the store as you need, although you need only one at the moment. In a way, you’re creating a better architecture by performing this middle step of combining reducers so that later, you can extend your app effortlessly by adding more reducers to ./modules/index.js (or ./modules), using the plug-in Node pattern.[5] This approach is also called splitting reducers (http://mng.bz/Wprj).
Azat Mardan, “Node Patterns: From Callbacks to Observer,” webapplog, http://mng.bz/p9vd.
Each reducer can change data in the store; but to make this operation safe, you may need to divide the application state into separate parts and then combine them into a single store. This divide-and-conquer approach is recommended for larger apps in which you’ll have increasing numbers of reducers and actions. You can easily combine multiple reducers with the combineReducers() function from redux (ch14/redux-netflix/src/modules/index.js).
You can pass as many reducers as you like and create independent branches in the store. You can name them as you like. In this case, the movies reducer is imported and then passed into the combineReducers() function as a property of a plain object with the key "movies".
This way, you declare a separate part of the store and call it “movies.” Every action that the reducer from ./movies is responsible for will touch only this part and nothing else.
Next, let’s implement the “movies” reducer. A reducer, in Redux, is a function that runs every time any action is dispatched. It’s executed with two arguments:
In other words, the reducer inputs are results of previous actions: the current state (state) and a current action (action). The reducer takes the current state and applies the action. The result of a reducer is a new state. If your reducers are pure functions without side effects (which they should be), you get all the benefits of using Redux with React, such as hot reloading and time travel.
The term reducers comes from functional programming. JavaScript has a somewhat functional nature, so it has Array.reduce().
In a nutshell, a reduce method is an operation that summarizes a list of items so that the input has multiple values and the output has a single value. The list on which a reducer works can be an array, as is the case with JavaScript, or it can be another data structure like a list, as is the case outside of JavaScript.
For example, you can return the number of occurrences of a name in a list of names. The list of names is the input, and the number of occurrences is the output.
To use a reducer, you call a method and pass a reducing function that accepts the following:
With each iteration over the items in the list (or array in JS), the reducer function gets the accumulator value. In JavaScript, the method is Array.reduce(). For example, to get a name frequency, you can run the following reducer code, which uses a ternary if the current value (curr) is “azat” and then adds 1 to the accumulator (acc):[6]
For detailed documentation of Array.prototype.reduce(), see the Mozilla Developer Network, http://mng.bz/Z55j.
const users = ['azat', 'peter', 'wiliam','azat','azat']
console.log(users
.reduce((acc, curr)=>(
(curr == 'azat') ? ++acc : acc
), 0)
)
In Redux reducers, the accumulator value is the state object, and the current value is the current action. The function result is the new state.
Avoid putting API calls into reducers. Remember, reducers are supposed to be pure functions with no side effects. They’re state machines; they shouldn’t do asynchronous operations such as HTTP calls to an API. The best place to put these types of async calls is in middleware (http://redux.js.org/docs/advanced/Middleware.html) or the dispatch() action creator (http://mng.bz/S31I; an action creator is a function that creates actions). You’ll see dispatch() in a component later in this chapter.
A typical reducer is a function containing a huge switch/case statement:
But using switch/case is considered a bad practice by the luminary Douglas Crockford in his classic JavaScript: The Good Parts (O’Reilly Media, 2008). There’s a handy redux-actions library (https://github.com/acdlite/redux-actions) that can bring this reducer function into a cleaner, more functional form. Instead of a huge switch/case statement, you can use a more robust object.
Let’s use handleActions from redux-actions. It takes a map-like plain object, where keys are action types and values are functions. This way, only a single function is called per action type; in other words, this function is cherry-picked by action type.
The function from the previous snippet can be rewritten with redux-actions and handleActions as shown next (ch14/redux-netflix/src/modules/movies.js).
This code looks similar to switch/case, but it’s more about mapping functions to actions than selecting them in a potentially huge conditional statement.
To change data in the store, you use actions. To clarify, an action can be anything, not just user input in a browser. For example, it could be the result of an async operation. Basically, any code can become an action. Actions are the only sources of information for the store; this data is sent from an app to the store. Actions are executed via store.dispatch(), which I mentioned earlier, or via a connect() helper. But before we look at how to call an action, let’s cover its type.
Every action is represented by a plain object that has at least one property: type. It can have as many other properties as you want, usually to pass data into the store. So, every action has a type, like this:
{
type: 'movies/I_AM_A_VALID_ACTION'
}
Here, the action type is a string.
It’s common to name actions using uppercase letters preceded by the module name in lowercase letters. You can omit the module name if you’re sure duplicates will never occur.
In modern Redux development, action types are declared as constant strings:
const FETCH_MOVIES = 'movies/FETCH_MOVIES' const FETCH_MOVIE = 'movies/FETCH_MOVIE'
Here, two action types are declared. Both are strings that consist of two parts: the name of the Redux module and the name of the action type. This practice may be useful when you have different reducers with similarly named actions.
Every time you want to change the application state, you need to dispatch a corresponding action. An appropriate reducer function is executed, and you end up with the updated application state. Think about data that you receive from an API or a form a user fills in: it all can be placed or updated in the store. Here’s an example:
this.props.dispatch({
type: FETCH_MOVIE,
movie: {}
})
This is the series of steps:
More on dispatching later. Let’s see how you can avoid passing/using action types in your components.
To change anything in the store, you need to run an action through all the reducers. A reducer then changes the application state based on the action type. For this reason, you always need to know the action type. But a shortcut lets you conceal action types under action creators. Overall, the steps are as follows:
Check this out:
this.props.dispatch(fetchMoviesActionCreator({movie: {}}))
Simply put, an action creator is a function that returns an action. It’s as straightforward as this:
function fetchMoviesActionCreator(movies) {
return {
type: FETCH_MOVIES,
movies
}
}
With action creators, you can hide complex logic in a single function call. In this case, though, there’s no logic. The only operation this function performs is returning an action: a plain object with a type property that defines this action and also a movies property that has the value of an array of movies. If you were to extend the Netflix clone so it could add a movie, you’d need an addMovie() action creator:
function addMovie(movie) {
return {
type: ADD_MOVIE,
movie
}
}
Or how about watchMovie()?
function watchMovie(movie, watchMovieIndex, rating) {
return {
type: WATCH_MOVIE,
movie,
index: watchMovieIndex,
rating: rating,
receivedAt: Date.now()
}
}
Remember, an action must have the type property!
To be able to dispatch actions, you must connect components to the store. This is getting more interesting, because you’re close to state updates.
Now that you’ve learned how to put data into the store, let’s see how you can access store data from components. Luckily, the Provider component has a feature to bring the data into your components in properties. But to access the data, you’ll need to connect your component to the store explicitly.
By default, a component isn’t connected to a data store; and having it somewhere in the hierarchy of the topmost Provider component isn’t enough. Why? Well, think of connecting as an explicit opt-in for certain components.
If you remember, there are two types of components, according to React best practices: presentational (dumb) and container (smart), as discussed in chapter 8. Presentational components should not need the store; they should just consume properties. At the same time, container components need the store and the dispatcher. Even the definition of container components in the Redux documentation specifies that they subscribe to the store (http://mng.bz/p4f9). All Provider is doing is providing a store for all components automatically so that some of them can subscribe/connect to it. Thus, for container components, you need both Provider and the store.
To sum up, a connected component can access any data from the store in its properties. How do you connect components to the store? With the connect() method, of course! Confused? Let’s look at an example. Think about your root component, App. It will use Movies, which at minimum should have this code to display the list of movies (the actual Movies component has a bit more code):
class Movies extends React.Component {
render() {
const {
movies = []
} = this.props
return (
<div className={styles.movies}>
{movies.map((movie, index) => (
<div key={index}>
{movie.title}
</div>
))}
</div>
)
}
}
Currently, the Movies component isn’t connected to the store despite having Provider as a parent. Let’s connect it by adding the following snippet. The connect() function comes with the react-redux package and accepts up to four arguments, but you’ll use just one at the moment:
const { connect } = require('react-redux')
class Movies extends React.Component {
...
}
module.exports = connect()(Movies)
The connect() function returns a function that’s then applied to the Movies component. As a result not of exporting Movies but of calling connect() with Movies, and having Provider as a parent, the Movies component becomes connected to the store.
Now the Movies component can receive any data from the store and dispatch actions (you didn’t see this coming, did you?). But to receive the data in the format you need, you must map the state to component properties by creating a simple mapper function (expression is a more precise term, because you need to return the result).
In some tutorials, you may see a function called mapStateToProps(), although it doesn’t have to be an explicitly declared function. Using an anonymous arrow function is just as clean and straightforward. This mapper function goes into a special method, connect(), from your favorite react-redux. Remember, state is the first argument of connect():
module.exports = connect(function(state) {
return state
})(Movies)
Or, here’s the fancy, hipster, ESNext React-friendly implicit return style:
module.exports = connect(state => state)(Movies)
With this setup, you take the entire application state from the store and put it into the properties of the Movies component. You’ll find that, usually, you need only a limited subset of the state. In the example, Movies only needs movies.all:
class Movies extends React.Component {
render() {
const {
children,
movies = [],
params = {}
} = this.props
...
module.exports = connect(({movies}) => ({
movies: movies.all
}), {
fetchMoviesActionCreator
})(Movies)
And this is the Movie snippet, which only maps movies.current from the state:
class Movie extends React.Component {
render() {
const {
movie = {
starring: []
}
} = this.props
...
module.exports = connect(({movies}) => ({
movie: movies.current
}), {
fetchMovieActionCreator
})(Movie)
You’ll also see that if the store is empty, the component won’t receive any extra properties, because, well, there aren’t any.
Some Redux magic happens next: every time part of the store is updated, all components that depend on that part receive new properties and therefore are re-rendered. This happens when you dispatch an action, which means your components are now loosely interdependent and update only when the store is updated. Any component can cause this update by dispatching a proper action. There’s no need to use classic callback functions passed as properties and stream them from the topmost component down to the most deeply nested; just connect your components to the store.
To apply changes to data in the store, you need to dispatch an action. Once you’ve connected the component to the store, you can receive properties mapped to certain properties of the application state, and you also receive the dispatch property.
The dispatch() method is a function that takes an action as an argument and dispatches (sends) it into the store. Hence, you can dispatch an action by invoking this.props.dispatch() with an action:
componentWillMount() {
this.props.dispatch({
type: FETCH_MOVIE,
movie: {}
})
}
type is a string value that the Redux library applies to all reducers matching this type. After the action has been dispatched, which usually means you’ve changed the store, all components that are connected to the store and that have properties mapped from the updated part of the application state are rerendered. There’s no need to check whether components should update or do anything at all. You can rely on new properties in components’ render() function:
class Movie extends React.Component {
render() {
const {
movie = {
starring: []
}
} = this.props
...
You can replace a bare action (an object with type) with an action creator (the fetchMovieActionCreator() function):
const fetchMovieActionCreator = (response) => {
type: FETCH_MOVIE,
movie: response.data.data.movie
}
...
componentWillMount() {
... // Make AJAX/XHR request
this.props.dispatch(fetchMovieActionCreator(response))
}
Because fetchMovieActionCreator() returns a plain object that’s identical to the object in the previous example (type and movie keys), you can call this action-creator fetchMovieActionCreator() function and pass the result to dispatch():
You can define action creators as functions right in the component file, but there’s another way to use action creators: you can define them in a module, import them, and put them into component properties. To do that, you can use the second argument of the connect() function and pass your action creator as a method:
Now you can refer to fetchMovieActionCreator() via properties and pass an action without using dispatch(), like this:
This new action creator is automatically wrapped in a valid dispatch() call. You don’t need to worry about doing it yourself. Awesome! This is how the Movies component is implemented in ch14/redux-netflix/src/components/movies/movies.js.
For clarity, you can rename fetchMoviesActionCreator() as fetchMovies() or do this:
The first argument to connect(), which is a function that maps state to component properties, takes the entire state (state) as the only argument and returns a plain object with a single property, movies:
...
module.exports = connect(state => ({
movies: state.movies.all
}), {
fetchMoviesActionCreator
})(Movies)
You can make the code more eloquent by destructuring state.movies:
module.exports = connect(({movies}) => ({
movies: movies.all
}), {
fetchMoviesActionCreator
})(Movies)
In the render() function of the Movies component, the value of movies is obtained from properties and is rendered into a collection of sibling DOM elements. Each is a div element with its inner text set to movie.title. This is a typical approach to rendering an array into a fragment of sibling DOM elements.
Wonder what the final Movies component looks like? Here’s the code (ch14/redux-netflix/src/components/movies/movies.js).
As you can see, swapping for async data is straightforward: make an async call (using the fetch() API, axios, and so on), and then dispatch an action in componentWillMount(). Or even better, let’s use componentDidMount(), which is recommended by the React team for AJAX/XHR calls:
And you can do the same thing with POST, PUT, and other HTTP calls that you did with GET. You’ll be making some of these calls in the next chapter.
We’re finished with Movies. Next, we’ll cover the Movie component—but only briefly, because much of the Redux wiring is similar to that in Movies. What’s different is that Movie will get the URL parameter’s movie ID. React Router puts it in this.props.params.id. This ID will be sent via action dispatch and used in the reducer to filter out only a single movie. As a reminder, these are the reducers from src/modules/movies.js:
Now, let’s look at the implementation of Movie, which uses a different state-to-properties mapping by taking a movie ID from a React Router’s URL parameter and using it as an index (src/components/movie/movie.js).
It’s time to run the project. Of course, you could have done it in the beginning, because the start script is in package.json. This script uses an npm library concurrently to run two processes at the same time: Webpack build in watch mode and Webpack development server (port 8080):
"start": "concurrently \"webpack --watch --config webpack.config.js\"
Navigate to the project root (ch14/redux-netflix). Install the dependencies with npm i, and run the project from the project folder: npm start. Open your favorite browser at http://localhost:8080.
Click around to see that the routing is working and the images are loading regardless of whether you used mock data (require()) or loaded it via the GET request. Notice that if you’re at http://localhost:8080/movies/1 and refresh the page, you don’t see anything. You’ll take care of that in the next chapter, where you’ll implement Node and Express server to support hash-less URLs. Now it’s time to wrap up this chapter.
Redux provides a single place to store an entire application’s data; the only way to change the data is through actions. This makes Redux universal—you can use it anywhere, not only in React apps. But with the react-redux library, you can use the connect() function to connect any component to the store and make it react to any change there.
This is the basic idea of reactive programming: an entity A that observes changes in entity B reacts to those changes as they occur, but the opposite is not true. Here, A is any of your components, and B is the store.
As you connect (connect()) the component and map properties of the store to a component’s properties (this.props), you can refer to the latter in the render() function. Usually, you need to first update the store with data to refer to that data. This is why you call an action in a component’s componentWillMount() function. By the time the component is mounted for the first time and render() is called, the part of the store that the component refers to may be empty. But once the store data is updated, it’s preserved. This is why in the Netflix clone example, the list of movies remains intact even after you navigate across the app’s locations (pages or views). Yes. Data doesn’t disappear from the store after a component is unmounted, unlike when you use the component’s state (remember this.state() and this.setState()?). Thus, your Redux store can serve different parts of your application that require the same data without the data having to be reloaded.
It’s also safe to update component properties in the render() function via the store by dispatching an action, because this operation is deferred. On the other hand, without Redux, you can’t use setState() at any point when the component may be updated: render(), componentWillMount(), or componentWillUpdate(). This feature of Redux adds to its flexibility.
Name the two main arguments of a reducing function (callback) to the Array.reduce() method in JavaScript.
Redux offers simplicity, a larger ecosystem, and a better developer experience than Facebook Flux (flux). True or false?
Which of the following would you use to create a store and provider? new Provider (createStore(reducers)), <Provider store={createStore(reducers)}>, or provider(createStore(reducers))
Redux needs a dispatcher because that’s what Flux defines. True or false?
In this project, movies.all fetches all movies, and movies.current fetches the current movie. They’re used in the Movies and Movie components, respectively, in the connect call. Where do you define the logic of movies.all and movies.current?
The accumulator value and the current value are the two primary arguments. Without them, you can’t summarize a list.
True. See the introduction to this chapter and Dan Abramov’s post “Why Use Redux over Facebook Flux?” on Stack Overflow (http://mng.bz/z9ok).
<Provider store={createStore(reducers)}>
False. Redux adheres to Flux but doesn’t require a dispatcher, so Redux is simpler to implement.
In src/modules/movies.js, in reducers.
This chapter covers
In chapter 14, you implemented a Netflix clone with Redux. The data came from a JSON file, but you could instead have used a RESTful API call using axios or fetch(). This chapter covers one of the most popular options for providing data to a front-end app: GraphQL.
Thus far, you’ve been importing a JSON file as your back-end data store or making RESTful calls to fetch the same file to emulate a GET RESTful endpoint. Ah, mocking APIs. This approach is good for prototyping, because you have the front end ready; when you need persistent storage, you can replace mocks with a back-end server, which is typically a REST API (or, if you really have to, SOAP[1]).
Imagine that the Netflix clone API has to be developed by another team. You agree on the JSON (or XML) data format over the course of a few meetings. They deliver. The handshake is working, and your front-end app gets all the data. Then, the product owners talk to the clients and decide they want a new field to show stars and ratings for movies. What happens when you need an extra field? You must implement a new movies/:id/ratings endpoint, or the back-end team needs to bump up the version of the old endpoint and add an extra field.
Maybe the app is still in the prototyping phase. If so, the field could probably be added to the existing movies/:id. It’s easy to see that over time, you’ll get more requests to change formats and structure. What if ratings must appear in movies as well? Or, what if you need new nested fields from other collections, such as friend recommendations? In the age of rapid agile development and lean startup methodology, flexibility is an advantage. The faster these fields and data can be adapted to the end product, the better. An elegant solution called GraphQL clears many of these hurdles.
The source code for the examples in this chapter is at www.manning.com/books/react-quickly and https://github.com/azat-co/react-quickly/tree/master/ch15. You can also find some demos at http://reactquickly.co/demos.
In this chapter, you’ll continue developing the Netflix clone by adding a server to it. This server will provide a GraphQL API, a modern way of exposing data to React apps. GraphQL is often used with Relay; but as you’ll see in this example, you can use it with Redux or any other browser data library. You’ll use axios for the AJAX/XHR/HTTP requests.
When you work with GraphQL and Redux, the server (back end and web server) can be built using anything (Ruby, Python, Java, Go, Perl), not necessarily Node.js; but Node is what I recommend, and that’s what you’ll use in this section because it lets you use JavaScript across the entire development tech stack.
In a nutshell, GraphQL (https://github.com/graphql/graphql-js) uses query strings that are interpreted by a server (typically Node), which in turn returns data in a format specified by those queries. The queries are written in a JSON-like format:
{
user(id: 734903) {
id,
name,
isViewerFriend,
profilePicture(size: 50) {
uri,
width,
height
}
}
}
And the response is good-old JSON:
{
"user" : {
"id": 734903,
"name": "Michael Jackson",
"isViewerFriend": true,
"profilePicture": {
"uri": "https://twitter.com/mjackson",
"width": 50,
"height": 50
}
}
}
The Netflix clone server could use REST or older SOAP standards. But with the newer GraphQL pattern, you can reverse control by letting clients (front-end or mobile apps) dictate what data they need instead of coding this logic into server endpoints/routes. Some of the advantages of this inverted approach are as follows:[2]
For more on the advantages of GraphQL, such as strong typing, see Nick Schrock, “GraphQL Introduction,” React, May 1, 2015, http://mng.bz/DS65.
You can also consume a GraphQL API in a React application using Relay (https://facebook.github.io/relay; graphql-relay-js and react-relay on npm). Some developers prefer to use Relay instead of Redux when working with a GraphQL back end. If you look at the examples provided in the documentation, you may see a similarity to how Redux connects components; and instead of a store, you have a remote GraphQL API.
Whereas React allows you to define views as components (UI) by composing many simple components to build complex UIs and apps, Relay lets components specify what data they need so the data requirements become localized. React components don’t care about the logic and rendering of other components.
The same is true with Relay: components keep their data closer to themselves, which allows for easier composition (building complex UIs and apps from simple components).
Relay Modern is the latest version of Relay. It’s easier to use and more extensible.[3] If you or your team plan to use GraphQL seriously, then I highly recommend looking into Relay/Relay Modern as well.
To deliver data to your React app, you’ll use a simple server made with Express (https://github.com/expressjs/express) and GraphQL. Express is great at organizing and exposing API endpoints, and GraphQL takes care of making your data accessible in a browser-friendly way, as JSON.
The project structure is as follows (you’ll reuse a lot of code from redux-netflix):
The data will still be taken from a JSON file, but this time it’s a server file. You can easily replace the JSON file movies.json with database calls in server/schema.js. But before we discuss schemas, let’s install all the dependencies, including Express.
The following listing shows the package.json file (ch15/redux-graphql-netflix/package.json). Do you know what to do? Copy it and run npm i, of course!
Next, you’ll implement the main server file server/index.js.
The powerhouse of the web server implemented with Express and Node is its starting point (sometime referred to as an entry point): index.js. This file is in the server folder because it’s used only on the back end and must not be exposed to clients, for security concerns (it can contain API keys and passwords). The file’s high-level structure is as follows:
Let’s fill in the missing pieces. First, keep in mind that you need to deliver the same file, index.html, for every route except the API endpoint and bundle files. This is necessary because when you use the HTML5 History API and go to a location using a hash-less URL like /movies/8, refreshing the page will make the browser query that exact location.
You’ve probably noticed that in the previous Netflix clone version, when you refreshed/reloaded the page on an individual movie (such as /movies/8), it didn’t show you anything. The reason is that you need to implement something additional for browser history to work. This code must be on the server, and it’s responsible for sending out the main index.html file on all requests (even /movies/8/).
In Express, when you need to declare a single operation for every route, you can use * (asterisk):
app.use('*', (req, res) => {
res.sendFile('index.html', {
root: PWD
})
})
Sending the HTML file per any location (* URL pattern) doesn’t do the trick. You’ll end up with 404 errors, because this HTML includes references to compiled CSS and JS files (/dist/styles.css and /dist/index.js). So, you need to catch those locations first:
app.use('/dist/:file', (req, res) => {
res.sendFile(req.params.file, {
root: path.resolve(PWD, 'build', 'public')
})
})
As an alternative, I recommend that you use using a piece of Express middleware called express.static(), like this:
app.use('/dist',
express.static(path.resolve(PWD, 'build', 'public'))
)
For more information about middleware and tips on Express, refer to appendix c and my books Pro Express.js (Apress, 2014) and Express Deep API Reference (Apress, 2014).
The importance of having the public folder inside build cannot be overstated. If you don’t restrict the act of serving resources (such as files) to a subfolder (such as dist or public), then all of your code will be exposed to anyone who visits the server. Even back-end code such as server.js can be exposed if you forego using a subfolder. For example, this
// Anti-pattern. Don't do this or you'll be fired
app.use('/dist',
express.static(path.resolve(PWD, 'build'))
)
will expose server.js to attackers—and it might contain secrets, API keys, passwords, and the details of implementation over the /dist/server.js URL.
By using a subfolder such as dist or public, exposing only it to the world (over HTTP), and putting only the front-end files in this exposed subfolder, you can restrict unauthorized access to other files.
For the GraphQL API to work, you need to set up one more route (/q) in which you use the graphqlHTTP library along with a schema (server/schema.js) and session (req.session) to respond with data:
app.use('/q', graphqlHTTP(req => ({
schema,
context: req.session
})))
And finally, to make the server work, you need to make it listen to incoming requests on a certain port:
app.listen(PORT, () => console.log(`Running server on port ${PORT}`))
Here, PORT is an environment variable. It’s a variable that you can pass into the process from the command-line interface, like this:
PORT=3000 node ./build/server.js
Recall that in package.json, you use nodemon:
nodemon ./build/server.js
Using nodemon is the same as running node, but nodemon will restart the code if you made changes to it.
In chapter 14, you used port 8080, because that’s the default value for the Webpack Development Server. There’s nothing wrong with using 8080 for this example’s Express server, but for some weird historical reason, the convention emerged that Express apps run on port 3000. Maybe we can blame Rails for that!
The server also uses another variable declared in uppercase: PWD. It’s an environment variable, too, but it’s set by Node to the project directory: that is, the path to the folder where the package.json file is located, which is the root folder of your project.
And finally, you use the graphqlHTTP and schema variables. You receive graphqlHTTP from the express-graphql package, and schema is your data schema built using GraphQL definitions.
The following listing shows the complete server setup (ch15/redux-graphql-netflix/server/index.js).
GraphQL is strongly typed, meaning it uses schemas as you saw in /q. The schema is defined in server/schema.js, as you saw in the project structure. Let’s see what the data looks like: the structure of the data will determine the schema you’ll use.
The app is a UI that displays data about movies. Therefore, you need to have this data somewhere. The easiest option is to save it in a JSON file (server/movies.json). The file contains all the movies, and each movie can be represented by a plain object with a bunch of properties, so the entire file is an array of objects:
[{
"title": "Pirates of the Caribbean: On Stranger Tides"
...
}, {
"title": "Pirates of the Caribbean: At World's End"
...
}, {
"title": "Avengers: Age of Ultron"
...
}, {
"title": "John Carter"
...
}, {
"title": "Tangled"
...
}, {
"title": "Spider-Man 3"
...
}, {
"title": "Harry Potter and the Half-Blood Prince"
...
}, {
"title": "Spectre"
...
}, {
"title": "Avatar"
...
}, {
"title": "The Dark Knight Rises"
...
}]
The example uses data for 10 of the most expensive movies according to Wikipedia (https://en.wikipedia.org/wiki/List_of_most_expensive_films).
Each object contains information such as the movie’s title, cover URL, year released, production cost in millions of dollars, and starring actors. For example, Pirates of the Caribbean has this data:
{
"title": "Pirates of the Caribbean: On Stranger Tides",
"cover": "/dist/images/On_Stranger_Tides_Poster.jpg",
"year": "2011",
"cost": 378.5,
"starring": [{
"name": "Johnny Depp"
}, {
"name": "Penélope Cruz"
}, {
"name": "Ian McShane"
}, {
"name": "Kevin R. McNally"
}, {
"name": "Geoffrey Rush"
}]
}
Currently, each movie is an object that only has a title. Later, you can add as many properties as you want; but right now let’s focus on the data schema.
You can use any data source with GraphQL: an SQL database, an object store, a bunch of files, or a remote API. Two things matter:
You have the list of movies stored in a JSON file, so you can import it:
const movies = require('./movies.json')
A typical GraphQL schema defines a query with fields and arguments. The example data schema has only a list of objects, and each object has only a single property: title. The schema definition is shown next. This is a basic example—you’ll see the full schema later:
The core idea is that when the query is performed, the function assigned to the resolve key is executed. After that, only properties of objects that are requested are picked from the result of this function call. These properties will be in the resulting objects, and fields that aren’t listed won’t appear. Thus you need to specify what properties you want to receive every time you perform a query. This makes your API flexible and efficient: you can arrange parts of the data as you want them in the runtime.
The example has two types of queries and more fields. The following listing shows how you can implement them (ch15/redux-graphql-netflix/server/schema.js).
Phew! Now let’s move to the front end and see how to query this neat little server.
To get the list of movies, you need to query the server. And after the response has been received, you must pass it to the store. This operation is asynchronous and involves an HTTP request, so it’s time to unveil axios.
The axios library implements promise-based HTTP requests. This means it returns a promise immediately after calling a function. Because an HTTP request isn’t guaranteed to be performed immediately, you need to wait until this promise is resolved.
To get data from a promise once it’s resolved, you use its then property. It accepts a function as a callback, which is called with a single argument; and this argument is the result of the initial operation—in this case, an HTTP call:
getPromise(options)
.then((data)=>{
console.log(data)
})
Using a promise and a callback (in then) is an alternative to using just a callback, in the sense that the previous code can be rewritten without promises:
getResource(options, (data)=>{
console.log(data)
})
There’s a controversy associated with promises. Although some people prefer promises and callbacks over plain callbacks due to the convenience of the promise catch.all syntax, others feel promises aren’t worth the hassle (I’m in this camp), especially considering that promises can bury errors and fail silently. Nevertheless, promises are part of ES6/ES2015 and are here to stay. At the same time, new patterns such as generators and async/await are emerging as part of the next evolution of writing async code.[4]
See my courses on ES6 and ES7+ES8 at https://node.university/p/es6 and https://node.university/p/es7-es8.
Rest assured, you can do any asynchronous coding with plain callbacks. But most modern (especially front-end) code uses (or will use) promises or async/await. For this reason, this book uses promises with fetch() and axios.
For more information on the promise API, refer to the documentation at MDN (http://mng.bz/7DcO) and my article “Top 10 ES6 Features Every Busy JavaScript Developer Must Know” (https://webapplog.com/es6).
axios uses promise-based requests, not unlike fetch(). To perform a GET HTTP call, use the get property of axios:
axios.get('/q')
Because axios returns a promise, you can immediately access its then property:
axios.get('/q').then(response => response)
The function you pass as the argument to then returns into the context of the promise and not the context of your component’s method. You need to call an action creator to deliver new data into the store:
axios.get('/q').then(response => this.props.fetchMovie(response))
Now, let’s build a proper query against your GraphQL API. To do that, you can use a multiline template string (notice that it uses backticks instead of single quotes):
axios.get(`/q?query={
movie(index:1) {
title,
cover
}
}`).then(response => this.props.fetchMovie(response))
Using a multiline template literal (the backticks) preserves line breaks, so the query string will have new lines. Not good. New lines in a query string might break the API endpoint URLs. For this reason, you need to remove unnecessary spaces and line breaks in the HTTP calls but keep them in the source code. The clean-tagged-string library (https://github.com/taxigy/clean-tagged-string) does only that: it transforms a huge, multiline template string into a smaller, single-line string resulting in this
clean`/q?query={
movie(index:1) {
title,
cover
}
}`
looking like this:
'/q?query={ movie(index:1) { title, cover } }'
Notice the syntax: there are no parentheses (round brackets) after clean, and it’s attached to the template string. This is valid syntax and is called using tagged strings (http://mng.bz/9CqH).
Now, let’s get the first movie, with an index of 1:
const clean = require('clean-tagged-string').default
axios.get(clean`/q?query={
movie(index:1) {
title,
cover
}
}`).then(response => this.props.fetchMovie(response))
Next, you need to implement code to get any movie based on its ID. You also want to request more fields, not just title and cover, so you can display the view shown in figure 15.1. It’s good to know that the single-movie page won’t be lost on reload, because you added the special server code to sendFile() for * to catch all routes that send index.html.
You can fetch the data for a single movie from the API in the lifecycle component using your favorite promise-based HTTP agent, axios:
componentWillMount() {
const query = clean`{
movie(index:${id}) {
title,
cover,
year,
starring {
name
}
}
}`
axios.get(`/q?query=${query}`)
.then(response =>
this.props.fetchMovie(response)
)
}
The list of requested properties for a movie entity is a little longer: not just title and cover, but also year and starring. Because starring is itself an array of objects, you also need to declare which properties of those objects you want to request. In this case, you only want name.
The response from the API goes to the fetchMovie action creator. After that, the store is updated with the movie the user wants to see.
Connect it:
const {
fetchMovieActionCreator
} = require('modules/movies.js')
...
module.exports = connect(({movies}) => ({
movie: movies.current
}), {
fetchMovie: fetchMovieActionCreator
})(Movie)
And render it:
render() {
const {
movie = {
starring: []
}
} = this.props;
return (
<div>
<img src={`url(${movie.cover})`} alt={movie.title} />
<div>
<div>{movie.title}</div>
<div>{movie.year}</div>
{movie.starring.map((actor = {}, index) => (
<div key={index}>
{actor.name}
</div>
))}
</div>
<Link to="/movies">
←
</Link>
</div>
)
}
To better organize the code, let’s add a fetchMovie() method to the Movie component that’s already familiar to you from chapter 14 (ch14/redux-netflix/src/components/movie/movie.js). This new method will be used to make AJAX-y calls that will, in turn, dispatch actions. The method is in the Movie component (ch15/redux-graphql-netflix/client/components/movie/movie.js).
Next, let’s move on to getting the list of movies.
When you show a list of movies, the query to the API is different, and it’s rendered in a different way than when you fetch a single movie. You fetched the data from the GraphQL server using a valid GraphQL query, via an asynchronous GET request performed with the axios library, and you put this data into the store via an action. The next thing to do is show this data to the user: time to render it.
You already know that, to take data from the store, a component needs to be connected: wrapped with a connect() function call that maps state and actions to properties. In the component’s render() function, you use component properties. But these properties need values; that’s why you make AJAX/XHR calls, usually after the component has been mounted for the first time (lifecycle events!).
Let’s declare a component to pick the data from the store, take it from properties, and render it. First, connect the component to the store (this snippet is from ch15/redux-graphql-netflix/client/components/movies/movies.js):
const React = require('react')
const { connect } = require('react-redux')
const {
fetchMoviesActionCreator
} = require('modules/movies')
class Movies extends Component {
// ...
}
module.exports = connect(({movies}) => ({
movies: movies.all
}), {
fetchMovies: fetchMoviesActionCreator
})(Movies)
The connect() function takes two arguments: the first maps the store to component properties, and the second maps action creators to component properties. After that, the component has two new properties: this.props.movies and this.props.fetchMovies().
Next, let’s fetch those movies and, as the data is received, place it in the store via the action creator (dispatch an action). Usually, data may be requested from a remote API when the component starts its lifecycle (componentWillMount() or componentDidMount()):
Finally, render the Movies component using data from properties, which comes from the Redux store:
// ...
render() {
const {
movies = []
} = this.props
return (
<div>
{movies.map((movie, index) => (
<Link
key={index}
to={`/movies/${index + 1}`}>
<img src={`url(${movie.cover})`} alt={movie.title} />
</Link>
))}
</div>
)
}
// ...
Every movie has cover and title properties. A link to a movie is basically a reference to its position in the array of movies. This setup isn’t stable when you have thousands of elements in a collection, because, well, the order is never guaranteed, but for now it’s okay. (A better way would be to use a unique ID, which is typically autogenerated by a database like MongoDB.)
The component now renders the list of movies, although it lacks styles. Check out this chapter’s source code to see how it works with styles and a three-level hierarchy of components.
Adding GraphQL support on a basic level is straightforward and transparent. GraphQL works differently than a typical RESTful API: you can query any property, at any nesting level, for any subset of entities the API provides. This makes GraphQL efficient for datasets of complex objects, whereas a REST design usually requires multiple requests to get the same data.
GraphQL is a promising pattern for implementing server-client handshakes. It allows for more control from the client, which can dictate the structure of the data to the REST API. This inversion of control allows front-end developers to request only the data they need and not have to modify back-end code (or ask a back-end team to do so).
Which command creates a GraphQL schema? new graphql.GraphQLSchema(), graphql.GraphQLSchema(), or graphql.getGraphQLSchema()
It’s okay to put API calls into reducers. True or false? (Hint: See a Tip in chapter 14.)
Where do you make the GraphQL call to fetch a movie? componentDidUnmount(), componentWillMount(), or componentDidMount()
You used this URL for GraphQL: `/q?query=${query}`. What does this syntax refer to? Inline Markdown, comments, template literal, string template, or string interpolation
GraphQLString is a special GraphQL schema type, and you can pull this class from the graphql package. True or false?
new graphql.GraphQLSchema()
False. Avoid putting API calls in reducers. It’s better to put them in components (container/smart components, to be specific).
componentWillMount(), but componentDidMount() is also a good location. componentDidUnmount() isn’t a valid method.
Template literal, string template, and string interpolation are all valid names to define the query with a variable.
True. This is valid code: const {GraphQLString} = require('graphql'). See listing 15.3.
This chapter covers
In modern software engineering, testing is important. It’s at least as important as using Agile methods, writing well-documented code, and having enough coffee on hand—sometimes even more so. Proper testing will save you from many hours of debugging later. The code isn’t an asset, it’s a liability, so your goal is to make it as easy to maintain as possible.
Googling the phrase “Code isn’t an asset, it’s a liability” gives 191 million results, which makes it hard to pinpoint its origins. Although I can’t find an author, I can tell you the gist of the idea: when you write software, you’re building apps/products/ services that are assets, but your code is not one of them.
Assets are things that generate income. Code does not generate any income by itself. Yes, code enables products, but the code is a tool to make the products (which are assets). The code itself isn’t an asset—it’s more of a necessary evil to get to the end goal of having a working application.
Thus, code is a liability, because you have to maintain it. More code does not automatically translate into more revenue or better product quality; but more code almost always increases complexity and the cost of maintenance. Some of the best ways to minimize the cost of maintaining code are to make it simple, robust, and flexible for future changes and enhancements. And testing—especially automated testing—helps when you’re making changes, because you have more assurance that the changes didn’t break your app.
Using test-driven/behavior-driven development (TDD/BDD) can make maintenance easier. It can also make your company more competitive by letting you iterate more quickly and make you more productive by giving you the confidence that your code works.
The source code for the examples in this chapter is at www.manning.com/books/react-quickly and https://github.com/azat-co/react-quickly/tree/master/ch16. You can also find some demos at http://reactquickly.co/demos.
There are multiple types of testing. Most commonly, they can be separated into three categories: unit, service, and UI testing, as shown in figure 16.1. Here’s an overview of each category, from lowest to highest level:
This chapter covers unit testing of React apps with a bit of UI testing of React components, using the mock DOM rendering of React and Jest. You’ll also use the standard toolchain of Node, npm, Babel, and Webpack. To begin unit testing, let’s investigate Jest.
Jest (https://facebook.github.io/jest) is a command-line tool based on Jasmine. It has a Jasmine-like interface. If you’ve worked with Mocha, you’ll find that Jest looks similar to it and is easy to learn. Jest is developed by Facebook and is often used together with React; the API documentation is at https://facebook.github.io/jest/docs/api.html#content.
Jest offers these features:
Christopher Poher, “JavaScript Unit Testing Performance,” Jest, March 11, 2016, http://mng.bz/YfXz.
The term mocking means faking a certain part of a dependency so you can test the current code. Automocking means mocking is done for you automatically. In Jest before v15,[2] every imported dependency is automocked, which can be useful if you frequently rely on mocking. Most developers don’t need automocking, so in Jest v15+ it’s off by default—but automocking can be turned on if necessary.
See Christoph Pojer, “Jest 15.0: New Defaults for Jest,” September 1, 2016, http://mng.bz/p20n.
Static analysis means the code can be analyzed before you run it, which typically involves type checking. Flow is a library that adds type checking to otherwise typeless (more or less) JavaScript.
Jasmine is a feature-rich testing framework that comes with an assertion language. Jest extends and builds on Jasmine under the hood so you don’t need to import or configure anything. Thus, you have the best of both worlds: you can tap into the common interface of Jasmine without needing extra dependencies or setup.
There are many opinions about what test framework is better for what job. Most projects use Mocha, which has a lot of features. Jasmine arose from front-end development but is interchangeable with Mocha and Jest. All of them use the same constructs to define test suites and tests:
Without getting into a heated debate in this book about what framework is the best, I encourage you to keep an open mind and explore Jest because of the features I’ve listed and because it comes from the same community that develops React. This way, you can make a better judgment about which framework to use for your next React project.
Most modern frameworks like Mocha, Jasmine, and Jest are similar for most tasks. Any difference will depend on your preferred style (maybe you like automocking, or maybe you don’t) and on the edge cases of your particular project (do you need all the features Mocha provides, or you need something lightweight like the Test Anything Protocol’s [TAP, https://testanything.org] node-tap [www.node-tap.org]?). Jest is a good place to start, because once you learn how to use Jest with React utilities and methods, you can use other test runners and testing frameworks such as Mocha, Jasmine, and node-tap.
If you’ve never worked with any of the testing frameworks I’ve been discussing, don’t worry; Jest is straightforward to learn. The main statement is describe, which is a test suite that acts as a wrapper for tests; and it, which is an individual test called a test case. Test cases are nested within the test suite.
Other constructs such as before, after, and their Each brethren beforeEach and afterEach execute either before or after the test suite or test case. Adding Each executes a piece of code many times as compared to just one time.
Writing tests consists of creating test suites, cases, and assertions. Assertions are like true or false questions, but in a nice readable format (BDD).
Here’s an example, without assertions for now:
You must have at least one describe and one it, but their number isn’t limited. Everything else, such as before and after, is optional.
You won’t be testing any React components yet. Before you can work with React components, you need to learn a little more about Jest by working on a Jest example that doesn’t have a UI.
In this section, you’ll create and unit-test a module that generates random passwords. Imagine you’re working on a sign-up page for a cool new chat app. You need the ability to generate passwords, right? This module will automatically generate random passwords. To keep things simple, the format will be eight alphanumeric characters. The project (module) structure is as follows:
/generate-password
/__test__
generate-password.test.js
/node_modules
generate-password.js
package.json
You’ll use the CommonJS/Node module syntax, which is widely supported in Node (duh) and also in browser development via Browserify and Webpack. Here’s the module in the ch16/generate-password.js file.
Just as a refresher, in this file you export the function via the module.exports global. This is Node.js and CommonJS notation. You can use it on the browser with extra tools like Webpack and Browserify (http://browserify.org).
The function uses Math.random() to generate a number and convert it to a string. The string length is eight characters, as specified by slice(-8).
To test the module, you can run this eval Node command from the terminal. It imports the module, invokes its function, and prints the result:
node -e \"console.log(require('./generate-password.js')())\"
You could improve this module by making it work with different numbers of characters, not just eight.
To begin using Jest, you need to create a new project folder and npm init it to create package.json. If you don’t have npm, this is the best time to install it; follow the instructions in appendix B.
Once you’ve created the package.json file in a new folder, install Jest:
$ npm install jest-cli@19.0.2 --save-dev --save-exact
I’m using jest-cli version 19.0.2; make sure your version is the same or compatible. --save-dev adds the entry to the package.json file. Open the file, and manually change the test entry to jest as shown next (ch16/jest/package.json). This will add the testing command. Also add the start script.
Now, create a folder named __tests__. The name is important because Jest will pick up tests from that folder. Then, create your first Jest test in __tests__/generate-password.js.
Typically, you only mock dependencies that you don’t need to isolate the library you’re currently unit testing. Jest prior to v15 automatically mocks every required file, so you need to use dontMock() or jest.autoMockOff() to avoid this for the main module you test (generate-password.js). This is one way to do it:
jest.dontMock('../generate-password.js')
Luckily, for the version of Jest used in this chapter (v19), you don’t need to disable automock, because it’s disabled by default. So, you can skip this dontMock() line of code or leave it commented out.
The test file has a single suite (only one describe), which expects the value to match the /^[a-z0-9]{8}$/ regular-expression pattern—only alphanumerics and exactly eight characters—to satisfy your condition for a strong password (ch16/generate- password/__tests__/generate-password.test.js). You don’t want your chat users to be hacked by brute force!
You can run the test with $ npm test. You’ll see something like this as the terminal output:
By default, Jest uses BDD syntax (https://en.wikipedia.org/wiki/Behavior-driven_development) powered by Expect syntax (https://facebook.github.io/jest/docs/api.html). Expect is a popular language that’s a replacement for TDD assertions. It has many flavors, and Jest uses a somewhat simplified version (in my opinion). Unlike other frameworks, such as Mocha, where you need to install additional modules for syntax support, in Jest it’s automatic.
TDD can mean test-driven development or TDD syntax with assertions. Briefly, during test-driven development you write a test, then run it (failing), then make it work (passing), and then make it right (refactor).
You most certainly can perform test-driven development with BDD. The main benefit of BDD style is that it’s intended for communicating with every member of a cross-functional team, not just software engineers. TDD is more of a techie language. BDD format makes it easier to read tests—ideally the spec title should tell you what you’re testing, as in this example:
Here’s a list of the main Expect methods that Jest supports (there are many more). You pass the actual values—returned by the program—to expect() and use the following methods to compare those values with expected values that are hardcoded in the tests:
See “Equality Comparisons and Sameness,” Mozilla Developer Network, http://mng.bz/kliO.
Deep equality compares objects, including all their properties and values, to the last level of nestedness (going deep). There’s no standard API for it in JavaScript, but there are implementations like Node’s core assert module (http://mng.bz/rhoX) and deep-equal (www.npmjs.com/package/deep-equal).
In JavaScript/Node, a truthy value translates to true when evaluated as a Boolean in an if/else statement. A falsy value, on the other hand, evaluates to else in an if/else.
The official definition is that a value is truthy if it’s not falsy, and there are only six falsy values:
Everything not listed here is truthy.
To summarize, Jest can be used for unit tests, which should be the most numerous of your tests. They’re lower level, and for this reason they’re more solid and less brittle, which makes them less costly to maintain.
Thus far, you’ve created a module and tested its method with Jest. This is a typical unit test. There are no dependencies involved—only the tested module itself. This skill should prepare you to continue with testing React components. Next, let’s look at more-complicated UI testing. The following section deals with the React testing utility, which enables you to perform UI testing.
Generally speaking, in UI testing (recommended to make up only 10% of your tests), you test entire components, their behavior, and even entire DOM trees. You can test components manually, which is a terrible idea! Humans make mistakes and take a long time to perform tests. Manual UI testing should be minimal or nonexistent.
What about automated UI testing? You can test automatically using headless browsers (https://en.wikipedia.org/wiki/Headless_browser), which are like real browsers but without a GUI. That’s how most Angular 1 apps are tested. It’s possible to use this process with React, but it isn’t easy, it’s often slow, and it requires a lot of processing power.
Another automated UI testing approach uses React’s virtual DOM, which is accessible via a browser-like testing JavaScript environment implemented by jsdom (https://github.com/tmpvar/jsdom). To use React’s virtual DOM, you’ll need a utility that’s closely related to the React Core library but not part of it: TestUtils, which is a React utility to test its components. Simply put, TestUtils allows you to create components and render them into the fake DOM. Then you can poke around, looking at the elements by tags or classes. It’s all done from the command line, without the need for browsers (headless or not).
There are other React add-ons, listed at https://facebook.github.io/react/docs/addons.html. Most of them are no longer in development or are still in the experimental stage, which in practice means the React team may change their interface or stop supporting them. All of them follow the naming convention react-addons-NAME. TestUtils is an add-on, and, like other React add-ons, it’s installed via npm. (You can’t use TestUtils without npm; if you haven’t already, you can get npm by following the instructions in appendix A.)
For versions of React before v15.5.4, TestUtils was in an npm package react-addons-test-utils (https://facebook.github.io/react/docs/test-utils.html). For example, if you’re using React version 15.2.1, you can install react-addons-test-utils v15.2.1 with npm using the following command:
$ npm install react-addons-test-utils@15.2.1 --save-dev --save-exact
And this goes in your test source code (React prior to v15.5.4):
const TestUtils = require('react-addons-test-utils')
In React v15.5.4, things are somewhat easier, because TestUtils is in ReactDOM (react-dom on npm). You don’t have to install a separate package for this example, because you’re using the newer v15.5.4:
const TestUtils = require('react-dom/test-utils')
TestUtils has a few primary methods for rendering components; simulating events such as click, mouseOver, and so on; and finding elements in a rendered component. You’ll begin by rendering a component and learn about other methods as you need them.
To illustrate the TestUtils render() method, the following listing renders an element into a div variable without using a headless (or real, for that matter) browser (ch16/testutils/__tests__/render-props.js).
describe('HelloWorld', ()=>{
const TestUtils = require('react-dom/test-utils')
const React = require('react')
it('has props', (done)=>{
class HelloWorld extends React.Component {
render() {
return <div>{this.props.children}</div>
}
}
let hello = TestUtils.renderIntoDocument(<HelloWorld>Hello Node!
</HelloWorld>)
expect(hello.props).toBeDefined()
console.log('my hello props:', hello.props) // my div: Hello Node!
done()
})
})
And package.json for ch16/testutils example looks like this with Babel, Jest CLI, React, and React DOM:
{
"name": "password",
"version": "2.0.0",
"description": "",
"main": "index.html",
"scripts": {
"test": "jest",
"test-watch": "jest --watch",
"build-watch": "./node_modules/.bin/webpack -w",
"build": "./node_modules/.bin/webpack"
},
"author": "Azat Mardan",
"license": "MIT",
"babel": {
"presets": [
"react"
]
},
"devDependencies": {
"babel-jest": "19.0.0",
"babel-preset-react": "6.24.1",
"jest-cli": "19.0.2",
"react": "15.5.4",
"react-dom": "15.5.4"
}
}
renderIntoDocument() only works on custom components, not standard DOM components like <p>, <div>, <section>, and so on. So if you see an error like Error: Invariant Violation: findAllInRenderedTree(...): instance must be a composite component, make sure you’re rendering a custom (your own) component class and not a standard class. See the commit at http://mng.bz/8AOc and the https://github.com/facebook/react/issues/4692 thread on GitHub for more information.
Once you have hello, which has the value of the React component tree (includes all child components), you can look inside it with one of the find-element methods. For example, you can get the <div> from within the <HelloWorld/> element, as shown next (ch16/testutils/__tests__/scry-div.js).
describe('HelloWorld', ()=>{
const TestUtils = require('react-dom/test-utils')
const React = require('react')
it('has a div', (done)=>{
class HelloWorld extends React.Component {
render() {
return <div>{this.props.children}</div>
}
}
let hello = TestUtils.renderIntoDocument(
<HelloWorld>Hello Node!</HelloWorld>
)
expect(TestUtils.scryRenderedDOMComponentsWithTag(
hello, 'div'
).length).toBe(1)
console.log('found this many divs: ',
TestUtils.scryRenderedDOMComponentsWithTag(hello, 'div').length)
done()
})
})
...
scryRenderedDOMComponentsWithTag() allows you to get an array of elements by their tag names (such as div). Are there any other ways to get elements? Yes!
In addition to scryRenderedDOMComponentsWithTag(), there are a few other ways to get either a list of elements (prefixed with scry, plural Components) or a single element (prefixed with find, singular Component). Both use an element class, not a component class, which is a different thing. For example, btn, main, and so on.
In addition to tag names, you can get elements by type (component class) or by their CSS classes. For example, HelloWorld is a type, whereas div is a tag name (you used it to pull the list of criteria).
You can mix and match scry and find with Class, Type, and Tag to get six methods, depending on your needs. Here’s what each method returns:
As you can see, there’s no shortage of methods when it comes to pulling the necessary element(s) from your components. If you need some guidance, I suggest using classes or types (component classes), because they let you target elements more robustly. For instance, suppose you use tag names now because there’s just one <div>. If you decide to add elements with the same tag names to your code (more than one <div>), you’ll need to rewrite your test. If you use an HTML class to test a <div>, your test will work fine after you add more <div> element to the tested component.
The only case when using tag names might be appropriate is when you need to test all the elements with a specific tag name (scryRenderedDOMComponentsWithTag()) or your component is so small that there are no other elements with the same tag name (findRenderedDOMComponentWithTag()). For example, if you have a stateless component that wraps an anchor tag <a> and you add a few HTML classes to it, there will be no additional anchor tags.
Consider a UI widget that can be used on a sign-up page to automatically generate passwords of a certain strength. As shown in figure 16.2, it has an input field, a Generate button, and a list of criteria.
The following section walks through the entire project. For now, we’re focusing on using TestUtils and its interface. Once TestUtils and other dependencies (such as Jest) are installed, you can create the Jest test file to UI-test your widget; let’s call it password/__tests__/password.test.js, because you’re testing a password component. The structure of this test is as follows:
describe('Password', function() {
it('changes after clicking the Generate button', (done)=>{
// Importations
// Perform rendering
// Perform assertions on content and behavior
done()
})
})
Let’s define the dependencies in describe. Note that I’ve created the shortcut fD for ReactDOM.findDOMNode() because you’ll use it a lot:
const TestUtils = require('react-dom/test-utils')
const React = require('react')
const ReactDOM = require('react-dom')
const Password = require('../jsx/password.jsx')
const fD = ReactDOM.findDOMNode
To render a component, you need to use renderIntoDocument(). For example, this is how you can render a Password component and save a reference to the object in the password variable. The properties you’re passing will be the keys of the rules for the password strength. For example, upperCase requires at least one uppercase character:
let password = TestUtils.renderIntoDocument(<Password
upperCase={true}
lowerCase={true}
special={true}
number={true}
over6={true}
/>
)
This example is in JSX because Jest automatically uses babel-jest when you have installed this module (npm i babel-jest --save-dev) and sets the Babel configuration to use "presets": ["react"]. You cannot use JSX in Jest if you don’t want to include babel-jest. In this case, call createElement():
let password = TestUtils.renderIntoDocument(
React.createElement(Password, {
upperCase: true,
lowerCase: true,
special: true,
number: true,
over6: true
})
)
Once you’ve rendered the component with renderIntoDocument(), it’s straightforward to extract the needed elements—children of Password—and execute assertions to see how your widget is working. Think of the extraction calls as your jQuery; you can use tags or classes. At the bare minimum, your test should check for these things:
Clicking Generate fulfills all criteria and makes the password visible (so users can memorize it), but you won’t see the test code for that feature in this book. That’s your homework for next week.
Let’s start with item 1. TestUtils.scryRenderedDOMComponentsWithTag() gets all elements from a particular class. In this case, the class is li for the <li> elements because that’s what the criteria list will use: <ul><li>. toBe(), which works like the triple equal (===), can be used to validate the list length as 5:
let rules = TestUtils.scryRenderedDOMComponentsWithTag(password, 'li')
expect(rules.length).toBe(5)
For item 2, which checks that the first list item has specific text, you use toEqual(). You expect the first item to say that an uppercase character is required. This will be one of the rules for password strength:
expect(fD(rules[0]).textContent).toEqual('Must have
at least one uppercase character')
To check items 3, 4, and 5, you find a button, click it, and compare the values of the second criteria (it must change from text to strikethrough).
toBe() and toEqual() aren’t the same in Jest. They behave differently. The easiest way to remember is that toBe() is === (strict equal), whereas toEqual() checks that two objects have the same value. Thus both assertions will be correct:
const copy1 = {
name: 'React Quickly',
chapters: 19,
}
const copy2 = {
name: 'React Quickly',
chapters: 19,
}
describe('Two copies of my books', () => {
it('have all the same properties', () => {
expect(copy1).toEqual(copy2) // correct
})
it('are not the same object', () => {
expect(copy1).not.toBe(copy2) // correct
})
})
But when you’re comparing literals such as the number 5 and the string “Must have at least one uppercase character,” toBe() and toEqual() will produce the same results:
expect(rules.length).toBe(5) // correct
expect(rules.length).toEqual(5) // correct
expect(fD(rules[0]).textContent).toEqual('Must have
at least one upper-case character') // correct
expect(fD(rules[0]).textContent).toBe('Must have
at least one upper-case character') // correct
There’s a TestUtils.findRenderedDOMComponentWithClass() method that’s similar to TestUtils.scryRenderedDOMComponentsWithTag() but returns only one element; it’ll throw an error if you have more than one element. And to simulate user actions, there’s a TestUtils.Simulate object that has methods with the names of events in camelCase: for example, Simulate.click, Simulate.keyDown, and Simulate.change.
Let’s use findRenderedDOMComponentWithClass() to get the button and then use Simulate.click to click it. All this is done in the code without a browser:
let generateButton =
TestUtils.findRenderedDOMComponentWithClass(password, 'generate-btn')
expect(fD(rules[1]).firstChild.nodeName.toLowerCase()).toBe('#text')
TestUtils.Simulate.click(fD(generateButton))
expect(fD(rules[1]).firstChild.nodeName.toLowerCase()).toBe('strike')
This test checks that the <li> component has a <strike> element (to make the text strikethrough) when the button is clicked. The button generates a random password that satisfies the second (rules[1]) criterion (as well as others), which is to have at least one lowercase character. You’re finished here; let’s move on to the next tests.
You’ve seen TestUtils.Simulate in action. It can trigger not just clicks, but other interactions as well, such as a change of value in an input field or an Enter keystroke (keyCode 13):
ReactTestUtils.Simulate.change(node)
ReactTestUtils.Simulate.keyDown(node, {
key: "Enter",
keyCode: 13,
which: 13})
You must manually pass data that will be used in the component, such as key or keyCode, because TestUtils won’t autogenerate it. There are methods in TestUtils for every user action supported by React.
For your reference, following is the project manifest file, package.json. It also includes the shallow-rendering library we’ll cover next. To run the examples from ch16/password, install dependencies with npm i and then execute npm test:
{
"name": "password",
"version": "2.0.0",
"description": "",
"main": "index.html",
"scripts": {
"test": "jest",
"test-watch": "jest --watch",
"build-watch": "./node_modules/.bin/webpack -w",
"build": "./node_modules/.bin/webpack"
},
"author": "Azat Mardan",
"license": "MIT",
"babel": {
"presets": [
"react"
]
},
"devDependencies": {
"babel-core": "6.10.4",
"babel-jest": "13.2.2",
"babel-loader": "6.4.1",
"babel-preset-react": "6.5.0",
"jest-cli": "19.0.2",
"react": "15.5.4",
"react-dom": "15.5.4",
"react-test-renderer": "15.5.4",
"webpack": "2.4.1"
}
}
Next, let’s look at another way to render React elements.
In some cases, you may want to test a single level of rendering: that is, the result of render() in a component without rendering its children (if any). This simplifies testing because it doesn’t require having a DOM—the system creates an element, and you can assert facts about it. First, you must have a package called react-test-renderer v15.5.4 (for older versions of React, this class was part of TestUtils, but it’s not as of v15.5.4):
npm i react-test-renderer -SE
To illustrate, here’s the same password element being tested with the shallow-rendering approach. This code can go in the same test file ch16/password/__tests__/password.test.js. In this case, you create a renderer and then pass a component to it to get its shallow rendering:
Now, if you log p as in console.log(p), the result contains the children but object p isn’t a React instance. Look at this result of shallow rendering:
{ '$$typeof': Symbol(react.element),
type: 'div',
key: null,
ref: null,
props:
{ className: 'well form-group col-md-6',
children: [ [Object], [Object], [Object], [Object],
[Object], [Object] ] },
_owner: null,
_store: {} }
Contrast that with the logs of the results of renderIntoDocument(<Password/>), which produces an instance of the Password React element with state. Look at this full rendering (not shallow):
Needless to say, you can’t test user behavior and nested elements with shallow rendering. But shallow rendering can be used to test the first level of children in a component as well as the component’s type. You can use this feature for custom (composable) component classes.
In the real world, you’d use shallow rendering for highly targeted (almost unit-like) testing of a single component and its rendering. You can use it when there’s no need to test children, user behavior, or changing states of a component—in other words, when you only need to test the render() function of a single element. As a rule of thumb, start with shallow rendering and then, if that’s not enough, continue with regular rendering.
Standard HTML classes can inspect and assert el.props, so there’s no need for a shallow renderer. For example, this is how you can create an anchor element and test that it has the expected class name and tag name:
let el = <a className='btn'/>
expect(el.props.className).toBe('btn')
expect(el.type).toBe('a')
You’ve learned a lot about TestUtils and Jest—enough to begin using them in your projects. That’s exactly what you’ll be doing in the projects in part 2 of this book: using Jest and TestUtils for behavior-driven development (BDD) of React components. (chapters 18–20). The password widget is in chapter 19, if you want to look at the Webpack setup and all the dependencies used in the real world.
For more information on TestUtils, refer to the official documentation at https://facebook.github.io/react/docs/test-utils.html. Jest is an extensive topic, and full coverage is outside the scope of this book. Feel free to consult the official API documentation to learn more: https://facebook.github.io/jest/docs/api.html#content.
Finally, the Enzyme library (https://github.com/airbnb/enzyme, http://mng.bz/Uy4H) provides a few more features and methods than TestUtils as well as more-compact names for methods. It’s developed by AirBnb and requires Test-Utils as well as jsdom (which comes with Jest, so you’ll need jsdom only if you’re not using Jest).
Testing is a beast. It’s so frightful that some developers skip it—but not you. You stuck it out to the end. Congratulations! Your code will be better quality, and you’ll develop more quickly and live a happier life. You won’t have to wake up in the middle of the night to fix a broken server—or at least, not as frequently as someone without tests.
Jest tests must be in a folder named which of the following? tests, __test__, or __tests__
TestUtils is installed with npm from react-addons-test-utils. True or false?
What TestUtils method allows you to find a single component by its HTML class?
What is the expect expression to compare objects (deep comparison)?
How do you test the behavior when the user hovers with a mouse? TestUtils .Simulate.mouseOver(node), TestUtils.Simulate.onMouseOver(node), or TestUtils.Simulate.mouseDown(node)
__tests__. This is the convention Jest follows.
True. TestUtils is a separate npm module.
findRenderedDOMComponentWithClass()
expect(OBJECT).toEqual(value) compares objects on sameness without comparing that they’re the same objects (which is done with === or toBe()).
TestUtils.Simulate.mouseOver(node). The mouseOver event is triggered by hovering the cursor.
This chapter covers
React is primarily a front-end library to build full-blown, single-page applications or simple UIs on the browser. So why should we concern ourselves with using it on the server? Isn’t rendering HTML on the server the old way to do things? Well, yes and no. It turns out that when you build web apps that always render on the browser, they miss out on a few key goodies. In fact, they miss out to the point of not being able to rank high in Google search results and maybe even losing millions of dollars in revenue. Arghhh.
Read on to find out why. You can skip this chapter in only one case: if you’re oblivious to the performance of your apps (that is, if you’re a newbie developer). All others, please proceed. You’ll gain precious knowledge that you can use to build amazing apps and that will make you look smart during developers’ happy hour when you use the term Universal JavaScript. You’ll also learn how to use React with Node and build Node servers, and by the end of the chapter you’ll understand how to build Universal JavaScript apps with React.js and Express.js (the most popular Node.js framework).
If you haven’t come across Express before, check out my book Pro Express.js (Apress, 2014), which covers the current v4; it’s comprehensive and still very relevant. See also Express in Action, by Evan Hahn (Manning, 2015). You can also check out my online course Express Foundation: https://node.university/p/express-foundation. If you’re familiar with Express but need a refresher, you can find an Express.js cheatsheet in appendix c, and Express installation is covered in appendix A.
The source code for the examples in this chapter is at www.manning.com/books/react-quickly and https://github.com/azat-co/react-quickly/tree/master/ch17. You can also find some demos at http://reactquickly.co/demos.
You may have heard about Universal JavaScript in relation to web development. It’s become such a buzzword that it seems as though every web tech conference in 2016 had not one but several presentations about it. There are even a few synonyms for Universal JavaScript, such as isomorphic JavaScript and full stack JavaScript. For simplicity, I’ll stick with Universal for this chapter. This section will help you understand what isomorphic/Universal JavaScript is about.
But before I define Universal JavaScript, let’s discuss some of the issues you face when building SPAs. The three main problems are these:
Let’s take a closer look at each of these problems.
SPAs built with frameworks like Backbone.js, Angular.js, Ember.js, and others are widely used for protected apps—that is, apps that require the user to enter a username and password in order to gain access (for example, see figure 17.1). Most SPAs serve protected resources and don’t need indexing, but the vast majority of websites aren’t protected behind logins.
For such public apps, SEO is important and mandatory, because their business depends heavily on search indexing and organic traffic. The majority of websites fall in this category.
Unfortunately, when you try to use SPA architecture for public-facing websites, which should have good search engine indexing, it’s not straightforward. SPAs rely on browser rendering, so you need to either reimplement the templates on the server or pre-generate static HTML pages using headless browsers just for the search engine crawlers.
Recently, Google added a JavaScript rendering capability to its crawlers. You may think this means that browser-rendered HTML will be indexed correctly now. You may think that by using Angular with a REST API server, you don’t need server-side rendering. Unfortunately, this may not be the case.
The following comes from the Google Webmaster Central Blog post “Understanding Web Pages Better” (http://mng.bz/Yv3B): “Sometimes things don’t go perfectly during rendering, which may negatively impact search results for your site.” The gist is that Google doesn’t advocate that we rely on its indexing of SPAs. Google can’t guarantee that what’s in its cache, index, and search results is exactly what your SPA rendered. So, to be on the safe side, you need to render without JavaScript as closely as possible to the JavaScript-enabled rendering.
With Universal JavaScript and React, in particular, you can generate HTML on the server for crawlers from the same components that browsers use to generate HTML for users. No need for bulky headless browsers to generate HTML on the server. Win-win!
Although some applications must have proper search engine indexing, others thrive on faster performance. Websites like http://mobile.walmart.com[1] and http://twitter.com[2] have done research that showed that they needed to render the first page (first load) on the server to improve performance. Companies lose millions of dollars because users will leave if the first page doesn’t load quickly enough.
Kevin Decker, “Mobile Server Side Rendering,” GitHub Gist, 2014, http://mng.bz/2B6P.
Dan Webb, “Improving Performance on twitter.com,” Twitter, May 29, 2012, http://mng.bz/2st9.
Being a web developer, and working and living with good internet connection speeds, you might forget that your website may be accessed via a slow connection. What loads in a split second for you might take half a minute in other cases. Suddenly, a bundle that’s more than 1 MB is too large. And loading the bundled file is just half the story: the SPA needs to make AJAX requests to the server to load the data, while your users patiently stare at the Loading... spinner. Yeah, right. Some of them already left, and others are frustrated.
You want to show users a functional web page as fast as you possibly can, not just some skeleton HTML and Loading.... Other code can be loaded later while the user browses the web page.
With Universal JavaScript, it’s easy to generate HTML to show the first page on the server. As a result, when users load the first page, they won’t see the obstructing Loading... message. The data is in the HTML for users to enjoy. They see a functional page and thus have a better user experience.
The performance boost comes from the fact that users don’t have to wait for AJAX calls to resolve. There are other opportunities to optimize performance as well, such as preloading data and caching it on the server before AJAX calls come to the server (that’s exactly what we did at DocuSign by implementing a data router).[3]
Ben Buckman, “The New DocuSign Experience, All in Javascript,” DocuSign Dev, March 30, 2014, http://mng.bz/4773.
Code is a liability. The more code you have, the more you and your team will need to support it. For these reasons, you want to avoid having different templates and logic for the same pages. Avoid duplication. Don’t repeat yourself (DRY).
Fortunately, Node.js, which is an essential part of Universal JavaScript, makes it effortless to use front-end/browser modules on the server. Many template engines, such as Handlebars.js, Mustache, Dust.js, and others, can be used on the server.
Given these problems, and knowing that Universal JavaScript can solve them, what’s a practical application?
Universal, in regard to web development, means using the same code (typically written in JavaScript) on both the server side and the client side. A narrow use case for Universal JavaScript is rendering on the server and client from the same source. Universal JavaScript often implies the use of JavaScript and Node.js, because this language and platform combination allows for the reuse of the libraries.
Browser JavaScript code can be run in the Node.js environment with few modifications. As a consequence of this interchangeability, the Node.js and JavaScript ecosystem has a wide variety of isomorphic frameworks, such as React.js (http://facebook.github.io/react), Next.js (https://github.com/zeit/next.js), Catberry (http://catberry.org/), LazoJS (https://github.com/lazojs/lazo), Rendr (https://github.com/rendrjs/rendr), Meteor (https://meteor.com), and others. Figure 17.2 shows how an universal/isomorphic stack works: isomorphic code is shared between server and client.
In a practical application, Universal JavaScript architecture consists of the following:
Figure 17.3 shows the model.
You may be thinking, “Show me how to use this wonder, Universal JavaScript, already!” All right, let’s look at a hands-on example of rendering React components on the server. We’ll do so in a gradual way, because several components (as in parts, not React components) are involved in using the Universal JavaScript pattern. You’ll need to learn how to do these things:
In the end, you’ll use React to generate server-side HTML while loading browser React at the same time—the Holy Grail of Universal JavaScript. But before you can fly, you need to learn to walk!
Let’s start with a basic use case: generating HTML from a Node script. This example doesn’t include servers or anything complex, just importing components and generating HTML. Make sure your Node version is at least 6 and your npm version is at least 3.
You need to learn only a handful of methods to generate HTML from React components on the server. First, you need the npm modules react and react-dom. You can install React and npm following the instructions in appendix A. This example uses React and React DOM version 15.
If you’re new to writing server-side Node code, you might wonder where this server-side code goes. It goes in a plain text file; name it index.js. The React component is in email.js (I’ll cover non-JSX plain JavaScript for now). Those two files must be in the same folder (ch17/node).
The project structure looks like this:
First, include the modules in your server-side code in node/index.js.
What’s up with createFactory()? Well, if you just imported email.js, that would be a component class; but you need a React element. Thus you can use JSX: createElement() or createFactory(). The latter gives a function that, when invoked, will give you an element.
Once you’ve imported your components, run renderToString() from ReactDOMServer:
const emailString = ReactDOMServer.renderToString(Email())
Here’s the code fragment from index.js:
const ReactDOMServer = require('react-dom/server')
const React = require('react')
const Email = React.createFactory(require('./email.js'))
const emailString = ReactDOMServer.renderToString(Email())
console.log(emailString)
// ...
Another approach to use JSX is to convert it on the fly. The babel-register library will enhance require to do just that so you can configure your require once and then import JSX like any other JS files.
To import JSX, you can use babel-register as shown here in its index.js, in addition to installing babel-register and babel-preset-react (use npm to install them):
require('babel-register')({
presets: [ 'react' ]
})
Is email.js regular JavaScript? In this case, it has to be. You can “build” JSX into regular JS with Webpack.
const React = require('react')
const Email = (props)=> {
return (
<div>
<h1>Thank you {(props.name) ? props.name: '' }
for signing up!</h1>
<p>If you have any questions, please contact support</p>
</div>
)
}
module.exports = Email
You’ll get strings rendered by React components. You can use these strings in your favorite template engine to show on a web page or somewhere else (such as HTML email). In my case, email.js (ch17/node/email.js) with a heading and a paragraph renders into the following HTML strings with Universal React attributes.
<div data-reactroot="" data-reactid="1" data-react-checksum="1319067066">
<h1 data-reactid="2">
<!-- react-text: 3 -->Thank you <!-- /react-text -->
<!-- react-text: 4 -->
<!-- /react-text -->
<!-- react-text: 5 -->for signing up!<!-- /react-text -->
</h1>
<p data-reactid="6">If you have any questions, please contact support</p>
</div>
What’s happening with the attributes data-reactroot, data-reactid, and data-react-checksum? You didn’t put them in there; React did. Why? For browser React and Universal JavaScript (discussed in the next section).
If you won’t need the React markup that browser React needs (for example, if you’re creating an HTML email), use the ReactDOMServer.renderToStaticMarkup() method. It works similarly to renderToString() but strips out all the data-reactroot, data-reactid, and data-react-checksum attributes. In this case, React is just like any other static template engine.
For example, you can load the component from email.js and generate HTML with renderToStaticMarkup() instead of renderToString():
const emailStaticMarkup = ReactDOMServer.renderToStaticMarkup(Email())
The resulting emailStaticMarkup doesn’t have React attributes:
<div><h1>Thank you for signing up!</h1><p>If you have any questions,
Although you won’t need the browser React for email, you use the original renderToString() for the Universal JavaScript architecture with React. Server-side React adds some secret sauce to the HTML in the form of checksums (data-react-checksum HTML attributes). Those checksums are compared by the browser React, and if they match, browser components won’t regenerate/repaint/rerender unnecessarily. There’s no flash of content (which often happens due to rerendering). The checksums will match if the data supplied to the server-side components is exactly the same as that on the browser. But how do you supply the data to the components created on the server? As properties!
If you need to pass some properties, pass them as object parameters. For example, you can provide a name (Johny Pineappleseed) to the Email component:
const emailStringWithName = ReactDOMServer.renderToString(Email({
name: 'Johny Pineappleseed'
}))
The full ch17/node/index.js is shown next, with three ways to render HTML—static, string, and string with a property:
const ReactDOMServer = require('react-dom/server')
const React = require('react')
const Email = React.createFactory(require('./email.js'))
const emailString = ReactDOMServer.renderToString(Email())
const emailStaticMarkup = ReactDOMServer.renderToStaticMarkup(Email())
console.log(emailString)
console.log(emailStaticMarkup)
const emailStringWithName =
ReactDOMServer.renderToString(Email({name: 'Johny Pineappleseed'}))
console.log(emailStringWithName)
That’s how you render React components into HTML in plain Node—no servers and no thrills. Next, let’s look at using React in an Express server.
Express.js is one of the most popular Node.js frameworks—maybe the most popular. It’s simple yet highly configurable. There are hundreds of plug-ins called middleware that you can use with Express.js.
In a bird’s-eye view of the tech stack, Express and Node take the place of an HTTP(S) server, effectively replacing technologies like Microsoft IIS (www.iis.net) Apache httpd (https://httpd.apache.org), nginx (www.nginx.com), and Apache Tomcat (http://tomcat.apache.org). What’s unique about Express and Node is that they allow you to build highly scalable, performant systems, thanks to the non-blocking I/O nature of Node (http://github.com/azat-co/you-dont-know-node). Express’s advantages are its vast ecosystem of middleware and its mature, stable codebase.
Unfortunately, a detailed overview of the framework is out of the scope of this book, but you’ll create a small Express app and render React in it. In no way is this is a deep dive into Express.js, but it’ll get you started with the most widely used Node.js web framework. Call it an express course in Express if you wish.
As mentioned earlier, appendix A covers how to install both node.js and Express, if you want to follow along with this example.
Let’s build HTTP and HTTPS servers using Express and then generate HTML on the server side using React, as shown schematically in figure 17.4. The most basic example of using React in Express as a view engine is to generate an HTML string without markup (checksums) and send it as a response to the request. Listing 17.4 illustrates the /about page rendered from a React component about.js.
This will work, but /about won’t be a complete page with <head> and <body>. It’s better to use a proper template engine (like Handlebars) for the layout and top HTML elements. You also may wonder what app.get() and app.listen() are. Let’s look at another example, and all will be revealed.
This is a more interesting example in which you’ll use some external plug-ins and a template engine. The idea for the app is the same: serve HTML generated from React using Express. The page will display some text that’s generated from about.jsx (see figure 17.5). No thrills, but it’s simple, and starting with simple is good.
Create a folder called react-express. (This example is in ch17/react-express.) The end project structure is as follows:
/react-express
/components
about.jsx
/views
about.hbs
index.js
package.json
Create package.json with npm init -y, and then install Express with npm like this:
$ npm install express@4.14.0 --save
As with any Node application, open an editor and create a file. Typically, you create a server file named index.js, app.js, or server.js, which you’ll later start with the node command. In this case, name it index.js.
The file has these parts:
Here’s a high-level overview of the Express and Node server file:
Now let’s go deeper. The imports section is straightforward. In it, you require dependencies and instantiate objects. For example, to import the Express.js framework and to create an instance, write these lines:
var express = require('express')
var app = express()
You set configurations with app.set(), where the first argument is a string and the second is a value. For example, to set the template engine to hbs (www.npmjs.com/package/hbs), use this configuration view engine:
app.set('view engine', 'hbs')
hbs (no affiliation with Harvard Business School) is an Express template (or view) engine for the Handlebars template language (http://handlebarsjs.com). You may have worked with Handlebars or a close relative of it, such as Mustache, Blaze, and so on. Ember also uses Handlebars (http://mng.bz/90Q2). It’s a common, easy-to-get-started template, which is why you’ll use it here.
One caveat: you must install the hbs package in order for Express to properly use the view engine. Do so by executing npm i hbs --save.
The next section sets up middleware. For example, to enable the app to serve static assets, use the static middleware:
app.use(express.static(path.join(__dirname, 'public')))
The static middleware is great because it turns Express into a static HTTP(S) server that proxies requests to files in a specified folder (public in this example), just as NGINX or Apache httpd would.
Next are routes, also known as endpoints, resources, pages, and many other names. You define a URL pattern that will be matched by Express against real URLs of incoming requests. If there’s a match, Express will execute the logic associated with this URL pattern; this is called handling a request. It can involve anything from displaying static HTML for a 404 Not Found page to making a request to another service and caching the response before sending it back to the client.
Routes are the most important part of a web application because they define URL routing and in a way act as controllers in your good-old model-view-controller (MVC) pattern. In Express, you define routes using the app.NAME() pattern, where NAME is the name of an HTTP method in lowercase. For example, this is a syntax to GET the / (home page or empty URL) endpoint, which will send back the string “Hello”:
app.get('/', (request, response, next) => {
response.send('Hello!')
})
For the /about page/route, you can change the first argument (the URL pattern). You can also render the HTML string:
app.get('/about', (req, res, next) => {
response.send(`<div>
<a href="https://node.university" target="_blank">Node.University</a>
is home to top-notch Node education which brings joy to JavaScript engineers.
</div>`)
})
Next you want to render React HTML from the Handlebars template, because Handlebars will provide you with an overall layout including such things as <html> and <body>. In other words, you have React for UI elements and Handlebars for the layout.
Create a new views folder containing this template, called about.hbs:
In the route (in the file ch17/react-express/index.js), change response.send() to response.render():
Express routes can render from Handlebars templates, with data such as the about string variable, or send a response in a string format.
It’s possible to use React for layouts, instead of Handlebars. There’s an express-react-views library to do that (www.npmjs.com/package/express-react-views). It’s only for static markup, not for browser React.
I won’t cover it here, because it requires extensive use of dangerouslySetInnerHTML,[4] doesn’t support all HTML, and often confuses beginner Express-React developers. In my humble opinion, there’s little benefit to using React for layouts.
Error handlers are similar to middleware. For example, they can be imported from a package such as errorhandler (www.npmjs.org/package/errorhandler):
const errorHandler = require('errorhandler')
...
app.use(errorHandler)
Or you can create them in index.js:
app.use((error, request, response, next) => {
console.error(request.url, error)
response.send('Wonderful, something went wrong...')
})
You trigger an error handler by invoking next(error) in a request handler or middleware. error is an error object, which you can create with new Error('Ooops'), where “Ooops” will become the error message. Here’s an example in /about:
app.get('/about', (request, response, next) => {
// ... do weird stuff
let somethingWeirdHappened = true
if (somethingWeirdHappened) return next(new Error('Ooops'))
})
Don’t forget to use return. For more about error handling in Node and Express, check out the Node Patterns course (http://node.university/p/node-patterns) or my post “Node Patterns: From Callbacks to Observer” (http://webapplog.com/node-patterns).
Finally, to start your app, run listen() by passing a port number and a callback (optional):
http.createServer(app).listen(portNumber, callback)
In this example, it looks like this:
http.createServer(app) .listen(3000)
Here’s the full server code for ch17/react-express/index.js, to make sure nothing has slipped through the cracks.
You can look up how to generate them in my post “Easy HTTP/2 Server with Node.js and Express.js,” https://webapplog.com/http2-node.
Now everything should be ready to run the server with node index.js or its shortcut (node .) to see the server response when you navigate to http://localhost:3000/about. If something is missing or you get errors when you start the server and navigate to the address, refer to the project source code in ch17/react-express.
The SSL key and certificate are needed for SSL and HTTPS to work. The GitHub code for this example purposely doesn’t include server.key and server.crt, because sensitive information like keys shouldn’t be committed to a version-control system. You should create your own keys by following the instructions at https://webapplog.com/http2-node. If you don’t have them, then the example code will only create an HTTP server.
The end result should be a proper HTML page with a header and body. In the body should be React markup such as data-react-checksum and data-reactroot, as shown in figure 17.6.
Why does this example use markup rendering and not static HTML strings or express-react-views? You’ll need this markup with checksums later, for the browser React; that’s the Universal JavaScript architecture.
In the next section, you’ll put together all you’ve learned about React on the browser, Express, and React on Node to implement a Universal JavaScript architecture.
This section combines all the skills from this chapter (and most of the book!). You’ll render component(s) on the server, plug them in the template, and enable browser React.
To learn about Universal JavaScript, you’ll build a message board with three components: Header, Footer, and MessageBoard (see figure 17.7). The Header and Footer components will have static HTML to display some text, and MessageBoard will have a form to post messages on the board and a list of messages. This app will use AJAX calls to get the list of messages and post new messages to the back-end server, which in turn will use a MongoDB NoSQL database.
Concisely, for Universal React, you’ll need to follow these steps:
A few parts interact with each other: server, components, data, and browser. Figure 17.8 shows a diagram of how they’re connected in the message board example. The server acts as a static-assets HTTP server and as an app that renders server-side HTML (first page load only). Browser React code enables interactivity of browser events and subsequent persistence (via HTTP requests to the server) after the initial page load.
You also need to install and launch MongoDB in order for this example to work. You can read about installation on its website or in appendix D. After you install MongoDB, run mongod and leave it running. This will allow your Express server to connect to it using the magic URL mongodb://localhost:27017/board.
The project structure is as follows:
The server dependencies include these packages (quoted from package.json):
Now you can set up the server in message-board/index.js.
I want to say a few words about the middleware used in this project, in case you’re new to Express. Express isn’t a large framework that does almost everything for you. On the contrary, it’s a base foundation layer on top of which Node engineers build custom systems that are virtually their own frameworks. They are fit precisely to the task at hand, which isn’t always the case with all-in-one frameworks. You get only what you need with Express and its ecosystem of plug-ins. Those plug-ins are called middleware because they use the middleware pattern, with Express implementing the middleware manager.
Every Express engineer has favorite middleware packages that they use from project to project. I tend to start with the following and then add more packages if and when I need them:
For information about compression, body-parser, and errorhandler, as well as a list of additional Express middleware, see appendix c, https://github.com/azatco/cheatsheets/tree/master/express4, or Pro Express.js (http://proexpressjs.com).
Just as you did in the previous examples, you’ll implement the server side of things in index.js and then work through the five sections so you can see how it breaks down. First, the following listing shows it in full (ch17/message-board/index.js).
Again, you need to use babel-register to import JSX, after installing babel-register and babel-preset-react with npm:
require('babel-register')({
presets: [ 'react' ]
})
In index.js, you implement your Express server. Let’s import the components using the relative path ./components/:
const Header = React.createFactory(require('./components/header.jsx')),
Footer = React.createFactory(require('./components/footer.jsx')),
MessageBoard = React.createFactory(require('./components/board.jsx'))
For the purpose of rendering React apps, you need to know that Express.js can use pretty much any template engine. Let’s consider Handlebars, which is close to regular HTML. You can enable Handlebars with this statement, assuming app is the Express.js instance:
app.set('view engine', 'hbs')
The hbs module must be installed (I have it in package.json).
Middleware provides a lot of functionality for your server that you’d otherwise have to implement yourself. The following are the most essential for this project:
In your route—let’s say, /—you call render on views/index.handlebars (res.render ('index')), because the default template folder is views:
app.get('/', (req, res, next) => {
req.messages.find({}, {sort: {_id: -1}}).toArray((err, docs) => {
if (err) return next(err)
res.render('index', data)
})
})
The req.message.find() call is a MongoDB method to fetch documents. Although you must have MongoDB installed and running for this example to work verbatim (without any changes), I don’t like to enforce my database preference on you. It’s easy to replace calls to MongoDB with whatever you want. Most modern RDBMS and NoSQL databases have Node drivers; most of them even have ORM/ODM libraries written in Node. Therefore, you can safely ignore my DB call, if you’re not planning to use MongoDB. If you do want to use MongoDB, appendix D has a cheatsheet for you. The idea is that in the request handler, you can make a call to an external service (for example, using axios to get Facebook user information) or use a database (MongoDB, PostgreSQL, and so on). How you get the data in Node isn’t the focus of this chapter.
The most important thing here with regard to Universal React is res.render() (ch17/message-board/index.js), shown in listing 17.7. This render() method is a special Express feature for templates. It has two arguments. The first is the name of the template: index.hbs, which is in the views directory. The second argument to res.render() is the locals: data that will be used in the templates. All the data is sent (or combined with or hydrated) to the ch17/message-board/view/index.hbs template (the .hbs extension is optional).
At this point, you have an Express server that renders a Handlebars template with three HTML strings from React components. This isn’t exciting by itself; you could have done this without React. You could have used Handlebars or Pug or Mustache or any other template engine to render everything, not just the layout. Why do you need React? Well, you’ll be using React on the browser, and browser React will take your server HTML and add all the events and states—all the magic. That’s why!
You aren’t finished with the server yet. You need to implement the two APIs for this example:
These routes will be used by browser React when it makes AJAX/XHR requests to GET and POST data. The code for the routes goes in Express, in index.js:
app.get('/messages', (req, res, next) => {
req.messages.find({},
{sort: {_id: -1}}).toArray((err, docs) => {
if (err) return next(err)
return res.json(docs)
})
})
The route to handle creation of messages (POST /messages) will use express-validator to make sure the incoming data is present (notEmpty()). express-validator is convenient middleware because you can set up all kinds of validation rules.
Input validation is paramount to securing your apps. Developers work with the code and the system: they wrote it, they know how it works, and they know what data it supports. Thus they unconsciously become biased about the data they feed the app, which can lead to loopholes. Always sanitize your data server-side. You should consider every user to be potentially either a malicious attacker or a negligent person who never reads your instructions and always sends weird data.
The route will also use the reference to the database from req.messages to insert a new message:
As mentioned earlier, I recommend using the nodemon tool or something similar, such as node-dev. node-dev monitors for file changes and restarts the server when changes are detected. It can save you hours of work! To install node-dev, run this command:
npm i node-dev@3.1.3 --save-dev
In package.json, you can add the command node-dev . to the start npm script:
...
"scripts": {
...
"start": "./node_modules/.bin/webpack && node-dev ."
},
...
The bootup call is primitive compared to the previous section, when you used HTTPS:
app.listen(3000)
Obviously, you can add HTTPS to it and change the port number or take the port number from environment variables.
Remember, the root / route handles all the GET requests to / or to http://localhost:3000/, in this case. It’s implemented in listing 17.7 (ch17/message-board/view/index.hbs). The route uses a template called index in res.render(). Now, let’s implement the template.
You can use any template engine on the server to render React HTML. Handlebars is a good option because it’s similar to HTML, which means little modification is needed when transitioning from HTML to this template engine. Following is the Handlebars index.hbs file:
<!DOCTYPE html>
<html lang="en">
<head>
<!-- meta tags and CSS -->
</head>
<body>
<div class="container-fluid">
<!-- header -->
<!-- props -->
<!-- messageBoard -->
<!-- footer -->
</div>
<script type="text/javascript" src="/js/bundle.js"></script>
</body>
</html>
You use triple curly braces ({{{...}}}) to output components and properties (unescaped output) such as HTML. For example, {{{props}}} will output a <script/> script tag so you can define a messages variable in it. The index.hbs code to render unescaped HTML string for props is
<div>{{{props}}}</div>
The rest of the locals (data) are outputted similarly:
<div id="header">{{{header}}}</div>
...
<div>{{{props}}}</div>
...
<div class="row-fluid" id="message-board" />{{{messageBoard}}}</div>
...
<div id="footer">{{{footer}}}</div>
Here’s how you output an HTML string from the Header component in Handlebars (ch17/message-board/views/index.hbs).
...
<div class="container-fluid">
<div class="row-fluid">
<div class="span12">
<div id="header">{{{header}}}</div>
</div>
</div>
...
What about the data? In order to get the benefit of server-side React working together with browser React, you must use the same data on the browser and server when you create React elements. You can pass the data from the server to browser React without needing AJAX calls by embedding the data as a JS variable right in the HTML!
When you pass header, footer, and messageBoard, you can add props in the / Express route. In index.hbs, print the values with triple curly braces and include the js/bundle.js script, which will be generated by Webpack later (ch17/message-board/views/index.hbs).
This template includes some Twitter Bootstrap styling, but it’s not essential for the project or the Universal JavaScript example. You use a few variables (a.k.a. locals: header, messageBoard, props, and footer) in your templates, which you need to provide in the render() of an Express request handler. As a reminder, this is index.js code that you implemented earlier (listing 17.7, ch17/message-board/view/index.hbs) and that uses the previous template by calling it index, which is a convention for index.hbs:
res.render('index', {
header: ReactDOMServer.renderToString(Header()),
footer: ReactDOMServer.renderToString(Footer()),
messageBoard:
ReactDOMServer.renderToString(MessageBoard({messages: docs})),
props: '<script type="text/javascript">var messages='+JSON.stringify(docs)+
'</script>'
})
The values will be generated from React components. This way, you’ll be using the same components on the server and on the browser. The ability to easily render on the server (with Node) is the beauty of React.
Next, let’s move on to variables: props, header, footer, and so on.
You’re finally doing what you did in all the previous chapters: creating React components. Isn’t it good to get back to something familiar once in a while? Yes. But where do the components come from? They live in the components folder. As I mentioned earlier, the components will be used on the browser and the server; that’s why you’re putting them in a separate components folder and not creating them in client. (Other options for component folder names are shared and common.)
To expose these components, each of them must have module.exports, which is assigned a value of the component class or a stateless function. For example, you require React, implement the class or a function, and then export Header as follows:
The message board will use AJAX/XHR calls to get a list of messages and post a new message. The calls are in board.jsx. The file will include MessageBoard. It’s your container (smart) component, so the calls are in that component.
It’s interesting to look at where you make AJAX calls in MessageBoard: in componentDidMount(), because this lifecycle event will never be called on the server (ch17/message-board/components/board.jsx)!
You can look up the implementation of NewMessage and MessageList in the same file (ch17/message-board/components/board.jsx); I won’t bore you here. They’re representational components with little or no logic—just the description of the UI in the form of JSX.
You’re done with rendering React (and layout) HTML on the server. Now, let’s sync up the markup with the browser React; otherwise, no messages would be added—there would be no interactive browser JavaScript events!
If you stopped the implementation at this point, there would be only static markup from the rendering of React components on the server. New messages wouldn’t be saved, because the onClick event for the POST button wouldn’t work. You need to plug in the browser React to take over where the server’s static markup rendering left off.
You create app.jsx as a browser-only file. It won’t be executed on the server (unlike the components). This is the place to put ReactDOM.render() calls to enable browser React:
ReactDOM.render(<MessageBoard messages={messages}/>,
document.getElementById('message-board')
)
You also need to use the global messages as a property for MessageBoard. The messages property value will be populated by the server-side template and {{{props}}} data (see section 17.4.3). In other words, the messages array of messages will be populated from index.hbs when the template gets data (called locals) from the props variable in the Express.js route /.
Failure to provide the same messages property to MessageBoard on the server and on the browser will result in browser React repainting the entire component, because browser React will consider the views to be different. Under the hood, React will use the checksum attribute to compare the data that’s already in the DOM (from the server-side rendering) with whatever browser React comes up with. React uses checksum because it’s quicker than doing an actual tree comparison (which could take a while).
In the app.js file, you need to require some front-end libraries and then render out components in the DOM (ch17/message-board/client/app.jsx).
const React = require('react')
const ReactDOM = require('react-dom')
const Header = require('../components/header.jsx')
const Footer = require('../components/footer.jsx')
const MessageBoard = require('../components/board.jsx')
ReactDOM.render(<Header />, document.getElementById('header'))
ReactDOM.render(<Footer />, document.getElementById('footer'))
ReactDOM.render(<MessageBoard messages={messages}/>,
document.getElementById('message-board'))
The browser code is tiny!
The final step is setting up Webpack to bundle the browser code into one file, manage dependencies, and convert JSX code. First you need to configure Webpack as follows, with the entry point client/app.jsx, with output set to public/js in the project folder, and using Babel loaders. The devtool setting gets the proper source code lines in Chrome DevTools (not the lines from the compiled JS code):
module.exports = {
entry: './client/app.jsx',
output: {
path: __dirname + '/public/js/',
filename: 'bundle.js'
},
devtool: '#sourcemap',
stats: {
colors: true,
reasons: true
},
module: {
loaders: [
{
test: /\.jsx?$/,
exclude: /(node_modules)/,
loader: 'babel-loader'
}
]
}
}
To convert JSX to JS, you can use babel-preset-react and specify the Babel configs in package.json:
...
"babel": {
"presets": [
"react"
]
},
...
The client-side dependencies (for browser React) like Babel and Webpack in package .json will be development dependencies, because Webpack will bundle everything that’s needed into bundle.js. Thus you won’t need them at runtime:
{
...
"devDependencies": {
"axios": "0.13.1",
"babel-core": "6.10.4",
"babel-jest": "13.2.2",
"babel-loader": "6.2.4",
"babel-preset-react": "6.5.0",
"node-dev": "3.1.3",
"webpack": "1.13.1"
}
}
Be sure you use the exact versions provided here. Otherwise, all the new stuff that will come out when I’m done writing this paragraph will break the project—and I’m only half joking!
Also, while you’re in package.json, add an npm build script (it’s optional but more convenient):
...
"scripts": {
...
"build": "./node_modules/.bin/webpack"
},
...
I personally love to use watch for Webpack (-w). In package.json, you can add the option -w to the npm build script:
...
"scripts": {
"build": "./node_modules/.bin/webpack -w",
...
},
...
Consequently, every time you run npm run build, Webpack will use Babel to convert JSX into JS and stitch all the files with their dependencies into a giant ball. In this case, it will be put in /public/js/app.js.
Thanks to the include in the views/index.hbs template, right before the ending </body> tag, the browser code is working (the following line is what’s in the template):
<script type="text/javascript" src="/js/bundle.js"></script>
When I run this default task with npm run build, I see these logs:
Hash: 1d4cfcb6db55f1438550
Version: webpack 1.13.1
Time: 733ms
Asset Size Chunks Chunk Names
bundle.js 782 kB 0 [emitted] main
bundle.js.map 918 kB 0 [emitted] main
+ 200 hidden modules
That’s a good sign. If you see another message or errors, compare your project with the code on at www.manning.com/books/react-quickly or https://github.com/azat-co/react-quickly/tree/master/ch17.
That’s it as far as rendering React.js components in Express.js apps goes. Typically, all you need are the following (assuming you have a build process and components):
Are you still confused about Universal Express and React? If so, get the tested, working code for the project from www.manning.com/books/react-quickly or https://github.com/azat-co/react-quickly/tree/master/ch17/message-board and poke around. You can remove code in app.js to disable browser React (so there’s no interactivity such as mouse clicks), or remove code in index.js to disable server React (slight delay when loading a page).
To run the project, have MongoDB running ($ mongod; for more instructions see appendix D). In the project folder, run these commands:
$ npm install $ npm start
Don’t forget to either have Webpack running builds in watch mode (npm run build) or restart the app every time you make a change to the browser code.
Open http://localhost:3000 in your browser, and you’ll see the message board (see figure 17.9). If you look closely at the way the page is loaded (Chrome DevTools), you’ll see that the first load is fast because the HTML is rendered on the server.
When you comment out the code in ch17/message-board/index.js that’s responsible for server-side rendering, you can compare the timing by looking at the Network tab. There, notice the localhost resource (first page load and server-side rendering) and the GET XHR call to /messages. My results for the localhost are much faster, as shown in figure 17.10.
Of course, the bulk of the total loading time is taken up by bundle.js. After all, it has more than 200 modules! GET /messages doesn’t take too long—just a few milliseconds. But still, users will see everything on the page when the localhost call happens. Conversely, without isomorphic/universal code, users will see fully formed HTML only after GET /messages, plus some for browser React to render the HTML client-side.
Let’s inspect the app from a different perspective by comparing Universal versus browser rendering side by side. Figure 17.11 shows the results for localhost. With the Universal approach, localhost has all the data, and it loads in a mere 20–30 ms. With browser-only React, localhost has only bare-bones, skeleton HTML. So, users will have to wait about 10 times as long. Anything greater than 150 ms is usually noticeable by humans.
You can play around by commenting out the rendering statements in index.js (Express.js) or app.jsx (browser React). For example, if you comment out the server-side Header but leave the browser render for Header intact, then you may not see Header for a few moments before it appears.
Also, if you comment out passing the props variable on the server or modify its value, browser React will update the DOM after getting the list of messages for axios. React will give you a warning that checksums don’t match.
Sooner or later, your application will grow, and you’ll need to use libraries such as React Router and Redux to route data (covered in chapters 13 and 14). Interestingly, these libraries already support Node, and React Router even supports Express. For example, you can pass React Router routes to Express for server-side support via match and RouterContext, to render components on the server side:
Redux has the createStore() method (chapter 14), which you can use server-side in Express middleware to provide a data store. For example, for an App component, the server-side code with Redux will look like this:
The index template looks like this:
<div id="root">${html}</div>
<script>
window.__PRELOADED_STATE__ = ${JSON.stringify(preloadedState)}
</script>
<script src="/static/bundle.js"></script>
Redux uses the same approach that you used for the message board: rendering HTML and data in a <script> tag.
The full example with explanations is at http://mng.bz/F5pb and http://mng.bz/Edyx.
This concludes the discussion of isomorphic or Universal JavaScript. The uniformity and code reuse it provides are tremendous benefits that help developers be more productive and live happier work lives!
What is the method used to render a React component on the server?
Rendering the first page on the server improves performance. True or false?
CommonJS and Node.js module syntax, using require() (along with Webpack), lets you “require” or import npm modules in browser code. True or false?
Which of the following is used to output unescaped strings in Handlebars? <%...%>, {{...}}, {{{...}}} or dangerouslySetInnerHTML=...
What is the best place to put AJAX/XHR calls in browser React so they won’t be triggered on the server?
ReactDOMServer.renderToString(). renderToStaticMarkup() won’t render checksums.
True. You get all the data on the first page load without having to wait for bundle.js and AJAX requests.
True. You can use the require() and module.exports syntax right out of the box with Webpack. Just by setting an entry point in the webpack.config.js, you can make Webpack traverse all the dependencies from there and include only the needed ones.
{{{...}}} is the correct syntax. For escaped variables, use {{data}} to ensure safer usage.
componentDidMount(), because it will never be called on server rendering.
This chapter covers
The project in this chapter focuses mainly on demonstrating how to use React Router, some ES6 features, and Webpack. In this project, you’ll build a simple e-commerce storefront for a bookstore (figure 18.1).
You’ll learn how to create browser routing, as well as the following techniques for working with React Router:
To illustrate these techniques, the project includes several screens with different routes:
The product information will come from an array of data set in one of the files (ch18/nile/jsx/app.js; refer to the project structure in the next section). The product page can act as a modal dialog or as a separate page. When you click a product image on the home page, a modal dialog will open; for example, figure 18.2 shows a modal dialog with the detailed view of React Quickly.
The URL is /products/3 followed by the hash token to keep track of the state. The link is shareable: if you open it in a new window/tab, it’s a normal screen, not a modal dialog (see figure 18.3). Modals are useful when you’re navigating through a list and don’t want to lose the context by going to a new page. But when you share a direct product link, there’s no context or list—you want to focus attention on the product.
The roadmap to implementing the bookstore front end consists of the following steps:
I encourage you to implement the items listed in the “Homework” section at the end of the chapter and submit your code to the book’s GitHub repository: https://github.com/azat-co/react-quickly.
To follow along with the project, you’ll need to download the unminified version of React and install node.js and npm for compiling JSX. I’m also using Webpack as the build tool. Appendix A covers how to install everything.
The source code for the project in this chapter is at www.manning.com/books/react-quickly and https://github.com/azat-co/react-quickly/tree/master/ch18. You can also find some demos at http://reactquickly.co/demos.
Let’s start with setting up the project.
You have a basic understanding of the end result of this project: a front-end web app with URL routing. Time to jump in to the project structure. This is what the folder structure will look like:
I’ve abridged the contents of the images and node_modules folders for the sake of brevity. This is a front-end-only application, but you need package.json to install dependencies and tell Babel what to do. The following listing shows those dependencies in full, in package.json.
After starting with the standard project properties, the scripts command points to the local installation of Webpack. This way, you’re using the same version as in the devDependencies property. The build creates the bundle.js file and starts the Webpack development server on port 8080. You don’t have to use it; you can instead build manually each time there’s a change and use node-static (https://github.com/cloudhead/node-static) or a similar local web server:
"scripts": {
"build": "node ./node_modules/webpack/bin/webpack.js -w"
},
The next line is required for Babel v6.x, because without it Babel won’t do much. You’re telling Babel to use the JSX transformer and ES2015 presets:
"babel": {
"plugins": [
"transform-react-jsx"
],
"presets": [
"es2015"
],
The next Babel config isn’t optional. It excludes some files from the Babel loader, such as certain node_modules folders and files:
"ignore": [
"js/bundle.js",
"node_modules/**/*.js"
]
},
Next, you’ll define dependencies. You need to use the exact version numbers shown here, because I can’t guarantee that future versions will work. Given the speed at which React and Babel are developing, there will most likely be changes. But there’s nothing wrong with using slightly older versions to learn the concepts, as you’re doing in this book.
The devDependencies are for development, as the name suggests, and aren’t part of production deployment. This is where you put Webpack, Webpack Dev Server, Babel, and other packages. Please double-check that you’re using the exact versions listed here:
...
"devDependencies": {
"babel-core": "6.3.21",
"babel-loader": "6.4.1",
"babel-plugin-transform-react-jsx": "6.3.13",
"babel-preset-es2015": "6.3.13",
"history": "4.0.0",
"react": "15.5.4",
"react-addons-test-utils": "15.2.1",
"react-dom": "15.5.4",
"react-router": "2.8.0",
"webpack": "2.4.1",
"webpack-dev-server": "1.14.0"
}
}
Now that you’ve defined the project dependencies, you need to set up the Webpack build process so you can use ES6 and transform JSX. To do this, create the file webpack.config.js in the root directory, with the following code (ch18/nile/webpack.config.js).
module.exports = {
entry: "./jsx/app.jsx",
output: {
path: __dirname + '/js',
filename: "bundle.js"
},
devtool: '#sourcemap',
stats: {
colors: true,
reasons: true
},
module: {
loaders: [
{
test: /\.jsx?$/,
exclude: /(node_modules)/,
loader: 'babel-loader'
}
]
}
}
Run npm i (short for npm install), and you’re finished with the setup. Next, you’ll create an HTML file that will hold skeleton <div> elements for React components.
The HTML for this project is very basic. It has a container with the ID content and includes js/bundle.js (ch18/nile/index.html).
<!DOCTYPE html>
<html>
<head>
<link href="css/bootstrap.css" type="text/css" rel="stylesheet"/>
</head>
<body>
<div class="container-fluid">
<div id="content" class=""></div>
</div>
<script src="js/bundle.js"></script>
</body>
</html>
Now you can do a quick test to see whether the build and development processes work:
Onward to building the app, assuming you were able to see the message. You’ll begin by importing the modules using ES6 modules and destructuring. Simply put, destructuring is a way to define a variable from an object by using the same name as one of the object’s properties. For example, if you want to import accounts from user.accounts and declare accounts (see the repetition?), then you can use {accounts} = user. If you’re not sure about destructuring, refer to the ES6 cheatsheet in appendix E.
The first file to write is app.jsx, where you set up the main imports, book information, and routes. Minus the component code, which we’ll get to in a moment, app.jsx looks like this (ch18/nile/jsx/app.jsx).
After you import everything at the top of the file, you hardcode the products into an array; each object has id, src, title, and url. Obviously, in the real world you’d get this data from the server, not have it in the browser JavaScript file:
const PRODUCTS = [
{ id: 0, src: 'images/proexpress-cover.jpg',
title: 'Pro Express.js', url: 'http://amzn.to/1D6qiqk' },
{ id: 1, src: 'images/practicalnode-cover.jpeg',
title: 'Practical Node.js', url: 'http://amzn.to/NuQ0fM' },
{ id: 2, src: 'images/expressapiref-cover.jpg',
title: 'Express API Reference', url: 'http://amzn.to/1xcHanf' },
{ id: 3, src: 'images/reactquickly-cover.jpg',
title: 'React Quickly',
url: 'https://www.manning.com/books/react-quickly'},
{ id: 4, src: 'images/fullstack-cover.png',
title: 'Full Stack JavaScript',
url: 'http://www.apress.com/9781484217504'}
]
You implement the next component as stateless using ES6 fat arrows. Why not have it as an <h1> in a render? Because doing it this way, you can use it on multiple screens. You use the same stateless style for Copy. It’s just static HTML, so you don’t need anything extra, not even properties:
const Heading = () => {
return <h1>Nile Book Store</h1>
}
const Copy = () => {
return <p>Please click on a book to view details in a modal. You can
copy/paste the link of the modal. The link will open the book on a
separate page.</p>
}
The two main components, App and Index, come next, followed by the cartItems object, which holds the current items in the shopping cart. It’s empty initially. addToCart() is a simple function—in a server-side version, you’d use Redux to persist the data to the server and sessions so a user could come back to the shopping cart later:
let cartItems = {}
const addToCart = (id) => {
if (cartItems[id])
cartItems[id] += 1
else
cartItems[id] = 1
}
Finally, here’s the ReactDOM.render() method you use to mount the Router component. You need to pass the history library to React Router. As I mentioned earlier, it can be the browser or hash history (this project is using the latter):
For the /products/:id route, the Product component route gets the addToCart() function to facilitate buying a book. The function will be available in this.props.route.addToCart because whatever property you pass to Route will be available in this.props.route.NAME in the component. For example, products will become this.props.route.products in Product:
<Route path="/products/:id" component={Product} addToCart={addToCart}
products={PRODUCTS} />
The /checkout route is outside of App, so it doesn’t have a header (see figure 18.4). If you recall, path and the route structure can be independent:
<Route path="/checkout" component={Checkout}
cartItems={cartItems} products={PRODUCTS}/>
In this case, by putting Checkout outside of App, Checkout isn’t App’s child. You can click Back to navigate back to the app from the invoice/checkout screen.
Now you can implement the App component! It’s the main component because it’s the entry point for Webpack and because it provides the layout for most of the views; renders child components such as Product, the product list, and Cart; and shows a modal dialog. Remember ReactDOM.render()? Here’s the gist, which shows that App is the root component of the app:
Unlike the stateless components, which were just functions, this component is the real deal (ch18/nile/jsx/app.jsx).
Recall that componentWillReceiveProps() takes the following properties as its argument. This method is a good place to determine whether this view is modal:
class App extends React.Component {
componentWillReceiveProps(nextProps) {
this.isModal = (nextProps.location.state &&
nextProps.location.state.modal)
The following condition checks whether you’re on a modal screen or a nonmodal screen. If it’s modal, you assign children as previous children. The isModal Boolean determines whether the screen is modal based on state, which comes from the location property set in the Link element (you’ll see an example in the Index component):
if (this.isModal &&
nextProps.location.key !== this.props.location.key) {
this.previousChildren = this.props.children
}
}
In the render() function, note that it doesn’t matter whether Heading is just a function (stateless component). You can render it like any other React component:
render() {
console.log('Modal: ', this.isModal)
return (
<div className="well">
<Heading/>
And the ternary expression renders either this.previousChildren or this.props.children. React Router populates this.props.children from other nested routes/components, such as Index and Product. Remember that App is used by almost all of the app’s screens. By default, you want to render this.props.children when working with React Router:
<div>
{(this.isModal) ? this.previousChildren: this.props.children}
If you didn’t have the isModal condition, and you output this.props.children every time, then when you clicked a book image to open the modal, you’d always see the same content, as shown in figure 18.5. Obviously, this behavior isn’t what you intend. For this reason, you render the previous children, which in the case of a modal window is the home page. You can reuse a modal link with state.modal equal to true (shown later, in the Index component). As a result, you’ll see the modal on top of the current context.
Finally, you can render the modal in another ternary expression. You’re passing isOpen and returnTo:
{(isModal)?
<Modal isOpen={true} returnTo={this.props.location.state.returnTo}>
{this.props.children}
</Modal> : ''
}
</div>
</div>
)
}
}
Continuing with nile/jsx/app.jsx, the next component is the home page. If you’ll recall, it shows the full list of books. The code is shown next (ch18/nile/jsx/app.jsx).
In the map() iterator, you render links to the book modals. These links will open in a separate, nonmodal view when you navigate to them directly:
{PRODUCTS.map(picture => (
<Link key={picture.id}
to={{pathname: `/products/${picture.id}`,
state: { modal: true,
returnTo: this.props.location.pathname }
}
}>
You can pass any property to the component associated with the /products/:id route (that is, Product and its parent, App). The properties are accessible in this.props.location.NAME, where NAME is the name of the property. You used state.modal earlier, in the Modal component.
The <img> tag uses the src attribute to render the book image:
<img style={{ margin: 10 }} src={picture.src} height="100" />
</Link>
))}
</div>
</div>
)
}
}
That’s it for the app.jsx file. The next component to implement is the Cart component; it will live in its own file, because it’s not closely related to the application the way App is a layout of the bookstore.
The /cart route, rendered by Cart, displays the list of books and their quantity in the shopping cart, as shown in figure 18.6. The Cart component uses cartItems to get the list of books and their quantity. Notice the ES6 style for the render() function (nile/jsx/cart.jsx).
Cart uses this.props.route.products, which is a list of products. This works because in app.js, you defined the route property:
<Route path="/cart" component={Cart}
cartItems={cartItems} products={PRODUCTS}/>
If you’re using Redux (chapter 14), you won’t need to manually pass properties such as products, because Provider will populate the data store in children automatically.
Next is Checkout, shown in figure 18.7. This is the only component outside the App route. To refresh your memory, this is the routing from app.js:
As you can see, App and Checkout are on the same level of the hierarchy. Thus, when you navigate to /checkout, the App route is not triggered. There’s no layout. (Interestingly, it’s possible to nest the URLs but keep the components out of the nested structure: for example, by setting /cart/checkout. You won’t do that here, though.)
The print-ready invoice uses a Twitter Bootstrap table and table-bordered styles. Again, you use ES6’s const (remember, object properties can change) and function syntax (nile/jsx/checkout.jsx).
Now you need to implement the Modal component.
This component renders its children in a modal dialog. Recall that in App, the code uses Modal like this:
{(this.isModal) ?
<Modal isOpen={true} returnTo={this.props.location.state.returnTo}>
{this.props.children}
</Modal> : ''
}
Modal takes children from App’s this.props.children, which in turn is defined in app.js, in <Route>. Here’s a reminder of the routing structure:
ReactDOM.render((
<Router history={hashHistory}>
<Route path="/" component={App}>
<IndexRoute component={Index}/>
<Route path="/products/:id" component={Product}
addToCart={addToCart}
products={PRODUCTS} />
<Route path="/cart" component={Cart}
cartItems={cartItems} products={PRODUCTS}/>
</Route>
<Route path="/checkout" component={Checkout}
cartItems={cartItems} products={PRODUCTS}/>
</Router>
), document.getElementById('content'))
This is how you can view a product page both as a standalone and as a modal. Components nested under the App route are its children, depending on the URL (nile/jsx/modal.jsx).
The modal window displays an individual Product component because that’s what’s nested under App in routing and because the Product route has the URL path /product/:id, which you used along with state set to modal true in Index (product list).
The Product component uses the property from its route to trigger actions (this.props.route.addToCart). The addToCart() method in app.js puts a specific book in the shopping cart (if you’re using Redux, then this dispatches the action). You trigger addToCart() with the browser onClick event handler and a local method in Product called handleBuy(), which triggers the method addToCart from app.js. To summarize: onClick → this.handleBuy → this.props.route.addToCart → addToCart() (app.js). As a reminder, addToCart() is as follows:
let cartItems = {}
const addToCart = (id) => {
if (cartItems[id])
cartItems[id] += 1
else
cartItems[id] = 1
}
Of course, if you’re using Redux or Relay, then you’ll use their methods. This example keeps things simple with a plain array acting as a data store and a single method.
Now let’s look at the Product component itself. As always, you start by importing React and defining the class; then you take care of the event and render. Here’s the full code for Product (nile/jsx/product.jsx) with the most interesting parts noted.
You can also send a state to Cart in the Link component:
<Link
to={{
pathname: `/cart`,
state: { productId: this.props.params.id}
}}
onClick={this.handleBuy}
className="btn btn-primary">
Buy
</Link>
Recall that Product is used by the modal indirectly: Modal doesn’t render Product. Instead, Modal uses this.props.children, which has Product. Thus, Modal can be considered a passthrough component. (See chapter 8 for more about this.props.children and passthrough components that use it.)
That’s all for the bookstore. You’ve used some ES6 features and passed around states with React Router. Now, run the project by building it with npm run build, starting a local web server (WDS or node-static), and navigating to http://localhost:8080/nile, assuming you have a static web server running in a parent folder that has a nile folder (the URL path depends on where you launched the static web server).
You should see the home page with a grid of book covers. When you click a cover, a modal window appears; click the Buy button to add the book to the cart, which appears on the /cart and /checkout pages. Enjoy!
For bonus points, do the following:
Submit your code in a new folder under ch18 as a pull request to this book’s GitHub repository: https://github.com/azat-co/react-quickly/.
This chapter covers
This project focuses on building a UI, working with modules, and testing with Jest, along with other React-related techniques such as component composition, ES6 syntax, state, properties, and so on. Recall that chapter 16 dealt with testing; you used a password widget as an example of unit testing and UI testing. In this project, you’ll build the widget itself to check, verify, and generate new passwords. Along the way, I’ll explain testing again, here and there, in an expanded format.
The widget has a Save button that’s disabled by default but becomes enabled when the password is strong enough (according to the preset rules), as shown in figure 19.1. In addition, the Generate button lets you create a strong (according to the criteria) password. As each rule is satisfied, it’s crossed out. There’s also a Show Password check box that hides/shows the password, just as in most macOS interfaces (see figure 19.2).
The parent component is called Password, and the child components are listed here:
The widget is built using a single parent component. You provide the password-strength rules to the component as properties, so the component is highly customizable. I’ll bet you can use it in your own apps with some customization!
To follow along with this project, you’ll need to install Node.js and npm to compile JSX. This example also uses Webpack as a build tool and, of course, Jest as the test engine. Appendix A covers how to install everything.
Because parts of this project were first introduced in chapter 16, the source code is in the ch16 folder; you can find it at www.manning.com/books/react-quickly and https://github.com/azat-co/react-quickly/tree/master/ch16. You can also find some demos at http://reactquickly.co/demos.
Let’s start by setting up the project.
This is what the complete folder structure looks like. Begin by creating a new project folder named password:
The __tests__ folder is for Jest tests. The css folder contains my Twitter Bootstrap theme, called Flatly (https://bootswatch.com/flatly). The js and jsx folders have libraries and components, respectively. And js/generate-password.js is the library responsible for generating random passwords.
The dist folder contains the compiled JSX files with source maps. That’s where Webpack will put the concatenated file and its source map. Here, dist is short for distribution; it’s a commonly used name, along with js or build. I used it here to introduce some variety and show you how to customize Webpack configs.
Don’t forget that to avoid having to install each dependency with the exact version manually, you can copy package.json from the following listing to the password folder and then run npm install in it (ch16/password/package.json).
The interesting thing here is the scripts section, which you’ll use for testing, compilation, and bundling:
"scripts": {
"test": "jest",
"test-watch": "jest --watch",
"build-watch": "./node_modules/.bin/webpack -w",
"build": "./node_modules/.bin/webpack"
},
Recall that in the Nile store in chapter 18, you used transform-react-jsx:
"babel": {
"plugins": [
"transform-react-jsx"
],
But in this project, you use the React preset. It’s just another way to accomplish the same thing. You can use a preset or a plug-in. Presets are a more modern approach and are used in more docs and projects.
The test script (npm test) is for running Jest tests manually. Conversely, the test-watch script keeps Jest running in the background. test-watch is launched with npm run test-watch because only test and start don’t require run. You run test-watch once, and Jest (in watch mode) will notice any source code changes and rerun the tests. Here’s an example of the output:
PASS __tests__/password.test.js PASS __tests__/generate-password.test.js Test Suites: 2 passed, 2 total Tests: 3 passed, 3 total Snapshots: 0 total Time: 1.502s Ran all test suites. Watch Usage > Press o to only run tests related to changed files. > Press p to filter by a filename regex pattern. > Press t to filter by a test name regex pattern. > Press q to quit watch mode. > Press Enter to trigger a test run.
So far, you’ve defined the project dependencies. Next, you need to set up the Webpack build process so you can transform JSX to JS. To do this, create the webpack .config.js file in the root directory with the following code (ch16/password/webpack.config.js).
Now you can define configs to build your project in webpack.config.js. The entry point is the app.js JSX file in the jsx folder, and the destination is the dist folder. Also, configs will set the source maps and the Babel loader (to convert JSX into JS).
The build will be called with ./node_modules/.bin/webpack, or with ./node_modules/.bin/webpack -w if you want the tool to monitor file changes. Yes, with -w (watch), you can make Webpack rebuild on every file change—that is, each time you click Save in Notepad (I don’t like IDEs). Watch is great for active development!
You can create more than one webpack.config.js by specifying a different filename with --config:
$ ./node_modules/.bin/webpack --config production.config.js
Each config file can use a new script in package.json for convenience.
The bottom line is that Webpack is easy and fun to work with because it supports CommonJS/Node modules by default. There’s no need for Browserify or any other module loaders. With Webpack, it’s like writing a Node program for browser JavaScript!
Next, create the index.html file. It has a container with ID content and includes dist/bundle.js (ch16/password/index.html).
Now you should be set up and ready to start developing. It’s a good idea to test in increments during development so the area in which you look for bugs is as small as possible. So, perform a quick test to see if the setup is working correctly, just as you did in chapter 18. Do something along these lines:
The strong-password module is a generate-password.js file sitting in password/js. The test for the file will be in password/__tests__/generate-password.test.js. This module will return random passwords when invoked. The passwords will contain a good mix of different types of characters:
These categories, along with length and randomness, will ensure that the password is secure enough. Using TDD/BDD, let’s implement the tests first.
Begin with the tests in generate-password.test.js. Remember that you store them in the __tests__ folder so Jest can find them (ch16/password/__tests__/generate-password.test.js).
You start by declaring the password variable and importing generate-password.js. The regular expression checks the content and length of the password. It’s not perfect, because you don’t check that each password has at least one of those characters, but it’ll do for now:
let password,
password2,
pattern = /^[A-Za-z0-9\!\@\#\$\%\^\&\*\(\)\_\+\{\}\:\"\<\>\?\\|
\[\]\/'\,\.\`\~]{8,16}$/
Write in the test suite describe the noun method generatePassword. That’s what you’re going to test: it’s the function exported in the generate-password.js module.
Implement the test suite it with the code to unit-test via the BDD-style expect statements, as described in chapter 16. At a minimum, check against a regular-expression pattern for the password:
describe('method generatePassword', () => {
it('returns a generated password of the set pattern', ()=>{
password = generatePassword()
expect(password).toMatch(pattern)
})
it('returns a new value different from the previous one', ()=>{
password2 = generatePassword()
expect(password2).not.toEqual(password)
})
})
What if the password isn’t different each time you invoke generatePassword()? What if it’s hardcoded in generate-password.js? That would be bad! So, the second test suite expects the second generated password to be different.
You’ll implement a strong-password module in js/generate-password.js so you can TDD/BDD it right away—that is, you’ll write the test first and only then write the code. Here’s a versatile password generator that uses three sets of characters to satisfy the strong-password criteria:
The exported function (assigned to module.exports) calls the shuffle() method, which randomly moves characters around in the string. shuffle() takes the password generated by pick(), which uses sets of characters to make sure the generated password includes at least one of a certain group of characters (numbers, uppercase letters, specials, and so on). The final part of the password consists of more random elements from the union set ALL.
You can run the unit test for password/__tests__/generate-password.js with the command jest __tests__/generate-password.test.js or npm test __tests__/ generate-password.test.js executed from the project root (password folder). It should pass with a message similar to the following:
jest __tests__/generate-password.test.js
PASS __tests__/generate-password.test.js
method generatePassword
✓ returns a generated password of the set pattern (4ms)
✓ return a new value different from the previous one (2ms)
Test Suites: 1 passed, 1 total
Tests: 2 passed, 2 total
Snapshots: 0 total
Time: 1.14s
Ran all test suites matching "__tests__/generate-password.test.js".
The next logical thing is to work on the main component, Password. According to TDD, you again must start with a test: a UI test, in this case, because you want to test behavior like clicking.
Create a UI test file called __tests__/password.test.js. We already covered this file in chapter 16, so I’ll present the full example here with some comments (ch16/password/__tests__/password.test.js).
You can extend this test case to check that all the properties and rules pass; this is homework (see the “Homework” section at the end of this chapter for more ideas). It’s a good idea to have another suite and provide a different mix of properties, and then test for that as well.
That’s it! Your test should fail (npm test or jest) with an error:
Error: Cannot find module '../jsx/password.jsx' from 'password.test.js'
That’s normal for test-driven development because we write tests before apps. The main thing you need to do now is to implement the Password component.
Next, you’ll create the Password component with some initial state. The state variables are as follows:
Imagine that a few days after you implement this widget, a developer from another team wants to use your component but with slightly stricter password criteria. The best approach is to abstract (a fancy word for copy and paste) the code with the password criteria (rules) into a separate file. You’ll do this before proceeding with password.jsx.
Create a file called rules.js (ch16/password/js/rules.js). This file will implement password rules that you can use in password.jsx to perform validation and show warning messages. Keeping the rules separate will make it straightforward to change, add, or remove rules in the future.
module.exports = {
upperCase: {
message: 'Must have at least one upper-case character',
pattern: /([A-Z]+)/
},
lowerCase: {
message: 'Must have at least one lower-case character',
pattern: /([a-z]+)/
},
special:{
message: 'Must have at least one special character (#$@!&%...)',
pattern: /([\!\@\#\$\%\^\&\*\(\)\_\+\{\}\:\"\<\>\?\\|\[\]\/'\,\.\`\~]+)/
},
number: {
message: 'Must have at least one number',
pattern: /([0-9]+)/
},
'over6': {
message: 'Must be more than 6 characters',
pattern: /(.{6,})/
}
}
Basically, you have a bunch of rules, each of which has the following:
Now, on to password.jsx. You need to do the following:
Let’s implement the component. You import dependencies and create the component with initial state (ch16/password/jsx/password.jsx).
const React = require('react')
const ReactDOM = require('react-dom')
const generatePassword = require('../js/generate-password.js')
const rules = require('../js/rules.js')
const PasswordGenerate = require('./password-generate.jsx')
const PasswordInfo = require('./password-info.jsx')
const PasswordInput = require('./password-input.jsx')
const PasswordVisibility = require('./password-visibility.jsx')
class Password extends React.Component {
constructor(props) {
super(props)
this.state = {strength: {}, password: '', visible: false, ok: false}
this.generate = this.generate.bind(this)
this.checkStrength = this.checkStrength.bind(this)
this.toggleVisibility = this.toggleVisibility.bind(this)
}
...
}
Next, you implement a method to check for the password strength:
checkStrength(event) {
let password = event.target.value
this.setState({password: password})
let strength = {}
The following code block goes through each property (upperCase, over6, and so on) and checks the current password using the regular-expression pattern in rules. If the criterion is met, the property in the strength object is set to true:
Object.keys(this.props).forEach((key, index, list)=>{
if (this.props[key] && rules[key].pattern.test(password)) {
strength[key] = true
}
})
this.setState() is asynchronous, so you use a callback to provide logic that relies on the updated state. In this case, you check that the number of properties in the strength object (this.state.strength) is equal to the number of rules (props). It’s a rudimentary check; checking each property in a loop would be a more robust solution, but this code works for now. You set ok to true if the numbers match (that is, if all the rules for password strength are satisfied):
this.setState({strength: strength}, ()=>{
if (Object.keys(this.state.strength).length ==
Object.keys(this.props).length) {
this.setState({ok: true})
} else {
this.setState({ok: false})
}
})
The next method hides and shows the password field. This is a useful feature when you’re generating a new password, because you may want to save the password (or need help remembering it):
toggleVisibility() {
this.setState({visible: !this.state.visible}, ()=>{
})
}
Next is the generate() method, which creates random passwords using the js/generate-password.js module. Setting visible to true ensures that users can see the newly generated password. Right after the password is generated, you call checkStrength() to check its strength. Typically, the conditions will be satisfied, and users will be able to proceed by clicking Save:
generate() {
this.setState({visible: true, password: generatePassword()}, ()=>{
this.checkStrength({target: {value: this.state.password}})
)
}
In the render() function, Password processes the rules and renders a few other React components:
You begin by processing the rules and determining which of them are satisfied (isCompleted). Instead of passing the context in _this or using the bind(this) pattern, you use fat-arrow functions ()=>{}. There’s no big difference; choose one approach or the other, and use it.
Object.keys flattens your hash table into an array by giving you an array of keys of that object. You can iterate over that array of keys with map() and construct a new array with objects that have key, rule, and isCompleted:
render() {
var processedRules = Object.keys(this.props).map((key)=>{
if (this.props[key]) {
return {
key: key,
rule: rules[key],
isCompleted: this.state.strength[key] || false
}
}
})
// return ...
Once your array of processed rules is ready, you can begin rendering the components. Remember that for is a special word in JavaScript. That’s why you need to use className, not class (ch16/password/jsx/password.jsx).
Let’s cover the most important parts in more detail. PasswordInput is a controlled component (for a detailed comparison between controlled and uncontrolled components, see chapter 5). You listen on every change with the this.checkStrength callback, which uses e.target.value, so there’s no need for refs:
<PasswordInput name="password" onChange={this.checkStrength}
value={this.state.password} visible={this.state.visible}/>
Similar to PasswordInput, PasswordVisibility is a controlled component, and the event handler for change is this.toggleVisibility:
<PasswordVisibility checked={this.state.visible}
onChange={this.toggleVisibility}/>
You pass the processedRules object to the list of rules, and the PasswordGenerate button triggers this.generate:
<PasswordInfo rules={processedRules}/>
<PasswordGenerate onClick={this.generate}>Generate</PasswordGenerate>
The Save button is disabled and enabled based on the this.state.ok value. Don’t forget the space before disabled, or you’ll get the btn-primarydisabled class instead of two classes, btn-primary and disabled:
<button className={'btn btn-primary' +
((this.state.ok)? '': ' disabled')}>Save</button>
</div>
)
}})
The other components, in listings 19.9 (ch16/password/jsx/password-generate.jsx), 19.10 (ch16/password/jsx/password-input.jsx), and 19.11 (ch16/password/jsx/password-visibility.jsx), are dumb components. They just render classes and pass properties.
const React = require('react')
class PasswordGenerate extends React.Component{
render() {
return (
<button {...this.props} className="btn generate-btn">
{this.props.children}</button>
)
}
}
module.exports = PasswordGenerate
const React = require('react')
class PasswordInput extends React.Component {
render() {
return (
<input className="form-control"
type={this.props.visible ? 'text' : 'password'}
name={this.props.name}
value={this.props.value}
onChange={this.props.onChange}/>
)
}
}
module.exports = PasswordInput
Let’s look at PasswordInfo for a moment (ch16/password/jsx/password-info.jsx). It takes the processed rules array and iterates over that property. If isCompleted is true, you add <strike> to the <li>. <strike> is an HTML tag that applies a strikethrough line to text. This is what you check for in the password.test.js test, too.
You’re finished with the password.jsx file! Now you have everything ready to rerun the test. Don’t forget to recompile with npm run build or npm run build-watch. If you followed everything to a T, you should see something like this after you run npm test:
Using Jest CLI v0.5.10 PASS __tests__/generate-password.test.js (0.03s) PASS __tests__/password.test.js (1.367s) 2 tests passed (2 total) Run time: 2.687s
Good job—you can pat yourself on the back!
To see the widget in action, you need to do one more tiny step: create jsx/app.jsx, which is an example file for the component. Here’s how to render the Password widget in your app:
const React = require('react')
const ReactDOM = require('react-dom')
const Password = require('./password.jsx')
ReactDOM.render(<Password
upperCase={true}
lowerCase={true}
special={true}
number={true}
over6={true}/>,
document.getElementById('password'))
You can run the files like any other front-end app. I prefer node-static (https://github.com/cloudhead/node-static), or you can see an online demo at http://reactquickly.co/demos. Notice how the Save button becomes active when all the rules are satisfied, as shown in figure 19.3.
The best software engineering practice doesn’t stop at writing and running tests locally. The tests are much more valuable when combined with the deployment process and automated. These processes, called continuous integration (CI) and continuous deployment (CD), are great for speeding up and automating software delivery.
I highly recommend setting up CI/CD for anything more than a prototype. There are plenty of good software-as-a-service (SaaS) and self-hosted solutions out there. With the tests in this project, setting up a CI/CD environment won’t take long. For example, with AWS, Travis CI, or CircleCI, all you need to do is configure your project in terms of the environment it should run in and then provide a test command such as npm test. You can even integrate those SaaS CIs with GitHub so that you and your team can see CI messages (pass, fail, how many failures, and where) on GitHub pull requests.
Amazon Web Services offers its own managed services: CodeDeploy, CodePipeline, and CodeBuild. For more information on these AWS services, refer to Node University: https://node.university/p/aws-intermediate. If you prefer a self-hosted solution instead of a managed solution, take a look at Jenkins (https://jenkins.io) and Drone (https://github.com/drone/drone).
For bonus points, try the following:
Submit your code in a new folder under ch16 as a pull request to this book’s GitHub repository: https://github.com/azat-co/react-quickly.
This chapter covers
The goal of this project is first of all to combine many of the techniques you’ve learned throughout this book, such as component composition, states, form elements, and testing, as well as how to fetch data from an API server and store and how to implement a simple Express server and Universal React rendering. You’ve already done most of these things in the book, but repetition is the mother of learning—especially intermittent repetition!
In this chapter, you’ll build a well-rounded component and supply it with a back end. This little project is close to the sort of real-life projects you’ll most likely perform on the job.
In a nutshell, this project will guide you through building an autocomplete component that’s visually and functionally similar to the one in Slack (a popular messaging app) and Google (a popular search engine), as shown in figure 20.1. For simplicity’s sake, the widget will work with the names of rooms in a chat application.
The autocomplete widget, shown in figure 20.2, has the following:
Room names are filtered using the entered characters as the first characters of each option. A simple comparison autocompletes the name of a room (see figure 20.3). For example, if you have rooms named angular, angular2, and react, and you type angu, then only angular and angular2 will be shown as a match, not the react option.
What if there are no matches? There’s a way to add a new option using the Add button. For convenience, the Add button is shown only when there are no matches (see figure 20.4). This button lets you persist (save permanently in the database) the new input.
The new option is saved to the database via an XHR call to the REST API. You can use this new room name in future matches (see figure 20.5), just like the initial list of room names.
To implement this autocomplete widget, you need to do the following:
You’ll render the React components on the server, test them with Jest, and make AJAX/XHR requests with axios.
The source code for the examples in this chapter is at www.manning.com/books/react-quickly and https://github.com/azat-co/react-quickly/tree/master/ch20. You can also find some demos at http://reactquickly.co/demos.
Let’s start by setting up the project.
To give you an overview of the tech stack, in this project you’ll use the following technologies and libraries:
I prefer to use Handlebars for the layout for several reasons. First, React makes it painstakingly difficult to output unescaped HTML; it uses a weird syntax that involves the word dangerously. But this is what you need to do for Universal React and server-side rendering. Yes, the unescaped HTML can expose an app to cross-site scripting attacks,[1] but you’re rendering on the server, so you control the HTML string.
A cross-site scripting (XSS) attack is characterized by attackers injecting malicious code into legitimate websites that users trust but that contain XSS vulnerabilities. For example, an attacker can post a message with some bad code that includes <script> elements on a vulnerable forum that isn’t sanitizing and/or escaping the post text. All visitors to the forum will end up executing the malicious code. For more on XSS, see Jakob Kallin and Irene Lobo Valbuena, “Excess XSS: A Comprehensive Tutorial on Cross-Site Scripting,” https://excess-xss.com.
The second reason is that Handlebars more naturally renders things like <!DOCTYPE html>. React can’t do it as naturally because React is meant more for individual elements than entire pages.
Third, React is for managing state and automatically maintaining the view in accordance with the state. If all you’re doing is rendering a static HTML string from a React component, why bother with React? It’s overkill. Handlebars is similar to HTML, so it’s easy to copy and paste existing HTML code without having to think twice about JSX and React gotchas that may bite you in the tail when you’re converting HTML to React.
Finally, my personal experience explaining code functionality to other developers and to students in my courses and workshops has shown that some people have a harder time understanding the structure when React components are used for layout on the server and other React components are used for views on both the client and server.
Appendix A covers the installation of these tools, so I won’t bore you by duplicating that information. Go ahead and create a new project folder named autocomplete. This is what the folder structure will look like:
The __tests__ folder is for Jest tests. As should now be familiar to you, the node_modules folder is for Node.js dependencies (from npm’s package.json). The public, public/css, and public/js folders contain the static files for the application.
Naming is paramount to good software engineering because a good name provides a crucial piece of information. It can tell you a lot about the script, file, module, or component without you having to read the source code, tests, or documentation (which may not exist!).
Just as you’ve gotten familiar with putting JSX files into the jsx folder and using build as a destination folder for compiled files, I’ve started to use other names. That’s because you’ll encounter many different conventions. Each project will probably have a different structure; the structure may vary a lot or a little. As a developer, it’s your job to be comfortable with configuring tools such as Webpack and libraries such as Express to work with any names. For that reason, and to add variety, in this chapter I use public instead of build (plus public is a convention for static files served by Express), src instead of jsx (you may have other source files, not just JSX, right?), and so on.
The public/js/app.js file will be bundled by Webpack from the dependencies and the JSX source code src/app.jsx. The source code for the Autocomplete component is in the src/autocomplete.jsx file.
The views folder is for Handlebars templates. If you feel confident about your React skills, you don’t have to use a template engine; you can use React as the Node.js template engine!
In the root of the project, you’ll find these files:
Don’t forget that to avoid installing each dependency with the exact version manually, you can copy the package.json file from the following listing (ch20/autocomplete/package.json) to the root folder, and run npm install.
Of course, using the same versions as in this book is important if you want to have a working app in the end. Also, don’t forget to install the dependencies from package .json using npm i.
The scripts section is interesting:
"scripts": {
"test": "jest",
"start": "./node_modules/.bin/node-dev index.js",
"build": "./node_modules/.bin/webpack",
"seed": "mongoimport rooms.json --jsonArray --collection=rooms
--db=autocomplete"
},
test is for running Jest tests, and start is for building and launching your server. You also add seed data for the room names, which you can run with $ npm run seed. The database name is autocomplete, and the collection name is rooms. This is the content of the rooms.json file:
[ {"name": "react"},
{"name": "node"},
{"name": "angular"},
{"name": "backbone"}]
When you run the seed command, it prints something like this (MongoDB must be running as a separate process):
> autocomplete@1.0.0 seed /Users/azat/Documents/Code/
You’ve defined the project dependencies, and now you need to set up your Web-pack build process so you can use ES6 and transform JSX. To do this, create the webpack.config.js file in the root directory with the following code (ch20/autocomplete/webpack.config.js).
There’s no difference between this Webpack config file and those in the other projects you’ve built so far. It sets up Babel for transpiling JSX files and identifying where the bundled JavaScript will be saved.
In this project, rather than a host HTML file, you need to write a simple web server to receive requests based on what the reader has typed so far and respond with a list of suggestions. It will also render the control on the server side and send the respective HTML to the client. As noted earlier, the example uses Express as the web server. The index.js file defines the web server and has three sections:
We’ll look at each section in turn. First is the most straightforward bit: the imports. The following listing shows the components and libraries the server needs (ch20/autocomplete/index.js).
The next section continues with index.js and discusses connecting to the database and middleware.
The index.js file has GET and POST routes for /rooms. They provide RESTful API endpoints for your front-end app to supply the data. The data in turn will come from a MongoDB database, which you can see with an npm script (npm run seed), assuming that you have it in package.json and that you have the rooms.json file. But before fetching data from the database, you need to connect to it and define the Express routes (ch20/autocomplete/index.js).
If you need to brush up on the Express.js API, there’s a convenient cheatsheet in appendix c.
Finally, index.js contains the / route, where you render React on the server by hydrating components with the room objects (ch20/autocomplete/index.js).
There are two properties for the Autocomplete component: options and url. options contains the names of the chat rooms, and url is the URL of the API server (http://localhost:3000/rooms in this case). The Autocomplete component will be rendered on the browser as well.
The browser script is an example of how someone might use the autocomplete widget; it will be run only on the browser. The file is very short. You just create an element with options and url properties (ch20/autocomplete/src/app.jsx).
The global __autocomplete_data is provided via the data local (local is the term for template data in Express lingo) using the <script> tag in the / route.
The <script> HTML tag is injected into the index.hbs template (the .hbs file extension is assumed by Express, so it’s optional). Next, you’ll implement this template.
In the index.handlebars file, you can see the props and autocomplete locals being output.
The work for running the autocomplete example is done. Obviously, it will be powered by the Autocomplete component. Next, you’ll finally start implementing it.
The Autocomplete component is self-sufficient, meaning it isn’t just a view component but can also fetch from and save to the REST API. It has two properties: options and url. In accordance with TDD, let’s start coding the Autocomplete component with tests.
According to the principles of TDD/BDD, you should begin with tests. The __tests__/autocomplete.test.js file lists room names and then renders the component into autocomplete:
You get the input field, which has an option-name class. These room options will match the input-field value.
Now you can write the actual tests. You can get all the option-name elements from the widget and compare them against the number 4, which is the number of rooms in the rooms array:
describe('Autocomplete', () => {
it('have four initial options', () => {
var options = TestUtils.scryRenderedDOMComponentsWithClass(
autocomplete,
'option-list-item'
)
expect(options.length).toBe(4)
})
The next test changes the input-field value and then checks for that value and the number of the offered autocomplete option. There should be only one match, which is react:
it('change options based on the input', () => {
expect(fD(optionName).value).toBe('')
fD(optionName).value = 'r'
TestUtils.Simulate.change(fD(optionName))
expect(fD(optionName).value).toBe('r')
options = TestUtils.scryRenderedDOMComponentsWithClass(autocomplete,
'option-list-item')
expect(options.length).toBe(1)
expect(fD(options[0]).textContent).toBe('#react')
})
The last test changes the room name field to ember. There should be no matches, only the Add button:
it('offer to save option when there are no matches', () => {
fD(optionName).value = 'ember'
TestUtils.Simulate.change(fD(optionName))
options = TestUtils.scryRenderedDOMComponentsWithClass(
autocomplete,
'option-list-item'
)
expect(options.length).toBe(0)
var optionAdd = TestUtils.findRenderedDOMComponentWithClass(
autocomplete,
'option-add'
)
expect(fD(optionAdd).textContent).toBe('Add #ember')
})
})
Finally, it’s time to write the Autocomplete component (ch20/autocomplete/src/autocomplete.jsx). It includes the input field, the list of matching options, and the Add button to add a new option when there are no matches. The component performs two AJAX/XHR calls: to retrieve a list of options and to create a new option. There are two methods:
This is how the Autocomplete component looks at a high level:
Now let’s start from the beginning of the file. Begin by importing the libraries in the CommonJS/Node.js style; thanks to Webpack, this is bundled for the browser’s consumption. The fD alias is for convenience:
const React = require('react'),
ReactDOM = require('react-dom'),
request = require('axios')
const fD = ReactDOM.findDOMNode
constructor sets the state and bindings. You set options from properties. filteredOptions will initially be the same as all the options, and the current option (input-field value) is empty. As the user types characters, filteredOptions will become narrower and narrower, to match the entered letters.
In componentDidMount(), you perform the GET request using the axios (request variable) library. It’s similar to jQuery’s $.get(), but with promises:
The filter() method is called on every change of the <input> field. The goal is to leave only the options that match user input:
The addOption() method handles the addition of a new option, in the event that there are no matches, by invoking the store’s action:
Finally, the render() method has a controlled component, <input>, with an onChange event listener, this.filter:
...
render() {
return (
<div className="form-group">
<input type="text"
onKeyUp={(event) => (event.keyCode==13) ? this.addOption() : ''}
className="form-control option-name"
onChange={this.filter}
value={this.currentOption}
placeholder="React.js">
</input>
onKeyUp can be written as a method, not necessarily as an anonymous inline function, right in {}.
The list of filtered options is powered by the filteredOptions state, which is updated in the filter() method. You iterate over it and print _id as keys and links with option.name:
The last element is the Add button, which is shown only when there’s no filtered-Options (no matches):
You’re using CommonJS syntax, so you can declare the Autocomplete component and export it like this:
module.exports = Autocomplete
You’re finished. Good job, mate!
If you’ve followed along through the steps, you should be able to install the dependencies with this command (if you haven’t done so already):
$ npm install
Then, launch the app as follows (you must have started MongoDB first with $ mongod):
$ npm start
The tests will pass after you run this command:
$ npm test
There’s also npm run build, without the watch (you’ll need to rerun it on changes). npm start runs npm run build for you.
Optionally, you can seed the database with $ npm run seed. Doing so populates MongoDB with names from ch20/autocomplete/rooms.json:
[ {"name": "react"},
{"name": "node"},
{"name": "angular"},
{"name": "backbone"}]
That’s all for the Autocomplete component. Now, run the project by building it with npm run build and navigating to http://localhost:3000, assuming you have MongoDB running in a separate terminal. Although 127.0.0.1 is an alias, you must use the same domain localhost as the browser location to avoid CORS/Access-Control-Allow-Origin issues, because JavaScript will call the localhost server.
You should see the component with names (if you seeded the database) on the page. When you type characters in the input field, the selection will be filtered according to matches in the input. When there are no matches, click the Add button to add the room to the database; it will immediately appear in the list.
If you ever need to manipulate the data in MongoDB directly, the mongo shell (a.k.a. REPL) is available via the mongo command in the terminal. It automatically connects to the locally running instance on port 27017 (you must have one running; to do so, use mongod). Once in the mongo shell, you can perform all kinds of operations like creating a new document, querying a collection, dropping a database, and so on. The advantage is that you can use the mongo shell anywhere, even on a remote server without a GUI.
But there’s a lot of typing involved when working with the mongo shell, and typing is slow and error-prone. Therefore, I built a better tool called MongoUI (https://github.com/azat-co/mongoui), which you can use to query, edit, add documents, remove documents, and do other things in a browser by clicking with your trackpad instead of typing copious amounts of JSON (MongoDB is JavaScript and JSON-based).
MongoUI allows you to work with MongoDB via a user-friendly web interface. This figure shows the names of the rooms in my rooms collection in the autocomplete data-base.
The MongoDB web interface
Install MongoUI with npm i -g mongoui, launch it with mongoui, and then open in the browser at http://localhost:3001. Oh, and MongoUI is built with React, Express, and Webpack. Enjoy!
The end result of this autocomplete example is shown in figure 20.6. You can open the Network tab and click Localhost to make sure the server-side rendering is working (that is, that the data and HTML for names are there).
If for some reason your project isn’t working, there may be a new version or a typo in your code. Refer to the working code at www.manning.com/books/react-quickly or https://github.com/azat-co/react-quickly/tree/master/ch20.
For bonus points, do the following:
Submit your code in a new folder under ch20 as a pull request to this book’s GitHub repository: https://github.com/azat-co/react-quickly.
In this appendix, you’ll find installation instructions for the following applications (valid as of May 2017):
You can download React in a myriad of ways:
If you’re unsure whether you have Node.js and npm, or you don’t know what version you have, run these commands in your Terminal/iTerm/bash/zsh/command line:
$ node -v $ npm -v
Most of the time, npm comes with Node.js, so follow the instructions for Node.js to install npm. The easiest way to install Node and npm is to go to the website and pick the right architecture for your computer (Windows, macOS, and so on): https://nodejs.org/en/download.
For macOS users who already have Ruby (which typically comes with Mac computers), I highly recommend using Homebrew. That’s what I use, because it allows me to install other developer tools like databases and servers. To get brew on your Mac, run this Ruby code in your terminal (I promise this will be the last time we use Ruby in this book!):
$ ruby -e "$(curl -fsSL
Now you should have brew installed; go ahead and update its registry and install Node.js along with npm. The latter comes with Node.js, so as I mentioned earlier, no additional commands are necessary:
$ brew update $ brew install node
Another great tool that will let you switch between Node versions effortlessly is Node Version Manager (nvm, https://github.com/creationix/nvm):
$ curl -o- https://raw.githubusercontent.com/creationix/nvm/v0.32.1/install.sh
That’s it. You should be able to see the versions of Node and npm. If you want to upgrade your npm, use the npm command:
$ npm i -g npm@latest
To upgrade Node, use nvm or a similar tool like nave or n. For example, in nvm this command will also reinstall packages to the new version:
$ nvm install node --reinstall-packages-from=node
If npm gives you permission errors when you install a module/package, then make sure the npm folder has the proper permissions (be sure you understand what this command does before you run it):
$ sudo chown -R $USER /usr/local/{share/man,bin,lib/node,include/node}
Express is a local dependency just like React, meaning each project must install it. The only way to install Express is with npm:
npm i express@4 -S
The -S adds the entry to package.json.
In no way is this is a deep dive into Express.js, but it’ll get you started with the most widely used Node.js web framework. First, install it with npm, like this:
$ npm install express@4.13.3
Typically, you’d create the server file index.js, app.js, or server.js, which you’ll later start with the node command (for example, node index.js). The file has these parts:
The imports section is trivial. In it, you require dependencies and instantiate objects. For example, to import the Express.js framework and create an instance, write these lines:
var express = require('express')
var app = express()
In the configurations section, you set configurations with app.set(), where the first argument is a string and the second is a value. For example, to set the template engine to Jade, use the configuration view engine:
app.set('view engine', 'jade')
The next section is for setting up middleware, which is similar to plug-ins. For example, to enable the app to serve static assets, use the static middleware:
app.use(express.static(path.join(__dirname, 'public')))
Most important, you define routes with the app.NAME() pattern. For example, this is the syntax for the GET /rooms endpoint taken from ch20/autocomplete:
app.get('/rooms', function(req, res, next) {
req.rooms.find({}, {sort: {_id: -1}}).toArray(function(err, docs){
if (err) return next(err)
return res.json(docs)
})
})
Error handlers are similar to middleware:
var errorHandler = require('errorhandler')
app.use(errorHandler)
Finally, to start your app, run listen():
http.createServer(app).listen(portNumber, callback)
Of course, there’s more to Express.js than this brief introduction. Otherwise, I wouldn’t have written a 350-page book on the framework (Pro Express.js; Apress, 2014, http://proexpressjs.com)! If you want to hear from a different author(s), then consider Express in Action by Evan M. Hahn (Manning, 2016, www.manning.com/books/express-in-action). The framework is powerful but flexible and can be configured without requiring much magic.
If building Express.js apps isn’t your core competency, or if you know how to do it but need a refresher, check out my Express.js cheatsheet in appendix C or view a graphical version of it at http://reactquickly.co/resources.
You can get Twitter Bootstrap from the official website: http://getbootstrap.com. This book uses v3.3.5. You have several options:
To link from a CDN, include these tags in your HTML file:
<!-- Latest compiled and minified CSS --> <link rel="stylesheet" href="https://maxcdn.bootstrapcdn.com/bootstrap/3.3.5/css/bootstrap.min.css"> <!-- Optional theme --> <link rel="stylesheet" href="https://maxcdn.bootstrapcdn.com/bootstrap/3.3.5/css/
For Bower, npm, and Composer, run these terminal commands, respectively, in your project folder (one for each package manager):
$ bower install bootstrap $ npm install bootstrap $ composer require twbs/bootstrap
For more information, see http://getbootstrap.com/getting-started.
Browserify lets you package npm modules into front-end bundles, ready for use in the browser. Basically, you can turn any npm module (usually only for Node) into a front-end module.
If you’re using Webpack, you won’t need Browserify.
First, install Browserify with npm:
$ npm install -g browserify
As an example, let’s use ch16/jest. Go to that folder, and create a script.js file to include the generate-password.js library. The contents of script.js can be as minimal as this:
var generatePassword = require('generate-password')
console.log(generatePassword())
console.log(generatePassword())
Save script.js, and run this command in your terminal or command prompt:
$ browserify script.js -o bundle.js
Inspect bundle.js, or include it in index.html:
<script src="bundle.js"></script>
Open the index.html file in your browser, and inspect the console; it will show two random passwords. The source code is in ch16/jest.
The easiest way to install MongoDB is to go to www.mongodb.org/downloads#production and choose the appropriate package for your system.
On macOS, you can use brew and run these commands:
$ brew update $ brew install mongodb
Don’t install mongodb globally with npm. It’s a driver, not a database, so it belongs with other dependencies in the local node_modules folder.
This book uses version 3.0.6, so use later (or older) versions at your own risk. They haven’t been tested to work with the book’s examples.
Most often, you’ll need to create a /data/db folder with the proper permissions. You can do that or pass any other custom folder to the mongod command with --dbpath. For example:
$ mongod --dbpath ./data
Once the database is running (mongod), play with code in the shell, which is mongo:
$ mongo > 1+1 > use autocomplete > db.rooms.find()
Here’s an explanation of some of the most commonly used shell commands:
Check out my MongoDB cheatsheet in appendix D, or view a graphical version of it at http://reactquickly.co/resources. In addition to the most-used MongoDB commands, it includes Mongoose (Node.js ODM) methods. Enjoy!
Babel is mostly for ES6+/ES2015+, but it can also convert JSX to JavaScript. By using Babel for React, you can get extra ES6 features to streamline your development.
ES6 is finalized, but its features—as well as the features of future versions of ECMAScript—may not be fully supported by all browsers. To use cutting-edge new features like ES Next (https://github.com/esnext/esnext) or to use ES6 in older browsers (IE9), get a compiler like Babel (https://babeljs.io). You can run it as a standalone tool or use with your build system.
To use Babel as a standalone CLI tool, first create a new folder. Assuming you have Node.js and npm installed, run this command to create package.json:
$ npm init
Open the package.json file, and add babel lines in JSON. You can place them in any order as long as babel is a top-level property. This tells Babel to use React and JSX to transform the source files. The setting is called a preset. Without it, the Babel CLI won’t do anything:
"babel": {
"presets": ["react"]
},
Install both Babel CLI v6.9.0 and React preset v6.5.0 with npm. In your terminal, command prompt, or shell, execute these commands:
$ npm i babel-cli@6.9.0 --save-dev $ npm i babel-preset-react@6.5.0 --save-dev
You can use this command to check the version:
$ babel --version
There are Babel plug-ins for Grunt, Gulp, and Webpack (http://babeljs.io/docs/setup). Here’s a Gulp example. Install the plug-in:
$ npm install --save-dev gulp-babel
In gulpfile.js, define a build task that compiles src/app.js into the build folder:
var gulp = require('gulp'),
babel = require('gulp-babel')
gulp.task('build', function () {
return gulp.src('src/app.js')
.pipe(babel())
.pipe(gulp.dest('build'))
})
For more about Webpack and Babel, see chapter 12.
You can compile Node.js files with a build tool or use the standalone Babel module babel-core. Install it as follows:
$ npm install --save-dev babel-core@6
Then, in Node.js, call this function:
require('babel-core').transform(es5Code, options)
Babel v5.x has a standalone browser file that you can use for in-browser transformation (development only). It was removed in 6.x, but some folks created a babel-standalone module to fill the gap (https://github.com/Daniel15/babel-standalone). You can use that or the older version’s files—for example, from Cloudflare CDN:
Or you can build your own standalone browser file using a build tool like Gulp or Webpack. This way, you can pick only the things you need, such as the React transformer plug-in and ES2015 presets.
When you develop your own projects, searching on the internet for React documentation and APIs or going back to this book’s chapters to find a single method isn’t efficient. If you’d like to save time and avoid the distractions lurking everywhere on the Net, use this React cheatsheet as a quick reference.
In addition to the text version presented here, I’ve created a free beautifully designed, print-ready PDF version of this cheatsheet. You can request this PDF at http://reactquickly.co/resources.
ReactDOM.render(
React.createElement(
Link,
{href: 'https://Node.University'}
)
),
document.getElementById('menu')
)
ReactDOM.render(
<Link href='https://Node.University'/>,
document.getElementById('menu')
)
const ReactDOMServer = require('react-dom/server')
ReactDOMServer.renderToString(Link, {href: 'https://Node.University'})
ReactDOMServer.renderToStaticMarkup(Link, {href: 'https://Node.University'})
var Link = React.createClass({
displayName: 'Link',
render: function() {
return React.createElement('a',
{className: 'btn', href: this.props.href}, 'Click ->', this.props.href)
}
})
var Link = React.createClass({
render: function() {
return <a className='btn' href={this.props.href}>Click ->
this.props.href</a>
}
})
class Link extends React.Component {
render() {
return <a className='btn' href={this.props.href}>Click ->
this.props.href</a>
}
}
var Link = React.createClass ({
propTypes: { href: React.PropTypes.string },
getDefaultProps: function() {
return { initialCount: 0 }
},
getInitialState: function() {
return {count: this.props.initialCount}
},
tick: function() {
this.setState({count: this.state.count + 1})
},
render: function() {
return React.createElement(
'a',
{className: 'btn', href: '#', href: this.props.href,
onClick: this.tick.bind(this)},
'Click ->',
(this.props.href ? this.props.href : 'https://webapplog.com'),
' (Clicked: ' + this.state.count+')'
)
}
})
var Link = React.createClass ({
propTypes: { href: React.PropTypes.string },
getDefaultProps: function() {
return { initialCount: 0 }
},
getInitialState: function() {
return {count: this.props.initialCount};
},
tick: function() {
this.setState({count: this.state.count + 1})
},
render: function() {
return (
<a onClick={this.tick.bind(this)} href="#" className="btn"
href={this.props.href}>
Click -> {(this.props.href ? this.props.href :
'https://webapplog.com')}
(Clicked: {this.state.count})
</a>
)
}
})
export class Link extends React.Component {
constructor(props) {
super(props);
this.state = {count: props.initialCount};
}
tick() {
this.setState({count: this.state.count + 1});
}
render() {
return (
<a onClick={this.tick.bind(this)} href="#" className="btn"
href={this.props.href}>
Click -> {(this.props.href ? this.props.href :
'https://webapplog.com')}
(Clicked: {this.state.count})
</a>
)
}
}
Link.propTypes = { initialCount: React.PropTypes.number }
Link.defaultProps = { initialCount: 0 }
|
Mounting |
Updating component properties |
Updating component state |
Using forceUpdate() |
Unmounting |
|---|---|---|---|---|
| getDefaultProps() | ||||
| getInitialState() | ||||
| componentWillMount() | ||||
| componentWillReceiveProps() | ||||
| shouldComponentUpdate() | shouldComponentUpdate() | |||
| componentWillUpdate() | componentWillUpdate() | componentWillUpdate() | ||
| render() | render() | render() | render() | |
| componentDidUpdate() | componentDidUpdate() | componentDidUpdate() | ||
| componentDidMount() | ||||
| componentWillUnmount() |
Types available under React.PropTypes:
To make a property required (warning only), append .isRequired.
More methods:
propTypes: {
customProp: function(props, propName, componentName) {
if (!/regExPattern/.test(props[propName])) {
return new Error('Validation failed!');
}
}
}
As npm modules:
When you develop your own projects, searching on the internet for React documentation and APIs or going back to this book’s chapters to find a single method isn’t efficient. If you’d like to save time and avoid the distractions lurking everywhere on the Net, use this Express cheatsheet as a quick reference.
In addition to the text version presented here, I’ve created a free beautifully designed, print-ready PDF version of this cheatsheet. You can request this PDF at http://reactquickly.co/resources.
$ express [options] [dir]
Install Jade and Stylus:
$ npm i -SE stylus jade
Apply the Jade template engine:
app.set('views', path.join(__dirname, 'views'))
app.set('view engine', 'jade')
Apply the Stylus CSS processor:
app.use(require('stylus').middleware(path.join(__dirname, 'public')))
var bodyParser = require('body-parser')
app.use(bodyParser.json())
app.use(bodyParser.urlencoded({
extended: true
}))
app.use(express.static(path.join(__dirname, 'public')))
$ sudo npm install <package_name> --save
When you develop your own projects, searching on the internet for React documentation and APIs or going back to this book’s chapters to find a single method isn’t efficient. If you’d like to save time and avoid the distractions lurking everywhere on the Net, use this MongoDB cheatsheet as a quick reference.
In addition to the text version presented here, I’ve created a free beautifully designed, print-ready PDF version of this cheatsheet. You can request this PDF at http://reactquickly.co/resources.
var mongoose = require('mongoose')
var dbUri = 'mongodb://localhost:27017/api'
var dbConnection = mongoose.createConnection(dbUri)
var Schema = mongoose.Schema
var postSchema = new Schema ({
title: String,
text: String
})
var Post = dbConnection.model('Post', postSchema, 'posts')
Post.find({},function(error, posts){
console.log(posts)
process.exit(1)
})
// Create
var post = new Post({title: 'a', text: 'b')
post.save(function(error, document){
...
})
// Read
Post.findOne(criteria, function(error, post) {
...
})
// Update
Post.findOne(criteria, function(error, post) {
post.set()
post.save(function(error, document){
...
})
})
// Delete
Post.findOne(criteria, function(error, post) {
post.remove(function(error){
...
})
})
This appendix provides a quick introduction to ES6. It describes the 10 best features of the new generation of the most popular programming language—JavaScript:
This list if highly subjective. It’s in no way intended to diminish the usefulness of other ES6 features that didn’t make it on the list only because I wanted to limit the number to 10.
Remember when we had to use statements like these to define default parameters?
var link = function (height, color, url) {
var height = height || 50
var color = color || 'red'
var url = url || 'http://azat.co'
...
}
In addition to this essay, I’ve created a free beautifully designed, print-ready ES6/ES2015 cheatsheet. You can request this PDF at http://reactquickly.co/resources.
This approach was fine until the value wasn’t 0. When you have 0, there may be a bug. A 0 value defaults to the hardcoded value instead of becoming the value itself, because 0 is falsy in JavaScript. Of course, who needs 0 as a value (#sarcasmfont)? So we ignored this flaw and used the logical OR. No more! In ES6, you can put the default value right in the signature of the function:
var link = function(height = 50, color = 'red', url = 'http://azat.co') {
...
}
This syntax is similar to Ruby. My favorite, CoffeeScript, has this feature, as well—and has had it for many years.
Template literals or interpolation in other languages is a way to output variables in a string. In ES5, you had to break the string like this:
var name = 'Your name is ' + first + ' ' + last + '.' var url = 'http://localhost:3000/api/messages/' + id
In ES6, you can use the new syntax ${NAME} in the back-ticked string:
var name = `Your name is ${first} ${last}.`
var url = `http://localhost:3000/api/messages/${id}`
Do you wonder if you still can use template-literal syntax with Markdown? Markdown uses back-ticks for inline code blocks. That’s a problem! The solution is to use two, three, or more back-ticks for Markdown code that has back-ticks for string templates.
Another bit of yummy syntactic sugar is the multiline string. In ES5, you had to use one of these approaches:
var roadPoem = 'Then took the other, as just as fair,\n\t'
+ 'And having perhaps the better claim\n\t'
+ 'Because it was grassy and wanted wear,\n\t'
+ 'Though as for that the passing there\n\t'
+ 'Had worn them really about the same,\n\t'
var fourAgreements = 'You have the right to be you.\n\
You can only be you when you do your best.'
In ES6, you can use back-ticks:
var roadPoem = `Then took the other, as just as fair,
And having perhaps the better claim
Because it was grassy and wanted wear,
Though as for that the passing there
Had worn them really about the same,`
var fourAgreements = `You have the right to be you.
You can only be you when you do your best.`
Destructuring can be a harder concept to grasp, because some magic is going on. Let’s say you have simple assignments where the keys/objects properties/attributes house and mouse are the variables house and mouse:
Here are some other examples of destructuring assignments (from Node.js):
In ES6, you can replace the previous ES5 code with these statements:
This also works with arrays. Crazy!
var [col1, col2] = $('.column'),
[line1, line2, line3, , line5] = file.split('\n')
The first line assigns the 0 element to col1 and the 1 element to col2. The second statement (yes, the missing line4 is intentional) produces the following assignment, where fileSplitArray is the result of file.split('\n'):
var line1 = fileSplitArray[0] var line2 = fileSplitArray[1] var line3 = fileSplitArray[2] var line5 = fileSplitArray[4]
It may take you some time to get used to the destructuring assignment syntax, but it’s a sweet sugarcoating—no doubt about that.
What you can now do with object literals is mind blowing! We went from a glorified version of JSON in ES5 to something closely resembling classes in ES6.
Here’s a typical ES5 object literal with some methods and attributes/properties:
var serviceBase = {port: 3000, url: 'azat.co'},
getAccounts = function(){return [1,2,3]}
var accountServiceES5 = {
port: serviceBase.port,
url: serviceBase.url,
getAccounts: getAccounts,
toString: function() {
return JSON.stringify(this.valueOf())
},
getUrl: function() {return "http://" + this.url + ':' + this.port},
valueOf_1_2_3: getAccounts()
}
If you want to be fancy, you can inherit from serviceBase by making it the prototype with the Object.create() method:
var accountServiceES5ObjectCreate = Object.create(serviceBase)
var accountServiceES5ObjectCreate = {
getAccounts: getAccounts,
toString: function() {
return JSON.stringify(this.valueOf())
},
getUrl: function() {return "http://" + this.url + ':' + this.port},
valueOf_1_2_3: getAccounts()
}
I know, accountServiceES5ObjectCreate and accountServiceES5 are not identical, because one object (accountServiceES5) has the properties in the proto object (see figure E.1). But for the sake of the example, we’ll consider them similar. In the ES6 object literal, there are shorthands for assignment: getAccounts: getAccounts, becomes just getAccounts, without the colon.
Also, you set the prototype in the __proto__ property, which makes sense (not '__proto__' though—that would be just a property):
var serviceBase = {port: 3000, url: 'azat.co'},
getAccounts = function(){return [1,2,3]}
var accountService = {
__proto__: serviceBase,
getAccounts,
In addition, you can invoke super in toString():
toString() {
return JSON.stringify((super.valueOf()))
},
getUrl() {return "http://" + this.url + ':' + this.port},
And you can dynamically create keys, object properties, and attributes such as valueOf_1_2_3 with the [ 'valueOf_' + getAccounts().join('_') ] construct:
[ 'valueOf_' + getAccounts().join('_') ]: getAccounts()
}
console.log(accountService)
The resulting ES6 object with __proto__ as the serviceBase object is shown in figure E.2. This is a great enhancement to good-old object literals!
This is probably the feature I wanted the most. I love the fat arrows in CoffeeScript, and now we have them in ES6. First, arrow functions save space and time because they’re short:
const sum = (a, b, c) => {
return a + b + c
}
Fat arrows are also amazing because they make this behave properly. this has the same value as in the context of a function—this doesn’t mutate. The mutation typically happens each time you create a closure.
Using arrow functions in ES6 means you don’t have to use that = this, self = this, _this = this, and .bind(this). For example, this code in ES5 is ugly:
var _this = this
$('.btn').click(function(event){
_this.sendData()
})
This ES6 code is better:
$('.btn').click((event) => {
this.sendData()
})
Sadly, the ES6 committee decided that having skinny arrows is too much of a good thing, and they left us with a verbose function() instead. (Skinny arrows in CoffeeScript work like the regular function in ES5 and ES6.)
Here’s another example that uses call to pass the context to the logUpperCase() function in ES5:
var logUpperCase = function() {
var _this = this
this.string = this.string.toUpperCase()
return function () {
return console.log(_this.string)
}
}
logUpperCase.call({ string: 'es6 rocks' })()
In ES6, you don’t need to mess around with _this:
var logUpperCase = function() {
this.string = this.string.toUpperCase()
return () => console.log(this.string)
}
logUpperCase.call({ string: 'es6 rocks' })()
Note that you can mix and match the old function with => in ES6 as you see fit. And when an arrow function is used with a one-line statement, it becomes an expression: that is, it will implicitly return the result of that single statement. If you have more than one line, you need to use return explicitly.
This ES5 code, which creates an array from the messages array,
becomes this in ES6:
Notice that this code uses string templates. Another feature I love from CoffeeScript!
Parentheses (()) are optional for single parameters in an arrow function’s signature. You need them when you use more than one parameter. In ES5, the following code has function() with an explicit return:
And the more eloquent version of the code in ES6 uses parentheses around the parameters and an implicit return:
Promises have historically been a controversial topic. There were many promise implementations with slightly different syntaxes: Q, Bluebird, Deferred.js, Vow, Avow, and jQuery Deferred, to name just a few. Other developers said we didn’t need promises and could use async, generators, callbacks, and so on. Fortunately, ES6 now has a standard Promise implementation.
Let’s consider a trivial example of delayed asynchronous execution with setTimeout():
setTimeout(function(){
console.log('Yay!')
}, 1000)
This code can be rewritten in ES6 with Promise:
var wait1000 = new Promise(function(resolve, reject) {
setTimeout(resolve, 1000)
}).then(function() {
console.log('Yay!')
})
It can also use ES6 arrow functions:
var wait1000 = new Promise((resolve, reject)=> {
setTimeout(resolve, 1000)
}).then(()=> {
console.log('Yay!')
})
So far, we’ve increased the number of lines of code from three to five without any obvious benefit. The benefit comes if you have more nested logic in the setTimeout() callback. The following code
setTimeout(function(){
console.log('Yay!')
setTimeout(function(){
console.log('Wheeyee!')
}, 1000)
}, 1000)
can be rewritten with ES6 promises:
var wait1000 = ()=> new Promise((resolve, reject)=>
{setTimeout(resolve, 1000)})
wait1000()
.then(function() {
console.log('Yay!')
return wait1000()
})
.then(function() {
console.log('Wheeyee!')
});
Still not convinced that promises are better than regular callbacks? Me neither. I think that once you get the idea of callbacks, there’s no need for the additional complexity of promises. Nevertheless, promises are available in ES6 for those who adore them; and they do have a fail-and-catch-all callback, which is a nice feature. See James Nelson’s post “Introduction to ES6 Promises: The Four Functions You Need to Avoid Callback Hell” for more about promises (http://mng.bz/3OAP).
You may have already seen the weird-sounding let in ES6 code. It isn’t a sugarcoating feature; it’s more intricate. let is a new var that lets you scope a variable to blocks. You define blocks with curly braces. In ES5, blocks did nothing to variables:
function calculateTotalAmount (vip) {
var amount = 0
if (vip) {
var amount = 1
}
{ // More crazy blocks!
var amount = 100
{
var amount = 1000
}
}
return amount
}
console.log(calculateTotalAmount(true))
The result is 1,000. Wow! That’s a bad bug. In ES6, you use let to restrict the scope to the blocks. Variables are function-scoped:
function calculateTotalAmount (vip) {
var amount = 0 // Probably should also be let, but you can mix var and let
if (vip) {
let amount = 1 // First amount is still 0
}
{ // more crazy blocks!
let amount = 100 // First amount is still 0
{
let amount = 1000 // First amount is still 0
}
}
return amount
}
console.log(calculateTotalAmount(true))
The value is 0, because the if block also has let. If it had nothing (amount=1), then the expression would have been 1.
When it comes to const, things are easier; it creates a read-only reference, and it’s block-scoped like let. (Read-only means you can’t reassign the variable identifier.) const works on objects as well; their properties can change.
Suppose you have a constant url, like this: const url="http://webapplog.com". Reassigning it with const url="http://azat.co" will fail in most browsers—although the documentation states that const doesn’t mean immutability, if you try to change the value, it won’t change.
To demonstrate, here’s a bunch of constants that are okay because they belong to different blocks:
function calculateTotalAmount (vip) {
const amount = 0
if (vip) {
const amount = 1
}
{ // More crazy blocks!
const amount = 100
{
const amount = 1000
}
}
return amount
}
console.log(calculateTotalAmount(true))
In my humble opinion, let and const overcomplicate the language. Without them, we had only one behavior; but now there are multiple scenarios to consider.
If you love object-oriented programming, then you’ll love this feature. It makes writing classes and inheriting from them as easy as liking a comment on Facebook.
Creating and using classes in ES5 was a pain because there was no class keyword (it was reserved but did nothing). In addition, lots of inheritance patterns like pseudo-classical,[1] classical,[2] and functional just added to the confusion, pouring gasoline on the fire of the JavaScript wars.
See Ilya Kantor, “Class Patterns,” http://javascript.info/class-patterns.
See Douglas Crockford, “Classical Inheritance in JavaScript,” www.crockford.com/javascript/inheritance.html.
I won’t show you how to write a class (yes, there are classes; objects inherit from objects) in ES5, because there are many flavors. Let’s look at an ES6 example. The ES6 class uses prototypes, not the function factory approach. Here’s a baseModel class in which you can define a constructor and a getName() method:
Notice that this code uses default parameter values for options and data. Also, method names no longer need to include the word function or a colon (:). The other big difference is that you can’t assign properties (this.NAME) the same way as methods—that is, you can’t say name at the same indentation level as a method. To set the value of a property, assign a value in the constructor.
AccountModel inherits from baseModel with class NAME extends PARENT_NAME. To call the parent constructor, you can effortlessly invoke super() with parameters:
If you want to be fancy, you can set up a getter like this, and accountsData will be a property:
How do you use this abracadabra? It’s easy:
let accounts = new AccountModel(5)
accounts.getName()
console.log('Data is %s', accounts.accountsData)
In case you’re wondering, the output is
Class name: Account Model Data is %s 32113123123,524214691
As you may know, JavaScript had no support for native modules before ES6. People came up with AMD, RequireJS, CommonJS, and other workarounds. Now there are modules with import and export operands.
In ES5, you use <script> tags with an immediately invoked function expression or a library like AMD, whereas in ES6 you can expose a class with export. I’m a Node.js guy, so I use CommonJS, which is also a Node.js module syntax.
It’s straightforward to use CommonJS on the browser with the Browserify bundler (http://browserify.org). Let’s say you have a port variable and a getAccounts method in an ES5 module.js file:
module.exports = {
port: 3000,
getAccounts: function() {
...
}
}
In the ES5 main.js file, you’d require('module') that dependency:
var service = require('module.js')
console.log(service.port) // 3000
In ES6, you use export and import. For example, this is the library in the ES6 module.js file:
export var port = 3000
export function getAccounts(url) {
...
}
In the ES6 main.js importer file, you use the syntax import {name} from 'my-module':
import {port, getAccounts} from 'module'
console.log(port) // 3000
Or you can import everything as a service variable in main.js:
import * as service from 'module' console.log(service.port) // 3000
Personally, I find ES6 modules confusing. Yes, they’re more eloquent, but Node.js modules won’t change anytime soon. It’s better to have only one style for browser and server JavaScript, so I’ll stick with CommonJS/Node.js style for now. In addition, support for ES6 modules in browsers isn’t available as of this writing, so you’ll need something like jspm (http://jspm.io) to use ES6 modules.
For more information and examples, see http://exploringjs.com/es6/ch_modules.html. And no matter what, write modular JavaScript!
To use ES6 today, use Babel as part of your build process. There’s more information on Babel in chapter 3.
There are many other noteworthy ES6 features that you probably won’t use (at least, not right away). Here they are, in no particular order:
ECMAScript improves productivity and reduces mistakes. It will continue to evolve. Learning never stops. Take advantage of these resources:
| INSTALLATION |
| React
<script src="https://unpkg.com/react@15/dist/react.js"></script> $ $ npm install react --save $ $ bower install react --save React DOM <script src="https://unpkg.com/react-dom@15/dist/react-dom.js"></script>$ npm install react-dom $ bower install react-dom --save |
| RENDERING |
| ES5
ReactDOM.render( React.createElement( Link, {href: 'https://Node.University'} ) ), document.getElementById('menu') ) ES5+JSX ReactDOM.render(<Link href='https://Node.University'/>, document.getElementById('menu') ) Server-side rendering const ReactDOMServer = require('react-dom/server')ReactDOMServer.renderToString(Link, {href: 'https://Node.University'}) ReactDOMServer.renderToStaticMarkup(Link, {href: |
| propTypes |
| Types available under React.PropTypes:
any array bool element func node number object string To make a property required (warning only), append .isRequired. More methods instanceOf(constructor)oneOf (['News', 'Photos']) oneOfType([propType, propType]) Custom validation propTypes: {customProp: function(props, propName, componentName) { if (!/regExPattern/.test(props[propName])) { return new Error('Validation failed!'); } } } |
| SPECIAL PROPERTIES |
| key—Unique identifier for an element to turn arrays/lists into hashes for better performance. For example: key={id}.
ref—Reference to an element via this.refs.NAME. For example: ref="email" will create a this.refs.email DOM node or ReactDOM.findDOMNode(this.refs.email). style—Accepts an object for camelCased CSS styles instead of a string (immutable since v0.14). For example: style={{color: red}}. className—HTML class attribute. For example: className="btn". htmlFor—HTML for attribute. For example: htmlFor="email". dangerouslySetInnerHTML—Sets inner HTML to raw HTML by providing an object with the key __html. children—Sets the content of the element via this.props.children. For example: this.props.children[0]. data-NAME—Custom attribute. For example: data-tooltip-text="...". |
| LIFECYCLE EVENTS |
|
componentWillMount function() componentDidMount function() componentWillReceiveProps function(nextProps) shouldComponentUpdate function(nextProps, nextState) -> bool componentWillUpdate function(nextProps, nextState) componentDidUpdate function(prevProps, prevState) componentWillUnmount function() |
| COMPONENT PROPERTIES AND METHODS |
| Properties this.refs—Lists components with a ref property. this.props—Lists any properties passed to an element (immutable). this.state—Lists states set by setState and getInitialState (mutable). Avoid setting state manually with this.state=... this.isMounted—Flags whether the element has a corresponding DOM node. Methods setState(changes)—Changes state (partially) to this.state, and triggers a rerender replaceState(newState)—Replaces this.state, and triggers a rerender forceUpdate()—Triggers an immediate DOM rerender |
| REACT ADDONS |
| As npm modules:
react-addons-css-transition-group react-addons-perf react-addons-test-utils react-addons-pure-render-mixin react-addons-linked-state-mixin react-addons-clone-with-props react-addons-create-fragment react-addons-css-transition-group react-addons-linked-state-mixin react-addons-pure-render-mixin react-addons-shallow-compare react-addons-transition-group react-addons-update |
| COMPONENTS |
| ES5
var Link = React.createClass({ displayName: 'Link', render: function() { return React.createElement('a', {className: 'btn', href: this.props.href}, 'Click ->', } }) ES5 + JSX var Link = React.createClass({render: function() { return <a className='btn' href={this.props.href}>Click -> this.props.href</a> } }) ES6 + JSX class Link extends React.Component {render() { return <a className='btn' href={this.props.href}>Click -> this.props.href</a> } } |
| ADVANCED COMPONENTS |
| Options (ES5)
Type validation in development mode—propTypes object Object of default properties—getDefaultProps function() Object of the initial state—getInitialState function() ES5 var Link = React.createClass ({propTypes: { href: React.PropTypes.string }, getDefaultProps: function() { return { initialCount: 0 } }, getInitialState: function() { return {count: this.props.initialCount} }, tick: function() { this.setState({count: this.state.count + 1}) }, render: function() { return React.createElement( 'a', {className: 'btn', href: '#', href: this.props.href, onClick: this.tick.bind(this)}, 'Click ->', (this.props.href ? this.props.href : 'https://webapplog.com'), ' (Clicked: ' + this.state.count+')' ) } }) ES5 + JSX var Link = React.createClass ({propTypes: { href: React.PropTypes.string }, getDefaultProps: function() { return { initialCount: 0 } }, getInitialState: function() { return {count: this.props.initialCount}; }, tick: function() { this.setState({count: this.state.count + 1}) }, render: function() { return ( <a onClick={this.tick.bind(this)} href="#" className="btn" href={this.props.href}> Click -> {(this.props.href ? this.props.href : (Clicked: {this.state.count}) </a> ) } }) ES6 + JSX export class Link extends React.Component {constructor(props) { super(props); this.state = {count: props.initialCount}; } tick() { this.setState({count: this.state.count + 1}); } render() { return ( <a onClick={this.tick.bind(this)} href="#" className="btn" href={this.props.href}> Click -> {(this.props.href ? this.props.href : 'https://webapplog.com')} (Clicked: {this.state.count}) </a> ) } } Link.propTypes = { initialCount: React.PropTypes.number } Link.defaultProps = { initialCount: 0 } |
[SYMBOL][A][B][C][D][E][F][G][H][I][J][K][L][M][N][O][P][Q][R][S][T][U][V][W][X][Z]
_ (underscore) character
... operator
{} (curly braces), 2nd, 3rd
* (asterisk) character
# (hash) symbol
about variable
abstractions, powerful
accountsData property
accumulator value
action argument
action creators
overview
passing into component properties
actions
dispatching
overview, 2nd
activeClassName attribute
add-ons
addOption() function, 2nd
addToCart() function, 2nd
ancestors
Angular, 2nd
animation events
Apache Tomcat
API (application program interface)
querying
saving responses into stores
App component, 2nd
app.get() function
app.jsx files
creating route mapping in
writing
App component
Index component
app.listen() function
app.NAME() function
app.set() function, 2nd
apps, running in Express
arbitrary code
Array class
Array.find() function
Array.reduce() function
arrow class
arrow functions
in ES6
overview
assert module
assertions
asset hashing
asterisk character
attributes, passing with spread operators
autobinding
Autocomplete component
code for
implementing
adding browser scripts
Autocomplete component
web servers
rendering on server side from
tests for
automocking
axios library, 2nd
Babel compiler
compiling
ES6
JSX
Node.js
standalone browser
using with ES6
babel property, 2nd
Babel tool, setting up JSX transpiler using
babel-core
babel-loader
babel-preset-react
babel-register, 2nd
Backbone framework
overview
routing with
backticks
baseModel class
BDD (behavior-driven development), 2nd
before statement
beforeEach statement
binary operator
bind() function, 2nd, 3rd
block-scoped constructs
const
let
body-parser, 2nd
bookstore, building with React Router
creating components
Host HTML files
project structure
Webpack configuration
Boolean attribute values, in JSX
booting servers
Bootstrap framework, installing
bootup
browser scripts, adding
Browserify tool
installing
overview
browsers
history
standalone, in Babel
btn-group class
btn-primarydisabled class
bubbling phases, in DOM events
build tool
Button component, Timer component and
Button form element
buttonLabel property
buttons, integrating
Cancel button
capture phases, in DOM events
capturing
changes, of uncontrolled elements
form changes
Cart component
CartItems object
CD (continuous deployment)
CDN (content-delivery network)
change() method
cheatsheet
for Express.js
basic usage
connect middleware
generator
handler signatures
HTTP verbs
installing
Jade
middleware
request-header shortcuts
requests
resources
response
routes
Stylus
for MongoDB database
for Mongoose
document methods
installing
model methods
schema
for React
add-ons
components, 2nd
installing
lifecycle events
methods
properties
propTypes
Checkbox element
checkboxGroup state
checked attribute
checked property
Checkout component
children
distinguishing from their parents
rendering
children property, 2nd, 3rd
CI (continuous integration)
class attribute
classes, in ES6
className
clean-tagged-string library
clearInterval() function
click event
click() method
ClickCounterButton, 2nd
client-side code
client-specific queries
clipboard events
cloning
Cloudflare
code
for Autocomplete component
for Password component
for password modules
maintainability of
modularizing with Webpack build tool
reusing with higher-order components
using displayName
using spread operator
splitting
code generators
CodeBuild
CodeDeploy
CodePipeline
combineReducers() function
comments, in JSX
community
compiling
ES6
JSX
Node.js
component classes, creating
component lifecycle events
categories of
example
executing all events together
implementing
mounting
componentDidMount()
componentWillMount()
overview
unmounting
updating
componentDidUpdate()
componentWillReceive-Props(newProps)
componentWillUpdate()
shouldComponentUpdate()
component-based architecture, using pure JavaScript
componentDidMount() function, 2nd, 3rd, 4th, 5th, 6th, 7th
componentDidUpdate() function, 2nd
components
composing on servers
connecting to stores
creating
writing app.jsx files
default properties in
distinguishing children from their parents
ES5, options
exchanging data between
higher-order
for code reuse
withRouter
in JSX
layout, creating
passing action creators into
presentational vs. container
rendering on server side from
HTML pages
simple text
scaling
property types
rendering children
validation.
See Button component; Menu component; Timer component; TimerWrapper component; Tooltip component.
componentWillMount() function, 2nd, 3rd, 4th, 5th
componentWillReceiveProps() function, 2nd
componentWillUnmount() function, 2nd, 3rd
componentWillUpdate() function, 2nd
compression, 2nd
concurrently tool, Node
configurations
configuring
Express
HMR
Redux data library
servers
Webpack, 2nd, 3rd
connect-cors
connect-multiparty
connect-redis
connect-timeout
connect() function, 2nd, 3rd, 4th, 5th, 6th
consoles, in MongoDB database
const construct
const variables
constructor() function, 2nd, 3rd, 4th
container components, vs. presentational
Content class
Content component
content-delivery network..
See CDN.
contextType
continuous integration.
See CD; ; CI.
controlled components
cookie-parser
cookie-session
cookies
count method
counter property
cover property
create method
create-react-app
createClass() function, 2nd, 3rd
createElement() function, 2nd, 3rd, 4th, 5th
createFactory() function
createStore() function, 2nd
cross-site scripting attack.
See XSS.
csurf
curly braces, 2nd, 3rd
current value
currentDate property
currentTarget
custom validation
dangerouslySetInnerHTML, 2nd
dashes
data
exchanging between components
Flux, architecture of
routes
unidirectional flow of, support for
using GraphQL
adding servers to Netflix clone
overview
using Redux
action creators
actions
combining reducers
configuration
connecting components to stores
dependencies
dispatching an action
enabling Redux
Netflix clone
passing action creators into component properties
React support for unidirectional data flow
reducer for movies
routes
running Netflix clone
understanding Flux data architecture
data structure, in GraphQL
data- attributes, in JSX
data-NAME attribute
data-react-checksum attribute, 2nd
data-reactid attribute
data-reactroot attribute, 2nd, 3rd
Datepicker
declarative style
default parameters, in ES6
default properties, in components
defaultProps attribute, 2nd, 3rd
defaultValue attribute
DELETE method requests
dependencies, in Redux data library
describe statement
destructuring
in ES6
overview
devDependencies property, 2nd, 3rd
developer experience.
See DX.
development mode
devtool property, 2nd
DevTools
directory flag
disabled attribute
disadvantages of React
dispatch() function, 2nd, 3rd, 4th
dispatching actions
Display component
displayName, distinguishing child components from their parents
distribution
div element, 2nd
document element
document methods, in Mongoose
DOM (document object model), events
bubbling phases
capture phases
exchanging data between components
not supported by React, responding to
overview
passing event handlers as properties
SyntheticEvent event objects
using states with
DOMEventTarget
DoneLink
dontMock() function
double quotes
DRY (don’t repeat yourself) principle, 2nd
DX (developer experience)
ECMAScript 5.
See ES5 language specification.
ECMAScript 6.
See ES6 language specification.
ecosystem
elements
creating with JSX
finding with TestUtils
nesting
of forms
<input> element
<option> element
<select> element
<textarea> element
uncontrolled with change capturing
uncontrolled without capturing changes
else statement
emailStaticMarkup
Ember
empty array, 2nd
enabling Redux
endpoints
enhanced object literals, in ES6
Enter keystroke
entry point
environment variables
Enzyme library
errors, handling, 2nd, 3rd, 4th
ES5 language specification
ES6 language specification
arrow functions
classes
compiling
default parameters
destructuring
enhanced object literals
features of
modules
multiline strings
promises
template literals
using with Babel
ESLint
event handlers, passing as properties
event objects, with SyntheticEvent
, 14th.
See component lifecycle events.
DOM
bubbling phases
capture phases
exchanging data between components
not supported by React, responding to
overview
passing event handlers as properties
SyntheticEvent event objects
using states with
in forms
integrating with jQuery UI
integrating buttons
integrating labels
exchanging data between components
Expect syntax
expect() function
expect(OBJECT).toBe(value)
expect(OBJECT).toBeDefined()
expect(OBJECT).toBeFalsy()
expect(OBJECT).toBeNull()
expect(OBJECT).toBeTruthy()
expect(OBJECT).toBe-Undefined()
expect(OBJECT).toEqual(value)
expect(OBJECT).toMatch (regexp)
Express framework
cheatsheet
basics
connect middleware
generator
handler signatures
HTTP verbs
installing
Jade
middleware
request-header shortcuts
requests
resources
response
routes
Stylus
implementing Autocomplete component
code for
tests for
implementing autocomplete with
adding browser scripts
creating server templates
implementing web servers
installing
Node and, rendering on the server side from components
with Universal JavaScript
client-side React code
composing React components on the server
running apps
server-side layout templates with Handlebars
setting up servers
setting up Webpack
express-graphql package
express-react-views library, 2nd
express-session
express-validator, 2nd, 3rd
express.static() function
extract-text-webpack-plugin
fat arrows
fat-arrow functions, 2nd
features, of ES6
fetch() function, 2nd, 3rd
fetchMovieActionCreator() function
fileSplitArray
filter() function, 2nd
filteredOptions
find method
findAndModify method
findById method
findByIdAndRemove method
findByIdAndUpdate method
findOne method
findOneAndUpdate method
findRenderedComponentWithType() function
findRenderedDOMComponent-WithClass() function, 2nd
findRenderedDOMComponent-WithTag() function
Flatly, 2nd, 3rd
flow-bin tool
flux module, Facebook
Flux, data architecture of
focus events
Footer component
for attribute
forceUpdate() function
form events
forms
capturing changes
default values
defining
defining elements of
<input> element
<option> element
<select> element
<textarea> element
defining its events
uncontrolled elements with change capturing
uncontrolled elements without capturing changes
using references to access values
fragment identifier
Generate Password module
generate() method
generatePassword() function
generator, in Express.js
GET endpoint
get method
GET method requests
getAccounts() method
getAttribute() method
getElementById() function
getEventListeners() method
getStyle() function
Glyphicons
Google Webmaster Central Blog
GraphQL
installing on servers
schema of
working with data
adding servers to Netflix clone
overview
graphqlHTTP library
handleActions
Handlebars templating engine
layouts with
server-side layout templates with
handleCheckbox() method
handleClick() method, 2nd, 3rd
handleMouseOver() method
handler property
handler signatures, in Express.js
handleSlide
handleStartTimer() method
handleSubmit() method
hash symbol
hash token
hash, history
hbs template
Header component
headless browsers
Hello World program
helmet
hierarchical queries
higher-order components
for code reuse, 2nd
using displayName
using spread operator
withRouter, accessing routers with
history library
HMR (hot module replacement), 2nd, 3rd, 4th
HOC (higher-order component)
hoisted function
Host HTML files, 2nd
href attribute
html attribute
HTML pages, rendering
booting up servers
configuration
handling errors
layout with Handlebars
middleware
routes
HTTP verbs, in Express.js
hydrating data
idempotent
if statement
if/else condition, in JSX
IFrame
ig (case insensitive and global)
image events
immutable state
implementing routers
creating route mapping in app.jsx
creating Router component in router.jsx
imports
incoming property transition
Index component, 2nd
index template
indexing pages
IndexRoute
innerHTML value
<input> element
inputValue
installing
Bootstrap
Browserify
Express
Express.js
GraphQL on servers
MongoDB
Mongoose
Node.js
React
React DOM
Webpack build tool
interactive properties
isActive() method
isDefaultPrevented() method
isModal condition
isModified() method
isPersistent
isPropagationStopped() method
isRequired property
isVisible
IT (information technology)
it statement
Jade templating engine, Express.js and
JavaScript XML.
See JSX.
JavaScript, component-based architecture using
Jest
assertions
checking passwords with
Host HTML files
implementing Password component
implementing password modules
implementing Autocomplete component
implementing autocomplete with
adding browser scripts
creating server templates
implementing web servers
UI testing with
finding elements with TestUtils
shallow rendering
UI-testing password widget
unit testing with
advantages of
Jest assertions
types of
UI testing with
writing tests
jest.autoMockOff() function
jQuery Slider
jQuery UI (user interface)
integrating with events
integrating buttons
integrating labels
JS.Coach
JSX (JavaScript XML)
attributes not accepted by
Boolean attribute values
building Menu component in
refactoring Link component
refactoring Menu component
running JSX projects
building Menu component without
comments
creating elements with
data-attributes
if/else condition
in components
outputting variables in
overview
properties
React component methods, creating
running projects in
special characters in
style attribute
tags, compiling
transpiler, setting up using Babel
with React Router
key attribute
key property, 2nd
keyboard events
keyCode
Khan Academy
label property
labels, integrating
launchClock() method
layout components, creating
layouts
server-side templates with Handlebars
with Handlebars
LESS files
let construct
libraries
lifecycle events, 2nd
Link component
overview
refactoring
listen() function, 2nd
loaders
loading times
LoadWebsite
local
Logo component
logUpperCase() function
maintainability
map() function, 2nd, 3rd, 4th
mapping object
mapping routes in app.jsx
mapStateToProps() function
Markdown
Material-UI
Math.random() function
Menu component
building in JSX
refactoring Link component
refactoring Menu component
running JSX projects
building without JSX
refactoring
scaffolding
structure
menuOptions property
menus array, 2nd
MessageBoard, 2nd
MessageList
messages array
messages property
method requests
method-override
methods
middleware, 2nd, 3rd, 4th, 5th
mocking
Modal component
model methods, in Mongoose
modularizing code with Webpack build tool
module.export global
module.exports
module.hot.accept() function
modules, in ES6
mongo command, 2nd
mongod command, 2nd
MongoDB database
cheatsheet
implementing Autocomplete component
code
tests
implementing autocomplete with
adding browser scripts
creating server templates
implementing web servers
installing
Mongoose library, cheatsheet
document methods
installing
model methods
schema
morgan, 2nd
mounting component lifecycle events
componentDidMount()
componentWillMount()
mounting events
mouse events
mouseOver event
Mozilla Developer Network
multiline strings, in ES6
multiple attribute
mutable state, 2nd
myUtil module
nativeEvent
nave
navigating programmatically
nesting elements
Netflix clone
adding servers to
data structure
GraphQL schema
installing GraphQL on servers
querying API and saving responses into stores
showing list of movies
Redux with
running
new Data() method
NewMessage
Node
Express and, rendering on the server side from components
React on
Universal JavaScript with
node command, 2nd
Node Patterns course
Node platform
compiling
installing
node value
node-dev
node-static
nodemon tool, 2nd
Note element
notEmpty() function
npm command
npm install, 2nd, 3rd, 4th
npm run build, 2nd, 3rd, 4th
nullified
nvm (Node Version Manager)
object literals, enhanced
Object.assign() function
Object.create() method
offsetLeft
onChange() method, 2nd, 3rd
onClick event, 2nd
one-way binding, 2nd
onInput event
onKeyUp() method, 2nd
onMouseOver
onMouseOverCapture
onResize
onSubmit event
opacity state, 2nd
<option> element
option-name class
options property
orphaned event handlers
parentheses
passport
Password component, implementing
code
render () function
tests
Password element
password field
password modules, implementing
password variable, 2nd, 3rd
Password widget
PasswordGenerate, 2nd
PasswordInfo, 2nd
PasswordInput, 2nd
passwords
checking with Jest
Host HTML files
implementing Password component
implementing password modules
UI-testing widgets
PasswordVisibility, 2nd
Pause/Resume button
performance, improving
persist() method
pick() function
placeholder property
play() method
populate() method
post hook
POST method requests
postlearn-react
posts array
pre hook
prelearn-react
presentational components, vs. container
preventDefault() method
processedRules object
Product component
--production flag
promises, in ES6
prop-types package
properties, 2nd
default in components
in JSX
passing event handlers as
passing in React Router
states and
types of
props
propTypes property, 2nd, 3rd
proto property
prototyping
Provider component, 2nd
publicPath
pushState
PUT method requests
PWD variable
query strings
querying API
queryKey
radio buttons
radioGroup
raw-body
React
advantages of using
better code maintainability
better performance
faster loading times
proper page indexing
benefits of
ecosystem and community
simplicity
speed and testability
cheatsheet
add-ons
components, 2nd
installing
lifecycle events
methods
properties
propTypes
disadvantages of
installing, 2nd
overview
problem solved by
rendering on servers
web applications and
React libraries and rendering targets
React stack
single-page applications
React component methods, creating
in JSX
React DOM (document object model)
React Rocks
React Router
browser history
building bookstores with
project structure
Webpack configuration
creating components
Cart component
Checkout component
Modal component
Product component
writing app.jsx files
creating layout components
development setup with Webpack
features of
accessing routers with withRouter higher-order component
navigating programmatically
route data
URL parameters
hash history
Host HTML files
JSX style
passing properties in
React stack
react-addons-test-utils package
react-dom
react-hot-loader
react-redux package
react-router
react-test-renderer package
React.Component() function
React.createClass() function
React.createElement() function
ReactDOM.findDOMNode() function
ReactDOM.render() function, 2nd, 3rd, 4th, 5th
ReactDOMServer
ReactJSX.com
readOnly
reduce method
reducers
combining
for movies
Redux container
enabling
working with data
React support for unidirectional data flow
understanding Flux data architecture
working with data library
action creators
actions
combining reducers
configuration
connecting components to stores
dependencies
dispatching an action
enabling Redux
Netflix clone
passing action creators into component properties
reducer for movies
routes
running Netflix clone
redux-actions library, 2nd, 3rd
redux-netflix
ref attribute
ref property
refactoring
Link component
Menu component
references, using to access values
regular-expression pattern
remove method
render() function, of Password component
rendering
children
HTML pages
booting up servers
configuration
handling errors
layout with Handlebars
middleware
routes
on the server side from components
HTML pages
simple text
React on servers
shallow
text
renderIntoDocument() function, 2nd
renderToStaticMarkup() function
renderToString() function
replace() method
replaceState() method
representational components
req.message.find() function
request-header, shortcuts in Express.js
request.accepts(type) shortcut
request.acceptsCharset(charset) shortcut
request.acceptsLanguage(language) shortcut
request.body shortcut
request.cookies shortcut
request.fresh shortcut
request.get(headerKey) shortcut
request.host shortcut
request.ip shortcut
request.ips shortcut
request.is(type) shortcut
request.originalUrl shortcut
request.params shortcut
request.path shortcut
request.protocol shortcut
request.query shortcut
request.route shortcut
request.secure shortcut
request.signedCookies shortcut
request.stale shortcut
request.subdomains shortcut
request.xhr shortcut
request/param
requests, in Express.js
require() function, 2nd
required properties
res.render() function
Reset button
resize event
resolve key
resources, in Express.js
response-time
response.render() function
response.send() function
responses, in Express.js
RESTful APIs (application program interfaces)
rooms array
route property
Router class
Router component, creating in router.jsx
router.jsx, creating Router component in
router.push(URL)
RouterContext
routers
accessing with withRouter higher-order component
implementing
creating route mapping in app.jsx
creating Router component in router.jsx
routes
data
in Express.js
in Redux data library
mapping in app.jsx
server-side
routing, with Backbone
row-fluid class
rules array
SaaS (software-as-a-service)
save method
save operation
SaveButton
scaffolding
of Menu component
of Timer component
of Tooltip component
scaling components
property types
rendering children
validation
schema, of Mongoose
scripts block
scryRenderedComponentsWithType() function
scryRenderedDOMComponents-WithClass() function
scryRenderedDOM-ComponentsWithTag() function
seed command
<select> element
selected property
selection events
sendData() method
sendFile() function
SEO (search engine optimization), 2nd
serve-favicon
serve-index
serve-static
server templates, creating
server-side layout templates, with Handlebars
server-side rendering, from components
HTML pages
simple text
server-side routes
servers
adding to Netflix clone
data structure
GraphQL schema
installing GraphQL on servers
querying API and saving responses into stores
showing list of movies
booting
composing components on
installing GraphQL on
rendering React on
setting up
configuration
middleware
server-side routes.
See web servers.
service testing
serviceBase
set method
SET_VISIBILITY_FILTER action
setInterval() function, 2nd
setState() function, 2nd, 3rd, 4th, 5th
setTimeout() function
shallow rendering
shouldComponentUpdate() lifecycle event
shuffle() method
signatures.
See handler signatures.
simplicity
component-based architecture using pure JavaScript
declarative over imperative style
powerful abstractions
skinny arrows
slider button
slider control element
SliderButtons
sliderValue state
SOAP protocol
software-as-a-service.
See SaaS.
SPA (single-page application), 2nd, 3rd
special characters, in JSX
speed
spread operators, passing attributes with
standalone browser, in Babel
startTimer() method, 2nd
state argument
states
accessing
overview
properties and
setting initial state
stateless components
general discussion
stateful vs.
updating
using with events
static assets
static files
static middleware
stopPropagation() method
store property
store.dispatch() function
stores
connecting components to
saving API responses into
strength variable
strings, multiline
strong typing
strong-password module
style attribute, in JSX
style property
style-loader
Stylus stylesheet language, Express.js and
super() method
switch/case statement, 2nd
SyntheticEvent, event objects
tagged strings
target property
TDD (test-driven development)
template literals, in ES6
test cases
testability
testing
for Autocomplete component
of Password component
of password modules
UI with Jest
finding elements with TestUtils
shallow rendering
UI-testing password widget
UI with TestUtils
finding elements with
shallow rendering
UI-testing password widget
UI-password widgets
units with Jest
advantages of
Jest assertions
types of
UI testing with
UI testing with TestUtils
writing unit tests in Jest
Webpack builds
TestUtils
finding elements with
UI testing with
finding elements with
shallow rendering
UI-testing password widget
TestUtils.findRenderedDOMComponentWithClass() function
TestUtils.scryRenderedDOMComponentsWithTag() function
text field
text, rendering
<textarea> element
then property
this.isMounted property
this.props property
this.props,children
this.props.dispatch()function
this.refs property
this.setState() function, 2nd
this.state property
time property, 2nd
timeLeft variable
Timer component
Button component and
scaffolding
structure
TimerWrapper component and
TimerWrapper component
title property, 2nd
toBe() function
toEqual() function
toggle() function
toJSON() method
toLocaleString() method
toLowerCase() method
tooltip
Tooltip component
render( ) function
scaffolding
structure
toggle( ) function
tooltipNode
toString() function
touch events
transform-react-jsx
transition events
transpiler, JSX
trim() method
triple curly braces
two-way binding, 2nd
type attribute
type property
UI (acceptance) testing
UI (user interface)
testing password widgets
testing with Jest
finding elements with TestUtils
shallow rendering
UI-testing password widget
testing with TestUtils
finding elements with
shallow rendering
UI-testing password widget
uncontrolled elements, of forms
with change capturing
without capturing changes
underscore character
unidirectional data flow, support for
unit testing
units, testing with Jest
advantages of
Jest assertions
types of
UI testing with
UI testing with TestUtils
writing tests
Universal JavaScript
Express with
client-side React code
composing React components on the server
running apps
server-side layout templates with Handlebars
setting up servers
setting up Webpack
with Node
with React
unmounting events, 2nd
update method
updating
component lifecycle events
componentDidUpdate( )
componentWillReceive-Props(newProps)
componentWillUpdate( )
shouldComponent-Update( )
states
upperCase property
url function
URL parameters, 2nd
URL path
url property
URL routing
urlencoded data format
user interface.
See UI.
-V option
v property
validate method
validation
value attribute
value property, 2nd
values
default
using references to access
variables, outputting in JSX
vhost
visibilityFilter value
visible variable
wds script
wds-cli script
web applications
React libraries and rendering targets
React stack
single-page applications
web servers, implementing
defining RESTful APIs
rendering React on servers
webpack -w command
Webpack build tool
configuring, 2nd, 3rd
development setup with
HMR
installing
installing dependencies of
modularizing code with
overview
running
testing builds
webpack-dev-server, 2nd, 3rd
wheel events
withRouter component, accessing routers with
XSS (cross-site scripting) attack
Chapter 1. Meeting React
Figure 1.2. A typical SPA architecture
Figure 1.3. Inside a single-page application
Figure 1.5. Inspecting the Hello World app as rendered by React
Chapter 2. Baby steps with React
Figure 2.1. The React Quickly website has many nested UI elements.
Figure 2.2. Rendering a single heading element
Figure 2.3. Structuring a React render by using a wrapper <div> container to render sibling headings
Figure 2.4. React DevTools shows a <div> wrapper for nested sibling h1 elements.
Figure 2.6. Rendering an element created from a custom HelloWorld component class
Chapter 3. Introduction to JSX
Figure 3.1. JSX is transpiled into regular JavaScript.
Figure 3.2. Results of rendering a link with the value from a method
Chapter 4. Making React interactive with states
Figure 4.1. The react-autocomplete component in action
Figure 4.2. We need another data type that’s mutable in the component to make the view change.
Figure 4.4. The Clock is ticking.
Figure 4.7. Clock with two ways to show time: analog and digital
Chapter 5. React component lifecycle events
Figure 5.3. The logger has been mounted.
Figure 5.5. Showing a list of users (fetched from a data store) styled with Twitter Bootstrap
Figure 5.6. A dialog confirmation when the user tries to leave the page
Figure 5.7. Note will be replaced by another element in 5, 4, ... seconds.
Figure 5.9. Dialog confirmation when the user tries to leave the page
Chapter 6. Handling events in React
Figure 6.1. Clicking the button prints the value of SaveButtonthis: SaveButton.
Figure 6.2. Capture, target, and bubbling phases
Figure 6.3. The capture event happens before the regular event.
Figure 6.5. Inspecting events on the <div> element (there are none)
Figure 6.6. Inspecting events on the document elementdocument element (there is one)
Figure 6.8. Hovering the mouse over the box prints the event object in the DevTools console.
Figure 6.10. Clicking the button increments the counter, which has an initial value of 0.
Figure 6.15. Programmatically disabling the Less button to prevent negative values
Chapter 7. Working with forms in React
Figure 7.3. Radio button group
Figure 7.4. Rendering check boxes with React as the preselected option
Figure 7.5. Defining and rendering the <textarea> element
Figure 7.6. Rendering and preselecting the value of a drop-down
Figure 7.7. Rendering and preselecting multiselect elements
Figure 7.9. The controlled element filters input by setting state to digits only.
Figure 7.10. This uncontrolled component has no value set by the application.
Figure 7.13. Uncontrolled form that gets data from two fields and prints it in logs
Chapter 8. Scaling React components
Figure 8.2. Warnings due to wrong property types
Figure 8.3. Expanding a warning revealed the problematic line number: 9.
Figure 8.4. Inspecting the compiled source code is often enough to understand the problem.
Figure 8.6. Rendering four elements with different content using a single component class
Chapter 9. Project: Menu component
Figure 9.1. The menu you’re going to build
Figure 9.2. React DevTools show you the keys of the list elements.
Figure 9.3. React menu showing rendering of nested components
Chapter 10. Project: Tooltip component
Figure 10.1. A tooltip appears when a user hovers their cursor over the marked text.
Chapter 11. Project: Timer component
Figure 11.2. Timer and Button components
Figure 11.3. Timer app execution, starting at the top
Figure 11.4. Clicking 15 Seconds launched the timer. Now it says that 14 seconds remain.
Chapter 12. The Webpack build tool
Chapter 13. React routing
Figure 13.4. The Content component as the Home page (no children)
Chapter 14. Working with data using Redux
Figure 14.1. Unidirectional vs. bidirectional data flow
Figure 14.3. A simplified view of the bidirectional data flow typical for an MVC-like architecture
Figure 14.7. The Netflix clone will show a grid of movies on the home page.
Figure 14.8. Details of a movie are shown when you click its poster.
Figure 14.9. Individual movie view on a small screen. The URL includes the movie ID.
Chapter 15. Working with data using GraphQL
Chapter 16. Unit testing React with Jest
Figure 16.1. Testing pyramid according to software engineering’s best practices
Figure 16.2. Password widget that autogenerates a password according to the given strength criteria
Chapter 17. React on Node and Universal JavaScript
Figure 17.1. SPA that doesn’t need SEO support because it’s behind a login screen
Figure 17.3. Practical application of Universal JavaScript with React, Node, and Express
Figure 17.4. The Express/Node server will generate HTML and send it to the browser.
Figure 17.5. Rendering from the React component on the server side
Figure 17.6. Rendering React markup from a Handlebars layout using Express gives you an HTML page.
Figure 17.7. Message board app with a form to post a message and a list of existing messages
Figure 17.8. Gist of Universal JavaScript with React and Express
Figure 17.9. Universal app in action, with server and browser rendering
Chapter 18. Project: Building a bookstore with React Router
Figure 18.1. Nile Book Store home page with a list of books
Figure 18.2. Product view in a modal window of the Nile bookstore
Figure 18.3. A direct link opens the product view in a new window rather than a modal.
Figure 18.4. An invoice shouldn’t have the header shown on other views.
Figure 18.5. If you don’t check for isModal and use previousChildren, the list of books isn’t shown.
Chapter 19. Project: Checking passwords with Jest
Figure 19.2. The widget with some of the criteria fulfilled and the password visible
Figure 19.3. The Save button is enabled when all the strength criteria are met.
Chapter 20. Project: Implementing autocomplete with Jest, Express, and MongoDB
Figure 20.1. In Slack, when you start typing, the widget offers matches.
Figure 20.2. Autocomplete form with an empty field
Figure 20.3. Typing angu filters the matches and shows only angular and angular2.
Figure 20.4. The Add button is shown only when there are no matches.
Figure 20.5. The room name has been saved and now appears in the list.
Appendix E. ES6 for success
Figure E.2. The ES6 object literal extends from serviceBase and defines methods and attributes.
Chapter 5. React component lifecycle events
Table 5.1. Lifecycle events (and their relation with state and properties)
Table 5.2. Lifecycle events invoked/called on component update
Chapter 6. Handling events in React
Chapter 1. Meeting React
Listing 1.1. Loading React libraries and code (index.html)
Listing 1.2. Creating and rendering an h1 element (index.html)
Chapter 2. Baby steps with React
Listing 2.1. Creating a <div> element with two <h1> children
Listing 2.2. HTML for the nested elements example without the React code
Listing 2.3. Creating and rendering a React component class
Listing 2.4. Using the frameworkName property in the render() method
Listing 2.5. Passing all the properties from HelloWorld to <h1>
Listing 2.6. Using properties passed during element creation
Chapter 3. Introduction to JSX
Listing 3.1. Hello World in JavaScript
Listing 3.2. Hello World in JSX
Listing 3.3. Creating a HelloWorld class in JSX
Listing 3.4. Outputting variables in JSX
Chapter 4. Making React interactive with states
Listing 4.1. Rendering state in JSX
Listing 4.2. Clock component constructor
Listing 4.3. Implementing a clock with state
Listing 4.4. Stateless Hello World
Listing 4.5. Passing state to children
Chapter 5. React component lifecycle events
Listing 5.1. Rendering and updating a Logger component three times
Listing 5.2. Observing component lifecycle events
Listing 5.3. Fetching data to display in a table
Chapter 6. Handling events in React
Listing 6.1. Declaring an event handler as a class method
Listing 6.2. Capture event following by bubbling event
Listing 6.3. Event handler receiving a synthetic event
Listing 6.4. Event handler as a class method; binding in render()
Listing 6.5. Nullifying a synthetic event
Listing 6.6. Updating state as a result of a click action
Listing 6.7. Stateless button component
Listing 6.8. Passing an event handler as a property
Listing 6.9. Button component using an event handler from Content
Listing 6.10. Passing an event handler and state to two components
Listing 6.11. Using lifecycle events to listen to DOM events
Listing 6.12. Using state values for styles to resize elements
Listing 6.13. Integrating with a jQuery plug-in via its events
Listing 6.14. Rendering slider buttons
Listing 6.15. Integrating with a jQuery plug-in via window
Listing 6.16. Setting up event listeners on a jQuery UI plug-in
Chapter 7. Working with forms in React
Listing 7.1. Rendering radio buttons and handling changes
Listing 7.2. Defining check boxes
Listing 7.3. Rendering form elements
Listing 7.4. Rendering form elements and capturing changes
Listing 7.5. Rendering form elements
Listing 7.6. Implementing a controlled component
Listing 7.7. Uncontrolled element that captures changes
Listing 7.8. Beginning of the email form
Listing 7.9. placeholder propertyrender() method of the email form
Chapter 8. Scaling React components
Listing 8.1. Using propTypes and defaultProps
Listing 8.2. Rendering six buttons
Listing 8.3. Rendering elements using Content
Chapter 9. Project: Menu component
Listing 9.1. Basic skeleton of the Menu script
Listing 9.2. Menu component that uses map() to render links
Chapter 10. Project: Tooltip component
Listing 10.1. Tooltip project package.json file
Listing 10.2. Tooltip project index.html file
Listing 10.3. Tooltip component and text
Chapter 11. Project: Timer component
Listing 11.1. Timer project package.json file
Listing 11.2. Timer project index.html file
Listing 11.3. Outline of timer.jsx
Listing 11.4. TimerWrapper component
Chapter 12. The Webpack build tool
Listing 12.1. Setting up the dev environment
Listing 12.2. Webpack configuration file
Chapter 13. React routing
Listing 13.1. Setting up the dev environment
Listing 13.2. webpack.config.js
Listing 13.3. require() functionRoute mapping (app.jsx)
Listing 13.4. Implementing a URL router
Listing 13.6. Dependencies to use Webpack v1, React Router v2.6, React v15.2, and JSX
Listing 13.7. Defining React explicitly
Listing 13.9. Configuring Webpack
Listing 13.10. Complete Content component
Listing 13.11. Calling router.push() to navigate
Listing 13.12. Rendering post data
Listing 13.13. Posts implementation with data from props.route
Chapter 14. Working with data using Redux
Listing 14.1. Dependences for the Netflix clone
Listing 14.2. Netflix clone Webpack configuration file
Listing 14.3. Main app entry point
Listing 14.4. Defining URL routing with React Router
Listing 14.5. Combining reducers
Listing 14.6. Using the redux-actions library
Listing 14.7. Passing action creators into Movies properties
Chapter 15. Working with data using GraphQL
Listing 15.1. Netflix clone package.json
Listing 15.2. Express server to provide data and static assets
Chapter 16. Unit testing React with Jest
Listing 16.1. Module for generating passwords
Listing 16.2. Saving a test CLI command
Listing 16.3. Test file for the password-generating module
Chapter 17. React on Node and Universal JavaScript
Listing 17.1. ReactDOMServerServer-side setup code
Listing 17.2. Server-side Email (node/email.jsx)
Listing 17.3. node/email.jsx rendered into strings
Listing 17.4. Using React on Express to show HTML on a page
Listing 17.5. Full code for React, Express, hbs server
Listing 17.6. Server side of the message board app
Listing 17.7. Rendering HTML generated from React components
Listing 17.8. Outputting HTML generated by React in Handlebars
Listing 17.9. Server-side layout to render HTML from React components
Listing 17.10. Fetching messages and sending a message
Listing 17.11. Rendering client React components on the browser
Chapter 18. Project: Building a bookstore with React Router
Listing 18.1. Nile Book Store project dependencies and setup
Listing 18.2. Webpack configuration for the Nile store
Listing 18.6. Index component for the home page
Chapter 19. Project: Checking passwords with Jest
Listing 19.1. Dependencies and setup for the project
Listing 19.2. Webpack configuration
Listing 19.4. testingof password modulesTests for the password module
Listing 19.5. testingof Password componentSpec for the Password component
Listing 19.6. Rules for password strength
Listing 19.7. Implementing the Password component
Listing 19.8. Implementing render()
Listing 19.9. PasswordGenerate component
Listing 19.10. PasswordInput component
Chapter 20. Project: Implementing autocomplete with Jest, Express, and MongoDB
Listing 20.1. Dependencies and setup for the project
Listing 20.2. Webpack configuration
Listing 20.3. Components and libraries for the web server
Listing 20.4. RESTful API routes
Listing 20.5. Server-side React
Listing 20.6. Main client-side script