Table of Contents for
React Quickly: Painless web apps with React, JSX, Redux, and GraphQL
 React Quickly: Painless web apps with React, JSX, Redux, and GraphQL
Published by
Manning Publications, 2017
React Quickly: Painless web apps with React, JSX, Redux, and GraphQL
Published by
Manning Publications, 2017
- Cover
- React Quickly: Painless web apps with React, JSX, Redux, and GraphQL
- Copyright
- React Quickly: Painless web apps with React, JSX, Redux, and GraphQL
- Brief Table of Contents
- Table of Contents
- Praise for React Quickly
- Foreword
- Preface
- Acknowledgments
- About This Book
- About the Author
- About the Cover
- Part 1. React foundation
- Chapter 1. Meeting React
- Chapter 2. Baby steps with React
- Chapter 3. Introduction to JSX
- Chapter 4. Making React interactive with states
- Chapter 5. React component lifecycle events
- Chapter 6. Handling events in React
- Chapter 7. Working with forms in React
- Chapter 8. Scaling React components
- Chapter 9. Project: Menu component
- Chapter 10. Project: Tooltip component
- Chapter 11. Project: Timer component
- Part 2. React architecture
- Chapter 12. The Webpack build tool
- Chapter 13. React routing
- Chapter 14. Working with data using Redux
- Chapter 15. Working with data using GraphQL
- Chapter 16. Unit testing React with Jest
- Chapter 17. React on Node and Universal JavaScript
- Chapter 18. Project: Building a bookstore with React Router
- Chapter 19. Project: Checking passwords with Jest
- Chapter 20. Project: Implementing autocomplete with Jest, Express, and MongoDB
- Appendix A. Installing applications used in this book
- Appendix B. React cheatsheet
- Appendix C. Express.js cheatsheet
- Appendix D. MongoDB and Mongoose cheatsheet
- Appendix E. ES6 for success
- React Cheatsheet
- Index
- List of Figures
- List of Tables
- List of Listings
Chapter 5. React component lifecycle events
This chapter covers
- Getting a bird’s-eye view of React component lifecycle events
- Understanding event categories
- Defining an event
- Mounting, updating, and unmounting events
Chapter 2 provided information about how to create components, but there are certain situations in which you need more granular control over a component. For instance, you may be building a custom radio button component that can change in size depending on the screen width. Or perhaps you’re building a menu that needs to get information from the server by sending an XHR request.
One approach would be to implement the necessary logic before instantiating a component and then re-create it by providing different properties. Unfortunately, this won’t create a self-contained component, and thus you’ll lose React’s benefit of providing a component-based architecture.
The best approach is to use component lifecycle events. By mounting events, you can inject the necessary logic into components. Moreover, you can use other events to make components smarter by providing specific logic about whether or not to rerender their views (overwriting React’s default algorithm).
Going back to the examples of a custom radio button and menu, the button can attach event listeners to window (onResize) when the button component is created, and detach them when the component is removed. And the menu can fetch data from the server when the React element is mounted (inserted) into the real DOM.
Onward to learning about component lifecycle events!
Note
The source code for the examples in this chapter is at www.manning.com/books/react-quickly and https://github.com/azat-co/react-quickly/tree/master/ch05 (in the ch05 folder of the GitHub repository https://github.com/azat-co/react-quickly). You can also find some demos at http://reactquickly.co/demos.
5.1. A bird’s-eye view of React component lifecycle events
React provides a way for you to control and customize a component’s behavior based on its lifecycle events (think of hooking [https://en.wikipedia.org/wiki/Hooking] in computer programming). These events belong to the following categories:
- Mounting events—Happen when a React element (an instance of a component class) is attached to a DOM node
- Updating events—Happen when a React element is updated as a result of new values of its properties or state
- Unmounting events—Happen when a React element is detached from the DOM
Each and every React component has lifecycle events that are triggered at certain moments depending on what a component has done or will do. Some of them execute just once, whereas others can be executed continuously.
Lifecycle events allow you to implement custom logic that will enhance what components can do. You can also use them to modify the behavior of components: for example, to decide when to rerender. This enhances performance, because unnecessary operations are eliminated. Another usage is to fetch data from the back end or integrate with DOM events or other front-end libraries. Let’s look more closely at how categories of events operate, what events they possess, and in what sequence those events are executed.
5.2. Categories of events
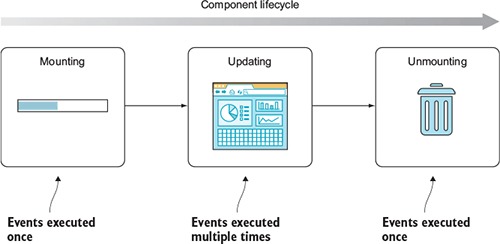
React defines several component events in three categories (see figure 5.1 and also table 5.1, later in the chapter). Each category can fire events various number of times:
- Mounting—React invokes events only once.
- Updating—React can invoke events many times.
- Unmounting—React invokes events only once.
Figure 5.1. Categories of lifecycle events as a component proceeds through its lifecycle, and how many times events in a category can be called
In addition to lifecycle events, I’ll include constructor(), to illustrate the order of execution from start to finish during the component’s lifecycle (updating can happen multiple times):
- constructor()—Happens when an element is created and lets you set the default properties (chapter 2) and the initial state (chapter 4)
- Mounting
- Updating
- – componentWillReceiveProps(nextProps)—Happens when the component is about to receive properties
- – shouldComponentUpdate(nextProps, nextState)-> bool—Lets you optimize the component’s rerendering by determining when to update and when to not update
- – componentWillUpdate(nextProps, nextState)—Happens right before the component is updated
- – componentDidUpdate(prevProps, prevState)—Happens right after the component updated
- Unmounting
Usually, an event’s name makes clear to developers when the event is triggered. For example, componentDidUpdate() is fired when the component is updated. In other cases, there are subtle differences. Table 5.1 shows the sequence of lifecycle events (from top to bottom) and how some of them depend on changes of properties or state (the Component Properties and Component State columns).
Table 5.1. Lifecycle events (and their relation with state and properties)
|
Mounting |
Updating component properties |
Updating component state |
Updating using |
Unmounting |
|---|---|---|---|---|
| constructor() | ||||
| componentWillMount() | ||||
| componentWillReceiveProps() | ||||
| shouldComponentUpdate() | shouldComponentUpdate() | |||
| componentWillUpdate() | componentWillUpdate() | componentWillUpdate() | ||
| render() | render() | render() | render() | |
| componentDidUpdate() | componentDidUpdate() | componentDidUpdate() | ||
| componentDidMount() | ||||
| componentWillUnmount() |
There’s one more case in which a component might be rerendered: when this.forceUpdate() is called. As you can guess from the name, it forces updates. You may need to resort to using it when, for one reason or another, updating state or properties won’t trigger a desired rerender. For example, this might happen when you use data in render() that isn’t part of the state or properties, and that data changes—hence, the need to manually trigger an update. Generally (and according to the React core team), the this.forceUpdate() method (http://mng.bz/v5sU) should be avoided, because it makes components impure (see the following sidebar).
Next, let’s define an event to see it in action.
In computer science in general—not just in React—a pure function is a function that
- Given the same input, will always return the same output
- Has no side effects (doesn’t alter external states)
- Doesn’t rely on any external state
For example, here’s a pure function that doubles the value of the input: f(x) = 2x or, in JavaScript/Node, let f= (n)⇒2*n. Here it is in action:
let f = (n)=>2*n
consoleg.log(f(7))
An impure function to double numbers looks like this in action (adding curly braces removes the implicit return of the one-liner fat-arrow function):
let sharedStateNumber = 7
let double
let f = ()=> {double =2*sharedStateNumber}
f()
console.log(double)
Pure functions are the cornerstone of functional programming (FP), which minimizes state as much as possible. Developers (especially functional programmers) prefer pure functions primarily because their usage mitigates shared state, which in turn simplifies development and decouples different pieces of logic. In addition, using them makes testing easier. When it comes to React, you already know that having more stateless components and fewer dependencies is better; that’s why the best practice is to create pure functions.
In some ways, FP contradicts OOP (or is it OOP that contradicts FP?), with FP fans saying that Fortran and Java were programming dead ends and that Lisp (and nowadays, Clojure and Elm) is the way to go. It’s a fascinating debate to follow. Personally, I’m slightly biased toward the functional approach.
Many good books have been written about FP, because the concept has been around for decades. For this reason, I won’t get into much detail here; but I highly recommend learning more about FP, because it will make you a better programmer even if you never plan to use it at your job.
5.3. Implementing an event
To implement lifecycle events, you define them on a class as methods (see section 3.2.5)—this is a convention that React expects you to follow. React checks to see whether there’s a method with an event name; if React finds a method, it will call that method. Otherwise, React will continue its normal flow. Obviously, event names are case sensitive like any name in JavaScript.
To put it differently, under the hood, React calls certain methods during a component’s lifecycle if they’re defined. For example, if you define componentDidMount(), then React will call this method when an element of this component class is mounted. componentDidMount() belongs to the mounting category listed in table 5.1, and it will be called once per instance of the component class:
class Clock extends React.Component {
  componentDidMount() {
  }
  ...
}
If no componentDidMount() method is defined, React won’t execute any code for this event. Thus, the name of the method must match the name of the event. Going forward, I’ll use the terms event, event handler, and method interchangeably in this chapter.
As you might have guessed from its name, the componentDidMount() method is invoked when a component is inserted into the DOM. This method is a recommended place to put code to integrate with other front-end frameworks and libraries as well as to send XHR requests to a server, because at this point in the lifecycle, the component’s element is in the real DOM and you get access to all of its elements, including children.
Let’s go back to the issues I mentioned at the beginning of the chapter: resizing, and fetching data from a server. For the first, you can create an event listener in componentDidMount() that will listen for window.resize events. For the second, you can make an XHR call in componentDidMount() and update the state when you have a response from the server.
Equally important, componentDidMount() comes in handy in isomorphic/universal code (where the same components are used on the server and in the browser). You can put browser-only logic in this method and rest assured that it’ll only be called for browser rendering, and not on the server side. There’s more on isomorphic JavaScript with React in chapter 16.
Most developers learn best by looking at examples. For this reason, let’s consider a trivial case that uses componentDidMount() to print the DOM information to the console. This is feasible because this event is fired after all the rendering has happened; thus, you have access to the DOM elements.
Creating event listeners for component lifecycle events is straightforward: you define a method on the component/class. For the fun of it, let’s add componentWillMount() to contrast the absence of the real DOM for this element at this stage.
The DOM node information is obtained via the React DOM’s utility function ReactDOM.findDOMNode(), to which you pass the class. Note that DOM isn’t camelCase, but rather is in all-caps:
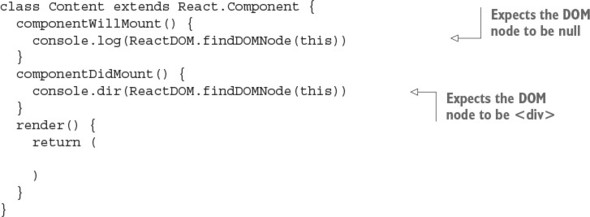
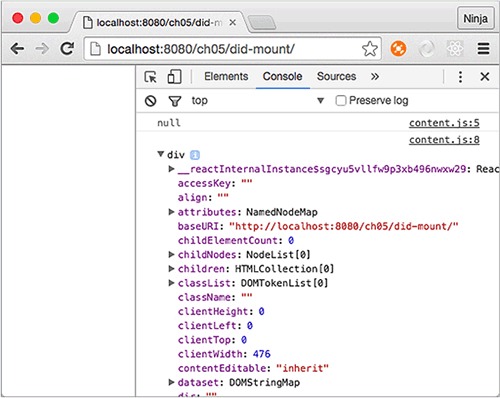
The result is this output in the developer console, which reassures you that componentDidMount() is executed when you have real DOM elements (see figure 5.2):
html
null
div
Figure 5.2. The second log shows the DOM node because componentDidMount() was fired when the element was rendered and mounted to the real DOM. Thus, you have the node.
5.4. Executing all events together
Listing 5.1 (ch05/logger/jsx/content.jsx) and listing 5.2 (ch05/logger/jsx/logger.jsx) show all the events in action at once. For now, all you need to know is that they’re like classes in the sense that they allow you to reuse code. This logger mixin can be useful for debugging; it displays all the events, properties, and state when the component is about to be rerendered and after it’s been rerendered.
Listing 5.1. Rendering and updating a Logger component three times
class Content extends React.Component {
  constructor(props) {
    super(props)
    this.launchClock()
    this.state = {
      counter: 0,
      currentTime: (new Date()).toLocaleString()
    }
  }
  launchClock() {
    setInterval(()=>{
      this.setState({
        counter: ++this.state.counter,
        currentTime: (new Date()).toLocaleString()
      })
    }, 1000)
  }
  render() {
    if (this.state.counter > 2) return
    return <Logger time="{this.state.currentTime}"></Logger>
  }
}
Listing 5.2. Observing component lifecycle events
class Logger extends React.Component {
  constructor(props) {
    super(props)
    console.log('constructor')
  }
  componentWillMount() {
    console.log('componentWillMount is triggered')
  }
  componentDidMount(e) {
    console.log('componentDidMount is triggered')
    console.log('DOM node: ', ReactDOM.findDOMNode(this))
  }
  componentWillReceiveProps(newProps) {
    console.log('componentWillReceiveProps is triggered')
    console.log('new props: ', newProps)
  }
  shouldComponentUpdate(newProps, newState) {
    console.log('shouldComponentUpdate is triggered')
    console.log('new props: ', newProps)
    console.log('new state: ', newState)
    return true
  }
  componentWillUpdate(newProps, newState) {
    console.log('componentWillUpdate is triggered')
    console.log('new props: ', newProps)
    console.log('new state: ', newState)
  }
  componentDidUpdate(oldProps, oldState) {
    console.log('componentDidUpdate is triggered')
    console.log('new props: ', oldProps)
    console.log('old props: ', oldState)
  }
  componentWillUnmount() {
    console.log('componentWillUnmount')
  }
  render() {
    // console.log('rendering... Display')
    return (
      {this.props.time}
    )
  }
}
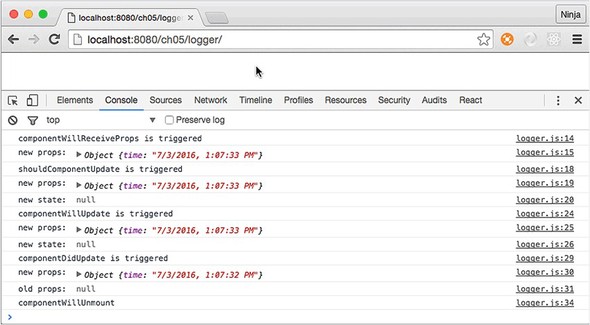
The functions and lifecycle events from the Display component give you console logs when you run this web page. Don’t forget to open your browser console, because all the logging happens there, as shown in figure 5.3!
Figure 5.3. The logger has been mounted.
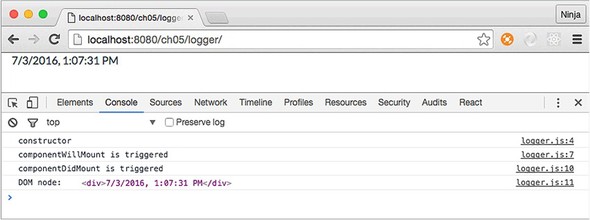
As noted in the text and shown in the figure, the mounting event fires only once. You can clearly see this in the logs. After the counter in Context reaches 3, the render function won’t use Display anymore, and the component is unmounted (see figure 5.4).
Figure 5.4. Content was removed from the logger after 2 seconds; hence, the componentWillUnmount() log entry right before the removal.
Now that you’ve learned about component lifecycle events, you can use them when you need to implement logic for components, such as fetching data.
5.5. Mounting events
The mounting category of events is all about a component being attached to the real DOM. Think of mounting as a way for a React element to see itself in the DOM. This typically happens when you use a component in ReactDOM.render() or in the render() of another, higher-order component that will be rendered to the DOM. The mounting events are as follows:
- componentWillMount()—React knows that this element will be in the real DOM.
- componentDidMount()—React has “inserted” the React element into the real DOM; and element is the DOM node.
constructor() execution happens prior to componentWillMount(). Also, React first renders and then mounts elements. (Rendering in this context means calling a class’s render(), not painting the DOM.) Refer to table 5.1 for events in between componentWillMount() and componentDidMount().
5.5.1. componentWillMount()
It’s worth mentioning that componentWillMount() is invoked only once in the component’s lifecycle. The timing of the execution is just before the initial rendering.
The lifecycle event componentWillMount() is executed when you render a React element on the browser by calling ReactDOM.render(). Think of it as attaching (or mounting) a React element to a real DOM node. This happens in the browser: the front end.
If you render a React component on a server (the back end, using isomorphic/universal JavaScript; see chapter 16), which basically gets an HTML string, then—even though there’s no DOM on the server or mounting in that case—this event will also be invoked!
You saw in chapter 4 how to update the currentTime state using Date and setInterval(). You triggered the series of updates in constructor() by calling launchClock(). You can do so in componentWillMount() as well.
Typically, a state change triggers a rerender, right? At the same time, if you update the state with setState() in the componentWillMount() method or trigger updates as you did with Clock, then render() will get the updated state. The best thing is that even if the new state is different, there will be no rerendering because render() will get the new state. To put it another way, you can invoke setState() in componentWillMount(). render() will get the new values, if any, and there will be no extra rerendering.
5.5.2. componentDidMount()
In contrast, componentDidMount() is invoked after the initial rendering. It’s executed only once and only in the browser, not on the server. This comes in handy when you need to implement code that runs only for browsers, such as XHR requests.
In this lifecycle event, you can access any references to children (for example, to access the corresponding DOM representation). Note that the componentDidMount() method of child components is invoked before that of parent components.
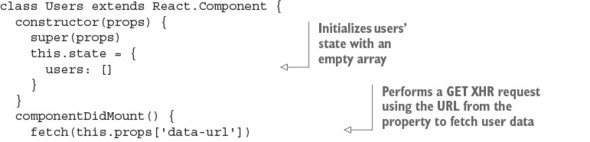
As mentioned earlier, the componentDidMount() event is the best place to integrate with other JavaScript libraries. You can fetch a JSON payload that has a list of users with their info. Then, you can print that information, using a Twitter Bootstrap table to get the page shown in figure 5.5.
Figure 5.5. Showing a list of users (fetched from a data store) styled with Twitter Bootstrap

The structure of the project is as follows:
/users
  /css
    bootstrap.css
  /js
    react.js
    react-dom.js
    script.js
    - users.js
  /jsx
    script.jsx
    users.jsx
  index.html
  real-user-data.json
You have the DOM element in the event, and you can send XHR/AJAX requests to fetch the data with the new fetch() API:
fetch(this.props['data-url'])
  .then((response)=>response.json())
  .then((users)=>this.setState({users: users}))
The Fetch API (http://mng.bz/mbMe) lets you make XHR request using promises in a unifying manner. It’s available in most modern browsers, but refer to the specs (https://fetch.spec.whatwg.org) and the standard (https://github.com/whatwg/fetch) to find out if the browsers you need to support for your apps implement it. The usage is straightforward—you pass the URL and define as many promise then statements as needed:
fetch('http://node.university/api/credit_cards/')
  .then(function(response) {
    return response.blob()
  })
  .then(function(blob) {
    // Process blob
  })
  .catch(function(error) {
    console.log('A problem with your fetch operation: ' +
      error.message)
})
If the browser you develop for doesn’t support fetch() yet, you can shim it, or use any other HTTP agent library such as superagent (https://github.com/visionmedia/superagent); request (https://github.com/request/request); axios (https://github.com/mzabriskie/axios); or even jQuery’s $.ajax() (http://api.jquery.com/jquery.ajax) or $.get().
You can put your XHR fetch request in componentDidMount(). You may think that by putting the code in componentWillMount(), you can optimize loading, but there are two issues: if you get data from the server faster than your rendering finishes, you may trigger rerender on an unmounted element, which could lead to unintended consequences. Also, if you’re planning to use a component on the server, then component-WillMount() will fire there as well.
Now, let’s look at the entire component, with fetch happening in componentDidMount() (ch05/users/jsx/users.jsx).
Listing 5.3. Fetching data to display in a table
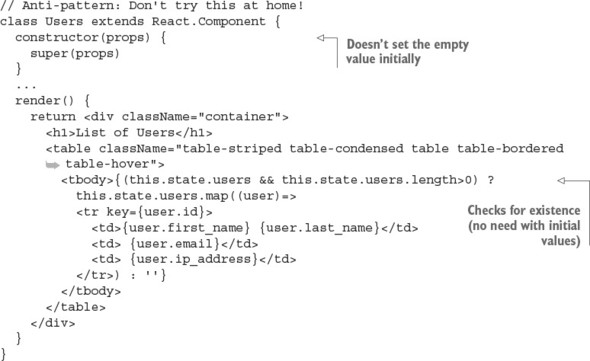
Notice that users is set to an empty array ([]) in the constructor. This gets around the need to check for existence later in render(). Repetitive checks and bugs due to undefined values—what a great way to waste time and get a repetitive-stress injury from excessive typing. Setting your initial values will help you avoid lots of pain later! In other words, this is an antipattern:
5.6. Updating events
As noted earlier, mounting events are often used to integrate React with the outside world: other frameworks, libraries, or data stores. Updating events are associated with updating components. These events are as follows, in order from the component lifecycle’s beginning to its end (see table 5.2 for just the updating lifecycle events and table 5.1 for all events).
- componentWillReceiveProps(newProps)
- shouldComponentUpdate()
- componentWillUpdate()
- componentDidUpdate()
Table 5.2. Lifecycle events invoked/called on component update
|
Updating component properties |
Updating component state |
Updating using forceUpdate() |
|---|---|---|
| componentWillReceiveProps() | ||
| shouldComponentUpdate() | shouldComponentUpdate() | |
| componentWillUpdate() | componentWillUpdate() | componentWillUpdate() |
| render() | render() | render() |
| componentDidUpdate() | componentDidUpdate() | componentDidUpdate() |
5.6.1. componentWillReceiveProps(newProps)
componentWillReceiveProps(newProps) is triggered when a component receives new properties. This stage is called an incoming property transition. This event allows you to intercept the component at the stage between getting new properties and before render(), in order to add some logic.
The componentWillReceiveProps(newProps) method takes the new prop(s) as an argument. It isn’t invoked on the initial render of the component. This method is useful if you want to capture the new property and set the state accordingly before the rerender. The old property value is in the this.props object. For example, the following snippet sets the opacity state, which in CSS is 0 or 1, depending on the Boolean property isVisible (1 = true, 0 = false):
componentWillReceiveProps(newProps) {
  this.setState({
    opacity: (newProps.isVisible) ? 1 : 0
  })
}
Generally speaking, the setState() method in componentWillReceiveProps(newProps) won’t trigger extra rerendering.
In spite of receiving new properties, these properties may not necessarily have new values (meaning values different from current properties), because React has no way of knowing whether the property values have changed. Therefore, componentWillReceiveProps(NewProps) is invoked each time there’s a rerendering (of a parent structure or a call), regardless of property-value changes. Thus, you can’t assume that newProps always has values that are different from the current properties.
At the same time, rerendering (invoking render()) doesn’t necessarily mean changes in the real DOM. The decision whether to update and what to update in the real DOM is delegated to shouldComponentUpdate() and the reconciliation process.[1]
For more reasons why React can’t perform smarter checks before calling componentWillReceiveProps(newProps), read the extensive article “(A ⇒ B) !⇒ (B ⇒ A),” by Jim Sproch, React, January 8, 2016, http://mng.bz/3WpG.
5.6.2. shouldComponentUpdate()
Next is the shouldComponentUpdate() event, which is invoked right before rendering. Rendering is preceded by the receipt of new properties or state. The should-ComponentUpdate() event isn’t triggered for the initial render or for forceUpdate() (see table 5.1).
You can implement the shouldComponentUpdate() event with return false to prohibit React from rerendering. This is useful when you’re checking that there are no changes and you want to avoid an unnecessary performance hit (when dealing with hundreds of components). For example, this snippet uses the + binary operator to convert the Boolean isVisible into a number and compare that to the opacity value:
shouldComponentUpdate(newProps, newState) {
  return this.state.opacity !== + newProps.isVisible
}
When isVisible is false and this.state.opacity is 0, the entire render() is skipped; also, componentWillUpdate() and componentDidUpdate() aren’t called. In essence, you can control whether a component is rerendered.
5.6.3. componentWillUpdate()
Speaking of componentWillUpdate(), this event is called just before rendering, preceded by the receipt of new properties or state. This method isn’t called for the initial render. Use the componentWillUpdate() method as an opportunity to perform preparations before an update occurs, and avoid using this.setState() in this method! Why? Well, can you imagine trying to trigger a new update while the component is being updated? It sounds like a bad idea to me!
If shouldComponentUpdate() returns false, then componentWillUpdate() isn’t invoked.
5.6.4. componentDidUpdate()
The componentDidUpdate() event is triggered immediately after the component’s updates are reflected in the DOM. Again, this method isn’t called for the initial render. componentDidUpdate() is useful for writing code that works with the DOM and its other elements after the component has been updated, because at this stage you’ll get all the updates rendered in the DOM.
Every time something is mounted or updated, there should be a way to unmount it. The next event provides a place for you to put logic for unmounting.
5.7. Unmounting event
In React, unmounting means detaching or removing an element from the DOM. There’s only one event in this category, and this is the last category in the component lifecycle.
5.7.1. componentWillUnmount()
The componentWillUnmount() event is called just before a component is unmounted from the DOM. You can add any necessary cleanup to this method; for example, invalidating timers, cleaning up any DOM elements, or detaching events that were created in componentDidMount.
5.8. A simple example
Suppose you’re tasked with creating a Note web app (to save text online). You’ve implemented the component, but initial feedback from users is that they lose their progress if they close the window (or a tab) unintentionally. Let’s implement the confirmation dialog shown in figure 5.6.
Figure 5.6. A dialog confirmation when the user tries to leave the page
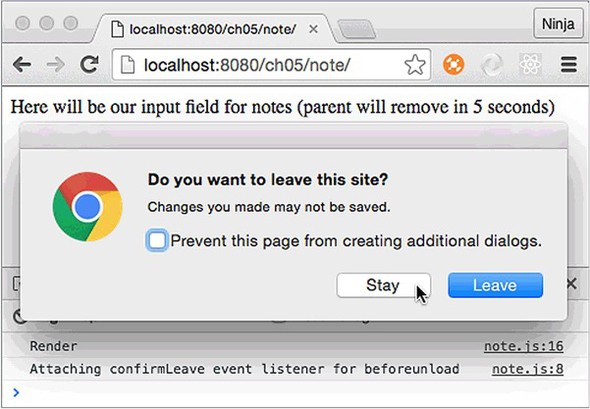
To implement a dialog like that, we need to listen to a special window event. The tricky part is to clean up after the element is no longer needed, because if the element is removed but its event is not, memory leaks could be the result! The best way to approach this problem is to attach the event on mounting and remove the event on dismounting.
The structure of the project is as follows:
/note
  /jsx
    note.jsx
    script.jsx
  /js
    note.jsx
    react.js
    react-dom.js
    script.js
  index.html
The window.onbeforeunload native browser event (with additional code for cross-browser support) is straightforward:
window.addEventListener('beforeunload',function () {
  let confirmationMessage = 'Do you really want to close?'
  e.returnValue = confirmationMessage     // Gecko, Trident, Chrome 34+
  return confirmationMessage              // Gecko, WebKit, Chrome < 34
})
The following approach will work, too:
window.onbeforeunload = function () {
  ...
  return confirmationMessage
}
Let’s put this code in an event listener in componentDidMount() and remove the event listener in componentWillUnmount() (ch05/note/jsx/note.jsx).
Listing 5.4. Adding and removing an event listener
class Note extends React.Component {
  confirmLeave(e) {
    let confirmationMessage = 'Do you really want to close?'
    e.returnValue = confirmationMessage     // Gecko, Trident, Chrome 34+
    return confirmationMessage              // Gecko, WebKit, Chrome <34
  }
  componentDidMount() {
    console.log('Attaching confirmLeave event listener for beforeunload')
    window.addEventListener('beforeunload', this.confirmLeave)
  }
  componentWillUnmount() {
    console.log('Removing confirmLeave event listener for beforeunload')
    window.removeEventListener('beforeunload', this.confirmLeave)
  }
  render() {
    console.log('Render')
    return Here will be our input field for notes (parent will remove in
     {this.props.secondsLeft} seconds)
  }
}
{this.props.secondsLeft} seconds)
}
}
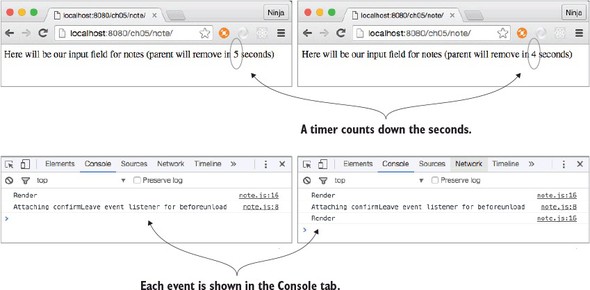
You want to check how your code works when the Note element is removed, right? For this reason, you need to remove the Note element so that it’s dismounted. Therefore, the next step is to implement the parent in which you not only create Note but remove it. Let’s use a timer for that (setInterval() all the way!), as shown in the following listing (ch05/note/jsx/script.jsx) and figure 5.7.
Figure 5.7. Note will be replaced by another element in 5, 4, ... seconds.
Listing 5.5. Rendering Note before removing it
let secondsLeft = 5
let interval = setInterval(()=>{
  if (secondsLeft == 0) {
    ReactDOM.render(
      <div>
        Note was removed after {secondsLeft} seconds.
      </div>,
      document.getElementById('content')
    )
    clearInterval(interval)
  } else {
    ReactDOM.render(
      <div>
        <Note secondsLeft={secondsLeft}/>
      </div>,
      document.getElementById('content')
    )
  }
  secondsLeft--
}, 1000)
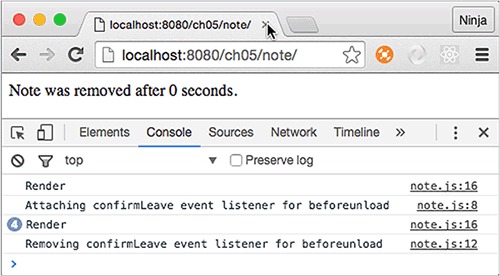
Figure 5.8 shows the result (with console logs): render, attach event listener, render four more times, remove event listener.
Figure 5.8. Note is replaced by a div, and there will be no dialog confirmation when the user tries to leave the page.
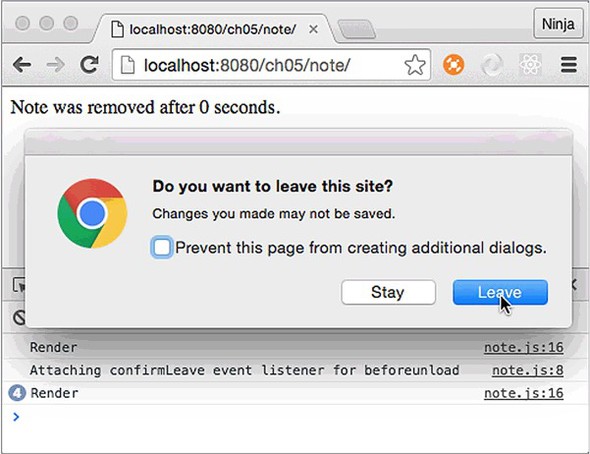
If you don’t remove the event listener in componentWillUnmount() (you can comment out this method to see), the page will still have a pesky dialog even though the Note element is long gone, as shown in figure 5.9. This isn’t a good UX and may lead to bugs. You can use this lifecycle event to clean up after components.
Figure 5.9. Dialog confirmation when the user tries to leave the page
The React team is listening to feedback from React developers. Most of these lifecycle events allow developers to tweak the behavior of their components. Think of lifecycle events as black-belt-Ninja-Matrix-Jedi skills. You can code without them, but boy your code will be more powerful with them. What’s interesting is that there’s still conversation about the best practices and usage. React is still evolving, and there may be changes or additions to the lifecycle events in the future. If you need to refer to the official documentation, see https://facebook.github.io/react/docs/react-component.html.
5.9. Quiz
componentWillMount() will be rendered on the server. True or false?
Which event will fire first, componentWillMount() or componentDidMount()?
Which of the following is a good place to put an AJAX call to the server to get some data for a component? componentWillUnmount(), componentHasMounted(), componentDidMount(), componentWillReceiveData(), or componentWillMount()
componentWillReceiveProps() means there was a rerendering of this element (from a parent structure), and you know for sure that you have new values for the properties. True or false?
Mounting events happen multiple times on each rerendering. True or false?
5.10. Summary
- componentWillMount() is invoked on both the server and the client, whereas componentDidMount() is invoked only on the client.
- Mounting events are typically used to integrate React with other libraries and get data from stores or servers.
- You use shouldComponentUpdate() to optimize rendering.
- You use componentWillReceiveProps() to perform a state change with new properties.
- Unmounting events are typically used for cleanup.
- Updating events provide a place to put logic that relies on new properties or state, and they give you more granular control over when to update a view.
5.11. Quiz answers
True. Although there’s no DOM, this event will be triggered on the server rendering, but componentDidMount() won’t.
componentWillMount is first, followed by componentDidMount().
componentDidMount(), because it won’t be triggered on the server.
False. You can’t guarantee new values. React doesn’t know if the values have been changed.
False. Mounting isn’t triggered on rerender to optimize performance, because excessive mounting is a relatively expensive operation.