Table of Contents for
React Quickly: Painless web apps with React, JSX, Redux, and GraphQL
 React Quickly: Painless web apps with React, JSX, Redux, and GraphQL
Published by
Manning Publications, 2017
React Quickly: Painless web apps with React, JSX, Redux, and GraphQL
Published by
Manning Publications, 2017
- Cover
- React Quickly: Painless web apps with React, JSX, Redux, and GraphQL
- Copyright
- React Quickly: Painless web apps with React, JSX, Redux, and GraphQL
- Brief Table of Contents
- Table of Contents
- Praise for React Quickly
- Foreword
- Preface
- Acknowledgments
- About This Book
- About the Author
- About the Cover
- Part 1. React foundation
- Chapter 1. Meeting React
- Chapter 2. Baby steps with React
- Chapter 3. Introduction to JSX
- Chapter 4. Making React interactive with states
- Chapter 5. React component lifecycle events
- Chapter 6. Handling events in React
- Chapter 7. Working with forms in React
- Chapter 8. Scaling React components
- Chapter 9. Project: Menu component
- Chapter 10. Project: Tooltip component
- Chapter 11. Project: Timer component
- Part 2. React architecture
- Chapter 12. The Webpack build tool
- Chapter 13. React routing
- Chapter 14. Working with data using Redux
- Chapter 15. Working with data using GraphQL
- Chapter 16. Unit testing React with Jest
- Chapter 17. React on Node and Universal JavaScript
- Chapter 18. Project: Building a bookstore with React Router
- Chapter 19. Project: Checking passwords with Jest
- Chapter 20. Project: Implementing autocomplete with Jest, Express, and MongoDB
- Appendix A. Installing applications used in this book
- Appendix B. React cheatsheet
- Appendix C. Express.js cheatsheet
- Appendix D. MongoDB and Mongoose cheatsheet
- Appendix E. ES6 for success
- React Cheatsheet
- Index
- List of Figures
- List of Tables
- List of Listings
Chapter 12. The Webpack build tool
This chapter covers
- Adding Webpack to a project
- Modularizing your code
- Running Webpack and testing the build
- Performing hot module replacement
Before we go any further with the React stack (a.k.a. React and friends), let’s look at a tool that’s essential to most modern web development: a build tool (or bundler). You’ll use this tool in subsequent chapters to bundle your many code files into the minimum number of files needed to run your applications and prepare them for easy deployment. The build tool you’ll be using is Webpack (https://webpack.js.org).
If you’ve not come across a build tool before, or if you’ve used another one such as Grunt, Gulp, or Bower, this chapter is for you. You’ll learn how to set up Webpack, configure it, and get it running against a project.
This chapter also covers hot module replacement (HMR), a feature of Webpack that enables you to hot-swap updated modules for those running on a live server. First, though, we’ll look at what Webpack can do for you.
Note
Code generators such as create-react-app (https://github.com/facebookincubator/create-react-app) create boilerplate/scaffolding code and help you start projects quickly. create-react-app also uses Webpack and Babel, along with other modules. But this book primarily teaches fundamentals, so you won’t use a code generator; instead, you’ll do the setup yourself to make sure you understand each part. If you’re interested, you can learn how to use a code generator for yourself—it just takes a few commands.
Note
The source code for the examples in this chapter is at www.manning.com/books/react-quickly and https://github.com/azat-co/react-quickly/tree/master/ch12 (in the ch12 folder of the GitHub repository https://github.com/azat-co/react-quickly). You can also find some demos at http://reactquickly.co/demos.
12.1. What does Webpack do?
Have you ever wondered why (in web development) everyone and their mother are talking about Webpack? Webpack’s core focus is optimizing the JavaScript you write so that it’s contained in as few files as possible for a client to request. This reduces the strain on the servers for popular sites and also reduces the client’s page-load time. Of course, it’s not as simple as that. JavaScript is often written in modules that are easy to reuse. But they often depend on other modules that may depend on other modules, and so on; and keeping track of what needs to be loaded when so that all the dependencies resolve quickly can be a headache.
Let’s say you have a utility module myUtil, and you use it in many React components—accounts.jsx, transactions.jsx, and so on. Without a tool like Webpack, you’d have to manually keep track of the fact that each time you use one of those components, you need to include myUtil as a dependency. Additionally, you might be loading myUtil unnecessarily for a second or third time, because another component that depends on myUtil has already loaded it. Of course, this is a simplified example; real projects have dozens or even hundreds of dependencies that are used in other dependencies. Webpack can help.
Webpack knows how to deal with all three types of JavaScript module—CommonJS (www.commonjs.org), AMD (https://github.com/amdjs/amdjs-api/wiki/AMD), and ES6 (http://mng.bz/VjyO)—so you don’t need to worry if you’re working with a hodgepodge of module types. Webpack will analyze the dependencies for all the JavaScript in your project and do the following:
- Ensure that all dependencies are loaded in the correct order
- Ensure that all dependencies are loaded only once
- Ensure that your JavaScript is bundled into as few files as possible (called static assets)
Webpack also supports code splitting and asset hashing, which let you identify blocks of code that are required only under certain circumstances. These blocks are split out to be loaded on demand rather than bundled in with everything else. You must opt in to use these features and further optimize your JavaScript and its deployment.
Note
Code splitting and asset hashing are outside the scope of this book. Check out the Webpack website for more information: https://webpack.github.io/docs/code-splitting.html.
Webpack isn’t just about JavaScript, though. It supports the preprocessing of other static files through the use of loaders. For example, you can do the following before any bundling takes place:
- Precompile your JSX, Jade, or CoffeeScript files into plain JavaScript
- Precompile ES6+ code into ES5 for browsers that don’t yet support ES6
- Precompile Sass and Compass files into CSS
- Optimize sprites into a single PNG or JPG file or inline data assets
Many loaders are available for all sorts of file types. In addition, plug-ins that modify Webpack’s behavior are catalogued on the Webpack homepage. If you can’t find what you’re looking for, there’s documentation about how to write your own plug-in.
For the rest of this book, you’ll be using Webpack to do the following:
- Manage and bundle dependencies from npm modules, so you don’t have to manually download files from the internet, and include them with <script> tags in HTML
- Transpile JSX into regular JavaScript while providing source maps for easier debugging
- Manage styles
- Perform hot module reloading
- Build a development web server
As you’ll see, you can configure the order in which Webpack loads, precompiles, and bundles your files using its webpack.config.js file. But first, let’s look at how to install Webpack and get it working with a project.
12.2. Adding Webpack to a project
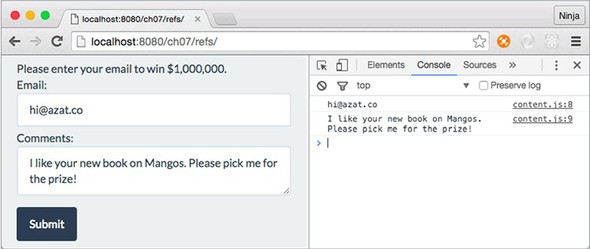
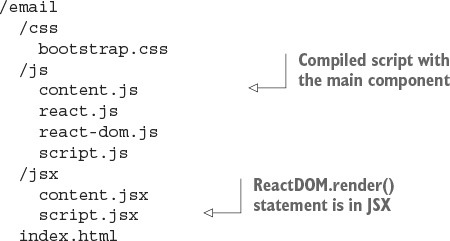
To illustrate how you can get starting working with Webpack, let’s slightly modify the project from chapter 7 shown in figure 12.1. It has email and comment input fields, two style sheets, and one Content component.
Figure 12.1. Original email project before using Webpack
Here’s the new project structure. I’ve pointed out where it differs from the project in chapter 7:
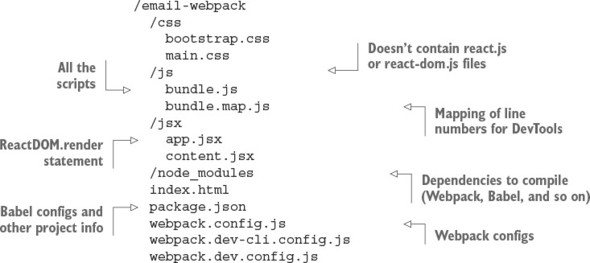
Contrast that with the non-Webpack setup from chapter 7:
Note
Do you have Node.js and npm? This is the best time to install them—you’ll need them, in order to proceed. Appendix A covers installation.
This section walks you through the following steps:
- Installing webpack
- Installing dependencies and saving them to package.json
- Configuring Webpack’s webpack.config.js
- Configuring the dev server and hot module replacement
Let’s get started.
12.2.1. Installing Webpack and its dependencies
To use Webpack, you’ll need a few additional dependencies, as noted in package.json:
- Webpack—The bundler tool (npm name: webpack); use v2.4.1
- Loaders—Style, CSS, hot module replacement (HMR), and Babel/JSX preprocessors (npm names: style-loader, css-loader, react-hot-loader and babel-loader, babel-core, and babel-preset-react); use the versions specified in package.json
- The webpack-dev-server—An Express development server that lets you use HMR (npm name: webpack-dev-server); use v2.4.2
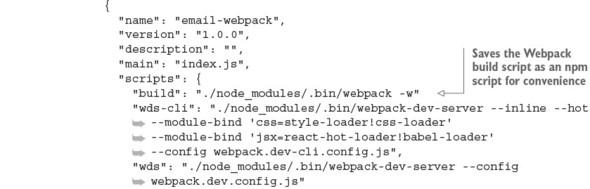
You can install each module manually, but I recommend copying the package.json file shown in listing 12.1 (ch12/email-webpack/package.json) from the GitHub repository to your project root (see the project structure shown in section 12.2). Then, run npm i or npm install from the project root (where you have package.json) to install the dependencies. This will ensure that you don’t forget any of the 10 modules (a synonym for package in Node). It also ensures that your versions are close to the ones I used. Using wildly different versions is a fantastic way to break the app!
Listing 12.1. Setting up the dev environment
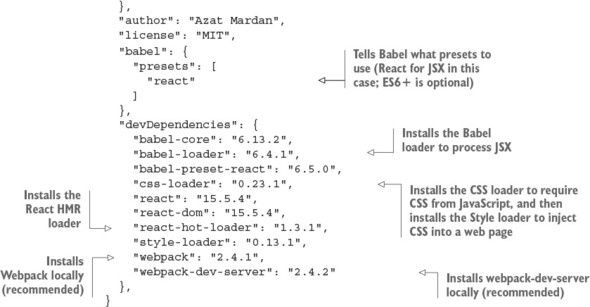
The babel property in package.json should be familiar to you from part 1 of this book, so I won’t spend time repeating myself. As a reminder, you need this property to configure Babel to convert JSX to JS. If you need to support browsers that can’t work with ES6, you can add the es2015 preset to presets:
"babel": {
  "presets": [
    "react",
    "es2015"
  ]
},
Also add babel-preset-es2015 to devDependencies:
"devDependencies": {
  "babel-preset-es2015": "6.18.0",
  ...
}
In addition to new dependencies, there are new npm scripts. The commands in scripts in package.json are optional but highly recommended, because using npm scripts for launching and building is a best practice when working with React and Node. Of course, you can run all the builds manually without using npm scripts, but why type extra characters?
You can either run Webpack with npm run build or run it directly with ./node_modules/.bin/webpack -w. The -w flag means watch—that is, continue to monitor for any source code changes, and rebuild bundles if there are any. In other words, Webpack will keep running to automatically make changes. Of course, you must have all the necessary modules installed with npm i.
The webpack -w command looks for webpack.config.js by default. You can’t run Webpack with this configuration file. Let’s create it next.
Note
The wds and wds-cli npm scripts in package.json are explained in section 12.5.
12.2.2. Configuring Webpack
Webpack needs to know what to process (the source code) and how to do it (with the loaders). That’s why there’s webpack.config.js in the root of the project structure. In a nutshell, in this project, you’re using Webpack to do the following:
- Transform your JSX files into JS files: babel-loader, babel-core, and babel-preset-react
- Load CSS via require and resolve url and imports in the process with css-loader (https://github.com/webpack/css-loader)
- Add CSS by injecting the <style> element with style-loader (https://github.com/webpack/style-loader)
- Bundle all the resulting JS files into one file called bundle.js
- Provide the proper source code–line mapping in DevTools via source maps
Webpack needs its own configuration file: email-webpack/webpack.config.js.
Listing 12.2. Webpack configuration file
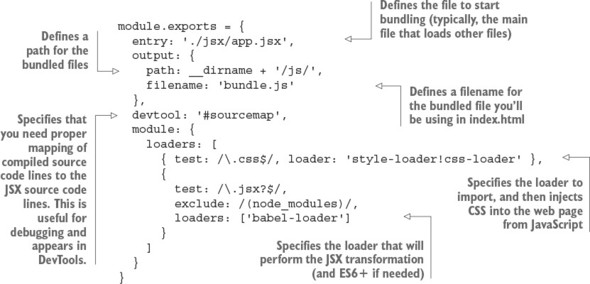
The devtool property is useful during development because it provides source maps that show you the line numbers in source—not compiled—code. You’re now ready to run Webpack for this project and also bootstrap any Webpack-based projects in the future.
If you wish, you can have more than one configuration file. These files can come in handy for development, production, testing, and other builds. In the example’s project structure, I created these files:
webpack.dev-cli.config.js
webpack.dev.config.js
Naming doesn’t matter as long as you and your teammates can understand the meaning of each file. The name is passed to Webpack with --config. You’ll learn more about these configuration files in section 12.4.
Webpack has a lot of features, and we’ve only covered the basics; but they’re enough to compile JSX, provide source maps, inject and import CSS, and bundle JavaScript. When you need more Webpack functionality, you can consult the documentation or a book like SurviveJS by Juho Vepsäläinen (https://survivejs.com).
Now you’re ready to use some of Webpack’s power in JSX.
12.3. Modularizing your code
As you’ll recall, in chapter 7, the email app used global objects and <script>. That’s fine for this book or a small app. But in large apps, using globals is frowned on because you may run into trouble with name collisions or managing multiple <script> tags with duplicate inclusions. You can let Webpack do all the dependency management by using CommonJS syntax. Webpack will include only needed dependencies and package them into a single bundle.js file (based on the configs in webpack.config.js).
Organizing your code by modularizing it is a best practice not only for React but also for software engineering in general. You can use Browserify, SystemJS, or another bundler/module loader and still use CommonJS/Node.js syntax (require and module.exports). Thus, the code in this section is transferable to other systems, once you refactor it away from primitive globals.
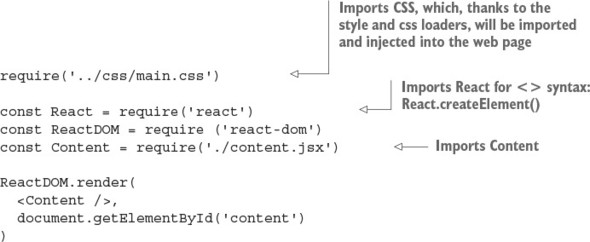
As of this writing, import (http://mng.bz/VjyO) is supported by only one browser—Edge—and isn’t supported by Node.js. ES6 modules with import syntax will need more work in the Webpack setup. It isn’t an exact replacement for CommonJS require/module.exports syntax, because those commands work differently. For this reason, the following listing (ch12/email-webpack/app.jsx) refactors app.jsx to use require() and module.exports instead of global objects and HTML <script>. Due to the use of style-loader, you can require CSS files as well. And because of the Babel loader, you can require JSX files.
Listing 12.3. Refactoring app.jsx
In contrast, ch07/email/jsx/script.jsx looks like this:
ReactDOM.render(
  <Content />,
  document.getElementById('content')
)
The old file is smaller, but this is one of the rare cases in which less isn’t more. It relies on the global Content, ReactDOM, and React objects, which, as I just explained, is a bad practice.
In content.jsx, you can use require() in a similar way. The code for constructor(), submit(), and render() doesn’t change:

The index.html file needs to point to the bundle that Webpack creates for you: the js/bundle.js file. Its name is specified in webpack.config.js, and now you need to add it. It will be created after you run npm run build. Here’s the new index.html code:
<!DOCTYPE html>
<html>
  <head>
    <link href="css/bootstrap.css" type="text/css" rel="stylesheet"/>
  </head>
  <body>
    <div id="content" class="container"></div>
    <script src="js/bundle.js"></script>
  </body>
</html>
Note that you also remove the reference to the stylesheet main.css from index.html. Webpack will inject a <style> element with a reference to main.css into index.html for you, because of require('main.css') in app.jsx. You can use require() for bootstrap.css as well.
That’s the last step in refactoring your project.
12.4. Running Webpack and testing the build
This is the moment of truth. Run $ npm run build, and compare your output with the following:
> email-webpack@1.0.0 build/Users/azat/Documents/Code/react-quickly/ch12/email-webpack > webpack -w Hash: 2ffe09fff88a4467788a Version: webpack 1.12.9 Time: 2545ms Asset Size Chunks Chunk Names bundle.js 752 kB 0 [emitted] main bundle.js.map 879 kB 0 [emitted] main + 177 hidden modules
If there are no errors and you can see newly created bundle.js and bundle.js.map files in the js folder, bingo! Now spin up your favorite web server (perhaps node-static or http-server), and check the web app. You’ll see that it’s logging emails and comments in the console.
As you can see, incorporating Webpack into a project is straightforward and yields great results.
There are 177 modules in ch12/email-webpack/js/bundle.js! You can open the file and search for webpack_require(1), webpack_require(2), and so on, through webpack_require(176), which is the Content component. The followed compiled code from app.jsx imports Content (lines 49–53 in bundle.js):
const React = __webpack_require__(5); const ReactDOM = __webpack_require__(38); const Content = __webpack_require__(176); ReactDOM.render(React.createElement(Content, null),
At a bare minimum, you’re ready to use Webpack for the rest of this book. But I strongly recommend that you set up one more thing: hot module replacement (HMR), which can speed up development dramatically. Before we proceed with React development, let’s look at this great Webpack feature.
I want to mention two other useful development tools. Obviously, they’re optional, but they’re a pretty big deal.
ESLint (http://eslint.org, npm name eslint) can take predefined rules or sets of rules and make sure your code (JS or JSX) adheres to the same standards. For example, how many spaces is an indent—four or two? Or, what if you accidentally put a semicolon in your code? (Semicolons are optional in JavaScript, and I prefer not to use them.) ESLint will even give you a warning about unused variables. It can prevent bugs from sneaking into your code! (Not all of them, of course.)
Check out “Getting Started with ESLint” (http://eslint.org/docs/user-guide/getting-started). You’ll also need eslint-plugin-react (https://github.com/yannickcr/eslint-plugin-react). Make sure you add the React rules to .eslintrc.json (the full code is in the ch12/email-webpack-eslint-flow folder):
"rules": {
    "react/jsx-uses-react": "error",
    "react/jsx-uses-vars": "error",
  }
Here’s an example of some warnings from running ESLint React on ch12/email-web-pack-lint-flow/jsx/content.jsx:
/Users/azat/Documents/Code/react-quickly/ch12/
Next, Flow (https://flowtype.org, npm name flow-bin) is a static type-checking tool you can use to add a special comment (// @flow) to your scripts and types. Yes! Types in JavaScript! Rejoice, if you’re a software engineer with a preference for strongly typed languages like Java, Python, and C. Once you’ve added the comment, you can run a Flow check to see whether there are any issues. Again, this tool can prevent some pesky bugs:
// @flow

var bookName: string = 13
console.log(bookName) // number. This type is incompatible with string
Flow has extensive documentation: see “Getting started with Flow” (https://flowtype.org/docs/getting-started.html) and “Flow for React” (https://flowtype.org/docs/react.html).
You can configure Atom or any other modern code editor to work with ESLint and Flow to catch problems on the fly.
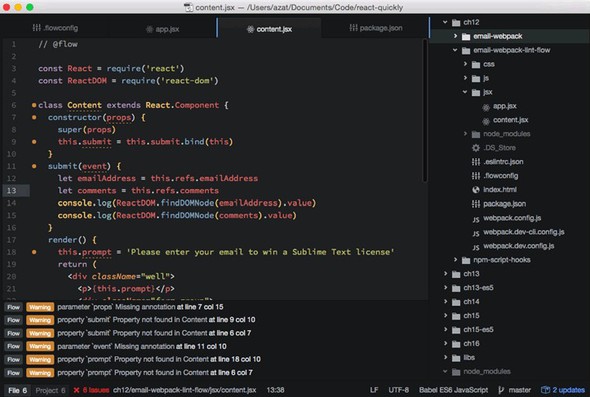
The Atom code editor supports Flow, which shows issues in the bottom pane and marks on the code line during development.
You can find the email project code with ESLint v3.8.1 and Flow v0.33.0 in the ch12/email-webpack-eslint-flow folder.
12.5. Hot module replacement
Hot module replacement (HMR) is one of the coolest features of Webpack and React. It lets you write code and test it more quickly by updating the browser with changes while preserving the app’s state.
Say you’re working on a complex single-page web application, and getting to the current page you’re working on takes 12 clicks. If you upload new code to the site, then to get it running, you have to click Reload/Refresh in your browser and repeat those 12 clicks. If you’re using HMR, on the other hand, there are no page reloads, and your changes are reflected on the page.
HMR’s primary benefit is that you can iterate (write, test, write, test, and so on) more quickly, because your app will save state when you make changes. Some developers consider HMR so groundbreaking that if React didn’t have any other features, they would still use it just for HMR!
For the nitty-gritty details of how the HMR process works, see the documentation at http://mng.bz/L9d5. This section covers the practical application of this technology as it pertains to the example email form.
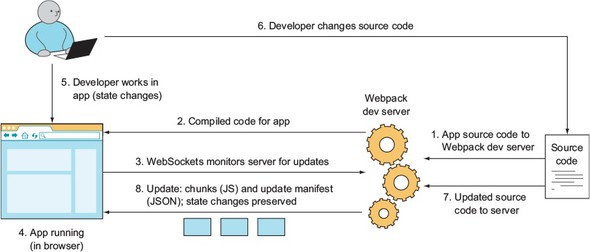
The process of hot-updating code requires multiple steps, shown in a simplified form in figure 12.2. Webpack HMR and the dev server use WebSockets to monitor update notifications from the server. If there are any, the front end gets chunks (JavaScript code) and an update manifest (JSON), which are basically the delta of the changes. The front-end app preserves its state (such as data in an input field or a screen position), but the UI and code change. Magic.
Figure 12.2. Webpack listens for code changes and sends update notifications along with updates to the running app in the browser.
To see HMR in an example, you’ll use a new configuration file and webpack-dev-server (WDS). It’s possible to use HMR with your own server, built with Express/Node; WDS is optional, but it’s provided by Webpack as a separate webpack-dev-server module, so I’ll cover it here.
Once everything is configured, you’ll enter an email in the form and make a few changes in the code. Thanks to HMR, you’ll see that the entered email remains on the form and your changes are propagated to the web app.
12.5.1. Configuring HMR
First, duplicate webpack.config.js by creating a copy named webpack.dev.config.js:
$ cp webpack.config.js webpack.dev.config.js
Next, open the newly created webpack.dev.config.js file. You need to add a few things such as new entry points, a public path, and the HMR plug-in, and set the dev-server flag to true. The following listing shows the final file (ch12/email-webpack/webpack.dev.config.js).
Listing 12.4. webpack-dev-server and HMR configuration

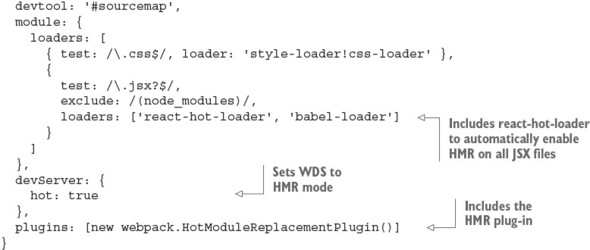
You need to tell WDS to use this new configuration file by providing the --config option:
./node_modules/.bin/webpack-dev-server --config webpack.dev.config.js
Save this in package.json for convenience, if you don’t have it there already. As you’ll recall, react-hot-loader is in the dependencies. This module enables HMR for all JSX files (which are in turn converted to JS).
I prefer to enable HMR for all files with react-hot-loader. But if you want to have HMR only for certain modules, not all of them, don’t use react-hot-loader; instead, opt in manually by adding the module.hot.accept() statement to the JSX/JS modules you want to cherry-pick for HMR. This module.hot magic comes from Webpack. It’s recommended that you check whether module.hot is available:
if(module.hot) {
  module.hot.accept()
}
That’s a lot of configurations! But there’s another way to use and configure Webpack: you can use command-line options and pack some configs in the commands.
If you prefer to use the command line, be my guest. Your config file will be smaller, but the commands will be bigger. For example, this webpack.dev-cli.config.js file has fewer configs:
module.exports = {
  entry: './jsx/app.jsx',
  output: {
    publicPath: 'js/',
    path: __dirname + '/js/',
    filename: 'bundle.js'
  },
  devtool: '#sourcemap',
  module: {
    loaders: [
      {
        test: /\.jsx?$/,
        exclude: /(node_modules)/,
        loaders: []
      }
    ]
  }
}
But it uses more CLI options:
./node_modules/.bin/webpack-dev-server --inline --hot
Several things are happening here. First, --inline and --hot include the entries enabling WDS and HMR mode. Then, you pass your loaders with --module-bind using the following syntax:
fileExtension=loader1!loader2!...
Make sure react-hot is before babel; otherwise, you’ll get an error.
When it comes to using the CLI or a full config file, the choice is yours. I find the CLI approach better for simpler builds. To avoid crying later when you discover that you mistyped this monstrosity of a command, you should save the command as an npm script in package.json. And no, batch/shell scripts/Make scripts aren’t cool anymore. Use npm scripts, like all the cool kids do! (Disclaimer: This is a joke. I’m not advocating fashion-driven development.)
npm scripts offer certain advantages, and they’re commonly used in Node and React projects. They’ve become a de facto standard, and you’ll generally find them when you first learn about a project. When I start working on a new project or library, the npm scripts are the first place I look, after readme.md—and sometimes instead of readme.md, which may be out of date.
npm scripts offer a flexible way to save essential scripts for testing, building, seeding with data, and running in development or other environments. In other words, any work that’s performed via the CLI and related to the app but that isn’t the app itself can be saved to npm scripts. They function as documentation, as well, to show others how building and testing work. You can call other npm scripts from npm scripts, thus simplifying your project further. The following example includes different versions of builds:
"scripts": {
 "test": "echo \"Error: no test specified\" && exit 1",
 "build": "./node_modules/.bin/babel -w",
 "build:method": " npm run build -- method/jsx/script.jsx -o
  method/js/script.js",
 "build:hello-js-world-jsx": "npm run build --
  hello-js-world-jsx/jsx/script.jsx -o
  hello-js-world-jsx/js/script.js",
 "build:hello-world-jsx": "npm run build --
  hello-world-jsx/jsx/script.jsx -o
  hello-world-jsx/js/script.js",
 "build:hello-world-class-jsx": "npm run build --
  hello-world-class-jsx/jsx/script.jsx -o
  hello-world-class-jsx/js/script.js"
},
npm scripts also support pre and post hooks, which makes them even more versatile. In general, a hook is a pattern in which some code is triggered when another event happens. For example, you can create a learn-react task along with two tasks that have pre and post hooks: prelearn-react and postlearn-react. As you may guess, the pre hook will be executed before learn-react, and the post hook will be executed after learn-react. For example, these bash scripts
"scripts": {
    "prelearn-react": "echo \"Purchasing React Quickly\"",
    "learn-react": "echo \"Reading React Quickly\" ",
    "postlearn-react": "echo \"Creating my own React app\""
  },
print the following output, based on the pre / post order:
...
Purchasing React Quickly
...
Reading React Quickly
...
Creating my own React app
With pre and post hooks, npm can easily replace some build steps performed by Webpack, Gulp, or Grunt.
See the documentation at https://docs.npmjs.com/misc/scripts and Keith Cirkel’s article “How to Use npm as a Build Tool” (www.keithcirkel.co.uk/how-to-use-npm-asa-build-tool) for more npm tips, including parameters and arguments. Any functionality that’s missing with npm scripts can be implemented from scratch as a Node script. The advantage is that you’ll have fewer dependencies on plug-ins for your project.
12.5.2. Hot module replacement in action
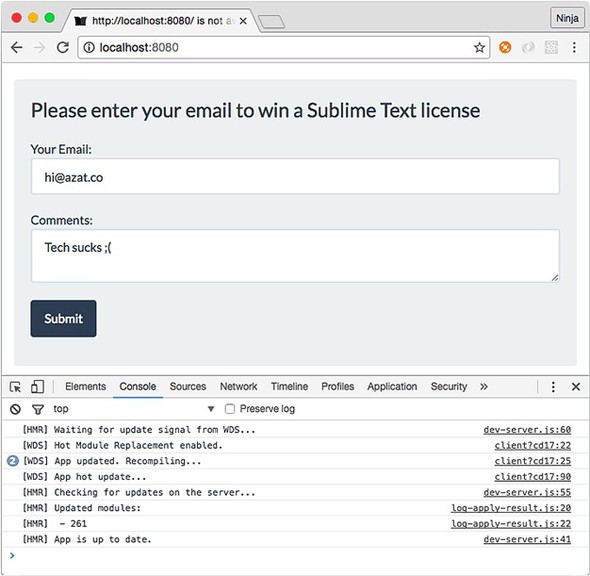
Go ahead and start WDS with npm run wds or npm run wds-cli. Then, go to http://localhost:8080 and open the DevTools console. You’ll see messages from HMR and WDS, as follows:
[HMR] Waiting for update signal from WDS...
[WDS] Hot Module Replacement enabled.
Enter some text in the email or comment field, and then change content.jsx. You can modify something in render()—for example, change the form text from Email to Your Email:
Your Email: <input ref="emailAddress" className="form-control" type="text"
You’ll see some logging:
[WDS] App updated. Recompiling...
...
[HMR] App is up to date.
Then your changes will appear on the web page, as shown in figure 12.3, along with the text you entered previously. Great—you no longer need to waste time entering test data or navigating deep inside nested UIs! You can spend more time doing important things instead of typing and clicking around the front-end app. Development is faster with HMR!
Figure 12.3. HMR updated the view from “Email” to “Your Email” without erasing the data in the fields, as shown in the log.
Note
HMR isn’t bulletproof. It won’t update or fail in some situations. WDS will reload the page (live reload) when that happens. This behavior is controlled by webpack/hot/dev-server; another option is to reload manually using webpack/hot/only-dev-server.
Webpack is a nice tool to use with React to streamline and enhance your bundling. It’s great not only for optimizing code, images, styles, and other assets when you deploy, but also for development, thanks to WDS and HMR.
12.6. Quiz
What is the command to run the dev npm script ("dev": "./node_modules/.bin/webpack-dev-server --config webpack.dev.config.js")? npm dev, npm run dev, NODE_ENV=dev npm run, or npm run development
HMR is just a React term for live reloading. True or false?
WDS will write compiled files to disk, just like the webpack command. True or false?
webpack.config.js must be a valid JSON file, just like package.json. True or false?
What loaders do you need to use in order to import and then inject CSS into a web page using Webpack?
12.7. Summary
- To make hot module replacement work, you need webpack-dev-server and react-hot-loader in your config or module.hot.accept() in files.
- You can use require() to load CSS with style-loader and css-loader.
- The --inline --hot options with CLI commands launch WDS in hot inline mode.
- devtool: '#sourcemap' enables proper line numbers for compiled code.
- publicPath is a WDS setting that tells WDS where to put the bundle.
12.8. Quiz answers
npm run dev. Only start and test npm scripts can be run without run. All other scripts follow npm run NAME syntax.
False. HMR can replace live reloading and fall back to it when HMR fails; but HMR is more advanced and offers more benefits, such as updating only parts of your app and preserving the app’s state.
False. WDS only serves files without writing them to disk.
False. webpack.config.js is a default Webpack configuration file. It must be a Node.js/JavaScript file with the CommonJS/Node.js module exporting the object literal for configurations (the object can have double quotes, akin to JSON).
The style loader imports, and the CSS loader injects.