Table of Contents for
Learning Web Design, 5th Edition
 Learning Web Design, 5th Edition
Published by
O'Reilly Media, Inc., 2018
Learning Web Design, 5th Edition
Published by
O'Reilly Media, Inc., 2018
- cover
- Learning Web Design, Fifth Edition
- lwd5_title_copy
- lwd5_title_copy-1
- lwd5_contents
- Foreword
- Preface
- Part I. Getting Started
- 2. How the Web Works
- 3. Some Big Concepts You Need to Know
- Part II. HTML for STRUCTURE
- 5. Marking Up Text
- 6. Adding Links
- 7. Adding Images
- 8. Table Markup
- 9. Forms
- 10. Embedded Media
- Part III. CSS for Presentation
- 12. Formatting Text
- 13. Colors and Backgrounds
- 14. Thinking Inside the Box
- 15. Floating and Positioning
- 16. CSS Layout with Flexbox and Grid
- 17. Responsive Web Design
- 18. Transitions, Transforms, and Animation
- 19. More CSS Techniques
- 20. Modern Web Development Tools
- Part IV. JavaScript for Behavior
- 22. Using JavaScript
- Part V. Web Images
- 24. Image Asset Production
- 25. SVG
- Part VI. Appendices
- B. HTML5 Global Attributes
- C. CSS Selectors, Levels 3 and 4
- D. From HTML+ to HTML5
20
In this chapter
Introduction to the command line
CSS preprocessors and postprocessors
Build tools and task runners
Git version control
In the exercises in this book, you’ve been writing static HTML pages with embedded style sheets, saving them, and opening them in your browser. Although that is a perfectly valid approach, it is likely not the way you would work if you were doing web development for a living. I figure if you are learning web design and development, you should be familiar with how things are done in a professional environment.
This chapter introduces you to some of the tools used by web developers to make their work easier and their code more robust:
- CSS processors for writing CSS more efficiently and optimizing the resulting code so it works across all browsers
- Build tools that automate the sorts of repetitive tasks you encounter when producing code
- Git, a version control program that keeps track of your previous versions and makes it easy for teams to work together on the same code
What these advanced tools have in common is that they are generally used with a command-line interface (CLI). So, before we look at specific tools, let’s first get up to speed with the command line.
Getting Cozy with the Command Line
You probably use a computer with a graphical user Interface (GUI), with icons that stand for files and folders, pull-down menus full of options, and intuitive actions like dragging files from folder to folder or into the trash.
Computer users in the ’60s and ’70s didn’t have that luxury. The only way to get a computer to perform a task was to type in a command. Despite our fancy GUIs, typing commands into a command-line terminal is far from obsolete. In fact, the more experienced you become at web development, the more likely it is you’ll dip into the command line for certain tasks. If you are already a programmer, the command line will be nothing new.
The command line is still popular for a number of reasons. First, it is useful for accessing remote computers, and developers often need to access and manage files on remote web servers. In addition, it is easier to write a program for the command line than a standalone application with a GUI, so many of the best tools for optimizing our workflow exist as command-line programs only. A lot of those tools can be used together in a pipeline for accomplishing complex tasks.
The time- and sanity-saving benefits are powerful incentives to take on the command line. Trust me: if you can learn all those elements and style properties, you can get used to typing a few commands.
The Command-Line Terminal
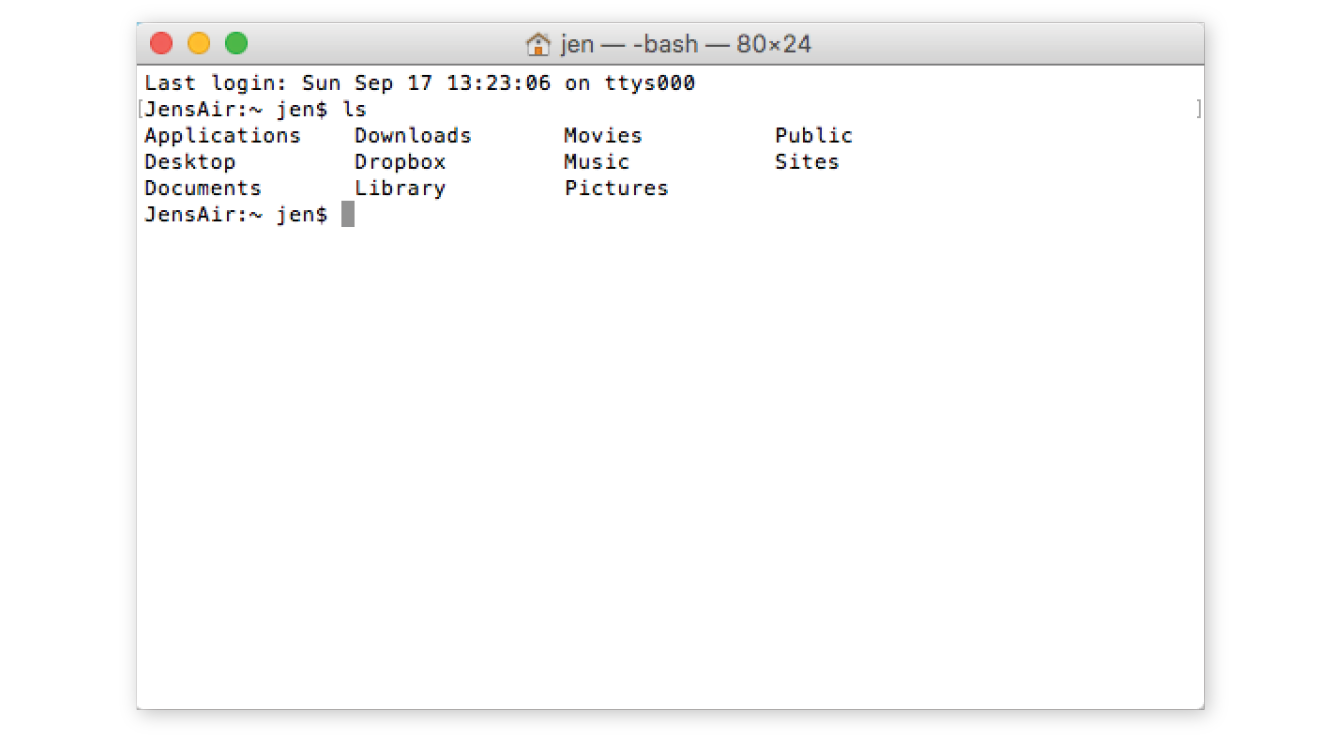
The program that interprets the commands you type is called a shell (visual interfaces are also technically a shell; they’re just fancier). Every Mac and Linux machine comes installed with Terminal, which uses a shell program called bash. On macOS, you will find the Terminal program in (Figure 20-1).
Windows users have a few more hoops to jump through to get set up. The default command-line tool on Windows is Command Prompt (most easily accessed with Search), which can perform many of the functions you may want to do as a developer; however, it does not use bash. Because so many tools use bash, it is better to install a bash-based shell emulator like Cygwin (cygwin.com) or cmder (cmder.net). If you use Windows 10, it is recommended that you install a Linux environment on your machine by using Windows Subsystem (msdn.microsoft.com/en-us/commandline/wsl/about) or Ubuntu, available in the Windows store (www.microsoft.com/en-us/store/p/ubuntu/9nblggh4msv6).
Getting Started with Commands
When you launch a Terminal window, the first thing you see is a command-line prompt, which is a string of characters that indicates the computer is ready to receive your command:
$: _
The dollar sign is common, but you may see another symbol in your terminal program (see Terminal Tip). The underscore in this example stands for the cursor position, which may appear as a little rectangle or a flashing line.
The complete prompt that I see in Terminal begins with my computer’s name (“JensAir”) and an indication of the working directory—that is, the directory the shell is currently looking at. In GUI terms, the working directory is the folder you are “in.” In this example, the tilde (~) indicates that I am looking at my root User directory. The “jen” before the prompt character is my username. In future examples, I will abbreviate the prompt to simply $:.
JensAir:~ jen$: _
When you see the prompt, type in a command, and hit Enter. The computer executes the command and gives you a new prompt when it is finished. It is very no-nonsense about it. For some commands, there may be feedback or information displayed before the next prompt appears. Sometimes everything happens behind the scenes, and all you see is a fresh prompt.
When you’re learning about the command line, it is common to start with the built-in commands for navigating the file system, tasks typically handled by the Finder on the Mac and My Computer on Windows. Because they are fairly intuitive, that’s where I’m going to start my simple command-line lesson as well.
A nice little utility to try as a beginner is pwd (for “print working directory”), which displays the complete path of the working (current) directory. To use it, simply type pwd after the prompt. It’s a good one to try first because you can’t break anything with it, but for seasoned users, it is useful for figuring out exactly where you’ve landed if you’re disoriented. The forward slash indicates that this path starts at the root directory for the entire computer.
$: pwd /Users/jen
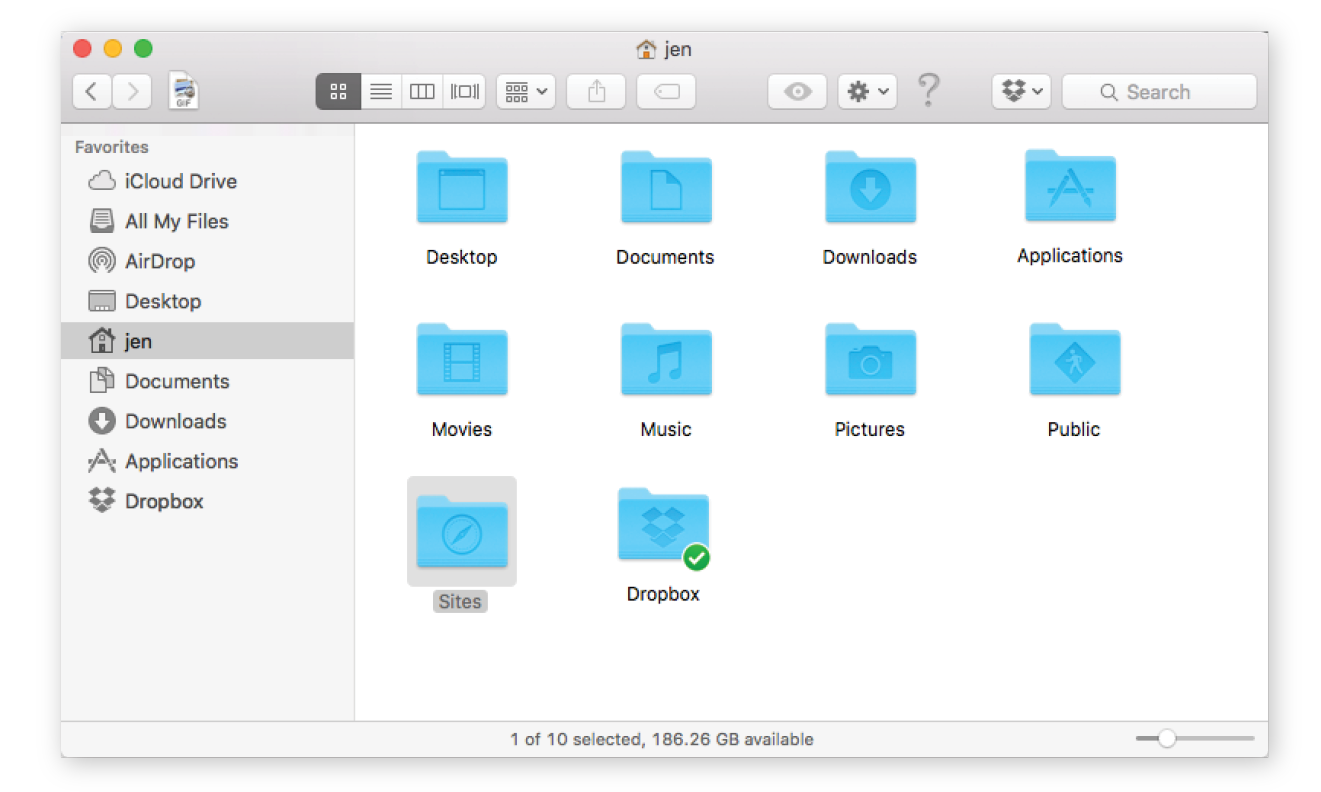
Here’s another easy (and low-risk!) example. Typing the ls command at the prompt returns a list of the files and directories in the working directory (/Users/jen). You can compare it to the Finder view of the same folder in Figure 20-2. They are two ways of looking at the same thing, just as directory and folder are two terms for the same thing depending on your view.
JensAir:~ jen$
|
|||
Applications |
Downloads |
Movies |
Public |
Desktop |
Dropbox |
Music |
Sites |
Documents |
Library |
Pictures |
|
JensAir:~ jen$ |
|||
Some utilities, like pwd, require only their name at the prompt to run, but it is more common that you’ll need to provide additional information in the form of flags and arguments. A flag changes how the utility operates, like an option or a preference. It follows the command name and is indicated by a single or double dash (-). In many cases, flags can be abbreviated to just their first letter because they are used in context with a particular utility. For example, I can modify the ls utility with the –l flag, which instructs the computer to display my directory contents in “long” format, including permission settings and creation dates:
JensAir:~ jen$ ls -l total 0 drwxr-xr-x 5 jen staff 170 Jul 8 2016 Applications drwx------ 57 jen staff 1938 Sep 11 09:47 Desktop drwx------ 26 jen staff 884 May 18 11:34 Documents drwx------+ 151 jen staff 5134 Sep 3 15:47 Downloads drwx------@ 48 jen staff 1632 Aug 16 16:34 Dropbox drwx------@ 72 jen staff 2448 Jul 15 11:21 Library drwx------ 22 jen staff 748 Oct 6 2016 Movies drwx------ 12 jen staff 408 Sep 29 2016 Music drwx------ 14 jen staff 476 Oct 13 2016 Pictures drwxr-xr-x 6 jen staff 204 May 6 2015 Public drwxr-xr-x 11 jen staff 374 Jul 10 2016 Sites JensAir:~ jen$
An argument provides the specific information required for a particular function. For example, if I want to change to another directory, I type cd (for “change directory”) as well as the name of the directory I want to go to (see Mac Terminal Tip). To make my Dropbox directory the new working directory, I type this:
JensAir:~ jen$: cd Dropbox
After I hit Enter, my prompt changes to JensAir:Dropbox jen$, indicating that I am now in the Dropbox directory. If I entered ls now, I’d get a list of the files and folders contained in the Dropbox folder (definitely way too long to show here).
To go up a level, and get back to my home user directory (~), I can use the Unix shorthand for “go up a level”: .. (remember that from your URL path lesson?). The returned prompt shows I’m back at my root directory (~).
JensAir:Dropbox jen$ cd ..JensAir:~ jen$
Some other useful file-manipulation commands include mv (moves files and folders), cp (copies files), and mkdir (creates a new empty directory). The rm command removes a file or folder in the working directory. Be careful with this command, however, because it doesn’t just move files to the Trash; it removes them from your computer entirely (see the “A Word of Caution” note).
A word of caution
The command line allows you to muck around in critical parts of your computer that your GUI graciously protects from you. It’s best not to type in a command if you don’t know exactly what it does and how it works. Make a complete backup of your computer before you start playing around with command line so you have the peace of mind that your files are still available if something goes horribly wrong.
Another handy command is man (short for manual), which displays documentation for any command you pass to it. For example, man ls shows a description of the ls (list) command and all of its available flags. Some man pages are long. To move down in the scroll, hitting the Return key moves you down one line at a time. To move down a page at a time, hit fn+down arrow on a Mac or Shift+Page Down on Linux. To go back up a page, it’s fn+up arrow or Shift+Page Up, respectively. Finally, to quit out of the man page, type q to return to the prompt.
Learning More
Not surprisingly, these commands are just the tip of the tip of the iceberg when it comes to command-line utilities. For a complete list of commands that can be used with bash, see “An A–Z Index of the Bash Command Line for Linux” at ss64.com/bash/. You’ll pick these up on an as-needed basis, so don’t get overwhelmed. In addition, as you start installing and using new tools like the ones listed in this chapter, you’ll gradually learn the commands, flags, and arguments for those too. All part of a day’s work!
Clearly, I don’t have the space (and if I’m being honest, the experience) to write a comprehensive tutorial on the command line in this chapter, but you will find books and plenty of tutorials online that can teach you. I found Michael Hartl’s tutorial “Learn Enough Command Line to Be Dangerous” to be thorough and accessible if you are starting from square one (www.learnenough.com/command-line-tutorial#sec-basics). I also recommend the series of tutorials from Envato Tuts+, “The Command Line for Web Design” (webdesign.tutsplus.com/series/the-command-line-for-web-design--cms-777). If you enjoy video tutorials, try the “Command Line for Non-Techies” course by Remy Sharp (terminal.training).
Now that you have a basic familiarity with the command line, let’s look at tools you might use it for, beginning with tools for writing and optimizing CSS.
CSS Power Tools (Processors)
I know that you are just getting used to writing CSS, but I would be negligent if I didn’t introduce you to some advanced CSS power tools that have become central to the professional web developer workflow. They fall into two general categories:
- Languages built on top of CSS that employ time-saving syntax characteristics of traditional programming languages. These are traditionally known as preprocessors. The most popular preprocessors as of this writing are Sass, LESS, and Stylus. When you write your styles in one of these languages, you have to use a program or script to convert the resulting file into a standard CSS document that browsers can understand.
- CSS optimization tools take your clean, standard CSS and make it even better by improving cross-browser consistency, reducing file size for better performance, and enhancing many other tasks. Tools that optimize browser-ready CSS are commonly known as postprocessors.
Before you get too comfortable with the terms preprocessor and postprocessor, you should know that the distinction is not exactly clear-cut. Preprocessors have always been able to do some of the optimization tasks that postprocessors are good for, and postprocessors are starting to allow some functions typically found in preprocessors. The lines are blurring, so some folks refer to all of these tools simply as CSS processors, including souped-up special syntaxes for authoring as well as CSS optimizers. Many CSS processor functions are also built in to third-party tools such as CodeKit (codekitapp.com, Mac only) for one-stop shopping. I think it is beneficial for you to be familiar with the traditional terms as they are still in widespread use, and I’m going to use them here for the sake of simplicity.
Introduction to Preprocessors (Especially Sass)
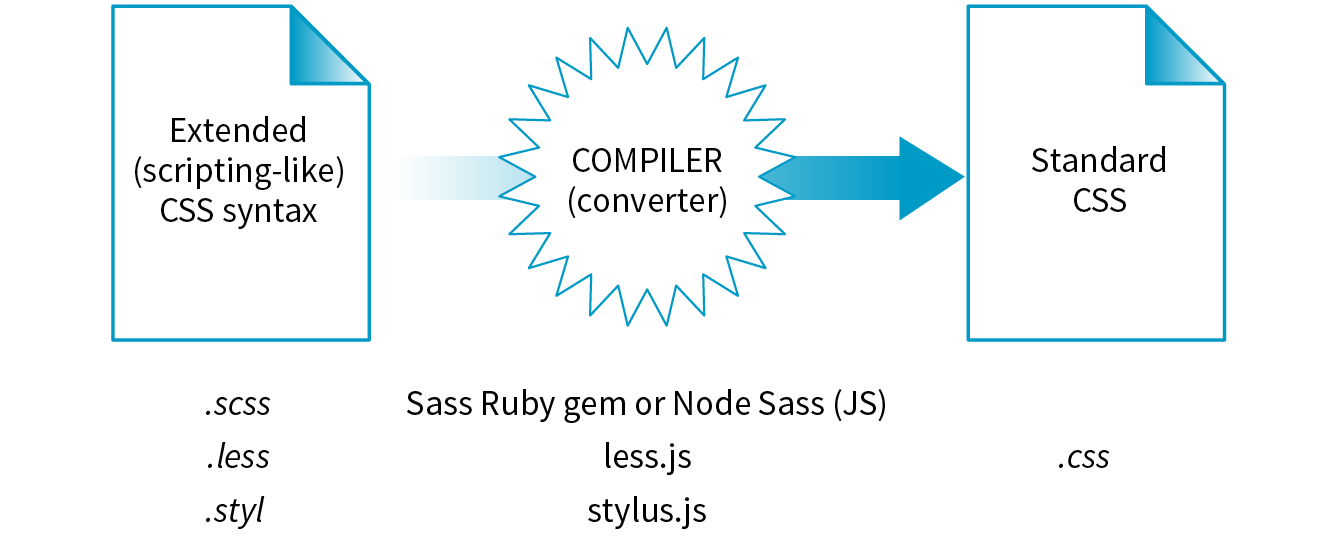
Preprocessors consist of an authoring syntax and a program that translates (or compiles, to use the proper term) files written in that syntax to plain old CSS files that browsers can use (Figure 20-3). For example, in Sass, you write in the Sass syntax language and save your files with the .scss suffix, indicating it is in that language and not a CSS file. The Sass program, originally written in the Ruby language (see Technical Note), converts the SCSS syntax to standard CSS syntax and saves the resulting file with the .css suffix. LESS and Stylus work the same way, but they use JavaScript for conversion. All of these tools are installed and run via the command line.
By far, the most popular preprocessor is Sass (“Syntactically awesome style sheets”), created by Hampton Catlin and Nathan Weizenbaum, who were tired of the repetitiveness of normal CSS. Their new syntax allowed CSS authors to use the type of shortcuts typical in scripting. Originally, it used an indented, bracket-free syntax (which is still an option), but a later release known as SCSS (for “Sassy CSS”) is based on the bracketed ({ }) CSS format we know and love. In fact, a valid CSS document would also be a valid SCSS document. This makes it much easier to get started with Sass, because it is familiar, and you can use just a little bit of Sass in style sheets written the way you’ve learned in this book.
I’m going to show you a few examples of Sass syntax to give you the general idea. When you are ready to take on learning Sass, a great first step is Dan Cederholm’s book Sass for Web Designers (A Book Apart). I’ve listed additional resources at the end of the section. In the meantime, let’s look at three of the most popular Sass features: nesting, variables, and mixins.
Nesting
Let’s say you have an HTML document with a nav element that contains an unordered list for several menu options. Sass lets you nest the style rules for the nav, ul, and li elements to reflect the structure of the HTML markup. That alleviates the need to type out the selectors multiple times—the Sass compiler does that for you. The following example shows nested styles as they can be written in Sass syntax:
nav{ margin: 1em 2em;ul{ list-style: none; padding: 0; margin: 0;li{ display: block; width: 6em; height: 2em; } }}
When Sass converts the SCSS file to standard CSS, it compiles to this:
nav{ margin: 1em 2em;}nav ul{ list-style: none; padding: 0; margin: 0;}nav ul li{ display: block; width: 6em; height: 2em;}
Variables
A variable is a value you can define once, and then use multiple times throughout the style sheet. For example, O’Reilly uses the same shade of red repeatedly on its site, so their developers could create a variable named “oreilly-red” and use the variable name for color values. That way, if they needed to tweak the shade later, they need to change the variable value (the actual RGB color) only in one place. Here’s what setting up and using a variable looks like in Sass:
$oreilly-red: #900; a { border-color:$oreilly-red; }
When it compiles to standard CSS, the variable value is plugged into the place where it is called:
a { border-color: #900;}
The advantage of using a variable is that you can change the value in one place instead of searching and replacing through the whole document. When teams use variable names, it also helps keep styles consistent across the site.
Mixins
Sass allows you to reuse whole sets of styles by using a convention called mixins. The following example saves a combination of background, color, and border styles as a mixin named “special.” To apply that combination of styles, @include it in the declaration and call it by name:
@mixin special{ color: #fff; background-color: #befc6d; border: 1px dotted #59950c;}a.nav {@include special;}a.nav: hover {@include special;border: 1px yellow solid; }
When compiled, the final CSS looks like this:
a.nav { color: #fff; background-color: #befc6d; border: 1px dotted #59950c;}
a.nav: hover { color: #fff; background-color: #befc6d; border: 1px dotted #59950c; border: 1px yellow solid; }
Notice that the hover state has a second border declaration that overrides the values in the mixin, and that’s just fine. Mixins are a popular solution for dealing with vendor prefixes. Here is a mixin for border-radius that includes an argument (a placeholder for a value you provide indicated with a $):
@mixin rounded($radius) { -webkit-border-radius: $radius; -moz-border-radius: $radius; border-radius: $radius;}When including the mixin in a style rule, provide the value for $radius, and it gets plugged into each instance in the declarations:
aside { @include rounded(.5em); background: #f2f5d5;}
This compiles to the following:
aside { -webkit-border-radius: .5em; -moz-border-radius: .5em; border-radius: .5em; background: #f2f5d5;}
Building a mixin around fill-in-the-blank arguments makes them reusable and even shareable. Many developers create their own mixin libraries to use on multiple projects. You can also take advantage of existing mixin libraries in tools like Compass (an open source CSS authoring framework at compass-style.org) or Bourbon (bourbon.io). By the time you read this, there may be others, so search around to see what’s available.
Sass resources
Nesting, variables, and mixins are only a tiny fraction of what Sass can do. It can handle math operations, “darken” and “lighten” colors mathematically on the fly, and process if/else statements, just to name a few features.
Once you get some practice under your belt and feel that you are ready to take your style sheets to the next level, explore some of these Sass and LESS articles and resources:
- The Sass site (sass-lang.com)
- “Getting Started with Sass,” by David Demaree (alistapart.com/articles/getting-started-with-sass)
- “An Introduction to LESS, and LESS Vs. Sass,” by Jeremy Hixon (www.smashingmagazine.com/2011/09/an-introduction-to-less-and-comparison-to-sass/)
Introduction to Postprocessors (Mostly PostCSS)
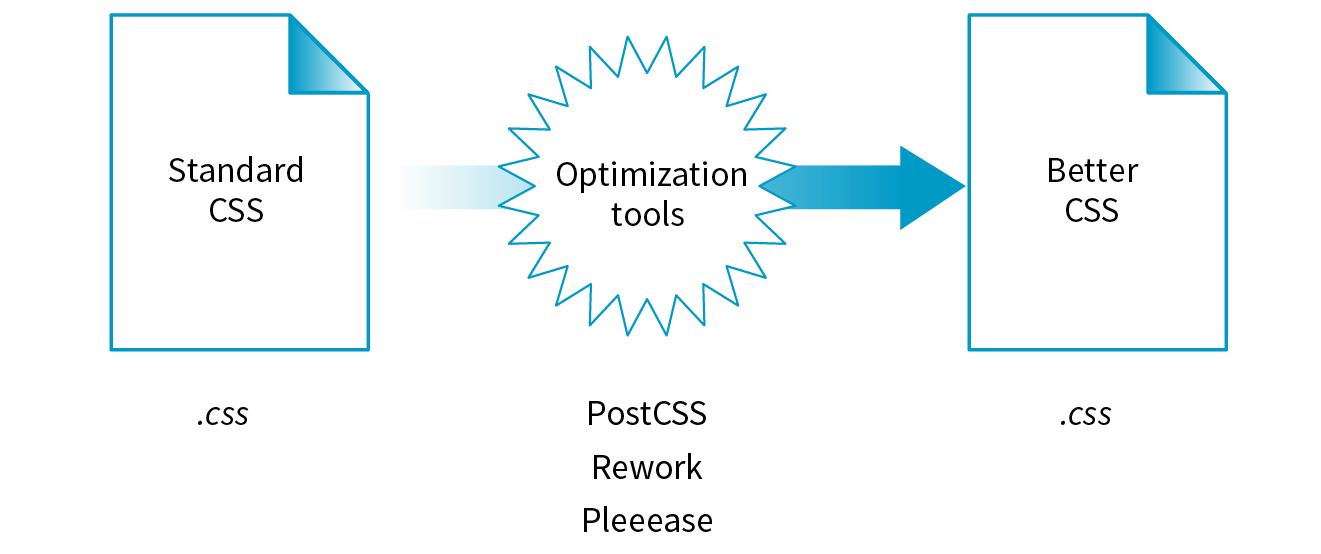
As I mentioned earlier, postprocessors are scripts that optimize standard CSS code to make it better (Figure 20-4). “Better” usually means consistent and bug-free browser support, but there are hundreds of postprocessing scripts that do a wide variety of cool things. We’ll look at some examples in a moment.
The poster child for postprocessing is Autoprefixer, which takes the CSS styles you write, scans them for properties that require vendor prefixes, and then inserts the prefixed properties automatically. What a time- and headache-saver!
Back in Chapter 16, CSS Layout with Flexbox and Grid, we used Autoprefixer via a web page interface (autoprefixer.github.io) to generate the required prefixes. Although the web page is handy (especially while you are learning), it is more common for postprocessors to be implemented with a task runner such as Grunt or Gulp. We’ll take a quick look at them later in this chapter.
As of this writing, the postprocessing scene is dominated by PostCSS (postcss.org). PostCSS is “a tool for transforming CSS with JavaScript” created by Andrey Sitnik, who also created Autoprefixer. PostCSS is both a JavaScript-based program (a Node.js module, to be precise) and an ecosystem of community-created plug-ins that solve all sorts of CSS problems.
PostCSS parses the CSS (or a CSS-like syntax such as Sass or LESS), analyzes its structure, and makes the resulting “tree” available for plug-ins to manipulate the code (see Note).
This open API makes it easy for anyone to create a PostCSS plug-in, and as a result, there are literally hundreds of plug-ins created and shared by developers (see them at www.postcss.parts). They range from the life-saving to the esoteric, but because it is a modular system, you can pick and choose just the tools that you find useful or even create your own. Here are just a few:
- Stylelint (stylelint.io) checks your CSS file for syntax errors (a process called linting) and redundancies.
- CSSNext (cssnext.io) allows you to use future CSS Level 4 features today by generating fallbacks that work across browsers that haven’t implemented those features yet.
- PreCSS (github.com/jonathantneal/precss) is a bundle of plug-ins that lets you write Sass-like syntax (loops, conditionals, variables, mixins, and so on) and converts it to standard CSS. This is an example of a postprocessor being used to aid authoring, which is where the line between pre- and postprocessing gets blurred.
- Fixie (github.com/tivac/fixie) inserts hacks that are required to make effects work in old versions of Internet Explorer (“Fix-IE,” get it?).
- Color format converters translate alternative color formats (such as HWB, HCL, and hex + alpha channel) to standard RGB or hexadecimal.
- The Pixrem plug-in converts rem units to pixels for non-supporting browsers.
- The List-selectors plug-in lists and categorizes the selectors you’ve used in your style sheet for code review. It is an example of a plug-in that does not alter your file but gives you useful information about it.
From that short list, you can probably see why postprocessors have become so popular. They free you up to write CSS with the syntax you want, taking advantage of cutting-edge properties and values, but with the peace of mind that everything will work well across browsers. They also eliminate the need to know about every browser idiosyncrasy, past and present, in order to do your job. It’s definitely worth knowing about even if you aren’t quite ready to take it on right away. Check out these resources for more information:
- Drew Minns’ article “PostCSS: A Comprehensive Introduction” for Smashing Magazine (www.smashingmagazine.com/2015/12/introduction-to-postcss/)
- The Envato Tuts+ tutorial “PostCSS Deep Dive” (webdesign.tutsplus.com/series/postcss-deep-dive--cms-889)
Build Tools (Grunt and Gulp)
In the world of software, a build process is required to test source code and compile it into a piece of executable software. As websites evolved from a collection of static HTML files to complex JavaScript-reliant applications, often generated from templates, build tools have become integral to the web development workflow as well. Some web build tools like Grunt and Gulp are commonly referred to as task runners. You use them to define and run various tasks (anything you might do manually from the command line) on your working HTML, JavaScript, CSS, and image files to get them ready to publish.
Automation
You can automate your tasks, too, so they happen in the background without your needing to type commands. To do this, you tell the build tool to “watch” your files and folders for changes. When a change is detected, it triggers the relevant tasks to run automatically as you’ve configured them.
Once you have the task runner configured and set to watch your files, you can go about your business writing CSS, and all that command-line stuff happens for you without ever touching a terminal appplication. Here’s how that might look. Imagine making a change to your Sass file and saving it. Grunt instantly sees that the .scss file has changed, automatically converts it to .css (see Note), and then reloads the browser to reflect your change.
Note
There is a Grunt plug-in for converting SCSS files, but it is not as full featured as Ruby.
Some Common Tasks
The previous section on CSS processors should have given you an idea of some things that would be nice to automate. Allow me to list several more to give you a solid view of the ways task runners make your job easier.
- Concatenation. It is common for web teams to divide style sheets and scripts into small, specialized chunks of .css and .js. When it’s time to publish, however, you want as few calls to the server as possible for performance purposes, so those little chunks get concatenated (put together) into master files.
- Compression and “minification.” Another way to improve performance is to make your files as small as possible by removing unnecessary spaces and line returns. Build tools can compress your CSS and minify JavaScript.
- Checking your HTML, CSS, and JavaScript for errors (linting).
- Optimizing images with tools that squeeze down the file size of all the images in a directory.
- Help committing or pushing changes to a version control repository (Git).
- Refreshing your browser to reflect whatever changes you just made to a file (LiveReload plug-in).
- Building final HTML files from templates and content data (see the sidebar “Building Sites with Data and Templates”).
- Running CSS pre- and postprocessors.
Grunt and Gulp
The first and most established web build tool is Grunt (gruntjs.com), presumably named for handling all of the “grunt work” for you. It is a JavaScript tool built on the open source Node.js framework, and you operate it using the command line. The compelling thing about Grunt is that the development community has created literally thousands of plug-ins that perform just about any task you can think of. Just download one, configure it, and start using it. You do not have to be a JavaScript master to get started.
Another popular option is Gulp (gulpjs.com), which has the advantage of running a little faster but also requires more technical knowledge than Grunt because you configure it with actual JS code. Other contenders as of this writing are Webpack (quite popular!), Brunch, Browserify, and Broccoli. New tools with amusing names pop up on a regular basis. Some developers simply use Node.js-based scripts without using a task-runner program as a go-between. The point is, there are plenty of options.
You will find many online tutorials for learning how to download and configure the build tool of your choice when you are ready to automate your workflow. I hope that I have made you aware of the possibilities, and when a job interviewer mentions Grunt and Gulp, you’ll know they aren’t just suffering from indigestion.
Building Sites with Data and Templates

speaker--name: "Jennifer Robbins" speaker--description: "Designer, Author, ARTIFACT Co-founder" speaker--photo: "/img/speakers/jennifer-robbins.jpg" #HTMLspeaker--biography:| <p>Jennifer has been designing for the web since 1993 when she worked on the first commercial web site, GNN, from O'Reilly Media. Since then she has gone on to write several books on web design for O'Reilly, including <i>Web Design in a Nutshell</i>, <i>Learning Web Design</i>, and the <i>HTML5 Pocket Reference</i>. More recently, Jennifer's days are filled with organizing the ARTIFACT Conference. …</p>speaker--links:- link--label:"Website"link--target:"http://www.jenville.com"link--title:"jenville.com"- link--label:"Twitter"link--target:"http://www.twitter.com/jenville"link--title:"@jenville"
<div class="layout--container"><div class="speaker--photo-container"> <img src="{{page-data.speaker--photo}}"></div><article class="speaker--content"> <div class="speaker--biography">{{{page-data.speaker--biography}}}</div> <ul class="speaker--links"> {{#each page-data.speaker--links}} <li class="speaker--link-item">{{link--label}}: <a href="http://{{link--target}}" class="speaker--link">{{link--title}}</a></li> {{/each}}
</ul></article></div
Version Control with Git and GitHub
If you’ve done any sort of work on a computer, you’ve probably used some sort of system for keeping track of the versions of your work. You might have come up with a system of naming drafts until you get to the “final” version (and the “final-final” version, and the “final-final-no-really” version, and so on). You might take advantage of macOS’s Time Machine to save versions that you can go back to in an emergency. Or you might have used one of the professional version control systems that have been employed by teams for decades.
The king of version control systems (VCS) for web development is a robust program called Git (git-scm.com). At this point, knowing your way around Git is a requirement if you are working on a team and is a good skill to have even for your own projects.
In this section, I’ll introduce you to the terminology and mental models that will make it easier to get started with Git. Teaching all the ins and outs of how to configure and use Git from the command line is a job for another book and online tutorials (I list a few at the end of the section), but I wish someone had explained the difference between a “branch” and a “fork” to me when I was starting out, so that’s what I’ll do for you.
We’ll begin with a basic distinction: Git is the version control program that you run on your computer; GitHub (github.com) is a service that hosts Git projects, either free or for a fee. You interact with GitHub by using Git, either from the command line, with the user interface on the GitHub website, or using a standalone application that offers a GUI interface for Git commands. This was not obvious to me at first, and I want it to be clear to you from the get-go.
GitHub and services like it (see Note) are mainly web-based wrappers around Git, offering features like issue tracking, a code review tool, and a web UI for browsing files and history. They are convenient, but keep in mind that you can also set up Git on your own server and share it with your team members with no third-party service like GitHub involved at all.
Why Use Git
There are several advantages to making Git (and GitHub) part of your workflow. First, you can easily roll back to an earlier version of your project if problems show up down the line. Because every change you make is logged and described, it helps you determine at which point things might have gone wrong.
Git also makes it easy to collaborate on a shared code source. You may tightly collaborate with one or more developers on a private project, merging all of your changes into a primary copy. As an added benefit, the sharing process is a way to get an extra set of eyes on your work before it is incorporated. You may also encourage loose collaboration on a public project by welcoming contributions of people you don’t even know in a way that is safe and managed. Git is a favorite tool for this type of collaboration on all sorts of open source projects.
Getting up to speed with GitHub in particular is important because it’s what everyone is using. If your project is public (accessible to anyone), the hosting is free. For private and commercial projects, GitHub charges a fee for hosting. In addition to hosting projects, they provide collaboration tools such as issue tracking. You may have already found that some of the links to tools I mentioned in this book go to GitHub repositories. I want you to know what you can do when you get there.
How Git Works
Git keeps a copy of every revision of your files and folders as you go along, with every change (called a commit) logged in with a unique ID (generated by Git), a message (written by you) describing the change, and other metadata. All of those versions and the commit log are stored in a repository, often referred to as a “repo.”
Once you have Git installed on your computer, every time you create a new repository or clone an existing one, Git adds a directory and files representing the repo’s metadata alongside other files in the project’s folder. Once the Git repository is initialized, you can commit changes and take advantage of the “time machine” feature if you need to get back to an earlier version. In this way, Git is a good tool for a solo workflow.
More likely you’ll be working with a team of other folks on a project. In that case, a hub model is used in which there is an official repository on a central server that each team member makes a local copy of to work on. Each team member works on their own machine, committing to their local repo, and at logical intervals, uploads their work back to the central repository.
That’s what makes Git a distributed version control system compared to other systems, like SVN, that require you to commit every change directly to the server. With Git, you can work locally and offline.
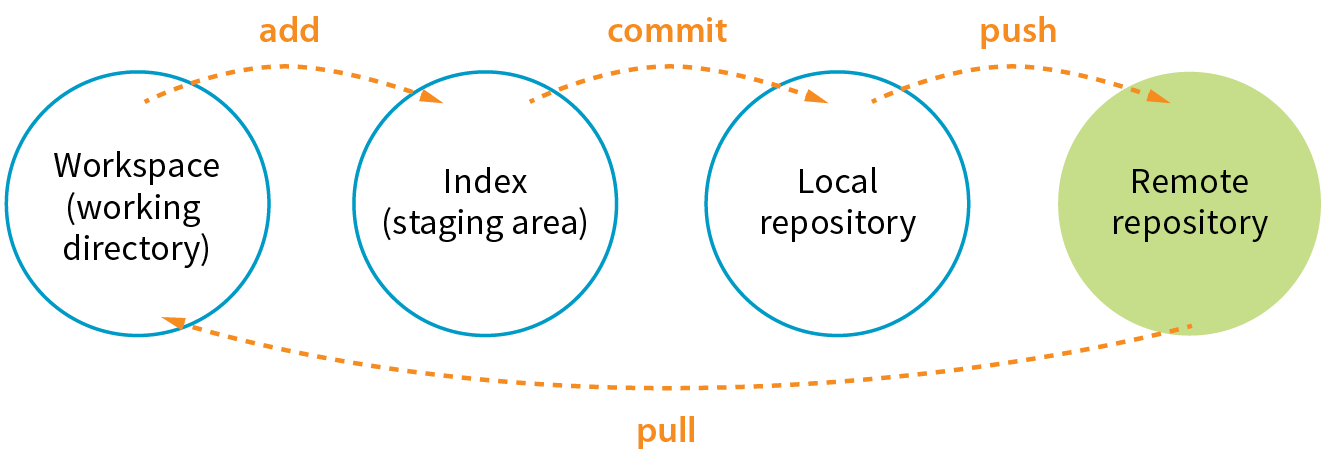
The first part of mastering Git is mastering its vocabulary. Let’s run through some of the terminology that will come in handy when you’re learning Git and the GitHub service. Figure 20-6 is a simplified diagram that should help you visualize how the parts fit together.
Working directory
The working directory is the directory of files on your computer in which you do your actual work. Your working copy of a file is the one that you can make changes to, or to put it another way, it’s the file you can open from the hard drive by using Finder or My Computer.
Repository
Your local Git repository lives alongside the files in your working directory. It contains copies, or snapshots, of all the files in a single project at every step in its development, although these are kept hidden. It also contains the metadata stored with each change. There may also be a central repository for the project that lives on a remote server like GitHub.
Commit
A commit is the smallest unit of Git interaction and the bulk of what you will do with Git. Git uses “commit” as a verb and a noun. You may “save” your working document frequently as you work, but you commit (v.) a change when you want to deliberately add that version to the repository. Usually you commit at a logical pause in the workflow—for example, when you’ve fixed a bug or finished changing a set of styles.
When you commit, Git records the state of all the project files and assigns metadata to the change, including the username, email, date and time, a unique multidigit ID number (see the “Hashes” sidebar), and a message that describes the change. These stored records are referred to as commits (n.). A commit is like a snapshot of your entire repository—every file it contains—at the moment in time you made the commit.
Commits are additive, so even when you delete a file, Git adds a commit to the stack. The list of commits is available for your perusal at any time. On GitHub, use the History button to see the list of commits for a file or folder.
The level of granularity in commits allows you to view the repository (project) at any state it’s ever been at, ever. You never lose work, even as you proceed further and further. It’s a great safety net. Indirectly this also means that there’s nothing you can do with Git that you can’t undo—you can’t ever get yourself into an impossible situation.
Staging
Before you can commit a change, you first have to make Git aware of the file (or to track it, to use the proper term). This is called staging the file, accomplished by adding it to Git. In the command line, it’s git add filename, but other tools may provide an Add button to stage files. This creates a local index of files that you intend to commit to your local repository but haven’t been committed yet. It is worth noting that you need to “add” any file that you’ve changed, not just new files, before committing them. Staging as a concept may take a little while to get used to at first because it isn’t especially intuitive.
Branch
A branch is a sequential series of commits, also sometimes referred to as a stack of commits. The most recent commit on any given branch is the head (see Note). You can also think of a branch as a thread of development. Projects usually have a primary or default branch, typically (although not necessarily) called master, which is the official version of the project. To work on a branch, you need to have it checked out.
Note
There are exceptions, as it is possible to reorder commits; however, it is almost always true that the head commit is also the most recent.
When working in a branch, at any point you can start a new branch to do a little work without affecting the source branch. You might start a new branch to experiment with a new feature, or to do some debugging, or to play around with presentation. Branches are often used for small, specific tasks like that, but you can create a new branch for any purpose you want.
For example, if you are working on “master,” but want to fix a bug, you can create a new branch off master and give the branch a new descriptive name, like “bugfix.” You can think of the bugfix branch as a copy of master at the point at which bugfix was created (Figure 20-7), although that’s not exactly what is happening under the hood.
To work on the bugfix branch, you first need to check it out (git checkout bugfix), and then you can go about your business of making changes, saving them, adding them to Git, and committing them. Eventually, the new branch ends up with a commit history that is different from the source branch.

When you are done working on your new branch, you can merge the changes you made back into the source branch and delete the branch. If you don’t like what’s happening with the new branch, delete it without merging, and no one’s the wiser.
Merging
Merging is Git’s killer feature for sharing code. You can merge commits from one branch into another (such as all of the commits on a feature branch into master) or you might merge different versions of the same branch that are on different computers. According to the Git documentation, merging “incorporates changes from the named commits (since the time their histories diverged from the current branch) into the current branch.” Put another way, Git sees merging as “joining two histories together,” so it useful to think of merging happening at the commit level.
Git attempts to merge each commit, one by one, into the target branch. If only one branch has changed, the other branch can simply fast-forward to catch up with the changes. If both branches have commits that are not in the other branch—that is, if both branches have changes—Git walks through each of those commits and, on a line-by-line basis, attempts to merge the differences. Git actually changes the code inside files for you automatically so you don’t have to hunt for what’s changed.
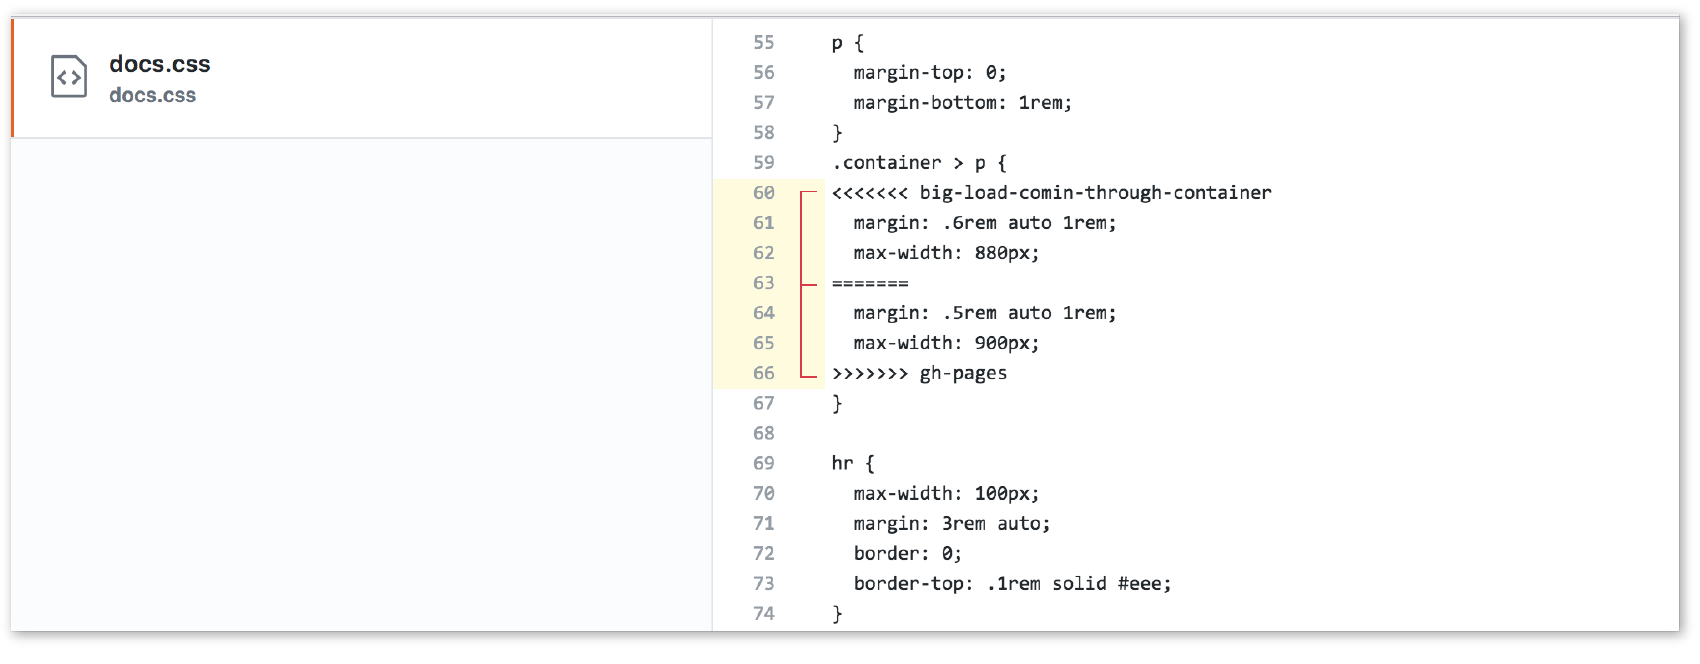
However, if Git finds conflicts, such as two different changes made to the same line of code, it gives you a report of the conflicts instead of trying to change the code itself. Conflicts are pointed out in the source files between ======= and <<<<<<< characters (Figure 20-8). When conflicts arise, a real person needs to read through the list and manually edit the file by keeping the intended change and deleting the other. Once the conflicts are resolved, the files need to be added and committed again.
Remotes
All of the features we’ve looked at so far (commits, branches, merges) can be done on your local computer, but it is far more common to use Git with one or more remote repositories. The remote repo could be on another computer within your organization, but it is likely to be hosted on a remote server like GitHub. Coordinating with a remote repository opens up a few other key Git features.
Clone
Cloning is making an exact replica of a repository and everything it contains. It’s common to clone a repo from a remote server to your own computer, but it is also possible to clone to another directory locally. If you are getting started on an existing project, making a clone of project’s repo is a logical first step.
Push/pull
If you are working with a remote repository, you will no doubt need to upload and download your changes to the server. The process of moving data from your local repository to a remote repository is known as pushing. When you push commits to the remote, they are automatically merged with the current version on the server. To update your local version with the version that is on the server, you pull it, which retrieves the metadata about the changes and applies the changes to your working files. You can think of pushing and pulling as the remote version of merging.
It is a best practice to pull the remote master frequently to keep your own copy up-to-date. That helps eliminate conflicts, particularly if there are a lot of other people working on the code. Many GUI Git tools provide a Sync button that pulls and pushes in one go.
Fork
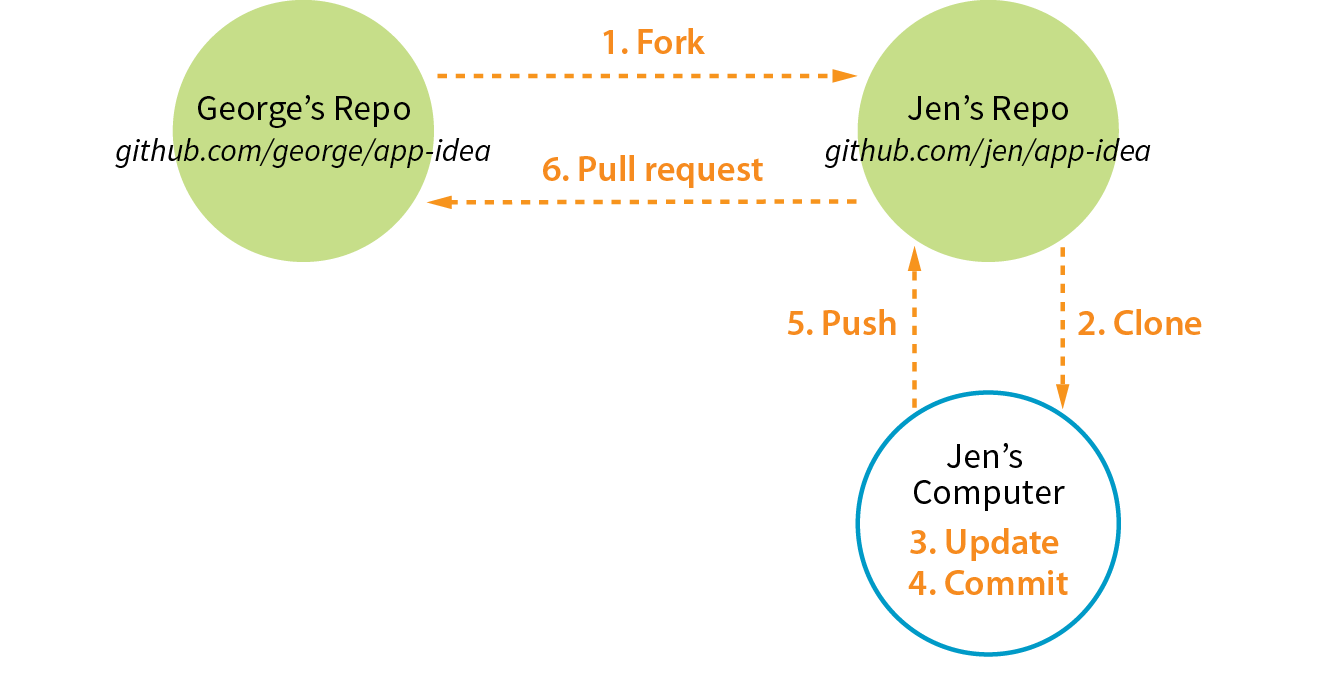
You may hear talk of “forking” a repo on GitHub. Forking makes a copy of a GitHub repository to your GitHub account so you have your own copy to play around with. Having the repo in your account is not the same as having a working copy on your computer, so once you’ve forked it, you need to clone (copy) it to your own computer (Figure 20-9).
People fork projects for all sorts of reasons (see Note). You might just want to have a look under the hood. You may want to iterate and turn it into something new. You may want to contribute to that project in the form of pull requests. In any scenario, forking is a safeguard for repository owners so they can make the project available to the public while also controlling what gets merged back into it.
Note
Forking is most often used for contributing to an open source project. For commercial or personal projects, you generally commit directly to the repository shared by your team.
Pull request
It is important to keep in mind that your forked copy is no longer directly connected to the original repository it was forked from. You will not be able to push to the original. If you come up with something you think is valuable to the original project, you can do what is called a pull request—that is, asking the owner to pull your changes into the original master.
You can also do a pull request for a repo that you have access to, not just one that you’ve forked. For example, if you’ve made a branch off the main project branch, you can do a pull request to get your team to review what you’ve done and give you feedback before merging your changes back in. In fact, pull requests may be used earlier in the process to start a discussion about a possible feature.
Git Tools and Resources
Most Git users will tell you that the best way to use Git is with the command line. As David Demaree says in his book Git for Humans, “Git’s command-line interface is its native tongue.” He recommends typing commands and seeing what happens as the best way to learn Git. The downside of the command line, of course, is that you need to learn all the Git commands and perhaps also tackle the command-line interface hurdle itself. The following resources will help get you up to speed:
- Git for Humans by David Demaree (A Book Apart) is a great place to start learning Git via the command line (or however you intend to use it!).
- Pro Git by Scott Chacon and Ben Straub (Apress) is available free online (git-scm.com/book/en/v2).
- “Git Cheat Sheet” from GitHub is a list of the most common commands (services.github.com/on-demand/downloads/github-git-cheat-sheet.pdf).
- The Git Reference Manual on the official Git site provides a thorough listing of commands and features (git-scm.com/docs).
There are also several graphical Git applications available for those who prefer icons, buttons, and menus for interacting with their repositories, and there’s no shame in it. I know many developers who use a graphical app and Terminal side by-side, choosing the tool that most easily allows them to do the task they need to do. If you feel more comfortable getting started with a graphical Git tool, I recommend the following:
- GitHub Desktop (from GitHub) is free and available for Mac and Windows (desktop.github.com).
- Git Tower 2 (Mac and Windows) costs money, but it is more powerful and offers a thoughtfully designed interface, including visualizations of branches and merges (www.git-tower.com).
Many code editors have built-in Git support or Git/GitHub plug-ins as well.
If you go to the GitHub.com site, they do a good job of walking you through the setup process with easy-to-follow tutorials. You can set up an account and gain some basic GitHub skills in a matter of minutes. Their online documentation is top-notch, and they even have a YouTube channel with video tutorials aimed at beginners (www.youtube.com/githubguides).
And speaking of GitHub, for a good introduction to the ins and outs of the GitHub interface, I recommend the book Introducing GitHub: A Non-Technical Guide by Brent Beer (O’Reilly).
When you are ready to get started using Git for version control, you’ll find all the support you need.
Conclusion
This concludes the web developer “power tools” chapter. We began with an introduction to the command line, and looked at some strong incentives for learning to use it. You can write CSS faster and make it more cross-browser compliant. You can take advantage of task runners and build tools that automate a lot of the repetitive grunt work you come across as a developer. Finally, although the command line is not required to use Git, it may make learning Git easier and will give you repo superpowers as you begin to master it.
We’ve talked a fair amount about JavaScript in this chapter. In Part IV, I hand over the keyboard to JavaScript master Mat Marquis, who will introduce you to JavaScript and its syntax (also somehow managing to make it very entertaining). I’ll be back in Part V to talk about web images.
Test Yourself
It’s time to test your knowledge of the topics introduced in this chapter. See Appendix A for the answers.
- In the computer world, what is a shell?
- Why might you want to learn to use the command line?
- It is a good way to manipulate files and folders on your own computer.
- It is a good way to manipulate files and folders on a remote server.
- It is required for many useful web development tools.
- All of the above.
- What is a prompt?
- What would you expect to happen if you type mkdir newsite after a command-line prompt?
- Name the two primary functions of CSS processors.
- Name one advantage of learning Sass.
- Name two features you might use a CSS postprocessor for.
- What is a task (in relation to a build tool/task runner)?
- What does “Grunt is watching this file” mean?
- What makes Git a distributed version control system?
- In Git, what does it mean if a file is staged?
- What is the difference between a branch and a fork?
- Why should you pull before you push?
- What is a pull request?