Table of Contents for
Building PHP Applications with Symfony™, CakePHP, and Zend® Framework
 Building PHP Applications with Symfony™, CakePHP, and Zend® Framework
Published by
Wrox, 2011
Building PHP Applications with Symfony™, CakePHP, and Zend® Framework
Published by
Wrox, 2011
- Copyright
- Credits
- ABOUT THE AUTHORS
- ACKNOWLEDGMENTS
- Introduction
- 1. Introducing Symfony, CakePHP, and Zend Framework
- 2. Getting Started
- 3. Working with Databases
- 4. Your First Application in the Three Frameworks
- 5. Forms
- 6. Mailing
- 7. Searching
- 8. Security
- 9. Templates
- 10. AJAX
- 11. Making Plug-ins
- 12. Web Services
- 13. Back End
- 14. Internationalization
- 15. Testing
- 16. User Management
- 17. Performance
- 18. Summary
- A. Web Resources
- B. CodeIgniter, Lithium, and Agavi with Code Examples
- GLOSSARY OF ACRONYMS AND TECHNICAL TERMS
The world will look up and shout 'save us' and I will look down and whisper 'no.'
WHAT'S IN THIS CHAPTER?
How should a web application be secured against unprivileged access? We want to explore this topic as deeply as possible in this chapter because of its significance and the severe consequences of neglecting security. The first major section of this chapter, "Basic User Management," covers not only the basic security issues, but also dynamic access control and features of specific frameworks.
The second major section of this chapter, "Identifying Users Using LDAP Implementation," is focused on implementing user authorization with LDAP within the frameworks. This is an alternative industry-scale solution, so you can skip this section if you don't need it. However, this knowledge will be invaluable for more advanced users, because it is not easily accessible on the Internet, and it is highly valued among big companies and corporations.
There are many ways to manage user authorization. In the frameworks featured in this book, there are two main user management approaches, RBAC and ACL. They are quite similar, but have some important differences that are described and explained in the following section.
RBAC, which stands for Role-based Access Control, is more role oriented (roles, not specific users, are authorized). This approach is generally more sophisticated, but also more practical than ACL. Figure 16-1 shows an example of what this looks like.
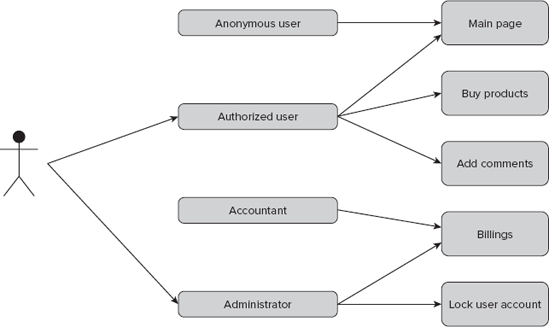
So let's assume that we have defined four roles: anonymous, authorized user, accountant, and administrator. Each of these roles has some privileges such as adding product comments, viewing billings, and so on. All that needs to be done is to assign users to roles. As shown in Figure 16-1, the example user has two roles: authorized user and administrator. These roles combined entitle him to add comments, buy products, see billings, and so on. Roles are named after the rights they provide: administrator, accountant, customer, and so on. This is a human-friendly approach because when someone talks about the administrator or authorized user role, automatically everyone connects this with some obvious behaviors such as buying products or locking users. RBAC is used in Symfony. Solaris 10 (and probably every subsequent version) will also use RBAC, so it's not only in web frameworks that there are RBAC capabilities.
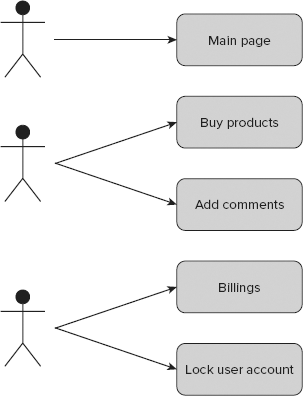
An access control list, or ACL (see Figure 16-2), is used in Zend and CakePHP. This solution is older than RBAC and is commonly used in almost all operating systems as the default access control methodology. This approach is also commonly used in network administration and is even implemented in network hardware. It is simpler than RBAC because it is user-oriented. Every user has a specific privilege for every object; for example, adding comments can be allowed or disallowed separately for every account.
That's why when you are setting access to buying a product, for example, you need to add the rule for each user. You must do this for each user who is to be granted access, at least, because a non-access rule can be assumed as a default rule. If an access rule to this object cannot be found for a user, it is assumed that this user has no privileges to access it. This saves lots of time needed to define all rules because you define only the part needed for allowing access. At first look, ACL seems easier to implement than RBAC, but it isn't. It is more flexible because each user can have custom rules assigned, but this means more time spent on assigning them. For example, userA may have the same privileges as userB, and there may be as many as 100 objects; for each object the rule has to be defined for both users. It's easier to create some main groups of rules and assign users to these groups. When you do so, you get something similar to RBAC, but this is not exactly the same because you are also able to assign users to objects. ACL with groups is very often mistaken for RBAC, and vice versa.
Methodologies described previously show different approaches to the problem of user access control. Let's see how the problem is solved in each framework.
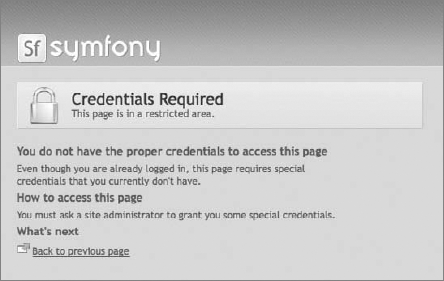
Symfony implements the RBAC idea. Before you can take advantage of RBAC, however, we must describe some Symfony configuration features. In the main configuration file settings.yml you can set default security modules. Symfony delivers two default modules that display login or credentials requirement information. These pages look like the welcome pages shown in Figures 16-3 and 16-4. If you want to have modules other than the default provided by Symfony, you should create an additional security module that would show these pages. Let's create a module called security and add two actions into it: login and auth. The first action would display an information screen stating that login is required in order to access these resources. The second would show an error message saying that the user has no proper credentials. So there is no proper role assigned to this user. These two actions are created only for informational purposes. Symfony delivers these two messages out of the box in its default layout (see Figures 16-3 and 16-4).
To change these default pages you need to make some changes in settings.yml. If these entries don't exist, update or create them and then change the default login and action modules to those that were just created. In the all and actions sections, change the default module and action from default/login to security/login.
all:
  .actions:
    login_module: default
    login_action: login
code snippet /basic/symfony/frontend/config/settings.yml
This is how it should look after the changes:
all:
  .actions:
    login_module: security
    login_action: login
code snippet /basic/symfony/frontend/config/settings.yml
To change the default page that shows the credentials requirement information, you need to change a few other entries in the settings.yml file.
all:
  .actions:
    secure_module: default
    secure_action: secure
code snippet /basic/symfony/frontend/config/settings.yml
After modification these entries should look like this:
all:
  .actions:
    secure_module: security
    secure_action: auth
code snippet /basic/symfony/frontend/config/settings.yml
You can provide any module and action that was previously created. A usual practice is to set them both, or at least the login requirement page entry, to a login action that is not only an informational page but also has a login form within.
In the simplest approach, no database for roles and users is needed. Let's say that for the purpose of this section you have three users and the same number of roles. The users are named with capital A, B, and C at the end. Available roles are admin, user, and anonymous. userA is anonymous, userB is just an authenticated user, and userC is an administrator. First, you can create a simple user module with login and logout actions. These modules should be responsible for checking user authentication, such as giving privileges and also removing them. Then create a products module that should be available only for authenticated users and one secretFeature for administrators only.
$ symfony generate:project securityExample
$ symfony generate:app frontend
$ symfony generate:module frontend user
$ symfony generate:module frontend products
$ symfony generate:module frontend secretFeature
Actions need to be added manually to the user module, as described in previous chapters. It will look like this:
<?php
class userActions extends sfActions {
    public function executeLogin(){
    }
    public function executeLogout() {
    }
    public function executeIndex() {
    }
}
code snippet /basic/symfony/frontend/modules/user/actions/actions.class.php
An index action should be created in the view layer as well as a login form with the following fields: login and password. That's why you need to create a login form definition in the /forms directory. The login form should also have some basic validation rules. Let's define it as shown here:
<?php
class LoginForm extends sfForm
{
    public function configure()
    {
        $this->setWidgets(array(
           'login' => new sfWidgetFormInputText(),
           'password' => new sfWidgetFormInputPassword(),
        ));
        $this->setValidators(array(
           'login' => new sfValidatorString(array('max_length' => 255)),
           'password' => new sfValidatorString(array('max_length' => 255)),
        ));
    }
}
code snippet /basic/symfony/frontend/lib/form/LoginForm.class.php
When you create the preceding form in the index action with $this->form = new LoginForm(),, it should be also implemented in the view.
<form action="<?php echo url_for('security/login'); ?>" method="POST">
  <table>
    <?php echo $form; ?>
    <tr>
      <td colspan="2">
        <input type="submit" />
      </td>
    </tr>
  </table>
</form>
code snippet /basic/symfony/frontend/modules/user/templates/indexSuccess.php
The generated web page should consist of all needed form fields. Notice that there is a CSRF token generated additionally by default. (CSRF is described in more detail in Chapter 8.)
<form action="security/login" method="POST">
<table>
  <tr>
    <th><label for="login">Login</label></th>
    <td><input type="text" name="login" id="login" /></td>
  </tr>
  <tr>
    <th><label for="password">Password</label></th>
    <td><input type="password" name="password" id="password" />
      <input type="hidden" name="_csrf_token"
         value="58702cd53a37190250899563f3dd9928"
id="csrf_token" />
</td>
</tr>
<tr>
<td colspan="2">
<input type="submit" />
</td>
</tr>
</table>
</form>To simplify this example, user authentication is carried out with if/else statements. So, if userB or userC is sent as login value, the corresponding user will be authenticated.
<?php
class userActions extends sfActions {
  public function executeLogin(){
    if ( ($request->getParameter('login') == 'userB') ||
         ($request->getParameter('login') == 'userC')) {
        $this->getUser()->setAuthenticated(true);
        $this->redirect('products/index');
    }
  }
  public function executeLogout(){
    $this->getUser()->setAuthenticated(false);
  }
  public function executeIndex() {
    $this->form = new LoginForm();
  }
}
code snippet /basic/symfony/frontend/modules/user/actions/actions.class.php
The user is authenticated now. So far, this gives you nothing because all modules and actions are not yet secured; they are public. To secure an action, you need to create a /config directory in the /module directory if it doesn't exist. Next you need to create a file called security.yml in this /config directory. In this example, it should be secretFeature/config/security.yml. There you create two actions: index and admin. The first one should be available for both authenticated users and administrators, and the second one should be for administrators only.
index:
    is_secure: true
admin:
    is_secure: true
code snippet /basic/symfony/frontend/modules/secretFeature/config/security.yml
Now both actions are secured and cannot be viewed by unauthorized users. The next step is to organize the privileges of actions and give credentials to roles that should have access to concrete actions. For example, for the action admin in the secretFeature module in security.yml, the entry will look as follows:
admin:
    is_secure: true
    credentials: [admin]
code snippet /basic/symfony/frontend/modules/secretFeature/config/security.yml
In the case of the index action, you need to add two roles that are allowed to perform this action: user and admin. These roles should be given: user for authenticated users and admin for administrators. You can choose role names as you wish, though they should reflect the real usage. So, for the index action, security.yml should look something like this:
index:
    credentials: [admin,user]
code snippet /basic/symfony/frontend/modules/secretFeature/config/security.yml
When you want to provide access for more than one role, just add another role, separated by a comma. When you add the previous entries into security.yml, you cannot access these pages because you have still not assigned any of these roles to any user. Therefore the next step in Symfony is to add credentials.
<?php
class userActions extends sfActions {
  public function executeLogin(){
    $user = $this->getUser();
    if ($request->getParameter('login') == 'userB') {
       $user->setAuthenticated(true);
       $user->addCredential('user');
    }
    if ($request->getParameter('login') == 'userC') {
       $user->setAuthenticated(true);
       $user->addCredentials('user','admin');
    }
  }
  public function executeLogout(){
    $this->getUser()->setAuthenticated(false);
    $user->clearCredentials();
  }
code snippet /basic/symfony/frontend/modules/user/actions/actions.class.php
There are two methods that manipulate the credentials: clearCredentials() and addCredentials(). The clearCredentials() method simply erases all credentials that were given to the user. It is commonly used in logout actions. The second one assigns roles to users. These role names can be set as you wish, but the names must be related to role names defined in security.yml.
In the view layer you can check if the current user has a credential using the hasCredential() method. The following code shows how to do this:
<ul>
<?php if ($sf_user->hasCredential('admin')): ?>
<li><?php echo link_to('logout', 'user/logout') ?></li>
<li><?php echo link_to('products','products/index') ?></li>
<li><?php echo link_to('products','products/admin') ?></li>
<?php elseif ($sf_user->hasCredential('user')): ?>
<li><?php echo link_to('logout', 'user/logout') ?></li>
<li><?php echo link_to('products', products/index') ?></li>
<?php else: ?>
<li><?php echo link_to('login', 'user/login') ?></li>
<?php endif; ?>
</ul>
code snippet /basic/symfony/frontend/modules/user/templates/indexSuccess.php
Everything described previously is just an example of basic security authentication features. Now it is time to move on to more advanced techniques.
Authentication is not usually based on fixed values like those described previously. It's obvious because when there are more than a few users, all your code responsible for security would grow exponentially. That's why when you plan to have a lot of users you should think about a dynamic access algorithm. The easiest way to apply dynamic user access in Symfony is by installing the sfGuard plug-in, which is also available for Doctrine and Propel. You install it just like any other Symfony plug-in.
$ symfony plugin:install sfDoctrineGuardPlugin
Note that for Propel this plug-in is called sfGuardPlugin instead of sfDoctrineGuardPlugin. There are some plug-in–naming intricacies because of history legacies. In earlier Symfony versions, Propel was the default object-relational mapping (ORM), which is why sfGuardPlugin was dedicated only for Propel and there wasn't a need to name it any differently.
sfDoctrineGuardPlugin provides basic dynamic access functionality. After installation, you need to enable this plug-in within the project configuration file ProjectConfiguration.class.php, as shown in the following code, unless the plug-in installation script does that automatically. It's placed in the project /config directory.
<?php
class ProjectConfiguration extends sfProjectConfiguration {
    public function setup() {
        $this->enablePlugins(array(
        'sfDoctrinePlugin',
        'sfDoctrineGuardPlugin'
    ));
  }
}
code snippet /basic/symfony/config/ProjectConfiguration.class.php
Now you can use the features of this plug-in. The sfGuard plug-in's security logic relies on a database, as mentioned before. As is usual in situations of this kind, you need to generate models, forms, and so on because sfGuard delivers only a schema. To do that, run the following command:
$ symfony doctrine:build --all
Note that after installing sfGuardPlugin you are able to run new tasks in the guard group. To see the full task list, just run the symfony command:
guard
    :add-group
    :add-permission
    :change-password
    :create-user
    :promote
So now you can manage users, groups, and so on from the command line. For example, to create a user you can use the following command:
$ symfony guard:create-user nowak@wrox.com nowakuser nowakpass Leszek Nowak
To change the password you can use this command:
$ symfony guard:change-password nwoakuser nowakpass
You can promote a user to be a super-user with the promote task:
$ symfony guard:promote nowak
These commands are nice, but it's not enough. To manage it from the application level, you need to add sfGuard modules.
all:
.settings:
enabled_modules: [default, sfGuardGroup, sfGuardUser, sfGuardPermission]
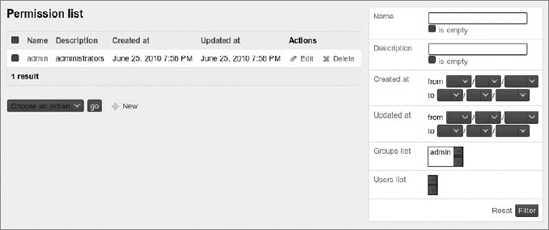
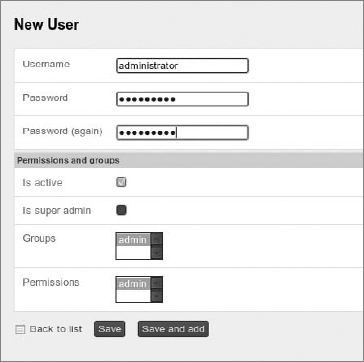
code snippet /basic/symfony/backend/config/settings.ymlThe module gives you the ability to manage groups, users, and permissions directly from the web page, for example: http://localhost/backend_dev.php/sfGuardUser. It is probably a good idea to enable these modules within a back-end application. At first glance, these modules are not the pretty ones. To apply Symfony admin stylesheets to them, you need to copy them from /usr/share/php/symfony/plugins/sfDoctrinePlugin/web/ to your project /web directory. For Windows XAMPP, you need to copy them from C:\xampp\php\PEAR\symfony\plugins\sfDoctrinePlugin\web\. After this, you should be able to see admin pages similar to those shown in Figures 16-5 and 16-6. You can also access admin pages for sfGuardPermission and sfGuardGroup.
In Figure 16-5, admin permissions are defined. Add a user and assign it to an admin permission, as shown in Figure 16-6.
All the previous steps are for the back-end side. By enabling the sfGuardAuth module, you can gain sfGuard functionalities on the front-end side. As before, you need to enable this module within the front-end settings.yml configuration file, as follows:
all:
  .settings:
    enabled_modules: [default, sfGuardAuth]
code snippet /basic/symfony/frontend/config/settings.yml
When using the sfGuard security approach, Symfony default security is not needed and should be replaced with sfGuard. To apply sfGuard as the main user security, you need to change myUser.class.php, which is placed in the application's /lib directory.
class myUser extends sfGuardSecurityUser {
}
code snippet /basic/symfony/frontend/lib/myUser.class.php
Now user security management is inherited from sfGuard, which also delivers login and logout actions. To add these actions, you need to add signin and signout actions from the sfGuardAuth module to routing rules:
sf_guard_signin:
    url: /login
    param: { module: sfGuardAuth, action: signin }

sf_guard_signout:
    url: /logout
    param: { module: sfGuardAuth, action: signout }
code snippet /basic/symfony/frontend/config/routing.yml
Note that the permissions you defined in the sfGuardPermission back-end module are also used as credentials that were described in the basic security approach section. Because you added a permission called admin, which is in fact a role definition, you can add it within the security.yml file of a module that needs to be secured.
index:
    is_secure: true
    credentials: [admin]
code snippet /basic/symfony/frontend/modules/secretFeature/config/security.yml
As you can see, it works well. In most cases, you will not add every user from the back-end side, but within a front-end controller. For this example, you'll create a method called executeCreateAccount(), which will add a user, set his password, make his account active, and assign him to a group and give him permissions.
<?php
    class securityActions extends sfActions {
        public function executeCreateAccount() {
    $user = new sfGuardUser();
    $user->setUsername($this->getRequestParameter('username'));
    $user->setPassword($this->getRequestParameter('password'));
    $user->setIsActive(false);
    $user->save();
    $user->addGroupByName("admin");
    $user->addPermissionByName("admin");
}
code snippet /basic/symfony/frontend/modules/security/actions/actions.class.php
You need to create also a registration form that should have username and password fields. These fields are taken from the form. Note that the password and the salt are created appropriately as a SHA1 hash and as a random generated hash. (Salt is described in detail in the "CSRF" section of Chapter 8.) Take a look at the database to see the results. In fact, this is a nice feature because you don't need to spend time on generating secure passwords. The next step is user activation. For a true value, the user is activated; for false, it is deactivated. At the end you need to assign the user to a group and/or permission. This is important when you define roles within the application.
One commonly used extension of sfGuard is a plug-in that registers the login history. To install it, do the following:
$ symfony plugin:install sfDoctrineGuardLoginHistoryPlugin
CakePHP presents a different approach. Security is entirely based on an ACL. In fact, you could say that the ACL mechanism is based on relations between the requested resource and the requester.
CakePHP defines two main tables: ARO and ACO, which stand for access request objects and access control objects. ARO maintains users and, if needed, groups. ACO is responsible for storing controllers and actions. There is also a third table that defines the relation between these tables. This table realizes the ideology of ACLs. Each user has access to a fixed amount of actions. In CakePHP, this boils down to controlling main actions for each model. These actions are create, read, update, and delete (CRUD) actions. To create all tables needed to make user authentication and authorization operations possible, just run the following command in your /app project directory:
$ cake acl initdb
You can now define some basic users and actions that can be requested later. One way to do this is to use CakePHP's command line interface (CLI) commands. You need two groups: User and Admin. To create these groups, run the following commands:
$ cake acl create aro / Admin
$ cake acl create aro / User
$ cake acl create aro / Guest
These commands create two main groups. The root sign (/) denotes that there is nothing higher in the hierarchy, so these entries don't belong to anything. Adding users is simple as well. Instead of the root, you need to enter the right group:
$ cake acl create aro User UserB
To see which entries you already have, you can execute the following command:
$ cake acl view aro
You should see something similar to this:
[1]Admin
[2]User
  [4]UserB
[3]Guest
So you have three groups and one user that belong to the group User. Note that the ARO/ACO rules have a tree structure that gives you more flexibility when developing a web application. For now, you have defined only requesters. Now it's time for definitions of actions and controllers. Create a controller called Confidential and grant access to this controller for the sample user. To create this controller, you need to create a confidential_controller.php file in the /controller path with the following content:
<?php
class ConfidentialController extends AppController {
    var $name = 'Confidential';
    function index() {
    }
 }
code snippet /basic/cakephp/app/controllers/confidential_controller.php
Before granting any privileges to this controller, you need to create an appropriate ACO entry:
$ cake acl create aco / Confidential
Note that the second parameter is also the route to a controller/action in the application address (for example, http://localhost/Confidential). You also need to create an index.ctp view file for this controller in order to prevent error messages. To give sample user privileges to access this resource, you need to run this command:
$ cake acl grant sample Confidential *
The last sign in this command means that sample user has all privileges provided by Confidential.
First of all, you need to create a User controller that holds login() and logout() actions:
<?php
class UsersController extends Controller {
    var $name = 'Users';
    var $uses = array('User');
    var $components = array('Auth');
    function login(){
    }
    function logout(){
    }
}
code snippet /basic/cakephp/app/controllers/users_controller.php
Next, you need to create a view template for each method. An exemplary login.ctp view may look as follows:
<?php echo $form->create('User',
    array('action' => 'login','id'=>'main_login_form'));?>
<div class="oneline">
  <?php echo $form->input('login', array('label'=>array('text'=>'USERNAME',
'class'=>'text_label')'class'=>'text','div'=> NULL)); ?>
<?php echo $form->input('password',array('label'=>array('text'=>'PASSWORD',
'class'=>'text_label'),'class'=>'text','div'=>NULL)); ?>
<input type="submit" value="SIGN-IN" class="submit" />
</div>
<?php echo $form->end(); ?>
code snippet /basic/cakephp/app/views/users/login.ctpCakePHP delivers form helpers, some of which you used previously. The first parameter of create() is the name of the model that is to be created. Further parameters are given as an array of <form> tag attributes. There are also two input() methods that print <input> tags with appropriate name attributes set to login and password. These fields are not the default ones provided by the Auth component responsible for user authentication. To change these settings, edit Auth.php, which is placed in the cake/libs/controller/components/ folder of the project. You need to find the lines shown here and change the username and password values:
var $fields = array('username' => 'login', 'password' => 'password');The same is true for the model that is used for authentication. By default, it is User. To change the default value, you also need this line in Auth.php:
var $userModel = 'User';
To do anything with users, you need to create a User model in /app/models as user.php, which should at least contain the following code:
<?php
class User extends AppModel {
    var $name = 'User';
}
code snippet /basic/cakephp/app/models/user.php
As described earlier, the user authentication controller should contain login() and logout() actions. For the given login form (as described previously), the login() action should look like the following:
function login() {
    if(!empty($this->data)) {
        $this->Auth->login($this->data);
        if($this->Auth->user()){
             $this->redirect('/', null, true);
       }
    }
}
code snippet /basic/cakephp/app/controllers/users_controller.php
If the form data is not empty, it should proceed to the Auth login() method, which checks whether the /login/password entry exists in the model with defined fields. If it does, then the user is redirected to the main page; otherwise, the login form is shown.
The Auth component also delivers a logout() method that does everything automatically. For security reasons, the Session should also be destroyed. Then the user is redirected to the main page:
function logout() {
    $this->Auth->logout();
    $this->Session->destroy();
    $this->redirect('/', null, true);
}
code snippet /basic/cakephp/app/controllers/users_controller.php
The authentication mechanism is not working yet because there is one more thing still missing. To enable access control security for each controller, you need to edit the AppController.php, which is placed in the /app directory. Code that is stored within beforeFilter() is executed before everything else. Also because all controllers that a developer normally defines inherit from the AppController, this code is executed for every other controller as well:
<?php
class AppController extends Controller {
  var $components = array('Auth', 'Acl');
  function beforeFilter() {
    $this->Auth->loginAction = array('controller'=>'users','action'=>'login');
    $this->Auth->logoutRedirect = array('controller'=>'pages','action'=>'index');
    $this->Auth->loginRedirect = array('controller'=>'pages','action'=>'index');
}
code snippet /basic/cakephp/app/app_controller.php
First of all, authorization and authentication components need to be loaded. Next login and logout actions are defined. These are the default ones if CakePHP points out that the current user has no credentials to access a controller/action. Note that the default ARO-ACO relation defines the access to four CRUD actions. Not every controller defines only these actions, which is why those mostly used are mapped by default in Auth.php to proper CRUD actions. The mapping is as follows:
var $actionMap = array(
    'index' => 'read',
    'add' => 'create',
    'edit' => 'update',
    'view' => 'read',
    'remove' => 'delete'
);
code snippet /basic/cakephp/cake/lib/controller/components/auth.php
You can search for this in Auth.php.
To define access control rules, you have used CLI commands. This is a hard way to execute them from PHP code. CakePHP also delivers aro and aco classes. To define a User group, as done previously with CLI, you need to invoke the following code:
$aro = new aro();
$aro->create();
$aro->save(array(
    'model'=>'User',
    'foreign_key'=>null,
    'parent_id'=>null,
    'alias'=>'User'));
code snippet /basic/cakephp/app/controllers/acl_controller.php
A foreign key is used to point to a concrete ID of a given model; for example, user, with an ID equal to 1. Because aro/aco lists can be tree hierarchies, there can be groups and users within other groups. That's why parent_id is used — to point to the parent entry from the list. Defining an ACL list usually requires more effort than in the RBAC case because concrete users are assigned to every resource (controller/action). To decrease this effort, users are grouped. This is the code you need to invoke when you want to assign a user to a previously created User group:
$parent = $aro->findByAlias('User');
$parentId = $parent['Aro']['id'];
$aro->create();
$aro->save(array(
    'model'=>'User',
    'foreign_key'=>1,
    'parent_id'=>$parentId,
    'alias'=>'User::1'));
code snippet /basic/cakephp/app/controllers/acl_controller.php
At the beginning, you need to search for a group called User. If this group exists, its ID is retrieved. Because the exemplary user has an id equal to 1, the foreign key is set to 1. Additionally, the alias should be unique; that's why it's commonly a concatenate of the model name and the foreign key, separated with a double colon.
The next step is to define an ACO entry. Let it be the User controller. The following code should solve this:
$aco = new Aco();
$aco->create();
$aco->save(array(
    'model'=>'User',
    'foreign_key'=>null,
    'parent_id'=>null,
    'alias'=>'User'));
code snippet /basic/cakephp/app/controllers/acl_controller.php
Analogically, in the case of ARO you can define groups. To allow users in the User group to access all actions in the User controller, you need to execute this code:
$this->Acl->allow('User', 'User', '*');
code snippet /basic/cakephp/app/controllers/acl_controller.php
The first parameter is the ARO, and second one is ACO.
var $component = array('Acl');
code snippet /basic/cakephp/app/controllers/acl_controller.php
Don't forget to enable the Auth component in the controller where you want to use the previous code.
Zend Framework (ZF) doesn't support any CLI commands for ACLs or authentication. Nevertheless you can accomplish user access control just as you do in CakePHP or Symfony. ZF delivers two classes (Zend_Acl and Zend_Auth) that you use to realize the authentication and authorization mechanisms.
To authenticate users, you need to make it possible to get their username and password from them. Therefore, you need to define a login form with username and password fields. As you know from Chapter 5, you need to create a form definition in the application's /forms directory. The login form should look like this:
<?php
class Application_Form_Login extends Zend_Form {
  public function init() {
    $this->setMethod('post');
    $this->addElement('text', 'username', array(
          'label' => 'Username:',
          'required' => false,
          'filters' => array('StringTrim'),
          )
    );
    $this->addElement('password', 'Password:', array(
          'label' => 'Password:',
          'required' => false,
          'filters' => array('StringTrim'),
          )
    );
    $this->addElement('submit', 'submit', array(
          'ignore' => true,
          'label' => 'Login'
   ));
}
}
?>
code snippet /basic/zf/application/forms/Login.phpThat's quite obvious. Now, you need to add this form to the login method in IndexController.php. This controller is used in the example to simplify it. Add this form as follows:
public function login() {
    $form = new Application_Form_Login();
    if ($this->getRequest()->isPost()){
       if ($form->isValid($request->getPost())) {
           /* authentication code here */
       }
    }
    $this->view->form = $form;
}
code snippet /basic/zf/application/controllers/IndexController.php
As soon as the form data is sent and validated, the authentication can proceed. First, database credentials need to be set. To do that, you need to create an array with database information that will be used for user authentication. In the example, this configuration is as follows:
$config= array('dbname'=>'addressBook',
    'username'=> 'dbUser',
    'password' =>'secret',
    'hostname' => 'localhost',
    );
code snippet /basic/zf/application/controllers/IndexController.php
The preceding configuration needs to be loaded into a proper database adapter. Let's say that you use MySQL as the database, so the configuration should be loaded like this:
$db = new Zend_Db_Adapter_Pdo_Mysql($config);
Next, you need to create a proper table within your database. This table will store information about users and will be used to verify them.
CREATE TABLE IF NOT EXISTS users (
    uid int(11) NOT NULL AUTO_INCREMENT,
    username varchar(32) NOT NULL,
    password varchar(32) NOT NULL,
    PRIMARY KEY (uid)
);
You also need to add an example user:
INSERT INTO users (username, password) VALUES ('admin', 'secret');After that, you can add the MySQL database adapter and create an instance of DbTable. You also need to define which table and which fields should be taken into consideration.
$adapter = new Zend_Auth_Adapter_DbTable($db);
$adapter
    ->setTableName('users')
    ->setIdentityColumn('username')
    ->setCredentialColumn('password');
code snippet /basic/zf/application/controllers/IndexController.php
The rest of the code is dedicated to authenticate concrete users. The following shows an example setting using username and password as the authentication values:
$adapter
    ->setIdentity($form->getValue('username'))
    ->setCredential($form->getValue('password'));
code snippet /basic/zf/application/controllers/IndexController.php
An instance of Zend_Auth needs to be created because it does all the authentication work. The authenticate() method with the adapter attribute checks the table and fields for a given username and password. The result is stored in the $result variable.
$auth = Zend_Auth::getInstance();
$result = $auth->authenticate($adapter);
code snippet /basic/zf/application/controllers/IndexController.php
If the result of the isValid() method returns true, the user is authenticated successfully, and is redirected to the index action.
if($result->isValid()) {
    return $this->_helper->redirector('index');
}
code snippet /basic/zf/application/controllers/IndexController.php
Authentication data is stored, and to delete that data you need to use the clearIdentity() method of Zend_Auth.
public function logout() {
    $auth = Zend_Auth::getInstance();
    $auth->clearIdentity();
}
code snippet /basic/zf/application/controllers/IndexController.php
A good approach is to create a link that redirects the user to the logout action that clears all credentials, as shown previously.
The shortest way to put an ACL approach into practice is to define ACLs within, for example, . AddressBookAcl.php. It should be placed in the /library directory.
<?php
class AddressBookAcl extends Zend_Acl {
    public function __construct() {
       /* ACL roles, resources and privileges */
    }
}
code snippet /basic/zf/library/AddressBookAcl.php
You store AddressBookAcl.php in the /library path because these rules need to be available for all controllers. You need to define the resources that should be secured:
$this->add(new Zend_Acl_Resource('index'));
$this->add(new Zend_Acl_Resource('confidential'));
$this->add(new Zend_Acl_Resource('backend'));
code snippet /basic/zf/library/AddressBookAcl.php
These are the controller names. Next, roles should be defined:
$this->addRole(new Zend_Acl_Role('guest'));
$this->addRole(new Zend_Acl_Role('user'), 'guest');
$this->addRole(new Zend_Acl_Role('admin'), 'user');
code snippet /basic/zf/library/AddressBookAcl.php
Note that the user role inherits from the guest role because the user role includes guest privileges.
$this->allow('guest', 'index');
$this->allow('user', 'confidential');
$this->allow('admin');
code snippet /basic/zf/library/AddressBookAcl.php
The last thing is to define the relations between resources and roles so the constructed access list meets your needs. You can also build ACLs more dynamically by loading them from the database. This is a good approach only if the access list is short because loading a long access list would take time and reduce performance. To enable AddressBookAcl you need to include its class definition within the application's Bootstrap.php.
<?php
require_once("AddressBookAcl.php");
class Bootstrap extends Zend_Application_Bootstrap_Bootstrap
{
code snippet /basic/zf/application/Bootstrap.php
Finally, you need to add ACLs within each controller. A good place is the init() method because it's invoked each time any action of this controller is executed.
<?php
class IndexController extends Zend_Controller_Action {
  function init(){
    $controller = $request->getControllerName();
    $acl = new AddressBookAcl();
    $acl->isAllowed($auth->getIndentity(),$controller);
  }
code snippet /basic/zf/application/controllers/IndexController.phpIn almost all cases, authentication mechanisms are built using databases. This is a good approach in general because it is easy to set up and configure, so it is attainable for everyone. But there is a faster and more maintainable solution, based on directory services and commonly used by corporations: the Lightweight Directory Access Protocol (LDAP), based on the X.500 standard, has various implementations. Authentication mechanisms based on LDAP are much faster than those based on relational databases, because they are just simpler. This is one of the reasons why LDAP is used for authentication purposes instead of relational databases.
In the following examples, you will be using OpenLDAP, which is an open source project; and Active Directory Application Mode (ADAM), which is an LDAP implementation offered by Microsoft. ADAM is free for use and is still very close to the LDAP standard, so it will be used here instead of Active Directory — another Microsoft LDAP implementation. Please, do not mistake ADAM (and its newer version called AD LDS) with Active Directory, which is a different and much more complex product.
Microsoft also delivers an LDAP implementation that is called Active Directory Lightweight Directory Services (AD LDS), which is a newer version of ADAM. In fact, it is just the same as ADAM, but it is a renamed version released for Windows 7 and later operating systems. The most important changes are the name and Windows 7 integration. In the examples you'll be using both ADAM and AD LDS. You will probably not see any differences, but when there are considerable ones, we will discuss them. There are also other LDAP implementations, such as IBM Tivoli Directory Server or Red Hat 389 Directory Server. They should work as well, but they are not within the scope of this book.
There are no special requirements needed to start. ADAM and AD LDS installation will be presented for Windows operating systems, while on Linux you need to install the LDAP PHP extension.
For ADAM you need to download the installation files. The file used here was ADAMSP1_x86_English.exe, which is available at the Microsoft downloads web page.
www.microsoft.com/downloads/en/details.aspx?familyid=96
88f8b9-1034-4ef6-a3e5-2a2a57b5c8e4&displaylang=en
The name may change in the future, but probably not much. You can type Microsoft ADAM into Google, and you should see a link to this page in the results. There is additionally a multilingual add-on available with MUI (Multilingual User Interface) in the name of the installer. Notice that these installers are available for two processor architectures: x86 and x64.
If you are using Windows 7, you should download AD LDS, which you can find here:
http://www.microsoft.com/downloads/en/details.aspx?familyid=A45
059AF-47A8-4C96-AFE3-93DAB7B5B658&displaylang=en
You can access this web page easily by typing Microsoft AD LDS download into Google. The proper installation file is called Windows6.1-KB975541-x86.msu. The .msu extension is a Windows Update extension, so this is not just a separate application but also an extension of the Windows operating system.
Before installing any LDAP implementations, please make sure that you are not running any other implementation of LDAP because ports can be blocked, which could be troublesome. So before doing anything with LDAP in PHP, you need to see whether PHP's LDAP extension is installed. XAMPP delivers it out of the box. Under UNIX systems, you usually need to install this extension separately. Under Ubuntu, you need to run this command with root privileges:
# apt-get install php-ldap
Under RHEL, after downloading the proper RPM package from one of the RPM repository sites, you need to use the following command to install LDAP support in PHP:
# rpm -i php-ldap-*.rpm
You must, of course, install PHP first, because it's a prerequisite.
Under FreeBSD you need to go to /usr/ports/net/php5-ldap/ and invoke the following command:
# make
To make sure that the PHP LDAP extension is installed, you need to find the php.ini file in the PHP extension directory. If you use Windows and XAMPP, that directory will be c:\<XAMPP PATH>\php\ext\, where <XAMPP PATH> is the directory in which you have installed XAMPP. In UNIX systems, the directory is almost always /usr/lib/php/.
;extension=php_ldap.dll
You generally also need to enable the LDAP extension in the php.ini config file, most often found in /etc/php5/apache/. (To enable means to delete the comma or hash before an extension library name.) Sometimes these config entries are separate files for each module (in Ubuntu, for example) placed in /etc/php5/apache/conf.d.
extension=ldap.so
In Windows, the extensions are stored in .dll files; under UNIX, they are stored in .so files.
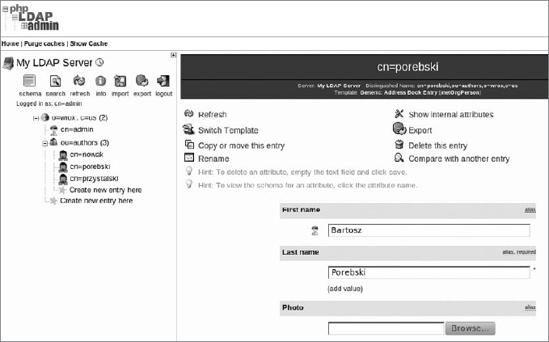
LDAP stores data records just like ordinary relational databases. The difference between these two is that databases are flat and LDAP has a tree structure in which each object can be subordinate to another one. Additionally, in LDAP each object can have a different structure. So LDAP is heterogeneous, unlike databases. In databases, each record in a table has the same structure. Each record is identified by its primary key. In LDAP, each record is identified by its distinguished name (DN) like cn=przystalski, ou=authors, o=wrox, c=us. So a company like Wrox will have its global information stored in o=wrox, c=us, but information on authors will be available in ou=authors, o=wrox, c=us. Similarly, when you want to see some information about an editor you should ask about cn=dinse, ou=editors, o=wrox ,c=us; or to see all editors, just ou=editors, o=wrox, c=us. In databases, you would do a SQL query like this one: SELECT * from editors; or SELECT * FROM editors WHERE surname='Dinse';
In the following sections, you install each LDAP engine and you can decide which best suits your needs. First, we describe the installation of ADAM. Next you move to OpenLDAP installation and configuration.
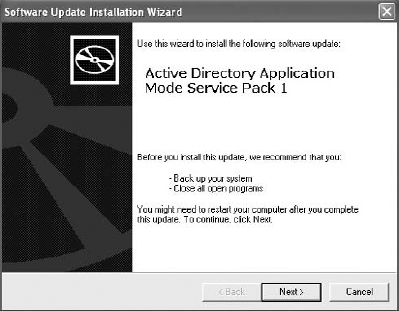
After downloading the proper installer, run it and a welcome dialog should be displayed (see Figure 16-7).
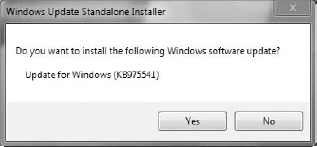
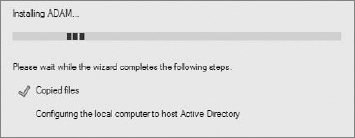
The next steps are very common to any other installations. Just read the license, click Next a few times and Finish at the end. That's all you do to install ADAM. In Windows 7, it looks a little bit different (see Figure 16-8). Just answer Yes and the installation moves on.
This update installs AD LDS shortcuts in the Windows Control Panel.
With OpenLDAP, it's probably easier. You only need to choose which distribution to use. Although each of them can call OpenLDAP in a different way, in most cases it's with openldap.
Installation is very simple, but in Ubuntu the OpenLDAP package is called slapd. This can be confusing.
# apt-get install slapd
Installation is nothing special; just make the openldap package that belongs to the net-nds group.
# cd /usr/ports/net-nds/openldap
# make
With Linux distributions such as Red Hat, you need to install .rpm packages. See Appendix B for a list of websites in which you can find the .rpm packages.
After completing the installation, you need to configure OpenLDAP or ADAM/AD LDS for it to work properly.
The following steps walk you through ADAM configuration:
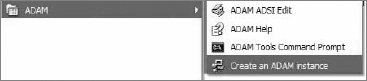
To start configuring ADAM, choose Create an ADAM Instance from the Windows Start Menu (see Figure 16-9).
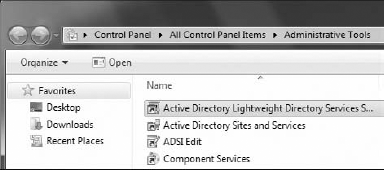
As described earlier, AD LDS shortcuts are available from the Administrative Tools in the Control Panel. Two shortcuts are of interest to us for this example: Active Directory Lightweight Directory Services and ADSI Edit (see Figure 16-10). The first shortcut is an equivalent of the Create an ADAM Instance shortcut.
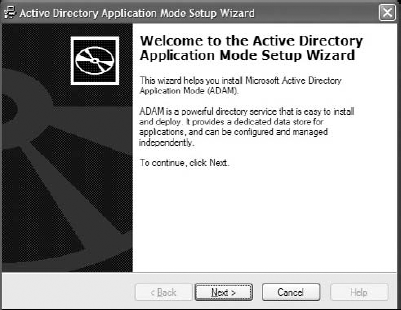
After clicking "Create an ADAM instance," a welcome page for the ADAM/AD LDS instance creation wizard displays, as shown in Figure 16-11.
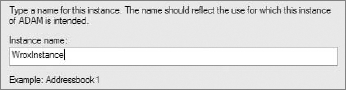
On the next page, you need to furnish an instance name that will be visible in Windows Services. If you want to use more than one instance, you should provide meaningful names (see Figure 16-12).
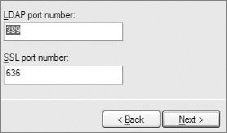
The next screen, shown in Figure 16-13, asks about instance ports. The default ports are commonly used: 389 for a plain connection and 636 for a secure connection. These port numbers are also the default in other LDAP implementations. Note that if you try to create a second instance without deleting the previous one, you will see some other ports as the defaults. This is annoying in most cases because you cannot set 389/636 ports.
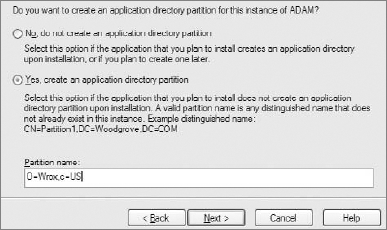
Next, you should set the main distinguished name. In the example, it's
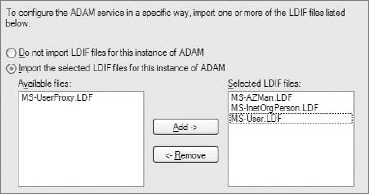
o=wrox,c=us. The main DN should be simple, but also meaningful. Figure 16-14 shows how to set a DN.After setting the main distinguished name, you should also specify which LDIF files should be imported into the ADAM/AD LDS instance. LDIF files are commonly used to modify any LDAP entry or setting. These files have an
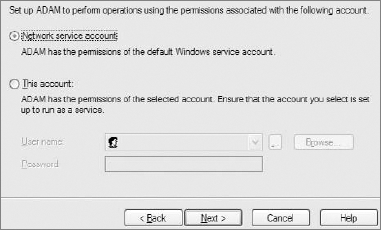
.ldifor.ldfextension. To make it simple, apart from modifying LDAP entries, these files are also sometimes used to define kind of a model-like structure of users that will be stored in LDAP. Generalizing, you can compare it with defining a table with structures like id, username, password, and so on. In this case, you need onlyMS-User.LDFbecause you will define only users. This LDIF adds Microsoft-specific attributes as well, which are not commonly used except by Microsoft solutions. In Figure 16-15, three LDIFs are selected to be added.Each instance exists as a service. These services have their associated permissions. In the case of web applications, it is easier to start an ADAM/AD LDS instance with Windows default privileges, as shown in Figure 16-16.
After clicking Next, an instance is created, as shown in Figure 16-17.
The ADAM/AD LDS instance is now visible in Services. To see it, go to Administrative Tools in the Control Panel. There should be a shortcut to Services. The instance is shown in Figure 16-18. You can start/stop and restart particular instances.

The preceding steps illustrate only the beginning of ADAM/AD LDS configuration. For the example, you also need to create a few user accounts, as shown in the following steps, to make it possible to authenticate users.
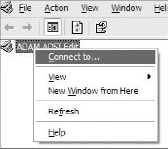
To connect to an instance, you need to run the ADSI Edit application and right-click the ADSI Edit root node. There should be an option available called Connect To, as shown in Figure 16-19.
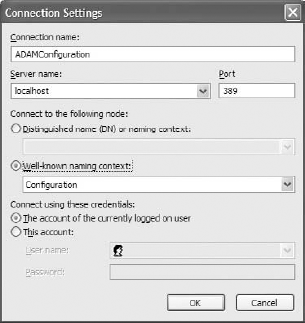
There are two main connection types that you can use to configure the instance. The first is to connect as a user, and the second is to connect as an administrator (super-user) to configure the LDAP server. The second one is named Configuration. This example uses the configuration context to connect to it, as shown in Figure 16-20.
This connection type allows you to change instance configuration.
After filling in the connection settings and clicking OK, you should see a new entry, as shown in Figure 16-21.
To add a user, you need to use the second connection type mentioned in Step 2 and shown in Figure 16-20 in the previous section.

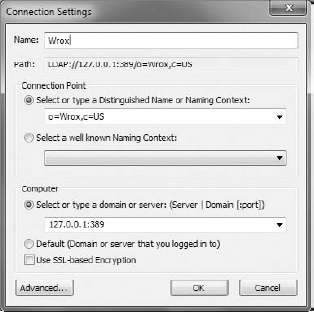
A good idea is to start adding users to the root node. Therefore, you should connect to the server using as the connection point the main DN, which is
o=wrox,c=us. In Windows 7, the server name (or server IP) and port number are in the bottom part of the window. The filled form shown in Figure 16-22 allows you to connect to LDAP.Now because you added
MS-User.LDF(in Step 6 of the ADAM configuration section), you can create users as objects in the LDAP tree. To complicate it a little more, you can add units likeauthorsandeditorsto separate users from their functions. These kinds of objects are calledorganizationalUnits. To create theauthorsobject, you need to right-click the main DN and invoke the New
Next, choose the proper object class from the list, as shown in Figure 16-24.
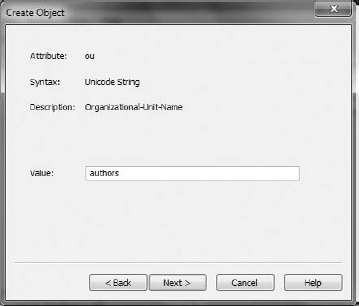
After you press Next you can enter the unit name, as shown in Figure 16-25.
This creates an
authorsunit. You can do the same with other units. You should see these units in the tree as new nodes.Adding users should be done in the same way as units, but instead of right-clicking
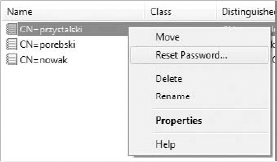
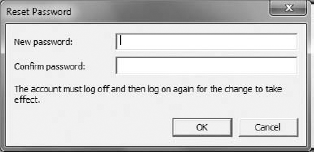
o=wrox,c=us, just add users by right-clicking the proper unit, which can beou=authors,o=wrox,c=us, for example. After that, you should see a list of users as shown in Figure 16-26.To finish the configuration, you need to reset passwords for users that were just created. A password dialog should display, as shown in Figure 16-27.
After password resetting, you can log in to ADAM/AD LDS with this information. The login name is the DN of each user. Now you can try to browse LDAP with your favorite LDAP browser tool.

While being created, each instance adds an entry within the Add/Remove Programs section of the Control Panel in Windows XP. To remove an instance, you need only to remove it from this list (see Figure 16-28).

In Windows 7, instances are shown in Programs and Features in the Control Panel. From there, you can remove unneeded AD LDS instances.
The following steps walk you through configuration of OpenLDAP, which is not as clickable as it is with ADAM/AD LDS. Almost all steps are done from the command line. OpenLDAP configuration differs a little bit from ADAM/AD LDS because you don't need to create instances.
Start by importing LDIFs delivered with OpenLDAP. To import those files, you need root privileges and to go to the
/etc/ldapdirectory. Then you need to execute these commands:# ldapadd -Y EXTERNAL -H ldapi:/// -f /etc/ldap/schema/cosine.ldif # ldapadd -Y EXTERNAL -H ldapi:/// -f /etc/ldap/schema/inetorgperson.ldif # ldapadd -Y EXTERNAL -H ldapi:/// -f /etc/ldap/schema/nis.ldif
These commands add some basic schemas.
Next you need to configure LDAP's back end. Configuring the back end is just setting the database that will be behind the LDAP. To make it possible, you need to create a LDIF file (call it
database.ldif) and execute it. Executing this file just adds entries within LDAP. To configure the database, you need to fill indatabase.ldifwith this piece of code:
dn: cn=module{0},cn=config objectClass: olcModuleList cn: module olcModulepath: /usr/lib/ldap olcModuleload: {0}back_hdbcode snippet /ldap/config/database.ldifThese entries set just the most basic information. To invoke these changes, you need to execute this command:
# ldapadd -Y EXTERNAL -H ldapi:/// -f database.ldif
Next, the database type needs to be set — and also the suffix, root, and some additional database configuration data. By default, OpenLDAP gives everyone privileges to write and read, so you need to create a root user that should have write permissions and give everyone else only read permissions. Define the suffix, database configuration, and root user as follows:
dn: olcDatabase={1}hdb,cn=config objectClass: olcDatabaseConfig objectClass: olcHdbConfig olcDatabase: {1}hdb olcDbDirectory: /var/lib/ldap olcSuffix: o=wrox,c=us olcRootDN: cn=admin,o=wrox,c=us olcRootPW: secret olcDbConfig: {0}set_cachesize 0 2097152 0 olcDbConfig: {1}set_lk_max_objects 1500 olcDbConfig: {2}set_lk_max_locks 1500 olcDbConfig: {3}set_lk_max_lockers 1500 olcLastMod: TRUE olcDbCheckpoint: 512 30 olcDbIndex: uid pres,eq olcDbIndex: cn,sn,mail pres,eq,approx,sub olcDbIndex: objectClass eqcode snippet /ldap/config/root.ldifSave the previous lines as
root.ldifand execute this command:# ldapadd -Y EXTERNAL -H ldapi:/// -f root.ldif
You should see something similar to this:
SASL/EXTERNAL authentication started
SASL username: gidNumber=0+uidNumber=0,cn=peercred,cn=external,cn=auth
SASL SSF: 0
adding new entry "cn=module{0},cn=config"
adding new entry "olcDatabase={1}hdb,cn=config"
If no error messages appear, you can add a user, whose distinguished name is
cn=admin,o=wrox,c=us, and who was set as therootuser before. This user doesn't exist now. A good approach is to set a password that is encrypted with a one-way hashing algorithm such as MD5. To set an MD5 password, you need to generate it. OpenLDAP delivers a tool that generates the proper value that can be copied directly into LDIF files. To generate a password hashed with the MD5 algorithm, execute this command:# slappasswd -h {MD5}For password
secret, you get this output:{MD5}Xr4ilOzQ4PCOq3aQ0qbuaQ==This value should be set for the
userPasswordattribute, which is a part of theuserobject structure. Earlier you set only an assignation to the root node and to the root user base structures, but not real objects. Now it's time to create both as existing objects. To do that, save the following lines withinadmin.ldiffile:dn: o=wrox,c=us objectClass: dcObject objectclass: organization o: wrox.com dc: wrox description: LDAP Root dn: cn=admin,o=wrox,c=us objectClass: simpleSecurityObject objectClass: organizationalRole cn: admin userPassword: {MD5}Xr4ilOzQ4PCOq3aQ0qbuaQ== description: LDAP administratorcode snippet /ldap/config/admin.ldifTo create a root node and LDAP administrator account using the above lines, execute the following command:
# ldapadd -Y EXTERNAL -H ldapi:/// -f admin.ldif
You should now see something similar to this:
SASL/EXTERNAL authentication started
SASL username: gidNumber=0+uidNumber=0,cn=peercred,cn=external,cn=auth
SASL SSF: 0
adding new entry "o=wrox,c=us"
adding new entry "cn=admin,o=wrox,c=us"
The output gives you information about added entries. Note that each added entry has a type. Types are called objectClass. Compared to relational databases such as MySQL, objectClass is a kind of table structure. objectClass says that this entry should consist of specific columns. For example, an entry with objectClass set to person should have at least sn and userPassword attributes.
OpenLDAP is available for everyone by default and allows writing and reading within it. This is something you don't want to allow, so let's allow only the LDAP administrator to write to LDAP. This sounds fairly secure and still makes LDAP usable.
Set a hashed password for the config admin user by filling in
admin-config.ldifwith thefollowing lines:dn: olcDatabase={0}config,cn=config changetype: modify add: olcRootDN olcRootDN: cn=admin,cn=config dn: olcDatabase={0}config,cn=config changetype: modify add: olcRootPW olcRootPW: {MD5}Xr4ilOzQ4PCOq3aQ0qbuaQ==code snippet /ldap/config/admin-config.ldifTo make it easier, you can use the same hashed password.
Now you need to modify these entries.
# ldapadd -Y EXTERNAL -H ldapi:/// -f admin-config.ldif
Set some kind of ACL. Because LDAP enables you to add more than one attribute within an object, you can define more than one access rule. Let's see what changes need to be made to allow only
cn=admin,o=wrox,c=usto write while allowing everyone else to read. (AllolcAccess:entries must be single lines even if they had to be split for print.)
dn: olcDatabase={1}hdb,cn=config
add: olcAccess
olcAccess: to attrs=userPassword,shadowLastChange by dn="cn=admin,o=wrox,c=us"
    write by anonymous auth by self write by * none
olcAccess: to dn.base="" by * read
olcAccess: to * by dn="cn=admin,o=ibm,c=us" write by * read
code snippet /ldap/config/acl.ldif
The last line makes the whole tree available for cn=admin,o=ibm,c=us to write and for all to read. The tree is also available for reading when the base distinguished name is set to an empty string. The middle entry allows users with a DN set to write cn=admin,o=wrox,c=us. This entry also allows authenticating by anonymous users and making changes within the user node; that's why write permissions need to be granted. To add these changes to LDAP, you need to execute this command:
# ldapmodify -x -D cn=admin,cn=config -W -f acl.ldif
Note that you log in with administrator permissions.
Now it's time to add units and users that you will use in the framework examples to authenticate.
To add an
authorsunit, you need to define a LDIF file with the following lines:dn: ou=authors,o=wrox,c=us objectClass: organizationalUnit ou: authorscode snippet /ldap/config/authors.ldifAs you can see, it's very simple to add the
authorsunit. It's an object oforganizationalUnitclass type, the same as in the case of ADAM.To add authors you need to execute following command:
# ldapadd -cvx -D cn=admin,o=wrox,c=us -W -f authors.ldif
Note that now you need to log in as the administrator to make any changes. You will be asked for a password. It's the same one that you added as a hashed MD5 password. You can also create other units like
editorsin the same way.Next you need to add a user. You can define this user as more than one object class type. Add the following lines within
users.ldif:dn: cn=nowak,ou=authors,o=wrox,c=us userPassword: {MD5}Xr4ilOzQ4PCOq3aQ0qbuaQ== sn: Leszek Nowak cn: nowak objectClass: top objectClass: person objectClass: organizationalPerson objectClass: inetOrgPersoncode snippet /ldap/config/users.ldifAs you did previously, you need to execute the following command with a different LDIF file as the parameter:
# ldapadd -cvx -D cn=admin,o=wrox,c=us -W -f users.ldif
After executing this command, you should see output similar to this:
Enter LDAP Password:
add userPassword:
    {MD5}GJaRVPnFMt38q41QWE1CVQ==
add sn:
Karol Przystalski
add cn:
przystalski
add objectClass:
top
person
organizationalPerson
inetOrgPerson
adding new entry "cn=przystalski,ou=authors,o=wrox,c=us"
modify completeTo browse OpenLDAP, you can use free applications such as Apache Directory Studio or phpLDAPadmin (which is available in most Linux distributions' package managers). You can install them just from sources or binary packages available at the phpLDAPadmin homepage (http://phpldapadmin.sourceforge.net/). After downloading, you need to unpack sources. If you are using Windows, use the context menu to unzip them. If you are using Linux, the best way to unpack them is to execute the following commands:
$ tar zxvf phpldapadmin-1.x.x.x.tgz
Note that you need to set your phpLDAPadmin version. Unpack it to the Apache main /htdocs directory. (On Linux, it's usually the /var/www/ directory. XAMPP has it in C:\xampp\htdocs\.) After unpacking and copying it to a proper directory (for example, /var/www/phpldapadmin), create a config file, which is placed in the /config directory. To do that, just change the name of the config.php.example file to config.php. Now your phpLDAPadmin tool is available through http://localhost/phpldapadmin/ if you deploy it on your desktop. Log in as cn=admin,o=wrox,c=us with the password chosen earlier and you should be able to see phpLDAPadmin, as shown in Figure 16-29.
You can easily browse available entries and create new ones. It's an easy-to-use tool for beginners and doesn't need additional packages except these, which are already installed when you install all applications required to deal with described frameworks (see Chapter 2).
A different approach, but in fact with almost the same functionalities, is presented in Apache Directory Studio (ADS). This is a nice, free LDAP tool that can also be used with Active Directory. It's based on Eclipse, which should be a sufficient recommendation. To use it, download it from http://directory.apache.org/studio/. For Linux distributions, you need to unpack it with the same commands as you use for phpLDAPadmin. For Windows, the Apache Foundation delivers an ADS installer. The installation procedure is obvious, so it will not be explained here. After unpacking under Linux, execute ApacheDirectoryStudio, which is within the unpacked ADS directory.
$ ./ApacheDirectoryStudio
Note that to make ADS work properly, you need to install the Java Runtime Environment before starting work. After launching LDS, you need to choose LDAP
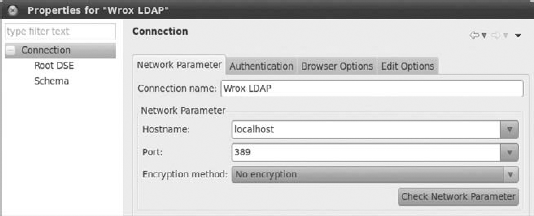
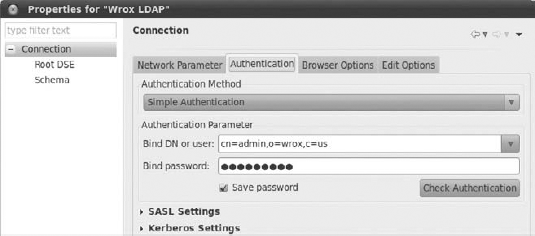
Note that Figures 16-30, 16-31, and 16-32 present connection properties that use the same values that you enter in the wizard pages. After you fill in all Network Parameter fields, you need to go to the Authentication tab. In the example, the user is cn=admin,o=ibm,c=us (see Figure 16-31).
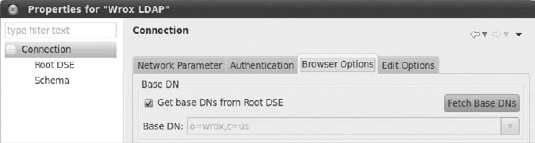
Finally you must set the base DN in the Browser Options tab. Base DN is, in fact, the root DN that you set earlier. You don't need to put it into the form, just click the Fetch Base DNs button to get it directly from LDAP (see Figure 16-32).
This was the last step of this wizard and you can use LDAP now. You should see something similar to Figure 16-33.
Using the context menu, you can do operations such as adding users, units, and so on.

LDAP is commonly known to be a very fast and simple solution. It's also usually a faster solution than relational databases such as MySQL, PostgreSQL, or Oracle. Probably you are wondering now what LDAP has to do with security. In many big companies, LDAP (or Microsoft's equivalent Active Directory) is used to authenticate users because it's fast and it's a great solution to represent users in companies' hierarchies. Sometimes you will be constrained to integrate a new application that you are developing with an existing solution based on LDAP. This is a frequent scenario because of LDAP's popularity.
Frameworks deliver add-ons or libraries for directory services to make developers' lives easier. By default, PHP supports LDAP and delivers a lot of LDAP functions. These functions stand behind any plug-in, add-on, or library. As a solution we mean that you can authenticate previously created users using frameworks features, plug-ins, and so on. Additional steps may include integration of described solutions with authentication modules, actions, or libraries.
Symfony provides a dedicated plug-in for LDAP called upSimpleLdapPlugin. To install it, execute the following command in your Symfony project directory:
$ symfony plugin:install upSimpleLdapPlugin
To configure the upSimpleLdapPlugin plug-in, just set basic LDAP server information within the application's app.yml. In this case, it should look like the following:
all:
  ldap:
    host: 127.0.0.1
    port: 389
    user: cn=admin,o=wrox,c=us
    pass: secret
    baseuser: ou=authors,o=wrox,c=us
    version: 3
code snippet /ldap/symfony/apps/frontend/config/app.yml
Note that you need to insert the password that you set earlier. You point to ou=authors,o=wrox,c=us because you want only to check authors. You can expand it to include the whole tree in the future. Let's see how the upSimpleLdapPlugin plug-in works by looking at the authenticate() method:
$sr = ldap_search($this->ds, $this->base_user, "uid=$login");
if (ldap_count_entries($this->ds, $sr) <= 0)
    return false;
$entry = ldap_first_entry($this->ds, $sr);
$dn = ldap_get_dn($this->ds, $entry);
ldap_free_result($sr);
if (is_string($dn) && !empty($dn)) {
    if (!@ldap_bind($this->ds, $dn, $password)) {
return false;
} else {
return true;
}
}
return false;As you can see in the first line, users are searched by a unique ID. All users don't have this attribute set because you didn't add it before. The easiest way to add unique IDs for every user is by using ADS. Select one of the users and on the right use the context menu to add a new attribute (see Figure 16-34).
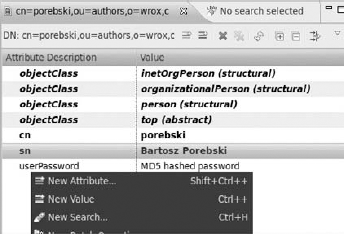
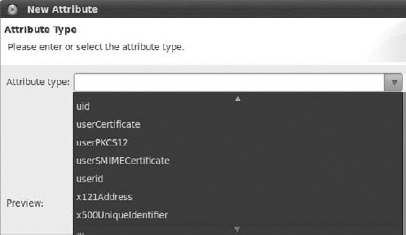
Set the attribute's type, which in this case is uid. ADS delivers a list of available attributes that is very helpful for beginning developers (see Figure 16-35). Choose uid and press Next and Finish.
Now you can see the new attribute. By default, it's set to an empty string, as shown in Figure 16-36.

Note that the uid attribute needs to be set to a unique value. Let's assume that the user's surname is unique in the scope of this example, so you can set it as the value for uid. After setting the value, the user's attributes should look like Figure 16-37.
In most cases, you have to set the attribute uid for many users. This is not possible to do for a lot of users in the way you have done it in this example, but ADS has a great feature that generates a proper LDIF section for every change. If you scroll to the bottom, you should be able to see something similar to what is shown in Figure 16-38.
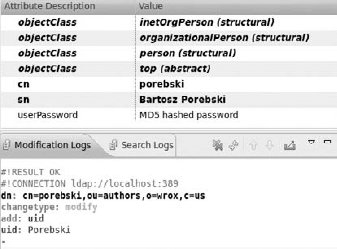
If you copy these lines to a separate LDIF file and execute it with the ldapmodify command, you get the same result. Unlike the preceding clickable method, the LDIF method can be automated when you use one of your favorite scripting languages. If you add the following lines, you get a True value in the $result variable.
$login = "Nowak";
$pass = "secret";
$result = $ldap->authenticate($login, $pass);
code snippet /ldap/symfony/apps/frontend/modules/ldapexample/actions/actions.class.php
This can be used easily to authenticate users using LDAP instead of a relational database. The following code provides an example of user authentication:
$login = $request->getParameter('login');
$pass = $request->getParameter('password');
$user = $this->getUser();
if($ldap->authenticate($login, $pass)) {
    $user->setAuthenticated(true);
    $user->addCredential('user');
}
code snippet /ldap/symfony/apps/frontend/modules/ldapexample/actions/actions.class.php
The upSimpleLdapPlugin plug-in also enables you to change the user's password by using the updatePassword() method. This is possible because you log in as cn=admin,o=wrox,c=us, and this user has write permissions.
$ldap->updatePassword($login, $oldpass, $newpass);
Symfony also delivers an equivalent plug-in for Active Directory, which can be installed with the following command:
$ symfony plugin:install bhLDAPAuthPlugin
You can also use a modified variant of the sfGuard plug-in used for authentication with Active Directory:
$ symfony plugin:install vjGuardADPlugin
CakePHP doesn't deliver any additional LDAP or AD add-ons/plug-ins. But this doesn't mean that it's impossible to achieve LDAP integration in an easy manner. You need to write a little bit more code than you do in Symfony, however.
There are a few ways to solve the problem of user authentication through LDAP in CakePHP. One of the solutions is to define a model that connects, disconnects, and searches LDAP and also validates users. You need to create a model within the /model directory. In the example, you call this model Ldap. The Ldap model should look like this:
<?php
class Ldap extends AppModel {
    var $name = 'Ldap';
    var $useTable = false;
?>
code snippet /ldap/cakephp/app/models/ldap.php
Note that you don't want to use a database. By default, any time you invoke this class, CakePHP will search for a table named Ldap. In this case, it is an undesirable behavior. To force a different behavior, you need to set the $useTable model variable to false. Now CakePHP will not search for any table for this model.
Next, you need to set some basic LDAP-specific data as the main variables. Note that information like hostname, base distinguished name, or administrator login and password does not change very often. Therefore, you can define the Ldap model as follows:
<?php
class Ldap extends AppModel {
    var $name = 'Ldap';
    var $useTable = false;
    var $hostname = 'localhost';
    var $baseDn = 'o=wrox,c=us';
    var $username = 'cn=admin,o=wrox,c=us';
    var $password = 'secret';
    var $ldapConn;
}
code snippet /ldap/cakephp/app/models/ldap.php
The $ldapConn variable handles the current connection to the LDAP server. This variable will often be used in the code because each time you want to get any information, you will use a handle to a LDAP server on which you want to do a search or any other actions. If you want to use the Ldap model very often, it's a good idea to connect to LDAP within the class constructor. Note that you inherit the AppModel class, so you should first invoke its class constructor and after that use the built-in PHP LDAP functions. The code should look like the following:
function __construct() {
    parent::__construct();
    $this->ldapConn = ldap_connect($this->hostname, 389);
ldap_set_option($this->ldapConn, LDAP_OPT_PROTOCOL_VERSION, 3);
ldap_bind($this->ldapConn, $this->username, $this->password);
}
function __destruct() {
ldap_close($this->ldapConn);
}
code snippet /ldap/cakephp/app/models/ldap.phpAn LDAP connection is defined in the third line, and the LDAP protocol is set in the following line. More options can also be set. To see all available options, go to: http://php.net/manual/en/function.ldap-set-option.php. Finally, before the destructor method, you need to bind the connection with a user. Then the class destructor closes the current LDAP connection. Now when you create an instance of the LDAP object type, you should be connected anytime while invoking any object methods. So let's find users so you can implement the authentication method.
function findAuthor($attribute = 'uid', $value = '*') {
    $baseDn = 'ou=authors,o=wrox,c=us';
    $result = ldap_search($this->ldapConn, $baseDn, $attribute . '=' . $value);
    return ldap_get_entries($this->ldapConn, $result);
    }
}
code snippet /ldap/cakephp/app/models/ldap.php
In the preceding code, you find an author by searching within the ou=authors,o=wrox,c=us subtree, as defined earlier. To make this example as compatible as possible with the other two framework examples, you use uid as the attribute for the search. All entries that match the search query are returned. As mentioned before, you use a unique ID, so note that the result should be only one entry.
The final method, shown in the following code, is responsible for user authentication. This method is based on the previously implemented findAuthor() method. If a user for given $uid and $password variables is found, try to bind with the user's distinguished name. If this method binds successfully, a true value is returned, which means that a user with given parameters exists and can be authenticated.
function authenticate($uid, $password) {
    $result = $this->findAuthor('uid', $uid);
    if($result[0]) {
        if (ldap_bind($this->ldapConn, $result[0]['dn'], $password)) {
            return true;
           } else {
           return false;
           }
    } else {
     return false;
    }
}
code snippet /ldap/cakephp/app/models/ldap.phpTo use the model described previously, you can create a controller that will utilize it. Let's create ldap_controller.php in CakePHP's /controllers path. Note that CakePHP will automatically assign the Ldap model to this controller, so you don't need to define the $uses variable. As shown in the following code, you create an object of the Ldap type, which is in fact the model. Next, you need to invoke the authenticate() method to make sure that the user with a uid set to Nowak and a password of secret exists in LDAP. If it does, authenticated is printed. Of course, in a real application you should replace the printing action with the actions you want to be done after the user is authenticated.
<?php
class LdapsController extends AppController {
    var $name = "Ldaps";
    function index(){
       $a = new Ldap();
       $result=$a->authenticate("Nowak","secret");
       if($result){
          echo "authenticated";
       } else {
         echo "not authenticated";
       }
    }
}
?>
code snippet /ldap/cakephp/app/controllers/ldap_controller.php
To make LDAP authentication usable for production, integration with CakePHP's Auth component should be done as well.
In Zend Framework, adapters are commonly used to implement database authentication easily. ZF also delivers other kinds of adapters out of the box, such as openID, LDAP, digest, or HTTP. Each of them can be used to implement a different method of user authentication.
In this example you use the LDAP adapter to provide LDAP authentication. To make it simpler and easier to learn, use the IndexController as the authentication code holder. First, you need to have a Zend_Auth instance and define an example user that you want to authenticate.
$auth = Zend_Auth::getInstance();
$username= "cn=nowak,ou=authors,o=wrox,c=us";
$password= "secret";
$wrongUsername= "cn=unknown,ou=authors,o=wrox,c=us";
$wrongPassword= "wrongPass";
code snippet /ldap/zf/application/controllers/IndexController.php
The next step is to define LDAP connection options that are provided to Zend_Auth_Adapter_Ldap. As in previous examples, you connect as the administrator with the base distinguished name set to o=wrox,c=us.
$options= array(array('host'=>'localhost',
    'username'=> 'cn=admin,o=wrox,c=us',
    'password' =>'secret',
    'baseDn' => 'o=wrox,c=us',
    'bindRequiresDn'=>1,
    ));
code snippet /ldap/zf/application/controllers/IndexController.php
Now everything is ready to create an instance of the ZF LDAP authentication adapter, as shown in the following code:
$adapter = new Zend_Auth_Adapter_Ldap($options, $username, $password);
To make sure that the adapter is working properly, you previously defined the $wrongUsername and $wrongPassword variables. After you test the proper username and password, you can check how the authentication works with the $wrongUsername and $wrongPassword. The LDAP authentication process works like database authentication. You need to send to the Zend_Auth authenticate() method an adapter as the parameter. Because all needed information to make the authentication possible is assigned to the LDAP adapter, $auth returns a Zend_Auth_Result object.
$result = $auth->authenticate($adapter);
if($result->isValid()) {
    print "authenticated";
}else {
    print "not authenticated";
}
code snippet /ldap/zf/application/controllers/IndexController.php
The isValid() method owned by the $result returns a true or false value, depending on whether authentication succeeded or not.
LDAP connection information is supposed to be used more than once; that's why when refactoring the code it's a good idea to export all this information to the ZF application.ini configuration file. For example, the LDAP connection entries in the configuration file might look like the following:
[development]
ldap.server.host = 127.0.0.1
ldap.server.username = "cn=admin,o=wrox,c=us"
ldap.server.password = secret
ldap.server.baseDn = "ou=authors,o=wrox,c=us"
ldap.server.bindRequiresDn = true
code snippet /ldap/zf/application/configs/application.ini
You should also set LDAP connection configuration for any other environment in which this information is used. To load LDAP information from a configuration file, you need to read it using the Zend_Config_Ini class:
$config = new Zend_Config_Ini(
               '../application/configs/application.ini',
               'development'
               );
$options = $config->ldap->toArray();
code snippet /ldap/zf/application/controllers/IndexController.php
Zend_Config_Ini inherits from Zend_Config and is responsible for changing configuration parameters within .ini configuration files. Note that the configuration variables start with the ldap prefix. That's why you can use $config->ldap to get only variables that start with this prefix. The toArray() method returns an array that looks almost the same as defined previously without using the configuration file.
To make authentication easier, you can also define a suffix that can be concatenated with a username.
$suffix=",ou=authors,o=wrox,c=us";
$username = "cn=".$this->_request->getParam('username').$suffix;
$password = $this->_request->getParam('password');
code snippet /ldap/zf/application/controllers/IndexController.php
This way, you get only the username from the form; the rest is added automatically.