Table of Contents for
Building PHP Applications with Symfony™, CakePHP, and Zend® Framework
 Building PHP Applications with Symfony™, CakePHP, and Zend® Framework
Published by
Wrox, 2011
Building PHP Applications with Symfony™, CakePHP, and Zend® Framework
Published by
Wrox, 2011
- Copyright
- Credits
- ABOUT THE AUTHORS
- ACKNOWLEDGMENTS
- Introduction
- 1. Introducing Symfony, CakePHP, and Zend Framework
- 2. Getting Started
- 3. Working with Databases
- 4. Your First Application in the Three Frameworks
- 5. Forms
- 6. Mailing
- 7. Searching
- 8. Security
- 9. Templates
- 10. AJAX
- 11. Making Plug-ins
- 12. Web Services
- 13. Back End
- 14. Internationalization
- 15. Testing
- 16. User Management
- 17. Performance
- 18. Summary
- A. Web Resources
- B. CodeIgniter, Lithium, and Agavi with Code Examples
- GLOSSARY OF ACRONYMS AND TECHNICAL TERMS
The more technologically advanced the medium, the more primitive, trivial and useless messages are transmitted through it.
WHAT'S IN THIS CHAPTER?
E-mail predates the first web pages and even the Internet itself, and compared to other web technologies, mailing has not changed much over the years. However e-mail is still the backbone of all advanced web services and the Internet could not work without it. Apart from user-to-user communication, mailing is indispensable for creating accounts, reminding users about passwords they've forgotten, sending newsletters, keeping up with newsgroups, and so on.
You can't develop web apps without mailing, and this chapter explains how to do it efficiently and effortlessly. Using the mailing engines presented here is easy and straightforward, so this chapter will be a piece of cake for you — a piece of very nutritious cake, in fact, taking into account how many beneficial uses of mailing there are.
Developers need to make sure that e-mail is automated and works as designed. Most of the commonly encountered problems are associated with the following:
Establishing connections
Sending HTML-formatted e-mail
Sending e-mail to multiple receivers
Carbon copies
All these problems can be easily solved with mailers. Mailers are ready-to-use solutions that are included within web application frameworks or separate modules that can be added to a web framework.
One of the biggest nuisances of web development is when you deploy your application on a hosting server and your mailing module stops working. This often happens because of configuration issues. One hosting server may work fine with mailing enabled in the PHP configuration and a properly configured mail server such as Sendmail or Postfix, but others may have the mailing server disabled. In most cases, you cannot force the administrators to configure the server and enable mailing. They don't want to do that, mostly for security reasons — which is a good point by the way. Unfortunately it's not a good point for you because you need to do more work on your side in this case.
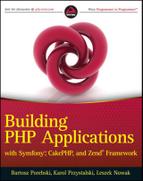
The more complete details of the e-mail-sending process are beyond the scope of this chapter, but in general it looks like Figure 6-1.
After you create the e-mail's content and click the Send button, all data is collected from the text fields and sent either to a remote mail server or a local mail server if you have an e-mail server where the application is deployed.
Note
In most cases, a remote SMTP server is used, even when it's on the same machine (it's not really remote, but it's treated as such).
Connecting to a remote mail server has some advantages. In almost all cases, this kind of connection requires a username and password because of the authentication process. While you are authenticated, your e-mail can be sent to any other mail server without being treated as spam. After the e-mail is sent from the remote mail server, it moves through the SMTP protocol to the destination mail server and can be read by the recipient through a web application or it can be requested by the recipient through the POP3/IMAP protocol.
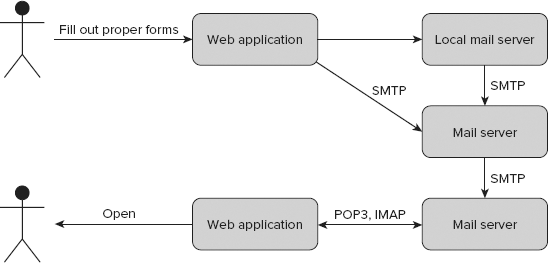
The php.ini file is used to configure PHP settings. It is placed in the /etc/php5/apache2/ directory under UNIX systems and in the C:\xampp\php\ under Windows if you use XAMPP. Important parts of this file are shown in Figures 6-2 and 6-3.
You can set the default SMTP hostname, SMTP port, and Sendmail's path and from values. You can also configure some mail-specific issues such as creating headers or a log file.

After editing php.ini, you should have something similar to these values:
[mail function]
SMTP = localhost
smtp_port = 25
;sendmail_from = me@example.com
;sendmail_path =
;mail.force_extra_parameters =
mail.add_x_header = On
;mail.log =
To apply an entry, you need to remove the semicolon that comments it out.
Sendmail, like almost all leading mail servers, is available both for UNIX and Windows systems.
To install Sendmail, you can use a package manager like Sendmail:
# apt-get install sendmail
Now, you should configure Sendmail by executing the following command with root privileges:
# sendmailconfig
You can now easily send an e-mail from the command line. Create a file called mail.txt and fill it with some text.
$ touch mail.txt
$ echo "Test mail" > mail.txt
$ mail -s "Hello world" john@wroxexample.com < mail.txt
At the end, you need to execute the mail command, as shown previously. Replace the example e-mail with your own text, send it, and check your mailbox. Probably it will be delivered but filtered as spam, so search your spam inbox as well.
This may come as a surprise, but despite the fact that Sendmail is a UNIX application, it is delivered within XAMPP for Windows, so if you followed XAMPP installation in Chapter 2, you don't have to install anything else. The file structure of Sendmail for Windows is presented below.
c:\xampp\sendmail\
    libeay32.dll
    sendmail.exe
    sendmail.ini
    ssleay32.dll
Sendmail is also used by PHP under Windows to send e-mail.

SwiftMailer is available not only as part of Symfony, but also as a separate application (see Figure 6-4). It is available for every framework considered in this book.
SwiftMailer is Symfony's default mailer and is included within framework libraries, so you don't need to install any additional libraries. The code snippets in this section can be put wherever you like into the controllers' actions.
You can employ SwiftMailer in Symfony by invoking the getMailer() method as shown here:
$mailer = $this->getMailer();
Creating and sending simple e-mail can be easily done using one method only: composeAndSend(), as shown in the following code. This is very useful when you are developing a big application in which the mailing code is not really the important part, but you need to close some functionalities that depend on sending e-mail.
$mailer->composeAndSend(
'example@wroxexample.com',
'example@wroxexample.com',
'Hello World!!!!',
'John Smith'
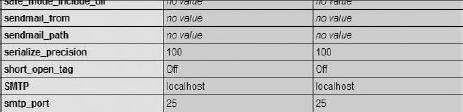
);After executing this code through a browser, you should be able to see in the right corner of the debug toolbar an envelope with the count of sent e-mail (see Figure 6-5).
When you click the envelope, you should see details of each e-mail on the left (see Figure 6-6).
You can send not only plain text e-mail but also HTML-formatted messages. You may specify what kind of e-mail you want to send with the setBody() method. It gets two parameters: message body (content) and message type. In the following example, an HTML message is sent:
$message = Swift_Message::newInstance('Hello World Subject!', 'foobar message');
$message->setBody('foobar <p style="font-weight: bold;">message</p>', 'text/html');
$this->getMailer()->send($message);
Additionally you can use Symfony's partial files for the message body. To get partial content, you should use the getPartial() method. As the second parameter, you send an array with key variables and their assigned values.
$message = Swift_Message::newInstance('Hello World Subject!', 'foobar message');
$htmlBody = $this->getPartial('activation',array('name'=>'John Smith'));
$message->setBody($htmlBody,'text/html');
$this->getMailer()->send($message);
To run this example, you need to create a partial file that should be saved as _activation.php in /modules/<example>/templates/ directory. Note that you replace <example> with your module name. The partial file's content can look like this:
Hello World!
<?php echo $name; ?>
The Swift_Attachment class is responsible for creating attachments in SwiftMailer. Attachments can be added in two major ways:
Using the path to an existing file
Dynamically
Depending on your business strategy and application architecture, you can store attachment files directly under a file system path or in a database. When you store attachments just as files, you can attach them using the fromPath() method and the file's path. An example e-mail code is shown following. Note that you can also set a proper content-type value. This is not obligatory, and you can omit this parameter, but it can be helpful for some e-mail clients to let them know the attachment type.
$message = Swift_Message::newInstance('Hello World Subject!', 'foobar message');
$message->setFrom('producer@wroxexample.com');
$message->setTo('example@wroxexample.com');
$attachment = Swift_Attachment::fromPath('C:\funny.jpg', 'image/jpeg');
$message->attach($attachment);
$this->getMailer()->send($message);
To hide files from public, sometimes they are kept with strange names such as frt4754fehrt954643gfwe0.jpg. Such names are very hard to guess, so they cannot be easily accessed from outside. This approach can't be called real security, but proves to be good for keeping the files out of the view of general public. In this case, you can set another filename that will be seen by the receiver. To do that, you should use the setFilename() method as follows:
$message = Swift_Message::newInstance('Hello World Subject!', 'foobar message');
$message->setFrom('producer@wroxexample.com');
$message->setTo('example@wroxexample.com');
$attachment = Swift_Attachment::fromPath(
  'C:\xampp\public_html\cake\app\webroot\attach\frt4754fehrt954643gfwe0.jpg')
  ->setFilename('funny.jpg');
$message->attach($attachment);
$this->getMailer()->send($message);
However, most developers keep files in databases, especially when attachments are dynamic and change very often, or if they differ for each e-mail. You can easily attach a file that was saved before in a database. Assume that your Attachments table structure looks as follows:
field name    type
id            int(3) primary key auto_increment
fileName      varchar(32)
content       BLOB
You can get attachment's content using Doctrine, as shown in the following code:
$attachData = Doctrine_Core::getTable('Attachments')->find(1);
$data=$attachData->getContent();
$fileName=$attachData->getFileName();
$message = Swift_Message::newInstance('Hello World Subject!', 'foobar message');
$message->setFrom('producer@wroxexample.com');
$message->setTo('example@wroxexample.com');
$attachment = Swift_Attachment::newInstance($data, $fileName);
$message->attach($attachment);
$this->getMailer()->send($message);
That's really easy to implement.
Adding more than one recipient can be done in few ways. The simplest way is to add more recipients in the TO field as follows:
$message = Swift_Message::newInstance('Hello World Subject!', 'foobar message');
$message->setFrom('producer@wroxexample.com');
$message->setTo(array('example@wroxexample.com','john@wroxexample.com'));
$this->getMailer()->send($message);
In some cases this solution is not the proper one. That's why carbon copies (CC) and blind carbon copies (BCC) were invented. You can add carbon copies using the addCc() method of the Swift_Message object.
$message = Swift_Message::newInstance('Hello World Subject!', 'foobar message');
$message->setFrom('producer@wroxexample.com');
$message->setTo('example@wroxexample.com');
$message->addCc('boss@wroxexample.com', 'John Kowalski');
$this->getMailer()->send($message);
Adding blind carbon copies is similar to adding carbon copies.
$message = Swift_Message::newInstance('Hello World Subject!', 'foobar message');
$message->setFrom('producer@wroxexample.com');
$message->setTo('example@wroxexample.com');
$message->setBcc(array(
    'pm@wroxexample.com',
    'boss@wroxexample.com' => 'John Kowalski',
));
$this->getMailer()->send($message);
Both in CC and BCC, you can apply more than one recipient, as shown previously.
SwiftMailer is integrated with Symfony. Therefore, you can configure an SMTP connection in application configuration files. By editing the factories.yml file in an application's /config directory, you can add some configuration entries dedicated to Symfony's default mailer. You can enable or disable logging for SwiftMailer, and set default charset and delivery options. But most interesting are the SMTP configuration entries. You can set user, password, host name and port for all sent e-mail. So you don't need to set it anywhere else when sending e-mail. Exemplary SwiftMailer entries for all environments can be set as follows:
all:
  routing:
    class: sfPatternRouting
    param:
      generate_shortest_url: true
      extra_parameters_as_query_string: true
  view_cache_manager:
    class: sfViewCacheManager
    param:
      cache_key_use_vary_headers: true
      cache_key_use_host_name: true
  mailer:
    class: sfMailer
    param:
      logging:           %SF_LOGGING_ENABLED%
      charset:           %SF_CHARSET%
      delivery_strategy: realtime
      transport:
        class: Swift_SmtpTransport
        param:
          host:       localhost
          port:       25
          encryption: ~
          username: ~
password: ~Because nonsecure connections (shown in the preceding code snippet) are very rarely used, you will most likely be using secure connections. You can easily change the configuration according to your needs. For example, for a secure connection, the configuration entries could be as follows:
all:
  routing:
    class: sfPatternRouting
    param:
      generate_shortest_url:            true
      extra_parameters_as_query_string: true
  view_cache_manager:
    class: sfViewCacheManager
    param:
      cache_key_use_vary_headers: true
      cache_key_use_host_name: true
  mailer:
    class: sfMailer
    param:
      logging: %SF_LOGGING_ENABLED%
      charset: %SF_CHARSET%
delivery_strategy: realtime
transport:
class: Swift_SmtpTransport
param:
host: smtp.gmail.com
port: 465
encryption: ssl
username: wroxexample@gmail.com
password: wroxexample123Note
See Chapter 8 to read more about the differences between secured and nonsecured connections.
In some situations, one global configuration for all sent e-mail is not a good solution. Let's assume that you use a few accounts on different SMTP servers. In this case, it's better to use Swift_SmtpTransport to define connection parameters for each e-mail module, as follows:
$transport = Swift_SmtpTransport::newInstance('smtp.example.org', 25)
->setUsername('your username')
->setPassword('your password');
Next you need to send the authentication data to Swift_Mailer as a parameter:
$mailer = Swift_Mailer::newInstance($transport);
You can also define a secure connection with the same effect as described previously:
$transport = Swift_SmtpTransport::newInstance('smtp.example.org', 465, 'ssl');To summarize, the following code shows a registration module example in which all previously described features are presented.
<?php
class RegistrationActions extends sfActions {
    public function executeRegister() {
           $transport = Swift_SmtpTransport::newInstance('smtp.gmail.com', 465, 'ssl')
           ->setUsername('wroxexampleregistration@gmail.com')
           ->setPassword('wroxexample123');
      $mailer = Swift_Mailer::newInstance($transport);
      $message = Swift_Message::newInstance('Hello World Subject!', 'foobar
message');
      $message->setFrom('wroxexampleregistration@gmail.com');
      $message->setTo('example@wroxexample.com');
      $message->setCc(array(
                            'admin@wroxexample.com' => 'John Kowalski',
      ));
     $attachment = Swift_Attachment::fromPath(
       '/home/wrox/public_html/symfony/web/attachments/subscription_pack.zip',
       'application/zip');
$message->attach($attachment);
$mailer->send($message);
}
}
code snippet /swiftmailer/symfony/app/frontend/modules/registration/actions/actions.class.phpSwiftMailer is not integrated with CakePHP the way it is in Symfony. That's why you need to use SwiftMailer through CakePHP's /vendor library path. You can download SwifMailer files from http://swiftmailer.org/download. After extraction, your directory structure should be as follows:
app/vendors/swift_mailer/
        CHANGES
        lib/
            classes/
            dependency_maps/
            mime_types.php
            preferences.php
            swift_init.php
            swift_required_pear.php
            swift_required.php
        tests/
        test-suite/
        LICENSE
        README
        VERSION
Now you can use the SwiftMailer library by importing it within the controller. The missing mailing code will be shown later in this section.
<?php
App::import('Vendor', 'Swift', array('file' =>
'swift_mailer'.DS.'lib'.DS.'swift_required.php'));
class RegistrationController extends AppController {
    var $name = 'registration';
    function send() {
        /* mailing code */
    }
}
?>After you import SwiftMailer, you can send e-mail as you can in Symfony. The only difference is that you need to set transport parameters through Swift_SmtpTransport every time you use SwiftMailer. The following code shows sending an e-mail with SwitfMailer via Gmail.
$transport = Swift_SmtpTransport::newInstance('smtp.gmail.com', 465, 'ssl')
                ->setUsername('wroxexample@gmail.com')
                ->setPassword('wroxexample123');
$mailer = Swift_Mailer::newInstance($transport);
$message = Swift_Message::newInstance('Cake SwiftMailer','Hello World!');
$message->setFrom('wroxexample@gmail.com');
$message->setTo('example@wroxexample.com');
$mailer->send($message);You can easily add message content using the setBody() method. But what about message templates? Can they be made as shown in Symfony using partials? Template loading is possible with CakePHP's View class.
$viewPath='email';
$type='html';
$viewName='registration';
$view = new View($this);
$view->layout=$this->layout;
$content=$view->element($viewPath.DS.$type.DS.$viewName, array('name' => "John
Smith"), true);
$htmlBody= $view->renderLayout($content);
Note that in the preceding example you get a page with the layout used by the current controller as the $htmlBody variable. To see any results, you need to create a registration.phtml template element, which should be placed in the /app/views/elements/email/html/ directory. If you print the $htmlBody content with the echo command, you will see something similar to Figure 6-7.

Your registration.ctp should be as follows:
Hello World!
<?php echo $name; ?>
The output shown in Figure 6-7 is probably not exactly the one you expected. This is because the default layout was used. To replace the default layout, you need to assign the layout's name to the $this->layout variable instead of assigning the current layout, which is by default the default layout. For example if you set the layout as follows:
$this->layout='mailing';
then you should also create mailing.ctp in the /app/views/layouts/ directory with the following content:
<?php echo $content_for_layout; ?>
The preceding layout has only one line, which includes the template's content. It works in the same way as it does in a usual application. After merging, your code should look like the following:
$viewPath='email';
$type='html';
$viewName='registration';
$view = new View($this);
$view->layout=$this->layout;
$content=$view->element($viewPath.DS.$type.DS.$viewName,
  array('name' => "John Smith"), true);
$htmlBody= $view->renderLayout($content);
$transport = Swift_SmtpTransport::newInstance('smtp.gmail.com', 465, 'ssl')
                ->setUsername('wroxexample@gmail.com')
                ->setPassword('wroxexample123');
$mailer = Swift_Mailer::newInstance($transport);
$message = Swift_Message::newInstance();
$message->setSubject('swiftExample');
$message->setFrom('wroxexample@gmail.com');
$message->setTo('example@wroxexample.com');
$message->setCc(array('admin@wroxexample.com' => 'John Kowalski',));
$message->setBody($htmlBody,'text/html');
$mailer->send($message);
Note that it is a good practice to keep HTML and plain e-mail in separate folders in the elements/email/ directory.
views/elements/email/html/
views/elements/email/text/
These are done exactly as described in the "Symfony" section earlier in this chapter, so it will not be covered again here.
When you merge all code described in this section, your code should be similar to following code.
<?php
App::import('Vendor', 'Swift', array('file' =>
'swift_mailer'.DS.'lib'.DS.'swift_required.php'));
class RegistrationController extends AppController {
    var $name = 'registration';
    function send() {
        $transport = Swift_SmtpTransport::newInstance('smtp.gmail.com', 465, 'ssl')
                ->setUsername('wroxexample@gmail.com')
                ->setPassword('wroxexample123');
        $mailer = Swift_Mailer::newInstance($transport);
        $message = Swift_Message::newInstance();
        $message->setSubject('swiftExample');
        $message->setFrom('wroxexample@gmail.com');
        $message->setTo('example@wroxexample.com');
        $message->setCc(array('admin@wroxexample.com' => 'John Kowalski',));
        $viewPath='email';
        $type='html';
        $viewName='registration';
        $view = new View($this);
        $view->layout=$this->layout;
        $content=$view->element($viewPath.DS.$type.DS.$viewName,
          array('name' => "John Smith"), true);
        $htmlBody= $view->renderLayout($content);
        $message->setBody($htmlBody,'text/html');
$attachment = Swift_Attachment::fromPath(
'/home/wrox/public_html/symfony/web/attachments/subscription_pack.zip',
'application/zip');
$message->attach($attachment);
$mailer->send($message);
}
}
?>
code snippet /swiftmailer/cakephp/app/controllers/registration_controller.phpNote that you also need to create proper template files and attachments to make this example runnable.
Using SwiftMailer in Zend Framework is done the same way as in CakePHP. You need to unpack SwiftMailer into your project's /library path. Your directory structure should look as follows:
library/swiftmailer/
    CHANGES
    lib/
        classes/
        dependency_maps/
        mime_types.php
        preferences.php
        swift_init.php
        swift_required_pear.php
        swift_required.php
    tests/
    test-suite/
    LICENSE
    README
    VERSION
You can now add the SwiftMailer library:
<?php
require_once('swiftmailer/lib/swift_required.php');
class RegistrationController extends Zend_Controller_Action {
}The rest of the code within the controller is almost the same as in Symfony and CakePHP.
$mailer = Swift_Mailer::newInstance($transport);
$message = Swift_Message::newInstance();
$message->setSubject('swiftExample');
$message->setFrom('wroxexample@gmail.com');
$message->setTo('example@wroxexample.com');
$message->setBody("Hello World",'text/plain');
$mailer->send($message);
The only difference, explained in the following section, is in getting the view template because it depends on the framework's architecture and libraries.
To get a template and send it as an HTML e-mail, you need to use Zend_View class.
$view = new Zend_View();
$view->addScriptPath(APPLICATION_PATH . '/application/views/scripts/email/');
$view->assign('name','John Smith');
$htmlBody = $view ->render(registration.phtml');
$mail->setBody($htmlBody,'text/html');
Your template should be saved as /application/views/scripts/email/registration.phtml and can look as follows:
Hello World! <br />
<?php echo $this->name; ?>
Note that the APPLICATION_PATH variable is defined in /application/public/index.php.
<?php
defined('APPLICATION_PATH')
|| define('APPLICATION_PATH', realpath(dirname(__FILE__) . '/../application'));Your merged efforts will result in following code.
<?php
require_once('swiftmailer/lib/swift_required.php');
class RegistrationController extends Zend_Controller_Action {
    function send() {
        $transport = Swift_SmtpTransport::newInstance('smtp.gmail.com', 465, 'ssl')
                ->setUsername('wroxexample@gmail.com')
                ->setPassword('wroxexample123');
        $mailer = Swift_Mailer::newInstance($transport);
        $message = Swift_Message::newInstance();
        $message->setSubject('swiftExample');
        $message->setFrom('wroxexample@gmail.com');
        $message->setTo('example@wroxexample.com');
        $message->setCc(array(
                                  'admin@wroxexample.com' => 'John Kowalski',
        ));
        $view = new Zend_View();
        $view->addScriptPath(APPLICATION_PATH .
 '/application/views/scripts/email/');
        $view->assign('name','John Smith');
        $htmlBody = $view ->render(registration.phtml');
        $message->setBody($htmlBody,'text/html');
        $attachment = Swift_Attachment::fromPath(
          '/home/wrox/public_html/symfony/web/attachments/subscription_pack.zip',
          'application/zip');
        $message->attach($attachment);
$mailer->send($message);
}
}
?>
code snippet /swiftmailer/zf/application/controllers/RegistrationController.phpCakePHP delivers within itself a ready-for-use mailing component. You can find it in the /cake/libs/controller/components directory. The component filename is very meaningful because it's called email.php. You can check it for default variables like the following:
var $replyTo = null;
You can change this variable if there is an address that is usually used.
To add this component to a controller to work with, you need to add the component name to the $components variable. Let's create an exemplary controller (MailController) with one method: sendEmail(). Your code should look like the following:
<?php
class MailController extends AppController {
    var $components = array('Email');
    var $uses = '';
    function sendEmail() {
    }
}
The bold line demonstrates how you can add components in CakePHP. Assume that the sendEmail() action is invoked every time when you want to send an e-mail with a fixed content. You can modify it to make the content dynamic, but to simplify the problem we will use fixed values such as subject, message, and so on.
To begin this example, we want to send a simple e-mail with "Hello World!" as the message. You can do it by accessing the Email component's methods and variables through $this->Email. The code that sends a plain text e-mail should look like the following:
$this->Email->to = 'john.smith@localhost';
$this->Email->subject = 'Just want to say Hi';
$this->Email->replyTo = 'noreply@wrox.com';
$this->Email->from = 'Example <noreply@wrox.com>';
$this->Email->send('Hello World!');
This piece of code sends an e-mail. The parameter given to the send() method is the body of the message. It's useful only when we want to send short messages, but what if we want to do more? We can define a variable where we can hold a bigger message. In CakePHP, there is also a different approach available. We can use layouts to send messages, which is an advantage of CakePHP. This feature facilitates working with e-mail because you can work only with code and then someone else prepares the e-mail layouts. To make it possible, we need to create an /email directory in the view's /layouts directory. We should also separate plain text and HTML layout directories, so the default text layout path will be /views/layouts/email/text/default.ctp. To make it possible to assign a layout as the message of an e-mail, you need to assign it as a template. You can do it with the following line:
$this->Email->template = 'default';
The content of default.ctp could be as follows:
Hello World!
Note that you don't add the .ctp extension to the template name. The line adding the template needs to be placed before the send() method is invoked. As mentioned before, we can send an e-mail in multiple formats. To mark a concrete format, we need to assign it to the sendAs variable like this:
$this->Email->sendAs = 'text';
As the default value, text is used here. So the prepared e-mail will be sent as a text with message defined within the detault.ctp file. Note that if you set a template to be the message within the Email object, you don't need to set it as a parameter of the send() method.
Usually you want to produce HTML-formatted e-mail because they look much better and almost all e-mail clients (web or standalone applications) can interpret them. The CakePHP mailer component supports HTML e-mail. As with plain text e-mail, we need to create a template layout. This time, you need to place default.ctp in the /views/layouts/email/html/ directory. Also in this case you need to point to the template that should be used.
$this->Email->template = 'default';
Note that you can create more than one template and assign only the one that is now needed.
To have this e-mail sent as HTML, we need to assign the proper mail format:
$this->Email->sendAs = 'html';
Because sometimes only one format can be interpreted by an e-mail client, we can send e-mail in both formats, so in worst case the client can read plain text. When you send both formats, the client can skip one of them and read the preferred one. To send both formats you need to set both values as below:
$this->Email->sendAs = 'both';
You will use mailing probably more often with dynamic data than with static data. To use information generated with templates, you need to use the set() method to assign some data to a variable, which is next sent to the template. An example of this may be the following:
$this->set('name', 'John Smith');And now your template can look like this:
<p>Hello World!</p>
Regards,
<?php echo $name; ?>
Using e-mail templates allows you to separate the presentation layer from the core mailing and thus maintain an organized structure of business logic. You can create generic messages and store all mailing code in one place, conforming to the DRY principle.
Adding attachments in the CakePHP e-mail component can be a little annoying. You first need to set the path or paths where attachments are placed. Next, the filename of the attachment or multiple attachments needs to be given. Example code could look like this:
$this->Email->filePaths=array(getcwd().'/');
$this->Email->attachments = array('foo.doc');
Note that this approach makes it impossible to include an attachment directly from a database, so it must have been saved previously and accessible by a file system path. In the preceding code, we added the getcwd() method, which returns the current path for the attachments. You may need to change it to your path for the attachments.
There are two ways to add a copy of a message for someone else: through carbon copy (CC) or blind carbon copy (BCC). The difference between them is the visibility. When you use CC, the copy receiver is visible to the original recipient. Addresses from the BCC list are not visible to the recipient nor to anyone else who is copied on the message. In CakePHP's mailer, you can use these copies this way:
$this->Email->cc=array('foo@bar.com');
$this->Email->bcc=array(''foo@bar.com');
You can add more than one e-mail in CC and/or BCC arrays.
As described earlier in this chapter, in many cases we need to use a remote SMTP server to send e-mail. You need to provide a username and password with which you sign in. A hostname and SMTP port number are also required. An unsecure SMTP server port number is set by default to 25. In CakePHP, you need to set all these parameters as smtpOptions in the following way:
$this->Email->smtpOptions = array(
    'port'=>'25',
    'timeout'=>'30',
    'host' => 'smtp.wroxexample.com',
    'username'=>'john.smith@wroxexample.com',
    'password'=>'secretPassword123'
);
$this->Email->delivery = 'smtp';
$this->Email->send();
Additionally you need to change the delivery mode to smtp because by default it's set to mail. Note that everything, including SMTP options, need to be set before Email's send() method is used. If you have some problems with this option, you can check smtpError where all errors are stored. You can access this variable as follows:
$this->Email->smtpError;
Remember that unlike previous variables, you should use it after the send() method is invoked.
In most cases, you should use secure connections. For a secure SMTP connection through SSL/TLS, port 465 is reserved. A secure connection in CakePHP's e-mail component looks like this:
$this->Email->smtpOptions = array(
    'port'=>'465',
    'timeout'=>'30',
    'host' => 'ssl://smtp.gmail.com',
    'username'=>'wroxexample@gmail.com',
    'password'=>'secretPassword123',
);
In this example, Gmail's SMTP server was used.
To summarize, a full example is presented below. Assume that your attachment is placed in /home/wrox/public_html/cake/app/webroot/attachments/schedule.doc. Additionally, you need to create two e-mail templates that should be placed in /home/wrox/public_html/cake/app/views/layouts/email/html/schedule.ctp and /home/wrox/public_html/cake/app/views/layouts/email/text/schedule.ctp. In Windows, equivalent paths to attachment and e-mail templates would be C:\xampp\htdocs\cake\app\webroot\attachments\schedule.doc, C:\xampp\htdocs\cake\app\views\layouts\email\html\schedule.ctp and C:\xampp\htdocs\cake\app\views\layouts\email\text\schedule.ctp.
<?php
class MailController extends AppController {
    var $components = array('Email');
    var $uses = '';
    function sendEmail() {
        $this->Email->to = 'john.smith@localhost';
        $this->Email->subject = 'Schedule';
        $this->Email->replyTo = 'hr@wroxexample.com';
        $this->Email->from = 'Example <noreply@wroxexample.com>';
        $this->Email->filePaths =
          array('/home/wrox/public_html/cake/app/webroot/attachments/');
        $this->Email->attachments = array('schedule.doc');
        $this->Email->cc=array('pm@wroxexample.com');
        $this->Email->template = 'schedule';
        $this->Email->sendAs = 'both';
        $this->Email->smtpOptions = array(
            'port'=>'465',
            'timeout'=>'30',
            'host' => 'ssl://smtp.wroxexample.com',
            'username'=>'mailing-list@wroxexample.com',
            'password'=>'secretPassword123',
        );
        $this->Email->send();
    }
}
code snippet /cakeMailer/cakephp/app/controllers/mail_controller.php
Such a prepared mailer will work if you change SMTP options to those that are relevant to you. If you want to send e-mail one by one, you should use the reset() method.
$this->Email->send();
This method resets all variables to default values, which can prevent mistakes.
Zend mailer is located in C:\xampp\php\Zend\Mail.php or /usr/share/php/Zend/Mail.php under UNIX. You can view all methods and variables at http://framework.zend.com/apidoc/1.10/Zend_Mail/Zend_Mail.html. An example controller could be like this:
<?php
class MailingController extends Zend_Controller_Action {
    public function sendMail() {
    }
}
?>
The sendMail() method in our example is invoked when you want to send an e-mail.
To send a simple e-mail, you need to fill in the sendMail() method with the following code:
$mail = new Zend_Mail();
$mail->setBodyText('Hello World!');
$mail->setFrom('noreply@wrox.com', 'Example');
$mail->addTo(john.smith@localhost', 'John Smith');
$mail->setSubject('Just want to say Hi');
$mail->send();
This code gives almost the same result as in CakePHP's mailer component. The only difference between these two solutions is that in Cake you assigned data through variables, whereas in Zend you use methods to complete all mail information.
Zend's approach is not as comfortable as CakePHP's. You cannot use e-mail templates as easily as in CakePHP. Usually you will also need another method for sending an HTML-formatted e-mail:
$mail = new Zend_Mail();
$mail->setBodyText('Hello World!');
$mail->setBodyHtml('<div class="text-weight: bold;">Hello World!</div>');
$mail->setFrom('noreply@wrox.com', 'Example');
$mail->addTo(john.smith@localhost', 'John Smith');
$mail->setSubject('Just want to say Hi');
$mail->send();
But not-so-easy doesn't equal impossible. Assigning a proper view template content to a variable can be done by using Zend_View.
$htmlTemplate = new Zend_View();
$htmlTemplate->addScriptPath(APPLICATION_PATH.'/views/scripts/email/');
$htmlTemplate->assign('name','Administrator');
$html_body = $htmlTemplate ->render('test.phtml');
After adding the rest of the mailing code, your code should be as follows:
$view = new Zend_View();
$view->addScriptPath(APPLICATION_PATH . '/application/views/scripts/email/');
$view->assign('name','John Smith');
$htmlBody = $view ->render(email.phtml');
$mail = new Zend_Mail();
$mail->setBodyHtml($htmlBody);
$mail->setFrom('wroxexample@gmail.co', 'Example');
$mail->addTo('kprzystalski@gmail.com', 'Karol');
$mail->setSubject('Just want to say Hi');
$mail->send();
You should also create a view template that should be saved as email.phtml in the /application/views/scripts/email/ directory.
<p>Hello World!</p>
Regards,
<?php echo $name; ?>
The easiest way to attach a file within a mail with Zend_Mail is to get the file content and send it as the parameter to the Zend_Mail createAttachment() method. To get the content from any file, you can use the PHP file_get_contents() function.
$fileContents = file_get_contents('schedule.doc');Because you get only the content of the file, you should also set the filename that will be shown. You can also provide a file type.
$mail = new Zend_Mail();
$mail->setBodyText('Hello World!');
$mail->setFrom('noreply@wrox.com', 'Example');
$mail->addTo(john.smith@localhost', 'John Smith');
$mail->setSubject('Just want to say Hi');
$fileContents = file_get_contents('schedule.doc');
$attachment = $mail->createAttachment($fileContents);
$attachment->filename='schedule.doc';
$attachment->type='application/msword';
$mail->send();Adding more recipients is as easy as in CakePHP's mailing component: Just use the addCc() or addBcc() methods.
$mail = new Zend_Mail();
$mail->setBodyText('Hello World!');
$mail->setFrom('noreply@wrox.com', 'Example');
$mail->addTo(john.smith@localhost', 'John Smith');
$mail->setSubject('Just want to say Hi');
$mail->addCc('john@wroxexample.com', 'John Smith');
$mail->addBcc('topsecret@wroxexample.com', 'Top Secret Recipient');
$mail->send();
You can add more than one recipient in CC/BCC by invoking the addCc() or addBcc() method again. This is a good approach when getting e-mail from a database in an iterative way.
You will probably send e-mail through remote servers. In Zend_Mail you need to define an array for configuration with expected keys: auth, username, and password. This array should be sent as the second parameter when initializing a Zend_Mail_Transport_Smtp object instance. The auth key can be set to plain, login, or crammd5. If you want to send an e-mail through a remote server, you should use login.
$config = array('auth' => 'login',
                'username' => 'username',
                'password' => 'password');
$transport = new Zend_Mail_Transport_Smtp('mail.wroxexample.com', $config);
$mail = new Zend_Mail();
$mail->setBodyText("Hello World!");
$mail->setFrom('wroxexample@gmail.co', 'Example');
$mail->addTo('kprzystalski@gmail.com', 'Karol');
$mail->setSubject('Just want to say Hi');
$mail->send($transport);
The Zend_Mail_Transport_Smtp configuration should be set as the parameter for the send() method if you want to use these configuration entries for sending an e-mail.
To secure the connection between your application and an SMTP server, you need to set two additional configuration entries: ssl and port. The port option is not really a security configuration entry, but remote servers usually use a different port number for secured SMTP connections.
<?php
$config = array('auth' => 'login',
                'username' => 'wroxexample@gmail.com',
                'password' => 'wroxexample123',
                'ssl' => 'ssl',
                'port' => 465);
$transport = new Zend_Mail_Transport_Smtp('smtp.gmail.com', $config);
$mail = new Zend_Mail();
$mail->setBodyHtml("Hello World!");
$mail->setFrom('wroxexample@gmail.co', 'Example');
$mail->addTo('kprzystalski@gmail.com', 'Karol');
$mail->setSubject('Just want to say Hi');
$mail->send($transport);Merging all the examples shown previously, you will get the following piece of code. It should be saved as MailingController.php in the /application/controllers/ directory.
<?php
class MailingController extends Zend_Controller_Action {
    public function sendAction() {
        $config = array('auth' => 'login',
                        'username' => 'wroxexample@gmail.com',
                        'password' => 'wroxexample123',
                        'ssl' => 'ssl',
                        'port' => 465);
        $transport = new Zend_Mail_Transport_Smtp('smtp.gmail.com', $config);
        $htmlTemplate = new Zend_View();
        $htmlTemplate->addScriptPath(ROOT_DIR .
            '/application/views/scripts/templates/');
        $htmlTemplate->assign('name','Administrator');
        $html_body = $htmlTemplate ->render(htmlEmailExample.phtml');
        $mail = new Zend_Mail();
        $mail->setBodyHtml($html_body);
        $mail->setFrom('sender@test.com', 'Some Sender');
        $mail->addTo('recipient@test.com', 'Some Recipient');
        $mail->addCc('someone@example.com', 'Someone Else');
        $mail->addBcc('topsecret@example.com', 'Top Secret Recipient');
        $fileContents = file_get_contents('schedule.doc');
        $attachment = $mail->createAttachment($fileContents);
        $attachment->filename='schedule.doc';
        $attachment->type='application/msword';
        $mail->addAttachment($attachment);
        $mail->setSubject('TestSubject');
        $mail->send($transport);
    }
}
code snippet /zendMailer/zf/application/controllers/MailingController.php
PHPMailer (see Figure 6-8) is not included in any of the frameworks presented in this chapter. However it is fairly popular and you may wish to add it as a separate mailer application, as in CakePHP and Zend Framework, or as a Symfony plug-in. You can find more about PHPMailer at http://phpmailer.worxware.com. As you can see, there are also a few add-ons available for PHPMailer on this page (PHPMailer-FE, PHPMailer-ML, PHPMailer-BMH). Additionally, you can also get support for PHPMailer from its founder: Worx International (not to be confused with Wrox Press, of course).
Symfony doesn't support PHPMailer since version 1.2. There was a plan to include PHPMailer as a part of Symfony 2.0, but SwiftMailer won this battle and it's still a part of Symfony. If you want to check how PHPMailer works with Symfony, you can try earlier versions of Symfony (1.2 and earlier) and install PHPMailer as a plug-in using the following command:
$ symfony plugin:install sfPHPMailerPlugin
If you really need to use PHPMailer, it's also possible to use PHPMailer in Symfony in a different way, similar to the way it's used in CakePHP, but you will break the strategy of adding add-ons in Symfony then. Anyway, we don't recommend this option. You should rather consider a different mailer to use with Symfony.
Unfortunately, CakePHP bases this installation on its individual components. But as in case of SwiftMailer, you can still use PHPMailer. To download PHPMailer, go to http://sourceforge.net/projects/phpmailer/files/phpmailer%20for%20php5_6/. Probably you have noticed that there are more versions available, including a Lite version, but we will describe in this chapter only the most popular PHPMailer for PHP5/6. To integrate PHPMailer with CakePHP, you need to unpack the proper PHPMailer package to the CakePHP application's /vendors directory. After unpacking, your directory structure should look like this:
app/vendors/phpmailer/
    docs/
    examples/
    language/
    test/
    LICENSE
    README
    aboutus.html
    changelog.txt
    class.phpmailer.php
    class.pop3.php
class.smtp.phpThe individual code snippets demonstrating PHPMailer are discussed in the Zend Framework section. For CakePHP developers, there is a merged example presented below and the discussion in the Zend Framework section applies to this example as well. Almost all PHPMailer code used in CakePHP example is the same as in Zend Framework.
<?php
App::import('Vendor', 'PHPMailer', array('file' =>
'phpmailer'.DS.'class.phpmailer.php'));
class MailController extends AppController {
    var $uses = '';
    function sendEmail() {
        $mail = new PHPMailer();
        $mail->IsSMTP();
        $mail->SMTPAuth = true;
        $mail->SMTPSecure = 'ssl';
        $mail->Host = 'smtp.gmail.com';
        $mail->Port = 465;
        $mail->Username = "wroxexample@gmail.com";
        $mail->Password = "wroxexample123";
        $mail->SetFrom("wroxexample@gmail.com", "PHPMailer Wrox Example");
        $mail->Subject = "PHPMailer example";
        $mail->AddAddress("kprzystalski@gmail.com");
        $viewPath='email';
        $type='html';
        $viewName='registration';
        $view = new View($this);
        $view->layout=$this->layout;
        $content=$view->element($viewPath.DS.$type.DS.$viewName,
          array('name' => "John Smith"), true);
        $htmlBody= $view->renderLayout($content);
        $mail->MsgHTML($htmlBody);
        $mail->Send();
    }
}
code snippet /phpMailer/cakephp/app/controllers/registration_controller.php
As you did with SwiftMailer, you need to include the PHPMailer libraries using the import() method. Note that you also need to use the View class to create e-mail contents using templates.
In Zend Framework, after unpacking PHPMailer, your directory structure should be as follows:
library/phpmailer/
    docs/
    examples/
    language/
    test/
    LICENSE
    README
aboutus.html
changelog.txt
class.phpmailer.php
class.pop3.php
class.smtp.phpThe file highlighted with bold in the preceding code is one you need to include (as shown in the following code), as is the case with every other add-on.
<?php
require_once('phpmailer/class.phpmailer.php');
class RegistrationController extends Zend_Controller_Action {
    function send() {
    }
}To send an e-mail with PHPMailer, you need to create an instance of PHPMailer and set some commonly known attributes.
$mail = new PHPMailer();
$mail->SetFrom("boss@wroxexample", "Boss");
$mail->Subject = "PHPMailer example";
$mail->Body = "Hello World!";
$mail->AddAddress("john@wroxexample.com");
$mail->Send();HTML e-mail can be sent using the MsgHTML() method. PHPMailer has a nice attribute, AltBody, which allows you to set a message that is shown when recipient can't receive HTML e-mail. Getting templates is done in the same way as in SwiftMailer.
$mail = new PHPMailer();
$mail->SetFrom("boss@wroxexample", "Boss");
$mail->Subject = "Wrox example";
$htmlTemplate = new Zend_View();
$htmlTemplate->addScriptPath(APPLICATION_PATH.'/views/scripts/email/');
$htmlTemplate->assign('name','Foo Bar');
$htmlBody = $htmlTemplate ->render('registration.phtml');
$mail->AltBody="To view the message, use an HTML compatible e-mail viewer!";
$mail->MsgHTML($htmlBody);
$mail->AddAddress("john@wroxexample.com");
$mail->Send();PHPMailer has options very similar to the CakePHP mailing component. You can attach a file using its file system path.
$mail = new PHPMailer();
$mail->SetFrom("boss@wroxexample", "Boss");
$mail->Subject = "PHPMailer example";
$mail->MsgHTML("Hello World!");
$mail->AddAddress("john@wroxexample.com");
$mail->AddAttachment("attachments/schedule.doc");
$mail->AddAttachment("attachments/fnf84y534thb38h53.doc","plan.doc");
$mail->Send();Additionally, you can set the name of the attachment that will be shown to the recipient.
This solution delivers three methods with which we can set the reply address, add additional recipients, and add hidden recipients: AddReplyTo(), AddCC(), and AddBCC().
$mail = new PHPMailer();
$mail->SetFrom("boss@wroxexample", "Boss");
$mail->Subject = "PHPMailer example";
$mail->MsgHTML("Hello World!");
$mail->AddAddress("john@wroxexample.com");
$mail->AddReplyTo("pm@wroxexample.com","PM");
$mail->AddCC("john.smith@wroxexample.com,"John Smith");
$mail->AddBCC("foo.bar@wroxexample.com", "foo bar");
$mail->Send();To connect to a remote SMTP server, you need to express it directly by invoking the isSMTP() method. Additionally you need to set all commonly needed attributes such as host name, port number, username, and password. PHPMailer also has additional functionalities dedicated to specific mail servers such as Qmail, Sendmail, or Gmail.
$mail = new PHPMailer();
$mail->IsSMTP();
$mail->SMTPAuth = true;
$mail->Host = 'smtp.wroxexample.com';
$mail->Port = 25;
$mail->Username = "admin@wroxexample.com";
$mail->Password = "wroxexample123";
$mail->SetFrom("admin@wroxexample.com", "Admin");
$mail->Subject ="PHPMailer example";
$mail->Body ="Hello World!";
$mail->AddAddress("john@wroxexample.com");
$mail->Send();For a secure connection you need only to set the SMTPSecure attribute to ssl and change the port to a secured one.
$mail = new PHPMailer();
$mail->IsSMTP();
$mail->SMTPAuth = true;
$mail->SMTPSecure = 'ssl';
$mail->Host = 'smtp.gmail.com';
$mail->Port = 465;
$mail->Username = "wroxexample@gmail.com";
$mail->Password = "wroxexample123";
$mail->SetFrom("wroxexample@gmail.com", "Admin");
$mail->Subject = "PHPMailer example";
$mail->Body = "Hello World!";
$mail->AddAddress("john@wroxexample.com");
$mail->Send();Your merged code should be as shown here.
<?php
require_once('phpmailer/class.phpmailer.php');
class RegistrationController extends Zend_Controller_Action {
    function send() {
        $mail = new PHPMailer();
        $mail->IsSMTP();
        $mail->SMTPAuth = true;
        $mail->SMTPSecure = 'ssl';
        $mail->Host = 'smtp.gmail.com';
        $mail->Port = 465;
        $mail->Username = "wroxexample@gmail.com";
        $mail->Password = "wroxexample123";
        $mail->SetFrom("wroxexample@gmail.com", "PHPMailer Wrox Example");
        $mail->Subject = "PHPMailer example";
        $mail->AddAddress("kprzystalski@gmail.com"));
        $htmlTemplate = new Zend_View();
        $htmlTemplate->addScriptPath(APPLICATION_PATH.'/views/scripts/email/');
        $htmlTemplate->assign('name','Foo Bar');
        $htmlBody = $htmlTemplate ->render('registration.phtml');
        $mail->MsgHTML($htmlBody);
        $mail->Send();
    }
}
code snippet /phpMailer/zf/application/controllers/RegistrationController.php