Table of Contents for
Building PHP Applications with Symfony™, CakePHP, and Zend® Framework
 Building PHP Applications with Symfony™, CakePHP, and Zend® Framework
Published by
Wrox, 2011
Building PHP Applications with Symfony™, CakePHP, and Zend® Framework
Published by
Wrox, 2011
- Copyright
- Credits
- ABOUT THE AUTHORS
- ACKNOWLEDGMENTS
- Introduction
- 1. Introducing Symfony, CakePHP, and Zend Framework
- 2. Getting Started
- 3. Working with Databases
- 4. Your First Application in the Three Frameworks
- 5. Forms
- 6. Mailing
- 7. Searching
- 8. Security
- 9. Templates
- 10. AJAX
- 11. Making Plug-ins
- 12. Web Services
- 13. Back End
- 14. Internationalization
- 15. Testing
- 16. User Management
- 17. Performance
- 18. Summary
- A. Web Resources
- B. CodeIgniter, Lithium, and Agavi with Code Examples
- GLOSSARY OF ACRONYMS AND TECHNICAL TERMS
It was a joke, okay? If we thought it would actually be used, we wouldn't have written it!
WHAT'S IN THIS CHAPTER?
Introducing AJAX
Including autocomplete feature into your text fields
Using pop-up windows
Making an AJAX chat
In Greek mythology, Ajax was a Titan who supported the heavens on his back. This applies to AJAX as well, but instead of the heavens, this technology supports the whole world of modern interactive websites. (Well, OK, the Titan's name was Atlas, but it doesn't really matter as long as the trope is valid, right? Just look at what AJAX is capable of!)
In many ways, AJAX has become a hallmark of modern web applications. Users expect autocomplete, updating content without reloading, and other AJAX goodies. And sometimes they get angry with a web page that doesn't provide it.
AJAX, which stands for Asynchronous JavaScript and XML, is a web development technique that provides web developers with the capability to create dynamic and interactive web applications. Applications developed using AJAX perform all the operations on the client side and can communicate with a server to retrieve data that results from running various scripts and database queries. Data retrieved from a server using the XMLHttpRequest object can be used to update website content without the necessity of reloading the entire page or influencing the application's behavior.
Note
There is also another similar technique: Asynchronous HTML and HTTP (AHAH), which uses XHTML instead of XML for data retrieval. It allows for easier development with less code, but is not as popular as AJAX.
Let's start with two clarifications concerning the AJAX name. The first letter of AJAX stands for asynchronous because the client communicates with the server asynchronously, mainly because of the interactive interface of AJAX web pages and the dynamic content sent back from the server. This isn't always true because the server queries do not need to be asynchronous. Also, the X in AJAX stands for XML, but the developer does not need to use XML anywhere to perform complex AJAX actions, although it is good practice in this technology.
So, what exactly is AJAX and how does it work? AJAX is not a software package; it is not a software library, a programming language, a markup language, or a communication protocol. It is actually a little of every technology used in web development tied up together to achieve some miraculous results. The easiest way to grasp the concept behind AJAX is to understand how it processes a portion of data. The following example is meant to illustrate the basic mechanics of AJAX:
<html>
<head>
    <script type="text/javascript">
    function loadNewContent() {
       if (window.XMLHttpRequest) { //support for IE7+, Firefox, Chrome, Opera, Safari
           xmlhttp = new XMLHttpRequest();
       }
       else { //support for IE6, IE5
           xmlhttp = new ActiveXObject("Microsoft.XMLHTTP");
       }
       xmlhttp.onreadystatechange=function() {
          if (xmlhttp.readyState==4 && xmlhttp.status==200) {
             document.getElementById("ajax_content").innerHTML=xmlhttp.responseText;
            }
       }
       xmlhttp.open("GET","ajax_script.php",true);
       xmlhttp.send();
     }
     </script>
  </head>
  <body>
       <div id="ajax_content">
         <h2>Page content</h2>
         <p>This content will reload after you press the button</p>
         <button type="button" onclick="loadNewContent()">Use AJAX</button>
       </div>
  </body>
  </html>
code snippet /introduction/index.html
As you can see, the index.html file contains a basic HTML structure with little content and one JavaScript function that is called when the button is pressed. This function is called thanks to the DHTML onclick action. The loadNewContent() function first creates a new XMLHttpRequest object, and then there is a function declared that is responsible for updating the content of the HTML element with ajax_content ID. This second function is called automatically each time the readyState property of the document changes. The content used for updating is a result of running ajax_script.php script. The code presented so far will render content like that shown at the left in Figure 10-1.

Then, when the Use AJAX button is clicked, the following code will be loaded through the AJAX XMLHttpRequest object:
<?php
echo '<h2>AJAX loaded page content</h2>
    <b>Bold title</b>
        <p style="color: red;">
        Red color text paragraph <br />
    </p>';
?>
code snippet /introduction/ajax_script.php
Loaded content will replace the current content without reloading the whole page, and the image illustrated to the right in Figure 10-1 will be rendered.
The XMLHttpRequest object has two status parameters: the readyState and status. These properties allow developers to perform certain actions corresponding to various status changes.
The xmlhttp.readyState variable holds the current state of the XMLHttpRequest. It is denoted as an integer and may have the following values:
0— Request not initialized1— Server connection established2— Request received3— Processing request4— Request finished and response is ready
When the readyState property changes, an event is triggered. It results in execution of the function stored in onreadystatechange. You can store just the name of a function there instead.
The xmlhttp.status variable can take two values: 200 and 404. The first one means that everything went well, and the second one means that page (or script in this case) was not found, and results in the famous "404 error."
This basic example should explain the concept of AJAX technology. In short, the Document Object Model (DOM) provides tools that allow manipulation of page content, while JavaScript and XMLHttpRequest objects are used to update web document structure. PHP or any scripting language used by the server can prepare web content that later is inserted into the current document structure. These scripts could be run as standalone scripts, without any participation of AJAX. Finally, AJAX utilizes HTML and CSS to present style-generated page content.
Autocomplete is a great feature that was introduced for the first time in desktop software such as command-line interpreters and code editors. In web applications, autocompletion arrived with the increasing popularity of JavaScript and found its place in online search engines such as Google, Yahoo, and Altavista. Now users expect this improvement in every web app.
There is a large variety of ready-to-use AJAX scripts that can easily be integrated with your applications, although web frameworks usually have some kind of solutions for that as well. For instance, CakePHP has an AJAX helper that gives you the option to use autocomplete very easily. Zend Framework has the ZendX library that includes jQuery autocomplete, and Symfony can use sfJqueryReloadedPlugin or sfFormExtraPlugin to achieve the same results.
In this example, the autocomplete feature is realized for Symfony, thanks to sfJqueryReloadedPlugin. This plug-in gives you access to the jq_input_auto_complete_tag() function that can be used in forms to create autocomplete elements. Alternatively, sfFormExtraPlugin, used in Chapter 5, gives you access to a number of widgets that enhance the form-building process. This plug-in includes the sfWidgetFormJQueryAutocompleter widget as well, and it can be used to create autocomplete form fields.
Moving to the sfJqueryReloadedPlugin installation, it is a standard procedure, as with any Symfony plug-in. In your command console you need to call the following command from the project directory:
$ symfony plugin:install sfJqueryReloadedPlugin
Cache clearing is suggested, too:
$ symfony cache:clear
The database table used to provide suggested values in the autocomplete field is defined by the following schema.yml file:
Mails:
    connection: doctrine
    tableName: mails
    columns:
id: {type: integer(4) fixed: false unsigned: false
primary: true autoincrement: true}
email: {type: string(32) fixed: false unsigned: false
primary: false notnull: true autoincrement: false}
code snippet /autocomplete/symfony/config/doctrine/schema.ymlThen you need to build it using the following command in your console:
$ symfony doctrine:build --all
If you wish to use styles for autocomplete, it is a good idea to modify the view.yml file and add the JqueryAutocomplete stylesheet. It should look as follows:
default:
  metas:
    stylesheets:    [main.css, JqueryAutocomplete]
code snippet /autocomplete/symfony/apps/frontend/config/view.yml
The most important fragment of this implementation is the actions file, in which the executeList() action is defined. It is responsible for generating a list of suggested values for the autocomplete input form element. The data is taken from a database and displayed by the list view:
<?php
class addressbookActions extends sfActions {
    public function executeIndex(sfWebRequest $request){
    }
    public function executeList(sfWebRequest $request) {
        $query = $request->getParameter('query');
        $q = Doctrine_Query::create()
            ->from('mails')
            ->andWhere('email like ?', '%' . $query . '%')
            ->addOrderBy('email')
            ->limit(10)
            ->execute();
        $this->results = $q;
    }
}
code snippet /autocomplete/symfony/apps/frontend/modules/addressbook/actions/actions.class.php
The view file responsible for displaying the form element with the autocomplete option looks as follows:
<?php use_helper('jQuery'); ?>
<?php echo jq_input_auto_complete_tag('query','','addressbook/list',array(),array());?>
code snippet /autocomplete/symfony/apps/frontend/modules/addressbook/templates/indexSuccess.php
The second view file is responsible for displaying the suggestion list, prepared by the list action from the actions.class.php file:
<?php foreach($results as $res): ?>
<?php echo $res->getEmail()."\n"; ?>
<?php endforeach; ?>
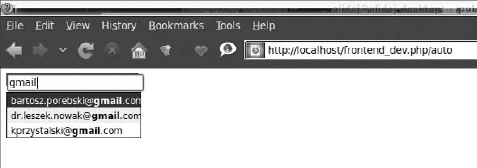
code snippet /autocomplete/symfony/apps/frontend/modules/addressbook/templates/listSuccess.phpYou can see the result of using the solution introduced here in Figure 10-2.
There are a number of solutions that enable you to implement autocomplete in most web applications. You could use one of the many available JavaScript libraries or simply use the CakePHP AJAX core helper. Because this book is all about frameworks and their features, you will see how to use the solution native to CakePHP.
The first thing necessary to implement autocomplete is to create a database of words that will be autocompleted. In this example, you can use the following SQL script to fill the months table with names of months.
INSERT INTO 'months' ('id', 'name') VALUES
(1,'January'), (2,'February'), (3,'March'), (4,'April'),
(5,'May'), (6,'June'), (7,'July'),(8,'August'),
(9,'September'), (10,'October'), (11,'November'), (12,'December');
The months table is now a part of the CakePHP database and consists of two columns: id (autoincremented int) and name (varchar(15)) that serves as the month name. The following SQL query can help you generate this table:
CREATE TABLE IF NOT EXISTS `months` (
`id` int(11) NOT NULL AUTO_INCREMENT,
`name` varchar(15) NOT NULL,
PRIMARY KEY (`id`)
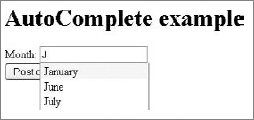
) ENGINE=MyISAM DEFAULT CHARSET=utf8;You can use any words or phrases in the database, but we advise that you use those suggested for this example, especially if you are new to CakePHP. Otherwise, the table name and variable names might be easy to confuse. The goal for this example is to achieve a simple one-field form that allows users to input a month name, as shown in Figure 10-3.

Moving on to the example, the layout file should contain the JavaScript libraries used by the CakePHP AJAX helper: prototype.js, scriptaculous.js, effects.js and controls.js. Make sure that your /app/webroot/js/ directory contains all the mentioned libraries. You can get up-to-date versions of these scripts from www.prototypejs.org and http://script.aculo.us/downloads. The layout used in this example looks as follows:
<html>
  <head>
  <?php
    echo $html->css ( "autocomplete", "stylesheet");
    if ( isset ( $javascript ) ):
      echo $javascript->link('prototype');
      echo $javascript->link('scriptaculous.js?load=effects');
      echo $javascript->link('controls');
    endif;
  ?>
  </head>
  <body>
    <?php echo $content_for_layout ?>
  </body>
</html>
code snippet /autocomplete/cakephp/app/views/layouts/default.ctp
Note the order in which the JavaScript libraries are linked, and that autocomplete.css is included in the <head> section. The autocomplete.css file is used to modify the style of the autocomplete box.
Set the routing to connect the web address http://localhost/cake/autocomplete with the controller and one of its actions by using the following line:
Router::connect('/autocomplete',
    array('controller' => 'autocomplete', 'action' => 'index'));
code snippet /autocomplete/cakephp/app/config/routes.php
Next, create the Month model file like this:
<?php
class Month extends AppModel {
    var $name = 'Month';
    var $useTable = 'months';
}
code snippet /autocomplete/cakephp/app/models/month.php
The most important file is the autocomplete_controller.php file located in the /app/controllers/ directory. It is responsible for processing actions, and needs to contain the autoComplete() function that will be responsible for creating the list of phrases matching text entered into a form field using autocomplete. The controller file for this example looks as follows:
<?php
  class AutocompleteController extends AppController {
    var $uses = 'Month';
    var $helpers = array ( 'Html', 'Javascript', 'Ajax' );
    function index() {
    }
    function autoComplete() {
        $months = $this->Month->find('all',
            array('conditions' =>
                array('Month.name LIKE' =>
                    $this->data['Date']['month'].'%'),
               'fields' => array('name')
        ));
        $this->set('months',$months);
        $this->layout = 'ajax';
    }
  }
?>
code snippet /autocomplete/cakephp/app/controllers/autocomplete_controller.php
So far, you should have the most important pieces needed for autocompletion already in your form, but at this point comes a twist. To use autocomplete in the form, you actually need two view files. One is the standard view matching the index action, and the second one is the view that is used to display the list of words matching the input text. Start with the view file that generates the suggestion list. It will be called and filled with data by AJAX. This file looks as follows:
<ul>
  <?php foreach($months as $month): ?>
    <li><?php echo $month['Month']['name']; ?></li>
  <?php endforeach; ?>
</ul>
code snippet /autocomplete/cakephp/app/views/autocomplete/auto_complete.ctp
Now the view file is located in the same directory, contains a small web form, and looks as follows:
<h1>AutoComplete example</h1>
<?php echo $form->create('Date', array('url' => '/autocomplete')); ?>
<label for="Date.month">Month:</label>
<?php echo $ajax->autoComplete('Date.month', '/autocomplete/autoComplete')?>
<?php echo $form->end('Post date')?>
code snippet /autocomplete/cakephp/app/views/autocomplete/index.ctp
As you can see in this code fragment, while calling the $ajax->autoComplete() function, the form field is created with the name parameter set to Date.month, and /autocomplete/autoComplete.ctp is requested to generate the suggestion list. The form shown in Figure 10-4 is rendered by the web browser.
If you do not like how your suggestion box looks, you can use styles such as those shown in this example. The autocomplete.css stylesheet needs to be located in the /app/webroot/css directory:
div.auto_complete {
    position :absolute;
    width :150px;
    background-color :white;
    border :1px solid #888;
    margin :0px;
    padding :0px;
}
li.selected {
    background-color: #ffb;
}
div.auto_complete ul {
    margin:0px;
    padding:0px;
}
div.auto_complete li {
    margin:0px;
    padding:0 5px;
    list-style-type: none;
}
code snippet /autocomplete/cakephp/app/webroot/css/autocomplete.css
One more thing. If by any chance you have artifacts in your suggestion box like those illustrated in Figure 10-5, it is probably because of the configuration settings in the /app/config/core.php file that contains the following line:
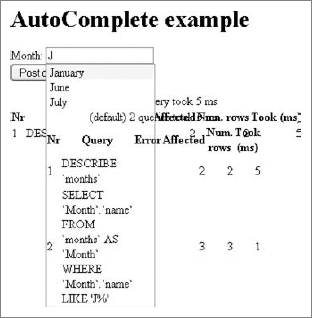
Configure::write('debug',2);It is used to set the debugging level. These artifacts are actually a summary of database queries that are run whenever the suggestion box is updated. To solve this problem, you simply need to change the debugging level by modifying the configuration line as follows:
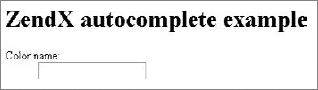
Configure::write('debug',1);ZendX is an additional library that includes jQuery–based view and form helpers that allow developers to enhance their applications. It contains elements such as date-picker, color-picker, slider, dialog container, and the autocomplete feature, which you will learn how to use in your application. Its stub is presented in Figure 10-6.
In Zend Framework 1.10.8, the ZendX library is not a part of the standard libraries yet. To be able to use ZendX, you need to do a few things first. In the downloaded Zend Framework package, you can find the /extras folder containing the ZendX library. You need to copy this folder into your /appName/library directory.
In the next step, add autoloaderNamespaces[] into your application.ini file and set its value to 'ZendX'. Add this line under the [production] tag after the database part, as shown in the following code fragment:
[production] ...autoloaderNamespaces[] = "ZendX"[staging : production]code snippet /autocomplete/zf/application/configs/application.ini
By enabling autoloader, it is now possible to use jQuery JavaScript by loading it from the Google Ajax Library content distribution network (CDN). It gives you the possibility to load both jQuery and jQuery UI libraries. What does this mean in practice? To load JavaScript files in your layout file, the following method was generally used:
<html>
  <head>
    <title>Autocomplete example</title>
    <?php
      echo $this->headScript()->appendFile(
        $this->baseUrl('/js/jquery-1.4.3.min.js')
                    );
      echo $this->headScript()->appendFile(
        $this->baseUrl('/js/jquery-ui-1.8.5.custom.min.js')
                    );
    ?>
  </head>
  <body>
    <?php echo $this->layout()->content; ?>
  </body>
</html>
code snippet /autocomplete/zf/application/layouts/scripts/layout.phtml
This required you to have all the included scripts stored inside your application file structure (for example, in the /appName/public/js/ folder). But now you can use the following code (used also throughout this example):
<html>
  <head>
    <title>Autocomplete example</title>
    <?php
      echo $this->headLink();
      echo $this->jQuery()->setVersion('1.4.3')->setUiVersion('1.8.5');
    ?>
    </head>
    <body>
      <?php echo $this->layout()->content; ?>
  </body>
</html>
code snippet /autocomplete/zf/application/layouts/scripts/layout.phtml
By using the $this->jQuery() method, you make sure that whenever jQuery is needed, it is loaded. setVersion() specifies what version of jQuery you want to use, and setUiVersion() specifies what version of jQuery UI is loaded.
Now you can proceed to create the controller file. Here in the init() function it is necessary to define the path to the ZendX helper using the addHelperPath() method. The autocompleteAction() function creates a new element to be rendered in the view file. The form element will work because autocomplete is created using the autocompleteElement object. The configuration for this object consists of a field label and a list of values from which suggestions will be generated.
<?php
class IndexController extends Zend_Controller_Action
{
    public function init() {$this->view->addHelperPath(
      "ZendX/JQuery/View/Helper", "ZendX_JQuery_View_Helper");
    }
    public function autocompleteAction() {
        $this->view->autocompleteElement = new
           ZendX_JQuery_Form_Element_Autocomplete('ac');
        $this->view->autocompleteElement->setLabel('Color name:');
        $this->view->autocompleteElement->setJQueryParam(
              'data', array('Red', 'Green', 'Blue','Redish', 'Rose Red')
                                                 );
    }
}
code snippet /autocomplete/zf/application/controllers/IndexController.php
Finally, the view file needs to be created. In the following listing you can see that only the $this->autocompleteElement object needs to be called to make autocomplete work:
<h1>ZendX autocomplete example</h1>
<form>
    <?php echo $this->autocompleteElement; ?>
</form>
code snippet /autocomplete/zf/application/views/scripts/index/autocomplete.phtml
The left side of Figure 10-7 illustrates the result of running the application in the browser by typing http://localhost/appName/public/index/autocomplete.
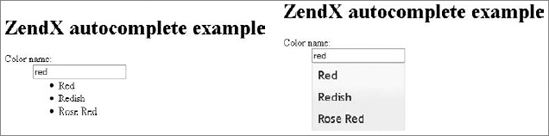
Figure 10.7. On the left — autocomplete with suggested values. On the right — autocomplete with styled suggested values
Looking at the effect of this example so far, you may not be entirely happy with the results. For one thing, you put all the autocompleting values inside the controller file, and this is a rough solution to say the least. And, of course, the appearance is somewhat crude. You can take care of the latter now because the jQuery user interface (UI) is a JavaScript library that gives you the possibility to build interactive web applications, and it comes with a number of different visual style variants. For this example, the ui-lightness theme was selected. You can download any of the available styles from http://jqueryui.com/download. After downloading the package, you need to copy the theme folder (/ui-lightness) into your project to the /addressBook/public/css/ directory. When that's done, you need to link the downloaded stylesheet to your layout file using the appendStylesheet() method. The following code listing illustrates how this is done:
<html>
  <head>
    <title>Autocomplete example</title>
    <?php
      echo $this->headLink();
      echo $this->headLink()->appendStylesheet(
              $this->baseUrl('/css/ui-lightness/jquery-ui-1.8.5.custom.css')
                               );
      echo $this->jQuery()->setVersion('1.4.3')->setUiVersion('1.8.5');
      /* alternative jQuery loading
      echo $this->headScript()->appendFile(
        $this->baseUrl('/js/jquery-1.4.3.min.js'));
      echo $this->headScript()->appendFile(
        $this->baseUrl('/js/jquery-ui-1.8.5.custom.min.js')); */
    ?>
</head>
<body>
<?php echo $this->layout()->content; ?>
</body>
</html>
code snippet /autocomplete/zf/application/layouts/scripts/layout.phtmlIf all went well, and you updated your layout file, you should get a result similar to the right side of Figure 10-7. This should be more acceptable in terms of appearance.
Now you will see how to use a database to hold your autocomplete data. Note that this topic is not about AJAX itself, and it refers to the standard application to database communication that was covered in Chapter 3 and Chapter 4. First, the database table can be created using the following SQL query:
CREATE TABLE IF NOT EXISTS `colors` (
    `id` int(11) NOT NULL AUTO_INCREMENT,
    `name` varchar(25) NOT NULL,
    PRIMARY KEY (`id`)
) ENGINE=MyISAM DEFAULT CHARSET=utf8;

INSERT INTO `colors` (`id`, `name`) VALUES
(1, 'AliceBlue'), (2, 'AntiqueWhite'), ...
The content was filled using a list of color names that are supported by web browsers, although any other content can be entered. Next, the model file needs to be created, and for this example it can be the following:
<?php
class Application_Model_Color {
}
code snippet /autocomplete/zf/application/models/Color.php
Then create the DbTable model file that looks like this:
<?php
class Application_Model_DbTable_Colors extends Zend_Db_Table_Abstract {
    protected $_name = 'colors';
}
code snippet /autocomplete/zf/application/models/DbTable/Colors.php
And the Color mapper used for this example is like the following:
<?php
class Application_Model_ColorMapper {
    protected $_dbTable;
    public function setDbTable($dbTable) {
      if (is_string($dbTable)) {
        $dbTable = new $dbTable();
}
if (!$dbTable instanceof Zend_Db_Table_Abstract) {
throw new Exception('Invalid table data gateway provided');
}
$this->_dbTable = $dbTable;
return $this;
}
public function getDbTable() {
if (null === $this->_dbTable) {
$this->setDbTable('Application_Model_DbTable_Colors');
}
return $this->_dbTable;
}
public function fetchAll() {
$resultSet = $this->getDbTable()->fetchAll();
$entries = array();
foreach ($resultSet as $row) {
$entry = new Application_Model_Color();
$entries[] = $row->name;
}
return $entries;
}
}
code snippet /autocomplete/zf/application/models/ColorMapper.phpWhen all model files are ready, the controller needs to be modified slightly. Two new lines are introduced to the controller. The first one creates the object that gives access to database data. The second one fetches the name column of the colors table. Finally the data is passed to the autocompleteElement:
<?php
class IndexController extends Zend_Controller_Action{
public function init() {
$this->view->addHelperPath(
"ZendX/JQuery/View/Helper",
"ZendX_JQuery_View_Helper"
);
}
public function autocompleteAction() {
$this->view->autocompleteElement = new
ZendX_JQuery_Form_Element_Autocomplete('ac');
$this->view->autocompleteElement->setLabel('Color name:');
$colors = new Application_Model_ColorMapper();
$colorList = $colors->fetchAll();
$this->view->autocompleteElement->setJQueryParam('data', $colorList);
}
}
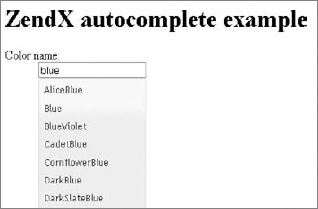
code snippet /autocomplete/zf/application/controllers/IndexController.phpAs a result, you should have the suggestion list generated from the database. Figure 10-8 illustrates the final result of this example.
Not long ago, popup windows were considered more of a nuisance than something useful. A popup would usually appear out of nowhere and cover the entire screen with some kind of advertisement. Of course, those popup windows had nothing to do with current AJAX technology because they used an early browser mechanism that didn't feature tabs. All web browsers currently protect users from this kind of popup.
With the appearance of AJAX, new kinds of advertising came to life, but at the same time AJAX opened a completely new set of possibilities that could be used to enhance web applications. Using AJAX it is easy to create a child window that users can interact with. Such windows are called modal windows. In Chapter 9 you read about Lightbox, which is an excellent example of how AJAX can generate modal windows with interactive content.
Another application of modal windows can be to display additional information on a website (for example, warning messages) without reloading it or modifying currently visible content. Another great use of modal windows is to block access to certain sections of a web application, by forcing users to interact with the window (to log in, for example).
Note
In this section we discuss a few modal window mechanisms that all allow the same outcome and differ little in their usage. We decided to show each of them used with one framework only, but they obviously can be used with every other framework.
For Symfony, this chapter shows two examples. One is sfFlashMessagePlugin, which allows you to change the default method of displaying messages to AJAX–based message windows. The other one illustrates how to use Lytebox script to create popup windows containing HTML content.
This plug-in relies on JqueryReloadedPlugin, which offers easy integration of jQuery with your application. You can read about JqueryReloadedPlugin at www.symfony-project.org/plugins/sfJqueryReloadedPlugin, and about sfFlashMessagePlugin at www.symfony-project.org/plugins/sfFlashMessagePlugin.
To install JqueryReloadedPlugin, from your project directory enter the following command in your command window (if you have JqueryReloadedPlugin already installed, skip this step):
$ symfony plugin:install sfJqueryReloadedPlugin
sfJqueryReloadedPlugin gives you the possibility to use the jQuery helper in your project files.
Do the same for sfFlashMessagePlugin using the following command:
$ symfony plugin:install sfFlashMessagePlugin
Cache clearing is advised:
$ symfony cache:clear
As far as installation goes, this is all you need to do. Now you can move to the project files. First, the layout file needs to have the include_javascripts() function present inside the <head></head> tags. The code used in this example is as follows:
<!DOCTYPE html PUBLIC "-//W3C//DTD XHTML 1.0 Transitional//EN"
      "http://www.w3.org/TR/xhtml1/DTD/xhtml1-transitional.dtd">
<html xmlns="http://www.w3.org/1999/xhtml" xml:lang="en" lang="en">
  <head>
    <?php include_http_metas() ?>
    <?php include_metas() ?>
    <?php include_title() ?>
    <link rel="shortcut icon" href="/favicon.ico" />
    <?php include_stylesheets() ?>
    <?php include_javascripts() ?>
  </head>
  <body>
    <?php echo $sf_content ?>
  </body>
</html>
code snippet /popup/flash/symfony/apps/frontend/templates/layout.php
Next, the action file needs to set some example flash messages. Four message types are available here: success, notice, warning, and error. Every one of these messages has a different color when rendered. The following are the example messages used for this example:
<?php
class flashmessageActions extends sfActions{
public function executeIndex(sfWebRequest $request){
$this->getUser()->setFlash('success', 'This is success message!'); //green
$this->getUser()->setFlash('notice', 'This is notice message!'); //yellow
$this->getUser()->setFlash('warning', 'This is warning message!'); //orange
$this->getUser()->setFlash('error', 'This is error message!'); //red
}
}
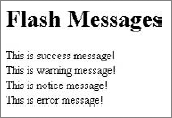
code snippet /popup/flash/symfony/apps/frontend/modules/flashmessage/actions/actions.class.phpThe view file is responsible for rendering those messages, and it usually is done as shown in the following code:
<h1>Flash Messages</h1>
<p>
<?php echo $sf_user->getFlash('success') ?><br />
<?php echo $sf_user->getFlash('warning') ?><br />
<?php echo $sf_user->getFlash('notice') ?><br />
<?php echo $sf_user->getFlash('error') ?></p>
code snippet /popup/flash/symfony/apps/frontend/modules/flashmessage/templates/indexSuccess.php
The resulting page content is rendered as shown in Figure 10-9.
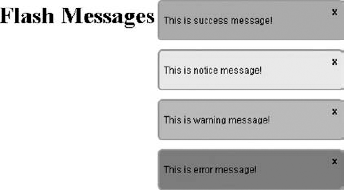
Now, you should use sfFlashMessagePlugin and render these messages using AJAX. To do so, you only need to prepend this file with the use_helper() function and set it to use the jQuery and sfFlashMessage helpers. The code of the indexSuccess.php view file can be shortened to the following code:
<?php use_helper( 'jQuery', 'sfFlashMessage') ?>
<h1>Flash Messages</h1>
code snippet /popup/flash/symfony/apps/frontend/modules/flashmessage/templates/indexSuccess.php
This will make your messages look like Figure 10-10.
Messages rendered using sfFlashMessagePlugin disappear after a set amount of time, except the error message; that is visible until it is closed manually. It is possible to modify the style and display delay time by modifying the plug-in's configuration in the app.yml file. Here you can select a display method from the pop and growl options, and set a delay time in milliseconds, as shown here:
sf_flash_message:
  delay: 2500
  method: growl
The script demonstrated in this example is another variation of Lightbox, which was introduced in Chapter 9. It differs from other similar scripts mainly by its independence from other AJAX libraries such as jQuery. Lytebox, created by Markus F. Hay, offers you options to create slideshow image galleries or windows with the possibility to browse HTML content in catalog-like style. The implementation for this script is probably the easiest of all scripts presented in this chapter.
To get moving with the integration, first visit the authors' website www.dolem.com/lytebox and get the Lytebox package. In this example, you need to place the unpacked content (lytebox.js file, lytebox.css file, and /images folder) inside the /appName/web/lytebox folder. If you wish to separate package files to the corresponding folders inside /appName/web folder, you could do so, but this will require you to modify all file paths accordingly, including the lytebox.css file.
When you have Lytebox in place, you need to include lytebox.js and lytebox.css into your layout file. The code for layout.php used in this example looks like the following:
<!DOCTYPE html PUBLIC "-//W3C//DTD XHTML 1.0 Transitional//EN"
      "http://www.w3.org/TR/xhtml1/DTD/xhtml1-transitional.dtd">
<html xmlns="http://www.w3.org/1999/xhtml" xml:lang="en" lang="en">
  <head>
    <?php include_http_metas() ?>
    <?php include_metas() ?>
    <?php include_title() ?>
    <link rel="shortcut icon" href="/favicon.ico" />
    <?php use_stylesheet('../lytebox/lytebox.css') ?>
    <?php include_stylesheets() ?>
    <?php use_javascript('../lytebox/lytebox.js') ?>
    <?php include_javascripts() ?>
  </head>
  <body>
    <?php echo $sf_content ?>
  </body>
</html>
code snippet /popup/lytebox/symfony/apps/frontend/templates/layout.php
As for the actions file, only the index action is needed, as shown in the following code:
<?php
class lyteboxActions extends sfActions{
    public function executeIndex(sfWebRequest $request){
    }
}
code snippet /popup/lytebox/symfony/apps/frontend/modules/lytebox/actions/actions.class.php
For the HTML side of this example, the base content is shown in Figure 10-11.
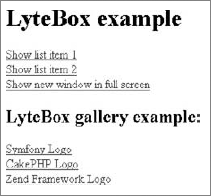
The first two links will open a window with HTML content, in which you can browse back and forth through the items in this list. This window is shown in Figure 10-12. The third link will open a window of the size specified in the following code without the possibility of scrolling its HTML content. Note that the rev attribute can be used for any link in this example to change the size of the displayed window. The code of the view file in this example looks as follows:
<h1>LyteBox example</h1>
<a href="http://www.wrox.com/" title="Wrox"
    rel="lyteframe[catalog]">Show list item 1 </a><br />
<a href="http://www.wiley.com/" title="Wiley"
    rel="lyteframe[catalog]">Show list item 2 </a><br />
<a href="http://www.wrox.com/" title="Wrox"
    rel="lyteframe" rev="width: 400px; height: 300px; scrolling: no;">
    Show new window in full screen</a>
code snippet /popup/lytebox/symfony/apps/frontend/modules/lytebox/templates/indexSuccess.php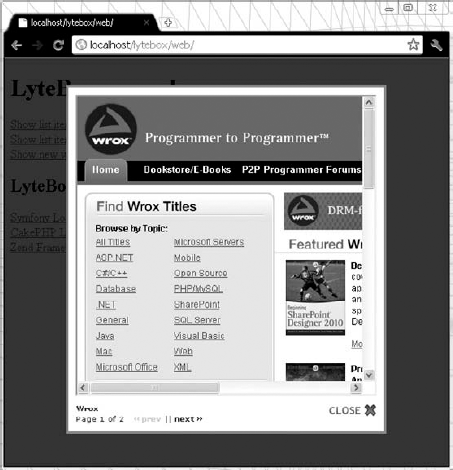
The gallery capabilities of the Lytebox script can be used by adding the following code into your indexSuccess.php view file:
<h2>LyteBox gallery example: </h2>
<a href="http://www.symfony-project.org/images/symfony_logo.gif"
    rel="lyteshow[logos]"
    title="Symfony Logo">Symfony Logo</a><br />
<a href="http://cakephp.org/img/cake-logo.png"
    rel="lyteshow[logos]"
    title="CakePHP Logo">CakePHP Logo</a><br />
<a href="http://framework.zend.com/images/logo.gif"
rel="lyteshow[logos]"
title="Zend Framework Logo">Zend Framework Logo</a>
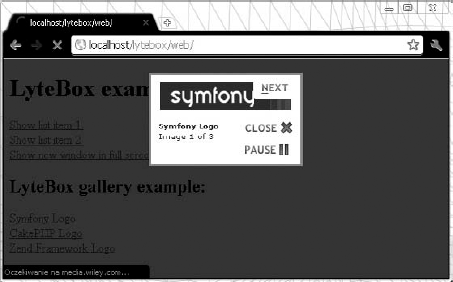
code snippet /popup/lytebox/symfony/apps/frontend/modules/lytebox/templates/indexSuccess.phpFigure 10-13 illustrates the image gallery that is displayed when any gallery link is clicked.
To create popup windows in CakePHP, you will incorporate ThickBox into your application. ThickBox is a script written by Cody Lindley in JavaScript. It originates from the Lightbox script designed to enhance websites with interactive image galleries. ThickBox works in a very similar manner, but is not restricted to images only because it allows you to display all sorts of content. There are many features behind ThickBox, such as simple system integration and displaying various kinds of content (images, iframed content, inline content, and AJAX content).
Figure 10-14 shows an example page that consists of a paragraph of text and two links using ThickBox to display content.
Now integrate ThickBox into your CakePHP application. The first thing to do is to download ThickBox files from the website: http://jquery.com/demo/thickbox/. You need to download thickbox.js or thickbox-compressed.js and place it inside the /app/webroot/js/ directory. The thickbox.js and thickbox-compressed.js files require jQuery in order to work properly. You can download jQuery from the same page as ThickBox or you can download it from the jQuery website at http://docs.jquery.com/Downloading_jQuery. The jQuery library should be placed in the same folder as the ThickBox script. Next you need to download thickbox.css and copy it to the /app/webroot/css/ directory. The last file that needs to be downloaded into /app/webroot/img/ is loadingAnimation.gif. When you're done, you should have the following file structure:
/app/webroot/
  js/
    thickbox-compressed.js
    jquery-1.4.3.min.js
  css/
    thickbox.css
  img/
    loadingAnimation.gif
To begin integration of ThickBox into a CakePHP application, start by creating a route in the routes.php file. This can look as follows:
Router::connect('/modalbox', array(
     'controller' => 'thickbox', 'action' => 'index'));
code snippet /popup/cakephp/app/config/routes.php
The layout file should contain corresponding helpers inside the <head> section. The three bold lines in the following code make sure that the supplied libraries are loaded properly. The layout used for this example is as follows:
<html>
  <head>
    <?php
      echo $html->css ( "thickbox", "stylesheet");
      if ( isset ( $javascript ) ):
         echo $javascript->link ("/app/webroot/js/jquery-1.4.3.min.js" );
         echo $javascript->link ("/app/webroot/js/thickbox-compressed.js" );
      endif;
   ?>
 </head>
 <body>
   <?php echo $content_for_layout ?>
 </body>
</html>
code snippet /popup/cakephp/app/views/layouts/default.ctp
This is nearly enough to use ThickBox, but you still need to define the set of helpers that your application is using. Set the $helpers variable in the thickbox_controller.php controller file. The code for this file is as follows:
<?php
  class ThickboxController extends AppController {
    var $name = 'thickbox';
    var $helpers = array ( "Javascript" );
    function index() {
    }
}
?>
code snippet /popup/cakephp/app/controllers/thickbox_controller.phpThe thickbox.php model file should be created and it might look like this one:
<?php
class Thickbox extends AppModel {
    var $useTable = false;
}
code snippet /popup/cakephp/app/models/thickbox.php
Finally, the index.ctp view file allows you to use ThickBox with your content. Assuming that you are using a standard link element to call popups, you will need to set the class attribute to the thickbox value, like this:
<a href="" class="thickbox"></a>
The href attribute needs to begin with the #TB_inline anchor. Next there are several options:
<a href="#TB_inline?height=100&width=200&inlineId=modalContent&modal=true"
    class="thickbox"></a>
The height and width options define the size of the popup window. The inlineId option is the id value of the element that will contain the ThickBox content. If the modal option is set as true, the content displayed in the window will have to contain an element with the onclick="tb_remove()" attribute. The following code illustrates how to use a simple message window and a yes/no message box:
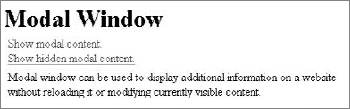
<h1>Modal Window</h1>
<p>
<a href="#TB_inline?height=100&width=200&inlineId=modalContent"
    class="thickbox">Show modal content.</a>
<br />
<a href="#TB_inline?height=150&width=200&inlineId=hiddenModalContent&modal=true"
    class="thickbox">Show hidden modal content.</a>
</p>
<div id="modalContent" >
    <p>Modal window can be used to display additional information on a website,
      without reloading it or modifying currently visible content.</p>
</div>
<div id="hiddenModalContent" style="display:none">
    <p>Modal windows are great way to block access to certain section of web
      application, by forcing user to interact with it.</p>
    <p>Do you agree?</p>
    <input type="button" id="Login" value=" Yes " onclick="tb_remove()" />
    <input type="button" id="Login" value=" No " />
</div>
code snippet /popup/cakephp/app/views/thickbox/index.ctp
To the left in Figure 10-15 is the message window displayed as the result of clicking the Show modal content link.
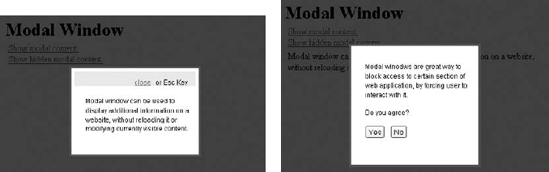
Figure 10.15. On the left — the ThickBox window, displayed by clicking the Show modal content link. On the right — the ThickBox window, displayed by clicking the Show hidden modal content link
To the right in Figure 10-15 you can see another message window that requires the user to click the Yes button in order to close it.
To create a popup window able to display content of various types, the GreyBox JavaScript library was selected. It is an independent library, and it means that no additional AJAX libraries are required. So no jQuery this time.
Installation of GreyBox in Zend Framework is a simple and swift task. Proceeding with the installation, first you need to download the GreyBox package from its author website: http://orangoo.com/labs/GreyBox/. The downloaded package contains GreyBox, and various examples of usage as well. You need to copy the /greybox folder to the /appName/public/js directory of your application. The /greybox folder contains various files: images, scripts, and stylesheets. You could group them into separate folders, but this is unnecessary.
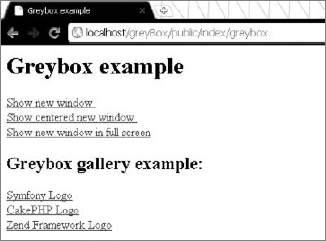
When the application using GreyBox is finished, it will look as shown in Figure 10-16. The links demonstrate various usage examples.
Moving to the controller file, it does not contain any additional functionality. Only the blank greyboxAction() is added. The following code is the listing of the controller used in this example:
<?php
class IndexController extends Zend_Controller_Action {
    public function init() {
    }
    public function greyboxAction() {
}
}
code snippet /popup/zf/application/controllers/IndexController.phpThe layout file makes GreyBox available for use in your application. Additionally, to include the GreyBox scripts and the stylesheet, you need to set the GB_ROOT_DIR variable to be used in GreyBox scripts. This variable holds the path to the image files used by GreyBox. You can see in the following code what value is set to make this example work with the Zend Framework file structure:
<html>
  <head>
    <title>Greybox example</title>
      <script type="text/javascript">
        var GB_ROOT_DIR = "../js/greybox/";
      </script>
      <?php
        echo $this->headLink()->appendStylesheet(
                   $this->baseUrl('/js/greybox/gb_styles.css')
                                            );
        echo $this->headScript()->appendFile($this->baseUrl('/js/greybox/AJS.js'));
        echo $this->headScript()->appendFile(
                   $this->baseUrl('/js/greybox/AJS_fx.js')
                                            );
        echo $this->headScript()->appendFile(
                   $this->baseUrl('/js/greybox/gb_scripts.js')
                                            );
       ?>
    </head>
    <body>
       <?php echo $this->layout()->content; ?>
    </body>
</html>
code snippet /popup/zf/application/layouts/scripts/layout.phtml
A CSS stylesheet in this example is linked by the appendStylesheet() method and it points to the folder where JavaScript is usually held. All scripts used by GreyBox here are located in the same folder, however. The JavaScript files are linked by the appendFile() method.
You should now have everything necessary to use the features of GreyBox with the standard HTML syntax. Using the rel attribute, you can now turn a hyperlink tag into a link to a new window or an image gallery. As the value for the rel attribute you can use a number or variables such as gb_page, gb_page_fs, gb_imageset, and so on. Each of these values has its own uses. For the full list of features, please refer to the GreyBox documentation. The following code illustrates various usages of the GreyBox library:
<h1>Greybox example</h1>
  <a href="http://www.wrox.com/"
    title="Wrox"
    rel="gb_page[790, 200]">Show new window </a> <br />
  <a href="http://www.wrox.com/"
title="Wrox"
rel="gb_page_center[200, 200]">Show centered new window </a> <br />
<a href="http://www.wrox.com/"
title="Wrox"
rel="gb_page_fs[]">Show new window in full screen</a>
<h2>Greybox gallery example: </h2>
<a href="http://www.symfony-project.org/images/symfony_logo.gif"
rel="gb_imageset[logos]"
title="Symfony Logo">Symfony Logo</a> <br />
<a href="http://cakephp.org/img/cake-logo.png"
rel="gb_imageset[logos]"
title="CakePHP Logo">CakePHP Logo</a> <br />
<a href="http://framework.zend.com/images/logo.gif"
rel="gb_imageset[logos]"
title="Zend Framework Logo">Zend Framework Logo</a>
code snippet /popup/zf/application/views/scripts/index/greybox.phtmlFinally, you can see results by typing http://localhost/appName/public/index/lightbox in your web browser. Figure 10-17 illustrates a centered window displaying a web page.
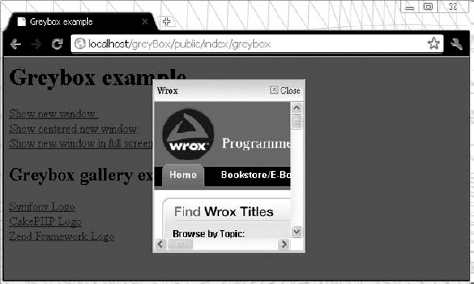
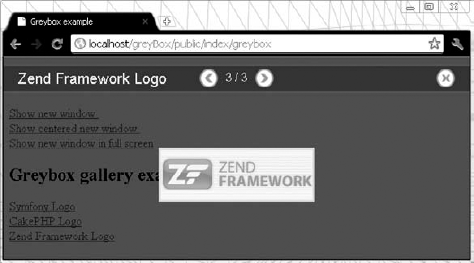
Figure 10-18 demonstrates how an image gallery can be realized using GreyBox. There is an issue with displaying images in a gallery reported in version 5.54 of GreyBox, where the images are not rendered the first time. If you encounter this problem, switching to version 5.53 should fix it.
Web chat is a form of conference-like communication between multiple users, using a web application. Chats are usually part of larger applications, such as social networks, information services, forums, or online games. They allow users to divide into chat rooms, where various subjects can be discussed. Chat can take different forms. It can be a shoutbox, user-to-user private conversation, or Internet Relay Chat (IRC). Some of these may require special software to use. Features of chat applications can cover things such as image sending, sound messages, IP blocking, forbidden word filtering, user bans, moderation, and so on.
In this section you will learn how to implement ready-to-use chat scripts and implement them as a part of your web application, created in web frameworks. One of the solutions uses a file system for storing chat messages; the two other use a database to do this.
To learn how a basic chat can be integrated into a Symfony application, the chat script created by Ryan Smith was chosen. This chat solution is easy to use in standalone applications, but in Symfony it needs to be slightly modified to take full advantage of the features offered by this framework. So go on and grab the AJAX chat package from www.dynamicajax.com/tutorials/ajax_chat_1.zip.
This package contains the following files: chat.html, chat.sql, database.php, getChat.php, and readme.html.
The first step is to create two files for your application: the chat.js file inside the /appName/web/js folder and the chat.css file in the /symfony/web/css folder. Now you need to copy all JavaScript code from between the <script> </script> tags of the chat.html file and paste it into the chat.js file of your project. You can do the same thing for styles in chat.html. Simply copy the style content from between the <style> </style> tags and place it inside chat.css. Later you can add your own styles inside this file to modify the visual style of the chat window and messages.
You must now modify the chat.js file and make sure that the AJAX sendReq.open() and receiveReq.open() requests point to the getchat action. This should be done in three lines, and these line numbers are 26, 38, and 84. An example of how this should be done is as follows:
// line 26
receiveReq.open(
      "GET",
      'index.php/moduleName/getchat?chat=1&last=' + lastMessage,
      true
);
// line 38
sendReq.open(
"POST",
'index.php/moduleName/getchat?chat=1&last=' + lastMessage,
true
);
// line 84
sendReq.open(
"POST",
'index.php/moduleName/getchat?chat=1&last=' + lastMessage,
true
);
code snippet /chat/symfony/web/js/chat.jsWhen you have the chat.js file ready, a modification to the view.yml file is necessary (highlighted in bold) as shown here:
default:
  http_metas:
    content-type: text/html
  metas:
  stylesheets:    [main.css, chat.css]
  javascripts:    [chat.js]
  has_layout:    true
  layout:        layout
code snippet /chat/symfony/apps/frontend/config/view.yml
When chat.js and chat.css are included in view.yml, you need to make sure that those files are loaded when the page is displayed. To do so, the <head> section of the layout file needs to contain the following code:
<?php include_stylesheets() ?>
<?php include_javascripts() ?>
code snippet /chat/symfony/apps/frontend/templates/layout.php
The chat application uses a database to hold all messages posted by users. The design for the database tables can be found in chat.sql of the original package. Alternatively you can use the following schema:
Message:
  connection: doctrine
  tableName: message
  columns:
    message_id: { type: integer(4) fixed: false unsigned: false
      primary: true autoincrement: true }
    user_id: { type: integer(4) fixed: false unsigned: false
      primary: false default: '0' notnull: true autoincrement: false }
    user_name:{ type: string(64) fixed: false unsigned: false
primary: false notnull: false autoincrement: false }
message: { type: string() fixed: false unsigned: false
primary: false notnull: false autoincrement: false }
post_time: { type: timestamp(25) fixed: false unsigned: false
primary: false notnull: false autoincrement: false }
code snippet /chat/symfony/apps/config/doctrine/schema.ymlTo generate the table described in schema.yml, use the following command in the command console from your project directory:
$ symfony doctrine:build --all
Now you can view the getChat.php file of the original package. This file is responsible for performing all database operations regarding user messages. Notice that it includes database.php to create a database connection. While using the Symfony framework, all this can be replaced by creating the executeGetchat() function in your actions.class.php file. The code in this function is equivalent to the code of the original package, and it looks as follows:
<?php
class chatActions extends sfActions {
    public function executeIndex(sfWebRequest $request) {
    }
    public function executeGetchat(sfWebRequest $request) {
      if(isset($_POST['message']) && $_POST['message'] != '') {
          $msg = new Message();
          $msg->setUserId(1);
          $msg->setUserName('unknown');
          $msg->setMessage($_POST['message']);
          $msg->setPostTime(date("Y-m-d H:i:s"));
          $msg->save();
      }
      $xml = '<?xml version="1.0" encoding="UTF-8" ?><root>';
      if(!isset($_GET['chat'])) {
          $xml .= '<message id="0">';
          $xml .= '<user>Admin</user>';
          $xml .= '<text>Your are not currently in a chat session.</text>';
          $xml .= '<time>'.date("Y-m-d H:i:s").'</time>';
          $xml .= '</message>';
      } else {
          $last = (isset($_GET['last']) && $_GET['last'] != '') ? $_GET['last'] : 0;
          $messages = Doctrine_Core::getTable('Message')
              ->createQuery('c')
              ->where('c.message_id > ?', $last)
              ->orderBy('c.message_id')
              ->execute();
          foreach($messages as $msg) {
              $xml .= '<message id="' . $msg->getMessageId() . '">';
              $xml .= '<user>' . $msg->getUserName() . '</user>';
              $xml .= '<text>'.htmlspecialchars($msg->getMessage()).'</text>';
              $xml .= '<time>' . $msg->getPostTime(). '</time>';
              $xml .= '</message>';
}
}
$this->text = $xml .= '</root>';
$response = $this->getResponse();
$response->setContentType('text/xml');
return $this->renderText($this->text);
}
}
code snippet /chat/symfony/apps/frontend/modules/chat/actions/actions.class.phpBecause actions.class.php contains two actions, two view files are needed; the first one is indexSuccess.php and must be filled with HTML code from chat.html from the original package. At the end of this file the startChat() JavaScript function needs to be called. The code used in this example is as follows:
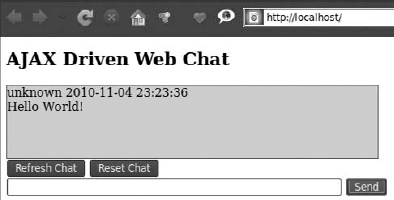
<h2><a href="http://www.dynamicAJAX.com"
    style="color: #000000; text-decoration: none;">
    AJAX Driven Web Chat
    </a>
</h2>
<div id="div_chat"
    style="height: 300px; width: 500px; overflow: auto; background-color:
      #CCCCCC; border: 1px solid #555555;">
</div>
<form id="frmmain" name="frmmain" onsubmit="return blockSubmit();">
    <input type="button" name="btn_get_chat" id="btn_get_chat" value="Refresh Chat"
            onclick="javascript:getChatText();" />
    <input type="button" name="btn_reset_chat" id="btn_reset_chat"
            value="Reset Chat" onclick="javascript:resetChat();" />
    <br />
    <input type="text" id="txt_message" name="txt_message" style="width: 447px;" />
    <input type="button" name="btn_send_chat" id="btn_send_chat" value="Send"
            onclick="javascript:sendChatText();" />
</form>
<script language="JavaScript" type="text/javascript">
    startChat();
</script>
code snippet /chat/symfony/apps/frontend/modules/chat/templates/indexSuccess.php
Finally, in the same directory as indexSuccess.php, you should create a blank getchatSuccess.php file, and you are done. The results of this example should look as illustrated in Figure 10-19.
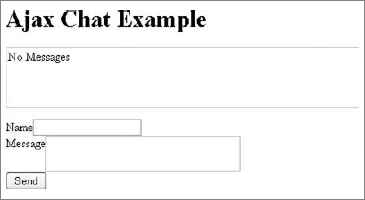
The solution used in CakePHP is an AJAX chat plug-in written by Matt Curry. It allows user communication by a web form, illustrated in Figure 10-20. This solution was selected because of its easy implementation and popularity.
You can get the plug-in package from http://github.com/mcurry/chat. Unpacked content needs to be placed in the /app/plugins/chat directory. There you will find the chats.sql file that contains an SQL query that is responsible for creating the chats database table for holding all user posts. This query is as follows:
CREATE TABLE `chats` (
`id` int(10) unsigned NOT NULL auto_increment,
`key` varchar(45) NOT NULL default '',
`name` varchar(20) NOT NULL default '',
`message` text NOT NULL,
`ip_address` varchar(15) NOT NULL default '',
`created` datetime default NULL,
PRIMARY KEY (`id`),
KEY `KEY_IDX` (`key`)
);
It is good to have the chats table created before proceeding. When that is done, you can begin creating the routing connection in the routing file. For this example, the following code is used:
Router::connect('/chat', array('controller' => 'chatbox', 'action' => 'index'));
code snippet /chat/cakephp/app/config/routes.php
The chat plug-in uses the jQuery library, so it needed to be included in the default.ctp layout file. You can get jQuery library from http://jquery.com/. Also, the plug-in's chat.css stylesheet and chat.js need to be linked inside the layout. In this case, the following layout is used:
<html>
  <head>
    <?php
       echo $html->css('/chat/css/chat.css', "stylesheet");
    if ( isset ( $javascript ) ):
       echo $javascript->link('jquery');
       echo $javascript->link('/chat/js/chat.js');
    endif;
    ?>
  </head>
  <body>
    <?php echo $content_for_layout ?>
  </body>
</html>
code snippet /chat/cakephp/app/views/layouts/default.ctp
We suggest not using the same name for the controller as the name of the plug-in. In this case, ChatboxController is used instead of ChatController. So moving to the controller file, you need to add the chat.ajaxChat value into the $helpers array, as well as the Ajax value.
<?php
  class ChatboxController extends AppController {
    var $uses = 'Chatpost';
    var $helpers = array('Ajax', 'chat.ajaxChat');
    function index() {
    }
  }
?>
code snippet /chat/cakephp/app/controllers/chatbox_controller.php
The model file is quite standard and goes like this:
<?php
class Chatpost extends AppModel {
    var $name = 'Chatpost';
    var $useTable = 'chats';
}
code snippet /chat/cakephp/app/models/chatpost.php
And finally the view file index.ctp needs only one line to have your chat up and running:
<?php echo $ajaxChat->generate('chatWindowName'); ?>
code snippet /chat/cakephp/app/views/index.ctp
By setting different values in the generate() method, it is possible to have multiple chat windows at the same time. The index.ctp view file used in this example goes as follows:
<h1>Ajax Chat Example</h1>
<?php echo $ajaxChat->generate('chat'); ?>
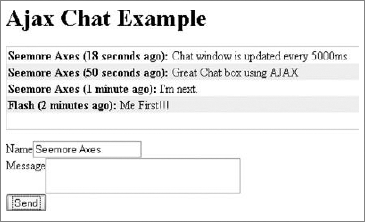
code snippet /chat/cakephp/app/views/index.ctpThere may be some problems with displaying messages. If this happens, you need to modify one of the plug-in's files: chat.js. This file is located in the /app/plugins/chat/vendors/js directory. At the end of this file there are lines similar to those presented here. Here you can set the path to update the script of the plug-in, and you can modify the interval in which the chat box is reloaded:
...
$.fn.chat.defaults = {
    update: '/cake/chat/update',
    interval: 5000
};
code snippet /chat/cakephp/app/plugins/chat/vendors/js/chat.js
At this point you should have a working AJAX chat that looks like the one illustrated by Figure 10-21.
The AJAX chat script selected to be implemented into the Zend Framework application is the Most Simple Ajax Chat Script, available from www.linuxuser.at. It will introduce you to the problem of implementing external scripts into your application. So why this script and not another? Well, it is a great piece of code for such a small package. It contains only three files. One is a PHP file responsible for saving and loading chat history. The other file is an HTML page with chat window and some JavaScript embedded inside it. The last is a text file that holds chat messages. This example will show you how to use AJAX chat and will set you up if you ever wish to develop the application further.
There is a huge selection of free AJAX scripts on the Internet, but most of them are quite large applications — too big to be introduced in this book. But if you have some spare time, we suggest the AJAX chat tutorial available at this page: http://devzone.zend.com/article/1581-Ajax-Chat-Tutorial.
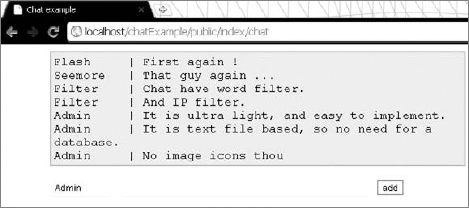
Moving to the example, first get the Most Simple Ajax Chat Script package from www.linuxuser.at/chat/index.html. You can run it just after unpacking it to your server and see how it works. A modified example rendered in the browser is shown in Figure 10-22.
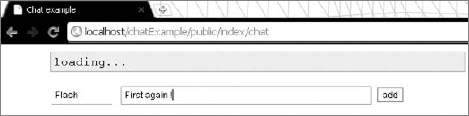
The package contains three files:
index.html— hat form, styles sheet, JavaScript codew.php— Responsible for reading and writing content of thechat.txtfilechat.txt— Contains chat history
First you should open the index.html file and prepare to split it into three files: chat.css, chat.js,and the chat.phtml view file. Start with cutting everything between the <style></style> tags from index.html and placing it inside chat.css in the /appName/public/css folder. For this example, the content of this file was slightly modified to achieve a white-gray theme style. When you have the CSS file ready, you can modify your layout file to include this style, as shown in the following code:
<html>
  <head>
    <title>Chat example</title>
    <?php
       echo $this->headLink();
       echo $this->headLink()->appendStylesheet($this->baseUrl('/css/chat.css'));
    ?>
    </head>
    <body>
  <?php echo $this->layout()->content; ?>
    </body>
</html>
code snippet /chat/zf/application/layouts/scripts/layout.phtml
Next you should cut JavaScript from between the <script> </script> tags of the index.html file and copy the extracted content into the chat.js file, placed inside the /appName/public/js/ folder. The rest of the index.html file needs to be copied into the chat.phtml file inside the /appName/application/views/scripts/index/ folder and modified so that it matches to the view file introduced next:
<div id="content">
<p id="chatwindow"> </p>
<!--
<textarea id="chatwindow" rows="19" cols="95" readonly></textarea><br>
-->
<input id="chatnick" type="text" size="9" maxlength="9" >
<input id="chatmsg" type="text" size="60" maxlength="80"
onkeyup="keyup(event.keyCode);">
<input type="button" value="add" onclick="submit_msg();"
style="cursor:pointer;border:1px solid gray;"><br><br>
<br>
</div>
<?php echo $this->headScript()->appendFile($this->baseUrl('/js/chat.js'));
?>
code snippet /chat/zf/application/views/scripts/index/chat.phtmlNotice that at the end of this file, appendFile() is used to include the chat.js file created before.
Finally the controller file contains two functions: chatAction(), which is responsible for displaying the initial view file; and chatwriteAction(), which contains the whole functionality of the w.php file.
As highlighted in the following code, you need to include $this->_helper->viewRenderer->setNoRender(); inside the chatwriteAction() action, because it is not supposed to render any view files:
<?php
class IndexController extends Zend_Controller_Action{
    public function init() {
    }
    public function chatAction() {
    }
    public function chatwriteAction() {
       $this->_helper->viewRenderer->setNoRender();
       // the content of w.php file goes here.
    }
}
code snippet /chat/zf/application/controllers/IndexController.php
The last file is the one containing the chat history. For this example the chat.txt file is located inside the newly created /appName/public/chat/ directory and it has write rights enabled.
You're nearly ready to have your chat application running, but first you need to adjust all paths pointing to the chat.txt file. The first code line of w.php and now the second line of the chatwriteAction() function is a variable containing the full path to chat.txt. For this example this path goes as follows:
$fn = "../public/chat/chat.txt";
Next the chat.js file needs to be modified. If you followed this example exactly without removing any comments, you have to modify lines 51, 100, and 109 of the chat.js file. Otherwise, you can look at the code and find the corresponding lines yourself. Modifications done for this example go as follows:
// line 51
intUpdate = setTimeout("ajax_read('../chat/chat.txt?x=" + ms + "')", waittime)
// line 100
ajax_write("./chatwrite?m=" + msg + "&n=" + nick);
// line 109
var intUpdate = setTimeout("ajax_read('../chat/chat.txt')", waittime);
Now you can run your application and enjoy the results. You should have a chat window similar to the one shown in Figure 10-23.
Your chatwriteAction() allows you to set some additional options, such as IP address blocking or word filtering. The following snippet illustrates the code responsible for these options:
/* Set this to a minimum wait time between posts (in sec) */
$waittime_sec = 0;
/* spam keywords */
$spam[] = "ass";
$spam[] = "hell";
$spam[] = "poo";
/* IP's to block */
$blockip[] = "72.60.167.89";
/* spam, if message IS exactly that string */
$espam[] = "ajax";
Additionally, with a little understanding of PHP and experience in development, you can easily modify this example to use a database instead of the text file.