Table of Contents for
Building PHP Applications with Symfony™, CakePHP, and Zend® Framework
 Building PHP Applications with Symfony™, CakePHP, and Zend® Framework
Published by
Wrox, 2011
Building PHP Applications with Symfony™, CakePHP, and Zend® Framework
Published by
Wrox, 2011
- Copyright
- Credits
- ABOUT THE AUTHORS
- ACKNOWLEDGMENTS
- Introduction
- 1. Introducing Symfony, CakePHP, and Zend Framework
- 2. Getting Started
- 3. Working with Databases
- 4. Your First Application in the Three Frameworks
- 5. Forms
- 6. Mailing
- 7. Searching
- 8. Security
- 9. Templates
- 10. AJAX
- 11. Making Plug-ins
- 12. Web Services
- 13. Back End
- 14. Internationalization
- 15. Testing
- 16. User Management
- 17. Performance
- 18. Summary
- A. Web Resources
- B. CodeIgniter, Lithium, and Agavi with Code Examples
- GLOSSARY OF ACRONYMS AND TECHNICAL TERMS
WHAT'S IN THIS CHAPTER?
Basic facts on enterprise software testing.
Functional and unit testing.
Using testing frameworks.
Automated tests with Selenium.
Many people associate "testing" with measuring the performance of applications. These kinds of tests will be conducted in Chapter 17, but this chapter deals with testing on a much deeper level, namely testing whether an application works as expected or not. It is easy to underestimate this kind of testing because it may seem a trivial issue. Indeed, it is trivial for very small applications, but when they grow and gain new functionalities, testing becomes an indispensable part of the software development process. It is an area of computer science that focuses on the quality of software.
Imagine that you have just written a really cool app with abundant functionalities and you have instantly sold it at a premium price. However, after a week your customer wants his money back or even sues you because your software crashes once a day. So, you delivered a piece of software that could be really great, but in fact is useless for your customer. Generally speaking, software stability may be something not easily noticeable from a developer's point of view, but it is critical for end users who will work with this software every day in their environments.
When starting a new project, some requirements for the final product must be established. A requirement is something a software quality engineer refers to while testing the software. It is good to start with making sure that all described requirements are comprehensible for everyone. That's why requirements are often presented as a list of stories and they are named as simply as possible; for example: As a customer, I want to be able to use my credit card so that I can pay for products in my basket. This story should then be described with as much detail as possible, but without overstatement.
Note
There are various software development and maintenance methodologies. A good example of methodology that supports defining requirements is the Scrum methodology belonging to Agile software development techniques. Scrum provides the following template, which can be used to develop meaningful stories: As a <type of user>, I want <some goal> so that <some reason>. It clearly defines the actor, the action, and the consequences of this story.
Test cases, test suites, and test coverage are concepts commonly used in software quality assurance. We will start by describing these concepts in detail.
A test case is nothing more than a list of steps and expected results. For example, assume that you need to test authentication functionality. To make sure that authentication works properly, you need to check that after filling out the login form we will be redirected to the main page if the authentication succeeds. So this test case could be defined as shown in the following table.
STEP | ACTION | EXPECTED RESULT |
|---|---|---|
1 | Go to the page | A page with a login form is displayed. |
2 | Fill out the username and password fields with | Username is filled out with plain text, and password is filled out with hidden text. |
3 | Click the login button. | Form information is submitted. |
4 | Check the current page location. | The page location is |
With the test case defined this way, you can to execute it easily because everything is clear — you know what action you need to execute and what the expectations are. All test cases must fulfill the requirements, which are defined before each functionality is implemented. Each requirement has its own acceptance criteria. Test cases also define steps to determine whether an application meets the acceptance criteria.
Note that the test case described in the preceding table doesn't really cover the requirement that authentication function properly because if the application accepted just any username and password, the test case would end successfully, but the application obviously wouldn't work properly and thus wouldn't meet the acceptance criteria. Each requirement in most cases needs more than one test case. Therefore, in the example you should also create additional test cases that check the negative scenario as well. An exemplary negative scenario test case is shown in the following table.
STEP | ACTION | EXPECTED RESULT |
|---|---|---|
1 | Go to the page | A page with a login form is displayed. |
2 | Fill out the username and password fields with the values | Username is filled out with plain text, and password is filled out with hidden text. |
3 | Click the login button. | Form information is submitted. |
4 | Check the current page location. | The page location is |
5 | Check the error message displayed. | Error message is Wrong username/password. Please try again. |
Other test cases can be made to check the main page when it's shown after successful login. You are free to invent more test cases to cover the requirements. Each test case can end as successful or failed. If it fails, we can show exactly where it's failing, so searching for errors is easier. That's why test cases are so important when we want to deliver quality software.
Test suites are just collections of test cases. Test suites collect test cases testing the same general issue. Most often, test cases from one test suite are executed together to cover a whole functionality.
For the issue of login authentication, you can call the corresponding example test suite AppLogin, containing test cases such as L001_PositiveLoginAdmin and L002_NegativeLoginAdmin, and also L003_PositiveLoginUser or L004_NegativeLoginUser, because this test suite should cover not only administrators' authentication but also users who are not administrators. This test suite should cover all roles that are supported by this authentication module.
And what if you deliver authentication through web services as well? Should this also be covered by this test suite? In most cases, there are separate test suites because web services authentication is an additional functionality that is not implemented at the same time as web authentication. But this also depends on requirements. The same concerns all other functionalities — test suites are created to group test cases by functionality, implementation time, and application structure.
Test coverage is a term that corresponds to the percentage of source code covered by test cases. It may be applied to the coverage of automated or manual tests of source code: code can be covered 50 percent through automated tests and 30 percent through manual tests. We may also speak of test coverage while testing concrete functionalities. We can say whether this functionality is covered by tests or not. A higher test coverage index usually results in higher software quality, but only if the tests are executed in a timely manner, of course.
There are two main layers of test categorization. The first layer divides tests into groups of automatic and manual tests. The second divides them into multiple purpose groups. These two layers are quite independent, so there can be a manual test used for build verification and an automatic test used for the same purpose. Let's take a closer look at the first layer of tests. The difference between them is the way they are executed. Manual tests are executed every time manually by software testers. Manual test cases need to be done step by step manually, so they are more time-consuming. On the other hand, they not only verify whether all operations provide correct output but also provide you with a look at its internal structure.
Black-box tests are so named because they follow the black-box scheme. In software testing this means that a tester doesn't know the code he is executing. Therefore we need to define the input of the application and then check the application's output (see Figure 15-1).

The actual output is compared with the expected output value; if they are equal, the test case or step is checked as successful. The two authentication test cases described previously would be black-box tests if we didn't know the application's code. We don't know exactly what is done within the application's authentication module, but we know that we should be redirected to the main page if the authentication ends successfully.
To show the idea of black-box testing, we have used the Lime test framework that is used in Symfony. As you can see, the following code presents a step-by-step scenario that covers the previously defined test case. Note that we don't check each step because we assume that the sfBrowser() methods are doing this correctly. If login page loading fails, we should get an error within the setField() method because we will not be able to set a value to the username field. At the end, we check the result page. If both values are equal, the test case succeeds. Note that we are using only Lime classes and methods, so we do not interfere with the application's code.
<?php
include(dirname(__FILE__).'/../../bootstrap/functional.php');
$browser = new sfTestFunctional(new sfBrowser());
$browser->get('/security/index');
$browser->with('response')->begin()->isStatusCode(200);
$browser->setField('login', 'admin');
$browser->setField('password', 'secret');
$browser->click('submit');
$browser->end();
$response= $browser->getResponse();
$browser->with('response')->
isStatusCode(200);
$browser->test()->like($response->getContent(), '/Main page/');
White-box tests, unlike black-box tests, are based on knowledge of the code that is being tested. The tester needs to have programming skills because he is testing the application at a lower level than in the case of black-box tests. The most popular tests that use white-box testing are unit tests. Unit tests cover the application at the source code level. The tester invokes methods to complete a scenario that realizes a requirement. We have used PHPUnit here to show the main assumptions of white-box testing. It is one of the most popular test frameworks for PHP. An exemplary scenario that tests the authorization module can look as follows:
<?php
require_once("Auth.class.php");
class AuthTest extends PHPUnit_Framework_TestCase {
    protected $_auth = null;
    protected $_adminLogin = "admin";
    protected $_adminPassword = "secret";
    protected $_wrongLogin = "badAdmin";
    protected $_wrongPassword = "wrongSecret";
    public function setUp() {
        $this->_auth = new Auth();
    }
    public function tearDown() {
        unset($this->_auth);
    }
    public function testAdminLogin() {
        $result = $this->_auth->authenticate($this->_adminLogin,
        $this->_adminPassword);
        $this->assertTrue($result);
    }
    public function testAdminLoginNegative() {
        $result = $this->_auth->authenticate($this->_wrongLogin,
        $this->_wrongPassword);
        $this->assertTrue($result);
    }
}
The preceding code has two test cases: AdminLogin and AdminLoginNegative. Unlike black-box testing, in this case we invoke authorization class methods, so we use the code that was written by developers. After getting the result of authentication, we need to check whether it is a true value. If yes, the test case ends successfully.
Grey-box tests are in fact a combination of black- and white-box tests. Application testing is done at the black-box level, but with knowledge of the application's data structures and algorithms. Note that in black-box testing, the data that is input can be given blindly.
Smoke tests are a group of tests that check the most important functionalities. Most important means that these are vital functionalities that are needed for an application to make sense.
Suppose you are developing a banking application. If the funds-transfer functionality of this application has blocking bugs (bugs that don't allow the application to proceed to the next step), the product doesn't make sense for any bank and it must be repaired as soon as possible. Imagine what would happen if you delivered a product without the main functionalities. To prevent that situation, smoke tests should be executed before delivery of every version of the product. These tests are also used in situations when developers deliver a new module and want to know if the whole program still works as designed. Smoke tests are very short tests that should take only a small part of the execution time of all tests.
Load tests and stress tests are sometimes recognized as subgroups of performance tests, but they really aren't. They are properly separate test groups because their goals are different, even if the tools used to execute them are the same.
With performance tests, you search for bottlenecks in your application. Performance can be measured in throughput, response times, scalability, or resource usage. The goal is to find places in our application where we can improve it to handle more web clients. For example, you can reduce HTML or CSS files when it's possible, so you need less bandwidth for the same effect.
Load tests check applications' behaviors in situations when the load is high. For example, we can start 1,000 threads that log in and log out from our application 24 hours per day. Normally, memory usage should finally fix on one value at some moment when testing begins and stays constant for 24 hours. If it is increasing all the time, you probably forgot to free the application's unused memory and should look for such bugs.
Stress tests are responsible for testing the durability of our application against peak load. As an example, let's take a banking application. Stress tests will test how many transfers your application can serve in a fixed period of time. It may be able to handle 1,000 transfers at one moment. If the application is working properly with 1,000, you should increase the amount to 10,000, and so on. If the application starts to crash or behave in an unstable way, this is probably the application's transfer limit. It depends, of course, on the hardware on which it is executed, but we still can say that on this particular machine the limit is 10,000 transfers. Then this can be scaled to a more powerful hardware configuration to achieve better results.
A popular tool for performance, load, and stress tests is Apache JMeter, which is discussed and applied in Chapter 17.
Regression tests are tests that are executed each time a new functionality is delivered. Scrum methodology states that these tests should be executed after each iteration ends. It depends on the situation, time, and human resources, but in most cases, whole tests are executed. Whole tests means all test cases, including both automated and manual test cases. The main reason for executing these tests is to check that nothing changed in the application since it was tested last time. In other words, we need to check that a new functionality didn't break any functionalities that were previously working correctly (the functionality passes all tests).
How should you determine when you've done enough testing? This is a good question. In software development, there are three main determinants of software development: cheap, fast, or good (see Figure 15-2).
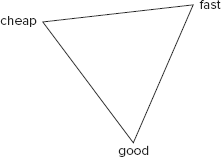
It's important not to pay excessive attention to any single one of these requirements. A good practice is to choose the two that are most important to you and try to accomplish them. That approach will get you near the middle of the triangle shown in Figure 15-2, which is where you get the best results. You can try to reach the very middle, but it's really hard to do so. So if your application needs to be of good quality, you need to decide whether it needs to be done fast (then it cannot be done cheap) or cheap (then it cannot be done fast).
The problem is described here because it's related to testing. How many application functionalities we can cover with tests depends on how much time and money we have to do that. Each quality assurance (QA) engineer needs to be paid. Fewer QA workers need more time to cover the same functionalities. So before you start a project, you need to create a good testing plan that includes costs and time. Thanks to that plan, you can estimate when the testing would finish.
Undiscovered bugs are very dangerous because they are like ticking time bombs. You never know how much time you have left until they explode or how much damage they can inflict. You cannot be sure how many undiscovered bugs there are in your software, but the fewer of them, the better the application quality. Finding undiscovered bugs is the main job of testers. To get the best results, you need to cover as much of your code as possible with tests. Of course, this quality assurance has its price, so this goal should be balanced with your available costs and time.
The bugs you know are in fact a measure of the quality of your software. Developers make mistakes like everybody else, especially because their work is creative and innovational, so some bugs are inevitable. Up to a point, the more bugs you can locate, the better. However, there is a limit above which more bugs imply that the developers made too many mistakes and the initial quality of code was really low.
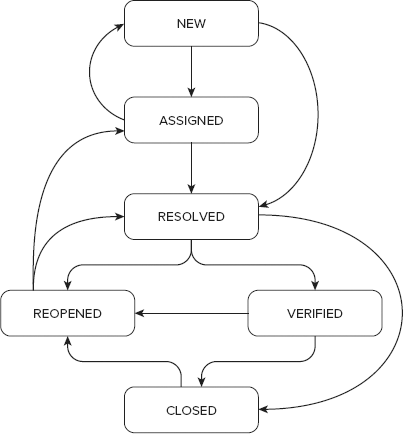
Each bug, when it is discovered, should be placed within a bug-tracking tool such as Bugzilla. The bug life cycle is shown in Figure 15-3. At the beginning, each bug has new status. In most cases it is then assigned to someone who will be responsible for it. If this is not assigned naturally to the person who wrote it, someone should be assigned to this responsibility anyway. When a bug is assigned, it may change the status back to new, but this does not happen often. More likely it may change the status from new to resolved without being assigned, if the problem described in a bug is fixed at once, without the need to assign anybody to it. The status is also changed from assigned to resolved when the bug is handled normally (that is, someone managed to solve it).
A bug can be handled in various ways. These conclusions are divided into the following groups, called resolutions: duplicated, fixed, invalid, moved, won't fix, and works for me. When one of these conditions is met, this bug has changed its status to resolved. If it's duplicated, this means that someone has already added a bug entry that covers this problem. There is no reason to fix the same issue more than once; that's why this bug entry needs to be ignored in future considerations. In bug-tracking tools, it's done gently by changing its status to resolved with its resolution set to duplicated. After that a duplicated bug can be closed. Most bugs, however, need to be repaired and get a fixed resolution afterward. Repairing or fixing bugs means repairing the problem within the application that constituted the issue within the bug description.
Invalid resolution means that this bug is not a real bug. Mostly, this resolution is added due to a mistake. Some bugs are not reproducible, so they were noticed only once. Another reason for this situation may be when you do testing on machines that are not configured properly. Each test case should be tested on a clean machine, which is prepared and meets all requirements. In other words, this is a machine that is identical to a typical machine the application's users will have. Let us illustrate this with an example. Assuming you are using Firefox, normally you don't install add-ons of unknown origin. One of these add-ons might interfere with your application and could generate bugs, which wouldn't exist without this add-on. Unless this add-on is commonly used or specifically required, such a conflict should not be considered a bug, but an exception. Additionally, this information should be included within the application's documentation.
The next resolution is moved, which means that this bug is related to a different product, so it should be moved to its bug tracker. It is not used when you develop only one application.
The next very interesting resolution is won't fix. This means that a developer agrees that it's a bug, but it cannot be fixed now or fixing it requires too much effort (this last case is sometimes denoted as another resolution, postponed). This resolution can be set only if the priority of this bug is low, it occurs in very rare situations, or it occurs in a functionality that is almost never used by users.
The last resolution is works for me. It is used in similar situations as in the case of the invalid resolution. Here a bug is also considered not to be a bug, but unlike invalid, a developer doesn't see any problem here at all. Another reason could be that it was confused with an actual feature. For example, some input fields may become inactive due to some other options.
Testers should check all resolved bugs to be certain they're really resolved. This is done mostly in situations when the resolution was set to fixed. In other cases, a tester should change the status to closed. Bugs are also closed after a tester ends bug verification and changes the status to verified. Note that closing bugs should not be done immediately after verification, but after a period of time, for example when Scrum iteration ends, the product is released, and so on. When it is closed, the bug normally ends its life.
When a resolved bug is verified negative, its status is changed to reopen. Reopen in most cases means the same as assigned, but the status was previously set as resolved. A reopened bug can be changed to resolved when a developer makes corrections based on testers' comments and suggestions. When the bug is closed, it shouldn't later be changed to any other status. But there are some exceptions when it can be reopened. These situations include development of a new version of the application with the old bug occurring again. The other reason can be when someone accidentally closed a bug that should not have been closed.
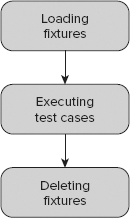
Fixtures are data sets created for testing purposes. Assume that you want to test some functionalities, but to make it possible, you need to have sample data imported into the database. These data sets are called fixtures. Fixtures can be stored as XML, YAML, or SQL files, but they also can be defined as a PHP class.
Imagine that you need to test a user's address list. You cannot start testing on production databases with real users because of the terrible consequences if something goes wrong. Therefore, you should use a different database for testing.
Another problem is loading and deleting a fixture's data. Note that for each test suite, you usually need different data within the database. That's why fixtures are loaded before each test suite is executed. You don't want to collect any previous testing results in the databases. Tests usually manipulate data stored in the database, but we want to have exactly the same data loaded every time. That's why you should flush the database after the test suite is done. Fixtures usage is shown in Figure 15-4.
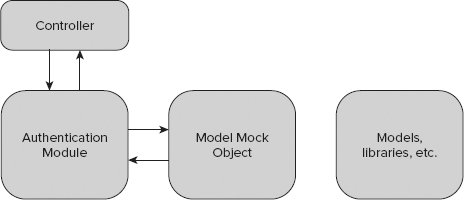
You should not always test a whole application as one big system. Some functionalities need to be tested separately. But how do you test intertwined systems separately (for example, authentication without a user model)? The answer to this question: by using a mock. We use mocks to simulate objects to test other objects' behavior. If you create a mock that properly simulates a user model, you can test authentication for all unusual behaviors. Figure 15-5 shows how it works when you don't use mocks.

The authentication module consists of methods, classes, and libraries that are responsible for authentication. Authentication uses some libraries or models. When we put a mock between the authentication module and the user model, it will look like Figure 15-6.
As you can see, there is no connection between the user model and authentication. The connection could exist between the user model mock and the real user model if needed, but this is not the reason why we create mocks. In most cases there are no connections between mocks and the models simulated by these mocks.
Assume that you have an authentication class such as that shown in the following code. This class gets a User model object as the parameter while creating its instance. The authenticate() method returns a true value if the user has $login and $password fields; otherwise, it returns false.
<?php
class Authentication {
protected $_User = null;
public function __construct($User) {
$this->_User = $User;
}
public function authenticate($login,$password) {
$results=$User->get($login,md5($password));
if($results) {
return true;
}
return false;
}
}Mocks are used mostly within testing code. They could be used within development code as well, but this is not considered a good practice. A test case testing the authentication using mocks is presented here:
<?php
require_once 'Auth.php';
class AuthTest extends PHPUnit_Framework_TestCase {
    public function testAdminAuth() {
        $UserMock = $this->getMock('User', array('get'));
        $UserMock->expects($this->any())
               ->method('get')
               ->will($this->returnValue(true'));
        $auth = new Authentication($UserMock);
        $this->assertTrue($auth->authenticate("admin","secret"));
    }
}
The $UserMock variable keeps the mock that was generated by the getMock() method. The parameters of this method are class name and the array of methods that this mock will have. In this case, it is the get() method. Next you have to define the behavior of this mock. When you set expects($this->any()), it means that the method can be invoked many times. The Authentication class needs a user model, so the prepared mock is used instead of the real model. Finally, an assertion is executed. It checks whether the authenticate() method returns a true value; if not, an exception is thrown and the test case fails.
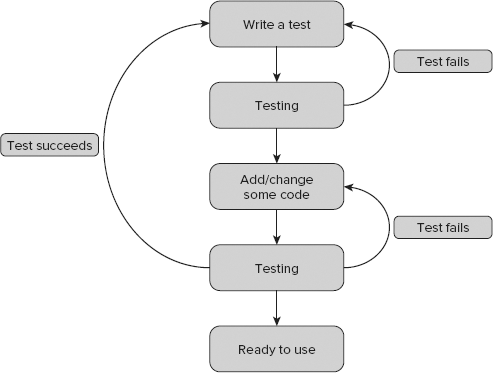
The common approach to development is to write functionalities first and test them later. But there is another interesting approach called test-driven development (TDD). Using TDD, you don't wait for development of functionalities; you prepare test cases first. An advantage of this approach is that all requirements are well known before the first line of code is written. The main idea of TDD is shown in Figure 15-7.
After requirements are defined, we write test cases that cover these requirements. Only then do we develop modules that allow us to run these tests. If the tests fail, we need to change our source code until they succeed. Then we prepare new tests for new functionalities and iterate until all requirements are met. Of course, sometimes we need to change the tests as well if they do not cover the requirements properly.
Each framework provides some tools and enhancements for Quality Assurance, such as specialized test frameworks and CLI commands. There are three commonly used test frameworks: PHPUnit, SimpleTest, and Lime.

PHPUnit (the logo is shown in Figure 15-8) is probably the most popular test framework among the PHP frameworks. It's the default test framework in Symfony 2.0 and Zend Framework.
To install PHPUnit separately, you can use your Linux distribution package manager or PEAR. The latter is like installing Symfony or Zend Framework. You need to run this command first:
# pear channel-discover pear.symfony-project.com
You can also use PHPUnit's channel:
# pear channel-discover pear.phpunit.de
After adding the channel, you can commence installation using this command:
# pear install phpunit/PHPUnit
Note that you can now run the PHPUnit command:
$ phpunit
If you want to install PHPUnit in Symfony 1.x, you should use the following command:
$ symfony plugin:install sfPhpunit2Plugin
Note that this command installs PHPUnit in version 2. We use the older version of PHPUnit in our Symfony examples because it's easier for beginners.
To install the newer version, you need to use the following command:
$ symfony plugin:install sfPhpUnitPlugin
After you install PHPUnit3, you can use Symfony's CLI tasks such as the following:
phpunit
    :generate-compat
    :generate-functional
    :generate-selenium
    :generate-unit
    :test-all
    :test-functional
    :test-selenium
    :test-unit
The first command makes it possible to use PHPUnit with older Symfony versions, such as 1.2. The next three commands generate sample test suites. The last four run the appropriate tests. They're very simple and easy to use. Note that all Symfony tasks are a kind of wrapper to the phpunit command. So you need to have PHPUnit already installed.

SimpleTest (the logo is shown in Figure 15-9) is an alternative solution to PHPUnit. It is also a full-featured test framework, very popular as a stand-alone solution. Modified SimpleTest is the default framework for CakePHP.
CakePHP contributors don't include test framework libraries into CakePHP, which can be a little annoying. Do they assume that nobody tests their applications?! If the libraries are not installed, you will see the following error:
$ cake testsuite
Error: Sorry, Simpletest could not be found. Download it from http://simpletest.org
and install it to your vendors directory.
You need to download SimpleTest from http://simpletest.org and extract the package into the CakePHP projects /app/vendors/ directory. Now you can start testing, and the error message will not be shown.
Apart from the /vendors directory where your SimpleTest libraries are placed, CakePHP also provides also a separate directory for test cases. The directory structure looks like this:
app/tests/
    cases/
behaviors/
components/
controllers/
helpers/
models/
fixtures/
groups/These directories are dedicated for test cases, fixtures, and groups of tests, respectively. Test cases are divided into those covering behaviors (such as ACL), components (such as Email), controllers, helpers, and models.
ZF does not provide any CLI facilities in this case, but thanks to integrated PHPUnit, ZF gives us a lot of classes that are ready to use. If you installed Zend Framework with PEAR following the installation in Chapter 2, the test library is placed in /usr/share/php/Zend/Test (UNIX) or C:\xampp\php\PEAR\Zend\Test (Windows with XAMPP). These classes are (for example) Zend_Test_PHPUnit_Db_Exception or Zend_Test_PHPUnit_ControllerTestCase. ZF also provides a testing directory structure that looks like this:
application/
    bootstrap.php
library/
    bootstrap.php
phpunit.xml
You can configure your tests by editing phpunit.xml. This configuration file is used for running test cases with PHPUnit as follows:
$ phpunit --configuration phpunit.xml
Black-box testing of web applications is done from the browser level as described earlier in this chapter. From the code-level perspective, there are two main testing approaches: unit and functional testing. Functional tests realize the black-box testing approach and we will describe them here.
First of all, you need to define an exemplary test case that will cover a simple user registration scenario, as shown in the following table. Assume a success scenario where everything goes as expected.
Step | Action | Expected Result |
|---|---|---|
1 | Go to the page | A page with a registration form displays with login, password, repeat password, e-mail, forename, and surname fields. |
2 | Fill in the login, passwords, e-mail, forename, and surname fields with: login: | The login, e-mail, forename, and surname fields are filled out with plain text, and the password fields are filled out with hidden text. |
3 | Click the register button. | Form information is submitted. |
4 | Check the current page location. | The page location is |
When someone fills out the registration form as above, a Thank You page will be shown. There are many other scenarios that should be considered, but to simplify let's consider only the above test case.
The solution is to implement a test case that covers the registration requirements. You need to use the frameworks' test frameworks to provide good-quality registration functionality. Assume that in each of our frameworks the registration form looks like this:
<form action="/registration/submit" method="POST">
<table>
  <tr>
    <th><label for="username">Username</label></th>
    <td><input type="text" name="username" id="username" /></td>
  </tr>
  <tr>
    <th><label for="password">Password</label></th>
    <td><input type="password" name="password" id="password" /></td>
  </tr>
  <tr>
    <th><label for="repeat_password">Repeat password</label></th>
    <td><input type="password" name="repeat_password" id="repeat_password"
    /></td>
  </tr>
  <tr>
    <th><label for="forename">Forename</label></th>
    <td><input type="text" name="forename" id="forename" /></td>
  </tr>
  <tr>
    <th><label for="surname">Surname</label></th>
    <td><input type="text" name="surname" id="surname" /></td>
  </tr>
  <tr>
<th><label for="email">Email</label></th>
<td><input type="text" name="email" id="email" /></td>
</tr>
<tr>
<td colspan="2">
<input type="submit" id="submit" name="submit" value="register" />
</td>
</tr>
</table>
</form>
code snippet /black-box/registration.htmlIt doesn't matter exactly how the form is formatted if it's within <table></table> or <div></div> HTML tags. It can be different from the HTML code perspective as long as it has <input /> fields. After submitting it, you should use a redirecting function to move to the Thank You page. For Symfony and CakePHP, the redirecting function is $this->redirect(); for Zend Framework it's $this->_redirect().
Functional tests in Symfony are better done using Selenium. In Symfony 1.4 and later 1.x versions, the PHPUnit plug-in is delivered as a fake wrapper that in fact uses Lime in the background. PHPUnit is a solution we can recommend, while Lime leaves much to be desired. That's why we advise against using Symfony 1.x functional tests. If possible, please use Symfony 2.0 or the Selenium extension delivered within the PHPUnit2 plug-in for Symfony 1.x.
CakePHP is based on a modified version of the SimpleTest framework. Let's test the registration functionality. (Chapter 5 discusses what you need to do to implement a registration form.) The CakePHP testing approach requires that every test file name should end with .test.php. For this example, the filename will be registration.test.php. We are testing the controller, so you need to save this file into the /app/tests/cases/controllers/ directory. Let's call the first test RegistrationControllerTest and add the testRegistrationPositive() method, which should load our registration page and check whether expected form fields exist. An exemplary test can look like the following:
<?php
class RegistrationFormTests extends WebTestCase {
    function testRegistrationPositive() {
        $this->get('http://localhost/registration');
        $this->assertField('username', '');
        $this->assertField('password', '');
        $this->assertField('repeat_password', '');
        $this->assertField('forename', '');
        $this->assertField('surname', '');
        $this->assertField('email', '');
    }
}
code snippet /black-box/cakephp/app/tests/cases/controllers/registration_controller.test.php
That's all you need for the first step. Why do we check to see whether form fields are blank? Because developers sometimes don't clean the code. By mistake, a username field can be set to something like foo or worse. This is a question for a QA engineer. Next, you need to fill out the registration form with proper data. The setField() method is used to set insert data into form input fields. The following code snippet illustrates how to do this:
$this->setField('username', 'admin');
$this->setField('password', 'secret');
$this->setField('repeat_password', 'secret');
$this->setField('forename', 'John');
$this->setField('surname', 'Smith');
$this->setField('email', 'john@example.com');
code snippet /black-box/cakephp/app/tests/cases/controllers/registration_controller.test.php
The preceding code needs to be placed after the assertField() methods within the testRegistrationPositive() method. We can, of course, believe our testing tools that they are setting form fields in the right way, but a good quality assurance engineer never trusts programs completely. That's why a good practice is to check registration form fields again. This time, we need to check whether values within the input fields are equal to those that we set earlier. We need to use the same assertField() method as previously, when we checked whether form fields are blank.
$this->assertField('username', 'admin');
$this->assertField('password', 'secret');
$this->assertField('repeat_password', 'secret');
$this->assertField('forename', 'John');
$this->assertField('surname', 'Smith');
$this->assertField('email', 'john@example.com');
code snippet /black-box/cakephp/app/tests/cases/controllers/registration_controller.test.php
These lines of code need to be placed after the setField() methods and within the testRegistrationPositive() method.
At this point, you are done with Step 2. In the next step, you will check whether the submit button can be pushed and whether any response is given. To click any field, you need to use the click() method. The assertResponse() method is dedicated to checking the response from the server. Step 3 should look like the following:
$this->click('submit');
$this->assertResponse(200);
This code needs to be added at the end of testRegistrationPositive(). In the last step, you expect to be redirected to a Thank You page. As shown in the following code, you need to get the current URL and compare it with the expected one. After that, you should also search page content for the expected text:
$current=$this->getUrl();
$this->assertEqual('http://localhost/index.php/thankyou',$current);
$this->assertText('Thank You');
The preceding code completes Step 4. Normally, you would be finished at this point, but when you go deeper into this test case you will see a lot of problems. What if the registration form is shown on the Thank You page? What if validation rules throw a validation error? These and more issues need to be coped with in further test cases. Use your imagination and write more test cases that cover the whole registration functionality.
CakePHP allows you to run tests from the command line. To test all written tests, you need to use the following command:
$ cake testsuite app all
This command starts with executing tests one by one. We have only one test case, so it should go fast. As a result, you see something similar to this:
Welcome to CakePHP v1.3 Console
---------------------------------------------------------------
App : app
Path: /home/wrox/public_html/cake/app
---------------------------------------------------------------
CakePHP Test Shell
---------------------------------------------------------------
Running app all
All App Tests
1/1 test cases complete: 15 passes.
As shown above, one test case is completed, and 15 assertions are passed. Note that assertions are those methods that make a test case fail if their conditions are not fulfilled. To run only the registration module, you need to run the following command:
$ cake testsuite app case controllers/registration
To learn more about allowed parameters, you need to run this command:
$ cake testsuite help
CakePHP, unlike Symfony or Zend Framework, delivers a great feature for web-level testing. To see all available test cases — those that you wrote and those delivered with CakePHP — you need to access test.php in the CakePHP /webroot directory. The right URL is http://localhost/test.php if your CakePHP application path is set in Apache to http://localhost/. When you access test.php, you should see something similar to Figure 15-10.
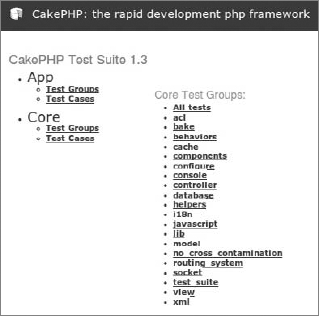
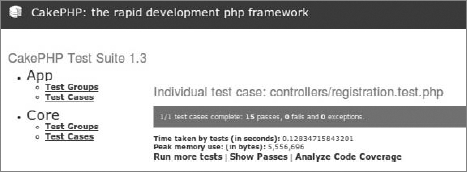
If you choose Test Cases from the App group (refer to Figure 15-10), you should see only one test case, the one that you wrote if you completed the example earlier in this section. After clicking the name of the test case, you should see something similar to Figure 15-11.
You can see all assertions that have passed by clicking the Show Passes option.
Zend Framework's functional tests are based on Selenium. We don't say that it's impossible to develop functional tests that work like CakePHP's tests, but just as with Symfony, we recommend using Selenium to accomplish this goal. The next section describes how to do this. Note that CakePHP uses SimpleTest, which doesn't support Selenium out of the box because SimpleTest has its own functional test solution. PHPUnit developers decided to use a known, existing solution and integrate it.
Each tester or quality assurance engineer will confront test automation sooner or later. This section describes how to use Selenium to automate web GUI testing.
Selenium consists of several components. You can see all of them at http://seleniumhq.org/download/. The Selenium integrated development environment (IDE) is only available for Firefox. To run your tests on other Internet browsers, you need to install Selenium Remote Control. We will work with the Selenium IDE. You don't have to install it to run the tests presented in this book, but if you have no experience with automated tests or Selenium you should try it to see how it works and get some experience with clickable test automation tools. When you click the Download link on the Selenium homepage, you will be asked whether you really want to install this add-on (see Figure 15-12).
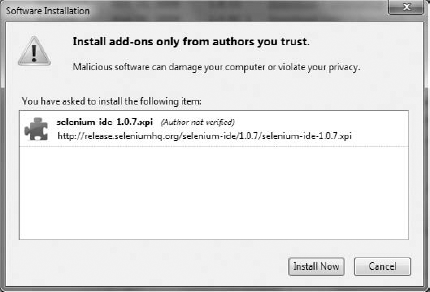
When you click Allow, the window shown in Figure 15-13 will be displayed. This is a second security notice. If you believe us that we are not trying to install malicious software on your machine, click Install Now.
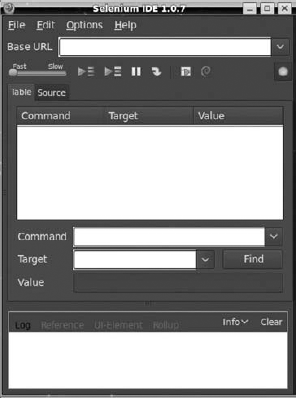
Next, you need to reboot Firefox. After rebooting, you will be able to access Selenium through Tools

In the top right of the Selenium IDE main window, there is a red round button that is very similar to the well-known audio record button. In fact, it is a record button, but it records your browser actions. Push the button and do something, such as sign in to your favorite social network. After signing in, you should be able to see something similar to Figure 15-15. Your password is not hidden and is shown as plain text in Selenium IDE. But you have also recorded your steps. Click the record button again to turn it off. You can click the green arrow to run your recorded test case.
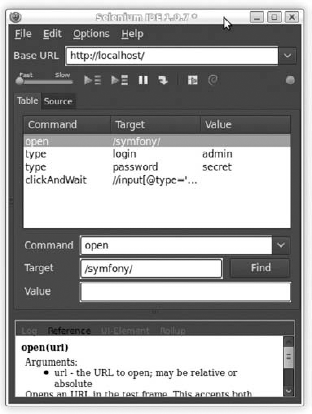
What can you use this for? Selenium IDE allows you to create tests by recording actions, like mouse clicks, instead of writing code. Of course, after you record these actions, you can see the source code for them. By default, an XHTML version of the source code is shown in the Source tab. We are not interested in XHTML; a piece of PHP code would be more useful, and the good news is that Selenium IDE provides this kind of functionality. Go to the Options menu and select the format type from the Format option. Select PHP - Selenium RC. In the Source tab, you will see something similar to this code:
<?php
require_once 'PHPUnit/Extensions/SeleniumTestCase.php';
class Example extends PHPUnit_Extensions_SeleniumTestCase {
    protected function setUp() {
        $this->setBrowser("*chrome");
        $this->setBrowserUrl("http://change-this-to-the-site-you-are-testing/");
    }
    public function testMyTestCase() {
    }
}
?>
code snippet /selenium/exampleTest.php
Remember this code; you will see more Selenium PHPUnit code later in this chapter.
With the Selenium IDE, you can click out your test cases, but only on Firefox. But what if you want to use a browser different from Firefox? This should be considered not only because someone might prefer a different browser, but also because you should test your application in all major browsers, especially when you use a lot of JavaScript in your web application. The solution is Selenium Remote Control.
You probably noticed that Selenium IDE has not generated the setBrowser() parameter as you might have expected. Why is it chrome while you were using Firefox? Because it's the default browser in Selenium, but you can replace this parameter with any browser you want to run this test case on. Note that the browser setup is set within the setUp() method, not in the test case method. For simplicity, we are running the Selenium test only on localhost.
To see how Selenium Remote Control works, you need to download it from http://seleniumhq.org/download/ and unpack it. Note that you also need a Java Runtime Environment (JRE) to work with Selenium RC. If you don't have one, you can get it from the Sun website (http://java.sun.com/). After installing it, you can run this command from the command line:
java -jar selenium-server.jar
To run the previous command, you need to be in the Selenium RC directory. After running it, you should see something similar to this:
15:04:05.979 INFO - Java: Sun Microsystems Inc. 14.0-b16
15:04:05.980 INFO - OS: Linux 2.6.32-23-generic amd64
15:04:05.985 INFO - v2.0 [a2], with Core v2.0 [a2]
15:04:06.049 INFO - RemoteWebDriver instances should connect to:
  http://192.168.1.3:4444/wd/hub
15:04:06.050 INFO - Version Jetty/5.1.x
15:04:06.050 INFO - Started HttpContext[/selenium-server/driver,
  /selenium-server/driver]
15:04:06.051 INFO - Started HttpContext[/selenium-server,/selenium-server]
15:04:06.051 INFO - Started HttpContext[/,/]
15:04:06.059 INFO - Started org.openqa.jetty.jetty.servlet.ServletHandler@16a4e743
15:04:06.059 INFO - Started HttpContext[/wd,/wd]
15:04:06.062 INFO - Started SocketListener on 0.0.0.0:4444
15:04:06.062 INFO - Started org.openqa.jetty.jetty.Server@7d2a1e44
This is the output generated when starting Selenium RC. You will see your individual configuration such as IP address or operating system instead of what is shown here.
Selenium is one of many solutions that you can use to realize black-box testing. The great thing about Selenium is that it's free and available for all operating systems in which Java is supported. Additionally, Selenium delivers the recording feature, which is rare in most automation frameworks/tools dedicated for web applications. Other tools, such as HP QuickTest Professional, are not free and are not dedicated only for the Web. The test case that we want to cover in this section is shown in the following table.
STEP | ACTION | EXPECTED RESULT |
|---|---|---|
1 | Go to the page | A page with a login form is displayed. |
2 | Fill out the username and password fields with | Username is filled out with plain text, and password is filled out with hidden text. |
3 | Click the login button. | Form information is submitted. |
4 | Check the current page location. | The page location is |
Earlier in this chapter, we described a similar test case for a functional test. We want to do the same now, but this time we want to have it working as a part of Selenium. Assume that the tested login form looks as follows:
<form action="/login/submit" method="POST">
<table>
  <tr>
    <th><label for="username">Username</label></th>
    <td><input type="text" name="username" id="username" /></td>
  </tr>
  <tr>
    <th><label for="password">Password</label></th>
    <td><input type="password" name="password" id="password" /></td>
  </tr>
  <tr>
<td colspan="2">
<input type="submit" id="submit" name="submit" value="submit" />
</td>
</tr>
</table>
</form>
code snippet /selenium/exampleLoginForm.htmlThis time we present all three web frameworks because it's also possible to integrate CakePHP's SimpleTest with Selenium using PEAR packages.
As described earlier, Symfony delivers some command-line tasks, and two are dedicated for Selenium tests. One of them generates a default test case. To do it, you need to type the following command:
$ symfony phpunit:generate-selenium frontend login
You should see output similar to this:
>> dir+ /home/wrox/public_html/symfony/test/phpunit/selenium/frontend
>> file+ /home/wrox/public_html/symfony/test/phpunit/selenium/frontend
           /loginActionsTest.php
>> help run this test with: ./symfony phpunit:test-selenium frontend login
Generated code should be as follows:
<?php
require_once dirname(__FILE__).'/../../bootstrap/selenium.php';
class selenium_frontend_loginActionsTest extends sfPHPUnitBaseSeleniumTestCase {
    protected function setUp() {
        $this->setBrowser('*firefox');
        $this->setBrowserUrl('http://localhost/');
    }
    public function testPositiveAdminLogin() {
    }
}
code snippet /selenium/symfony/test/phpunit/selenium/frontend/loginActionsTest.php
We changed the default test case method name to make it more meaningful. Now we need to fill it out with proper code. The following code accomplishes our earlier defined test case:
public function testPositiveAdminLogin() {
        $this->open('http://localhost/login');
        $this->assertTitle('Login Page');
        $this->type("username", "admin");
        $this->type("password", "secret");
        $this->click("submit");
        $this->waitForPageToLoad("30000");
        $this->verifyTextPresent("Successfully logged in");
}
code snippet /selenium/symfony/test/phpunit/selenium/frontend/loginActionsTest.php
You can run Selenium tests with the following command:
$ symfony phpunit:test-selenium
This should give an output similar to this:
PHPUnit 3.4.15 by Sebastian Bergmann.
.
Time: 6 seconds, Memory: 10.00Mb
OK (1 test, 2 assertions)
We get plain text output, but Selenium also provides the Selenium Remote Control Web console, as shown in Figure 15-16.

Also, a second browser window is opened, in which all steps are executed one by one.
CakePHP doesn't support Selenium by default because its SimpleTest doesn't provide Selenium support, unlike PHPUnit. But this problem can be easily solved using the Testing_Selenium package that is available in the PEAR package database. You can download it from http://pear.php.net/package/Testing_Selenium. You can also install it by using the PEAR command-line installation parameter, but in this case, a better solution is to extract this package to CakePHP's /vendors directory. Because of dependencies within the main Selenium.php file, it's better to extract files from the package to the /Testing subdirectory. After proper extraction, your directory structure should look like the following:
app\vendors\Testing\
    examples\
    Selenium\
    tests\
    ChangeLog
    readme
    Selenium.php
    selenium-server.jar
    todo
Make sure that it's exactly the same in your case. Next, you need to make one easy change in Selenium.php. Find this line:
require_once 'Testing/Selenium/Exception.php';
Change it to this:
require_once 'Selenium/Exception.php';
This is only one word, but without this change you would not be able to run tests using Selenium. This PEAR package is something like a wrapper for PHPUnit Selenium classes. After making these changes, you can start implementing a sample test case. The test case can be saved as selenium.test.php and placed in the /app/tests/cases/behaviors directory.
To begin, include the Selenium wrapper. In CakePHP, you can do so by using the App::import() method. An exemplary test class draft can look like the following:
<?php
App::import('Vendor','Selenium', array('file' => 'Testing'.DS.'Selenium.php'));
class LoginSeleniumTest extends UnitTestCase {
    function setUp() {
    }
    function tearDown() {
    }
}
code snippet /selenium/cakephp/app/tests/cases/behaviors/selenium.test.php
The first parameter in the import() method, Vendor, states from which part of CakePHP we want to import a class. The next parameter is only an identifier; you can call it whatever you want. The last parameter is an array. For the file key, assign the path and filename of Selenium.php. The DS variable is the separator between paths. In Windows, it's "\"; in UNIX it's "/". Now you can define what the setUp() and tearDown() functions will do. These methods are very common in many testing frameworks: setUp() is invoked when a test begins, and tearDown() is invoked when all invoked methods are done (except tearDown()). Before executing any test case, we need to define in which Internet browser the test cases should be executed and the starting URL. This method looks like the following:
function setUp() {
        $this->selenium =
            new Testing_Selenium("*firefox /usr/lib/firefox/firefox-bin",
                "http://localhost/login");
        $this->selenium->start();
}
code snippet /selenium/cakephp/app/tests/cases/behaviors/selenium.test.php
Because we don't need to work with Selenium after test cases are done, the tearDown() method should be as follows:
function tearDown() {
        $this->selenium->stop();
}
code snippet /selenium/cakephp/app/tests/cases/behaviors/selenium.test.php
Let's name our test case as we did in Symfony and Zend Framework: testPositiveAdminLogin():
function testPositiveAdminLogin() {
}
code snippet /selenium/cakephp/app/tests/cases/behaviors/selenium.test.php
In CakePHP, follow the same steps as in Symfony. The only difference is that you do not invoke Selenium dedicated methods through $this, but through the $this->selenium wrapper. Therefore, the testPositiveAdminLogin() method content should be as follows:
$this->selenium->open('http://localhost/login');
$this->assertTrue($this->selenium->getTitle('Login page'));
$this->selenium->type("username", "admin");
$this->selenium->type("password", "secret");
$this->selenium->click("login");
$this->selenium->waitForPageToLoad("30000");
$this->selenium->verifyTextPresent("Successfully logged in");
code snippet /selenium/cakephp/app/tests/cases/behaviors/selenium.test.php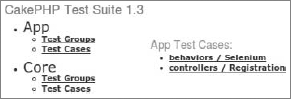
Now, when you go to http://localhost/test.php, you should be able to see two test cases, as shown in Figure 15-17.
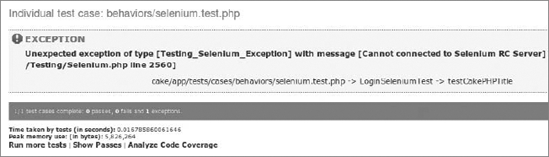
Remember to start Selenium RC before you run any Selenium test cases. Otherwise, you will see something similar to Figure 15-18.
Zend Framework doesn't support any features that help executing test cases. This is not really a problem, though, because ZF delivers PHPUnit classes, so with the phpunit command, you don't need anything else. To start, you need to create a directory in which you want to keep your Selenium test cases. Let it be /tests/application/selenium. You can save your test drafts as LoginTestCases.php. It should look like the following:
<?php
require_once 'PHPUnit/Extensions/SeleniumTestCase.php';
class LoginSeleniumTest extends PHPUnit_Extensions_SeleniumTestCase {
    protected function setUp() {
        $this->setBrowser("*chrome");
        $this->setBrowserUrl("http://localhost/");
    }
    public function testPositiveAdminLogin() {
}
}
?>
code snippet /selenium/zf/tests/application/selenium/LoginTestCases.phpIn fact, all the test drafts do not differ from each other a lot. The only difference is what libraries they import. In the case of ZF, Selenium libraries are stored in C:\xampp\php\PEAR\PHPUnit under Windows and in /usr/share/php/PHPUnit under UNIX systems. Note that you don't need to use Chrome or Firefox as testing browsers; you can use any of the following with $this->setBrowser():
*firefox
*chrome
*iexplore
*googlechrome
*safari
*opera
*custom
firefox, googlechrome, opera, safari, and iexplore are obvious. Note that if you choose chrome, Firefox will be used. When you choose custom, you will be able to use other browsers not listed previously. In this case, you need to give a proper path to the browser. (This is also a good solution if you want to test more versions of a browser.)
The test case should look like this:
$this->open('http://localhost/login');
$this->assertTitle('Login Page');
$this->type("username", "admin");
$this->type("password", "secret");
$this->click("login");
$this->waitForPageToLoad("30000");
$this->verifyTextPresent("Successfully logged in");
code snippet /selenium/zf/tests/application/selenium/LoginTestCases.php
It's the same as with Symfony. The difference is in execution. In Symfony, we did it with tasks delivered out of the box. In ZF, we need to use PHPUnit's executables. In ZF, each test can be executed as follows:
$ phpunit application/selenium/LoginTestCases.php
This needs more effort because you need to automate it further when more tests are available. When you switch to the Selenium RC console, you should be able to see something similar to this:
11:12:43.261 INFO - creating new remote session
11:12:43.262 INFO - Allocated session 1b843f2a2f714a049305340656f72dc7 for
    http://localhost/, launching...
11:12:43.285 INFO - Preparing Firefox profile...
11:12:45.658 INFO - Launching Firefox...
11:12:48.702 INFO - Got result: OK,1b843f2a2f714a049305340656f72dc7 on session
1b843f2a2f714a049305340656f72dc7
11:12:48.748 INFO - Command request: setTimeout[30000, ] on session
1b843f2a2f714a049305340656f72dc7
11:12:48.755 INFO - Got result: OK on session 1b843f2a2f714a049305340656f72dc7
11:12:48.802 INFO - Command request: open[http://localhost/login, ] on session
1b843f2a2f714a049305340656f72dc7
11:12:48.912 INFO - Got result: OK on session 1b843f2a2f714a049305340656f72dc7
11:12:48.959 INFO - Command request: getTitle[Login Page, ] on session
1b843f2a2f714a049305340656f72dc7
11:12:48.975 INFO - Got result: OK,Login Page on session
1b843f2a2f714a049305340656f72dc7
11:12:49.023 INFO - Command request: type[username, admin] on session
1b843f2a2f714a049305340656f72dc7
11:12:49.053 INFO - Got result: OK on session 1b843f2a2f714a049305340656f72dc7
11:12:49.101 INFO - Command request: type[password, secret] on session
1b843f2a2f714a049305340656f72dc7
11:12:49.128 INFO - Got result: OK on session 1b843f2a2f714a049305340656f72dc7
11:12:49.176 INFO - Command request: click[submit, ] on session
1b843f2a2f714a049305340656f72dc7
11:12:49.288 INFO - Got result: OK on session 1b843f2a2f714a049305340656f72dc7
11:12:49.335 INFO - Command request: waitForPageToLoad[30000, ] on session
1b843f2a2f714a049305340656f72dc7
11:12:49.358 INFO - Got result: OK on session 1b843f2a2f714a049305340656f72dc7
11:12:49.406 INFO - Command request: isTextPresent[Successfully logged in, ] on
session 1b843f2a2f714a049305340656f72dc7
11:12:49.426 INFO - Got result: OK,true on session 1b843f2a2f714a049305340656f72dc7
11:12:49.474 INFO - Command request: testComplete[, ] on session
1b843f2a2f714a049305340656f72dc7
11:12:49.474 INFO - Killing Firefox...
11:12:49.955 INFO - Got result: OK on session 1b843f2a2f714a049305340656f72dc7This output shows what exactly was executed by Selenium RC step by step. ZF doesn't deliver any scripts to run test cases, but we still can use PHPUnit's configuration XML file to run more test cases at one time. To make it possible, edit the phpunit.xml file placed in the /tests directory. It should look like the following code:
<phpunit bootstrap="./application/bootstrap.php">
    <testsuite name="Wrox Example">
          <directory>./</directory>
    </testsuite>
</phpunit>
code snippet /selenium/zf/tests/phpunit.xml
You need to define the bootstrap file that will set up all needed variables before the test suites are executed. A test suite name should be defined as well as the test suite's directory in which PHPUnit will start to search for test cases. In the case of Zend Framework, bootstrap.php should be as following:
<?php
define('BASE_PATH', realpath(dirname(__FILE__) . '/../../'));
define('APPLICATION_PATH', BASE_PATH . '/application');
define('APPLICATION_ENV', 'testing');
code snippet /selenium/zf/tests/application/bootstrap.php
Note that you define the application's environment as testing, so all testing parameters, such as database connection settings, will be used. To execute tests, you can use PHPUnit's command-line application:
$ phpunit -configuration phpunit.xml
Unit testing uses mostly white-box testing schemas. However, depending on how we use unit testing frameworks, we can also use other testing approaches. Normally, unit tests focus on the quality of the code at the code level. Formal test cases are not always defined because unit tests are implemented mostly by developers, not testers.
E-mails are often sent for subscriptions, registrations, password recovery mechanisms, and so on. Developers need to use mailing functionality many times in different controllers. According to the Don't Repeat Yourself (DRY) rule, mailing code is commonly extracted into libraries. This gives you another advantage: the possibility to encapsulate parts of code and test their quality separately.
Let's assume that you have a Mailing class with two methods: sendMailSubscription() and sendMail(). sendMailSubscription() takes only two arguments: subscription type and mail address. The sendMail() method takes no arguments. The first method sends a proper e-mail for a given subscription type. The next method sends one e-mail to 10 random accounts from a mailing database. For these two methods, you can define four simple test cases, two negative and two positive, as shown in the following table.
STEP | ACTION | EXPECTED RESULT |
|---|---|---|
Invoke with the | The method returns a |
Let's assume that the sendMailSubscription() method sends an e-mail with previously prepared content. The content is fixed, but it depends on the subscription type. Assume that there are two types of subscriptions: full and trial, and for each type there is a different content. But what happens if you invoke the method with a completely different argument? The expected action is that if the argument is not full or trial, the sendMailSubscription() method returns a false value, as shown in the following table.
STEP | ACTION | EXPECTED RESULT |
|---|---|---|
1 | Invoke with the | The method returns a |
Next, test cases use the Mails model. A random e-mail address needs to be retrieved from the database, and we need to use the Mails model to do that. One test case can check a scenario in which the Mails table has valid e-mail. To do that, we need to load some sample data (fixtures), as shown in the following table.
STEP | ACTION | EXPECTED RESULT |
|---|---|---|
1 | Load fixtures. | Fixtures are loaded. |
2 | The method returns a | |
3 | Delete fixtures. | Fixtures are deleted. |
To keep test cases clean, you should delete fixtures when they are no longer needed, which prevents mistakes in subsequent test cases. The last test case, shown in the following table, should check the action when sendMail() is invoked and the table is empty.
STEP | ACTION | EXPECTED RESULT |
|---|---|---|
1 | Check for mail in the database. | The Mails table is empty. |
2 |
| The method returns a |
The Mailing class, described in Chapter 6, looks like this:
<?php
/* including libraries here */
class Mailing {
    public function sendMailSubscription($type, $mail) {
         /* method content */
    }
    public function sendMail() {
         /* method content */
    }
}
You should feed the method's content with proper code, as described in Chapter 6.
The Mailing class should be saved as Mailing.class.php in the project's /lib directory to make it available for every application.
In CakePHP, the Mailing class should be named as in Symfony and placed in the application's library path: /app/libs. But there is one difference. Because of CakePHP's specific behavior, it's easier to make a model object an argument of the sendMail() method. After this change, the sendMail() method should be as follows:
public function sendMail($mail) {
    /* method content */
}As mentioned in the "Test Frameworks" section of this chapter, each framework prefers a different unit testing framework. We'll show only the most popular ones, although some frameworks can use more than one testing framework.
Symfony 2.0 uses PHPUnit, whereas Symfony 1.0 uses Lime (except when the PHPUnit2 plug-in is installed, in which case Symfony1 uses PHPUnit). The following example is written in Symfony 1.0 with the PHPUnit2 plug-in installed. To start working with Symfony tests, you need to generate a default unit test:
$ symfony phpunit:generate-unit mailing
This will generate proper files:
>> dir+ /home/wrox/public_html/symfony//test/phpunit/unit
>> file+ /home/wrox/public_html/symfony//test/phpunit/unit/mailingTest.php
>> help run this test with: ./symfony phpunit:test-unit mailingTest
You need to use the Mailing class, so it should be set up for every test case. To do that, you can use the setUp() and tearDown() methods as follows:
<?php
require_once dirname(__FILE__).'/../bootstrap/unit.php';
class unit_mailingTest extends sfPHPUnitBaseTestCase
{
    public function setUp() {
        $this->_mailing = new Mailing();
    }
    public function tearDown() {
        unset($this->_mailing);
    }
    /* test cases methods */
}
code snippet /unit/symfony/test/phpunit/unit/mailingTest.php
The first two test cases are very simple because the implementation needs only to change the attributes that are sent. Finally, the test cases should be as follows:
public function testSubscriptionPositive() {
    $this->assertTrue($this->_mailing
           ->sendMailSubscription("full","example@wroxexample.com"));
    }
    public function testSubscriptionNegative() {
       $this->assertTrue(!$this->_mailing
          ->sendMailSubscription("foobar","example@wroxexample@com"));
    }
code snippet /unit/symfony/test/phpunit/unit/mailingTest.php
Note that $this->_mailing is the Mailing instance. The last test case doesn't need any data in the Mails table, so it can be easily implemented as follows:
public function testRandomMailNegative() {
        $this->assertTrue(!$this->_mailing->sendMail());
    }
code snippet /unit/symfony/test/phpunit/unit/mailingTest.php
In both negative test cases, we place an exclamation mark to the left of $this->_mailing to check whether the inversed values from the returned values are true.
The last test case is the most complicated of all. You need to define fixtures that would be loaded before sendMail() is invoked. Fixture files should be placed in the project's /data/fixtures directory. For example, you can save the fixture file as mailing.yml in the /data/fixtures/mailing directory. This separates fixture files from the functionalities for which they are needed. mailing.yml should be defined as follows:
mails:
  john_smith:
    email: example@wroxexample.com
    forename: John
    surname: Smith
    subscription: full
code snippet /unit/symfony/data/fixtures/mailing/mailing.yml
To load data, you need information about the project configuration, which provides information about database connections that can be used to load fixture data into proper tables. You should use sfDatabaseManager to establish a connection and Doctrine_Core to load data. After testing, the sendMail() method fixtures need to be deleted, as shown in the following code:
public function testRandomMailPositive() {
    $configuration =
       ProjectConfiguration::getApplicationConfiguration('frontend','test',true);
    $conn = new sfDatabaseManager($configuration);
    Doctrine_Core::loadData(sfConfig::get('sf_data_dir').'/fixtures/mailing/');
        $this->assertTrue($this->_mailing->sendMail());
    Doctrine_Core::getTable('mails')->findAll()->delete();
}
code snippet /unit/symfony/test/phpunit/unit/mailingTest.php
The test string defines which environment configuration is to be loaded. sfConfig::get('sf_data_dir') returns the project's /data path (for example, /home/wrox/public_html/symfony/data). To run the test, you need to execute the following command:
$ symfony phpunit:test-unit
Output is similar to that from the Selenium tests you saw earlier in this chapter.
In CakePHP, you should start with defining fixtures. Fixtures, which are classes that inherit from CakeTestFixture, are placed in the /app/test/fixtures directory. CakePHP presents a slightly different approach to fixtures. Fixtures are not loaded to a database as is done in Symfony or ZF. This is a kind of mock that simulates all behaviors of a model with data that can be accessed with commonly used methods such as find(). But first you should define a fixture as follows:
<?php
class MailTestFixture extends CakeTestFixture {
    var $name = 'Mail';

    var $fields = array(
        'id' => array('type' => 'integer', 'key' => 'primary'),
        'email' => 'text',
        'surname' => 'text',
        'forename' => 'text',
        'subscription' => 'text',
    );
    var $records = array(
        array ('id' => 1, 'email' => 'example@wroxexample.com',
           'surname' => 'Smith', 'forename' => 'John', 'subscription' => 'full')
    );
}
?>
code snippet /unit/cakephp/app/test/fixtures/app/test/fixtures
Because fixtures simulate a model, you don't need to define any connections or get configuration information. The fixture presented in the preceding code should be saved as mail_test_fixture.php. Now you can load this fixture file by assigning its name to the $fixtures variable as follows:
<?php
require_once('libs/Mailing.class.php');
class MailingTest extends CakeTestCase {
    var $fixtures = array( 'mail_test');
    public function setUp() {
      $this->_mailing = new Mailing();
    }
    public function tearDown() {
      unset($this->_mailing);
    }
    /* test cases methods */
}
code snippet /unit/cakephp/app/test/cases/components/mailing.test.php
The test case file should be placed in /app/test/cases/components as mailing.test.php. The Mailing class will be used. Therefore, we need to include it and get an instance of Mailing as shown in the preceding code. The first two test cases are obvious and look like the following:
public function testSubscriptionPositive() {
    $this->assertTrue($this->_mailing->sendMailSubscription(
      "full","example@wroxexample.com"));
  }
  public function testSubscriptionNegative() {
    $this->assertTrue(!$this->_mailing->sendMailSubscription(
      "foobar","example@wroxexample@com"));
  }
code snippet /unit/cakephp/app/test/cases/components/mailing.test.php
To get the Mail object fixtures, you need to get its instance by using ClassRegistry:
public function testRandomMailPositive() {
        $this->Mail =& ClassRegistry::init('Mail');
        $this->assertTrue($this->_mailing->sendMail($this->Mail));
 }
code snippet /unit/cakephp/app/test/cases/components/mailing.test.php
When find() is invoked within sendMail() with the given object as the argument, a list of rows defined in the fixture will be returned as the result. This is an advantage of CakePHP because this approach is very easy to use and you don't need to use the database at all. Of course, you can use the database as well and sometimes that will be necessary.
In the last test case, you need only to delete all data defined in the fixture to get an empty database. Use the delete() method, as shown in the following code, to clear the Mails table:
public function testRandomMailNegative() {
        $this->Mail =& ClassRegistry::init('Mail');
        $this->Mail->delete();
        $this->assertTrue(!$this->_mailing->sendMail($this->Mail));
    }
code snippet /unit/cakephp/app/test/cases/components/mailing.test.php
You can now execute the preceding test using the http://localhost/test.php URL.
The most difficult approach for the QAs is delivered by Zend Framework. However, it is still easy to implement, just as it is in the two frameworks already discussed. To begin, you should include ZF's Application class, and PHPUnit's framework and Mailing classes. The first class is used to get the project's configuration, especially the database connection configuration. The second class is used to make testing with the PHPUnit framework possible. The purpose of the third class is obvious. In setUp(), you need to get an instance of Mailing and additionally get a database connection adapter. The adapter looks like the following:
<?php
require_once 'Zend/Application.php';
require_once 'PHPUnit/Framework.php';
require_once '../library/Mailing.class.php';
class MailingTest extends PHPUnit_Framework_TestCase {
  public function setUp() {
    $application = new Zend_Application(
      APPLICATION_ENV,
      APPLICATION_PATH . '/configs/application.ini'
    );
    $bootstrap = $application->getBootstrap();
    $bootstrap->bootstrap('db');
    $dbAdapter = $bootstrap->getResource('db');
    $this->_mailing = new Mailing();
    }
public function tearDown() {
unset($this->_mailing);
}
/* test cases methods */
}
code snippet /unit/zf/tests/application/unit/MailingTest.phpUnit tests should be placed in the /tests/application/unit directory (for example, /tests/application/unit/MailingTest.php). As the following code shows, the first two test cases don't differ from Symfony and CakePHP test case implementations:
public function testSubscriptionPositive() {
  $this->assertTrue($this->_mailing->sendMailSubscription(
    "full","example@wroxexample.com"));
}
public function testSubscriptionNegative() {
  $this->assertTrue(!$this->_mailing->sendMailSubscription(
    "foobar","example@wroxexample@com"));
}
code snippet /unit/zf/tests/application/unit/MailingTest.php
You can also try to load fixtures manually, as described in Chapter 3, or try to execute this script from the code level, but in cases where the test needs to be automated, a simpler approach is available, as shown in the following code. You need to define an array of data that should be loaded into the database. Next, a model and mapper are used in the same way as they are used in controllers:
public function testRandomMailPositive() {
    $fixtures=array('firstName'=>'John',
             'lastName'=>'John',
             'email'=>'John',
    );
    $entry = new Application_Model_Mails($fixtures);
    $mapper = new Application_Model_MailsMapper();
    $id=$mapper->save($entry);
    $this->assertTrue($this->_mailing->sendMail());
    $mapper->deleteOne($id);
}
code snippet /unit/zf/tests/application/unit/MailingTest.php
At the end, you need to delete the entry saved previously with $id that was returned through the save() method. All methods such as save() or deleteOne() are defined for each model, as described in Chapter 4.
The last test case is the same as in Symfony and CakePHP:
public function testRandomMailNegative(){
        $this->assertTrue(!$this->_mailing->sendMail());
}
code snippet /unit/zf/tests/application/unit/MailingTest.php
To run the unit test, you can use the phpunit.xml configuration file, as shown in the "CMS Tests Automation Using Selenium" section of this chapter, or you can use the following command:
$ phpunit tests/application/unit/MailingTest.php
All tests should pass if your Mailing class methods are done correctly. The output is similar to that obtained with Selenium.