Table of Contents for
Building PHP Applications with Symfony™, CakePHP, and Zend® Framework
 Building PHP Applications with Symfony™, CakePHP, and Zend® Framework
Published by
Wrox, 2011
Building PHP Applications with Symfony™, CakePHP, and Zend® Framework
Published by
Wrox, 2011
- Copyright
- Credits
- ABOUT THE AUTHORS
- ACKNOWLEDGMENTS
- Introduction
- 1. Introducing Symfony, CakePHP, and Zend Framework
- 2. Getting Started
- 3. Working with Databases
- 4. Your First Application in the Three Frameworks
- 5. Forms
- 6. Mailing
- 7. Searching
- 8. Security
- 9. Templates
- 10. AJAX
- 11. Making Plug-ins
- 12. Web Services
- 13. Back End
- 14. Internationalization
- 15. Testing
- 16. User Management
- 17. Performance
- 18. Summary
- A. Web Resources
- B. CodeIgniter, Lithium, and Agavi with Code Examples
- GLOSSARY OF ACRONYMS AND TECHNICAL TERMS
WHAT'S IN THIS CHAPTER?
Setting secure SSL connections
Defending against XSS injection attacks
Securing forms against CSRF session hijacking
Security enforcement is one of the best things that frameworks have to offer. While basic functionalities of a web application are mostly straightforward and obvious, proper dealing with security takes a lot of work and knowledge. This is also very responsible work. When you mess up something trivial like mailing, this error shows right away, and you can fix it before the application is launched. On the contrary, when there is a hole in security, it remains completely unseen until somebody exploits it; then the damage may be catastrophic.
When you are an inexperienced programmer, frameworks do a great job of taking care of the best security practices for you. If you are a professional, they are still valuable because they save you from writing a lot of not really exciting fragments of code. This chapter takes a closer look at various security problems like setting safe HTTPS connections that allow sending vulnerable data. Next we'll show how to defend against a cross-site scripting (XSS) attack that injects malicious code into a website, and a cross-site request forgery (CSRF) that hijacks the security context of an inconspicuous user.
In most cases, sending unsecured data is a normal behavior, but when an application has more to do with business (for example, e-commerce), then security matters. There are ways to secure connections between customers and the server where the web application is deployed. However, you must remember that a Secure Socket Layer (SSL) connection is just a tool and it does not guarantee full security of data transfer. There is currently no secure way to have mixed HTTP/HTTPS access to a site.
There are many reasons to hide sent information, so you want to make the connection as secure as possible. For web application frameworks, the main problem is closely coupled with secure connection protocols such as HTTPS. Other protocols are very rarely used, so in this section we describe how to prevent information sniffing using HTTPS. But why should you use a secure connection at all? Because you usually don't want to share data transferred to and from clients with third parties. These strangers can use the data to do really nasty things to the application or users, such as stealing passwords or credit card numbers.
Here's an example of data sniffing when someone tries to log on to a web application with HTTP and with HTTPS. We used Wireshark (www.wireshark.org/) to sniff packet transmissions.
Note
Under Linux, you need to run Wireshark with root privileges.
Note
For Linux distributions, it's easier to install Wireshark using the specific distribution's package manager.
Note
On Wireshark's homepage, you can download a version for Windows and Mac OS X as well.

So, let's try to sniff some packets. To sniff the proper data, you need to define the capture options. There is an icon below the main menu that shows the capture options window, as shown in Figure 8-1.
Next, a capture filter needs to be defined. On the capture filter list (shown in Figure 8-2), there is an entry called TCP or UDP port 80 (HTTP) that perfectly satisfies your needs now.
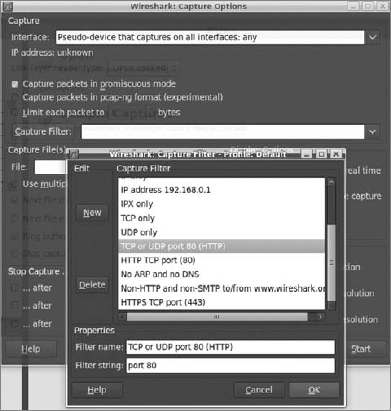
In this example, you can use a simple login form. To capture packets, you need to click the Start button, which is shown on the bottom right of Figure 8-2. Enter random data in the login and password form input fields; then submit this form. In Wireshark, you should be able to see something like Figure 8-3. If the next page appears, capturing can be switched off because you don't need any more data.

Captured requests and responses are shown in Figure 8-4. (Note that we assume that the web application is on the same PC where Wireshark is working.) That's why 127.0.0.1 is shown as the address (refer to Figure 8-3) and the pseudo-interface any (refer to Figure 8-2) is set in the capture options. Your captured data can differ a bit from the data shown in Figures 8-3 and 8-4. The highlighted HTTP request in Figure 8-3 shows the submit action, which is in fact a POST request to a specific URL. After clicking the highlighted entry in Figure 8-3, you will see something similar to Figure 8-4 at the bottom of the Wireshark's window. This is the captured information that is sent to the server. This data is sent as plain text, so it can be sniffed and is easily readable by humans.
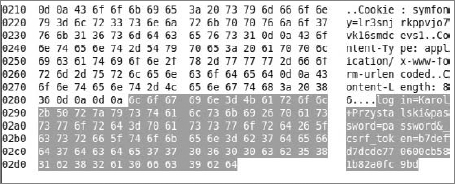
In the example, the intercepted information is rather useless because you sniffed data that was sent by you to your own web application. But the same can be done at any node between the client and the server. In most cases, such a node is a switch or a server that is relaying the packets, which is why it's so dangerous to send confidential data with an unsecured channel such as HTTP.
The solution for this problem is really simple. First you need to start with generating proper X.509 keys with OpenSSL. Next, the web server needs to be configured properly to make it possible to connect using HTTPS.
Before running Apache with HTTPS enabled, you need to generate a server certificate, which is used every time when connecting to Apache using the HTTPS protocol. The certificate needs to be signed by someone. In this example, you will sign the certificate yourself. The following approach should be used for testing only. In real business applications, each certificate should be signed by a trusted company. Many companies offer certificates signed by a certificate authority (CA), which promises that the signed certificate is valid.
In the example, you need only a private and public key. The first step is to install OpenSSL, which is really straightforward.
Note
You can get OpenSSL for Linux here: www.openssl.org/, and for Windows here: www.openssl.org/related/binaries.html.
Note
For Linux, you can also install OpenSSL using the distribution's package manager.
As the first step after installation, a private key needs to be created, which can be done with this command:
openssl genrsa -out /etc/apache2/ssl/apache.key 1024
This gives you a private key file with .key extension that is generated using an RSA algorithm with key strength of 1024 bytes. This strength size is now commonly used because 512 may be too weak, and bigger ones are not properly interpreted by some applications. This key should not be published anywhere because it's the private key needed to decrypt encrypted information. The second step is to generate a public key for the private key. This key is published to everyone who wants to connect to the server and is used to encrypt any information sent from clients to the server:
openssl req -new -x509 -days 365 -key /etc/apache2/ssl/apache.key
    -out /etc/apache2/ssl/apache.crt
Notice that if the previous folder doesn't exist, you need to create it; otherwise, both commands will print an error message. The previous command needs to include the key standard and expiration time, as well as the private key path and the path for the newly created public key as the parameters. X509 and updated standards derived from the same idea are commonly used standards in private and public key cryptography. The time expiration should be given as the number of days from the present that this key is valid. In this example, the public key is valid for one year. Note that if you are using Windows, you should replace the /etc/... path with the Windows equivalent; for example, C:\xampp\apache\ssl\... . OpenSSL will ask you some questions about key details such as city, region, country, and e-mail address. If you don't like filling in your details, just put in some random data. This doesn't matter in the example, but does in a real production environment. In that case, you should buy a certificate like those offered by VeriSign.
Now Apache or the other web server installed by you needs to know about the generated keys, so you need to make some changes in one configuration file. In XAMPP for Windows, you should edit the httpd-ssl.conf file, which is placed in the C:\xampp\apache\conf\extra\ directory. Ubuntu stores Apache configuration files in /etc/apache2/sites-enabled/000default-ssl. Note that Ubuntu sometimes asks to enable sites with SSL. To enable them, create a link in /sites-enabled to the file default-ssl placed in the \sites-available directory. In other distributions, it can be stored under other configuration file names, but you should easily find it because it contains the name ssl or https.
# cd /etc/apache2/sites-enabled
# ln -s /etc/apache2/sites-available/default-ssl 000default-ssl
Lines to be changed are those that point to the key files. SSLCertificateFile handles the public key file, and SSLCertificateKeyFile handles the private key file.
SSLEngine on

SSLOptions +FakeBasicAuth +ExportCertData +CompatEnvVars +StrictRequire

SSLCertificateFile /etc/apache2/ssl/apache.crt
SSLCertificateKeyFile /etc/apache2/ssl/apache.key
code snippet ssl/configuration/default-ssl
Don't forget to turn SSLEngine on if it's turned off. After the configuration, it's time to start or restart Apache web server:
/etc/init.d/apache2 restart
This should not take long. For this example, you can use (as with the case of the unsecured page) the login form used previously in this chapter. Because the certificate is not signed by a real CA, a security message is displayed in Firefox, shown in Figure 8-5. This is good security from the browser. To proceed, you need to get this certificate and confirm it as an exception.
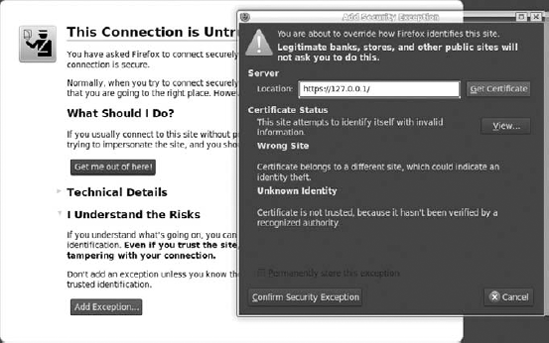
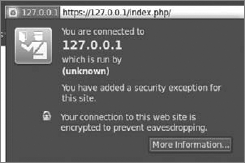
When you go to https://127.0.0.1/index.php/, you should see that 127.0.0.1 has a blue background in the navigation bar. For the purpose of this example, we used Firefox as the browser, so if you use a different browser, the window might look a little bit different from Figure 8-6. When you click on it, a new window appears. This window shows more details about the certificate.
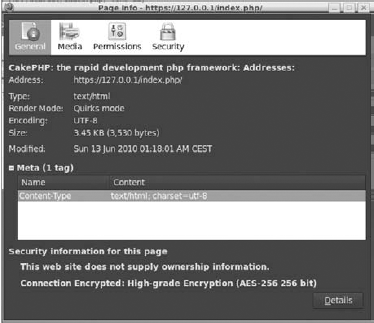
There is also a second window with full certificate information. In Firefox, it looks like Figure 8-7. This window also shows your certificate details given as answers for OpenSSL questions.
Let's see what the sniffed information looks like. Instead of HTTP in the capture filter options, you should set HTTPS. It's the last entry in the list in Figure 8-2. After repeating the steps as in HTTP, you should see something similar to Figure 8-8.

As you can see in the figure, there is a key exchange at the beginning, after which the data is sent. Highlight the Application Data entry and you should see something similar to Figure 8-9 at the bottom of the screen.
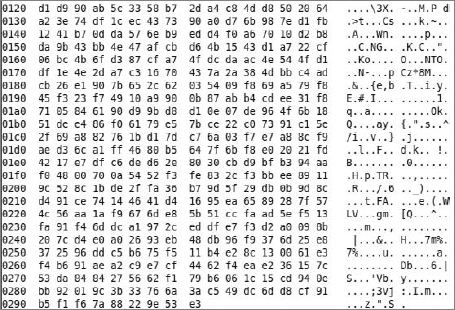
Try to read it now. This is an encrypted text, so it's not human-friendly. We can't promise that decrypting it is impossible, but it's almost impossible in a short period of time. That's why using the HTTPS protocol is very useful when sending any confidential information.
Symfony provides filters, which are methods executed before sending any data to the client. Filters are implemented as a design pattern called chain of responsibility. (This pattern is described in Chapter 1 of this book).
To create a filter, you need to make a class that inherits sfFilter. This definition should be stored as sslFilter.class.php in the application's /lib directory.
<?php
class sslFilter extends sfFilter {
    public function execute($filterChain) {
       $context = $this->getContext();
       $request = $context->getRequest();
       if (!$request->isSecure()) {
          $secure_url = str_replace('http', 'https', $request->getUri());
          return $context->getController()->redirect($secure_url);
       } else {
          $filterChain->execute();
       }
    }
}
code snippet /ssl/symfony/apps/frontend/lib/sslFiler.class.php
The main method that is invoked when the filter is running is execute(). The preceding code checks whether the current page is secured (that this action has an is_secure entry in the /config/security.yml file of modules). To access this action, you must have privileges, so you need to be authenticated first. In other words, if the current action is available for the public, it should replace http with https in the URL and redirect to a page prepared this way. If the current action is not available for the public, return the handle to the next filter. To enable a filter, add an entry in filters.yml in the configuration directory of the application. Call this entry SSL, as in the following code. It is important to set the class name so it reflects the name of the filter it refers to.
ssl:
    class: sslFilter

rendering: ~
security: ~

cache: ~
execution: ~
code snippet /ssl/symfony/apps/frontend/config/filters.yml
Another important thing to note is where this filter is placed in filters.yml. Symfony goes through filters.yml from the beginning to the end, and invokes each filter. The last invoked filter is execution. It doesn't matter whether there is any filter after this one because it will not be invoked. That's why SSL is the first filter in the preceding code, but it could also be placed after rendering or security. The list of executed filters is available in Symfony's web debug logs (see Figure 8-10).

If you want to use HTTPS in one module, you can easily get the current module name by invoking this method: $context->getModuleName(). Now you need only to create a simple if-else statement.
In CakePHP, the process is a little bit different and much easier to implement. Because HTTPS is used only when confidential data is sent, it is more useful to place every confidential action into one controller. CakePHP controllers are built so that the beforeFilter() method is executed, as in Symfony, before any other action is invoked.
function beforeFilter() {
    if(!$this->RequestHandler->isSSL()) {
        $this->redirect('https://' . env('SERVER_NAME') . $this->here);
        exit();
    }
}
code snippet /ssl/cakephp/app/controller/ssl_controller.php
This code redirects to a secured web page if the isSSL() method doesn't return a true value. The $this->here variable stores the module name and action, which you can give as a fixed string. The isSSL() method is a part of the RequestHandler component that needs to be added prior to beforeFilter().
var $components = array('RequestHandler');
code snippet /ssl/cakephp/app/controller/ssl_controller.php
At the end, the exit() method should be invoked for security purposes because nothing else should be executed after redirecting.
Zend Framework offers a solution similar to that of CakePHP. Each controller has an init() method, which is invoked before any other actions.
<?php
require_once 'Zend/Controller/Action.php';
class IndexAction extends Zend_Controller_Action {
   function init() {
      $path = "/";
       if( empty($_SERVER["HTTPS"])) {
           $hostname = $_SERVER["HTTP_HOST"];
           $url = 'https://'.$hostname .$path;
           $this->_redirect($url);
       }
    }
}
code snippet /ssl/zf/applications/controllers/IndexController.php
Because you are in the default index controller, the $path variable is set to /. In the lines that follow, the HTTPS protocol is checked. If it is being used, nothing happens; if it isn't being used, the $url of the application is set, and the redirection method is invoked for it. This is a good solution when you are in the default controller. A more generic solution is presented in the following code:
function init() {
    $request = $this->getRequest();
    $module = $request->getModuleName();
    $controller = $request->getControllerName();
    $action = $request->getActionName();
    $path = $module .'/'.$controller.'/'.$action;
    /* as previously */
code snippet /ssl/zf/applications/controllers/IndexController.php
In this piece of the code module, the controller and action names are retrieved. Next, a proper $path for current module and action is built. In the case of an index action in the index controller, the $path variable would look like index/index, so you would be redirected to https://127.0.0.1/index/index, for example.
Cross-site scripting (XSS) and all kinds of injection attacks are a real threat that must always be taken into account when developing web applications. These attacks are commonly used by hackers because of their simplicity. The only knowledge one needs is just some basics of SQL, HTML, JS, CSS, and general web application structure.
XSS and injection attacks are different security problems, but they use almost the same web application vulnerabilities. This section explains how each attack works and how is it used.
Unlike CSRF, XSS is not dedicated against a particular user, but against the website. XSS utilizes the injection mechanism. Figure 8-11 shows an example of how it works.
This example starts with a vulnerable functionality of a web application. This security bug can be used to add some malicious code to the website that will be executed every time a user invokes this functionality (for example, it displays a profile on a social network). Because it's invoked for every user who executes it, this code can send user confidential information (for example, session cookies) to the attacker. The problem is that the web application doesn't check the data that is sent to it.
SQL injection attacks exploit the vulnerability that occurs when the data entered into a form on the website (or otherwise sent to the server) is not properly validated. If someone enters a string that contains an apostrophe or quote into a web form, various things can happen — from simple SQL query execution errors to erasing all data from a database. Suppose that a web page contains the following form:
<form method="post" action="login.php">
    Login: <input type="text" name="login">
    Password: <input type="password" name="pass">
    <input type="submit" value="Login">
</form>
Now suppose that after form data is submitted, a PHP script is executed with the following query:
SELECT user FROM users WHERE login = '$login' AND password = $pass
The $login and $pass variables contain the username and password entered within the form. Of course, this is a simplified example and in real applications, passwords are never stored in databases as plain text, but as MD5 or SHA1 hashes. However, no matter what the storage technique is, when you enter the following string as a password:
' OR '1'='1
the resulting query to be executed is as follows:
SELECT user FROM users WHERE login = 'admin' AND password='' OR '1'='1'
The form input has changed the query that checks the password, and now it uses two logical conditions. Although the first might be false, the other one is always true. So it is possible to log in having only a valid login name.
The next example is more aggressive. After inserting the following code as the password, the users table and all its contents are removed from the database. This could be truly catastrophic because you have a table called users.
'; DROP TABLE users;
Attacks exploiting SQL injection vulnerability can steal, modify, or remove information from databases, as well as grant unauthorized access, so they are very dangerous.
Besides SQL injections, there are also JavaScript, HTML, and CSS injection attacks. JavaScript injection is commonly used in XSS attacks. If there is a security vulnerability in web applications that enables an attacker to inject client-side code, which is then displayed in a web page viewed by other users, it can mislead them to perform undesirable actions. Scripts located in the affected site can bypass some of the mechanisms that control access to user data held by the browser. A potential attacker can find ways of injecting malicious scripts into web pages in order to gain greater privileges to access sensitive page content, session cookies, and other information stored for the user by the web browser.
One of the most common forms of JavaScript injection is when web page content is generated directly from data submitted to a server by parameters in an HTTP query, or simply by an HTML form. It is possible only when no proper sanitizing of the submitted data is present. At first glance, submitting a JavaScript injection input to the website does not seem to be a serious problem because the user would could influence only his own security (his own browser cookies, cache data, and so on). A potential attacker can prepare malicious code sections to modify web-page content by adding hidden frames or misleading links that can cause a viewer's browser to navigate to other URLs. This process can happen completely in the background; in such a case, an attacker can interact with a user without his knowledge, which can threaten his security. For example, the following code can be put into a browser's URL bar:
javascript:void(document.cookie="login=true");
JavaScript will modify the content of a cookie. This example illustrates how simple it is to interfere with information held by the browser. The next example shows how easy it is to view session cookie content stored by the browser:
javascript:alert(document.cookie);
There is a more persistent variation of JavaScript injection that can be used to attack vulnerable web applications. It relies on the fact that the data submitted by the attacker is later saved on the server; then this data (whenever it is malicious script or simple text) is displayed on a web page displayed to other users while they are browsing affected content. Without proper HTML escaping, this can be a serious security flaw.
Most malicious JavaScript programs act upon the document object model (DOM) and modify the structure and content of a web page by injecting them with dynamically generated data.
For example, a persistent attack can look like this. A social network allows posting of HTML-formatted messages on an online message board. An attacker prepares a message containing malicious code and posts it on that board. While a user views that message board, his cookies and session data are stolen and sent to the attacker. At this point, the attacker can use the stolen cookie to use the user's session and impersonate him.
HTML sanitization (validation, escaping, filtering) is a method to eliminate some XSS vulnerabilities. This solution also works against injection attacks. To sanitize is to validate incoming data and reject undesired characters or replace them with acceptable ones. Of course, simple character replacement isn't the only solution to this problem. The appropriate method may depend on the context in which the problem occurs. These methods rely on escaping all unwanted data and leaving only the content that is correct for the context. In this way, it is possible to apply a proper escaping scheme, depending on where the sanitized input needs to be placed. For example, sanitization can be done by JavaScript escaping, HTML escaping, CSS escaping, and so on. By using these methods, protection against injection attacks can be a fairly simple task as long as the web application does not require rich data storage.
Look at some examples of how to protect scripts against injection attacks. The primary way to protect against SQL injection is to prevent unauthorized changes of queries executed by the database engine. In PHP, this can be done by executing the PHP built-in function addslashes() on the text in each parameter used for the construction of queries. This function adds the backslash before characters, such as ', ", or \, so that the characters are not treated as special characters. There are also functions specific to each database, such as that offered by the MySQL server: mysql_real_escape_string(). This function works like addslashes(), with the difference that it takes into account the character set used in the MySQL connection. The following example shows how to utilize the server mysql_real_escape_string() function while building an SQL query.
$user = mysql_real_escape_string($_POST['user_name']);
$sql = "SELECT * FROM users WHERE username = '$user'";
PHP delivers functions that can be used to sanitize strings. There are two commonly used PHP functions: htmlentities() and htmlspecialchars().
htmlentities($str);
htmlspecialchars("<a href='test'>Test</a>");
These commands are very similar. They change HTML tags such as <a>link</a> to <a>link</a>. A user will see strange text, but thanks to the above commands, it will not be executed as an HTML or JavaScript code.
In Symfony, it's very easy to protect against XSS and injection attacks. Symfony does it globally; you need only to edit the application's settings.yml configuration file and turn on the escaping.
all:
  .settings:
    escaping_strategy: on
    escaping_method: ESC_SPECIALCHARS
code snippet /xss/symfony/app/frontend/config/settings.yml
There are a few escaping methods in Symfony. As described before, PHP delivers two main functions, which are used in Symfony as follows:
ESC_SPECIALCHARS - htmlspecialchars(),
ESC_ENTITIES - htmlentities().
Symfony also has two methods dedicated to JavaScript escaping:
ESC_JS,
ESC_JS_NO_ENTITIES.
These methods are used when you want to use dynamically changed HTML code or just a string inside JavaScript. If you don't want to escape any values, just set ESC_RAW as the method or turn escaping off.
The Sanitize class is responsible for escaping in CakePHP. To use its methods, you need to add it at the beginning of the controller.
App::import('Sanitize');
class xssController extends AppController {
}
code snippet /xss/cakephp/app/controller/xss_controller.php
Sanitizing allows the use of four methods: clean(), escape(), html(), and paranoid().
Sanitize::clean($data, $options);
The clean() method changes the $data input and outputs as given in $options. Available options are odd_spaces, encode, dollar, carriage, unicode, escape, and backslash. Each option cleans the input string or array. To enable them, set them as true, as shown in the following code:
Sanitize::clean($data, array('backslash'=>true));
code snippet /xss/cakephp/app/controller/xss_controller.php
The escape() method escapes a SQL statement where $database is the variable that describes the used database (see database.php in the configuration directory); for example, 'default'.
Sanitize::escape(string $SQL, string $database)
code snippet /xss/cakephp/app/controller/xss_controller.php
The html() method cleans a string of HTML tags:
$HTMLString = '<a href='test'>Test</a>';
echo Sanitize::html($HTMLString);
code snippet /xss/cakephp/app/controller/xss_controller.php
The method in the preceding code will print <a href="test">Test</a>:
echo Sanitize::html($HTMLString, array('remove' => true));If you set the remove option to true, you get a string that doesn't contain any HTML tag.
The last method is paranoid(), which removes all special characters such as ;, :, <, >, @, #.
$HTMLString = "<a href='test'>Test</a>";
echo Sanitize::paranoid($HTMLString);
code snippet /xss/cakephp/app/controller/xss_controller.php
The preceding code prints a href=testTesta.
Zend Framework delivers the Zend_Filter class, which is responsible for sanitizing. Additionally, ZF offers a method that is available as a helper in the view layer.
$this->escape($this->testData);
Some developers prefer a strategy to escape only the output that is shown to the user. This is usually a good practice because XSS and injection attacks are based on showing malicious code. If it's escaped before it's sent to the user, the attack fails.
A second approach in ZF is to filter the bad code within the controller. To do this, you need to create an instance of Zend_Filter_HtmlEntities and invoke filter() with a parameter that is the filtered data. The filter() method returns an escaped value, so it's clean and ready to safely use.
$entityFilter = new Zend_Filter_HtmlEntities();
$goodData = $entityFilter->filter($HTMLString);
code snippet /xss/zf/application/controllers/IndexController.php
It is possible to specify filters still while building a web form, as shown here:
$this->addElement('text', 'firstName', array(
    'label' => 'Your first name:',
    'required' => false,
   'filters' => array('StripTags'),
));
code snippet /xss/zf/application/forms/Addresses.php
A filter created this way will return the input string, with all HTML and PHP tags removed from it. Yet it is possible to specify which tags are allowed and which are not.
Cross-site request forgery (CSRF) attacks are commonly mistaken for XSS attacks because of similarities in their outcomes. They work completely differently, however. While for XSS the attacker must put malicious code on a targeted website, for CSRF all he needs is to make you click a prepared link. That's all; there is no JavaScript required, and you can even have scripting disabled in your browser.
Developers have some problems defending against this kind of attack because it takes much knowledge to know how to do it properly. And there is no limit on the severity of these attacks. Fortunately, all this knowledge is already included in the frameworks, so this section describes how to secure against CSRF fast and simply.
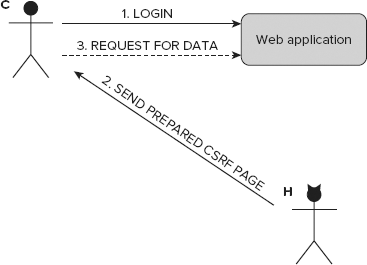
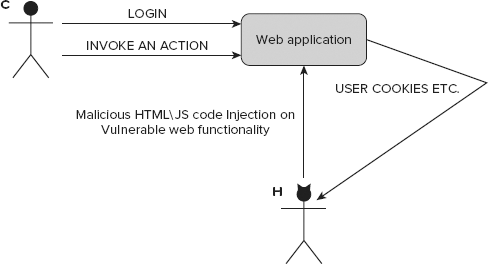
This attack is linked with form security and exploits some form vulnerabilities. Unlike XSS attacks, CSRF attacks are more user-oriented, and they do more harm to users than to web applications. Figure 8-12 illustrates a short CSRF example. C is the unaware Customer, and H stands for the Hacker.
Because CSRF attacks can be carried out only in some situations, to make this attack possible, some additional favorable circumstances need to be fulfilled. Let the web application in Figure 8-12 be an e-commerce application. H wants to get profile data. To get it, H needs to execute a piece of code such as the following on the attacked side. C needs to be logged in to the web application, and then H makes him execute this script by a prepared link.
<script>
var url = 'http://example.com/profile;
setTimeout(30000, "window.open(url)");
</script>
</html>
So here's how it works: Customer C logs in to the web application. Next, H sends a link to the prepared web page. As shown in the preceding code, a fixed URL is opened in a new window after a period of time. This window displays the profile data. This script could be even more malicious and save this data somewhere or buy something expensive. C doesn't know about this attack because the malicious web page can be opened in another tab in his browser or even completely in the background. Therefore, this kind of attack is very popular, but it also needs some information about the attacked person to make it possible.
To defend against CSRF attacks, a small change needs to be done in all forms that could be potentially used for this attack. Hacker needs to collect some information about Customer and also about the web application that he uses. Suppose that H is also a customer that has his own account in the example e-commerce web application. H can collect information about form structure and fields, so he can prepare a malicious web page on this basis.
Each form has some input fields (name, forename, email, and so on). Values that are entered into these fields are different for each user, but fields usually still have the same names (<input name="">). In some applications, the fields may differ for each user, which makes this attack more difficult, but it's still possible. If the attacker can figure out the form names that are expected to be sent from C, this attack may succeed.
Symfony delivers CSRF protection utilities out of the box, just as all the frameworks described in this book do. By default, these protection utilities are enabled in settings.yml, which is placed in the application's /config directory.
all:
  .settings:
     csrf_secret:          vxfdb8wrh34ni3th93y
code snippet /csrf/symfony/apps/frontend/config/settings.yml
For security purposes, you need to change the csrf_secret value. When this value is correctly set, an additional input field will be placed in each form, called _csrf_token.
<input type="hidden" name="_csrf_token" value="58702cd53a37190250899563f3dd9928"
     id="csrf_token" />
code snippet /csrf/symfony/apps/frontend/modules/csrfExample/templates/indexSuccess.php
The value of this field is different from that given in the configuration file because csrf_secret in the settings.yml config file is a salt, or random seed, used to generate the token. The salt is only one of the items that produce the resulting token value. All other items can be known to the attacker in some cases, but the salt is and should be always kept in secret.
CakePHP allows for securing a web application against CSRF attacks as well. Instead of setting a common variable in configuration files, as in Symfony, CakePHP gives the possibility to secure each controller separately.
To secure all forms that are generated with a controller, add this line at the top of it:
public $components = array('Security');After adding it, an exemplary controller looks like the following:
<?php
class AddressesController extends AppController {
    var $name = 'addresses';
    var $components = array('Security');
    function index($id = null) {
        $this->set('address_list', $this->Address->find('all'));
}
code snippet /csrf/cakephp/app/controller/xss_controller.php
As with Symfony, a salt needs to be set. This can be done in core.php, which is placed in the /config directory.
Configure::write('Security.salt', 'vxfdb8wrh34ni3th93y');
code snippet /csrf/cakephp/app/config/core.php
Unlike Symfony, CakePHP generates not one, but two CSRF tokens.
<form id="AddressEditForm"
    method="post"
    action="/index.php/addresses/edit/addresses/edit"
    accept-charset="utf-8">
    <div style="display:none;">
        <input type="hidden" name="_method" value="POST" />
        <input type="hidden" name="data[_Token][key]"
            value="7f72422a68cfce07a88966cade00118025b034a8"
            id="Token1034995606" />
    </div>
code snippet /csrf/cakephp/app/view/csrf/index.ctp
The first one is placed after <form> start tag, and the second one is placed in the bottom part of the following code:
<div class="submit">
    <input type="submit" value="Save address" />
</div>
<div style="display:none;">
<input type="hidden" name="data[_Token][fields]"
value="5d49a9573ceb05291667243fcc672d85f1
bdbd25%3An%3A1%3A%7Bv%3A0%3Bf%3A10%3A%22Nqqerff.vq%22%3B%7D"
id="TokenFields1736401509" />
</div>
</form>
code snippet /csrf/cakephp/app/view/csrf/index.ctpThese keys are both checked after each submit. If they are not the same, an error message is shown. The preceding code prevents CSRF attacks because token values are different for each user, and the attacker can't know the values for each user.
In contrast with the previous two frameworks, each form is secured separately in Zend Framework. To enable CSRF protection, you need to add an additional element of type hash into the form definition.
<?php
class Application_Form_Guestbook extends Zend_Form {
    public function init() {
        $this->addElement(
            'hash', 'csrf_token', array('salt' => 'vxfdb8wrh34ni3th93y'));
    }
}
code snippet /csrf/zf/application/forms/Guestbook.php
In ZF, a salt is also employed, which generates a form field as follows:
<dt id="csrf_token-label"> </dt>
<dd id="csrf_token-element">
<input type="hidden"
name="csrf_token"
value="5e7b35565c404102c04697fa4637f4c7"
id="csrf_token">
</dd>
code snippet /csrf/zf/application/views/scripts/index/index.phtmlThis field is checked during form validation. The same result can be achieved as well with the following code:
$token = new Zend_Form_Element_Hash('token');
$token->setSalt(md5(uniqid(rand(), TRUE)));
$token->setTimeout(Globals::getConfig()->authentication->timeout);
$this->addElement($token);
code snippet /csrf/zf/application/forms/Guestbook.php
A timeout can also be set for the token to make it lose validity after a certain amount of time.