Table of Contents for
Ubuntu: Up and Running
 Ubuntu: Up and Running
Published by
O'Reilly Media, Inc., 2010
Ubuntu: Up and Running
Published by
O'Reilly Media, Inc., 2010
- Cover
- Ubuntu: Up and Running
- Ubuntu: Up and Running
- Dedication
- Foreword
- Preface
- 1. About Ubuntu
- 2. Installing and Upgrading Ubuntu
- 3. Configuring
- 4. The Desktop: Accessing Applications and Features
- 5. The Filesystem, File Attributes, and Permissions
- 6. The Nautilus File Browser
- 7. The Command Line
- 8. Installing and Removing Software
- 9. System Maintenance and Security
- 10. Networking Ubuntu
- 11. The Internet
- 12. Using OpenOffice.org
- 13. Playing Games
- 14. Pictures, Sound, and Video
- 15. Other Ubuntu Distributions
- 16. Using Wine
- Index
- About the Author
- Colophon
- Copyright
Chapter 9. System Maintenance and Security
Now that you have your Ubuntu system up and running, it’s time to look at how you can keep it that way by taking the proper security precautions and maintaining your computer in tip-top condition.
Don’t worry that this chapter will be full of convoluted command-line statements and advanced Linux features, because you can actually do almost everything you need right from the desktop, with just a little mouse pointing and clicking.
Mostly, all you need to know is how to use a selection of programs and utilities that are accessible from Ubuntu’s menu system, and how to install a couple of others that aren’t. As you’ll soon see, it’s all quite easy.
System Maintenance
Proper maintenance includes power management to limit unnecessary wear on components when the computer isn’t in use, configuring your preferred and startup applications, setting up how your removable media is treated, and various other system settings.
Preferences
The place to find most of your maintenance and administration tasks is in the System → Preferences menu (see Figure 9-1). Some of these programs offer fairly advanced options that you most likely won’t need, but there are half a dozen of them with which you should acquaint yourself.
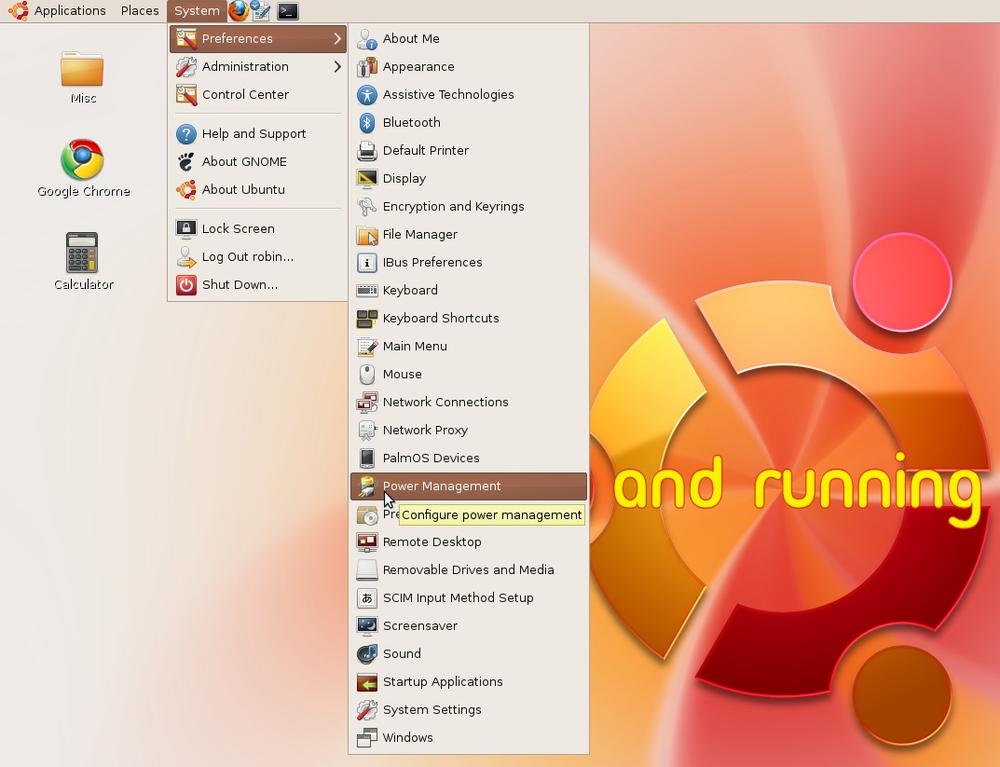
I’ll run through these programs in the order in which they appear in the menu.
Power Management
This program is useful for extending the product life of the components used by your PC, by giving you the ability to turn some or all off when the computer is idle.
It displays differently depending on whether you’re using a laptop or a desktop computer. Laptops will usually display items you won’t see for a desktop, such as a battery power tab.
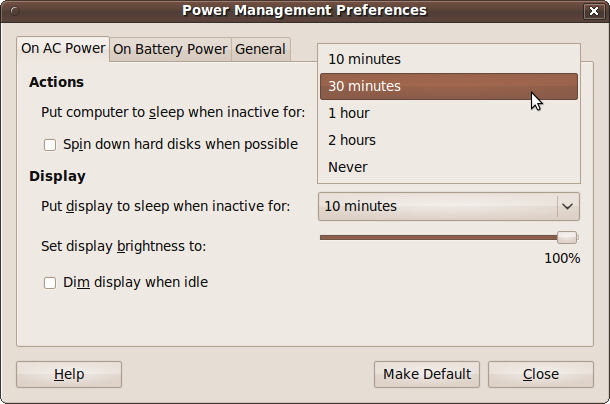
Figure 9-2 shows what the window looks like on a laptop. On a desktop PC there is no On Battery Power tab and no ability to set the display brightness.
The On AC Power tab
This is the first tab, which is shown on all computers. With it, you can choose whether to put your computer to sleep after a period of inactivity. This is good for cost savings, reducing wear on the computer, and ecological benefits—but obviously, if you make the time too short and cycle frequently between sleeping and waking, the effects will be both annoying and detrimental. You can also choose an interval after which, if no user input is detected, the display will go to sleep.
Another option makes hard disks spin down slowly, which can help the battery last longer on a laptop. Also on a laptop computer, you have the opportunity to choose your display’s default brightness and to dim the display when your computer is idle.
The On Battery Power tab
This tab is available only on laptops or when a battery power source is detected. Its actions are similar to those on the AC power tab, as shown in Figure 9-3.
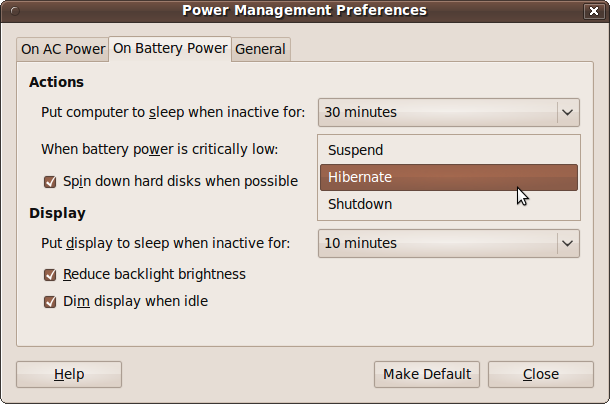
You also get some additional options, such as the ability to choose what to do—suspend, hibernate, or shut down your PC—if battery power becomes critically low. A hibernated PC is a little safer because it can lose all power and yet return to where it left off when power resumes, including all documents and open programs, whereas a suspended PC will lose all of these once power is lost. On the other hand, a suspended PC starts up much more quickly than a hibernated one.
Finally, you can use this panel to reduce the backlight brightness from its AC power level when the laptop is running on battery power.
The General tab
Using this tab you can choose your preferred action (suspend, hibernate, shut down, or prompt the user with these choices) when either the power or suspend button is pressed, as shown in Figure 9-4. You can also choose which icon, if any, to display in the notification area.

Preferred Applications
Using this window, you can choose the programs to use for the most common computing tasks, such as web browsing and reading email. Whenever one program has to call another—such as when you open an attachment in email or download a PDF in your browser—the system checks your preferred applications to make its choice. Figure 9-5 shows what the Preferred Applications window looks like when you call it up.
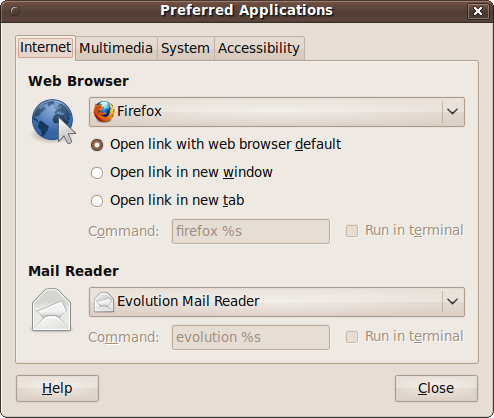
The Internet tab
In this tab you can choose which programs to use as your
preferred web browser and email reader. To change a program, you can
click it and then select Custom, which will enable the Command
input field. The concepts I laid out in Chapter 7 help you here. You can enter a program
name, which you should normally follow with %s to allow files dropped onto the
program’s icon to be passed to it. If the program is not in your
path, you’ll need to provide its full path and program
name.
You can also check the “Run in terminal” checkbox if the program runs in text output mode (in other words, if it uses standard output).
The Multimedia tab
This works in exactly the same way as the previous tab, but it sets your preferred multimedia player.
The System tab
This tab is for system commands and is similar to the previous two, except that the command you enter is split up into Command and “Execute flag” sections, as shown in Figure 9-6.
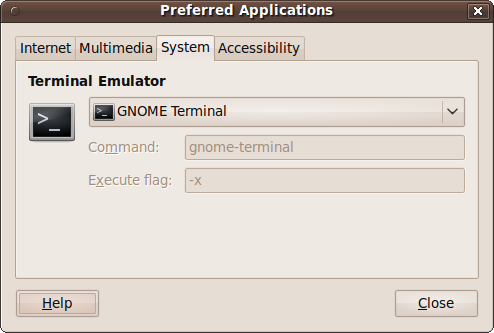
Most terminal applications have an option that causes them to
treat the remaining command-line options as commands to run. This
can be set by entering -x in the
“Execute flag” field.
Startup Applications
When Ubuntu boots up, there are a number of programs that get started by default, such as Bluetooth and network managers, the power manager, volume control, and so on (see Figure 9-7).
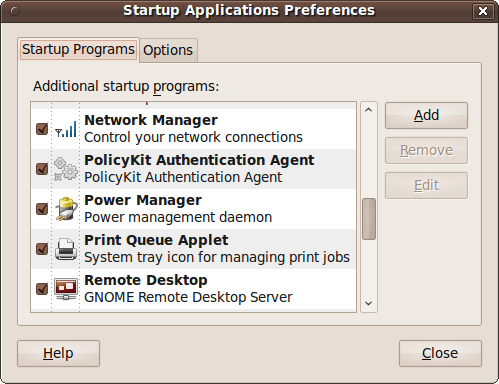
Using the Startup Applications utility, you can disable any of these or add new programs to the list using the Add, Remove, and Edit buttons. Remove and Edit will be grayed out until you select a program.
Be careful which programs you remove, as you could have difficulty restoring them if you need them later. The same goes for editing any of the default programs.
To add a program, click the Add button to bring up the dialog shown in Figure 9-8.
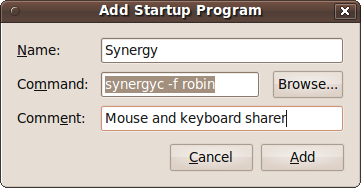
Here, I have chosen to add the program synergyc to run at startup. This is the client program of the Synergy utility, which lets me use a single keyboard and mouse on the computer named robin to operate all my Windows, OS X, and Ubuntu PCs. So now, each time this computer starts up, it will accept input from the robin computer’s keyboard and mouse. Chapter 10 offers more details on setting up and using this great little program.
If you don’t know a program’s name and/or location, you can click the Browse button and look for it.
Remember current applications
After you log out, all your programs will be closed. If you want Ubuntu to remember them and reload them for you when you next log in, you can click the Options tab and then check the box called “Automatically remember running applications when logging in,” as shown in Figure 9-9.
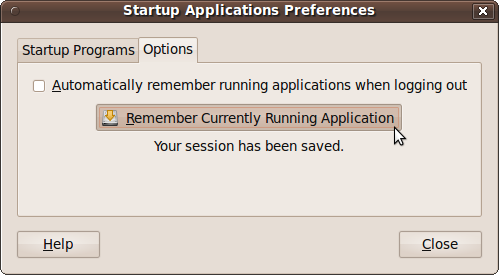
Thereafter, all your programs will be reloaded each time you log in. If you close any programs before logging out, only those that remain open will be remembered.
You can also have Ubuntu remember your open applications by clicking the button with the label Remember Currently Running Application (even though there is no final “s” on the end of the button label to indicate that the option potentially controls multiple applications), and they will be loaded in again each time you log in. To turn this behavior off, ensure all applications have been closed, and then click the Remember Currently Running Application button again.
Windows
The Window Preferences window allows you to control the way windows behave in conjunction with the mouse and keyboard (see Figure 9-10).
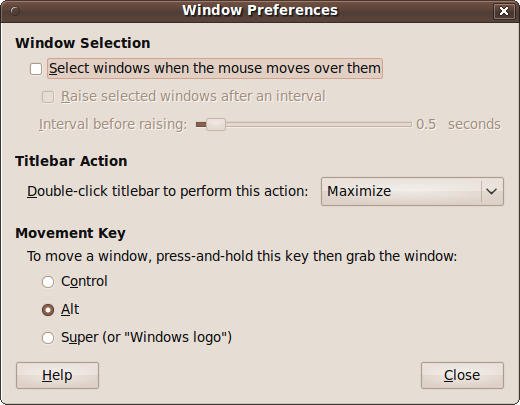
The window is divided into three main sections.
Window Selection
In this section, you can choose to make the desktop select a window when the mouse moves over it. This means that whichever window happens to be under the mouse will be focused, and therefore the target for mouse and keyboard actions.
Although a window becomes focused as soon as you pass a mouse over any portion of it, if any part of the window is obscured by another, you won’t be able to access that portion unless you click the window to bring it to the front, also known as raising it.
For this reason, you can also choose an interval after which a newly selected window will automatically be raised, as long as the mouse stays over it. By default, the interval is half a second, which is convenient for most users. If you pass over one window on the way to another, you won’t be distracted by having it raised, but as soon as you hover for half a second, the window is raised. You can change the time to any value between 0 and 10 seconds.
Titlebar Action
Normally when you double-click a window’s titlebar, it will cause the window to maximize. But with this pull-down menu, you can choose the action to associate with this event. The options are:
- Maximize
Expand the window to fill the whole desktop.
- Maximize Vertically
Expand the height of the window to the height of the desktop.
- Maximize Horizontally
Expand the width of the window to the width of the desktop.
- Minimize
Reduce the window to a tab on the bottom panel.
- Roll up
Stop displaying the window’s contents, but leave the titlebar in place.
- None
Do nothing.
Double-clicking the title bar another time reverses the action, restoring a window to its previous state.
Movement Key
You can drag windows around by clicking and dragging their titlebars, but when a titlebar is off-screen, you can hold down the Alt key and then drag the window by clicking any visible part of it.
Using the Movement Key option, you can change this action from the Alt key to either the Ctrl key or the Windows logo key.
Administration
Moving on to the Administration menu next, there are several more maintenance options you may need.
Computer Janitor
The Computer Janitor helps you remove old files that are no longer needed. When you select it, you will be prompted for your password, and then a screen such as the one in Figure 9-11 will be displayed.
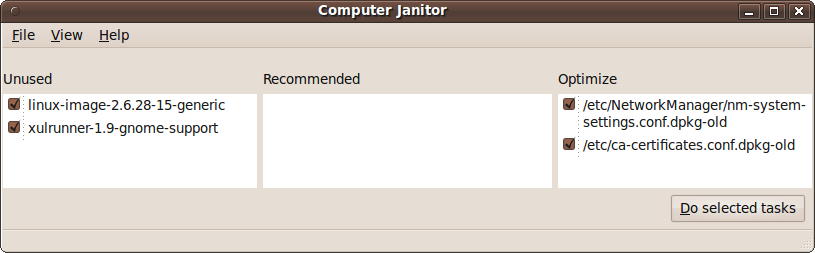
In the lefthand frame, you can see that two old packages have been found and their checkboxes automatically checked. Clicking either of them will display more details and help you decide whether to uncheck it.
The central frame will list any recommended changes to make, whereas the righthand one lists changes you can make to optimize Ubuntu. Again, in each case you can click an entry to view more information about it.
Once you have selected all the changes you wish to make, click the “Do selected tasks” button and you’ll be asked whether you are sure you want to clean up. If you are, click the “Clean up” button.
Sometimes after cleaning up, the program will discover one or more new items that can be optimized, and you can repeat the process. If the Computer Janitor can’t find anything to clean up, it will pop up a window to tell you so and advise you to close the program.
Login Screen
With this utility, you can choose the action that should occur on login. By default, all users will be required to select their username and then enter their password. But if you click the Unlock button and enter your password, you can select one user who will be logged in automatically, as shown in Figure 9-12.
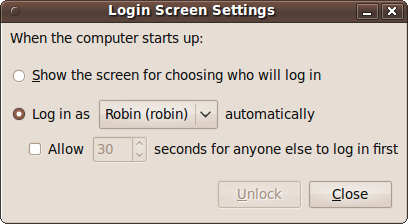
You can either have that user logged in as soon as the computer starts or reboots, or set a time delay during which other users can select their usernames and log in. If the delay is passed without another account being chosen, then the automatic login of the selected user will proceed.
Warning
Allowing automatic logins is an extremely unsafe option where security is an issue—for example, if you have access to sensitive data via a particular computer. Generally, I recommend using this setting only in a home environment in which you are certain there are no security issues. Even if you trust everyone with access to your computer, remember that they can always pull an annoying prank on you if you leave open access to your account.
Creating a password-free system
In our house, we keep a Netbook PC in the living room so that we can look things up and check our email and social networking sites from time to time. We used to have just one account on it that we all shared, but we decided it was annoying to keep logging in and out and entering passwords in the web browser each time when changing users.
So, I decided to create a completely unsecure environment on this machine, because ease and speed of use were much more important to us than privacy and security, particularly since it never leaves the house.
The Netbook now has multiple users, each with empty passwords that the system automatically accepts. Any user can now click the User Switch icon at the top right of the desktop, and then choose a username from the list shown to automatically log in as that user. As long as the PC hasn’t been restarted, each of us now has all the programs we want open all the time, and which we can instantly return to—with all our settings and password details already entered.
If you want to create such a system, call up a Terminal window and then, for each user, enter the following:
sudo passwd -d usernameThe first time you do this you’ll need to enter your own password, but for the next 15 minutes you won’t be prompted. So, for example, if you have the users andy, brian, claire, and denise, you would enter the following:
sudo passwd -d andy
sudo passwd -d brian
sudo passwd -d claire
sudo passwd -d denise
This removes the password from all the users mentioned. You now need to edit a file to tell the system that users without passwords are allowed to log in automatically. To do this, enter the following:
sudo gedit /etc/pam.d/common-authThe file will then be opened up in the editor, so move the cursor to the line (about 17 lines from the top) that looks like this:
auth [success=1 default=ignore] pam_unix.so nullok_secure
Now delete the _secure at the
end of the line, click the Save button, log out, and enter your
username to verify that you can now log in without a password. You
will now have a completely open system, and even sudo commands will not require
passwords.
Warning
Remember that a fully open computer is completely unsecure,
and that if it is lost or stolen, account information for each user
could be easily extracted and used maliciously. Also, having no
password for sudo means that it
is very easy for someone careless (not even necessarily malicious)
to seriously mess up or break your computer. So don’t create such a
system lightly.
System Monitor
The System Monitor is the place to go when you need to know how well your computer is handling its resources, such as memory, the network, hard disks, and so on. Figure 9-13 shows the program’s first tab, the System summary screen.
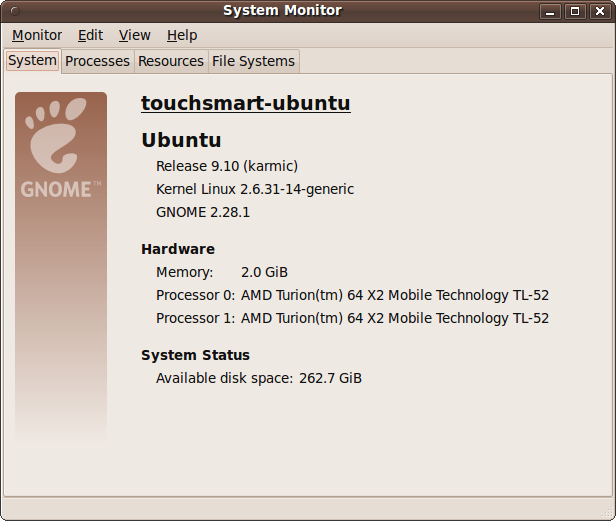
The System tab
This tab provides an at-a-glance summary of your computer, including the name it has been given, the versions of Ubuntu, Linux kernel, and GNOME desktop, the amount of memory, the processor(s) used, and available disk space.
The Processes tab
This tab provides full details on the processes currently running, as shown in Figure 9-14. You can click on any of the column titles to sort by the data in that column and determine, for example, which processes are consuming the most CPU time or memory.
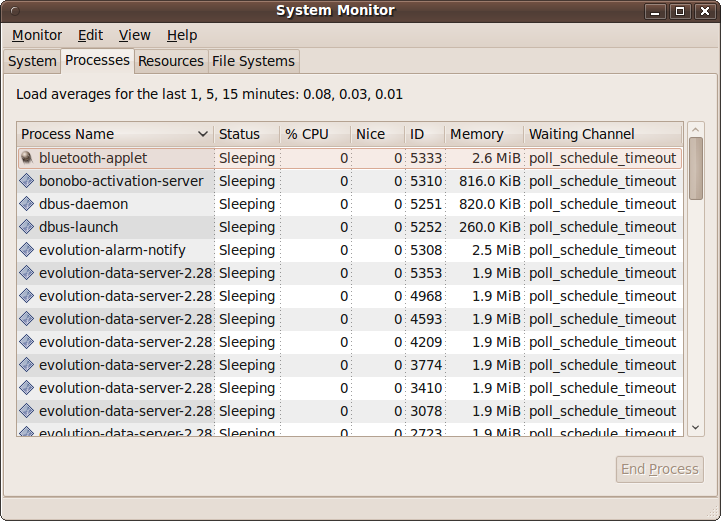
To kill a process (in other words, to terminate its execution), highlight it and click the End Process button. But be careful—you may lose or corrupt data that the program was using, or disrupt another program that depends on the program you kill. Use this button only when you know what you are doing, and only when the program has hung or you can’t close it normally for some other reason.
The Resources tab
This tab shows you graphically how your computer’s various resources are being used, as shown in Figure 9-15.

Each graph slowly moves to the left with the latest data point plotted on the right. In the figure you can see that the processors are averaging about 20% or less usage, the memory used is only in the region of 15% (with no use of a swap file), and the network graph shows four peaks, corresponding to web pages I called up in the Firefox web browser.
Note
Compared to the Windows Vista operating system that this PC came with, these low levels are a tribute to the power and compactness of Linux. The fan on this PC also runs in its slowest and quietest mode under Ubuntu, but under Vista it whines away as it tries to diffuse the heat generated by the extensive CPU workload.
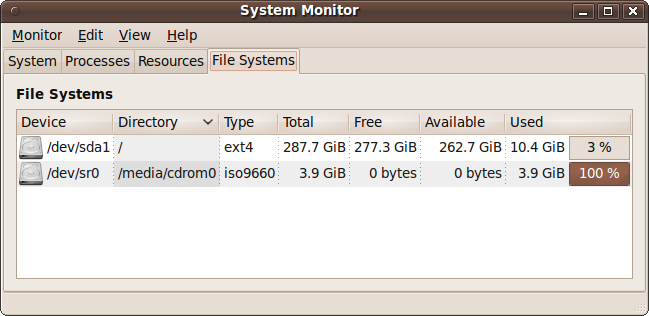
The File Systems tab
This final tab shows how your hard disks are doing. It lists the device name, location, and type, as well as its total, used, and free space, as shown in Figure 9-16.
System Testing
To thoroughly test your hardware, you can use the System Testing facility, as shown in Figure 9-17.
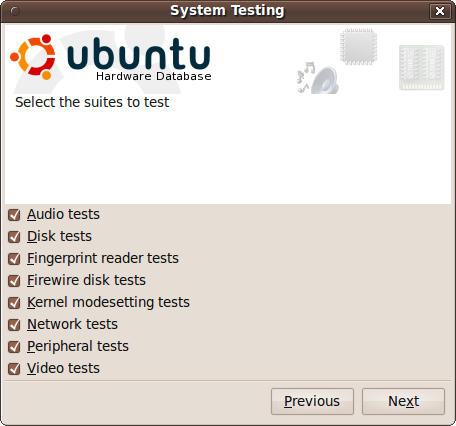
Select the tests you would like made, and click Next. You will then be taken through various tests. For example, when testing the audio on your computer, you’ll be asked to open the volume control application and make certain setting adjustments before clicking the Test button. The process will then continue for Bluetooth headsets, microphones, and USB audio devices.
Performing all the tests may take a while, but doing so will alert you to any problems with your computer that might need your attention.
Alpha and Beta Releases
Although I covered the Update Manager at the end of Chapter 2, there was one item I left out until you were ready, which is how you can upgrade to alpha and beta tests of new Ubuntu releases.
If your computer is used for important tasks or contains valuable data, you should never install beta software on it (let alone alpha). But if you have a computer on which you are prepared to lose all your data and reinstall the operating system if the worst should happen, it’s a candidate machine on which you could play with prerelease versions of Ubuntu.
New editions of Ubuntu are released every six months, preceded by various alpha and beta tests available for people who are willing to test them and report any bugs found back to the developers. You can also install them purely out of curiosity if you wish, as there’s no requirement to report bugs.
The new editions are usually released in April and October, so the alpha tests are generally available from about January to February and July to August. However, these will be the most unstable versions and are recommended only for seasoned Linux users.
But each March and September, the beta releases come out. These are much more stable and can be fun to install to see what’s coming up in the forthcoming edition. So, bearing all my prior warnings in mind, if you still want to go ahead and check for an alpha or beta test, you can open up the Terminal and enter the following command:
sudo update-manager -dAfter entering your password, the Update Manager will load, and if there are new versions or an alpha or a beta test, a button will appear offering the opportunity to upgrade to it. It will also tell you what type of upgrade is being offered (whether it’s a full release, alpha, or beta), so you can decide whether or not to go ahead.
But remember that there’s no easy way to go back if you proceed with an upgrade at this point. Anyone willing to run alpha or beta software should also be comfortable with completely restoring a system from a backup.
Note
ISO images for clean installs of the latest development versions of Ubuntu can always be downloaded from http://iso.qa.ubuntu.com.
System Security
On the security side, because it was built from the ground up as a multiuser operating system, Ubuntu suffers far less from virus attacks, but they still must be guarded against. You also need to lock your computer against intrusion, whether via the Internet or from physical access to your hardware.
Passwords
Passwords are one of the most important parts of securing any computer. Unfortunately, most people don’t realize how easy it is these days for attackers to crack passwords based on dictionary words. In fact, even combinations of letters and numbers can be broken.
For example, one common way to save a password is to store it as a hash, which is a string of hexadecimal numbers derived from the original but which cannot be used to determine the password it came from—at least not in any practical timescale using current technology.
However, cunning hackers have spent years building huge databases of hashes for every password combination they can compute. These databases contain millions of combinations, so just imagine trying to think of an original combination of letters and numbers that won’t be in such a database. It would have to be quite long (probably in excess of 20 characters) to stand a chance of being unique.
So, not only can hackers send repeated guesses to a password prompt by running through their dictionaries of passwords, whenever they manage to compromise a weakly protected computer, they can gain access to the password files and also try hash dictionaries against those.
For these and other reasons, your best bet for securing a computer is to create a password based on a combination of the following, all of which should be used:
Uppercase letters
Lowercase letters
Digits
Punctuation
At the same time, you need to be able to remember your password, so you can’t just use a random string of characters, or you’ll have to write it down—which is also a security risk. So the following three examples illustrate some passwords that are memorable but likely to remain unguessable and unique:
{+}JaMeS0311MaRy0704{+}This makes use of a repeated string of punctuation, surrounding the main password, which is built up using the names and birthdays of two people, but with alternating upper- and lowercase letters.
disney112008LAND!!!!This uses a vacation destination split into two words, one upper- and one lowercase, separated by the month and year of the vacation, and followed by four exclamation marks because it was a great time.
kanye--TAYLOR++WEST--swift++Here, I have mixed up two musicians’ names and kept the password memorable because the two inner words are uppercase and the two outer are lowercase, while the names of one artist are followed by pairs of dashes and those of the other by pairs of plus signs.
Obviously, don’t use these exact passwords or methods, because some cracker has already read them and added them to a database. Instead, spend a minute to be creative and make up your own. You should also think about changing your password from time to time, just in case.
Root Access
As I have mentioned a few times, there is one user that can access any and all files and programs, regardless of their file permissions and settings: the root user, or super user. On many operating systems, people who know the password can log into this account and use it to access any other user account. But this creates a huge security risk because absolutely any file can be accessed or deleted, and in the wrong hands such an account could be devastating.
Therefore, the developers of Ubuntu took the decision to disable the root account by default and allow access to it only one command at a time using the sudo command, which is covered in Chapter 7.
But you must remember that once a sudo command has been issued and you have provided your password, for the next 15 minutes your password will not be requested. So if you leave your computer unlocked for any reason during this time, someone else could come in and use your root access to create a new account or perform other mischief.
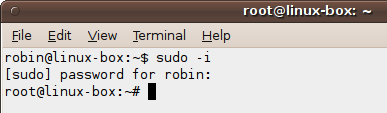
Also, if you ever use the sudo
-i command to drop into a shell running as the root user, you
must remember to exit from the shell before you leave your computer.
Better still, don’t use that particular option. Luckily, when you are in
a root shell the command prompt will inform you by changing from
user@ to root@, as shown in Figure 9-18.
Physical Access
While the developers of Ubuntu have made every attempt to securely isolate physically local users of a shared computer from one another, the standard Ubuntu installation is not intended to block an attacker with physical access.
In other words, a default Ubuntu installation is extremely secure when connected to via a network or the Internet. But Ubuntu is also a very user-friendly operating system, so the root user doesn’t have a password by default.
This means that someone can walk up to your system, reboot it into a safe or recovery mode (which are provided to debug serious system problems), and log in as the root user without a password. Therefore, if local security is important, I strongly recommend that you issue the following command to give the root user its own password:
sudo passwd rootYou will then be prompted (twice) to “Enter a new UNIX password.” Do so and make sure you remember the password you enter. Once a root password has been set, the safe and recovery modes will require the new password before proceeding.
To further increase security, you may also wish to look into setting your BIOS password to prevent someone forcing a boot up using a different device from the internal hard disk, and then copying or changing data on the main hard disk. However, details on changing the BIOS password are beyond the scope of this book, so please refer to the documentation that came with your computer.
Another good security measure is to use hard drive encryption so that even if someone gains access to your hard disk, they still won’t be able to read it. This is also an advanced topic that I don’t have enough room to cover in this book, but you can get further details from the following URL on the official Ubuntu website:
| https://help.ubuntu.com/community/EncryptedFilesystemHowto |
Firewall
It’s a fact of life that most computers with Internet connections are probed daily by hoards of automated systems searching for exploitable weaknesses. Ideally, your computer will already be using a firewall, either at work or behind a home ADSL or cable router. Check the manual that came with your router or access point to see whether you have a firewall and, if so, how to change its settings to, for example, allow certain programs such as Skype or BitTorrent access through it.
Also, by default Ubuntu comes with no open ports on public interfaces, so port scans will only show closed ports.
Note
A port is just a number used to indicate connection to a particular service, such as the Web or email, but you can consider it as if it were a phone socket. Disconnecting a port is therefore like unplugging a phone plug from a phone socket—no signal can get through to your browser, email program, or whatever service uses the port.
This theoretically means that you don’t actually need a firewall. However, if you should unintentionally install a server program that opened up a port, your computer could be compromised. Therefore, by installing a firewall, you can have the peace of mind of knowing that you are in ultimate control over your computer’s ports, because the firewall will override any other installed program.
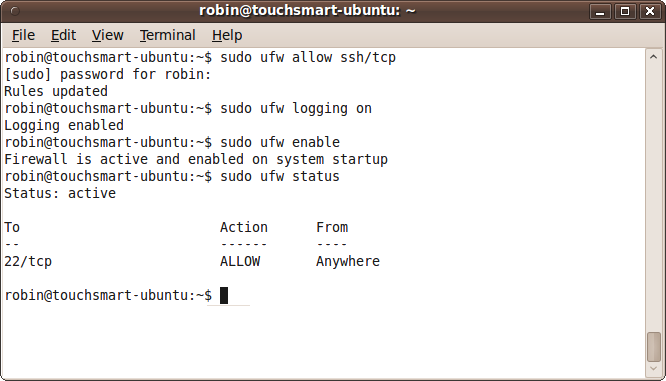
There’s lots to learn when managing firewalls, but to at least get you up and running, you can enter the following sequence of commands into the Terminal to create a basic level of additional security:
sudo ufw allow ssh/tcp
sudo ufw logging on
sudo ufw enable
sudo ufw status
The result of issuing these commands should look like Figure 9-19, in which I have enabled the firewall on my touchsmart-ubuntu computer. Now all incoming connections are definitely denied, but all outgoing ones are allowed. A facility called state tracking lets in the responses to my outgoing connections, such as the web pages that my browser asks for, but a malicious intruder trying to exploit a bug in the browser cannot establish a new incoming connection.
For further details on using the firewall, including opening and closing individual ports, I recommend you visit the following URL:
| https://wiki.ubuntu.com/UncomplicatedFirewall |
Use Reliable Sources
Where possible, you should try to install software only via the
Synaptic utility, the Ubuntu Software Center, or the
apt-get program, all described in Chapter 8. That way at least you’ll
know that a program has been checked by the community and considered
worthy of inclusion.
But of course, not all software will be in these repositories, especially new programs that have yet to be evaluated, so sometimes you have no alternative other than to install software using instructions supplied by the developer. In such cases, I recommend you perform a couple of quick search engine checks on the program’s filename, and perhaps also the developer’s name, just to ensure there are no reports of problems associated with the software.
Don’t Use Untrusted Commands
If you ask for advice or read the answer to someone else’s question in an Internet forum, and you now have one or more commands to type in, make sure that they are not dangerous.
For example, any command with rm in it will try to remove something from
your filesystem. Likewise, mv
commands will copy or move files and folders, possibly overwriting
important ones, and so will commands that use the > symbol to redirect output.
In other words, use your common sense before arbitrarily typing in
commands, just in case a hacker is trying to get you to compromise your
computer, or a malicious person is trying to corrupt it. Above all, use
the -r and -f arguments in conjunction with the rm command (they often appear as rm -rf) with the absolute utmost
caution—together they could erase your entire filesystem.
Updating
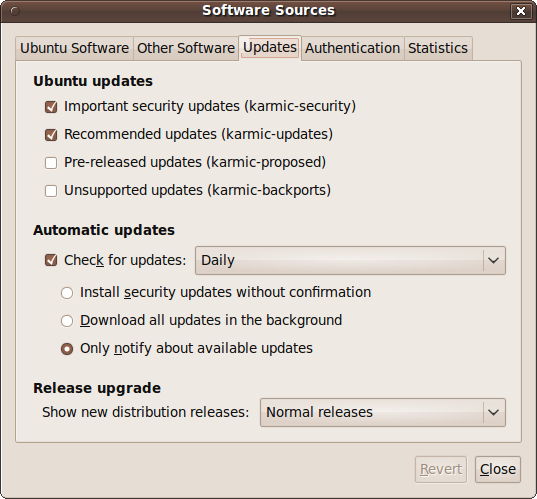
Keeping your computer up-to-date is another important security measure you should get into the habit of taking. Not only will you ensure that you have all the latest features, you’ll also be updating to the latest security measures.
The best way to do this is to call up the Update Manager, click the Settings button, and ensure that updates are checked for daily, as shown in Figure 9-20.
Viruses and Malware
Because the Linux desktop market is still quite small, and also because it is very secure, there are very few reports of viruses and other malware for it. Still, that doesn’t mean you can relax your vigilance. Linux is growing in popularity, and hackers are bound to spend more time trying to hack it in the future.
You’ll gain the most protection from malware just by sticking to repository software. But for extra protection, you may wish to install ClamTk, a graphical frontend for the ClamAV antivirus program.
You may also want to consider rkhunter and chkrootkit for detecting rootkits that try to take over your PC at its core, although, yet again, there have not been many reported instances of rootkits for Linux to date.
To install any or all of these programs, call up the Synaptic Package Manager and enter their names into the “Quick search” field. If you like, you can enter all three names at once, separated by spaces, and the results returned will be related to these items (see Figure 9-21).
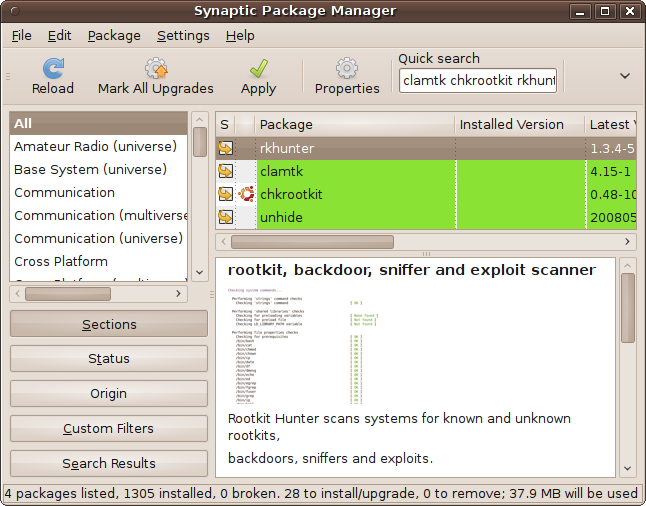
You can then click each of the accompanying checkboxes in turn and mark them for installation, along with other programs they depend on. When finished, click the Apply button to perform the installation. The required files will then be downloaded and installed.
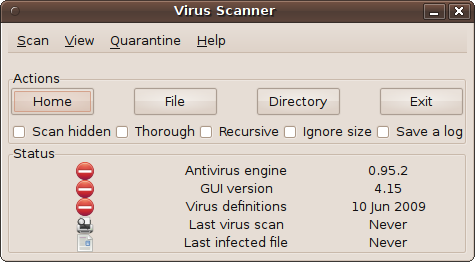
You can now select Applications → System Tools → Virus Scanner to open up the program shown in Figure 9-22, with which you can scan for and fix viruses found on your computer. Numerous options are available, but you can just click the Home button to scan your home folder. For a much longer but more thorough scan, check the Recursive checkbox, click the Directory button, and select File System to scan the entire filesystem.
Browsers and Email Clients
I sometimes worry that Linux users may be a little too complacent about the robustness of their operating system so that should an exploit be discovered and a virus spread, they will be less prepared than Windows users to deal with it.
Fortunately, browser exploits and email attachment malware mostly affect Windows users, and therefore the programs they try to install on a Linux computer will fail. But you must still be cautious about what you download, as you never know whether someone will succeed in writing a malicious program that exploits Ubuntu and other versions of Linux.
Generally, this means you should keep your browser updated so that it is aware of potential attack sites, and don’t trust email attachments or web pages that are sent to you from people you don’t know. In fact, don’t trust them period, until you are sure they are safe to use. One technique that reduces your risk (although it doesn’t eliminate it) is to save the attachments and run the virus checker over them before opening them.
Wine
Let’s face it, there is some very good software out there that hasn’t made its way onto the Ubuntu or any Linux operating system. Even the OpenOffice.org suite, which is mostly compatible with Microsoft Word and other Office programs, doesn’t entirely substitute for them in everyday use. “Mostly” is the key word here. Often you’ll find that files get corrupted or display and print differently when transferred from one program to another. Therefore, the Wine Windows application interface is especially handy, as it can run a huge variety of Windows-only programs, including Word and other Office programs.
But this compatibility brings with it a security risk. True, it’s not as great a risk as running Windows itself, particularly as long as you don’t run Wine as root. But nevertheless, a risk exists, so all the preceding cautions should apply doubly whenever you run a Windows program using Wine. For further details on using Wine, please refer to Chapter 16.
Summary
This chapter discussed some of the best ways to keep your computer current and secure, but you should always remember that both maintenance and security are ever-evolving issues that you need to keep on top of.
Therefore, every time you upgrade your Ubuntu installation to a new version, which will generally be every six months (unless you are intentionally staying with a particular release), you should make a note of any new programs or features for properly maintaining and securing your computer.
You can also join one or more of the Ubuntu mailing lists to keep yourself informed. There are actually a couple of hundred lists available at http://lists.ubuntu.com, but don’t be put off by that number. Unless you need very specific information, you’ll probably only want to join one or two of the following lists:
- Ubuntu Announcements
- Ubuntu News
- Ubuntu Security Announcements
http://lists.ubuntu.com/mailman/listinfo/ubuntu-security-announce
- Ubuntu Users
- Kubuntu Users
- Xubuntu Users
- Edubuntu Users
- Ubuntu Studio Users
http://lists.ubuntu.com/mailman/listinfo/Ubuntu-Studio-users
Now that you know how to keep your computer secure, in the next chapter, I’ll explain how to network your computer with others for file sharing and remote access over local networks and the Internet.