Table of Contents for
Ubuntu: Up and Running
 Ubuntu: Up and Running
Published by
O'Reilly Media, Inc., 2010
Ubuntu: Up and Running
Published by
O'Reilly Media, Inc., 2010
- Cover
- Ubuntu: Up and Running
- Ubuntu: Up and Running
- Dedication
- Foreword
- Preface
- 1. About Ubuntu
- 2. Installing and Upgrading Ubuntu
- 3. Configuring
- 4. The Desktop: Accessing Applications and Features
- 5. The Filesystem, File Attributes, and Permissions
- 6. The Nautilus File Browser
- 7. The Command Line
- 8. Installing and Removing Software
- 9. System Maintenance and Security
- 10. Networking Ubuntu
- 11. The Internet
- 12. Using OpenOffice.org
- 13. Playing Games
- 14. Pictures, Sound, and Video
- 15. Other Ubuntu Distributions
- 16. Using Wine
- Index
- About the Author
- Colophon
- Copyright
Chapter 2. Installing and Upgrading Ubuntu
In this chapter, we’ll take a look at the companion DVD for this book, which is attached to the inside back cover, and I’ll also show readers without access to the DVD how to get the same software by downloading and burning ISO disc images.
Unlike most program discs you may have used, this DVD is unusual in that you don’t actually have to install anything if you don’t wish to, because it’s been set up as a Live DVD.
This means that the DVD itself is a fully working installation of Ubuntu 9.10 that will run from the disc without the need to install anything. Therefore you can test Ubuntu to ensure it will work properly on your computer before installing it. It achieves this trick by creating a RAM disc out of system memory, which it then treats as if it were the hard disk.
The disc also contains the installer for Ubuntu 9.10 desktop edition and a set of ISO files for several of the other popular editions of Ubuntu, such as Kubuntu and Xubuntu. This chapter shows you how to use and install these files.
Note
To access the disc, you must have a DVD-compatible optical drive. If you don’t, you cannot use the disc and should refer to the section Downloading a Distribution.
The Live DVD
The great thing about the Live DVD system is that you can insert the disc into most PCs and run Ubuntu without installing anything. Once you’ve verified that all is in order, you can then choose to install Ubuntu, either as the only operating system or as an additional OS (alongside Microsoft Windows, for example). Or you can simply run the Live DVD if you choose.
The downside of running from the Live DVD is that it is much slower than a hard disk installation because DVD drives are not as fast. Also, because the operating system exists only in RAM, any settings you make or documents you save locally will be lost when you close a session (although there are techniques you can use to keep session data on a USB drive, explained at https://help.ubuntu.com/community/LiveCD/Persistence). But I recommend you perform a full installation as soon as you’re ready. First, however, let’s look at simply running Ubuntu from the disc.
To do this, you should ensure that your BIOS settings allow booting from your CD/DVD drive. Systems usually do this by default. If not, the manual that came with your PC will have advice on how to change it. Sometimes you can simply watch the messages that come up on your screen as you boot your system, and they will tell you how to enter BIOS and change your boot settings by pressing a certain key combination.
Note
The DVD will work on an Intel Macintosh computer, but you will need to force it to boot from the DVD by either setting the System Preference for the startup disk, or shutting down and turning off your Mac and then holding down the C key while you turn it on again.
Now insert the disc into your drive and restart your computer. You should be presented with the screen shown in Figure 2-1.
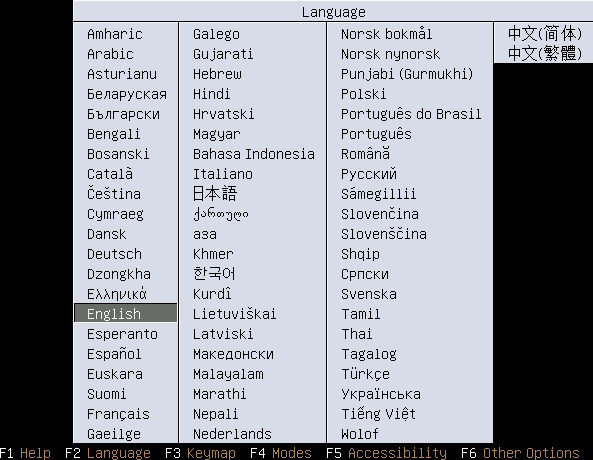
This is where you select the language that should be used for the Live DVD (or during installation if you select that option). Only the main language type is required. For example, as long as English is your native language, go ahead and select it, regardless of which country you are in. Don’t worry about local differences such as keyboard layout. In the next section you’ll see how you can further tailor the language to your locale.
So either select the language of your choice or, if you wait 30 seconds, English will be chosen by default. Upon selection, the screen shown in Figure 2-2 will appear.
The Main Menu
From here, you have five main choices and a range of options selectable via the function keys. The choices are:
- Try Ubuntu without any change to your computer
As it sounds, this choice launches Ubuntu ready for you to use. It then runs from the DVD without modifying your computer’s hard disk.
- Install Ubuntu
Select this choice when you wish to install Ubuntu on your computer.
- Check disc for defects
If you are experiencing problems with the DVD and suspect it may be faulty, you can test it using this choice.
- Test memory
Using this choice, you can check that all your computer’s memory is in working order.
- Boot from first hard disk
You will most likely use this choice if you accidentally leave the DVD in your hard drive during a reboot but actually intended to run the operating system installed on your hard drive. With this choice you can quit from the DVD and commence a regular boot from your hard disk.
The Function Key Options
Using these options, you can set up various features before selecting one of the main five menu choices. Most of these options either let you revisit options that were presented to you already or provide workarounds for unusual situations advanced users face, so I’ll just point you in the right direction and let you investigate further if necessary.
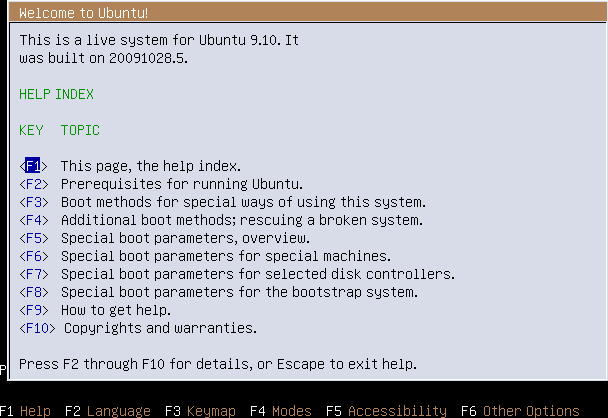
- F1 Help
This brings up a comprehensive help system, the top screen for which is shown in Figure 2-3. From within the help system, you use the function keys shown to select different sections, which you can scroll through with the cursor keys. To exit, press the Esc key.
- F2 Language
This option redisplays the language selection menu shown in Figure 2-1.
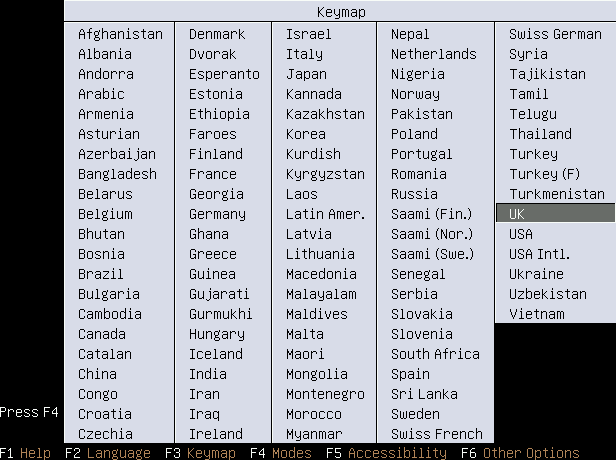
- F3 Keymap
This option is where you can tell Ubuntu about the country in which you live, and therefore which keyboard type you are using, as shown in Figure 2-4.
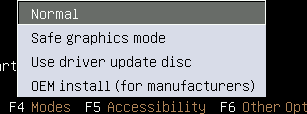
- F4 Modes
With this option you can tell Ubuntu the graphic mode to use, as shown in Figure 2-5. Normally you should leave the default selected unless you experience problems, in which case try the Safe graphics mode. You are unlikely to need either of the remaining two options.
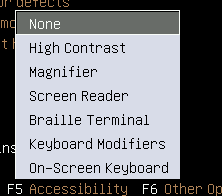
- F5 Accessibility
This option provides a number of assistive features such as high contrast, a magnifier, use of a screen reader or Braille terminal, and more. You can see the options available in Figure 2-6.
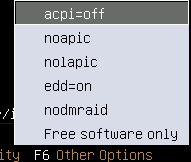
- F6 Other Options
You are extremely unlikely to need this option, which provides a range of different parameters for booting Ubuntu, as shown in Figure 2-7. If you are curious, the help system provides more information on what they do. Purists who do not want to run any proprietary software at all, such as binary device drivers, may wish to select the “Free software only” option.
Starting the Live DVD
Select the first choice from the menu, “Try Ubuntu without any change to your computer,” to start loading the operating system. When you do this, the screen will show a small Ubuntu logo in white, followed by a large, animated version.
In between you may see some text scroll by, but you can generally ignore this, even if you see what look like warning messages, as they usually are just generated when the operating system checks your PC for certain types of nonessential hardware and does not find them.
After that, a small, animated disc will appear while Ubuntu loads the operating system drivers and other files into memory. Then, you’ll see the screen shown in Figure 2-8, which is the Ubuntu desktop.
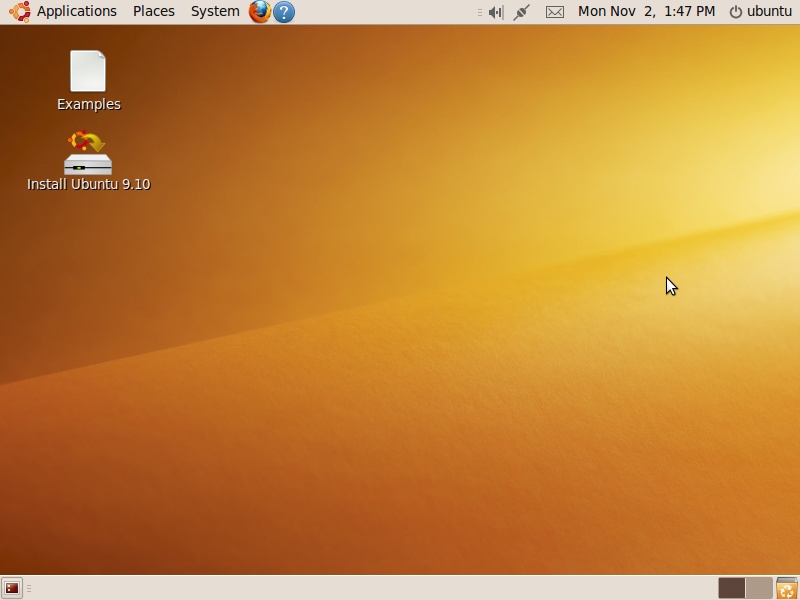
The various parts of the desktop are explained in the following chapters, but you may want to double-click the Examples icon to bring up a folder of examples and readme files that are worth browsing through (see Figure 2-9).
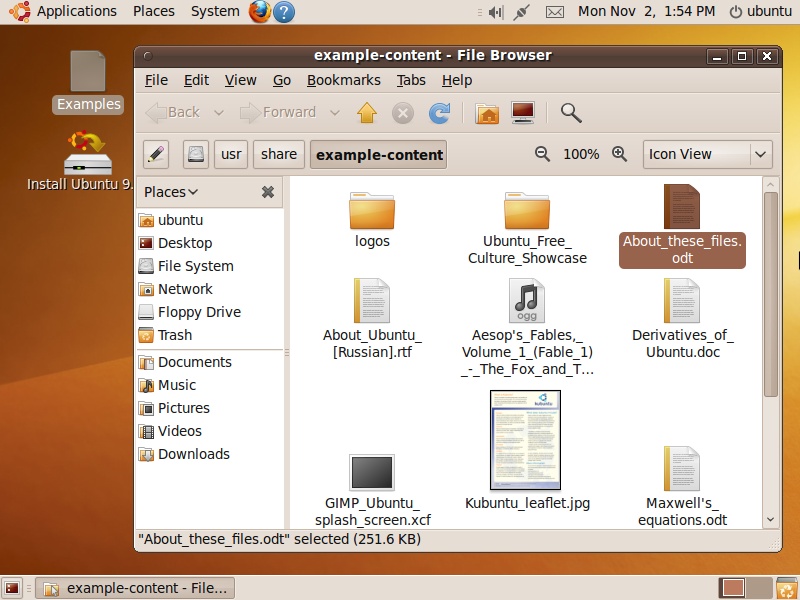
For example, the file Welcome_to_Ubuntu.odt is a document that you can double-click to view, as shown in Figure 2-10. You can safely open all the files in this folder and its subfolders by double-clicking them. These include documents, spreadsheets, images, music, presentations, and more.
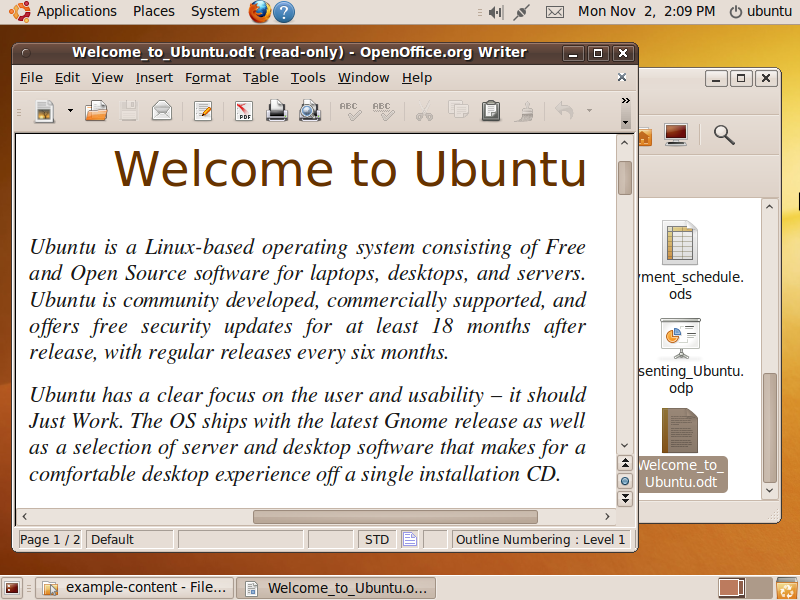
By opening a range of files from the Examples folder, you’ll also be able to ensure that Ubuntu works properly on your computer, including whether your audio is functioning.
To determine whether your networking is operational, check for an icon in the top panel that looks like two plugs connecting together. If instead you see an icon that looks like the “no signal” symbol on mobile phones (an antenna next to five dots), your networking is not currently working. Try right-clicking that icon and then ensure that the Enable Networking checkbox is checked. If it is and you have an Ethernet cable connected, the symbol showing two plugs should appear. If not, left-click the symbol and select “Auto eth0” to enable your networking card.
If you have a wireless networking card and it isn’t shown when you left-click that icon, you will need to establish a wired Ethernet connection in order to search for and locate a suitable driver. Details on how to do this are in Chapter 3.
Note
A long as you can connect via Ethernet and your mouse, keyboard, monitor, sound card, and other peripherals work using the Live DVD, installing Ubuntu shouldn’t present any problems. But as a newcomer to Ubuntu, you may want to install it alongside your computer’s original operating system until the time comes that you find you can do everything you need with it, and are prepared to delete your original OS to reclaim the space it uses.
Alternative Editions
The DVD supplied with this book also contains a number of other Ubuntu editions that are saved as ISO files—representations of an entire CD-ROM that can be easily transferred across networks and the Internet. They will take up an entire CD when copied, and can also be opened and treated like optical discs if you have the right software.
Warning
Although the installation procedures for other varieties of Ubuntu are similar, they are not identical to the directions in this chapter for installing the standard desktop edition. In fact, there are so many distros that there’s simply not enough room in this book to detail the installation process for each. Therefore, when installing an alternative edition, you should keep your eyes open, carefully read all the prompts and information provided during the process, and use your common sense when making choices and entering information.
The ISO files are located in the distros folder and are detailed in Table 2-1.
Filename | MD5 hash | Distribution |
ubuntu-9.10-desktop-i386.iso |
| Ubuntu: the main release that uses the GNOME desktop |
kubuntu-9.10-desktop-i386.iso |
| Kubuntu: the version of Ubuntu that uses the KDE desktop in place of GNOME |
xubuntu-9.10-desktop-i386.iso |
| Xubuntu: the version of Ubuntu that uses the Xfce desktop in place of GNOME |
mythbuntu-9.10-desktop-i386.iso |
| Mythbuntu: a version of Ubuntu configured to act as a standalone Myth TV Personal Video Recorder |
ubuntu-9.10-netbook-remix-i386.iso |
| Ubuntu Netbook Remix: a version of Ubuntu enhanced specifically for running on Netbook PCs |
About the MD5 Hashes
In order for you to verify that the ISO files are uncorrupted, Table 2-1 also contains the MD5 hash values for each one. These are unique strings that will be quite different if even one single byte of an ISO file is changed, compared to the original file.
To check the files using Windows, you can download a utility such as winMD5sum from http://www.nullriver.com/index/products/winmd5sum. After installation, you can compare a file’s hash value against the string value for the original ISO shown in Table 2-1. If the values are the same, you can be sure that the file is an exact copy of the original.
On Mac OS X, you can use the Disk Utility program, located in the Utilities folder, by dragging an ISO file to Disk Utility’s dock icon. Then select the ISO file and go to the Images menu, where you should select Checksum → MD5.
If you wish to install any of these alternative distros, you can do so either by using a virtualization program such as VirtualBox (see the section Virtual Installation) or by burning them to CD or DVD and performing a full installation (see the section Full Installation).
Downloading a Distribution
If you are reading an electronic version of this book, you won’t have access to the DVD and will need to download the ISO image file that you want to install. This will also be the case if the edition you need isn’t on the DVD.
In either case, Table 2-2 lists the main URLs for downloading the various ISO distributions.
Distribution | URL |
Edubuntu | |
Eeebuntu | |
Kubuntu | |
Mythbuntu | |
Ubuntu | |
Ubuntu MID Edition | |
Ubuntu Netbook Edition | |
Ubuntu on ARM | |
Ubuntu Server | |
Ubuntu Studio | |
Xubuntu |
You can also access all past and present releases (since version 6.06) at http://releases.ubuntu.com.
Note
In case you’re wondering, the MID edition is a version of Ubuntu specially tailored for use on very small PCs. It uses a different desktop and icon layout that is more suitable for the small screen size. Netbook Remix (renamed to Netbook Edition beginning with version 10.04) is a version created to run well on Netbooks such as the Eee PC range, which also has its own edition. And the ARM version is for use on ARM processor technology. None of these is covered in this book, so you will need to refer to their internal and online documentation. However, there are more details on the other versions in Chapter 15.
If you wish to try out either Kubuntu or Xubuntu in particular, Chapter 15 shows how you can easily add either (or both) onto a standard Ubuntu desktop installation with a few simple commands, which can save you a lot of time compared with installing them separately. You will then be able to choose between the different distributions when you log in.
Once you’ve downloaded the ISO file you need, you should burn it to a disc (see the following section) or perform a virtual installation from the ISO file (see the section Virtual Installation).
Burning a CD or DVD
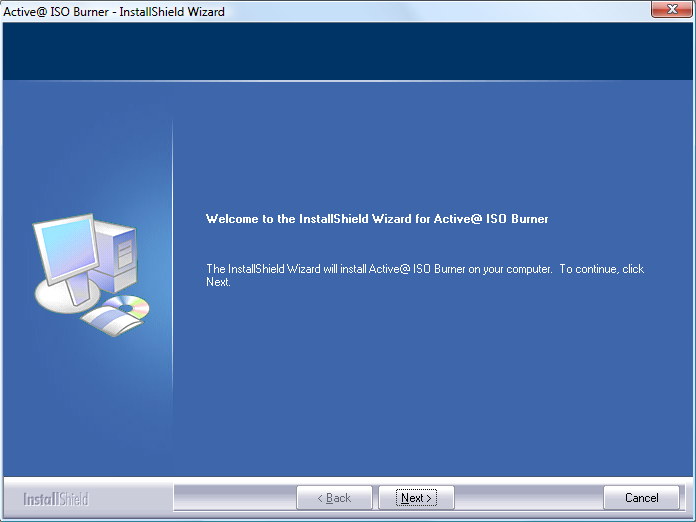
If you are using Windows and don’t already have a CD/DVD-burning utility, the distros folder contains the subfolder Active ISO Burner, which contains a program for installing Active ISO Burner, a utility for burning ISO files to CD or DVD. Mac OS X and Ubuntu users have solutions already built in.
Warning
If you intend to use the Wubi installer (see “Installing Ubuntu Under Windows” on page 36), you must burn the ISO file to CD, as the program functions only with CDs and ISO files and doesn’t support DVDs.
Using Active ISO Burner for Windows
Locate the Active ISO Burner folder within the distros folder of the DVD, and then double-click the file within it called IsoBurner-Setup.exe to commence installation. After clicking the Next button on the initial welcome screen (see Figure 2-11), you’ll be shown the License screen. Click to accept the agreement, and then click Next.
On the third screen, you are given a choice between a Complete and Custom setup. I recommend you select Complete and then click Next, and then click Install on the screen that follows. A progress bar will then appear.
After the program completes installation, you can click Finish and the program will launch, presenting a screen such as the one shown in Figure 2-12.
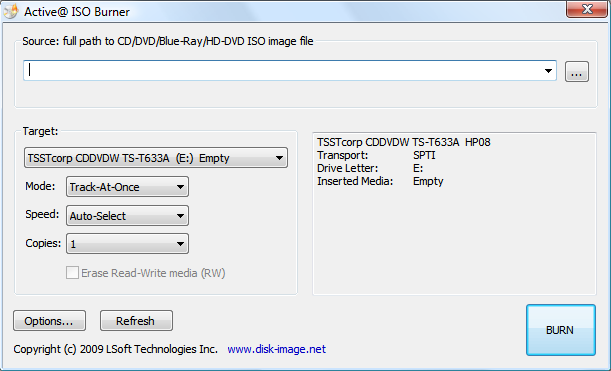
To burn one of the ISO files to disc, click the Browse button at the top right to select it. Then make sure that the correct optical drive is shown under the Target heading and that you have inserted a blank disc.
You can also choose the speed at which to write within a range between 1 and 24 times (if your drive can handle it). I recommend using Auto-Select to let the program choose an optimum speed.
All that’s left is to decide how many copies you need and then to click the BURN button.
Burning an ISO Image Using OS X
To burn an ISO image to disc using OS X, simply select Applications → Utilities → Disk Utility. Then go to Images → Burn and locate the ISO file.
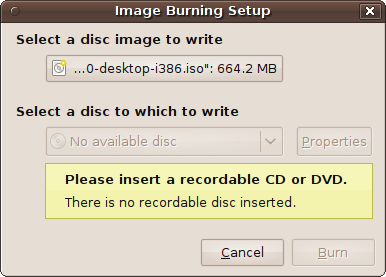
Burning an ISO Image Using Ubuntu
With Ubuntu, burning an ISO file to disc is as easy as right-clicking it, selecting Open with Brasero, inserting a blank disc, and then clicking Burn, as shown in Figure 2-13.
Burning to a Thumb Drive
You can also burn an ISO image to a USB thumb drive in Ubuntu by selecting System → Administration → USB Startup Disk Creator. Just ensure that the memory capacity of the USB device is equal to or greater than the ISO image size. When the utility’s window opens, select the ISO image as the source and the USB device for the destination, and then click Make Startup Disk.
You can then use the USB drive as if it were a Live CD, by inserting it into a target computer that is configured so it is able to boot from such a device. This is the perfect way to try out Ubuntu or install it on a laptop without an optical drive. You can also use the USB drive as a handy, portable Ubuntu environment that lets you boot up on any computer that you are allowed to access.
Virtual Installation
One of the easiest ways to install Ubuntu alongside another operating system, or even another installation of Ubuntu, is to use virtualization software. This is a technology that creates a virtual PC that, to the operating system being installed, looks exactly like a physical PC.
You can create virtual hard drives and CD-ROM drives, as well as specify the amount of RAM to provide, among various other configuration options. There are a number of products that offer this technology. The following sections outline just a few.
Microsoft Virtual PC
I generally don’t recommend Microsoft’s Virtual PC for virtualizing Ubuntu, as it is supported only on Windows XP Professional and Tablet PC, Windows Vista Business, Enterprise and Ultimate, or Windows 7. Users of operating systems such as XP Home or Vista Home Premium are left out.
That said, I have had a modicum of success with it, even when the installer warns that it may not work, so you might find that it runs adequately for you. However, if you choose to use it, I apologize in advance that you’ll have to figure out on your own any Ubuntu customization issues whose configuration lies outside of Ubuntu and must be performed in Virtual PC.
VMware
VMware comprises a set of powerful virtualization systems that will run on Linux and Max OS X, as well as most Windows platforms. It’s a proprietary system, but one version (VMware Player) is available for download free of charge. It’s quite popular and meets many people’s needs. Its cousin, VMware Workstation, which is not free, offers even more.
Please refer to the documentation supplied with the VMware software if you are using it to run Ubuntu and need to perform any customizations that cannot be made within Ubuntu itself. The only task most people need to do with VMware desktop virtualization is find the version of Ubuntu (or other operating systems) appropriate for them and install it. VMware offers a number of preconfigured “appliances” that you can download.
Sun VirtualBox
This is far and away my favorite virtualization system. It’s open source, is available for Windows, OS X, Ubuntu, and Solaris, and is the most robust yet easy to use system I have seen. Even better, it’s free of charge for personal and academic use.
There are two ways you can use VirtualBox to install or run a Live CD or DVD: insert a physical disc into the drive, or provide an ISO image file.
So let’s look at using the DVD supplied with this book from within VirtualBox. Once you’ve seen how it works, you’ll be able to do the same with any other Ubuntu edition.
Getting started
The first thing to do is visit http://www.virtualbox.org and download the program using the Downloads link, located in the lefthand panel of the web page. Then, choose the version to download from the choices of Windows, Intel Macs, Linux, or Solaris. For example, as I write this, the Windows version is 3.1.4 and is 71 MB in size.
Once you have downloaded the file, you should run it to bring up the installer, as shown in Figure 2-14.
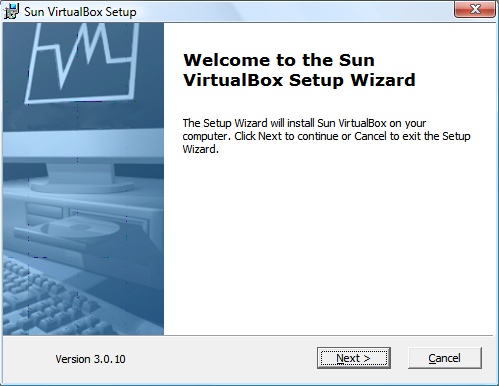
Click Next, and then agree to the license before clicking Next again. After that you can choose the support and networking features you want. If in doubt, just click Next to continue using the defaults. Then click Next one more time, followed by clicking Yes and then Install to start the installation.
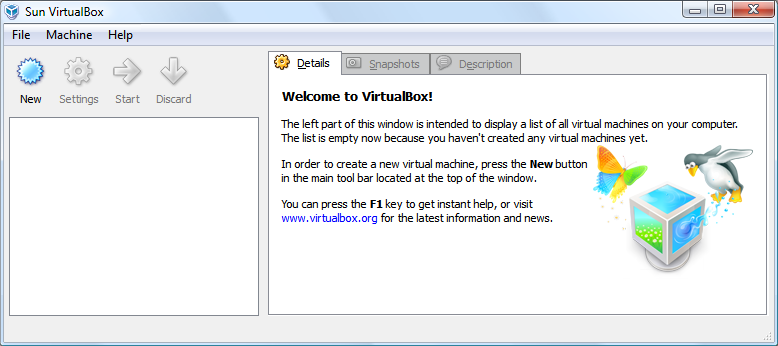
A window with a progress bar will appear to keep you up-to-date on the installation. When finished, click the Finish button. After that, the program will run, presenting the window shown in Figure 2-15.
Warning
When you run VirtualBox, a registration window may also pop up asking you to create and/or enter a Sun account, but sometimes the Sun registration server doesn’t appear to work correctly. Don’t worry if you can’t create a new Sun account when requested. Just close the registration window, and you can proceed with using VirtualBox without registering.
Creating a virtual machine
You are now ready to create a virtual machine, so click the New icon at the top left. Then, when the New Virtual Machine Wizard window opens, click Next to bring up the window shown in Figure 2-16.
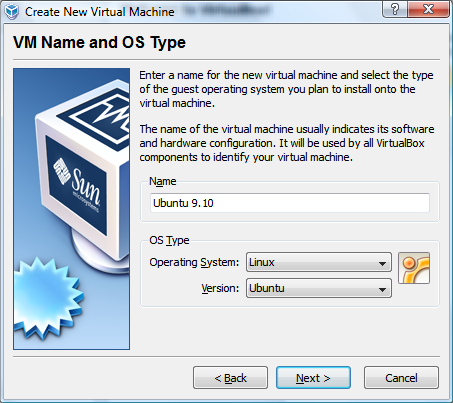
For name, enter the name of the operating system, such as Ubuntu 9.10, and then select Linux for the operating system. The version of Linux will then default to Ubuntu, which is what you want, so click Next to get to the Memory screen (see Figure 2-17).
I recommend you accept the default of 384 MB shown here. However, if you have plenty of memory (say, 2 GB or more), you could increase that to 1000 MB or thereabouts. Then click Next to move on to the hard disk screen shown in Figure 2-18.
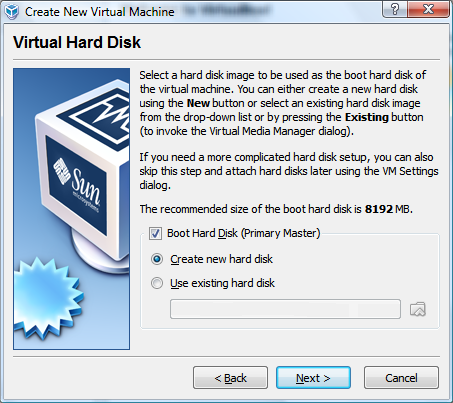
Ensure that “Boot Hard Disk” and “Create new hard disk” are both checked, and then click Next, then Next again on the following screen, to get to the Hard Disk Storage Type screen (see Figure 2-19).

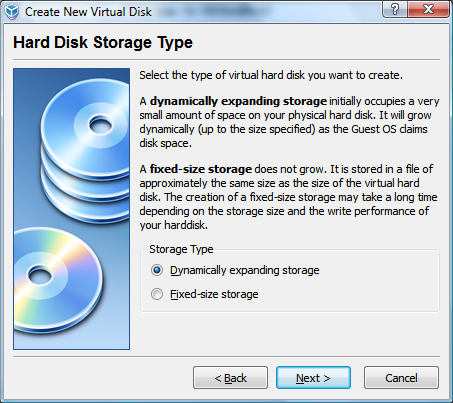
Here, I recommended you select the “Dynamically expanding storage” option, and then click Next. The reason for this is that you don’t actually need to create a large hard disk in VirtualBox, because it has the ability to increase a hard disk’s size as necessary. The only downside to this is that the upper limit to how large it can grow is your physical hard disk’s size. If you think you will be using a lot of disk space in your virtual machine and this may impinge on the space you need for your original operating system, you may wish to choose “Fixed-size storage” instead. This will ensure that the virtual hard disk will never grow any larger than a set size.
On the next screen (see Figure 2-20), you get to choose the virtual hard disk’s starting size (or exact size if you chose “Fixed-size storage”).
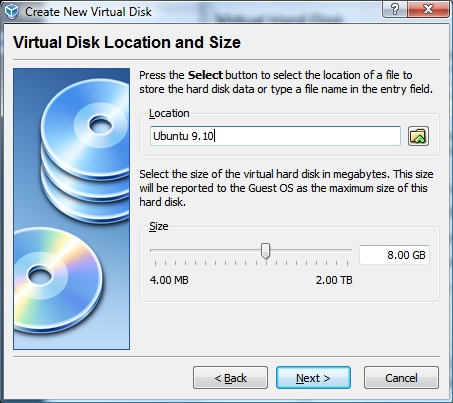
Here, you can also choose the location and filename for this disc, which by default will have the same name as the virtual machine. Click Next when you are done, and then click Finish to complete the creation of the virtual hard disk. If you enter a location and filename that is already in use, you will receive an error message and should enter a different one instead.
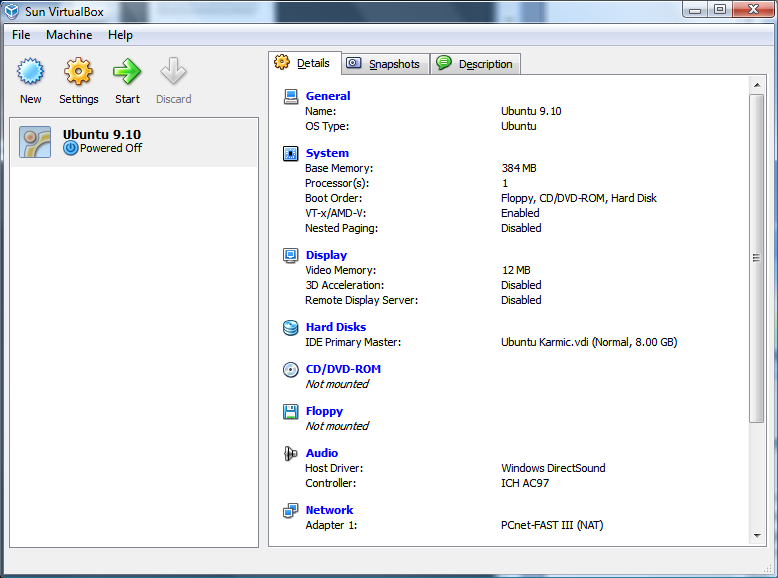
Otherwise, click the Finish button that will be displayed on the summary screen that appears. Your virtual machine will now be created and ready to use (but powered off), as shown in Figure 2-21.
Running a virtual machine
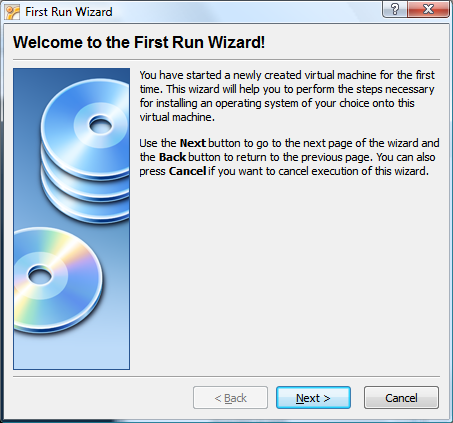
To start up your new virtual machine, double-click its icon in the lefthand pane. The first time you do this, it will call up the First Run Wizard (see Figure 2-22).
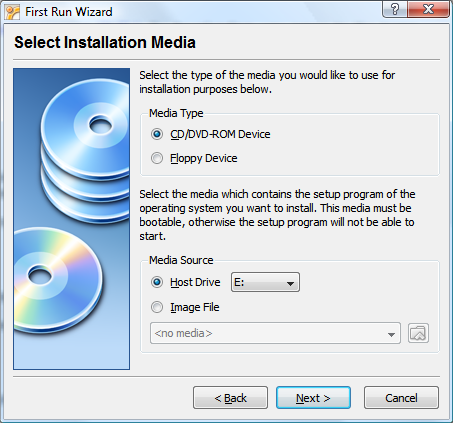
Click the Next button to start the wizard and bring up the screen shown in Figure 2-23, where you have the opportunity to choose to install an operating system on the virtual machine from either the optical drive or an ISO file.
If you click Next at this point (while Host Drive is selected), the CD or DVD in the drive will be used as the installation media.
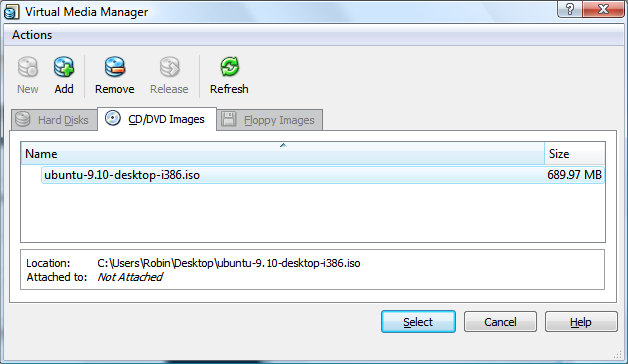
Alternatively, you can choose an ISO file to boot from by selecting the Image File option. You must then click the Browse button, locate the required file, and click the Add button at the top left of the next screen (see Figure 2-24).
Here, you can see I have added the image file ubuntu-9.10-desktop-i386.iso. Once you have added an ISO file, click the Select button to return to the previous media selection screen, and then click Next, followed by Finish to commence the installation process.
The familiar Ubuntu startup screen shown earlier in Figure 2-1 will then be displayed, waiting for you to select a language.
From here onward, you can consider the new “machine” to be a complete PC in its own right, and you can either run the ISO or disc in Live mode or go right ahead and install the operating system. I recommend the latter because you can then power up the virtual machine any time you like and start up where you left off work before.
There’s more information on using VirtualBox in Chapter 3.
Other Virtualizers
Of course, there are other virtualizers available, such as the free Bochs and QEMU systems. If one of these is your preferred choice, go ahead and use it; running software that you already know is usually preferable when you have a lot of new things to learn. However, you may need to refer to the supplied documentation or use a search engine if you encounter any difficulties.
Full Installation
There are three main types of full installation you can make (other than via a virtualizer):
As the sole operating system, taking over all hard disk partitions
As part of a dual- or multi-boot setup with its own hard disk partition
Using the Wubi program to run Ubuntu from within a Microsoft Windows virtual disk, without any hard disk repartitioning
The most efficient way to run Ubuntu together with Windows is option 2. But installation can take a very long time to complete because the Ubuntu installer needs to repartition the hard disk to make room for the new operating system, potentially moving hundreds of gigabytes of data around.
Wubi offers the fastest installation possible, because Ubuntu installs in just a few files within your Windows filesystem. Wubi also changes your boot menu options, adding Ubuntu as an alternative operating system that you can select with the cursor keys and Enter at boot time, just as with a full dual- or multi-boot install. Therefore, I will cover Wubi first.
Installing Ubuntu Under Windows
Wubi is a powerful program that creates a virtual hard disk under Windows and runs Ubuntu from there as part of a dual- or multi-boot operating system.
Performing the installation
To perform the installation, as it will not run directly from the DVD, drag and drop the following two files from the distros folder of the DVD onto your Windows desktop:
wubi.exe
ubuntu-9.10-desktop-i386.iso
Once they are on your desktop, remove the DVD from the drive (this is important; if you leave the disc in the drive, Wubi will not run correctly), and double-click wubi.exe to commence installation.
Important considerations
There are a number of things to consider when using Wubi, as follows:
There appears to be a bug in the Wubi program, which can occur after a disc is inserted and then removed (such as when copying the preceding files). Sometimes the program will ask you to reinsert the disc in the drive because it thinks it needs access to it. In fact, Wubi doesn’t, and it must not gain access, so don’t reinsert the disc, or the program will not work correctly. If this happens to you, the only way to get a functioning installation is to click the Continue button several times until the program starts. You may also have to do this during the installation process if the disc is again requested.
If you burn the ISO file to CD (or otherwise have access to an Ubuntu CD), you can insert it into a Windows CD-ROM drive and Wubi will offer the option to install Ubuntu inside Windows without you having to copy an ISO file to your computer—but this only works with CDs, not DVDs.
If you have Windows configured so that it doesn’t display file extensions, you will see only the filenames wubi and ubuntu-9.10-desktop-i386, without the .exe and .iso extensions. This is normal, and you can still drag and drop the icons to make copies and double-click the Wubi program icon to run it (after removing the disc from the drive).
If you wish, you can copy a different ISO file to the desktop in place of the standard Ubuntu one. You can then select that edition from Wubi’s menu to have it installed instead of regular Ubuntu.
Once the program is running, the next screen you’ll see will be the one shown in Figure 2-25.
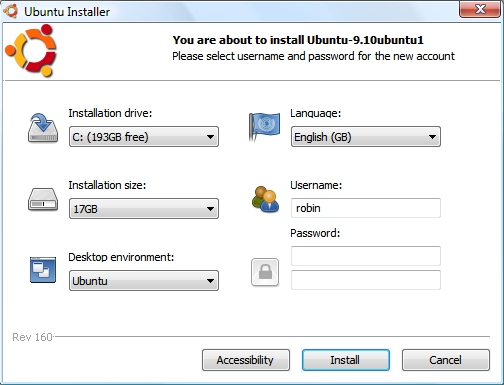
From this screen, you can choose the drive to which Ubuntu should be installed, the language to use, the size of virtual hard disk to create, and your Ubuntu username and password.
I recommend you keep the installation size large enough to make it unlikely for you to run out of room. The default is usually 17 GB, but if you have a 100 or more gigabytes of free space, you may wish to change this to the maximum of 30 GB.
It is important to choose both a username and a password, even though Wubi will let you continue without entering a password, because I have encountered a number of difficulties using Ubuntu/Wubi without one. To ensure you enter it correctly, you must type in the password twice.
If your computer will contain private information, I suggest you choose a difficult-to-guess password, possibly consisting of both uppercase and lowercase letters as well as numerals and punctuation. But make sure that you can remember whatever password you choose. I discuss the creation of good passwords in Chapter 9.
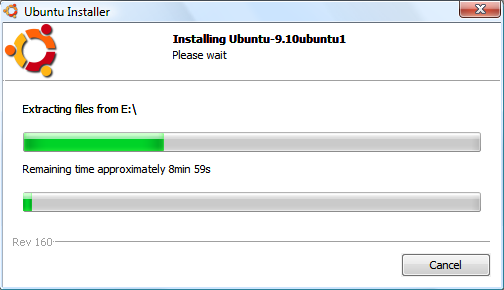
The installation process will then begin, continuously showing you how far the installation has progressed. Typically, for any fairly recent PC, the initial installation should take less than 10 minutes (see Figure 2-26).
If Wubi detects any problems with the disc, it may try to download the ISO over the Internet. If this happens, it is usually because the ISO you copied to the desktop is corrupted. To prevent this from happening, you can first check the MD5 hash for a file, as described in the section About the MD5 Hashes, to ensure that it’s a true copy of the original.
When installation is complete, you will see the window shown in Figure 2-27. If you are ready to start using Ubuntu now, select “Reboot now.” Otherwise, select “I want to manually reboot later” if you have work that needs saving. Either way, click Finish to end the installation.
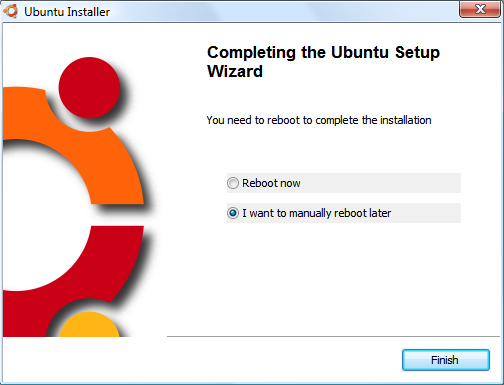
Whenever you reboot from now onward, Ubuntu will be displayed as a selectable operating system alongside your usual Windows OS. The first time you start Ubuntu, it will spend a few minutes performing some additional installation functions and will then reboot when it has finished.
If you wish, the next time you load Windows you can delete the two files that you copied to your Windows desktop.
You are now ready to move on to Chapter 3 to continue your exploration of Ubuntu, although I recommend you complete this chapter first, since there’s a lot of useful information in the following sections.
Installing Ubuntu As a Standalone OS
Wubi is great for getting Ubuntu installed quickly, but the overhead it imposes for managing the virtual hard disk causes a slight performance hit.
To create a native Ubuntu installation that uses your hard disk directly, and is therefore as fast as it can be, you will need to perform some partitioning of your hard disk during the installation process (explained a little further on).
There are two ways you can go about natively installing Ubuntu. The first is to run the Live DVD and then double-click the Install Ubuntu 9.10 icon on the desktop (see Figure 2-8) to start a six-screen setup process, which begins with choosing the installation language. Alternatively, when you reboot your computer, simply select the Install Ubuntu option.
Either way, the installation screens will be similar to those starting at Figure 2-28.
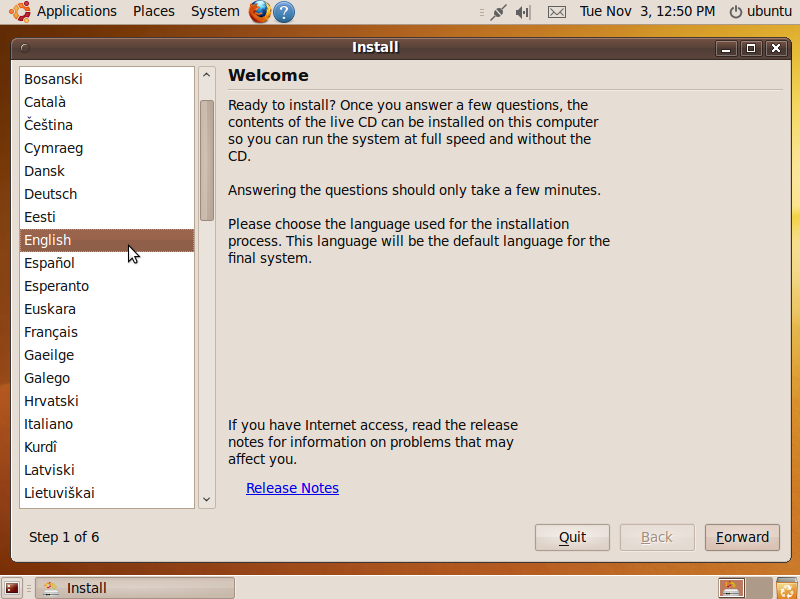
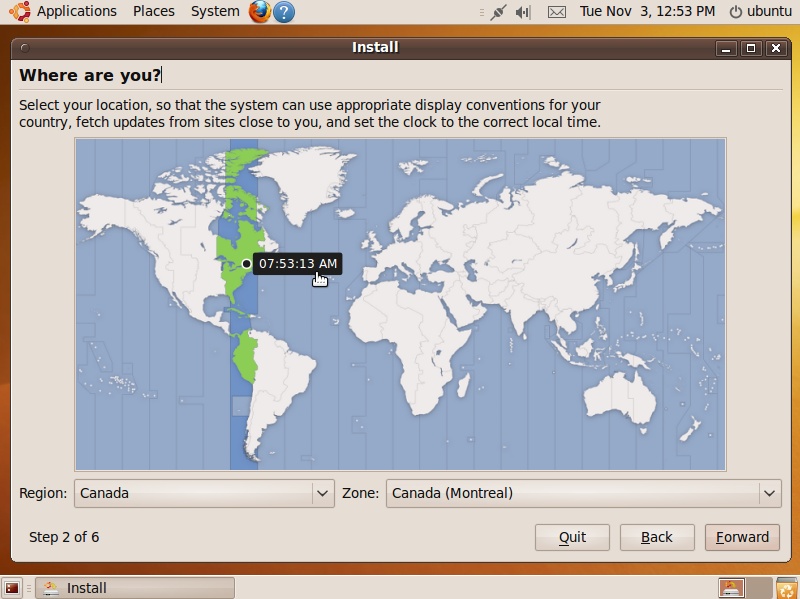
Don’t concern yourself with keyboard layouts or countries at this point; just choose the language you wish to use for the installation process. You will be given other options to customize your installation later. Once you have selected your language, click the Forward button to move on to the location screen, shown in Figure 2-29.
Here, you can either click the part of the map where you are or use the drop-down inputs to select your region and zone. When done, click the Forward button to move on to the keyboard selection screen (see Figure 2-30).
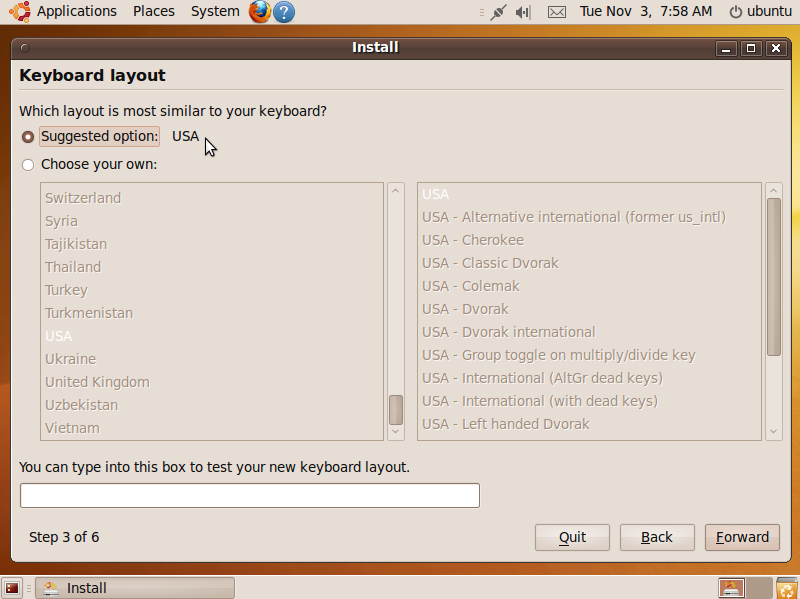
Normally you can just click Forward at this point, but if your keyboard layout is different from the one shown, click “Choose your own” and select the right keyboard. You can test your selection by typing text into the white box. When you click Forward, you’ll be taken to the disk-partitioning screen.
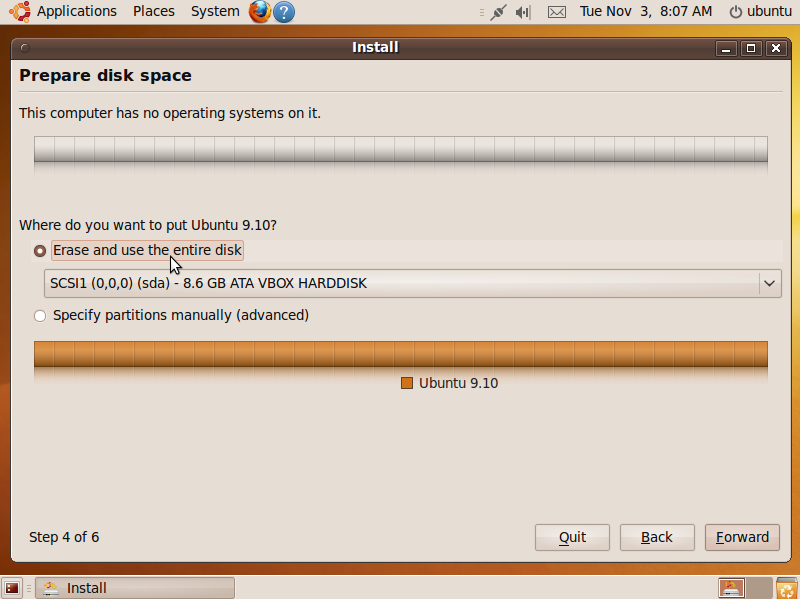
If your computer doesn’t already have an operating system, the partitioning screen will look like Figure 2-31, in which case, you will most likely wish to select the “Erase and use the Entire disk” option to turn your entire hard disk over to Ubuntu.
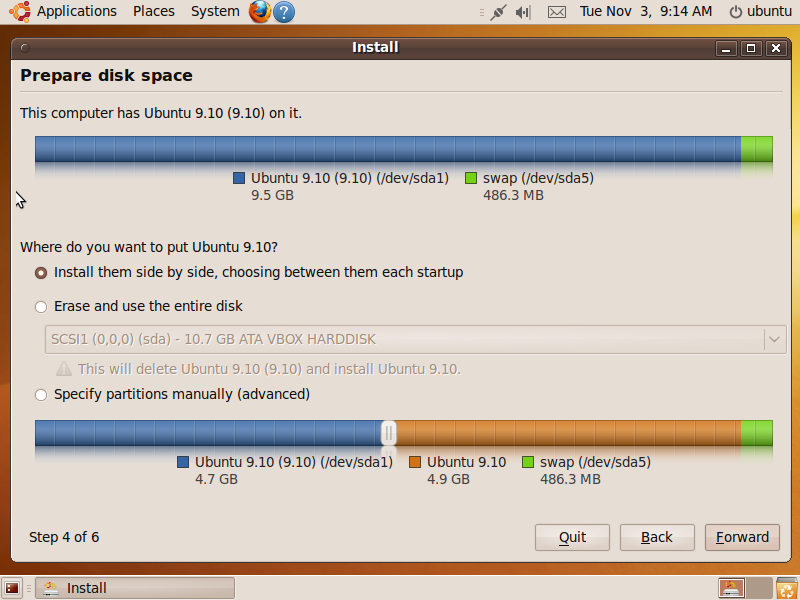
However, if there is already an operating system on the disk (which, depending on your computer, could be Windows, OS X, or even another installation of Ubuntu), as shown in Figure 2-32, you now have to decide whether to install the operating systems side by side or overwrite the original operating system.
Warning
Be careful here. If you choose “Erase and use the entire disk,” it will not be retrievable. So I recommend that you make doubly sure that you have working backups of all programs and data you need from the original operating system before removing it.
If you choose the “Erase and use the entire disk” option, all you need to do now is press Forward for the disk partitioner to do its work.
But if you have decided to add Ubuntu alongside your previous operating system (by selecting “Install them side by side, choosing between them each startup”), you can now slide the partition division icon left or right along the bottom bar. As you move it to the left, you will reduce the space used by the original operating system, leaving more space available for the new one. Conversely, by moving the division to the right, you will decrease the size of the new OS and allocate more space to the original one.
Either way, you will divide up the available space and share it between the two operating systems.
Warning
If you are an advanced Linux user, you can also choose to manually specify the partitions. However, I strongly recommend that newcomers bypass that option.
Sharing the hard disk
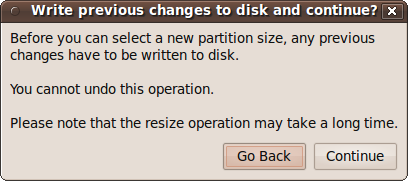
If you decide to install Ubuntu alongside an existing operating system, after choosing the sizes that each will have, click Forward. The dialog in Figure 2-33 will display to remind you that what you plan to do is irrevocable. It will also tell you that the resizing operation might take a long time.
When you click Continue, one or more windows will pop up explaining what’s going on until the installation process eventually gets to the screen shown later in Figure 2-34.
Note
Depending on where data is stored on the hard disk, once the resizing process starts, you should be prepared to leave the computer to the repartitioning and installation for a couple of hours or more, although it usually takes a lot less time than that. Compared to how long it can take to install some major operating systems, this is actually not that bad.
Using the entire hard disk
If you choose to have the Ubuntu installation take up the entire hard disk, partitioning will be very quick because there will be no data to move about during a resize operation. So, a few seconds after you click the Forward button, the user information screen should be displayed.
Entering your user details
The next screen to be displayed asks you to enter your user details, such as your name, username, password, and computer name (see Figure 2-34).
Here, you should enter your name, which could be your full name, just your first or last name, or whatever you prefer. You can use uppercase characters if you like. Your username will then be created for you based on the name you give, but it will be set to all lowercase.
You can change the username if you wish, as long as you keep it to lowercase letters and numbers. However, I don’t recommend doing so, because it could then be confusing to tell which user has what username, especially on a system with several users.
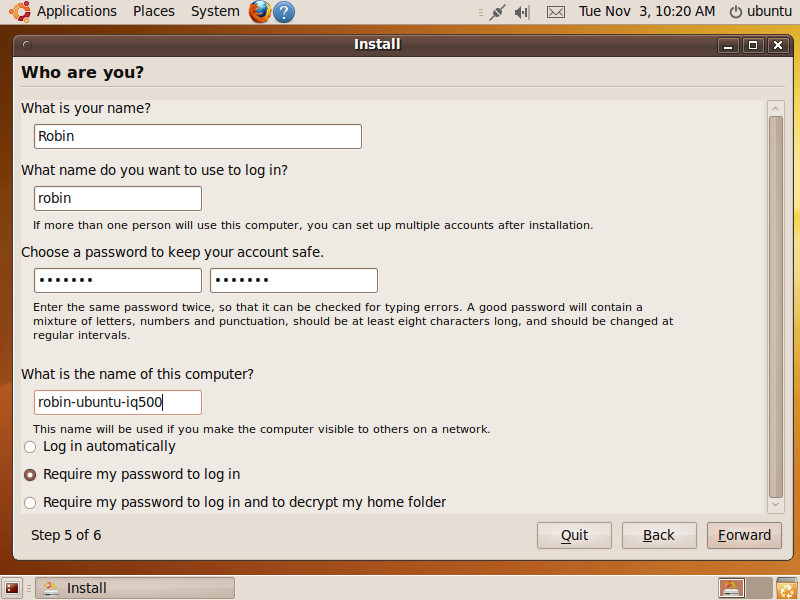
You must then choose a password for your computer (without setting a password, you will not be able to progress to the next screen). If you will have sensitive data in your account, I recommend that you create a strong password comprising both uppercase and lowercase letters, as well as numbers and punctuation; just make sure you can remember it. You will have to type the password in twice to ensure you didn’t make a typo.
If you choose a password that Ubuntu considers weak, it will tell you so and offer to let you choose a different one, or you can confirm that you do want the one you chose.
For computer names, I generally choose to combine the username, the operating system name, and the computer model. That way, it’s easy to see exactly which computer is what over a network, and it’s especially useful when building dual- and multi-boot systems with different operating systems. In this case, I ended up with a computer name of robin-ubuntu-iq500 for the installation, although you can enter any name you like here.
Finally, on this screen, you can decide whether to have Ubuntu log you in automatically. If you won’t have any sensitive data on the computer and are not concerned about other people using it, then go ahead.
But generally I would recommend you choose the second option to require a password. If someone else wants to use the computer, you can simply create a new account. That way you never have to think about it again. To be ultra secure, you can require a password to be used both for logging in and to decrypt the contents of your home folder.
Note
If you choose the option to have your home folder encrypted,
the first time you run Ubuntu after installation a special password
will be generated, and you will need to keep a note of it should you
ever need to manually recover the folder. You can also run the
command ecryptfs-unwrap-passphrase from the
Terminal at any time to retrieve this passphrase if you forget
it.
Once you have filled in all the details, click the Forward button to continue to the final summary screen, which will look like Figure 2-35.
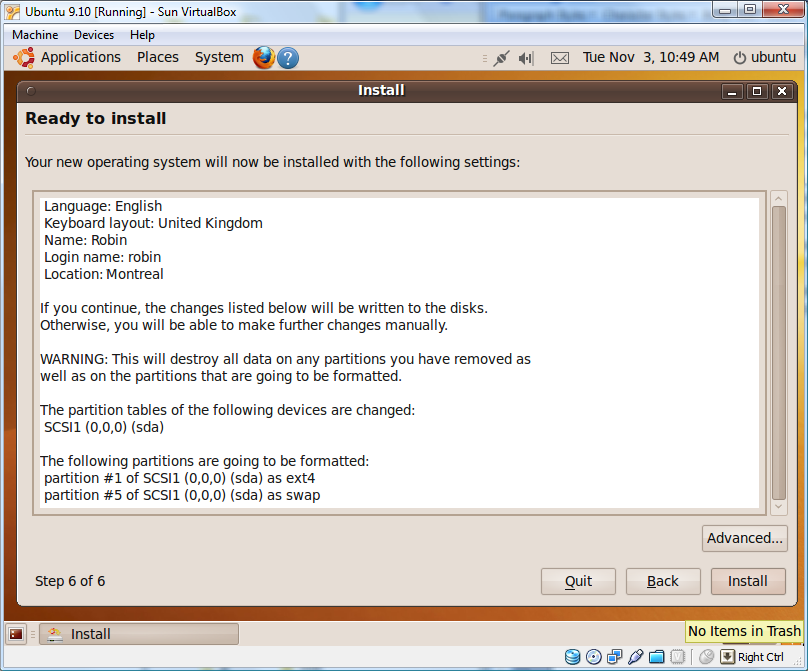
If everything looks correct, click the Install button to commence the installation process, which should proceed uninterrupted—so now’s the time to go and make a pot of coffee.
Note
Don’t worry if the installation appears to hang at various points during the process. It’s almost certainly still installing—even when you can’t see anything. If you have a hard disk indicator light, you can check that it is flickering, or just place your ear to the PC and listen for the clicking of the disk being accessed to assure yourself that your computer hasn’t hung.
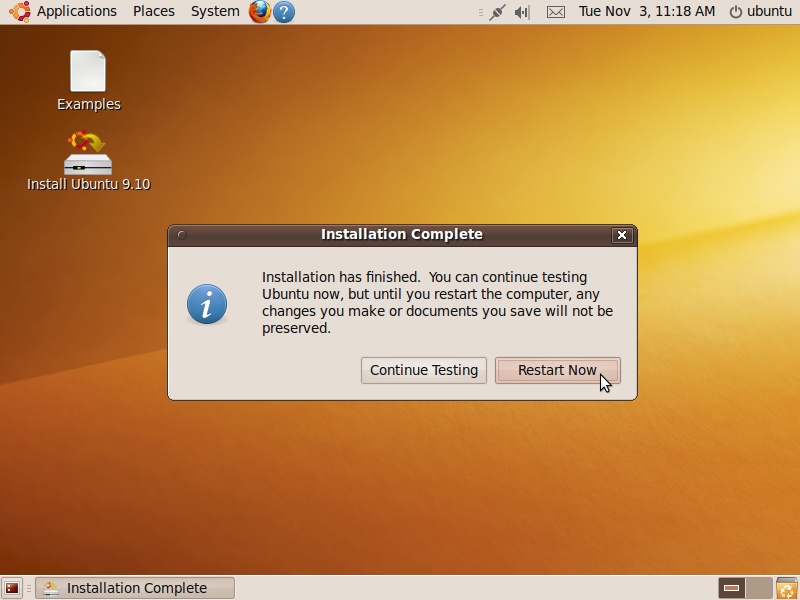
Once installation is complete, a window will pop up asking you to click the Restart Now button. If you ran the installer from the Live DVD, you’ll also see a Continue Testing button (see Figure 2-36). So go ahead, remove the DVD from the drive, and prepare to enjoy your new operating system by clicking Restart Now.
After rebooting
If you have installed Ubuntu as the computer’s only operating system, rebooting will display a couple of lines of text that will quickly disappear, to be replaced with the official Ubuntu logo, followed by the Ubuntu login screen.
Dual- and multi-boot setups
On dual- or multi-boot computers, you will be offered a choice each time your computer boots up. This will vary according to the operating systems installed, but will look something like Figure 2-37.
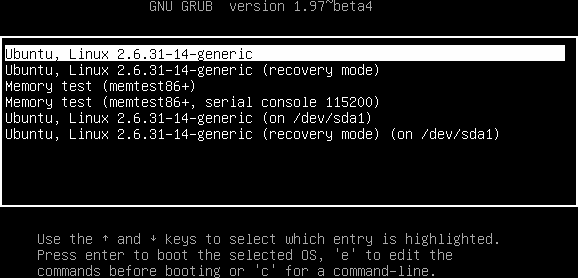
In this case, there are two installations of Ubuntu. The first entry shown is one of them, and the fifth entry is the other.
Dual- and multi-boot setups can also include many more operating systems, which could include Windows and OS X, as well as the recovery mode and memtest86+ options shown in the screen grab.
Recovery mode
The recovery mode entries boot the associated Ubuntu operating system into a command mode from which you can perform various repair functions that are quite technical and therefore beyond the scope of this book.
Instead, I recommend you keep your Ubuntu Live DVD on hand so that you can use it to recover from various problems, using the information supplied on the Ubuntu website: https://help.ubuntu.com/community/LiveCdRecovery.
If all else fails and nobody at the Ubuntu forums has been able to provide a solution to fixing a broken installation, you can always reinstall Ubuntu from this DVD. You do keep regular backups of important files, don’t you?
Memory testing
The memtest86+ option is very useful when you suspect you may have a problem with your computer’s system memory. When run, it performs a sequence of stringent tests, reporting any errors it finds (see Figure 2-38).
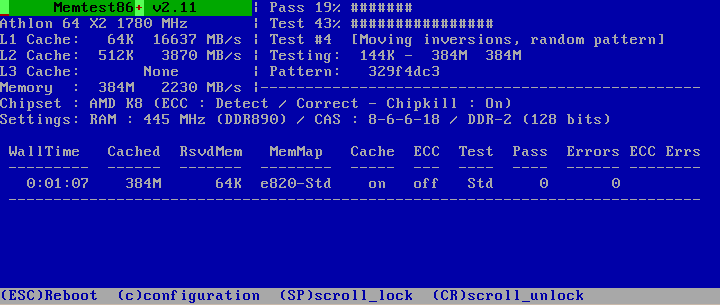
The tests take a few minutes to run, but you can keep track of how far the program has progressed by watching the Pass and Test lines at the top of the screen. The program will continue running these tests indefinitely, but once one complete pass has been made, the program will either display one or more error messages or tell you that there are no errors.
To exit at any time and reboot back to the operating system selection menu, press the Esc key.
What’s New in 10.04
One of the major goals of Ubuntu 10.04 was to substantially decrease the time it takes to boot into the operating system to under 10 seconds. This book went to test during the beta tests, and even by then boot times on my test machines had already been reduced from between 30 to 60 (or more) seconds to between 10 and 20 seconds, with a couple of the machines usually arriving at the desktop within 12 seconds. This is a major breakthrough and is way faster than any other operating systems, by a huge margin. If you are interested in keeping track of your boot times and would like to compare the results before and after upgrading to 10.04, https://wiki.ubuntu.com/BootCharting has advice on installing a simple program to keep a record of your reboot times, and display them using charts.
Upgrading to New Releases
Ubuntu 9.10 was the most current release when this book went to print, but due to the six-month upgrade cycle, Ubuntu 10.04 was already on the horizon and 10.10 was being planned. With such a release cycle, it’s important that you know how you can upgrade Ubuntu to take advantage of new and better features, and to keep your computer secure.
Before upgrading, though, it is always a good idea to acquaint yourself with everything that’s new in the upgrade by visiting the following URL:
| http://www.ubuntu.com/getubuntu/releasenotes |
Click the More » link next to the release for full details. That way there shouldn’t be any major surprises.
Note
By participating in the Alpha and Beta tests, I was able to include in this book the new features and improvements the Ubuntu 10.04 release offers. In fact, the Beta is so good that we considered putting a copy on the companion DVD. However, in the end we agreed that beta tests are just that: tests, and unforeseen bugs might show up that this book couldn’t help you with—so we dropped that idea. Therefore this section shows you how to upgrade over the Internet to the fully tested, final release of Ubuntu 10.04. The same procedure will let you upgrade to all other future versions, too.
Installing from CD
There are two ways that you can upgrade your installation of Ubuntu. First, you can download the latest ISO file, burn it to CD, and perform a fresh installation. The download locations you need are listed in the section Downloading a Distribution. Immediately following that, the section Burning a CD or DVD provides all the information you need to burn the ISO to disc.
This method is probably your best choice when you want to set up new Ubuntu installations or provide copies of the latest release to friends and colleagues, or if you have a version of Ubuntu more than one release behind the current release.
However, there’s a much easier way to upgrade an existing installation, as explained in the following section.
Upgrading an Existing Installation
Instead of upgrading from disc, you can upgrade Ubuntu directly from the desktop. But before you start, it’s important to ensure that you have applied all the latest updates. To do this, select System → Administration → Update Manager to bring up a window like the one shown in Figure 2-39.
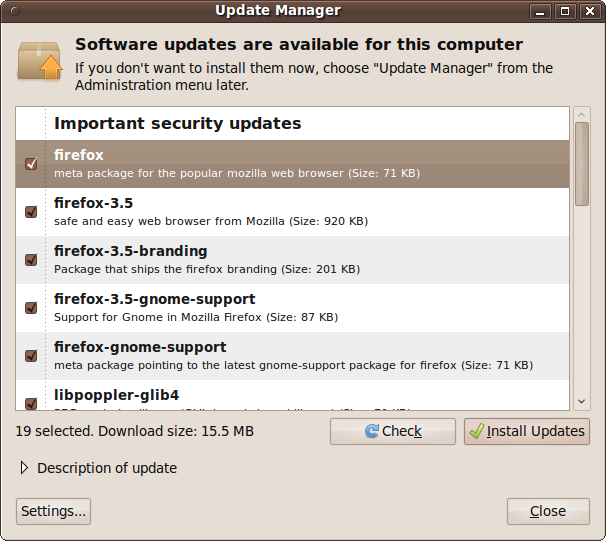
The contents of this window will vary. You may have different upgrades or no upgrades shown, depending on how up-to-date your installation is. But to make absolutely sure that your computer is aware of all the latest available updates, you should click the Check button.
After downloading all the latest information, you may see the same or different updates in the window. If any updates are displayed, click the Install Updates button to install them. If you are asked for your password at any point, you should enter it. You may also be prompted to restart your computer.
On the other hand if, after clicking Check, there are still no new updates, the Install Updates button will be grayed out, indicating that the release of Ubuntu installed is already fully up-to-date.
Upgrade availability
When a new distribution is available (which usually happens
twice a year, generally in April and October), the top of the Update
Manager screen will show the text “New Distribution release
'xx.xx' is available,” where
xx.xx will be the release number, as shown
in Figure 2-40. If there is no
release newer than your current version, this screen will not be
shown.
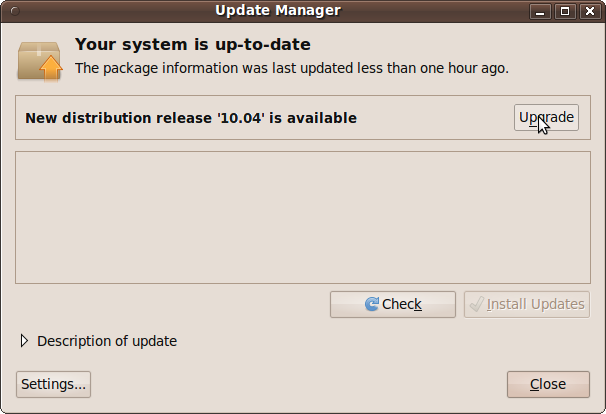
To upgrade to the new distribution, click the Upgrade button and follow the simple instructions on the screen, entering your password if requested and rebooting when necessary.
If your current release is more than one version older than the latest one, you will need to keep repeating the preceding process to upgrade through all the intermediate releases in turn, until you get to the latest one. When no newer release is available, you have finished.
Skipping versions
If your installed release is more than one behind the latest and you wish to avoid upgrading through a number of intermediate versions, you will need to download the ISO image file of the latest version, burn it to disc, and perform a full installation from it. Make sure all your data is fully backed up first, though, because a full installation creates a brand new environment, either replacing your original one or creating a new one alongside it (depending on the option you choose). If you decide to overwrite your current installation, you’ll need to back up and restore all your data and configuration options.
What’s New in 10.04
Ubuntu 10.04 uses new programs to improve the bootup experience, removing unwanted messages and replacing them with clean graphical animations. In particular the version of GRUB (Grand Unified Bootloader) that is used is now version 2 which, by default, does not display a screen of options. Therefore when you want to choose whether to boot directly into Ubuntu, or into a repair mode, or previous kernel and so on, you need to hold down the Shift key while booting. This causes GRUB 2 to display the standard menu and wait for a key press.
Summary
Ubuntu is generally very fast to install, unless you make it part of a dual- or multi-boot setup and therefore have to resize partitions. And even then it’s a lot quicker to install Ubuntu than some other major operating systems.
So, by the time you finish this chapter, you should have Ubuntu installed on your computer in one form or another: alongside another operating system, within a virtualizing application, or as your computer’s only operating system.
Whichever type of installation you have, the next chapter will show you how to fully configure it to your requirements, and how to get it working with the peripherals you have connected to your computer, such as printers, webcams, and the like.