Table of Contents for
Ubuntu: Up and Running
 Ubuntu: Up and Running
Published by
O'Reilly Media, Inc., 2010
Ubuntu: Up and Running
Published by
O'Reilly Media, Inc., 2010
- Cover
- Ubuntu: Up and Running
- Ubuntu: Up and Running
- Dedication
- Foreword
- Preface
- 1. About Ubuntu
- 2. Installing and Upgrading Ubuntu
- 3. Configuring
- 4. The Desktop: Accessing Applications and Features
- 5. The Filesystem, File Attributes, and Permissions
- 6. The Nautilus File Browser
- 7. The Command Line
- 8. Installing and Removing Software
- 9. System Maintenance and Security
- 10. Networking Ubuntu
- 11. The Internet
- 12. Using OpenOffice.org
- 13. Playing Games
- 14. Pictures, Sound, and Video
- 15. Other Ubuntu Distributions
- 16. Using Wine
- Index
- About the Author
- Colophon
- Copyright
Chapter 3. Configuring
Before exploring Ubuntu in depth in Chapter 4, I think it’s best to first ensure that your Ubuntu setup is properly installed and configured to your requirements.
Luckily, this is very easy to do due to the huge amount of work Ubuntu’s developers have put in. In fact, as a result of the open source approach in which users write the features they want themselves, some drivers are faster and more feature-packed than their Windows equivalents. They also tend to be simpler to manage because of the user feedback built into the development process.
So whatever keyboard, mouse, graphics card, monitor, and network card you have, there is almost certainly already a Linux driver for it, and this chapter will show you how to install it, if it hasn’t been already. I also think that by reading this chapter you’ll learn about using the Ubuntu desktop by osmosis, and will pick up how things work while learning how to perform useful and essential configurations of your new installation.
By the way, Ubuntu supports multiple users, so by default the changes you make to preferences will apply only to you.
Keyboard
Once you’ve installed Ubuntu following the advice in Chapter 2—whether you are running it within Windows, as part of a dual-boot system, or standalone—you can now further tweak your setup to match your keyboard, mouse, and other peripherals.
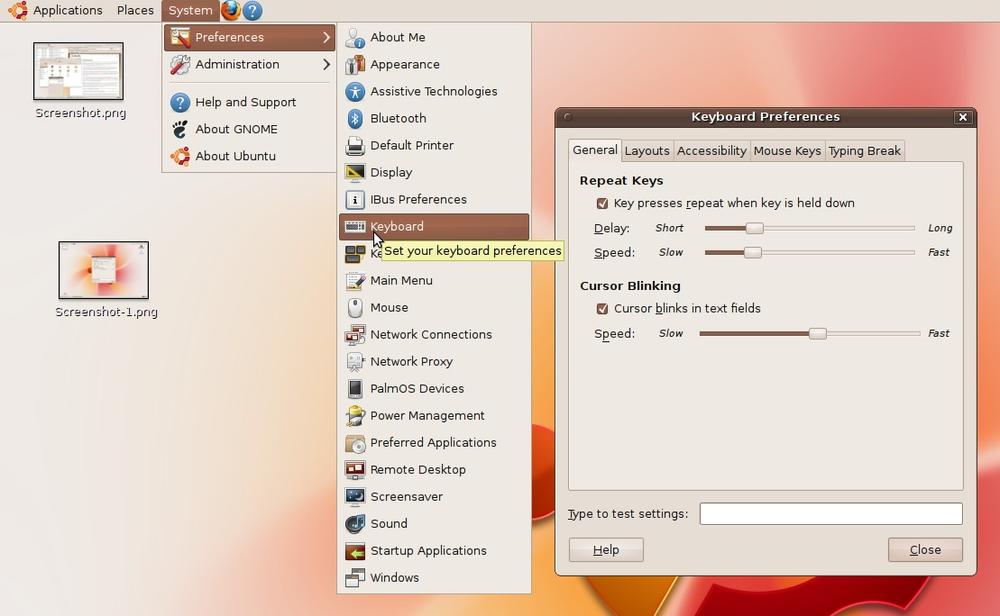
Generally, the way to reconfigure your environment using Ubuntu’s GNOME desktop is to select the System menu at the top left of your screen, followed by Preferences, and then choose one of the options in that submenu. Figure 3-1 shows the Keyboard Preferences being selected in this manner. From now on, I’ll describe a sequence of menu selections in the style System → Preferences → Keyboard.
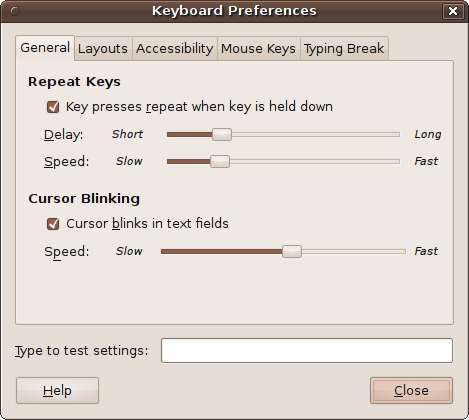
The Keyboard Preferences dialog that comes up looks similar to Figure 3-2. Five tabs across the top of the window represent the main options. The following subsections describe what each tab offers.
Note
Ubuntu is ever evolving, and during the life of this book there may be a number of new releases, so some options may be labeled differently or even move from one menu or screen to another. If you find that an option you want is not in the location that I give in this book, just browse the menus and look for other possible candidates. It’s extremely unlikely that the Ubuntu developers would remove any of the essential options I describe in this book, but they could decide to put it under a different menu or dialog box.
General
As can be seen in Figure 3-2, the General tab allows you to change the delay before a key repeats and the speed of repeating using the Repeat Keys section. If you don’t wish to allow keys to repeat, you should uncheck the box. Otherwise, move the two sliders left and right, and then enter text in the “Type to test settings” box to try out the settings.
You can also choose whether or not the cursor should blink when in a text field and, if so, the speed at which it should blink. Again, you can test the result in the input box at the bottom of the window.
If you need assistance at any time, you can click the Help button. When you are finished setting the current options, don’t click the Close button yet, as there are more settings to look at first.
Layouts
During installation of the version of Ubuntu used for these screen grabs, I chose to use a UK keyboard by default, as can be seen in Figure 3-3 (although if you are using Ubuntu 10.04 or higher, the screen layout will be slightly different).
But let’s assume that you don’t have the correct settings here and need to change them. First of all, to ensure that you have the correct keyboard installed, click the button to the right of “Keyboard model.” This opens up a new window in which you can see a range of keyboard models from a wide variety of vendors, as Figure 3-4 shows.
If in doubt, or if you can’t find your keyboard manufacturer listed, you should choose Generic for the vendor and then select the model most similar to yours. Click OK when you are done.
If you use more than one keyboard, you can check the “Separate layout for each window” box to match different keyboards to different windows.


If you need to change the country layout of your keyboard, the best way is to click the Add button to create a new one. This will bring up a new window, such as the one in Figure 3-5, in which the full layout is displayed, making it very easy to select the one that matches your keyboard.
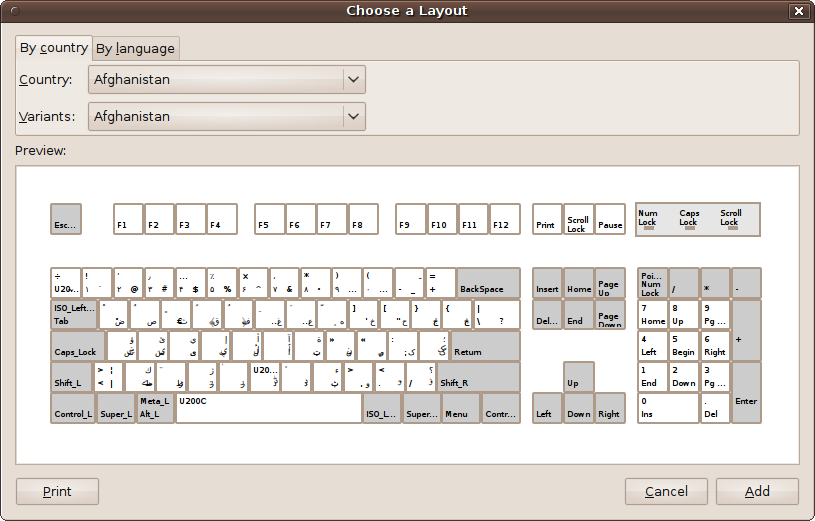
So, for example, to choose a U.S. keyboard layout, you could click the “By country” tab, then select United States for the country, and then USA for the variant from the options provided. Alternatively, you can click the “By language” tab, then select English, followed by USA for the variant, or, for example, Spanish; Castilian followed by Latin American, and so on.
When you have the right keyboard layout selected, click the Add button and you will see it listed in the Layout section. At this point, if you want to remove a keyboard, you can now highlight it and click the Remove button.
Incidentally, on Ubuntu 9.10, once you have more than one layout installed, if you check the “Separate layout for each window” box, the Layout section will show a radio button next to each layout, which you can use to choose one of the layouts as the default.
If you decide you don’t want to keep the changes you have made, you can always click the Reset to Defaults button, or you can make your changes apply to all users on your system by clicking on the Apply System-Wide button.
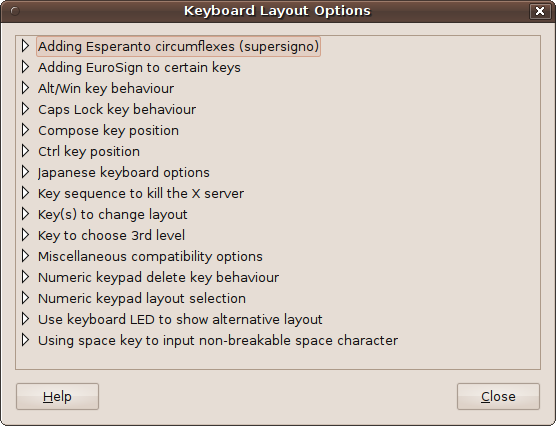
You can also further customize your layout by clicking the Layout Options button to bring up the window shown in Figure 3-6. Here, you have all manner of options relating to the handling of Esperanto, the Euro monetary sign, the Caps Lock and Ctrl keys, the numeric keypad, and much more. Just click on a heading to open up its available options.
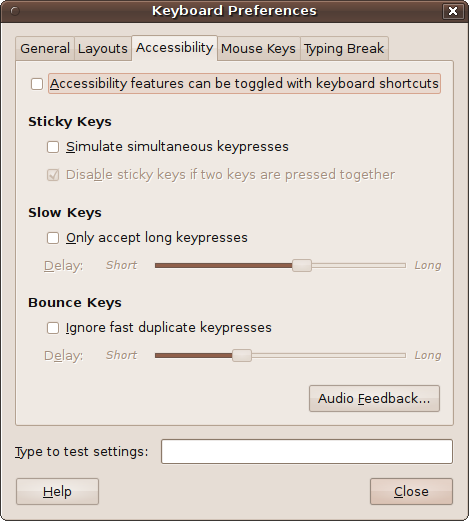
Accessibility
As you would expect from a good operating system, Ubuntu offers some useful accessibility features under the Accessibility tab (see Figure 3-7). The options available include Sticky Keys, which lets you press Ctrl and Shift keys before the key being controlled instead of simultaneously; Slow Keys, which ignores brief key presses; and Bounce Keys, which ignores fast duplicate key presses. These are all enabled or disabled by checking or unchecking the associated boxes.
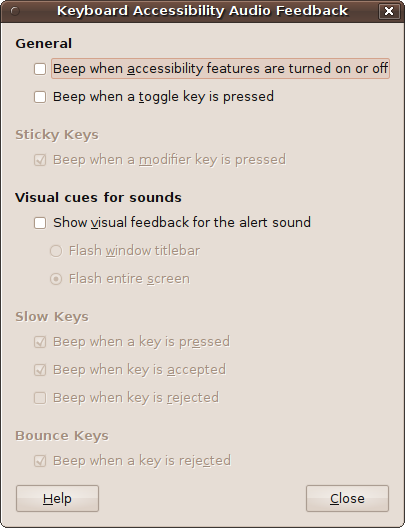
You can also choose to provide audio and visual feedback for these actions by clicking on the Audio Feedback button, which brings up the window in Figure 3-8. Just check or uncheck the boxes provided to enable or disable beeps for the actions shown, as well as to flash the title bar or screen if needed.
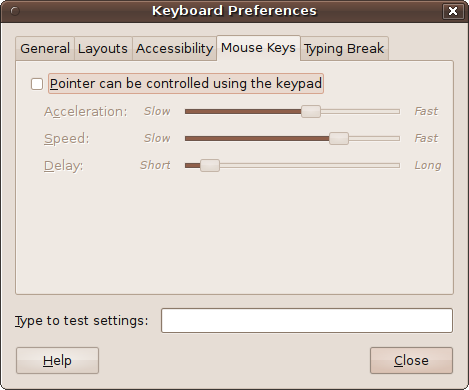
Mouse Keys
Sometimes it can be useful to be able to control the mouse using the keyboard. You can do just that with the Mouse Keys tab, shown in Figure 3-9.
Click the checkbox to activate the feature, and you can then choose your desired acceleration, speed, and delay for the simulated mouse by moving the sliders left and right. You can test the settings by pressing the keypad arrow keys.
Typing Break
Are you or someone else who uses your computer a workaholic, or someone susceptible to carpal tunnel or tendinitis problems, who must be forced to take a break? If so, Ubuntu comes to the rescue with the Typing Break tab (see Figure 3-10).
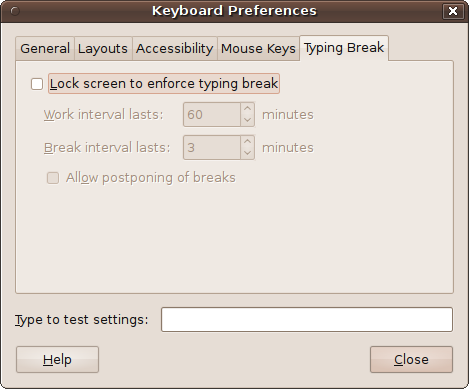
Enable the feature by clicking in the checkbox. Then you can choose the lengths of the work and break periods, and whether to allow the user to postpone breaks should something important come up.
This facility is smart about timings. If you stop using the keyboard and mouse for any period equal to or longer than the break interval, you’ll get a new, full work interval when you next use the computer again.
Assuming you have now been through all the tabs and set up all the keyboard options the way you want them, you can click the Close button to close the window.
Keyboard Shortcuts
While you’re at it, now is a good time to set up or edit your keyboard shortcuts. To do this, select System → Preferences → Keyboard Shortcuts, and the window in Figure 3-11 will appear.
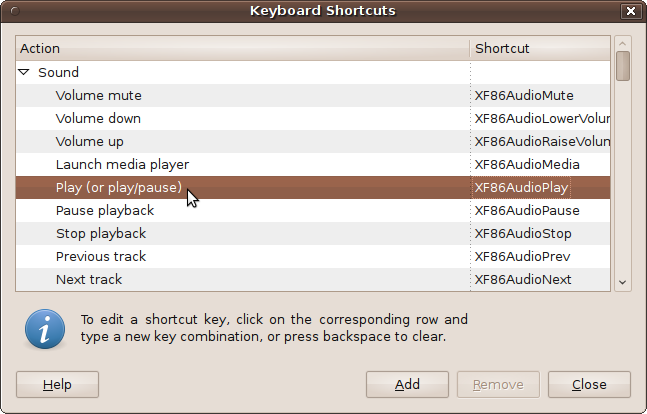
To change the shortcut for a specified action, select it with the mouse and then press the key (or combination of keys) you want to initiate that action. For example, if you would like Ctrl-PgUp to increase the volume, click on “Volume up” and then hold down the Ctrl key and press the PgUp key.
If you have one of those fancy advanced keyboards that has special keys for actions such as volume control, web surfing, or fetching email, and Ubuntu doesn’t appear to recognize them, you can attach them in the same way by clicking on an action and pressing the associated key.
You can also add custom shortcuts for actions that aren’t listed by clicking the Add button. But be aware that you’ll need to enter details about the program to call up by entering a Linux (shell) command, so it’s best to leave such advanced configuration until you’ve mastered how to use these commands (see Chapter 7).
When you have finished with the shortcuts, click the Close button.
Mouse
Configuring your mouse is a little easier than the keyboard, as there are fewer options. To start the process, select System → Preferences → Mouse to call up the window in Figure 3-12, which offers two sets of options: General and Accessibility.

General
Under the General tab you can choose whether you will use your mouse left- or right-handed, and whether to highlight the location of the mouse pointer when the Ctrl key is pressed. You also can adjust various settings such as the Acceleration speed and Sensitivity, the Drag and Drop Threshold, and the Double-Click Timeout.
Adjust the settings to your preference, and then click the light bulb image. A single click will make it light dimly for a while and then go out. This length of time is the Double-Click Timeout, which increases as you move the slider to the right.
The Acceleration setting determines the speed at which the pointer will move as you move the mouse, whereas the Sensitivity determines the responsiveness. If you find the mouse pointer is a little jerky, move the slider to the left; if it seems sluggish, move the slider to the right.
The Drag and Drop Threshold specifies the distance you have to move an item before Ubuntu decides you are conducting a drag-and-drop operation.
Accessibility
The Accessibility tab provides enhanced features to provide assistance when a user’s mouse control is limited. The options available, Simulated Secondary Click and Dwell Click, are shown in Figure 3-13.
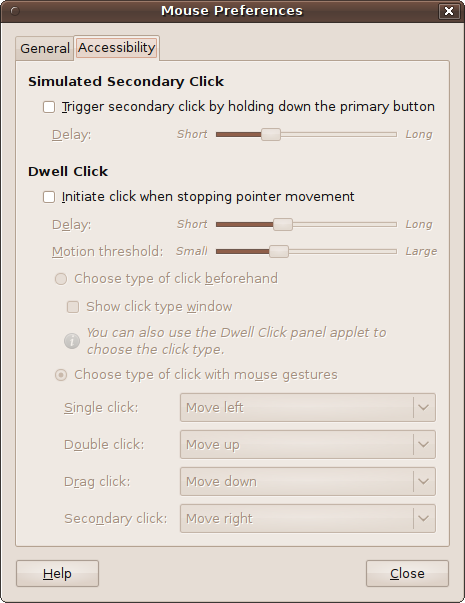
If you can’t use the second button on your mouse, you can enable the Simulated Secondary Click feature to invoke the function of a second button, which generally opens a menu. This feature invokes the right-click function when you hold down your primary button (usually the left button) for the period of time specified.
However, for this feature to work, the system has to enable Assistive Technology Support, which is disabled by default. So if you haven’t already enabled the support, when you click in the checkbox, a new window will open up, as shown in Figure 3-14. This window will ask you to enable Assistive Technology Support and then log out so that you can log back in again with everything correctly set up.
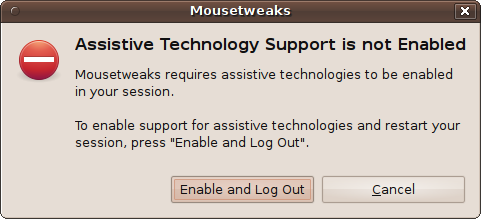
If you want this support, click the Enable and Log Out button and Ubuntu will return to the login screen, where you should re-enter your username and password. Having done this, try moving your mouse pointer to an open area of the desktop and hold down the left button. As you hold it, you will see the mouse pointer icon slowly fill with a different color.
If you leave the button held down until the pointer has fully changed color, a right mouse click event will be generated, and you’ll see the context menu you’d expect as a result of right-clicking the desktop. Set the delay before the secondary click is activated by returning to the Mouse Accessibility dialog and sliding the delay timer left or right.
With Assistive Technology Support enabled, the Mouse Accessibility dialog also lets you try out the Dwell Click option. This performs a click for you, even if you are unable to depress the mouse button. It does this by noticing that the pointer has stopped moving, and then starts to fill the mouse pointer icon with a different color.
If you leave the pointer still and the cursor fills up, it will then change to a crosshair symbol. If you then move the cursor a little bit to the left (while the crosshair is visible), a mouse click will be generated at the position at which the mouse was just resting. In fact, you can generate four different types of mouse events according to the direction in which you choose to move the mouse while the crosshair is visible:
Move left: single click
Move up: double click
Move down: drag click
Move right: secondary click
You can modify these directions and behaviors if you like, using the drop-down boxes provided in the Mouse Accessibility window.
The initial delay while the mouse cursor fills up can be changed by moving the delay slider left and right, and the amount of cursor movement required to initiate an action can be set using the motion threshold slider.
If this behavior turns out to be a little too complicated, you can use a simpler system by clicking the “Choose type of click beforehand” option and ensuring that “Show click type window” is checked. A new control window will pop up (see Figure 3-15) that lets you rest the mouse over the action that you want to happen next.
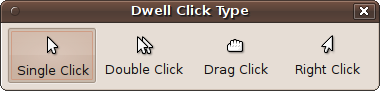
So, to create a right-click, you would pass the mouse pointer over the Right Click icon and leave it there until the mouse pointer fills up with the new color. Now move the mouse pointer to a clear part of the desktop and leave it there to call up the desktop right-click context menu.
To disable either of these options, just uncheck their associated radio buttons or boxes.
Graphics
In the early years of Linux desktops, sections such as this one on setting up graphics tended to be much longer, showering the reader with potential problems to solve and pitfalls to avoid. But over the years, more and more work has gone into making the Linux graphics drivers as bulletproof as possible.
For a long time, a Linux installation might not have been able to call up a graphical desktop at all without strenuous configuration work. Nowadays you are almost certain to be able to open up a desktop of 800 × 600 (or at the very least, 640 × 480) pixels. This is because a lot of effort has been put into developing a very robust set of basic drivers.
However, that doesn’t mean that your new high-resolution widescreen monitor is guaranteed to display its top resolution mode straight “out of the box,” and less standard graphics cards and monitors may also have difficulties displaying some graphic resolutions. So some hints and tips follow to help you achieve the best possible results from your graphics card and monitor.
Display Preferences
You can call up the Display Preferences window by selecting System → Preferences → Display, which will present a window similar to that shown in Figure 3-16.
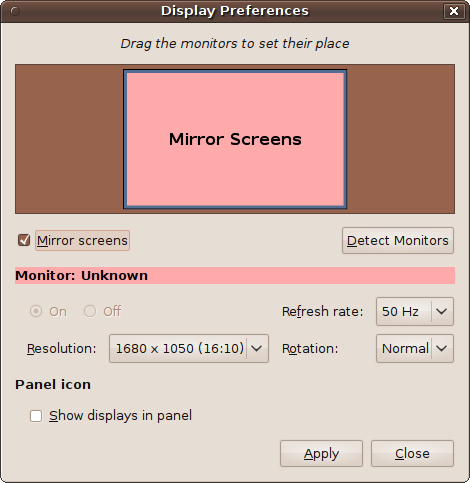
There are a number of options available in this window, but the most important to you at this moment is probably the Resolution drop-down menu. When you click on it, you will be shown all the different display resolutions that Ubuntu thinks your graphics card and monitor are capable of displaying.
In this window, you can also change the refresh rate of your monitor (generally not necessary) and the screen rotation (if supported), and decide whether to echo (or mirror) the display from your main monitor onto any others you have attached. If you have more than one monitor and turn mirroring off, you can drag the monitors to the positions relative to each other that you prefer. If you do have multiple monitors but not all of them are shown, you can click Detect Monitors, which should make Ubuntu find them all.
I tend to check the box called “Show displays in panel” after a new Ubuntu install. This places a small icon resembling a computer monitor at the top right of the desktop top panel, and you can use this icon to quickly change display settings.
As I mentioned, the main option of interest here after installing Ubuntu is probably the Resolution, which sometimes isn’t set to the width and height you prefer. Figure 3-17 shows the resolutions available for a widescreen monitor, with a maximum resolution of 1680 × 1050 pixels. Currently, 1024 × 768 is selected. A click on 1680 × 1050 will put Ubuntu into the desired widescreen mode.
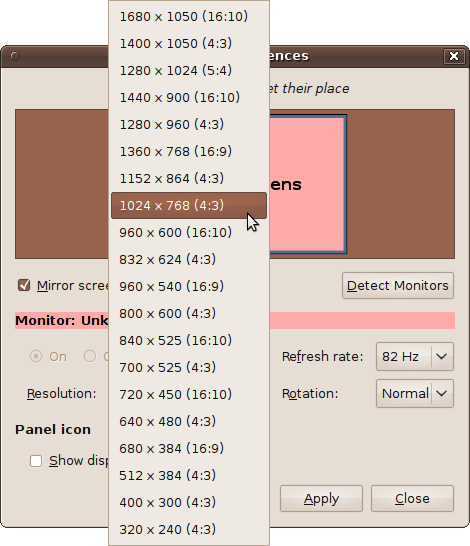
However, sometimes the resolution you require isn’t displayed in this window because the right drivers haven’t been loaded yet. If you load these drivers, they will show up on the list and you can choose them.
The reason Ubuntu doesn’t load some drivers is that they are proprietary and not open source. Proprietary drivers do not provide source code publicly and therefore have not undergone the full scrutiny of the Linux community. However, companies sometimes have legitimate reasons for keeping source code secret—for instance, they may have licensed part of the code from another company and lack the rights to make it open—but the proprietary drivers that you can load using the procedure in this section have been tested by the Ubuntu team, so they can be considered safe enough to use.
Therefore, if you have installed Ubuntu either as a standalone installation or as part of a dual- or multi-boot system, you may be able to install proprietary drivers for your hardware. These need to be downloaded from development sites, so your system must be connected to the Internet.
Note
If you are running Ubuntu directly from the DVD, you will not be able to select any screen resolutions except those shown in the Display Preferences window. So if you are not yet ready to perform a full Ubuntu installation, I recommend you either use the Wubi program for installing Ubuntu alongside a Windows setup or install Ubuntu inside a Sun VirtualBox virtual machine. Either way, you will keep your original operating system on your computer. Both of these types of installation are fully detailed in Chapter 2.
To find out whether there are any such drivers available on your computer, select System → Administration → Hardware Drivers, and you’ll be presented with a window similar to that in Figure 3-18. Any proprietary drivers that are available for your computer will be listed there. In the case of the system I used for the Figure 3-18 screen grab, some Nvidia graphics drivers can be enabled to provide additional functionality and possibly a wider range of screen resolutions.
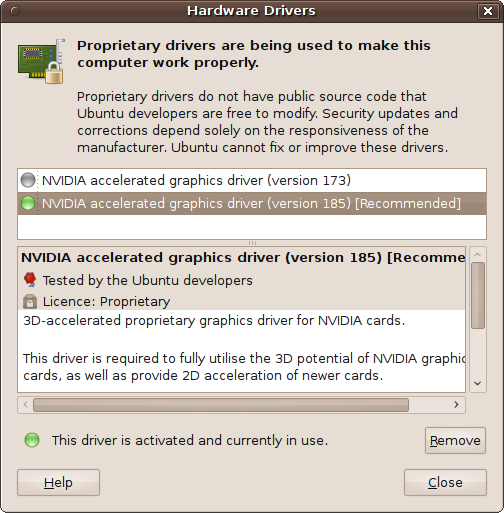
Starting with Ubuntu 10.04, the latest drivers are marked as “version current,” making it obvious which is the best one to select. If you find any graphics drivers listed here, you can try enabling one by highlighting it and clicking on the Activate button. You will be prompted for your password, and the driver will then be downloaded and installed. After installation completes, you should reboot Ubuntu, and you may find that you now have additional screen resolutions available.
If there is more than one driver, you might want to try them in turn to find out which supports the most features on your monitor. You can determine this by trying the three options available in System → Preferences → Appearance → Visual Effects, ranging from “No extra features,” to Normal, and Extra.
Once you have installed a proprietary driver, you may also be offered use of a different Display Preferences window (see Figure 3-19). If you select No, you will be shown the standard window, which may or may not work fully, due to the proprietary driver.
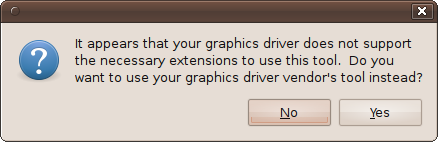
If you select Yes, you’ll be presented with a different window, such as the one in Figure 3-20, which is for an Nvidia driver.

Because of the wide variety of proprietary driver software, you will be on your own at this point, as it’s beyond the scope of this book to detail each one. That said, though, you’ll generally find the tools provided to be intuitive and easy to use and comparable with (if not more fully featured than) the Ubuntu default.
Sun VirtualBox
As I explained in Chapter 2, Sun’s VirtualBox virtual machine software is my preferred virtualization solution because it’s extremely robust software that I have found almost impossible to crash, and it runs Ubuntu at quite a reasonable speed considering it’s not running natively. What’s more, it’s available for all of Windows NT 4.0, 2000, XP, Server 2003, Vista, and Windows 7, as well as for DOS/Windows 3.x, Linux, Solaris, OpenSolaris, and OpenBSD.
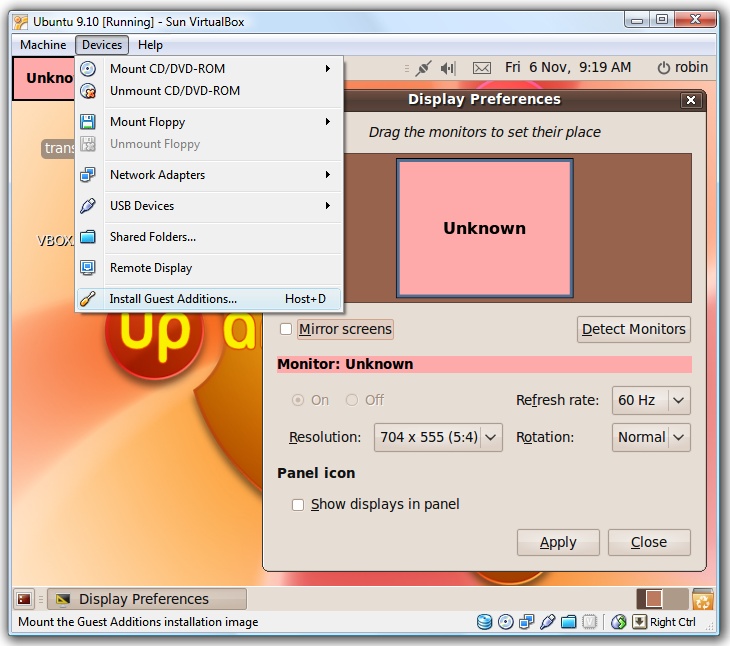
However, if you are running Ubuntu inside a Sun VirtualBox virtual machine, then you may have only 640 × 480 and 800 × 600 resolutions available to you by default. To increase these dimensions, you will need to make sure you have a clear Ubuntu desktop that is fully visible. Then, press the Ctrl key on the right of your keyboard to ensure you are controlling your computer (not the virtual machine), and select Devices → Install Guest Additions from the VirtualBox menu (as shown in Figure 3-21).
Now click again inside the window to regain control of the virtual machine and, if a new CD-ROM icon has not been added to your desktop, restart Ubuntu by clicking the broken circle icon at the top right of the desktop.
Once you have the new virtual CD-ROM icon on your Ubuntu desktop (with a name similar to VBOXADDITIONS_5_3, although this may change for different versions), double-click it to open up the disc. You will see that one of the new icons displayed is called autorun.sh. Double-click this icon and then select either Run in Terminal or simply Run, and follow any prompts, inputting your Ubuntu password if it is requested. Figure 3-22 shows what the installation process will look like.
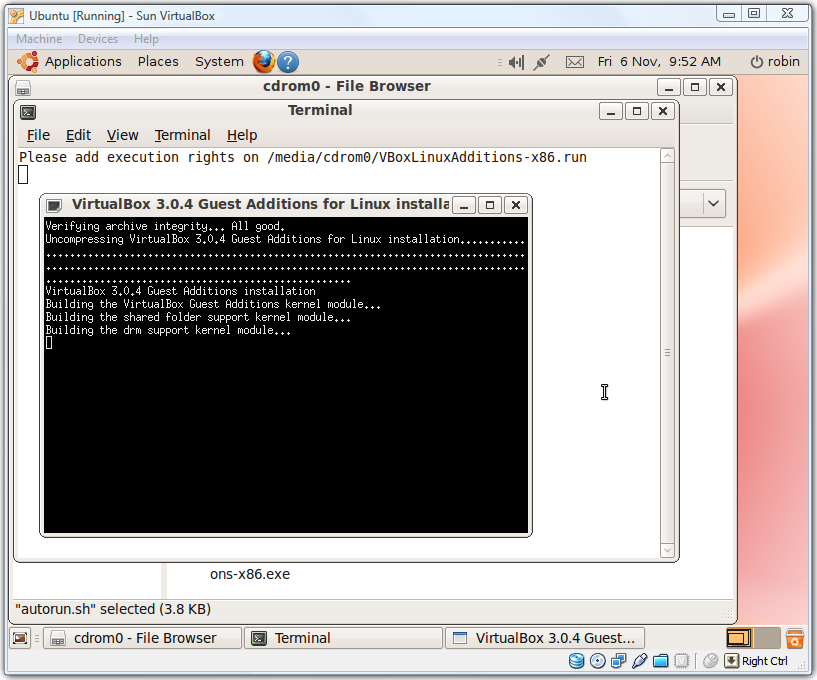
If a message appears asking you to add execution rights to a particular file, you should be able to ignore it, as the installation appears to proceed without problems anyway.
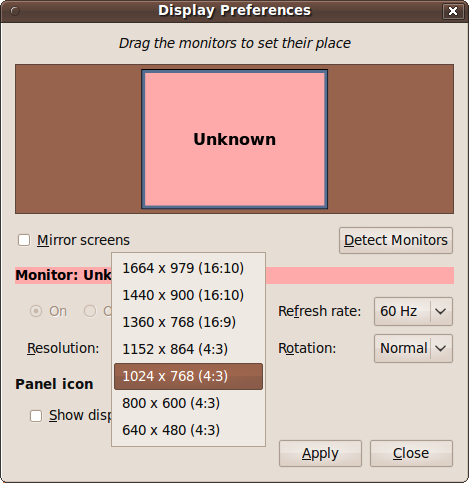
Once installation is complete, you can press Return (in the virtual machine) to exit the install, and then restart Ubuntu. When it has rebooted, you can select the display preferences again from within Ubuntu and should now be presented with more available screen resolutions from which to choose (see Figure 3-23).
It is important when using virtualization software to save the state of your guest operating system when you aren’t using it. Otherwise, any updates may be completely lost next time you run the virtual machine. With VirtualBox, you can click on the Close icon and you will be given three choices:
Save the machine state
Send the shutdown signal
Power off the machine
Normally you should check the first option to ensure that next time you use it the guest operating system will be fully up-to-date. However, if it has hung and become unresponsive, you may have no choice other than to select one of the other two options. You may then have to reinstall any software added since the last time you saved the machine’s state.
Sound
Sound cards these days generally stick to rigidly defined protocols, so you’ll rarely have problems with them. However, you may still wish to configure certain sound options to your taste. You can do this using the Sound Preferences window, available by selecting System → Preferences → Sound, which results in the window shown in Figure 3-24.
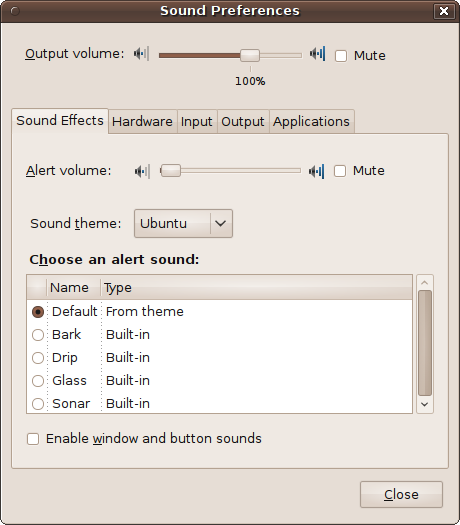
In addition to a volume slider and a checkbox for muting audio, this window displays five main tabs. We’ll look at each one in the following subsections.
Sound Effects
This tab lets you choose the sound theme. By default, the theme will be Ubuntu. If other themes are available you can select them (or choose to not use a theme and so turn sounds off) using the “Sound theme” drop-down menu. Underneath there you can also choose your preferred alert sound and choose whether to enable window and button sounds by checking the associated box.
Hardware
If you don’t know what sound hardware you computer uses, you are best advised to avoid this tab for now, but if you still have sound problems after trying everything else, you can try changing the settings here to see whether that helps. To do this, select a device to configure and then use the Profile drop-down menu to configure it.
Input
Here, you can specify the input volume with a slider, or mute input entirely by checking the Mute checkbox. You can also test sound levels by checking the lights next to “Input level” (see Figure 3-25).
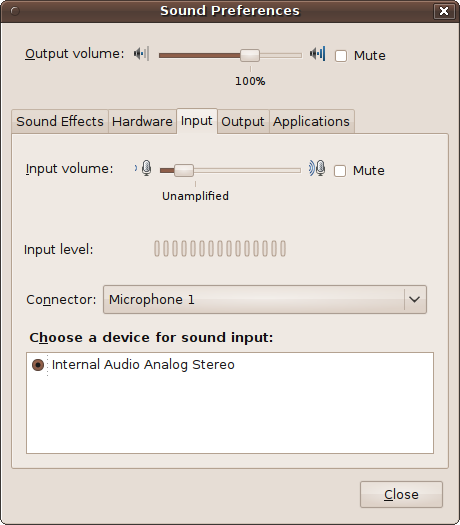
Underneath that you can choose which connection to use for input through the Connector drop-down menu (the most common choices are line in and microphone input), and use the radio buttons in the bottom area to select between different input devices.
Output
This tab lets you specify the device to use for output by selecting the radio buttons in the top area of the window, or you can set the balance using the slider underneath (see Figure 3-26).
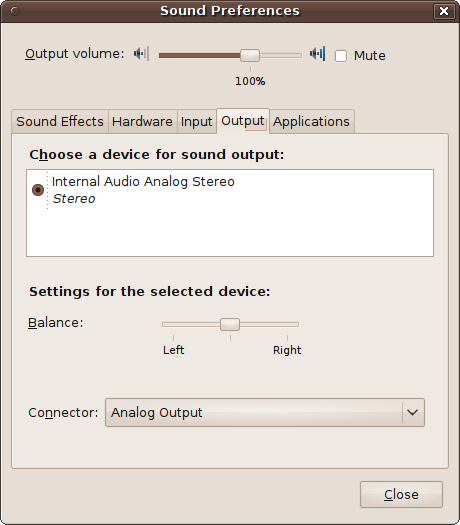
Below that you can select the output method using the Connector drop-down menu. The usual choices here will be either headphones or general analog output.
Applications
Whenever you have any applications using sound on your computer, the Applications tab will show the application and enable you to alter the sound level or mute it (see Figure 3-27). By the way, some sound drivers have a bug where the action of the mute checkbox is reversed. So if it is unchecked and you cannot hear any sound, try checking it.
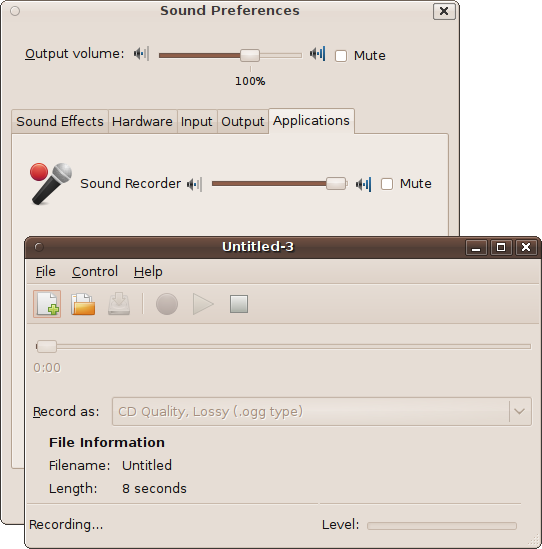
If no sound is in use (either recording or playing), this tab will simply display the message “No application is currently playing or recording audio.”
PulseAudio
The standard sound server in Ubuntu is PulseAudio, a background process that takes input from multiple sources, processes it, and outputs it to multiple sound cards, servers, or other processes. The idea is to allow all audio streams to integrate seamlessly with each other to provide crystal-clear sound, no matter how the input streams are combined.
Although it’s not essential to have it installed in order to play sound, PulseAudio features, among many other things, per-application volume controls, compatibility with most popular audio applications, and high-quality resampling, and it even handles network audio. So it’s a very useful and powerful program to have installed.
However, there have been reports of sound problems on certain setups, such as scratchy sound and random pops, or even no sound at all. So if you’ve tried everything else and still can’t get the sound to work correctly in Ubuntu, you may be able to solve the problem by uninstalling PulseAudio.
To do this, make sure that you do not have Synaptic running, and then open a Terminal window by selecting Applications → Accessories → Terminal. Then enter the following, providing your password when asked:
sudo apt-get remove pulseaudioHopefully the issue will now be solved, but you may still wish to try reinstalling a future release of PulseAudio (which may now work for you) in order to gain use of the features it offers. To do this, you would enter the following from a Terminal window prompt:
sudo apt-get install pulseaudioYou can always uninstall it again if it still doesn’t work for you.
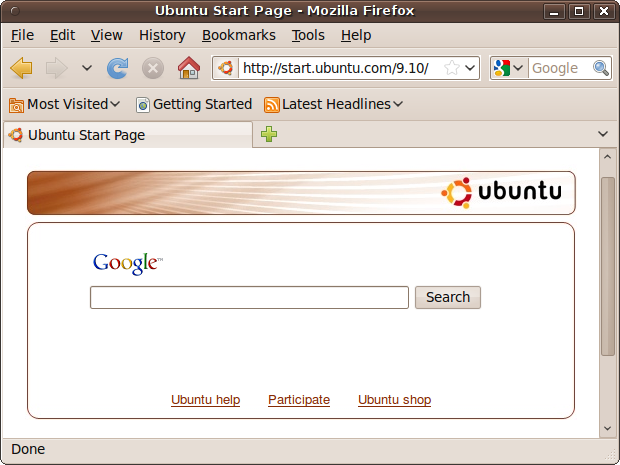
Basic Networking
There’s a lot more about networking in Chapter 10, but for now you’ll just want to ensure your new Ubuntu installation is able to reach the network in your own home or office, and from there the Internet. To find out if that’s the case, double-click on the Firefox icon right next to the system menu at the top left of the screen, or select Applications → Internet → Firefox Web Browser. When the browser opens, it should display the default Google/Ubuntu home page, as shown in Figure 3-28.
If the home page doesn’t open and you get an error such as “Offline Mode, This document cannot be displayed while offline…”, then you need to check your network configuration options.
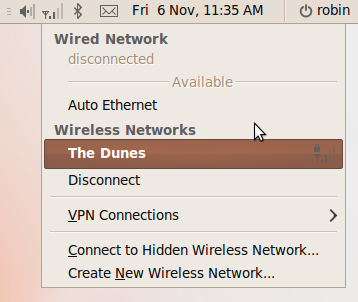
To see what might be the problem, take a look at Figure 3-29. You can call up this menu by clicking on the network settings icon at the top right of the desktop. The icon will usually look like a pair of plugs connecting to each other diagonally or, as in this case because a wireless network is connected, a set of signal strength bars.
Normally you will see “Auto eth0” under Wired Network if you have an Ethernet cable plugged into the computer. Furthermore, if your machine has a wireless card and there’s a wireless hub within range, you’ll see the name of the network to which you are connected under Wireless Networks. In this case, my computer isn’t plugged into a wired network, but it is connected to a wireless network called The Dunes. If you’re not connected to either type of network, or wish to connect to one that you can see in the box but isn’t connected, just click it to activate it.
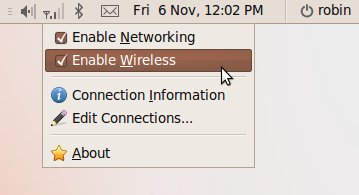
You also need to be aware that either or both types of network connection may be disabled. To check this, right-click on the network connections icon and make sure that you have checked all the boxes that need to be enabled, as shown in Figure 3-30.
Wired Connections
In the case of a wired (or Ethernet) connection, select “Auto eth0” (or “Auto eth1”, etc., if you have more than one network card). The icon will show an animation while the connection attempt is made, and if successful, will be replaced with the diagonal-pair-of-plugs Ethernet icon I mentioned earlier. You will also know whether this has worked because a black message box will appear saying “Auto eth0 connection established.” If you ever unplug your Ethernet lead, this message will become “Auto eth0 disconnected.”
If you don’t have an Ethernet cable connected, all that will appear under Wired Network is the word “disconnected,” and you will be unable to select a wired network. Likewise, if there are no wireless networks within range, then the word “disconnected” will appear underneath the Wireless Networks section.
Installing suitable drivers
You should also bear in mind that if you do not have a network card (either wired or wireless) or it is not correctly installed, then Ubuntu will not show any option at all, as only the cards it finds connected are provided as options. Therefore, if you do have a wired network card but none is listed, then you may need to use a search engine to find a suitable driver and install it.
For example, I discovered from a Google search that one of my computers experiencing networking problems uses the RALink 2790 chipset—which is not installed by default. After performing another quick search, I located the RT2860STA driver software, which I downloaded and installed according to the supplied instructions. After a reboot, the menu was properly activated.
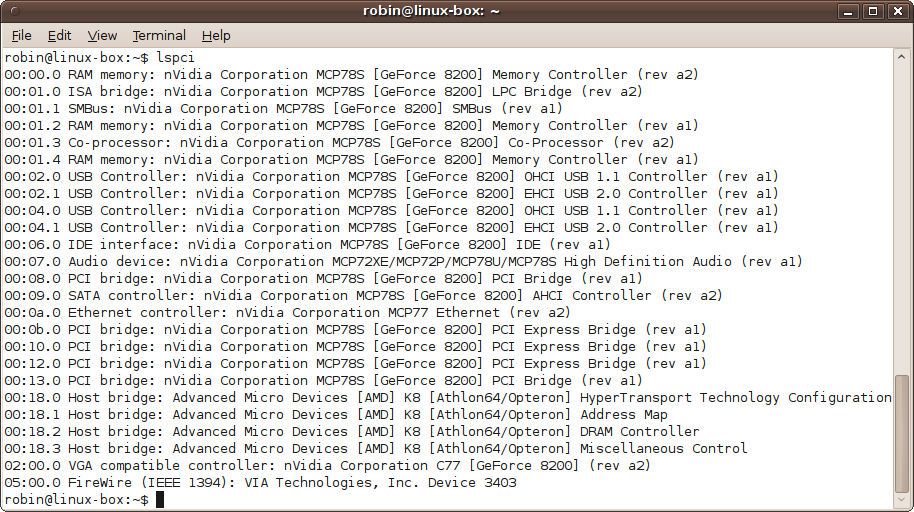
Due to the wide variety of network cards, it’s not practical to
list them and their drivers here. However, you can usually determine
what hardware is connected by opening up the Terminal (by selecting
Applications → Accessories → Terminal), typing lspci (the command to list all PCI devices),
and then pressing Enter. The result of running this command can be
seen in Figure 3-31. Look for the words
Network or Ethernet, and you should see which devices are used for
networking. You can then use a search engine to get more information
and download drivers.
Wireless Connections
The same advice for installing drivers given in the previous section also applies here. If your wireless network card is not detected, follow the advice in that section for looking up the card’s details and installing the correct driver for it.
The first step is always to ensure that you can see the name of the wireless connection you want and that you can click on it. When you do so, if no password is required you should be connected automatically. Otherwise, Ubuntu will determine the type of encryption used and prompt for the right type of password. In the case of Figure 3-32, a WEP 40/128-bit key is being requested.
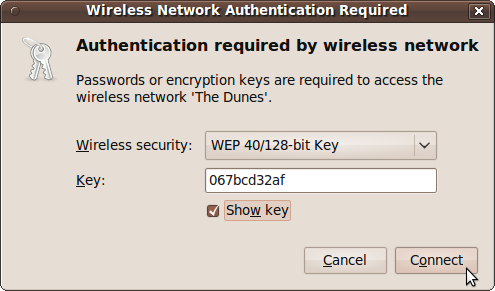
If you wish to ensure you have entered the correct characters, you can click the “Show key” box before you enter them, but for security reasons, you should uncheck the box afterward.
When you click the Connect button, the network connections icon will animate for a while, and assuming you are successful, you will see a black message box appear saying “connection established.”
Using an Ethernet Bridge
When trying to get wireless networking to connect, if all else fails there is a solution that should work every time: using an Ethernet bridge, which is a wireless device that features a socket for connecting to the Ethernet card in your computer. When you do this, as far as your computer is concerned it’s using a wired connection to your network via its Ethernet card.
There are two types of bridge available. One uses the wiring in your electrical sockets to connect two devices together, just as if you had run a long Ethernet cable between them. They usually come in pairs, and you connect one to your computer and the other to your router or access point.
The other type of bridge uses an antenna to connect your computer to your wireless network. You configure the device with your network’s name and security details, and it remembers this information, even when it’s switched off. You then plug it into the Ethernet socket of any computer (running Ubuntu, Windows, OS X, or any other operating system) within range of an access point. This kind of device is often called a Wireless Ethernet Bridge or a Wireless Gaming Adapter.
This solution always seems to work because wired networking has been around much longer than wireless, and the drivers required are now refined to such a level that just about all Ethernet cards are supported—which isn’t something that can be said about all wireless networking devices.
Printing
To install your printer, select System → Administration → Printing, which will call up the printer configuration window. Then click the New button, or select Server → New → Printer, and a Searching message will appear for a few seconds, which is then replaced by a list of any network or other printers found by Ubuntu (see Figure 3-33).
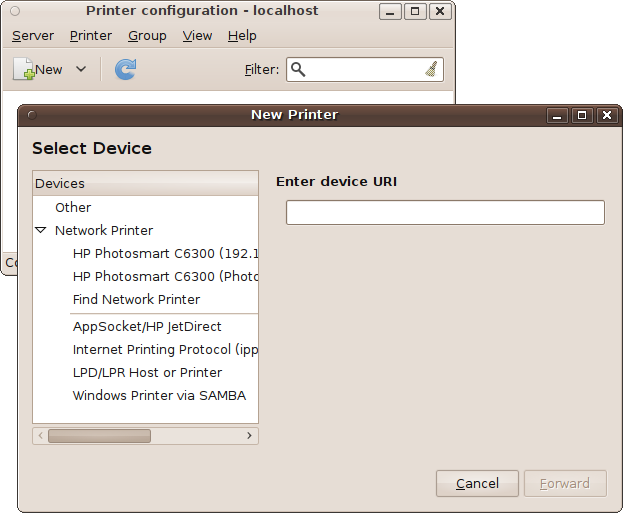
If your printer is shown, select it and click the Forward button. A box will then pop up telling you that Ubuntu is searching for available drivers. If it finds the right one, it will prompt you to install it. Otherwise, it will call up the dialog shown in Figure 3-34. Here, you should manually select the manufacturer and model of the printer. Using a little more technical sophistication, you can provide a PPD (printer driver) file, or search the Web for a driver to download.
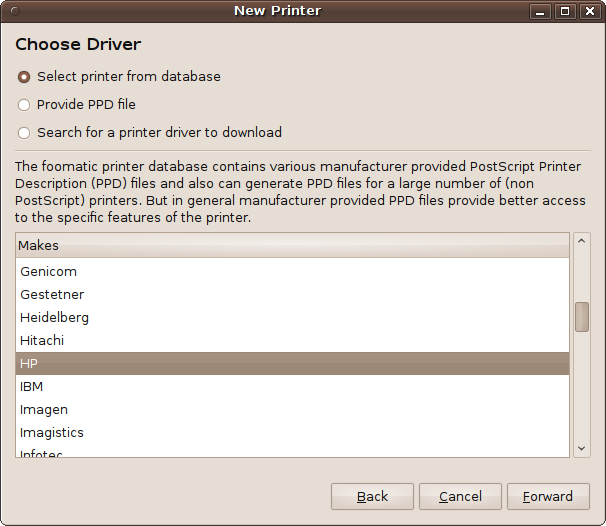
If you manually select the driver, submenus will appear until you narrow it down enough and the driver you want is listed in the Drivers window. Select the driver, click Forward, and you’ll be prompted to provide a printer name, description, and location (see Figure 3-35).
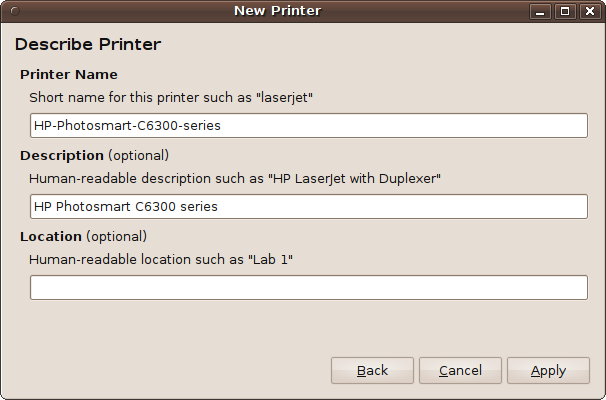
After clicking Apply, you will be asked whether you would like to print a test page. I recommend you click Yes, just to make sure everything installed correctly.
Upon successful installation, your printer will appear in the printer configuration window. You can also add other printers to this window.
Finding Unreported Printers
If your network printer is not automatically discovered by Ubuntu
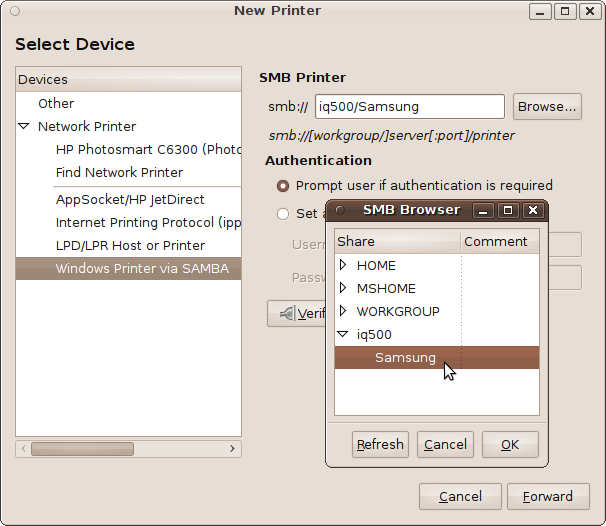
and it is a Windows printer, you should try selecting the “Windows
Printer via SAMBA” option and entering the server/printer details in the
“smb://” input box. These will be the name of the computer to which the
printer is connected, followed by a /, and then the shared name that computer has
provided for it. Then click Browse to list any printers attached to that
server. In the case of my local network, I know there’s a shared printer
using the name Samsung attached to a machine
identified by the name IQ500, so I entered those
details, and Ubuntu found the printer, as shown in Figure 3-36.
From there it was simply a matter of choosing the correct printer driver as before and then printing out a test page, all of which worked smoothly.
Other Printers
Of course, there are hundreds (if not thousands) of different makes and models of printer, and so you may still be having difficulty installing yours under Ubuntu. If this is the case, I suggest you visit https://help.ubuntu.com/community/Printers (make sure you use a capital P for Printers), where there’s advice on installing most of the Brother, HP, Lexmark, Samsung, and Xerox printers.
There’s also http://wiki.ubuntu.com/HardwareSupportComponentsPrinters for information on the entire range of Ubuntu supported printers. If yours isn’t there, unfortunately there’s probably no Ubuntu driver available for it…yet. I say yet because if your printer is very new, keep checking back. A driver could be available soon.
TV Tuners
A wide variety of TV tuner cards (both analog and digital) are supported by Ubuntu, and the best way to use them is with the MythTV program, the Linux equivalent of Windows Media Center. To install it you can either visit apt://mythtv in the Firefox web browser (making sure you select apturl as the application launcher if a pop-up window requests it) or select Applications → Accessories → Terminal and enter:
sudo apt-get install mythtvIf you are prompted for your password, you should enter it and then wait a few minutes for installation to complete, as there are a number of other programs it depends on that may also require installing.
During the process you may be advised to set a password for the MySQL root user. If so, type one in and make sure you remember it, as you’ll be using it later on in the installation. Alternatively, if you are behind a firewall and running a personal computer, you may wish to just press Enter here to leave the password unset; you can always create a root password for MySQL later if you need one.
You will also have the opportunity to allow remote computers running MythTV to connect to this service. If your computers are all behind a firewall, this is a reasonably safe thing to allow and you can go ahead and select Yes. If not, I don’t recommend this option, as you may expose both MythTV and MySQL services to the Web.
Restarting and Setup
Although you may not be asked to, I recommend restarting your computer after installing MythTV to be absolutely sure that installation is complete. You will now be ready to configure the system.
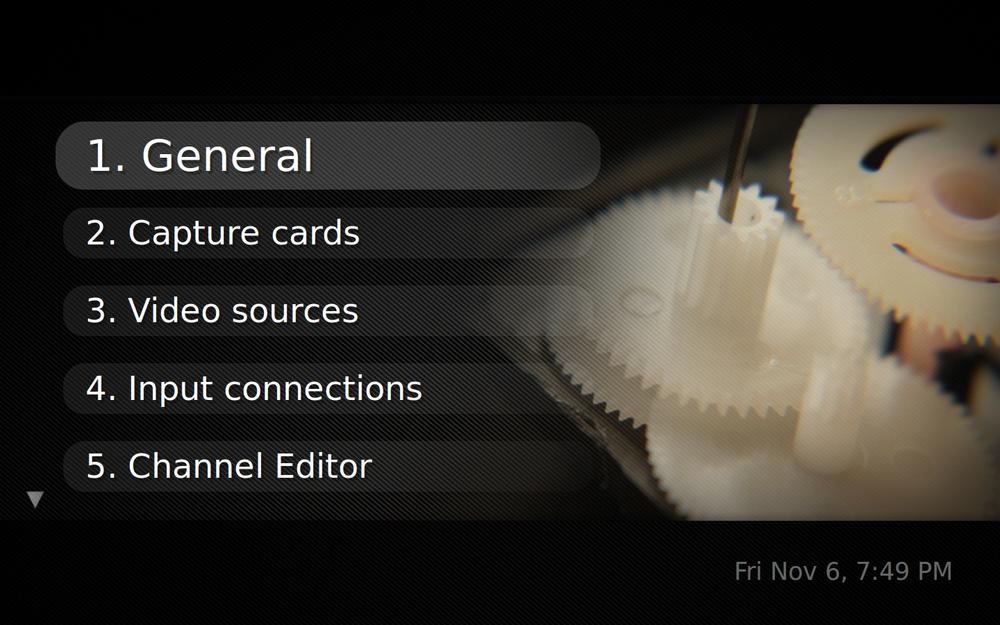
First you will need to tell the program about your TV card by selecting System → Administration → MythTV Backend Setup, which will present the screen shown in Figure 3-37. The first time you do so, you may be asked if you wish to be added to the mythtv group. If you do, click OK and enter your Ubuntu password when prompted. After that you will need to log in to Ubuntu again, so click log out, then log back in again, and then re-run the MythTV program.
Once up and running, you may not see your mouse on the screen. If this is the case, you will have to use the cursor keys and Enter to select and change options. The first option you’ll need to use is “Capture cards,” with which you will tell MythTV what capture card you have connected to your computer.
Capture Cards
Select “Capture cards” by pressing the down cursor key a few times and pressing Enter, followed by (New Capture card). There may be a delay of several seconds while the configuration software searches your machine’s hardware, after which a screen similar to Figure 3-38 will appear.
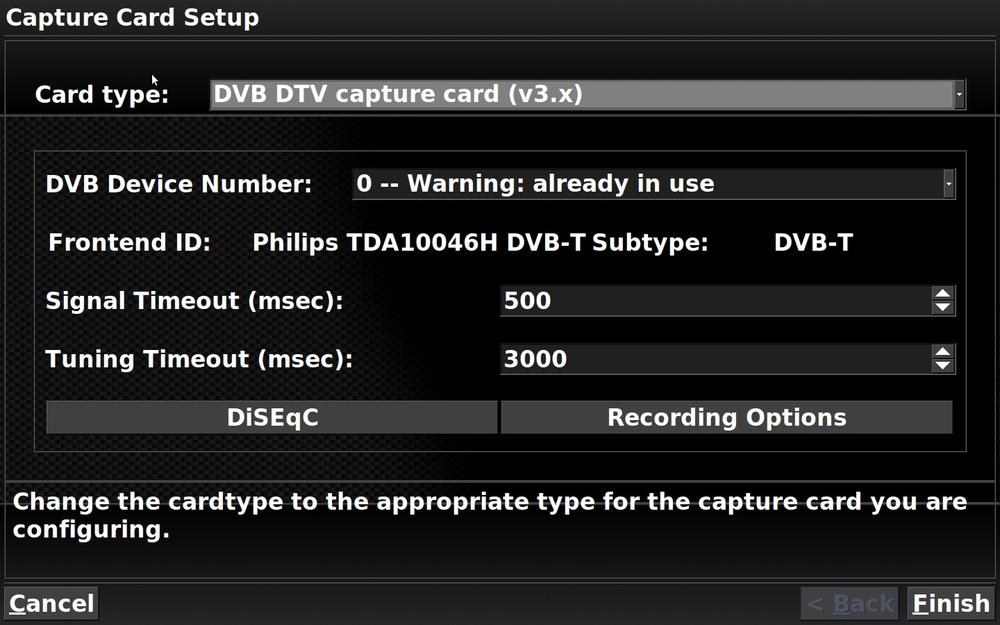
Use the cursor keys to move to the “Card type” field, and press the right cursor key to scroll through the types of cards shown until yours is listed, ignoring any USB cameras or other input devices. For example, the computer used for the screen grab in Figure 3-38 has a Philips digital tuner card, so once the program displayed that one, I selected Finish by pressing Alt-F. To go back a level you can press Alt-B, or to discard any changes you can press Alt-C or the Escape key.
At this point, though, you should be back at the “Capture cards” menu and should now press Escape to return to the Main menu.
Note
If you find that MythTV doesn’t find all your channels when performing a scan (which we’ll get to shortly), you can tweak the configuration here to help by changing either or both of the Signal Timeout and Tuning Timeout fields to a larger number, such as 5,000 milliseconds instead of 500 (or whatever the default value shows).
Video Sources
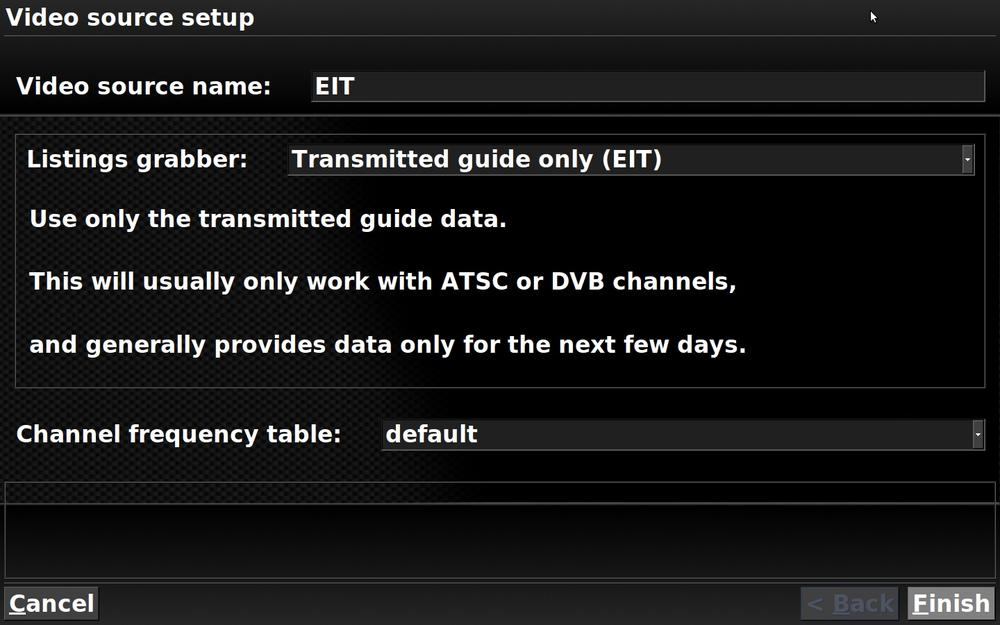
Next you need to select the “Video sources” menu and then select (New video source) to bring up the screen shown in Figure 3-39. To keep things simple, I have chosen to use only TV listings supplied along with the television channels by setting the “Listings grabber” field to “Transmitted guide only (EIT).” I therefore entered the name EIT in the “Video source name” field and then selected Finish.
To return back to the Main menu, press Escape.
Input Connections
You are now ready for the final essential step, which is the “Input connections” menu. Select it, and then select the single connection that should be listed to enter the setup screen shown in Figure 3-40.
Here, I chose to give a display name of Digital TV, and then moved onto the “Video source” field and pressed the right cursor key to call up the previously created video source, EIT.
Once the video source has been selected, you can then click “Scan for channels,” followed by selecting Next, to set up all the TV channels your card can receive. Be prepared to wait for some time while all possible channels are scanned. It will take even longer if you have increased any of the Timeout settings for your card, but higher settings help you stand a greater chance of finding all receivable channels.
Once the scanning is complete, your main configuration work is done, but you can then go ahead and configure other options if you like and, when you are ready, exit from the program. When you exit, you’ll be asked whether you wish to run mythfilldatabase to update MythTV. If you will be using the EIT program information rather than obtaining listings information over the Internet, just click Cancel.

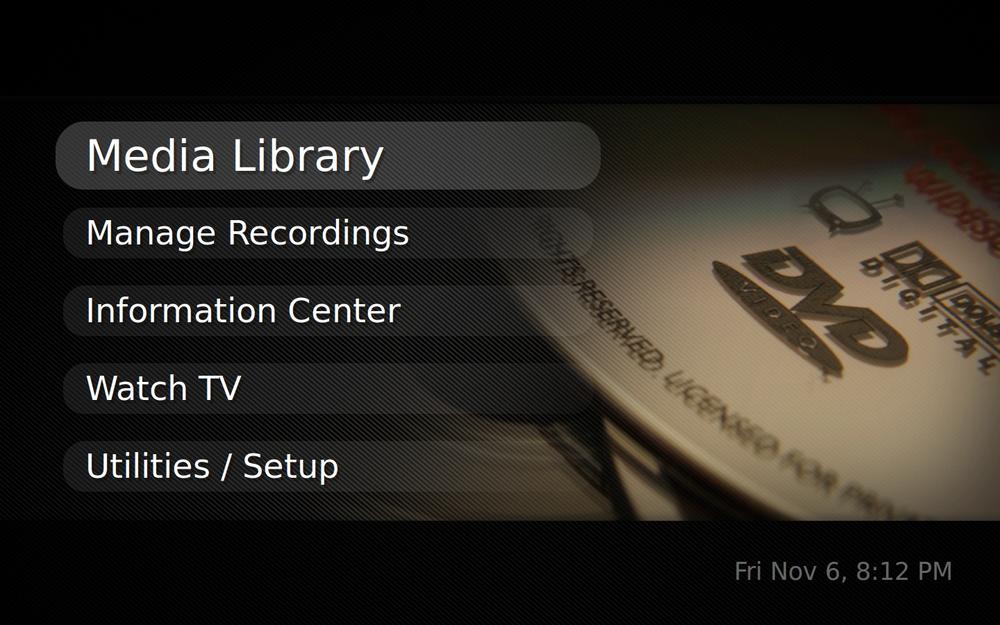
Once you have completed installation and configuration, you are ready to call up MythTV itself by selecting Applications → Sound & Video → MythTV Frontend. Your screen should now look like Figure 3-41.
Running MythTV
You are now ready to test out MythTV by selecting Watch TV. All being well, you’ll get a screen such as the one shown in Figure 3-42. You should also be able to pause live TV and record and play back various TV programs and other media. Just experiment with the options to get the hang of them.
Webcams
There’s a USB standard called UVC that defines streaming video, which makes webcams as easy to use as memory sticks and hard drives by allowing one driver to work with many webcams. Therefore, most (if not all) webcams work automatically in Ubuntu.
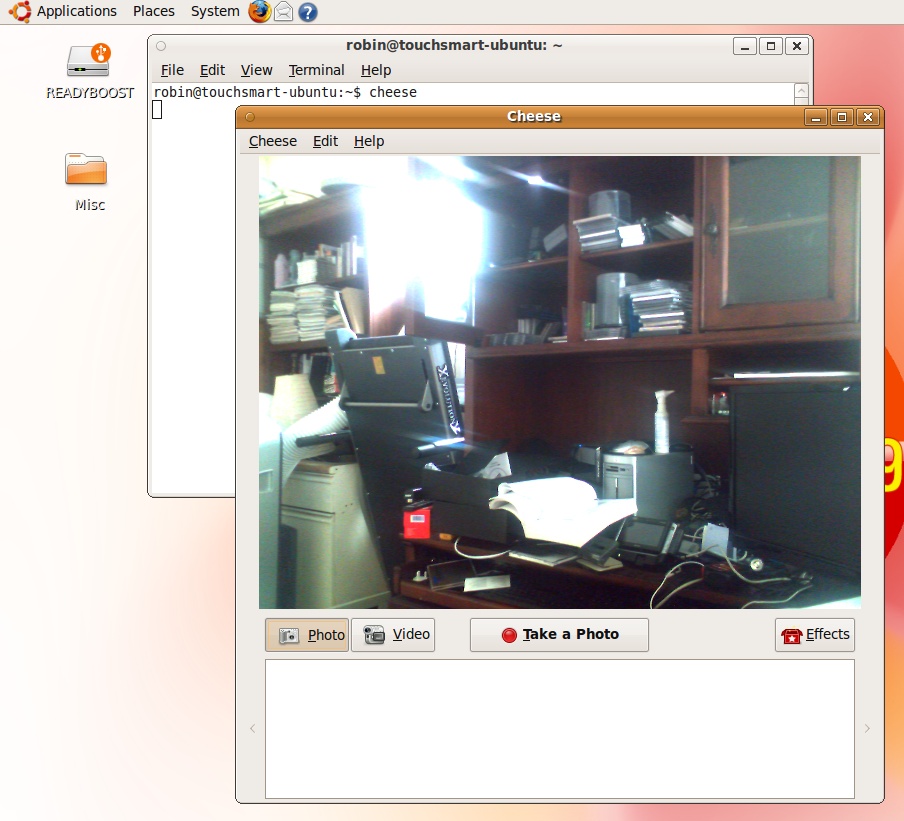
For a quick way to ensure that your webcam is working, you can install and run the Cheese program by selecting the Terminal (Applications → Accessories → Terminal) and then entering:
sudo apt-get install cheese
cheese

The first command installs the program (and will prompt you for your Ubuntu password), whereas the second (which you should issue only after installation finishes) will run the webcam program and bring up a window similar to the one shown in Figure 3-43. Once you have satisfied yourself that your webcam works, you can close Cheese, but it’s worth leaving on your computer because it’s a great utility for recording video and taking photos.
USB Media
You may have various storage devices connected (or sometimes connected) to your computer via USB, such as cameras, thumb drives, hard disk drives, and so on. All of these should be recognized by Ubuntu as soon as you connect them, after which they are then mounted in the filesystem and on the desktop.
You can usually drag and drop files in and out of the device’s folders, and in the case of cameras, you can delete the photos on the camera once you have copied them to your hard disk.
Note
A note about iPhones. In versions of Ubuntu prior to 10.04, iPhones only mounted the photo part of their memory because the iPod media files are encrypted. To handle them, some people have had success installing the Wine Windows interface and then installing the iTunes software. However, results vary due to different versions of iTunes, and often this method results in iTunes hanging or simply not recognizing the iPhone. The most success seems to come from running VirtualBox on Ubuntu, and then installing both Windows XP and iTunes. This is a long-winded approach just to run a single program, but see the following section.
What’s New in 10.04
Starting with Ubuntu 10.04, as well as mounting your iPhone’s photo folders using Nautilus, it will also let you browse the entire contents of your iPhone, including your apps, music and videos. What’s more, the Rhythmbox music player now integrates with iPhones, working in a similar manner to the iTunes program. Hopefully this integration will stay and won’t be interrupted by any future iPhone firmware upgrades. It’s one more good reason to upgrade to 10.04 soon after you’ve installed 9.10.
Summary
I know this chapter covered a lot of material, but by throwing you in the deep end and getting your installation properly configured, I hope you now have a good feel for what Ubuntu is like, how easy it is to use, and what it can do for you.
In the next chapter, we’ll look at the desktop in more depth and learn how to modify its layout via the various personalization options, as well as how to add more users to the system (and manage them), how to perform searches, and other useful features.