Table of Contents for
Ubuntu: Up and Running
 Ubuntu: Up and Running
Published by
O'Reilly Media, Inc., 2010
Ubuntu: Up and Running
Published by
O'Reilly Media, Inc., 2010
- Cover
- Ubuntu: Up and Running
- Ubuntu: Up and Running
- Dedication
- Foreword
- Preface
- 1. About Ubuntu
- 2. Installing and Upgrading Ubuntu
- 3. Configuring
- 4. The Desktop: Accessing Applications and Features
- 5. The Filesystem, File Attributes, and Permissions
- 6. The Nautilus File Browser
- 7. The Command Line
- 8. Installing and Removing Software
- 9. System Maintenance and Security
- 10. Networking Ubuntu
- 11. The Internet
- 12. Using OpenOffice.org
- 13. Playing Games
- 14. Pictures, Sound, and Video
- 15. Other Ubuntu Distributions
- 16. Using Wine
- Index
- About the Author
- Colophon
- Copyright
Chapter 7. The Command Line
As powerful as the GNOME desktop and Nautilus file manager are, there are still times when you will need to use a command line in Ubuntu. Fortunately, though, the days when you needed to learn enough stuff to fill an entire book before you could make good use of the command line are long gone.
Instead, you should be able to get by with just the information provided in this chapter, in which you’ll learn how to start a command-line session, manage files and folders and their permission settings, run programs, and perform many other housekeeping tasks.
If you’ve never used a command line before, please don’t be put off by this chapter. Unix, the operating system on which Linux is based, has been around a very long time, precisely because it’s actually quite easy to use and, yes, even easy to learn, as you’ll soon discover.
The Terminal
The main method you will use to enter command-line instructions into Ubuntu is via the Terminal program, which you call up by selecting Applications → Terminal. This results in a blank window capable of displaying 24 rows of 80 characters, as shown in Figure 7-1.

This resolution is used because it has been the standard size for text displays since the dawn of Unix. However, you can change it by dragging the window borders to suit your preferences and accommodate the text being displayed. Or select the Terminal menu and choose one of the four predefined resolutions. You can also zoom in and out, enlarging and decreasing both the window and font size, using the View menu.
Looking again at the screenshot, you’ll see that the window’s title shows robin@linux-box: ~. This indicates that the user robin on the computer linux-box is logged in, and the ~ means that the current folder (also known as the working directory) is the home folder for robin, which is /home/robin. By default, the command-line program used in the window will be Bash.
Bash
The Bash program is what is known as a shell program—a type of interface that provides access to the operating system’s kernel. The name Bash is an acronym for “Bourne again shell,” a free version of the earlier Unix shell written in the 1970s by Stephen Bourne. Bash is the default shell for the GNU project and most flavors of Linux, including Ubuntu. Interestingly, Bash is also used by Mac OS X, so if you have any recent Mac experience, you should be at home with it.
The Command-Line Editor
Before looking at the command-line instructions, I’d like to explore the various ways you can enter and edit text on the command line, because numerous options are available to make your life a lot easier.
For example, once you have entered one or more commands, you can scroll back and forth through the command history to reselect or edit previous commands by using the Up and Down cursor keys, or Ctrl-N for Next and Ctrl-P for Previous, as you can see from Table 7-1.
Shortcut | Equivalent to | Action |
Ctrl-A | Home | Move the cursor to the start of the line. |
Ctrl-E | End | Move the cursor to the end of the line. |
Ctrl-D | Delete | Delete the character under the cursor. On a blank line, Ctrl-D (but not Delete) will cause the Terminal window to close. |
Ctrl-H | Backspace | Delete the character to the left of the cursor. |
Ctrl-J | Enter | Enter the current line. |
Ctrl-B | Left arrow | Move the cursor back a character. |
Ctrl-F | Right arrow | Move the cursor forward a character. |
Ctrl-P | Up arrow | Recall the previous command (if any). See also Ctrl-N. |
Ctrl-N | Down arrow | Recall the next command (if any). Using this and Ctrl-P, you can scroll back and forth through all the commands entered in a session. |
Alt-B | Ctrl-left arrow | Move the cursor to the previous start of a word. |
Shift-Alt-F | Ctrl-right arrow | Move the cursor to the first character following the end of the current word. |
Shift-Ctrl-C | Copy the highlighted contents to the Ubuntu (not the Bash) clipboard. | |
Shift-Ctrl-V | Paste the contents of the Ubuntu (not the Bash) clipboard to the current cursor position. | |
Ctrl-C | Abort the current task or input. | |
Ctrl-K | Remove all the text from the current cursor position to the end of the line, saving it to the clipboard. | |
Ctrl-L | Clear the screen. Equivalent to the | |
Ctrl-U | Remove all the text before the cursor position, saving it to the Bash (not the Ubuntu) clipboard. | |
Ctrl-W | Remove the word before the cursor position to the Bash (not the Ubuntu) clipboard. | |
Ctrl-Y | Insert the Bash (not the Ubuntu) clipboard contents at the cursor position. | |
Ctrl-Z | If a program is currently running, this will suspend
it and display a number and the word Stopped. To bring it back to
the foreground again, you type | |
Alt-C | Capitalize the character under the cursor, and then move the cursor to the character following the end of the current word. | |
Alt-D | Remove the word starting at the cursor position up to the first nonword character. | |
Alt-L | Lower the case of the character under the cursor and all those up to the end of the current word. | |
Alt-R | Cancel all changes made to a line and return it to its position in the history of commands. | |
Alt-Backspace | Delete the word immediately to the left of the cursor position. |
Many of the Ctrl key shortcuts are holdovers from the days when keyboards didn’t come with cursor keys, so unless you’re also missing these keys, you can ignore them and use the equivalent arrow key and keypad shortcuts.
You may wish to try out the command line by entering some nonsense
text, ensuring you start it with a #
character to tell Ubuntu to ignore everything you type. You could even
practice entering commands and scrolling back and forth through the
history. A couple of minutes spent getting the hang of these shortcuts
will make it much easier for you to work through the rest of this
chapter.
A particular point to note while practicing is that Bash keeps its own clipboard, which you use with Ctrl-U, Ctrl-W, and Ctrl-Y. To paste from the Ubuntu clipboard into Bash, you use Shift-Ctrl-V or Edit → Paste, and to copy to the Ubuntu clipboard from Bash, you should highlight some text and either press Shift-Ctrl-C or select Edit → Copy.
Bash Commands
Running Bash commands is quite easy. For example, you can verify the
location of the current folder simply by entering the command pwd, which stands for print working
directory, to print out the full path of the current working
folder. Or you can see which files and subfolders are in the current
folder by entering ls, which stands for
list contents. Table 7-2 details some of the more common
commands relating to files and folders (along with what they
do).
Note
Throughout this book I use the terms folder and directory interchangeably. Directory was the initial term for a folder in Unix, whereas folder is the term more commonly used on desktop systems such as Ubuntu, but they both refer to the same thing.
Command | Arguments | Action |
|
| Display the contents of
|
|
| Change the working directory (or folder) to
|
|
| Change the file or folder
|
|
| Copy the file or folder
|
|
| Compare the contents of
|
|
| Display the string
|
|
| Search the filesystem for filenames matching the
string |
|
| Search the contents of the file or files supplied in
|
| List all files and folders in the current folder (except hidden ones). | |
|
| List all files and folders (except hidden ones)
matching |
|
| Display all files and folders one line at a time with extended information (long form). |
|
| Display all files and folders (including hidden ones). |
|
| Display all files and folders (including hidden ones) in long form. |
|
| Display the files or folders matching
|
|
| Create
|
|
| Display the contents of
|
|
| Rename or move the file or folder
|
|
| Open |
| Display the full path of the current working folder. | |
|
| Remove the file or folder
|
|
| Remove |
|
| Remove |
|
| Change the timestamp of
|
|
| Display the number of lines, words, and characters in
|
The cd, pwd, and ls Commands
By default, the prompt you see when you first open a Terminal window will be something like this:
user@computer:~$
In my case, my username is robin and the computer I am using is called linux-box, so the prompt I see is:
robin@linux-box:~$
The idea behind this is to remind you of the username and computer you are using, so you don’t have to remember those details yourself, which is especially useful when managing multiple computers or logins.
Now let’s look at some commands, starting with the cd command, which is used to change
directory (or folder). In its simplest form, you just enter
something like the following:
cd /homeThis command makes the home folder the default working folder. Enter the text shown and press the Return or Enter key, and the Terminal prompt will change to show something like the following:
user@computer:/home$
Remember that the actual prompt you see will have your username
and computer name in place of user and
computer. Now try entering the following two
commands:
cd /home
pwd
Ubuntu should report that you are now in the home folder by displaying the following:
/homeuser@computer:/home$
You can try navigating back up a level to the / directory by entering this:
cd ..Note
I often use the terms changing up and changing down a level in this book and realize that different people view them in different ways. I look at the filesystem as having the root directory at the top level of the root system of a tree (rather than the bottom level of the trunk and branches of a tree), and therefore when I say changing up it refers to going back a level toward the root, and changing down refers to moving to a deeper directory or folder.
The .. is a shorthand you use
to represent the parent folder. Whatever the parent of the current
folder is, Ubuntu will go to it automatically when this command is
issued. Now try the following command to select your home
folder:
cd ~I have no way of knowing what your username is, but Ubuntu does,
and when you use the ~ symbol, it is
substituted with your home folder. So, enter the following to see which
folder is now the working directory:
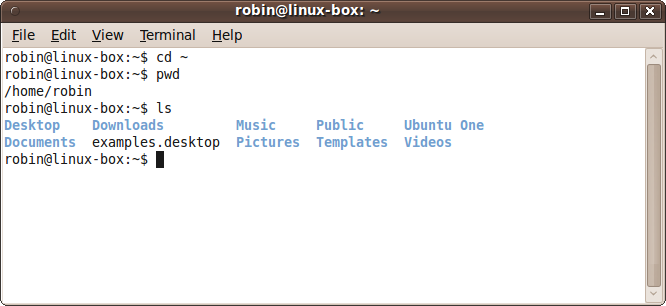
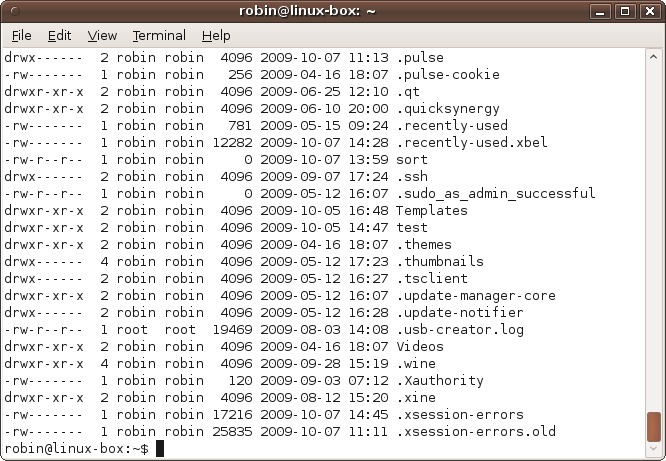
pwdNow type the following to view the contents of this folder:
lsThe result should look something like Figure 7-2. Although you may have more or less items, you should have a very similar collection of subfolders, and unless you have deleted any of your default folders, you will at least see Desktop, Documents, Downloads, example.desktop, Music, Pictures, Public, Templates, Ubuntu One, and Videos.
You can also use -a option with
the ls command to show all the files
in the current folder, like this:
ls -aYou will then be presented with a long list of files and folders that looks something like the following:
.                   .gnome2              .profile
..                  .gnome2_private      Public
.adobe              .gnupg               .pulse
.apport-ignore.xml  .gstreamer-0.10      .pulse-cookie
.bash_history       .gtk-bookmarks       .qt
.bash_logout        .gvfs                .quicksynergy
.bashrc             .hplip               .recently-used
.cache              .ICEauthority        .recently-used.xbel
.compiz             .icons               .ssh
.config             .kde                 .sudo_as_admin_successful
.dbus               .local               Templates
Desktop             .macromedia          test
   (etc...)
All the items beginning with a period are normally hidden, but the
-a option has revealed them.
Generally, though, you don’t need to see these files.
To display the output in long form you can use another option, like this:
ls -lAnd the result will then look something like this:
drwxr-xr-x  3 robin robin 4096 2009-10-05 14:12 Desktop
drwxr-xr-x  2 robin robin 4096 2009-09-07 15:29 Documents
drwx------  2 robin robin 4096 2009-09-02 10:15 Downloads
lrwxrwxrwx  1 robin robin   26 2009-04-16 17:56 Examples
                            -> /usr/share/example-content
drwxr-xr-x 12 robin robin 4096 2009-06-16 00:45 firefox
drwxr-xr-x  2 robin robin 4096 2009-04-16 18:07 Music
drwxr-xr-x  2 robin robin 4096 2009-10-05 13:45 My Projects
drwxr-xr-x  2 robin robin 4096 2009-04-16 18:07 Pictures
drwxr-xr-x  2 robin robin 4096 2009-04-16 18:07 Public
drwxr-xr-x  2 robin robin 4096 2009-09-23 15:13 Templates
drwxr-xr-x  2 robin robin 4096 2009-10-05 14:47 test
drwxr-xr-x  2 robin robin 4096 2009-04-16 18:07 Videos
You can also combine the switches like this:
ls -alAnyway, getting back to the cd
command, for the next example you should now change your working folder
to Pictures by entering the following:
cd PicturesNow enter pwd to verify that
this has worked; you should see that you have switched to the
Pictures folder.
So, let’s see the .. shortcut
in action by changing up a level and back down again to the
Downloads folder, all in a single command, like
this:
cd ../DownloadsWhat you have given the cd
command is a relative path, which will work no matter what your username
is; see Absolute and Relative Paths.
Note
Windows users should remember to enter forward slashes (/), not backslashes (\), to represent folders in Bash. Bash follows the Unix and Linux convention of separating folders with forward slashes, which you should be comfortable with because URLs on the Web use the same character. Also remember that Linux is case-sensitive, which means the folder Downloads is different from the folder downloads.
The cp and mkdir Commands
The cp command takes two
arguments: an existing file to copy and a destination. So, for example,
if you have the file accounts.txt
and would like to make a backup file, you can issue this
command:
cp accounts.txt accounts.bakThis will create the new file accounts.bak, which will be an identical copy of the original file. You can also use this command to copy folders, and even entire filesystems and subsystems. If the second argument is a folder instead of a file, the files you copy go directly under the folder and are given the source file’s filename.
For example, to create a copy of the /boot folder within your home folder, you
could ensure that you are in that folder and create a new one in which
to copy the files by entering the following commands (the mkdir command standing for make
directory):
cd ~
mkdir test
Then you would enter the following to perform the copy:
cp /boot/* testWhat this does is tell Ubuntu to copy all the files it finds in
the /boot folder—achieved by use of
the * wildcard character, which used
this way means “any file at all”—into the test folder. It does not, however, copy any
subfolders, and if there are any (such as the grub subfolder in this case), it will issue a
message telling you that it has omitted them. To copy a folder and all
its subfolders, you would add the -r
argument for recursive copying, like this:
cp -r /boot/* testThe mv Command
Ubuntu considers renaming and moving items to be equivalent. If
you rename a file, Ubuntu treats it as if you have moved it to a new
location comprising the current folder and the new filename. Therefore,
unlike DOS, instead of having both a MOVE and a RENAME command, Ubuntu provides just the
mv command.
Renaming items
To rename a file in the current folder, you could issue a command such as this:
mv accounts.txt accounts.oldThe file that was previously called accounts.txt will now have the name accounts.old. To move the file to a new location, you might use a command such as the following, which moves the file accounts.txt to the backups subfolder, if it exists (if not, the file will simply be renamed backups):
mv accounts.txt backupsSimilarly, you can rename a folder by making that the first argument, like this:
mv oldfolder newfolderMoving items
To move a file, you might enter something like the following, which moves the file accounts.txt into the backups folder:
mv accounts.txt backupsIf the folder backups exists, then accounts.txt will be moved into it. Otherwise, accounts.txt will be renamed to backups.
To move and rename a file at the same time, you might enter something like the following, which moves the file accounts.txt into the backups folder, giving it the new name of accounts.old:
mv accounts.txt backups/accounts.oldIf the backups folder doesn’t exist, you will get an error message.
You can move an entire folder (and its files and subfolders) to another location by making that the first argument, like this:
mv oldfolder otherfolderIf otherfolder exists, then oldfolder will be moved into it. Otherwise, oldfolder will be renamed to otherfolder.
You can also move groups of files specified by wildcards, like this:
mv *.txt textfolderThis moves all files with the extension .txt into textfolder.
If you like, you can provide multiple filenames to the mv command, like this:
mv *.txt *.jpg readme.doc destinationThe final name is treated as the destination, and all the files
preceding it are the sources. Other commands such as rm and cp
also allow multiple arguments.
The diff Command
Using diff, you can quickly get
a glimpse of the differences between two document
files. The syntax to use is like this:
diff file1 file2The program loads in the two files it is passed, synchronizes all the parts of text that are the same in each file, and then discards them. Whatever text remains from each file must be different from the other one. Then it is displayed, as shown in Figure 7-3.

Note
If you want to create some text files to try out some commands such as diff, skip ahead to the section Using Nano to Edit Files.
Any text that exists in the first file but is not present in the
second one is shown first, prefaced by a < symbol to remind you that the text is
unique to the first file. Likewise, the text that occurs only in the
second file comes next, but this time prefaced by a > symbol.
The screen grab shows that there are two extra lines in the file
review1.txt and four in review2.txt. Using diff, it’s clear to see that each file has
been separately edited, with an extra paragraph added (or
removed).
Programmers often use this program to highlight changes between various different versions of a program. You could use it to see changes made between versions of a report, a recipe, or anything that you save copies of as you go along.
The find Command
There are thousands of files in an Ubuntu installation (if not
hundreds of thousands), so locating individual ones could be a nightmare
without the find command. But with
it, you can find almost any file within a few seconds.
The program supports many options, but at its most basic you use it by entering a command such as this:
find / -name blackjackThis command searches the entire filesystem for any files called blackjack. However, as you will see from Figure 7-4, folders that you do not have permission to access are skipped, with the error message “Permission denied.”
At the top of the screen grab, you’ll see that six files with the
name blackjack have been found, and plenty of
folders have not been searched due to permission settings. If you want
to be given access to these folders, you can use the sudo command to temporarily become the
root user (see the section Using sudo for more information), like this (entering your
password when prompted):
sudo find / -name blackjackEither way, from the information returned, we can see that the likely location of the blackjack program is /usr/games/blackjack, shown in the fourth line in the screenshot.
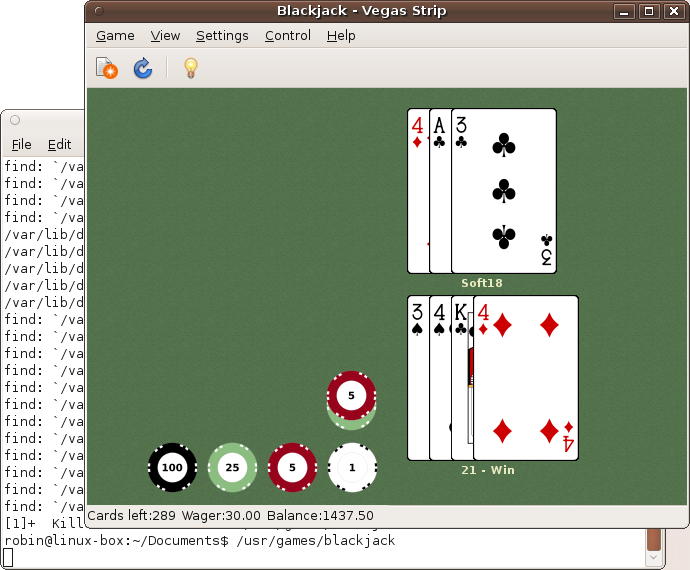
Of course, the default Ubuntu games are all available from the Applications → Games submenu, but if you ever delete any of these (or other) entries, this is how you can find out where the programs are located. And, indeed, if you type the following into the Terminal, the Blackjack game will open, as shown in Figure 7-5.
/usr/games/blackjack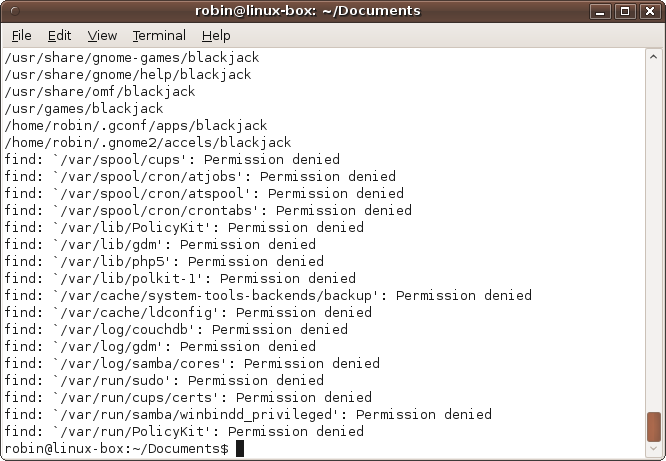
If you only know part of a file’s name, you can also use the
* and ? wildcard symbols. For more on this subject,
see the section later in this chapter called Wildcards, Sets, and Brace Expansion. But for now all you
need to know is that a ? represents a
single wildcard character, and *
represents zero or more unknown characters.
So, for example, all the following will locate the blackjack program file (and many others):
find / -name black*
find / -name *jack
find / -name bl?ck*
In fact, there may be so many entries that you want to page
through them all, which you can do using the more command, explained in the next
section.
You don’t have to always search from the root folder. You can, for example, search for files only in the current folder and its subfolders, which you can do using the period character, like this:
find . -name invoice*or starting from your home folder, like this:
find ~ -name invoice*What’s new in 10.04
The Blackjack game was removed from the default Ubuntu 10.04 distribution, but should still be on your computer if you upgraded from 9.10. However, if you don’t have this game, you may wish to install it first before trying the previous and following examples. It wasn’t in the 10.04 repositories at the time of publication, but you can always add it by entering the following URL into a web browser:
| http://mirrors.kernel.org/ubuntu/pool/main/g/gnome-games/gnome-blackjack_2.28.0-0ubuntu1_i386.deb |
This is a single line that should be entered in its entirety, without pressing the space bar or Return until it has been typed in.
The cat and more Commands
The cat command takes a file
and outputs it to the screen. To use it, enter a command such as the
following:
cat chapter7.txtHowever, if there are more lines than will fit in the window, the
text will scroll, which is where the more program comes in.
On its own, the more command is
very useful for paging through text files that have more lines than can
be displayed in the Terminal window. To use it, you enter the command’s
name followed by the name of the file to view, like this:
more chapter7.txtSee Figure 7-6 for the result of using the program on an early draft of this chapter.
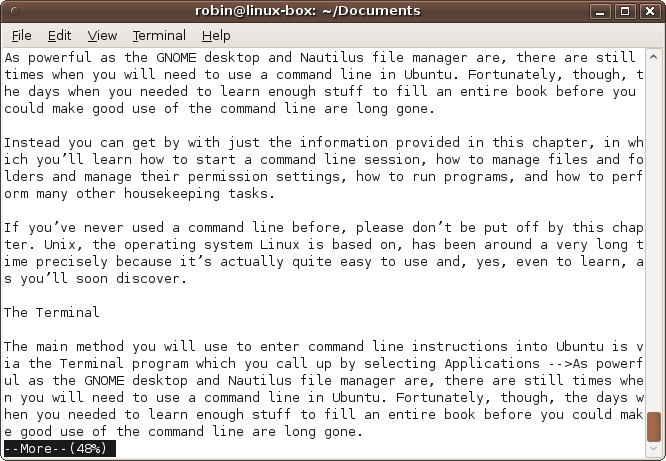
As you can see, this is easier than loading the file into a text
editor just for viewing it. You can scroll though the file a line at a
time by pressing the Enter key, or a page at a time by pressing the
space bar. To quit, press the q
key.
The more command is, however,
far more powerful than you might think, thanks to Ubuntu’s ability to
use pipes—a method by which the output from one program is passed as the
input to another—which is fully explained later on in the sections Using Redirection and Using Pipes. But
more is such a useful feature that
it’s worth a quick look at now.
For example, in the previous section on using the find command, I promised we would see how we
can combine it with more to page the
output. And here’s how you would do it:
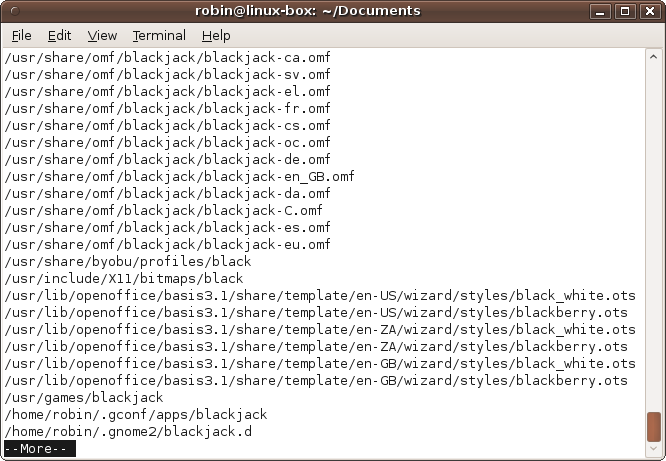
find / -name bl?ck* |moreAt the end of this command, I have added a | (pipe) symbol followed by a call to the
more program. As you’ll learn later,
the | takes the output that would
have been displayed and passes it to the more program to deal with instead.
What happens is that all the output (except for any error
messages) is stored up, and when find
exits, the more program takes over,
displaying the stored-up output a page at a time. The first page
displayed by more looks like Figure 7-7.
You can add the more command
this way to almost any other Bash command where there is more output
than will fit in the Terminal window. An odd little side effect of the
pipe improves the value of the output from more: all the “Permission denied” error
messages from find are displayed
before more runs so that you get only
the useful output all at the end. There are also ways to completely
suppress error messages altogether, which I’ll show later.
The grep Command
Using the grep command, you can
take your searches a step further and look inside files for text to
match. It is a very powerful command with some quite sophisticated
features, such as choosing (or ignoring) case-sensitivity, matching only
whole words, and much more. In fact, entire books have been written
about the program. But most of us will generally use grep in its simplest form, in which a given
set of files is searched for a particular word or phrase.
For example, to locate every file in your Documents folder containing the word invoice, you could issue the following command:
grep invoice ~/Documents/*You should remember the ~
character from the earlier section on the cp command; it represents your home folder.
Using it this way cuts out a step because you don’t have to use cd to change to the home folder. Instead, by
prefacing a file or folder name with ~, you tell Ubuntu to start a relative path
from that point.
Therefore, if you have the username fred, then ~/Documents/* will refer to all the documents within the folder /home/fred/Documents.
So the previous command calls up the grep command, asking it to search for the word
invoice in all the files within the given folder,
and then displays those that match. To illustrate this, here’s a command
you can type in right now:
grep -r videos /usr/share/docThis command specifies the -r
option to search the /usr/share/doc folder and all
its subfolders for any files whose contents contain the word
videos. (The option used is -r because programmers
use the word recursive to describe a task that
keeps on drilling down through levels, such as in this case of folders
within folders within folders, and so on.)
If you don’t care about the case of a match, you can use the
-i option to choose a
case-insensitive search, which will return even more results (but will
take longer to perform):
grep -ri videos /usr/share/docAnd to only return documents where the word
videos appears on its own and not, for example, as
part of the string videosettings, you can use the
-w option as follows, the result of
which will look like Figure 7-8.
grep -rw videos /usr/share/doc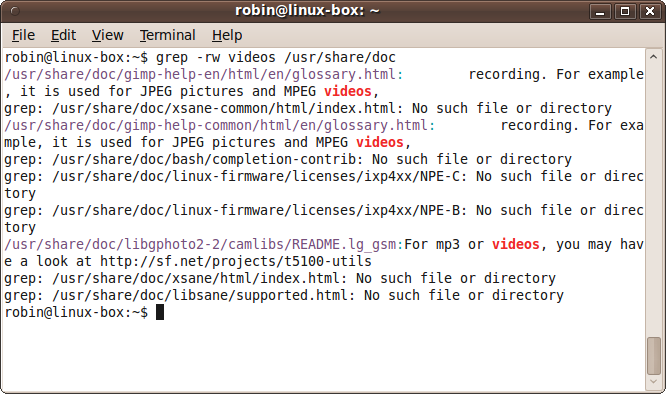
As with the more command, you
can also use grep in conjunction with
a pipe. So, for example, to narrow down the output from an ls command to display only certain files, such
as those containing the sequence Do within your
home folder, you could enter this command:
ls ~ |grep DoThis will list at least your Documents and Downloads folders, as well as any others you have created that match the specified pattern.
The rm and rmdir Commands
To delete a file or folder, use the rm command, which stands for
remove. For example, to erase the file
tempfile in the current folder, use this
command:
rm tempfileOr to erase a file in your home folder, you could enter a command such as:
rm ~/oldfileYou can also delete an empty folder using rmdir, like this:
rmdir EmptyFolderHowever, to remove a folder containing any files or subfolders,
you need to use the rm command with
the argument -rf, like
this:
rm -rf FolderWithStuffInWarning
Be careful, as the previous line is one of the most destructive
commands there is. If you execute it on the / folder using root privileges, it will wipe
out your entire filesystem. Or, executing it on ~, your home folder, will completely remove
that. Inserting an extra space character in an unfortunate place in
the command can also cause you to lose directories you wanted to
save.
So please, when using this command, look very hard at what you
have typed before pressing Enter. And don’t type an rm command someone on a bulletin board
recommends without first checking to see which files and folders it
will erase.
The wc Command
Using this command, you can quickly summarize the number of lines, words, and characters in a text file. You use it like this:
wc documentThe program will then display a result such as this:
10 234 1319 document
This tells you that document has 10 lines, 234 words, and 1,319 characters. Actual lines within the document are counted, not the number of lines the file would use if displayed in the Terminal window. The character count will include one character for each end-of-line character, so it will be higher than the number of visible characters.
Using man
I’ve really only scratched the surface of the commands I’ve shown, giving you just enough information to get you started. But they all offer a wide range of options, providing additional control over how they work and the output displayed.
Using the man command, you can
look up everything you could ever want to know about a Bash program. It’s
as easy as entering man followed by the
command name, like this:
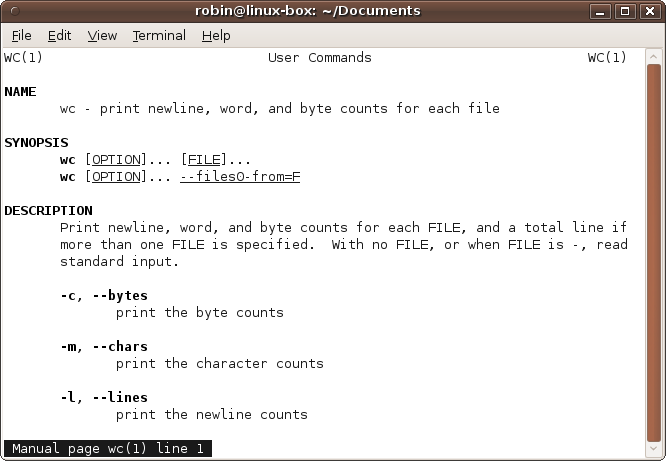
man wcThis displays the manual page for the wc command, which you can scroll through a line
at a time by pressing the Enter key, or a page at a time with the space
bar. You can also use the Up and Down cursor keys to scroll back and
forth. To quit the program, press the q
key.
If you have a scroll wheel on your mouse, you can also use that to
scroll back and forth through a man page. Figure 7-9 shows the manpage for the
wc command.
Ubuntu comes packed with masses of such information, so whenever you
are in doubt about how to use a command or what it does, just call up its
manpage. Some manpages tell you that the command is documented in another
page called an info page with more up-to-date or
extended information. You call up an info page by substituting info for man.
Additionally, you can usually get a quick explanation of a command
and its switches using -help in the
following manner, which summarizes the options for the man command:
man -helpAbsolute and Relative Paths
Although you may not realize it, you already have learned the difference between an absolute pathname and a relative one. But if you haven’t come across these terms before, let me explain them to you, as they are very important when using the command line.
An absolute path is fixed, such as /home/robin/Documents, and works the same way regardless of your working directory, whereas a relative path leaves out one or more parent folder names, either substituting them with the .. shortcut or referencing files and folders within the current one.
A path that uses parent folders without naming them might look like
../Videos, or on a deeply nested folder something
like ../../../Documents. Each time the
.. is encountered, Ubuntu knows to go back up a
level. A / is then required afterward
if there is more in the path. If not, a relative path such as ../../.. is quite valid—it takes you to the
folder three levels up.
The other type of relative path is where only files and folders within the current folder are referenced, such as Documents/Reports or Vacation/Cancun/Photos. In fact, although it would be pointless, a relative path such as Vacation/Cancun/../Barbados is perfectly valid because it actually represents the path Vacation/Barbados, unnecessarily visiting the Cancun folder on the way.
All you have to remember is that what differentiates a relative from
an absolute path is the existence of a / at the front. Without an initial forward
slash, a path is relative to the current location, but with the slash it
is relative to the filesystem’s root folder, which is more commonly known
as an absolute path.
Using Quotation Marks
With the Nautilus file manager, it is easy to create files and folders that include spaces in their names. You can also copy and move these about by dragging and dropping them without any problem.
But when you come to access such files from the command line, you
must remember to enclose them in quotation marks. For example, if your
username is jenny and you have a folder called
My Projects in your home folder that you would like
to access from the command line, you cannot use the cd command in the normal way, like this:
cd /home/jenny/My ProjectsThe reason is that Ubuntu will think you want to change to a folder called /home/jenny/My and will report the following error:
bash: cd: /home/jenny/My: No such file or directory
To prevent this, the correct way to change to such a folder is to enter the following, with double quotation marks (or you can use single quotation marks instead if you prefer):
cd "/home/jenny/My Projects"Likewise, using any other Bash commands with spaces in file or folder names requires similar use of quotation marks. The following collection of commands all illustrate the correct way to handle spaces in folder and filenames:
mkdir "/home/jenny/My Projects"
cd ~/"My Projects"
ls -al "/home/jenny/My Projects/January"
rm "Backups/Old|Report.doc"
The fourth line doesn’t have any spaces but it still requires the
use of quotation marks. The reason is that the | character—which, like the space, is a normal
character when used on the desktop—is a special operator when used in the
command line. There are many more of these special operators, such as
>, <, and ;.
If you omit the quotes when referencing files or folders that contain such characters, you will receive one of many different types of error message, depending on the characters used and their locations. Even worse, sometimes you may not get an error message at all, because such a string may look like a valid command that then gets executed, possibly even changing or erasing data!
As you can see by the second line in the previous code example, you
do not have to surround the entire path in quotes, and sometimes should
not if you want certain characters such as the ~ to be correctly acted upon. In fact, it is
sufficient to simply surround just the nonalphanumeric characters in
quotation marks. Therefore, the following commands are all equivalent to
the previous four:
mkdir /home/jenny/"My Projects"
cd ~/My" "Projects
ls -al /home/jenny/"My Projects"/January
rm Backups/Old"|"Report.doc
The PATH Environment Variable
Many commands you enter at the command line require the use of an
external program that is loaded from the filesystem. For example, commands
such as mkdir and wc actually reside in the
/bin folder.
Whenever you enter an instruction that Bash doesn’t recognize, it tries executing it as a program and returns an error if no program of the same name is found. And this doesn’t only include the main commands we’ve been looking at, because you can run almost any program from the command line.
But with a filesystem comprising thousands of files, how does Ubuntu
know which programs to run and from which directories? The answer is that
it uses a system environment variable to point to a subset of folders it
must search upon receipt of an unknown command. This variable is called
PATH, and it can be displayed using the
echo command, like this (the $ symbol is required):
echo $PATHThe result of issuing this command will look something like the following seven absolute folder paths, separated by colons:
/usr/local/sbin:/usr/local/bin:/usr/sbin:/usr/bin:/sbin:/bin:/usr/games
Each time an unknown command is entered, Ubuntu will search each of the folders in the path in the order they are provided to try and find a program of the same name. If one is found, it is executed; otherwise, an error message is displayed.
These seven folders provide easy access to all the main programs in the operating system, including the games. But any programs that are not located in one of these folders cannot be executed by simply entering their names at the command line.
For example, let’s say you have downloaded a utility program into
your home folder called diary. If you enter its name
at the command line, you will receive an error message because it is not
located in the path. Instead, you would enter a command such as the
following to run it (remembering that the ~ symbol is shorthand for your home
folder):
~/diaryOr, if you have saved it to a folder outside of your path, you would have to enter the absolute path and filename in order to run it. Of course, this assumes that diary is a simple standalone program that doesn’t require installation, because most major applications will place an executable program file somewhere in your path during the installation process.
Using the . Operator
Now let’s look at a possibly confusing situation by assuming you
have entered cd ~ to set your home
folder as your working directory, and have saved into it a program
called find. In this case you might think you can
now enter find and the program will
run, but actually it won’t, because there’s a program with the name
find located in the /usr/bin
folder, and Ubuntu will execute that file by default because it is in
the path, and that gets searched before the current folder.
One solution is to reference the program with either an absolute or a relative path and filename, such as this:
~/findHowever, when a program is in the current directory, you can use the single period operator to run it, like this:
./findThis turns the command into a relative pathname and tells the system to run the program exactly where you say it is, not to first search for the program in the path.
Alternatively, if you tried to run a program in your home folder
(or any other not in the path) that didn’t have a
counterpart file with the same name somewhere in path, you would just
receive a “command not found” error message, unless you properly
identified the program’s location with a ~, a ., or
another relative or absolute prefix.
Other Environment Variables
Ubuntu also provides many other environment variables; some of the more common ones are listed in Table 7-3.
Environment variable | Contents |
| Your home folder |
| The default language |
| The path to the |
| The system path |
| The current working directory |
| The current shell |
| The time zone |
| Your username |
Each variable’s contents can be displayed using the echo command, like this:
echo $HOMENote
Most commands require you to preface variables with a $ sign to let the operating system know that
you are referring to a variable and not just a string of
letters.
You can also use environment variables in paths, so you could list the contents of the Documents folder within your home folder using this command:
ls $HOME/DocumentsAs you can see, $HOME and the
~ operator are interchangeable.
Alternative Shells
Unless you have changed it, until now you have been using Ubuntu’s version of the Bash program called Dash (the Debian Almquist shell). Dash is based on the Ash shell by Kenneth Almquist and is almost identical to Bash in use—but is much smaller and faster.
Other shells are also available. For example, advanced users may
sometimes encounter the slight differences between Dash and Bash, and so
can choose to use Bash itself by entering chsh (for “choose shell”), entering your
password, and then pressing Enter to accept the default new shell of
/bin/bash. To change back, enter chsh again, enter your password and select
/bin/sh for your default shell. If you wish to be
certain that you are using Dash, you can enter chsh and select /bin/dash
as your shell.
You can view the list of available shells by entering the following command:
cat /etc/shellsIf you are a seasoned Linux user and prefer to use a shell that isn’t shown, from the desktop you can select System → Administration → Synaptic Package Manager and search for the term shell to list all those available. Normally, though, most users will want to stick with using the default shell.
Using Nano to Edit Files
Most of the time you’ll probably edit files from the desktop using either the Gedit or OpenOffice.org program. But when you are already using a Terminal window, sometimes it’s quicker and easier to use the Nano text editor. It’s very easy to use, and unlike the Linux or Unix editors that programmers use for heavy text editing, Nano doesn’t require learning a complex series of keyboard shortcuts.
To edit an already existing file, type nano followed by its path and filename. For
example, to edit the document chapter7.txt in the
Documents folder, I entered the following, resulting
in the screen shown in Figure 7-10:
nano ~/Documents/chapter7.txt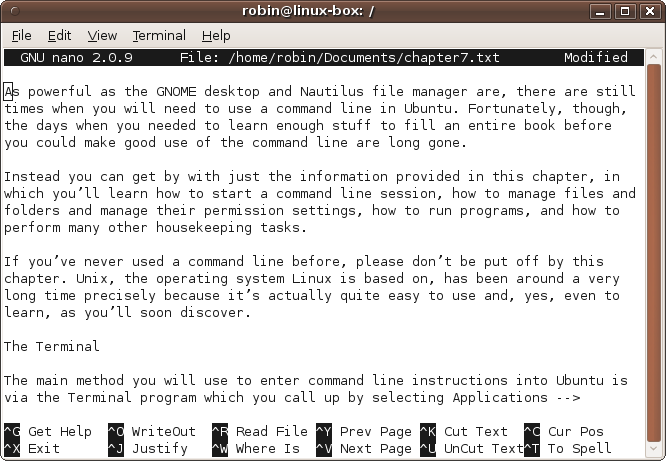
To navigate around the document, use the cursor keys. All the other
actions you need are listed at the bottom of the screen, with the ^ character representing the Ctrl key. So, to
save a document, press Ctrl-O, edit the filename shown near the bottom of
the screen (if necessary), and then press Enter. If you want to save a
file and exit the program at the same time, you can press Ctrl-X, press
the y key when asked to confirm the
save, edit the filename if necessary, and then press Enter.
You can also create a brand new document by entering nano without any argument. You would then
specify your document’s path and filename upon saving it.
Shell Scripts
A shell script is a sequence of command-line commands brought together into a single file to work like a small program. Let’s make a simple Hello World script by entering the following command to call up Nano ready to create the file hello in your home folder:
nano ~/helloNow enter the following two lines into the editor, pressing Enter
after each. Then press Ctrl-X, followed by y to
confirm, and then Enter to save the file:
#!/bin/sh
echo "Hello World\n"
The first line, #!/bin/sh, tells
Ubuntu to use the /bin/sh shell program to execute
the following commands. It could equally have requested
/bin/bash or another shell, but I have chosen to use
/bin/sh for this example. The second line prints the
text Hello World followed by a blank line, specified
by the \n at the end.
Once you have saved this file, you then need to make it executable by entering the following command:
chmod +x ~/helloThe chmod command stands for
change mode, and +x tells Ubuntu to
make the file executable. See the section File and Folder Permissions for more details on this
command.
You are now ready to run your script by entering the following. Afterward, you should see the welcoming message followed by a blank line, and then the command-line prompt:
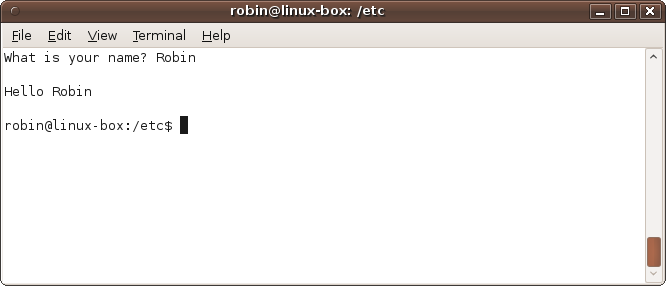
~/helloAs I said, any commands you can enter at the command line can be used in a shell script, and that includes the use of environment variables, or even creating new variables of your own. For example, here’s an improved version of the previous script that will ask you your name and then say hello to you:
#!/bin/sh
clear
echo -n "What is your name? "
read NAME
echo "\nHello $NAME\n"
The clear command clears the
Terminal window, and the -n argument
after the first echo command tells
Ubuntu to suppress the carriage return so that the next text displayed
will follow directly, rather than appearing underneath. That’s why there’s
a space after the question mark—to leave a small gap.
The read command is used to
request input from a user, and the word NAME after it is the name of the variable in
which to place that input. In this instance, a $ symbol should not preface the variable name.
When you type in your name, the text will appear directly following the
preceding output.
In the final line, to tell the echo command that NAME is a variable (and not just a string of
text), it is prefaced with a $ symbol.
Figure 7-11 shows this
script in action.
This is an interactive script, but usually you’ll want your scripts to simply get on with a task quietly, for example, compressing and backing up weblog files, or deleting files from a temporary folder. If you want to learn more about the vast subject of shell scripting, I recommend the book Classic Shell Scripting, also from O’Reilly.
Using Backticks
The backtick is a special type of quotation mark that you’ll usually find near the 1 key on your keyboard. You use it in a command line to tell Ubuntu to execute the contents between the ticks as a separate command, and then to paste the output in place of the backtick’s contents.
For example, you can combine some text with a command to display the current date like this:
echo "Today is `date`"Or, to list the current working directory in a friendly way, you could use this command:
echo "You are in `pwd`"Or here’s how you can list all the files in your home folder (and its subfolders) that have the file extension .txt:
echo -e "`clear`Your text files:\n\n`find ~ -name *.txt`";As you can see, there are two uses of backticks here: once to clear
the screen and again to search for the text files. The -e argument tells Ubuntu to allow escaped
characters such as \n, which is used to
display new lines.
Using Pipes
A little earlier we looked at alternative ways of using the more and grep
commands by piping output through them using the | operator. Pipes are such a useful device that
you will see them used in a variety of ways, often with multiple commands
piped together to produce a final output. For example, take a look at the
following composite command:
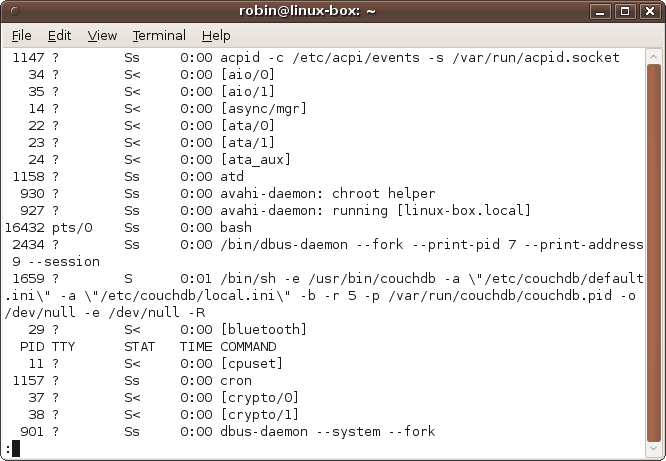
ps -ax | sort -k5 | lessThe ps program, in conjunction
with the argument -ax, displays all the
background processes running on your computer, and is covered in more
detail in the section System Processes. On its own,
ps -ax will display many screens full
of information; and the last few lines will look like Figure 7-12.
The processes are listed in order of when they were started (as
indicated by the numbers in the first column). So, to quickly search
through the list and find processes you may be interested in, you can use
the sort command with the -k5 option. This causes a sort to occur on the
fifth column (as defined by the end of a section of whitespace), which is
the one containing the process path and filenames. This results in the
screen grab shown in Figure 7-13.
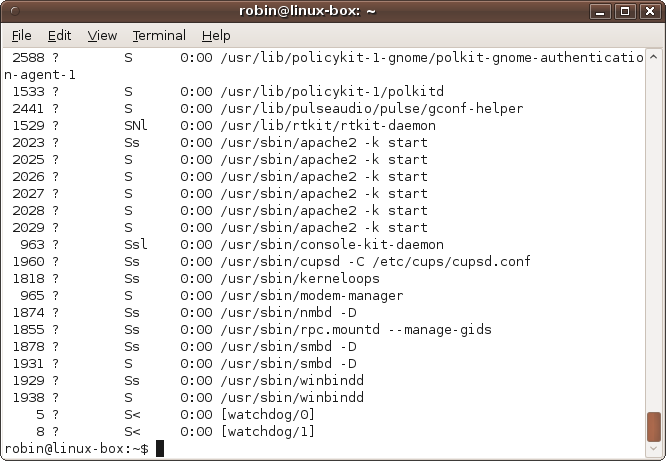
This is an improvement, but we can do even better by also adding the
less command, which is an enhanced
version of more. The less command makes it easier to move back and
forth in the output because it supports the cursor keys as well as Enter
and the space bar.
So, the combined result is to list all the current processes alphabetically, displayed in a manner that supports scrolling through it in both directions, as shown in Figure 7-14.

Note
I’ve used sort in a somewhat
advanced manner here. As explained earlier, you can find quite powerful
options for nearly any command through its manpage or info page.
How you use pipes is entirely down to the result you want to achieve. You can have as few or as many as you want, and there are many different ways to achieve the same result.
For example, you could even extend the composite command further by displaying only lines that match a search string, such as the following, which limits the output to processes with gnome somewhere in the string:
ps -ax | sort -k5 | grep gnome | lessUsing Redirection
In addition to supporting pipes, Ubuntu allows you to redirect
output using the > and < symbols. Using the first, you can, for
example, send the output from a program directly to a file, whereas the
second accepts input from a program.
Redirecting Output
The following command creates a file called files.txt in your home folder containing the
output from ls -al:
ls -al > ~/files.txtIf files.txt already exists, it will be overwritten; otherwise, it will be created.
When you issue that command, you won’t see anything on the screen, because the output that would have been displayed has been redirected to a file. But you can verify that the command worked by entering the following, which displays the file’s contents:
cat ~/files.txtThe result of issuing this command will look something like Figure 7-15.
But what if you want to know which files and folders were created first? The answer would be to sort them by column 6, and you could use this command to do it:
ls -al | sort -k6 > ~/files.txtRedirecting Input
If you need to keep the file sorted alphabetically but still wish to sometimes view the lines in date order, you can issue the following command on it instead:
sort -k6 < ~/files.txtThis opens up files.txt,
reads it in, and passes its contents to the command immediately
preceding the < symbol.
You could even extend that to use the less command by adding the | operator:
sort -k6 < ~/files.txt | lessThis works because the > and
< operators work on files and
devices, whereas the | operator
creates pipes between commands. Therefore, sort
-k6 < ~/files.txt is seen as a complete command in its own
right, the output of which can be displayed or, as in this case, piped
to another command.
The Difference Between Pipes and Redirections
You should now see that a pipe is the equivalent of combining two separate redirection commands. For example, take a look at the following simple command, which pages the output from a file listing:
ls -al | moreThis is actually equivalent to these two lines:
ls -al > tempfile
more < tempfile
Actually, to make these commands fully identical in action, you should also add the following command afterward to remove the temporary file:
rm tempfileSo, all told, each pipe can represent the equivalent of three separate commands.
Standard Input, Output, and Error
In the previous section, we were redirecting streams known as
standard input and standard output. When using a < redirection operator, you are telling the
operating system that for just this one command it should ignore the
standard input device (which is your keyboard) and instead take its input
from a file.
Likewise, when using the >
operator you are telling Ubuntu to ignore the standard output device
(which is your monitor or, more precisely, the Terminal window) and
instead send its output to the supplied file.
You may recall from the section The find Command that sometimes an error message would be displayed when access to a particular folder was not allowed, such as with the following command, in which some of the folders are not permitted to be searched by regular users:
find / -name blackjackTry this command again now, and you’ll see a whole bunch of error messages scroll past, obscuring the few matches we are interested in.
There’s actually a simple solution for this, which is to strip out
the error messages from the useable output. In the previous example we
separated the error messages from the output we wanted by piping the
output through the more command. But
how did it do that?
Streams and Handles
The answer is that Ubuntu uses three different streams for input,
output, and error messages, and when you use a > or |
for redirection or piping, it affects only standard output, not standard
error. This means that when you type this:
find / -name blackjack | moreonly the standard output is redirected; the standard error stream
is still displayed by the initial find command. However, after displaying the
errors, the more program then pages
through the standard output. So, although the display is a little untidy
because the errors are still shown, at least the matching results are
all shown together.
But you can clear up any messiness by telling Ubuntu
exactly what should be redirected or piped by using
stream handles. Table 7-4
lists the three streams, along with their handles and their short names,
stdin, stdout, and stderr, which I’ll use from now on.
Name | Stream number | Description |
| 0 | Standard input |
| 1 | Standard output |
| 2 | Standard error |
The way we force a particular stream to be used is to place it
directly before a redirection or pipe operator. So, for example, we
could send all the stderr error
messages from a command directly to a different file like this:
find / -name blackjack 2> ignoreme.txtHowever, this is not an optimal solution, because we end up
creating a useless file that’s not actually wanted or needed. But as I
mentioned in the section Using Redirection, this
scenario has already been covered by the operating system’s programmers,
who created an imaginary device called /dev/null,
which acts as a black hole for unwanted output. Therefore, a much more
elegant solution would be to redirect all the output from stderr into that abyss, like this:
find / -name blackjack 2> /dev/nullIf you try out this improved version, you’ll have to wait before
you see anything while all the various folders are searched. But sure as
eggs are eggs, your patience will be rewarded, as one by one, matches
for the search term blackjack are displayed. The
output also can be piped to more or
less if you like.
Redirecting One Stream to Another
Error messages can be very useful, though, so suppose you have
decided you actually do want them included in a
file created from a redirect. You can achieve this by merging the
stderr and stdout streams like this:
find / -name blackjack > ~/results.txt 2>&1This command redirects stdout
using the default > operator to
the file ~/results.txt, and then
redirects stderr, using its stream
number of 2, to the unlikely looking
recipient of &1. Note that there
must be no space between the > and
the &.
What the 2>&1 says to
the operating system is “redirect the output for stderr, sending it to stdout,” because stdout has the stream number 1.
Note
By now you’ll see that I wasn’t entirely truthful when I implied earlier that you could redirect all the output from a program to /dev/null with the following redirection:
./install-program >/dev/null
In fact, this only redirects stdout. As you should now realize, to fully
redirect all output you would need to merge stdout and stderr together:
./install-program >/dev/null 2>&1
There’s also a convenient shortcut that combines > with 2>&1;
simply use >& instead:
find / -name blackjack >& ~/results.txtAlso, if you really want to get fancy, you can use the shortcut
|& to pipe standard error and
standard output together.
The tee Command
There are times when you want output to be sent to a file and also
to the Terminal window, both at the same time. The way to do this is to
pipe whichever output you desire (stdout or stderr, or even both if you create the proper
redirects) to the tee command, and
then supply the recipient filename, like this:
ls -al | tee ~/files.txtThis lists all the files in the current folder both to the screen
and to ~/files.txt. You can also
use tee with the merged streams in
the previous section, like this:
find / -name blackjack | tee ~/results.txt 2>&1Wildcards, Sets, and Brace Expansion
We’ve already used wildcards in a few places in this chapter, but
there’s a lot more you can do with them than just using the * and ?
operators to match strings and characters, respectively, as shown in Table 7-5.
Wildcard | Meaning |
Any sequence of characters, except for a leading period | |
Any single character, except for a leading period | |
| Any one of the characters in the set |
| Any one of the characters from |
| Any single character not in the set |
| Any single character not from |
| Match all the characters and/or strings |
Using Sets and Ranges
A set of characters placed within a pair of rectangular brackets
can match a single character in a file or folder name. This is a more
precise version of the ?
single-character wildcard. For example, the set [abcdef] will match any of the six characters
shown so that [abcdef]ark.txt will
match the filenames bark.txt and
dark.txt, as long as they both
exist. You can also save on typing by using a hyphen to indicate a range
of characters so that [a-f] is
equivalent to [abcdef].
Another neat thing you can do with a set is force all upper- or
all lowercase matches using the ranges [A-Z] or [a-z]. Or you can limit the matching to only
alphabetical characters of either case (excluding digits and other
characters) by using the set [a-zA-z]. And you can also use numbers in a
range, as in [0-9].
Alternatively, you can exclude characters from matching by using
the ^ operator. In this case,
[^b]ark.txt would prevent the file
bark.txt from being matched, but
would let through dark.txt,
lark.txt, and so on.
You can also use ranges with the ^ operator so that [^a-l]ark.txt will allow through only
filenames starting from mark.txt
onward, as all the first letters prior to m are excluded.
Using Brace Expansion
With brace expansion you can offer sets of alternatives strings of
any length, so you aren’t limited to the single characters of sets. For
example, all three terms in the expression ca{ree,mpe,tere}rs.txt will be expanded,
allowing all of the files careers.txt,
campers.txt and
caterers.txt through the
filter (if they exist), with the matching portions shown in
bold.
Unlike sets and wildcards, brace expansions are also supported in
other parts of the command line, so the following echo command will show you the result of using
the expression just shown:
echo ca{ree,mpe,tere}rsThe following is the displayed result:
careers campers caterers
By the way, did you notice that there are no quotation marks
around the argument to the echo
command (unlike previous examples in this chapter)? That’s because
quotation marks tell Ubuntu to use the exact contents of the string,
rather than supporting brace expansion and other features. Therefore the
following command results in displaying only the expression itself, so
make sure you know when you do and when you don’t need quotation
marks:
echo "ca{ree,mpe,tere}rs"The displayed result of entering this command is simply:
ca{ree,mpe,tere}rsUsing Aliases
You can make up your own command names to replace those used in
Ubuntu. For example, if you’re used to using the command md in Windows to create a directory and keep
forgetting to enter mkdir, you can set
an alias like this:
alias md="mkdir"Thereafter both md and mkdir will refer to the mkdir command. Note that you can use either
single or double quotation marks.
Note
An even more common and powerful use of aliases is to add options
to commands. For instance, many people make sure they know exactly which
files are removed by rm (because its
deletions are irreversible) by aliasing it as follows:
alias rm="rm -i"
The -i option causes rm to ask you whether it’s OK before removing
each file—a time-consuming addition, but a safe one.
And you’re free to create your own commands, like this:
alias newf="find ~ -type d -mtime -3"Now when you type newf you will
see all files under your home directory that were created or modified
within the past three days. This will include a lot of hidden files
created by your browser and other programs you use.
To find out which aliases have been created, just type alias on its own, like this:
aliasIf you do this you may see that, among others, the ls command has been aliased as follows (having
the effect of allowing color to be used to display files with different
file and folder attributes, where applicable):
alias ls='ls --color=auto'To remove an alias, use the unalias command. So, if you like, you can remove
the color display option from the ls
command like this:
unalias lsFile Compression
Ubuntu Linux supports various file compression formats, many of which will automatically open when accessed via the desktop. The main compression file types you are likely to encounter are listed in Table 7-6.
File type | Compress with | Decompress with |
.bz2 | bzip2 | bunzip2 |
.gz | gzip | gunzip |
.tar | tar | tar |
.zip | zip | unzip |
.tar.gz or .tgz | gzip and tar | gunzip and tar |
.tar.bz2 | bzip2 and tar | bunzip2 and tar |
Some of the compression programs will handle other types of files
too, but generally each is best compressed and decompressed using its own
programs. For example, to compress the file finances.doc using gzip, you could enter the following:
gzip finances.docA new file called finances.doc.gz will then be
created containing the compressed file, and the original will be removed.
To keep your original file when creating a compressed copy, use the
-k option (for keep), like this:
gzip -k finances.docLikewise, you can compress a file with bzip2 in the same way using either of the
following:
bzip2 finances.doc
bzip2 -k finances.doc
The first creates the compressed file finances.doc.bz2 and removes the original file, whereas the second creates a compressed file but also keeps the original in place.
Extracting Files
To extract files from a gzip
archive, enter a command such as the following:
gunzip finances.doc.gzThis extracts the file finances.doc and then removes the archive
file. You can similarly extract files from a bzip2 archive using a command such as
this:
bunzip2 finances.doc.bz2This will restore the compressed original file and remove the archive.
You can also use these and many other compression and
decompression programs to manage multiple files and folders and provide
a range of other archiving features. For example, you may come across
.tar archive files, which combine
multiple files or directories into a single file to facilitate backup
and copying. The tar program is often
combined with other compression programs to create .tar.gz or .tar.bz2 files.
A beginner to Ubuntu really doesn’t need to explore the
intricacies of archive and compression utilities, thanks mainly to the
GNOME desktop and the Nautilus file browser’s ability to handle
everything for you automatically. But if you wish to access advanced
command-line file compression features, you should read the manpages by
entering man followed by the
compression program in question, such as man
tar.
File and Folder Permissions
In Chapter 5, we looked at managing groups, users, and file permissions from the desktop. Here, you’ll learn how to do all that and more from the command line. Let’s recall the possible file attributes, which are:
No permissions
Execute only
Write only
Execute and Write
Read only
Execute and Read
Write and Read
Execute and Write and Read
I have numbered them from 0 to 7 because these values are used by the system to store the attributes in octal (base 8). Table 7-7 shows each of these attributes, with a checkmark indicating where an attribute is set.
Value | Read | Write | Execute |
0 | |||
1 | ✓ | ||
2 | ✓ | ||
3 | ✓ | ✓ | |
4 | ✓ | ||
5 | ✓ | ✓ | |
6 | ✓ | ✓ | |
7 | ✓ | ✓ | ✓ |
Looking at these checkmarks, you’ll see that they actually represent the binary values for 0 through 7, like this:
0 = 000
1 = 001
2 = 010
3 = 011
4 = 100
5 = 101
6 = 110
7 = 111
The highest value that can be created from three binary digits is 7, and so this is how the octal system of file permissions came about.
But in Ubuntu Linux (as with Unix and other Linux distributions), there are actually three sets of attributes (known as permissions) for each file and folder: one for the owner of the file or folder, one for the group that is allowed to access it, and one for everybody else.
The Owner, Group, and World Attributes
With eight possible permutations of permissions (and three sets of them), there are 512 different possible permissions per file. So, how on earth does anyone, or even the computer, keep track of all this? Well, it’s actually quite simple, as illustrated by Table 7-8, in which each of the owner, group, and world columns can have a value between 0 and 7, giving possible values between 000 and 777 in octal (the 0 through 511 permutations in decimal being the same as 0 through 777 in octal).
Value | Owner | Group | World | ||||||
Read | Write | Exec | Read | Write | Exec | Read | Write | Exec | |
0 | |||||||||
1 | ✓ | ✓ | ✓ | ||||||
2 | ✓ | ✓ | ✓ | ||||||
3 | ✓ | ✓ | ✓ | ✓ | ✓ | ✓ | |||
4 | ✓ | ✓ | ✓ | ||||||
5 | ✓ | ✓ | ✓ | ✓ | ✓ | ✓ | |||
6 | ✓ | ✓ | ✓ | ✓ | ✓ | ✓ | |||
7 | ✓ | ✓ | ✓ | ✓ | ✓ | ✓ | ✓ | ✓ | ✓ |
Let’s look at the most commonly used permission setting, which is 644. The value 644 corresponds to an owner setting of 6, and group and world settings of 4, such that a file with attributes set to this value can be written to and read from by the file’s owner, but people in the file’s group or anyone else (the world) can only read the file. This is the default setting applied to new files you create.
To see how this works, look at Table 7-8 and reference row 6, and then look up the checkmarks for this value in the owner column; both read and write are checked. Then look at the row where the value is 4, and you’ll see that only read is checked.
An executable program file that you want to protect in a manner similar to a document should have permission settings of 755. This is the same as 644, except that the exec column is checked for each type of user (in other words, a 1 has to be added to each of the three parts).
Or, as another example, if you want to make a file so that only you can access it, but can do anything you want to it—write to, read from, or execute—you would set its permission value to 700. Any file with attributes ending in 00 is therefore 100% private to you—except that the superuser account, root, can also do anything it wants with such a file.
Using chmod
The chmod command is used to
change a file or folder’s attributes (the name refers to another term,
mode, which is sometimes used for the set of
attributes), as long as you are its owner. So, to set the file filename to readable and writable for
yourself but only readable by all others, you would need to use a
setting of 644, like this:
chmod 644 filename
If you don’t want to be bothered with working out the octal number, you’ll be glad to hear you can also use the following shorthand options:
uUser (the owner)
gGroup
oOthers (neither
unorg)aAll users
+/-rAdd or remove read permission
+/-wAdd or remove write permission
+/-xAdd or remove execute permission
The first four options specify which users (out of the owner,
group, world, or all) the permission change should apply to, the default
being a for all users. The final
three are the permission(s) to change.
Therefore, to force a setting of 644 (regardless of a file’s previous permissions), you could use these two commands:
chmod a+r-w-x filename
chmod u+w filename
The first command sets all of user, group, and others (a) as allowed to read but not to write or
execute (+r-w-x) the file. The second
enables the user (u) to write
(+w) to the file.
To find out what the current attributes are, type:
ls -l filenameThis will display a long line containing the meta information the system knows about the file. The first column will contain the attributes and will look like this:
-r--r--r--
The very first character on the line indicates whether an item is
a file, a directory, or a symbolic link. Files show up as a hyphen
(-), directories display the letter
d, and links are represented by the
letter l. So, ignoring that first
character, there are nine remaining: three triplets of three,
representing in turn the permissions for each of the owner, group, and
world.
Therefore we can see from the example just shown that filename offers only read access to the owner, the group, and the world. To change this file so it is writable by the owner, all that needs to be done is add that one attribute, like this:
chmod u+w filenameFor another example, if the file you are accessing needs to be set to executable so that it can be run by everyone, you could use this command:
chmod a+x filenameAlternatively, because the default always applies to all users, you could simply enter:
chmod +x filenameNote
Whether you choose to use octal or shorthand notation is up to you; there is no right or wrong way.
When you view a folder using the ls
-l command, the output will look something like this:
drwxr-xr-x 2 robin robin 4096 2009-11-30 10:38 Desktop
drwxr-xr-x 2 robin robin 4096 2009-11-27 04:48 Documents
drwxr-xr-x 2 robin robin 4096 2009-11-27 04:48 Downloads
-rw-r--r-- 1 robin robin  167 2009-11-27 04:38 examples.desktop
drwxr-xr-x 2 robin robin 4096 2009-11-27 04:48 Music
drwxr-xr-x 2 robin robin 4096 2009-11-27 04:48 Pictures
drwxr-xr-x 2 robin robin 4096 2009-11-27 04:48 Public
drwxr-xr-x 2 robin robin 4096 2009-11-27 04:48 Templates
drwxrwxr-x 2 robin robin 4096 2009-11-27 12:49 Ubuntu One
drwxr-xr-x 2 robin robin 4096 2009-11-27 04:48 Videos
In turn, each of these columns displays the following information:
File type and permissions
Number of hard links (an old feature of files, rarely used)
Owner
Group owner
Size (for text files, the number of characters in them)
Date and time of creation or last modification
Name
Using chown
The chown command allows the
ownership of a file or folder to be changed. This is such a powerful
command that it can be used only by the root user, which means you must
preface it with a sudo command and
will be prompted for your password.
So, for example, to change the ownership of a file to the user mary, you would use a command such as this (as long as the user mary already exists):
sudo chown mary filenameIf you then perform an ls -l
command on the file, you’ll see that the file has changed ownership. If
the file was one that you previously owned, changing its attributes now
will require using sudo, unless you
change the ownership back again.
Ubuntu comes with the ready-created user called nobody, so you can easily test this command out using the following sequence of instructions:
echo > testfile
ls -l testfile
sudo chown nobody testfile
ls -l testfile
sudo rm testfile
These lines create an empty file called
testfile by redirecting a blank echo command. Then the file’s attributes are
viewed using the ls command, before
then changing its ownership with chown. After that, the ownership is again
displayed, showing that it has indeed changed, and finally, the test
file is removed with the rm command.
Figure 7-16 shows what you
should see on your display if you enter these lines.
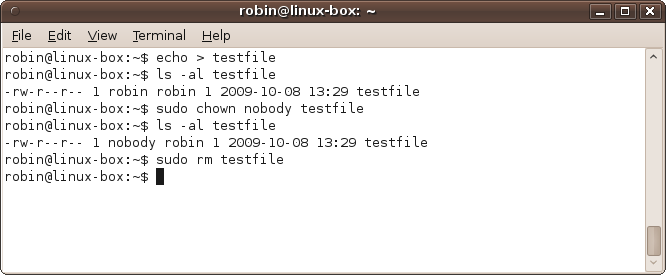
On the sixth line down in the screenshot you’ll see that robin is no longer the owner of the file, as that privilege now belongs to nobody, although the group called robin retains its ownership.
Using chgrp
This command is similar to chown except that it works for groups. With it
the group assigned to a file or folder can be changed to another one,
and with the sudo command, you can do this without
assuming the root user—as long as you are the owner of the item and also
a member of new group that you wish to assign.
So, for example, if you are a member of the group accounts, you could change the group associated with a file to that group with this command:
chgrp accounts filenameWhen you are not already a member of the group that you wish to
change a file or folder to, or if you need to change the file of another
user or group, you will need to assume root for the
command with sudo, like this:
sudo chgrp accounts filenameYou can change owner and group in a single chown command by specifying the owner followed
by a colon and group name:
sudo chown mary:accounts filenameUsing sudo
So, just what is all this talk of root and
sudo? Well, root
is the name given to the super user on an Ubuntu system. It is an
all-powerful user with maximum privileges, allowing it to do
anything.
For this reason, Ubuntu actually disables the root user and only allows you to assume it one command at a time. This is because permissions on the filesystem normally prevent you from running dangerous commands that are all too easy to enter accidentally during routine system use, and none of these permissions can hold back root. So, should you become the root user for a particular command but forget to change back, you could end up damaging your installation.
The Ubuntu viewpoint is “better safe than sorry,” so you have to
preface every command requiring root privileges with sudo. Thankfully, the developers realized it can
be annoying to keep entering your password each time you do this, so after
you use sudo and provide your password,
you won’t be asked for your password again for another 15 minutes.
Hopefully this will be sufficient time to perform all your
maintenance.
Logging in As root
That said, if you ever have a lot of work to
perform as root or have a specific reason to do so,
you can actually log in as root (and also bypass typing all the sudo commands) by entering the
following:
sudo -iThis will log you in as the root user with all the dangers
previously discussed, so don’t do this unless you know exactly what you
are up to. To log back out again, enter the command exit.
For more information on sudo,
as with all commands, enter the following:
man sudoSystem Processes
All operating systems comprise a main kernel and several different programs that all work together. Most of them wait patiently until you need the system to do a task for you, such as send documents to your printer or sound to your speakers. They handle the graphical desktop environment, keep track of the time, communicate with the network, and…well, handle everything that your computer needs to do.
These programs are referred to as processes (or tasks) and can be
viewed by entering the following (with ps standing for process
status):
ps -axFigure 7-12, shown earlier, shows typical output from this command. In it you can see that each process is assigned a unique number, and using these you can interact with processes by stopping or restarting them, and so on. As a beginner to Ubuntu, it is very unlikely you will have to manage your processes. However, there may be times when you at least need to take a look at them, if only to provide information for obtaining help on the Ubuntu bulletin boards.
So, this section is mainly intended to give you an overview and provide a couple of helpful pointers. For example, sometimes Ubuntu may not seem to perform as well as it should. When this happens, it’s usually after you have accepted an update to one of its packages, or perhaps installed a new driver or other program. Problems you may encounter could be unusual slowdowns, or maybe the computer fan is making a loud noise because the processor is working harder than normal and getting hotter.
In such cases you can enter the command top to see all your processes in order of the
amount of Central Processing Unit (CPU) time they are taking up. Figure 7-17 shows a typical
display.
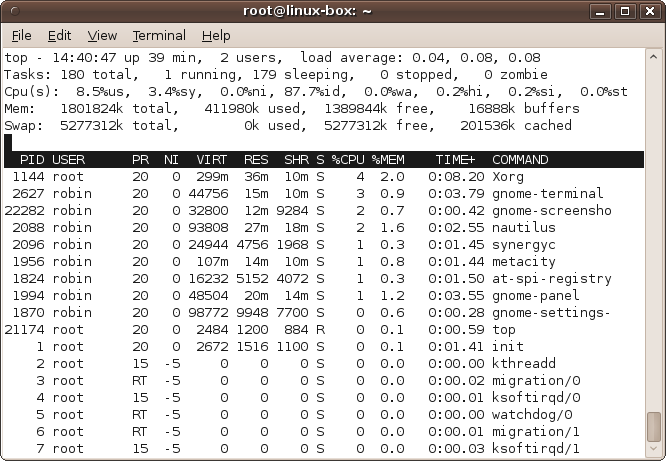
In the bottom section, where the processes are listed, you can see that X.org, the software behind the graphics capabilities of Ubuntu, is using up the most processor time at just 4%, and the Terminal program is next at 3%. Then, because a screenshot is being taken, that process comes up third, Nautilus is fourth, and so on. If you then take a look in the top portion (on the third line down), you’ll see that the “Cpu(s)” entry shows that Ubuntu is very efficient and currently has over 87.7% idle (or spare) processor capacity available for programs, which means only 12.3% is being used.
When you have a stuck program or one that is otherwise causing problems (like the fan whirring I mentioned), you will often find much more CPU time being used up, and the culprit will probably be listed somewhere near the top of this list of processes—usually in the first two or three entries. When it is acting up, the safest way to restart your computer is to use the built-in options in the desktop menus, but if that fails and if you know what you are doing (and it’s best that you take advice from an expert who has confirmed that you have a problem before doing anything), it is possible to kill one of these tasks by pressing the K key and entering the process PID number, as shown in the first column.
Be warned, though, that doing this for an important process may make your computer unstable and could cause other problems requiring a reboot, and maybe even some corrective action after that. So, like I said, do this only when you know what you are up to.
That warning out of the way, if killing an offending process frees up your computer or slows your fan back down because the processor doesn’t have to work so hard, then you have possibly found the cause of the problem and can investigate whether you can uninstall or reinstall the program in question. One of the experts in the Ubuntu forums may have further advice for you.
Killing and Restarting Processes from the Command Line
You can also search through the running processes using the
ps command (generally using the
options -ax to display all processes)
and can terminate any of them using the kill command. For example, to kill a process
with the process ID of 7662, you would enter:
kill 7662This sends the process a signal requesting it to terminate. However, some processes may refuse (or be unable) to act on this signal, in which case wait a few seconds and try it again. If it still fails, you may need to reboot your computer. But before you give up and reboot your computer, try using a more powerful kill signal:
kill -9 7662Again, please be aware that you should not issue such commands lightly, and ought to do so only if you know what you are up to or if a bona fide expert has suggested you do so.
Summary
Congratulations! You’ve just completed the hardest chapter in this book. I hope I have explained things clearly, but there was a lot of material to cover, and you may find it helpful to review it again in a few days. You should also find it a good reference for those cases when you need to use the command line, which hopefully won’t be too often—unless you want to, of course.
Anyway, pat yourself on the back and get yourself a well-deserved cup of tea or coffee as we prepare to move on to the subject of installing and removing programs in the next chapter.