Table of Contents for
Ubuntu: Up and Running
 Ubuntu: Up and Running
Published by
O'Reilly Media, Inc., 2010
Ubuntu: Up and Running
Published by
O'Reilly Media, Inc., 2010
- Cover
- Ubuntu: Up and Running
- Ubuntu: Up and Running
- Dedication
- Foreword
- Preface
- 1. About Ubuntu
- 2. Installing and Upgrading Ubuntu
- 3. Configuring
- 4. The Desktop: Accessing Applications and Features
- 5. The Filesystem, File Attributes, and Permissions
- 6. The Nautilus File Browser
- 7. The Command Line
- 8. Installing and Removing Software
- 9. System Maintenance and Security
- 10. Networking Ubuntu
- 11. The Internet
- 12. Using OpenOffice.org
- 13. Playing Games
- 14. Pictures, Sound, and Video
- 15. Other Ubuntu Distributions
- 16. Using Wine
- Index
- About the Author
- Colophon
- Copyright
Chapter 6. The Nautilus File Browser
In the preceding chapters, we’ve had some occasions to use the Nautilus file browser built into Ubuntu. Now I’ll cover some of the powerful features it provides, such as file searching, creating symbolic links (which are like Windows shortcuts), compressing and decompressing files, using templates for creating new files, and more.
On the way, you’ll discover how well integrated Ubuntu is and how different parts work seamlessly with one another. For example, because Nautilus is the silent power behind the Ubuntu desktop (something of which many users are unaware), many things I’ll show you how to do with the Nautilus file browser can also be done directly to files and folders on the desktop.
What’s more, items on the desktop can be copied or moved into the location displayed by the file browser, and vice versa, and when you open a folder from the desktop its contents appear within the file browser.
Opening Files and Folders
When you move your pointer over anything that you can manipulate through the use of the pointer, either within the Nautilus file browser or on the desktop, the icon will usually change to a lighter color to show that it’s clickable, as shown in Figure 6-1.
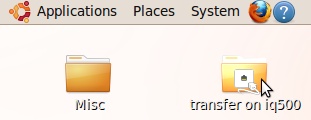
But if you have enabled single-clicking, as discussed in the section Creating Folders, Launchers, and Files, then the mouse pointer will also change into a pointing finger icon to remind you of this, as shown in Figure 6-2.

Note
Reminder: to enable single-clicking, open up a file browser window and select Edit → Preferences → Behavior → “Single click to open items.”
When you open a folder (by either a single- or double-click), a file browser window is called up, displaying the items it contains.
However, if you open a file, then one of two things will happen:
If the file has an application associated with it, the application is opened and the file is loaded into it ready to be edited, displayed, or otherwise used.
If there is no associated application, a warning window will appear telling you that the file is of an unknown type. If this happens but you know the file is openable by a certain application, you can right-click the file and select Open with Other Application, and then choose the right one to open that file.
Dragging and Dropping
As long as you have sufficient permissions, most files and folders can be moved to any part of your filesystem by dragging and dropping them (although I recommend doing so only with nonsystem files; by moving a system file, you might disrupt the operation of some programs). To do this, place the mouse pointer over a file, press and hold down the left mouse button, drag the file to its destination folder, and then release the mouse.
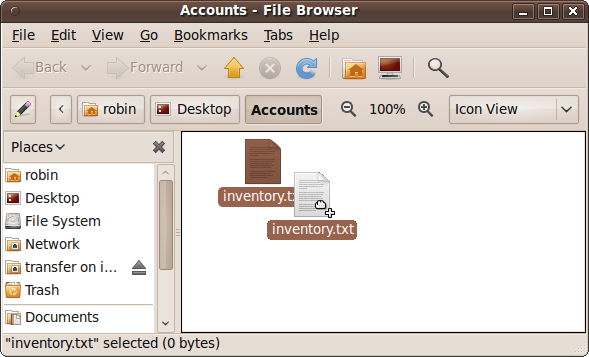
As you do this, the mouse pointer will change to represent a hand grabbing something with an arrow pointing at the hand. This indicates that you are using the move feature, as shown in Figure 6-3 where the file inventory.txt has just been grabbed, ready for moving somewhere else.

Copying Files and Folders
But you can also copy a file or folder by holding down the Ctrl key before you start a drag-and-drop operation. When you do this, the mouse cursor will change to represent a hand dragging something, with a plus sign at its bottom right, as shown in Figure 6-4. Keep the Ctrl key held down until you release the mouse button, or the operation will return to being a simple move, rather than a copy operation.
Warning
Copying a folder results in all its subfolders also being copied; if these folders contain very large files, this could take a while and use a lot of disk space.
Copying with External Media
There is no need to hold down the Ctrl key when copying files from one media device to another—whether from a CD-ROM to your hard disk, or vice versa, or between a DVD-ROM and a USB thumb drive, and so on.
Just drag and drop the files you want to copy, and Ubuntu will know that this is a copy operation, so your original files will not be deleted. However, they will remain highlighted so that you can more easily delete them should you wish (if the media is writeable), without having to select them again—which I’ll talk about next.
Selecting Files and Folders
All the previous operations are well and good if you are only copying a single file or folder (even if the folder has subfolders). But often you need to select groups of items for copying, moving, and even deleting, and there are several ways to highlight multiple selections.
Lassoing Items
If all the items you are interested in are located within a rectangular area, you can click the file browser background and then drag a lasso around them. When you release the mouse the selected files will be highlighted. In Figure 6-5, I have chosen to lasso the four items to the right. Notice how a rectangular shape (like an elastic band stretched around four points) outlines the selected area, which itself now has a slightly darkened background color.

Individually Selecting Items
For even more control over selecting files and folders, you can hold down the Ctrl key and click each item once to add to the selection group. If you make a mistake, don’t worry, because each time you click the item’s state will toggle between being selected and unselected. Figure 6-6 shows three items that have been selected in this manner, which couldn’t have been achieved any other way.
Note
Windows users should note that if you are used to the Windows single-click setting, it works differently on Ubuntu when selecting files. With Windows, when in single-click mode you can simply hover over a file or folder to select it. But Ubuntu doesn’t support this behavior. Personally I think Ubuntu does it better because it’s so easy to accidentally lose a carefully selected group of files in Windows by hovering a moment too long over another file without the Ctrl key depressed.
Selecting Items in Sequence
If you wish to select a sequence of items, press Ctrl and single-click the first item in the group, then locate the final item and press the Shift key and click. This will highlight all the folders from the first to the last selected.
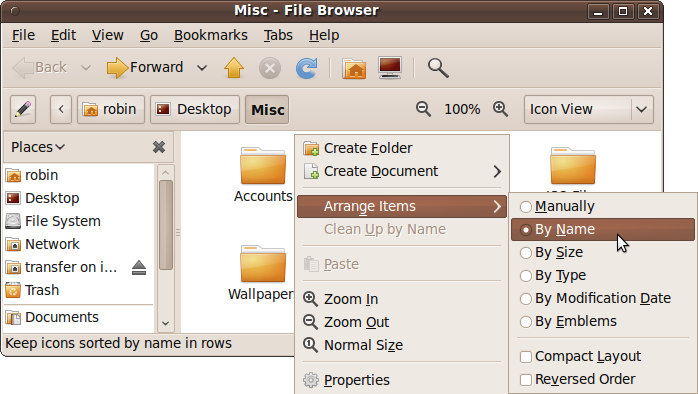
The way Shift-selecting works depends on how you have arranged the items in a folder. If you right-click the file browser background and select the Arrange Items submenu, you can specify how all the items in the folder should be arranged, out of the following choices:
Manually
By Name
By Size
By Type
By Modification Date
By Emblems
Additionally, you can choose whether to use a compact layout and whether to reverse the order of all items. Whichever order you choose will be the one used for selecting a sequence, as shown in Figure 6-7.
Selecting All Items
Click a blank area of the file browser to clear any current selections, and then press Ctrl-A to select all the files shown in the browser. They will now all change to a darker color, and the text underneath each one will be given a dark background to show that they have been grouped together, as shown in Figure 6-8.
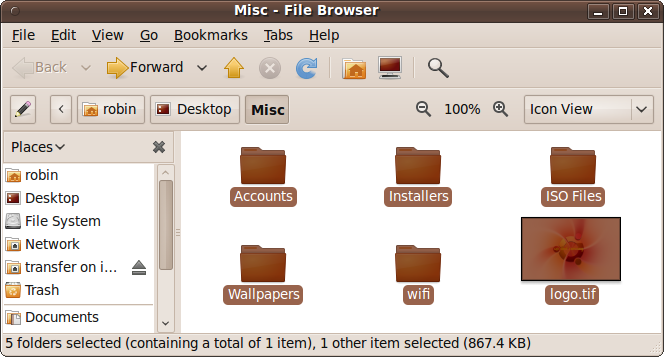
At the bottom of the file browser, the status bar will tell you all the files and folders that have been selected in this manner and how much disk space they take up.
Sometimes you want most of the items but not all. After pressing Ctrl-A, you can keep the Ctrl key held down or depress it again, and then left-click individual items to deselect them.
Moving or Deleting with Selections
Once you have selected a group of files or folders, all the items that are highlighted can be treated as though they are a single item for most operations. For example, when you initiate a drag-and-drop operation on one of the highlighted items, all the others in the group come along for the ride (whether they’re being copied, moved, or deleted).
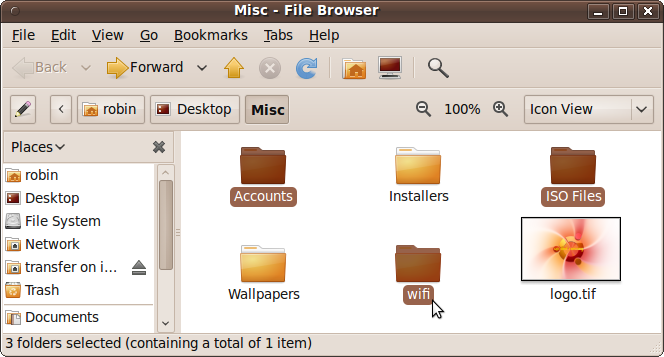
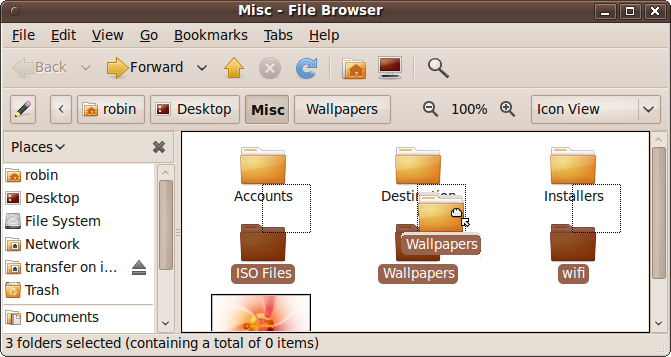
In Figure 6-9, I have chosen to move three folders and their contents into a new folder I just made called Destination. I did this by highlighting the three folders, grabbing one of them, and dragging it. The screen grab shows all three being dragged and dropped into the new folder.
Opening Multiple Items
The same applies to opening a group of files, but with a difference. To open multiple files at once, you need to right-click a group and select the Open With option. The default action for each file type will then be used to open each file.
Opening multiple folders
If the group of files is made up entirely of folders on the desktop, you can right-click and choose Browse Folders to open up several file browser windows at once, one for each folder. If the folders are in a file browser window already, you should right-click and choose between using Open in New Tabs or Open in New Windows. The latter has the same effect as right-clicking on a group of folders on the desktop and then selecting Browse Folders; several new file browsers will open up, displaying each folder’s contents.
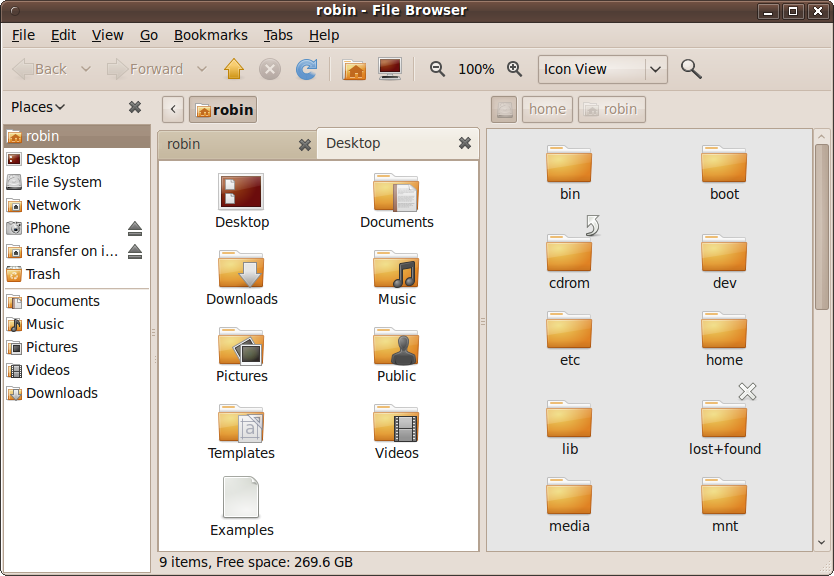
Using Tabs
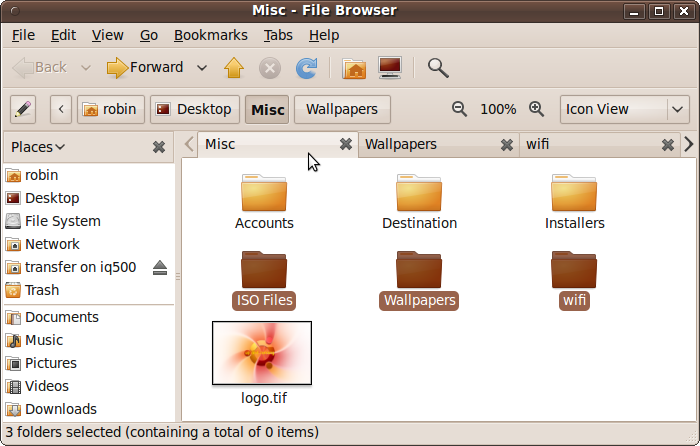
The tabs option keeps your screen space usage at a minimum by making the file browser work like a web browser, with tabs at the top; just click the tab you want in order to view its contents. For example, Figure 6-10 shows three folders opened up as tabs. The left and right arrows on the tab line enable you to scroll through the tabs when there are too many to display at once. Click the X icon at the right to close tabs.
Deselecting
As I mentioned before, your selections remain in place until you deselect them. This means that if you make a mistake when performing a drag-and-drop operation, you can undo it by dragging files back again. In the case of the Trash, you can also drag them back out of there as a ready-selected group.
When you have finished with a selection, the simplest way to deselect it is to click the background next to a selection group. If you are in a file browser window, click its background; on the desktop, click a clear area of the desktop.
Zooming In and Out
Have you ever used the Zoom facility in Firefox and other browsers to view a web page in larger or smaller type? Well, you can do exactly the same thing with Ubuntu, which offers seven different levels of zoom control over the display of items in the file browser (but not of the desktop icons).
This makes it easy to locate documents even if you have limited visibility, and it is also a great feature for using Ubuntu on a device with a small screen, such as a MID, UMPC, or Netbook. You might want to reduce the size of icons or text so you can see more of them on a small screen, or because you have the luxury of a large monitor that lets you see small things clearly. On the other hand, you can increase the size to see them more clearly on a small screen, at the cost of viewing fewer at one time.
Figure 6-11 shows the icons reduced to their next-to-smallest size so more of them can fit in the file browser.
- Zooming in
To zoom in or enlarge the file browser icons, you can use any of the following controls:
Hold down Ctrl and press the + (plus sign) key
Hold down Ctrl and scroll the mouse wheel forward
Right-click the file browser background and select Zoom In
- Zooming out
To zoom out or decrease the size of file browser icons, use one of the following combinations:
Hold Down Ctrl and press the – (hyphen) key
Hold down Ctrl and scroll the mouse wheel backward
Right-click the file browser background and select Zoom Out
- Restoring the default size
To return the icons to their default size, you can use one of the following combinations:
Hold down the Ctrl key and press the 0 (zero) key
Right-click the file browser background and select Normal Size
The File Browser Menus
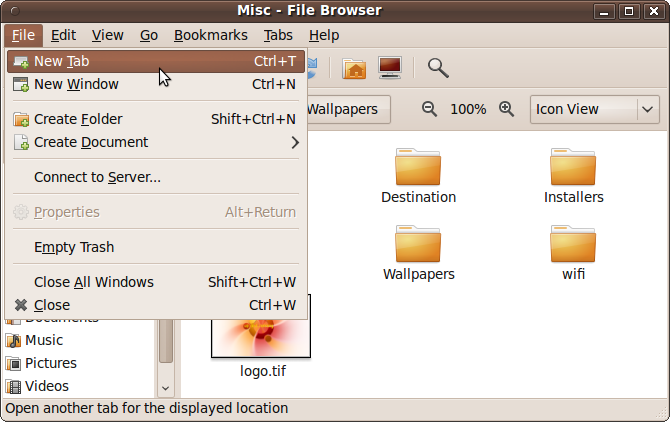
I know that we’ve covered a few of the menu options provided with the Nautilus file browser over the last few chapters, but those features only scratch the surface of what’s on offer. So, let’s look at these menus in a little more detail, starting with the File menu, as shown in Figure 6-12.
File Menu
The file menu is context-sensitive, so you will have different options available depending on whether you have selected an item or not, and some will be grayed out if you have insufficient permission. When no files or folders have been selected, the options on offer are:
- New Tab
This option creates a new tab within the file browser. Initially, it will show the same files and folders as the original window. You can then switch between the different tabs, using them as though they were separate windows.
- New Window
Select this option to open a new file browser window. In contrast to the New Tab option, this one will always open up your home folder.
- Create Folder
Select this option to create a new empty folder within the current one being viewed. The new folder will be given the default filename of untitled folder, but the text will be selected so that you can easily rename it.
- Create Document
When you select this option, an empty text file will be created with the name new file highlighted so that you can rename it. This file will then be editable in whichever application has been set to handle text documents. By default, this is the gedit program.
- Connect to Server
This option has the same functionality as selecting Places → Connect to Server…, as covered in the section Mounting Network Folders.
- Empty Trash
This option is available only when there are items in the Trash. When you select it, you are prompted to confirm whether you wish to delete the files. In non-American English installations, the word Trash will be replaced with Deleted Items or Wastebasket.
- Close All Windows
This option immediately closes all file browser windows without prompting. If you merely want them out of the way temporarily so that you can see the desktop, you may prefer to use the Hide/Show Desktop icon at the bottom-lefthand corner of your desktop instead.
- Close
This option closes the current window in the same way as clicking the close icon on the title bar.
If you have one or more items selected, the File menu will include the following options:
- Open
If a file has been selected and it has an associated application, this option will appear as “Open with” followed by the application’s name. Clicking it will open the application and load in the file. If more than one file of the same type is selected, they will all be passed to the application, which may or may not open them all, depending on the program. If the selected item is a folder, it will be opened as though it had been clicked. If the selection contains two or more folders, they will be opened up in new tabs.
- Open in New Tab
This option is available only when a folder has been selected. If two folders have been selected, the menu will say Open in 2 New Tabs, and so on.
- Open in New Window
This is the same as the previous option except that the folders will be opened up in new windows instead of tabs.
- Open with Other Application
Sometimes you will have more than one application that can use a particular type of file. For example, GIMP, F-Spot, and the OpenOffice.org Drawing program can all handle graphic files. For each type of file, one program is the default “Open with” program on the menu, but this option lets you choose a different application.
- Properties
This option brings up the files and folders properties window, as covered in the section Other File Attributes of Chapter 5. If more than one item is selected, you can change all their properties at once.
Edit Menu
Like the File menu, the Edit menu is context-sensitive. By default, when no files or folders have been selected it will look like Figure 6-13. This is quite a powerful menu with a number of options you haven’t yet seen:
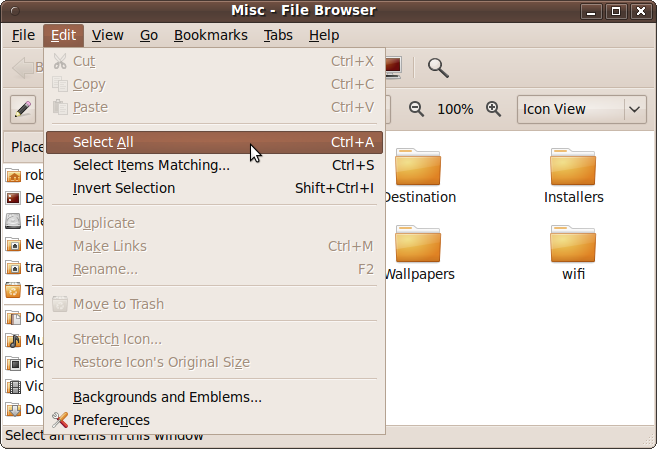
- Select All
This option has the same effect as pressing Ctrl-A, discussed in the earlier section Selecting All Items. All folders and files in the current folder will be selected.
- Select Items Matching…
This is an interesting option for narrowing down a large selection of items. When you select it, a new window pops up requesting a pattern. You can enter filenames containing special characters, such as the
*(asterisk), for use as wildcards. For example, the pattern*.jpgwill select all the files in the current folder with any combination of characters followed by the file extension .jpg. Similarly, to find all files beginning with temp, use the patterntemp*. You can also search for files containing the word memo anywhere in their filename through the pattern*memo*, and so on.- Invert Selection
This option changes the selection state of all files and folders. In other words, any that are selected become unselected, and those that are unselected become selected.
Backgrounds and Emblems…
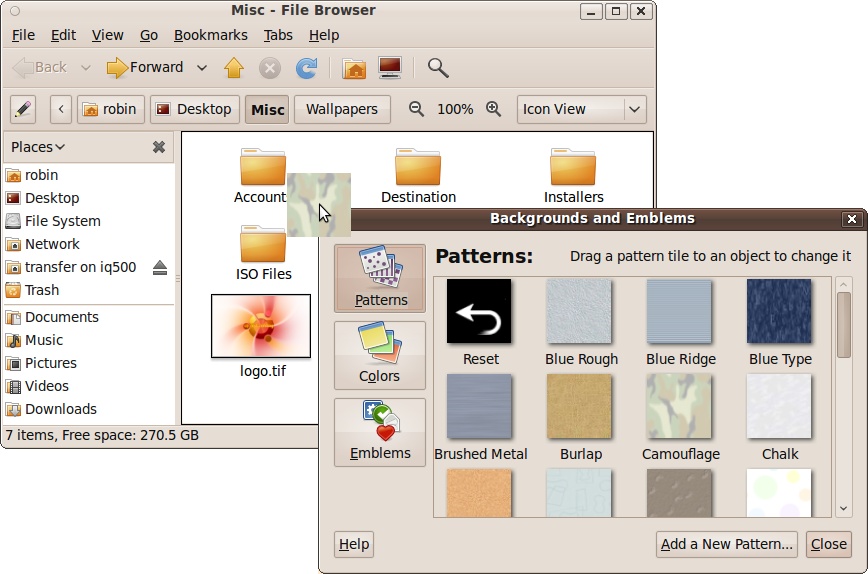
Using this option, you can drag a background of your choice onto a folder to replace the default white background color. If you keep a lot of windows open in the file browser, setting different colors can help you find a folder quickly. The background can be a solid color or a textured pattern, as shown by Figure 6-14, in which the camouflage background is being dragged and dropped onto the folder’s background. To remove a patterned background (and restore the original), you will need to drop the color white on top of it.
The Emblems option offers a way of attaching an emblem to an icon, as detailed in the section Other File Attributes. As long as you have selected an item, you can drag and drop an emblem onto it, rather than having to right-click the item and select Preferences. Figure 6-15 shows a folder with the Camouflage texture applied to the background. To remove an emblem, you can uncheck it.
Other Features of the File Manager
The Nautilus file manager offers many useful features to make handling files and folders as easy as possible. In the next few sections, we’ll look at the file manager’s Edit → Preferences window and its tabs, as well as the file manager’s menu bar features. In these sections, you will learn:
How to use the tree and bookmarks to navigate quickly through your system
The difference between icon, list, and compact views, and what each offers
What you normally see, such as names, dates, and so on
How to view attached devices in the Computer folder
How to preview files, including sound files
How to zoom in and out
How to browse a compressed archive
Preferences
This is an important part of the Nautilus file browser if you intend to customize it to your own liking. You already have seen how one of its options lets you change the default clicking action from double-clicking to single-clicking. Here, you’ll find a lot of other things you can change. Figure 6-16 shows the Edit → Preferences window, with six tabs of configurable options.
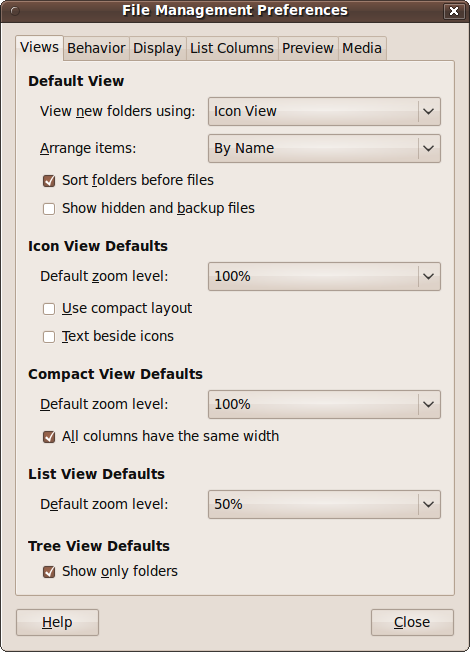
Edit → Preferences → Views
This tab contains the following options:
- Default View
With this section of the Views tab, you can set up defaults for a number of things, such as whether folders should be viewed in an icon view, list view, or compact view. You can also decide whether items should be arranged by name, size, type, modification date, or emblems. Both of these options are available from drop-down menus. Underneath, you can check a box if you want folders to always appear before files, and another if you want to view hidden and backup files.
- Icon View Defaults
This section allows you to specify which zoom level to use when opening folders, to select a compact layout, and whether to view text beside icons instead of underneath them.
- Compact View Defaults
In this section, you can choose the zoom level from a drop-down box, and also restrain all columns to the same width to keep the display looking clean.
- List View Defaults
This drop-down input allows you to choose the default zoom level for icons.
- Tree View Defaults
This section has a single option you can check if you want to display only folders in the lefthand pane.
Edit → Preferences → Behavior
This tab covers settings for controlling how you open items, whether you should be prompted by the system before it executes certain actions, and how to manage the Trash, as shown in Figure 6-17.
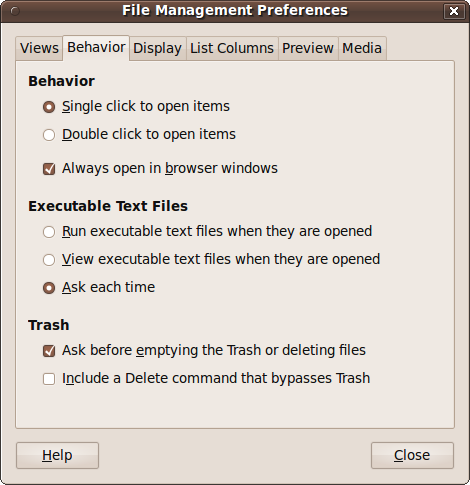
- Behavior
As mentioned in Chapter 4, you can use this section to change the default click behavior from double-click to single-click for opening a file or folder. You can also choose to always open folders in browser windows, which is the default for a new install. This means that when the box is checked, file browser windows will include the directory tree pane on the left. But if you uncheck the box, the lefthand pane will be omitted and the top toolbars will not appear. The former case (i.e., the box is checked) is called Browser mode, and the latter is known as Spatial mode. This checkbox applies only to folders that have not yet been opened.
- Executable Text Files
Some text files can contain executable programs called shell scripts, which are similar to batch files on Windows. Using the options in this tab, you can choose whether such files should execute when opened or if they should only be viewed. If neither of these options is selected, the default will be used, which means the computer will ask you each time what it should do with executable files.
- Trash
In this section, you can uncheck the first box to remove the confirm dialog that normally appears when you empty the Trash. You can also add a new command to the right-click context menu that lets you immediately delete a file, bypassing the Trash. If you are a new Ubuntu user, I strongly suggest you leave these two options alone because they will make it impossible to recover from any accidental file deletions.
Edit → Preferences → Display
This tab lets you choose what information appears next to your icons and how you wish the date to be formatted. Not all of the selected icon captions appear all the time. When you are zoomed out, there will be no captions, but the more you zoom in, the more are displayed, until all three captions are visible. Figure 6-18 shows the three caption selection menus and the long date format being selected:
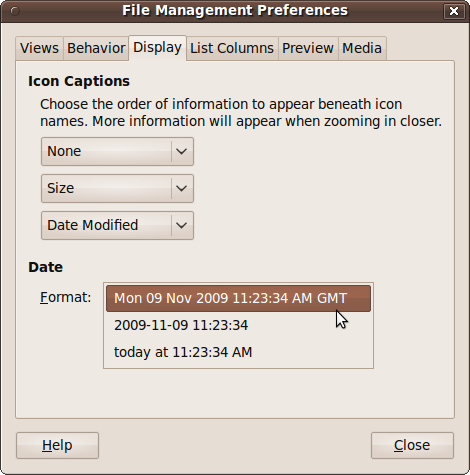
- Icon Captions
The drop-down boxes in this section let you select three options you would like displayed next to your icons, in the order of how soon they will appear as you zoom in. At the default zoom level, only the first caption will appear next to the file or folder’s name. However, after a new install the first caption is set to None, so you will need to change it if you want more than just the file or folder names displayed. The types of information you can display in a caption include a file or folder’s size, date modified, last-accessed date, owner, and location. A few other options will appear, such as Permissions and SELinux Context, which you probably won’t need unless you become an advanced Linux user, so you can safely ignore them for now.
- Date
If one or more of your chosen captions displays the date, you can choose between three formats, from a comprehensive one including the day name, date, year, time, and time zone, to a simple day and time format.
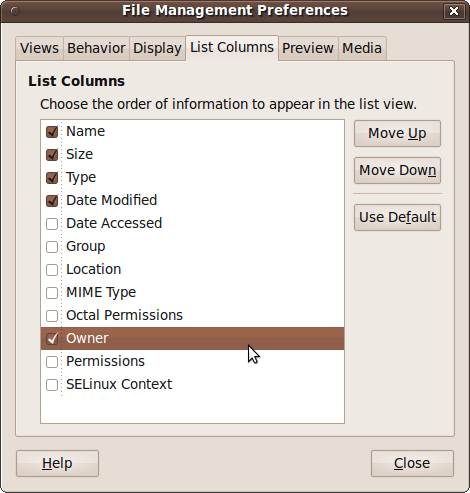
Edit → Preferences → List Columns
This tab selects the columns displayed when you set the file browser to List mode. By default, the file or folder’s name, size, type, and modification date are displayed, but you can choose to change that or add up to eight more columns of information. Figure 6-19 shows the Owner column being added to the list.
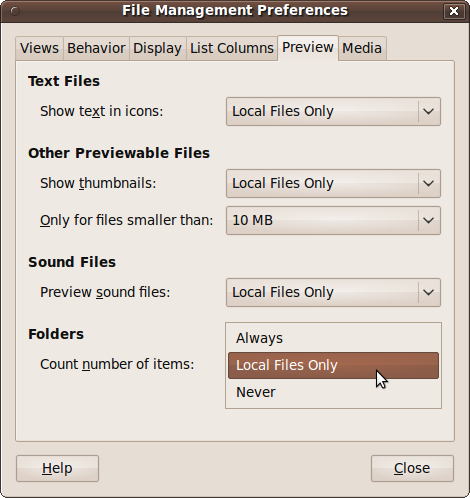
Edit → Preferences → Preview
Using this tab, you can choose how you want your icons to display, including whether to display thumbnail icons (tiny versions of the real file), whether to show tiny text thumbnail icons for text files, whether to preview sounds, and more. Figure 6-20 shows the Folders section being set to count only the items on the local filesystem:
- Text Files
Retrieving information from files on a low-speed hard disk or over a network can sometimes be annoyingly slow, especially if there are a lot of them, so Ubuntu gives you control over what level of work it should put into providing you with information about files. In this section, you can choose whether to have the system create thumbnail images of text files to use as icon images all the time, only for local files, or never. The fastest option is Never.
- Other Previewable Files
Some other files, such as images and videos, are also previewable, but with this option you can modify how their icons are displayed: always create a thumbnail, create one only for local files, or not at all. If you choose either of the two thumbnail settings, you can use the drop-down menu underneath to limit thumbnail creation to files less than a specified file size of your choosing. As with text files, this option can make the file manager display windows faster.
- Sound Files
Just as visual files can be previewed, so can sound files. This section gives you the option to enable this for all files, local files, or none.
- Folders
Just counting all the files in a folder and its subfolders can take time, so you can decide whether to make this happen all the time, only with local folders, or not at all. Remember that you will see the number of files in a folder only when you have selected to see that as a caption within the Display tab, and only when you have zoomed in sufficiently to view that caption.
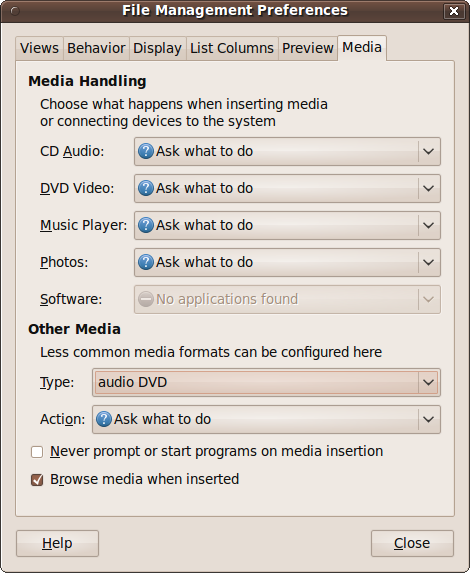
Edit → Preferences → Media
When you insert a CD or DVD or connect a USB thumb or other drive, you can have Ubuntu perform a default action on the media, such as playing an audio CD or displaying a collection of photos. This tab enables you to precisely specify which actions are performed for which media types. Figure 6-21 shows the Media tab selected, where I have enabled the “Browse media when inserted” option at the window’s bottom.
Media Handling
In this section, you can specify what will happen when any audio, video, graphic, or software files are inserted in the drive or attached via USB. The options available are:
- Ask what to do
A prompt will be displayed asking how you want the media handled.
- Do Nothing
The operating system will ignore the media and leave the manner of access up to you.
- Open Folder
The folder or drive containing the media will be opened in a file browser window.
- Open in
programname The program shown in the menu as
programnamewill be used to open the media. If more than one application can handle the media, these will also become choices.- Open with other Application…
If the application in which you wish the media to be opened is not listed, you can select this option to add a new application as a handler for that type of data, and set it to the default for inserted media.
Other Media
Using this section you can add additional media types, such as Audio DVDs and Blu-ray, to the media-handling list. Click the Type drop-down menu to select the media type, and then click the Action drop-down menu to choose which application should handle it.
The final two checkboxes allow you to turn off automatic handling of inserted media, and to make the system automatically open up a file browser window for any unrecognized media types.
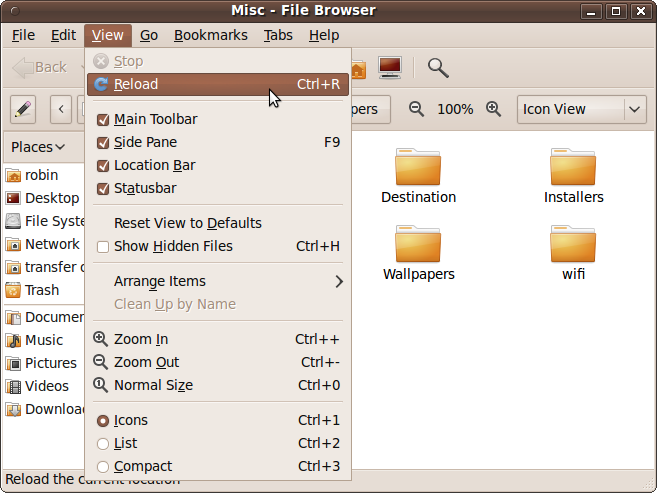
The View Menu
With the View menu, you can decide how you would like Nautilus to lay out and display your files and folders. Figure 6-22 shows the options available.
- Stop
This option will stop the current file browser if it is spending too long getting information from a slow local or network drive.
- Reload
This refreshes the file browser to bring it up-to-date with any changes to the folder and its contents.
- Hide/view checkboxes
This section offers four checkboxes with which you can show or hide various toolbars and panes, including the main toolbar, the side pane, the location bar, and the status bar. Removing the top three and leaving the status bar has the same effect as changing the file browser view to Spatial mode, as described in Edit → Preferences → Media.
- Reset View to Defaults
If you change the file browser’s layout but decide you don’t want the changes, you can quickly set it back to its display defaults with this option.
- Show Hidden Files
When you need to see the hidden files on your computer, check this box. You probably will want to uncheck it after doing any administrative work that requires these files; otherwise, they may clutter up your view of your documents and folders.
- Arrange Items
This provides the same functionality as right-clicking on the file browser background and selecting Arrange Items. See the section Selecting Items in Sequence to view the available arrangement options.
- Clean Up by Name
This option is enabled only when you have used Arrange Items to set manual arrangement as the default. In this case, a click on this option will order the items by name.
- The Zoom Controls
The options shown here are the same as the controls available when you right-click the file browser background. See the section Zooming In and Out for details on how they work.
- Icons, List, and Compact
These options let you choose the way you want files and folders to be displayed. Just select the one you need.
The Go Menu
This menu handles navigating around the filesystem and provides quick access to your most important folders and documents, as well as the network. It also gives you convenient access to the files and documents you’ve used most recently, as shown in Figure 6-23.
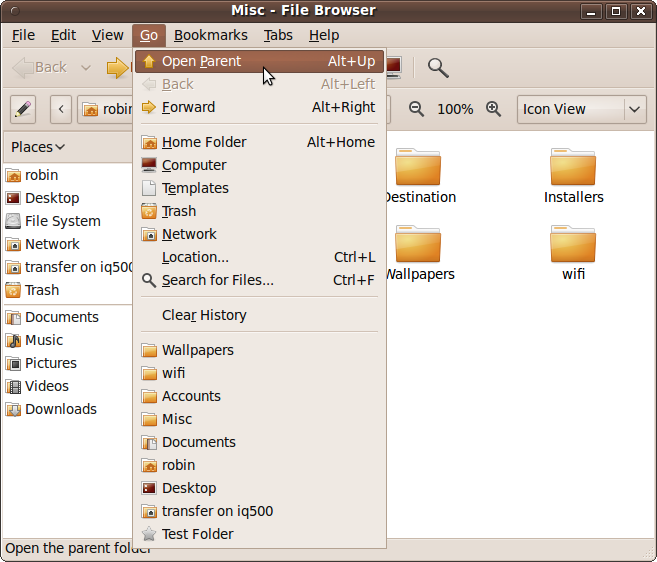
- Open Parent
This option in the Go menu replaces the current folder view with that of its parent. So, if the current folder is Documents, selecting this will take you back a level to your home folder.
- Back and Forward
These two options in the Go menu are enabled when you have browsed through a directory structure. If you have clicked through from one folder to another, the Back option is enabled so you can return to the first folder. Once you use the Back option, the Forward option becomes enabled so you can move forward again.
- Home Folder, Computer, Templates, Trash, and Network
These five options are duplicates of those on the desktop’s main Places menu and take you directly to each of the listed folders or to the network.
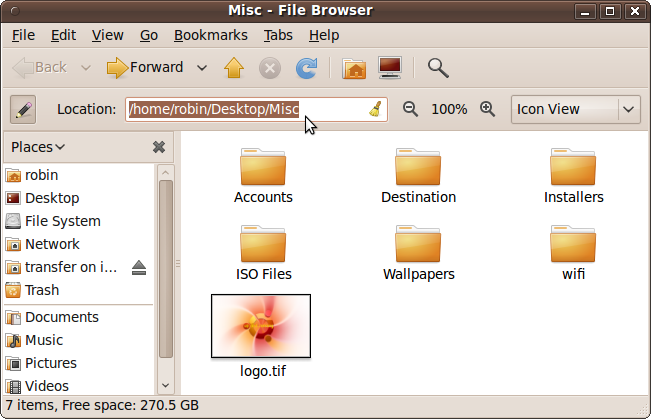
- Location…
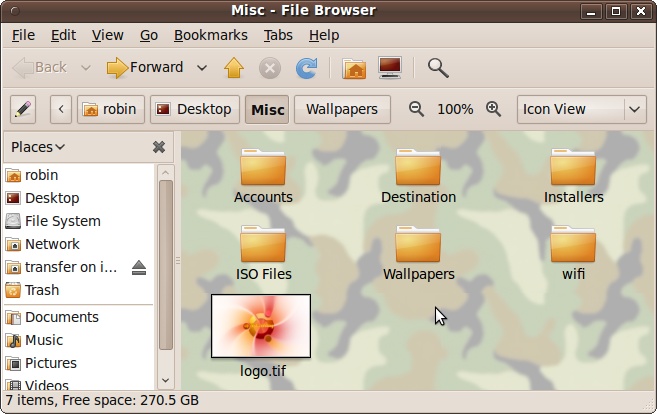
This option opens up an address bar into which you can type a path for the location you would like to go to. Figure 6-24 shows the path /home/robin/Desktop/Misc being entered.
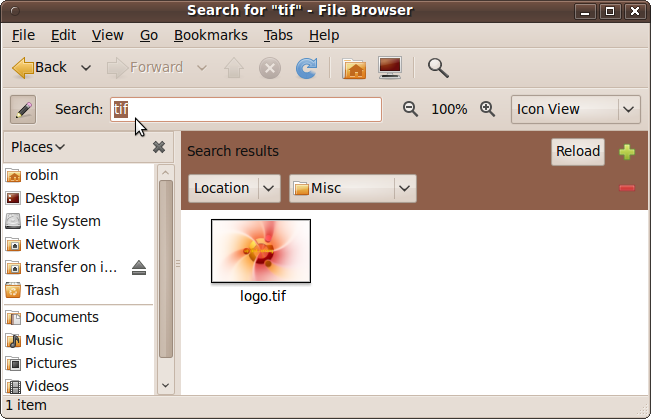
- Search for Files…
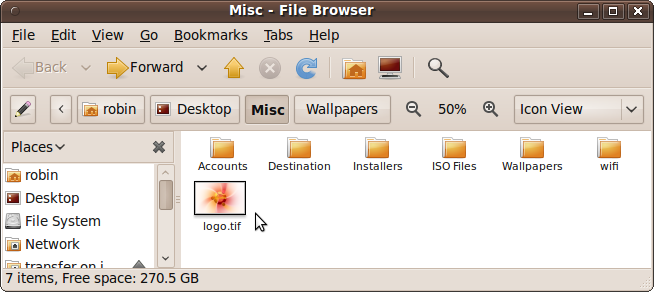
When you use this option, a search input bar appears into which you can enter a piece of a filename to search for, starting at the current folder and searching all the folders within it. Figure 6-25 shows a search made for the term “tif” to find all TIF graphic image files.
- Folder History
Ubuntu keeps track of the folders you’ve recently visited, as it’s likely you’ll want to go back to them. These are all listed at the bottom of the Go menu. If you wish to clear that section, use the Clear History option. You can remove all of them at once, but you can’t remove individual items.
The Bookmarks Menu
Just as you can bookmark web pages in a web browser, you can also bookmark folders using Nautilus. By default, a few bookmarks are already set up to your main folders, as shown in Figure 6-26, and you can click any of the bookmarks shown at the bottom of the list to be taken straight there.

- Add Bookmark
You can add more bookmarks at any time you like. Just browse to the folder you want to bookmark, and then select this option. The bookmark will be added using the name of the current folder.
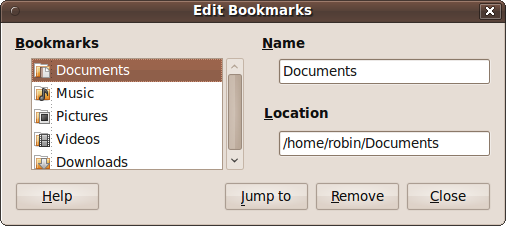
- Edit Bookmarks
Use this option to edit or remove bookmarks by scrolling through them in the lefthand pane and editing their details on the right, or clicking the Remove button. You can also use the “Jump to” button to view a bookmark’s location while editing, as Figure 6-27 shows.
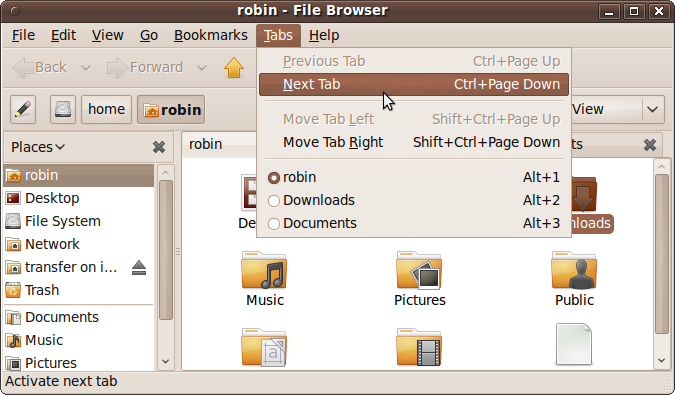
The Tabs Menu
When you have open tabs in the file browser, you can navigate through them by using the Tabs menu, which is a very simple menu for moving back and forth through the various tabs. Available options will be shown in bold, and unavailable options will be grayed out, as can be seen in Figure 6-28. You can also click directly on the tab you want out of those shown at the bottom of the menu.
Help
In the file manager, as in most parts of Ubuntu, comprehensive help is available when you need it. Just press the F1 key or select Contents from the Help menu. You can also select Help → Get Help Online to ask a question at launchpad.net, or read the documentation online at http://help.ubuntu.com.
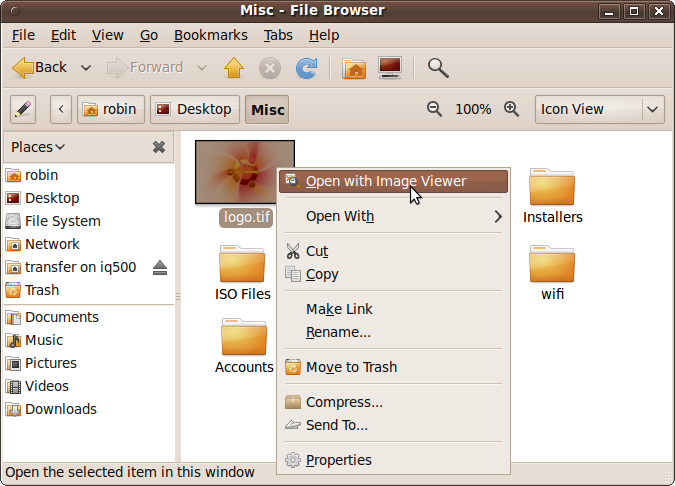
Context Menus
When you right-click a file or folder, a menu appears whose contents vary based on the item and the available activities (hence the term context menu). There will be options such as cut, copy, and paste, making symbolic links (shortcuts), encrypting, compressing, and more. Figure 6-29 shows a range of typical options for an image file.
- Open with
programname This option opens the file using the application named in the option.
- Open With
This lets you choose the application with which to open the file.
- Cut
This option cuts the file so that it can be pasted elsewhere. If you do not perform a paste operation, the file will be unchanged, but if you do a paste after a cut, the original item is deleted, which has the effect of moving it.
- Copy
This is similar to the Cut option, except that the original item is always retained, so a copy is made when you paste.
- Make Link
With this option, you can create a symbolic link, also known as a shortcut. The new linked file will be given the name Link to <name>, where <name> is the original file or folder’s name. You can then drag and drop this link icon anywhere you like, and when it is accessed, the item it is linked to will be used. You can also change the name of the link, which has no effect on the original file or its name. An arrow on the top right of the icon indicates that it refers to a link.
- Rename
This option lets you change a file or folder’s name.
- Move to Trash
This moves the file or folder to the trash.
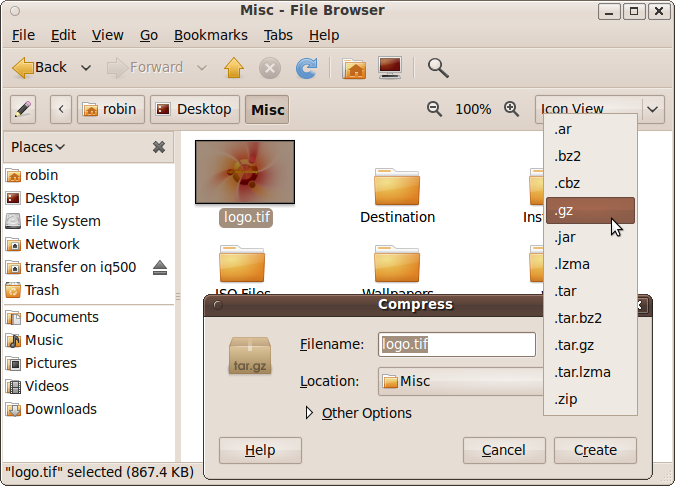
- Compress
This option compresses a file or folder (or a selected group) to save disk space or to reduce a file’s size for sending over the Internet. Figure 6-30 shows the wide range of compressed file formats supported, including .zip, .tar, and .gz. Once you have a compressed file, you can navigate within it just as though it were an extension to the regular filesystem; just click and browse. You can even open a file from within an archive by clicking it, or add more items to the archive by dragging and dropping them into it at the correct location in the archive’s file structure. To decompress files that are within an archive, first click it to open it, select the files to extract, and then click the Extract button. If you wish to extract everything, press Ctrl-A to select all and then click Extract.
- Send To…
Using this option, you can send the selected item(s) to a number of different destinations or in different ways. Your choices of methods are: as an email, to the CD or DVD creator, over Bluetooth, as an instant message, or to a removable disk or shared folder. If you click the Compression checkbox, the item will be reduced (if possible) to a smaller, more manageable size.
- Properties
This brings up the Properties window, as described in the section Other File Attributes.
- Open
This and the following four options will appear only when one or more folders has been selected. This option does the same thing as clicking on the folder.
- Open in New Tab
This option opens the folder or folders within tabs in the file browser.
- Open in New Window
This option opens up each selected folder in a separate window.
- Open with Other Application…
This allows you to open the folder or folders in a different application of your choosing.
- Sharing Options
This last option opens up the folder-sharing window, in which you can share the folder’s contents if the Sharing service has been installed. See Chapter 10 for more details.
Template Files
In the previous section, I explained all the features that the file browser’s context menu has to offer—with the exception of one. The feature I saved for now is templating, which I touched on in Chapter 5, in the section The Directory Tree.
With templates, you can configure the context menu to create a new file based on an existing template saved in the Templates folder of your home folder.
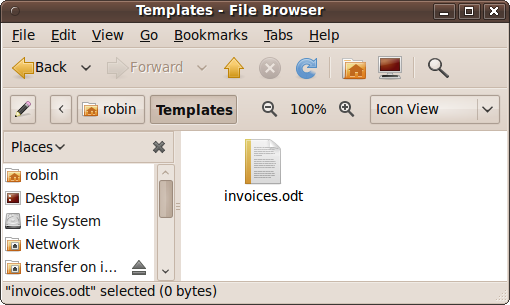
For example, if you frequently have to send out invoices, you can create a file with all the standard invoice details already typed and save it into the Templates folder. Figure 6-31 shows such a template file, invoices.odt (an OpenOffice.org document), which has been saved in this folder.
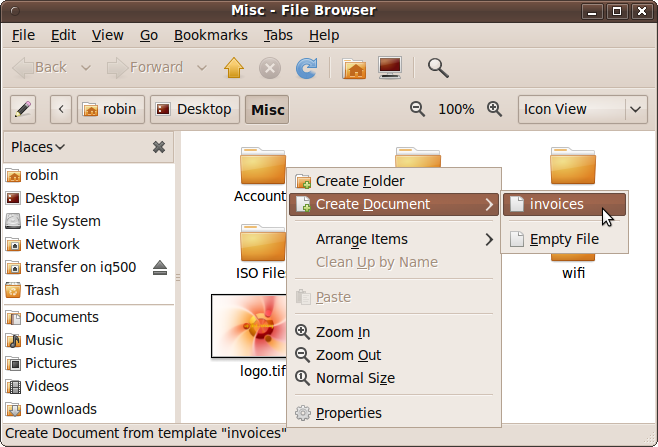
Once you have one or more template files stored in the Templates folder, you can start to use this extra functionality by right-clicking on the desktop or a folder background, and then selecting Create Document, followed by the name of the template. Figure 6-32 shows a new document being created using the template file (notice that in this case, it is shown using the filename invoices, without the extension .odt).
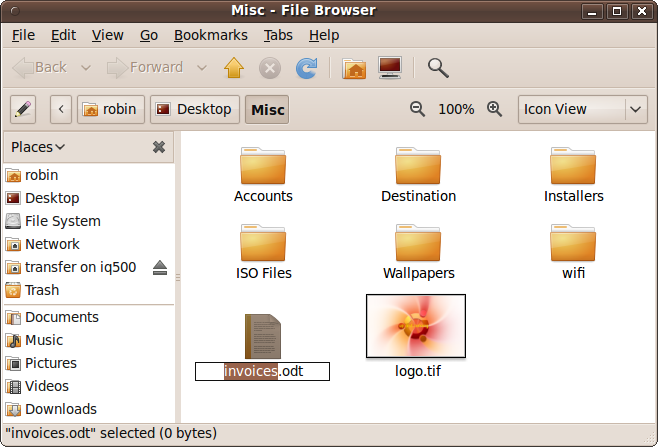
The new file will be given exactly the same filename and extension as the template file but with the filename part selected so that you can easily rename it, as shown in Figure 6-33.
When you now open up the file, it will automatically launch OpenOffice.org and load it in, ready for you to edit, with all the default invoice details already in place. All you have to do now is add the specifics, save, and print.
This feature also works if you select File → Create Document from the file browser menu. You can also right-click the desktop to create new documents from template files.
The Toolbars
The top of the Nautilus file browser window features two toolbars called Main and Location, which appear as long as you are in Browser mode. If you are in Spatial mode, you will not see the top toolbars or the lefthand directory tree pane (see the section Edit → Preferences → Behavior for how to change between modes). Figure 6-34 shows the toolbars displayed in a file browser window set to Browser mode.
The Main Toolbar
In order from left to right, the icons on this toolbar are all duplicated in the file browser menus, and are as follows:
- Back and Forward
When enabled, these move you back and forth through a path of folders you have previously navigated.
- Up
This icon takes you up to the level directly above the current folder.
- Stop
This icon stops the file browser when it is taking too long to return all the information.
- Reload
This icon refreshes the file browser window, updating it with any changes that have been made.
- Home
This icon takes you to your home folder.
- Computer
This icon takes you to the Computer folder, which shows everything on your local system, including connected devices such as CD drivers and USB devices.
- Search
This icon opens up the search bar.
The Location Bar
The first icon on the Location bar (which looks like a pencil and paper) toggles the bar between showing buttons for the folders and displaying a text box to type in a location. Just to its right is the location area itself, which, depending on the setting of the toggle, comprises either clickable buttons or a simple text input field.
Just to the right of the location area are the zoom in and out icons for enlarging and reducing icon sizes. Between them, you will see the current zoom level expressed as a percentage. If you click this zoom level indicator, the zoom level returns to the default, which is usually 100%.
The final item on this bar is the Icon view selector. With it, you can choose whether files and folders are to be displayed in Icon view, List view, or Compact view.
Configuration Editor
This is an editor available for modifying various GNOME settings, which works in much the same way as editing a Windows registry. Most of the settings available are quite advanced, and it’s possible to mess up programs, even GNOME itself, if you make the wrong changes. However, there are some benign uses for the program, such as specifying the icons that should or should not display on the desktop.
To run the editor, press Alt-F2, enter gconf-editor into the input field that pops up,
and click Run. This will bring up the window shown in Figure 6-35, in which I have
used the lefthand pane to drill down to apps → nautilus →
desktop.
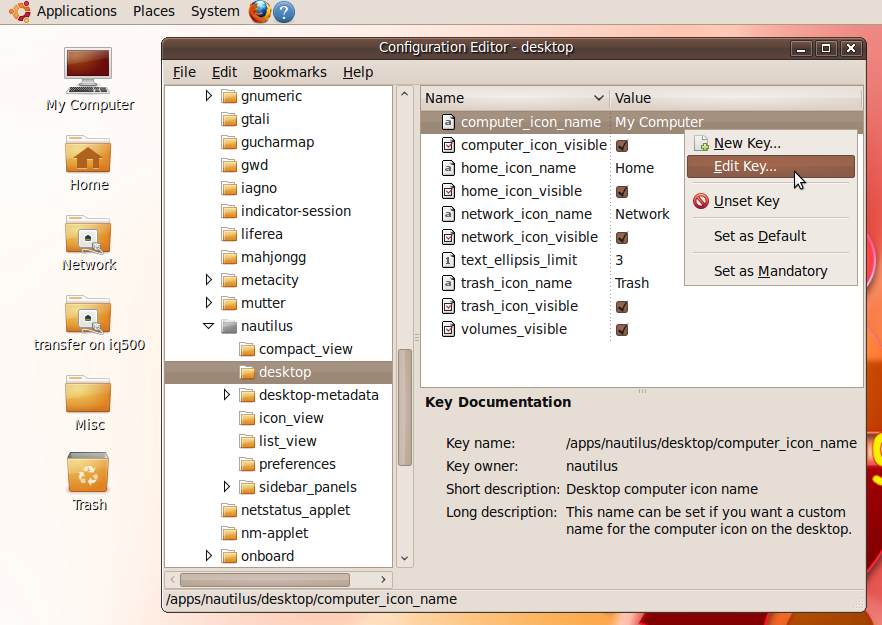
To the left of the Configuration Editor window, on the desktop, you can see half a dozen icons that are similar to those you might see on a Windows computer. I achieved this by right-clicking computer_icon_name and other keys within the righthand frame, and entering string values for these keys. Then I checked computer_icon_visible and the other checkboxes to enable their display on the desktop.
You can also decide whether mounted volumes should have icons displayed on the desktop by checking or unchecking volumes_visible.
There are also many other options available in this Nautilus section, and they are all fairly safe to experiment with. But I recommend you don’t alter settings for other programs unless you know what you’re doing.
What’s New in 10.04
Ubuntu 10.04 has a redesigned Nautilus File Manager in which the following changes have been made (as shown in Figure 6-36):
The Zoom and Icon view controls have been moved from the directory bar to the main toolbar.
The graphic presentation has been slightly enhanced with the addition of a single pixel border around the window panes.
The lefthand pane has been enlarged by moving the Places title up to the directory bar and extending the pane all the way to the window bottom.
The Pencil icon for toggling between the text and button-based address bars is removed, so now the only ways to manually enter a location are to select Go → Location or press either the / key or Ctrl-L.
Most of these changes seem to have been made to enable a new split view option, which you can call up either by pressing F3 or by selecting View → Extra Pane. You then have two views open on the filesystem at the same time.
Summary
At this point, you should be quite a proficient Ubuntu Linux user, so in the next chapter, I’ll start to test your mettle by introducing the Terminal window and how to use the command line for issuing powerful commands as the root user, setting advanced file permissions, and monitoring the operating system’s internal processes. But don’t worry; it doesn’t get too technical, I promise.