Table of Contents for
Ubuntu: Up and Running
 Ubuntu: Up and Running
Published by
O'Reilly Media, Inc., 2010
Ubuntu: Up and Running
Published by
O'Reilly Media, Inc., 2010
- Cover
- Ubuntu: Up and Running
- Ubuntu: Up and Running
- Dedication
- Foreword
- Preface
- 1. About Ubuntu
- 2. Installing and Upgrading Ubuntu
- 3. Configuring
- 4. The Desktop: Accessing Applications and Features
- 5. The Filesystem, File Attributes, and Permissions
- 6. The Nautilus File Browser
- 7. The Command Line
- 8. Installing and Removing Software
- 9. System Maintenance and Security
- 10. Networking Ubuntu
- 11. The Internet
- 12. Using OpenOffice.org
- 13. Playing Games
- 14. Pictures, Sound, and Video
- 15. Other Ubuntu Distributions
- 16. Using Wine
- Index
- About the Author
- Colophon
- Copyright
Chapter 4. The Desktop: Accessing Applications and Features
Long gone are the days when Linux was considered the exclusive domain of highly technical and skilled programmers. Nowadays, we have desktops that provide easy and intuitive interfaces to all their functions, in much the same way as we now expect from any other modern OS, such as Windows or Mac OS X. Xfce, KDE, and the default Ubuntu desktop, GNOME, have been developed through many years of cooperative labor and take advantage of the most advanced graphics cards.
In particular, the GNOME environment of Ubuntu 10.04 represents the leading edge of Linux desktops, and this chapter will help you to thoroughly familiarize yourself with how it works and what it has to offer.
Logging In
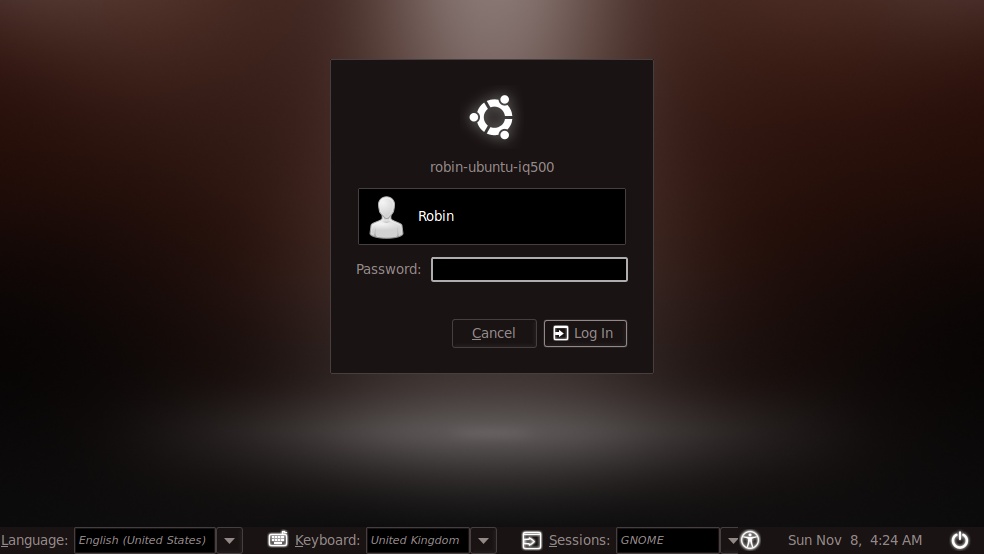
You may wonder why there’s a whole section on logging in. Well, it’s because you can do more than just log in at this screen, as you can see from Figure 4-1. I’ve set up my system so the login screen already shows the user Robin and is waiting for a password to be entered. But at the bottom of the screen are a number of options you can use to modify your login session. So,s before getting on with the logging in itself, let’s look at them in turn.
Language
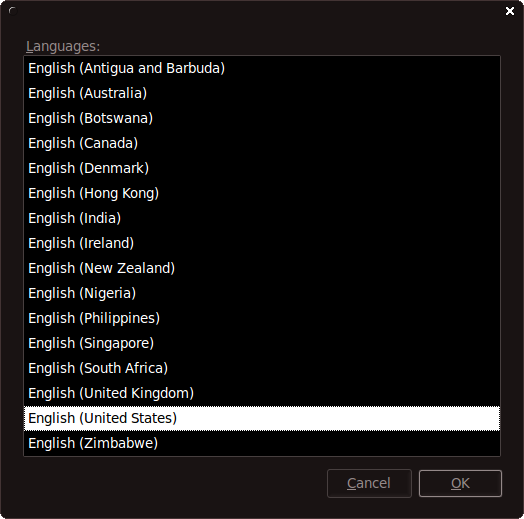
By clicking the Language drop-down menu at the bottom left of the screen (displaying the country United States in the screen grab,) you can change the language you will be using, which is useful if you need to work in more than one language. For example, Canadians might need to use both English and French, or Belgians might need to switch between Flemish and French, and so on. Or, as shown in Figure 4-2, you may simply wish to have a variety of different versions of English available to you.
By default, all supported variations of the installed language(s) are offered for selection. To obtain access to additional languages, you first select System → Administration → Language Support from the Ubuntu Desktop, and then click Install / Remove Languages, as shown in Figure 4-3. The first time you do so, you may be informed that language support is not completely installed and may have to click the Install button.
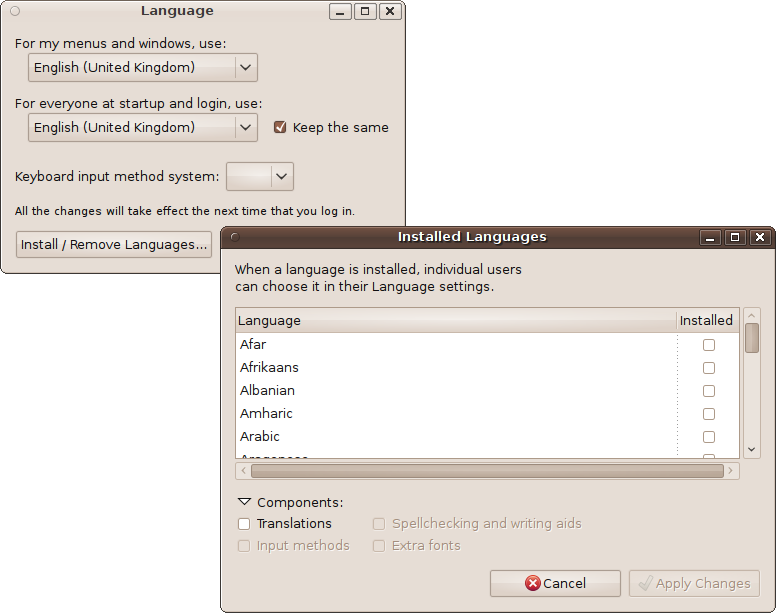
Make sure you check the boxes for the translations and/or writing aids you need before clicking Apply Changes. You will also most likely need to follow the instructions provided in the section Layouts for installing new keyboard layouts.
Keyboard
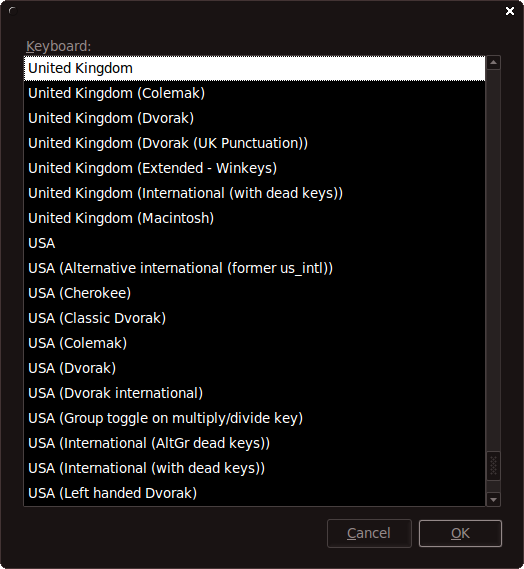
If you change the language, you can also change your keyboard layout to match it by clicking the Keyboard drop-down menu and choosing the layout you need, as shown by Figure 4-4. If, when using Ubuntu, you press a key and an unexpected character appears on the screen, you can probably fix the problem right there: you just have to figure out which keyboard matches your language and make the change. Once you have chosen the right one, click OK to continue.
Sessions
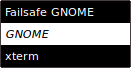
This option lets you choose the type of desktop to open (see Figure 4-5). By default, it will be the GNOME desktop, but later on, in Chapter 15, I’ll show how you can add the KDE or Xfce desktop environments to Ubuntu. And if you do, they will also be listed here as selectable sessions, alongside GNOME.
There is also the Failsafe GNOME option that you can choose if you have display problems when using the regular GNOME desktop. The other option available here is xterm, which opens up a Terminal instead of the Ubuntu desktop. This is useful for situations when the desktop seems to crash or won’t even open, perhaps because of changing a graphic driver. With it, you can use text commands to fix the problem. But generally you will not need to use it.
Accessibility
If you need it, the Accessibility menu (or as Ubuntu calls it, Universal Access Preferences) can be called up by clicking the icon of a person with his arms and legs extended. You can then enable any or all of the following options:
Use onscreen keyboard
Use screen reader
Use screen magnifier
Enhance contrast in colors
Make text larger and easier to read
Use sticky keys
Use bounce keys
Use slow keys
Chapter 3 describes the last three items in the list.
Desktop Layout
One of the best things about Ubuntu is the care and attention that’s gone into developing its desktop layout. Based on the GNOME desktop environment (unless you are using Kubuntu or Xubuntu), it provides a slick and intuitive interface to your computer (as do both Xfce and KDE).
The screen grab in Figure 4-6 shows a typical Ubuntu desktop soon after installation. The only minor difference between the screen grab and what you will see on your computer is the wallpaper, which was produced especially for this book.
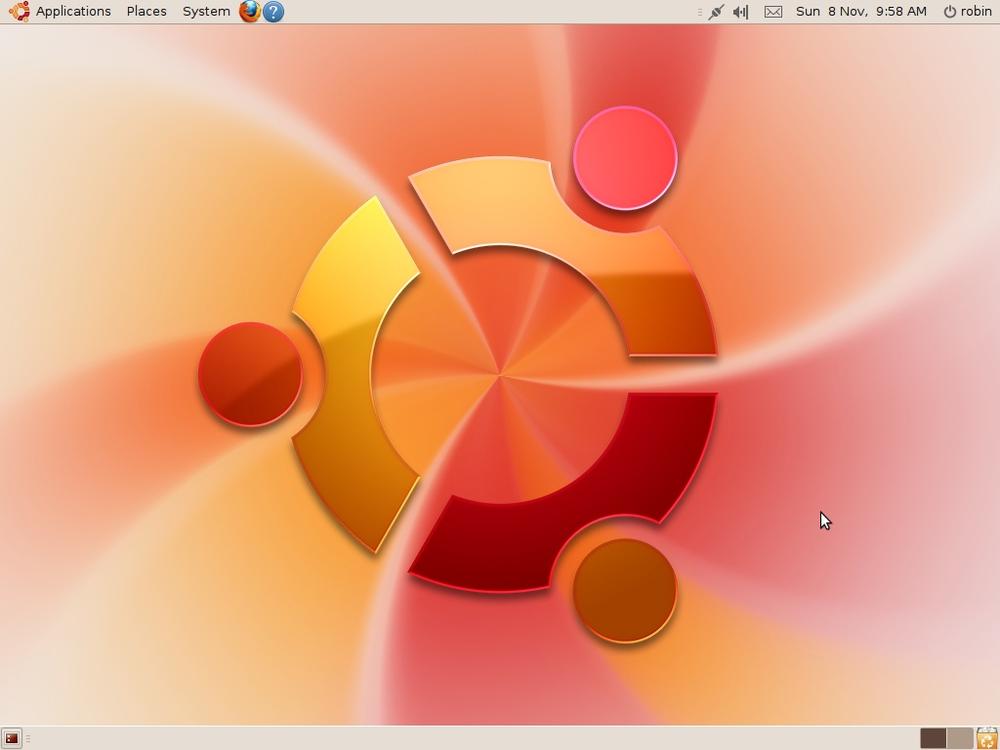
So, let’s take a look at the various parts by taking a clockwise tour, starting at the top left where there are the three main menus. If you are used to using Windows, you can think of these menus as being three Start menus instead of one; rather than having to drill down through a single tree of menu items, Ubuntu divides the options into things dealing with applications, places, and the system itself.
The Applications Menu
The Applications menu (see Figure 4-7) contains the main programs and accessories you use. This includes things such as Calculator, CD/DVD Creator, and Terminal under the Accessories subheading; over a dozen games under Games; the GIMP image editor and F-Spot Photo Manager under Graphics; the Firefox web browser and Empathy instant messenger (IM) program under Internet; Dictionary and the OpenOffice.org applications under Office; and Sound Recorder, Brasero Disc Burner, and Movie Player under Sound & Video. The Ubuntu Software Center (see Chapter 8) can also be accessed from here. This is where you can easily install and uninstall new software.
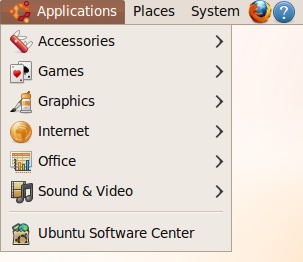
As you use Ubuntu and start to install more applications, they will usually appear in this menu under new subheadings such as Education, System Tools, Universal Access, and so on. So, if you can’t find a program, the Applications menu is the first place to look.
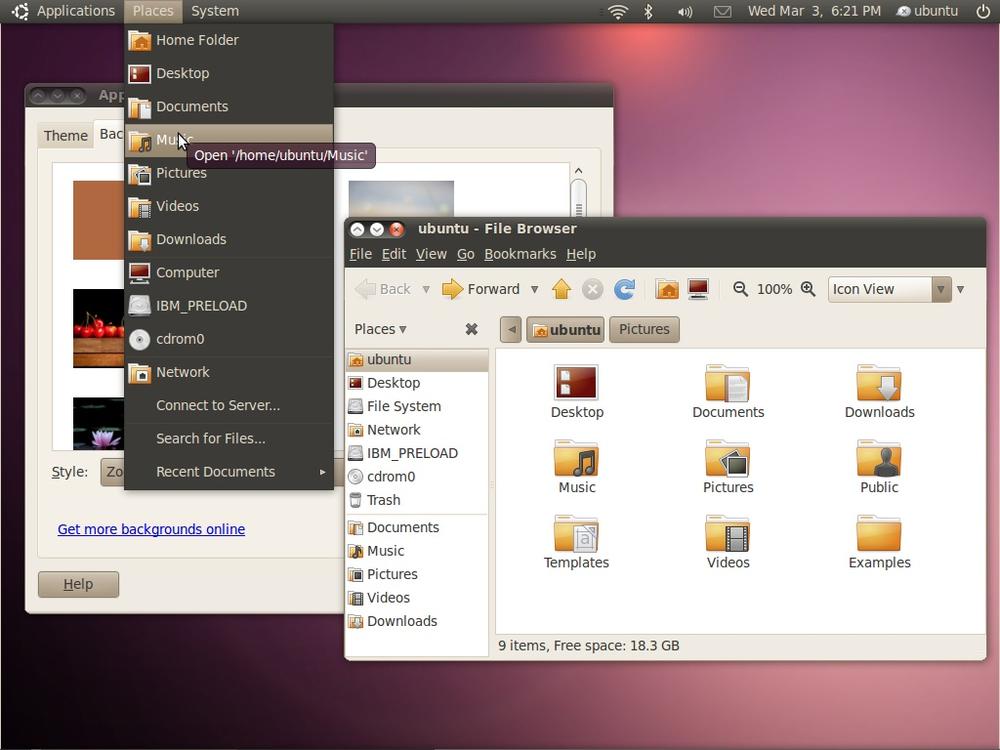
The Places Menu
The Places menu (see Figure 4-8) is where you can browse and search all the folders on your computer, as well as any external drives or USB memory sticks. It is also the place for connecting to other computers on the network.

The Home Folder group
The first group of entries in this menu relate to your local computer, as follows:
- Home Folder
Each user on the computer has a different home folder, so this is your main folder on the computer. In my case the path to the folder is /home/robin. For a user named hannah, it would be /home/hannah. All the folders referred to in this group are subfolders of this main one. So, in my case, my Desktop is at /home/robin/Desktop. Note the capital letter D. Linux is case-sensitive, so you must use the capital letter when referring to this folder.
- Desktop
This folder contains all your desktop items, excluding mounted drives.
- Documents
This is the place where you’ll find your documents as stored by default by applications such as OpenOffice.org.
- Music
Music applications will usually use this folder for storing music you download, record, or edit.
- Pictures
Your photos and other images as handled by programs such as the GIMP will be stored here.
- Videos
- Downloads
The Storage Devices group
The second group of entries relates to your computer’s hard disk drives and any attached USB memory sticks or external hard drives. In Figure 4-8, you can see the first item is called Computer. When you click it, a new window similar to the one shown in Figure 4-9 will appear showing all the storage devices and networks attached to your computer or connected to the network.
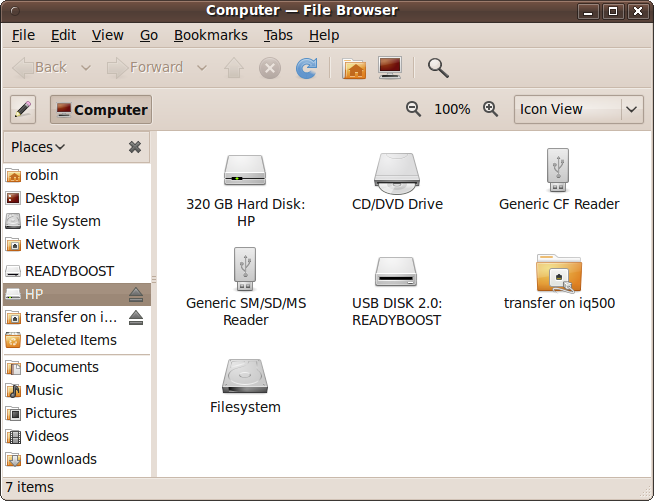
In both the Places menu and the File Browser, you may have noticed that this computer has a USB memory stick attached called READYBOOST, which is used to provide additional memory caching to Windows Vista. Because that computer has Ubuntu installed alongside Vista in a dual-boot system, I have left that device alone so that it’s ready for use whenever I need to reboot into Windows (not that I use it that often anymore).
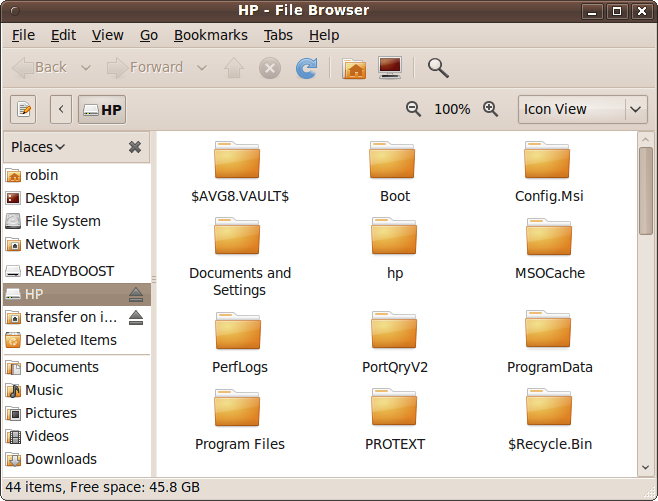
Speaking of Windows, on that computer the HP drive is the name of the Windows partition. Such partitions can be accessed from Ubuntu. When you click one (either in the File Browser or the Places menu) you may be prompted for your password; if so, enter it. A window such as the one in Figure 4-10 will then open, and as long as the folders and files have the required permissions, you can copy files between the Ubuntu and Windows partitions.
The Network group
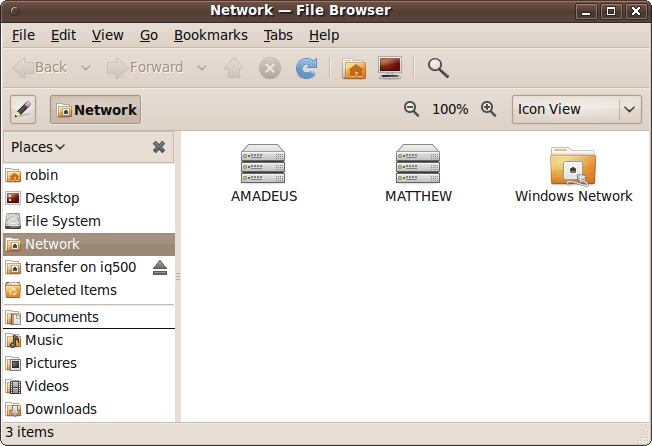
In Figure 4-8, you can see that I have mounted a network folder called transfer on iq500 in the Network group of the Places menu. This name means the folder called transfer on the computer called iq500. To access other computers and folders on the network, you click the Network entry to bring up a File Browser window such as the one in Figure 4-11, where two computers on the local network have been found (AMADEUS and MATTHEW), and a Windows network has also been detected.
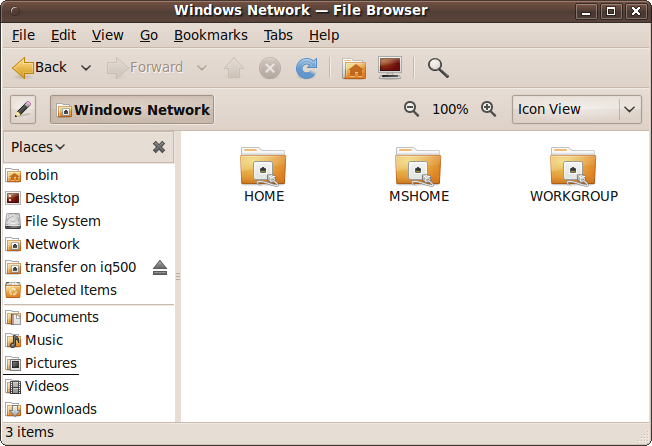
Clicking AMADEUS takes me to the shared folders on another Linux computer on my desk, whereas clicking Windows Network first brings up the workgroups Ubuntu has detected within the Windows network. In my case, as shown in Figure 4-12, three workgroups have been found: HOME, MSHOME, and WORKGROUP.
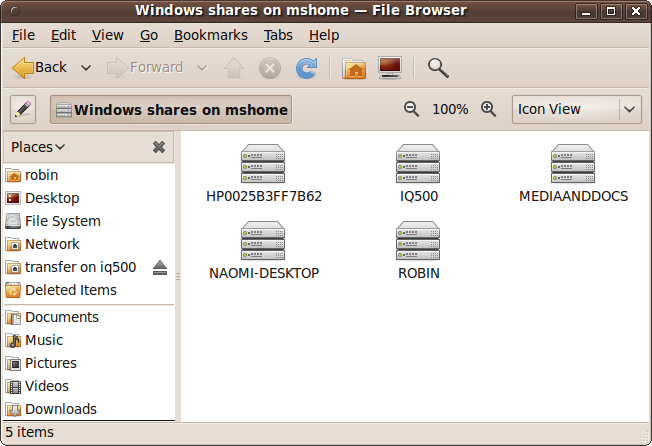
Clicking any of these will bring up another window showing all the computers within that network. So, for example, clicking MSHOME brings up five computers in the workgroup, as shown in Figure 4-13. From here on in, you can choose a computer and then select available folders on that machine, although you will have to enter the right passwords for computers that require them.
Once you have connected to another computer and opened up a folder, it will then become accessible directly from the Places menu, and will also be mounted on the desktop as an icon.
Of course, if your computer isn’t part of a network or you have a different set of workgroups, what you see when you use the Networks group of the Places menu may be quite different. In any case, you should be able to access whatever Windows and Mac systems that your site can access.
The Search for Files… and Recent Documents groups
The final group in the Places menu is for searching for files or selecting recently accessed documents. Figure 4-14 shows both the Search for Files window and the Recent Documents submenu of the Places menu.
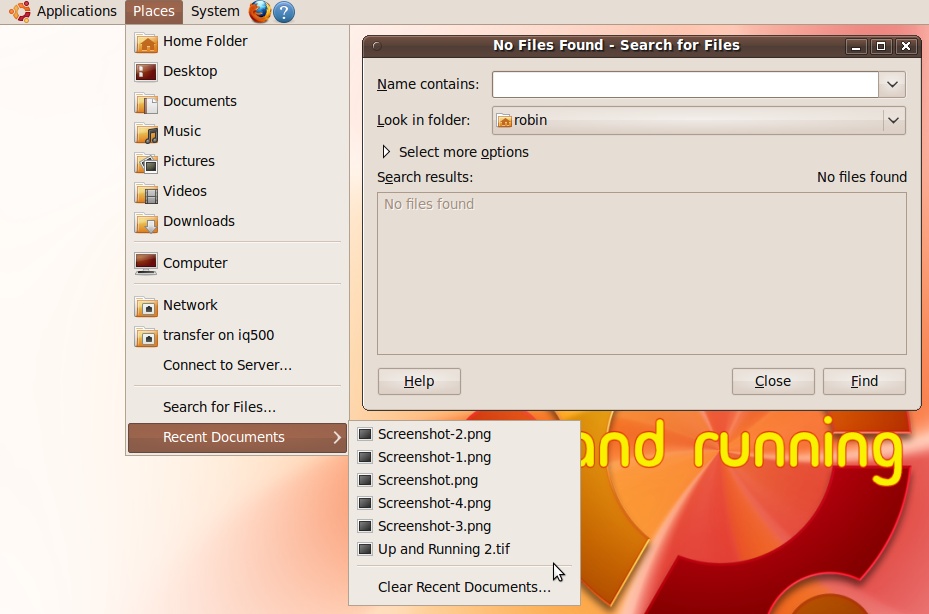
When searching for files you can tell Ubuntu where to look by clicking the “Look in folder” drop-down list and selecting the folders and/or computers or external drives to search.
If you wish to search for specific text within your files, click “Select more options” and you’ll be able to enter text to search for, and also narrow down results by date, file size, and several other specifiers.
The System Menu
The System menu (see Figure 4-15) has two groups of items.
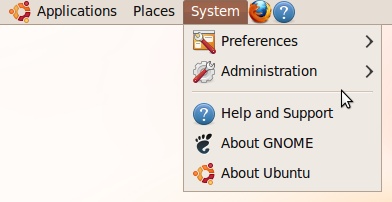
We’ll explore the first group in this section.
Preferences
As you will recall from Chapter 3, the System → Preferences menu (see Figure 4-16) is the place to go when you need to change various settings in your Ubuntu configuration, ranging from the keyboard and display to power management, sound, and the applications to run automatically when the computer boots up.
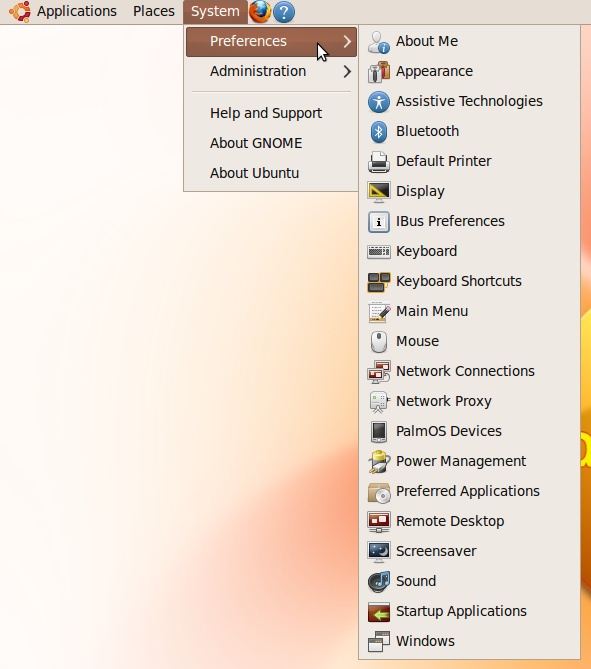
There’s plenty of information on customizing your computer in the rest of this chapter and throughout this book, so I won’t go into further details in this section.
Administration
The System → Administration menu (see Figure 4-17) is where you make more fundamental changes to your computer, such as installing hardware device drivers, setting up TV tuners or webcams, and installing new packages.
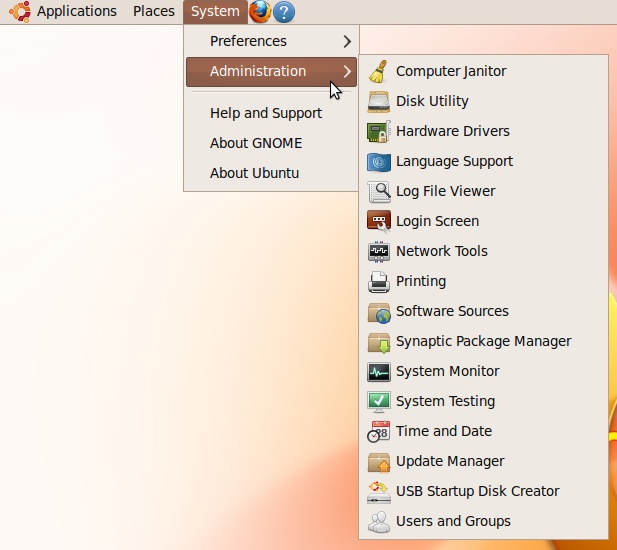
All of these operations and more are fully explained throughout this chapter and the rest of this book.
The bottom three menu entries
The second group of menu items provides support through built-in web pages, specific information on Ubuntu, and GNOME’s online help.
The Top-Left Icons
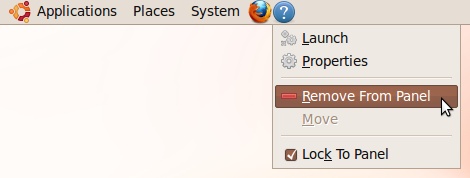
As you move your eyes past the menus at the top-left side of the GNOME screen, you’ll see icons to their immediate right. These are intended to represent some of the most frequently used programs and features. By default, the icons are likely to be for Firefox and Help, but you can remove any of them by right-clicking and selecting Remove from Panel (see Figure 4-18).
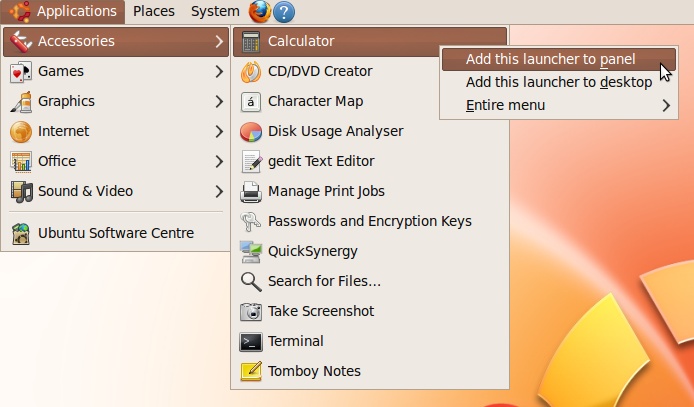
Likewise, you can add a program to the panel as an icon by right-clicking it from within the various menus and selecting “Add this launcher to panel” (see Figure 4-19). You can also add an icon to the desktop by selecting the second option, “Add this launcher to desktop.” Or by selecting “Entire menu,” you can add a complete menu and its suboptions to either the panel or the desktop.
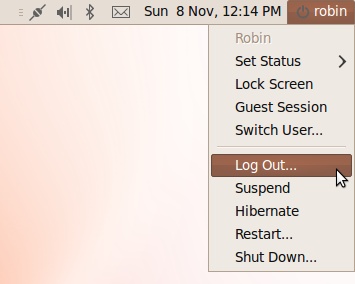
The Quit Button
Starting at the top-righthand corner and working from right to left, the very first icon is the Quit button, which will display your username (see Figure 4-20). When you click it, a menu will come up with various options, described next.
Set Status
If you are logged into the Pidgin or Empathy messaging programs, the first thing you can do is set your user presence by selecting the Set Status submenu. You can then choose to set your presence status to any of the following:
- Available
I am available to be contacted.
- Away
I am not at my computer.
- Busy
I am busy; please don’t try to contact me.
- Invisible
You can’t see me; effectively, I’m not here.
- Offline
My computer is offline.
If you are not logged into either IM program, these options will be grayed out and unselectable.
Lock Screen
This blanks out the screen, leaving only a password entry box, which is woken up only when a key is pressed or the mouse is moved (see Figure 4-21). To resume working on your computer, enter your password and click the Unlock button. Alternatively, you can use Switch User to log in as another user.
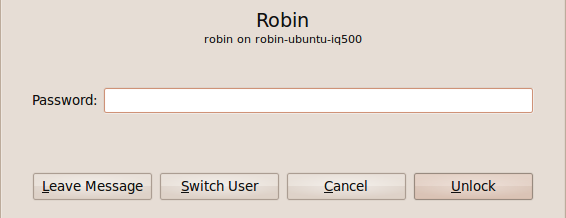
Other people can also leave you a message while you’re away with the Leave Message button. The Cancel button is there to darken the screen again without waiting for the blanking timeout delay. In Figure 4-21, you’ll see that the box reminds you which user you are on which computer. In this instance, I am user robin on the machine identified as robin-ubuntu-iq500.
Guest Session
This option lets you commence a guest session, which creates a new desktop with the user Guest logged in. Guest users have severely restricted permissions and are prevented from making any major changes. To exit from this session, click the icon again and select Log Out…. You will then be prompted for your password in order to resume using the account from which the Guest user desktop was called up.
Switch User…
This takes you back to the login screen shown earlier in Figure 4-1, where you can log in as another user or log back into your previous session.
Log Out…
This option logs you out of your current session and returns you to the login screen, where you can choose to log in again as another (or the same) user, reboot the computer, or turn it off. The difference between Switch User… and Log Out… is that the former keeps your programs open when returning to the Login screen, whereas the latter closes them all first.
Suspend
With the Suspend option you can put the computer to sleep so that all processing is suspended until you reawaken it by pressing a key or by using the mouse. A word of caution here though, because Ubuntu has a known history of occasional problems with this feature, and sometimes, depending on your hardware, it may crash and won’t reawaken (or Resume) in a usable state. I recommend that you test it without any important programs open before deciding whether to use it in the future.
Hibernate
The Hibernate option goes a step further because it saves the current configuration to hard disk and then completely turns the computer off. This is the best method for saving electricity while being able to return to exactly where you left off the next time you turn the computer on. Again, testing is recommended before relying on this feature.
Restart
When you select this option, your computer starts a 60-second countdown timer in a window on the desktop, leading to the restarting of your computer. You can choose to click the Cancel button if you didn’t intend to restart your PC, or the Restart button to bypass the timer and restart immediately.
However, if other users are logged into the computer, another window will pop up requesting your password before allowing the restart to occur. You can either type in your password and click the Authenticate button to force a restart, or click the Cancel button to halt the process.
Shutdown
This option works identically to Restart, except that the computer is turned off and does not turn on again until you press its on button.
What’s new in 10.04
Starting with Ubuntu 10.04, the Quit menu has been divided in two, with all the status indicators now having their own Me Menu on the left and the current username shown next to a speech bubble as the heading/drop-down menu button. The Me Menu lists your username at the top, alongside a thumbnail image which you can personalize by clicking it. Underneath that is an input box where you can enter updates to Twitter, Facebook, and/or other similar sites once you have configured Ubuntu to access them. You can also directly enter any Chat or Broadcast accounts you have set up, or open Ubuntu One from here. To the right, all the user functions such as shutdown and restart are now selectable from the universal broken circle power button.
The Remaining Top-Right Icons
The remaining icons to the left of the Quit button will vary from computer to computer, but generally there will be some or all of the following.
The date and time
Although it shows as text, as soon as you pass your mouse over it, you’ll see that the date and time display is actually part of a button that brings up a calendar when clicked, as shown in Figure 4-22.
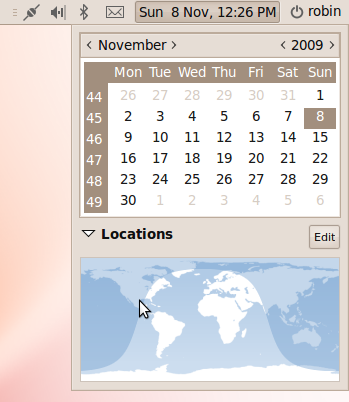
When you click any dates, the Evolution email groupware application is called up to help you manage appointments, tasks, and so on. If it’s the first time you’ve used it, you’ll be taken through a setup process before it opens.
If you just want to insert today’s date or time into a document, you can right-click the button and select either Copy Time or Copy Date.
Note
If the time and/or date is incorrect on your computer, you can fix it by selecting System → Administration → Time and Date. To change any settings, select “Click to make changes” and, after requesting your password, this will bring up a new window in which you can specify your local time zone and the time and date where you are.
New mail
The new mail icon (which looks like an unopened letter) is likely to be displayed immediately after installing Ubuntu because there is a friendly email from the Evolution email program developers waiting to be read. Once you have set up the program by providing your email account details, you’ll be able to view the welcome message, as well as your other emails.
Sound volume
Whether or not the sound volume icon is displayed seems to depend on your sound hardware. When it is visible, you can click it to slide the volume up and down, and right-clicking provides access to the Mute checkbox and the Sound Preferences window. If you did not hear an introductory tune when Ubuntu booted up and you have a working sound card, then most likely this checkbox will be selected, so look there first before investigating whether you have a hardware or driver issue.
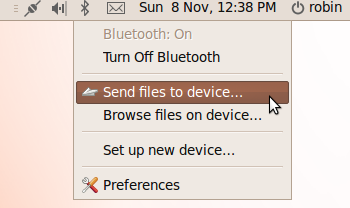
Bluetooth
If your computer has Bluetooth capability, you may also see a Bluetooth icon. You can click it to bring up a menu with which you can turn it on and off, send files and browse devices, set up new devices, and change your Bluetooth preferences (see Figure 4-23). For this icon, both the left and right mouse buttons pull up the same menu.
Network connection
This icon changes according to the network hardware you have:
If you don’t have a networking device, the icon will show a symbol similar to the one for a mobile phone’s connectivity, but with the four bars showing no signal, which indicates that there is no connection.
If you are using a WiFi card and it is working, the four ascending bars will show your signal level. If it’s unconnected, no signal level will be shown.
If you have a wired connection that is working, the icon will resemble two plugs connected to each other diagonally.
When you click the icon, a menu will open in which you can select the connections you require activated (see Figure 4-24). You can also configure VPN (Virtual Private Networking) from here, as well as connect to hidden wireless networks (those that do not broadcast their name) or create a new wireless network.
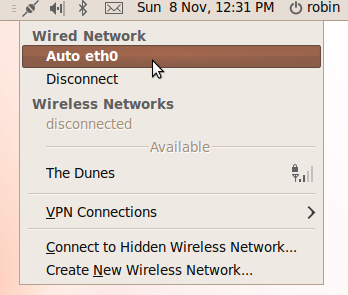
Right-clicking brings up a different menu with which you can turn all networking (or just wireless networking) on and off. You can also view information about your connection and edit your connection settings. See Chapter 3 for more on this icon.
The Bottom-Right Icons
Down at the far right of your desktop, you’ll find a couple more icons, including the Trash, as shown in Figure 4-25.
Note
Users of non-American English will see this referred to using the word Wastebasket instead of Trash.
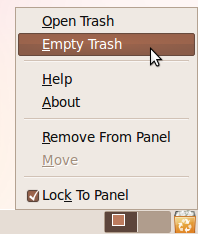
The Trash
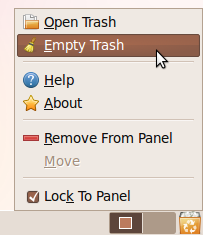
Whenever you wish to delete a file, just drag and drop it into the Trash and it will be deleted. But there’s a failsafe to prevent you from accidentally deleting files you didn’t mean to: erased files are stored in the Trash until you empty it by right-clicking the icon and selecting Empty Trash.
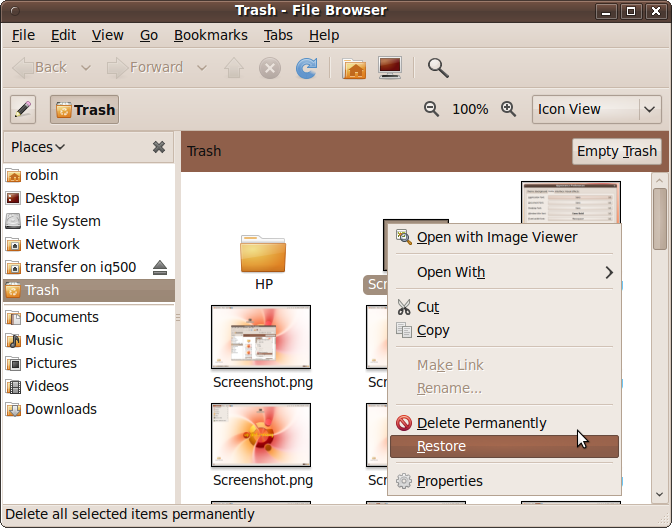
To restore or undelete a file, click the Trash icon and a window will open up displaying its contents (see Figure 4-26). You can then drag and drop the files shown to other places in the computer’s filesystem, or right-click any item for a list of further features, including options to permanently delete or restore a file. There is also an Empty Trash button in this window.
The workspace switcher
Using the workspace switcher, you can have multiple desktops (up to 36, in fact), each displaying different programs and windows. Each workspace is represented by an icon showing where the various windows are located within it. To switch between them, you can:
Click the icon representing the workspace you wish to access.
Use the keyboard shortcut alternatives of Ctrl-Alt-Left arrow to select the workspace to the left or Ctrl-Alt-Right arrow to select the one to the right. When you do this, a grid will appear in the center of the screen showing which workspace you are currently viewing, where the other ones are located relative to it, and the windows each one contains.
Place the mouse pointer over the workspace switcher and scroll the middle mouse wheel.
The icons on your desktop will remain where they are, but the open windows and programs will change.
There are also a number of ways you can move a window from one workspace to another. You can:
Right-click the title bar (or left-click the small dot at the far left of the title bar) and select Move to Workspace Right, Move to Workspace Left, or Move to Another Workspace. The former two will move the window one place to the left or right, whereas the latter opens up a submenu from which you can choose which workspace the window should be moved to.
Locate the miniature representation of the window to move within the workspace icons at the bottom right of the desktop, and then click and drag it to another workspace.
Select the window to move by clicking it or its title bar, and then press Ctrl-Alt-Shift-Left arrow to move it to the workspace on the left of the current one (if there is one) or Ctrl-Alt-Shift-Right arrow to move it to the workspace immediately to the right (if there is one).
Drag any window by its title bar to any workspace of your choice. (For this to work, you need to have a suitable Nvidia graphics card and the Nvidia proprietary drivers installed, as discussed in the section Display Preferences of Chapter 3.)
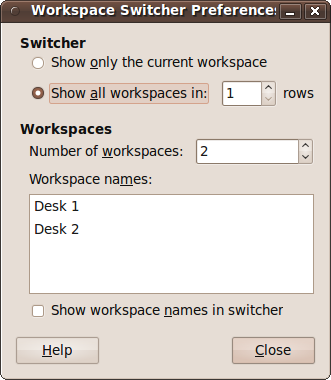
You can change the way your workspaces are laid out by right-clicking one of the workspace switcher icons in the bottom-righthand corner and selecting Preferences. A new Workspace Switcher Preferences window will then appear (see Figure 4-27). From here, you can effectively disable all additional workspaces by choosing to display only the current one, or change the number of rows and the total number of workspaces available.
If you choose to have more than one row of workspaces, you’ll also find that all the previous key presses mentioned are augmented with Up arrow and Down arrow shortcuts to move or select workspaces above and/or below the current one. For example, you’ll be able to move a window up by pressing Ctrl-Alt-Shift-Up arrow.
You can also give each workspace different names from the rather inexpressive defaults, such as Desk 1 and Desk 2, and can choose between displaying either the icons or the workspace names.
The Bottom Panel
The bottom panel holds the previously discussed workspace switcher and Trash, as well as all the buttons for controlling the open programs and windows. Figure 4-28 shows three programs open (Four-in-a-Row, Calculator, and Firefox, which is minimized), with matching entries in the bottom panel, which I’ll call tabs for want of a better name.
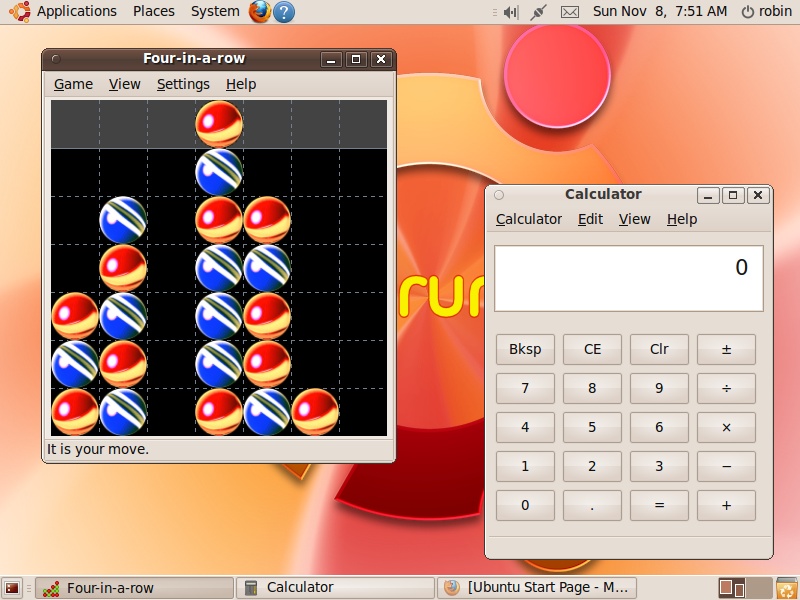
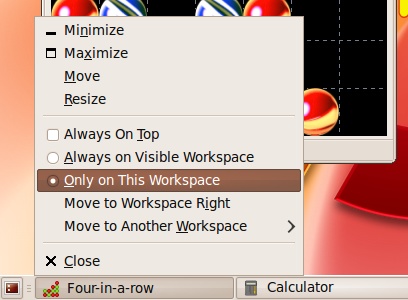
Clicking a program or a window’s tab toggles between displaying and hiding it. By right-clicking, you can call up a context menu with which you can move and resize the window, set its attributes, such as On Top status or Visibility, and move the window to another workspace (see Figure 4-29).
Show desktop
The final icon in this desktop roundup is in the bottom-left corner, looking like a miniature representation of a monitor showing a desktop. You can click this icon to hide or reveal all the windows on the desktop at once. Each time you click it, Ubuntu toggles the desktop between the two states. This is a great feature when you need to quickly remove all windows to access an icon on the desktop, and then restore the windows back to where they were in order to continue working with them.
Personalization
Now that you’ve been introduced to the default desktop and have a good feel for where everything is, what it does, and how it works, you may wish to customize it to your own preferences—and personalization is something at which Ubuntu excels, due to its tremendous range of customization options and preference settings.
Appearance
The place to start when customizing Ubuntu is the Appearance Preferences window, which you get to by selecting System → Preferences → Appearance. As Figure 4-30 shows, there are five main sections divided into tabs.
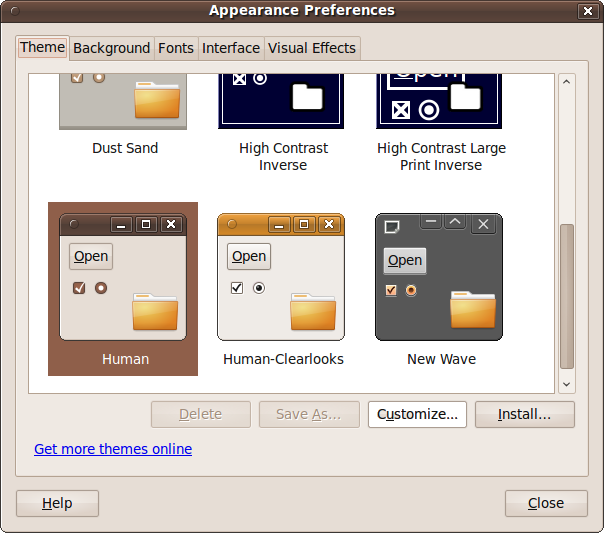
Theme
The Theme tab lets you choose between a selection of predefined themes, of which Human is the default. Try clicking different ones, and the desktop will change after a few seconds. For example, a good theme to choose for people with visual difficulties would be High Contrast Large Print Inverse. Whichever theme you choose will stay selected.
You can further modify a theme by clicking the Customize button, which brings up another window with five options (see Figure 4-31).
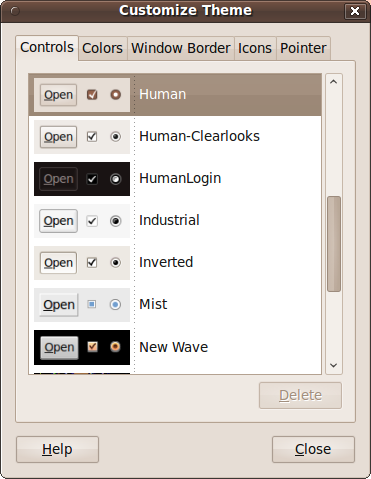
- Controls
Lets you choose how you want items such as checkboxes and buttons to appear. Just click the example you want to use.
- Colors
Lets you choose the text and background colors for windows, input boxes, selected items, and tooltips.
- Window Border
Lets you can choose a variety of border types for your windows.
- Icons
Lets you choose the icon set you prefer most.
- Pointer
Lets you choose the type of mouse pointer you prefer to use.
Background
The Background tab chooses which wallpaper (if any) to use, how to display it, and which color to use for the desktop background. Some wallpapers include transparency, so these choices are not mutually exclusive and can be combined. Figure 4-32 shows some of the several backgrounds supplied by default.
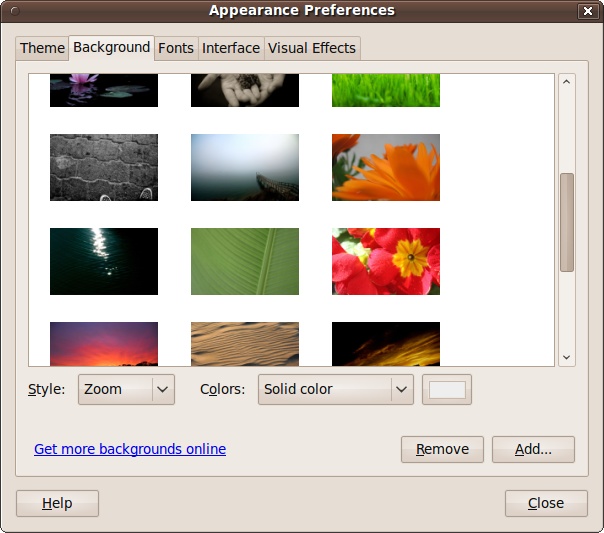
You can choose between having the wallpaper tiled, zoomed, centered, scaled, or shown full screen by clicking the Style drop-down menu. Or you can choose a different image by either clicking one of the other wallpapers or clicking Add and browsing through the filesystem to locate a picture to use. Programs such as Firefox and the Image Viewer also have options to set the current image as the desktop background.
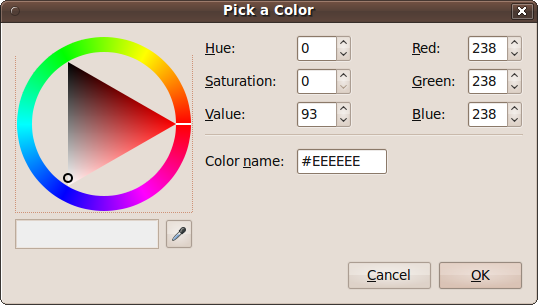
The Colors drop-down menu allows you to choose between a solid color and either a horizontal or vertical gradient for the background. A gradient shades gradually from one color to another. The box to the right can be clicked to select the actual color to use with a color picker, or you can type in its hexadecimal value (see Figure 4-33).
If you choose one of the gradients, two color boxes will be displayed next to the drop-down menu, one for each color in the gradient.
By the way, any background whose icon shows up as several images in a stack is just that: a group of images that will rotate at 30-minute intervals.
Fonts
With the Fonts tab (see Figure 4-34), you can choose the default face and size of font to use for your applications, documents, desktop, window titles, and fixed-width text. Just click a font name and choose the new one. A window will then appear in which you can choose the font you want, whether it should appear by default in regular, bold, italic, or combined bold and italic style, and the size of the font. Click Cancel to return without making a change, or OK to make the change and go back.
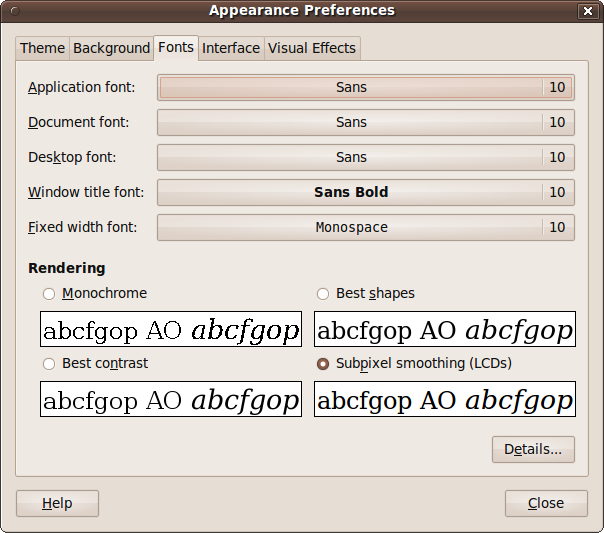
There’s also quite a clever feature below the fonts with which you can specify the type of font rendering you prefer. Not all monitors are the same, so try clicking the various choices to see which you prefer.
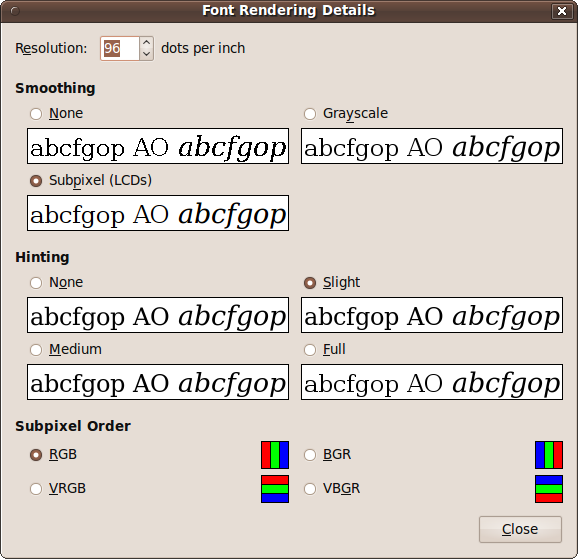
For even finer control, you can then click the Details button (see Figure 4-35) to tell Ubuntu the number of dots per inch your monitor displays, the type of smoothing to use, what hinting setting you prefer, and the subpixel order. The latter is a setting you make to match the order of the red, green, and blue components of each pixel on your monitor, as this varies by manufacturer.
Interface
The Interface tab (see Figure 4-36) lets you change the way some icons and menus appear. In the Menus and Toolbars section, you can check the “Show icons in menus” box to place an icon before each menu item.
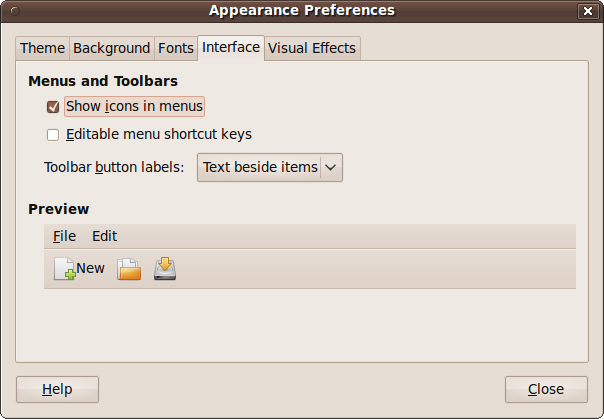
For example, Figure 4-37 shows what the Trash menu shown earlier in Figure 4-25 looks like with this box unchecked—notice how it’s a lot plainer. To my mind, the tiny amount of speed increase you might see by removing the icons is outweighed by the better look and feel and quicker comprehension that the icons’ visual cues provide.
If you check the “Editable menu shortcut keys” box you can define new keyboard shortcuts for menu items. To change an application shortcut key, open the menu, and with the mouse pointer on the menu item you wish to change, press the new combination of keys. To remove a shortcut key, press Backspace or Delete.
Warning
When using the “Editable menu shortcut keys” feature, you won’t be warned if assigning a new shortcut key to a command will also remove it from another command, and there is no way to restore the default keyboard shortcut for a command. You can also inadvertently assign a normal keyboard key, such as the letter e, to a function, making it so that typing the letter e would no longer result in that letter being sent to the application you are using. For this reason I recommend you keep this option disabled.
Using the drop-down menu next to “Toolbar button labels,” you can further specify the appearance of toolbars by choosing whether text should appear below or beside items, and whether to display only text or only icons.
What’s new in 10.04
With the release of Ubuntu 10.04, the Interface tab is
completely removed from the Appearance Preferences window. This was a
decision taken by the GNOME development team, which decided that such
options should be provided only by third-party user interface tweaking
tools. However, you are able to access the setting directly with the
GNOME Configuration Editor by pressing Alt-F2 and then entering
gconf-editor. When the editor opens, drill down to
desktop → gnome → interface and then either check or uncheck
the box next to the entry “menus_have_icons”. You can also modify many
other aspects of GNOME with this interface, but be very careful in
case you mess up your desktop.
Visual effects
Depending on your hardware and the drivers installed, Ubuntu may be capable of providing enhanced visual effects (see Figure 4-38).
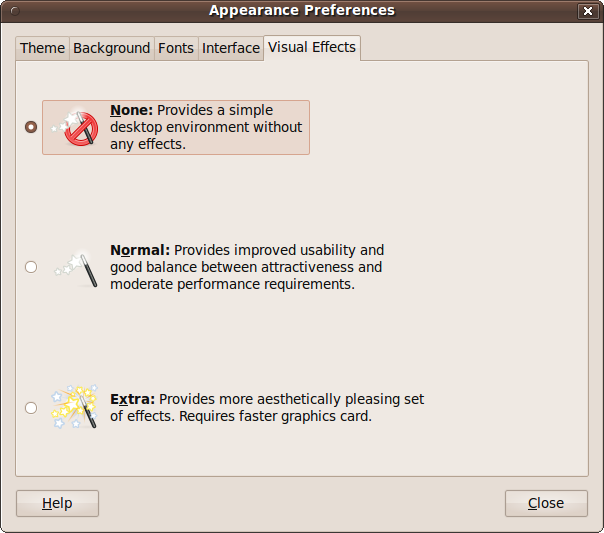
The three levels of effects are:
- None
This setting doesn’t make use of any special effects and is best suited to slower machines or older graphics hardware.
- Normal
This is the most common setting that should suit the widest range of computers and graphics cards. With it, you’ll see shadows around windows, windows will gracefully zoom as you minimize and maximize them, and opacity will be enabled, giving an effect similar to Windows Vista and 7’s Aero Glass.
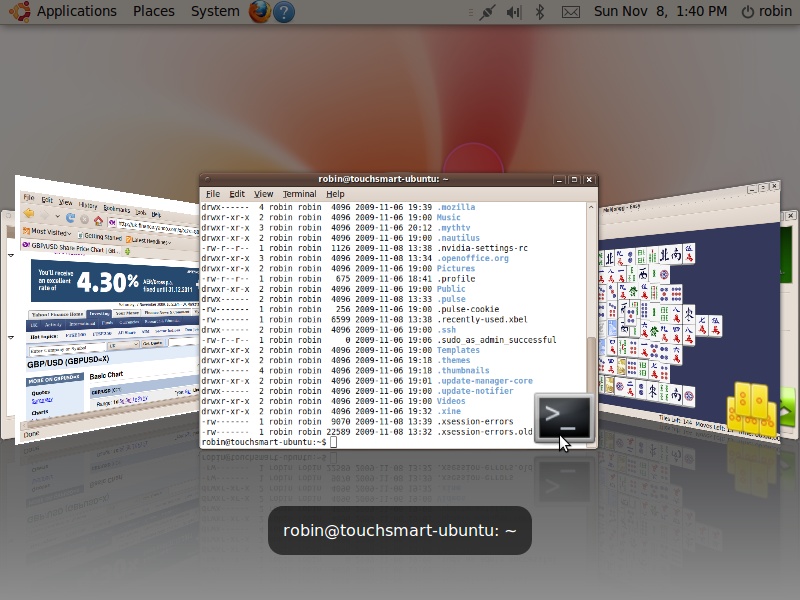
- Extra
This setting gives you a set of ultra cool effects, such as wobbly windows when you shake them, but you need a fast graphics card and a suitable driver installed. For a great example effect (if your computer lets you select this setting), try opening a few programs and then press WindowsKey-Tab to see the task switcher shown in Figure 4-39.
If you choose a setting that requires a graphics driver that isn’t already installed, Ubuntu will attempt to locate and install it. If it can’t do so, that setting won’t be available to you.
Managing Panels
Although I don’t recommend doing so, you can remove the top and bottom panels from your Ubuntu desktop simply by right-clicking them and selecting “Delete this panel.” In the same way, you can add more panels by right-clicking a panel and selecting New Panel. By default, the first new panel you add will be placed on the righthand side of the screen and the second will go on the left.
Warning
If you ever remove the default panels, you won’t have access to
the programs required to restore them. To fix this, press Alt-F2 and
then type gnome-terminal and click Run. Next enter
the following commands into the Terminal window:
gconftool --recursive-unset /apps/panel
rm -rf/.gconf/apps/panel
pkill gnome-panel
Note that there are two dashes preceding the word recursive.
If you add more than two extra panels, new ones will be added underneath the top panel, but you can change the location by right-clicking a panel, selecting Properties, and using the Orientation drop-down menu.
Adding an item to a panel
To add an item to a panel, right-click it and then select Add to Panel to bring up the Add to Panel window. Here, you can select from a wide range of launchers and applets, as shown in Figure 4-40.
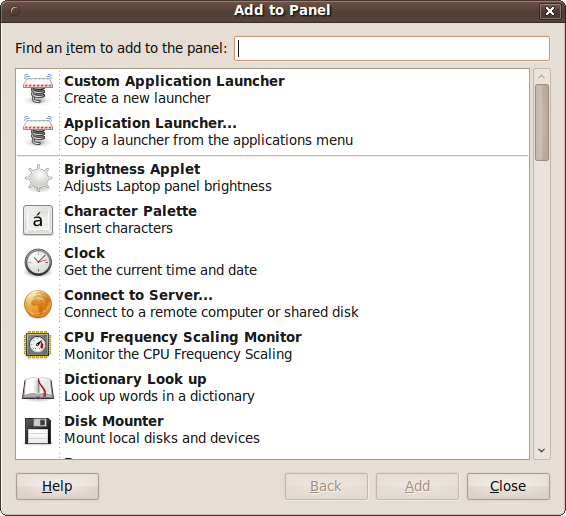
The first two options let you add an application of your choosing to the panel, either by creating a new launcher or by copying a launcher from the Applications menu. Alternatively, scroll down through the list of preselected applications and you may find the one you want already listed.
In fact, you can add more than applications using this window because it supports items such as a keyboard status indicator, a custom menu bar, a file searcher, Shut Down and Restart buttons, and many more.
There’s also an easy way to add any menu item to the top panel. Just locate the item using the mouse, right-click it, and select “Add this launcher to panel.”
Removing an item from a panel
To remove an item from the panel, right-click it and select Remove from Panel. Be careful, though, because you can remove the Quit menu and other important items that are not easy to restore using this feature.
Moving an item within a panel
To move an item to a different location in a panel, select Move and then use the mouse to move it left and right (or up and down) along the panel until you reach the desired destination, then click the left mouse button. Alternatively, you can drag and drop the icon into its new location.
If you wish to insert an item between two others that are right against each other, you will have to move them apart first to make room. Otherwise, you may end up dropping an item onto another, which would have the unwanted effect of opening up the latter item, passing the item dropped to it as if it were data to be acted on.
If you wish to prevent an item from being moved, right-click it and select “Lock to Panel.” Dragging and dropping that item will then be disabled. You may also need to uncheck this option to move items in the first place.
Changing a launcher’s icon
If you want to display a different icon for an item (or launcher) in a panel, right-click it and select Properties to bring up the launcher’s properties window. Now click the icon to bring up the icon browser, as shown in Figure 4-41. To reach the state shown in that figure, I created a new Calculator launcher in the top panel, opened up its properties window, and clicked its icon.
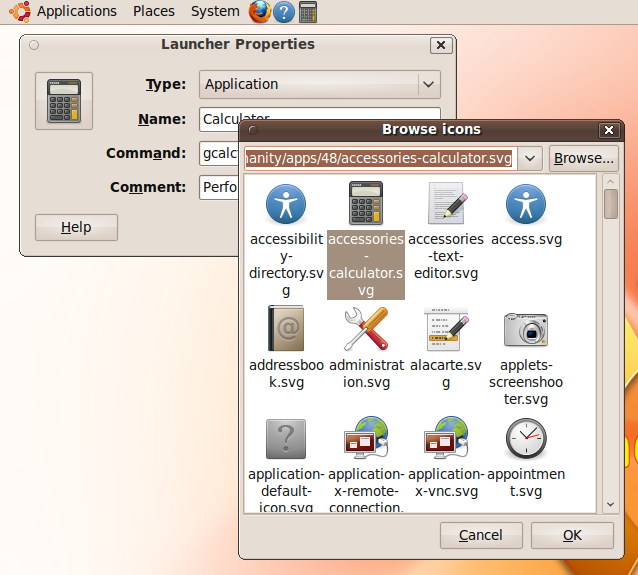
After browsing through the icons and selecting the one you want, click OK to change the launcher’s icon. Otherwise, click Cancel to back out again without making any changes.
Incidentally, as you can see, this window also lets you change a panel item’s type, name, command (the command to issue or program to run), and tooltip comment.
Adding a drawer
Ubuntu’s panels are already powerful and versatile tools, but you can make them even more useful by adding drawers to them. These are drop-down menus in which you can store other items. To add a drawer to a panel, right-click it and select Add to Panel, then scroll down to the Drawer entry, select it, and click the Add button. A small icon that looks like an open drawer will then appear on the panel. If you click this icon, it will drop down an empty box, as there’s nothing in it.
To add items to the drawer, as you can probably guess, right-click it and select Add to Drawer. This will bring up a window almost exactly the same as the one shown in Figure 4-40, except it will have the title Add to Drawer, and that includes featuring the Drawer entry again so that you can add drawers within other drawers and so on. Mostly, though, you’ll want to add a selection of related items to a drawer.
Changing a drawer’s icon
To change a drawer’s icon, right-click it and select Properties. Then, click the Choose Icon button and proceed in the same way as described in the earlier section Changing a launcher’s icon. You can also change the drawer icon’s size and background color or image.
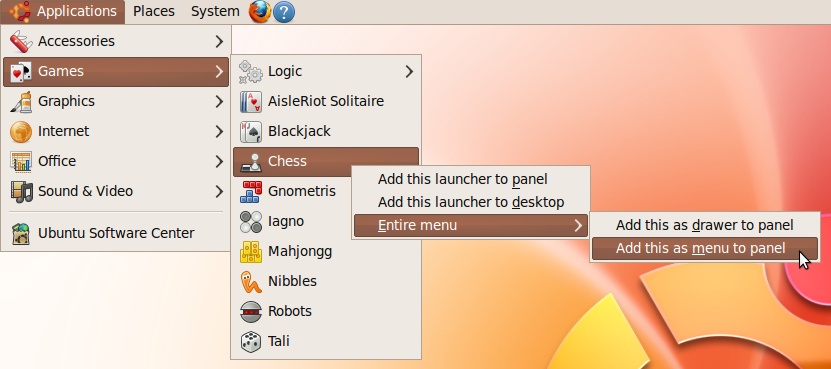
Adding a menu to a panel
But that’s not all, because you can also add complete menus to the top panel by right-clicking a single item within a menu and then selecting “Entire menu.” From here, you can then choose to add the menu to the panel, either as a drawer or as a menu, as you can see from Figure 4-42.
Hiding a panel
If you want to obtain a bit more desktop space, you can hide one or more of your panels by right-clicking one and selecting Properties, followed by checking the Autohide box. Then, click the Close button. The panel will disappear, but it can be brought back whenever you need it by moving your mouse to the edge of the screen and leaving it there. The panel will then slide into view and slide back again when you move the mouse away.
If you prefer, instead of checking the Autohide box, check the “Show hide buttons” box instead. This will place an arrow icon at the edge of the panel that, if you click it, will make the panel slide away lengthways to the screen’s edge, leaving only the arrow icon behind. Click it again to restore the panel.
Other panel properties
When you right-click a panel and select Properties, you can also uncheck the Expand box, which will make the panel only as big as it needs to be to contain its contents. Or you can set the edge of the desktop (top, bottom, left, or right) to which the panel should be attached, and its width in pixels. Also, if you click the Background tab, you can change the panel’s background color and transparency or image.
Editing Menus
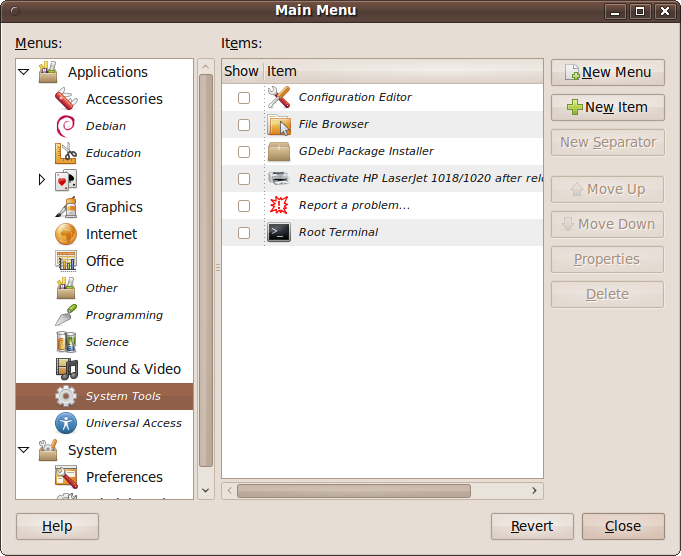
Ubuntu comes with a sophisticated menu-editing program that makes it easy for you to customize your menus exactly to your preference. To use it, right-click any of the top panel menus out of System, Places, or Applications (it makes no difference which) and select Edit Menus. As you can see in Figure 4-43, this brings up the Main Menu editor window.
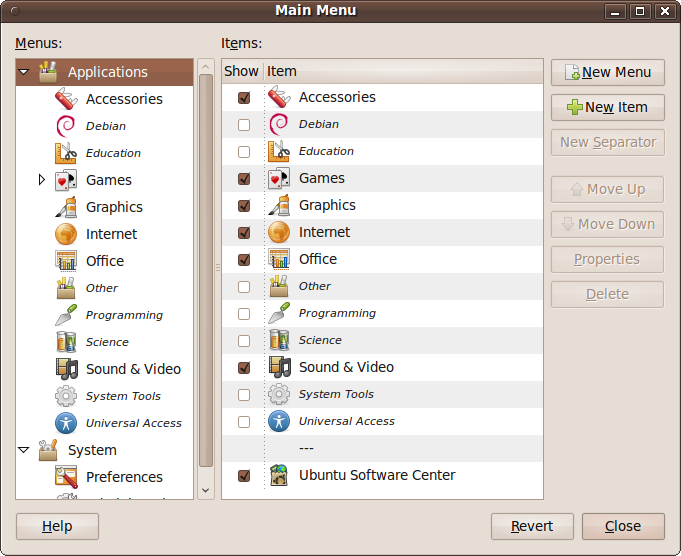
In the lefthand pane of the window you can see the two main menus, Applications and System, as they appear on your desktop, along with the items within them. In the righthand pane all the menu items are displayed, including some that have been set to invisible by unchecking their associated Show boxes.
Whichever item you click in the left pane is opened up in the right one. In the case of a new Ubuntu installation, the Debian, Education, and Science submenus have yet to be populated, and so they are shown in italics. Because they are empty, even if you check their Show boxes in the righthand pane, they will not be enabled on your desktop.
However, you may have items in one or more of the Programming, System Tools, or Universal Access menus, but they will have been set to hidden so that beginners won’t stumble across the programs in them and possibly mess up their Ubuntu installation.
Nevertheless, you can verify that they contain items by clicking them in the lefthand pane, so go ahead and click some of them, and you may see the righthand pane change to something like the one shown in Figure 4-44. At this point, I don’t recommend checking the Show boxes for any of these items unless you know what you’re doing.
Changing menu entry icons
To change the icon for a menu entry, first select the menu in the lefthand pane of the editor, and then select the entry within that menu in the righthand pane. You can now click the Properties button (or right-click the item and select Properties) to bring up the Launcher Properties window shown in Figure 4-41. To edit the icon, follow the procedure outlined in the earlier section Changing a launcher’s icon.
In this window, you can also edit the launcher’s type, name, the command used to launch a program, and the tooltip comment for the entry.
Moving and deleting entries
To move an entry, select it in the righthand pane and then click the Move Up or Move Down button until it is in the desired location.
If you wish to delete an entry, simply select it and click the Delete button. Be careful, though, as there is no “Are you sure?” warning for this action.
Adding new menus and items
To add a new submenu, highlight the position where you want it to be inserted and click the New Menu button. A window will pop up asking you to enter a name and comment to be displayed as a tooltip, which you should fill in before clicking OK to create the menu. Click Cancel to return without making a change.
To add a new item to a menu, move to the place where you want it inserted and click the New Item button. A new window will pop up entitled Create Launcher, which is identical to the one shown in Figure 4-41, except that all of the fields are blank and need to be filled in. To complete the process, you will need to enter the entry’s type, name, and comment, as well as the command required to launch the item. The command is the critical piece of information you need to know; if you don’t have that information, click Cancel and see whether you can figure out the command after reading Chapter 7. Otherwise, enter the information and click the OK button to add the item.
The Desktop Itself
So far I’ve talked a lot about things relating to the desktop but not so much about the desktop itself and what you can do with it.
After a new install, your desktop will likely have nothing on it, unless you have a CD-ROM or other drive mounted, in which case you might see an icon for it that you can click to browse its files.
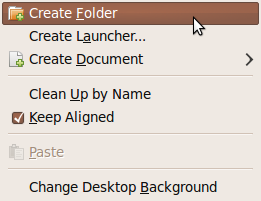
Creating Folders, Launchers, and Files
So, let’s put something on the desktop by right-clicking it to bring up the context menu shown in Figure 4-45. Click Create Folder, and when the new folder appears with the words “untitled folder” highlighted, replace that text with something meaningful, such as “Test Folder.”
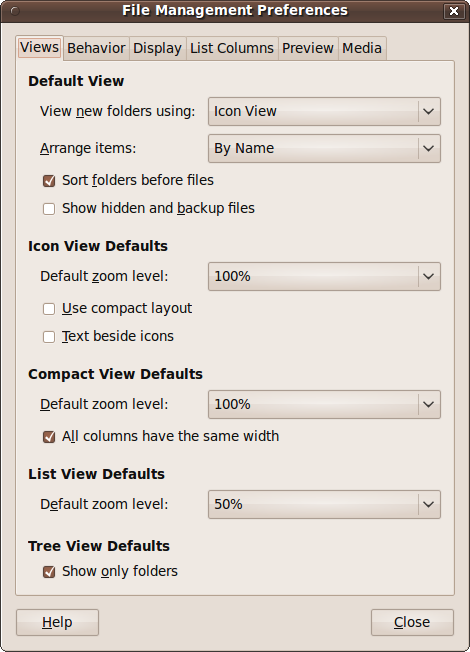
Now double-click the folder to open it up, and an empty file browser window will open. The first thing you might want to do at this point is something I always do after a fresh install: enable Ubuntu to respond to single-clicks instead of always requiring double-clicks.
If you want to make your installation work this way, click the Edit menu and select Preferences to bring up the window shown in Figure 4-46. Several options become available to you here under various tabs, which I’ll explain in Chapter 6, but for now just select the Behavior tab, check “Single-click to open items,” and then click Close. If you won’t be using it, you may wish to delete the test folder by dragging it into the Trash.
Other things you can do after right-clicking the desktop include creating a new launcher and creating a new, empty file.
Managing Desktop Icons
To move desktop icons around, all you have to do is drag them to their new locations. If you want to move more than one item, you can lasso a group by clicking and holding the mouse button on a clear area of the desktop and then dragging it so that a rectangle surrounds the icons you are interested in. This groups the enclosed icons, which then can be dragged about as a group.
Alternatively, you can hold down the Ctrl key and click each icon you wish to add to a group. This technique is great when the icons you want are not all next to each other and other icons you don’t want selected are among them.
You can also select all the icons on your desktop by clicking once on a clear area of desktop and then pressing Ctrl-A.
Warning
Be careful when deleting or moving icons because a large number of grouped icons can be dragged to the Trash or transferred to other folders in a single action.
If you want Ubuntu to tidy up all your icons for you, you can right-click the desktop and select “Clean Up by Name.” This will place them all in alphabetical order in neat columns, starting at the top left of the desktop.
You can also right-click and check the “Keep aligned” box if you would like your icons to always line up along an invisible grid of horizontal and vertical lines. This will keep them in straight rows and columns. If you move icons roughly where you want them, they will snap to the nearest grid line intersection.
Adding New Users
Now that you’ve set up your desktop exactly how you like it, you may want to give access to your computer to friends, family, or colleagues. Luckily, you can do this very securely using Ubuntu, and each user will be able to customize her working environment to her preferences (or you can do it for them).
The place to start is System → Administration → Users and Groups, which brings up the window shown in Figure 4-47.
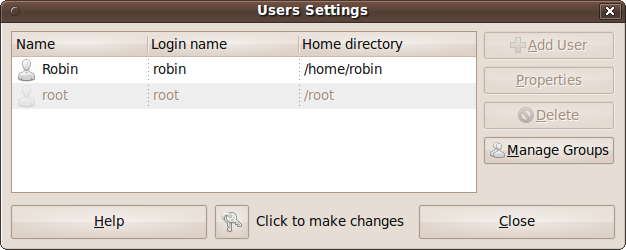
In this figure, you can see there are two users, Robin and root. The user root is the main and most important user as far as managing your computer goes, as will be explained later, but for now you can ignore it. The other user is me, Robin. Because administrating users is a potential security risk, I can edit my own details at this point by clicking my name, followed by the Properties button (which becomes enabled at that point). However, I cannot edit the root user or add new users.
To enable these features, you need to click the key icon next to “Click to make changes.” You will then be asked for your password, and after you enter it the various grayed-out options will become enabled.
Once you have entered your password and the Add User button becomes accessible, you should click it to bring up the “New user account” window, shown in Figure 4-48.
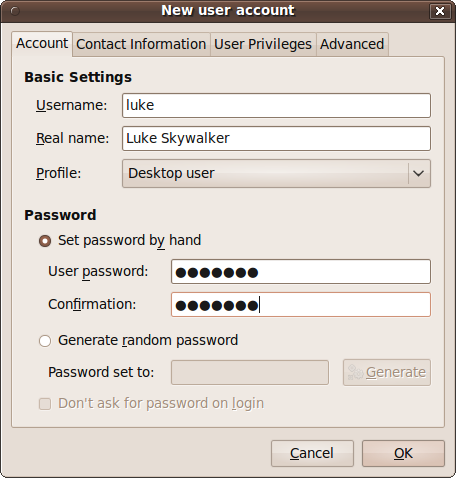
Here, you need to enter the Username and Real name of the new account. The username is the short, single-word text that is used to name the Home folder and for other information about the user on the system. The real name is a longer string that can contain spaces and is used to display the user’s name on the desktop; if you fail to provide one, the desktop will just display the username. Then, either enter the new user’s password manually or ask the computer to generate a random one for you. You should leave the user’s profile as “Desktop user” unless you have a reason for changing it.
That’s all you need to do to create a new account, but don’t press OK yet, though. I recommend you click the other tabs first to fill in other information you may wish to save, such as the user’s contact details, their privileges (such as whether they can use printers and video devices, and so on), and advanced settings, such as their Home directory. But unless you know what you’re doing, I recommend you ignore the Advanced tab for now.
When you click OK, the new user will be added to the computer and become available at the login screen. Now you can click the Close button and test the new account by logging out and then back in as the new user, or by starting a new session. Both of these options are available from the Quit button.
What’s New in 10.04
The 10.04 Lucid Lynx release of Ubuntu sees a switch from the Humanity theme that has been used for many years to one based on Light. The first impressions of Ubuntu forum users was that the new look is “sharp” and “impressive.” I think so, too. But you will need to get used to a few things such as the minimize, maximize, and close buttons being at the top left of each window (rather than the top right), as shown in Figures 4-49 and 4-50 (which reveal two versions of the new themes, Ambiance and Radiance).
Although the Ubuntu forum users loved the new styling, only about 8% were in favor of the buttons being moved (as of this writing, that is). Therefore, by the time the final version of 10.04 is released, it is possible that some things may have changed again. If you find the new styling too different for your tastes, you can easily change it by selecting System → Preferences → Appearance and then either choosing a new theme (perhaps, the old Human theme), or you can click the Customize button and refine a theme to your preferences.
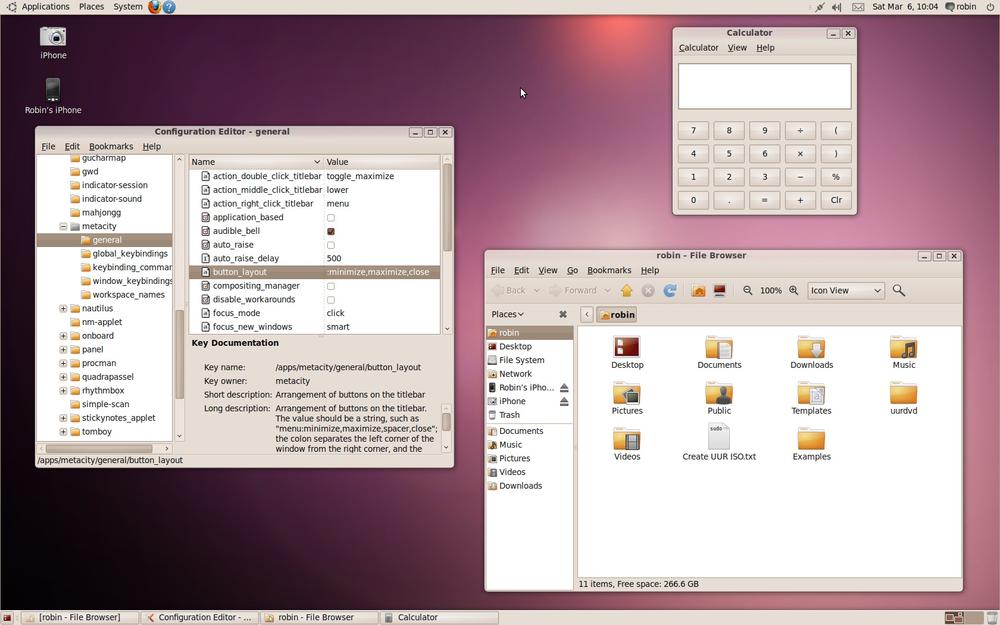
You can also press Alt-F2 and enter the command gconf-editor
gconf-editormaximize,minimize,close: with the colon
representing the opposite window edge from the buttons, and the order of
the button names indicating the order in which they should appear. You
will need to change this value by right-clicking it and choosing Edit Key.
Then, to change the location and order of the buttons, you should edit the
entry to give it a new value of
menu:minimize,maximize,close and click the OK button to
store the value. You should then see the buttons immediately return to
their previous top-right position (and in the previous order) on all, as
shown in Figure 4-51.