Table of Contents for
Ubuntu: Up and Running
 Ubuntu: Up and Running
Published by
O'Reilly Media, Inc., 2010
Ubuntu: Up and Running
Published by
O'Reilly Media, Inc., 2010
- Cover
- Ubuntu: Up and Running
- Ubuntu: Up and Running
- Dedication
- Foreword
- Preface
- 1. About Ubuntu
- 2. Installing and Upgrading Ubuntu
- 3. Configuring
- 4. The Desktop: Accessing Applications and Features
- 5. The Filesystem, File Attributes, and Permissions
- 6. The Nautilus File Browser
- 7. The Command Line
- 8. Installing and Removing Software
- 9. System Maintenance and Security
- 10. Networking Ubuntu
- 11. The Internet
- 12. Using OpenOffice.org
- 13. Playing Games
- 14. Pictures, Sound, and Video
- 15. Other Ubuntu Distributions
- 16. Using Wine
- Index
- About the Author
- Colophon
- Copyright
Chapter 8. Installing and Removing Software
If you’re used to Windows or OS X, you’re in for a pleasant surprise with Ubuntu because the developers have taken on the laborious task of assembling a collection of all the best software for the operating system.
Not only have they done that, it’s all been brought together into a single location called the Ubuntu Software Center; with just a few mouse clicks, you can install any of several thousand programs.
That’s right, you don’t have to go trawling the Web looking for a program you need, and then wade through pages of information about how to install it. That’s all a thing of the past with Ubuntu, as you’ll see in this chapter.
The Ubuntu Software Center
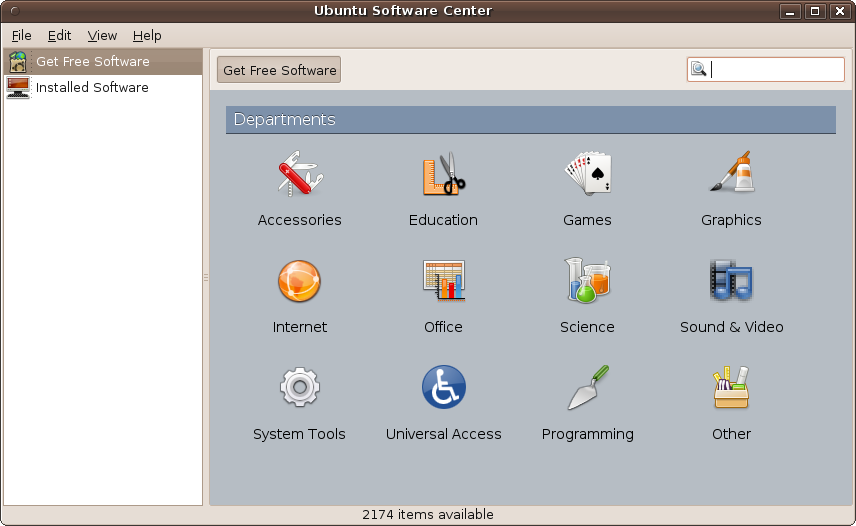
To open up the Ubuntu Software Center, select Applications → Ubuntu Software Center from the main menus. A new window will then open up that looks like the one shown in Figure 8-1.
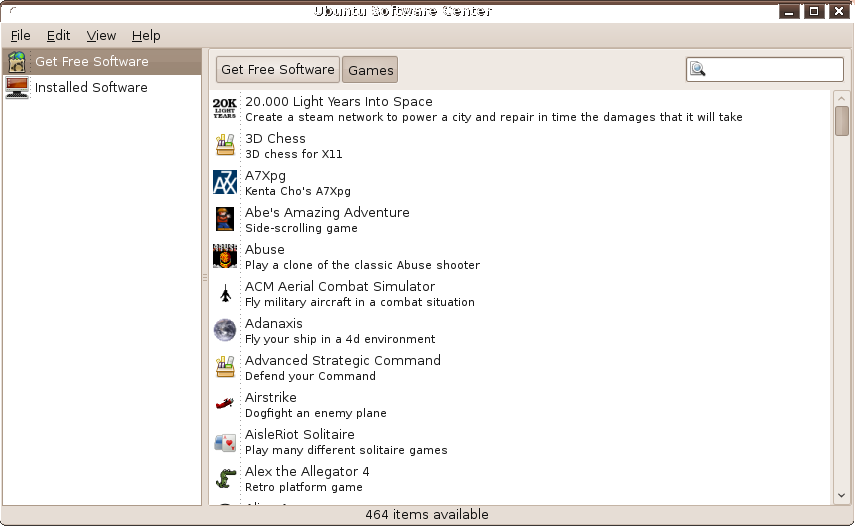
The application is very easy to use. To add a new program to your computer, browse through the righthand departments to locate what you are looking for. For example, if you want to install a game of chess, select the Games department and you’ll see the program 3D Chess appears near the top, as shown in Figure 8-2.
At the bottom of the window, you can see that, on this occasion, there are actually 464 games listed, so there’s a good chance that other versions of chess are also available. To check this, you can scroll down using the scroll bar, the up and down cursor keys (once you have highlighted an item), or your mouse’s scroll wheel. And, indeed, as expected, at least another three versions of the game show up once you get to programs starting with the letter C.
But this is quite an inefficient way to look for a program. So instead you can enter a search string in the upper-right input box, as shown in Figure 8-3, where you will see that there are over 20 different versions of chess (or programs that have been tagged with that word) available for installation.
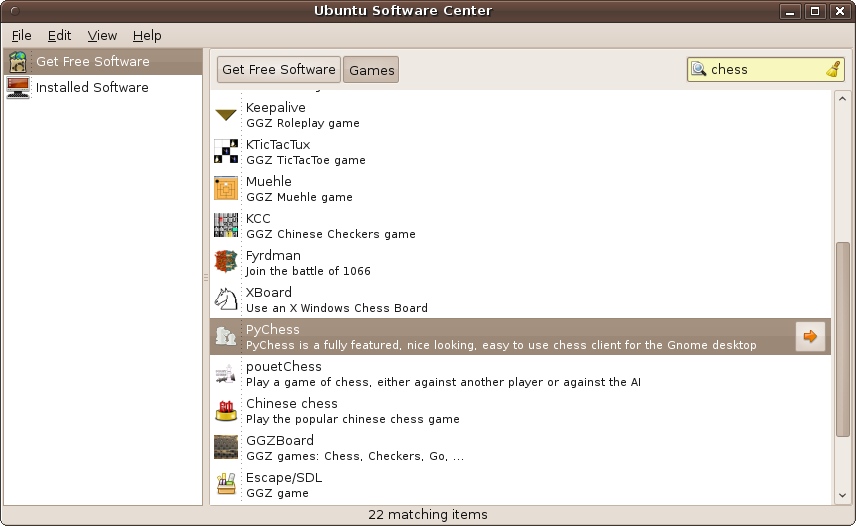
Actually, you may find that sometimes the compilers of the Software Center have been a little overzealous in applying keywords because, as in this example, at least 10 of the results are not actual chess games. But hey, at least hundreds of programs have been narrowed down to a couple of dozen from which to choose.
Installing a Program
So, let’s install one of these games. To do this, double-click on the first result returned, Chess (gnome-chess), and you’ll see the screen shown in Figure 8-4 in which the program is described, accompanied by a screenshot and the program’s license details and price. At the time of this writing, all the programs in the Software Center are free, so I assume the latter information is there to support the addition of commercial programs in the future.
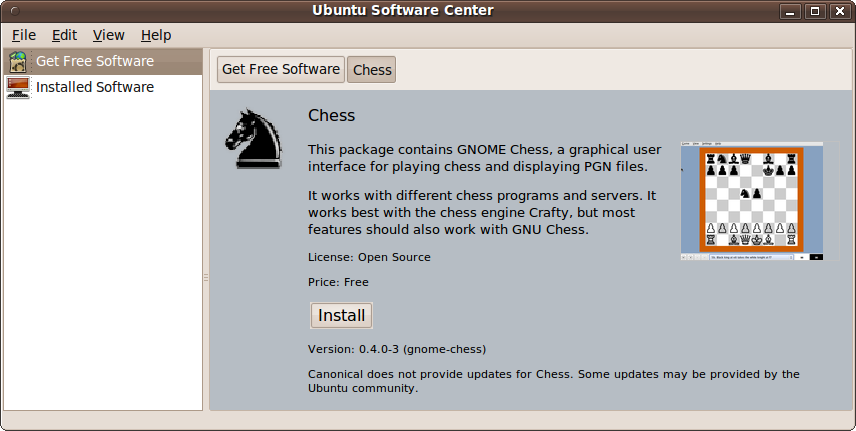
If after reading this page you don’t wish to install the program, you can return to the main menu where you started browsing for software. Notice the button at the top of the main window called Chess, which shows you the current page you’re on, and the button labeled Get Free Software right before it (above the picture of the chess knight). These show the sequence of windows you’ve opened, and the Get Free Software button returns you to that window.
The left pane also has a button labeled Get Free Software, but that refers to the whole collection you’re in. The button under it, Installed Software, refers to the packages that your computer already has. We’ll use that button later.
Let’s install the Chess game on your computer. Click the Install button and enter your password when prompted by the Authenticate window that pops up. The lefthand pane will then show an additional item with the name In Progress, accompanied by a round icon with rotating arrows.
Once the installation has finished, the program’s information page will return, but the Install button will now be replaced with a Remove button, indicating that it has been installed. So, let’s verify that this is the case by clicking in the lefthand pane on the entry called Installed Software. You should now see the program listed in the righthand pane.
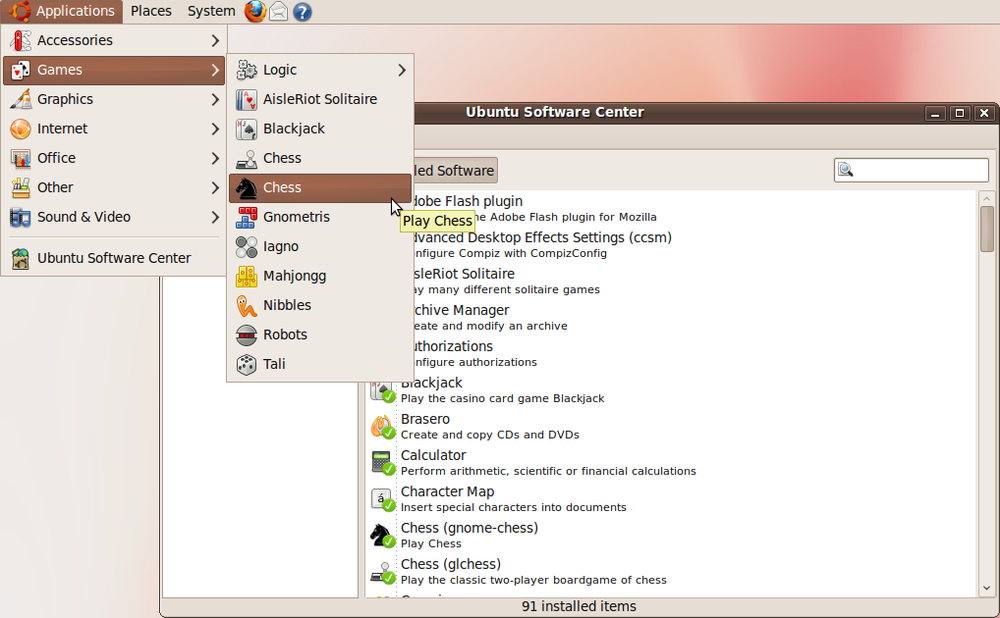
You can also check that the program has been installed by opening the Applications → Games menu, as shown in Figure 8-5, where you’ll see that you are now able to run the program by selecting it from the menu.
Removing a Program
It’s just as easy to remove a program you no longer need. Simply open up the Ubuntu Software Center and click the Installed Software heading in the lefthand pane. Then either search for the program to remove by name, or because you’ll probably have a small number of installed programs, just scroll down the list until you find it.
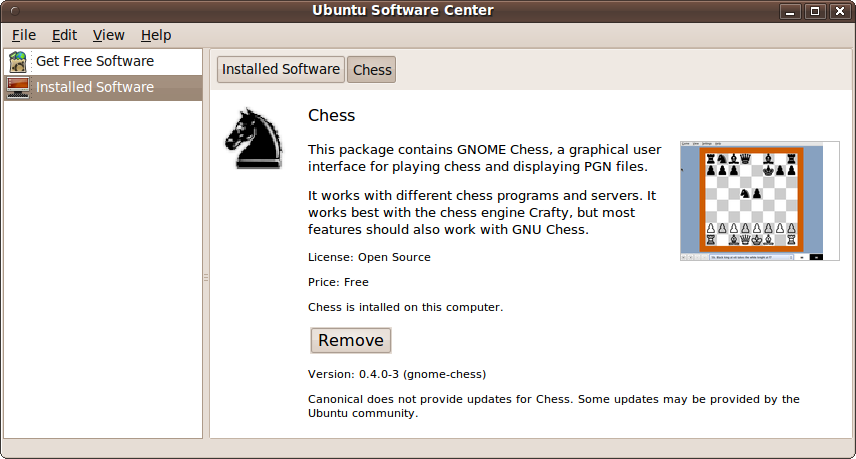
Now double-click the program’s name, which in this case is Chess (gnome-chess), to display the information screen shown in Figure 8-6. This is the same as the initial screen in the Get Free Software section, except that the background color is different, the program is shown as having been installed, and there’s a Remove button.
To remove the program, click the Remove button and enter your password in the Authentication window that pops up. The In Progress entry will then appear for a while in the lefthand pane, after which the information screen changes to show the list of installed software, and the recently removed program will no longer be in this list.
Advanced Features
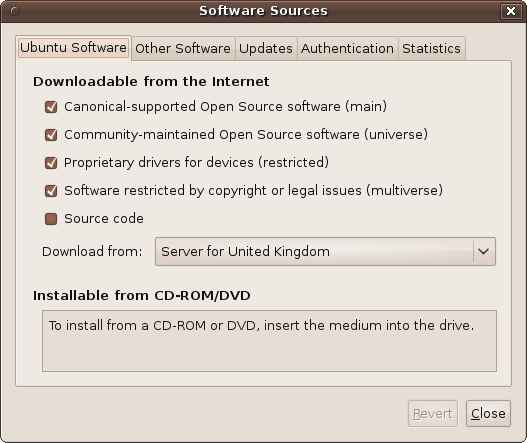
The Software Center comes with a few extra features that are available from the menus. The first of these is Software Sources, available under the Edit menu. With it, you can choose the types of software to download and from which locations, among other things, as shown in Figure 8-7, which shows the contents of the Ubuntu Software Tab.
The Ubuntu Software Tab
When you call up the Software Sources window, you must first enter your password. Then you’ll see a selection of five tabs, the first of which is Ubuntu Software. Under this tab, there are several checkboxes and a drop-down input, with which you can specify the types of software to display, as follows.
Canonical-supported and community-maintained software
Canonical-supported software is maintained by the programmers at Canonical, the company that publishes Ubuntu. Community-maintained software is maintained by members of the open source community at large. The only difference between the two is that non-Canonical programs have many different authors and maintainers and therefore they may not always have the same look and feel, or even the same level of testing, as Canonical programs.
Even so, don’t be scared by the sound of this. Because the whole range of GNU and Linux software is continuously supported by the developers, bugs are quickly caught and corrected. Basically, this is Canonical’s way of saying “we think the software that we list from third parties is of sufficiently high quality to promote it, but we don’t maintain it or provide support for it.”
Proprietary drivers
The proprietary drivers tend to be graphic or printer drivers that have been developed by the hardware manufacturer, rather than through open source developers, meaning there is a closed development approach that isn’t scrutinized by the open source community. That said, all hardware manufacturers want their hardware to work, so it behooves them to release solid, professional drivers, just as they do for Windows or OS X.
Software restricted by copyright
Additionally, some of the software available may be restricted by copyright and other legal encumbrances so that, for example, you cannot reuse or reverse engineer it. But again, if you are just going to run software and don’t intend to modify or redistribute it, I see no reason to uncheck this box.
Source code
If you are an advanced Linux user, you may be interested in viewing and compiling from source code, and can check this box to display such software. Otherwise, I recommend you leave it unchecked.
Download from
Depending on the country assigned to your Ubuntu account and your location in the world, the download server nearest to you will be selected by default. But you can change this to another one with this drop-down list. If the location you want isn’t displayed, select the Other… option to browse through servers from all over the world, as shown in Figure 8-8.
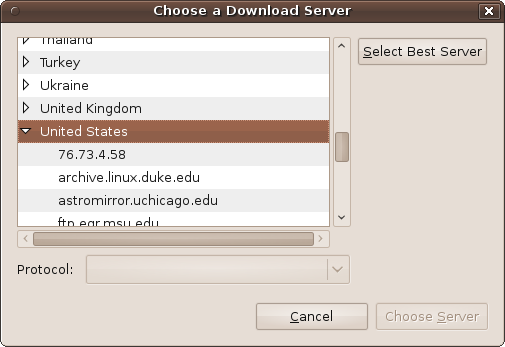
Normally, you won’t need to change this setting, but it can be useful if, for example, the default server appears unresponsive (perhaps because it is currently down), in which case, you can select an alternative to try.
In fact, you can click the Select Best Server button to test a range of servers and find the fastest one for you. But be prepared to wait for a while as each of over 300 servers is checked in turn. If it takes too long, you can always click Cancel and go back to selecting one manually.
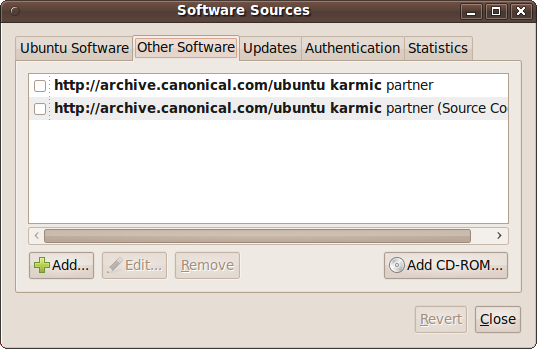
The Other Software Tab
This tab allows you to include updates that are unsupported, as well as updated from other versions of Ubuntu. Unless you are an expert and know what you are doing, I recommend you leave all of the boxes unchecked, as shown in Figure 8-9.
The Updates Tab
The Updates tab lets you choose the types of updates you would like to receive, as shown in Figure 8-10.
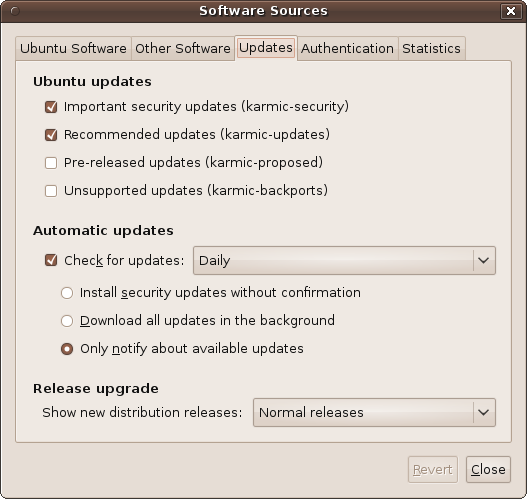
Ubuntu updates
Generally, I recommend you keep the first two tabs checked. These refer to important and recommended updates for your current version of Ubuntu. The next two offer the ability to include prereleased and unsupported updates. I recommend you don’t check these boxes, unless you are prepared to install updates that could crash your computer or make it work incorrectly.
Automatic updates
In this section, you can decide how often you would like Ubuntu to check for updates using a drop-down list with the options Daily, Every two days, Weekly, and Every two weeks. If you want your computer to be as secure and up-to-date as possible, I recommend the Daily option.
Underneath the drop-down list, there are three radio buttons, with “Only notify about available updates” as the default setting for the group. You can also choose to download updates in the background or install security updates without confirmation. I recommend you don’t use the latter, as it could conflict with a document you are working on, requiring a system restart when you least expect it. In my view, it’s best to know when your computer is installing updates so that you can close all applications in case a restart is required.
Release upgrade
The final drop-down list lets you choose which distribution releases you wish to upgrade. The options are:
- Never
Select this if you don’t want your operating system to ever be upgraded. This is the best choice if you intend to manually upgrade only certain parts of your operating system.
- Normal
This will download every release of the types you have checked.
- Long term
This limits downloads to releases that Canonical has declared to be Long Term Support (LTS). These releases are made every two years, and they are supported for three years for desktop and five years for server versions.
Generally, you will want to select the Normal option.
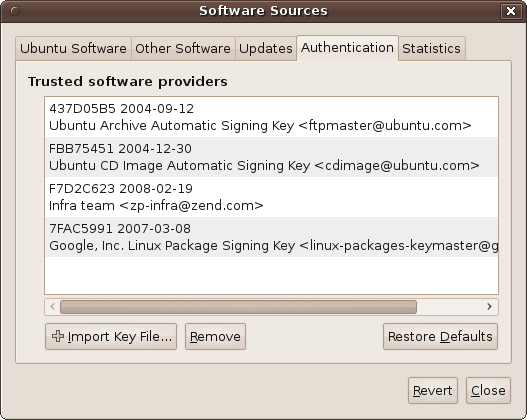
The Authentication Tab
This tab is best left completely alone. It lists all the trusted providers of software and their encrypted keys, which are used to identify them as being who they claim to be. Figure 8-11 shows some of the providers you will see if you click this tab. The screen grab includes ubuntu.com, zend.com, and google.com, but you may see others.
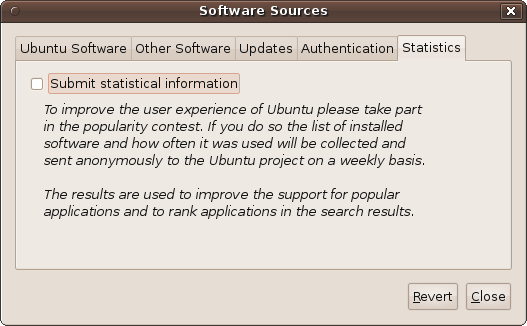
The Statistics Tab
This tab helps you give back to the Ubuntu community by reporting on which programs you have installed, as shown in Figure 8-12. The data supplied helps the developers see which programs are the most popular, and therefore select the ones deserving the most support and further development.
Don’t worry about your privacy, though, because all the data is sent anonymously, and you and your machine will not be associated with the programs you use; only the program names are collected to add to the totals for each.
The View Menu
The View menu, as shown in Figure 8-13, is another means by which you can quickly change between viewing all available applications and viewing just the ones maintained by Canonical.
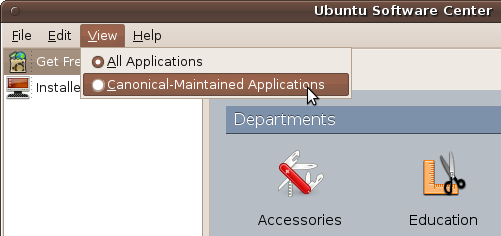
You’ll notice that the total number of available items (displayed in the bottom status bar) drops sharply when only the Canonical-maintained ones are displayed.
The Remaining Menus
The other options in the menus mostly replicate actions you’ve already seen and that you can usually perform more quickly using the mouse to point, click, and select. So, there’s no need to detail them any further, other than mentioning that there’s additional help available in the Help menu, which may be useful if you are using a different version of Ubuntu, such as the Netbook Edition (or Remix).
The Synaptic Package Manager
The predecessor to the Ubuntu Software Center is the Synaptic Package Manager, which you can call up by selecting System → Administration → Synaptic Package Manager. After entering your password, you’ll see a new window similar to Figure 8-14.
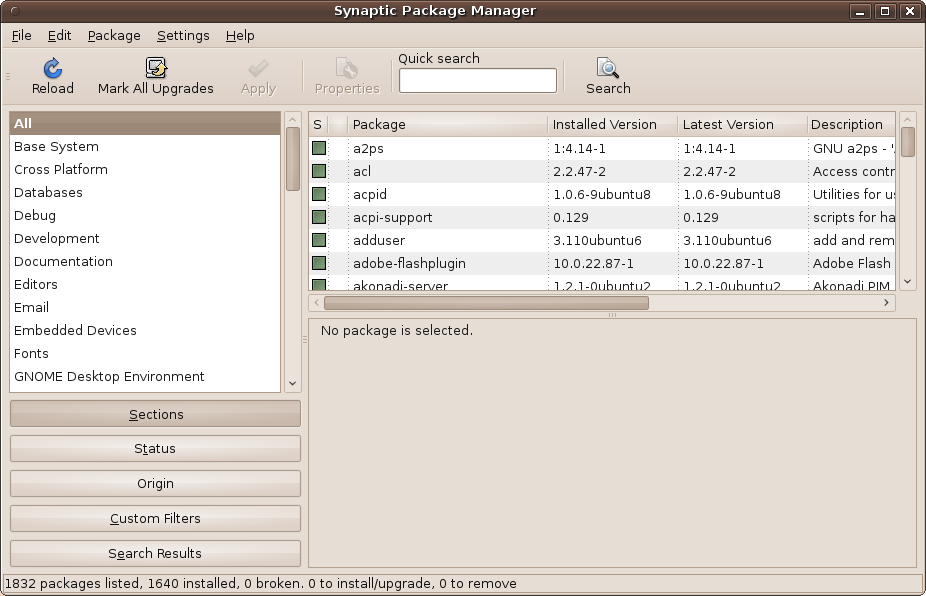
You might need to use Synaptic because the Software Center is actually more of a work in progress that’s transitioning from Synaptic to a more user-friendly experience. I say “work in progress” because not all possible Ubuntu programs have made it into the Software Center yet, and it may be some time before they do. Therefore, when you can’t find the program you want in the Software Center, the next best place to look is the Synaptic Package Manager.
To ensure you are shown all the latest packages, it’s always a good idea to click on the Reload button when you first run Synaptic. Then, in a similar way to using the Software Center, you can browse through the various departments listed in the lefthand pane to change the contents of the top-righthand one. For example, if you select Editors, then the top-righthand pane will list all the editors Synaptic knows about, including program editors and word processors, as shown in Figure 8-15.
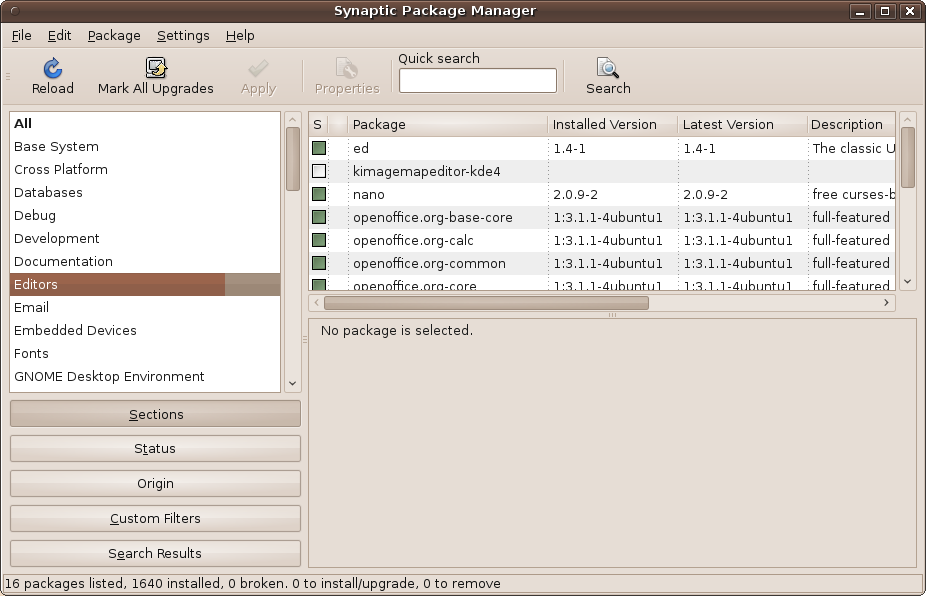
Packages that haven’t yet been installed have an empty checkbox next to them, whereas ones already installed have filled-in checkboxes, and Canonical applications have a little Ubuntu logo next to the checkbox.
Figure 8-15 illustrates why the Software Center is being developed: the top-righthand pane lists all the programs with long-winded filenames, and it’s not immediately clear which entry does what. Also, some entries have no explanation, such as the one for kimagemapeditor-kde4, although it can be surmised that the package is probably something to do with editing image maps for the KDE desktop.
Installing a Program
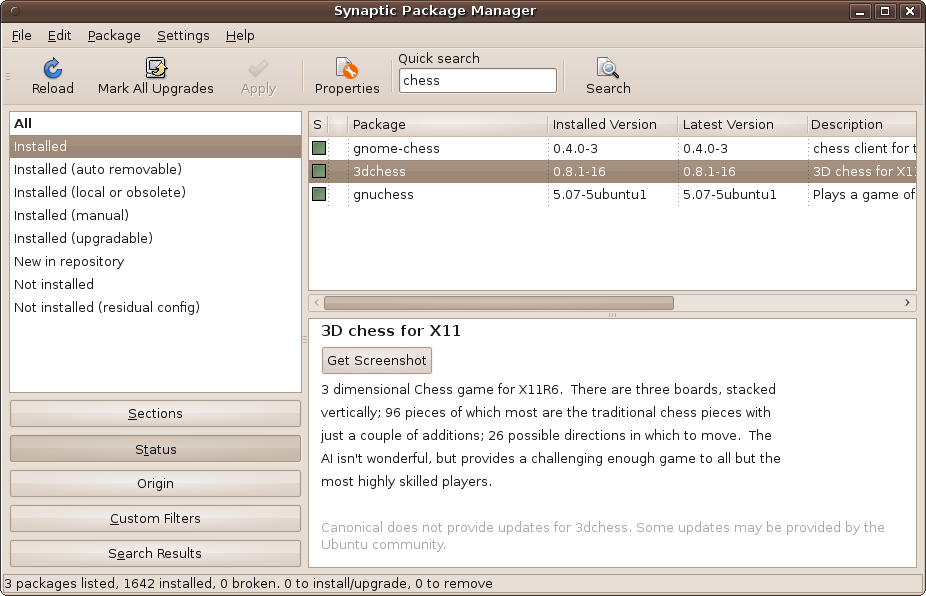
Anyway, let’s persevere with finding a chess game using this system. There are a couple of ways to do this. First, click on the wide Status button at the lower left, and the upper-left pane will then let you choose the type of packages to display out of Installed, Not installed, and so on, as shown in Figure 8-16.

In the top-right pane I have selected the 3dchess game, and its details have been displayed in the lower-right pane. At this point, you can see what the program looks like by clicking Get Screenshot, which, if one is available, will download an image and display it in place of the button.
Marking a program for installation
If you decide you want to install the program, you can then click on the checkbox next to its name in the upper-right pane, and then select the “Mark for Installation” option, as shown in the close-up in Figure 8-17.

When you mark a program for installation, Ubuntu checks to see whether there are any other programs or data that also require downloading; if so, it pops up a window detailing them, as shown in Figure 8-18, where the additional item xaw3dg is also needed.
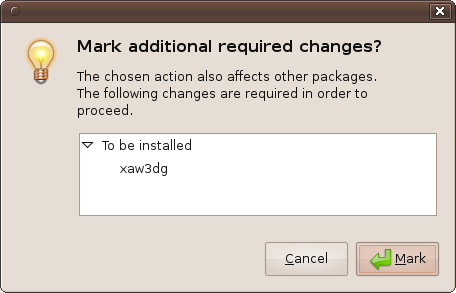
You should generally click the Mark button at this point to include the dependency in your installation. If you press Cancel, you can go ahead and try to install the program you want, but this dependency will not be installed with it, and the program will probably fail when you try to run it. When you click Mark, the checkbox icon will change to show the program has been selected (as will those of any additional items to be installed).
Activating the installation process
You are now ready to perform the installation by clicking the Apply button, which will pop up a confirmation window like the one shown in Figure 8-19.
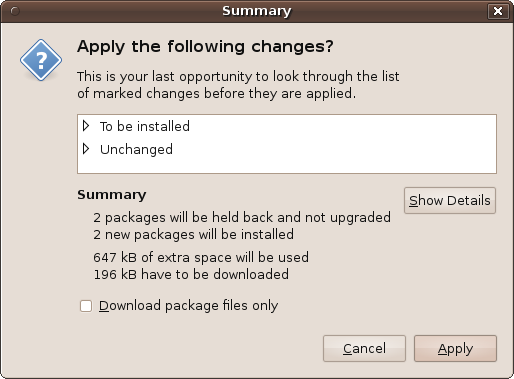
It is actually possible to mark many different programs for installation, and then later select them all for installation at the same time using the Apply button. In this case, all the programs you marked since the previous installation you performed will be listed in the confirmation window.
By clicking the triangle at the left of the entries in the white area, you can list all the items in each of the categories. You can also click the Show Details button to get additional information. I don’t recommend clicking the “Download package files only” checkbox, as you would then have to locate and install the packages yourself.
So, just click Apply and the program (or programs) will be downloaded and installed for you. Afterward, the top-right pane will no longer show the program(s), as it is only displaying packages that haven’t been installed.
To verify that the installation has worked, select Applications → Games and you’ll see 3D Chess is there, ready to be run.
Using Search to Install a Program
Instead of browsing through the Synaptic categories, you can use
the Quick Search input box. So, in the preceding example, just type
chess into the box, and it will
narrow down the packages displayed in the top-righthand pane to those
whose filenames or descriptions match that word.
There will probably be many alternatives in the list, or some specialized programs that add extra functionality. You probably won’t want all the items displayed, so just mark the packages you want, and then apply the installation as in the previous example.
Removing a Program
To remove a program, you can select the Installed category in the lefthand pane and browse for it in the top-righthand one. Alternatively, you can use the “Quick search” input box and type the program’s name (or part of it) to narrow down the items displayed, as shown in Figure 8-20.
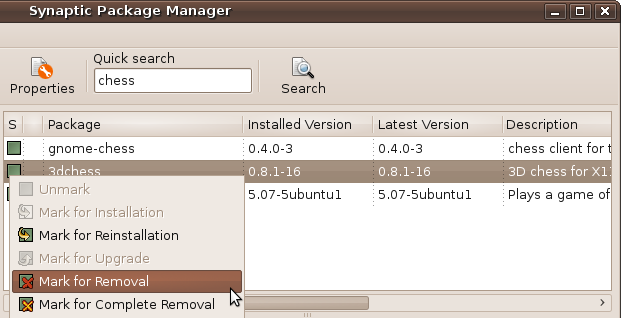
When you have found the program to remove, you can click on its name to display its details in the bottom-right frame. You can also look at the checkbox next to the name to ensure that it has already been installed. Once you are certain it’s the right program, you can click the checkbox to call up a menu with a number of choices available to you, as shown in the close-up in Figure 8-21.
These choices will usually include Mark for Reinstallation, Mark for Removal, and Mark for Complete Removal. You may also see Mark for Upgrade if one is available. So just click Mark for Complete Removal to remove any configuration files along with the package.
The checkbox will then show a yellow x symbol to indicate that the package has been
marked for complete removal. If you mark a package for normal removal
(without deleting the configuration files), the x symbol will be red.
To finalize the package removal, click the Apply button to bring up the confirmation window shown in Figure 8-22.
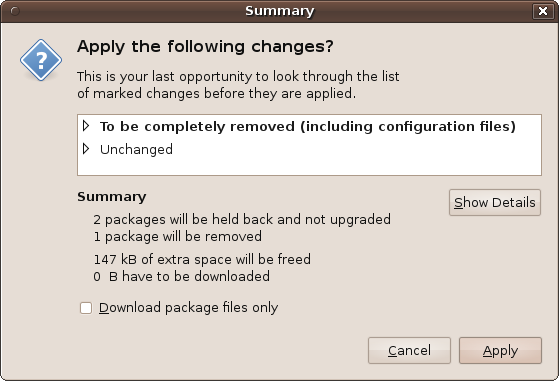
Remember that before clicking the Apply button you are allowed to mark as many packages as you like for either installation or removal. This enables you to perform your housekeeping in one go. Therefore, any other actions you have chosen will be shown in this window, and you can view them by clicking the triangles shown next to each entry or by clicking the Show Details button.
So, when you are ready, click the Apply button to perform the removal (and any other selected actions). After the process has completed, you will be returned to Synaptic, with checkboxes newly filled for programs you just installed and cleared for those you’ve removed.
Other Synaptic Options
So far you’ve seen the Sections and Status buttons used to display the categories and installation statuses, but there are three other wide buttons at the bottom left: Origin, Custom Filters, and Search Results. With these, you can see where packages originate from, apply advanced filters for searching, and display the results from searches.
But as a new user to Ubuntu I wouldn’t worry too much about them, as you can do practically everything you need with the commands I’ve shown you so far.
Synaptic’s Menus
Synaptic’s menus offer several additional features of interest that are worth mentioning.
The File Menu
Starting with the File menu, shown in Figure 8-23, you can save and read the markings you make, generate package download scripts, add download packages, or view the history of your use of Synaptic.
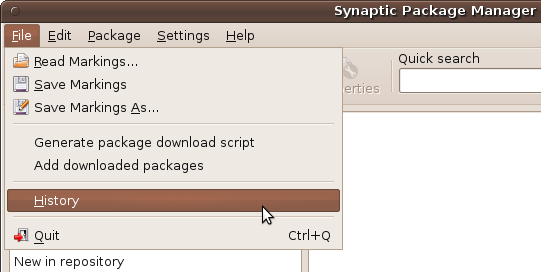
Only the last selection, History, is of use to you as a beginner to Ubuntu. With it you can view by month and year every change made to your system, which can be invaluable when you need to check exactly when you installed or removed a certain package.
The Edit Menu
The Edit menu mostly replicates buttons and features from elsewhere in the program, but it does include a very useful Fix Broken Packages facility, shown in Figure 8-24.
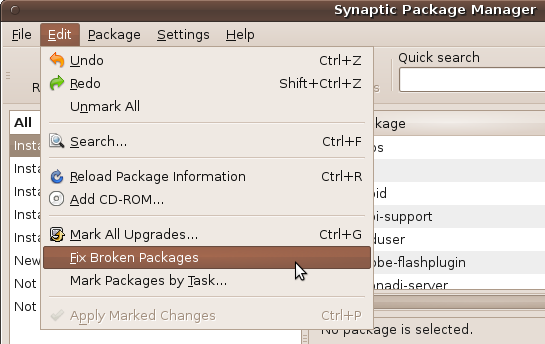
If any broken or corrupted packages are detected by Synaptic, it won’t allow any further changes to your system until all the broken packages have been fixed. The way you’re informed of this problem is an error message about “unsatisfied dependencies,” meaning that parts of a package are missing. Should that ever happen to you, you now know to use this option in the hope that it can fix the dependency.
When you select the Fix option, all the broken packages will be marked to be fixed, but you must then also click the Apply button (or select Apply Marked Changes), which will then cause the broken packages to be fixed by downloading the missing parts.
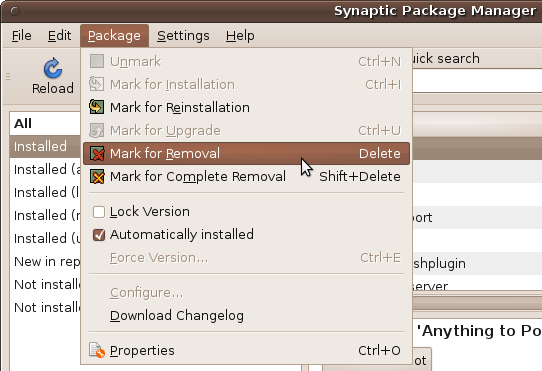
The Package Menu
You probably won’t need to use this menu, as it mostly replicates the effect of clicking on the checkboxes next to packages, although there are a couple of advanced features that seasoned users can utilize, as shown in Figure 8-25.
For example, you can lock a package so that it won’t get upgraded when new versions become available. Also, Ubuntu installs many packages automatically because they are part of the default operating system. However, you can change this by checking and unchecking the “Automatically installed” checkbox.
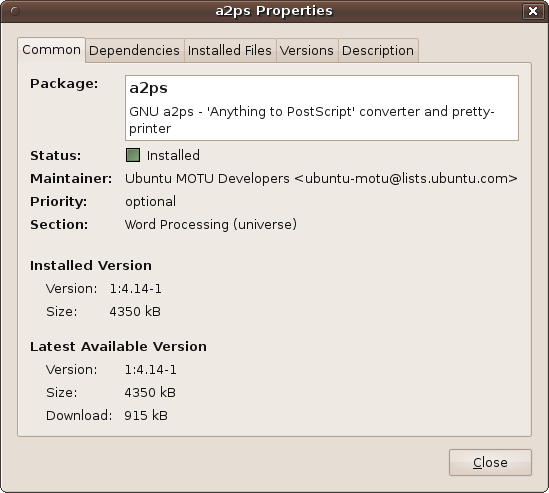
There’s also the Download Changelog option, which provides information about changes to, and bugs closed, in a package. The Properties option brings up the Properties information window for a package, in which you can view a wide range of information, including the description, dependencies on other packages, versions released, and more. This information is divided into five tabs, as shown in Figure 8-26.
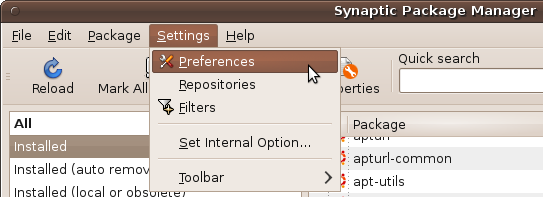
The Settings Menu
In the Settings menu, shown in Figure 8-27, the first entry, Preferences, can change settings in five different areas, with each assigned to its own tab.
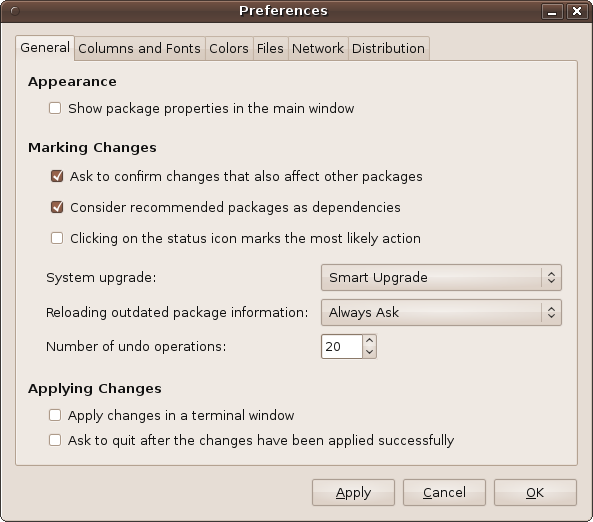
Again, as a newcomer to Ubuntu I wouldn’t recommend you change anything in this window, or you run the risk of rendering Synaptic incapable of correctly installing and updating packages.
That said, if you know what you are doing, you can use the Preferences window tabs, shown in Figure 8-28, to modify the confirmation options, set the default view of properties, change the columns, fonts, and colors of packages, decide what to do with temporary files, manage the history, set up a proxy, and change the package upgrade behavior.
The Settings menu also includes the Repositories option, which you saw earlier in Figure 8-7 in the discussion of the Ubuntu Software Center, where it was referred to by the name Software Sources. All the tabs shown are the same as in the Software Center Advanced Features section.
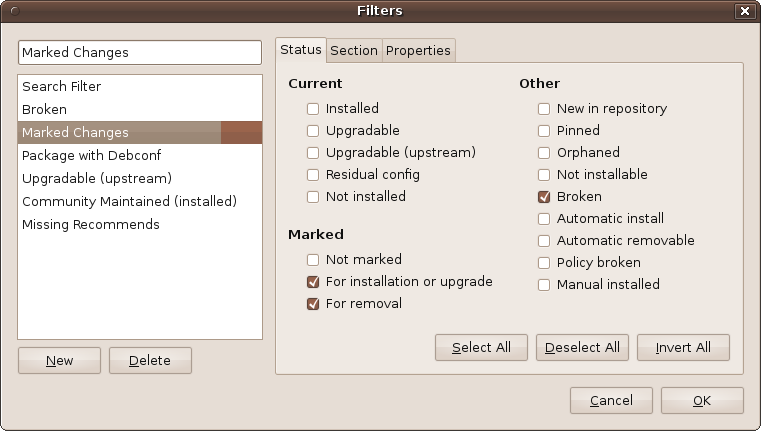
The Filters option brings up the window shown in Figure 8-29, in which you can specify exactly which packages will and won’t be displayed by Synaptic. You probably won’t need to use it, though, until (or unless) you become fully proficient in using Synaptic.
As the Set Internal Option states when you click it: “Only experts should use this.” So, it’s probably best left alone.
Finally, in the Settings menu, the Toolbar option lets you decide whether to display the icons, how they should look, whether to show accompanying text, and where to place it.
The Help Menu
Of course, as you’d expect from Ubuntu, there’s also plenty of assistance available in the Help menu. You can call it up by pressing F1 or by selecting Help → Contents. Or you can bring up a summary by selecting Help → Quick Introduction, or view the online help with Help → Get Help Online.
Using Aptitude
Another way to install and remove programs in Ubuntu is with the Aptitude Package Manager, a frontend for the Advanced Packaging Tool (APT), which you call up from a Terminal window command line like this:
sudo aptitudeWhen asked, enter your password. Also, make sure that neither the Software Center nor Synaptic are running when you do this, or you’ll get an error message. Once Aptitude is running, your Terminal window should look like Figure 8-30.
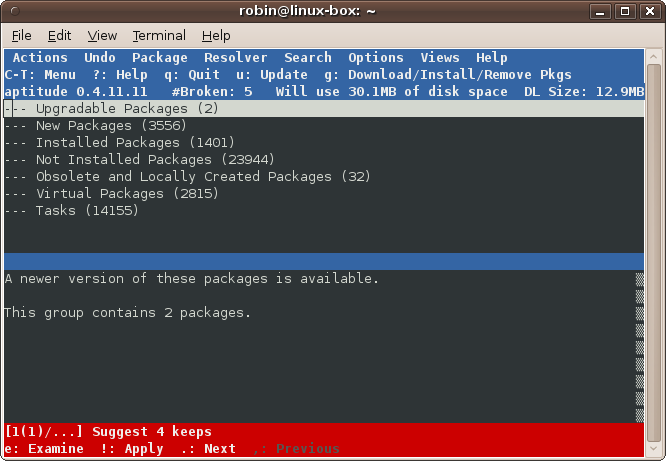
Personally, I don’t recommend using Aptitude, now that both Synaptic and the Software Center are available as alternatives. However, if you happen to be logged into a Terminal window, it may be convenient to run the program.
You navigate around Aptitude using your cursor keys and the Enter key. For example, to list all the installed packages, highlight that option and press Enter. A list of all the packages will show up below. You can then move the cursor through the package list, and the description of each will appear in the bottom section. Press Enter again to close the list.
To perform actions on packages, such as installing or removing them,
refer to the toolbar at the top. It explains that the ? key will display help, q quits the program, u updates a package, g either installs or removes a package, and so
on. If you are presented with a dialog box (perhaps with “Yes” and “No”
options), you can move between the options using the Tab key.
Instead of this menu-driven program, when I wish to perform an
installation or other action on a package from the Terminal, I generally
use the much quicker apt-get program, described in the
following section.
Using apt-get
This is the fourth and most precise way of performing an action on a package. Like Aptitude, it runs from the command line, and there are four main types of commands you will issue with it.
You are mostly likely to use one of these commands when following advice you have been given to install or remove a particular program. This is because it’s much easier to provide you with a single line that you should type into the Terminal than to provide the step-by-step instructions needed to navigate through Synaptic or the Software Center, although most programs can also be installed through the latter two programs if you so choose.
Updating the package index
Before using apt-get, it’s usually a good idea
to enter the following, which will update your computer with the latest
version information on all the packages it knows about (as well as
adding packages that have recently been released):
sudo apt-get updateAs ever, the sudo command
starts the line to temporarily acquire super user privileges. The first
time you use it, you’ll have to enter your password, but you won’t be
prompted again for your password for another 15 minutes.
Upgrading packages
Once you have the system updated with all the latest package information, you may wish to enter the following command, which upgrades any packages you have installed that have newer versions available:
sudo apt-get upgradeIf any packages have unresolved dependencies and you get any
error messages, you can use the dist-upgrade command instead, which
intelligently handles dependencies that change with new versions of
packages:
sudo apt-get dist-upgradeSearching for packages
You can quickly search the cache for the names of new packages using a command such as the following, which returns all installable packages matching the word chess:
sudo apt-cache search chessInstalling a package
To install a package, as long as you know the right name for it, you can issue the following command, which will download and install the package with the name packagename:
sudo apt-get install packagenameSummary
Each of the four methods covered in this chapter for installing and removing programs has its pros and cons, and also its own supporters in the Ubuntu community.
Whichever you choose is entirely up to you, although I would recommend that you try to install new programs using the Ubuntu Software Center. Drivers and other packages that you cannot locate in the Software Center may well be installable using Synaptic.
The program you are least likely to run, and which I also recommend the least, is Aptitude. Although it’s powerful and fast, it does take some getting used to, and in my view is superseded by the Software Center and Synaptic. On the other hand, whenever you are in an environment without access to a graphical desktop, Aptitude will do everything you need.
But I’m afraid there’s no getting away from the command line and
apt-get; sometimes this will be the only way for you to
quickly install or remove a program without going through a whole lot of
pointing and clicking. It’s also the method most experts provide for
installing packages when you ask them for advice. And once you’ve tried
it, you’ll probably find that the Ubuntu command line isn’t that hard
after all.
So, now that you have the tools for adding programs to your computer, the next chapter will cover maintaining it and keeping it secure.