Table of Contents for
Ubuntu: Up and Running
 Ubuntu: Up and Running
Published by
O'Reilly Media, Inc., 2010
Ubuntu: Up and Running
Published by
O'Reilly Media, Inc., 2010
- Cover
- Ubuntu: Up and Running
- Ubuntu: Up and Running
- Dedication
- Foreword
- Preface
- 1. About Ubuntu
- 2. Installing and Upgrading Ubuntu
- 3. Configuring
- 4. The Desktop: Accessing Applications and Features
- 5. The Filesystem, File Attributes, and Permissions
- 6. The Nautilus File Browser
- 7. The Command Line
- 8. Installing and Removing Software
- 9. System Maintenance and Security
- 10. Networking Ubuntu
- 11. The Internet
- 12. Using OpenOffice.org
- 13. Playing Games
- 14. Pictures, Sound, and Video
- 15. Other Ubuntu Distributions
- 16. Using Wine
- Index
- About the Author
- Colophon
- Copyright
Chapter 5. The Filesystem, File Attributes, and Permissions
If you come from a Windows background, in which hard disks, CD-ROMs, USB thumb drives, and other storage media are assigned drive letters, then you’ll find Ubuntu a little unusual. Mac OS X users, though, will find themselves right at home. The reason for this is that OS X is based on Unix, which uses the same filesystem model to encompass all media available to the operating system.
On a Windows computer, the root of the main hard disk will often be
C:\, but in Ubuntu, (as with OS X, Unix,
and Linux in general) the root of the filesystem is simply /, a forward slash. And that / is not just the root for the main hard disk,
it’s the root of absolutely everything, so if you have more than one storage
device attached, they will also be mounted as extensions to the filesystem
(I’ll explain how later). Don’t confuse the filesystem root with the user
named root.
Note
On Ubuntu this filesystem is sometimes also known as Filesystem, but whether you see file system, File System, or Filesystem, they all refer to the same thing.
The Directory Tree
Right under the root / lies a
handful of system files and several subfolders that make up the next level
of the Ubuntu filesystem.
Note
The terms folder and directory are generally interchangeable, although you’ll mostly see the word directory used when discussing using the command line, whereas the word folder is mainly used when referring to the desktop. For the sake of simplicity, I’ve chosen to use the term “folder” in both instances throughout most of this book.
Here is a short list of some of the folders and subfolders (out of the thousands) that exist in an Ubuntu filesystem:
/
/bin
/boot/
/cdrom
/dev
/etc
/etc/X11
/home
/home/user1/Desktop
/home/user2/Desktop
/lib
/lost+found
/media
/media/cdrom
/mnt
/opt
/proc
/root
/sbin
/selinux
/srv
/sys
/tmp
/usr
/usr/bin
/var
Figure 5-1 shows what the first level looks like when viewed with Ubuntu’s file browser. In it you can see all the root folders from the preceding list.
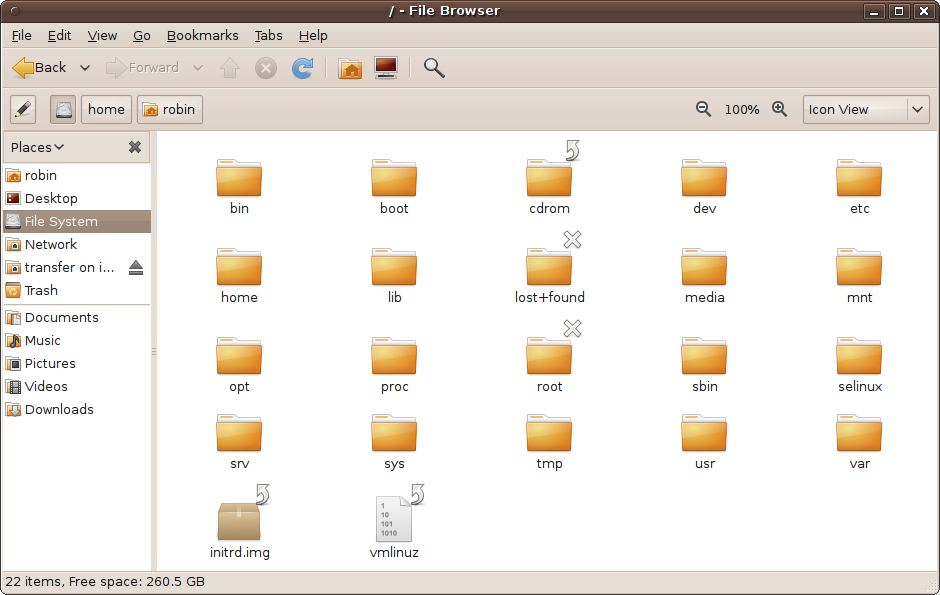
At the first level, the filesystem root, there are several folders and a few system files. Many of the folders are reserved mostly for system use, but here are a few that you are likely to access:
- /etc
This folder stores most of the configuration files that control how Ubuntu works. For example, the name of your Ubuntu computer is stored in the file /etc/hostname.
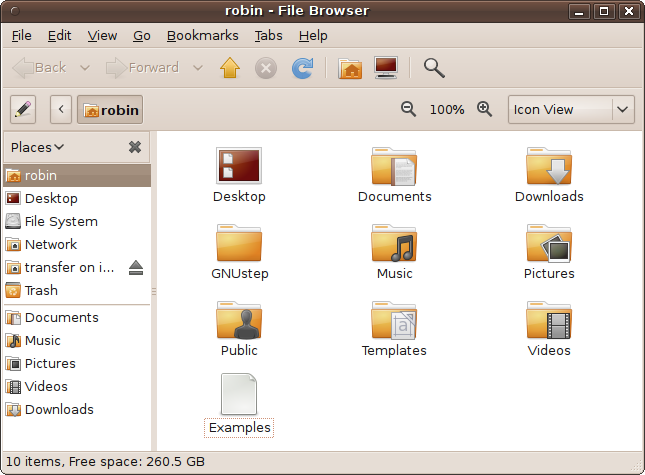
- /home
This is the folder in which all the main user files are stored, separated into subfolders with each user’s name. For example, the user robin’s files are all located in /home/robin, as shown in Figure 5-2.
Within this folder are also several subfolders used for sorting files and documents by type:
- Desktop
Contains all the items that appear on the user’s desktop.
- Documents
Contains all the documents created by OpenOffice.org and other applications.
- Pictures, Music, and Videos
For audio and visual media.
- Public
A place where you can copy or move files to be shared.
- Templates
Presaved files with the information and formatting for creating new files of particular document types; see Chapter 6 for more.
- Examples
Contains a range of documents created with the applications supplied with Ubuntu, illustrating things you can do using them.
- /media
All your media devices will show up here, not with drive letters as they would under Windows, but using the name of the media. So, for example, if you insert a CD-ROM or DVD-ROM, an icon appears here using that disc’s name. Mounted media also appear in the Places menu and will be displayed as a main item when you select the Computer option from the Places menu. What’s more, an icon will also be placed on the desktop, so you should always be able to find your removable media easily.
- /tmp
This folder is used by the system and other applications for storing temporary files. You can use it too, as long as you don’t overwrite any files or folders already in use.
Case Sensitivity and Special Characters
Newcomers to Linux can sometimes run into problems, particularly if they come from a Windows background in which all three of the folders Business, business, and BUSINESS refer to the same directory. This is because Linux (like Unix) is case-sensitive when it comes to files and folders. So, to avoid confusion, you may wish to always use lowercase file and folder names, at least until you are used to this system.
Also, if you ever want easy access to your filesystem from the command line, I recommend you steer clear of using spaces in your file and folder names because you would then have to use quotation marks to surround them. Instead, try using underscore or hyphen characters.
You should also avoid using special characters such as *, ?,
>, and | in your filenames because each has a different
meaning to Ubuntu (explained in Chapter 7), and
using them will give you unexpected results.
Mounting Media
When you need access to data, whether on a CD or DVD, another computer, an external USB drive, and so on, you must mount it as part of your Ubuntu filesystem. Mostly this happens automatically as part of the process of accessing the media, for example, by inserting a CD-ROM into the drive.
Drive Mounting
I mentioned the /media folder a little earlier, which is where external media gets mounted as part of the Linux filesystem. Generally, you simply need to insert a USB thumb drive, other storage device, or a CD or DVD, and it will automatically show up in the /media folder and the Places menu, as well as on the desktop.
Mounting ISO Files
You can also mount ISO files, which represent the raw contents of a CD-ROM or DVD-ROM in the form of a single file, typically using the file extension .iso. To do this, right-click the ISO file’s icon and select “Open with Archive Mounter.” This will have the same effect as if you had actually inserted a CD or DVD into your drive, except that you access the ISO image at the speed of the media on which it is saved. So, for example, an ISO image on your hard drive will access at the speed of the drive, which will be many times faster than an optical device reading a CD or DVD.
ISO images can be located anywhere there is space for them, such as the main hard disk, USB hard disks, thumb drives, and even CDs and DVDs. In fact, as you saw in Chapter 2, the DVD-ROM that comes with this book includes a few ISO images of various Ubuntu installation CD-ROMs.
ISO images are set to read-only; you can list, view the contents of, and run files, but you cannot change any or add new ones.
Mounting Network Folders
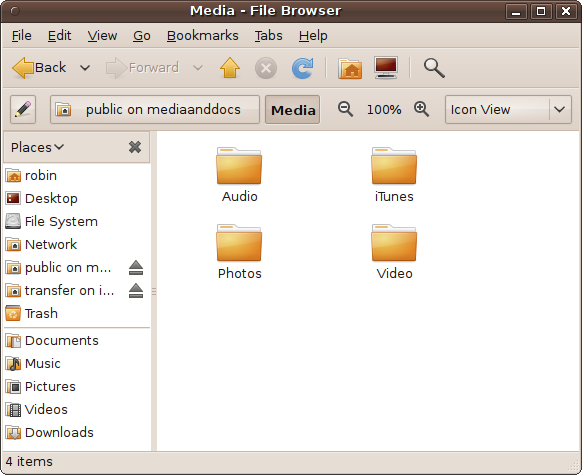
To mount a folder on another computer on your network, select Places → Network, browse through the connected workgroups and computers, and click the appropriate icons to descend through them to the item you want.
If the computer or folder you click on is password protected, you will be asked to provide the correct username and password for an account on that computer that is able to access the folder. Once a folder opens up, it will look just like folders on your own system, as shown by the screen grab in Figure 5-3 in which the folder media is being browsed on the computer mediaanddocs.
If you have browsed your network and cannot find a computer that you are certain is connected to the network, select Places → Connect to Server…, and a new window, as shown in Figure 5-4, will open up.
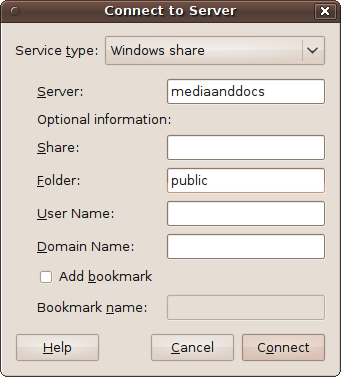
For a standard Windows share, you should then change the “Service type” from Public FTP to “Windows share” and enter the name of the computer in the Server field. You can enter other optional details, such as the folder under which it should open, and then click the Connect button.
Note
Sharing must be enabled on the computer you connect to, and the folders and files you access must have been specified as being shared. Chapter 10 explains how to do this in detail.
Unmounting
When you have finished using a mounted drive (whether a physical one or a logical one, such as an ISO image), you can unmount it from your system by right-clicking on it and selecting the Unmount option.
If, however, it’s a CD or DVD, you may wish to instead select the Eject option, which will both unmount and eject the CD. The Unmount option would leave you with an unmounted disc that you can’t right-click on to eject. The disc will, however, remain listed in the Places menu, and if you access it, the disc will automatically be remounted. You can also unmount and eject discs from the Places menu.
Hidden Files and Folders
As with other operating systems, Ubuntu can make certain folders and files invisible. The purpose is to protect important system files from being accidentally modified or deleted by casual users. Hidden files and folders are ones whose filenames start with a period or dot (.) character.
Although the next chapter will cover Nautilus, the file browsing program, in detail, it’s worth mentioning here that you can look at hidden files when you need to by selecting Edit → Preferences from any file browser and then clicking the Views tab. This brings up a dialog where, among other features, you can check or uncheck the “Show hidden and backup files” box to reveal or conceal files and folders marked as hidden. But remember that they are hidden for a reason, and you should access these files and folders only if you know what you are doing.
On the other hand, if you would like to make a file or folder of your own hidden from casual view, you can do so by creating it (or renaming it) so that it starts with a period. So, if the file is currently called diary, you can hide it by renaming it .diary. The file will temporarily stay visible in the current file browser, but if you navigate away and come back it will be gone, and the only way to view it again will be to enable the display of hidden files.
Symbolic Links
Sometimes you need easy access to a file or a folder from a different location. For example, if you have the username mary and work mostly in your home folder, it would be inconvenient to keep having to browse to a document stored at the following location:
| /home/mary/Documents/freelance/invoicing/template.odt |
But with a symbolic link to the file as follows, you can always access it directly from your home folder:
| /home/mary/invtemp.odt |
Whenever you open the linked file invtemp.odt (also known as an alias or shortcut), you will actually be accessing the original file template.odt, several folders down the filesystem. It is also possible to create a symbolic link to an entire folder (and its subfolders).
Creating such links is covered in Chapter 6, and is easily done with a couple of mouse clicks.
File Extensions
Another difference between Linux and Windows files is that Linux imposes no requirement for program files to use any particular extension, such as .exe or .dll. Instead, each file has an extended set of attributes that tell the operating system what it can do with the file. So, as well as having attributes for read-only, hidden, and system, such as you would use on Windows, there is also an executable attribute.
However, Linux does make good use of file extensions for data files, and they often use full terms such as .html and .jpeg instead the truncated, three-letter versions .htm and .jpg that grew up because of restrictions imposed by early Windows systems. Graphic files such as .gif, .tif, and .png files also retain their extensions, as do many other file types. Table 5-1 lists the main extension types and what they are generally used for in Ubuntu.
Extension | Type of file |
.0–.9 | Help pages for the man program, and old logfiles |
.asm | Assembly language program |
.au | Audio file |
.bmp | Graphic image |
.bz2 | A file compressed using the bzip2 program |
.c | C language program |
.class | Java language compiled program |
.cfg / .conf | Configuration file |
.cc / .cpp | C++ language program |
.css | Cascading style sheet |
.csv | Comma-separated value data file |
.db | Berkeley DB data file |
.deb | Debian application package |
.diff | File of differences generated by the diff program |
.dtd | Document type definition for XML data |
.gif | Graphic image |
.gz | File compressed using the gzip program |
.h | Header file used by the C or C++ program languages |
.jar | Java program archive file containing classes and sources |
.java | Source file for the Java language |
.kwd | Document file for the Kword word processor |
.ksp | Document file for the Kspread spreadsheet application |
.kss | KDE screensaver |
.m3u | MP3 playlist file |
.md5 | File containing checksum data |
.mpg / .mpeg | Mpeg movie |
.mp3 | Audio file |
.o | Compiled source code from the C or C++ languages |
.odt | OpenOffice.org document file |
.ods | OpenOffice.org spreadsheet file |
.odp | OpenOffice.org presentation file |
.ogg | Sound file |
Adobe portable document file | |
.php | PHP program |
.pl | Perl program |
.png | Graphic image |
.py | Python program |
.rpm | Red Hat Linux package manager file |
.rtf | Rich-text format file |
.s | Assembly language source code |
.sh | Shell script |
.tar | File archived with the tar program |
.tgz | A file archived with both the tar and gzip programs |
.tga | Graphic image |
.ttf | True type font file |
.txt | Plain-text file |
.wav | Audio file |
.xml | XML data file |
File Permissions
From the very start, Unix was designed as a multiuser environment in which different users are given different permissions. But more than that, users can be assigned to groups too, and files and programs can then be made accessible either by user or by group. All this rich multiuser support and precision control over the filesystem has been brought into Linux, making it one of the most robust and secure computing environments. It’s achieved by combining all the different concepts of users, groups, and file permissions.
Taking file permissions first, all files have a set of attributes that define what can and can’t be done with a file, and who has permission to access it. These are known as permissions, of which there are three main types:
These permissions can be combined with each other to provide the eight possibilities in Table 5-2. The permissions are numbered from 0 through 7 because these are the numbers that you will use when manually changing a file’s permissions using the command line (see Chapter 7).
Users and Groups
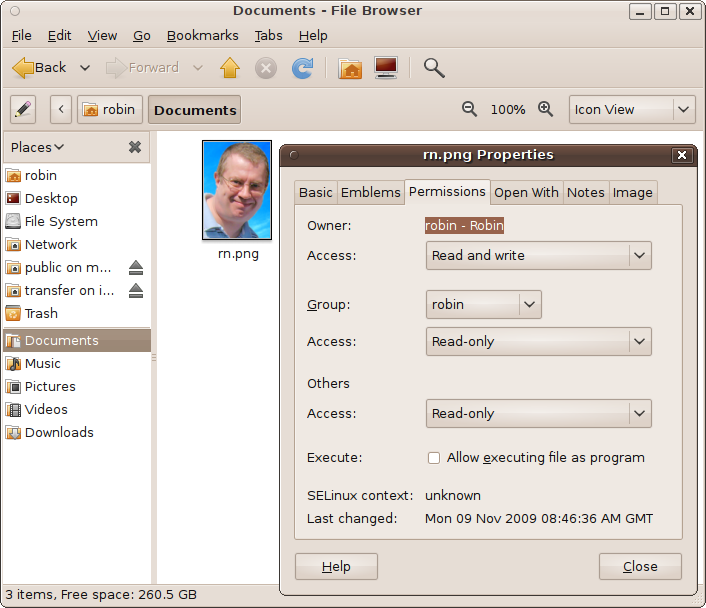
Each file has two additional attributes that are string values: one for the Owner and one for the Group the file belongs to. There is also a third attribute known as World (or sometimes Others) that is automatically assumed when a user is not in either of a file’s Owner or Group attributes.
In Figure 5-5, I have right-clicked the file rn.png and then selected the Permissions tab. In it you can see the Owner, Group, and Others sections, within which my username is applied to both the Owner and Group attributes. As Owner I am allowed to read from and write to the file, as a group member (if I were not the Owner) I could only read from it, and everyone else is also limited to only reading the file. A checkbox below this allows you to enable the file as executable.
When you installed Ubuntu and it asked you for a username, it then went and gave your user account membership in a new group it also created, with the same name as your username. So, if your username is joesmith, you will also be a member of the group called joesmith. This is because you must be a member of at least one group. But you can also be a member of other groups.
For example, an Ubuntu multiuser installation might offer several different user accounts for accessing different parts of a company’s data. One group able to access the accounts might be called finance, and another responsible for PR and advertising might be called marketing. Indeed there might also be a group for web server files called internet, and another for telesales, and so on. And members of some of these groups can also belong to others. Table 5-3 shows a group of six employees working in such a company.
Username | Position | Member of group | |||
Finance | Internet | Marketing | Telesales | ||
joesmith | CEO | ✓ | ✓ | ✓ | ✓ |
marywhite | CFO | ✓ | ✓ | ✓ | |
harryjones | Sales exec | ✓ | |||
paulharvey | Ad manager | ✓ | ✓ | ||
annwatson | Payroll exec | ✓ | |||
jennywilson | Web admin | ✓ | |||
Each username, in addition to being a member of the group with his or her own name, is a member of one or more other groups. For example, Joe Smith, the chief executive officer, is a member of all groups, whereas Paul Harvey, the advertising manager, needs to be a member of only the marketing and telesales groups.
With people properly allocated to the right groups, sensitive financial information can be restricted to only those employees who need access to it, the website can be set to allow updating only by the webmaster, and so on.
Managing Users
To manage groups, select System → Administration → Users and Groups, which brings up the Users Settings window shown in Figure 5-6. You must then click the key next to “Click to make changes” and enter your password in order to enable the various buttons. Once you’ve done that, you can click Add User to add a new user account to the computer, as described in the section Adding New Users.
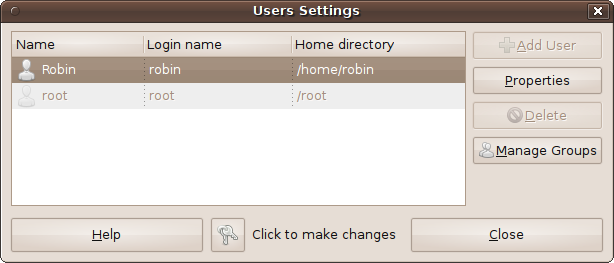
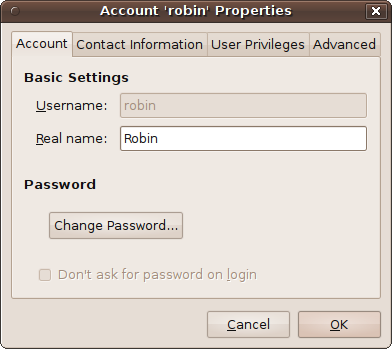
You can also modify a user’s details by selecting the user and then clicking the Properties button to bring up the Account Properties window shown in Figure 5-7. Here, you can change the user’s real name or password, or modify the user’s contact information using the Contact Information tab. You can also change the privileges that have been granted and other information, such as the user’s home directory, using the final two tabs, User Privileges and Advanced.
When using the Users Settings window for more than a few minutes, you may be re-prompted for your password. This is a security measure: changing user and group permissions modifies a computer’s entire security settings, so the time delay before revalidating a user is short. Just re-enter your password if asked.
To remove a user from the computer, click the Delete button in the Users Settings window, and then confirm the deletion by clicking the second Delete button that is displayed. Be careful, as this cannot be undone. Furthermore, any files owned by the user you’ve deleted stay around without an owner.
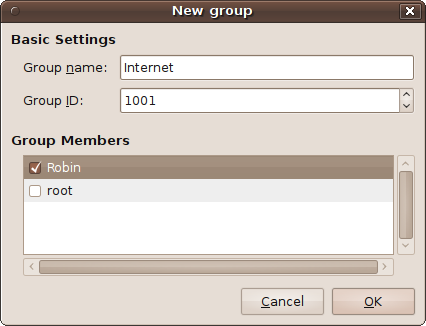
Managing Groups
To add groups and then add users to them, click Manage Groups and then Add Group to bring up the window shown in Figure 5-8. Here, I have chosen to create a new group called internet and added the user Robin to it.
The Group ID you see is suggested by Linux and is usually the next free ID number (starting from 1000). You are not recommended to change this unless you know why you are doing so.
Instead of clicking Add Group, you can also click Properties in the Users Settings window to add and remove users to and from a preexisting group. The Properties window that appears is identical to the New group window, except that you cannot change the group’s name. If you need to rename a group, you should create a new group and add all the users to it who need to be there; then you can delete the old one.
By the way, you never need to add the user root to a group, because that user can access absolutely every file and folder in the filesystem anyway, regardless of which owner the file has or which group it belongs to.
Other File Attributes
As if all that weren’t enough, a number of other file attributes are available to you. To view them, right-click on a file and select Properties to bring up a window such as the one shown in Figure 5-9. Here, you can see a number of tabs, which vary according to the file type or folder selected.
The tabs provide even more control over what you can do with your files and how they are displayed, and include the following:
- Basic
Lists basic details about a file or folder, such as its type, size, and location, whether it is a link to another file or folder, and statistics about when the file was last accessed or modified. You can also change the file or folder’s name here.
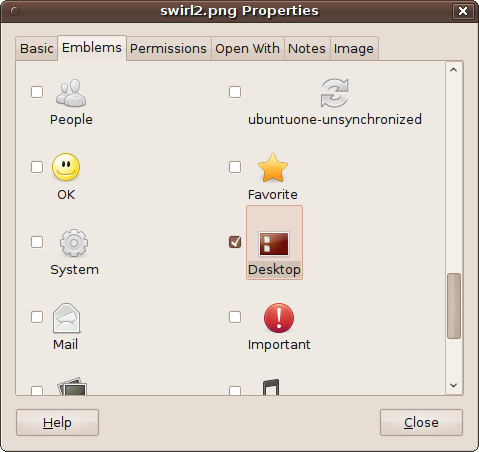
- Emblems
Ubuntu icons are great because you can attach secondary icons called emblems that appear above and to the right of them. Figure 5-10 shows the Desktop emblem being attached to swirl2.png (because it is being used for the desktop wallpaper). You can choose emblems representing hobbies, finance, games, important files, photos, social networking, and more.
- Permissions
I already covered the Permissions tab in the earlier section Users and Groups, which contained a screenshot of the options shown earlier in Figure 5-5. But, to recap, this is where you set a file’s users, groups, and read, write and executable attributes.
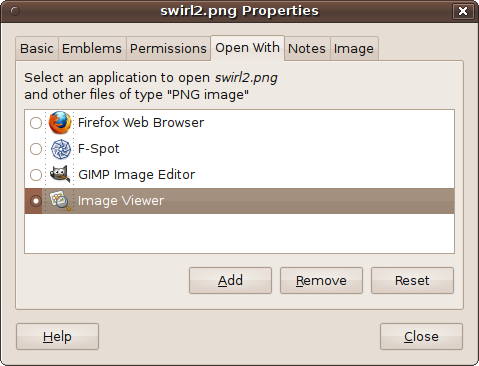
- Open With
Many types of file can be opened with more than one type of program. For example, as Figure 5-11 illustrates, by default Ubuntu offers a choice of four different programs to open the file swirl2.png, with Image Viewer being the default choice. Now the Image Viewer is well and good if you mostly just want to browse your image files. But, for example, if you generally need to edit them, you might prefer to make the GIMP Image Editor the default application for PNG files by clicking the circle next to that program’s icon.

- Notes
This tab lets you add a page of notes to a file or folder detailing what it is about. If you do this, an extra emblem, which looks like a pencil and notepad, is added to the right of the icon to indicate the presence of a note.
- Image
This tab is available only for image files, in which case it will display the file’s type, width, and height.
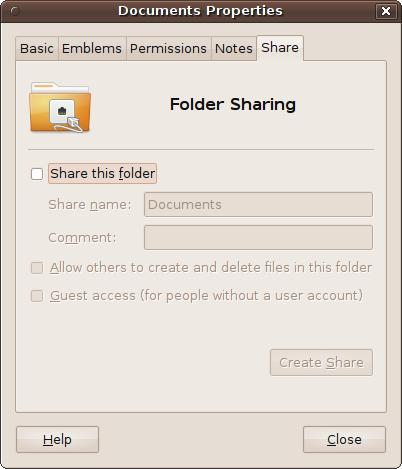
- Share
This tab is visible only when you call up the properties for a folder, as shown in Figure 5-12. If you have installed the sharing service (see Chapter 10), you can then check the box next to “Share this folder” and select the name by which to share it, along with an optional comment. Or, the first time you try to share a file or folder, Ubuntu will offer to install the Sharing service for you. Underneath this option, you can also choose whether others can create and delete files in the folder files, and whether guest users (who don’t have an account) are also granted access.
The Trash
Whenever you have finished with a file, you can drag and drop it into the Trash at the bottom right of the desktop. Selecting multiple files as well as folders (including their subfolders) is allowed, and they will be immediately removed from the filesystem.
But if you make a mistake, all is not lost. You can open up the Trash and either drag any items you didn’t want deleted back to their rightful places, or right-click them and select the Restore option.
When you are certain that the files are indeed trash, you can either right-click the Trash icon and select Empty Trash or open up the folder and delete them separately, by right-clicking each and selecting Delete Permanently. This allows you to delete files you definitely don’t need anymore, while holding on to others you’re not totally certain you want completely erased.
Summary
This chapter gave you an in-depth introduction to the basics of the GNU/Ubuntu Linux filesystem, which will stand you in good stead when installing new programs or working with files and data. In the following chapter, I will show you all the things you can do with the Nautilus file browser to increase your productivity and your enjoyment of using Ubuntu.