Table of Contents for
SSH, The Secure Shell: The Definitive Guide, 2nd Edition
 SSH, The Secure Shell: The Definitive Guide, 2nd Edition
Published by
O'Reilly Media, Inc., 2005
SSH, The Secure Shell: The Definitive Guide, 2nd Edition
Published by
O'Reilly Media, Inc., 2005
- Cover
- SSH, the Secure Shell, 2nd Edition
- Preface
- Protect Your Network with SSH
- Intended Audience
- Reading This Book
- Our Approach
- Which Chapters Are for You?
- Supported Platforms
- Disclaimers
- Conventions Used in This Book
- Comments and Questions
- Safari Enabled
- Acknowledgments
- 1. Introduction to SSH
- What Is SSH?
- What SSH Is Not
- The SSH Protocol
- Overview of SSH Features
- History of SSH
- Related Technologies
- Summary
- 2. Basic Client Use
- A Running Example
- Remote Terminal Sessions with ssh
- Adding Complexity to the Example
- Authentication by Cryptographic Key
- The SSH Agent
- Connecting Without a Password or Passphrase
- Miscellaneous Clients
- Summary
- 3. Inside SSH
- Overview of Features
- A Cryptography Primer
- The Architecture of an SSH System
- Inside SSH-2
- Inside SSH-1
- Implementation Issues
- SSH and File Transfers (scp and sftp)
- Algorithms Used by SSH
- Threats SSH Can Counter
- Threats SSH Doesn’t Prevent
- Threats Caused by SSH
- Summary
- 4. Installation and Compile-Time Configuration
- Overview
- Installing OpenSSH
- Installing Tectia
- Software Inventory
- Replacing r-Commands with SSH
- Summary
- 5. Serverwide Configuration
- Running the Server
- Server Configuration: An Overview
- Getting Ready: Initial Setup
- Authentication: Verifying Identities
- Access Control: Letting People In
- User Logins and Accounts
- Forwarding
- Subsystems
- Logging and Debugging
- Compatibility Between SSH-1 and SSH-2 Servers
- Summary
- 6. Key Management and Agents
- What Is an Identity?
- Creating an Identity
- SSH Agents
- Multiple Identities
- PGP Authentication in Tectia
- Tectia External Keys
- Summary
- 7. Advanced Client Use
- How to Configure Clients
- Precedence
- Introduction to Verbose Mode
- Client Configuration in Depth
- Secure Copy with scp
- Secure, Interactive Copy with sftp
- Summary
- 8. Per-Account Server Configuration
- Limits of This Technique
- Public-Key-Based Configuration
- Hostbased Access Control
- The User rc File
- Summary
- 9. Port Forwarding and X Forwarding
- What Is Forwarding?
- Port Forwarding
- Dynamic Port Forwarding
- X Forwarding
- Forwarding Security: TCP-Wrappers and libwrap
- Summary
- 10. A Recommended Setup
- The Basics
- Compile-Time Configuration
- Serverwide Configuration
- Per-Account Configuration
- Key Management
- Client Configuration
- Remote Home Directories (NFS, AFS)
- Summary
- 11. Case Studies
- Unattended SSH: Batch or cron Jobs
- FTP and SSH
- Pine, IMAP, and SSH
- Connecting Through a Gateway Host
- Scalable Authentication for SSH
- Tectia Extensions to Server Configuration Files
- Tectia Plugins
- 12. Troubleshooting and FAQ
- Debug Messages: Your First Line of Defense
- Problems and Solutions
- Other SSH Resources
- 13. Overview of Other Implementations
- Common Features
- Covered Products
- Other SSH Products
- 14. OpenSSH for Windows
- Installation
- Using the SSH Clients
- Setting Up the SSH Server
- Public-Key Authentication
- Troubleshooting
- Summary
- 15. OpenSSH for Macintosh
- Using the SSH Clients
- Using the OpenSSH Server
- 16. Tectia for Windows
- Obtaining and Installing
- Basic Client Use
- Key Management
- Accession Lite
- Advanced Client Use
- Port Forwarding
- Connector
- File Transfers
- Command-Line Programs
- Troubleshooting
- Server
- 17. SecureCRT and SecureFX for Windows
- Obtaining and Installing
- Basic Client Use
- Key Management
- Advanced Client Use
- Forwarding
- Command-Line Client Programs
- File Transfer
- Troubleshooting
- VShell
- Summary
- 18. PuTTY for Windows
- Obtaining and Installing
- Basic Client Use
- File Transfer
- Key Management
- Advanced Client Use
- Forwarding
- Summary
- A. OpenSSH 4.0 New Features
- Server Features: sshd
- Client Features: ssh, scp, and sftp
- ssh-keygen
- B. Tectia Manpage for sshregex
- Regex Syntax: Egrep Patterns
- Regex Syntax: ZSH_FILEGLOB (or Traditional) Patterns
- Character Sets for Egrep and ZSH_FILEGLOB
- Regex Syntax: SSH Patterns
- Authors
- See Also
- C. Tectia Module Names for Debugging
- D. SSH-1 Features of OpenSSH and Tectia
- OpenSSH Features
- Tectia Features
- E. SSH Quick Reference
- Legend
- sshd Options
- sshd Keywords
- ssh Options
- scp Options
- ssh and scp Keywords
- ssh-keygen Options
- ssh-agent Options
- ssh-add Options
- Identity and Authorization Files, OpenSSH
- Identity and Authorization Files, Tectia
- Environment Variables
- Index
- Index
- Index
- Index
- Index
- Index
- Index
- Index
- Index
- Index
- Index
- Index
- Index
- Index
- Index
- Index
- Index
- Index
- Index
- Index
- Index
- Index
- Index
- Index
- Index
- Index
- About the Authors
- Colophon
- Copyright
To set up public-key authentication in your account on an SSH server machine, you create an authorization file, typically called authorized_keys (OpenSSH) or authorization (Tectia), and list the keys that provide access to your account. [2.4] Well, we’ve been keeping a secret. Your authorization file can contain not only keys, but also other keywords or options to control the SSH server in powerful ways. We will discuss:
The full format of an authorization file
Forced commands for limiting the set of programs that the client may invoke on the server
Restricting incoming connections from particular hosts
Setting environment variables for remote programs
Setting an idle timeout so that clients will be forcibly disconnected if they aren’t sending data
Disabling or placing limits on certain features of the incoming SSH connection, such as port forwarding and tty allocation
As we demonstrate how to modify your authorization file, remember that the file is consulted by the SSH server only at authentication time. Therefore, if you change your authorization file, only new connections will use the new information. Any existing connections are already authenticated and won’t be affected by the change.
Also remember that an incoming connection request won’t reach your authorization file if the SSH server rejects it for other reasons, namely, failing to satisfy the serverwide configuration. If a change to your authorization file doesn’t seem to be having an effect, make sure it doesn’t conflict with a (more powerful) serverwide configuration setting.
Your OpenSSH authorization file, ~/.ssh/authorized_keys, is a secure doorway into your account via SSH. Each line of the file contains a public key and means the following: “I give permission for SSH clients to access my account, in a particular way, using this key as authentication.” Notice the words “in a particular way.” Until now, public keys have provided unlimited access to an account. Now we’ll see the rest of the story.
Each line may contain, in order:
A set of authorization options for the key (optional)
A string indicating the key type:
ssh-dssfor a DSA key, orssh-rsafor an RSA key (required)The public key, represented as a long string (required)
A descriptive comment (optional); this can be any text, such as “Bob’s public key” or “My home PC using SecureCRT 3.1”
Here’s an example:
from="192.168.10.1" ssh-dss AAAAB3NzaC1kc3MA... My OpenSSH key
It contains authorization options (from="192.168.10.1"), the key type (ssh-dss), the public key itself (abbreviated
here with an ellipsis), and the final comment (“My OpenSSH
key”).
Public keys are generated by ssh-keygen in .pub files, you may recall, and you typically insert them into authorized_keys by copying. [2.4.3] Options, however, are usually typed into authorized_keys with a text editor.[119]
An option may take two forms. It may be a keyword, such as:
    # OpenSSH: Turn off port forwarding
    no-port-forwarding
or it may be a keyword followed by an equals sign and a value, such as:
    # OpenSSH: Allow connections only from myhost
    from=myhost
Multiple options may be given together, separated by commas, with no whitespace between the options:
    # OpenSSH
    no-port-forwarding,from=myhost
If you mistakenly include whitespace:
    # THIS IS ILLEGAL: whitespace between the options
    no-port-forwarding, from=myhost
your connection by this key won’t work properly. If you connect with debugging turned on (ssh -v), you will see a “bad options” message from the SSH server.
Many SSH users aren’t aware of options or neglect to use them. This is a pity because options provide extra security and convenience. The more you know about the clients that access your account, the more options you can use to control that access.
A Tectia authorization file, typically found in
~/.ssh2/authorization,[120] has a different format than OpenSSH’s. Instead of public
keys, it contains keywords and values, much like other SSH
configuration files we’ve seen. Each line of the file contains one
keyword followed by its value. The most commonly used keywords are
Key and Options.
Public keys are indicated using the Key keyword. Key is followed by whitespace, and then the
name of a file containing a public key. Relative filenames refer to
files in ~/.ssh2. For
example:
    # Tectia
    Key myself.pub
means that an SSH-2 public key is contained in ~/.ssh2/myself.pub. Your authorization file must contain at least
one Key line for public-key
authentication to occur.
Each Key line may optionally
be followed immediately by an Options keyword and its value, which is a
comma-separated list of options:
    # Tectia
    Key myself.pub
    Options no-port-forwarding, no-x11-forwarding, command="mycommand"
One common option is command,
which specifies a forced command, i.e., a command
to be executed whenever the key immediately above
is used for access. We discuss forced commands later in great detail. [8.2.3] For now, all you need
to know is this: a forced command begins with the keyword Options followed by command and its quoted value, a shell
command line. For example:
    # Tectia
    Key somekey.pub
    Options command="/bin/echo All logins are disabled"
Remember that an Options line
by itself is an error. The following examples are illegal:
    # Tectia
    # THIS IS ILLEGAL: no Key line
    Options command="/bin/echo This line is bad."
    # THIS IS ILLEGAL: no Key line precedes the second Options
    Key somekey.pub
    Options command="/bin/echo All logins are disabled"
Options command="/bin/echo This line is bad."Tectia supports authentication by PGP key. [6.5] Your authorization file may also include
PgpPublicKeyFile, PgpKeyName, PgpKeyFingerprint, and PgpKeyId lines. An Options line may follow PgpKeyName, PgpKeyFingerprint, or PgpKeyId, just as it may follow Key.
    # Tectia
    PgpKeyName my-key
Options command="/bin/echo PGP authentication was detected"Ordinarily, an SSH connection invokes a remote command chosen by the client:
# Invoke a remote login shell
$ ssh server.example.com
# Invoke a remote directory listing
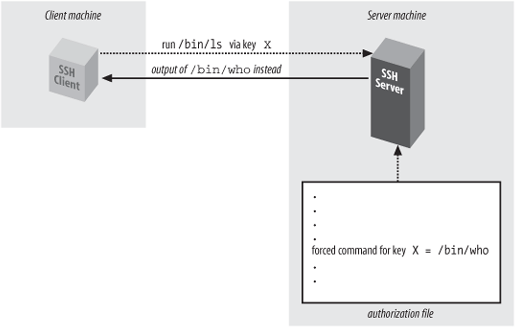
$ ssh server.example.com /bin/lsA forced command transfers this control from the client to the server. Instead of the client deciding which command will run, the owner of the server account decides. In Figure 8-2, the client has requested the command /bin/ls, but the server-side forced command runs /bin/who instead.
Forced commands can be quite useful. Suppose you want to give your assistant access to your account, but only to read your email. You can associate a forced command with your assistant’s SSH key to run only your email program and nothing else.
In OpenSSH, a forced command may be specified in authorized_keys with the command option preceding the desired key. For example, to run the email program pine whenever your assistant connects:
    # OpenSSH
    command="/usr/bin/pine" ...secretary's public key...
In Tectia, a forced command appears on the line immediately
following the desired Key, using
the command option. The previous
example would be represented like so:
    # Tectia
    Key secretary.pub
    Options command "/usr/bin/pine"
You may associate, at most, one forced command with a given key. To associate multiple commands with a key, put them into a script on the remote machine and run the script as the forced command. (We will demonstrate this. [8.2.3.3])
Before we begin in-depth examples of forced commands, let’s discuss security. At first glance, a forced command seems at least as secure as a “normal” SSH connection that invokes a shell. This is because a shell can invoke any program, while a forced command can invoke only one program, the forced command itself. If a forced command is /usr/bin/pine, only /usr/bin/pine can be invoked.
Nevertheless, there’s a caveat. A forced command, carelessly used, may lull you into a sense of false security, believing that you have limited the client’s capabilities when you haven’t. This occurs if the forced command unintentionally permits a shell escape, i.e., a way to invoke a shell from within the forced command. Using a shell escape, a client can invoke any program available to a shell. Many Unix programs have shell escapes, such as text editors (vi, Emacs), pagers (more, less), programs that invoke pagers (man), news readers (rn), mail readers (such as Pine in the previous example!), and debuggers (gdb). Interactive programs are the most common culprits, but even noninteractive commands may run shell commands (find, xargs, etc.).
When you define a forced command, you probably don’t want its key used for arbitrary shell commands. Therefore, we propose the following safety rules for deciding whether a program is appropriate as a forced command:
Avoid programs that have shell escapes. Read their documentation carefully. If you still aren’t sure, get help.
Avoid compilers, interpreters, or other programs that let the user generate and run arbitrary executable code.
Treat very carefully any program that creates or deletes files on disk in user-specified locations. This includes not only applications (word processors, graphics programs, etc.), but also command-line utilities that move or copy files (cp, mv, rm, scp, ftp, etc.).
Avoid programs with their setuid or setgid bits set, particularly setuid root.
If using a script as a forced command, follow traditional rules of safe script writing. Within the script, limit the search path to relevant directories (omitting “.”), invoke all programs by absolute path, don’t blindly execute user-supplied strings as commands, and don’t make the script setuid anything.[121] And again, don’t invoke any program that has a shell escape.
Consider using a restricted shell to limit what the incoming client can do. For example, the restricted shell /usr/lib/rsh (not to be confused with the r-command also called “rsh”) can limit the remote directories the client can enter.
Associate the forced command with a separate, dedicated SSH key, not the one used for your logins, so that you can conveniently disable the key without affecting your login capability.
Disable unnecessary SSH features using other options we cover later. Under OpenSSH, you may disable port forwarding with
no-port-forwarding, X forwarding withno-x11-forwarding, agent forwarding withno-agent-forwarding, and tty allocation usingno-pty.
Any program may be used as a forced command, but some may be risky choices. In the examples that follow, we cover several of these issues as they’re encountered.
Suppose you’ve permitted a friend to access your account by SSH, but now you’ve decided to disable the access. You can simply remove his key from your authorization file, but here’s something fancier. You can define a forced command to print a custom message for your friend, indicating that his access has been disabled. For example:
    # OpenSSH
    command="/bin/echo Sorry, buddy, but you've been terminated!" ...key...

    # Tectia
    Key friend.pub
    Options command="/bin/echo Sorry, buddy, but you've been terminated!"
Any incoming SSH connection that successfully authenticates with this key causes the following message to be displayed on standard output:
Sorry, buddy, but you've been terminated!
and then the connection closes. If you’d like to print a longer message, which might be awkward to include in your authorization file, you can store it in a separate file (say, ~/go.away) and display it using an appropriate program (e.g., cat):
    # OpenSSH
    command="/bin/cat $HOME/go.away" ...key...

    # Tectia
    Key friend.pub
    Options command="/bin/cat $HOME/go.away"
Since the message is long, you might be tempted to display it one screenful at a time with a pager program such as more or less. Don’t do it!
    # OpenSSH: Don't do this!
    command="/usr/bin/less $HOME/go.away" ...key...
This forced command opens an unwanted hole into your account: the less program, like most Unix pager programs, has a shell escape. Instead of restricting access to your account, this forced command permits unlimited access.[122]
Suppose you want to provide limited access to your account, permitting the incoming SSH client to invoke only a few, specific programs. Forced commands can accomplish this. For instance, you can write a shell script that permits a known set of programs to be executed and then run the script as a forced command. A sample script, shown in Example 8-1, permits only three programs to be chosen from a menu.
Example 8-1. Menu script
#!/bin/sh
/bin/echo "Welcome!
Your choices are:

1       See today's date
2       See who's logged in
3       See current processes
q       Quit"

/bin/echo "Your choice: \c"
read ans
while [ "$ans" != "q" ]
do
  case "$ans" in
    1)
        /bin/date
        ;;
    2)
        /bin/who
        ;;
    3)
        /usr/ucb/w
        ;;
    q)
        /bin/echo "Goodbye"
        exit 0
        ;;
    *)
        /bin/echo "Invalid choice '$ans': please try again"
        ;;
  esac
  /bin/echo "Your choice: \c"
  read ans
done
exit 0
When someone accesses your account by public key and invokes the forced command, the script displays:
    Welcome!
    Your choices are:
     1       See today's date
     2       See who's logged in
     3       See current processes
     q       Quit

    Your choice:
The user may then type 1, 2, 3, or q to run the associated program. Any other input is ignored, so no other programs can be executed.
Such scripts must be written carefully to avoid security holes. In particular, none of the permitted programs should provide a means to escape to a shell, or else the user may execute any command in your account.
As we’ve seen, a forced command gets substituted for any other command the SSH client might send. If an SSH client attempts to invoke the program ps:
$ ssh server.example.com ps
but a forced command is set up to execute “/bin/who” instead:
    # OpenSSH
    command="/bin/who" ...key...

    # Tectia
    key mykey.pub
    Options command="/bin/who"
then ps is ignored and /bin/who runs instead. Nevertheless, the
SSH server does read the original command string sent by the client
and stores it in an environment variable. For OpenSSH, the
environment variable is SSH_ORIGINAL_COMMAND, and for Tectia, it’s
SSH2_ORIGINAL_COMMAND . So, in our example, the value of SSH_ORIGINAL_COMMAND would be
ps.
A quick way to see these variables in action is to print their values with forced commands. For OpenSSH, create a forced command like the following:
    # OpenSSH
    command="/bin/echo You tried to invoke $SSH_ORIGINAL_COMMAND" ...key...
Then connect with an SSH client, supplying a remote command (which won’t be executed), such as:
$ ssh server.example.com cat /etc/passwd
Instead of executing cat, the OpenSSH server simply prints:
You tried to invoke cat /etc/passwd
and exits. Similarly, for Tectia, you can set up a forced command like this:
    # Tectia
    Key mykey.pub
    Options command="/bin/echo You tried to invoke $SSH2_ORIGINAL_COMMAND"
Then, a client command like:
$ ssh server.example.com cat /etc/passwd
produces:
You tried to invoke cat /etc/passwd
Let’s try a slightly more complex example using the
environment variable SSH_ORIGINAL_COMMAND. We create a forced
command that examines the environment variable and turns a requested
command into another of our choice. For example, suppose you want to
permit a friend to invoke remote commands in your account, except
for the rm (remove file) command. In other
words, a command like:
$ ssh server.example.com rm myfile
is rejected. Here’s a script that checks for the presence of rm in the command string and, if present, rejects the command:
    #!/bin/sh
    # OpenSSH.  For Tectia, use $SSH2_ORIGINAL_COMMAND.
    #
    case "$SSH_ORIGINAL_COMMAND" in
      *rm*)
        echo "Sorry, rejected"
        ;;
      *)
        $SSH_ORIGINAL_COMMAND
        ;;
    esac
Save this script in ~/rm-checker, and define a forced command to use it:
    # OpenSSH
    command="$HOME/rm-checker" ...key...

    # Tectia
    Key mykey.pub
    Options command="$HOME/rm-checker"
Our script is just an example: it isn’t secure. It can be easily bypassed by a clever command sequence to remove a file:
$ ssh server.example.com '/bin/ln -s /bin/r? ./killer && ./killer myfile'
which creates a link to /bin/rm with a different name (killer) and then performs the removal.
Nevertheless, the concept is still valid: you can examine SSH_ORIGINAL_COMMAND to select another
command to execute instead.
Another cool use of the “original command” environment variables is to keep a log of commands that are run using a given key. For example:
    # OpenSSH
    command="log-and-run" ...key...

    # Tectia
    Key mykey.pub
    Options command="log-and-run"
where log-and-run is the following script. It appends a line to a log file, containing a timestamp and the command attempted:
    #!/bin/sh
    # OpenSSH.  For Tectia, use $SSH2_ORIGINAL_COMMAND.
    if [ -n "$SSH_ORIGINAL_COMMAND" ]
    then
      echo "`/bin/date`: $SSH_ORIGINAL_COMMAND" >> $HOME/ssh-command-log
      exec $SSH_ORIGINAL_COMMAND
fiWe’ve seen what happens when ssh encounters a key with a forced command. But what does scp do in this situation? Does the forced command run, or does the copy operation take place?
In this case, the forced command executes, and the original operation (file copy) is ignored. Depending on your needs, this behavior might be good or bad. In general, we do not recommend using scp with any key that has a forced command. Instead, use two keys, one for ordinary logins and file copying and the other for the forced command.
Now that we’ve thoroughly examined forced commands, let’s move on to other features of per-account configuration.
Public-key authentication requires two pieces of information: the corresponding private key and its passphrase (if any). Without either piece, authentication can’t succeed. Per-account configuration lets you add a third requirement for additional security: a restriction on the client’s hostname or IP address.
In OpenSSH, host access control is accomplished in the authorized_keys file with the from option. For example:
    # OpenSSH
    from="client.example.com" ...key...
enforces that any SSH connection must come from client.example.com, or else it is rejected. Therefore, if your private-key file is somehow stolen, and your passphrase cracked, an attacker might still be stymied if he can’t connect from the authorized client machine.
If the concept of “from” sounds familiar, you’ve got a good
memory: it’s the same access control provided by the AllowUsers keyword for serverwide
configuration. [5.5.1]
The authorized_keys option,
however, is set by you within your account and applies to a single
key, while AllowUsers is
specified by the system administrator and applies to all connections
to an account. Here’s an example to demonstrate the difference.
Suppose you want to permit connections from
remote.org to enter the benjamin account. As
system administrator, you can configure this within /etc/ssh/sshd_config:
    # OpenSSH
    AllowUsers benjamin@remote.org
Using per-account configuration, the user benjamin can configure the identical setting within his authorized_keys file, for a particular key only:
    # OpenSSH
    # File ~benjamin/.ssh/authorized_keys
    from="remote.org" ...key...
Of course, the serverwide setting takes precedence. If the
system administrator had denied this access using the DenyUsers keyword:
    # OpenSSH
    DenyUsers benjamin@remote.org
then user benjamin can’t override this restriction using the
from option in authorized_keys.
Just like AllowUsers, the
from option can use the wildcard
characters *, matching any
string, and ?, matching any one
character:
    from="*.someplace.org"   Matches any host in the someplace.org domain
    from="som?pla?e.org"     Matches somXplaYe.org but not foo.someXplaYe.org or foo.somplace.org
It may also match the client IP address, with or without wildcards:
    from="192.220.18.5"
    from="192.2??.18.*"
There can also be multiple patterns, this time separated by
commas (AllowUsers employs
spaces). No whitespace is allowed. You may also negate a pattern by
prefixing it with an exclamation point (!). The exact matching rules are: every
pattern in the list is compared to either the client’s canonical
hostname or its IP address. If the pattern contains only numerals,
dots, and wildcards, it is matched against the address, otherwise,
it is matched against the hostname.[123] The connection is accepted if and only if the client
matches at least one positive pattern and no negated patterns. So
for example, the following rule denies connections from
saruman.ring.org, allows connections from other
hosts in the domain ring.org, and denies
everything else:
from="!saruman.ring.org,*.ring.org"
while this one again denies saruman.ring.org but allows all other clients:
from="!saruman.ring.org,*"
Remember that access control by hostname may be problematic,
due to issues with name resolution and security. [3.4.3.6] Fortunately, the
from option is just an auxiliary
feature of OpenSSH public-key authentication, which provides
stronger security than would an entirely hostname-based
solution.
Host access control in Tectia is accomplished in the
authorization file with the
allow-from and deny-from options. For example, to permit
connections to your account from the
example.com domain:
    # ~/.ssh2/authorization
    Key mykey.pub
    Options allow-from="example.com"
or to deny them from very.evil.org:
    # ~/.ssh2/authorization
    Key otherkey.pub
    Options deny-from="very.evil.org"
These options follow the same rules as the AllowHosts and DenyHosts server configuration keywords,
respectively. [5.5.3]
However, allow-from and deny-from control access per key, rather
than serverwide.
The environment option
instructs the SSH server to set an environment variable when a client
connects via the given key. For example, the OpenSSH authorized_keys line:
    # OpenSSH
    environment="EDITOR=emacs" ...key...
or Tectia authorization file option:
    # Tectia
    Key mykey.pub
    Options environment="editor=emacs"
sets the environment variable EDITOR to the value emacs, thereby setting the client’s default
editor for the login session. The syntax following environment= is a quoted string containing a
variable, an equals sign, and a value. All characters between the
quotes are significant, i.e., the value may contain whitespace:
    # OpenSSH
    environment="MYVARIABLE=this value has whitespace in it" ...key...

    # Tectia
    Key mykey.pub
    Options environment="MYVARIABLE=this value has whitespace in it"
or even a double quote, if you escape it with a forward slash:
    # OpenSSH
    environment="MYVARIABLE=I have a quote\" in my middle" ...key...

    # Tectia
    Key mykey.pub
    Options environment="MYVARIABLE=I have a quote\" in my middle"
Also, a single key may have multiple environment variables set:
    # OpenSSH
    environment="EDITOR=emacs",environment="MYVARIABLE=26" ...key...

    # Tectia
    Key mykey.pub
    environment="EDITOR=emacs",environment="MYVARIABLE=26"
Why set an environment variable for a key? This feature lets you
tailor your account to respond differently based on which key is used.
For example, suppose you create two keys, each of which sets a
different value for an environment variable—say, SPECIAL:
    # OpenSSH
    environment="SPECIAL=1" ...key...
    environment="SPECIAL=2" ...key...

    # Tectia
    Key key1.pub
    Options environment="SPECIAL=1"
    Key key2.pub
    Options environment="SPECIAL=2"
Now, in your account’s shell configuration file, you can examine
$SPECIAL and trigger actions
specific to each key:
    # In your .login file
    switch ($SPECIAL)
      case 1:
        echo 'Hello Bob!'
        set prompt = 'bob> '
        breaksw
      case 2:
        echo 'Hello Jane!'
        set prompt = jane> '
        source ~/.janerc
        breaksw
    endsw
Here, we print a custom welcome message for each key user, set
an appropriate shell prompt, and in Jane’s case, invoke a custom
initialization script, ~/.janerc.
Thus, the environment option
provides a convenient communication channel between a particular key
and the remote shell.
As a more advanced example of the environment option, suppose a team of open
source software developers around the Internet is developing a
computer program. The team decides to practice good software
engineering and store its code with CVS, the Concurrent Versions
System, a popular version control tool. Lacking the funds to set up
a server machine, the team places the CVS repository into the
computer account of one of the team members, Benjamin, since he has
lots of available disk space. Benjamin’s account is on the SSH
server machine cvs.repo.com.
The other developers do not have accounts on cvs.repo.com, so Benjamin places their public keys into his authorized_keys file so that they can do check-ins. Now there’s a problem. When a developer changes a file and checks the new version into the repository, a log entry is made by CVS, identifying the author of the change. But everyone is connecting through the benjamin account, so CVS always identifies the author as “benjamin,” no matter who checked in the changes. This is bad from a software engineering standpoint: the author of each change should be clearly identified.[124]
You can eliminate this problem by modifying Benjamin’s file,
preceding each developer’s key with an environment option. CVS examines the
LOGNAME environment variable to
get the author’s name, so you set LOGNAME differently for each developer’s
key:
    # OpenSSH
    environment="LOGNAME=dan" ...key...
    environment="LOGNAME=richard" ...key...
    ...

   # Tectia
   Key dan.pub
   Options environment="LOGNAME=dan"
   Key richard.pub
   Options environment="LOGNAME=richard"
   ...
Now, when a given key is used for a CVS check-in, CVS
identifies the author of the change by the associated, unique
LOGNAME value. Problem
solved![125]
Tectia’s idle-timeout
option tells the SSH server to disconnect a session that has been idle
for a certain time limit. This is just like Tectia’s IdleTimeout keyword for serverwide
configuration but is set by you within your account, instead of by the
system administrator. [5.3.3.5]
Suppose you let your friend Jamie access your account by SSH. Jamie works in an untrusted environment, however, and you are worried that he might walk away from his computer while connected to your account, and someone else might come by and use his session. One way to reduce the risk is to set an idle timeout on Jamie’s key, automatically disconnecting the SSH session after a given period of idle time. If the client stops sending output for a while, Jamie has probably walked away, and the session is terminated.
Timeouts are set with the idle-timeout option. For example, to set the
idle timeout to 60 seconds:
    # Tectia
    Key mykey.pub
    Options idle-timeout=60s
idle-timeout uses the same
notation for time as the IdleTimeout server keyword. [5.3.3.5] It also
overrides any serverwide value set with the
IdleTimeout keyword. For example,
if the serverwide idle timeout is five minutes:
    # Tectia
    IdleTimeout 5m
but your authorization file sets it to 10 minutes for your account:
    # Tectia
    Key mykey.pub
    Options idle-timeout=10m
then any connection using this key has an idle timeout of 10 minutes, regardless of the serverwide setting.
This feature has more uses than disconnecting absent typists. Suppose you’re using an SSH key for an automated process, such as backups. An idle timeout value kills the process automatically if it hangs due to an error.
Although you’re permitting SSH access to your account, you might
not want your account to be used as a springboard to other machines by
port forwarding. [9.2] To
prevent this, use the no-port-forwarding option for that
key:
    # OpenSSH
    no-port-forwarding ...key...

    # Tectia
    Key mykey.pub
    Options no-port-forwarding
Rather than disable forwarding, OpenSSH can place limits on it
with the permitopen option for a
key. For example, to restrict port forwarding to local port 12345
connecting to remote host
server.example.com:
    # OpenSSH
    permitopen="server.example.com:12345" ...key...
permitopen may have multiple
values separated by commas. The syntax is
hostname:port
for IPv4 addresses and
hostname/port
for IPv6 addresses.
X forwarding [9.4]
can be prohibited per key with the no-x11-forwarding option:
    # OpenSSH
    no-x11-forwarding ...key...

    # Tectia
    Key mykey.pub
    Options no-x11-forwarding
Agent forwarding can also be disabled per key, if you don’t want
remote users to travel through your account and onto other computers
using the given key. [6.3.5] This is done with the
no-agent-forwarding option:
    # OpenSSH
    no-agent-forwarding ...key...

    # Tectia
    Options no-agent-forwarding
Warning
These aren’t strong restrictions. As long as you allow shell access, just about anything can be done over the connection. The user need employ only a pair of custom programs that talk to each other across the connection and directly implement port forwarding, agent forwarding, or anything else you thought you were preventing. To be more than just a reminder or mild deterrent, these options must be used together with carefully restricted access on the server side, such as forced commands or a restricted shell on the target account.
Normally, when you log in via SSH, the server allocates a pseudo-terminal (henceforth, tty) for the login session: [7.4.6.5]
    # A tty is allocated for this client
    $ ssh server.example.com
The server even sets an environment variable, SSH_TTY for OpenSSH or SSH2_TTY for Tectia, with the name of the
tty allocated. For example:
    # After logging in via OpenSSH
    $ echo $SSH_TTY         Use $SSH2_TTY for Tectia
    /dev/pts/1
When you run a noninteractive command, however, the SSH server doesn’t allocate a tty to set the environment variable, e.g.:
    # OpenSSH: No tty is allocated
    $ ssh server.example.com /bin/ls
Suppose you want to give someone SSH access for invoking
noninteractive commands, but not for running an interactive login
session. You’ve seen how forced commands can limit access to a
particular program, but as an added safety precaution, you can also
disable tty allocation with the no-pty option:
    # OpenSSH
    no-pty ...key...

    # Tectia
    Key mykey.pub
    Options no-pty
Noninteractive commands will now work normally, but requests for interactive sessions are refused by the SSH server. If you try to establish an interactive session, your client may appear to hang.[126] Run it in verbose mode to see the reason:
    # OpenSSH output
    debug1: Remote: Pty allocation disabled.
Just for fun, let’s observe the effect of no-pty on the environment variable with a
simple experiment. Set up a public key and precede it with the
following forced command:
    # OpenSSH
    command="echo SSH_TTY is [$SSH_TTY]" ...key...

    # Tectia
    Key mykey.pub
    Options command="echo SSH2_TTY is [$SSH2_TTY]"
Now try connecting noninteractively and interactively, and watch the output. The interactive command assigns a value to the environment variable, but the noninteractive one doesn’t:
    $ ssh server.example.com
    SSH_TTY is [/dev/pts/2]       For Tectia it would be SSH2_TTY

    $ ssh server.example.com anything
    SSH_TTY is []                 For Tectia it would be SSH2_TTY
Next, add the no-pty
option:
    # OpenSSH
    no-pty,command="echo SSH_TTY is [$SSH_TTY]" ...key...

    # Tectia
    Key mykey.pub
    no-pty,command="echo SSH_TTY is [$SSH_TTY]"
and try connecting interactively. The connection (properly) fails and the environment variable has no value:
    $ ssh server.example.com
    SSH_TTY is []         For Tectia it would be SSH2_TTY
    Connection to server.example.com closed.
Even if a client requests a tty specifically (with ssh
-t), the no-pty option
forbids its allocation. For instance, if you try running the Emacs
editor over the SSH connection:
$ ssh -t server.example.com emacs
Emacs will fail to run or appear to hang.
[119] When editing authorized_keys, be sure to use a text editor capable of handling long lines. The public key may be several hundred characters long. Some text editors can’t display long lines, won’t edit them properly, automatically insert line breaks, or wreak other sorts of havoc upon your nice public keys. (Aaargh. Don’t get us started talking about brain-damaged text editors.) Use a modern editor, and turn off automatic line breaking. We use GNU Emacs.
[120] The name can be changed with the keyword AuthorizationFile in the serverwide
configuration file. [5.3.1.6]
[121] Modern Unix implementations often ignore the setuid bit on scripts for security reasons.
[122] The less program has a secure mode
that disables shell escapes. See the manpage for
less about the environment variable
LESSSECURE.
[123] OpenSSH unfortunately doesn’t let you specify arbitrary IP networks using an address and mask, nor by “address / number of bits.” libwrap does [9.5], but its restrictions apply to all connections, not on a per-key basis.
[124] In an industrial setting, each developer would have an account on the CVS repository machine, so the problem wouldn’t exist.
[125] Incidentally, the authors used this technique while collaborating on this book.
[126] If the connection hangs and your client appears to be frozen, type the ssh escape character followed by a period (usually ~. unless you’ve overridden it) to close the connection.