Table of Contents for
SSH, The Secure Shell: The Definitive Guide, 2nd Edition
 SSH, The Secure Shell: The Definitive Guide, 2nd Edition
Published by
O'Reilly Media, Inc., 2005
SSH, The Secure Shell: The Definitive Guide, 2nd Edition
Published by
O'Reilly Media, Inc., 2005
- Cover
- SSH, the Secure Shell, 2nd Edition
- Preface
- Protect Your Network with SSH
- Intended Audience
- Reading This Book
- Our Approach
- Which Chapters Are for You?
- Supported Platforms
- Disclaimers
- Conventions Used in This Book
- Comments and Questions
- Safari Enabled
- Acknowledgments
- 1. Introduction to SSH
- What Is SSH?
- What SSH Is Not
- The SSH Protocol
- Overview of SSH Features
- History of SSH
- Related Technologies
- Summary
- 2. Basic Client Use
- A Running Example
- Remote Terminal Sessions with ssh
- Adding Complexity to the Example
- Authentication by Cryptographic Key
- The SSH Agent
- Connecting Without a Password or Passphrase
- Miscellaneous Clients
- Summary
- 3. Inside SSH
- Overview of Features
- A Cryptography Primer
- The Architecture of an SSH System
- Inside SSH-2
- Inside SSH-1
- Implementation Issues
- SSH and File Transfers (scp and sftp)
- Algorithms Used by SSH
- Threats SSH Can Counter
- Threats SSH Doesn’t Prevent
- Threats Caused by SSH
- Summary
- 4. Installation and Compile-Time Configuration
- Overview
- Installing OpenSSH
- Installing Tectia
- Software Inventory
- Replacing r-Commands with SSH
- Summary
- 5. Serverwide Configuration
- Running the Server
- Server Configuration: An Overview
- Getting Ready: Initial Setup
- Authentication: Verifying Identities
- Access Control: Letting People In
- User Logins and Accounts
- Forwarding
- Subsystems
- Logging and Debugging
- Compatibility Between SSH-1 and SSH-2 Servers
- Summary
- 6. Key Management and Agents
- What Is an Identity?
- Creating an Identity
- SSH Agents
- Multiple Identities
- PGP Authentication in Tectia
- Tectia External Keys
- Summary
- 7. Advanced Client Use
- How to Configure Clients
- Precedence
- Introduction to Verbose Mode
- Client Configuration in Depth
- Secure Copy with scp
- Secure, Interactive Copy with sftp
- Summary
- 8. Per-Account Server Configuration
- Limits of This Technique
- Public-Key-Based Configuration
- Hostbased Access Control
- The User rc File
- Summary
- 9. Port Forwarding and X Forwarding
- What Is Forwarding?
- Port Forwarding
- Dynamic Port Forwarding
- X Forwarding
- Forwarding Security: TCP-Wrappers and libwrap
- Summary
- 10. A Recommended Setup
- The Basics
- Compile-Time Configuration
- Serverwide Configuration
- Per-Account Configuration
- Key Management
- Client Configuration
- Remote Home Directories (NFS, AFS)
- Summary
- 11. Case Studies
- Unattended SSH: Batch or cron Jobs
- FTP and SSH
- Pine, IMAP, and SSH
- Connecting Through a Gateway Host
- Scalable Authentication for SSH
- Tectia Extensions to Server Configuration Files
- Tectia Plugins
- 12. Troubleshooting and FAQ
- Debug Messages: Your First Line of Defense
- Problems and Solutions
- Other SSH Resources
- 13. Overview of Other Implementations
- Common Features
- Covered Products
- Other SSH Products
- 14. OpenSSH for Windows
- Installation
- Using the SSH Clients
- Setting Up the SSH Server
- Public-Key Authentication
- Troubleshooting
- Summary
- 15. OpenSSH for Macintosh
- Using the SSH Clients
- Using the OpenSSH Server
- 16. Tectia for Windows
- Obtaining and Installing
- Basic Client Use
- Key Management
- Accession Lite
- Advanced Client Use
- Port Forwarding
- Connector
- File Transfers
- Command-Line Programs
- Troubleshooting
- Server
- 17. SecureCRT and SecureFX for Windows
- Obtaining and Installing
- Basic Client Use
- Key Management
- Advanced Client Use
- Forwarding
- Command-Line Client Programs
- File Transfer
- Troubleshooting
- VShell
- Summary
- 18. PuTTY for Windows
- Obtaining and Installing
- Basic Client Use
- File Transfer
- Key Management
- Advanced Client Use
- Forwarding
- Summary
- A. OpenSSH 4.0 New Features
- Server Features: sshd
- Client Features: ssh, scp, and sftp
- ssh-keygen
- B. Tectia Manpage for sshregex
- Regex Syntax: Egrep Patterns
- Regex Syntax: ZSH_FILEGLOB (or Traditional) Patterns
- Character Sets for Egrep and ZSH_FILEGLOB
- Regex Syntax: SSH Patterns
- Authors
- See Also
- C. Tectia Module Names for Debugging
- D. SSH-1 Features of OpenSSH and Tectia
- OpenSSH Features
- Tectia Features
- E. SSH Quick Reference
- Legend
- sshd Options
- sshd Keywords
- ssh Options
- scp Options
- ssh and scp Keywords
- ssh-keygen Options
- ssh-agent Options
- ssh-add Options
- Identity and Authorization Files, OpenSSH
- Identity and Authorization Files, Tectia
- Environment Variables
- Index
- Index
- Index
- Index
- Index
- Index
- Index
- Index
- Index
- Index
- Index
- Index
- Index
- Index
- Index
- Index
- Index
- Index
- Index
- Index
- Index
- Index
- Index
- Index
- Index
- Index
- About the Authors
- Colophon
- Copyright
The first question to consider when installing any implementation of SSH is whether to use a binary or source distribution.
Binary distributions are already configured and compiled, and are therefore easy to use. They are available for popular SSH implementations like OpenSSH and Tectia on a variety of common platforms. The packaging technology and installation instructions vary according to the target system—consult the documentation provided by your vendor for details. For example, on Linux systems, binary distributions are usually shipped as RPM packages, and can be installed using a single command like:
$ rpm -Uhv openssh-3.9p1-1.i386.rpm
Installation on Unix systems typically requires root access, to install files in system directories, and to update the databases that keep track of installed packages.
Binary distributions are often cryptographically signed, to ensure that no one has tampered with the files. Signatures can be provided as separate files, or (depending on the package format) embedded within the binary distribution files, and the technique to verify the signature depends on how the files were signed. For example, on RPM-based Linux systems, first import the vendor’s public key, which is distributed by keyservers or the vendor’s web site:
$ rpm --import http://www.redhat.com/security/db42a60e.txt
Then use the public key to check the signature:
$ rpm --checksig -v openssh-3.9p1-1.i386.rpm
Warning
Always check the signatures of binary distributions before installing. Imagine the havoc that could be caused if a maliciously hacked version of SSH was unwittingly used on your system.
Source distributions require more work to install, but allow many more configuration options. They can also be used on platforms for which no binary distributions are available.
To install from sources, perform the following general steps; we’ll cover specific details for OpenSSH and Tectia in subsequent sections.
Some SSH implementations rely on other software packages; these must be obtained and installed first. The precise requirements sometimes depend on the configuration options chosen: e.g., support for hardware authentication devices (smartcards) might require special libraries.
Source code for open source SSH implementations can be downloaded from each project’s web site, and often a large number of mirror sites. Sources for commercial products are sometimes provided on the distribution media, or are available on vendors’ password-protected web sites.
Sources should be distributed with a signature file that guarantees the distribution is genuine and has not been modified. [1.6.2] The precise steps used to verify the signature depend on how the source file was signed.
Always check the signature before installing sources. Otherwise, you can be fooled by a hacked version created by an untrusted third party. If you blindly install a source without checking the signature, you can seriously compromise your system’s security.
Source distributions are almost invariably packaged in compressed tar format.[37] Filenames ending in .tar.gz (or sometimes .tgz) are compressed using gzip, and can be extracted using a command like:
$ tar xzvf openssh-3.9p1.tar.gz
If your version of tar does not support the z option for running gunzip automatically, try:
$ gunzip < openssh-3.9p1.tar.gz | tar xvf -
gzip (and gunzip) can be obtained, if you don’t already have them, from http://www.gzip.org/.
Similarly, filenames ending in .tar.bz2 are compressed using bzip2, and can be extracted using a command like:
$ tar xjvf openssh-3.9p1.tar.bz2
If your version of tar does not support the j option for running bunzip2 automatically, try:
$ bunzip2 < openssh-3.9p1.tar.bz2 | tar xvf -
bzip2 (and bunzip2) can be obtained from http://sources.redhat.com/bzip2.
In all cases, the result is a new subdirectory containing all files in the distribution. The name of the source directory is usually the same as the tar file, e.g., openssh-3.9p1.
To list the contents of the tar file, without extracting, use the t option instead of x; for example:
$ tar tzvf openssh-3.9p1.tar.gz
Most SSH implementations have dozens of configuration options you can set at compile time. It’s a good idea to carefully consider each one, instead of blindly accepting the defaults. In fact, the flexibility provided by this compile-time configuration process is a primary motivation for installing from source distributions.
Compile-time configuration is performed by running a script named configure that is usually found in the top-level source directory.[38] Roughly speaking, the configure script accomplishes two tasks:
It examines the local system, setting various platform-specific and operating-system-specific options. For example,
configurenotices which header files and libraries are available and whether your C compiler is ANSI or not. It does this by compiling and running a series of carefully constructed, small test programs, examining system files, etc. This happens automatically in most cases, so you can just sit back and watch the script announce what it discovers as it runs.It includes or excludes certain features found in the SSH source code. For example,
configurecan keep or remove support for Kerberos authentication.
We’ll discuss only the second task, since it’s SSH-specific, and cover only the configuration options that are directly related to SSH or security. For example, we won’t cover options that relate to the compiler (e.g., whether warnings should be printed or suppressed) or operating system (e.g., whether particular Unix library functions should be used). To see the full set of configure options, use the command:
$ configure --help
Also, read the installation documentation, which is often found in files named README and INSTALL in the source directory.
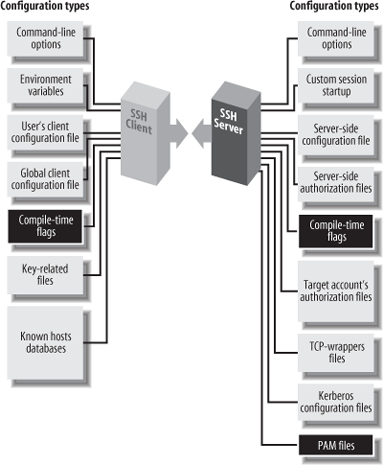
The behavior of SSH servers can be controlled at three levels. The first is compile-time configuration as discussed in this chapter. In addition, serverwide configuration (Chapter 5) controls global settings for a running SSH server, and per-account configuration (Chapter 8) controls settings for each user account accepting SSH connections. Figure 4-1 illustrates where compile-time configuration fits into the whole spectrum. We’ll remind you of this picture each time we introduce a new type of configuration.
Compile-time configuration affects both the SSH server and client programs. Changing the configuration requires recompiling and reinstalling, which is neither easy nor convenient, so for most aspects of server and client operation, it’s more appropriate to edit configuration files after installation. Nevertheless, there are some good reasons to use compile-time configuration:
Some configuration options can only be set at compile time.
Features that are disabled at compile time can’t be accidentally enabled by erroneous configuration files. Inflexibility can be an asset.
Removing code for unused features improves security—you can’t be burned by security holes in code that you don’t compile!
Similarly, code removal sometimes yields a performance advantage, since less memory and disk space is used.
The configure script accepts command-line flags, each beginning with a double dash (--), to control its actions. Flags are of two types:
- With/without flags
Include a package during compilation. These flags begin with
--withor--without. For example, support for the X Window System can be included using the flag--with-xand omitted using--without-x.- Enable/disable flags
Set the default behavior of SSH. These flags begin with
--enableor--disable. For example, the X forwarding feature in Tectia is enabled by the flag--enable-X11-forwardingor disabled with--disable-X11-forwarding. Some of these defaults can be overridden later by serverwide or per-account configuration.
Flags beginning with --with or
--enable may optionally be followed by an equals sign
and a string value, such as:
    --with-etcdir=/usr/local/etc
    --enable-X11-forwarding=no
Various string values are used, but the most common are
yes and no. For a given package
P, the flags --with-
P and --with-
P = yes are equivalent.
The following table illustrates the relationship:
If you write: | It’s equivalent to: |
|---|---|
| |
| |
This next table shows the relationships for a given feature
F :
If you write: | It’s equivalent to: |
|---|---|
| |
| |
In the sections that follow, we show many examples of configure with different command-line flags. Most examples demonstrate only one flag at a time, but keep in mind that other flags might be present on the command line. The proper way to run configure is just once, before compilation, with all desired flags on the same command line.
The configure script uses directory
information from its own location to embed pathnames into the
Makefiles, header files, etc.,
that it creates. Relying on the PATH environment variable to find the
configure script is therefore a bad practice. If
you choose to compile within the source directory, specify the current
directory explicitly when you run
configure:
$ ./configure ...options...Alternately, you can compile in a different directory, which is convenient if the source directory is used for multiple platforms. To do this, create a separate, empty build directory, and run configure there, specifying the source directory for the configure pathname:
    $ mkdir -p /elsewhere/build/ssh
    $ cd /elsewhere/build/ssh
    $ /somewhere/src/ssh/configure ...
In our examples, we’ll omit the directory components from the configure pathname, but remember that they should be included when you run the script.
$ make
Compiling can take a while, depending on the speed of your system.
The make command should be run in the same directory where the configure script ran.
Tip
If make fails when you attempt to use a separate build directory (i.e., different from the source directory), then you might need to upgrade your version of the make program. A good choice is GNU make, available from http://www.gnu.org/software/make/.
You need root privileges to install files in system directories, which is the usual location:
    $ su
    Password: ********
# make install[37] Often called a “tarball.”
[38] The configure script is generated by a Free Software Foundation package called autoconf . You don’t need to know this to compile SSH, but if you’re interested in learning more about autoconf, visit the GNU web site at http://www.gnu.org/software/autoconf/.