Table of Contents for
SSH, The Secure Shell: The Definitive Guide, 2nd Edition
 SSH, The Secure Shell: The Definitive Guide, 2nd Edition
Published by
O'Reilly Media, Inc., 2005
SSH, The Secure Shell: The Definitive Guide, 2nd Edition
Published by
O'Reilly Media, Inc., 2005
- Cover
- SSH, the Secure Shell, 2nd Edition
- Preface
- Protect Your Network with SSH
- Intended Audience
- Reading This Book
- Our Approach
- Which Chapters Are for You?
- Supported Platforms
- Disclaimers
- Conventions Used in This Book
- Comments and Questions
- Safari Enabled
- Acknowledgments
- 1. Introduction to SSH
- What Is SSH?
- What SSH Is Not
- The SSH Protocol
- Overview of SSH Features
- History of SSH
- Related Technologies
- Summary
- 2. Basic Client Use
- A Running Example
- Remote Terminal Sessions with ssh
- Adding Complexity to the Example
- Authentication by Cryptographic Key
- The SSH Agent
- Connecting Without a Password or Passphrase
- Miscellaneous Clients
- Summary
- 3. Inside SSH
- Overview of Features
- A Cryptography Primer
- The Architecture of an SSH System
- Inside SSH-2
- Inside SSH-1
- Implementation Issues
- SSH and File Transfers (scp and sftp)
- Algorithms Used by SSH
- Threats SSH Can Counter
- Threats SSH Doesn’t Prevent
- Threats Caused by SSH
- Summary
- 4. Installation and Compile-Time Configuration
- Overview
- Installing OpenSSH
- Installing Tectia
- Software Inventory
- Replacing r-Commands with SSH
- Summary
- 5. Serverwide Configuration
- Running the Server
- Server Configuration: An Overview
- Getting Ready: Initial Setup
- Authentication: Verifying Identities
- Access Control: Letting People In
- User Logins and Accounts
- Forwarding
- Subsystems
- Logging and Debugging
- Compatibility Between SSH-1 and SSH-2 Servers
- Summary
- 6. Key Management and Agents
- What Is an Identity?
- Creating an Identity
- SSH Agents
- Multiple Identities
- PGP Authentication in Tectia
- Tectia External Keys
- Summary
- 7. Advanced Client Use
- How to Configure Clients
- Precedence
- Introduction to Verbose Mode
- Client Configuration in Depth
- Secure Copy with scp
- Secure, Interactive Copy with sftp
- Summary
- 8. Per-Account Server Configuration
- Limits of This Technique
- Public-Key-Based Configuration
- Hostbased Access Control
- The User rc File
- Summary
- 9. Port Forwarding and X Forwarding
- What Is Forwarding?
- Port Forwarding
- Dynamic Port Forwarding
- X Forwarding
- Forwarding Security: TCP-Wrappers and libwrap
- Summary
- 10. A Recommended Setup
- The Basics
- Compile-Time Configuration
- Serverwide Configuration
- Per-Account Configuration
- Key Management
- Client Configuration
- Remote Home Directories (NFS, AFS)
- Summary
- 11. Case Studies
- Unattended SSH: Batch or cron Jobs
- FTP and SSH
- Pine, IMAP, and SSH
- Connecting Through a Gateway Host
- Scalable Authentication for SSH
- Tectia Extensions to Server Configuration Files
- Tectia Plugins
- 12. Troubleshooting and FAQ
- Debug Messages: Your First Line of Defense
- Problems and Solutions
- Other SSH Resources
- 13. Overview of Other Implementations
- Common Features
- Covered Products
- Other SSH Products
- 14. OpenSSH for Windows
- Installation
- Using the SSH Clients
- Setting Up the SSH Server
- Public-Key Authentication
- Troubleshooting
- Summary
- 15. OpenSSH for Macintosh
- Using the SSH Clients
- Using the OpenSSH Server
- 16. Tectia for Windows
- Obtaining and Installing
- Basic Client Use
- Key Management
- Accession Lite
- Advanced Client Use
- Port Forwarding
- Connector
- File Transfers
- Command-Line Programs
- Troubleshooting
- Server
- 17. SecureCRT and SecureFX for Windows
- Obtaining and Installing
- Basic Client Use
- Key Management
- Advanced Client Use
- Forwarding
- Command-Line Client Programs
- File Transfer
- Troubleshooting
- VShell
- Summary
- 18. PuTTY for Windows
- Obtaining and Installing
- Basic Client Use
- File Transfer
- Key Management
- Advanced Client Use
- Forwarding
- Summary
- A. OpenSSH 4.0 New Features
- Server Features: sshd
- Client Features: ssh, scp, and sftp
- ssh-keygen
- B. Tectia Manpage for sshregex
- Regex Syntax: Egrep Patterns
- Regex Syntax: ZSH_FILEGLOB (or Traditional) Patterns
- Character Sets for Egrep and ZSH_FILEGLOB
- Regex Syntax: SSH Patterns
- Authors
- See Also
- C. Tectia Module Names for Debugging
- D. SSH-1 Features of OpenSSH and Tectia
- OpenSSH Features
- Tectia Features
- E. SSH Quick Reference
- Legend
- sshd Options
- sshd Keywords
- ssh Options
- scp Options
- ssh and scp Keywords
- ssh-keygen Options
- ssh-agent Options
- ssh-add Options
- Identity and Authorization Files, OpenSSH
- Identity and Authorization Files, Tectia
- Environment Variables
- Index
- Index
- Index
- Index
- Index
- Index
- Index
- Index
- Index
- Index
- Index
- Index
- Index
- Index
- Index
- Index
- Index
- Index
- Index
- Index
- Index
- Index
- Index
- Index
- Index
- Index
- About the Authors
- Colophon
- Copyright
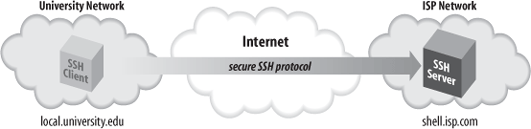
Suppose your remote username on shell.isp.com is pat. To connect to your remote account from your friend’s account on local.university.edu, you type:
    $ ssh -l pat shell.isp.com
    pat's password: ******
    Last login: Mon Aug 16 19:32:51 2004 from quondam.nefertiti.org
    You have new mail.
    shell.isp.com>
This leads to the situation shown in Figure 2-1. The ssh command runs a client that contacts the SSH server on shell.isp.com over the Internet, asking to be logged into the remote account with username pat.[5] You can also provide user@host syntax instead of the -l option to accomplish the same thing:
$ ssh pat@shell.isp.com
On first contact, SSH establishes a secure channel between the client and the server so that all transmissions between them are encrypted. The client then prompts for your password, which it supplies to the server over the secure channel. The server authenticates you by checking that the password is correct and permits the login. All subsequent client/server exchanges are protected by that secure channel, including everything you type into the SSH application and everything it displays to you from shell.isp.com.
It’s important to remember that the secure channel exists only between the SSH client and server machines. After logging into shell.isp.com via ssh, if you then telnet or ftp to a third machine, insecure.isp.com, the connection between shell.isp.com and insecure.isp.com is not secure. However, you can run another ssh client from shell.isp.com to insecure.isp.com, creating another secure channel, which keeps the chain of connections secure.
We’ve covered only the simplest use of ssh. Chapter 7 goes into far greater depth about its many features and options.
Continuing the story, suppose that while browsing your files, you encounter a PDF file you’d like to print. In order to send the file to a local printer at the university, you must first transfer the file to local.university.edu. Once again, you reject as insecure the traditional file-transfer programs, such as ftp. Instead, you use another SSH client program, scp, to copy the file across the network via a secure channel.
First, you write the attachment to a file in your home directory on shell.isp.com using your mail client, naming the file printme.pdf. When you’ve finished reading your other email messages, log out of shell.isp.com, ending the SSH session and returning to the shell prompt on local.university.edu. You’re now ready to copy the file securely.
The scp program has syntax much like the traditional Unix cp program for copying files.[6] It is roughly:
scpname-of-sourcename-of-destination
In this example, scp copies the file printme.pdf on shell.isp.com over the network to a local file in your friend’s account on local.university.edu, also called printme.pdf :
$ scp pat@shell.isp.com:printme.pdf printme.pdf
The file is transferred over an SSH-secured connection. The source and destination files may be specified not only by filename, but also by username (“pat” in our example) and hostname (shell.isp.com), indicating the location of the file on the network. Depending on your needs, various parts of the source or destination name can be omitted, and default values used. For example, omitting the username and the at sign (pat@) makes scp assume that the remote username is the same as the local one.
Like ssh, scp prompts for your remote password and passes it to the SSH server for verification. If successful, scp logs into the pat account on shell.isp.com, copies your remote file printme.pdf to the local file printme.pdf, and logs out of shell.isp.com. The local file printme.pdf may now be sent to a printer.
The destination filename need not be the same as the remote one. For example, if you’re feeling French, you could call the local file imprime-moi.pdf :
$ scp pat@shell.isp.com:printme.pdf imprime-moi.pdf
The full syntax of scp can represent local and remote files in powerful ways, and the program also has numerous command-line options. [7.5]