Table of Contents for
Python Web Penetration Testing Cookbook
 Python Web Penetration Testing Cookbook
Published by
Packt Publishing, 2015
Python Web Penetration Testing Cookbook
Published by
Packt Publishing, 2015
- Cover
- Table of Contents
- Python Web Penetration Testing Cookbook
- Python Web Penetration Testing Cookbook
- Credits
- About the Authors
- About the Reviewers
- www.PacktPub.com
- Disclamer
- Preface
- What you need for this book
- Who this book is for
- Sections
- Conventions
- Reader feedback
- Customer support
- 1. Gathering Open Source Intelligence
- Gathering information using the Shodan API
- Scripting a Google+ API search
- Downloading profile pictures using the Google+ API
- Harvesting additional results from the Google+ API using pagination
- Getting screenshots of websites with QtWebKit
- Screenshots based on a port list
- Spidering websites
- 2. Enumeration
- Performing a ping sweep with Scapy
- Scanning with Scapy
- Checking username validity
- Brute forcing usernames
- Enumerating files
- Brute forcing passwords
- Generating e-mail addresses from names
- Finding e-mail addresses from web pages
- Finding comments in source code
- 3. Vulnerability Identification
- Automated URL-based Directory Traversal
- Automated URL-based Cross-site scripting
- Automated parameter-based Cross-site scripting
- Automated fuzzing
- jQuery checking
- Header-based Cross-site scripting
- Shellshock checking
- 4. SQL Injection
- Checking jitter
- Identifying URL-based SQLi
- Exploiting Boolean SQLi
- Exploiting Blind SQL Injection
- Encoding payloads
- 5. Web Header Manipulation
- Testing HTTP methods
- Fingerprinting servers through HTTP headers
- Testing for insecure headers
- Brute forcing login through the Authorization header
- Testing for clickjacking vulnerabilities
- Identifying alternative sites by spoofing user agents
- Testing for insecure cookie flags
- Session fixation through a cookie injection
- 6. Image Analysis and Manipulation
- Hiding a message using LSB steganography
- Extracting messages hidden in LSB
- Hiding text in images
- Extracting text from images
- Enabling command and control using steganography
- 7. Encryption and Encoding
- Generating an MD5 hash
- Generating an SHA 1/128/256 hash
- Implementing SHA and MD5 hashes together
- Implementing SHA in a real-world scenario
- Generating a Bcrypt hash
- Cracking an MD5 hash
- Encoding with Base64
- Encoding with ROT13
- Cracking a substitution cipher
- Cracking the Atbash cipher
- Attacking one-time pad reuse
- Predicting a linear congruential generator
- Identifying hashes
- 8. Payloads and Shells
- Extracting data through HTTP requests
- Creating an HTTP C2
- Creating an FTP C2
- Creating an Twitter C2
- Creating a simple Netcat shell
- 9. Reporting
- Converting Nmap XML to CSV
- Extracting links from a URL to Maltego
- Extracting e-mails to Maltego
- Parsing Sslscan into CSV
- Generating graphs using plot.ly
- Index
In the previous recipes, we've looked at hiding images within another. This is all well and good, but our main aim of this chapter is to pass text that we can use in a command and control style format. The aim of this recipe is to hide some text within an image.
So far, we've looked at focusing on the RGB values of a pixel. In PNGs, we can access another value, the A value. The A value of RGBA is the transparency level of that pixel. In this recipe, we are going to work with this mode, as it will allow us to store 8 bits in the LSBs of each value across two pixels. This means that we can hide a single char value across two pixels, so we will need an image that has a pixel count of at least twice the number of characters we are trying to hide.
Let's look at the script:
from PIL import Image

def Set_LSB(value, bit):
    if bit == '0':
        value = value & 254
    else:
        value = value | 1
    return value

def Hide_message(carrier, message, outfile):
    message += chr(0)
    c_image = Image.open(carrier)
    c_image = c_image.convert('RGBA')

    out = Image.new(c_image.mode, c_image.size)
    pixel_list = list(c_image.getdata())
    new_array = []

    for i in range(len(message)):
        char_int = ord(message[i])
        cb = str(bin(char_int))[2:].zfill(8)
        pix1 = pixel_list[i*2]
        pix2 = pixel_list[(i*2)+1]
        newpix1 = []
        newpix2 = []

        for j in range(0,4):
            newpix1.append(Set_LSB(pix1[j], cb[j]))
            newpix2.append(Set_LSB(pix2[j], cb[j+4]))

        new_array.append(tuple(newpix1))
        new_array.append(tuple(newpix2))

    new_array.extend(pixel_list[len(message)*2:])

    out.putdata(new_array)
    out.save(outfile)
    print "Steg image saved to " + outfile

Hide_message('c:\\python27\\FunnyCatPewPew.png', 'The quick brown fox jumps over the lazy dogs back.', 'messagehidden.png')First, we import the Image module from PIL:
from PIL import Image
Next we set up a helper function that will assist in setting the LSB of the value we pass in based on the binary to be hidden:
def Set_LSB(value, bit):
    if bit == '0':
        value = value & 254
    else:
        value = value | 1
    return value
We are using a bitmask to set the LSB-based on whether the binary value we pass in is either a 1 or 0. If it's a 0, we use the bitwise AND with a mask of 254 (11111110), and if it's a 1, we bitwise OR with a mask of 1 (00000001). The resulting value is returned from our function.
Next up, we create our main Hide_message method that takes three parameters: the filename for our carrier image, a string for the message we want to hide, and finally, the filename of the image we will create for the output:
def Hide_message(carrier, message, outfile):
The next line of code adds the value of 0x00 to the end of our string. This will be important in the extraction function as it will let us know that we've reached the end of the hidden text. We use the chr() function to convert 0x00 to a string-friendly representation:
message += chr(0)
The following section of the code creates two image objects: one of our carrier and one for the output image. For our carrier image, we change the mode to RGBA to make sure we have the four values per pixel. We then create a few arrays: pixel_list is all the pixel data from our carrier image and new_array will hold all the new pixel values for our combined carrier and message image:
c_image = Image.open(carrier)
c_image = c_image.convert('RGBA')
out = Image.new(c_image.mode, c_image.size)

pixel_list = list(c_image.getdata())
new_array = []
Next, we loop over each character in our message in a for loop:
for i in range(len(message)):
We start by converting the character to an int:
char_int = ord(message[i])
We then convert that int to a binary string, we zfill the string to ensure that it's 8 character long. This will make it easier later on. When you use bin(), it will prefix the string with 0 bits, so the [2:] just strips that out:
cb = str(bin(char_int))[2:].zfill(8)
Next, we create two pixel variables and populate them. We use the current messages character index *2 for the first of the pixels and the (current messages character index *2) and 1 for the second. This is because we are using two pixels per character:
pix1 = pixel_list[i*2]
pix2 = pixel_list[(i*2)+1]
Next, we create two arrays that will hold the values of the hidden data:
newpix1 = []
newpix2 = []
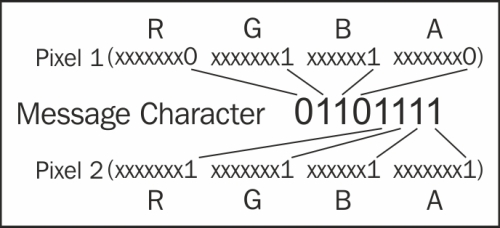
Now that everything is set up, we can start to change the values of the pixel data we iterate 4 times (for the RGBA values) and call our helper method to set the LSB. The newpix1 function will contain the first 4 bits of our 8-bit character; newpix2 will have the last 4:
for j in range(0,4):
            newpix1.append(Set_LSB(pix1[j], cb[j]))
            newpix2.append(Set_LSB(pix2[j], cb[j+4]))
Once we have our new values, we will convert them to tuples and append them to the new_array:
new_array.append(tuple(newpix1))
new_array.append(tuple(newpix2))
The following is an image that describes what we will achieve:
All that's left to do is extend the new_array method with the remaining pixels from our carrier image and then save it using the filename parameter that was passed in to our Hide_message function:
new_array.extend(pixel_list[len(message)*2:])

out.putdata(new_array)
out.save(outfile)
print "Steg image saved to " + outfile
As stated at the start of this recipe, we need to make sure that the carrier images pixel count is twice the size of our message that we want to hide. We could add in a check for this, like so:
if len(message) * 2 < len(list(image.getdata())):
  #Throw an error and advise the user
That's pretty much it for this recipe; we can now hide text in an image, and also with the previous recipes, we can hide images too. In the next recipe, we will extract the text data out.