Table of Contents for
Raspberry Pi Cookbook, 2nd Edition
 Raspberry Pi Cookbook, 2nd Edition
Published by
O'Reilly Media, Inc., 2016
Raspberry Pi Cookbook, 2nd Edition
Published by
O'Reilly Media, Inc., 2016
- nav
- Cover
- Raspberry Pi Cookbook
- Raspberry Pi Cookbook
- Preface to the Second Edition
- Setup and Management
- Networking
- Operating System
- Software
- Python Basics
- Python Lists and Dictionaries
- Advanced Python
- Computer Vision
- Hardware Basics
- Controlling Hardware
- Motors
- Digital Inputs
- Sensors
- Displays
- The Internet of Things
- Arduino and Raspberry Pi
- Parts and Suppliers
- Raspberry Pi Pinouts
- Index
- About the Author
- Colophon
Chapter 15. The Internet of Things
15.0 Introduction
The Internet of Things (IoT) is the rapidly growing network of devices (things) connected to the Internet. That doesn’t just mean more and more computers using browsers, but actual appliances and wearable and portable technology. This includes all sorts of home automation from smart appliances and lighting, to security systems and even Internet-operated pet feeders, as well as lots of less practical but fun projects.
In this chapter, you will learn how your Raspberry Pi can participate in the Internet of Things in various ways.
15.1 Controlling GPIO Outputs Using a Web Interface
Solution
Use the bottle Python web server library (Recipe 7.17) to create an HTML web interface to control the GPIO port.
To make this recipe, you will need:
-
Breadboard and jumper wires (see “Prototyping Equipment”)
-
Three 1kΩ resistors (see “Resistors and Capacitors”)
-
Three LEDs (see “Opto-Electronics”)
-
Tactile push switch (see “Miscellaneous”)
The breadboard layout for this is shown in Figure 15-1.
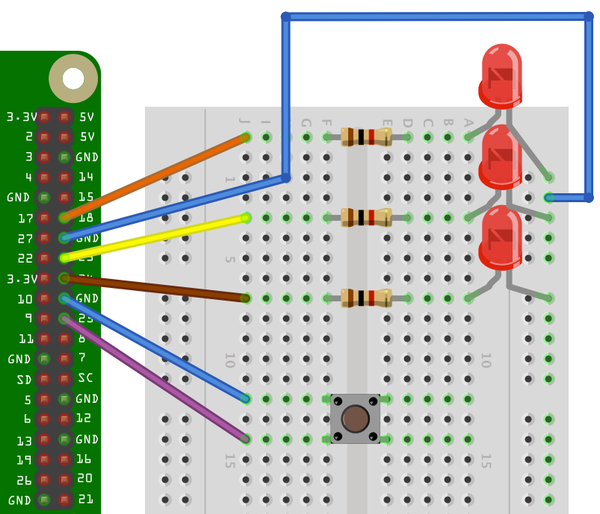
Figure 15-1. The breadboard layout controlling GPIO outputs from a web page
An alternative to using a breadboard is to attach a Raspberry Squid and Squid Button (see Recipe 9.10 and Recipe 9.11). These can be plugged directly into the GPIO pins of the Raspberry Pi, as shown in Figure 15-2.

Figure 15-2. Raspberry Squid and Squid Button
To install the bottle library, see Recipe 7.17.
Open an editor (nano or IDLE) and paste in the following code. As with all the program examples in this book, you can also download the program from the Code section of the Raspberry Pi Cookbook website, where it is called web_control.py. You will also find a program called web_control_test.py. This program simply tests the hardware by flashing the LEDs in sequence and displaying the state of the switch, without any of the complications of the web server.
Here’s the web_control.py program:
frombottleimportroute,runimportRPi.GPIOasGPIOGPIO.setmode(GPIO.BCM)led_pins=[18,23,24]led_states=[0,0,0]switch_pin=25GPIO.setup(led_pins[0],GPIO.OUT)GPIO.setup(led_pins[1],GPIO.OUT)GPIO.setup(led_pins[2],GPIO.OUT)GPIO.setup(switch_pin,GPIO.IN,pull_up_down=GPIO.PUD_UP)defswitch_status():state=GPIO.input(switch_pin)ifstate:return'Up'else:return'Down'defhtml_for_led(led):l=str(led)result=" <input type='button' onClick='changed("+l+")' value='LED "+l+"'/>"returnresultdefupdate_leds():fori,valueinenumerate(led_states):GPIO.output(led_pins[i],value)@route('/')@route('/<led>')defindex(led):ifled>='0'andled<='9':led_num=int(led)led_states[led_num]=notled_states[led_num]update_leds()response="<script>"response+="function changed(led)"response+="{"response+=" window.location.href='/' + led"response+="}"response+="</script>"response+='<h1>GPIO Control</h1>'response+='<h2>Button='+switch_status()+'</h2>'response+='<h2>LEDs</h2>'response+=html_for_led(0)response+=html_for_led(1)response+=html_for_led(2)returnresponsetry:run(host='0.0.0.0',port=80)finally:('\nCleaning up')GPIO.cleanup()
You must run the program as superuser:
sudopythonweb_control.py
If it starts correctly, you should see a message like this:
Bottleserverstartingup(usingWSGIRefServer())...Listeningonhttp://0.0.0.0:80/HitCtrl-Ctoquit.
Open a browser window from any machine on your network, even the Raspberry Pi itself, and navigate to the IP address of the Raspberry Pi. The web interface shown in Figure 15-3 should appear.
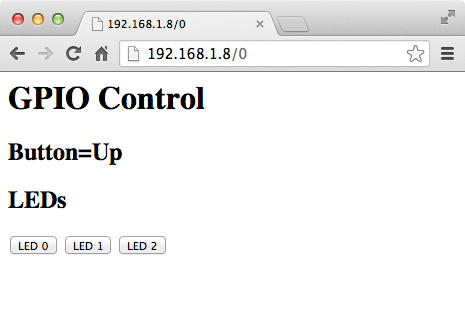
Figure 15-3. A web interface to GPIO
If you click on one of the three LED buttons at the bottom of the screen, you should find that the appropriate LED toggles on and off.
Also, if you hold down the button as you reload the web page, you should see that the text next to Button says Down rather than Up.
Discussion
To understand how the program works, we first need to look at how a web interface works. All web interfaces rely on a server somewhere (in this case, a program on the Raspberry Pi) responding to requests from a web browser.
When the server receives a request, it looks at the information that comes with the request and formulates some HyperText Markup Language (HTML) in response.
If the web request is just to the root page (http://192.168.1.8/), then led will be given a default value of n. However, if we were to browse the URL http://192.168.1.8/2, then the 2 on the end of the URL would be assigned to the led parameter.
The led parameter is then used to determine that LED 2 should be toggled.
To be able to access this LED-toggling URL, we need to arrange things so that when the button for LED 2 is pressed, the page is reloaded with this extra parameter on the end of the URL. The trick here is to include a JavaScript function in HTML that is returned to the browser. When the browser runs this function, it causes the page to be reloaded with the appropriate extra parameter.
This all means that we have the rather mind-bending situation where the Python program is generating code in JavaScript to be run later by the browser. The lines that generate this JavaScript function are as follows:
    response = "<script>"
    response += "function changed(led)"
    response += "{"
    response += "  window.location.href='/' + led"
    response += "}"
    response += "</script>"
Rather than repeat the HTML for each of the buttons, this is generated by the function html_for_led:
defhtml_for_led(led):l=str(led)result=" <input type='button' onClick='changed("+l+")'value='LED " + l + "'/>"returnresult
This code is used three times, once for each button, and links a button press with the changed function. The function is also supplied with the LED number as its parameter.
The code that actually changes the GPIO outputs lives in the update_leds function. This function is called every time the server receives a request that includes an LED number that requires toggling:
defupdate_leds():fori,valueinenumerate(led_states):GPIO.output(led_pins[i],value)
The function simply iterates over an array of states, setting each output in turn to its current value.
The following line in the index function toggles the value in the state array for the LED supplied in the led parameter:
led_states[led_num]=notled_states[led_num]
The process of reporting the state of the push button is much more straightforward. It is simply the act of reading the state of the input and generating HTML that reports the button position. This is all contained in the switch_status function:
defswitch_status():state=GPIO.input(switch_pin)ifstate:return'Up'else:return'Down'
See Also
For more information on using bottle, see the bottle documentation.
15.2 Displaying Sensor Readings on a Web Page
Solution
Use the bottle web server and some fancy JavaScript to automatically update your display.
The example shown in Figure 15-4 displays the Raspberry Pi’s CPU temperature using its built-in sensor.
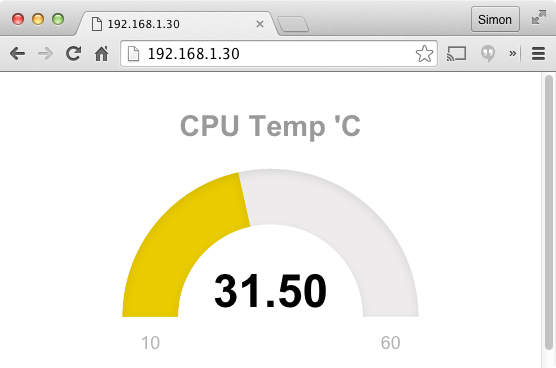
Figure 15-4. Displaying the Raspberry Pi CPU temperature
To install the bottle library, see Recipe 7.17.
There are four files for this example, which are contained in the folder web_sensor:
- web_sensor.py
Contains the Python code for the
bottleserver- main.html
Contains the web page that will be displayed in your browser
- justgage.1.0.1.min.js
A third-party JavaScript library that displays the temperature meter
- raphael.2.1.0.min.js
A library used by the
justgagelibrary
As with all the program examples in this book, you can also download the program from the Code section of the Raspberry Pi Cookbook website.
To run the program, change directory to web_sensor and then run the Python program using:
$ sudo python web_sensor.py
Then open a browser, either on the same Raspberry Pi or any computer on the same network as the Raspberry Pi, and enter the IP address of the Raspberry Pi into the browser’s address bar. The page shown in Figure 15-4 should appear.
Discussion
The main program (web_sensor.py) is actually quite concise:
importos,timefrombottleimportroute,run,templatedefcpu_temp():dev=os.popen('/opt/vc/bin/vcgencmd measure_temp')cpu_temp=dev.read()[5:-3]returncpu_temp@route('/temp')deftemp():returncpu_temp()@route('/')defindex():returntemplate('main.html')@route('/raphael')defindex():returntemplate('raphael.2.1.0.min.js')@route('/justgage')defindex():returntemplate('justgage.1.0.1.min.js')run(host='0.0.0.0',port=80)
The function cpu_temp reads the temperature of the Raspberry Pi’s CPU, as described in Recipe 13.9.
Four routes are then defined for the bottle web server. The first (/temp) returns a string containing the CPU temperature in degrees C. The root route (/) returns the main HTML template for the page (main.html). The other two routes provide access to copies of the raphael and justgage JavaScript libraries.
The file main.html mostly contains the JavaScript to render the user interface.
<html><head><scriptsrc="http://ajax.googleapis.com/ajax/libs/jquery/1.7.2/jquery.min.js"type="text/javascript"charset="utf-8"></script><scriptsrc="raphael"></script><scriptsrc="justgage"></script><script>functioncallback(tempStr,status){if(status=="success"){temp=parseFloat(tempStr).toFixed(2);g.refresh(temp);setTimeout(getReading,1000);}else{alert("There was a problem");}}functiongetReading(){$.get('/temp',callback);}</script></head><body><divid="gauge"class="200x160px"></div><script>varg=newJustGage({id:"gauge",value:0,min:10,max:60,title:"CPU Temp 'C"});getReading();</script></body></html>
The JQuery, Raphael, and JustGage libraries are all imported (JQuery from https://developers.google.com/speed/libraries/#jquery and the other two from local copies).
Getting a reading from the Raspberry Pi to the browser window is a two-stage process. First, the function getReading is called. This sends a web request with the route /temp to web_sensor.py and specifies a function called callback to be run when the web request completes. The callback function is then responsible for updating the JustGage display before setting a timeout to call getReading again after a second.
See Also
For an example of using Tkinter to display sensor values in an application rather than a web page, see Recipe 13.19.
The JustGage library has all sorts of useful options for displaying sensor values. See http://justgage.com/ for more information.
15.3 Sending Email and Other Notifications with IFTTT
Solution
Have your Raspberry Pi send requests to the If This Then That (IFTTT) Maker channel to trigger configurable notifications.
This recipe is illustrated with an example that sends you an email when the CPU temperature of your Raspberry Pi exceeds a threshold.
You need to create an account with IFTTT before you can start using it, so visit www.ifttt.com and sign up.
The next step is to create a new IFTTT recipe. Rather confusingly, IFTTT uses the word recipe to refer to a rule, such as When I get a web request from a Raspberry Pi, send an email. Click on the Create a Recipe button. This will prompt you to first enter the IF part of the recipe and later the THAT part.
In this case, the IF THIS part (the trigger) is going to be the receipt of a web request from your Raspberry Pi, so click on THIS and then enter Maker into the search field to find the Maker channel. Select the Maker channel and when prompted to Choose a Trigger, select the option (Receive a Web Request). This will open the form shown in Figure 15-5.
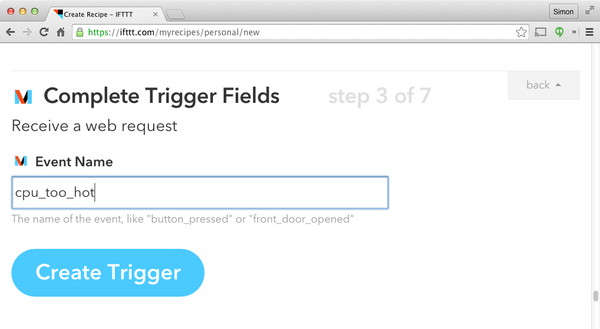
Figure 15-5. The “Receive a web request” trigger form
Enter the text cpu_too_hot into the Event Name field and click Create Trigger.
This will now move you to the THAT portion of the recipe, the action , and you will need to select an action channel. Here there are many options, but for this example you will use the Email channel, so type Email into the search field and then select the Email channel. You will see several email-related channels, including Gmail. Use the email channel, even if you are sending from a Gmail account.
Having selected the Email channel, select the action Send Me an Email, and the form shown in Figure 15-6 will be displayed.
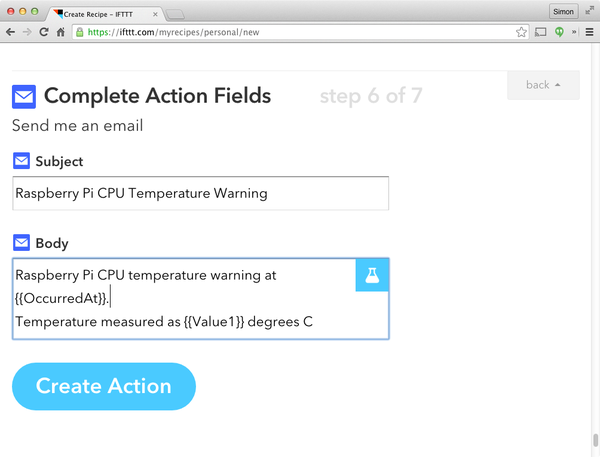
Figure 15-6. Configuring the Send Me an Email action
Change the text so that it appears as shown in Figure 15-6. Note that the special values OccurredAt and Value1 will both be surrounded by {{ and }}. These values are called ingredients and are variable values that will be taken from the web request and substituted into the email subject and body.
Click Create Action and then Create Recipe to finish the recipe creation.
That’s it—the recipe is now live, and once the Raspberry Pi is ready to send web requests to it, it will start emailing.
The Python program to send the web request can be found with the downloads for the book on the Raspberry Pi Cookbook website and is called ifttt_cpu_temp.py.
importtime,os,urllib,urllib2MAX_TEMP=37.0MIN_T_BETWEEN_WARNINGS=60# MinutesEVENT='cpu_too_hot'BASE_URL='https://maker.ifttt.com/trigger/'KEY='cyR3vPNFlP9K32W4NZB9cd'defsend_notification(temp):data=urllib.urlencode({'value1':str(temp)})url=BASE_URL+EVENT+'/with/key/'+KEYresponse=urllib2.urlopen(url=url,data=data)(response.read())defcpu_temp():dev=os.popen('/opt/vc/bin/vcgencmd measure_temp')cpu_temp=dev.read()[5:-3]returnfloat(cpu_temp)whileTrue:temp=cpu_temp()("CPU Temp (C): "+str(temp))iftemp>MAX_TEMP:("CPU TOO HOT!")send_notification(temp)("No more notifications for: "+str(MIN_T_BETWEEN_WARNINGS)+" mins")time.sleep(MIN_T_BETWEEN_WARNINGS*60)time.sleep(1)
Before running the program, you will need to get an access key for the Maker Action channel by selecting Channels (at the top of the IFTTT web page), and then searching for Maker. Connect to the channel, and then you will see your key displayed near the bottom of the web page (Figure 15-7).
Paste the key into ifttt_cpu_temp.py on the line that starts KEY= and then run the program using:
$ sudo python ifttt_cpu_temp.py
You can increase your CPU temperature by playing a video or temporarily wrapping your Raspberry Pi in bubble wrap. Once the event is triggered, you should receive an email that looks like Figure 15-8. Notice how the values have been substituted into the email.
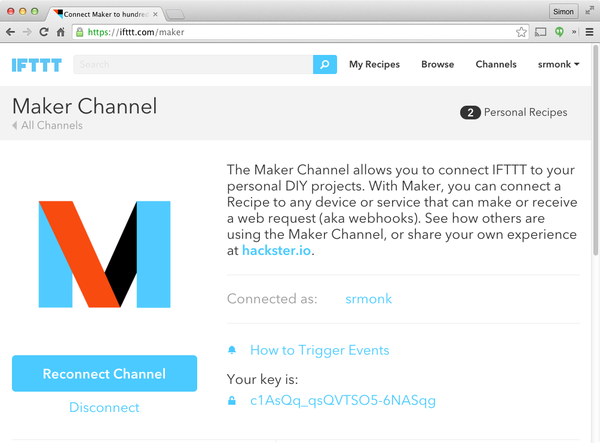
Figure 15-7. Getting an IFTTT key
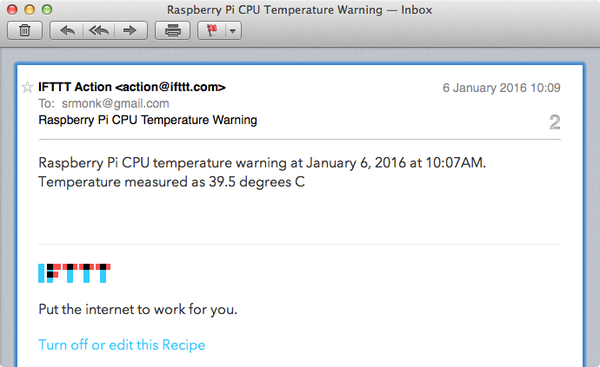
Figure 15-8. A notification email
Discussion
Most of the action for this program takes place in the send_notification email. This first constructs a URL including the key and request parameter value1 (containing the temperature) and then uses the Python urllib2 to send the web request to IFTTT.
The main loop continually checks the temperature against the MAX_TEMP, and if the CPU temperature exceeds MAX_TEMP, the web request is sent and a long sleep is started as specified by MIN_T_BETWEEN_WARNINGS to prevent your inbox from being flooded with notifications.
As an alternative to using IFTTT, you could, of course, just send an email directly using Recipe 7.16. However, by using IFTTT to send the messages, you are not restricted to email notifications—you could use any of the action channels available in IFTTT without having to write any code.
See Also
To send an email directly from Python, see Recipe 7.16.
The code to measure the CPU temperature is described in Recipe 13.9.
15.4 Sending Tweets Using ThingSpeak
Solution
You could just use Recipe 15.3 and change the Action Channel to be Twitter. However, the ThingSpeak service is an alternative way of doing this.
ThingSpeak is similar to IFTTT but is aimed squarely at IoT projects. It allows you to create channels that can store and retrieve data using web requests, and also has a number of actions, including ThingTweet, which provides a web services wrapper around Twitter. This is easier to use than the Twitter API, which requires you to register your application with Twitter.
Start by visiting https://thingspeak.com and signing up. Then select the ThingTweet action (Figure 15-9). You will be prompted to log in to Twitter.
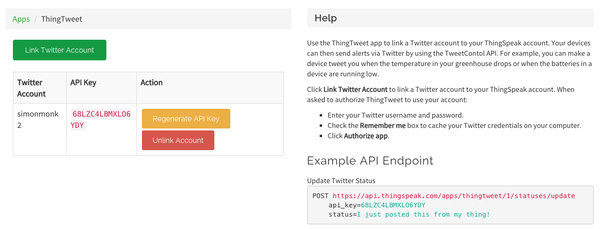
Figure 15-9. The ThingTweet action
The Python program to send the web request that triggers the tweet can be found with the downloads for the book on the Raspberry Pi Cookbook website and is called send_tweet.py:
importtime,os,urllib,urllib2MAX_TEMP=37.0MIN_T_BETWEEN_WARNINGS=60# MinutesBASE_URL='https://api.thingspeak.com/apps/thingtweet/1/statuses/update/'KEY='68LZC4LBMXLO6YDY'defsend_notification(temp):status='Raspberry Pi getting hot. CPU temp='+tempdata=urllib.urlencode({'api_key':KEY,'status':status})response=urllib2.urlopen(url=BASE_URL,data=data)(response.read())defcpu_temp():dev=os.popen('/opt/vc/bin/vcgencmd measure_temp')cpu_temp=dev.read()[5:-3]returncpu_tempwhileTrue:temp=cpu_temp()("CPU Temp (C): "+str(temp))iftemp>MAX_TEMP:("CPU TOO HOT!")send_notification(temp)("No more notifications for: "+str(MIN_T_BETWEEN_WARNINGS)+" mins")time.sleep(MIN_T_BETWEEN_WARNINGS*60)time.sleep(1)
As with Recipe 15.3, you will need to paste your key from Figure 15-9 into the code before you run the program. Run and test the program in just the same way you did in Recipe 15.3.
Discussion
The code is very similar to Recipe 15.3. The main difference is in the function send_notification, which constructs the tweet and then sends the web request with the message as the parameter status.
See Also
For full documentation of the ThingSpeak service, see https://uk.mathworks.com/help/thingspeak/.
In Recipe 15.5, you use the popular Cheerlights, implemented in ThingSpeak; and i Recipe 15.6, you learn how to use ThingSpeak to collect sensor data.
15.5 CheerLights
Problem
You want to hook your Raspberry Pi up to an RGB LED and participate in the popular Cheerlights project.
Cheerlights is a web service that, when anyone sends a tweet to @cheerlights containing the name of a color, will record that color as being the last color. Around the world, many people have Cheerlight projects that use a web service to request the last color and set their lighting to that color. So when anyone tweets, everyone’s lights change color.
Solution
Use a Raspberry Squid RGB LED connected to your Raspberry Pi (Figure 15-10) and run the test program called cheerlights.py, which can be found with the downloads for the book on the Raspberry Pi Cookbook website.

Figure 15-10. A Cheerlight
fromsquidimport*importurllib,timesquid=Squid(18,23,24)cheerlights_url="http://api.thingspeak.com/channels/1417/field/2/last.txt"try:whileTrue:try:cheerlights=urllib.urlopen(cheerlights_url)c=cheerlights.read()cheerlights.close()(c)squid.set_color_rgb(c)except:('Error')time.sleep(2)finally:GPIO.cleanup()
Before running the program, you will need to install the Squid library (see Recipe 9.10).
Your LED should immediately set itself to the last color. It will probably change color after a while as someone tweets; if it doesn’t, try tweeting a message such as “@cheerlights red” and the color of both your LED and the rest of the world’s LEDs should all change. Valid color names for Cheerlights are red, blue, cyan, white, oldlace, purple, magenta, yellow, orange, and pink.
Discussion
The code just sends a web request to ThingSpeak, which returns a string of colors as a 6-digit hexadecimal number. This is then used to set the LED color.
The inner try/except code is used to ensure that the program does not crash if there is a temporary network outage.
See Also
Cheerlights uses ThingSpeak to store the last color in a channel. In Recipe 15.6, a channel is used to record sensor data.
If you don’t have a Squid, you can use an RGB on a breadboard (see Recipe 10.10), or even adapt Recipe 14.7 to control an entire LED strip.
15.6 Sending Sensor Data to ThingSpeak
Solution
Log into ThingSpeak, and from the Channels drop-down, select My Channels. Now create a new channel by completing the top of the form as shown in Figure 15-11.
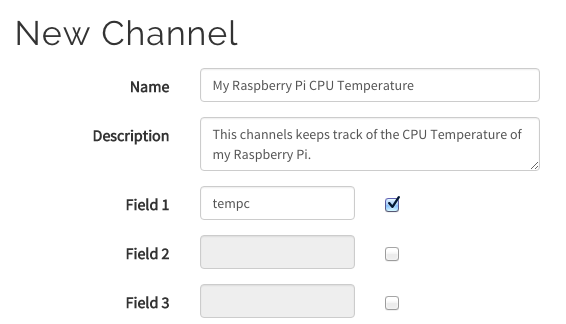
Figure 15-11. Creating a channel in ThingSpeak
The rest of the form can be left blank. When you have finished editing, click Save Channel at the bottom of the page. Click on the Data Import/Export tab to find a summary of the web requests that you can use, customized to the channel you just created (Figure 15-12).
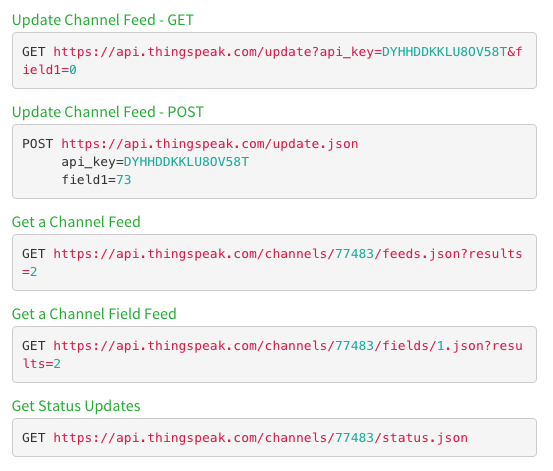
Figure 15-12. Getting data into a ThingSpeak channel
To send data to the channel, a web request must be sent. The Python program to send the web request can be found with the downloads for the book on the Raspberry Pi Cookbook website and is called thingspeak_data.py.
importtime,os,urllib,urllib2PERIOD=60# SecondsBASE_URL='https://api.thingspeak.com/update.json'KEY='DYHHDDKKLU8OV58T'defsend_data(temp):data=urllib.urlencode({'api_key':KEY,'field1':temp})response=urllib2.urlopen(url=BASE_URL,data=data)(response.read())defcpu_temp():dev=os.popen('/opt/vc/bin/vcgencmd measure_temp')cpu_temp=dev.read()[5:-3]returncpu_tempwhileTrue:temp=cpu_temp()("CPU Temp (C): "+str(temp))send_data(temp)time.sleep(PERIOD)
Run the program. On the ThingSpeak channel page on the Private View tab, you should see a graph like the one shown in Figure 15-13.
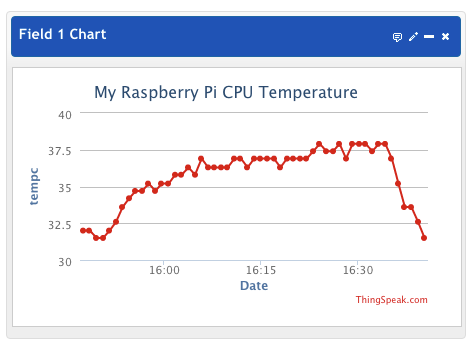
Figure 15-13. Charting the sensor data
This will update as a new reading arrives every minute.
Discussion
The variable PERIOD is used to determine the time interval between each sending of the temperature. This period is in seconds.
The send_data function constructs the web request, supplying the temperature in a parameter called field1.
If your data might be of public interest—say, accurate environmental readings—then you might want to make the channel public so that anyone can make use of it. This probably isn’t the case for your Pi’s CPU temperature.
See Also
For an example of exporting sensor data into a spreadsheet, see Recipe 13.20.
For an explanation of the code that reads the CPU temperature, see Recipe 13.9.
15.7 Responding to Tweets Using Dweet and IFTTT
Problem
You want your Raspberry Pi to perform some action in response to a certain hashtag or mention in a tweet.
Recipe 15.5 does just this, but it does it very inefficiently because it relies on you continually polling with web requests to see if the color has changed.
Solution
An efficient mechanism for monitoring tweets that does not rely on polling is to use IFTTT (see Recipe 15.3) to spot tweets of interest and then send a web request to a service called Dweet that can push notifications to a Python program running on your Raspberry Pi (Figure 15-14).
For example, you could flash an LED for 10 seconds every time there is a mention of your username on Twitter by using a Raspberry Squid or an LED attached to a breadboard.
As far as the hardware goes, this recipe just requires some electronics that do something noticeable when GPIO 18 goes high. This could be one channel of a Raspberry Squid (see Recipe 9.10) or a single LED attached to breadboard (see Recipe 10.1) or for ultimate flexibility, a relay (see Recipe 10.6). Using a relay would allow you to create a project like Bubblino.
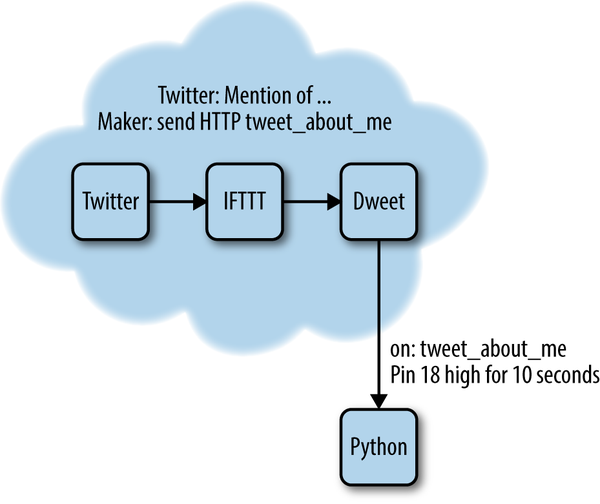
Figure 15-14. IFTTT, Dweet, and Python, working together
The first step is to log in to IFTTT (see Recipe 15.3) and then create a new recipe. Choose an action channel of New Mention of You and then click Create Trigger. For the recipe’s action channel, select Maker and then select the action “Make a Web Request” and complete the fields as shown in Figure 15-15.
The URL includes a request parameter with the ingredient of text. This will contain the body of the tweet. Although this will not be used other than to print it in the console, you might have the message displayed on an LCD screen for a more sophisticated project, so it is useful to know how to pass data from tweet to the Python program.
Then click Create Recipe to take the IFTTT recipe live.
The dweet.io web service operates rather like Twitter for IoT things. It has a web interface that allows you to both post and listen for dweets.
Dweet does not require an account or any login details to make use of it; you can just have one thing (IFTTT in this case) send a message to it and have another thing (your Raspberry Pi Python program) wait for notifications from it that something you are interested in has happened. In this case, the token that links the two is tweet_about_me. This is not very unique, and if several people are trying out this example from the book at the same time, then they will get each other’s messages. To avoid this, use a more unique token (say, by adding a random string of letters and numbers to the message).
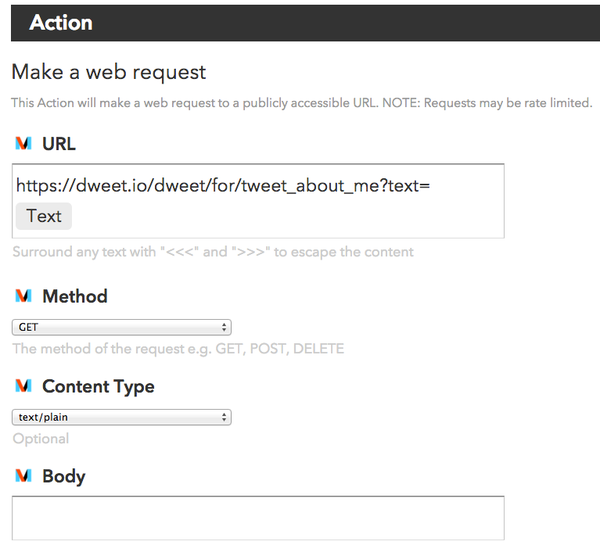
Figure 15-15. Completing the Send HTTP Request action channel in IFTTT
To access Dweet from your Python program, the dweepy library needs to be installed, using the following commands:
$ git clone git://github.com/paddycarey/dweepy.git
$ cd dweepy
$ sudo python setup.py install
The program for this recipe can be found with the downloads for the book on the Raspberry Pi Cookbook website and is called twitter_trigger.py.
importtimeimportdweepyimportRPi.GPIOasGPIOKEY='tweet_about_me'OUTPUT_PIN=18OUTPUT_DURATION=10GPIO.setmode(GPIO.BCM)GPIO.setup(OUTPUT_PIN,GPIO.OUT)whileTrue:try:fordweetindweepy.listen_for_dweets_from(KEY):('Tweet: '+dweet['content']['text'])GPIO.output(OUTPUT_PIN,True)time.sleep(OUTPUT_DURATION)GPIO.output(OUTPUT_PIN,False)exceptException:pass
Discussion
The program uses the listen_for_dweets_from method to leave an open connection to the dweet.io server, listening for any push messages from the server as a result of a dweet arriving from IFTTT in response to a tweet. The try/except block ensure that if there is any communication outage, the program will just start the listenning process again.
See Also
For a similar project using a different approach, see Recipe 15.5.