Table of Contents for
Hands-On Cryptography with Python

Version ebook / Retour

Cover image for bash Cookbook, 2nd Edition Hands-On Cryptography with Python by Samuel Bowne Published by Packt Publishing, 2018
  1. Hands-On Cryptography with Python
  2. Title Page
  3. Copyright and Credits
  4. Hands-On Cryptography with Python
  5. Packt Upsell
  6. Why subscribe?
  7. PacktPub.com
  8. Contributor
  9. About the author
  10. Packt is searching for authors like you
  11. Table of Contents
  12. Preface
  13. Who this book is for
  14. What this book covers
  15. To get the most out of this book
  16. Download the example code files
  17. Download the color images
  18. Conventions used
  19. Get in touch
  20. Reviews
  21. Obfuscation
  22. About cryptography
  23. Installing and setting up Python
  24. Using Python on Mac or Linux
  25. Installing Python on Windows
  26. Caesar cipher and ROT13
  27. Implementing the Caesar cipher in Python
  28. ROT13
  29. base64 encoding
  30. ASCII data
  31. Binary data
  32. XOR
  33. Challenge 1 – the Caesar cipher
  34. Challenge 2 – base64
  35. Challenge 3 – XOR
  36. Summary
  37. Hashing
  38. MD5 and SHA hashes
  39. What are hashes?
  40. Windows password hashes
  41. Getting hashes with Cain
  42. MD4 and Unicode
  43. Cracking hashes with Google
  44. Cracking hashes with wordlists
  45. Linux password hashes
  46. Challenge 1 – cracking Windows hashes
  47. Challenge 2 – cracking many-round hashes
  48. Challenge 3 – cracking Linux hashes
  49. Summary
  50. Strong Encryption
  51. Strong encryption with AES
  52. ECB and CBC modes
  53. ECB
  54. CBC
  55. Padding oracle attack
  56. Strong encryption with RSA
  57. Public key encryption
  58. RSA algorithm
  59. Implementation in Python
  60. Challenge – cracking RSA with similar factors
  61. Large integers in Python
  62. What's next?
  63. Cryptography within IoT
  64. ZigBee cryptographic keys
  65. Complexity of ZigBee key management
  66. Bluetooth – LE
  67. Summary
  68. Other Books You May Enjoy
  69. Leave a review - let other readers know what you think

Installing Python on Windows

If you have Windows, you have to download and install Python.

Here are the steps which you need to follow:

  1. Download Python from https://www.python.org/downloads/
  2. Run it in a Command Prompt window
  3. Start interactive mode with Python
  4. Close with exit()

To create a script, you just use Notepad, enter the text, save the file with Ctrl + S, and then run it with python followed by the script name. Let's get started with the installation. 

Open the Python page using link given previously and download Python. It offers you various versions of Python. In this book, we will use Python 2.7.12.

Sometimes, you can't install it right away because Windows marks it as untrusted:

  1. You have to unblock it in the properties first so that it will run, and run the installer
  2. If you go through the steps of the installer, you'll see an optional step named Add python.exe to path. You need to choose that selection

The purpose of that selection is to make it so Python can run from the command line in a Terminal window, which is called Command Prompt on Windows.

Now let's proceed with our installation:

  1. Open the Terminal and type the following command:
$ python
  1. When you run it, you can see that it works. So, now we will type a command:
print "HELLO"

Refer to the following screenshot:

  1. We can exit using the exit() command as shown earlier.
  2. Now, if we want to make a script, we type the following command:
notepad hello.py
  1. This opens up Notepad:
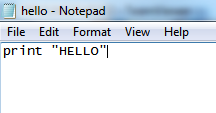
  1. We want to create a file. In that file, we enter the following command:
print "HELLO"
  1. Then, save and close it. In order to run it, we need to enter the following command:
$ python hello.py

It runs and prints HELLO.

Usually, when you install Python on Windows, it fails to correct the path, so you have to execute the following commands to create a symbolic link; otherwise, Python will not start correctly from the command line:

  1. cd c: \Windows
  2. mklink /H python.exe
  3. c: \python27\python.exe

In the next section, we will look at the Caesar cipher and ROT13 obfuscation techniques.