Table of Contents for
Learning Linux Shell Scripting
 Learning Linux Shell Scripting
Published by
Packt Publishing, 2015
Learning Linux Shell Scripting
Published by
Packt Publishing, 2015
- Cover
- Table of Contents
- Learning Linux Shell Scripting
- Learning Linux Shell Scripting
- Credits
- About the Author
- Acknowledgments
- About the Reviewers
- www.PacktPub.com
- Preface
- What you need for this book
- Who this book is for
- Conventions
- Reader feedback
- Customer support
- 1. Getting Started and Working with Shell Scripting
- Tasks done by shell
- Working in shell
- Learning basic Linux commands
- Our first script – Hello World
- Compiler and interpreter – difference in process
- When not to use scripts
- Various directories
- Working more effectively with shell – basic commands
- Working with permissions
- Summary
- 2. Drilling Deep into Process Management, Job Control, and Automation
- Monitoring processes using ps
- Process management
- Process monitoring tools – top, iostat, and vmstat
- Understanding "at"
- Understanding "crontab"
- Summary
- 3. Using Text Processing and Filters in Your Scripts
- IO redirection
- Pattern matching with the vi editor
- Pattern searching using grep
- Summary
- 4. Working with Commands
- Command substitution
- Command separators
- Logical operators
- Pipes
- Summary
- 5. Exploring Expressions and Variables
- Working with environment variables
- Working with read-only variables
- Working with command line arguments (special variables, set and shift, getopt)
- Understanding getopts
- Understanding default parameters
- Working with arrays
- Summary
- 6. Neat Tricks with Shell Scripting
- The here document and the << operator
- The here string and the <<< operator
- File handling
- Debugging
- Summary
- 7. Performing Arithmetic Operations in Shell Scripts
- Using the let command for arithmetic
- Using the expr command for arithmetic
- Binary, octal, and hex arithmetic operations
- A floating-point arithmetic
- Summary
- 8. Automating Decision Making in Scripts
- Understanding the test command
- Conditional constructs – if else
- Switching case
- Implementing simple menus with select
- Looping with the for command
- Exiting from the current loop iteration with the continue command
- Exiting from a loop with a break
- Working with the do while loop
- Using until
- Piping the output of a loop to a Linux command
- Running loops in the background
- The IFS and loops
- Summary
- 9. Working with Functions
- Passing arguments or parameters to functions
- Sharing the data by many functions
- Declaring local variables in functions
- Returning information from functions
- Running functions in the background
- Creating a library of functions
- Summary
- 10. Using Advanced Functionality in Scripts
- Using the trap command
- Ignoring signals
- Using traps in function
- Running scripts or processes even if the user logs out
- Creating dialog boxes with the dialog utility
- Summary
- 11. System Startup and Customizing a Linux System
- User initialization scripts
- Summary
- 12. Pattern Matching and Regular Expressions with sed and awk
- sed – noninteractive stream editor
- Using awk
- Summary
- Index
In the last chapter, you studied about basic process management. You learned about the ps command. You also studied about job management using commands such as jobs, fg, bg, kill, pkill as well as various other tools such as top, iostat, and vmstat.
In this chapter, you will cover the following topics:
- Using more, less, head, and tail
- Using diff, cut, paste, comm, and uniq
- Working with grep
- Understand standard input, output, and standard error
- Understand various metacharacters and their usage
Normally, Shell scripting involves report generation, which will include processing various text files and filtering their output to finally produce desirable results. Lets start discussing the two Linux commands, namely, more and less:
more: Sometimes we get a very large output on the screen for certain commands, which cannot be viewed completely on one screen. In such cases, we can use the more command to view the output text one page at a time. Add "| more" after the command, as follows:
$ ll /dev | more
The | is called pipe. You will learn more about it in the next chapters. In this command, pressing the spacebar will move the output on the screen one page at a time, or pressing Enter will move the screen by one line at a time.
less: Instead of more, if you use less it will show a screen containing the full text all at once. We can move forward as well as backwards. This is a very useful text filtering tool.
The syntax of usage is as follows:
$ command |  less
e.g. $ ll /proc | less
This command will show a long listing of directory listing of the /proc folder. Let's say that we want to see if the cpuinfo file is present in the directory or not? Just press the arrow key up or down to scroll through the display. With the more command, you can not scroll backwards. You can move forward only. With page up and down key presses, you can move forward or backward one page at a time, which is very fast.
In addition to scrolling forward or backward, you can search for pattern using / for forward search and ? for backward search. You can use N for repeating the search in a forward or backward direction.
For testing the next few commands, we will need a file with a sequence of numbers 1 to 100. For this, use the following command:
$ seq 100 > numbers.txt
The preceding command created a file with the numbers 1 to 100 on separate lines. The following example shows the usage of the head command:
$ head  // will display top 10 lines
$ head  -3  numbers.txt   // will show first 3 lines
$ head +5 numbers.txt   // will show from line 5. Some shell may not work this command
The following example shows the usage of the tail command:
$ tail  // will display last 10 lines
$ tail  -5  numbers.txt  // will show last 5 lines
$ tail +15 numbers.txt  // will show from line 15 onwards. Some shell may not work
To print lines 61 to 65 from numbers.txt into file log.txt, type the following:
$ head -65 numbers.txt | tail -5 > log.txt
The diff command is used to find differences between two files. Let's see a few examples to find out its usage.
The content of file1 is as follows:
I go for shopping on Saturday
I rest completely on Sunday
I use Facebook & Tweeter for social networking
The content of file2 is as follows:
Today is Monday.
I go for shopping on Saturday
I rest completely on Sunday
I use Facebook & Tweeter for social networking
Then, type the diff command:
$ diff file1 file2
Output:
0a1
> Today is Monday
In the output, 0a1 tells us that line number 1 is added in file2.
Let's learn another example with line deletion.
The content of file1 is as follows:
Today is Monday
I go for shopping on Saturday
I rest completely on Sunday
I use Facebook & Tweeter for social networking
The content of file2 is as follows:
Today is Monday
I go for shopping on Saturday
I rest completely on Sunday
Then, type the diff command:
$ diff file1 file2
The output is as follows:
4d3
< I use Facebook & Tweeter for social networking.
In the output, 4d3 tells us that line number 4 is deleted in file2. Similarly, the change command will show us changes in file as well.
The cut command is used to extract specified columns/characters of a text, which is given as follows:
-c: Will specify the filtering of characters-d: Will specify the delimiter for fields-f: Will specify the field number
The following are few examples that show the usage of the cut command:
- Using the next command, from the
/etc/passwdfile, the fields 1 and 3 will be displayed. The display will contain the login name and user ID. We used the–d:option to specify that the field or columns are separated by a colon (:):$ cut -d: -f1,3 /etc/passwd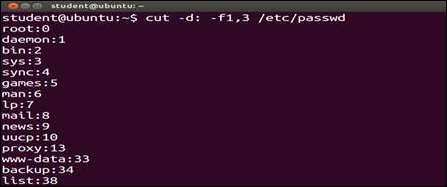
- Using this command, from the
/etc/passwdfile, the fields 1 to 5 will be displayed. The display will contains the login name, encrypted password, user ID, group ID, and user name:$ cut -d: -f1-5 /etc/passwd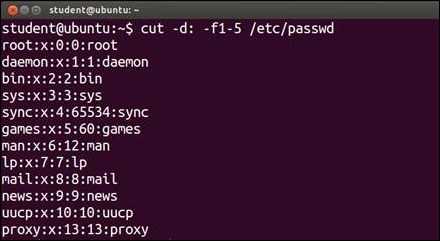
- This command will show characters 1 to 3 and 8 to 12 from the
emp.lstfile:$ cut -c1-3,8-12 /home/student/emp.lst - The output of the
datecommand is sent as an input to thecutcommand and only the first three characters are printed on screen, which is shown as follows:$ date | cut -c1-3 Mon
Using this utility, we can paste two files horizontally, such as file_1, which will become the first column and file_2 will become the second column:
$ paste file_1 file_2
Consider two files, namely, one.txt and two.txt.
- The content of
one.txtis as follows:1 India 2 UK 3 Canada 4 US 5 Ireland
- The content of
two.txtis as follows:1 New Delhi 2 London 3 Toronto 4 Washington 5 Dublin
In this case, for both the files, the common fields are the fields which have serial numbers that are the same in both files. We can combine both files by following command:
$ join one.txt two.txt
The output will be as follows:
1 India New Delhi
2 UK London
3 Canada Toronto
4 US Washington
5 Ireland Dublin
The comm command shows the lines unique to file_1, file_2 along with the common lines in them. We can use various options while using the command in the scripts:
$ cat file_1
Barack Obama
David Cameron
Narendra Modi

$ cat file_2
Barack Obama
Engela Merkel
Vladimir Putin

$ comm –nocheck-order file_1 file_2
      Barack Obama
  David Cameron
    Engela Merkel
  Narendra Modi
    Vladimir Putin
In the preceding example, we can see:
- The first column shows unique lines in
file_1 - The second column shows unique lines in
file_2 - The last column shows the content common in both the files
The output shows that the unique files in file_1 are David Cameron and Narendra Modi. Unique files in the second file are Engela Merkel and Vladimir Putin. The command name in both the files is Barack Obama, which is displayed in the third column.
The tr command is a Linux utility for text processing such as translating, deleting, or squeezing repeated characters, which is shown as follows:
$ tr '[a-z]' '[A-Z]' < filename
This will translate the lower case characters to upper case:
$ tr '|' '~' < emp.lst
This will squeeze multiple spaces into a single space:
$ ls –l | tr -s " "
In this example, the -s option squeezes multiple contiguous occurrences of the character into a single char.
Additionally, the -d option can remove the characters.
Sort: It sorts the contents of a text file, line by line.
-n: Will sort as per the numeric value-d: Will sort as per the dictionary meaning-r: Will sort in the reverse order-t: Option to specify delimiter for fields+num: Specifies sorting field numbers-knum: Specifies sorting filed numbers$ sort +4 sample.txt: This will sort according to the 4th field$ sort –k4 sample.txt: This will sort according to the 4th fieldSr
Examples of command usage
Explanation
1
sort
sample.txtAlphabetically sorting of lines
2
sort -u
sample.txtDuplicate entries are sorted
3
sort -r
sample.txtReverse sort
4
sort-n -k3
sample.txtNumerical sorting of the 3rd field