Copyright © 2015 Packt Publishing
All rights reserved. No part of this book may be reproduced, stored in a retrieval system, or transmitted in any form or by any means, without the prior written permission of the publisher, except in the case of brief quotations embedded in critical articles or reviews.
Every effort has been made in the preparation of this book to ensure the accuracy of the information presented. However, the information contained in this book is sold without warranty, either express or implied. Neither the author, nor Packt Publishing, and its dealers and distributors will be held liable for any damages caused or alleged to be caused directly or indirectly by this book.
Packt Publishing has endeavored to provide trademark information about all of the companies and products mentioned in this book by the appropriate use of capitals. However, Packt Publishing cannot guarantee the accuracy of this information.
First published: December 2015
Production reference: 1211215
Published by Packt Publishing Ltd.
Livery Place
35 Livery Street
Birmingham B3 2PB, UK.
ISBN 978-1-78528-621-6
Author
Ganesh Sanjiv Naik
Reviewers
Advait Deo
Eax Melanhovich
Shawn Solomon
Commissioning Editor
Nadeem Bagban
Acquisition Editor
Tushar Gupta
Content Development Editor
Nikhil Potdukhe
Technical Editor
Rupali R. Shrawane
Copy Editor
Charlotte Carneiro
Project Coordinator
Izzat Contractor
Proofreader
Safis Editing
Indexer
Rekha Nair
Production Coordinator
Manu Joseph
Cover Work
Manu Joseph
Ganesh Sanjiv Naik is an author, consultant, and corporate trainer for embedded Android, embedded Linux, and Internet of Things related product development.
He completed his computer engineering in 1988. Since then, he has worked in this industry. He has worked on projects including micro-controller based projects to advanced Embedded Android projects. He has more than 20 years of professional experience and project accomplishment in information technology.
Ganesh has a passion and deep desire for teaching. He has trained 1,000 engineers in Linux and Android product development. He has developed a lot of training material as well as curriculum for various universities and training institutes.
He has an interest in spiritual study and practices such as meditation. He is a certified yoga teacher. His hobbies include yoga and martial arts.
He has worked as a corporate trainer for Indian Space Research Organization, Intel, GE, Samsung, Motorola, Penang Skill Development Center (Malaysia), various companies in Singapore as well as various other corporates in India and other countries. He has started a company called Levana Technologies, which works with the Penang Skill Development Center (Malaysia) for consulting and training activities. If you would like to send feedback, suggestions, or corrections in the book, he can be contacted at https://in.linkedin.com/in/naikganesh.
This book is his real-life experience….
He has worked as a consultant and corporate trainer in the following skills:
I would like to thank my wife, Vishalakshi, for putting up with my late night writing sessions. Even though Vishalakshi is from microbiology background, on my request, she proofed all the chapters to spot language shortcomings. She patiently read my complete book, and even after not being a programmer, she gave me many valuable suggestions. Without her support and continuous motivation, this book would not have been possible. My professional friend, Kuldeep Vaity, has also read all chapters from a developer's perspective. His feedback was very valuable from technical angles, such as unclear code, insufficient explanation, and similar.
I feel proud to say that the book's cover picture was designed by my daughter, Roopali. She conceptualized the theme and took a lot of effort to properly convey the meaning of the book to readers.
My special thanks to the technical reviewers of the book. Their valuable suggestions have helped me add value to this book.
I would like to thank the entire Packt Publishing team. I would especially like to thank, Aditya Nair and Nikhil Potdukhe of Packt Publishing for the positive, motivating support given to me during the initial period to the end of the completion of this book. Nikhil was very helpful and patient in following up with me for chapters. Due to my busy schedule of consulting and training activities, I was not able to complete my chapters as per schedule; but Nikhil used to follow up very nicely, understandingly, and patiently for the chapter's completion. Without his patient follow up, either I would have completed this book very late, or I would have left the writing work incomplete.
Advait Deo has more than 10 years of experience in database domain, has spent time on many aspects of databases until now, starting from Oracle version 8 until 12c. He mainly focuses on database performance tuning, integrating database with front end application, scripting, and automation. He is currently working as a senior database administrator for (world leader in retail business).
Prior to this book, Advait has reviewed Oracle Database 11g R2 Performance Tuning Cookbook, Packt Publishing (ISBN 1849682607). He also publishes some of his work and learnings on his website at http://avdeo.com.
Eax Melanhovich is 27 and lives in Moscow, Russia. Most people don't know his real name or where he works since Eax is concerned about his privacy. Eax is an author of probably the most popular Russian standalone technical blog eax.me. He is also one of the co-hosts of the popular Russian IT podcast devzen.ru. Eax is an Ubuntu user and a functional programming enthusiast.
Shawn Solomon is a technology veteran with a broad background of experience from more than 20 years of pioneering in various technologies. While working in the ISP, VoIP, educational, open source development, and disaster recovery fields, his skillset has adapted and broadened over the years.
For support files and downloads related to your book, please visit www.PacktPub.com.
Did you know that Packt offers eBook versions of every book published, with PDF and ePub files available? You can upgrade to the eBook version at www.PacktPub.com and as a print book customer, you are entitled to a discount on the eBook copy. Get in touch with us at <service@packtpub.com> for more details.
At www.PacktPub.com, you can also read a collection of free technical articles, sign up for a range of free newsletters and receive exclusive discounts and offers on Packt books and eBooks.

https://www2.packtpub.com/books/subscription/packtlib
Do you need instant solutions to your IT questions? PacktLib is Packt's online digital book library. Here, you can search, access, and read Packt's entire library of books.
If you have an account with Packt at www.PacktPub.com, you can use this to access PacktLib today and view 9 entirely free books. Simply use your login credentials for immediate access.
I wish to dedicate this book to my Gurudev His Holiness Dr. Jayant Balaji Athavale. I wish to express gratitude for his guidance, which I have received for, how to become good human being, good professional and a seeker on the path of spiritual progress.
- Ganesh Sanjiv Naik
Shell scripts are an essential part of any modern operating system, such as UNIX, Linux, Windows, and similar. The scripting language or its syntax may vary from OS to OS; but the fundamental principles remain the same. I first encountered Linux Shell scripts during the development of embedded Linux product development. Shell scripts were initializing the complete product from the basic booting procedure until users logged in and a complete operating system was initialized. Another situation was in the automation of regular activities, such as the build and release management of source codes of very complex products, where more than 10,000 files were a part of a single project. Similarly, another very common requirement comes while using the make utility, which is used to compile and build complex product source codes.
Initially, I had learned scripts to solve practical problems and customize already existing products. This book is the summary of what I have learned over the years in Linux Shell scripting during project development work, consultancy, and corporate trainings and their Q&A sessions.
In this book, you will learn about the very basics of Shell scripting to complex, customized automation. By the end of this book, you will be able to confidently use your own Shell scripts for the real-world problems out there. The idea is to be as practical as possible and give you the look and feel of what real-world scripting looks like.
This book covers bash, the GNU Bourne-Again Shell scripting. You can use the knowledge gained by reading this book for any shell of any of the UNIX flavors or distributions. You will need to take care of a few syntax changes if you are working in other shells, such as Korn, and similar. You should be able to read this book cover to cover, or you can just pick it up and read anything that you might find interesting. But perhaps most importantly, if you have a question about how to solve a particular problem or you need a hint, you will find it easy to find the right solution or something close enough to save your time and energy.
Chapter 1, Getting Started and Working with Shell Scripting, you will learn different ways to write and run Shell scripts. You will also learn ways to handle files and directories, and you will learn about working with permissions.
Chapter 2, Drilling Deep into Process Management, Job Control, and Automation, you will learn about basic process management. You will learn about command ps and job management using commands such as jobs, fg, bg, kill, and pkill. Later on, you will learn about process monitoring tools: top, iostat, vmstat and sar.
Chapter 3, Using Text Processing and Filters in Your Scripts, you will learn about using more, less, head, and tail commands. You will also learn text processing tools such as, cut, paste, comm, and uniq. You will learn about standard input, output, and error. Later on, you will learn about metacharacters and pattern matching using vi and grep.
Chapter 4, Working with Commands, you will learn about how shell interprets any command entered on the command line. You will also learn command substitution, separators, and pipes in detail.
Chapter 5, Exploring Expressions and Variables, you will learn about variables—environment variables. This will include how to export environment variables, set, shift, read-only variables, command-line arguments, and about creating and handling arrays.
Chapter 6, Neat Tricks with Shell Scripting, you will learn about debugging, the here operator, interactive Shell scripts for taking input from the keyboard, and file handling.
Chapter 7, Performing Arithmetic in Shell Scripts, you will learn about doing arithmetic operations in various ways, such as using declare, let, expr, and arithmetic expressions. You will also learn about representing numbers in different bases, such as hex, octal, and binary. You will learn about using the bc utility for doing floating point or fractional arithmetic.
Chapter 8, Automating Decision Making in Scripts, you will learn about using decision making in scripts working with test, if…else, and switching case. You will also use select for loop with menu. For repeating tasks such as processing lists, you will learn about using for loop, while loop and do while. You will also learn about how to control loops using break and continue statements.
Chapter 9, Working with Functions, we will understand about functions in Shell scripts. You will learn about the definition and display of functions by removing the function from the shell. You will also learn about passing arguments to functions, sharing data between functions, declaring local variables in functions, returning results from functions, and running functions in background. You will finally learn about using source and . commands. We will use these commands to use the library of functions.
Chapter 10, Using Advanced Functionality in Scripts, you will learn about using traps and signals. You will also learn about creating menus with the help of the dialog utility.
Chapter 11, System Startup and Customizing a Linux System, you will learn about Linux system startup from power on until the user login and how to customize a Linux system environment.
Chapter 12, Pattern Matching and Regular Expressions with sed and awk, you will learn about regular expressions and using sed (stream editor) and awk for text processing. You will learn about the usage of various commands and options along with a lot of examples for using sed and awk.
Any computer that has Linux OS installed on it will be sufficient for learning all the topics discussed in this book. I have personally tested all the commands and scripts in Ubuntu 12.10 distribution.
While learning, if you find that any utility has not installed alongside Ubuntu or any Debian-based distribution, then enter the following command to install this utility:
$ sudo apt-get update
$ sudo apt-get install package-name
The Internet should be available for the previous commands to run.
In Red Hat or any other rpm-based distribution, enter the following commands:
$ sudo yum update
$ sudo yum install package-name
If the Internet is connected, then using these commands, you can install any command or utility that is not already installed.
This book is for the readers that are proficient at working with Linux, and who want to learn about Shell scripting to improve their efficiency and practical skills. The following are a few examples where we can use skills learned in this book:
In this book, you will find a number of text styles that distinguish between different kinds of information. Here are some examples of these styles and an explanation of their meaning.
Code words in text, database table names, folder names, filenames, file extensions, pathnames, dummy URLs, user input, and Twitter handles are shown as follows: "In the output, 4d3 tells us that line number 4 is deleted in file2. Similarly, the change command will show us changes in the file as well."
A block of code is set as follows:
#!/bin/bash
# This is comment line
echo "Hello World"
ls
date
When we wish to draw your attention to a particular part of a code block, the relevant lines or items are set in bold:
$ expr 4 * 10
expr: syntax error
With command expr, we cannot use * for multiplication. We need to use \* for multiplication.
$ expr "4 * 10"
4 * 10
$ expr 4 \* 10
40
Any command-line input or output is written as follows:
$ sed '1,3d' datafile >  tempfile
$ awk -F: '/Marie/{print $1, $2}' people1.txt
New terms and important words are shown in bold.
Feedback from our readers is always welcome. Let us know what you think about this book—what you liked or disliked. Reader feedback is important for us as it helps us develop titles that you will really get the most out of.
To send us general feedback, simply e-mail <feedback@packtpub.com>, and mention the book's title in the subject of your message.
If there is a topic that you have expertise in and you are interested in either writing or contributing to a book, see our author guide at www.packtpub.com/authors.
Now that you are the proud owner of a Packt book, we have a number of things to help you to get the most from your purchase.
We also provide you with a PDF file that has color images of the screenshots/diagrams used in this book. The color images will help you better understand the changes in the output. You can download this file from https://www.packtpub.com/sites/default/files/downloads/LearningLinuxShellScripting_ColorImages.pdf.
Although we have taken every care to ensure the accuracy of our content, mistakes do happen. If you find a mistake in one of our books—maybe a mistake in the text or the code—we would be grateful if you could report this to us. By doing so, you can save other readers from frustration and help us improve subsequent versions of this book. If you find any errata, please report them by visiting http://www.packtpub.com/submit-errata, selecting your book, clicking on the Errata Submission Form link, and entering the details of your errata. Once your errata are verified, your submission will be accepted and the errata will be uploaded to our website or added to any list of existing errata under the Errata section of that title.
To view the previously submitted errata, go to https://www.packtpub.com/books/content/support and enter the name of the book in the search field. The required information will appear under the Errata section.
Piracy of copyrighted material on the Internet is an ongoing problem across all media. At Packt, we take the protection of our copyright and licenses very seriously. If you come across any illegal copies of our works in any form on the Internet, please provide us with the location address or website name immediately so that we can pursue a remedy.
Please contact us at <copyright@packtpub.com> with a link to the suspected pirated material.
We appreciate your help in protecting our authors and our ability to bring you valuable content.
If you have a problem with any aspect of this book, you can contact us at <questions@packtpub.com>, and we will do our best to address the problem.
Whoever works with Linux will come across shell as the first program to work with. The Graphical user interface (GUI) usage has become very popular due to the ease of use. Those who want to take advantage of the power of Linux will use the shell program by default.
Shell is a program which provides the user direct interaction with the operating system. Let's understand the stages in the evolution of the Linux operating system. Linux was developed as a free and open source substitute for UNIX OS. The chronology can be as follows:
In this chapter, we will cover the following topics:
Initially, the UNIX OS used a shell program called Bourne Shell. Then eventually, many more shell programs were developed for different flavors of UNIX. The following is brief information about different shells:
A brief comparison of various shells is presented in the following table:
|
Feature |
Bourne |
C |
TC |
Korn |
Bash |
|---|---|---|---|---|---|
|
Aliases |
no |
yes |
yes |
yes |
yes |
|
Command-line editing |
no |
no |
yes |
yes |
yes |
|
Advanced pattern matching |
no |
no |
no |
yes |
yes |
|
Filename completion |
no |
yes |
yes |
yes |
yes |
|
Directory stacks (pushd and popd) |
no |
yes |
yes |
no |
yes |
|
History |
no |
yes |
yes |
yes |
yes |
|
Functions |
yes |
no |
no |
yes |
yes |
|
Key binding |
no |
no |
yes |
no |
yes |
|
Job control |
no |
yes |
yes |
yes |
yes |
|
Spelling correction |
no |
no |
yes |
no |
yes |
|
Prompt formatting |
no |
no |
yes |
no |
yes |
What we see here is that, generally, the syntax of all these shells is 95% similar. In this book, we are going to follow Bash shell programming.
Whenever we type any text in the shell terminal, it is the responsibility of shell to execute the command properly. The activities done by shell are as follows:
We will discuss the preceding topics in the subsequent chapters.
Let's get started by opening the terminal, and we will familiarize ourselves with the Bash Shell environment:
$ echo $SHELL
/bin/bash
/bin/bash such as BASH shell:$ bash --version GNU bash, version 2.05.0(1)-release (i386-redhat-linux-gnu) Copyright 2000 Free Software Foundation, Inc.
Hereafter, we will use the word Shell to signify the BASH shell only. If we intend any other shell, then it will be specifically mentioned by name such as KORN and similar other shells.
In Linux, filenames in lowercase and uppercase are different; for example, the files Hello and hello are two distinct files. This is unlike Windows, where case does not matter.
As far as possible, avoid using spaces in filenames or directory names such as:
Hello World.txtHello_World.txt or HelloWorld.txtThis will make certain utilities or commands fail or not work as expected, for example, the make utility.
While typing in filenames or directory names of the existing files or folders, use the tab completion feature of Linux. This will make working with Linux faster.
The following table lists a few basic Linux commands:
Since we learned basic commands to use Linux OS, we will now write our first Shell script called hello.sh. You can use any editor of your choice such as vi, gedit, nano, and other similar editors. I prefer to use the vi editor.
hello.sh file as follows:#!/bin/bash # This is comment line echo "Hello World" ls date
The #!/bin/bash line is called the shebang line. The combination of the characters # and ! is called the magic number. The shell uses this to call the intended shell such as /bin/bash in this case. This should always be the first line in a Shell script.
The next few lines in the Shell script are self explanatory.
#, will be treated as a comment line. An exception to this would be the first line with #!/bin/bashecho command will print Hello World on the screenls command will display directory content on the consoledate command will show the current date and timeWe can execute the newly created file by the following commands:
$ bash hello.sh
$ chmod +x hello.sh
By running any of the preceding commands, we are adding executable permission to our newly created file. You will learn more about file permissions in later in this same chapter.
$ ./hello.sh
By running the preceding command, we are executing hello.sh as the executable file. By technique one, we passed filename as an argument to Bash shell.
The output of executing hello.sh will be as follows:
Hello World hello.sh Sun Jan 18 22:53:06 IST 2015
Since we have successfully executed our first script, we will proceed to develop a more advanced script, hello1.sh. Please create the new script hello.sh as follows:
#!/bin/bash # This is the first Bash shell # Scriptname : Hello1.sh # Written by: Ganesh Naik echo "Hello $LOGNAME, Have a nice day !" echo "Your are working in directory `pwd`." echo "You are working on a machine called `uname -n`." echo "List of files in your directory is." ls # List files in the present working directory echo "Bye for now $LOGNAME. The time is `date +%T`!"
The output of executing hello.sh will be as follows:
Hello student, Have a nice day !. Your are working in directory /home/student/work. You are working on a machine called ubuntu. List of files in your directory is. hello1.sh hello.sh Bye for now student. The time is 22:59:03!
You will learn about the LOGNAME, uname, and other similar commands as we go on with the book.
In any program development, the following are the two options:
When we use a compiler-based language, we compile the complete source code, and as a result of compilation, we get a binary executable file. We then execute the binary to check the performance of our program.
On the contrary, when we develop the Shell script, such as an interpreter-based program, every line of the program is input to Bash shell. The lines of Shell script are executed one by one sequentially. Even if the second line of a script has an error, the first line will be executed by the shell interpreter.
Shell scripts have certain advantages over compiler-based programs, such as C or C++ language. However, Shell scripting has certain limitations as well.
The following are the advantages:
The following are the limitations of Shell scripts:
We will explore the directory structure in Linux so that it will be useful later on:
/bin/: This contains commands used by a regular user./boot/: The files required for the operating system startup are stored here./cdrom/: When CD-ROM is mounted, the CD-ROM files are accessible here./dev/: The device driver files are stored in this folder. These device driver files will point to hardware-related programs running in kernel./etc/: This folder contains configuration files and startup scripts./home/: This folder contains a home folder of all users except the administrator./lib/: The library files are stored in this folder./media/: External media such as a USB pen drive is mounted in this folder./opt/: The optional packages are installed in this folder./proc/: This contains files which give information about kernel and every process running in OS./root/: This is the administrators home folder./sbin/: This contains commands used by the administrator or root user./usr/: This contains secondary programs, libraries, and documentation about user-related programs./var/: This contains variable data such as http, tftp, and similar other./sys/: This dynamically creates the sys filesLet us learn a few commands, which are required very often, such as man, echo, cat and similar:
man command:
$ man man
From the following table, you can get an idea about various types of man pages for the same command:
|
Section number |
Subject area |
|---|---|
|
1 |
User commands |
|
2 |
System calls |
|
3 |
Library calls |
|
4 |
Special files |
|
5 |
File formats |
|
6 |
Games |
|
7 |
Miscellaneous |
|
8 |
System admin |
|
9 |
Kernel routines |
man command to display corresponding manual pages as follows:$ man 1 command $ man 5 command
passwd command, which is used for changing the current password of a user, you can type the command as follows:$ man command man -k passwd // show all pages with keyword man –K passwd // will search all manual pages for pattern $ man passwd
This will show information about the passwd command:
$ man 5 passwd
The preceding command will give information about the file passwd, which is stored in /etc /passwd.
$ whatis passwd
Output:
passwd (1ssl) - compute password hashes passwd (1) - change user password passwd (5) - the password file
$ which passwd /usr/bin/passwd
The preceding line tells us that the binary file of the passwd command is located in the /usr/bin/passwd folder.
$ whereis passwd
The output will be as follows:
passwd: /usr/bin/passwd /etc/passwd /usr/bin/X11/passwd /usr/share/man/man1/passwd.1.gz /usr/share/man/man1/passwd.1ssl.gz /usr/share/man/man5/passwd.5.gz
$ whoami
This command displays the user name of the logged in user:
$ su
The su command (switch user) will make the user as the administrator; but, you should know the administrators, password. The sudo command (superuser do) will run the command with administrator's privileges. It is necessary that the user should have been added in the sudoers list.
# who am i
This command will show the effective user who is working at that moment.
# exit
$ alias ll='ls –l' $ alias copy='cp –rf'
To list all declared aliases, use the following command:
$ alias
To remove an alias, use the following command:
$ unalias copy
$ uname
Output:
Linux
This will display the basic OS information (UNIX name)
$ uname –r
Output:
3.13.0-32-generic
$ uname –a
Output:
Linux ubuntu 3.13.0-32-generic #57~precise1-Ubuntu SMP Tue Jul 15 03:50:54 UTC 2014 i686 i686 i386 GNU/Linux
$ cat /proc/version // detailed info about distribution $ cat /etc/*release # lsb_release -a // will tell distribution info for Ubuntu
The command
cat is used for reading files and displayed on the standard output.
$ ln -s file file_link
$ file fil_name // show type of file
But this is very rarely used, as many powerful editors are already existing, such as vi or gedit.
Hello World on the console. The echo command is very useful for Shell script writers:
$ echo "Hello World"
Hello World to the hello.c file:
$ echo "Hello World" > hello.c
The command echo with > overwrites the content of the file. If content already exists in the file, it will be deleted and new content will be added in the file. In a situation, when we need to append the text to the file, then we can use the echo command as follows:
$ echo "Hello World" >> hello.c will append the text
$ cat hello.c
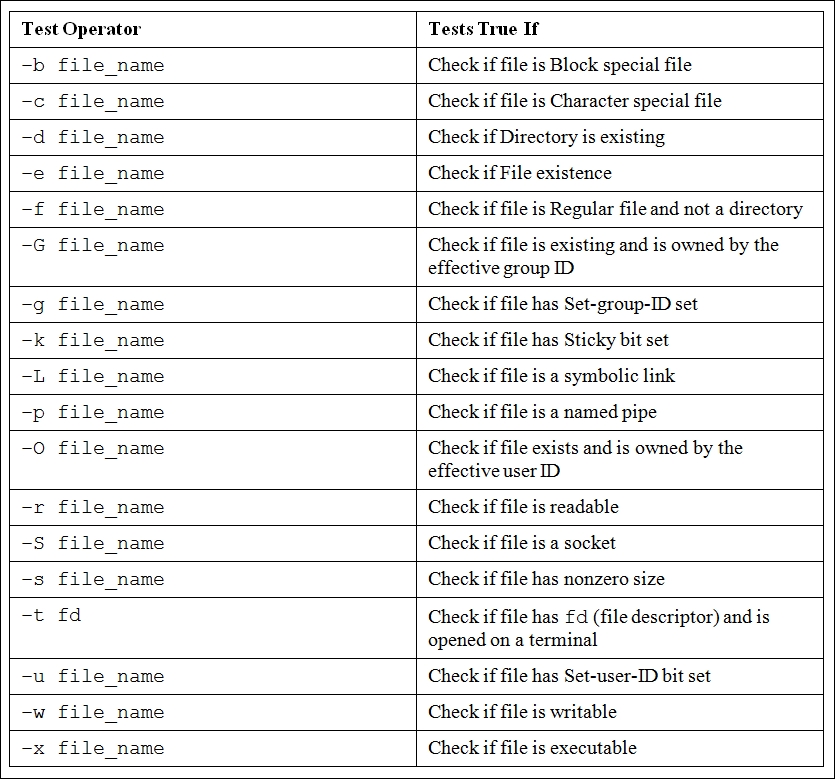
The following are the types of permissions:
The following are the commands for changing the file permissions:
To check the file permission, give the following command:
$ ll file_name
The details of file permissions are as seen in the following image:
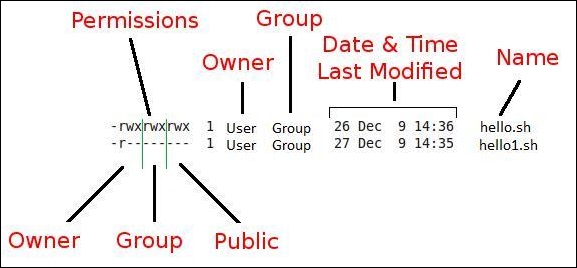
In the preceding diagram, as we can see, permissions are grouped in owner-user and group and other users' permissions. Permissions are of three types such as read, write, and execute permissions. As per the requirement, we may need to change permissions of the various files.
We can change the file or directory permissions by the following two ways:
We will see how Linux decides the default permissions of the newly created file or folder:
$ umask 0002
The meaning of the preceding output is that, if we create a new directory, then from the permissions of +rwx, the permission 0002 will be subtracted. This means that for a newly created directory, the permissions will be 775 or rwx rwx r-x. For a newly created file, the file permissions will be rw- rw- r--. By default, for any newly created text file, the execute bit will never be set. Therefore, the newly created text file and directory will have different permissions even though the umask is same.
Another very interesting functionality is the setuid feature. If the setuid bit is set for a script, then the script will always run with the owner's privileges irrespective of which user is running the script. If the administrator wants to run script written by him by other users, then he can set this bit.
Consider either of the following situations:
$ chmod u+s file_name $ chmod 4777 file
The file permissions after any of the preceding two commands will be drwsrwxrwx.
Similar to setuid, the setgid functionality gives the user the ability to run scripts with group owner's privileges, even if it is executed by any other user.
$ chmod g+s filename
Alternatively, you can use the following command:
$ chmod 2777 filename
File permissions after any of the preceding two commands will be drwxrwsrwtx.
Sticky bit is a very interesting functionality. Let's say, in the administration department there are 10 users. If one folder has been set with sticky bit, then all other users can copy files to that folder. All users can read the files, but only the owner of the respective file can edit or delete the file. Other user can only read but not edit or modify the files if the sticky bit is set.
$ chmod +t filename
Alternatively, you can use the following command:
$ chmod 1777
File permissions after any of the preceding two commands will be drwxrwxrwt.
In the last chapter, we introduced ourselves to the Bash shell environment in Linux. You learned basic commands and wrote your first Shell script as well.
You also learned about process management and job control. This information will be very useful for system administrators in automation and solving many problems.
In this chapter, we will cover the following topics:
A running instance of a program is called as process. A program stored in the hard disk or pen drive is not a process. When that stored program starts executing, then we say that process has been created and is running.
Let's very briefly understand the Linux operating system boot-up sequence:
start_kenel().init.
$ ps –ef
init process is 1. This process is the parent process of all user space processes.fork().
$ pstree
You can see the very first process as init as well as all other processes with a complete parent and child relation between them. If we use the $ps –ef command, then we can see that the init process is owned by root and its parent process ID is 0. This means that there is no parent for init:

Therefore, except the init process, all other processes are created by some other process. The init process is created by the kernel itself.
The following are the different types of processes:
init process becomes the parent of the orphan process.$ echo "Hello" command, it will be printed in the terminal itself. There are certain processes that are not associated with any terminal. Such processes are called a daemon process. These processes are running in background. An advantage of the daemon process is they are immune to the changes happening to Bash shell, which has created it. When we want to run certain background processes, such as DHCP server and so on, then the daemon processes are very useful.We have used the command ps in the introduction. Let's learn more about it:
$ ps
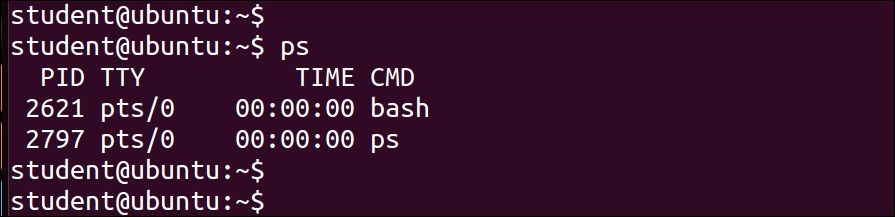
$ ps –f
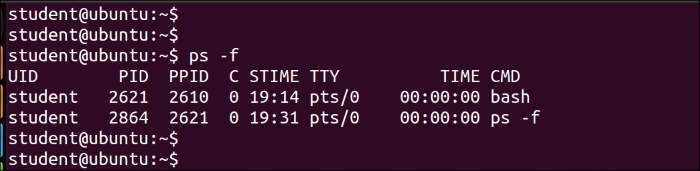
We can see the process ID in the PID column and the parent process ID in the PPID column in the preceding output.
$ ps –lf

In the preceding output, the column with S (state) shows the current state of a process, such as R for running and S for suspended state.
$ ps –ef
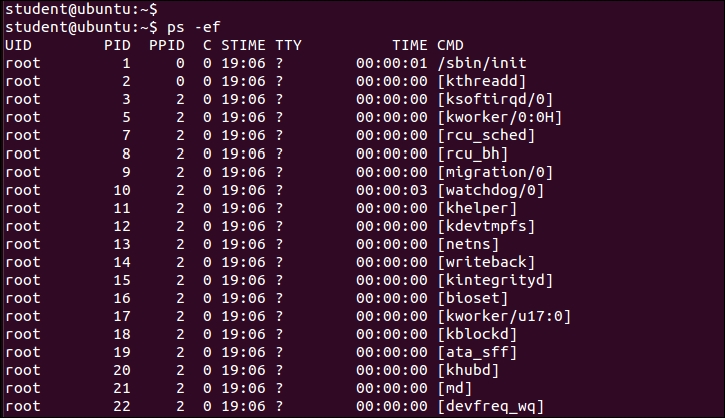
The process names in [] are kernel threads. If you are interested in more options to learn about the ps command, you can use the following command:
$ man ps.
To find a particular process, you can use the following command:
$ ps –ef | grep "process_name"
The command with grep will display the process with process_name.
$ kill pid_of_process_to_be_killed
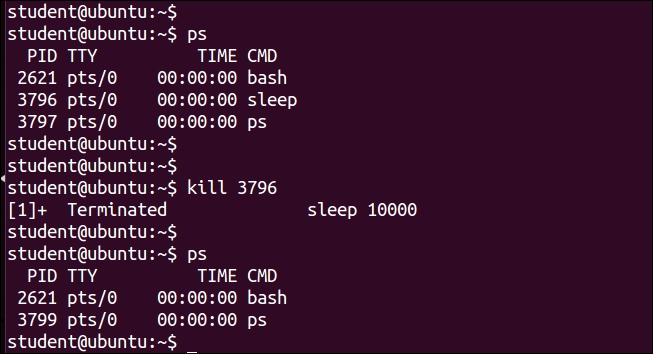
$ kill command, you may need to pass additional option to ensure that the required process is killed, which is shown as follows:
$ kill -9 pid_of_process_to_be_killed
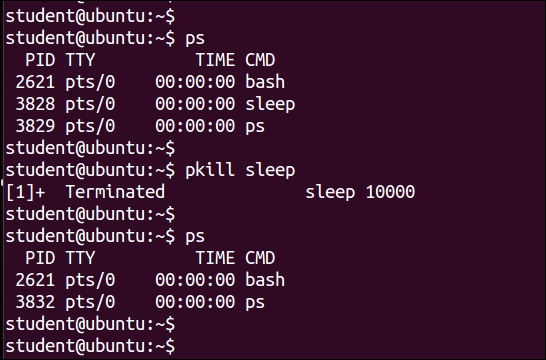
$ pkill command_name $ pkill sleep
Or:
$ pkill -9 command_name
kill, enter following command:
$ kill –l
This displays all the signals or software interrupts used by the operating system. When we enter the $ kill command, the operating system sends the SIGTERM signal to the process. If the process is not killed by this command, then we enter the following command:
$ kill -9 process_name
This sends SIGKILL to the process to be killed.
Since we have understood the command to check processes, we will learn more about managing different processes as follows:
&.Hello as the background process, then the command would be as follows:
$ Hello &
&, then it starts running as the background process.For example, we will issue a simple sleep command, which creates a new process. This process sleeps for the duration, which is mentioned in the integer value next to the sleep command:
10000 seconds. This means we will not be able to use any other command from the same terminal:$ sle ep 10000
sleep command.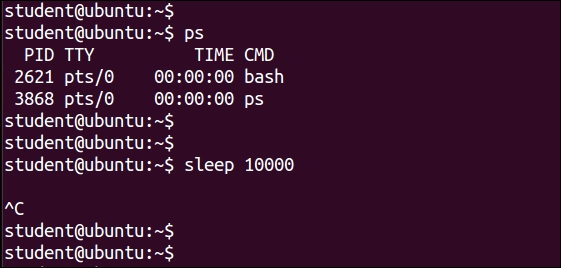
$ sleep 10000 &
The preceding command will create a new process, which will be put to sleep for 10000 seconds; but this time, it will start running in the background. Therefore, we will be able to enter the next command in the Bash terminal.
$ sleep 20000 & $ sleep 30000 & $ sleep 40000 &
$ jobs
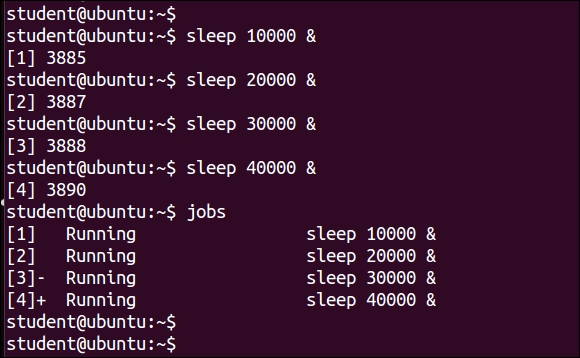
The jobs command lists all the processes running in terminal, including foreground and background processes. You can clearly see their status as running, suspended, or stopped. The numbers in [] show the job ID. The + sign indicates which command will receive fg and bg commands by default. We will study them in the next topics.
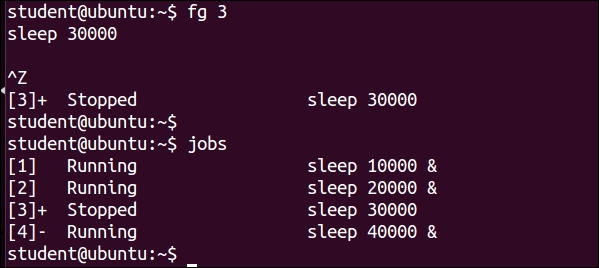
$ fg 3
The preceding command will make the job number 3 to run in the foreground instead of the background.
If we want to make the process to stop executing and get it suspended, then press Ctrl + Z. This key combination makes the foreground process to stop executing. Please note that the process has stopped but not terminated.
$ bg job_number $ bg 3
The preceding command will make suspended job numbered process 3 to run in background.
$ jobs –l // This will list jobs with pid $ kill pid or $ kill %job_id // This will kill job $ kill %3
We can view the native performance of various processes in OS using tools which will be discussed further. To view a dynamic real-time view of the top running processes in OS, use the following command:
$top
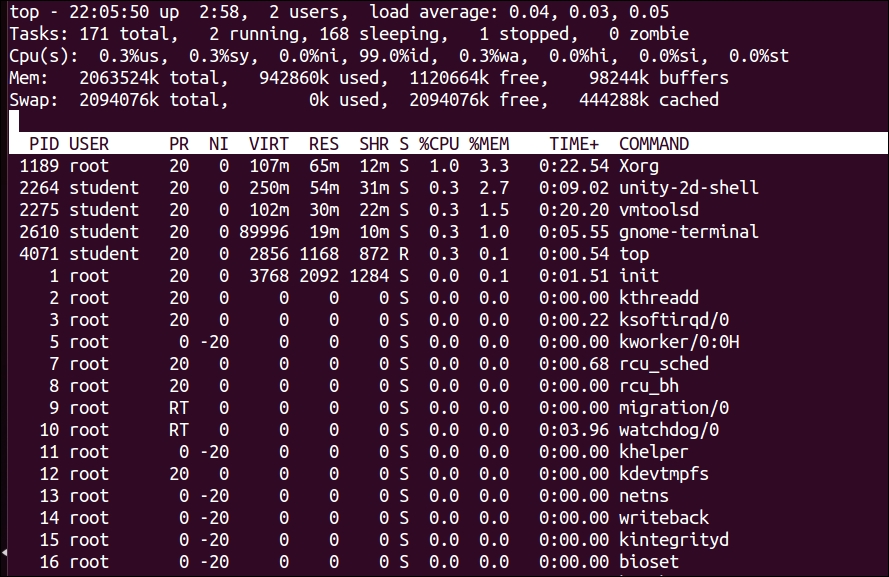
An explanation of the top command generated output is as follows:
The $top command displays a lot of information about the running system.
The first line of the display is shown as follows:

The description of fields in the first line is as follows:
The second line is shown as follows:

This line shows the summary of tasks or processes. It shows the total number of all the processes, which includes the total number of running, sleeping, stopped, and zombie processes.
The third line is shown as follows:

This line shows information about CPU usage in % in different modes as follows:
The fourth line is shown as follows:

This line provides information about memory usage. It shows the physical memory that is used, free, available, and used for buffers. The next line shows the swap memory that is available, used, free, and cached.
After this line, we see the table of values with the following columns:
PID: This is the ID of the processUSER: This is the user that is the owner of the processPR: This is the priority of the processNI: This is the "NICE" value of the processVIRT: This is the virtual memory used by the processRES: This is the physical memory used for the processSHR: This is the shared memory of the processS: This indicates the status of the process: S=sleep, R=running, and Z=zombie (S)%CPU: This is the % of CPU used by this process%MEM: This is the % of RAM used by the processTIME+: This is the total time of activity of this processCOMMAND: This is the name of the processLet's take a look at the performance monitoring tools—iostat, vmstat, and sar:
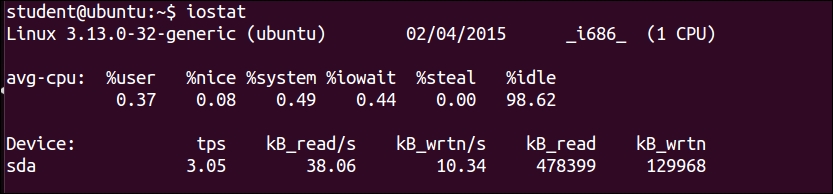
$ iostat
$ iostat –c
Shows only CPU statistics
$ iostat –d
Shows only disk statistics
$vmstat

$ vmstat -s
This shows various event counters and memory statistics.
$ vmstat –t 1 5
Runs for every one second stops after executing for five intervals.
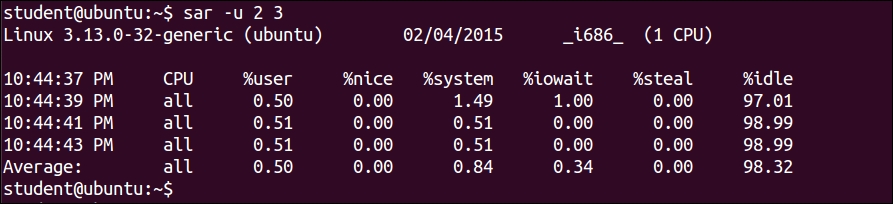
$ sar –u 2 3
This will show the CPU activity report every 2 seconds, 3 times:
Many a times we need to schedule a task for a future time, say in the evening at 8 P.M. on a specific day. We can use the at command in such a situation.
Sometimes we need to repeat the same task at a specific time, periodically, every day, or every month. In such situations, we can use the crontab command.
Let's learn more about the utility of the at command. To use the at command, the syntax is as follows:
$ at time date
The following are the examples of the at command:
Control + D command will save the at job. The task will be executed at 11.15 A.M. This command will log messages to the log.txt file at 11.15 A.M.:$ at 11.15 AM at > echo "Hello World" > $HOME/log.txt at > Control + D
$ at 10am mar 31 2015 at> echo "taxes due" | mail jon at> ^D
$ at 11 am may 20
at command can be listed using the following command:
$ atq
atq command, we can use the following command:
$ atrm job-id
If we need to run a specific task repetitively, then the solution is to use crontab.
The syntax of the command is as follows:
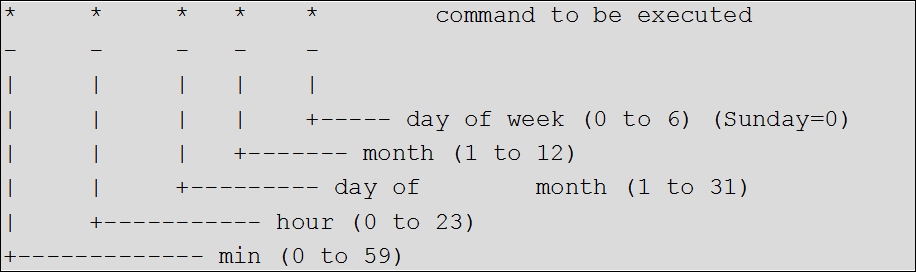
$ crontab –e
This will open a new editor. The following diagram is the syntax to add tasks. The fields to use for repeating tasks at what time are explained here:
Finally, to save the jobs, use the following:
wq # save and quite crontab job
The following are a few examples of the crontab command:
5 * * * * $HOME/bin/daily.job >> $HOME/tmp/out 2>&1
5 0 * * * $HOME/bin/daily.job >> $HOME/tmp/out 2>&1
15 14 1 * * * $HOME/bin/monthly
<ganesh@abc.com>:
0 22 * * 1-5 sendmail ganesh@abc.com < ~/work/email.txt
sendmail utility is used for sending e-mails. We can use the mail utility also as follows:
sendmail user@example.com < /tmp/email.txt
23 0-23/2 * * * echo "run 23 minutes after midn, 2 am, 4 am, everyday 5 4 * * sun echo "run at 5 after 4 every Sunday"
The following are a few more crontab command examples:
|
Min |
Hour |
Day / month |
Month |
Day / week |
Execution time |
|---|---|---|---|---|---|
|
45 |
0 |
5 |
1,6,12 |
* |
00:45 hrs on the 5th of January, June, and December. |
|
0 |
18 |
* |
10 |
1-5 |
6.00 P.M. every weekday (Monday-Friday) only in October. |
|
0 |
0 |
1,10,15 |
* |
* |
Midnight on the 1st ,10th, and 15th of the month |
|
5,10 |
0 |
10 |
* |
1 |
At 12.05 and 12.10 every Monday and on the 10th of every month |
We can add macros in the crontab file. Use the following to restart my_program after each reboot:
@reboot /bin/my_program @reboot echo `hostname` was rebooted at `date` | mail -s "Reboot notification" ganesh.admin@some-corp.com
The following is the summary of a few more macros:
|
Entry |
Description |
Equivalent To |
|---|---|---|
|
@reboot |
Run once at startup |
None |
|
@weekly |
Run once a week |
0 0 * * 0 |
|
@daily |
Run once a day |
0 0 * * * |
|
@midnight |
(same as @daily) |
0 0 * * * |
|
@hourly |
Run once an hour |
0 * * * * |
In this chapter, we studied about the basic process management. You learned about the ps command. Using commands like jobs, fg, bg, kill, and pkill, we studied about job management. Later on, you learned about the top, iostat, and vmstat process monitoring tools.
In the next chapter, you will learn about standard input/output, various meta-characters, and text filters used in Shell scripting.
In the last chapter, you studied about basic process management. You learned about the ps command. You also studied about job management using commands such as jobs, fg, bg, kill, pkill as well as various other tools such as top, iostat, and vmstat.
In this chapter, you will cover the following topics:
Normally, Shell scripting involves report generation, which will include processing various text files and filtering their output to finally produce desirable results. Lets start discussing the two Linux commands, namely, more and less:
more: Sometimes we get a very large output on the screen for certain commands, which cannot be viewed completely on one screen. In such cases, we can use the more command to view the output text one page at a time. Add "| more" after the command, as follows:
$ ll /dev | more
The | is called pipe. You will learn more about it in the next chapters. In this command, pressing the spacebar will move the output on the screen one page at a time, or pressing Enter will move the screen by one line at a time.
less: Instead of more, if you use less it will show a screen containing the full text all at once. We can move forward as well as backwards. This is a very useful text filtering tool.
The syntax of usage is as follows:
$ command | less e.g. $ ll /proc | less
This command will show a long listing of directory listing of the /proc folder. Let's say that we want to see if the cpuinfo file is present in the directory or not? Just press the arrow key up or down to scroll through the display. With the more command, you can not scroll backwards. You can move forward only. With page up and down key presses, you can move forward or backward one page at a time, which is very fast.
In addition to scrolling forward or backward, you can search for pattern using / for forward search and ? for backward search. You can use N for repeating the search in a forward or backward direction.
For testing the next few commands, we will need a file with a sequence of numbers 1 to 100. For this, use the following command:
$ seq 100 > numbers.txt
The preceding command created a file with the numbers 1 to 100 on separate lines. The following example shows the usage of the head command:
$ head // will display top 10 lines $ head -3 numbers.txt // will show first 3 lines $ head +5 numbers.txt // will show from line 5. Some shell may not work this command
The following example shows the usage of the tail command:
$ tail // will display last 10 lines $ tail -5 numbers.txt // will show last 5 lines $ tail +15 numbers.txt // will show from line 15 onwards. Some shell may not work
To print lines 61 to 65 from numbers.txt into file log.txt, type the following:
$ head -65 numbers.txt | tail -5 > log.txt
The diff command is used to find differences between two files. Let's see a few examples to find out its usage.
The content of file1 is as follows:
I go for shopping on Saturday I rest completely on Sunday I use Facebook & Tweeter for social networking
The content of file2 is as follows:
Today is Monday. I go for shopping on Saturday I rest completely on Sunday I use Facebook & Tweeter for social networking
Then, type the diff command:
$ diff file1 file2
Output:
0a1 > Today is Monday
In the output, 0a1 tells us that line number 1 is added in file2.
Let's learn another example with line deletion.
The content of file1 is as follows:
Today is Monday I go for shopping on Saturday I rest completely on Sunday I use Facebook & Tweeter for social networking
The content of file2 is as follows:
Today is Monday I go for shopping on Saturday I rest completely on Sunday
Then, type the diff command:
$ diff file1 file2
The output is as follows:
4d3 < I use Facebook & Tweeter for social networking.
In the output, 4d3 tells us that line number 4 is deleted in file2. Similarly, the change command will show us changes in file as well.
The cut command is used to extract specified columns/characters of a text, which is given as follows:
-c: Will specify the filtering of characters-d: Will specify the delimiter for fields-f: Will specify the field numberThe following are few examples that show the usage of the cut command:
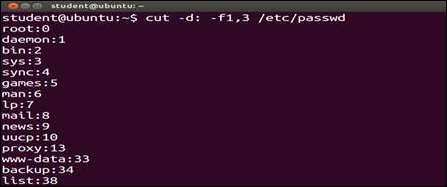
/etc/passwd file, the fields 1 and 3 will be displayed. The display will contain the login name and user ID. We used the –d: option to specify that the field or columns are separated by a colon (:):
$ cut -d: -f1,3 /etc/passwd
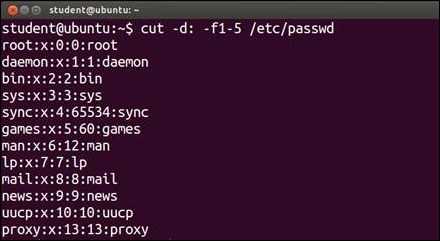
/etc/passwd file, the fields 1 to 5 will be displayed. The display will contains the login name, encrypted password, user ID, group ID, and user name:
$ cut -d: -f1-5 /etc/passwd
emp.lst file:
$ cut -c1-3,8-12 /home/student/emp.lst
date command is sent as an input to the cut command and only the first three characters are printed on screen, which is shown as follows:$ date | cut -c1-3 Mon
Using this utility, we can paste two files horizontally, such as file_1, which will become the first column and file_2 will become the second column:
$ paste file_1 file_2
Consider two files, namely, one.txt and two.txt.
one.txt is as follows:1 India 2 UK 3 Canada 4 US 5 Ireland
two.txt is as follows:1 New Delhi 2 London 3 Toronto 4 Washington 5 Dublin
In this case, for both the files, the common fields are the fields which have serial numbers that are the same in both files. We can combine both files by following command:
$ join one.txt two.txt
The output will be as follows:
1 India New Delhi 2 UK London 3 Canada Toronto 4 US Washington 5 Ireland Dublin
The comm command shows the lines unique to file_1, file_2 along with the common lines in them. We can use various options while using the command in the scripts:
$ cat file_1 Barack Obama David Cameron Narendra Modi $ cat file_2 Barack Obama Engela Merkel Vladimir Putin $ comm –nocheck-order file_1 file_2 Barack Obama David Cameron Engela Merkel Narendra Modi Vladimir Putin
In the preceding example, we can see:
file_1file_2The output shows that the unique files in file_1 are David Cameron and Narendra Modi. Unique files in the second file are Engela Merkel and Vladimir Putin. The command name in both the files is Barack Obama, which is displayed in the third column.
The tr command is a Linux utility for text processing such as translating, deleting, or squeezing repeated characters, which is shown as follows:
$ tr '[a-z]' '[A-Z]' < filename
This will translate the lower case characters to upper case:
$ tr '|' '~' < emp.lst
This will squeeze multiple spaces into a single space:
$ ls –l | tr -s " "
In this example, the -s option squeezes multiple contiguous occurrences of the character into a single char.
Additionally, the -d option can remove the characters.
Sort: It sorts the contents of a text file, line by line.
-n: Will sort as per the numeric value-d: Will sort as per the dictionary meaning-r: Will sort in the reverse order-t: Option to specify delimiter for fields+num: Specifies sorting field numbers-knum: Specifies sorting filed numbers$ sort +4 sample.txt: This will sort according to the 4th field$ sort –k4 sample.txt: This will sort according to the 4th field|
Sr |
Examples of command usage |
Explanation |
|---|---|---|
|
1 |
sort |
Alphabetically sorting of lines |
|
2 |
sort -u |
Duplicate entries are sorted |
|
3 |
sort -r |
Reverse sort |
|
4 |
sort-n -k3 |
Numerical sorting of the 3rd field |
You will learn the very useful concept of I/O redirection in this section.
All I/O, including files, pipes, and sockets, are handled by the kernel via a mechanism called the file descriptor. A file descriptor is a small unsigned integer, an index into a file-descriptor table maintained by the kernel and used by the kernel to reference open files and I/O streams. Each process inherits its own file-descriptor table from its parent. The first three file descriptors are 0, 1, and 2. File descriptor 0 is standard input (stdin), 1 is standard output (stdout), and 2 is standard error (stderr). When you open a file, the next available descriptor is 3, and it will be assigned to the new file.
When a file descriptor is assigned to something other than a terminal, it is called I/O redirection. The shell performs redirection of output to a file by closing the standard output file descriptor 1 (the terminal) and then assigning that descriptor to the file. When redirecting standard input, the shell closes file descriptor 0 (the terminal) and assigns that descriptor to a file. The Bash shells handle errors by assigning a file to the file descriptor 2.
The following command will take input from the sample.txt file:
$ wc < sample.txt
The preceding command will take content from the sample.text file. The wc command will print the number of lines, words, and characters in the sample.txt file.
$ echo "Hello world" > log.txt
This command will redirect output to be saved in the log.txt file.
$ echo "Welcome to Shell Scripting" >> log.txt
This command will append the Hello World text in the log.txt file.
The single > will overwrite or replace the existing text in log file. And double >> will append the text in the log file.
Let's see a few more examples:
$ tr '[A-Z]' '[a-z]' < sample.txt
The preceding tr command will read text from the sample.txt file. The tr command will convert all uppercase letters to lower case letters and will print converted text on screen:
$ ls > log.txt $ cat log.txt
The output of command will be as follows:
dir_1 sample.txt extra.file
In this example command, ls is sending directory content to file log.txt. Whenever we want to store the result of the command in the file, we can use the preceding example.
$ date >> log.txt $ cat log.txt
Output:
dir_1 dir_2 file_1 file_2 file_3 Sun Sept 17 12:57:22 PDT 2004
In the preceding example, we are redirecting and appending the result of the date command to the log.txt file.
$ gcc hello.c 2> error_file
The gcc is a C language compiler program. If an error is encountered during compilation, then it will be redirected to error_file. The > character is used for a success result and 2> is used for error results redirection. We can use error_file for debugging purposes:
$ find . –name "*.sh" > success_file 2> /dev/null
In the preceding example, we are redirecting output or success results to success_file and errors to /dev/null. /dev/null is used to destroy the data, which we do not want to be shown on screen.
$ find . –name "*.sh" &> log.txt
The preceding command will redirect both output and error to log.txt.
$ find . –name "*.sh" > log.tx 2>&1
The preceding command will redirect result to log.txt and send errors to where the output is going, such as log.txt.
$ echo "File needs an argument" 1>&2
The preceding command will send a standard output to the standard error. This will merge the output with the standard error.
The summary of all I/O redirection commands will be as follows:
|
< sample.txt |
The command will take input from |
|
> sample.txt |
The success result will be stored in |
|
>> sample.txt |
The successive outputs will be appended to |
|
2> sample.txt |
The error results will be stored in |
|
2>> sample.txt |
The successive error output will be appended to |
|
&> sample.txt |
This will store success and errors, such as in |
|
>& sample.txt |
This will store success and errors, such as in |
|
2>&1 |
This will redirect an error to where output is going |
|
1>&2 |
This will redirects output to where error is going |
|
>| |
This overrides no clobber when redirecting the output |
|
<> filename |
This uses the file as both standard input and output if a device file (from |
|
cat xyz > success_file 2> error_file |
This stores success and failure in different files |
The following is the summary of various metacharacters:
$ touch filea fileb filec fileab filebc filead filebd filead $ touch file{1,2,3}
Try the following command out:
$ ls s* $ ls file $ ls file[abc] $ ls file[abc][cd] $ ls file[^bc] $ touch file file1 file2 file3 … file20 $ ls ????? file1 file2 file3 $ ls file* file file1 file10 file2 file3 $ ls file[0-9] file1 file2 file3 $ ls file[0-9]* file1 file10 file2 file3 $ ls file[!1-2] file3
Curly braces allow you to specify a set of characters from which the shell automatically forms all possible combinations. To make this work, the characters to be combined with the given string must be specified as a comma separated list with no spaces:
$ touch file{1,2,3} $ ls

$ mkdir directory{1,2,3}{a,b,c} $ ls

$ touch file{a..z} $ ls

The following is the summary of various io-redirection and logical operators:
For example:
$ ls || echo "Command un-successful" $ ls a abcd || echo "Command un-successful"
These commands will print Command un-successful if the ls command is unsuccessful.
For learning pattern matching, we will ensure that the pattern that we will search should be highlighted when the searched pattern is found.
The configuration file for vi is /etc/vimrc.
In the vi editor, give the following command to highlight search:
|
Sr. |
Commands |
Description |
|---|---|---|
|
1 |
|
This highlights search pattern |
|
2 |
|
Show when you are in insert mode |
|
3 |
|
Ignore case when searching |
|
4 |
|
Shows case sensitive search |
The mentioned user should open the file in vi, press the Esc button so that it goes into command mode and then enter colon followed by these commands.
The following are commands for pattern search and replace:
The following is an example of regular expression for replacing Tom by David:
:1,$s/tom/David/g // from line 1 to end ($), replace tom by David :1,$s/\<[tT]om\>/David/g // start and end of word \< \>
This is another example of regular expression.
Create the love.txt file, as follows:
Man has love for Art World is full of love Love makes world wonderful love looove lve love Love love lover loves I like "Unix" more than DOS I love "Unix"/ I said I love "Unix" I love "unix" a lot
Use the following commands for testing pattern searching facilities:
The g/RE/p stands for globally search for the regular expression (RE) and print out the line.
Return status – success 0, pattern not found 1, file not found 2.
$ ps -ef | grep root
The preceding command will show all processes running currently whose user ID is "root".
$ ll /proc | grep "cpuinfo"
The preceding command will show the file with the name cpuinfo from the /proc directory.
$ grep –lir "text" * // only file names // $ grep –ir "text" dir_name // show lines of files //
We will try the following commands on the love.txt file:
We will create a new file sample.txt, as follows:
Apple Fruit 5 4.5 Potato Vegetable 4 .5 Onion Vegetable .3 8 Guava Fruit 5 1.5 Almonds Nuts 1 16 Tomato Vegetable 3 6 Cashew Nuts 2 12 Mango Fruit 6 6 Watermelon Fruit 5 1
We will try the following commands on the sample.txt file:
In this chapter, you learned about using more, less, head, and tail commands, and text processing tools like cut, paste, comm, and uniq. We also learned what standard input, output, and standard error are. Later on, you learned about metacharacters and pattern matching using vi and grep.
In the next chapter, you will learn about analyzing shell interpretation of commands, working with command substitution, command separators, and pipes.
In the last chapter, you learned about using more, less, head, and tail commands, and text processing tools like diff, cut, paste, comm, and uniq. You learned what standard input, output, and standard error are. You also learned about metacharacters and pattern matching using vi and grep.
In this chapter, you will cover the following topics:
When we log in, the
$ sign will be visible in the shell terminal (# prompt if logged in as root or administrator). The Bash shell runs scripts as interpreter. Whenever we type a command, the BASH shell will read them as series of words (tokens). Each word is separated by a space ( ), semi colon (;), or any other command delimiter. We terminate the command by pressing the Enter key. This will insert a new line character at the end of the command. The first word is taken as a command, then consecutive words are treated as options or parameters.
The shell processes the command line as follows:
$name and $user) is performedecho `cal` and echo `date`) is performedrm *)The sequence of execution of different types of commands will be as follows:
l, ll, egrep, and similar)for, if, while, and similar)bg, fg, source, cd, and similar)bin and sbin folder)Whenever a command is given in a shell or terminal, the complete command will be tokenized, and then shell will check if the command is alias.
Aliases, keywords, functions, and built-in commands are executed in the current shell, therefore their execution is fast as compared to executable external commands or scripts. Executable external commands will have a corresponding binary file or Shell script file in the file system, which will be stored in any folder. The shell will search the binary file or script of a command by searching in the PATH environment variable. If we want to know what the type of command it is, such as if it is an alias or a function or internal command, it can be found out by the type built-in command, which is shown as follows:
$ type mkdir mkdir is /bin/mkdir $ type cd cd is a shell builtin $ type ll ll is aliased to `ls -alF' $ type hello hello is a function hello () { echo "Hello World !"; } $ type for for is a shell keyword
Bash has provision of a few built-in commands to change the sequence of command line processing. We can use these built-in commands to change default behavior of command-line processing.
$ command ls
This will make aliases and functions be ignored and the external ls command will execute.
builtin command will work as follows:
$ builtin BUILT-IN
This will ignore aliases and functions from the shell environment and only built-in commands and external commands will be processed.
break built-in command will work as follows:
$ builtin –n break
This will make the break built-in to be disabled and the external command break will be processed.
$ enable
|
. |
command |
eval |
history |
pwd |
test |
|
.. |
compgen |
exec |
jobs |
read |
times |
|
[ |
complete |
exit |
kill |
readarray |
trap |
|
alias |
compopt |
export |
let |
readonly |
true |
|
bg |
continue |
false |
local |
return |
type |
|
bind |
declare |
fc |
logout |
set, unset |
typeset |
|
break |
dirs |
fg |
mapfile |
shift |
ulimit |
|
builtin |
disown |
getopts |
popd |
shopt |
umask |
|
caller |
echo |
hash |
printf |
source |
unalias |
|
cd |
enable |
help |
pushd |
suspend |
wait |
$ enable –n built-in-command
For example: $ enable –n test
In this case, in my shell, if we have to test an external command, then instead of the internal test command, the external test command will be executed.
In Shell scripting, we need to check if the last command has successfully executed or not. For example, whether a file or directory is present or not. As per the result, our Shell script will continue processing.
For this purpose, the BASH shell has one status variable ?. The status of the last command execution is stored in ?. The range of numerical value stored in ? will be from 0 to 255. If successful in execution, then the value will be 0; otherwise, it will be non-zero, which is as follows:
$ ls $ echo $? 0
Here, zero as the return value indicates success.
In the next case, we see:
$ ls /root $ echo $? 2
Here, non-zero value indicates an error in the last command execution.
In the next case, we see:
$ find / -name hello.c $ echo $?
The return value will indicate if the hello.c file is present or not!
In the keyboard, there is one interesting key, the backward quote such as "`". This key is normally situated below the Esc key. If we place text between two successive back quotes, then echo will execute those as commands instead of processing them as plane text.
Alternate syntax for $(command) is the backtick character "`", which we can see as follows:
$(command) or `command`
For example:
$ echo "Hello, whoami"
Hello, whoami:
Hello, whoami
$ echo "Hello, `whoami`." Hello, student
When we enclose whoami text in the "`" character, the same text which was printed as plain text will run as a command, and the command output will be printed on screen.
$ echo "Hello, $(whoami)." Hello, student.
Same like the earlier explanation.
echo "Today is date"
Output:
Today is date
A similar example:
echo "Today is `date`"
Or:
echo "Today is $(date)"
Output:
Today is Fri Mar 20 15:55:58 IST 2015
Further, similar examples include:
$ echo $(cal)

In this example, new lines are lost.
Another example:
$ echo "$(cal)"
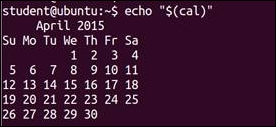
Here, the display is properly formatted.
Next, nesting of commands is as follows:
$ pwd /home/student/work $ dirname="$(basename $(pwd)) " $ echo $dirname
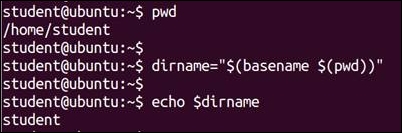
This command shows us that the base directory for the current directory is student.
Commands can also be combined in such a way that they are executed in a particular sequence.
A command line can consist of multiple commands. Each command is separated by a semicolon, and the command line is terminated with a newline. The exit status is that of the last command in the chain of commands.
The first command is executed, and the second one is started as soon as the first one has finished.
$ w; date
Output:

$ w ; date > whoandwhen
Output of the date command will be redirected to the whoandwhen file.
In the preceding example, we can see that when we put multiple commands on the same line, but separated by the ";" command, then those commands execute sequentially one by one.
$ date; who am i Tue Mar 10 23:21:38 PDT 201 student pts/0 2015-03-10 23:12 (:0.0)
In the preceding example, the date command is executed first and the who am I command will be executed next. Both the commands are typed on same lines, separated by the ";" " command.
Commands may also be grouped so that all of the output is either piped to another command or redirected to a file.
$ ( ls; pwd; date ) > outputfile
The output of each of the commands is sent to the file called outputfile. The spaces inside the parentheses are necessary.
$ ( w ; date ) > whoandwhen
The output of the w command and date will be redirected to the whoandwhen file:
$ (echo "***x.c***";cat x.c) > log.txt
Output:
This redirects the content of x.c with a heading ***x.c*** to the file out.
$ (pwd; ls; date) > log.txt
Output:
This redirects output of commands pwd, ls, and date in the log.txt file.
Let's now take a look at logical operators.
The first command is started in the background to continue until it has finished; immediately after starting first command, the second command is started and it will run in the foreground:
$ find / -name "*.z" & s ---------------- ----- Command1 command2
In the preceding example, first command such as find will start running in the background and while the find command is running in background, the ls command will start running in foreground.
The second command is only started if the first command is successful. To achieve this, the shell checks the exit (return) status of the first command and starts the second command only if and when that exit status is found to be "0".
$ ls /home/ganesh && echo "Command executed successfully" Since we are working as user ganesh, $ ls /root && echo "Command executed successfully"
Since we are working as a normal user, we cannot access the /root directory. Therefore, nothing will be printed on screen.
The second command is only started if the first command fails. The shell checks the exit status of the first command and starts the second command only if that exit status is not equal to "0".
$ ls /root || echo "Command execution failed"
Example:
$ ls || echo "command ls failed"
In the preceding example, if ls runs successfully, then echo will not be called. If the ls command fails such as $ ls /root and if user is not root, then ls will fail and the echo command will print command ls failed.
When && or || are used, the exit status of the first command is checked first, then the decision to perform the next will be taken.
For example:
$ ls $ echo $? 0 $ ls /root ls: /root: Permission denied $ echo $? 1 $ tar cvzf /dev/st0 /home /etc | | mail -s "Something went wrong with the backup" root
If we give the command as follows:
$ cd /home/student/work/temp/; rm –rf *
Initially, the shell will change to the /home/student/work/temp folder, and then it will delete all files and folders.
If we give the command as follows:
cd /backup/ol/home/student/work/temp/ && rm * -rf
This will first change to the required folder, and then the rm command will be called for deletion. The problem with ";" is that even if the shell fails to change to the required folder, the rm command will execute and it will delete all the files and folders from your original folder. This will be really dangerous.
For example:
$ [[ "a" = "b" ]]; echo ok ok
In this case, the [[ ]] expression will evaluate to false. Since the semicolon will not check the status of the earlier command, ok will be printed even if the first [[ ]] fails.
$ [[ "a" = "b" ]] && echo ok
In this case, the [[ ]] expression will evaluate to false. As the first expression is false, the "&&" operator will not proceed to execute the next command.
In this case, ok will be printed only if [[ ]] is true.
We have already used pipes in many earlier sessions. It is a tool for inter-process communication.
$ command_1 | command_2
In this case, the output of command_1 will be send as an input to command_2. The limitation is that the communication is half duplex. This means the data can flow in only one direction. Normally for inter-process communication, you need to open files then get the file descriptor. This will be used to write to the pipe file. Again, we need to create a Fifo file by special commands. The preceding technique simplifies all this process. We only need to insert "|" in between the two processes. The operating system creates one intermediate buffer. This buffer is used for storing the data from one command and will be used again for the second command.
A simple example is as follows:
$ who | wc
The preceding simple command will be carrying out three different activities. First, it will copy the output of the who command to the temporary file. Then the wc command will read the temporary file and display the result. Finally, the temporary file will be deleted.
Normally, there will be two processes. The first command is the writer process. The second process is the reader process. The writer process will write to temp_file and the reader will read from temp_file. Examples of writer processes are ps, ls, and date. Examples of reader processes are wc, cat, and sort.
In this chapter, you learned about how the shell interprets any command entered on the command line. We also studied command substitution and separators in detail.
In the next chapter, you will learn about variables and environment variables. You will also learn about how to export environment variables, and then you will learn about read only variables, command line arguments, and arrays.
In the last chapter, you learned about how shell interprets any command, which is entered in the terminal or the command line. We also studied command substitution and separators in detail.
In this chapter, we will cover following topics:
Let's learn about creating variables in shell.
Declaring variables in Linux is very easy. We just need to use the variable name and initialize it with the required content.
$ person="Ganesh Naik"
To get the content of the variable we need to prefix $ before the variable.
For example:
$ echo person person $ echo $person Ganesh Naik
The unset command can be used to delete a variable:
$ a=20 $ echo $a $ unset a
The unset command will clear or remove the variable from shell environment as well.
$ person="Ganesh Naik" $ echo $person $ set
Here, the
set command will show all variables declared in shell.
$ declare -x variable=value
Here, the declare command with the –x option will make it an environmental or global variable. We will understand more about environmental variables in the next sessions.
$ set
Again here, the set command will display all variables as well as functions that have been declared.
$ env
Here, the env command will display all environmental variables.
variable=value
Whenever we declare a variable, that variable will be available in the current terminal or shell. This variable will not be available to any other processes, terminal, or shell.
Let's write a Shell script as follows:
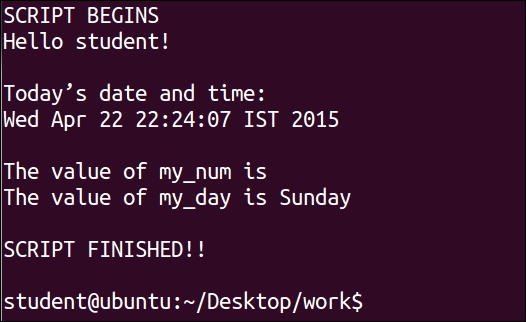
#!/bin/bash # This script clears the window, greets the user, # and displays the current date and time. clear # Clear the window echo "SCRIPT BEGINS" echo "Hello $LOGNAME!" # Greet the user echo echo "Today's date and time:" date # Display current date and time echo # Will print empty line my_num=50 my_day="Sunday" echo "The value of my_num is $my_num" echo "The value of my_day is $my_day" echo echo "SCRIPT FINISHED!!" echo
Let's see the effect of $, "", '' and \ on variable behavior:
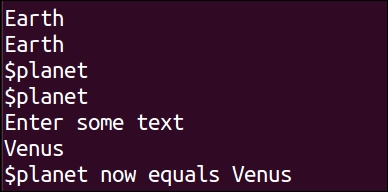
#!/bin/bash planet="Earth" echo $planet echo "$planet" echo '$planet' echo \$planet echo Enter some text read planet echo '$planet' now equals $planet exit 0
Output:
You will learn about the read command in the next chapters. Using read, we can ask the user to enter data, which can be stored in a variable.
From the preceding script execution, we can observe that $variable and "$ variable" can be used for displaying the content of the variable. But if we use '$variable' or \$variable, then special functionality of the $ symbol is not available. The $ symbol is used as a simple text character instead of utilizing its special functionality of getting variable content.
Environmental variables are inherited by any subshells or child processes. For example, HOME, PATH. Every shell terminal has the memory area called environment. Shell keeps all details and settings in the environment. When we start a new terminal or shell, this environment is created every time.
We can view environment variables by the following command:
$ env
Or:
$ printenv
Output:

This is the output of the $ env command. The list of environment variables will be quite extensive. I advise you to browse through the complete list. We can change the content of any of these environment variables.
Environmental variables are defined in a terminal or shell. They will be available in subshells or child shells created from the current shell terminal. You will learn about these activities in the next few sections. You have already learned that every command in shell creates a new subshell from the current shell.
The following is a brief summary of the few environmental variables:
Whenever any user logs in, the /etc/profile Shell script is executed.
For every user, the .bash_profile Shell script is stored in the home folder. The complete path or location is /home/user_name/.profile.
Whenever a new terminal is created, every new terminal will execute the script .bashrc, which is located in the home folder of every user.
In the current shell, we can create and store user defined variables. These may contain characters, digits, and "_". A variable should not start with a digit. Normally for environment variables, upper case characters are used.
If we create a new variable, it will not be available in subshells. The newly created variable will be available only in the current shell. If we run Shell script, then local variables will not be available in the commands called by Shell script. Shell has one special variable $$. This variable contains the process ID of the current shell.
Let's try a few commands:
$ echo $$ 1234
This is the process ID of the current shell.
$ name="Ganesh Naik" $ echo $name Ganesh Naik
We declared the variable name and initialized it.
$ bash
This command will create a new subshell.
$ echo $$ 1678
This is the process ID of the newly created subshell.
$ echo $name
Nothing will be displayed, as the local variables from the parent shell are not inherited in the newly created child shell or subshell:
$ exit
We will exit the subshell and return to the original shell terminal.
$ echo $$ 1234
This is the process ID of the current shell or parent shell.
$ echo $name Ganesh Naik
This is displaying the variable's presence in the original shell or parent shell.
Variables created in the current shell will not be available in a subshell or child shell. If we need to use a variable in a child shell, then we need to export them using the export command.
Using the export command, we are making variables available in the child process or subshell. But if we declare new variables in the child process and export it in the child process, the variable will not be available in parent process. The parent process can export variables to child, but the child process cannot export variables to the parent process.
Whenever we create a Shell script and execute it, a new shell process is created and the Shell script runs in that process. Any exported variable values are available to the new shell or to any subprocess.
We can export any variable as follows:
$ export NAME
Or:
$ declare -x NAME
Let's understand the concept of exporting the variable by the following example:
$ PERSON="Ganesh Naik" $ export PERSON $ echo $PERSON Ganesh Naik $ echo $$ 515
The process ID of the current shell or parent shell is 515.
$ bash
This will start a subshell.
$ echo $$ 555
This is the process ID of new or subshell.
$ echo $PERSON Ganesh Naik $ PERSON="Author" $ echo $PERSON Author $ exit
This will terminate the subshell, and will be placed in the parent shell.
$ echo $$ 515
This is the process ID of the parent shell.
$ echo $PERSON Author
Let's write Shell script to use the concept we learned:
# Ubuntu Timezone files location : /usr/share/zoneinfo/ # redhat "/etc/localtime" instead of "/etc/timezone" # In Redhat # ln -sf /usr/share/zoneinfo/America/Los_Angeles /etc/localtime export TZ=America/Los_Angeles echo "Your Timezone is = $TZ" date export TZ=Asia/Tokyo echo "Your Timezone is = $TZ" date unset TZ echo "Your Timezone is = $(cat /etc/timezone)" # For Redhat or Fedora /etc/localtime date
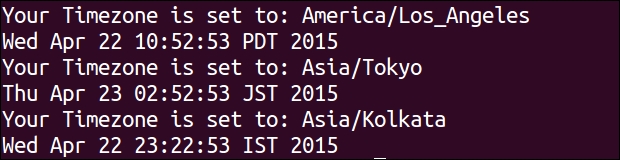
The date command checks the TZ environmental variable. We initialized the TZ for Los_Angeles, then to Tokyo, and then finally we removed it. We can see the difference in the date command output.
Let's write another Shell script to study the parent and child process and exportation of variables.
Create the export1.sh Shell script:
#!/bin/bash foo="The first variable foo" export bar="The second variable bar" ./export2.sh Create another shell script export2.sh #!/bin/bash echo "$foo" echo "$bar"
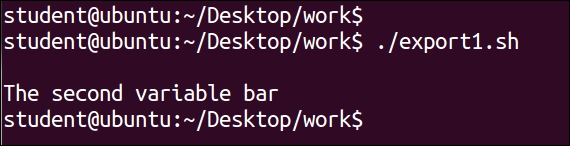
The Shell script export1.sh runs as a parent process and export2.sh is started as a child process of export1.sh. We can clearly observe that the variable bar, which was exported, is available in the child process; but variable foo, which was not exported, is not available in the child process.
During Shell scripting, we may need a few variables, which cannot be modified. This may be needed for security reasons. We can declare variables as read-only using following command read-only:
The usage is as follows:
$ readonly currency=Dollars
Let's try to remove the variable:
$ unset currency bash: unset: currency: cannot unset: readonly variable
If we try to change or remove the ready-only variable in the script, it will give the following error:
#!/bin/bash AUTHOR="Ganesh Naik" readonly AUTHOR AUTHOR="John"
This would produce the following result:
/bin/sh: AUTHOR: This variable is read only.
Another technique:
Declare -r variable=1 echo "variable=$variable" (( var1++ ))
Output after execution of the script:
line 4: variable: readonly variable
Command line arguments are required for the following reasons:
Check the following command line:
student@ubuntu:~$ my_program arg1 arg2 arg3
If my_command is a bash Shell script, then we can access every command line positional parameters inside the script as follows:
$0 would contain "my_program" # Command $1 would contain "arg1" # First parameter $2 would contain "arg2" # Second parameter $3 would contain "arg3" # Third parameter
The following is the summary of positional parameters:
|
$0 |
Shell script name or command |
|
$1–$9 |
Positional parameters 1–9 |
|
${10} |
Positional parameter 10 |
|
$# |
Total number of parameters |
|
$* |
Evaluates to all the positional parameters |
|
$@ |
Same as $*, except when double quoted |
|
"$*" |
Displays all parameters as "$1 $2 $3", and so on |
|
"$@" |
Displays all parameters as "$1" "$2" "$3", and so on |
Let's create a script param.sh as follows:
#!/bin/bash echo "Total number of parameters are = $#" echo "Script name = $0" echo "First Parameter is $1" echo "Second Parameter is $2" echo "Third Parameter is $3" echo "Fourth Parameter is $4" echo "Fifth Parameter is $5" echo "All parameters are = $*"
Then as usual, give execute permission to script and then execute it:
./parameter.sh London Washington Delhi Dhaka Paris
Output:
Total number of parameters are = 5 Command is = ./parameter.sh First Parameter is London Second Parameter is Washington Third Parameter is Delhi Fourth Parameter is Dhaka Fifth Parameter is Paris All parameters are = London Washington Delhi Dhaka Paris
Many times we may not pass arguments on the command line, but we may need to set parameters internally inside the script.
We can declare parameters by the set command as follows:
$ set USA Canada UK France $ echo $1 USA $ echo $2 Canada $ echo $3 UK $ echo $4 France
We can use this inside the set_01.sh script as follows:
#!/bin/bash set USA Canada UK France echo $1 echo $2 echo $3 echo $4
Run the script as:
$ ./set.sh
Output:
USA Canada UK France
|
Table declare Options | |
|---|---|
|
Option |
Meaning |
|
–a | |
|
–f | |
|
–F | |
|
–i | |
|
–r | |
|
–x | |
We give commands as follows:
set One Two Three Four Five echo $0 # This will show command echo $1 # This will show first parameter echo $2 echo $* # This will list all parameters echo $# # This will list total number of parameters echo ${10} ${11} # Use this syntax for parameters for 10th and # 11th parameters
Let us write script set_02.sh as follows:
#!/bin/bash echo The date is $(date) set $(date) echo The month is $2 exit 0
Output:
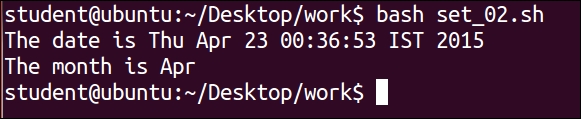
In the script $(date), the command will execute and the output of that command will be used as $1, $2, $3 and so on. We have used $2 to extract the month from the output.
Let's write script set_03.sh as follows:
#!/bin/bash echo "Executing script $0" echo $1 $2 $3 set eins zwei drei echo "One two three in German are:" echo "$1" echo "$2" echo "$3" textline="name phone address birthdate salary" set $textline echo "$*" echo 'At this time $1 = ' $1 'and $4 = ' $4
Output:
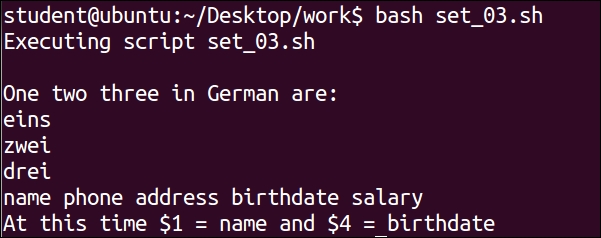
Using shift, we can change the parameter to which $1 and $2 are pointing to the next variable.
Create a script shift_01.sh as follows:
#!/bin/bash echo "All Arguments Passed are as follow : " echo $* echo "Shift By one Position :" shift echo "Value of Positional Parameter $ 1 after shift :" echo $1 echo "Shift by Two Positions :" shift 2 echo "Value of Positional Parameter $ 1 After two Shifts :" echo $1
Execute the command as follows:
$ chmod +x shift_01.sh $ ./shift_01.sh One Two Three Four
Output:
student@ubuntu$ ./shift_01.sh One Two Three Four
All arguments passed are as follows:
One Two Three Four
Shift by one position.
Here, the value of the positional parameter $1 after shift is:
Two
Shift by two positions.
The value of the positional parameter $1 after two shifts:
Four
We observed that initially $1 was One. After shift, $1 will be pointing to Two. Once shift is done, the value in position 1 is always destroyed and is inaccessible.
Create a shift_02.sh script as follows:
#!/bin/bash
echo '$#: ' $#
echo '$@: ' $@
echo '$*: ' $*
echo
echo '$1 $2 $9 $10 are: ' $1 $2 $9 $10
echo
shift
echo '$#: ' $#
echo '$@: ' $@
echo '$*: ' $*
echo
echo '$1 $2 $9 are: ' $1 $2 $9
shift 2
echo '$#: ' $#
echo '$@: ' $@
echo '$*: ' $*
echo
echo '$1 $2 $9 are: ' $1 $2 $9
echo '${10}: ' ${10}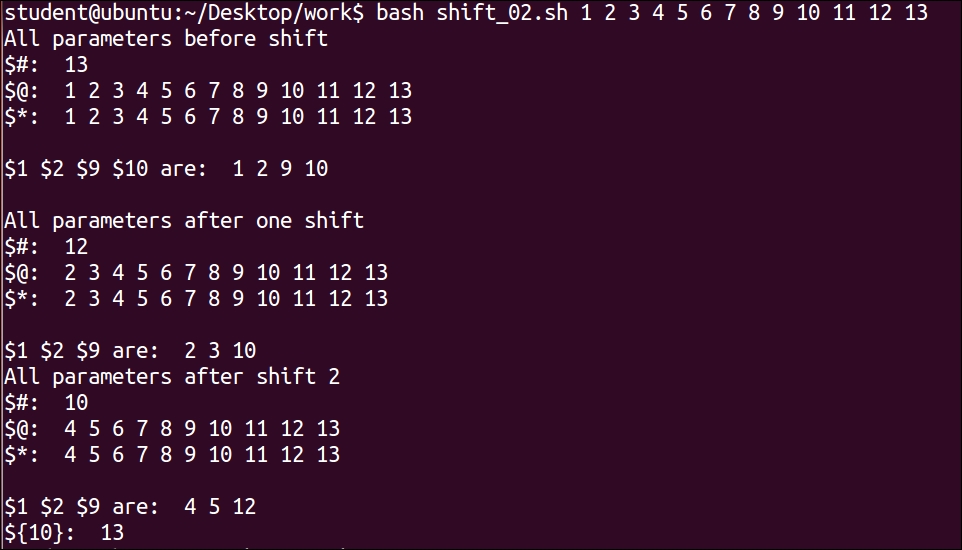
In this script execution, the following output shows:
$1 to $13 were numerical values 1 to 13, respectively.$1 shifted to number 2 and accordingly all $numbers are shifted.2, then $1 shifted to number 4 and accordingly all $numbers are shifted.In certain situations, we may need to reset original positional parameters.
Let's try the following:
set Alan John Dennis
This will reset the positional parameters.
Now $1 is Alan, $2 is John, and $3 is Dennis.
Inside the scripts, we can save positional parameters in a variable as follows:
oldargs=$*
Then, we can set new positional parameters.
Later on, we can bring back our original positional parameters as follows:
set $oldargs
Command line parameters passed along with commands are also called as positional parameters. Many times, we need to pass options such as –f and -v along with positional parameter.
Let's learn the example for passing the –x or –y options along with commands. Write the Shell script getopt.sh as follows:
#!/bin/bash
USAGE="usage: $0 -x -y"
while getopts :xy: opt_char
do
case $opt_char in
x)
echo "Option x was called."
;;
y)
echo "Option y was called. Argument called is $OPTARG"
;;
\?)
echo "$OPTARG is not a valid option."
echo "$USAGE"
;;
esac
doneExecute this program:
$ ./getopt.sh
You will be learning switch and case statements in the next chapters. In this script, if option –x is passed, a case statement for x will be executed. If the –y option is passed, then a case statement for –y will be executed. Since no option is passed, there will not be any output on the screen.
$ ./getopt.sh –x
Output:
Option x was called." $ ./getopt.sh –y my_file Output: Option y was called. Argument called is my_file. $ ./getopt.sh –x –y my_file Output: Option x was called. Option y was called. Argument called is my_file. $ ./getopt.sh –y my_file -x Output: Option y was called. Argument called is my_file. Option x was called.
Many times we may pass certain parameters from the command line; sometimes, we may not pass any parameters at all. We may need to have certain default values to be initialized to certain variables.
We will understand this concept by the following script.
Create a default_argument_1.sh script as follows:
#!/bin/bash
MY_PARAM=${1:-default}
echo $MY_PARAMExecute the script and check:
$ chmod +x default_argument_1.sh One $ ./default_argument_1.sh One One $ ./default_argument_1.sh default
Create another default_argument_2.sh script:
#!/bin/bash
variable1=$1
variable2=${2:-$variable1}
echo $variable1
echo $variable2Output:
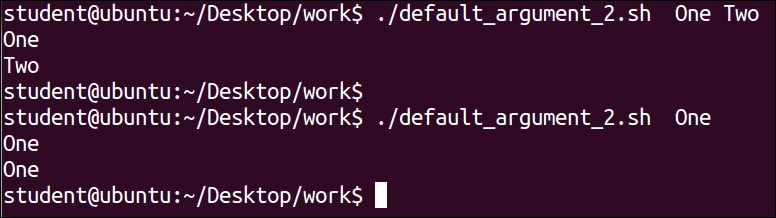
We executed the script two times:
variable1 was $1 and variable2 was $2.$1 was taken as a default argument for $2. Therefore, variable1 was used as default variable2. If we do not give a second parameter, then the first parameter is taken as a default second parameter.An array is a list of variables. For example, we can create an array FRUIT, which will contain many fruit names. The array does not have a limit on how many variables it may contain. It can contain any type of data. The first element in an array will have the index value as 0:
student@ubuntu:~$ FRUITS=(Mango Banana Apple) student@ubuntu:~$ echo ${FRUITS[*]} Mango Banana Apple student@ubuntu:~$ echo $FRUITS[*] Mango[*] student@ubuntu:~$ echo ${FRUITS[2]} Apple student@ubuntu:~$ FRUITS[3]=Orange student@ubuntu:~$ echo ${FRUITS[*]} Mango Banana Apple Orange
You will learn about creating an array in the Bash shell.
If the array name is FRUIT, then we can create an array as follows:
FRUIT[index]=value
Index is the integer value. It should be 0 or any positive integer value.
We can also create an array as follows:
$ declare -a array_name $ declare -a arrayname=(value1 value2 value3)
Example:
$ declare -a fruit=('Mango' 'Banana' 'Apple' 'Orange' 'Papaya') $ declare -a array_name=(word1 word2 word3 ...) $ declare -a fruit=( Pears Apple Mango Banana Papaya ) $ echo ${fruit[0]} Pears $ echo ${fruit[1]} Apple $ echo "All the fruits are ${fruit[*]}" All the fruits are Pears Apple Mango Banana Papaya $ echo "The number of elements in the array are ${#fruit[*]}" The number of elements in the array are 3 $ unset fruit or unset ${fruit[*]}
Once we have initialized an array, we can access it as follows:
${array_name[index]}
We will create the script array_01.sh as follows:
#!/bin/bash
FRUIT[0]="Pears"
FRUIT[1]="Apple"
FRUIT[2]="Mango"
FRUIT[3]="Banana"
FRUIT[4]="Papaya"
echo "First Index: ${FRUIT[0]}"
echo "Second Index: ${FRUIT[1]}"output:
$ chmod +x array_01.sh $./array_01.sh First Index: Pears Second Index: Apple
To display all the items from the array, use the following commands:
${FRUIT[*]} ${FRUIT[@]}
Create an array_02.sh script as follows:
#!/bin/bash
FRUIT[0]="Pears"
FRUIT[1]="Apple"
FRUIT[2]="Mango"
FRUIT[3]="Banana"
FRUIT[4]="Papaya"
echo "Method One : ${FRUIT[*]}"
echo "Method Two : ${FRUIT[@]}"Output:
$ chmod +x array_02.sh $./ array_02.sh Method One : Pears Apple Mango Banana Papaya Method Two : Pears Apple Mango Banana Papaya
Let's see few more examples:
$ city[4]=Tokyo
The fourth member of the array, city, is being assigned Tokyo. Since it is the only element in the array, array the size will be 1.
$ echo ${city[*]} Tokyo
The size of the array city is 1, since any other member of the array is not yet initialized.
${city[*]} will display the only element of the array city.
$ echo ${city[0]}
city[0] has no value, and neither does city[1] and city[2].
$ echo ${city[4]} Tokyo
city[4] has the name of city as Tokyo.
$ countries=(USA [3]=UK [2]=Spain)
The array countries are being assigned USA at index 0, UK at index 3, and Spain at index 2. We can observe here that it does not matter in which sequence we are initializing the members of the array. They need not be in same sequence.
$ echo ${countries[*]} USA Spain UK $ echo ${countries[0]} USA
The first element of the countries array is printed.
$ echo ${countries[1]}
There is nothing stored in countries [1].
$ echo ${countries[2]} Spain
The third element of the countries array, countries [2], was assigned Spain.
$ echo ${countries[3]} UK
The fourth element of the countries array, countries [3], was assigned UK.
In this chapter, you learned about variables and environment variables. You also learned about how to export environment variables, set, shift, read-only variables, command line arguments, and about creating and handling arrays.
In the next chapter, you will learn about debugging, the here operator, interactive Shell scripts for taking input from keyboard, and file handling.
In the last chapter, you learned about shell and environment variables. You also learned about how to export environment variables, read-only variables, command-line arguments, and create/handle arrays.
In this chapter, we will cover following topics:
here operator (<<) and here string (<<<)The read command is a shell built-in command for reading data from a file or keyboard.
The read command receives the input from the keyboard or a file until it receives a newline character. Then, it converts the newline character into a null character:
read variable echo $variable
This will receive text from the keyboard. The received text will be stored in the variable.
–p option. The option -p displays the text that is placed after –p on the screen:#!/bin/bash # following line will print "Enter value: " and then read data # The received text will be stored in variable value read -p "Enter value : " value
Output:
Enter value : abcd
read command, then the received data or text will be stored in a special built-in variable called REPLY. Let's write a simple script read_01.sh, shown as follows:#!/bin/bash echo "Where do you stay ?" read # we have not supplied any option or variable echo "You stay in $REPLY"
Save the file, give the permission to execute, and run the script as follows:
$ chmod u+x read_01.sh $ ./read_01.sh
Output:
"Where do you stay?" Mumbai "You stay at Mumbai"
read_02.sh. This script prompts the user to enter their first and last name to greet the user with their full name:#!/bin/bash echo "Enter first Name" read FIRSTNAME echo "Enter Last Name" read LASTNAME NAME="$FIRSTNAME $LASTNAME" echo "Name is $NAME"
$ read value1 value2 value3
Let's write Shell script read_03.sh, shown as follows:
#!/bin/bash echo "What is your name?" read fname mname lname echo "Your first name is : $fname" echo "Your middle name is : $mname" echo "Your last name is : $lname"
Save the file, give the permission to execute, and run the script as follows:
What is your name? Ganesh Sanjiv Naik "Your first name is : Ganesh" "Your middle name is : Sanjiv" "Your last name is : Naik"
#!/bin/bash
echo -n "Name few cities? "
read -a cities
echo "Name of city is ${cities[2]}."Save the file, give the permission to execute, and run the script as follows:
Name few cities? Delhi London Washington Tokyo Name of city is Washington.
In this case, the list of cities is stored in the array of cities. The elements in the array are here:
cities[0] = Delhi cities[1] = London cities[2] = Washington cities[3] = Tokyo
The index of the array starts with 0, and in this case, it ends at 3. In this case, four elements are added in the cities[] array.
read command along with one unused variable, shown as follows:Echo "Please press enter to proceed further " read temp echo "Now backup operation will be started ! "
The following table summarizes various read command-related options that you learned in the previous sections:
It is a special type of block of text or code. It is also a special form of I/O redirection. It can be used to feed the command list to an interactive program.
The syntax of the usage of the here document or the << operator is as follows:
command << HERE text1 ….. text 2…. HERE
This tells the shell that the command should receive the data from a current source, such as the here document, until the pattern is received. In this case, the pattern is HERE. We have used the delimiter as HERE. We can use any other word as the delimiter, such as quite or finish. All the text reads up to a pattern; or the HERE text is used as an input for command. The text or file received by the command is called as the Here document:
$ cat << QUIT > first input line > ... > last input line > QUIT
The block of text inserted after and before QUIT will be treated as a file. This content will be given as input to the command cat. We will also see more examples with various other commands, such as sort, wc, and similar.
Let's write the script here_01.sh:
#!/bin/bash cat << quit Command is $0 First Argument is $1 Second Argument is $2 Quit Save the file, give execute permission and run the script as follows: $ chmod here_01.sh $./here_01.sh Monday Tuesday
Output:
Command is here_01.sh First Argument is Monday Second Argument is Tuesday
The text block created in the preceding script between the quit words is called as the here document. We can treat this here document as a separate document. It can also be treated as multiple line input redirected to a Shell script.
Let's learn a few more sample programs.
Let's write script for using the sort command along with the here document:
here_02.sh as follows:#!/bin/bash sort << EOF > cherry > mango > apple > banana > EOF
$ chmod u+x here_02.sh $ ./here_02.sh
apple banana cherry mango
In this script, the here document is enclosed between the EOF pattern. We have used the here document to supply text to the sort command.
Let's write script for using the wc command along with the here document:
here_03.sh:#!/bin/bash wc -w << EOF There was major earthquake On April 25, 2015 in Nepal. There was huge loss of human life in this tragic event. EOF
$ chmod u+x here_03.sh $ ./here_03.sh
21
In this script, we have used the here document as an input for the wc command to calculate the number of words:
Tape backup using << here operator
Let's write a script for taking the tape backup by using the tar command and the here document:
here_04.sh:#!/bin/bash # We have used tar utility for archiving home folder on tape tar -cvf /dev/st0 /home/student 2>/dev/null # store status of tar operation in variable status [ $? -eq 0 ] && status="Success" || status="Failed" # Send email to administrator mail -s 'Backup status' ganesh@levanatech.com << End_Of_Message The backup job finished. End date: $(date) Status : $status End_Of_Message
$ chmod u+x here_04.sh $ ./here_04.sh
This script uses the tar command to archive the home folder in the tape device, and then it sends mail to an administrator using the command mail. We have used the here document to feed data into the command mail.
The ed is a basic type of editor. We can edit text files using this editor:
here_05.sh:#!/bin/bash # flowers.txt contains the name of flowers cat flowers.txt ed flowers.txt << quit ,s/Rose/Lily/g w q quit cat flowers.txt
$ chmod u+x here_05.sh $ ./here_05.sh
Aster, Daffodil, Daisy, Jasmin, Lavender, Rose, Sunflower 59 59 Aster, Daffodil, Daisy, Jasmin, Lavender, Lily, Sunflower
In this script, we have used passed the here document to utility for editing the file flowers.txt. We replaced the Rose word with Lily.
All the users who are logged in will receive the message using the wall command:
here_06.sh:#!/bin/bash
# wall utility is used for sending message to all logged in users
wall << End_Of_Message
Tomorrow, on Friday evening, we will be celebrating
Birthday of few of our colleagues.
All are requested to be present in cafeteria by 3.30 PM.
John
End_Of_Message
echo "Message sent"$ chmod u+x here_06.sh $ ./here_06.sh
The command wall is used to send messages to the logged-in users. All the users that are logged in will receive the message.
FTP is a commonly used protocol to transfer data on websites. FTP stands for File Transfer Protocol. The following steps show the usage of FTP and data transfer:
here_07.sh:#!/bin/bash # Checking number of arguments passed along with command if [ $# -lt 2 ] then echo "Error, usage is:" echo "ftpget hostname filename [directory]." exit -1 fi hostname=$1 filename=$2 directory="." # Default value if [ $# -ge 3 ] then directory=$3 fi ftp <<End_Of_Session open $hostname cd $directory get $filename quit End_Of_Session echo "FTP session ended."
$ chmod u+x here_07.sh $ ./here_07.sh ftp.somehost.com index.html WWW
For a successful execution of the script, we need to set up an autologin for the ftp command. The here operator does not work well when the ftp command asks for a username and password.
Enter the following script to see how to avoid a variable substitution in these files:
here_no.sh, shown as follows:filename="test1" cat <<'Quoted_End_Marker' When we add quotes before and after here Document marker, we can include variables Such as $USER, $PATH, $name and similar Quoted_End_Marker
$ bash here_no.sh With quotes around the here document marker, you can include variable references such as $HOME, $filename, and $USER.
This script uses an ordinary here file, but it turns off the variable substitution. Otherwise, you would see the values of $HOME, $filename, and $USER in the output instead of the literal text. All of this is done by magically enclosing the end marker, Quoted_End_Marker, in quotes at the original reference. Do not enclose the marker in quotes at the end of the here file.
The here string is used for input redirection from text or a variable. Input is mentioned on the same line within single quotes ('').
The syntax is as follows:
$ command <<< 'string'
hereString_01.sh:#!/bin/bash wc –w <<< 'Good Morning and have a nice day !'
$ chmod u+x hereString_01.sh $ ./hereString_01.sh
8
In this example, the string
Good Morning and have a nice day ! is called as the here string.
In this section, you will learn about handling files for reading and writing. In Chapter 8, Automating Decision Making in Scripts, you will learn about checking various attributes of files along with decision making constructs, such as if, case, and similar.
The exec command is very interesting. Whenever we run any command in shell, the new subshell or process gets created, and the command runs in this newly created process. When we run any command as argument to the exec command, exec will replace the current shell with the command to be executed. It does not create or spawn a new process to run the command.
In the Bash shell environment, every process has three files opened by default. These are standard input, display, and error. The file descriptors associated with them are 0, 1, and 2 respectively. In the Bash shell, we can assign the file descriptor to any input or output file. These are called file descriptors.
The syntax for declaring output.txt as output is as follows:
exec fd > output.txt
This command will declare the number fd as an output file descriptor.
The syntax for closing the file is as follows:
exec fd<&-
To close fd, which is 5, enter the following:
exec 5<&-
We will try to understand these concepts by writing scripts.
Let's understand the opening, closing, and writing of a file.
Write a Shell script file_01.sh, shown as follows:
#!/bin/bash # We will open file for writing purpose # We are assigning descriptor number 3 for file sample_out.txt exec 3> sample_out.txt # We are sending output of command "echo" to sample_out.txt file echo "This is a test message for sample_out.txt file" >&3 # Run command date & store output in file sample_out.txt date >&3 # Closing file with file descriptor 3 exec 3<&-
Save the file, give the permission to execute, and run the script as follows:
$ chmod u+x file_01.sh $ ./file_01.sh $ cat sample_out.txt
Output:
This is a test message for sample_out.txt file Tue Sep 29 23:19:22 IST 2015
Let's write script to read from a file:
Write the script file_02.sh, shown as follows:
#!/bin/bash # We will open file sample_input.txt for reading purpose. # We are assigning descriptor 3 to the file. exec 3< sample_input.txt cat <&3 # Closing file exec 3<&-
Save the file, give the permission to execute, and run the script as follows:
$ chmod u+x file_02.sh
We will create the sample_input.txt file as follows:
$ echo "Hello to All" > sample_input.txt
Run the script and check the result:
$ ./file_02.sh
Output:
Hello to All
In the earlier examples, we opened the file either for reading or writing. Now, we will see how to open the file for reading and writing purposes:
exec fd<> fileName
If the file descriptor number is not specified, then 0 will be used in its place. The file will be created if it does not exist. This procedure is useful to update files.
Let's understand following script.
Write the Shell script file_03.sh as follows:
#!/bin/bash file_name="sample_out.txt" # We are assing fd number 3 to file. # We will be doing read and write operations on file exec 3<> $file_name # Writing to file echo """ Do not dwell in the past, do not dream of the future, concentrate the mind on the present moment. - Buddha """ >&3 # closing file with fd number 3 exec 3>&-
We can use command read to get data from a file to store it in variables. The procedure for using the read command to get text from a file is as follows:
read -u fd variable1 variable2 ... variableN
Now, we will see how to read from one file and write to another. Let's write script file_04.sh as follows:
#!/bin/bash # We are assigning descriptor 3 to in_file.txt exec 3< in_file.txt # We are assigning descriptor 4 to out_file.txt exec 4> out_file.txt # We are reading first line of input.txt read -u 3 line echo $line echo "Writing content of in_file.txt to out_file.txt" echo "Line 1 - $line " >&4 # Closing both the files exec 3<&- exec 4<&-
Save the file, give the permission to execute, and run the script as follows:
$ chmod u+x file_04.sh $ echo "Sun is at the center of Solar System." > in_file.txt $ cat in_file.txt
Output:
Sun is at the center of Solar System. $ ./file_04.sh
Output:
Sun is at the center of Solar System. Writing content of in_file.txt to out_file.txt $ cat out_file.txt
Output:
Line 1 - Sun is at the center of Solar System.
In this example, we read the complete line in the variable line and we used the same variable to write it to another file.
Let's write one more script file_05.sh to get the hostname and addresses:
#!/bin/sh cp /etc/hosts hosts2 grep -v '^#' hosts2 > hosts3 exec 3< hosts3 # opening hosts3 as input file exec 4> hostsfinal # opening hostsfinal as output file read <& 3 address1 name_1 extra_info read <& 3 address2 name_2 extra_info echo $name_1 $address1 >& 4 echo $name_2 $address2 >& 4 exec 3<&- # Closing hosts3 exec 4<&- # Closing hostsfinal
In this script, we used the variables address1, name_1, extra_info, address2, and name_2 to store useful information.
We will write the script to display the actual file descriptors associated with the file.
Let's write the script file_06.sh, shown as follows:
#!/bin/bash # we are assigning file descriptor 3 to input file test.txt exec 3< test.txt # we are assigning file descriptor 4 to output.txt exec 4> output.txt # we are using read command to read line from file read -u 3 line echo "Process id of current process is $$" my_pid=$$ echo "Currently following files are opened by $0 script :" ls -l /proc/$my_pid/fd # We are closing both files test.txt and output.txt exec 3<&- exec 4>&-
You will learn how to use the while loop and the read command to read a file line by line. You will learn more about the while loop in the upcoming chapters.
Let's write the script file_07.sh, shown as follows:
#!/bin/bash echo "Enter the name of file for reading" read file_name exec<$file_name while read var_line do echo $var_line done
For executing the preceding script, we will need to create a file with some text in it. Then, we will pass this file name for reading purposes.
The following is the syntax for storing the output of a command in a file:
Command >& fd ./script >& fd
The following is the illustrative example script file_08.sh:
#!/bin/bash exec 4> output.txt cat /proc/cpuinfo >&4 exec 3<&-
Save the file, give the permission to execute, and run the script as follows:
$ chmod u+x file_08.sh $ ./file_08.sh
Output:
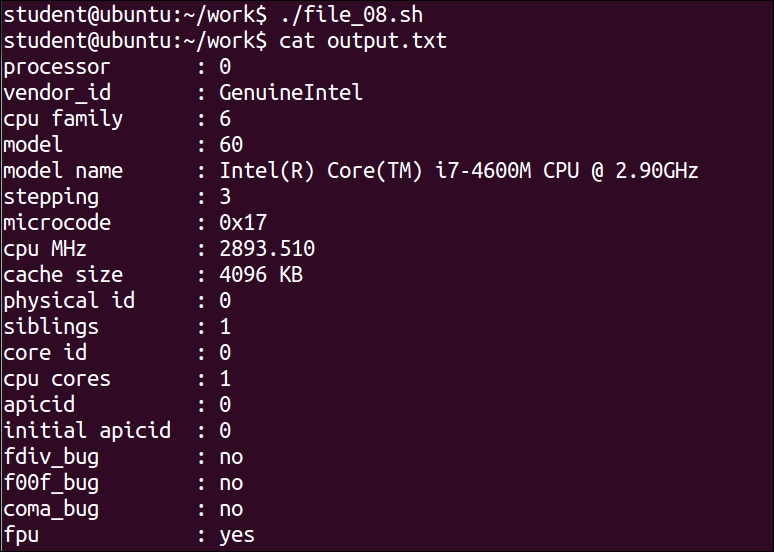
In this example, we have executed the command cat /proc/cpuinfo and we have stored the output in file output.txt.
The following is the summary of the exec command for using various file handling-related operations:
|
Command |
What it does |
|---|---|
|
exec command |
This command will replace shell and execute it. Therefore, it will not return to its original shell, which started it. |
|
exec > data.txt |
This opens |
|
exec < data.txt |
This opens |
|
exec 3< data.txt |
This opens |
|
sort <&3 |
This will sort |
|
exec 4>data.txt |
This opens |
|
ll >&4 |
The output of |
|
exec 6<&5 |
This makes fd 6 a copy of fd 5 |
|
exec 4<&– |
This closes fd 4. |
In the very old days of computer technology, the initial problems with computers were due to real insects. Due to this, fault finding was later called as finding a bug. Therefore, the process of finding and fixing the problems in computers was called debugging.
The process of debugging involves the following:
In the actual debugging process, you will need to do the following:
debug_sp: line 11: [7: command not found]file: line 6: unexpected EOF while looking for matching `"'These messages inform the user about the line numbers of script which contain errors.
In the Bash shell, the -n option is a shortcut for noexec (as in no execution). This option tells the shell to not run the commands. Instead, the shell just checks for syntax errors.
We can test the script as follows:
$ bash –n hello.sh
The –n option will tell the Bash shell to check the syntax in the Shell script; but not to execute the Shell script.
Another way to do this is as follows:
#!/bin/bash -n We have modified shebang line.
In this case, we can test the Shell script as follows:
$ chmod u+x hello.sh $ ./hello.sh
This option is safe, since the shell commands are not executed. We can catch incomplete if, for, while, case, and similar programming constructs as well as many more syntactical errors.
Let's write debug_01.sh:
#!/bin/bash
echo -n "Commands in bin directory are : $var"
for var in $(ls )
do
echo -n -e "$var "
do
# no error if "done" is typed instead of "do"Save the file, give the permission to execute, and run the script as follows:
$ chmod u+x debug_01.sh $ ./debug_01.sh
Output:
Commands in bin directory are : ./hello.sh: line 7: syntax error near unexpected token `do' ./hello.sh: line 7: `do' $ bash –n debug_01.sh
Output:
hello.sh: line 7: syntax error near unexpected token `do' hello.sh: line 7: `do'
The -v option tells the shell to run in a
verbose mode. In practice, this means that the shell will echo each command prior to executing the command. This will be useful in locating the line of script that has created an error.
We can enable the script execution with the –v option as follows:
$ bash –v hello.sh
Another way is by modifying the shebang line as follows:
#!/bin/bash -v
In this case, we can run the script with the –v option as follows:
$ chmod u+x hello.sh $ ./hello.sh
Let's write the script debug_02.sh, shown as follows:
#!/bin/bash echo "Hello $LOGNAME" echo "Today is `date` echo "Your present working directory is $PWD echo Good-bye $LOGNAME
Save the file, give the permission to execute, and run the script as follows:
$ chmod u+x debug_02.sh $ ./debug_02.sh
Output:
Hello student Today is Fri May 1 00:18:52 IST 2015 Your present working directory is /home/student/work Good-bye student
Let's enable the –v option for debugging, and run the script again as follows:
$ bash –v debug_02.sh
Output:
#!/bin/bash echo "Hello $LOGNAME" "Hello student" echo "Today is `date` date "Today is Fri May 1 00:18:52 IST 2015 echo "Your present working directory is $PWD "Your present working directory is /home/student/work echo Good-bye $LOGNAME Good-bye student
The -x option, short for xtrace or execution trace, tells the shell to echo each command after performing the substitution steps. Thus, we will see the value of variables and commands.
We can trace the execution of the Shell script as follows:
$ bash –x hello.sh
Instead of the previous way, we can modify the shebang line as follows:
#!/bin/bash -x
Let's test the earlier script debug_01.sh as follows:
$ bash –x hello.sh
Output:
$ bash –x debug_02.sh + echo Hello student Hello student + date + echo The date is Fri May 1 00:18:52 IST 2015 The date is Fri May 1 00:18:52 IST 2015 + echo Your home shell is /bin/bash Your home shell is /bin/bash + echo Good-bye student Good-bye student
Let's try the following programs with the –n –v –f and –x options. Here's a sample program—debug_03.sh:
#!/bin/bash echo "Total number of parameters are = $#" echo "Script name = $0" echo "First Parameter is $1" echo "Second Parameter is $2" echo "All parameters are = $*" echo "File names starting with f* in current folder are :" ls f*
Save the file, give the permission to execute, and run the script as follows:
$ chmod u+x debug_03.sh $ ./debug_03.sh One Two
Output:
"Total number of parameters are = 2" "Script name = ./debug_03.sh" "First Parameter is India" "Second Parameter is Delhi" "All parameters are = India Delhi" "File names starting with debug_02.sh debug_03.sh in current folder are: " debug_02.sh debug_03.sh
Let's test the same script with the –n option, which will check for syntax errors:
$ bash –n debug_03.sh One Two
Let's test the same script with the –v option:
$ bash –v debug_03.sh One Two
Output:
#!/bin/bash echo "Total number of parameters are = $#" "Total number of parameters are = 2" echo "Script name = $0" "Script name = debug_03.sh" echo "First Parameter is $1" "First Parameter is India" echo "Second Parameter is $2" "Second Parameter is Delhi" echo "All parameters are = $*" "All parameters are = India Delhi" echo "File names starting with d* in current folder are :" "File names starting with debug_02.sh debug_03.sh in current folder are: " ls d* debug_02.sh debug_03.sh
Let us test the same script with the –x option:
$ bash –x debug_03.sh One Two
Output:
+ echo $'\342\200\234Total' number of parameters are = $'2\342\200\235' "Total number of parameters are = 2" + echo $'\342\200\234Script' name = $'debug_03.sh\342\200\235' "Script name = debug_03.sh" + echo $'\342\200\234First' Parameter is $'India\342\200\235' "First Parameter is India" + echo $'\342\200\234Second' Parameter is $'Delhi\342\200\235' "Second Parameter is Delhi" + echo $'\342\200\234All' parameters are = India $'Delhi\342\200\235' "All parameters are = India Delhi" + echo $'\342\200\234File' names starting with debug_02.sh debug_03.sh in current folder are $':\342\200\234' "File names starting with debug_02.sh debug_03.sh in current folder are: " + ls debug_02.sh debug_03.sh debug_02.sh debug_03.sh
Let's test one more program, which will give a syntax error during the –n and –x options debugging. Write the Shell script debug_04.sh as follows:
#!/bin/bash
echo "Commands in bin directory are : $var"
for var in $(ls )
do
echo -n -e "$var "
doSave the file, give the permission to execute, and run the script as follows:
$ chmod u+x debug_04.sh $ bash –n debug_04.sh
Output:
debug_04.sh: line 7: syntax error near unexpected token `do' debug_04.sh: line 7: `do'
The preceding program has a syntax error on line number 7. The word do has an error. We need to change word "do" to "done".
The following is a summary of various debugging options used for debugging, such as -x, -v, and -n with their details:
$ bash –n script_name // interpretation without execution $ bash –v script_name // Display commands in script $ bash –x script_name // Trace the execution of script $ bash –xv script_name // Enable options x and v for debugging $ bash +xv script_name //Disable options x and v for debugging
Most of the time, we invoke the debugging mode from the first line of script. This debugging mode will remain active until the last line of code. But many times, we may need to enable debugging for a particular section of script. By using the set command, we can enable and disable debugging at any point in our Shell script:
set -x section of script set +x
Consider the following script:
#!/bin/bash str1="USA" str2="Canada"; [ $str1 = $str2 ] echo $? Set –x [ $str1 != $str2 ] echo $? [ -z $str1 ] echo $? Set +x [ -n $str2 ] echo $? Exit 0
In this case, the debugging will be enabled after the set -x and will be disabled immediately after the set +x.
The following table summarises the various options for the set command:
For general debugging, we can use the vi editor along with certain options.
During debugging, many times we search for a pattern throughout the complete document. It is preferable to highlight the searched item. We will enable search pattern highlighting by using the following command in the vi editor when the document is opened:
:set hlsearch :set ic vi –b filename
We can even modify the vi editor configuration file—.exrc or .vimrc so that we need not give the previous command again and again.
If we follow certain good practices, then we will face errors. Even if errors are found, these will be easier to debug:
if [ $rate -lt 3 ] then echo "Sales tax rate is too small." fi
WORKING_DIR=$HOME/work if [ -e $WORKING_DIR] then # Do something.... fi
In this chapter, you learned about debugging, the here operator, interactive Shell scripts for taking input from the keyboard, and file handling.
In the next chapter, you will learn about arithmetic and various operations, such as addition, subtraction, multiplication, division, and the extraction of the modulus of numerical variables.
In the last chapter, you learned about debugging, the here operator, interactive Shell scripts for taking input from the keyboard, and file handling.
In this chapter, we will cover the following arithmetic operations topics:
We can perform arithmetic operations in various ways, such as using declare, let, expr, and arithmetic expressions. You will also learn about representing numbers in different bases, such as binary, octal, and hex.
Whenever we declare any variable, by default, this variable stores the string type of data. We cannot do arithmetic operations on them. We can declare a variable as an integer by using the declare command. Such variables are declared as integers; if we try to assign a string to them, then bash assigns 0 in these variables.
Bash will report an error if we try to assign fractional values (floating points) to integer variables.
We can create an integer variable called value, shown as follows:
$ declare –i value
We tell the shell that the variable value is of type integer. Otherwise, shell treats all variables as character strings:
name string to the integer variable value, then the value variable will be assigned the 0 value by Bash shell:$ value=name $ echo $value 0
$ value=4 + 4 bash: +: command not found
$ value=4+4 $ echo $value 8
$ value=4*3 $ echo $value 12 $ value="4 * 5" $ echo $value 20
"", the multiplication operation is performed. Due to double quotes (""), the * operator was not used as a wildcard (*):$ value=5.6 bash: num: 5.6: syntax error in expression (remainder of expression is ".5").
Since we have declared the variable value as an integer variable, when we initialize the variable with a floating point number, the error gets displayed by Bash shell.
If we want to see all declared integer variables along with their values, then we must give the following command:
$ declare –i
Output:
declare -ir BASHPID="" declare -ir EUID="1001" declare -i HISTCMD="" declare -i LINENO="" declare -i MAILCHECK="60" declare -i OPTIND="1" declare -ir PPID="1966" declare -i RANDOM="" declare -ir UID="1001"
We can use the bash built-in command let for performing arithmetic operations. To get more information about let, type the following:
$ help let
Output:
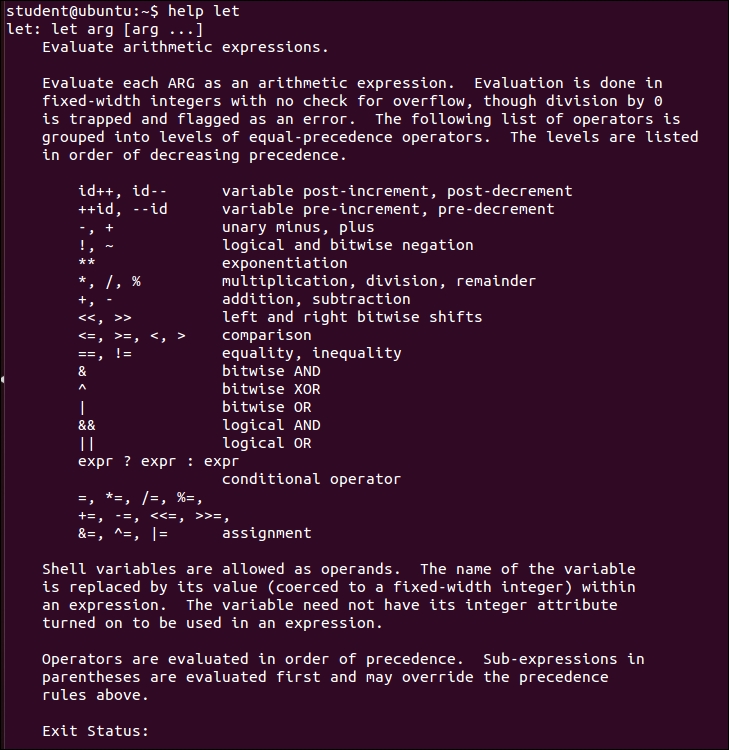
Let's start using the let command:
$ value=6 $ let value=value+1 $ echo $value 7 $ let "value=value+4" $ echo $value 11 $ let "value+=1" #above expression evaluates as value=value+1 $ echo $value 12
A summary of operators available with the let command follows:
Prior to bash 2.x, the following operators were not available:
We can use the expr command for arithmetic operations. The
expr command is an external command; the binary of the expr command is stored in the folder called /usr/bin/expr.
Perform an addition operation as follows:
$ expr 40 + 2 42
Perform a subtraction operation as follows:
$ expr 42 - 2 40
Perform a division operation as follows:
$ expr 40 / 10 4
Perform a modulus (getting remainder) operation as follows:
$ expr 42 % 10 2 $ expr 4 * 10 expr: syntax error
With the expr command, we cannot use * for multiplication. We need to use \* for multiplication:
$ expr "4 * 10" 4 * 10 $ expr 4 \* 10 40
We will write a simple script to add two numbers. Write the Shell script called arithmetic_01.sh as follows:
#!/bin/bash x=5 y=2 z=`expr $x + $y` echo $z Test the script as follows: $ chmod +x arithmetic_01.sh $ ./arithmetic_01.sh
The output is here:
7
Let's write a script to perform all the basic arithmetic operations. Write the Shell script called arithmetic_02.sh as follows:
#!/bin/bash
var1=30
var2=20
echo `expr $var1 + $var2` # Arithmetic Addition
echo `expr $var1 - $var2` # Arithmetic Subtraction
echo `expr $var1 \* $var2` # Arithmetic Multiplication
echo `expr $var1 / $var2` # Arithmetic Division
echo `expr $var1 % $var2` # Arithmetic Modular Division
# (Remainder)Let us test the script:
$ chmod +x arithmetic_02.sh $ ./arithmetic_02.sh
The output is here:
50 10 600 1 10
We can use two different ways for evaluating arithmetic expressions:
$(( expression )) $[ expression ]
Learn arithmetic operations using the preceding mentioned arithmetic expansion:
$ a=10 $ b=20 $ c=$((a + b)) $ echo $c
During arithmetic operations, we may need to find square or cube of any given number. These operations are called as exponent operations. We can perform exponent operations as follows:
$ a=5 $ b=3 $ expo=$[ $a ** $b ]# This is equivalent to ab $ echo $expo 125
This is the result of the 53 operations.
Another way of arithmetic expansions is as follows:
$ B=10 $ A=$[B + 10] $ echo $A 20 $ echo $[ 3 + 4 - 5 ] 2 $ echo $[ 3 + 4 * 5] 23
Arithmetic multiplication has more precedence over addition. Therefore, 4*5 was performed first, and the addition of 3+20 was performed later on:
$ echo $[(3 + 4) * 5] 35 $ echo $(( 3 + 4 )) 7 $ echo $(( 6 / 0 )) bash: 6/0: division by 0 ( error token is "0")
We will use many of the preceding arithmetic techniques for doing the same addition operation and check the result.
Let's write an interactive script called arithmetic_03.sh as follows:
#!/bin/bash echo "Enter first value" read number_1 echo "Enter secondvalue" read number_2 total=`expr $number_1 + $number_2` echo $total sum=$(($number_1 + $number_2)) echo "sum is "$sum echo "Sum is $[ $number_1+$number_2 ]"
Let us test the script:
$ chmod +x arithmetic_03.sh $ ./arithmetic_03.sh
Output:
Enter first value 10 Enter second value 5 15 Sum is 15 Sum is 15
The preceding Shell script shows that even if we use any of the previous techniques, the result remains the same.
Let's write the shell called script arithmetic_04.sh as follows:
#!/bin/bash # Interactive Shell Script Demonstrating Arithmetic Operators echo "Enter First value" read number_1 echo "Enter Second value" read number_2 echo $(($number_1 + $number_2)) echo $(($number_1 / $number_2)) # Division of two numbers
Let's test the program as follows:
$ chmod +x arithmetic_04.sh $ ./arithmetic_04.sh
Output:
Enter First value 10 Enter Second value 5 15 2
We will write one more script with a different technique. Let's write the Shell script arithmetic_05.sh as follows:
#!/bin/bash # Script is For Demonstrating Arithmetic var1=10 var2=20 echo $(($var1+$var2)) # Adding Two Values echo $(($var1-$var2)) # Subtract Two Values echo $(($var1*$var2)) # Multiply Two Values echo $(($var1%$var2)) # Remainder
Let's test the program here:
$ chmod +x arithmetic_05.sh $ ./arithmetic_05.sh
Output:
30 -10 200 10
We will write a script to add five numbers that are passed from a command line. Let's write the Shell script arithmetic_06.sh as follows:
#!/bin/bash # Write a shell script which will receive 5 numbers from command line # and print their sum. echo "Sum of Five Numbers is:" $(($1 + $2 + $3 + $4 + $5))
Let's test the program:
$ chmod +x arithmetic_06.sh $ ./arithmetic_06.sh 10 20 30 40 50
Output:
Sum of Five Numbers is: 150
Let's write the Shell script arithmetic_07.sh as follows for finding cube, quotient, and remainder:
#!/bin/bash x=99 (( cube = x * x * x )) (( quotient = x / 5 )) (( remainder = x % 5 )) echo "The cube of $x is $cube." echo "The quotient of $x divided by 5 is $quotient." echo "The remainder of $x divided by 5 is $remainder." # Note the use of parenthesis to controlling arithmetic operator # precedence evaluation. (( y = 2 * (quotient * 5 + remainder) )) echo "Two times $x is $y."
Let's test the program:
$ chmod +x arithmetic_07.sh $ ./arithmetic_07.sh
Output:
The cube of 99 is 970299. The quotient of 99 divided by 5 is 19. The remainder of 99 divided by 5 is 4. Two times 99 is 198.
Integer values can be represented in decimal, binary, octal, or hex numeric notations. By default, integer values are represented in decimal notation. Binary numbers have base 2. Octal numbers use base 8. Hexadecimals numbers use base 16. We will learn about various notations with examples in this section.
Syntax:
variable=base#number-in-that-base
Let's understand the preceding syntax with examples:
$ declare -i x=21 $ echo $x 21
$ x=2#10101 $ echo $x 21
$ declare -i x $ x=8#25 $ echo $x 21
$ declare -i x $ x=16#15 $ echo $x 21
In the preceding examples, we displayed the, decimal 21 value in binary, octal, and hexadecimal representations.
In Bash shell, we can only perform integer arithmetic. If we want to perform arithmetic involving a floating point or fractional values, then we will need to use various other utilities, such as awk, bc, and similar.
Let's see an example of using the utility called bc:
$ echo "scale=2; 15 / 2" | bc 7.50
For using the bc utility, we need to configure a scale parameter. Scale is the number of significant digits to the right of the decimal point. We have told the bc utility to calculate 15 / 2, and then display the result with the scale of 2.
Or:
$ bc ((83.12 + 32.13) * 37.3) 4298.82
Many things can be done with the bc utility, such as all types of arithmetic operations including binary and unary operations; it has many defined mathematical functions. It has its own programming syntax.
You can get more information about the utility bc at http://www.gnu.org/software/bc/.
Let's look at using awk for a floating-point arithmetic:
$ result=`awk -v a=3.1 -v b=5.2 'BEGIN{printf "%.2f\n",a*b}'` $ echo $result 16.12
You will be learning more about the awk programming in the coming chapters. Therefore, we will not get into a detailed discussion of awk in this session.
Let's write few more Shell scripts using arithmetic programming skill in shell, which we have learned so far.
Let's write the Bash Shell script arithmetic_08.sh to find whether an input integer is even or odd:
#!/bin/bash echo "Please enter a value" read x y=`expr $x%2` if test $y -eq 0 then echo "Entered number is even" else echo "Entered number is odd" fi
Let's test the program:
$ chmod +x arithmetic_08.sh $ ./arithmetic_08.sh
Output:
$ ./hello.sh "Enter a number" 5 "Number is odd" $ ./hello.sh "Enter a number" 6 "Number is even"
Let's write the script arithmetic_09.sh to find the length of an input string:
#!/bin/bash echo "Please Enter the String:" read str len=`echo $str | wc -c` let len=len-1 echo "length of string = $len"
Let's test the script:
$ chmod +x arithmetic_09.sh $ ./arithmetic_09.sh
Output:
Enter String: Hello World length of string = 11
Let's write a script to calculate the area and circumference of a rectangle and circle.
Write the Shell script arithmetic_10.sh as follows:
#!/bin/bash echo "Please enter the length, width and radius" read length width radius areaRectangle=`expr $length \* $width ` temp=`expr $length + $width ` perimeterRect=`expr 2 \* $temp` areaCircle=`echo 3.14 \* $radius \* $radius | bc` circumferenceCircle=`echo 2 \* 3.14 \* $radius | bc` echo "Area of rectangle = $areaRectangle" echo "Perimeter of Rectangle = $perimeterRect." echo "Area of circle = $areaCircle." echo "Circumference of circle = $circumferenceCircle" echo
$ chmod +x arithmetic_10.sh $ ./arithmetic_10.sh
Output:
Enter the length, width and radius 5 10 5 Area of rectangle = 50 Perimeter of Rectangle = 30 Area of circle = 78.50 Circumference of circle = 31.40
In this chapter, you learned about performing arithmetic operations in various ways such as, using declare, let, expr, and arithmetic expressions. You also learned about representing numbers in different bases such as hex, octal, and binary. You learned about using the bc utility to perform floating point or fractional arithmetic.
In the next chapter, you will learn about automatic decision making by working with test and using if-else, case, select, for, while, and dowhile. You will also learn to control loops using break and continue statements.
In the last chapter, you learned about performing arithmetic operations in various ways such as using declare, let, expr, and arithmetic expressions. You also learned about representing numbers in different bases such as hex, octal, and binary, and using the bc utility for performing floating point or fractional arithmetic.
In real-world scripts, it is not just a sequential execution of commands, we need to check certain conditions or proceed as per certain logic and accordingly the script should continue executing. This is precisely what we do with automation. Automation refers to performing tasks, the sequence of which will change as per changes in the programming environment. A simple example would be to check if the directory is present; if present, then change to that directory, otherwise create a new directory and proceed. All these activities come under decision making in Shell scripts.
In this chapter, we will cover the following topics:
testif-elsecaseselectfor loopwhile loopcontinue statementbreak statementAutomation using Shell scripts involves checking if the earlier command executed successfully or failed, if the file is present or not, and so on. You will learn various constructs such as if, case, and so on, where we will need to check whether certain conditions are true or false. Accordingly, our script should conditionally execute various commands.
Let's enter the following command:
$ ls
Using the Bash shell, we can check if the preceding command executed successfully or failed as follows:
$ echo $?
The preceding command will return 0, if the ls command executed successfully. The result will be nonzero, such as 1 or 2 or any other nonzero number, if the command has failed. The Bash shell stores the status of the last command execution in a variable. If we need to check the status of the last command execution, then we should check the content of the variable.
Let's see the following example:
$ x=10 $ y=20 $ (( x < y )) $ echo $? 0
This indicates that the $(( x < y )) expression has executed successfully.
Let's learn the same concept in the case of string handling:
$ name=Ganesh $ grep "$name" /etc/passwd Ganesh:9ZAC5G:6283:40:Ganesh Naik:/home/ganesh:/bin/sh $ echo $? 0
Since the user Ganesh is already created on the computer, the string Ganesh was found in the /etc/passwd file.
$ name=John $ grep "$name" /etc/passwd $ echo $? 1 # non zero values means error
Since the user John was not found in the /etc/passwd file, the grep command returned a nonzero value. In scripts, we can use this during automation.
Let's now understand the test command.
Let's learn the following example to check the content or value of expressions:
$ test $name = Ganesh $ echo $? 0 if success and 1 if failure.
In the preceding example, we want to check if the content of the variable name is the same as Ganesh and ? To check this, we have used the test command. The test will store the result of the comparison in the ? variable.
We can use the following syntax for the preceding test command. In this case, we used [ ] instead of the test command. We've enclosed the expression to be evaluated in square brackets:
$ [[ $name = Ganesh ]] # Brackets replace the test command $ echo $? 0
During the evaluation of expressions by test, we can even use wildcard expressions:
$ [[ $name = [Gg]????? ]] $ echo $? 0
Therefore, we can either use the test command or square brackets for checking or evaluating expressions. Since word splitting will be performed on variables, if we are using text with white spaces, then we will need to enclose the text inside double quotes such as " ".
Let's consider the case where we want to check whether there is the name Ganesh and if his friend is John. In this case, we will have multiple expressions to be checked using the AND operator &&. In such a case, we can use following syntax:
$ [[ $name == Ganesh && $friend == "John" ]]
Another way to do this is as follows:
[ $name == Ganesh ] && [ $friend == "John" ]
We used double brackets in the preceding expressions.
Here, we want to evaluate multiple expressions on the same command line. We can use the preceding syntax with AND (&&) or OR (||) logical operators.
The following is a summary of various options for string comparison using test which is taken from the Bash reference manual available at http://www.gnu.org/software/bash/:
|
Test operator |
Tests true if |
|---|---|
|
-n string |
True if the length of string is nonzero. |
|
-z string |
True if the length of string is zero. |
|
string1 != string2 |
True if the strings are not equal. |
|
string1 == string2 string1 = string2 |
True if the strings are equal. |
|
string1 > string2 |
True if string1 sorts after string2 lexicographically. |
|
string1 < string2 |
True if string1 sorts before string2 lexicographically. |
Suppose we want to check if the length of a string is nonzero, then we can check it as follows:
test –n $string or [ –n $string ] echo $?
If the result is 0, then we can conclude that the string length is nonzero. If the content of ? is nonzero, then the string is 0 in length.
Let's write Shell script test01.sh for learning various string operations:
#!/bin/bash str1="Ganesh"; str2="Mumbai"; str3= [ $str1 = $str2 ] # Will Check Two Strings Are Equal Or Not echo $? [ $str1 != $str2 ] # Will Check Two Strings Are Not Equal echo $? [ -n $str1 ] # Will confirm string length is greater than zero echo $? [ -z $str3 ] # Will Confirm length of String is Zero echo $?
Let's test the following program:
$ chmod +x test01.sh $ ./test01.sh
The following will be the output after executing the preceding commands:
1 0 0 0
Let's write an interactive Shell script test02.sh to get names from the user and then compare if both are the same:
#!/bin/bash echo "Enter First name" read name1 echo "Enter Second name" read name2 [ $name1 = $name2 ] # Check equality of two names echo $? [ -n $name2 ] # Check String Length is greater than Zero echo $?
Let's test the following program:
$ chmod +x test02.sh $ ./test02.sh
The following will be the output after executing the preceding commands:
Enter First name LEVANA Enter Second name TECHNOLOGIES 1 0
The following is the summary of various options for numerical comparison using test:
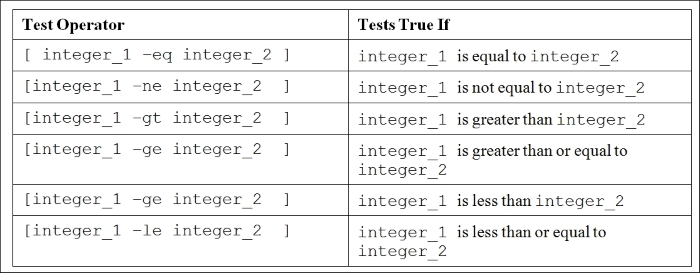
Let's write the Shell script test03.sh for learning various the numerical test operators' usage:
#!/bin/bash num1=10 num2=30 echo $(($num1 < $num2)) # compare for less than [ $num1 -lt $num2 ] # compare for less than echo $? [ $num1 -ne $num2 ] # compare for not equal echo $? [ $num1 -eq $num2 ] # compare for equal to echo $?
Let's test the following program:
$ chmod +x test03.sh $ ./test03.sh
The following will be the output after executing the preceding commands:
1 0 0 1
Let's write the script test04.sh for interactively asking the user for three numbers and then testing those numbers for various comparisons:
#!/bin/bash echo "Please enter 1st First Number" read num1 echo "Please enter 2nd Number" read num2 echo "Please enter 3rd Number" read num3 [[ $num1 > $num2 ]] # compare for greater than echo $? [[ $num1 != $num2 ]] # compare for not equal to echo $? [[ $num2 == $num3 ]] # compare for equal to echo $? [[ $num1 && $num2 ]] # Logical And Operation echo $? [[ $num2 || $num3 ]] # Logical OR Operation echo $?
Let's test the following program:
$ chmod +x test04.sh $ ./test04.sh
The following will be the output after executing the preceding commands:
Please enter 1st First Number 10 Please enter 2nd Number 20 Please enter 3rd Number 30 1 0 1 0 0
Let's write the script test05.sh for using string and numerical test operations:
#!/bin/bash Var1=20 Var2=30 Str1="Accenture" FileName="TestStringOperator" test $Var1 -lt $Var2 # Test for Less Than echo $? test $Var1 -gt $Var2 # Test For Greater Than echo $? test -n $Str1 # Test for String Having Length Greater Than 0 echo $? test -f $FileName # Test for File Attributes echo $?
Let's test the following program:
$ chmod +x test05.sh $ ./test05.sh
The following will be the output after executing the preceding commands:
0 1 0 1
We used the test operation for the file in this script. It will check if the file is present. You will learn more about it in next section.
Now, we will write the script test06.sh using the test command interactively asking the user for data and then performing numerical as well as string comparison operations:
#!/bin/bash echo "Please enter 1st Number" read num1 echo "Please enter 2nd Number" read num2 echo test $num1 -eq $num2 # Test for Equal echo $? test $num1 -ne $num2 # Test for Not Equal echo $? test $num1 -ge $num2 # Test for Greater Than Equal echo $? echo "Please enter 1st String" read Str1 echo "Please enter 2nd String" read Str2 test $Str1 = $Str2 # Test for Two Strings Are Equal echo $? test -z $Str1 # Test for The Length Of The String Is > 0 echo $? test $Str2 # Test for The String Is Not NULL echo $?
Let's test the following program:
$ chmod +x test06.sh $ ./test06.sh
The following will be the output after executing the preceding commands:
Please enter 1st Number 10 Please enter 2nd Number 20 1 0 1 Please enter 1st String LEVANA Please enter 2nd String TECHNOLOGIES 1 1 0
Depending on the value of $? in the preceding output, we can decide whether the operation returned true or false. We will use this in if, case, and similar decision making, as well as in looping, activities.
The following are various options for binary file operations using test which is taken from the Bash reference manual available at http://www.gnu.org/software/bash/:
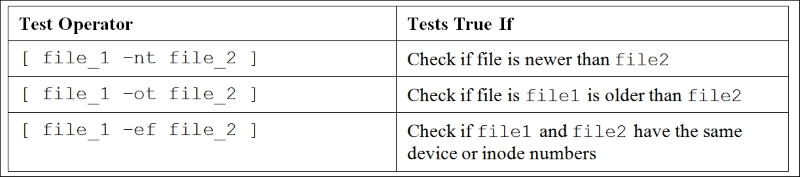
Let's write the script test07.sh to test the basic file attributes such as whether it is a file or folder and whether it has a file size bigger than 0. The output will be different if the case file is present or not:
#!/bin/bash # Check if file is Directory [ -d work ] echo $? # Check that is it a File [ -f test.txt ] echo $? # Check if File has size greater than 0 [ -s test.txt ] echo $?
Let us test the program:
$ chmod +x test07.sh $ ./test07.sh
The following will be the output after executing the preceding commands:
1 1 1 $ mkdir work $ touch test.txt $ ./test07.sh 0 0 1
We executed the script with and without the directory and text.txt file.
The following script test08.sh is checking the file permissions such as read, write, and execute permissions:
#!/bin/bash # Check if File has Read Permission [ -r File2 ] echo $? # Check if File Has Write Permission [ -w File2 ] echo $? # Check if File Has Execute Permission [ -x File2 ] echo $?
$ touch File2 $ ls -l File2 -rw-rw-r-- 1 student student 0 Jun 23 22:37 File2 $ chmod +x test08.sh $ ./test08.sh
The following will be the output after executing the preceding commands:
0 0 1
The following are the various options for logical operations using test which is taken from the Bash reference manual available at http://www.gnu.org/software/bash/:
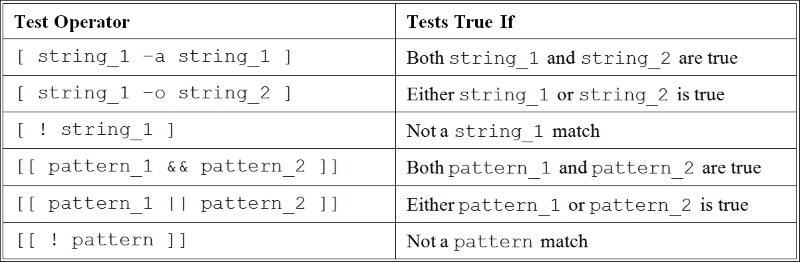
We can use the test operator for strings along with pattern matching as follows:
$ name=Ganesh $ [[ $name == [Gg]anesh ]] # Wildcards allowed $ echo $? 0
The following is the example for multiple strings with the && logical operator:
$ name=Ganesh; friend=Anil $ [[ $name == [Gg]anesh && $friend == "Lydia" ]] $ echo $? 1
The following is the script with the test command along with the extended pattern matching enabled:
$ shopt -s extglob # we are enabling extended pattern matching $ city=Kannur $ [[ $city == [Kk]a+(n)ur ]] $ echo $? 0
In the given expressions, we are checking equality for strings. It tests if the city name starts with K or k, followed by a, one or more n characters, a u, and r.
We use the if command to check the pattern or command status and accordingly we can make certain decisions to execute scripts or commands.
The syntax of the if conditional is as follows:
if command
then
command
command
fiFrom the preceding syntax, we can clearly understand the working of the if conditional construct. Initially, if will execute the command. If the result of command execution is true or 0, then all the commands that are enclosed between then and fi will be executed. If the status of command execution after if is false or nonzero, then all the commands after then will be ignored and the control of execution will directly go to fi.
Let's learn another variation of if constructs.
Syntax:
if command
then
command
command
else
command
fiIn the preceding case if the command after if is successfully executed or the status variable ? content is 0, then all the commands after then will be executed. If the result of the command is a failure or nonzero, then all the commands after else will be executed.
For numeric or string expression evaluations using if, the syntax is as follows:
if [ string/numeric expression ]
then
command
fiAlternatively, use the following syntax:
if [[ string expression ]]
then
command
fiAlternatively, use the following syntax:
if (( numeric expression ))
then
command
fiThe simple example to check the status of the last command executed using the if construct is as follows:
#!/bin/bash
if [ $? -eq 0 ]
then
echo "Command was successful."
else
echo "Command was successful."
fiWhenever we run any command, the exit status of command will be stored in the ? variable. The preceding construct will be very useful in checking the status of the last command.
Let's learn about using the if construct for numerical decision making.
We can use the test command for finding which variable contains the smaller value:
$ X=10 $ y=20 $ (( x < y )) $ echo $? 0 The result 0 shows that x is smaller than y.
In the Shell script if_01.sh, we can use the test command along with the if construct for checking equality of variable with numerical value as follows:
#!/bin/bash
a=100
if [ $a -eq 100 ]
then
echo "a is equal to $a"
else
echo "a is not equal"
fiLet's test the following program:
$ chmod +x if_01.sh $ ./if_01.sh
The following will be the output after executing the preceding commands:
a is equal to 100
Use the script if_02.sh to check which product is costly. The script is as follows:
#!/bin/bash echo "Enter the cost of product a" read a echo "Enter the cost of product b" read b if [ $a -gt $b ] then echo " a is greater" else echo " b is greater" fi
Let's test the following program:
$ chmod +x if_02.sh $ ./if_02.sh
The following will be the output after executing the preceding commands:
Enter the cost of product a 100 Enter the cost of product b 150 b is greater $
If we need to terminate the Shell script and come back to command line, then we can use the exit command. The syntax is very simple:
exit 0
The given command will terminate the Shell script and return to the command line. It will store the 0 value in the status variable ?. We can use any value between 0 and 255. Value 0 means success and any other nonzero value means an error. We can use these values to indicate error information.
The script to check the value of a parameter, which is passed along with command, either less than 0 or greater than 30 is as follows. This will save our efforts of using the nested if statement:
#!/bin/bash
if (( $1 < 0 || $1 > 30 ))
then
echo "mdays is out of range"
exit 2
fiThe test command used in the preceding expression for OR can be written as follows:
[ $1 -lt 0 -o $1 -gt 30 ]
Let's learn about using string-related checking using the if command.
The following script if_03.sh will check the equality of two strings:
echo "Enter the first string to compare"
read name1
echo "Enter the Second string to compare"
read name2
if [ $name1 == $name2 ]
then
echo "First string is equal to Second string"
else
echo "Strings are not same"
fiLet's test the following program:
$ chmod +x if_03.sh $ ./if_03.sh
The following will be the output after executing the preceding commands:
$ ./ if_03.sh Enter the first string to compare LEVANA Enter the Second string to compare TECHNOLOGIES Strings are not same $ ./ if_03.sh
The following will be the output after executing the preceding commands:
Enter the first string to compare LEVANA Enter the Second string to compare LEVANA First string is equal to Second string $
We will write the script for performing various other string operations using a test. Let's write the script if_04.sh to compare two strings for various attributes:
#!/bin/bash
str1="Ganesh"
str2="Naik"
if [ $str1 = $str2 ]
then
echo "Two Strings Are Equal"
fi
if [ $str1 != $str2 ]
then
echo "Two Strings are not equal"
fi
if [ $str1 ]
then
echo "String One Has Size Greater Than Zero"
fi
if [ $str2 ]
then
echo "String Two Has Size Greater Than Zero"
fiLet's test the following program:
$ chmod +x if_04.sh $ ./if_04.sh
The following will be the output after executing the preceding commands:
Two Strings are not equal String One Has Size Greater Than Zero String Two Has Size Greater Than Zero
If we want to verify whether the entered password is valid then script i_05.sh will be as follows:
#!/bin/bash stty –echo # password will not be printed on screen read -p "Please enter a password :" password if test "$password" == "Abrakadabra" then echo "Password is matching" fi stty echo
Let's test the following program:
$ chmod +x if_05.sh $ ./if_05.sh
The following will be the output after executing the preceding commands:
$ ./ if_05.sh Please enter a password : levana $ ./ if_05.sh Please enter a password : Abrakadabra Password is matching $
Many a time we need to check the value of variable, such as is it null? The null value means zero value. If we want to create the string with the null value, then we should use double quotes "" while declaring it:
if [ "$string" = "" ] then echo "The string is null" fi
We can even use [ ! "$string" ] or [ -z "$string" ] for null checking of strings.
Let's write the script if_08.sh, which will search if the entered person name is the user of the computer system:
#!/bin/bash
read -p "Enter a user name : " user_name
# try to locate username in in /etc/passwd
#
grep "^$user_name" /etc/passwd > /dev/null
status=$?
if test $status -eq 0
then
echo "User '$user_name' is found in /etc/passwd."
else
echo "User '$user_name' is not found in /etc/passwd."
fiLet's test the following program:
$ chmod +x if_08.sh $ ./if_08.sh
The following will be the output after executing the preceding commands:
Enter a user name : ganesh User 'ganesh' is not found in /etc/passwd.
In the preceding script, we are searching the username in the /etc/passwd file. If a person's name is not found in the /etc/passwd file, then we can conclude that the username is not created in the system.
Let's write a script to check the disk space being used. The script will print a warning if 90 percent or more of the disk space is used on one of the mounted partitions.
The Shell script if_09.sh for solving the disk filesystem usage warning will be as follows:
#!/bin/bash
df -h | grep /dev/sda1 | cut -c 35-36 > log.txt
read usage < log.txt
if [ $usage -gt 80 ]
then
echo "Warning – Disk file system has exceeded 80% !"
echo "Please move extra data to backup device.
else
echo "Good - You have enough disk space to continue working !"
fiLet's test the following program:
$ chmod +x if_09.sh $ ./if_0.sh
Due to some hardware differences, if the preceding program does not work, then make the following changes in the script:
$df –h command.Using the df command, we get the disk filesystem usage information. The grep command is filtering the hard disk partition, which contains our data. Then, we filter the disc % utilization number and store that value in the log.txt file. Using the read command, we read the % utilization and store it in the variable usage. Later on using the if command, we check and warn the user if the % utilization is greater than 80.
You have already learned about how to use the test command for checking various file operations such as checking the file's permissions and similar other attributes. A command's task in any script is to check if the file or folder is present or not. Then accordingly, we need to proceed. We will see how to use the if command along with the test command.
Use the simple script if_10.sh to check if the file exists or not in the current directory as follows:
#!/bin/bash
read filename
if test -e $filename
then
echo "file exists"
else
echo " file does not exist"
fiLet's test the program as follows:
$ chmod +x if_10.sh $ ./if_10.sh
The following will be the output after executing the preceding commands:
sample.txt file does not exist $ touch sample.txt $ ./ if_10.sh sample.txt file exists
First, we checked without the file. Then, we created a file with the touch command. We can very easily check the presence of the file.
Let's learn how to use the if command to check various file attributes, such as whether it exists, does it have file permissions to read, write, executable, and similar by writing script if_11.sh as follows:
#!/bin/bash echo "$1 is: " if ! [ -e $1 ] then echo "..Do not exists" exit else echo "file is present" fi if [ -x $1 ] then echo "..Executable" fi if [ -r $1 ] then echo "..Readable" fi if [ -w $1 ] then echo "..Writable" fi
Let's test the following program:
$ chmod +x if_11.sh $ ./if_11.sh
Output:
sample.txt is: "file is present" ..Readable ..Writable
The Shell script if_12.sh for performing the file copy operation, and then checking if the copy operation was successful or not, will be as follows:
#!/bin/bash file1="File1" file2="File2" if cp $file1 $file2 then echo "Copy Command Executed Successfully" echo "Content of file named Fil1 copied in another file named File2" else echo "Some problem in command execution" fi
Let's test the program:
$ chmod +x if_12.sh $ ./if_12.sh
The following will be the output after executing the preceding commands:
$ touch File1 $ ./ if_12.sh Copy Command Executed Successfully Content of file named Fil1 copied in another file named File2
These type of constructs enable us to execute the second command depending on the success or failure of the first command:
command1 && command2 command1 || command2
Let's write script if_13.sh. In this script, we will ask the user to input two numbers. Then, the if statement will evaluate two expressions. If both are true, then the command after then will be executed, otherwise commands after else will be called:
#!/bin/bash echo "Enter the first number" read val_a echo "Enter the Second number" read val_b if [ $val_a == 1 ] && [ $val_b == 10 ] then echo "testing is successful" else echo "testing is not successful" fi
Let's test the program:
$ chmod +x if_13.sh $ ./if_13.sh
The following will be the output after executing the preceding commands:
Enter the first number 10 Enter the Second number 20 testing is not successful $ ./if_13.sh Enter the first number 1 Enter the Second number 10 testing is successful
Sometimes, we may need to enter a command to check if the file has the execute permission? If it is executable, then the file should be executed. The script for such a requirement will be as follows:
test -e file && . file.
Let's learn one more example of && and multiple expressions using the test command. In the next script if_14.sh, we will check if file_one is present, then we will print Hello and then immediately we will check if file_two is present, then we will print there on the screen:
#!/bin/bash touch file_one touch file_two if [ -f "file_one" ] && echo "Hello" && [ -f file_two ] && echo "there" then echo "in if" else echo "in else" fi exit 0
Let's test the program:
$ chmod +x if_14.sh.sh $ ./if_14.sh
The following will be the output after executing the preceding commands:
Hello there in if
The following script if_15.sh will check file permissions such as read, write, and execute in the same if command using multiple && with the test command:
#!/bin/bash
echo "Please enter file name for checking file permissions"
read file
if [[ -r $file && -w $file && -x $file ]]
then
echo "The file has read, write, and execute permission"
fiLet's test the program:
$ chmod +x if_15.sh $ touch sample.txt $ chmod +rwx sample.txt $ ./if_15.sh
The following will be the output after executing the preceding commands:
The file has read, write, and execute permissions.
Till now, we have seen multiple expressions using the && logical operator. Now we will see one example with the OR (||) logical operator. In the following script if_16.sh, we will check the existence of file_one and then we will print Hello on the screen. If the first expression of file checking fails, then the second expression of echo will be executed:
#!/bin/sh
if [ -f file_one ] || echo "Hello"
then
echo "In if"
else
echo "In else"
fiLet's test the program:
$ chmod +x if_16.sh $ ./if_16.sh
The following will be the output after executing the preceding commands:
hello In if $ touch file_one $ ./if_16.sh
Output:
In if
We checked in the preceding script if file_one is absent or present.
Whenever we need to take decision from multiple situations or options such as whether it a city is the capital of a country, the state capital, a major city, or a small town. In such situations where, depending on various options, we need to execute different commands, if/else or if/elif/else decision-making commands are useful.
Using the if/elif/else commands, we can have multiple decision-making processes. If the if command succeeds, the command after then will be executed. If it fails, the command after the elif statement will be tested. If that statement succeeds, then statements under the elif are executed. However, suppose none of the elif conditions are true, then statements after the else command are executed. Here, the else block is executed by default. The fi statement will close the if/elif/else command.
The syntax of decision making using the if elif construct is as follows:
If expression_1
then
Command
elif
expression_2
then
Command
elif
expression_3
then
Command
else
Command
fiLet's write script if_18.sh as follows. In this script, we are checking if the directory with a given name exists or not. If this fails, then we are checking whether the file with the given name exists. Even if this fails, then we will inform the user that neither the file nor the directory exists with the given name:
#!/bin/bash
echo "Kindly enter name of directory : "
read file
if [[ -d $file ]]
then
echo "$file is a directory"
elif [[ -f $file ]]
then
echo "$file is a file."
else
echo "$file is neither a file nor a directory. "
fiLet's test the program:
$ chmod +x if_18.sh $ ./is_18.sh
The following will be the output after executing the preceding commands:
$ ./ if_18.sh Kindly enter name of directory : File1 File1 is a file. $ mkdir dir1 $ ./ if_18.sh Kindly enter name of directory : dir1 dir1 is a directory $ ./ if_18.sh Kindly enter name of directory : File007 File007 is neither a file nor a directory.
In many situations, we may need a command that does nothing and returns a success status such as 0. In such cases, we can use the null command. It is represented by a colon (:). For example, in the if loop, we do not want to put any command if it is successful, but we have certain commands to execute if it fails. In such situations, we can use the null command. This is illustrated in the following if_19.sh script. If we want to loop forever, then the null command can be used in the for loop:
#!/bin/bash
city=London
if grep "$city" city_database_file >& /dev/null
then
:
else
echo "City is not found in city_database_file "
exit 1
fiLet's test the program:
$ chmod +x if_19.sh $ ./if_19.sh
The following will be the output after executing the preceding commands:
City is not found in city_database_file
We can observe from the preceding script that the colon is a null command and it does nothing.
Apart from simple branches with if, it is also possible to process multiple decision-making operations using the case command. In a case statement, the expression contained in a variable is compared with a number of expressions, and for each expression matched, a command is executed.
It is possible to have multiple branching using the if/elif/else commands. But if more than two or three elif commands are used, then code becomes very complex. When all the different conditions are depending on a single variable, in such cases, the esac statement is used. The interpreter checks the value of the case variable against value1, value2, value3, and so on, till the match is found. If the value is matched then all the statements after that case value are executed till the double semicolon is reached. If nothing is matched then statements after esac are executed. Wildcard characters and pipe (vertical bar for ORing two values) are allowed in the case statement.
A case statement has the following structure:
case variable in
value1)
command(s)
;;
value2)
command(s)
;;
*)
command(s)
;;
esac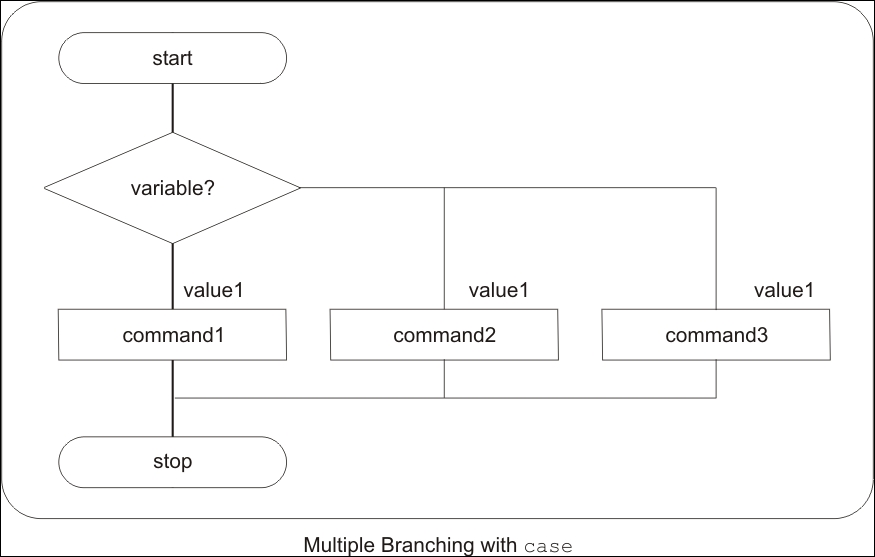
For illustrating the switch case scripting example, we will write the case_01.sh script as follows. We will ask the user to enter any number from the range 1–9. We will check the entered number with the case command. If a user enters any other number, then we will display the error by displaying the Invalid key message:
#!/bin/bash
echo "Please enter any number from 1 to 9"
read number
case $number in
1) echo "ONE"
;;
2) echo "TWO"
;;
3) echo "Three"
;;
4) echo "FOUR"
;;
5) echo "FIVE"
;;
6) echo "SIX"
;;
7) echo "SEVEN"
;;
8) echo "EIGHT"
;;
9) echo "NINE"
;;
*) echo "SOME ANOTHER NUMBER"
;;
esacLet's test the program:
$ chmod +x case_01.sh $ ./case_01.sh
The following will be the output after executing the preceding commands:
Please enter any number from 1 to 9 5 FIVE
Sometimes, in the Shell script we may need to ask for an e-mail address from the user. In such situations, we need to verify if the address is correct or not. We can use the case command to validate the correct e-mail address as follows:
#!/bin/bash
case $1 in
*@*.com) echo "valid email address"
;;
*) echo "invalid string"
;;
esacLet's test the program:
$ chmod +x case_02..sh $ ./ case_02.sh abc@gmail.com
The following will be the output after executing the preceding commands, if the e-mail address is correct:
valid email address $ ./ case_02.sh abc.com
The following will be the output after executing the preceding commands, if the e-mail address is not correct:
invalid string
If inside the script, we need to provide file operations such as copy, move, or delete, then we can use the case command for such scripts. The script case_03.sh for file operations is as follows:
#!/bin/bash echo "Press 1 for copy or 2 for move or 3 for removing the file" read num case $num in 1) echo "We are going to do copy operation" echo " Enter Source file name" read source echo " Enter destination file name" read destination cp $source $destination ;; 2) echo "We are going to do move operation" echo " Enter Source file name" read source echo "Enter destination file name" read destination mv $source $destination ;; 3) echo "We are going to remove the file" echo " Enter the name of file to remove" read source rm $source ;; *) echo "invalid key" esac
Let's test the program:
$ chmod +x case_03.sh $ ./case_03.sh
The following will be the output after executing the preceding commands:
Press 1 for copy or 2 for move or 3 for removing the file 1 We are going to do copy operation Enter Source file name File1 Enter destination file name File4
In this Shell script case_04.sh, we will ask the user to enter the day of the week. Inside the script, we will detect the text entered and print a detailed description of the day such as First Day is Monday and similar on the screen. Note that we are able to perform pattern matching for the upper case and lower case in the case statement:
#!/bin/bash
echo "Enter Day Of The Week"
read day
case $day in
[mM][oO][nN][dD][aA][yY])
echo "First Day is Monday"
;;
[tT][uU][eE][sS][dD][aA][yY])
echo "Second Day Tuesday"
;;
[wW][eE][dD][nN][eE][sS][dD][aA][yY])
echo "Third Day Wednesday"
;;
[tT][hH][uU][rR][sS][dD][aA][yY])
echo " Fourth Day Thursday"
;;
[fF][rR][iI][dD][aA][yY])
echo "Fifth Day Friday"
;;
[sS][aA][tT][uU][rR][dD][aA][yY])
echo "Sixth Day Saturday"
;;
[sS][uU][nN][dD][aA][yY])
echo "Seventh Day Sunday"
;;
*)
echo "Invalid Day of Week"
;;
esac$ chmod +x case_04.sh $ ./case_04.sh
The following will be the output after executing the preceding commands:
$ ./ case_04.sh Enter Day Of The Week Monday First Day is Monday $ ./ case_04.sh Enter Day Of The Week Thursday Fourth Day Thursday
We write the script case_05.sh for printing days in the current month. We will use the date command in the script for finding the current month:
#!/bin/bash mth=$(date +%m) case $mth in 02) echo "February usually has 28 days." echo "If it is a leap year, it has 29 days." ;; 04|06|09|11) echo "The current month has 30 days." ;; *) echo "The current month has 31 days." ;; esac
Let's test the program:
$ chmod +x case_05.sh $ ./case_05.sh
The following will be the output after executing the preceding commands:
The current month has 30 days.
With the Bash shell, it is possible to create simple menus with the help of the select built-in command.
The syntax of select is as follows:
PS3=prompting-text
select VARIABLE in item1 item2 item3
do
commands
doneThe advantage of a menu with select is that we can have an endless loop with it. We can have a condition in which we exit the loop.
In the following script select_01.sh, we show the menu with five options such as a, bc, def, ghi, and jkl. The script will execute the command inside do and done:
#!/bin/bash select var1 in a bc def ghi jkl do echo "Present value of var1 is $var1 done
Let's test the program:
$ chmod +x select_01.sh $ ./select_01.sh
The following will be the output after executing the preceding commands:
1) a 2) bc 3) def 4) ghi 5) jkl #? 2 "Present value of var1 is bc #? 4 "Present value of var1 is ghi #? 5 "Present value of var1 is jkl #? Press ^C to quit
We can implement the case command inside the do and done part of the select menu. The syntax will be as follows:
PS3=prompting text
select VARIABLE in item1 item2 item3
do
case VARIABLE in
value1 ) command1 ; ;
value2 ) command2 ; ;
esac
doneIn the following script select_02.sh, we used the case command inside do and done. This gives us many convenient features. Due to select, we get endless such as continuous loop. In case the if option entered is quit, then it exits the continuous loop:
#!/bin/bash PS3="please select any one : " select var in a b quit do case $var in a) echo option is a ;; b) echo option is b ;; quit) exit ;; *) echo option is default ;; esac done
Let's test the program:
$ chmod +x select_02.sh $ ./select_02.sh
The following will be the output after executing the preceding commands:
1) a 2) b 3) quit please select any one : 1 option is a please select any one : 2 option is b please select any one : 3
In the following script select_03.sh, we used a case with numerical options 1, 2, 3, 4, and an option for an invalid choice:
#!/bin/bash
PS3="Please enter one of the option"
select var in 1 2 3 4
do
case $var in
1) echo "One is selected";;
2) echo "Two is selected;;
3) echo "Two is selected;;
4) echo "Two is selected;;
*) echo "not a proper option";;
esac
doneLet's test the program:
$ chmod +x select_03.sh $ ./select_03.sh
The following will be the output after executing the preceding commands:
1) 1 2) 2 3) 3 4) 4 Please enter one of the option : 1 "One is selected" Please enter one of the option : 2 "Two is selected Please enter one of the option : 3 "Two is selected Please enter one of the option : 4 "Two is selected Please enter one of the option : 8 "not a proper option" Please enter one of the option :
In the case statement, we can put many choices to select the same command. Here is an example of the script select_04.sh as follows:
#!/bin/bash PS3="Please select one of the above:" select COMPONENT in comp1 comp2 comp3 all none do case $COMPONENT in comp1|comp2|comp3) echo "comp1 or comp2 or comp3 selected" ;; all) echo "selected all" ;; none) break ;; *) echo "ERROR: Invalid selection, $REPLY." ;; esac done
$ chmod +x select_04.sh $ ./select_04.sh
The following will be the output after executing the preceding commands:
1) comp1 2) comp2 3) comp3 4) all 5) none Please select one of the above:
The script select_05.sh is used to inform the user about the calorie information in fruits as follows:
#!/bin/bash
PS3="Enter the number for your fruit choice: "
select fruit in apple orange banana peach pear "Quit Menu"
do
case $fruit in
apple)
echo "An apple has 80 calories."
;;
orange)
echo "An orange has 65 calories."
;;
banana)
echo "A banana has 100 calories."
;;
peach)
echo "A peach has 38 calories."
;;
pear)
echo "A pear has 100 calories."
;;
"Quit Menu")
break
;;
*)
echo "You did not enter a correct choice."
;;
esac
doneLet's test the program:
$ chmod +x select_05.sh $ ./select_05.sh
The following will be the output after executing the preceding commands:
1) apple 3) banana 5) pear 2) orange 4) peach 6) Quit Menu Enter the number for your fruit choice: 1 An apple has 80 calories. Enter the number for your fruit choice: 2 An orange has 65 calories. Enter the number for your fruit choice: 3 A banana has 100 calories. Enter the number for your fruit choice: 4 A peach has 38 calories. Enter the number for your fruit choice: 5 A pear has 100 calories. Enter the number for your fruit choice: 6
For iterative operations, the bash shell uses three types of loops: for, while, and until. Using the for looping command, we can execute a set of commands for a finite number of times for every item in a list. In the for loop command, the user-defined variable is specified. After the in command, the keyword list of values can be specified. The user-defined variable will get the value from that list and all statements between do and done get executed until it reaches the end of the list.
The purpose of the for loop is to process a list of elements. It has the following syntax:
for variable in element1 element2 element3 do commands done
The simple script with the for loop could be as follows:
for command in clear date cal do sleep 1 $command Done
In the preceding script, the commands clear, date, and cal will be called one after another. The sleep command will be called before every command for a second.
If we need to loop continuously or infinitely, then the following is the syntax:
for ((;;))
do
command
doneLet's write a simple script for_01.sh. In this script, we will print the var variable 10 times:
#!/bin/bash
for var in {1..10}
do
echo $var
doneLet's test the program:
$ chmod +x sor_01.sh $ ./for_01.sh
The following will be the output after executing the preceding commands:
1 2 3 4 5 6 7 8 9 10
The following script for_02.sh uses the C programming style syntax:
#!/bin/bash max=10 for ((i=1; i<=max; i++)) do echo -n "$i " # one case with echo without –n option done
$ chmod +x for_02.sh $ ./for_02.sh
The following will be the output after executing the preceding commands:
$ ./for_02.sh # OUTPUT with –n option 1 2 3 4 5 6 7 8 9 10 $ ./for_02.sh # OUTPUT without –n option 1 2 3 4 5 6 7 8 9 10
In the next script for_03.sh, we will be processing a list of numbers, which are listed next to the in keyword:
#!/bin/bash for var in 11 12 13 14 15 16 17 18 19 20 do echo $var done
Let's test the program:
$ chmod +x for_03.sh $ ./for_03.sh
The following will be the output after executing the preceding commands:
$ ./for_03.sh 11 12 13 14 15 16 17 18 19 20
In the following script for_04.sh, we create users11 to user20 along with their home directory:
#!/bin/bash
for var in user{11..20}
do
useradd –m $var
passwd -d $var
doneLet's test the program:
$ chmod +x for_04.sh.sh $ sudo ./for_04.sh
The following will be the output after executing the preceding commands:
user11 to user20 will be created with their home folders in the /home/ folder. You need to be a root user or administrator to run this script.
In the for_05.sh script, we will be passing command-line parameters. All the command-line parameters will be available as the $* inside script:
#!/bin/sh for var in $* do echo "command line contains: $var" done
Let's test the program:
$ chmod +x for_05.sh $ ./for_05.sh 1 2 3 4 5 6
The following will be the output after executing the preceding commands:
command line contains: 1 command line contains: 2 command line contains: 3 command line contains: 4 command line contains: 5 command line contains: 6
In the next script for_06.sh, we are passing a list of words such as name of fruits. Inside the script, we are printing the information of variable:
#!/bin/bash
# create fruits.txt => Apple Mango Grapes Pears Banana Orange Pineapple
for var in `cat fruits.txt`
do
echo "var contains: $var"
doneLet's test the program:
$ chmod +x for_06.sh $ ./for_06.sh
The following will be the output after executing the preceding commands:
var contains: Apple var contains: Mango var contains: Grapes var contains: Pears var contains: Banana var contains: Orange var contains: Pineapple
Using the for_07.sh script, we generate a list of files with the ls shell command. This will be the list of filenames. In the for loop, the following list of files will be printed:
#!/bin/bash
echo -n "Commands in bin directory are : $var"
for var in $(ls /bin/*)
do
echo -n -e "$var \t"
doneLet's test the program:
$ chmod +x for_07.sh $ ./for_07
The following will be the output after executing the preceding commands:
This will print the content of /bin/ directory.
For taking a backup of files, we can write the for_08.sh script as follows:
#!/bin/bash for filename in *.c do echo "Copying $filename to $filename.bak" cp $filename $filename.bak done
Let's test the program:
$ chmod +x for_08.sh $ touch 1.c 2.c $ ./for_08.sh
The following will be the output after executing the preceding commands:
"Copying 1.c to 1.c.bak" "Copying 2.c to 2.c.bak"
With the help of the
continue command, it is possible to exit from the current iteration of the loop and to resume the next iteration of the loop. We use the for, while, or until commands for loop iterations.
The following is the for_09.sh script for the loop with the continue command to skip a certain part of the loop commands:
#!/bin/bash
for x in 1 2 3
do
echo before $x
continue 1
echo after $x
done
exit 0Let's test the program:
$ chmod +x for_09.sh $ ./for_09.sh
The following will be the output after executing the preceding commands:
before 1 before 2 before 3
The following is the for_10.sh script, in which we will check all files and directories. If the file is found, we will print the name. If the directory is found, we will skip further processing with the continue command. Take care that any of your useful files with the name sample* are not in the testing directory before testing this script:
#!/bin/bash
rm -rf sample*
echo > sample_1
echo > sample_2
mkdir sample_3
echo > sample_4
for file in sample*
do
if [ -d "$file" ]
then
echo "skipping directory $file"
continue
fi
echo file is $file
done
rm -rf sample*
exit 0Let's test the program:
$ chmod +x for_10.sh $ ./for_10.sh
The following will be the output after executing the preceding commands:
file is sample_1 file is sample_2 skipping directory sample_3 file is sample_4
In the following script for_11.sh, we are checking the backup of files in the /MP3/ folder. If the file is not found in the folder, we are copying it into the folder for backup purposes. We can implement incremental backup scripts using this functionality:
#!/bin/bash
for FILE in 'ls *.mp3'
do
if test -e /MP3/$FILE
then
echo "The file $FILE exists."
continue
fi
cp $FILE /MP3
doneLet's test the program:
$ chmod +x for_11.sh $ ./for_11.sh
If the file exists in the MP3 folder, then the loop will continue to check the next file. If the file backup is not present in the MP3 folder, then the file will be copied to it.
In the previous section, we discussed about how continue can be used to exit from the current iteration of a loop. The break command is another way to introduce a new condition within a loop. Unlike continue, however, it causes the loop to be terminated altogether if the condition is met.
In the for_12.sh script, we check the directory's content. If the directory is found, then we are exiting the loop and displaying the message that the first directory is found:
#!/bin/bash
rm -rf sample*
echo > sample_1
echo > sample_2
mkdir sample_3
echo > sample_4
for file in sample*
do
if [ -d "$file" ]; then
break;
fi
done
echo The first directory is $file
rm -rf sample*
exit 0Let's test the program:
$ chmod +x for_12.sh $ ./for_12.sh
The following will be the output after executing the preceding commands:
The first directory is sample_3
In the for_13.sh script, we ask the user to enter any number. We print the square of numbers in the while loop. If a user enters the number 0, then we use the break command to exit the loop:
#!/bin/bash
typeset -i num=0
while true
do
echo -n "Enter any number (0 to exit): "
read num junk
if (( num == 0 ))
then
break
else
echo "Square of $num is $(( num * num ))."
fi
done
echo "script has ended"Let's test the program:
$ chmod +x for_13.sh $ ./for_13.sh
The following will be the output after executing the preceding commands:
Enter any number (0 to exit): 1 Square of 1 is 1. Enter any number (0 to exit): 5 Square of 5 is 25. Enter any number (0 to exit): 0
Similar to the for command, while is also the command for loop operations. The command next to while is evaluated. If it is successful or 0 then the commands inside do and done are executed.
The purpose of a loop is to test a certain condition or expression and execute a given command while the condition is true (while loop) or until the condition becomes true (until loop):
|
while condition do commands done |
until condition do commands done |
The following is the while_01.sh script, in which we read a file and display its it's content:
#!/bin/bash file=/etc/resolv.conf while IFS= read -r line # IFS : inter field separator do # echo line is stored in $line echo $line done < "$file"
Let's test the program:
$ chmod +x while_01.sh $ ./while_01.sh
The following will be the output after executing the preceding commands:
nameserver 192.168.168.2 search localdomain
In the following script while_02.sh, we are printing number 1–10 on the screen using the while loop:
#!/bin/bash declare -i x x=0 while [ $x -le 10 ] do echo $x x=$((x+1)) done
Let's test the program:
$ chmod +x while_02.sh $ ./while_02.sh
The following will be the output after executing the preceding commands:
0 1 2 3 4 5 6 7 8 9 10
In the following script while_03.sh, we ask the user to input the test. If the input of the text is quit, then we terminate the loop; otherwise, we print the text on the screen:
#!/bin/bash INPUT="" while [ "$INPUT" != quit ] do echo "" echo 'Enter a word (quit to exit) : ' read INPUT echo "You typed : $INPUT" done
Let's test the program:
$ chmod +x while_03.sh $ ./while_03.sh
The following will be the output after executing the preceding commands:
Enter a word (quit to exit) : GANESH You typed : GANESH Enter a word (quit to exit) : Naik You typed : Naik Enter a word (quit to exit) : quit You typed : quit
In the following while_04.sh script, we print the content of variable num on screen. We are starting with value 1. In the loop, we increment the value of the num variable by 1. When the value of the variable num reaches 6, then the while loop is terminated:
#!/bin/bash num=1 while (( num < 6 )) do echo "The value of num is: $num" (( num = num + 1 )) # let num=num+1 done echo "Done."
Let's test the program:
$ chmod +x while_04.sh $ ./while_04.sh
The following will be the output after executing the preceding commands:
The value of num is: 1 The value of num is: 2 The value of num is: 3 The value of num is: 4 The value of num is: 5 Done.
The while_05.sh script prints a series of odd numbers on the screen. We are passing a total number of odd numbers required as command-line parameter:
#!/bin/bash count=1 num=1 while [ $count -le $1 ] do echo $num num=`expr $num + 2` count=`expr $count + 1` done
Let's test the program:
$ chmod +x while_05.sh $ ./while_05.sh 5
The following will be the output after executing the preceding commands:
1 3 5 7 9
The until command is similar to the while command. The given statements in the loop are executed as long as they evaluate the condition as true. As soon as the condition becomes false, then the loop is exited.
The syntax is as follows:
until command
do
command(s)
doneIn the following script until_01.sh, we are printing numbers 0-9 on screen. When the value of variable x becomes 10, then the until loop stops executing:
#!/bin/bash x=0 until [ $x -eq 10 ] do echo $x x=`expr $x + 1` done
Let's test the program:
$ chmod +x until_01.sh $ ./until_01.sh
The following will be the output after executing the preceding commands:
0 1 2 3 4 5 6 7 8 9
In the following script until_02.sh, we ask the user to input text. We are printing entered text on the screen. When the user enters the text quit, the until loop ends the iterations:
#!/bin/bash INPUT="" until [ "$INPUT" = quit ] do echo "" echo 'Enter a word (quit to exit) : ' read INPUT echo "You typed : $INPUT" done
Let's test the program:
$ chmod +x until_02.sh $ ./until_02.sh
The following will be the output after executing the preceding commands:
Enter a word (quit to exit) : Ganesh You typed : Ganesh Enter a word (quit to exit) : Naik You typed : Naik Enter a word (quit to exit) : quit You typed : quit
In the following script until_03.sh, we are passing the username as a command-line parameter to the script. When required, the user logs in the grep command and will find it from the output of the who command. Then, the until loop will stop iterations and inform on screen about the user login:
#!/bin/bash until who | grep "$1" > /dev/null do sleep 60 done echo -e \\a echo "***** $1 has just logged in *****" exit 0
Let's test the program:
$ chmod +x until_03.sh $ ./until_03.sh User10
The following will be the output after executing the preceding commands:
"***** User10 has just logged in *****"
This message will be displayed when user10 has logged into the server.
If we need to redirect the output of a loop to any other Linux command such as sort, we can even redirect the loop output to be stored in the file:
The following is an example of source code for_14.sh:
#!/bin/bash
for value in 10 5 27 33 14 25
do
echo $value
done | sort -nLet's test the program:
$ chmod +x for_14.sh $ ./for_14.sh
The following will be the output after executing the preceding commands:
5 10 14 25 27 33
In the preceding script, the for loop iterates through a list of numbers which is unsorted. The numbers are printed in the body of the loop, which are enclosed between do and done commands. Once the loop is complete, the output is piped to the sort command, which in turn is performing a numerical sort and printing the result on the screen.
In certain situations, the script with loops may take lot of time to complete. In such situations, we may decide to run the script containing loops in the background so that we can continue other activities in the same terminals. The advantage of this will be that the terminal will be free for giving the next commands.
The following for_15.sh script is the technique to run a script with loops in the background:
#!/bin/bash
for animal in Tiger Lion Cat Dog
do
echo $animal
sleep 1
done &Let's test the program:
$ chmod +x for_15.sh $ ./for_15.sh
The following will be the output after executing the preceding commands:
Tiger Lion Cat Dog
In the preceding script, the for loop will process animals Tiger, Lion, Cat, and Dog sequentially. The variable animal will be assigned the animal names one after another. In the for loop, the commands to be executed are enclosed between do and done. The ampersand after the done keyword will make the for loop run in the background. The script will run in the background till the for loop is complete.
The shell has one environment variable, which is called the Internal Field Separator (IFS). This variable indicates how the words are separated on the command line. The IFS variable is, normally or by default, a white space (' '). The IFS variable is used as a word separator (token) for the for command. In many documents, IFS can be any one of the white space, ':', '|', ': ' or any other desired character. This will be useful while using commands such as read, set, for, and so on. If we are going to change the default IFS, then it is a good practice to store the original IFS in a variable.
Later on, when we have done our required tasks, then we can assign the original character back to IFS.
In the following script for_16.sh, we are using ":" as the IFS character:
#/bin/bash
cities=Delhi:Chennai:Bangaluru:Kolkata
old_ifs="$IFS" # Saving original value of IFS
IFS=":"
for place in $cities
do
echo The name of city is $place
doneLet's test the program:
$ chmod +x for_16.sh $ ./for_16.sh
The following will be the output after executing the preceding commands:
The name of city is Delhi The name of city is Chennai The name of city is Bangaluru The name of city is Kolkata
By default the original inter field separator is a whitespace. We have saved the original IFS in the old_ifs variable. We assigned colon ':' and an IFS in the script. Therefore, we can use ':' as an inter field separator in our test file or text string.
In this chapter, you learned about using decision making in scripts by working with Test, if-else, and switching case. We also used select for a loop with menu. For repeating tasks, such as processing lists, you learned about using the for loop, while loop and do while. You also learned how to control loops using the break statement and continue statement.
In the next chapter, you will learn about writing new functions and calling them, sharing data between functions, passing parameters to functions, and creating a library of functions.
In the last chapter, you learned about using decision making in scripts by working with test, if-else, and switch case. We also used select for loop with menu. For repeated tasks, such as processing lists, you learned to use the for and while loops and the do while. You also learned about how to control loops using the break and continue statements.
In this chapter, you will learn the following topics:
We, human beings, in our day-to day lives, take help from people, who are specialized in certain knowledge or skills, such as doctors, lawyers, and barbers. This helps our lives to be more organized and comfortable so that we need not learn every skill in this world. We take advantage of skills that have already been acquired by other people. The same thing applies to software development as well. If we use whatever code or scripts that have already been developed, then this will save our time and energy.
In real-world scripts, we break down big tasks or scripts into smaller logical tasks. This modularization of scripts helps in the better development and understanding of code. The smaller logical blocks of script are be called functions.
The advantages of functions are as follows:
Functions can be defined on a command line or inside scripts. The syntax for defining functions on a command line is as follows:
functionName { command_1; command_2; . . . }
Or:
functionName() { command_1; command_2; . . }
In single-line functions, every command should end with a semicolon.
Let's write a very simple function to illustrate the preceding syntax:
$ hello() {echo 'Hello world!';}
We can use the previously defined function as follows:
$ hello
Output:
Hello world!
The syntax of the function declaration inside the Shell script is as follows:
function_name() {
block of code
}An alternate function syntax is mentioned here:
function function_name
{
block of code
}Functions should be defined at the beginning of a script.
We can add this function in the Shell script function_01.sh as follows:
#!/bin/bash
hello()
{echo "Executing function hello"
}
echo "Script has started now"
hello
echo "Script will end"Test the script as follows:
$ chmod +x function_01.sh $ ./function_01.sh
Output:
Script has started now Executing function hello Script will end
We can modify the preceding script into function_02.sh with some more functionality, shown as follows:
#!/bin/bash
function greet()
{ echo "Hello $LOGNAME, today is $(date)"; }
greetTest the script as follows:
$ chmod +x function_02.sh $ ./function_02.sh
Output:
Hello ganesh, today is Sun Jul 5 22:47:23 PDT 2015
The system init functions are placed in the /lib/lsb/init-functions folder in the Linux operating system:
The script function_03.sh with a function for listing the present working directory and listing all the files in the current directory is as follows:
#!/bin/bash
function_lister ()
{
echo Your present working directory is `pwd`
echo Your files are:
ls
}
function_listerTest the script as follows:
$ chmod +x function_03.sh $ ./function_03.sh
Output:
Your present working directory is /home/student/Desktop/test Your files are: 01.sh 02.sh 03.sh
The script function_04.sh with a function to pause the script until users press any key is as follows:
#!/bin/bash
# pause: causes a script to take a break
pause()
{
echo "To continue, hit RETURN."
read q
}
pauseTest the script as follows:
$ chmod +x function_04.sh $ ./function_04.sh
Output:
To continue, hit RETURN. (after hitting any key it resumes)
The script function_05.sh with a function to print the previous day is as follows:
#!/bin/bash
yesterday()
{
date --date='1 day ago'
}
yesterdayTest the script as follows:
$ chmod +x function_05.sh $ ./function_05.sh
Output:
Sat Jul 4 22:52:24 PDT 2015
The function to convert lowercase letters into uppercase letters is shown in function_06.sh as follows:
#!/bin/bash
function Convert_Upper()
{
echo $1 | tr 'abcdefghijklmnopqrstuvwxyz' \
'ABCDEFGHIJKLMNOPQRSTUVWXYZ'
}
Convert_Upper "ganesh naik - embedded android and linux training"$ chmod +x function_06.sh $ ./function_06.sh
Output:
GANESH NAIK - EMBEDDED ANDROID AND LINUX TRAINING
In certain situations, we may need to pass arguments or parameters to functions. In such situations, we can pass arguments as follows.
Calling the script with command-line parameters is as follows:
$ name arg1 arg2 arg3 . . .
Let's type a function as follows:
$ hello() { echo "Hello $1, let us be a friend."; }
Call the function in the command line as follows:
$ hello Ganesh
Output:
Hello Ganesh, let us be a friend
Let's write the script function_07.sh. In this script, we pass command-line parameters to the script as well as the function:
#!/bin/bash
quit()
{
exit
}
ex()
{
echo $1 $2 $3
}
ex Hello hi bye# Function ex with three arguments
ex World# Function ex with one argument
echo $1# First argument passed to script
echo $2# Second argument passed to script
echo $3# Third argument passed to script
quit
echo fooTest the script as follows:
$ chmod +x function_07.sh $ ./function_07.sh One Two Three
Output:
Hello hi bye World One Two Three
We can observe from the output that the parameters passed to the function are local to the function. In global scope, the command-line parameters to script are available as $1, $2, $3, and more.
Another example script called function_08.sh to pass multiple arguments to the function is as follows:
#!/bin/bash
countries()
{
# let us store first argument $1 in variable temp
temp=$1
echo "countries(): \$0 = $0" # print command
echo "countries(): \$1 = $1" # print first argument
echo "countries(): total number of args passed = $#"
echo "countries(): all arguments (\$*) passed = -\"$*\""
}
# Call function with one argument
echo "Calling countries() for first time"
countriesUSA
# Call function with three arguments
echo "Calling countries() second time "
countriesUSA India JapanTest the script as follows:
$ chmod +x function_08.sh $ ./function_08.sh
Output:
Calling countries() for first time countries(): $0 = ./hello.sh countries(): $1 = USA countries(): total number of args passed = 1 countries(): all arguments ($*) passed = -"USA" Calling countries() second time countries(): $0 = ./hello.sh countries(): $1 = USA countries(): total number of args passed = 3 countries(): all arguments ($*) passed = -"USA India Japan"
We can create a function that could create a new directory and change to it during the execution of the program. The script function_09.sh is as follows:
#!/bin/bash
# mcd: mkdir + cd; creates a new directory and
# changes into that new directory
mcd ()
{
mkdir $1
cd $1
}
mcd test1The preceding script will create the test1 folder in the current folder and change the path to the test1 folder.
A common task in many scripts is to ask users to input an answer as either Yes or No. In such situations, the following script function_10.sh would be very useful:
#!/bin/bash
yesno ( )
{
while true .
do
echo "$*"
echo "Please answer by entering yes or no : "
read reply
case $reply in
yes)
echo "You answered Yes"
return 0
;;
no)
echo "You answered No"
return 1
;;
* )
echo "Invalid input"
;;
esac
done
}
Yesno$ chmod +x function_10.sh $ ./function_10.sh
Output:
Please answer by entering yes or no: yes "You answered Yes" $ ./function_10.sh Please answer by entering yes or no: no "You answered No"
We can create variables that may contain strings or numerical values. These global variables can be accessed by all the functions inside a script.
A simple script called function_11.sh with functions is as follows:
#!/bin/bash
# We will define variable temp for sharing data with function
temp="/temp/filename"
remove_file()
{
echo "removing file $temp..."
}
remove_fileTest the script as follows:
$ chmod +x function_11.sh $ ./function_11.sh
Output:
removing file /temp/filename...
Whenever we declare a variable in a script, it is accessible to all functions. The variable is global by default. If the variable is modified by any line of script or any function, it will be modified in global scope. This may create problems in certain situations. We will see this problem in the following script function_12.sh:
#!/bin/bash
name="John"
hello()
{name="Maya"
echo $name
}
echo $name# name contains John
hello# name contains Maya
echo $name# name contains MayaTest the script as follows:
$ chmod +x function_12.sh $ ./function_12.sh
Output:
John Maya Maya
To make a variable local, we declare it as follows:
local var=value local varName
Let's write the script function_13.sh as follows:
#!/bin/bash
name="John"
hello()
{local name="Mary"
echo $name
}
echo $name# name contains John
hello# name contains Mary
echo $name# name contains JohnTest the script as follows:
$ chmod +x function_13.sh $ ./function_13.sh
Output:
John Mary John
The command local can only be used within a function. The keyword local limits the scope of the variable to the function. In the previous script, we initially declared the variable name; it has global scope. This variable name has the content John. Then, we have declared the local variable name in the function hello. This local variable name is initialized to Mary. Then, outside of the function hello, we again access the global variable name, which has the content John.
You have learned to pass command-line parameters to functions. Similarly, the function can return integers as a return value. Normally, functions return either TRUE or FALSE. In certain cases, the function can return integer values, such as 5 or 10, as well.
The syntax is:
return N
When the function calls the command return, the function exits with the value specified by N.
If the function does not call the command return, then the exit status returned is that of the last command executed in the function. If what we need is the status of the last command executed in the function, then we need not return any value from the function. This is illustrated in the following script function_14.sh:
#!/bin/bash
is_user_root() { [ $(id -u) -eq 0 ]; }
is_user_root && echo "You are root user, you can go ahead."\
|| echo "You need to be administrator to run this script"Test the script as follows:
$ chmod +x function_14.sh $ ./function_14.sh
If you are a root user, then the output will be as follows:
You are root user, you can go ahead.
If you are a normal user, then the output will be as follows:
You need to be administrator to run this script
A modified version of the previous script is function_15.sh:
#!/bin/bash
declare -r TRUE=0
declare -r FALSE=1
is_user_root()
{
[ $(id -u)-eq 0 ]&&return$TRUE||return$FALSE
}
is_user_root && echo "You can continue" || echo "You need to be root to run this script."$ chmod +x function_15.sh $ ./function_15.sh
Output:
You need to run this script as a root user.
Let's see the script in which the function returns a value:
#!/bin/bash
yes_or_no()
{
echo "Is your name $*?"
while true
do
echo -n "Please reply yes or no :"
readreply
case$reply in
Y | y | yes) return 0;;
N | n | no ) return 1;;
*) echo "Invalid answer"
esac
done
}
if yes_or_no $1
then
echo "Hello $1"
else
echo "name not provided"
fi$ chmod +x function_16.sh $ ./function_16.sh Ganesh
Output:
Is your name Ganesh? Please reply yes or no :yes Hello Ganesh
We have already seen in previous chapters that to run any command in the background, we have to terminate the command using &:
$ command &
Similarly, we can make the function run in the background by appending & after the function call. This will make the function run in the background so that the terminal will be free:
#!/bin/bash
dobackup()
{
echo "Started backup"
tar -zcvf /dev/st0 /home >/dev/null 2>&1
echo "Completed backup"
}
dobackup &
echo -n "Task...done."
echoTest the script as follows:
$ chmod +x function_17.sh $ ./function_17.sh
Output:
Task...done. Started backup Completed backup
Normally, whenever we enter a command, the new process gets created. If we want to make functions from the script to be made available in the current shell, then we need a technique that will run the script in the current shell instead of creating a new shell environment. The solution to this problem is using either the source or "."commands.
The commands source and "." can be used to run the Shell script in the current shell instead of creating a new process. This helps with declaring functions and variables in the current shell.
The syntax is as follows:
$ source filename [arguments]
Or:
$ . filename [arguments]
$ source functions.sh
Or:
$ . functions.sh
If we pass command-line arguments, these will be handled inside a script as $1, $2, and more:
$ source functions.sh arg1 arg2
Or:
$ ./path/to/functions.sh arg1 arg2
The source command does not create a new shell; but runs the Shell scripts in the current shell, so that all the variables and functions will be available in the current shell for usage.
If we want to create our own library of functions, then we can create a script and add all the functions into this script. We can make all the functions from our script functions.sh available in the current shell by calling source or the period . command.
The procedure to load all functions into the current shell is as follows:
$ countryUSA
Since the function country is not a part of the shell environment, this command will give an error:
$ . functions.sh
Or:
$ source functions.sh $ country USA India Japan
This will execute the function country along with the parameter USAIndia Japan.
We can even load a script containing library functions inside another script as follows:
#!/bin/bash . /../my-library.sh call_library_functions();
We have called the library function script my-library.sh inside another script. This will define all the functions within the script my-library.sh available in the current script environment.
In this chapter, we understood the functions in Shell scripts. You learned about defining and displaying functions and removing the functions the from shell. You also learned about passing arguments to functions, sharing data between functions, declaring local variables in functions, returning results from functions, and running functions in background. You finally learned about using the source and .commands. We used these commands to use the library of functions.
In the next chapter, you will learn about using traps and signals. You will also learn about creating menus with the help of the utility dialog.
In the last chapter, you learned about using functions in Shell scripts and defining, displaying, and removing functions from the shell. You also learned about passing arguments to functions, sharing data between functions, declaring local variables in functions, returning results from functions, and running functions in the background. In the end, you learned about using source and . commands. You used these commands for using a library of functions.
In this chapter, you will learn the following topics:
dialog utilityTwo types of interrupts exist in the Linux operating system: the hardware interrupt and the software interrupt. Software interrupts are called signals or traps. Software interrupts are used for interprocess synchronizations.
Signals are used to notify about a certain event occurrence or to initiate a certain activity.
We use software signals many times, for example, if any command is not responding after it is typed, then you might have entered Ctrl + C. This sends a SIGINT signal to the process, and the process is terminated. In certain situations, we may want the program to perform a certain activity instead of terminating it using the Ctrl + C command. In such cases, we can use the trap command to ignore a signal or to associate our desired function with that signal.
In operating systems, software interrupts or signals are generated when the process attempts to divide a number by zero or due to power failure, system hang up, illegal instruction execution, or invalid memory access.
The action performed by a few signals is to terminate the process. We can configure the shell to do the following responses:
Enter either of following commands to get the full list of all signals:
$ kill -l $ trap –l
Output:
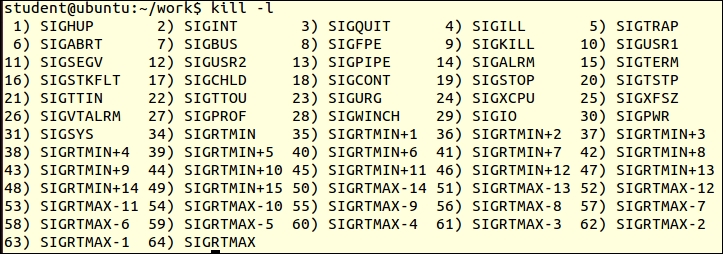
If we want to know which keys are used for particular signals, then we enter the following command:
$ stty -a
The following is a list of a few of the standard signals that a process can use:
|
Number |
Name |
Description |
Action |
|---|---|---|---|
|
0 |
|
The shell exits. |
Termination |
|
1 |
|
The terminal has been disconnected. |
Termination |
|
2 |
|
The user presses Ctrl + C |
Termination |
|
3 |
|
The user presses Ctrl + \ |
Termination |
|
4 |
|
This gives an illegal hardware instruction. |
Program error |
|
5 |
|
This is produced by debugger. |
Program error |
|
8 |
|
This gives an arithmetic error, such as division by zero. |
Program error |
|
9 |
|
This cannot be caught or ignored. |
Termination |
We can send either of the kill signals to a process with PID # 1234 as follows:
kill -9 1234 kill -KILL 1234 kill -SIGKILL 1234
As we can see, we can use a signal number or a signal name along with the process ID. By default, the kill command sends signal number 15 to process. Using the kill command, we can send the desired signal to any specific process.
We can stop a process using the Ctrl + Z signal as follows:
$ kill -19 pid
Ctrl + Z or SIGTSTP will stop the process.
We can run the stopped process by sending the SIGCONT signal.
$ kill -18 pid
The signal number of SIGCONT is 18.
If a signal or software interrupt is generated while the script is running, then we can define what action is performed by that interrupt handler using the trap command. The trap command helps us in reassigning the system response to a particular signal through the user defined function or commands.
The syntax to use the trap command is either of the following:
$ trap 'command; command' signal-name $ trap 'command; command' signal-number
The usage as per the preceding syntax is as follows:
trap 'echo "You pressed Control key"; exit 1' 0 1 2 15
This will print the message You pressed Control Key, any SIGINT, SIGHUP, or SIGTERM received by the process:
trap 'rm file.tmp; exit 1' EXIT INT TERM HUP
When any of the SIGINT, SIGTERM, or SIGHUP signals arrives, then it will delete the file.tmp file and exit with status 1.
While using the trap command, if the command string is surrounded by double quotes, then the command substitution and variable substitution will be done during the trap command execution. If the command string is enclosed in single quotes then the command substitution and variable substitution will be done when the signal is detected.
If we want the shell to ignore certain signals, then we can call the trap command followed by a pair of empty quotes as a command. Those signals will be ignored by the shell process shown by either of the following commands:
$ trap " " 2 3 20 $ trap "" INT QUIT TSTP
The signals 2 (SIGINT), 3 (SIGQUIT), and 20 (SIGTSTP) will be ignored by the shell process.
If we want to reset the signal behavior to the original default action, then we need to call the trap command followed by the signal name or number as shown in the following examples, respectively:
$ trap TSTP $ trap 20
This will reset the default action of signal 20 (SIGTSTP). The default action is to suspend the process (Ctrl + Z).
Let's reassign our function to signals by the trap command:
$ trap 'echo "You pressed Control key"; exit 1' 0 1 2 15
If we do not pass any arguments after the trap command, then it lists all reassigned signals along with their functions.
We can list all the assigned signal lists by the following command:
$ trap
Output:
trap -- 'echo "You pressed Control key"; exit 1' EXIT trap -- 'echo "You pressed Control key"; exit 1' SIGHUP trap -- 'echo "You pressed Control key"; exit 1' SIGINT trap -- 'echo "You pressed Control key"; exit 1' SIGTERM
If we use the trap command inside a function in script, then the reassigned signal behavior will become global inside a script. We can check this effect in the following script example.
Let's write Shell script trap_01.sh as follows:
#!/bin/bash
trap "echo caught signal SIGINT" SIGINT
trap "echo caught signal SIGQUIT" 3
trap "echo caught signal SIGTERM" 15
while :
do
sleep 50
doneLet's test the program as follows:
$ chmod +x trap_01.sh $ ./ trap_01.sh
Output:
^Ccaught signal SIGINT ^\Quit (core dumped) caught signal SIGQUIT
Let's write one more Shell script trap_02.sh as follows:
#!/bin/bash
trap "echo caught signal SIGINT" SIGINT
trap "echo caught signal SIGQUIT" 3
trap "echo caught signal SIGTERM" 15
trap "echo caught signal SIGTSTP" TSTP
echo "Enter any string (type 'dough' to exit)."
while true
do
echo "Rolling...\c"
read string
if [ "$string" = "dough" ]
then
break
fi
done
echo "Exiting normally"Let's test the program as follows:
$ chmod +x trap_02.sh $ ./ trap_02.sh
Output:
Enter any string (type 'dough' to exit). Rolling...\c ^Ccaught signal SIGINT dough Exiting normally
Sometimes we may need our script to run even after we log out, such as when taking a back up and similar activities. In this case, even if we log out, the system is powered on and running. In such situations, we can use the nohup command. The nohup command prevents the process from terminating using the SIGHUP signal.
The nohup command makes our script run without attaching it to a terminal. Therefore, if we use the echo command to print text on the terminal. It will not be printed in a terminal, since the script is not attached to a terminal. In such cases, we need to redirect the output to the file, or nohup will automatically redirect the output to a nohup.out file.
Therefore, if we need to run a process, even if we log out, we need to use the nohup command as follows:
$ nohup command &
The example is as follows:
$ nohup sort emp.lst &
This will run a program to sort the emp.lst file in the background.
$ nohup date &
The dialog utility is used to create a basic level graphical user interface. We can use this in Shell script to create very useful programs.
To install the dialog utility in Debian or Ubuntu Linux, enter following command:
$ sudo apt-get update $ sudo apt-get install l dialog
Similarly, enter the following command to install the utility dialog in CentOS or Red Hat Linux:
$ sudo yum install dialog
The typical syntax of the dialog command is as follows:
$ dialog --common-options --boxType "Text" Height Width \ --box-specific-option
The common-options utility is used to set the background color, title, and so on in dialog boxes.
The option details are as follows:
To create a simple message box, we can use the following command:
$ dialog --msgbox "This is a message." 10 50

Enter the following command to create a message box with the following title:
$ dialog --title "Hello" --msgbox 'Hello world!' 6 20
The option details are as follows:
--title "Hello": This will set the title of the message box as "Hello"--msgbox 'Hello world!': This will set the content of the message box as "Hello world!"6: This will set the height of the message box20: This will set the width of message box: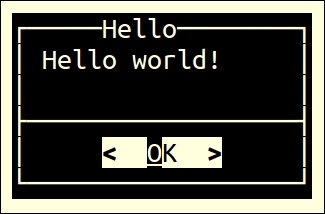
The message box has a Hello title with content Hello World! It has a single OK button. We can use this message box to inform the user about any events or information. The user will have to press Enter to close this message box. If the content is large for a message box, then the dialog utility will provide the scrolling of the message.
If we need to obtain a yes or no answer from the user, we can use the following options along with the dialog command:
$ dialog --yesno "Would you like to continue?" 10 50
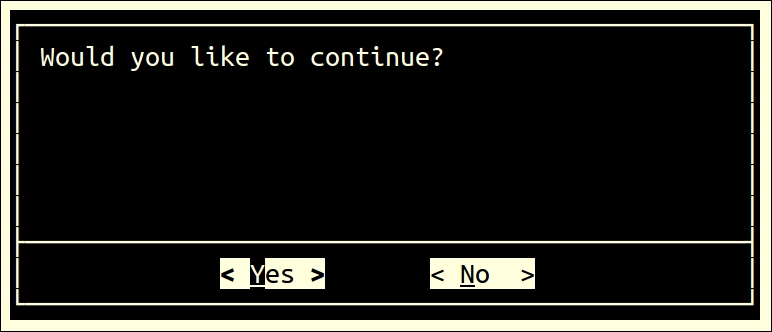
We can have the same yes/no dialog box with a title as follows:
$ dialog --title "yesno box" --yesno "Would you like to continue?" 10 50
Let's write the Shell script dialog_01.sh as follows:
#!/bin/bash
dialog --title "Delete file" \
--backtitle "Learning Dialog Yes-No box" \
--yesno "Do you want to delete file \"~/work/sample.txt\"?" 7 60
# Selecting "Yes" button will return 0.
# Selecting "No" button will return 1.
# Selecting [Esc] will return 255.
result=$?
case $result in
0) rm ~/work/sample.txt
echo "File deleted.";;
1) echo "File could not be deleted.";;
255) echo "Action Cancelled – Presssed [ESC] key.";;
esacLet's test the following program:
$ chmod +x dialog_01.sh $ ./dialog_01.sh
Output:
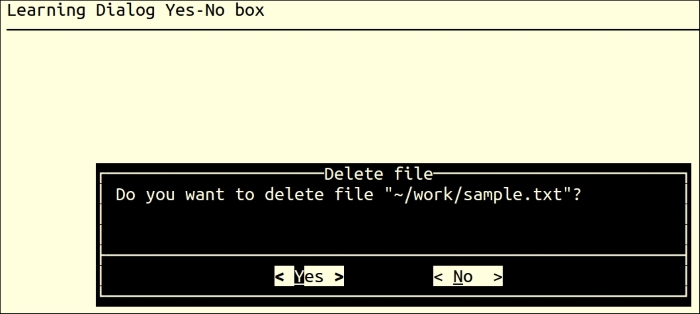
Whenever we want to ask a user for an input text via the keyboard, in such situations, the inputbox option is useful. While entering text via keyboard, we can use keys such as delete, backspace, and the arrow cursor keys for editing. If the input text is larger than the input box, the input field will be scrolled. Once the OK button is pressed, the input text can be redirected to a text file:
# dialog --inputbox "Please enter something." 10 50 \ 2> /tmp/tempfile VAR=`cat ~/work/output.txt
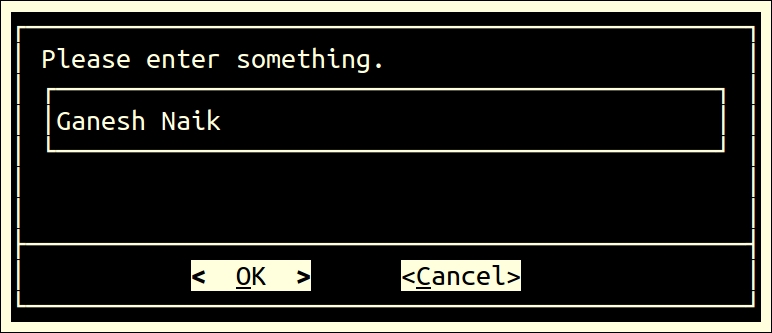
Let's write the Shell script dialog_02.sh to create an input box as follows:
#!/bin/bash
result="output.txt"
>$ $result # Create empty file
dialog --title "Inputbox Demo" \
--backtitle "Learn Shell Scripting" \
--inputbox "Please enter your name " 8 60 2>$result
response=$?
name=$(<$result)
case $response in
0) echo "Hello $name"
;;
1) echo "Cancelled."
;;
255) echo "Escape key pressed."
esac
rm $resultLet's test the following program:
$ chmod +x dialog_02.sh $ ./dialog_02.sh
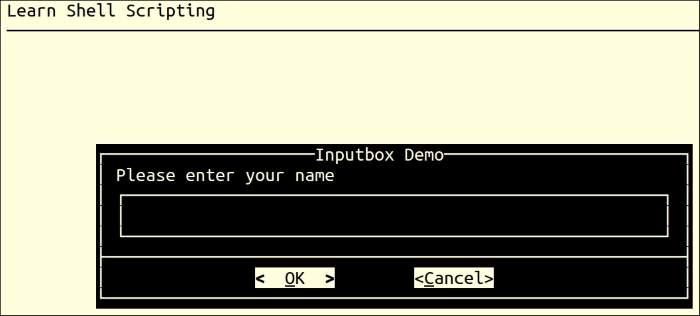
Output:
"Hello Ganesh Naik"
If we want to display the contents of the file in a textbox inside the menu created by dialog, then enter the following command:
$ dialog --textbox /etc/passwd 10 50
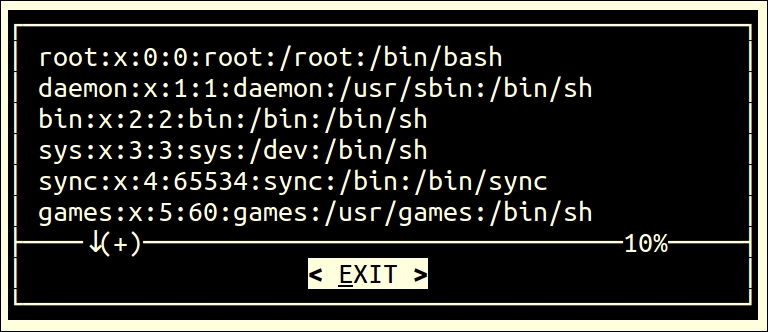
We are displaying the /etc/passwd file in the textbox with the previous command.
Many a time, we need to get the password from the user. In this case, the password should not be visible on the screen. The password box option is perfectly useful for this purpose.
If we want to display an entered password as a string of ****, then we will need to add the--insecure option.
We will need to redirect the inserted password in a file.
Let's write Shell script dialog_03.sh to receive the password as follows:
#!/bin/bash # creating the file to store password result="output.txt 2>/dev/null" # delete the password stored file, if program is exited pre-maturely. trap "rm -f output.txt" 2 15 dialog --title "Password" \ --insecure \ --clear \ --passwordbox "Please enter password" 10 30 2> $result reply=$? case $reply in 0) echo "You have entered Password : $(cat $result)";; 1) echo "You have pressed Cancel";; 255) cat $data && [ -s $data ] || echo "Escape key is pressed.";; esac
Let's test the following program:
$ chmod +x dialog_03.sh $ ./dialog_03.sh
Output:
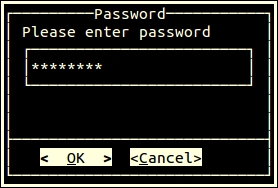
Output:
You have entered Password : adcd1234
Usually, any program or Shell script may be required to perform multiple types of tasks. In such cases, the menu box option is very useful. This option will display the list of choices for the user. Then, the user may select any of his or her desired choice. Our script should execute the desired option.
Each menu has two fields, a tag and an item string. In the next example menu demo, we have tags such as date, calendar, and editor. The description of tags is called as an item string.
Let's write the Shell script dialog_04.sh to create a menu as follows:
#!/bin/bash
# Declare file to store selected menu option
RESPONSE=menu.txt
# Declare file to store content to display date and cal output
TEMP_DATA=output.txt
vi_editor=vi
# trap and delete temp files
trap "rm $TEMP_DATA; rm $RESPONSE; exit" SIGHUP SIGINT SIGTERM
function display_output(){
dialog --backtitle "Learning Shell Scripting" --title "Output" --clear --msgbox "$(<$TEMP_DATA)" 10 41
}
function display_date(){
echo "Today is `date` @ $(hostname -f)." >$TEMP_DATA
display_output 6 60 "Date and Time"
}
function display_calendar(){
cal >$TEMP_DATA
display_output 13 25 "Calendar"
}
# We are calling infinite loop here
while true
do
# Show main menu
dialog --help-button --clear --backtitle "Learn Shell Scripting" \
--title "[ Demo Menubox ]" \
--menu "Please use up/down arrow keys, number keys\n\
1,2,3.., or the first character of choice\n\
as hot key to select an option" 15 50 4 \
Calendar "Show the Calendar" \
Date/time "Show date and time" \
Editor "Start vi editor" \
Exit "Terminate the Script" 2>"${RESPONSE}"
menuitem=$(<"${RESPONSE}")
# Start activity as per selected choice
case $menuitem in
Calendar) display_calendar;;
Date/time) display_date;;
Editor) $vi_editor;;
Exit) echo "Thank you !"; break;;
esac
done
# Delete temporary files
[ -f $TEMP_DATA ] && rm $TEMP_DATA
[ -f $RESPONSE ] && rm $RESPONSELet's test the following program:
$ chmod +x dialog_04.sh $ ./dialog_04.sh
Output:
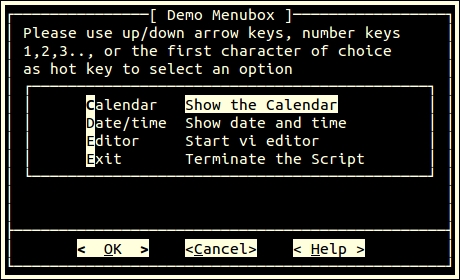
In this case, we can present the user with a choice to select one or multiple options from a list:'
# dialog --checklist "This is a checklist" 10 50 2 \ "a" "This is one option" "off" \ "b" "This is the second option" "on"
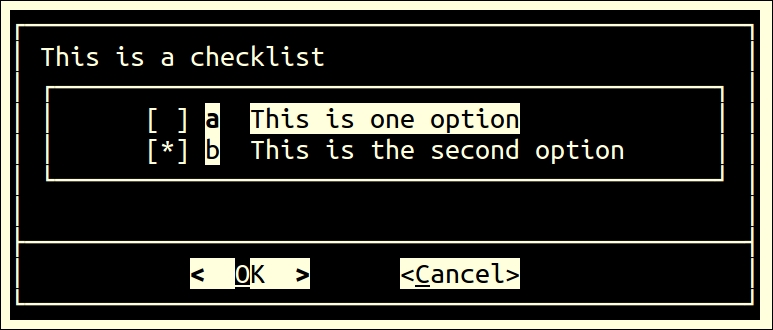
If you want the user to select only one option out of many choices, then radiolist is a suitable option:
# dialog --radiolist "This is a selective list, where only one \ option can be chosen" 10 50 2 \ "a" "This is the first option" "off" \ "b" "This is the second option" "on"
Radio buttons are not square but round, as can be seen in the following screenshot:

The progress meter displays a meter at the bottom of the box. This meter indicates the percentage of the process completed. New percentages are read from standard input, one integer per line. This meter is updated to reflect each new percentage.
Let's write the Shell script dialog_05.sh to create a progress meter as follows:
#!/bin/bash
declare -i COUNTER=1
{
while test $COUNTER -le 100
do
echo $COUNTER
COUNTER=COUNTER+1
sleep 1
done
} | dialog --gauge "This is a progress bar" 10 50 0Let's test the following program:
$ chmod +x dialog_05.sh $ ./dialog_05.sh
Output:
Customization of dialog with the configuration file
We can customize dialog using the ~/.dialogrc configuration file. The default file location is $HOME/.dialogrc.
To create the .dialogrc configuration file, enter the following command:
$ dialog --create-rc ~/.dialogrc
We can customize the output of the dialog utility by changing any of the configuration parameters defined in the .dialogrc file.
In this chapter, you learned about using traps and signals. You also learned about creating menus with the help of the dialog utility.
In the next chapter, you will learn about Linux system startup, from power on till the login-logout of the user and how to customize a Linux system environment.
In the last chapter, you learned about using traps and signals. You also learned about creating menus with the help of dialog utility.
In this chapter, you will learn about Linux system startup, from power on to the user login and how to customize a Linux system environment.
When we power on the Linux system, the Shell scripts are run one after another and the Linux system is initialized. These scripts start various services, daemons, start databases, mount discs, and many more applications. Even during the shutting down of the system, certain Shell scripts are executed so that important system data and information can be saved to the disk and the applications are properly shut down. These are called boot, startup, and shutdown scripts. These scripts are copied during installation of the Linux operating system in your computer. As a developer or administrator, understanding these scripts may help you in understating and debugging the Linux system. If required, you can customize these scripts if the need arises.
In our computers, there is one EPROM chip called BIOS, which is situated on the motherboard or main board of our computers. When we power on, the processor starts executing a program from BIOS. The program from BIOS, does a power on self-test such as checking memory and other peripherals. Then the BIOS program initializes the basic hardware required for PC operation, such as initializing the PCI bus, video devices, and similar.
Finally, BIOS checks the boot device sequence and queries the first boot device. This BIOS program then reads the master boot record of the first boot device, which is normally a hard disk, USB device, or DVD. Once BIOS reads the master boot record of the first boot device, then the boot loader is started. The boot loader reads kernel binary and copies it in the RAM memory. The boot loader checks if the kernel binary is clean and not corrupt. If the integrity check is good then it uncompresses the kernel in the RAM. The bootloader then calls the start_kernel()function, which is a part of kernel. Once the start_kernel()function is called, the kernel is started.
The kernel then initializes the subsystems of kernel such as process management, filesystem, device drivers, memory management, network management, and similar other modules of the kernel. Then, it mounts the root file system, and kernel creates the first process called init. This init process reads the /etc/inittab file. In inittab, the run level information is stored. As per this information, the operating system is initialized process init.
The typical /etc/inittab content will be as follows:
$ cat /etc/inittab
Output:
# Default runlevel. The runlevels used are: # 0 - halt (Do NOT set initdefault to this) # 1 - Single user mode # 2 - Multiuser, without NFS (The same as 3, if you do not have networking) # 3 - Full multiuser mode # 4 - unused # 5 - X11 # 6 - reboot (Do NOT set initdefault to this) # id:5:initdefault:
In the preceding line, the number 5 after ID specifies that the system should be started in run level 5. It means that the system should be started in X11, such as a graphical user interface. We will study more about run levels in the next section.
Nowadays, many distributions have modified the boot-up sequence. They have removed the /etc/inittab file and used different applications to customize the boot-up process.
There are seven run levels. The system will be started in run level 1 to 5. Run level 0 is used for shutting down the system. Run level 6 is used for rebooting the system. The graphical user interface is started in run level 5. The following is the summary of different run levels:
|
Sr. No. |
Run level number |
Description |
|---|---|---|
|
1 |
0 | |
|
2 |
1 |
Single-user mode |
|
3 |
2 |
Multi-user mode |
|
4 |
3 |
Multi-user with network support |
|
5 |
4 |
Not used |
|
6 |
5 |
Graphical user interface with multi-user and networking support |
|
7 |
6 |
Rebooting the system |
We need to be in the root-user mode to use the init command.
If we give the following command, then the system will shutdown:
# init 0
To reboot the system use the following command:
# init 6
If the system is running in the command-line mode, and if you want to start your server in the graphical user mode, then use the following command:
# init 5
In the Linux system, the following folders will be present in the /etc/ folder:
|
Sr. No. |
Folder name |
Description |
|---|---|---|
|
1 |
|
The scripts called during shutting down |
|
2 |
|
The run level 1 scripts |
|
3 |
|
The run level 2 scripts |
|
4 |
|
The run level 3 scripts |
|
5 |
|
The run level 4 scripts |
|
6 |
|
The run level 5 scripts |
|
7 |
|
The run level 6 scripts |
|
8 |
|
The scripts called before every run level |
|
9 |
|
The final script called after run level initialization |
Every run level folder will have script names starting either with S or K. When starting the system, the scripts with names starting with S are called one after another. When shutting down, all the script names starting with K are called one after another.
For example, if the system has to be started in run level 5, then initially all the scripts from the rcS.d folder will be called, then all the scripts from rc5.d will be called. Finally, the rc.local script will be called.
The content of /etc/rc.local is as follows:
$ cat /etc/rc.local
Output:
#!/bin/sh -e # # rc.local # # This script is executed at the end of each multiuser runlevel. # Make sure that the script will "exit 0" on success or any other # value on error. # # In order to enable or disable this script just change # the execution bits. # # By default this script does nothing. exit 0
We can add our customization commands before the exit 0 line in the preceding rc.local script.
Before any user is logged in, the mentioned scripts will be called. After this, user login initialization will be started. This is explained in the following sessions.
Till now, we have seen different scripts, these scripts initialize the operating system, prior to the login of any user. Once the basic operating system in initialized, the user login process starts. This process is explained in the following topics.
In the /etc/ folder, the following files are related to the user level initialization:
/etc/profile: Few distributions will have additional folder /etc/profile.d/. All the scripts from the profile.d folder will be executed./etc/bash.bashrcThe preceding scripts are called by all the users, including root and normal users. Initially, the /etc/profile script will be called. This script creates system-wide environment settings. Few distributions will have the /etc/profile.d/ folder. SuSE Linux has additional /etc/profile.local script. The scripts in this folder will also be called. Then, the /etc/bash.bachrc script will be executed.
Scripts in the /etc/ folder will be called for all the users. Particular user-specific initialization scripts are located in the HOME folder of each user. These are as follows:
$HOME/.bash_profile: This contains user-specific bash environment default settings. This script is called during the login process.$HOME/.bash_login: This contains the second user environment initialization script called during login process.$HOME/.profile: If present, this script internally calls the .bashrc script file.$HOME/.bashrc: This is an interactive shell or terminal initialization script.All the preceding script's names start with dot. These are hidden files. We will need to give the ls -a command to view these files.
Whenever we create a new shell terminal, such as, if we pressed the Ctrl + Alt + T key combination or we start a terminal from the applications tab then the terminal which is created is called the interactive shell terminal. We use this terminal to interact with the operating system. This is not the login shell, which is created during the boot-up process. But this interactive shell terminal gives us the CLI prompt for entering the command to execute.
Whenever we create an interactive bash terminal, Shell scripts from /etc/profile and similar are not called, only the ~/.bashrc script is called every time we create a new interactive shell terminal. If we want any environment customization for every newly created interactive shell terminal, we need to customize the .bashrc script from the home folder of the user.
If you check the content of $HOME/.bashrc, you will observe the following:
.bashrc script is the setting promptless commandgrep, fgrep, egrep, ll, la, l, and similarIf we customize .bashrc such as adding new alias commands or declaring a new function or environment variables, then we should execute .bashrc to take its effect. The following are the two ways to run the .bashrc script so that the environment of the current shell will also be updated as per the customization done in the .bashrc script:
$ source .bashrc$ . bashrcIn these two techniques, the child shell is not created but the new function is. Environment and similar variables will become a part of the current shell environment.
Every user's home folder has one more script called .bash_logout. This script is called or executed when the user exits from the login shell.
If the system user is an embedded system developer, who is interested in adding or modifying the device's driver-related command, then he or she will have to make changes in the /etc/rc*.d folder scripts, or they may have to modify the /etc/rc.local script.
If the administrator wants to modify the environment for all the users, then they will have to modify the /etc/profile and /etc/bash_bashrc scripts.
If we want to customize the environment related to a particular user, then the scripts located in the user's home folder, such as $HOME/.profile, $HOME/bash_profile, and $HOME/bash_login scripts, should be modified.
If the user wants to customize only the interactive shell terminal environment, then they will have to customize the $HOME/.bashrc script.
If you are working in system administration, then I would suggest you learn about the /etc/fstab file and it's editing. This file is used for configuring mount points and how file systems are mounted.
In the previous chapter, you learned about Linux system's startup, from power-on till user login, and how to customize a Linux system environment.
In this chapter, we will cover the following topics:
A sequence of characters that have certain patterns of text (with meta-characters), which will be searched from in a larger text or file is called regular expressions:
$ ll /proc | grep cpuinfo
In the preceding command, the grep utility will search for the cpuinfo text in all lines of input text and will print lines that have the cpuinfo text.
The utilities such as grep, sed, or awk use regular expressions for filtering text and then apply various processing commands as required by the user. The lines which do not match the pattern will be rejected. The following diagram explains the same concept:
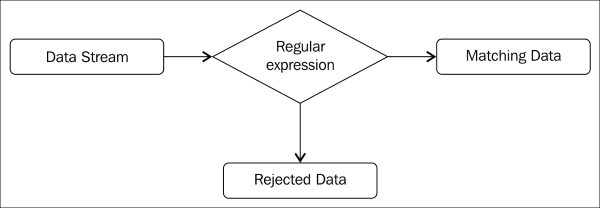
In Chapter 3, Using Test Processing and Filters in Your Scripts, you learned about the basics of regular expressions and pattern matching using the vi editor and the grep utility.
The stream editor (sed) is a very popular noninteractive stream editor. Normally, whenever we edit files using the vi editor, we need to open the file using the vi command, then we interact with the file, such as to see the content of the file on screen, then, edit it, and save the file. Using sed, we can type commands on the command line and sed will make the changes to the text file. The sed is a nondestructive editor. The sed makes the changes to the file and displays the content on screen. If we want to save the changed file, then we need to redirect the output of the sed to the file.
The procedure to install sed is shown here.
For Ubuntu or any Debian-based distributions enter the following command:
$ apt-get install sed
For Red Hat or any rpm-based distribution enter the following command:
$ yum install sed
To check the version of sed, enter the following command:
$ sed –V
Otherwise, enter this command:
$ sed --version GNU sed version 3.0 2
Whenever you use sed commands on a text file, sed reads the first line of the file and stores it in a temporary buffer called pattern space. The sed processes this pattern space buffer as per commands given by the user. Then, it prints the output on screen. This line from the pattern space is then removed and the next line of the file is loaded in the pattern space. In this way, it processes all the lines one by one. This line-by-line processing is continued till the last line of the file. As the sed commands are processed on the temporary buffer or pattern space, the original line is not modified. Therefore, we say sed is a nondestructive buffer.

While using sed, regular expressions are enclosed in forward slashes. As grep and sed use regular expressions and metacharacters for searching patterns in the file. For example:
sed -n '/Regular_Expression/p' filename sed -n '/Mango/p' filename
This will print lines matching the Mango pattern:
sed -n 's/RE/replacement string/' filename sed -n 's/Mango/Apple/' filename
This will find the line containing the Mango pattern and then the Mango pattern will be replaced by the Apple text. This modified line will be shown on screen and the original file will be unchanged.
The following is a summary of various metacharacters and it's usage in sed:
|
Metacharacter |
Function |
|---|---|
|
^ |
This is the beginning-of-line anchor |
|
$ |
This is the end-of-line anchor |
|
. | |
|
* |
This matches zero or more characters |
|
[ ] |
This matches one character in the set |
|
[^ ] |
This matches one character not in the set |
|
\(..\) |
This saves matched characters |
|
& |
This saves the search string so it can be remembered in the replacement string |
|
\< |
This is the beginning-of-word anchor |
|
\> |
This is the end-of-word anchor |
|
x\{m\} |
This is the repetition of the character |
|
x\{m,\} |
This means at least |
|
x\{m,n\} |
This means between |
We can specify which line or number of lines the pattern search and commands are to be applied on while using the sed commands. If line numbers are not specified, then the pattern search and commands will be applied on all lines of the input file.
The line numbers on which commands are to be applied are called address. Address can be a single line number or range of lines in which the starting number of the line and the ending number of the range will be separated by commas. Ranges can be composed of numbers, regular expressions or a combination of both.
The sed commands specify actions such as printing, removing, replacing, and so on.
The syntax is as follows:
sed 'command' filename(s )
Example:
$ cat myfile | sed '1,3d'
Otherwise it can be:
sed '1,3d' myfile
This will delete lines 1 to 3:
sed -n '/[Aa]pple/p' item.list
If the Apple or apple pattern is found in the item.list file, then those lines will be printed on screen and the original file myfile will be unchanged.
To negate the command, the exclamation character (!) can be used.
Example:
sed '/Apple/d' item.list
This tells sed to delete all the lines containing the Apple pattern.
Consider the following example:
sed '/Apple/!d' item.list
This will delete all the lines except the line containing the Apple pattern.
The sed is a nondestructive editor. This means the output of sed is displayed on screen; but the original file is unchanged. If we want to modify the file, then we can redirect the output of the sed command to the file. Deleting lines is illustrated in the following examples:
$ sed '1,3d' datafile > tempfile $ mv tempfile newfile
In this example, we have deleted lines 1 to 3 and stored the output in tempfile. Then, we have to rename tempfile to newfile.
By default, the action of the sed command is to print the pattern space, such as every line which is copied in buffer, and then print the result of processing on it. Therefore, the sed output will consist of all lines along with the processed line by sed. If we do not want the default pattern space line to be printed, then we need to give the –n option. Therefore, we should use the –n option and the p command together to see the result of the sed processed output.
Here is an example:
$ cat country.txt
The output is as follows:
Country Capital ISD Code USA Washington 1 China Beijing 86 Japan Tokyo 81 India Delhi 91 $ sed '/USA/p'country.txt
The output is as follows:
Country Capital ISD Code USA Washington 1 USA Washington 1 China Beijing 86 Japan Tokyo 81 India Delhi 91
All the lines from the file are printed by default and the lines with the USA pattern are also printed:
$ sed –n '/USA/p' country.txt
The output is as follows:
USA Washington 1
As we have given the –n option, sed has suppressed default printing of all lines from the country file; but has printed the line that contains the text pattern USA.
The d command is used to delete lines. After sed copies a line from a file and puts it into a pattern buffer, it processes commands on that line, and finally, displays the contents of the pattern buffer on screen. When the d command is issued, the line currently in the pattern buffer is removed, not displayed which is shown as follows:
$ cat country.txt Country Capital ISD Code USA Washington 1 China Beijing 86 Japan Tokyo 81 India Delhi 91 $ sed '3d' country.txt
The output is as follows:
Country Capital ISD Code USA Washington 1 Japan Tokyo 81 India Delhi 91
Here is the explanation.
The output will contain all the lines except the third line. The third line is deleted by the following command:
$ sed '3,$d' country.txt
Country Capital ISD Code USA Washington 1
This will delete third line to the last line. The dollar sign in the address indicates the last line. The comma is called ra nge operator.
$ sed '$d' country.txt
The output is as follows:
Country Capital ISD Code USA Washington 1 China Beijing 86 Japan Tokyo 81
Here is the explanation.
This deletes the last line. All lines except lines will be displayed.
Here is an example:
$ sed '/Japan/d' country.txt
The output is as follows:
Country Capital ISD Code USA Washington 1 China Beijing 86 India Delhi 91
The line containing the Japan pattern is deleted. All other lines are printed:
$ sed '/Japan/!d' country.txt
The output is as follows:
Japan Tokyo 81
This has deleted all the lines that do not contain Japan.
Let's see a few more examples with the delete command.
This will delete line 4 and the next five lines:
$ sed '4,+5d'
This will keep lines 1 to 5 and delete all the other lines:
$ sed '1,5!d'
This will delete lines 1, 4, 7, and so on:
$ sed '1~3d'
Starting from 1, every third line step increments. The number that follows the tilde is what is called the step increment. The step increment indicates the following:
$ sed '2~2d'
This will delete every other line starting with line 2 to be deleted.
If we want to substitute the text by new text, then we can use commands. After the forward slash, the regular expression is enclosed and then the text to be substituted is placed. If the g option is used, then substitution will happen globally, meaning that it will be applied in the full document. Otherwise, only the first instance will be substituted:
$ cat shopping.txt
The output is as follows:
Product Quantity Unit_Price Total_Cost Apple 2 3 6 Orange 2 .8 1.6 Papaya 2 1.5 3 Chicken 3 5 15 Cashew 1 10 10 $ sed 's/Cashew/Almonds/g' shopping.txt
The output is as follows:
Product Quantity Unit_Price Total_Cost Apple 2 3 6 Orange 2 .8 1.6 Papaya 2 1.5 3 Chicken 3 5 15 Almonds 1 10 10
The s command has replaced Cashew by Almonds. The g flag at the end indicates that the substitution is to be applied globally. Otherwise, it will be applied to the first pattern match only.
The following substitution command will replace two digit numbers at the end of the line with .5 appended to them:
$ sed 's/[0–9][0–9]$/&.5/' shopping.txt
The output is as follows:
Product Quantity Unit_Price Total_Cost Apple 2 3 6 Orange 2 .8 1.6 Papaya 2 1.5 3 Chicken 3 5 15.5 Cashew 1 10 10.5
The ampersand in the search pattern represents the exact pattern found. This will be replaced by the exact pattern with .5 appended to it.
To use the sed effectively, we should be clear about how to define range. Range is typically two addresses in a file as follows:
'6d': range of line 6 '3,6d': range from line 3 to 6
'/pattern1/,/pattern2/
This will specify the range of all the lines between the pattern1 and pattern2 patterns. We can even specify th range with a combination of both, that is, '/pattern/,6'. This will specify the range of lines between the pattern and line 6.
As mentioned, we can specify the range as numbers, pattern, or a combination of both.
For example:
$ cat country.txt Country Capital ISD Code USA Washington 1 China Beijing 86 Japan Tokyo 81 India Delhi 91 $ sed -n '/USA/,/Japan/p' country.txt
The output is as follows:
USA Washington 1 China Beijing 86 Japan Tokyo 81
In this example, all the lines between addresses starting from USA and until the pattern Japan will be printed on screen.
For example:
$ sed -n '2,/India/p' country.txt
The output is as follows:
USA Washington 1 China Beijing 86 Japan Tokyo 81 India Delhi 91
In this example, line 2 to the pattern India, are printed on screen.
For example:
$ sed '/Apple/,/Papaya/s/$/** Out of Stock **/' shopping.txt
The output is as follows:
Product Quantity Unit_Price Total_Cost Apple 2 3 6** Out of Stock ** Orange 2 .8 1.6** Out of Stock ** Papaya 2 1.5 3** Out of Stock ** Chicken 3 5 15 Cashew 1 10 10
In this example. for all the lines between the Apple and Papaya patterns, the end of line will be replaced by the ** Out of Stock ** string.
If we need to perform multiple editing by the same command, then we can use the –e command. Each edit command should be separated by the –e command. The sed will apply each editing command separated by –e on the pattern space before loading the next line in the pattern space:
$ cat shopping.txt
The output is as follows:
Product Quantity Unit_Price Total_Cost Apple 2 3 6 Orange 2 .8 1.6 Papaya 2 1.5 3 Chicken 3 5 15 Cashew 1 10 10
For example:
sed -e '5d' -e 's/Cashew/Almonds/' shopping.txt
The output is as follows:
Product Quantity Unit_Price Total_Cost Apple 2 3 6 Orange 2 .8 1.6 Papaya 2 1.5 3 Almonds 1 10 10
Initially, the command for deleting the fifth line is called, then, the next substitution command to replace Cashew by Almonds is processed.
If we need to insert text from another file into the file, which is processed by sed, then we can use the r command. We can insert text from another file to the specified location:
For example:
$ cat new.txt
The output will be:
********************************* Apples are out of stock $ sed '/Apple/r new.txt' shopping.txt
The output is as follows:
Product Quantity Unit_Price Total_Cost Apple 2 3 6 ********************************* Apples are out of stock ********************************* Orange 2 .8 1.6 Papaya 2 1.5 3 Chicken 3 5 15 Cashew 1 10 10
The explanation is that, this command has added the content of the new.txt file after the line containing the Apple pattern.
The sed command for write is w. Using this command, we can write lines from one file to another file.
For example:
$ cat new.txt
The output is as follows:
new is a empty file $ sed -n '/Chicken/w new.txt' shopping.txt $ cat new.txt Chicken 3 5 15
After the w command, we specify the file to which we will perform the write operation. In this example, the line containing the Chicken pattern is written to the new.txt file.
The a command is used for appending. When the append command is used, it appends the text after the line in the pattern space, in which the pattern is matched. The backslash should be placed immediately after the a command. On the next line, the text to be appended is to be placed.
For example:
$ cat shopping.txt
The output is as follows:
Product Quantity Unit_Price Total_Cost Apple 2 3 6 Orange 2 .8 1.6 Papaya 2 1.5 3 Chicken 3 5 15 Cashew 1 10 10 $ sed '/Orange/a\ **** Buy one get one free offer on this item ! ****' shopping.txt
The output is as follows:
Product Quantity Unit_Price Total_Cost Apple 2 3 6 Orange 2 .8 1.6 **** Buy one get one free offer on this item ! **** Papaya 2 1.5 3 Chicken 3 5 15 Cashew 1 10 10
The new text **** Buy one get one free offer on this item ! **** is appended after the line containing the Orange pattern.
The i command is used for inserting text above the current pattern space line. When we use the append command, new text is inserted after the current line which is in the pattern buffer. In this similar-to-append command, the backslash is inserted after the i command.
For example:
$ cat shopping.txt Product Quantity Unit_Price Total_Cost Apple 2 3 6 Orange 2 .8 1.6 Papaya 2 1.5 3 Chicken 3 5 15 Cashew 1 10 10 $ sed '/Apple/i\ New Prices will apply from Next month ! ' shopping.txt
The output is as follows:
Product Quantity Unit_Price Total_Cost New Prices will apply from Next month ! Apple 2 3 6 Orange 2 .8 1.6 Papaya 2 1.5 3 Chicken 3 5 15 Cashew 1 10 10
In this example, the new text New Prices will be applied from next month! is inserted before the line containing the Apple pattern. Please check the i command and the backslash following it.
The c command is the change command. It allows the sed to modify or change existing text with new text. The old text is overwritten with the new:
$ cat shopping.txt
The output is as follows:
Product Quantity Unit_Price Total_Cost Apple 2 3 6 Orange 2 .8 1.6 Papaya 2 1.5 3 Chicken 3 5 15 Cashew 1 10 10
For example:
$ sed '/Papaya/c\ Papaya is out of stock today !' shopping.txt
The output is as follows:
Product Quantity Unit_Price Total_Cost Apple 2 3 6 Orange 2 .8 1.6 Papaya is out of stock today ! Chicken 3 5 15 Cashew 1 10 10
In this example, the line containing the expression Papaya is changed by the new line Papaya is out of stock today!.
The command transform is similar to the Linux tr command. The characters are translated as per character sequence given. For example, y/ABC/abc/ will convert lowercase abc into uppercase ABC.
For example:
$ cat shopping.txt
The output will be:
Product Quantity Unit_Price Total_Cost Apple 2 3 6 Orange 2 .8 1.6 Papaya 2 1.5 3 Chicken 3 5 15 Cashew 1 10 10 $ sed '2,4y/abcdefghijklmnopqrstuvwxyz/ABCDEFGHIJKLMNOPQRSTUVWXYZ/' shopping.txt
The output will be:
Product Quantity Unit_Price Total_Cost APPLE 2 3 6 ORANGE 2 .8 1.6 PAPAYA 2 1.5 3 Chicken 3 5 15 Cashew 1 10 10
In this example, on lines 2, 3 and 4, all the lowercase letters are converted to uppercase letters.
The q command is used for quitting the sed processing without proceeding to the next lines:
$ cat shopping.txt
The output will be:
Product Quantity Unit_Price Total_Cost Apple 2 3 6 Orange 2 .8 1.6 Papaya 2 1.5 3 Chicken 3 5 15 Cashew 1 10 10
For example:
$ sed '3q' shopping.txt
The output will be:
Product Quantity Unit_Price Total_Cost Apple 2 3 6 Orange 2 .8 1.6
In this example, after printing the first to third lines, sed quits further processing.
We have already seen that the sed has pattern buffer. The sed has one more type of buffer called holding buffer. By the h command, we can inform sed to store the pattern buffer in the holding buffer. And whenever we need the line that is stored in the pattern buffer, we can get it by the g command, that is, get the buffer.
For example:
$ sed -e '/Product/h' -e '$g' shopping.txt
The output is as follows:
Product Quantity Unit_Price Total_Cost Apple 2 3 6 Orange 2 .8 1.6 Papaya 2 1.5 3 Chicken 3 5 15 Cashew 1 10 10 Product Quantity Unit_Price Total_Cost
In this example, the line containing the Product pattern is stored in the holding buffer by the h command. Then, the next editing command indicates to the sed to get the line from the holding buffer when the last line of the file is reached and appends the line from the holding buffer after the last line of the file.
The x is an exchange command. By using this command, we can exchange the holding buffer with the current line in the pattern buffer.
For example:
$ sed -e '/Apple/h' -e '/Cashew/x' shopping.txt
The output is as follows:
Product Quantity Unit_Price Total_Cost Apple 2 3 6 Orange 2 .8 1.6 Papaya 2 1.5 3 Chicken 3 5 15 Apple 2 3 6
In this example, the line with the Apple pattern is stored in the holding buffer. When the pattern with Cashew is found, that line will be exchanged by the holding buffer.
The sed script file contains a list of sed commands in a file. To inform the sed about our script file, we should use the –f option before the script file name. If the sed commands are not separated by a new line, then every command should be separated by a colon ":". We have to take care that there should not be any training white space after every command in the sed script file; otherwise, the sed will give an error. sed takes each line in the pattern buffer and then, it will process all commands on that line. After this line is processed, the next line will be loaded in the pattern buffer. For the continuation of any sed command, which cannot be fitted in one line, we need to add one backslash at the end of the line to inform about continuation.
For example:
$ cat shopping1.txt
The output is as follows:
Product Quantity Unit_Price Apple 200 3 Orange 200 .8 Papaya 100 1.5 Chicken 65 5 Cashew 50 10 April, third week $ cat stock
The output is as follows:
# This is my first sed script by : 1i\ Stock status report /Orange/a\ Fresh Oranges are not available in this season. \ Fresh Oranges will be available from next month /Chicken/c\ **********************************************************\ We will not be stocking this item for next few weeks.\ ********************************************************** $d
Enter the next command as follows:
$ sed -f stock shopping1.txt
The output is as follows:
Stock status report Product Quantity Unit_Price Apple 200 3 Orange 200 .8 Fresh Oranges are not available in this season. Fresh Oranges will be available from next month Papaya 100 1.5 ********************************************************** We will not be stocking this item for next few weeks. ********************************************************** Cashew 50 10
In this script, the following processing has taken place:
#) sign.1i\ informs sed to insert the next text before line number 1./Orange/a\ informs sed to append the next text after the line containing the Orange pattern./Chicken/c\ informs sed to replace the line containing the Chicken pattern by the next line.$d, tells sed to delete the last line of the input file.awk is a program, which has its own programming language for performing data processing and to generate reports.
The GNU version of awk is gawk.
awk processes data, which can be received from a standard input, input file, or as the output of any other command or process.
awk processes data similar to sed, such as lines by line. It processes every line for the specified pattern and performs specified actions. If pattern is specified, then all the lines containing specified patterns will be displayed. If pattern is not specified, then the specified actions will be performed on all the lines.
The name of the program awk is made from the initials of three authors of the language, namely Alfred Aho, Peter Weinberger and Brian Kernighan. It is not very clear why they selected the name awk instead of kaw or wak!
The following are different ways to use awk:
pattern:
$ awk 'pattern' filename
In this case, all the lines containing pattern will be printed.
action:
$ awk '{action}' filename
In this case, action will be applied on all lines
pattern and action:
$ awk 'pattern {action}' filename
In this case, action will be applied on all the lines containing pattern.
As seen previously, the awk instruction consists of patterns, actions, or a combination of both.
Actions will be enclosed in curly brackets. Actions can contain many statements separated by a semicolon or a newline.
awk commands can be on the command line or in the awk script file. The input lines could be received from keyboard, pipe, or a file.
Let's see a few examples by using the preceding syntax using input from files:
$ cat people.txt
The output is as follows:
Bill Thomas 8000 08/9/1968 Fred Martin 6500 22/7/1982 Julie Moore 4500 25/2/1978 Marie Jones 6000 05/8/1972 Tom Walker 7000 14/1/1977
Enter the next command as follows:
$ awk '/Martin/' people.txt
The output is as follows:
Fred Martin 6500 22/7/1982
This prints a line containing the Martin pattern.
For example:
$ cat people.txt
The output is as follows:
Bill Thomas 8000 08/9/1968 Fred Martin 6500 22/7/1982 Julie Moore 4500 25/2/1978 Marie Jones 6000 05/8/1972 Tom Walker 7000 14/1/1977
Enter the next command as follows:
$ awk '{print $1}' people.txt
The output is as follows:
Bill Fred Julie Marie Tom
This awk command prints the first field of all the lines from the people.txt file:
$ cat people.txt
The output is as follows:
Bill Thomas 8000 08/9/1968 Fred Martin 6500 22/7/1982 Julie Moore 4500 25/2/1978 Marie Jones 6000 05/8/1972 Tom Walker 7000 14/1/1977
For example:
$ awk '/Martin/{print $1, $2}' people.txt Fred Martin
This prints the first and second field of the line that contains the Martin pattern.
We can use the output of any other Linux command as an input to the awk program. We need to use the pipe to send an output of other command as the input to the awk program.
The syntax is as follows:
$ command | awk 'pattern' $ command | awk '{action}' $ command | awk 'patter n {action}'
For example:
$ cat people.txt | awk '$3 > 6500'
The output is as follows:
Bill Thomas 8000 08/9/1968 Tom Walker 7000 14/1/1977
This prints all lines, in which field 3 is greater than 6500.
For example:
$ cat people.txt | awk '/1972$/{print $1, $2}'
The output is as follows:
Marie Jones
This prints fields 1 and 2 of the lines, which ends with the 1972 pattern:
$ cat people.txt | awk '$3 > 6500 {print $1, $2}'
This prints fields 1 and 2 of the line, in which the third field is greater than 6500.
Let's understand how the awk program processes every line. We will consider a simple file, sample.txt:
$ cat sample.txt Happy Birth Day We should live every day.
Let's consider the following awk command:
$ awk '{print $1, $3}' sample.txt
The following diagram shows, how the awk will process every line in memory:
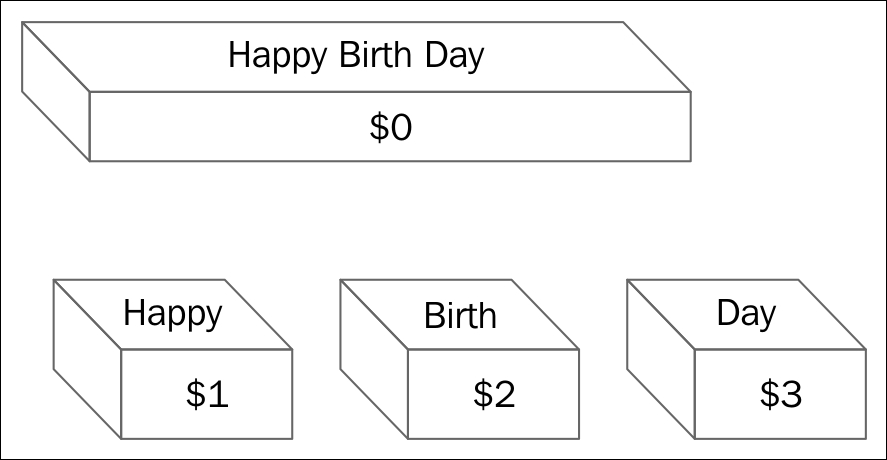
The explanation about the preceding diagram is as follows:
$0. Each line is called record. By default, every line is terminated by a newline.$1, $2, and so on. There can be as many as 100 fields per record.: in the /etc/passwd file, then we will need to specify it in the awk command line.When awk checks an action as '{print $1, $3}', it tells awk to print the first and third fields. Fields will be separated by space. The command will be as follows:
$ awk '{print $1, $3}' sample.txt
The output will be as follows:
Happy Day We live
the explanation of the output is as follows:
We can put awk commands in a file. We will need to use the -f option before using the awk script file name to inform about using the awk script file for all processing instructions. awk will copy the first line from the data file to be processed in $0, and then, it will apply all processing instructions on that record. Then, it will discard that record and load the next line from the data file. This way, it will proceed till the last line of the data file. If the action is not specified, the pattern matching lines will be printed on screen. If the pattern is not specified, then the specified action will be performed on all lines of the data file.
For example:
$ cat people.txt Bill Thomas 8000 08/9/1968 Fred Martin 6500 22/7/1982 Julie Moore 4500 25/2/1978 Marie Jones 6000 05/8/1972 Tom Walker 7000 14/1/1977 $ cat awk_script /Martin/{print $1, $2}
Enter the next command as follows:
$ awk -f awk_script people.txt
The output is as follows:
Fred Martin
The awk command file contains the Martin pattern and it specifies the action of printing fields 1 and 2 of the line, matching the pattern. Therefore, it has printed the first and second fields of the line, containing the Martin pattern.
Every line terminated by the newline is called record and every word separated by white space is called field. We will learn more about them in this section.
awk does not see the file as one continuous stream of data; but it processes the file line by line. Each line is terminated by a new line character. It copies each line in the internal buffer called record.
By default, a newline or carriage return is an input record separator and output record separator. The input record separator is stored in the built-in variable RS, and the output record separator is stored in ORS. We can modify the ORS and RS, if required.
The entire line that is copied in buffer, such as record, is called $0.
Take the following command for example:
$ cat people.txt
The output is as follows:
Bill Thomas 8000 08/9/1968 Fred Martin 6500 22/7/1982 Julie Moore 4500 25/2/1978 Marie Jones 6000 05/8/1972 Tom Walker 7000 14/1/1977 $ awk '{print $0}' people.txt
The output is as follows:
Bill Thomas 8000 08/9/1968 Fred Martin 6500 22/7/1982 Julie Moore 4500 25/2/1978 Marie Jones 6000 05/8/1972 Tom Walker 7000 14/1/1977
This has printed all the lines of the text file. Similar results can be seen by the following command:
$ awk '{print}' people.txt
awk has a built-in variable called NR. It stores the record number. Initially, the value stored in NR is 1. Then, it will be incremented by one for each new record.
Take, for example, the following command:
$ cat people.txt
The output will be:
Bill Thomas 8000 08/9/1968 Fred Martin 6500 22/7/1982 Julie Moore 4500 25/2/1978 Marie Jones 6000 05/8/1972 Tom Walker 7000 14/1/1977 $ awk '{print NR, $0}' people.txt
The output will be:
1 Bill Thomas 8000 08/9/1968 2 Fred Martin 6500 22/7/1982 3 Julie Moore 4500 25/2/1978 4 Marie Jones 6000 05/8/1972 5 Tom Walker 7000 14/1/1977
This has printed every record, such as $0 with record number, which is stored in NR. That is why we see 1, 2, 3, and so on before every line of output.
Every line is called record and every word in record is called field. By default, words or fields are separated by whitespace, that is, space or tab. awk has an internal built-in variable called NF, which will keep track of field numbers. Typically, the maximum field number will be 100, which will depend on implementation. The following example has five records and four fields.
For example:
$1 $2 $3 $4 Bill Thomas 8000 08/9/1968 Fred Martin 6500 22/7/1982 Julie Moore 4500 25/2/1978 Marie Jones 6000 05/8/1972 Tom Walker 7000 14/1/1977 $ awk '{print NR, $1, $2, $4}' people.txt
The output will be:
1 Bill Thomas 08/9/1968 2 Fred Martin 22/7/1982 3 Julie Moore 25/2/1978 4 Marie Jones 05/8/1972 5 Tom Walker 14/1/1977
This has printed record number and field numbers 1, 2, and so on, on the screen.
Every word is separated by white space. We will learn more about them in this section.
We have already discussed that input field separator is whitespace, by default. We can change this IFS to other values on the command line or by using the BEGIN statement. We need to use the -F option to change IFS.
For example:
$ cat people.txt
The output will be:
Bill Thomas:8000:08/9/1968 Fred Martin:6500:22/7/1982 Julie Moore:4500:25/2/1978 Marie Jones:6000:05/8/1972 Tom Walker:7000:14/1/1977 $ awk -F: '/Marie/{print $1, $2}' people.txt
The output will be:
Marie Jones 6000
We have used the -F option to specify colon (:) as IFS instead of the default, IFS. Therefore, it has printed field 1 and 2 of the records in which the Marie pattern was matched. We can even specify more than one IFS on the command line as follows:
$ awk –F'[ :\t]' '{print $1, $2, $3}' people.txt
This will use space, colon, and tab characters as the inter field separator or IFS.
While executing commands using awk, we need to define patterns and actions. Let's learn more about them in this section.
awk uses the patterns to control the processing of actions. When pattern or regular expression is found in the record, then action is performed, or if no action is defined then awk simply prints the line on screen.
For example:
$ cat people.txt
The output will be:
Bill Thomas 8000 08/9/1968 Fred Martin 6500 22/7/1982 Julie Moore 4500 25/2/1978 Marie Jones 6000 05/8/1972 Tom Walker 7000 14/1/1977 $ awk '/Bill/' people.txt
The output will be:
Bill Thomas 8000 08/9/1968
In this example, when the Bill pattern is found in the record, that record is printed on screen:
$ awk '$3 > 5000' people.txt
The output will be:
Bill Thomas 8000 08/9/1968 Fred Martin 6500 22/7/1982 Marie Jones 6000 05/8/1972 Tom Walker 7000 14/1/1977
In this example, when field 3 is greater than 5000, that record is printed on screen.
Actions are performed when the required pattern is found in record. Actions are enclosed in curly brackets such as '{' and '}'. We can specify different commands in the same curly brackets; but those should be separated by a semicolon.
The syntax is as follows:
pattern{ action statement; action statement; .. } or pattern { action statement action statement }
The following example gives a better idea:
$ awk '/Bill/{print $1, $2 ", Happy Birth Day !"}' people.txt
Output:
Bill Thomas, Happy Birth Day !
Whenever a record contains the Bill pattern, awk performs the action of printing field 1, field 2 and prints the message Happy Birth Day.
The regular expressions is a pattern enclosed in forward slashes. Regular expression can contain metacharacters. If the pattern matches any string in the record, then the condition is true and any associated action, if mentioned, will be executed. If no action is specified, then simply the record is printed on screen.
Metacharacters used in awk regular expressions are as follows:
|
Metacharacter |
What it does |
|---|---|
|
. | |
|
* |
Zero or more characters are matched |
|
^ |
The beginning of the string is matched |
|
$ |
The end of the string is matched |
|
+ |
One or more of the characters are matched |
|
? |
Zero or one of the characters are matched |
|
[ABC] |
Any one character in the set of characters A, B, or C is matched |
|
[^ABC] |
Any one character not in the set of characters A, B, or C is matched |
|
[A–Z] |
Any one character in the range from A to Z is matched |
|
a|b |
Either a or b is matched |
|
(AB)+ |
One or more sets of AB; such as AB, ABAB, and so on is matched |
|
\* | |
|
& |
This is used to represent the replacement string when it is found in the search string |
In the following example, all lines containing regular expression "Moore" will be searched and matching record's field 1 and 2 will be displayed on screen:
$ awk '/Moore/{print $1, $2}' people.txt
The output is as follows:
Julie Moore
Whenever we need to write multiple patterns and actions in a statement, then it is more convenient to write a script file. The script file will contain patterns and actions. If multiple commands are on the same line, then those should be separated by a semicolon; otherwise, we need to write them on separate lines. The comment line will start by using the pound (#) sign.
For example:
$ cat people.txt
The output is as folllows:
Bill Thomas 8000 08/9/1968 Fred Martin 6500 22/7/1982 Julie Moore 4500 25/2/1978 Marie Jones 6000 05/8/1972 Tom Walker 7000 14/1/1977
(The awk script)
$ cat report
The output is as follows:
/Bill/{print "Birth date of " $1, $2 " is " $4}
/^Julie/{print $1, $2 " has a salary of $" $3 "."}
/Marie/{print NR, $0}Enter the next command as follows:
$ awk -f report people.txt
The output will be:
Birth date of Bill Thomas is 08/9/1968 Julie Moore has a salary of $4500. 4 Marie Jones 6000 05/8/1972
In this example, the awk command is followed by the -f option, which specifies the script file as record and then processes all the commands on the text file people.txt.
In this script, regular expression Bill is matched, then print text, field 1, field 2, and then print the birth date information. If the regular expression Julie is matched at the start of the line, then print her salary information. If regular expression Marie is matched, then print the record number NR and print the complete record.
We can simply declare a variable in the awk script, without even any initialization. Variables can be of type string, number, or floating type and so on. There is no type declaration required like in C programming. awk will find out the type of variable by its right-hand side data type during initialization or its usage in the script.
Uninitialized variables will have the value 0 or strings will have a value null such as "", depending on how it is used inside scripts:
name = "Ganesh"
The variable name is of the string type:
j++
The variable j is a number. Variable j is initialized to zero and it is incremented by one:
value = 50
The variable value is a number with initial value 50.
The technique to modify the string type variable to the number type is as follows:
name + 0
The technique to modify the number type variable to the string type is as follows:
value " "
User-defined variables can be made up of letters, digits, and underscores. The variable cannot start with a digit.
In awk programming, the if statement is used for decision making. The syntax is as follows:
if (conditional-expression) action1 else action2
If the condition is true, then action1 will be performed, else action2 will be performed. This is very similar to C programming if constructs.
An example of using the if statement in the awk command is as follows:
$ cat person.txt
The output is as follows:
Bill Thomas 8000 08/9/1968 Fred Martin 6500 22/7/1982 Julie Moore 4500 25/2/1978 Marie Jones 6000 05/8/1972 Tom Walker 7000 14/1/1977 $ awk '{ if ($3 > 7000) { print "person with salary more than 7000 is \n", $1, " " , $2;} }' people.txt
The output is as follows:
person with salary more than 7000 is Bill Thomas
In this example, field 3 is checked for greater than 7000 in every record. If field 3 is greater than 7000 for any record, then the action of printing the name of the person and value of third record will be done.
The for loop is used for doing certain actions repetitively. The syntax is as follows:
for(initialization; condition; increment/decrement) actions
Initially, a variable is initialized. Then, the condition is checked, if it is true, then action or actions enclosed in curly brackets are performed. Then, the variable is incremented or decremented. Again, the condition is checked. If the condition is true, then actions are performed, otherwise, the loop is terminated.
An example of the awk command with the for loop is as follows:
$ awk '{ for( i = 1; i <= NF; i++) print NF, $i }' people.txt
Initially, the i variable is initialized to 1. Then, the condition is checked to see whether i is less than NF. If true, then the action of printing NF and the field is performed. Then i is incremented by one. Again, the condition is checked if it is true or false. If true, then it will perform actions again; otherwise, it will terminate the looping activity.
Similar to C programming, awk has a while loop for doing the tasks repeatedly. while will check for the condition. If the condition is true, then actions will be performed. If condition is false, then it will terminate the loop.
The syntax is as follows:
while(condition) actions
An example of using the while construct in awk is as follows:
$ cat people.txt $ awk '{ i = 1; while ( i <= NF ) { print NF, $i ; i++ } }' people.txt
NF is the number of fields in the record. The variable i is initialized to 1. Then, while i is smaller or equal to NF, the print action will be performed. The print command will print fields from the record from the file people.txt. In the action block, i is incremented by one. The while construct will perform the action repeatedly until i is less than or equal to NF.
The do while loop is similar to while loop; but the difference is, even if the condition is true, at least once the action will be performed unlike the while loop.
The syntax is as follows:
do action while (condition)
After the action or actions are performed, the condition is checked again. If the condition is true, then the action will be performed again, otherwise, the loop will be terminated.
The following is an example of using the do while loop:
$ cat awk_script BEGIN { do { ++x print x } while ( x <= 4 ) } $ awk -f awk_script 1 2 3 4 5
In this example, x is incremented to 1 and value of x is printed. Then the condition is checked to see whether x is less than or equal to 4. If the condition is true, then the action is performed again.
In this chapter, you learned about regular expressions and about using sed and awk for text processing. You learned various commands and usage of options along with a lot of examples for using sed and awk. In this example, the value of x is set in the body of the loop using the auto-increment operator. The body of the loop is executed once and the expression is evaluated.
Copyright © 2015 Packt Publishing
All rights reserved. No part of this book may be reproduced, stored in a retrieval system, or transmitted in any form or by any means, without the prior written permission of the publisher, except in the case of brief quotations embedded in critical articles or reviews.
Every effort has been made in the preparation of this book to ensure the accuracy of the information presented. However, the information contained in this book is sold without warranty, either express or implied. Neither the author, nor Packt Publishing, and its dealers and distributors will be held liable for any damages caused or alleged to be caused directly or indirectly by this book.
Packt Publishing has endeavored to provide trademark information about all of the companies and products mentioned in this book by the appropriate use of capitals. However, Packt Publishing cannot guarantee the accuracy of this information.
First published: December 2015
Production reference: 1211215
Published by Packt Publishing Ltd.
Livery Place
35 Livery Street
Birmingham B3 2PB, UK.
ISBN 978-1-78528-621-6
Author
Ganesh Sanjiv Naik
Reviewers
Advait Deo
Eax Melanhovich
Shawn Solomon
Commissioning Editor
Nadeem Bagban
Acquisition Editor
Tushar Gupta
Content Development Editor
Nikhil Potdukhe
Technical Editor
Rupali R. Shrawane
Copy Editor
Charlotte Carneiro
Project Coordinator
Izzat Contractor
Proofreader
Safis Editing
Indexer
Rekha Nair
Production Coordinator
Manu Joseph
Cover Work
Manu Joseph
Ganesh Sanjiv Naik is an author, consultant, and corporate trainer for embedded Android, embedded Linux, and Internet of Things related product development.
He completed his computer engineering in 1988. Since then, he has worked in this industry. He has worked on projects including micro-controller based projects to advanced Embedded Android projects. He has more than 20 years of professional experience and project accomplishment in information technology.
Ganesh has a passion and deep desire for teaching. He has trained 1,000 engineers in Linux and Android product development. He has developed a lot of training material as well as curriculum for various universities and training institutes.
He has an interest in spiritual study and practices such as meditation. He is a certified yoga teacher. His hobbies include yoga and martial arts.
He has worked as a corporate trainer for Indian Space Research Organization, Intel, GE, Samsung, Motorola, Penang Skill Development Center (Malaysia), various companies in Singapore as well as various other corporates in India and other countries. He has started a company called Levana Technologies, which works with the Penang Skill Development Center (Malaysia) for consulting and training activities. If you would like to send feedback, suggestions, or corrections in the book, he can be contacted at https://in.linkedin.com/in/naikganesh.
This book is his real-life experience….
He has worked as a consultant and corporate trainer in the following skills:
I would like to thank my wife, Vishalakshi, for putting up with my late night writing sessions. Even though Vishalakshi is from microbiology background, on my request, she proofed all the chapters to spot language shortcomings. She patiently read my complete book, and even after not being a programmer, she gave me many valuable suggestions. Without her support and continuous motivation, this book would not have been possible. My professional friend, Kuldeep Vaity, has also read all chapters from a developer's perspective. His feedback was very valuable from technical angles, such as unclear code, insufficient explanation, and similar.
I feel proud to say that the book's cover picture was designed by my daughter, Roopali. She conceptualized the theme and took a lot of effort to properly convey the meaning of the book to readers.
My special thanks to the technical reviewers of the book. Their valuable suggestions have helped me add value to this book.
I would like to thank the entire Packt Publishing team. I would especially like to thank, Aditya Nair and Nikhil Potdukhe of Packt Publishing for the positive, motivating support given to me during the initial period to the end of the completion of this book. Nikhil was very helpful and patient in following up with me for chapters. Due to my busy schedule of consulting and training activities, I was not able to complete my chapters as per schedule; but Nikhil used to follow up very nicely, understandingly, and patiently for the chapter's completion. Without his patient follow up, either I would have completed this book very late, or I would have left the writing work incomplete.
Advait Deo has more than 10 years of experience in database domain, has spent time on many aspects of databases until now, starting from Oracle version 8 until 12c. He mainly focuses on database performance tuning, integrating database with front end application, scripting, and automation. He is currently working as a senior database administrator for (world leader in retail business).
Prior to this book, Advait has reviewed Oracle Database 11g R2 Performance Tuning Cookbook, Packt Publishing (ISBN 1849682607). He also publishes some of his work and learnings on his website at http://avdeo.com.
Eax Melanhovich is 27 and lives in Moscow, Russia. Most people don't know his real name or where he works since Eax is concerned about his privacy. Eax is an author of probably the most popular Russian standalone technical blog eax.me. He is also one of the co-hosts of the popular Russian IT podcast devzen.ru. Eax is an Ubuntu user and a functional programming enthusiast.
Shawn Solomon is a technology veteran with a broad background of experience from more than 20 years of pioneering in various technologies. While working in the ISP, VoIP, educational, open source development, and disaster recovery fields, his skillset has adapted and broadened over the years.
For support files and downloads related to your book, please visit www.PacktPub.com.
Did you know that Packt offers eBook versions of every book published, with PDF and ePub files available? You can upgrade to the eBook version at www.PacktPub.com and as a print book customer, you are entitled to a discount on the eBook copy. Get in touch with us at <service@packtpub.com> for more details.
At www.PacktPub.com, you can also read a collection of free technical articles, sign up for a range of free newsletters and receive exclusive discounts and offers on Packt books and eBooks.
https://www2.packtpub.com/books/subscription/packtlib
Do you need instant solutions to your IT questions? PacktLib is Packt's online digital book library. Here, you can search, access, and read Packt's entire library of books.
If you have an account with Packt at www.PacktPub.com, you can use this to access PacktLib today and view 9 entirely free books. Simply use your login credentials for immediate access.
I wish to dedicate this book to my Gurudev His Holiness Dr. Jayant Balaji Athavale. I wish to express gratitude for his guidance, which I have received for, how to become good human being, good professional and a seeker on the path of spiritual progress.
- Ganesh Sanjiv Naik
Shell scripts are an essential part of any modern operating system, such as UNIX, Linux, Windows, and similar. The scripting language or its syntax may vary from OS to OS; but the fundamental principles remain the same. I first encountered Linux Shell scripts during the development of embedded Linux product development. Shell scripts were initializing the complete product from the basic booting procedure until users logged in and a complete operating system was initialized. Another situation was in the automation of regular activities, such as the build and release management of source codes of very complex products, where more than 10,000 files were a part of a single project. Similarly, another very common requirement comes while using the make utility, which is used to compile and build complex product source codes.
Initially, I had learned scripts to solve practical problems and customize already existing products. This book is the summary of what I have learned over the years in Linux Shell scripting during project development work, consultancy, and corporate trainings and their Q&A sessions.
In this book, you will learn about the very basics of Shell scripting to complex, customized automation. By the end of this book, you will be able to confidently use your own Shell scripts for the real-world problems out there. The idea is to be as practical as possible and give you the look and feel of what real-world scripting looks like.
This book covers bash, the GNU Bourne-Again Shell scripting. You can use the knowledge gained by reading this book for any shell of any of the UNIX flavors or distributions. You will need to take care of a few syntax changes if you are working in other shells, such as Korn, and similar. You should be able to read this book cover to cover, or you can just pick it up and read anything that you might find interesting. But perhaps most importantly, if you have a question about how to solve a particular problem or you need a hint, you will find it easy to find the right solution or something close enough to save your time and energy.
Chapter 1, Getting Started and Working with Shell Scripting, you will learn different ways to write and run Shell scripts. You will also learn ways to handle files and directories, and you will learn about working with permissions.
Chapter 2, Drilling Deep into Process Management, Job Control, and Automation, you will learn about basic process management. You will learn about command ps and job management using commands such as jobs, fg, bg, kill, and pkill. Later on, you will learn about process monitoring tools: top, iostat, vmstat and sar.
Chapter 3, Using Text Processing and Filters in Your Scripts, you will learn about using more, less, head, and tail commands. You will also learn text processing tools such as, cut, paste, comm, and uniq. You will learn about standard input, output, and error. Later on, you will learn about metacharacters and pattern matching using vi and grep.
Chapter 4, Working with Commands, you will learn about how shell interprets any command entered on the command line. You will also learn command substitution, separators, and pipes in detail.
Chapter 5, Exploring Expressions and Variables, you will learn about variables—environment variables. This will include how to export environment variables, set, shift, read-only variables, command-line arguments, and about creating and handling arrays.
Chapter 6, Neat Tricks with Shell Scripting, you will learn about debugging, the here operator, interactive Shell scripts for taking input from the keyboard, and file handling.
Chapter 7, Performing Arithmetic in Shell Scripts, you will learn about doing arithmetic operations in various ways, such as using declare, let, expr, and arithmetic expressions. You will also learn about representing numbers in different bases, such as hex, octal, and binary. You will learn about using the bc utility for doing floating point or fractional arithmetic.
Chapter 8, Automating Decision Making in Scripts, you will learn about using decision making in scripts working with test, if…else, and switching case. You will also use select for loop with menu. For repeating tasks such as processing lists, you will learn about using for loop, while loop and do while. You will also learn about how to control loops using break and continue statements.
Chapter 9, Working with Functions, we will understand about functions in Shell scripts. You will learn about the definition and display of functions by removing the function from the shell. You will also learn about passing arguments to functions, sharing data between functions, declaring local variables in functions, returning results from functions, and running functions in background. You will finally learn about using source and . commands. We will use these commands to use the library of functions.
Chapter 10, Using Advanced Functionality in Scripts, you will learn about using traps and signals. You will also learn about creating menus with the help of the dialog utility.
Chapter 11, System Startup and Customizing a Linux System, you will learn about Linux system startup from power on until the user login and how to customize a Linux system environment.
Chapter 12, Pattern Matching and Regular Expressions with sed and awk, you will learn about regular expressions and using sed (stream editor) and awk for text processing. You will learn about the usage of various commands and options along with a lot of examples for using sed and awk.
Any computer that has Linux OS installed on it will be sufficient for learning all the topics discussed in this book. I have personally tested all the commands and scripts in Ubuntu 12.10 distribution.
While learning, if you find that any utility has not installed alongside Ubuntu or any Debian-based distribution, then enter the following command to install this utility:
$ sudo apt-get update $ sudo apt-get install package-name
The Internet should be available for the previous commands to run.
In Red Hat or any other rpm-based distribution, enter the following commands:
$ sudo yum update $ sudo yum install package-name
If the Internet is connected, then using these commands, you can install any command or utility that is not already installed.
This book is for the readers that are proficient at working with Linux, and who want to learn about Shell scripting to improve their efficiency and practical skills. The following are a few examples where we can use skills learned in this book:
In this book, you will find a number of text styles that distinguish between different kinds of information. Here are some examples of these styles and an explanation of their meaning.
Code words in text, database table names, folder names, filenames, file extensions, pathnames, dummy URLs, user input, and Twitter handles are shown as follows: "In the output, 4d3 tells us that line number 4 is deleted in file2. Similarly, the change command will show us changes in the file as well."
A block of code is set as follows:
#!/bin/bash
# This is comment line
echo "Hello World"
ls
date
When we wish to draw your attention to a particular part of a code block, the relevant lines or items are set in bold:
$ expr 4 * 10
expr: syntax error
With command expr, we cannot use * for multiplication. We need to use \* for multiplication.
$ expr "4 * 10"
4 * 10
$ expr 4 \* 10
40Any command-line input or output is written as follows:
$ sed '1,3d' datafile > tempfile $ awk -F: '/Marie/{print $1, $2}' people1.txt
New terms and important words are shown in bold.
Feedback from our readers is always welcome. Let us know what you think about this book—what you liked or disliked. Reader feedback is important for us as it helps us develop titles that you will really get the most out of.
To send us general feedback, simply e-mail <feedback@packtpub.com>, and mention the book's title in the subject of your message.
If there is a topic that you have expertise in and you are interested in either writing or contributing to a book, see our author guide at www.packtpub.com/authors.
Now that you are the proud owner of a Packt book, we have a number of things to help you to get the most from your purchase.
We also provide you with a PDF file that has color images of the screenshots/diagrams used in this book. The color images will help you better understand the changes in the output. You can download this file from https://www.packtpub.com/sites/default/files/downloads/LearningLinuxShellScripting_ColorImages.pdf.
Although we have taken every care to ensure the accuracy of our content, mistakes do happen. If you find a mistake in one of our books—maybe a mistake in the text or the code—we would be grateful if you could report this to us. By doing so, you can save other readers from frustration and help us improve subsequent versions of this book. If you find any errata, please report them by visiting http://www.packtpub.com/submit-errata, selecting your book, clicking on the Errata Submission Form link, and entering the details of your errata. Once your errata are verified, your submission will be accepted and the errata will be uploaded to our website or added to any list of existing errata under the Errata section of that title.
To view the previously submitted errata, go to https://www.packtpub.com/books/content/support and enter the name of the book in the search field. The required information will appear under the Errata section.
Piracy of copyrighted material on the Internet is an ongoing problem across all media. At Packt, we take the protection of our copyright and licenses very seriously. If you come across any illegal copies of our works in any form on the Internet, please provide us with the location address or website name immediately so that we can pursue a remedy.
Please contact us at <copyright@packtpub.com> with a link to the suspected pirated material.
We appreciate your help in protecting our authors and our ability to bring you valuable content.
If you have a problem with any aspect of this book, you can contact us at <questions@packtpub.com>, and we will do our best to address the problem.
Whoever works with Linux will come across shell as the first program to work with. The Graphical user interface (GUI) usage has become very popular due to the ease of use. Those who want to take advantage of the power of Linux will use the shell program by default.
Shell is a program which provides the user direct interaction with the operating system. Let's understand the stages in the evolution of the Linux operating system. Linux was developed as a free and open source substitute for UNIX OS. The chronology can be as follows:
In this chapter, we will cover the following topics:
Initially, the UNIX OS used a shell program called Bourne Shell. Then eventually, many more shell programs were developed for different flavors of UNIX. The following is brief information about different shells:
A brief comparison of various shells is presented in the following table:
|
Feature |
Bourne |
C |
TC |
Korn |
Bash |
|---|---|---|---|---|---|
|
Aliases |
no |
yes |
yes |
yes |
yes |
|
Command-line editing |
no |
no |
yes |
yes |
yes |
|
Advanced pattern matching |
no |
no |
no |
yes |
yes |
|
Filename completion |
no |
yes |
yes |
yes |
yes |
|
Directory stacks (pushd and popd) |
no |
yes |
yes |
no |
yes |
|
History |
no |
yes |
yes |
yes |
yes |
|
Functions |
yes |
no |
no |
yes |
yes |
|
Key binding |
no |
no |
yes |
no |
yes |
|
Job control |
no |
yes |
yes |
yes |
yes |
|
Spelling correction |
no |
no |
yes |
no |
yes |
|
Prompt formatting |
no |
no |
yes |
no |
yes |
What we see here is that, generally, the syntax of all these shells is 95% similar. In this book, we are going to follow Bash shell programming.
Whenever we type any text in the shell terminal, it is the responsibility of shell to execute the command properly. The activities done by shell are as follows:
We will discuss the preceding topics in the subsequent chapters.
Let's get started by opening the terminal, and we will familiarize ourselves with the Bash Shell environment:
$ echo $SHELL /bin/bash
/bin/bash such as BASH shell:$ bash --version GNU bash, version 2.05.0(1)-release (i386-redhat-linux-gnu) Copyright 2000 Free Software Foundation, Inc.
Hereafter, we will use the word Shell to signify the BASH shell only. If we intend any other shell, then it will be specifically mentioned by name such as KORN and similar other shells.
In Linux, filenames in lowercase and uppercase are different; for example, the files Hello and hello are two distinct files. This is unlike Windows, where case does not matter.
As far as possible, avoid using spaces in filenames or directory names such as:
Hello World.txtHello_World.txt or HelloWorld.txtThis will make certain utilities or commands fail or not work as expected, for example, the make utility.
While typing in filenames or directory names of the existing files or folders, use the tab completion feature of Linux. This will make working with Linux faster.
The following table lists a few basic Linux commands:
Since we learned basic commands to use Linux OS, we will now write our first Shell script called hello.sh. You can use any editor of your choice such as vi, gedit, nano, and other similar editors. I prefer to use the vi editor.
hello.sh file as follows:#!/bin/bash # This is comment line echo "Hello World" ls date
The #!/bin/bash line is called the shebang line. The combination of the characters # and ! is called the magic number. The shell uses this to call the intended shell such as /bin/bash in this case. This should always be the first line in a Shell script.
The next few lines in the Shell script are self explanatory.
#, will be treated as a comment line. An exception to this would be the first line with #!/bin/bashecho command will print Hello World on the screenls command will display directory content on the consoledate command will show the current date and timeWe can execute the newly created file by the following commands:
$ bash hello.sh
$ chmod +x hello.sh
By running any of the preceding commands, we are adding executable permission to our newly created file. You will learn more about file permissions in later in this same chapter.
$ ./hello.sh
By running the preceding command, we are executing hello.sh as the executable file. By technique one, we passed filename as an argument to Bash shell.
The output of executing hello.sh will be as follows:
Hello World
hello.sh
Sun Jan 18 22:53:06 IST 2015
Since we have successfully executed our first script, we will proceed to develop a more advanced script, hello1.sh. Please create the new script hello.sh as follows:
#!/bin/bash
# This is the first Bash shell
# Scriptname : Hello1.sh
# Written by:  Ganesh Naik
echo "Hello $LOGNAME, Have a nice day !"
echo "Your are working in directory `pwd`."
echo "You are working on a machine called `uname -n`."
echo "List of files in your directory is."
ls      # List files in the present working directory
echo  "Bye for now $LOGNAME. The time is `date +%T`!"
The output of executing hello.sh will be as follows:
Hello student, Have a nice day !.
Your are working in directory /home/student/work.
You are working on a machine called ubuntu.
List of files in your directory is.
hello1.sh  hello.sh
Bye for now student. The time is 22:59:03!
You will learn about the LOGNAME, uname, and other similar commands as we go on with the book.
In any program development, the following are the two options:
When we use a compiler-based language, we compile the complete source code, and as a result of compilation, we get a binary executable file. We then execute the binary to check the performance of our program.
On the contrary, when we develop the Shell script, such as an interpreter-based program, every line of the program is input to Bash shell. The lines of Shell script are executed one by one sequentially. Even if the second line of a script has an error, the first line will be executed by the shell interpreter.
Shell scripts have certain advantages over compiler-based programs, such as C or C++ language. However, Shell scripting has certain limitations as well.
The following are the advantages:
The following are the limitations of Shell scripts:
We will explore the directory structure in Linux so that it will be useful later on:
/bin/: This contains commands used by a regular user./boot/: The files required for the operating system startup are stored here./cdrom/: When CD-ROM is mounted, the CD-ROM files are accessible here./dev/: The device driver files are stored in this folder. These device driver files will point to hardware-related programs running in kernel./etc/: This folder contains configuration files and startup scripts./home/: This folder contains a home folder of all users except the administrator./lib/: The library files are stored in this folder./media/: External media such as a USB pen drive is mounted in this folder./opt/: The optional packages are installed in this folder./proc/: This contains files which give information about kernel and every process running in OS./root/: This is the administrators home folder./sbin/: This contains commands used by the administrator or root user./usr/: This contains secondary programs, libraries, and documentation about user-related programs./var/: This contains variable data such as http, tftp, and similar other./sys/: This dynamically creates the sys filesLet us learn a few commands, which are required very often, such as man, echo, cat and similar:
man command:
$ man man
From the following table, you can get an idea about various types of man pages for the same command:
|
Section number |
Subject area |
|---|---|
|
1 |
User commands |
|
2 |
System calls |
|
3 |
Library calls |
|
4 |
Special files |
|
5 |
File formats |
|
6 |
Games |
|
7 |
Miscellaneous |
|
8 |
System admin |
|
9 |
Kernel routines |
man command to display corresponding manual pages as follows:$ man 1 command $ man 5 command
passwd command, which is used for changing the current password of a user, you can type the command as follows:$ man command man -k passwd // show all pages with keyword man –K passwd // will search all manual pages for pattern $ man passwd
This will show information about the passwd command:
$ man 5 passwd
The preceding command will give information about the file passwd, which is stored in /etc /passwd.
$ whatis passwd
Output:
passwd (1ssl)        - compute password hashes
passwd (1)           - change user password
passwd (5)           - the password file
$ which passwd
/usr/bin/passwd
The preceding line tells us that the binary file of the passwd command is located in the /usr/bin/passwd folder.
$ whereis passwd
The output will be as follows:
passwd: /usr/bin/passwd /etc/passwd /usr/bin/X11/passwd /usr/share/man/man1/passwd.1.gz /usr/share/man/man1/passwd.1ssl.gz /usr/share/man/man5/passwd.5.gz
$ whoami
This command displays the user name of the logged in user:
$ su
The su command (switch user) will make the user as the administrator; but, you should know the administrators, password. The sudo command (superuser do) will run the command with administrator's privileges. It is necessary that the user should have been added in the sudoers list.
# who am i
This command will show the effective user who is working at that moment.
# exit
$ alias ll='ls –l'
$ alias copy='cp –rf'
To list all declared aliases, use the following command:
$ alias
To remove an alias, use the following command:
$ unalias copy
$ uname
Output:
Linux
This will display the basic OS information (UNIX name)
$ uname –r
Output:
3.13.0-32-generic
$ uname –a
Output:
Linux ubuntu 3.13.0-32-generic #57~precise1-Ubuntu SMP Tue Jul 15 03:50:54 UTC 2014 i686 i686 i386 GNU/Linux
$ cat /proc/version   // detailed info about distribution
$ cat /etc/*release
# lsb_release -a   // will tell distribution info for Ubuntu
The command
cat is used for reading files and displayed on the standard output.
$ ln -s file file_link
$ file fil_name // show type of file
But this is very rarely used, as many powerful editors are already existing, such as vi or gedit.
Hello World on the console. The echo command is very useful for Shell script writers:
$ echo "Hello World"
Hello World to the hello.c file:
$ echo "Hello World" > hello.c
The command echo with > overwrites the content of the file. If content already exists in the file, it will be deleted and new content will be added in the file. In a situation, when we need to append the text to the file, then we can use the echo command as follows:
$ echo "Hello World" >> hello.c will append the text
$ cat hello.c
The following are the types of permissions:
The following are the commands for changing the file permissions:
To check the file permission, give the following command:
$ ll file_name
The details of file permissions are as seen in the following image:
In the preceding diagram, as we can see, permissions are grouped in owner-user and group and other users' permissions. Permissions are of three types such as read, write, and execute permissions. As per the requirement, we may need to change permissions of the various files.
We can change the file or directory permissions by the following two ways:
We will see how Linux decides the default permissions of the newly created file or folder:
$ umask
0002
The meaning of the preceding output is that, if we create a new directory, then from the permissions of +rwx, the permission 0002 will be subtracted. This means that for a newly created directory, the permissions will be 775 or rwx rwx r-x. For a newly created file, the file permissions will be rw- rw- r--. By default, for any newly created text file, the execute bit will never be set. Therefore, the newly created text file and directory will have different permissions even though the umask is same.
Another very interesting functionality is the setuid feature. If the setuid bit is set for a script, then the script will always run with the owner's privileges irrespective of which user is running the script. If the administrator wants to run script written by him by other users, then he can set this bit.
Consider either of the following situations:
$ chmod u+s file_name
$ chmod 4777 file
The file permissions after any of the preceding two commands will be drwsrwxrwx.
Similar to setuid, the setgid functionality gives the user the ability to run scripts with group owner's privileges, even if it is executed by any other user.
$ chmod g+s filename
Alternatively, you can use the following command:
$ chmod 2777 filename
File permissions after any of the preceding two commands will be drwxrwsrwtx.
Sticky bit is a very interesting functionality. Let's say, in the administration department there are 10 users. If one folder has been set with sticky bit, then all other users can copy files to that folder. All users can read the files, but only the owner of the respective file can edit or delete the file. Other user can only read but not edit or modify the files if the sticky bit is set.
$ chmod +t filename
Alternatively, you can use the following command:
$ chmod 1777
File permissions after any of the preceding two commands will be drwxrwxrwt.
In the last chapter, we introduced ourselves to the Bash shell environment in Linux. You learned basic commands and wrote your first Shell script as well.
You also learned about process management and job control. This information will be very useful for system administrators in automation and solving many problems.
In this chapter, we will cover the following topics:
A running instance of a program is called as process. A program stored in the hard disk or pen drive is not a process. When that stored program starts executing, then we say that process has been created and is running.
Let's very briefly understand the Linux operating system boot-up sequence:
start_kenel().init.
$ ps –ef
init process is 1. This process is the parent process of all user space processes.fork().
$ pstree
You can see the very first process as init as well as all other processes with a complete parent and child relation between them. If we use the $ps –ef command, then we can see that the init process is owned by root and its parent process ID is 0. This means that there is no parent for init:
Therefore, except the init process, all other processes are created by some other process. The init process is created by the kernel itself.
The following are the different types of processes:
init process becomes the parent of the orphan process.$ echo "Hello" command, it will be printed in the terminal itself. There are certain processes that are not associated with any terminal. Such processes are called a daemon process. These processes are running in background. An advantage of the daemon process is they are immune to the changes happening to Bash shell, which has created it. When we want to run certain background processes, such as DHCP server and so on, then the daemon processes are very useful.We have used the command ps in the introduction. Let's learn more about it:
$ ps
$ ps –f
We can see the process ID in the PID column and the parent process ID in the PPID column in the preceding output.
$ ps –lf
In the preceding output, the column with S (state) shows the current state of a process, such as R for running and S for suspended state.
$ ps –ef
The process names in [] are kernel threads. If you are interested in more options to learn about the ps command, you can use the following command:
$ man ps.
To find a particular process, you can use the following command:
$ ps –ef | grep "process_name"
The command with grep will display the process with process_name.
$ kill pid_of_process_to_be_killed
$ kill command, you may need to pass additional option to ensure that the required process is killed, which is shown as follows:
$ kill -9 pid_of_process_to_be_killed
$ pkill command_name
$ pkill sleep
Or:
$ pkill -9 command_name
kill, enter following command:
$ kill –l
This displays all the signals or software interrupts used by the operating system. When we enter the $ kill command, the operating system sends the SIGTERM signal to the process. If the process is not killed by this command, then we enter the following command:
$ kill -9 process_name
This sends SIGKILL to the process to be killed.
Since we have understood the command to check processes, we will learn more about managing different processes as follows:
&.Hello as the background process, then the command would be as follows:
$ Hello &
&, then it starts running as the background process.For example, we will issue a simple sleep command, which creates a new process. This process sleeps for the duration, which is mentioned in the integer value next to the sleep command:
10000 seconds. This means we will not be able to use any other command from the same terminal:$ sle ep 10000
sleep command.
$ sleep 10000 &
The preceding command will create a new process, which will be put to sleep for 10000 seconds; but this time, it will start running in the background. Therefore, we will be able to enter the next command in the Bash terminal.
$ sleep 20000 &
$ sleep 30000 &
$ sleep 40000 &
$ jobs
The jobs command lists all the processes running in terminal, including foreground and background processes. You can clearly see their status as running, suspended, or stopped. The numbers in [] show the job ID. The + sign indicates which command will receive fg and bg commands by default. We will study them in the next topics.
$ fg 3
The preceding command will make the job number 3 to run in the foreground instead of the background.
If we want to make the process to stop executing and get it suspended, then press Ctrl + Z. This key combination makes the foreground process to stop executing. Please note that the process has stopped but not terminated.
$ bg job_number
$ bg 3
The preceding command will make suspended job numbered process 3 to run in background.
$ jobs –l   //  This will list jobs with pid
$ kill pid      or
$ kill %job_id  // This will kill job
$ kill %3
We can view the native performance of various processes in OS using tools which will be discussed further. To view a dynamic real-time view of the top running processes in OS, use the following command:
$top
An explanation of the top command generated output is as follows:
The $top command displays a lot of information about the running system.
The first line of the display is shown as follows:
The description of fields in the first line is as follows:
The second line is shown as follows:
This line shows the summary of tasks or processes. It shows the total number of all the processes, which includes the total number of running, sleeping, stopped, and zombie processes.
The third line is shown as follows:
This line shows information about CPU usage in % in different modes as follows:
The fourth line is shown as follows:
This line provides information about memory usage. It shows the physical memory that is used, free, available, and used for buffers. The next line shows the swap memory that is available, used, free, and cached.
After this line, we see the table of values with the following columns:
PID: This is the ID of the processUSER: This is the user that is the owner of the processPR: This is the priority of the processNI: This is the "NICE" value of the processVIRT: This is the virtual memory used by the processRES: This is the physical memory used for the processSHR: This is the shared memory of the processS: This indicates the status of the process: S=sleep, R=running, and Z=zombie (S)%CPU: This is the % of CPU used by this process%MEM: This is the % of RAM used by the processTIME+: This is the total time of activity of this processCOMMAND: This is the name of the processLet's take a look at the performance monitoring tools—iostat, vmstat, and sar:
$ iostat
$ iostat –c
Shows only CPU statistics
$ iostat –d
Shows only disk statistics
$vmstat
$ vmstat -s
This shows various event counters and memory statistics.
$ vmstat –t 1 5
Runs for every one second stops after executing for five intervals.
$ sar –u 2 3
This will show the CPU activity report every 2 seconds, 3 times:
Many a times we need to schedule a task for a future time, say in the evening at 8 P.M. on a specific day. We can use the at command in such a situation.
Sometimes we need to repeat the same task at a specific time, periodically, every day, or every month. In such situations, we can use the crontab command.
Let's learn more about the utility of the at command. To use the at command, the syntax is as follows:
$ at time date
The following are the examples of the at command:
Control + D command will save the at job. The task will be executed at 11.15 A.M. This command will log messages to the log.txt file at 11.15 A.M.:$ at 11.15 AM at > echo "Hello World" > $HOME/log.txt at > Control + D
$ at 10am mar 31 2015
at> echo "taxes due" | mail jon
at> ^D
$ at 11 am may 20
at command can be listed using the following command:
$ atq
atq command, we can use the following command:
$ atrm job-id
If we need to run a specific task repetitively, then the solution is to use crontab.
The syntax of the command is as follows:
$ crontab –e
This will open a new editor. The following diagram is the syntax to add tasks. The fields to use for repeating tasks at what time are explained here:
Finally, to save the jobs, use the following:
wq # save and quite crontab job
The following are a few examples of the crontab command:
5 * * * * $HOME/bin/daily.job >> $HOME/tmp/out 2>&1
5 0 * * * $HOME/bin/daily.job >> $HOME/tmp/out 2>&1
15 14 1 * * * $HOME/bin/monthly
<ganesh@abc.com>:
0 22 * * 1-5 sendmail ganesh@abc.com < ~/work/email.txt
sendmail utility is used for sending e-mails. We can use the mail utility also as follows:
sendmail user@example.com < /tmp/email.txt
23  0-23/2  *  *  *  echo "run 23 minutes after midn, 2 am, 4 am, everyday
5 4 *  *  sun        echo "run at 5 after 4 every Sunday"
The following are a few more crontab command examples:
|
Min |
Hour |
Day / month |
Month |
Day / week |
Execution time |
|---|---|---|---|---|---|
|
45 |
0 |
5 |
1,6,12 |
* |
00:45 hrs on the 5th of January, June, and December. |
|
0 |
18 |
* |
10 |
1-5 |
6.00 P.M. every weekday (Monday-Friday) only in October. |
|
0 |
0 |
1,10,15 |
* |
* |
Midnight on the 1st ,10th, and 15th of the month |
|
5,10 |
0 |
10 |
* |
1 |
At 12.05 and 12.10 every Monday and on the 10th of every month |
We can add macros in the crontab file. Use the following to restart my_program after each reboot:
@reboot  /bin/my_program
@reboot echo `hostname` was rebooted at `date` | mail -s "Reboot notification" ganesh.admin@some-corp.com
The following is the summary of a few more macros:
|
Entry |
Description |
Equivalent To |
|---|---|---|
|
@reboot |
Run once at startup |
None |
|
@weekly |
Run once a week |
0 0 * * 0 |
|
@daily |
Run once a day |
0 0 * * * |
|
@midnight |
(same as @daily) |
0 0 * * * |
|
@hourly |
Run once an hour |
0 * * * * |
In this chapter, we studied about the basic process management. You learned about the ps command. Using commands like jobs, fg, bg, kill, and pkill, we studied about job management. Later on, you learned about the top, iostat, and vmstat process monitoring tools.
In the next chapter, you will learn about standard input/output, various meta-characters, and text filters used in Shell scripting.
In the last chapter, you studied about basic process management. You learned about the ps command. You also studied about job management using commands such as jobs, fg, bg, kill, pkill as well as various other tools such as top, iostat, and vmstat.
In this chapter, you will cover the following topics:
Normally, Shell scripting involves report generation, which will include processing various text files and filtering their output to finally produce desirable results. Lets start discussing the two Linux commands, namely, more and less:
more: Sometimes we get a very large output on the screen for certain commands, which cannot be viewed completely on one screen. In such cases, we can use the more command to view the output text one page at a time. Add "| more" after the command, as follows:
$ ll /dev | more
The | is called pipe. You will learn more about it in the next chapters. In this command, pressing the spacebar will move the output on the screen one page at a time, or pressing Enter will move the screen by one line at a time.
less: Instead of more, if you use less it will show a screen containing the full text all at once. We can move forward as well as backwards. This is a very useful text filtering tool.
The syntax of usage is as follows:
$ command |  less
e.g. $ ll /proc | less
This command will show a long listing of directory listing of the /proc folder. Let's say that we want to see if the cpuinfo file is present in the directory or not? Just press the arrow key up or down to scroll through the display. With the more command, you can not scroll backwards. You can move forward only. With page up and down key presses, you can move forward or backward one page at a time, which is very fast.
In addition to scrolling forward or backward, you can search for pattern using / for forward search and ? for backward search. You can use N for repeating the search in a forward or backward direction.
For testing the next few commands, we will need a file with a sequence of numbers 1 to 100. For this, use the following command:
$ seq 100 > numbers.txt
The preceding command created a file with the numbers 1 to 100 on separate lines. The following example shows the usage of the head command:
$ head  // will display top 10 lines
$ head  -3  numbers.txt   // will show first 3 lines
$ head +5 numbers.txt   // will show from line 5. Some shell may not work this command
The following example shows the usage of the tail command:
$ tail  // will display last 10 lines
$ tail  -5  numbers.txt  // will show last 5 lines
$ tail +15 numbers.txt  // will show from line 15 onwards. Some shell may not work
To print lines 61 to 65 from numbers.txt into file log.txt, type the following:
$ head -65 numbers.txt | tail -5 > log.txt
The diff command is used to find differences between two files. Let's see a few examples to find out its usage.
The content of file1 is as follows:
I go for shopping on Saturday
I rest completely on Sunday
I use Facebook & Tweeter for social networking
The content of file2 is as follows:
Today is Monday.
I go for shopping on Saturday
I rest completely on Sunday
I use Facebook & Tweeter for social networking
Then, type the diff command:
$ diff file1 file2
Output:
0a1
> Today is Monday
In the output, 0a1 tells us that line number 1 is added in file2.
Let's learn another example with line deletion.
The content of file1 is as follows:
Today is Monday
I go for shopping on Saturday
I rest completely on Sunday
I use Facebook & Tweeter for social networking
The content of file2 is as follows:
Today is Monday
I go for shopping on Saturday
I rest completely on Sunday
Then, type the diff command:
$ diff file1 file2
The output is as follows:
4d3
< I use Facebook & Tweeter for social networking.
In the output, 4d3 tells us that line number 4 is deleted in file2. Similarly, the change command will show us changes in file as well.
The cut command is used to extract specified columns/characters of a text, which is given as follows:
-c: Will specify the filtering of characters-d: Will specify the delimiter for fields-f: Will specify the field numberThe following are few examples that show the usage of the cut command:
/etc/passwd file, the fields 1 and 3 will be displayed. The display will contain the login name and user ID. We used the –d: option to specify that the field or columns are separated by a colon (:):
$ cut -d: -f1,3 /etc/passwd
/etc/passwd file, the fields 1 to 5 will be displayed. The display will contains the login name, encrypted password, user ID, group ID, and user name:
$ cut -d: -f1-5 /etc/passwd
emp.lst file:
$ cut -c1-3,8-12 /home/student/emp.lst
date command is sent as an input to the cut command and only the first three characters are printed on screen, which is shown as follows:$ date | cut -c1-3 Mon
Using this utility, we can paste two files horizontally, such as file_1, which will become the first column and file_2 will become the second column:
$ paste file_1 file_2
Consider two files, namely, one.txt and two.txt.
one.txt is as follows:1 India 2 UK 3 Canada 4 US 5 Ireland
two.txt is as follows:1 New Delhi 2 London 3 Toronto 4 Washington 5 Dublin
In this case, for both the files, the common fields are the fields which have serial numbers that are the same in both files. We can combine both files by following command:
$ join one.txt two.txt
The output will be as follows:
1 India New Delhi
2 UK London
3 Canada Toronto
4 US Washington
5 Ireland Dublin
The comm command shows the lines unique to file_1, file_2 along with the common lines in them. We can use various options while using the command in the scripts:
$ cat file_1
Barack Obama
David Cameron
Narendra Modi

$ cat file_2
Barack Obama
Engela Merkel
Vladimir Putin

$ comm –nocheck-order file_1 file_2
      Barack Obama
  David Cameron
    Engela Merkel
  Narendra Modi
    Vladimir Putin
In the preceding example, we can see:
file_1file_2The output shows that the unique files in file_1 are David Cameron and Narendra Modi. Unique files in the second file are Engela Merkel and Vladimir Putin. The command name in both the files is Barack Obama, which is displayed in the third column.
The tr command is a Linux utility for text processing such as translating, deleting, or squeezing repeated characters, which is shown as follows:
$ tr '[a-z]' '[A-Z]' < filename
This will translate the lower case characters to upper case:
$ tr '|' '~' < emp.lst
This will squeeze multiple spaces into a single space:
$ ls –l | tr -s " "
In this example, the -s option squeezes multiple contiguous occurrences of the character into a single char.
Additionally, the -d option can remove the characters.
Sort: It sorts the contents of a text file, line by line.
-n: Will sort as per the numeric value-d: Will sort as per the dictionary meaning-r: Will sort in the reverse order-t: Option to specify delimiter for fields+num: Specifies sorting field numbers-knum: Specifies sorting filed numbers$ sort +4 sample.txt: This will sort according to the 4th field$ sort –k4 sample.txt: This will sort according to the 4th field|
Sr |
Examples of command usage |
Explanation |
|---|---|---|
|
1 |
sort |
Alphabetically sorting of lines |
|
2 |
sort -u |
Duplicate entries are sorted |
|
3 |
sort -r |
Reverse sort |
|
4 |
sort-n -k3 |
Numerical sorting of the 3rd field |
You will learn the very useful concept of I/O redirection in this section.
All I/O, including files, pipes, and sockets, are handled by the kernel via a mechanism called the file descriptor. A file descriptor is a small unsigned integer, an index into a file-descriptor table maintained by the kernel and used by the kernel to reference open files and I/O streams. Each process inherits its own file-descriptor table from its parent. The first three file descriptors are 0, 1, and 2. File descriptor 0 is standard input (stdin), 1 is standard output (stdout), and 2 is standard error (stderr). When you open a file, the next available descriptor is 3, and it will be assigned to the new file.
When a file descriptor is assigned to something other than a terminal, it is called I/O redirection. The shell performs redirection of output to a file by closing the standard output file descriptor 1 (the terminal) and then assigning that descriptor to the file. When redirecting standard input, the shell closes file descriptor 0 (the terminal) and assigns that descriptor to a file. The Bash shells handle errors by assigning a file to the file descriptor 2.
The following command will take input from the sample.txt file:
$ wc < sample.txt
The preceding command will take content from the sample.text file. The wc command will print the number of lines, words, and characters in the sample.txt file.
$ echo "Hello world" > log.txt
This command will redirect output to be saved in the log.txt file.
$ echo "Welcome to Shell Scripting" >> log.txt
This command will append the Hello World text in the log.txt file.
The single > will overwrite or replace the existing text in log file. And double >> will append the text in the log file.
Let's see a few more examples:
$ tr '[A-Z]' '[a-z]' < sample.txt
The preceding tr command will read text from the sample.txt file. The tr command will convert all uppercase letters to lower case letters and will print converted text on screen:
$ ls > log.txt
$ cat log.txt
The output of command will be as follows:
dir_1
sample.txt
extra.file
In this example command, ls is sending directory content to file log.txt. Whenever we want to store the result of the command in the file, we can use the preceding example.
$ date >> log.txt
$ cat log.txt
Output:
dir_1
dir_2
file_1
file_2
file_3
Sun Sept 17 12:57:22 PDT 2004
In the preceding example, we are redirecting and appending the result of the date command to the log.txt file.
$ gcc hello.c 2> error_file
The gcc is a C language compiler program. If an error is encountered during compilation, then it will be redirected to error_file. The > character is used for a success result and 2> is used for error results redirection. We can use error_file for debugging purposes:
$ find . –name "*.sh" > success_file 2> /dev/null
In the preceding example, we are redirecting output or success results to success_file and errors to /dev/null. /dev/null is used to destroy the data, which we do not want to be shown on screen.
$ find . –name "*.sh" &> log.txt
The preceding command will redirect both output and error to log.txt.
$ find . –name "*.sh" > log.tx 2>&1
The preceding command will redirect result to log.txt and send errors to where the output is going, such as log.txt.
$ echo "File needs an argument" 1>&2
The preceding command will send a standard output to the standard error. This will merge the output with the standard error.
The summary of all I/O redirection commands will be as follows:
|
< sample.txt |
The command will take input from |
|
> sample.txt |
The success result will be stored in |
|
>> sample.txt |
The successive outputs will be appended to |
|
2> sample.txt |
The error results will be stored in |
|
2>> sample.txt |
The successive error output will be appended to |
|
&> sample.txt |
This will store success and errors, such as in |
|
>& sample.txt |
This will store success and errors, such as in |
|
2>&1 |
This will redirect an error to where output is going |
|
1>&2 |
This will redirects output to where error is going |
|
>| |
This overrides no clobber when redirecting the output |
|
<> filename |
This uses the file as both standard input and output if a device file (from |
|
cat xyz > success_file 2> error_file |
This stores success and failure in different files |
The following is the summary of various metacharacters:
$ touch filea fileb filec fileab filebc filead filebd filead
$ touch file{1,2,3}
Try the following command out:
$ ls  s*
$ ls  file
$ ls  file[abc]
$ ls  file[abc][cd]
$ ls  file[^bc]
$ touch file file1 file2 file3 … file20
$ ls ?????
file1
file2
file3
$ ls file*
file file1 file10 file2 file3
$ ls file[0-9]
file1 file2 file3
$ ls file[0-9]*
file1 file10 file2 file3
$ ls file[!1-2]
file3
Curly braces allow you to specify a set of characters from which the shell automatically forms all possible combinations. To make this work, the characters to be combined with the given string must be specified as a comma separated list with no spaces:
$ touch file{1,2,3}
$ ls
$ mkdir directory{1,2,3}{a,b,c}
$ ls
$ touch file{a..z}
$ ls
The following is the summary of various io-redirection and logical operators:
For example:
$ ls || echo "Command un-successful"
$ ls a abcd || echo "Command un-successful"
These commands will print Command un-successful if the ls command is unsuccessful.
For learning pattern matching, we will ensure that the pattern that we will search should be highlighted when the searched pattern is found.
The configuration file for vi is /etc/vimrc.
In the vi editor, give the following command to highlight search:
|
Sr. |
Commands |
Description |
|---|---|---|
|
1 |
|
This highlights search pattern |
|
2 |
|
Show when you are in insert mode |
|
3 |
|
Ignore case when searching |
|
4 |
|
Shows case sensitive search |
The mentioned user should open the file in vi, press the Esc button so that it goes into command mode and then enter colon followed by these commands.
The following are commands for pattern search and replace:
The following is an example of regular expression for replacing Tom by David:
:1,$s/tom/David/g    // from line 1 to end ($), replace tom by David
:1,$s/\<[tT]om\>/David/g  //   start and end of word   \<    \>
This is another example of regular expression.
Create the love.txt file, as follows:
Man has love for Art
World is full of love
Love makes world wonderful
love  looove lve
love
Love love  lover loves
I like "Unix" more than DOS
I love "Unix"/
I said I love "Unix"
I love "unix" a lot
Use the following commands for testing pattern searching facilities:
The g/RE/p stands for globally search for the regular expression (RE) and print out the line.
Return status – success 0, pattern not found 1, file not found 2.
$ ps -ef | grep root
The preceding command will show all processes running currently whose user ID is "root".
$ ll /proc | grep "cpuinfo"
The preceding command will show the file with the name cpuinfo from the /proc directory.
$  grep –lir "text" *   // only file names  //
$ grep –ir  "text" dir_name   // show lines of files //
We will try the following commands on the love.txt file:
We will create a new file sample.txt, as follows:
Apple  Fruit    5  4.5
Potato  Vegetable  4  .5
Onion  Vegetable  .3  8
Guava  Fruit    5  1.5
Almonds  Nuts    1  16
Tomato  Vegetable  3  6
Cashew  Nuts    2  12
Mango    Fruit    6  6
Watermelon  Fruit    5  1
We will try the following commands on the sample.txt file:
In this chapter, you learned about using more, less, head, and tail commands, and text processing tools like cut, paste, comm, and uniq. We also learned what standard input, output, and standard error are. Later on, you learned about metacharacters and pattern matching using vi and grep.
In the next chapter, you will learn about analyzing shell interpretation of commands, working with command substitution, command separators, and pipes.
In the last chapter, you learned about using more, less, head, and tail commands, and text processing tools like diff, cut, paste, comm, and uniq. You learned what standard input, output, and standard error are. You also learned about metacharacters and pattern matching using vi and grep.
In this chapter, you will cover the following topics:
When we log in, the
$ sign will be visible in the shell terminal (# prompt if logged in as root or administrator). The Bash shell runs scripts as interpreter. Whenever we type a command, the BASH shell will read them as series of words (tokens). Each word is separated by a space ( ), semi colon (;), or any other command delimiter. We terminate the command by pressing the Enter key. This will insert a new line character at the end of the command. The first word is taken as a command, then consecutive words are treated as options or parameters.
The shell processes the command line as follows:
$name and $user) is performedecho `cal` and echo `date`) is performedrm *)The sequence of execution of different types of commands will be as follows:
l, ll, egrep, and similar)for, if, while, and similar)bg, fg, source, cd, and similar)bin and sbin folder)Whenever a command is given in a shell or terminal, the complete command will be tokenized, and then shell will check if the command is alias.
Aliases, keywords, functions, and built-in commands are executed in the current shell, therefore their execution is fast as compared to executable external commands or scripts. Executable external commands will have a corresponding binary file or Shell script file in the file system, which will be stored in any folder. The shell will search the binary file or script of a command by searching in the PATH environment variable. If we want to know what the type of command it is, such as if it is an alias or a function or internal command, it can be found out by the type built-in command, which is shown as follows:
$ type mkdir
mkdir is /bin/mkdir

$ type cd
cd is a shell builtin

$ type ll
ll is aliased to `ls -alF'

$ type hello
hello is a function
hello ()
{
       echo "Hello World !";
}


$ type for
for is a shell keyword
Bash has provision of a few built-in commands to change the sequence of command line processing. We can use these built-in commands to change default behavior of command-line processing.
$ command ls
This will make aliases and functions be ignored and the external ls command will execute.
builtin command will work as follows:
$ builtin BUILT-IN
This will ignore aliases and functions from the shell environment and only built-in commands and external commands will be processed.
break built-in command will work as follows:
$ builtin –n break
This will make the break built-in to be disabled and the external command break will be processed.
$ enable
|
. |
command |
eval |
history |
pwd |
test |
|
.. |
compgen |
exec |
jobs |
read |
times |
|
[ |
complete |
exit |
kill |
readarray |
trap |
|
alias |
compopt |
export |
let |
readonly |
true |
|
bg |
continue |
false |
local |
return |
type |
|
bind |
declare |
fc |
logout |
set, unset |
typeset |
|
break |
dirs |
fg |
mapfile |
shift |
ulimit |
|
builtin |
disown |
getopts |
popd |
shopt |
umask |
|
caller |
echo |
hash |
printf |
source |
unalias |
|
cd |
enable |
help |
pushd |
suspend |
wait |
$ enable –n built-in-command
For example: $ enable –n test
In this case, in my shell, if we have to test an external command, then instead of the internal test command, the external test command will be executed.
In Shell scripting, we need to check if the last command has successfully executed or not. For example, whether a file or directory is present or not. As per the result, our Shell script will continue processing.
For this purpose, the BASH shell has one status variable ?. The status of the last command execution is stored in ?. The range of numerical value stored in ? will be from 0 to 255. If successful in execution, then the value will be 0; otherwise, it will be non-zero, which is as follows:
$ ls
$ echo $?
0
Here, zero as the return value indicates success.
In the next case, we see:
$ ls /root
$ echo $?
2
Here, non-zero value indicates an error in the last command execution.
In the next case, we see:
$ find / -name hello.c
$ echo $?
The return value will indicate if the hello.c file is present or not!
In the keyboard, there is one interesting key, the backward quote such as "`". This key is normally situated below the Esc key. If we place text between two successive back quotes, then echo will execute those as commands instead of processing them as plane text.
Alternate syntax for $(command) is the backtick character "`", which we can see as follows:
$(command) or `command`
For example:
$ echo "Hello, whoami"
Hello, whoami:
Hello, whoami
$ echo "Hello, `whoami`."
Hello, student
When we enclose whoami text in the "`" character, the same text which was printed as plain text will run as a command, and the command output will be printed on screen.
$ echo "Hello, $(whoami)."
Hello, student.
Same like the earlier explanation.
echo "Today is date"
Output:
Today is date
A similar example:
echo "Today is `date`"
Or:
echo "Today is $(date)"
Output:
Today is Fri Mar 20 15:55:58 IST 2015
Further, similar examples include:
$ echo $(cal)
In this example, new lines are lost.
Another example:
$ echo "$(cal)"
Here, the display is properly formatted.
Next, nesting of commands is as follows:
$ pwd
/home/student/work
$ dirname="$(basename $(pwd)) "
$ echo $dirname
This command shows us that the base directory for the current directory is student.
Commands can also be combined in such a way that they are executed in a particular sequence.
A command line can consist of multiple commands. Each command is separated by a semicolon, and the command line is terminated with a newline. The exit status is that of the last command in the chain of commands.
The first command is executed, and the second one is started as soon as the first one has finished.
$ w; date
Output:
$ w ; date > whoandwhen
Output of the date command will be redirected to the whoandwhen file.
In the preceding example, we can see that when we put multiple commands on the same line, but separated by the ";" command, then those commands execute sequentially one by one.
$ date; who am i
Tue Mar 10 23:21:38 PDT 201
student  pts/0        2015-03-10 23:12 (:0.0)
In the preceding example, the date command is executed first and the who am I command will be executed next. Both the commands are typed on same lines, separated by the ";" " command.
Commands may also be grouped so that all of the output is either piped to another command or redirected to a file.
$ ( ls; pwd; date ) > outputfile
The output of each of the commands is sent to the file called outputfile. The spaces inside the parentheses are necessary.
$ ( w ; date ) > whoandwhen
The output of the w command and date will be redirected to the whoandwhen file:
$ (echo "***x.c***";cat x.c) > log.txt
Output:
This redirects the content of x.c with a heading ***x.c*** to the file out.
$ (pwd; ls; date) > log.txt
Output:
This redirects output of commands pwd, ls, and date in the log.txt file.
Let's now take a look at logical operators.
The first command is started in the background to continue until it has finished; immediately after starting first command, the second command is started and it will run in the foreground:
$ find / -name "*.z" & s
----------------     -----
Command1            command2
In the preceding example, first command such as find will start running in the background and while the find command is running in background, the ls command will start running in foreground.
The second command is only started if the first command is successful. To achieve this, the shell checks the exit (return) status of the first command and starts the second command only if and when that exit status is found to be "0".
$ ls /home/ganesh  &&  echo "Command executed successfully"
Since we are working as user ganesh,
$ ls /root  && echo "Command executed successfully"
Since we are working as a normal user, we cannot access the /root directory. Therefore, nothing will be printed on screen.
The second command is only started if the first command fails. The shell checks the exit status of the first command and starts the second command only if that exit status is not equal to "0".
$ ls /root || echo "Command execution failed"
Example:
$ ls || echo "command ls failed"
In the preceding example, if ls runs successfully, then echo will not be called. If the ls command fails such as $ ls /root and if user is not root, then ls will fail and the echo command will print command ls failed.
When && or || are used, the exit status of the first command is checked first, then the decision to perform the next will be taken.
For example:
$ ls
$ echo $?
  0
$ ls /root
    ls: /root: Permission denied
$ echo $?
  1
$ tar cvzf /dev/st0 /home /etc | | mail -s "Something went wrong with the backup" root
If we give the command as follows:
$ cd /home/student/work/temp/; rm –rf *
Initially, the shell will change to the /home/student/work/temp folder, and then it will delete all files and folders.
If we give the command as follows:
cd /backup/ol/home/student/work/temp/ && rm * -rf
This will first change to the required folder, and then the rm command will be called for deletion. The problem with ";" is that even if the shell fails to change to the required folder, the rm command will execute and it will delete all the files and folders from your original folder. This will be really dangerous.
For example:
$ [[ "a" = "b" ]]; echo ok
ok
In this case, the [[ ]] expression will evaluate to false. Since the semicolon will not check the status of the earlier command, ok will be printed even if the first [[ ]] fails.
$ [[ "a" = "b" ]] && echo ok
In this case, the [[ ]] expression will evaluate to false. As the first expression is false, the "&&" operator will not proceed to execute the next command.
In this case, ok will be printed only if [[ ]] is true.
We have already used pipes in many earlier sessions. It is a tool for inter-process communication.
$ command_1 | command_2
In this case, the output of command_1 will be send as an input to command_2. The limitation is that the communication is half duplex. This means the data can flow in only one direction. Normally for inter-process communication, you need to open files then get the file descriptor. This will be used to write to the pipe file. Again, we need to create a Fifo file by special commands. The preceding technique simplifies all this process. We only need to insert "|" in between the two processes. The operating system creates one intermediate buffer. This buffer is used for storing the data from one command and will be used again for the second command.
A simple example is as follows:
$ who | wc
The preceding simple command will be carrying out three different activities. First, it will copy the output of the who command to the temporary file. Then the wc command will read the temporary file and display the result. Finally, the temporary file will be deleted.
Normally, there will be two processes. The first command is the writer process. The second process is the reader process. The writer process will write to temp_file and the reader will read from temp_file. Examples of writer processes are ps, ls, and date. Examples of reader processes are wc, cat, and sort.
In this chapter, you learned about how the shell interprets any command entered on the command line. We also studied command substitution and separators in detail.
In the next chapter, you will learn about variables and environment variables. You will also learn about how to export environment variables, and then you will learn about read only variables, command line arguments, and arrays.
In the last chapter, you learned about how shell interprets any command, which is entered in the terminal or the command line. We also studied command substitution and separators in detail.
In this chapter, we will cover following topics:
Let's learn about creating variables in shell.
Declaring variables in Linux is very easy. We just need to use the variable name and initialize it with the required content.
$ person="Ganesh Naik"
To get the content of the variable we need to prefix $ before the variable.
For example:
$ echo person
person
$ echo $person
Ganesh Naik
The unset command can be used to delete a variable:
$ a=20
$ echo $a
$ unset a
The unset command will clear or remove the variable from shell environment as well.
$ person="Ganesh Naik"
$ echo $person
$ set
Here, the
set command will show all variables declared in shell.
$ declare -x variable=value
Here, the declare command with the –x option will make it an environmental or global variable. We will understand more about environmental variables in the next sessions.
$ set
Again here, the set command will display all variables as well as functions that have been declared.
$ env
Here, the env command will display all environmental variables.
variable=value
Whenever we declare a variable, that variable will be available in the current terminal or shell. This variable will not be available to any other processes, terminal, or shell.
Let's write a Shell script as follows:
#!/bin/bash
# This script clears the window, greets the user,
# and displays the current date and time.

clear                                   # Clear the window
echo "SCRIPT BEGINS"
echo "Hello $LOGNAME!"                  # Greet the user
echo

echo "Today's date and time:"
date                           # Display current date and time
echo          # Will print empty line

my_num=50
my_day="Sunday"

echo "The value of my_num is $my_num"
echo "The value of my_day is $my_day"
echo

echo "SCRIPT FINISHED!!"
echo
Let's see the effect of $, "", '' and \ on variable behavior:
#!/bin/bash

planet="Earth"

echo $planet
echo "$planet"
echo '$planet'
echo \$planet

echo Enter some text
read planet
echo '$planet' now equals $planet

exit 0
Output:
You will learn about the read command in the next chapters. Using read, we can ask the user to enter data, which can be stored in a variable.
From the preceding script execution, we can observe that $variable and "$ variable" can be used for displaying the content of the variable. But if we use '$variable' or \$variable, then special functionality of the $ symbol is not available. The $ symbol is used as a simple text character instead of utilizing its special functionality of getting variable content.
Environmental variables are inherited by any subshells or child processes. For example, HOME, PATH. Every shell terminal has the memory area called environment. Shell keeps all details and settings in the environment. When we start a new terminal or shell, this environment is created every time.
We can view environment variables by the following command:
$ env
Or:
$ printenv
Output:
This is the output of the $ env command. The list of environment variables will be quite extensive. I advise you to browse through the complete list. We can change the content of any of these environment variables.
Environmental variables are defined in a terminal or shell. They will be available in subshells or child shells created from the current shell terminal. You will learn about these activities in the next few sections. You have already learned that every command in shell creates a new subshell from the current shell.
The following is a brief summary of the few environmental variables:
Whenever any user logs in, the /etc/profile Shell script is executed.
For every user, the .bash_profile Shell script is stored in the home folder. The complete path or location is /home/user_name/.profile.
Whenever a new terminal is created, every new terminal will execute the script .bashrc, which is located in the home folder of every user.
In the current shell, we can create and store user defined variables. These may contain characters, digits, and "_". A variable should not start with a digit. Normally for environment variables, upper case characters are used.
If we create a new variable, it will not be available in subshells. The newly created variable will be available only in the current shell. If we run Shell script, then local variables will not be available in the commands called by Shell script. Shell has one special variable $$. This variable contains the process ID of the current shell.
Let's try a few commands:
$ echo $$
1234
This is the process ID of the current shell.
$ name="Ganesh Naik"
$ echo $name
Ganesh Naik
We declared the variable name and initialized it.
$ bash
This command will create a new subshell.
$ echo $$
1678
This is the process ID of the newly created subshell.
$ echo $name
Nothing will be displayed, as the local variables from the parent shell are not inherited in the newly created child shell or subshell:
$ exit
We will exit the subshell and return to the original shell terminal.
$ echo $$
1234
This is the process ID of the current shell or parent shell.
$ echo $name
Ganesh Naik
This is displaying the variable's presence in the original shell or parent shell.
Variables created in the current shell will not be available in a subshell or child shell. If we need to use a variable in a child shell, then we need to export them using the export command.
Using the export command, we are making variables available in the child process or subshell. But if we declare new variables in the child process and export it in the child process, the variable will not be available in parent process. The parent process can export variables to child, but the child process cannot export variables to the parent process.
Whenever we create a Shell script and execute it, a new shell process is created and the Shell script runs in that process. Any exported variable values are available to the new shell or to any subprocess.
We can export any variable as follows:
$ export NAME
Or:
$ declare -x NAME
Let's understand the concept of exporting the variable by the following example:
$ PERSON="Ganesh Naik"
$ export PERSON
$ echo $PERSON
Ganesh Naik
$ echo $$
515
The process ID of the current shell or parent shell is 515.
$ bash
This will start a subshell.
$ echo $$
555
This is the process ID of new or subshell.
$ echo $PERSON
Ganesh Naik
$ PERSON="Author"
$ echo $PERSON
Author
$ exit
This will terminate the subshell, and will be placed in the parent shell.
$ echo $$
515
This is the process ID of the parent shell.
$ echo $PERSON
Author
Let's write Shell script to use the concept we learned:
# Ubuntu Timezone files location : /usr/share/zoneinfo/
# redhat "/etc/localtime"  instead of "/etc/timezone"
# In Redhat
# ln -sf /usr/share/zoneinfo/America/Los_Angeles /etc/localtime

export TZ=America/Los_Angeles
echo "Your Timezone is = $TZ"
date
export TZ=Asia/Tokyo
echo "Your Timezone is = $TZ"
date

unset TZ

echo "Your Timezone is = $(cat /etc/timezone)"
# For Redhat or Fedora /etc/localtime
date
The date command checks the TZ environmental variable. We initialized the TZ for Los_Angeles, then to Tokyo, and then finally we removed it. We can see the difference in the date command output.
Let's write another Shell script to study the parent and child process and exportation of variables.
Create the export1.sh Shell script:
#!/bin/bash
foo="The first variable foo"
export bar="The second variable bar"
./export2.sh

Create another shell script export2.sh
#!/bin/bash
echo "$foo"
echo "$bar"
The Shell script export1.sh runs as a parent process and export2.sh is started as a child process of export1.sh. We can clearly observe that the variable bar, which was exported, is available in the child process; but variable foo, which was not exported, is not available in the child process.
During Shell scripting, we may need a few variables, which cannot be modified. This may be needed for security reasons. We can declare variables as read-only using following command read-only:
The usage is as follows:
$ readonly currency=Dollars
Let's try to remove the variable:
$ unset currency
bash: unset: currency: cannot unset: readonly variable
If we try to change or remove the ready-only variable in the script, it will give the following error:
#!/bin/bash
AUTHOR="Ganesh Naik"
readonly AUTHOR
AUTHOR="John"
This would produce the following result:
/bin/sh: AUTHOR: This variable is read only.
Another technique:
Declare  -r  variable=1
echo "variable=$variable"
(( var1++ ))
Output after execution of the script:
line 4: variable: readonly variable
Command line arguments are required for the following reasons:
Check the following command line:
student@ubuntu:~$ my_program arg1 arg2 arg3
If my_command is a bash Shell script, then we can access every command line positional parameters inside the script as follows:
$0 would contain "my_program"    # Command
$1 would contain "arg1"      # First parameter
$2 would contain "arg2"      # Second parameter
$3 would contain "arg3"      # Third parameter
The following is the summary of positional parameters:
|
$0 |
Shell script name or command |
|
$1–$9 |
Positional parameters 1–9 |
|
${10} |
Positional parameter 10 |
|
$# |
Total number of parameters |
|
$* |
Evaluates to all the positional parameters |
|
$@ |
Same as $*, except when double quoted |
|
"$*" |
Displays all parameters as "$1 $2 $3", and so on |
|
"$@" |
Displays all parameters as "$1" "$2" "$3", and so on |
Let's create a script param.sh as follows:
#!/bin/bash
echo "Total number of parameters are = $#"
echo "Script name = $0"
echo "First Parameter is $1"
echo "Second Parameter is $2"
echo "Third Parameter is $3"
echo "Fourth Parameter is $4"
echo "Fifth Parameter is $5"
echo "All parameters are = $*"
Then as usual, give execute permission to script and then execute it:
./parameter.sh London Washington Delhi Dhaka Paris
Output:
Total number of parameters are = 5
Command is = ./parameter.sh
First Parameter is London
Second Parameter is Washington
Third Parameter is Delhi
Fourth Parameter is Dhaka
Fifth Parameter is Paris
All parameters are = London Washington Delhi Dhaka Paris
Many times we may not pass arguments on the command line, but we may need to set parameters internally inside the script.
We can declare parameters by the set command as follows:
$ set USA Canada UK France
$ echo $1
USA
$ echo $2
Canada
$ echo $3
UK
$ echo $4
France
We can use this inside the set_01.sh script as follows:
#!/bin/bash
set USA Canada UK France
echo $1
echo $2
echo $3
echo $4
Run the script as:
$ ./set.sh
Output:
USA
Canada
UK
France
|
Table declare Options | |
|---|---|
|
Option |
Meaning |
|
–a | |
|
–f | |
|
–F | |
|
–i | |
|
–r | |
|
–x | |
We give commands as follows:
set One Two Three Four Five
echo $0      # This will show command
echo $1       # This will show first parameter
echo $2
echo $*    # This will list all parameters
echo $#    # This will list total number of parameters
echo ${10} ${11}  # Use this syntax for parameters for 10th and
         # 11th parameters
Let us write script set_02.sh as follows:
#!/bin/bash
echo The date is $(date)
set $(date)
echo The month is $2
exit 0
Output:
In the script $(date), the command will execute and the output of that command will be used as $1, $2, $3 and so on. We have used $2 to extract the month from the output.
Let's write script set_03.sh as follows:
#!/bin/bash

echo "Executing script $0"
echo $1 $2 $3

set eins zwei drei
echo "One two three in German are:"
echo "$1"
echo  "$2"
echo  "$3"

textline="name phone address birthdate salary"
set $textline
echo  "$*"
echo 'At this time $1 = ' $1 'and $4 = ' $4
Output:
Using shift, we can change the parameter to which $1 and $2 are pointing to the next variable.
Create a script shift_01.sh as follows:
#!/bin/bash
echo "All Arguments Passed are as follow : "
echo $*
echo "Shift By one Position :"
shift
echo "Value of Positional Parameter $ 1 after shift :"
echo $1
echo "Shift by Two Positions :"
shift 2
echo "Value of Positional Parameter $ 1 After two Shifts :"
echo $1
Execute the command as follows:
$ chmod +x shift_01.sh
$ ./shift_01.sh One Two Three Four
Output:
student@ubuntu$ ./shift_01.sh One Two Three Four
All arguments passed are as follows:
One Two Three Four
Shift by one position.
Here, the value of the positional parameter $1 after shift is:
Two
Shift by two positions.
The value of the positional parameter $1 after two shifts:
Four
We observed that initially $1 was One. After shift, $1 will be pointing to Two. Once shift is done, the value in position 1 is always destroyed and is inaccessible.
Create a shift_02.sh script as follows:
#!/bin/bash

echo '$#: ' $#
echo '$@: ' $@
echo '$*: ' $*
echo
echo '$1 $2 $9 $10 are: ' $1 $2 $9 $10
echo

shift
echo '$#: ' $#
echo '$@: ' $@
echo '$*: ' $*
echo
echo '$1 $2 $9 are: ' $1 $2 $9

shift 2
echo '$#: ' $#
echo '$@: ' $@
echo '$*: ' $*
echo
echo '$1 $2 $9 are: ' $1 $2 $9

echo '${10}: ' ${10}
In this script execution, the following output shows:
$1 to $13 were numerical values 1 to 13, respectively.$1 shifted to number 2 and accordingly all $numbers are shifted.2, then $1 shifted to number 4 and accordingly all $numbers are shifted.In certain situations, we may need to reset original positional parameters.
Let's try the following:
set Alan John Dennis
This will reset the positional parameters.
Now $1 is Alan, $2 is John, and $3 is Dennis.
Inside the scripts, we can save positional parameters in a variable as follows:
oldargs=$*
Then, we can set new positional parameters.
Later on, we can bring back our original positional parameters as follows:
set $oldargs
Command line parameters passed along with commands are also called as positional parameters. Many times, we need to pass options such as –f and -v along with positional parameter.
Let's learn the example for passing the –x or –y options along with commands. Write the Shell script getopt.sh as follows:
#!/bin/bash

USAGE="usage: $0 -x -y"

while getopts :xy: opt_char
do
  case $opt_char in
  x)
    echo "Option x was called."
    ;;
  y)
    echo "Option y was called. Argument called is $OPTARG"
    ;;
  \?)
    echo "$OPTARG is not a valid option."
    echo "$USAGE"
    ;;
  esac
done
Execute this program:
$ ./getopt.sh
You will be learning switch and case statements in the next chapters. In this script, if option –x is passed, a case statement for x will be executed. If the –y option is passed, then a case statement for –y will be executed. Since no option is passed, there will not be any output on the screen.
$ ./getopt.sh –x
Output:
Option x was called."

$ ./getopt.sh –y my_file
Output:
Option y was called. Argument called is my_file.

$ ./getopt.sh –x –y my_file
Output:
Option x was called.
Option y was called. Argument called is my_file.

$ ./getopt.sh –y my_file -x
Output:
Option y was called. Argument called is my_file.
Option x was called.
Many times we may pass certain parameters from the command line; sometimes, we may not pass any parameters at all. We may need to have certain default values to be initialized to certain variables.
We will understand this concept by the following script.
Create a default_argument_1.sh script as follows:
#!/bin/bash
MY_PARAM=${1:-default}
echo $MY_PARAM
Execute the script and check:
$ chmod +x default_argument_1.sh One
$ ./default_argument_1.sh One
One
$ ./default_argument_1.sh
default
Create another default_argument_2.sh script:
#!/bin/bash
variable1=$1
variable2=${2:-$variable1}
echo $variable1
echo $variable2
Output:
We executed the script two times:
variable1 was $1 and variable2 was $2.$1 was taken as a default argument for $2. Therefore, variable1 was used as default variable2. If we do not give a second parameter, then the first parameter is taken as a default second parameter.An array is a list of variables. For example, we can create an array FRUIT, which will contain many fruit names. The array does not have a limit on how many variables it may contain. It can contain any type of data. The first element in an array will have the index value as 0:
student@ubuntu:~$ FRUITS=(Mango Banana Apple)
student@ubuntu:~$ echo ${FRUITS[*]}
Mango Banana Apple
student@ubuntu:~$ echo $FRUITS[*]
Mango[*]
student@ubuntu:~$ echo ${FRUITS[2]}
Apple
student@ubuntu:~$ FRUITS[3]=Orange
student@ubuntu:~$ echo ${FRUITS[*]}
Mango Banana Apple Orange
You will learn about creating an array in the Bash shell.
If the array name is FRUIT, then we can create an array as follows:
FRUIT[index]=value
Index is the integer value. It should be 0 or any positive integer value.
We can also create an array as follows:
$ declare -a array_name
$ declare -a arrayname=(value1 value2 value3)
Example:
$ declare -a fruit=('Mango' 'Banana' 'Apple' 'Orange' 'Papaya')
$ declare -a array_name=(word1 word2 word3 ...)
$ declare -a fruit=( Pears Apple Mango Banana Papaya )
$ echo ${fruit[0]}
Pears
$ echo ${fruit[1]}
Apple
$ echo "All the fruits are ${fruit[*]}"
    All the fruits are Pears Apple Mango Banana Papaya
$ echo "The number of elements in the array are ${#fruit[*]}"
    The number of elements in the array are 3
$ unset fruit  or unset ${fruit[*]}
Once we have initialized an array, we can access it as follows:
${array_name[index]}
We will create the script array_01.sh as follows:
#!/bin/bash

FRUIT[0]="Pears"
FRUIT[1]="Apple"
FRUIT[2]="Mango"
FRUIT[3]="Banana"
FRUIT[4]="Papaya"
echo "First Index: ${FRUIT[0]}"
echo "Second Index: ${FRUIT[1]}"
output:
$ chmod +x array_01.sh
$./array_01.sh
First Index: Pears
Second Index: Apple
To display all the items from the array, use the following commands:
${FRUIT[*]}
${FRUIT[@]}
Create an array_02.sh script as follows:
#!/bin/bash
FRUIT[0]="Pears"
FRUIT[1]="Apple"
FRUIT[2]="Mango"
FRUIT[3]="Banana"
FRUIT[4]="Papaya"
echo "Method One : ${FRUIT[*]}"
echo "Method Two : ${FRUIT[@]}"
Output:
$ chmod +x array_02.sh
$./ array_02.sh
Method One : Pears Apple Mango Banana Papaya
Method Two : Pears Apple Mango Banana Papaya
Let's see few more examples:
$ city[4]=Tokyo
The fourth member of the array, city, is being assigned Tokyo. Since it is the only element in the array, array the size will be 1.
$ echo ${city[*]}
Tokyo
The size of the array city is 1, since any other member of the array is not yet initialized.
${city[*]} will display the only element of the array city.
$ echo ${city[0]}
city[0] has no value, and neither does city[1] and city[2].
$ echo ${city[4]}
Tokyo
city[4] has the name of city as Tokyo.
$ countries=(USA [3]=UK [2]=Spain)
The array countries are being assigned USA at index 0, UK at index 3, and Spain at index 2. We can observe here that it does not matter in which sequence we are initializing the members of the array. They need not be in same sequence.
$ echo ${countries[*]}
USA Spain UK
$ echo ${countries[0]}
USA
The first element of the countries array is printed.
$ echo ${countries[1]}
There is nothing stored in countries [1].
$ echo ${countries[2]}
Spain
The third element of the countries array, countries [2], was assigned Spain.
$ echo ${countries[3]}
UK
The fourth element of the countries array, countries [3], was assigned UK.
In this chapter, you learned about variables and environment variables. You also learned about how to export environment variables, set, shift, read-only variables, command line arguments, and about creating and handling arrays.
In the next chapter, you will learn about debugging, the here operator, interactive Shell scripts for taking input from keyboard, and file handling.
In the last chapter, you learned about shell and environment variables. You also learned about how to export environment variables, read-only variables, command-line arguments, and create/handle arrays.
In this chapter, we will cover following topics:
here operator (<<) and here string (<<<)The read command is a shell built-in command for reading data from a file or keyboard.
The read command receives the input from the keyboard or a file until it receives a newline character. Then, it converts the newline character into a null character:
read variable
echo $variable
This will receive text from the keyboard. The received text will be stored in the variable.
–p option. The option -p displays the text that is placed after –p on the screen:#!/bin/bash # following line will print "Enter value: " and then read data # The received text will be stored in variable value read -p "Enter value : " value
Output:
Enter value : abcd
read command, then the received data or text will be stored in a special built-in variable called REPLY. Let's write a simple script read_01.sh, shown as follows:#!/bin/bash echo "Where do you stay ?" read # we have not supplied any option or variable echo "You stay in $REPLY"
Save the file, give the permission to execute, and run the script as follows:
$ chmod u+x read_01.sh
$ ./read_01.sh
Output:
"Where do you stay?"
Mumbai
"You stay at Mumbai"
read_02.sh. This script prompts the user to enter their first and last name to greet the user with their full name:#!/bin/bash echo "Enter first Name" read FIRSTNAME echo "Enter Last Name" read LASTNAME NAME="$FIRSTNAME $LASTNAME" echo "Name is $NAME"
$ read value1 value2 value3
Let's write Shell script read_03.sh, shown as follows:
#!/bin/bash
echo "What is your name?"
read fname mname lname
echo "Your first name is : $fname"
echo "Your middle name is : $mname"
echo "Your last name is : $lname"
Save the file, give the permission to execute, and run the script as follows:
What is your name?
Ganesh Sanjiv Naik
"Your first name is : Ganesh"
"Your middle name is : Sanjiv"
"Your last name is : Naik"
#!/bin/bash
echo -n "Name few cities? "
read -a cities
echo "Name of city is ${cities[2]}."
Save the file, give the permission to execute, and run the script as follows:
Name few cities? Delhi London Washington Tokyo
Name of city is Washington.
In this case, the list of cities is stored in the array of cities. The elements in the array are here:
cities[0] = Delhi
cities[1] = London
cities[2] = Washington
cities[3] = Tokyo
The index of the array starts with 0, and in this case, it ends at 3. In this case, four elements are added in the cities[] array.
read command along with one unused variable, shown as follows:Echo "Please press enter to proceed further " read temp echo "Now backup operation will be started ! "
The following table summarizes various read command-related options that you learned in the previous sections:
It is a special type of block of text or code. It is also a special form of I/O redirection. It can be used to feed the command list to an interactive program.
The syntax of the usage of the here document or the << operator is as follows:
command << HERE
text1 …..
text 2….

HERE
This tells the shell that the command should receive the data from a current source, such as the here document, until the pattern is received. In this case, the pattern is HERE. We have used the delimiter as HERE. We can use any other word as the delimiter, such as quite or finish. All the text reads up to a pattern; or the HERE text is used as an input for command. The text or file received by the command is called as the Here document:
$ cat << QUIT
> first input line
> ...
> last input line
> QUIT
The block of text inserted after and before QUIT will be treated as a file. This content will be given as input to the command cat. We will also see more examples with various other commands, such as sort, wc, and similar.
Let's write the script here_01.sh:
#!/bin/bash
cat << quit
  Command is $0
  First Argument is $1
  Second Argument is $2
Quit
Save the file, give execute permission and run the script as follows:
$ chmod here_01.sh
$./here_01.sh Monday Tuesday
Output:
  Command is here_01.sh
  First Argument is Monday
  Second Argument is Tuesday
The text block created in the preceding script between the quit words is called as the here document. We can treat this here document as a separate document. It can also be treated as multiple line input redirected to a Shell script.
Let's learn a few more sample programs.
Let's write script for using the sort command along with the here document:
here_02.sh as follows:#!/bin/bash sort << EOF > cherry > mango > apple > banana > EOF
$ chmod u+x here_02.sh
$ ./here_02.sh
apple
banana
cherry
mango
In this script, the here document is enclosed between the EOF pattern. We have used the here document to supply text to the sort command.
Let's write script for using the wc command along with the here document:
here_03.sh:#!/bin/bash wc -w << EOF There was major earthquake On April 25, 2015 in Nepal. There was huge loss of human life in this tragic event. EOF
$ chmod u+x here_03.sh
$ ./here_03.sh
21
In this script, we have used the here document as an input for the wc command to calculate the number of words:
Tape backup using << here operator
Let's write a script for taking the tape backup by using the tar command and the here document:
here_04.sh:#!/bin/bash # We have used tar utility for archiving home folder on tape tar -cvf /dev/st0 /home/student 2>/dev/null # store status of tar operation in variable status [ $? -eq 0 ] && status="Success" || status="Failed" # Send email to administrator mail -s 'Backup status' ganesh@levanatech.com << End_Of_Message The backup job finished. End date: $(date) Status : $status End_Of_Message
$ chmod u+x here_04.sh
$ ./here_04.sh
This script uses the tar command to archive the home folder in the tape device, and then it sends mail to an administrator using the command mail. We have used the here document to feed data into the command mail.
The ed is a basic type of editor. We can edit text files using this editor:
here_05.sh:#!/bin/bash # flowers.txt contains the name of flowers cat flowers.txt ed flowers.txt << quit ,s/Rose/Lily/g w q quit cat flowers.txt
$ chmod u+x here_05.sh
$ ./here_05.sh
  Aster, Daffodil, Daisy, Jasmin, Lavender, Rose, Sunflower
  59
  59
  Aster, Daffodil, Daisy, Jasmin, Lavender, Lily, Sunflower
In this script, we have used passed the here document to utility for editing the file flowers.txt. We replaced the Rose word with Lily.
All the users who are logged in will receive the message using the wall command:
here_06.sh:#!/bin/bash
# wall utility is used for sending message to all logged in users
wall << End_Of_Message
Tomorrow, on Friday evening, we will be celebrating
Birthday of few of our colleagues.
All are requested to be present in cafeteria by 3.30 PM.
John
End_Of_Message
echo "Message sent"$ chmod u+x here_06.sh $ ./here_06.sh
The command wall is used to send messages to the logged-in users. All the users that are logged in will receive the message.
FTP is a commonly used protocol to transfer data on websites. FTP stands for File Transfer Protocol. The following steps show the usage of FTP and data transfer:
here_07.sh:#!/bin/bash # Checking number of arguments passed along with command if [ $# -lt 2 ] then echo "Error, usage is:" echo "ftpget hostname filename [directory]." exit -1 fi hostname=$1 filename=$2 directory="." # Default value if [ $# -ge 3 ] then directory=$3 fi ftp <<End_Of_Session open $hostname cd $directory get $filename quit End_Of_Session echo "FTP session ended."
$ chmod u+x here_07.sh
$ ./here_07.sh ftp.somehost.com index.html WWW
For a successful execution of the script, we need to set up an autologin for the ftp command. The here operator does not work well when the ftp command asks for a username and password.
Enter the following script to see how to avoid a variable substitution in these files:
here_no.sh, shown as follows:filename="test1" cat <<'Quoted_End_Marker' When we add quotes before and after here Document marker, we can include variables Such as $USER, $PATH, $name and similar Quoted_End_Marker
$ bash here_no.sh
With quotes around the here document marker,
you can include variable references such
as $HOME, $filename, and $USER.
This script uses an ordinary here file, but it turns off the variable substitution. Otherwise, you would see the values of $HOME, $filename, and $USER in the output instead of the literal text. All of this is done by magically enclosing the end marker, Quoted_End_Marker, in quotes at the original reference. Do not enclose the marker in quotes at the end of the here file.
The here string is used for input redirection from text or a variable. Input is mentioned on the same line within single quotes ('').
The syntax is as follows:
$ command <<< 'string'
hereString_01.sh:#!/bin/bash wc –w <<< 'Good Morning and have a nice day !'
$ chmod u+x hereString_01.sh
$ ./hereString_01.sh
8
In this example, the string
Good Morning and have a nice day ! is called as the here string.
In this section, you will learn about handling files for reading and writing. In Chapter 8, Automating Decision Making in Scripts, you will learn about checking various attributes of files along with decision making constructs, such as if, case, and similar.
The exec command is very interesting. Whenever we run any command in shell, the new subshell or process gets created, and the command runs in this newly created process. When we run any command as argument to the exec command, exec will replace the current shell with the command to be executed. It does not create or spawn a new process to run the command.
In the Bash shell environment, every process has three files opened by default. These are standard input, display, and error. The file descriptors associated with them are 0, 1, and 2 respectively. In the Bash shell, we can assign the file descriptor to any input or output file. These are called file descriptors.
The syntax for declaring output.txt as output is as follows:
exec fd > output.txt
This command will declare the number fd as an output file descriptor.
The syntax for closing the file is as follows:
exec fd<&-
To close fd, which is 5, enter the following:
exec 5<&-
We will try to understand these concepts by writing scripts.
Let's understand the opening, closing, and writing of a file.
Write a Shell script file_01.sh, shown as follows:
#!/bin/bash
# We will open file for writing purpose
# We are assigning descriptor number 3 for file sample_out.txt
exec 3> sample_out.txt

# We are sending output of command "echo" to sample_out.txt file
echo "This is a test message for sample_out.txt file" >&3

# Run command date & store output in file sample_out.txt
date >&3

# Closing file with file descriptor 3
exec 3<&-
Save the file, give the permission to execute, and run the script as follows:
$ chmod u+x file_01.sh
$ ./file_01.sh
$ cat sample_out.txt
Output:
This is a test message for sample_out.txt file
Tue Sep 29 23:19:22 IST 2015
Let's write script to read from a file:
Write the script file_02.sh, shown as follows:
#!/bin/bash
# We will open file sample_input.txt for reading purpose.
# We are assigning descriptor 3 to the file.
exec 3< sample_input.txt

cat <&3
# Closing file
exec 3<&-
Save the file, give the permission to execute, and run the script as follows:
$ chmod u+x file_02.sh
We will create the sample_input.txt file as follows:
$ echo "Hello to All" > sample_input.txt
Run the script and check the result:
$ ./file_02.sh
Output:
Hello to All
In the earlier examples, we opened the file either for reading or writing. Now, we will see how to open the file for reading and writing purposes:
exec fd<> fileName
If the file descriptor number is not specified, then 0 will be used in its place. The file will be created if it does not exist. This procedure is useful to update files.
Let's understand following script.
Write the Shell script file_03.sh as follows:
#!/bin/bash
file_name="sample_out.txt"
# We are assing fd number 3 to file.
# We will be doing read and write operations on file
exec 3<> $file_name

# Writing to file
echo """
 Do not dwell in the past,
 do not dream of the future,
 concentrate the mind on the present moment. - Buddha
""" >&3
# closing file with fd number 3
exec 3>&-
We can use command read to get data from a file to store it in variables. The procedure for using the read command to get text from a file is as follows:
read -u fd variable1 variable2 ... variableN
Now, we will see how to read from one file and write to another. Let's write script file_04.sh as follows:
#!/bin/bash
# We are assigning descriptor 3 to in_file.txt
exec 3< in_file.txt
# We are assigning descriptor 4 to out_file.txt
exec 4> out_file.txt

# We are reading first line of input.txt
read -u 3 line

echo $line

echo "Writing content of in_file.txt to out_file.txt"
echo  "Line 1 - $line " >&4

# Closing both the files
exec 3<&-
exec 4<&-
Save the file, give the permission to execute, and run the script as follows:
$ chmod u+x file_04.sh
$ echo "Sun is at the center of Solar System." > in_file.txt
$ cat in_file.txt
Output:
Sun is at the center of Solar System.
$ ./file_04.sh
Output:
Sun is at the center of Solar System.
Writing content of in_file.txt to out_file.txt
$ cat out_file.txt
Output:
Line 1 - Sun is at the center of Solar System.
In this example, we read the complete line in the variable line and we used the same variable to write it to another file.
Let's write one more script file_05.sh to get the hostname and addresses:
#!/bin/sh

cp /etc/hosts hosts2

grep -v '^#' hosts2 > hosts3

exec 3< hosts3    # opening hosts3 as input file

exec 4> hostsfinal  # opening hostsfinal as output file

read <& 3 address1 name_1 extra_info
read <& 3 address2 name_2 extra_info

echo $name_1 $address1 >& 4
echo $name_2 $address2 >& 4

exec 3<&-      # Closing hosts3
exec 4<&-      # Closing hostsfinal
In this script, we used the variables address1, name_1, extra_info, address2, and name_2 to store useful information.
We will write the script to display the actual file descriptors associated with the file.
Let's write the script file_06.sh, shown as follows:
#!/bin/bash
# we are assigning file descriptor 3 to input file test.txt
exec 3< test.txt
# we are assigning file descriptor 4 to output.txt
exec 4> output.txt
# we are using read command to read line from file
read -u 3 line
echo "Process id of current process is $$"
my_pid=$$
echo "Currently following files are opened by $0 script :"
ls -l /proc/$my_pid/fd

# We are closing both files test.txt and output.txt
exec 3<&-
exec 4>&-
You will learn how to use the while loop and the read command to read a file line by line. You will learn more about the while loop in the upcoming chapters.
Let's write the script file_07.sh, shown as follows:
#!/bin/bash
echo "Enter the name of file for reading"
read file_name
exec<$file_name
while read var_line
do
  echo $var_line
done
For executing the preceding script, we will need to create a file with some text in it. Then, we will pass this file name for reading purposes.
The following is the syntax for storing the output of a command in a file:
Command >& fd
./script >& fd
The following is the illustrative example script file_08.sh:
#!/bin/bash
exec 4> output.txt
cat /proc/cpuinfo  >&4
exec 3<&-
Save the file, give the permission to execute, and run the script as follows:
$ chmod u+x file_08.sh
$ ./file_08.sh
Output:
In this example, we have executed the command cat /proc/cpuinfo and we have stored the output in file output.txt.
The following is the summary of the exec command for using various file handling-related operations:
|
Command |
What it does |
|---|---|
|
exec command |
This command will replace shell and execute it. Therefore, it will not return to its original shell, which started it. |
|
exec > data.txt |
This opens |
|
exec < data.txt |
This opens |
|
exec 3< data.txt |
This opens |
|
sort <&3 |
This will sort |
|
exec 4>data.txt |
This opens |
|
ll >&4 |
The output of |
|
exec 6<&5 |
This makes fd 6 a copy of fd 5 |
|
exec 4<&– |
This closes fd 4. |
In the very old days of computer technology, the initial problems with computers were due to real insects. Due to this, fault finding was later called as finding a bug. Therefore, the process of finding and fixing the problems in computers was called debugging.
The process of debugging involves the following:
In the actual debugging process, you will need to do the following:
debug_sp: line 11: [7: command not found]file: line 6: unexpected EOF while looking for matching `"'These messages inform the user about the line numbers of script which contain errors.
In the Bash shell, the -n option is a shortcut for noexec (as in no execution). This option tells the shell to not run the commands. Instead, the shell just checks for syntax errors.
We can test the script as follows:
$ bash –n hello.sh
The –n option will tell the Bash shell to check the syntax in the Shell script; but not to execute the Shell script.
Another way to do this is as follows:
#!/bin/bash  -n
We have modified shebang line.
In this case, we can test the Shell script as follows:
$ chmod u+x hello.sh
$ ./hello.sh
This option is safe, since the shell commands are not executed. We can catch incomplete if, for, while, case, and similar programming constructs as well as many more syntactical errors.
Let's write debug_01.sh:
#!/bin/bash
echo -n "Commands in bin directory are : $var"

for var in $(ls )
do
        echo -n -e "$var   "
do
# no error if "done" is typed instead of "do"
Save the file, give the permission to execute, and run the script as follows:
$ chmod  u+x debug_01.sh
$ ./debug_01.sh
Output:
Commands in bin directory are : ./hello.sh: line 7: syntax error near unexpected token `do'
./hello.sh: line 7: `do'

$ bash –n debug_01.sh
Output:
hello.sh: line 7: syntax error near unexpected token `do'
hello.sh: line 7: `do'
The -v option tells the shell to run in a
verbose mode. In practice, this means that the shell will echo each command prior to executing the command. This will be useful in locating the line of script that has created an error.
We can enable the script execution with the –v option as follows:
$ bash –v hello.sh
Another way is by modifying the shebang line as follows:
#!/bin/bash -v
In this case, we can run the script with the –v option as follows:
$ chmod u+x hello.sh
$ ./hello.sh
Let's write the script debug_02.sh, shown as follows:
#!/bin/bash
echo "Hello $LOGNAME"
echo "Today is `date`
echo "Your present working directory is $PWD
echo Good-bye $LOGNAME
Save the file, give the permission to execute, and run the script as follows:
$ chmod u+x debug_02.sh
$ ./debug_02.sh
Output:
Hello student
Today is Fri May 1 00:18:52 IST 2015
Your present working directory is /home/student/work
Good-bye student
Let's enable the –v option for debugging, and run the script again as follows:
$ bash –v debug_02.sh
Output:
#!/bin/bash
echo "Hello $LOGNAME"
"Hello student"
echo "Today is `date`
date
"Today is Fri May 1 00:18:52 IST 2015
echo "Your present working directory is $PWD
"Your present working directory is /home/student/work
echo Good-bye $LOGNAME
Good-bye student
The -x option, short for xtrace or execution trace, tells the shell to echo each command after performing the substitution steps. Thus, we will see the value of variables and commands.
We can trace the execution of the Shell script as follows:
$ bash –x hello.sh
Instead of the previous way, we can modify the shebang line as follows:
#!/bin/bash -x
Let's test the earlier script debug_01.sh as follows:
$ bash –x hello.sh
Output:
$ bash –x debug_02.sh
+ echo Hello student
Hello student
+ date
+ echo The date is Fri May 1 00:18:52 IST 2015
The date is Fri May 1 00:18:52 IST 2015
+ echo Your home shell is /bin/bash
Your home shell is /bin/bash
+ echo Good-bye student
Good-bye student
Let's try the following programs with the –n –v –f and –x options. Here's a sample program—debug_03.sh:
#!/bin/bash
echo "Total number of parameters are = $#"
echo "Script name = $0"
echo "First Parameter is $1"
echo "Second Parameter is $2"
echo "All parameters are = $*"
echo "File names starting with f* in current folder are :"
ls f*
Save the file, give the permission to execute, and run the script as follows:
$ chmod u+x debug_03.sh
$ ./debug_03.sh One Two
Output:
"Total number of parameters are = 2"
"Script name = ./debug_03.sh"
"First Parameter is India"
"Second Parameter is Delhi"
"All parameters are = India Delhi"
"File names starting with debug_02.sh debug_03.sh in current folder are: "
debug_02.sh  debug_03.sh
Let's test the same script with the –n option, which will check for syntax errors:
$ bash –n debug_03.sh One Two
Let's test the same script with the –v option:
$ bash –v debug_03.sh One Two
Output:
#!/bin/bash
echo "Total number of parameters are = $#"
"Total number of parameters are = 2"
echo "Script name = $0"
"Script name = debug_03.sh"
echo "First Parameter is $1"
"First Parameter is India"
echo "Second Parameter is $2"
"Second Parameter is Delhi"
echo "All parameters are = $*"
"All parameters are = India Delhi"
echo "File names starting with d* in current folder are :"
"File names starting with debug_02.sh debug_03.sh in current folder are: "
ls d*
debug_02.sh  debug_03.sh
Let us test the same script with the –x option:
$ bash –x debug_03.sh One Two
Output:
+ echo $'\342\200\234Total' number of parameters are = $'2\342\200\235'
"Total number of parameters are = 2"
+ echo $'\342\200\234Script' name = $'debug_03.sh\342\200\235'
"Script name = debug_03.sh"
+ echo $'\342\200\234First' Parameter is $'India\342\200\235'
"First Parameter is India"
+ echo $'\342\200\234Second' Parameter is $'Delhi\342\200\235'
"Second Parameter is Delhi"
+ echo $'\342\200\234All' parameters are = India $'Delhi\342\200\235'
"All parameters are = India Delhi"
+ echo $'\342\200\234File' names starting with debug_02.sh debug_03.sh in current folder are $':\342\200\234'
"File names starting with debug_02.sh debug_03.sh in current folder are: "
+ ls debug_02.sh debug_03.sh
debug_02.sh  debug_03.sh
Let's test one more program, which will give a syntax error during the –n and –x options debugging. Write the Shell script debug_04.sh as follows:
#!/bin/bash
echo "Commands in bin directory are : $var"

for var in $(ls )
do
        echo -n -e "$var   "
do
Save the file, give the permission to execute, and run the script as follows:
$ chmod u+x debug_04.sh
$ bash –n debug_04.sh
Output:
debug_04.sh: line 7: syntax error near unexpected token `do'
debug_04.sh: line 7: `do'
The preceding program has a syntax error on line number 7. The word do has an error. We need to change word "do" to "done".
The following is a summary of various debugging options used for debugging, such as -x, -v, and -n with their details:
$ bash –n script_name  // interpretation without execution
$ bash –v script_name  // Display commands in script
$ bash –x script_name  // Trace the execution of script

$ bash –xv script_name    // Enable options x and v for debugging
$ bash  +xv script_name    //Disable options x and v for debugging
Most of the time, we invoke the debugging mode from the first line of script. This debugging mode will remain active until the last line of code. But many times, we may need to enable debugging for a particular section of script. By using the set command, we can enable and disable debugging at any point in our Shell script:
set -x
section of script
set +x
Consider the following script:
#!/bin/bash

str1="USA"
str2="Canada";

[ $str1 = $str2 ]
echo $?

Set –x

[ $str1 != $str2 ]
echo $?

[ -z $str1 ]
echo $?

Set +x

[ -n $str2 ]
echo $?

Exit 0
In this case, the debugging will be enabled after the set -x and will be disabled immediately after the set +x.
The following table summarises the various options for the set command:
For general debugging, we can use the vi editor along with certain options.
During debugging, many times we search for a pattern throughout the complete document. It is preferable to highlight the searched item. We will enable search pattern highlighting by using the following command in the vi editor when the document is opened:
:set hlsearch :set ic vi –b filename
We can even modify the vi editor configuration file—.exrc or .vimrc so that we need not give the previous command again and again.
If we follow certain good practices, then we will face errors. Even if errors are found, these will be easier to debug:
if [ $rate -lt 3 ]
then
  echo "Sales tax rate is too small."
fi
WORKING_DIR=$HOME/work
if [ -e $WORKING_DIR]
then
  # Do something....
fi
In this chapter, you learned about debugging, the here operator, interactive Shell scripts for taking input from the keyboard, and file handling.
In the next chapter, you will learn about arithmetic and various operations, such as addition, subtraction, multiplication, division, and the extraction of the modulus of numerical variables.
In the last chapter, you learned about debugging, the here operator, interactive Shell scripts for taking input from the keyboard, and file handling.
In this chapter, we will cover the following arithmetic operations topics:
We can perform arithmetic operations in various ways, such as using declare, let, expr, and arithmetic expressions. You will also learn about representing numbers in different bases, such as binary, octal, and hex.
Whenever we declare any variable, by default, this variable stores the string type of data. We cannot do arithmetic operations on them. We can declare a variable as an integer by using the declare command. Such variables are declared as integers; if we try to assign a string to them, then bash assigns 0 in these variables.
Bash will report an error if we try to assign fractional values (floating points) to integer variables.
We can create an integer variable called value, shown as follows:
$ declare –i value
We tell the shell that the variable value is of type integer. Otherwise, shell treats all variables as character strings:
name string to the integer variable value, then the value variable will be assigned the 0 value by Bash shell:$ value=name $ echo $value 0
$ value=4 + 4
bash: +: command not found
$ value=4+4
$ echo $value
8
$ value=4*3
$ echo $value
12
$ value="4 * 5"
$ echo $value
20
"", the multiplication operation is performed. Due to double quotes (""), the * operator was not used as a wildcard (*):$ value=5.6 bash: num: 5.6: syntax error in expression (remainder of expression is ".5").
Since we have declared the variable value as an integer variable, when we initialize the variable with a floating point number, the error gets displayed by Bash shell.
If we want to see all declared integer variables along with their values, then we must give the following command:
$ declare –i
Output:
declare -ir BASHPID="" declare -ir EUID="1001" declare -i HISTCMD="" declare -i LINENO="" declare -i MAILCHECK="60" declare -i OPTIND="1" declare -ir PPID="1966" declare -i RANDOM="" declare -ir UID="1001"
We can use the bash built-in command let for performing arithmetic operations. To get more information about let, type the following:
$ help let
Output:
Let's start using the let command:
$ value=6 $ let value=value+1 $ echo $value 7 $ let "value=value+4" $ echo $value 11 $ let "value+=1" #above expression evaluates as value=value+1 $ echo $value 12
A summary of operators available with the let command follows:
Prior to bash 2.x, the following operators were not available:
We can use the expr command for arithmetic operations. The
expr command is an external command; the binary of the expr command is stored in the folder called /usr/bin/expr.
Perform an addition operation as follows:
$ expr 40 + 2 42
Perform a subtraction operation as follows:
$ expr 42 - 2 40
Perform a division operation as follows:
$ expr 40 / 10 4
Perform a modulus (getting remainder) operation as follows:
$ expr 42 % 10 2 $ expr 4 * 10 expr: syntax error
With the expr command, we cannot use * for multiplication. We need to use \* for multiplication:
$ expr "4 * 10" 4 * 10 $ expr 4 \* 10 40
We will write a simple script to add two numbers. Write the Shell script called arithmetic_01.sh as follows:
#!/bin/bash x=5 y=2 z=`expr $x + $y` echo $z Test the script as follows: $ chmod +x arithmetic_01.sh $ ./arithmetic_01.sh
The output is here:
7
Let's write a script to perform all the basic arithmetic operations. Write the Shell script called arithmetic_02.sh as follows:
#!/bin/bash
var1=30
var2=20
echo `expr $var1 + $var2` # Arithmetic Addition
echo `expr $var1 - $var2` # Arithmetic Subtraction
echo `expr $var1 \* $var2` # Arithmetic Multiplication
echo `expr $var1 / $var2` # Arithmetic Division
echo `expr $var1 % $var2` # Arithmetic Modular Division
# (Remainder)Let us test the script:
$ chmod +x arithmetic_02.sh $ ./arithmetic_02.sh
The output is here:
50 10 600 1 10
We can use two different ways for evaluating arithmetic expressions:
$(( expression )) $[ expression ]
Learn arithmetic operations using the preceding mentioned arithmetic expansion:
$ a=10 $ b=20 $ c=$((a + b)) $ echo $c
During arithmetic operations, we may need to find square or cube of any given number. These operations are called as exponent operations. We can perform exponent operations as follows:
$ a=5 $ b=3 $ expo=$[ $a ** $b ]# This is equivalent to ab $ echo $expo 125
This is the result of the 53 operations.
Another way of arithmetic expansions is as follows:
$ B=10 $ A=$[B + 10] $ echo $A 20 $ echo $[ 3 + 4 - 5 ] 2 $ echo $[ 3 + 4 * 5] 23
Arithmetic multiplication has more precedence over addition. Therefore, 4*5 was performed first, and the addition of 3+20 was performed later on:
$ echo $[(3 + 4) * 5] 35 $ echo $(( 3 + 4 )) 7 $ echo $(( 6 / 0 )) bash: 6/0: division by 0 ( error token is "0")
We will use many of the preceding arithmetic techniques for doing the same addition operation and check the result.
Let's write an interactive script called arithmetic_03.sh as follows:
#!/bin/bash echo "Enter first value" read number_1 echo "Enter secondvalue" read number_2 total=`expr $number_1 + $number_2` echo $total sum=$(($number_1 + $number_2)) echo "sum is "$sum echo "Sum is $[ $number_1+$number_2 ]"
Let us test the script:
$ chmod +x arithmetic_03.sh $ ./arithmetic_03.sh
Output:
Enter first value 10 Enter second value 5 15 Sum is 15 Sum is 15
The preceding Shell script shows that even if we use any of the previous techniques, the result remains the same.
Let's write the shell called script arithmetic_04.sh as follows:
#!/bin/bash # Interactive Shell Script Demonstrating Arithmetic Operators echo "Enter First value" read number_1 echo "Enter Second value" read number_2 echo $(($number_1 + $number_2)) echo $(($number_1 / $number_2)) # Division of two numbers
Let's test the program as follows:
$ chmod +x arithmetic_04.sh $ ./arithmetic_04.sh
Output:
Enter First value 10 Enter Second value 5 15 2
We will write one more script with a different technique. Let's write the Shell script arithmetic_05.sh as follows:
#!/bin/bash # Script is For Demonstrating Arithmetic var1=10 var2=20 echo $(($var1+$var2)) # Adding Two Values echo $(($var1-$var2)) # Subtract Two Values echo $(($var1*$var2)) # Multiply Two Values echo $(($var1%$var2)) # Remainder
Let's test the program here:
$ chmod +x arithmetic_05.sh $ ./arithmetic_05.sh
Output:
30 -10 200 10
We will write a script to add five numbers that are passed from a command line. Let's write the Shell script arithmetic_06.sh as follows:
#!/bin/bash # Write a shell script which will receive 5 numbers from command line # and print their sum. echo "Sum of Five Numbers is:" $(($1 + $2 + $3 + $4 + $5))
Let's test the program:
$ chmod +x arithmetic_06.sh $ ./arithmetic_06.sh 10 20 30 40 50
Output:
Sum of Five Numbers is: 150
Let's write the Shell script arithmetic_07.sh as follows for finding cube, quotient, and remainder:
#!/bin/bash x=99 (( cube = x * x * x )) (( quotient = x / 5 )) (( remainder = x % 5 )) echo "The cube of $x is $cube." echo "The quotient of $x divided by 5 is $quotient." echo "The remainder of $x divided by 5 is $remainder." # Note the use of parenthesis to controlling arithmetic operator # precedence evaluation. (( y = 2 * (quotient * 5 + remainder) )) echo "Two times $x is $y."
Let's test the program:
$ chmod +x arithmetic_07.sh $ ./arithmetic_07.sh
Output:
The cube of 99 is 970299. The quotient of 99 divided by 5 is 19. The remainder of 99 divided by 5 is 4. Two times 99 is 198.
Integer values can be represented in decimal, binary, octal, or hex numeric notations. By default, integer values are represented in decimal notation. Binary numbers have base 2. Octal numbers use base 8. Hexadecimals numbers use base 16. We will learn about various notations with examples in this section.
Syntax:
variable=base#number-in-that-base
Let's understand the preceding syntax with examples:
$ declare -i x=21 $ echo $x 21
$ x=2#10101 $ echo $x 21
$ declare -i x $ x=8#25 $ echo $x 21
$ declare -i x $ x=16#15 $ echo $x 21
In the preceding examples, we displayed the, decimal 21 value in binary, octal, and hexadecimal representations.
In Bash shell, we can only perform integer arithmetic. If we want to perform arithmetic involving a floating point or fractional values, then we will need to use various other utilities, such as awk, bc, and similar.
Let's see an example of using the utility called bc:
$ echo "scale=2; 15 / 2" | bc 7.50
For using the bc utility, we need to configure a scale parameter. Scale is the number of significant digits to the right of the decimal point. We have told the bc utility to calculate 15 / 2, and then display the result with the scale of 2.
Or:
$ bc ((83.12 + 32.13) * 37.3) 4298.82
Many things can be done with the bc utility, such as all types of arithmetic operations including binary and unary operations; it has many defined mathematical functions. It has its own programming syntax.
You can get more information about the utility bc at http://www.gnu.org/software/bc/.
Let's look at using awk for a floating-point arithmetic:
$ result=`awk -v a=3.1 -v b=5.2 'BEGIN{printf "%.2f\n",a*b}'` $ echo $result 16.12
You will be learning more about the awk programming in the coming chapters. Therefore, we will not get into a detailed discussion of awk in this session.
Let's write few more Shell scripts using arithmetic programming skill in shell, which we have learned so far.
Let's write the Bash Shell script arithmetic_08.sh to find whether an input integer is even or odd:
#!/bin/bash echo "Please enter a value" read x y=`expr $x%2` if test $y -eq 0 then echo "Entered number is even" else echo "Entered number is odd" fi
Let's test the program:
$ chmod +x arithmetic_08.sh $ ./arithmetic_08.sh
Output:
$ ./hello.sh "Enter a number" 5 "Number is odd" $ ./hello.sh "Enter a number" 6 "Number is even"
Let's write the script arithmetic_09.sh to find the length of an input string:
#!/bin/bash echo "Please Enter the String:" read str len=`echo $str | wc -c` let len=len-1 echo "length of string = $len"
Let's test the script:
$ chmod +x arithmetic_09.sh $ ./arithmetic_09.sh
Output:
Enter String: Hello World length of string = 11
Let's write a script to calculate the area and circumference of a rectangle and circle.
Write the Shell script arithmetic_10.sh as follows:
#!/bin/bash echo "Please enter the length, width and radius" read length width radius areaRectangle=`expr $length \* $width ` temp=`expr $length + $width ` perimeterRect=`expr 2 \* $temp` areaCircle=`echo 3.14 \* $radius \* $radius | bc` circumferenceCircle=`echo 2 \* 3.14 \* $radius | bc` echo "Area of rectangle = $areaRectangle" echo "Perimeter of Rectangle = $perimeterRect." echo "Area of circle = $areaCircle." echo "Circumference of circle = $circumferenceCircle" echo
$ chmod +x arithmetic_10.sh $ ./arithmetic_10.sh
Output:
Enter the length, width and radius 5 10 5 Area of rectangle = 50 Perimeter of Rectangle = 30 Area of circle = 78.50 Circumference of circle = 31.40
In this chapter, you learned about performing arithmetic operations in various ways such as, using declare, let, expr, and arithmetic expressions. You also learned about representing numbers in different bases such as hex, octal, and binary. You learned about using the bc utility to perform floating point or fractional arithmetic.
In the next chapter, you will learn about automatic decision making by working with test and using if-else, case, select, for, while, and dowhile. You will also learn to control loops using break and continue statements.
In the last chapter, you learned about performing arithmetic operations in various ways such as using declare, let, expr, and arithmetic expressions. You also learned about representing numbers in different bases such as hex, octal, and binary, and using the bc utility for performing floating point or fractional arithmetic.
In real-world scripts, it is not just a sequential execution of commands, we need to check certain conditions or proceed as per certain logic and accordingly the script should continue executing. This is precisely what we do with automation. Automation refers to performing tasks, the sequence of which will change as per changes in the programming environment. A simple example would be to check if the directory is present; if present, then change to that directory, otherwise create a new directory and proceed. All these activities come under decision making in Shell scripts.
In this chapter, we will cover the following topics:
testif-elsecaseselectfor loopwhile loopcontinue statementbreak statementAutomation using Shell scripts involves checking if the earlier command executed successfully or failed, if the file is present or not, and so on. You will learn various constructs such as if, case, and so on, where we will need to check whether certain conditions are true or false. Accordingly, our script should conditionally execute various commands.
Let's enter the following command:
$ ls
Using the Bash shell, we can check if the preceding command executed successfully or failed as follows:
$ echo $?
The preceding command will return 0, if the ls command executed successfully. The result will be nonzero, such as 1 or 2 or any other nonzero number, if the command has failed. The Bash shell stores the status of the last command execution in a variable. If we need to check the status of the last command execution, then we should check the content of the variable.
Let's see the following example:
$ x=10 $ y=20 $ (( x < y )) $ echo $? 0
This indicates that the $(( x < y )) expression has executed successfully.
Let's learn the same concept in the case of string handling:
$ name=Ganesh $ grep "$name" /etc/passwd Ganesh:9ZAC5G:6283:40:Ganesh Naik:/home/ganesh:/bin/sh $ echo $? 0
Since the user Ganesh is already created on the computer, the string Ganesh was found in the /etc/passwd file.
$ name=John $ grep "$name" /etc/passwd $ echo $? 1 # non zero values means error
Since the user John was not found in the /etc/passwd file, the grep command returned a nonzero value. In scripts, we can use this during automation.
Let's now understand the test command.
Let's learn the following example to check the content or value of expressions:
$ test $name = Ganesh $ echo $? 0 if success and 1 if failure.
In the preceding example, we want to check if the content of the variable name is the same as Ganesh and ? To check this, we have used the test command. The test will store the result of the comparison in the ? variable.
We can use the following syntax for the preceding test command. In this case, we used [ ] instead of the test command. We've enclosed the expression to be evaluated in square brackets:
$ [[ $name = Ganesh ]] # Brackets replace the test command $ echo $? 0
During the evaluation of expressions by test, we can even use wildcard expressions:
$ [[ $name = [Gg]????? ]] $ echo $? 0
Therefore, we can either use the test command or square brackets for checking or evaluating expressions. Since word splitting will be performed on variables, if we are using text with white spaces, then we will need to enclose the text inside double quotes such as " ".
Let's consider the case where we want to check whether there is the name Ganesh and if his friend is John. In this case, we will have multiple expressions to be checked using the AND operator &&. In such a case, we can use following syntax:
$ [[ $name == Ganesh && $friend == "John" ]]
Another way to do this is as follows:
[ $name == Ganesh ] && [ $friend == "John" ]
We used double brackets in the preceding expressions.
Here, we want to evaluate multiple expressions on the same command line. We can use the preceding syntax with AND (&&) or OR (||) logical operators.
The following is a summary of various options for string comparison using test which is taken from the Bash reference manual available at http://www.gnu.org/software/bash/:
|
Test operator |
Tests true if |
|---|---|
|
-n string |
True if the length of string is nonzero. |
|
-z string |
True if the length of string is zero. |
|
string1 != string2 |
True if the strings are not equal. |
|
string1 == string2 string1 = string2 |
True if the strings are equal. |
|
string1 > string2 |
True if string1 sorts after string2 lexicographically. |
|
string1 < string2 |
True if string1 sorts before string2 lexicographically. |
Suppose we want to check if the length of a string is nonzero, then we can check it as follows:
test –n $string or [ –n $string ] echo $?
If the result is 0, then we can conclude that the string length is nonzero. If the content of ? is nonzero, then the string is 0 in length.
Let's write Shell script test01.sh for learning various string operations:
#!/bin/bash str1="Ganesh"; str2="Mumbai"; str3= [ $str1 = $str2 ] # Will Check Two Strings Are Equal Or Not echo $? [ $str1 != $str2 ] # Will Check Two Strings Are Not Equal echo $? [ -n $str1 ] # Will confirm string length is greater than zero echo $? [ -z $str3 ] # Will Confirm length of String is Zero echo $?
Let's test the following program:
$ chmod +x test01.sh $ ./test01.sh
The following will be the output after executing the preceding commands:
1 0 0 0
Let's write an interactive Shell script test02.sh to get names from the user and then compare if both are the same:
#!/bin/bash echo "Enter First name" read name1 echo "Enter Second name" read name2 [ $name1 = $name2 ] # Check equality of two names echo $? [ -n $name2 ] # Check String Length is greater than Zero echo $?
Let's test the following program:
$ chmod +x test02.sh $ ./test02.sh
The following will be the output after executing the preceding commands:
Enter First name LEVANA Enter Second name TECHNOLOGIES 1 0
The following is the summary of various options for numerical comparison using test:
Let's write the Shell script test03.sh for learning various the numerical test operators' usage:
#!/bin/bash num1=10 num2=30 echo $(($num1 < $num2)) # compare for less than [ $num1 -lt $num2 ] # compare for less than echo $? [ $num1 -ne $num2 ] # compare for not equal echo $? [ $num1 -eq $num2 ] # compare for equal to echo $?
Let's test the following program:
$ chmod +x test03.sh $ ./test03.sh
The following will be the output after executing the preceding commands:
1 0 0 1
Let's write the script test04.sh for interactively asking the user for three numbers and then testing those numbers for various comparisons:
#!/bin/bash echo "Please enter 1st First Number" read num1 echo "Please enter 2nd Number" read num2 echo "Please enter 3rd Number" read num3 [[ $num1 > $num2 ]] # compare for greater than echo $? [[ $num1 != $num2 ]] # compare for not equal to echo $? [[ $num2 == $num3 ]] # compare for equal to echo $? [[ $num1 && $num2 ]] # Logical And Operation echo $? [[ $num2 || $num3 ]] # Logical OR Operation echo $?
Let's test the following program:
$ chmod +x test04.sh $ ./test04.sh
The following will be the output after executing the preceding commands:
Please enter 1st First Number 10 Please enter 2nd Number 20 Please enter 3rd Number 30 1 0 1 0 0
Let's write the script test05.sh for using string and numerical test operations:
#!/bin/bash Var1=20 Var2=30 Str1="Accenture" FileName="TestStringOperator" test $Var1 -lt $Var2 # Test for Less Than echo $? test $Var1 -gt $Var2 # Test For Greater Than echo $? test -n $Str1 # Test for String Having Length Greater Than 0 echo $? test -f $FileName # Test for File Attributes echo $?
Let's test the following program:
$ chmod +x test05.sh $ ./test05.sh
The following will be the output after executing the preceding commands:
0 1 0 1
We used the test operation for the file in this script. It will check if the file is present. You will learn more about it in next section.
Now, we will write the script test06.sh using the test command interactively asking the user for data and then performing numerical as well as string comparison operations:
#!/bin/bash echo "Please enter 1st Number" read num1 echo "Please enter 2nd Number" read num2 echo test $num1 -eq $num2 # Test for Equal echo $? test $num1 -ne $num2 # Test for Not Equal echo $? test $num1 -ge $num2 # Test for Greater Than Equal echo $? echo "Please enter 1st String" read Str1 echo "Please enter 2nd String" read Str2 test $Str1 = $Str2 # Test for Two Strings Are Equal echo $? test -z $Str1 # Test for The Length Of The String Is > 0 echo $? test $Str2 # Test for The String Is Not NULL echo $?
Let's test the following program:
$ chmod +x test06.sh $ ./test06.sh
The following will be the output after executing the preceding commands:
Please enter 1st Number 10 Please enter 2nd Number 20 1 0 1 Please enter 1st String LEVANA Please enter 2nd String TECHNOLOGIES 1 1 0
Depending on the value of $? in the preceding output, we can decide whether the operation returned true or false. We will use this in if, case, and similar decision making, as well as in looping, activities.
The following are various options for binary file operations using test which is taken from the Bash reference manual available at http://www.gnu.org/software/bash/:
Let's write the script test07.sh to test the basic file attributes such as whether it is a file or folder and whether it has a file size bigger than 0. The output will be different if the case file is present or not:
#!/bin/bash # Check if file is Directory [ -d work ] echo $? # Check that is it a File [ -f test.txt ] echo $? # Check if File has size greater than 0 [ -s test.txt ] echo $?
Let us test the program:
$ chmod +x test07.sh $ ./test07.sh
The following will be the output after executing the preceding commands:
1 1 1 $ mkdir work $ touch test.txt $ ./test07.sh 0 0 1
We executed the script with and without the directory and text.txt file.
The following script test08.sh is checking the file permissions such as read, write, and execute permissions:
#!/bin/bash # Check if File has Read Permission [ -r File2 ] echo $? # Check if File Has Write Permission [ -w File2 ] echo $? # Check if File Has Execute Permission [ -x File2 ] echo $?
$ touch File2 $ ls -l File2 -rw-rw-r-- 1 student student 0 Jun 23 22:37 File2 $ chmod +x test08.sh $ ./test08.sh
The following will be the output after executing the preceding commands:
0 0 1
The following are the various options for logical operations using test which is taken from the Bash reference manual available at http://www.gnu.org/software/bash/:
We can use the test operator for strings along with pattern matching as follows:
$ name=Ganesh $ [[ $name == [Gg]anesh ]] # Wildcards allowed $ echo $? 0
The following is the example for multiple strings with the && logical operator:
$ name=Ganesh; friend=Anil $ [[ $name == [Gg]anesh && $friend == "Lydia" ]] $ echo $? 1
The following is the script with the test command along with the extended pattern matching enabled:
$ shopt -s extglob # we are enabling extended pattern matching $ city=Kannur $ [[ $city == [Kk]a+(n)ur ]] $ echo $? 0
In the given expressions, we are checking equality for strings. It tests if the city name starts with K or k, followed by a, one or more n characters, a u, and r.
We use the if command to check the pattern or command status and accordingly we can make certain decisions to execute scripts or commands.
The syntax of the if conditional is as follows:
if command
then
command
command
fiFrom the preceding syntax, we can clearly understand the working of the if conditional construct. Initially, if will execute the command. If the result of command execution is true or 0, then all the commands that are enclosed between then and fi will be executed. If the status of command execution after if is false or nonzero, then all the commands after then will be ignored and the control of execution will directly go to fi.
Let's learn another variation of if constructs.
Syntax:
if command
then
command
command
else
command
fiIn the preceding case if the command after if is successfully executed or the status variable ? content is 0, then all the commands after then will be executed. If the result of the command is a failure or nonzero, then all the commands after else will be executed.
For numeric or string expression evaluations using if, the syntax is as follows:
if [ string/numeric expression ]
then
command
fiAlternatively, use the following syntax:
if [[ string expression ]]
then
command
fiAlternatively, use the following syntax:
if (( numeric expression ))
then
command
fiThe simple example to check the status of the last command executed using the if construct is as follows:
#!/bin/bash
if [ $? -eq 0 ]
then
echo "Command was successful."
else
echo "Command was successful."
fiWhenever we run any command, the exit status of command will be stored in the ? variable. The preceding construct will be very useful in checking the status of the last command.
Let's learn about using the if construct for numerical decision making.
We can use the test command for finding which variable contains the smaller value:
$ X=10 $ y=20 $ (( x < y )) $ echo $? 0 The result 0 shows that x is smaller than y.
In the Shell script if_01.sh, we can use the test command along with the if construct for checking equality of variable with numerical value as follows:
#!/bin/bash
a=100
if [ $a -eq 100 ]
then
echo "a is equal to $a"
else
echo "a is not equal"
fiLet's test the following program:
$ chmod +x if_01.sh $ ./if_01.sh
The following will be the output after executing the preceding commands:
a is equal to 100
Use the script if_02.sh to check which product is costly. The script is as follows:
#!/bin/bash echo "Enter the cost of product a" read a echo "Enter the cost of product b" read b if [ $a -gt $b ] then echo " a is greater" else echo " b is greater" fi
Let's test the following program:
$ chmod +x if_02.sh $ ./if_02.sh
The following will be the output after executing the preceding commands:
Enter the cost of product a 100 Enter the cost of product b 150 b is greater $
If we need to terminate the Shell script and come back to command line, then we can use the exit command. The syntax is very simple:
exit 0
The given command will terminate the Shell script and return to the command line. It will store the 0 value in the status variable ?. We can use any value between 0 and 255. Value 0 means success and any other nonzero value means an error. We can use these values to indicate error information.
The script to check the value of a parameter, which is passed along with command, either less than 0 or greater than 30 is as follows. This will save our efforts of using the nested if statement:
#!/bin/bash
if (( $1 < 0 || $1 > 30 ))
then
echo "mdays is out of range"
exit 2
fiThe test command used in the preceding expression for OR can be written as follows:
[ $1 -lt 0 -o $1 -gt 30 ]
Let's learn about using string-related checking using the if command.
The following script if_03.sh will check the equality of two strings:
echo "Enter the first string to compare"
read name1
echo "Enter the Second string to compare"
read name2
if [ $name1 == $name2 ]
then
echo "First string is equal to Second string"
else
echo "Strings are not same"
fiLet's test the following program:
$ chmod +x if_03.sh $ ./if_03.sh
The following will be the output after executing the preceding commands:
$ ./ if_03.sh Enter the first string to compare LEVANA Enter the Second string to compare TECHNOLOGIES Strings are not same $ ./ if_03.sh
The following will be the output after executing the preceding commands:
Enter the first string to compare LEVANA Enter the Second string to compare LEVANA First string is equal to Second string $
We will write the script for performing various other string operations using a test. Let's write the script if_04.sh to compare two strings for various attributes:
#!/bin/bash
str1="Ganesh"
str2="Naik"
if [ $str1 = $str2 ]
then
echo "Two Strings Are Equal"
fi
if [ $str1 != $str2 ]
then
echo "Two Strings are not equal"
fi
if [ $str1 ]
then
echo "String One Has Size Greater Than Zero"
fi
if [ $str2 ]
then
echo "String Two Has Size Greater Than Zero"
fiLet's test the following program:
$ chmod +x if_04.sh $ ./if_04.sh
The following will be the output after executing the preceding commands:
Two Strings are not equal String One Has Size Greater Than Zero String Two Has Size Greater Than Zero
If we want to verify whether the entered password is valid then script i_05.sh will be as follows:
#!/bin/bash stty –echo # password will not be printed on screen read -p "Please enter a password :" password if test "$password" == "Abrakadabra" then echo "Password is matching" fi stty echo
Let's test the following program:
$ chmod +x if_05.sh $ ./if_05.sh
The following will be the output after executing the preceding commands:
$ ./ if_05.sh Please enter a password : levana $ ./ if_05.sh Please enter a password : Abrakadabra Password is matching $
Many a time we need to check the value of variable, such as is it null? The null value means zero value. If we want to create the string with the null value, then we should use double quotes "" while declaring it:
if [ "$string" = "" ] then echo "The string is null" fi
We can even use [ ! "$string" ] or [ -z "$string" ] for null checking of strings.
Let's write the script if_08.sh, which will search if the entered person name is the user of the computer system:
#!/bin/bash
read -p "Enter a user name : " user_name
# try to locate username in in /etc/passwd
#
grep "^$user_name" /etc/passwd > /dev/null
status=$?
if test $status -eq 0
then
echo "User '$user_name' is found in /etc/passwd."
else
echo "User '$user_name' is not found in /etc/passwd."
fiLet's test the following program:
$ chmod +x if_08.sh $ ./if_08.sh
The following will be the output after executing the preceding commands:
Enter a user name : ganesh User 'ganesh' is not found in /etc/passwd.
In the preceding script, we are searching the username in the /etc/passwd file. If a person's name is not found in the /etc/passwd file, then we can conclude that the username is not created in the system.
Let's write a script to check the disk space being used. The script will print a warning if 90 percent or more of the disk space is used on one of the mounted partitions.
The Shell script if_09.sh for solving the disk filesystem usage warning will be as follows:
#!/bin/bash
df -h | grep /dev/sda1 | cut -c 35-36 > log.txt
read usage < log.txt
if [ $usage -gt 80 ]
then
echo "Warning – Disk file system has exceeded 80% !"
echo "Please move extra data to backup device.
else
echo "Good - You have enough disk space to continue working !"
fiLet's test the following program:
$ chmod +x if_09.sh $ ./if_0.sh
Due to some hardware differences, if the preceding program does not work, then make the following changes in the script:
$df –h command.Using the df command, we get the disk filesystem usage information. The grep command is filtering the hard disk partition, which contains our data. Then, we filter the disc % utilization number and store that value in the log.txt file. Using the read command, we read the % utilization and store it in the variable usage. Later on using the if command, we check and warn the user if the % utilization is greater than 80.
You have already learned about how to use the test command for checking various file operations such as checking the file's permissions and similar other attributes. A command's task in any script is to check if the file or folder is present or not. Then accordingly, we need to proceed. We will see how to use the if command along with the test command.
Use the simple script if_10.sh to check if the file exists or not in the current directory as follows:
#!/bin/bash
read filename
if test -e $filename
then
echo "file exists"
else
echo " file does not exist"
fiLet's test the program as follows:
$ chmod +x if_10.sh $ ./if_10.sh
The following will be the output after executing the preceding commands:
sample.txt file does not exist $ touch sample.txt $ ./ if_10.sh sample.txt file exists
First, we checked without the file. Then, we created a file with the touch command. We can very easily check the presence of the file.
Let's learn how to use the if command to check various file attributes, such as whether it exists, does it have file permissions to read, write, executable, and similar by writing script if_11.sh as follows:
#!/bin/bash echo "$1 is: " if ! [ -e $1 ] then echo "..Do not exists" exit else echo "file is present" fi if [ -x $1 ] then echo "..Executable" fi if [ -r $1 ] then echo "..Readable" fi if [ -w $1 ] then echo "..Writable" fi
Let's test the following program:
$ chmod +x if_11.sh $ ./if_11.sh
Output:
sample.txt is: "file is present" ..Readable ..Writable
The Shell script if_12.sh for performing the file copy operation, and then checking if the copy operation was successful or not, will be as follows:
#!/bin/bash file1="File1" file2="File2" if cp $file1 $file2 then echo "Copy Command Executed Successfully" echo "Content of file named Fil1 copied in another file named File2" else echo "Some problem in command execution" fi
Let's test the program:
$ chmod +x if_12.sh $ ./if_12.sh
The following will be the output after executing the preceding commands:
$ touch File1 $ ./ if_12.sh Copy Command Executed Successfully Content of file named Fil1 copied in another file named File2
These type of constructs enable us to execute the second command depending on the success or failure of the first command:
command1 && command2 command1 || command2
Let's write script if_13.sh. In this script, we will ask the user to input two numbers. Then, the if statement will evaluate two expressions. If both are true, then the command after then will be executed, otherwise commands after else will be called:
#!/bin/bash echo "Enter the first number" read val_a echo "Enter the Second number" read val_b if [ $val_a == 1 ] && [ $val_b == 10 ] then echo "testing is successful" else echo "testing is not successful" fi
Let's test the program:
$ chmod +x if_13.sh $ ./if_13.sh
The following will be the output after executing the preceding commands:
Enter the first number 10 Enter the Second number 20 testing is not successful $ ./if_13.sh Enter the first number 1 Enter the Second number 10 testing is successful
Sometimes, we may need to enter a command to check if the file has the execute permission? If it is executable, then the file should be executed. The script for such a requirement will be as follows:
test -e file && . file.
Let's learn one more example of && and multiple expressions using the test command. In the next script if_14.sh, we will check if file_one is present, then we will print Hello and then immediately we will check if file_two is present, then we will print there on the screen:
#!/bin/bash touch file_one touch file_two if [ -f "file_one" ] && echo "Hello" && [ -f file_two ] && echo "there" then echo "in if" else echo "in else" fi exit 0
Let's test the program:
$ chmod +x if_14.sh.sh $ ./if_14.sh
The following will be the output after executing the preceding commands:
Hello there in if
The following script if_15.sh will check file permissions such as read, write, and execute in the same if command using multiple && with the test command:
#!/bin/bash
echo "Please enter file name for checking file permissions"
read file
if [[ -r $file && -w $file && -x $file ]]
then
echo "The file has read, write, and execute permission"
fiLet's test the program:
$ chmod +x if_15.sh $ touch sample.txt $ chmod +rwx sample.txt $ ./if_15.sh
The following will be the output after executing the preceding commands:
The file has read, write, and execute permissions.
Till now, we have seen multiple expressions using the && logical operator. Now we will see one example with the OR (||) logical operator. In the following script if_16.sh, we will check the existence of file_one and then we will print Hello on the screen. If the first expression of file checking fails, then the second expression of echo will be executed:
#!/bin/sh
if [ -f file_one ] || echo "Hello"
then
echo "In if"
else
echo "In else"
fiLet's test the program:
$ chmod +x if_16.sh $ ./if_16.sh
The following will be the output after executing the preceding commands:
hello In if $ touch file_one $ ./if_16.sh
Output:
In if
We checked in the preceding script if file_one is absent or present.
Whenever we need to take decision from multiple situations or options such as whether it a city is the capital of a country, the state capital, a major city, or a small town. In such situations where, depending on various options, we need to execute different commands, if/else or if/elif/else decision-making commands are useful.
Using the if/elif/else commands, we can have multiple decision-making processes. If the if command succeeds, the command after then will be executed. If it fails, the command after the elif statement will be tested. If that statement succeeds, then statements under the elif are executed. However, suppose none of the elif conditions are true, then statements after the else command are executed. Here, the else block is executed by default. The fi statement will close the if/elif/else command.
The syntax of decision making using the if elif construct is as follows:
If expression_1
then
Command
elif
expression_2
then
Command
elif
expression_3
then
Command
else
Command
fiLet's write script if_18.sh as follows. In this script, we are checking if the directory with a given name exists or not. If this fails, then we are checking whether the file with the given name exists. Even if this fails, then we will inform the user that neither the file nor the directory exists with the given name:
#!/bin/bash
echo "Kindly enter name of directory : "
read file
if [[ -d $file ]]
then
echo "$file is a directory"
elif [[ -f $file ]]
then
echo "$file is a file."
else
echo "$file is neither a file nor a directory. "
fiLet's test the program:
$ chmod +x if_18.sh $ ./is_18.sh
The following will be the output after executing the preceding commands:
$ ./ if_18.sh Kindly enter name of directory : File1 File1 is a file. $ mkdir dir1 $ ./ if_18.sh Kindly enter name of directory : dir1 dir1 is a directory $ ./ if_18.sh Kindly enter name of directory : File007 File007 is neither a file nor a directory.
In many situations, we may need a command that does nothing and returns a success status such as 0. In such cases, we can use the null command. It is represented by a colon (:). For example, in the if loop, we do not want to put any command if it is successful, but we have certain commands to execute if it fails. In such situations, we can use the null command. This is illustrated in the following if_19.sh script. If we want to loop forever, then the null command can be used in the for loop:
#!/bin/bash
city=London
if grep "$city" city_database_file >& /dev/null
then
:
else
echo "City is not found in city_database_file "
exit 1
fiLet's test the program:
$ chmod +x if_19.sh $ ./if_19.sh
The following will be the output after executing the preceding commands:
City is not found in city_database_file
We can observe from the preceding script that the colon is a null command and it does nothing.
Apart from simple branches with if, it is also possible to process multiple decision-making operations using the case command. In a case statement, the expression contained in a variable is compared with a number of expressions, and for each expression matched, a command is executed.
It is possible to have multiple branching using the if/elif/else commands. But if more than two or three elif commands are used, then code becomes very complex. When all the different conditions are depending on a single variable, in such cases, the esac statement is used. The interpreter checks the value of the case variable against value1, value2, value3, and so on, till the match is found. If the value is matched then all the statements after that case value are executed till the double semicolon is reached. If nothing is matched then statements after esac are executed. Wildcard characters and pipe (vertical bar for ORing two values) are allowed in the case statement.
A case statement has the following structure:
case variable in
value1)
command(s)
;;
value2)
command(s)
;;
*)
command(s)
;;
esacFor illustrating the switch case scripting example, we will write the case_01.sh script as follows. We will ask the user to enter any number from the range 1–9. We will check the entered number with the case command. If a user enters any other number, then we will display the error by displaying the Invalid key message:
#!/bin/bash
echo "Please enter any number from 1 to 9"
read number
case $number in
1) echo "ONE"
;;
2) echo "TWO"
;;
3) echo "Three"
;;
4) echo "FOUR"
;;
5) echo "FIVE"
;;
6) echo "SIX"
;;
7) echo "SEVEN"
;;
8) echo "EIGHT"
;;
9) echo "NINE"
;;
*) echo "SOME ANOTHER NUMBER"
;;
esacLet's test the program:
$ chmod +x case_01.sh $ ./case_01.sh
The following will be the output after executing the preceding commands:
Please enter any number from 1 to 9 5 FIVE
Sometimes, in the Shell script we may need to ask for an e-mail address from the user. In such situations, we need to verify if the address is correct or not. We can use the case command to validate the correct e-mail address as follows:
#!/bin/bash
case $1 in
*@*.com) echo "valid email address"
;;
*) echo "invalid string"
;;
esacLet's test the program:
$ chmod +x case_02..sh $ ./ case_02.sh abc@gmail.com
The following will be the output after executing the preceding commands, if the e-mail address is correct:
valid email address $ ./ case_02.sh abc.com
The following will be the output after executing the preceding commands, if the e-mail address is not correct:
invalid string
If inside the script, we need to provide file operations such as copy, move, or delete, then we can use the case command for such scripts. The script case_03.sh for file operations is as follows:
#!/bin/bash echo "Press 1 for copy or 2 for move or 3 for removing the file" read num case $num in 1) echo "We are going to do copy operation" echo " Enter Source file name" read source echo " Enter destination file name" read destination cp $source $destination ;; 2) echo "We are going to do move operation" echo " Enter Source file name" read source echo "Enter destination file name" read destination mv $source $destination ;; 3) echo "We are going to remove the file" echo " Enter the name of file to remove" read source rm $source ;; *) echo "invalid key" esac
Let's test the program:
$ chmod +x case_03.sh $ ./case_03.sh
The following will be the output after executing the preceding commands:
Press 1 for copy or 2 for move or 3 for removing the file 1 We are going to do copy operation Enter Source file name File1 Enter destination file name File4
In this Shell script case_04.sh, we will ask the user to enter the day of the week. Inside the script, we will detect the text entered and print a detailed description of the day such as First Day is Monday and similar on the screen. Note that we are able to perform pattern matching for the upper case and lower case in the case statement:
#!/bin/bash
echo "Enter Day Of The Week"
read day
case $day in
[mM][oO][nN][dD][aA][yY])
echo "First Day is Monday"
;;
[tT][uU][eE][sS][dD][aA][yY])
echo "Second Day Tuesday"
;;
[wW][eE][dD][nN][eE][sS][dD][aA][yY])
echo "Third Day Wednesday"
;;
[tT][hH][uU][rR][sS][dD][aA][yY])
echo " Fourth Day Thursday"
;;
[fF][rR][iI][dD][aA][yY])
echo "Fifth Day Friday"
;;
[sS][aA][tT][uU][rR][dD][aA][yY])
echo "Sixth Day Saturday"
;;
[sS][uU][nN][dD][aA][yY])
echo "Seventh Day Sunday"
;;
*)
echo "Invalid Day of Week"
;;
esac$ chmod +x case_04.sh $ ./case_04.sh
The following will be the output after executing the preceding commands:
$ ./ case_04.sh Enter Day Of The Week Monday First Day is Monday $ ./ case_04.sh Enter Day Of The Week Thursday Fourth Day Thursday
We write the script case_05.sh for printing days in the current month. We will use the date command in the script for finding the current month:
#!/bin/bash mth=$(date +%m) case $mth in 02) echo "February usually has 28 days." echo "If it is a leap year, it has 29 days." ;; 04|06|09|11) echo "The current month has 30 days." ;; *) echo "The current month has 31 days." ;; esac
Let's test the program:
$ chmod +x case_05.sh $ ./case_05.sh
The following will be the output after executing the preceding commands:
The current month has 30 days.
With the Bash shell, it is possible to create simple menus with the help of the select built-in command.
The syntax of select is as follows:
PS3=prompting-text
select VARIABLE in item1 item2 item3
do
commands
doneThe advantage of a menu with select is that we can have an endless loop with it. We can have a condition in which we exit the loop.
In the following script select_01.sh, we show the menu with five options such as a, bc, def, ghi, and jkl. The script will execute the command inside do and done:
#!/bin/bash select var1 in a bc def ghi jkl do echo "Present value of var1 is $var1 done
Let's test the program:
$ chmod +x select_01.sh $ ./select_01.sh
The following will be the output after executing the preceding commands:
1) a 2) bc 3) def 4) ghi 5) jkl #? 2 "Present value of var1 is bc #? 4 "Present value of var1 is ghi #? 5 "Present value of var1 is jkl #? Press ^C to quit
We can implement the case command inside the do and done part of the select menu. The syntax will be as follows:
PS3=prompting text
select VARIABLE in item1 item2 item3
do
case VARIABLE in
value1 ) command1 ; ;
value2 ) command2 ; ;
esac
doneIn the following script select_02.sh, we used the case command inside do and done. This gives us many convenient features. Due to select, we get endless such as continuous loop. In case the if option entered is quit, then it exits the continuous loop:
#!/bin/bash PS3="please select any one : " select var in a b quit do case $var in a) echo option is a ;; b) echo option is b ;; quit) exit ;; *) echo option is default ;; esac done
Let's test the program:
$ chmod +x select_02.sh $ ./select_02.sh
The following will be the output after executing the preceding commands:
1) a 2) b 3) quit please select any one : 1 option is a please select any one : 2 option is b please select any one : 3
In the following script select_03.sh, we used a case with numerical options 1, 2, 3, 4, and an option for an invalid choice:
#!/bin/bash
PS3="Please enter one of the option"
select var in 1 2 3 4
do
case $var in
1) echo "One is selected";;
2) echo "Two is selected;;
3) echo "Two is selected;;
4) echo "Two is selected;;
*) echo "not a proper option";;
esac
doneLet's test the program:
$ chmod +x select_03.sh $ ./select_03.sh
The following will be the output after executing the preceding commands:
1) 1 2) 2 3) 3 4) 4 Please enter one of the option : 1 "One is selected" Please enter one of the option : 2 "Two is selected Please enter one of the option : 3 "Two is selected Please enter one of the option : 4 "Two is selected Please enter one of the option : 8 "not a proper option" Please enter one of the option :
In the case statement, we can put many choices to select the same command. Here is an example of the script select_04.sh as follows:
#!/bin/bash PS3="Please select one of the above:" select COMPONENT in comp1 comp2 comp3 all none do case $COMPONENT in comp1|comp2|comp3) echo "comp1 or comp2 or comp3 selected" ;; all) echo "selected all" ;; none) break ;; *) echo "ERROR: Invalid selection, $REPLY." ;; esac done
$ chmod +x select_04.sh $ ./select_04.sh
The following will be the output after executing the preceding commands:
1) comp1 2) comp2 3) comp3 4) all 5) none Please select one of the above:
The script select_05.sh is used to inform the user about the calorie information in fruits as follows:
#!/bin/bash
PS3="Enter the number for your fruit choice: "
select fruit in apple orange banana peach pear "Quit Menu"
do
case $fruit in
apple)
echo "An apple has 80 calories."
;;
orange)
echo "An orange has 65 calories."
;;
banana)
echo "A banana has 100 calories."
;;
peach)
echo "A peach has 38 calories."
;;
pear)
echo "A pear has 100 calories."
;;
"Quit Menu")
break
;;
*)
echo "You did not enter a correct choice."
;;
esac
doneLet's test the program:
$ chmod +x select_05.sh $ ./select_05.sh
The following will be the output after executing the preceding commands:
1) apple 3) banana 5) pear 2) orange 4) peach 6) Quit Menu Enter the number for your fruit choice: 1 An apple has 80 calories. Enter the number for your fruit choice: 2 An orange has 65 calories. Enter the number for your fruit choice: 3 A banana has 100 calories. Enter the number for your fruit choice: 4 A peach has 38 calories. Enter the number for your fruit choice: 5 A pear has 100 calories. Enter the number for your fruit choice: 6
For iterative operations, the bash shell uses three types of loops: for, while, and until. Using the for looping command, we can execute a set of commands for a finite number of times for every item in a list. In the for loop command, the user-defined variable is specified. After the in command, the keyword list of values can be specified. The user-defined variable will get the value from that list and all statements between do and done get executed until it reaches the end of the list.
The purpose of the for loop is to process a list of elements. It has the following syntax:
for variable in element1 element2 element3 do commands done
The simple script with the for loop could be as follows:
for command in clear date cal do sleep 1 $command Done
In the preceding script, the commands clear, date, and cal will be called one after another. The sleep command will be called before every command for a second.
If we need to loop continuously or infinitely, then the following is the syntax:
for ((;;))
do
command
doneLet's write a simple script for_01.sh. In this script, we will print the var variable 10 times:
#!/bin/bash
for var in {1..10}
do
echo $var
doneLet's test the program:
$ chmod +x sor_01.sh $ ./for_01.sh
The following will be the output after executing the preceding commands:
1 2 3 4 5 6 7 8 9 10
The following script for_02.sh uses the C programming style syntax:
#!/bin/bash max=10 for ((i=1; i<=max; i++)) do echo -n "$i " # one case with echo without –n option done
$ chmod +x for_02.sh $ ./for_02.sh
The following will be the output after executing the preceding commands:
$ ./for_02.sh # OUTPUT with –n option 1 2 3 4 5 6 7 8 9 10 $ ./for_02.sh # OUTPUT without –n option 1 2 3 4 5 6 7 8 9 10
In the next script for_03.sh, we will be processing a list of numbers, which are listed next to the in keyword:
#!/bin/bash for var in 11 12 13 14 15 16 17 18 19 20 do echo $var done
Let's test the program:
$ chmod +x for_03.sh $ ./for_03.sh
The following will be the output after executing the preceding commands:
$ ./for_03.sh 11 12 13 14 15 16 17 18 19 20
In the following script for_04.sh, we create users11 to user20 along with their home directory:
#!/bin/bash
for var in user{11..20}
do
useradd –m $var
passwd -d $var
doneLet's test the program:
$ chmod +x for_04.sh.sh $ sudo ./for_04.sh
The following will be the output after executing the preceding commands:
user11 to user20 will be created with their home folders in the /home/ folder. You need to be a root user or administrator to run this script.
In the for_05.sh script, we will be passing command-line parameters. All the command-line parameters will be available as the $* inside script:
#!/bin/sh for var in $* do echo "command line contains: $var" done
Let's test the program:
$ chmod +x for_05.sh $ ./for_05.sh 1 2 3 4 5 6
The following will be the output after executing the preceding commands:
command line contains: 1 command line contains: 2 command line contains: 3 command line contains: 4 command line contains: 5 command line contains: 6
In the next script for_06.sh, we are passing a list of words such as name of fruits. Inside the script, we are printing the information of variable:
#!/bin/bash
# create fruits.txt => Apple Mango Grapes Pears Banana Orange Pineapple
for var in `cat fruits.txt`
do
echo "var contains: $var"
doneLet's test the program:
$ chmod +x for_06.sh $ ./for_06.sh
The following will be the output after executing the preceding commands:
var contains: Apple var contains: Mango var contains: Grapes var contains: Pears var contains: Banana var contains: Orange var contains: Pineapple
Using the for_07.sh script, we generate a list of files with the ls shell command. This will be the list of filenames. In the for loop, the following list of files will be printed:
#!/bin/bash
echo -n "Commands in bin directory are : $var"
for var in $(ls /bin/*)
do
echo -n -e "$var \t"
doneLet's test the program:
$ chmod +x for_07.sh $ ./for_07
The following will be the output after executing the preceding commands:
This will print the content of /bin/ directory.
For taking a backup of files, we can write the for_08.sh script as follows:
#!/bin/bash for filename in *.c do echo "Copying $filename to $filename.bak" cp $filename $filename.bak done
Let's test the program:
$ chmod +x for_08.sh $ touch 1.c 2.c $ ./for_08.sh
The following will be the output after executing the preceding commands:
"Copying 1.c to 1.c.bak" "Copying 2.c to 2.c.bak"
With the help of the
continue command, it is possible to exit from the current iteration of the loop and to resume the next iteration of the loop. We use the for, while, or until commands for loop iterations.
The following is the for_09.sh script for the loop with the continue command to skip a certain part of the loop commands:
#!/bin/bash
for x in 1 2 3
do
echo before $x
continue 1
echo after $x
done
exit 0Let's test the program:
$ chmod +x for_09.sh $ ./for_09.sh
The following will be the output after executing the preceding commands:
before 1 before 2 before 3
The following is the for_10.sh script, in which we will check all files and directories. If the file is found, we will print the name. If the directory is found, we will skip further processing with the continue command. Take care that any of your useful files with the name sample* are not in the testing directory before testing this script:
#!/bin/bash
rm -rf sample*
echo > sample_1
echo > sample_2
mkdir sample_3
echo > sample_4
for file in sample*
do
if [ -d "$file" ]
then
echo "skipping directory $file"
continue
fi
echo file is $file
done
rm -rf sample*
exit 0Let's test the program:
$ chmod +x for_10.sh $ ./for_10.sh
The following will be the output after executing the preceding commands:
file is sample_1 file is sample_2 skipping directory sample_3 file is sample_4
In the following script for_11.sh, we are checking the backup of files in the /MP3/ folder. If the file is not found in the folder, we are copying it into the folder for backup purposes. We can implement incremental backup scripts using this functionality:
#!/bin/bash
for FILE in 'ls *.mp3'
do
if test -e /MP3/$FILE
then
echo "The file $FILE exists."
continue
fi
cp $FILE /MP3
doneLet's test the program:
$ chmod +x for_11.sh $ ./for_11.sh
If the file exists in the MP3 folder, then the loop will continue to check the next file. If the file backup is not present in the MP3 folder, then the file will be copied to it.
In the previous section, we discussed about how continue can be used to exit from the current iteration of a loop. The break command is another way to introduce a new condition within a loop. Unlike continue, however, it causes the loop to be terminated altogether if the condition is met.
In the for_12.sh script, we check the directory's content. If the directory is found, then we are exiting the loop and displaying the message that the first directory is found:
#!/bin/bash
rm -rf sample*
echo > sample_1
echo > sample_2
mkdir sample_3
echo > sample_4
for file in sample*
do
if [ -d "$file" ]; then
break;
fi
done
echo The first directory is $file
rm -rf sample*
exit 0Let's test the program:
$ chmod +x for_12.sh $ ./for_12.sh
The following will be the output after executing the preceding commands:
The first directory is sample_3
In the for_13.sh script, we ask the user to enter any number. We print the square of numbers in the while loop. If a user enters the number 0, then we use the break command to exit the loop:
#!/bin/bash
typeset -i num=0
while true
do
echo -n "Enter any number (0 to exit): "
read num junk
if (( num == 0 ))
then
break
else
echo "Square of $num is $(( num * num ))."
fi
done
echo "script has ended"Let's test the program:
$ chmod +x for_13.sh $ ./for_13.sh
The following will be the output after executing the preceding commands:
Enter any number (0 to exit): 1 Square of 1 is 1. Enter any number (0 to exit): 5 Square of 5 is 25. Enter any number (0 to exit): 0
Similar to the for command, while is also the command for loop operations. The command next to while is evaluated. If it is successful or 0 then the commands inside do and done are executed.
The purpose of a loop is to test a certain condition or expression and execute a given command while the condition is true (while loop) or until the condition becomes true (until loop):
|
while condition do commands done |
until condition do commands done |
The following is the while_01.sh script, in which we read a file and display its it's content:
#!/bin/bash file=/etc/resolv.conf while IFS= read -r line # IFS : inter field separator do # echo line is stored in $line echo $line done < "$file"
Let's test the program:
$ chmod +x while_01.sh $ ./while_01.sh
The following will be the output after executing the preceding commands:
nameserver 192.168.168.2 search localdomain
In the following script while_02.sh, we are printing number 1–10 on the screen using the while loop:
#!/bin/bash declare -i x x=0 while [ $x -le 10 ] do echo $x x=$((x+1)) done
Let's test the program:
$ chmod +x while_02.sh $ ./while_02.sh
The following will be the output after executing the preceding commands:
0 1 2 3 4 5 6 7 8 9 10
In the following script while_03.sh, we ask the user to input the test. If the input of the text is quit, then we terminate the loop; otherwise, we print the text on the screen:
#!/bin/bash INPUT="" while [ "$INPUT" != quit ] do echo "" echo 'Enter a word (quit to exit) : ' read INPUT echo "You typed : $INPUT" done
Let's test the program:
$ chmod +x while_03.sh $ ./while_03.sh
The following will be the output after executing the preceding commands:
Enter a word (quit to exit) : GANESH You typed : GANESH Enter a word (quit to exit) : Naik You typed : Naik Enter a word (quit to exit) : quit You typed : quit
In the following while_04.sh script, we print the content of variable num on screen. We are starting with value 1. In the loop, we increment the value of the num variable by 1. When the value of the variable num reaches 6, then the while loop is terminated:
#!/bin/bash num=1 while (( num < 6 )) do echo "The value of num is: $num" (( num = num + 1 )) # let num=num+1 done echo "Done."
Let's test the program:
$ chmod +x while_04.sh $ ./while_04.sh
The following will be the output after executing the preceding commands:
The value of num is: 1 The value of num is: 2 The value of num is: 3 The value of num is: 4 The value of num is: 5 Done.
The while_05.sh script prints a series of odd numbers on the screen. We are passing a total number of odd numbers required as command-line parameter:
#!/bin/bash count=1 num=1 while [ $count -le $1 ] do echo $num num=`expr $num + 2` count=`expr $count + 1` done
Let's test the program:
$ chmod +x while_05.sh $ ./while_05.sh 5
The following will be the output after executing the preceding commands:
1 3 5 7 9
The until command is similar to the while command. The given statements in the loop are executed as long as they evaluate the condition as true. As soon as the condition becomes false, then the loop is exited.
The syntax is as follows:
until command
do
command(s)
doneIn the following script until_01.sh, we are printing numbers 0-9 on screen. When the value of variable x becomes 10, then the until loop stops executing:
#!/bin/bash x=0 until [ $x -eq 10 ] do echo $x x=`expr $x + 1` done
Let's test the program:
$ chmod +x until_01.sh $ ./until_01.sh
The following will be the output after executing the preceding commands:
0 1 2 3 4 5 6 7 8 9
In the following script until_02.sh, we ask the user to input text. We are printing entered text on the screen. When the user enters the text quit, the until loop ends the iterations:
#!/bin/bash INPUT="" until [ "$INPUT" = quit ] do echo "" echo 'Enter a word (quit to exit) : ' read INPUT echo "You typed : $INPUT" done
Let's test the program:
$ chmod +x until_02.sh $ ./until_02.sh
The following will be the output after executing the preceding commands:
Enter a word (quit to exit) : Ganesh You typed : Ganesh Enter a word (quit to exit) : Naik You typed : Naik Enter a word (quit to exit) : quit You typed : quit
In the following script until_03.sh, we are passing the username as a command-line parameter to the script. When required, the user logs in the grep command and will find it from the output of the who command. Then, the until loop will stop iterations and inform on screen about the user login:
#!/bin/bash until who | grep "$1" > /dev/null do sleep 60 done echo -e \\a echo "***** $1 has just logged in *****" exit 0
Let's test the program:
$ chmod +x until_03.sh $ ./until_03.sh User10
The following will be the output after executing the preceding commands:
"***** User10 has just logged in *****"
This message will be displayed when user10 has logged into the server.
If we need to redirect the output of a loop to any other Linux command such as sort, we can even redirect the loop output to be stored in the file:
The following is an example of source code for_14.sh:
#!/bin/bash
for value in 10 5 27 33 14 25
do
echo $value
done | sort -nLet's test the program:
$ chmod +x for_14.sh $ ./for_14.sh
The following will be the output after executing the preceding commands:
5 10 14 25 27 33
In the preceding script, the for loop iterates through a list of numbers which is unsorted. The numbers are printed in the body of the loop, which are enclosed between do and done commands. Once the loop is complete, the output is piped to the sort command, which in turn is performing a numerical sort and printing the result on the screen.
In certain situations, the script with loops may take lot of time to complete. In such situations, we may decide to run the script containing loops in the background so that we can continue other activities in the same terminals. The advantage of this will be that the terminal will be free for giving the next commands.
The following for_15.sh script is the technique to run a script with loops in the background:
#!/bin/bash
for animal in Tiger Lion Cat Dog
do
echo $animal
sleep 1
done &Let's test the program:
$ chmod +x for_15.sh $ ./for_15.sh
The following will be the output after executing the preceding commands:
Tiger Lion Cat Dog
In the preceding script, the for loop will process animals Tiger, Lion, Cat, and Dog sequentially. The variable animal will be assigned the animal names one after another. In the for loop, the commands to be executed are enclosed between do and done. The ampersand after the done keyword will make the for loop run in the background. The script will run in the background till the for loop is complete.
The shell has one environment variable, which is called the Internal Field Separator (IFS). This variable indicates how the words are separated on the command line. The IFS variable is, normally or by default, a white space (' '). The IFS variable is used as a word separator (token) for the for command. In many documents, IFS can be any one of the white space, ':', '|', ': ' or any other desired character. This will be useful while using commands such as read, set, for, and so on. If we are going to change the default IFS, then it is a good practice to store the original IFS in a variable.
Later on, when we have done our required tasks, then we can assign the original character back to IFS.
In the following script for_16.sh, we are using ":" as the IFS character:
#/bin/bash
cities=Delhi:Chennai:Bangaluru:Kolkata
old_ifs="$IFS" # Saving original value of IFS
IFS=":"
for place in $cities
do
echo The name of city is $place
doneLet's test the program:
$ chmod +x for_16.sh $ ./for_16.sh
The following will be the output after executing the preceding commands:
The name of city is Delhi The name of city is Chennai The name of city is Bangaluru The name of city is Kolkata
By default the original inter field separator is a whitespace. We have saved the original IFS in the old_ifs variable. We assigned colon ':' and an IFS in the script. Therefore, we can use ':' as an inter field separator in our test file or text string.
In this chapter, you learned about using decision making in scripts by working with Test, if-else, and switching case. We also used select for a loop with menu. For repeating tasks, such as processing lists, you learned about using the for loop, while loop and do while. You also learned how to control loops using the break statement and continue statement.
In the next chapter, you will learn about writing new functions and calling them, sharing data between functions, passing parameters to functions, and creating a library of functions.
In the last chapter, you learned about using decision making in scripts by working with test, if-else, and switch case. We also used select for loop with menu. For repeated tasks, such as processing lists, you learned to use the for and while loops and the do while. You also learned about how to control loops using the break and continue statements.
In this chapter, you will learn the following topics:
We, human beings, in our day-to day lives, take help from people, who are specialized in certain knowledge or skills, such as doctors, lawyers, and barbers. This helps our lives to be more organized and comfortable so that we need not learn every skill in this world. We take advantage of skills that have already been acquired by other people. The same thing applies to software development as well. If we use whatever code or scripts that have already been developed, then this will save our time and energy.
In real-world scripts, we break down big tasks or scripts into smaller logical tasks. This modularization of scripts helps in the better development and understanding of code. The smaller logical blocks of script are be called functions.
The advantages of functions are as follows:
Functions can be defined on a command line or inside scripts. The syntax for defining functions on a command line is as follows:
functionName { command_1; command_2; . . . }
Or:
functionName() { command_1; command_2; . . }
In single-line functions, every command should end with a semicolon.
Let's write a very simple function to illustrate the preceding syntax:
$ hello() {echo 'Hello world!';}
We can use the previously defined function as follows:
$ hello
Output:
Hello world!
The syntax of the function declaration inside the Shell script is as follows:
function_name() {
block of code
}An alternate function syntax is mentioned here:
function function_name
{
block of code
}Functions should be defined at the beginning of a script.
We can add this function in the Shell script function_01.sh as follows:
#!/bin/bash
hello()
{echo "Executing function hello"
}
echo "Script has started now"
hello
echo "Script will end"Test the script as follows:
$ chmod +x function_01.sh $ ./function_01.sh
Output:
Script has started now Executing function hello Script will end
We can modify the preceding script into function_02.sh with some more functionality, shown as follows:
#!/bin/bash
function greet()
{ echo "Hello $LOGNAME, today is $(date)"; }
greetTest the script as follows:
$ chmod +x function_02.sh $ ./function_02.sh
Output:
Hello ganesh, today is Sun Jul 5 22:47:23 PDT 2015
The system init functions are placed in the /lib/lsb/init-functions folder in the Linux operating system:
The script function_03.sh with a function for listing the present working directory and listing all the files in the current directory is as follows:
#!/bin/bash
function_lister ()
{
echo Your present working directory is `pwd`
echo Your files are:
ls
}
function_listerTest the script as follows:
$ chmod +x function_03.sh $ ./function_03.sh
Output:
Your present working directory is /home/student/Desktop/test Your files are: 01.sh 02.sh 03.sh
The script function_04.sh with a function to pause the script until users press any key is as follows:
#!/bin/bash
# pause: causes a script to take a break
pause()
{
echo "To continue, hit RETURN."
read q
}
pauseTest the script as follows:
$ chmod +x function_04.sh $ ./function_04.sh
Output:
To continue, hit RETURN. (after hitting any key it resumes)
The script function_05.sh with a function to print the previous day is as follows:
#!/bin/bash
yesterday()
{
date --date='1 day ago'
}
yesterdayTest the script as follows:
$ chmod +x function_05.sh $ ./function_05.sh
Output:
Sat Jul 4 22:52:24 PDT 2015
The function to convert lowercase letters into uppercase letters is shown in function_06.sh as follows:
#!/bin/bash
function Convert_Upper()
{
echo $1 | tr 'abcdefghijklmnopqrstuvwxyz' \
'ABCDEFGHIJKLMNOPQRSTUVWXYZ'
}
Convert_Upper "ganesh naik - embedded android and linux training"$ chmod +x function_06.sh $ ./function_06.sh
Output:
GANESH NAIK - EMBEDDED ANDROID AND LINUX TRAINING
In certain situations, we may need to pass arguments or parameters to functions. In such situations, we can pass arguments as follows.
Calling the script with command-line parameters is as follows:
$ name arg1 arg2 arg3 . . .
Let's type a function as follows:
$ hello() { echo "Hello $1, let us be a friend."; }
Call the function in the command line as follows:
$ hello Ganesh
Output:
Hello Ganesh, let us be a friend
Let's write the script function_07.sh. In this script, we pass command-line parameters to the script as well as the function:
#!/bin/bash
quit()
{
exit
}
ex()
{
echo $1 $2 $3
}
ex Hello hi bye# Function ex with three arguments
ex World# Function ex with one argument
echo $1# First argument passed to script
echo $2# Second argument passed to script
echo $3# Third argument passed to script
quit
echo fooTest the script as follows:
$ chmod +x function_07.sh $ ./function_07.sh One Two Three
Output:
Hello hi bye World One Two Three
We can observe from the output that the parameters passed to the function are local to the function. In global scope, the command-line parameters to script are available as $1, $2, $3, and more.
Another example script called function_08.sh to pass multiple arguments to the function is as follows:
#!/bin/bash
countries()
{
# let us store first argument $1 in variable temp
temp=$1
echo "countries(): \$0 = $0" # print command
echo "countries(): \$1 = $1" # print first argument
echo "countries(): total number of args passed = $#"
echo "countries(): all arguments (\$*) passed = -\"$*\""
}
# Call function with one argument
echo "Calling countries() for first time"
countriesUSA
# Call function with three arguments
echo "Calling countries() second time "
countriesUSA India JapanTest the script as follows:
$ chmod +x function_08.sh $ ./function_08.sh
Output:
Calling countries() for first time countries(): $0 = ./hello.sh countries(): $1 = USA countries(): total number of args passed = 1 countries(): all arguments ($*) passed = -"USA" Calling countries() second time countries(): $0 = ./hello.sh countries(): $1 = USA countries(): total number of args passed = 3 countries(): all arguments ($*) passed = -"USA India Japan"
We can create a function that could create a new directory and change to it during the execution of the program. The script function_09.sh is as follows:
#!/bin/bash
# mcd: mkdir + cd; creates a new directory and
# changes into that new directory
mcd ()
{
mkdir $1
cd $1
}
mcd test1The preceding script will create the test1 folder in the current folder and change the path to the test1 folder.
A common task in many scripts is to ask users to input an answer as either Yes or No. In such situations, the following script function_10.sh would be very useful:
#!/bin/bash
yesno ( )
{
while true .
do
echo "$*"
echo "Please answer by entering yes or no : "
read reply
case $reply in
yes)
echo "You answered Yes"
return 0
;;
no)
echo "You answered No"
return 1
;;
* )
echo "Invalid input"
;;
esac
done
}
Yesno$ chmod +x function_10.sh $ ./function_10.sh
Output:
Please answer by entering yes or no: yes "You answered Yes" $ ./function_10.sh Please answer by entering yes or no: no "You answered No"
We can create variables that may contain strings or numerical values. These global variables can be accessed by all the functions inside a script.
A simple script called function_11.sh with functions is as follows:
#!/bin/bash
# We will define variable temp for sharing data with function
temp="/temp/filename"
remove_file()
{
echo "removing file $temp..."
}
remove_fileTest the script as follows:
$ chmod +x function_11.sh $ ./function_11.sh
Output:
removing file /temp/filename...
Whenever we declare a variable in a script, it is accessible to all functions. The variable is global by default. If the variable is modified by any line of script or any function, it will be modified in global scope. This may create problems in certain situations. We will see this problem in the following script function_12.sh:
#!/bin/bash
name="John"
hello()
{name="Maya"
echo $name
}
echo $name# name contains John
hello# name contains Maya
echo $name# name contains MayaTest the script as follows:
$ chmod +x function_12.sh $ ./function_12.sh
Output:
John Maya Maya
To make a variable local, we declare it as follows:
local var=value local varName
Let's write the script function_13.sh as follows:
#!/bin/bash
name="John"
hello()
{local name="Mary"
echo $name
}
echo $name# name contains John
hello# name contains Mary
echo $name# name contains JohnTest the script as follows:
$ chmod +x function_13.sh $ ./function_13.sh
Output:
John Mary John
The command local can only be used within a function. The keyword local limits the scope of the variable to the function. In the previous script, we initially declared the variable name; it has global scope. This variable name has the content John. Then, we have declared the local variable name in the function hello. This local variable name is initialized to Mary. Then, outside of the function hello, we again access the global variable name, which has the content John.
You have learned to pass command-line parameters to functions. Similarly, the function can return integers as a return value. Normally, functions return either TRUE or FALSE. In certain cases, the function can return integer values, such as 5 or 10, as well.
The syntax is:
return N
When the function calls the command return, the function exits with the value specified by N.
If the function does not call the command return, then the exit status returned is that of the last command executed in the function. If what we need is the status of the last command executed in the function, then we need not return any value from the function. This is illustrated in the following script function_14.sh:
#!/bin/bash
is_user_root() { [ $(id -u) -eq 0 ]; }
is_user_root && echo "You are root user, you can go ahead."\
|| echo "You need to be administrator to run this script"Test the script as follows:
$ chmod +x function_14.sh $ ./function_14.sh
If you are a root user, then the output will be as follows:
You are root user, you can go ahead.
If you are a normal user, then the output will be as follows:
You need to be administrator to run this script
A modified version of the previous script is function_15.sh:
#!/bin/bash
declare -r TRUE=0
declare -r FALSE=1
is_user_root()
{
[ $(id -u)-eq 0 ]&&return$TRUE||return$FALSE
}
is_user_root && echo "You can continue" || echo "You need to be root to run this script."$ chmod +x function_15.sh $ ./function_15.sh
Output:
You need to run this script as a root user.
Let's see the script in which the function returns a value:
#!/bin/bash
yes_or_no()
{
echo "Is your name $*?"
while true
do
echo -n "Please reply yes or no :"
readreply
case$reply in
Y | y | yes) return 0;;
N | n | no ) return 1;;
*) echo "Invalid answer"
esac
done
}
if yes_or_no $1
then
echo "Hello $1"
else
echo "name not provided"
fi$ chmod +x function_16.sh $ ./function_16.sh Ganesh
Output:
Is your name Ganesh? Please reply yes or no :yes Hello Ganesh
We have already seen in previous chapters that to run any command in the background, we have to terminate the command using &:
$ command &
Similarly, we can make the function run in the background by appending & after the function call. This will make the function run in the background so that the terminal will be free:
#!/bin/bash
dobackup()
{
echo "Started backup"
tar -zcvf /dev/st0 /home >/dev/null 2>&1
echo "Completed backup"
}
dobackup &
echo -n "Task...done."
echoTest the script as follows:
$ chmod +x function_17.sh $ ./function_17.sh
Output:
Task...done. Started backup Completed backup
Normally, whenever we enter a command, the new process gets created. If we want to make functions from the script to be made available in the current shell, then we need a technique that will run the script in the current shell instead of creating a new shell environment. The solution to this problem is using either the source or "."commands.
The commands source and "." can be used to run the Shell script in the current shell instead of creating a new process. This helps with declaring functions and variables in the current shell.
The syntax is as follows:
$ source filename [arguments]
Or:
$ . filename [arguments]
$ source functions.sh
Or:
$ . functions.sh
If we pass command-line arguments, these will be handled inside a script as $1, $2, and more:
$ source functions.sh arg1 arg2
Or:
$ ./path/to/functions.sh arg1 arg2
The source command does not create a new shell; but runs the Shell scripts in the current shell, so that all the variables and functions will be available in the current shell for usage.
If we want to create our own library of functions, then we can create a script and add all the functions into this script. We can make all the functions from our script functions.sh available in the current shell by calling source or the period . command.
The procedure to load all functions into the current shell is as follows:
$ countryUSA
Since the function country is not a part of the shell environment, this command will give an error:
$ . functions.sh
Or:
$ source functions.sh $ country USA India Japan
This will execute the function country along with the parameter USAIndia Japan.
We can even load a script containing library functions inside another script as follows:
#!/bin/bash . /../my-library.sh call_library_functions();
We have called the library function script my-library.sh inside another script. This will define all the functions within the script my-library.sh available in the current script environment.
In this chapter, we understood the functions in Shell scripts. You learned about defining and displaying functions and removing the functions the from shell. You also learned about passing arguments to functions, sharing data between functions, declaring local variables in functions, returning results from functions, and running functions in background. You finally learned about using the source and .commands. We used these commands to use the library of functions.
In the next chapter, you will learn about using traps and signals. You will also learn about creating menus with the help of the utility dialog.
In the last chapter, you learned about using functions in Shell scripts and defining, displaying, and removing functions from the shell. You also learned about passing arguments to functions, sharing data between functions, declaring local variables in functions, returning results from functions, and running functions in the background. In the end, you learned about using source and . commands. You used these commands for using a library of functions.
In this chapter, you will learn the following topics:
dialog utilityTwo types of interrupts exist in the Linux operating system: the hardware interrupt and the software interrupt. Software interrupts are called signals or traps. Software interrupts are used for interprocess synchronizations.
Signals are used to notify about a certain event occurrence or to initiate a certain activity.
We use software signals many times, for example, if any command is not responding after it is typed, then you might have entered Ctrl + C. This sends a SIGINT signal to the process, and the process is terminated. In certain situations, we may want the program to perform a certain activity instead of terminating it using the Ctrl + C command. In such cases, we can use the trap command to ignore a signal or to associate our desired function with that signal.
In operating systems, software interrupts or signals are generated when the process attempts to divide a number by zero or due to power failure, system hang up, illegal instruction execution, or invalid memory access.
The action performed by a few signals is to terminate the process. We can configure the shell to do the following responses:
Enter either of following commands to get the full list of all signals:
$ kill -l $ trap –l
Output:
If we want to know which keys are used for particular signals, then we enter the following command:
$ stty -a
The following is a list of a few of the standard signals that a process can use:
|
Number |
Name |
Description |
Action |
|---|---|---|---|
|
0 |
|
The shell exits. |
Termination |
|
1 |
|
The terminal has been disconnected. |
Termination |
|
2 |
|
The user presses Ctrl + C |
Termination |
|
3 |
|
The user presses Ctrl + \ |
Termination |
|
4 |
|
This gives an illegal hardware instruction. |
Program error |
|
5 |
|
This is produced by debugger. |
Program error |
|
8 |
|
This gives an arithmetic error, such as division by zero. |
Program error |
|
9 |
|
This cannot be caught or ignored. |
Termination |
We can send either of the kill signals to a process with PID # 1234 as follows:
kill -9 1234 kill -KILL 1234 kill -SIGKILL 1234
As we can see, we can use a signal number or a signal name along with the process ID. By default, the kill command sends signal number 15 to process. Using the kill command, we can send the desired signal to any specific process.
We can stop a process using the Ctrl + Z signal as follows:
$ kill -19 pid
Ctrl + Z or SIGTSTP will stop the process.
We can run the stopped process by sending the SIGCONT signal.
$ kill -18 pid
The signal number of SIGCONT is 18.
If a signal or software interrupt is generated while the script is running, then we can define what action is performed by that interrupt handler using the trap command. The trap command helps us in reassigning the system response to a particular signal through the user defined function or commands.
The syntax to use the trap command is either of the following:
$ trap 'command; command' signal-name $ trap 'command; command' signal-number
The usage as per the preceding syntax is as follows:
trap 'echo "You pressed Control key"; exit 1' 0 1 2 15
This will print the message You pressed Control Key, any SIGINT, SIGHUP, or SIGTERM received by the process:
trap 'rm file.tmp; exit 1' EXIT INT TERM HUP
When any of the SIGINT, SIGTERM, or SIGHUP signals arrives, then it will delete the file.tmp file and exit with status 1.
While using the trap command, if the command string is surrounded by double quotes, then the command substitution and variable substitution will be done during the trap command execution. If the command string is enclosed in single quotes then the command substitution and variable substitution will be done when the signal is detected.
If we want the shell to ignore certain signals, then we can call the trap command followed by a pair of empty quotes as a command. Those signals will be ignored by the shell process shown by either of the following commands:
$ trap " " 2 3 20 $ trap "" INT QUIT TSTP
The signals 2 (SIGINT), 3 (SIGQUIT), and 20 (SIGTSTP) will be ignored by the shell process.
If we want to reset the signal behavior to the original default action, then we need to call the trap command followed by the signal name or number as shown in the following examples, respectively:
$ trap TSTP $ trap 20
This will reset the default action of signal 20 (SIGTSTP). The default action is to suspend the process (Ctrl + Z).
Let's reassign our function to signals by the trap command:
$ trap 'echo "You pressed Control key"; exit 1' 0 1 2 15
If we do not pass any arguments after the trap command, then it lists all reassigned signals along with their functions.
We can list all the assigned signal lists by the following command:
$ trap
Output:
trap -- 'echo "You pressed Control key"; exit 1' EXIT trap -- 'echo "You pressed Control key"; exit 1' SIGHUP trap -- 'echo "You pressed Control key"; exit 1' SIGINT trap -- 'echo "You pressed Control key"; exit 1' SIGTERM
If we use the trap command inside a function in script, then the reassigned signal behavior will become global inside a script. We can check this effect in the following script example.
Let's write Shell script trap_01.sh as follows:
#!/bin/bash
trap "echo caught signal SIGINT" SIGINT
trap "echo caught signal SIGQUIT" 3
trap "echo caught signal SIGTERM" 15
while :
do
sleep 50
doneLet's test the program as follows:
$ chmod +x trap_01.sh $ ./ trap_01.sh
Output:
^Ccaught signal SIGINT ^\Quit (core dumped) caught signal SIGQUIT
Let's write one more Shell script trap_02.sh as follows:
#!/bin/bash
trap "echo caught signal SIGINT" SIGINT
trap "echo caught signal SIGQUIT" 3
trap "echo caught signal SIGTERM" 15
trap "echo caught signal SIGTSTP" TSTP
echo "Enter any string (type 'dough' to exit)."
while true
do
echo "Rolling...\c"
read string
if [ "$string" = "dough" ]
then
break
fi
done
echo "Exiting normally"Let's test the program as follows:
$ chmod +x trap_02.sh $ ./ trap_02.sh
Output:
Enter any string (type 'dough' to exit). Rolling...\c ^Ccaught signal SIGINT dough Exiting normally
Sometimes we may need our script to run even after we log out, such as when taking a back up and similar activities. In this case, even if we log out, the system is powered on and running. In such situations, we can use the nohup command. The nohup command prevents the process from terminating using the SIGHUP signal.
The nohup command makes our script run without attaching it to a terminal. Therefore, if we use the echo command to print text on the terminal. It will not be printed in a terminal, since the script is not attached to a terminal. In such cases, we need to redirect the output to the file, or nohup will automatically redirect the output to a nohup.out file.
Therefore, if we need to run a process, even if we log out, we need to use the nohup command as follows:
$ nohup command &
The example is as follows:
$ nohup sort emp.lst &
This will run a program to sort the emp.lst file in the background.
$ nohup date &
The dialog utility is used to create a basic level graphical user interface. We can use this in Shell script to create very useful programs.
To install the dialog utility in Debian or Ubuntu Linux, enter following command:
$ sudo apt-get update $ sudo apt-get install l dialog
Similarly, enter the following command to install the utility dialog in CentOS or Red Hat Linux:
$ sudo yum install dialog
The typical syntax of the dialog command is as follows:
$ dialog --common-options --boxType "Text" Height Width \ --box-specific-option
The common-options utility is used to set the background color, title, and so on in dialog boxes.
The option details are as follows:
To create a simple message box, we can use the following command:
$ dialog --msgbox "This is a message." 10 50
Enter the following command to create a message box with the following title:
$ dialog --title "Hello" --msgbox 'Hello world!' 6 20
The option details are as follows:
--title "Hello": This will set the title of the message box as "Hello"--msgbox 'Hello world!': This will set the content of the message box as "Hello world!"6: This will set the height of the message box20: This will set the width of message box:The message box has a Hello title with content Hello World! It has a single OK button. We can use this message box to inform the user about any events or information. The user will have to press Enter to close this message box. If the content is large for a message box, then the dialog utility will provide the scrolling of the message.
If we need to obtain a yes or no answer from the user, we can use the following options along with the dialog command:
$ dialog --yesno "Would you like to continue?" 10 50
We can have the same yes/no dialog box with a title as follows:
$ dialog --title "yesno box" --yesno "Would you like to continue?" 10 50
Let's write the Shell script dialog_01.sh as follows:
#!/bin/bash
dialog --title "Delete file" \
--backtitle "Learning Dialog Yes-No box" \
--yesno "Do you want to delete file \"~/work/sample.txt\"?" 7 60
# Selecting "Yes" button will return 0.
# Selecting "No" button will return 1.
# Selecting [Esc] will return 255.
result=$?
case $result in
0) rm ~/work/sample.txt
echo "File deleted.";;
1) echo "File could not be deleted.";;
255) echo "Action Cancelled – Presssed [ESC] key.";;
esacLet's test the following program:
$ chmod +x dialog_01.sh $ ./dialog_01.sh
Output:
Whenever we want to ask a user for an input text via the keyboard, in such situations, the inputbox option is useful. While entering text via keyboard, we can use keys such as delete, backspace, and the arrow cursor keys for editing. If the input text is larger than the input box, the input field will be scrolled. Once the OK button is pressed, the input text can be redirected to a text file:
# dialog --inputbox "Please enter something." 10 50 \ 2> /tmp/tempfile VAR=`cat ~/work/output.txt
Let's write the Shell script dialog_02.sh to create an input box as follows:
#!/bin/bash
result="output.txt"
>$ $result # Create empty file
dialog --title "Inputbox Demo" \
--backtitle "Learn Shell Scripting" \
--inputbox "Please enter your name " 8 60 2>$result
response=$?
name=$(<$result)
case $response in
0) echo "Hello $name"
;;
1) echo "Cancelled."
;;
255) echo "Escape key pressed."
esac
rm $resultLet's test the following program:
$ chmod +x dialog_02.sh $ ./dialog_02.sh
Output:
"Hello Ganesh Naik"
If we want to display the contents of the file in a textbox inside the menu created by dialog, then enter the following command:
$ dialog --textbox /etc/passwd 10 50
We are displaying the /etc/passwd file in the textbox with the previous command.
Many a time, we need to get the password from the user. In this case, the password should not be visible on the screen. The password box option is perfectly useful for this purpose.
If we want to display an entered password as a string of ****, then we will need to add the--insecure option.
We will need to redirect the inserted password in a file.
Let's write Shell script dialog_03.sh to receive the password as follows:
#!/bin/bash # creating the file to store password result="output.txt 2>/dev/null" # delete the password stored file, if program is exited pre-maturely. trap "rm -f output.txt" 2 15 dialog --title "Password" \ --insecure \ --clear \ --passwordbox "Please enter password" 10 30 2> $result reply=$? case $reply in 0) echo "You have entered Password : $(cat $result)";; 1) echo "You have pressed Cancel";; 255) cat $data && [ -s $data ] || echo "Escape key is pressed.";; esac
Let's test the following program:
$ chmod +x dialog_03.sh $ ./dialog_03.sh
Output:
Output:
You have entered Password : adcd1234
Usually, any program or Shell script may be required to perform multiple types of tasks. In such cases, the menu box option is very useful. This option will display the list of choices for the user. Then, the user may select any of his or her desired choice. Our script should execute the desired option.
Each menu has two fields, a tag and an item string. In the next example menu demo, we have tags such as date, calendar, and editor. The description of tags is called as an item string.
Let's write the Shell script dialog_04.sh to create a menu as follows:
#!/bin/bash
# Declare file to store selected menu option
RESPONSE=menu.txt
# Declare file to store content to display date and cal output
TEMP_DATA=output.txt
vi_editor=vi
# trap and delete temp files
trap "rm $TEMP_DATA; rm $RESPONSE; exit" SIGHUP SIGINT SIGTERM
function display_output(){
dialog --backtitle "Learning Shell Scripting" --title "Output" --clear --msgbox "$(<$TEMP_DATA)" 10 41
}
function display_date(){
echo "Today is `date` @ $(hostname -f)." >$TEMP_DATA
display_output 6 60 "Date and Time"
}
function display_calendar(){
cal >$TEMP_DATA
display_output 13 25 "Calendar"
}
# We are calling infinite loop here
while true
do
# Show main menu
dialog --help-button --clear --backtitle "Learn Shell Scripting" \
--title "[ Demo Menubox ]" \
--menu "Please use up/down arrow keys, number keys\n\
1,2,3.., or the first character of choice\n\
as hot key to select an option" 15 50 4 \
Calendar "Show the Calendar" \
Date/time "Show date and time" \
Editor "Start vi editor" \
Exit "Terminate the Script" 2>"${RESPONSE}"
menuitem=$(<"${RESPONSE}")
# Start activity as per selected choice
case $menuitem in
Calendar) display_calendar;;
Date/time) display_date;;
Editor) $vi_editor;;
Exit) echo "Thank you !"; break;;
esac
done
# Delete temporary files
[ -f $TEMP_DATA ] && rm $TEMP_DATA
[ -f $RESPONSE ] && rm $RESPONSELet's test the following program:
$ chmod +x dialog_04.sh $ ./dialog_04.sh
Output:
In this case, we can present the user with a choice to select one or multiple options from a list:'
# dialog --checklist "This is a checklist" 10 50 2 \ "a" "This is one option" "off" \ "b" "This is the second option" "on"
If you want the user to select only one option out of many choices, then radiolist is a suitable option:
# dialog --radiolist "This is a selective list, where only one \ option can be chosen" 10 50 2 \ "a" "This is the first option" "off" \ "b" "This is the second option" "on"
Radio buttons are not square but round, as can be seen in the following screenshot:
The progress meter displays a meter at the bottom of the box. This meter indicates the percentage of the process completed. New percentages are read from standard input, one integer per line. This meter is updated to reflect each new percentage.
Let's write the Shell script dialog_05.sh to create a progress meter as follows:
#!/bin/bash
declare -i COUNTER=1
{
while test $COUNTER -le 100
do
echo $COUNTER
COUNTER=COUNTER+1
sleep 1
done
} | dialog --gauge "This is a progress bar" 10 50 0Let's test the following program:
$ chmod +x dialog_05.sh $ ./dialog_05.sh
Output:
Customization of dialog with the configuration file
We can customize dialog using the ~/.dialogrc configuration file. The default file location is $HOME/.dialogrc.
To create the .dialogrc configuration file, enter the following command:
$ dialog --create-rc ~/.dialogrc
We can customize the output of the dialog utility by changing any of the configuration parameters defined in the .dialogrc file.
In this chapter, you learned about using traps and signals. You also learned about creating menus with the help of the dialog utility.
In the next chapter, you will learn about Linux system startup, from power on till the login-logout of the user and how to customize a Linux system environment.
In the last chapter, you learned about using traps and signals. You also learned about creating menus with the help of dialog utility.
In this chapter, you will learn about Linux system startup, from power on to the user login and how to customize a Linux system environment.
When we power on the Linux system, the Shell scripts are run one after another and the Linux system is initialized. These scripts start various services, daemons, start databases, mount discs, and many more applications. Even during the shutting down of the system, certain Shell scripts are executed so that important system data and information can be saved to the disk and the applications are properly shut down. These are called boot, startup, and shutdown scripts. These scripts are copied during installation of the Linux operating system in your computer. As a developer or administrator, understanding these scripts may help you in understating and debugging the Linux system. If required, you can customize these scripts if the need arises.
In our computers, there is one EPROM chip called BIOS, which is situated on the motherboard or main board of our computers. When we power on, the processor starts executing a program from BIOS. The program from BIOS, does a power on self-test such as checking memory and other peripherals. Then the BIOS program initializes the basic hardware required for PC operation, such as initializing the PCI bus, video devices, and similar.
Finally, BIOS checks the boot device sequence and queries the first boot device. This BIOS program then reads the master boot record of the first boot device, which is normally a hard disk, USB device, or DVD. Once BIOS reads the master boot record of the first boot device, then the boot loader is started. The boot loader reads kernel binary and copies it in the RAM memory. The boot loader checks if the kernel binary is clean and not corrupt. If the integrity check is good then it uncompresses the kernel in the RAM. The bootloader then calls the start_kernel()function, which is a part of kernel. Once the start_kernel()function is called, the kernel is started.
The kernel then initializes the subsystems of kernel such as process management, filesystem, device drivers, memory management, network management, and similar other modules of the kernel. Then, it mounts the root file system, and kernel creates the first process called init. This init process reads the /etc/inittab file. In inittab, the run level information is stored. As per this information, the operating system is initialized process init.
The typical /etc/inittab content will be as follows:
$ cat /etc/inittab
Output:
# Default runlevel. The runlevels used are: # 0 - halt (Do NOT set initdefault to this) # 1 - Single user mode # 2 - Multiuser, without NFS (The same as 3, if you do not have networking) # 3 - Full multiuser mode # 4 - unused # 5 - X11 # 6 - reboot (Do NOT set initdefault to this) # id:5:initdefault:
In the preceding line, the number 5 after ID specifies that the system should be started in run level 5. It means that the system should be started in X11, such as a graphical user interface. We will study more about run levels in the next section.
Nowadays, many distributions have modified the boot-up sequence. They have removed the /etc/inittab file and used different applications to customize the boot-up process.
There are seven run levels. The system will be started in run level 1 to 5. Run level 0 is used for shutting down the system. Run level 6 is used for rebooting the system. The graphical user interface is started in run level 5. The following is the summary of different run levels:
|
Sr. No. |
Run level number |
Description |
|---|---|---|
|
1 |
0 | |
|
2 |
1 |
Single-user mode |
|
3 |
2 |
Multi-user mode |
|
4 |
3 |
Multi-user with network support |
|
5 |
4 |
Not used |
|
6 |
5 |
Graphical user interface with multi-user and networking support |
|
7 |
6 |
Rebooting the system |
We need to be in the root-user mode to use the init command.
If we give the following command, then the system will shutdown:
# init 0
To reboot the system use the following command:
# init 6
If the system is running in the command-line mode, and if you want to start your server in the graphical user mode, then use the following command:
# init 5
In the Linux system, the following folders will be present in the /etc/ folder:
|
Sr. No. |
Folder name |
Description |
|---|---|---|
|
1 |
|
The scripts called during shutting down |
|
2 |
|
The run level 1 scripts |
|
3 |
|
The run level 2 scripts |
|
4 |
|
The run level 3 scripts |
|
5 |
|
The run level 4 scripts |
|
6 |
|
The run level 5 scripts |
|
7 |
|
The run level 6 scripts |
|
8 |
|
The scripts called before every run level |
|
9 |
|
The final script called after run level initialization |
Every run level folder will have script names starting either with S or K. When starting the system, the scripts with names starting with S are called one after another. When shutting down, all the script names starting with K are called one after another.
For example, if the system has to be started in run level 5, then initially all the scripts from the rcS.d folder will be called, then all the scripts from rc5.d will be called. Finally, the rc.local script will be called.
The content of /etc/rc.local is as follows:
$ cat /etc/rc.local
Output:
#!/bin/sh -e # # rc.local # # This script is executed at the end of each multiuser runlevel. # Make sure that the script will "exit 0" on success or any other # value on error. # # In order to enable or disable this script just change # the execution bits. # # By default this script does nothing. exit 0
We can add our customization commands before the exit 0 line in the preceding rc.local script.
Before any user is logged in, the mentioned scripts will be called. After this, user login initialization will be started. This is explained in the following sessions.
Till now, we have seen different scripts, these scripts initialize the operating system, prior to the login of any user. Once the basic operating system in initialized, the user login process starts. This process is explained in the following topics.
In the /etc/ folder, the following files are related to the user level initialization:
/etc/profile: Few distributions will have additional folder /etc/profile.d/. All the scripts from the profile.d folder will be executed./etc/bash.bashrcThe preceding scripts are called by all the users, including root and normal users. Initially, the /etc/profile script will be called. This script creates system-wide environment settings. Few distributions will have the /etc/profile.d/ folder. SuSE Linux has additional /etc/profile.local script. The scripts in this folder will also be called. Then, the /etc/bash.bachrc script will be executed.
Scripts in the /etc/ folder will be called for all the users. Particular user-specific initialization scripts are located in the HOME folder of each user. These are as follows:
$HOME/.bash_profile: This contains user-specific bash environment default settings. This script is called during the login process.$HOME/.bash_login: This contains the second user environment initialization script called during login process.$HOME/.profile: If present, this script internally calls the .bashrc script file.$HOME/.bashrc: This is an interactive shell or terminal initialization script.All the preceding script's names start with dot. These are hidden files. We will need to give the ls -a command to view these files.
Whenever we create a new shell terminal, such as, if we pressed the Ctrl + Alt + T key combination or we start a terminal from the applications tab then the terminal which is created is called the interactive shell terminal. We use this terminal to interact with the operating system. This is not the login shell, which is created during the boot-up process. But this interactive shell terminal gives us the CLI prompt for entering the command to execute.
Whenever we create an interactive bash terminal, Shell scripts from /etc/profile and similar are not called, only the ~/.bashrc script is called every time we create a new interactive shell terminal. If we want any environment customization for every newly created interactive shell terminal, we need to customize the .bashrc script from the home folder of the user.
If you check the content of $HOME/.bashrc, you will observe the following:
.bashrc script is the setting promptless commandgrep, fgrep, egrep, ll, la, l, and similarIf we customize .bashrc such as adding new alias commands or declaring a new function or environment variables, then we should execute .bashrc to take its effect. The following are the two ways to run the .bashrc script so that the environment of the current shell will also be updated as per the customization done in the .bashrc script:
$ source .bashrc$ . bashrcIn these two techniques, the child shell is not created but the new function is. Environment and similar variables will become a part of the current shell environment.
Every user's home folder has one more script called .bash_logout. This script is called or executed when the user exits from the login shell.
If the system user is an embedded system developer, who is interested in adding or modifying the device's driver-related command, then he or she will have to make changes in the /etc/rc*.d folder scripts, or they may have to modify the /etc/rc.local script.
If the administrator wants to modify the environment for all the users, then they will have to modify the /etc/profile and /etc/bash_bashrc scripts.
If we want to customize the environment related to a particular user, then the scripts located in the user's home folder, such as $HOME/.profile, $HOME/bash_profile, and $HOME/bash_login scripts, should be modified.
If the user wants to customize only the interactive shell terminal environment, then they will have to customize the $HOME/.bashrc script.
If you are working in system administration, then I would suggest you learn about the /etc/fstab file and it's editing. This file is used for configuring mount points and how file systems are mounted.
In the previous chapter, you learned about Linux system's startup, from power-on till user login, and how to customize a Linux system environment.
In this chapter, we will cover the following topics:
A sequence of characters that have certain patterns of text (with meta-characters), which will be searched from in a larger text or file is called regular expressions:
$ ll /proc | grep cpuinfo
In the preceding command, the grep utility will search for the cpuinfo text in all lines of input text and will print lines that have the cpuinfo text.
The utilities such as grep, sed, or awk use regular expressions for filtering text and then apply various processing commands as required by the user. The lines which do not match the pattern will be rejected. The following diagram explains the same concept:
In Chapter 3, Using Test Processing and Filters in Your Scripts, you learned about the basics of regular expressions and pattern matching using the vi editor and the grep utility.
The stream editor (sed) is a very popular noninteractive stream editor. Normally, whenever we edit files using the vi editor, we need to open the file using the vi command, then we interact with the file, such as to see the content of the file on screen, then, edit it, and save the file. Using sed, we can type commands on the command line and sed will make the changes to the text file. The sed is a nondestructive editor. The sed makes the changes to the file and displays the content on screen. If we want to save the changed file, then we need to redirect the output of the sed to the file.
The procedure to install sed is shown here.
For Ubuntu or any Debian-based distributions enter the following command:
$ apt-get install sed
For Red Hat or any rpm-based distribution enter the following command:
$ yum install sed
To check the version of sed, enter the following command:
$ sed –V
Otherwise, enter this command:
$ sed --version GNU sed version 3.0 2
Whenever you use sed commands on a text file, sed reads the first line of the file and stores it in a temporary buffer called pattern space. The sed processes this pattern space buffer as per commands given by the user. Then, it prints the output on screen. This line from the pattern space is then removed and the next line of the file is loaded in the pattern space. In this way, it processes all the lines one by one. This line-by-line processing is continued till the last line of the file. As the sed commands are processed on the temporary buffer or pattern space, the original line is not modified. Therefore, we say sed is a nondestructive buffer.
While using sed, regular expressions are enclosed in forward slashes. As grep and sed use regular expressions and metacharacters for searching patterns in the file. For example:
sed -n '/Regular_Expression/p' filename sed -n '/Mango/p' filename
This will print lines matching the Mango pattern:
sed -n 's/RE/replacement string/' filename sed -n 's/Mango/Apple/' filename
This will find the line containing the Mango pattern and then the Mango pattern will be replaced by the Apple text. This modified line will be shown on screen and the original file will be unchanged.
The following is a summary of various metacharacters and it's usage in sed:
|
Metacharacter |
Function |
|---|---|
|
^ |
This is the beginning-of-line anchor |
|
$ |
This is the end-of-line anchor |
|
. | |
|
* |
This matches zero or more characters |
|
[ ] |
This matches one character in the set |
|
[^ ] |
This matches one character not in the set |
|
\(..\) |
This saves matched characters |
|
& |
This saves the search string so it can be remembered in the replacement string |
|
\< |
This is the beginning-of-word anchor |
|
\> |
This is the end-of-word anchor |
|
x\{m\} |
This is the repetition of the character |
|
x\{m,\} |
This means at least |
|
x\{m,n\} |
This means between |
We can specify which line or number of lines the pattern search and commands are to be applied on while using the sed commands. If line numbers are not specified, then the pattern search and commands will be applied on all lines of the input file.
The line numbers on which commands are to be applied are called address. Address can be a single line number or range of lines in which the starting number of the line and the ending number of the range will be separated by commas. Ranges can be composed of numbers, regular expressions or a combination of both.
The sed commands specify actions such as printing, removing, replacing, and so on.
The syntax is as follows:
sed 'command' filename(s )
Example:
$ cat myfile | sed '1,3d'
Otherwise it can be:
sed '1,3d' myfile
This will delete lines 1 to 3:
sed -n '/[Aa]pple/p' item.list
If the Apple or apple pattern is found in the item.list file, then those lines will be printed on screen and the original file myfile will be unchanged.
To negate the command, the exclamation character (!) can be used.
Example:
sed '/Apple/d' item.list
This tells sed to delete all the lines containing the Apple pattern.
Consider the following example:
sed '/Apple/!d' item.list
This will delete all the lines except the line containing the Apple pattern.
The sed is a nondestructive editor. This means the output of sed is displayed on screen; but the original file is unchanged. If we want to modify the file, then we can redirect the output of the sed command to the file. Deleting lines is illustrated in the following examples:
$ sed '1,3d' datafile > tempfile $ mv tempfile newfile
In this example, we have deleted lines 1 to 3 and stored the output in tempfile. Then, we have to rename tempfile to newfile.
By default, the action of the sed command is to print the pattern space, such as every line which is copied in buffer, and then print the result of processing on it. Therefore, the sed output will consist of all lines along with the processed line by sed. If we do not want the default pattern space line to be printed, then we need to give the –n option. Therefore, we should use the –n option and the p command together to see the result of the sed processed output.
Here is an example:
$ cat country.txt
The output is as follows:
Country Capital ISD Code USA Washington 1 China Beijing 86 Japan Tokyo 81 India Delhi 91 $ sed '/USA/p'country.txt
The output is as follows:
Country Capital ISD Code USA Washington 1 USA Washington 1 China Beijing 86 Japan Tokyo 81 India Delhi 91
All the lines from the file are printed by default and the lines with the USA pattern are also printed:
$ sed –n '/USA/p' country.txt
The output is as follows:
USA Washington 1
As we have given the –n option, sed has suppressed default printing of all lines from the country file; but has printed the line that contains the text pattern USA.
The d command is used to delete lines. After sed copies a line from a file and puts it into a pattern buffer, it processes commands on that line, and finally, displays the contents of the pattern buffer on screen. When the d command is issued, the line currently in the pattern buffer is removed, not displayed which is shown as follows:
$ cat country.txt Country Capital ISD Code USA Washington 1 China Beijing 86 Japan Tokyo 81 India Delhi 91 $ sed '3d' country.txt
The output is as follows:
Country Capital ISD Code USA Washington 1 Japan Tokyo 81 India Delhi 91
Here is the explanation.
The output will contain all the lines except the third line. The third line is deleted by the following command:
$ sed '3,$d' country.txt
Country Capital ISD Code USA Washington 1
This will delete third line to the last line. The dollar sign in the address indicates the last line. The comma is called ra nge operator.
$ sed '$d' country.txt
The output is as follows:
Country Capital ISD Code USA Washington 1 China Beijing 86 Japan Tokyo 81
Here is the explanation.
This deletes the last line. All lines except lines will be displayed.
Here is an example:
$ sed '/Japan/d' country.txt
The output is as follows:
Country Capital ISD Code USA Washington 1 China Beijing 86 India Delhi 91
The line containing the Japan pattern is deleted. All other lines are printed:
$ sed '/Japan/!d' country.txt
The output is as follows:
Japan Tokyo 81
This has deleted all the lines that do not contain Japan.
Let's see a few more examples with the delete command.
This will delete line 4 and the next five lines:
$ sed '4,+5d'
This will keep lines 1 to 5 and delete all the other lines:
$ sed '1,5!d'
This will delete lines 1, 4, 7, and so on:
$ sed '1~3d'
Starting from 1, every third line step increments. The number that follows the tilde is what is called the step increment. The step increment indicates the following:
$ sed '2~2d'
This will delete every other line starting with line 2 to be deleted.
If we want to substitute the text by new text, then we can use commands. After the forward slash, the regular expression is enclosed and then the text to be substituted is placed. If the g option is used, then substitution will happen globally, meaning that it will be applied in the full document. Otherwise, only the first instance will be substituted:
$ cat shopping.txt
The output is as follows:
Product Quantity Unit_Price Total_Cost Apple 2 3 6 Orange 2 .8 1.6 Papaya 2 1.5 3 Chicken 3 5 15 Cashew 1 10 10 $ sed 's/Cashew/Almonds/g' shopping.txt
The output is as follows:
Product Quantity Unit_Price Total_Cost Apple 2 3 6 Orange 2 .8 1.6 Papaya 2 1.5 3 Chicken 3 5 15 Almonds 1 10 10
The s command has replaced Cashew by Almonds. The g flag at the end indicates that the substitution is to be applied globally. Otherwise, it will be applied to the first pattern match only.
The following substitution command will replace two digit numbers at the end of the line with .5 appended to them:
$ sed 's/[0–9][0–9]$/&.5/' shopping.txt
The output is as follows:
Product Quantity Unit_Price Total_Cost Apple 2 3 6 Orange 2 .8 1.6 Papaya 2 1.5 3 Chicken 3 5 15.5 Cashew 1 10 10.5
The ampersand in the search pattern represents the exact pattern found. This will be replaced by the exact pattern with .5 appended to it.
To use the sed effectively, we should be clear about how to define range. Range is typically two addresses in a file as follows:
'6d': range of line 6 '3,6d': range from line 3 to 6
'/pattern1/,/pattern2/
This will specify the range of all the lines between the pattern1 and pattern2 patterns. We can even specify th range with a combination of both, that is, '/pattern/,6'. This will specify the range of lines between the pattern and line 6.
As mentioned, we can specify the range as numbers, pattern, or a combination of both.
For example:
$ cat country.txt Country Capital ISD Code USA Washington 1 China Beijing 86 Japan Tokyo 81 India Delhi 91 $ sed -n '/USA/,/Japan/p' country.txt
The output is as follows:
USA Washington 1 China Beijing 86 Japan Tokyo 81
In this example, all the lines between addresses starting from USA and until the pattern Japan will be printed on screen.
For example:
$ sed -n '2,/India/p' country.txt
The output is as follows:
USA Washington 1 China Beijing 86 Japan Tokyo 81 India Delhi 91
In this example, line 2 to the pattern India, are printed on screen.
For example:
$ sed '/Apple/,/Papaya/s/$/** Out of Stock **/' shopping.txt
The output is as follows:
Product Quantity Unit_Price Total_Cost Apple 2 3 6** Out of Stock ** Orange 2 .8 1.6** Out of Stock ** Papaya 2 1.5 3** Out of Stock ** Chicken 3 5 15 Cashew 1 10 10
In this example. for all the lines between the Apple and Papaya patterns, the end of line will be replaced by the ** Out of Stock ** string.
If we need to perform multiple editing by the same command, then we can use the –e command. Each edit command should be separated by the –e command. The sed will apply each editing command separated by –e on the pattern space before loading the next line in the pattern space:
$ cat shopping.txt
The output is as follows:
Product Quantity Unit_Price Total_Cost Apple 2 3 6 Orange 2 .8 1.6 Papaya 2 1.5 3 Chicken 3 5 15 Cashew 1 10 10
For example:
sed -e '5d' -e 's/Cashew/Almonds/' shopping.txt
The output is as follows:
Product Quantity Unit_Price Total_Cost Apple 2 3 6 Orange 2 .8 1.6 Papaya 2 1.5 3 Almonds 1 10 10
Initially, the command for deleting the fifth line is called, then, the next substitution command to replace Cashew by Almonds is processed.
If we need to insert text from another file into the file, which is processed by sed, then we can use the r command. We can insert text from another file to the specified location:
For example:
$ cat new.txt
The output will be:
********************************* Apples are out of stock $ sed '/Apple/r new.txt' shopping.txt
The output is as follows:
Product Quantity Unit_Price Total_Cost Apple 2 3 6 ********************************* Apples are out of stock ********************************* Orange 2 .8 1.6 Papaya 2 1.5 3 Chicken 3 5 15 Cashew 1 10 10
The explanation is that, this command has added the content of the new.txt file after the line containing the Apple pattern.
The sed command for write is w. Using this command, we can write lines from one file to another file.
For example:
$ cat new.txt
The output is as follows:
new is a empty file $ sed -n '/Chicken/w new.txt' shopping.txt $ cat new.txt Chicken 3 5 15
After the w command, we specify the file to which we will perform the write operation. In this example, the line containing the Chicken pattern is written to the new.txt file.
The a command is used for appending. When the append command is used, it appends the text after the line in the pattern space, in which the pattern is matched. The backslash should be placed immediately after the a command. On the next line, the text to be appended is to be placed.
For example:
$ cat shopping.txt
The output is as follows:
Product Quantity Unit_Price Total_Cost Apple 2 3 6 Orange 2 .8 1.6 Papaya 2 1.5 3 Chicken 3 5 15 Cashew 1 10 10 $ sed '/Orange/a\ **** Buy one get one free offer on this item ! ****' shopping.txt
The output is as follows:
Product Quantity Unit_Price Total_Cost Apple 2 3 6 Orange 2 .8 1.6 **** Buy one get one free offer on this item ! **** Papaya 2 1.5 3 Chicken 3 5 15 Cashew 1 10 10
The new text **** Buy one get one free offer on this item ! **** is appended after the line containing the Orange pattern.
The i command is used for inserting text above the current pattern space line. When we use the append command, new text is inserted after the current line which is in the pattern buffer. In this similar-to-append command, the backslash is inserted after the i command.
For example:
$ cat shopping.txt Product Quantity Unit_Price Total_Cost Apple 2 3 6 Orange 2 .8 1.6 Papaya 2 1.5 3 Chicken 3 5 15 Cashew 1 10 10 $ sed '/Apple/i\ New Prices will apply from Next month ! ' shopping.txt
The output is as follows:
Product Quantity Unit_Price Total_Cost New Prices will apply from Next month ! Apple 2 3 6 Orange 2 .8 1.6 Papaya 2 1.5 3 Chicken 3 5 15 Cashew 1 10 10
In this example, the new text New Prices will be applied from next month! is inserted before the line containing the Apple pattern. Please check the i command and the backslash following it.
The c command is the change command. It allows the sed to modify or change existing text with new text. The old text is overwritten with the new:
$ cat shopping.txt
The output is as follows:
Product Quantity Unit_Price Total_Cost Apple 2 3 6 Orange 2 .8 1.6 Papaya 2 1.5 3 Chicken 3 5 15 Cashew 1 10 10
For example:
$ sed '/Papaya/c\ Papaya is out of stock today !' shopping.txt
The output is as follows:
Product Quantity Unit_Price Total_Cost Apple 2 3 6 Orange 2 .8 1.6 Papaya is out of stock today ! Chicken 3 5 15 Cashew 1 10 10
In this example, the line containing the expression Papaya is changed by the new line Papaya is out of stock today!.
The command transform is similar to the Linux tr command. The characters are translated as per character sequence given. For example, y/ABC/abc/ will convert lowercase abc into uppercase ABC.
For example:
$ cat shopping.txt
The output will be:
Product Quantity Unit_Price Total_Cost Apple 2 3 6 Orange 2 .8 1.6 Papaya 2 1.5 3 Chicken 3 5 15 Cashew 1 10 10 $ sed '2,4y/abcdefghijklmnopqrstuvwxyz/ABCDEFGHIJKLMNOPQRSTUVWXYZ/' shopping.txt
The output will be:
Product Quantity Unit_Price Total_Cost APPLE 2 3 6 ORANGE 2 .8 1.6 PAPAYA 2 1.5 3 Chicken 3 5 15 Cashew 1 10 10
In this example, on lines 2, 3 and 4, all the lowercase letters are converted to uppercase letters.
The q command is used for quitting the sed processing without proceeding to the next lines:
$ cat shopping.txt
The output will be:
Product Quantity Unit_Price Total_Cost Apple 2 3 6 Orange 2 .8 1.6 Papaya 2 1.5 3 Chicken 3 5 15 Cashew 1 10 10
For example:
$ sed '3q' shopping.txt
The output will be:
Product Quantity Unit_Price Total_Cost Apple 2 3 6 Orange 2 .8 1.6
In this example, after printing the first to third lines, sed quits further processing.
We have already seen that the sed has pattern buffer. The sed has one more type of buffer called holding buffer. By the h command, we can inform sed to store the pattern buffer in the holding buffer. And whenever we need the line that is stored in the pattern buffer, we can get it by the g command, that is, get the buffer.
For example:
$ sed -e '/Product/h' -e '$g' shopping.txt
The output is as follows:
Product Quantity Unit_Price Total_Cost Apple 2 3 6 Orange 2 .8 1.6 Papaya 2 1.5 3 Chicken 3 5 15 Cashew 1 10 10 Product Quantity Unit_Price Total_Cost
In this example, the line containing the Product pattern is stored in the holding buffer by the h command. Then, the next editing command indicates to the sed to get the line from the holding buffer when the last line of the file is reached and appends the line from the holding buffer after the last line of the file.
The x is an exchange command. By using this command, we can exchange the holding buffer with the current line in the pattern buffer.
For example:
$ sed -e '/Apple/h' -e '/Cashew/x' shopping.txt
The output is as follows:
Product Quantity Unit_Price Total_Cost Apple 2 3 6 Orange 2 .8 1.6 Papaya 2 1.5 3 Chicken 3 5 15 Apple 2 3 6
In this example, the line with the Apple pattern is stored in the holding buffer. When the pattern with Cashew is found, that line will be exchanged by the holding buffer.
The sed script file contains a list of sed commands in a file. To inform the sed about our script file, we should use the –f option before the script file name. If the sed commands are not separated by a new line, then every command should be separated by a colon ":". We have to take care that there should not be any training white space after every command in the sed script file; otherwise, the sed will give an error. sed takes each line in the pattern buffer and then, it will process all commands on that line. After this line is processed, the next line will be loaded in the pattern buffer. For the continuation of any sed command, which cannot be fitted in one line, we need to add one backslash at the end of the line to inform about continuation.
For example:
$ cat shopping1.txt
The output is as follows:
Product Quantity Unit_Price Apple 200 3 Orange 200 .8 Papaya 100 1.5 Chicken 65 5 Cashew 50 10 April, third week $ cat stock
The output is as follows:
# This is my first sed script by : 1i\ Stock status report /Orange/a\ Fresh Oranges are not available in this season. \ Fresh Oranges will be available from next month /Chicken/c\ **********************************************************\ We will not be stocking this item for next few weeks.\ ********************************************************** $d
Enter the next command as follows:
$ sed -f stock shopping1.txt
The output is as follows:
Stock status report Product Quantity Unit_Price Apple 200 3 Orange 200 .8 Fresh Oranges are not available in this season. Fresh Oranges will be available from next month Papaya 100 1.5 ********************************************************** We will not be stocking this item for next few weeks. ********************************************************** Cashew 50 10
In this script, the following processing has taken place:
#) sign.1i\ informs sed to insert the next text before line number 1./Orange/a\ informs sed to append the next text after the line containing the Orange pattern./Chicken/c\ informs sed to replace the line containing the Chicken pattern by the next line.$d, tells sed to delete the last line of the input file.awk is a program, which has its own programming language for performing data processing and to generate reports.
The GNU version of awk is gawk.
awk processes data, which can be received from a standard input, input file, or as the output of any other command or process.
awk processes data similar to sed, such as lines by line. It processes every line for the specified pattern and performs specified actions. If pattern is specified, then all the lines containing specified patterns will be displayed. If pattern is not specified, then the specified actions will be performed on all the lines.
The name of the program awk is made from the initials of three authors of the language, namely Alfred Aho, Peter Weinberger and Brian Kernighan. It is not very clear why they selected the name awk instead of kaw or wak!
The following are different ways to use awk:
pattern:
$ awk 'pattern' filename
In this case, all the lines containing pattern will be printed.
action:
$ awk '{action}' filename
In this case, action will be applied on all lines
pattern and action:
$ awk 'pattern {action}' filename
In this case, action will be applied on all the lines containing pattern.
As seen previously, the awk instruction consists of patterns, actions, or a combination of both.
Actions will be enclosed in curly brackets. Actions can contain many statements separated by a semicolon or a newline.
awk commands can be on the command line or in the awk script file. The input lines could be received from keyboard, pipe, or a file.
Let's see a few examples by using the preceding syntax using input from files:
$ cat people.txt
The output is as follows:
Bill Thomas 8000 08/9/1968 Fred Martin 6500 22/7/1982 Julie Moore 4500 25/2/1978 Marie Jones 6000 05/8/1972 Tom Walker 7000 14/1/1977
Enter the next command as follows:
$ awk '/Martin/' people.txt
The output is as follows:
Fred Martin 6500 22/7/1982
This prints a line containing the Martin pattern.
For example:
$ cat people.txt
The output is as follows:
Bill Thomas 8000 08/9/1968 Fred Martin 6500 22/7/1982 Julie Moore 4500 25/2/1978 Marie Jones 6000 05/8/1972 Tom Walker 7000 14/1/1977
Enter the next command as follows:
$ awk '{print $1}' people.txt
The output is as follows:
Bill Fred Julie Marie Tom
This awk command prints the first field of all the lines from the people.txt file:
$ cat people.txt
The output is as follows:
Bill Thomas 8000 08/9/1968 Fred Martin 6500 22/7/1982 Julie Moore 4500 25/2/1978 Marie Jones 6000 05/8/1972 Tom Walker 7000 14/1/1977
For example:
$ awk '/Martin/{print $1, $2}' people.txt Fred Martin
This prints the first and second field of the line that contains the Martin pattern.
We can use the output of any other Linux command as an input to the awk program. We need to use the pipe to send an output of other command as the input to the awk program.
The syntax is as follows:
$ command | awk 'pattern' $ command | awk '{action}' $ command | awk 'patter n {action}'
For example:
$ cat people.txt | awk '$3 > 6500'
The output is as follows:
Bill Thomas 8000 08/9/1968 Tom Walker 7000 14/1/1977
This prints all lines, in which field 3 is greater than 6500.
For example:
$ cat people.txt | awk '/1972$/{print $1, $2}'
The output is as follows:
Marie Jones
This prints fields 1 and 2 of the lines, which ends with the 1972 pattern:
$ cat people.txt | awk '$3 > 6500 {print $1, $2}'
This prints fields 1 and 2 of the line, in which the third field is greater than 6500.
Let's understand how the awk program processes every line. We will consider a simple file, sample.txt:
$ cat sample.txt Happy Birth Day We should live every day.
Let's consider the following awk command:
$ awk '{print $1, $3}' sample.txt
The following diagram shows, how the awk will process every line in memory:
The explanation about the preceding diagram is as follows:
$0. Each line is called record. By default, every line is terminated by a newline.$1, $2, and so on. There can be as many as 100 fields per record.: in the /etc/passwd file, then we will need to specify it in the awk command line.When awk checks an action as '{print $1, $3}', it tells awk to print the first and third fields. Fields will be separated by space. The command will be as follows:
$ awk '{print $1, $3}' sample.txt
The output will be as follows:
Happy Day We live
the explanation of the output is as follows:
We can put awk commands in a file. We will need to use the -f option before using the awk script file name to inform about using the awk script file for all processing instructions. awk will copy the first line from the data file to be processed in $0, and then, it will apply all processing instructions on that record. Then, it will discard that record and load the next line from the data file. This way, it will proceed till the last line of the data file. If the action is not specified, the pattern matching lines will be printed on screen. If the pattern is not specified, then the specified action will be performed on all lines of the data file.
For example:
$ cat people.txt Bill Thomas 8000 08/9/1968 Fred Martin 6500 22/7/1982 Julie Moore 4500 25/2/1978 Marie Jones 6000 05/8/1972 Tom Walker 7000 14/1/1977 $ cat awk_script /Martin/{print $1, $2}
Enter the next command as follows:
$ awk -f awk_script people.txt
The output is as follows:
Fred Martin
The awk command file contains the Martin pattern and it specifies the action of printing fields 1 and 2 of the line, matching the pattern. Therefore, it has printed the first and second fields of the line, containing the Martin pattern.
Every line terminated by the newline is called record and every word separated by white space is called field. We will learn more about them in this section.
awk does not see the file as one continuous stream of data; but it processes the file line by line. Each line is terminated by a new line character. It copies each line in the internal buffer called record.
By default, a newline or carriage return is an input record separator and output record separator. The input record separator is stored in the built-in variable RS, and the output record separator is stored in ORS. We can modify the ORS and RS, if required.
The entire line that is copied in buffer, such as record, is called $0.
Take the following command for example:
$ cat people.txt
The output is as follows:
Bill Thomas 8000 08/9/1968 Fred Martin 6500 22/7/1982 Julie Moore 4500 25/2/1978 Marie Jones 6000 05/8/1972 Tom Walker 7000 14/1/1977 $ awk '{print $0}' people.txt
The output is as follows:
Bill Thomas 8000 08/9/1968 Fred Martin 6500 22/7/1982 Julie Moore 4500 25/2/1978 Marie Jones 6000 05/8/1972 Tom Walker 7000 14/1/1977
This has printed all the lines of the text file. Similar results can be seen by the following command:
$ awk '{print}' people.txt
awk has a built-in variable called NR. It stores the record number. Initially, the value stored in NR is 1. Then, it will be incremented by one for each new record.
Take, for example, the following command:
$ cat people.txt
The output will be:
Bill Thomas 8000 08/9/1968 Fred Martin 6500 22/7/1982 Julie Moore 4500 25/2/1978 Marie Jones 6000 05/8/1972 Tom Walker 7000 14/1/1977 $ awk '{print NR, $0}' people.txt
The output will be:
1 Bill Thomas 8000 08/9/1968 2 Fred Martin 6500 22/7/1982 3 Julie Moore 4500 25/2/1978 4 Marie Jones 6000 05/8/1972 5 Tom Walker 7000 14/1/1977
This has printed every record, such as $0 with record number, which is stored in NR. That is why we see 1, 2, 3, and so on before every line of output.
Every line is called record and every word in record is called field. By default, words or fields are separated by whitespace, that is, space or tab. awk has an internal built-in variable called NF, which will keep track of field numbers. Typically, the maximum field number will be 100, which will depend on implementation. The following example has five records and four fields.
For example:
$1 $2 $3 $4 Bill Thomas 8000 08/9/1968 Fred Martin 6500 22/7/1982 Julie Moore 4500 25/2/1978 Marie Jones 6000 05/8/1972 Tom Walker 7000 14/1/1977 $ awk '{print NR, $1, $2, $4}' people.txt
The output will be:
1 Bill Thomas 08/9/1968 2 Fred Martin 22/7/1982 3 Julie Moore 25/2/1978 4 Marie Jones 05/8/1972 5 Tom Walker 14/1/1977
This has printed record number and field numbers 1, 2, and so on, on the screen.
Every word is separated by white space. We will learn more about them in this section.
We have already discussed that input field separator is whitespace, by default. We can change this IFS to other values on the command line or by using the BEGIN statement. We need to use the -F option to change IFS.
For example:
$ cat people.txt
The output will be:
Bill Thomas:8000:08/9/1968 Fred Martin:6500:22/7/1982 Julie Moore:4500:25/2/1978 Marie Jones:6000:05/8/1972 Tom Walker:7000:14/1/1977 $ awk -F: '/Marie/{print $1, $2}' people.txt
The output will be:
Marie Jones 6000
We have used the -F option to specify colon (:) as IFS instead of the default, IFS. Therefore, it has printed field 1 and 2 of the records in which the Marie pattern was matched. We can even specify more than one IFS on the command line as follows:
$ awk –F'[ :\t]' '{print $1, $2, $3}' people.txt
This will use space, colon, and tab characters as the inter field separator or IFS.
While executing commands using awk, we need to define patterns and actions. Let's learn more about them in this section.
awk uses the patterns to control the processing of actions. When pattern or regular expression is found in the record, then action is performed, or if no action is defined then awk simply prints the line on screen.
For example:
$ cat people.txt
The output will be:
Bill Thomas 8000 08/9/1968 Fred Martin 6500 22/7/1982 Julie Moore 4500 25/2/1978 Marie Jones 6000 05/8/1972 Tom Walker 7000 14/1/1977 $ awk '/Bill/' people.txt
The output will be:
Bill Thomas 8000 08/9/1968
In this example, when the Bill pattern is found in the record, that record is printed on screen:
$ awk '$3 > 5000' people.txt
The output will be:
Bill Thomas 8000 08/9/1968 Fred Martin 6500 22/7/1982 Marie Jones 6000 05/8/1972 Tom Walker 7000 14/1/1977
In this example, when field 3 is greater than 5000, that record is printed on screen.
Actions are performed when the required pattern is found in record. Actions are enclosed in curly brackets such as '{' and '}'. We can specify different commands in the same curly brackets; but those should be separated by a semicolon.
The syntax is as follows:
pattern{ action statement; action statement; .. } or pattern { action statement action statement }
The following example gives a better idea:
$ awk '/Bill/{print $1, $2 ", Happy Birth Day !"}' people.txt
Output:
Bill Thomas, Happy Birth Day !
Whenever a record contains the Bill pattern, awk performs the action of printing field 1, field 2 and prints the message Happy Birth Day.
The regular expressions is a pattern enclosed in forward slashes. Regular expression can contain metacharacters. If the pattern matches any string in the record, then the condition is true and any associated action, if mentioned, will be executed. If no action is specified, then simply the record is printed on screen.
Metacharacters used in awk regular expressions are as follows:
|
Metacharacter |
What it does |
|---|---|
|
. | |
|
* |
Zero or more characters are matched |
|
^ |
The beginning of the string is matched |
|
$ |
The end of the string is matched |
|
+ |
One or more of the characters are matched |
|
? |
Zero or one of the characters are matched |
|
[ABC] |
Any one character in the set of characters A, B, or C is matched |
|
[^ABC] |
Any one character not in the set of characters A, B, or C is matched |
|
[A–Z] |
Any one character in the range from A to Z is matched |
|
a|b |
Either a or b is matched |
|
(AB)+ |
One or more sets of AB; such as AB, ABAB, and so on is matched |
|
\* | |
|
& |
This is used to represent the replacement string when it is found in the search string |
In the following example, all lines containing regular expression "Moore" will be searched and matching record's field 1 and 2 will be displayed on screen:
$ awk '/Moore/{print $1, $2}' people.txt
The output is as follows:
Julie Moore
Whenever we need to write multiple patterns and actions in a statement, then it is more convenient to write a script file. The script file will contain patterns and actions. If multiple commands are on the same line, then those should be separated by a semicolon; otherwise, we need to write them on separate lines. The comment line will start by using the pound (#) sign.
For example:
$ cat people.txt
The output is as folllows:
Bill Thomas 8000 08/9/1968 Fred Martin 6500 22/7/1982 Julie Moore 4500 25/2/1978 Marie Jones 6000 05/8/1972 Tom Walker 7000 14/1/1977
(The awk script)
$ cat report
The output is as follows:
/Bill/{print "Birth date of " $1, $2 " is " $4}
/^Julie/{print $1, $2 " has a salary of $" $3 "."}
/Marie/{print NR, $0}Enter the next command as follows:
$ awk -f report people.txt
The output will be:
Birth date of Bill Thomas is 08/9/1968 Julie Moore has a salary of $4500. 4 Marie Jones 6000 05/8/1972
In this example, the awk command is followed by the -f option, which specifies the script file as record and then processes all the commands on the text file people.txt.
In this script, regular expression Bill is matched, then print text, field 1, field 2, and then print the birth date information. If the regular expression Julie is matched at the start of the line, then print her salary information. If regular expression Marie is matched, then print the record number NR and print the complete record.
We can simply declare a variable in the awk script, without even any initialization. Variables can be of type string, number, or floating type and so on. There is no type declaration required like in C programming. awk will find out the type of variable by its right-hand side data type during initialization or its usage in the script.
Uninitialized variables will have the value 0 or strings will have a value null such as "", depending on how it is used inside scripts:
name = "Ganesh"
The variable name is of the string type:
j++
The variable j is a number. Variable j is initialized to zero and it is incremented by one:
value = 50
The variable value is a number with initial value 50.
The technique to modify the string type variable to the number type is as follows:
name + 0
The technique to modify the number type variable to the string type is as follows:
value " "
User-defined variables can be made up of letters, digits, and underscores. The variable cannot start with a digit.
In awk programming, the if statement is used for decision making. The syntax is as follows:
if (conditional-expression) action1 else action2
If the condition is true, then action1 will be performed, else action2 will be performed. This is very similar to C programming if constructs.
An example of using the if statement in the awk command is as follows:
$ cat person.txt
The output is as follows:
Bill Thomas 8000 08/9/1968 Fred Martin 6500 22/7/1982 Julie Moore 4500 25/2/1978 Marie Jones 6000 05/8/1972 Tom Walker 7000 14/1/1977 $ awk '{ if ($3 > 7000) { print "person with salary more than 7000 is \n", $1, " " , $2;} }' people.txt
The output is as follows:
person with salary more than 7000 is Bill Thomas
In this example, field 3 is checked for greater than 7000 in every record. If field 3 is greater than 7000 for any record, then the action of printing the name of the person and value of third record will be done.
The for loop is used for doing certain actions repetitively. The syntax is as follows:
for(initialization; condition; increment/decrement) actions
Initially, a variable is initialized. Then, the condition is checked, if it is true, then action or actions enclosed in curly brackets are performed. Then, the variable is incremented or decremented. Again, the condition is checked. If the condition is true, then actions are performed, otherwise, the loop is terminated.
An example of the awk command with the for loop is as follows:
$ awk '{ for( i = 1; i <= NF; i++) print NF, $i }' people.txt
Initially, the i variable is initialized to 1. Then, the condition is checked to see whether i is less than NF. If true, then the action of printing NF and the field is performed. Then i is incremented by one. Again, the condition is checked if it is true or false. If true, then it will perform actions again; otherwise, it will terminate the looping activity.
Similar to C programming, awk has a while loop for doing the tasks repeatedly. while will check for the condition. If the condition is true, then actions will be performed. If condition is false, then it will terminate the loop.
The syntax is as follows:
while(condition) actions
An example of using the while construct in awk is as follows:
$ cat people.txt $ awk '{ i = 1; while ( i <= NF ) { print NF, $i ; i++ } }' people.txt
NF is the number of fields in the record. The variable i is initialized to 1. Then, while i is smaller or equal to NF, the print action will be performed. The print command will print fields from the record from the file people.txt. In the action block, i is incremented by one. The while construct will perform the action repeatedly until i is less than or equal to NF.
The do while loop is similar to while loop; but the difference is, even if the condition is true, at least once the action will be performed unlike the while loop.
The syntax is as follows:
do action while (condition)
After the action or actions are performed, the condition is checked again. If the condition is true, then the action will be performed again, otherwise, the loop will be terminated.
The following is an example of using the do while loop:
$ cat awk_script BEGIN { do { ++x print x } while ( x <= 4 ) } $ awk -f awk_script 1 2 3 4 5
In this example, x is incremented to 1 and value of x is printed. Then the condition is checked to see whether x is less than or equal to 4. If the condition is true, then the action is performed again.
In this chapter, you learned about regular expressions and about using sed and awk for text processing. You learned various commands and usage of options along with a lot of examples for using sed and awk. In this example, the value of x is set in the body of the loop using the auto-increment operator. The body of the loop is executed once and the expression is evaluated.