Table of Contents for
Node.js for Embedded Systems
 Node.js for Embedded Systems
Published by
O'Reilly Media, Inc., 2016
Node.js for Embedded Systems
Published by
O'Reilly Media, Inc., 2016
- Cover
- nav
- Node.js for Embedded Systems
- Node.js for Embedded Systems
- Foreword
- Preface
- 1. Connecting Worlds
- 2. Blink with Arduino
- 3. Espruino
- 4. The Tessel 2
- 5. Particle Photon
- 6. Single-Board Computers
- 7. Components for Prototyping
- 8. Node.js Libraries for Hardware
- 9. Exploring Network Protocols
- 10. Web Frontends for Things
- 11. Entering the Cloud
- 12. Making Robots with Node.js
- 13. Wireless Data with Bluetooth
- 14. Toward the Physical Internet
- 15. From Products to Toolkits
- A. Node.js
- B. Early Hardware for IoT Systems
- Index
- About the Authors
- Colophon
Chapter 12. Making Robots with Node.js
The NodeBots movement is all about creating robots using JavaScript and Node.js. The focus is typically on making something that works as quickly and easily as possible. From a learning perspective, this is inspiring and engaging—you have the ability to create something new in just a few hours! This can be extremely empowering, especially when you consider that hardware is often an intimidating field to enter. Because NodeBots use high-level languages, you can create a robot on your first day.
Robots exist in all forms and categories. Researchers in robotics, such as Rodney Brooks, professor emeritus for robotics at MIT, suggest that robotics will create new kinds of professions.1 On the flipside, robots might provoke a number of discussions that will challenge the classical view of work and play.
For now, building robots with JavaScript leans more toward play and prototyping. But before going into practical examples, let’s explore some concepts and motivations for Nodebots.
What Is a Robot?
When people think of robots, they think of a physical device performing “programmed actions.” Programmed actions can include motion, sound, or blinking parts.
The motion of mechanical devices can evoke very human-like expressions, as demonstrated by the Sony dancing robots. In addition to novel actions like dancing, robots can also serve some “useful” function, such as feeding your cat when you are not at home or industrial uses such as building an automotive part.
From a computer science perspective, robots are based on several abstractions, as illustrated in Figure 12-1.
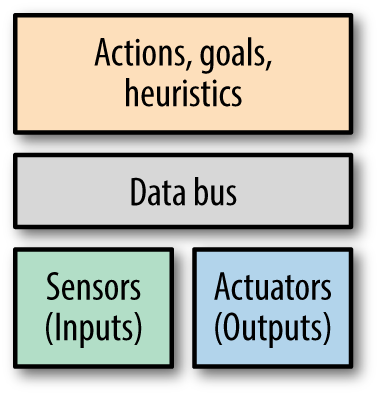
Figure 12-1. Robot abstractions
At the lowest levels, robots are made of actuators and sensors.
An actuator is a part that converts energy into motion. There are different types of actuators. For example, the motors that turn the wheels on a remote control car are rotational actuators. Your bicep muscle is a linear actuator.
A sensor is an input to the system in the form of data about the environment. For example, your phone knows which direction is down by reading which axis of its accelerometer most closely matches Earth’s gravitational pull.
Note
Building robots requires a multidisciplinary approach. You need to have an understanding of the mechanics of motion. You may need motors (and gears possibly) before anything can move. To control motors, you’ll need to explore electronics. Finally, you must be able to communicate with a robot through software.
From a hardware perspective, building a robot is about putting together a system of inputs (sensors) and outputs (actuators). These parts communicate over a data bus, such as I2C or SPI. Robots can perform actions depending on the inputs and their plans and heuristics (decision-making processes).
Why Build Robots in Node.js?
Depending on your background, there are different reasons Node.js is a good choice for creating robots.
Community
In Node.js, we are accustomed to plugging together pieces of code (other people’s Node.js modules) to build our projects. This is normal practice in programming, and many programming languages flourish because their users share their libraries (e.g., for Ruby, there are Ruby Gems; for Python, there is Rust; etc.).
One of Node.js’s biggest advantages is that npm makes it so convenient for the community to create and share code components they have created. You saw examples of hardware libraries in Chapter 8, but robots need special libraries for actuators and sensors. With Node.js, more often that not, you can find a library to reuse in your own project so that you can save time and get up and running quickly.
Note
Libraries such as Johnny-Five provide a nice starting point into the Nodebots community (not least because of good documentation and tutorials at http://nodeschool.io). Rick Waldron first presented ideas behind Johnny-Five at NodeConf 2012. Raquel Velez has presented Vektor, a library for kinematics in JavaScript. Raquel discusses the general idea of JavaScript robotics in her talk at LXJS 2013.
Education
One reason it is interesting to use Node.js for robotics is the educational context.
In traditional electronics and low-level programming languages, it might take you a full session to learn how to blink an LED. It’s the “Hello, World!” of hardware, and extremely useful if you need to debug a circuit. However, if all you learned on your first day of programming was how to print “Hello, World!”, you would probably not be inspired to try something more complex.
JavaScript robotics are high level enough that you should be able to go beyond one blinking light to building a robot on your first day.
Building a robot on your first day shows you that you are capable of creating something interesting and possibly unique. It’s a starting point. It makes you think about how you could take it further, do it better. “Sure I made a robot car,” you think. “Now can I control it from the Internet? Can I let Twitch.tv drive it? Would it respond better if I took a look at the module I’m using to run the servos? What if it had some obstacle-avoiding intelligence onboard?” Because you already have a base project, these new capabilities are approachable as small, fun, new features.
Product Development
From a design and entrepreneurship standpoint, you want to get to a minimum viable product, or proof of concept, as quickly as possible. Building quickly means plugging prebuilt pieces together, getting prompt feedback, and using modularity to swap in different ideas and interactions.
A Nodebot can help you answer questions like: Is the thing that I have made interesting? What could it be worth to someone? Would it be better if I changed this or that aspect of the design?
By using a dynamic language such as JavaScript, you can prove the merits of your idea—and if you’re so inclined, show potential investors or teammates what you mean when you describe your vision.
As with robots for education, building a NodeBot for product development is a beginning, not necessarily an end result. JavaScript and pluggable components help you understand the scope and value of the thing you are trying to accomplish. And then you can build up, tear down, or iterate from there.
The Tessel Project
To build robots, you need hardware. If you are new to hardware, the activation energy might be too high to get started.
You might be able to buy a sensor or a component, but it can feel like starting from scratch every time: get the component, read the datasheet, and figure out what its power requirements are and how to turn it on.
Arduino libraries challenge this notion, but the Arduino programming language is still relatively low level. Moreover, there is no single system for the community to contribute libraries or organize a project with, such as a manifest file like the package.json from a project in Node.js.
However, Node.js libraries for hardware components is an increasing phenomenon. The open source Tessel Project in particular creates modular components (such as a climate sensor) that easily plug into microcontroller boards and come with npm installable libraries. The project also explicitly promotes community-created modules: npm libraries for commodity hardware parts, such as breakout boards from Adafruit and SparkFun, along with community-member instructions on how to wire the component. You can see Tessel modules and community modules at http://tessel.io/modules. Tessel modules let you quickly experiment with motors, sensors, and other components without having to think too much about underlying mechanics or electronics (see Figure 12-2).
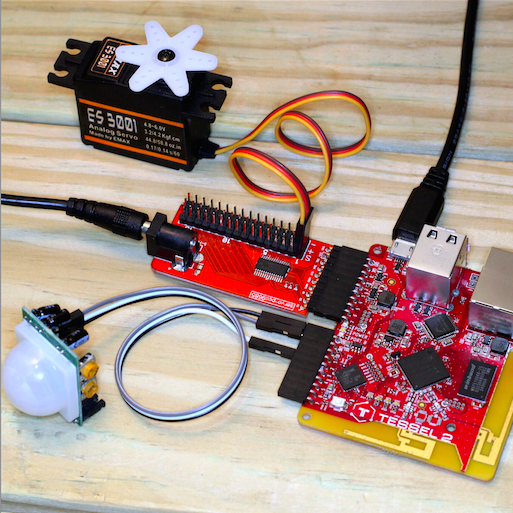
Figure 12-2. Tessel 2 with servo module and a community-contributed motion sensor
When you want to start building a robot with Tessel, take a look at the following modules:
- Servo module
-
The servo module is based on a PCA9685 PWM controller. This module also provides a power plug to drive motors from an external power supply. Managing power is important when working with motors, as forces and voltages from a motor can potentially harm a micrcontroller.
- Relay module
-
The relay module can help you to power on/off devices from a standard 220V power plug. This means you can take existing electronic devices like a floor lamp, a toaster, or an industrial machine and make them part of your robot’s output. The relay connects these things to your JavaScript code.
- Distance sensors
-
For driving robots, it is often important to detect obstacles. The community-contributed modules SEN10737p and HCSR04 are nice plug-and-play distance-sensing solutions.
- Potentiometer
-
To simulate values from sensors, potentiometers can often be helpful. Currently there are no Tessel modules with potentiometers and ADC, but you can easily build one yourself.
These are helpful for a traditional robot that might move and react to the environment. But you can also push the boundaries: what about a robot that moves in response to something else? Maybe it reacts to sound or warmth, like animals do. What if it reacts to information from the Internet, like a Twitter feed? Or what about a simple data-collecting robot that provides input to a system’s online code, like a motion detector that emails you when something moves? Internet access provides powerful input and output tools to any robotic system.
Some examples of this are:
-
Hot enough text sends you a text through Twilio when the water on your stove is boiling
-
Flinching robot runs away from loud noises
-
RFID webapp authorization provides security by only letting you view a site if an authorized card is present
-
Website down alarm brings the digital world into the physical space by turning on an alarm if your website doesn’t return a 200 OK response when it is pinged
If you’d like to get involved in the Nodebots community, check out this map of Nodebots meetup groups.
Robot Kits
In addition to a microcontroller and electronics to control actuators, you will often need some motors to get started with robots. In “Actuators”, you saw different motors you can use. In the language of electronics, motors are “actuators,” as they convert energy into motion.
Note
Hackster.io lets authors define “robot kits” on each of their projects. For example, if you scroll down to the “Things Used in This Project” section of the Website Down Alarm project, you’ll see that it has purchase links for every component! You could buy the parts, use the code from GitHub, and follow the instructions to make your own alarm very easily. The combination of shareable or commodity hardware components with open source software libraries and instruction kits shares the vision of 3D printing: “make your own, at home.” If you have a 3D printer, you can make any of thousands of open source inanimate objects. If you have software libraries, purchasable components, and possibly a 3D printer, you can make and collaborate on thousands of smart, useful objects.
Motors and Potentiometers
In principle, you can begin working with robots by putting together a simple “kit”—all you need to do is connect a servo motor to a microcontroller. If you want to detect distance to objects or provide motion feedback, you can do so by simply adding a potentiometer to this setup.
Robots often need multiple motors, and the Tessel Servo Module from Figure 12-2 is a great way to get the power and PWM signals you need for up to 16 servos. Even though the module is designed for Tessel, many people also throw the module into systems using Raspberry Pi or Arduino because it’s easier than building a servo controller from scratch.
Servo motors are typically controlled with PWM. We’ll look at some examples of motor control with JavaScript momentarily.
Sumobot Jr.
There are a number of projects for robotic vehicles available today. One popular open source option is Pawel Szymczykowski’s Sumobot Jr. (see Figure 12-3).
The Sumobot Jr. provides a great laser-cuttable design that you can adapt to do just about whatever you want.
Although you might not have a laser cutter of your own, most maker spacers offer courses on how to laser cut parts. Another place to get your parts is Ponoko, or you can even buy a small laser cutter for home usage such as Mr. Beam. If you’re interested in learning more, check out Pawel’s Sumobot Jr. assembly video.
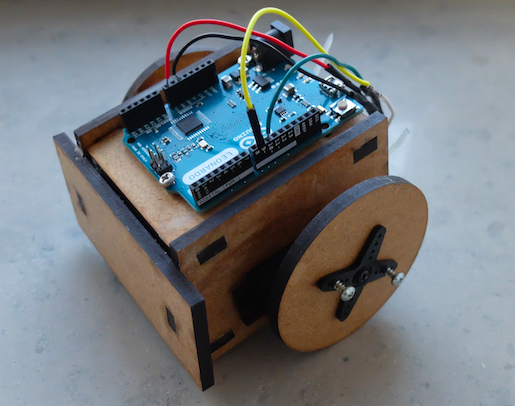
Figure 12-3. An assembled Sumobot Jr.
Hackarobot
The Hackarobot design was funded via a Kickstarter campaign in 2014. This robot is based on an Arduino Nano together with DC motors, sensors for proximity (HC-SR04), and an MPU6050 with an accelerometer.
You can buy the Hackarobot (Figure 12-4) from its creator Thomas Lee via Tindie.
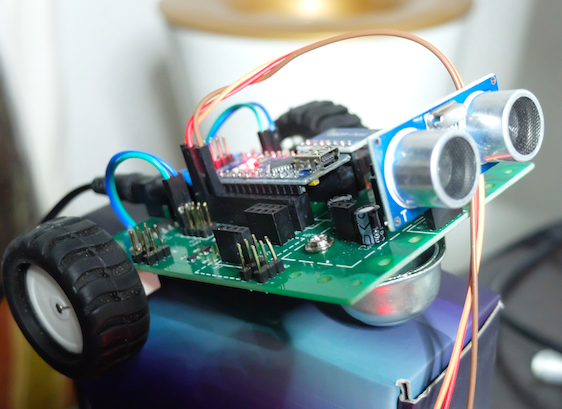
Figure 12-4. The Hackarobot comes with sensors and a Bluetooth module
Example Project: The Robot Claw
As you can see in Figure 12-5, the simple robot claw built for this example consists of a mechanical frame combined with servo motors.
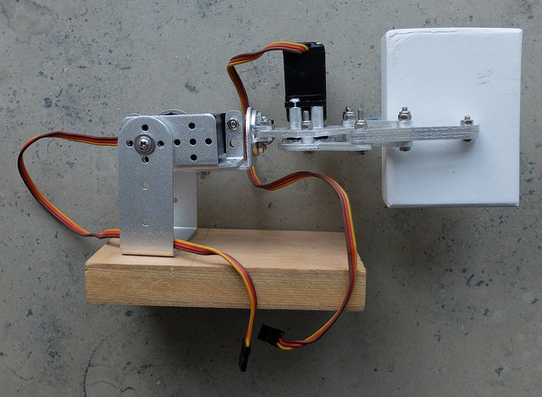
Figure 12-5. A simple robot claw with servo motors
The following provides direct control of servo motors:
// direct_arm.jsvarfive=require("johnny-five");varboard=newfive.Board({});board.on("ready",function(){// arm servo on pin 9vararm=newfive.Servo(9);// hand servo on pin 10varhand=newfive.Servo(10);this.repl.inject({hand:hand,arm:arm});});
You can then add “actions” to combine control of multiple servo motors:
// add_actions.jsvarfive=require("johnny-five");varutil=require('util');varboard=newfive.Board({});// create a new Arm classvarArm=function(){five.Servo.apply(this,arguments);this.up=function(){this.max();}this.moveTo=function(pos){this.to(pos);}this.down=function(){this.min();}};util.inherits(Arm,five.Servo);// create a new Hand classvarHand=function(){five.Servo.apply(this,arguments);this.open=function(){this.min();}this.moveTo=function(pos){this.to(pos);}this.close=function(){this.max();}};util.inherits(Hand,five.Servo);board.on("ready",function(){// arm servo on pin 9vararm=newArm(9);// hand servo on pin 10varhand=newHand(10);this.repl.inject({hand:hand,arm:arm});});
Let’s try the movements in the Node.js read-eval-print loop:
$node hello_action.js1453555335508Device(s)/dev/cu.usbmodem141311453555335518Connected /dev/cu.usbmodem141311453555339060Repl Initialized >> hand.open()>> hand.close()>> arm.up()>> hand.open()
To make more complex movements, you can combine multiple actions into “goals”:
// add_goals.jsvarfive=require("johnny-five");varutil=require('util');varboard=newfive.Board({});// create a new Arm classvarArm=function(){five.Servo.apply(this,arguments);this.up=function(){this.max();}this.moveTo=function(pos){this.to(pos);}this.down=function(){this.min();}};util.inherits(Arm,five.Servo);// create a new Hand classvarHand=function(){five.Servo.apply(this,arguments);this.open=function(){this.min();}this.moveTo=function(pos){this.to(pos);}this.close=function(){this.max();}};util.inherits(Hand,five.Servo);varGoal=function(arm,hand){this.arm=arm;this.hand=hand;this.prepare=function(){this.arm.down();this.hand.open();console.log('prepared');}this.grabObject=function(){console.log('hand will close');this.hand.close();}this.moveObject=function(){this.arm.up();}this.releaseObject=function(){this.hand.open();}}// connect to Arm objectboard.on("ready",function(){// arm servo on pin 9vararm=newArm(9);// hand servo on pin 10varhand=newHand(10);// add goalvargoal=newGoal(arm,hand);this.repl.inject({hand:hand,arm:arm,goal:goal});});
Try it out:
>> goal.prepare()>> goal.grabObject()>> goal.moveObject()>> goal.releaseObject()>> goal.grabObject()>> goal.prepare()
This robot claw provides provides two axes of freedom. With three axes of freedom, kinematics starts getting interesting—it provides a way to calculate movements on the basis of predefined coordinates. If you’d like to learn more about complex robotics, check out the tharp package.
Example Project: Move a Vehicle
In addition to actuators, it’s important to enable your robot to capture sensor data.
There is a Node/Tessel library to control a robot of a vehicle built around two continuous servo motors: servo-car for general use and RC-Sumobot for controlling it over a websocket.
Servo
vartessel=require('tessel');varservolib=require('servo-pca9685');varservo=servolib.use(tessel.port['D']);varservo1=1;servo.on('ready',function(){varposition=0;vardir=0.05;servo.configure(servo1,0.05,0.11,function(){setInterval(function(){servo.move(servo1,position);if(position>1||position<0){dir=-dir;}position+=dir;},100);});});
MD25 Motor Shield
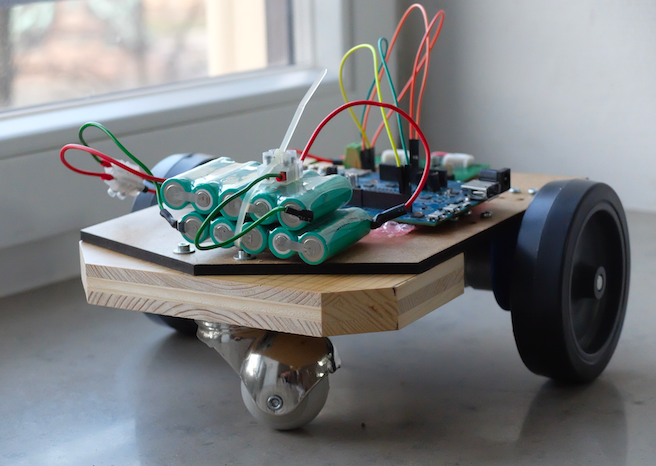
For real-world usage, you need larger DC motors to drive a vehicle. The Veter robot is a nice example of a moving vehicle. The robot controls different motors via I2C signals. You can build your own robot as shown in Figure 12-6 with the instructions at http://veterobot.com/buildyourself.html.