Table of Contents for
Node.js for Embedded Systems
 Node.js for Embedded Systems
Published by
O'Reilly Media, Inc., 2016
Node.js for Embedded Systems
Published by
O'Reilly Media, Inc., 2016
- Cover
- nav
- Node.js for Embedded Systems
- Node.js for Embedded Systems
- Foreword
- Preface
- 1. Connecting Worlds
- 2. Blink with Arduino
- 3. Espruino
- 4. The Tessel 2
- 5. Particle Photon
- 6. Single-Board Computers
- 7. Components for Prototyping
- 8. Node.js Libraries for Hardware
- 9. Exploring Network Protocols
- 10. Web Frontends for Things
- 11. Entering the Cloud
- 12. Making Robots with Node.js
- 13. Wireless Data with Bluetooth
- 14. Toward the Physical Internet
- 15. From Products to Toolkits
- A. Node.js
- B. Early Hardware for IoT Systems
- Index
- About the Authors
- Colophon
Chapter 11. Entering the Cloud
Now that we’ve examined some examples that worked on a local network, it is time to see how to connect devices across networks. Instead of sending messages between devices, a place in the network will act as a message broker. With a message broker, location of devices is just another abstraction.
The use case of message brokers is usually this: imagine a number of sensors in different houses or different cities. If these sensors used the same physical network, it would be difficult to collect data (this becomes less of a problem with new kinds of LoRaWAN networks). Instead, you need messages to travel via gateways or “message brokers” that are accessible from different locations.
To enable messaging across networks, a popular technology is the Message Queue Telemetry Transport (MQTT) protocol. With MQTT, you can apply the publish–subscribe pattern to multiple devices and locations. There are different ways to use MQTT. You can either set up an MQTT server, or you can rent services for message transmission.
The publish–subscribe software pattern provides the foundations for MQTT. It is not too difficult to implement publish–subscribe patterns with JavaScript yourself. With this, you’ll see some more options to distribute state over a network, or to subscribe to updates from devices.
Publish–Subscribe Pattern
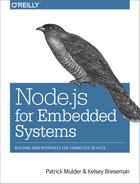
The publish–subscribe pattern is an important software design pattern for distributed systems. In a nutshell, it works similarly to a newspaper or an RSS feed. Many systems might be interested in news from different origins. As such, the newspaper acts as a publisher of messages that readers can then subscribe to. Figure 11-1 illustrates how this works.
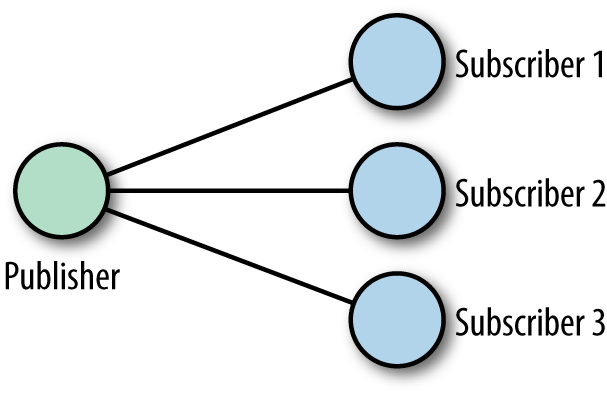
Figure 11-1. The publish–subscribe pattern
To show how useful this is, let’s extend the dnode example from Chapter 9. Instead of a single link between one server and one client, you can now have multiple inputs and outputs to the Internet.
Let’s start by reading a simple slider:
// simple_readout.js// main publish functionfunctionpublish(ev,n){console.log(ev+': '+n);}// set up boardvarfive=require('johnny-five');varboard=newfive.Board({repl:false});board.on('ready',function(){varslider=newfive.Sensor('A0');slider.scale([0,200]).on('slide',function(){publish('slider',this.value);});});
In this example, bytes are published from a slider. This is just a basic check that everything works:
$ node simple_readout.js
slider: 12.1231
slider: 130.13
To make the publisher notify subscribers, you can use EventEmitters from JavaScript, as follows:
// pub.jsvarHash=require('hashish');varsubscribers={};// the publishers calls the subscribersfunctionpublish(){varargs=arguments;Hash(subscribers).forEach(function(emit){emit.apply(emit,args);});}
To test this code, you can add subscriber callback functions:
// subscribers for testing purposessubscribers.pete=function(ev,n){console.log('pete.'+ev+': '+n)};subscribers.carla=function(ev,n){console.log('carla.'+ev+': '+n)};
To see how this works, you can run:
$node pub.js pm:pubsub pmu$node pub1452626939884Device(s)/dev/cu.usbserial-AL01TQ7A1452626939892Connected /dev/cu.usbserial-AL01TQ7A pete.slider: 79.17888563049853 carla.slider: 79.17888563049853 pete.button: 1452626945698 carla.button: 1452626946270
As a next step, you can broadcast data from the device via websockets to multiple clients. The following approach is based on dnode:
// pub_server.js//// simple pub-sub example inspired by// http://substack.net/roll_your_own_pubsub_with_dnode//// simple modules to iterate over subscribersvarHash=require('hashish');varsubscribers={};// the publisher notifies the subscribersfunctionpublish(){varargs=arguments;Hash(subscribers).forEach(function(emit){// call emit function from subscriberemit.apply(emit,args);});}// board is publisher// button on digital input: D4// slider on analog input: A0//varfive=require('johnny-five');varboard=newfive.Board({repl:false});board.on('ready',function(){varslider=newfive.Sensor('A0');varbutton=newfive.Button(4);slider.scale([0,200]).on('slide',function(){publish('slider',this.value);});button.on('press',function(){publish('button',newDate().getTime());});});// start up dnode servervardnode=require('dnode');dnode(function(client,conn){// generate callback function for subscribers// subscribers pass an emit functionthis.subscribe=function(emit){console.log('new connection: '+conn.id);// publishers wants call emit functionsubscribers[conn.id]=emit;// cleanup if connection closesconn.on('end',function(){deletesubscribers[conn.id];});};}).listen(5050);
The publisher on the server calls the emit function from subscribers. You can use dnode to enter the context of the server with a remote object. With this, you can add subscribers from multiple processes. To show how this works, you can write a simple command-line client as follows:
// client.js//// sample dnode client// inspired by http://substack.net/roll_your_own_pubsub_with_dnodevardnode=require('dnode');varEventEmitter=require('events').EventEmitter;// enter server context with remote objectdnode.connect(5050,function(remote){// prepare subscriber to capture events from servervarsubscriber=newEventEmitter;// capture slider eventsubscriber.on('slider',function(n){console.log('slider: '+n);});// capture button eventsubscriber.on('button',function(n){console.log('button: '+n);});// all other eventssubscriber.on('all',function(ev){console.log(ev);});// attach this context to the emittervaremitter=subscriber.emit.bind(subscriber);// add subscriber to remote publisherremote.subscribe(emitter);// from client to server// remote.write('test');});
Now, you could easily modify the client to specifically subscribe to events from only a button or a slider. The main obstacle with this publish–subscribe approach right now is that the subscriber must still be within the same network.
To overcome this, you need to learn about extending the publish–subscribe pattern with a message broker.
The MQTT Protocol
In contrast to the detailed headers of the HTTP, the MQTT protocol uses only a two-byte header. MQ stands for “messaging queue” and TT for “telemetry transport.” It is much more common to use the abbreviation MQTT.
Early development of MQTT was done by Andy Stanford-Clark and Arlen Nipper at IBM in 1999. Their research was about transporting data from remote measurement sites, usually places that are hard for humans to access, such as oil fields.
Although MQTT was originally highly specialized, it is now quite popular for connecting all kinds of devices. In a sense, MQTT enables the publish–subscribe pattern across networks. This is different from previous examples, where data and its monitoring happened within the same network.
Figure 11-2 provides a visual representation of how this works.

Figure 11-2. An MQTT broker
A simple example of MQTT might be a device to monitor temperature, light, and humidity (e.g., in a greenhouse), while capturing data at another node in the network.
The nodes that send data are “publishers,” while nodes that capture data are called “subscribers.” Data publishers and subscribers must have access to the same message broker.
Connecting to an MQTT Broker
An easy way to see MQTT in action is from the command line with the Node.js library MQTT.js, connecting to an MQTT broker.
There are several brokers available for free testing. A popular one is test.moquitto.org.
Note
A message broker can also run on an embedded device, such as a Raspberry Pi or Intel Galileo. Some boards with embedded Linux have MQTT preinstalled.
To explore MQTT, let’s install the MQTT.js library with:
$ npm install -g mqtt
When you can connect to a public broker for testing, you can see all kinds of messages. Let’s subscribe to messages from a popular MQTT broker for testing: test.mosquitto.org.
Messages on a broker are grouped into “topics.” Topics can have multiple levels like device/sensors/temperature:
$mqtt subscribe -v -h test.mosquitto.org'#'ajiang/demo MQTT通信机制 command_from_grm dimmer command_from_grm/1 left edison/config{"enabled":"true"}foo/bar hallo
To query a broker for messages, you can use wildcards for topics. For example, when you apply a #, it will match all topics from a root element:
$mqtt subscribe -v -h test.mosquitto.org'location/#'location/me/b26a9d441622a657{"_type":"location","lat":"30.4884162","lon":"-97.6870723","tst":"1450271909","acc":"33.0"}location/mm{"cog":-1,"batt":"45","lon":"-0.0819448","acc":"431","vel":-1,"vac":33,"lat":"51.5144","t":"u","tst":"1433351164","alt":18,"_type":"location","tid":"mc"}
If you use +, you can filter for topics as follows:
$mqtt subscribe -v -h test.mosquitto.org'location/+/b26a9d441622a657'location/me/b26a9d441622a657{"_type":"location","lat":"30.4884162","lon":"-97.6870723","tst":"1450271909","acc":"33.0"}
Instead of looking at messages from others, let’s get going with our own simple messaging example. There are MQTT libraries for most boards with network access.
To publish messages with MQTT, you can also use the following command:
$ mqtt publish -v -h test.mosquitto.org 'location/pm' 'munich'
Playing with these commands is good preparation for the material to come.
Publish Messages
Instead of using MQTT.js from the command line, you can require the library as a dependency in a script:
varmqtt=require('mqtt');varclient=mqtt.connect('mqtt://test.mosca.io');client.on('connect',function(){client.publish('location/device1','munich');client.end();});
Let’s extend this basic example by having a device publish messages.
First, let’s build a data publisher:
// pub_arduino.js // varmqtt=require('mqtt');varclient=mqtt.connect('mqtt://test.mosquitto.org', 1883);varfive=require('johnny-five');// add board varboard=new five.Board({repl:false});board.on('ready',function(){client.publish('arduino','connected');// connect a sensor to an analog input varsensor=five.Sensor({pin:'A5'});// Publish a message sensor.on('data',function(){varmessage='value: '+ this.value;client.publish('arduino/slider', message);});});
This code now publishes a message to the Arduino topic on the MQTT channel. You can capture that data from another device—for example, to light an LED.
Subscribe to Updates
On a laptop, you could capture data from publishers. Let’s subscribe to the data channel:
// mqtt_sub_10s.js//varmqtt=require('mqtt');// create an MQTT clientclient=mqtt.connect('mqtt://test.mosquitto.org',1883);// indicate what topics we care aboutclient.subscribe('arduino/#');// respond to message on subscribed topic(s)client.on('message',function(topic,message){console.log(topic,": ",message.toString());});// exit after 10s whether or not we get a messagesetTimeout(function(){client.end();},10000);
If everything works, you see:
$ node mqtt_sub_10s.js
arduino/slider :  value: 312
arduino/slider :  value: 412
arduino/slider :  value: 553
MQTT Server with Mosca
Instead of using public MQTT brokers, you can write your own MQTT server with Node.js. One such option is Mosca.
To use Mosca, you must install a persistence store such as Ascoltatori. Using this package, Mosca supports several options, including MongoDB and Redis.
Redis is easy to install and even runs on most embedded devices. You could also use VPS, or an EC2 server at Amazon, for example, and send updates from devices everywhere in the world.
Mosca can run standalone or “embedded” inside a Node.js application.
To run Mosca inside a Node.js application use this:
varmosca=require('mosca')varascoltatore={type:'redis',redis:require('redis'),db:12,port:6379,return_buffers:true,// to handle binary payloadshost:"localhost"};varmoscaSettings={port:1883,backend:ascoltatore,persistence:{factory:mosca.persistence.Redis}};varserver=newmosca.Server(moscaSettings);server.on('ready',setup);server.on('clientConnected',function(client){console.log('client connected',client.id);});// fired when a message is receivedserver.on('published',function(packet,client){console.log('Published',packet.payload);});// fired when the mqtt server is readyfunctionsetup(){console.log('Mosca server is up and running')}
Now you can start the server with:
vagrant@vagrant-ubuntu-trusty-64:~/.nvm$ mosca -v
       +++.+++:   ,+++    +++;   '+++    +++.
      ++.+++.++   ++.++  ++,'+  `+',++  ++,++
      +`  +,  +: .+  .+  +;  +; '+  '+  +`  +`
      +`  +.  +: ,+  `+  ++  +; '+  ;+  +   +.
      +`  +.  +: ,+  `+   +'    '+      +   +.
      +`  +.  +: ,+  `+   :+.   '+      +++++.
      +`  +.  +: ,+  `+    ++   '+      +++++.
      +`  +.  +: ,+  `+     ++  '+      +   +.
      +`  +.  +: ,+  `+  +:  +: '+  ;+  +   +.
      +`  +.  +: .+  .+  +;  +; '+  '+  +   +.
      +`  +.  +:  ++;++  ++'++   ++'+'  +   +.
      +`  +.  +:   +++    +++.   ,++'   +   +.
{"name":"mosca","hostname":"vagrant","pid":7999,"level":30,"mqtt":1883,
         "msg":"server started","time":"2015-12-08T22:19:31.985Z","v":0}
{"name":"mosca","hostname":"vagrant","pid":7999,"client":"mqttjs_ef3","level":30,"
        msg":"client connected","time":"2015-12-08T22:19:32.287Z","v":0}
Having your own MQTT server allows you to tune the broker to your needs—for example, to process messages more quickly or more reliably. The MQTT protocol supports “levels of quality.” Jan-Piet Mens’s slidedeck for “MQTT for Sysadmins” offers a good introduction to the topic.
Cloud Services
Running your own servers in the cloud is not for everyone. It often requires time to install, secure, and maintain servers. Instead of running your own servers, you could rent services in the cloud.
CloudMQTT
If you want to try a hosted MQTT service, a good start is CloudMQTT. You must sign up for an account first, where you will get a username and password to use private channels.
Then, similar to the free testing service test.mosquitto.org, you can use the command line to test your channel.
First, to subscribe to the channel in one terminal:
$ mqtt sub -h m20.cloudmqtt.com -p 12001 \
           -P <password> -u <user> -t "/welcome/hello" -v
And, in another terminal, you can publish messages for testing:
$ mqtt pub -h m20.cloudmqtt.com -p 12001 \
           -P <password> -u <user> -t "/welcome/hello" -m "123"
Now, you should see your message in the first terminal window as follows:
hello
HiveMQ
HiveMQ is an MQTT broker that targets enterprise use cases. In addition to MQTT for the enterprise, HiveMQ offers a number of development tools.
There is a public broker broker.hivemq.com for development of MQTT services, and there is a browser-based MQTT client. Both can be handy when you develop a new service.
PubNub
PubNub is more than a pure MQTT broker. It allows you to send messages in real time over networks.
Entering PubNub with MQTT is a nice start. Pubnub provides an MQTT broker as discussed in the previous sections; however, compared to the previous brokers, PubNub uses IDs for the channel names. You can see the special message format at PubNub with:
$mqtt sub -v -h mqtt.pubnub.com'#'pub-c-11817d38-b172-45f3-8214-280d8af48492/ sub-c-394a95fc-1cf5-11e5-a5e2-02ee2ddab7fe/my_channel 888PPM pub-c-11817d38-b172-45f3-8214-280d8af48492/ sub-c-394a95fc-1cf5-11e5-a5e2-02ee2ddab7fe/test 888PPM
PubNub uses a “publish key” and a “subscribe key” for the topic name. With this, it is hard for attackers to guess channel names. Instead of exploring MQTT with PubNub further, let’s now look at how to work with PubNub in real time.
To learn more about using PubNub, get its JavaScript library. The library gives us an object to send and receive messages. Here is an example from the Publish–Subscribe tutorial:
// publish a simple message to the demo_tutorial channel PUBNUB_demo.publish({channel:'demo_tutorial', message:{"color":"blue"}});
Telegram
Telegram is a messaging platform similar to WhatsApp. However, Telegram offers a “bot API” that allows you to send and receive messags from an embedded device. With this, you can quickly control devices from your mobile phone.
To use Telegram, you must sign up for an account with an app on your mobile phone. The Telegram app is available for both Android and iOS.
Telegram offers good support for creating a message bot, as shown in Figure 11-3.
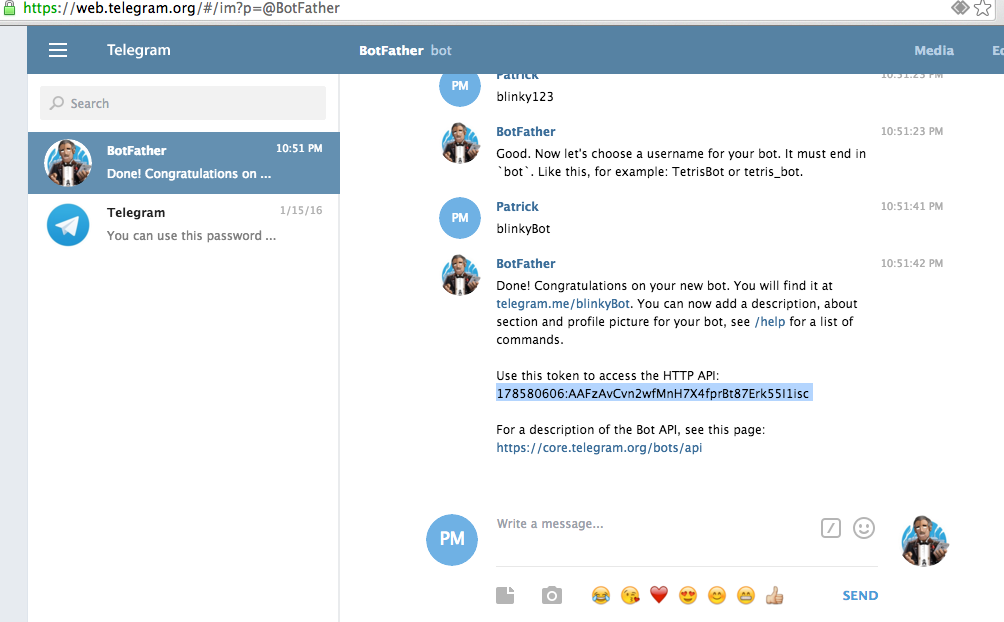
Figure 11-3. The “BotFather” helps you to obtain an API key
With this API key, you can use a couple of Node.js modules to interact with Telegram. These modules are nicely described by Rafael Specht da Silva.
For example, to connect an LED to your bot, you can write:
// led-on.js// use Johnny-Five for hardwarevarfive=require('johnny-five');// create the Telegram botvarTelegramBot=require('node-telegram-bot-api');varjohnnyTelegram=require('johnny-telegram');vartoken='<API_TOKEN_HERE>';varbot=newTelegramBot(token,{polling:true});varboard=newfive.Board();// instantiates the module and passes the telegram bot as parameterjohnnyTelegram.init(bot);// waits until the Johnny-Five board is ready. Creating sensors// before it is ready will probably cause execution errorsboard.on('ready',function(){// instantiate a new LEDvarled=newfive.Led(3);// we are adding an LED to Johnny-Telegram called 'led' so we have a// reference name to call on TelegramjohnnyTelegram.add('led',led);// this method adds a listener to the telegram eventsjohnnyTelegram.bindEvents();});
You can start the service with:
$ node led-on.js
This server will automatically connect to Telegram. And, from Telegram, you now can send messages to your device with:
call led on
call led off
call led blink
Instead of calling remote functions, you could also read out sensor data:
// read_sensor.jsvarjohnnyTelegram=require('johnny-telegram');varfive=require('johnny-five');varTelegramBot=require('node-telegram-bot-api');varboard=newfive.Board();vartoken='<API_TOKEN_HERE>';varbot=newTelegramBot(token,{polling:true});johnnyTelegram.init(bot);board.on('ready',function(){// instantiate a sensorvarsensor=newfive.Sensor({pin:'A5'});// adds a sensor named 'sensor'johnnyTelegram.add('sensor',sensor);// every time that this sensor has data,// call the Johnny-Telegram 'setValue' method// setting the 'sensor' sensor stored valueproximity.on('data',function(){console.log(this.value);johnnyTelegram.setValue('sensor',this.value);});johnnyTelegram.bindEvents();});
Now, to obtain this value from the sensor from your message, you can send a message to the Telegram bot:
value sensor
 5
Temboo
Temboo allows easy integration of Arduino and other boards with cloud services such as Twitter and others. By using Temboo, you can easily wrap existing APIs. Working with Temboo, you can quickly get some working examples of reading and writing messages to Twitter, for example. To get started, go to the Temboo installation page.
System Design with NodeRED
NodeRED advertises itself as “a visual tool for wiring the Internet of Things.” The focus is on a “visual programming” approach where you can easily connect devices and services. NodeRED is one of the first open IoT design systems, and the framework is built with Node.js so that you can run it wherever you want.
The authors Nick O’Leary and Dave Conway-Jones developed NodeRED at IBM Emerging Technology and released it to GitHub in 2013. NodeRED projects can run standalone on SBCs or can be easily integrated into cloud services, such as the IBM Bluemix environment. Bluemix provides special Bluemix node types to make integration of devices easier. Besides Bluemix, there are cloud providers such as “fred” (free node red) where you can immediately get a running instance at no cost.
NodeRED should work easily on your laptop or any kind of SBC with Linux. NodeRED runs well on small Linux systems such as BeagleBone and Raspberry Pi, and it is quite easy to set up a federated set of servers exchanging messages with each other.
Concepts
The visual interface of NodeRED is a web GUI served by default at port 1880. This makes it easy to design systems from a web browser.
As you can see in Figure 11-4, the GUI contains a list of NodeRED elements to the left, and on the right, there is a debug console and a “deploy” button to put the current system live.
Figure 11-4. The NodeRED GUI with different components on the left
To design a system, you drag components from the left side of the screen onto an active tab. Then, you link them together by dragging links between them. In the parlance of NodeRED, a program is called a FLOW and a step is called a NODE.
Each node can be either an INPUT node, an OUTPUT node, or a PROCESS node. Typically, an INPUT node starts a FLOW. It often takes its input from an external source and always has at least one output. In the example shown in Figure 11-5 the input is a Twitter search for the term “javascript.”
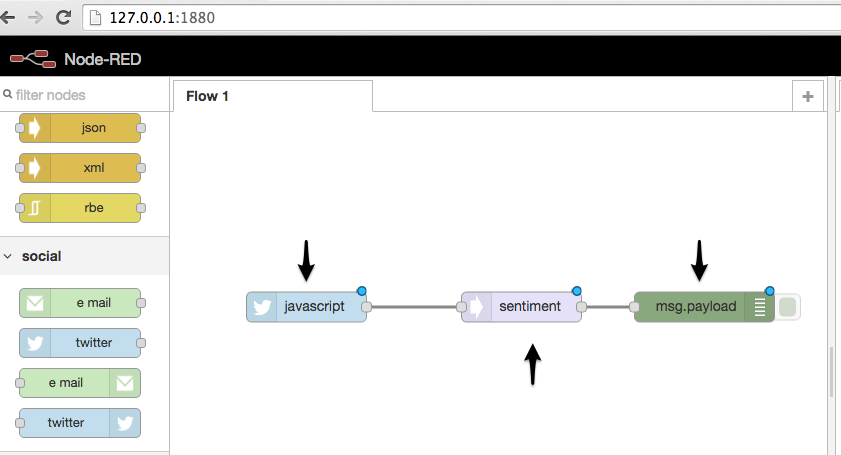
Figure 11-5. Different node types: input, process, and output
A PROCESS node has one input and at least one output. It always takes its input from another node. In this example, the input is the output from the Twitter feed and the node is performing sentiment analysis on it.
An OUTPUT node typically ends a flow. It takes its input from another node and passes its output to an external target. In this example, the output is going to the “debug console.” You can pipe debug output to the server process too.
The data that is passed from node to node is called a MESSAGE. A message is a JSON object with at least one element called “payload.” There can be more root elements though. In this example, the message contains the element “topic.”
An example of the actual data sent from a Twitter feed called “antwerp” looks like this:
1Mar 13:36:35 -[info][debug:2f55a60b.8dc4aa]{score: 2, comparative: 0.11764705882352941, tokens:['we','are','proud','to','announce','the','opening','of','two','new','showrooms'], words:['proud'], positive:['proud'], negative:[]}21Mar 13:36:35 -[info][debug:e0ea087c.1e9748]We are proud to announce the opening of two new showrooms in Munich and Antwerp https://t.co/J2ORDi4l6U https://t.co/WGRcb0o4bO
One of the nice things about NodeRED is that the flows are stored in JSON format in a plain-text file. That means that sharing flows with colleagues is a simple matter of copying your flow or part of a flow and sending it to your coworker, where they can paste it in.
All nodes and flows are in a standard folder format, so it is simple to extend the system with your own flows based on any available Node.js library.
Note
You can extend this example to blink an LED according to Twitter sentiments, as demonstrated in “Tweet Sentiment to LED Using Node-RED” on Hackster.io.
New node types can be found either by crawling GitHub for NodeRED nodes or by looking on sites such as http://flows.nodered.org.
If you want to add nodes yourself, you can to go to the nodes folder under your NodeRED installaton and find two sample files: an HTML file for the visual UI and a JavaScript file for the functionality.