Table of Contents for
Node.js for Embedded Systems
 Node.js for Embedded Systems
Published by
O'Reilly Media, Inc., 2016
Node.js for Embedded Systems
Published by
O'Reilly Media, Inc., 2016
- Cover
- nav
- Node.js for Embedded Systems
- Node.js for Embedded Systems
- Foreword
- Preface
- 1. Connecting Worlds
- 2. Blink with Arduino
- 3. Espruino
- 4. The Tessel 2
- 5. Particle Photon
- 6. Single-Board Computers
- 7. Components for Prototyping
- 8. Node.js Libraries for Hardware
- 9. Exploring Network Protocols
- 10. Web Frontends for Things
- 11. Entering the Cloud
- 12. Making Robots with Node.js
- 13. Wireless Data with Bluetooth
- 14. Toward the Physical Internet
- 15. From Products to Toolkits
- A. Node.js
- B. Early Hardware for IoT Systems
- Index
- About the Authors
- Colophon
Chapter 8. Node.js Libraries for Hardware
In this chapter, we’ll continue programming hardware with JavaScript. By now, you have made some basic steps to set up hardware and a software toolchain. Let’s go beyond the blinking LED. This chapter begins by introducing a library to communicate with an embedded device over a serial port.
Next, after sending and reading bytes from a device, it is time to look into representations of components in JavaScript. For this, the library Johnny-Five will get you going.
Finally, this chapter closes with some ideas and instructions on using your new knowledge to experiment in a variety of directions.
Most examples will still work with a simple Arduino Uno. But with a board that supports embedded Linux, you can run the examples inside an embedded device too. As for components, the Seeed Studio Grove Kit should cover most of the examples for now. The Grove Kit shield lets you quickly connect components such as buttons and outputs to your base board.
Note
The Johnny-Five Inventor’s Kit includes a set of hardware with tutorials that explain how to use Tessel 2 with Johnny-Five. You can see some experiments using Johnny-Five on the Tessel 2 (and associated hardware kit) in the “Experiment Guide for the Johnny-Five Inventor’s Kit”.
You’ll also see some examples that are based on the LibMRAA library. Don’t be confused by its name—it does not (yet) have a meaning. What’s important is that this library provides bindings for JavaScript to low-level pin functions and interrupts.
JavaScript for the Hardware Abstraction Layer
The language of circuits consists of signals, voltages, currents, and pins. Program pins and signals are fundamental in embedded development. However, after a certain point, you must translate the hardware into the language of software. Embedded engineers call this interface between hardware and software the hardware abstraction layer (HAL).
The HAL hides details of components and peripherals and helps to make software libraries compatible with different kinds of hardware. For example, you can run the same Arduino code on different boards, such as an Arduino Uno or Arduino Nano.
As JavaScript is a high-level language, you can find many interesting objects and libraries to make hardware abstractions. In an IoT project, you want to manage different hardware “resources” at different abstraction levels (see Figure 8-1). On the outer level, there might be a board object. On a board, there are pin objects that deal with analog or digital signals. Attached to a pin, there might be components such as an LED object that you want to control.
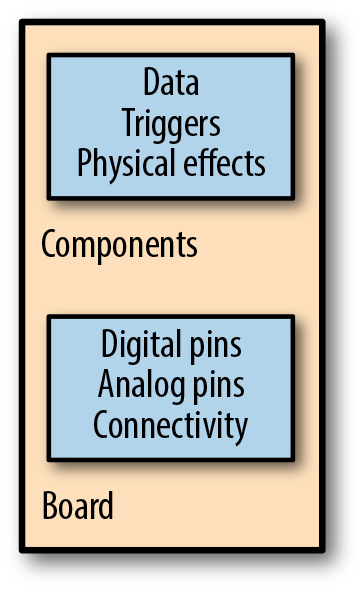
Figure 8-1. Basic categories for hardware abstractions
Within the Node Package Manager (npm), there are many JavaScript libraries to translate buttons or signals for communication into JavaScript objects. Exploring the forms of JavaScript objects for hardware is the goal of this chapter. In later chapters, you will see how to combine JavaScript libraries for hardware with services and the Internet.
Good hardware abstraction layers are formulated in these JavaScript libraries:
- serialport
-
The node-serialport library provides some simple JavaScript objects for communication between devices. With this library you obtain a data stream to read and write bytes to the serial port. Experimenting with serial communication will give you insight into general communication problems.
- Johnny-Five
-
This project by Rick Waldron has been around since 2012 and pioneered a number of ideas for JavaScript hardware development. Johnny-Five runs on many boards, including Arduino, Tessel, Intel Edison, and Raspberry Pi. In addition to boards, the library provides a number of nice abstractions for hardware components such as LEDs, switches, and accelerometers.
- Cylon.js
-
This project by Ron Evans has been around since 2013 and provides a hardware abstraction layer for different IoT devices.
- MRAA
-
LibMRAA provides a bridge between low-level driver software for components for Intel boards mainly. With LibMRAA, you get a bridge from JavaScript to lower-level programming languages that are needed for embedded development.
We’ll first look at some examples of JavaScript abstractions for serial communication. After that, you’ll see some examples based on the Johnny-Five library. Johnny-Five also supports a so-called read-eval-print-loop (REPL) that makes it easy explore and play with components.
The node-serialport Library
When you work with embedded devices, you’ll often find yourself in a situation where you must transfer data from one device to another. In its simplest form, this means providing a cable link such as a RS-232 or USB cable between two devices, as shown in Figure 8-2.
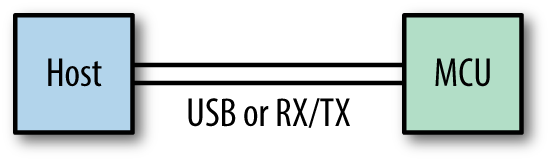
Figure 8-2. A serial link between devices
With the JavaScript library for serial communication, you obtain some objects and functions to send data from one device to another. The node-serialport library was authored by Chris Williams. Many hardware projects employ serial communication in one way or another. Before exploring the library, let’s quickly provide an overview of use cases and concepts.
Serial Communication with JavaScript
Why would JavaScript for serial communication be more interesting than using another programming language? The CodeBender platform offers a good example. As shown in Figure 8-3, the website allows you to flash your Arduino directly from the browser. While the embedded code is built on the server, the code is uploaded to the devices via the browser and a USB cable. Behind the scenes is serial communication with JavaScript at work.
After you flash your Arduino with the example code shown here, you can monitor the value of a sensor in the serial console of the browser. This example is an excellent demonstration of serial communication.
Have a look at Figure 8-4. In general, serial communication is based on the following idea: a transmitter (TX) has one line to send data and a receiver (RX) has another line to receive data. Two wires allow you to send and receive data independently from each other, which is called full-duplex communication.
Because TX and RX are hard-wired signals between devices, the communication protocol can be kept simple. By defining a data rate beforehand, a clock signal is not necessary. When you want to have more flexible communication, you can share a clock signal to share timing information between transmitter and receiver.
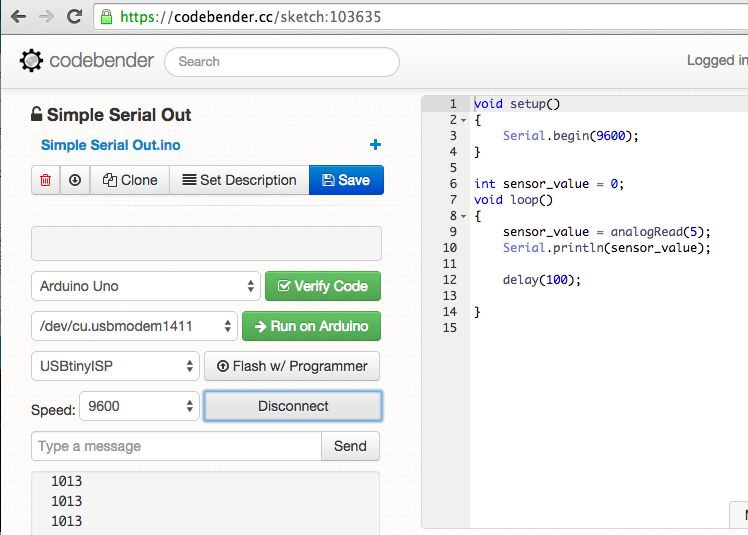
Figure 8-3. The CodeBender platform links an Arduino to a web browser with serial communication

Figure 8-4. Serial communication provides a protocol to transfer data between devices
The core building block of a serial port is a universal asynchronous receiver and transmitter (UART). Some datasheets refer to ports that are based on a universal synchronous/asynchronous receiver and transmitter (USART). In the case of a UART, clock information is automatically recovered from the incoming data stream, which simplifies the configuration of a port somewhat, while a USART can be driven by an external clock signal allowing for much faster transmission speeds and support for a variety of protocols.
Note
If you are interested in learning more about hardware communication protocols, Kevin Sidwar and Kelsey Breseman’s blog post “A Web Developer’s Guide to Communication Protocols” provides a good introduction to several, including how they work and why you might choose them.
On a host computer, an operating system connects to the UART via a software driver. The driver takes care of inputs and outputs and configuration of the signals (“I/O control,” or ioctl in embedded language). This means if you want to talk to an Arduino from your laptop with Node.js, your JavaScript will actually talk to the driver for the serial port of the operating system.
With these concepts, you are ready to explore the node-serialport library. First, we will discuss how to scan for devices with JavaScript. Then, once you can find your device, the next step is to receive data, or to “dump” data coming from a device. Finally, you will learn how to send data from JavaScript to a device.
Scanning for Devices
To get started with the serialport library, let’s first create a fresh JavaScript project and add this module to it:
$ npm install --save-dev serialport
After the module has been downloaded, you are ready to start some serial communication fun:
// list_ports.jsvarserialPort=require("serialport");serialPort.list(function(err,ports){ports.forEach(function(port){console.log(port.comName);});});
Now connect an Arduino with a USB cable to your computer. After the devices are connected, run:
$ node list_ports.js
You should see something similar to:
$node list_ports.js /dev/cu.Bluetooth-Incoming-Port|/dev/cu.Bluetooth-Modem|/dev/cu.usbmodem1411|Arduino(www.arduino.cc)
In this case, there is an Arduino connected at /dev/cu.usbmodem1411. Because listing connected devices at the serial port is a useful command, you can add a shortcut in the package.json to extend npm with new features:
"scripts":{"list_ports":"node list_ports.js"}
You can now run the following npm command:
$npm run list_ports > ch08@1.0.0 list_ports > node list_ports.js /dev/cu.Bluetooth-Incoming-Port|/dev/cu.Bluetooth-Modem|/dev/cu.usbmodem1411|Arduino(www.arduino.cc)
Receiving Data from Arduino
Now that you can list devices that are attached on a serial port, let’s capture some data from a device. You must pass the port name, something like COM1 on Windows or /dev/ttyS0 on POSIX platforms. In the example above, the Arduino is on port /dev/cu.usbmodem1411.
Let’s prepare an Arduino to send some data over to your host computer. Instead of using a sensor, let’s use counter.ino, a simpler Arduino sketch that simply increases a counter (you’ll see how to capture that data with Node.js momentarily):
// Arduino sketch for testing serial communicationsetup(){Serial.begin(9600);}inti=0;voidloop(){Serial.println(i++);delay(100);// poll every 100ms}
The last “delay” gives the laptop some time to process the data. Providing a delay is a good idea when you want to watch a data stream with human eyes instead of a CPU’s.
Note
When you configure a serial port, you must sometimes include things such as flow control, parity, stop bits, and character size, but this is out of scope for most Arduino projects.
For Arduino projects, a good choice for transmission speed is 9600 baud, because it is slow enough to watch incoming bits “live.” If there is a speed mismatch between your computer and your Arduino, you’ll see garbled output.
To read bits from the port with JavaScript, you must first open the port:
// read_port.jsvarserialport=require("serialport");varSerialPort=serialport.SerialPort;varserialPort=newSerialPort("/dev/cu.usbmodem14131",{baudrate:9600,parser:serialport.parsers.readline("\n")});serialPort.on("open",function(){// capture data});
When the serial port is instantiated (as var serialPort = new SerialPort), the final argument sets a parser for the incoming data. In this example, we use the default readline parser, which yields human-readable text broken up by newlines.
Once the serial port is open, you have access to its data stream. The easiest thing to do is dump data from the stream to the terminal:
// read_port.jsvarserialport=require("serialport");varSerialPort=serialport.SerialPort;varserialPort=newSerialPort("/dev/cu.usbmodem14131",{baudrate:9600,parser:serialport.parsers.readline("\n")});serialPort.on("open",function(){console.log('open');serialPort.on('data',function(data){console.log(data);});});
As you can see, the serialPort object listens to the data events from the port. The received bits are displayed to the screen with console.log(data).
If everything works out, you’ll see some numbers from the Arduino scrolling down on the screen. By adding some components, you can easily dump data from measurements (e.g., temperature or positions from a potentiometer).
Sending Data to Arduino
Let’s now look at sending data to an embedded device—for example, simple control commands.
To see how this works, let’s write a very basic command parser for an Arduino board:
// Arduino sketch to test receiving dataif(Serial.available()>0){incoming=Serial.parseInt();if(Serial.read()=='\n'){// light the display}}
With this code, the Arduino examines its UART to determine whether there is data in the receive buffer. If so, the Arduino parses the data and does something, such as toggling LEDs. To see some options, have a look in the ReadASCIIString example or the parseInt API in the Arduino documentation.
On the JavaScript side, you can define a “write” callback to write to the serial port. When you include the serial port in the previous example, the code becomes:
// write_data.jsvarStream=require('stream');varmodem='cu.usbmodem14231';varws=newStream();ws.writable=true;ws.write=function(data){serialPort.write(data);};ws.end=function(buf){console.log('bye');}varserialPort=newSerialPort('/dev/'+modem,{baudrate:9600,parser:serialport.parsers.readline("\n")});process.stdin.pipe(ws);
The idea behind this JavaScript code is that you redirect the output from, for example, the computer console into a writable stream. Data from this stream is then written into the serial port with serialPort.write(data).
The Johnny-Five Library
Johnny-Five comes with many JavaScript classes for components to work with.1 Instead of translating desired behavior to the technical workings of a board pin, you can directly use a button or LED class that provides a default behavior.
An Empty Project
To begin, you need an empty project from which you can install JavaScript dependencies.
On your host machine, let’s create an empty project with:
$ mkdir led13
Next, you can use the npm to initialize the project:
$ npm init -y
The first dependency to install is Johnny-Five.
This library includes plugins for various boards including Intel Galileo and Edison boards. You can install Johnny-Five as follows:
$ npm install --save johnny-five
As you can see in the directory, you now have a file called package.json. This is the project manifest, where you can add different dependencies.
Depending on the board you are working with, you must use a board “adapter.” For example, in the case of the Intel Edison, this means:
$ npm install --save edison-io
With these libraries, you are ready to go.
The Board Object
The core class of a Johnny-Five project is the board class. In its simplest form (connecting to an Arduino Uno), the board is initialized as follows:
// board_ready.jsvarfive=require("johnny-five");varboard=newfive.Board();
The script will search for an Arduino connected to the host computer. To specify the serial port where the board is connected, you can add a parameter port as follows:
varboard=newfive.Board({port:'/dev/cu.usbmodem12'});
Johnny-Five supports many different boards. For example, if you want to control an Intel Edison with Johnny-Five, you pass the Edison board adapter when you set up the board:
varedison=require('edison-io');varboard=newfive.Board({io:newEdison()});
Once you have a board instance, you can easily capture events from a board object. For example, the board will emit a “ready” event that you can capture like this:
board.on("ready",function(){console.log("Board is ready!");});
The fun really starts with objects inside the “ready” callback.
The Johnny-Five REPL
As a first experiment with hardware, let’s set up the read-eval-print-loop (REPL). Similar to working with a console or terminal, a REPL gives you the chance to interactively inspect a hardware setup. It’s like having a command line for your hardware.
You can also inject variables into an interactive programming session with:
// simple_repl.jsvarfive=require("johnny-five");varEdison=require("edison-io");varboard=newfive.Board({io:newEdison()});board.on("ready",function(){console.log("Board is ready!");this.repl.inject({led13:newfive.Led(led13)});});
The LED13 is now available in the console once you run this script with:
$ node simple_repl.js
We can then do some simple tests in the Node REPL:
>> led13.low();
>> led13.high();
Now that we have a working system with a blinking LED, let’s look at capturing user input.
Buttons
The simplest way to capture user input is with buttons. Johnny-Five makes working with buttons very easy, as you can simply “subscribe” to events from a button. The events a button can emit are “down,” “up,” and “hold.” To see how this works, let’s look at the following example:
// button_tests.js// import dependenciesvarfive=require("johnny-five");varEdison=require("edison-io");varboard=newfive.Board({io:newEdison()});varbutton,oe;// init boardboard.on("ready",function(){button=newfive.Button(7);button.on('down',function(){console.log('button down');});button.on('up',function(){console.log('button up');});button.on('hold',function(){console.log('button hold');});// provide variables for interactive sessionthis.repl.inject({button:button});});
With these simple events, you could build a simple stopwatch—the first button press starts the clock, the second press stops the clock, and a “hold” event resets the clock.
Analog Inputs
A user can easily change the state of a device with a button press. In an application, you might need analog inputs instead of digital buttons. In contrast to a digital input such as a button, an analog input is more like a measurement.
With Johnny-Five, you can directly read data from an “analog” component such as a potentiometer, slider, or sensor.
Let’s take a look at how to do this:
// read_analog.jsvarfive=require('johnny-five');varEdison=require('edison-io');varboard=newfive.Board({io:newEdison()});board.on("ready",function(){varslider=newfive.Sensor("A0");// "slide" is an alias for "change"slider.scale([0,100]).on("slide",function(){console.log("slide",this.value);});});
There are two differences between working with an analog input and working with a button: first, you provide a scale for the input, and second, you listen for “change” events and do something with its value.
Another example for analog inputs is reading data from sensors. Or, to read data from a whole lot of sensors such as the Nintendo Wii Nunchuk.
Proximity
If you want to build a robot, one common approach for obstacle detection is an ultrasonic distance meter. Johnny-Five has a nice module to work with proximity detectors.
Look at the following code for an example based on the SRF10 sensor:
// check_proximity.jsvarfive=require("johnny-five");varboard=newfive.Board();board.on("ready",function(){varproximity=newfive.Proximity({controller:"SRF10"});proximity.on("data",function(){console.log(this.cm+"cm",this.in+"in");});proximity.on("change",function(){console.log("The obstruction has moved.");});});
Nodebot
Johnny-Five was built for robots. Thanks to the Nodebot class, you can program a simple robot with only 12 lines of code:
// simple_nodebot.jsvarfive,Nodebot;five=require("johnny-five");five.Board().on("ready",function(){Nodebot=newfive.Nodebot({right:10,left:11});this.repl.inject({n:Nodebot});})
When you start this program, you’ll have a REPL from which you can control the robot. In this case, the robot has two servo motors for a moving robot. If you want to test this out with a serial cable, it can be handy to mount the robot in a position in which it does not move.
We will learn more about building robots in Chapter 12.
The I2C Library
Compared to serial communication via UART, communication via I2C is a bit more complex. Many sensors and electronic components support I2C because it supports many sensors on the same bus using only two wires.
The I2C bus is a half-duplex interface, which means two nodes (usually called “master” and “slave”) can only communicate over the wires in turn. When one node is listening, the other node can talk and vice versa. Imagine a phone call where only one party is allowed to speak and the other one must listen.
In I2C communication, the data line for communication is called SDA. The I2C bus adds another wire for providing timing information. The two wires, SDA (data) and SCL (clock), are both bidirectional.
The I2C specification version 3.0 defines four speed categories: Standard mode at up to 100 kbits/s, Fast mode at up to 400 kbits/s, Fast mode Plus at up to 1 Mbits/s, and High Speed mode at up to 3.4 Mbits/s.
There are different Node.js I2C libraries for I2C, for example using sysfs.
The LibMRAA Library
The MRAA library offers a number of interesting bindings to hardware. Originally, MRAA was an open source library for Intel Galileo and Edison boards, and supports an API similar to Arduino for different high-level programming languages. The library provides low-level access to GPIOs, PWM, and analog I/O ports.
MRAA Setup
MRAA is based on C++ libraries that access the operating system on a low level. This means that to use MRAA from JavaScript, you must install some C libraries first.
On an Intel Edison, this means adding libmraa dependencies to the board first:
echo"src mraa-upm http://iotdk.intel.com/repos/1.1/intelgalactic"> /etc/opkg/mraa-upm.conf opkg update opkg install libmraa0
With this, you can install the Node.js bindings to libmraa with:
npm install --save mraa
Let’s check that it worked by creating a file called hello.js:
// hello.jsvarmraa=require('mraa');console.log('MRAA Version: '+mraa.getVersion());
If everything worked, you should see:
# node hello.js
MRAA Version: v0.8.0
Let’s look next at processing inputs and outputs with MRAA.
Outputs
Similar to Arduino, libmraa provides different output modes for pins.
As usual, digital outputs provide a good start for exploring a setup. In MRAA, a digital output can take a state 0 or 1:
// simple_blink.jsvarmraa=require('mraa');varled=newmraa.Gpio(8);led.dir(mraa.DIR_OUT);
With led.dir(mraa.DIR_OUT) you specify the direction of a GPIO. In this case, it acts as an output. Then you could use the event loop in JavaScript to write 0 and 1 to the pin as follows:
varblink=0;setInterval(function(){blink=!blink;blink?led.write(1):led.write(0);},2000);
In this example, the timeout is 2000 milliseconds (2 seconds).
You can also generate PWM signals (because the PWM signal is generated by the Linux operating system, the granularity of the PWM is a bit lower than on a microcontroller):
// hello_pwm.jsvarpin=newmraa.Pwm(3);pin.period(200);pin.enable(true);varlevel=0;setInterval(function(){pin.write(level);level+=0.01;if(level>=1){level=0;}},50);
This concludes our introduction to pins as outputs. Let’s take a look at input pins.
Reading Inputs
To use a pin as digital input, you must declare the direction of the pin first:
// simple_buttons.jsvarbutton=newmraa.Gpio(4);button.dir(mraa.DIR_IN);
Next, you can read the state of the pin with:
setInterval(function(){varinput=button.read();console.log(input);},200);
To read an analog input, you’ll address the pin with:
varanalogPin0=newmraa.Aio(0);
Now you can fetch the data with:
setInterval(function(){varsample=analogPin0.read();varsampleFloat=analogPin0.readFloat();console.log(sample);console.log(sampleFloat);},300);
As you can see, the pin abstractions from MRAA are very low-level. To prevent re-writing drivers for sensors and components from scratch, you can load JavaScript drivers for MRAA projects with the UPM project. UPM stands for “useful packages and modules,” and a number of drivers exist already, such as https://www.npmjs.com/package/jsupm_joystick12.
Interrupts
In contrast to other JavaScript libraries, LibMRAA allows you to bind functions to external interrupts from pins. This means you can avoid “blocking” code to detect pin changes and jump to code directly when it is needed.
The following example shows the usage of an interrupt on a GPIO pin:
// interrupt_check.jsvarmraa=require('mraa');functionh(){console.log('button press');}varpin=newmraa.Gpio(4);pin.isr(mraa.EDGE_FALLING,h);setInterval(function(){console.log("nothing happened");},400);
On the hardware side, you can add a button to digital pin 4 of a Galileo or Edison. If you then run the code:
$ node isr_example.js
You should see something like:
nothing happened
nothing happened
button press
nothing happened
As soon as GPIO 4 goes down, the interrupt is triggered. In this case, the callback function is executed.
Communications
LibMRAA also provides a number of low-level libraries for communication with other hardware devices. For example, to communicate with I2C:
varx=newmraa.I2c(0);x.address(0x62);x.writeReg(0,0);
This can be tested with a simple I2C memory, for example.
For UART, you can use the following code:
u.setBaudRate(115200);u.setMode(8,0,1);u.setFlowcontrol(false,false);u.writeStr("test\n");
The Cylon.js Library
The Cylon.js library by Ron Evans and Adrian Zankich aims to bring the ease of jQuery to IoT applications. The library brings an object-oriented approach to working with hardware devices and aims to make robotics applications portable across platforms. The library comes with good documentation and provides some help on board setup for JavaScript too.
To see how the library works, let’s look at the following code example:
// cylon_blink.jsvarCylon=require('cylon');Cylon.robot({connections:{galileo:{adaptor:'intel-iot'}},devices:{led:{driver:'led',pin:13},button:{driver:'button',pin:8}},work:function(my){my.button.on('push',function(){my.led.toggle();});}}).start();
With Cylon.robot(), you instantiate a new “robot” object. The configuration of a robot is based on a number of properties: connections, devices, and a work function.
In this example, the robot is connected to an Intel Galileo board. With only one change in variable, this code can be run on different boards such as a BeagleBone or Arduino.
Next, you can add devices that the robots should control. Note that there is a driver property that provides the necessary hardware abstraction layer.
Last, there is the work function, where you can program how the robot controls devices. In this case, a button toggles an LED.
1 Johnny-Five was a fictional robot character in the movie Short Circuit (1986). He was an experimental robot who was struck by lightning, became intelligent, and escaped from a lab.